Delivering DEM App Personalization to App Volumes Packages
Delivering DEM Application Personalization to App Volumes Packages
Omnissa Dynamic Environment Manager is an excellent tool for delivering application personalization and standardizing the user experience of an application launch. The Dynamic Environment Manager (DEM) Application Profiler captures application settings changes stored in not-so-common locations, such as within a user's profile, instead of the Program Data or Program Files locations. This document will demonstrate the practical usage of the DEM Application Profiler, capturing application settings delivered by an Omnissa App Volumes Package and then delivering them to the end user as a predefined application setting, thereby standardizing the user experience when launching the application. The DEM Application Profiler bridges the gap by capturing application settings stored within a user profile, enhancing the overall App Volumes packaging and delivery process to the intended target.
The Three Step Workflow

We have categorized the steps to demonstrate the Application Profiling, delivery, and validation into three sections.
The “Prepare” section will describe the environment and prerequisites needed to be successful. We then follow this up with
the “Create” section, which provides step-by-step instructions on the creation of a DEM Flex Configuration file from a target application (we have used Notepad++ in this demonstration) and captured two predefined application settings delivered to the end user at application launch. Finally, we explore the output captured by the DEM Application Profiler.
The last section, “Validate”, is where the end-user logs into a virtual desktop and has an App Volumes delivered application. At the application launch, the end user confirms the delivery of the application settings captured by the Application Profiler. A demo walkthrough of the instructions in this guide is available in the Demonstrate section.
Prepare
In addition to the preparation process of creating a packaging virtual machine, the following components were present in the environment used to build and validate the scenario.
- Omnissa Horizon 8: delivers virtual desktops built from a Windows 10 Guest OS image using the following method.
- App Volumes 4.x environment: delivers App Volumes application packages to virtual desktops.
- An App Volumes packaging virtual machine
- The App Volumes Agent is installed in the packaging virtual machine if the target application profiled is delivered from the App Volumes Manager.
- The App Volumes tools are installed if the packaging virtual machine is standalone.
- An account with administrative permission is required when logging into the packaging virtual machine.
- The Dynamic Environment Manager Agent will not be installed on the packaging virtual machine.
- An App Volumes packaging virtual machine
- Dynamic Environment Manager Application Profiler will be installed on the packaging virtual machine.
- Understanding the Dynamic Environment Manager Application Profiler
- The Application Profiler is a standalone tool designed to streamline the creation of Flex configuration files and predefined settings for Dynamic Environment Manager.
- Application Profiler generates an optimized Flex configuration file by examining where an application stores its file and registry settings. The output can be modified within the Application Profiler or used directly in the Dynamic Environment Manager environment.
- Delivery of Dynamic Environment Manager Personalization settings applies to both virtual and physical Windows desktop environments.
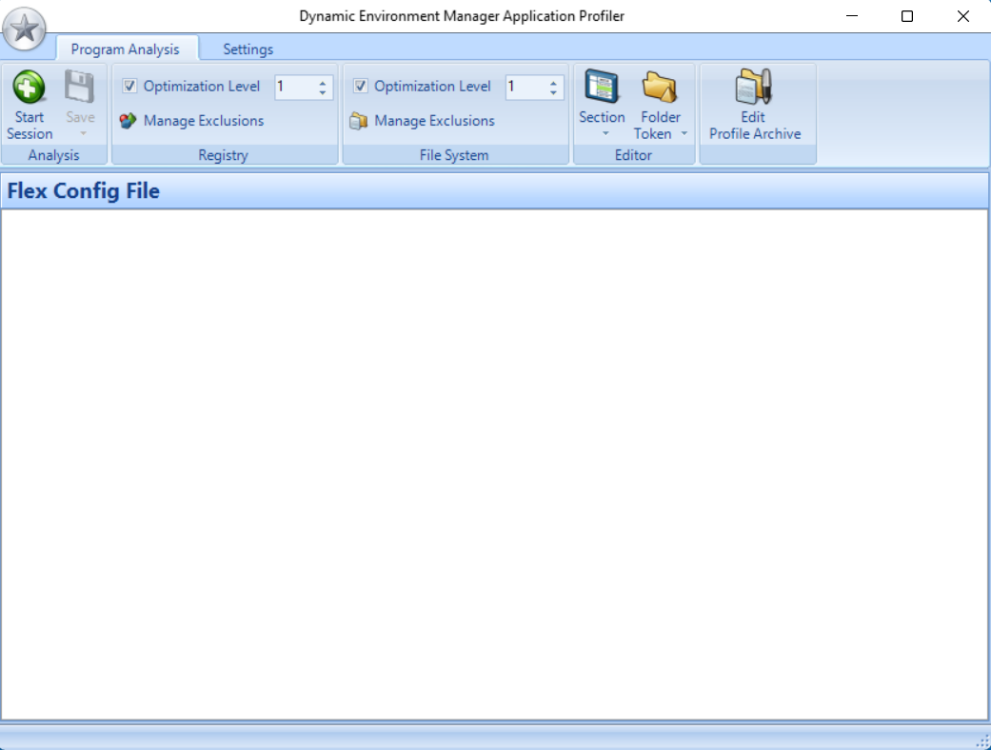
- The Application Profiler installation instructions are available in the product documentation.
- Prerequisites for installation of the Application Profiler are available in the product documentation.
- Profiling an application and administering the Application Profiler can be accessed from product documentation.
- Advanced Configuration of Application Profiler settings can be configured using these instructions in the product documentation.
Note the following considerations:
- Capturing application settings using the DEM Application Profiler starts with the launch of the target application using the DEM Application Profiler.
- Make desired changes to the target application and close the capture process by closing the target application.
- This provides the initial output in the DEM Application Profiler. If satisfied with the results, and where applicable, you can save the Flex Configuration file (and/or) save the Flex Configuration file along with predefined settings captured by the DEM Application Profiler.
- If specific settings are missing or not configured, you can expand the inclusion/exclusion within the DEM Application Profiler console and initiate the capture process again.
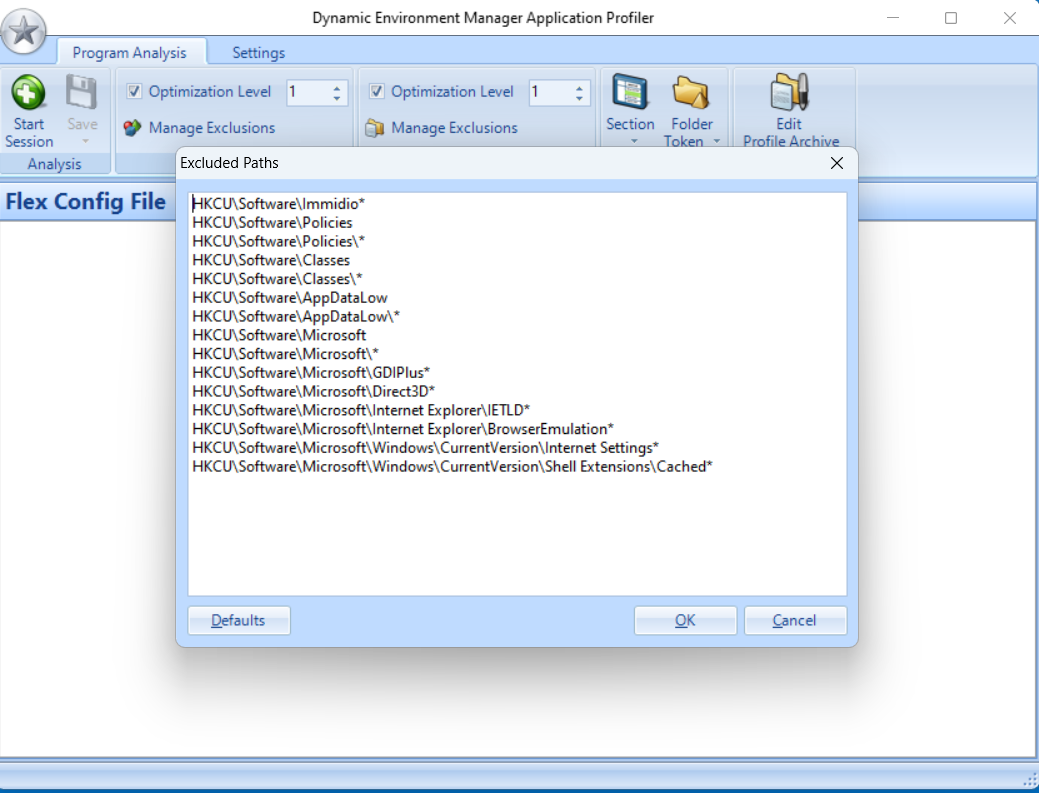
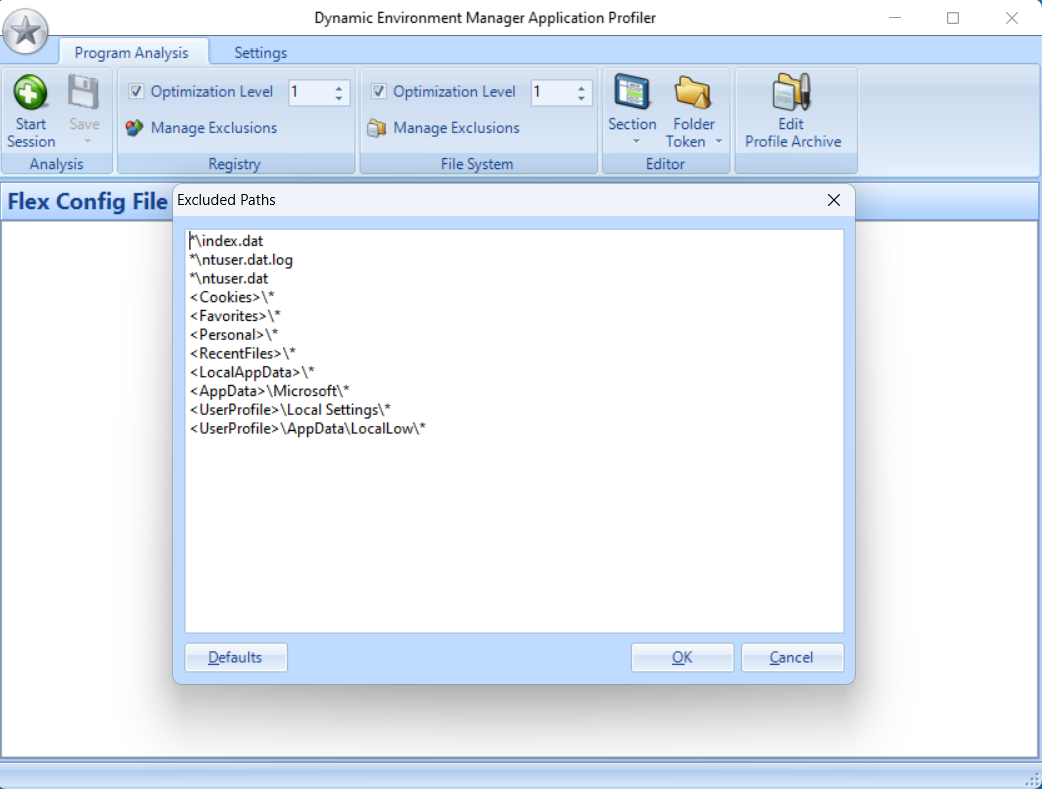
- The Application Profiler can be customized based on the profiled target application to include/exclude areas of the Operating System Registry and File System.
- Below, the two screenshots from the Application Profiler console show the Registry - Manage Exclusions defaults and the File System - Manage Exclusions.


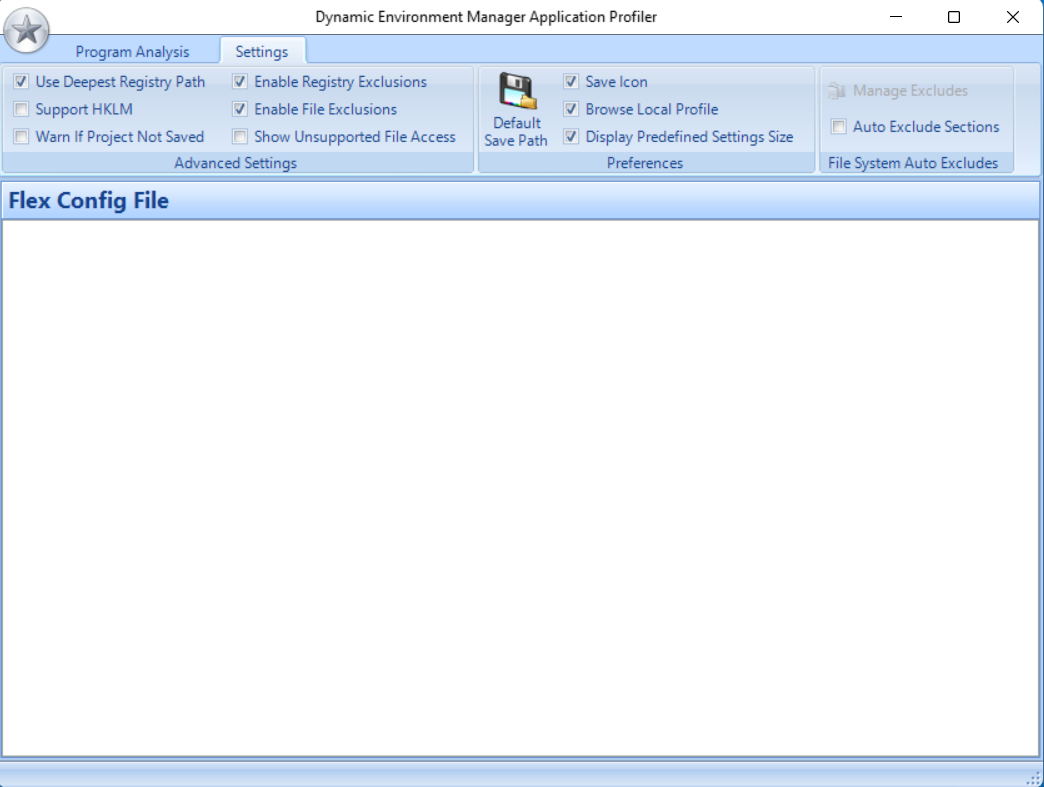
- Further settings have been provided on the Application Profiler console to fine-tune the target application's profiling.

- We will use the Notepad++ software delivered as an App Volumes package to the packaging virtual machine. Capturing the Notepad++ software is documented here using the App Volumes Management Console or the Command Line Interface guides.
- As we will be using the Packaging virtual machine, the user account logging into the VM should have administrative privileges to successfully launch and capture desired settings.
Create
From the App Volumes Packaging Virtual Machine, installed with the Dynamic Environment Manager Application Profiler, the DEM administrator/packager initiates the following steps;

Step 1: Deliver an App Volumes package to the packaging virtual machine
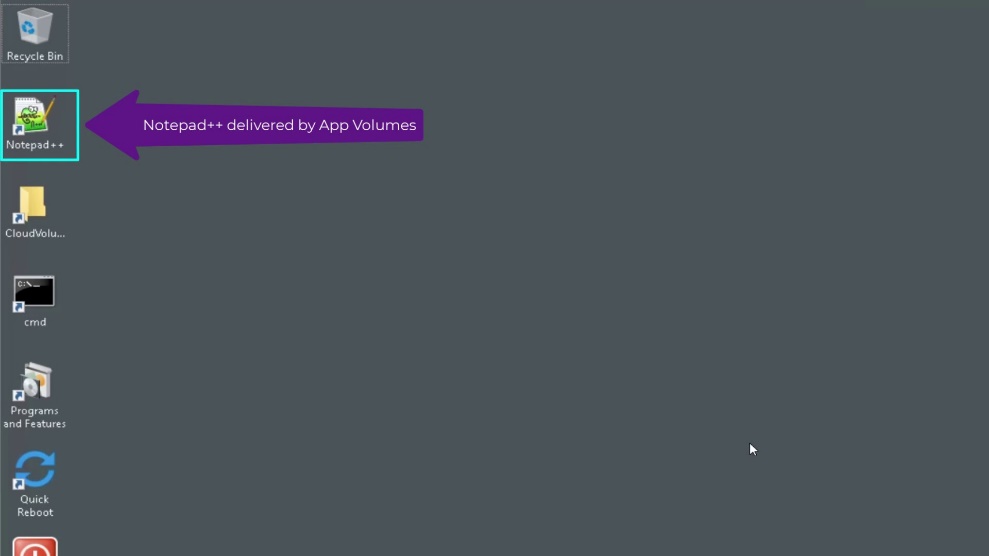
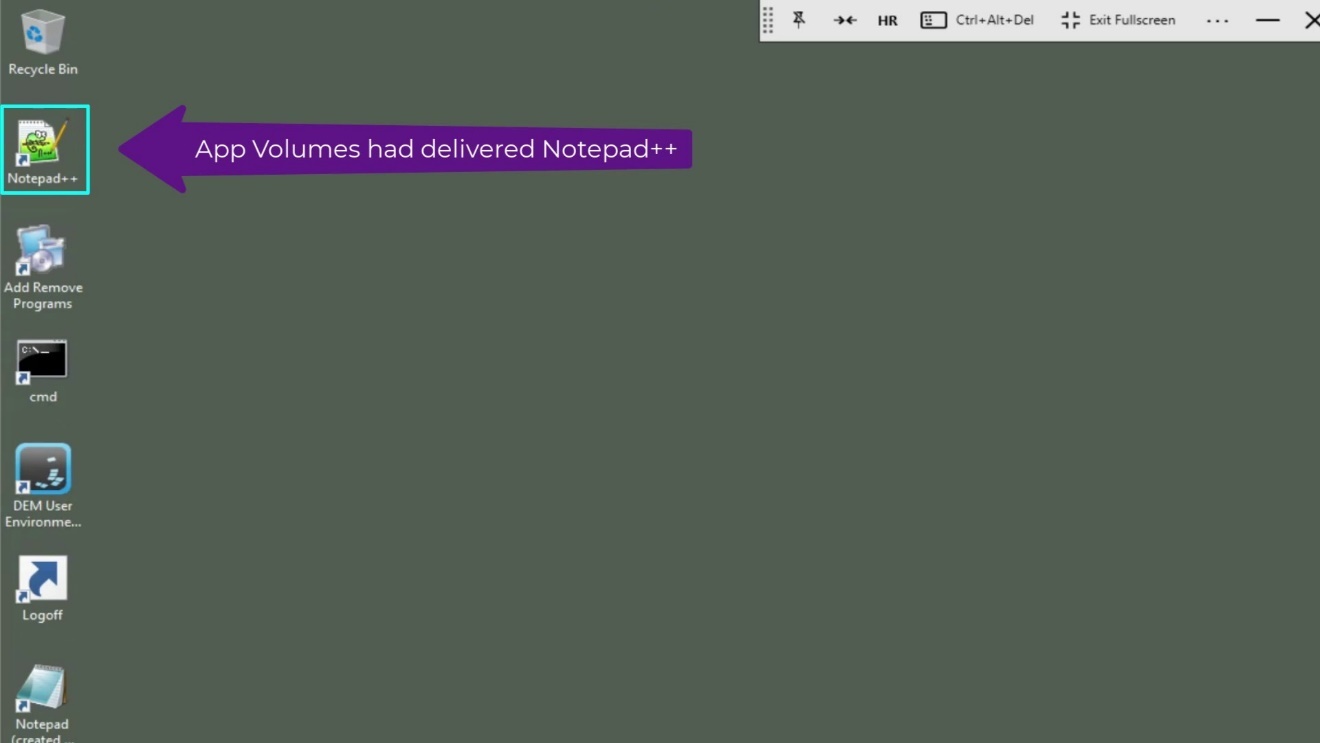
- The DEM administrator/packager logs into the packaging virtual machine. We confirm that the App Volumes package Notepad++ has been delivered and that the application launch icon is on the desktop. Use the capture and delivery steps detailed in the App Volumes Management Console or the Command Line Interface guides.

Step 2: Initiate the DEM Application Profiler capture process
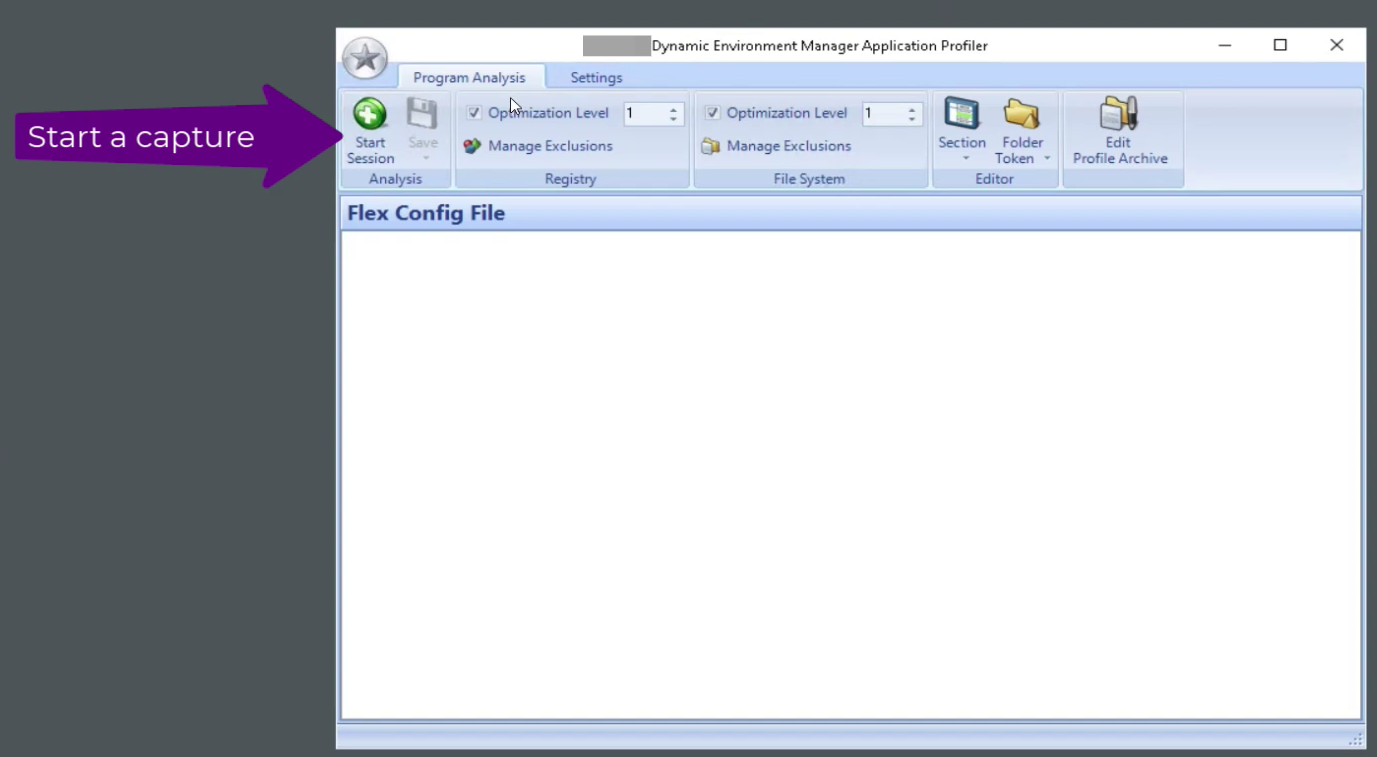
- Launch the Application Profiler and initiate a new session by clicking Start Session on the navigation ribbon.

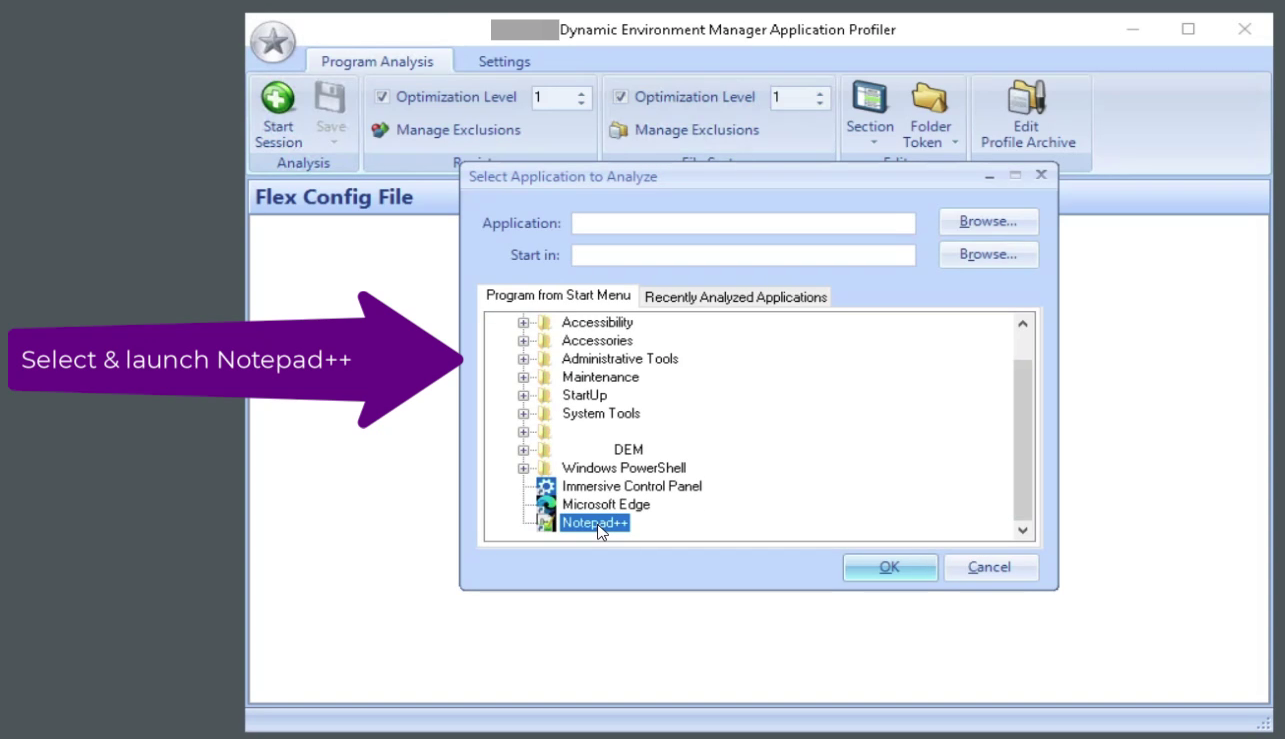
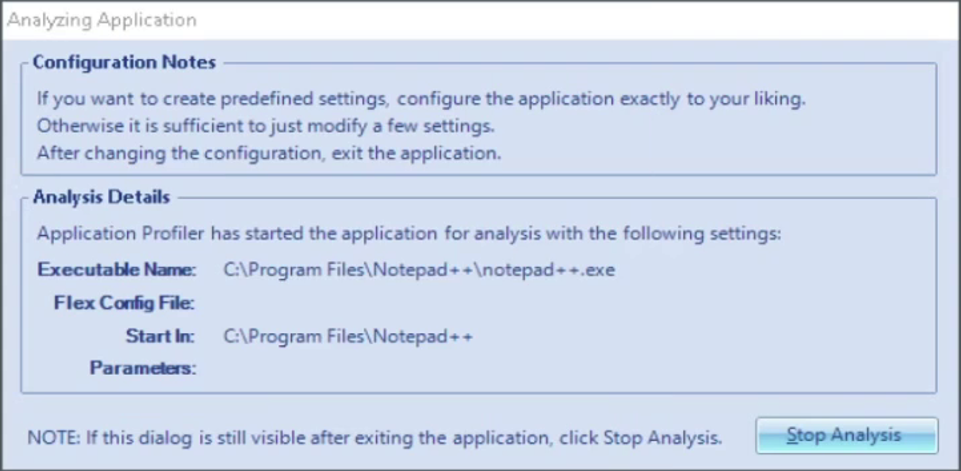
- This opens the Select Application to Analyze window. Here, we select the target application for our profile. We have chosen Notepad++. Alternatively, if the application icon is not present in the Start Menu, you can click the Browse button to navigate to the application folder and select the application executable.

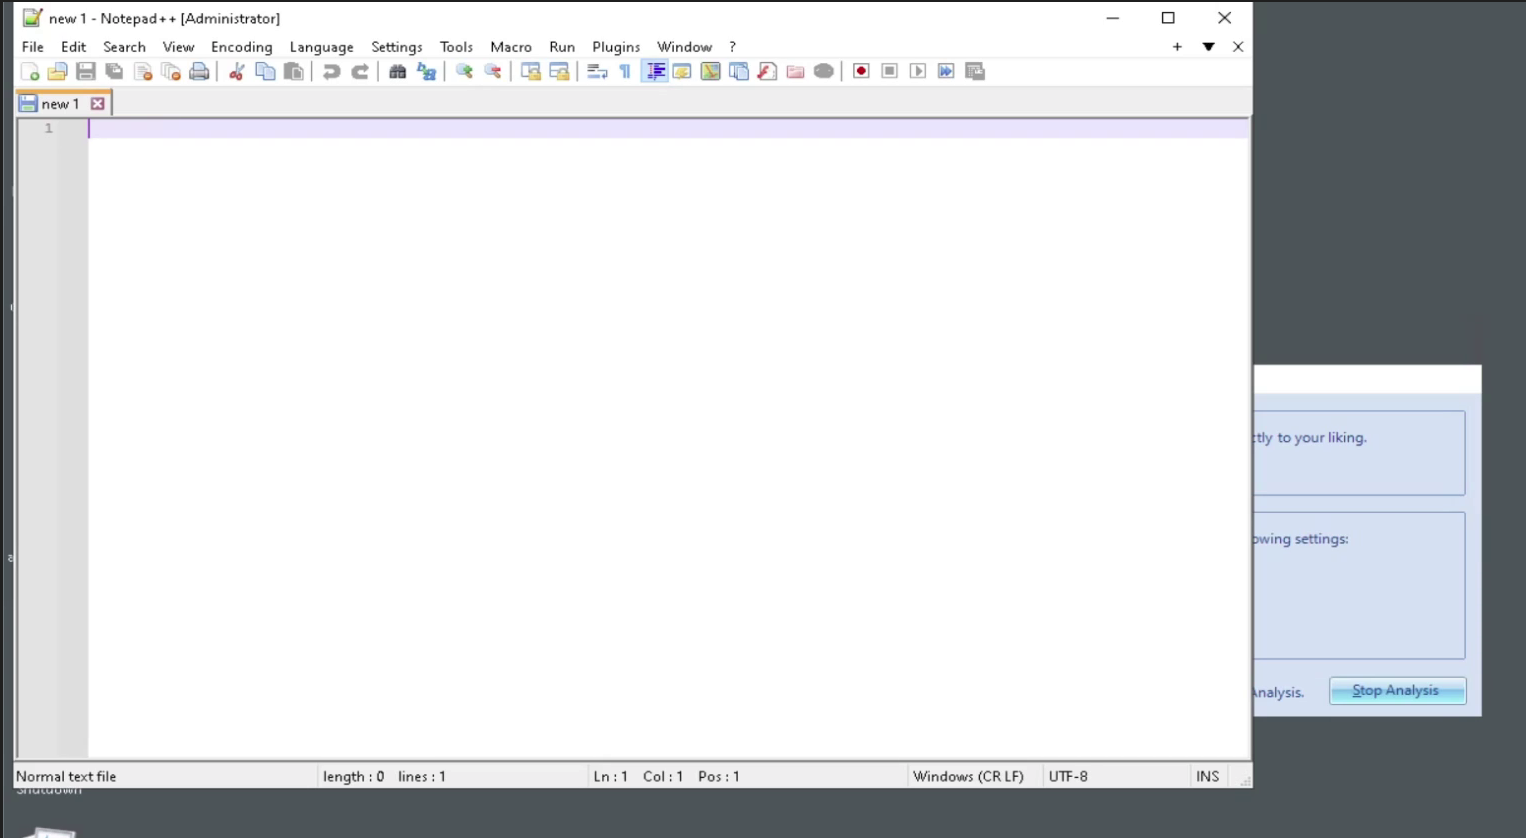
- The above step triggers the launch of the application Notepad++ and changes to the application at a Registry and File System level are monitored by the Application Profiler.
- If modifications are detected in the Registry and/or File System level as changes are made to the application, then the application is closed or exited. Those changes will be captured by the Application Profiler.

- If modifications are detected in the Registry and/or File System level as changes are made to the application, then the application is closed or exited. Those changes will be captured by the Application Profiler.
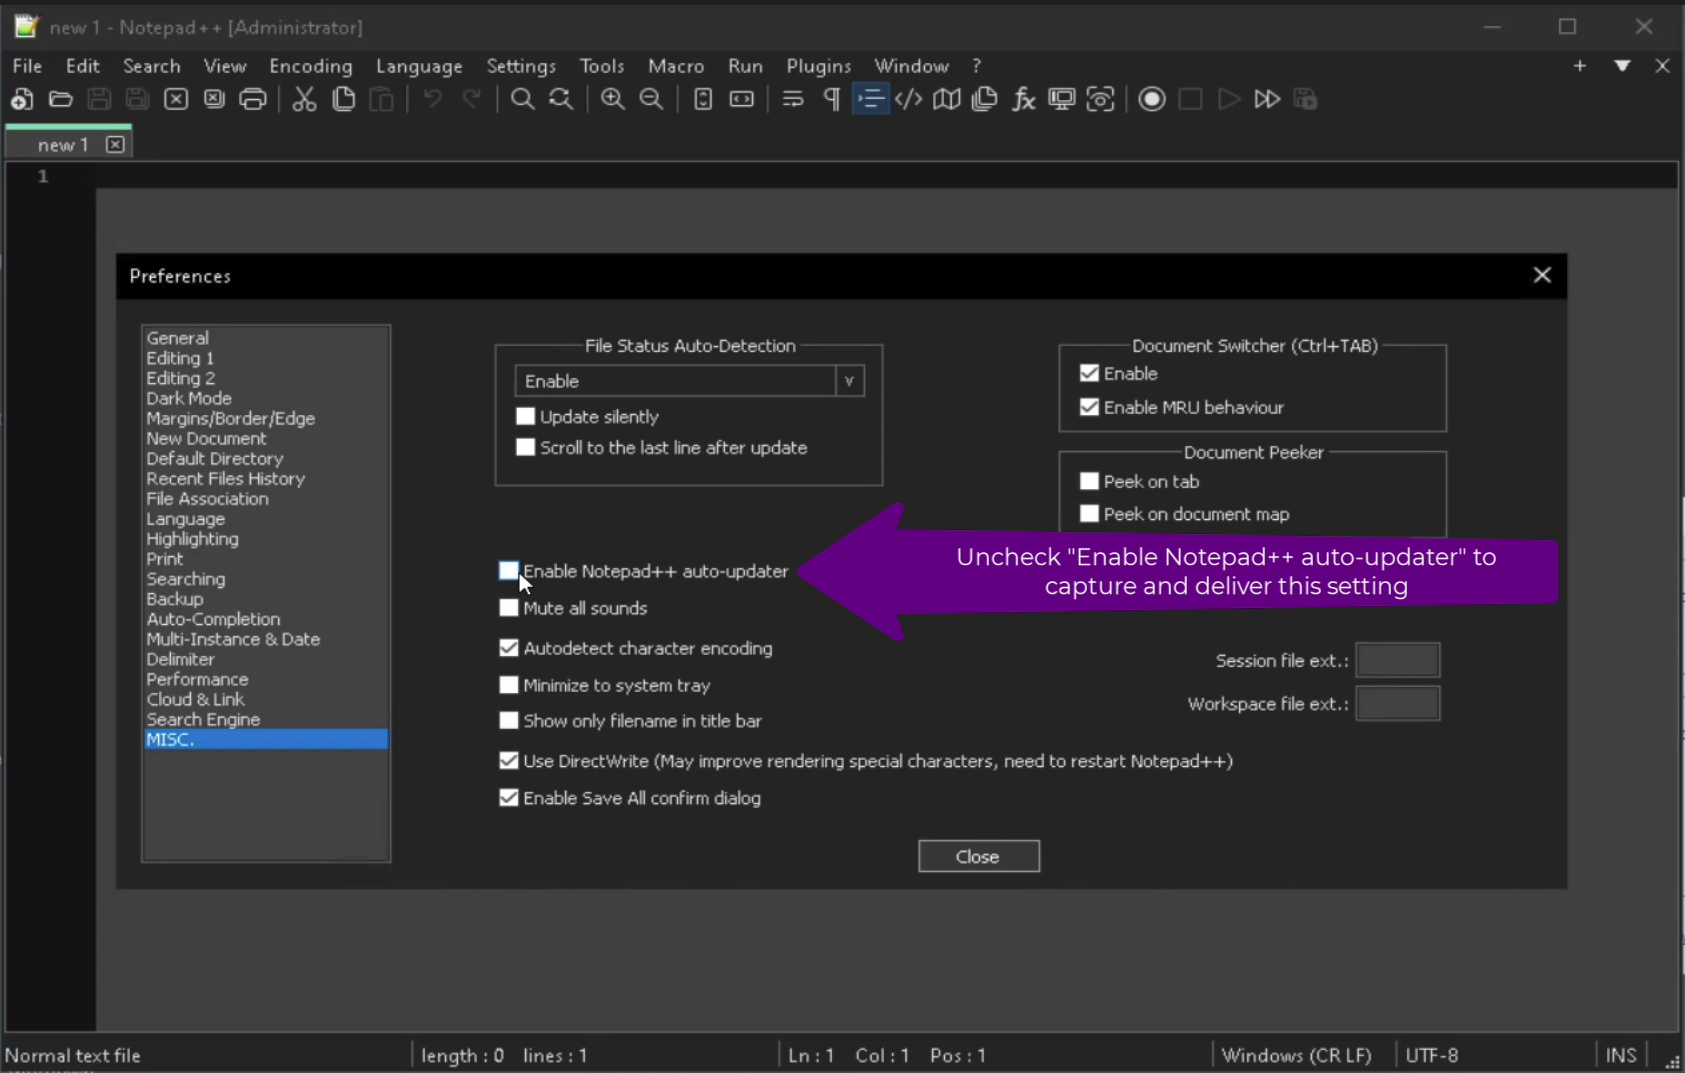
- In our example and demonstration, we have made two application setting changes which we want to have captured by the Application Profiler and injected into a user session at logon as a predefined setting for Notepad++.
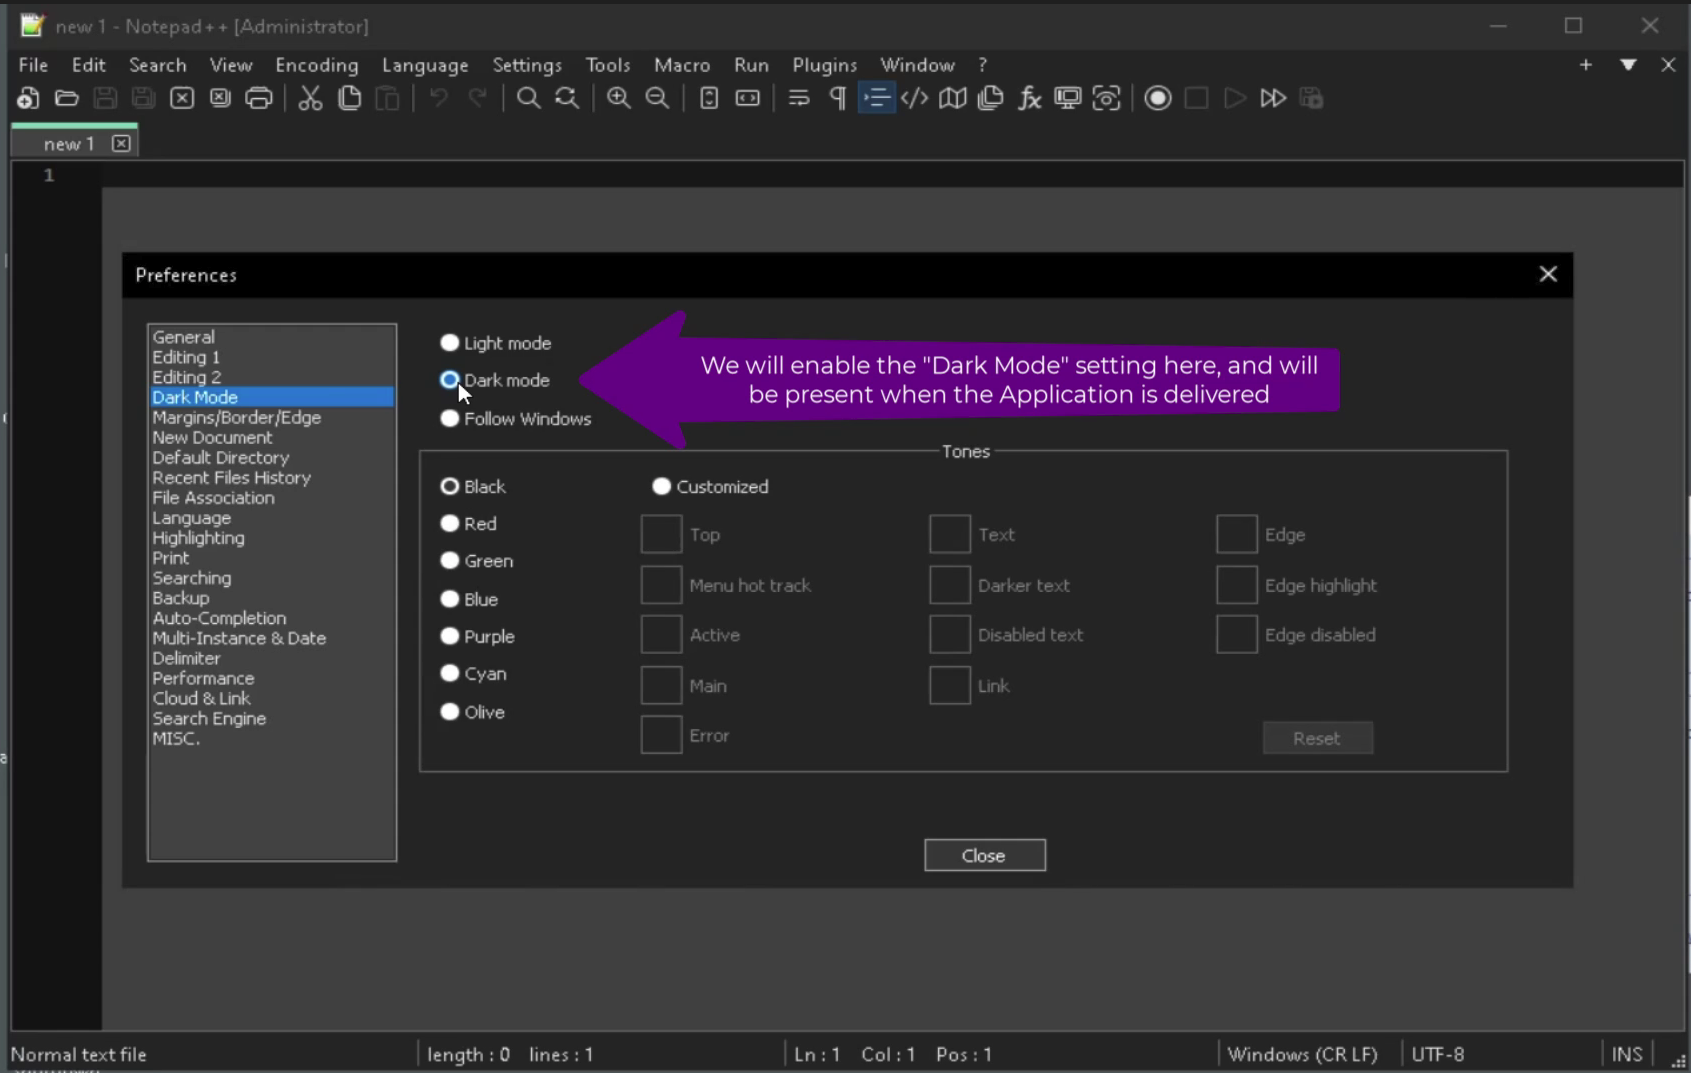
- The first setting is a visual setting where we’ve enabled the dark mode in Notepad++.

- The second setting was a setting we were not able to achieve while capturing Notepad++ using steps in the App Volumes Management Console or the Command Line Interface guides. This was because this application stored its application-level settings within the user profile instead of a common file system location.
- Most applications store their application-level settings in common file system locations like the ProgramData or Program Files locations and the App Volumes capture of the settings would have been successful during the capturing of the application package using steps in the App Volumes Management Console or the Command Line Interface guides.

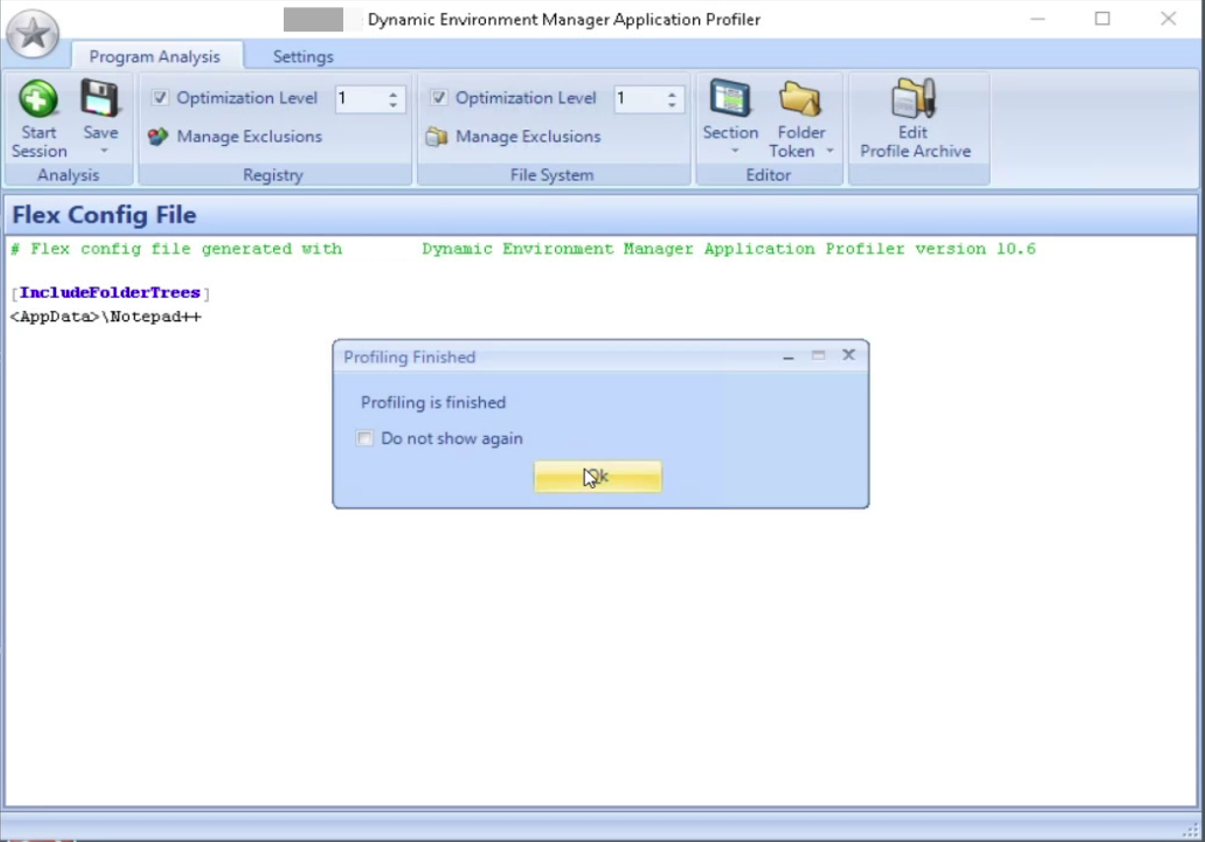
- Once we’ve implemented the two application setting changes and confirmed they are in place, we close the Notepad++ application, which in turn will close out and exit the Application profiling process, as the capture process was initiated on the launch of the Notepad++.exe executable, which is now closed.

- The first setting is a visual setting where we’ve enabled the dark mode in Notepad++.
Step 3: Validate the captured predefined application settings
- On close of the Notepad++ application, the Application Profiler computes the changes done by the Notepad++ executable to the Registry and File System and provides an output shown.

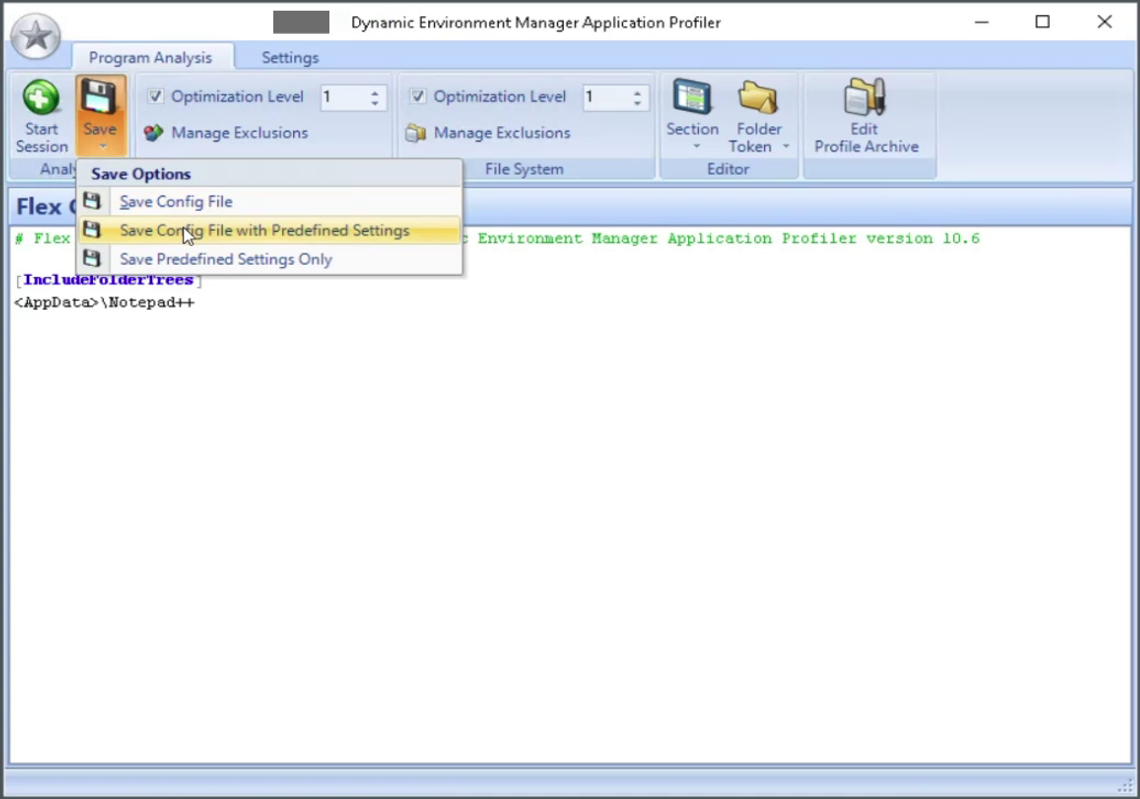
- We want to not only capture the Registry and File System locations affected by the Notepad++ executable in the form of the Flex Configuration file but also to capture the two application-level changes we made above and export them in the form of Predefined Settings.

- The output of the above action to Save Config File with Predefined Settings is the following;
- An export of the application icon file.
- An export of the DEM Flex Configuration file and FLAG file which contains the detected location of change within the Registry and/or File System when the Notepad++ application was launched.
- A compressed ZIP file that contains the actual Registry values and/or File System files that were modified when the two settings were put into the Notepad++ settings.

- Looking at the content of the zipped file, we find that the two changes affected the following files within the user’s profile Roaming AppData > Notepad++.

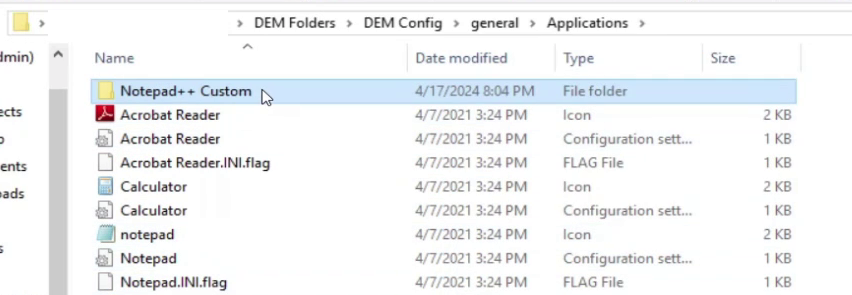
- Export the folder including 4 files to the File Server hosting the DEM Config Share. Then shut down the packaging virtual machine and revert to snapshot.
Note: Exploring the content of the zipped file is only carried out during troubleshooting, to understand its content. Manipulation of the DEM profiled zip file should not be altered by any other means, if so, DEM will fail to inject the predefined settings.
Step 4: Import the Flex Configuration File and Predefined settings into the DEM console
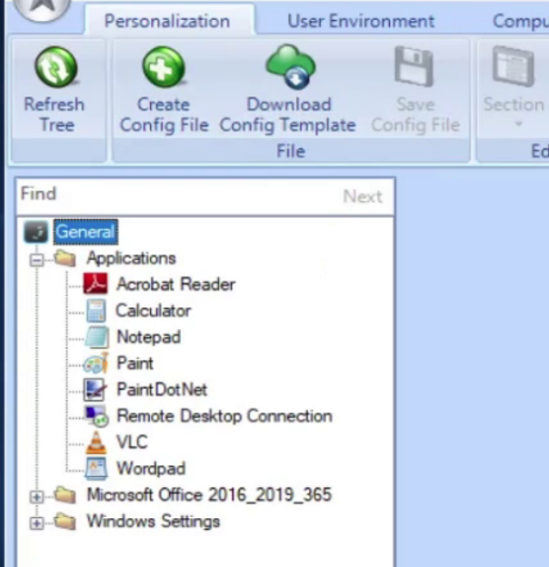
- Launch the Dynamic Environment Manager Management Console. The Personalization tab contains the list of applications and their settings managed by Dynamic Environment Manager.
- We will now import the custom captured application setting of Notepad++ into the Management Console and place the settings under the Applications folder.

- Copy the Application profiler exported folder and place it within the DEM Config Share, under the General > Applications sub-folder.

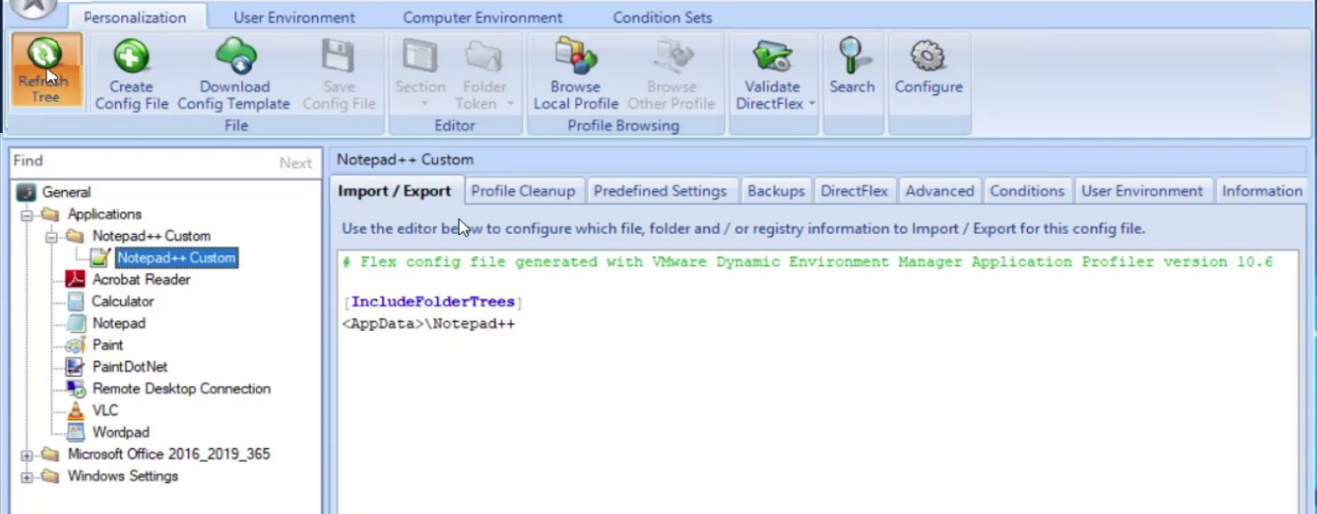
- Back at the Management console, click the Refresh Tree button on the navigation ribbon to have the new Notepad++ Custom application listed along with its settings, reflecting in the Import/Export section.

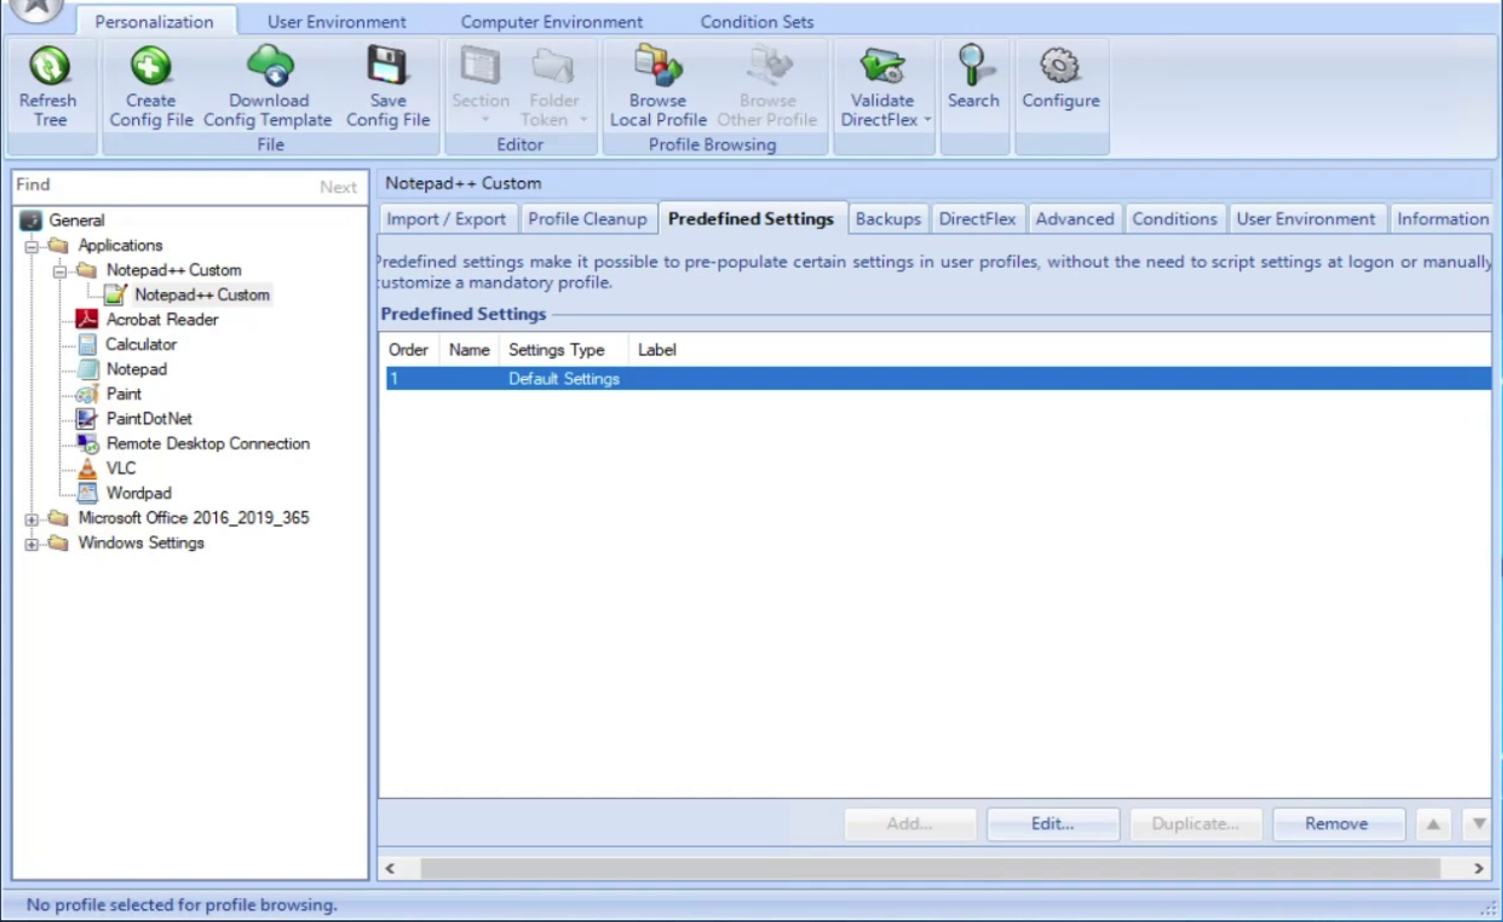
- As we have also imported the predefined settings, we can see the same reflected under the Predefined Settings tab for Notepad++.

- Multiple predefined settings can be configured for the application. Existing imported predefined settings can be edited to provide granular functionality.
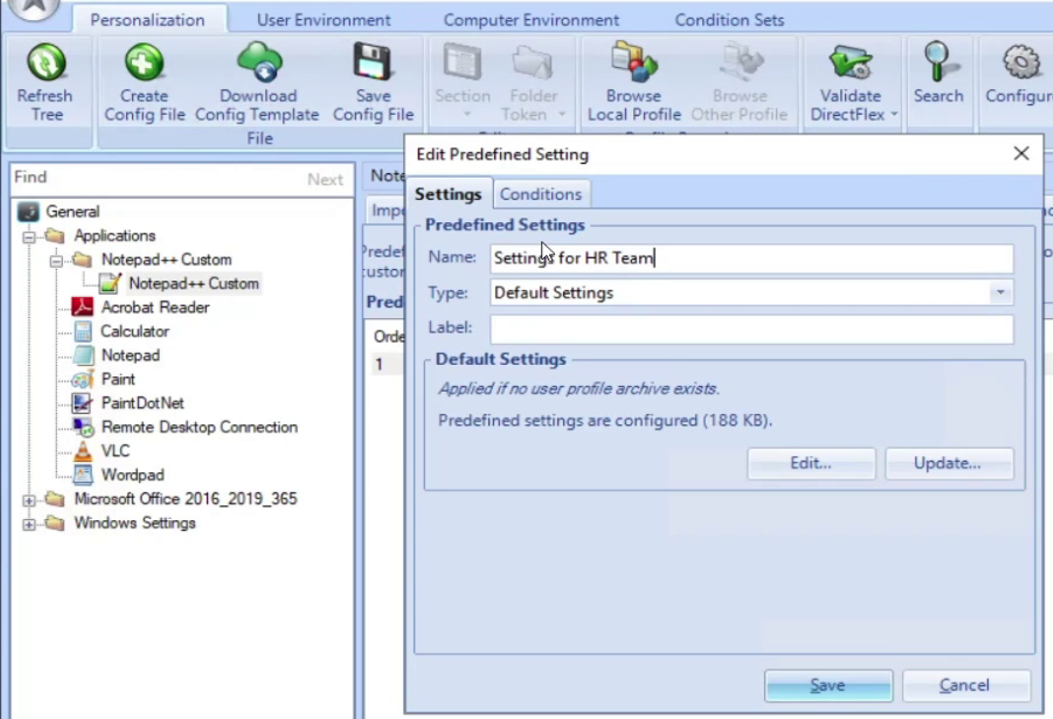
- In this demo, we edit the predefined settings imported into the Management Console, provide a name, and target these settings to the HR department.

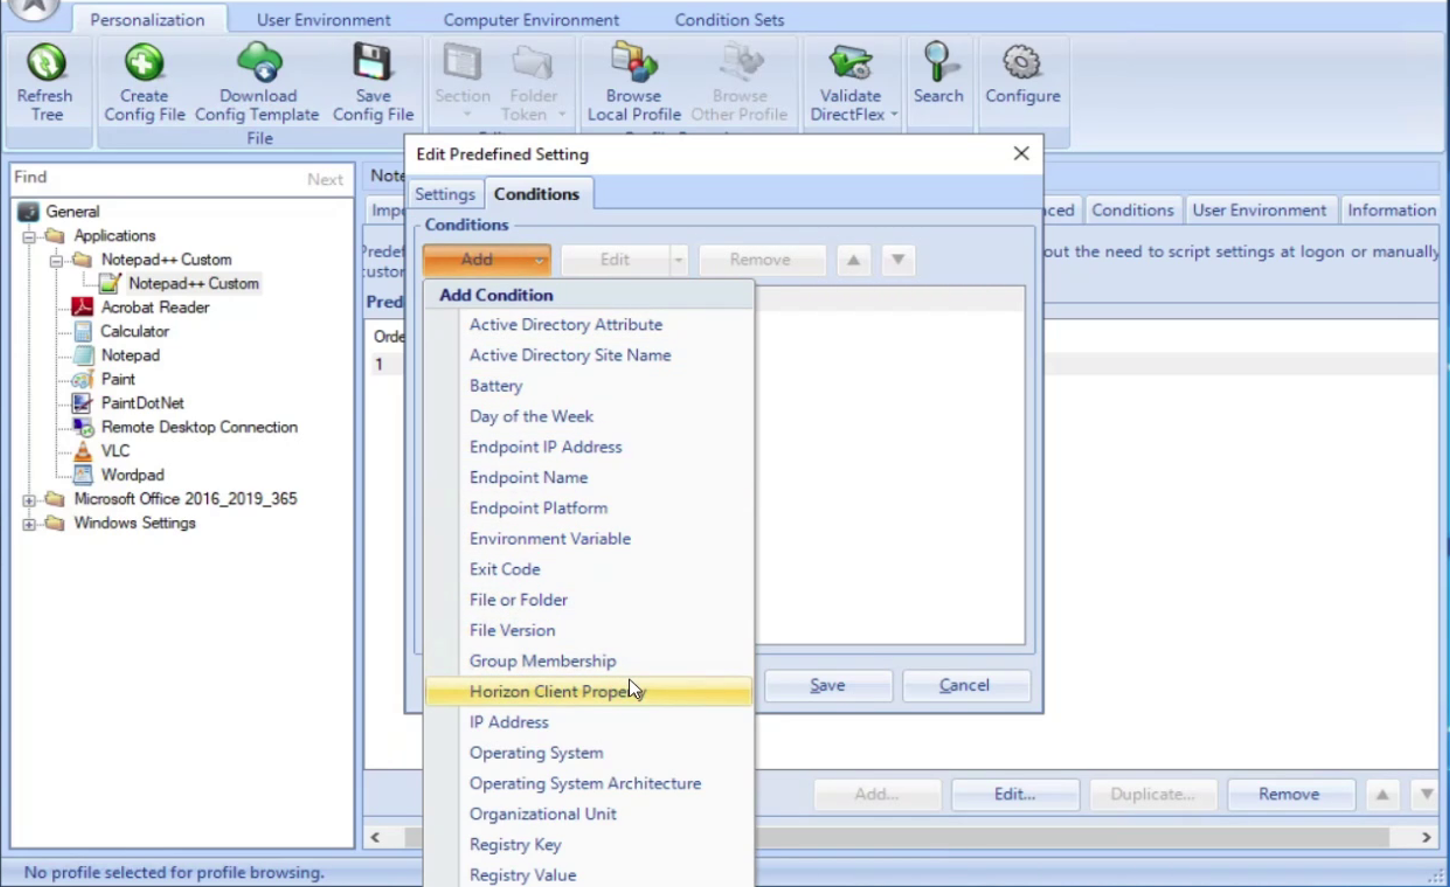
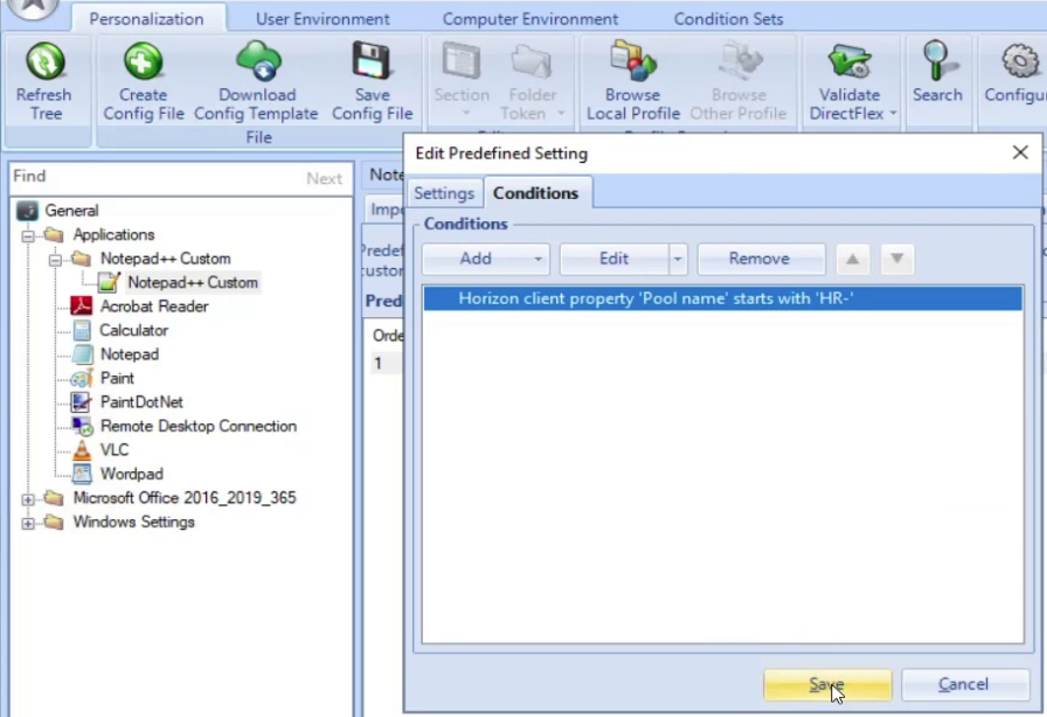
- Configure Conditions to target these settings to be applied only to users logging into a Horizon VDI Pool with the Pool Name starting with HR-.

- We use Dynamic Environment Manager and target the Horizon Client Properties to get the value of the VDI Pool the user has logged into, and if the pool name matches with the below Condition then the predefined setting for Notepad++ is applied.

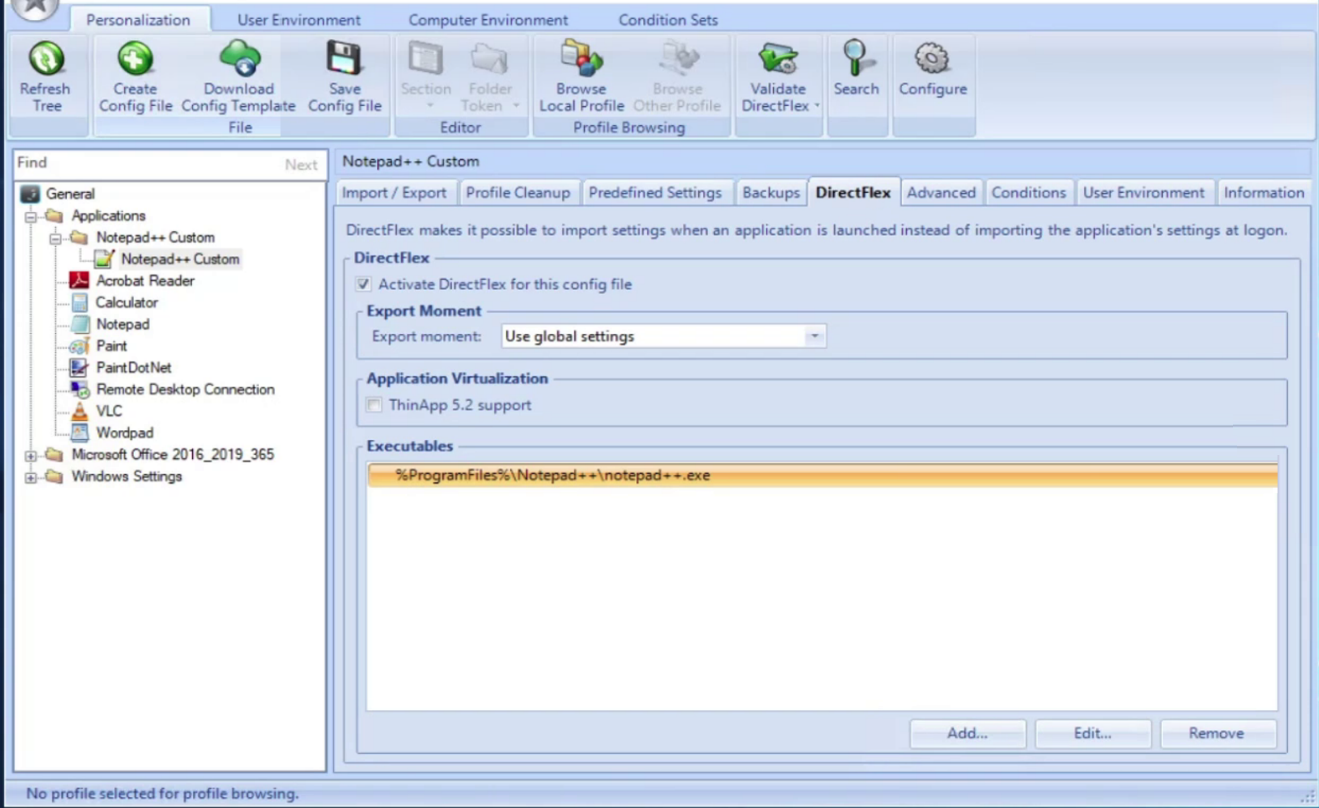
- As the Application Profile has captured the application settings on the target execution of the application executable Notepad++.exe, the “DirectFlex” option is enabled. Thereby ensuring that the predefined settings are injected into the user session only at the launch of the Notepad++.exe executable.

- In this demo, we edit the predefined settings imported into the Management Console, provide a name, and target these settings to the HR department.
The next steps are for an end user to login to a virtual machine in a Horizon VDI environment that is provisioned from a VDI Pool name starting with HR-.
Validate
The final step is to validate the delivery of Notepad++ predefined settings from Dynamic Environment Manager, we have an end user login to a Horizon VDI launching a virtual desktop session from a pool with the pool name starting with HR-. This Horizon virtual desktop pool has been configured with an image that has both App Volumes and Dynamic Environment Manager agents installed and configured.
- At first, we validated the delivery of the Notepad++ application package using App Volumes.

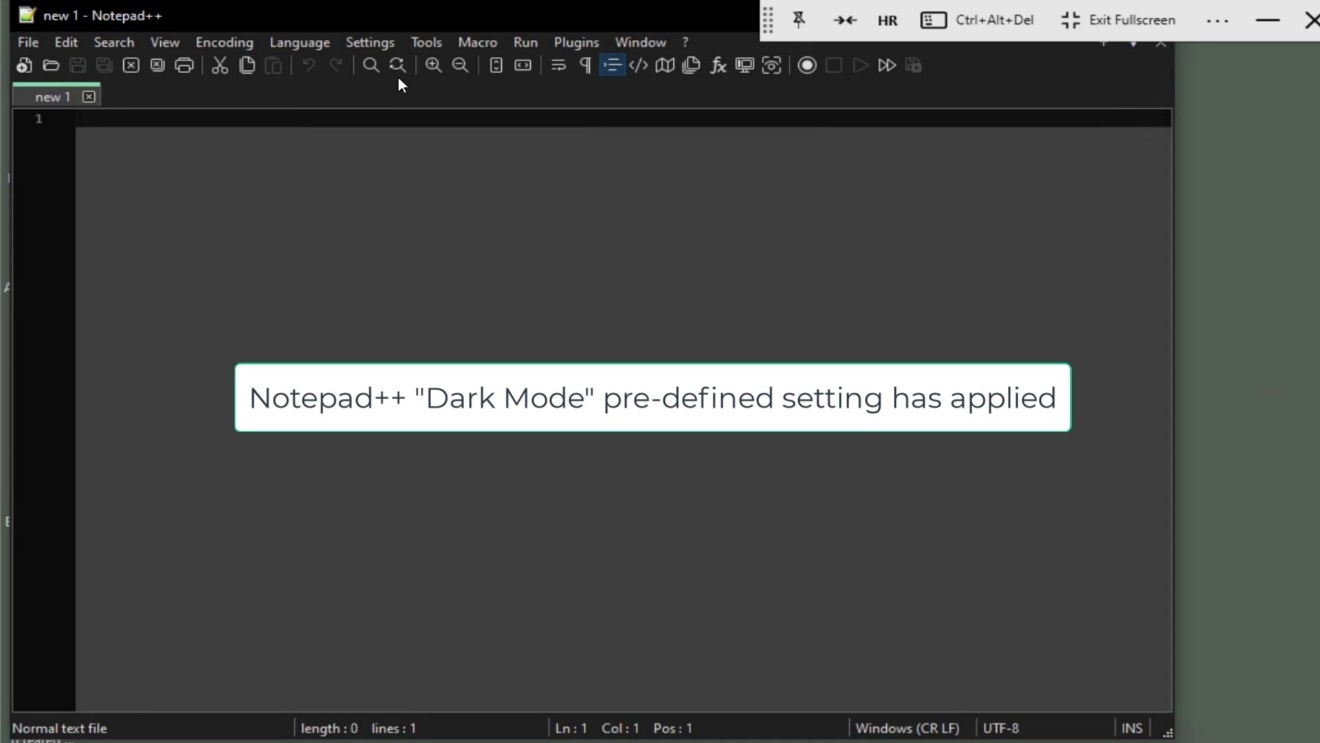
- Launching the Notepad++ application, we can visually confirm the dark mode has been applied.

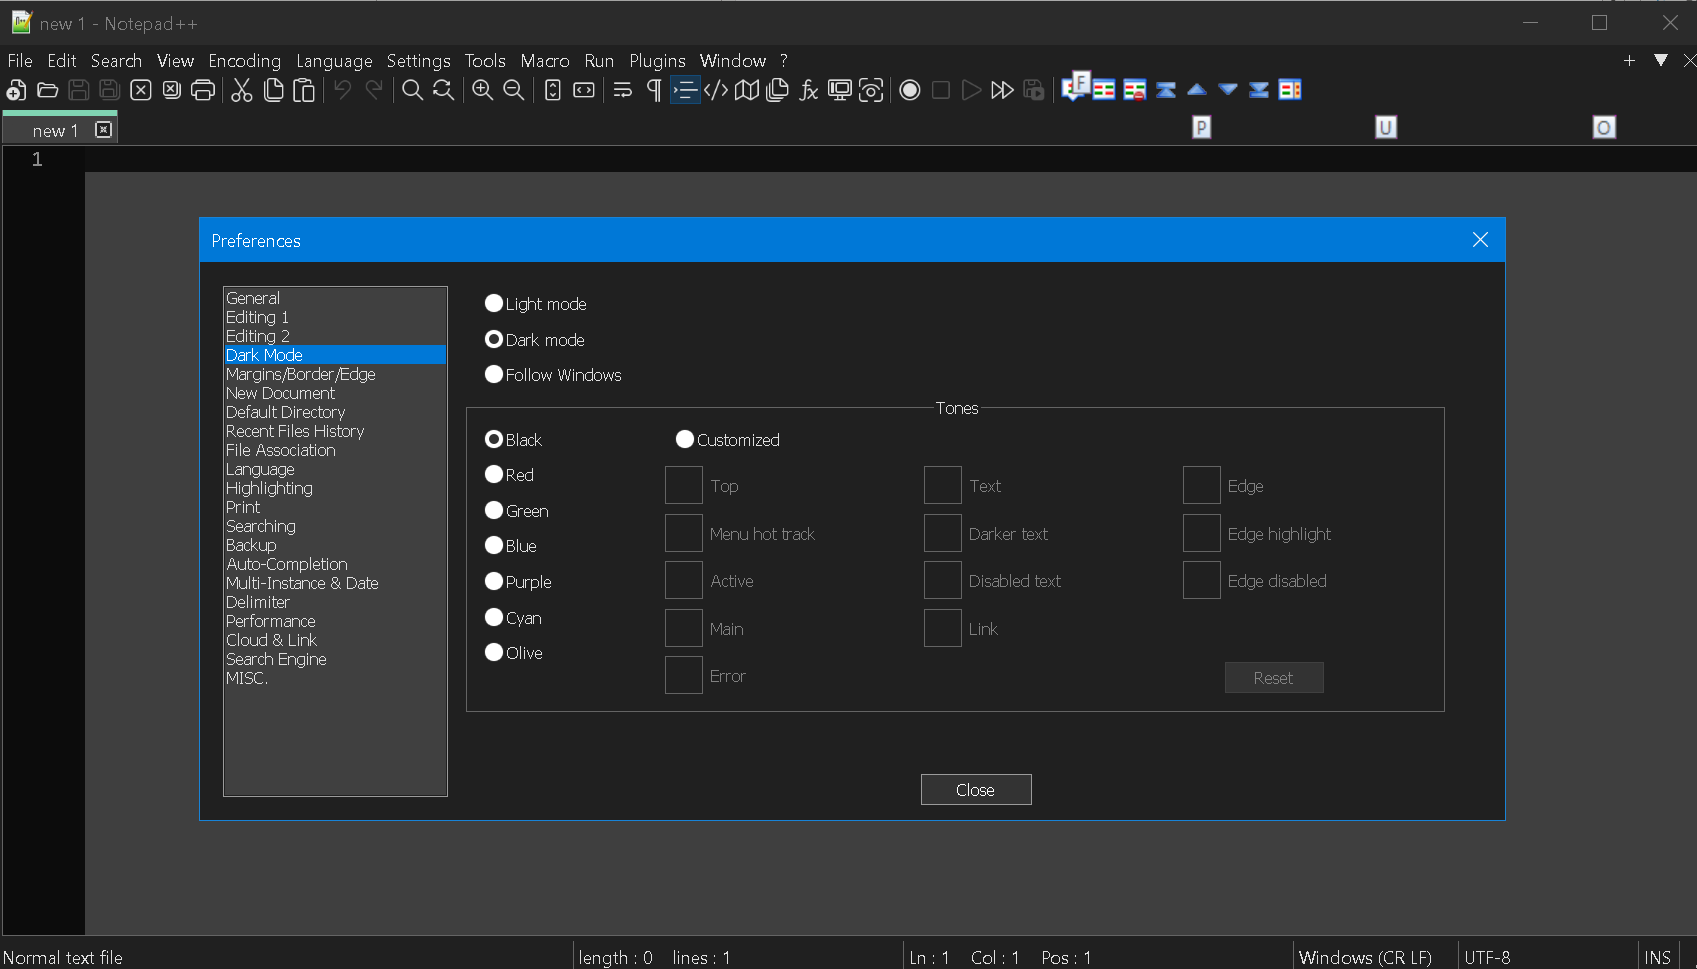
- Getting into the Notepad++ Settings, we can validate that dark mode has been enabled.

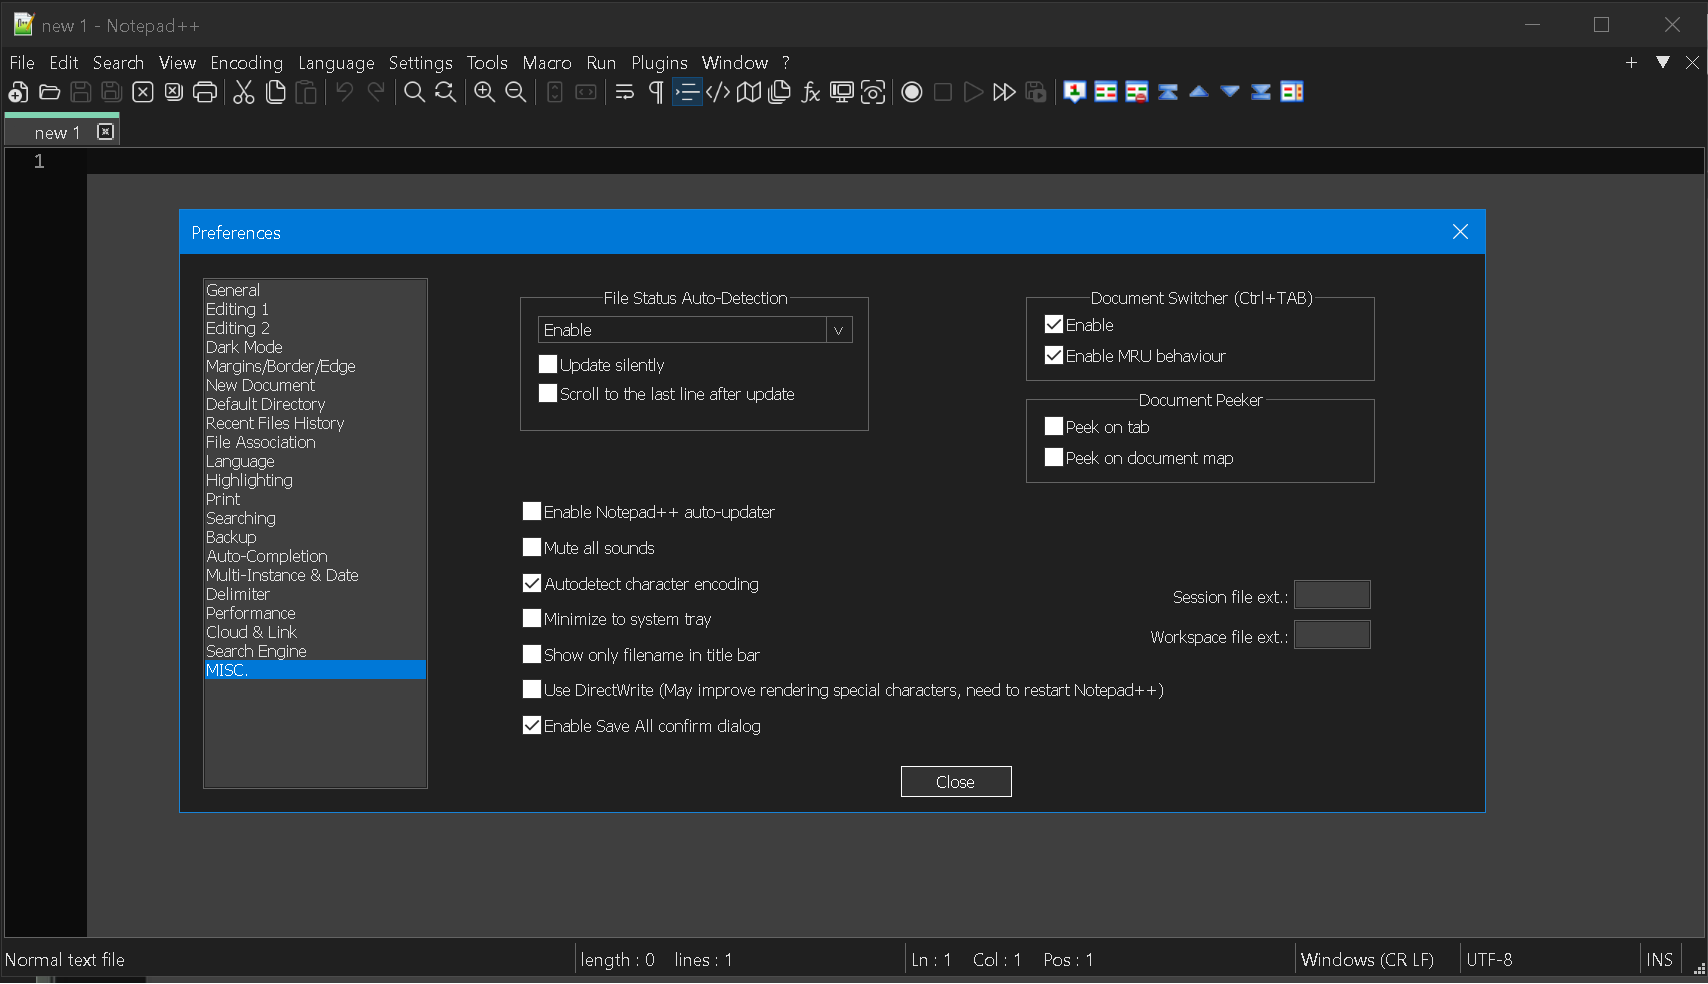
- And can also confirm the Enable Notepad++ auto-updater setting is turned off.

We have now validated the delivery of predefined settings to the Notepad++ application package delivered from App Volumes to a user.
Demonstrate
For a demo of the steps in this guide, see:
Summary and Additional Resources
The administration of an Omnissa App Volumes and Omnissa Dynamic Environment Manager environments to complement each other in delivering applications with configurable predefined settings is inherently complex and constantly evolving. This Application Packaging series aims to be a steady companion, offering reliable guidance and support to help you effectively manage these daily operational tasks. By utilizing this resource, you will be better prepared to handle the challenges of your role, ensuring operational excellence and technical proficiency with App Volumes and Dynamic Environment Manager.
We trust you will find this Application Packaging series invaluable in your day-to-day activities and encourage you to refer to it regularly. Your feedback is welcome and will be instrumental in continuously improving this resource.
Additional Resources
Explore the following additional resources.
- Reference Architecture – App Volumes
- Reference Architecture – Dynamic Environment Manager
- App Volumes Product Page
- Horizon 8 Product Page
- Dynamic Environment Manager Product Page
- Dynamic Environment Manager Application Profiler Product Documentation
Changelog
The following updates were made to this guide.
|
Date |
Description of Changes |
|
Oct-2024 |
|
|
August-2024 |
|
Authors and Contributors
The following authors and contributors have helped make this paper possible:
Authors
- Sujay Gopalan, Sr. Technical Marketing Architect, Omnissa.
Reviewers
- Graeme Gordon, Sr. Staff Architect, Omnissa.
- Rick Terlep, Staff Technical Marketing Architect, Omnissa.
- Mike Erb, Staff Technical Marketing Architect, Omnissa.
Feedback
Your feedback is valuable. To comment on this paper, either use the feedback button or contact us at tech_content_feedback@omnissa.com


