Application Packaging using the Command Line Interface
Application capture using the App Volumes Tools
If you liked Omnissa App Volumes capturing and packaging Applications using the GUI method and are now looking for a guide to how the command line interface method works using the Omnissa App Volumes Tools? Then, this guide will take you, an App Volumes Administrator, App Volumes Applications Administrator, or an Application Packager, through the steps to prepare and create an application capture using the “App Volumes Tools” command line interface and execute the delivery of the package from the App Volumes Management console.
We have categorized the steps involved under three sections. The “Prepare” section will describe the environment and prerequisites needed to be successful. We follow this up with
The Three-Step Workflow

This workflow demonstrates the steps an App Volumes Administrator would follow to initiate and capture an application from the App Volumes Admin Console and the App Volumes Packaging Virtual Machine, following the three-step process in the below sections.
The “Prepare” section will describe the environment and prerequisites needed to be successful. We follow this up with
The “Create” section provides step-by-step instructions on navigating the “App Volumes Tools” Command Line Interface to capture an Application Package. The application to be captured should conform to the EXE, MSI, or MSIX-based application format and installation standards. The capture process is carried out on a packaging VM built using the Preparing for Application Package Capture guidelines, and the output is uploaded to the App Volumes Manager. Once the process is completed, we navigate the App Volumes Manager console, where an App Volumes Administrator or an App Volumes Applications Administrator performs administrative tasks on the newly captured application package and proceed with the application assignment.
The “Validate” section, the end-user assigned with the application package from the App Volumes Manager will log into a Virtual Desktop, confirm delivery, and launch the application. A demo walk-through of the instructions in this guide is available in the Demonstrate section.
Prepare
The following components have been deployed in the environment used to build and validate the scenario.
- Omnissa Horizon 8: virtual desktops built from a Windows 10 Guest OS image using the following method.
- Omnissa App Volumes 4.x environment
- Use a standalone packaging virtual machine built with the following guidelines outlined in Preparing a Packaging Virtual Machine. This scenario will not require installing the Horizon agent, App Volumes agent, and Omnissa Dynamic Environment Manager (DEM) agent.
- App Volumes Tools is installed instead of the App Volumes agent.
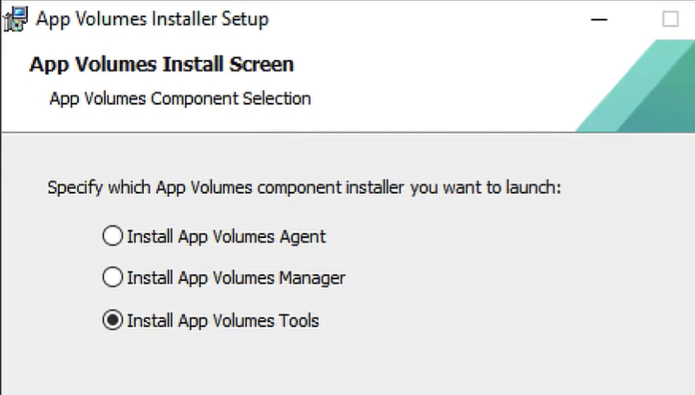
- We will install the target business application(s) during the App Volumes capture process.
- Additional software used;
- The source file(s) for the business application are needed for capture. In the demonstration, we used Notepad++.
- It is essential to note the following considerations for capturing an App Volumes package outlined in Best Practices for Packaging App Volumes Applications.
- On this standalone App Volumes package capture VM, you will need to know the locations of the App Volumes Tools launched from “C:\Program Files\Omnissa\AppVolumes\Agent\appcapture.exe”
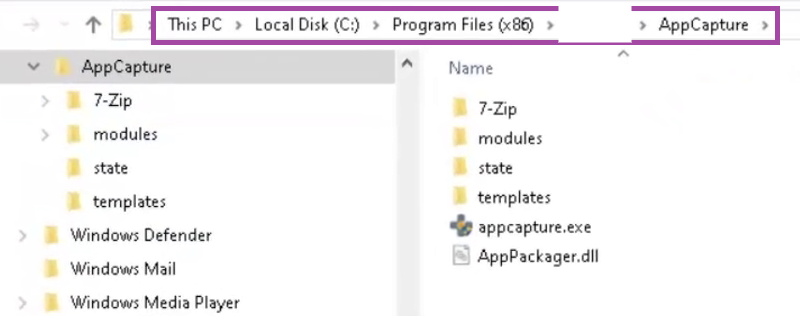
- The capture process output from the “appcapture.exe” tool generates the Virtual Hard Disk (VHD), a vSphere Virtual Hard Disk (VMDK), and the JSON files.

Create
We use the outlined CLI method of the capture and validation process described in the Omnissa App Volumes Administration Guide under the section Using the App Volumes Application Capture Command-Line Program.
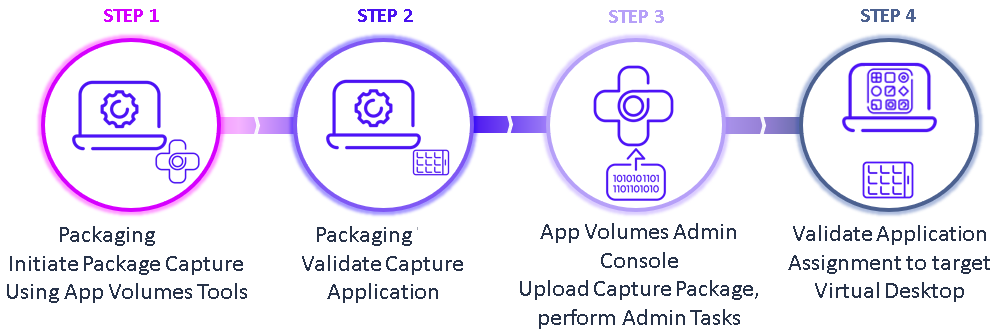
With the process outlined in Using the App Volumes Application Capture Command-Line Program of the administration document, tasks will be performed under four sections, from capture, initial validation, upload, and administrative tasks to user validation of the delivered application.
The application packager will execute the first two tasks on the standalone Packaging virtual machine installed with App Volumes Tools. This is followed by the next two sections, where the “App Volumes Administrators” or “Application Administrators” user, defined from the list of roles, will initiate the package upload and administrative tasks from the App Volumes Manager console. The four sections will be as follows:
Step 1: Use “appcapture.exe” on the Packaging VM to capture the target application
- The application packager logs in to the standalone packaging virtual machine as an administrator. This ensures that the App Volumes best practices outlined in the product documentation are followed during the capture process. The following screenshots have been captured from the demonstration made available at the end of this scenario.
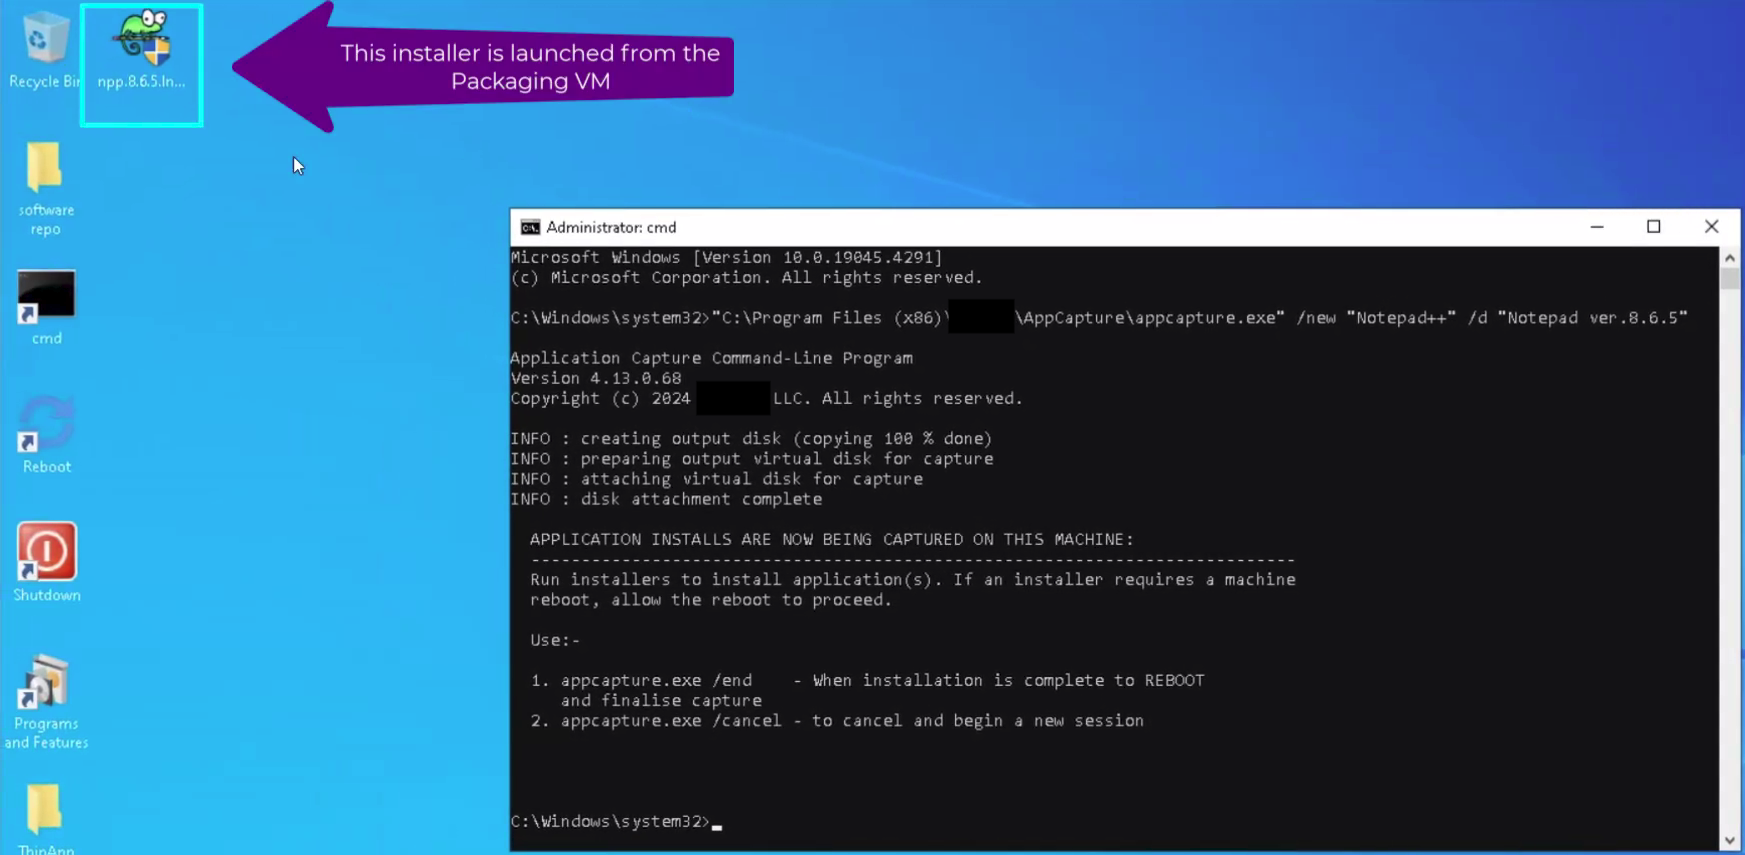
- Launch an elevated command prompt and execute the following command to initiate the capture sequence using the “appcapture.exe” utility.
Syntax:
The command used in demo:
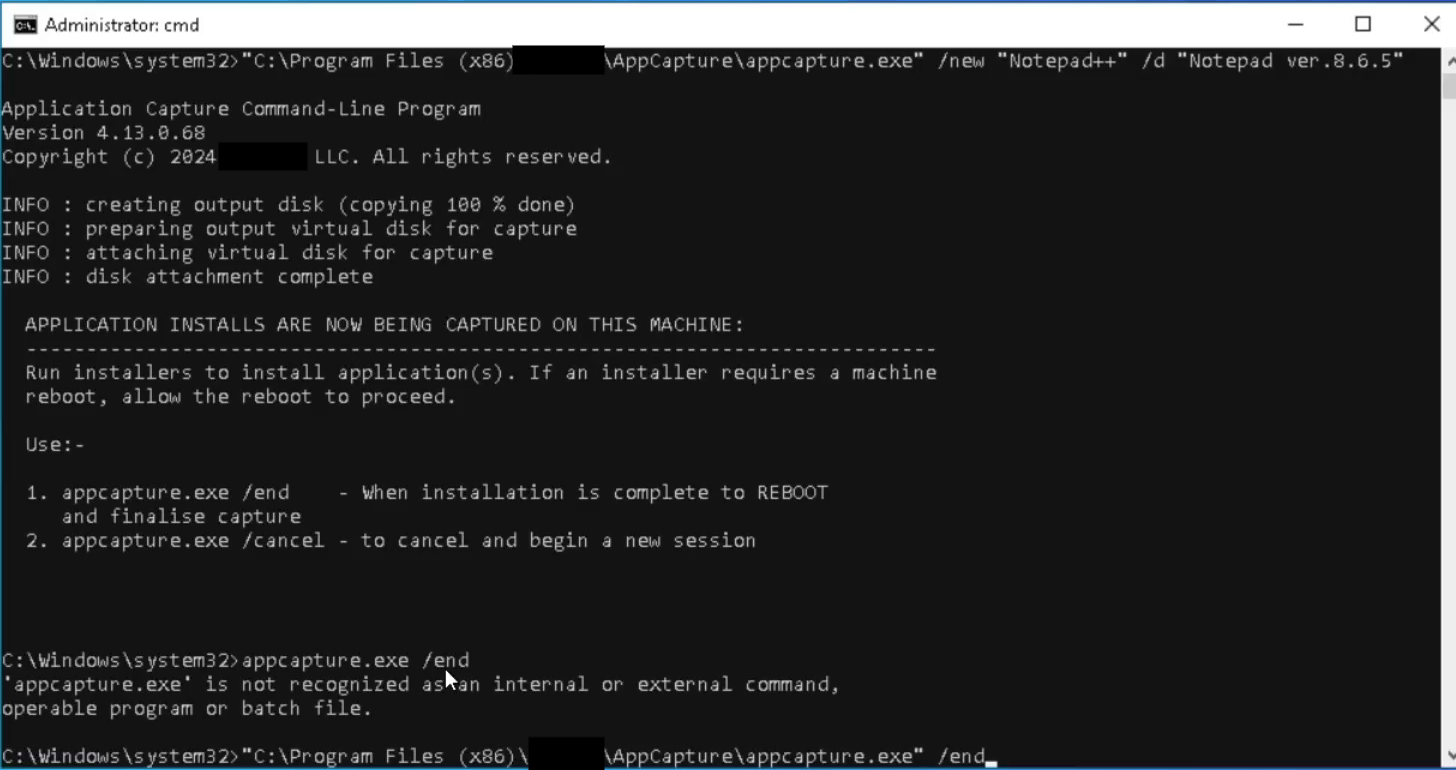
C:\> “C:\Program Files\Omnissa\AppVolumes\Agent\appcapture.exe” /new “Notepad++” /d “Notepad ver.8.6.5”
- The result of this command is shown below. A blank Virtual Hard Disk (VHD) is created, mounted, and ready for application installation.
- If an installer requires a system reboot, the administrator can go ahead and reboot the virtual machine.
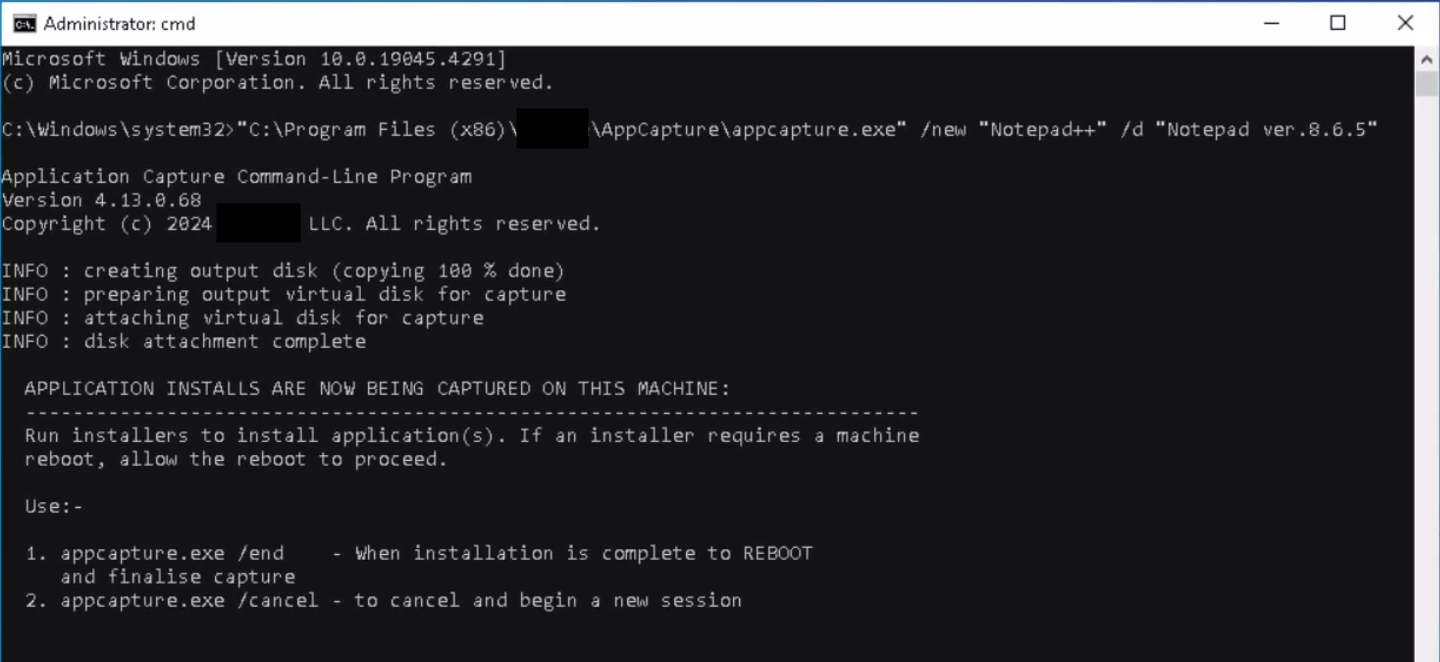
- At this stage, the App Volumes appcapture utility is ready to capture the installation.
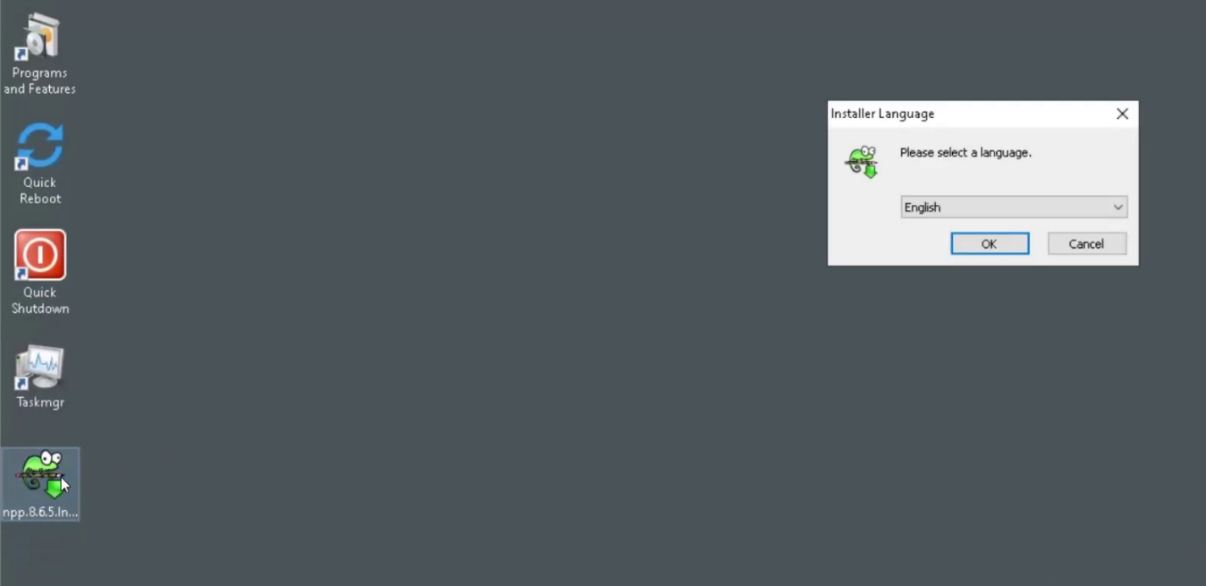
- The package can have the desired application made available locally and proceed to install the application.

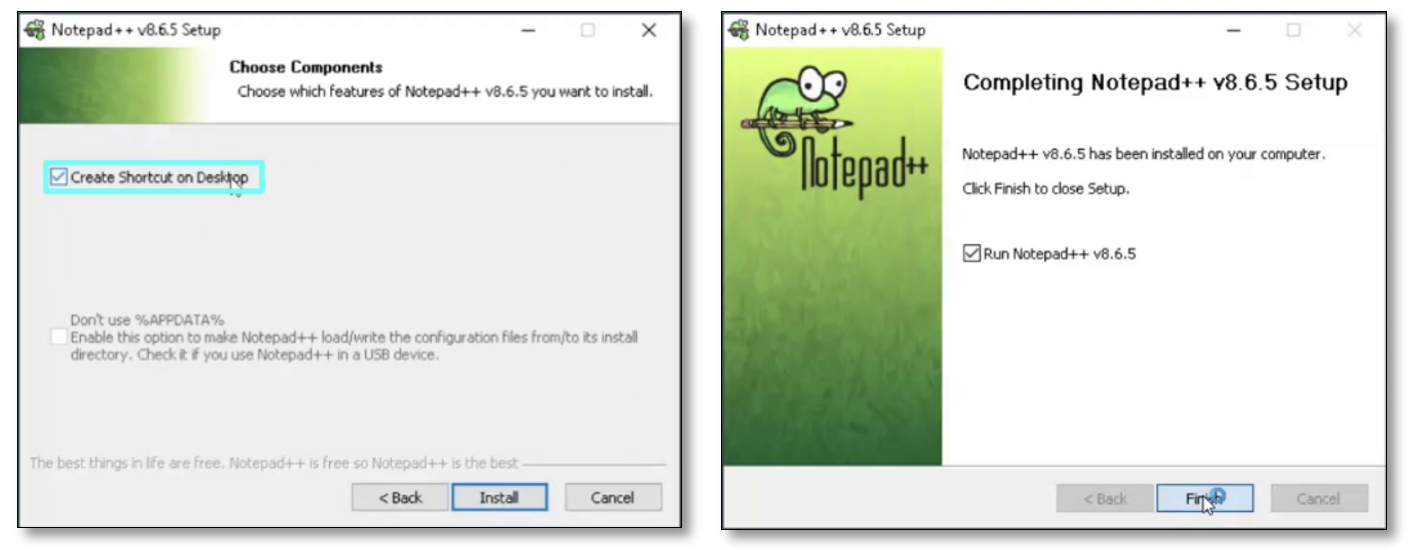
- The Application Packager initiates the installation based on the instructions provided by the application vendor.

- In installing Notepad++, the demonstration considers having a shortcut of the application available on the user’s Desktop before completing the application installation.

- If the application shortcut is placed within the user’s profile, it is not captured. Consider moving it to the “C:\Users\Public\Desktop” location, or in most cases, the application shortcut on the Desktop is from within the application folder in the Program Files location.
- The App Volumes capture process allows for multiple reboots during the application installation.
- Once the application is installed, run it to validate its functionality.
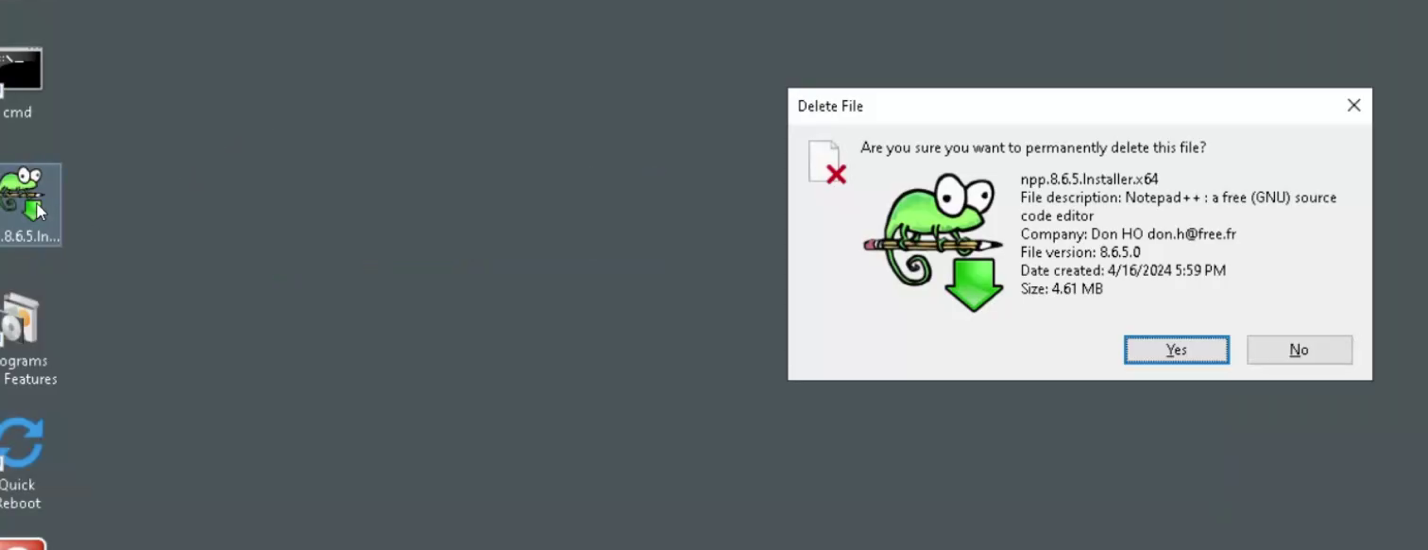
- Follow this up with the deletion of the application installer file(s) to avoid it from being captured.

- To close out the App Volumes package capture process, run the below appcapture command.
- The package can have the desired application made available locally and proceed to install the application.
Syntax:
C:\> “C:\Program Files\Omnissa\AppVolumes\Agent\appcapture.exe” /end
- If you wish to cancel the installation capture process, run the below appcapture command.
Syntax:
C:\> “C:\Program Files\Omnissa\AppVolumes\Agent\appcapture.exe” /cancel
- The below screenshot shows the execution of the appcapture.exe with the /end to close out the capture process.

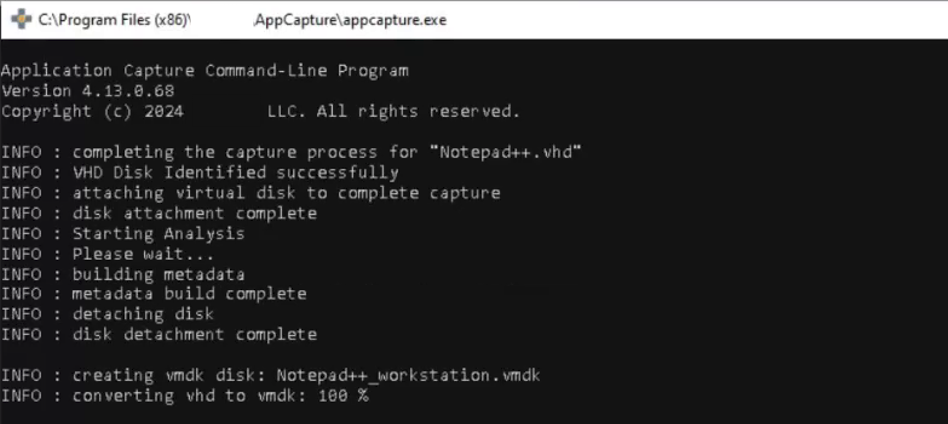
- The command to complete the capture process will result in a reboot of the system, followed by the below confirmation that the capture process was completed successfully.

- A successful capture will result in a JSON, VHD, and VMDK file getting created with the name of the “Application Name”, in our demo this will result in “Notepad++.json”, “Notepad++.vhd” and “Notepad++_workstation.vmdk”.
- When uploading the VMDK file to App Volumes Manager, it is required to have the naming convention with the “application_workstation.vmdk” to be recognized for upload.

- The generated output will be stored here “C:\ProgramData\Omnissa\AppVolumes\Packages”
- Copy the output files to a share, and revert the Packaging virtual machine to its previous snapshot.
- When uploading the VMDK file to App Volumes Manager, it is required to have the naming convention with the “application_workstation.vmdk” to be recognized for upload.
Step 2: Validation - Use “appcapture.exe” to verify a successful application capture
- Power ON the virtual machine and log in with an administrative account.
- Copy the VHD and JSON files back to the virtual machine.
- In the demonstration, we copy the two files back to the original App Volumes folder location “C:\ProgramData\Omnissa\AppVolumes\Packages”

- Open an elevated command prompt and run the following “appcapture” command to mount the VHD file.
- In the demonstration, we copy the two files back to the original App Volumes folder location “C:\ProgramData\Omnissa\AppVolumes\Packages”
Syntax:
C:\> “C:\Program Files\Omnissa\AppVolumes\Agent\appcapture.exe” /test <Path to the VHD>
The command used in demo:
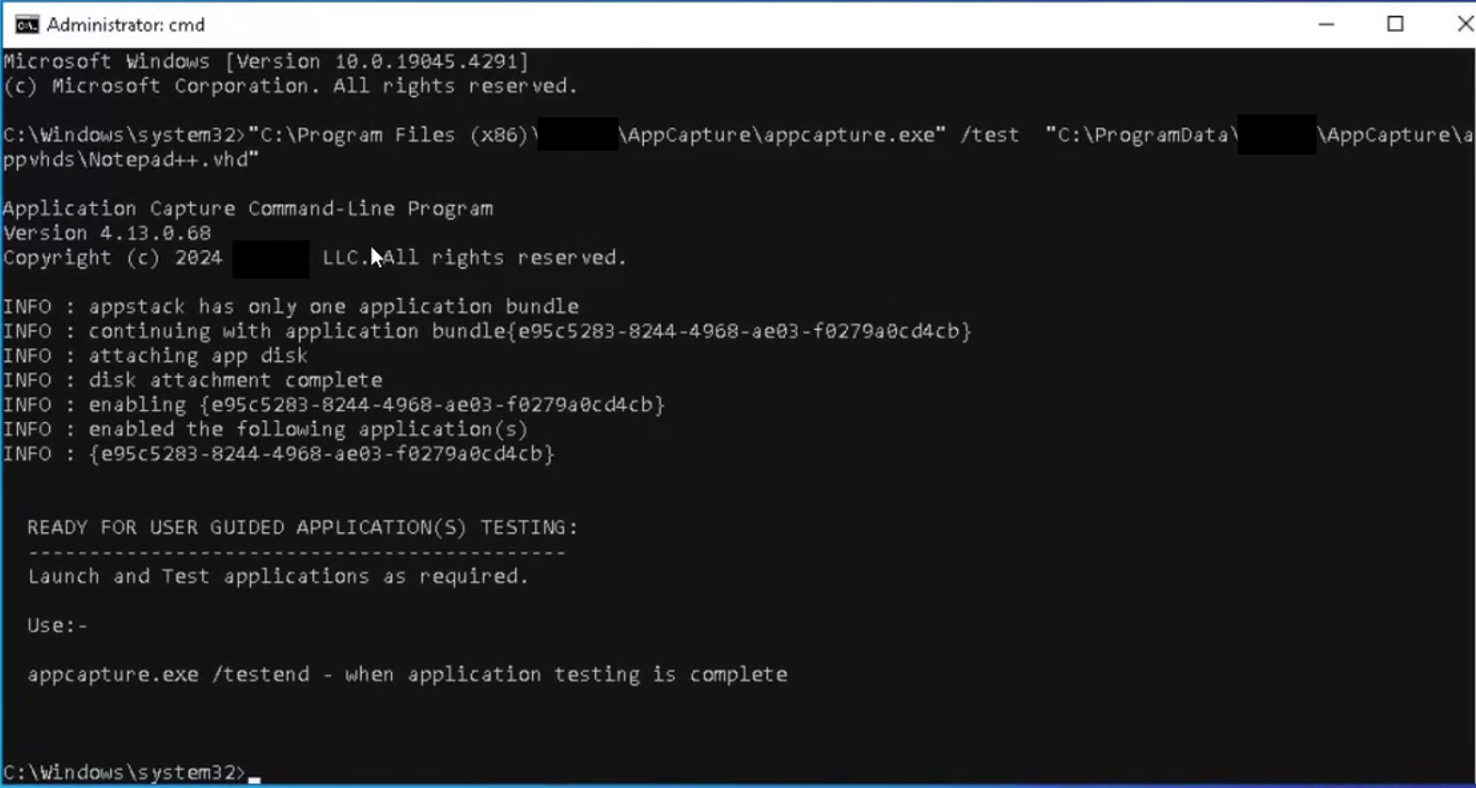
C:\> “C:\Program Files\Omnissa\AppVolumes\Agent\appcapture.exe” /test “C:\ProgramData\Omnissa\AppVolumes\Packages\Notepad++.vhd”
- The following screenshot shows the output of the execution of the command to mount the VHD file.

- At this point, you will have the following available.
- The earlier captured application will be available to launch/execute.
- The ICON(s) will be visible, in the demo we captured Notepad++ with the placement of the desktop icon, which can be seen in the below screenshot.
- The captured application will have its file/folder structure available in its installed location on the local drive along with any registry entries added to the current system’s registry.
- The application will also be listed in the “Add or Remove Programs” or “Programs and Features” list of applications.
- As you can see from the below screenshot, the successful execution of the appcapture command with /test has resulted in the mounting of the virtual hard disk (VHD) and the installed application presented for use.
- At this point, the application packager or an application tester can validate the application’s successful capture, by launching and running the application.
- This certifies that the application has been captured successfully and is ready to be uploaded into the App Volume Infrastructure and ready for rollout to the end user.
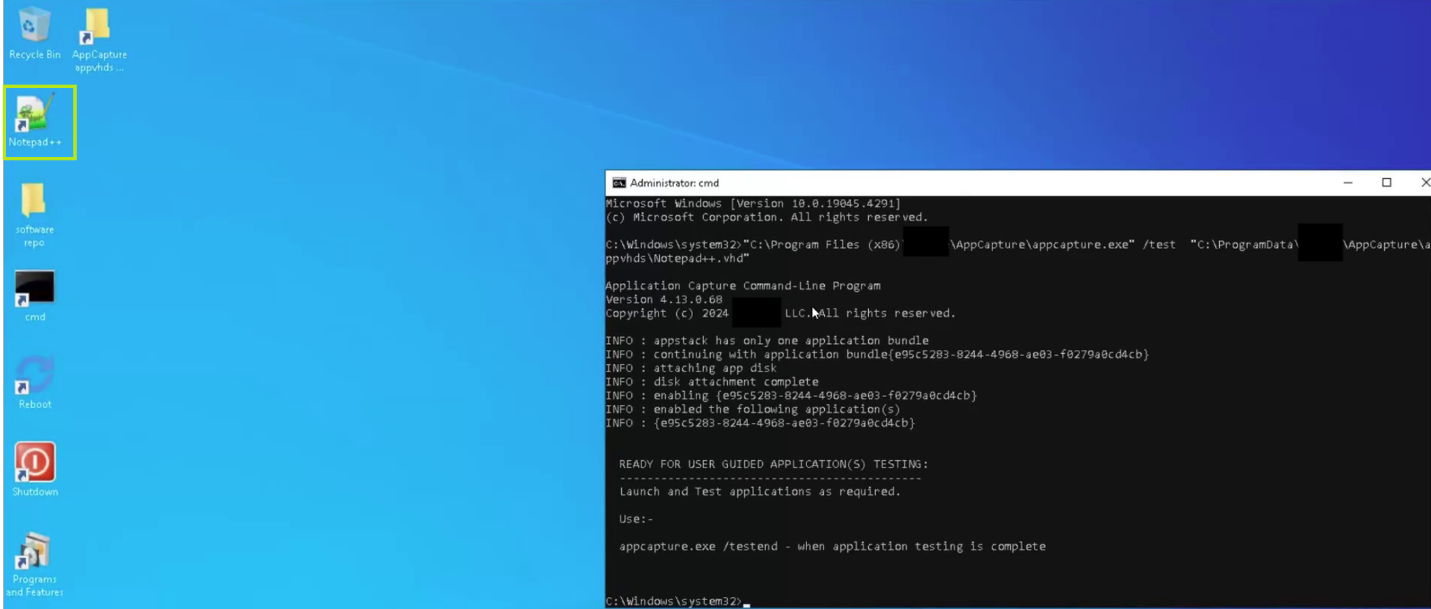
- Once the validation is completed, the below command can be executed to unmount the virtual hard disk (VHD) and remove the application from the packaging virtual machine.
Syntax:
C:\> “C:\Program Files\Omnissa\AppVolumes\Agent\appcapture.exe” /testend
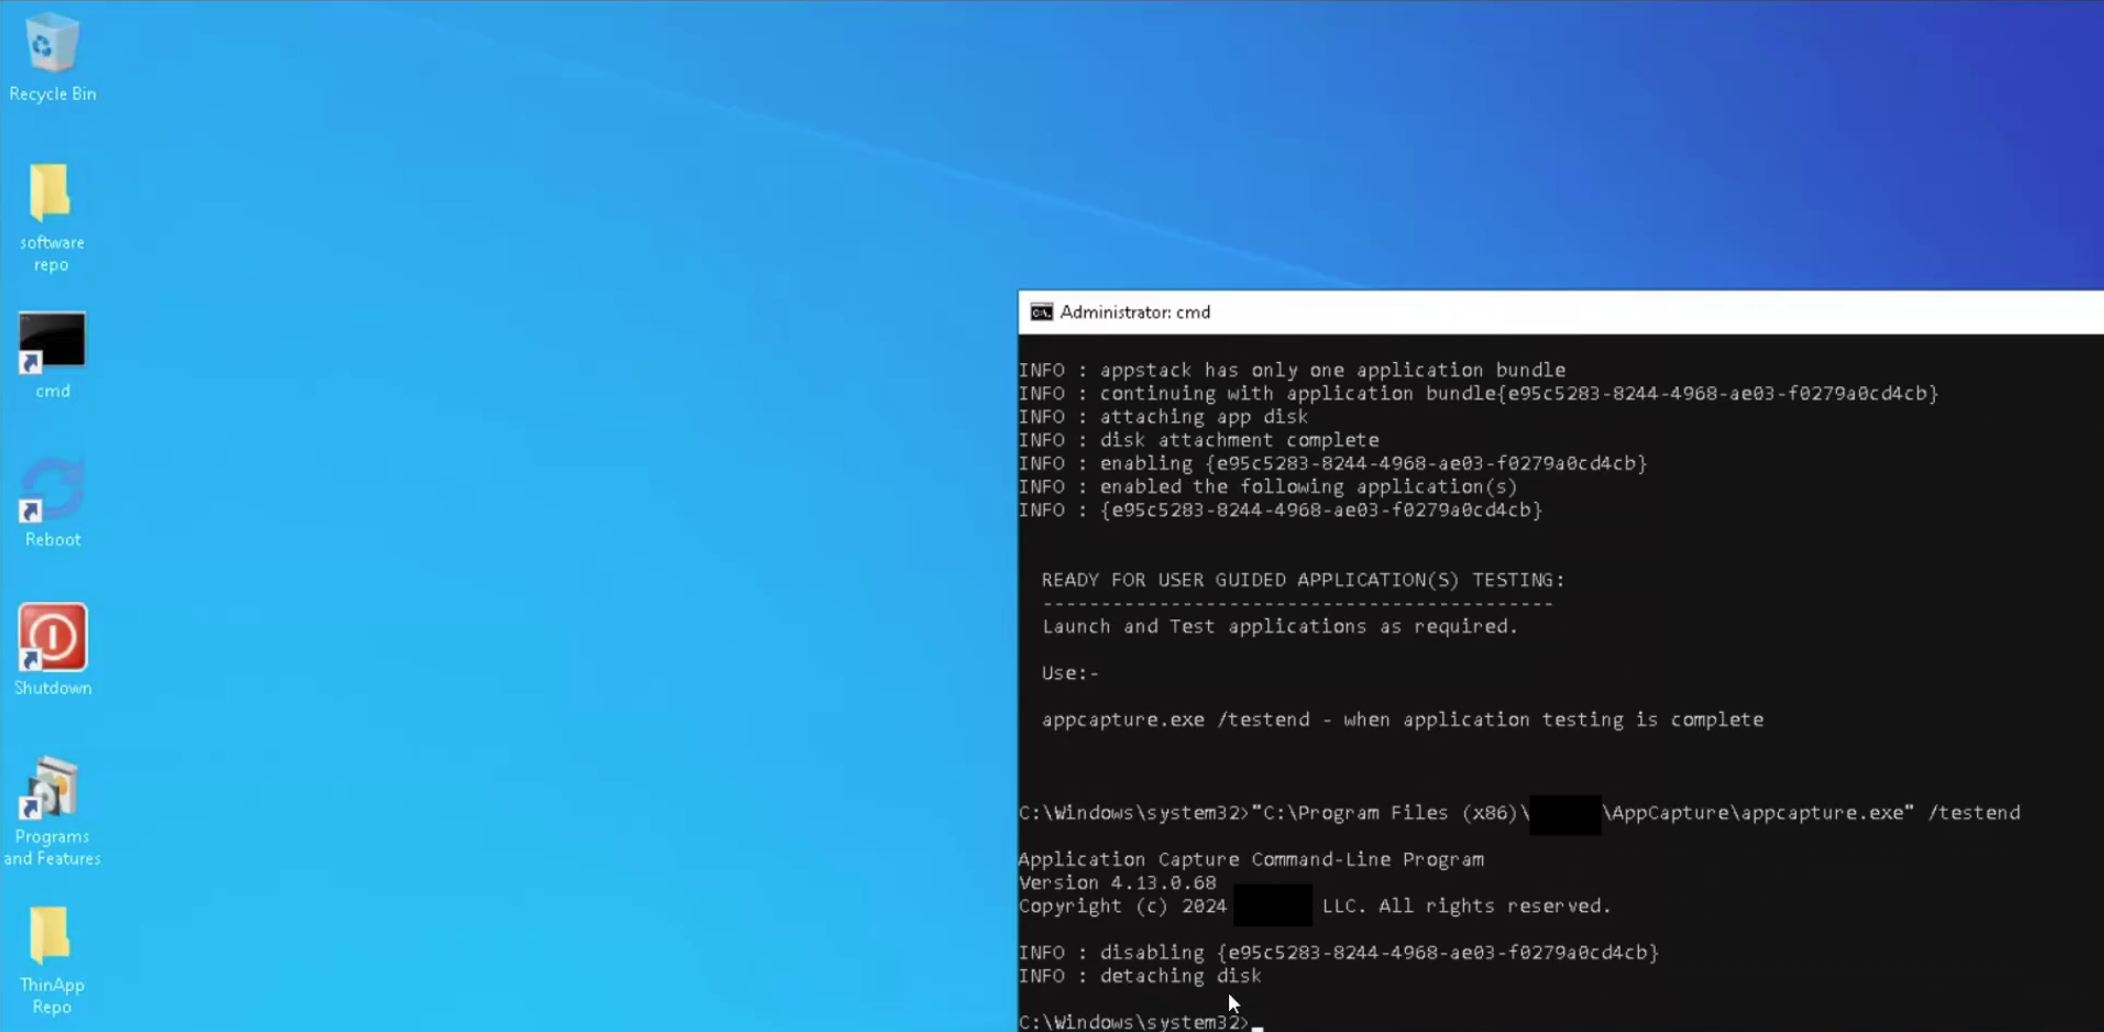
Step 3: Administration - Upload the Application Package to App Volumes (VMDK and JSON files)
App Volumes has 3 types of Machine Managers, the “vCenter Server” and “Single ESXi Host” support VMDK + JSON package format. And the “VHD In-Guest Services” type supports the VHD + JSON package format.
- As the demonstration App Volumes environment has a “vCenter Server” Machine Manager setup, we will follow through with the upload of the VMDK+JSON files to the App Volumes Manager.
- Copy the VMDK + JSON files to the following location “<installation_directory>\CloudVolumes\Manager\ppv\packages” on the App Volumes Manager server.

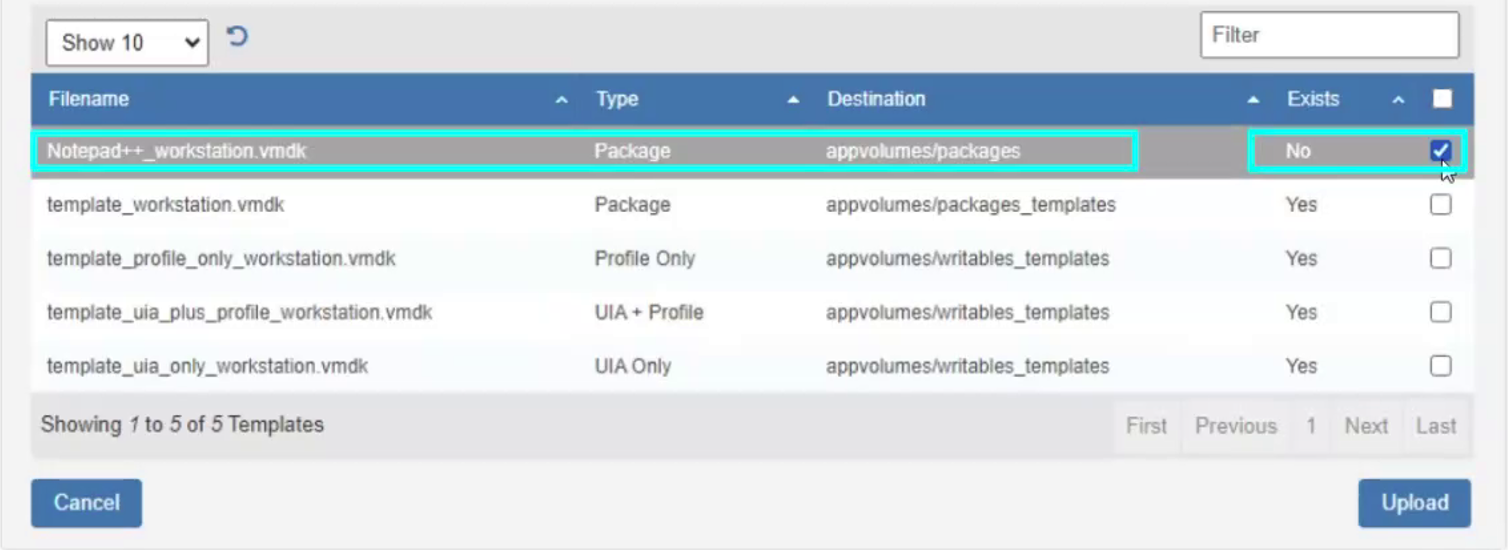
- Now have the App Volumes Administrator login to the App Volumes Manager console UI, navigate to the CONFIGURATION > Storage tab, and click Upload Templates.
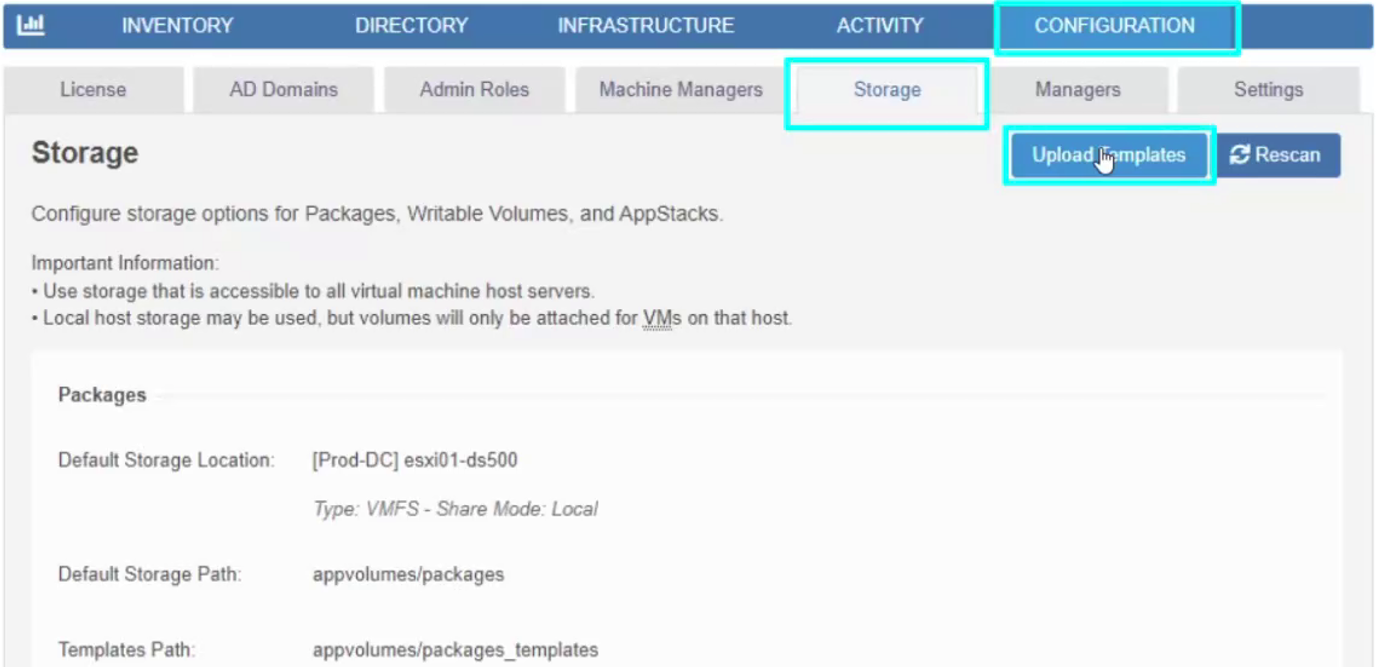
- The result will look like the below screenshot. Where any new application package, that is not available and registered in the current App Volumes environment, will reflect with the value of “No” under the “Exists” tab.
- We can also see that in the demo, scanning of the application “Notepad++” reflects with the “Type” as a “Package” and will automatically be placed in the App Volumes storage location in the datastore under “appvolumes/packages”.

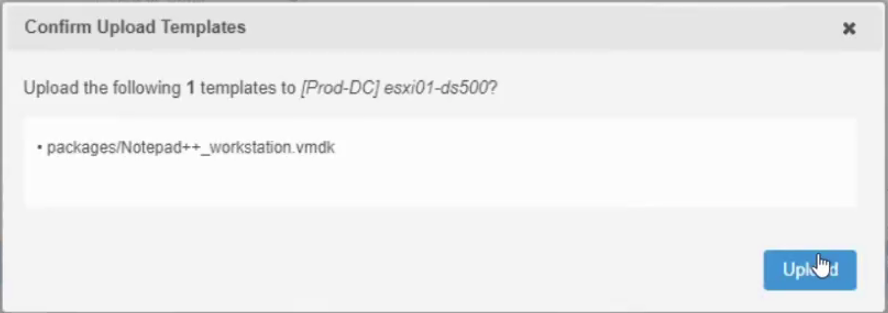
- Select the new package to be uploaded and click Upload. When presented for confirmation, click Upload.

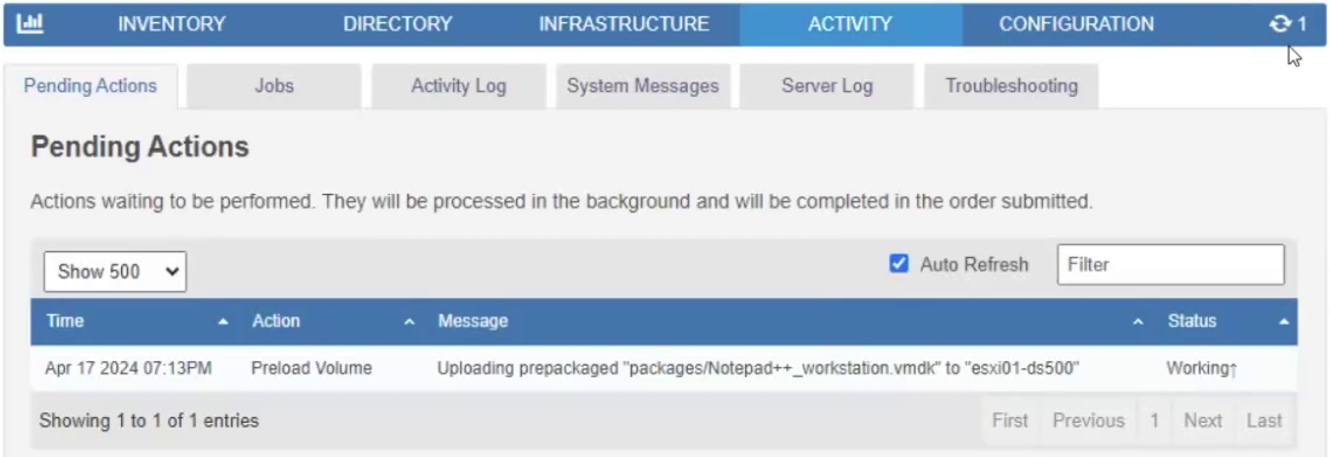
- The below screenshot shows the progress while the package is being uploaded.

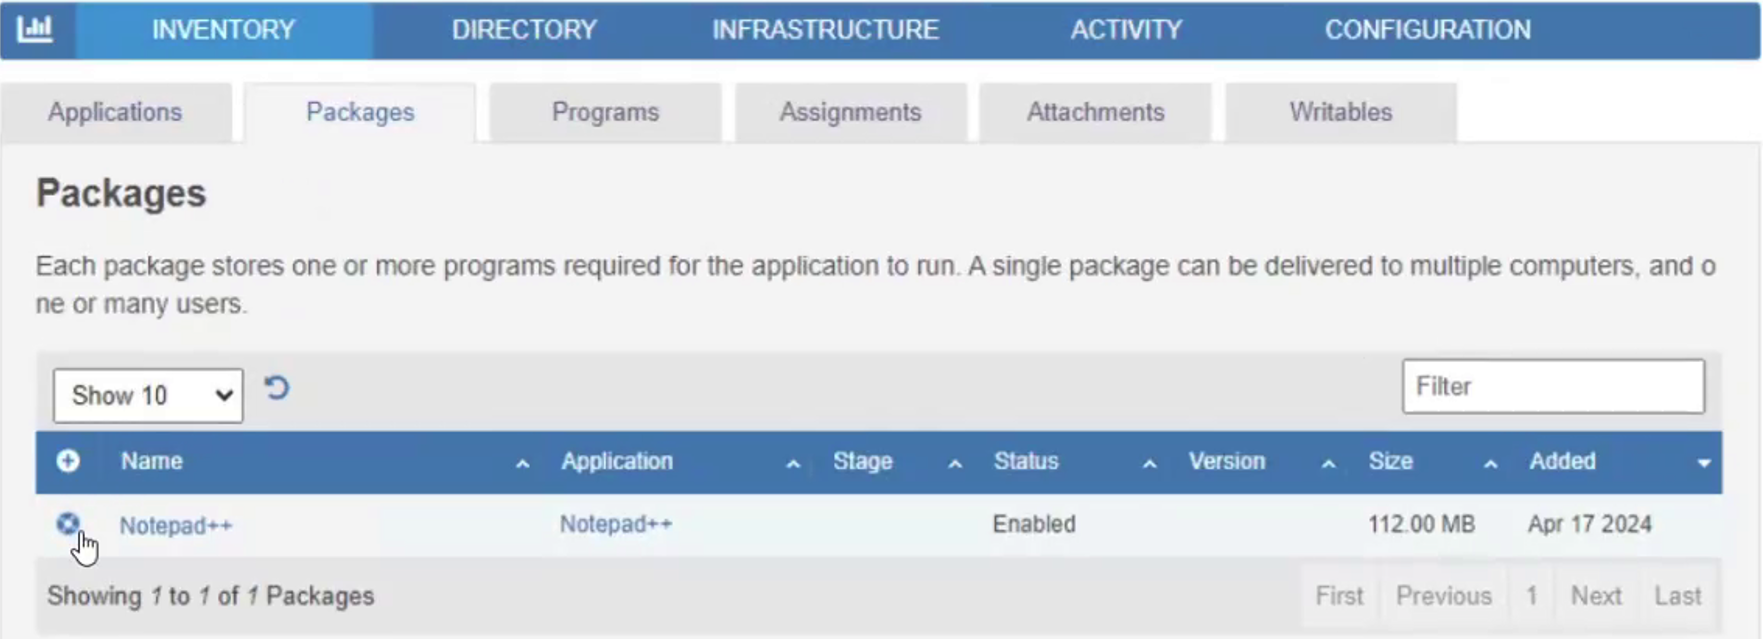
- Finally navigate to the INVENTORY > Packages tab to confirm the presence of the newly uploaded application package, in this case, Notepad++.

Step 3: Administration - Setting the Marker to CURRENT and Assigning an application.
We return to the App Volumes Manager console and carry out validation and administrative tasks on the newly created App Volumes application package.
- Navigate to the INVENTORY > Packages tab to validate the successful completion of the package creation process by confirming the change in the Status from Packaging to Enabled.
- Next, the administrator carries out two tasks: setting the current version of the Package to be the version of the package to be delivered by default assignments. This is done by setting the Marker for this package version to CURRENT.
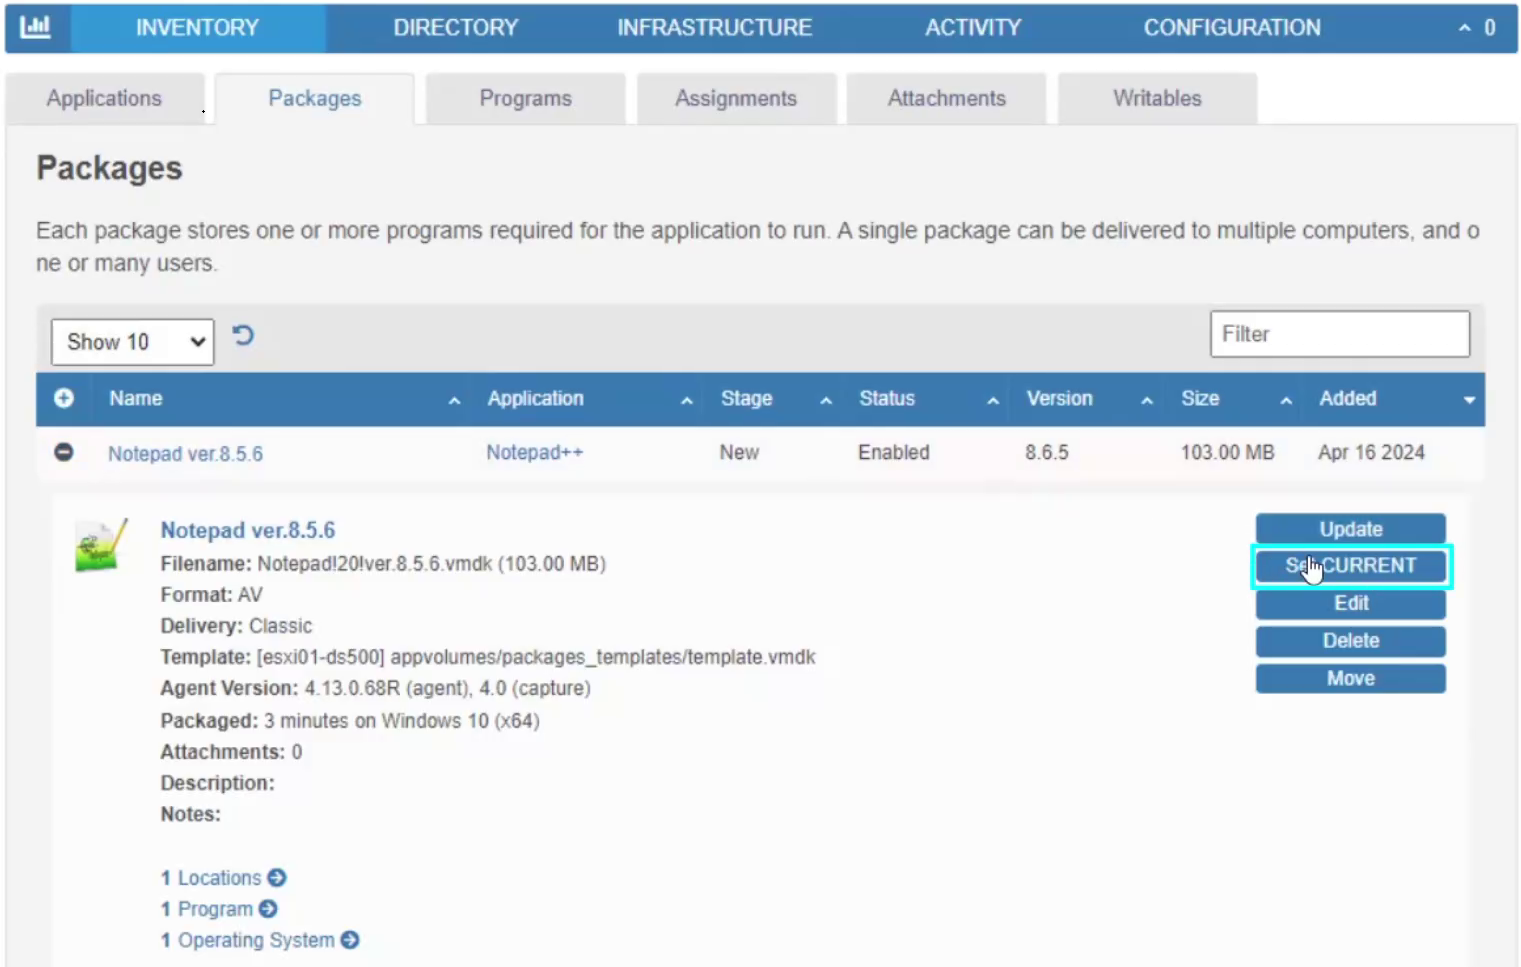
- Expand the package, click the “Set CURRENT” button, and confirm.

- At the Packages tab, the package now has the CURRENT tag displayed next to the version of the package to be delivered by default assignment.

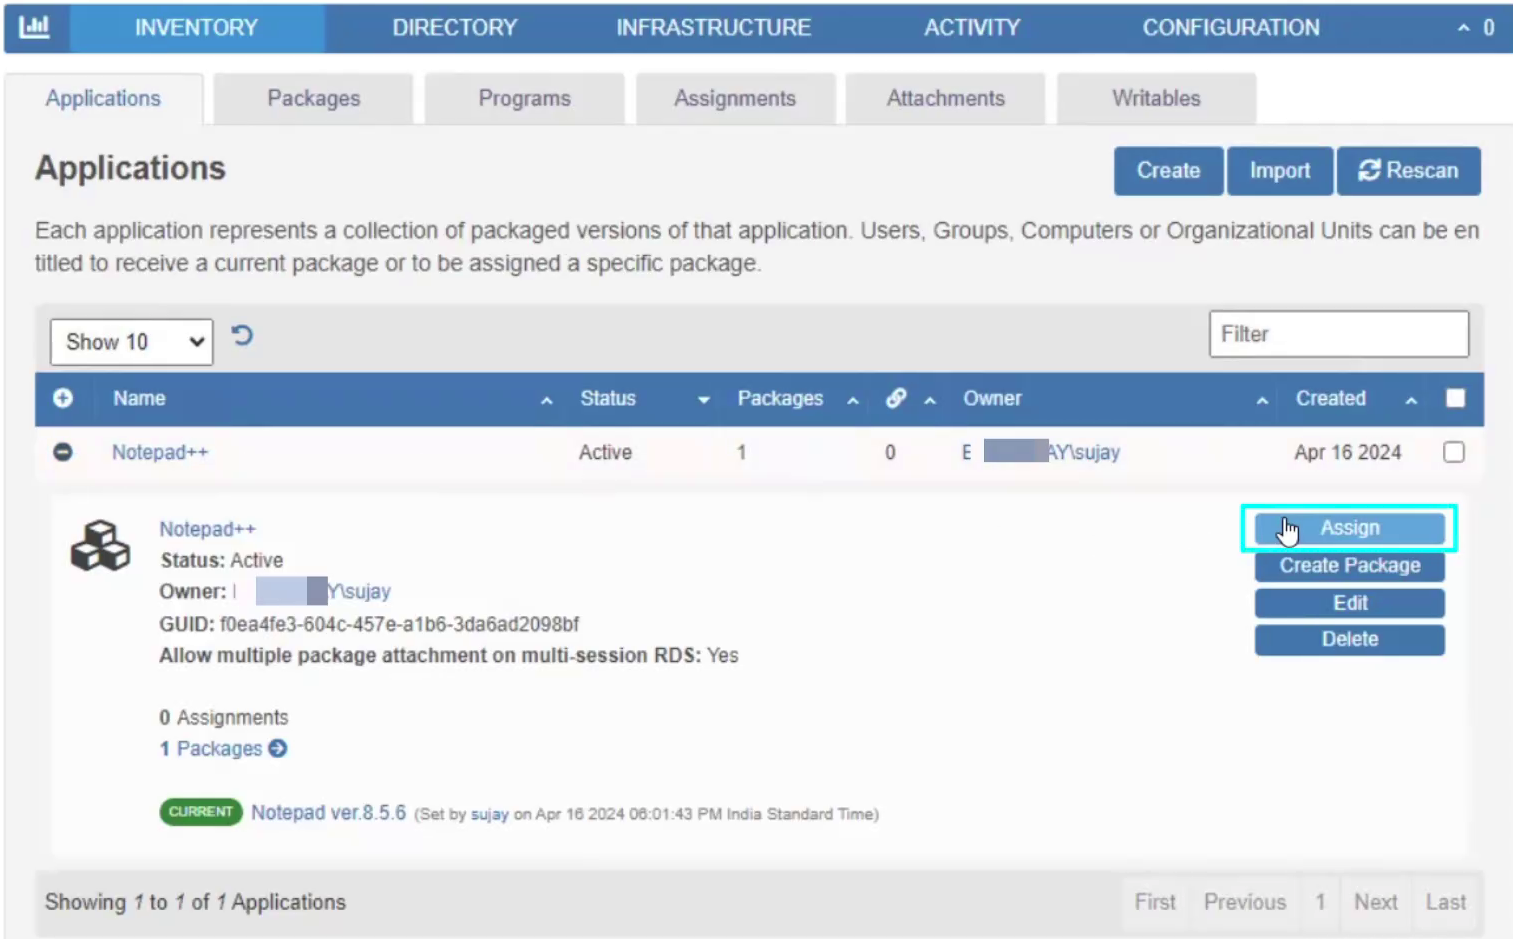
- The next task is Assigning the Application to a target entity {User/Computer account} detailed in the App Volumes Administration Guide. This is done by navigating to the INVENTORY > Applications tab.
- Expand the application and click Assign.

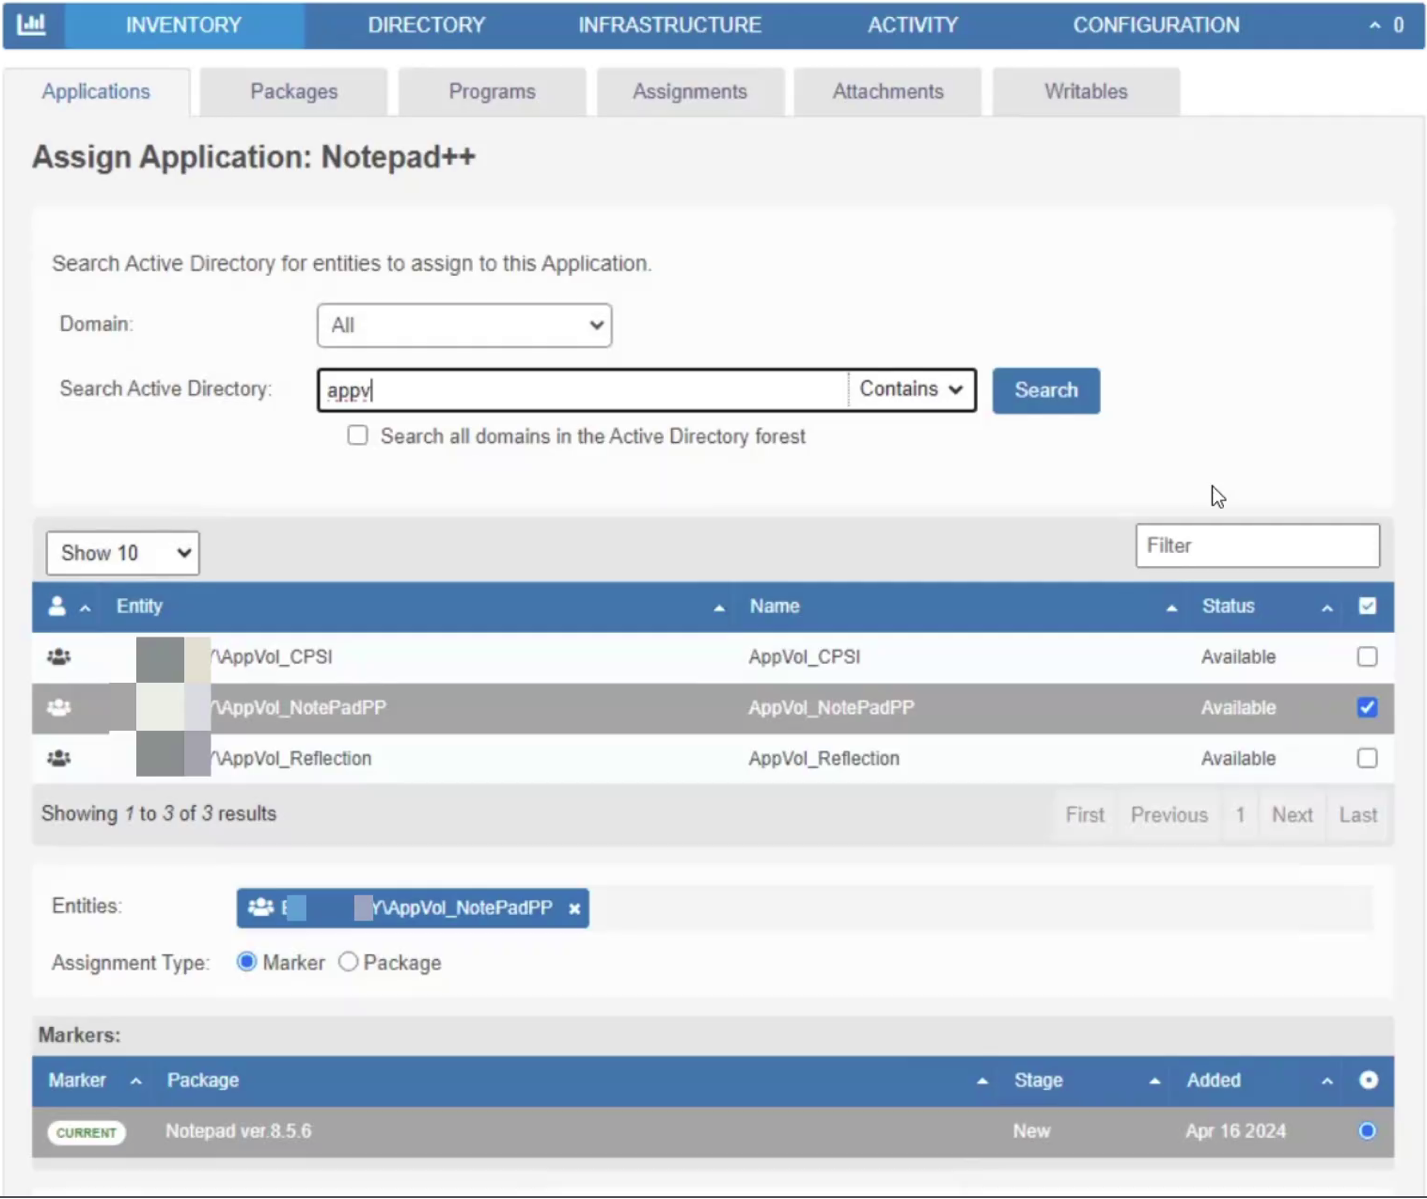
- This brings up the Assign Application wizard, where the administrator can search the Active Directory for the target entity {User/Computer account}.

- The above example shows a listing of Active Directory Groups to which target users are members. Assigning the App Volumes application to an Active Directory Group will entitle all users in this group to the application. Multiple Active Directory accounts can be selected during an assignment.
- If the Assignment Type: Marker option is selected, then the Package that has been set with CURRENT will be the version of the package that will be made available to the end user.
- The Assignment Type: Package – is selected if there is a requirement for the administrator to choose an alternative package version other than the one marked as CURRENT. This could be for users testing a newer version of the application package or requiring an older version. This will be the case if three versions of the package are available for this application (an older version, a CURRENT version used by most users, and a newer version being tested out and subsequently marked as CURRENT at a future state.)
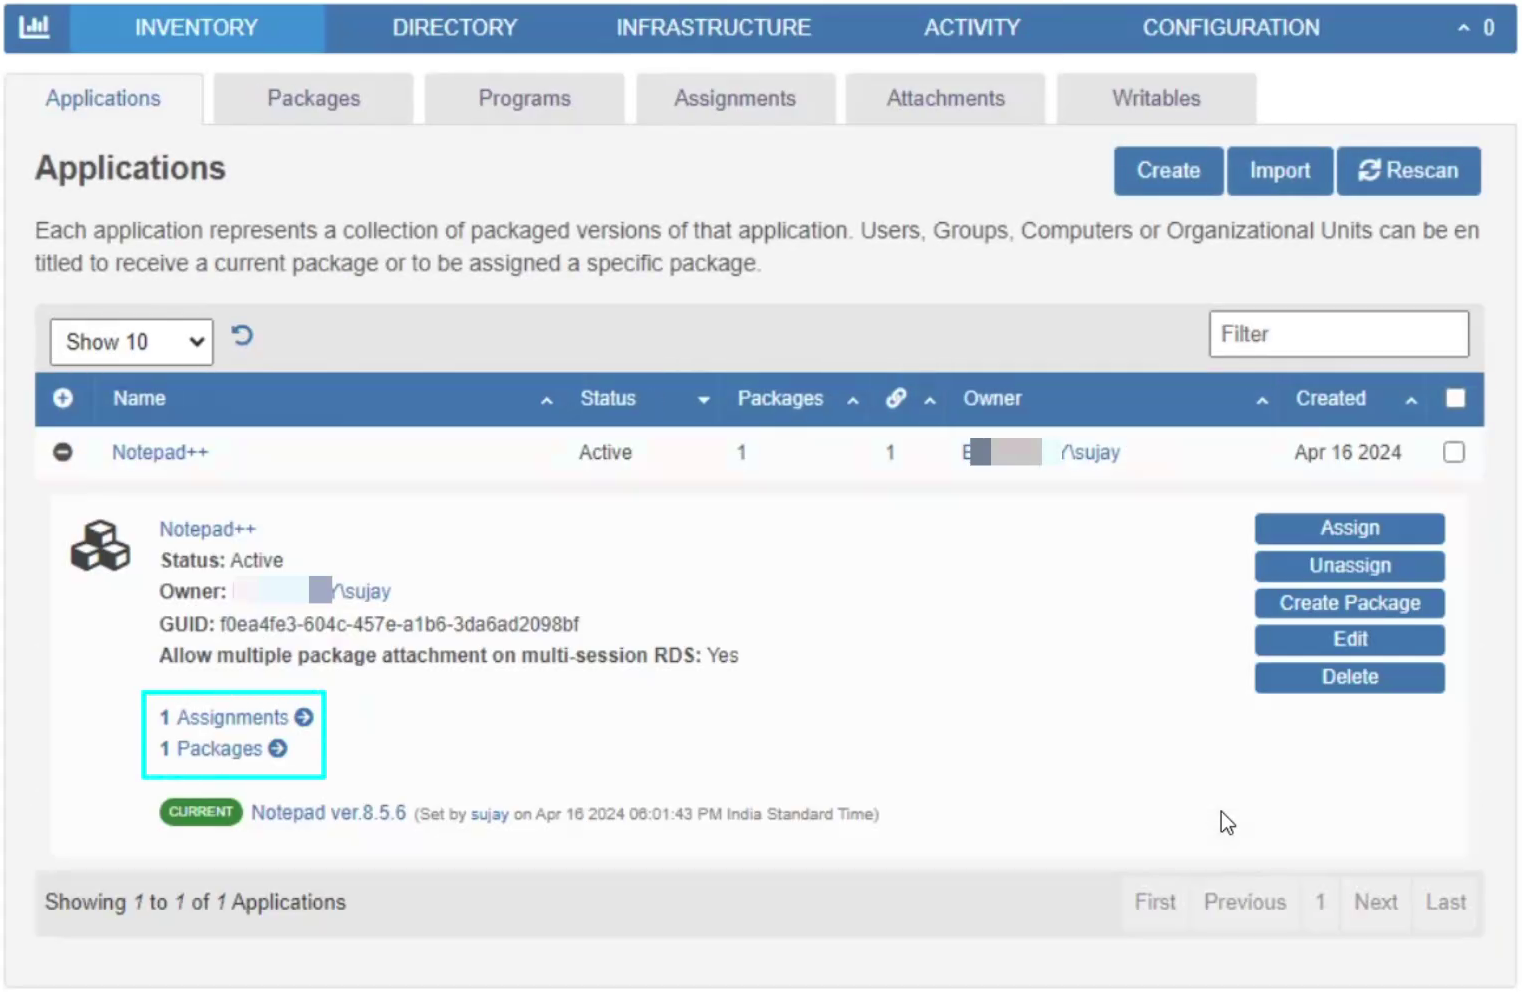
- Once the administrator has confirmed the selections, hit the confirmation and return you to the INVENTORY > Applications tab.

- The administrator can carry out a final validation by expanding the application and validating the number of assignments and packages listed for this application.
- Expand the package, click the “Set CURRENT” button, and confirm.
Validate
Validating the assignment of the App Volumes Application Package.
This final section calls out the steps for validating the App Volumes application assignment and package delivery and confirms that the application's running is successful on the target virtual desktop.
- The end user logs in using the Horizon Client or HTML browser and launches their virtual desktop session.

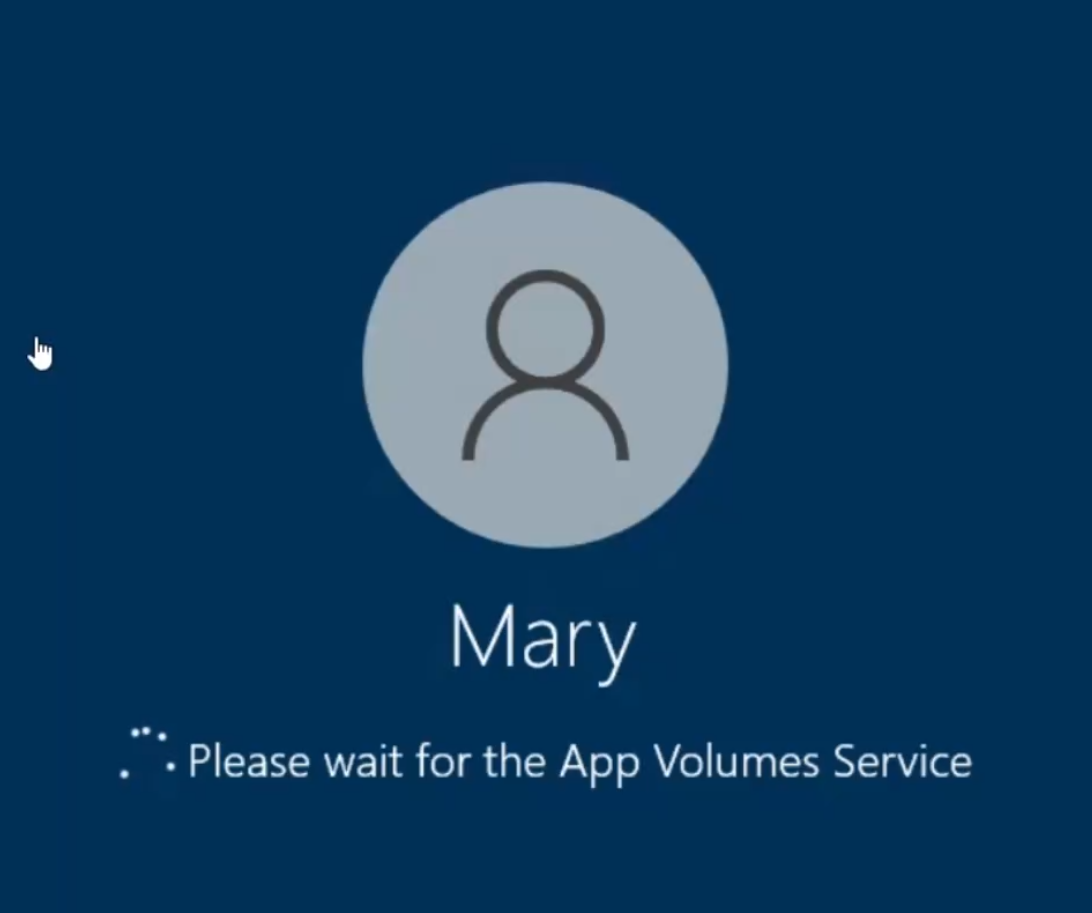
- The below screenshot shows a quick validation of the presence of the App Volumes Agent on the virtual desktop session and connecting of App Volumes Service, during the logon process.

- The below screenshot shows a quick validation of the presence of the App Volumes Agent on the virtual desktop session and connecting of App Volumes Service, during the logon process.
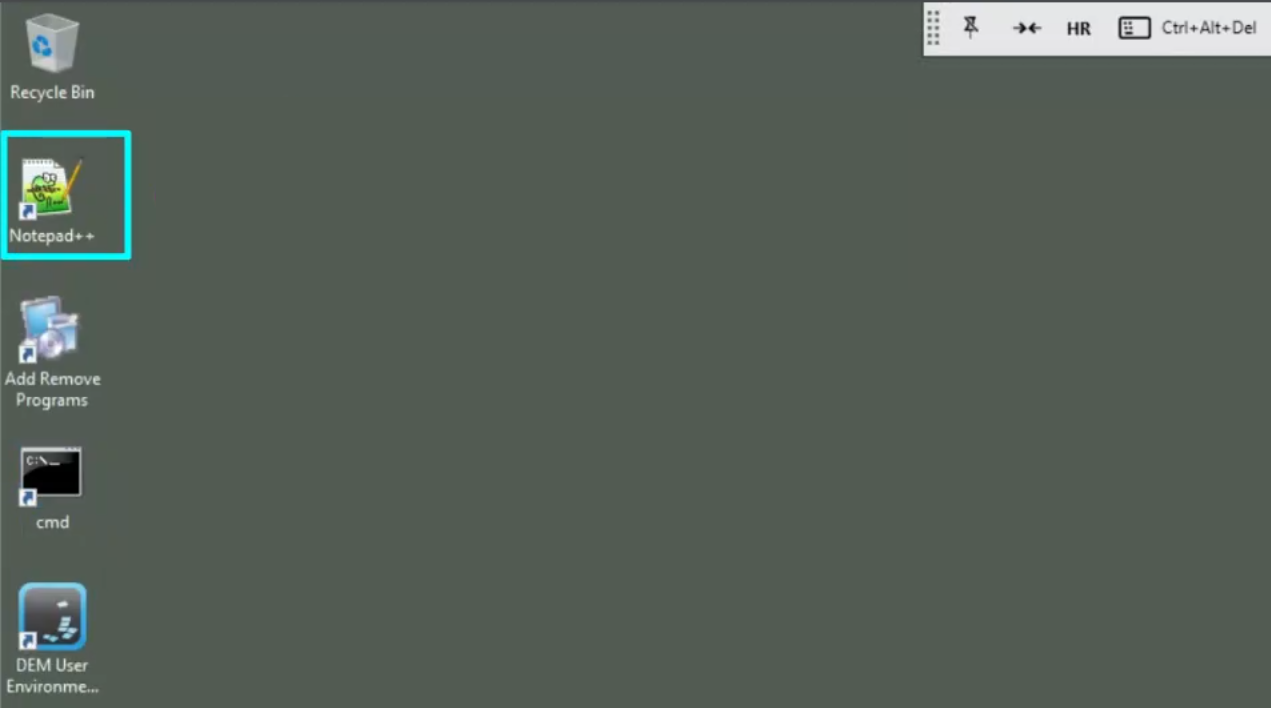
- The application shortcut icon of Notepad++ was created while installing the Notepad++ application. This shortcut placed on the user’s desktop was captured and is now made available to subsequent users entitled to the Notepad++ application package from the App Volumes Manager console. This is visible from the screenshot below, showing the “Notepad++” desktop shortcut being presented when the App Volumes application package is attached to the user’s session.
- The placement of the application shortcut icon within the “Public Desktop” folder location or a location identified by App Volumes during the capture process, like the “Program Files” or “Program Files (x86)”, will result in the application icon being made available on the user’s desktop at the time of login.
- Application shortcut icons placed within the user’s profile of the packaging user account will not be captured by the App Volumes package capture process. The application shortcut icon can be placed in the “Public Desktop” folder or delivered at user logon using Dynamic Environment Manager (DEM).

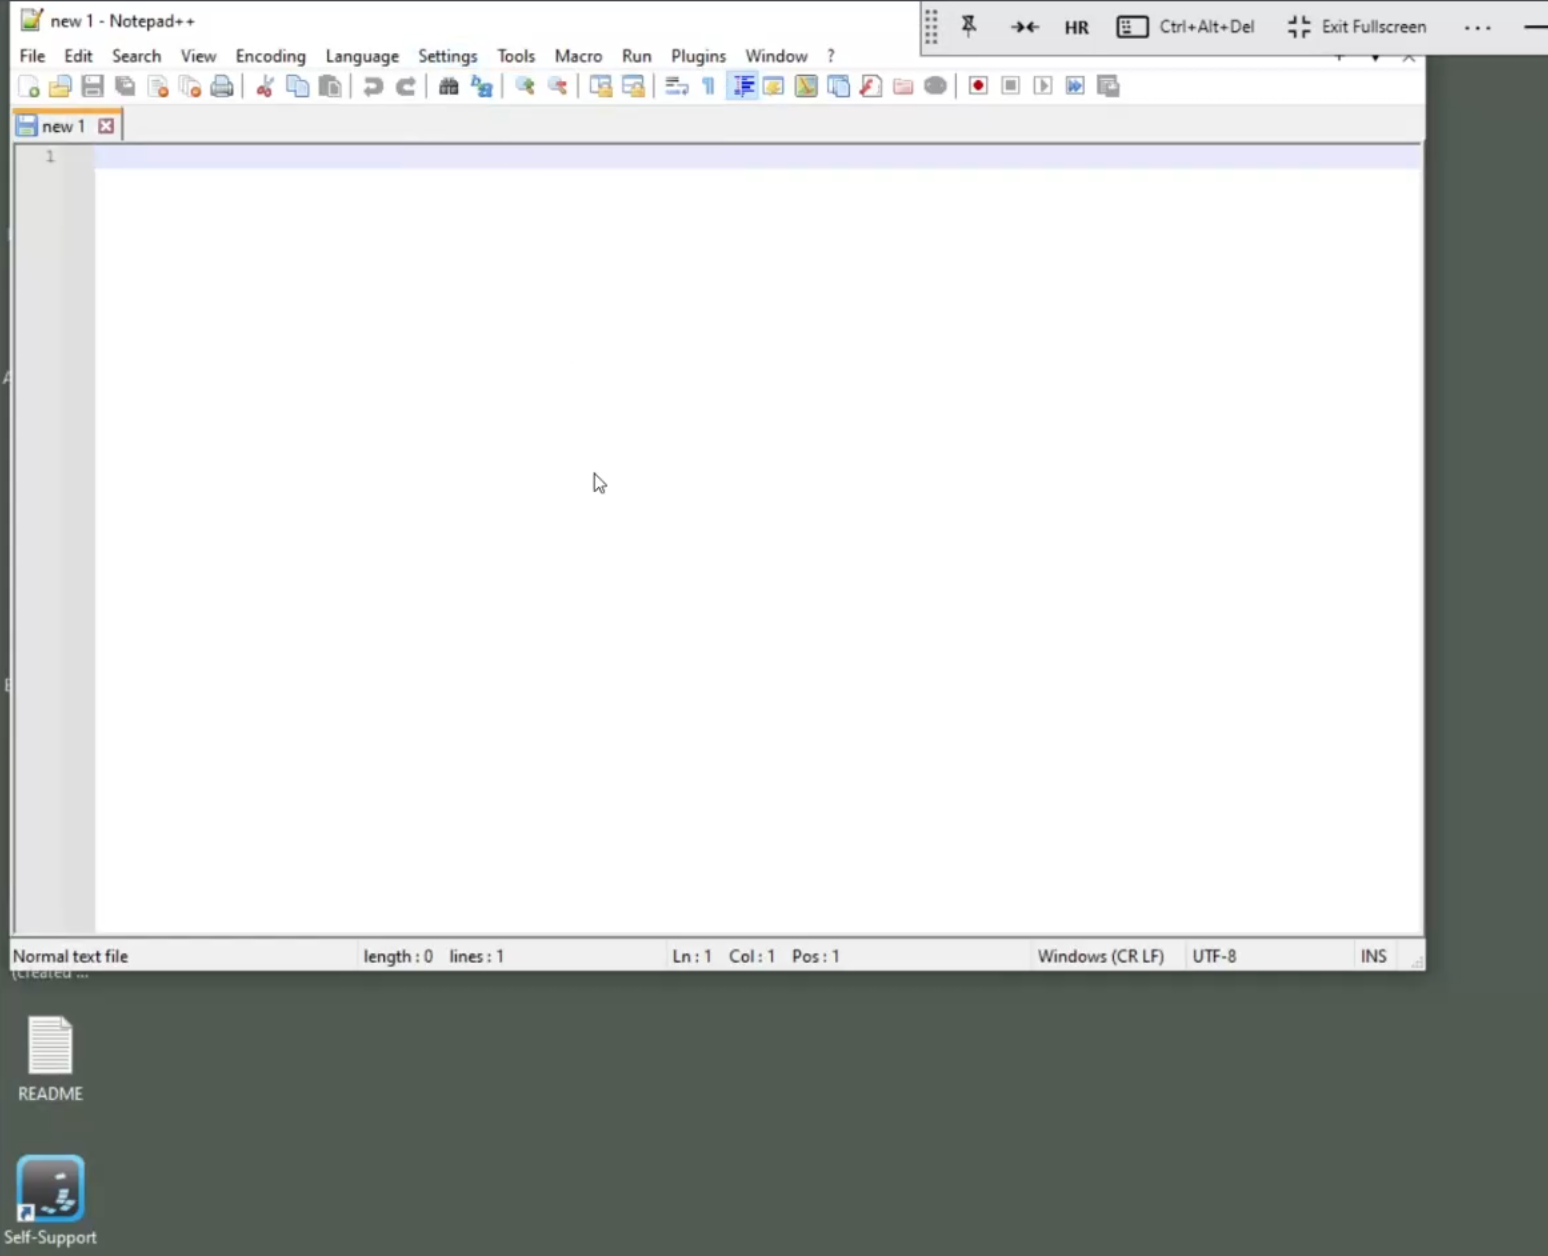
- Launching the Notepad++ application from the Desktop results in the below launch of the application within the virtual desktop session.

We have completed the validation and can confirm the successful delivery of the App Volumes Application Package in a virtual desktop session.
Demonstrate
For a brief demo of the steps in this guide, see:
Summary and Additional Resources
The administration of an Omnissa App Volumes environment is inherently complex and constantly evolving. This Application Packaging series aims to be a steady companion, offering reliable guidance and support to help you effectively manage these daily operational tasks. By utilizing this resource, you will be better prepared to handle the challenges of your role, ensuring operational excellence and technical proficiency with App Volumes.
We trust you will find this Application Packaging series invaluable in your day-to-day activities and encourage you to refer to it regularly. Your feedback is welcome and will be instrumental in continuously improving this resource.
Additional Resources
Explore the following additional resources.
- Reference Architecture – App Volumes
- App Volumes Product Page
- App Volumes Product Documentation
- App Volumes Knowledge Base Articles
- Horizon 8 Product Page
- Dynamic Environment Manager Product Page
Changelog
The following updates were made to this guide.
| Date | Description of Changes |
| Dec-2024 |
|
| Oct-2024 |
|
| Jun-2024 |
|
Authors and Contributors
The following authors and contributors have helped make this paper possible:
Authors
- Sujay Gopalan, Sr. Technical Marketing Architect, Omnissa
Reviewers
- Graeme Gordon, Sr. Staff Architect, Omnissa
- Rick Terlep, Staff Technical Marketing Architect, Omnissa
- Mike Erb, Staff Technical Marketing Architect, Omnissa
Feedback
Your feedback is valuable. To comment on this paper, either use the feedback button or contact us at tech_content_feedback@omnissa.com.


