

Manually creating optimized Windows images for Horizon VMs
Overview of the procedure to build a golden image
This guide provides a step-by-step procedure for creating optimized Windows images for use in Horizon deployments. For more information on why you should optimize Windows, and an introduction to the Windows OS Optimization Tool, see Why you should optimize, towards the end of this guide.
The procedure to build a golden image involves the following tasks.

- Create a virtual machine on your chosen hypervisor capacity.
- Install Windows.
- Install the hypervisor tools and drivers.
- Update Windows.
- Install applications that you want to be part of the golden image.
- Optimize Windows using the Windows OS Optimization Tool for Horizon.
- Generalize Windows using the Windows OS Optimization Tool for Horizon.
- Clean up Microsoft Store apps.
- Install the Omnissa agents.
- Install GPU drivers (optional).
- Finalize Windows using the Windows OS Optimization Tool for Horizon.
- Prepare the image for deployment.
How to use this guide
This guide is organized into a chapter for each of the tasks listed above.
- The procedure given in this guide is intended to be non-hypervisor specific and applicable to all hypervisors or capacity types.
- The tasks given in the procedure in this guide are sequential and build on one another.
- Ensure you complete each task in a chapter before moving on to the next one.
This guide also includes chapters that give guidance on performing specific activities on a particular hypervisor platform. Hypervisor-specific activities are included within the overall procedure as inline references and links (for example Create a virtual machine includes links to the various hypervisor specific guidance on doing this).
This guide currently includes specific activity guidance for:
Important: With some capacity or hypervisor types, certain tasks are not required. This will be indicated in each task.
This guide also includes chapters on:
- Group Policies – Common group policy settings, including adding users to remote desktops, and deactivate the local administrator account.
- Day-2 updates - such as updating Windows and hypervisor tools.
Infrastructure prerequisites
Before you can perform the procedures in this guide, you must have certain infrastructure components installed and configured.
Verify that you have the following components installed and configured:
- Hypervisor management – Console and user credentials with login rights and the privileges required to create a VM.
- Hypervisor hosts or capacity – Capacity available and configured in the hypervisor management instance.
- Active Directory - An authentication infrastructure that includes Active Directory.
- DNS and DHCP - Available on the network subnets that will be used to create the golden image.
- Horizon 8 - If you plan to use Horizon 8 to create desktop pools or RDSH server farms, ideally at this point you would also have Horizon Connection Server installed and configured. For installation instructions, see the Evaluation Guide for Horizon 8.
- Horizon Cloud – If you plan to use Horizon Cloud to create desktop pools, you should have access to a Horizon Cloud tenant, with a Horizon Edge deployed in your capacity provider. For more information, see Evaluation Guide for Horizon Cloud Service.
- App Volumes - If you intend to use App Volumes, you must have the host name or IP address of the server on which App Volumes Manager is installed or the load balancer fronting the server on which App Volumes Manager is installed. You will enter this information when you install the App Volumes Agent on the golden image.
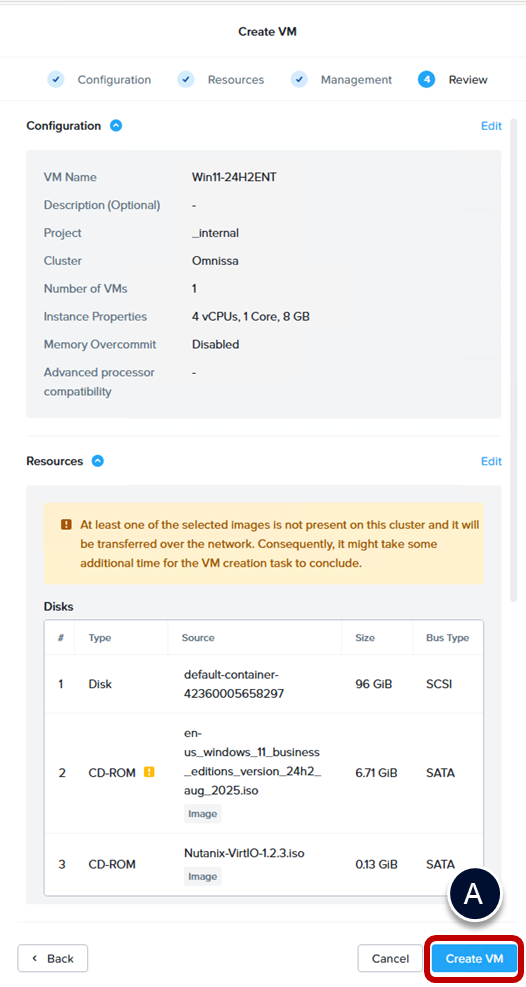
Create a virtual machine
The first step in creating your golden image is to create a suitable virtual machine on your chosen hypervisor or capacity platform.
| | For some cloud capacity platforms, you can choose to skip manually building a virtual machine and installing Windows. Instead, you can import a virtual machine image from the cloud vendors marketplace. |

Create a suitable virtual machine with at least the following virtual hardware:
- CPU – 4 vCPU or more
- Memory – 4GB or more
- Disk – Appropriately sized for an install the version of Windows. Use guidance from the hypervisor vendor but also allow space for applications you may wish to install in the golden image.
- Network – Attached to a suitable subnet and using the hypervisor optimized driver.
- Display – Virtual display with allocated vRAM.
- CD-ROM – Used to install Windows from the ISO installation media.
- TPM - If you are installing Windows 11, you should also add a Trusted Platform Module (TPM) device to the VM. The Windows 11 installer has a restriction to only install on the systems that include a TPM or vTPM device.
You may wish to allocate greater amounts of CPU and memory resources to the virtual machine than those planned for the clones that will be derived from the golden image. This can speed up Windows installation, application deployment, and system optimization processes.
You can decrease the CPU and memory back to desired levels after you have created the image and are Optimizing the VM hardware in the last task Prepare the image for deployment. On some hypervisor platforms you can also use Compute Profiles to apply different CPU and memory settings when deploying pools.
For guidance on creating a suitable virtual machine on a specific hypervisor or capacity, see:
- For a vSphere-based VM, see Create a vSphere-based VM.
- For a Nutanix AHV-based VM, see Create an AHV-based VM.
- For a Microsoft Azure VM, see Methods to add Microsoft Azure.
Install Windows
Once you have the virtual machine defined, you can proceed with installing Windows.
| | If you imported a virtual machine image from a cloud vendors marketplace, Windows will already be installed, and you can skip this task. |
Prerequisites for installing Windows
You should only install Windows versions and editions that are supported by both Omnissa and Microsoft.
- Windows ISO file – You must have uploaded an ISO file to a hypervisor datastore or image repository.
- Supported Windows version - The ISO file must contain a supported version of the Windows operating system.
- Important: Use an OS version that has a Microsoft Windows volume license key using the Key Management Service (KMS). KMS treats each activated clone as a computer with a newly issued license. In a production environment, you must activate Windows. In an evaluation environment, you can create the VM and log in without activating Windows.
Supported operating systems
See the knowledgebase article Supported Windows 10 and Windows 11 Guest Operating Systems for Horizon Agent and Remote Experience, for Omnissa Horizon 8.x (2006 and Later) (78714), for the minimal Horizon version of that operating system version/edition.
Horizon only supports those that have active Microsoft support (or are extended with a Microsoft support contract). Check the following pages to determine if your intended version/edition is still supported:
Installing Windows
After you boot the virtual machine (VM), installation of the Windows OS should begin automatically. You will accept most of the default settings and specify that you are doing a new installation rather than an update.
- Open a remote console for the virtual machine (VM) using the hypervisor management console and power on the VM.
- With some hypervisor management you will need to power on the VM before you can connect to its remote console.
- See the relevant hypervisor specific guidance in the sections at the end of this guide.
- Boot the VM from the Windows installation ISO.
If you miss the message and the opportunity to press a key, you can reset or reboot the VM using the hypervisor management console.
- Press a key on your keyboard.

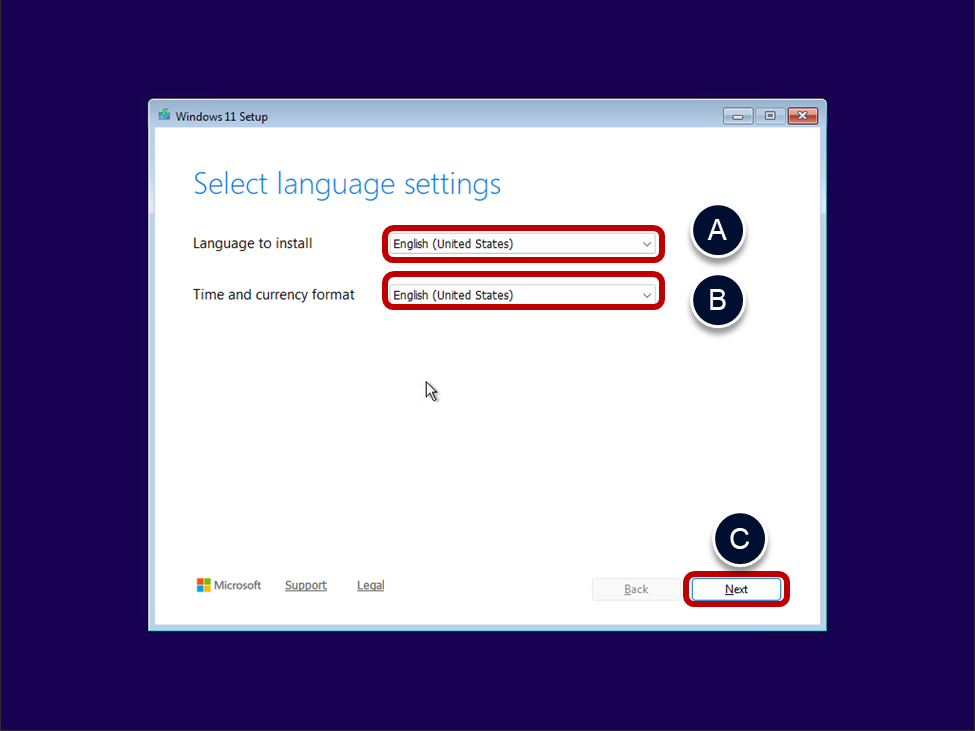
- Select the appropriate language settings.
- Select the correct Language to install option.
- Select the appropriate region for the Time and currency format.
- Click Next.
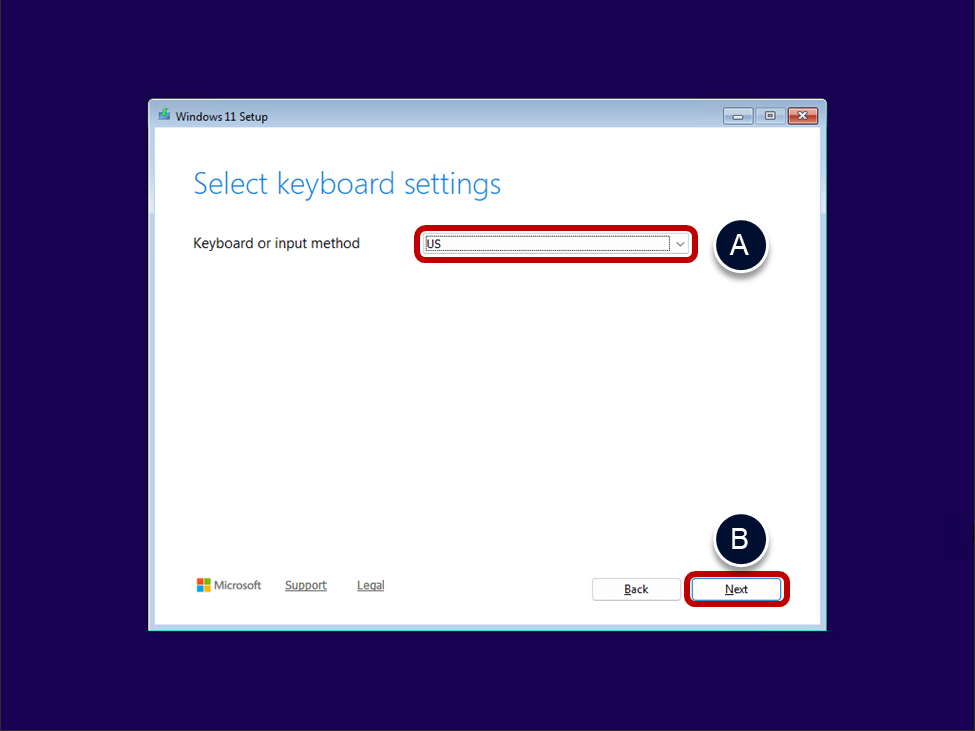
- Select the keyboard settings.
- Choose the appropriate Keyboard or input method.
- Click Next.
- Select the setup option.
- Click on the box next to I agree everything will be deleted…
- Click Next.

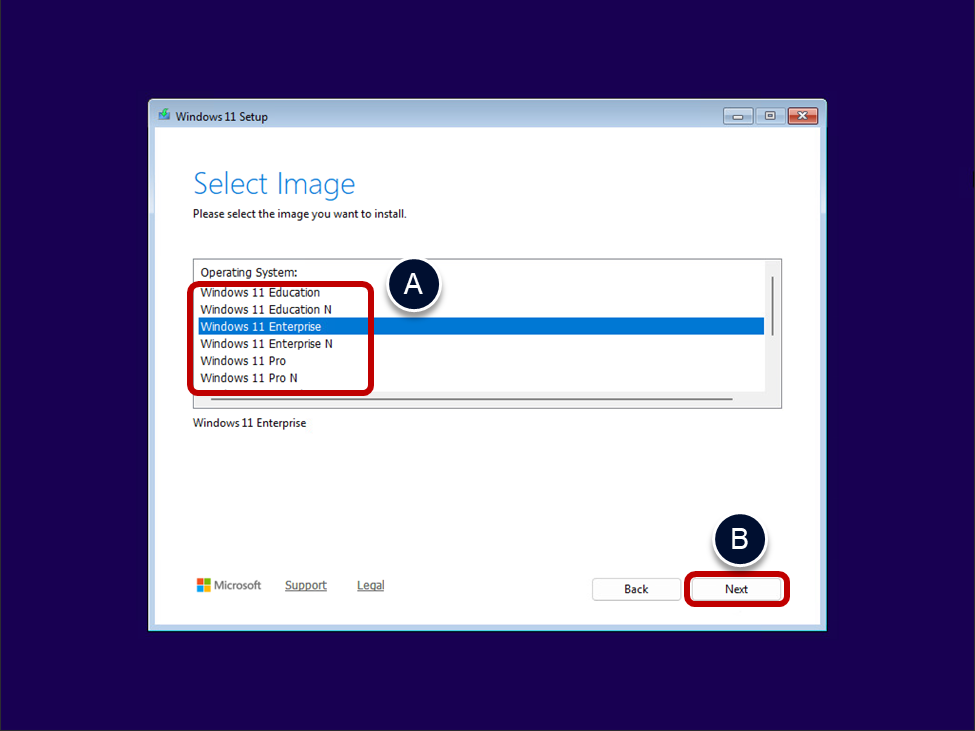
- Select the Windows edition to install (This screen is only shown for an ISO that contains multiple editions).
- Select the image from the list.
- Important: For Windows Server, select an edition with "Desktop Experience".
- Click Next.
- Select the image from the list.
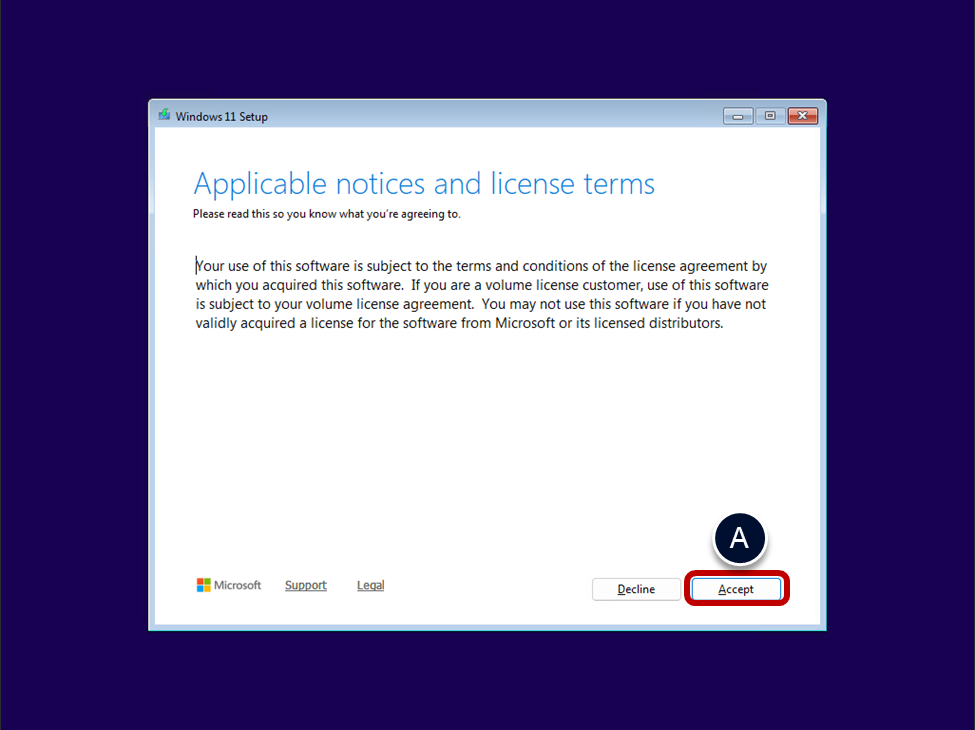
- Accept the license agreement.
- Select the I accept the Microsoft Software License Terms check box.
- Click Next.
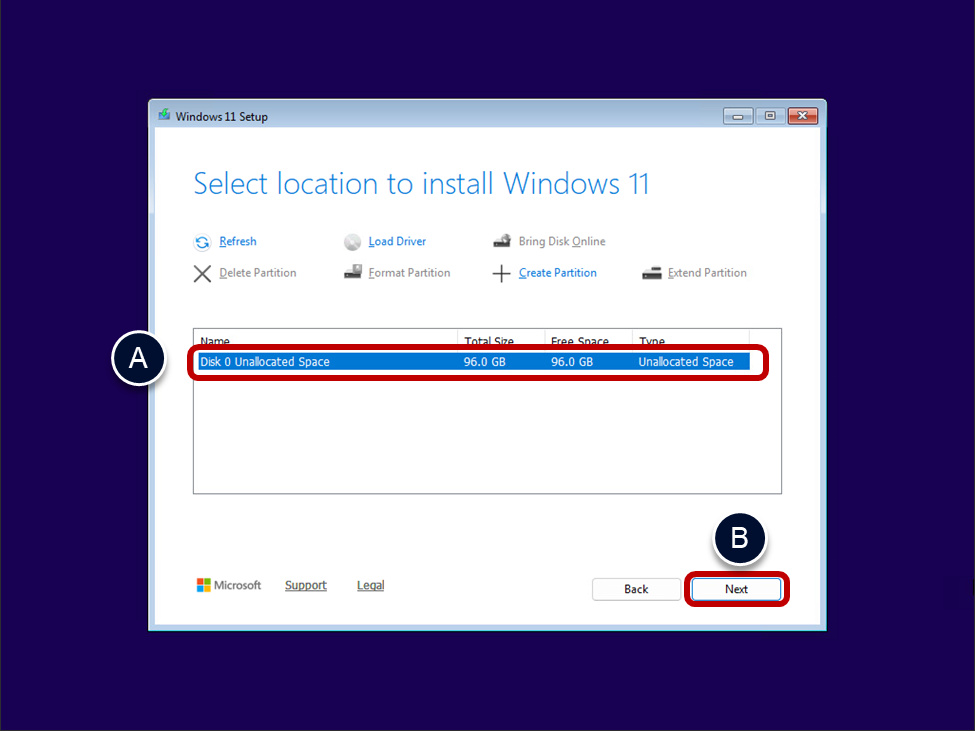
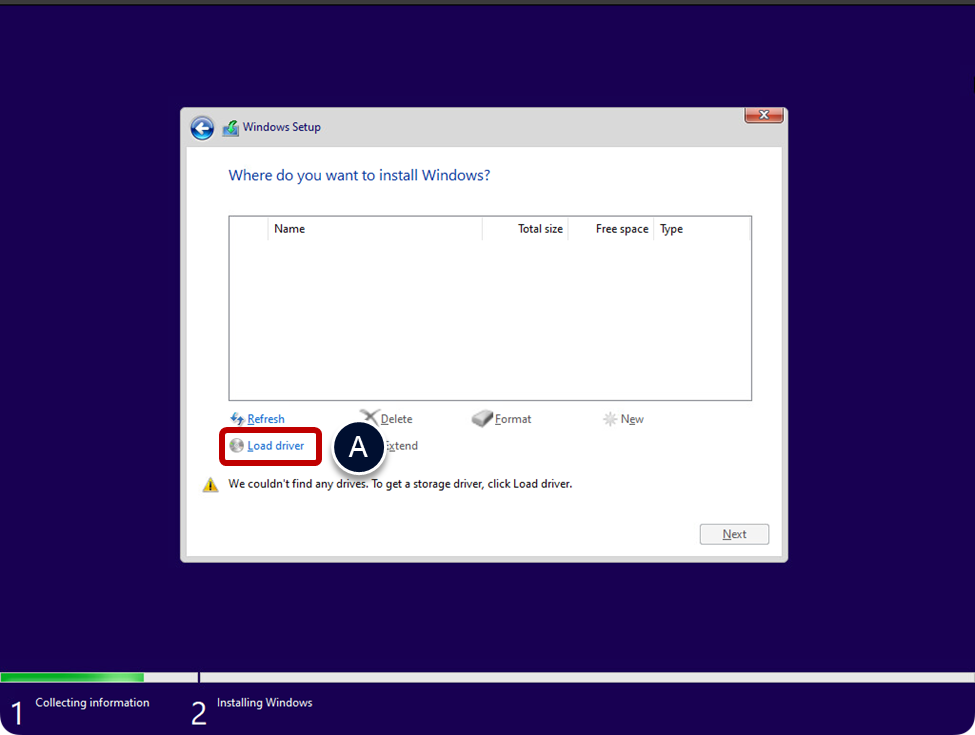
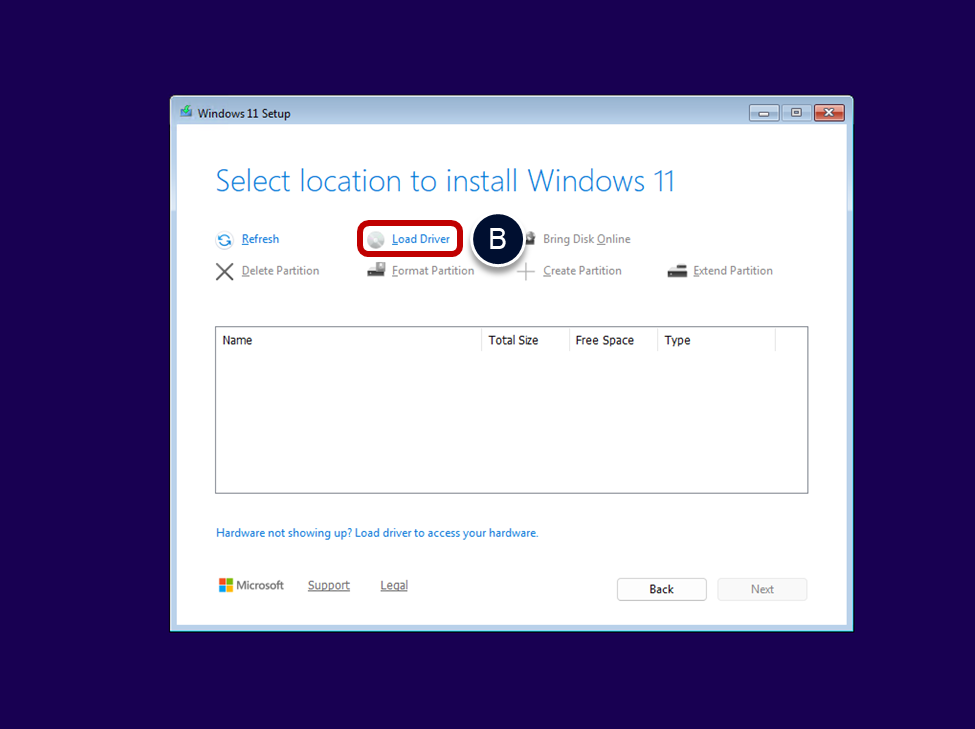
- Select the location to install Windows.
- Select the disk you want to install Windows into.
- Note: If no drives are listed, load the SCSI driver that comes with the hypervisor tools. See the relevant hypervisor specific section towards the end of this guide for information on how to do this on the chose platform.
- Load the SCSI driver to install Windows on a vSphere VM.
- Load the SCSI driver to install Windows on an AHV VM.
- Click Next.
- Select the disk you want to install Windows into.
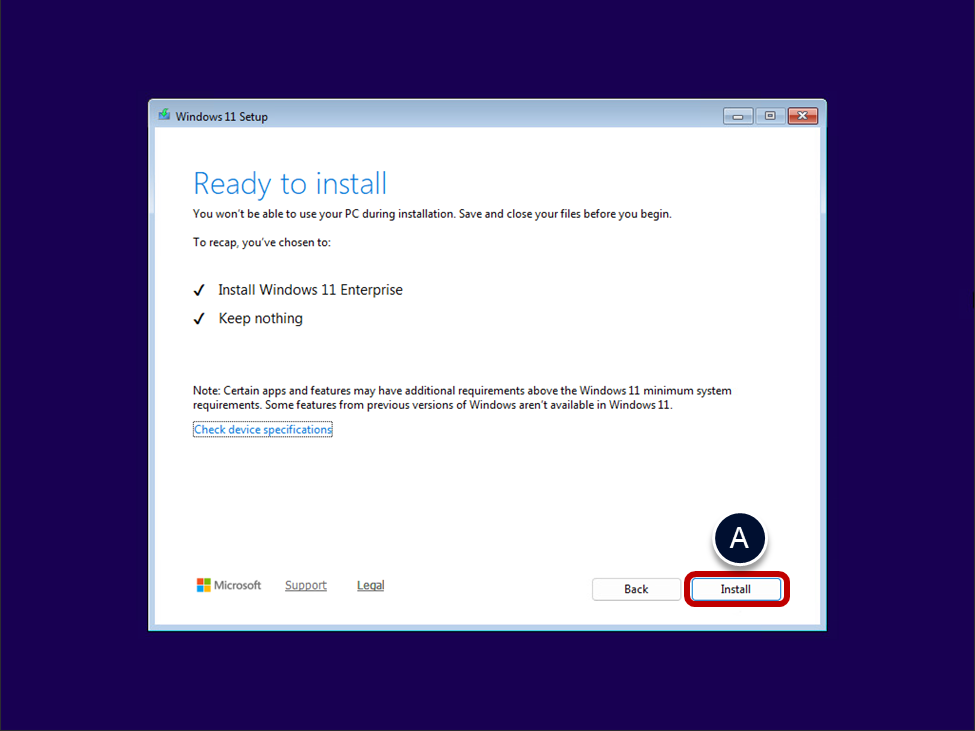
- Review and start the installation.
- Click Install.
- Monitor installation progress.
- Wait for Windows to be installed.

When Windows finishes installation, it will restart, and you can carry on to the next step of entering audit mode.
Enter audit mode
After the Windows operating system is installed, you need to enter audit mode.
Audit mode allows you to bypass the Windows Out-of-Box Experience (OOBE), the initial setup screen that asks for user information, region, and language, so you can run tasks such as, adding drivers, installing applications, applying updates, running scripts, and applying optimizations. You will enter OOBE, in a later task when you Generalize the image.
- Enter audit mode by pressing CTRL+SHIFT+F3
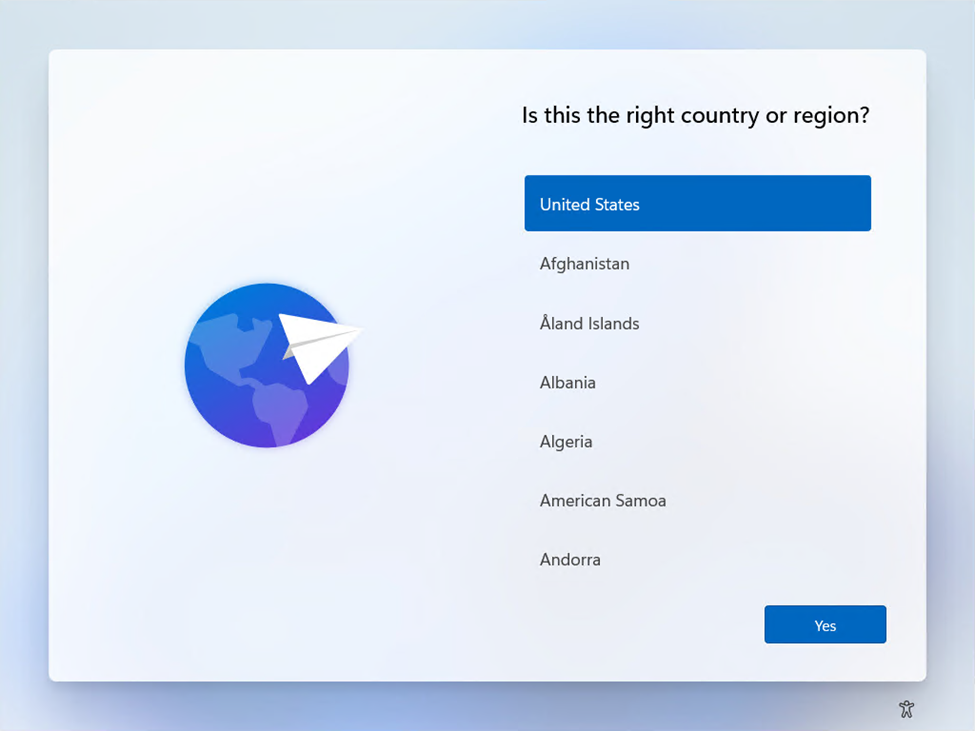
- When Windows reboots after installing, you are prompted with a regional settings screen. The screen at which you enter audit mode depends on which Windows operating system you are using and could be worded differently:
- Is this the right country or region?
- Let's start with a region
- Get going fast
- Personalize
- Customize Settings
- Setup Windows
- Some operating systems will automatically log in to Windows after a restart operation, while others will prompt for user credentials.
- If prompted for credentials, use Administrator for the username and leave the password field blank.
- Press CTRL+SHIFT+F3 to switch to Windows to audit mode.
- When Windows reboots after installing, you are prompted with a regional settings screen. The screen at which you enter audit mode depends on which Windows operating system you are using and could be worded differently:
The following screenshot shows the screen where you press CTRL+SHIFT+F3 after you install Windows 11 24H2.
The following screenshot shows the screen where you press CTRL+SHIFT+F3 after you install Windows Server.

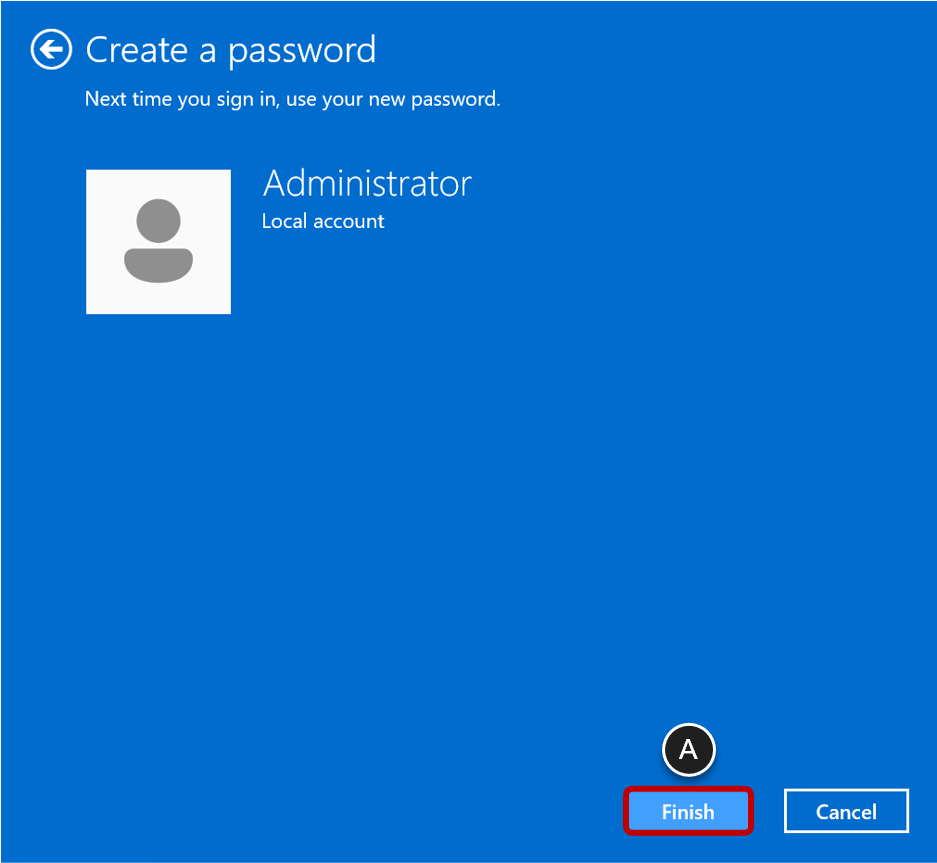
- Windows will enter audit mode, reboot, and login as Administrator.
- Cancel the System Preparation Tool dialog.
- While Windows is in audit mode, the Sysprep dialog will appear each time you login. Cancel the dialog to close it without executing Sysprep each time it appears.
- Click Cancel.
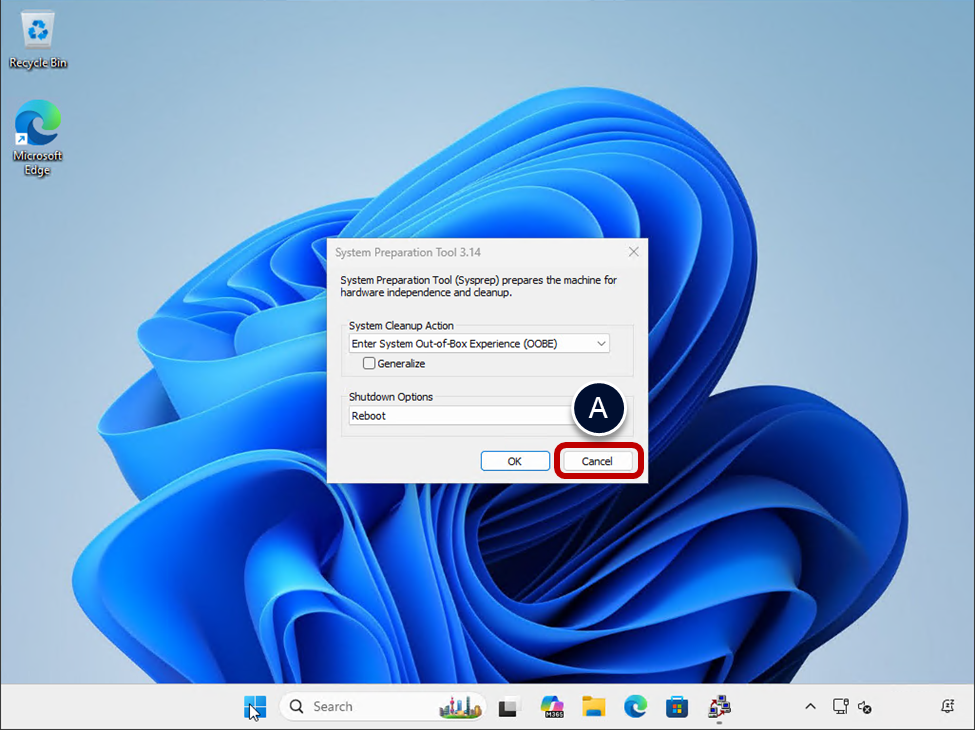
| | While Windows is in Audit mode, subsequent restarts will always prompt with the Sysprep dialog box. Continue to cancel this each time it is displayed. Once the image is generalized using the Operating System Optimization tool (OSOT), this dialog window will no longer appear. |
Install hypervisor tools and drivers
Once Windows is installed, the next step is to install the hypervisor tools. These can include drivers for network cards, mouse, etc.
Use the hypervisor specific guidance for the hypervisor or capacity type you are using:
- For a vSphere-based VM, see Install VMware Tools.
- For a Nutanix AHV-based VM, see Install the VirtIO drivers.
| | If you imported a virtual machine image from a cloud vendors marketplace, the required drivers should already be installed in the provide Windows image, and you can skip this task. |
Update Windows
It is good practice to update Windows.
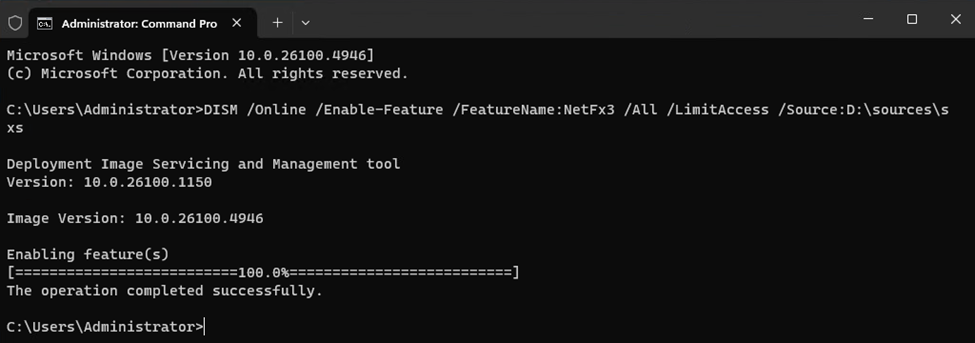
Install .Net Framework 3.5 (optional)
Many applications and functions leverage .Net Framework, so it is advantageous to install .Net Framework into the golden image and update it with Windows update. The Finalize task that you run later, performs a precompile of the .Net libraries which means that each clone does not have to do this at a later time.
- Open a command prompt, Run as Administrator.
- Run the following command
DISM /Online /Enable-Feature /FeatureName:NetFx3 /All /LimitAccess
/Source:D:\sources\sxs
The following screenshot shows an example of successfully running this command.
Install Windows updates
Check for and install the latest Windows OS updates.
- Select Windows update in Windows settings.
- Open Windows Settings.
- Click Windows Update.
- Click Check for updates and wait for the updates to be installed.
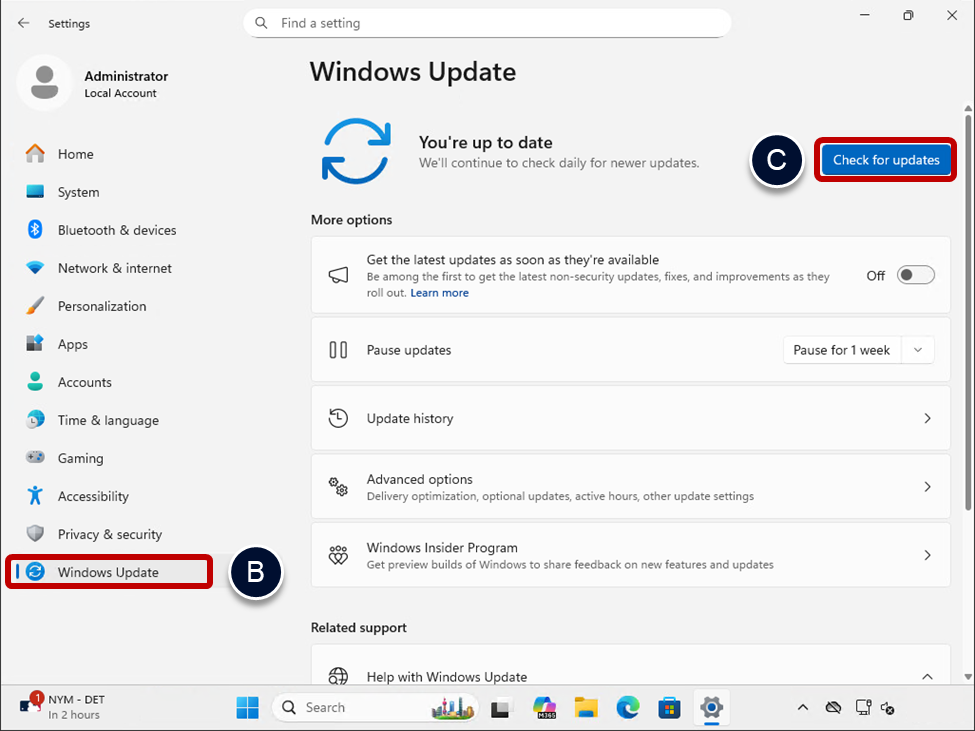
Note: For earlier non-LTSC Windows 10 versions, click Advanced options first and select Defer feature upgrades so that new features are not downloaded and installed. Deferring feature upgrades does not affect security updates.
- Restart Windows.
- Click Restart now.
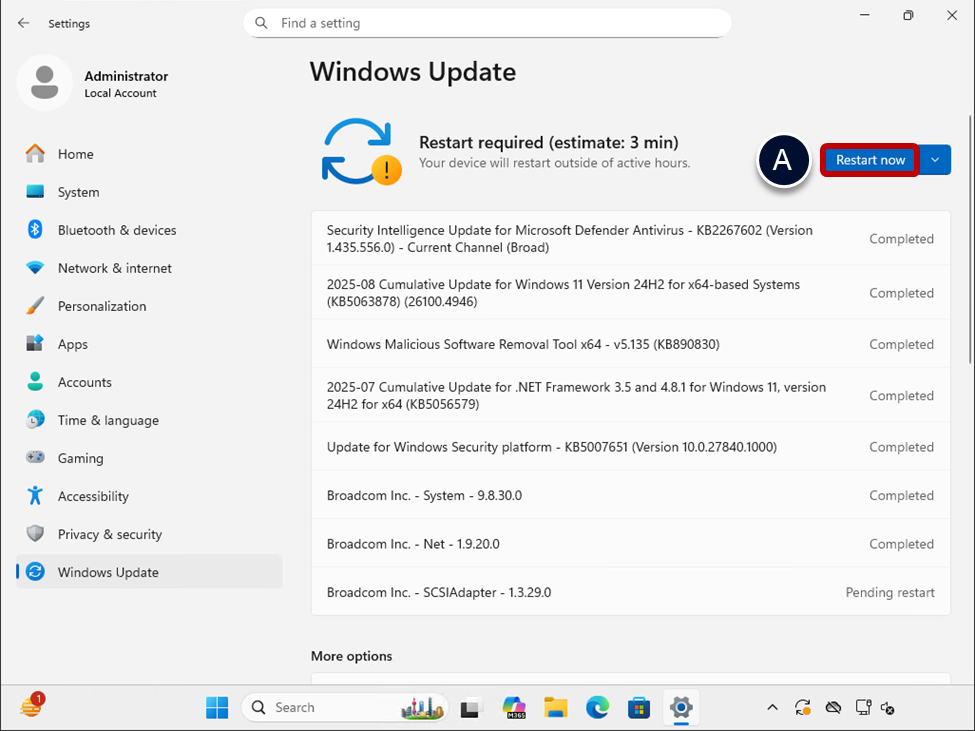
- When Windows restarts.
- Run Windows Update again until no more updates are available, and no restarts are required.
Install applications into the golden image
Although our primary application-delivery mechanism is App Volumes, it might be desirable to install select applications in the golden image VM so that all clones get those applications in their base disk.
Many applications have integrated auto-update functionality. Install these applications, and update them to the latest version, and then turn off or deactivate the auto-update functionality to prevent the clones from updating individually.
| | For a golden image that will be used for non-persistent clones, remember to disable the auto-update functionality in any applications you install. |
Turn off hardware graphics acceleration in commonly used applications
If the VMs are not going to be using a physical GPU in the hypervisor hosts, you can reduce CPU usage by not emulating hardware graphics in applications.
While you can disable these application settings in the golden image, Omnissa recommends using Dynamic Environment Manager configuration files to control these application settings.
Microsoft Office and Adobe Reader are already done by OSOT, unless you deselected them.
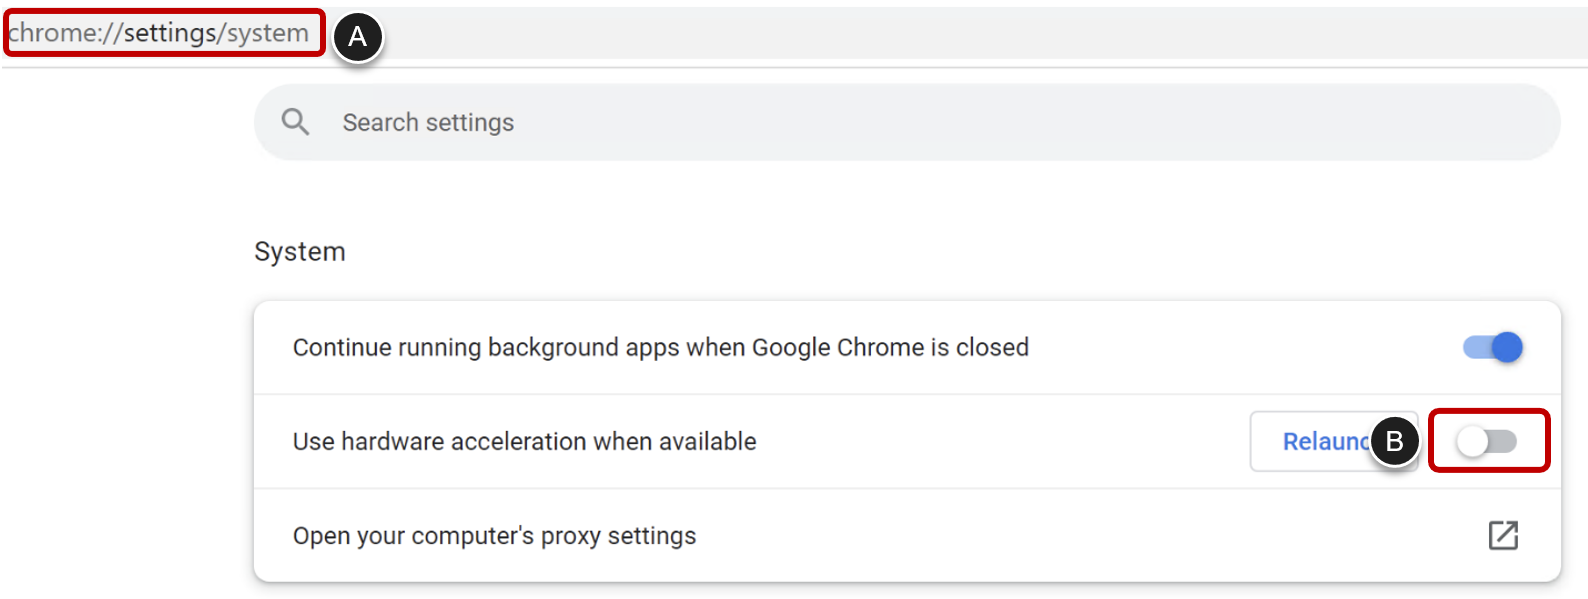
The following is an example of disabling this in the golden image, for Google Chrome.
- Google Chrome
- To turn off hardware graphics acceleration for Chrome, navigate to chrome://settings/system
- Turn off Use hardware acceleration when available.
Optimize Windows using the Windows OS Optimization Tool for Horizon
In this task, you use the Windows OS Optimization Tool for Horizon (OSOT) to analyze the list of recommended optimizations, confirm your selections, and apply those optimizations.
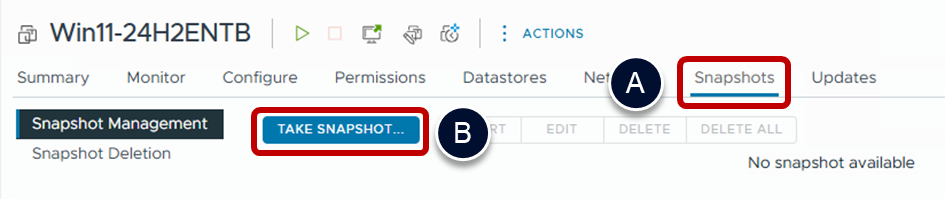
- Take a snapshot of the virtual machine (optional but recommended).
- A snapshot of the VM allows you to reset the VM to a pre-optimized state. This is useful if you discover that some of optimizations that you applied, disabled functionality that you want to retain.
- Power down the VM by shutting down Windows.
- Take a VM-level snapshot of the virtual machine.
- For guidance on talking a VM-level snapshot on a specific hypervisor or capacity, see:
- For a vSphere-based VM, see Take a vSphere VM snapshot.
- For a Nutanix AHV-based VM, see Create an AHV VM recovery point.
- Power the virtual machine back on.
- Run the Windows OS Optimization Tool for Horizon (OSOT executable).
- You can run OSOT either from a network share or by copying the files into a local folder.
- Accept the license.
- Select I accept the terms of the agreement.
- Click on Next.

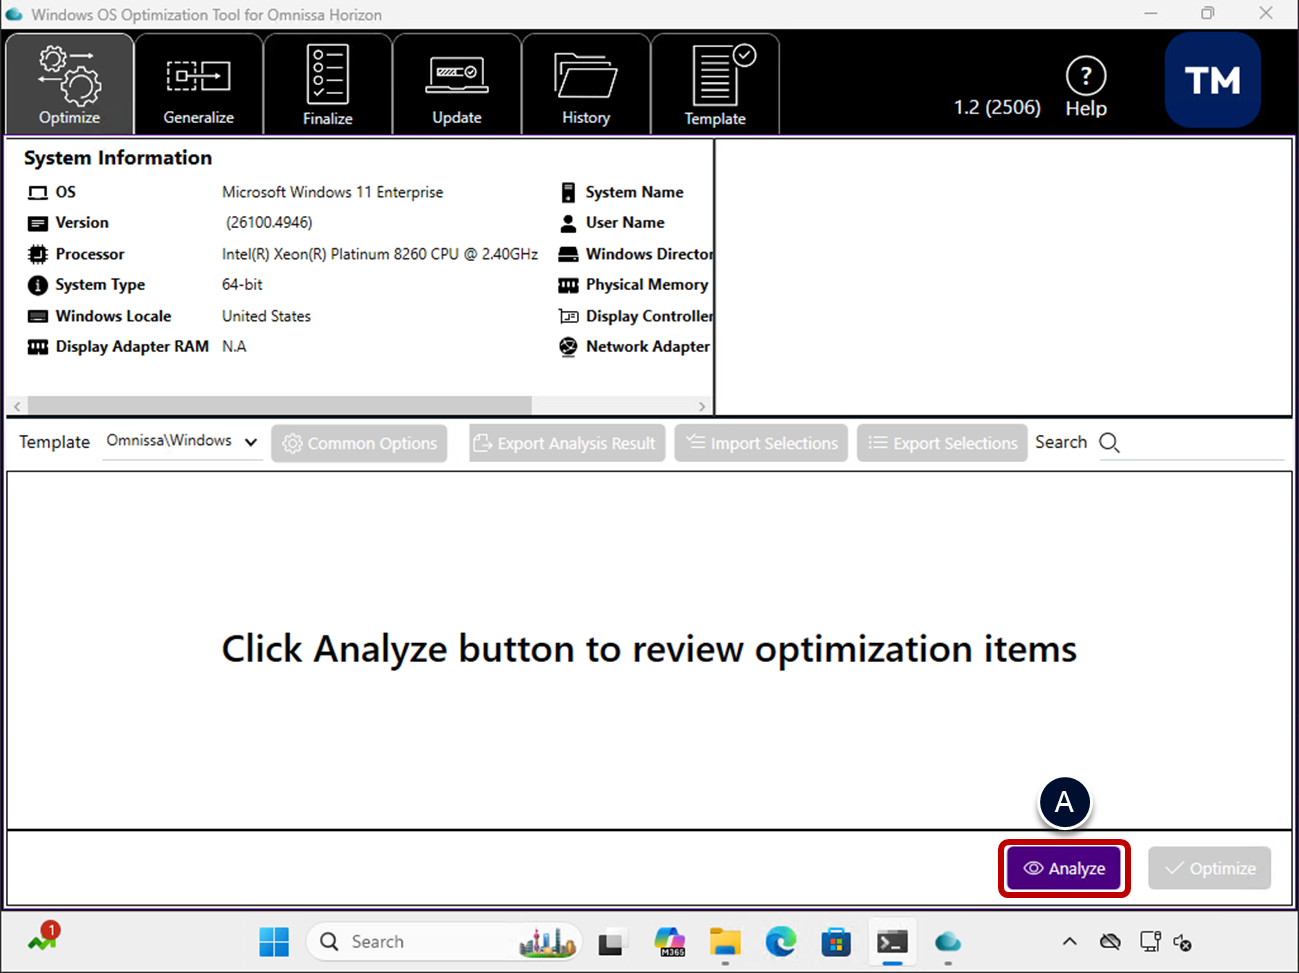
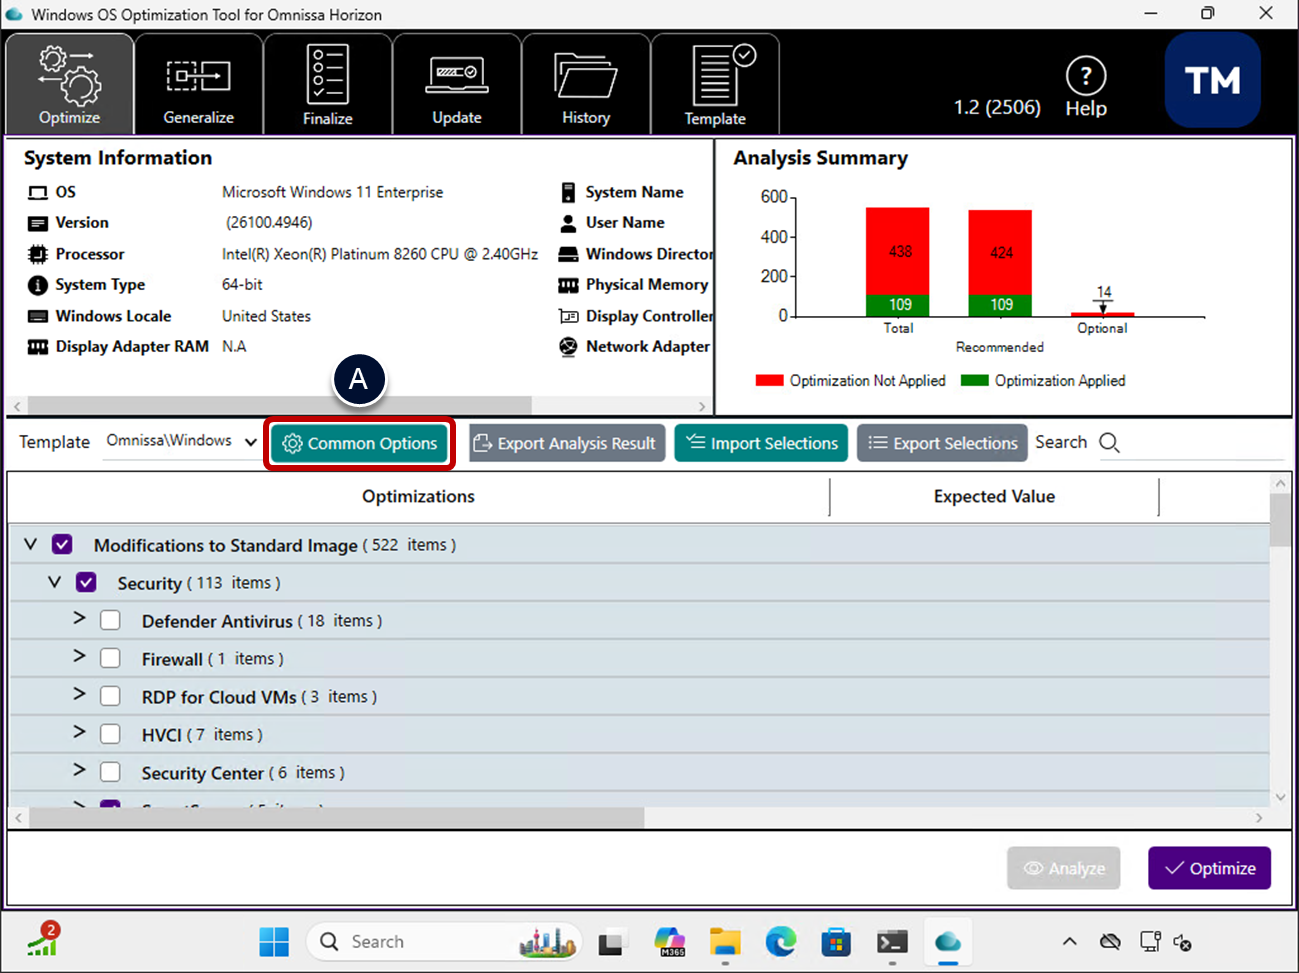
- Analyze recommended system optimizations to apply.
- Click Analyze.
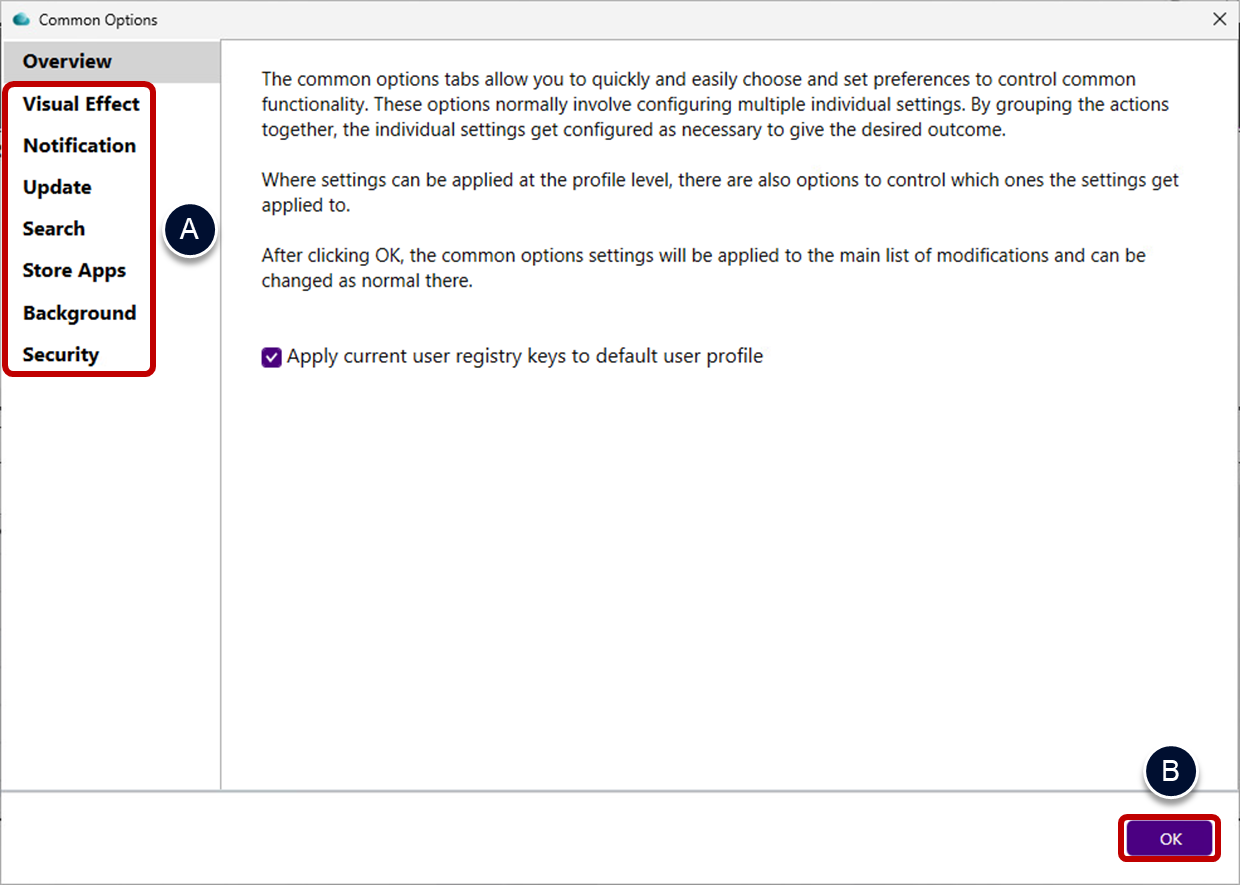
- Configure common options.
- Click the Common Options button.
- Review the tabs to determine which options to set.
- Here you can select alternate defaults that will change the selection of optimizations that will be applied.
- Click through the Common Options sections using the left-hand menu, and change any settings as required.
- As an example, when creating a golden image to provision persistent VMs, you probably want to change the default optimizations for Windows Update and Search to leave them enabled.
- Other typical changes include selecting which Store Apps are kept.
- When you are finished configuring common options, click OK.
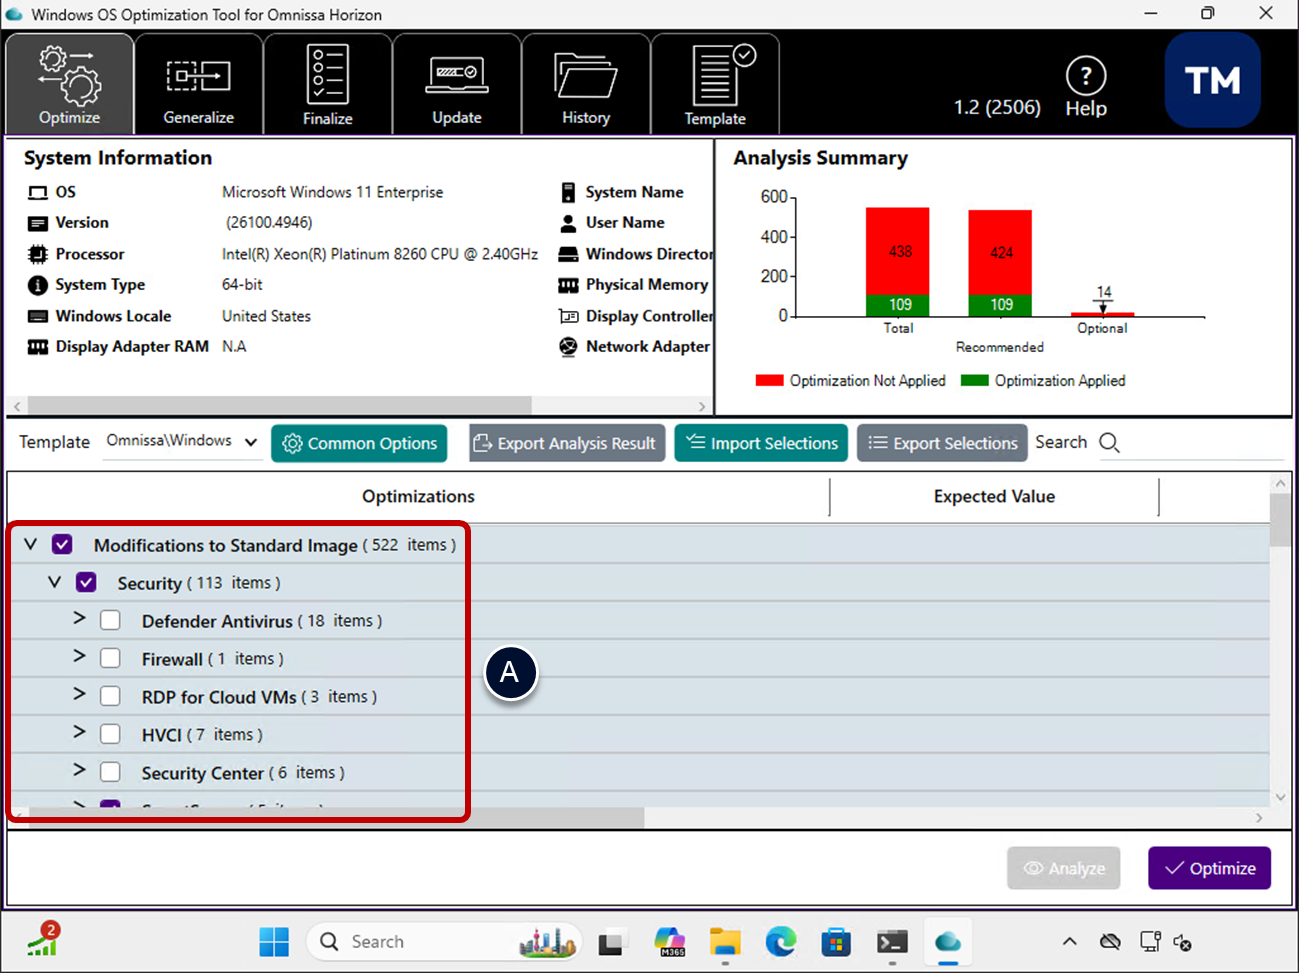
- Select the optimizations to apply.
- Select the appropriate optimizations from the extensive list. For most VDI environments, use the default selection.
- Export Selections (optional)
- Save your optimization selections prior to optimizing, using the Export Selections button.
- This generates a JSON file that can be imported into and reused for future optimizations of this image.
- It also allows you to import your selections into other images you might create.
- Apply the optimizations.
- Click Optimize.
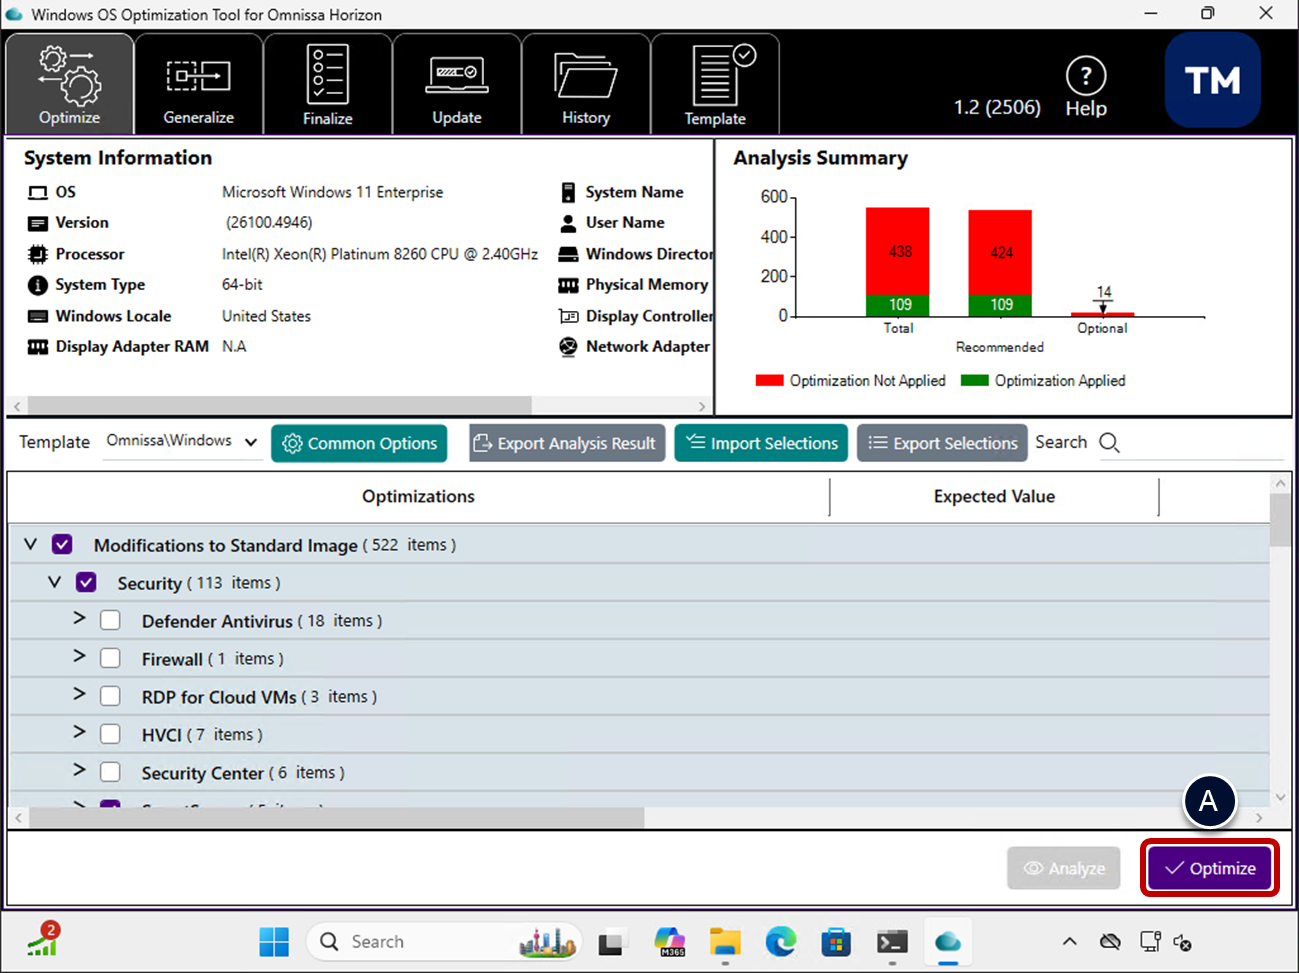
- Monitor the optimization results until the process is complete.
- Restart Windows.
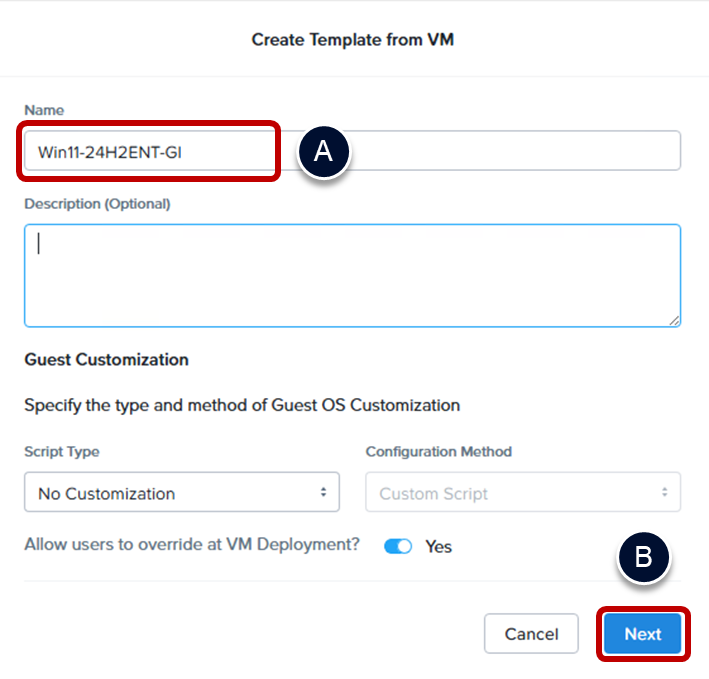
Generalize Windows using the Windows OS Optimization Tool for Horizon
Generalizing a Windows image means removing computer-specific information so that the image can be deployed throughout an enterprise. You use the Generalize tab of OSOT to run the system preparation tool (Sysprep) with a supplied and editable unattend.xml answer file.
| | If you are using Horizon Cloud and have imported a virtual machine image from a Marketplace, do not run Generalize. You will instead use the Horizon Universal Console to publish the image, which is when Sysprep is run on VMs in Horizon Cloud. |
Turn off device encryption
Some recent versions of Windows 11 have been observed enabling device encryption functionality during installation. This causes an error during Sysprep execution when the Generalize task takes Windows out of audit mode to enter Out-of-Box Experience (OOBE).
If device encryption is enabled, you will need to disable it to prevent this issue.
- Open Windows Settings.
- Select Privacy & security.
- Select Device encryption.
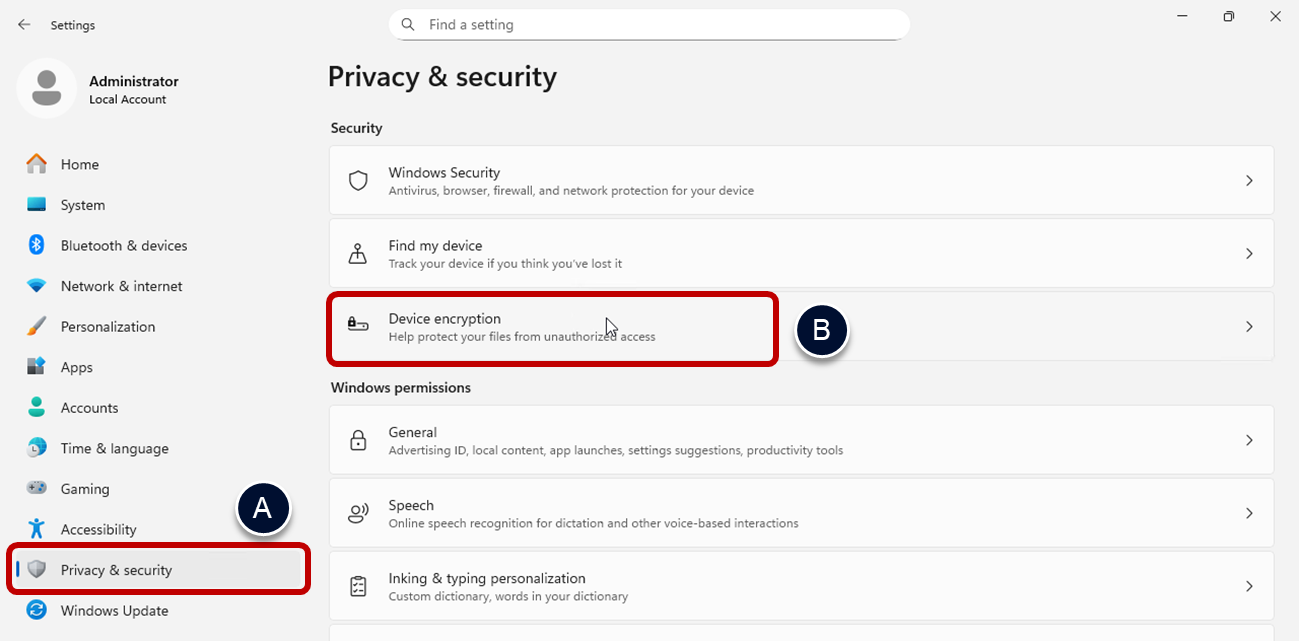
- Turn off device encryption.
- Toggle Device encryption to Off (if it is already off you don’t need to change anything).
- Confirm by clicking Turn off.
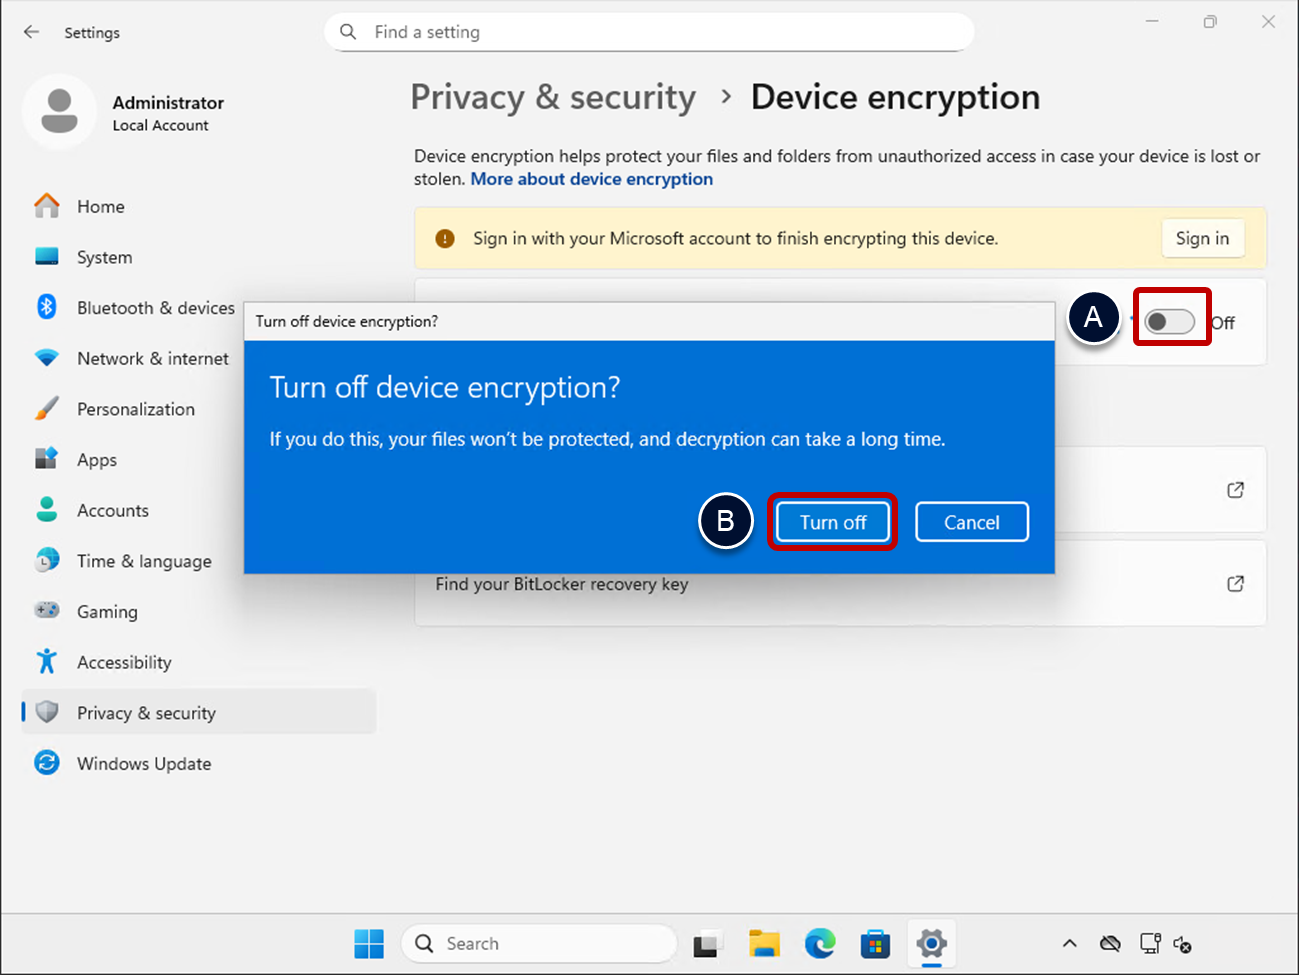
Turning off device encryption can take some time to complete. Make sure decryption has fully completed, shown in Windows Settings, before moving on to run Generalize.
Alternatively, you can use the command line to turn off device encryption of the C: drive.
- Open a command prompt, Run as Administrator.
- Run the following command
manage-bde -off C:
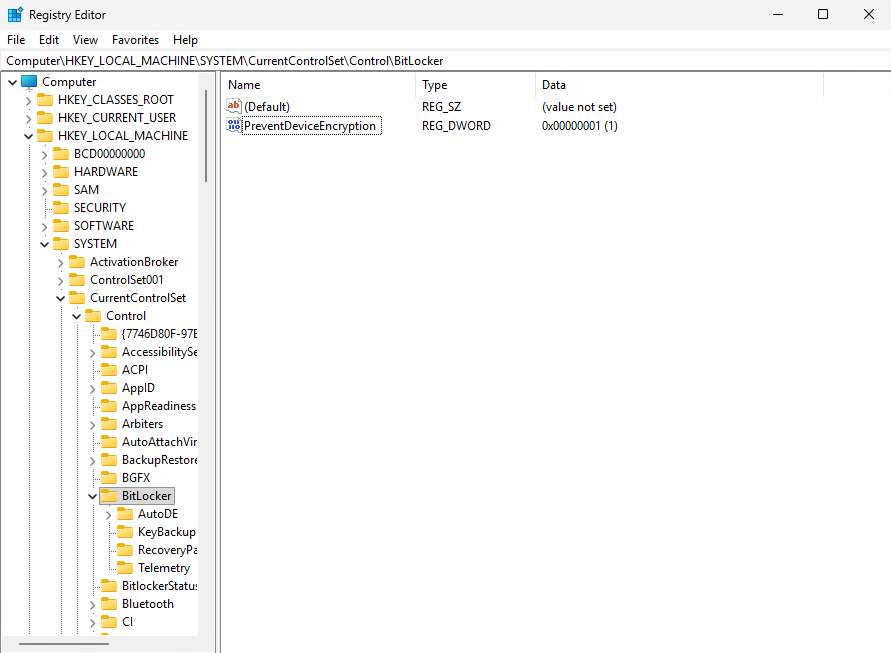
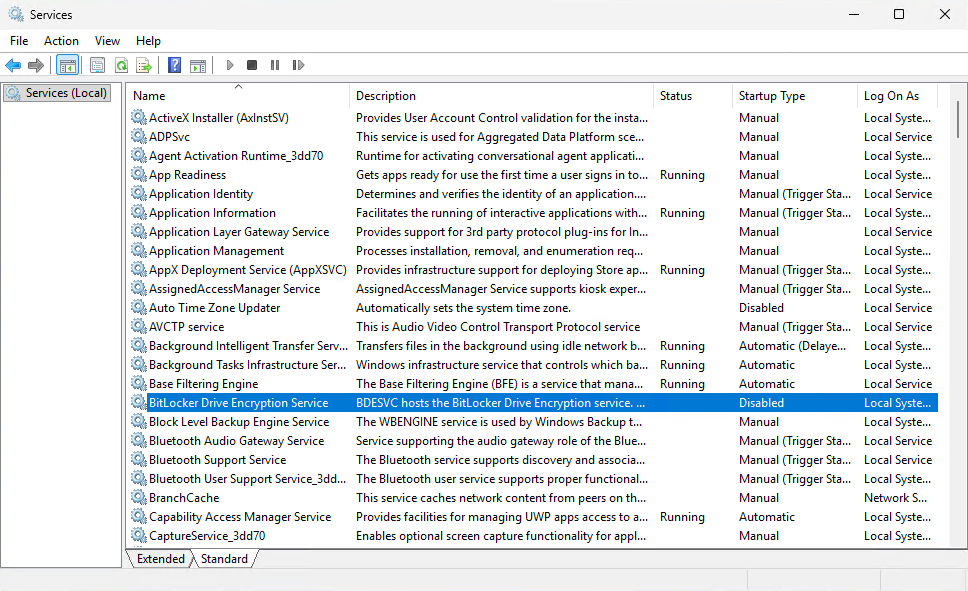
Disable Bitlocker
Some recent versions of Windows 11 have been observed starting the Bitlocker service and re-enabling device encryption functionality on the C: drive. If BitLocker is allowed to start and the C: drive is encrypted, this can lead to an increase in storage consumption across clones created from the gold image.
If you do not intend to use Bitlocker on the clones you will create from this gold image, you should disable Bitlocker and prevent it from running. If you do intend to use Bitlocker skip these steps.
- Update the registry with a new key
- Open regedit
- Browse to HKEY_LOCAL_MACHINE:\SYSTEM\CurrentControlSet\Control\BitLocker
- Create a new DWORD key
- Name: PreventDeviceEncryption
- Value: 1
- Configure the Bitlocker Drive Encryption Service startup mode to disabled and ensure it is stopped.
- Open the Services console.
- Stop the Bitlocker Drive Encryption Service (BDESVC).
- Change the Startup Type to Disabled.
Run Generalize
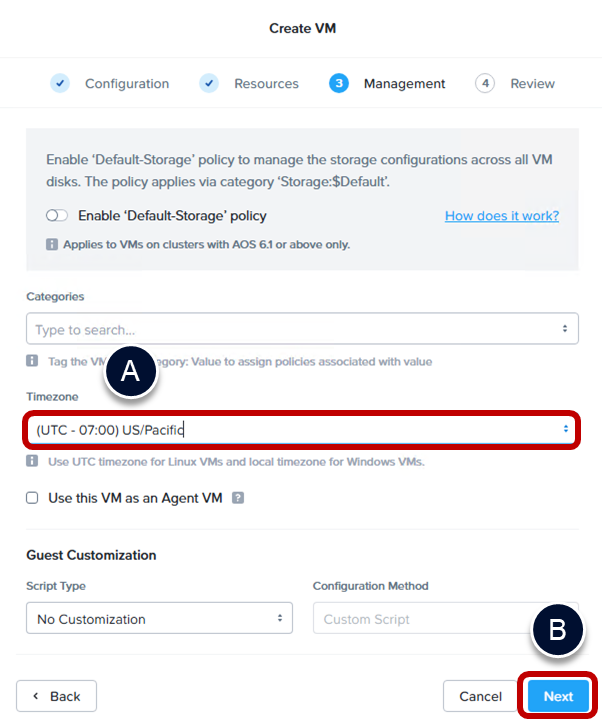
Now run the Generalize task using the Windows OS Optimization Tool for Horizon, selecting your time zone and locales. You optionally, change other settings such as specifying a password for the Administrator account, or even viewing and editing the answer file that Sysprep will use.
- Generalize Windows using the Windows OS Optimization Tool for Horizon.
- Select the Generalize tab in OSOT.
- Select the correct Time Zone, Input Locale, and System Locale.
- Click Generalize.
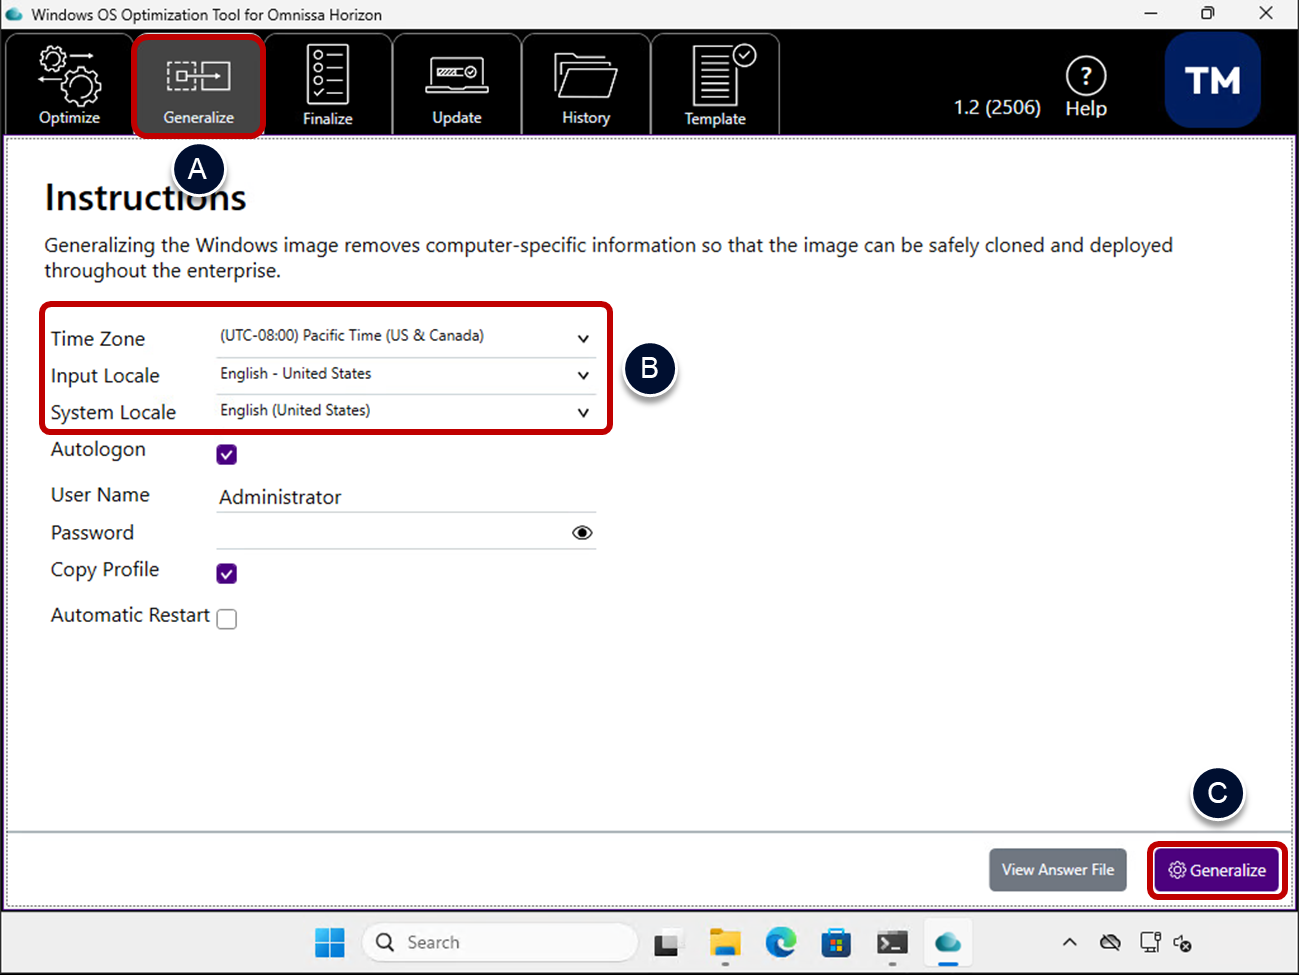
- When the Generalize task completes.
- Select OK (if a message that confirms Generalize has completed is displayed).
- Restart Windows (if it does not automatically restart).
- Wait for AppX package provisioning
- After Windows reboots and enters Out of the Box Experience mode, AppX packages can be provisioned.
- To allow these to be fully provisioned, you should wait 1-2 minutes after the first login post-generalize before progressing.
Clean up Microsoft Store apps
After you run Generalize and Windows restarts it enters OOBE mode (Out of the Box Experience). As part of entering OOBE, recent versions of Windows 11 have been observed enabling Copilot and BingSearch for the current user.
This can cause a problem if you intend to use Sysprep as the customization method when provisioning pools from this golden image. To avoid that use of Sysprep failing, you can remove these applications from the current user.
- Open a Windows PowerShell console, as Administrator.
- Run the following commands.
Get-AppxPackage –AllUsers Microsoft.Copilot | Remove-AppxPackage -AllUsers
Get-AppxPackage –AllUsers Microsoft.BingSearch | Remove-AppxPackage –AllUsers
Diagnosing Sysprep failures during pool provisioning
When a pool deployment fails, you can confirm if the cause is Sysprep by looking at the following Sysprep log file.
C:\Windows\System32\Sysprep\Panther\setupact.log
You can get this file from the internal template VM that is created as part of automated pool provisioning. Alternatively, you can clone the golden image, run Sysprep on that copy, and analyze the logs on that VM.
Below is an extract from the end of the setupact.log file showing the error caused by Copilot being installed for the current user.

For more information see Troubleshooting Windows Sysprep Failures and Known Issue (77253).
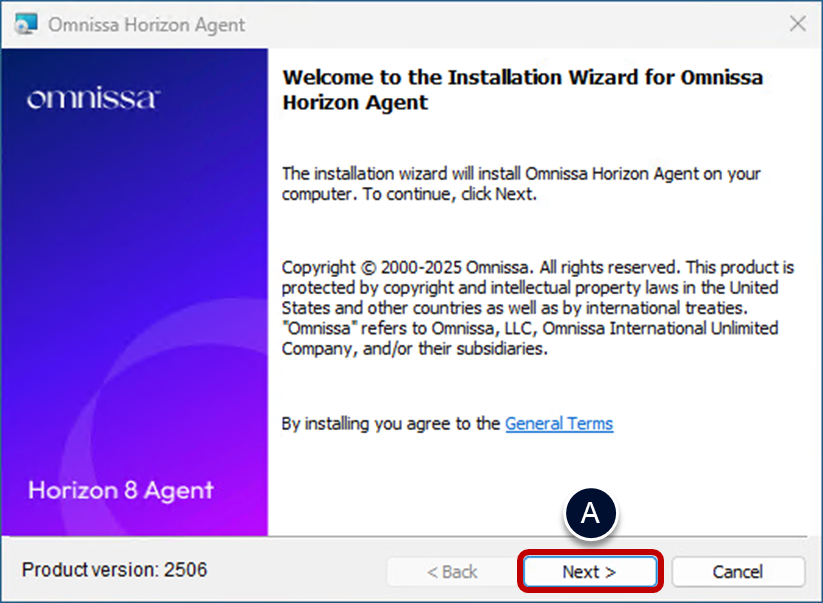
Install the Omnissa agents
Next, install the required Omnissa agents into the Windows image.
If you are also installing third-party agent software (for example FSLogix), you should also install it at this time. When installing all the Omnissa agents, and third-party agents, the installation order would be the following:
- Horizon Agent
- Dynamic Environment Manager
- FSLogix (example of a third-party agent)
- App Volumes
Important: The App Volumes Agent should always be installed last, after any other Omnissa or third-party agent.
| | If you are using Horizon Cloud, there are options for installing the Horizon Agent, Dynamic Environment Manager FlexEngine, and the App Volumes Agent. You can manually install them following the guidance below or choose to install them when you publish the image for use in the Horizon Cloud Universal Console. |
Prerequisites
To install the required Omnissa agents, you will need the following:
- User account – When you log in to the OS of the golden image to run the installer, the account you use must have local administrative privileges.
- Agent installation files – If necessary, you can download the agent installation files from the Customer Connect downloads page.
Install Horizon Agent
If you plan to create Horizon desktops or application pools or server farms, you must install Horizon Agent on the golden VM image so that Horizon servers can communicate with and manage the VMs that you deploy. The Horizon Agent also communicates with Horizon Client on end users' computers to provide features such as connection monitoring, virtual printing, access to the local file system, and access to locally connected USB devices.
Prerequisites for installing Horizon Agent
To do this, you need the following:
- Horizon Agent installer – Horizon Agent installer (
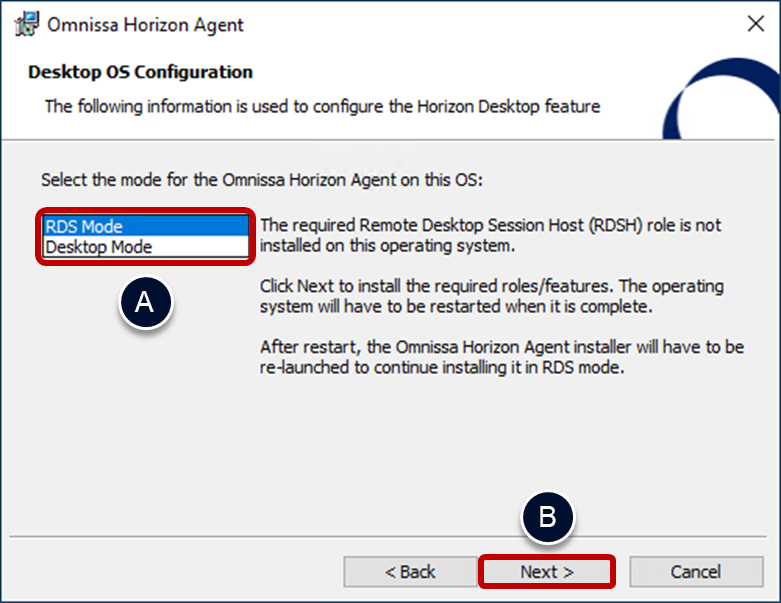
.exe) file is available from the Customer Connect Downloads page. You must download the file and copy it to the system where it will run or to a location accessible to the system. - Windows Server – If you intend the machine to function as a Remote Desktop Services (RDS) host, install the Remote Desktop Session Host (RDSH) role before installing the Horizon Agent. The Horizon Agent wizard when install in RDS Mode.
- If you install Horizon Agent on a Windows Server on which the RDSH role is not installed, the wizard will show an additional screen to allow you to choose between RDS Mode and Desktop Mode.
- Selecting RDS Mode installs the Remote Desktop Session Host (RDSH) role and will then prompt for a reboot. After the reboot relaunch the Horizon Agent installation.
- Selecting Desktop Mode configures the Windows Server machine as a single-user virtual desktop rather than as an RDS host.
Installing the Horizon Agent
Review the guidance for a specific hypervisor:
Follow the process below to install the Horizon Agent, using any specific guidance for the hypervisor platform.
- Run the Horizon Agent installer file.
- Click Next on the welcome and license agreement page.
- Configure the RDS or desktop mode.
- The following screen is only shown on a Windows Server which does not have the Remote Desktop Session Host (RDSH) role installed.
- Select either RDS Mode, for shared multi-user sessions, or Desktop Mode, for single-user (VDI) desktops.
- If you select RDS Mode the RDS role is installed and you are prompted to restart, after which you can launch the agent installer again.
- Click Next.
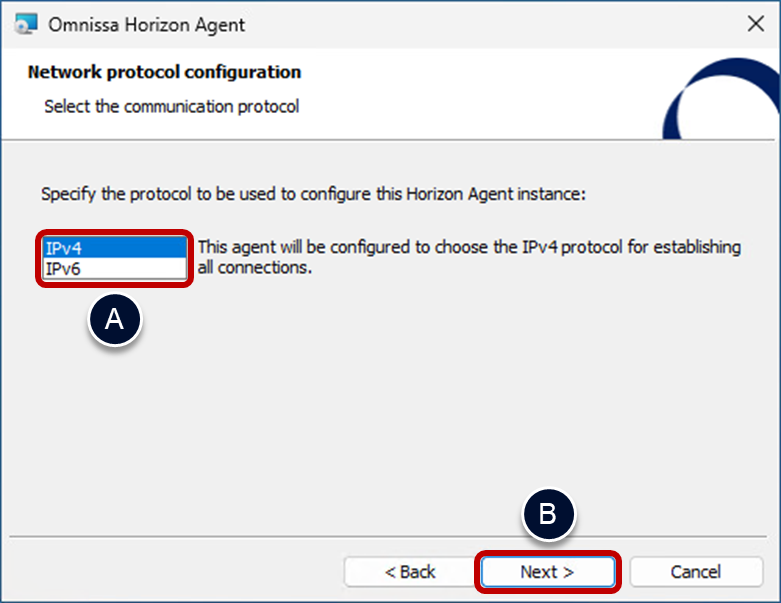
- Select the network protocol configuration.
- The environment must be either IPv6 only or IPv4 only.
- Horizon does not support a mixed IPv6 and IPv4 environment.
- Select the IP mode (IP version 4 or IP version 6) that the agent should use.
- Click Next.
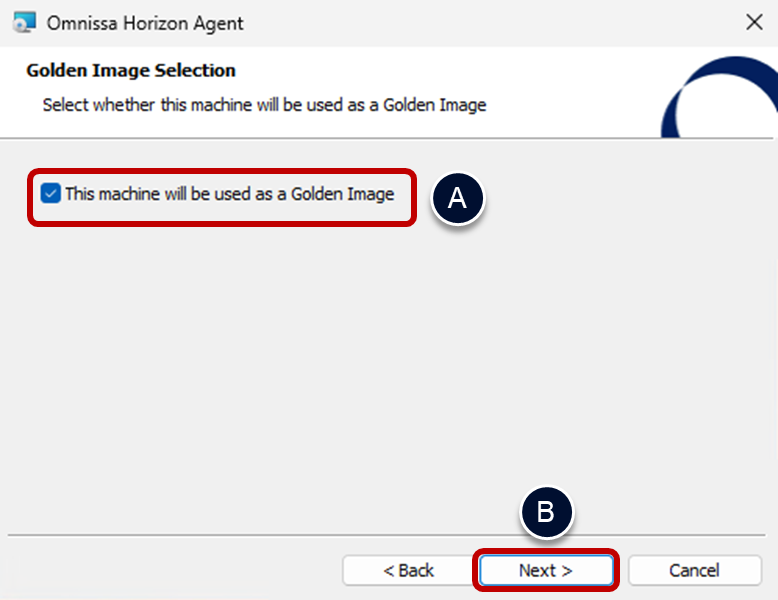
- Indicate that this is a golden image.
- The following screen will only be displayed on some hypervisors or capacity platforms.
- Select This machine will be used as a Golden Image.
- Click Next.
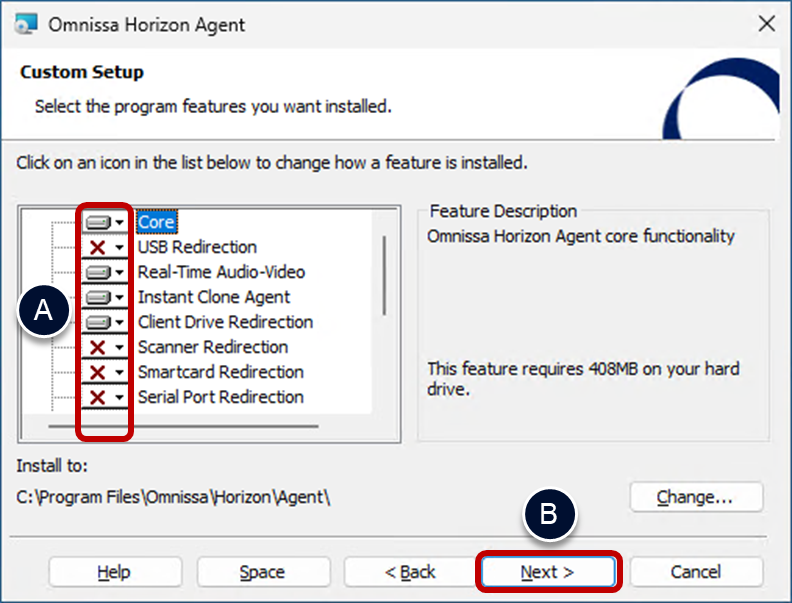
- Select required features.
- Select only the features that are required.
- For most environments these are Core, Horizon Instant Clone Agent, Horizon Audio, and Horizon Integrated Printing.
- Some features may have security considerations that you need to take into account (for example USB redirection).
- Click Next.
- Select only the features that are required.
| | The Instant Clone Agent naming can be confusing. This feature enables a linked clone agent feature and should be selected when deploying automated clone pools on any supported hypervisor platform. |
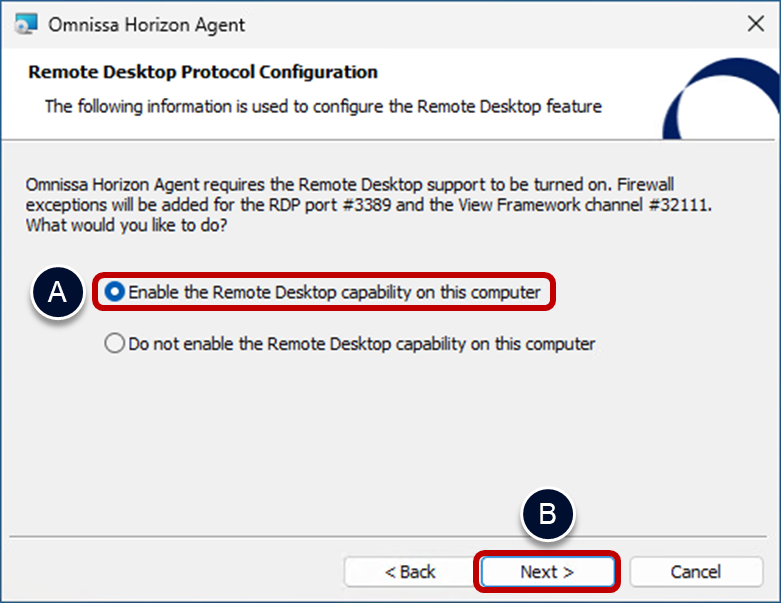
- Enable remote desktop support.
- Leave the default selection of Enable the Remote Desktop Capability on this Desktop.
- Click Next
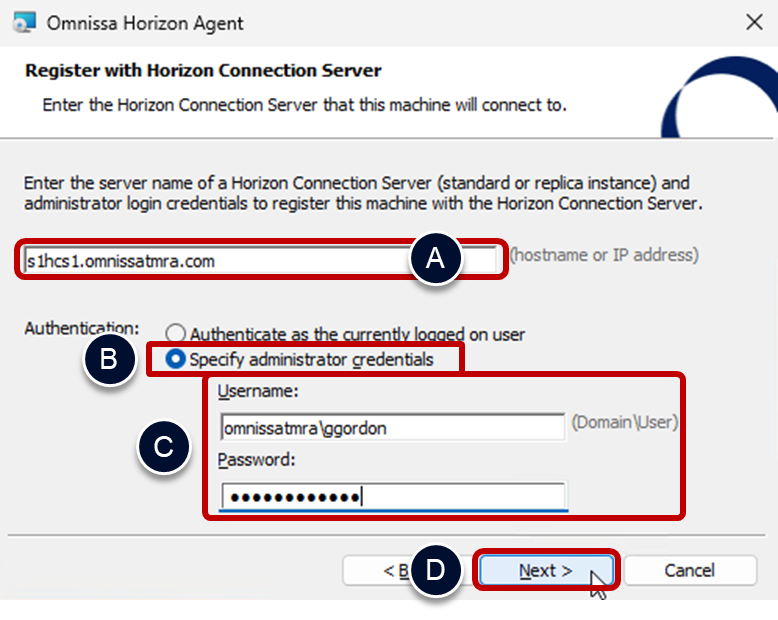
- Register the agent instance with the Connection Servers.
- The following screen will only be displayed on some hypervisors or capacity platforms.
- Enter a hostname for one of the Connection Servers in your pod.
- Select Specify administrator credentials.
- Enter a Username and Password, with permission to register agents with the Horizon Connection Server.
- Click Next.
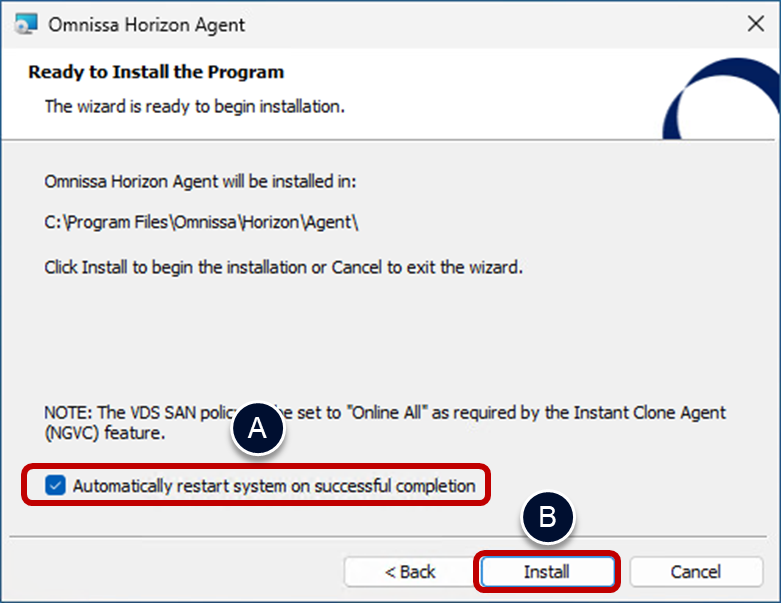
- Click install.
- Tick the box to Automatically restart the system on successful completion.
- Click Install.
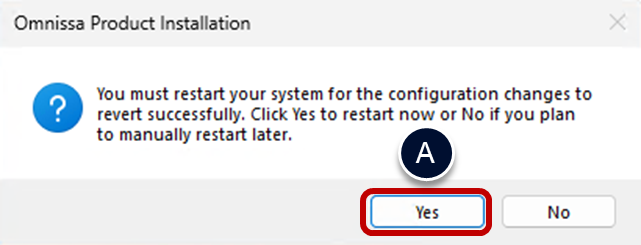
- If Windows does not automatically restart.
- Click Yes.
Install the Dynamic Environment Manager Agent
Dynamic Environment Manager provides profile management by capturing user settings for the operating system and applications. Unlike traditional application profile management solutions, Dynamic Environment Manager captures only the settings that the administrator specifies. This reduces login and logout time because less data needs to be loaded. User data is managed through folder redirection.
FlexEngine, the Dynamic Environment Manager Agent component, applies the policies that the IT administrator creates with the Dynamic Environment Manager Management Console. To install this component, you run the same Dynamic Environment Manager Setup wizard that you run to install the management console.
Note: Installing the Dynamic Environment Manager Agent is an optional step. Install this agent only if you plan to use this functionality.
Prerequisites for FlexEngine Installation
To do this, you need the following:
- Dynamic Environment Manager FlexEngine Installer –The installer is included in a ZIP file. You must download the file, extract the Dynamic Environment Manager MSI file, and copy it to the system where it will run or to a location accessible to the system.
- Internet access – The installation process includes a certificate revocation check to verify the digital signature of the MSI file. This check requires Internet access.
Note: When you install the Dynamic Environment Manager Agent on a VM where Horizon Agent is already installed, you are not required to specify a Dynamic Environment Manager license file. However, you are required to have purchased Dynamic Environment Manager.
Installing Dynamic Environment Manager FlexEngine
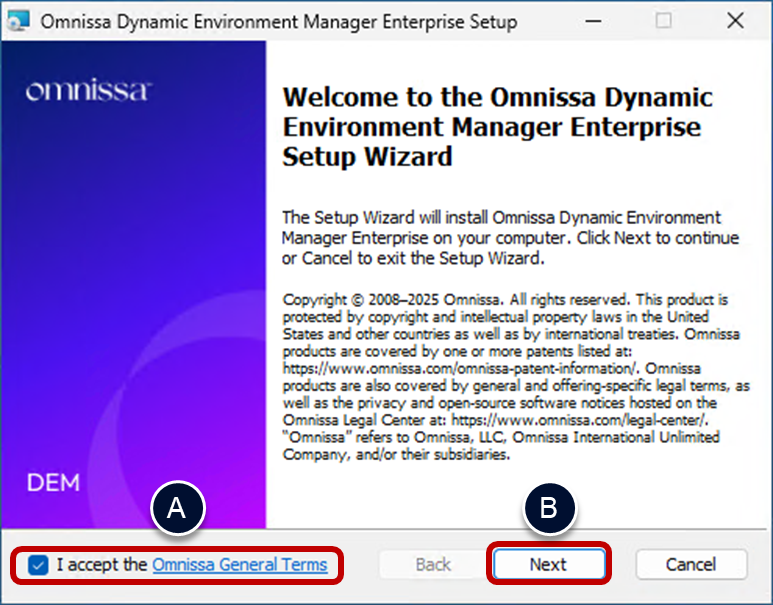
- Run the Dynamic Environment Manager installer file.
- Select I accept the Omnissa General Terms.
- Click Next.
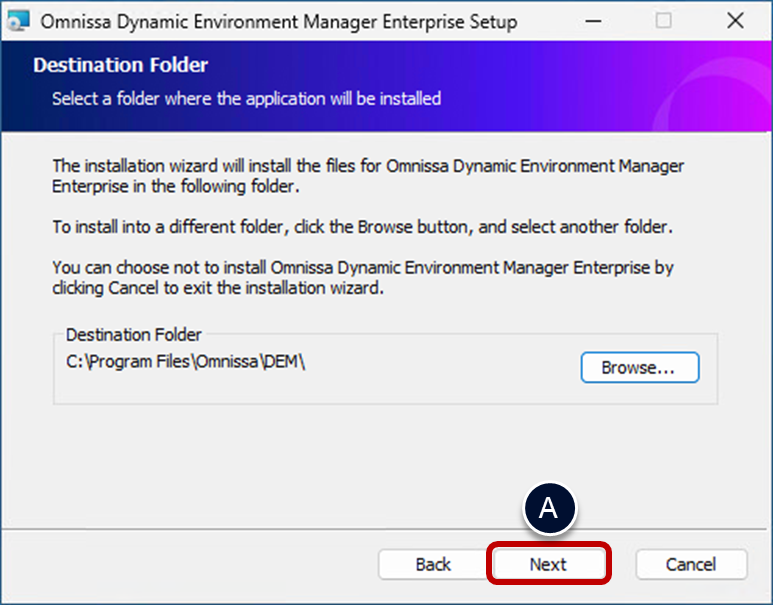
- Choose Destination Folder.
- Click Next.
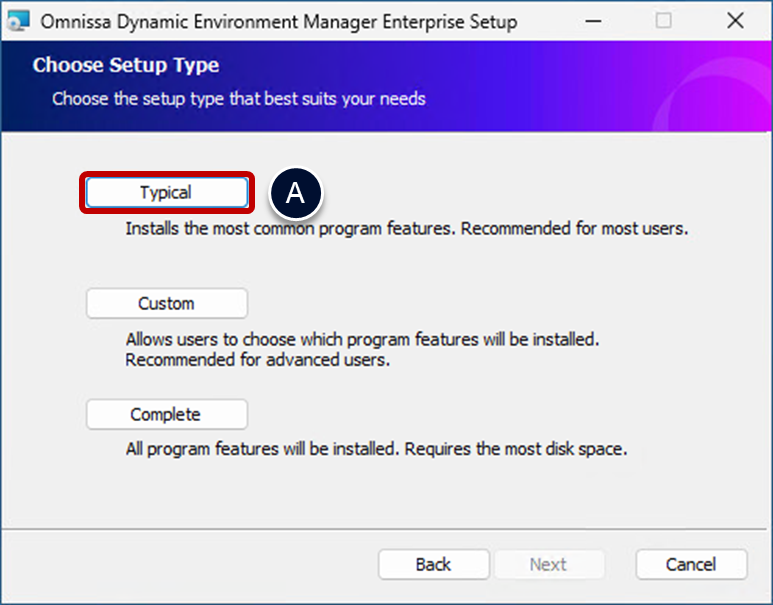
- Choose the Typical Setup Type.
- Click Typical.
The typical setup installs the DEM FlexEngine agent component, along with the optional components: Application Migration and Self-Support. You can also choose a Custom setup and select the components you want to install.
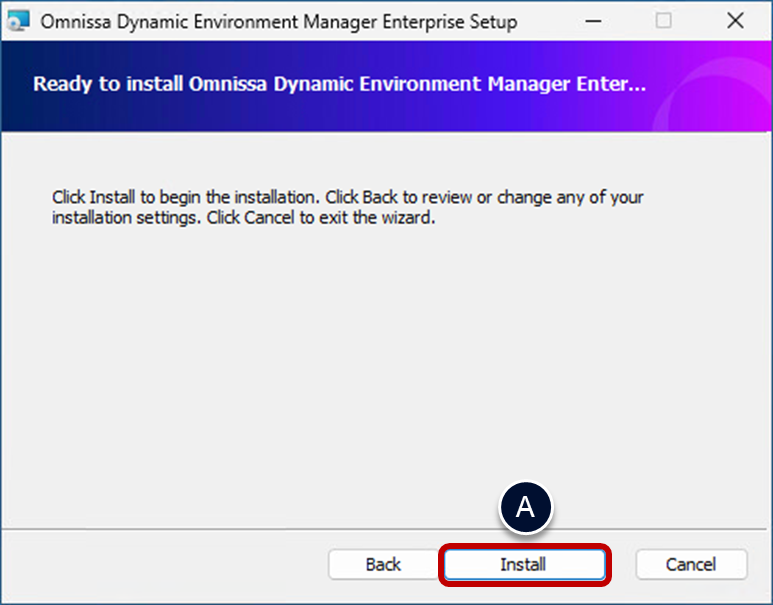
- Begin Installation.
- Click Install.
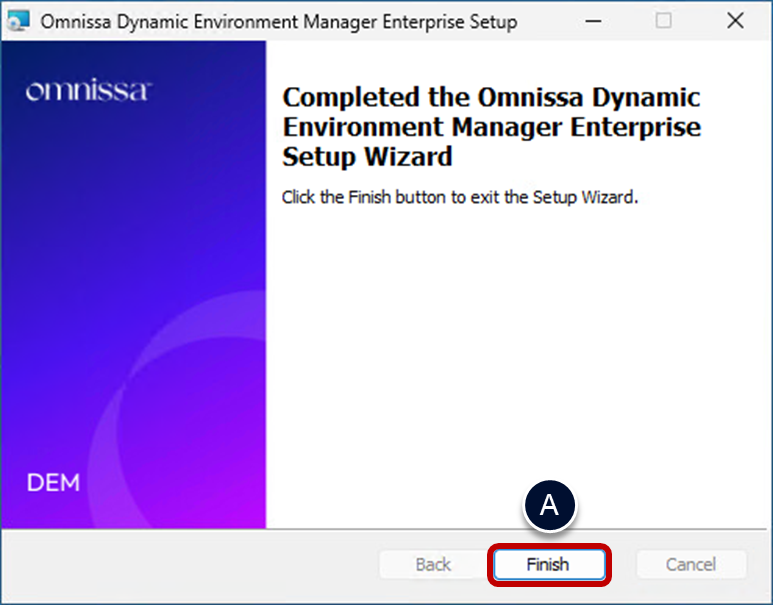
- Complete Installation.
- Click Finish.
Install the App Volumes Agent
App Volumes delivers applications that are not in the golden image. Application containers, called packages, are assigned to a user, group, OU, or machine and mounted each time the user logs in to a desktop. With this strategy, user changes can persist between sessions. App Volumes can also provide user-writable volumes, which allow users to install their own applications and have those applications follow the user as they connect to different virtual desktops.
Install the App Volumes Agent on the golden image so that the App Volumes Manager can communicate with the cloned VMs that are deployed and attach the correct applications for a user.
Notes: Installing the App Volumes Agent is an optional step. Install this agent only if you plan to use this App Volumes functionality.
Prerequisites for installing the App Volumes Agent
To do this, you need the following:
- App Volumes Agent Installer –The App Volumes installer is distributed as an ISO file. You can mount the ISO on the machine where you want to create the App Volumes component, or you can also extract the ISO contents to a shared folder. This option allows you to install each component without mounting the ISO each time.
- App Volumes Manager server information – During agent installation, you will be prompted to enter the host name or IP address and port number of the App Volumes Manager that this agent will communicate with.
Install the App Volumes Agent
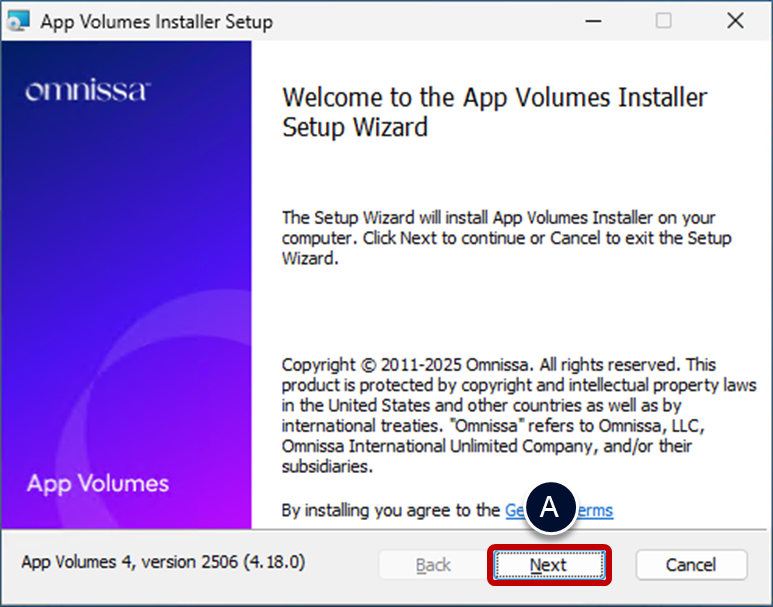
- Run the App Volumes Installer
- You can use either the Setup.msi file or the App Volumes Agent.msi installer files from the App Volumes ISO.
- The screens shown in steps 2 and 3 only appear if you run the installation using the setup.msi. if you used the App Volumes Agent.msi, they would not appear.
- Accept the setup license.
- Click Next on the welcome and license page.
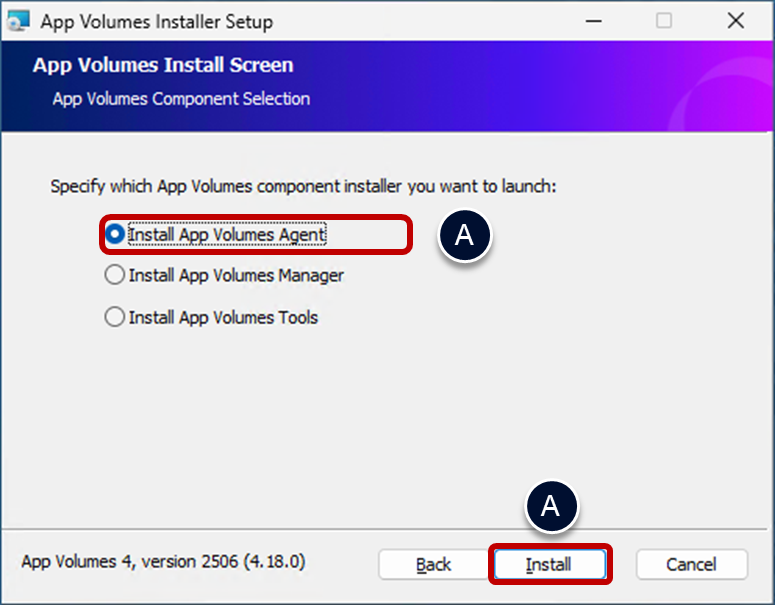
- Select the App Volumes Agent component.
- Leave the default selection of Install App Volumes Agent.
- Click Install.
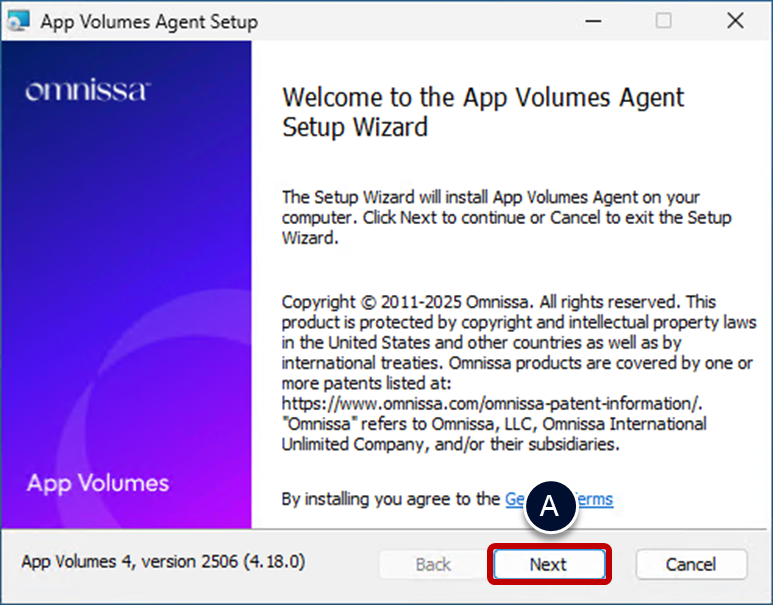
- Accept the App Volumes Agent license.
- Click Next on the App Volumes Agent welcome and license page.
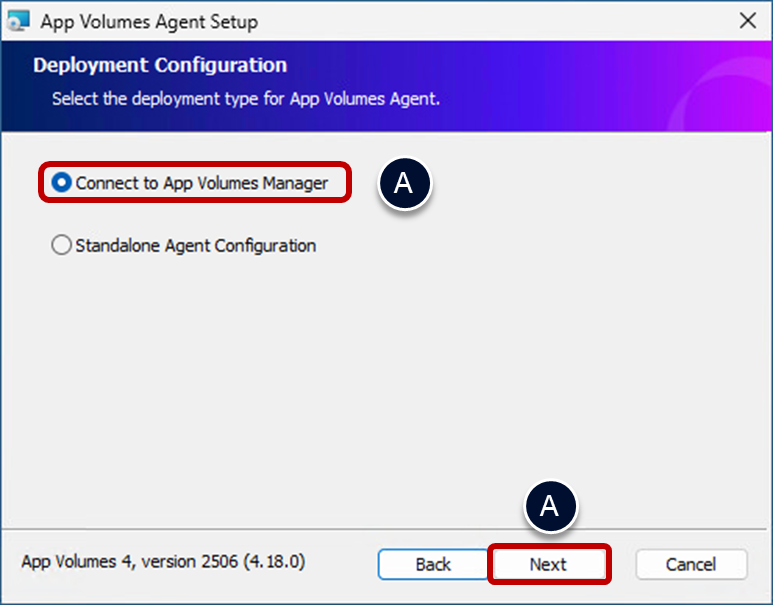
- Select the deployment configuration.
- Leave the default selection of Connect to App Volumes Manager.
- Click Next.
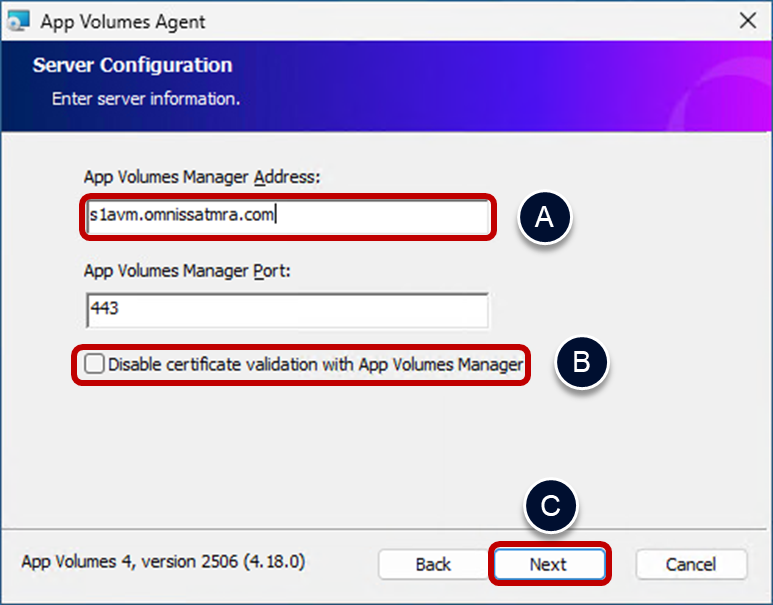
- Supply the App Volumes Manager information.
- Provide the App Volumes Manager Address.
- Leave Disable certificate validation with App Volumes Manager as the default, not selected.
- Click Next.
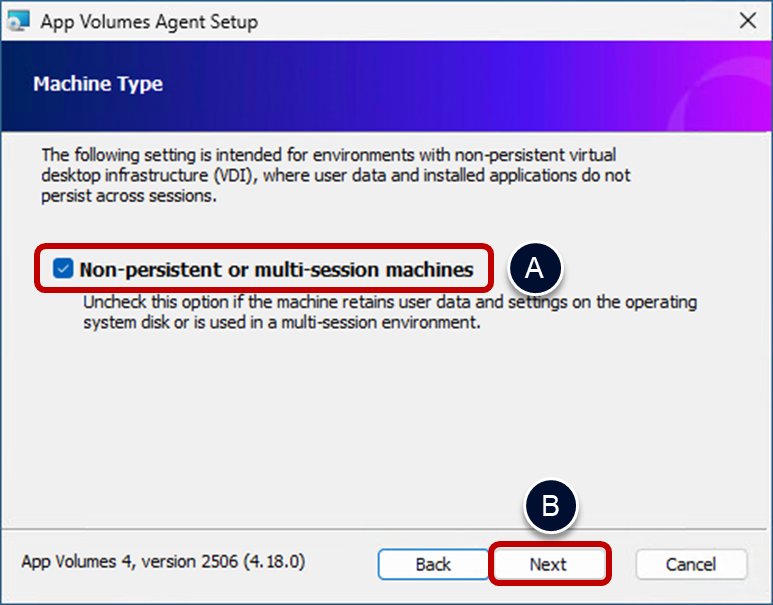
- Choose the Machine Type.
- Change the selection to match the types of machines you intend to create from this golden image. (Leave this selected for non-persistent or deselected for persistent machines).
- Click Next.
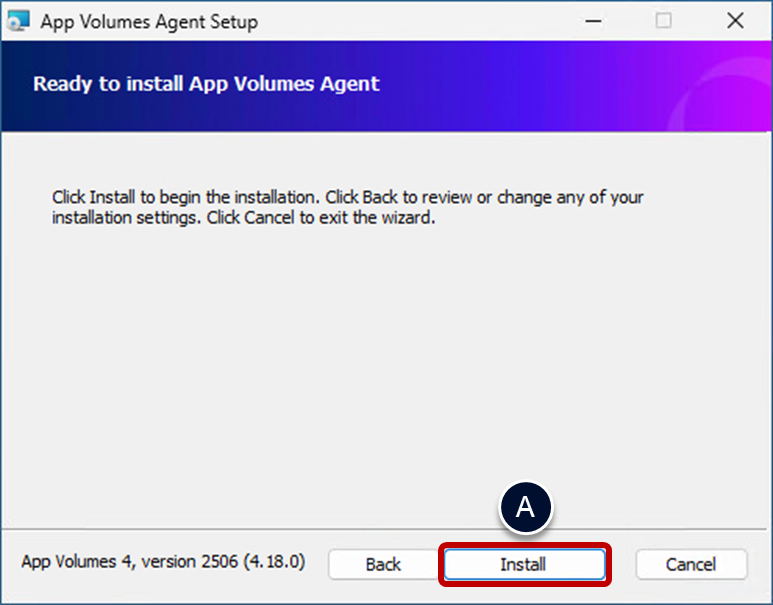
- Begin installation.
- Click Install.
- When the installation completes, exit the setup wizard.
- Click Finish.
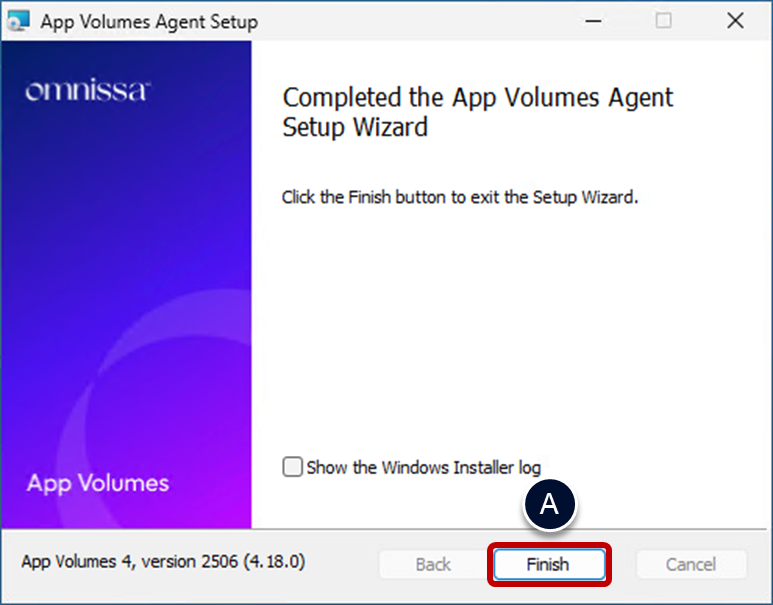
- Do not restart Windows.
Install GPU drivers
Installing GPU drivers is an optional task. This is only necessary if your hypervisor hosts have shared graphic cards installed, and you want to enable the virtual machines to use them.
Install NVIDIA vGPU driver and license in the base image
If your hypervisor hosts have NVIDIA GPUs installed, and you want to enable the virtual machines to use them, you need to install the NVIDIA vGPU drivers into Windows.
For more information on using NVIDIA vGPU, see:
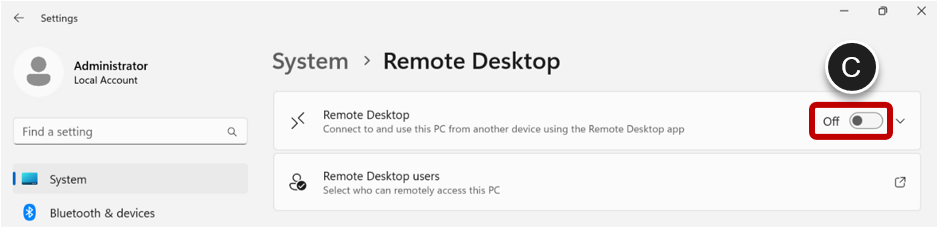
Enable Windows Remote Desktop
As soon as a GPU is active within the virtual machine, the hypervisor console will no longer work, so before you install the driver, you need to enable Windows remote desktop and add a password.
- Enable remote desktop.
- Open Windows Settings.
- Go to System and then to Remote Desktop.
- Enable Remote Desktop.
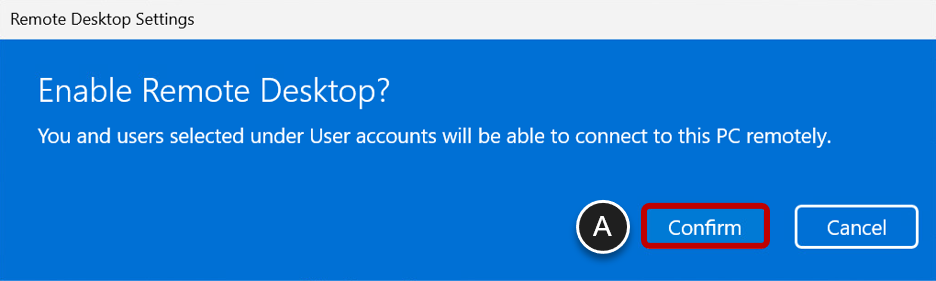
- Confirm the Remote Desktop Settings.
- Click on Confirm.
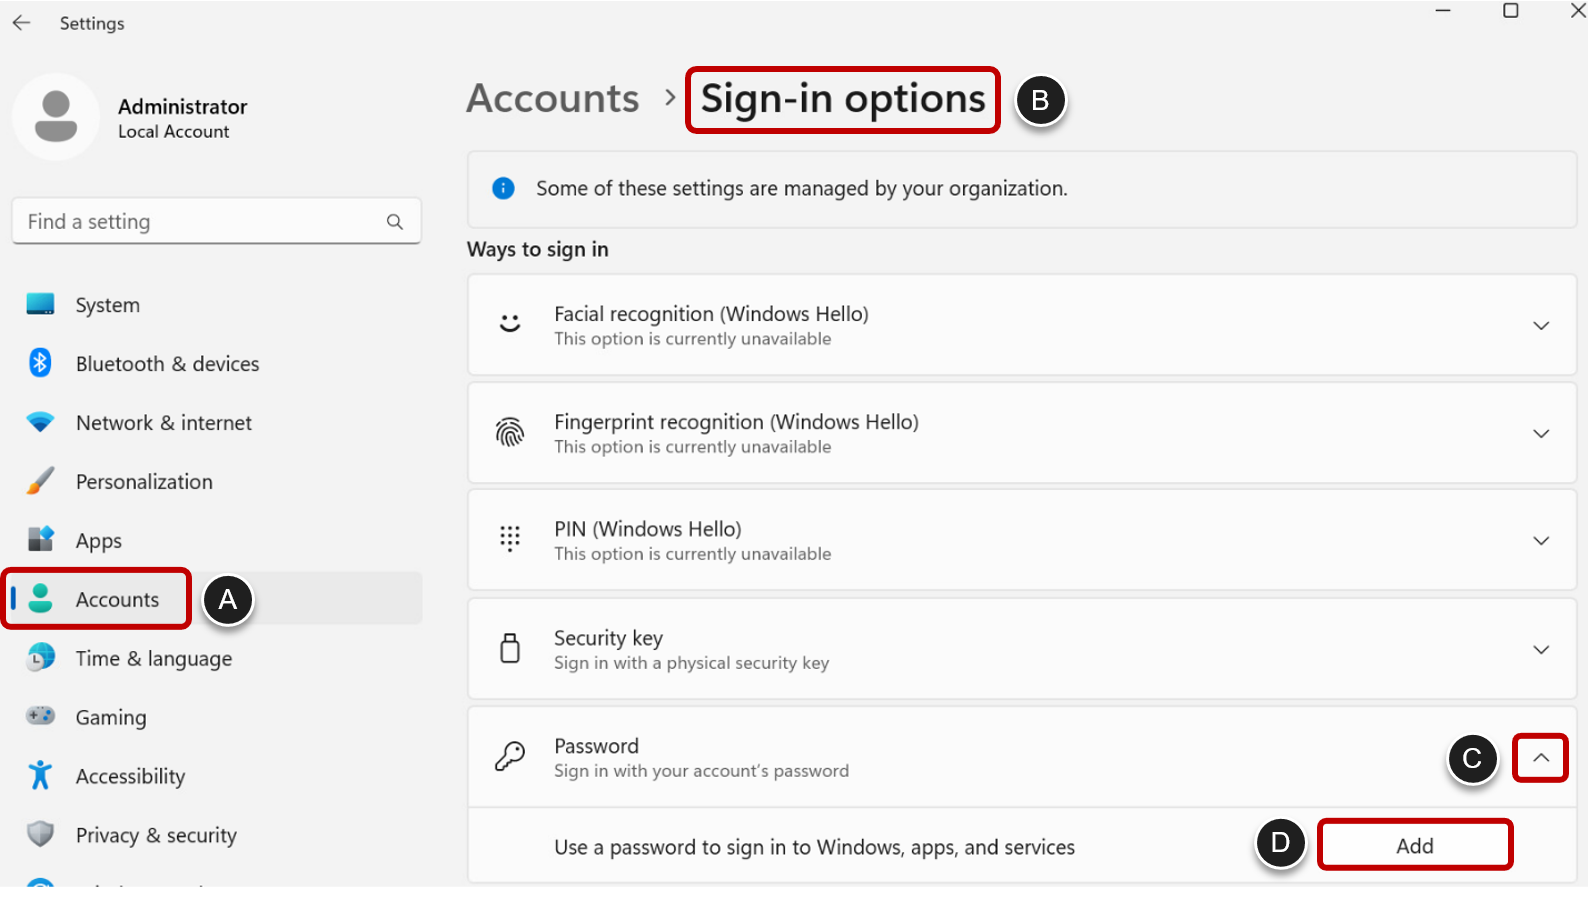
- Go to Sign-in options and add a password.
- Click on Accounts.
- Click on Sign-in options.
- Expand Password.
- Click on Add.
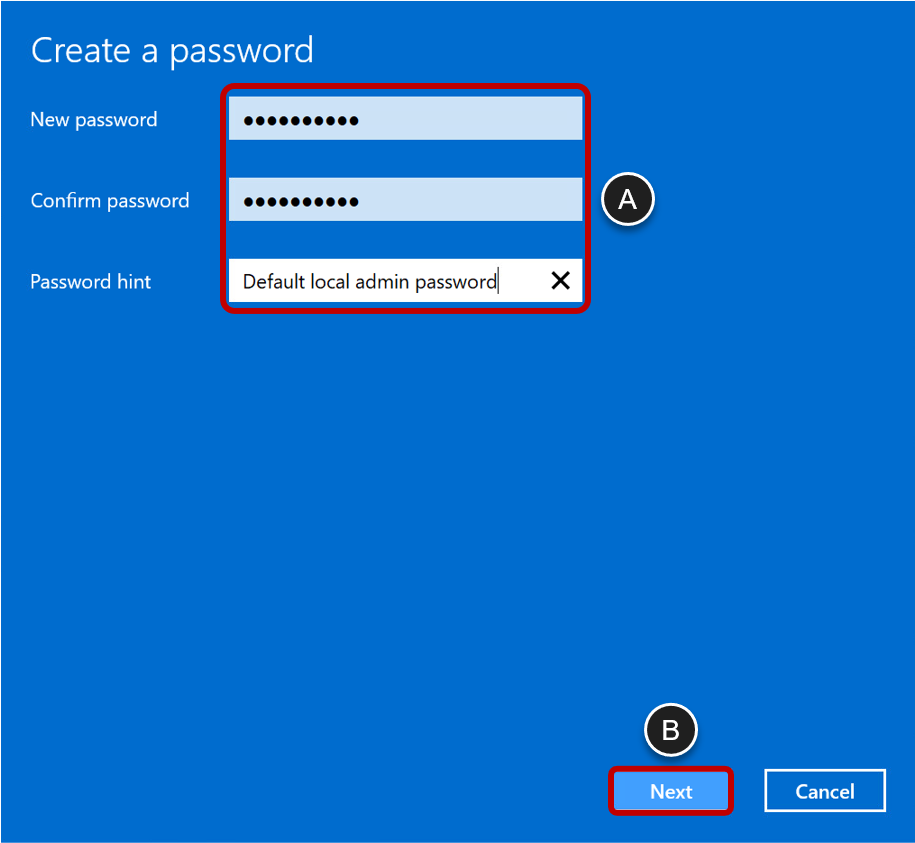
- Provide a password.
- Provide a new password, confirm it and provide a hint.
- Click Next.
- Finish the wizard.
- Click on Finish.
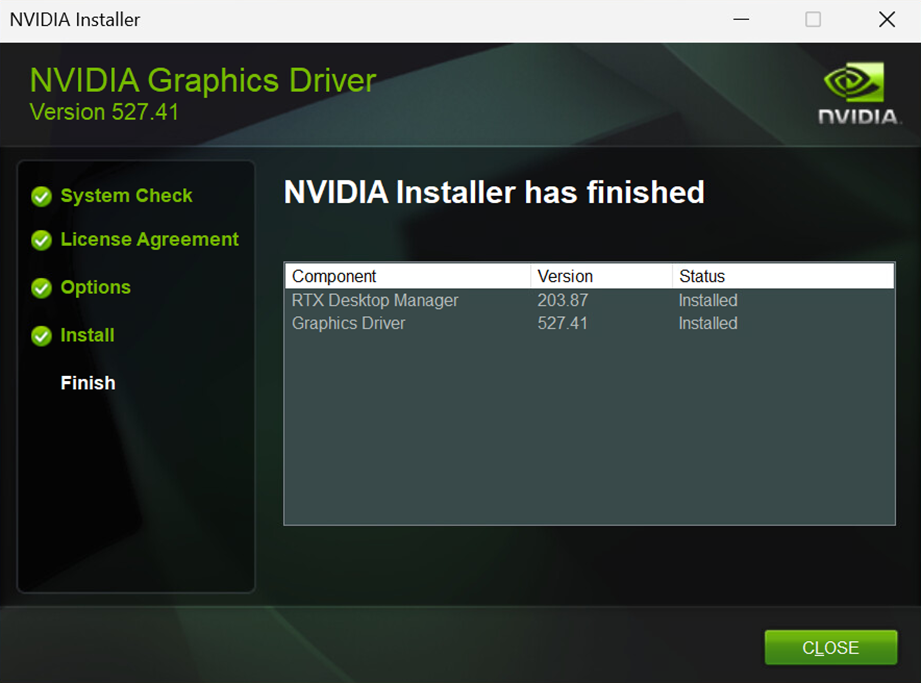
Install NVIDIA drivers
- Connect to the machine with RDP.
- Start the NVIDIA guest driver installation package that came with the hypervisor driver you installed on the hypervisor hosts.
- Click on OK.
- Click on AGREE AND CONTINUE on the NVIDIA license agreement.
- Click on NEXT to perform an Express installation.
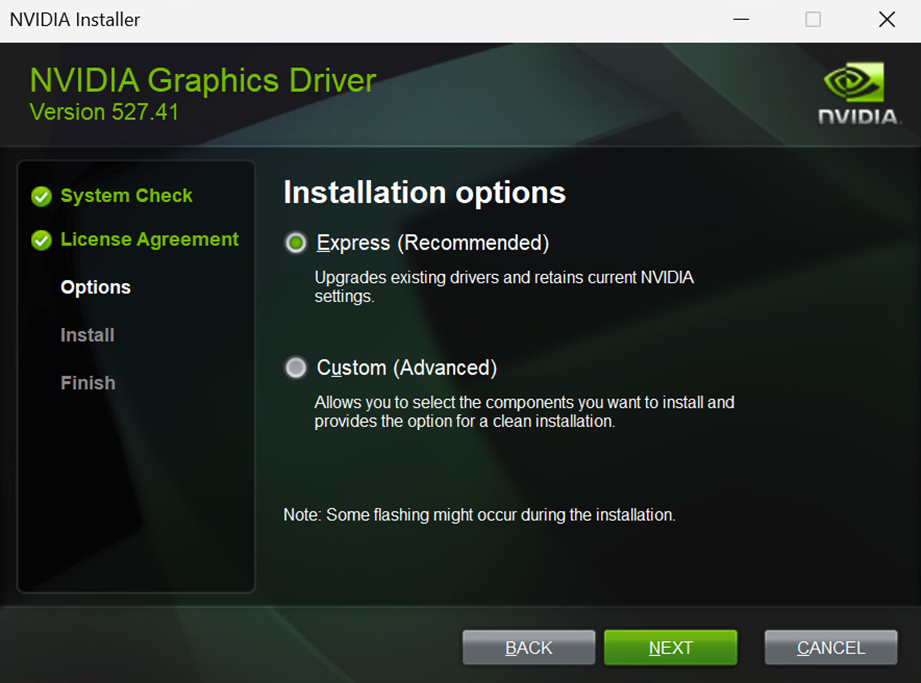
- When the installation finishes, click on CLOSE.
- Copy the client configuration token (license) file.
- Copy the .tok file from the license portal
- Into C:\Program Files\NVIDIA Corporation\vGPU Licensing\ClientConfigToken
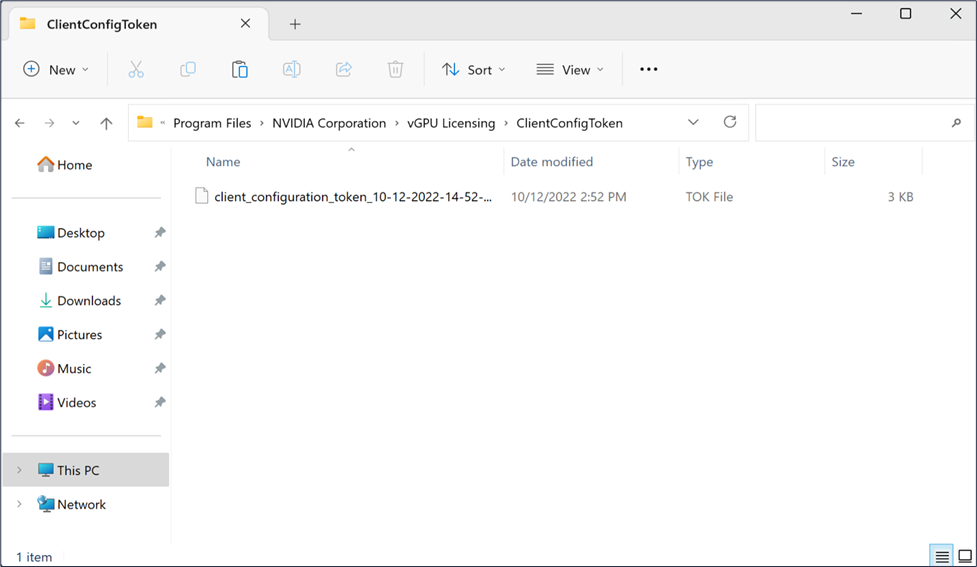
Alternatively, you can store the client configuration token in a custom location, such as a network file share.
- Change the registry string ClientConfigTokenPath (optional)
- This is located in HKEY_LOCAL_MACHINE\SYSTEM\CurrentControlSet\Services\nvlddmkm\Global\GridLicensing
- Change the value to the full path to the folder in which you want to store the client configuration token for the client.
- For more information, see Configuring a Licensed Client on Windows with Custom Settings in the NVIDIA documentation.
- Additionally, see the third-party blog Network placement of NVIDIA vGPU Licensing Client Configuration Token.
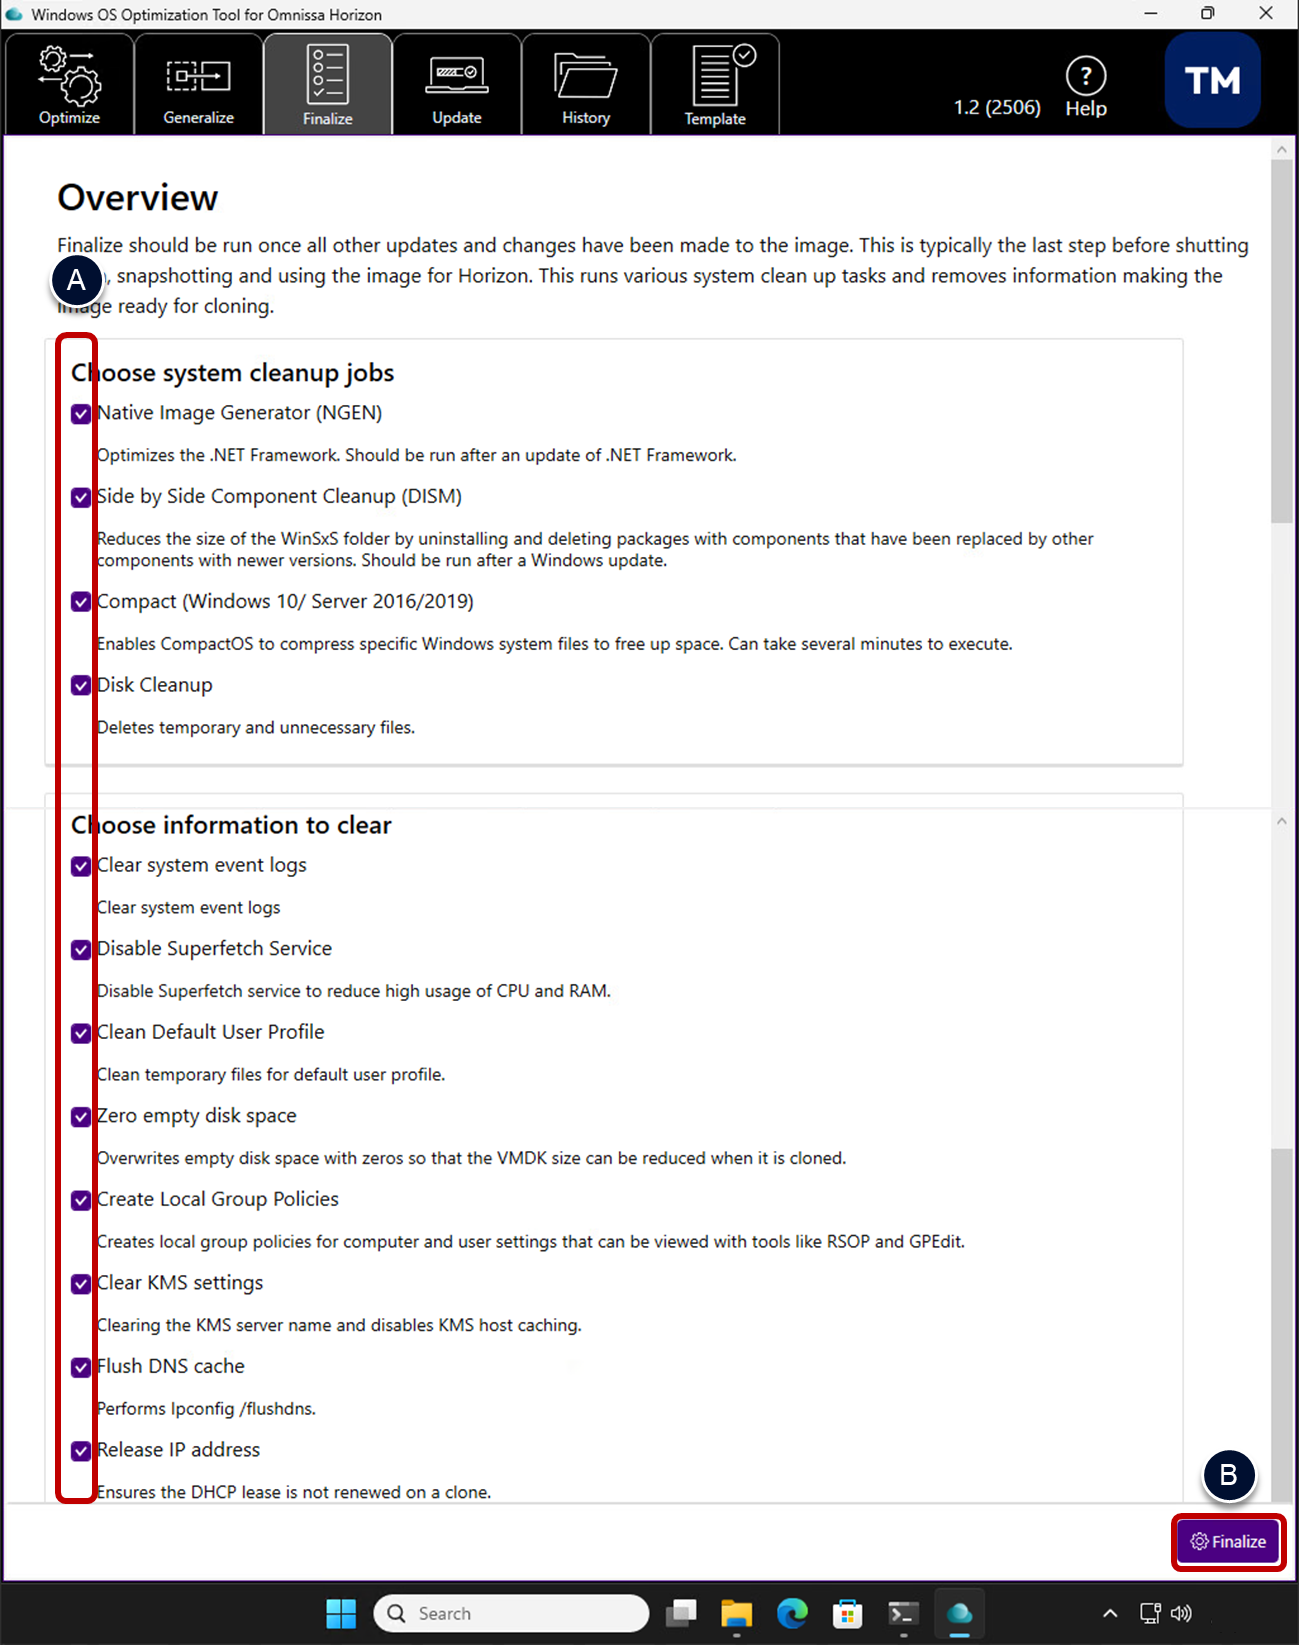
Finalize Windows using the Windows OS Optimization Tool for Horizon
Before you shut down Windows to use it in a Horizon pool or farm, it is best practice to run certain system cleanup jobs and clear information from certain fields. You can use the Finalize tab of OSOT to perform the following tasks.
System cleanup jobs:
- Native Image Generator (
Ngen.exe) – Improves the performance of managed applications. - NTFS Compression (
compact.exe) – Saves space on the Windows image by running the operating system and other system files from compressed files. This strategy reduces the number of IOPS required for storage with cache and has a negligible impact on the CPU. - Deployment Image Servicing Management (
DISM.exe) – Cleans unused files from the Side-by-Side component store. - Local Group Policy Object Utility (
LGPO.exe) – Manages local group policy. - Secure Delete (
sdelete64.exe) – Provides the ability to overwrite empty space with zeros.
Clear information:
- Clear KMS settings.
- Release the IP address.
- Delete unnecessary files.
- Zero empty disk space.
Note: The jobs you select for finalization may vary when performing this on initial image creation versus Day-2 updates maintenance of an existing image. On subsequent Day-2 updates, you may consider deselecting options such as Zero empty disk space and Create Local Group Policies.
| | If you are using Horizon Cloud, you can skip this procedure. |
Prerequisites for running Finalize in OSOT
- Download third-party tools.
- Local Group Policy Object Utility can be downloaded as a zip file, as part of the Microsoft Security Compliance Toolkit.
- Secure Delete can be downloaded by clicking https://download.sysinternals.com/files/SDelete.zip.
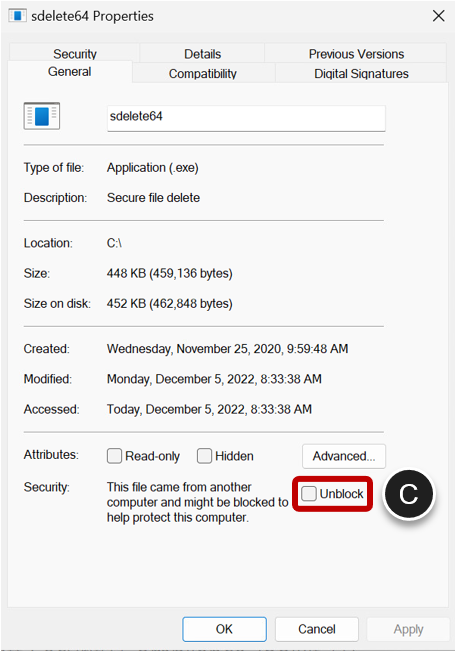
- Make sure tools aren’t blocked and copy the tools to the OSOT folder.
- After downloading and extracting the executables, right-click each file (sdelete64.exe and lgpo.exe).
- Select Properties, and in the Properties dialog box,
- If available, select Unblock and click OK.
- Then move the executables to the same folder as OSOT and launch the Windows OS Optimization Tool for Horizon.
Run Finalize
- Run the Windows OS Optimization Tool for Horizon (OSOT executable).
- Select the Finalize tab.
- Run the Finalize task.
- Deselect any cleanups job you do not want to run as part of the finalize task.
- It is recommended that all steps and jobs are selected to be run on initial image creation.
- Some jobs can take a considerable amount of time to process (e.g. Compact).
- Click Finalize.
- Deselect any cleanups job you do not want to run as part of the finalize task.
- When all steps are completed.
- Click OK.
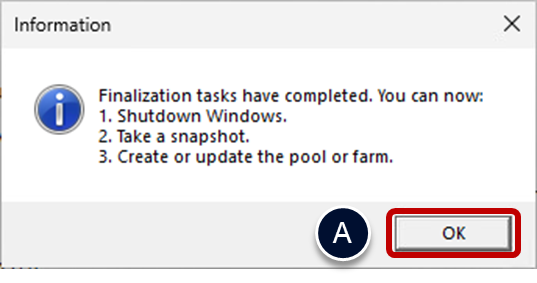
- Shut down Windows.
Prepare the image for deployment
With a built golden image virtual machine, you can now prepare it for use in deploying Horizon pools and farms.
Optimizing the VM hardware
If virtual hardware is no longer required it can be removed from the virtual machine, to reduce resource consumption. Depending on the hypervisor platform, this could include the following devices that are no longer needed and would consume additional resources on each clone:
- CD-ROM/DVD drives
- USB controller
- SATA controller
Additionally, you should remove the Trusted Platform Module (TPM) device from the Windows 11 golden image. Removing a TPM device on a golden image is needed to be able to export or clone the VM. Do not remove TPM devices from production machines when software is storing keys in the TPM device.
The Horizon pool provisioning process adds new and individual virtual TPM devices to each clone.
For guidance on optimizing the VM hardware on a specific hypervisor or capacity, see:
- For a vSphere-based VM, see Optimize the VM hardware on vSphere.
- For a Nutanix AHV-based VM, see Optimize the VM hardware on AHV.
Export and import the VM to adjust disk size
With some hypervisor platforms, you can reduce the disk size of the golden image VM, and therefore the initial disk size of the clones, by exporting it and then importing it.
If the Secure Delete tool (sdelete64.exe) was run during the Finalize task, it overwrote empty space with zeros. Using the export and import process you can select the thin-disk option and shrink the size of the VM.
For guidance on exporting the VM, and reimporting again, with a specific hypervisor or capacity, see:
- For a vSphere-based VM, see Export and import the vSphere VM to adjust disk size.
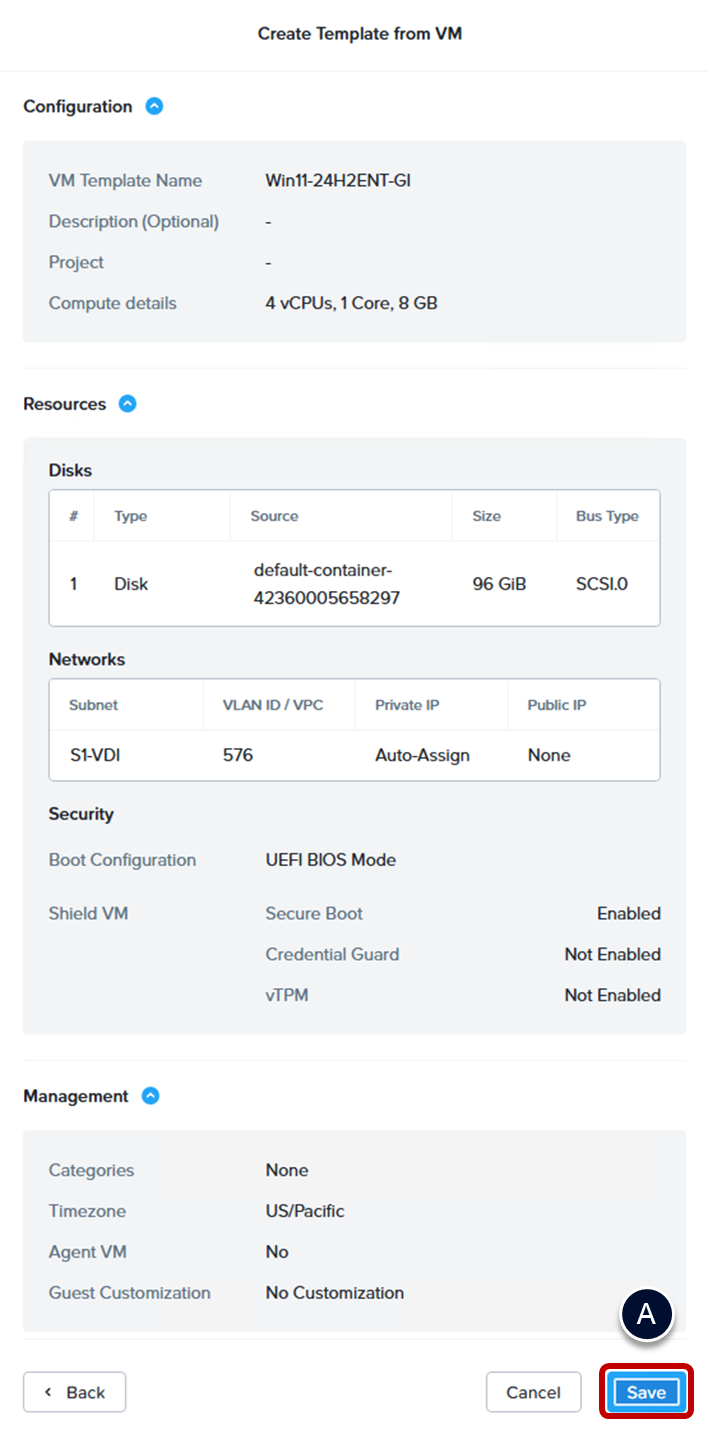
Take a VM snapshot or create a VM template
To use the golden image to create clones for either a desktop pool or an RDSH farm, you need to create a frozen state, from which clones can be derived.
- For vSphere-based instant-clone pools and server farms, you achieve this state by taking a VM snapshot of the golden image VM.
- For vSphere full-clone pools, you achieve this state by cloning the golden image VM to a VM template.
- For AHV, you achieve this state by cloning the golden image VM to a VM template.
For guidance on preforming this on a specific hypervisor or capacity, see:
- For a vSphere-based VM, see Take a vSphere VM snapshot.
- For a Nutanix AHV-based VM, see Create an AHV VM template from a VM.
| | If you are using Horizon Cloud, you can skip this procedure. |
Although it is possible to take a snapshot of a VM that is powered on, for the purposes of creating a base image for a Horizon desktop pool or server farm, the VM must be shut down and powered off.
Your golden image (VM or VM template) is now ready to use to deploy desktop pools or RDSH farms.
Group Policies
Much of the initial configuration and ongoing management of virtual desktops, RDSH server farms, feature enablement, and end user experience is performed by creating and applying group policies in Active Directory. Some standard Microsoft Group Policy Object settings are required to configure virtual desktops and applications.
If you use Horizon, you can also use the provided GPO administrative templates for fine-grained control of access to features. See Using Group Policy Administrative Template Files.
Organizational Units for VMs
You should create an organizational unit (OU) specifically for your virtual desktops and an OU for your RDSH server VMs. An OU is a subdivision in Active Directory that contains users, groups, computers, or other OUs.
To prevent group policy settings from being applied to other Windows servers or workstations in the same domain as your desktops or server farms, you can create a GPO for group policies and link it to the OU that contains your VMs.
You can also delegate control of the OU to subordinate groups, such as server operators or individual users.
User groups
You should also create groups for different types of users in Active Directory. For example, you can create a group called End Users for your end users and another group called Horizon Administrators for users that will administer virtual desktops and applications.
Later in this guide, you will add a user group containing end users to the local Remote Desktop Users group in AD. Then members of the group will be able to connect to any VM that is joined to the domain.
Set other common Group Policies
For both virtual desktops and RDSH servers, create a GPO for the OU in Active Directory, and use the Group Policy Management Editor to apply the following GPO settings.
| Setting | Value |
| Computer Configuration > Policies > Administrative Templates > Windows Components > Windows Update | |
| Configure Automatic Updates | Disabled |
| Computer Configuration > Policies > Administrative Templates > System > Group Policy | |
| Configure user Group Policy loopback processing mode | Enabled |
| Computer Configuration > Policies > Administrative Templates > System > Logon | |
| Always wait for the network at computer startup and logon | Enabled |
Set policies for RDSH servers
If you plan to use the image for creating RDSH servers, create a GPO for the RDSH server OU in Active Directory, and use the Group Policy Management Editor to apply the following GPO settings.
| Setting | Value |
| Computer Configuration > Policies > Administrative Templates > Windows Components > Remote Desktop Services > Remote Desktop Session Host > Licensing | |
| Use the specified Remote Desktop license server | Enabled |
| Set the Remote Desktop license mode | Enabled |
| Computer Configuration > Policies > Administrative Templates > System > User Profiles | |
| Delete cached copies of roaming profiles | Enabled |
If you use Horizon 8, review the settings listed in the RDSH Server OU-Level Settings section of the Horizon Configuration chapter of the Workspace ONE and Horizon Reference Architecture.
Add users to the local remote desktop users’ group
To connect to a remote desktop or RDSH server, users must belong to the local Remote Desktop Users group of the virtual desktop or RDSH server. You can use the Restricted Groups policy in Active Directory to add users or groups to the Remote Desktop Users group.
The members of the Remote Desktop Users group are always added to the local Remote Desktop Users group of every virtual desktop or RDSH server that is joined to your domain. When adding new users, you need only add them to the Remote Desktop Users group.
Note: Before you can perform the procedure in this article, you must have created one or more user groups in Active Directory that contain the end users who will connect to virtual desktops and RDSH servers.
- Open the Group Policy Management Editor
- Add a group.
- Expand Computer Configuration > Policies > Windows Settings > Security Settings.
- Right-click Restricted Groups.
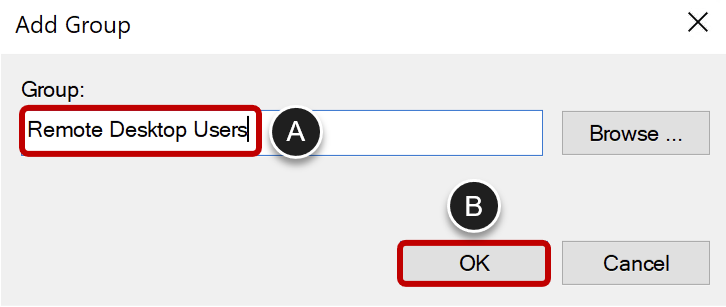
- Select Add Group.
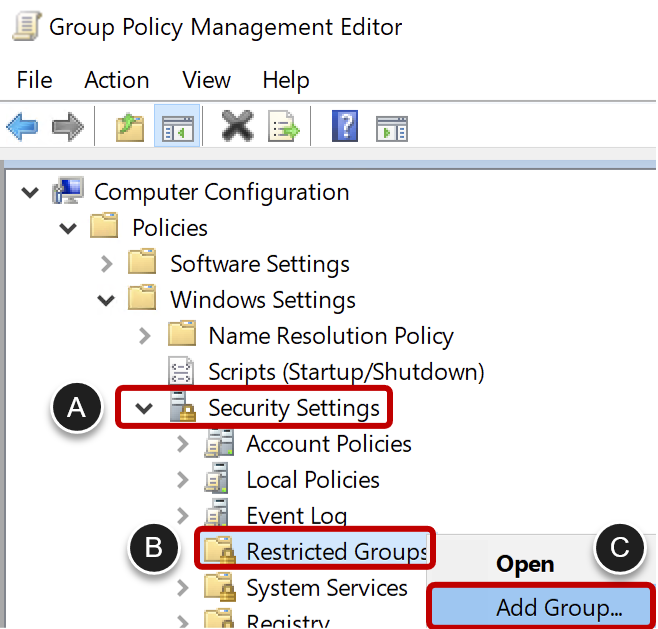
- Add the Remote Desktop Users Group.
- In the Add Group dialog box, enter Remote Desktop Users.
- Click OK.
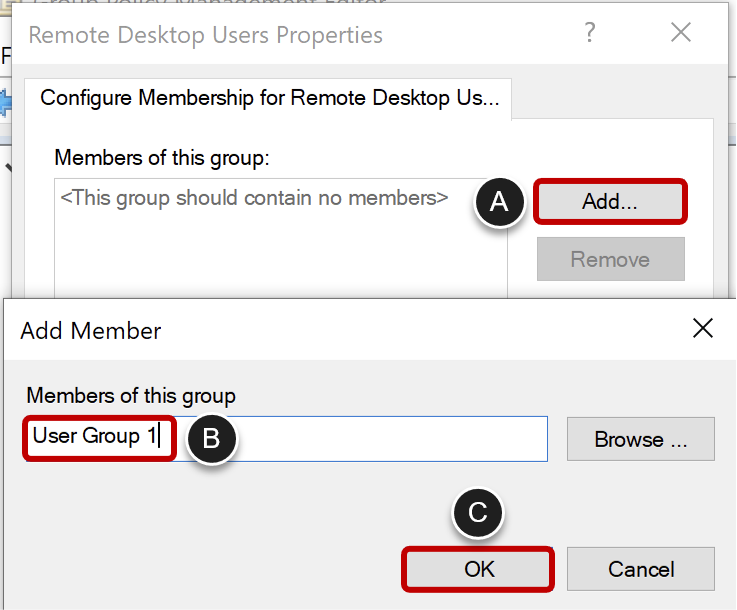
- Add User Groups to the Remote Desktop Users Group.
- Click on Add... under Members of this group.
- Add a group of end users.
- Click OK in the Add Member dialog box.
- Click OK in the Remote Desktop Users Properties dialog box.
Deactivate the local administrator user account
When you built the golden image, the local Administrator account was left enabled. Depending on the options chosen during Generalize, it may also have a blank password.
Use a GPO to deactivate the local administrator account.
- In the Group Policy Management Editor.
- Edit the GPO.
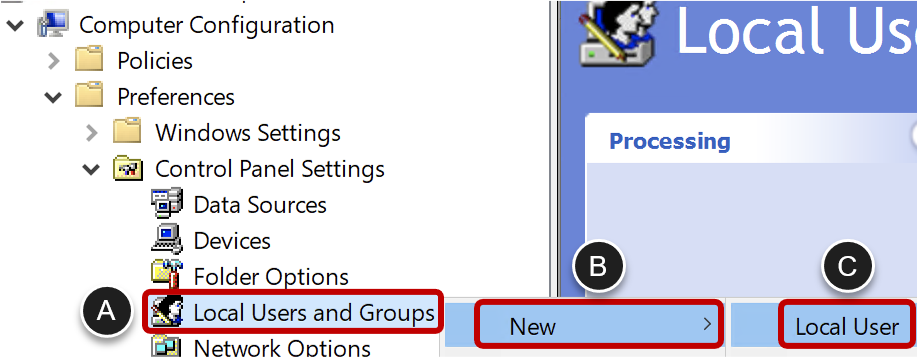
- Navigate to Local Users and Groups.
- Navigate to Computer Configuration > Preferences > Control Panel Settings > Local Users and Groups.
- Click New.
- Click Local User.
- Change Properties for the Local Administrator Account.
- Select Administrator (built-in).
- De-select User must change password at next logon.
- Select Account is disabled.
- Click OK.

If you use Horizon, you can also use GPO administrative templates for fine-grained control of access to features. See Using Group Policy Administrative Template Files.
Day-2 updates
It may be necessary to update the golden image with changes such as new Omnissa Horizon Agents, hypervisor tools, and Windows updates.
Update hypervisor tools
Use the hypervisor specific guidance to update the tools and drivers that are installed in Windows to support the hypervisor platform.
- For a vSphere-based VM, see Update VMware Tools.
- For a Nutanix AHV-based VM, see Update VirtIO drivers.
Update Windows as part of day-2 operations
Important: Updating Windows in the golden image is not typically recommended. Rather, it is better practice to generate a new image. You should build a new image on every Windows feature release and not upgrade the gold image.
If, however, you want to update Windows in the golden image, you can do so. The default optimization action is to disable Windows Update functionality, but you may have changed this in the common options selection during optimization.
If Windows Update functionality is disabled, you must re-enable it before you can update Windows. After you update Windows, the best practice is to run the OSOT to optimize and finalize again before using the updated VM.
- Re-enable Windows Update functionality.
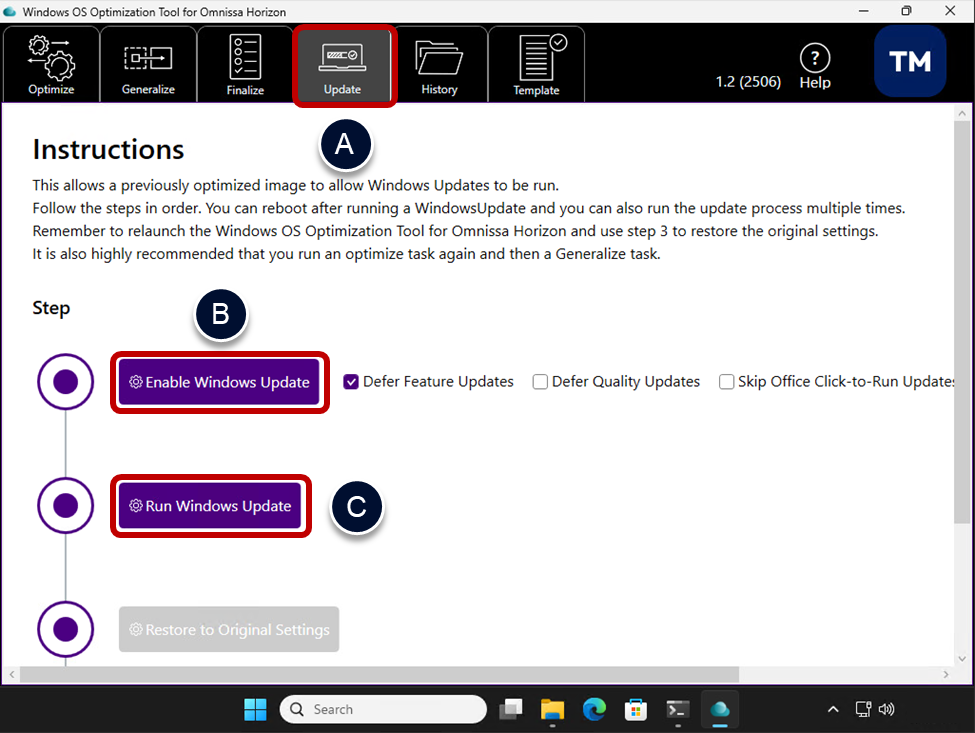
- Run OSOT again and click on the Update tab.
- Click Enable Windows Update. Let the process complete and click OK to close the information message that appears.
- Click Run Windows Update.
- Update Windows
- To update Windows, follow the instructions from Install Windows updates.
- Disable Windows Update functionality using OSOT.
- Click Restore to Original Settings. Let the process complete and click OK to close the information message that appears.
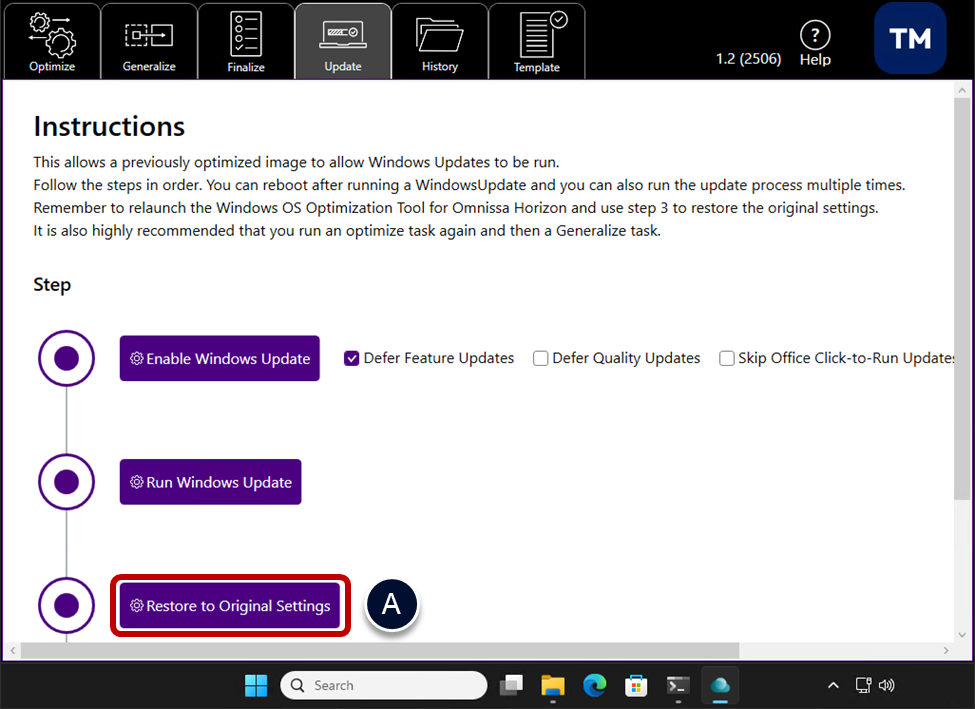
- Use OSOT to Optimize and Finalize again.
- Optimize
- Running Optimize again is recommended as updates may have made changes to Windows that you do not want to be enabled. This could include services, scheduled tasks, etc.
- Follow the instructions from Optimize Windows using the Windows OS Optimization Tool for Horizon.
- Finalize
- Running Finalize again is recommended as updates may have made changes to Windows that need to be processed. This can include things like updates to .NET Framework, which a Finalize task can perform a pre-compile on.
- Follow the instructions from Finalize Windows using the Windows OS Optimization Tool for Horizon.
- Optimize
VMware vSphere specific guidance
This section only contains guidance on performing specific activities on VMware vSphere. For the overall procedure, refer to Overview of the procedure to build a golden image, at the beginning of this guide.
Prerequisites for vSphere
If you are using a vSphere infrastructure, which can reside either on-premises or on one or more cloud platforms, verify that you have the following components installed and configured:
- vCenter Server.
- vSphere ESXi host or hosts configured in the vCenter Server instance.
- vSphere user account – When you log in to vSphere Web Client, the account you use must have the privileges required to create a VM.
Create a vSphere-based VM
For a vSphere-based infrastructure, you use vSphere Web Client to create the golden VM.
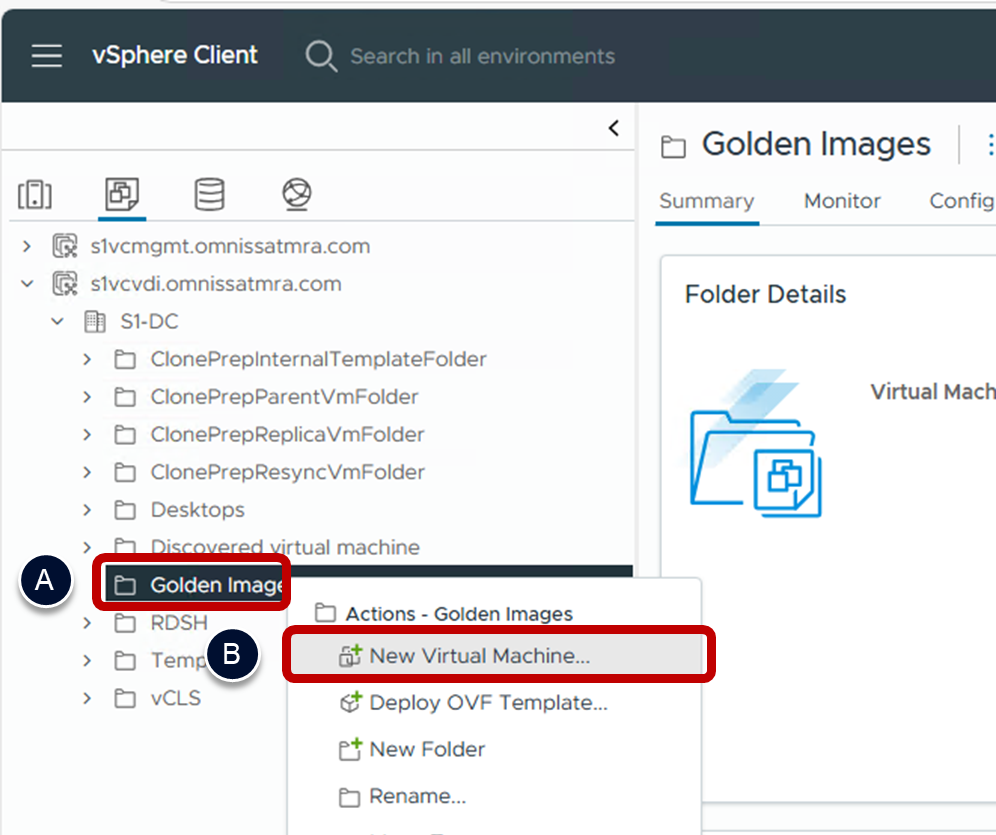
- Start the new virtual machine wizard in the vSphere Web Client.
- In vSphere Web Client, right-click a data center, cluster, host, or VM folder.
- Select New Virtual Machine.
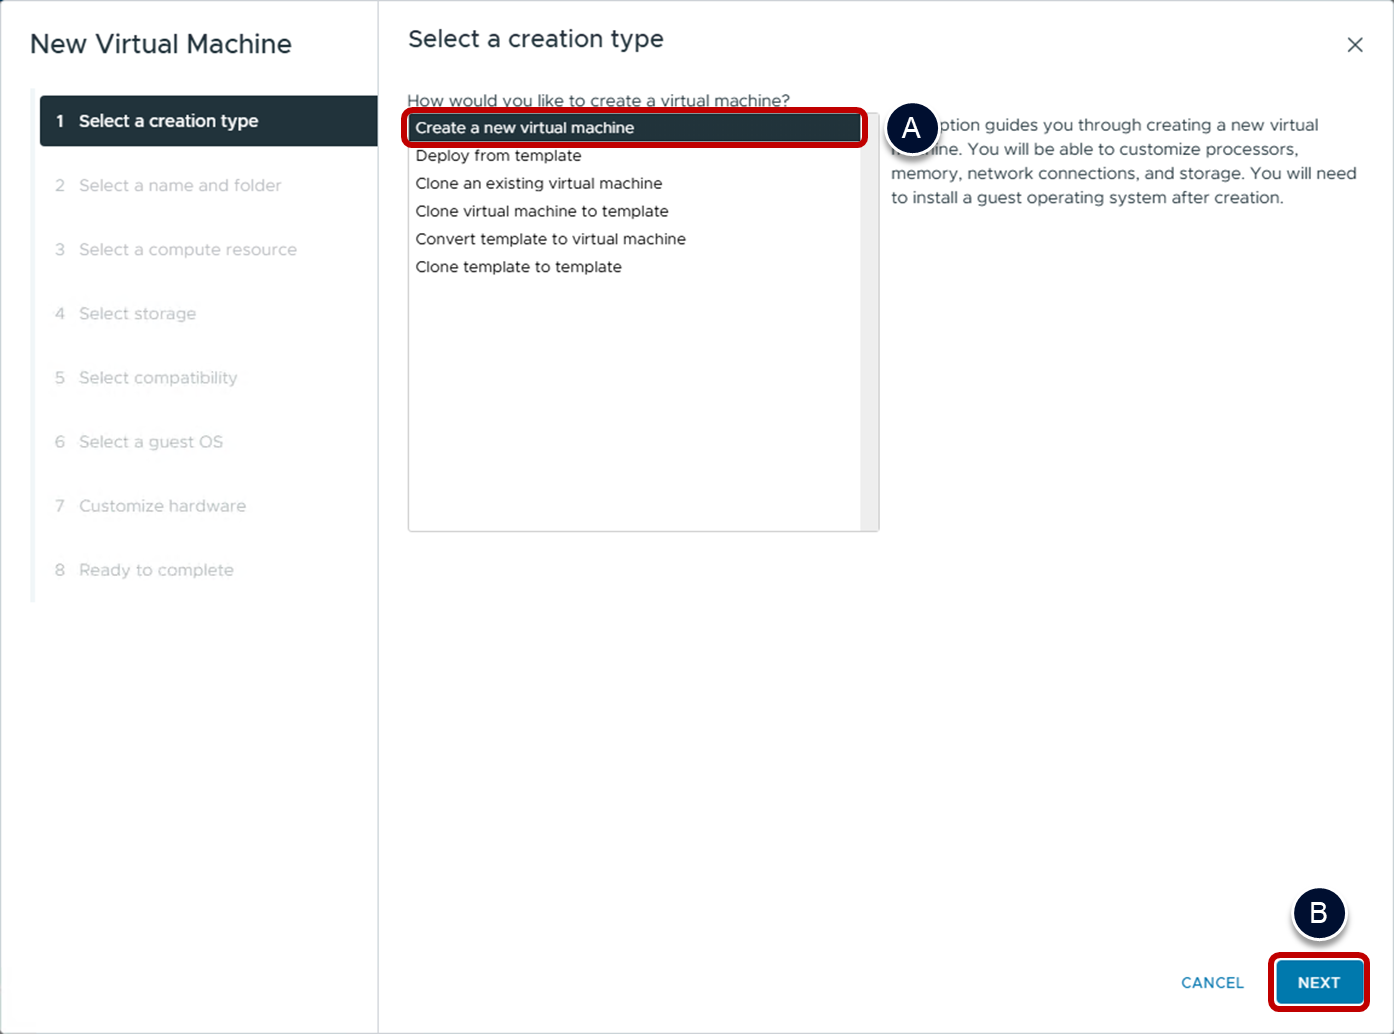
- Select the new virtual machine creation type.
- Select Create a new virtual machine.
- Click NEXT.
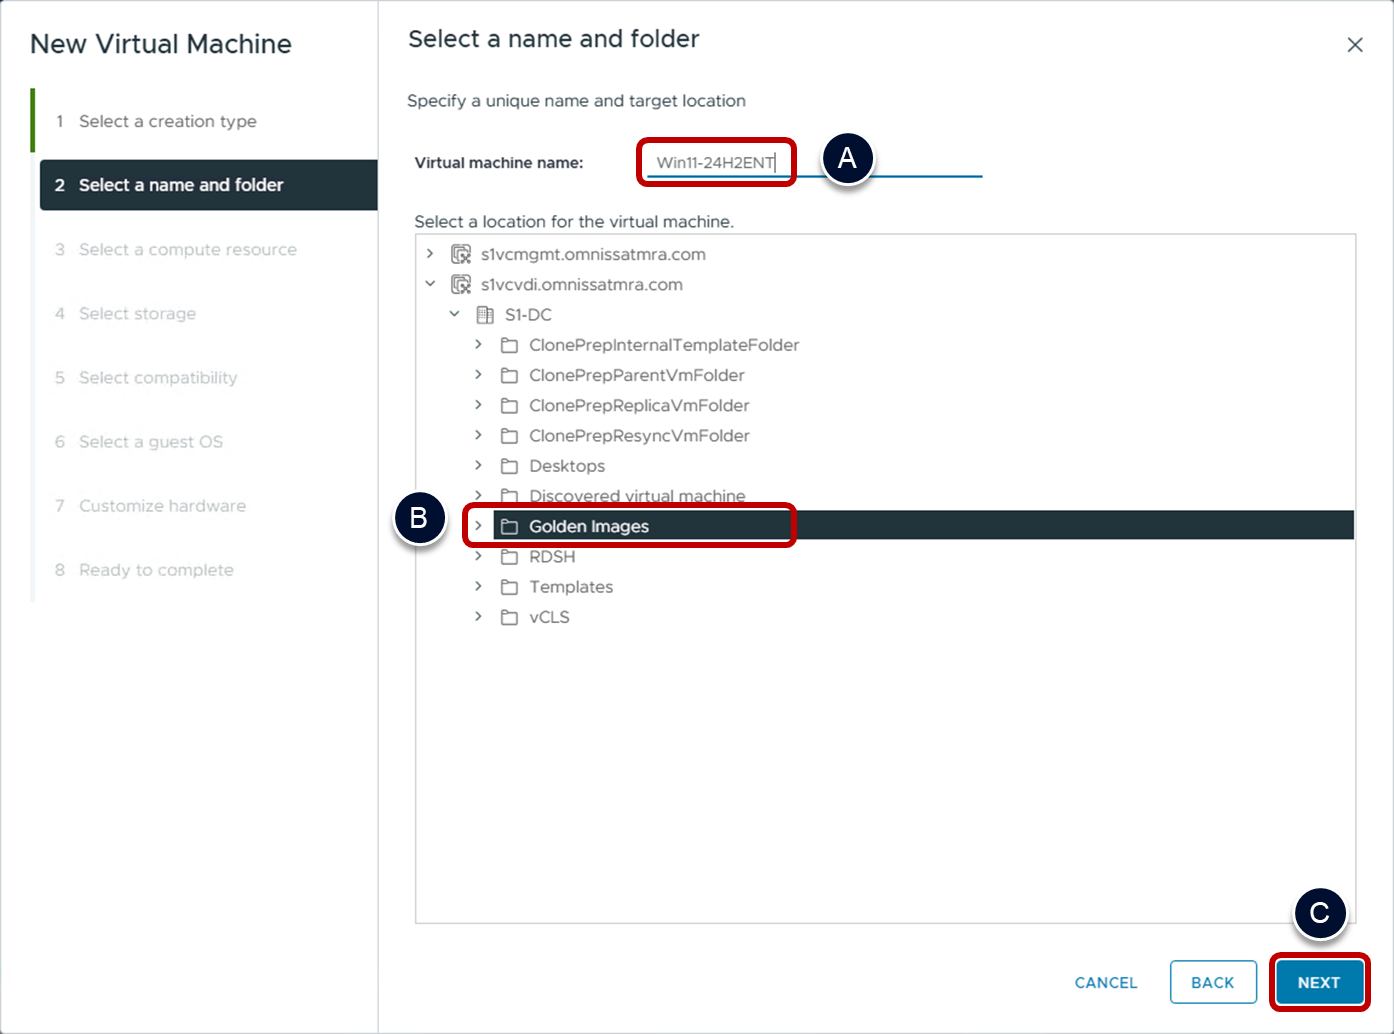
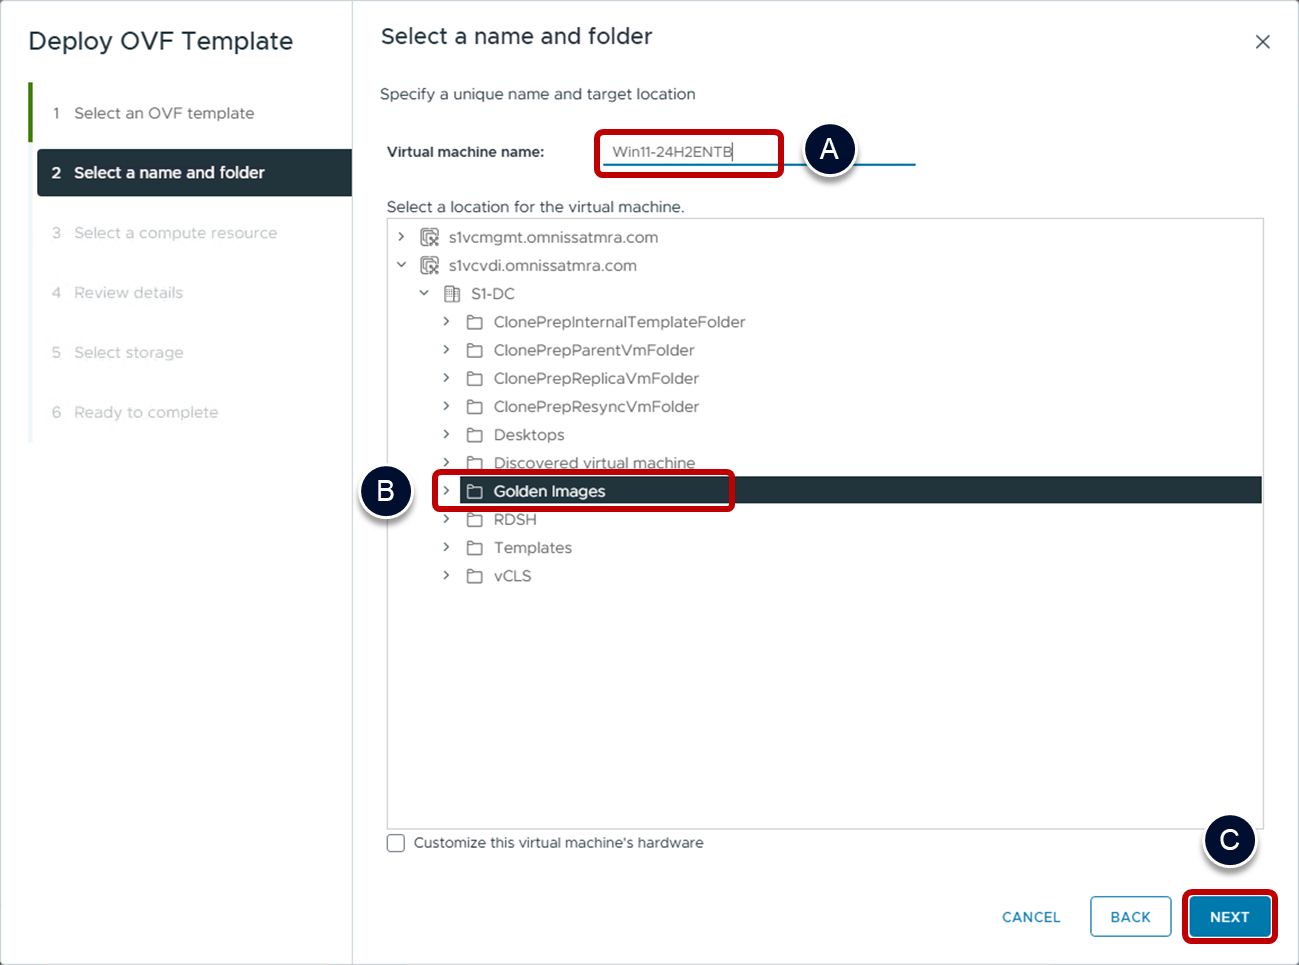
- Select a VM name and folder.
- Provide a name in the Virtual machine name field.
- Select a location.
- Click NEXT.
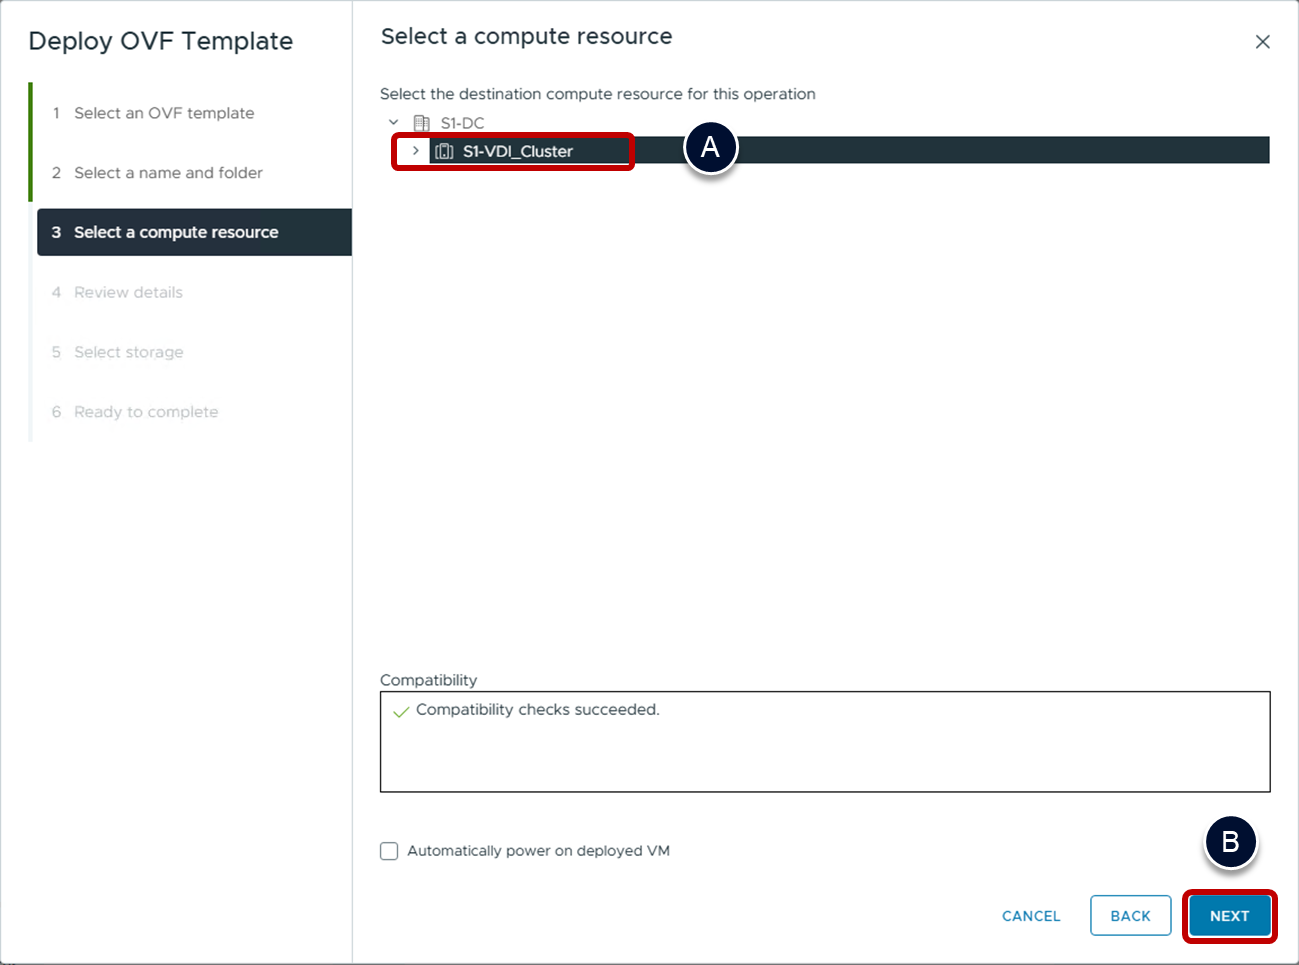
- Select a cluster or host.
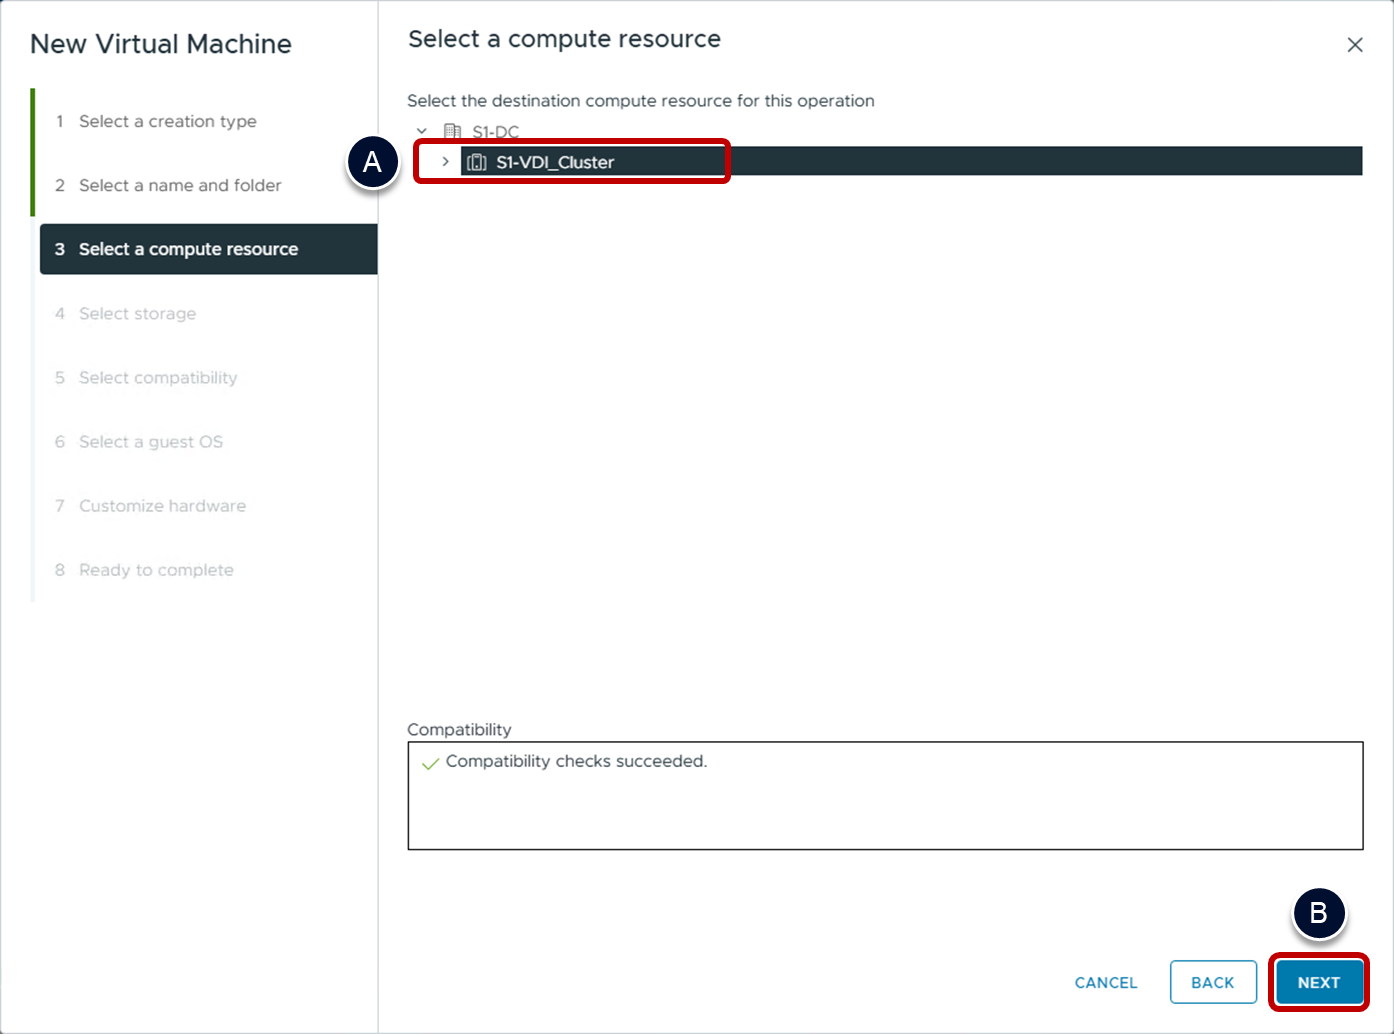
- Select a cluster or host as the compute resource.
- Click NEXT.
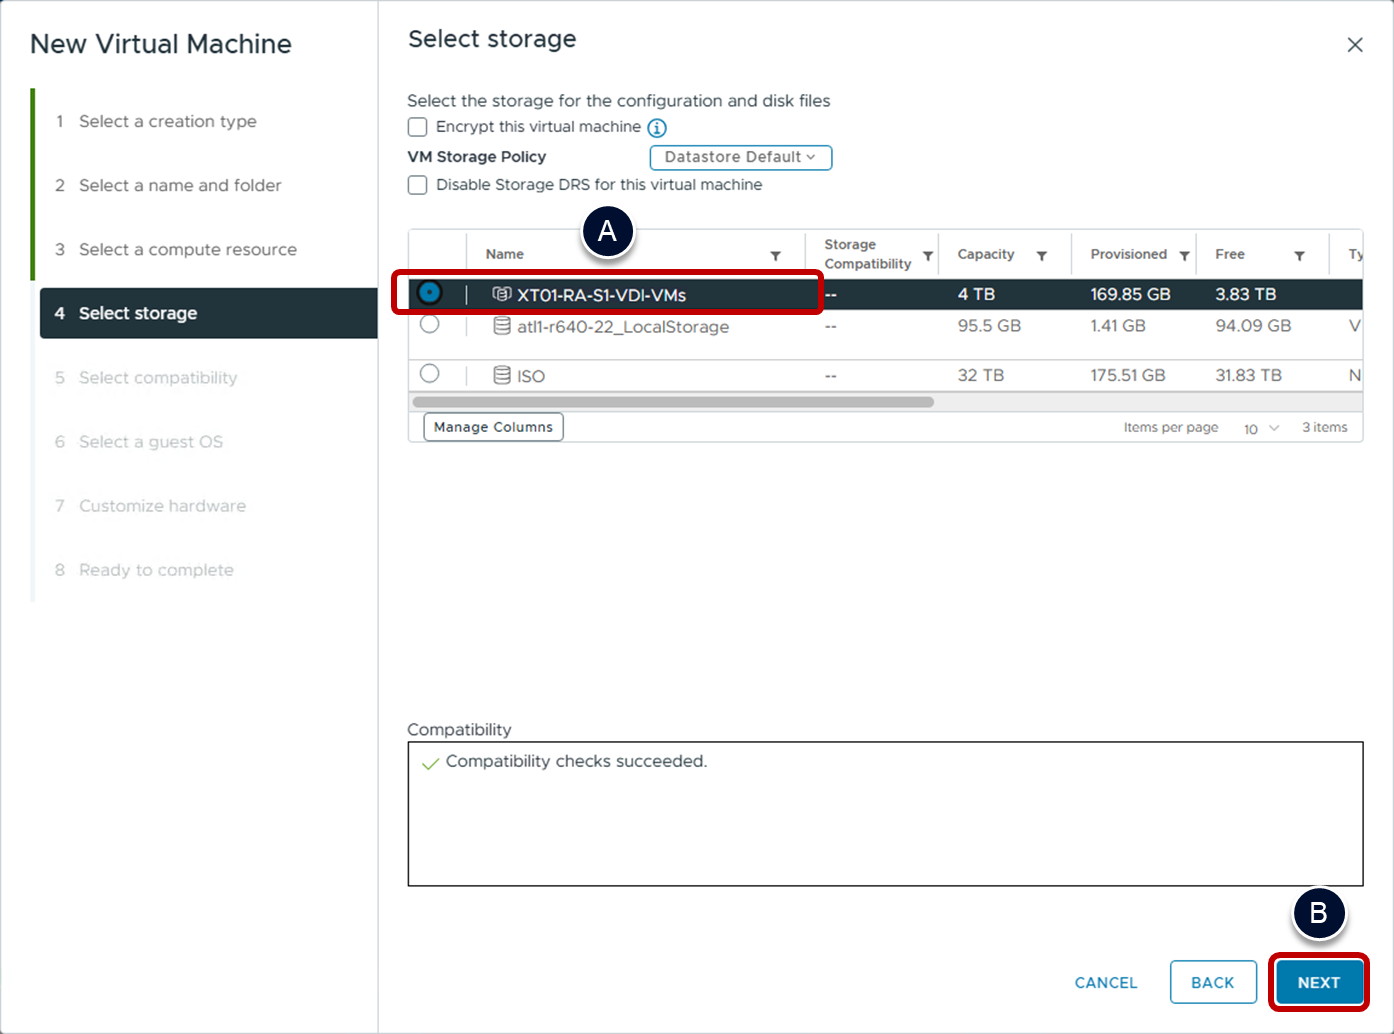
- Select a datastore for the VM.
- Select a datastore or datastore cluster where you would like to store the VM.
- Click NEXT.
- Select the vSphere compatibility level.
- Select the lowest version of ESXi that this VM would be deployed to.
- Click NEXT.

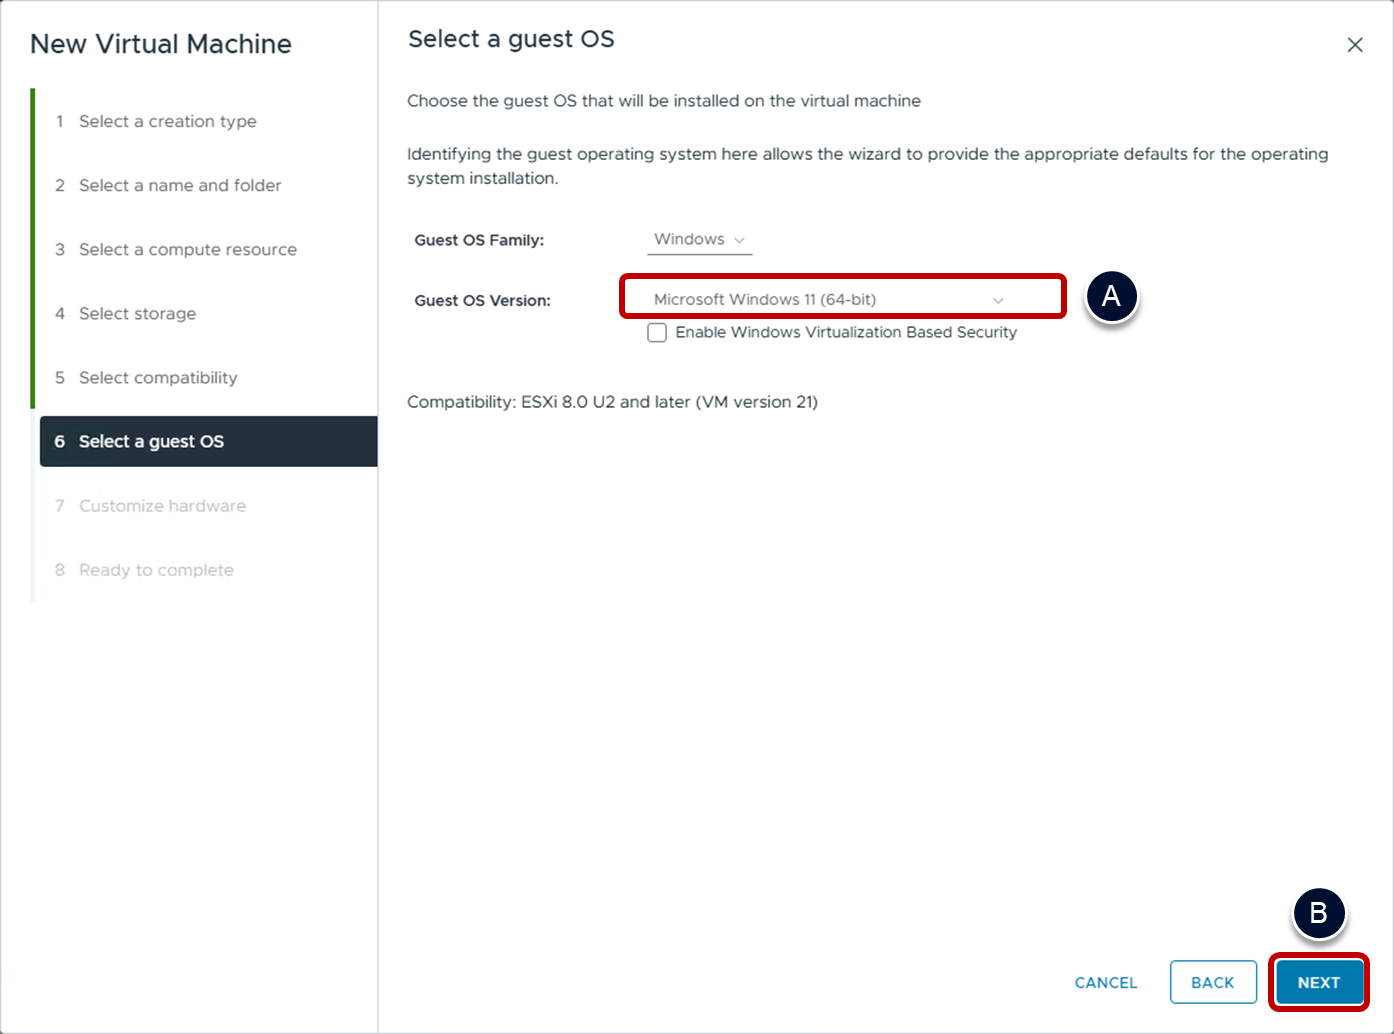
- Select the Windows version and architecture.
- Select the Guest OS Version with the correct architecture (32- or 64-bit).
- Choose Microsoft Windows 10 when deploying Windows 11 to hardware version 19.
- Only enable Windows Virtualization Based Security (VBS) if your environment specifically requires it. (Note that VBS cannot be used together with vGPU or any kind of device passthrough.)
- Click NEXT.
- Select the Guest OS Version with the correct architecture (32- or 64-bit).
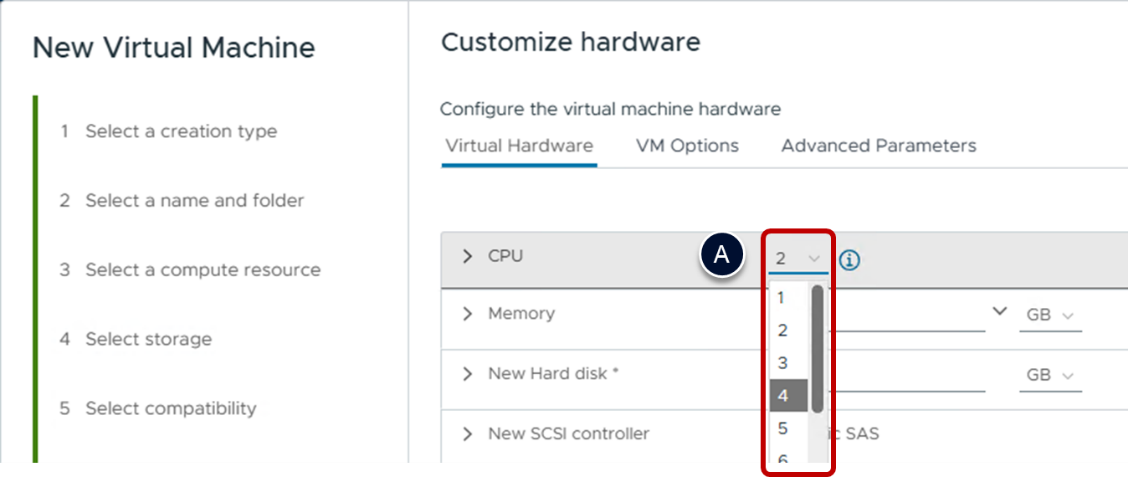
- On the customize hardware page, specify the CPU.
- Use the dropdown menu next to CPU to select the desired amount of vCPU.
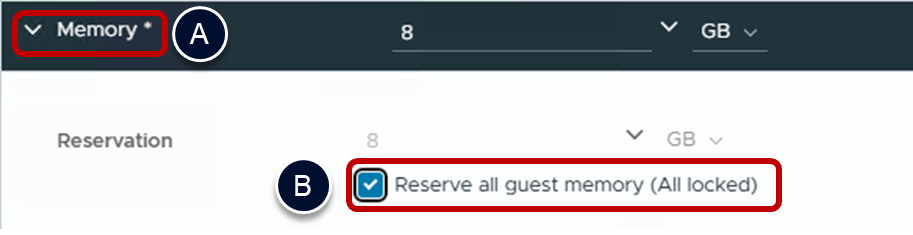
- Specify the memory settings for the VM.
- Expand the Memory section.
- Select Reserve all guest memory (All locked).
- Reserving all the guest memory removes the risk of memory swapping, ballooning, and the associated performance issues.
- This also removes the need for vSphere to create VM swap files for each clone and having to provide datastore space for them on suitably performant storage.
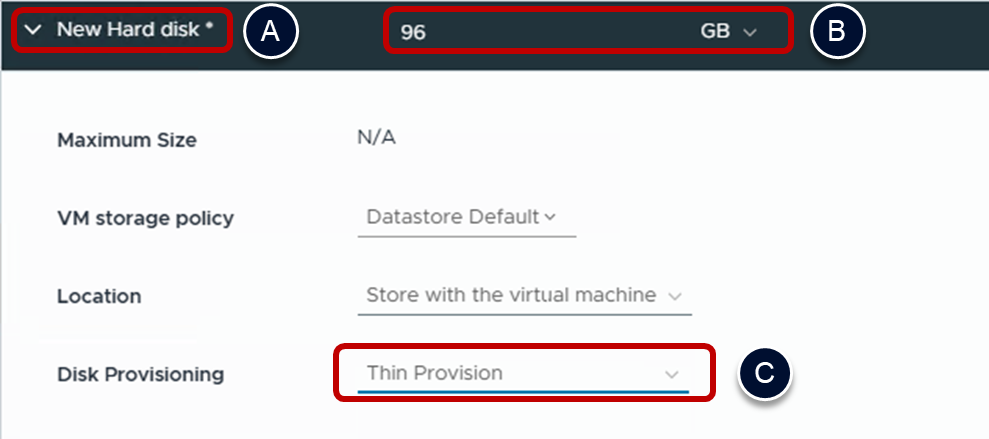
- Specify the hard disk settings for the VM.
- Expand the New Hard disk section.
- Choose an appropriate hard disk size.
- Choose Thin Provision as the Disk Provisioning method.
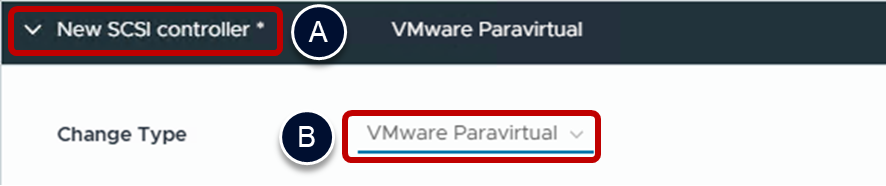
- Specify the SCSI controller.
- Expand the New SCSI controller section.
- Select VMware Paravirtual.
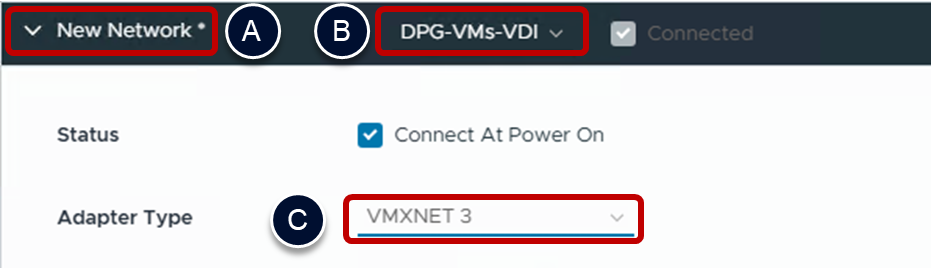
- Specify the network controller and settings.
- Expand New Network.
- From the VM Network list, select the appropriate network.
- Select VMXNET3 as the Adapter Type.
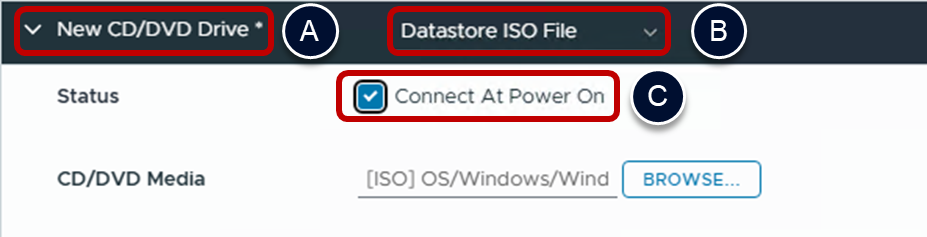
- Specify the CD/DVD drive settings.
- Expand New CD/DVD Drive.
- Select Datastore ISO File and browse to the Windows ISO file.
- Select Connect At Power On.
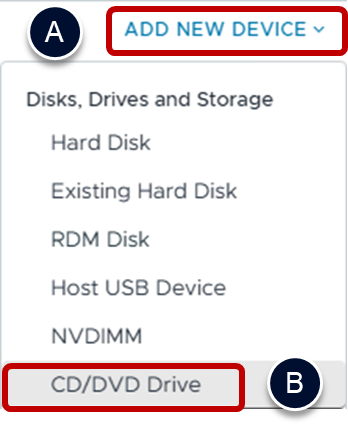
- Add a second CD/DVD drive (optional).
- When installing something older than Windows 11 22H2 or Windows Server 2022, you need to add a second CD/DVD drive to allow you to mount the VMware Tools during Window installation, so you can install the SCSI driver.
- At the top of the page click on ADD NEW DEVICE
- Select CD/DVD Drive.
- Specify video settings.
- Expand the Video card section.
- Select the maximum Number of displays that will be used.
- Use the table below to determine which number to enter in the Total video memory field.
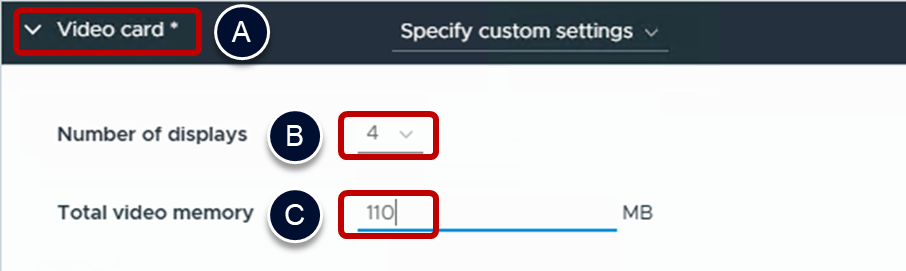
Note: The table that follows describes the small amount of RAM on the ESXi host that is required for video overhead in addition to system memory. This VRAM size requirement depends on the display resolution and number of monitors configured for end users.
| Display Resolution Standard | Width, in Pixels | Height, in Pixels | 1-Monitor Overhead | 2-Monitor Overhead | 3-Monitor Overhead | 4-Monitor Overhead |
| VGA | 640 | 480 | 1.20 MB | 3.20 MB | 4.80 MB | 5.60 MB |
| WXGA | 1280 | 800 | 4.00 MB | 12.50 MB | 18.75 MB | 25.00 MB |
| 1080p | 1920 | 1080 | 8.00 MB | 25.40 MB | 38.00 MB | 50.60 MB |
| WQXGA | 2560 | 1600 | 16.00 MB | 60.00 MB | 84.80 MB | 109.60 MB |
| UHD (4K) | 3840 | 2160 | 32.00 MB | 78.00 MB | 124.00 MB | Not supported |
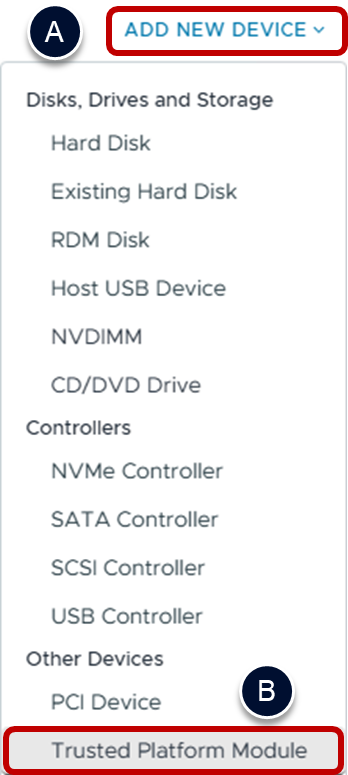
- Add a virtual TPM device for Windows 11 (if not already present).
- When installing Windows 11 with newer VM hardware levels, a Trusted Platform Module (TPM) should already be present under Security Devices. If you are installing Windows 11 and using VM Hardware Level 19 (ESXi 7 U2) or earlier, you will have to add the Trusted Platform Module.
- At the top of the page click on ADD NEW DEVICE.
- Select Trusted Platform Module.
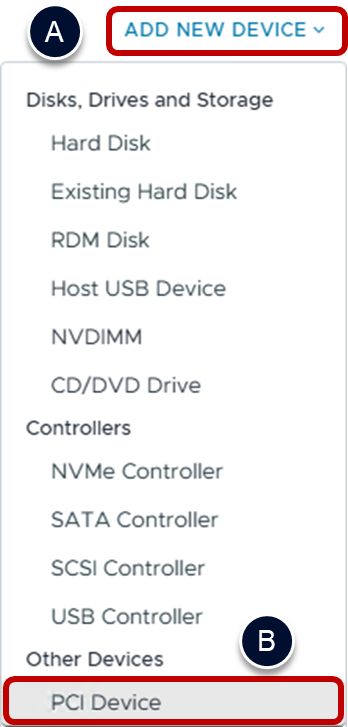
- Add a vGPU device (optional).
- When you want to use vGPU, you need to add a PCI device to the VM.
- At the top of the page click on ADD NEW DEVICE.
- Select PCI Device.
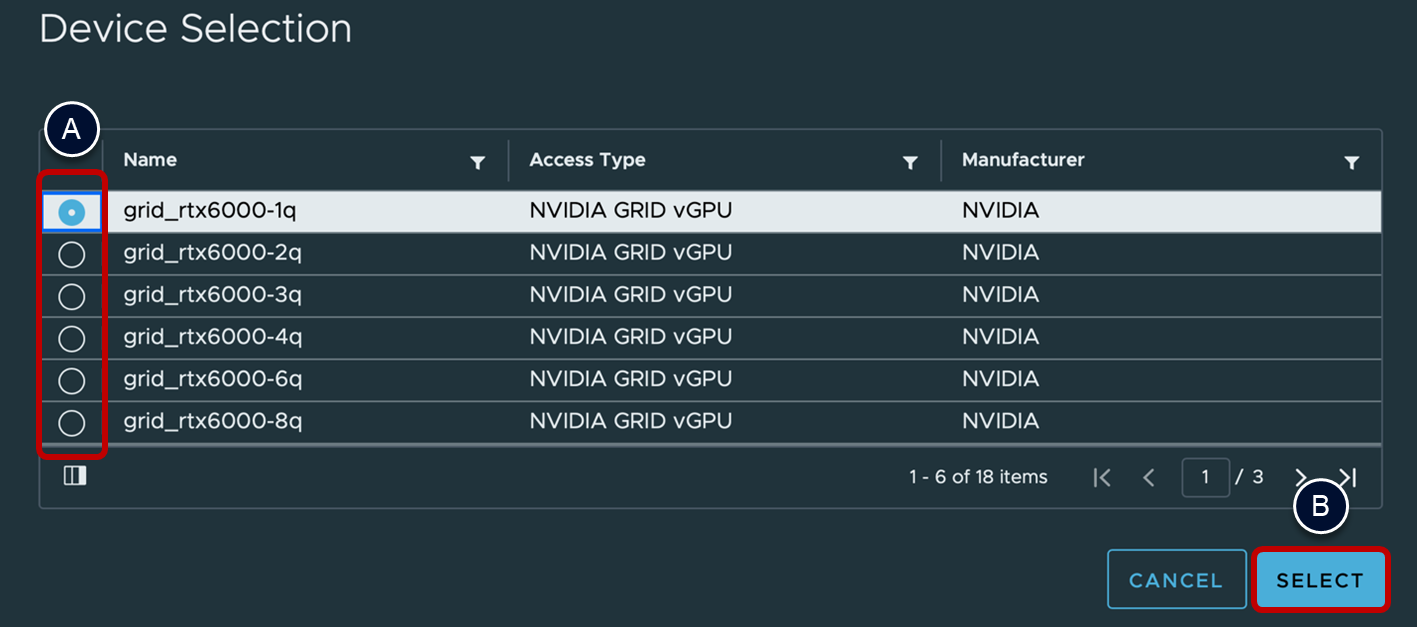
- If you’ve added vGPU
- Select the desired profile.
- Click on SELECT.
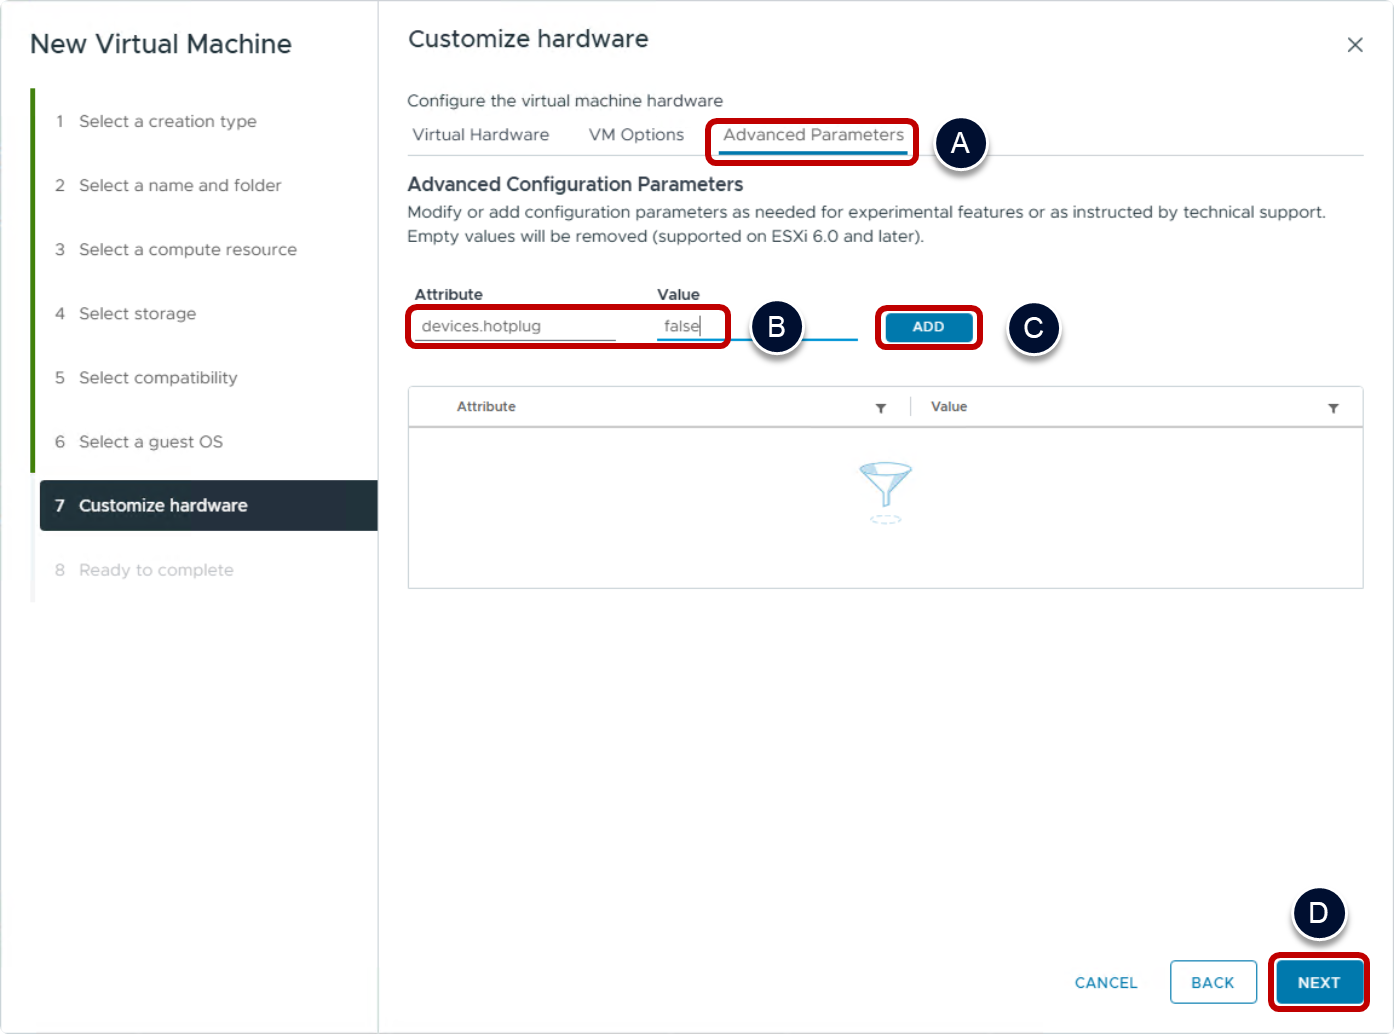
- Add Advanced Parameters.
- At the top of the customize hardware page, select Advanced Parameters.
- Add a new attribute devices.hotplug with a Value of false.
- Click on ADD.
- Click on NEXT.
- Click on FINISH.
Open a remote console to a vSphere VM
- Open a Remote Console for the Virtual Machine (VM).
- Using the vSphere Web Client, from the inventory list, select the newly created Windows VM.
- Launch a console for the VM by clicking either Launch Web Console or Launch Remote Console.
Note: To launch a remote console, you must have downloaded and installed the vSphere Remote Console.
Note: To launch a Web Console, the VM must first be powered on.
- Power on the VM.
- Click the small green triangle-shaped button at the top of the remote console window or in the vSphere Client page for the VM.
Load the SCSI driver to install Windows on a vSphere VM
With some older versions of Windows, the PVSCSI driver is not included in the Windows installation media. In those cases, you will need to load the PVSCSI Driver from the VMware Tools disk image, to be able to install to use the PVSCSI controller and install Windows to the disk.
Note: Windows 11 22H2 and later, and Windows Server 2022/2025 and later, come with the PVSCSI driver so you should not need to mount the VMware Tools disk image and select it.
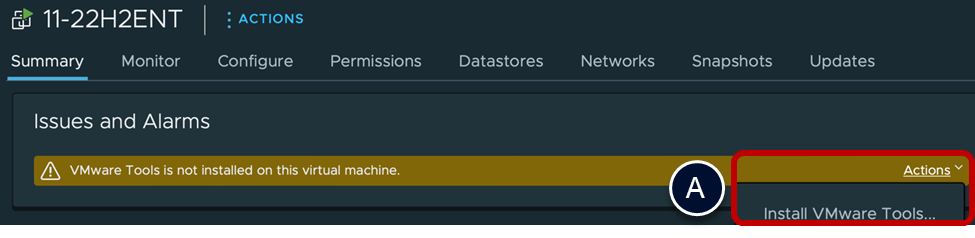
- Access the Tools Disk Image from vSphere Web Client.
- Click on Actions > Guest OS and click on Install VMware Tools.
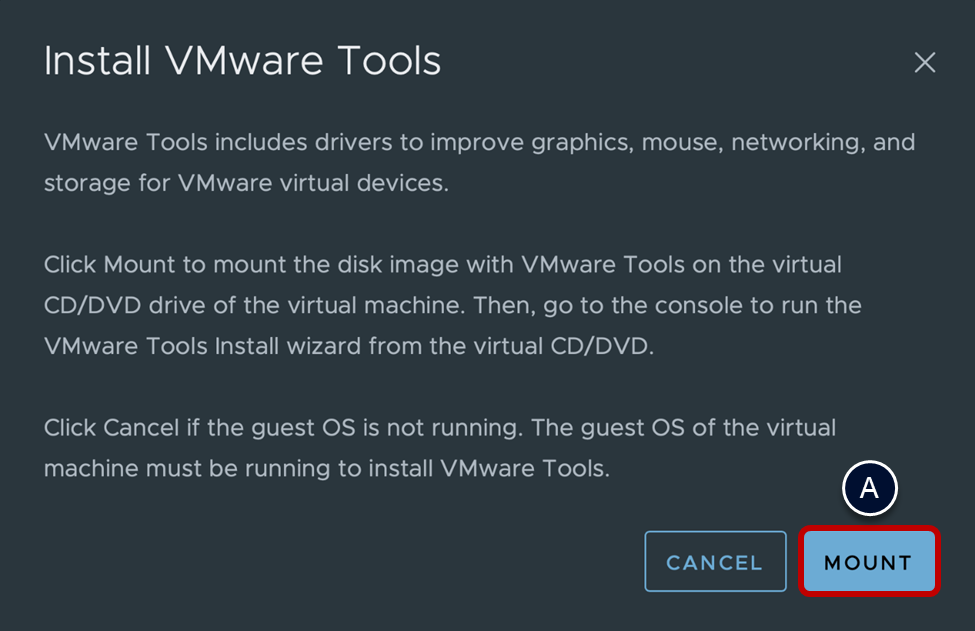
- Mount the VMware Tools disk image on a virtual drive of the VM.
- Click on MOUNT and go back to the remote console.
- Switch back to the VM remote console and open the load driver dialog box.
- Click Load driver.
- Open the file browser.
- Click Browse.
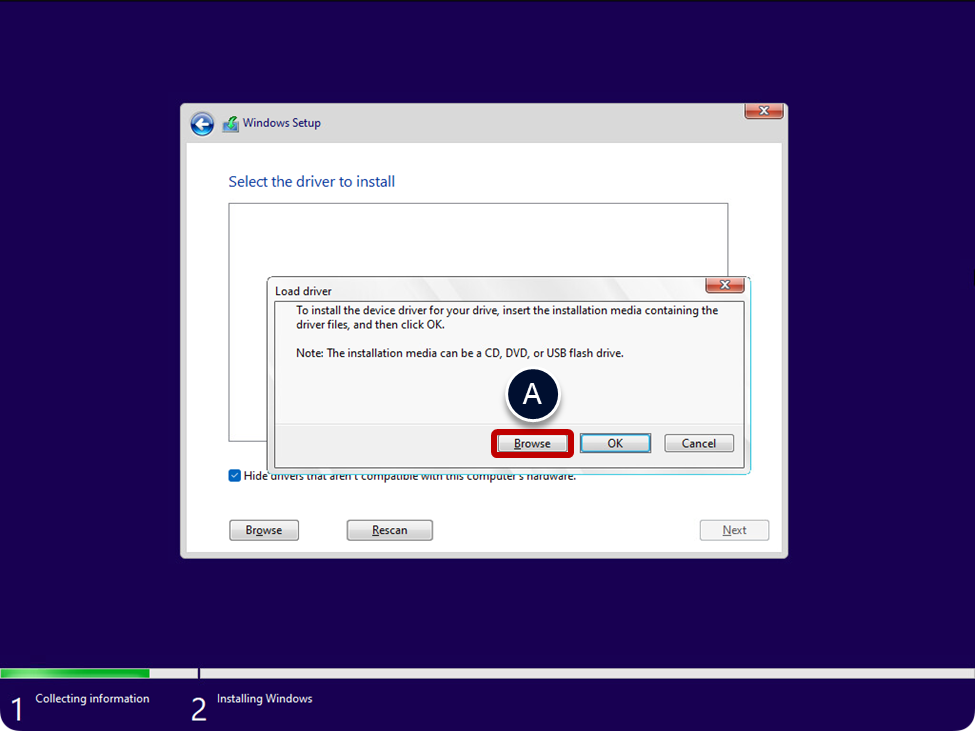
- Browse to the correct PVSCSI driver.
- Browse to E:\Program Files\VMware\VMware Tools\Drivers\pvscsi\
- Then navigate to and select the sub-directory that corresponds to the version of Windows you are installing, as indicated in the table below.
- Click OK when you have selected the correct driver.
| Operating System | Version | PVSCSI Driver Location |
| Windows Server 2022 | 21H2 20348 | Built in |
| Windows 11 | 22H2 22621 | Built in |
| Windows 11 | 21H2 22000 | Win10\amd64 |
| Windows 10 | 22H2 19045 | Win8\amd64 |
| Windows 10 | 21H2 19044 | Win8\amd64 |
| Windows 10 | 21H2 19044 | Win8\amd64 |
| Windows 10 | 20H2 19042 | Win8\amd64 |
| Windows Server 2019 | 1809 17763 | Win8\amd64 |

- Select the driver.
- With the VMware PVSCSI driver selected, click Next.
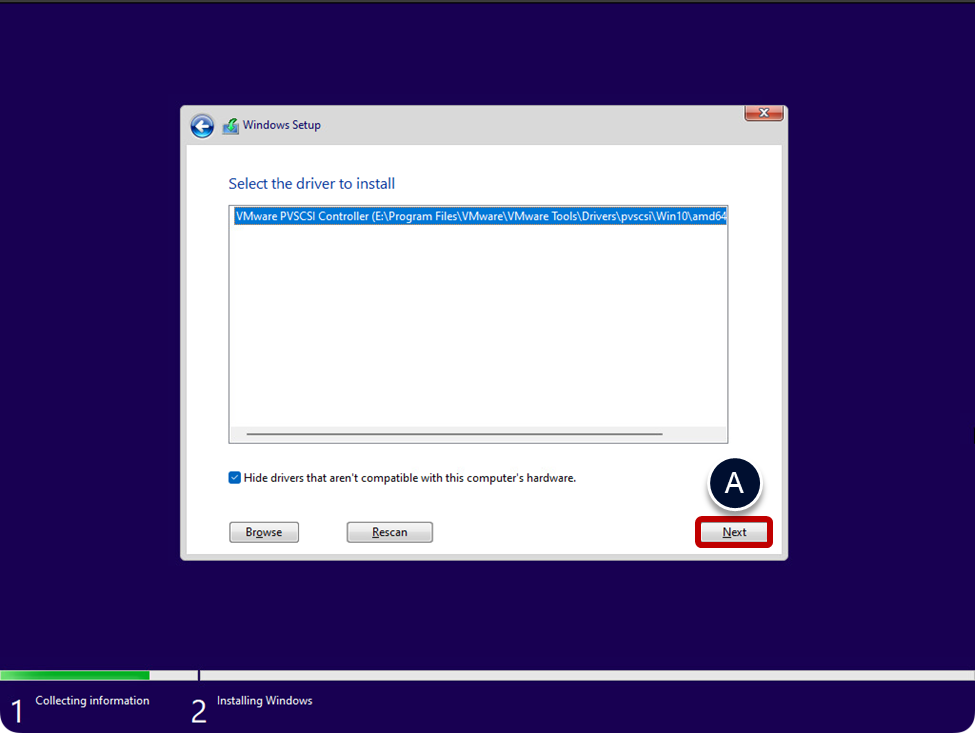
Windows should now recognize the hard disk attached to the PVSCSI controller and you should be able to select it as a target to install Windows to.
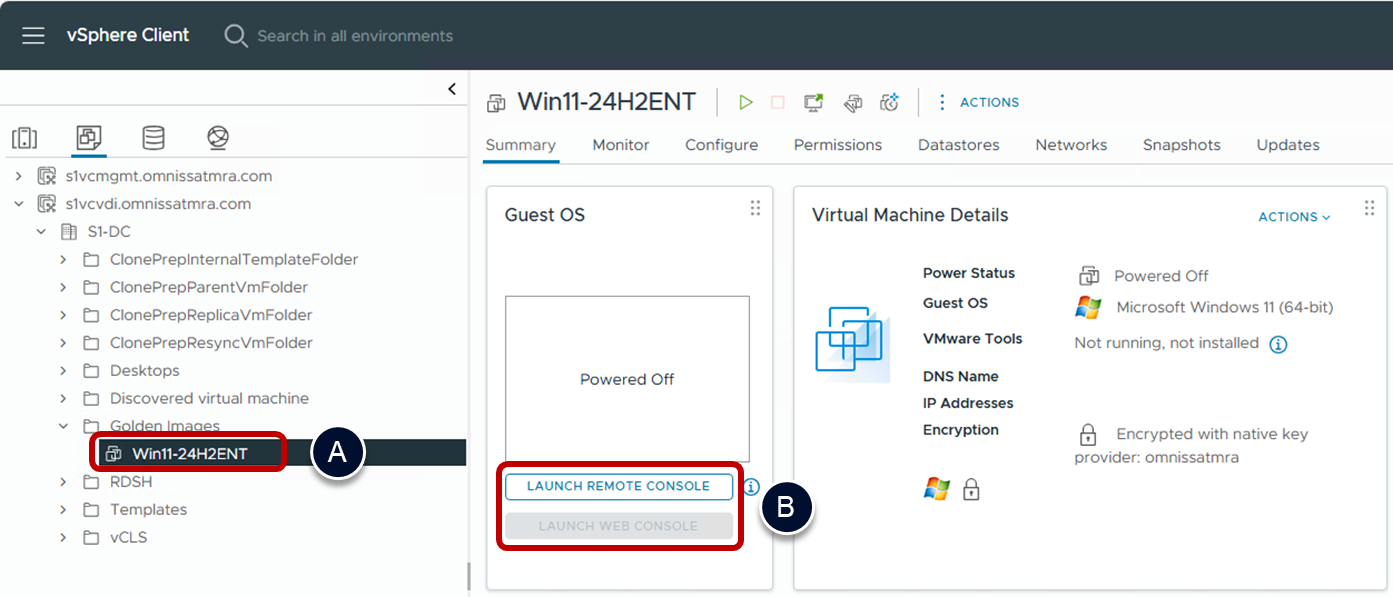
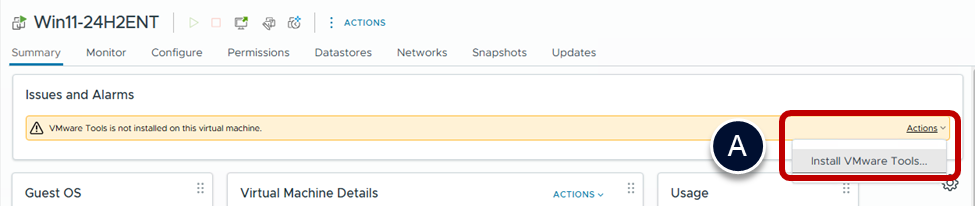
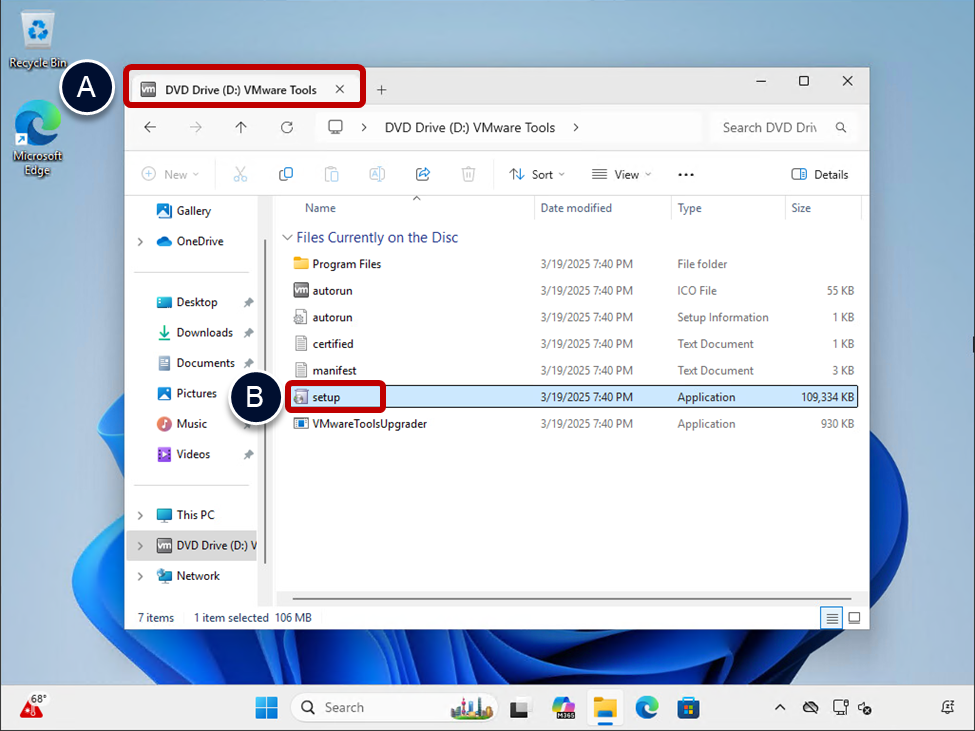
Install VMware Tools
VMware Tools is a set of services and modules that enable several features for better management of, and seamless user interactions with, guests operating systems. For example, Tools can run scripts that automate OS operations and can synchronize the time in the guest operating system with the time on the vSphere host. You must install Tools in vSphere based VMs used for desktop and application pools.
- Using the vSphere Web Client.
- Select the VM in the inventory list.
- Access the VMware Tools disk image.
- From the Summary tab for the VM, click on Actions and click on Install VMware Tools.
- Mount the VMware Tools disk image.
- Click MOUNT.
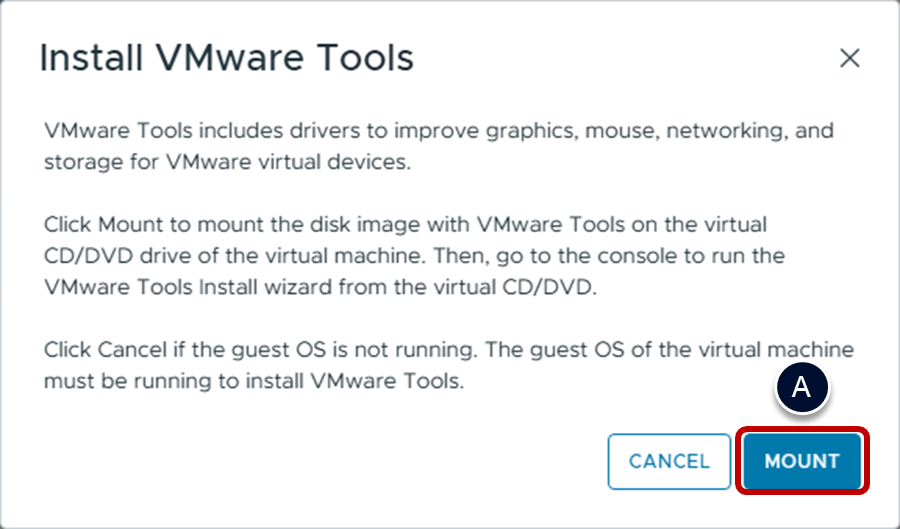
- Go back to the vSphere remote console for the VM.
- Open File Explorer and select the VMware Tools virtual drive.
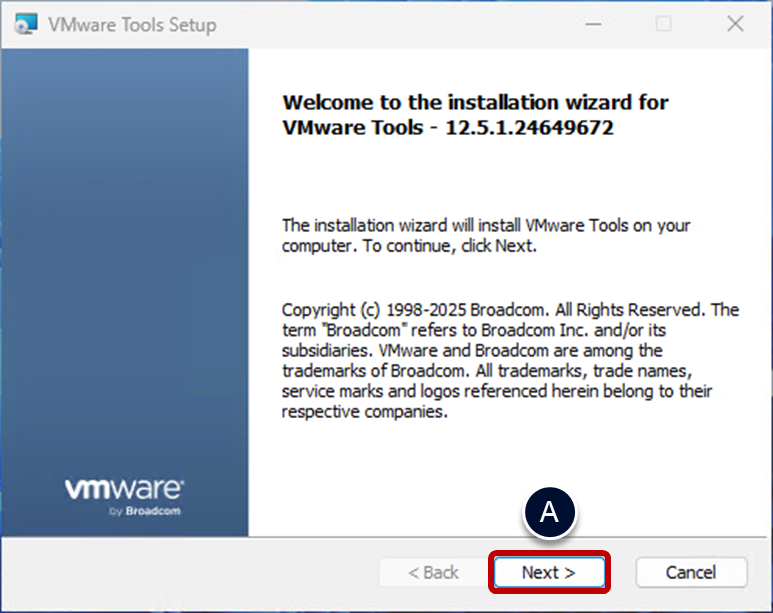
- Run setup.exe.
- Click Next on the welcome page.
- Click Next.
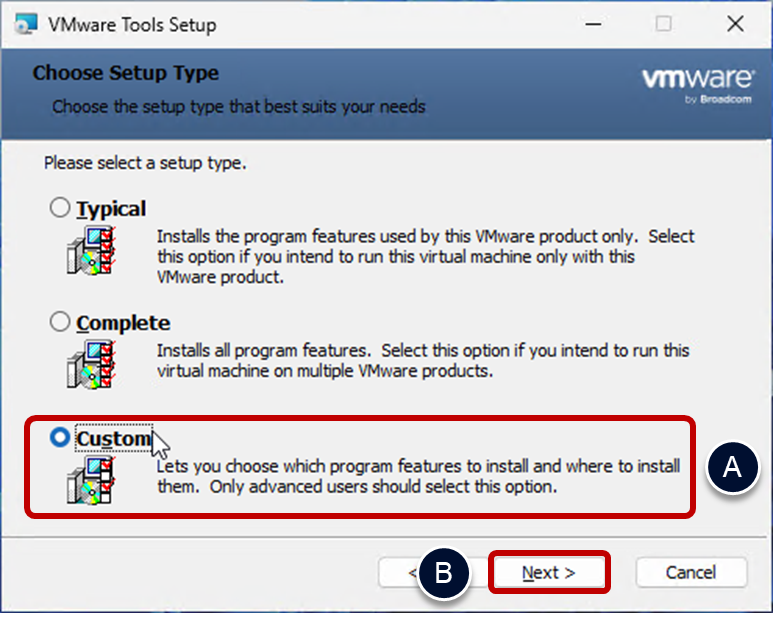
- Select the custom setup type.
- Select Custom.
- Click Next.
- Deactivate the Carbon Black Helper component (if not required).
- Deselect VMware Carbon Black Helper, unless you use Carbon Black.
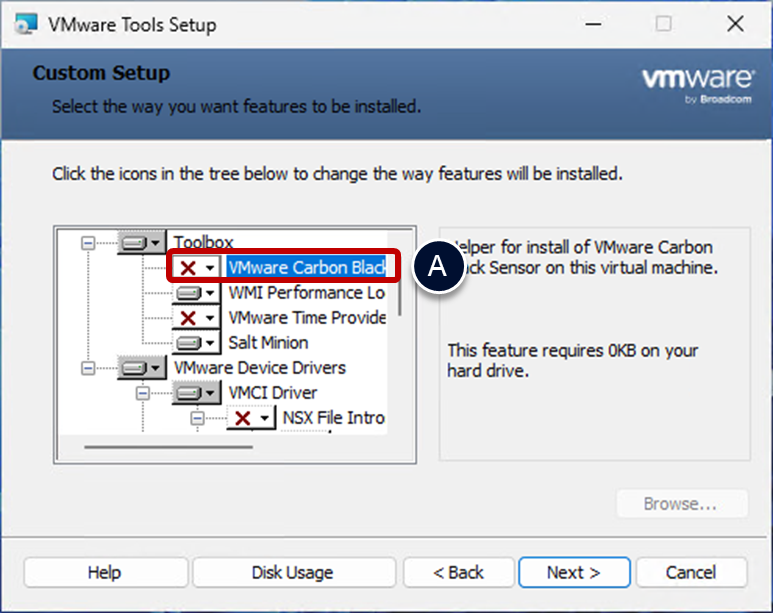
- If you leverage NSX, enable the NSX File and Network Introspection drivers.
- Deactivate the service discovery component.
- Scroll down.
- Deselect Service Discovery, which enables the discovery of various services running inside a virtual machine. This component is not necessary.
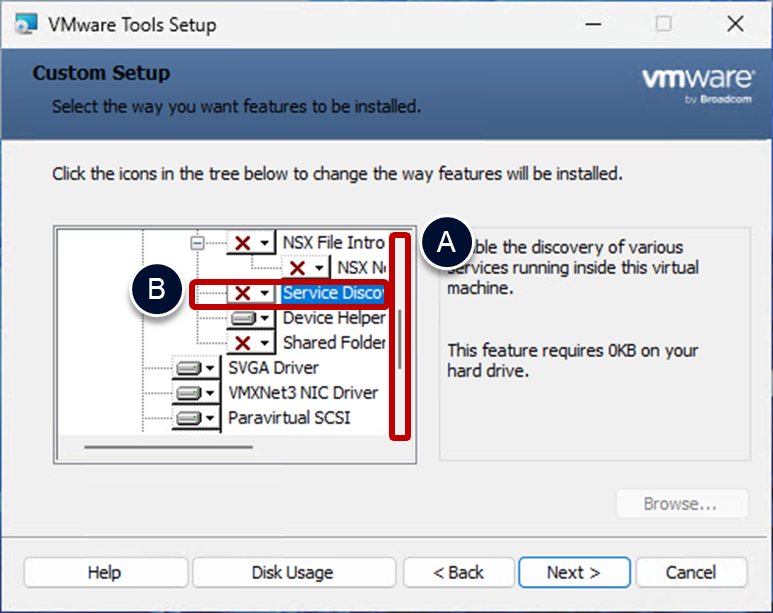
- Deactivate the volume shadow copy component.
- Scroll down.
- Deselect Volume Shadow Copy Services Support. This component is not required.
- Click Next.

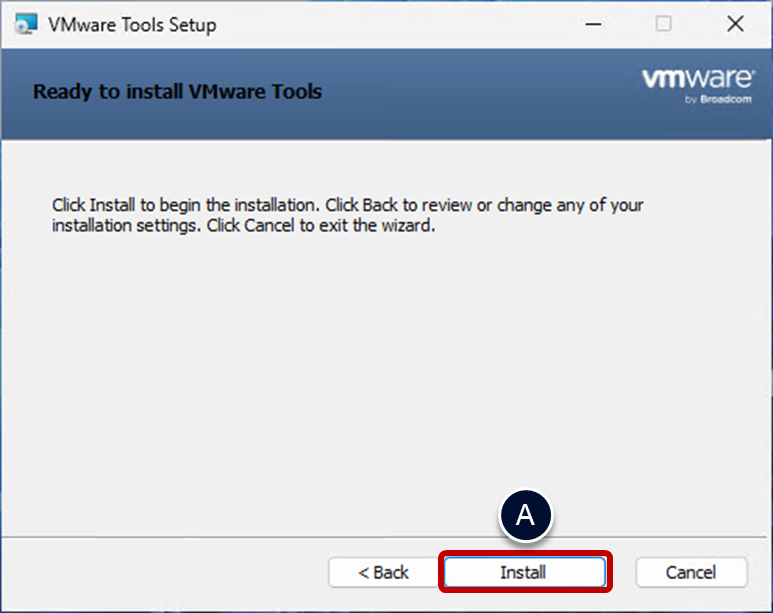
- Begin installation of VMware Tools
- Click Install.
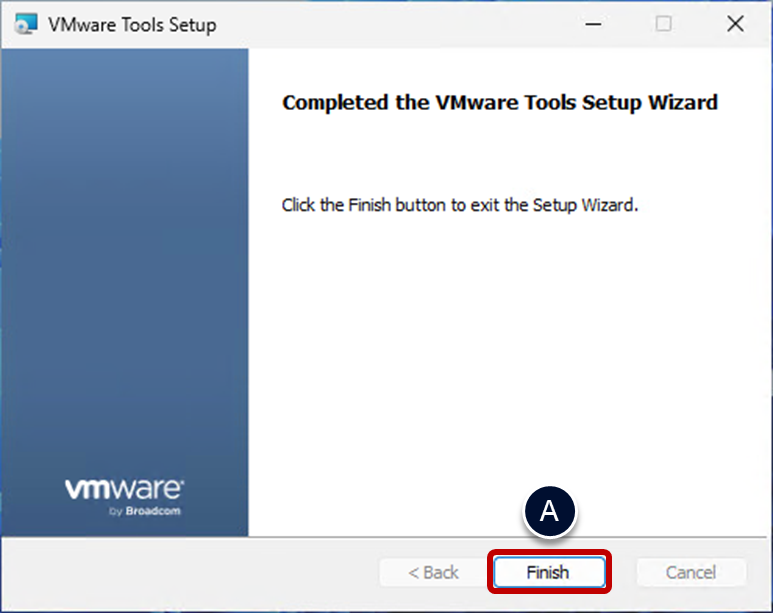
- Exit the installation wizard.
- Click Finish.
- Restart Windows
- Click Yes and Windows will reboot.
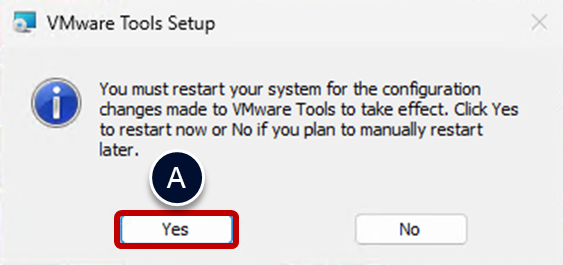
You have now completed installing VMware Tools.
Take a vSphere VM snapshot
This procedure describes taking a VM snapshot.
- Using vSphere Web Client.
- Select the VM in the inventory list.
- Ensure that the VM is powered off.
- Click on Snapshots.
- In the VM details pane, select the Snapshots menu.
- Click on TAKE SNAPSHOT.
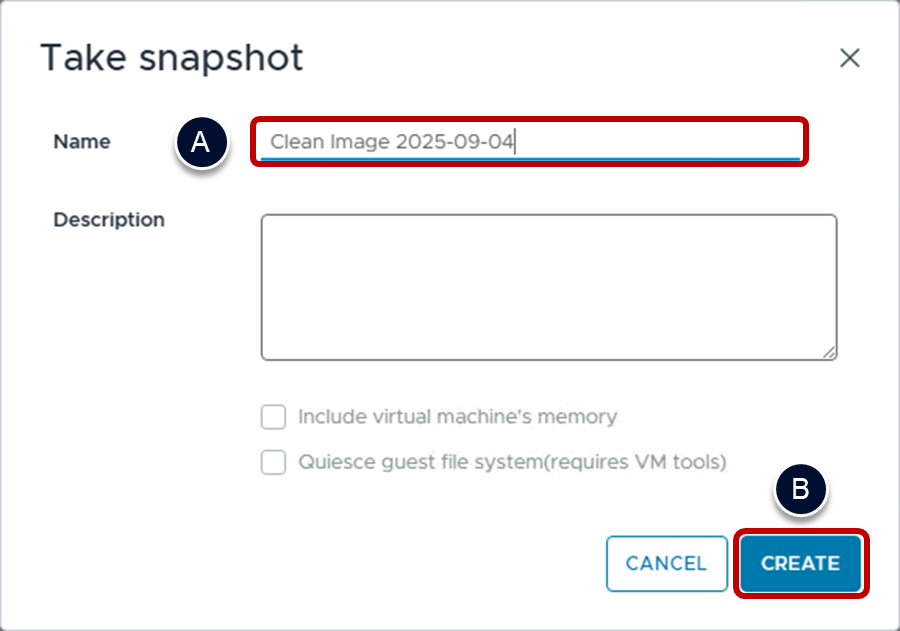
- Define and create the Snapshot.
- Provide a descriptive Name; for example, the name might include the date of the snapshot.
- Click CREATE.
Optimize the VM hardware on vSphere
If virtual hardware is no longer required it can be removed from the virtual machine, which will reduce resource consumption on each clone.
- Using the vSphere Web Client.
- Select the VM in the inventory list.
- Ensure the VM is shutdown.
- Open the Edit Settings dialog box.
- Right-click the VM and select Edit Settings.
- Adjust CPU and memory (optional).
- You may wish to change the allocated CPU and memory.
- Change the CPU value.
- Change the Memory value.
- Remove the CD/DVD drives.
- In the CD/DVD drive 1 row, click the three dots on the right-hand side.
- Select Remove device.
- Do the same for the CD/DVD drive 2 if it exists.
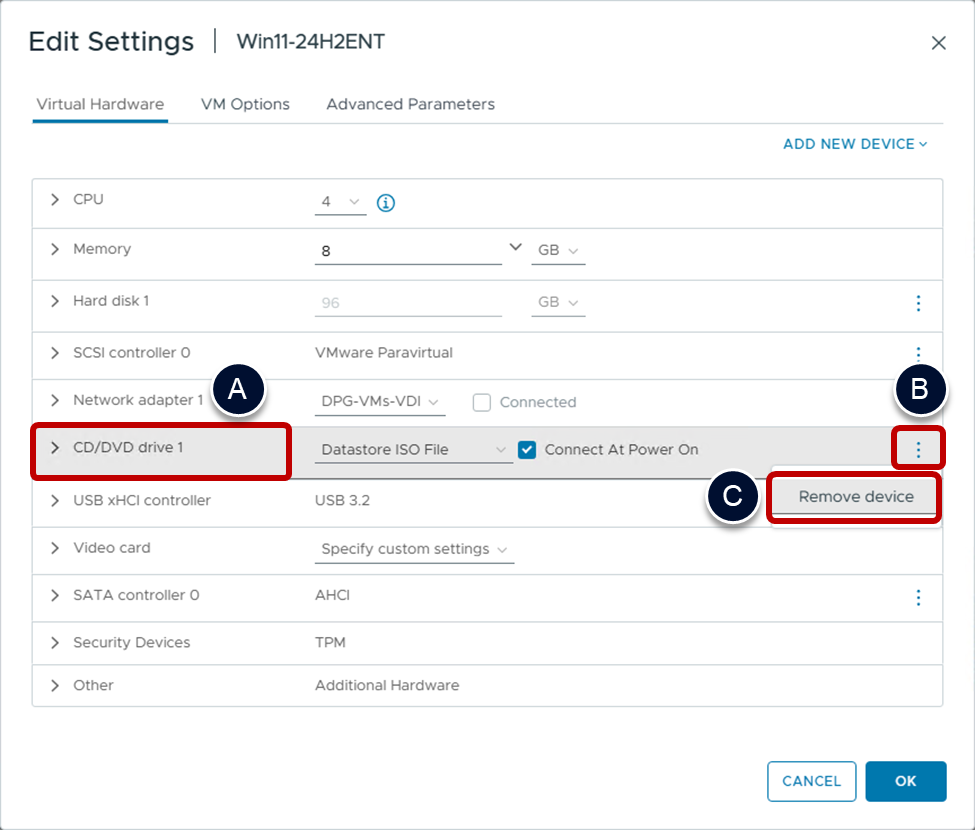
- Remove the SATA Controller.
- In the SATA Controller 0 row, click the three dots on the right-hand side.
- Select Remove device.
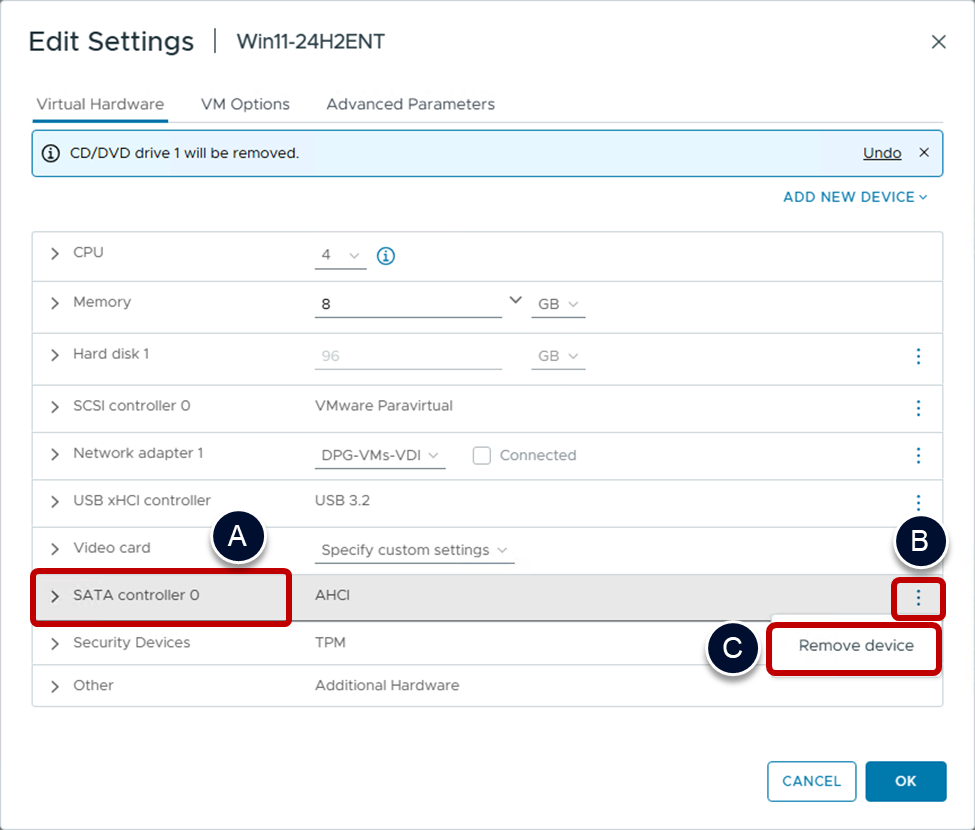
- Remove the USB controller.
- In the USB xHCI controller row, click the three dots on the right-hand side.
- Select Remove device.
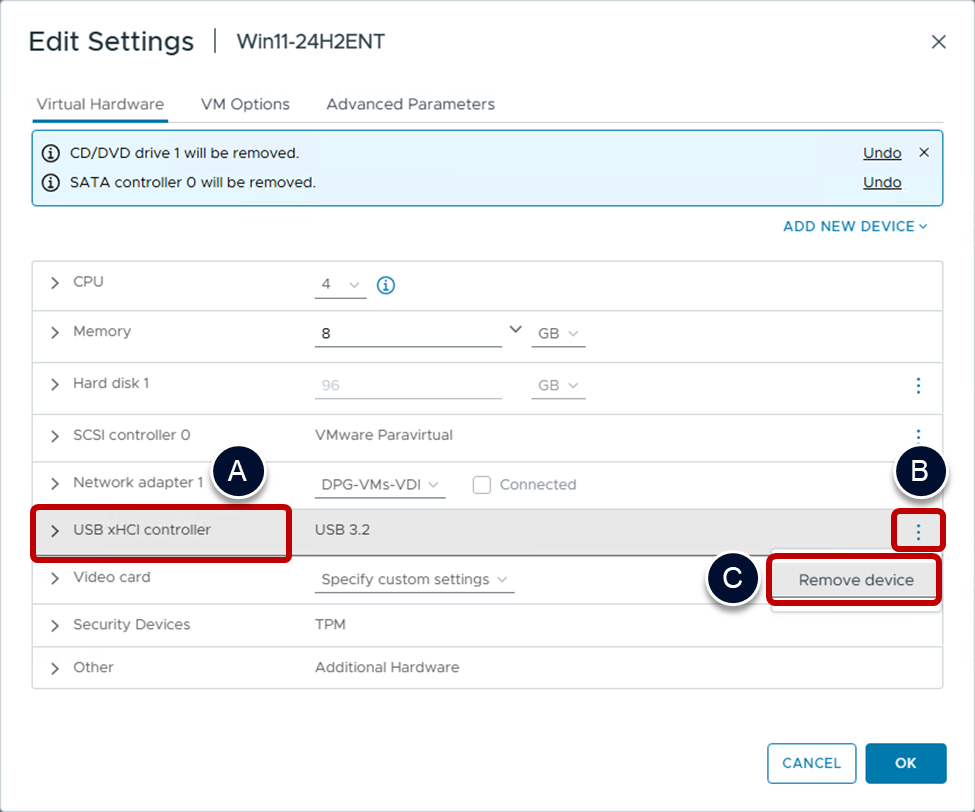
- Apply the virtual hardware changes.
- Click OK.

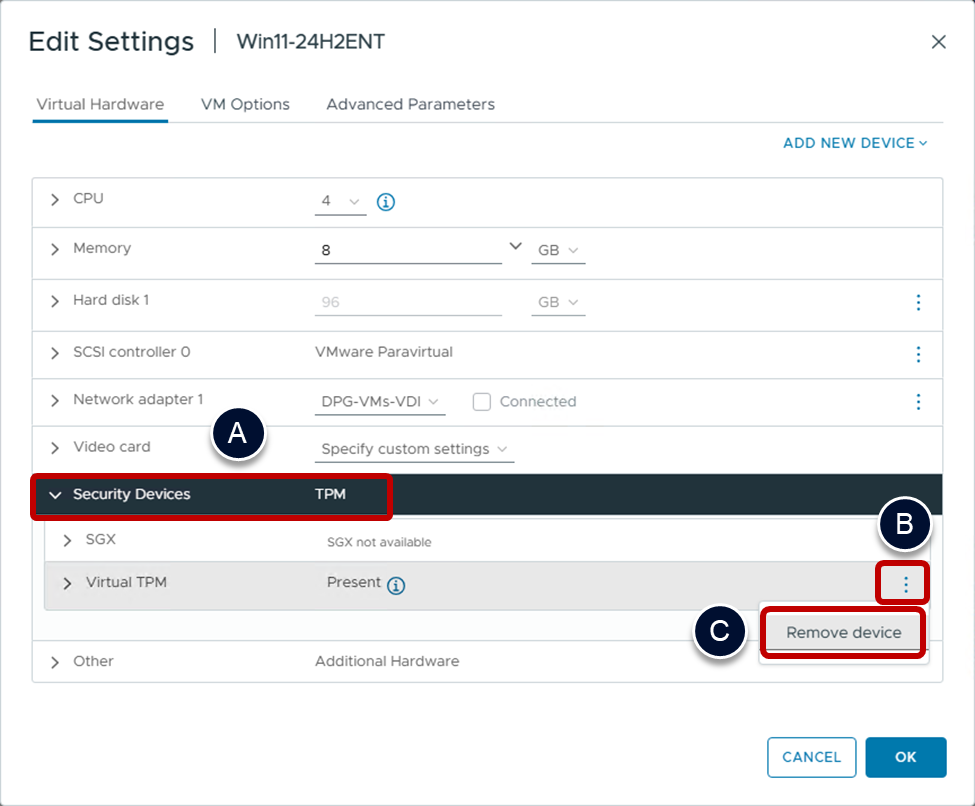
Remove the virtual TPM device
Removing a Trusted Platform Module (TPM) device on a golden image is needed to be able to export or clone the VM. A TPM device is normally only added to a Windows 11 VM.
Do not remove TPM devices from production machines when software is storing keys in the TPM device. See https://knowledge.broadcom.com/external/article?legacyId=88320 for an alternative method that doesn’t remove a TPM device.
- Delete any snapshots from VM.
- Remove the virtual TPM device.
- Edit the VM settings again and expand the Security Devices section.
- In the Virtual TPM row, click the three dots on the right-hand side.
- Select Remove device.
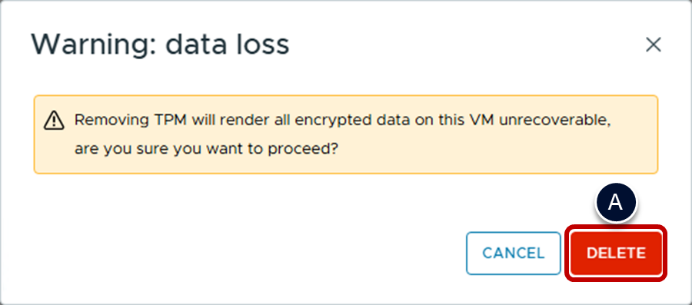
- Confirm removal of the TPM device.
- Click DELETE.
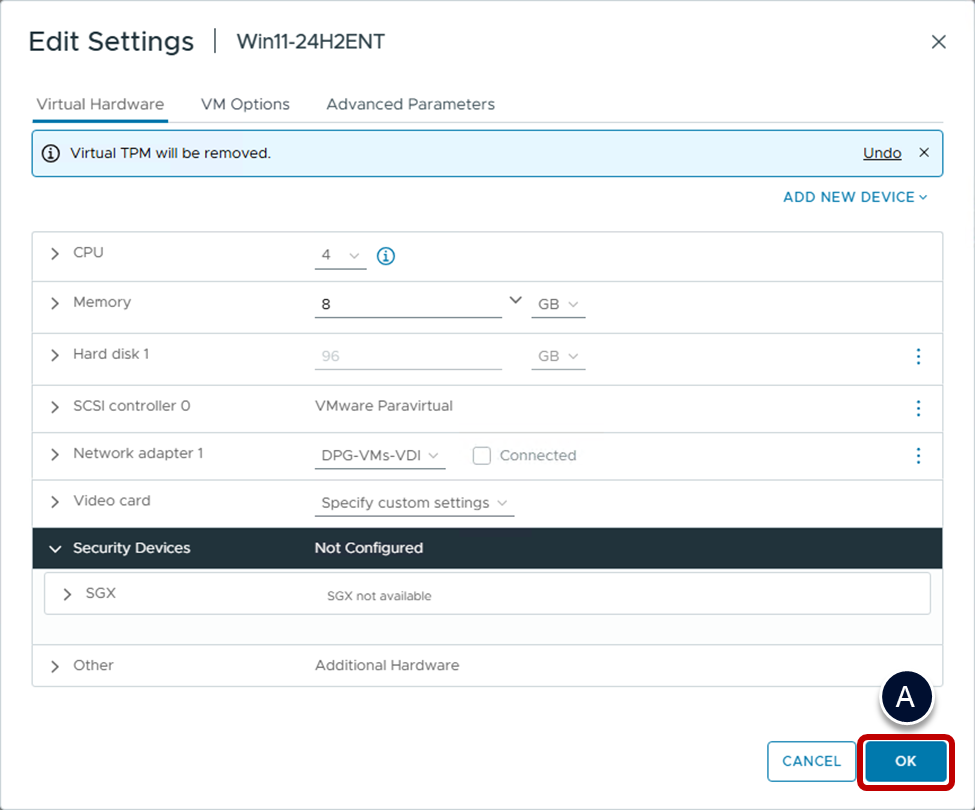
- Apply the removal of the TPM device.
- Click OK.
Export and import the vSphere VM to adjust disk size
Using the export/import process described in this section, you can select the thin-disk option and shrink the size of the VM according to the number of zeroes written during the finalize procedure, when the Secure Delete tool (sdelete64.exe) was run to overwrite empty space with zeros.
Over time the space reclamation function of vSphere could do the same if enabled.
- Using vSphere Web Client.
- Select the VM in the inventory list.
- Ensure that the VM is powered off.
- Export to OVF (Open Virtualization Format).
- Right-click the VM and select Template.
- Select Export OVF Template.
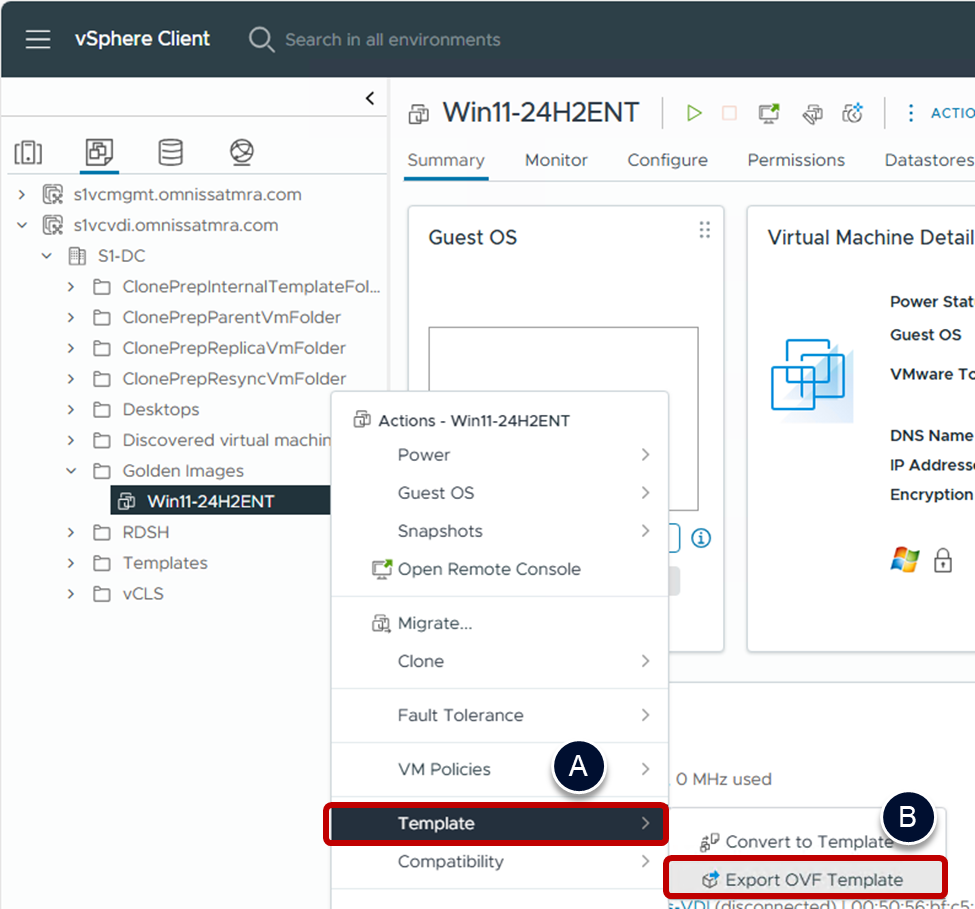
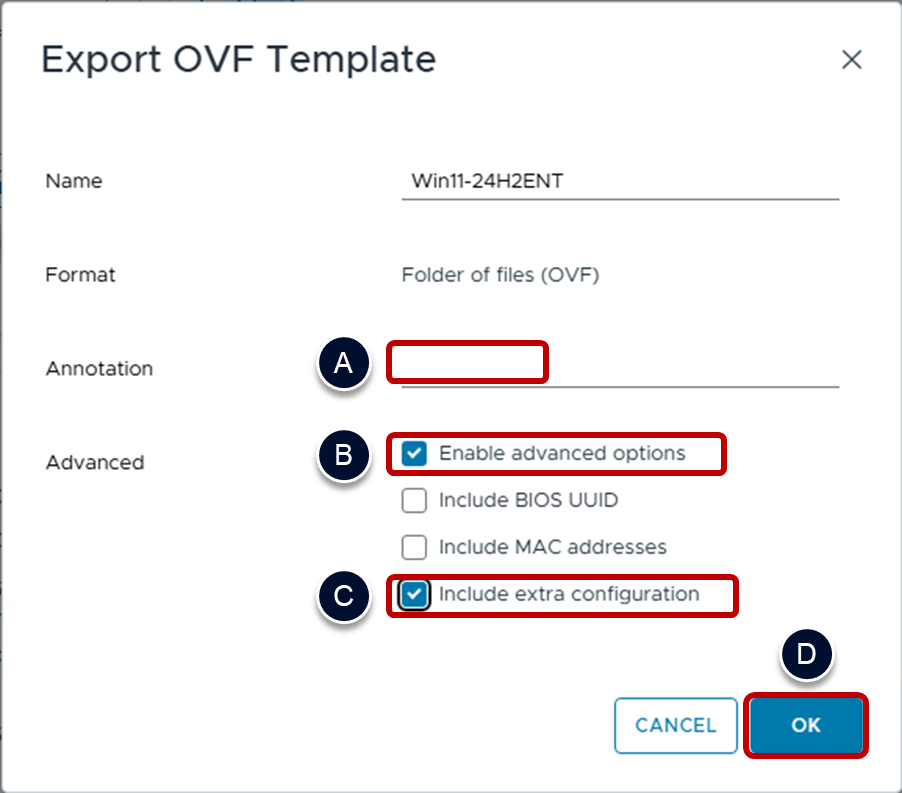
- Supply OVF template information.
- Optionally provide an Annotation; for example, you could specify the Windows build number.
- Select Enable advanced options.
- Select Include extra configuration.
- Click OK.
- Download and save the VM files.
- Your web browser should allow you to download and save the following files: .ovf, .nvram, .vmdk, .mf.
- During export of the VM the file download may appear to stall. This is normal as the export is skipping empty (non-used) space.
- In some vSphere environments there may be a delay where the .mf (manifest) file has a slight delay before the download is started after other files complete.
- Do not delete the original VM from inventory until all required files are downloaded and you are confident that you can deploy a new VM from them.
- Deploy the OVF template.
- Right-click a VM folder, host, or cluster.
- Select Deploy OVF Template.
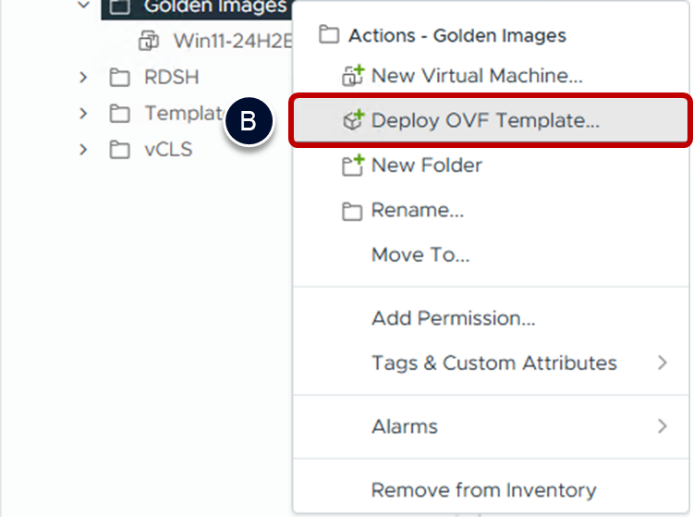
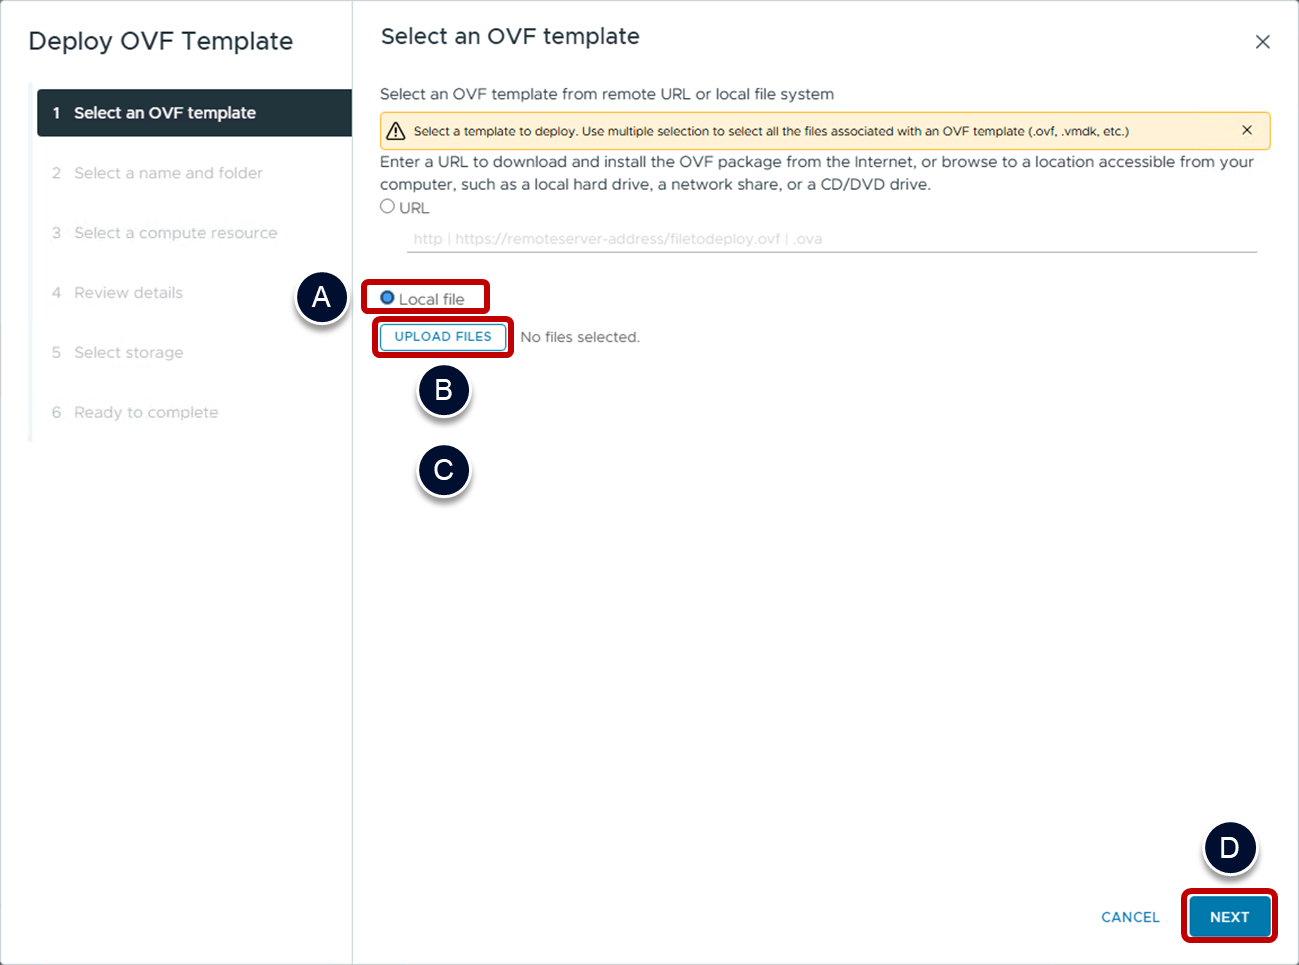
- Select the OVF template you just exported.
- Select Local file.
- Click UPLOAD FILES.
- Browse to and select all files you have just downloaded when exporting to OVF: .ovf, .nvram, .vmdk, and click Open.
- Click NEXT.
- Select a folder.
- Change the Virtual machine name so that it is unique.
- Select a folder as a location for this VM in the vSphere inventory.
- Click NEXT.
- Select a compute resource.
- Select a compute resource to host this VM.
- Click NEXT.
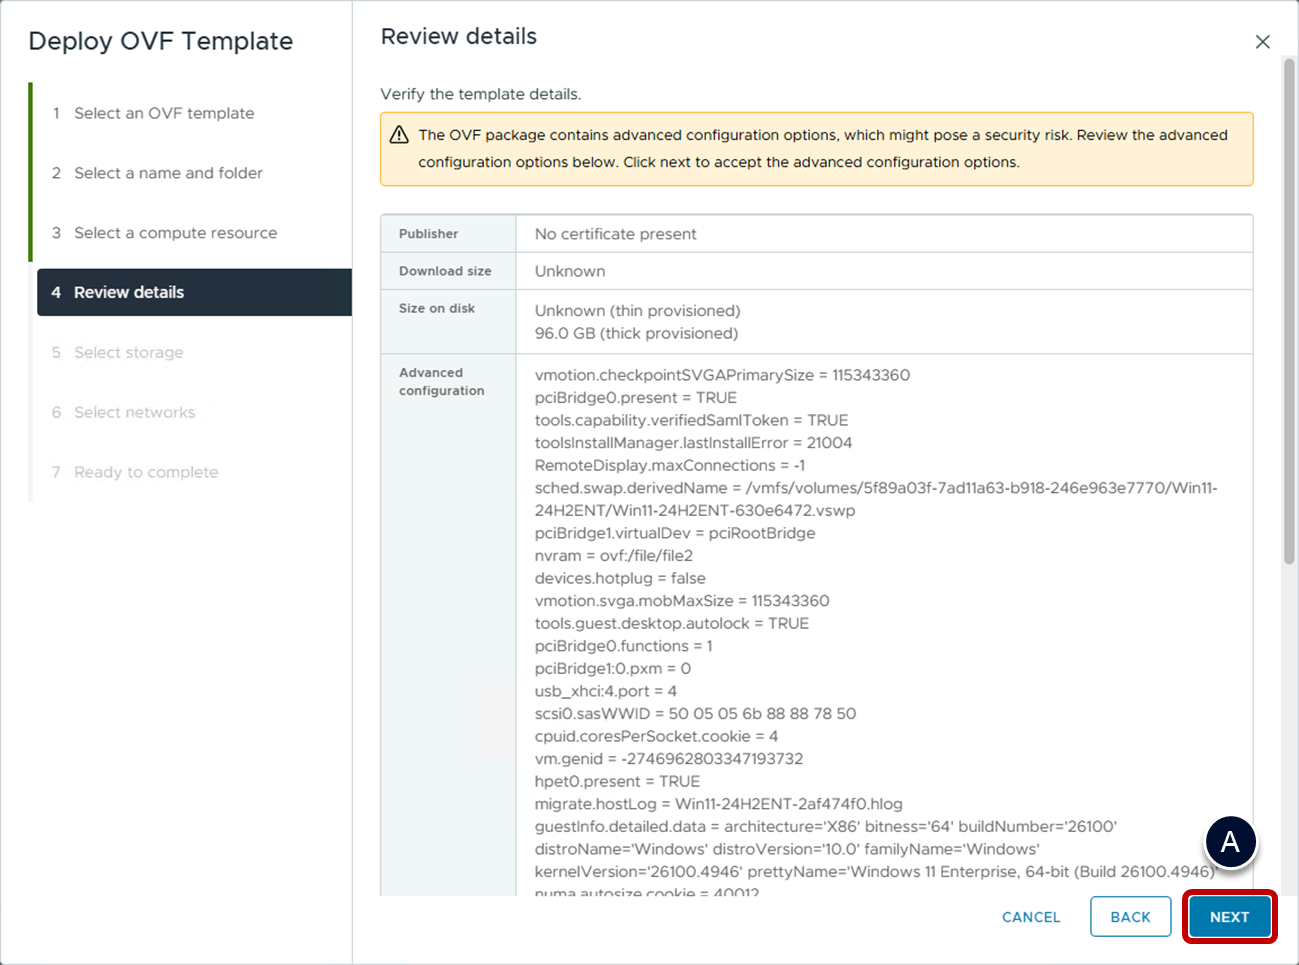
- Review details.
- Click NEXT.
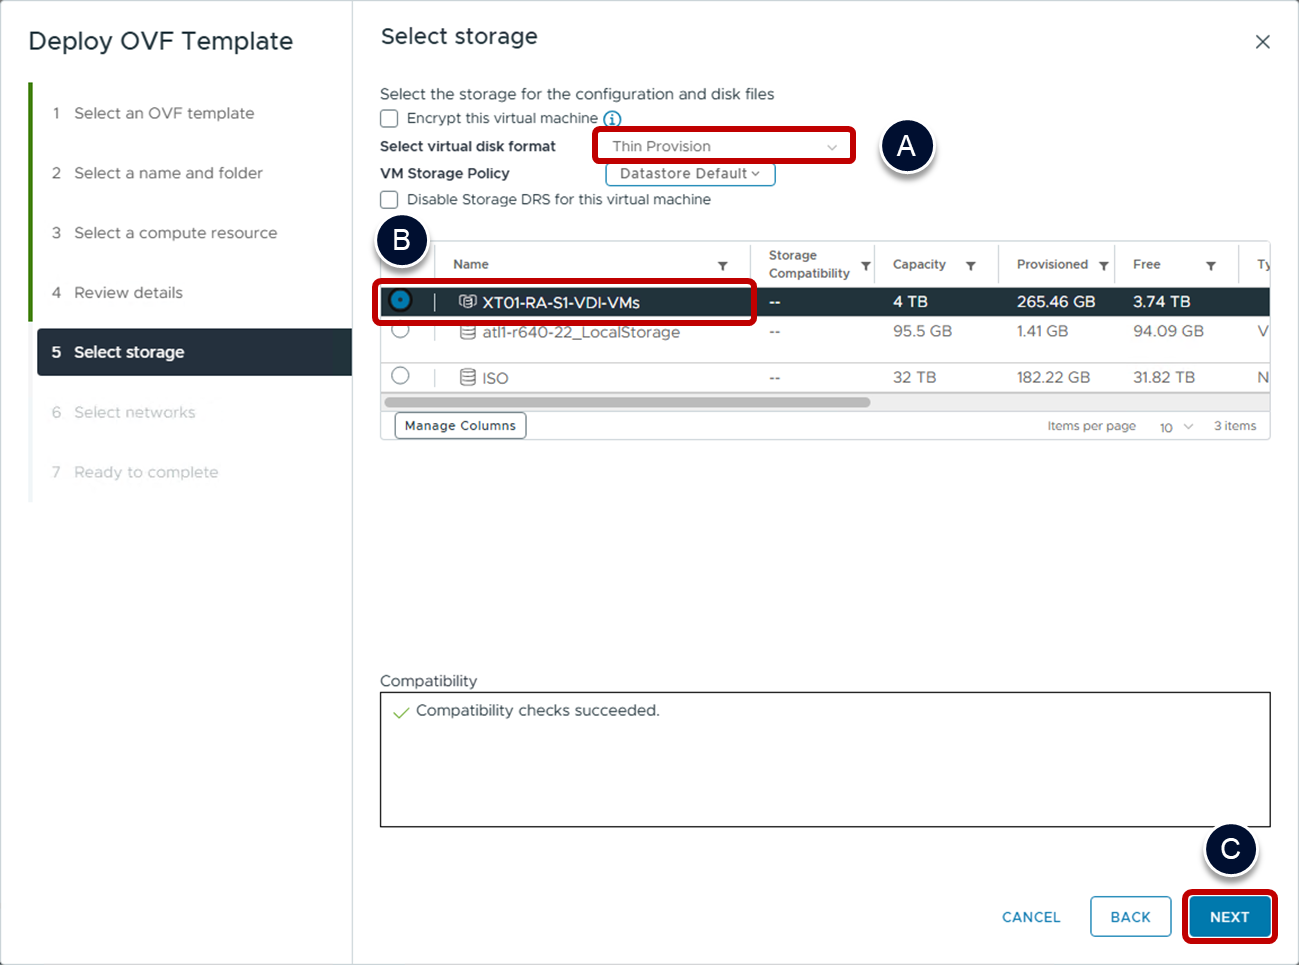
- Select storage.
- Select a datastore.
- When using storage without storage policies, select Thin Provision; otherwise, select an item from the VM Storage Policy list that has thin provisioning.
- Click NEXT.
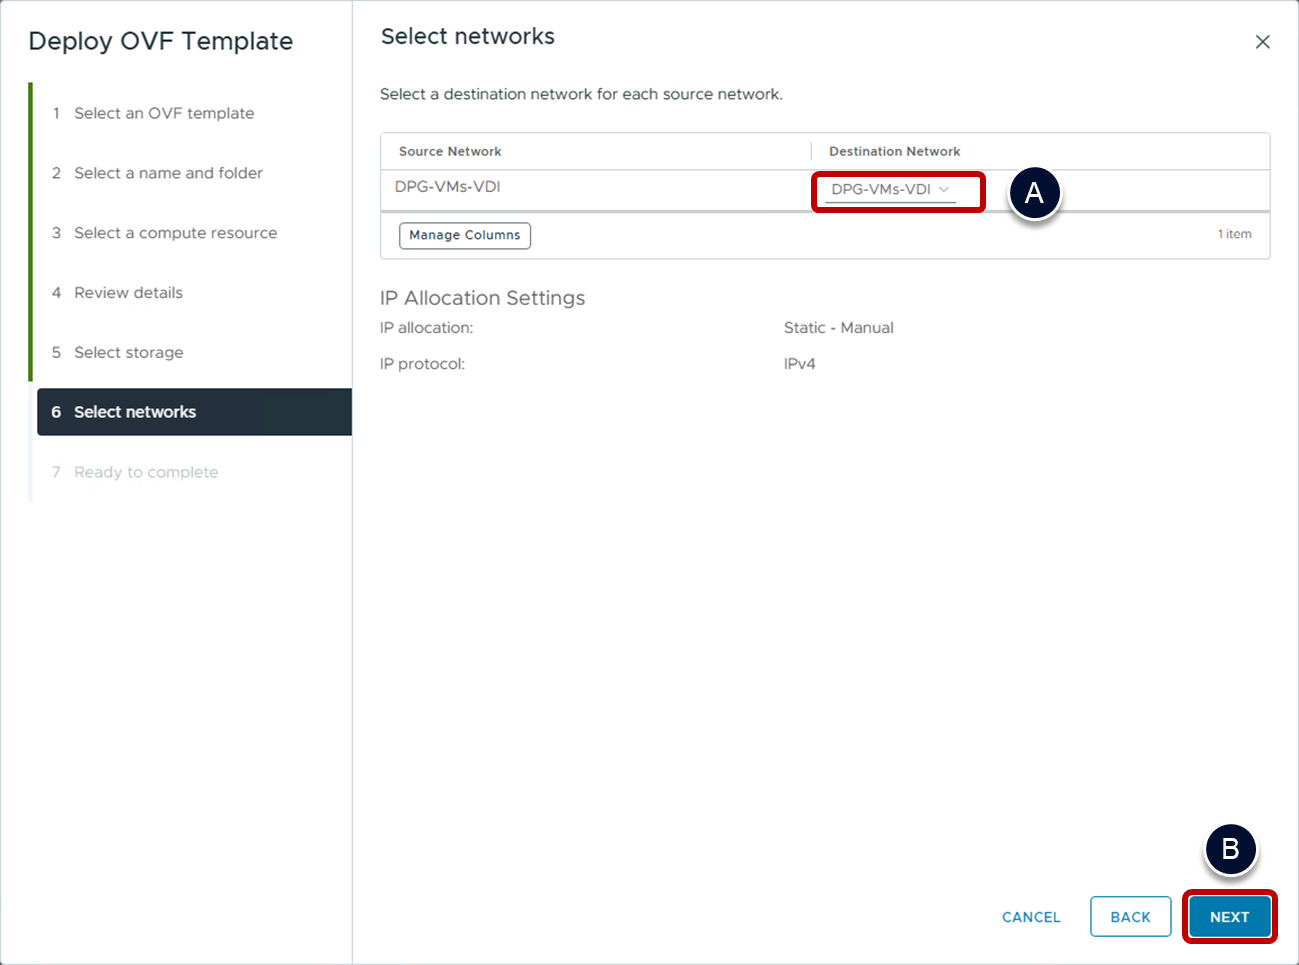
- Select network.
- Select a Destination Network.
- Click NEXT.
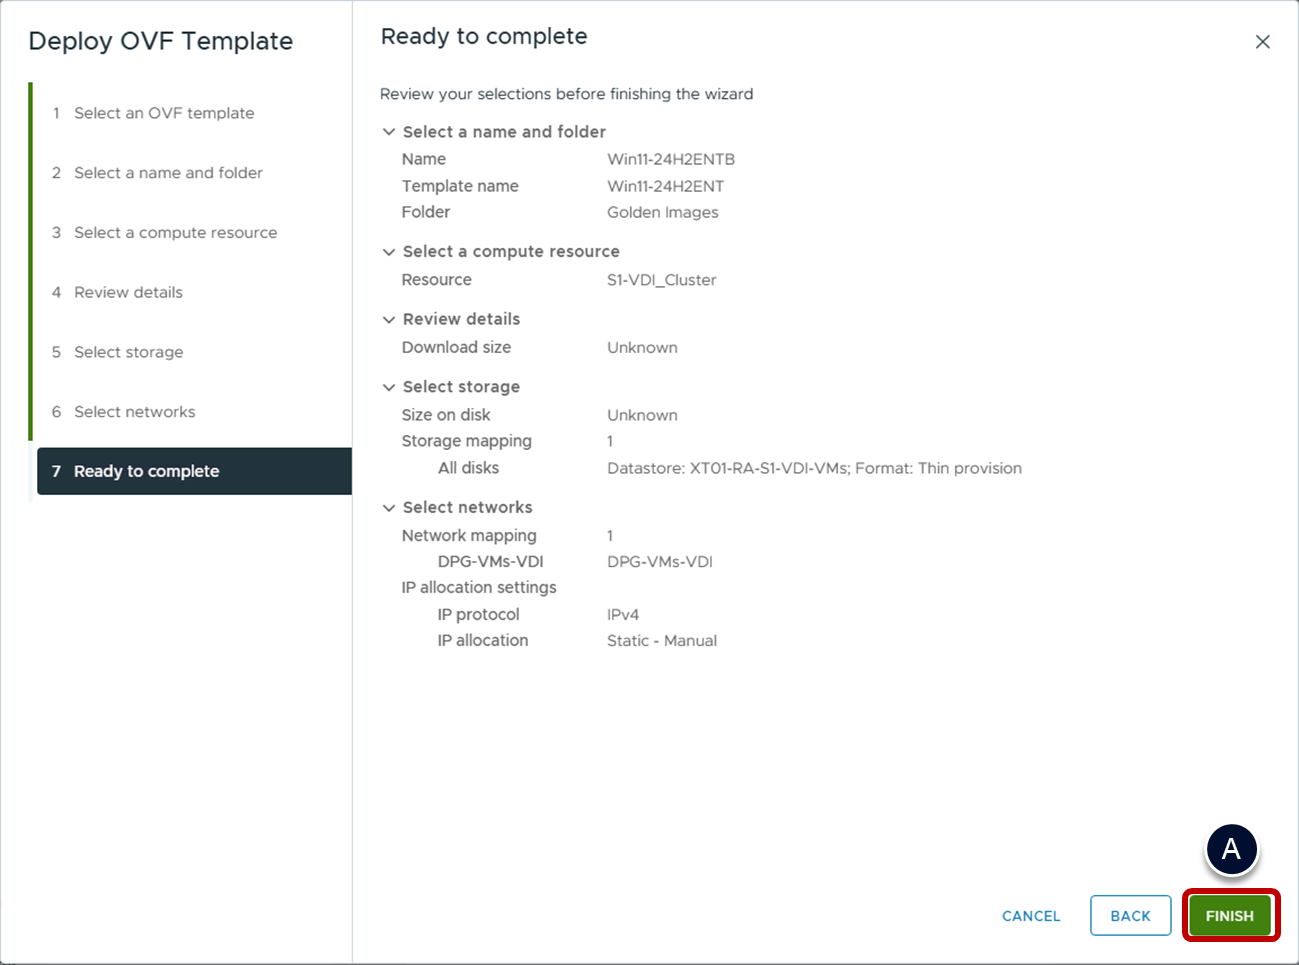
- Click finish on the ready to complete page.
- Click FINISH.
Delete the original VM after importing the OVF template
Once you are satisfied with the imported VM, you can delete the original VM, to save disk space.
- Using vSphere Web Client.
- Select the original VM from the inventory list.
- Delete the original VM.
- Right-click on the VM and select Delete from Disk.
- Confirm the deletion.
- Click YES.
Update VMware Tools
When new versions of VMware Tools are released, use this procedure to update Tools in the golden image.
- Use the vSphere Web Client.
- Select the VM in the inventory list.
- Open the edit VM settings dialog box.
- Right-click the VM and select Edit Settings.
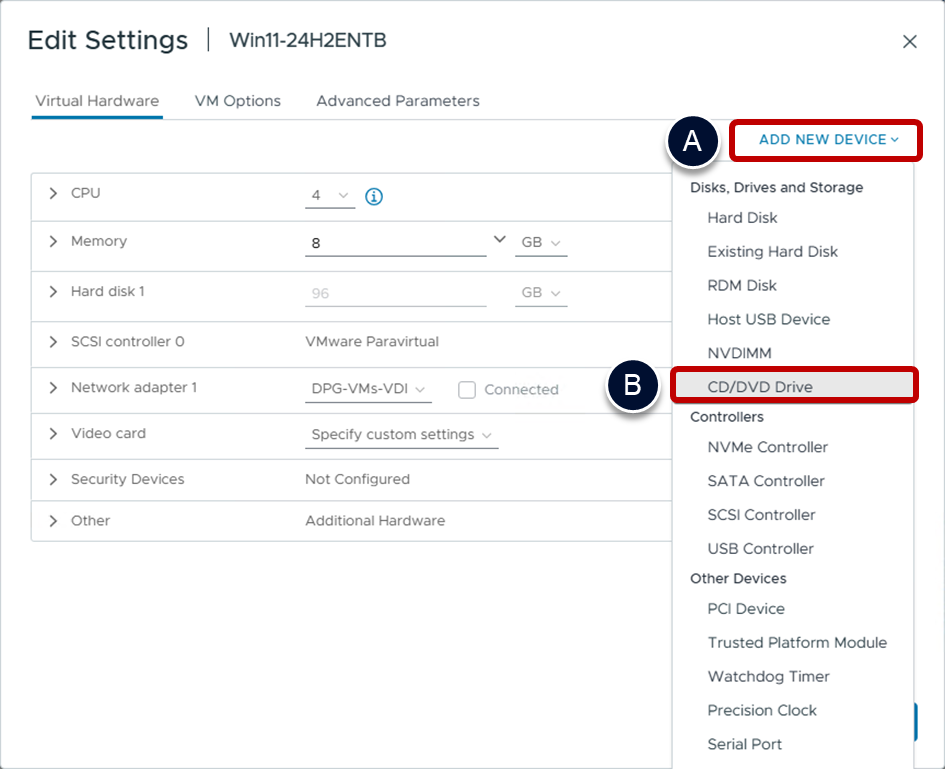
- Add a virtual CD/DVD drive back to the VM.
- Click ADD NEW DEVICE.
- Select CD/DVD Drive.
- Click OK.
- Power on the VM.
- Select the VM.
- Click on the power icon.
- Click upgrade VMware Tools on the summary tab.
- On the Summary tab for the VM, click Upgrade VMware Tools.
- Use the interactive upgrade.
- Select Interactive Upgrade.
- Click UPGRADE.
- Now repeat the steps from Install VMware Tools.
- Remove the virtual CD/DVD drive from the VM.
- When the upgrade of VMware Tools has completed, you should remove the CD/DVD drive that you added.
- Follow the guidance in Optimize the VM hardware on vSphere.
Nutanix AHV specific guidance
This section only contains guidance on performing specific activities on Nutanix AHV. For the overall procedure, refer to Overview of the procedure to build a golden image, at the beginning of this guide.
To get more information on the platform requirements for installing and running Windows 11 in a virtual desktop environment on Nutanix AHV, see the Nutanix Solutions Document Windows 11 on Nutanix AHV.
Prerequisites for Nutanix AHV
The installation media needs to be imported to the Images store before creating a VM.
- Windows installation media (ISO).
- Nutanix VirtIO drivers (ISO).
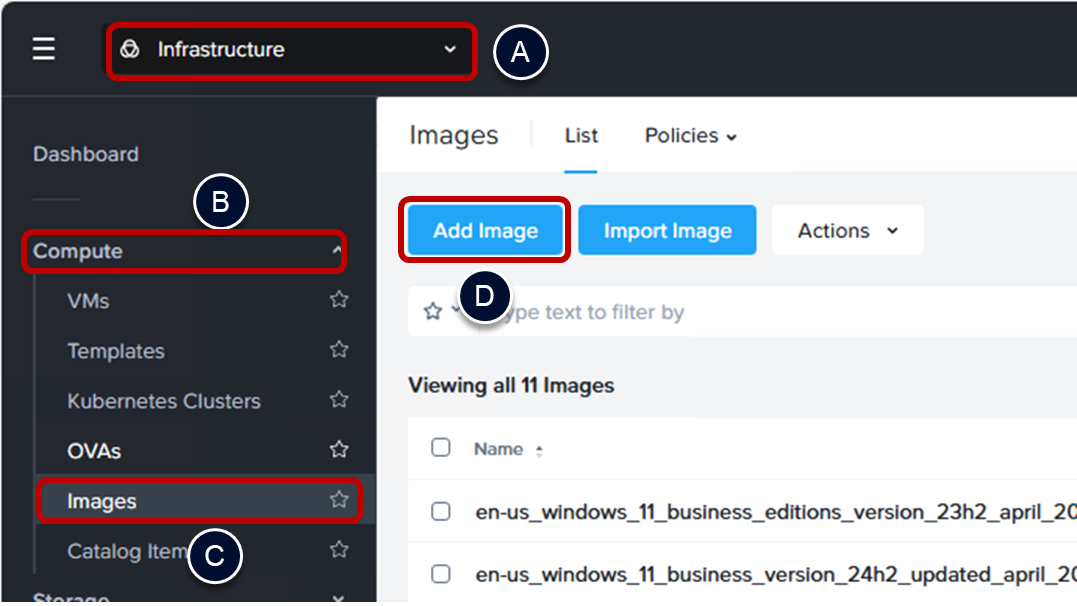
- Import the Windows installation media using the Prism Central console.
- Ensure the console has the Infrastructure view selected.
- Expand the Compute option in the left-hand menu.
- Select Images.
- Select Add Image.
- Select the Image File.
- Click on Add File and browse to the location you have the Windows ISO.
- Adjust the Name as necessary (usually if the name is too long).
- Click Next.
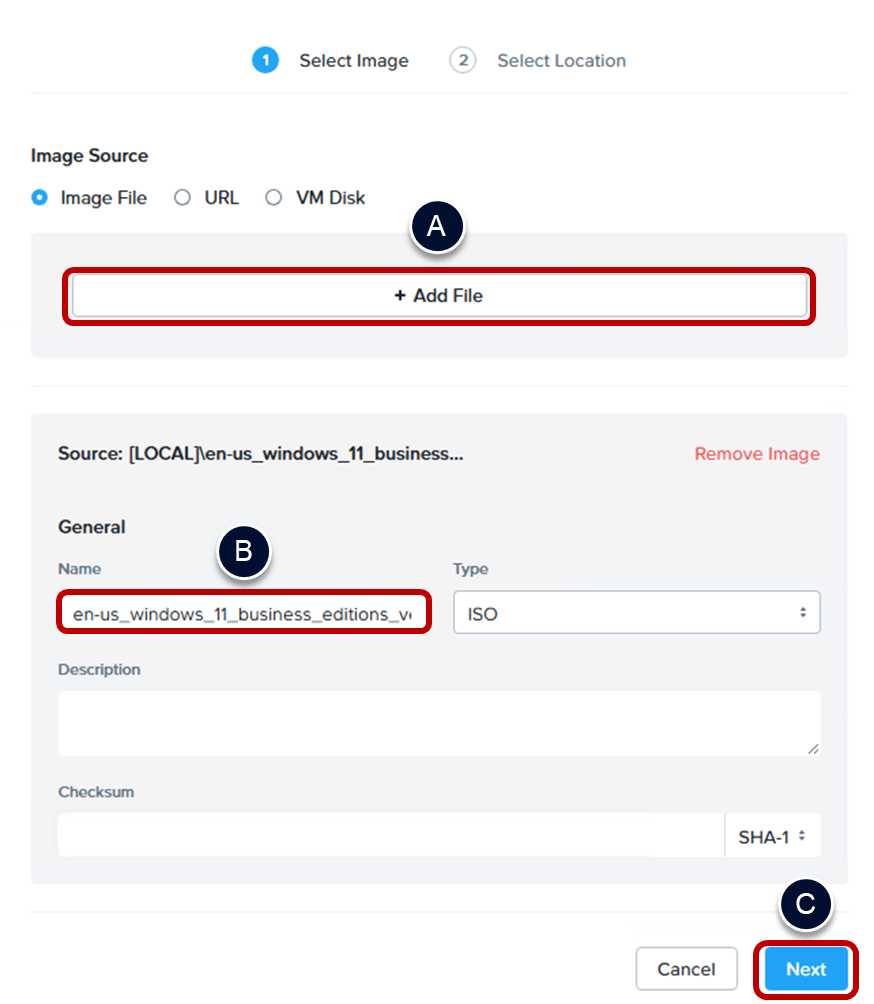
- Select the Location.
- Select the same Cluster where you intend to locate your golden image VM.
- Click Save.
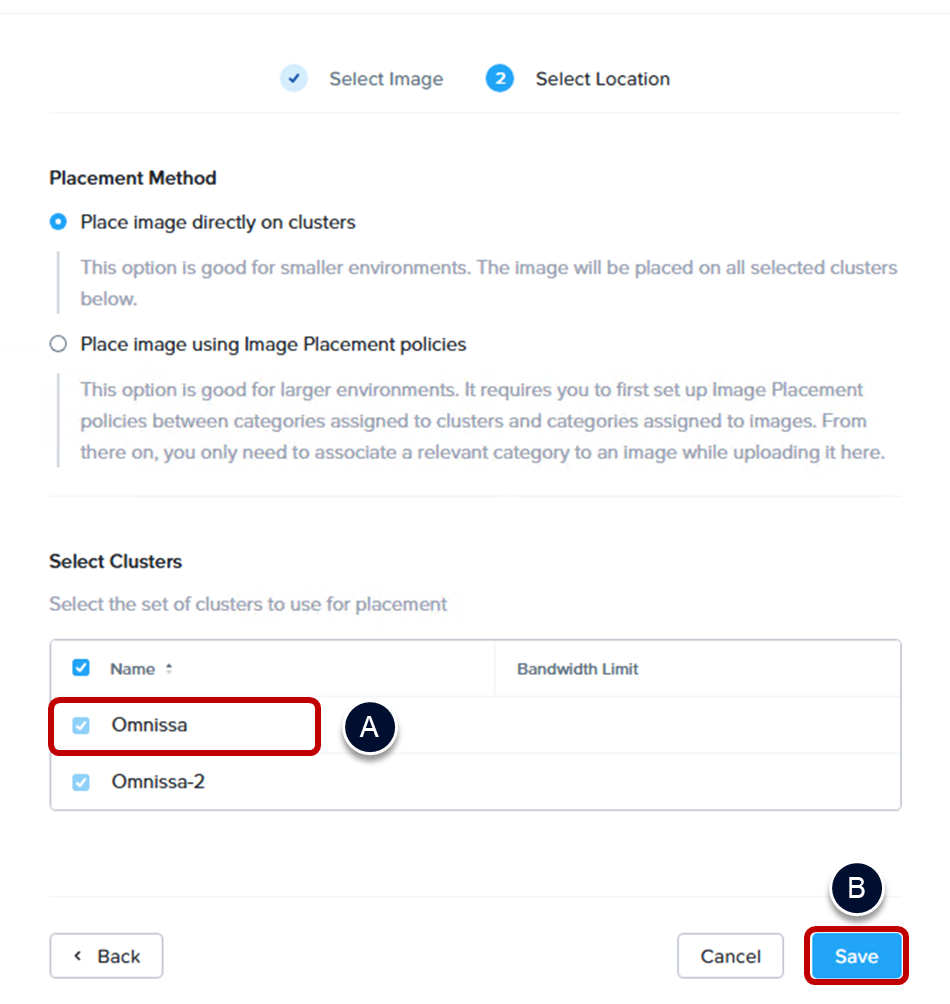
- You can monitor the progress of the Upload using the Recent Tasks functionality of the Prism Central console.
- Repeat the steps for the Nutanix-VirtIO-x.y.z.iso file.
Create an AHV-based VM
For a Nutanix AHV-based infrastructure, you use the Prism Central console to create the golden VM.
For additional guidance, see the Nutanix documentation Creating a VM through Prism Central (AHV).
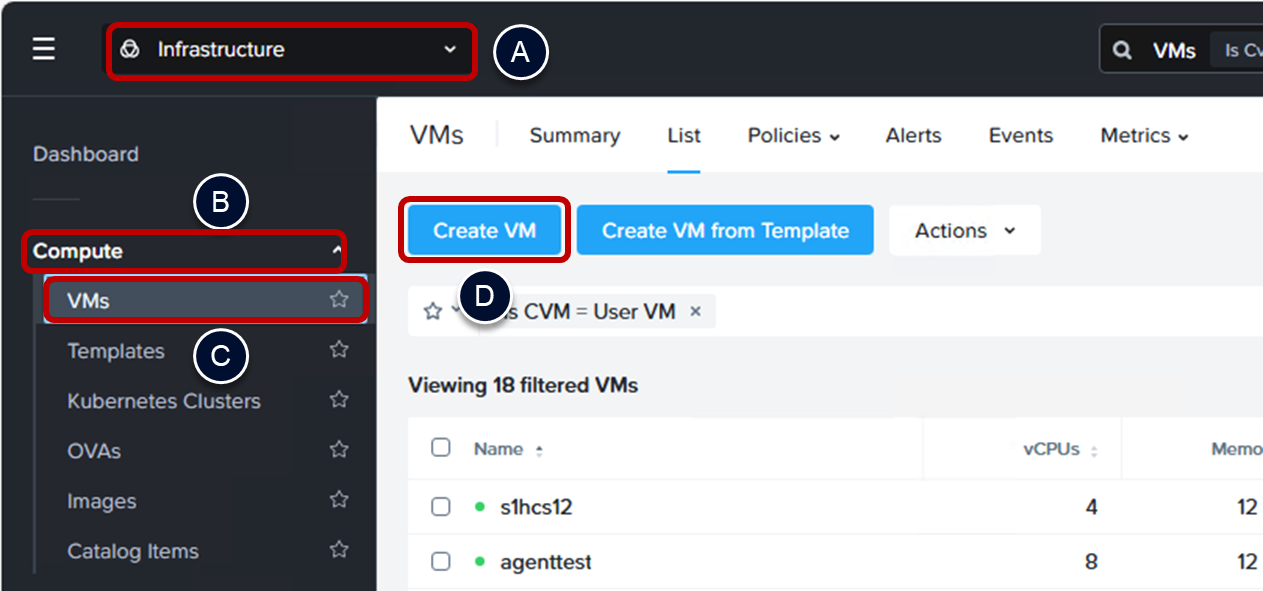
- Start the new virtual machine wizard in the Prism Central console.
- Ensure the console has the Infrastructure view selected.
- Expand the Compute section in the left-hand menu.
- Select the VMs entry in the left-hand menu.
- Select Create VM.
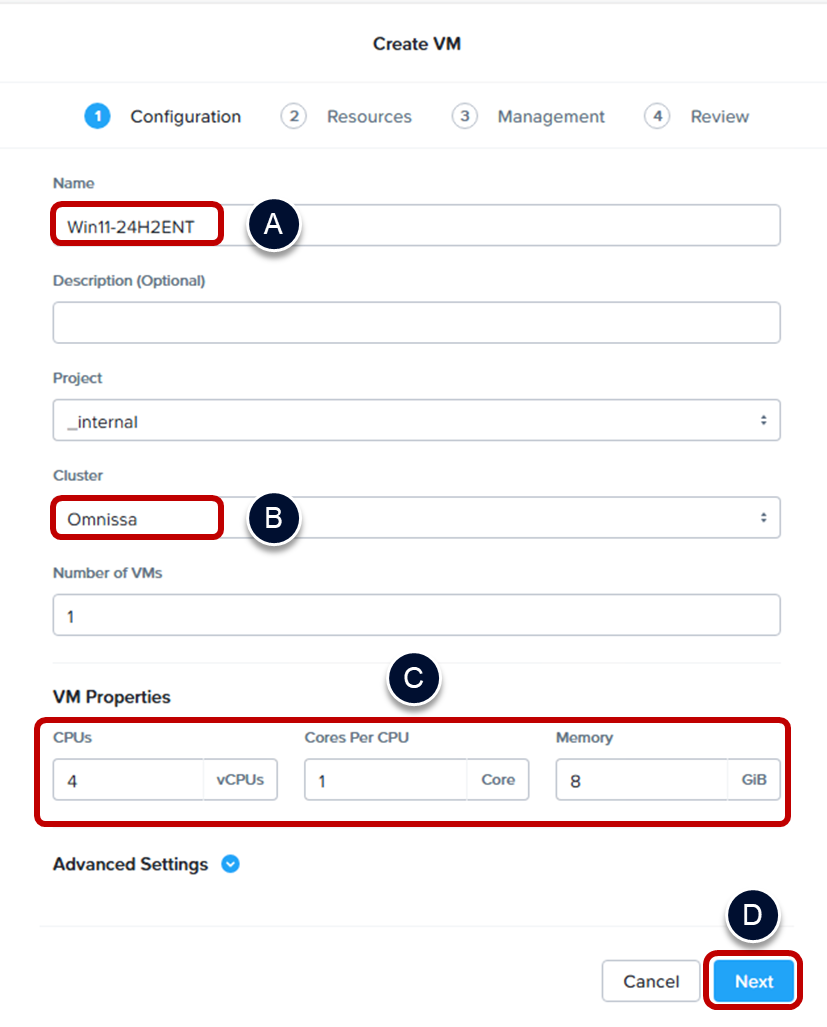
- Complete the Configuration page.
- Specify a Name for the VM.
- Choose a Cluster where the VM will be hosted.
- Configure the VM Properties, including CPUs, Cores per CPU, and Memory.
- Click Next.
AHV shows no performance difference between using a single-socket, multicore approach and multiple sockets. In general, Nutanix recommends a single-socket configuration.
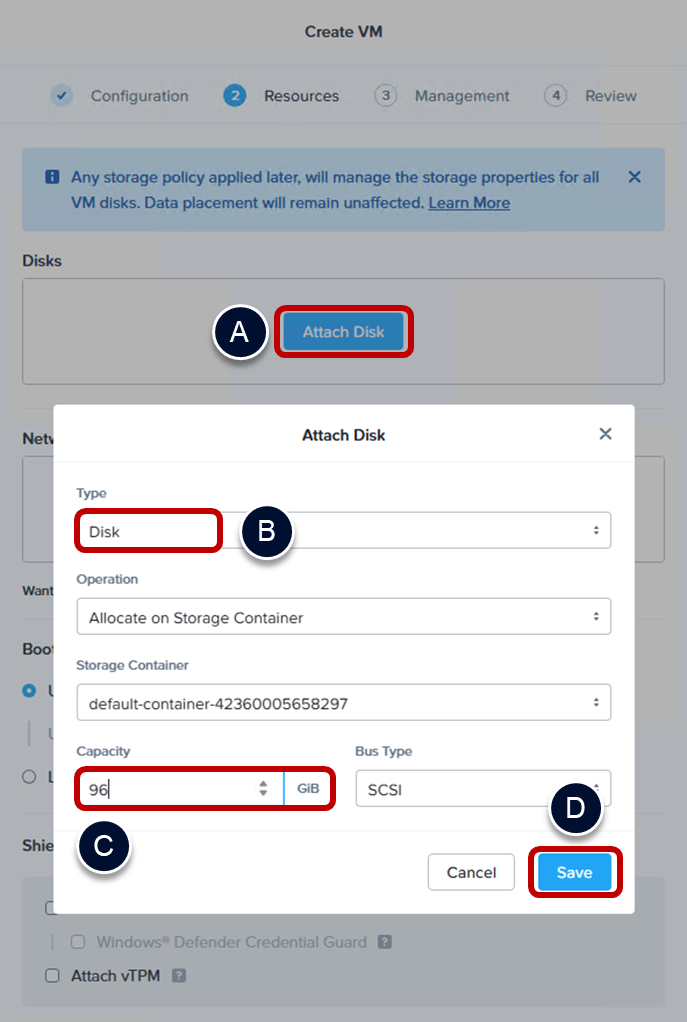
- Add hard disk to the VM.
- On the Resources page, in the Disks panel, click on Attach Disk.
- Leave the Type as Disk.
- Change the Capacity to a suitable size, e.g. 90GB.
- Click Save.
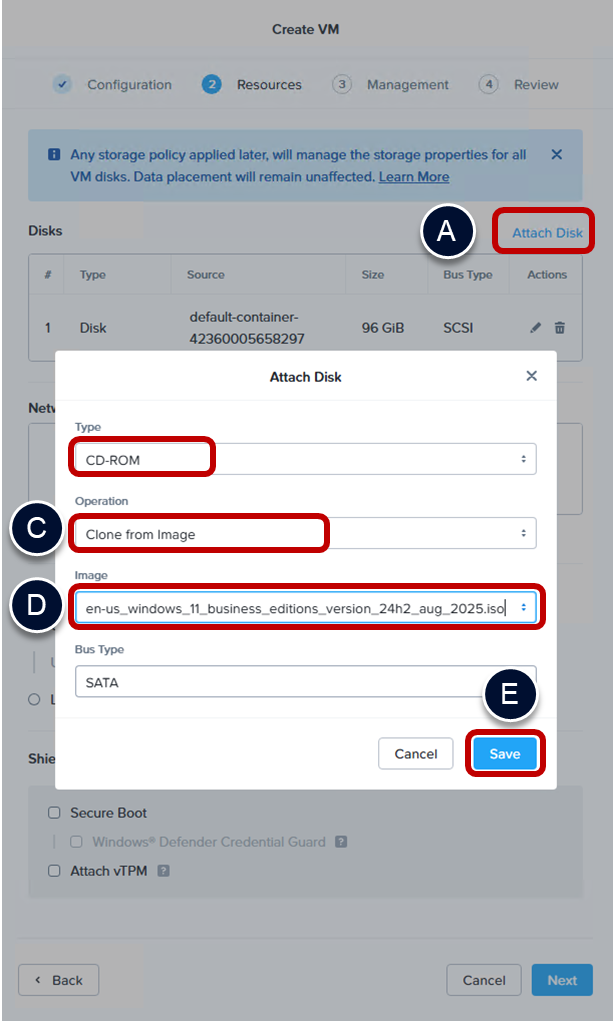
- Add CD-ROM drive for Windows installation media.
- Still on the Resources page, click on Attach Disk (just above the Disks panel).
- Change the Type to CD-ROM.
- Change the Operation to Clone from Image.
- Click on the Image field and select the appropriate Windows installation image (you uploaded this as part of the prerequisites).
- Click Save.
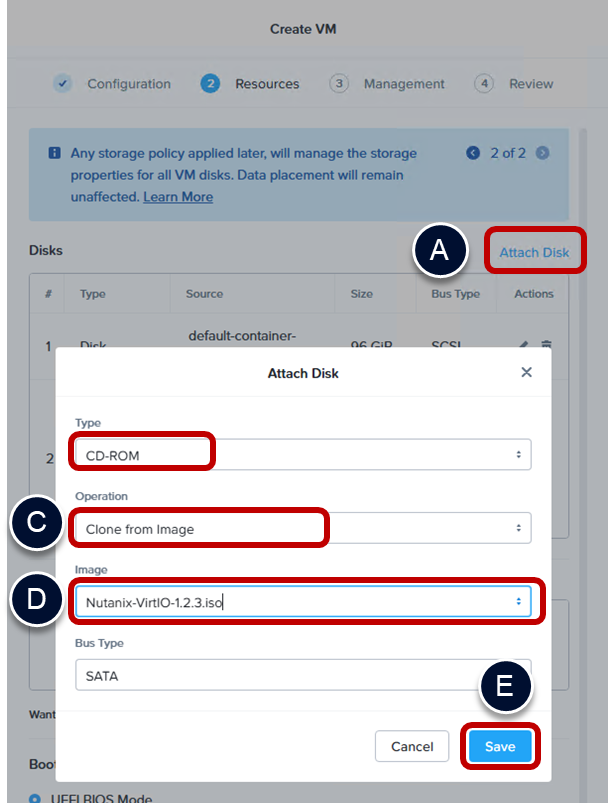
- Add CD-ROM drive for SCSI controller driver (VirtIO).
- Click on Attach Disk to add s second CD-ROM device.
- Change the Type to CD-ROM.
- Change the Operation to Clone from Image.
- Click on the Image field and select the Nutanix VirtIO installation image (you uploaded this as part of the prerequisites).
- Click Save.
- Attach a network.
- Still on the Resources page, in the Network panel, click Attach to Subnet.
- Select the appropriate Subnet that you want to attach this VM to.
- Click Save.

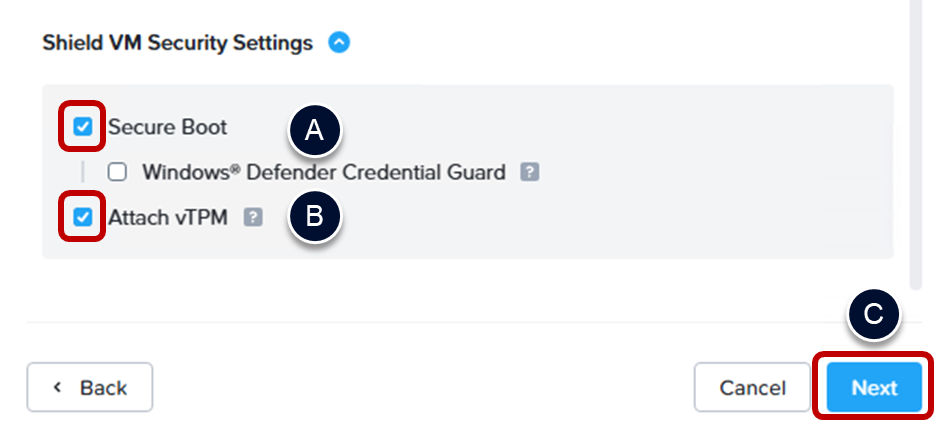
- Configure the Shield VM Security Settings.
- Tick the box next to Secure Boot.
- Tick the box next to Attach vTPM (if required).
- For Windows 11, you need to attach a vTPM to the VM.
- Click Next.
- Configure the Timezone on the Management page.
- Select the appropriate Timezone.
- Click Next.
- Review the VM settings and create the VM.
- Click Create VM.
- You can monitor the progress using the Recent Tasks functionality of the Prism Central console.
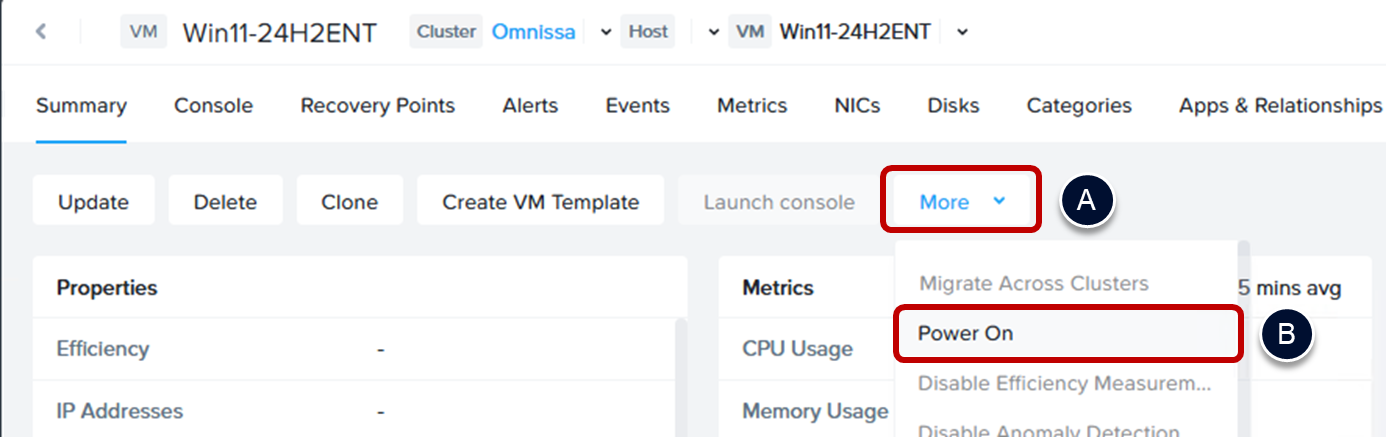
Open a remote console to an AHV VM
For a Nutanix AHV-based infrastructure, you use the Prism Central console to open a remote console to a VM.
- Using Prism Central, browse to and select the VM.
- In the VM Summary pane, click on the More menu.
- Select Power On.
- Open a Remote Console for the Virtual Machine (VM).
- In the VM Summary pane, click on the Launch console button.
- You might need to refresh the VM Summary page before the Launch Console button is available.
- Clicking on the Summary menu option should do this.
- In the VM Summary pane, click on the Launch console button.

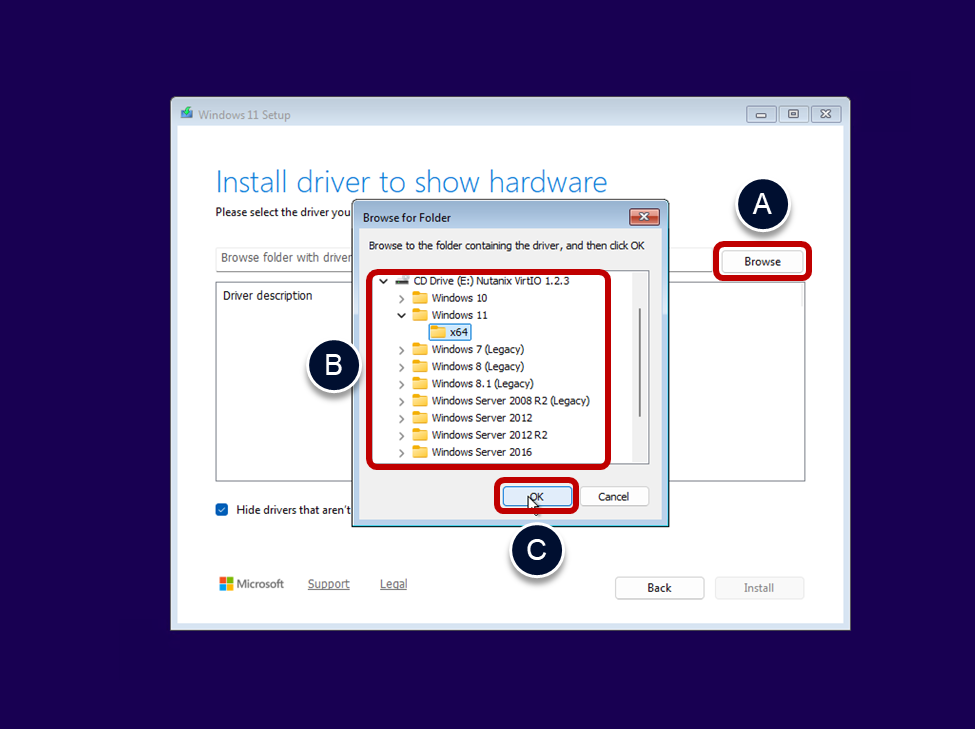
Load the SCSI driver to install Windows on an AHV VM
The SCSI driver for the AHV implementation of a SCSI controller is not included in the Windows installation media.
When you try to install Windows, you will not see any hard drives until you load the SCSI driver from the VirtIO installation media.
- Load a new driver.
- Click on Load Driver.
- Select the correct driver folder.
- Click on the Browse button.
- Navigate to the appropriate Windows and architecture folder.
- Click OK.
- Select and install the SCSI controller.
- Select the row Nutanix VirtIO SCSI pass-through controller.
- Click Install.
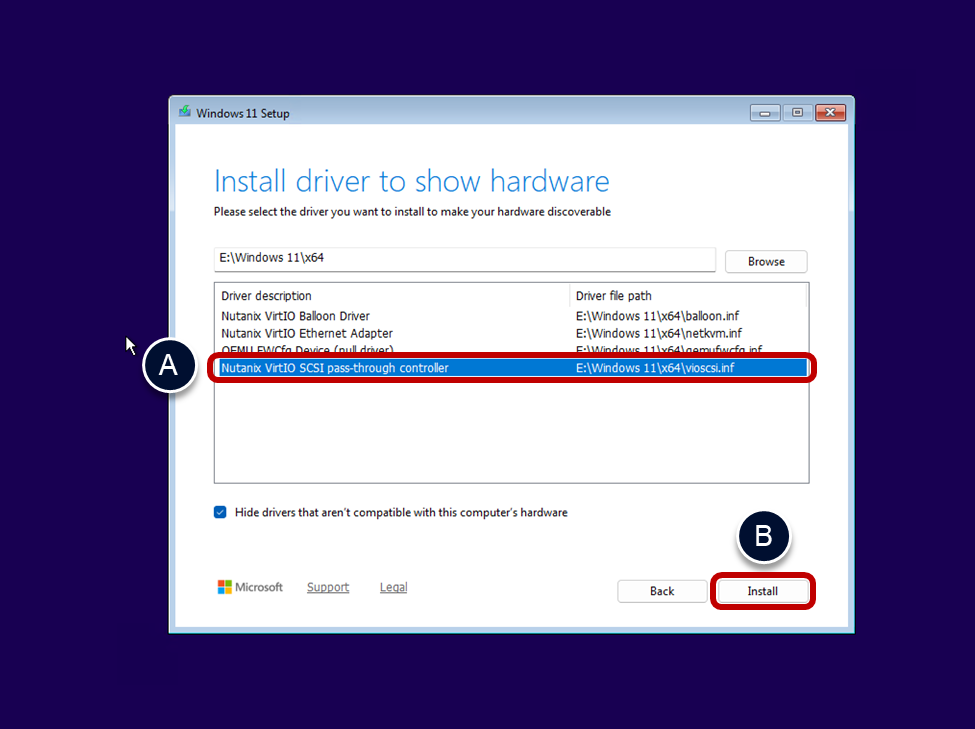
You can now return to Installing Windows, where you will be able to select the hard disk as a location to install Windows to.
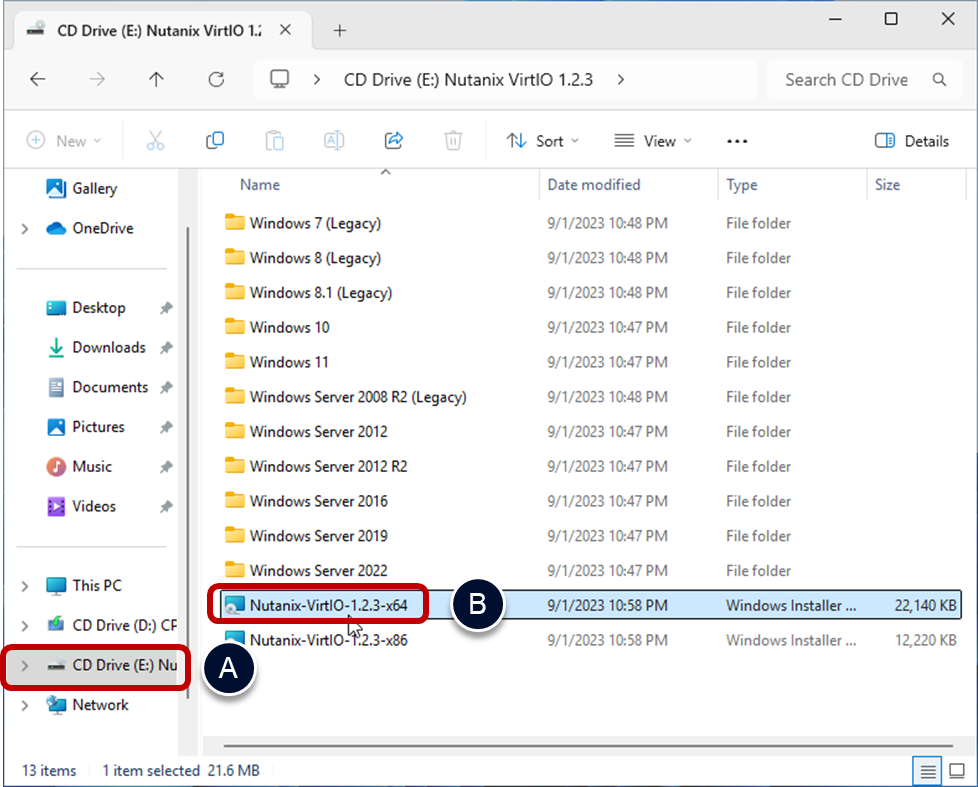
Install the VirtIO drivers
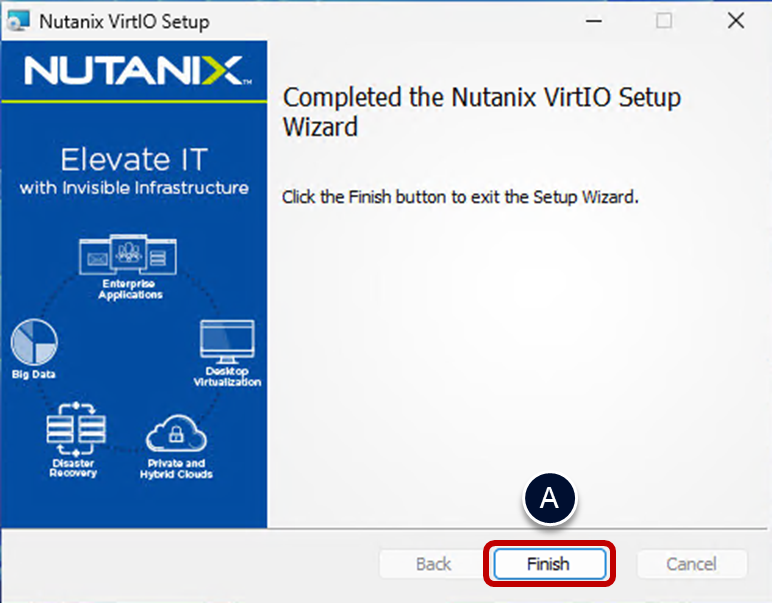
The Nutanix VirtIO drivers enable the support for various hardware devices, such as SCSI controllers, and network cards.
You must install the network driver before you can continue working with Windows.
- Open File Explorer.
- Browse to the CD Drive with the mounted Nutanix VirtIO image.
- Run the installer Nutanix-VirtIO.x.y.z-x64.msi.
- Accept the license agreement.
- Select I accept the terms in the License Agreement.
- Click Install.
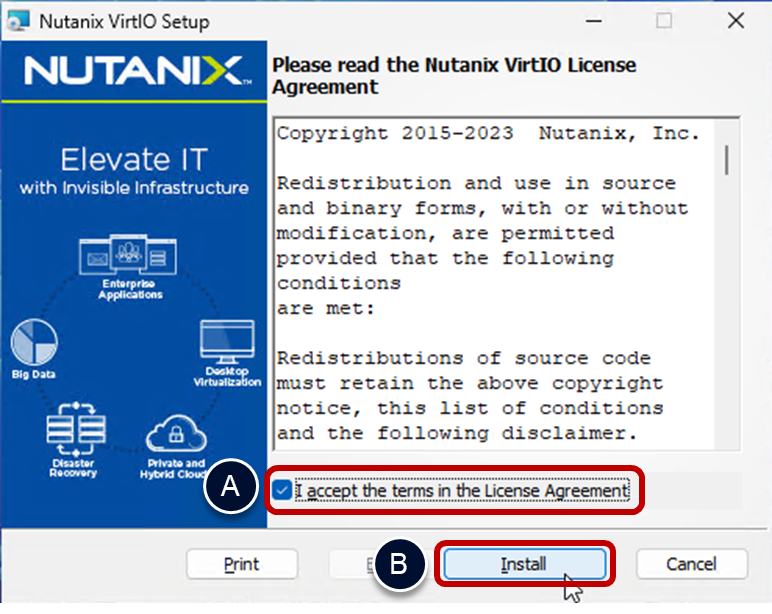
- Close the setup.
- Click Finish.
Windows will now be able to recognize the network adapter and you can continue with the next task, Update Windows.
Note: Do not install Nutanix Guest Tools (NGT) into gold images.
Install the Horizon Agent on an AHV VM
When installing the Horizon Agent on a Nutanix AHV-based VM, ensure that the following configuration is followed:
- Select the option to indicate that This machine will be used as a Golden Image.
- Ensure that the Instant Clone Agent feature is selected for installation. This feature is really a linked clone agent feature and should be selected when deploying automated clone pools on Nutanix AHV.
- Register the agent instance with a Horizon Connection Server.
Create an AHV VM recovery point
This procedure describes creating a VM recovery point for an AHV VM.
- Using Prism Central, browse to and select the VM.
- Ensure that the VM is powered off.
- Open the recovery point wizard.
- In the VM Summary pane, click on the More menu.
- Select Create Recovery Point.
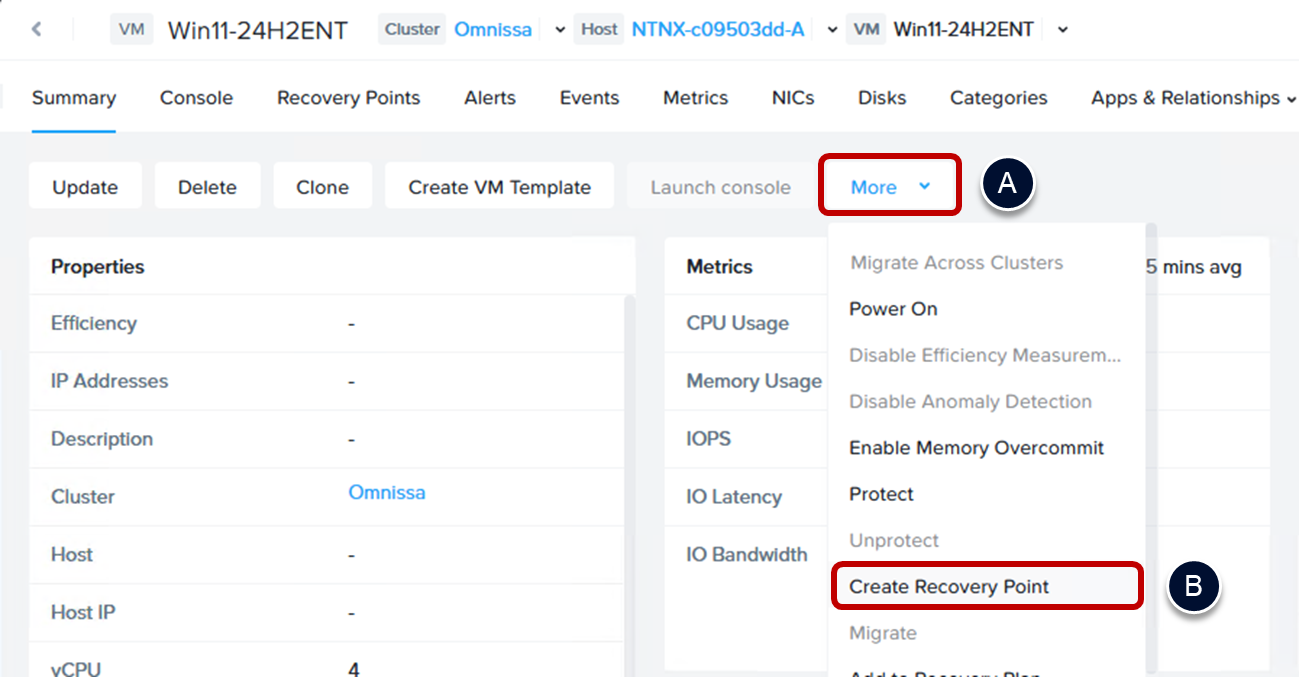
- Create the recovery point.
- Enter a meaningful name in Recovery Point Name.
- Click Create.

You can monitor the progress in Recent Tasks.
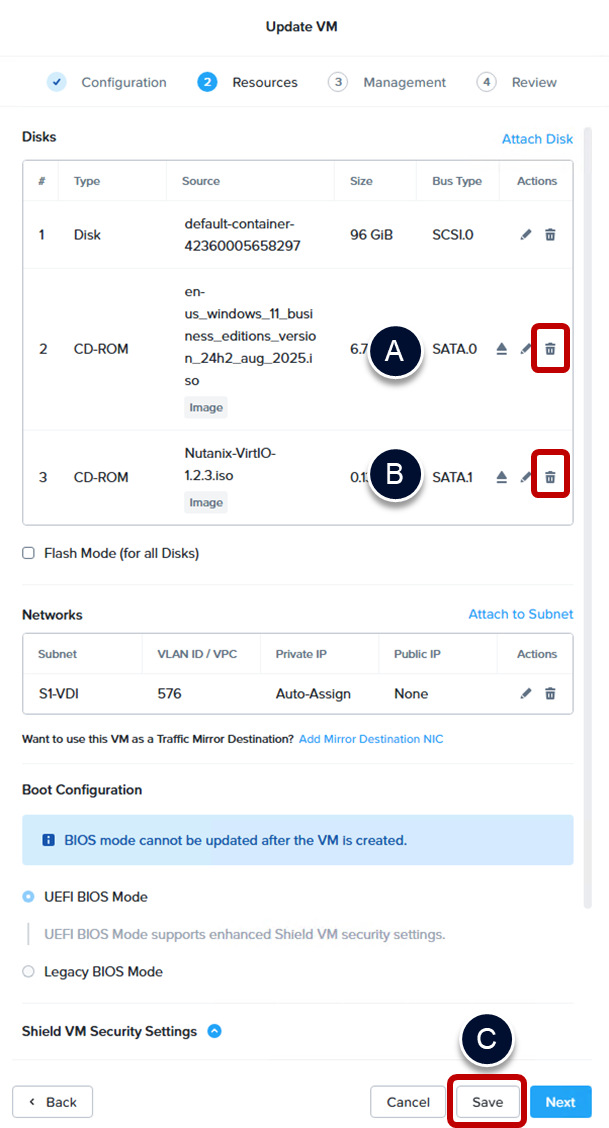
Optimize the VM hardware on AHV
If virtual hardware is no longer required it can be removed from the virtual machine, which will reduce resource consumption on each clone.
- Using Prism Central, browse to and select the VM.
- Ensure that the VM is powered off.
- Update the VM hardware.
- In the VM Summary pane, click on the Update button.

- Adjust CPU and memory (optional).
- You may wish to change the allocated CPU and memory.
- Change the CPU value.
- Change the Memory value.
- Move to Resources tab of the VM.
- Click Next.
- Remove the CD-ROM drives.
- In the first CD-ROM row, click the trash icon on the right-hand side.
- In the remaining CD-ROM row, click the trash icon on the right-hand side.
- Click Save.
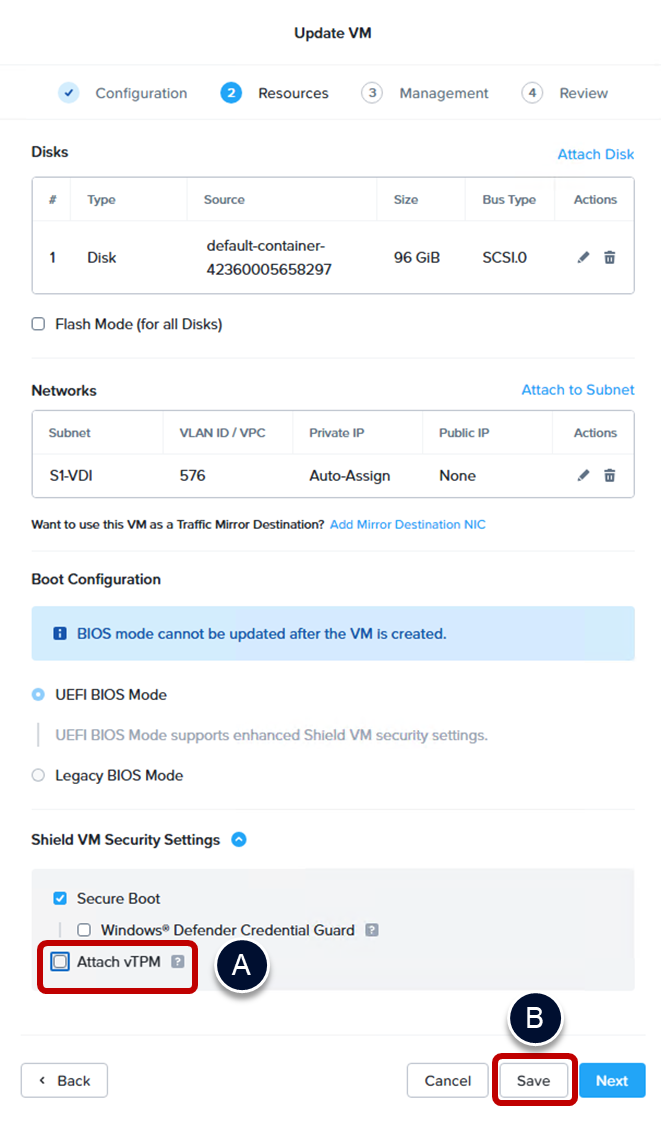
Remove the virtual TPM device
Removing a TPM device on a golden image is needed to be able to export or clone the VM. Do not remove TPM devices from production machines when software is storing keys in the TPM device.
- Update the VM hardware.
- In the VM Summary pane, click on the Update button.
- Move to Resource tab of the VM.
- Click Next.
- Remove the virtual TPM device.
- Deselect Attach vTPM.
- Click Save.
Create an AHV VM template from a VM
This procedure describes creating a VM template from the VM on Nutanix AHV.
- Using Prism Central, browse to and select the VM.
- Ensure that the VM is powered off.
- Open the VM Template wizard.
- Select Create VM Template.

- Name the VM template.
- Fill in the Name field with an appropriate name for the VM template.
- Click Next.
- Save the VM template.
- Click Save.
You can monitor the progress of the VM template creation in Recent tasks.
Update VirtIO drivers
This procedure describes updating the Nutanix VirtIO drivers in a VM.
- Download the updated VirtIO installer.
- The latest version of the Nutanix VirtIO installer can be downloaded from: https://portal.nutanix.com/page/downloads?product=ahv&bit=VirtIO
For ease of update, download the installer version (msi). The ISO version can be used but that will require you to upload the ISO to Images and then add a CD-ROM to the VM to use that image.
- Open a console to the VM and login to Windows.
- Follow the instructions in Open a remote console to an AHV VM.
- Login into Windows.
- Run the VirtIO installer.
- Run the Nutanix-VirtIO.x.y.z-x64.msi
- Follow the instructions in Install the VirtIO drivers.
- Create a new VM template and update the Horizon pool with using the new VM template.
- Follow the instructions in Create an AHV VM template from a VM.
Microsoft Azure specific guidance
This section only contains guidance on performing specific activities on Microsoft Azure. For the overall procedure, refer to Overview of the procedure to build a golden image, at the beginning of this guide.
Prerequisites
If you are using Horizon Cloud Service consuming Microsoft Azure capacity, you must provide your own Microsoft Azure IaaS capacity and configure the Microsoft Azure prerequisites for a Horizon Cloud Service deployment.
Methods to add Microsoft Azure images
There are three methods to add a Microsoft Azure image to Horizon Cloud.
- Import an image from Microsoft Azure Marketplace - Use this option if you need an image based on the latest OS builds available in the Azure Marketplace.
- Add an image with Microsoft Custom VM - Choose this option if you have a custom workflow in Azure that generates base VMs for preparing images. This method also supports adding an image on a custom VM hosted on a Microsoft Azure dedicated host.
- Add an Image from Microsoft Azure Compute Gallery - Select this option if you have an existing image in your Microsoft Azure Compute Gallery.
For more information, see Managing Images for Microsoft Azure Provider Deployments.
Amazon WorkSpaces Core specific guidance
This section contains an overview and links to guidance on image import for deployments that use Amazon WorkSpaces Core capacity.
Amazon WorkSpaces Core image import for Horizon 8 deployments
There are two distinct import methods for integrating images with Omnissa Horizon 8 when using AWS WorkSpaces Core capacity. Each uses a different AWS service.
- Method 1: AWS WorkSpaces Core custom image import process
Setting up an image with Horizon 8 on AWS WorkSpaces Core involves a defined set of configuration steps. It begins with preparing a base image in Amazon EC2, followed by importing it into the WorkSpaces Core platform using the Horizon management console.
- Method 2: Import using AWS VM import/export process
AWS VM Import/Export serves as a foundational tool for migrating virtual machines from on-premises environments to Amazon EC2. It’s a general-purpose utility designed for broad infrastructure migration.
For more information, see Amazon WorkSpaces Core image import for Horizon 8 deployments.
Amazon WorkSpaces Core image import for Horizon Cloud deployments
There are three distinct methods for importing images to Horizon Cloud when using AWS WorkSpaces Core capacity.
- Method 1: AWS EC2 custom instance import
This method involves creating a standard Amazon Machine Image (AMI) from a prepared EC2 instance within your AWS account and then having Horizon Cloud manage the conversion and import process into the WorkSpaces Core catalog
- Method 2: AWS WorkSpaces Core custom image import process
This approach leverages an image that has already been processed and published in the AWS WorkSpaces image catalog, rather than using standard EC2 AMIs
- Method 3: Import using AWS VM import/export process
AWS VM Import/Export serves as a foundational tool for migrating virtual machines from on-premises environments to Amazon EC2. It’s a general-purpose utility designed for broad infrastructure migration.
For more information, see Amazon WorkSpaces Core image import for Horizon Cloud deployments.
Why you should optimize
The considerations for creating a Windows image for deployment as virtual machines are different from those if using it on physical machines.
- Physical machines – Resource usage on a physical machine only impacts the user who is using that machine. The operating system on a physical machine determines whether or not resources are available. One-time actions impact the user only the first time they are performed because the machine is never refreshed. For example, a user typically gets a new user profile the first time they log on, and they continue to use that same profile with all subsequent logons.
- Virtual machines – In contrast, in a virtual environment, the guest operating system behaves as if it has exclusive access to the CPU cores, but in reality, the cores are shared between multiple virtual machines. When using nonpersistent Omnissa Horizon VMs or user profiles, the actions that are intended to run only once could run every time a user logs on.
Therefore, with virtual desktops, one-time system actions must be configured in the golden image, and one-time user actions must be configured in the default user profile. In addition, to reach a higher consolidation ratio, increasing the number of VMs hosted on a single hypervisor host, it is recommended to turn off Windows features that are not required.
Advantages of an optimized image
Optimizing the golden image is well worth the time and effort involved. Savings are returned on a variety of fronts.
Initial deployment time savings
By trimming the image, you can reduce the amount of required disk space by up to 80 percent, which translates to a significant reduction in the time it takes to create desktop pools (up to 3 times faster).
By default, Windows generates native images and performs disk cleanup actions after being idle for 10 minutes, which can use a full core for up to an hour. When deploying a large pool, this means that the cluster might not be usable for up to an hour after deployment. With image optimization, however, this process could be reduced to 30 seconds.
User logon time savings
When a user logs on, the portion of logon time devoted to creating a standard user profile can take up to 30 seconds, but when optimized, this portion of logon time could be reduced to 3.5–10.5 seconds.
Host memory savings
A default deployment can use up to 2 GB of active memory, but with optimization, memory requirements can be reduced significantly (up to 50 percent).
Host CPU savings
An optimized deployment can reduce CPU usage by up to 40 percent, allowing for up to a 40-percent increase in VM density on the physical hypervisor host.
Storage and IOPS savings
Because of the earlier-mentioned disk-space savings, you realize cache-usage improvements as well. Deactivating unneeded features and compressing the OS files means a larger portion can fit in the cache, which can reduce the amount of IOPS required by up to 250 percent.
Windows OS Optimization Tool for Horizon
The Omnissa Windows OS Optimization Tool for Horizon (often referred to as OSOT) helps optimize Windows 10/11 and Windows Server systems for use as VDI or RDSH server VMs.
OSOT includes customizable templates to activate or deactivate Windows system services and features, according to recommendations and best practices, across multiple systems. Because most Windows system services are enabled by default, OSOT can be used to easily deactivate unnecessary services and features to improve performance. For more information on the Windows OS Optimization Tool for Horizon, see Optimizing Images for Horizon.
OSOT also includes the ability to run commonly used Windows tools for image creation and optimization, including the Native Image Generator (Ngen.exe), NTFS Compression (compact.exe), and Deployment Image Servicing Management (DISM.exe). These tools can be run from the Finalize tab of the OSOT.
Using automation
A recommended alternative to manually creating the VM image is to use automation, which is provided by Microsoft Deployment Toolkit (MDT). For step-by-step instructions, see the companion guide Using Automation to Create Optimized Windows Images for Horizon VMs.
Summary and additional resources
With the image optimization procedures in this guide, you are able to achieve a significant reduction in the amount disk space, CPU, and memory used by virtual desktop and RDSH server VMs and their vSphere hosts. The result is corresponding savings in initial deployment time, user logon times, and IOPS.
- Image optimization techniques included:
- Deleting unnecessary files and folders, such as event logs and temporary files
- Compressing OS files
- Zeroing out free disk space and shrinking the disk
Using the Windows OS Optimization Tool for Horizon greatly simplifies many of these tasks.
This guide also provided step-by-step instructions for configuring the Windows image to perform optimally in a virtual environment, where CPU cores are shared among many VMs, and where users might be accessing a new VM every time they log in, though they probably will not realize it.
The procedures in this guide help you create an optimized Windows image that you can use in a Horizon implementation or in other types of deployments.
Additional resources
For more information about the products mentioned in this guide, you can explore the following resources:
- Horizon 8 documentation
- Horizon Cloud documentation
- Dynamic Environment Manager documentation
- App Volumes documentation
- Omnissa Product Interoperability Matrix
Changelog
The following updates were made to this guide:
| Date | Description of Changes |
| 2026-04-30 | Added notes to clarify that when installing the Horizon Agent, you should always leave the Instant Clone feature enabled if you intend creating automated pools, regardless of the hypervisor being used. |
| 2025-11-08 | Added instructions about disabling Bitlocker service before running Generalize. |
| 2025-11-20 | Added instructions to remove BingSearch from current user as part of the Clean up Microsoft Store apps step. (With latest Windows updates, this appears to get installed for the current user after a Sysprep generalize). |
| 2025-10-03 | Major rewrite and reorganization to make the procedure non-hypervisor specific. Tasks expanded to make the guidance clearer. Order of tasks changed to provide more reliable and consistent image build on different hypervisors. Separate sections to give instructions on specific activities on the different hypervisor platforms. These are referenced inline to the overall procedure. |
| 2024-05-13 | Update links for Omnissa Tech Zone, Docs, and Downloads |
| 2023-01-12 | Added table and wording to indicate which version of the PVSCSI driver to use depending on which version of Windows you are installing. |
| 2022-12-07 | Added Windows 10 21H2/22H2, Windows 11 21H2/22H2 and Server 2022. Removed Windows 10 1607 LTSB, 1909, 2004 and Server 2016 as they are out of mainstream support by Microsoft. Dropped Windows 10 1809 LTSC, 20H2, 21H1 and Server 2019 from the list of extensively tested operating systems as by the time the guide is published it will have less than a year of mainstream Microsoft support remaining. Updated for vSphere 8.0. Updated for Windows OS Optimization Tool for Horizon 2204. Updated for Horizon 2209. Added section for vGPU. Updated for Horizon Cloud on Azure 22.2.0. |
| 2021-07-01 | Added links to Using Automation to Create Optimized Windows Images for Horizon VMs. Changed storage controller to PVSCSI for future compatibility. Removed SVGA driver deselection from Tools install, as it is no longer order dependent with the Horizon Agent with latest vSphere Tools. Added Windows 21H1 Education/Enterprise/Professional to the list of tested operating systems. Removed all Windows 10 1709/1803/1809 (besides LTSC)/1903 editions and 1909 Pro from the list of tested operating systems as they are no longer supported. Retested all supported operating systems with 2021-06-08 updates. Updated for vSphere 7.0 U2. Updated for OSOT 2106 and higher. Updated links to product documentation topics. |
| 2020-09-10 | Added Horizon Cloud on Azure. Added Windows 2004/20H2 Education/Enterprise/Professional to the list of tested operating systems. Retested all operating systems with 2020-09-08 updates. Updated for vSphere 7. Updated for OSOT 1170 and higher. Updated for Horizon/App Volumes/Dynamic Environment Manager 2006. |
| 2020-01-30 | Removed Windows 7/8.1, Server 2012R2, Windows 10 1709/1803 Pro from the list of tested operating systems. Added Windows Server 2019 and .NET Framework 3.5. Retested all operating systems with 2020-01-14 updates. Added a new chapter for day-2 updates for Tools and Windows Update. Added new sections that correspond to the Generalize and Finalize tabs of the OS Optimization Tool (January 2020 release) and removed the procedures that told how to do these tasks manually. |
| 2019-10-10 | Removed mention of Windows mandatory profiles because this feature does not work reliably when used with Windows 10 version 1809 and later. Also, we found that login times are nearly equivalent if you use default user profiles instead of mandatory user profiles. Removed the section "Configure Local Group Policies" because this task is now done by the OS Optimization Tool (as of the September 2019 release). Renamed User Environment Manager to Dynamic Environment Manager. Updated links to product documentation topics. |
About the author and contributors
- Graeme Gordon, Senior Staff Architect, Omnissa
- Hilko Lantinga, Staff Engineer 2, Omnissa.
Feedback
Your feedback is valuable.
To comment on this paper, contact us at tech_content_feedback@omnissa.com.