Dynamic Environment Manager architecture
This chapter is one of a series that make up the Omnissa Workspace ONE and Horizon Reference Architecture, a framework that provides guidance on the architecture, design considerations, and deployment of Omnissa Workspace ONE and Omnissa Horizon solutions. This chapter provides information about architecting Omnissa Dynamic Environment Manager.
A companion chapter, Dynamic Environment Manager Configuration, provides information about common configuration and deployment tasks.
Introduction
Omnissa Dynamic Environment Manager provides profile management by capturing user settings for the operating system and applications. Unlike traditional application profile management solutions, Dynamic Environment Manager does not manage the entire profile. Instead, it captures settings that the administrator specifies. This reduces login and logout time because less data needs to be loaded. The settings can be dynamically applied when a user launches an application, making the login process more asynchronous. User data is managed through folder redirection.
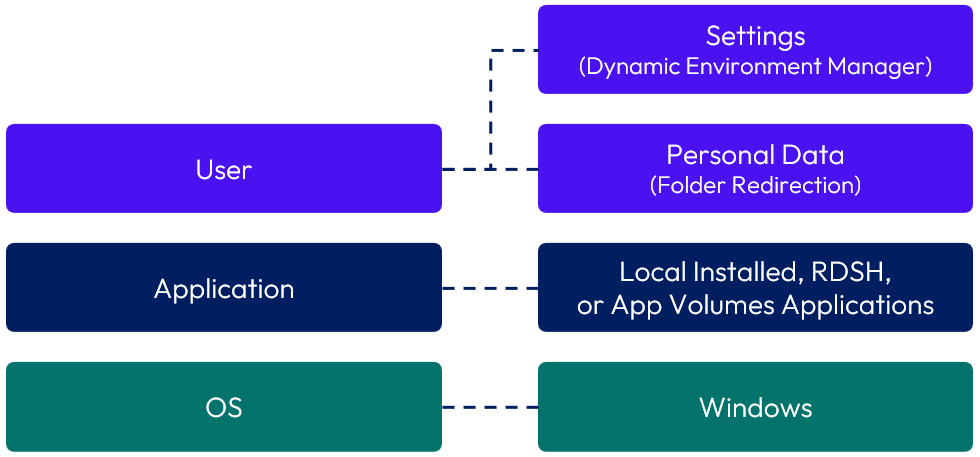
Figure 1: Dynamic Environment Manager
Components and Key Features
Dynamic Environment Manager is a Windows-based application that consists of the following components.
Table 1: Dynamic Environment Manager Components
| Component | Description |
| Active Directory Group Policy | Mechanism for configuring Dynamic Environment Manager. ADMX template files are provided with the product. |
| NoAD mode XML file | An alternative to using Active Directory Group Policy for configuring Dynamic Environment Manager. With NoAD mode, you do not need to create a GPO, write logon and logoff scripts, or configure Windows Group Policy settings. |
| IT configuration share | A central share (SMB) on a file server, which can be a replicated share (DFS-R) for multi-site scenarios, as long as the path to the share is the same for all client devices. Is read-only to users. If using DFS-R, it must be configured as hub and spoke. Replication between multiple file shares that are all actively being used for writes is not supported. |
| Profile archive share | File shares (SMB) to store the users’ profile archives and profile archive backups. Is used for read and write by end users. For best performance, place archives on a share near the computer where the Dynamic Environment Manager FlexEngine (desktop agent) runs. |
| FlexEngine | The Dynamic Environment Manager agent that resides on the virtual desktop or RDSH server VM being managed. |
| Flex configuration file | Files that contain data describing how a given application or Windows setting is stored in the registry or file system. FlexEngine uses these Flex configuration files to read and store user settings. |
| Application Profiler | Utility that creates a Dynamic Environment Manager Flex configuration file from an application by determining where the application stores configuration data in the registry and file system. Dynamic Environment Manager can manage settings for applications that have a valid Flex configuration file in the configuration share. |
| Helpdesk Support Tool | Allows support personnel to reset or restore user settings. Enables administrators to open or edit profile archives. Allows analysis of profile archive sizes. Includes a log file viewer. |
| Self-Support | Optional self-service tool to allow users to manage and restore their configuration settings on an environment setting or application. |
| SyncTool | Optional component designed to support physical PCs working offline or in limited bandwidth scenarios. |
| DirectFlex | Feature that provides the option to import application settings at application startup rather than at user logon |
The following figure shows how these components interact.
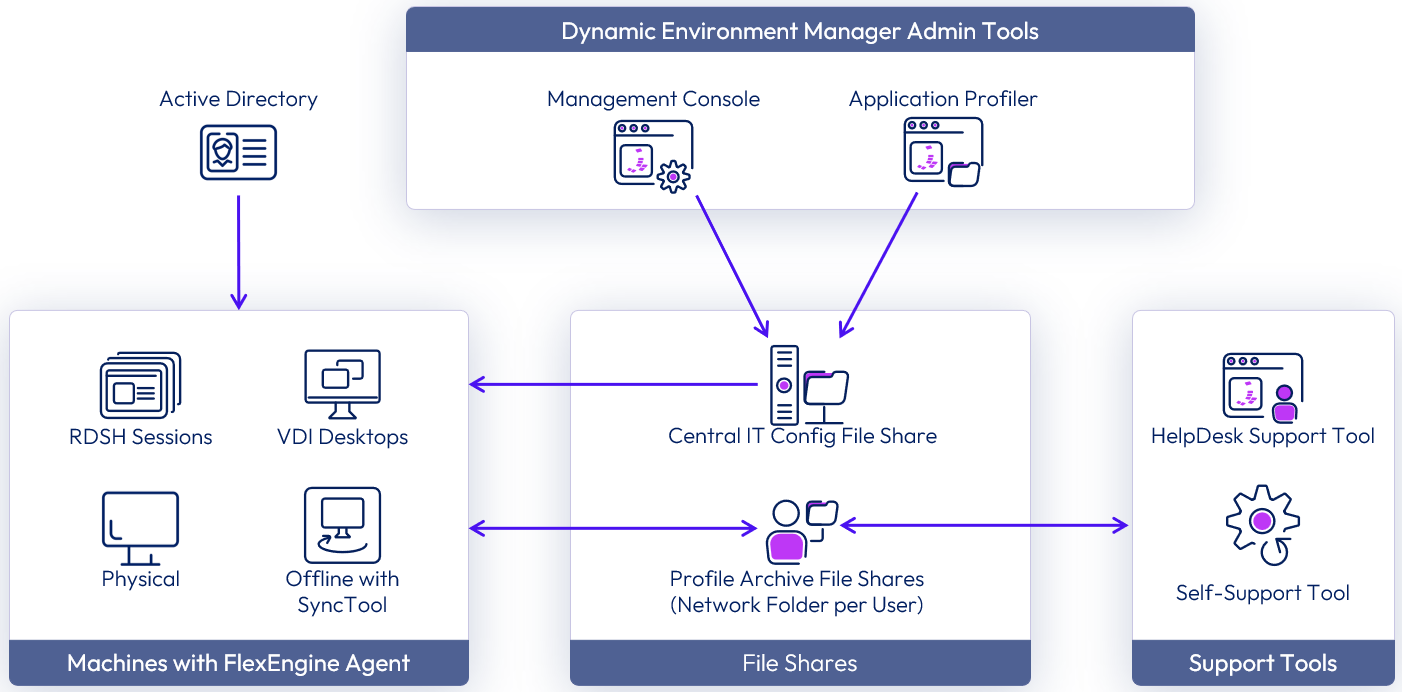
Figure 2: Dynamic Environment Manager Logical Architecture
See Network Ports in Horizon 8 for a comprehensive list of ports requirements for Horizon 8, Dynamic Environment Manager, and much more. For the ports that SMB uses, see Server Message Block. For the ports required by GPOs, see the Microsoft article Configure Firewall Port Requirements for Group Policy.
Table 2: Implementation Strategy for Dynamic Environment Manager
| Decision | Dynamic Environment Manager was implemented to support both Horizon and Horizon Cloud Service environments. |
| Justification | Dynamic Environment Manager enables configuration of IT settings such as Horizon Smart Policies, predefined application settings, and privilege elevation rules, while providing user personalization for Windows and applications. Applied across all types of Horizon environments, this strategy provides consistency and a persistent experience for the users. |
DirectFlex
DirectFlex improves usage efficiency. If you configure an application for DirectFlex, the application’s settings are read when the user starts the application rather than when the user logs in to the operating system. Changes to application settings are written back to profile archives when the user exits the application instead of when the user logs out of the operating system.
FlexEngine, which is the Dynamic Environment Manager agent running in the virtual desktop or RDSH server, starts when a user logs in from a client device, and it runs until the user logs out. When a user logs in, the Active Directory GPO or NoAD.xml file configures FlexEngine. FlexEngine starts at login, imports user environment settings from the configuration share, and imports personalization settings (for those applications not configured with DirectFlex) from the profile archive share.
Once logged in, when a user opens an application, FlexEngine uses DirectFlex to dynamically load and apply the related configurations such as personalization and predefined application settings. When the user closes the application, FlexEngine uses DirectFlex to copy the changes back to the user profile archive share. When the user logs out, FlexEngine writes the remaining Windows personalization back to the user profile archive share. The following figure illustrates this process.

Figure 3: Typical Workflow of the FlexEngine Agent and DirectFlex
If an IT administrator makes changes while a user is logged in, the changes are not applied until the next time the user logs in to a session. Changes made by the user are applied to the current session and the following sessions.
Without DirectFlex, all settings are read during the login process and written back during the logout process. For example, a user could have 10 applications on the desktop but use only 2 applications in one session. If DirectFlex is not enabled, settings for all 10 applications are loaded, which can slow down the login and logout process if there are many settings.
Take the following guidelines into consideration when enabling DirectFlex:
- To enable DirectFlex, FlexEngine must be configured to run at login. See Configure Run FlexEngine at Logon and Logoff Setting.
- Do not enable DirectFlex for configuration files containing Windows settings such as the wallpaper, keyboard, and regional settings. These settings must always be processed during login and logout.
- Best practice is to not enable DirectFlex for applications that act as middleware and use many plug-ins, such as Microsoft Office and Internet browsers.
Table 3: Implementation Strategy for DirectFlex
| Decision | DirectFlex was enabled for appropriate application configuration files. |
| Justification | DirectFlex improves login and logout times by reducing the amount of application configuration data copied from and to the profile archive share. |
Flex Configuration Files for Applications
Dynamic Environment Manager provides you, the administrator, with granular control over which parts of the user profile are managed. Given this design approach, you must specify which applications and settings will be managed. Flex configuration files are imported or created for each application you want to manage with Dynamic Environment Manager.
A number of Flex configuration files, or templates, for common Windows settings and applications such as Microsoft Office are included when you install the Dynamic Environment Manager Management Console.
An included utility called the Application Profiler can be used to create your own Flex configuration files and predefined settings templates. For more information, see Introduction to Dynamic Environment Manager Application Profiler.
Triggers
Dynamic Environment Manager relies on triggers to invoke a variety of actions. Events such as a login, logout, application start, and application exit are triggers used by FlexEngine to dynamically import and export Windows and applications settings as they are needed. Several additional triggers such as workstation lock, session reconnect, and All AppStacks attached (Omnissa App Volumes) are available and may be used to create triggered tasks.
Note: The All AppStacks attached trigger functions in the same way for both App Volumes 2 AppStacks and App Volumes 4 packages.
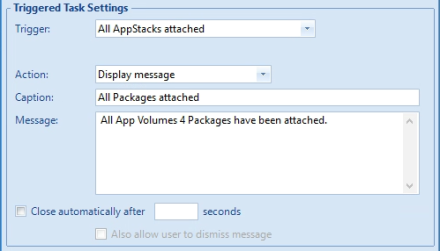
Figure 4: Triggered Task Settings
Triggered tasks consist of a trigger and an action to perform. For example, creating a triggered task that uses the trigger Session reconnect with the action DirectFlex refresh will cause DirectFlex settings to be refreshed when a Horizon user connects to a previously disconnected virtual desktop or application session.
A variety of user environment settings such as file-type associations, drive mappings, and printer mappings can be refreshed using the User environment refresh trigger. Combining triggers with conditions supports advanced capabilities such as location-aware printing.
For example, when a user connects to a Horizon session from an endpoint in building A, Dynamic Environment Manager can map the appropriate printers based on the endpoint device’s IP range. If the user disconnects, moves to building B, and reconnects to the same Horizon session, Dynamic Environment Manager can dynamically map the new printers based on the new location of the endpoint device.
See Configure Triggered Tasks for more information.
SyncTool for Offline Scenarios
SyncTool lets you use Dynamic Environment Manager when Windows computers are working offline or have unreliable or slow WAN connections. SyncTool is not suitable for VDI and RDSH users.
SyncTool synchronizes the Dynamic Environment Manager configuration share and the personal archives to a local cache folder, so the user can always log in, even when the WAN connection is unreliable or unavailable. SyncTool is completely configurable and can generate detailed log files that provide troubleshooting assistance for IT.
You can limit network traffic by configuring SyncTool to replicate data only at specified intervals.
The following figure shows the SyncTool architecture and how the components work together.
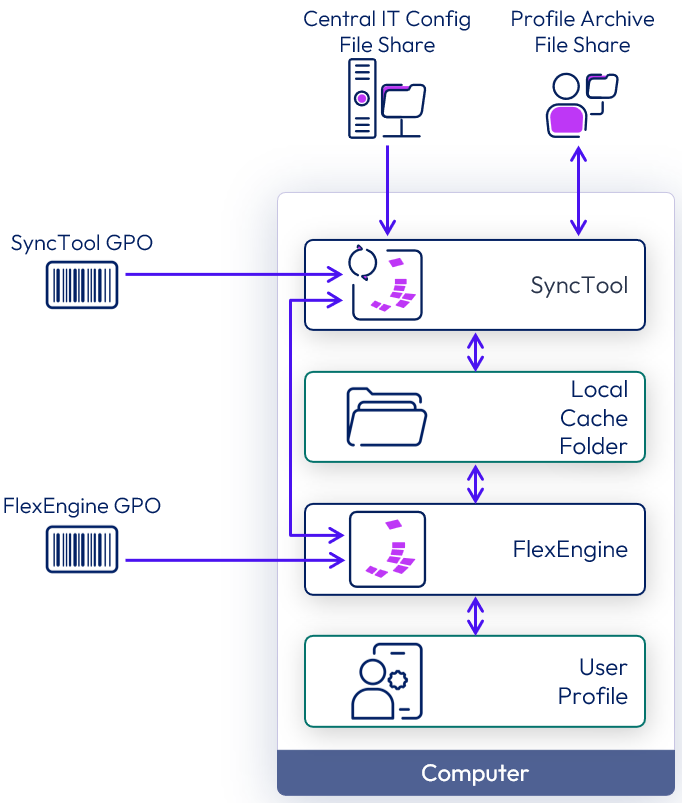
Figure 5: SyncTool Architecture
See the Dynamic Environment Manager SyncTool Administration Guide for more information.
User Profile Strategy
A Windows user profile is made of multiple components, including profile folders, user data, and the user registry. See About User Profiles for more information about Windows user profiles.
There are a number of user profile types, such as local, roaming, and mandatory. Dynamic Environment Manager complements each user profile type, providing a consistent user experience as end users roam from device to device. Dynamic Environment Manager is best-suited to run long-term with local and mandatory profile types. See Dynamic Environment Manager Scenario Considerations for more information and considerations when using roaming profiles.
Folder redirection can be used to abstract user data from the guest OS, and can be configured through GPO or using the Dynamic Environment Manager user environment settings.
See the Folder Redirection section in Dynamic Environment Manager Configuration for folder redirection options and recommended practices.
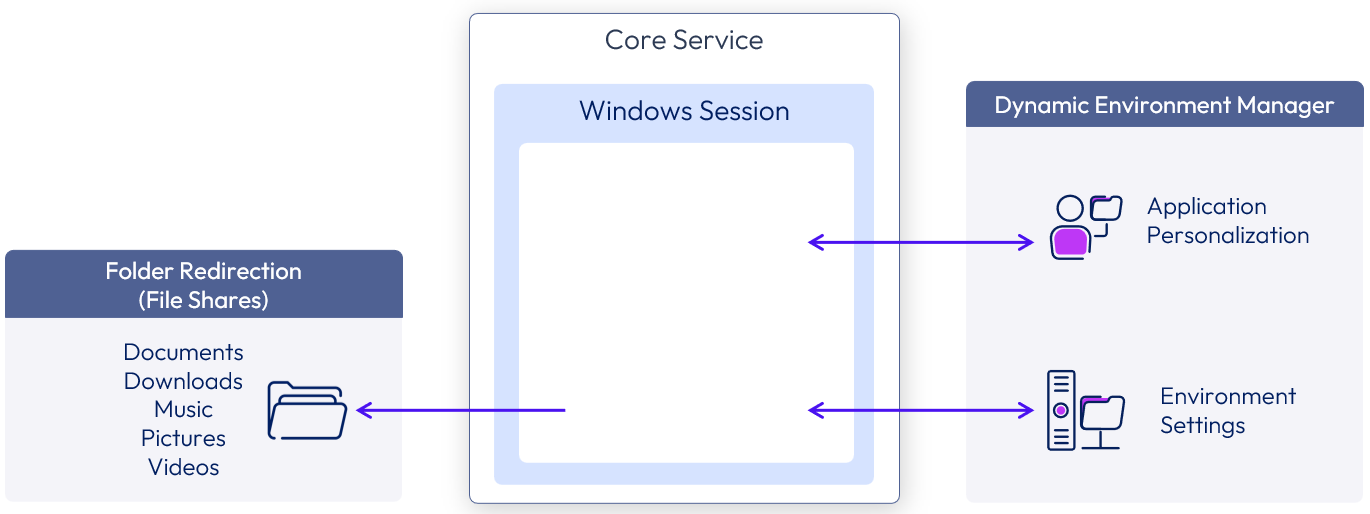
Figure 6: Dynamic Environment Manager User Profile Strategy
Table 4: User Profile Strategy with Dynamic Environment Manager
| Decision | Local user profiles and folder redirection were used in this reference architecture. A local user profile is automatically created when a user logs on to the Windows VM. |
| Justification | With local user profiles, a user can modify their desktop during a session. Dynamic Environment Manager persists those Windows and application customizations you specified with Flex configuration files. Extraneous changes are simply discarded when the VM is refreshed. |
Note: Previous versions of this reference architecture recommended the use of mandatory user profiles to improve logon times. In our testing, mandatory profiles do not work reliably with Windows 10 version 1809 and later. By following the process outlined in Manually Creating Optimized Windows Images for Horizon VMs, you can achieve comparable logon times with local profiles.
Optimized, local profiles are strongly recommended with Dynamic Environment Manager.
Infrastructure
Omnissa Dynamic Environment Manager requires little infrastructure. SMB file shares are used to host the configuration data and profile data, and Active Directory group policies (GPOs) are used to specify the SMB file shares to be used. Administrators use the Dynamic Environment Manager Management Console to configure settings.
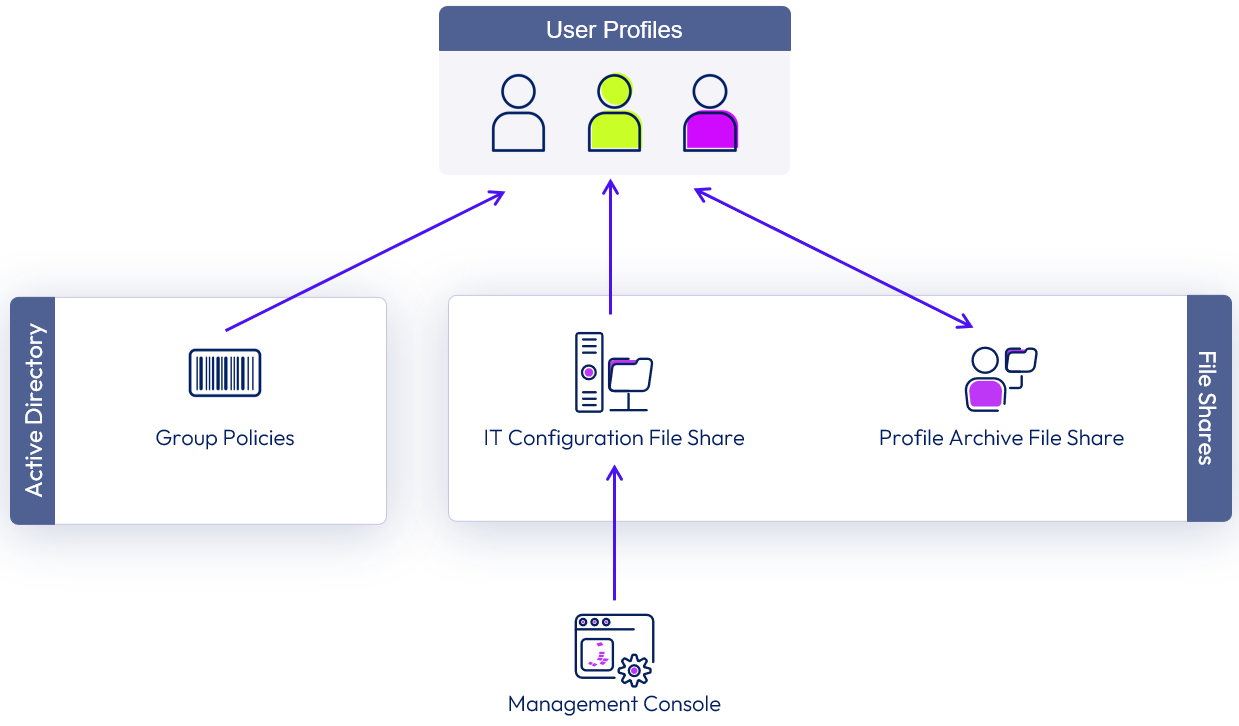
Figure 7: Dynamic Environment Manager Infrastructure
FlexEngine Agent Configuration
The FlexEngine agent must be installed on any physical, virtual, or cloud-hosted Windows device you wish to manage with Dynamic Environment Manager. See Installing Dynamic Environment Manager for information about manual and automated installation options.
Once FlexEngine is installed, it must be enabled and configured. You accomplish this either by creating a GPO using the provided ADMX templates or by creating an XML-based configuration file for use with NoAD mode.
NoAD Mode for FlexEngine
NoAD mode enables configuration of FlexEngine with no dependency on Active Directory. You do not need to create a GPO or logon and logoff scripts. For organizations where Active Directory is not available or GPO configuration is highly restricted, NoAD mode may be the better choice. For proof-of-concept or test environments, NoAD mode may enable you to make changes faster than going through formal AD change control processes.
To use NoAD mode, FlexEngine must be installed using the NOADCONFIGFILEPATH property on the MSI installer. See Install FlexEngine in NoAD Mode for details. If FlexEngine is installed for NoAD mode, any previous GPO-based deployment settings are ignored.
Be sure to configure your Dynamic Environment Manager configuration share before installing the FlexEngine agent. You must specify the path to the configuration share as part of the NoAD-mode installation process.
Note: To turn off NoAD mode, uninstall FlexEngine, and reinstall it without the NOADCONFIGFILEPATH MSI property.
If you use the Import Image wizard from the Azure Marketplace with Horizon Cloud Service on Microsoft Azure, the FlexEngine agent will be automatically installed for use with GPOs. You will need to reinstall the agent in NoAD mode.
Table 5: Strategy for Configuring Dynamic Environment Manager Settings
| Decision | Active Directory Group Policy is chosen over NoAD mode. |
| Justification | This provides the flexibility to apply different user environment configuration settings for different users. An ADMX template is provided to streamline configuration. |
See the Group Policy Settings section in Dynamic Environment Manager Configuration for additional information on Group Policy configuration options.
Scalability and Availability
The Dynamic Environment Manager architecture does not rely on dedicated servers or a database. The primary infrastructure components are the configuration share and profile archive share, which should be hosted on SMB shares. This simple architecture makes scaling Dynamic Environment Manager easy and has enabled numerous companies to manage production environments with more than 100,000 devices without running into scale limits.
Server Sizing
A general recommendation is to use Windows file servers for the SMB shares because they have proven to be faster and more reliable than SMB implementations from SAN and NAS devices. Use the latest Windows version for the best SMB performance. Do not use a Windows version earlier than Windows Server 2012, which introduced SMB 3.0.
Ensure file servers have sufficient resources. A single Windows file server can scale to support 10,000 Dynamic Environment Manager users. We recommend four CPUs and 16 GB RAM for a dedicated Windows file server supporting 10,000 users.
A single, dedicated Windows file server could suffice for a target of 8,000 users but would create a large fault domain. Consider clustering more, smaller file servers to reduce the fault domain and more easily recover from hardware failures. Internal testing has shown that a single Windows file server with four vCPUs and 10 GB RAM can provide excellent performance for 2,000 users.
In addition to allocating enough CPU and RAM, make sure the Windows file servers have access to a performant disk subsystem. Dynamic Environment Manager will be reading from and writing to the file servers throughout the user session. The faster these operations are, the better the user experience will be. Consider placing the configuration share on storage optimized for read operations. Place the profile archive share on storage optimized for reads and writes.
Configuration Share Sizing
The configuration share is accessed during login and logout and during startup and shutdown of DirectFlex-enabled applications. Because Dynamic Environment Manager is reading only small bits of configuration data as needed, bandwidth consumption to the configuration share is low. Actual bandwidth utilization will vary with the number of configuration elements such as config files and predefined settings you have configured. Keeping the configuration share on servers near the user desktops will ensure the best performance and logon times.
While your capacity requirements may vary, 1 GB per 5,000 users is sufficient for typical deployments
Profile Archive Share Sizing
The profile archive share contains personal settings for all users stored as ZIP files. A unique subfolder is created for each user. The personal user settings are read from this share at login or application startup, and are written back at logout or application exit. To ensure the best performance, place this folder in the same data center or network location as the users. Configuring FlexEngine to use the correct folder can be achieved by using multiple GPOs, for instance, a separate GPO per Active Directory site or per organizational unit (OU).
Consider the following best practices when creating the profile archive share:
- Configure Dynamic Environment Manager to store all user profile archives, profile archive backups, and log files in the same share.
- Use a dedicated share and not the home drive.
The size of the profile archive folder per user depends on the following:
- Number of application and Windows settings used for personalization – When an application is configured for personalization, registry settings, INI files, or other repositories are used to capture configuration data, which is stored on the profile archive share. The amount of configuration data stored for most applications is very small. The following are examples from our testing environment:
- VLC Media Player: 30 KB
- Notepad++: 145 KB
- Mozilla Firefox: 1.14 MB
- Number of backups configured – When user settings change for an application configured for personalization, a backup copy of the old profile archive ZIP file is created. This backup can be used to restore user configuration to an earlier state. Maintaining several backup copies provides more flexibility if you need to restore settings, but maintaining more copies consumes more space. We recommend maintaining five backup copies.
- Types of applications – Applications store configuration data in various ways, including as registry keys, INI files, and databases, and may use a combination of options. It is important to thoroughly test applications you profile to ensure only the necessary configuration data is being persisted on the profile archive share. Keeping profile archives small not only reduces capacity consumption on the share but reduces the amount of data transferred between the virtual desktop or RDSH server and the file server.
While your capacity requirements may vary, 100 MB per user is sufficient for typical deployments.
Disaster Recovery
The next section, Multi-site Design, describes how Microsoft DFS was used to create highly available SMB shares, which can be failed over in the case of a disaster. Alternatively, Windows failover clustering may be used to create a highly available file server cluster. See the High Availability with Windows Failover Clustering section in Dynamic Environment Manager Configuration.
Because Dynamic Environment Manager uses the existing file servers and domain controllers, ensure that those servers are highly available and that a disaster recovery plan is in place.
It is recommended to integrate the Management Console into an already existing disaster recovery plan. You can install the Management Console on as many computers as required. If the Management Console is not available after a system failure, you can install it on a new management server or administrator workstation.
File Share Replication
Dynamic Environment Manager data consists of the following types. This data is typically stored on separate shares and can be treated differently to achieve high availability:
- IT configuration data – IT-defined settings that give predefined configuration for the user environment or applications
Note: A Dynamic Environment Manager instance is defined by the configuration data share. - Profile archive (user settings and configuration data) – The individual end user’s customization or configuration settings
It is possible to have multiple sets of shares to divide the user population into groups. This can provide separation, distribute load, and give more options for recovery. By creating multiple Dynamic Environment Manager configuration shares, you create multiple environments. You can use a central installation of the Management Console to switch between these environments and to export and import settings between environments. You can also use Dynamic Environment Manager group policies to target policy settings to specific groups of users, such as users within a particular Active Directory OU. See the Multiple Environments section in Dynamic Environment Manager Configuration for example configuration options when using multiple environments.
To meet the requirements of having Dynamic Environment Manager IT configuration data and user settings data available across two sites, this design uses Distributed File System Namespace (DFS-N) for mapping the file shares.
Although we used DFS-N, you are not required to use DFS-N. Many different types of storage replication and common namespaces can be used. The same design rules apply.
Configuration Share
For IT configuration file shares, having multiple file server copies active at the same time with DFS-N is fully supported. This is possible because end users are assigned read-only permissions to the file shares so as to avoid write conflicts.
There are two typical models for the layout of the configuration share.
- Centralized configuration share – Designing a multi-site Dynamic Environment Manager instance using a centralized configuration share streamlines administration for centralized IT. Changes to the configuration share are made to a primary copy, which is then replicated to one or more remote sites.
- Separate configuration share at each site – Another option is to implement multiple Dynamic Environment Manager sites by creating a configuration share at each site. This model supports decentralized IT, as IT admins at each site can deploy and manage their own Dynamic Environment Manager instances.
Note: Only administrators should have permissions to make changes to the content of the IT configuration share. To avoid conflicts, have all administrators use the same file server for all the writes, connecting using the server URL rather than with DFS-N.
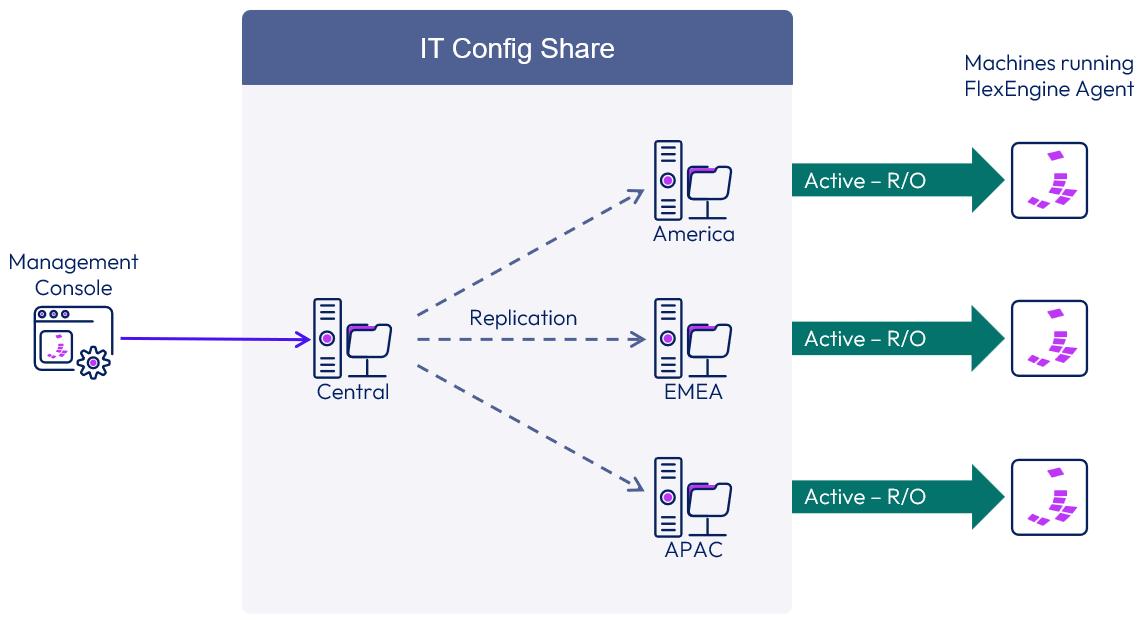
Figure 8: IT Configuration Share – Supported DFS Topology
Table 6: Strategy for Managing Configuration Shares
| Decision | The configuration shares were replicated to at least one server in each site using DFS-R. Each server was enabled with DFS-N to allow each server to be used as a read target. |
| Justification | This strategy provides replication of the configuration data and availability in the event of a server or site outage. Aligned with Active Directory sites, this can also direct usage to the local copy to minimize cross-site traffic. This strategy provides centralized administration for multiple sites, while configuration data is read from a local copy of the configuration share. |
Profile Archive Shares
For user settings file shares, DFS-N is supported and can be used to create a unified namespace across sites. Because the content of these shares will be read from and written to by end users, it is important that the namespace links have only one active target. Configuring the namespace links with multiple active targets can result in data corruption. See the Microsoft KB article Microsoft’s Support Statement Around Replicated User Profile Data for more information.
Configuring the namespace links with one active and one or more inactive (passive) targets provides you the ability to quickly, albeit manually, fail over to a remote site in case of an outage.
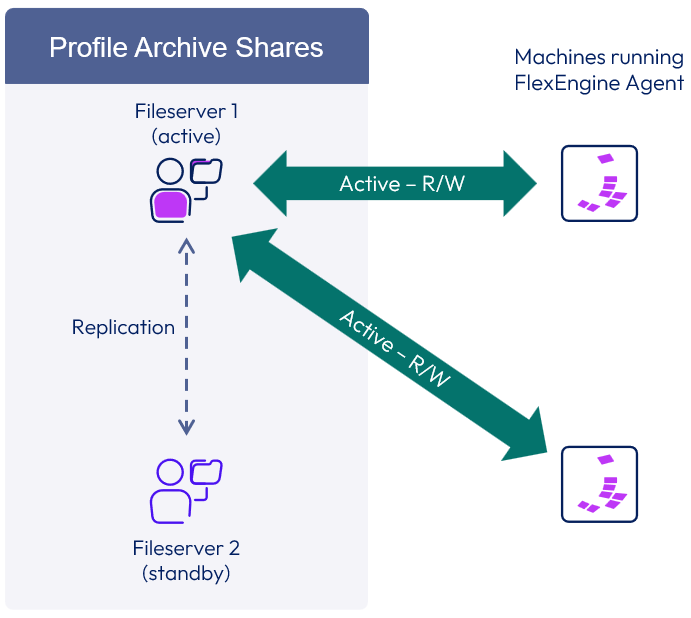
Figure 9: Profile Archive Shares – Supported DFS Topology
Switching to another file server in the event of an outage requires a few simple manual steps:
- If possible, verify that data replication from the active folder target to the desired folder target is complete.
- Turn off the DFS-N referral status for the active folder target.
- Enable the DFS-N referral status on the desired folder target.
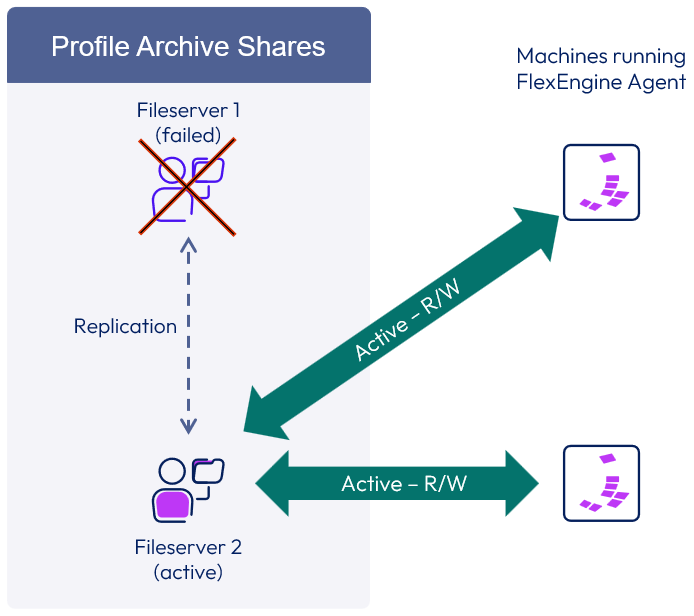
Figure 10: Profile Archive Shares – Failover State
Table 7: Strategy for Managing Profile Archive Shares
| Decision | The profile archive shares were replicated to at least one server in each site using DFS-R. DFS-N was configured, but only one server was set as an active referral target. The rest were set as deactivated targets. |
| Justification | This strategy provides replication of the profile archive data and availability in the event of a server or site outage. A deactivated target can be enabled in the event of a server or site outage to provide access to the data. User configuration data is accessed or modified on a local copy of the profile archive share, ensuring good performance for end users. |
The Dynamic Environment Manager Management Console can be installed on as many computers as desired. If the Management Console is not available after a disaster, you can install it on a new management server or on an administrator’s workstation and point that installation to the Dynamic Environment Manager configuration share.
Multiple Environments
Creating and managing multiple Dynamic Environment Manager environments is easy. You can use multiple environments to:
- Support separation of administrative duties across departments
- Manage test, development, and production environments independently
- Support multi-tenant environments
See Managing Multiple Environments for more information.
Using Group Policy to Configure the Management Console
You create multiple environments by creating multiple Dynamic Environment Manager configuration shares and managing them from a central installation of the Management Console. With the Management Console, you can switch between environments and export and import settings between different environments. You can configure the Management Console manually or using a GPO.
Dynamic Environment Manager provides ADMX templates to configure the Management Console. You can configure one or more environments (configuration shares) in the GPO and link the GPO to the appropriate group of users.
When the GPO is used, a user cannot change the Management Console environment settings manually. The settings are mandatory to prevent users from adding other environments. See Configuring Environments Through Group Policy for more information.
If environments are configured using Group Policy, you can also lock down access to the Management Console by using the policy setting Lock down access to Omnissa DEM Management Console (defined in the Management Console ADMX template). You can lock down the Management Console entirely or choose which Management Console features users can access. See Lock Down Access to the Management Console for more information.
Exporting Settings Between Environments
It is easy to transfer changes from one environment to another. The export feature prevents users from manual-copy errors in the production environment and prevents copy errors when transferring changes from the test environment to production. With this feature, Dynamic Environment Manager supports a tiered change model, which is often seen in organizations that use ITIL-based processes.
To export a setting from one environment to another, right-click the Flex configuration file or setting in the Dynamic Environment Manager Management Console and select Export. You can also select multiple Dynamic Environment Manager settings and export them at the same time.
You can configure Dynamic Environment Manager settings and then send them to another department by using the Management Console export function. When only one configuration share is configured, the export function sends settings to a file. You can then send the exported file using any transport mechanism, such as USB removable media or FTP. If more than one configuration share is configured, you can export Flex configuration files to another share, such as, to a test environment.
If you have access to the Application Profiler, you can also save the output of the Application Profiler in this configuration share.
Centrally Managed Dynamic Environment Manager Environments
The following figure shows an example of two users with separate Dynamic Environment Manager environments, managed centrally with the Dynamic Environment Manager management tools.
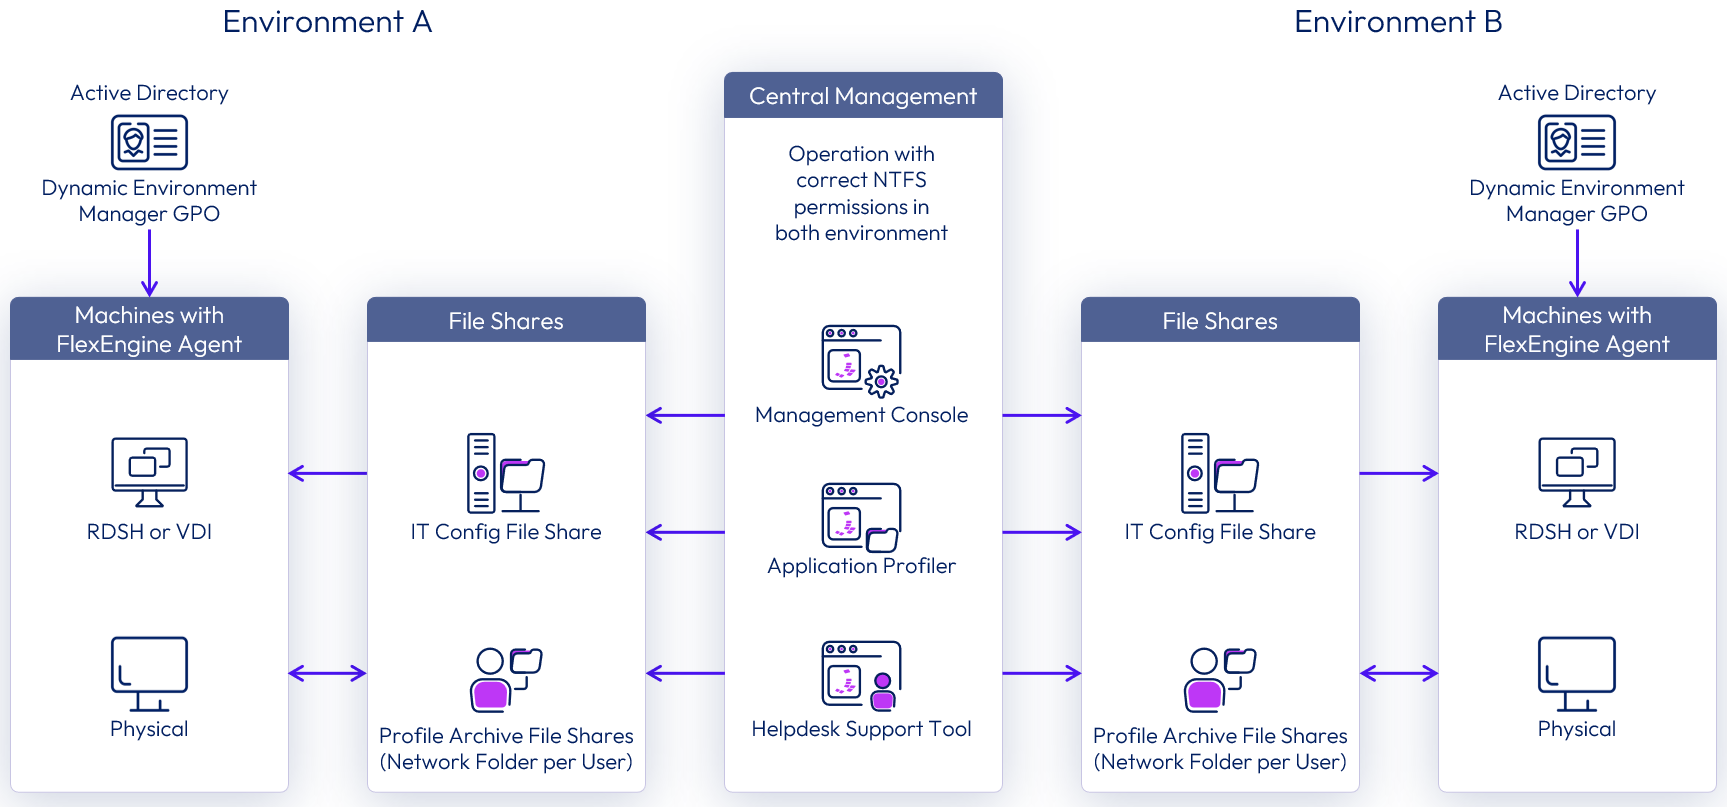
Figure 11: Two Dynamic Environment Manager Environments Managed Centrally
A central IT department can manage multiple Dynamic Environment Manager environments. This example assumes that the Dynamic Environment Manager clients for the two users are in different Active Directory domains, and IT uses two GPOs (one in each domain) to configure the clients. Each domain has its own Dynamic Environment Manager configuration and profile shares. IT manages each environment centrally and can create new printer mappings, reset profiles, and so on.
Tiered Dynamic Environment Manager Environments
Dynamic Environment Manager supports a tiered model with development, test, acceptance, and production environments. The following figure illustrates tiered Dynamic Environment Manager environments. Changes are made in the central development environment and then are copied to the department’s acceptance environments. Environment-specific administrators can use their own installed Dynamic Environment Manager management tools to test and accept changes and move them to production.
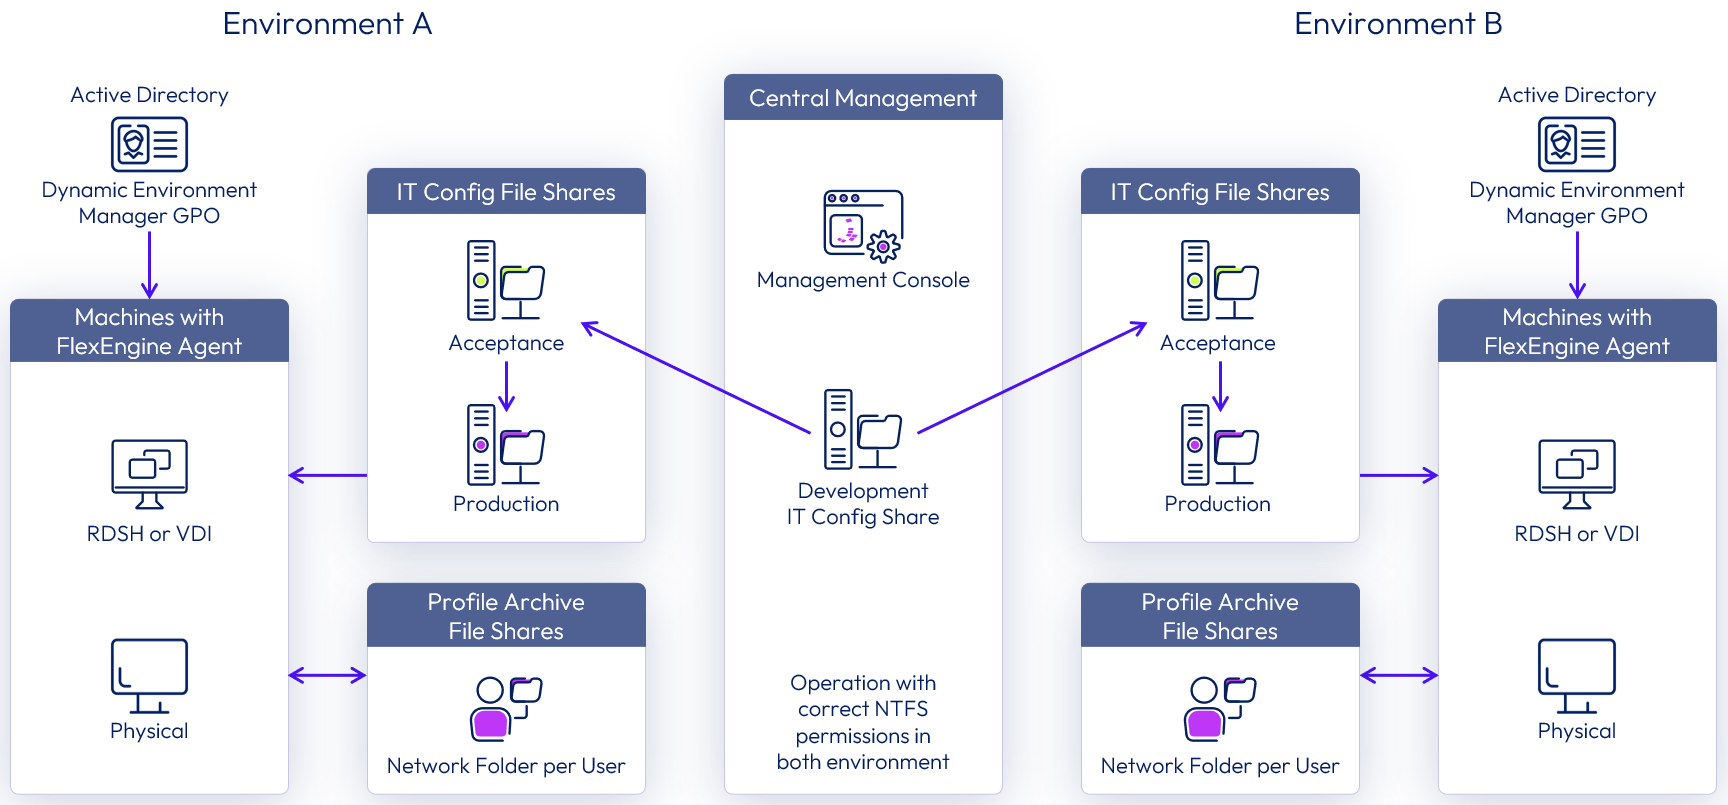
Figure 12: Tiered Dynamic Environment Manager Environments
This example requires both environments A and B to install their own Dynamic Environment Manager, so each environment can be managed separately. The tiered approach with development, acceptance, and production environments allows users to test the configuration in different environments before moving those changes to production. This setup does not require multiple Active Directory domains.
The setup of FlexEngine and file shares is the same as a regular setup, but additional GPOs are used to link computers to the correct environment. For example, you can create a GPO called Acceptance, and link a set of computers to this GPO. Use these computers to test changes before copying them to the production environment. Using multiple GPOs allows you to separate computers and link them to the correct Dynamic Environment Manager environment.
Functionality is not limited to the use cases depicted in the figures shown in this section and the previous section. For instance, you could also combine the two use cases or design your own approach.
Decentralized IT Infrastructure with Multiple Locations
In a decentralized infrastructure with physical Windows clients dispersed across different locations connected through WAN links, the Dynamic Environment Manager configuration share can be replicated to file servers at multiple locations.
If the locations are connected with a LAN, you can also use a central Dynamic Environment Manager configuration share. As with all infrastructure changes and products, the solution depends on your specific scenario. The only way to determine the best solution for the best performance is to test thoroughly.
In general, it is best to use your existing replication methods. If you have SAN or NAS storage that provides a replication solution for high availability and disaster recovery, use that. The replication method can be either file-based or block-based replication. If you already use Windows Server Failover Clustering (WSFC) or DFS, use that. You can also use scripts to create an infrastructure that supports Dynamic Environment Manager.
You can configure the different clients to connect to the right Dynamic Environment Manager environment by using multiple Active Directory GPOs.
Recommended Practices for Deployment and Management
Installation is a straightforward process, as outlined in the next section. After installation, be sure to follow the recommendations for initial configuration and ongoing management, as described in the sections that follow.
Installation
You can install and configure Dynamic Environment Manager in a few easy steps:
- Create SMB file shares for configuration data and user data.
- Import ADMX templates for Dynamic Environment Manager
- Create Group Policy settings for Dynamic Environment Manager.
- Note: When applying the GPO settings to computer objects, use loopback processing. For more information, see Circle Back to Loopback.
- Install the FlexEngine agent on the virtual desktop or RDSH server VMs to be managed.
- If you manually create a golden image VM, install the FlexEngine agent.
- If you use the Import Image wizard to import from the Azure Marketplace, the FlexEngine agent is automatically installed when the image is created.
- Install the Dynamic Environment Manager Management Console and point to the configuration share.
Refer to Installing and Configuring Dynamic Environment Manager for detailed installation procedures. Also see the Evaluation Guide for Dynamic Environment Manager.
Initial Configuration
When implementing Dynamic Environment Manager, consider the following best practices:
- To optimize logon speed and the user experience, use DirectFlex as much as possible. Application Profiler enables DirectFlex by default for all created Dynamic Environment Manager configuration files. Do not enable DirectFlex for applications that act as middleware and use many plug-ins, such as Microsoft Office and Internet browsers.
- Using the provided ADMX template to create a GPO that configures FlexEngine is recommended. If you use a GPO to configure FlexEngine, do not use a logon script to start FlexEngine at logon. Rather, enable the Run FlexEngine as Group Policy client-side extension GPO setting to start FlexEngine at logon. Using the Group Policy client-side extension optimizes logon times and supports more Windows settings.
- When using the Group Policy client-side extensions, ensure that the extension runs during each logon by enabling the Always wait for the network at computer startup and logon computer Group Policy setting. Apply this Group Policy to an OU in Active Directory where all the Windows clients are located.
- Consider using the optional SyncTool when end users rely on laptops that are frequently disconnected from or have limited bandwidth to the corporate network. See the Dynamic Environment Manager SyncTool Administration Guide.
- When preparing your Application Profiler machine to create configuration files or predefined settings, be sure the FlexEngine agent is not installed. See the Dynamic Environment Manager Application Profiler.
- If possible, do not use roaming profiles. Dynamic Environment Manager works well when using local profiles with any physical or virtual Windows desktop or RDSH server. Mandatory profiles are another option, though they tend not to work consistently between Windows 10 versions. An optimized local profile provides comparable logon times without the challenges that come with mandatory profiles.
- Be sure to optimize your Windows 10 images using Manually Creating Optimized Windows Images for Horizon VMs to ensure the best performance possible.
- Incorporate folder redirection into your Dynamic Environment Manager design to abstract user data to SMB shares. Folder redirection can be configured using the Dynamic Environment Manager Management Console or by using Windows GPO.
- Use a dedicated share to store user profile archives instead of the existing home drive. Doing so prevents users from browsing the share or accidently deleting the profile archives. It also simplifies configuring SyncTool and makes it easier to set the correct permissions for the Helpdesk Support Tool.
Managing
Consider the following best practices when managing your Dynamic Environment Manager deployment.
- When creating drive and printer mappings, make sure that the Run asynchronously option is enabled (this setting is enabled by default). This setting optimizes the login speed because the user login process is not waiting for the mappings to be created. The user can start working while the drives and printers are mapped in the background.
- Use the Dynamic Environment Manager Management Console Comments tab to keep track of configuration changes and make important notes.
- Use condition sets where possible. Instead of using the same condition multiple times (for actions such as a drive mapping, printer mapping, or desktop shortcuts), it is faster to create one condition set and link it to all related items. Login time is quicker because the condition set is processed only once, and the result is cached.
- Use the Endpoint IP Address, Endpoint Name, and Endpoint Platform conditions to deliver location- based printing and other settings.
- Use triggered tasks to further optimize the login speed and refresh the user environment during a session. The available triggers are lock and unlock and disconnect and reconnect. For example, printer mappings are refreshed when a remote session is reconnected only if the client IP has been changed. Printers are added and removed based on the physical location of the user.
Next Steps
After installing Dynamic Environment Manager, perform the following tasks to verify functionality:
- Set a few customizations (for example, desktop shortcuts for VLC, Notepad++).
- Use the Management Console to download and use configuration templates for one or more applications. Configuration templates are preconfigured Flex configuration files that are designed to facilitate the initial implementation of popular applications.
- The configuration templates are starter templates that you must test in your environment and possibly modify to suit the needs of your organization. See Download Configuration Templates.
- (Optional) Use the Easy Start feature when performing a proof of concept. Easy Start is not recommended for production implementations.
- Important: If the FlexEngine agent was automatically installed in your Windows desktop image as part of the Horizon Cloud Import Image wizard, any desktop shortcut that references FlexEngine.exe will need to be modified to reflect the correct program files path.
- Log in to the virtual desktop or RDSH-published application and verify that Dynamic Environment Manager has made the requested changes.
- Check the user log to verify that Dynamic Environment Manager is working, or troubleshoot if it is not working as expected. The logs folder is in the SMB share specified for user data. For more information, see the Troubleshooting section in Dynamic Environment Manager Configuration.
- Familiarize yourself with Horizon Smart Policies and Horizon Client property conditions. See Using Smart Policies for requirements, settings, and configuration details.
- Important: Take note of the following nuances when using Smart Policies with Horizon Cloud Service on Microsoft Azure as opposed to Horizon.
- The Horizon Client property Pool Name applies to pools in Horizon, but in Horizon Cloud, this property applies to a similar construct called an assignment.
- The Horizon Client property Launch Tags is applicable only to Horizon. Horizon Cloud Service on Microsoft Azure does not support the Launch Tags property.
Summary and Additional Resources
Now that you have come to the end of this design chapter on Omnissa Horizon Cloud Service – next-gen, you can return to the reference architecture landing page and use the tabs, search, or scroll to select further chapter in one of the following sections:
- Overview chapters provide understanding of business drivers, use cases, and service definitions.
- Architecture chapters give design guidance on the Omnissa products you are interested in including in your deployment, including Workspace ONE UEM, Access, Intelligence, Workspace ONE Assist, Horizon Cloud Service, Horizon 8, App Volumes, Dynamic Environment Manager, and Unified Access Gateway.
- Integration chapters cover the integration of products, components, and services you need to create the environment capable of delivering the services that you want to deliver to your users.
- Configuration chapters provide reference for specific tasks as you deploy your environment, such as installation, deployment, and configuration processes for Omnissa Workspace ONE, Horizon Cloud Service, Horizon 8, App Volumes, Dynamic Environment Management, and more.
Additional Resources
For more information about Dynamic Environment Manager, you can explore the following resources:
Changelog
The following updates were made to this guide:
| Date | Description of Changes |
| 2024-10-10 |
|
| 2024-05-16 |
|
| 2023-07-19 |
|
| 2020-07-01 |
|
| 2020-02-27 |
|
Author and Contributors
This chapter was written by:
- Graeme Gordon, Senior Staff Architect Omnissa.
- Josh Spencer, Senior Product Line Manager, Omnissa.
Contributors:
- Pim van de Vis, Lead Solution Engineer, Omnissa.
Feedback
Your feedback is valuable. To comment on this paper, either use the feedback button or contact us at tech_content_feedback@omnissa.com.

