

Workspace ONE Vulnerability Defense for remediation of desktop and server vulnerabilities
Vulnerabilities
The harsh reality is that vulnerabilities and exploits are embedded within the operating system and applications of every type of endpoint. To maximize endpoint security, Omnissa addresses vulnerabilities contained within endpoints via two mechanisms:
- Mobile Threat Defense, which addresses mobile devices, including Android and Apple devices.
- Vulnerability Defense, which is the newest vulnerability remediation solution for Windows devices, including Windows Server®, Windows desktop, and Horizon virtual desktops, as well as upcoming support for Apple macOS devices.
This document focuses on Vulnerability Defense and will help you understand how this solution improves the security posture of desktop and server devices. Finding vulnerabilities and reporting them is not enough; fast and complete remediation is essential.
Government and regulatory requirements
Depending on your country and industry, identifying and remediating vulnerabilities may be stringently controlled. For example, United States government agencies are now required to remediate critical vulnerabilities within as little as three calendar days.
Many organizations have or seek ISO 27001 compliance and having a mechanism to address vulnerabilities is a factor. Specifically, ISO 27001 Control 8.8: Management of Technical Vulnerabilities requires not only identification of vulnerabilities but also mitigation processes.
While some IT organizations still implement remediations via manual processes, the quantity, complexity, and regulatory requirements of vulnerabilities and remediations are necessitating the need for automation.
Workspace ONE Vulnerability Defense
Omnissa designed Vulnerability Defense to counter vulnerabilities within Workspace ONE managed devices. This purpose-built tool not only identifies vulnerabilities, but a key differentiator is that it also automates prescriptive remediation.
Vulnerability Defense example
Before delving into how Vulnerability Defense functions behind the scenes, let’s first understand how Vulnerability Defense works from an administrative point of view. Below is an example of an app vulnerability that was discovered within Workspace ONE and the subsequent remediation steps.
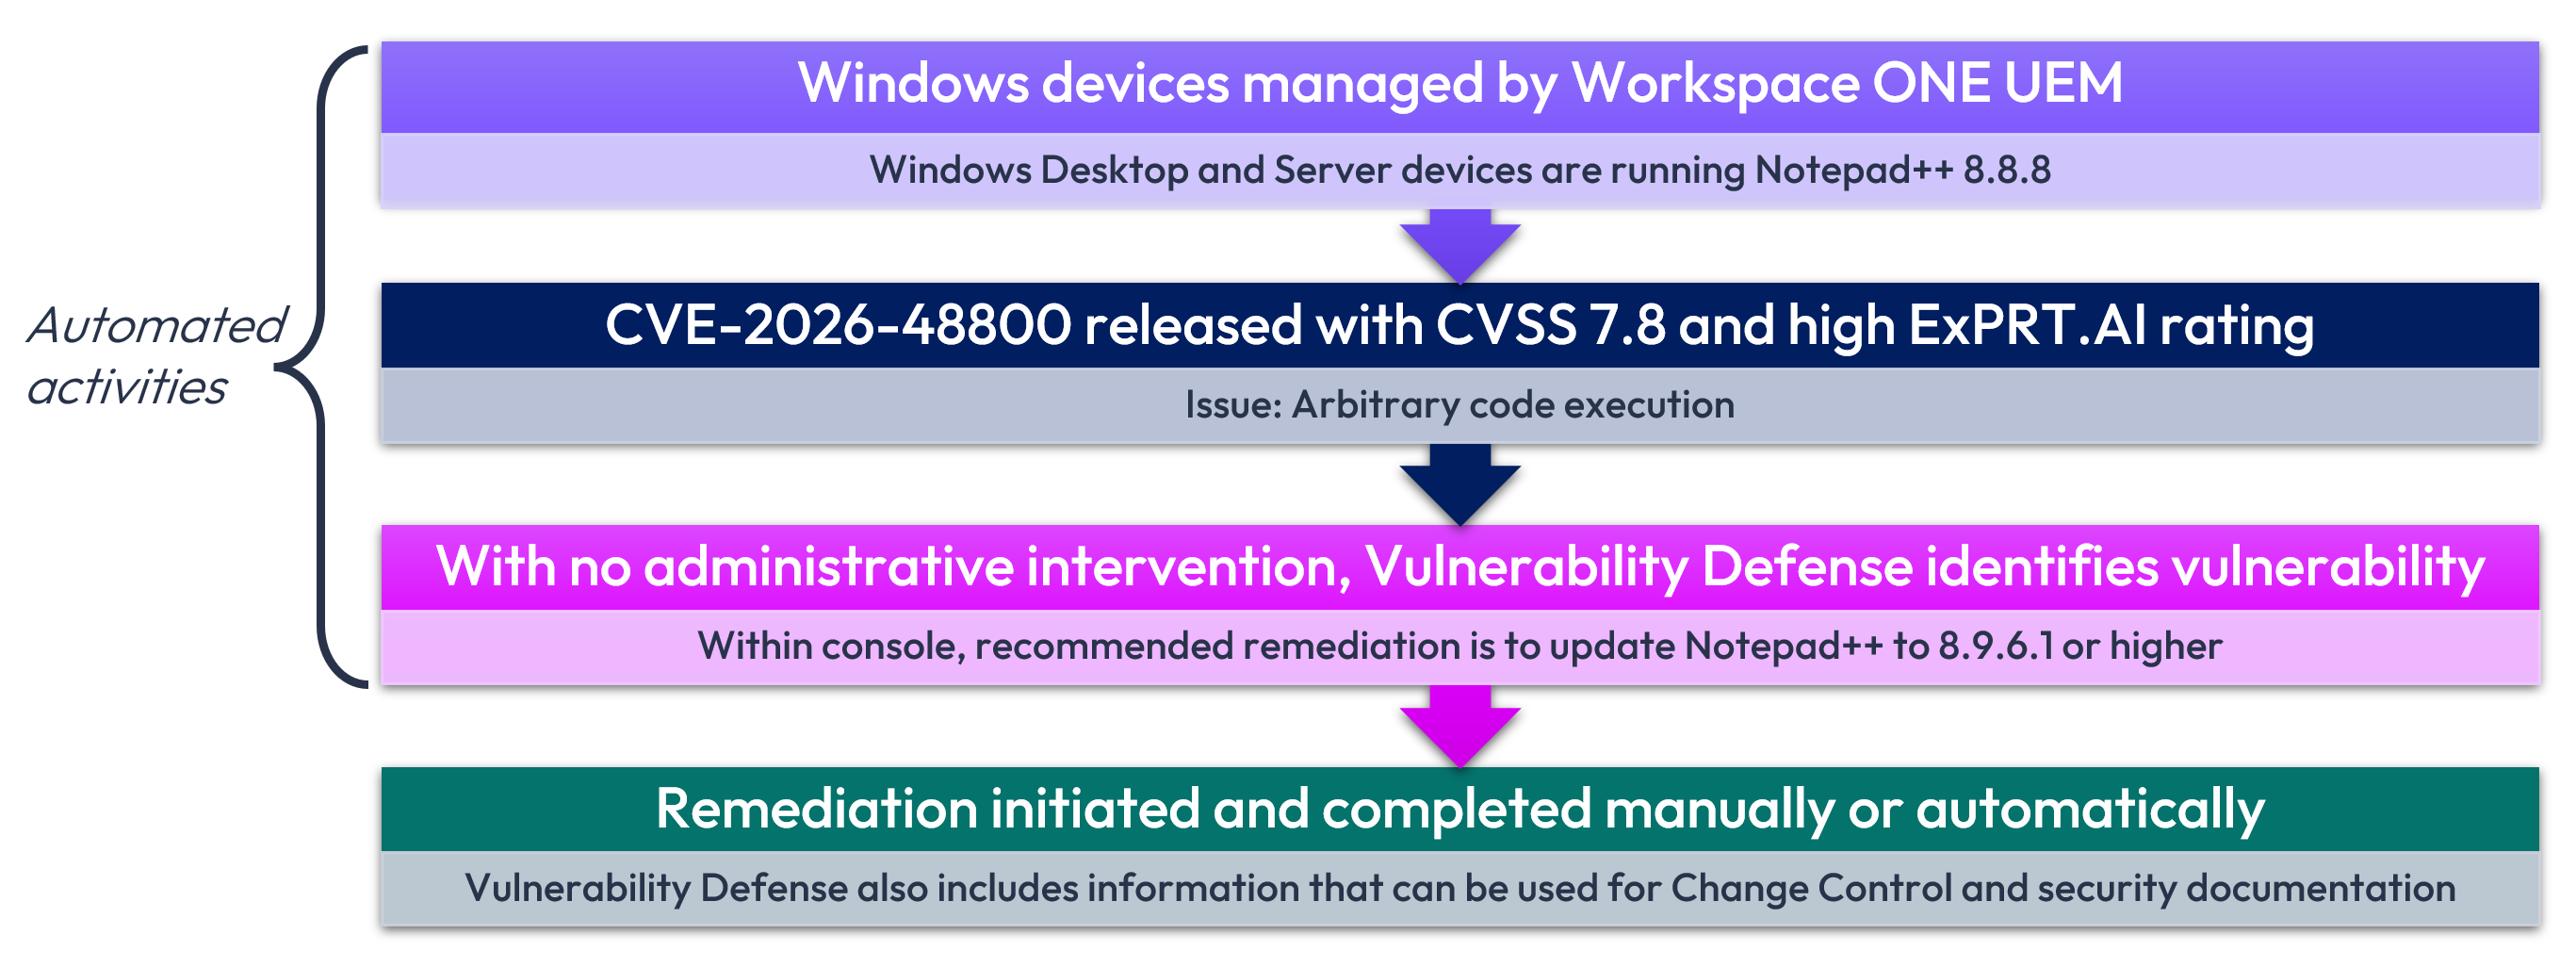
Figure 1: Vulnerability Defense example of Notepad++ vulnerability
In this case, Workspace ONE is already managing Windows devices, and Notepad++ v8.8.8 is installed on them. Unbeknownst to the IT staff, this deployed version of Notepad++ contains a high vulnerability.
A Common Vulnerabilities and Exposures (CVE) incident record is released with a Common Vulnerability Scoring System (CVSS) rating of 7.8, which translates to high criticality. According to NIST, “Notepad++ fails to validate or sanitize text content inside the <Command> tag within <UserDefinedCommands> in the shortcuts.xml configuration file.” In addition to the high CVSS score and high number of impacted devices throughout the enterprise, other ratings deem this app as highly exploitable, so quick remediation is necessary.
Without administrative intervention, Workspace ONE Vulnerability Defense identifies this vulnerability and associated criticality. In addition, it reports that the recommended remediation is to update the Windows devices with a newer version of Notepad++.
Within the Workspace ONE console, information is presented that can be used to file the Change Control and security documentation. Then, remediation can be completed with just a few keystrokes or can be automated. In addition, the administrator can track the remediation status of those devices and confirm success.
In the near future, Vulnerability Defense remediation actions will be further automatable such that the administrator sets the policy, not the pace. Omnissa’s AI-powered assistant, Omni will be able to not only assess and prioritize but also remediate and track continuously. Rather than wait for an administrator to initiate actions, Omni will advise when something needs administrative intervention.
Vulnerability Defense deep dive
Workspace ONE already provides endpoint management for your fleet, as well as a complete inventory of those devices. By appending Vulnerability Defense, vulnerabilities can be discovered, assessed, prioritized, remediated, and validated.
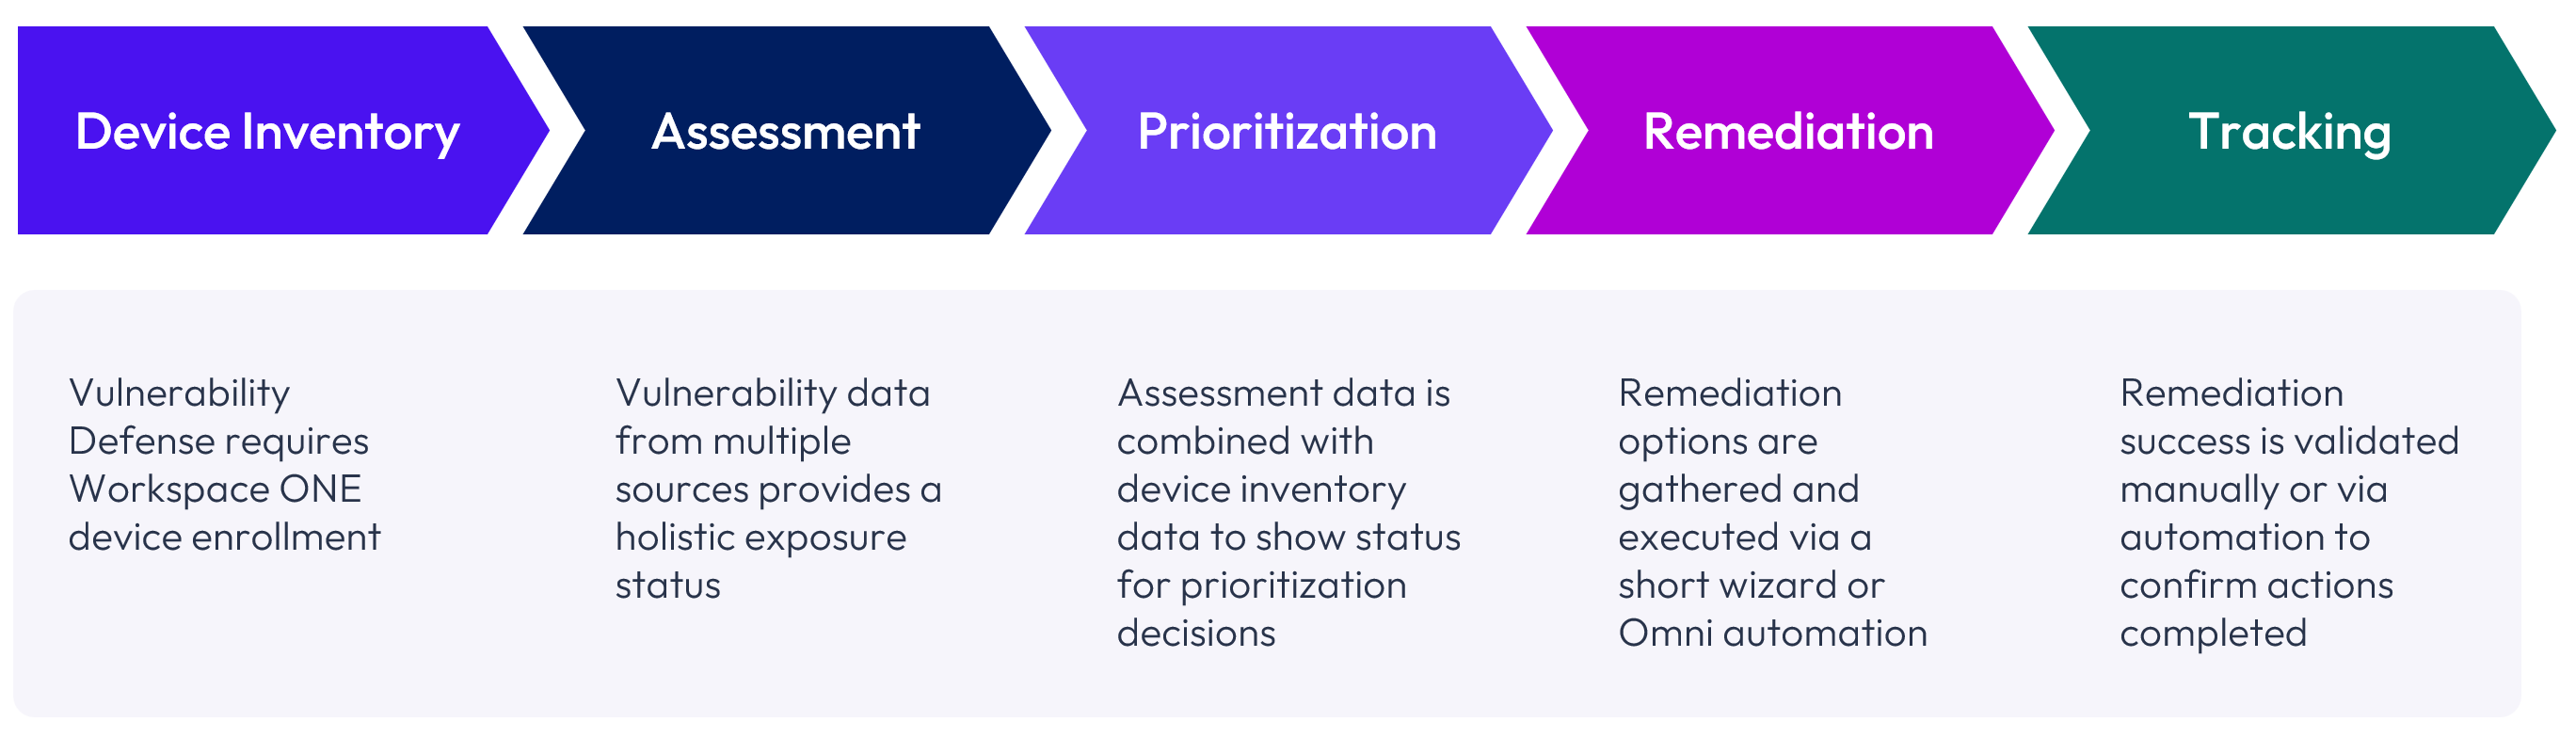
Figure 2: Vulnerability Defense processes
Vulnerability Defense tackles device security via:
- Device Inventory of all Workspace ONE enrolled desktop and server devices, including cataloging of operating systems, applications, and other details
- Assessment of vulnerabilities across your device fleet via data feeds, including criticality of each vulnerability and applicability to each device
- Prioritization allows administrators to determine remediation priority based on various clearly presented criteria
- Remediation of vulnerabilities by means of app and OS patches by administrative or automated actions
- Tracking provides verification that vulnerabilities have been nullified
Each of these processes will be discussed below.
Device Inventory
Workspace ONE already maintains a complete inventory of all enrolled devices, which includes not only the operating system, but also applications, and policies that have been deployed. Vulnerability Defense explicitly catalogs the vulnerabilities contained within each unique device.
As of late 2026, the following platforms can be subscribed to Vulnerability Defense:
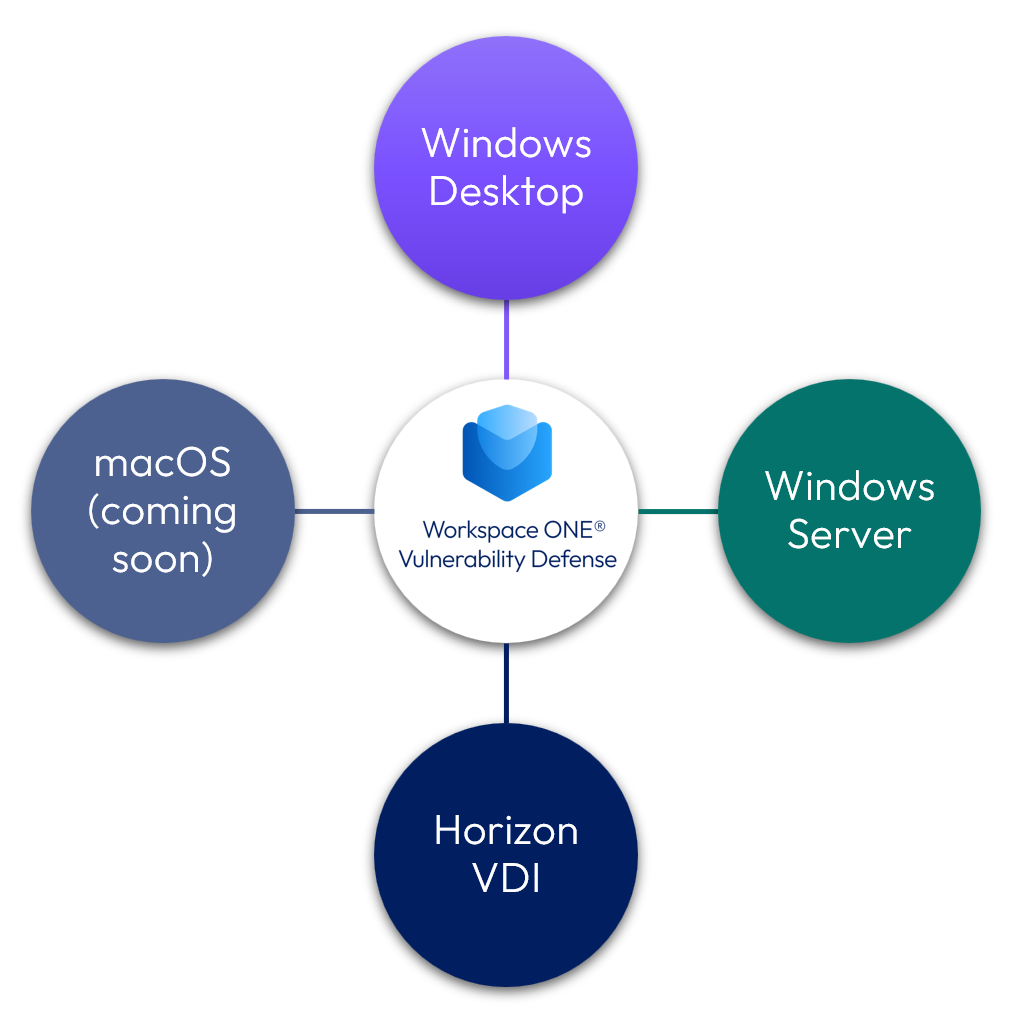
Figure 3: Vulnerability Defense supported device types
Devices to be cataloged for vulnerabilities must be enrolled into Workspace ONE via Intelligent Hub Managed Mode or Full MDM. Intelligent Hub management is the mechanism for cataloging the device itself, as well as all aspects related to vulnerability status.
When enrolled devices synchronize with Workspace ONE, device characteristics, such as successful deployment of a new version of an application, are reported, and Vulnerability Defense then updates the associated status. For example, if a newly deployed version of an app addresses a previously reported vulnerability, the Workspace ONE console would update the status accordingly.
Please note that Registered Mode does not integrate with Vulnerability Defense. Registered Mode is primarily deployed to provide Omnissa Digital Experience (DEX) data.
Assessment
Assessing vulnerabilities includes determining which vulnerabilities exist within the environment and this is accomplished via vulnerability-related data feeds into Workspace ONE.
Data from a variety of sources feeds into Workspace ONE in order to assess the presence of vulnerabilities, including known or potential impact. These sources include:
- National Vulnerability Database (NVD) is a US-based threat repository run by NIST.
- European Vulnerability Database (EUVD) is a European-based threat repository run by ENISA.
- Common Vulnerabilities and Exposures (CVE) identifies and catalogs vulnerabilities.
- Known Exploited Vulnerabilities (KEV) provides a catalog of active exploitations.
- Common Platform Enumeration (CPE) identifies the specific component affected by the vulnerability.
- Common Vulnerability Scoring System (CVSS) provides an algorithm for determining the severity of a vulnerability.
- Exploit Prediction Scoring System (EPSS) estimates the probability that a CVE will be exploited within the next 30 days.
- GitHub Security Database (GHSA) includes security flaws in an open-source software package tracked and documented inside the GitHub Advisory Database.
Workspace ONE Assessment and CrowdStrike Falcon integration
Customers have the option of choosing the soon-to-be-released Workspace ONE Assessment that includes the sources listed above or whether to integrate with a third-party cybersecurity platform such as CrowdStrike Falcon® Exposure Management, which also includes ExPRT.AI, a proprietary vulnerability exposure management data feed.
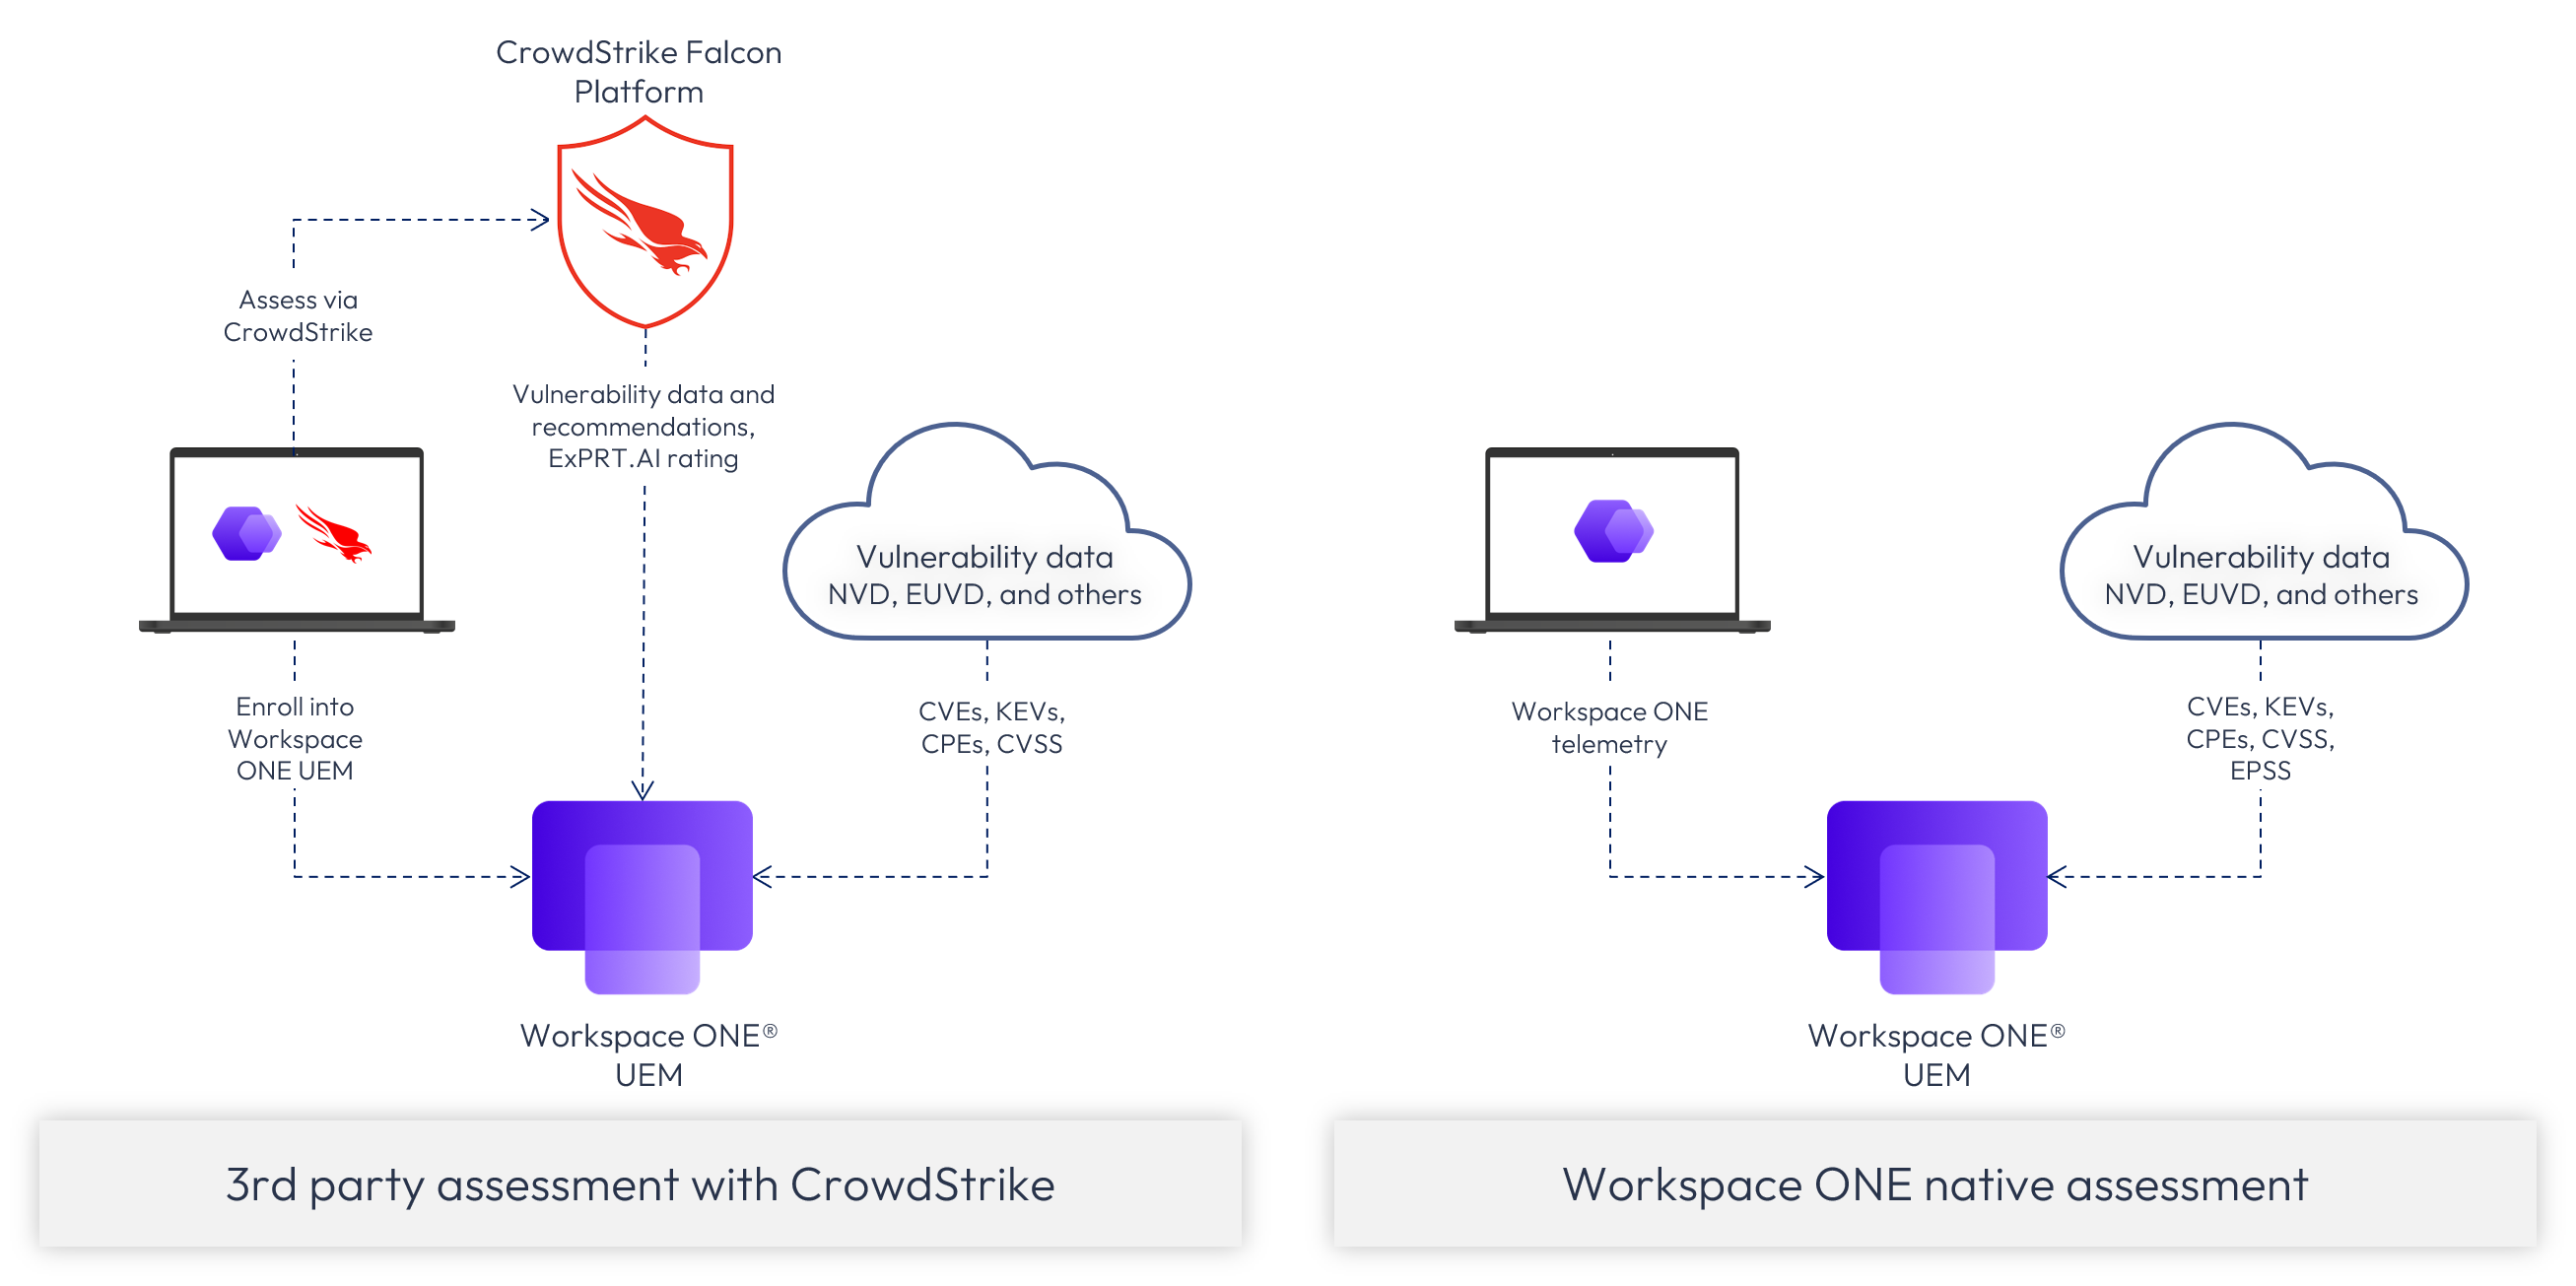 Figure 4: Vulnerability data feeds into Workspace ONE
CrowdStrike Falcon Exposure Management integration
CrowdStrike Falcon integration with Vulnerability Defense became generally available in September 2026, and Workspace ONE Assessment will be available soon.
Below is a detailed flow diagram of CrowdStrike Falcon integration:
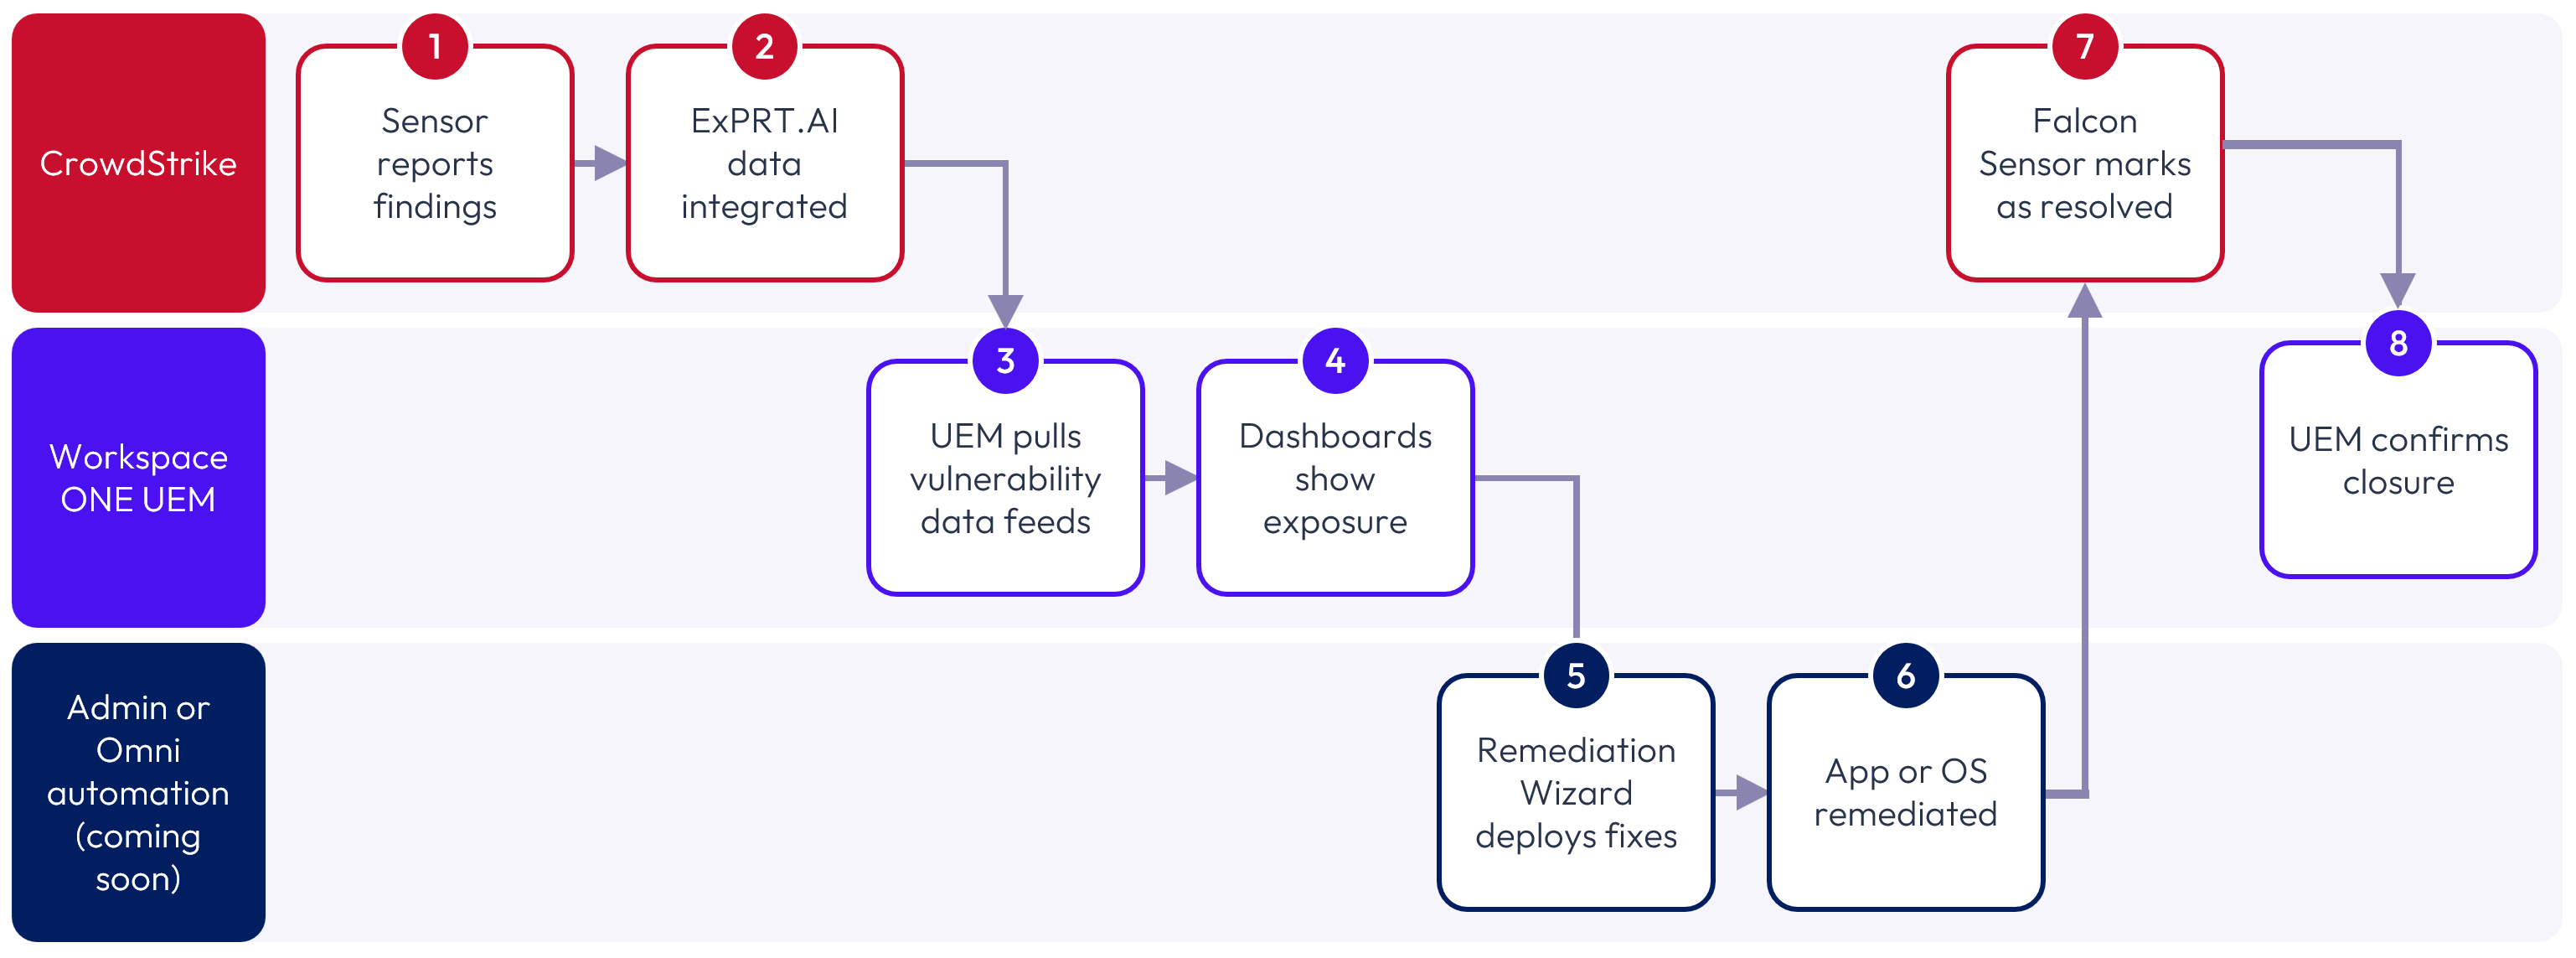
Figure 5: CrowdStrike integration data flow
Requirements for CrowdStrike Falcon integration are:
- CrowdStrike Falcon Exposure Management licensing from CrowdStrike; specifically, the Discover and Spotlight modules
- CrowdStrike Falcon Sensor installed on client devices, which can be deployed via Workspace ONE
- Configure CrowdStrike integration within Workspace ONE UEM console
For more information about CrowdStrike Falcon integration, please see CrowdStrike documentation and Appendix B.
Workspace ONE Assessment
Workspace ONE Assessment does not require any additional configuration or client-side installation. Once Workspace ONE licensing is applied, full functionality is provided.
Below is a detailed flow diagram of Workspace ONE Assessment:
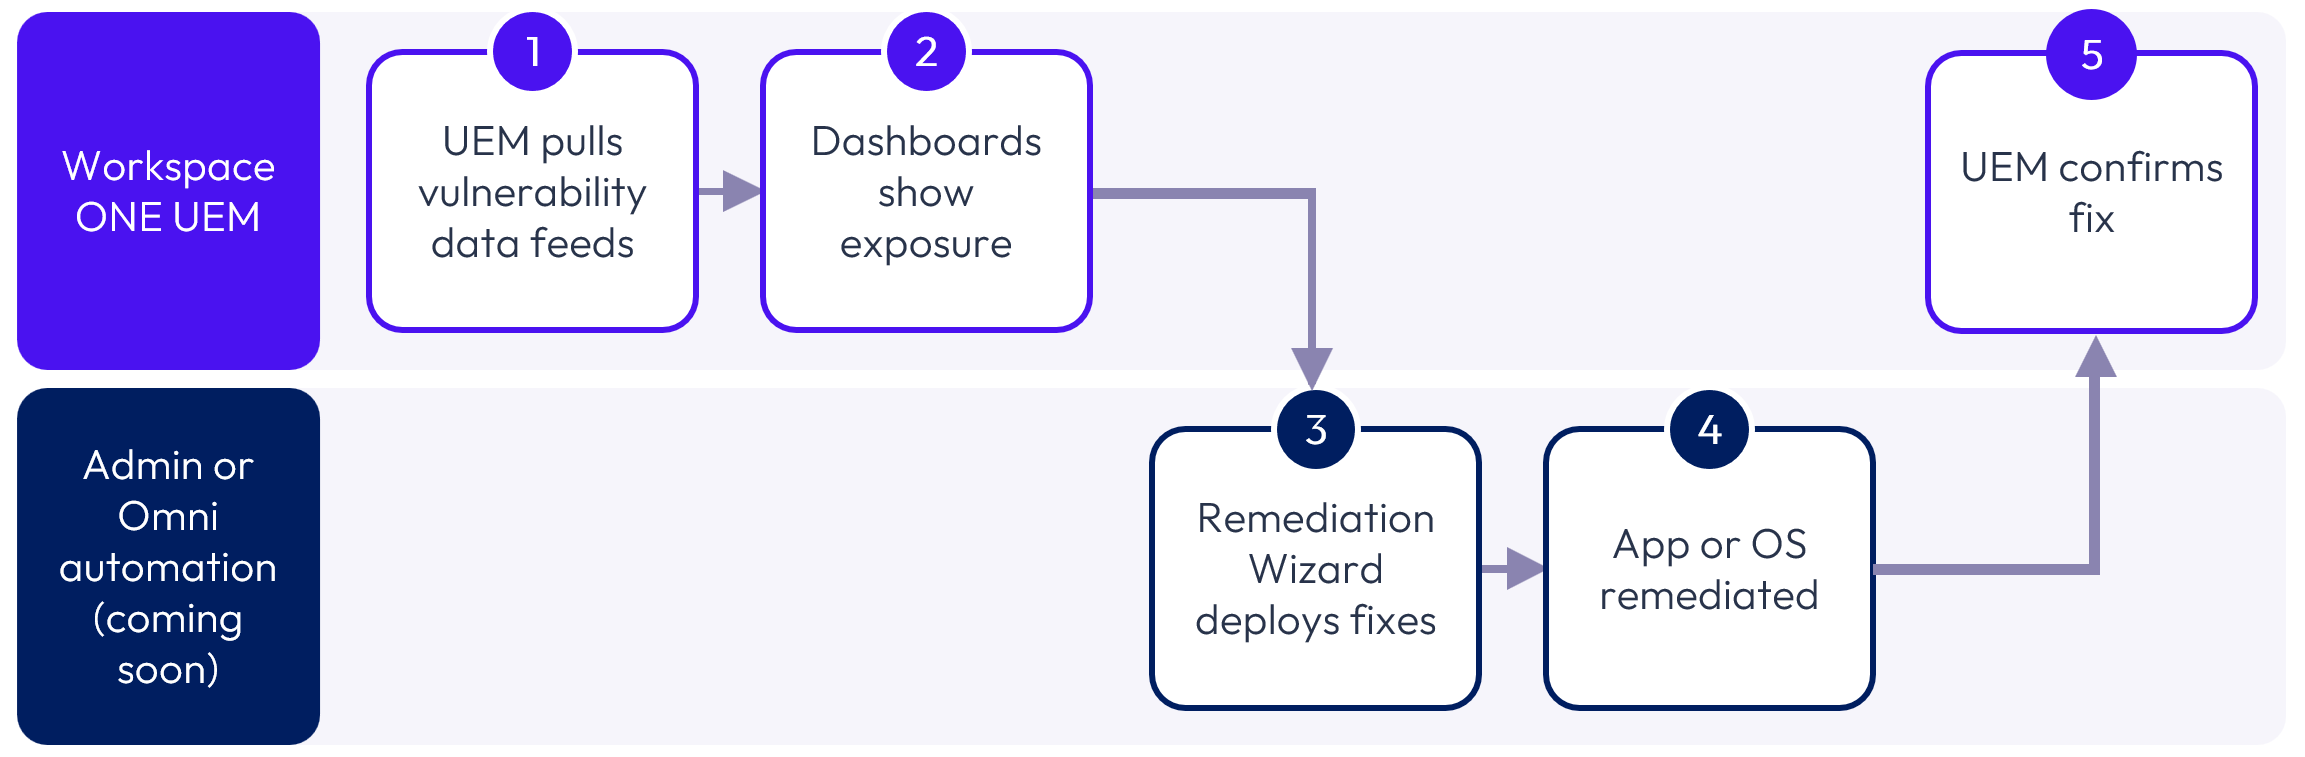
Figure 6: Workspace ONE Assessment data flow
Licensing
Omnissa offers trial licensing so that you can validate Vulnerability Defense within your environment, and your account team can help you with this.
Licensing differs for the two Vulnerability Defense assessment types. The two types of licenses are not interchangeable, so please ensure that the correct Workspace ONE license type is procured and applied.
Regardless of the assessment solution that is elected, Vulnerability Defense licensing applies to the entire fleet of devices. For example, if an administrator wishes to only use Vulnerability Defense to assess and remediate vulnerabilities for devices contained within a Child Organizational Group that includes contractors’ devices, it is not possible to segregate functionality and thus licensing would be required for all devices in the fleet, not just the subset.
Prioritization
Device inventory and assessment data alone are not sufficient for tackling vulnerabilities. Intelligently combining these two key data components enables administrators to prioritize which vulnerabilities need to be addressed in short order versus those that are not of immediate concern.
For example, a critical vulnerability may impact 12 engineering devices whereas another high vulnerability may impact every Windows device in the fleet. Based on the data presented, the administrator can prioritize which vulnerability must be addressed first.
Vulnerability Defense provides three distinct views for vulnerability data, each providing search and filtering options. By viewing the presented data, prioritization decisions can be made.
By vulnerability
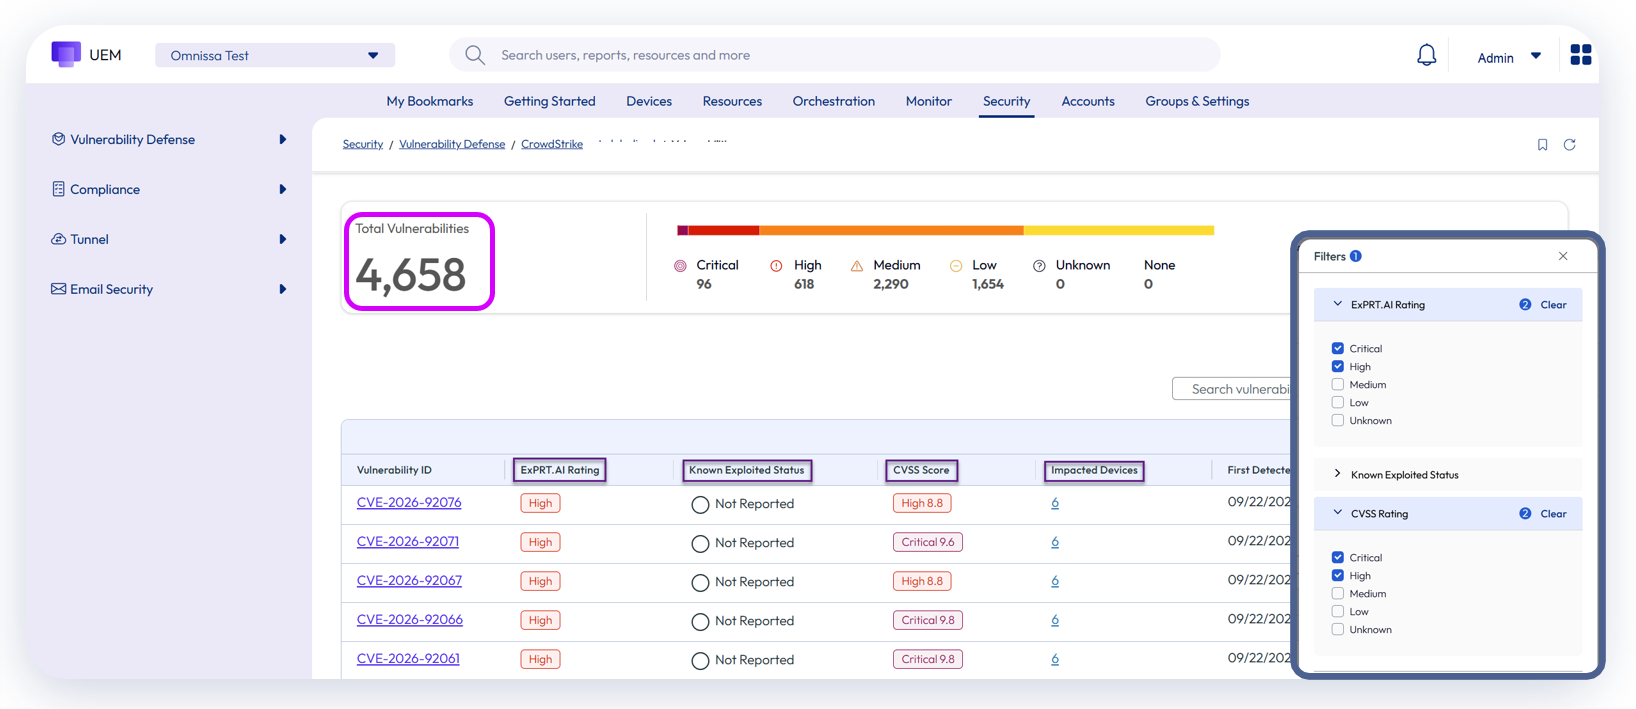
Figure 7: Prioritize based on specific vulnerability
For example, if your CISO advises you that five specific critical vulnerabilities must be addressed today, these can easily be researched via the vulnerability view.
By product
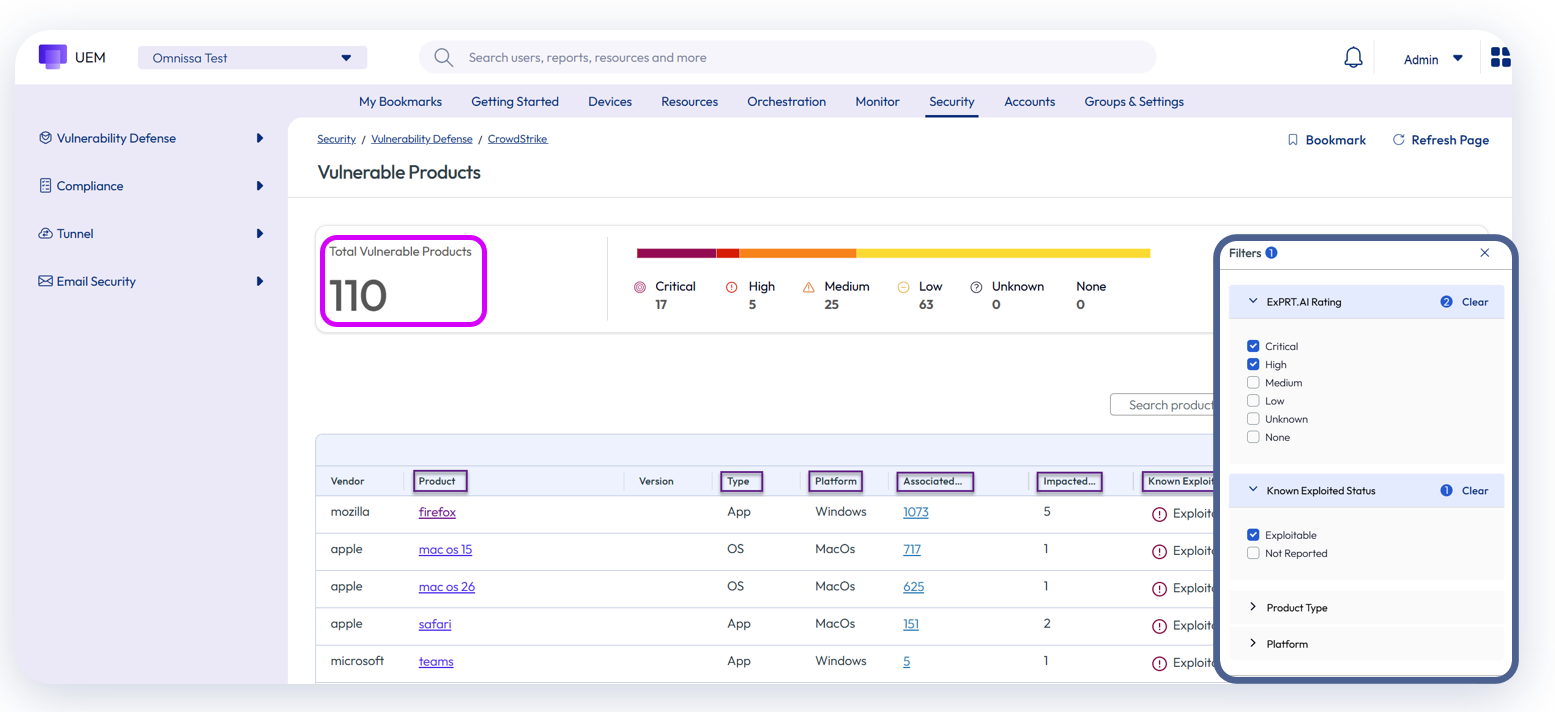
Figure 8: Prioritize based on product
Similarly, vulnerable products can be viewed based on specific application or operating system products. As an example, identifying vulnerabilities affecting only Firefox can be viewed in this way.
By device
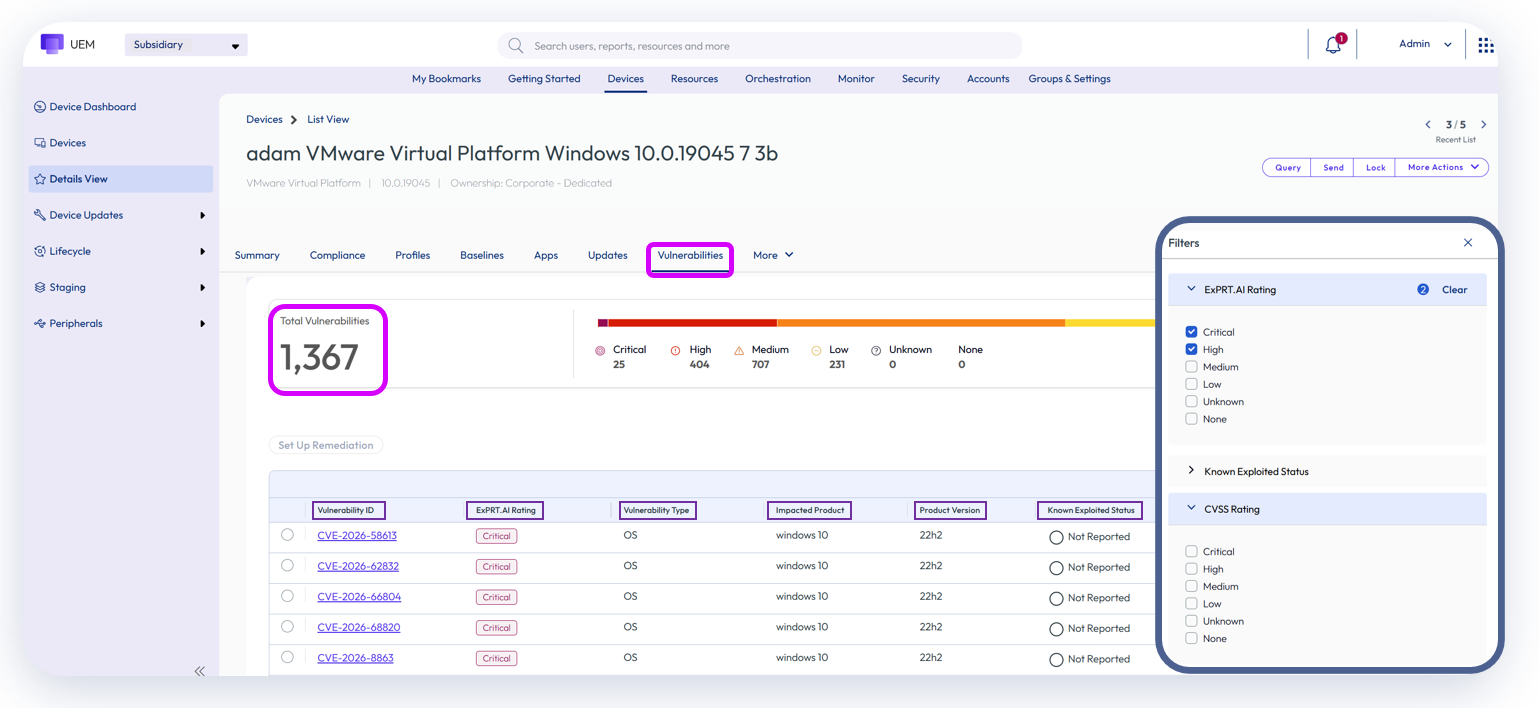
Figure 9: Prioritize based on vulnerabilities impacting specific device
Lastly, vulnerabilities can be viewed based on specific devices by selecting the Vulnerabilities tab within the device view. This may be particularly useful for viewing specific devices used by contractors or high-risk users.
Remediation
Once a specific vulnerability is selected, the administrator can read more about the vulnerability. This information may also be useful for Change Control documentation.
Remediations can be addressed in two ways:
- After prioritization, the administrator performs the remediation.
- Automated remediation. Options for automating remediation will be available in the near future.
Presently, the remediation process is initiated by simply selecting the Set Up Remediation button.
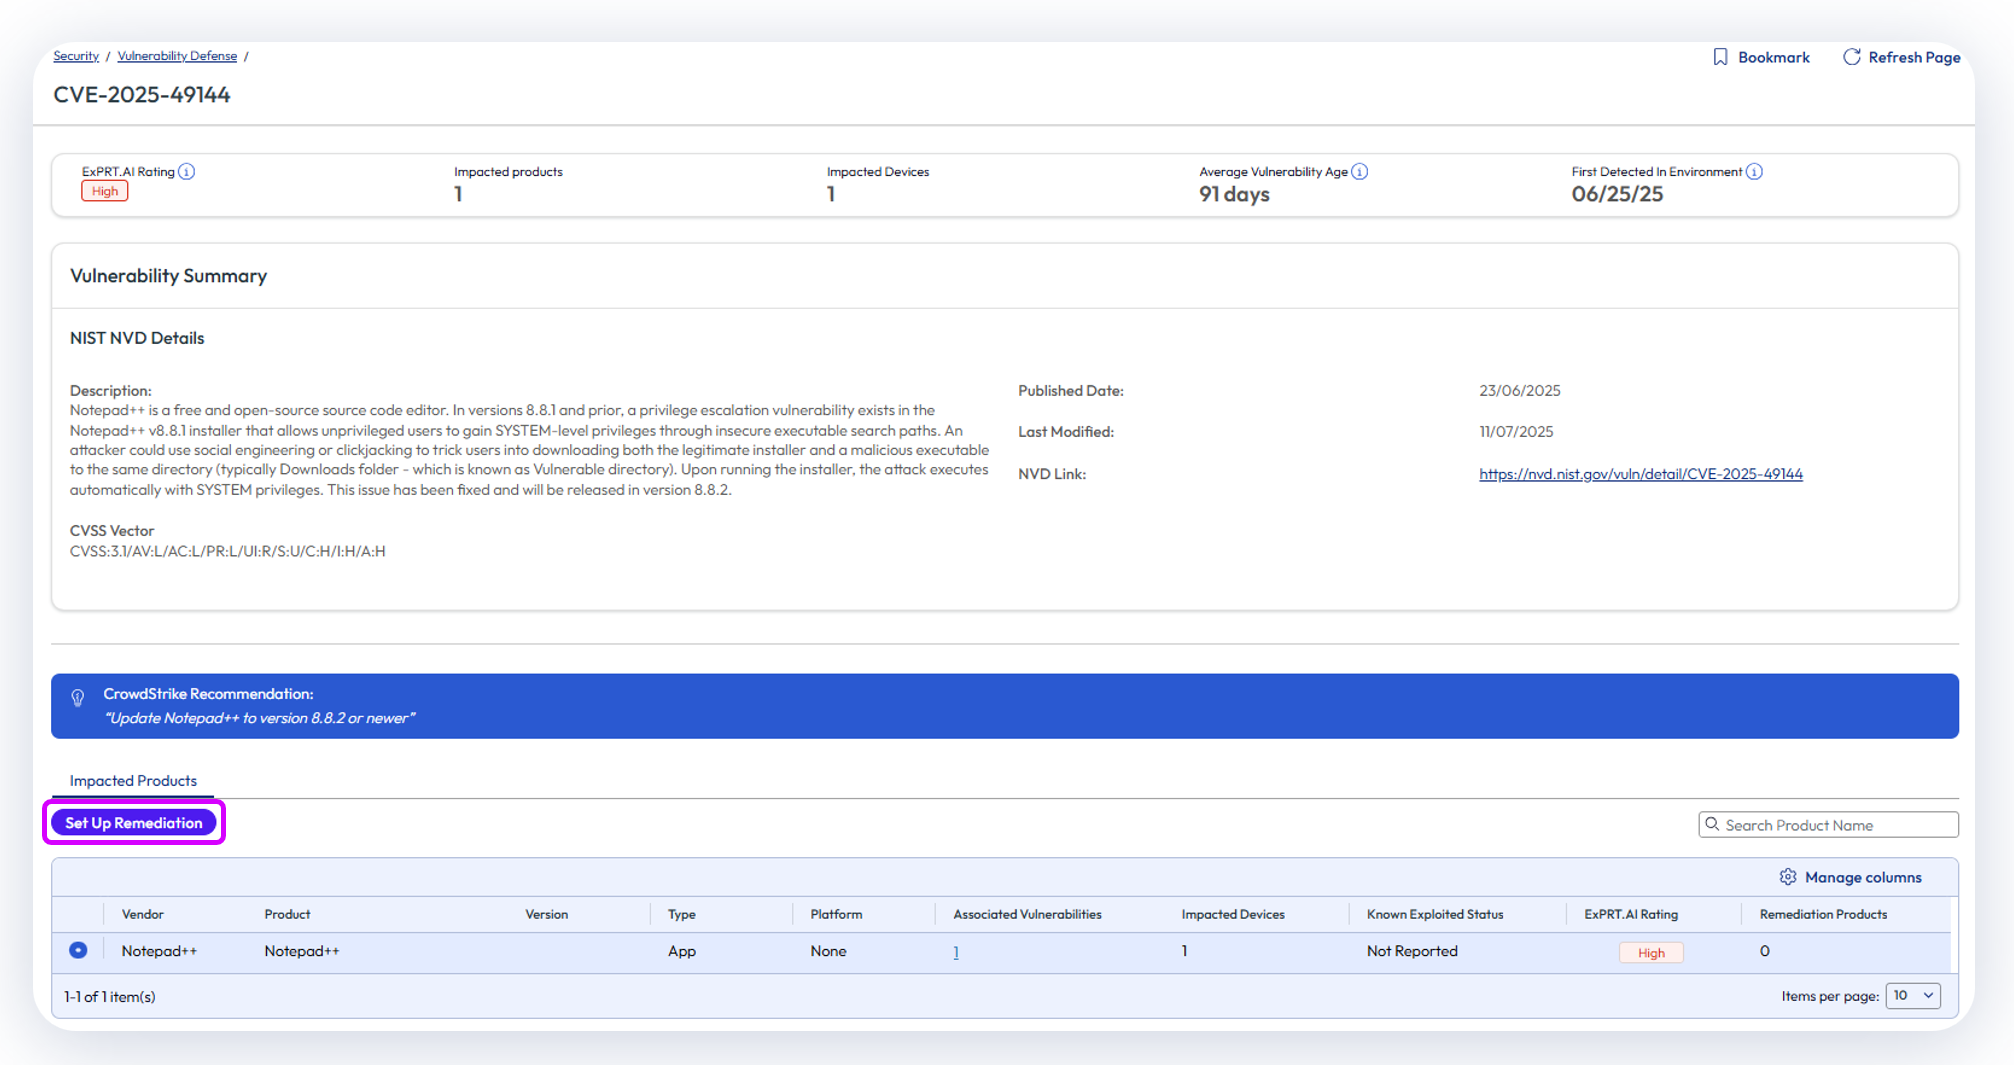
Figure 10: Initiating remediation
Next steps differ slightly based on whether the subject of the remediation is an operating system or application vulnerability. In particular, remediation of Windows Server devices should align with your maintenance periods.
Operating System Remediation
When remediating the operating system, the following steps are presented within the wizard:
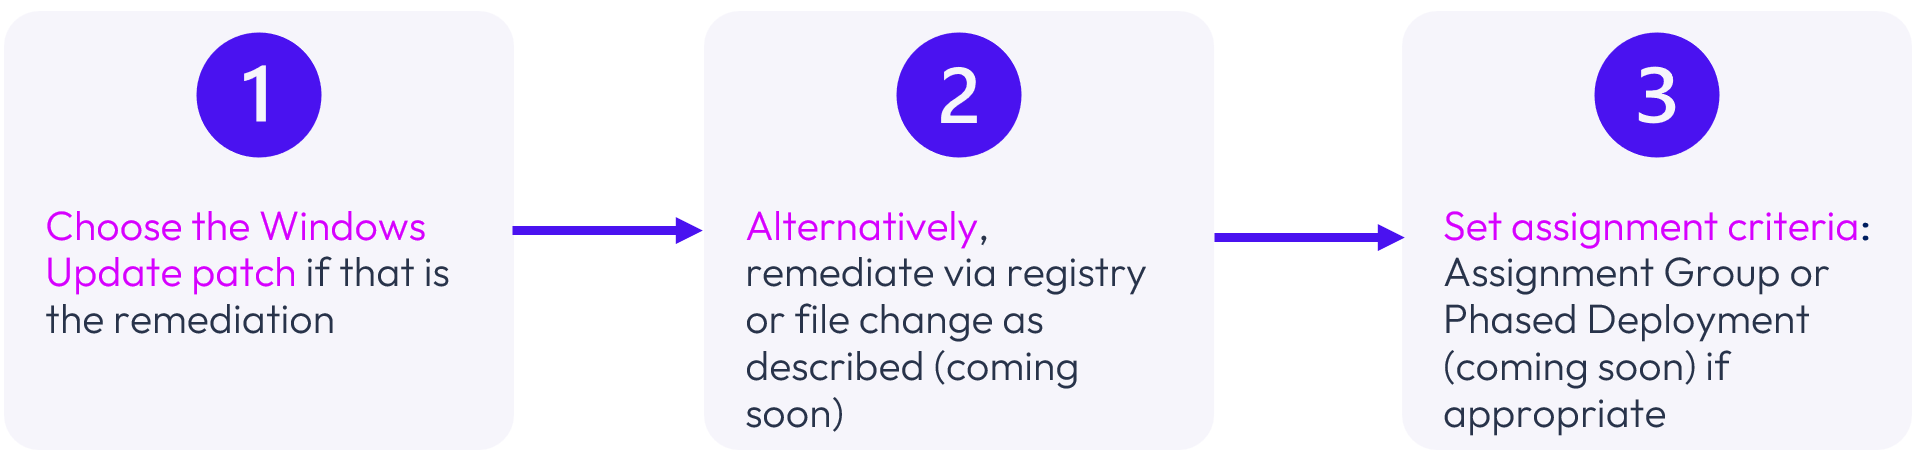
Figure 11: Operating System remediation
Operating System remediation for Windows devices incorporates Granular Patch Management functionality to select and deploy patches. Updating the operating system via registry or file change, as well as phased deployment will be available in the near future.
Please ensure that operating system remediation coordinates properly with your Windows Update configuration and corporate policies.
Application Remediation
Similarly, the steps for application remediation are straightforward and presented within the wizard:
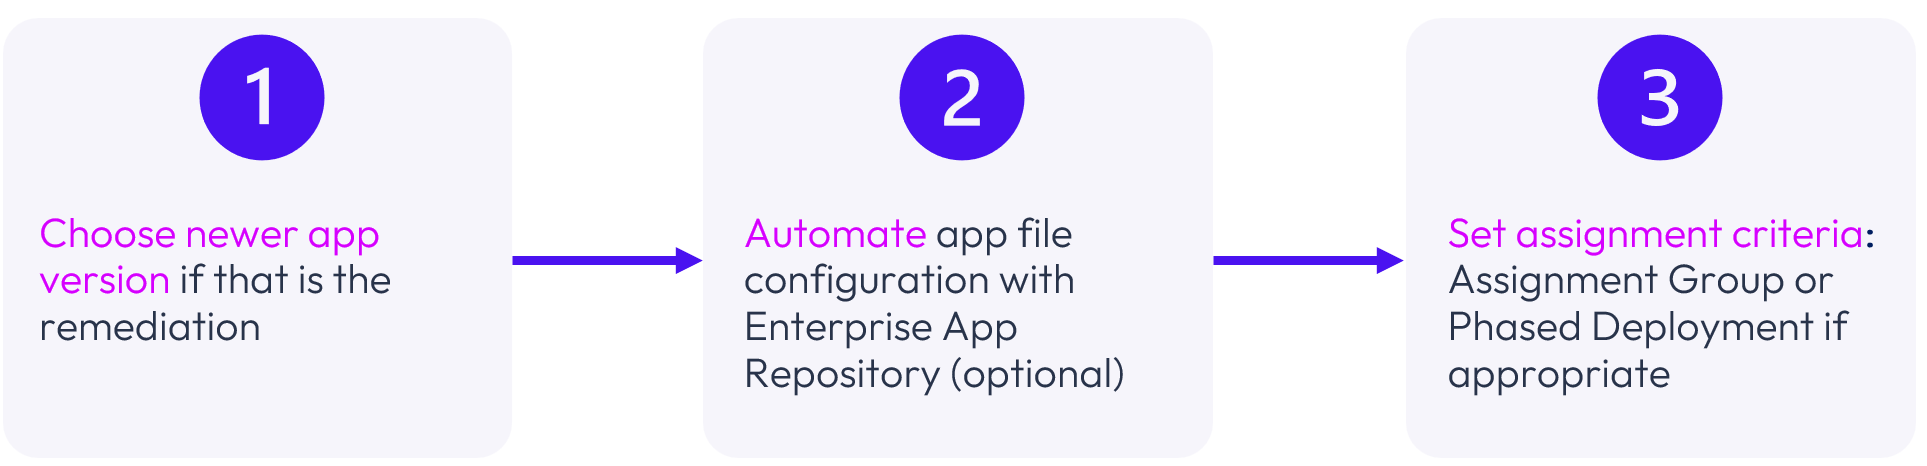
Figure 12: Application remediation
Omnissa recommends using Enterprise App Repository (EAR) for application remediation where feasible because EAR includes over 10,000 pre-configured applications. Updating by means of EAR also includes an option to auto-update apps. While this option has many benefits, it should be considered in the context of corporate governance, especially for Windows Server devices.
Alternatively, the Native Apps functionality within Workspace ONE can be utilized to create App Files.
Tracking
Once the Remediation process is executed, devices will be upgraded and/or modified based on check-in time and specific remediation configuration parameters. Administrators can determine remediation success by monitoring the outstanding number of devices and vulnerabilities, as well as the individual devices.
Troubleshooting
These resolutions may be useful if Vulnerability Defense is not functioning as expected:
| Issue | Solution |
| No data appears in Vulnerability Defense dashboards | Initial data ingestion after Vulnerability Defense is configured for the first time may take 24 hours or more depending on the volume of data to be retrieved from CrowdStrike |
| Vulnerability Defense is applying to all devices in the fleet, not just the desired Organizational Group | Vulnerability Defense applies to all devices and cannot be segregated to a subset of devices |
| How to test without impacting all devices | Omnissa recommends first testing in a UAT environment, which is also useful for creating a blueprint for rollout; please see also the Proof of Concept guide |
| Not all devices showing on impacted devices list | This is likely due to the CrowdStrike Falcon sensor not reporting latest data to the CrowdStrike console. Latest data from the CrowdStrike console is reflected in Workspace ONE UEM within roughly 1 hour. |
| Remediation for Windows Servers | Windows Server remediation works exactly the same as Windows Desktops and is fully supported |
| Validate Credentials fails in Workspace ONE UEM | Try switching the Service URL between falcon.<region>.crowdstrike.com and api.<region>.crowdstrike.com. Verify all required API scopes have Read access. Confirm the Client Secret was copied correctly (shown only once at creation). |
| Dashboard shows no CVEs | Confirm Falcon Sensor shows STATE: 4 RUNNING on test devices. Verify devices appear in CrowdStrike Falcon under Hosts. Ensure the CrowdStrike connection in WORKSPACE ONE shows as Connected (not just Saved). Initial sync can take up to 24 hours. |
| Remediation Wizard shows no applications | Confirm the impacted product has a CrowdStrike recommended remediation version. Check EAR availability. For obscure applications, use the Upload an App File option with the updated installer. |
| Impacted Devices count unchanged after patching | 1. Verify the app installed successfully in the Workspace ONE UEM App details page 2. Verify that CrowdStrike console shows the vulnerability as Closed or Resolved 3. Allow up to 1 hour for data to be reconciled in Workspace ONE UEM |
| ExPRT.AI ratings differ between WORKSPACE ONE and CrowdStrike | ExPRT.AI ratings update daily. A temporary mismatch may reflect a rating change between Workspace ONE sync cycles. Wait for the next sync and re-compare. If persistent, contact your Omnissa account representative. |
| CrowdStrike and WORKSPACE ONE device CVE lists do not match | Verify that the last-synced date in Workspace ONE UEM’s Vulnerability Defense section is up to date. Note that WORKSPACE ONE Vulnerability Defense focuses on WORKSPACE ONE-managed devices; devices managed only in CrowdStrike (not enrolled in WORKSPACE ONE) will not appear in WORKSPACE ONE dashboards. |
Figure 13: Troubleshooting steps
Appendix A: Vulnerability Defense Proof of Concept guide
This Proof-of-Concept (POC) Evaluation Guide provides a structured, step-by-step guide for evaluating Workspace ONE Vulnerability Defense integrated with CrowdStrike Falcon Exposure Management. The guide focuses specifically on how CrowdStrike's ExPRT.AI engine surfaces and prioritizes vulnerabilities that pose the greatest real-world risk, and how Workspace ONE UEM enables rapid, streamlined remediation of those vulnerabilities through its enterprise application management capabilities.
Estimated POC Duration: This POC is designed to be completed in approximately 1 to 3 business days of active effort, typically spread over 1 to 4 calendar days to accommodate data synchronization windows. The POC is organized into three phases: Environment Setup (1–2 hours), Test Exercises (2–3 hours of guided testing), and Evaluation and Debrief. Individual exercise time estimates are provided at the start of each exercise. This Vulnerability Defense POC is intentionally scoped to be completed quickly due to the speed of exploitation in the current threat landscape.
By completing the exercises in this guide, you will be able to:
- Validate the integration between Workspace ONE UEM and CrowdStrike Falcon
- Identify your most critical vulnerabilities using ExPRT.AI ratings
- Prioritize remediation using ExPRT.AI rather than CVSS scores
- Deploy application remediations through the Workspace ONE Remediation Wizard
- Deploy OS remediations through Workspace ONE
- Track remediation progress across managed endpoints
- Measure the combined value of UEM and vulnerability intelligence in a single workflow
1. Prerequisites
1.1 Environment requirements
Confirm all of the following are in place before beginning the POC:
| Requirement | Owner | Status |
| Workspace ONE UEM tenant running v2607 or later | Customer / Omnissa | |
| Vulnerability Defense enabled by Omnissa | Omnissa Product Team | |
| CrowdStrike Falcon Exposure Management license active with Discover and Spotlight modules enabled | Customer / CrowdStrike | |
| Access to CrowdStrike Falcon console with API Clients and Keys permissions | Customer | |
| Workspace ONE UEM Admin account with Customer-type Organization Group (OG) level access | Customer | |
| At least 2–5 Windows 10/11 or Windows Server test devices enrolled in Workspace ONE UEM | Customer | |
| Test devices have known vulnerable application versions installed (Firefox, Chrome, Notepad++, or similar) | Customer | |
| Network connectivity from test devices to CrowdStrike cloud endpoints | Customer | |
| CrowdStrike Falcon Sensor installer downloaded from your CrowdStrike console | Customer |
Configuring the integration between Workspace ONE UEM and CrowdStrike involves steps taken in these individual consoles, and deployment of the CrowdStrike Falcon Sensor to your Windows endpoints.
2. Environment setup
Please complete all steps in this section before proceeding to the test exercises. Estimated time: 1–2 hours (plus up to 1 hour or more depending on the size of your CrowdStrike environment for data sync).
2.1 Create CrowdStrike OAuth2 API client
Workspace ONE UEM authenticates to CrowdStrike using OAuth 2.0. Create an API client in the CrowdStrike Falcon console:
- Log in to your CrowdStrike Falcon console (e.g., https://falcon.us-2.crowdstrike.com/).
- Navigate to Support and Resources > API Clients and Keys.
- Click Create API Client.
- Enter a Client Name (e.g., "Workspace ONE UEM Vulnerability Defense").
- Under API Scopes, grant Read access to: API integrations, Apps, Detections, Hosts, Assets, Vulnerabilities.
- Click Create.
- Copy and securely store the Client ID and Client Secret — these are only shown once.
| Value to Record | Your Value |
| CrowdStrike Service URL (Base URL) | |
| OAuth2 Client ID | |
| OAuth2 Client Secret | (store securely — do not write here) |
3. Configure integration in Workspace ONE UEM
Connect Workspace ONE UEM to CrowdStrike using the credentials from Section 2.1:
- Log in to Workspace ONE UEM.
- Navigate to Groups & Settings > Configurations.
- Search for Vulnerability Defense and select it.
- Click Add Provider and select CrowdStrike.
- Under Set Up Integration, complete:
- Service URL: Your CrowdStrike Falcon API URL (e.g., https://falcon.us-2.crowdstrike.com/)
- Client ID: The Client ID copied in Section 2.1
- Client Secret: The Client Secret copied in Section 2.1
- Click Validate Credentials. Wait a few seconds for the success confirmation.
- Click Save. Then click the three-dot menu next to the provider and select Connect.
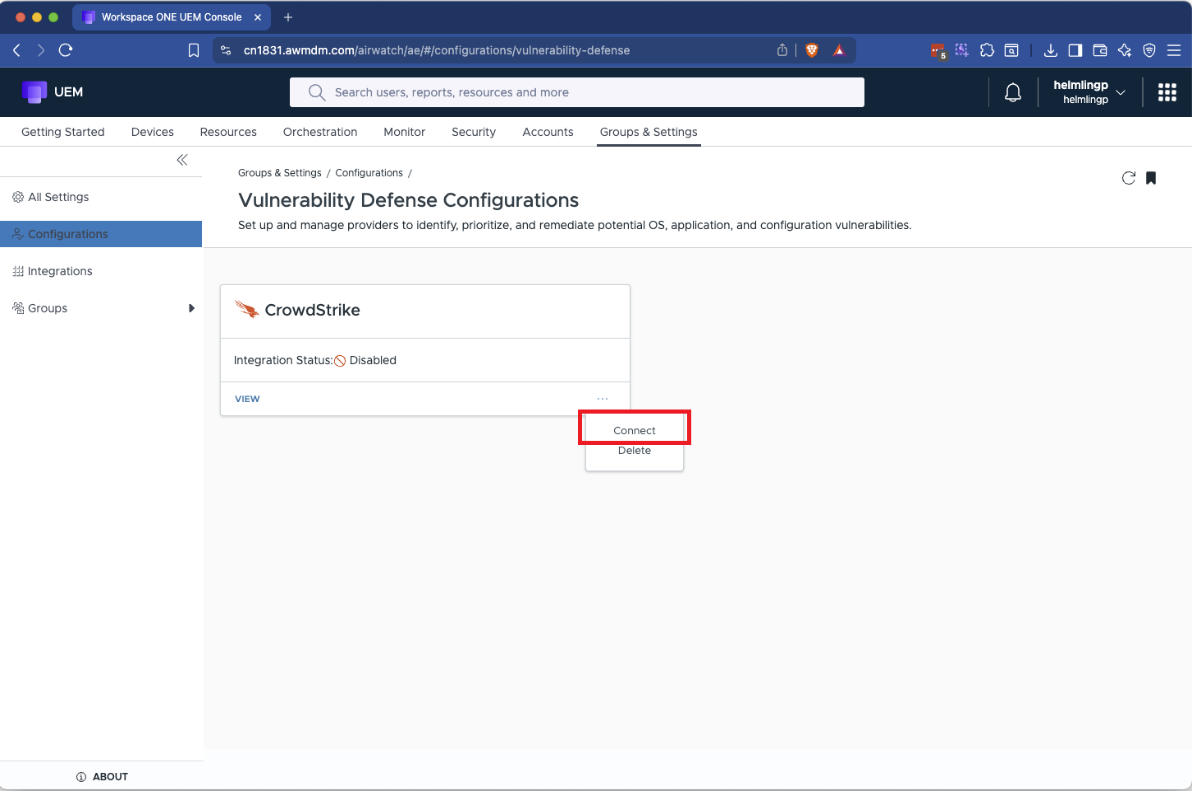
NOTE: If Validate Credentials fails with the falcon.<domain>.com Service URL, try https://api.<domain>.com instead.
TIP: After enabling the connection, please allow up to 24 hours for the initial data synchronization to complete. Dashboards will appear empty during this sync period.
3.1 Deploy the CrowdStrike Falcon Sensor to Windows devices, including Windows Server
The Falcon Sensor must be installed on test devices before CrowdStrike can detect vulnerabilities. You may deploy the sensor before or after configuring the UEM integration.
Option A: Manual install (Quickest for a small POC)
Download the Falcon Sensor installer from your CrowdStrike console (Support > Tool Downloads) and run on each test device:
FalconSensor_Windows.exe /install /quiet /norestart CID=<Your_CrowdStrike_CID>
Replace <Your_CrowdStrike_CID> with your Customer ID, available under Sensor Downloads in the CrowdStrike console.
Option B: Deploy via Workspace ONE UEM (Recommended for multiple devices)
- Create a ZIP file containing FalconSensor_Windows.exe and CsUninstallTool.exe (which requires an administrative maintenace token for uninstallation) or simply use the FalconSensor_Windows.exe.
- In Workspace ONE UEM, go to Resources > Apps > Native Apps > Add > Application File. Upload the file.
- Configure the app:
- Name: CrowdStrike Falcon Sensor
- Version: Match the version of your downloaded installer (e.g., 7.28.20006.0)
- Supported Processor Architecture: 64-bit
- Supported Models: Desktop + Server
- Install Command: FalconSensor_Windows.exe /install /quiet /norestart CID=<Your_CID>
- Uninstall Command: CsUninstallTool.exe MAINTENANCE_TOKEN=<token> /quiet
- Identify Application By: Defining Criteria > File Exists > C:\Program Files\CrowdStrike\CSFalconService.exe
- Assign the app to your test device Smart Group and deploy.
Verify Falcon Sensor status
On each test device, open a command prompt and run both commands. Both should return STATE: 4 RUNNING:
sc.exe query csagent         (should show STATE: 4 RUNNING)
sc.exe query csfalconservice  (should show STATE: 4 RUNNING)
For more details, please see: Install Falcon Sensor Omnissa Community Blog.
3.2 Suggested test applications
Install older versions of widely used applications on test devices to generate meaningful ExPRT.AI-rated findings:
| Application | Older Version to Install | Notes |
| Mozilla Firefox | 130.0 or earlier | Multiple high/critical CVEs with active exploitation. Frequently used in POC scenarios. |
| Google Chrome | 128.0 or earlier | Older versions carry multiple ExPRT.AI Critical ratings. Widely deployed. |
| Notepad++ | 8.8.8.x or earlier | Useful for demonstrating application-specific CVE remediation workflow. |
| 7-Zip | 22.x or earlier | Widely deployed, frequently targeted. Good for demonstrating software prevalence signals. |
| Edge | 154.0 or earlier | Older versions carry multiple ExPRT.AI Critical ratings. Widely deployed. |
NOTE: Do not install vulnerable software versions on production systems. Use isolated test devices or a dedicated POC environment.
TIP — Using EAR for older application versions: Older versions of common test applications (Firefox, Chrome, 7-Zip, Notepad++) are available directly in the Workspace ONE Enterprise App Repository (EAR), which maintains multiple versions per application. In Workspace ONE UEM, navigate to Resources > Apps, search for the application by name, and select an older version from the version list. This avoids the need to locate and manually download legacy installers from the internet.
3.3 Install vulnerable test applications
Install the vulnerable application versions listed using EAR on your test devices. You can do this manually or deploy through Workspace ONE UEM (Preferably with EAR). After installation, wait 30–60 minutes for the Falcon Sensor to inventory the applications and sync to Workspace ONE UEM.
'%3E%3Cpath id='Rectangle_1' data-name='Rectangle 1' d='M0,0H800V300H0Z' transform='translate(2297 1132)' fill='%23E2F0D9'/%3E%3Cg id='Group_5' data-name='Group 5' transform='translate(-6 -3)'%3E%3Ctext transform='translate(2534 1280)' font-size='50' font-family='Roboto-Regular, Roboto'%3E%3Ctspan x='0' y='0'%3ECurated Assets%3C/tspan%3E%3C/text%3E%3Ctext transform='translate(2611 1333)' font-size='20' font-family='Roboto-Regular, Roboto'%3E%3Ctspan x='0' y='0'%3ETile View (with image and controls)%3C/tspan%3E%3C/text%3E%3C/g%3E%3C/g%3E%3C/svg%3E)
3.4 Setup verification checklist
| Verification Item | Result |
| CrowdStrike Falcon console shows enrolled test devices in Hosts | Pass / Fail / Notes |
| Workspace ONE UEM shows CrowdStrike integration status as Connected (green) | Pass / Fail / Notes |
| Security > Vulnerability Defense in Workspace ONE UEM shows CVEs (after 24-hour sync) | Pass / Fail / Notes |
| ExPRT.AI Rating column is visible in the Vulnerabilities table | Pass / Fail / Notes |
| Test devices appear in the Impacted Devices count for at least one CVE | Pass / Fail / Notes |
4. Test exercises
Complete the exercises in order. Each exercise builds on the previous. Total estimated time: 1–3 hours depending on your environment.
Exercise 1: Navigate the Vulnerability Defense dashboard and apply ExPRT.AI filtering
Objective: Understand the Vulnerability Defense dashboard and use ExPRT.AI ratings to surface the highest-risk CVEs across your managed fleet.
Estimated time: 5–10 minutes
Steps
- In Workspace ONE UEM, click Security in the left navigation menu.
- Select Vulnerability Defense. The dashboard opens with a high-level summary showing total CVE count, a categorized breakdown by ExPRT.AI severity (Critical / High / Medium / Low), and a sortable CVE table.
- Review the column headers in the Vulnerabilities table. Confirm you see: Vulnerability ID, Description, CVSS Score, ExPRT.AI Rating, Known Exploited (KEV), Impacted Devices, First Detected, and Remediation Products.
- Click the ExPRT.AI Rating column header to sort vulnerabilities descending (Critical first).
- Apply a filter: click the Filter icon > set ExPRT.AI Rating = Critical. Observe how the list narrows to only the highest-priority CVEs.
- Add a second filter: Known Exploited = Yes. This identifies CVEs that are both ExPRT.AI Critical AND confirmed active in CISA's Known Exploited Vulnerabilities catalog.
- Note the number of CVEs remaining after both filters.
Observations to record
| Question | Your Observation |
| Total CVEs detected across managed devices? | |
| CVEs with ExPRT.AI Rating = Critical? | |
| CVEs that are both ExPRT.AI Critical AND KEV-listed? | |
| Highest CVSS score among Critical ExPRT.AI CVEs? | |
| Any CVEs with CVSS < 7.0 but ExPRT.AI = Critical? (list examples) | Yes / No: |
Success criteria
- ExPRT.AI Rating column is visible and populated for all detected CVEs.
- Filtering by ExPRT.AI Rating correctly limits displayed CVEs.
- ExPRT.AI Critical + KEV intersection provides a clearly actionable prioritized list.
TIP: ExPRT.AI Critical + Known Exploited represents the highest-urgency remediation target: AI-predicted high likelihood of exploitation AND confirmed active exploitation in the wild. These should always be addressed first.
Exercise 2: Compare ExPRT.AI ratings vs. CVSS scores
Objective: Demonstrate why ExPRT.AI provides more actionable prioritization than CVSS alone, and how the two metrics complement each other.
Estimated time: 5–10 minutes
Steps
- Remove all filters from Exercise 1 to view all CVEs.
- Sort by CVSS Score descending. Record the top 5 CVEs by CVSS score, including their ExPRT.AI ratings.
- Now sort by ExPRT.AI Rating descending (Critical first). Record the top 5 CVEs by ExPRT.AI, including their CVSS scores.
- Compare the two lists. Identify CVEs that appear in one list but not the other.
- For any CVE with a high CVSS (>=8.0) but Medium or Low ExPRT.AI: click the Vulnerability ID and review whether exploitation is practically difficult (e.g., requires physical access, complex prerequisites, or no known public exploit exists).
- For any CVE with a lower CVSS (<7.5) but High or Critical ExPRT.AI: check for active exploit activity, known adversary tooling, or vulnerability chaining potential.
Comparison Table
| CVE (by CVSS) | CVSS Score | ExPRT.AI |
| CVE (by ExPRT.AI) | ExPRT.AI | CVSS Score |
Discussion questions
- Did your CVSS top 5 and ExPRT.AI top 5 lists differ significantly? What does this suggest about CVSS-only patching strategies?
- Are there CVEs in your fleet that would be missed with a "patch everything CVSS >=9.0" policy?
- How many CVEs are in your fleet total? How many are ExPRT.AI Critical? What percentage reduction does ExPRT.AI-based filtering achieve?
Success criteria
- At least one CVE demonstrates meaningful divergence between ExPRT.AI and CVSS rankings.
- The team understands that ExPRT.AI accounts for real-world attacker behavior, not theoretical severity alone.
Exercise 3: Drill Into a critical ExPRT.AI CVE
Objective: Use the vulnerability details page to understand all available context for a high-priority CVE and identify affected devices and products.
Estimated time: 10 minutes
Steps
- Filter the Vulnerability Defense dashboard for ExPRT.AI Rating = Critical.
- Select the CVE with the highest number of Impacted Devices. Click its Vulnerability ID to open the CVE details page.
- Review and record the following from the CVE Details page:
- CVE description from NIST NVD
- CVSS Base Score and vector string
- ExPRT.AI Rating
- Known Exploited (KEV) status
- First Detected date in your environment
- Scroll to the Impacted Products section. Note each application or OS version affected.
- Click an impacted product to see CrowdStrike's recommended remediation version (e.g., "Update Firefox to version X.X or later").
- Review the Impacted Devices section. Note the specific managed devices affected.
CVE detail capture
| Field | Value |
| CVE ID | |
| CVSS Score | |
| ExPRT.AI Rating | |
| Known Exploited (KEV)? | |
| Number of Impacted Devices | |
| Impacted Application / OS | |
| CrowdStrike Recommended Remediation Version | |
| Remediation Products already deployed? |
Success criteria
- CVE detail page shows complete context: description, CVSS, ExPRT.AI, KEV status, impacted products, and impacted devices.
- CrowdStrike's remediation recommendation (target version) is visible on the impacted product drill-down.
- Impacted devices correspond to Workspace ONE UEM-managed device records.
Exercise 4: Explore the Vulnerable Products view
Objective: Use the Vulnerable Products dashboard to identify which applications are driving the most vulnerability risk by ExPRT.AI rating.
Estimated time: 5–10 minutes
Steps
- From the Vulnerability Defense dashboard, click the Vulnerable Products tab.
- Confirm that the following columns are visible: Product Name, Vendor, Version, Platform, Associated Vulnerabilities, Impacted Devices, ExPRT.AI Rating, KEV Status, Remediation Products.
- Click the ExPRT.AI Rating column to sort products by risk level (Critical first).
- Click the product with the highest ExPRT.AI rating to open its Product Details page.
- Review the list of CVEs affecting this product, including each CVE's ExPRT.AI rating and CVSS score.
- Note whether the product has any associated Remediation Products already deployed. If so, check their deployment status.
- Use the search bar to look up your specific test applications (e.g., Firefox, Chrome). Identify the installed version vs. CrowdStrike's recommended fix version.
Vulnerable products capture
| Product Name / Version | ExPRT.AI | CVE Count | Devices | KEV? | Remediation? |
Success criteria
- Vulnerable Products view correctly shows all applications with associated vulnerabilities.
- ExPRT.AI Rating is visible and sortable at the product level.
- Drilling into a product surfaces the individual CVEs driving its risk rating.
Exercise 5: Review per-device vulnerability posture
Objective: Demonstrate per-device vulnerability visibility and confirm that ExPRT.AI-rated CVEs are accessible at the device level for targeted remediation.
Estimated time: 10 minutes
Steps
- In Workspace ONE UEM, navigate to Devices > List View.
- Select one of your test Windows devices and open Device Details.
- Click the Vulnerabilities tab.
- Confirm that ExPRT.AI Rating, CVSS Score, KEV status, and Vulnerability ID are all visible.
- Filter the device vulnerability list for ExPRT.AI Rating = Critical or High. Note the count.
- Click a Critical CVE's Vulnerability ID to navigate to the CVE details page and confirm this device is listed among Impacted Devices.
- Repeat for at least two additional test devices and note whether all devices with the same vulnerable application show the same CVEs.
- Confirm that Impacted Device counts on the fleet-level dashboard match the per-device findings.
Per-Device Results
| Device Name/ID | Total CVEs | ExPRT Critical | ExPRT High | Top Critical CVE |
Success criteria
- Device-level Vulnerabilities tab shows all CVEs detected by CrowdStrike for that device.
- ExPRT.AI rating is visible and filterable at the device level.
- Impacted Devices counts on the fleet dashboard match per-device findings.
Exercise 6: Remediate a critical OS vulnerability
Objective: Use the Vulnerability Defense Remediation Wizard to deploy an OS update to address an ExPRT.AI Critical CVE and confirm the vulnerability is resolved.
Estimated time: 10–15 minutes (not including OS deployment and CrowdStrike sync time)
Steps
- In Workspace ONE UEM, navigate to Devices > List View.
- Select one of your test Windows devices and open Device Details.
- Click the Vulnerabilities tab.
- Click the CVE's Vulnerability ID to open the CVE Details page.
- Select the radio button for your OS.
- Click Setup Remediation.
- Select the radio button for your update and click >Select Update>Select Architecture>Continue.
- Add Assignment and configure deployment parameters.
- Create Assignment>Click Save & Assign. Deploy
- Wait 15–30 minutes for the Falcon sensor to detect and report the updated OS remediation to CrowdStrike.
- Return to the Vulnerability Defense dashboard. Verify: Impacted Devices count for the CVE has decreased. Remediation Products count for the CVE now shows at least 1.
| Item | Value |
| CVE remediated | |
| ExPRT.AI Rating of CVE | |
| Impacted Devices BEFORE remediation | |
| OS Update deployed for remediation | |
| Source: | |
| Time from deployment to device installation | |
| Impacted Devices AFTER remediation (post-sync) | |
| Remediation Products count updated in dashboard? | Yes / No |
Success criteria
- Remediation Wizard launched directly from the CVE detail page.
- OS update deployed successfully to at least one test device.
- The count of impacted devices for the CVE decreased after the CrowdStrike sync.
- CVE's Remediation Products count reflects the available OS updates.
WHILE YOU WAIT: After deploying the OS update, the CrowdStrike Falcon sensor may take 15–60 minutes to confirm remediation and update the dashboard. Use this time productively: proceed to Exercise 7 (Application Vulnerability Remediation) now, then return here to validate the OS CVE Impacted Device count once the sync completes. This parallel approach ensures no time is wasted during synchronization windows.
Exercise 7: Remediate a critical application vulnerability
Objective: Use the Workspace ONE Remediation Wizard to deploy an application update that addresses an ExPRT.AI Critical CVE, and confirm the vulnerability is resolved.
Estimated time: 30–45 minutes (including app deployment and CrowdStrike sync time)
Steps
- From the Vulnerability Defense dashboard, filter for ExPRT.AI Rating = Critical. Identify a CVE affecting one of your test applications (Firefox, Edge, Chrome, or Notepad++).
- Click the CVE's Vulnerability ID to open the CVE Details page.
- In the Impacted Products section, click the affected application to reveal CrowdStrike's recommended remediation version.
- Click Set Up Remediation to launch the Remediation Wizard.
- The Remediation Wizard loads a list of suitable application updates based on CrowdStrike's recommendation, drawn from: (a) applications already deployed in your UEM console, and (b) applications available in the Workspace ONE Enterprise App Repository (EAR), which contains approximately 10,000 + applications.
- Select the recommended application version. If not present, search the EAR. If unavailable in EAR, use Upload an App File to upload the updated installer manually.
- Complete the application configuration: confirm the name and version, set deployment type to Managed, assign to the Smart Group containing your test devices, and set deployment timing to Auto for immediate delivery. Alternatively, Phased Deployment could be configured.
- Click Save or Publish. The app is now deployed and linked to the CVE as a Remediation Product.
- Monitor deployment: navigate to Resources > Apps > Native Apps and locate your app. Check deployment status per device.
- Wait 15–30 minutes for the Falcon sensor to detect the updated application and report to CrowdStrike.
- Return to the Vulnerability Defense dashboard. Verify: Impacted Devices count for the CVE has decreased. Remediation Products count for the CVE now shows at least 1.
Remediation tracking
| Item | Value |
| CVE remediated | |
| ExPRT.AI Rating of CVE | |
| Impacted Devices BEFORE remediation | |
| Application deployed for remediation | |
| Source: EAR / existing app / manual upload | |
| Time from deployment to device installation | |
| Impacted Devices AFTER remediation (post-sync) | |
| Remediation Products count updated in dashboard? | Yes / No |
Success criteria
- Remediation Wizard launched directly from the CVE detail page.
- Application update deployed successfully to at least one test device.
- Impacted Devices count for the CVE decreased after the CrowdStrike sync.
- CVE's Remediation Products count reflects the newly deployed application.
TIP: For most common applications (Firefox, Chrome, 7-Zip), the recommended version is available directly in the EAR, making the entire workflow native to the Workspace ONE UEM console without needing to download or host an installer separately.
Exercise 8: Validate cross-platform data consistency
Objective: Confirm that ExPRT.AI ratings and vulnerability data in Workspace ONE UEM accurately match what is reported in the CrowdStrike Falcon console, establishing trust in the integration.
Estimated time: 20–30 minutes
Steps
- In CrowdStrike Falcon, navigate to Exposure Management > Vulnerabilities. Filter to show only your test devices.
- Note the ExPRT.AI ratings for your top 5 CVEs as shown in the CrowdStrike console.
- In Workspace ONE UEM, navigate to Security > Vulnerability Defense. Filter for the same CVEs.
- Compare ExPRT.AI ratings between both consoles — they should match, as WORKSPACE ONE pulls directly from CrowdStrike via the API.
- Select a specific device in CrowdStrike Falcon and note its complete vulnerability list.
- Find the same device in Workspace ONE UEM > Device Details > Vulnerabilities tab. Compare the CVE list.
- Document any discrepancies and their likely cause (e.g., sync latency, OS-level CVE handling differences).
Consistency validation table
| CVE ID | ExPRT.AI (CS) | ExPRT.AI (WORKSPACE ONE) | Match? | KEV Match? | Notes |
Success criteria
- ExPRT.AI ratings in Workspace ONE UEM match those in the CrowdStrike Falcon console for all tested CVEs.
- Device-level CVE lists are consistent between platforms (accounting for up to 1-hour sync latency).
- No false positives: CVEs shown in WORKSPACE ONE are confirmed present in CrowdStrike.
5. POC success criteria and evaluation scorecard
Use this scorecard to assess the POC outcome. Score each criterion as Met, Partially Met, or Not Met, and add notes or evidence.
| Success Criterion | Result | Notes / Evidence |
| Integration: Workspace ONE UEM authenticates to CrowdStrike via OAuth2 and syncs vulnerability data | Met / Partial / Not Met | |
| Visibility: CVE data appears in WORKSPACE ONE Vulnerability Defense dashboards with ExPRT.AI ratings | Met / Partial / Not Met | |
| Prioritization: ExPRT.AI filtering reduces the CVE list to a focused Critical/High set | Met / Partial / Not Met | |
| Differentiation: ExPRT.AI and CVSS rankings diverge on at least some CVEs, showing value of AI prioritization | Met / Partial / Not Met | |
| Device-level visibility: Per-device Vulnerabilities tab shows ExPRT.AI-rated CVEs for managed endpoints | Met / Partial / Not Met | |
| Remediation: Remediation Wizard launches from CVE detail page and initiates app deployment | Met / Partial / Not Met | |
| Closure: Impacted Devices count decreases after successful app deployment and CrowdStrike sync | Met / Partial / Not Met | |
| Accuracy: ExPRT.AI ratings in WORKSPACE ONE match CrowdStrike Falcon console for all tested CVEs | Met / Partial / Not Met | |
| EAR Integration: Remediation Wizard locates the recommended app update in the Enterprise App Repository | Met / Partial / Not Met |
5.1 Overall Assessment
| Assessment area | Customer rating (1–5) + comments |
| Ease of integration setup | |
| Quality of vulnerability data and ExPRT.AI ratings | |
| Value of ExPRT.AI vs. CVSS-only approach | |
| Dashboard usability and filtering experience | |
| Remediation Wizard workflow efficiency | |
| Overall solution value for your organization |
Key Findings and Observations:
_____________________________________________________________________________
_____________________________________________________________________________
_____________________________________________________________________________
Blockers or Issues Encountered:
_____________________________________________________________________________
_____________________________________________________________________________
_____________________________________________________________________________
Questions for Follow-Up with Omnissa / CrowdStrike:
_____________________________________________________________________________
_____________________________________________________________________________
_____________________________________________________________________________
Appendix B: CrowdStrike Falcon integration
Integrating an existing CrowdStrike Falcon Exposure Management subscription with Vulnerability Defense requires several steps as detailed below:
CrowdStrike licensing
Proper subscription licensing must be provided by CrowdStrike, as well as administrative access. This includes access to the CrowdStrike console.
Note that customers with previous SKUs of the Falcon Exposure Management bundle may not have both the Spotlight and Discover add-on; both add-ons are required for UEM integration. Please contact your CrowdStrike representative regarding Licensing questions.
Install CrowdStrike Falcon Sensor on Windows desktop and server devices
This client software can optionally be deployed via Workspace ONE. Please consult CrowdStrike documentation for additional details.
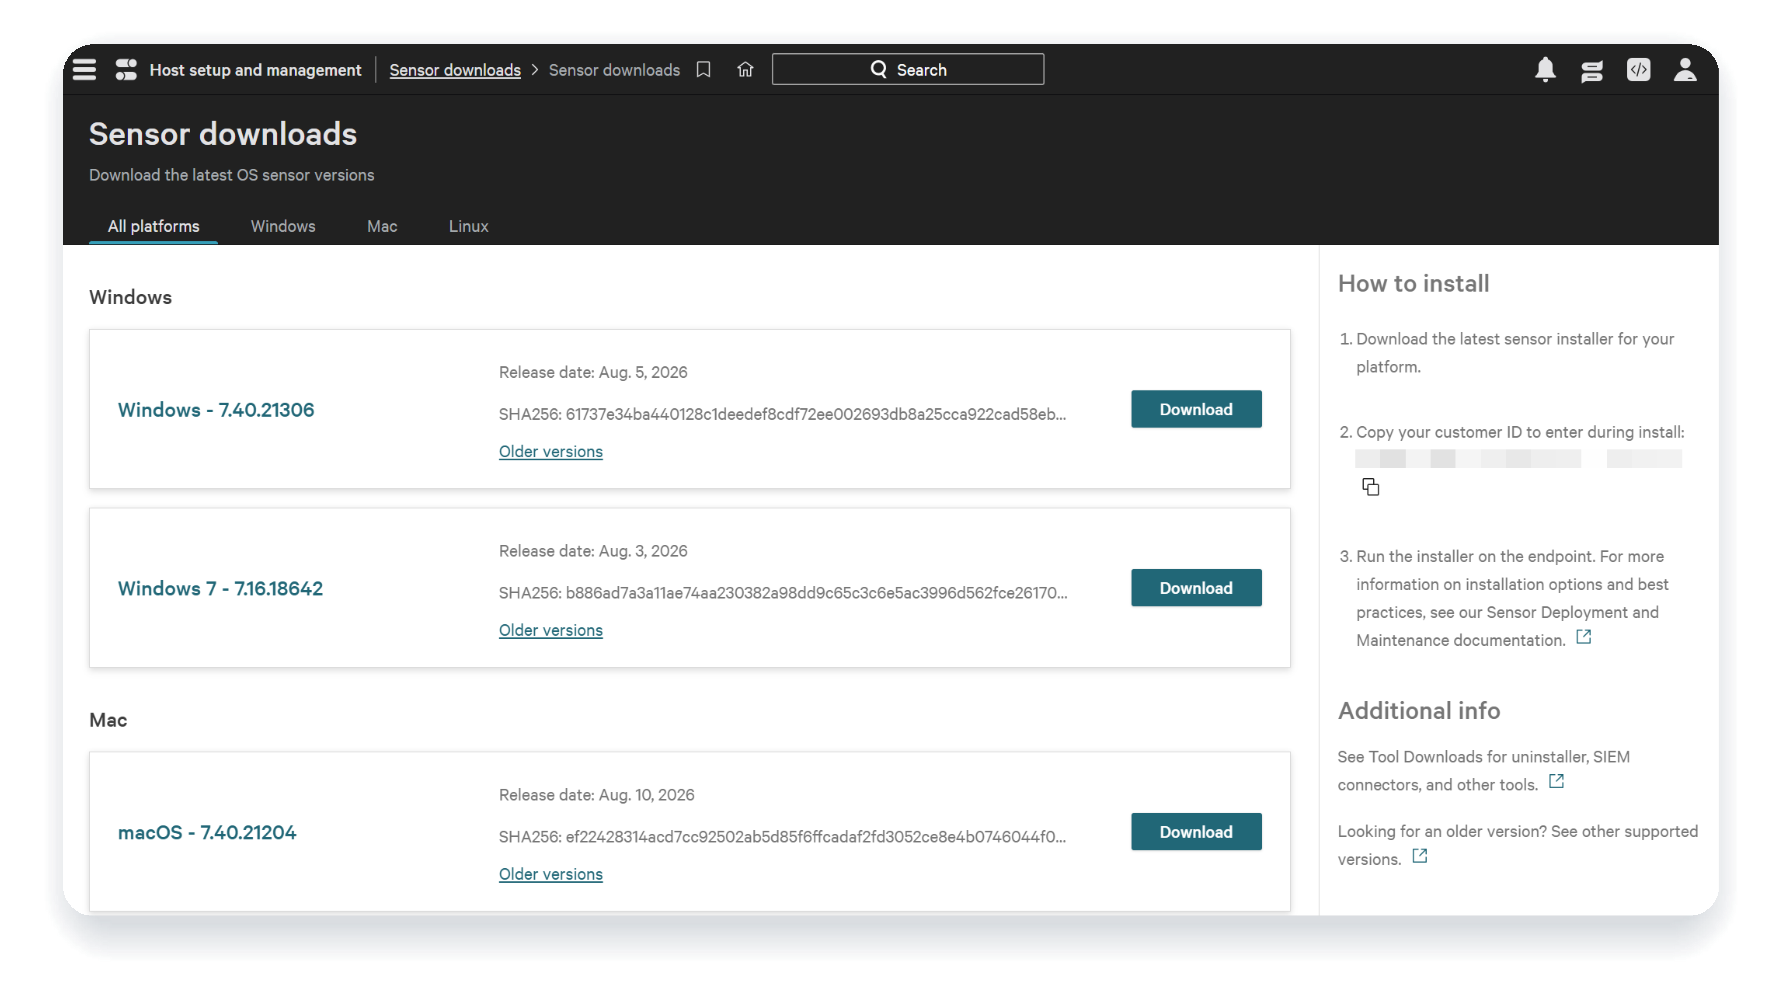
- Download the Falcon Sensor client from your CrowdStrike instance. Within the CrowdStrike console, go to Host setup/mgmt > Sensor downloads and then select the appropriate platform(s). In addition, on the right side of the screen, your Customer ID is shown. Copy this string to a safe location as it will be required as part of the installation process.
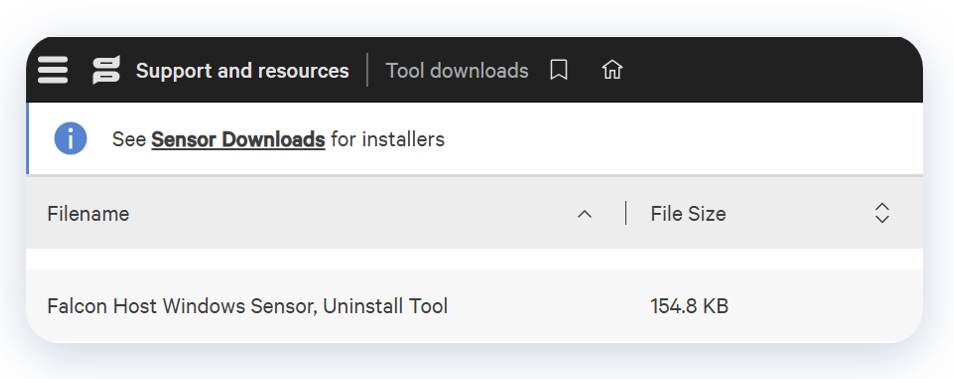
- Download the CrowdStrike Uninstall Tool, CsUninstallTool (optional). Go to Support and resources > Tool downloads, and select Falcon Host Windows Sensor, Uninstall Tool to download. Where maintenance and tamper protection is enabled, the CsUninstallTool.exe is required for administrative uninstallation.
- If both EXEs are required, combine both files into a ZIP file. In preparation for creating a Workspace ONE app, these two files should be combined into a ZIP file. If only the Falcon Sensor EXE will be deployed without the CsUninstallTool.exe, then it is not necessary to create a ZIP file.
- Create a Workspace ONE Native App. Initiate a new App File based on the EXE or ZIP file from the previous step. The Customer ID that was noted earlier needs to be included as part of the installation string.
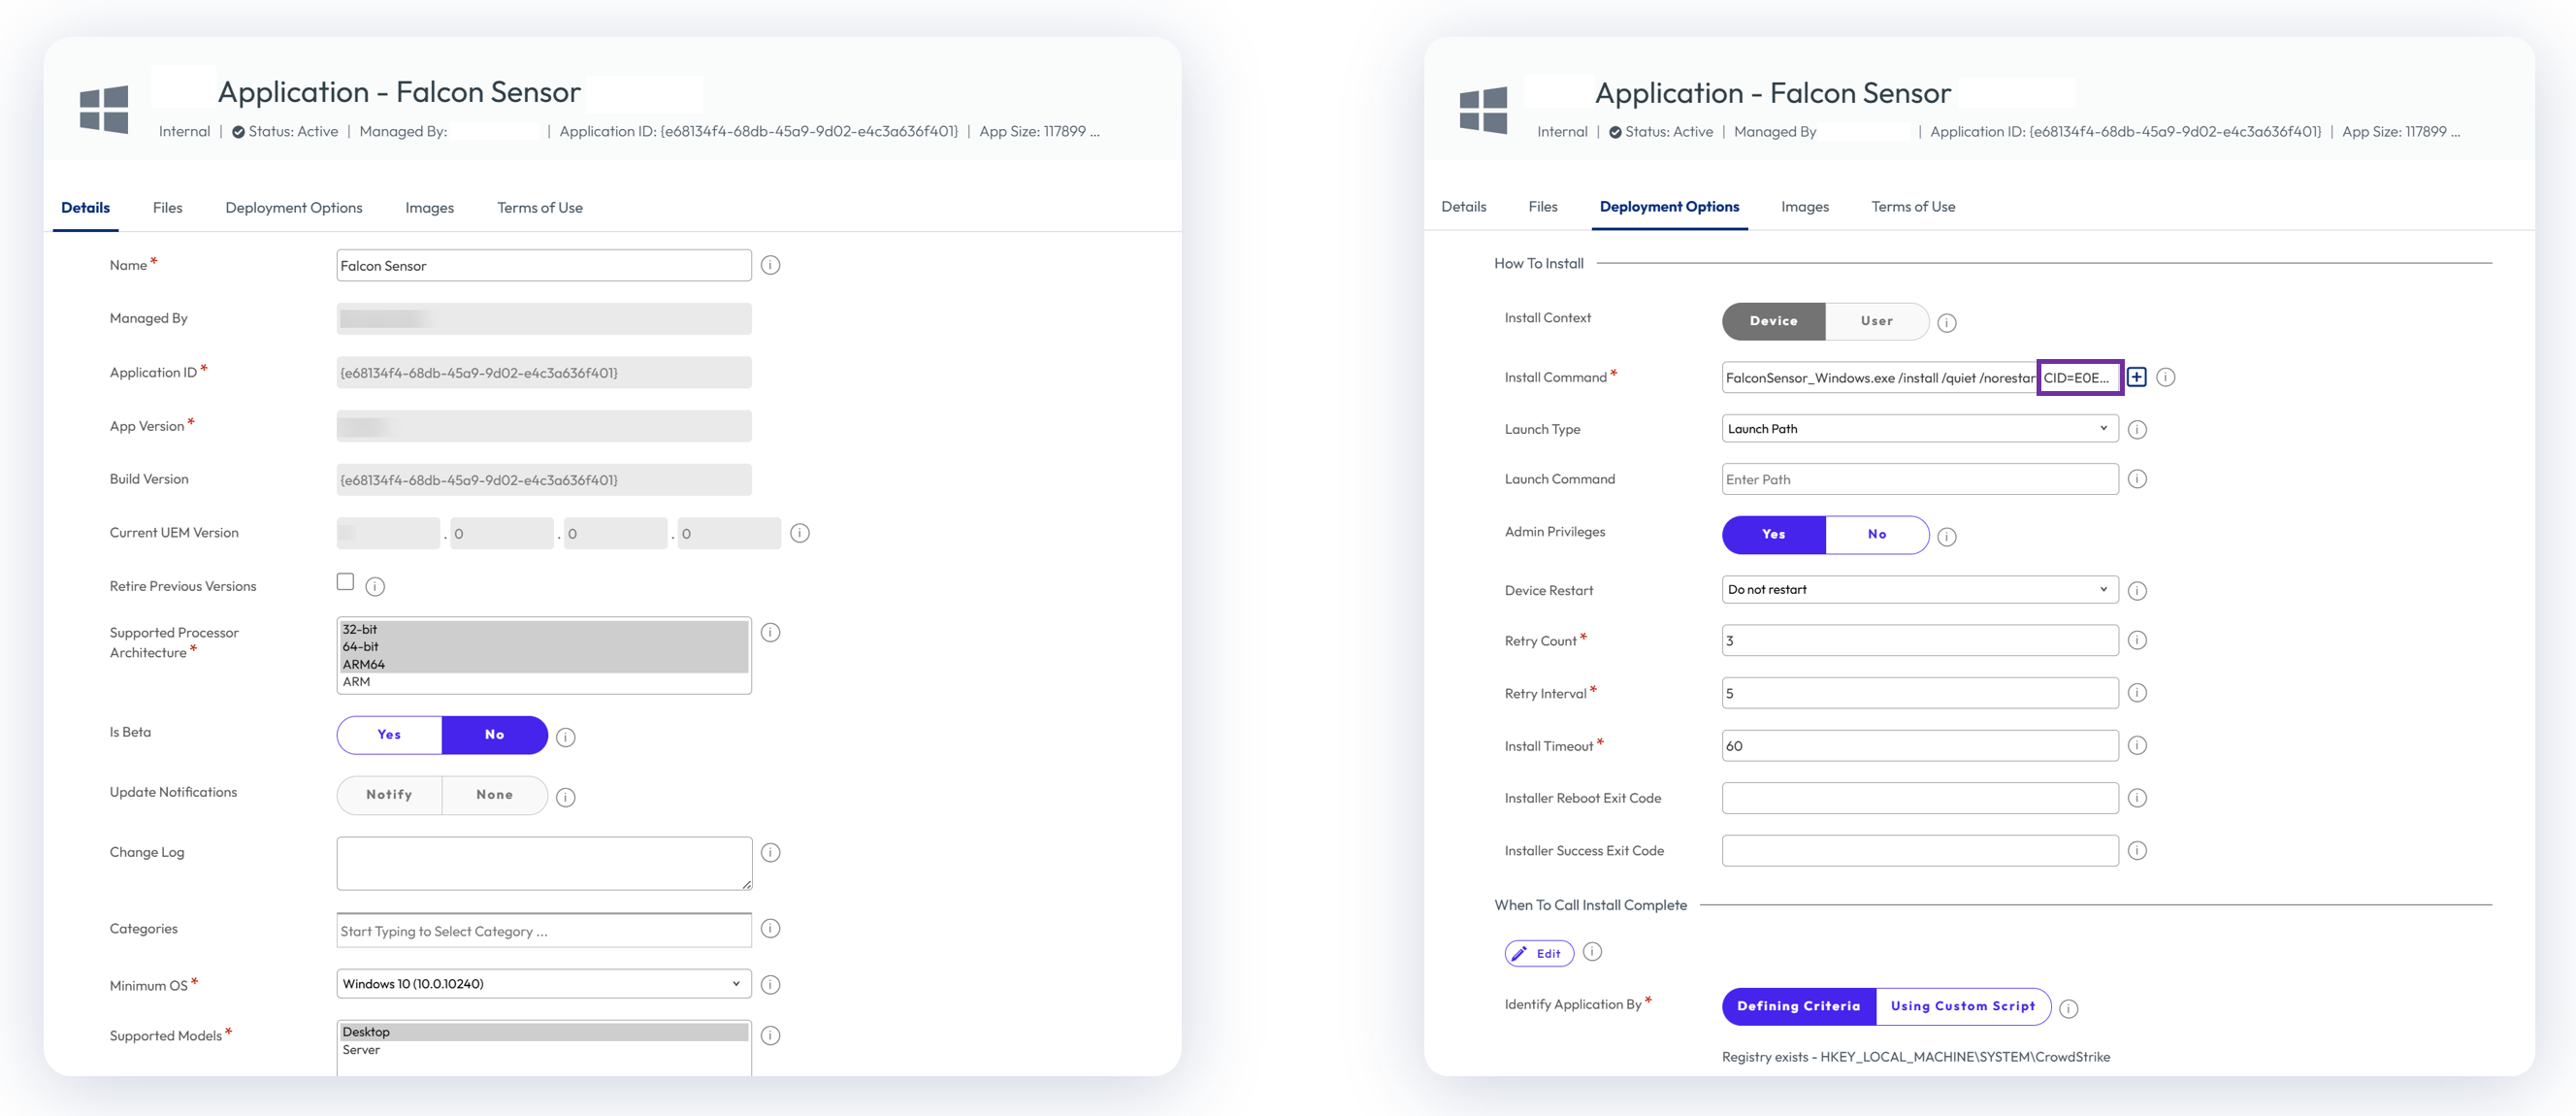
- Please also refer to these instructions for installing CrowdStrike Falcon as a Workspace ONE Native App: https://omnissa.link/4nozKNL
- CrowdStrike Falcon Sensor installation can optionally be configured to run during the Freestyle Orchestrator Onboarding phase for new device enrollments, Onboarding is one-time post-enrollment workflow and will ensure that Falcon Sensor is installed before standard applications, policies, and other resources.
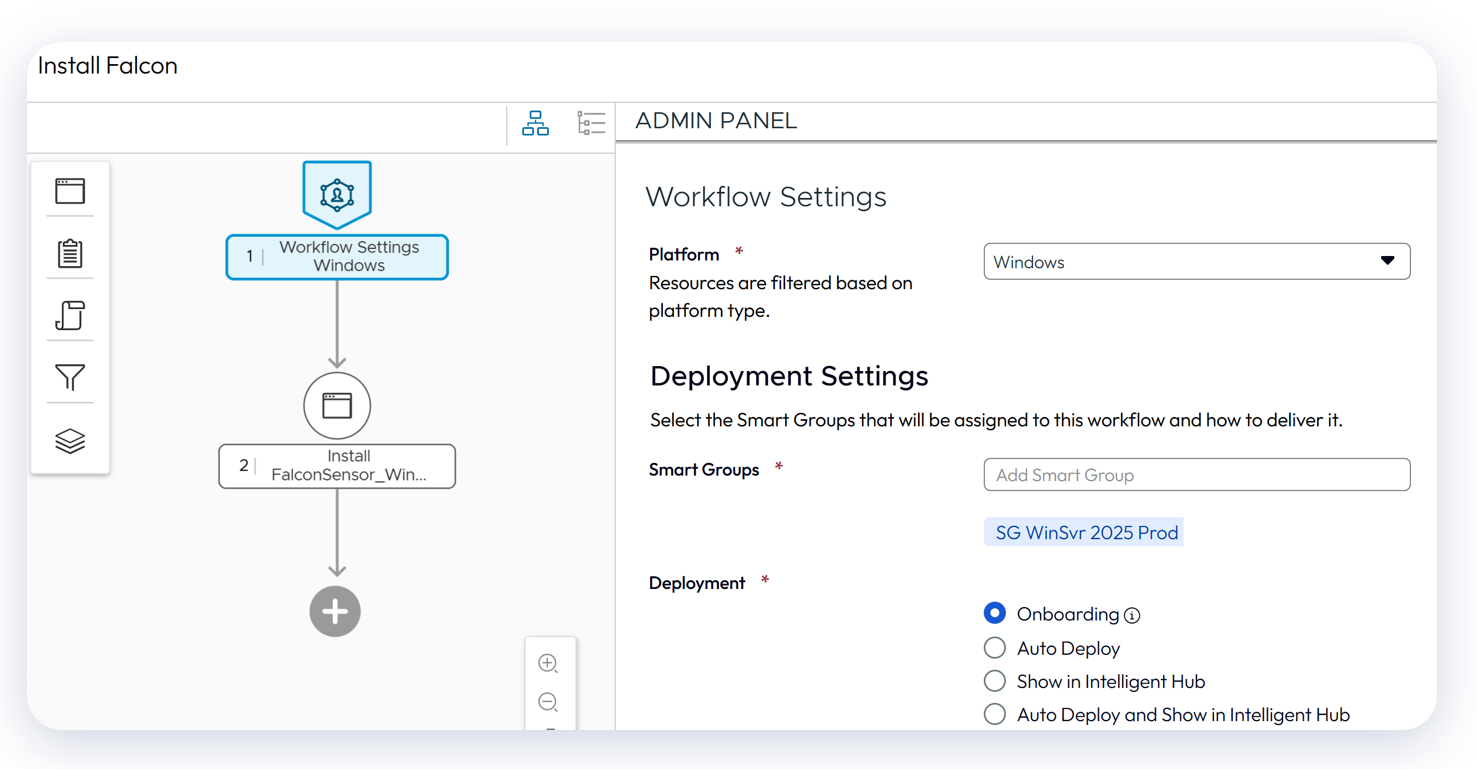
Configure CrowdStrike integration within Workspace ONE UEM console
- Create an API key. Within the CrowdStrike console, go to Support and resources > API clients and keys. Create a new key with read access to API scopes:
- API integrations
- Apps
- Detections
- Hosts
- Assets
- Vulnerabilities
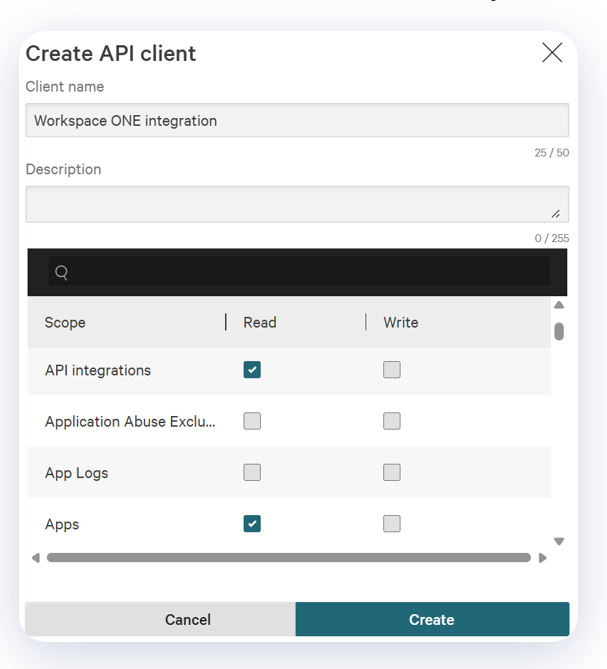
After clicking Create, save the API key information that is presented.
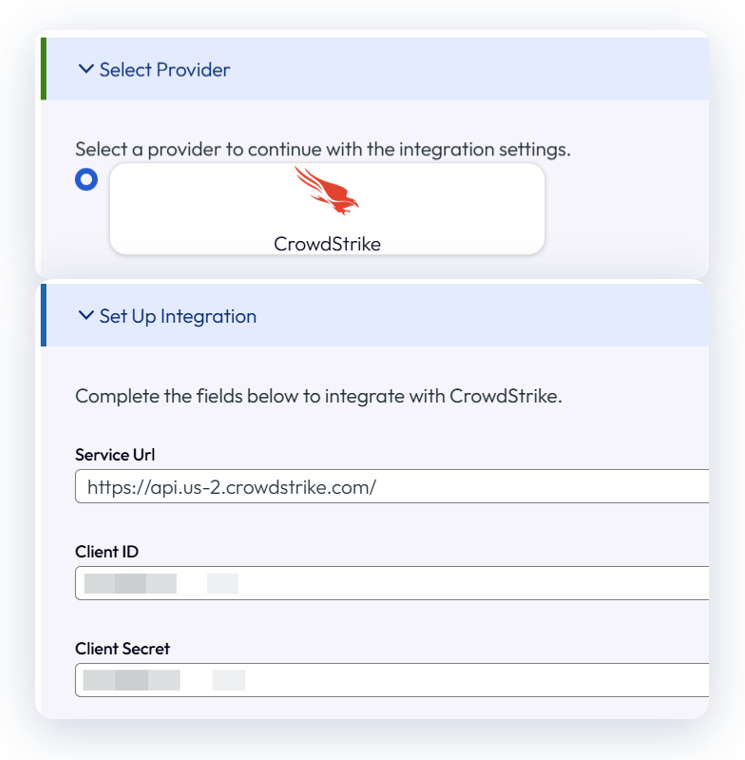
- Create integration within Workspace ONE console. In the Workspace ONE UEM console, go to Workspace ONE UEM > Groups & Settings > Configurations > Vulnerability Defense to initiate the CrowdStrike integration. In the setup box, enter the Service URL, client ID, and client secret that were presented after creating the API key.
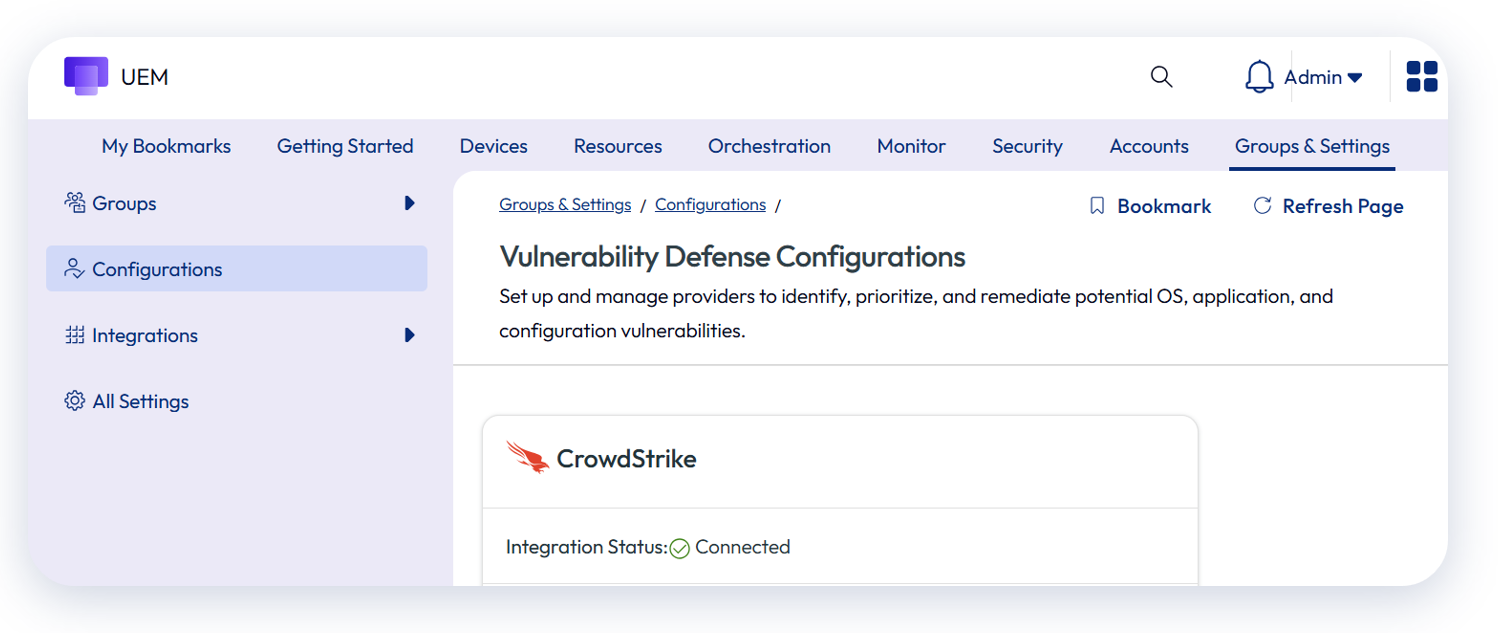
- Validate success of configuration. Integration status should show a green box and indicated Connected.
Note: It may take 24 hours or more for the initial data feed to populate Workspace ONE.
Summary
Vulnerability Defense is integrated with Workspace ONE and facilitates full-scope vulnerability management. Unlike many solutions that simply identify vulnerabilities, Vulnerability Defense enables easy remediation. Administrators can view vulnerabilities from three distinct lenses and make appropriate prioritization decisions. Prescriptive remediation is accomplished via just a few keystrokes. Alternatively, once Omni integration is released, many of these steps can be further automated.
Additional resources
Vulnerability Defense provides enhanced security and compliance for desktop and server devices. To learn more about Vulnerability Defense, please see:
Authors and Contributors
Authors:
- Jo Harder, Principal Product Specialist
- Julius Robinson, Senior Technical Solutions Specialist
Reviewers:
- Aditya Bandikallu, Product Line Manager
- Alayah Myint-Shaw, Technical Solutions Specialist
- Cile Montgomery, Product Marketing Manager
Changelog
The following updates were made to this guide:
| Date | Description of Changes |
| 2026/11 |
|
Questions and Feedback
For questions or feedback, send to tech_content_feedback@omnissa.com.