

Managing Updates for Windows Devices: Workspace ONE Operational Tutorial
Windows Updates overview
Workspace ONE® UEM™ (Unified Endpoint Management) provides tailored functionality to address Windows Updates within your enterprise. The Workspace ONE UEM update-as-a-service model not only automates and propagates Windows Updates, but it also enables administrators to apply emergency patches, as well as pause, resume, and/or rollback updates.
Whether administering Windows Server or Desktop physical or Horizon® virtual devices, this guide helps you understand:
- Options for sourcing, deploying, and managing Windows Updates
- Windows Update policy configuration options
- Deployment options, including network peering, deployment rings, and new functionality
- Addressing emergency patches via Granular Patch Management and/or Vulnerability Defense
- How to assess the status of Windows Update patches, as well as validation and reports
Workspace ONE UEM Windows Update process flow
Managing Windows Updates with Workspace ONE UEM is based on the following process flow:
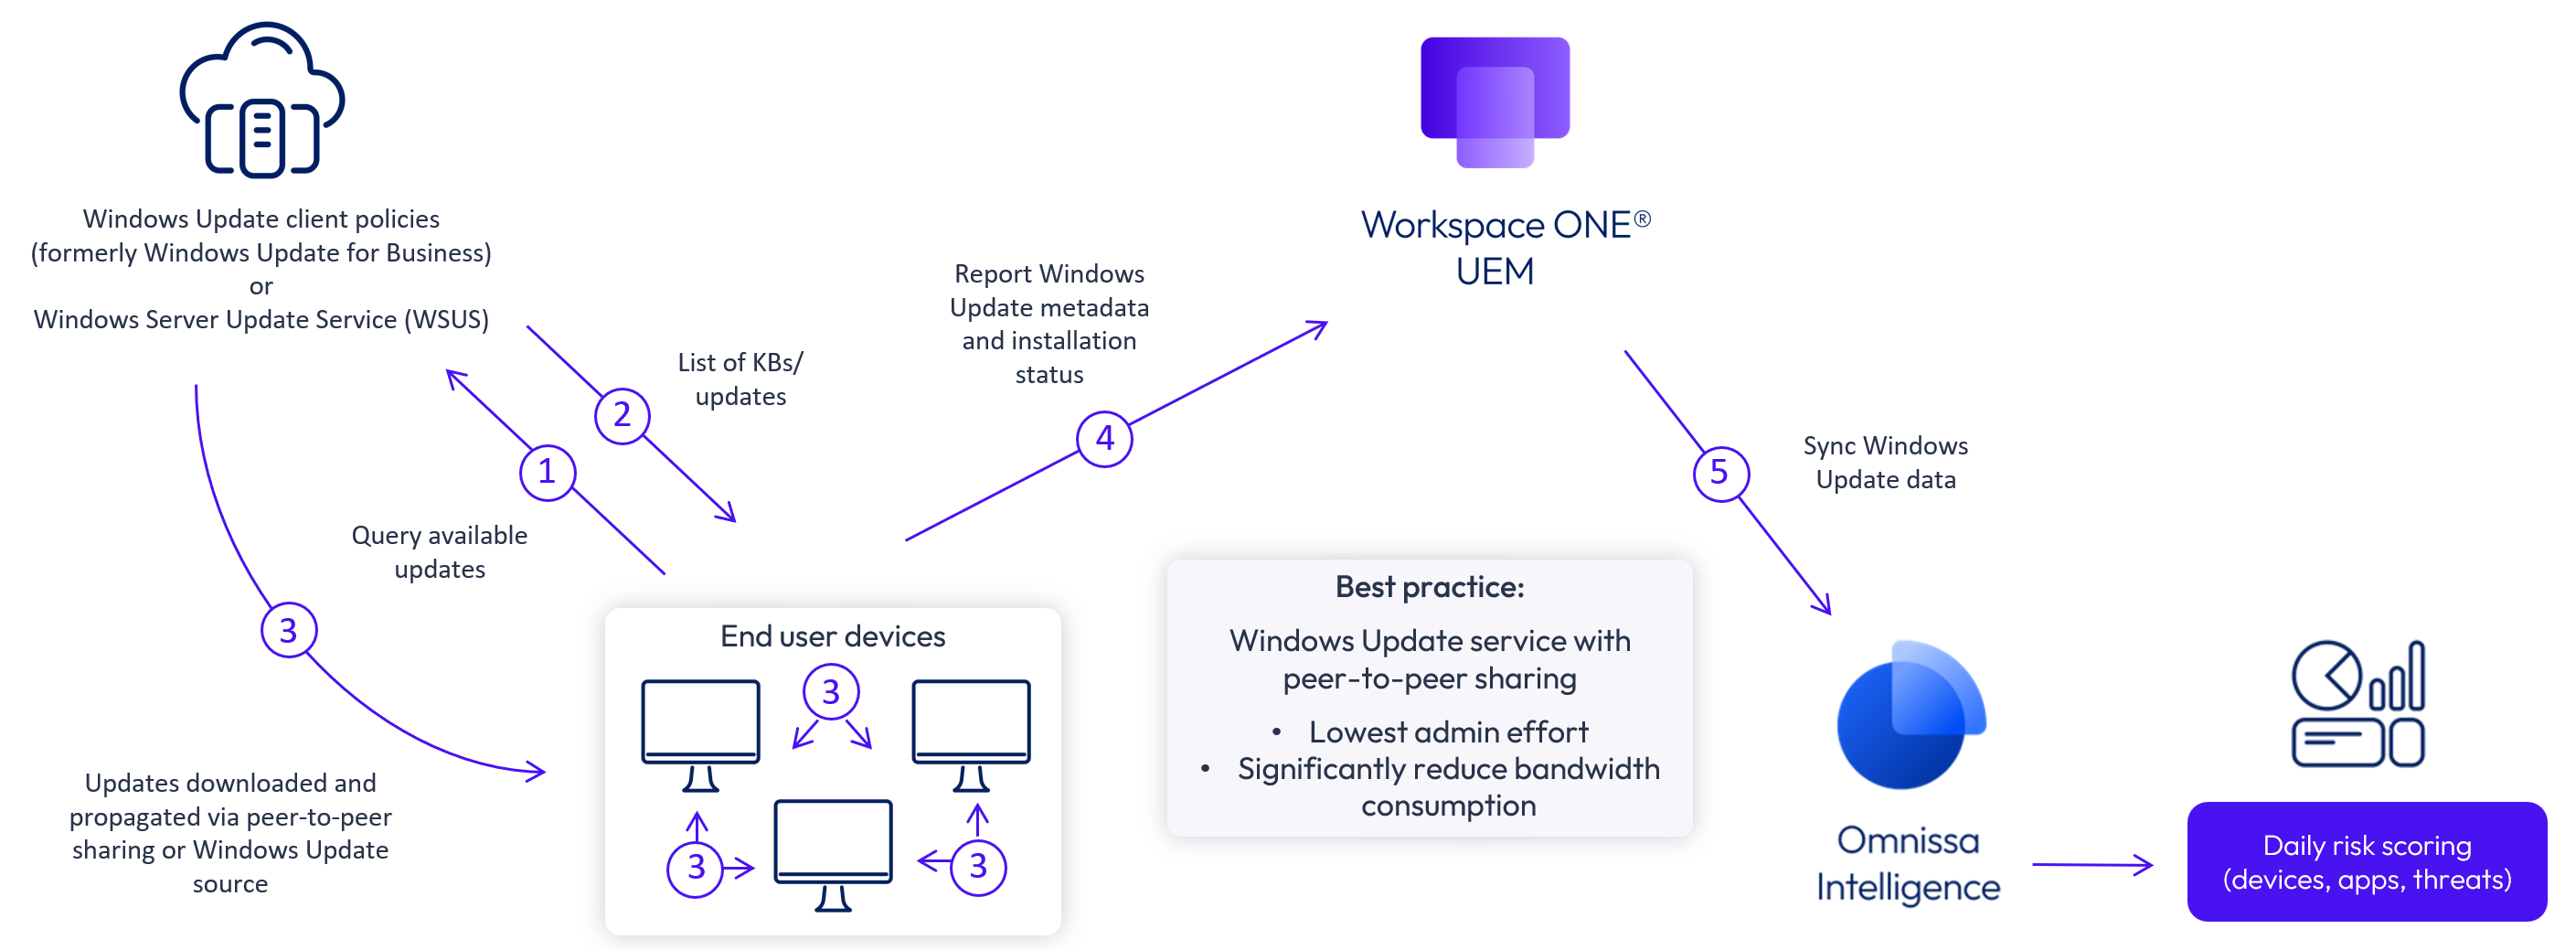
Figure 1: Windows Update process flow
Note that Microsoft has announced no further development of Windows Server Update Service (WSUS).
- Workspace ONE UEM managed Windows devices reach out to the Microsoft Update source to query available updates
- A list of KBs/Updates is sent back to the device in the form of metadata
- Following the next update scan by the device or manual scan by the user, the device will fetch the authorized updates from either a peer device or Windows Update source, depending on configuration
- Devices report available updates to Workspace ONE UEM on the next Windows Update sample interval
- If Workspace ONE Intelligence is integrated, Windows Update data is also sent to Workspace ONE Intelligence
Omnissa recommends:
- Utilizing the Windows Update cloud service, rather than Windows Server Update Services (WSUS), for longevity
- Peer-to-peer sharing, rather than individualized fetching, to reduce network bandwidth
These settings save system, network, and administrative resources and will be explained further.
Windows Updates technical management
When configuring Windows Updates via Workspace ONE UEM, several key considerations and settings should be reviewed. Each of these items is detailed within this document.
- Windows Update source and types: Differentiation between Windows Update sources, as well as applicability for Windows Server and Desktop
- Windows Update configuration: Policy configuration options and recommendations
- Deployment: Via Assignment Groups (Smart Groups) or Phased Deployment, as well as Granular Patch Management and Vulnerability Defense
- Validation and status: Check the status of Windows Updates and determine whether subsequent action is necessary
Windows Update source and types
Windows Updates for both Windows Server and Windows Desktops can be sourced from either:
- Windows Update client policies (formerly Windows Update for Business)
- Windows Server Update Service (WSUS)
Workspace ONE functions equally well via either mechanism; however, Windows Update client policies is recommended for Workspace ONE UEM due to cloud-based functionality and minimal administration.
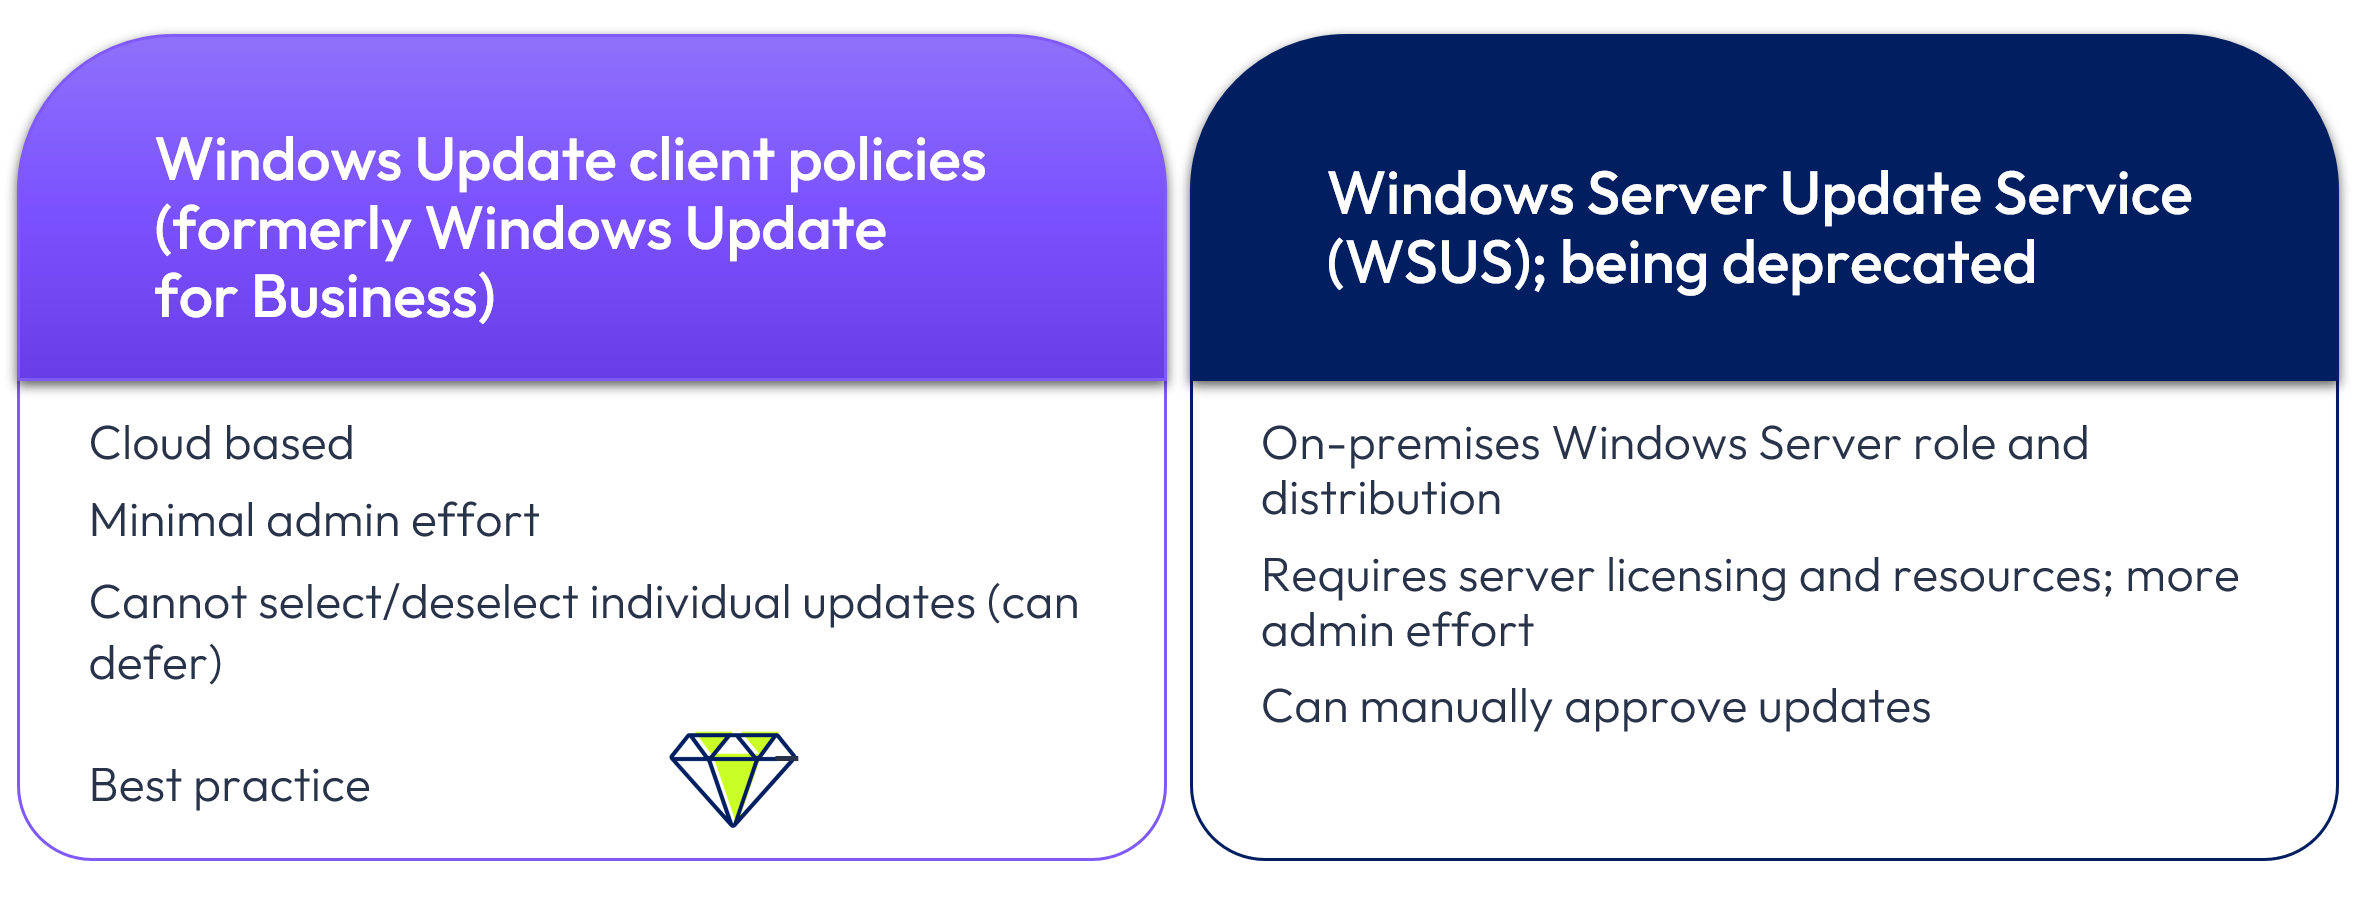
Figure 2: Windows Update source comparison
Several types of Windows Updates can be applied to Windows devices, and this document will focus on Feature and Quality Updates. For a complete description of Windows Update types, see Microsoft learning documentation.
Feature and Quality updates may be directly controlled by administrators within Workspace ONE UEM, and this document will thus focus on the configuration of these types of updates:
- Feature Updates are released annually for Windows Desktop and contain new features and functionality. Feature Updates are designated based on the year and calendar designation, such as Windows 11 25H2.
- Quality Updates are released monthly for both Windows Server and Windows Desktop as part of “patch Tuesday” but emergency patches may be released at any time. Quality Updates address both security and standard issues and may be configured to include Windows drivers and/or Microsoft application updates.
When configuring Windows Updates, the maximum deferral period for Quality Updates is 30 days. This lengthy configuration timeframe is not recommended because it is possible that specific updates will be superseded before propagation. For example, if an update is released on “patch Tuesday” and then superseded 20 days later without having been deployed, the original update would no longer be available. For this reason, it is recommended that Windows Updates not align with the maximum deferral period settings but instead be configured for deployment as soon as reasonably practicable, optimally within 14 days.
Windows Update configuration
Windows Update configuration controls not only the source, but also how and when updates are applied based on policies.
Windows Update policy types
Windows Updates is a policy configuration selection and may be configured within multiple policy types. A key aspect of success is configuration within only one policy type. Why? Configuration within a single policy type ensures that Windows Update policies are applied consistently and without the potential for intermittent issues due to policy duplication and precedence.
As an example, the setting Post Windows Update installation device restart can be configured within five distinct policy types, and the default values differ as well. If this specific setting is activated within multiple policy engines whether based on the default setting or a modified setting, intermittent and likely undesirable outcomes may result. Further, depending on policy precedence, when policies are reapplied at various intervals, device behavior may be temporarily or permanently altered.
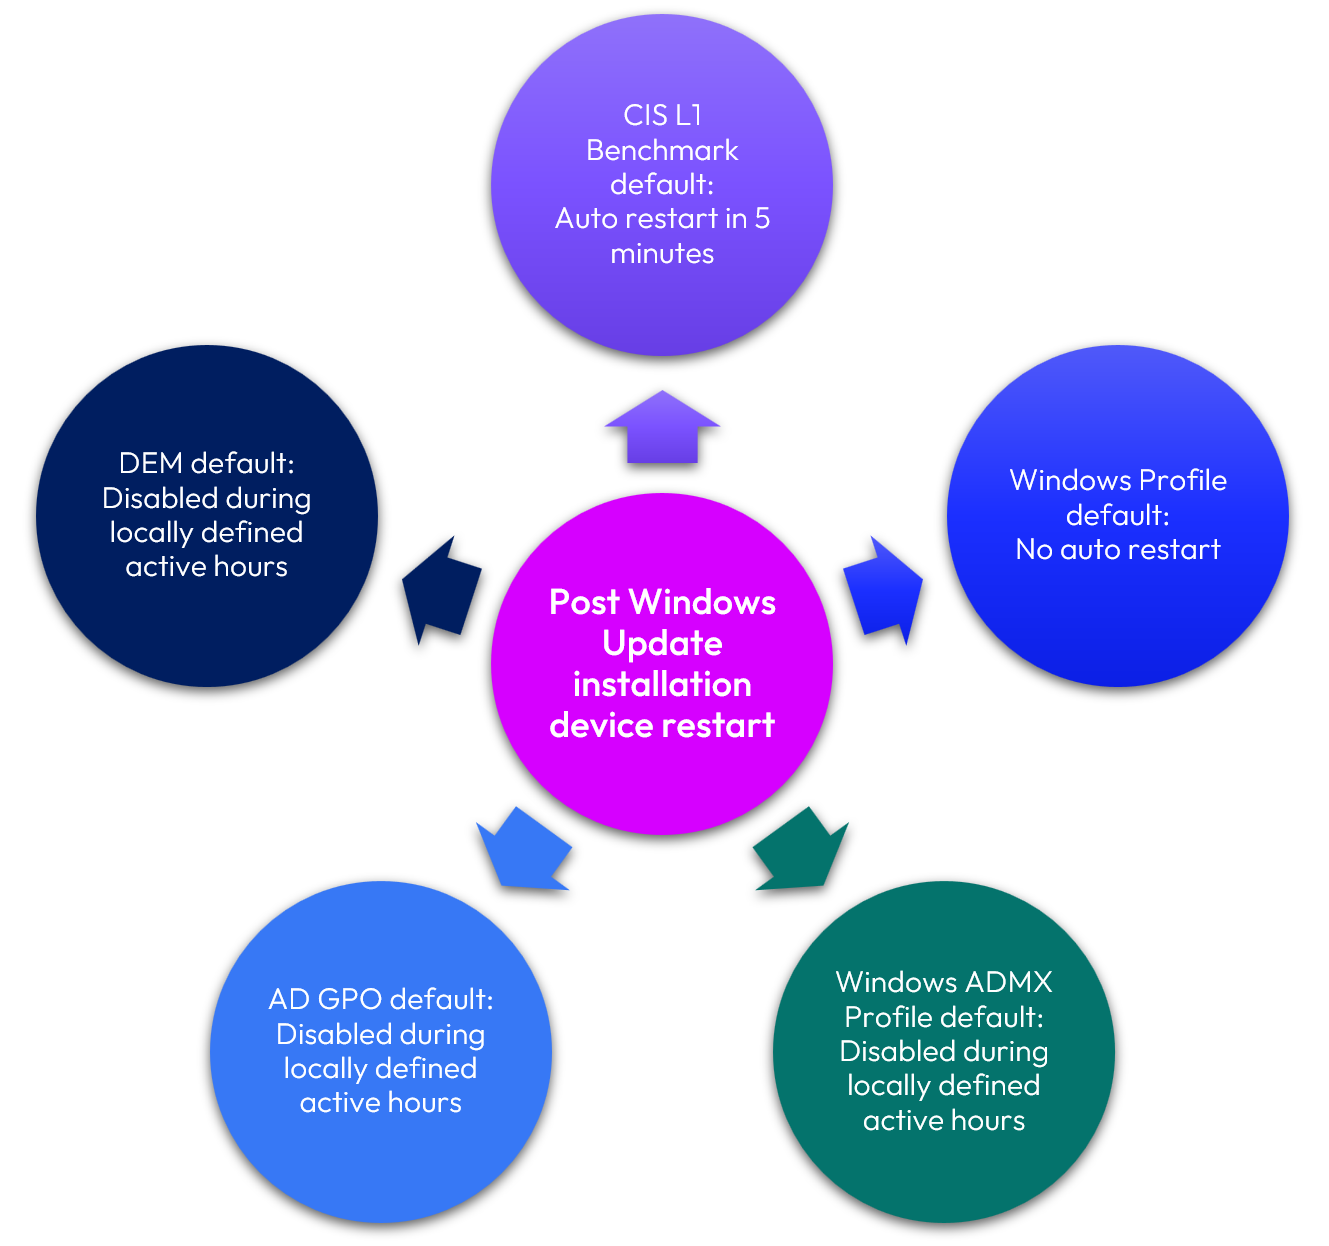
Figure 3: Post Windows Update installation device restart can be configured in 5 distinct policies
Configuring Windows Update settings via more than one policy engine creates overlap, resulting in unexpected system behavior and may cause extensive troubleshooting efforts.
Based on these policy types, below is Omnissa’s recommendation for Windows Updates:
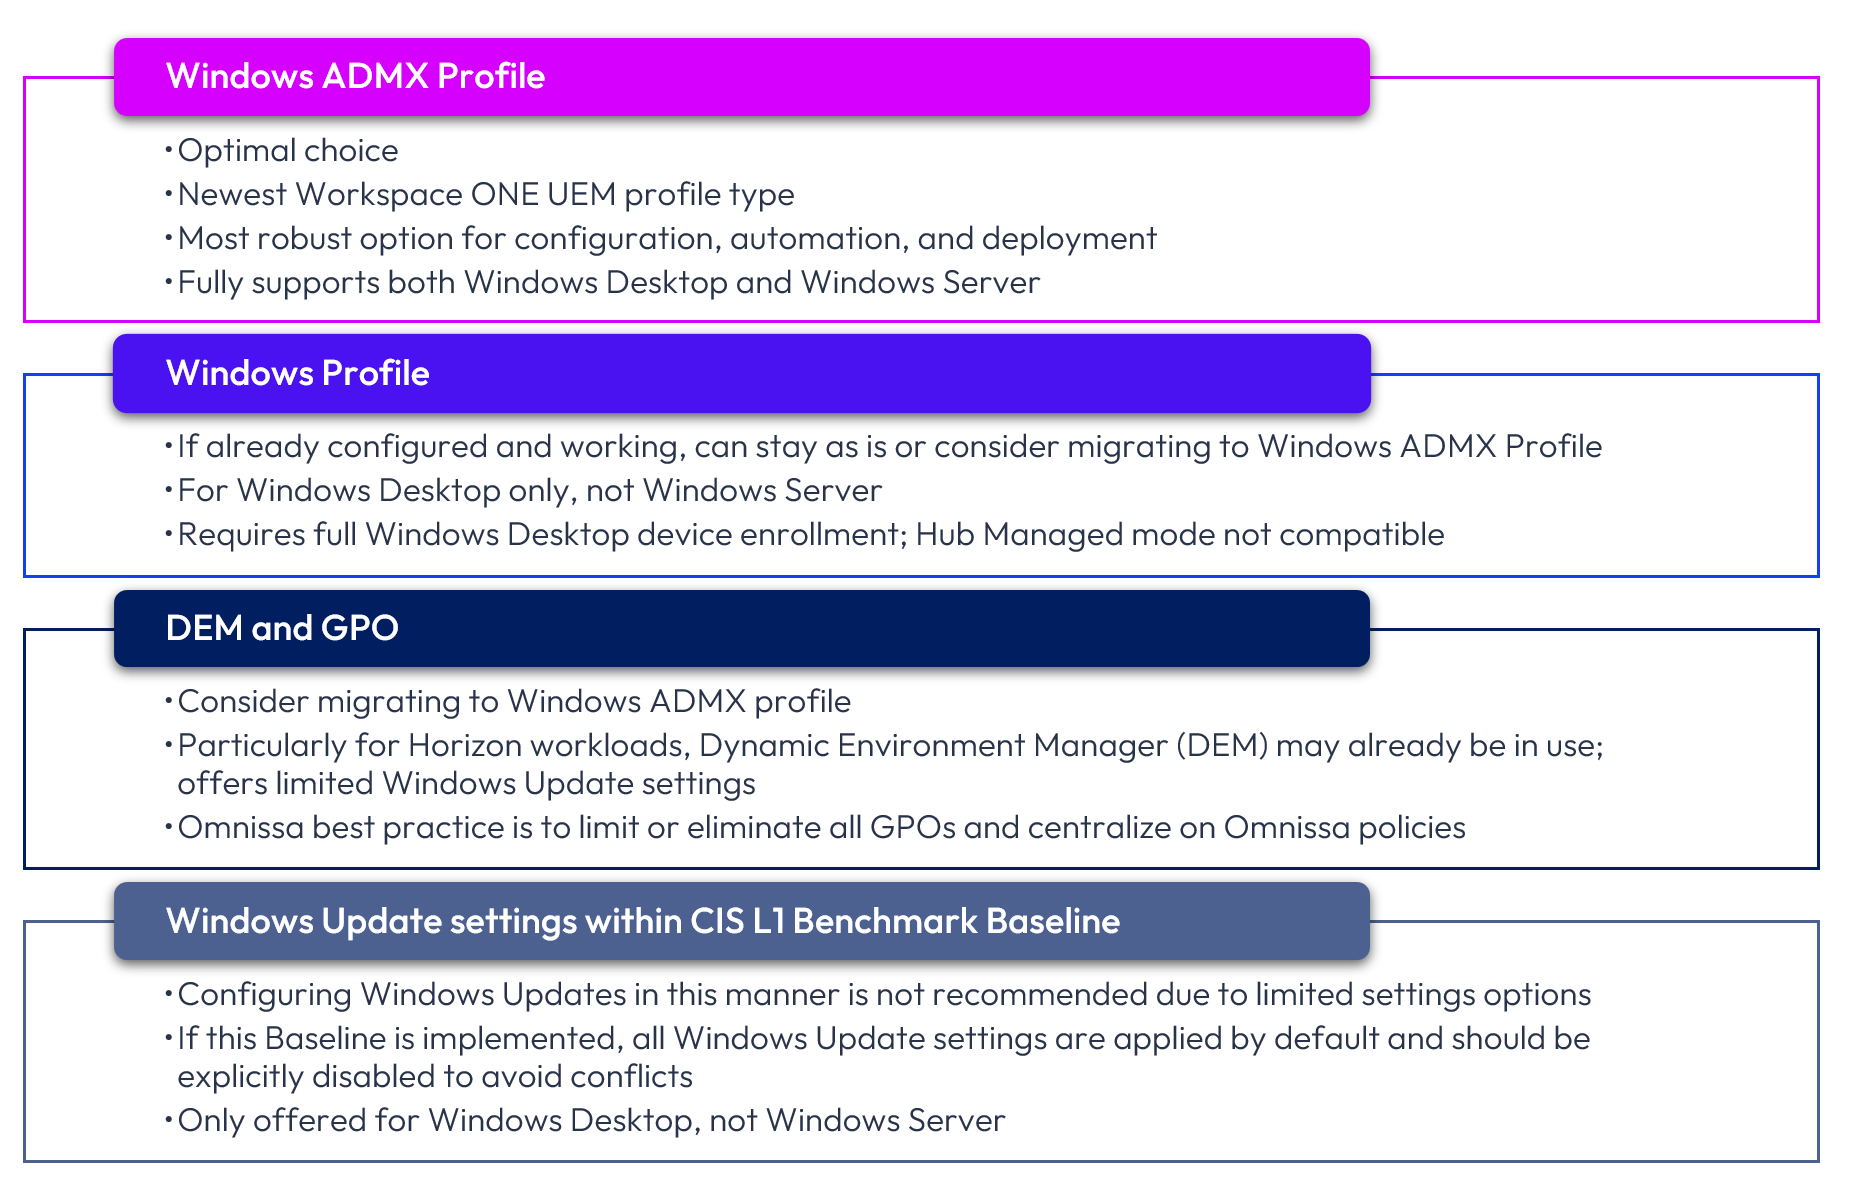
Figure 4: Omnissa recommendations for Windows Update policy type selection
For policy type selected, full review of all available settings is strongly recommended. Note that options differ and cannot be assumed. For example, the default deferral for Quality Updates for Windows Profile is 7 days, whereas for all other policy types, the default is 0 days.
Applicability of each of these policy engines by Windows platform is shown below:
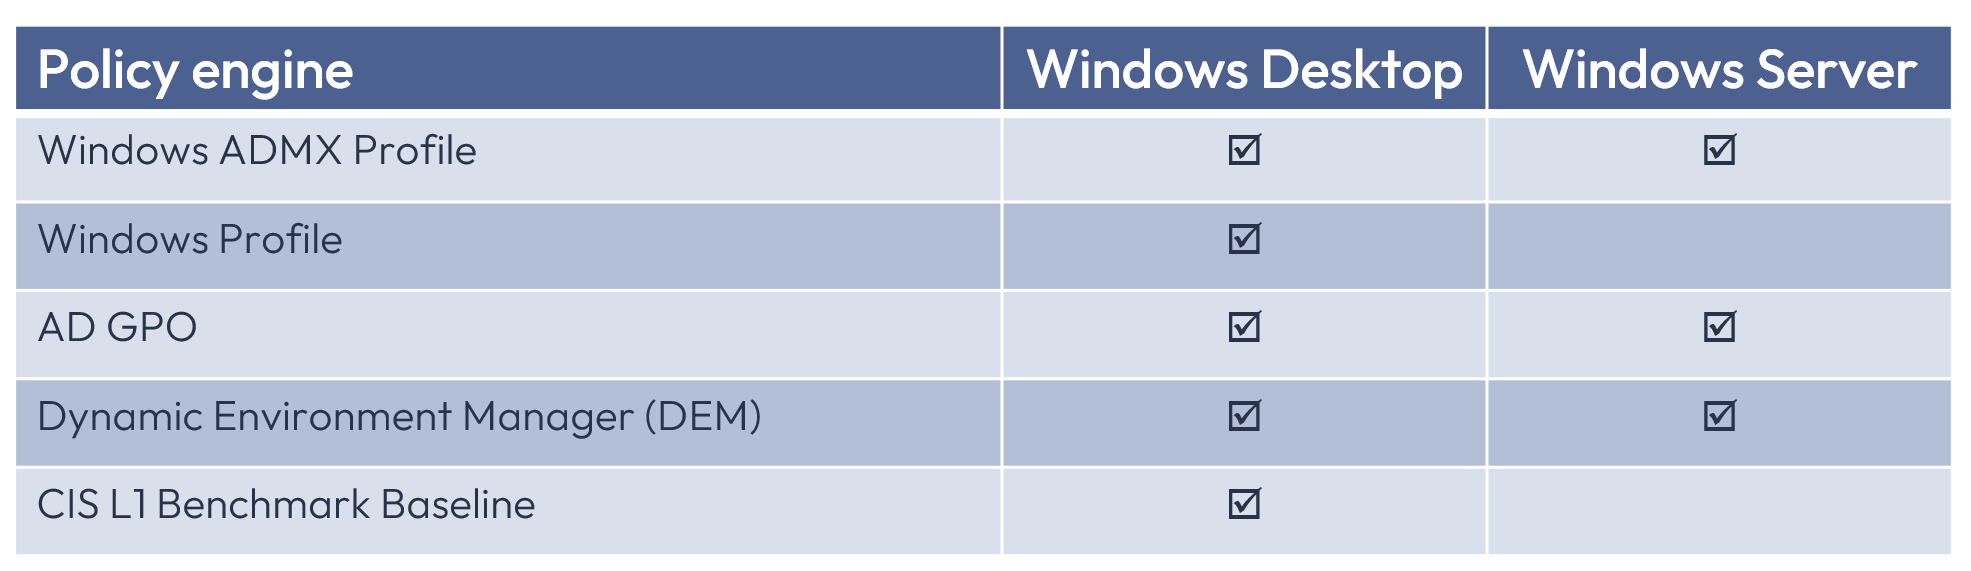
Figure 5: Policy engine options for Windows Desktop and Windows Server
While the policy engine choices for Windows Server are limited, Windows Desktop devices can be configured via the full array of options. Omnissa recommends configuring all Windows Update settings via one of the Workspace ONE UEM Profile options.
Each of the policy engine options will be discussed subsequently.
Windows ADMX Profile
Windows ADMX Profiles became available in early 2026 and provides the optimal policy type for configuration of Windows Updates for both Windows Server and Windows Desktop devices. Windows Updates configured via Windows ADMX Profile provide the ultimate flexibility and control.
Although Windows ADMX Profiles can be configured as both user settings and device settings, the latter provides the most robust options and is the primary configuration source.
Configuration of Windows ADMX Profile
Windows ADMX Profiles are configured in the following sequence:
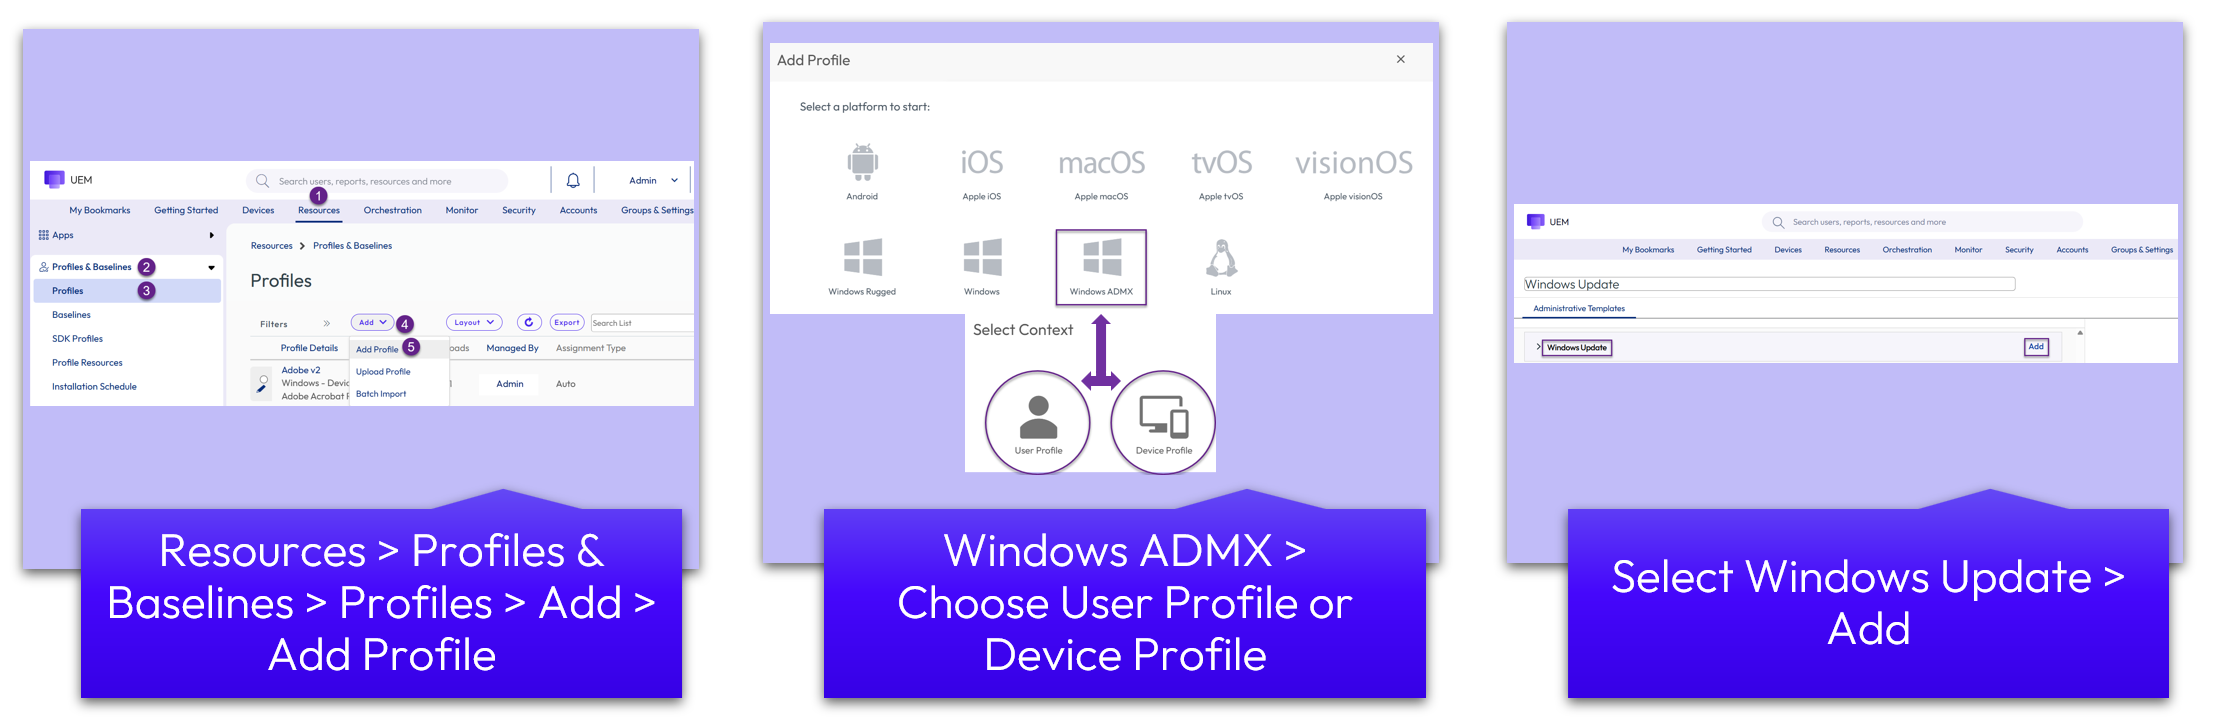
Figure 6: Windows ADMX Profile configuration steps
Windows Update device settings appear as shown:
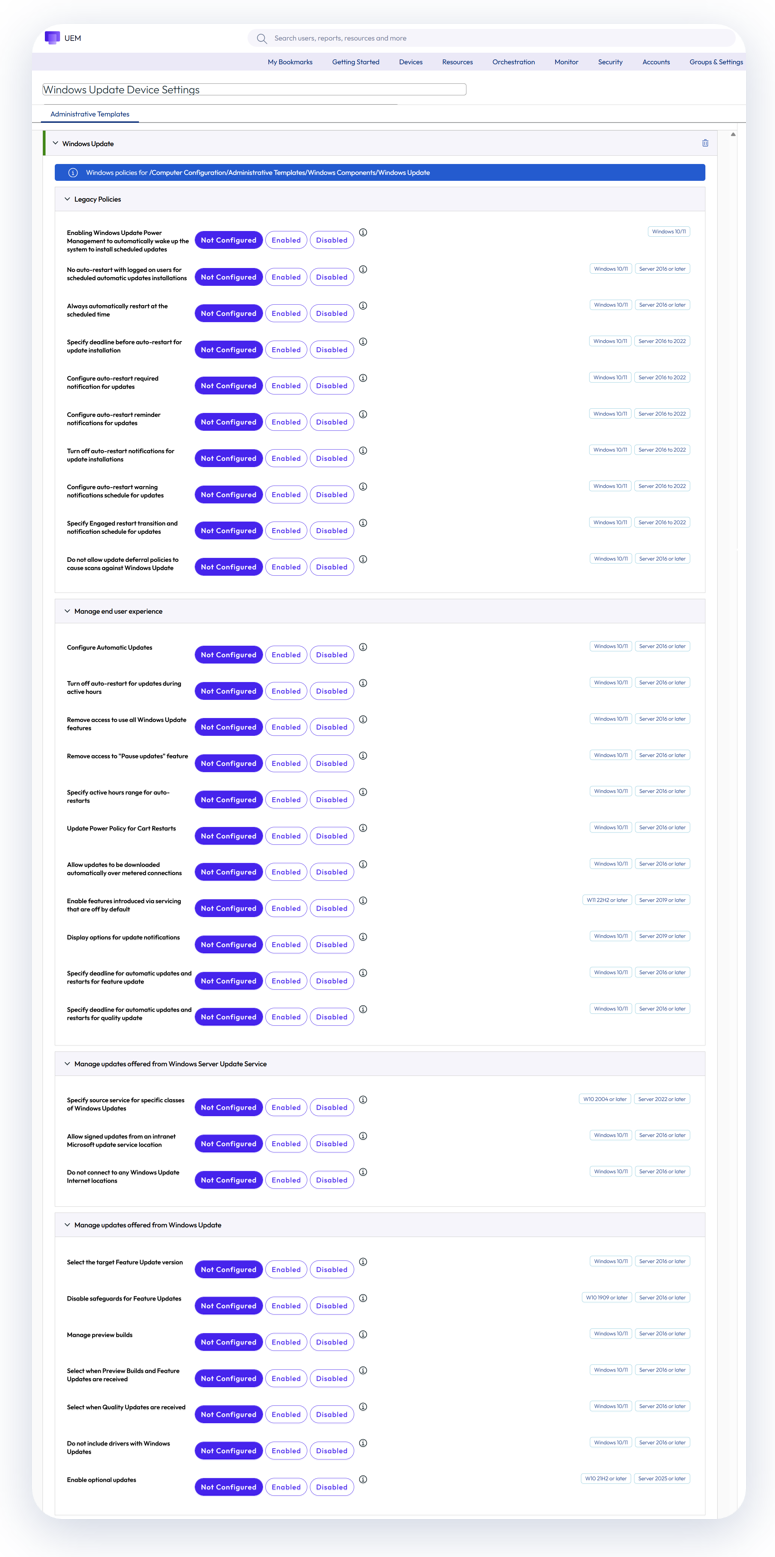
Figure 7: Go to Resources > Profiles > Add > Add Profile > Windows ADMX > Device Profile to configure Windows ADMX Profile device settings
Administrators should review all settings and configure as appropriate. In particular, please note the following:
- Manage end user experience tab
- Enable automatic updates, including installation day and time, as well as update behavior
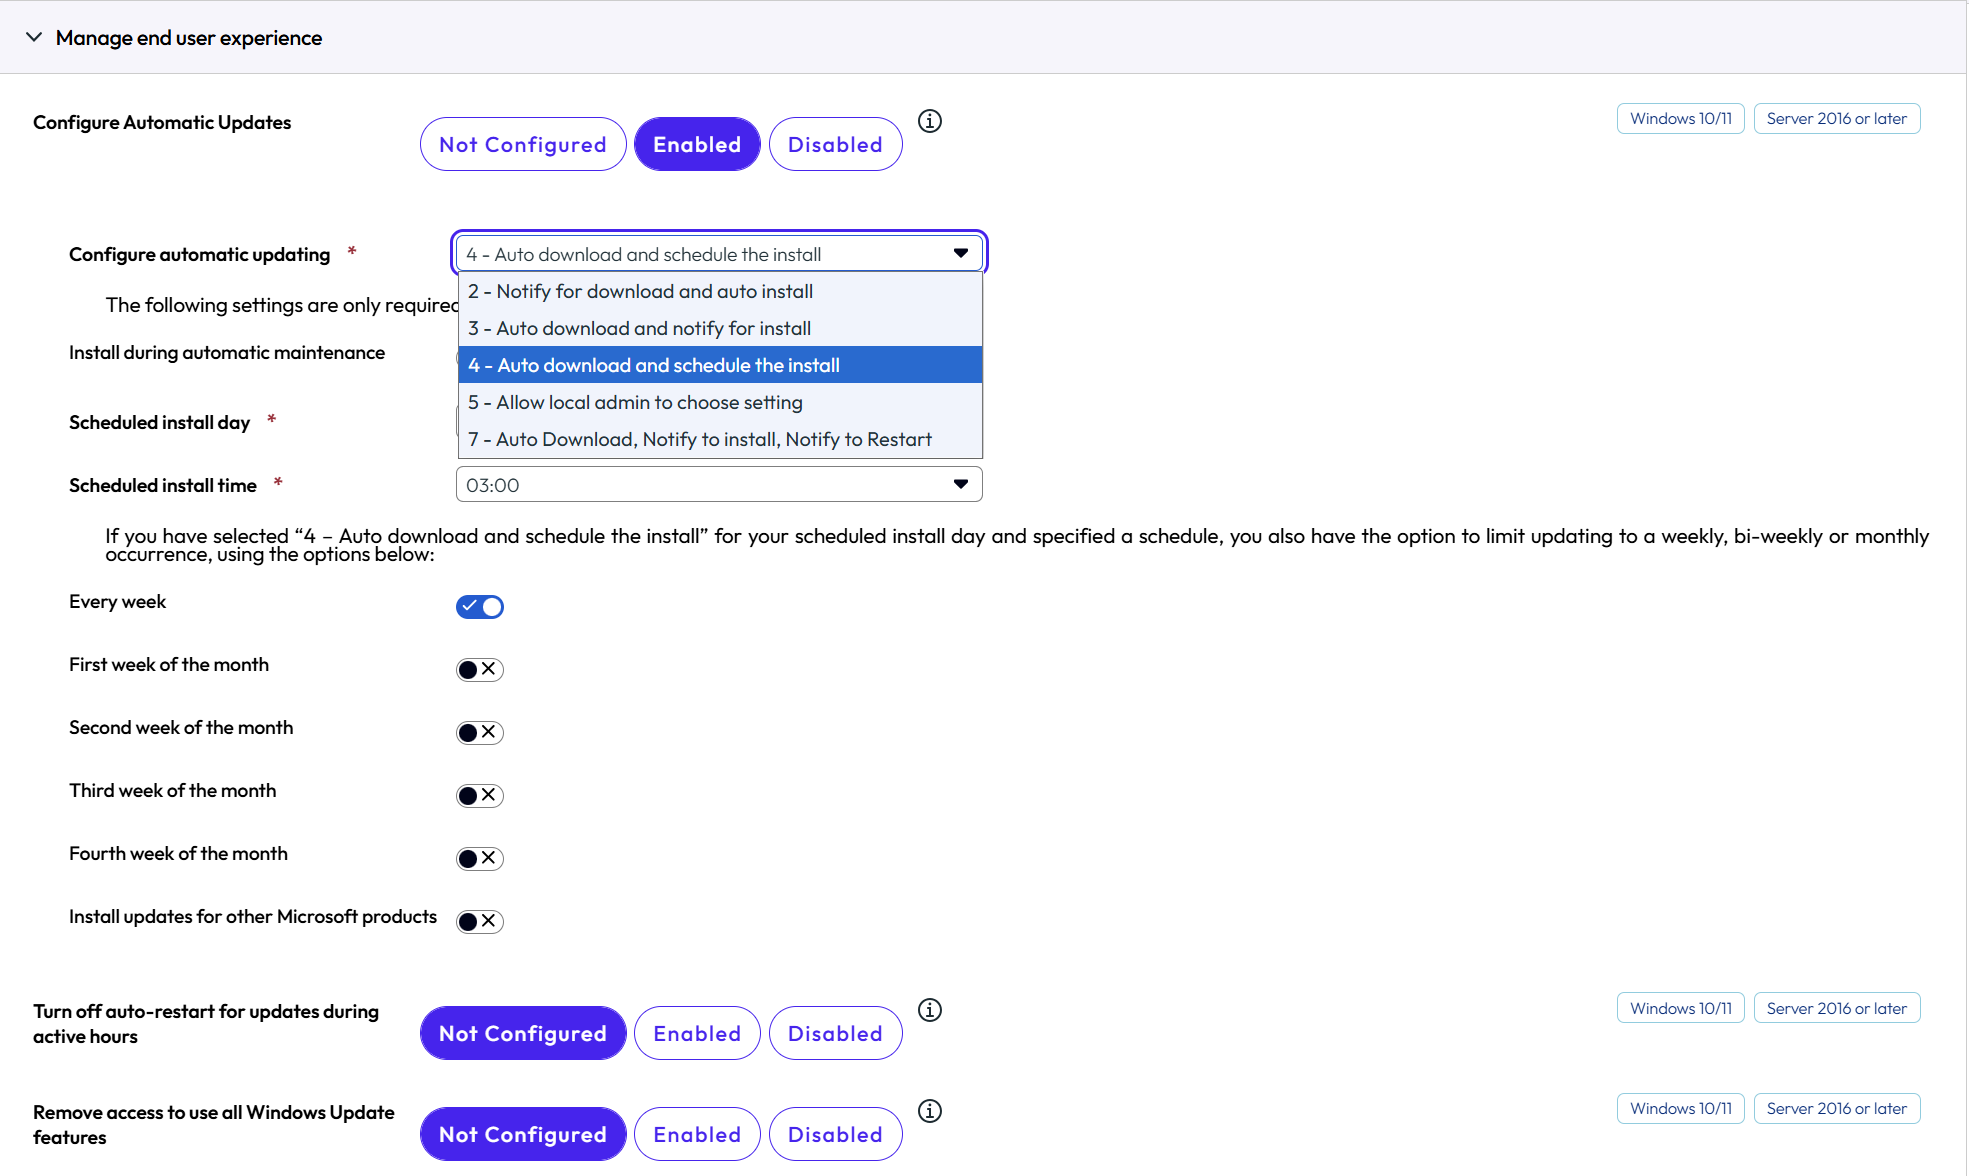
Figure 8: To enable Automatic Updates, scheduling, and other options, configure Manage End User Experience
- Manage updates offered from Windows Server Update Service tab
- Designate Windows Update source, i.e., Windows Server Update Service or Windows Update
- Note that the default is Windows Server Update Service, which is likely not the desired source
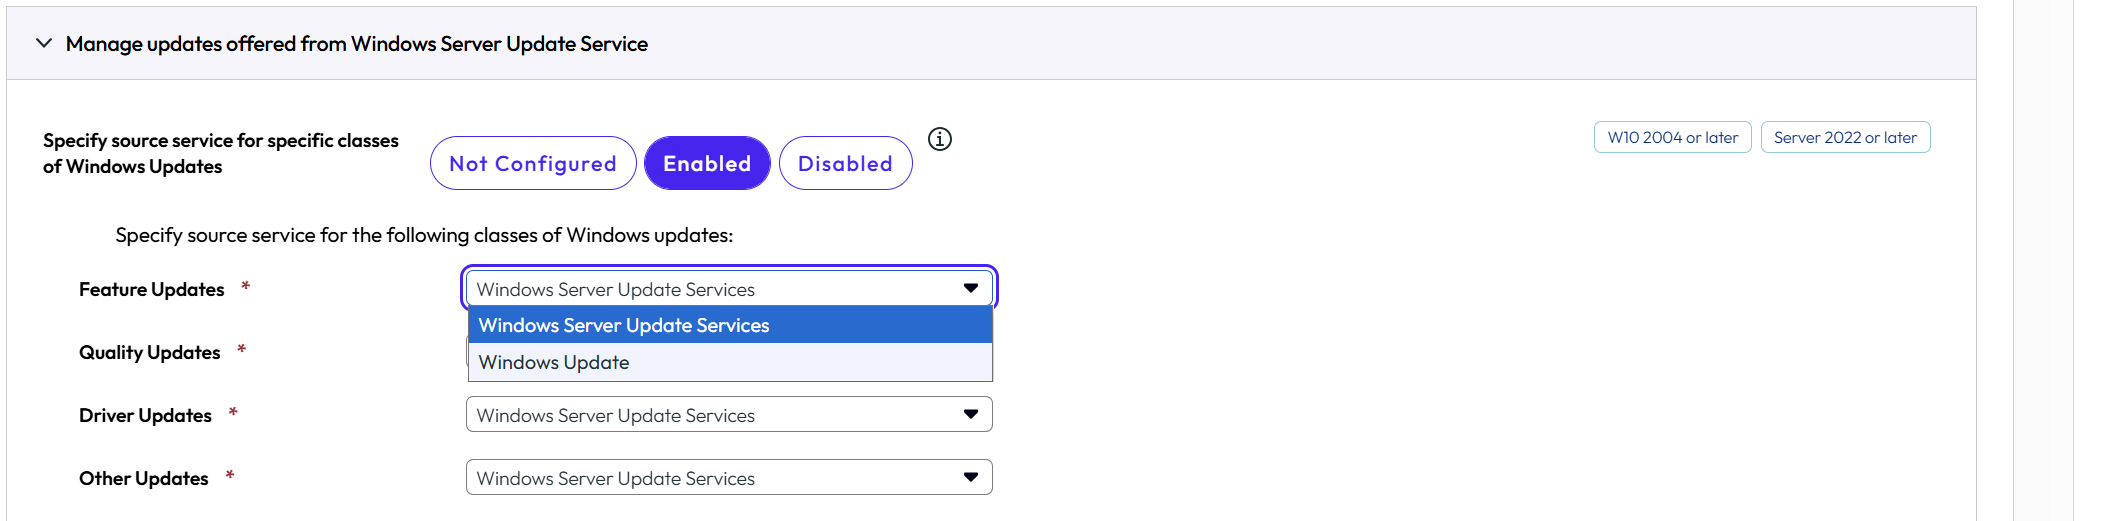
Figure 9: To specify which updates are sourced from which update type, configure Manage Updates Offered
In addition, three Windows Update settings can be configured as User settings:
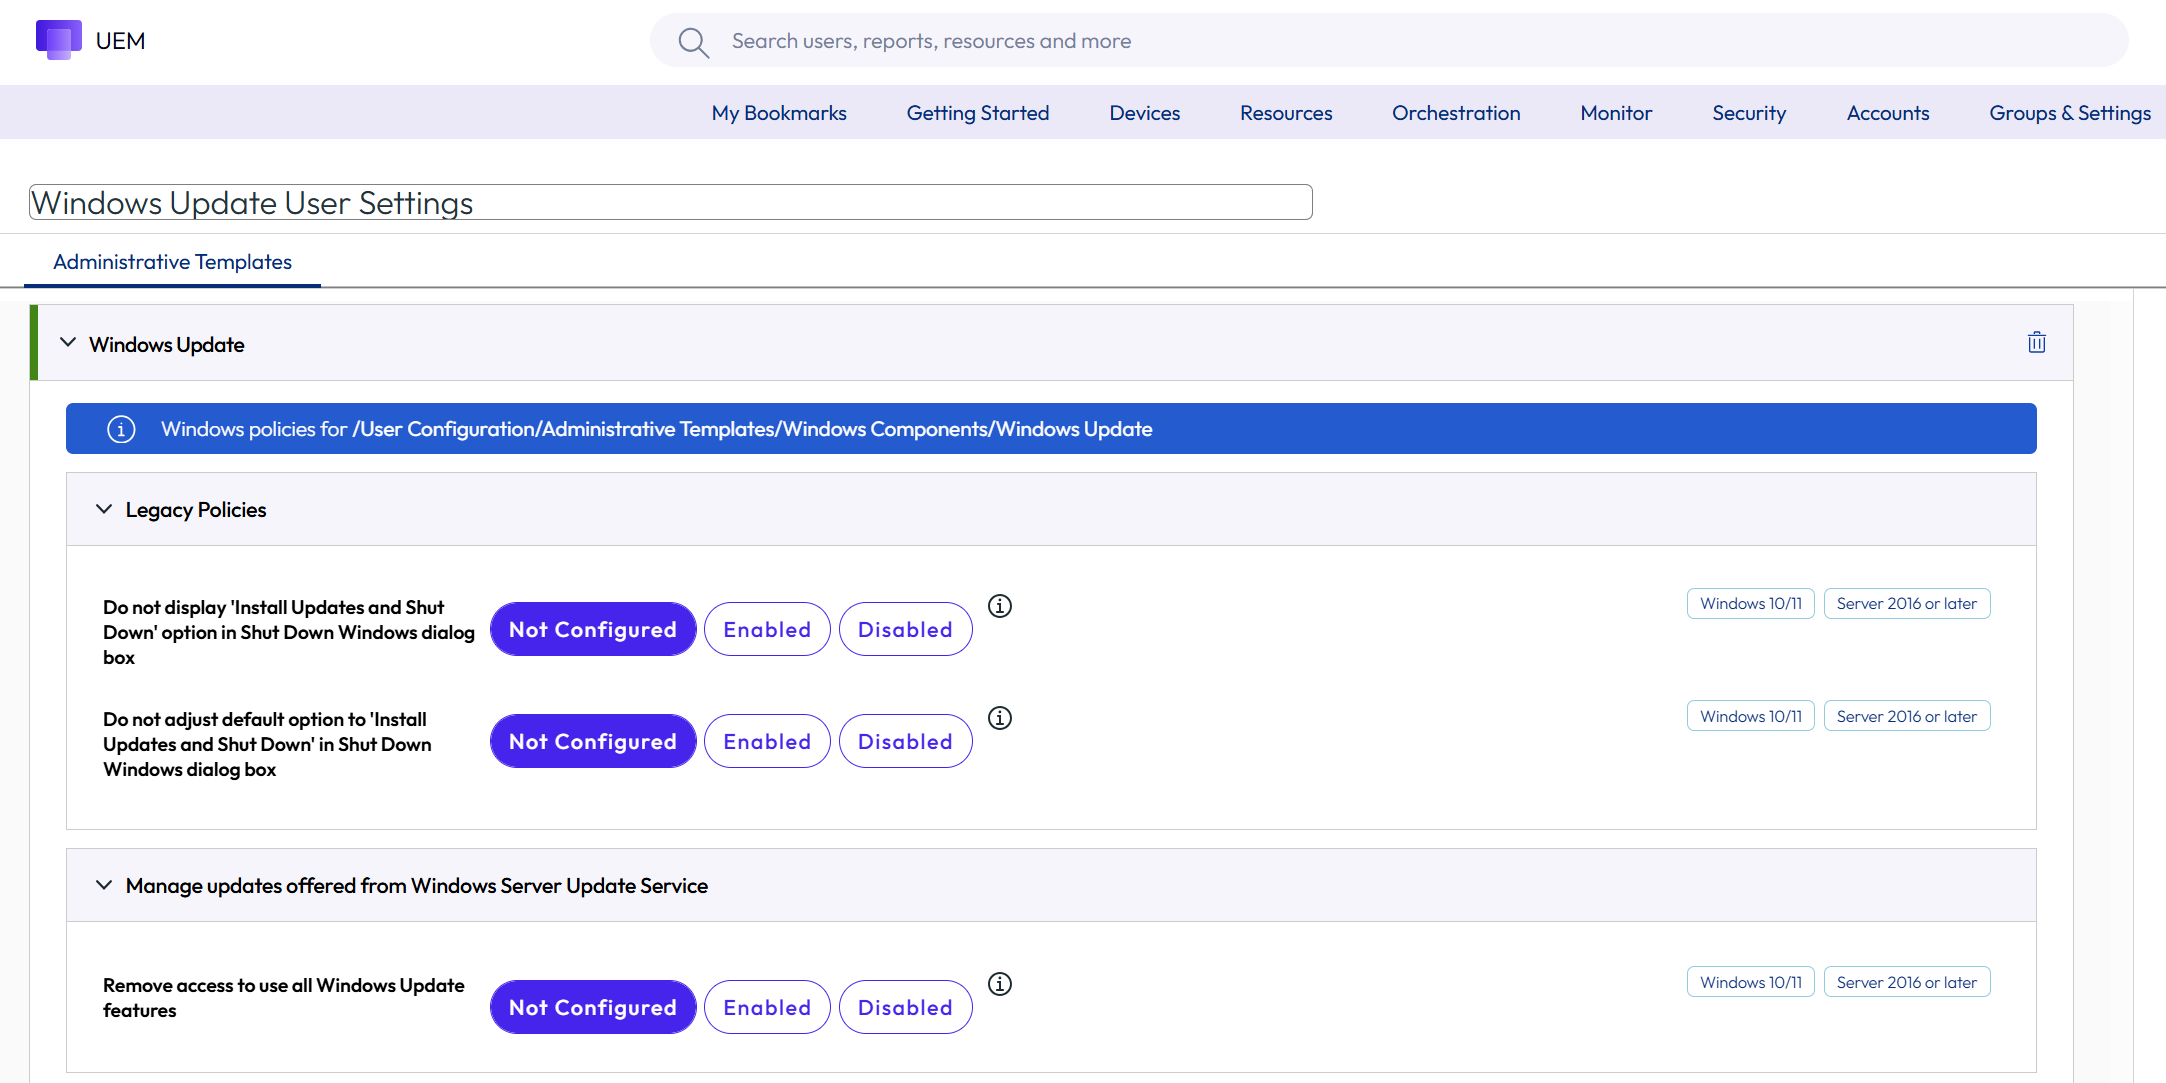
Figure 10: Go to Resources > Profiles > Add > Add Profile > Windows ADMX > User Profile to configure Windows ADMX Profile user settings
Note that the following similar settings can be configured within both device settings and user settings:
- Remove access to use all Windows Update features
- User settings: Managed updates offered from Windows Server Update Service > Remove access to all Windows Update features presents two options:
- Do not show any notifications
- Show restart required notifications
- User settings: Managed updates offered from Windows Server Update Service > Remove access to all Windows Update features presents two options:

Figure 11: User setting: Remove access to all Windows Update features
- Device settings: Managed end user experience > Remove access to all Windows Update features

Figure 12: Device setting: Remove access to all Windows Update features
- Similar display notification options:
- Device setting: Manage end user experience > Display option for update notification enables specifying:
- Default OS Update notifications
- Disable all notifications, excluding restart warnings
- Disable all notifications including restart warnings
- Device setting: Manage end user experience > Display option for update notification enables specifying:

Figure 13: Device setting: Display options for update notifications
- User settings:
- Do not display “Install Updates and Shut Down” option in Shut Down Windows dialog box
- Do not adjust default option to “Install Updates and Shut Down” in Shut Down Windows dialog box

Figure 14: User settings: Do not display "Install Updates and Shut Down" option in Shut Down Windows dialog box and Do not adjust default option to "install Updates and Shut Down" in Shut Down Windows dialog box
Windows Profile
Many enterprises have successfully deployed Windows Updates to Windows Desktop devices using the existing Windows Profile option, and if this option is working well, it can continue to be used. Windows Profiles will continue to exist alongside Windows ADMX Profiles, and there are no plans for deprecation.
When configuring Windows Updates via Windows Profile, available options and recommended selections vary slightly based on the Windows Update source. For example, the on-premises Windows Server Update Service (WSUS) includes configuration options within the Definition section that are not applicable to the cloud-based Microsoft Update client policies (formerly Windows Update for Business).
The designated Windows Update source cannot be subsequently changed after creation via Windows Profile; it is necessary to create a new profile if the Windows Update source needs to be later modified. For example, if your enterprise currently uses WSUS as the source and then transitions to Windows Update client policies, that Profile cannot be modified; it would be necessary to create a new Windows Profile.
Configuration of Windows Profile
To configure a Profile for Windows Updates, follow these steps:

Figure 15: Creating Device Profile for Windows Update.
Note that the only option for Windows Updates configured via the Windows Profile is based on the selection of Desktop and Device Profile.
If your existing Windows Update policy is based on what is labelled Windows Update (Legacy), you can easily migrate that policy to the newer version. Simply open the existing Profile and select migrate.
The following chart compares the Windows Update policy options and respective default settings based on selecting the source as Windows Update client policies vs. WSUS:
|
| Item | Microsoft Update client policies | WSUS |
| Definition | Windows Update Source | [default] | |
| WSUS Server URL | n/a | ||
| Proxy Behavior | n/a | Allow system proxy only for HTTP scans | |
| Telemetry | n/a | 0 - Security | |
| Update Branch | General Availability Channel (Targeted) | General Availability Channel (Targeted) | |
| Manage Preview Builds | Disable Preview Builds | Disable Preview Builds | |
| Device Scheduling
| Disabled | Disabled | |
| Enable Device Scheduling | Enable | Enable | |
| Configure Automatic Update Behavior | Updates automatically download and install at an optimal time determined by the device | Updates automatically download and install at an optimal time determined by the device | |
| Configuration Deadline Daily Reboot | Disabled | Disabled | |
| Feature Update (Days) | 7 | 7 | |
| Quality Update (Days) | 7 | 7 | |
| Grace Period (Days) | 2 | 2 | |
| Update Behavior
| Disabled | Disabled | |
| Disable Dual Scan | n/a | Yes | |
| Allow Windows Update Service | n/a | No | |
| Allow Microsoft Application Updates | No | No | |
| Feature Update Uninstall Period (Days) | 10 | 10 | |
| Defer Feature Updates (Days) | 365 | 365 | |
| Defer Quality Updates (Days) | 7 | 7 | |
| Exclude Windows Drivers from Quality Updates | No | No | |
| Disable Safe Guard | No | No | |
| Allow Non-Microsoft Signed Update | n/a | No | |
| Device Behavior
| Disabled | Disabled | |
| Allow Auto Windows Update Download Over Metered Network | No | No | |
| Ignore Cellular Data Download Limit for Application Updates | Yes | Yes | |
| Ignore Cellular Data Download Limit for System Updates | Yes | Yes | |
| Delivery Optimization
| Disabled | Disabled | |
| Caching Source | Peer mode | Peer mode | |
| Hosted Mode Cache Host Source | DHCP Option ID | DHCP Option ID | |
| Hosted Mode Cache Host | |||
| Download Mode | HTTP Blended with Peering Behind the Same NAT | HTTP Blended with Peering Behind the Same NAT | |
| Max Cache Age (Days) | 0 | 0 | |
| Cache Drive | |||
| Absolute Max Cache Size (GB) | 20 | 20 | |
| Allow VPN Peer Caching | No | No | |
| Minimum Size to Cache (MB) | 50 | 50 | |
| Non-Peer Download Delay: Foreground download delay (in seconds) | 60 | 60 | |
| Non-Peer Download Delay: Background download delay (in seconds) | 60 | 60 | |
| Network | Disable | Disable | |
| Foreground Download Bandwidth (KB/s) | 0 | 0 | |
| Background Download Bandwidth (KB/s) | 0 | 0 | |
| Minimum Background QoS (KB/s) | 200 | 200 | |
| Monthly Upload Data Limit (GB) | 0 | 0 | |
| Restrict Peer Selection by Subnet | No | No | |
| Device Requirements for Caching | Disable | Disable | |
| Minimum Battery Limit (Percent) | 40 | 40 | |
| Minimum Available Storage (GB) | 32 | 32 | |
| Minimum Available Memory (GB) | 4 | 4 | |
| Network Bandwidth Limitation | Disabled | Disabled | |
| Time Period (Start) | 6:00 AM | 6:00 AM | |
| Time Period (End) | 6:00 AM | 6:00 AM | |
| Background Download Limit During Time Period (Percent) | 20 | 20 | |
| Background Download Limit Outside of Time Period (Percent) | 20 | 20 | |
| Foreground Download Limit During Time Period (Percent) | 20 | 20 | |
| Foreground Download Limit Outside of Time Period (Percent) | 20 | 20 | |
| OS Version
| Disabled | Disabled | |
| Target Release Version | |||
| Target Product Version | Windows 10 | Windows 10 |
Figure 16: Windows Update options presented within Windows Profile
The default settings should be configured as appropriate.
When configuring profiles, ensure that Windows Active Directory GPOs do not have any Windows Update settings configured to avoid conflicts. As a best practice, Workspace ONE UEM should be the single source for Windows Update settings.
AD GPOs
Although the Windows ADMX Profile offers the same settings options as AD GPOs, the background functionality and deployment of these two profile engines differs.
Omnissa does not recommend the application of Active Directory GPOs to Workspace One managed Windows devices; however, if you must incorporate GPOs, it is critical to ensure that no policy settings, including Windows Updates settings, are duplicated and propagated via more than one policy type.
Dynamic Environment Manager (DEM)
Windows Updates may be configured via DEM, which is most commonly used for Horizon workloads. Many of the same Windows Update settings that are available within other policy engines overlap with DEM configuration options, so it is critical to ensure that there is no duplication of settings.
Where Horizon devices are being managed via Workspace ONE UEM, Omnissa recommends considering Windows Update settings to Windows ADMX Profiles or Windows Profiles because these options allow administrators to holistically view the status of Windows Updates within the admin console, as well as control propagation and emergency updates.
CIS L1 Benchmark Baseline
CIS Benchmark Baseline is only available for Windows Desktop, and by default, all settings are universally applied unless explicitly altered or disabled. As a result, Windows Update settings are consequently applied, which is not recommended without careful consideration.
The Windows Security Baseline does not contain any Windows Updates items. For a detailed explanation regarding Workspace ONE Baselines and Profiles and functionality, please see the Omnissa Tech Zone article Configuring Workspace ONE Baselines and Profiles.
While Omnissa recommends using a template Baseline as the primary security setting, the Windows Update settings are the exception as discussed below.
Configuration of CIS L1 Baseline
Although several configuration settings related to Windows Updates are available within the CIS Level 1 Baseline, the options presented are minimal and do not enable a robust Windows Update solution that includes functionality such as selecting peer-to-peer access designations and centralizing Windows Update status in the console.
For example, within the CIS L1 Windows Update configuration, under the Legacy Policies tab, only the No auto-restart with logged on users for scheduled reboot option is presented, whereas the related Windows ADMX Profile provides 10 options.
If the CIS Level 1 Baseline is used within your organization, the following settings should be changed to disabled under Computer Configuration\Administrative Templates\Windows Components\Windows Update in favor of settings that should be configured via a Workspace ONE Profile.
- Configure Automatic Updates
- Select when Quality Updates are received
- Select when Preview Builds and Feature Updates are received
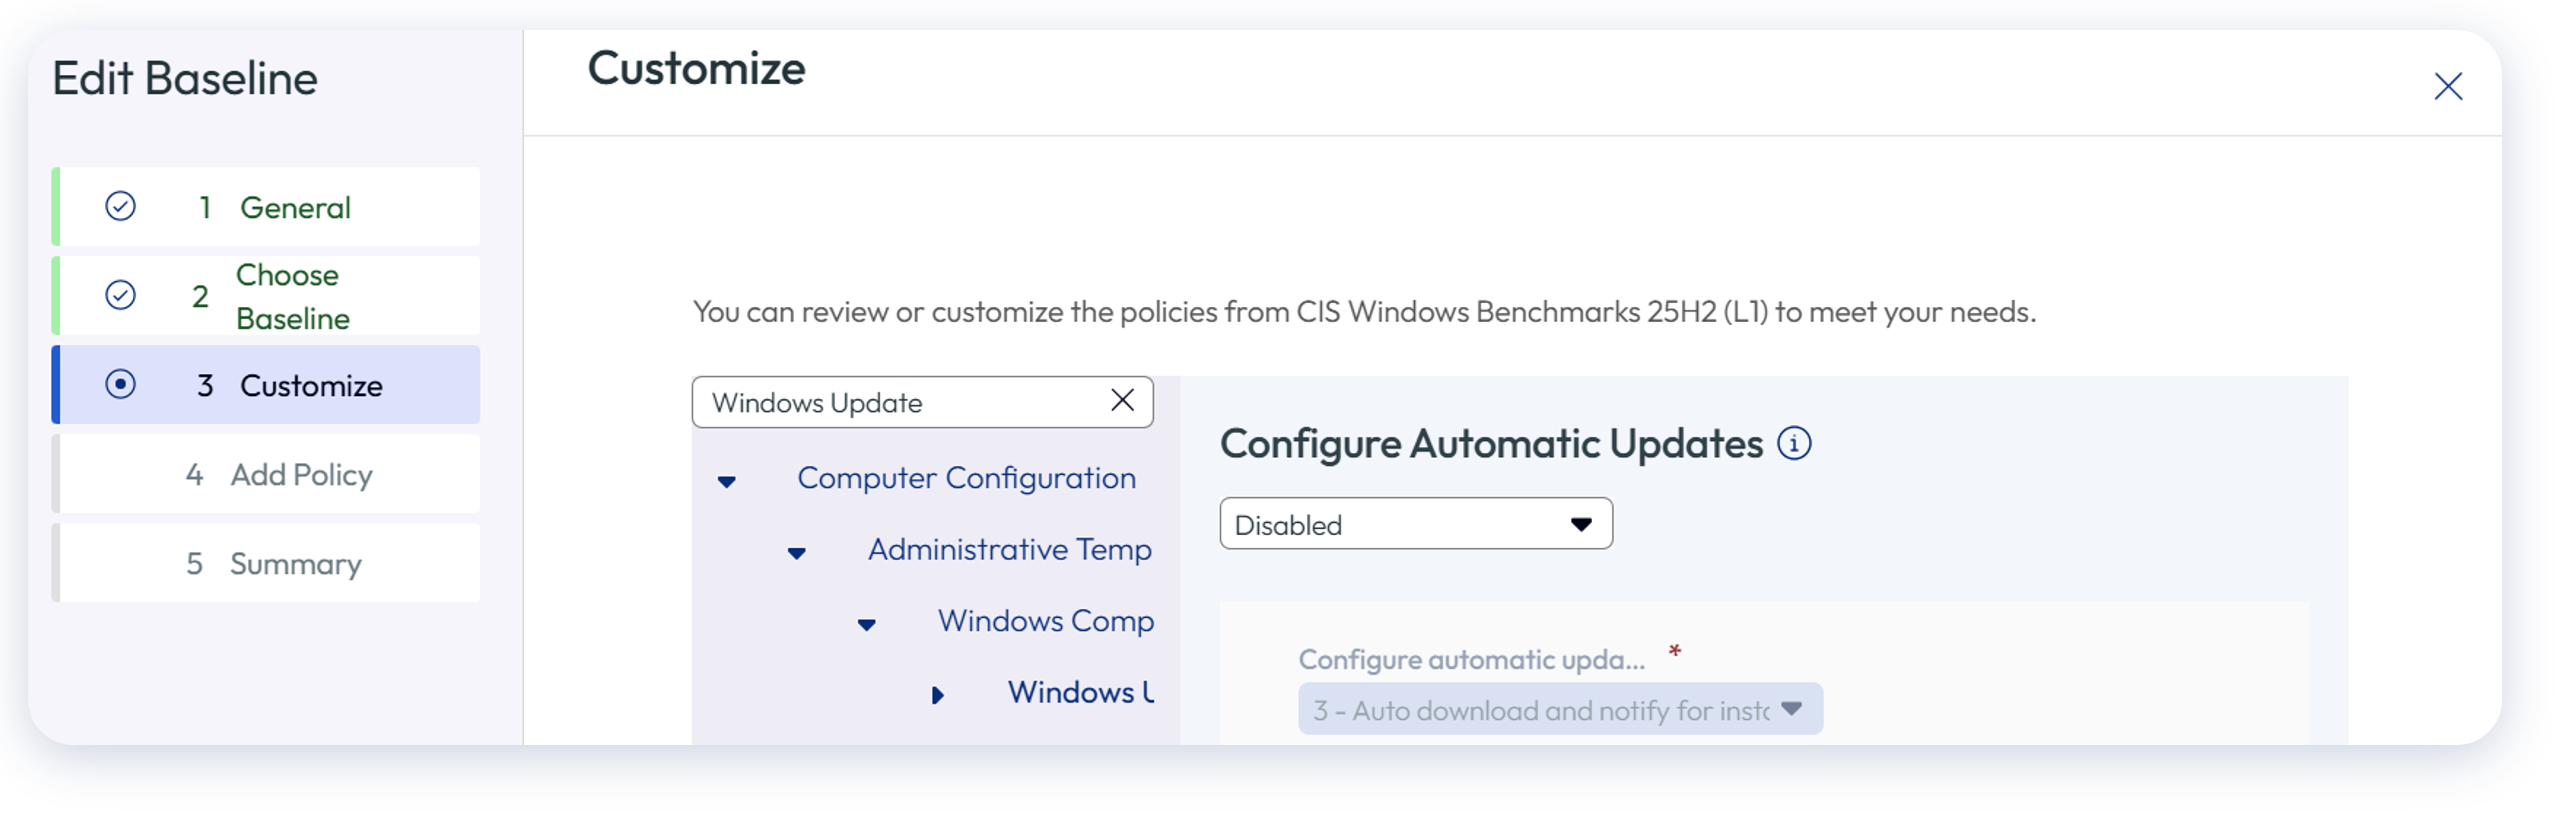
Figure 17: When CIS L1 Baselines are implemented, Omnissa recommends disabling all Windows Updates options including Configure Automatic Updates
If any of the Windows Update options are enabled within the Baseline, caution should be taken to ensure that no duplication occurs with other policies.
Deploying Windows Updates
Now that the Windows Update policy has been configured, next comes the “how?” as related to deployment.
Distribution via network peering
Will each individual device fetch Windows Updates or will peering be used to minimize network bandwidth?
Network peering enables a device to share updates with other devices, rather than individually fetching. Most commonly, network peering is enabled based on physical sites. In the example below, a company has main offices in New York, Sydney, and Paris. Once the first device in each of these offices has fetched the Windows Update, it is then shared with other devices. Deployment Rings, as will be discussed shortly, control the distribution timeframe.
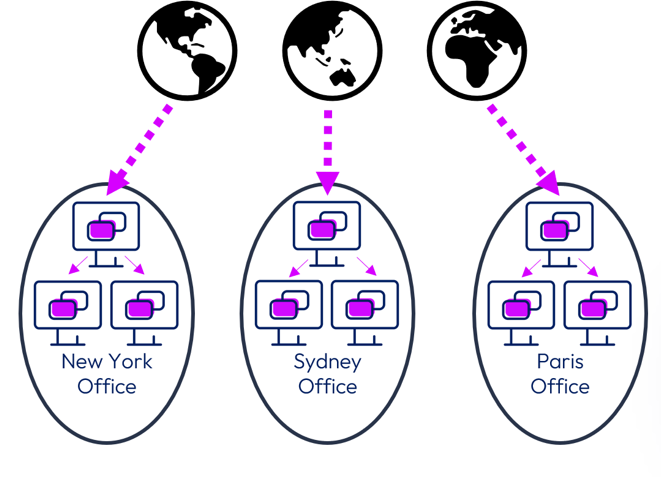
Figure 18: Windows Updates can be distributed via network peering
Depending on the policy type that has been enabled for Windows Updates, peering configuration options and defaults vary.
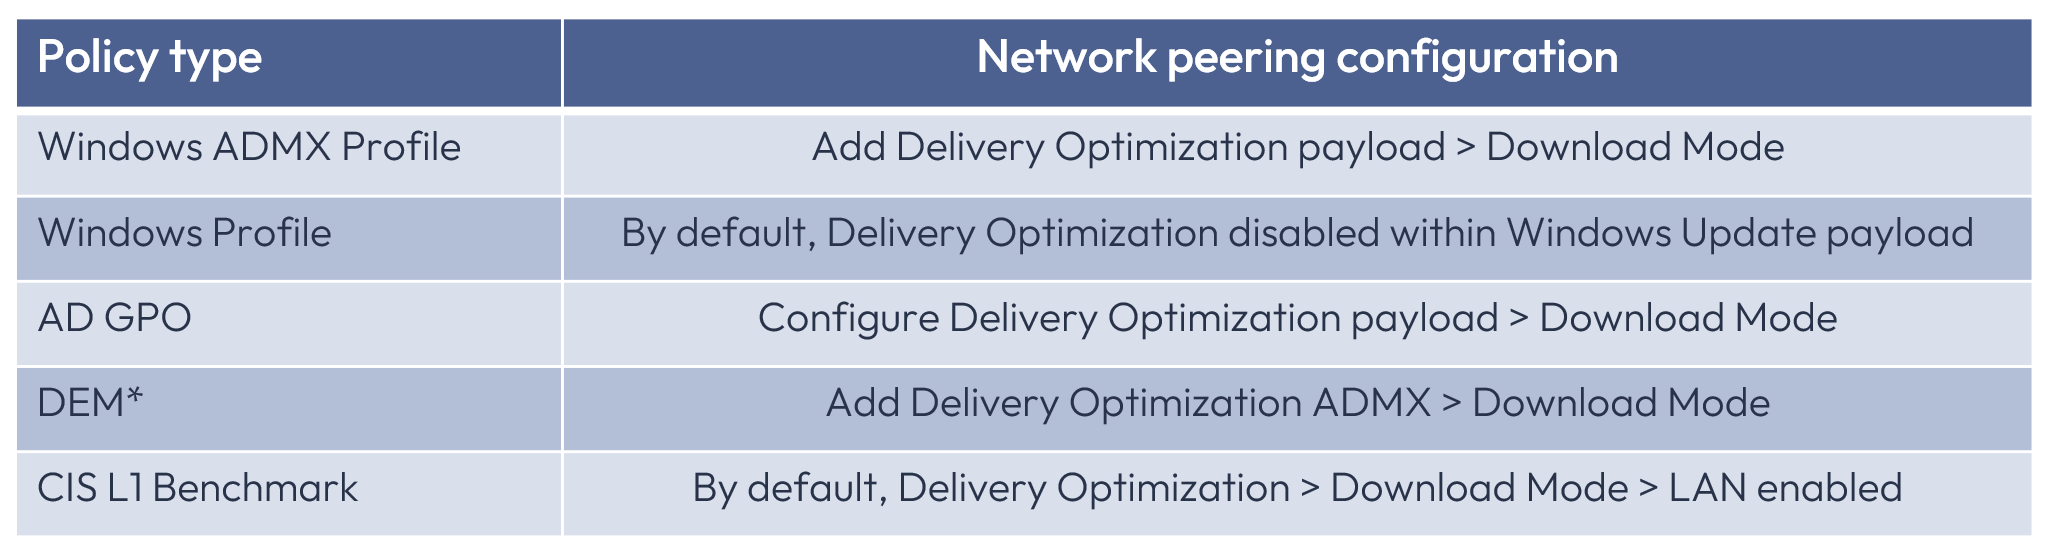
Figure 19: How to configure network peering based on policy type
Staggered deployment
Will all Windows devices be updated at once?
- If yes, then the Windows Update policy can simply be assigned to an all-encompassing Smart Group
- If no, which is the most common scenario, then some additional configurations are necessary in order to segment rollout via Deployment Rings
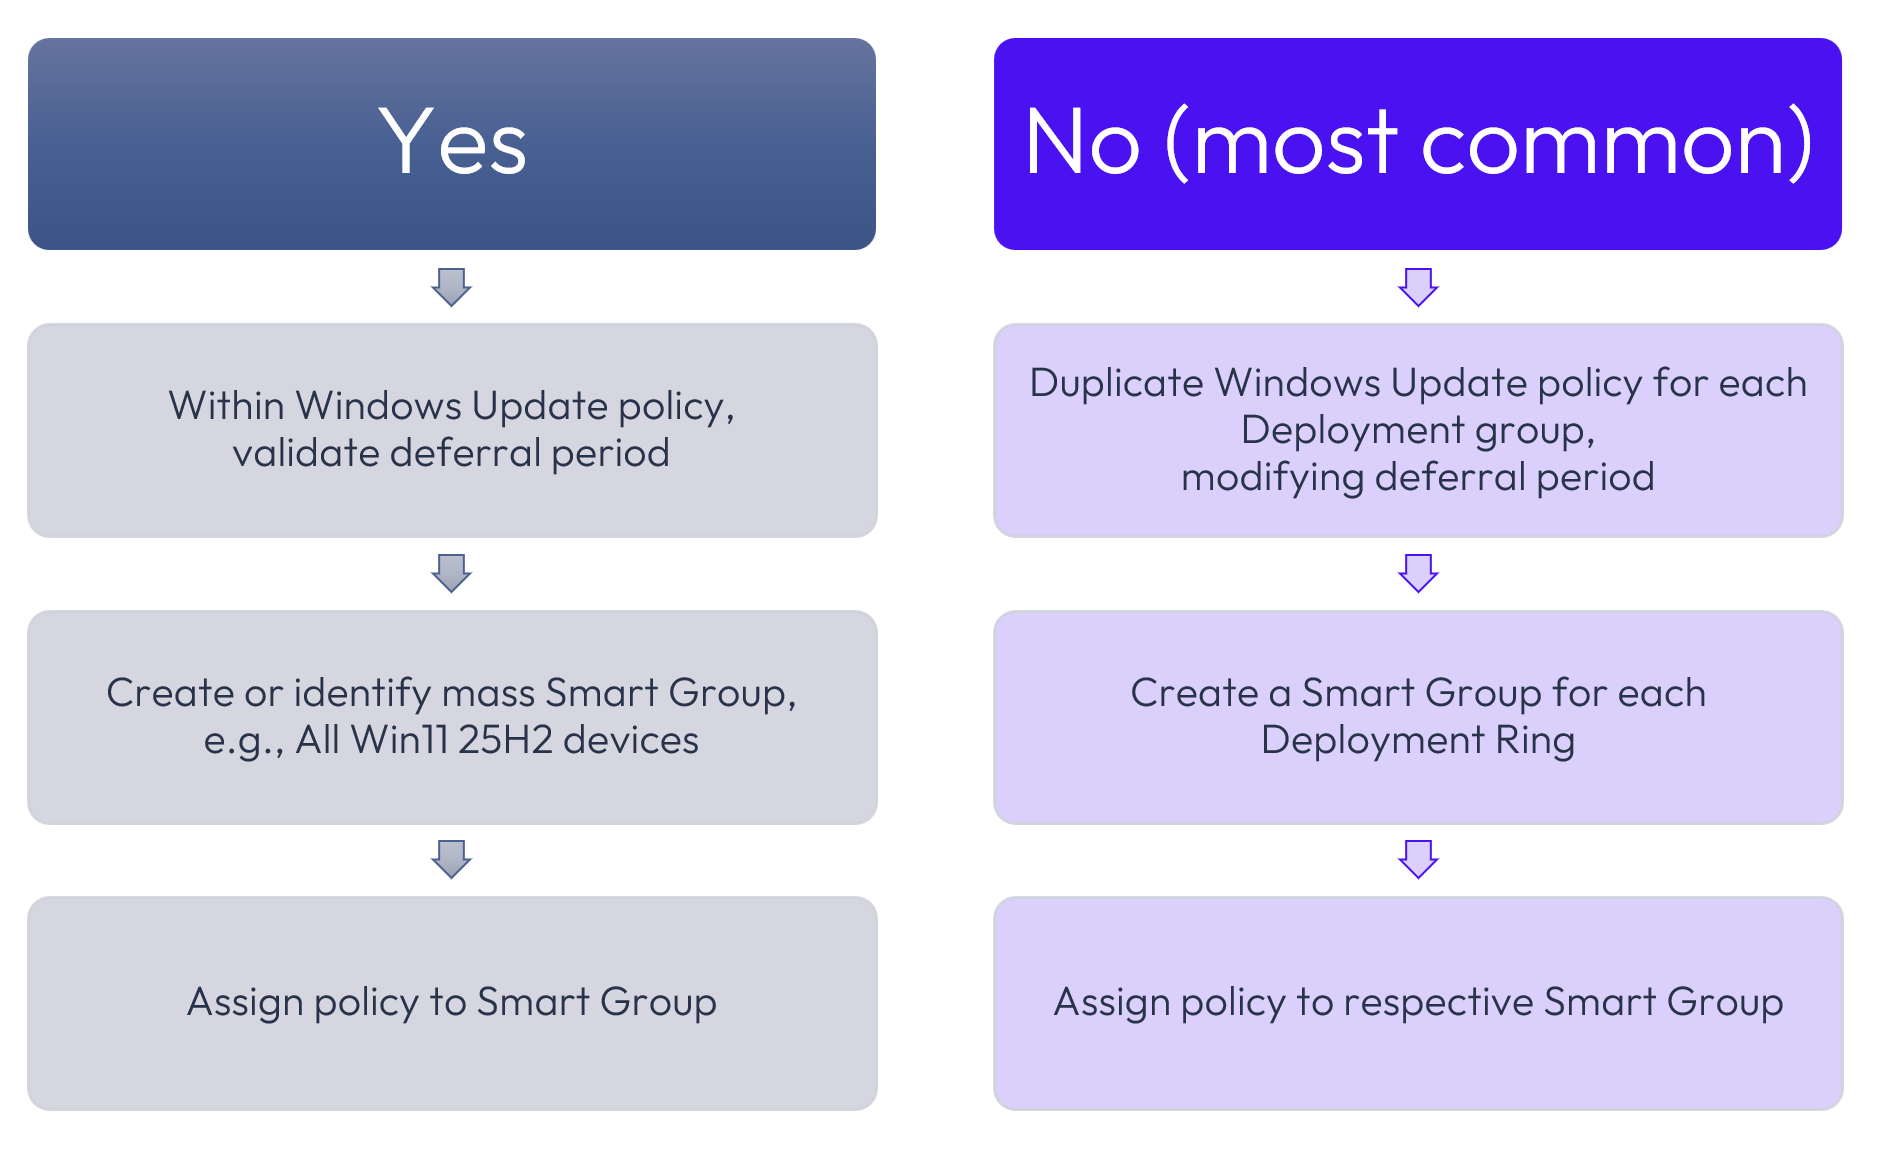
Figure 20: Will Windows devices be updated simultaneously?
Vanilla deployment of Windows Updates consists of the policy configuration and Smart Group assignment. Omnissa recommends incorporating Deployment Rings, as will be discussed subsequently.
Smart Groups
In addition to properly configured policies, Smart Groups must be properly designated. Large, all-encompassing Smart Groups, such as all Windows 11 devices as designated only by Platform and Operating System, should be broken down into smaller Smart Groups so that the progressive deployment of Windows Updates can be batched and automated via Deployment Rings. In addition, the specific operating system version(s) should be used to differentiate Feature Release version, such as Windows 11 25H2.
For example, additional Smart Groups could be created for IT Windows 11 25H2 devices, Marketing Windows 11 25H2 devices, and so on, with confirmation that all appropriate groups have been designated.
To modify or create a Smart Group, go to Groups & Settings > Groups > Assignment Groups.
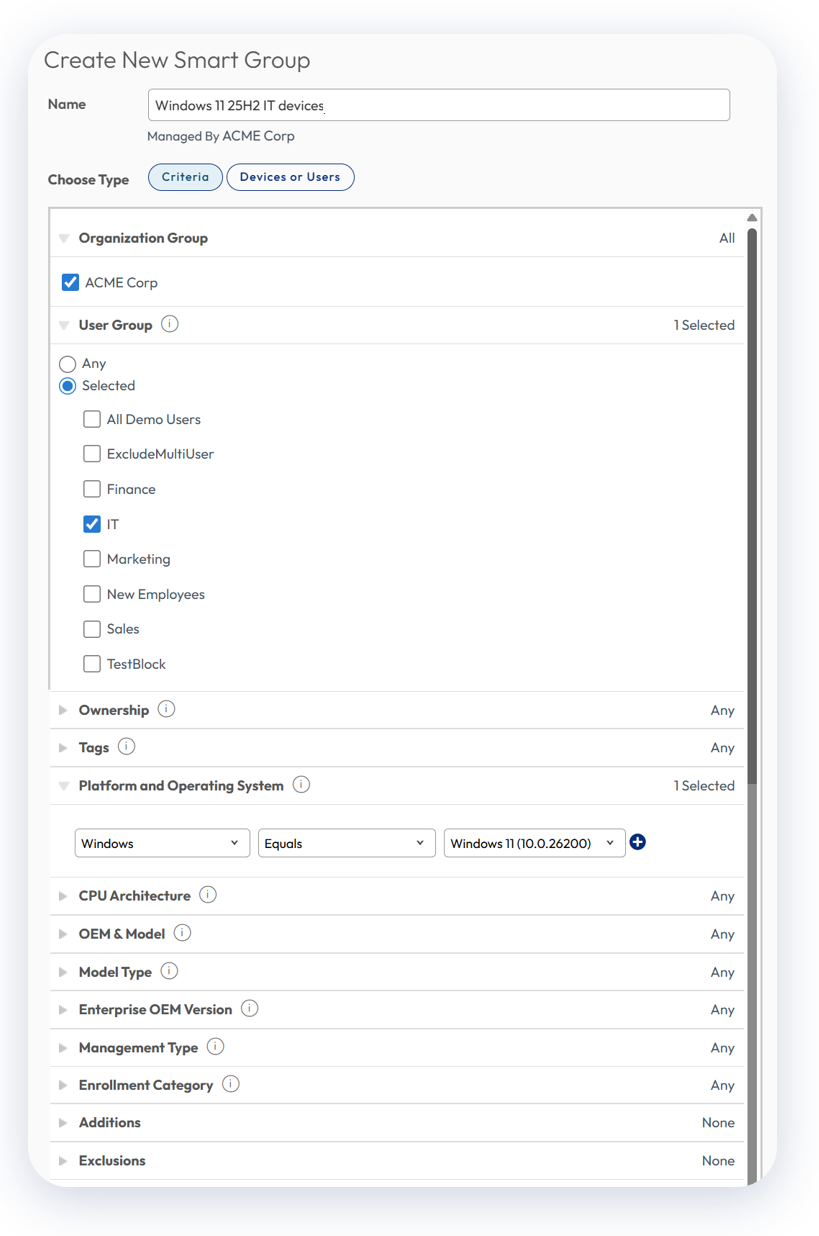
Figure 21: Granular designation of Smart Groups, e.g., Windows 11 25H2 IT devices
Assignment
After configuring a Windows Update policy, the next screen requests assignment criteria. Here, the appropriate Smart Group(s) are designated, as well as several additional options as shown below:
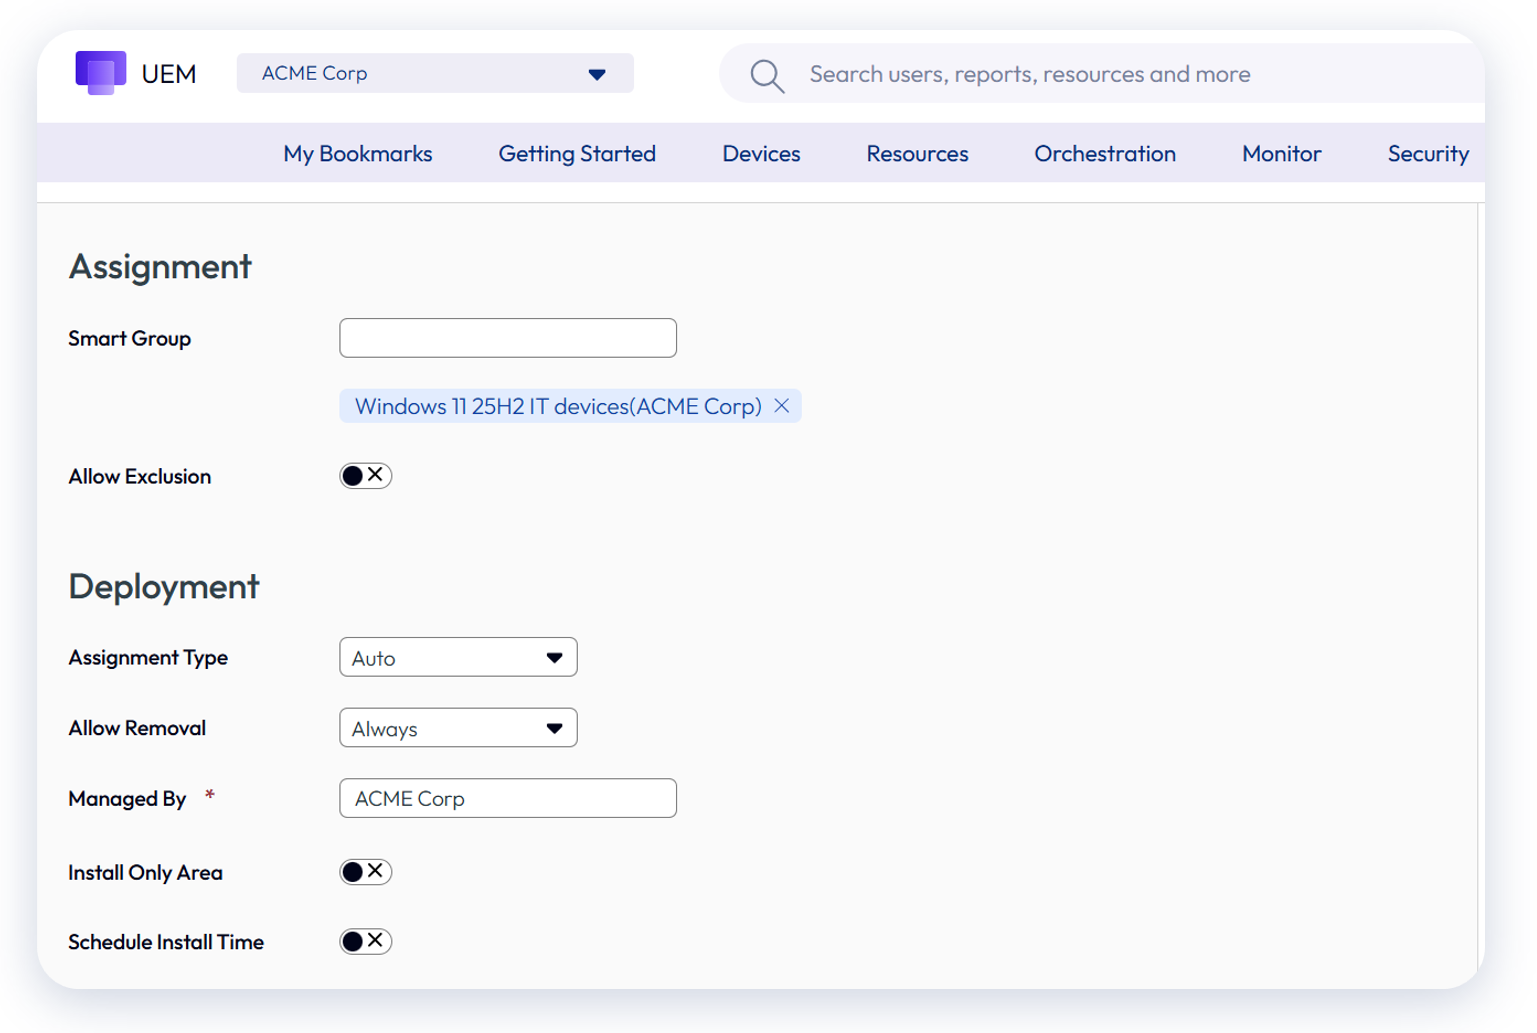
Figure 22: Assignment of Windows Update policy to Windows 11 25H2 devices
Deployment Rings
Deployment Rings are an important consideration for Windows Updates. By segmenting devices into numerous groups, Windows Updates can effectively be deployed over a period of time, which staggers rollout and provides a better user experience.
The example below shows a total of seven Deployment Rings and the respective deferral time. Of course, the number of rings appropriate for your environment may be higher or lower.
In this example, Ring 0 is focused on test devices so that Windows Updates can be validated before rollout to the Win11 25H2 IT devices group two days later.
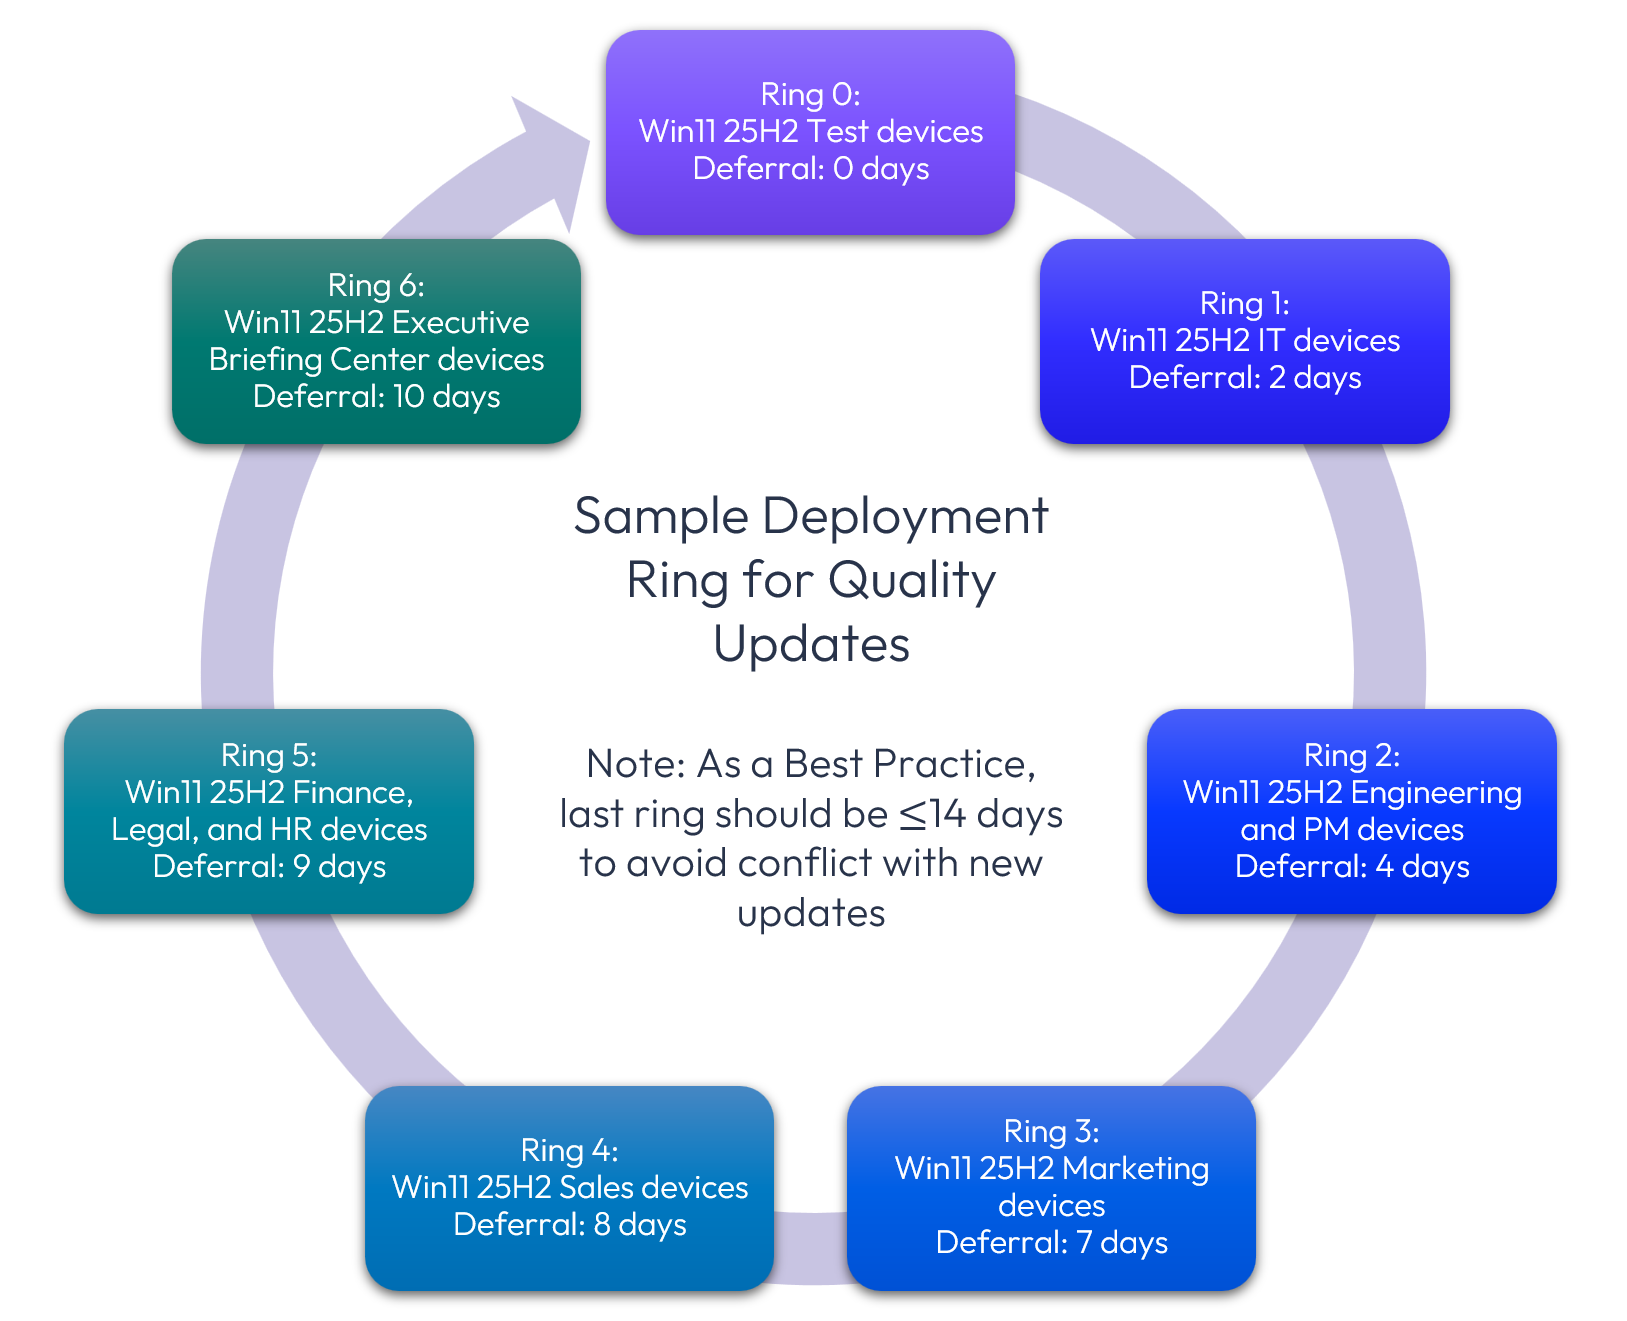
Figure 23: Deployment Ring example
Assignments are based on distinct Smart Groups, which means that each Windows Update policy aligns with a specific Smart Group. Using the example above, copies of the Windows Policy would be modified and deployed as follows:
- Windows Update policy master (no assignment)
- Windows Update policy Ring 0, which is a copy of the master policy
- Deferral period set to 0 days
- Assigned to Windows 11 25H2 Test devices Smart Group
- Windows Update policy Ring 1, which is a copy of the master policy
- Deferral period set to 2 days
- Assigned to Windows 11 25H2 IT devices Smart Group
- Remaining assignments follow the strategy outlined above
Deferral period
Most IT organizations choose to delay the deployment of Windows Updates. Although Quality Updates are released monthly on “Patch Tuesday,” it is common to defer deployment by a few days.
The default deferral period for each policy type differs and should be adjusted as appropriate to align with your Deployment Ring strategy.

Figure 24: Default deferral period by policy type
Alternatively, all policy types provide automatic update settings that can be configured to install Windows Updates on specific days of the week and time. For example, if Windows Desktop devices should be updated on Thursdays at 12:00 noon, this can be enabled via policy.
Deploying Windows Updates via Sensors and Freestyle Orchestrator
Sensors may also be used to determine device characteristics, such as device state, which can then be incorporated into a Freestyle Orchestrator workflow that incorporates if/then/else criteria.
Sensors
When determining eligibility for Windows Updates, Sensors may be a useful tool to query devices. A multitude of sample Sensors are available within GitHub.
For example, an administrator does not want deployment of updates to devices to occur when Windows Update is already in a pending reboot state. By first running a Sensor to determine device state, the output can be later incorporated into a Freestyle Orchestrator workflow.
For this example, wu_status.ps1 has been selected from the GitHub repository. Within this Sensor configuration, one output is “Pending Reboot.”
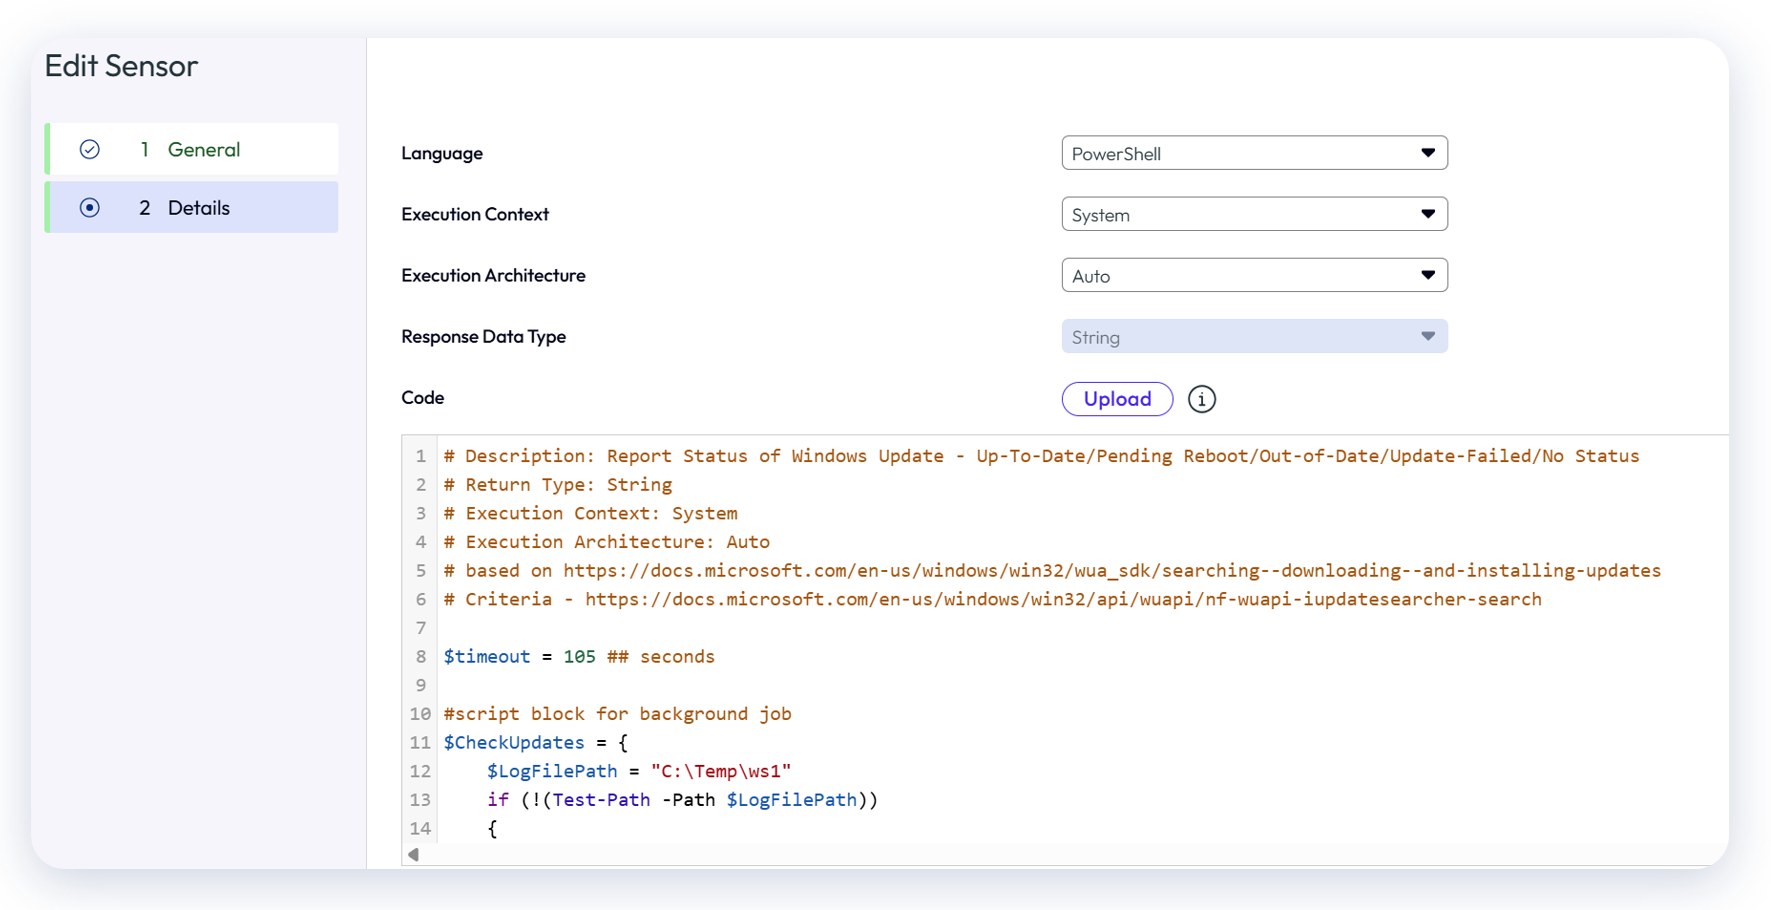
Figure 25: Go to Resources > Scripting > Sensors to configure or edit a sensor
Freestyle Orchestrator
Although not typically used for this purpose, if you have unique if/then/else requirements for installing Windows Updates, Freestyle Orchestrator may be a suitable distribution mechanism.
In this basic example, the previously created Sensor is used as the criteria to determine whether a Windows device is pending reboot after Windows Updates were installed. If the device is not in a pending reboot state, then the Windows Update Profile would be installed.
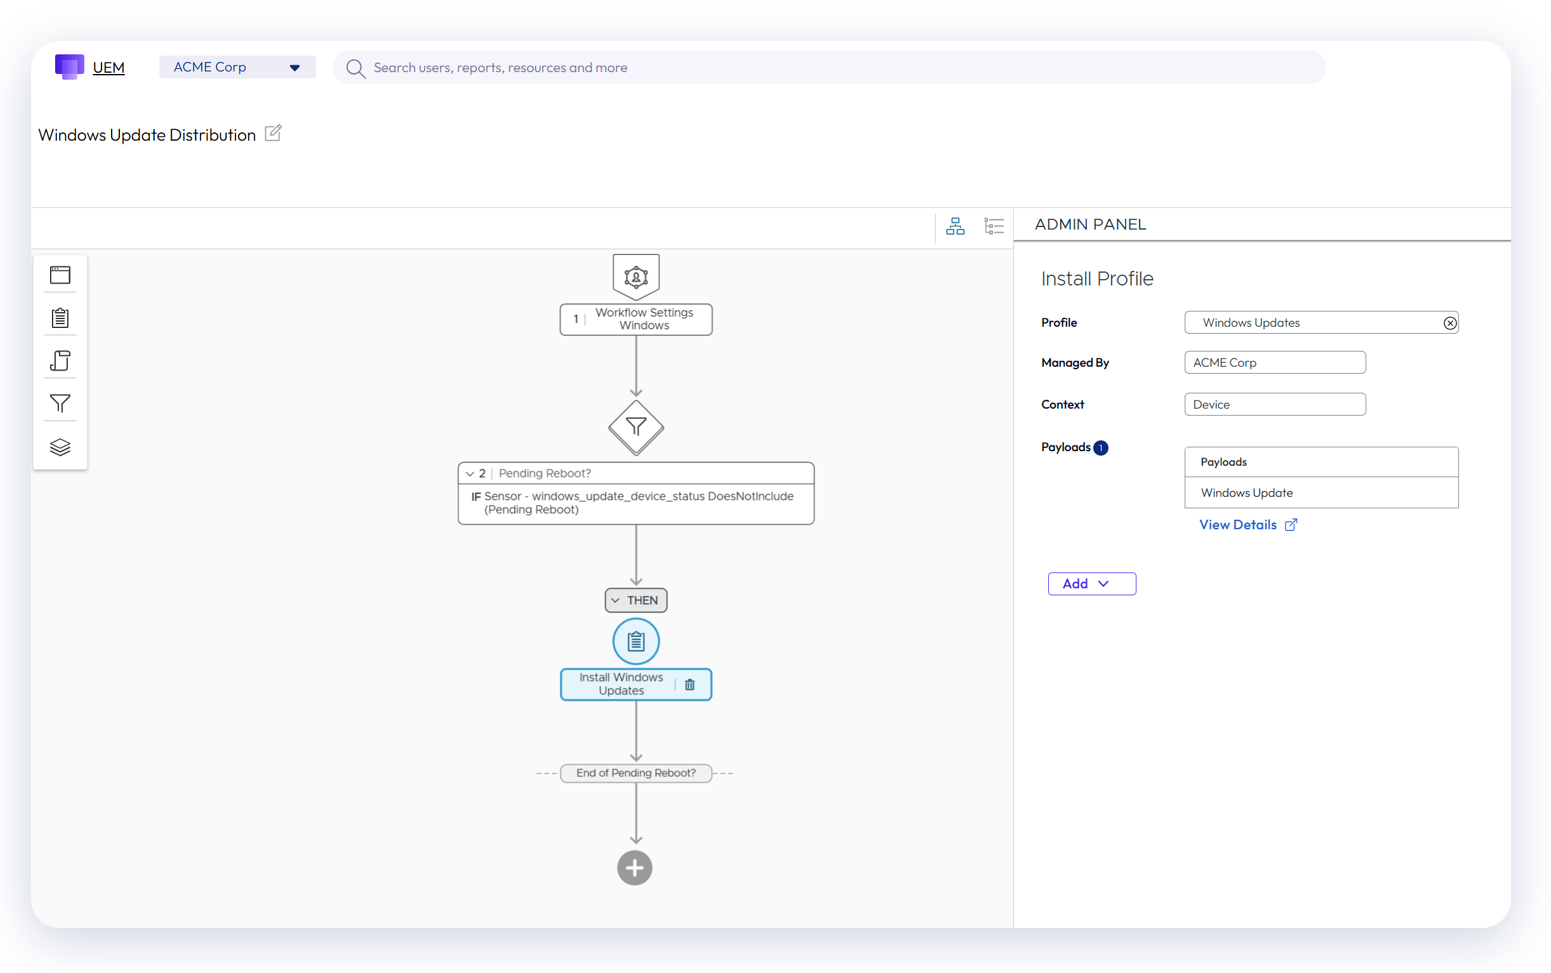
Figure 26: Go to Orchestration > Freestyle > Provisioning Workflows to use Freestyle Orchestrator for addressing if/then/else requirements
Pause, Resume, Rollback
After Windows Updates have started to deploy, it may be necessary to pause, resume, or rollback. For example, if a specific update causes an issue, rolling back or pausing it may be necessary. Once the issue is resolved, deployment can be administratively resumed. Alternatively, Windows Update automatically restarts the installation process after 35 days.
Pause, resume, and rollback of Windows Updates functions in the following situations:
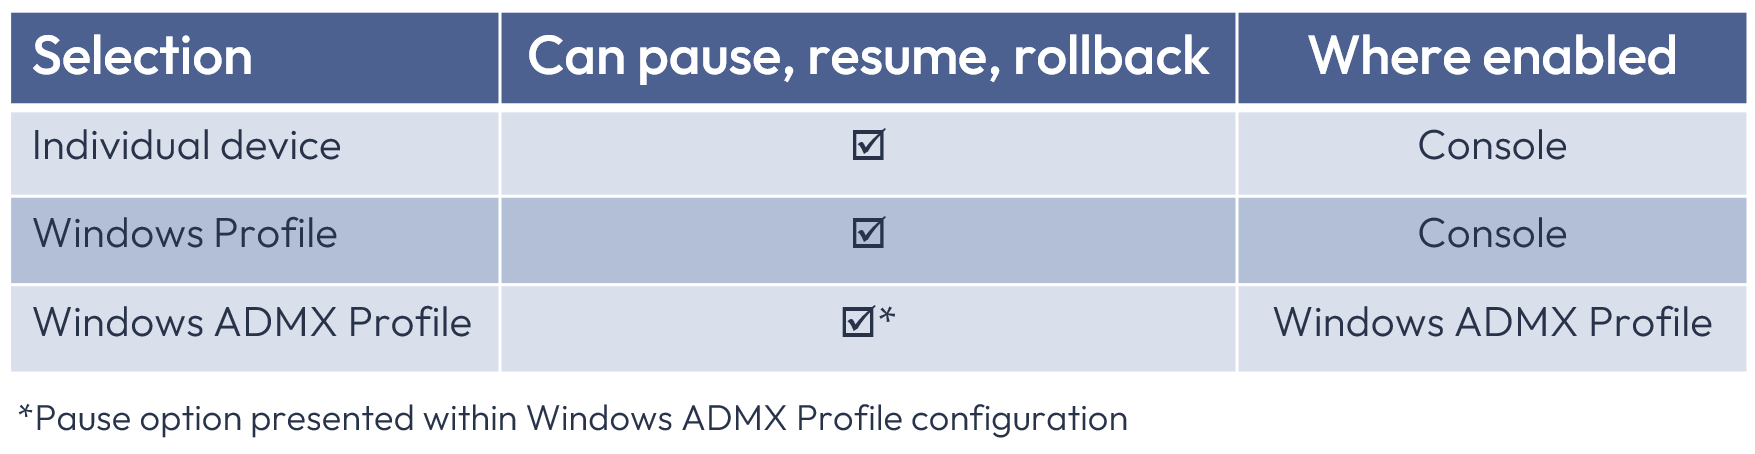
Figure 27: Selections that allow pause, resume, and rollback of Windows Updates
From the console, all three of these actions may be accessed for individual devices, whereas pause and rollback options are available for the Windows Profile. Note that Windows Updates configured via Windows ADMX Profiles require modification of the Profile.
Below is an example of how pause, resume, and rollback can be administratively executed for a single device:
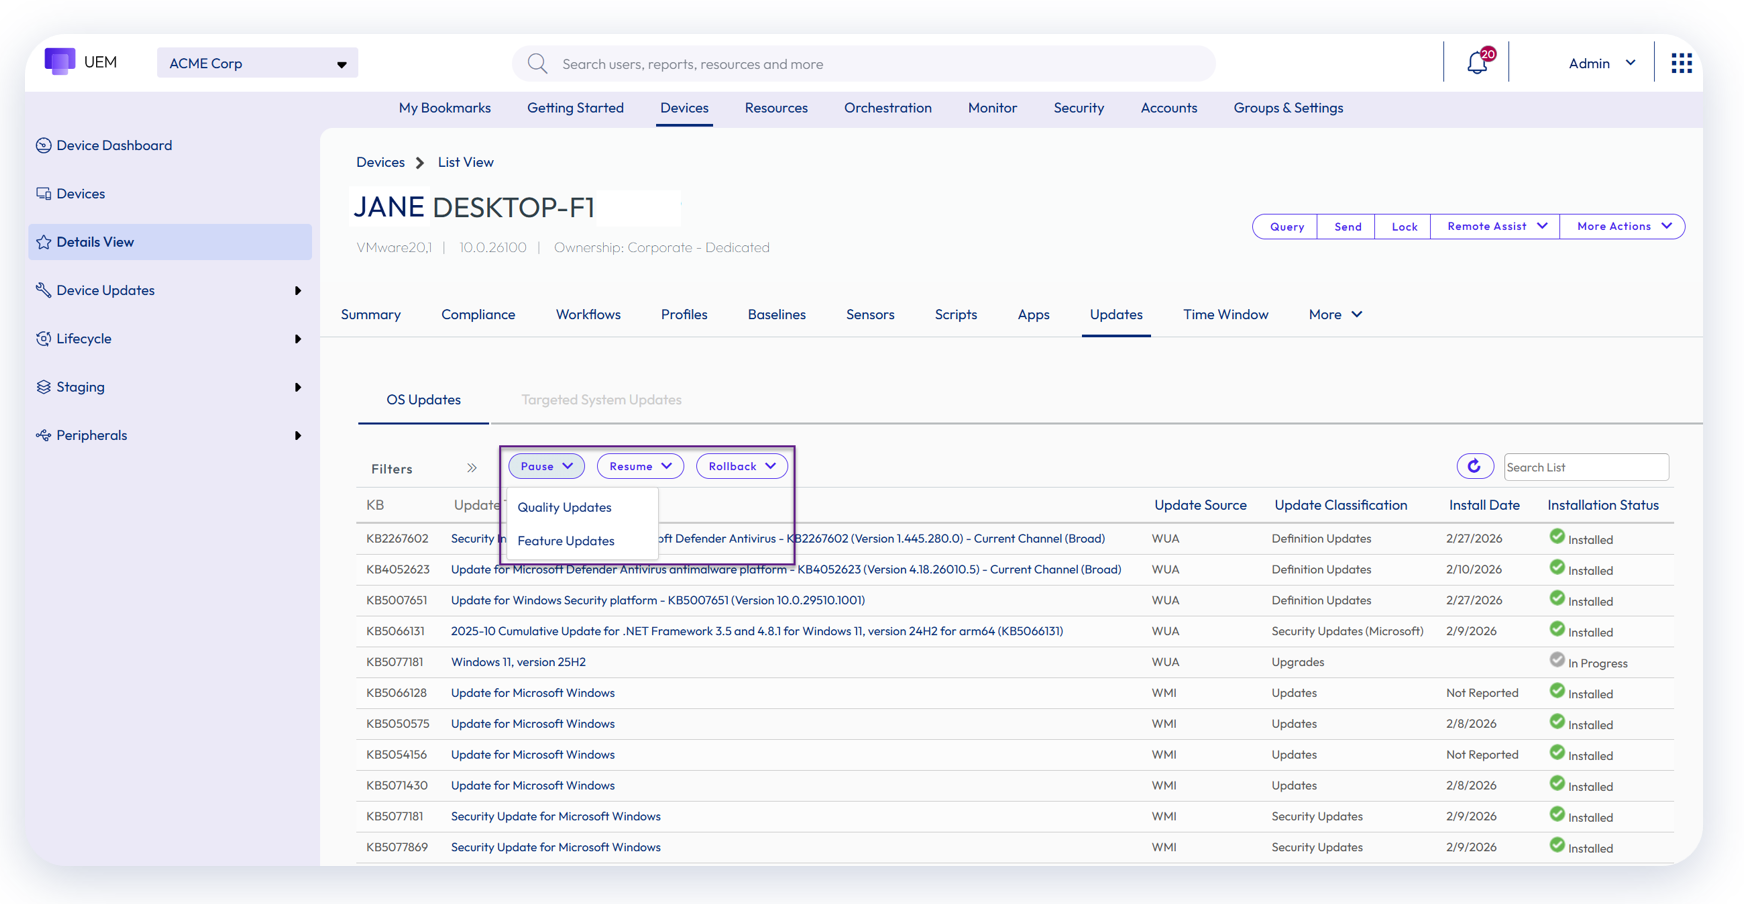
Figure 28: Go to Devices > Details View > Updates to pause, resume, and rollback on an individual device
If Windows Updates have been configured via a Windows Profile, the Profile can be selected within the Profiles screen and pause and rollback can be enabled for the Profile. To pause or rollback the Windows Update Profile, access Resources > Profiles. After selecting the Profile, the options to pause and rollback appear. Once pause or rollback have been enabled, the option to resume is presented.
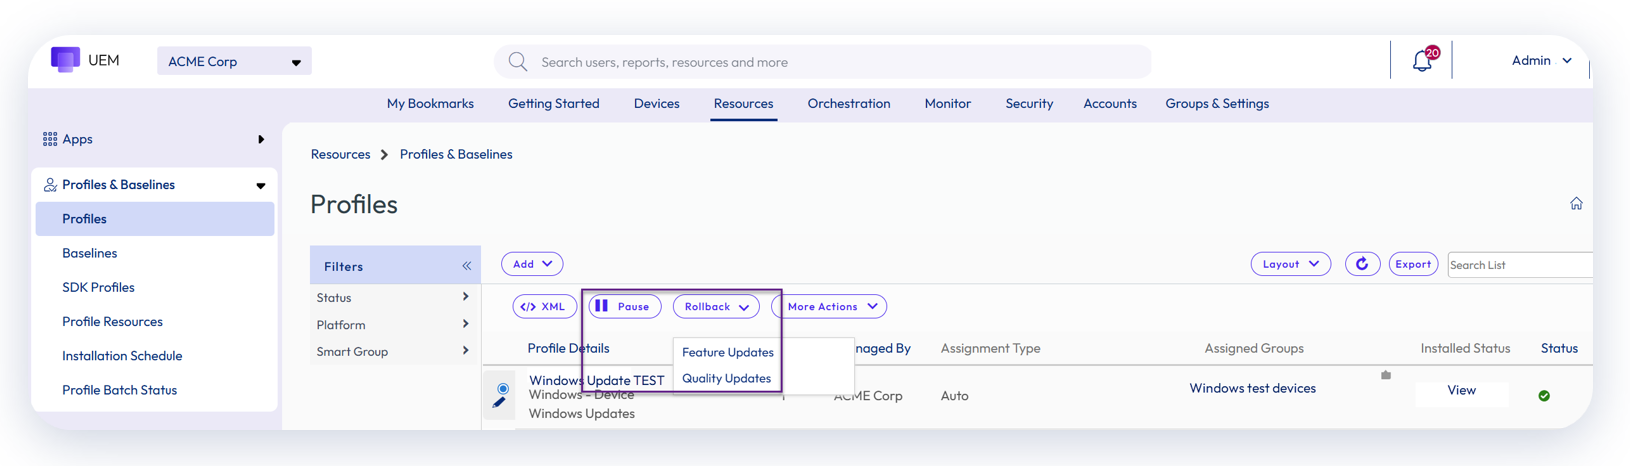
Figure 29: Within Resources > Profiles & Baselines > Profiles, Windows Updates configured as a Windows Profile present the options to pause and rollback
If rollback is selected, the administrator can choose feature updates or quality updates. If pause is selected, the administrator is presented with a unique Profile view with the option to select whether to pause feature and/or quality updates, as well as the start date.
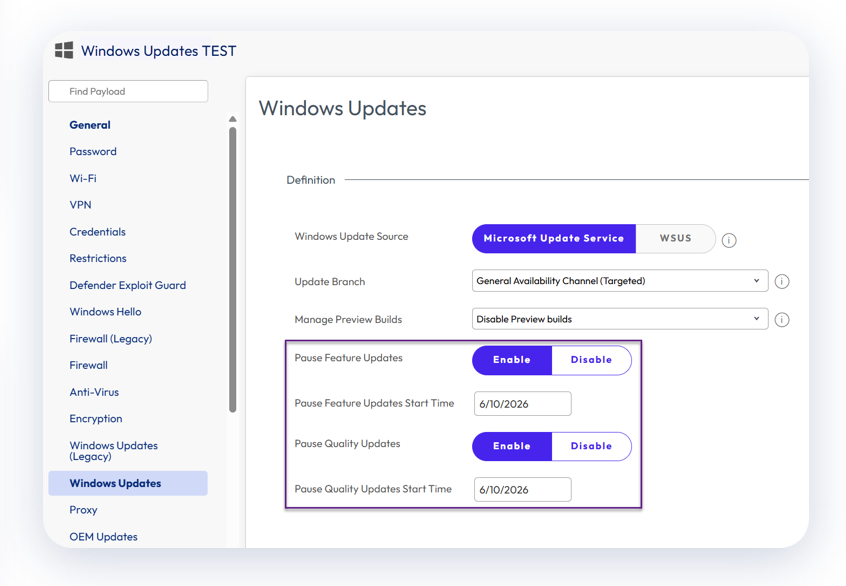
Figure 30: Pausing Feature Updates and/or Quality Updates, as well as the start time
Please note that Windows Updates configured via Windows ADMX Profiles do not present the options to pause, resume, and/or rollback within the Profiles screen.
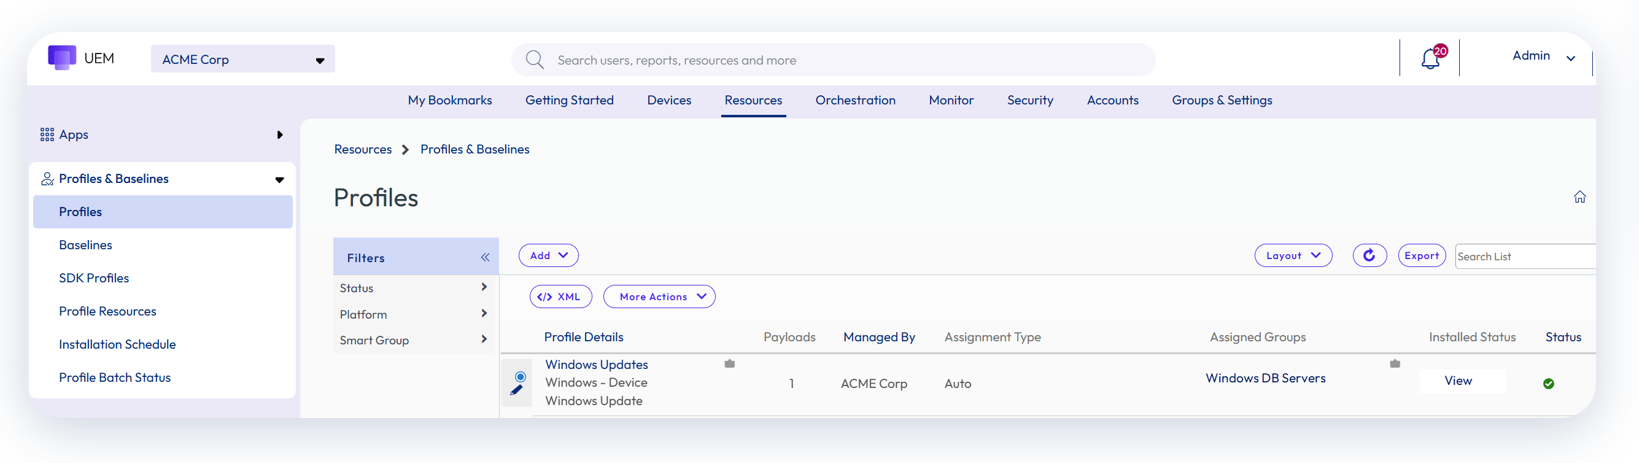
Figure 31: Windows Updates configured via Windows ADMX Profiles cannot be enabled for pause or rollback directly from the Profiles page
However, deferral and pause options can be configured within the Windows Update payload of the Windows ADMX Profile itself as shown below.
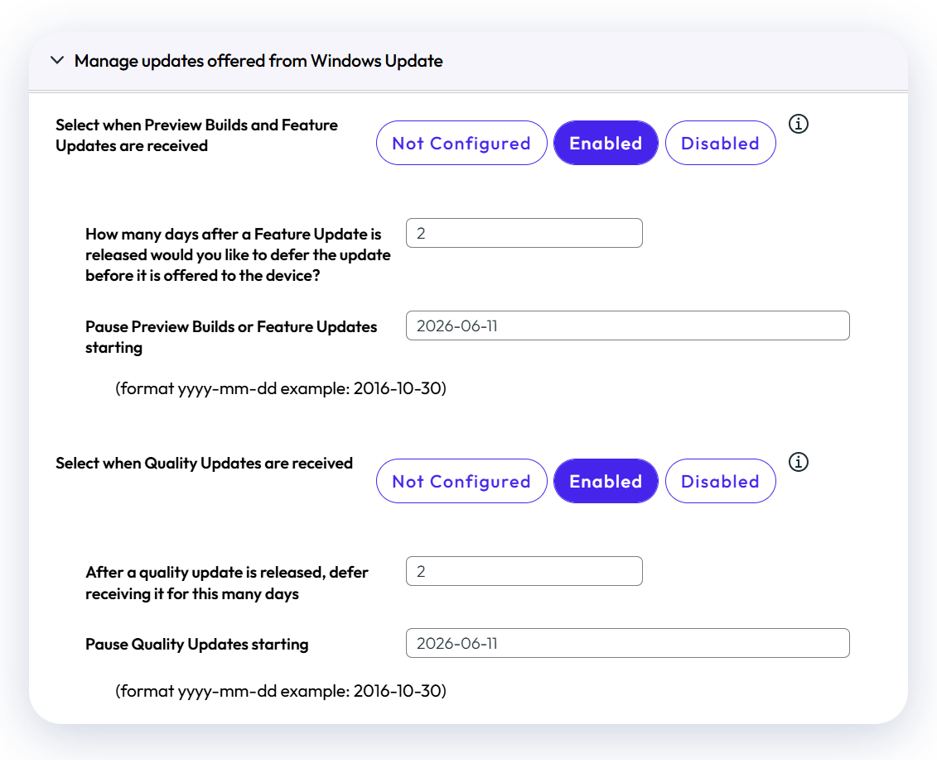
Figure 32: Where Windows Updates are configured within Windows ADMX Profiles, deferral and pausing of Feature Updates and Quality Updates can be optionally be configured
New functionality for addressing zero-day patches and vulnerabilities
To maximize Windows patching security, Omnissa recently introduced Granular Patch Management and Vulnerability Defense.
- Granular Patch Management addresses zero-day emergency Windows Updates
- Vulnerability Defense provides the ability to largely automate the identification and remediation of operating system vulnerabilities
Phased Deployment functionality will soon include automated, graduated dissemination of Windows Updates as an enhancement to the current Deployment Ring processes. However, until that capability is available, Deployment Rings should be utilized.
Granular Patch Management
Granular Patch Management provides precise control over Windows Update deployments for Windows 10/11 and Windows Server endpoints and is ideal for time-sensitive scenarios such as zero-day vulnerabilities, critical security advisories, or urgent compliance requirements when waiting for standard update cycles is not feasible.
Why would Granular Patch Management be utilized?
As shown below, Granular Patch Management increases administrative and security control while decreasing response time for vulnerabilities and specific updates.
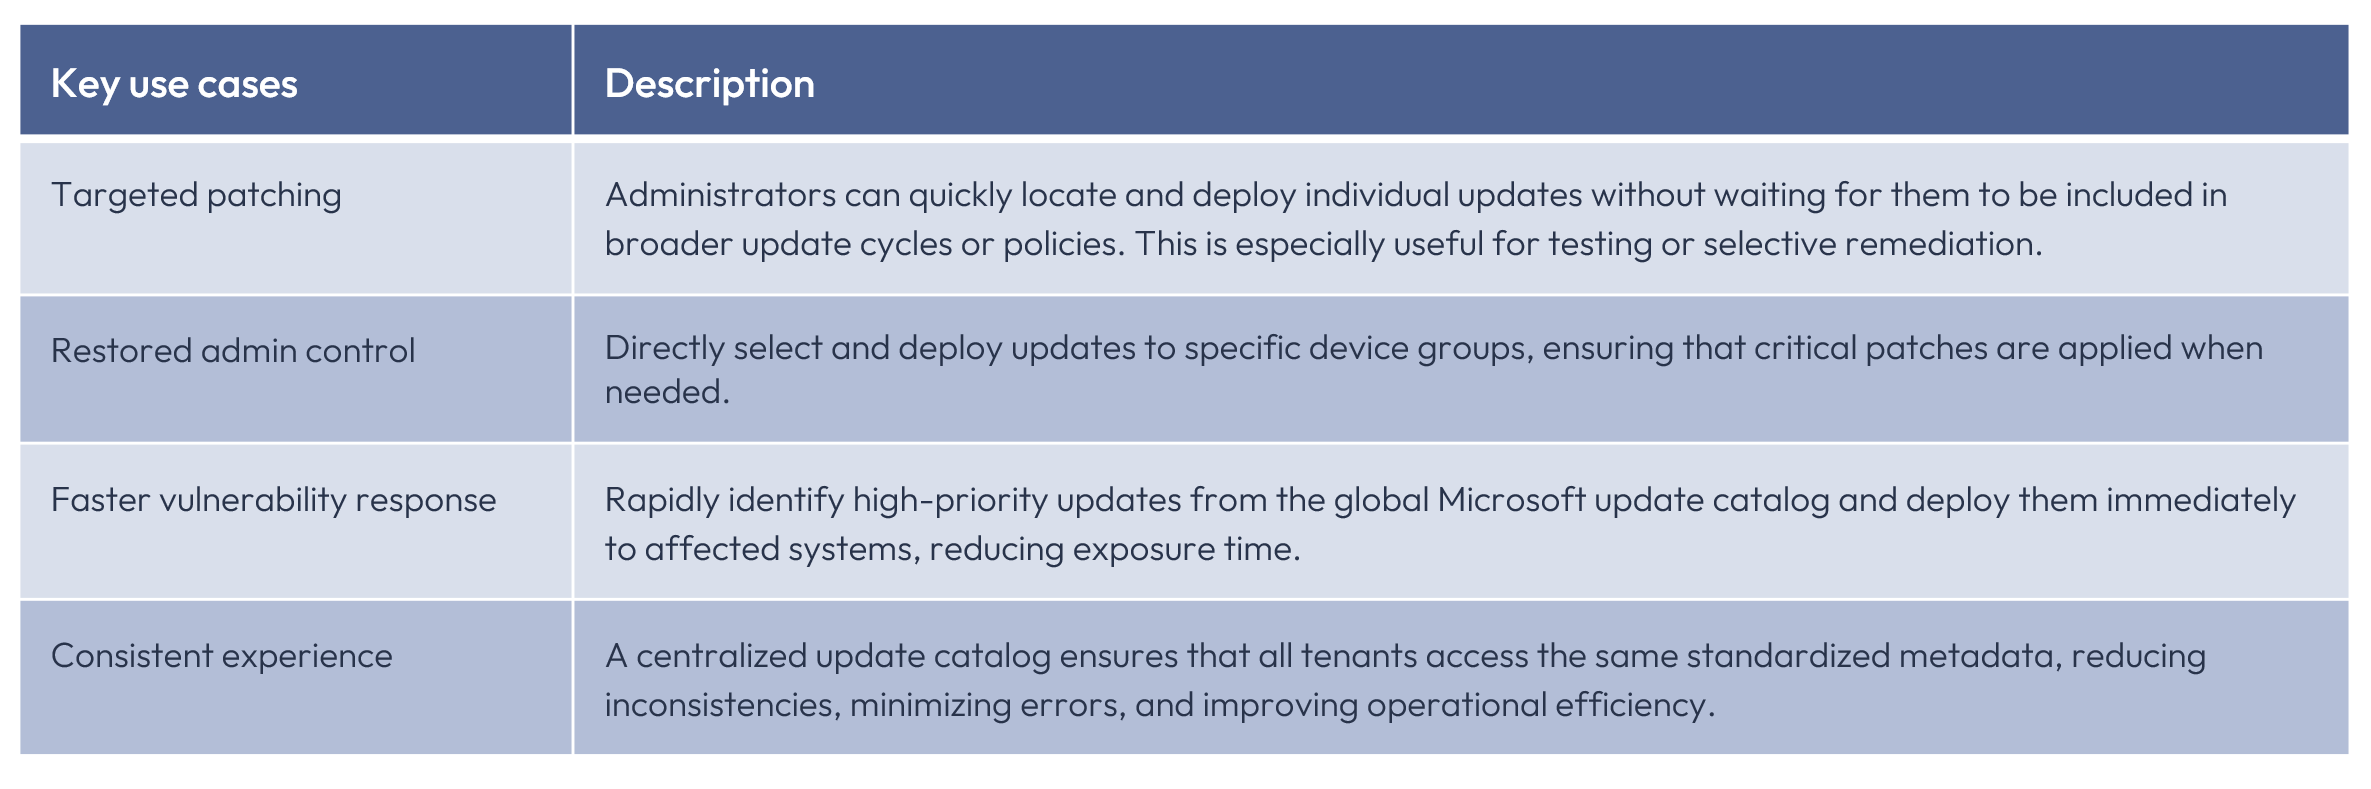
Figure 33: Use cases for Granular Patch Management
Using Granular Patch Management
With Granular Patch Management, administrators can:

Figure 34: Granular Patch Management enables administrators to address emergency updates
- Search and select the Microsoft Windows Updates for Windows Server and Windows Desktop platforms directly from the Workspace ONE UEM console or add update manually
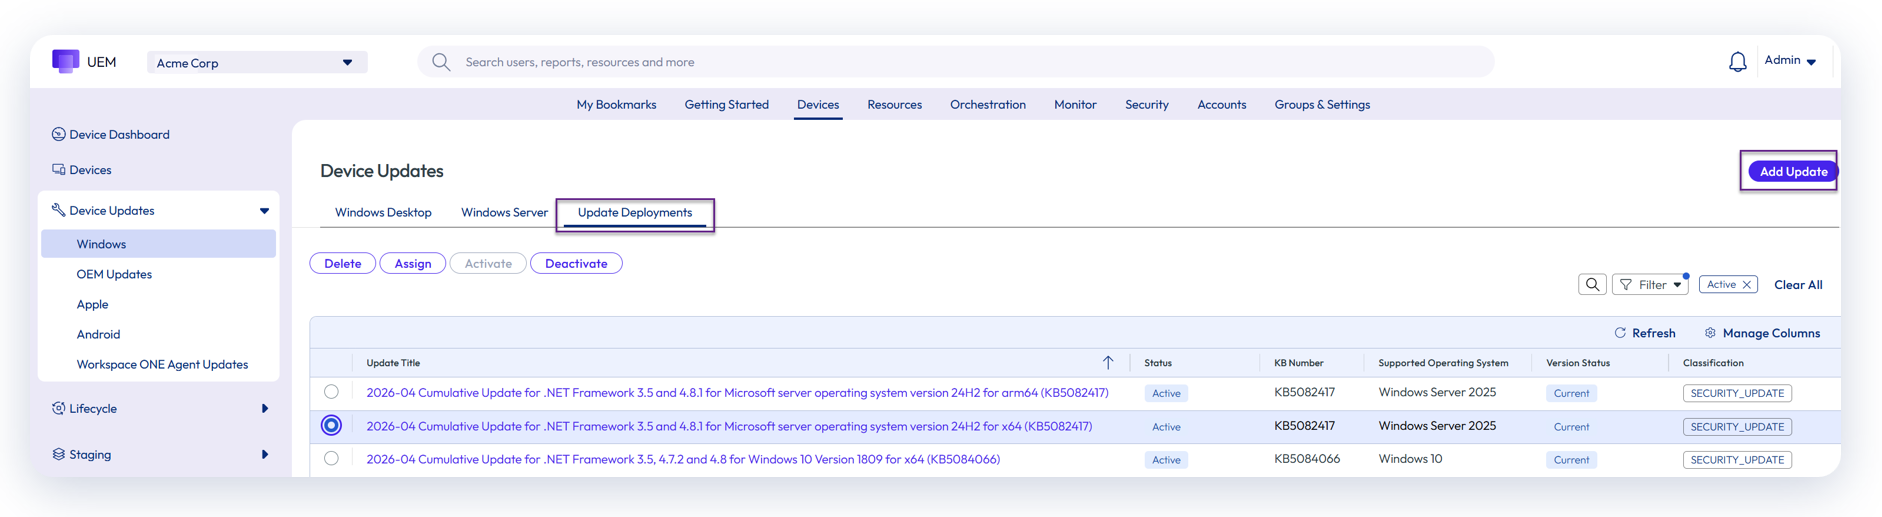
Figure 35: Go to Devices > Device Updates > Windows > Update Deployments to view available updates or to add an update for deployment
- View classification of Windows Update, including security update, upgrade, update, and critical update
- Deploy updates to Device groups, Organizational groups (OGs), or individual devices
- Dynamically control update deployments even after they have been created; deployments can be activated to immediately begin distributing updates or deactivated to pause or stop further rollout if issues are identified
For more information about configuring Update Deployments, see Granular Patch Management documentation.
Vulnerability Defense
Vulnerability Defense is add-on functionality that provides clear insight into the status of application and operating system vulnerabilities, as well as built-in remediation. In conjunction with CrowdStrike Falcon® Exposure Management, Vulnerability Defense integrates the best of both worlds from a security perspective:
- Workspace ONE manages and catalogs all enrolled Windows devices, including applications and operating system versions and applied patches, enforces security policies, and provides built-in remediation
- CrowdStrike Falcon Exposure Management provides best-in-class vulnerability detection and recommendations, including proprietary ExPRT.AI rating
Within the Workspace ONE UEM console, administrators can see the status of vulnerabilities, with a focus on four key metrics:
- ExPRT.AI rating as provided by CrowdStrike Falcon
- Known Exploited Status
- CVSS Score (Common Vulnerability Scoring System)
- Impacted Devices
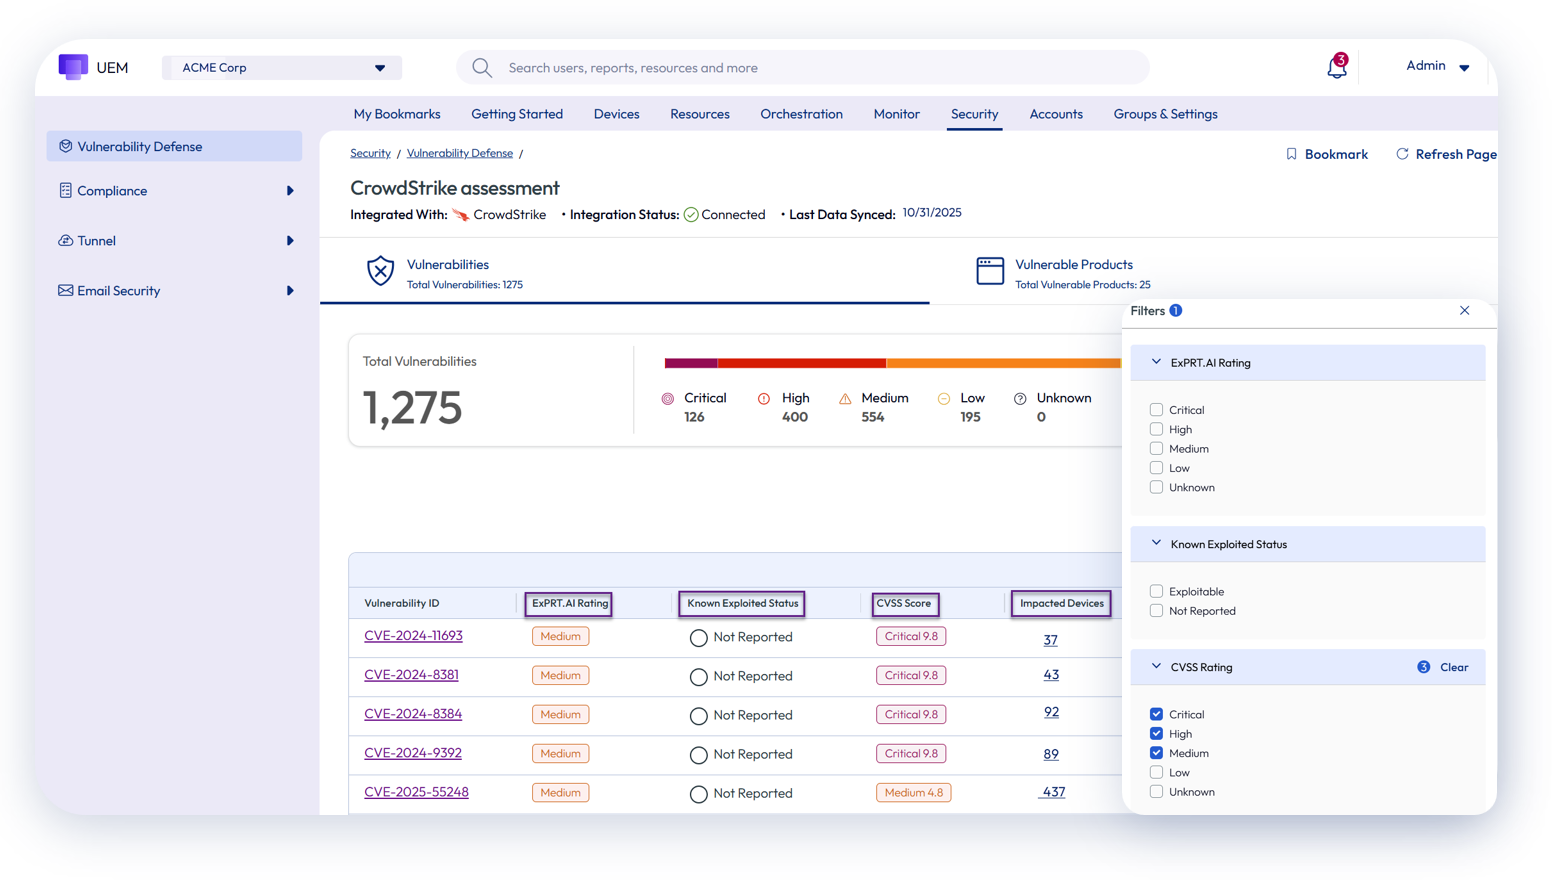
Figure 36: Go to Security > Vulnerability Defense to view vulnerability status and remediation options
In the example shown, the number of impacted devices causes concern. Once CVE-2025-55248 is selected, additional information and remediation options are presented.
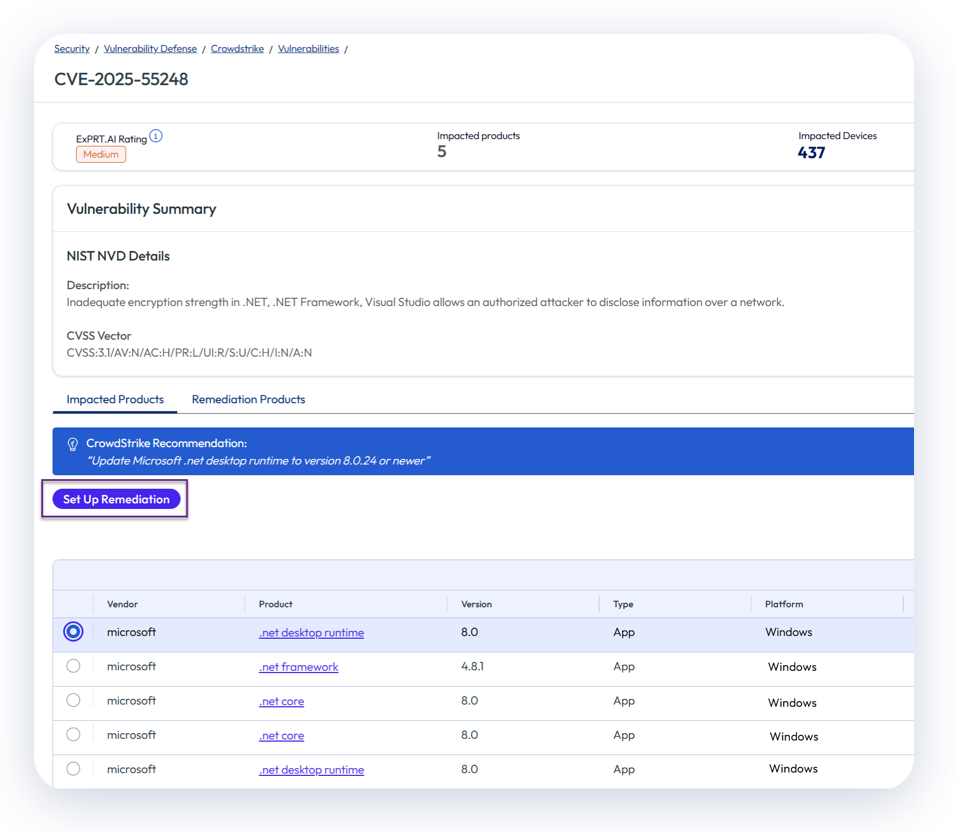
Figure 37: After selecting a vulnerability, it can be remediated with just a few additional keystrokes
For more information about Vulnerability Defense, please see Omnissa Docs.
Validation and Status
There are several ways to validate the status of Windows Updates. Within the Workspace ONE UEM console, go to Devices > Device Updates > Windows. The top tab enables a view of Windows Desktop, Windows Server, and Update Deployments. In addition, the Update Overview section shows numerous data points regarding Windows Updates, including details regarding each update.
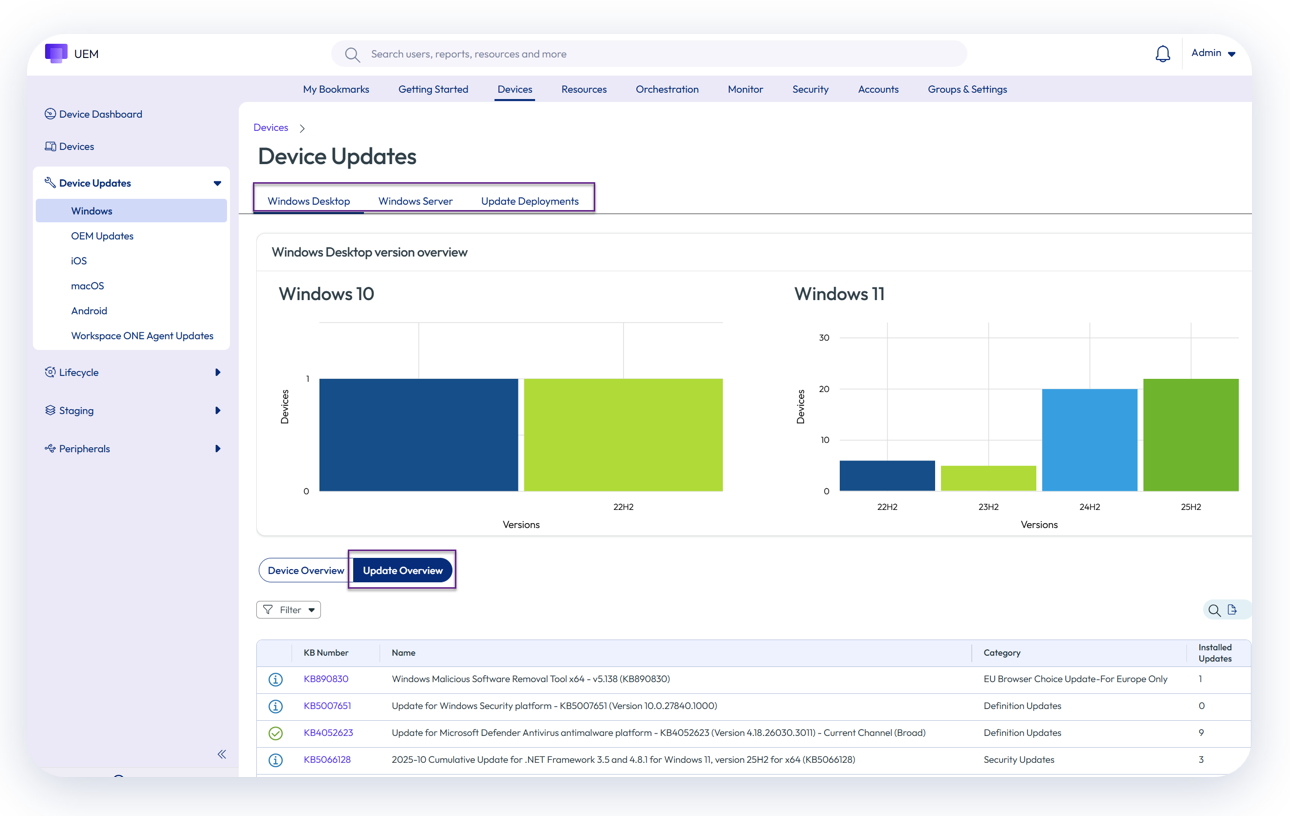
Figure 38: Device Updates screen showing status of Windows Updates.
An administrator can select a device and view the Updates tab for a holistic view of all updates that have been installed on the device. The Update sources include queries based on the Windows Update Agent (WUA), DISM, and WMI. Because these three sources are used, the accuracy and validity of the Windows Update status is ensured.
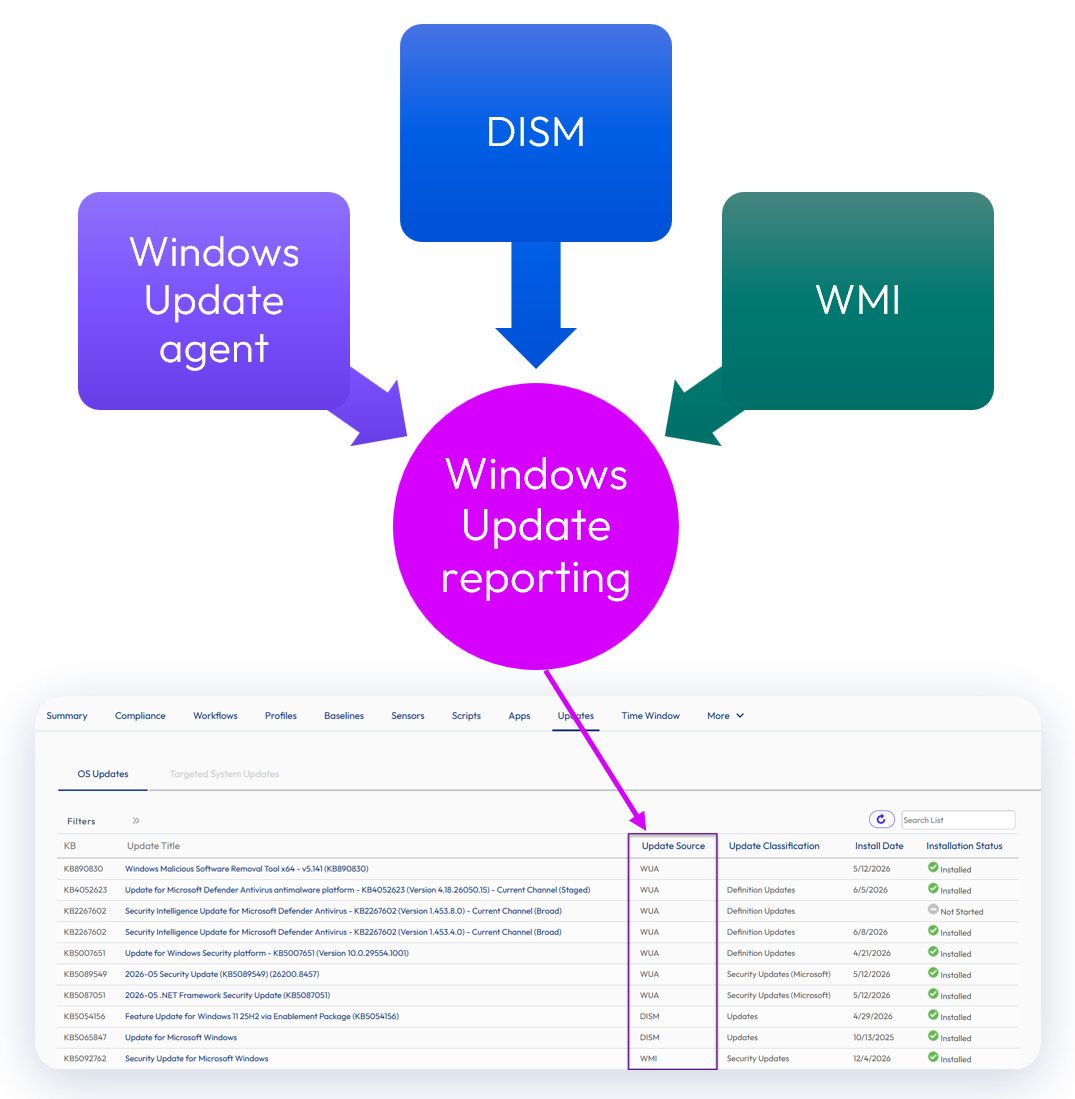
Figure 39: Device report showing Windows Updates by source.
Lastly, customizable dashboards can be created within Intelligence based on real-time Windows Updates metrics.
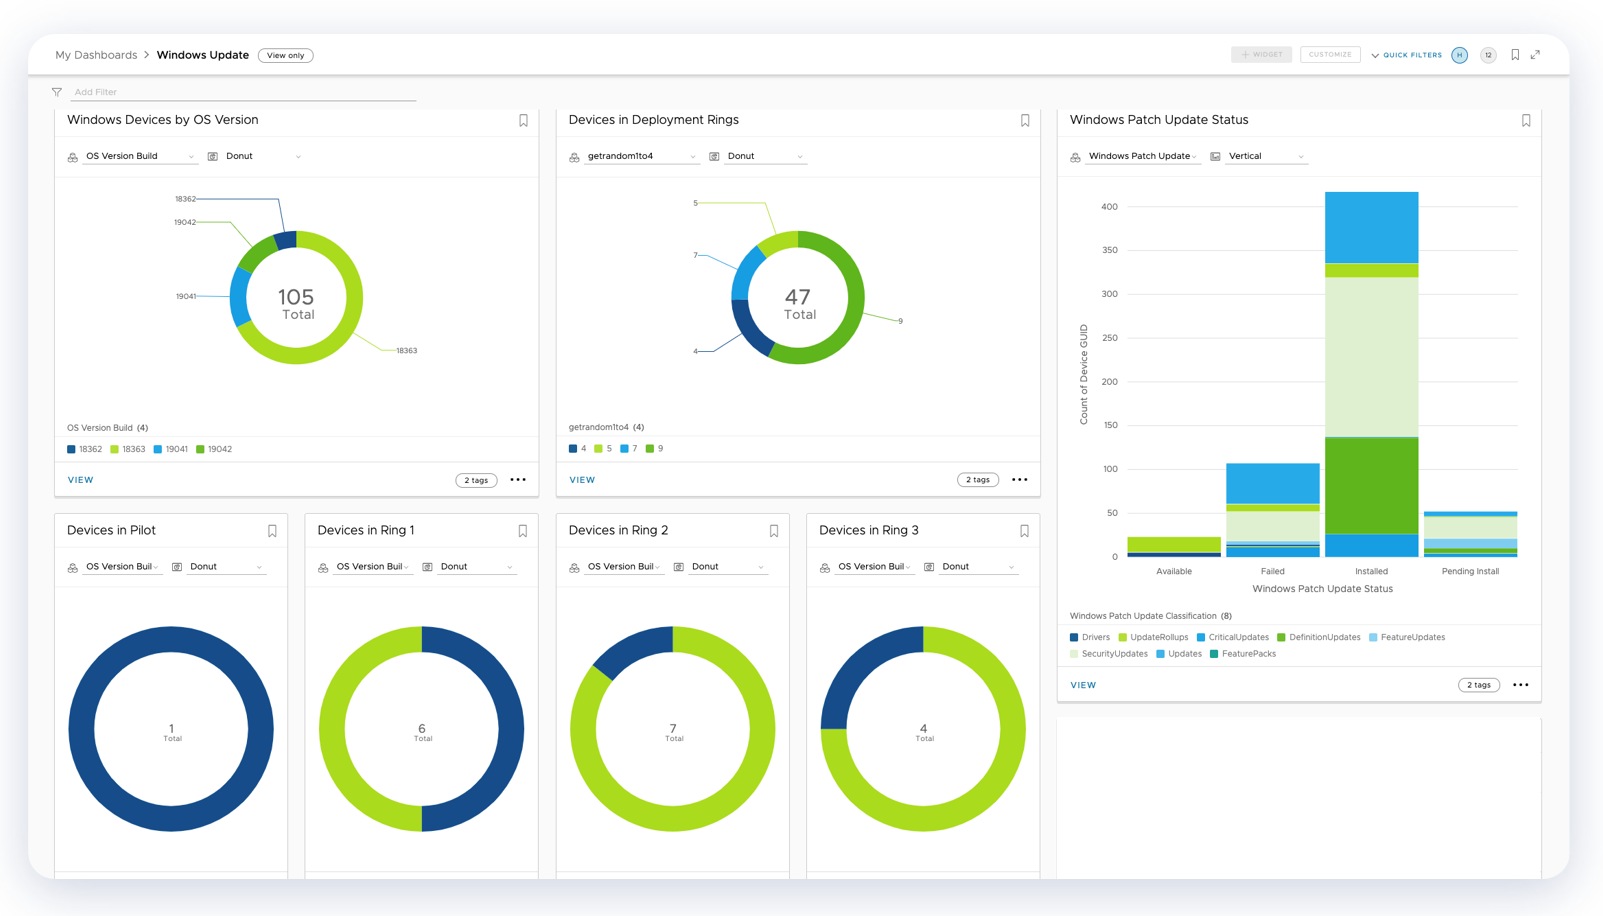
Figure 40: Intelligence Windows Updates data points.
Troubleshooting
If issues arise with the propagation of Windows Updates, several actions may be taken to troubleshoot.
Conflicting Settings
Firstly, ensure that conflicting settings are not present. Windows Update settings should not be configured in multiple places as this could cause intermittent and/or inconsistent results. Specifically, verify the following aspects of Windows Update configuration:
- Active Directory GPOs are not configured to enable Windows Updates
- If a CIS L1 Baseline is deployed, validate that the Windows Update settings are disabled
- The Smart Group(s) are correctly configured.
Troubleshooting tab
The Troubleshooting tab within the Devices view provides information regarding all events affecting a device, and line items regarding Profile failures may provide insight regarding issues. After selecting a device, select More > Troubleshooting.
Transitioning from Windows Update (Legacy) to New Windows Update Profile
Two options are presented within Windows Profiles for configuring Windows Updates:
- Windows Updates (Legacy)
- Windows Updates
Windows Updates (Legacy) should be transitioned to Windows Updates. If you encounter an issue transitioning from Windows Update (Legacy) Profile to the new Windows Update Profile, it is possible that some devices are not installing Windows Updates.
The first step is to ensure that the Windows Update (Legacy) profile has been properly unlinked/disabled and the new Windows Update policy has been configured and applied correctly. In particular, examine the Smart Group designation.
Secondarily, it is possible that some residual impact of the old policy remains on the Windows device, and this can be validated by checking registry keys on the Windows device.
Ascertain which resource is being accessed for Windows Updates by checking the following registry key:
- HKLM\Software\Microsoft\PolicyManager\current\device\Update\UpdateServiceUrl
If this key points to the previous Windows Update resource, the new Windows Update policy has not been applied properly, and/or antiquated settings have not been correctly updated.
It may be necessary to remove the Windows Update registry keys from the following location:
- HKLM\Software\Policies\Microsoft\Windows\WindowsUpdate
Of course, the registry should be backed up before making any changes.
If the Windows device still does not properly apply Windows Updates, it may be necessary to reset Windows Update components.
Local Device
In addition to the administrative views for validation presented above, data points on the user device may help pinpoint issues. On the local device, Settings > Windows Update provides two key tabs that may be used for further research:
- Update History showing the updates that have been installed on the device.
- Advanced Options provides details regarding configured update policies controlled by Workspace ONE, as well as delivery optimization data that may be useful for tracking down bandwidth utilization and the impact of peer-to-peer optimization.
Lastly, several additional actions can be undertaken on the endpoint to research issues:
- To see all Windows Updates settings, view the registry on the local device via Computer\HKLM\SOFTWARE\Microsoft\PolicyManager\current\device\Update.
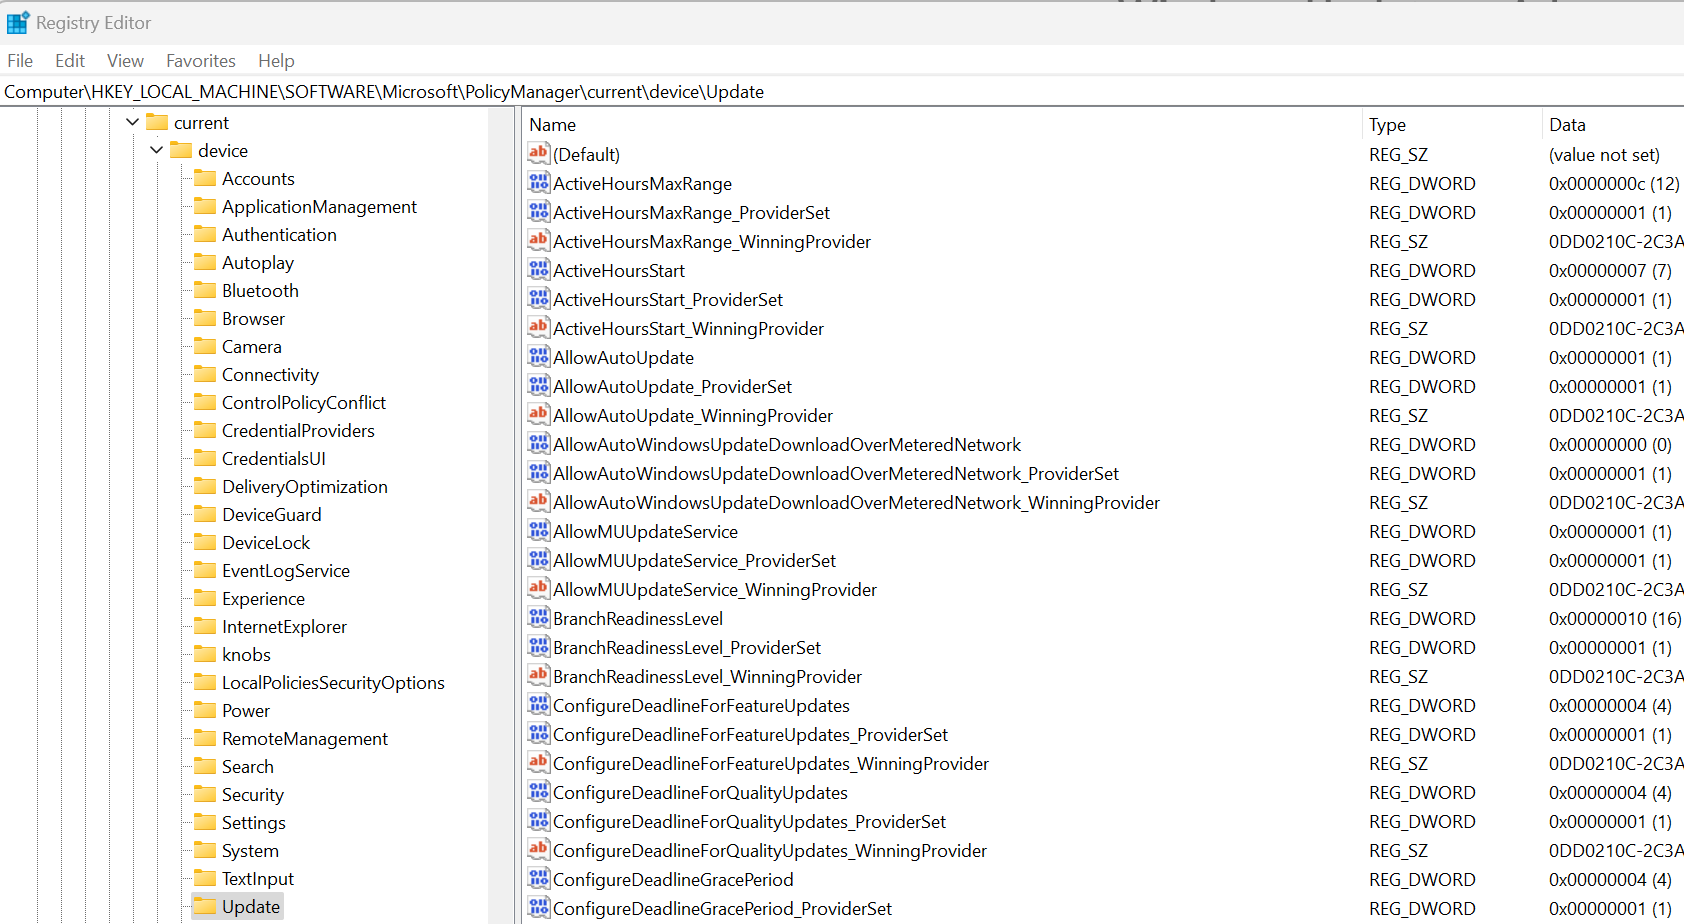
Figure 41: Registry details of Computer\HKLM\SOFTWARE\Microsoft\PolicyManager\current\device\Update.
- On the local device, execute get-hotfix to see the Windows Updates that have been installed.
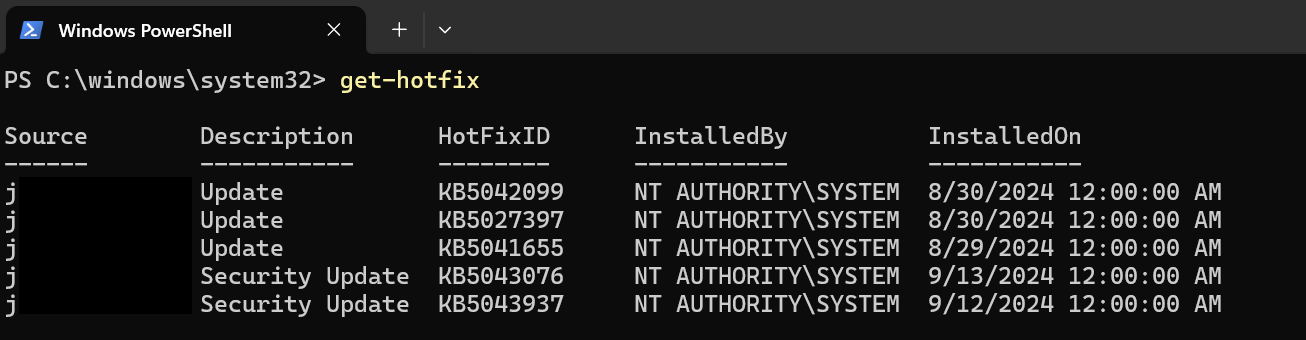
Figure 42: List of Windows Updates as shown via get-hotfix command.
- On the local device, execute get-windowsupdatelog to pull the related log files.
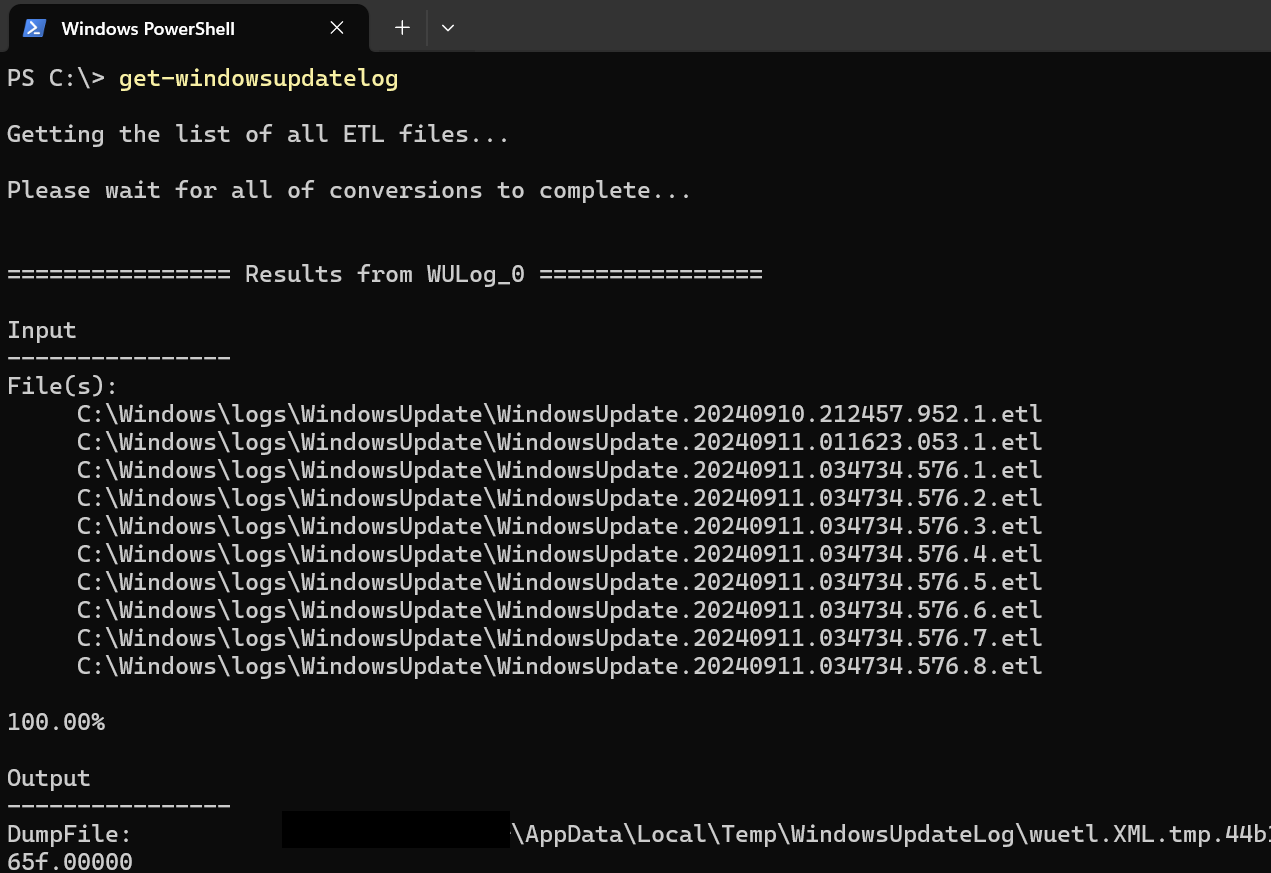
Figure 43: Windows Update logs as output from get-windowsupdate log command.
- Within the Event Viewer under Applications and Services Logs > Microsoft > Windows > WindowsUpdateClient > Operational, various types of event logs will be displayed.

Figure 44: Event Viewer output as accessed from Applications and Services Logs > Microsoft > Windows > WindowsUpdateClient > Operational.
Summary and Additional Resources
This document provided a comprehensive guide to managing Windows Updates with Workspace ONE UEM, covering key concepts such as Windows Updates sources, Deployment Rings, Smart Groups, sensors, and validation steps.
When configuring Windows Server and Windows Desktop policies, ensure that no policy duplicates apply to Windows devices.
Additional Resources
For more information about configuring Workspace ONE UEM Profiles based on Windows Updates, please see:
'%3E%3Cpath id='Rectangle_1' data-name='Rectangle 1' d='M0,0H800V300H0Z' transform='translate(2297 1132)' fill='%23E2F0D9'/%3E%3Cg id='Group_5' data-name='Group 5' transform='translate(-6 -3)'%3E%3Ctext transform='translate(2534 1280)' font-size='50' font-family='Roboto-Regular, Roboto'%3E%3Ctspan x='0' y='0'%3ECurated Assets%3C/tspan%3E%3C/text%3E%3Ctext transform='translate(2611 1333)' font-size='20' font-family='Roboto-Regular, Roboto'%3E%3Ctspan x='0' y='0'%3ETile View (with image and controls)%3C/tspan%3E%3C/text%3E%3C/g%3E%3C/g%3E%3C/svg%3E)
Integrating Windows Server devices into Workspace ONE
Changelog
The following updates were made to this guide:
| Date | Description of Changes |
| 2026/06 | Major content update to incorporate Window ADMX Profile and new functionality |
| 2024/03 | Complete rewrite of this guide. |
About the Author and Contributors
This guide was written by Jo Harder, Principal Product Specialist, Omnissa, and with valuable contributions from:
- Saurabh Jhunjhunwala, Lighthouse Architect, Omnissa
- Grischa Ernst, Senior Product Manager, Omnissa
- Criselda Abarquez, Staff Solution Engineer, Omnissa
- Nalina Kantharaj, Product Specialist, Omnissa
Feedback
Your feedback is valuable.
To comment on this paper, contact Omnissa End User Computing at tech_content_feedback@omnissa.com.