Service integration
This chapter is one of a series that make up the Omnissa Workspace ONE and Horizon Reference Architecture, a framework that provides guidance on the architecture, design considerations, and deployment of Omnissa Workspace ONE and Omnissa Horizon solutions. This chapter provides information about building integrated services for users.
Introduction
At this stage, the Omnissa Workspace ONE and Omnissa Horizon components have been designed and deployed, and the environment has all the functionality and qualities that are required. We can now proceed to creating the parts from each component and assembling and integrating them into the various services that are to be delivered to end users. Some components are common to multiple services.
Workspace ONE Use Case Service Integration
The following table lists the parts required for each Omnissa Workspace ONE service. The rest of this section details the design and configuration of each service.
Table 1: Workspace ONE Service Requirements
|
| Enterprise Mobility Management Service | Enterprise Productivity Service | Enterprise Application |
| Workspace ONE UEM | X | X | X |
| Workspace ONE Access | X | X | X |
| AirWatch Cloud Connector | X | X | X |
| Workspace ONE Access Connector |
| X | X |
| Adaptive management | X |
|
|
| Device enrollment |
| X | X |
| Native mobile apps | X | X | X |
| SaaS apps | X | X | X |
| Unified app catalog | X | X | X |
| Mobile email management |
| X |
|
| Mobile content management |
| X |
|
| DLP restrictions |
| X | X |
| Secure browsing |
| X |
|
| Mobile SSO | X | X | X |
| Conditional access |
| X | X |
| Horizon 8 or Horizon Cloud Service |
|
| X |
| Unified Access Gateway |
|
| X |
The two broad categories of application types are handled as follows:
- SaaS applications – Are added from the Workspace ONE SaaS cloud catalog and are entitled to appropriate users.
- Native mobile apps – Are added from the Workspace ONE UEM Console. Privileged apps have the Require Management option selected; other apps do not.
Enterprise Mobility Management Service
The Enterprise Mobility Management service brings an organization that has minimal device management capabilities—such as Exchange ActiveSync policies applied for passcode, wipe, and other basic settings—under an EMM strategy.
The devices are initially configured to support adaptive management. Some less critical applications are enabled for SSO, while other applications are configured to require enrollment. Employees are encouraged, but not required, to enroll their devices. Users can use their native email clients, email apps available from the public app stores, or Workspace ONE Boxer.
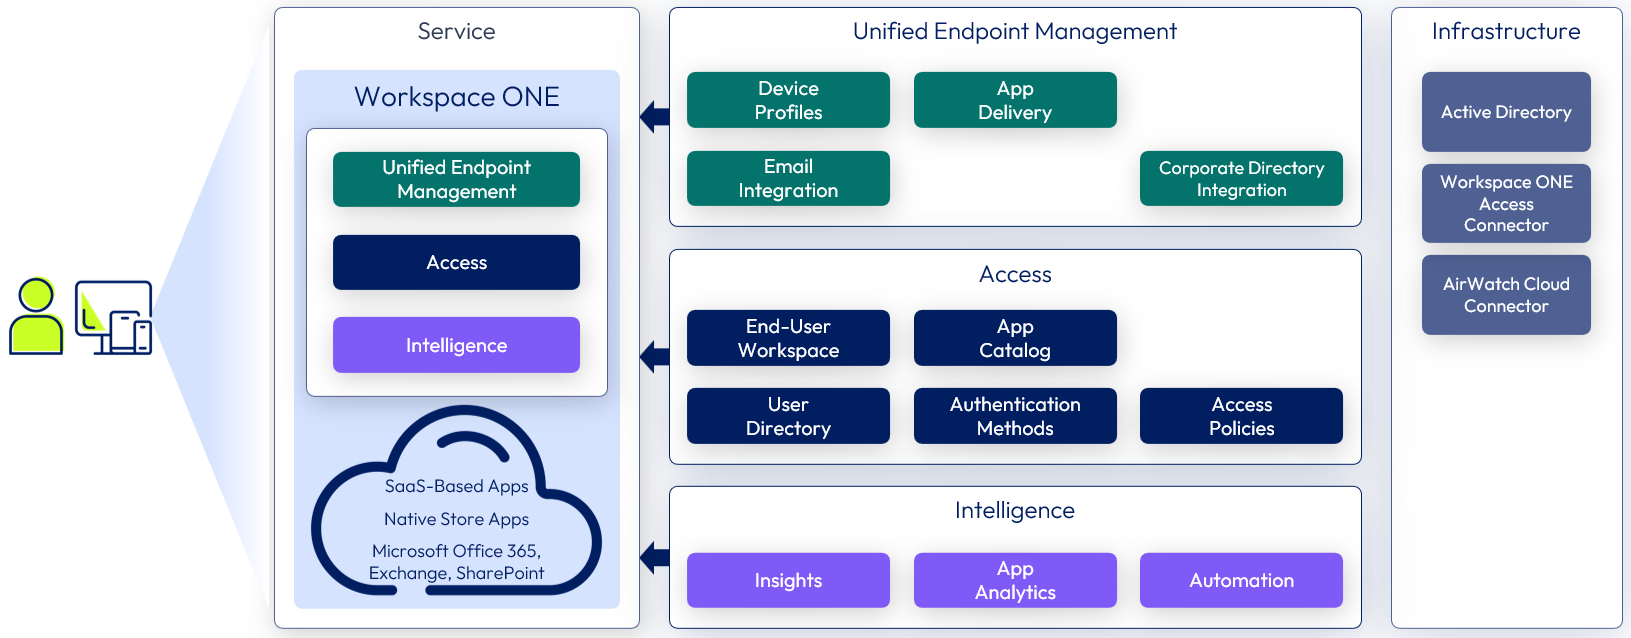
Figure 1: Enterprise Mobility Management Service
Devices in this service have the following characteristics.
Table 2: Configuration Considerations for the Enterprise Mobility Management Service
| Service Feature | Configuration Considerations |
| Adaptive management | Adaptive management enables applications such as WebEx and Concur to be used with mobile SSO across all platforms without device enrollment. Other applications, such as HR sites, ADP, or Salesforce, require device enrollment to have a high degree of control over the device. Users are encouraged to download the Workspace ONE app from a public app store. Applications that are deemed to have a higher risk to user or company data are set to require management in the Workspace ONE UEM device profile. |
| Active Directory – cloud password authentication | Workspace ONE Access is configured with a policy to use the cloud password from the built-in identity provider and authenticate through the Workspace ONE Access Connector to the Active Directory account. |
| Email access | Users are provided appropriate documentation on how to configure their device for native or third-party email client access. If users choose to install Workspace ONE Boxer, their email configuration is automatically pushed to the device. Typically, users are provided with the Exchange ActiveSync Server address (outlook.office365.com) and their email address and password. |
| Enrollment | Enrollment is completed through the Workspace ONE application. If a user attempts to access an application that has been deployed as one that requires management in Workspace ONE UEM, the enrollment process is initiated. After enrollment in Workspace ONE, end users have all applications available to them. They can also use mobile SSO after they have enrolled because they have a device profile. This profile deploys the appropriate payloads to authenticate using the appropriate SSO technology. Additional compliance information is passed to Workspace ONE Access. If the device is no longer in compliance, the user loses access to the applications provided by Workspace ONE Access. |
Enterprise Productivity Service
The Enterprise Productivity service builds on the previous service in that it begins with devices that have been enrolled with the Workspace ONE Intelligent Hub and that are fully managed at deployment. When new devices are brought into the organization, they are essentially quarantined until enrolled.
Devices in this service have the following characteristics.
Table 3: Configuration Considerations for the Enterprise Productivity Service
| Service Feature | Configuration Considerations |
| Device enrollment | All devices in the Enterprise Productivity service are required to enroll using the Workspace ONE Intelligent Hub. These devices are likely to have valuable enterprise data on them and so require a higher level of control and security. |
| Email restrictions | Native and third-party email apps are blocked, and all users use Workspace ONE Boxer for increased security. |
| Content access | Workspace ONE Content is pushed to the device and configured for secure access to corporate repositories. |
| Secure browsing | Workspace ONE Web is pushed to the device to ensure that links to intranet sites are always opened in a secure browser. |
| Email access | Email and content are delivered from Microsoft Office 365, so federation with the Microsoft Office 365 service is enabled to allow SSO to the Office service and native mobile Microsoft Office 365 apps. |
| Data loss prevention | DLP components are enabled within Workspace ONE Content and Workspace ONE Boxer to prevent the use of unapproved applications, ensuring that data cannot be inadvertently or purposely copied and pasted into other apps. |
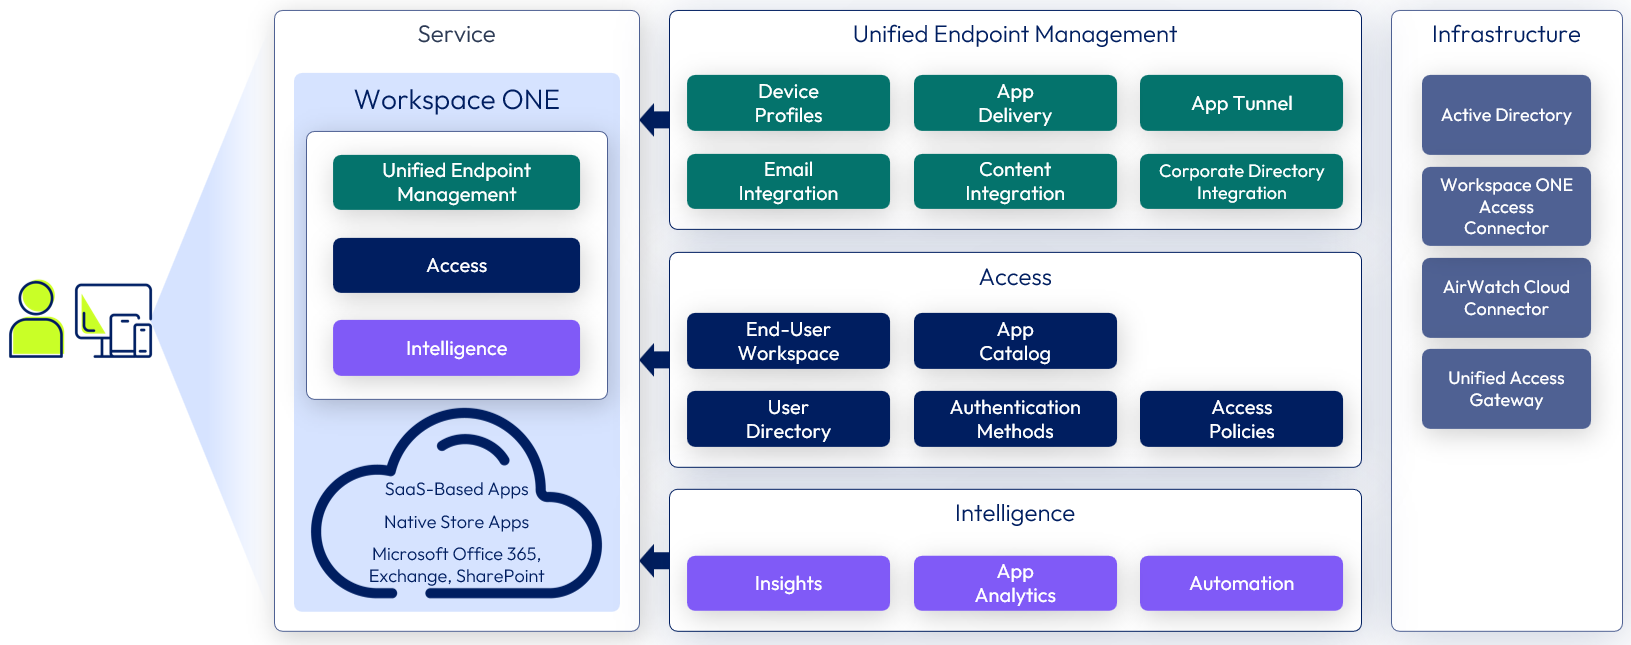
Figure 2: Enterprise Productivity Service
Table 4: Configuration Considerations for Microsoft Office 365 Federation
| Configuration Item | Tasks and Considerations |
| Federation to Microsoft Office 365 | Workspace ONE Access uses the Microsoft Federated Identity approach to authenticate login requests to the Microsoft Office 365 service. For information about this configuration, see the following resource: |
| Enable federation in the Microsoft Office 365 or Microsoft Azure AD portals | Sync Active Directory user accounts through the Microsoft Azure AD or Microsoft Office 365 portal. Use PowerShell scripting to configure the Microsoft Office 365 service to authenticate through Workspace ONE as a federated identity provider. A set of PowerShell scripts with appropriate parameters and signing certificates establish trust between Microsoft Office 365 and Workspace ONE Access. Note: An important criterion to make Microsoft Office 365 integration work is ensuring that the attribute ObjectGUID is synced from AD to the Workspace ONE Access service. |
| Configure Microsoft Office 365 apps in Workspace ONE Access | Using the templates in the Cloud Application Catalog, configure the Microsoft Office 365, WS-fed based template to allow authentication against Workspace ONE Access for Microsoft Office 365-based apps and resources, such as email, SharePoint Online, Skype for Business, and other Microsoft Services. |
Table 5: Configuration Considerations for Email
| Configuration Item | Tasks and Considerations |
| Email integration with Microsoft Office 365 through PowerShell | Workspace ONE UEM issues commands through PowerShell to Exchange in Microsoft Office 365. Devices communicate directly with Exchange ActiveSync in the Microsoft Office 365 service. For full configuration information, see PowerShell Integration with Workspace ONE UEM. |
| PowerShell Roles in Office 365 | PowerShell requires specific roles to be established in the Microsoft Office 365 administration portal for Exchange. These roles enable the execution of PowerShell cmdlets from Workspace ONE UEM to the Microsoft Office 365 service. |
| Blocking and quarantine rules | To prevent unauthorized devices from connecting to the Exchange server, you can block or quarantine devices until they have enrolled. PowerShell commands are used to set the appropriate policy. These rules are not needed for environments where enrollment is not required. |
| Email compliance policies | Compliance policies for email include a range of options for controlling managed and unmanaged devices:
|
| ActiveSync profiles for email clients | To enable email sync, you must configure the Exchange ActiveSync payload for the device profiles. The hostname for Microsoft Office 365 is typically outlook.office365.com. The domain, username, and email address are configured with lookup values. Make sure that these values are available in the directory and are properly mapped from AD through the AirWatch Cloud Connector (ACC). |
Table 6: Configuration Considerations for Content
| Configuration Item | Tasks and Considerations |
| Content integration with Microsoft Office 365 | Integration is established through the Workspace ONE UEM Console under the Content node. From here, you configure templates for the SharePoint libraries in Microsoft Office 365, to sync to the mobile devices. For more information see Corporate File Servers. |
| Office 365 SharePoint document libraries | Use https://portal.office.com to log in to Microsoft Office 365 and create SharePoint sites with document libraries containing content. |
| Content templates in Workspace ONE UEM for automatic deployment | To create these templates: In the Workspace ONE UEM Console, access the Content node, select Templates, and then select Automatic.
For more information, see the Enable End-User Access to Corporate File Server Content section in Corporate File Servers. |
| Workspace ONE Content | To ensure access to content, require that Workspace ONE Content be automatically deployed to groups who use SharePoint. |
Table 7: Configuration Considerations for Data Loss Prevention
| Configuration Item | Tasks and Considerations |
| DLP configuration on a global basis | You can set DLP configuration on a global basis, platform basis, or per application deployment. For DLP settings to take effect, the application must be built with the Workspace ONE Software Development Kit (SDK), or, for an internal application, DLP settings must be supported through app wrapping. Workspace ONE Boxer, Workspace ONE Content, and Workspace ONE Web are built using the Workspace ONE SDK and honor the settings chosen. |
| SDK profile defaults for iOS or Android | SDK profiles allow global configuration of DLP settings that are applied to applications on the platform for which the profile is defined. Policy settings include enabling or disabling:
|
| Custom policies for Workspace ONE Content and Workspace ONE Boxer | Workspace ONE Content can use the default policies defined in the SDK profile, or defaults can be overridden by enabling custom policies. Requiring MDM (mobile device management) enrollment ensures that content is accessed only by enrolled devices. |
| Email compliance policies | When configuring Workspace ONE Content policies, verify that the email compliance policies match corporate standards, including whether devices must be enrolled in device management to receive email. |
Table 8: Configuration Considerations for Access and Compliance Policies
| Policy | Tasks and Considerations |
| Workspace ONE UEM compliance | Create a compliance policy for the appropriate platforms through the Workspace ONE UEM Console. Criteria for evaluation can include jail-broken or rooted devices, devices that have not checked in to the Workspace ONE UEM environment in a certain period of time, or the installation of denylisted applications. The policy can include an escalation of notifications as actions, starting with an email notification to the user, followed by an email notification to an administrator, and ultimately blocked access to email if the device is not remediated in time. |
| Workspace ONE Access compliance | Workspace ONE Access compliance checking is enabled through policy configuration. Policies include device compliance with the Workspace ONE UEM authentication adapter and other authentication methods, such as a password. You can use the policies in conjunction with network ranges, OS platforms, or specific applications, allowing varying requirements to evaluate whether an application can launch based on the location of the user, which device they are using, and how they are authenticating. |
Enterprise Application Workspace Service
The Enterprise Application Workspace service has a similar configuration to the Enterprise Productivity service, but also includes access to Horizon applications running on Horizon or Horizon Cloud. Horizon resources can be synced with Workspace ONE through an outbound-only connection from the Workspace ONE Access Connector. This method allows entitlements to sync to the service.
Inbound access to the Horizon environment or the Horizon Cloud pod, virtual desktops, and applications is still required. Therefore, Unified Access Gateway is also part of this solution.
Components in the Enterprise Application Workspace service have the following unique characteristics.
Table 9: Enterprise Application Workspace Service Details
| Component | Purpose |
| Workspace ONE Access Connector | The connector component of Workspace ONE Access is installed and runs as a service on a Windows server. The connector integrates with your enterprise directory to sync users and groups to the Workspace ONE Access service and to provide authentication. |
| Horizon entitlements | Entitlements are enabled through the Workspace ONE Access catalog by connecting to Horizon pods or Horizon Cloud tenants that expose user-entitled apps and desktops. The Horizon-based services that facilitate these entitlements are described separately, in the following sections of this guide: Horizon 8 Use Case Service Integration and Horizon Cloud on Microsoft Azure - first-gen Use Case Service Integration. |
| Unified Access Gateway | This component enables external Horizon Client devices to securely access Horizon resources for virtual apps and desktops. |
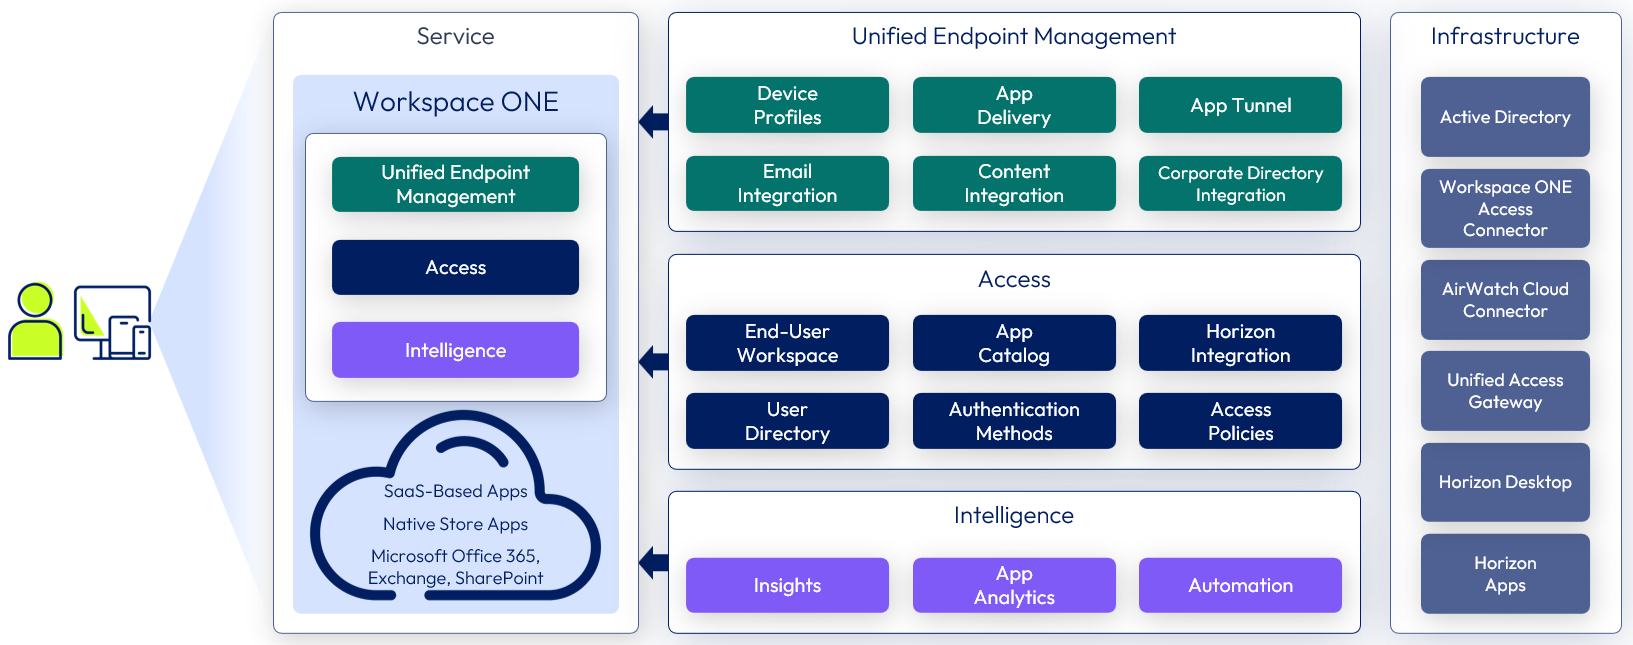
Figure 3: Enterprise Application Workspace Service
Table 10: Configuration Considerations for Workspace ONE Access
| Configuration Item | Tasks and Considerations |
| Workspace ONE Access Connector deployment | The connector can be deployed either on-premises or in any data center that has a line of sight to Active Directory domain controllers. Instructions for deploying the connector are given in Installing Workspace ONE Access Connector 23.09. |
| Directory sync | After the connector is deployed, directory synchronization is performed to sync Active Directory users and groups with the Workspace ONE Access service. For more information, see Directory Integration with Workspace ONE Access. |
| Access to Horizon desktops and applications in the Workspace ONE app catalog | To make Horizon resources available in the Workspace ONE app, you create one or more virtual apps collections in the Workspace ONE Access administration console. The collections contain the configuration information for the Horizon pods, as well as sync settings. See Providing Access to Horizon Desktops and Applications in Workspace ONE Access and Using SAML Authentication for Workspace ONE Access Integration. User entitlements for apps and desktops are made available through the Horizon configuration and automatically appear in the Workspace ONE app and in a web browser. |
| Access to Horizon from external devices | To access the resources made available through Horizon, you must establish a means of access from Internet-based devices. You can configure Unified Access Gateway and optionally True SSO to allow egress and provide connectivity to the Horizon pods. See Deployment with Horizon 8 in the Unified Access Gateway documentation. |
| Access to Horizon Cloud desktops and applications in the Workspace ONE app catalog | To make Horizon Cloud resources available in the Workspace ONE app, you create one or more virtual apps collections in the Workspace ONE Access administration console. The collections contain the configuration information for the Horizon Cloud tenants, as well as sync settings. See the following documentation:
User entitlements for apps and desktops are made available through the Horizon Cloud configuration and automatically appear in the Workspace ONE app and in a web browser. |
| Access to Horizon Cloud from external devices | To access the resources made available through Horizon Cloud, you must establish a means of access from Internet-based devices. You can configure Unified Access Gateway along with True SSO to allow egress and provide connectivity to the Horizon Cloud pods. Unified Access Gateway appliances can be automatically deployed in external or internal configurations. See Add a Gateway Configuration to a Deployed Horizon Cloud Pod. |
Table 11: Configuration Considerations for Horizon Client
| Configuration Item | Consideration |
| Horizon Client native app | When Horizon resources are used in Workspace ONE, the resources appear on the Launcher page of the app, but the resources launch using the Horizon Client native mobile app. |
Horizon 8 Use Case Service Integration
The following table details the parts required for each Omnissa Horizon 8 based service. The rest of this section details the design and build of each of these services.
Table 12: Components Required by Horizon Services
|
| Published App | GPU- | Desktop Service | Desktop with User-Installed App Service | GPU- | Linux Desktop Service |
| Windows 11 or 10 instant clone |
|
| X | X | X |
|
| RDSH instant clone | X | X |
|
|
|
|
| Linux instant clone |
|
|
|
|
| X |
| App Volumes package | X | X | X | X | X |
|
| App Volumes writable volume |
|
|
| X | X |
|
| Dynamic Environment Manager | X | X | X | X | X |
|
| Smart Policies | X | X | X | X | X | X |
| Application blocking |
| X | X | X | X |
|
| Folder redirection | X | X | X | X | X |
|
| GPO | X | X | X | X | X |
|
| Virtual printing | X | X | X | X | X |
|
| ThinApp Packages | X | X | X | X | X |
|
| SaaS apps |
|
| X | X | X |
|
| Unified Access Gateway | X | X | X | X | X | X |
| True SSO | X | X | X | X | X |
|
| vGPU |
| X |
|
| X |
|
Multiple Horizon 8 services can use the same underlying desktop pool type (core service). When there is no variation in the hardware specifications of the desktop, you can reuse the same pool to address multiple use cases. App Volumes and Dynamic Environment Manager can provide the customization to the use case.
Horizon 8 Published Application Service
This service is created for static task workers, who require a small number of Windows applications.
Core Service
The core service consists of RDSH-published applications that can optionally be made available to end users through the Workspace ONE app catalog. A Horizon 8 server farm is created running Windows Servers with Remote Desktop Server Host (RDSH) enabled.
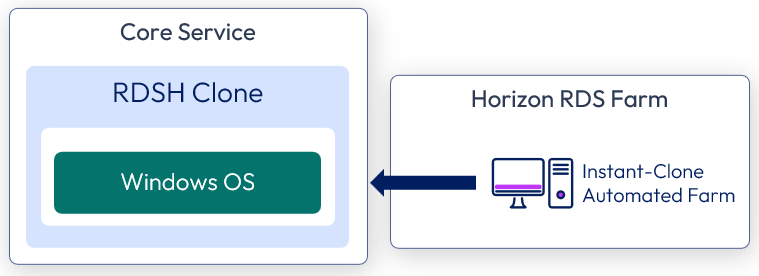
Figure 4: Horizon 8 Published Application Service – Core
Table 13: Configuration Considerations for RDSH-Published Applications
| RDSH Instant Clone | Configuration Considerations |
| Windows Server golden image VM | Build a Windows Server VM using the guidelines in Manually Creating Optimized Windows Images for Horizon VMs. |
| Automated RDSH farm | Create a Horizon 8 RDSH automated farm using the prepared golden image VM. See Creating and Managing Farms. For details on the specific settings to use, see the Horizon Installation and Configuration section in Horizon 8 Configuration. |
Applications
The applications available from the RDSH server farm can be either of the following:
- Applications that are installed in the golden image VM.
- Applications that are part of App Volumes packages, which are attached to the RDSH server at system startup.
We assign the package containing the core software programs, and each RDSH instant-clone server has the same software program set for publishing.
Placing the software programs in packages allows for the separation of the application from the Windows operating system. This strategy can offer operational efficiencies, such as updating applications without having to update the golden image VM and the RDSH server farm. It also allows the golden image VM to be reused for different farms that might use different applications.
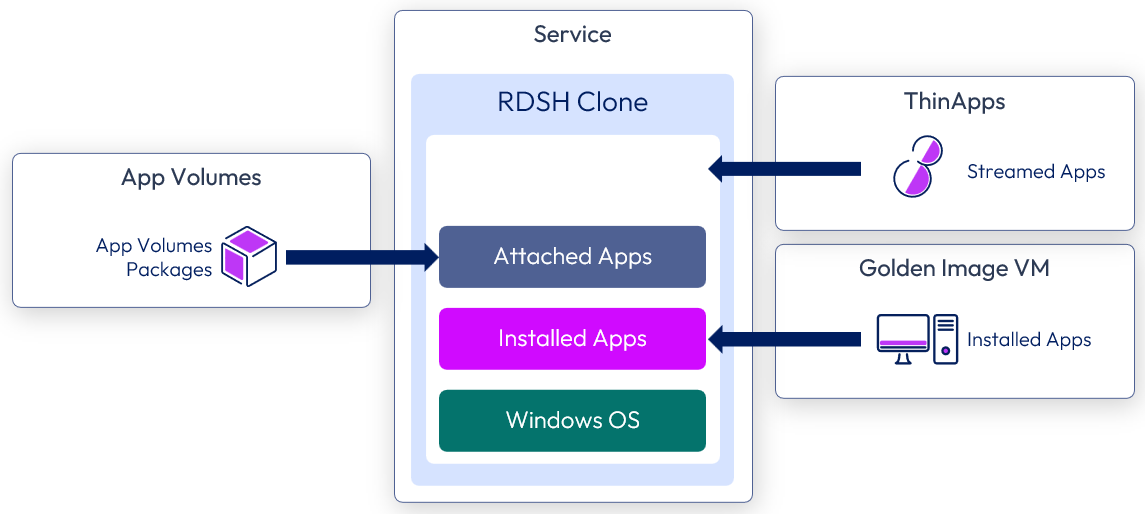
Figure 5: Horizon 8 Published Application Service – Applications
Table 14: Configuration Considerations for packages in the Horizon 8 Published Application Service
| App Volumes | Configuration Considerations |
| Overview | Create packages as required to address the use cases. With RDSH instant clones, App Volumes saves us from needing to install the same apps on each node. We assign the package containing the core software programs so that each RDSH instant-clone server has the same software program set for publishing. |
| Packaging machine | Because the packages are created for an RDSH server, each package should be captured on the same operating system to ensure that applications are compatible with the OS that they are being attached to. |
| Core applications | Create a package to contain all core software programs to be delivered as RDSH-published apps. Follow the instructions in Working with Applications for details. These package-delivered apps are published through RDSH. Assign and entitle the packages to an Active Directory OU containing the RDSH server machine accounts—these are machine-based assignments. Note: OU-based assignments are not required but ensure that packages are available as soon as new hosts in an RDSH farm are provisioned. |
| Application pool | Use the Horizon 8 Administrator console to add an application pool and publish the desired applications. See Creating Application Pools. Entitle the relevant user groups to the matching published applications. |
Profile and User Data
With Dynamic Environment Manager, a combination of Windows and application environment settings, user preference settings, and folder redirection work together to create and maintain the user profile.
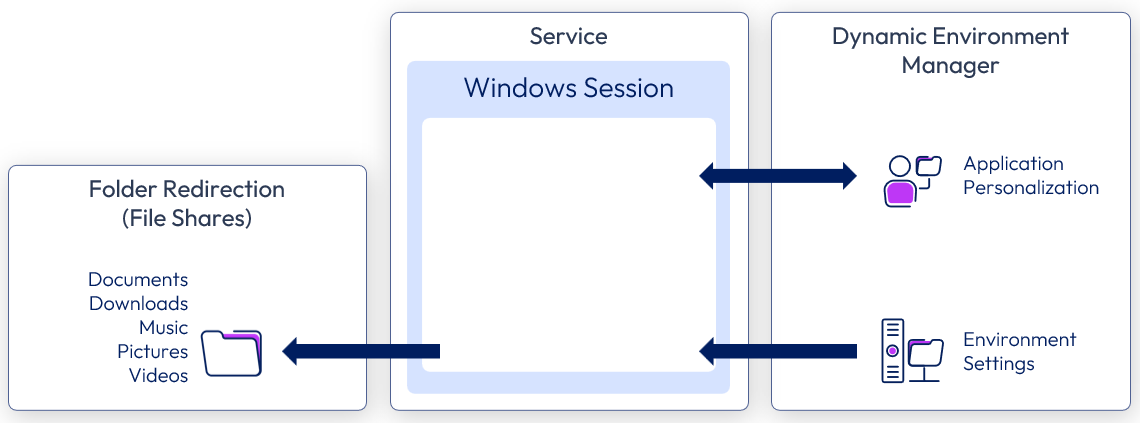
Figure 6: Horizon 8 Published Application Service – Profile and User Data
For detailed instructions for all of the tasks mentioned in the following table, see the Dynamic Environment Manager Administration Guide.
Table 15: Configuration Considerations for User Profiles in the Horizon 8 Published Application Service
| Profiles | Configuration Considerations |
| Environment settings | Map the H: drive to the users’ home drive with Dynamic Environment Manager. Map location-based printers with Dynamic Environment Manager, according to the IP address range. |
| Personalization – applications | Verify that Dynamic Environment Manager Flex configuration files are created and configured properly for each application that allows users to save preference settings. Verify that each application that persists user settings across sessions has a Dynamic Environment Manager Flex configuration file. If a Dynamic Environment Manager Flex configuration file does not exist, use the Application Profiler to create one and place it in the configuration share. See Introduction to Dynamic Environment Manager Application Profiler to get started. |
| Folder redirection | Folder redirection is configured from Dynamic Environment Manager, which redirects user profile folders to a file share so that user data persists across sessions. See the Horizon Group Policies section in Horizon Configuration. |
| Smart Policies | Leverage Horizon Smart Policies to apply the Internal Horizon Smart Policy profile, which allows USB, copy and paste, client-drive redirection, and printing. See the Horizon Smart Policies section in Dynamic Environment Manager Configuration. |
Horizon 8 GPU-Accelerated Application Service
Core Service
The core service consists of RDSH-published applications and is constructed similarly to the core service of the Horizon 8 Published Application Service. When creating the golden image VM, you must prepare the VM for NVIDIA GRID vGPU capabilities.
The high-level steps are given in Configure 3D Rendering Options for Instant-Clone Desktop Pools.
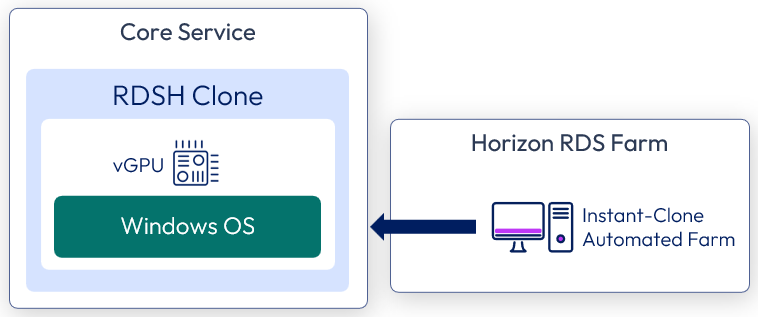
Figure 7: Horizon 8 GPU-Accelerated Application Service – Core
To understand the GPU profile choices, see the Virtual GPU Software Quick Start Guide.
You should also configure DRS and affinity rules to ensure that these RDSH VMs always remain on hosts that have NVIDIA cards if the whole vSphere cluster is not vGPU enabled.
Table 16: Configuration Considerations for GPU-Accelerated Applications
| RDSH Instant Clone | Configuration Considerations |
| Windows Server golden image VM | Build a Windows Server VM using the guidelines in Manually Creating Optimized Windows Images for Horizon VMs. Prepare the golden image VM to use NVIDIA GRID vGPU. See Configure 3D Rendering Options for Instant-Clone Desktop Pools and the Virtual GPU Software Quick Start Guide. |
| Automated RDSH farm | Create a Horizon 8 RDSH automated farm using the prepared golden image VM. See Creating an Automated Instant-Clone Farm. At farm creation, chose NVIDIA GRID vGPU as the 3D Renderer option. The clones will use the same graphics profile that was selected during golden image VM creation. For details on the specific settings to use, see the RDS Farm Settings section in Horizon Configuration. |
Applications
This service uses the same application types as the Horizon 8 Published Application Service. The actual applications available from the RDSH farm can either be applications installed in the golden image VM image or as part of App Volumes packages. After the applications are installed or attached, create the application pools and entitle users or groups.

Figure 8: Horizon 8 GPU-Accelerated Published Application Service – Applications
Table 17: Configuration Considerations for Application Pools
| Applications | Configuration Considerations |
| Application pool | Use the Horizon Administrator console to add an application pool and publish the desired applications. See Creating Application Pools. Entitle the relevant user groups to the matching published applications. |
Profile and User Data
This service uses the same structure and design for profile and user data as was outlined previously in Horizon 8 Published Application Service.
Horizon 8 Published Apps on Demand Service
This service uses the same constructs as the Horizon 8 Published Application service and the Horizon 8 GPU-Accelerated Application service. The difference, in this service, is how applications are assigned and consumed.
Application packages are only attached to an RDSH server when a user requests that application. This drives several benefits and efficiencies as the RDSH farm can host many differing sets of applications without requiring dedicated farms for each set or type. See Horizon Published Apps on Demand for more information.
Core Service
The core service consists of RDSH-published applications and is constructed similarly to the core service of the Horizon 8 Published Application Service. A Horizon 8 server farm is created running Windows Servers with Remote Desktop Server Host (RDSH) enabled.
Applications
The applications available from the RDSH server farm are part of App Volumes packages, which are attached to the RDSH server in real-time, as a user requests an application.
Placing the software programs in App Volumes packages allows for the separation of the application from the Windows operating system. This strategy can offer operational efficiencies, such as updating applications without having to update the golden image VM and the RDSH server farm.
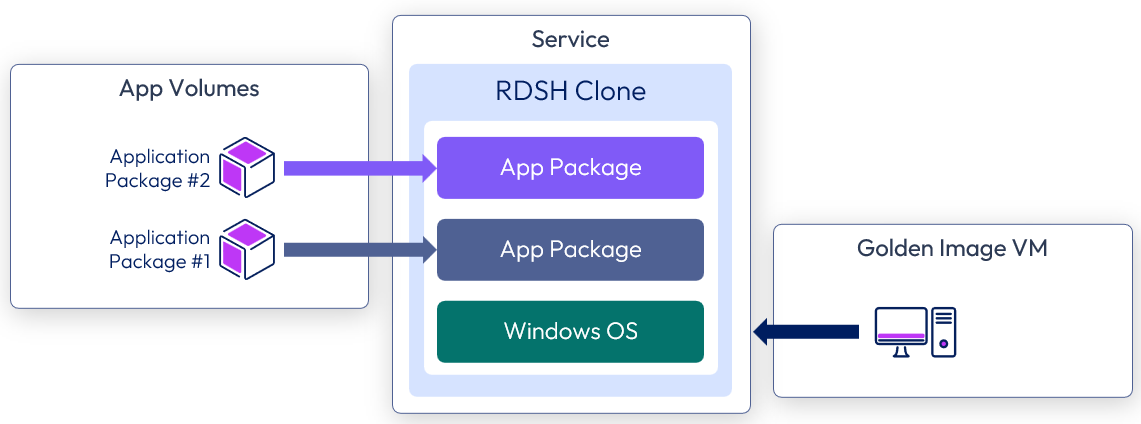
Figure 9: Horizon 8 Published Apps on Demand Service – Applications
Table 18: Configuration Considerations for packages in the Horizon 8 Published Apps on Demand Service
| App Volumes | Configuration Considerations |
| Overview | With Horizon 8 Published Apps on Demand, App Volumes saves us from needing to install the apps into the RDSH farm and allows the farm to deliver many differing use cases and sets of applications. We register the App Volumes Manager instance with the Horizon pod and associate it with target RDSH farms. Application packages are attached to a target RDSH server in real-time, as a user requests the application. |
| Packaging machine | Create application packages as required to address the use cases. Because the packages are created for an RDSH server, each package must be captured on the same operating system to ensure that applications are compatible with the OS that they are being attached to. |
| Integrate App Volumes with Horizon |
Profile and User Data
This service uses the same structure and design for profile and user data as was outlined previously in the Horizon 8 Published Application Service.
Horizon 8 Desktop Service
This service is created for mobile knowledge workers and contractors, who require a large number of core and departmental applications, require access from many external locations, and might need access to USB devices.
Core Service
The core service consists of a Windows 11 or Windows 10 virtual desktop made available to end users through the Workspace ONE app catalog.
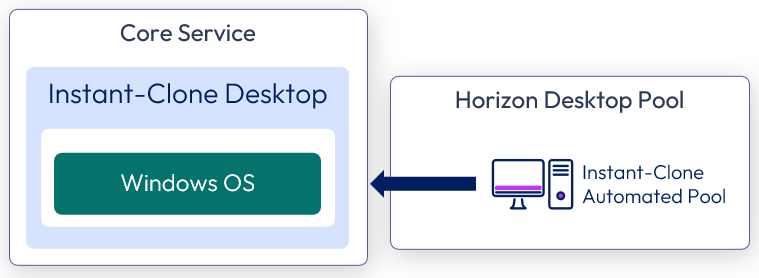
Figure 10: Horizon 8 Desktop Service – Core
When creating an automated, instant-clone desktop pool, you can choose between floating and dedicated user assignments.
- Floating instant-clone desktop pools.
- Users are assigned random desktops from the pool. When a user logs out, the desktop VM is deleted.
- New clones are created according to the provisioning policy, which can be on-demand or up-front.
- Dedicated instant-clone desktop pools.
- Users are assigned a particular remote desktop, and they return to the same desktop at each login.
- When a user logs out, a resync operation on the golden image VM retains the name and MAC address of the VM.
- Dedicated desktops are useful when you must retain the identity of the desktop. For example, some software uses the MAC address to track license activation.
- Because each user is assigned a dedicated desktop, which no other user is allowed to use, the pool size reflects the total number of users. This can lead to more desktops being required for a dedicated pool than for a floating pool, which means an increase in the resources consumed.
Table 19: Configuration Considerations for Windows 11 or 10 Instant-Clone Desktops
| Windows 11 or 10 Instant Clone | Configuration Considerations |
| Windows 11 or 10 golden image VM | Build a Windows 11 or 10 VM using the guidelines in Manually Creating Optimized Windows Images for Horizon VMs. |
| Automated desktop pool | Create a Horizon 8 automated instant-clone desktop pool using the prepared golden image VM. See Create an Instant-Clone Desktop Pool. Use the specific pool settings from Horizon 8 Configuration. Entitle users by adding the appropriate AD group or groups. |
Applications
The actual applications available on the desktops can either be applications installed in the golden image VM image or as part of App Volumes packages. The use of App Volumes allows the golden image to be reused in more use cases and gives operational advantages. With App Volumes the majority of applications are delivered with core and different departmental packages. Individual or conflicting applications are packaged with ThinApp and available through the Workspace ONE app catalog.
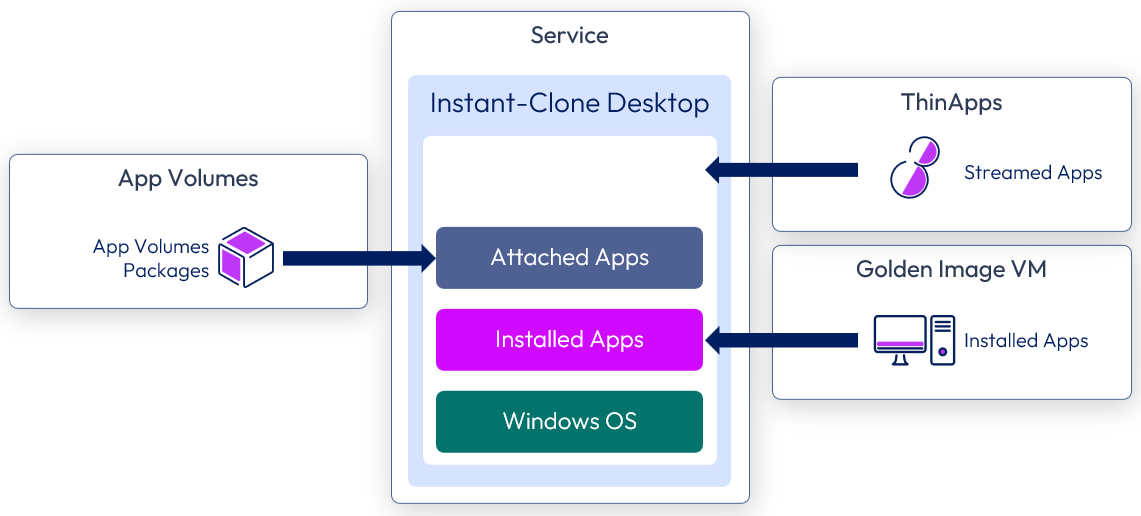
Figure 11: Horizon 8 Desktop Service – Applications
Table 20: Configuration Considerations for Packages in the Horizon 8 Desktop Service
| App Volumes | Configuration Considerations |
| Core applications | Create a package to contain all core software programs. See the instructions in Working with Applications in App Volumes for details. Assign and entitle the package to an AD group. |
| Departmental applications | Create a package for each department containing software programs unique to them. Assign and entitle relevant user groups to their matching departmental package. |
Profile and User Data
This service uses the same structure and design for profile and user data as outlined in the Horizon 8 Published Application Service.
Table 21: Configuration Considerations for User Profiles in the Horizon 8 Desktop Service
| Policy | Configuration Considerations |
| Smart Policies | Mobile knowledge worker:
Contractors: Apply the restrictive zContractor Horizon Smart Policy at all times. Note: Smart Policies are evaluated in alphabetical order. Adding the z character before Contractor places the policy name at the bottom of the sort group. For examples, see the section Horizon Smart Policies in Dynamic Environment Manager Configuration. |
| Application blocking | Leverage application blocking in Dynamic Environment Manager to block the following program files: Cmd.exe |
| Group policies | No specific group policies. |
Horizon 8 Desktop with User-Installed Applications Service
The Horizon 8 Desktop with User-Installed Applications service uses a similar integration as the Horizon 8 Desktop Service, with the addition of an App Volumes writable volume.
Core Service
The core service consists of a Windows 11 or Windows 10 virtual desktop and is constructed similarly to the Horizon 8 Desktop Service.
Applications
This service uses similar application types as the Horizon 8 Desktop Service. The actual applications available on the desktops can either be applications installed in the golden image VM or as part of App Volumes packages.
For user-installed applications, the user gets an App Volumes writable volume, which helps provide a persistent experience for the user. Individual or conflicting applications are packaged with ThinApp.
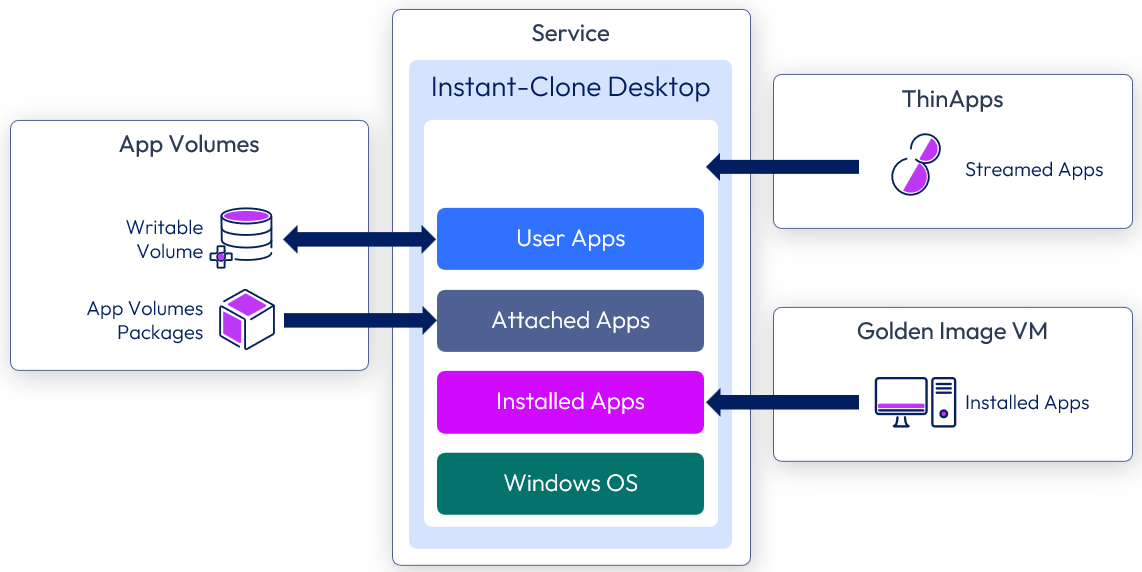
Figure 12: Horizon 8 Desktop with User-Installed Applications Service – Applications
Table 22: Configuration Considerations for Packages and Writable Volumes in the Horizon 8 Desktop with User-Installed Applications Service
| App Volumes | Configuration Considerations |
| Core applications | Create a package to contain all core software programs. See the instructions in Working with Applications in App Volumes for details. Assign and entitle the package to an AD group. |
| Departmental applications | Create a package for each department containing unique applications for that department. Assign and entitle relevant user groups to their matching departmental package. |
| Writable volumes | Create writable volumes for each user (or for the user group) entitled to this desktop pool. See Working with Writable Volumes. We used the User-Installed Applications (UIA) template to create the writable volumes. This writable volume type can capture any user-installed application and persist the application across user sessions. See Configuring Storage for more information about writable volume template options. |
Profile and User Data
This service uses the same structure and design for profile and user data as outlined in the Horizon 8 Desktop Service.
Table 23: Configuration Considerations for User Profiles in the Horizon 8 Desktop with User-Installed Applications Service
| Policy | Configuration Considerations |
| Smart Policies | Software developer:
IT (power user):
See the section Horizon Smart Policies in Dynamic Environment Manager Configuration. |
| Application blocking | No application blocking settings. |
| Group policies | No specific group policies. |
Horizon 8 GPU-Accelerated Desktop Service
This service is similar to that described in Horizon 8 Desktop Service but has more CPU and memory and can use hardware-accelerated rendering with NVIDIA GRID graphics cards installed in the vSphere servers (vGPU).
Core Service
The core is constructed using Horizon instant clones similar to that described in Horizon 8 Desktop Service. When creating the golden image VM, you must prepare the VM for NVIDIA GRID vGPU capabilities.
The high-level steps are given in Configuring 3D Rendering Options for Instant-Clone Pools.
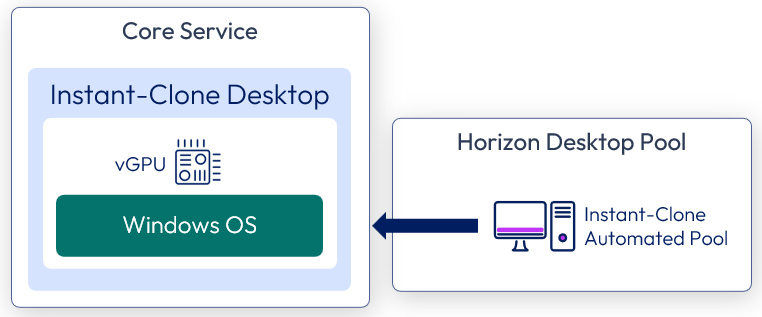
Figure 13: Horizon 8 GPU-Accelerated Desktop Service – Core
To understand the graphic profile choices, see the Virtual GPU Software Quick Start Guide.
You should also configure DRS and affinity rules to ensure that these desktops always remain on hosts that have NVIDIA cards if the whole vSphere cluster is not vGPU-enabled.
Table 24: Configuration Considerations for the Windows 10/11 VM in the Horizon 8 GPU-Accelerated Desktop Service
| Windows 11 or 10 Instant Clone | Configuration Considerations |
| Windows 11 or 10 golden image VM | Build a Windows 11 or 10 VM using the guidelines in Manually Creating Optimized Windows Images for Horizon VMs. Prepare the golden image VM to use NVIDIA GRID vGPU. See Configuring 3D Rendering Options for Instant-Clone Pools. |
| Automated desktop pool | Create a Horizon 8 automated instant-clone desktop pool using the prepared golden image VM. See Create an Instant-Clone Desktop Pool. At pool creation, chose NVIDIA GRID vGPU as the 3D Renderer option. The clones will use the same graphics profile that was selected during golden image VM creation. Use the specific pool settings from the Desktop Pool Settings section in Horizon Configuration. Entitle users by adding the appropriate AD group or groups. |
Applications
This service uses similar application types as those described in Horizon 8 Desktop with User-Installed Applications Service. The actual applications available on the desktops can either be applications installed in the golden image VM or as part of App Volumes packages.
For user-installed applications, the user gets an App Volumes writable volume, which helps provide a persistent experience for the user. Individual or conflicting applications are packaged with ThinApp.

Figure 14: Horizon 8 GPU-Accelerated Desktop Service – Applications
Profile and User Data
This service uses the same structure and design for profile and user data as was outlined previously in the Horizon 8 Desktop Service.
Table 25: Configuration Considerations for User Profiles in the Horizon 8 GPU-Accelerated Desktop Service
| Policy | Configuration Considerations |
| Smart Policies | Multimedia Designer:
For examples, see the section Horizon Smart Policies in Dynamic Environment Manager Configuration. |
| Application blocking | No application blocking settings. |
| Group policies | No specific group policies. |
Horizon 8 Linux Service
Horizon for Linux centralizes desktop management and secures data in the data center while supporting end users with seamless access to Linux services across devices, locations, mediums, and connections. Furthermore, this solution allows organizations to move away from costly Windows licensing and to embrace low-cost endpoints to deliver the best possible total cost of ownership.
Core Service and Apps
The core desktop is a full clone of a Linux VM that already has applications installed. Applications can be preinstalled in the golden image VM, and users can add their own applications to their individual clones. Desktops are persistent to the user.
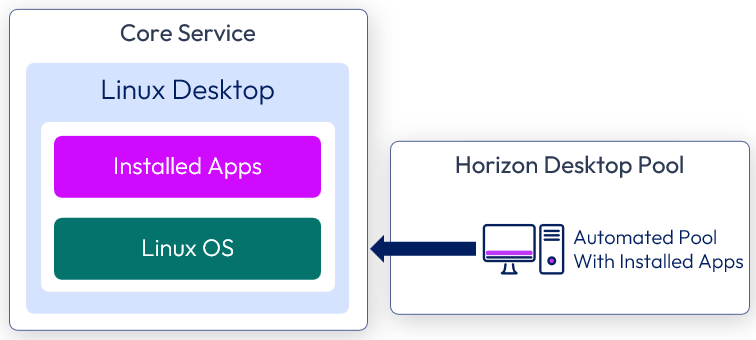
Figure 15: Horizon 8 Linux Desktop Service – Core and Apps
Table 26: Configuration Considerations for the VM in the Horizon 8 Linux Desktop Service
| Linux Clone | Configuration Considerations |
| Linux golden image VM | Follow the instructions in Creating and Preparing a Linux Virtual Machine for Cloning. |
| Install applications | Install all required applications on the golden image VM. |
| Domain join | Follow the instructions in Setting Up Active Directory Integration and User Authentication Features for Linux Desktops. |
| 3D rendering (optional) | Follow the instructions in Setting Up Graphics for Linux Virtual Machines. |
| Horizon Agent | Follow the instructions in Installing Horizon Agent for Linux. |
| Configuration options (optional) | Follow the instructions in Edit Configuration Files on a Linux Desktop. |
| Desktop pool | Depending on the type of desktop pool desired, follow the instructions in |
User Data
Users can reach their user data from their file shares. For automount on Red Hat Enterprise Linux, see AUTOFS.
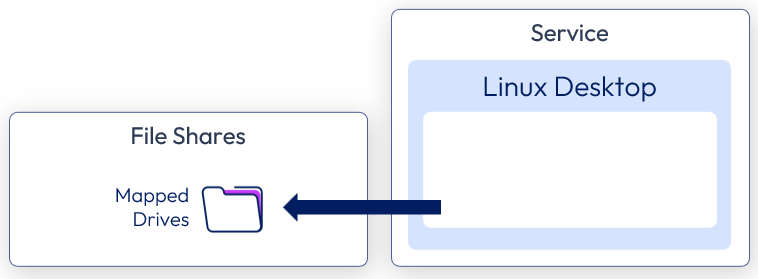
Figure 16: Horizon 8 Linux Desktop Service – User Data
Recovery Service Integration
With a focus on disaster recovery, consideration must be given to the questions of if and how the user is to consume an equivalent service in the event of a site outage.
At this stage, we have all of the disaster recovery components designed and deployed, and the environment should have all the functionality and qualities that are required to deliver the services defined earlier. The components required can now be created, assembled, and integrated into the recovery services to be mapped against the use case services that are consumed by end users.
- Some of these steps might have already been completed while creating the use case services described earlier.
- Where services are being consumed as cloud-based services, such as Workspace ONE UEM and Workspace ONE Access, availability is delivered as part of the platform.
- Any services that have been deployed on-premises, including Horizon 8, App Volumes, Dynamic Environment Manager, Workspace ONE Access, and Workspace ONE UEM, should have been deployed across multiple sites to provide resilience and disaster recovery capabilities.
- Some cloud-based services, including Horizon Cloud on Microsoft Azure - first-gen, might contain user configuration settings and user data and might be running in a single Azure region. To provide full disaster recovery, a second, equivalent service can be built in a different Azure region.
Horizon 8 Recovery Services
The following table details the components required for each recovery service. Some are optional, as indicated in the Recovery Services section of Business Drivers, Use Cases and Service Definitions. The rest of this section details the steps for implementing each of the recovery service types.
Table 27: Horizon 8 Recovery Service Components
| Component | Active/Passive | Active/Active Recovery Service | vSAN Stretched Active/ Passive Service |
| Workspace ONE UEM | X |
| X |
| Workspace ONE Access | X |
| X |
| Windows instant clone | X | X |
|
| RDSH instant clone | X | X |
|
| Windows full clone |
|
| X |
| App Volumes package | X | X |
|
| App Volumes writable volume | X |
|
|
| Dynamic Environment Manager | X | X | X |
| Folder redirection | X | X | X |
| Storage replication (active/active) |
| X | X |
| vSAN stretched cluster |
|
| X |
Some parts are prerequisites for any of the services. Ensure that these services are configured and functional before looking at the specifics for a given service:
- Dynamic Environment Manager GPO (ADMX) configuration
- DFS namespace (for Dynamic Environment Manager profile global access)
- Storage array replication
- SQL Server Always On (for App Volumes and Workspace ONE Access databases)
- Load balancing between sites
- Load balancing within sites
Horizon 8 Active-Passive Recovery Service
This section covers the high-level steps required to build out the active/passive service, which can be seen from the user’s perspective.
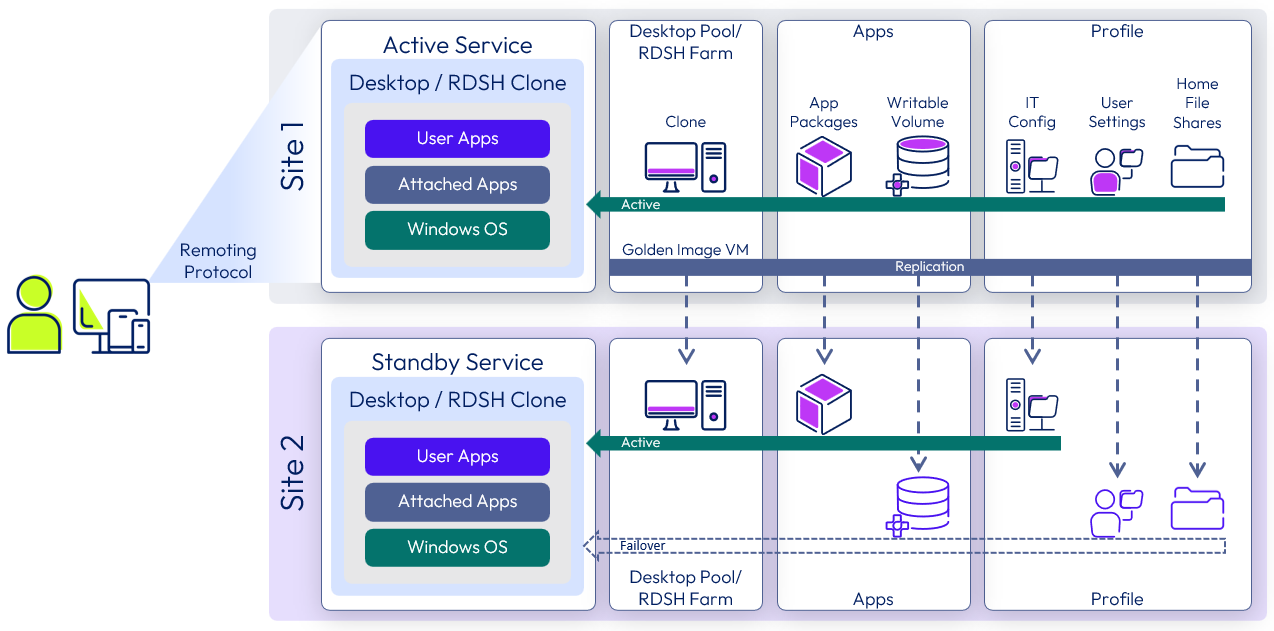
Figure 17: Horizon 8 Active/Passive Recovery Service Components
Desktops and RDSH-Published Applications
The first step is to create the Windows component of the service. This consists of either desktops or RDSH servers in pools or farms at both sites. Cloud Pod Architecture is then configured to provide a global entitlement to pools of desktops and published applications from both sites.
Table 28: Steps for Creating the Windows Component of a Horizon Active/Passive Service
| Step | Details |
| Load balancing | Verify both global and local load balancing are functional. |
| Golden image VM | Build out a golden image VM image in Site 1 to meet requirements. Replicate the golden image VM image to Site 2. |
| Create pools or farms | For desktops, create identical desktop pools in both sites based on the golden image VM. For RDSH-published applications:
|
| Cloud Pod Architecture | Set up and initialize Cloud Pod Architecture between the two sites.
See the Cloud Pod Architecture section in Horizon 8 Configuration for detail. |
Profile (Dynamic Environment Manager) and User Creation
To manage user settings, user data, and users’ access to applications, set up file shares in Site 1, set up DFS-N so that the file shares are replicated to Site 2, and determine which site is primary for each user so that the profile service can function as shown in the following figure.
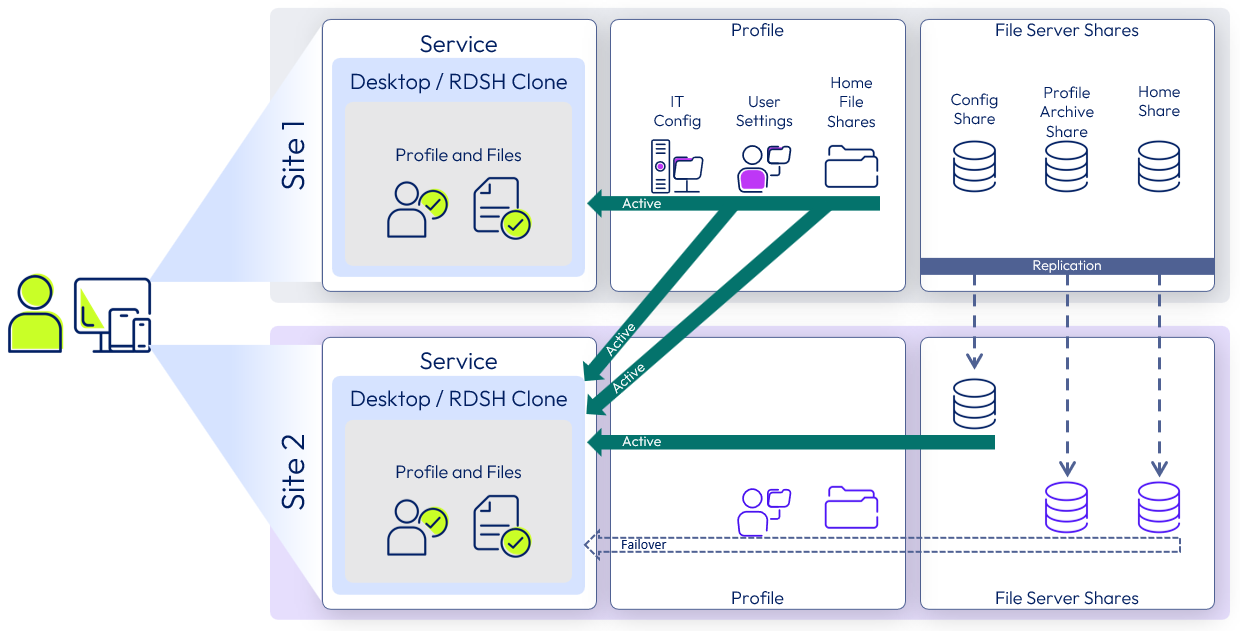
Figure 18: Profile Recovery Service Component
Table 29: Steps for Creating the User Profile Component of an Active/Passive Service
| Step | Details |
| File shares | Create three file shares on the file server in Site 1 and set the relevant permissions.
Set up DFS-Namespace following the guidance given in Environment Infrastructure Design. |
| User placement | Decide where a given named user is initially placed (Site 1 or Site 2). Map a user to a GPO that matches that placement from a Dynamic Environment Manager perspective. Verify profile creation and functionality by performing a login with a user. |
App Volumes Active-Passive Design
To set up this container-style technology that attaches applications to a VM when the user logs in, you must install redundant instances of App Volumes Manager, create packages, which store applications in shared read-only virtual disks (VMDK files), and, optionally, create writable volumes if users need to install their own applications.
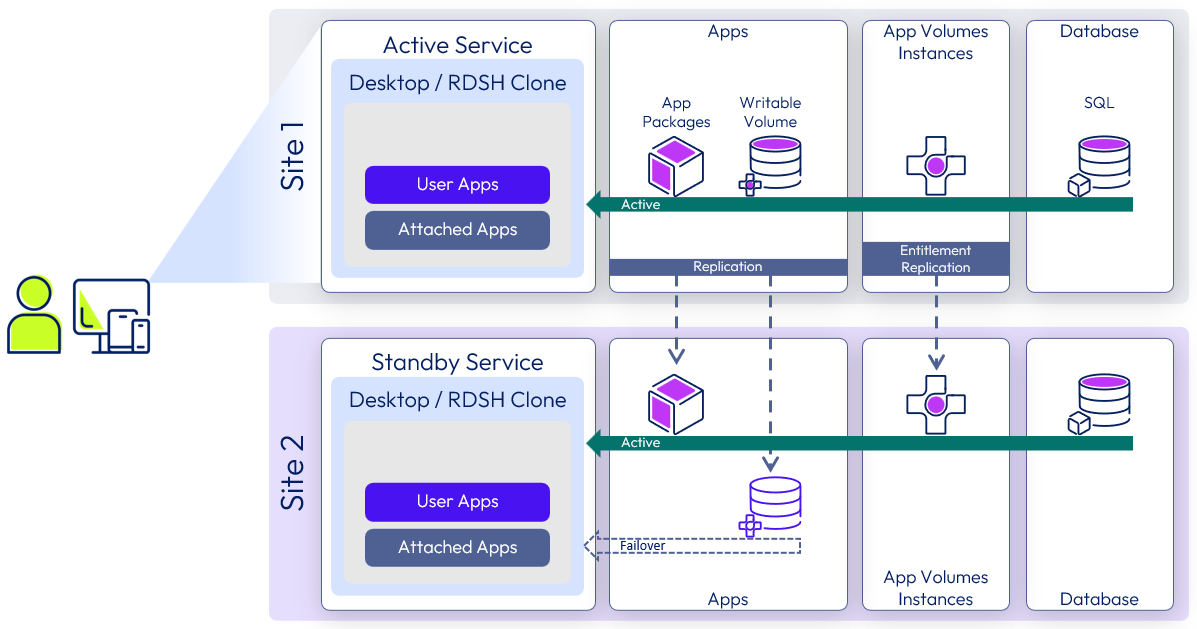
Figure 19: App Volumes Active-Passive Recovery Service Component
Table 30: Steps for Creating the Streamlined Application Component of an Active/Passive Service
| Step | Details |
| App Volumes installation | Set up two App Volumes Managers in Site 1. Set up two App Volumes Managers in Site 2. See Install and Configure App Volumes Managers in App Volumes Configuration for details. |
| Load balancing | Configure local load balancing within each site with a virtual IP (VIP) for the local App Volumes Managers. Point the App Volumes agent in the golden images to their respective VIP based on their site. |
| Multi-instance Management | Setup a source and target relationship between the App Volumes instance in Site 1 and Site2. Site 1 will be the source instance of App Volumes and Site 2 will be the first target instance.
Review the full instructions in Multi-Instance Configuration. |
| Storage groups | Set up an App Volumes storage group in Site 1.
Create another storage group for the App Volumes instance in Site 2 using the same settings but with the Site 2 datastores. |
| Packages | Working In the source App Volumes instance, Site 1.
|
| Writable volumes (optional) | Create a writable volume for each user who requires one. Follow the instructions in Working with Writable Volumes. Place writable volumes on dedicated LUNs, which can later be configured to be protected using storage replication. |
Horizon 8 Active-Active Recovery Service
This section covers the high-level steps required to build out the active/active service, which can be seen from the user’s perspective in the following figure.
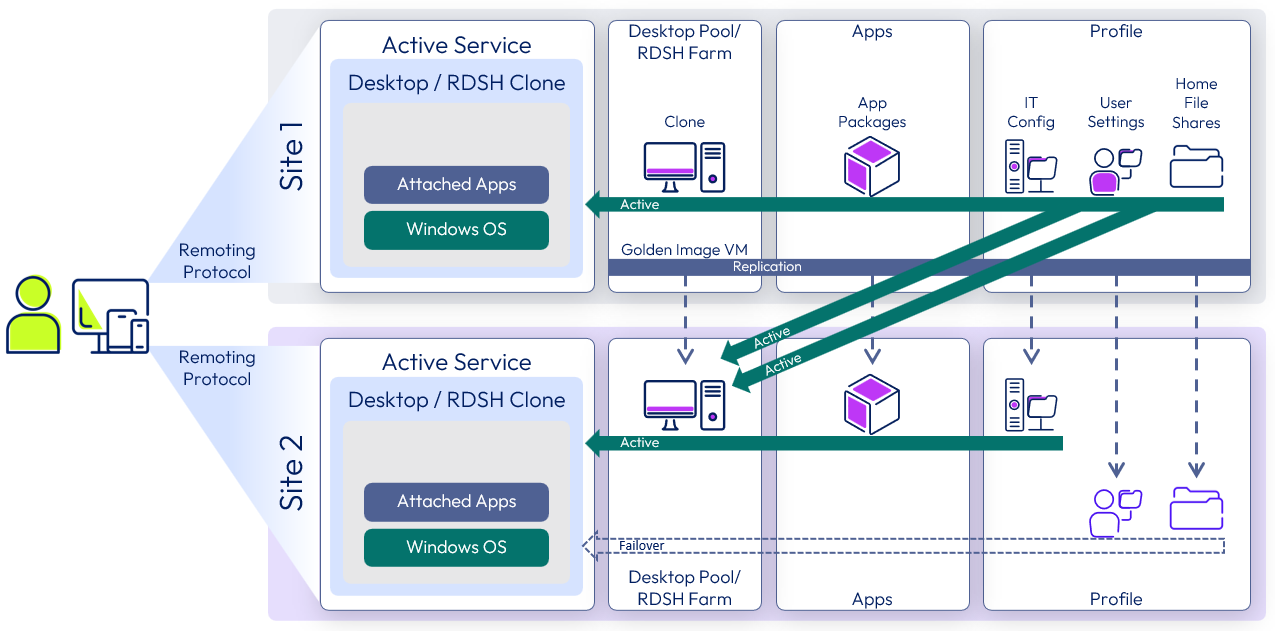
Figure 20: Horizon 8 Active/Active Recovery Service Components
Desktops and RDSH-Published Applications
The first step is to create the Windows component of the service. This consists of either desktops or RDSH servers in pools or farms at both sites. Cloud Pod Architecture is then configured to provide a global entitlement to pools of desktops and published applications from both sites.
Table 31: Steps for Creating the Windows Component of a Horizon Active/Active Recovery Service
| Step | Details |
| Load balancing | Verify both global and local load balancing are functional. |
| Golden image VM | Build out a golden image VM image in Site 1 to meet requirements. Replicate the golden image VM image to Site 2. |
| Create pool or farm | For desktops, create identical desktop pools in both sites based on the golden image VM. For RDSH-published applications:
|
| Cloud Pod Architecture | Set up and initialize Cloud Pod Architecture between the two sites.
|
Profile (Dynamic Environment Manager) and User Creation
The next step is to set up file shares in Site 1, set up DFS-N so that the file shares are replicated to Site 2, and determine which site is primary for each user so that the profile service can function as shown in the following figure.

Figure 21: Profile Recovery Service Component
Table 32: Steps for Creating the User Profile Component of an Active/Active Recovery Service
| Step | Details |
| File shares | Create three file shares on the file server in Site 1 and set the relevant permissions.
Set up DFS-Namespace following the guidance given in Environment Infrastructure Design. |
| User placement | Decide where a given named user is initially placed (Site 1 or Site 2). Map a user to a GPO that matches that placement from a Dynamic Environment Manager perspective. Verify profile creation and functionality by performing a login with a user. |
App Volumes Active-Active Design
To set up this container-style technology that attaches applications to a VM when the user logs in, you must install redundant instances of App Volumes Manager, and create packages, which store applications in shared read-only virtual disks (VMDK files).
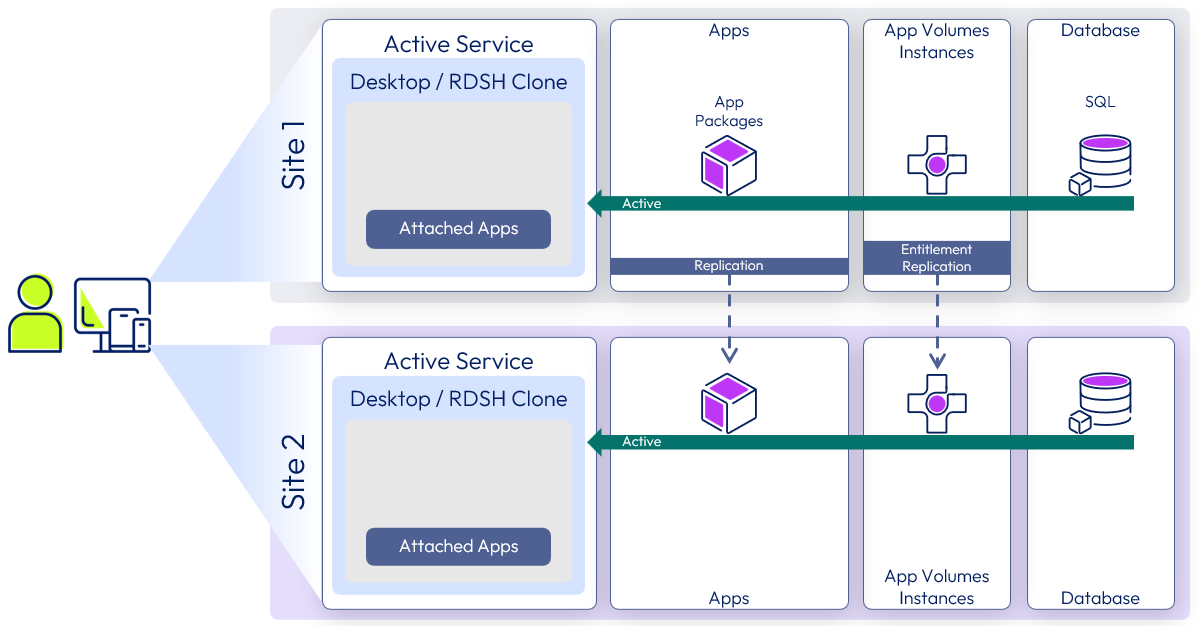
Figure 22: App Volumes Active-Active Recovery Service Component
The steps for setting up App Volumes to deliver an active-active service follow the same as the instructions as given in the App Volumes Active-Passive Design section of the Horizon 8 Active-Passive Recovery Service.
From a user consumption perspective, it is important to consider the following though:
- Application packages can be actively consumed in both sites. Packages can be replicated from one site to another. Entitlements are replicated from the source App Volumes instance to the target instances.
- An individual Writeable Volume should only be active in one site at a time. While it can be replicated to another site, that copy should only be activated in a DR scenario.
On-Premises Workspace ONE Access Recovery Service
The Workspace ONE Access service provides a common entry point to all types of applications, regardless of which data center is actively being used. To build this service, you deploy three instances in Site 1, three instances in Site 2, and set up global load balancing.
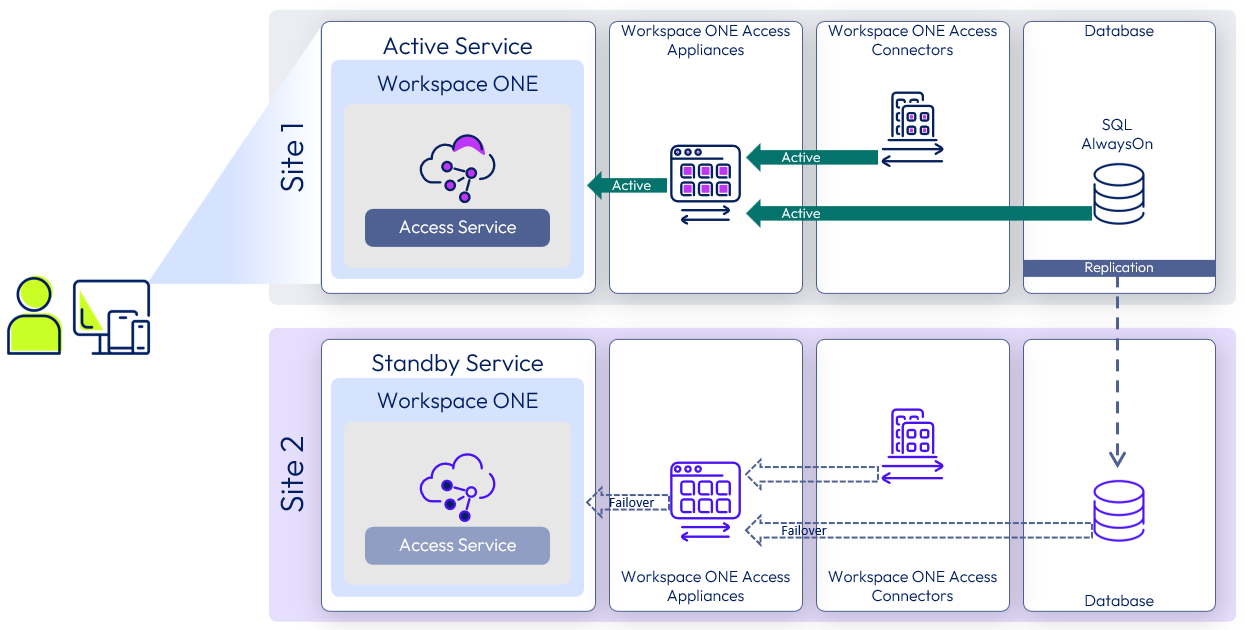
Figure 23: Workspace ONE Access Recovery Service Component
For instructions, see Workspace ONE Access Configuration
Summary and Additional Resources
Now that you have come to the end of this integration chapter, you can return to the reference architecture landing page and use the tabs, search, or scroll to select further chapter in one of the following sections:
- Overview chapters provide understanding of business drivers, use cases, and service definitions.
- Architecture chapters give design guidance on the Omnissa products you are interested in including in your deployment, including Workspace ONE UEM, Access, Intelligence, Workspace ONE Assist, Horizon Cloud Service, Horizon 8, App Volumes, Dynamic Environment Manager, and Unified Access Gateway.
- Integration chapters cover the integration of products, components, and services you need to create the environment capable of delivering the services that you want to deliver to your users.
- Configuration chapters provide reference for specific tasks as you deploy your environment, such as installation, deployment, and configuration processes for Omnissa Workspace ONE, Horizon Cloud Service, Horizon 8, App Volumes, Dynamic Environment Management, and more.
Changelog
The following updates were made to this guide:
| Date | Description of Changes |
| 2025-01-14 |
|
| 2024-06-04 |
|
| 2023-07-26 |
|
| 2023-02-24 |
|
| 2020-03-10 |
|
Author and Contributors
This chapter was written by:
- Graeme Gordon, Senior Staff Architect, Omnissa.
Feedback
Your feedback is valuable. To comment on this paper, either use the feedback button or contact us at tech_content_feedback@omnissa.com.

