

App Volumes configuration
This chapter is one of a series that make up the Omnissa Workspace ONE and Horizon Reference Architecture, a framework that provides guidance on the architecture, design considerations, and deployment of Omnissa Workspace ONE and Omnissa Horizon solutions. This chapter provides information about common configuration and deployment tasks for App Volumes.
This includes detailed instructions for configuring App Volumes across multiple sites, implementing redundancy both within and across sites. As is described in the Multi-site design section of App Volumes Architecture, the recommended deployment option for App Volumes across multiple sites is to use separate databases.
The procedures in this guide create a setup in which the App Volumes database can fail over automatically within each site. Site 1 and site 2 have separate databases, but during a failover, users at site 1 will be able to use replicated App Volumes packages in site 2, as long as the user entitlements are also replicated using multi-instance management. See Multi-instance management for more information.
Installation and initial configuration
Refer to the App Volumes install guide for full installation procedures. The prerequisites are covered in more detail in the System Requirements section. The App Volumes Administration guide details the initial configuration.
After installation is complete, you must perform the following tasks to start using App Volumes:
- Complete the App Volumes initial configuration wizard.
- Install the App Volumes Agent on one or more clients and point the agent to the App Volumes Manager address (load-balanced address).
- Select a clean packaging system and create an application package. See Working with Applications in App Volumes and Working with Packages for instructions.
- Assign the package to a test user and verify it is connecting properly.
- Assign a Writable Volume to a test user and verify it is connecting properly.
For better performance, it is recommended to use a local vCenter account instead of an active directory account when configuring a vCenter Server as a machine manager.
- For details on how to create a local user account, see Managing Local User Accounts in vCenter Server.
- Information on the permissions required for a vCenter account are detailed in the App Volumes Manager console, at the bottom of the Configuration, machine managers section.
See Configure and Register the Machine Manager for more information on registering a vCenter Server as a machine manager.
Refer to product documentation Deploy App Volumes for Amazon AppStream 2.0 for automated deployment of App Volumes from AWS Marketplace and Deploy App Volumes Manager through Azure Marketplace for automated deployment of App Volumes from Azure Marketplace.
Rebranding changes in Omnissa Horizon products
As part of Omnissa’s launch as an independent company, significant updates to the Horizon 8, App Volumes and Dynamic Environment Manager product family, starting with the 2412 release, are documented in the Kb article - Rebranding Changes in Omnissa Horizon Products (6000681).
Using SQL Always on with App Volumes
This design uses separate App Volumes database instances for each site. With this option, you can use SQL Always on availability groups within each site to achieve local, high availability of the database.
To use this setup, perform the procedures in the following order:
- Create a Windows Server Failover Cluster in each site
- Install SQL Server stand-alone in all VMs
- Create the App Volumes databases and Enable Availability groups for the clusters
- Create Always on Availability groups for App Volumes databases
- Configure Cluster Quorum settings
- Install App Volumes to use a highly available database
Create a Windows server failover cluster in each site
A failover cluster is a group of VMs that have the same software installed on them and work together as one instance to provide high availability for a service, such as a Microsoft SQL Server database. If a VM, or cluster node fails, another node in the cluster begins to provide the service.
To create a Windows Server Failover Clustering (WSFC) cluster:
- On two hosts in site 1, create and configure the two VMs that will be used as a clustered instance of Microsoft SQL Server, and then do the same in site 2.
- For this reference architecture, we used the Windows Server Standard operating system in the VMs that run SQL Server.
- In this example, we named the VMs as follows:
- In site 1, we created VMs named s1-sql4 and s1-sql5 on separate hosts.
- In site 2, we created VMs named s2-sql4 and s2-sql5 on separate hosts.
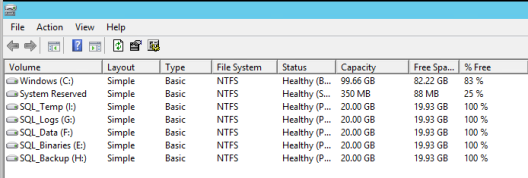
- Set up each VM in the same way, with a total of five 20-GB hard disks: one disk for the Windows OS and five disks for the various types of SQL Server data.

Inside the OS, the disks are mapped to drive letters as follows.
- In preparation for creating the failover cluster, choose a cluster name and obtain a corresponding static IP address for the cluster in site 1 and in site 2.
- For example, in this reference architecture, we use s1-sqlclust-2 and s2-sqlclust-2 for the cluster names.
- To set up failover clustering on the SQL Server VMs, user Server Manager on each of the four VMs (two in site 1 and two in site 2), and use the Windows Server Add Roles and Features Wizard to add the Failover Clustering feature.
In the wizard, select to add the following features:
- .NET Framework 3.5 features
- Failover Clustering, including adding the Failover Clustering tools
For detailed instructions, see the Microsoft blog post Installing the Failover Cluster Feature and Tools in Windows Server 2012. One of the tools installed is the Failover Cluster Manager, which you will use for many of the steps that follow.
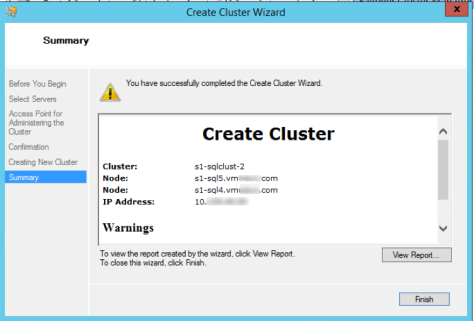
- Use the Failover Cluster Manager to create a WSFC cluster that includes two SQL Server VMs in site 1, and then do the same in site 2.
For detailed instructions, see Create a Failover Cluster. The failover cluster for site 1 includes the VMs s1-sql4 and s1-sql5. The cluster for site 2 includes the VMs s2-sql4 and s2-sql5.
Install SQL server stand-alone in all VMs
You install SQL Server Stand-Alone on each VM, rather than creating a SQL Server failover cluster. You can stop after the first step (i.e. if you choose to install only a single SQL server instance in your environment and create the App Volumes database). For a high availability of the App Volumes database, you use stand-alone installations and then create Always On availability groups to achieve failover within a site.
To install SQL Server:
- In site 1, on the first SQL Server VM, complete the SQL Server installation wizard, using the following guidelines:
- Installation page – Select New SQL Server stand-alone installation.
- Feature Selection page – Select Database Engine Services and Management Tools - Basic.
- Instance Configuration page – Select Default instance. The instance ID is MSSQLSERVER.
- Server Configuration page – The startup type is Automatic for the SQL Server Agent and SQL Server Database Engine.
- Database Engine Configuration page
- On the Server Configuration tab, select Mixed Mode (SQL Server authentication and Windows authentication), and enter credentials for a user account that will be part of the SQL Server administrators.
- On the Data Directories tab, for each item, select the disk that you created for that type of file during VM creation. Use the following screenshot as a guide:
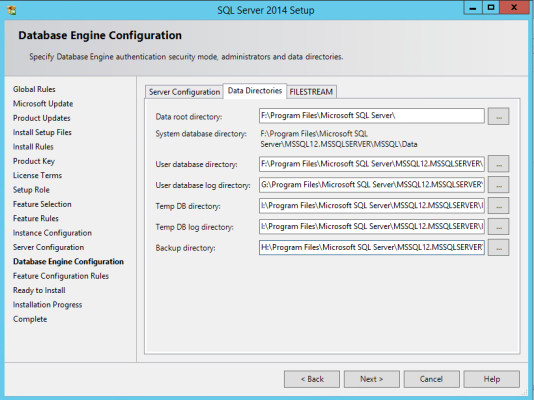
For more information about the setup wizard, see Install SQL Server from the Installation Wizard (Setup).
- Repeat Step 1 to install SQL Server on the other VM in site 1 and on the VMs in site 2.
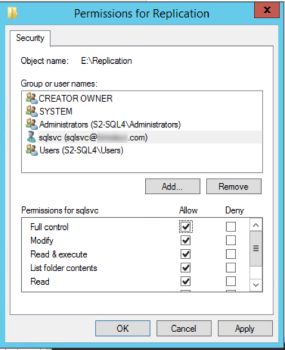
- Create a shared folder on the first SQL Server VM in each site; for this example, the VMs are s1-sql4 and s2-sql4).
- Create a folder named Replication on the SQL_Binaries (E:) drive. You created this drive during Step 1 of Create a Windows Server Failover Cluster in Each Site.
- Give the SQL service account full permissions on the folder.
Create the App Volumes databases and enable availability groups for the clusters
This section provides detailed instructions for creating a highly available database, but does not give recommendations regarding the sizing of the database for various sizes of deployments. For information about database sizing, see App Volumes Database Best Practices.
To create the databases:
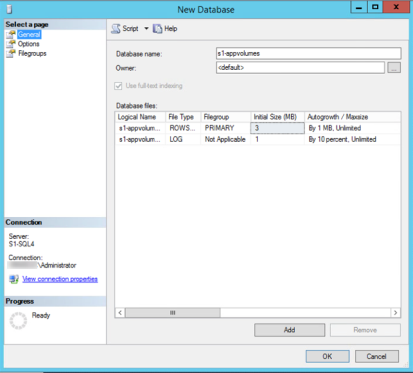
- On the first SQL Server VM in each site, use Microsoft SQL Server Management Studio to create an App Volumes database.
- For this example, the VMs are s1-sql4 and s2-sql4.
- Log in to the Management Studio as the sysadmin or as a user account with sysadmin privileges.
- Connect to the SQL Server instance on the VM, right-click the Databases folder, and select New Database.
- Enter a database name and click OK.
For example, for site 1, we named the database s1-appvolumes. For site 2, we named the database s2-appvolumes.
- Open SQL Server Configuration Manager and enable Always On availability groups for the Windows Failover cluster in site 1 and site 2.
For instructions, see Enable or disable Always On availability group feature (SQL Server).
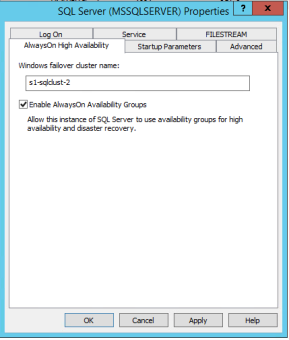
The cluster names are the names you created in Step 2 of Create a Windows Server Failover Cluster in Each Site.
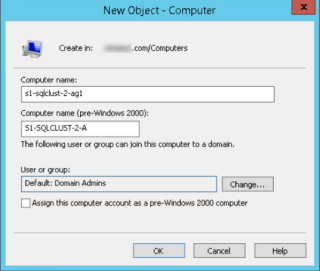
- In each site, on the domain controller, open Active Directory Users and Groups, and create a new Computer object for the availability group.
For this example, for site 1, the AD computer name for the group is s1-sqlclust2-ag1. For site 2, the name is s2-sqlclust2-ag1.
Create Always on availability groups for App Volumes databases
In this procedure, you create an Always On availability group, adding the SQL Server stand-alone instances from site 1 as the primary replica and secondary replicas. You then do the same for site 2, so that each site has its own Always On availability group to achieve automatic failover within each site (but not across sites).
To create the availability groups:
- On the first SQL Server VM in site 1, open the Management Studio, right-click Always On High Availability in the left pane, and select New Availability Group Wizard.
- Complete the New Availability Group wizard, using the following guidelines:
- Specify Name page – Use the name of the AD computer object you just created. For this example, the name is s1-sqlclust2-ag1 for Site 1.
- Select Databases page – Select the check box for the local database, which is s1-appvolumes in this example.
- Specify Replicas > Replicas tab – The first SQL Server VM should already be listed. Click Add Replica to connect to and add the second SQL Server VM from this site.
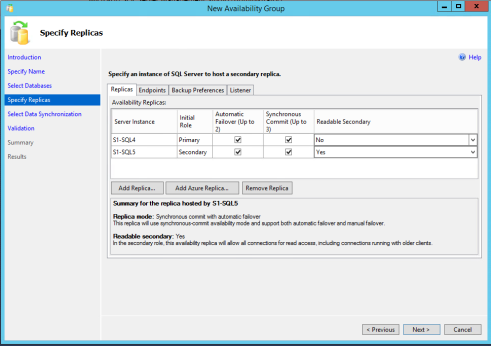
Important: Select the Synchronous Commit and Automatic Failover check boxes. For the Readable Secondary setting, select No for the primary instance and Yes for the secondary instance.
- Select Data Synchronization page – Select Full, and specify the shared Replication folder that you created in Step3, Install SQL server stand-alone in all VMs.
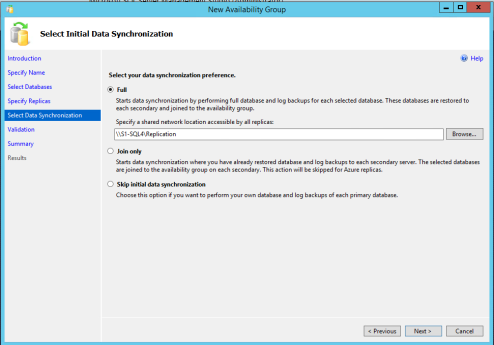
This share is used to synchronize the database on the secondary replica with that on the primary.
After you complete these pages, the validation page, the summary page, and the results page take you through the process of creating the availability groups and listeners, and adding the replicas. On the results page, you can see that the s1-appvolumes database is synchronized between both SQL servers.
When the process is complete, you can view the new availability groups using the Management Studio. The following screenshot shows the availability group with the primary replica on the s1-sql4 VM.

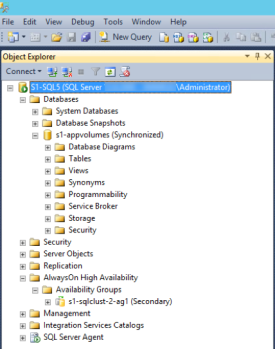
The following screenshot shows the availability group with the secondary replica on the s1-sql5 VM.
- Repeat steps 1 and 2 for site 2.
Configure cluster quorum settings
At this point, you will configure cluster quorum settings to use a file share witness. Each element in a cluster can cast one “vote” to determine whether the cluster can run. Because you have two nodes in a cluster and you need an odd number of voting elements, create a file share quorum witness, which will cast the third vote. A file share witness is recommended when you need to consider multi-site disaster recovery with replicated storage.
To configure cluster quorum settings:
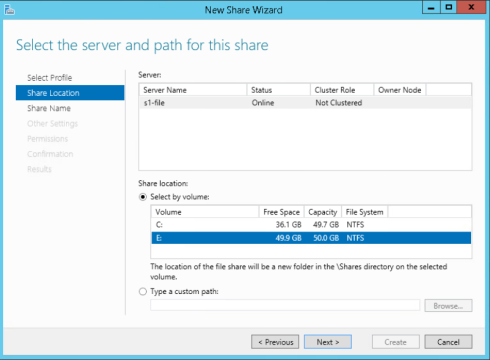
- On a file server in each site, use Server Manager to open and complete the New Share wizard and create an SMB share, using the following guidelines:
- Select Profile page – Select SMB Share – Quick.
- Share Location page – For the share location, choose Select by volume, and select the drive.
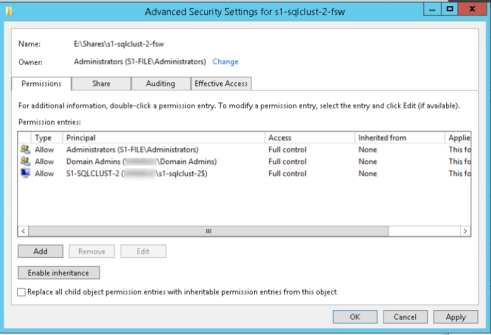
- Permissions page – Click Customize permissions and give the WSFC cluster object full control over the file share.
When you finish this step, you have two files shares: one for site 1 and one for site 2. For more details about accessing and using this wizard, see 12 Steps to NTFS Shared Folders in Windows Server 2012.
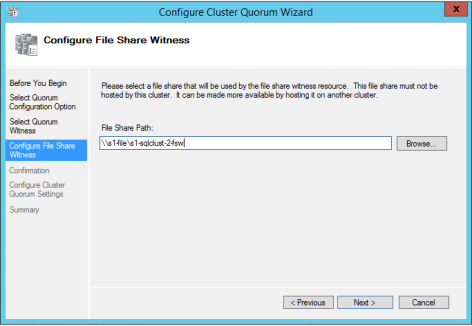
- Configure the cluster quorum settings for each site:
- Open Failover Cluster Manager on the first VM in site 1, right-click the cluster, and select More Actions > Configure Cluster Quorum Settings.
- Complete the Configure Cluster Quorum Wizard, using the following guidelines:
- Select Quorum Configuration Option page – Choose Select the quorum witness.
- Select Quorum Witness page – Select Configure a file share witness.
- Configure File Share Witness page – Enter the path to the file share you created in Step 1.
For detailed instructions, see Configure and manage quorum.
- Repeat this procedure to set up a file share quorum witness in site 2.
You are now ready to install App Volumes and point to the availability group you created.
Install App Volumes to use a highly available database
This procedure focuses on the specific settings required for connecting App Volumes to a highly available database. For details about other aspects of App Volumes installation, including system requirements, see the App Volumes Installation Guide.
To install App Volumes:
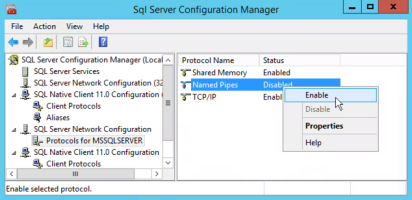
- In preparation for installing App Volumes and connecting to the availability group listener, use SQL Server Configuration Manager on each SQL Server VM to enable named pipes.
- For instructions, see Enable or Disable a Server Network Protocol.
- Important: Restart the SQL Server service so the new setting can take effect.
- In site 1, on the first VM on which you want to install App Volumes, download the App Volumes Manager installer, start the installation wizard, and follow the prompts to the Database Server page.
- Complete the Database Server page, using the following guidelines:
- Choose local or remote database server to use – Select the SQL Server Always On availability group listener that you created in Create Always on availability groups for App Volumes databases.
- Name of database catalog to use or create – Select the database that you created in Create the App Volumes databases and enable availability groups for the clusters.
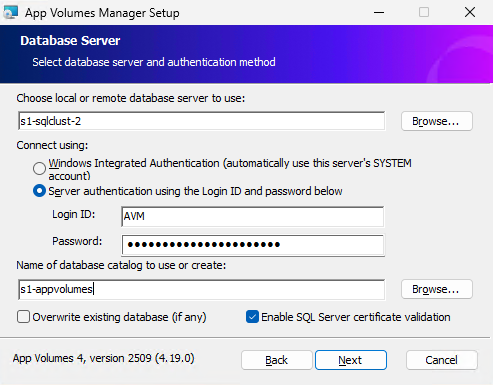
Important: If you see an error message check that you enabled named pipes, as described in Step 1.
- On the Choose Network Ports page, verify that the HTTP port is set to 80 and the HTTPS port is set to 443.
- Follow the rest of the wizard prompts to complete the installation.
- Repeat Steps 1–5 on the second App Volumes VM in site 1, but on the Database Server page, be sure to leave the Overwrite existing database (if any) check box deselected.
Both App Volumes Managers in site 1 must point to the same highly available database. - Repeat this entire procedure in site 2.
With App Volumes successfully installed, you can begin configuration. For detailed instructions see the App Volumes Administration Guide.
Multi-instance configuration
When configuring multiple instances and sites of App Volumes, you can set a source and target relationship between App Volumes instances so that packages are distributed across different App Volumes instances and locations. With App Volumes version 2203, the ability to synchronize metadata, markers, and assignments between instances was also added.
The instructions below give the process for a two-site deployment, with one instance of App Volumes per site. It can be amended to add additional sites or instances as targets to the source instance in Site 1.
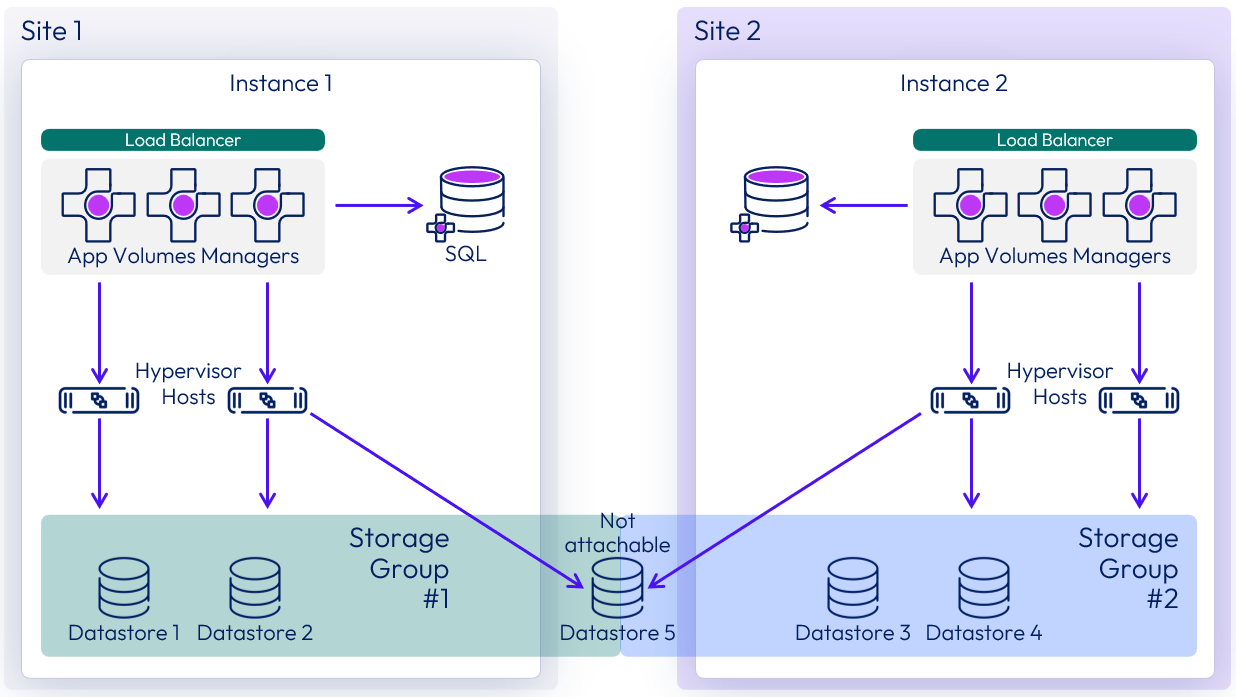
Figure 1: Example multi-instance configuration
With this design, the following is achieved:
- The site 1 instance is defined as the source and becomes the source for packages and assignments. The instance in site 2 is a target.
- Packages are made available in both sites.
- Packages are replicated from site 1 (source) to site 2 (target) through the storage groups defined, and through the use of a shared datastore that is configured as non-attachable.
- User-based entitlements for packages are replicated between sites
Install and configure App Volumes managers
Install App Volumes Managers.
If using Always On availability groups to provide a local and highly available database, use the local availability group listener for site 1 when configuring the ODBC connection. For step-by-step instructions on this process, see Install App Volumes to use a highly available database.
- Install the first App Volumes Manager in site 1.
- Complete the App Volumes Manager wizard and add the vCenter Servers for site 1 as machine managers, including mapping their corresponding datastores.
- Continue installing the subsequent App Volumes Managers for site 1. Add them as targets to the local load balancer virtual IP.
- Repeat steps 1–3 for site 2 so that the App Volumes Managers in site 2 point to the local availability group listener for site 2, and register the local vCenter Servers for site 2 as machine managers.
Add target App Volumes instances
Add the target App Volumes instances to site 1.
- Using the App Volumes admin console for the site 1 instance.
- Add the site 2 instance as a target instance. See Register an App Volumes Instance as a Target.
- Enable the following options:
- Application Package Import
- Package Symmetry Assurance
- Synchronize Markers
- Synchronize Assignments
- Enable the following options:
site 1 is now the source instance, and site 2 is a target instance.
Setup package replication
This design uses a shared NFS datastore to replicate packages between sites and app volumes instances. Though NFS is not a requirement, it provides low-cost storage replication that works with both vSphere VMFS and vSAN implementations.
NFS datastores can also be used on VMC on AWS to provide a shared datastore between different SDDCs (software defined data centers).
To use this setup, perform the procedures described in the sections that follow.
Configure a not attachable NFS datastore for site 1 and site 2 instances
Configure a non-attachable datastore that will act as an intermediary for package replication between the instances of App Volumes.
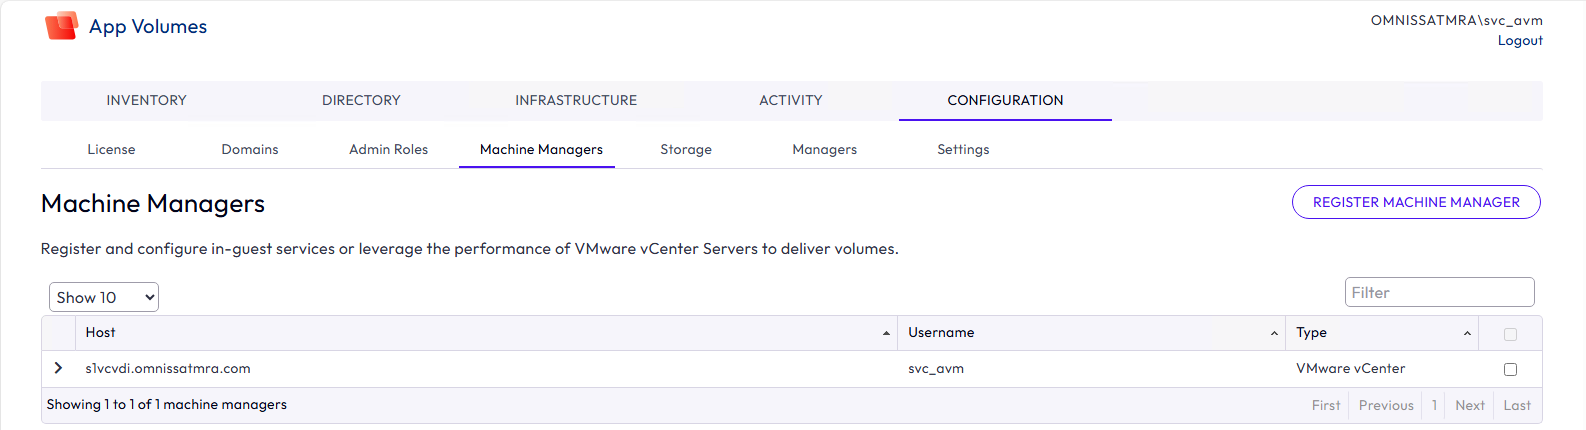
- Use the App Volumes Manager console to configure a machine manager for the vCenter Server.
- App Volumes managed storage locations are available, based on the vCenter Server selected in the App Volumes machine manager configuration.
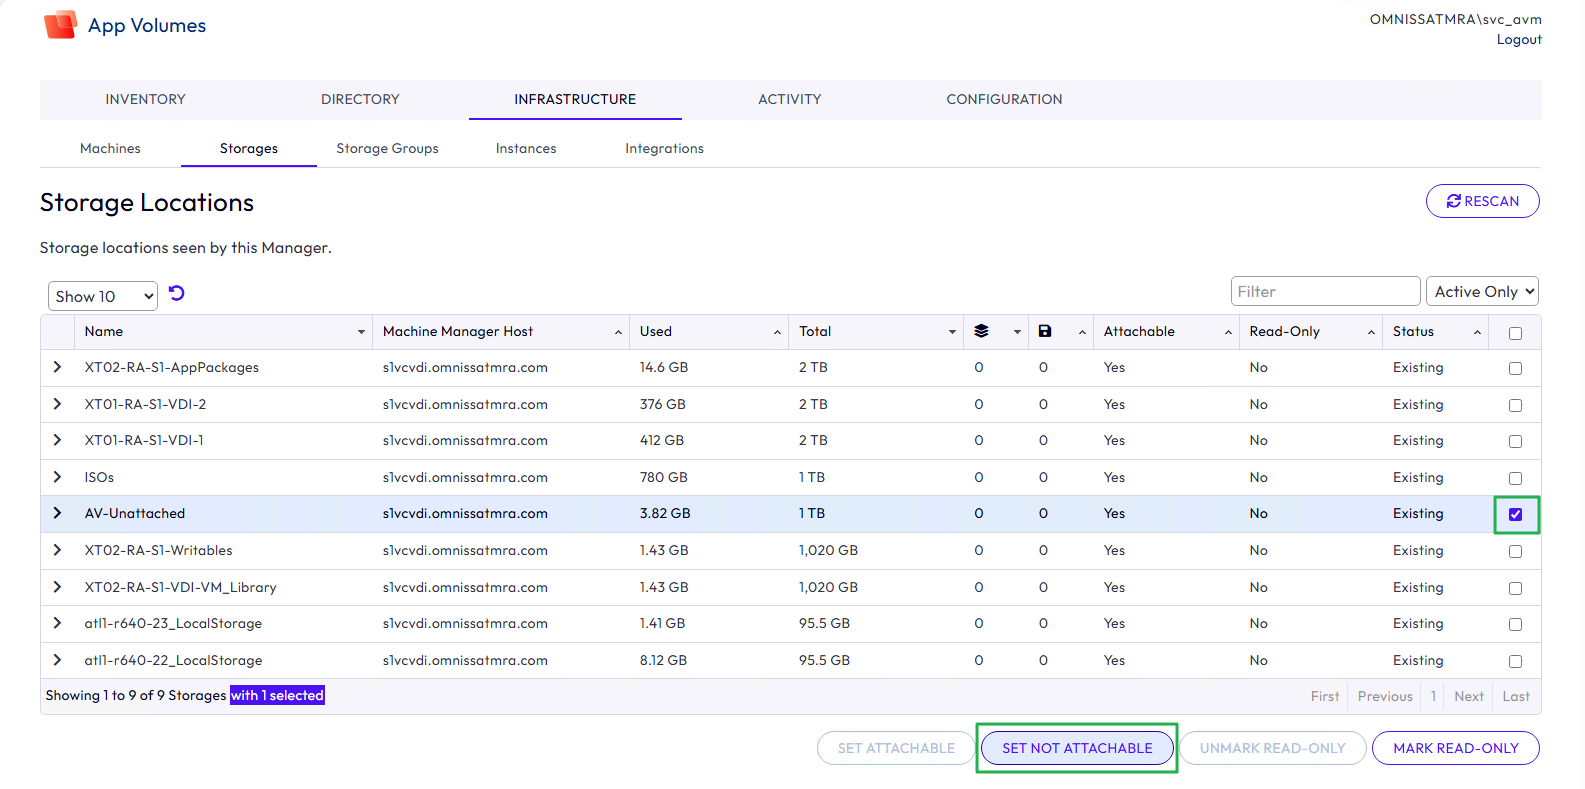
- Mount the NFS datastore to the hosts in the selected vCenter Server, to make them available as App Volumes managed storage locations.
- After the NFS datastore has been added to the vSphere hosts, click Rescan to make it available as a storage location.
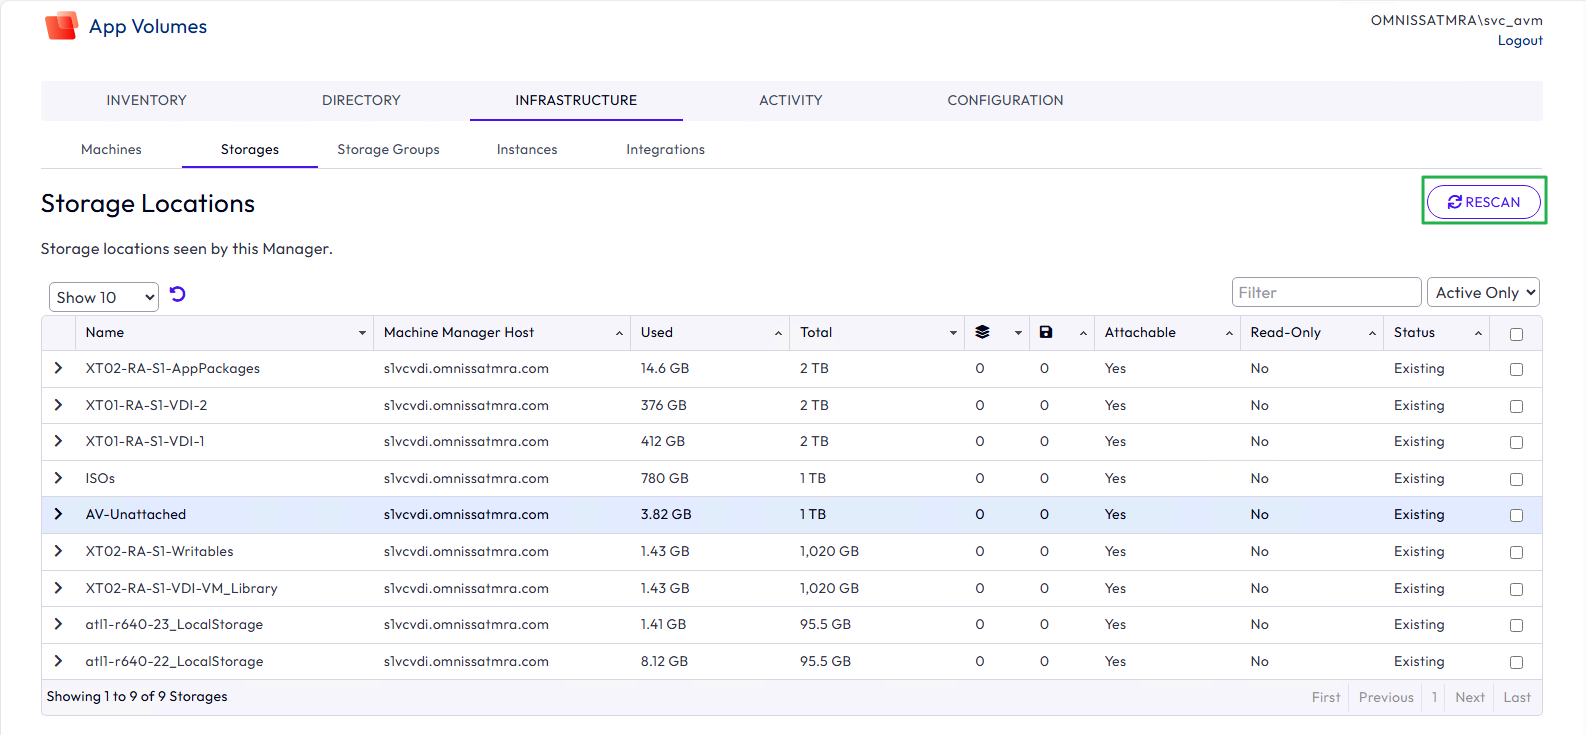
- Select the datastore and click SET NOT ATTACHABLE.
- This option allows packages to replicate to and from this datastore, but prevents packages on this datastore from being mounted for use.
- Repeat these steps for all other App Volumes instances.
Mark shared datastore as read-only on target instances
It is best practice to designate one instance of App Volumes as the source for package replication. This avoids possible conflicts if changes are made on two instances. On the target instances, you should mark the shared storage location, that is there for replication from the source instance, as read-only.
- Use the App Volumes Manager console on the target App Volumes instance, site 2.
- Select the shared datastore and click MARK READ-ONLY.
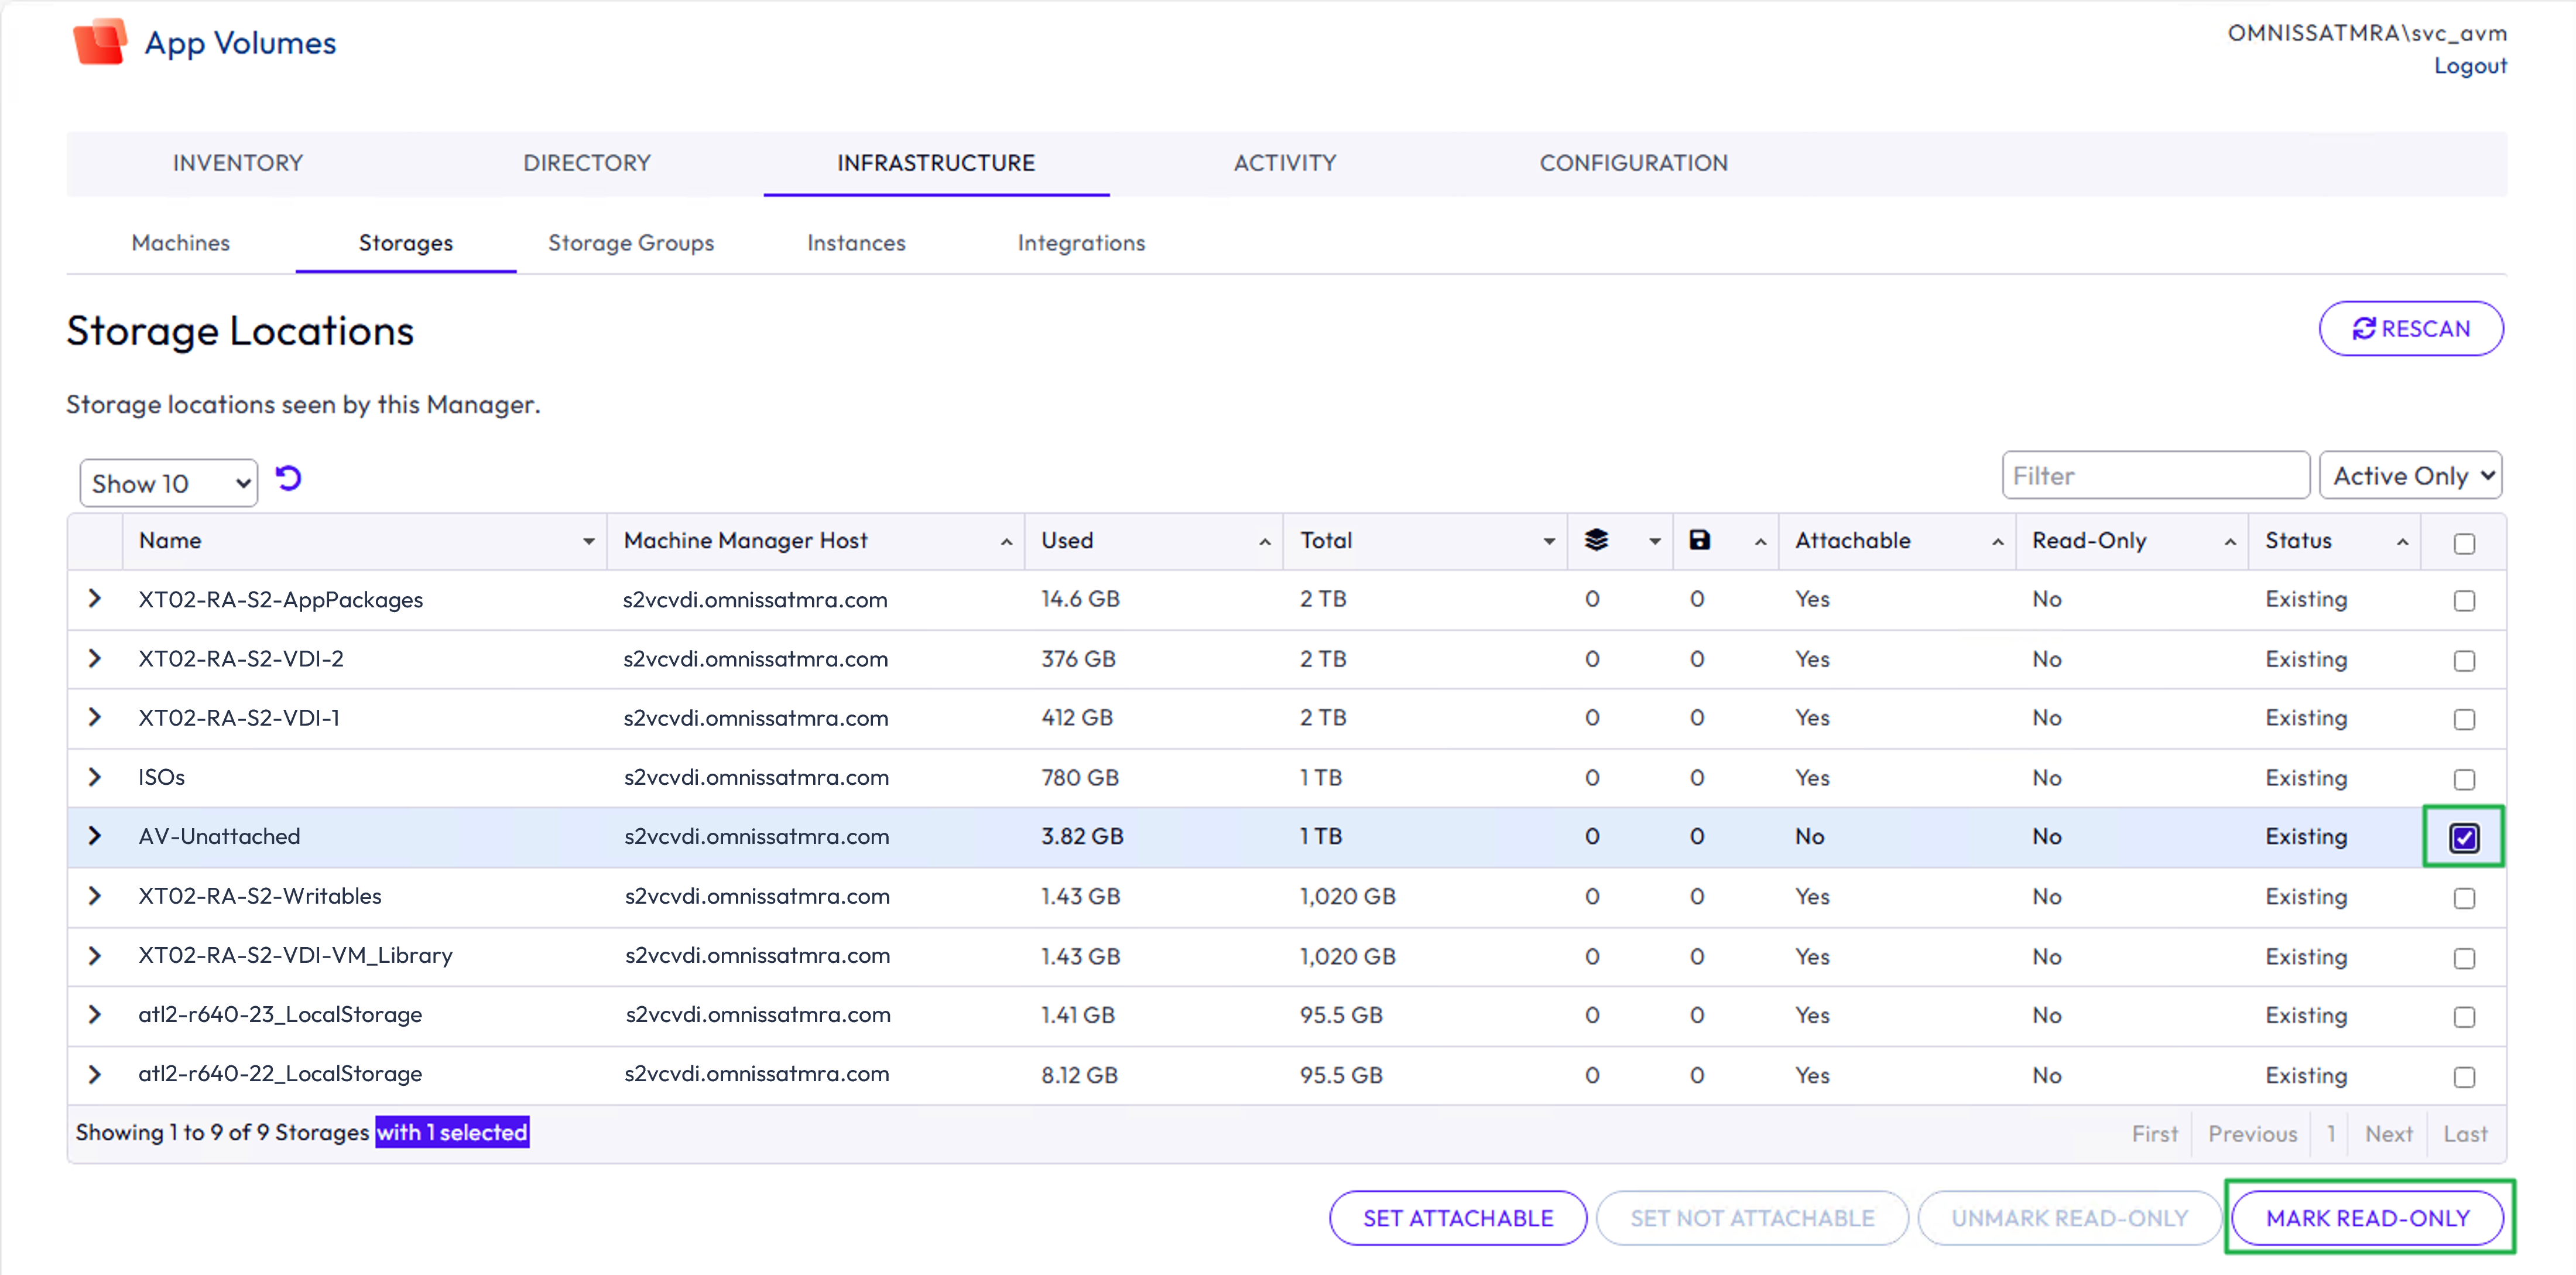
Figure 2: Mark shared datastore as read-only on target instance
- Repeat these steps for all other target App Volumes instances.
Note: Do not set the shared datastore as read-only on the source App Volumes instance.
Create storage groups
Next, you create a storage group that includes one or more attachable datastores, and the non-attachable datastore, as shown in the following screenshot.
- Set up a storage group on each App Volumes instance:
- Create a storage group. For details, see Configure Storage Groups in App Volumes Manager.
- Select all datastores to be used for packages.
- Additionally, select one shared datastore to be used to replicate packages between instances.
- Do not select Automatically Import Application Packages.
- Select to Automatically Replicate Application Packages.
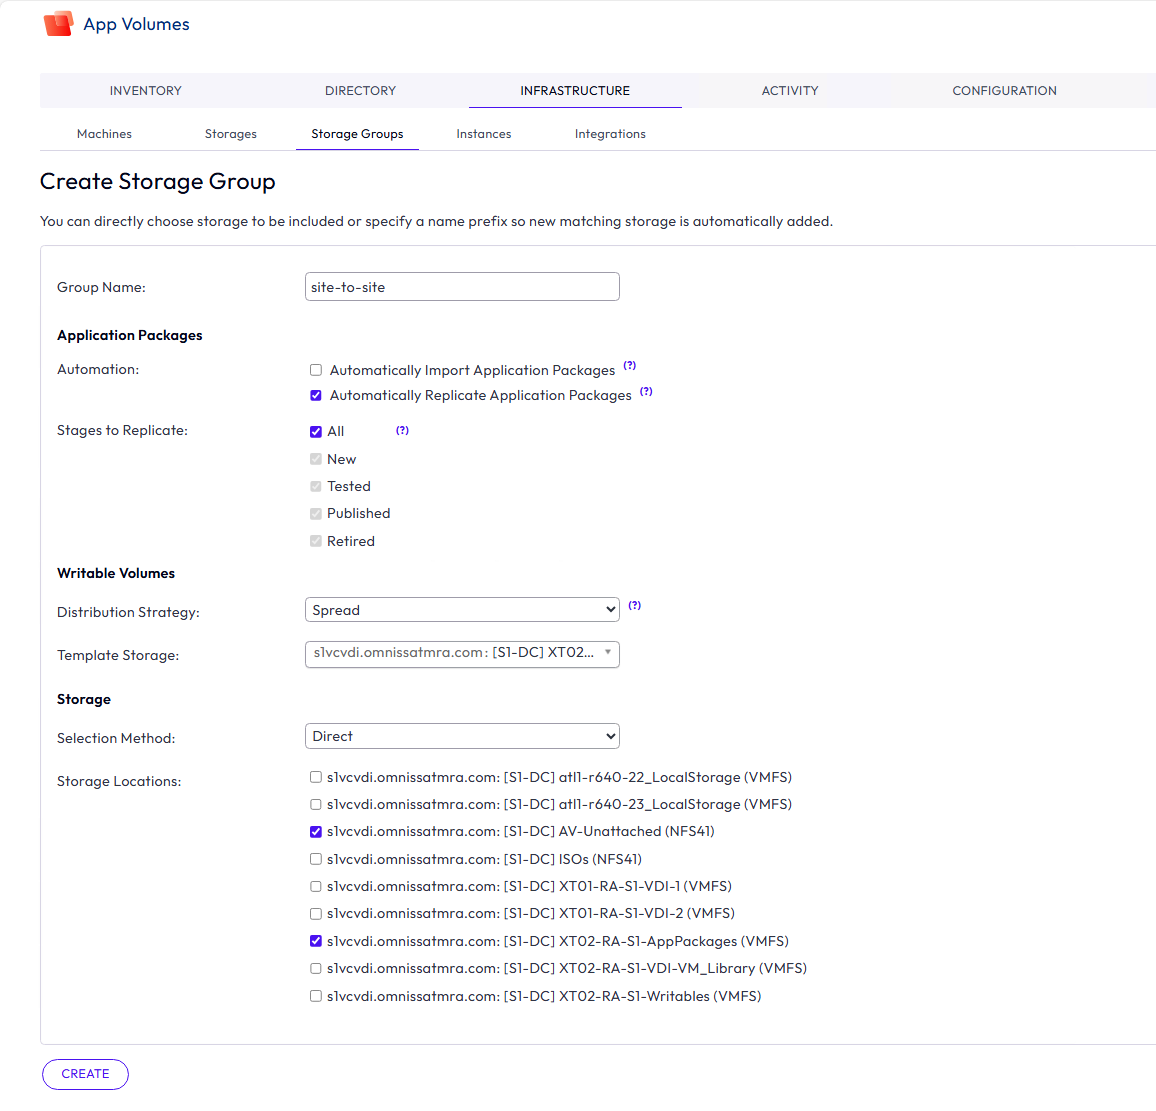
Figure 3: Creating a storage group
- Repeat this step for the site 2 instance, and any other target instances.
Additional configuration options for Writable Volumes
You can configure writable volumes so that end users can determine how much free disk space is available in their writable volume. You can expand the amount of disk space if necessary.
Allowing end users to see the size of Writable Volumes
Administrators can use the App Volumes Manager console to view the disk space remaining in writable volumes. Administrators can also allow end users to see how much disk space is available on their writable volume by looking at their system volume. To do this, administrators must create a new registry key during the App Volumes Agent configuration:
- Navigate to HKLM\System\CurrentControlSet\Services\svdriver
- From this location, create a new registry key called Parameters if it does not already exist.
- Within the Parameters key, create a new key called ReportSystemFreeSpace with a DWORD value of 0 (zero).
Alternatively, run a command from an elevated CMD prompt to create the correct key and value:
reg add hklm\system\currentcontrolset\services\svdriver\parameters /v ReportSystemFreeSpace /t REG_DWORD /d 0

Figure 4: Screenshot of the Windows registry with the proper path, key, and value
Note: This change requires a reboot to take effect. Logging out or logging in does not apply the changes.
End-user viewing of Writable Volume space
When end users look at available disk space through Windows Explorer before you make the registry changes, they can see the free space and total space reported for the C: drive.
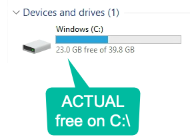
Figure 5: Actual free space on C:\
After you make the registry modifications and reboot the system, the C: drive reports the amount of free space on the user’s writable volume, which is 19.7 GB total in the following example:
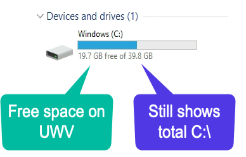
Figure 6: Free space on user Writable Volume
Notice the total space still reflects the C: drive value.
Configuring the registry so end users can view free space on their writable volumes is recommended any time you use writable volumes.
Expanding Writable Volumes
The default writable volumes template in App Volumes 4 is 10 GB. If a user’s writable volume has reached or is about to reach full capacity, it can be expanded. To expand the writable volume for each user from the App Volumes Manager console:
- Locate the user’s writable volume on the Volumes tab under the Writables sub-tab, and expand the information on the specific writable volume.
- Click the Expand Volume option and enter a larger value in 1-GB increments.
- Have the user log out and log back in. The additional size is added to the writable volume after the user logs out and back in. Also, the free-space usage is not reflected in the App Volumes Manager until the user logs out and back in.
Understand packages and packaging for day 2 operations
This section builds upon the design guidance provided in the App Volumes Reference Architecture that focused on the selection of App Volumes packaging methods using App Volumes Agent and App Volumes Tools to now provide day 2 operational guidance for creating, sizing, scaling, provisioning, configuring, and updating App Volumes Packages.
Package templates
By default, a single 20-GB package template is deployed in an App Volumes environment. This template is thin-provisioned and is provided in both a VMDK and VHD format. This template can be copied and customized, depending on how large the package needs to be for a given deployment scenario.
For more information, see the Knowledge Base article Creating a new App Volumes AppStack template VMDK changing the default size of 20 GB (2116022). Note: Although this KB article was written for AppStacks, it is applicable to App Volumes 4 packages as well. With App Volumes 4.x, up to 25 packages are recommended.
If you have packages from a previous App Volumes 4 release, they will continue to work. However, additional features or fixes included in later versions are not applied to packages created with earlier versions.
Packages at scale
The number of packages that can be attached to a given VM is technically limited by the maximum number of possible drive attachments in Windows and the hypervisor platform being used. See the App Volumes Configuration Maximums for guidance. In practice, the number of packages attached to a VM will likely be considerably lower than the maximum values.
Attaching packages involves the following processes:
- The disk mount (mounting the package VMDK to the VM)
- The virtualization process applied to the content in the package (merging files and registry entries with the guest OS)
The time required to complete the virtualization process varies greatly, depending on the programs contained in a given package. The more packages that need to be attached, the longer this operation might take to complete.
Packages may be assigned to a number of Active Directory objects, which has implications for the timing and specifics of which volumes are attached. See Assign an App Volumes Application to an Entity.
There are two different modes for application package delivery that
- Classic – An assigned application is delivered to an end user either at computer startup or user login even when the application is not immediately required by the end user.
- On demand – When a user launches an assigned application, from the provided shortcut, App Volumes performs the attachment.
Using on-demand packages can minimize the impact of application attachment at user login, reducing resource load and login storms. Instead, an attachment only occurs if and when the user starts the application, spreading out attachments and distributing load.
Recommended practices for packages in production environments
The size of the default package template is 20 GB. The default Writable Volume template is 10 GB. In some environments, it might make sense to add larger or smaller templates. For information on creating multiple, custom-sized templates, see the Knowledge Base (KB) article Creating a new App Volumes AppStack template VMDK changing the default size of 20 GB (2116022).
App Volumes 4 includes enhancements to the agent compared with 2.x agents. The result is improved logon times and better performance with many packages attached. Although you can likely attach more App Volumes 4 packages than App Volumes 2.x AppStacks, we recommend keeping the total number of packages assigned to a given user or computer relatively small. This can be accomplished by adding multiple programs to each package. Group the apps in such a way as to simplify distribution.
The following is a simple example for grouping App Volumes programs into packages:
- Create a package containing core programs (apps that most or all users should receive). This package can be assigned to a large group or OU.
- Create a package for departmental programs (apps limited to a department). This package can be assigned at a group or departmental level.
For traditional storage (VMFS, NFS, and so on):
- Do not place packages and VMs on the same datastore.
- Use storage groups for packages when packages are assigned to a large population of users or desktops. This helps to distribute the aggregated I/O load across multiple datastores, while keeping the assignments consistent and easy to manage.
For VMware vSAN:
- Packages and VMs can be placed on a single datastore.
- Storage groups for packages to distribute the load are not required in a vSAN implementation.
- Storage groups can still be used for the replication of packages into and out of the vSAN datastore.
See the Knowledge Base article App Volumes Sizing Limits and Recommendations (67354).
Packaging applications recommended practices
Consider the following best practices when creating and packaging applications:
- The following characters cannot be used when naming packages: & “ ‘ < > .
- For the packaging VM, use a clean golden image that resembles as closely as possible the target environment where the package is to be deployed. For example, the packaging VM and target should be at the same OS patch and service pack level and, if programs are included in the golden image, they should also be in the packaging VM.
- The packaging VM should have the App Volumes Agent installed but should not have either the Horizon Agent or the Dynamic Environment Manager FlexEngine agent installed.
- Do not use a packaging machine where you have previously installed and then uninstalled any of the programs that you will capture. Uninstalling a program might not clean up all remnants of the software, and the subsequent App Volumes package capture might not be complete.
- Always take a snapshot of your packaging VM before packaging or attaching any packages to it. If any packages have been assigned to the VM, or if the VM has been used previously for packaging, revert that VM to the clean snapshot before creating a new package.
Updating and assigning updated packages recommended practices
App Volumes uses assignment types called marker and package to improve the administrative process of updating application packages. Using the CURRENT marker enables distribution of the current package to your end-user population, whereas using the package assignment type enables distribution of test versions to a subset of users for validation.
Once a new package has been tested and approved, you can simply change the CURRENT marker to point to the new package. As end users log off their desktop sessions, the old version of the package is detached. When they log on again, the new version is attached.
The following illustration shows the Adobe Reader application, which contains three packages with different versions of the software. Package Adobe Reader-11.0.2 has the CURRENT marker, so it is used for any user who has an assignment to the Adobe Reader application, using a marker assignment type, with the current marker.
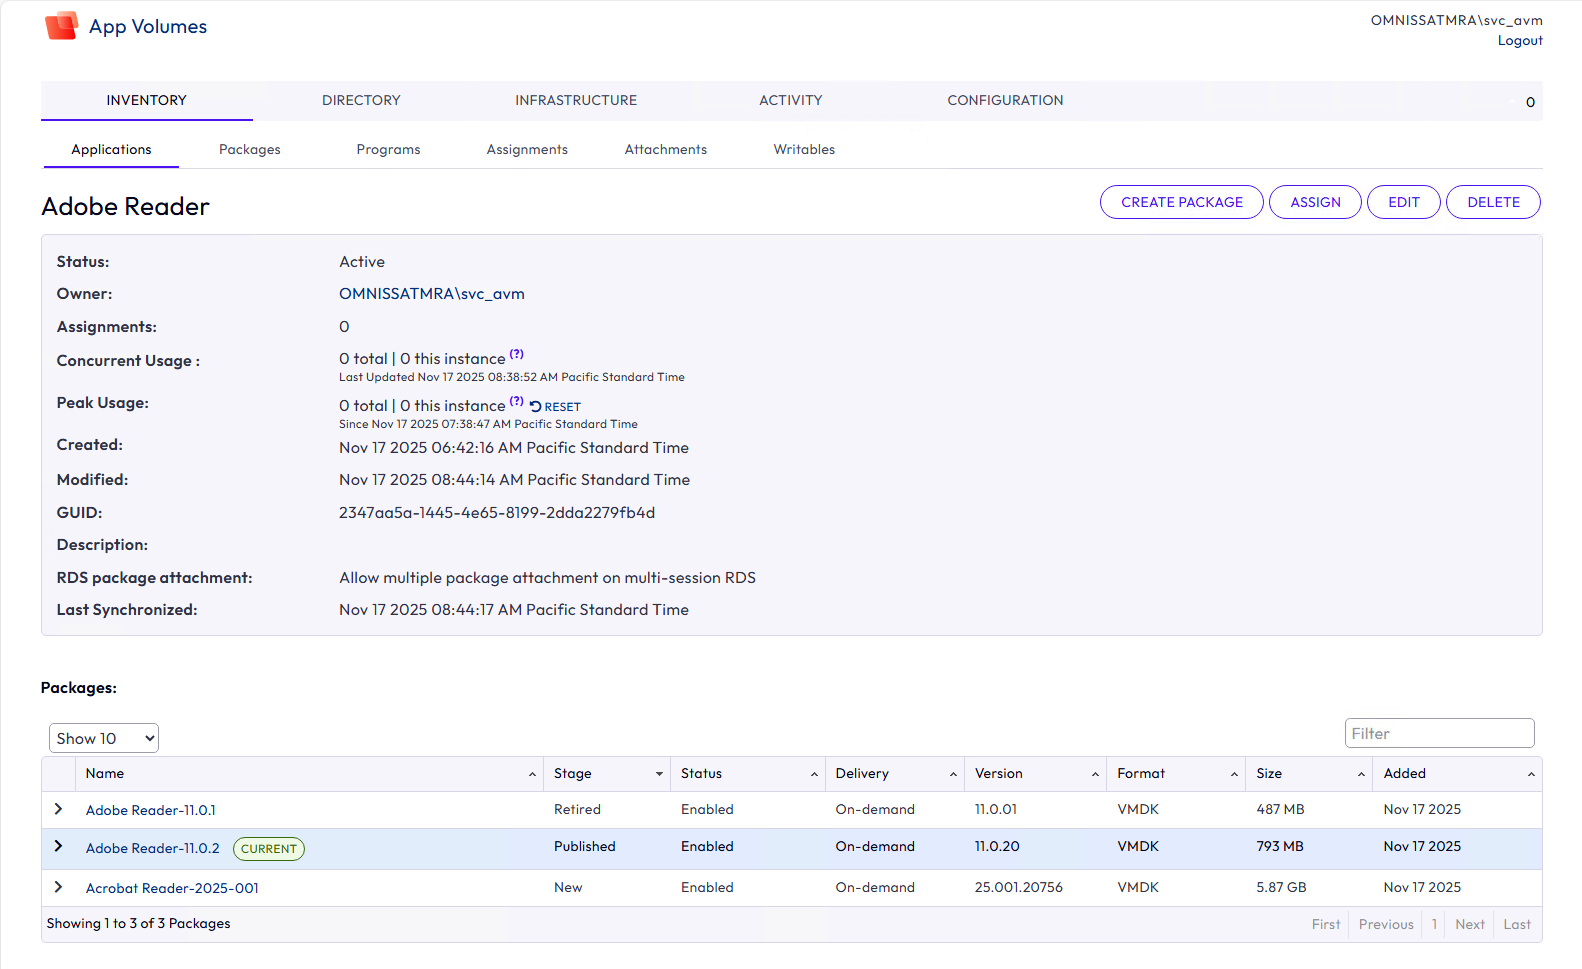
Figure 10: Application with three different package versions, one with the current marker
When new version of an application is to be rolled out to users, a new package version can be captured, in this case Adobe Reader-2025-001. You can either update an existing package version or create a new package from scratch. When updating an existing package, this clones the original package for you to work with and apply updates. End users continue to work from the original package to prevent user downtime.
Before pushing the new version of this out to users, it is best practice to assign it to a group of test users to confirm functionality. This can be achieved by creating an assignment for those test users that uses the Package assignment type.
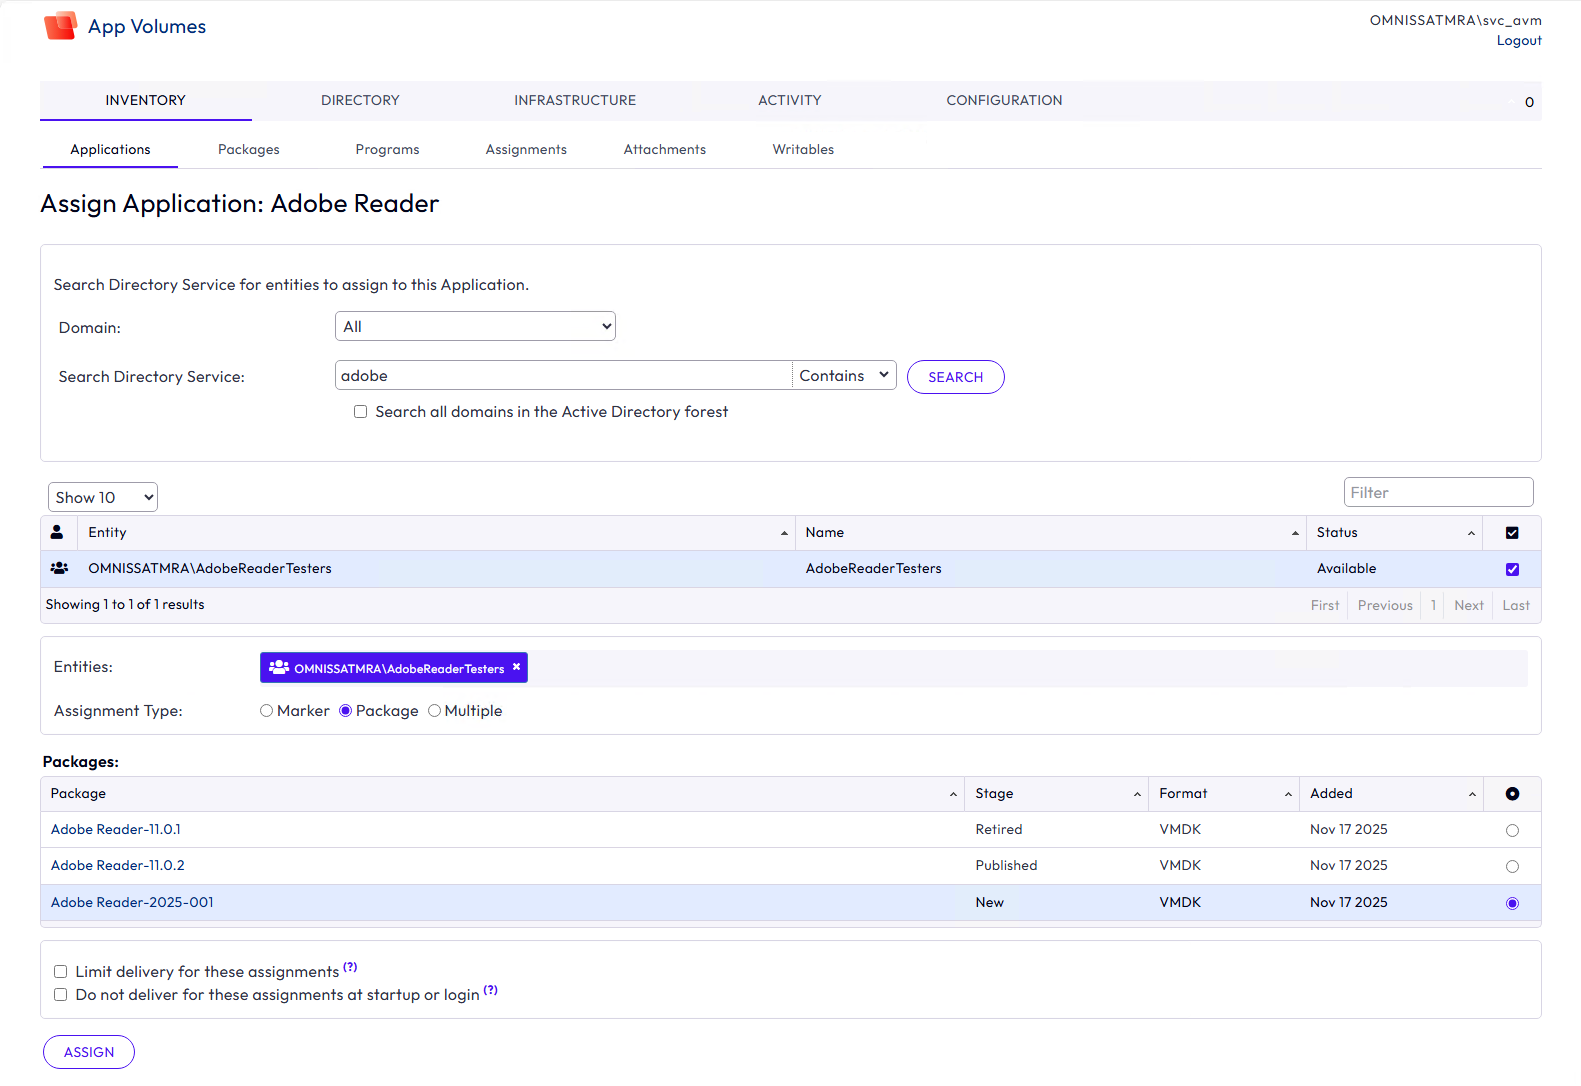
Figure 11: Using a package marker assignment
Once tested, you can simply swap the CURRENT marker to the new Package version that you want users to get. In the example below, we set the CURRENT marker to the Adobe Reader-2025-001 package. Any user who has an assignment to Adobe Reader application with the CURRENT marker type will now get the new version.
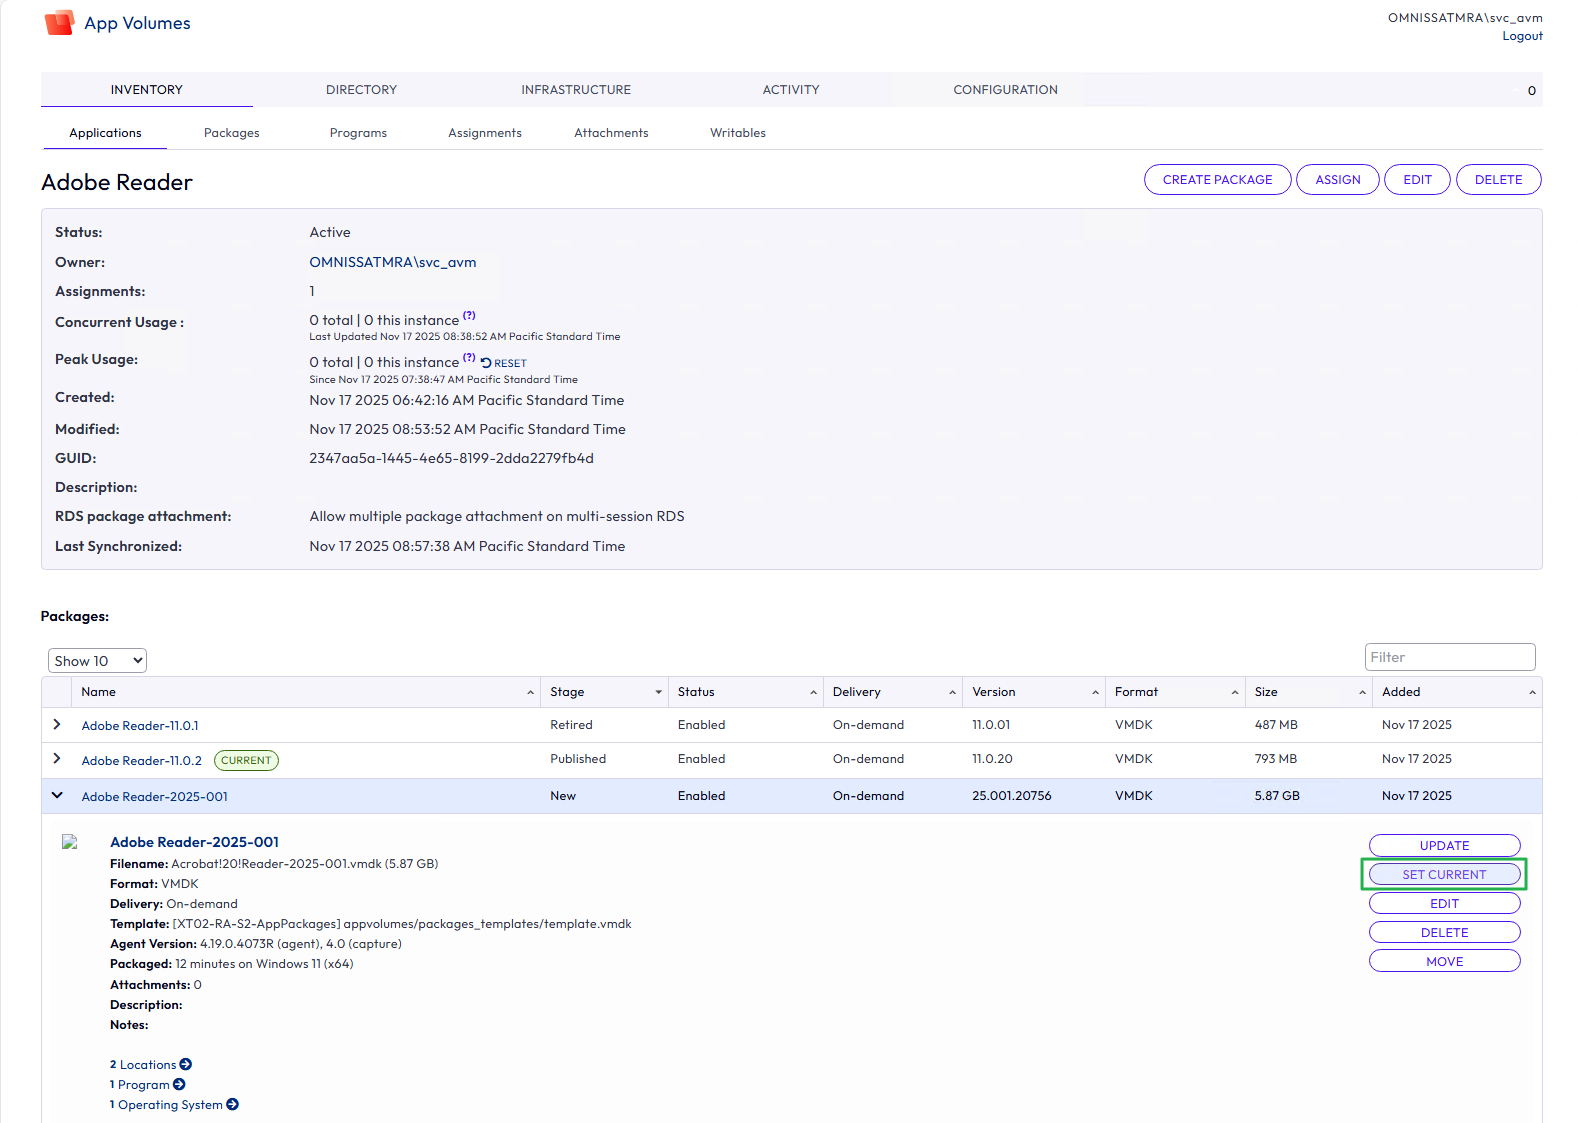
Figure 12: Setting the CURRENT marker to a new package version
To learn more about assignment types refer to Understanding Assignment Types.
To initiate an update to programs in an existing package, use the App Volumes Manager Admin UI to invoke the update process. This process clones the original package for you to work with and apply updates. End users continue to work from the original package to prevent user downtime. The new package with the updated programs is distributed by simply moving the CURRENT marker once it has been approved.
Consider the following best practices when updating and assigning updated packages:
- When creating and updating packages, use the Stage drop-down list to select an appropriate value. This makes it easy for you and other App Volumes admins to manage the lifecycle of the package.
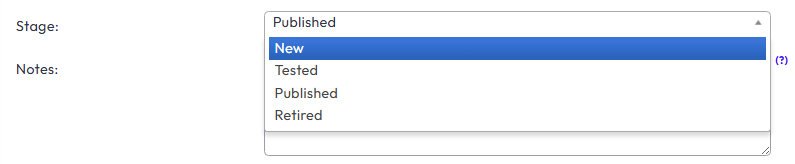
Figure 13: Define the stage for a package
- Use the marker assignment type to simplify updates for your general population of users.
- Use the Unset CURRENT option to prevent delivery of a package without modifying assignments.
- Use the package assignment type for one-off, explicit assignments of a specific version.
Note: If both package and marker assignments are made, the package assignment is used.
Performance testing for packages
Test packages immediately after packaging to determine their overall performance. Using a performance analytics tool, gather virtual machine, host, network, and storage performance information for use when packages are operated on a larger scale. Do not neglect user feedback, which can be extremely useful for assessing the overall performance of an application.
Because App Volumes provides an application container and brokerage service, storage performance is very important in a production environment. Packages are read-only. Depending on utilization patterns, the underlying shared storage platform might have significant read I/O activity. Consider using flash and hybrid-flash storage technologies for packages.
This evaluation can be time-consuming for the administrator, but it is necessary for any desktop- transformation technology or initiative.
ThinApp integration with packages
Network latency is often the limiting factor for scalability and performance when deploying ThinApp packages in streaming mode. But ThinApp provides exceptional application-isolation capabilities. With App Volumes, administrators can present ThinApp packages as dynamically attached applications that are located on storage rather than as bits that must traverse the data center over the network.
Using App Volumes to deliver ThinApp packages removes network latency due to Windows OS and environmental conditions. It also allows for the best of both worlds; real-time delivery of isolated and troublesome applications alongside other applications delivered on packages.
With App Volumes in a virtual desktop infrastructure, enterprises can take advantage of local deployment mode for ThinApp packages. ThinApp virtual applications can be provisioned inside a package using all the storage options available for use with packages. This architecture permits thousands of virtual desktops to share a common ThinApp package through packages without the need to stream or copy the package locally.
Microsoft Office application packages
For guidance on deploying Microsoft Office in a Horizon environment, see Best Practices for Delivering Microsoft Office 365 in Omnissa Horizon.
Core Microsoft Office applications can either be packaged with App Volumes or included in the base golden image used to create the desktop pool. Factors to consider include your preference in application packaging, and whether all users will get access to core Microsoft Office applications. See Application suitability for packages to understand some of the considerations.
Non-core Microsoft Office applications, such as Visio and Project, can be packaged separately with App Volumes and then assigned to only the users that require those applications. Versions of core and non-core Office that are delivered to the same VM, should be the same version.
Note: Ensure that core and non-core Microsoft Office applications are of similar version and patch levels.
Office plug-ins and add-ons
The most straightforward method is to include Microsoft Office plug-ins or add-ons in the same package as the Microsoft Office installation.
However, if necessary, you can include plug-ins or add-ons in packages that are separate from the packages that contain the Microsoft applications to which they apply. Before packaging the plug-in or add-on, install the primary application natively in the OS of the packaging VM.
Note: Ensure the plug-in or add-on is at the same version as the Microsoft Office application in the package. This includes any patches or updates.
RDSH integration with packages
App Volumes supports package integration with Microsoft RDSH-published desktops and published applications. Packages are assigned to RDSH servers rather than directly to users. Users are then entitled to the RDSH-published desktops or applications through the Horizon entitlement process. For more information, see Setting up Published Applications on Demand.
- When using Horizon Published Apps on Demand, App Volumes packages are attached to the RDSH server when a user launches the application.
- Otherwise, packages are attached to the RDSH server when the machine is powered on, and the App Volumes service starts.
Note: Writable Volumes are not supported with RDSH assignments.
Published Apps on Demand is recommended as it gives flexibility and simplifies the farm operations. If you are not using Apps on Demand but instead assigning packages to specific RDSH farms:
- Consider associating packages at the OU level in Active Directory, rather than to individual computer objects. This practice reduces the number of package entitlements and ensures packages are always available as new hosts are created and existing hosts are refreshed.
- Entitling packages to an OU where Horizon instant-clone RDSH server farms are provisioned ensures that all hosts are configured exactly alike, which supports dynamic growth of farms with minimal administrative effort.
Create dedicated packages for RDSH servers. Do not reuse a package that was originally created for a desktop OS.
When creating the package, install programs on a packaging machine that has the same operating system as that used on the deployed RDSH servers. Before installing software, switch the RDSH server to RD-Install mode. For more information, see Learn How To Install Applications on an RD Session Host Server.
See System Requirements to verify that the Windows Server version you want to use for RDSH is supported for the App Volumes Agent.
For information about using App Volumes in a Citrix Virtual Apps and Desktops shared-application environment, see Deliver Apps on Demand in the Citrix Virtual Apps and Desktops Environment.
Application suitability for packages
Most Windows applications work well with App Volumes, including those with services and drivers, and require little to no additional interaction. If you need an application to continue to run after the user logs out, it is best to natively install this application on the desktop or desktop image.
The following sections briefly describe situations and application types where App Volumes might need special attention to work properly or where the application would work best when installed in the golden image, rather than in a package.
Applications that work best in the golden image
Applications that should be available to the OS in the event that a package or Writable Volume is not present should remain in the golden image and not in an App Volumes virtual disk. These types of applications include antivirus, Windows updates, and OS and product activations, among others. Applications that should be available to the OS when no user is logged in should also be placed in the golden image.
Similarly, applications that integrate tightly with the OS should not be virtualized in a package. If these apps are removed from the OS in real time, they can cause issues with the OS. Again, if the application needs to be present when the user is logged out, it must be in the golden image and not in a package. Applications that start at boot time or need to perform an action before a user is completely logged in, such as firewalls, antivirus, and Microsoft Internet Explorer, fall into this category.
Applications that use the user profile as part of the application installation should not be virtualized in an App Stack. App Volumes does not capture the user profile space C:\users\<username>. If, as part of its installation process, an application places components into this space, those components will not be recorded as part of the packaging process. If this happens, undesired consequences or failure of the application might result when the application is captured in a package.
Applications whose components are not well understood
In the rare event that an issue with an application does present itself, it is important to have a thorough understanding of how the application functions. Understanding the processes that are spawned, file and registry interactions, and where files are created and stored is useful troubleshooting information.
App Volumes is a delivery mechanism for applications. It is important to understand that App Volumes does an intelligent recording of an installation during the packaging process and then delivers that installation. If the installation is not accurate or is configured incorrectly, the delivery of that application will also be incorrect (“garbage in, garbage out”). It is important to verify and test the installation process to ensure consistent and reliable App Volumes delivery.
App Volumes Agent altitude and interaction with other mini-filter drivers
The App Volumes Agent is a mini-filter driver. Microsoft applies altitudes to filter drivers. The concept is that the larger the number, the “higher” the altitude. Mini-filter drivers can see only the other filter drivers that are at a higher altitude. The actions at a lower altitude are not seen by filter drivers operating at a higher altitude.
The lower-altitude mini-filter drivers are the first to interact with a request from the OS or other applications. Generally speaking, the requests are then given to the next mini-filter driver in the stack (next highest number) after the first driver finishes processing the request. However, this is not always the case because some mini-filter drivers might not release the request and instead “close” it out to the OS or application.
In the case where a request is closed, the subsequent mini-filter drivers will never see the request at all. If this happens with an application running at a lower altitude than App Volumes, the App Volumes mini-filter driver will never get a chance to process the request, and so will not be able to virtualize the I/O as expected.
This is the primary reason that certain applications that use a mini-filter driver should be turned off or removed from the OS while you install applications with App Volumes. There might be additional scenarios where App Volumes Agent should be turned off, allowing other applications to install correctly in the base OS.
Other special considerations
The following guidelines will also help you determine whether an application requires special handling during the virtualization process or whether virtualization in a package is even possible:
- Additional application virtualization technologies – Other application virtualization technologies (Microsoft App-V, ThinApp, and others) should be turned off during packaging because the filter drivers could potentially conflict and cause inconsistent results in the packaging process.
- Mixing of 32- and 64-bit OS types – The OS type (32- or 64-bit) of the machine that the package is attached to should match the OS type that applications were packaged on. Mixing of application types in App Volumes environments follows the same rules as Windows application types—that is, if a 32-bit application is certified to run in a 64-bit environment, then App Volumes supports that configuration also.
- Exceptional applications – Some software apps just do not work when installed on an App Volumes package. There is no list of such applications, but an administrator might discover an issue where an application simply does not work with App Volumes.
In summary, most applications work well with App Volumes, with little to no additional interaction needed. However, you can save time and effort by identifying potential problems early, by looking at the application type and use case before deciding to create a package.
Recommended practices for production environments
The following recommendations pertain to golden image optimization, setting up virtual desktops, and security best practices.
Golden image optimization
Golden images should be optimized for VDI or RDSH to ensure the best performance possible in a virtualized environment. Consider using the instructions in Manually Creating Optimized Windows Images for Horizon VMs when building your golden images. The Windows OS Optimization Tool for Horizon helps optimize Windows desktop and server operating systems for use with Horizon.
The OS Optimization Tool includes a customizable template to enable or turn off Windows system services and features across multiple systems, per recommendations and best practices. Because most Windows system services are enabled by default, the OS Optimization Tool can be used to easily turn off unnecessary services and features to improve performance.
Desktop pool recommendations
When setting up client endpoint devices, consider the following best practices:
- When reverting a desktop VM that is running the App Volumes Agent to a previous snapshot, make sure that the VM is gracefully shut down, to avoid synchronization issues. This is primarily relevant to the packaging desktop and golden image VMs for Horizon linked- and instant-clone desktop pools.
- If you are using a Horizon desktop pool, the App Volumes Agent should be installed on the golden image VM for linked- and instant-clone pools, or on the VM template for full-clone pools, for ease of distribution.
- If using a Horizon linked-clone pool, make sure the Delete or Refresh machine on logoff policy in Desktop Pool Settings is set to Refresh Immediately. This policy ensures that the VMs stay consistent across logins.
Summary and additional resources
Now that you have come to the end of this configuration chapter on Omnissa App Volumes, you can return to the reference architecture landing page and use the tabs, search, or scroll to select further chapter in one of the following sections:
- Overview chapters provide understanding of business drivers, use cases, and service definitions.
- Architecture chapters give design guidance on the Omnissa products you are interested in including in your deployment, including Workspace ONE UEM, Access, Intelligence, Workspace ONE Assist, Horizon Cloud Service, Horizon 8, App Volumes, Dynamic Environment Manager, and Unified Access Gateway.
- Integration chapters cover the integration of products, components, and services you need to create the environment capable of delivering the services that you want to deliver to your users.
- Configuration chapters provide reference for specific tasks as you deploy your environment, such as installation, deployment, and configuration processes for Omnissa Workspace ONE, Horizon Cloud Service, Horizon 8, App Volumes, Dynamic Environment Management, and more.
Additional resources
For more information about App Volumes, you can explore the following resources:
Changelog
The following updates were made to this guide:
| Date | Description of Changes |
| 2025-11-20 | Updated multi-instance configuration guidance, along with new screenshots. Updated all URL links |
| 2025-02-15 | Added sections
|
| 2024-05-27 | Updated for Omnissa docs, KB, and Tech Zone links. |
| 2023-07-25 | Added this Summary and Additional Resources section to list changelog, authors, and contributors within each design chapter. |
| 2022-05-25 | Updated with additional guidance on how to configure multi-instance management. |
| 2020-07-01 | Updated App Volumes version 2.x to App Volumes 4. Added a new section, Replicate Application Packages and Reconstruct Relationships and Entitlements. |
Author and contributors
This chapter was written by:
- Graeme Gordon, Senior Staff Architect, Omnissa.
- Donal Geary, Senior Lab Manager, Omnissa.
- Josh Spencer, Senior Product Line Manager, Omnissa.
Feedback
Your feedback is valuable. To comment on this guide, either use the feedback button or contact us at tech_content_feedback@omnissa.com.