

Component integration
This chapter is one of a series that make up the Omnissa Workspace ONE and Horizon Reference Architecture, a framework that provides guidance on the architecture, design considerations, and deployment of Omnissa Workspace ONE and Omnissa Horizon solutions. This chapter provides information about integrating the separate products and components together.
Introduction
After the various Workspace ONE and Horizon products and components have been designed and deployed, some one-time integration tasks must be completed.
- Integrate Workspace ONE UEM with Omnissa Access, Omnissa Intelligence, and Workspace ONE Assist.
- Also integrate Omnissa Intelligence with Omnissa Access and Workspace ONE Trust Network.
- Integrate Horizon 8 with Omnissa Access.
Workspace ONE UEM and Omnissa Access integration
Omnissa Access and Workspace ONE UEM are built to provide tight integration between identity and device management. This integration has been simplified in recent versions to ensure that configuration is relatively straightforward. For information about the latest release, see Workspace ONE UEM Integration with Omnissa Access.
Although Access and Workspace ONE UEM are the core components in a Workspace ONE deployment, you can also deploy a variety of other components, depending on your business use cases. As the following figure shows, you can use Unified Access Gateway for access to an on-premises Exchange server through Workspace ONE UEM Secure Email Gateway (SEG) or Per-App Tunnel through Workspace ONE Tunnel edge service to access internal resources. Refer to the various sections in the Workspace ONE UEM Documentation for descriptions of the full range of components that apply to a deployment.
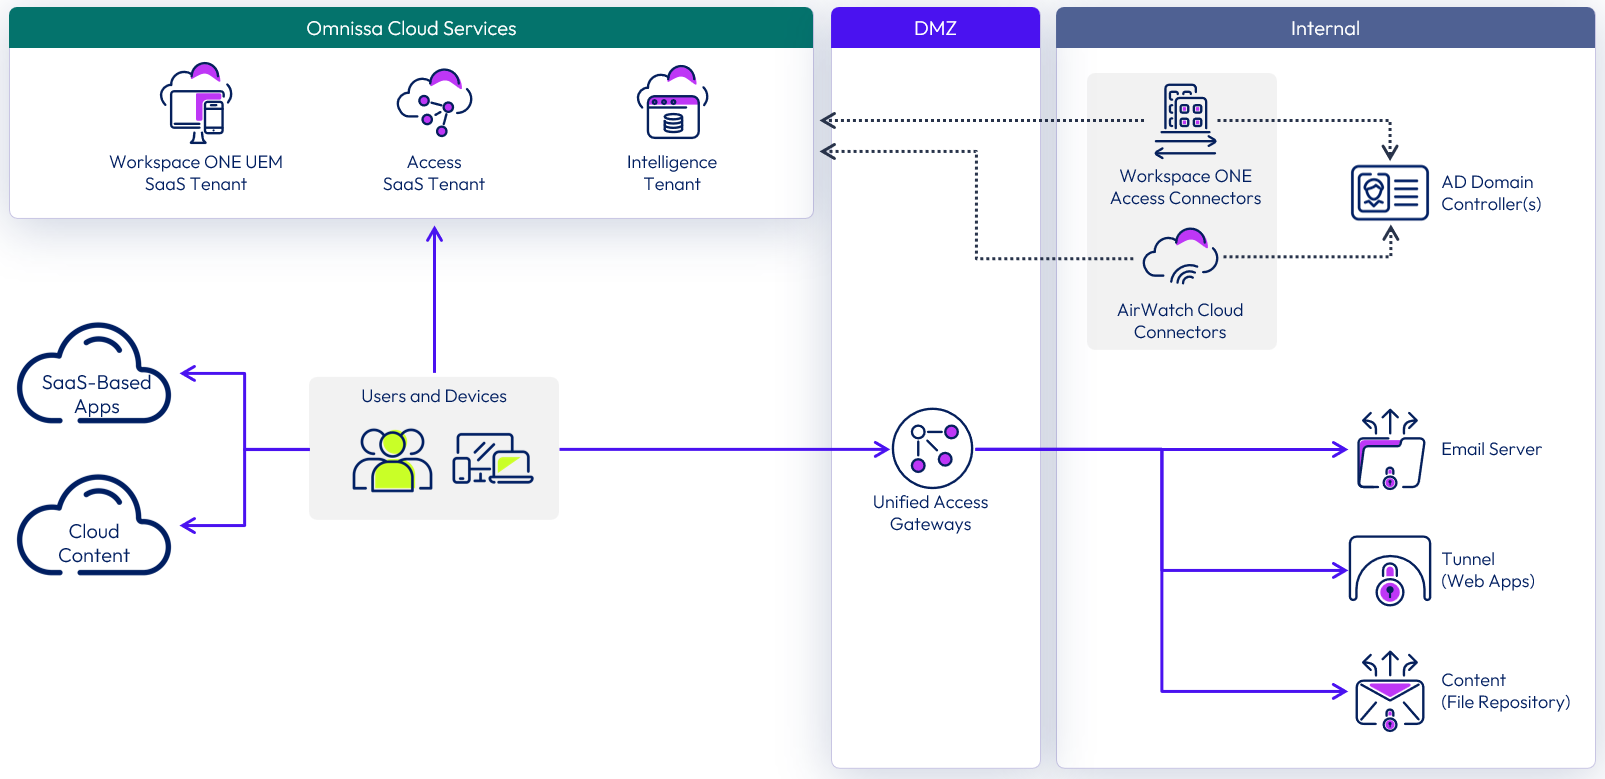
Figure 1: Sample Workspace ONE architecture
Many other enterprise components can be integrated into a Workspace ONE deployment. These components include technologies such as a Certificate Authority, Active Directory, file services, email systems, SharePoint servers, external access servers, and reverse proxies. We assume that these enterprise systems are in place and are functional if necessary.
To successfully integrate Workspace ONE UEM with Access, you can use the Workspace ONE Getting Started wizards. The Identity and Access Management wizard walks you through connecting to Access, and setting up the AirWatch Cloud Connector to allow the components of Workspace ONE, Workspace ONE UEM, and Workspace ONE Access to communicate with your Active Directory. Documentation for this process is available in the Workspace ONE UEM Integration with Omnissa Access.
Connect UEM to Access
First prepare Access with an OAuth 2.0 service client account that you can use to authorize the connection. For more information, see Creating the Omnissa Access OAuth 2.0 Service Client for Integration with Workspace ONE UEM.
You can then use the Workspace ONE wizard, in the UEM console, to connect UEM to Access.
- Using the UEM console, navigate to GETTING STARTED, Workspace ONE.
- Click on CONFIGURE next to Connect to Workspace ONE Access.
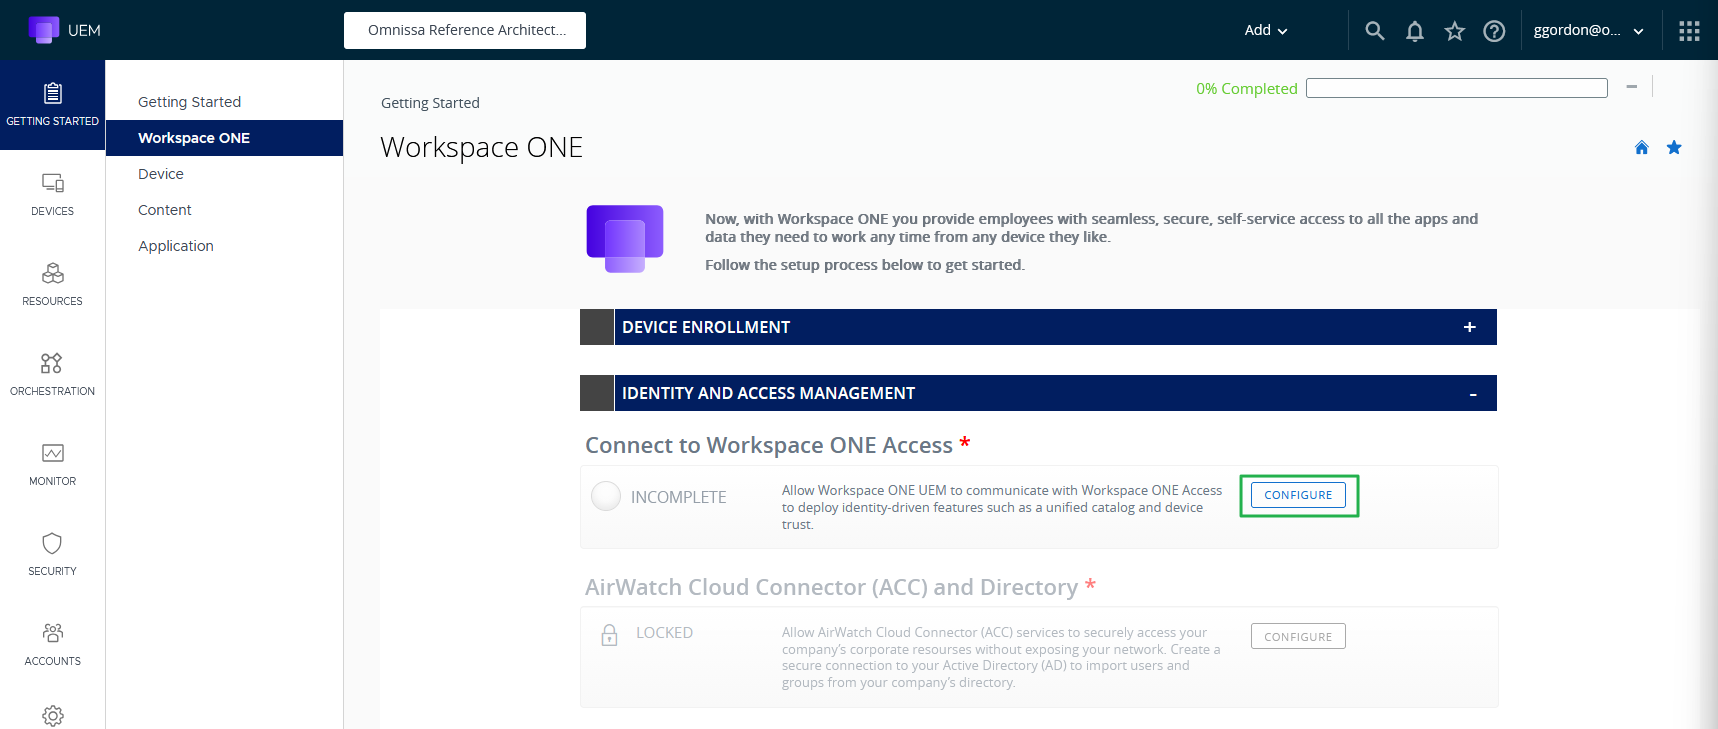
Figure 2: Identity and access management wizard
- Fill in the Access Tenant URL, the client ID and the shared secret (for the service client you created in preparation on Access).
- Click TEST CONNECTION and then SAVE.
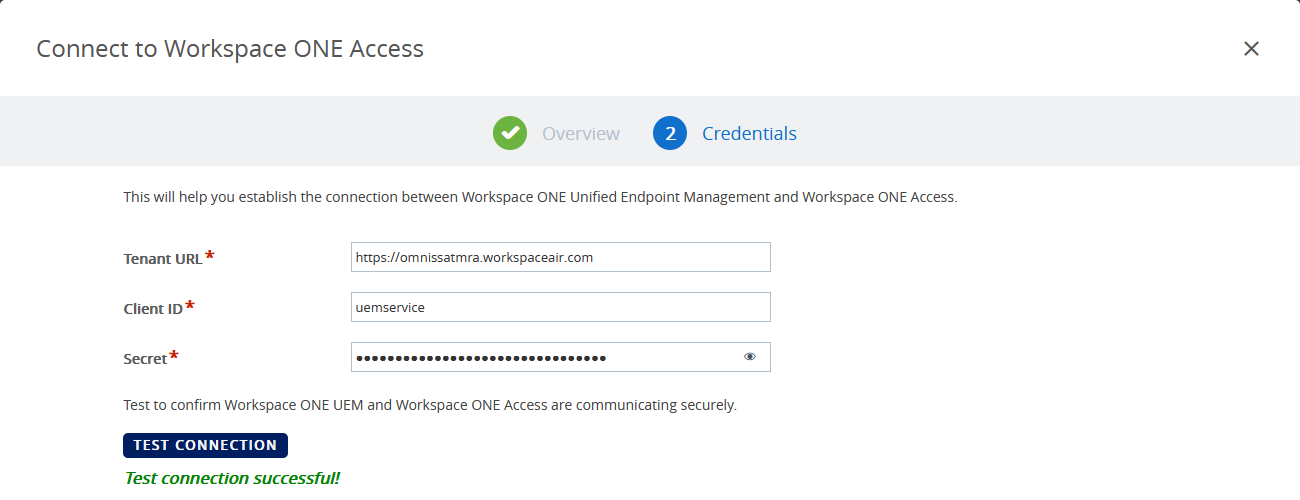
Figure 3: Connect to Access
After you enter the fully qualified domain name (FQDN) and supply authentication credentials for the Workspace ONE Access tenant, the connection can be made.
- The Workspace ONE UEM console servers must be able to reach the Access tenant through port 443.
- The Access tenant must be able communicate with the Workspace ONE UEM API service through port 443.
AirWatch Cloud Connector
After the connection is made, the first step in the Identity and Access Management wizard is marked as complete. The next step in the Identity and Access Management wizard is to install the AirWatch Cloud Connector and connect Workspace ONE UEM to Active Directory.
- In the row, AirWatch Cloud Connector (ACC) and Directory, click on CONFIGURE.
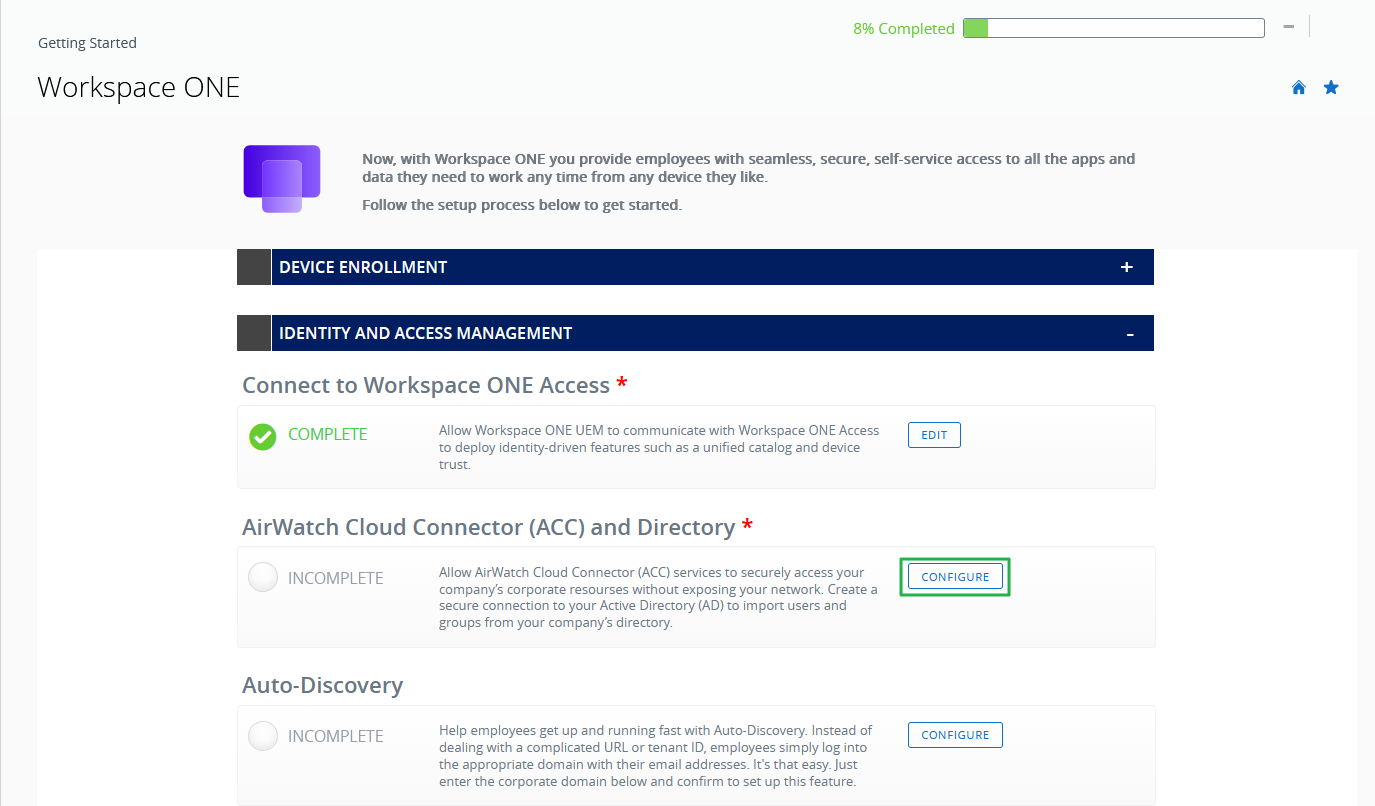
Figure 4: Identity and access management wizard – connection to Access completed
- The wizard for setting up the AirWatch Cloud Connector starts with an overview page. Click CONTINUE.
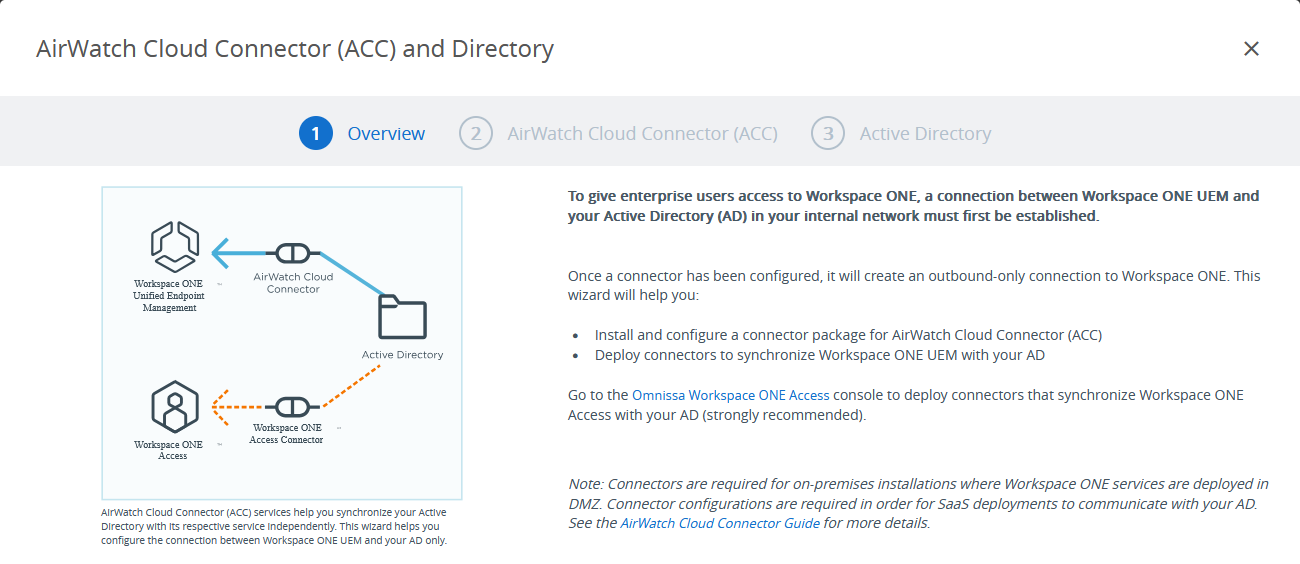
Figure 5: AirWatch Cloud Connector (ACC) and Directory wizard overview
The AirWatch Cloud Connector provides the ability to integrate Workspace ONE UEM with an organization’s backend enterprise systems. It is enabled in the Workspace ONE UEM Console and is downloaded to a Windows Server in the enterprise to enable communication between Active Directory and the Workspace ONE service.
- The wizard prompts you to set up a password before downloading the AirWatch Cloud Connector installer. Use this password while running the installer.
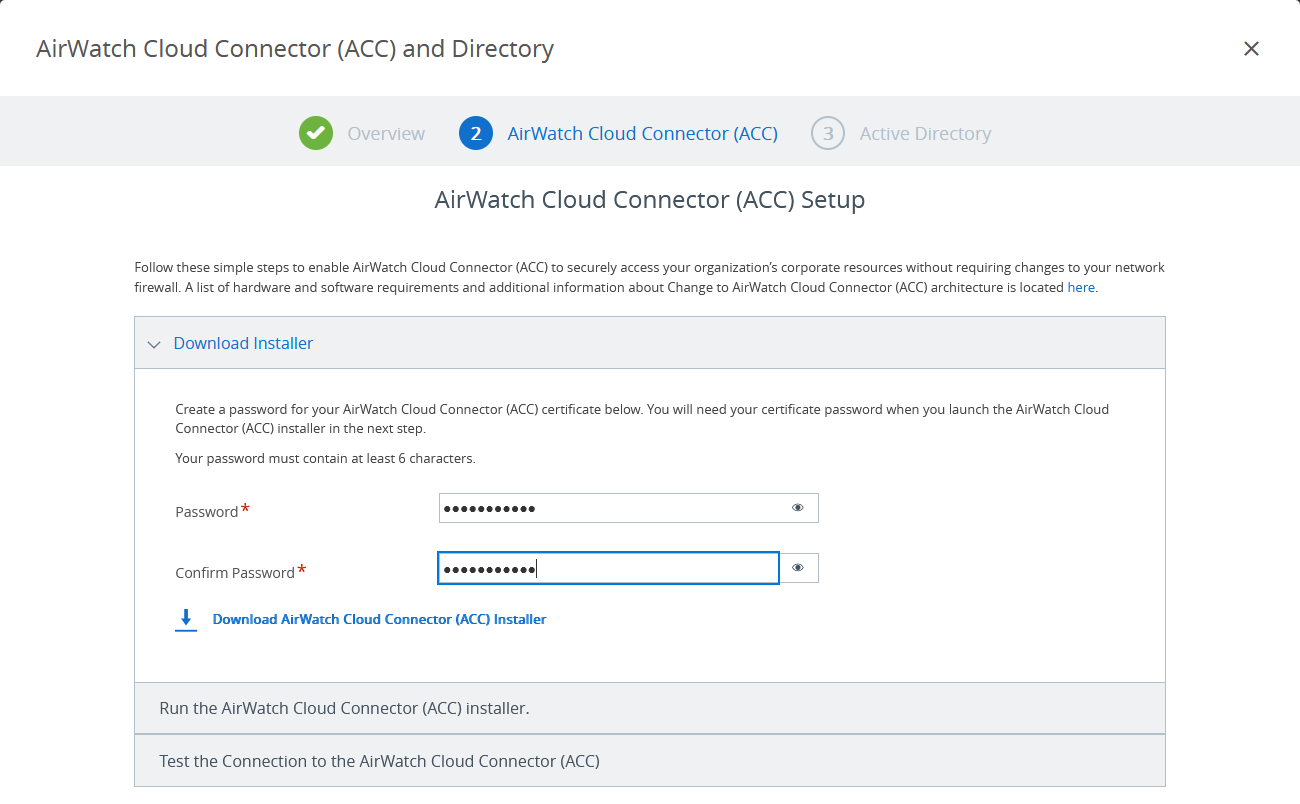
Figure 6: Download the AirWatch Cloud Connector
- Complete the installation of the AirWatch Cloud Connector, following the guidance in Run the AirWatch Cloud Connector Installer.
Active Directory integration
The next step, after setting up the AirWatch Cloud Connector, is to enter your Active Directory and bind authentication information to integrate AD with Workspace ONE UEM. Because you are making connections from the AirWatch Cloud Connector, ensure that networking and server IPs and host names can be resolved.
Note: Ensure that the Active Directory domain name you enter in the wizard matches the name used in Access. Otherwise, administrators will not be able to access some features and configurations of Access from the Workspace ONE UEM Console.
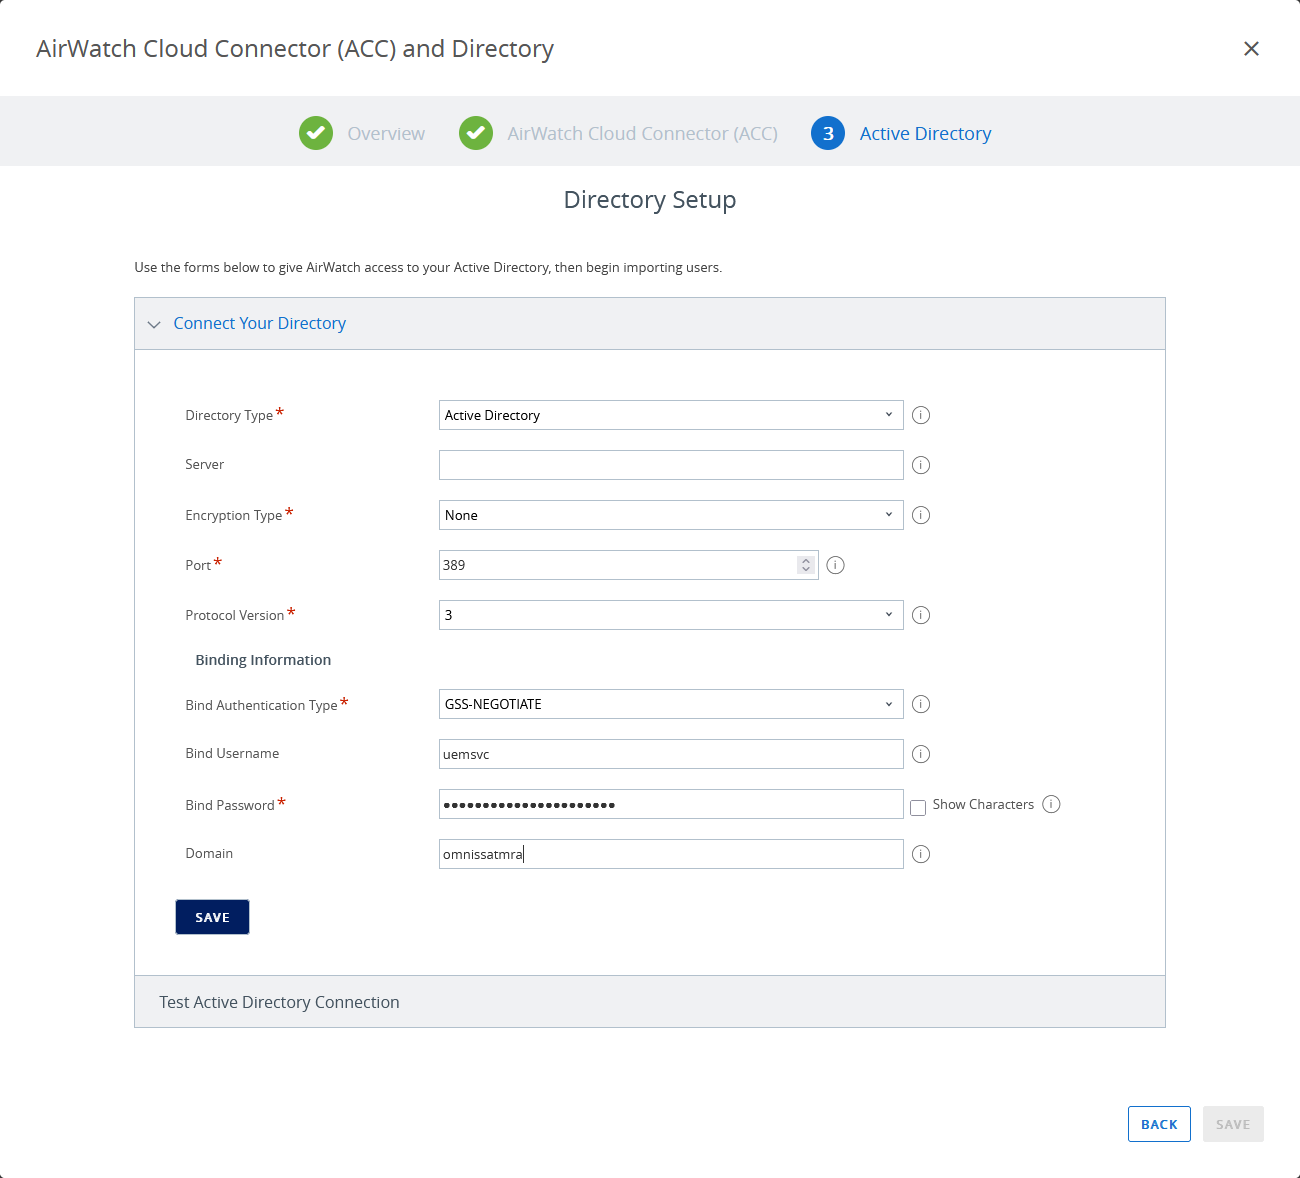
Figure 7: Connect to Active Directory
Access Connector
The Omnissa Access Connector provides connectivity to synchronize Omnissa Access with your user directory, such as Active Directory. The Access Connector also provides user authentication and integration with Horizon, along with following capabilities:
- Many authentication methods for external users, including password, RSA Adaptive Authentication, RSA SecurID, and RADIUS
- Kerberos authentication for internal users
- Access to Horizon 8 resources
- Access to Horizon Cloud resources
- Access to Citrix-published resources
To set up the Omnissa Access Connector along with directory integration, see Installing Omnissa Access Connector and Directory Integration with Omnissa Access.
Catalog population
The unified Workspace ONE app catalog contains many types of applications. SaaS-based SAML apps and Horizon apps and desktops are delivered through the Access catalog, and native mobile apps are delivered through the Workspace ONE UEM catalog.
Table 1: Configuration considerations for populating the Omnissa Access catalog
| Resource | Configuration considerations |
| SaaS apps | To add a new SaaS application, go to the Catalog tab, select Web Apps from the drop-down list, and select New. Applications can be defined manually, or a predefined application template can be customized. See Setting Up Resources in Omnissa Access. You can manually create SaaS apps that do not have a template in the cloud catalog by using the appropriate parameters. Assign the appropriate users or groups to the applications being published and choose whether the entitlement is user-activated or automatic. |
| Horizon 8 or Horizon Cloud | To include Horizon or Horizon Cloud resources in the catalog, entitlements are synced from the Horizon environment to Access. Horizon and Horizon Cloud pods are added into the Access catalog. For more information, see Setting Up Resources in Omnissa Access. The launch of a Horizon desktop or application from Access does not alter the traffic path of the Horizon session. External access to Horizon environments still requires Unified Access Gateway appliances. |
| Native mobile apps | In the Workspace ONE UEM Console, you use the Apps and Books node to assign apps from the public app stores to their respective device platforms. Apps are defined by platform (iOS, Android, Windows, and more) and are located in the app store for that platform. The apps are then assigned to Smart Groups as appropriate. Application configuration key values are provided to point the Workspace ONE app to the appropriate Access tenant. Recommended apps to deploy include the Workspace ONE mobile app and popular Workspace ONE apps such as Workspace ONE Boxer, Workspace ONE Content, and Workspace ONE Browser. |
Device profile configuration and single sign-on
Device profiles provide key settings that are applied to devices as part of enrollment in Workspace ONE UEM. The settings include payloads, such as credentials, passcode requirements, and other parameters used to configure and secure devices. Different payloads are configured in different services, as described in this document, but SSO is a common requirement across all devices and use cases.
Table 2: Configuration considerations for device profiles in Workspace ONE UEM
| Device profiles | Configuration considerations |
| iOS SSO | The iOS platform uses the mobile SSO authentication adapter. The authentication adapter is enabled in and is added to an access policy. Use the Mobile SSO Getting Started wizard to enable mobile SSO in your environment. The Mobile SSO wizard creates an SSO profile that uses a certificate issued by the AirWatch Certificate Authority. |
| Android SSO | Android uses the mobile SSO authentication adapter. It is enabled in Access and is added to an access policy. A profile is deployed to support SSO. For more information, see Implementing Mobile Single Sign-On Authentication for Workspace ONE UEM Managed Android Devices. Use the Mobile SSO Getting Started wizard to enable mobile SSO in your environment. The Mobile SSO wizard creates the necessary Workspace ONE Tunnel device profile, publishes the Workspace ONE Tunnel application, and creates the required network rules. |
| Windows 10 SSO | Windows 10 SSO uses certificate authentication. A certificate is generated from the AirWatch CA through a SCEP (Simple Certificate Enrollment Protocol) profile. The certificate (cloud deployment) authentication adapter is enabled to use Windows 10 SSO. For more information, see Configuring Certificate Authentication for Use with Omnissa Access. The user is prompted to select a certificate at Workspace ONE app launch. For device-compliance checking to function, part of the certificate request template for Workspace ONE UEM must include a SAN type of DNS name with a value of UDID={DeviceUid}. |
The Access directory synchronizes user account information from Active Directory and uses it for entitling applications to users through the Workspace ONE app or browser page. For SSO and True SSO to work when integrating with Access and Horizon, a number of configuration considerations must be considered.
Table 3: Configuration considerations for features in Access
| Component | Configuration considerations |
| Access catalog | This catalog is the launch point for applications through the Workspace ONE portal. Applications in the following categories are expected to be configured:
|
| True SSO | True SSO support is configured in Access to ensure simple end-user access to desktops and apps without multiple login prompts and without requiring AD credentials. |
| Workspace ONE Access Connectors | Workspace ONE Access Connectors are placed in the internal network to ensure that users external to the organization can access the resources that have been configured in the Workspace ONE catalog. |
| SaaS-based web apps | SaaS-based applications that use SAML as an authentication method can be accessed through Access. Configuration of applications is done through the templates in the cloud application catalog. |
| Horizon desktop assignments | In the Access administration console, create one or more virtual apps collections for the Horizon pods or Horizon Cloud tenants. See Setting Up Resources in Omnissa Access. Configure SAML authentication between Access and the Horizon pods or Horizon Cloud tenants. |
| Horizon published applications | RDSH-published applications and their entitlements populate the Access catalog when Horizon pods or Horizon Cloud tenants are configured as described for virtual desktop assignments. |
| Active Directory Kerberos authentication | To provide SSO to the Access catalog, the appropriate authentication methods must be enabled.
Kerberos authentication must be enabled under the Connectors section in the administration console. For more information, see Configuring Kerberos Authentication In Omnissa Access. |
| Access policies | Access policies are configured to establish how users will authenticate to an operating system, network, or application. Use the Identity and Access Management tab to manage policies and edit the default access policy, as described in Managing Access Policies in the Omnissa Access Service. You can use different policies for different network ranges so that, for example, AD Kerberos is used for internal connections, but other authentication methods are used for external connections. |
Workspace ONE UEM and Omnissa Intelligence integration
Omnissa Intelligence offers insights into your digital workspace. It offers enterprise mobility management (EMM) planning and automation. All these components help to optimize resources, strengthen security and compliance, and enrich user experience across your environment.
Workspace ONE UEM is the minimum and main required integration point for Intelligence. When Workspace ONE UEM is hosted on-premises, it requires the installation of the Workspace ONE Intelligence Connector service on the internal network.
Note: For those using cloud-based Workspace ONE UEM, there is no need to install the Workspace ONE Intelligence Connector service because it is already enabled by default.
The Intelligence Connector service collects data related to devices, apps, and OS updates from your Workspace ONE UEM database and pushes this data to the cloud-based report service.
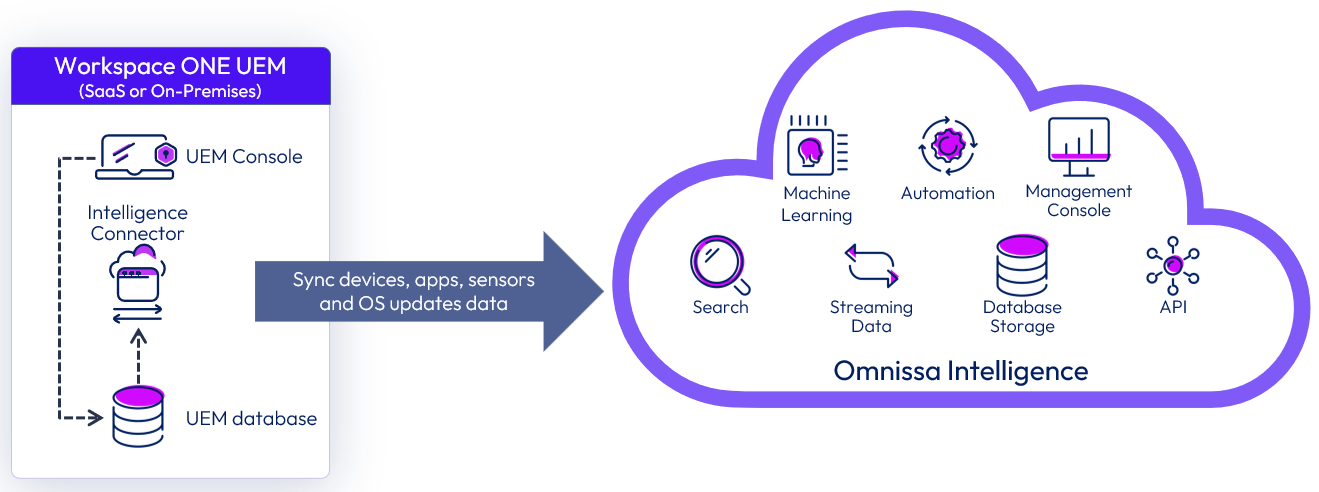
Figure 8: Integration of Workspace ONE UEM with Intelligence cloud service
The integration consists of high-level steps:
- Define the region where the Intelligence Connector service will sync the data. This information will be required during the installation process.
- Ensure you have allowlisted the applicable URLs so that the connector installation process can communicate with the correct cloud-based reports service.
For the list of URLs, see Requirements in Intelligence Dashboards, Workflows, and Reports. - If you use a proxy server and want to use it with the Intelligence Connector, make sure you have allowlisted specific destinations. If you do not allowlist these destinations, the installation can fail.
- Ensure you have met the hardware, software, and network requirements outlined in see Requirements in Intelligence Dashboards, Workflows, and Reports.
- Run the Intelligence Connector installer.
For more information, see the Installing the Intelligence Connector Service.
After you successfully install the Intelligence Connector service and opt-in to Intelligence through the Workspace ONE UEM Console, the Intelligence Connector service will perform the first import of all devices, apps, and OS update data. Subsequent synchronizations will be based on samples taken from the devices, sensors, apps, and OS updates.
For more information regarding Intelligence Connector support for high availability and disaster recovery, see High availability and disaster recovery support with the Intelligence Connector.
Workspace ONE Mobile Threat Defense and Workspace ONE UEM integration
Workspace ONE Mobile Threat Defense offers advanced mobile protection for iOS, Android, and Chrome devices managed by Workspace ONE UEM, securing devices against app, device, OS, and network-based threats.
Workspace ONE Mobile Threat Defense is powered by Lookout and uniquely integrates with Workspace ONE UEM embedding the Lookout SDK within the Intelligence Hub app to form a robust endpoint protection suite on these managed devices. This lightweight mobile app activates security via the Intelligent Hub and provides mobile security in an easy to deploy and manage way while offering integrated management of the device and the ability to provide actions on alerts and threats on the device without user interaction.
Workspace ONE UEM is the minimum and main required integration point for Workspace ONE Mobile Threat Defense (SaaS only). For more information on the requirements, see the Workspace ONE Mobile Threat Defense documentation.
The integration of Workspace ONE Mobile Threat Defense and Omnissa Intelligence is optional and performed through the Trust Network integration to enable advanced incident response.
The following diagram shows the main points of integration to enable Workspace ONE Mobile Threat Defense.
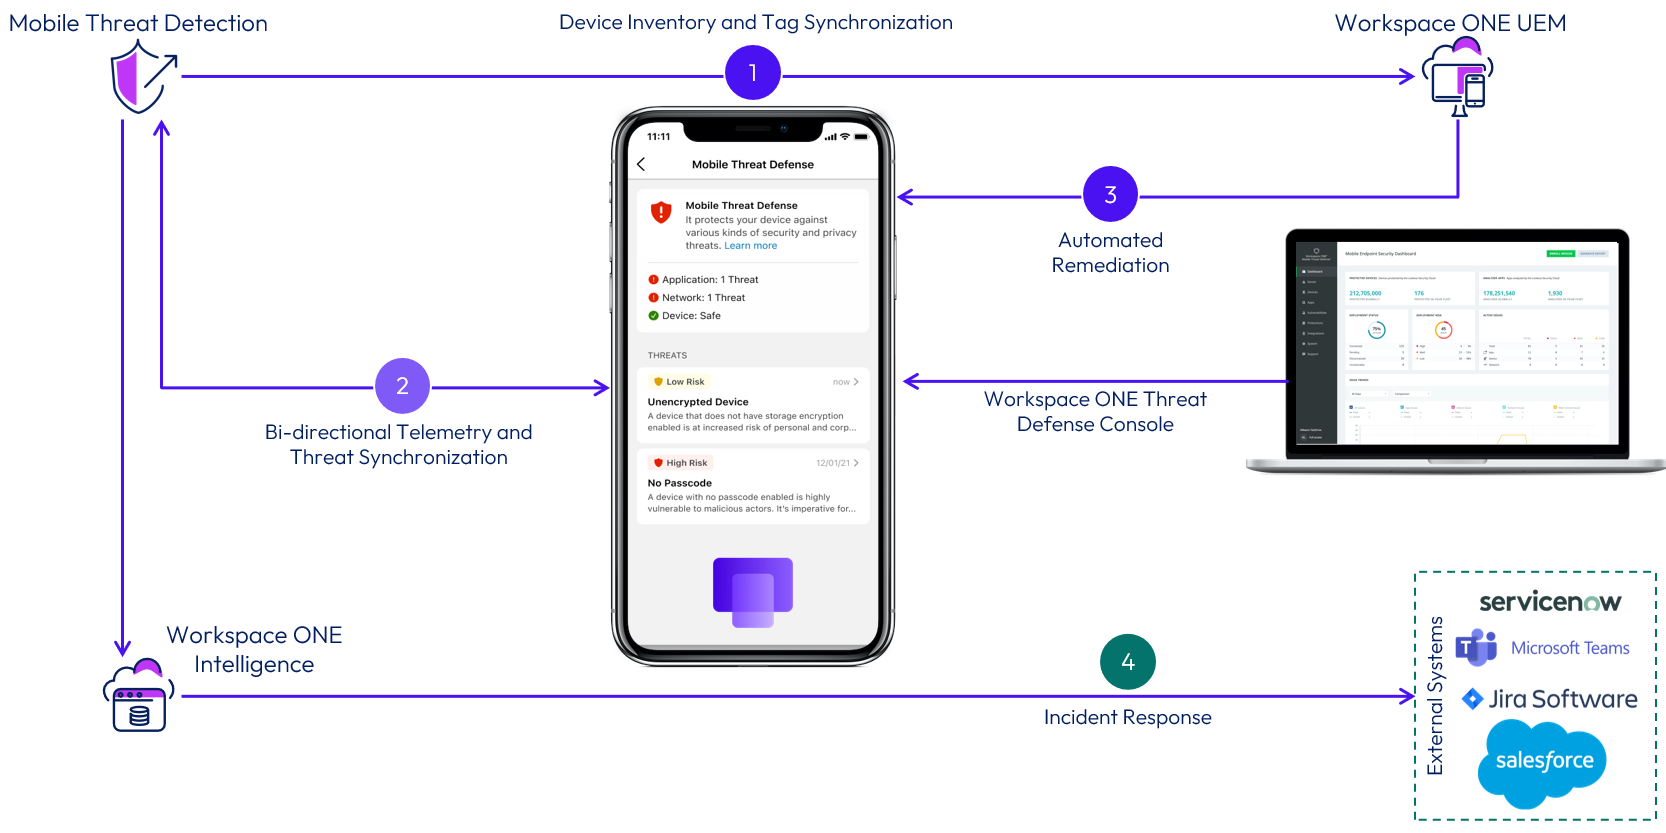
Figure 9: Workspace ONE Mobile Threat Defense logical architecture
Device inventory and tag synchronization
Workspace ONE Mobile Threat Defense (MTD) and Workspace ONE UEM integrate via REST API to enable device inventory synchronization from UEM into MTD, allowing the Security Team to see the required device information when threats are displayed in the MTD Console and associate security policies to a group of devices.
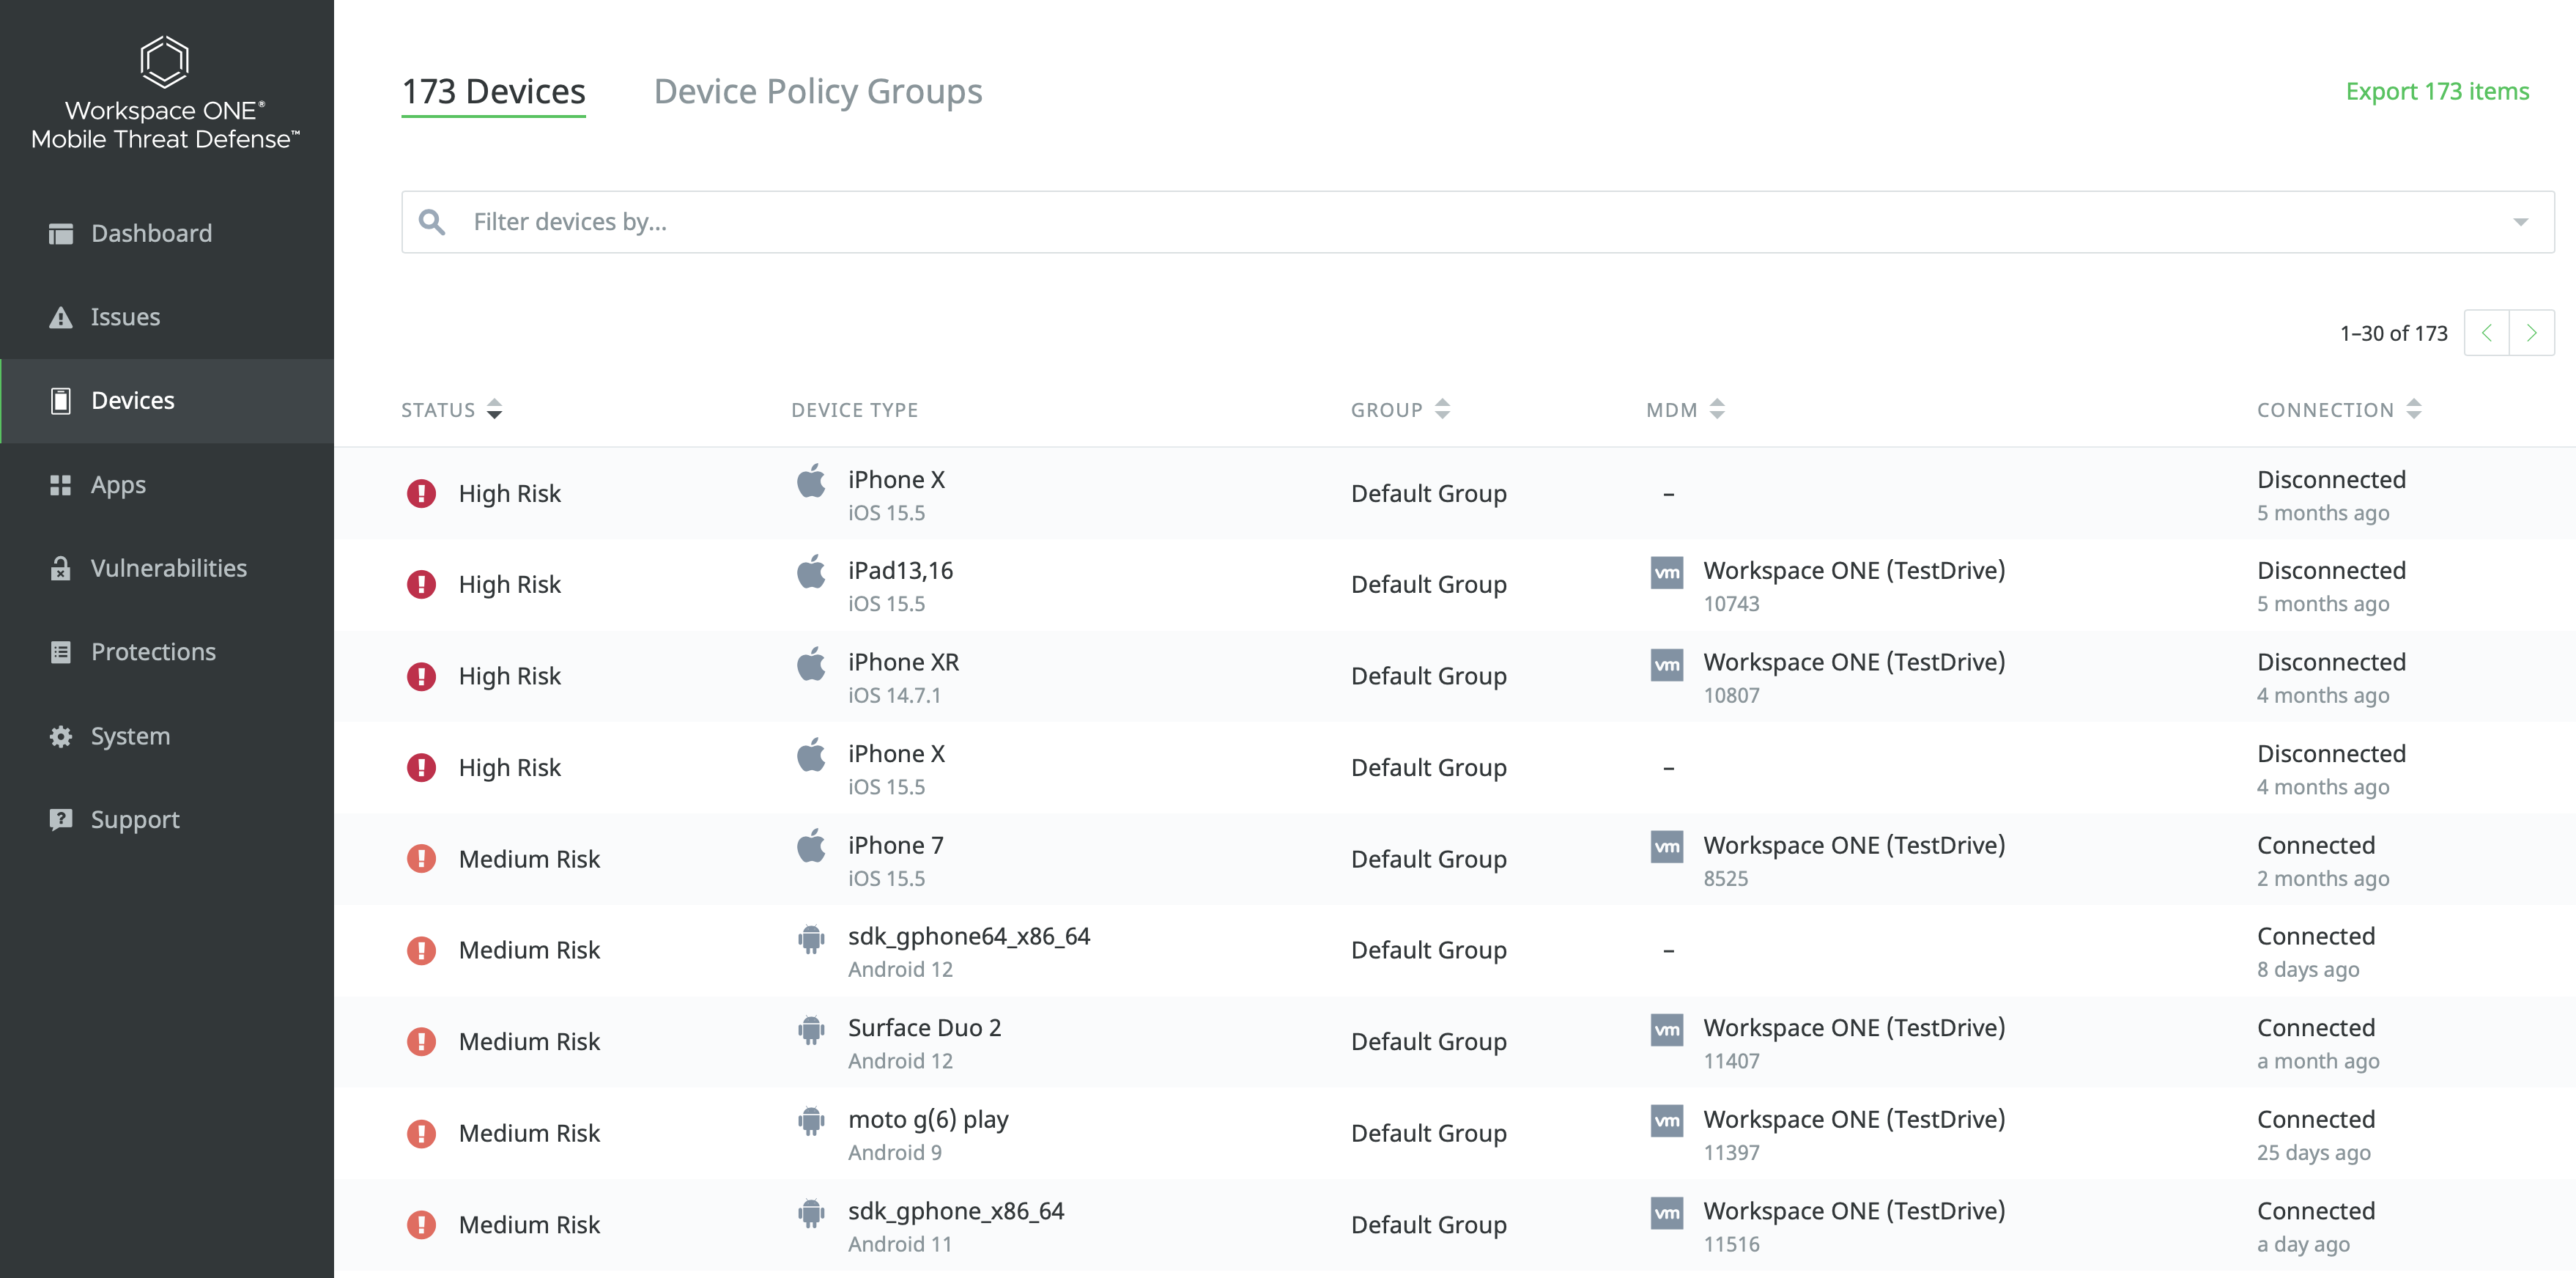
Figure 10: List of devices and respective risk status into Workspace ONE Mobile Threat Defense console
This integration also enables MTD to update the device status in UEM when threats are identified. The devices in UEM will receive Tags that represent their current risk status. The tags are created in the UEM Console and associated with the respective risk status in the MTD console.
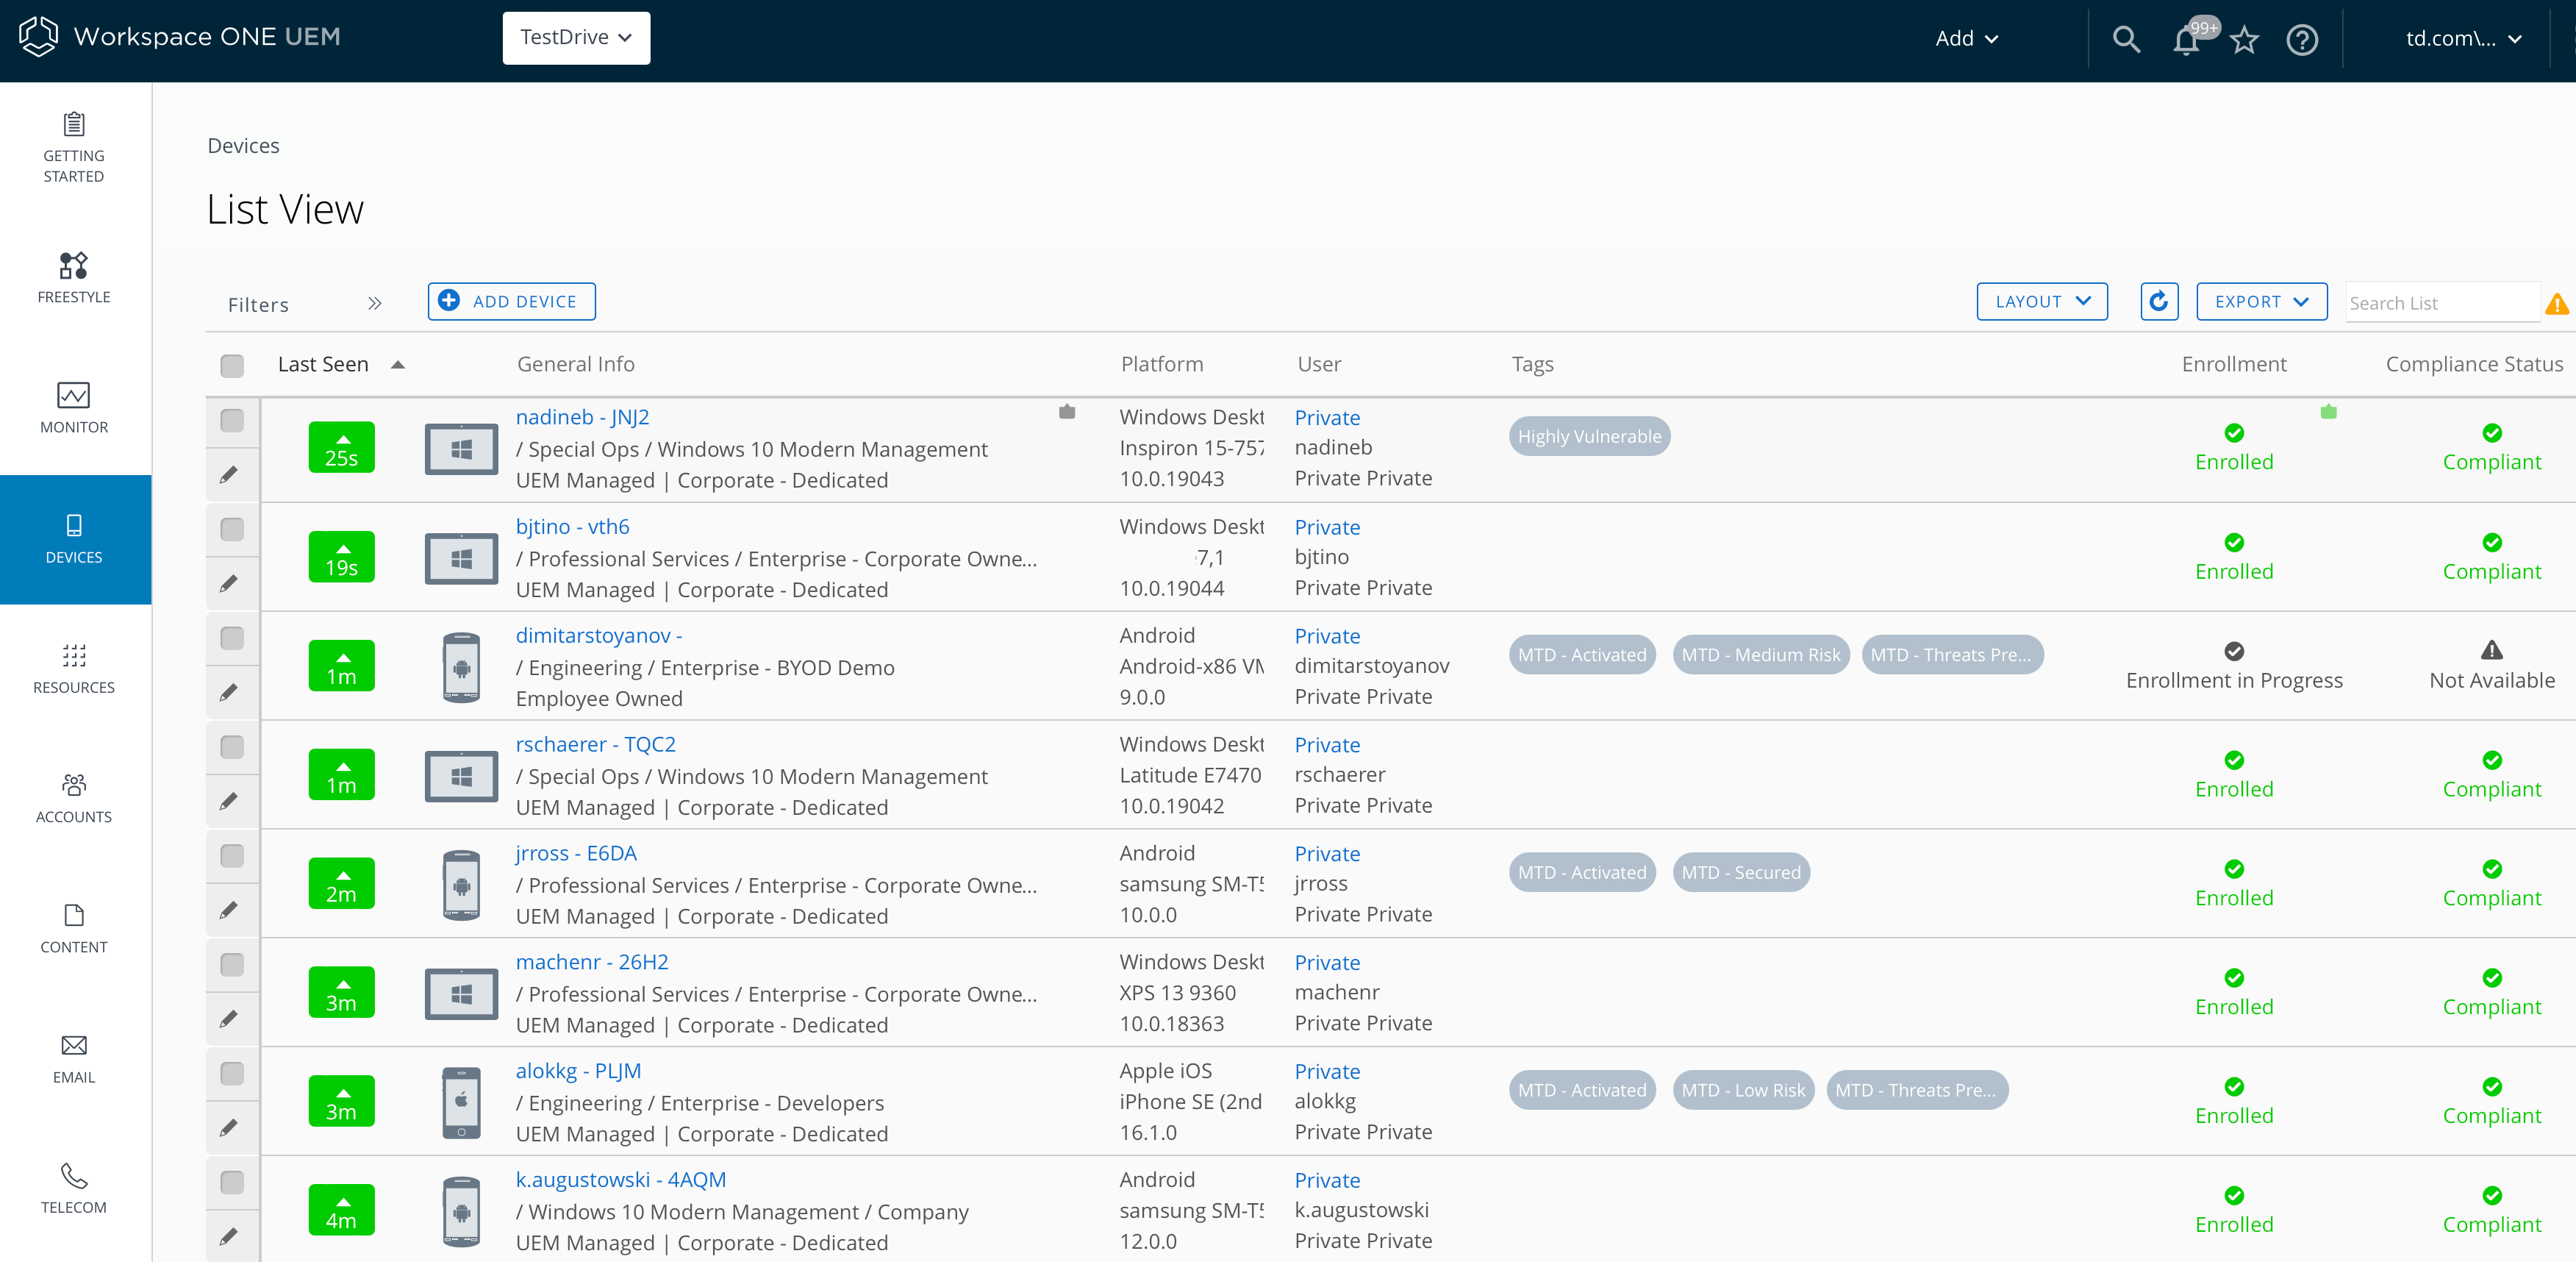
Figure 11: List of devices and respective risk status into Workspace ONE UEM console
To learn how to perform this integration step by step, see Integrate Workspace ONE Mobile Threat Defense with Workspace ONE UEM.
Mobile Threat Defense device activation
Workspace ONE Mobile Threat Defense must be activated on the devices. The activation process on Intelligence Hub is configured through custom SDK configuration and does not require the end-user to launch a separate app to activate MTD. This is possible because of our unique integration that brings Lookout SDK into Intelligent Hub; all the MTD protection happens in the Intelligent Hub.
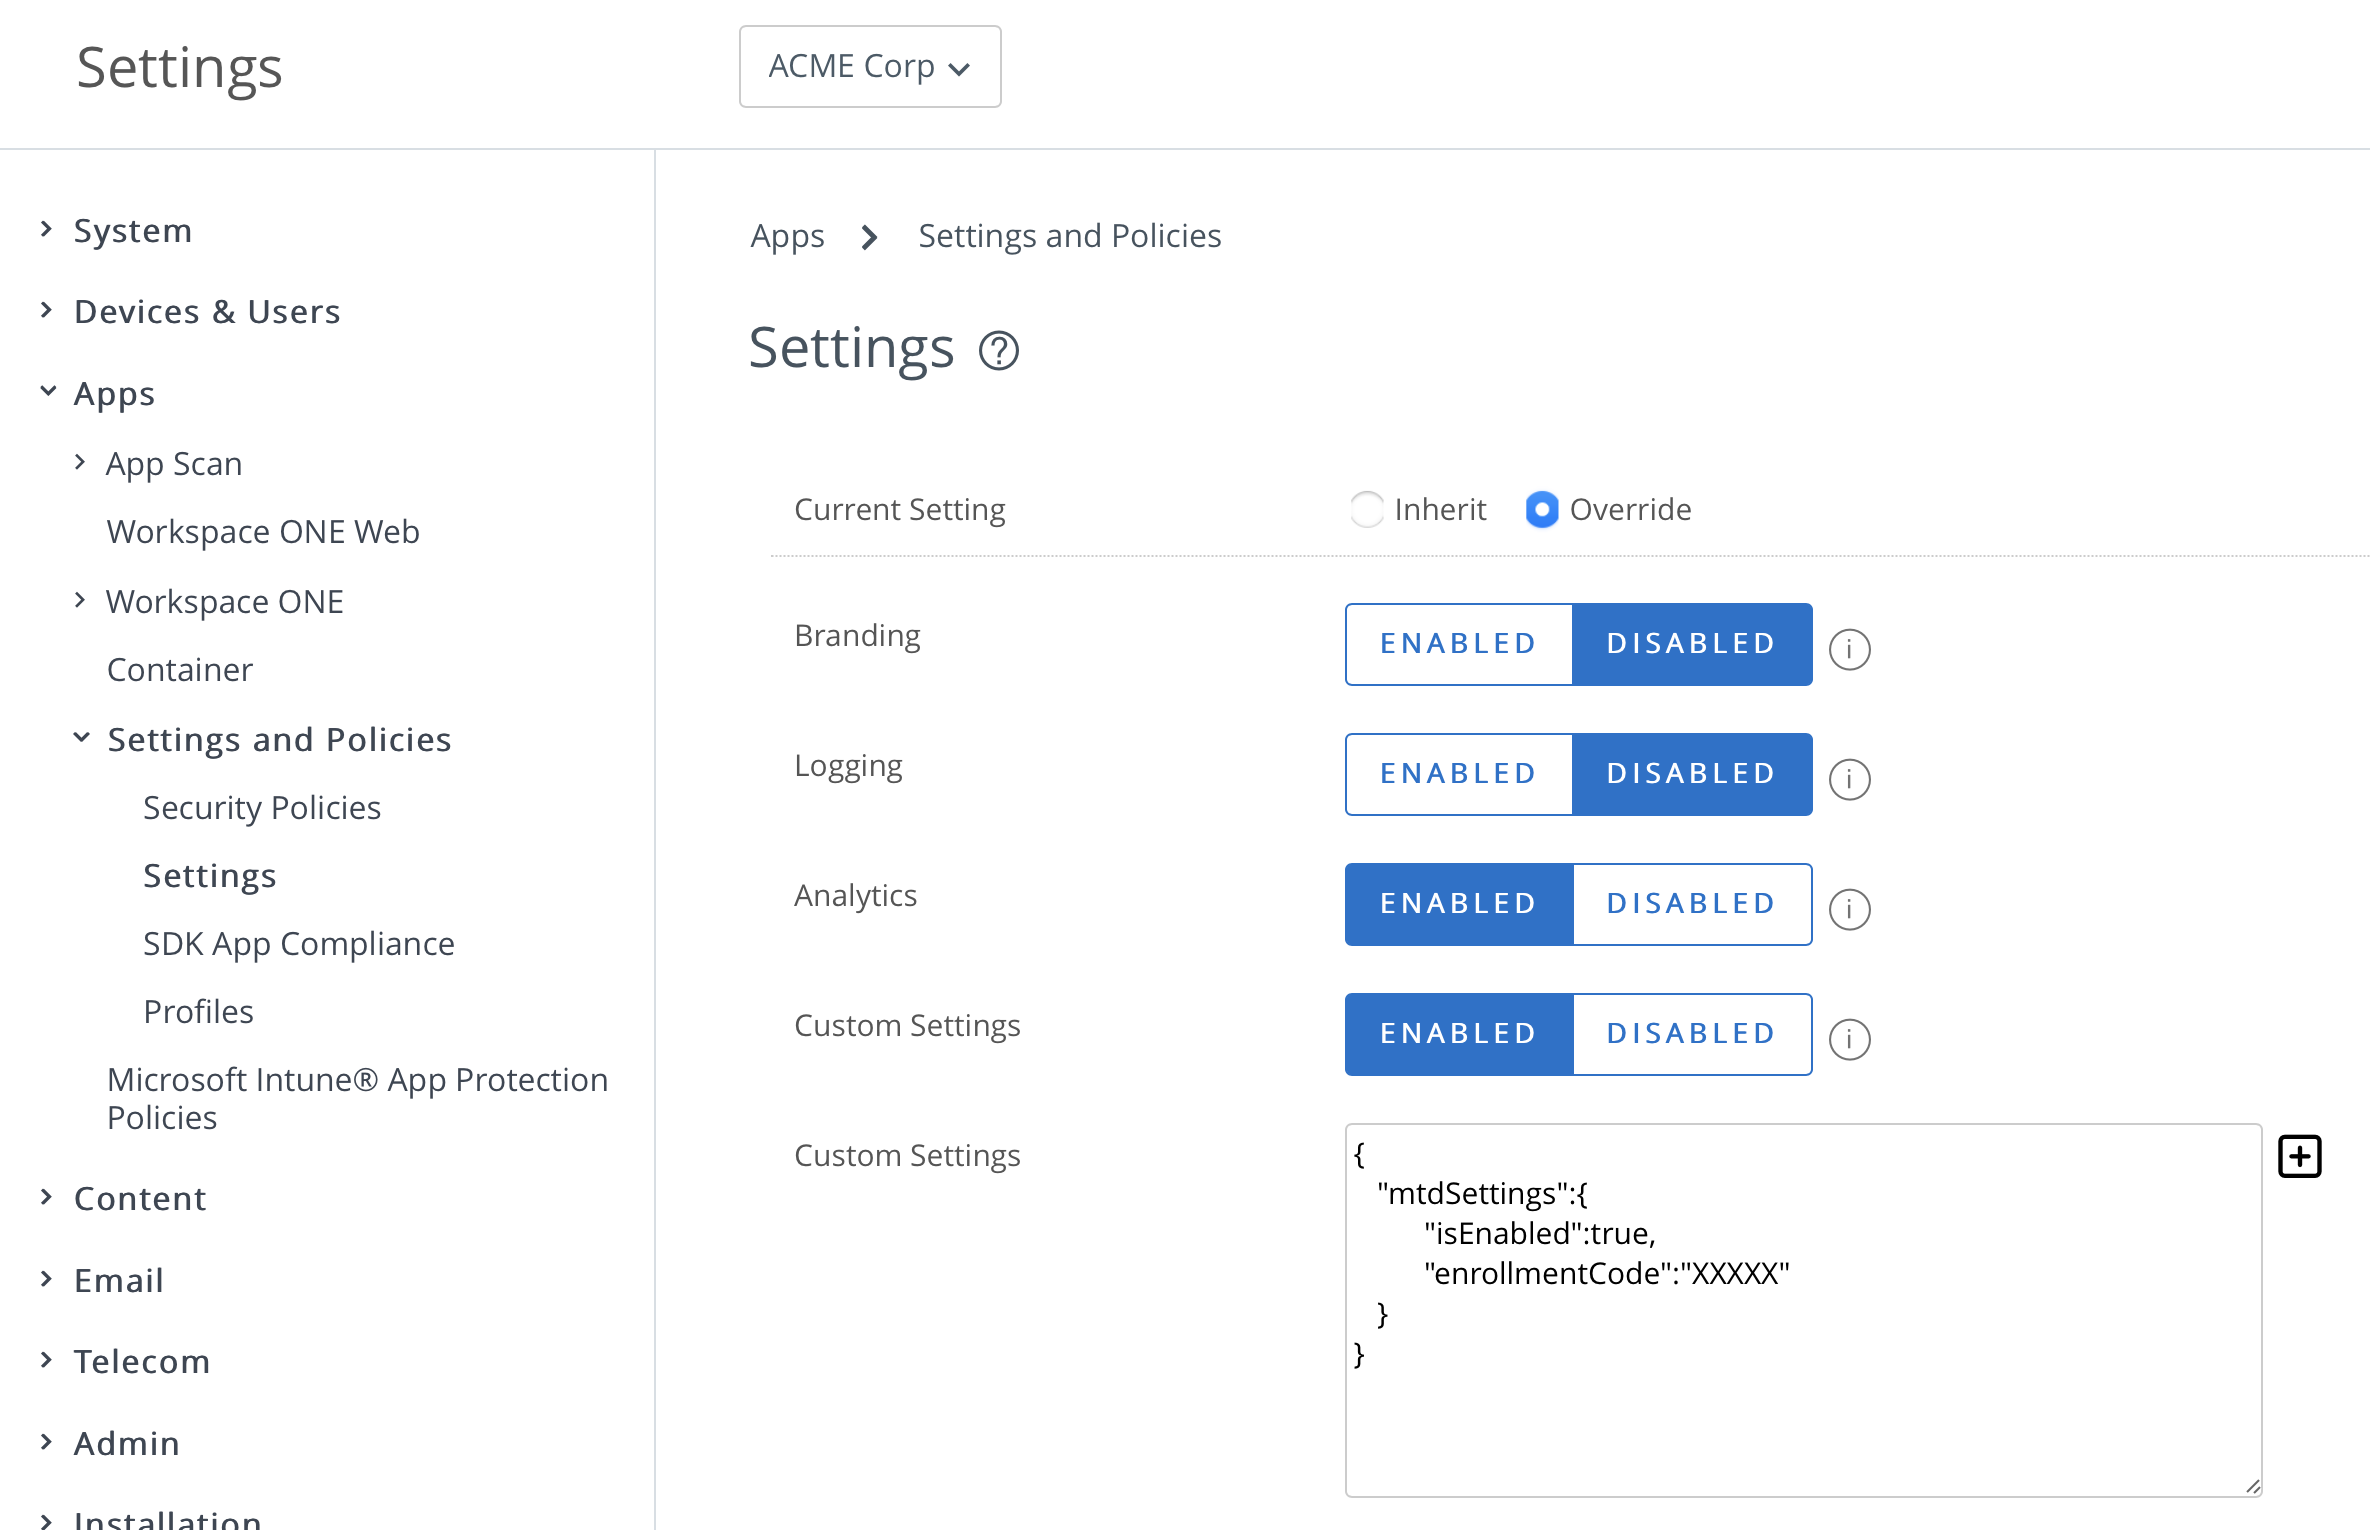
Figure 12: SDK custom configuration required to enable MTD on Intelligent Hub
When MTD is activated, it analyzes the device information, initiates a scan process looking for threats on the device, including the operation system, network communication, and apps. MTD can identify local threats and configuration issues; it leverages the Lookout Security Graph that contains information from millions of other mobile users protected by MTD to identify additional threats.
The MTD protection capabilities enabled on the device will depend on which app (Intelligent Hub or Lookout for Work App) you deploy. When using MTD with Intelligent Hub for iOS and Android, devices are protected against device, apps, and network threats. For the following uses cases, Lookout for Work App will be required as MTD protection:
- Support for phishing and content protection
- Support for Chrome OS
- Support for Android Dual Enrollment
Note: Intelligent Hub and Lookout for Work app cannot be activated on the same device, because MTD on Hub is activated at the Organization Group (OG) level. When the Lookout for Work App is required, devices with the Lookout for Work app must be enrolled in a different OG.
Automated remediation
An important step in the integration is the setup of automated remediation to protect access to corporate resources only from safe devices. This step ensures that devices at risk do not get access to managed corporate resources. It also requires the UEM administrator to create a smart group that contains devices tagged at risk by MTD. This smart group is then added as an exclusion to the assignment of managed resources, such profiles, and apps.
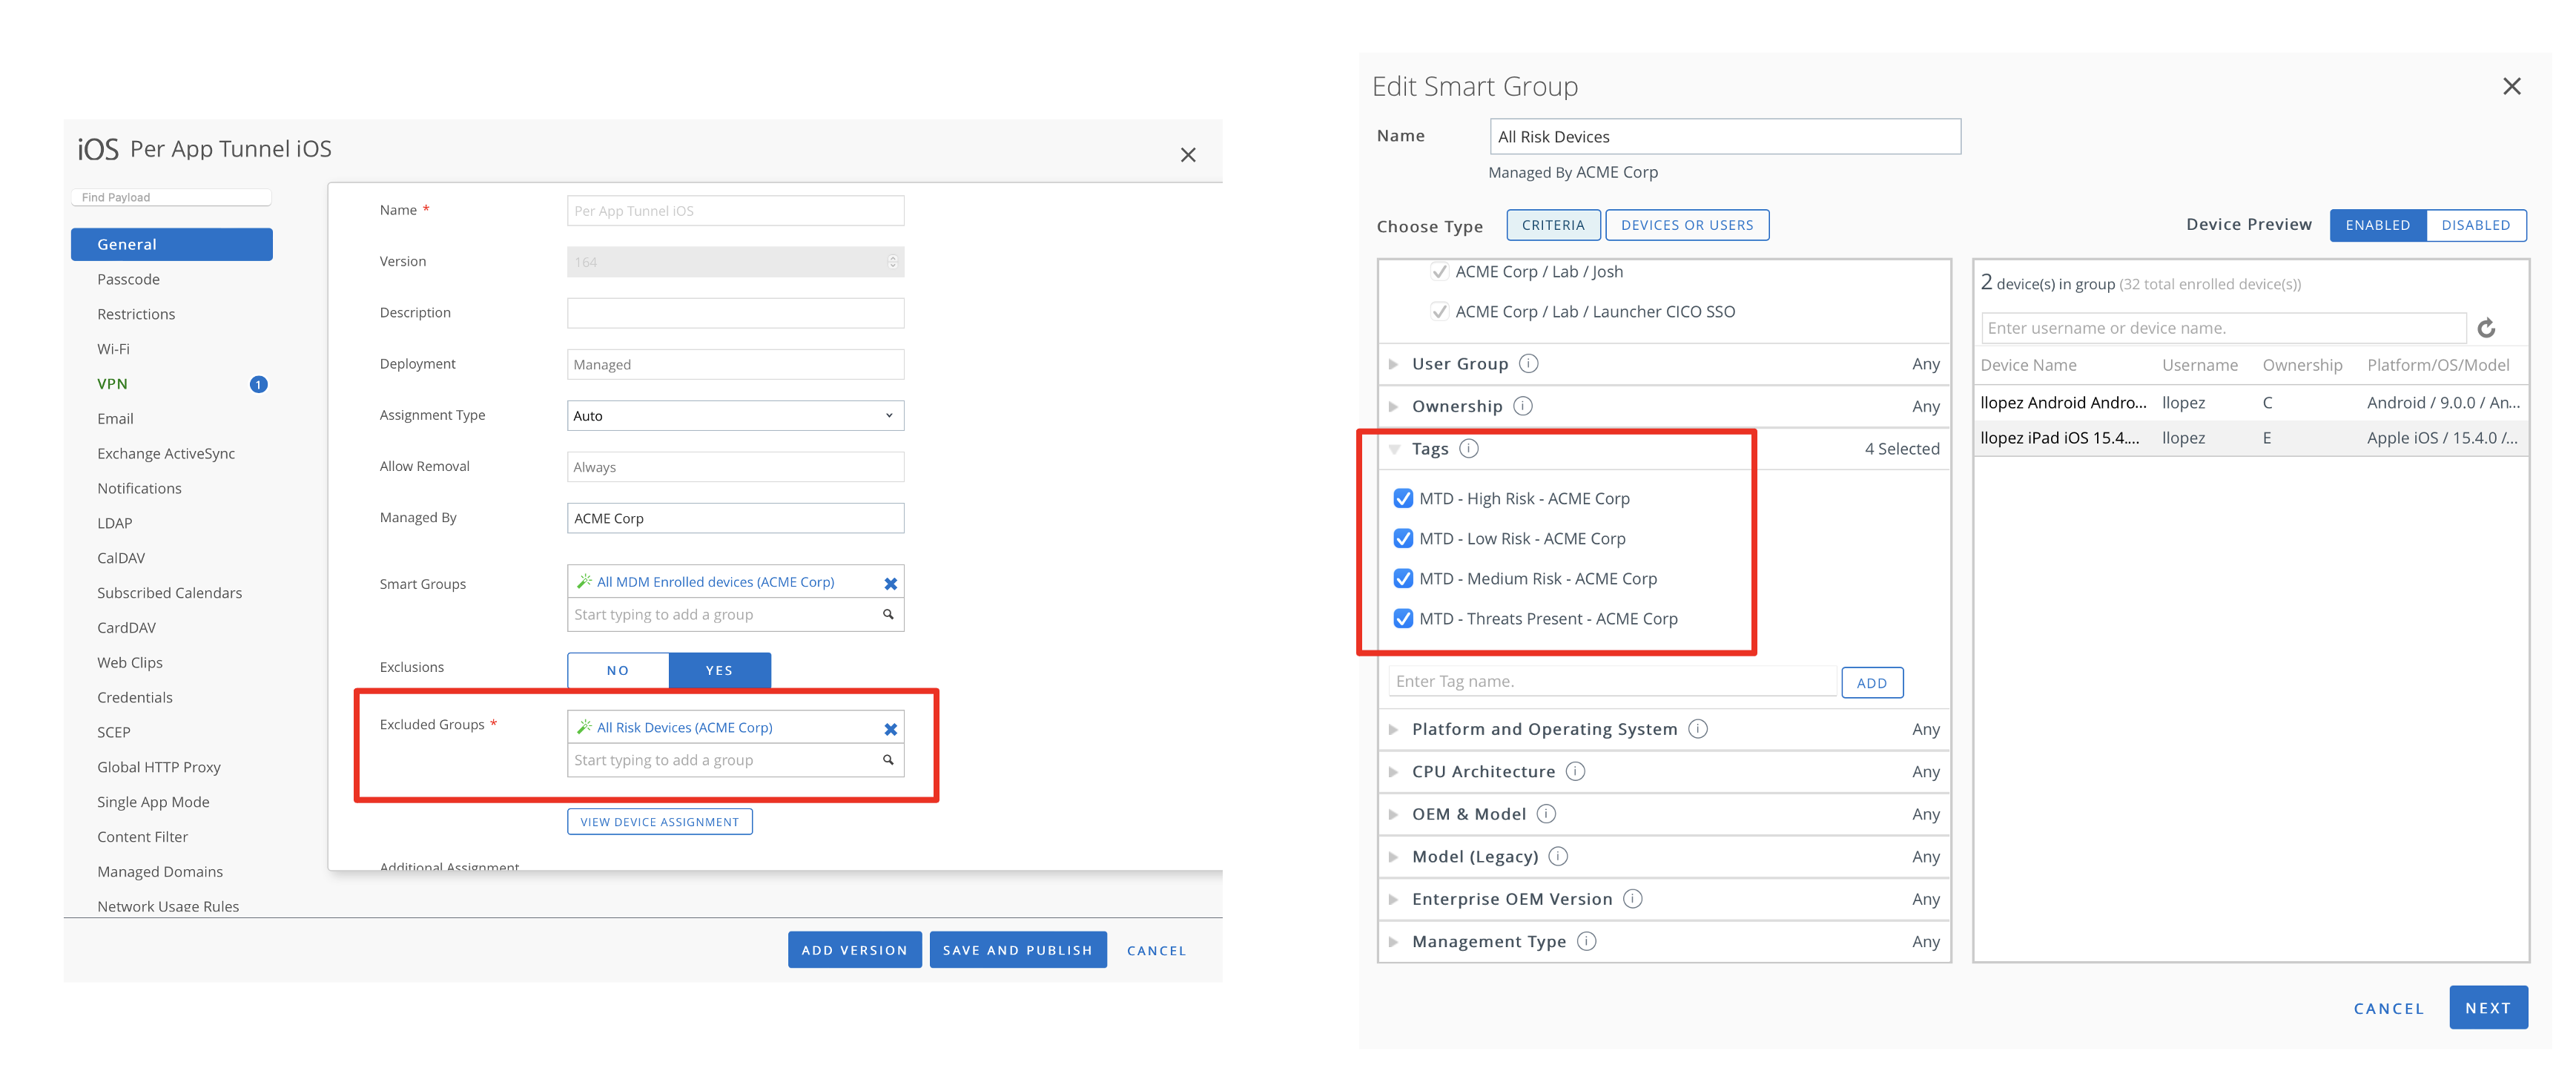
Figure 13: Workspace ONE UEM configuration to remove VPN profile of devices tagged at risk by MTD
In a real use case scenario, devices can have managed applications (for example, Workspace ONE Boxer, Tunnel, Content, Office 365) removed when the device is at risk (low, medium, high-risk tags), and when the device returns to a safe state, those apps are automatically reprovisioned. For more information, see Configure and Enforce Compliance.
Automated incident response
Omnissa Intelligence can be integrated with MTD via Intelligence Automation to automate incident responses, such as notify IT and InfoSec about unresolved threats via the helpdesk system and other collaboration tools, such as ServiceNow, Microsoft Teams, Slack, JIRA, and so on. For more information, see Integrate with Workspace ONE Trust Network.
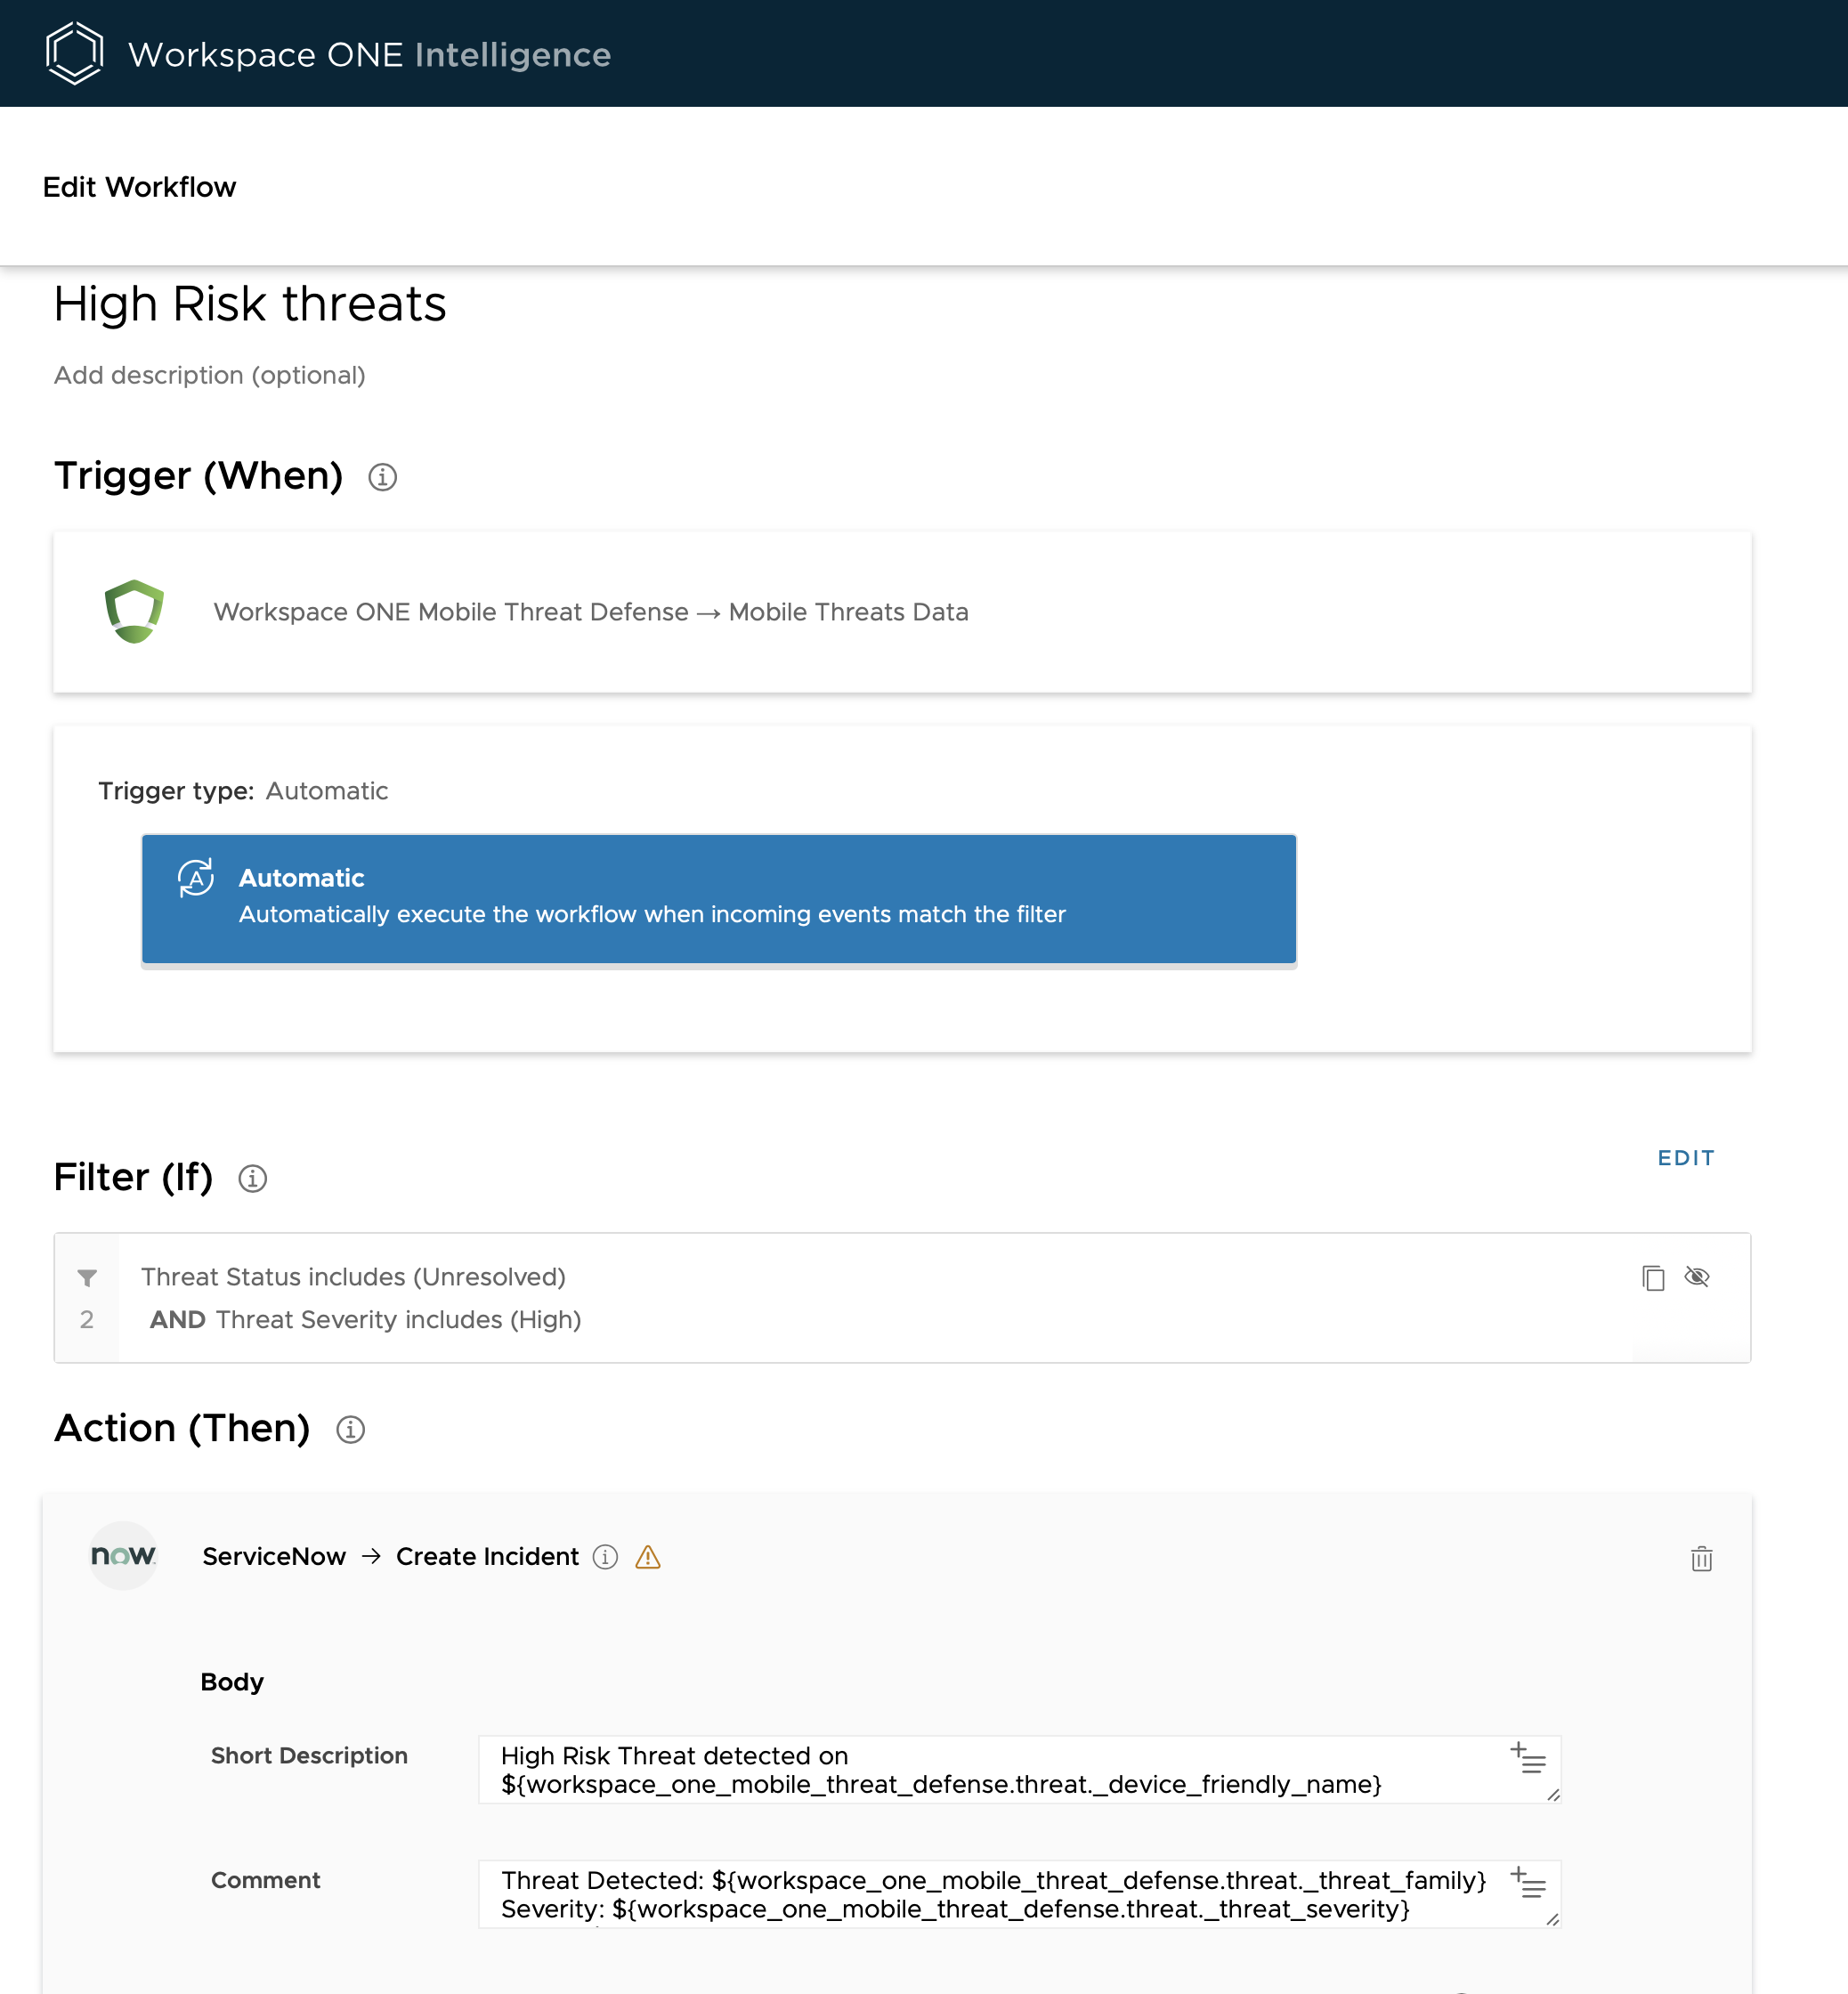
Figure 14: Intelligence automation example that creates a Service Now ticket for high-risk threats detected
You can also learn more with the following guide: How Omnissa MTD can secure mobile endpoints with Threat Defense (MTD)
Omnissa Access and Omnissa Intelligence integration
Omnissa Access can be integrated with Omnissa Intelligence to provide insights about user logins and application launches. The integration requires a cloud-based Access tenant and a licensed tenant of Intelligence.
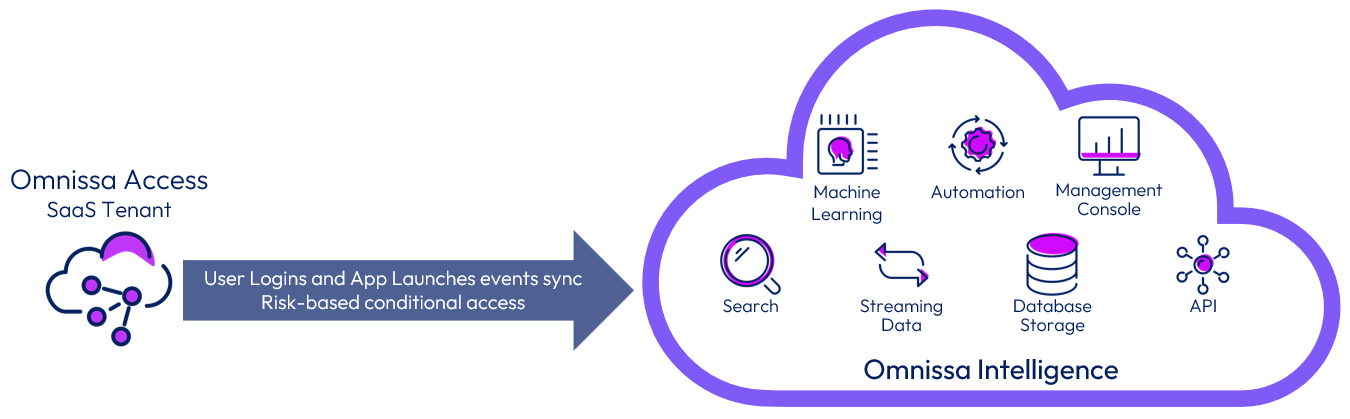
Figure 15: Integration of Intelligence with Access
Because the integration is performed between two cloud services, there is no need to perform any on-premises configuration.
- Use the Intelligence console and follow the procedure given in Omnissa Access Integration.
Important: Ensure your Access and Intelligence tenants are in the same region. An Access tenant can be registered with Intelligence only if both are in the same region.
After integration is complete, Intelligence collects user and event data about Workspace ONE logins and app loads for all the apps contained in the Workspace ONE catalog. Events are synced every second or when 50,000 events have accumulated, whichever comes first.
The integration also enables the Risk Adapter in Access for risk-based conditional access. For a complete list of data collected by the integration, see Workspace ONE UEM Data Definitions.
Omnissa Intelligence and Trust Network integration
Workspace ONE Trust Network includes several security solutions that can be integrated with Omnissa Intelligence. This integration can provide a consolidated view of all threats reported by the various security solutions, and the intelligence component helps automate remediation actions. The integration requires a licensed cloud-based Workspace ONE Trust Network partner solution tenant and an Intelligence tenant.
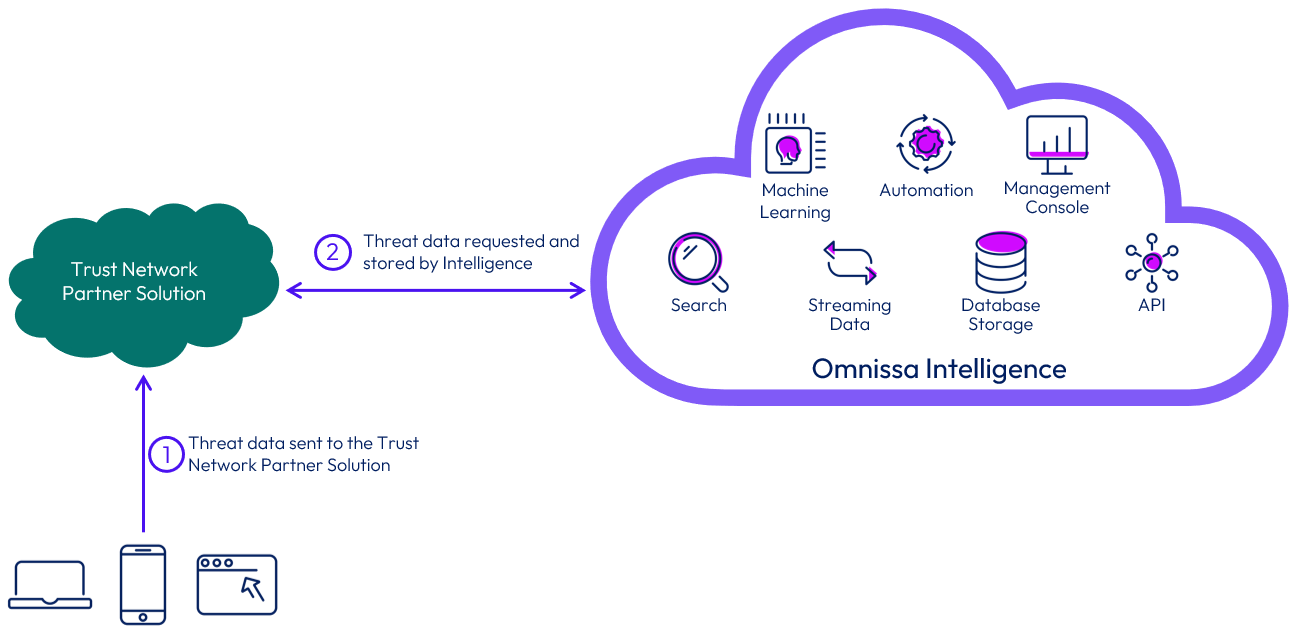
Figure 16: Integration flow of Omnissa Intelligence service with Workspace ONE Trust Network
Because the integration is performed between two cloud services, there is no need to perform any on-premises configuration. You must, however, deploy and configure an agent provided by the security solution. Otherwise, threats could not be reported to the Workspace ONE Trust Network, and Intelligence would not obtain any data.
The integration consists of the following high-level steps:
- Obtain the URL and API keys required by the Workspace ONE Trust Network partner solution.
- Register the respective Workspace ONE Trust Network solution in the Intelligence console, under Settings > Integration.
- Deploy the Trust Network agent on all managed devices.
- Note: You can leverage Workspace ONE UEM to deploy and configure the Workspace ONE Trust Network solution agent across all of your managed devices.
To learn how to set up each of the current partner solutions that can be part of Workspace ONE Trust Network integration with Intelligence, see the Workspace ONE Trust Network section of the Intelligence documentation.
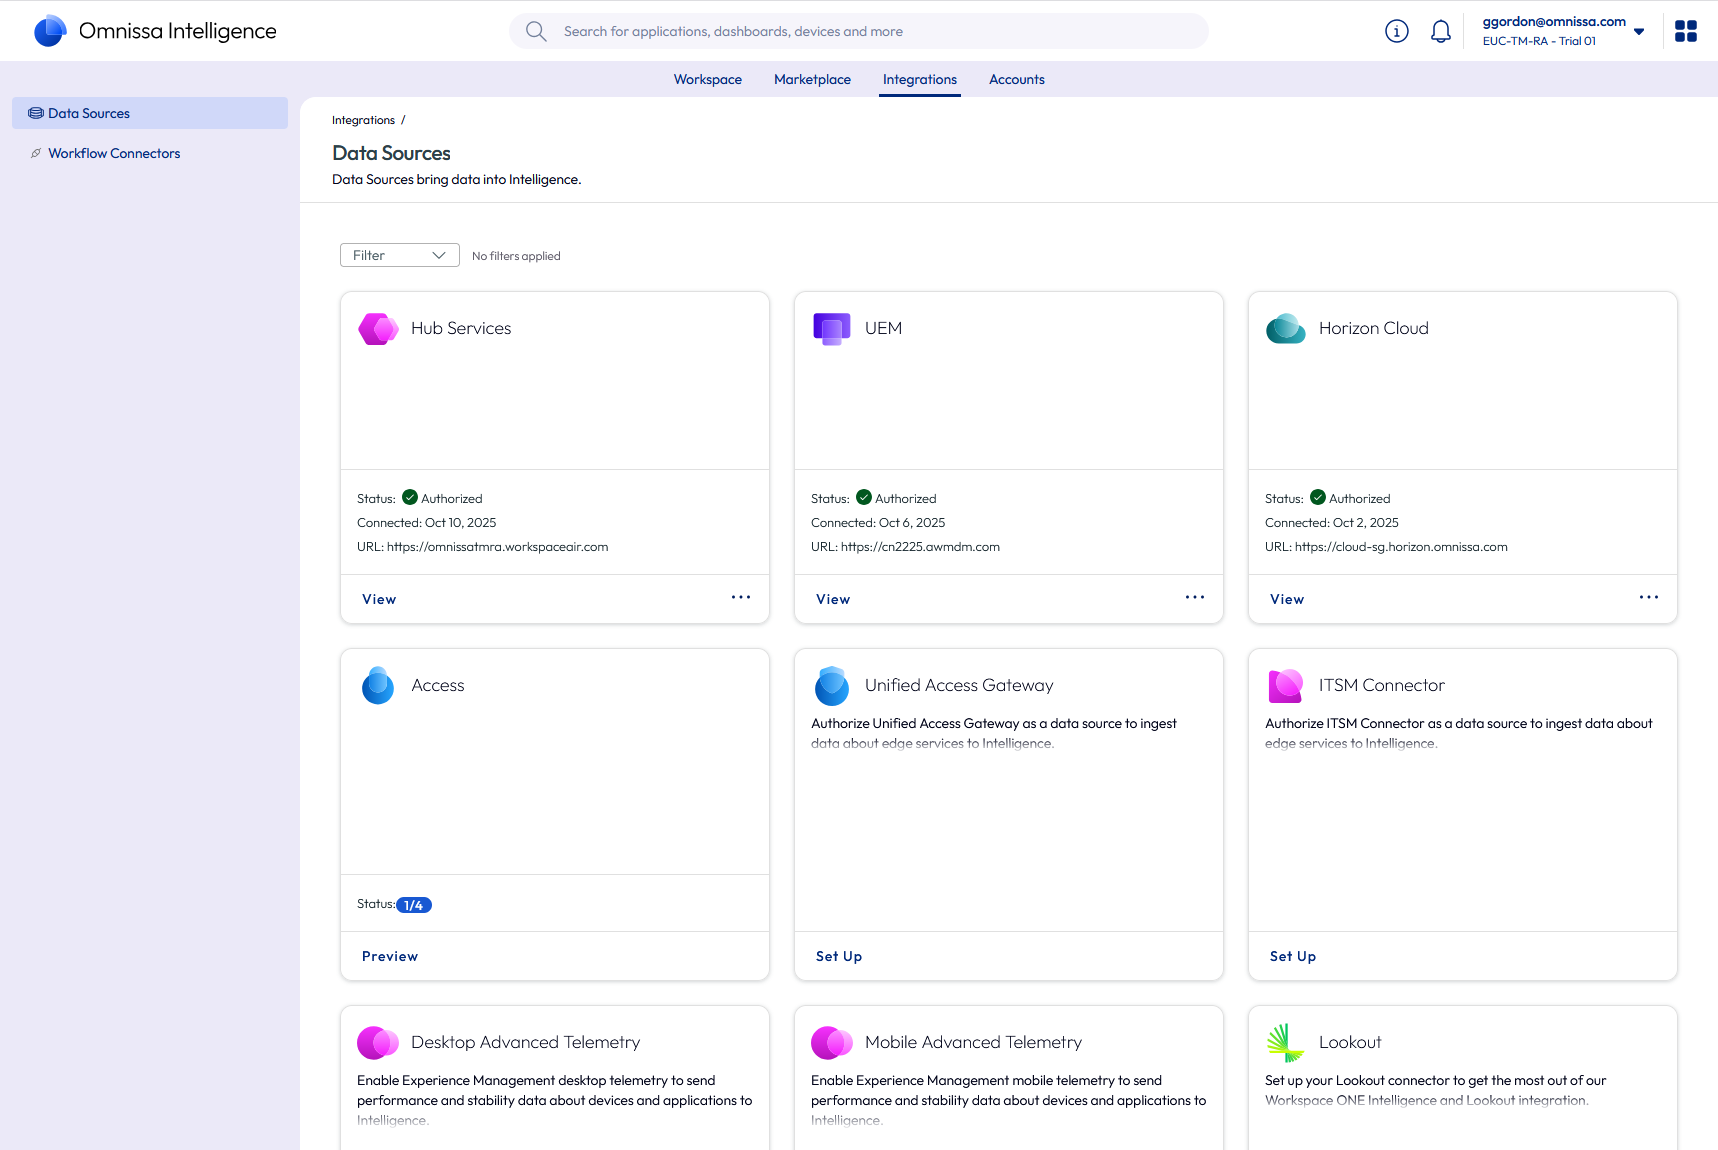
Figure 17: Intelligence integration setup for multiples security solutions
After integration is complete, Intelligence checks every 30 seconds for new threats reported by the Workspace ONE Trust Network solutions configured in your environment. Any new events that are identified are stored in an Intelligence database. That way, any automations based on threat data that matches criteria for incoming events is immediately executed.
Workspace ONE UEM and Workspace ONE Assist integration
Workspace ONE Assist can be integrated with Workspace ONE UEM to provide your administrators with single-sign-on capabilities into the Workspace ONE Assist Portal server. With this integration, administrators can seamlessly launch remote management sessions for your eligible devices from the Workspace ONE UEM console.
The integration with Workspace ONE UEM consists of a simple site URL configuration in the Workspace ONE UEM console, as detailed in the section that follows. Your devices will also require the Workspace ONE Assist application to be installed, which can be distributed to your managed devices using Workspace ONE UEM.
Workspace ONE UEM configuration
The integration with Workspace ONE Assist consists of two high-level steps:
- Log in to the Workspace ONE UEM console with an admin account that has global organization group access.
- Navigate to the Site URLs settings under System > Advanced and configure the Workspace ONE Assist fields.
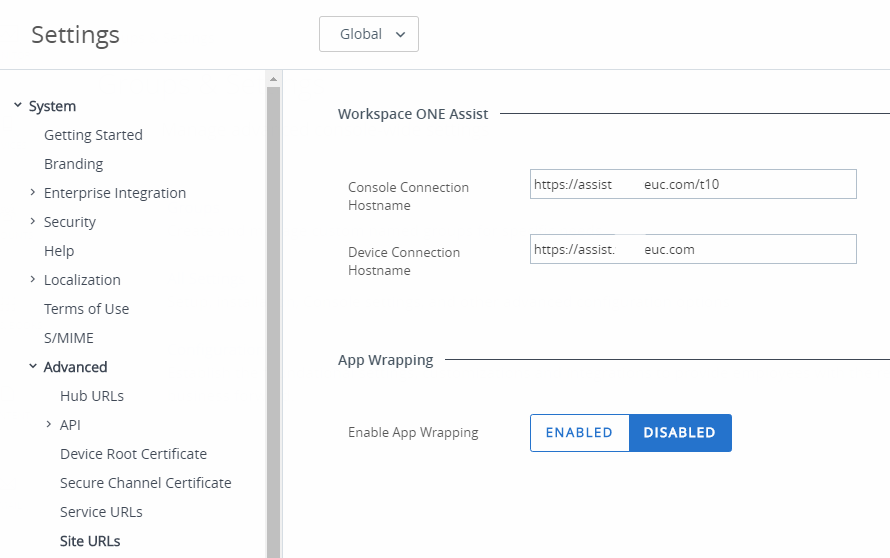
Figure 18: Workspace ONE Assist configuration in the Workspace ONE UEM console
See Install Omnissa Workspace ONE Assist to an On-Premises Environment for detailed steps.
Configure end-user devices
Once Workspace ONE UEM has been configured, you must install the platform-specific Workspace ONE Assist agents on your devices before they can be remotely managed.
This process consists of the following high-level steps:
- Locate the Workspace ONE Assist app for your desired supported platform or platforms.
- Publish the Workspace ONE Assist app to your managed devices.
- Determine if your platform or device requires additional supporting apps or configurations for remote management sessions.
For full details, see Configure End-User Devices..
Start a remote management session
Once the necessary Workspace ONE UEM and end-user device configurations have been made, your administrators can begin a remote management session by connecting to your managed devices through the Workspace ONE UEM console.
The process of starting this remote management session consists of the following high-level steps:
- Log in to the Workspace ONE UEM console.
- Navigate to the managed device you intend to start a remote management session with, and click Remote Management under MORE ACTIONS.
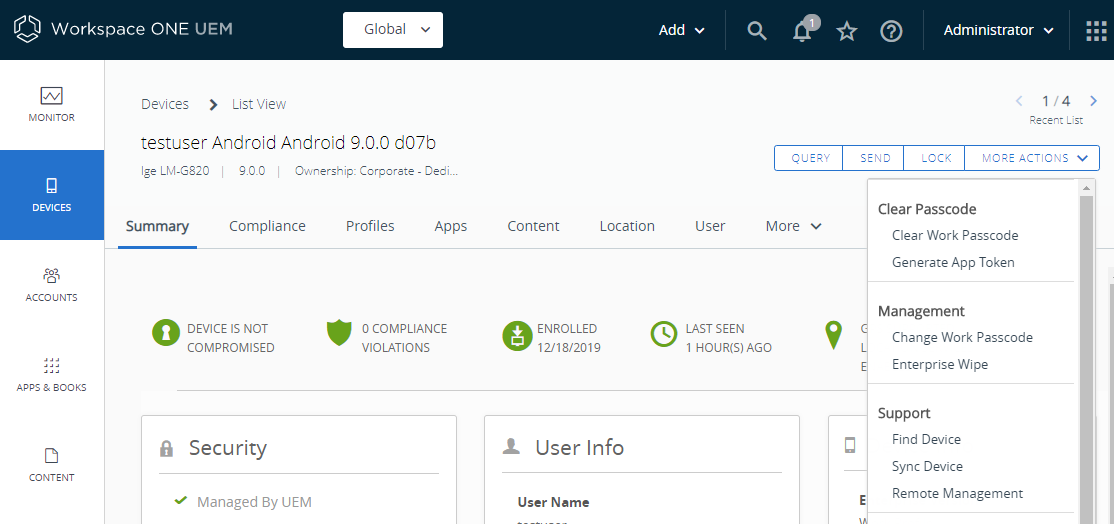
Figure 19: Start a Workspace ONE Assist remote management session
See Start an Assist Session for more details.
Workspace ONE UEM screen capture restriction profiles
Workspace ONE UEM Restriction Profiles have a setting named Allow Screen Capture, which, if disabled, prevents devices from taking screen captures. Be aware that if you create a Restriction Profile that disallows screen capture, and you push that profile to a device, the profile will prevent Workspace ONE Assist from remotely viewing or controlling the device.
If you use a Restriction Profile that disables screen capturing, it is recommended to unassign this profile from any device that would utilize Workspace ONE Assist for remote screen-sharing sessions.
Horizon and Omnissa Access integration
Horizon can be integrated into Workspace ONE through Omnissa Access to present the entitled Horizon published apps and desktops to end users in Workspace ONE Intelligent Hub. You can set up SSO for Horizon apps and desktops, ensure security with multi-factor authentication, and control conditional access.
The type of integration used depends on whether or not Horizon Universal Broker is in use.
- Horizon Universal Broker integration – When using Universal Broker, direct integration can be done which allows the entitlements of all participating pods to be queried and presented to the user in Access and Intelligent Hub services.
- Virtual App Collections integration – When Universal Broker is not in use, each Horizon 8 pod or cloud pod federation can be registered as a virtual apps collection with Access.
Horizon 8 virtual apps collections integration
Horizon 8 can be integrated into Workspace ONE through Access using virtual apps collections.
The Horizon 8 license includes Omnissa Access, which supports access to Horizon apps and desktops only. Horizon can be used with other license types if access to other apps such as Horizon apps and desktops, SaaS apps, or mobile apps, is also required.
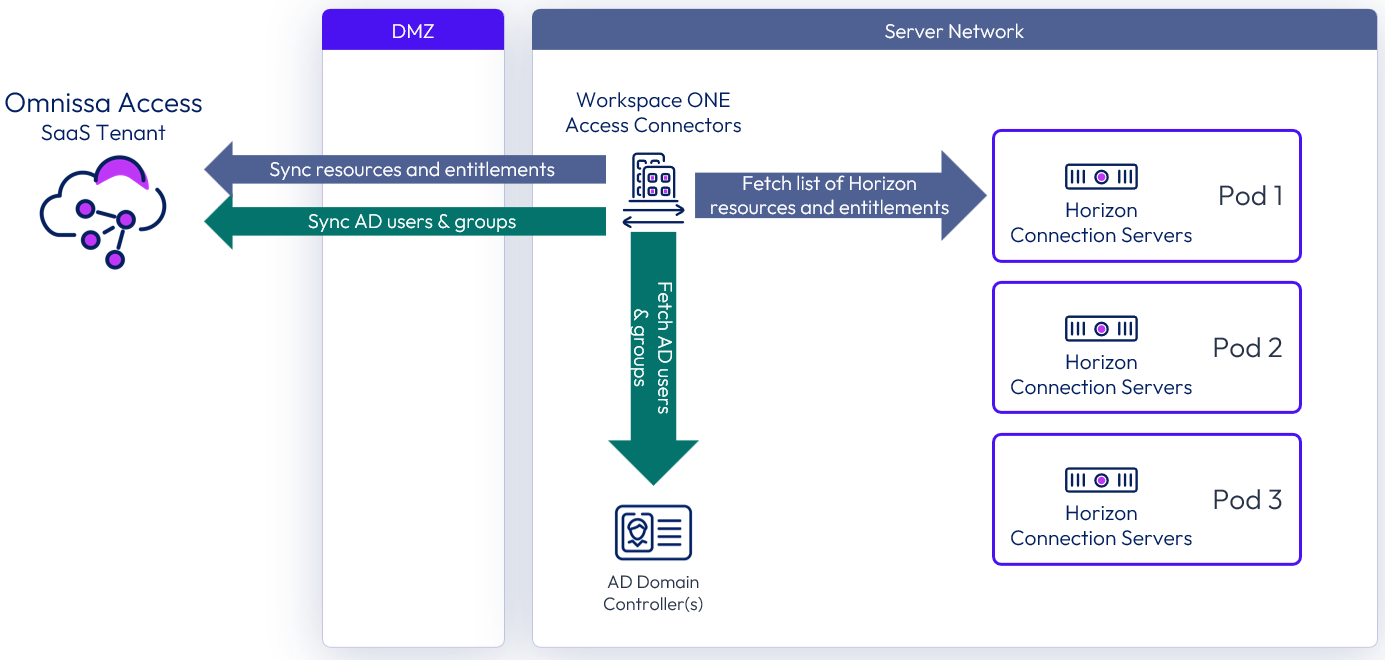
Figure 20: Integration of Horizon 8 with cloud-based Access
Integrating Horizon 8 with an instance of Access consists of three high-level steps:
- Complete the prerequisite steps outlined in the next section. These steps include deploying Workspace ONE Access Connectors and configuring Active Directory synchronization.
- Configure SAML authentication in your Horizon environment, as described in Using SAML Authentication for Omnissa Workspace ONE Access Integration.
- Create one or more virtual apps collections, as described in Virtual apps collection creation for Horizon 8 integration.
Prerequisites for Horizon 8 integration
Perform the following prerequisite tasks:
- Prepare the Access environment by following the instructions in Setting up Virtual Apps Collections in Omnissa Access and Providing Access to Horizon Desktops and Applications in Omnissa Access.
- Ensure time synchronization is set so that Access, Access Connectors, and Horizon Connection Servers have the same time.
SAML authentication configuration for Horizon 8 integration
Before you create a virtual apps collection for Horizon 8 in the Access console, first add Access as a SAML 2.0 authenticator to the Horizon Connection Servers. Repeat this process for each additional pod.
- Open the Horizon console and navigate to Settings > Servers > Connection Servers.
- Select one of the Connection Servers and click Edit.
- On the Authentication tab, change Delegation of authentication to Omnissa Horizon (SAML 2.0 Authenticator) to either Allowed or Required.
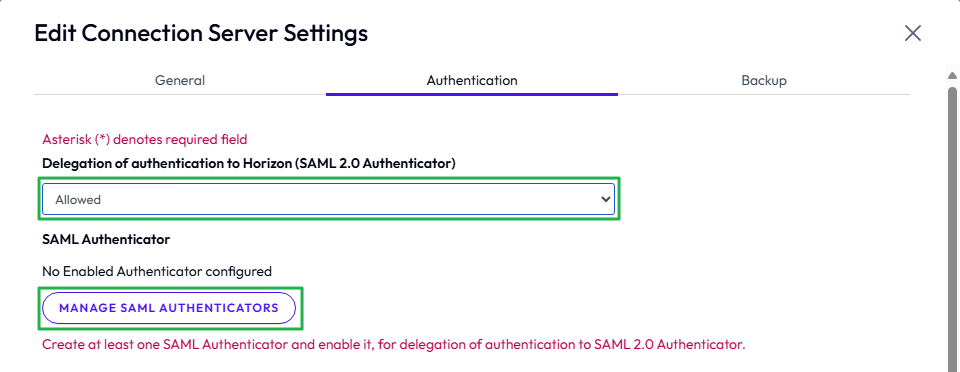
Figure 21: Manage SAML authentication in Horizon 8 console
- Select Manage SAML Authenticators to add a new SAML Authenticator, and click Add.
- Enter a label to identify the authenticator.
- In the Metadata URL field, change <YOUR SAML AUTHENTICATOR NAME> to the FQDN of Access. Leave the other text as it is.
- Change the TrueSSO Trigger Mode to Enabled.
- Leave Enabled for Connection Server selected and click OK.
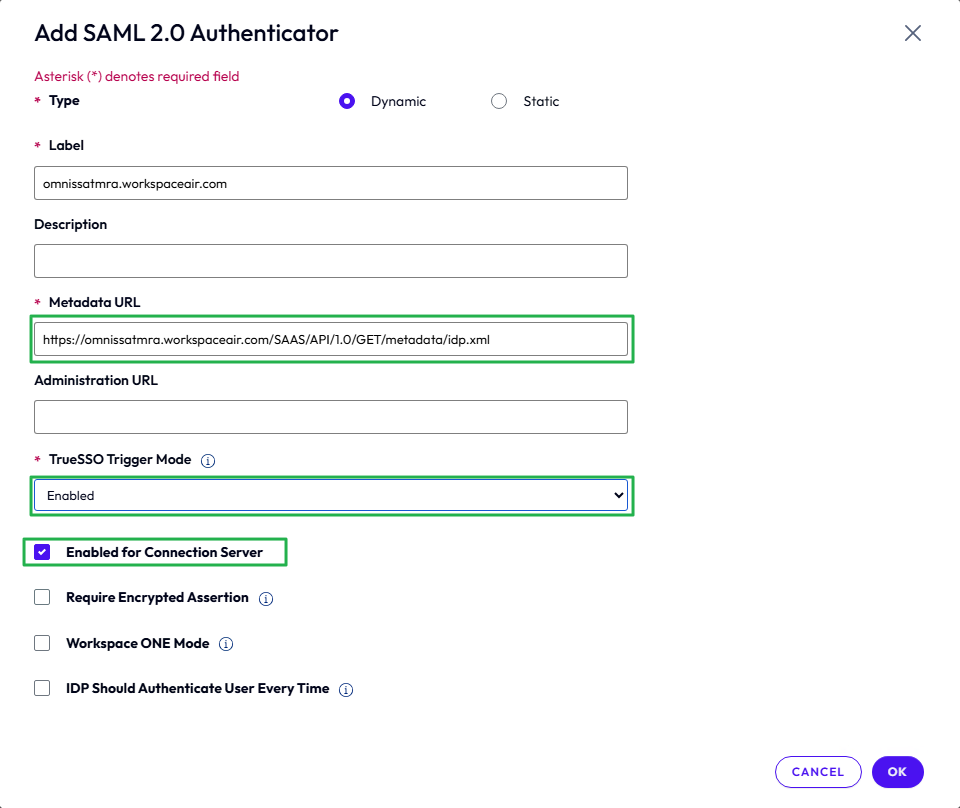
Figure 22: Add SAML authenticator in Horizon 8 console
- Although the SAML 2.0 authenticator is defined once per pod, you must enable the authenticator individually on each Connection Server that is to use SAML authentication.
- Use the Horizon Console to edit the configuration of each Connection Server.
- Select the Authentication tab and change Delegation of authentication to Omnissa Horizon (SAML 2.0 Authenticator) to either Allowed or Required, matching what was selected on the first Connection Server.
- Select Manage SAML Authenticators, select the SAML authenticator just defined, and click Edit.
- Select Enabled for Connection Server and click OK.
For more information see, Configure a SAML Authenticator in Horizon Console.
Virtual apps collection creation for Horizon 8 integration
You integrate Horizon 8 desktops and applications into Access by using virtual apps collections. See Providing Access to Horizon Desktops and Applications in Omnissa Access.
- Log in to the Access administrative console.
- From the Resources menu, select Virtual Apps Collection.
- Click New to add a new virtual apps collection.
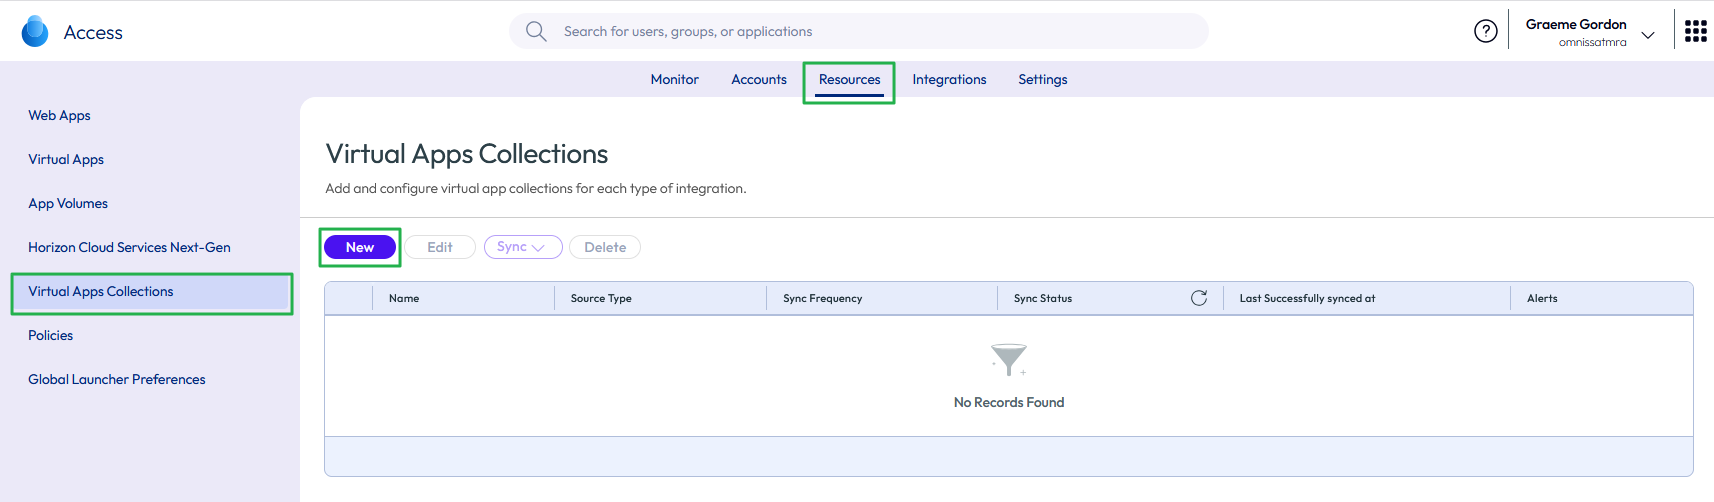
Figure 23: Add new virtual apps collection
- Select Horizon as the source type to create a Horizon virtual apps collection for your Horizon pods and Cloud Pod Architecture federation. This collection will host desktop or application capacity.
A virtual apps collection can contain one or more Horizon pods. The collection defines the configuration information about your Horizon environment, Workspace ONE Access Connectors, and settings to sync resources and entitlements to Access.

Figure 24: Select Horizon virtual apps collection type
- Name the new Horizon collection and select the connectors.
- Give the virtual apps collection a unique name.
- Select the Workspace ONE Access Connectors that will perform synchronization. Reorder the connectors if required and click NEXT.
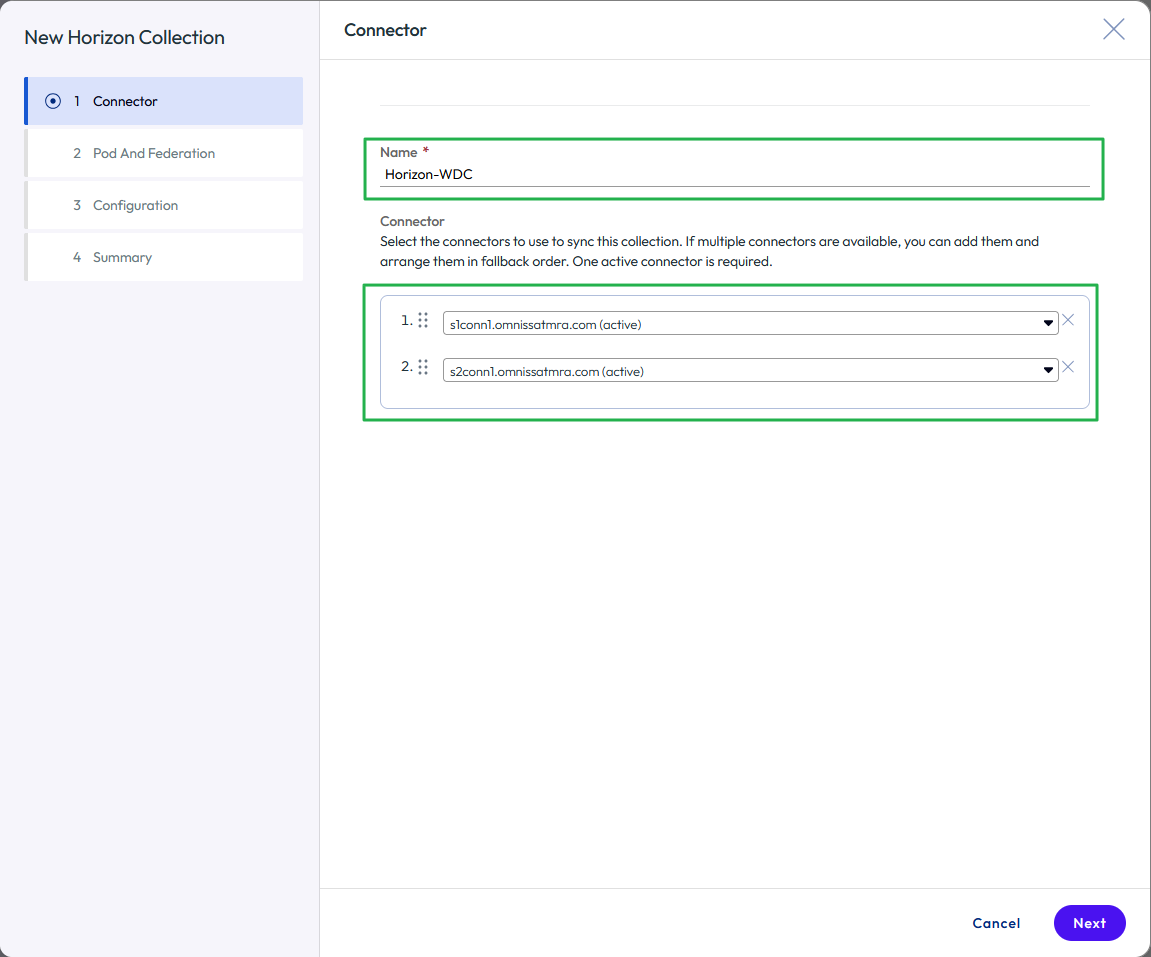
Figure 25: Name the virtual apps collection and select the connectors
- To add the Horizon pods, click Add A Pod.

Figure 26: Add Horizon pods to the virtual apps collection
- Enter details for the first Horizon pod, specifying one of the Horizon Connection Servers, credentials, and whether smart card authentication or True SSO is set up in the pod, and once complete, click ADD.
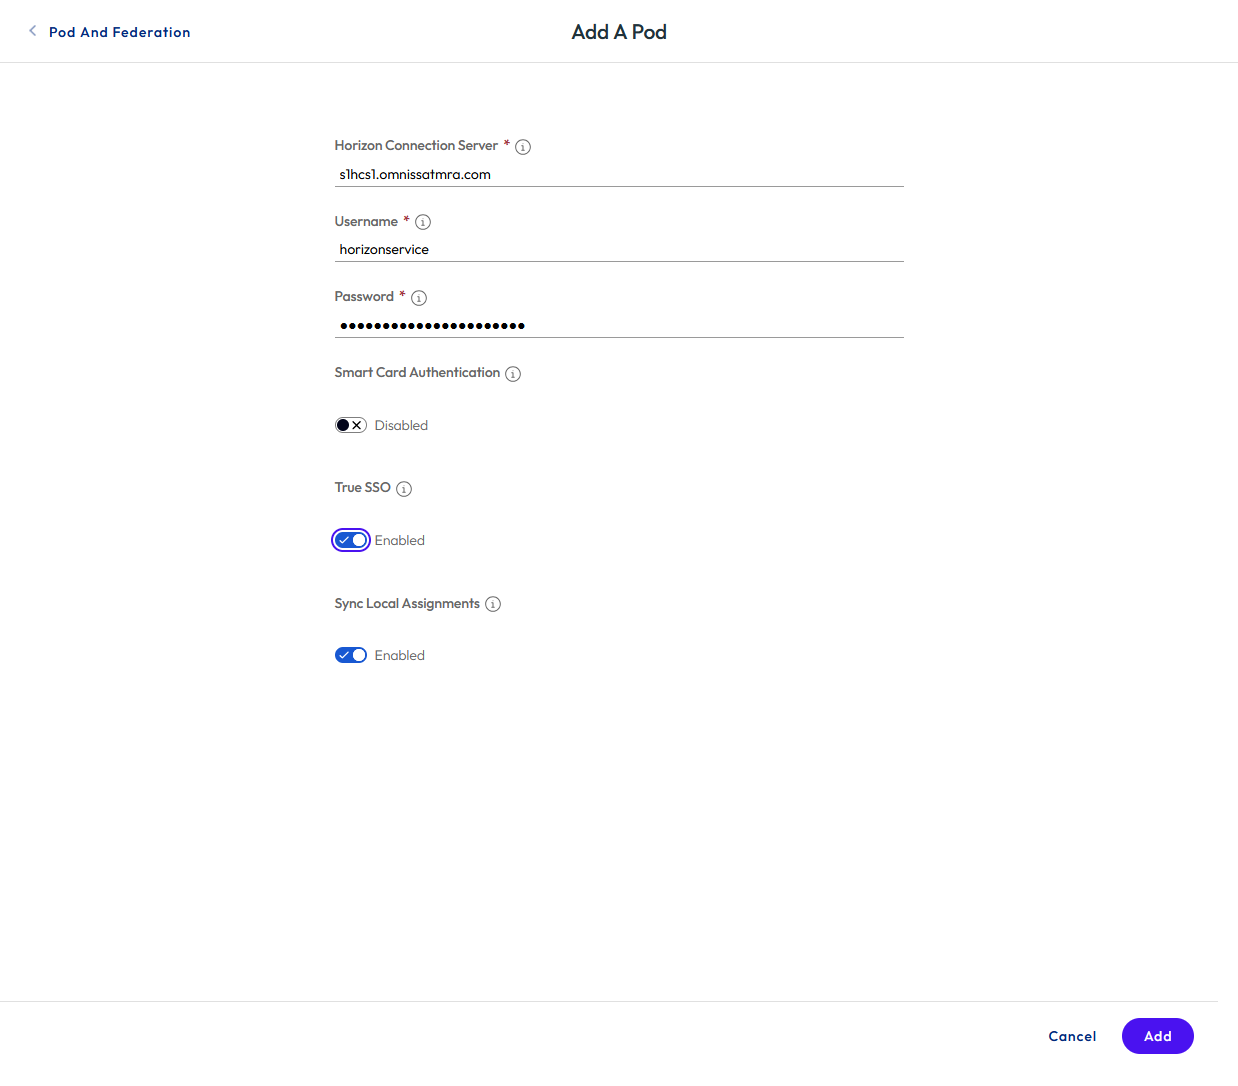
Figure 27: Define the Horizon pod details
- For each additional Horizon pod in your environment, click Add A Pod and repeat the process.
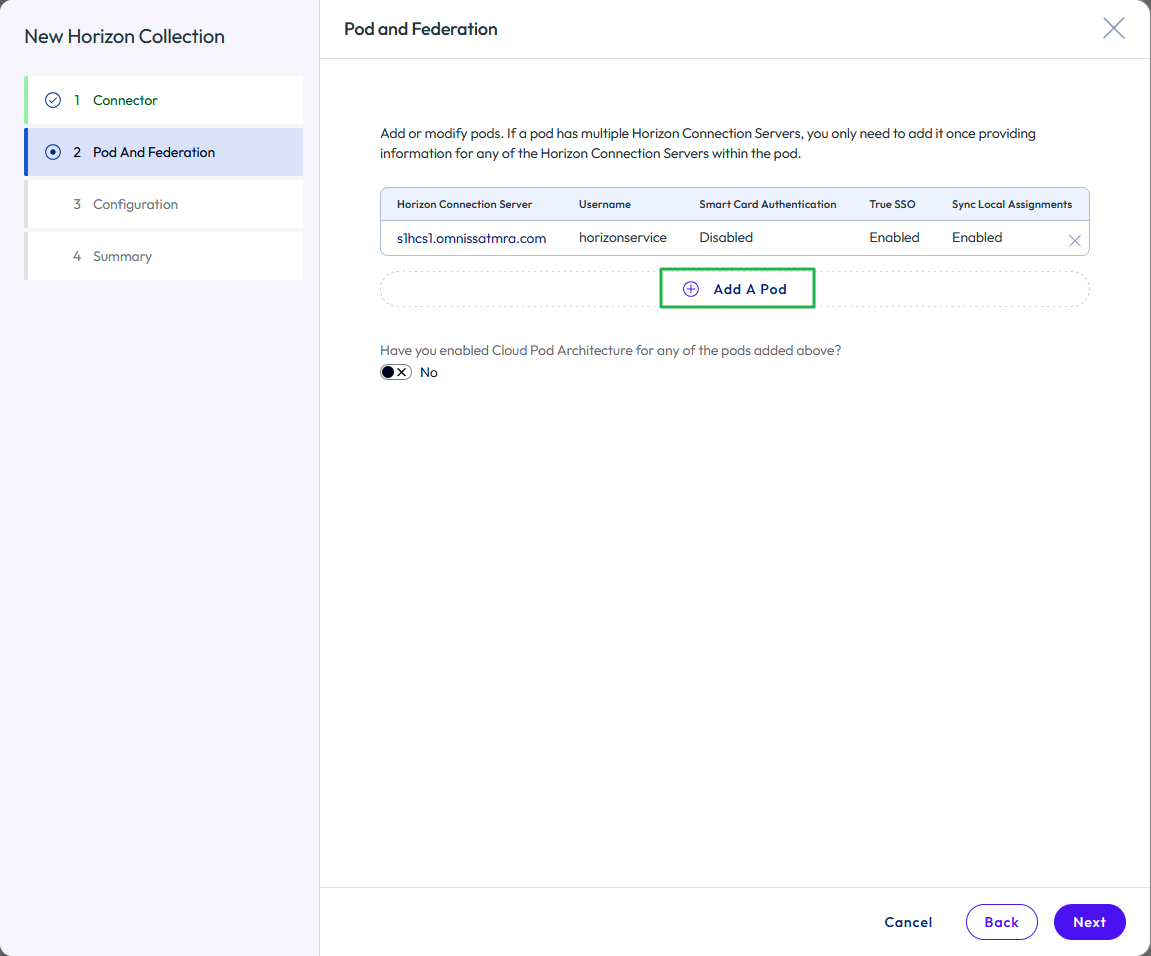
Figure 28: Add additional Horizon pods to the virtual apps collection
- Configure Horizon Cloud Pod Architecture.
- If you have configured Cloud Pod Architecture for the Horizon pods, select the check box to indicate it is enabled.
- Then click Add A Federation.
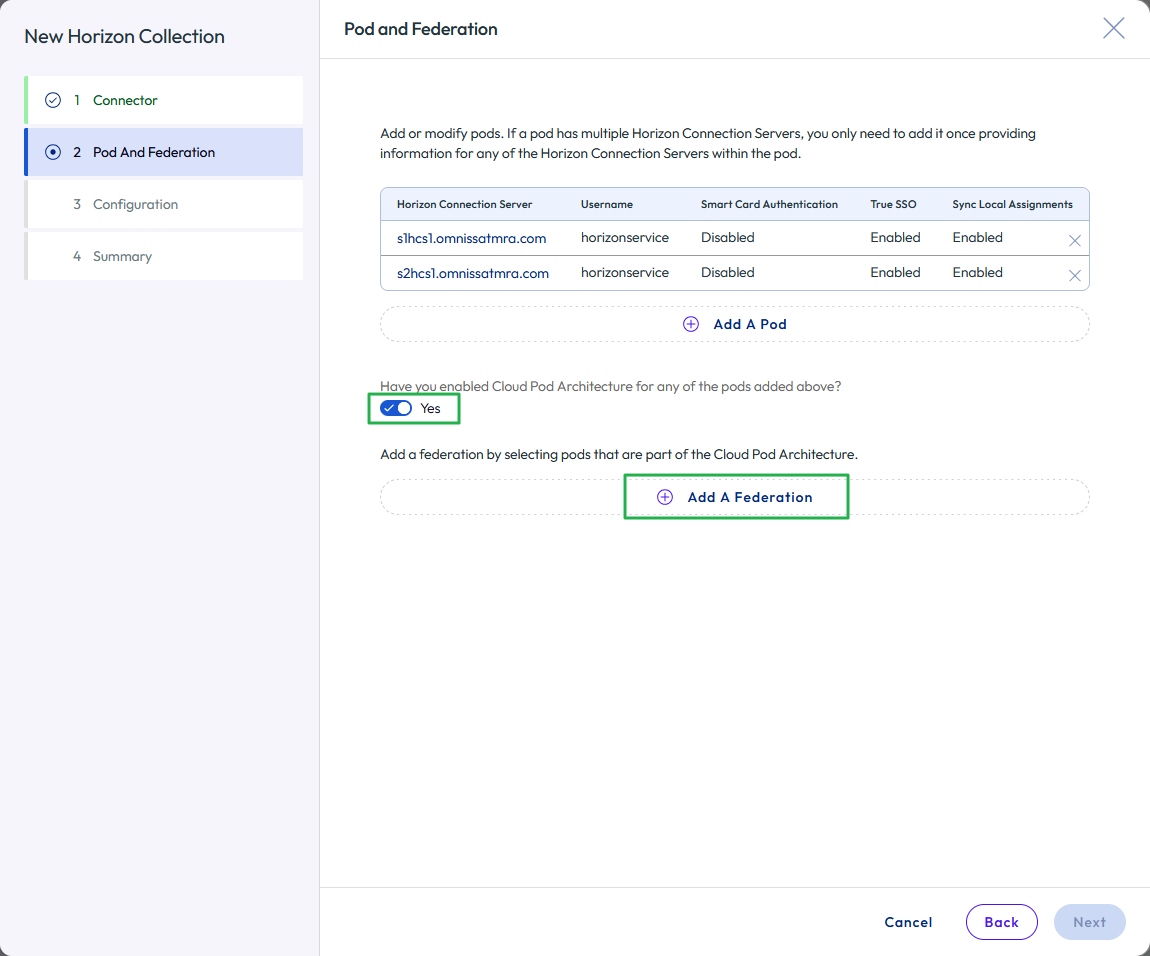
Figure 29: Configure federation for the Horizon pods in the virtual apps collection
- Specify a unique federation name.
- Complete the Client Access FQDN field. This is usually the load balancer namespace for the Horizon environment.
- Select and add the Horizon pods that are part of this federation.
- Click Save.
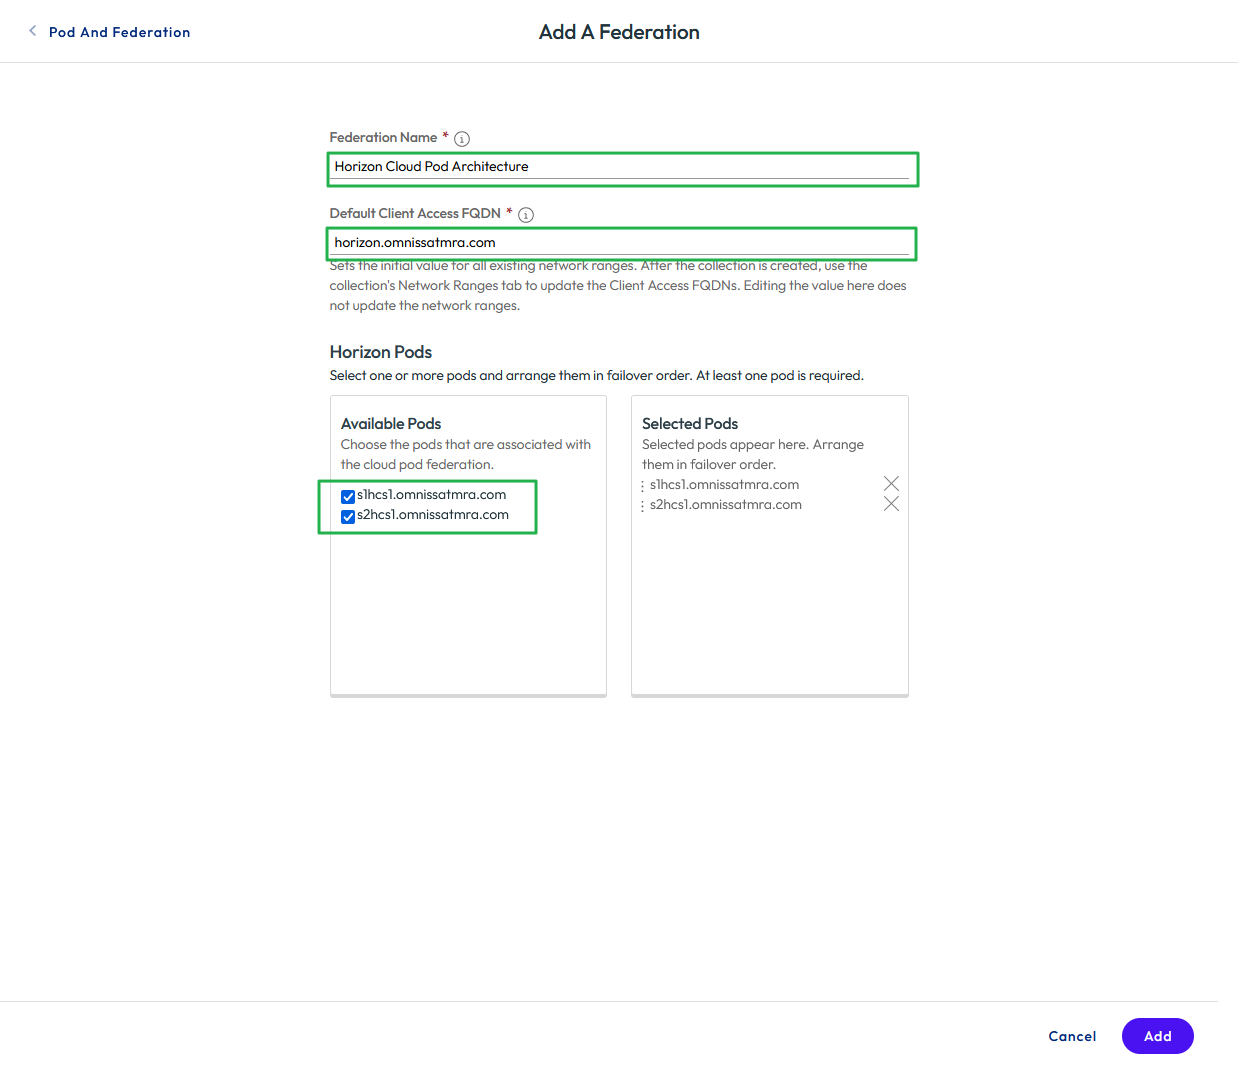
Figure 30: Configure federation for the Horizon pods in the virtual apps collection
- Complete the additional configuration for the new collection.
- Click Next to move to the Configuration
- Set up a sync frequency schedule.
- Set Sync Duplicate Apps to No.
- Choose an activation policy. In most cases, leave this as the default of User-Activated, which allows the user to self-serve any Horizon resources they are entitled to from the Access catalog.
- Choose which default client should be used for a Horizon session by selecting an item from the Default Launch Client list.
- Click Next to review the Summary page.
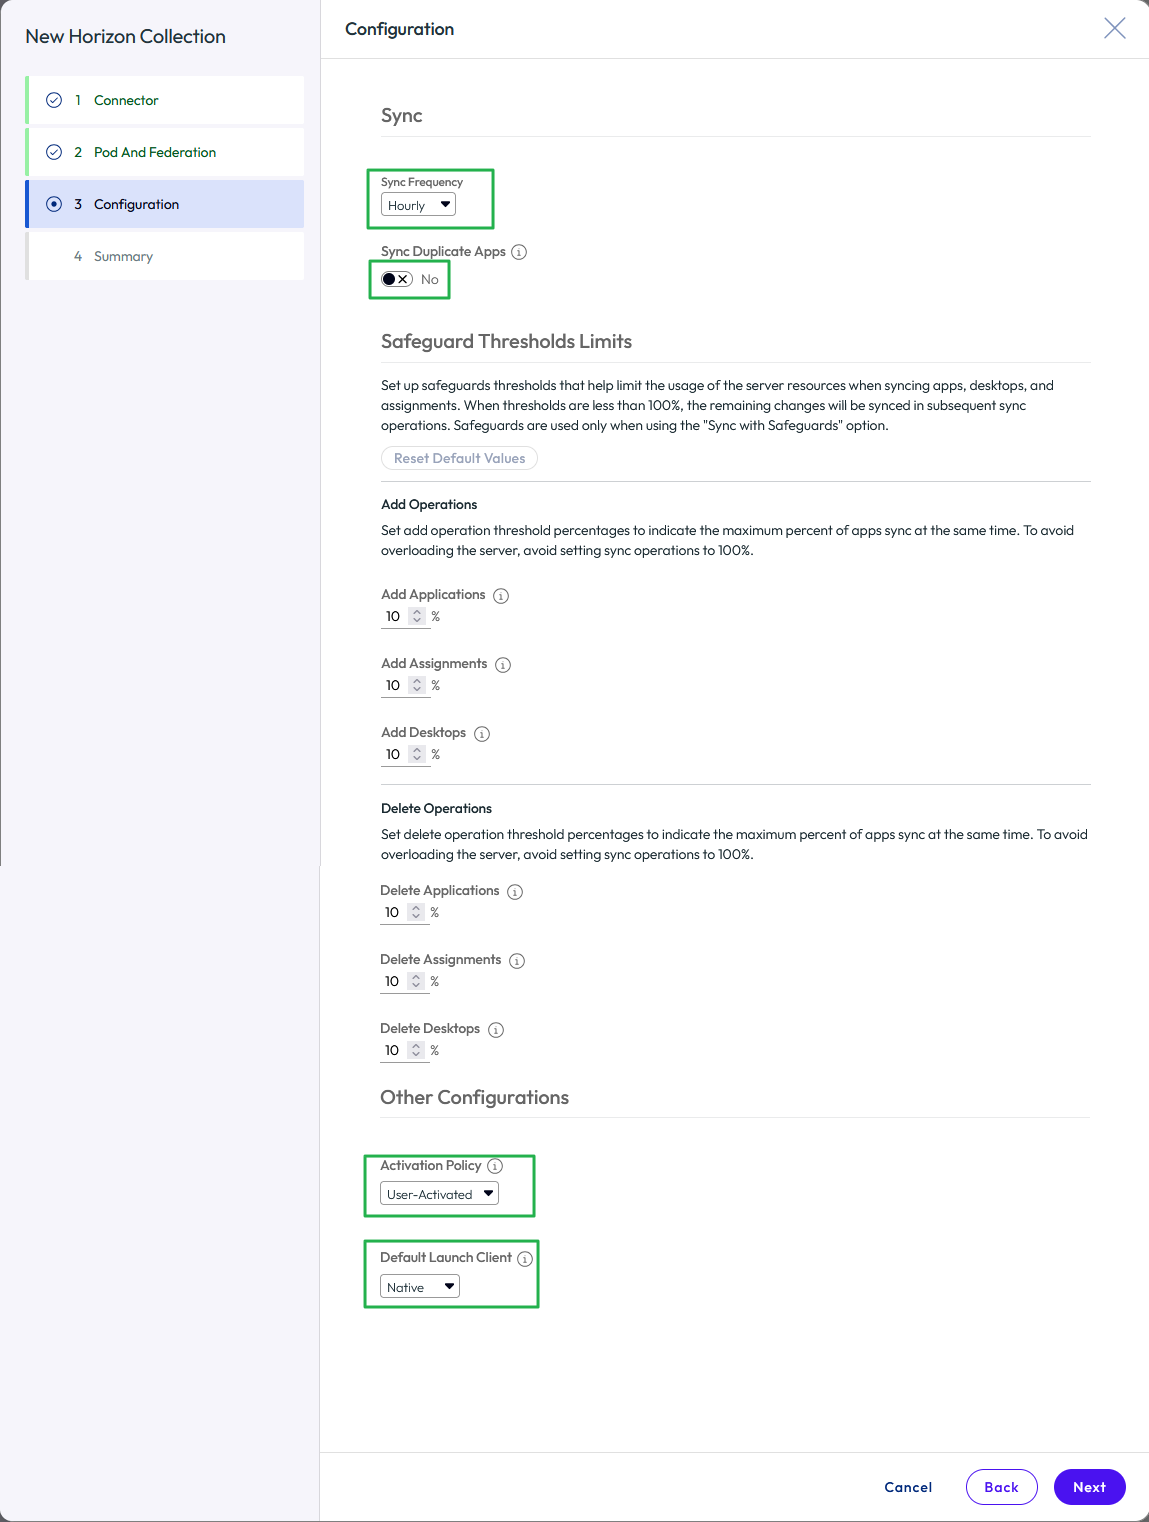
Figure 31: Complete the configuration for the virtual apps collection
- After you review the Summary page, click Back if you need to make changes, or click Save. The information you entered is validated and saved.
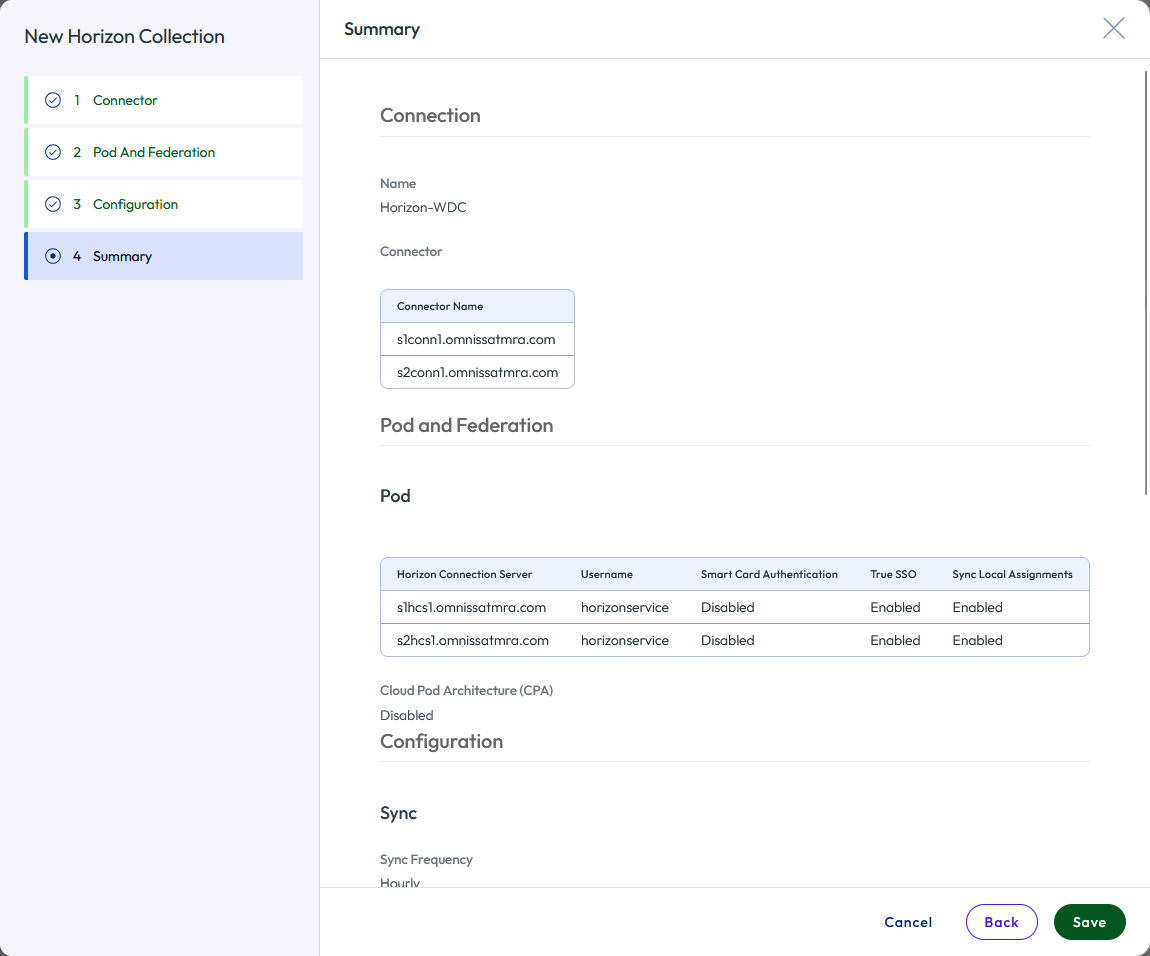
Figure 32: Add a new Horizon virtual apps collection summary
The collection is added, and the Network Ranges page appears.
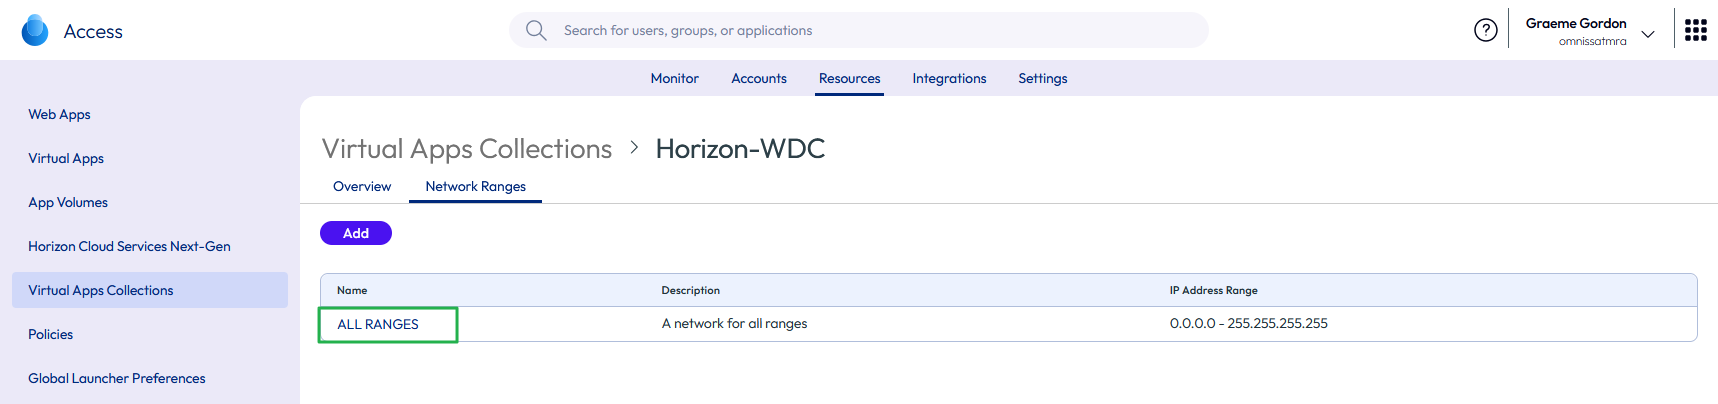
Figure 33: Edit the network ranges to amend the client access FQDNs
Note: The default configuration for network settings in specifies a single All Ranges scope. Also consider adding additional network ranges and tailoring the client access FQDN as necessary.
- Change the client access FQDN for the All Ranges scope so that it points to the namespace for the load balancer.
- Click the ALL RANGES button on the Network Ranges page.
- Change the Client Access FQDN entries as needed. Any Horizon pods added will, by default, use the FQDN of the Horizon Connection Server used for adding the pod. Be sure to change the FQDN to the load balancer common namespace for the Connection Servers. Click Save.
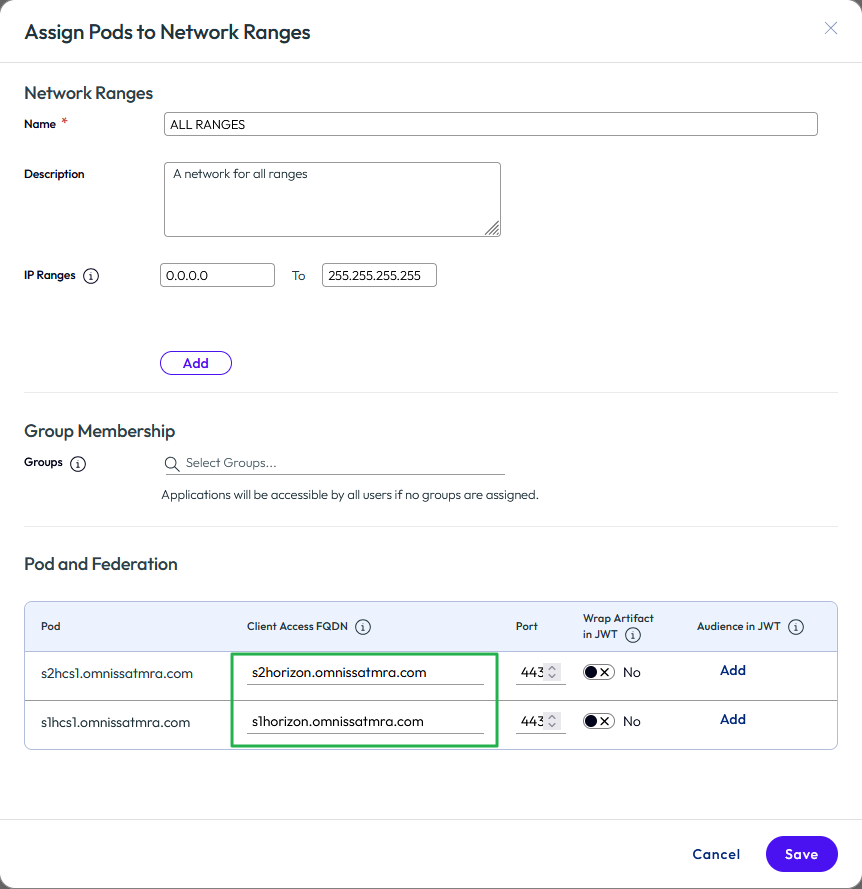
Figure 34: Change client access FQDNs for all ranges
- If necessary, configure different client access FQDNs for specific network ranges. For example, perhaps different FQDNs should be used for internal and external connections.
- Click Add.
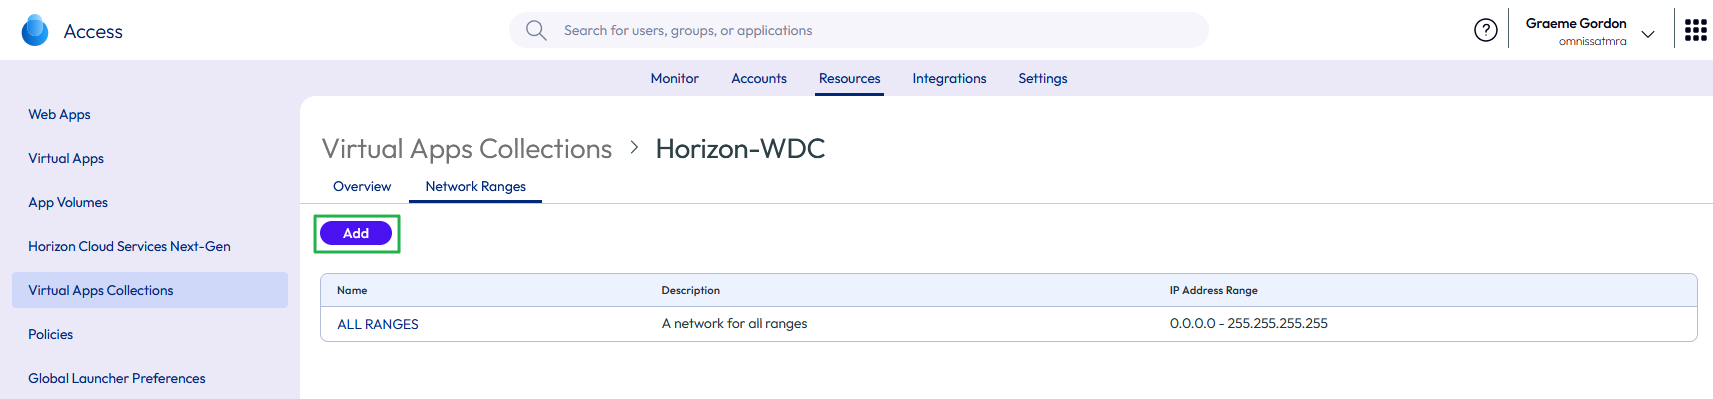
Figure 35: Add new network range
- Fill in the Name, IP Ranges, and change the Client Access FQDN entries. In the example below, a new range has been defined for internal IP ranges with the associated client access FQDNs. Click Save.
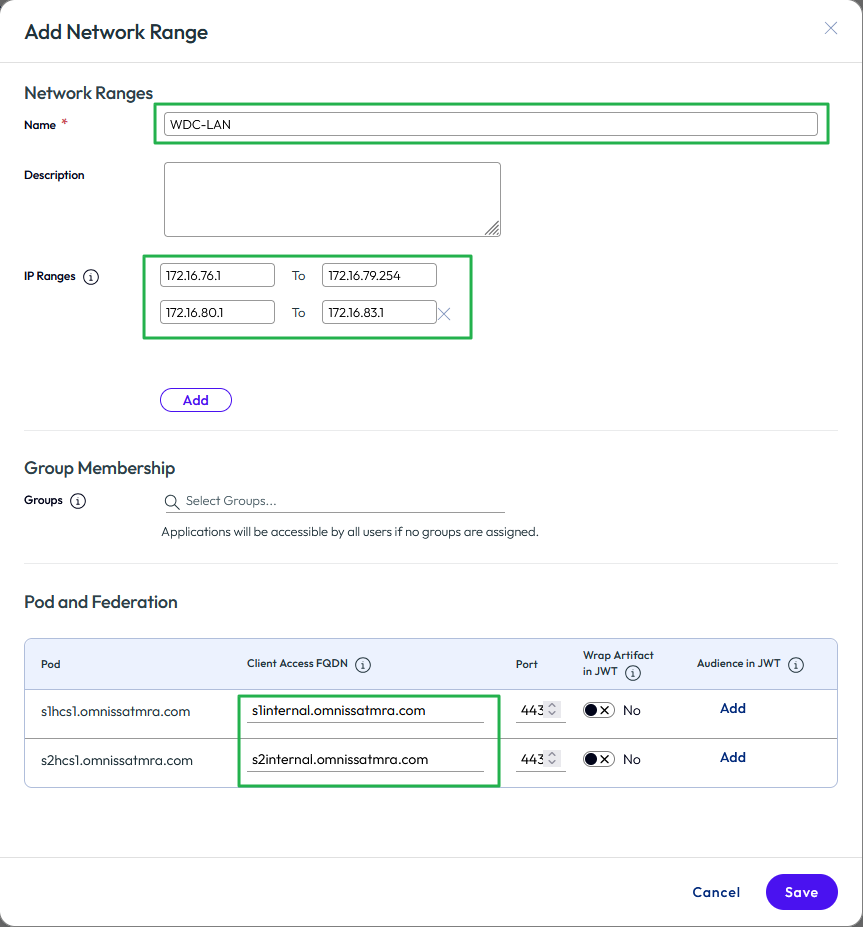
Figure 36: Sample new network range with internal client access FQDNs
- After you add a virtual apps collection, you might want to force a synchronization of any entitlements, rather than waiting for the sync schedule to run.
- From the list of Virtual Apps Collections, select the collection and click the SYNC button.
- For the first sync you might want to choose Sync Without Safeguards. This ignores Safeguard Threshold Limits that you defined when configuring the Virtual Apps Collection.
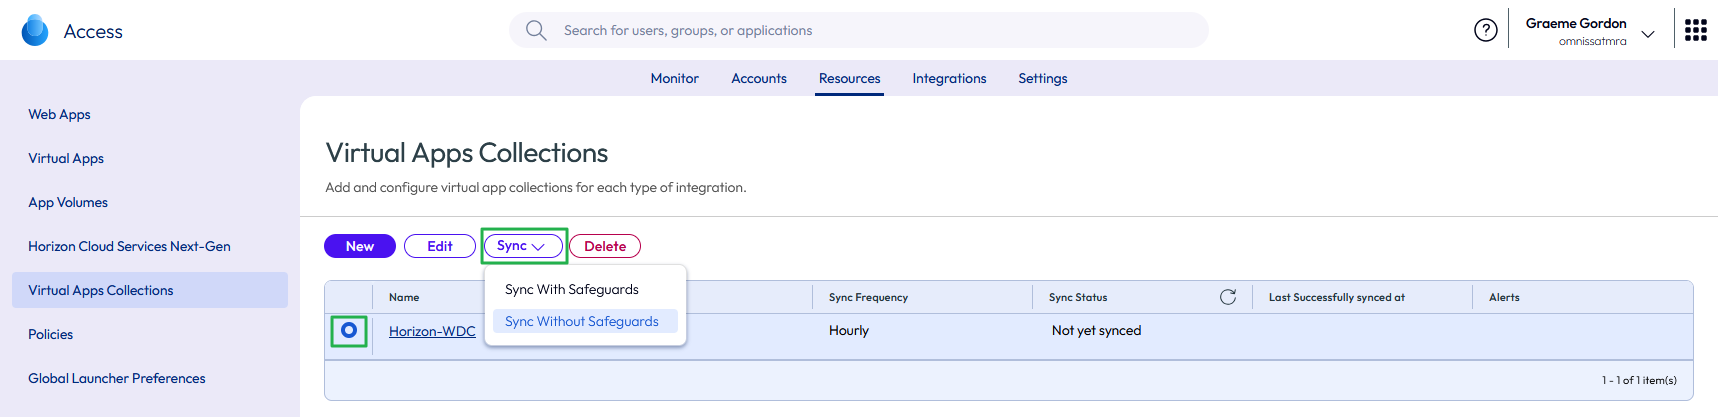
Figure 37: Manual Sync of a Virtual Apps Collection
See Configuring Horizon Pods and Pod Federations in Omnissa Access for more information.
Communication flow when launching a Horizon resource from Access
After Horizon 8 has been integrated with Access, a user can select a Horizon resource, such as a desktop or a published application, from Workspace ONE Intelligent Hub.
Internal client
The following figure depicts the flow of communication that takes place when an internal user selects and launches an entitled Horizon desktop or application.
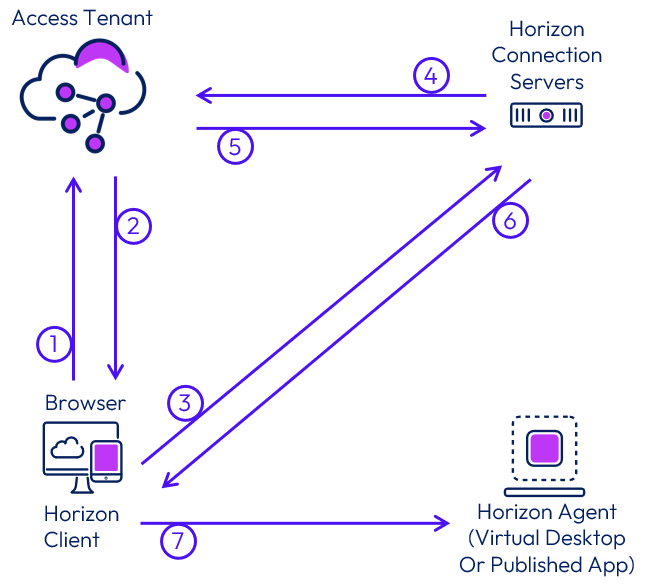
Figure 38: Internal Launch of a Horizon resource from Access
- After the user is authenticated to Access, either in a browser or using the Workspace ONE Intelligent Hub app, the user selects and launches a Horizon resource.
- Access generates a SAML assertion and an artifact that contains the horizon-client URL. It returns this SAML artifact to the browser on the client device (horizon-client://URL SAMLArt=<saml-artifact>).
- The default URL handler for horizon-client types (normally the Horizon Client) is launched using the URL that was returned in the artifact (XML-API request do-submit-authentication <saml-artifact>).
- The Horizon Connection Server performs a SAML Artifact Resolve operation against Access (<saml-artifact>).
- Access validates the artifact and returns a SAML Assertion to the Horizon Connection Server (<saml-assertion>).
- The Horizon Connection Server returns successful authentication (XML-API OK response submit-authentication).
- The remote protocol client launches the session with the parameters returned.
External client
The following figure depicts the flow of communication that takes place when an external user selects and launches an entitled Horizon desktop or application.
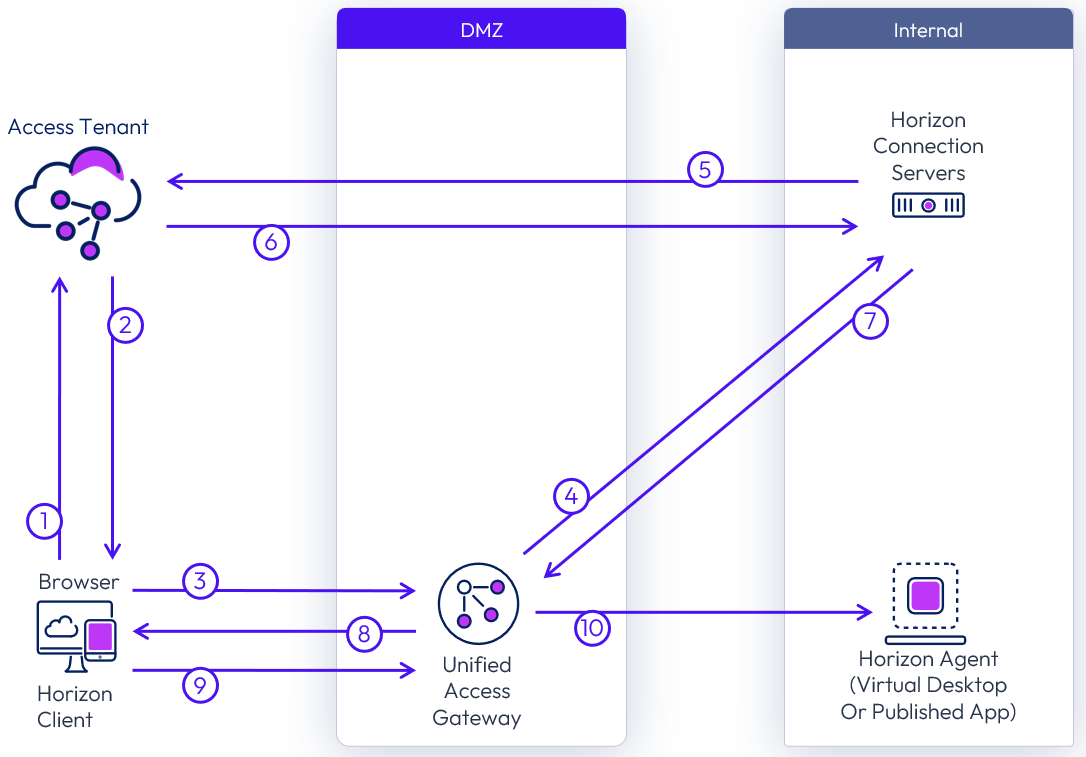
Figure 39: External launch of a Horizon resource from Access
- After the user is authenticated to Access, either in a browser or using the Workspace ONE Intelligent Hub app, the user selects and launches a Horizon resource.
- Access generates a SAML assertion and a SAML artifact that contains the horizon-client URL. It returns this URL to the browser on the client device (horizon-client://URL SAMLArt=<saml-artifact>).
- The default URL handler for horizon-client types (normally the Horizon Client) is launched using the URL that was returned in the artifact (XML-API request do-submit-authentication <saml-artifact>).
- Unified Access Gateway proxies the authentication to the Horizon Connection Server
- The Horizon Connection Server performs a SAML resolve against Access (<saml-artifact>).
- Access validates the artifact and returns an assertion to the Horizon Connection Server (<saml-assertion>).
- The Horizon Connection Server returns successful authentication (XML-API OK response submit-authentication).
- Unified Access Gateway returns the successful authentication to the client.
- The remote protocol client launches the session with the parameters returned.
- Unified Access Gateway proxies the protocol session to the Horizon Agent.
Summary and additional resources
Now that you have come to the end of this integration chapter, you can return to the reference architecture landing page and use the tabs, search, or scroll to select further chapter in one of the following sections:
- Overview chapters provide understanding of business drivers, use cases, and service definitions.
- Architecture chapters give design guidance on the Omnissa products you are interested in including in your deployment, including Workspace ONE UEM, Access, Intelligence, Workspace ONE Assist, Horizon Cloud, Horizon 8, App Volumes, Dynamic Environment Manager, and Unified Access Gateway.
- Integration chapters cover the integration of products, components, and services you need to create the environment capable of delivering the services that you want to deliver to your users.
- Configuration chapters provide reference for specific tasks as you deploy your environment, such as installation, deployment, and configuration processes for Omnissa Workspace ONE, Horizon Cloud, Horizon 8, App Volumes, Dynamic Environment Management, and more.
Changelog
The following updates were made to this guide:
| Date | Description of Changes |
| 2025-11-11 |
|
| 2025-01-14 |
|
| 2024-05-28 |
|
| 2023-07-26 |
|
| 2022-11-17 |
|
| 2020-07-01 |
|
Author and contributors
This chapter was written by:
- Graeme Gordon, Senior Staff Architect, Omnissa.
Feedback
Your feedback is valuable. To comment on this paper, either use the feedback button or contact us at tech_content_feedback@omnissa.com.