

Configuring macOS Platform SSO using Omnissa Access and Workspace ONE UEM
Overview
Traditionally, end-user authentication on macOS devices has relied on local accounts, posing challenges for IT admins in ensuring adherence to password best practices. Mobile device management (MDM) offers solutions, enabling organizations to enforce security policies and configure devices to sync with an LDAP domain. However, these options still present difficulties for both IT admins and end users. IT admins continue managing multiple tools and workflows for device access and security, while end users remain burdened with remembering multiple passwords for their devices and various applications.
Platform SSO
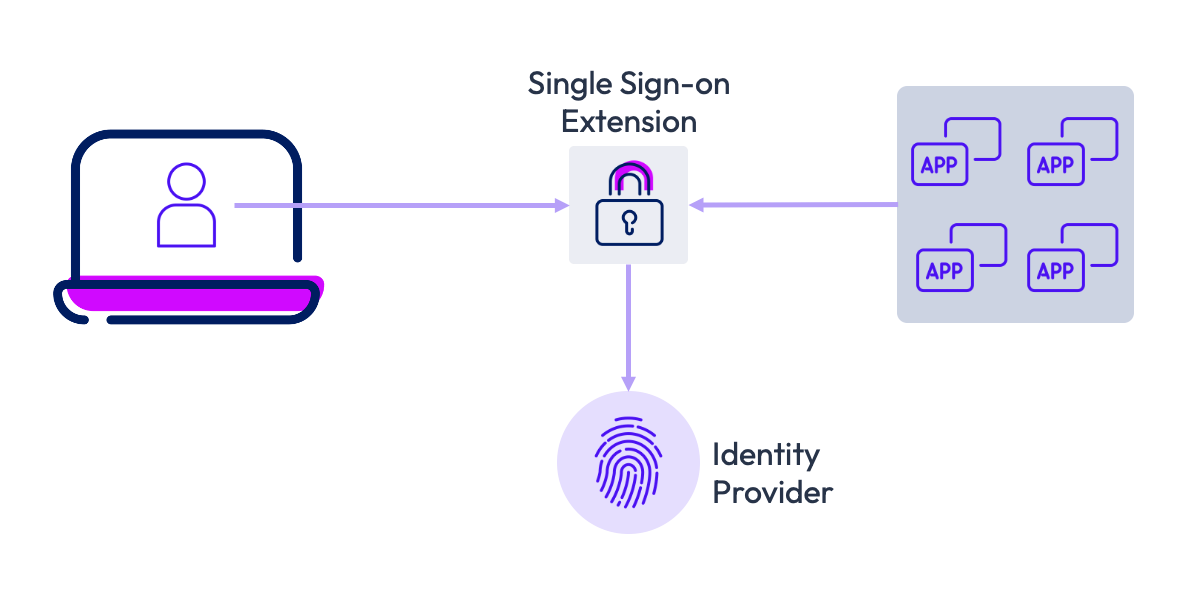
At WWDC 2023, Apple introduced Platform Single Sign-On, a game changer that simplifies user authentication. Platform SSO allows users to seamlessly synchronize their local account credentials with their organization’s identity provider, eliminating the need to remember multiple passwords. Users can log into their devices using their corporate account and password or even access their device without a password using other methods of authentication.
Platform SSO authentication
Platform SSO offers IT administrators four user authentication options:
- Password – This option synchronizes the end user’s local credentials with the identity provider, allowing the user to log into their device using their identity provider credentials.
- Secure Enclave Key – With this option, the end user can unlock their macOS device with Touch ID or Apple Watch using a Secure Enclave-backed key to authenticate with the identity provider, eliminating the need for a password.
- SmartCard – The end user can use a SmartCard to authenticate with the identity provider when logging into their device. This option is only available for macOS 14 and higher.
- Password with WS-Trust – A federated identity provider, which facilitates federated authentication across multiple security domains, can use the local account password for authentication.
The availability of the above options is dependent on what the Identity Provider supports in their solution.
An MDM solution, such as Workspace ONE UEM, is necessary to enable Platform SSO on macOS devices. The required applications and device profiles must be pushed to the devices. It’s worth noting that if a macOS device is unenrolled from MDM, it will also be unregistered from the configured identity provider.
Platform SSO device registration process
The overall Platform SSO device registration process comprises several steps and prompts the user at different stages. The process outlined below is general and may differ depending on the identity provider being utilized. This process applies to macOS Ventura 13 to Sequoia 15.
The process commences when a user enrolls and logs into an MDM-managed macOS device. This initial login will be made using a local device account.
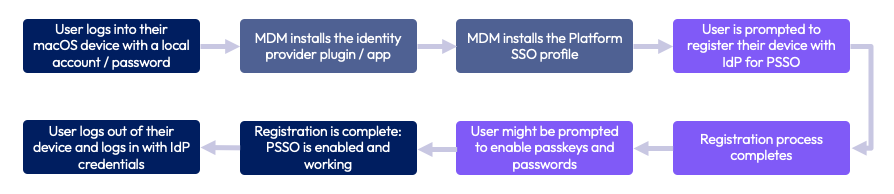
An MDM solution, such as Workspace ONE UEM, installs the SSO extension app created by the identity provider. Subsequently, it installs the device profile, which contains the SSO extension payload to configure Platform SSO.
The user is prompted to register their device with the identity provider. During this process, the user will be required to provide their local device credentials. Additionally, the registration process involves authenticating with the user’s identity provider credentials. A new account will be created on the device matching the user’s identity provider credentials. If required by the identity provider, the user may be prompted to enable Passkeys and Passwords in the device’s System Settings.
Once the registration is complete, the end user can log out and log back in to the device using their identity provider credentials.
Supported identity providers
For Platform SSO to function, identity providers must integrate the framework into their platform solution. Two identity providers that have fully embraced Apple’s Platform SSO are Okta and Microsoft Entra ID. The following Tech Zone articles provide guidance on configuring Workspace ONE UEM to connect these two platforms to your Apple device fleet.
- Configuring macOS Platform SSO using Okta and Workspace ONE UEM
- Configuring macOS Platform SSO using Microsoft Entra ID and Workspace ONE UEM
Omnissa Access also supports the Platform SSO framework, allowing administrators to utilize almost any federated identity provider, even if it doesn’t natively support Platform SSO. By configuring Omnissa Access as the identity provider for Platform SSO, organizations can authenticate users to macOS devices using Active Directory and other third-party identity providers. Omnissa Access can facilitate authentication with any identity provider that supports the OAuth 2.0 Password Grant flow.
Purpose of this tutorial
This tutorial walks you through setting up the device profiles required to use Omnissa Access as the identity provider for Platform SSO on your macOS devices. The sections included in this guide are:
- Platform SSO with Omnissa Access
- Configuring Omnissa Access as a Platform SSO identity provider
- End user experience
- Troubleshooting Platform SSO
However, this guide does not cover federating identity providers in Omnissa Access. For information on integrating identity providers with Omnissa Access, refer to Directory Integration with Omnissa Access.
Audience
This operational tutorial is intended for IT professionals and Workspace ONE administrators of existing production environments.
Both current and new administrators can benefit from using this tutorial. Familiarity with macOS, XML, and basic scripting is assumed.
Knowledge of additional technologies such as Omnissa Intelligence and Omnissa Workspace ONE® UEM is also helpful.
Platform SSO with Omnissa Access
This section offers a brief introduction to Omnissa Access and highlights its essential features. It also delves into how Access integrates with Platform SSO, while also outlining the current limitations of this feature.
Omnissa Access
In the rapidly evolving IT landscape, where user identities are becoming increasingly diverse, encompassing more than just a username and password. Omnissa Access combines user identity with factors like device and network information to make intelligent, conditional access decisions for applications. This seamless integration enables organizations to provide a consistent application access experience across various devices, ensuring quick and secure access.
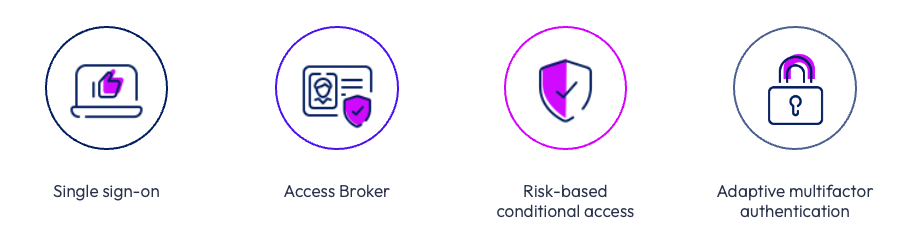
Some of the key advantages of the Omnissa Access service for Workspace ONE include:
- Single Sign-On (SSO): Seamlessly integrate SSO with Omnissa Workspace ONE® Intelligent Hub to provide single sign-on access to web, SaaS, mobile, and legacy applications.
- Access Broker: Collaborate with leading identity providers to reduce deployment time and enhance the security of access to any application.
- Risk-Based Conditional Access: Develop and implement access policies that leverage device enrollment, network, user behavior, location, and third-party security signals and information.
- Adaptive Multifactor Authentication (MFA): Offer native MFA or integrate with existing MFA providers to bolster application and data security while providing a frictionless experience for end users.
The Omnissa Access console serves as a centralized management hub, enabling you to manage users and groups, configure and manage authentication and access policies, and add resources to the catalog while managing their entitlements. Additionally, you can configure the integration with Workspace ONE UEM.
The primary tasks performed through the Omnissa Access console involve managing user authentication and access policies, as well as granting users access to resources. Other tasks support this core function by providing more granular control over which users or groups are entitled to which resources under specific conditions.
Using Omnissa Access with Platform SSO
Omnissa Access can be configured as the identity provider for Platform SSO, allowing authentication with third-party identity providers like Active Directory, Google Workspaces, Ping, and others. Omnissa Access supports two primary identity source configurations for Platform SSO: Active Directory and any identity provider that supports the OAuth 2.0 Password Grant flow. Once configured, the user’s macOS local password is synchronized with their third-party identity provider password.
The provided diagram offers a high-level overview of how Platform SSO with Omnissa Access operates.
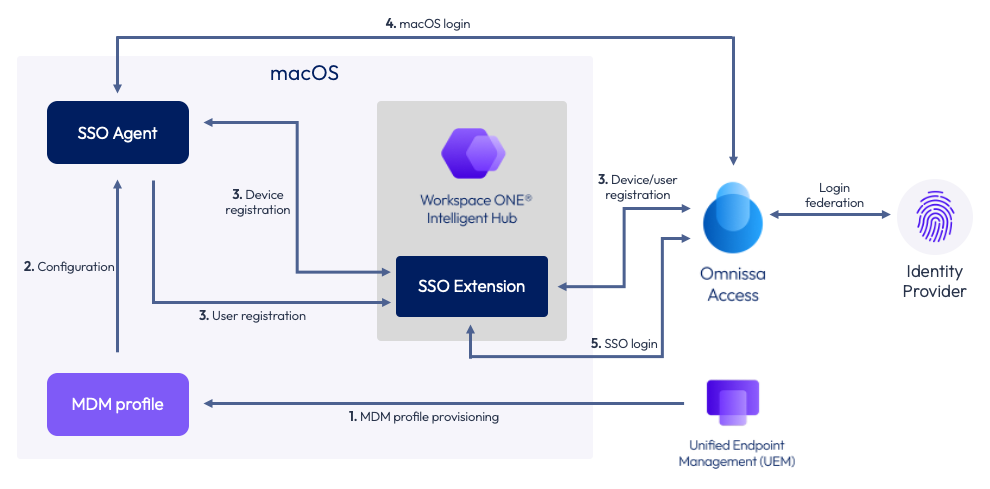
- MDM profile provisioning – An administrator creates a SSO Extension profile in Workspace ONE UEM and assigns it to one or more smart groups containing macOS devices. Workspace ONE UEM provisions the profile to those assigned devices.
- Configuration – The MDM profile pushed to the device by Workspace ONE configures the SSO agent. The SSO agent is part of the macOS operating system and manages device/user registration and device logins.
- Device / user registration – Once the configuration has been applied to the SSO agent, the Platform SSO orchestration begins. The user is prompted to register with the identity provider, in this case, Omnissa Access. The registration process registers both the user and the device with Omnissa Access. Access, in turn, will issue a token which serves as a unique identifier and is stored in the macOS keychain.
- macOS login – Once the registration process is complete, the user’s identity provider password is synchronized with their local user account in macOS. When a user logs into macOS, they use their identity provider credentials to access their device.
- SSO login – If the user launches an app that requires authentication with their identity provider account, the Platform SSO extension within Intelligent Hub will automatically authenticate the user with the identity provider credentials provided during login.
In case the user changes its identity provider password, Omnissa Access and Platform SSO will automatically synchronize the new password with the user’s local account on the device.
Limitations
Using Omnissa Access as an identity provider does have two limitations that you must be aware of prior to implementation.
- Multi-user macOS devices are not supported. While macOS allows multiple user accounts, Platform SSO with Omnissa Access currently only supports single-user devices. Consequently, macOS devices shared among multiple users cannot be configured to use Platform SSO with Omnissa Access.
- Omnissa Access currently only supports Platform SSO, version 1.0.
Configuring Omnissa Access as a Platform SSO identity provider
This section outlines the essential requirements and process for configuring Omnissa Access as the Platform SSO identity provider for your macOS devices. It does not delve into specific identity providers or the process of federating them with Omnissa Access. This document assumes that your Workspace ONE UEM tenant is already integrated with your Omnissa Access tenant and does not cover the integration process.
The steps described in this section include:
- Required pre-configurations
- Software requirements
- Configuring the Workspace ONE UEM root certificate in Omnissa Access
- Creating a SCEP profile in Workspace ONE UEM
- Creating a SSO Extension profile in Workspace ONE UEM
Required pre-configurations
There are a few configurations that this document assumes already exist within your Omnissa Access and Workspace ONE UEM tenants. This guide will not provide detailed instructions for each of these items. It is recommended that you consult Omnissa product documentation for more information.
NOTE: Before proceeding, ensure that your administrative account in Omnissa Access has Manage Settings privileges for the Identity and Access Management service. To learn how to manage roles in Omnissa Access, please read, Managing Administrator Roles in Omnissa Access.
Integrating third-party identity providers with Omnissa Access
If you’re using a third-party Identity Provider, it must be integrated with Omnissa Access as an OpenID Connect identity provider. To learn how to integrate an OpenID Connect identity provider, refer to the guide titled, Add and Configure an OpenID Connect Third-Party Identity Provider in Omnissa Access. This OpenID Connect identity provider must be configured to use the OAuth 2.0 Password Grant flow within the identity provider.
NOTE: The setting name may vary depending on the identity provider. For instance, in Okta, the setting is called “Resource Owner Password.”
NOTE: It’s unnecessary to enable the OAuth 2.0 Password Grant flow with a federated instance of Active Directory.
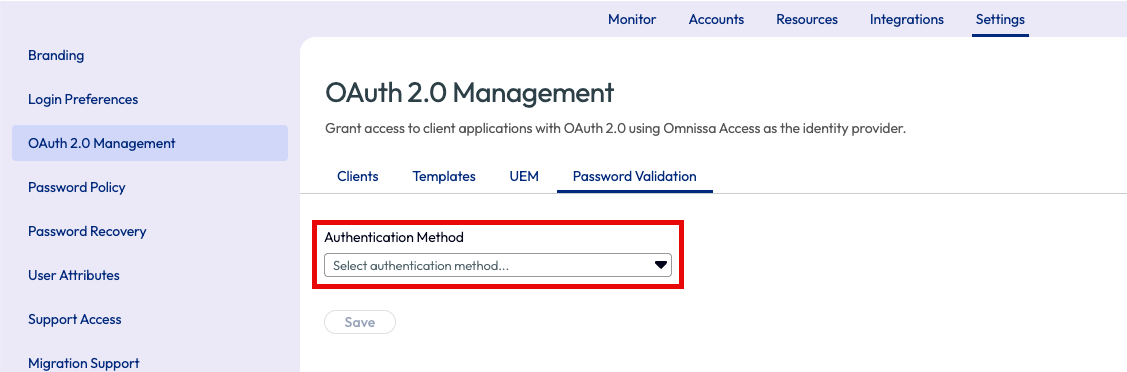
In Omnissa Access, it’s also essential to configure OAuth 2.0 Management to utilize the OAuth 2.0 Password Grant flow for password validation. This configuration can be made in the Omnissa Access console under the OAuth 2.0 Management > Password Validation tab. However, this configuration is unnecessary if you’re using a federated Active Directory instance.
Authentication and directory synchronization settings
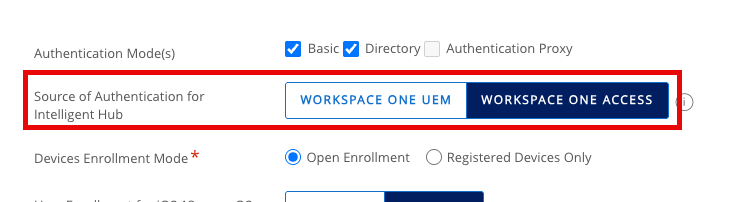
Your source of authentication can be configured to either Workspace ONE UEM or Omnissa Access. Platform SSO supports both configurations. This can be configured in the Workspace ONE UEM console under Groups & Settings > All Settings > Devices & Users > General > Enrollment.
Additionally, the users you want to enable Platform SSO for must exist in both Omnissa Access and Workspace ONE UEM, and the externalId attribute is mandatory for all users. The values for this attribute must be consistent between Omnissa Access and Workspace ONE UEM.

Software requirements
To use Omnissa Access as an identity provider for Platform SSO, you must fulfill the following requirements.
- Workspace ONE Access Cloud
- Workspace ONE UEM, version 24.10 or higher
- Intelligent Hub for macOS, version 25.11 or higher
- Devices running macOS version 14 (Sonoma) or higher
Configuring the Workspace ONE UEM root certificate in Omnissa Access
Although your Workspace ONE UEM and Omnissa Access tenants are already integrated, it’s essential to establish a specific trust between the two products for authentication with Platform SSO. This certificate import will create a trust between Workspace ONE UEM and Omnissa Access authentication adapters.
To establish a trust between Workspace ONE UEM and Omnissa Access authentication adapters, follow these steps:
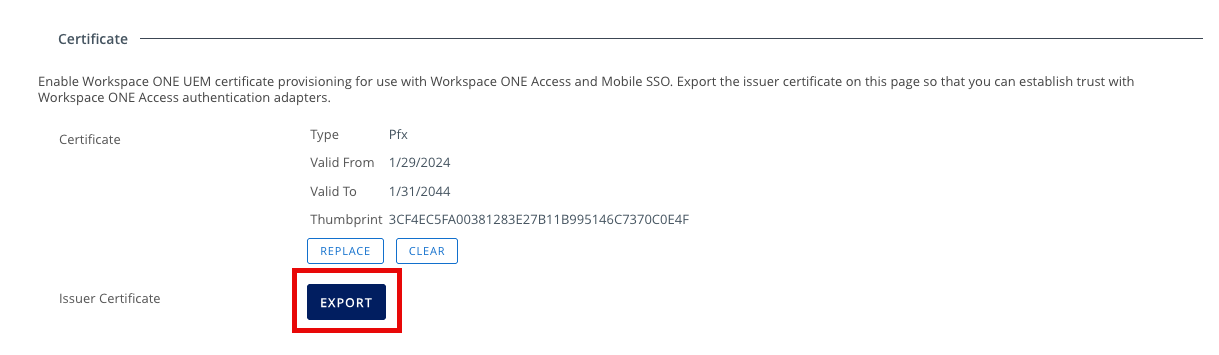
- In the Workspace ONE UEM console, select Groups & Settings, and then All Settings.
- Expand System and expand Enterprise Integration. Expand Workspace ONE Access and select Configuration.
- Click the Export button to download the Workspace ONE UEM Issuer Certificate.
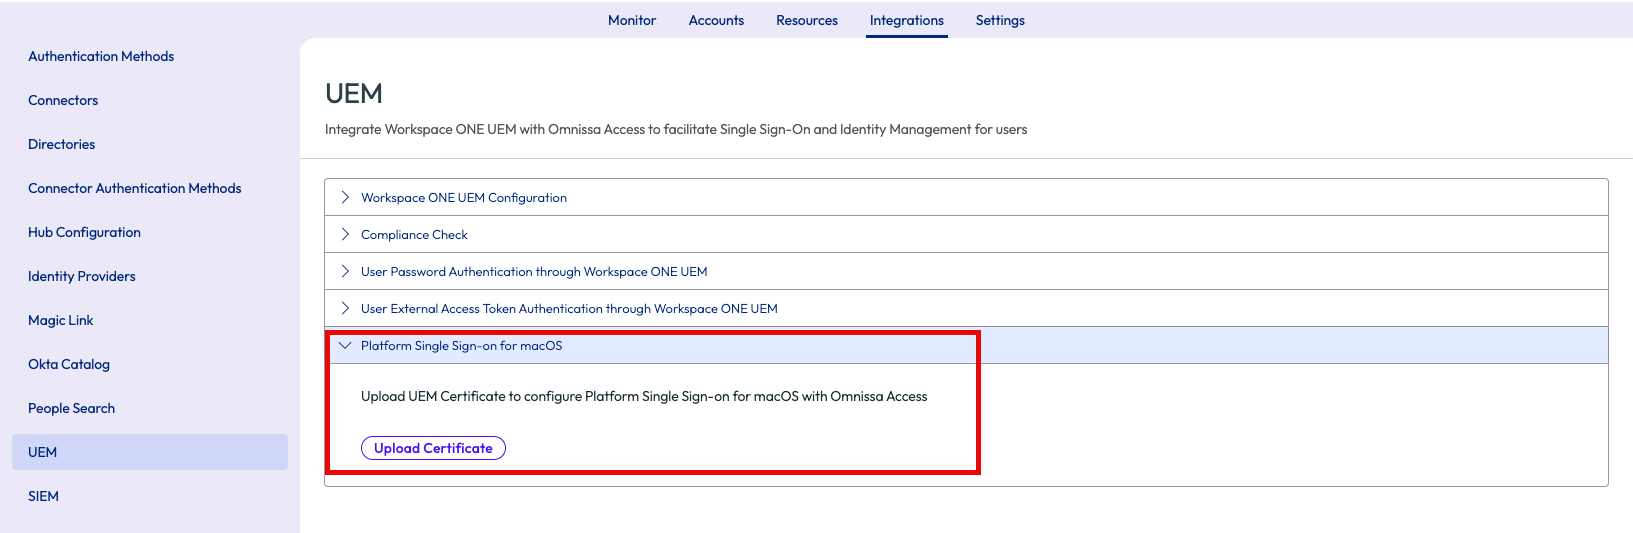
- In the Omnissa Access console, click the Integrations tab, and expand Platform Single Sign-on for macOS.
- Click Upload Certificate to upload the certificate you just downloaded from the Workspace ONE UEM console.
Creating a SCEP profile in Workspace ONE UEM
To use Omnissa Access as an identity provider for Platform SSO, you will need to create a SCEP profile and assign it to your users.
NOTE: You may already have this configured in your Workspace ONE UEM tenant. If so, you can ignore these steps and move onto the next section, Creating a SSO Extension profile in Workspace ONE UEM.
To configure and deploy a SCEP profile, do the following steps:
- Within the Workspace ONE UEM console, select Resources and then click Profiles.
- Click the Add dropdown and select Add Profile.
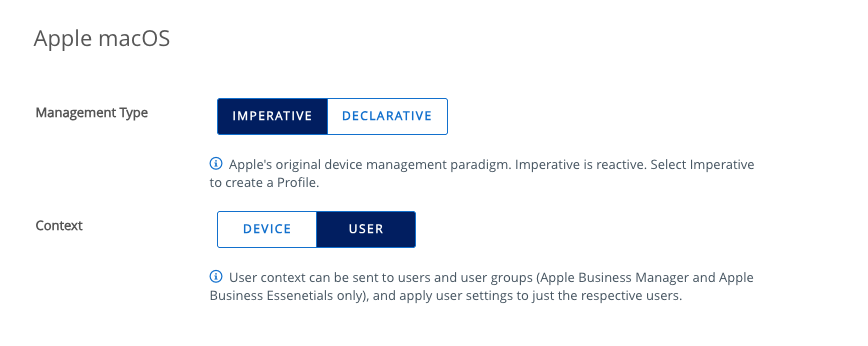
- Select Apple macOS.
- For Management Type, select Imperative and select User for the Context. Click Next.
- Enter a name for the profile. For example, you might name the profile,
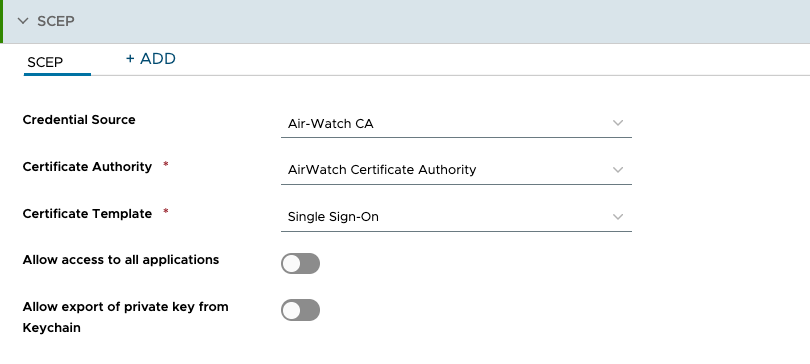
macOS – SCEP PSSO. - Scroll down the list of payloads until you find SCEP. Click Add.
- In the Credential Source dropdown, select Air-Watch CA.
- In the Certificate Authority dropdown, select AirWatch Certificate Authority.
- From the Certificate Template dropdown, select Single Sign-on.
- Deselect Allow export of private key from Keychain.
- Click Next.
- Scroll down to view Assigned Groups and click in the search box. From the list of assignment groups that appear, select the appropriate group. For example, select
All Corporate macOS Devices. - Select Auto for the Assignment Type.
- Click Save & Publish.
Creating a SSO Extension profile in Workspace ONE UEM
The SSO Extension for macOS configures the necessary settings for enabling Platform SSO on macOS devices. It also configures single sign-on for native macOS apps and websites. The properties in this profile define the authentication source, authentication method (such as password, secure enclave, etc.), and other options required for Platform SSO. However, the fields required to configure Platform SSO for identity providers other than Omnissa Access may vary. The procedure defined in this section is specific to configuring Omnissa Access as the identity provider used by Platform SSO.
To configure the SSO Extension profile for Omnissa Access, follow the below outlined steps:
- Within the Workspace ONE UEM console, select Resources and then click Profiles.
- Click the Add dropdown and select Add Profile.
- Select Apple macOS.
- For Management Type, select Imperative and select Device for the Context. Click Next.
- Enter a name for the profile. For example, you might name the profile,
macOS – PSSO. - Scroll down the list of payloads until you find SSO Extension. Click Add.
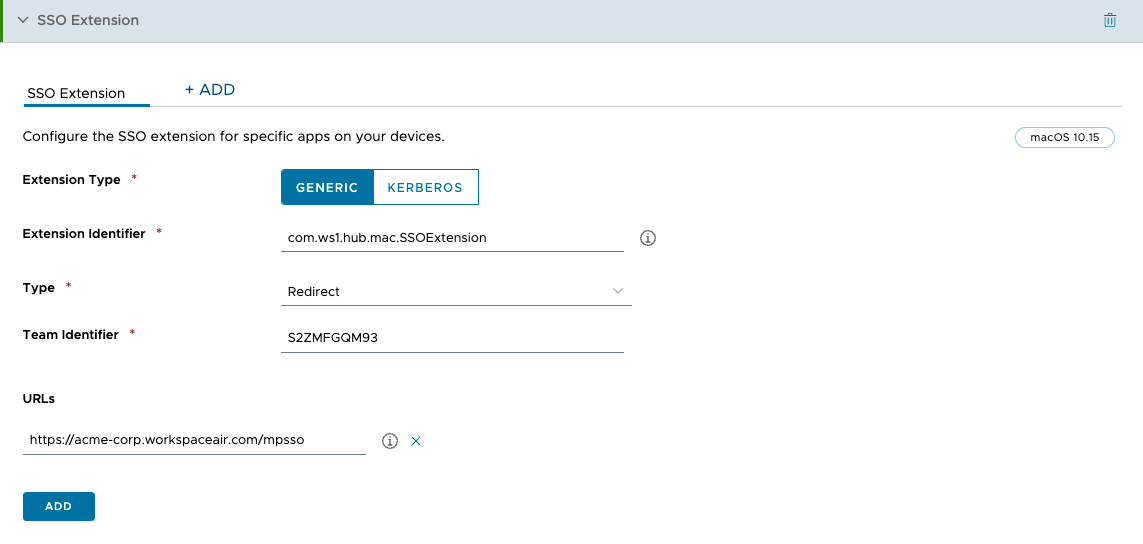
- Set the Extension Type to Generic.
- Enter
com.ws1.hub.mac.SSOExtensionfor the Extension Identifier. - From the Type dropdown, select Redirect.
- Enter
S2ZMFGQM93for the Team Identifier. - For URLs, enter
https://<AccessTenantFQDN>/mpsso, where<AccessTenantFQDN>represents the FQDN for your Omnissa Access tenant.
- As you scroll down, you will find two dropdown menus labeled Authentication method. Leave the first dropdown as the default value of Not Configured and select Password in the second dropdown.

- Scroll down until you see the Platform SSO section. Enter a name in the Account Display Name field. This name will be visible to end users during registration.
- Click Enable for Use shared device keys.
- At the bottom of the payload, you will find a text box under Additional Settings section labeled Custom XML. Copy and paste the following XML code in the text box.
<dict>
<key>AuthorizationRules</key>
<array>
    <dict>
        <key>URLPrefix</key>
        <string>https://<AccessTenantFQDN>/</string>
        <key>ExtensionManaged</key>
        <false/>
    </dict>
</array>
</dict>
NOTE: Change <AccessTenantFQDN> to the FQDN for your Omnissa Access tenant.
- Scroll down the list of payloads until you find System Extensions. Click Add.
- Click the Add System Extension Type button.
- In the Team Identifier field, enter
S2ZMFGQM93. - In the Allowed System Extensions section, enter
S2ZMFGQM93in the Team Identifier field andcom.ws1.hub.mac.SSOExtensionfor the Bundle Identifier. - Scroll down to the Non Removable From UI System Extensions section. Click the X next to the empty field.
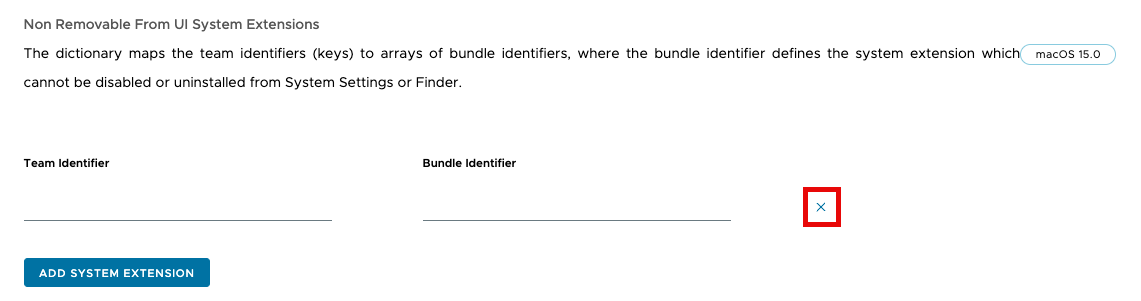
- Scroll down to the Non Removable System Extensions section. Enter
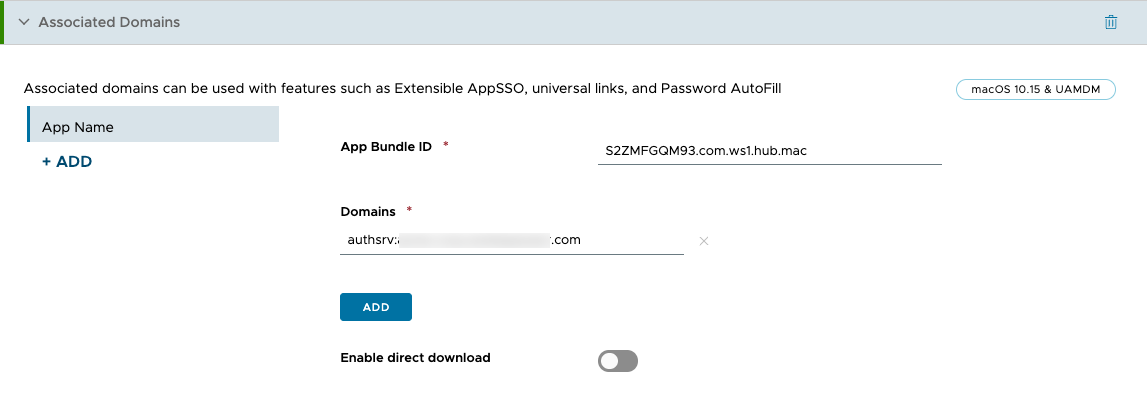
S2ZMFGQM93in the Team Identifier field andcom.ws1.hub.mac.SSOExtensionfor the Bundle Identifier. - Scroll up the list of payloads until you find Associated Domains. Click Add.
- For App Bundle ID, enter
S2ZMFGQM93.com.ws1.hub.mac, and for Domains, enterauthsrv:<AccessTenantFQDN>, where<AccessTenantFQDN>is the FQDN for your Omnissa Access tenant.
- Click Next.
- Scroll down to view Assigned Groups and click in the search box. From the list of assignment groups that appear, select the appropriate group. For example, select
All Corporate macOS Devices. - Select Auto for the Assignment Type.
- Click Save and Publish.
End user experience
This section briefly outlines the anticipated end-user experience during the device registration process.
Workspace ONE Intelligent Hub
Omnissa Workspace ONE Intelligent Hub is an application that provides a secure digital workspace for employees on any device, anywhere. Intelligent Hub serves as a central hub where employees can access all the necessary tools and resources to enhance their productivity, regardless of whether they are working on a desktop, mobile device, or in a web browser. This includes seamless single sign-on to a unified app catalog, people directory, support resources, and more. Additionally, Intelligent Hub facilitates the deployment of the Workspace ONE Assist client, enabling real-time remote support.
Omnissa Access utilizes the Intelligent Hub for macOS to facilitate authentication and single sign-on through Platform SSO. The Intelligent Hub must be installed on all macOS devices that will be configured to use Platform SSO.
Device registration
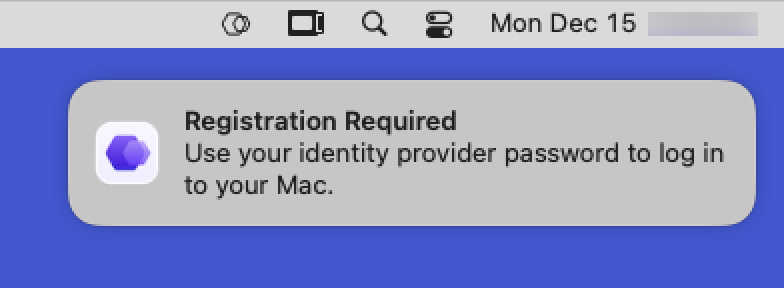
Once you’ve pushed the profiles you created earlier to your macOS devices, a notification pop-up will appear, reminding the user that registration is required.
Clicking on the notification initiates the registration process. The end user doesn’t need to launch or interact with the Intelligent Hub. To apply the Platform SSO configuration to their device, the end user will be prompted to authenticate using their local password.
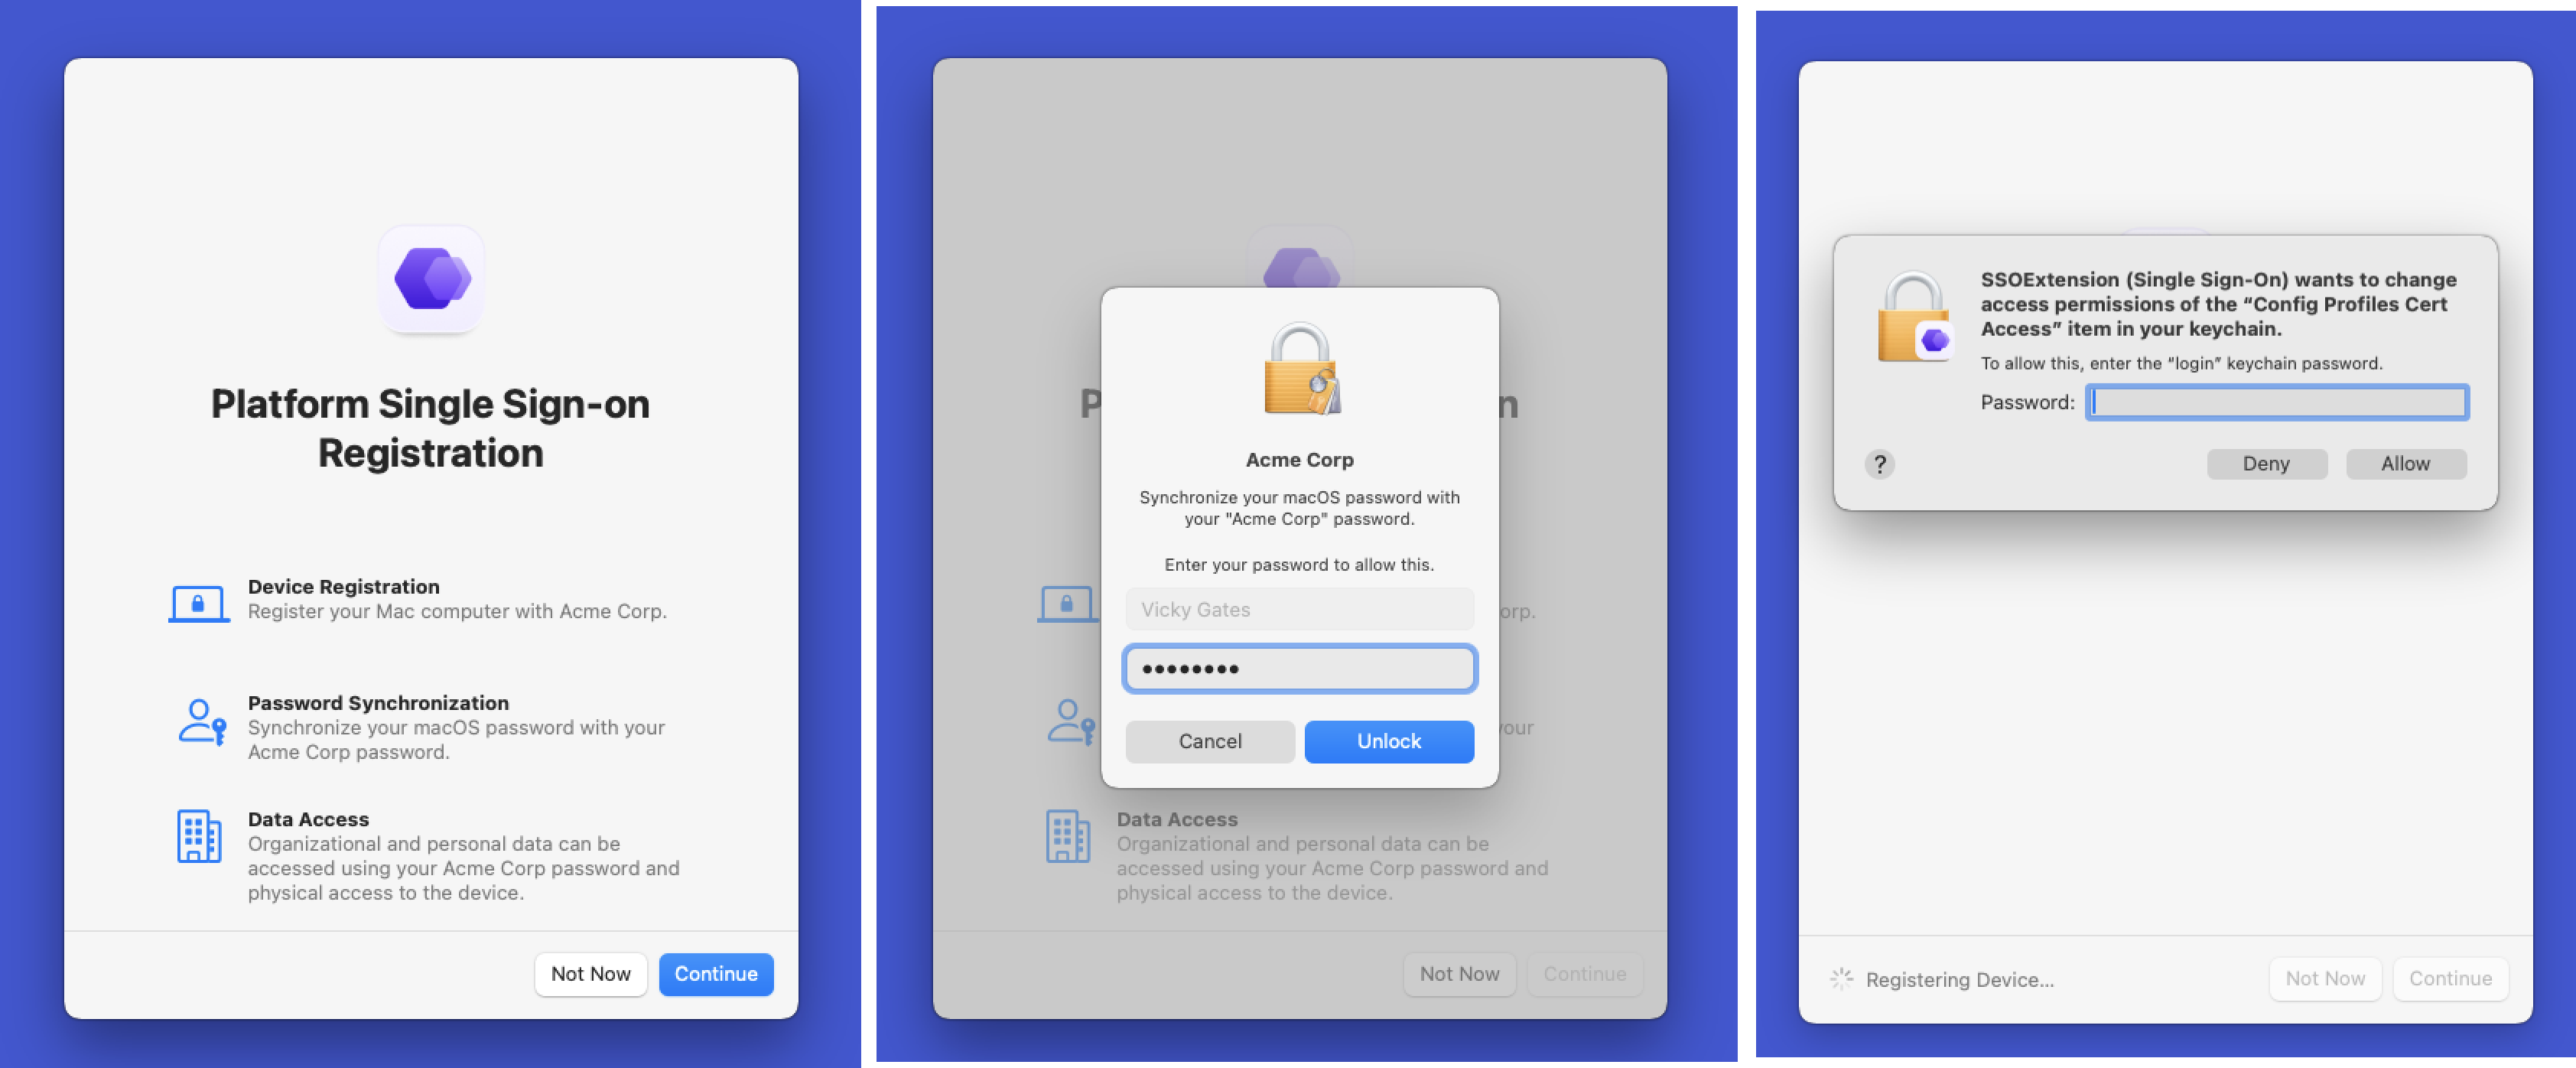
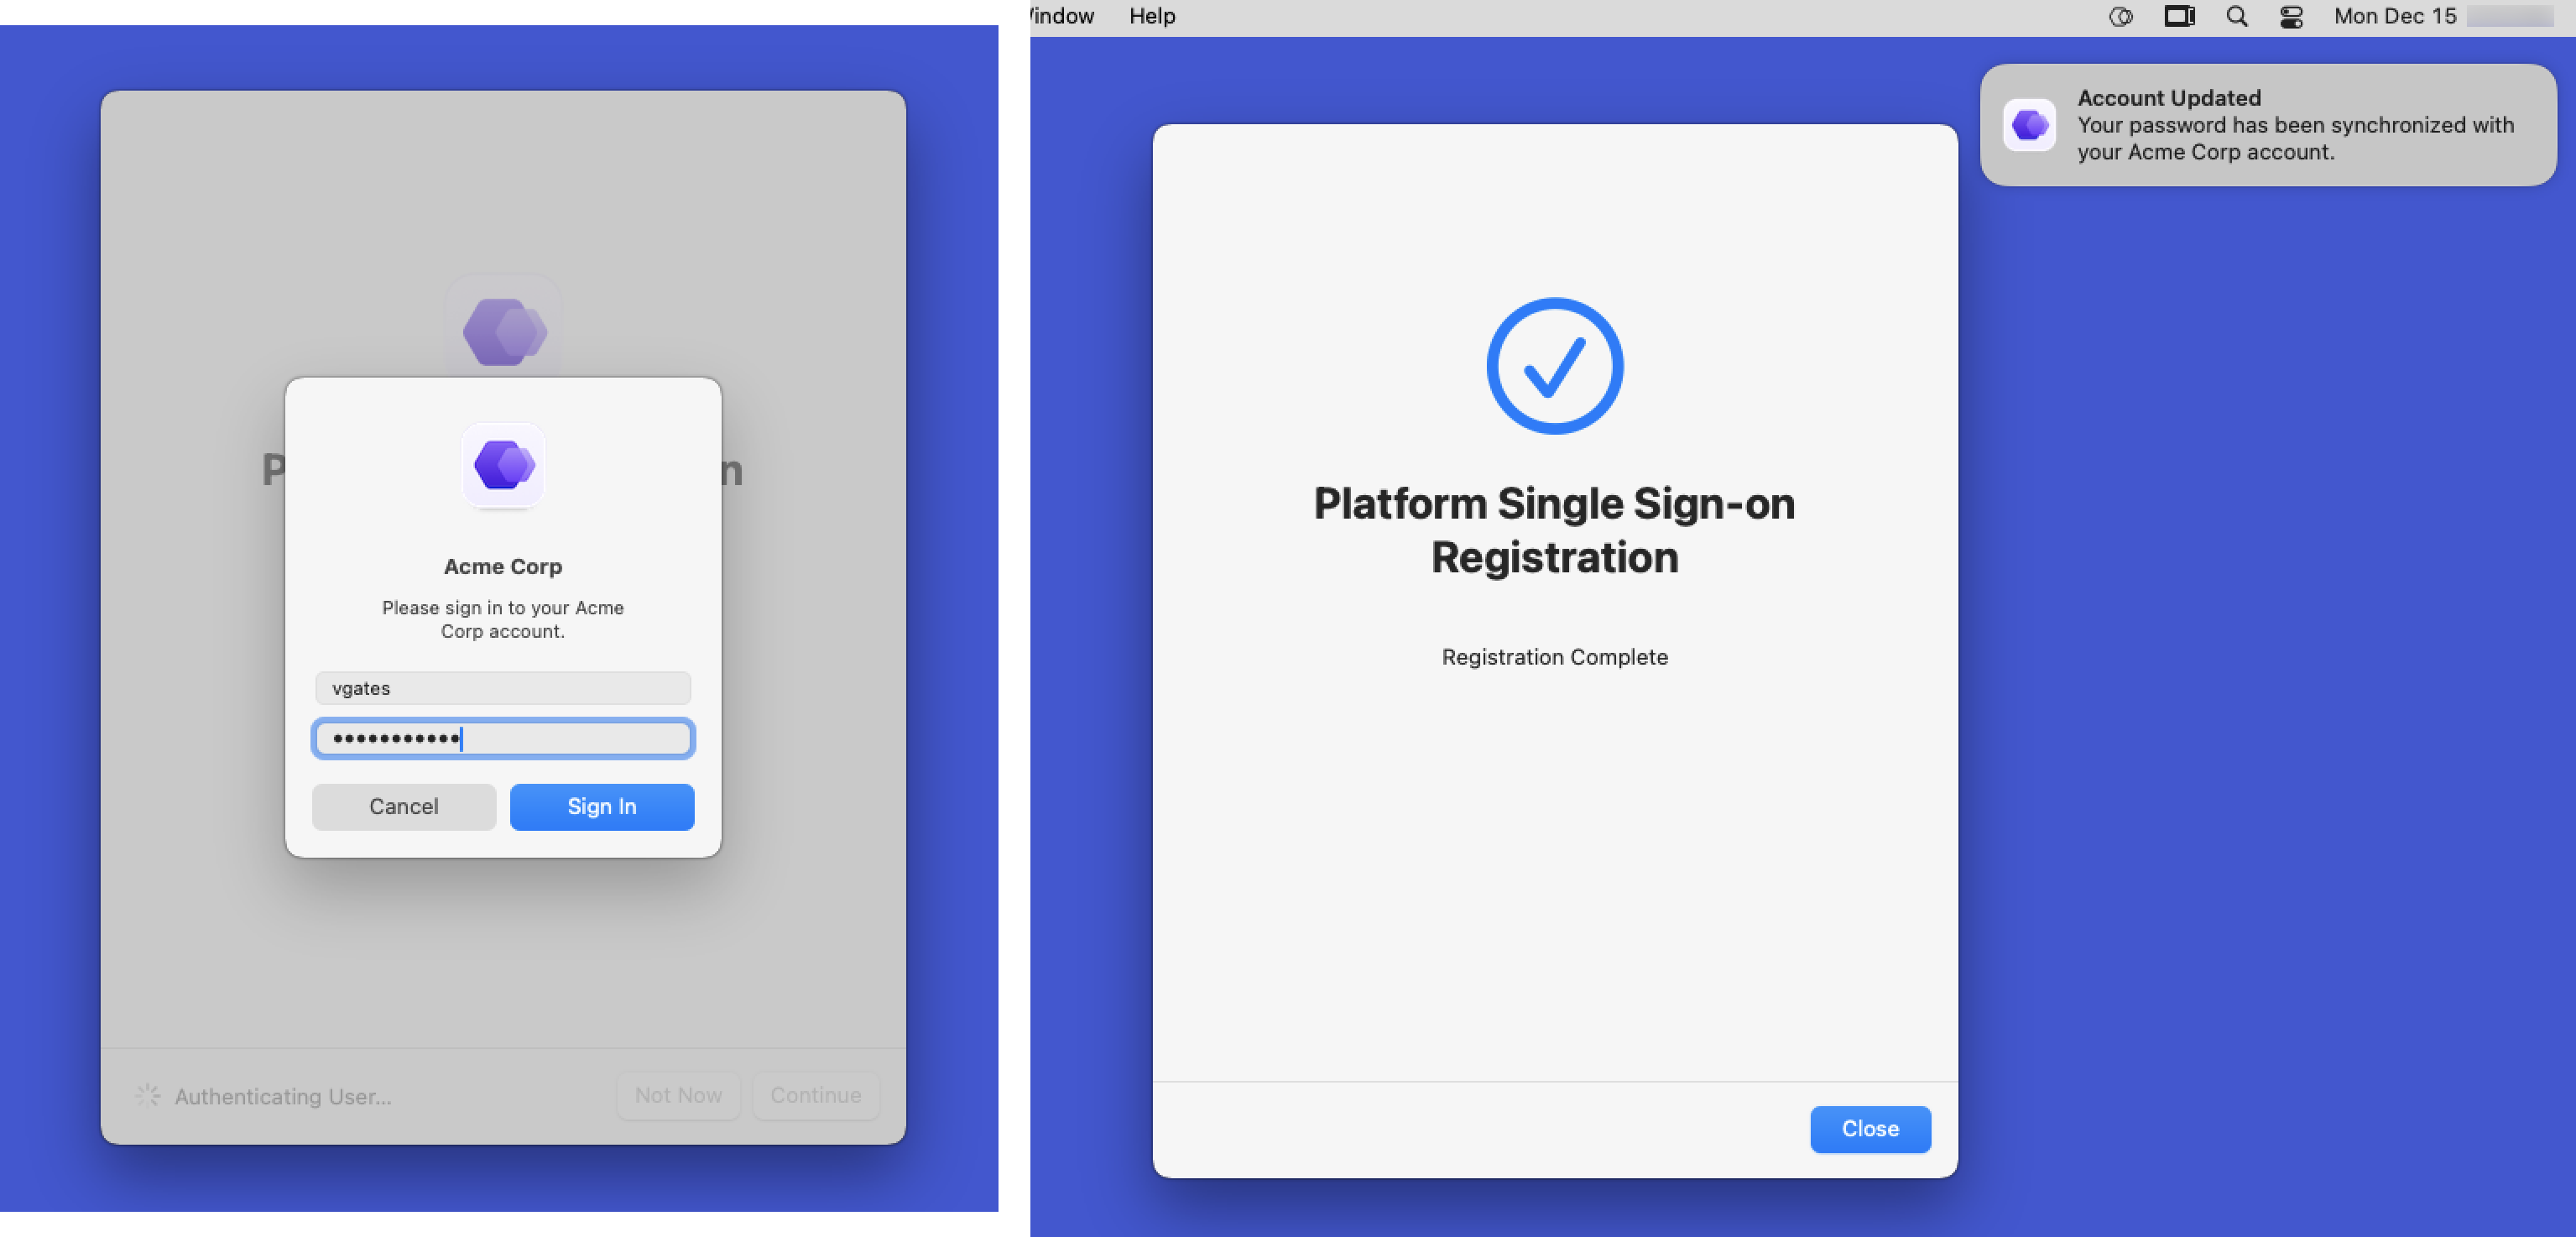
The end user will then be prompted to authenticate to Omnissa Access using their identity provider credentials to complete the device registration. Once the registration has completed, the end user will be notified.
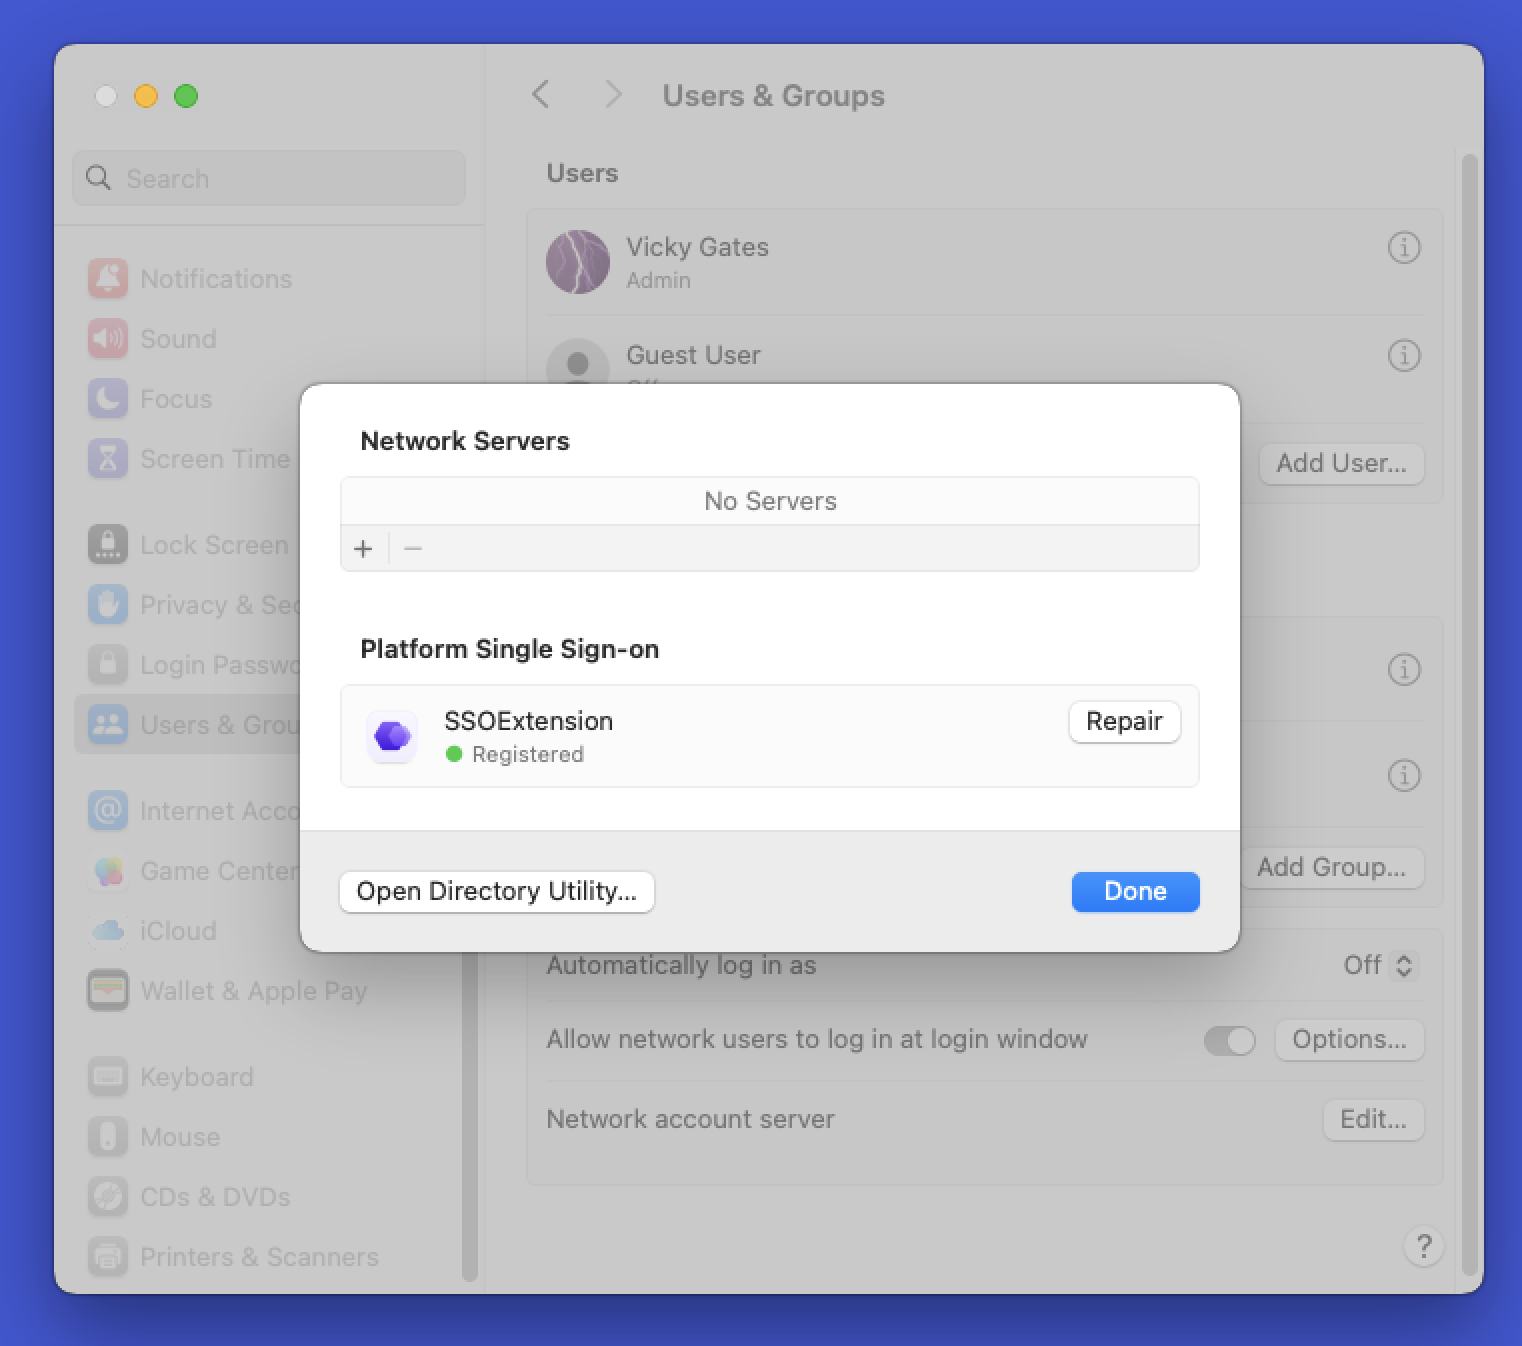
To confirm that Platform SSO has been configured, the end user can open System Preferences on the macOS device. Then, selecting User & Groups, the user can click the Edit button for Network Account Server. If Platform SSO is configured, the SSO Extension will be listed as Registered under Platform Single Sign-on.
Troubleshooting Platform SSO
This section explores some common tasks you can employ to troubleshoot issues with Workspace ONE UEM and Platform SSO. While it’s not an exhaustive troubleshooting guide, it serves as a starting point.
Confirm the Platform SSO profile has been applied to the device
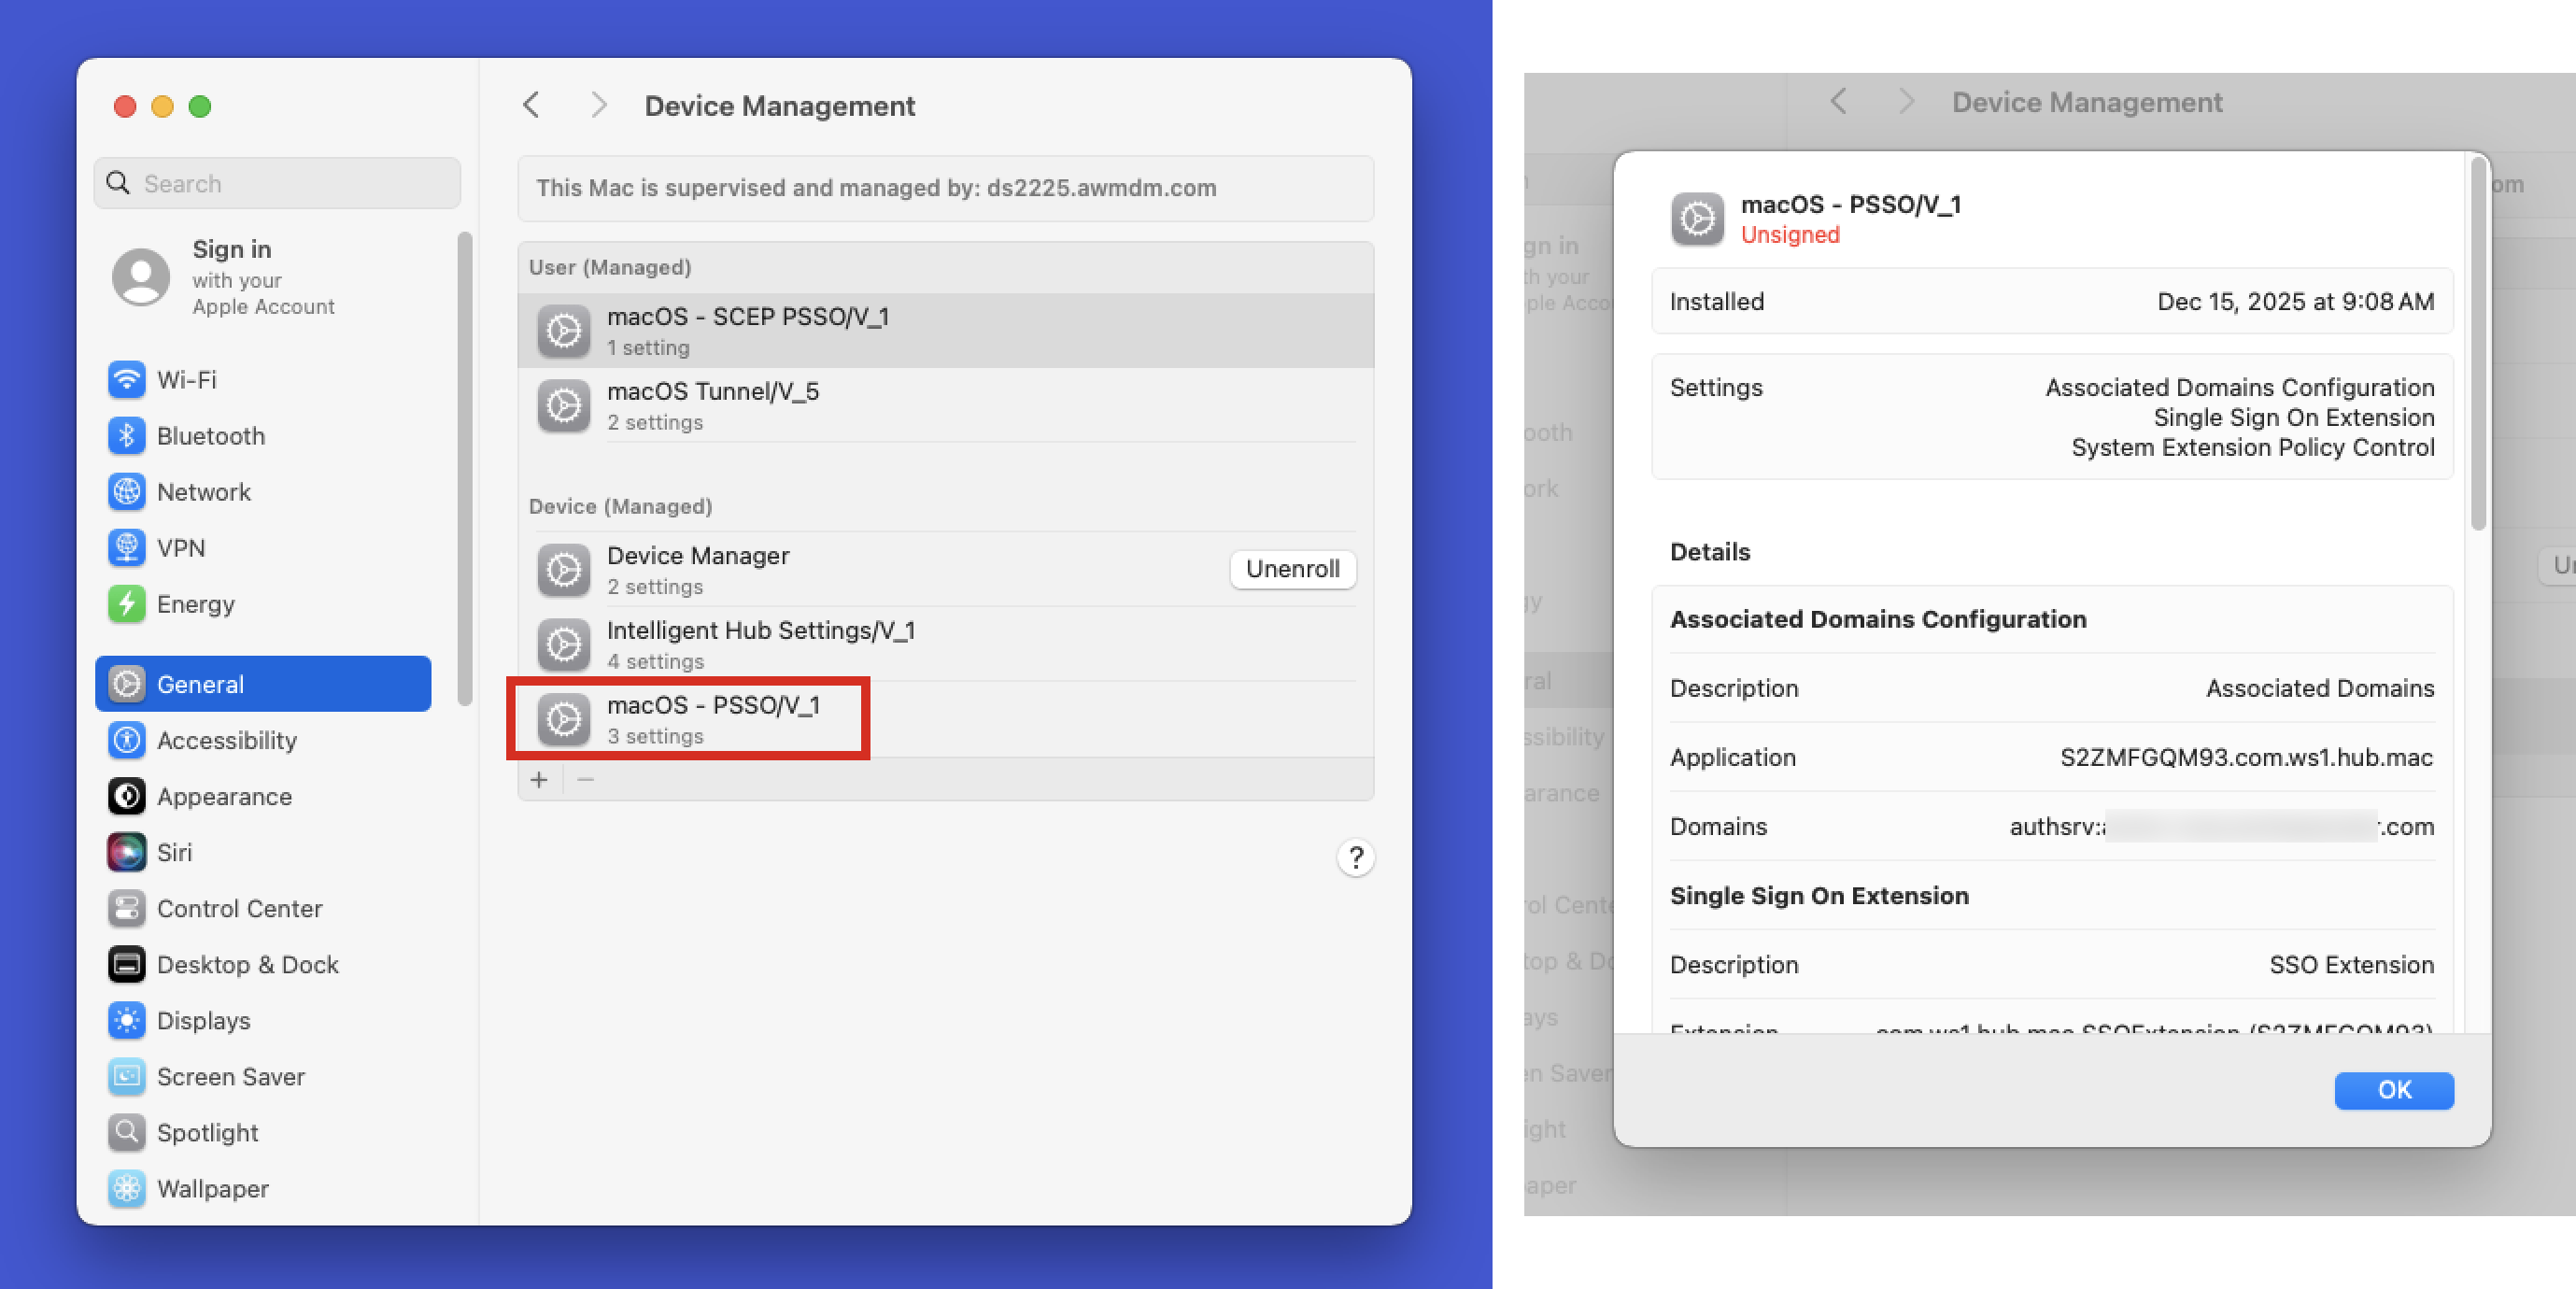
You can check the status of the profile in macOS Systems Settings. Under General > Device Management, you’ll find a list of all profiles applied to the device. Look for the Platform SSO profile. If you double-click on it, you can view the settings applied, including URLs, authentication methods, and so on. Ensure that these settings match what you configured in Workspace ONE UEM.
Validate that device registration completed successfully
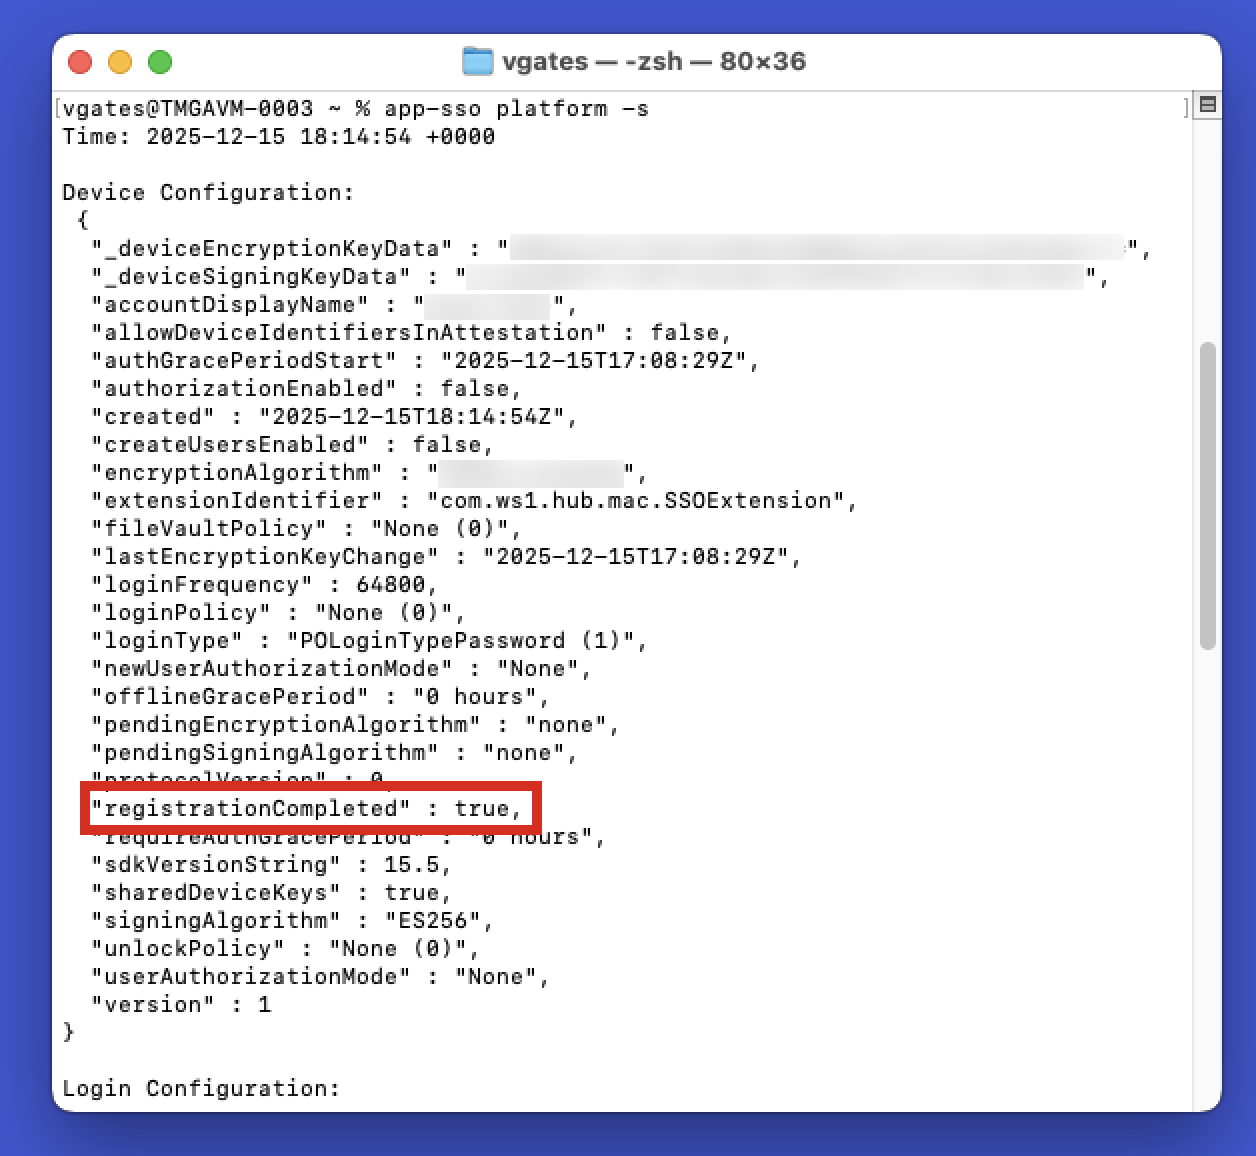
You can confirm the successful device registration with the identity provider by running the following command in Terminal on your macOS device:
app-sso platform -s
This command will provide detailed information about the Platform SSO registration. The key you’re specifically looking for is under Device Configuration. Look for registrationCompleted. A successful completion is indicated by a value of true.
Removing Platform SSO from a device
If necessary, you may need to remove Platform SSO as part of troubleshooting. The process may vary depending on the identity provider you’re using. For Omnissa Access, you’ll start by unassigning the Platform SSO profile mentioned earlier in the document under Creating a SSO Extension profile in Workspace ONE UEM.
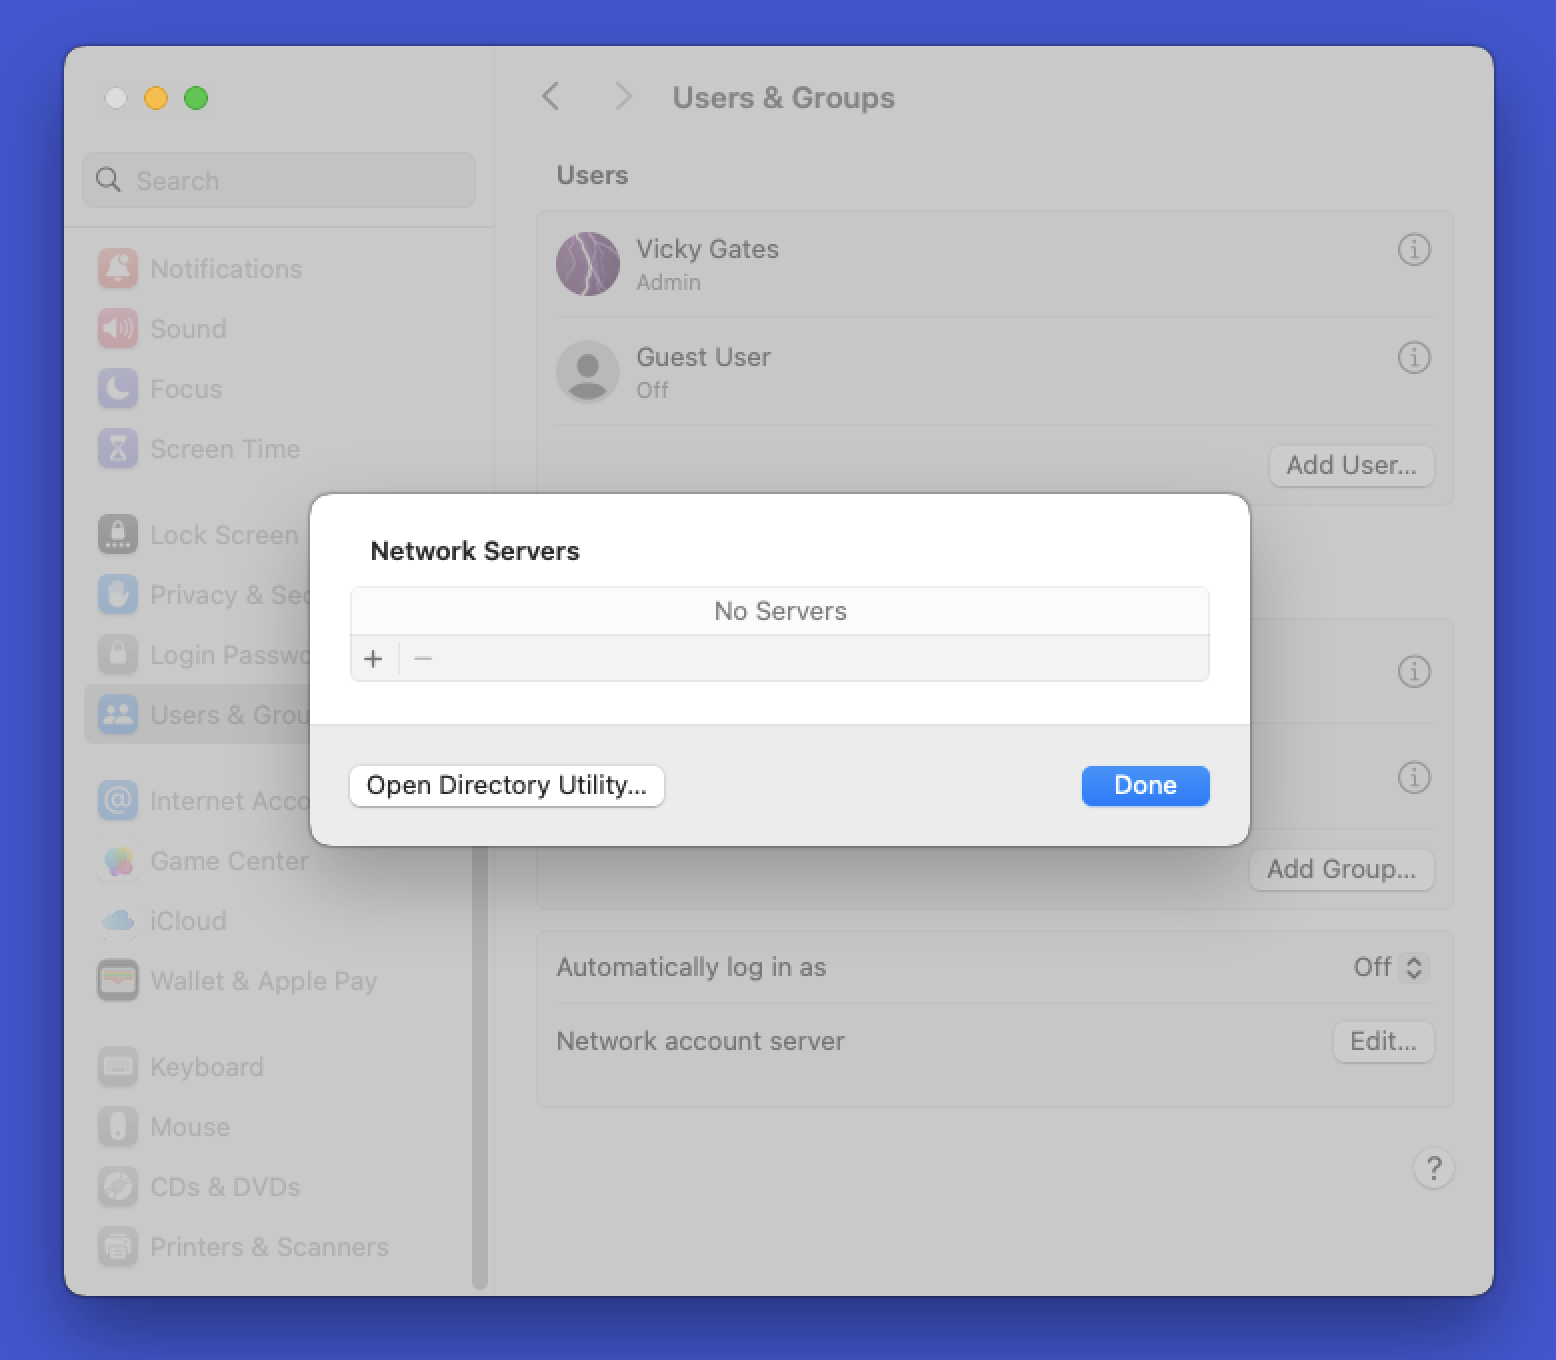
Confirm that the profile has been removed from the device. You can validate this in two ways: first, check the list of profiles in System Settings under General > Device Management. Second, confirm that the SSO Extension is no longer listed as a network account server.
NOTE: Removing Platform SSO won’t reset the local user account’s password to its original state before the configuration was applied. The password will remain as the last synchronized value from the identity provider.
Summary and additional resources
Apple’s Platform SSO offers a more secure mechanism for logging into macOS devices, as well as providing a better experience for end users. By integrating with third-party identity providers, IT admins can increase the security of macOS devices by ensuring that end users must use their identity provider password to log into their macOS devices. Omnissa Access can be configured as the identity provider for Platform SSO, facilitating authentication with Active Directory or with a third-party identity provider.
Topics discussed included:
- Platform SSO with Omnissa Access
- Configuring Omnissa Access as a Platform SSO identity provider
- End user experience
- Troubleshooting Platform SSO
Additional resources
To learn about other supported identity providers that support Platform SSO, please check out these operational tutorials on Tech Zone.
- Configuring macOS Platform SSO using Microsoft Entra ID and Workspace ONE UEM
- Configuring macOS Platform SSO using Okta and Workspace ONE UEM
You may also wish to read these additional operational tutorials from macOS on Tech Zone.
- Configuring Basic macOS Management in Workspace ONE UEM
- Using Workspace ONE to manage operating system updates on macOS devices
- Distributing Scripts to macOS Devices
- Deploying a Third-Party macOS App
Changelog
The following updates were made to this guide:
| Date | Description of Changes |
| 01/15/2026 | Initial release |
About the author and contributors
This tutorial was written by:
- Michael Bradley, Senior Product Specialist, Omnissa.
- Bryan Garmon, Senior Technical Solution Specialist, Omnissa.
- Simon Elberts, Enterprise Architect, Omnissa.
Additional contributions provided by:
- Samidha Rege, Product Manager, Omnissa
- Sandhya US, Product Specialist, Omnissa
- Nandini Sharma, Product Specialist, Omnissa
Questions and feedback
For questions or feedback, send to tech_content_feedback@omnissa.com.