Configuring macOS Platform SSO using Okta and Workspace ONE UEM
Overview
Traditionally, end-user authentication on macOS devices has been through accounts that are local to the device. These local accounts are a challenge for IT admins, particularly when it comes to ensuring that end users are following password best practices, such as complexity, length, and expiration. Mobile device management (MDM) can help with this by allowing organizations to enforce security policies and even configure the devices to sync with an LDAP domain. However, these options can still be challenging for IT admins and end users alike. IT admins must continue to manage multiple tools and workflows for managing device access and security, and end users are still required to remember multiple passwords for their device and various apps.
Apple introduced support for Platform Single Sign-On (SSO), which allows users to synchronize their local account credentials with their organization’s identity provider (IdP). End users only need to remember one set of credentials to access all their resources.
Using Omnissa Workspace ONE UEM, organizations can configure Platform SSO on their macOS devices, allowing them to integrate their chosen IdP. In this tutorial, you will learn how to configure Platform SSO on your macOS devices using Workspace ONE UEM.
Purpose of this tutorial
This tutorial takes you through the steps to configure the device profile required to implement Okta as the IdP for Platform SSO 2.0 on your macOS devices. Because Okta is a third-party platform, this guide will not cover any configurations required within the Okta software. However, links will be provided to Okta documentation whenever necessary configurations must be performed within their platform.
Audience
This operational tutorial is intended for IT professionals and Workspace ONE administrators of existing production environments.
Both current and new administrators can benefit from using this tutorial. Familiarity with macOS, XML, and basic scripting is assumed.
Knowledge of additional technologies such as Omnissa Intelligence and Omnissa Workspace ONE® UEM is also helpful.
Validation environment
The content created for this operational tutorial used the following software and hardware versions for testing:
- Workspace ONE UEM version 23.10.0.11
- Apple macOS Sonoma 14.5
- Okta Verify 9.19
NOTE: This tutorial focuses on Apple’s Platform SSO 2.0, which is only supported on macOS 14 Sonoma or later, and Okta Verify 9.19 or later.
Okta Desktop Password Sync
Okta has adopted Apple’s Platform SSO in a feature within their platform called Desktop Password Sync, which is part of their Device Access offering. Okta Device Access allows end users to authenticate into their macOS devices using their Okta credentials directly on the macOS login screen. This benefits end users, as well as IT admins. Users only need to remember one user ID and password which gives them access to their device and apps, and IT admins can improve security by configuring strong password policies in the Okta console.
Once configured and deployed, Okta’s Desktop Password Sync requires the end user to register their macOS device and link their local account with Okta. Once registration is complete, the local account password syncs with the end user’s Okta password. Going forward, the end user uses their Okta password to log into their device.
The process of configuring Desktop Password Sync in the Okta console is not covered in this tutorial. However, you can read up on the process in Okta’s product documentation. You will also need to configure Okta as a certificate authority for device access. You learn more about this process in Okta’s product documentation.
The following section will, however, discuss the process for configuring devices to use Platform SSO and Okta’s Desktop Password Sync through Workspace ONE UEM. The process includes the following:
- Configuring SCEP for Device Access.
- Pushing the Okta Verify app to macOS Devices.
- Configuring a Device Profile for Configuring the Okta Verify App and the SSO Extension.
This tutorial assumes that you have already followed the steps outlined in Configure Desktop Password Sync for macOS in Okta’s product documentation.
Configuring SCEP for device access
To use Okta with Apple’s Platform SSO 2.0, you will need to configure Okta as a certificate authority for device access and create a device profile in Workspace ONE UEM to configure the Simple Certificate Enrollment Protocol (SCEP) on your devices.
This tutorial will not cover the configuration process within Okta. To configure your Okta instance as a certificate authority for SCEP, see Okta’s product documentation.
NOTE: When you configure Okta as a SCEP certificate authority, be sure to configure Okta to use a Static SCEP URL.
Make note of the following values as you configure Okta as a CA. You will need these values later in this tutorial.
| Value | Description |
| SCEP URL | This is the URL generated by Okta for SCEP. This is the URL used by devices during certificate enrollment. |
| Secret Key | This is the key generated by Okta. It is used by devices to have their CSR signed by the Okta CA. |
| x509 Certificate | This certificate can be downloaded from the Certificate authority tab in your Okta Admin Console. |
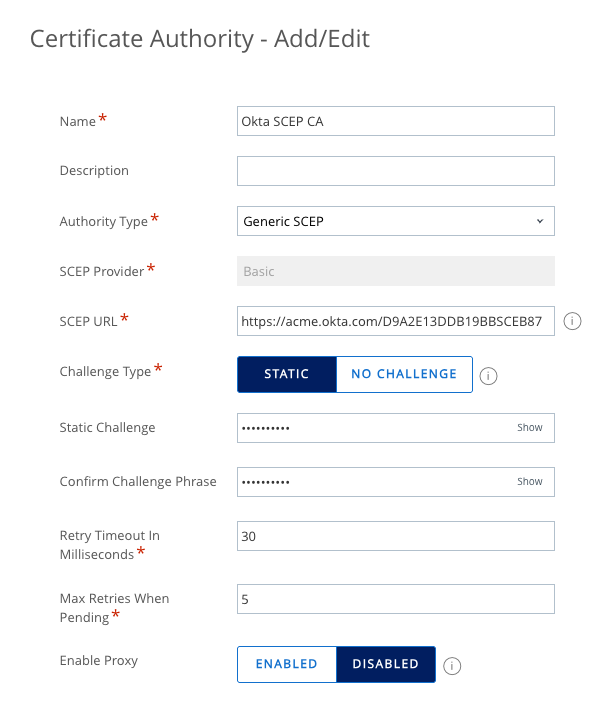
Create SCEP Certificate Authority in Workspace ONE UEM
- In the Workspace ONE UEM console, select Groups & Settings. Then, click All Settings.
- From the menu, expand System, and then Enterprise Integration. Click Certificate Authorities.
- Click Add.
- Give the new certificate authority a name. For example, enter
Okta SCEP CA. - From the Authority Type dropdown, select Generic SCEP.
- Enter the SCEP URL for your Okta instance.
- Select Static for the Challenge Type.
- For Static Challenge, enter the Secret Key you noted earlier. Confirm this by entering the same Secret Key in the Confirm Challenge Phrase field.
- Set your preferred Retry Timeout in Milliseconds and your Max Retries When Pending values.
- Click Save.

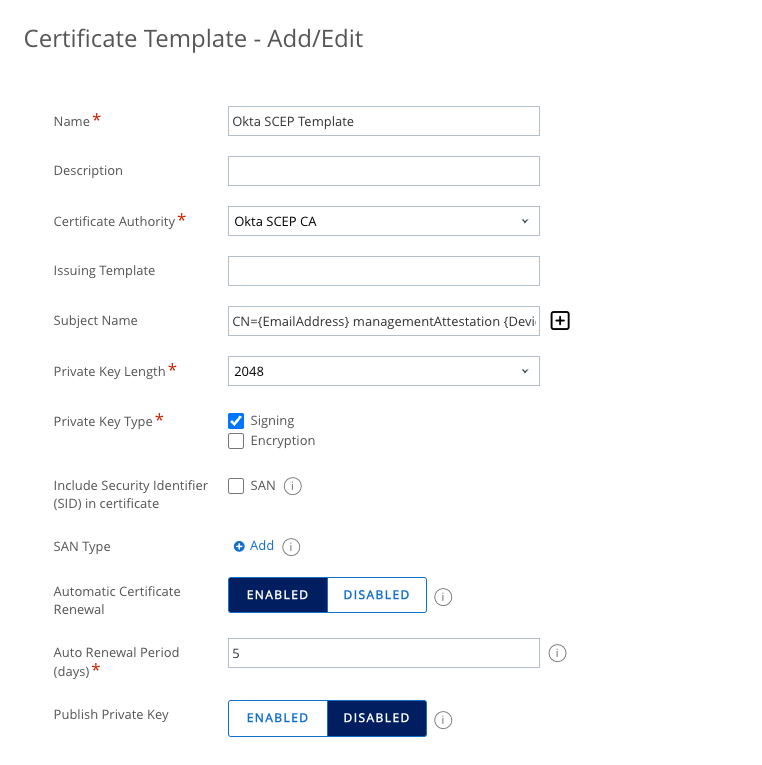
- On Certificate Authorities, click the Request Templates tab, and then click Add.
- Enter a name for the Certificate Template. For example, enter
Okta SCEP Template. - Select the CA you just created from the Certificate Authority dropdown. For this example, select
Okta SCEP CA. - Enter the Subject Name. This is the subject given to the device when it generates its key pair. You can click the plus sign (+) to lookup available dynamic values. For this example, enter
CN={EmailAddress} managementAttestation {DeviceUid}. - Select Signing for the Private Key Type.
- Select Enabled for Automatic Certificate Renewal, and set the Auto Renewal Period (days) to your preferred timeframe.
- Click Save.

Create SCEP device profile for macOS Devices
In this exercise, you will create a device profile to configure SCEP on your macOS devices.
- In the Workspace ONE UEM console, select Resources, and then click on Profiles.
- From the Add drop-down menu, select Add Profile.
- Select the Profile Platform by clicking macOS.
- For the Management Type select Imperative and for Context, select Device.
- Enter
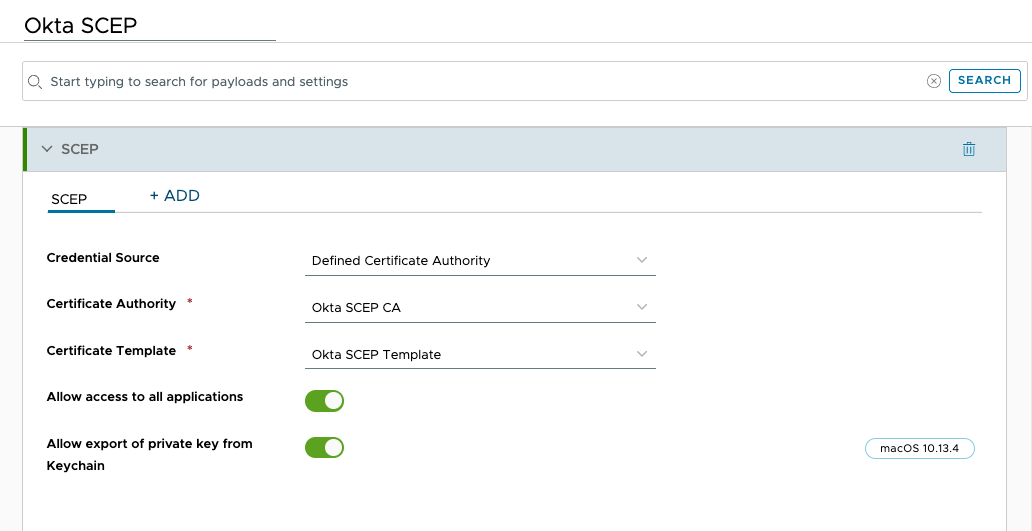
Okta SCEPfor the profile name. - Scroll down the list of payloads until you find SCEP. Click Add.
- From the Credential Source dropdown, click Defined Certificate Authority.
- Select the Certificate Authority you created in the previous exercise. For this example, you would select
Okta SCEP CA. - Select the Certificate Template you created earlier. For this example, you would select
Okta SCEP Template.
- Scroll through the list of available payloads until you find Credentials. Click Add.
- For Credential Source, click the Upload button and upload the x509 certificate you downloaded from Okta.
- Enter your preferred Credential Name. For this example, enter
Okta.cert. - Make sure Allow access to all applications is selected.
- Click Next.
- Click in the Smart Group field. From the list of Assignment Groups that appear, select the appropriate group. For example, select
All Corporate macOS Devices. - Select Auto for the Assignment Type.
- Click Save and Publish.
- You should now see your Okta SCEP device profile within the list on the Profiles window.
Pushing the Okta Verify app to macOS Devices
This exercise will walk you through the process of packaging the Okta Verify app and importing it into Workspace ONE UEM for deployment to your macOS devices. This process requires the Workspace ONE Admin Assistant, which you can download from here.
Prerequisites
Before you can perform the steps in this exercise, you must perform the following:
- Download and install the Workspace ONE Admin Assistant on a macOS device.
- Create and configure the Desktop Password Sync app integration in the Okta console (See Configure Desktop Password Sync for macOS).
- Download the Okta Verify app from the Okta Admin Console.
NOTE: You must use the Okta Verify app from the Okta console, not the Apple App Store.
Prepare the Okta Verify app with the Workspace ONE Admin Assistant
In this exercise, you will download the Workspace ONE Admin Assistant Tool and prepare the Okta Verify app for deployment through Workspace ONE UEM.
For this exercise, you will need to download the latest Okta Verify for macOS app from your Okta console.
To get the desired result, perform the following steps:
- On a macOS device, launch an Internet browser (i.e. Safari, Google Chrome, Firefox).
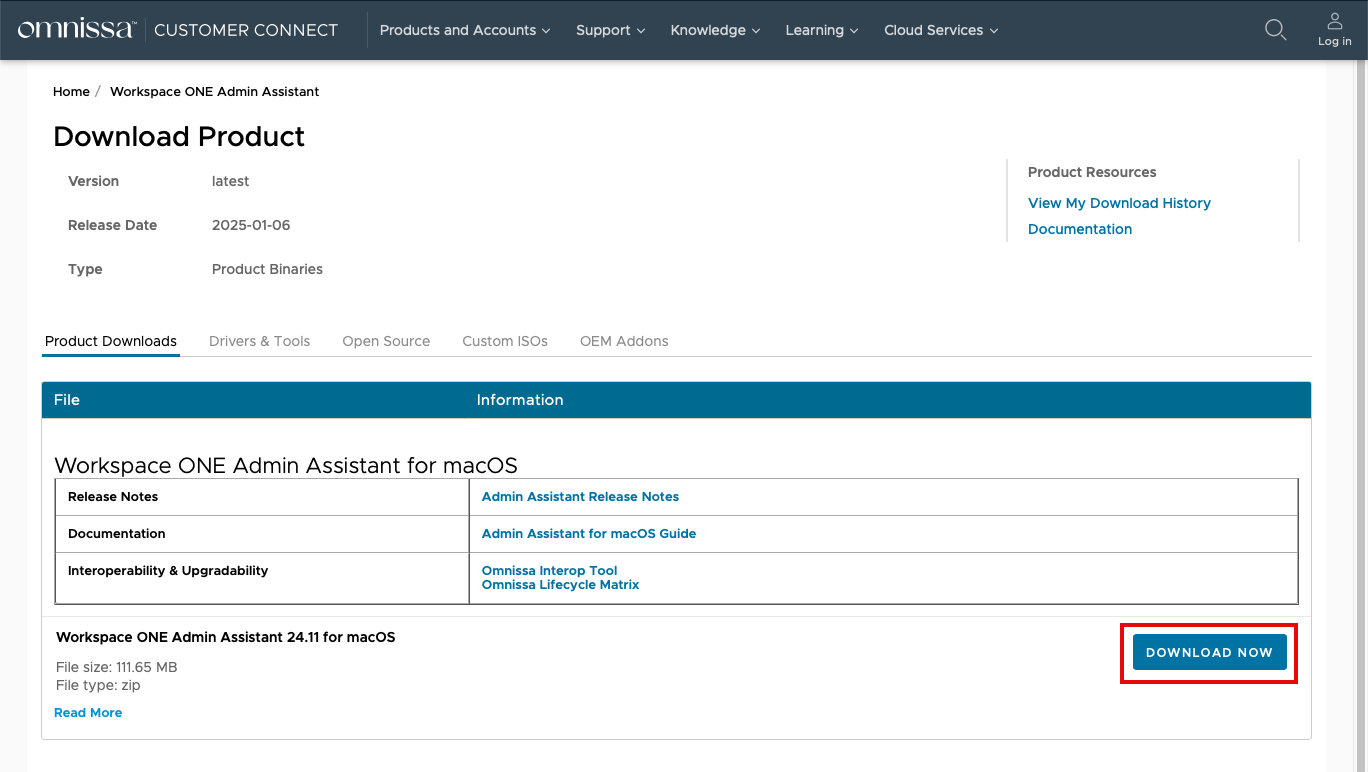
- Navigate to the Workspace ONE Admin Assistant Tool download website.
At the time of this document’s creation, the URL for the website was: https://customerconnect.omnissa.com/downloads/details?downloadGroup=WSONE-ADMIN-ASSISTANT&productId=1595&rPId=118941.
NOTE: You might be required to log into Omnissa Customer Connect.
- Click the Download Now button.
- Unzip the downloaded file and double-click on the Workspace ONE Admin Assistant package file (PKG).
- Accept the default options for installation and install the application on your macOS device.
- When the installation is complete, launch the Workspace ONE Admin Assistant located in your Applications folder.
- Drag and drop the DMG file for the Okta Verify app into the Admin Assistant tool. When the tool has finished parsing, click the folder icon next to the listed DMG file.
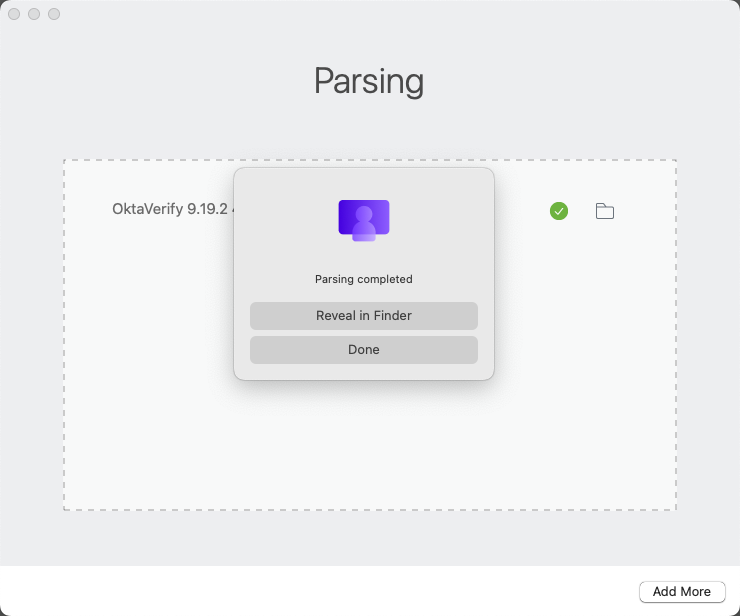
Note: The folder will contain three files: a PLIST file, a PNG file, and a DMG file.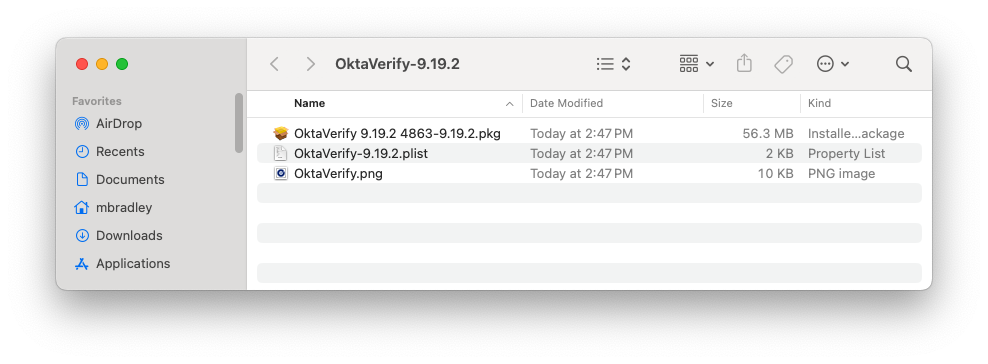
Deploy the Okta Verify for macOS app
- In the Workspace ONE UEM console, select Resources. Then select Native Apps.
- Click Internal.
- From the Add drop-down menu, select Application File.
- Click Upload and select Choose File. Navigate to the folder that was created by the Workspace ONE Admin Assistant. Choose the DMG file and click Upload.
- Click Save.
- After the upload completes, click Continue.
- You will upload the Metadata file by clicking Upload and choosing the PLIST file from the same folder. Click Save.
- After the upload has been completed, click Continue.
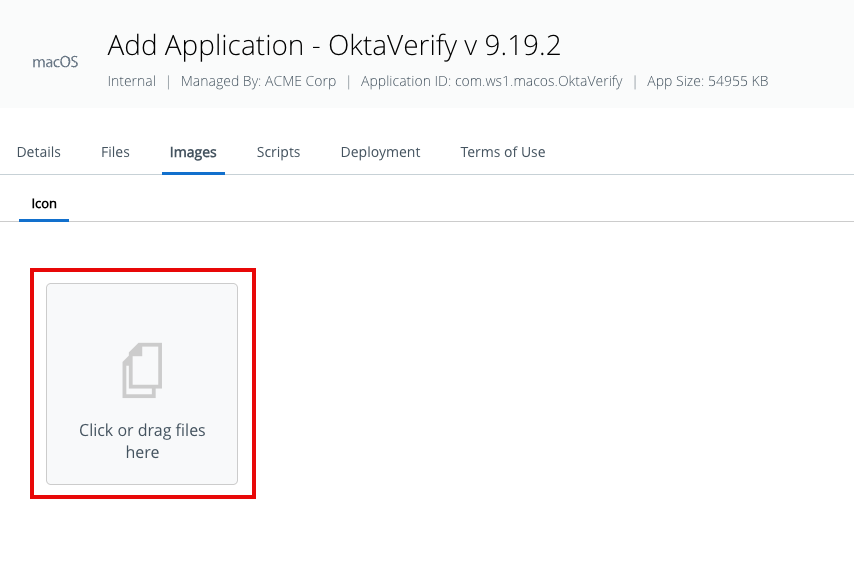
- Click Images and then select Click or drag files here to add the PNG file from the same folder as the other files.
- Click Save & Assign.
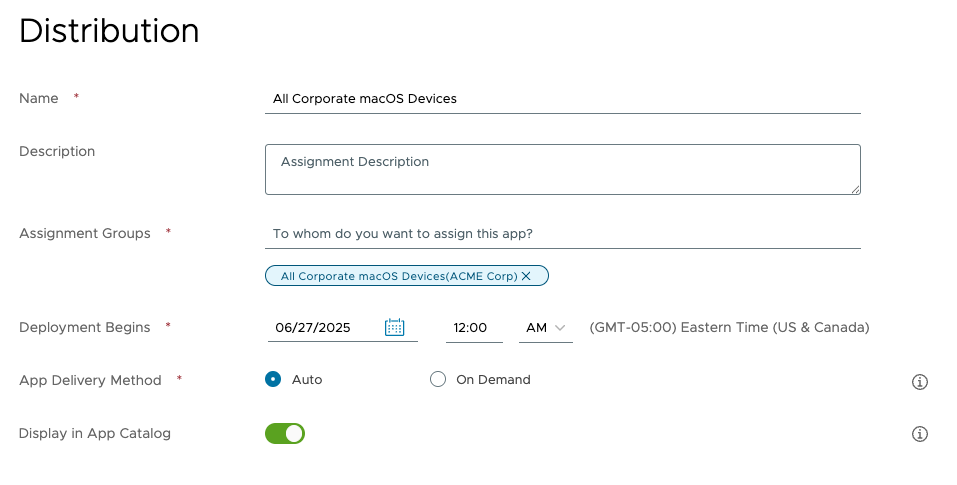
- Enter a name for the assignment. For example,
All Corporate macOS Devices. - Click in the Assignment Group section and select an assignment group. The selected group appears underneath the text box.
- Select a time and date to begin the deployment if you do not want to begin immediately.
- Select Auto to deliver the app automatically.
- Click Create.
- If additional assignments are required, click Add Assignment and repeat the process you just stepped through. When all assignments have been created, click Save.
- Click Publish.
Configuring a macOS Platform SSO profile for Okta
This exercise will walk you through the process of creating the necessary device profile required for configuring Okta as a Platform SSO provider on your macOS devices. You will create a profile that contains three payloads.
- Associated Domains
- SSO Extension
- Custom Settings
In this example, you will create a single profile for all payloads required. However, it is possible to create more than device profile for each payload if preferred.
Prerequisites
There are several parameters that you will need to perform this exercise. Some of these parameters you will obtain from your Okta console. The following table outlines those parameters.
| Parameter | Example | Description |
| Extension Identifier | | This is the identifier for the Okta extension. This will be the same as listed in the example column. |
| Team Identifier | | This value will always be |
| URLs |
| These URLs include your organization’s URL as provided by Okta. |
| App Identifiers | | The App Identifiers consists of the Team Identifier and the Extension Identifier. |
| Associated Domains | | This will be your Okta organization URL with |
| Account Display Name | | This is the display name for the account in notifications and authentication requests. This is a system level setting. The value set here is shown to all users. |
| PayloadUUID (2) | | These are UUIDs for the Custom Settings profiles you will create. You will need two. You can generate these using the |
| Okta Verify Password Sync Client ID | | This is the specific Client ID for your Okta instance. |
These values will be required at several points during the below-described process.
Create the Okta Platform SSO device profile
In this exercise, you will create a device profile to configure the Okta Verify app, as well as configure Platform SSO on your macOS devices.
- Select Resources, and then click Profiles.
- From the Add dropdown menu, select Add Profile.
- Select the Profile Platform by clicking macOS.
- For the Management Type select Imperative and for Context, select Device..
- Enter
Okta Platform SSOfor the profile name. - Scroll down the list of payloads until you find Associated Domains. Click Add.
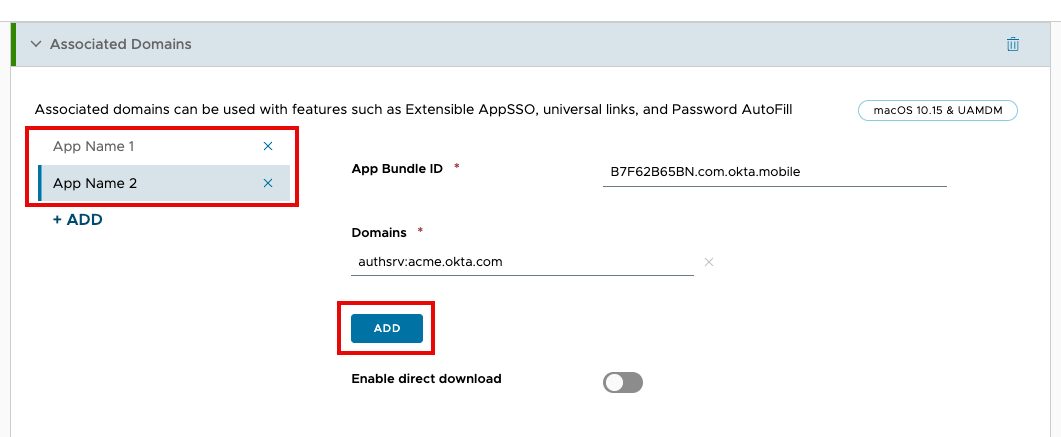
- In the App Bundle ID field, enter the first App Identifier as outlined in the above table.
- For Domains, enter your associated domain(s) as outlined in the above table. If you have more than one, click Add to include additional domains.
- Click Add. Repeat steps 7 and 8 for the second App Identifier listed in the above table.
- Scroll down the list of payloads until you find SSO Extension. Click Add.
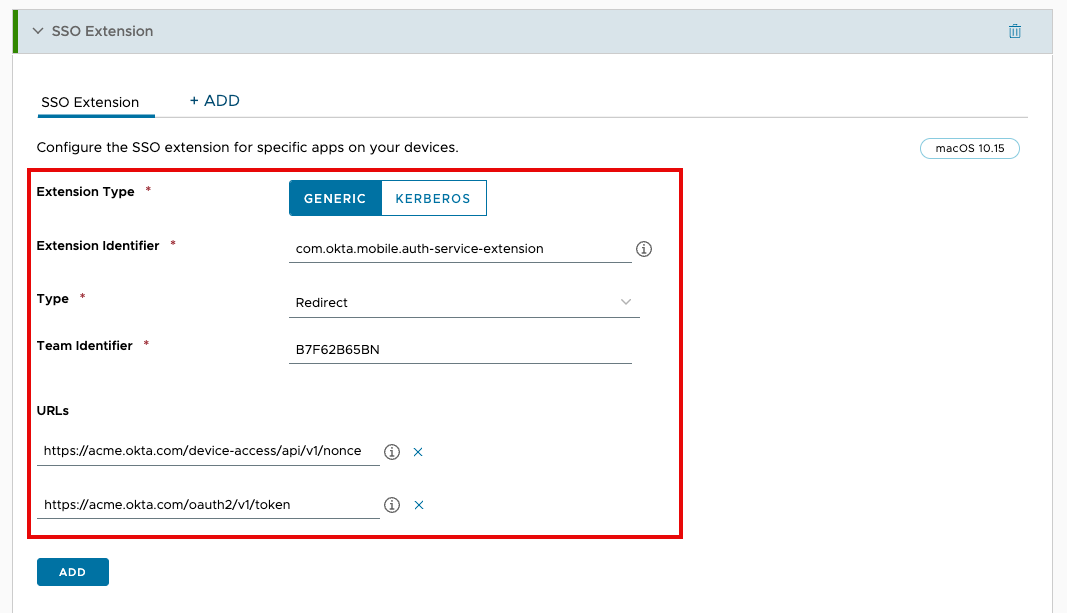
- Enter the Extension Identifier as outlined in the above table. Leave Type set to the default value of Redirect.
- Enter the Team Identifier as outlined in the above table.
- Next, enter your Okta organization URL with the path
/device-access/api/v1/nonceand/oauth2/v1/token.
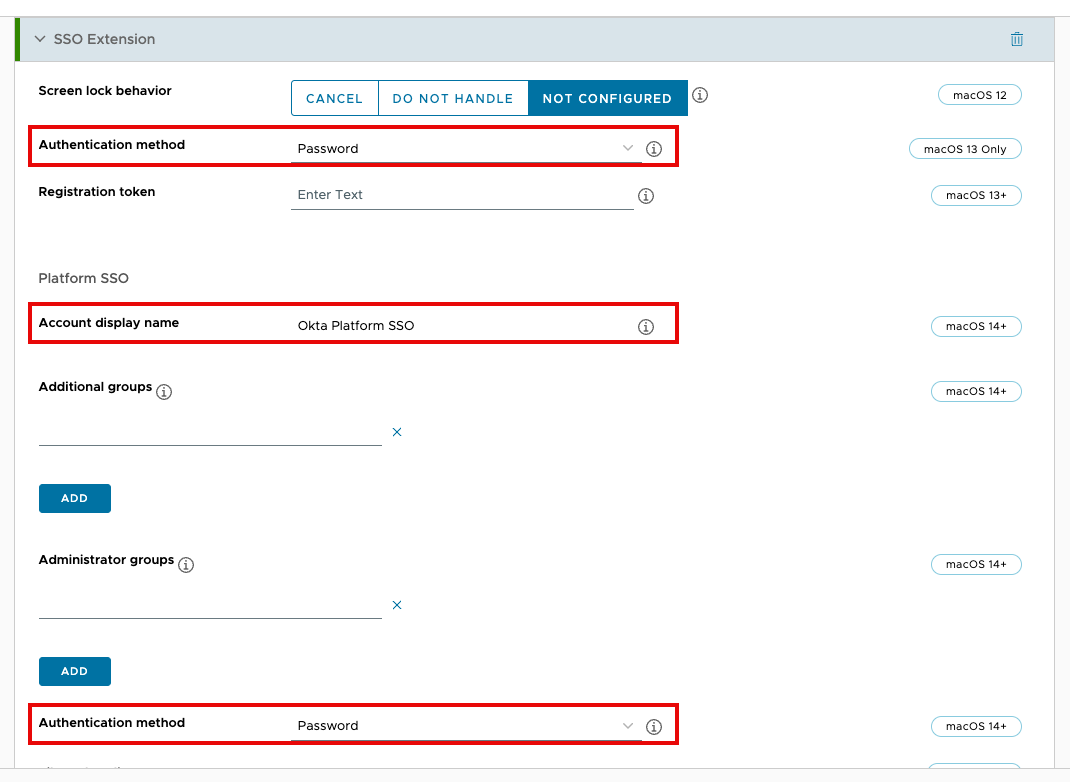
- Further down in the SSO Extension payload, you’ll find two drop-down menus called Authentication Method. If you need Platform SSO support for macOS 13 (Ventura), select Password from the first drop-down menu. To support macOS 14 (Sonoma) and higher, select Password from the second drop-down menu. You can have both selected to support multiple versions of macOS.
- In the Account Display Name field, enter the
Account Display Namediscussed in the above table. NOTE: Additional options not discussed here within the SSO Extension payload.
 - Look further down the SSO Extension payload for the option labeled Use shared device keys. Click Enable.

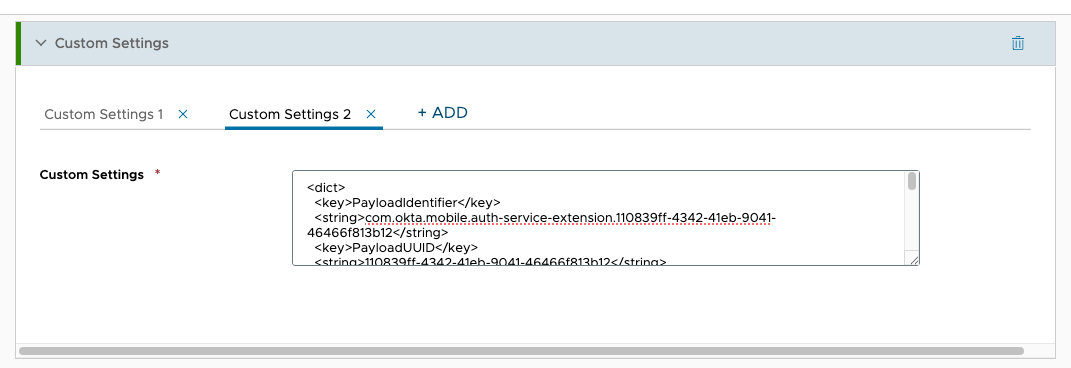
- Now, scroll through the list of payloads until you find Custom Settings. Click Add.
- Under Custom Settings 1, copy and paste the following XML:
<dict>
  <key>PayloadIdentifier</key>
  <string>com.okta.mobile.[UUID]</string>
  <key>PayloadUUID</key>
  <string>[UUID]</string>
  <key>PayloadOrganization</key>
  <string>Okta</string>
  <key>PayloadType</key>
<string>com.okta.mobile</string>
<key>OktaVerify.OrgUrl</key>
<string>[Okta_Org_URL]</string>
<key>OktaVerify.UserPrincipalName</key>
<string>{EmailAddress}</string>
  <key>PayloadVersion</key>
  <integer>1</integer>
  <key>PayloadDisplayName</key>
  <string>Okta Mobile Payload</string>
  <key>PayloadDescription</key>
  <string>Okta Mobile Payload</string>
</dict>
NOTE: Be sure to replace the following placeholders with parameters specific to your configuration:
-
[UUID]– One of the two UUIDs you generated earlier. Be sure to use the same one for both[UUID]placeholders. -
[Okta_Org_URL]– Your Okta assigned URL for your organization. For example,https://acme.okta.com.
- Click the ADD+ button to add an additional Custom Setting.
- Copy and paste the following XML into Custom Settings 2:
<dict>
  <key>PayloadIdentifier</key>
  <string>com.okta.mobile.auth-service-extension.[UUID]</string>
  <key>PayloadUUID</key>
  <string>[UUID}</string>
  <key>PayloadOrganization</key>
  <string>Okta</string>
<key>PayloadType</key>
<string>com.okta.mobile.auth-service-extension</string>
<key>OktaVerify.OrgUrl</key>
<string>[Okta_Org_URL]</string>
<key>OktaVerify.PasswordSyncClientID</key>
<string>[Paasword_Sync_Client_ID]</string>
<key>PlatformSSO.ProtocolVersion</key>
<string>2.0</string>
<key>OktaVerify.UserPrincipalName</key>
<string>{EmailAddress}</string>
  <key>PayloadVersion</key>
  <integer>1</integer>
  <key>PayloadDisplayName</key>
  <string>Okta Mobile Auth Service Extension</string>
  <key>PayloadDescription</key>
  <string>Okta Mobile Auth Service Extension Payload</string>
</dict>
NOTE: Be sure to replace the following placeholders with parameters specific to your configuration:
-
[UUID]– One of the two UUIDs you generated earlier. Be sure to use the same one for both[UUID]placeholders. -
[Okta_Org_URL]– Your Okta assigned URL for your organization. For example,https://acme.okta.com. -
[Password_Sync_Client_ID]– The Client ID for your Okta instance.
- Click Next.
- Click in the Smart Group field. From the list of Assignment Groups that appear, select the appropriate group. For example, select
All Corporate macOS Devices. - Select Auto for the Assignment Type.
- Click Save and Publish.
- You should now see your Okta Platform SSO device profile within the list on the Profiles window.
Platform SSO end user experience
Once the Okta Verify app and the Okta Platform SSO device profile are deployed to your devices, the end user will be prompted to register their device the next time they log in. The prompt will come as a system notification. Once the user clicks Register in the notification window, their device will execute a Mac-native workflow which will walk them through the registration process. The end user will be prompted for their local account password to enable Okta to manage their password.
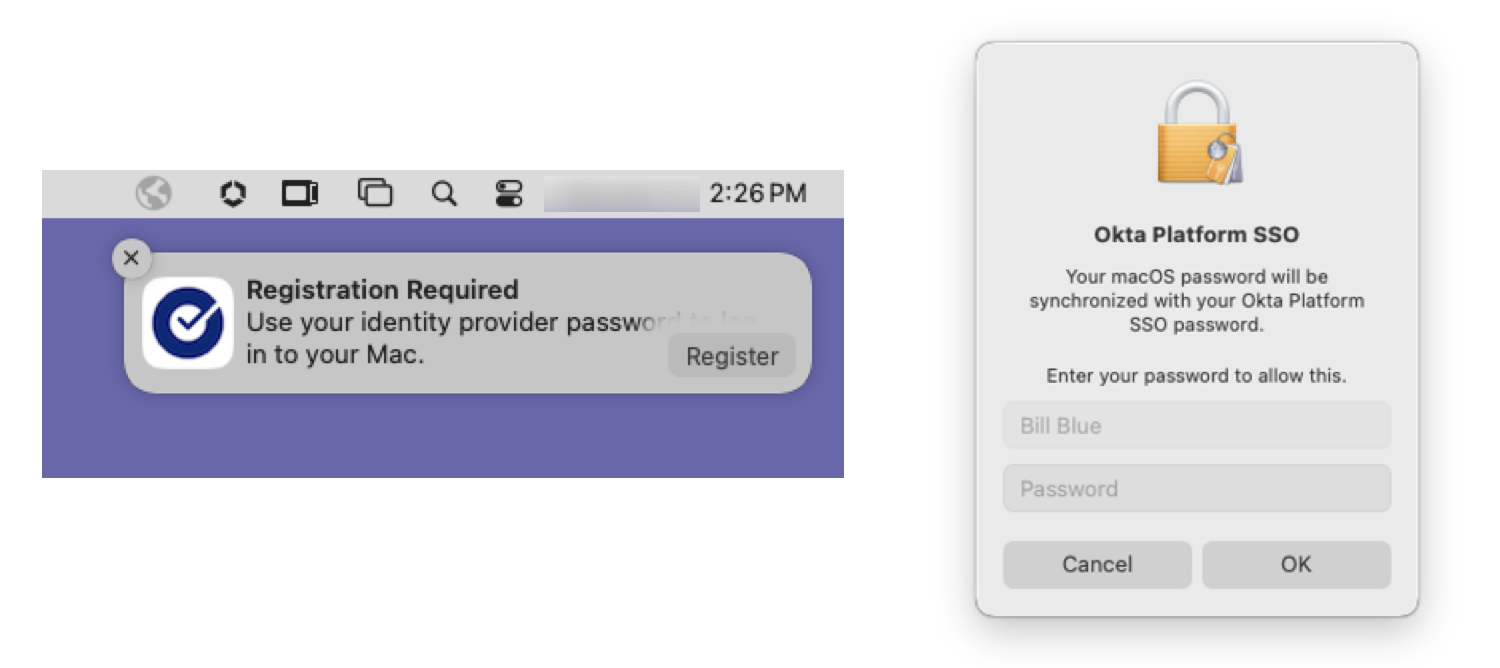
Then the user will be prompted to log in and verify their Okta account to complete the registration process. Once authenticated, the Okta Verify app will sync the end user’s Okta account password with the local account and then notify the user once the local account has been updated.
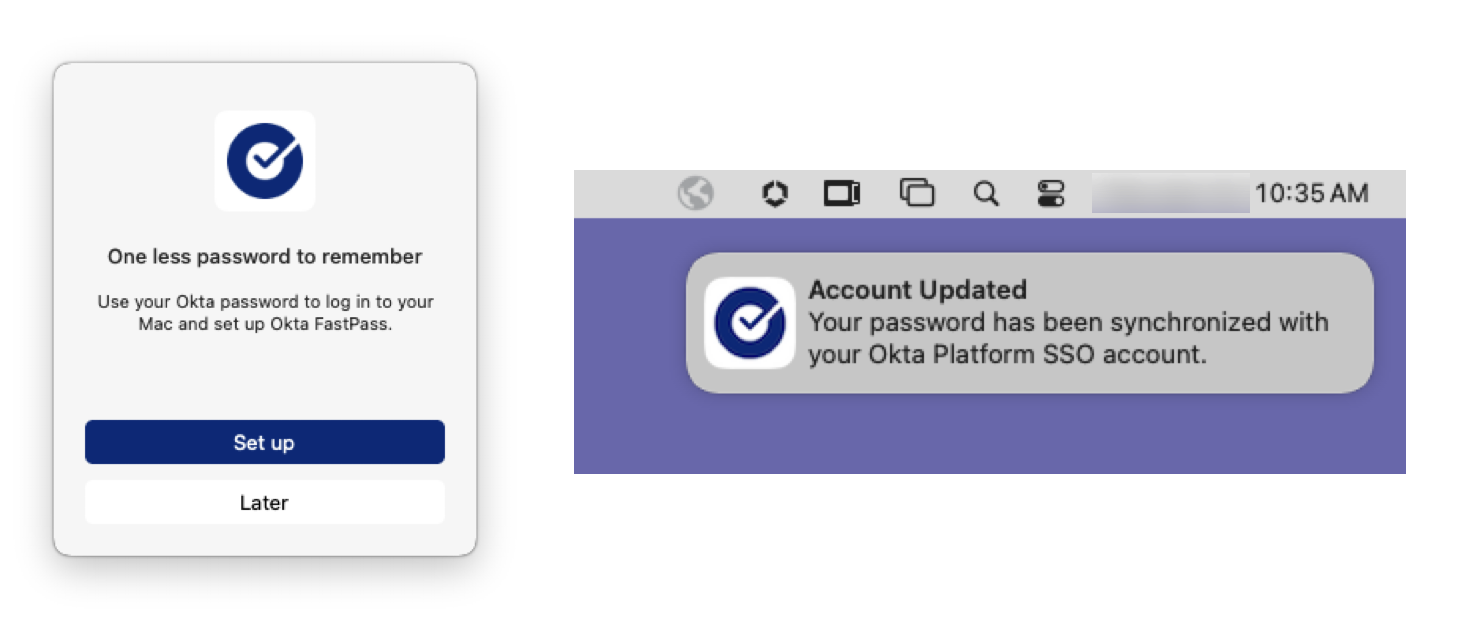
Once registration is complete, the end user will authenticate to the macOS device using their Okta password.
Summary and additional resources
Apple’s Platform SSO offers a more secure mechanism for logging into macOS devices, as well as providing a better experience for end users. By integrating with third-party identity providers (IdP), IT admins can increase the security of macOS devices by ensuring that end users must use their IdP password to log into their macOS devices. Okta is one of several identity providers that support Apple’s Platform SSO. This operational tutorial provided details on how to use Workspace ONE UEM to configure Platform SSO with Okta on macOS devices.
Procedures included:
- Pushing the Okta Verify app to macOS Devices.
- Configuring a Device Profile for Configuring the Okta Verify App and the SSO Extension.
For more operational tutorials on using macOS with Workspace ONE UEM, visit Tech Zone.
Additional resources
You may also wish to read these additional operational tutorials from macOS on Tech Zone.
- Configuring Basic macOS Management
- Distributing Scripts to macOS Devices
- Deploying a Third-Party macOS App
Changelog
The following updates were made to this guide:
| Date | Description of changes |
| 10/28/2025 |
|
| 06/27/2025 |
|
| 07/16/2024 |
|
About the author and contributors
This tutorial was written by:
- Michael Bradley, Product Specialist, Omnissa
Considerable contributions were made by the following subject matter experts:
- Simon Elberts, Senior Customer Success Engineer, Omnissa.
- Bryan Garmon, Staff Customer Success Engineer, Omnissa
Questions and Feedback
For questions or feedback, send to tech_content_feedback@omnissa.com.


 NOTE: Additional options not discussed here within the SSO Extension payload.