Distributing scripts to macOS devices using Workspace ONE UEM
Overview
Omnissa Workspace ONE® UEM, a comprehensive endpoint management solution for macOS devices, offers extensive capabilities for managing macOS devices. However, in certain situations, IT administrators may need to deploy scripts to a group of endpoints for advanced management or customization processes. The Scripts resource within Workspace ONE UEM simplifies this task by enabling the easy deployment and execution of Bash, Python 3, and Zsh scripts on macOS devices.
This tutorial delves into the process of deploying scripts to endpoint devices using the Scripts resource. It also outlines the alternative payload-free package method for those not licensed to use the Scripts resource.
Purpose of this tutorial
This tutorial takes you through the steps to deploy scripts to macOS devices using the Scripts resource within Workspace ONE UEM. The tutorial will also offer an alternative method for delivering scripts as payload-free packages for customers who are not licensed to use the Scripts resource.
Audience
This operational tutorial is intended for IT professionals and Workspace ONE administrators of existing production environments.
Both current and new administrators can benefit from using this tutorial. Familiarity with macOS, XML, and basic scripting is assumed.
Knowledge of additional technologies such as Omnissa Intelligence and Omnissa Workspace ONE® UEM is also helpful.
Scripts for macOS devices
Overview
A script for macOS, also known as a shell script, is a text file containing a series of instructions (commands) that are typically executed on the device using the macOS command line interpreter (CLI) through the Terminal application. Shell scripts are useful because they allow you to combine many common tasks into a single script, saving you time and reducing the likelihood of errors when performing similar tasks repeatedly. You can run a shell script to execute commands that you might otherwise enter at the command line.
The CLI enables interaction with the system kernel using UNIX commands. It converts your text-based commands into a language understood by the operating system for execution. Since macOS Catalina’s release, the default shell language has been Z shell (zsh). However, Bash (bash) is also available as an additional shell language in the operating system.
Both shell languages provide a wide range of commands, and many of these commands have additional flags that can be used to modify their behavior. Some commands require elevated permissions to be executed. Additionally, shell scripts can utilize variables, which are used to store data for reuse throughout the script, such as a username or date. Arguments are also available to pass values into a script during execution. Furthermore, shell scripts can also use conditional statements to perform decision-making tasks during execution.
macOS scripts in Workspace ONE UEM
Workspace ONE UEM supports the automated distribution and execution of Bash, Python 3, and Zsh scripts to macOS devices. One of the key features of the Scripts resource is the support for variables. This allows administrators to protect sensitive data, such as passwords and API keys, within the scripts. Additionally, scripts can utilize UEM lookup values to retrieve information like device ID or username.
Integrating the Scripts resource with Workspace ONE Intelligent Hub further enhances its capabilities. IT administrators can now make various scripts available to end-users as part of their App catalog.
The Scripts resource is included in the Workspace ONE Advanced and Enterprise licensing tiers, as well as an Add-On SKU. For customers who lack the necessary licensing to utilize the Scripts resource, an alternative mechanism exists. This alternative approach leverages internal apps as payload-free packages, providing a viable solution for deploying scripts in such environments.
In this tutorial, we will discuss both methods for deploying scripts to macOS devices.
Deploying scripts using the Scripts resource
For customers with either the Workspace ONE UEM Advanced or Enterprise licensing tier, Scripts provides a simple method to execute Bash, Python 3, or Zsh for configuring macOS devices. This guide will walk you through the process of deploying a script to an endpoint using Workspace ONE UEM Scripts functionality. The steps are sequential and build upon each other, so make sure to complete each step before moving onto the next.
For this exercise, you will use a simple script that creates a text file on the desktop of the device’s logged-in end user. However, this process is just as useful for advanced scripts that perform complex administrative tasks.
Prerequisites
The procedures in this tutorial were validated on the following macOS and application versions. The results of these procedures may vary if you use older versions.
- Apple device running macOS version 13.1 (Ventura) or later
- Workspace ONE Intelligent Hub for macOS version 2310 or later
- Workspace ONE UEM version 2310 (SaaS) or later
For more information, see the Omnissa Workspace ONE UEM Documentation.
Procedure
To get the desired result, perform the following steps:
- In the Workspace ONE UEM console, select Resources. Then select Scripts.
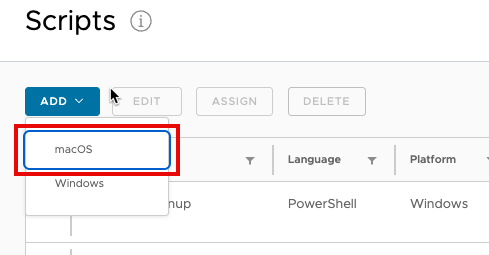
- Click Add and select macOS from the dropdown.
- Name the script
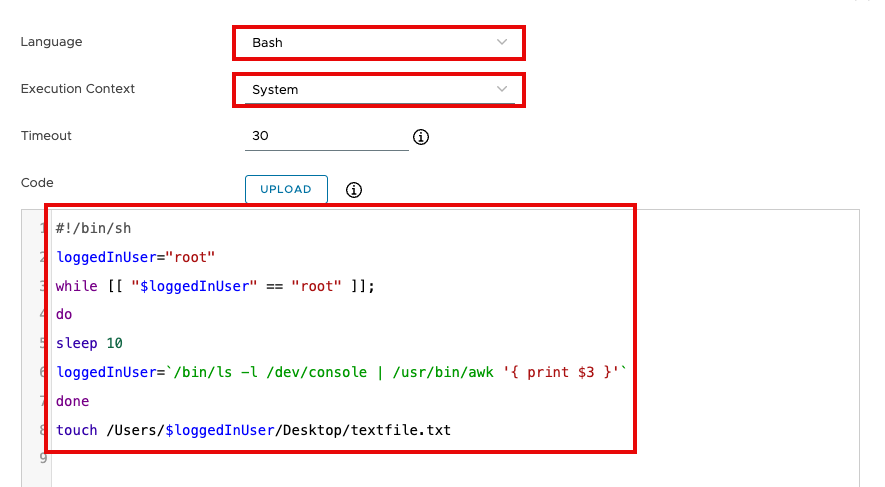
Create-File-On-Desktop. Leave App Catalog Configuration deactivated. Click Next. - Set the Language to Bash, and the Execution Context to System.
- Paste the following script sample into the Code window.
#!/bin/sh
loggedInUser="root"
while [[ "$loggedInUser" == "root" ]];
do
sleep 10
loggedInUser=`/bin/ls -l /dev/console | /usr/bin/awk '{ print $3 }'`
done
touch /Users/$loggedInUser/Desktop/textfile.txt
- Click Next, then click Save.
- Click Save.
- In the Scripts list, check the new script you just created, and click Assign.
- Click New Assignment. Enter a name for the assignment. For example,
All macOS Devices. - For Select Smart Group, click in the search box. From the list of Assignment Groups that appear, select the appropriate group. For example, select All macOS Devices (your@email.shown.here).
- Click Next.
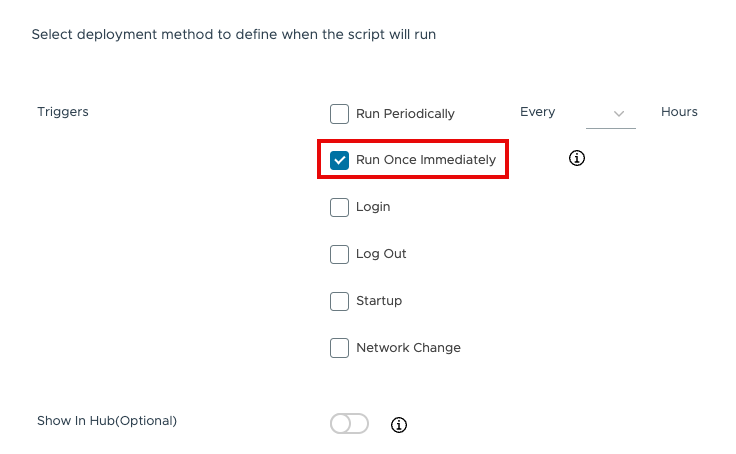
- Check Run Once Immediately.
- Click Add.
- Click Save & Publish and then Publish.
Validate successful execution of the script
- To validate that the script has successfully executed, log into a macOS device that is included in the assignment you configured earlier. Look on the desktop for a file called textfile.txt.
Note: If you have just logged into your macOS device, it may take a few minutes for the script to execute. - You can also check the execution status in the Workspace ONE UEM console by selecting Devices.
- Click a macOS device in the list, and then select Scripts.
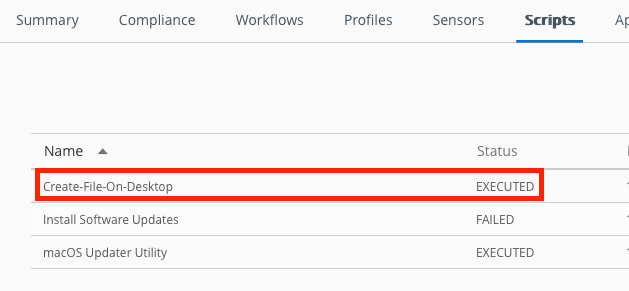
- Look for the script you created earlier. Check the Status of the script. If it was successful, the status will be Executed.
Note: If the script does not appear on the list, try refreshing the screen. It might take a moment for Intelligent Hub to update Workspace ONE UEM on the status of the script’s execution.
Distributing scripts as internal apps
Workspace ONE UEM offers a method to distribute non-app store software packages to macOS devices. This delivery method enables the delivery and execution of scripts on endpoint devices. This tutorial focuses on leveraging Internal Apps to deliver scripts as payload-free packages. This approach is suitable for customers who lack access to the Scripts resource or are using an on-premises version of Workspace ONE UEM.
For this exercise, you’ll use a simple script that creates a text file on the desktop of the logged-in end user. However, this method is equally applicable to advanced scripts that perform intricate administrative tasks. As part of this exercise, you’ll create a payload-free package and utilize the Install Scripts option within Internal Apps to execute the script during the package installation process.
NOTE: In this tutorial, you’ll use options within Workspace ONE UEM to deploy and execute your script. You can also embed your script within the payload-free package and execute it from there. However, this approach requires re-packaging the payload-free package every time you make a change to the script. For this tutorial, we’ll exclude the script from the payload-free package, but the method is available as an option if needed.
Prerequisites
The procedures in this tutorial were validated on the following macOS and application versions. The results of these procedures may vary if you use older versions.
- Apple device running macOS version 13.1 (Ventura) or later
- Workspace ONE Intelligent Hub for macOS version 2310 or later
- Workspace ONE UEM version 2310 (SaaS) or later
Ensure you are logged in to the machine used to create the internal app using a payload-free package and install the following:
- The Omnissa Workspace ONE Admin Assistant application
- A macOS Developer ID Installer Certificate
- A script editor, such as Xcode, Visual Studio Code, or BBEdit
Note: Although a macOS Developer ID Installer Certificate is not required to build a payload-free package, it is considered a best practice.
For more information, see the Omnissa Workspace ONE UEM Documentation.
Determine the Developer ID Installer Certificate common name
Before you begin creating a payload-free package, you must acquire the Developer ID Installer Certificate common name. The Developer ID Installer Certificate is not required to perform the steps in this section, but it is recommended for production environments.
Note: If you do not have a macOS Developer ID Installer certificate, you can skip this section.
To find your macOS Developer ID Installer Certificate common name, follow the steps:
- Copy the Developer ID Installer Certificate common name from your device’s keychain. On the macOS device that you will use to create the payload-free package, go to Applications, click the Utilities folder, and launch Keychain Access.
- Click the login keychain.
- Find your Developer ID Installer certificate.
- Copy the title of the Developer ID Installer certificate (this will match the Common Name). Paste this somewhere for safekeeping. You will need it later.
Create a payload-free package
In a macOS installer package, scripts and files are executed and installed by the installer process on the macOS device. The installer process within macOS also supports packages that do not contain a list of files to install (for example, payload-free). In these payload-free packages, the package defines a format whereby scripts can be executed within macOS. In this exercise, you will create a payload-free package that will be used in Workspace ONE UEM to facilitate the execution of your script.
To create a payload-free package:
- On your macOS device, select the Finder icon on the dock.
- Create a new folder with the script's intended function in the location of your choice.
In the example shown, the package folder structure is located in~/Desktop/Create-Text-File. - Create the necessary folder structure for the payload-free package as shown in the below screenshot.
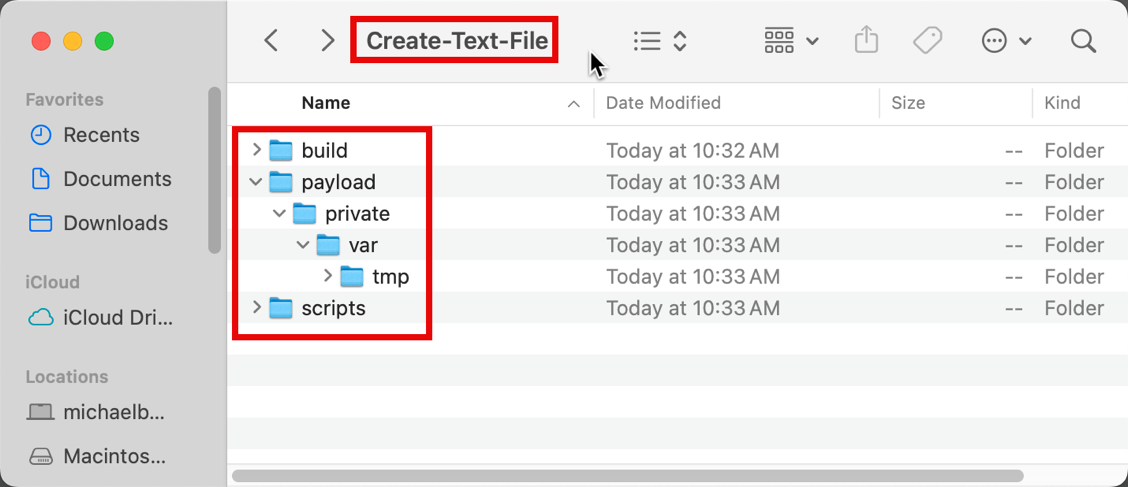
Folder descriptions are as follows:
- Build - This folder contains the output (for example, the payload-free package) created by the
pkgbuildcommands. - Payload - This folder contains a blank set of folders (
private,var, andtmp) to force the package to leave a receipt. - Scripts - This folder contains the preinstall and postinstall scripts (for example, you can place scripts in this folder that you wish to execute on devices).
Note: Although a true payload-free package contains only the pre/post install script, the lack of a payload prevents the installer from generating a receipt file when the package is installed. Without a receipt file, the underlying framework of Workspace ONE UEM's Internal Apps for macOS will continually execute the package (for example, re-run the script). As such, we can supply a basic set of filesystem folders so the resultant payload-free package leaves a receipt file when it completes successfully.
Note: If you wanted to include a script in the payload-free package, you would need to create a script called postinstall and place it in the scripts folder. Then, you would need to make the script executable using the command,chmod a+x postinstall. This option will not be covered in the following steps.
- In Finder, select Applications. Click into the Utilities folder. Launch Terminal.
- Now you will build the payload-free package. Enter the following command into Terminal. Enter the administrative password when prompted.
sudo pkgbuild --install-location / --identifier “<package_identifier>” --version “<package_version>” --root <package_root_directory> --scripts <package_scripts_directory> --sign “<developer_ID_installer_certificate>” <output_package_name>
Note: In the pkgbuild command line, supply the following modified values as appropriate (bolded in the previous command line):
<package_identifier> - Generally in the format of com.<company>.<script purpose>. For this example, you will use com.omnissa.create-text-file.
<package_version> - The version of the package being deployed. For this example, you will use 1.0.0
<package_root_directory> - Filesystem location of the payload folder. For this example, you will use ~/Desktop/create-text-file/payload.
<package_script_directory> - Filesystem location of the scripts folder. For this example, you will use ~/Desktop/create-text-file/scripts.
<developer_ID_installer_certificate> - Use the common name of the appropriate developer ID installer certificate that you copied in Determine Developer ID Installer Certificate Common Name. Although it is considered a best practice, the Developer ID Installer Certificate common name is optional. If you do not have a Developer ID Installer Certificate, you can exclude this value from the command.
<output_package_name> - Filesystem location and name of the built package. For this example, you will use ~/Desktop/create-text-file/build/Create-Text-File.pkg.
Important: When modifying the content of the package, it is critical to increment the <package_version> number in the pkgbuild command line. Failure to increment the version with each rebuild may result in problems during testing, particularly for devices that have already installed a previous version of the package.
Prepare a payload-free package for deployment
Now that you have created a payload-free package, the next step is to prepare the package for deployment as an internal app. This section covers generating the necessary metadata for the package and reviewing key pieces of the metadata that could be modified.
- In Finder, click Applications, and double-click the Omnissa Workspace ONE Admin Assistant.
- Locate the package you created in the previous section. Drag and drop the package onto the Omnissa Workspace ONE Admin Assistant.
- After parsing is complete, click Reveal in Finder.
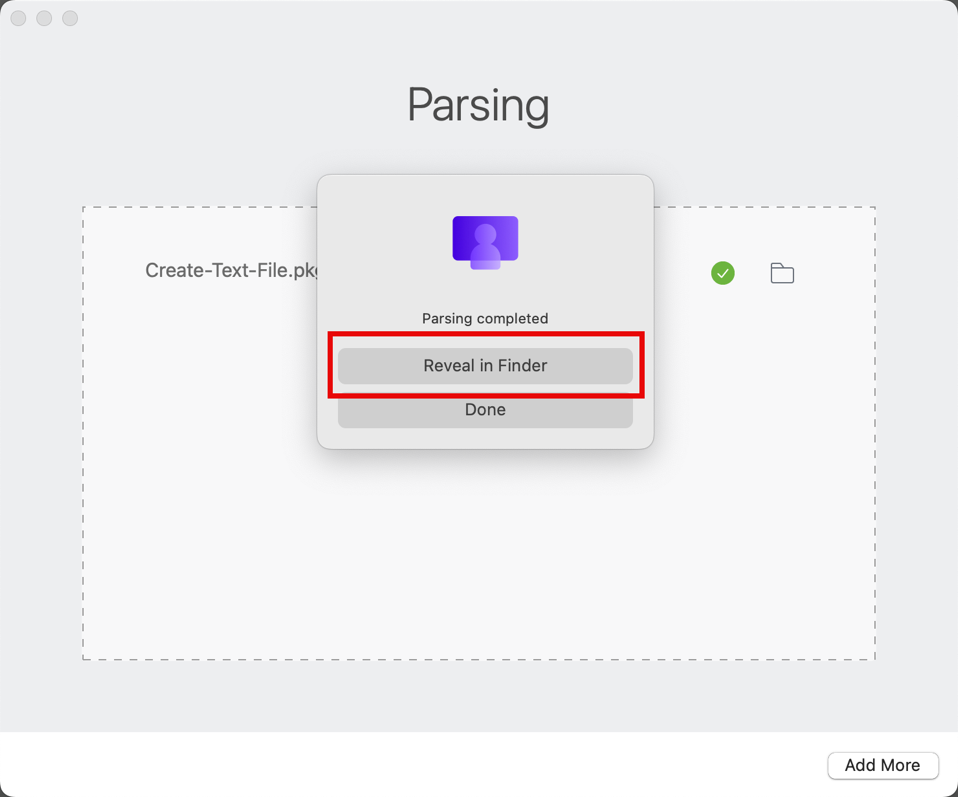
- In the Finder window, expand the folder named after your
<Package Name>-<Version>. (Create-Text-File-1.0.0in this example). Note the existence of the PKG and the corresponding.plistfiles. - Right-click the plist file and select Open With.
- Select your script editor (such as BBEdit or Xcode).
- Scroll down through the file until you find the receipts key.
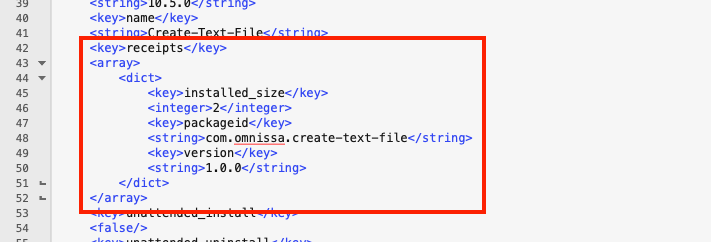
The receipts key determines if the payload-free package has been executed. By adding a payload in the package (even though it is an empty folder structure), the package outputs a BOM and plist file to the receipts folder. When the package is executed on a device, bom and plist files are created when the package completes successfully.
Note: Receipts are added to /private/var/db/receipts when a package with a payload (folder structure -- even if empty) is executed. If a payload structure is not included (or the --root parameter is excluded from the pkgbuild command), no receipts are left when the package is installed.
Deploy a payload-free package in Workspace ONE UEM
In this exercise, you will add the payload-free package as an internal app in the Workspace ONE UEM Console. This sends the package to the enrolled devices in the appropriate assignment groups and executes your script with root privileges.
- In the Workspace ONE UEM console, select Resources.
- Select Native, and then click Internal.
- From the Add dropdown menu, select Application File.
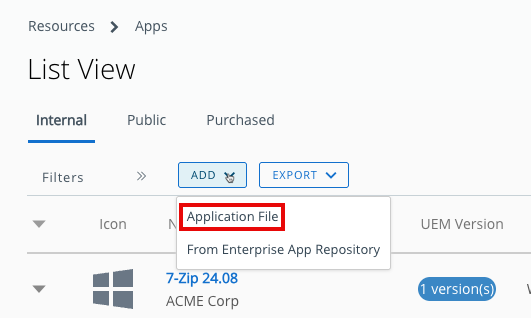
- Click Upload and select Choose File. Navigate to the folder that was created by the Workspace ONE Admin Assistant. Choose the PKG file and click Upload.
- Click Save.
- After the upload has completed, click Continue.
- To upload the Metadata file, click Upload and choose the
.plistfile from the same folder. Click Save.

- After the upload has completed, click Continue.
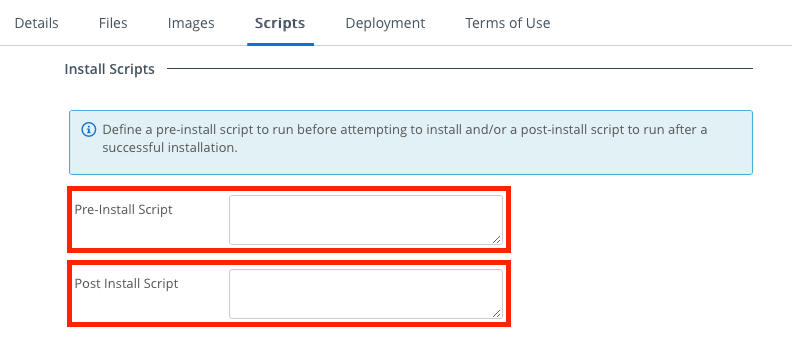
- Click Scripts.
The Pre-Install Script runs before the Workspace ONE Intelligent Hub runs the dmg/pkg/mpkg file that installs the application. The pre-install script can be used to set up prerequisite items before the installer runs. The pre-install script must have an exit code of zero (0) for the installation to proceed.
The Post-Install Script runs after the Workspace ONE Intelligent Hub runs the dmg/pkg/mpkg file. This can be useful for applying configurations after the software completes the installation.
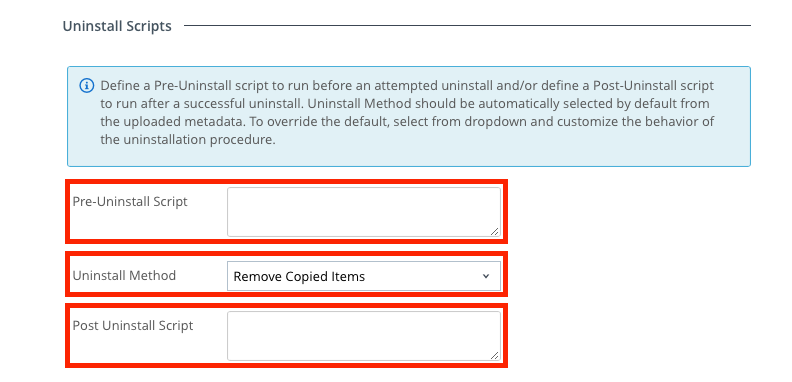
The Pre-Uninstall Script runs before the Workspace ONE Intelligent Hub initiates the uninstall. The pre-uninstall script must have an exit code of zero (0) for the uninstall to proceed.
The Uninstall Method defines how the Workspace ONE Intelligent Hub uninstalls software. Typically, Remove Copied Items is used for a DMG installer, and Remove Packages is used for a PKG installer.
The Post-Uninstall Script provides a method to validate that an uninstall was completed and potentially handle any cleanup for the uninstall.
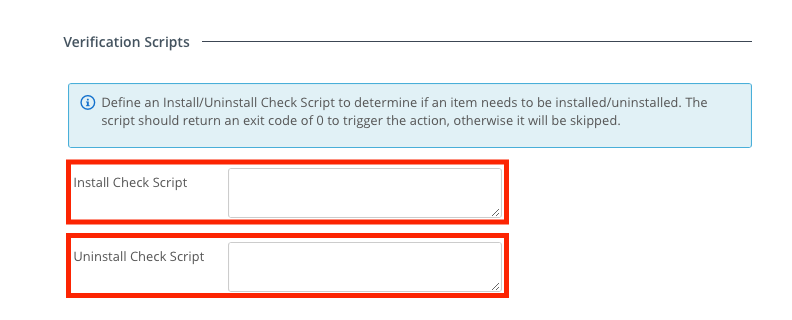
The Install Check script assists the Workspace ONE Intelligent Hub with determining whether an install needs to happen. This script can be useful for desired state purposes and ensuring that a software install remains intact on a user's machine. If the script has an exit code of zero (0), the agent assumes an Install is needed.
The Uninstall Check Script validates whether an uninstall has occurred. If the script has an exit code of zero (0), the agent determines an uninstall is (or is still) required.
Note: Use the pre and post install scripts to avoid repackaging installers. By including scripts, you can automate tasks that would normally require user input before/after an installation.
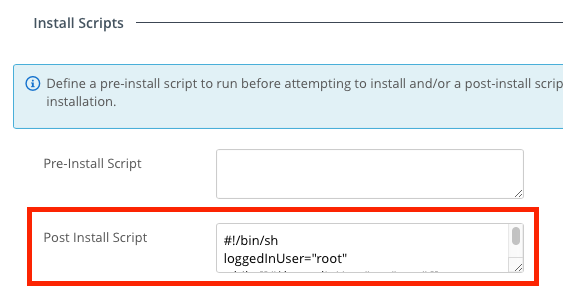
- Under Install Scripts, paste the following script sample into the Post Install Script window.
#!/bin/sh
loggedInUser="root"
while [[ "$loggedInUser" == "root" ]];
do
sleep 10
loggedInUser=`/bin/ls -l /dev/console | /usr/bin/awk '{ print $3 }'`
done
touch /Users/$loggedInUser/Desktop/textfile.txt
- Click Deployment.
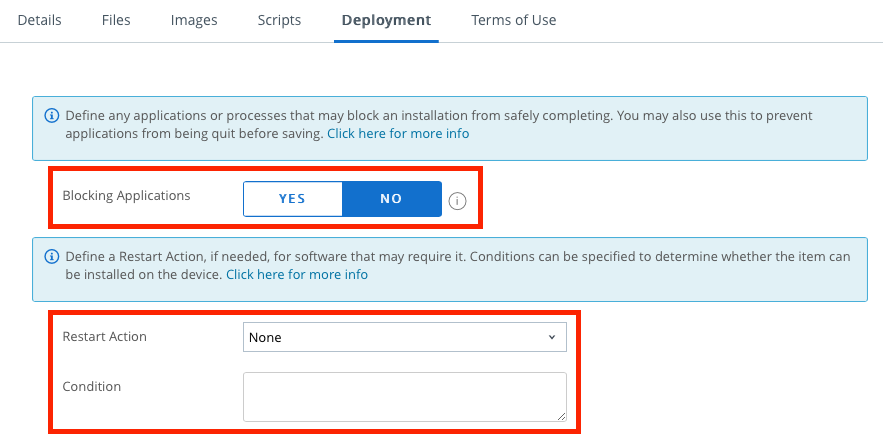
- Note the section for Blocking Applications. If you select Yes, enter the name of any apps that should be closed before an app install or upgrade can proceed. For this exercise, you will select No.
- Note the different Restart actions. For this exercise, you will select None.
- Note the section to include conditions that can further constrain the deployment.
- Optionally, you can assign an Application Terms of Use by clicking Terms of Use and selecting an existing Terms of Use from the dropdown. You can also create a new Terms of Use by clicking the Manage Terms of Use button. You will not create Terms of Use for this exercise.
- Click Save & Assign.
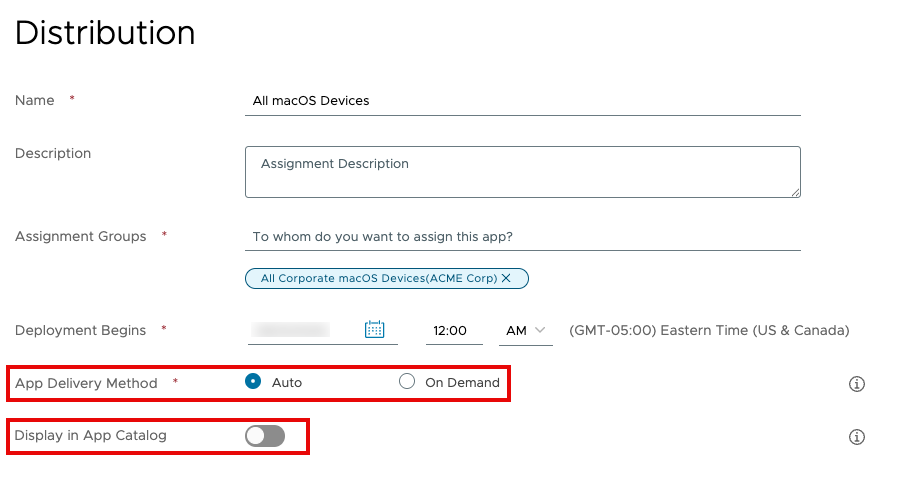
- Enter a name for the assignment. For example,
All macOS Devices. - Click in the Assignment Group section and select an assignment group. The selected group appears underneath the text box.
- Select a time and date to begin the deployment if you do not want to begin immediately.
- Select Auto to deliver the app automatically or On Demand (to deliver the app when requested by the user from the catalog). For this exercise, select Auto.
- Enable Display in App Catalog if you want to display the app in the user's app catalog. For this exercise, leave this option deactivated.
- Click Create.
- If additional assignments are required, click Add Assignment and repeat the process you just stepped through. When all assignments have been created, click Save.
- Click Publish.
Validate successful execution of the payload-free package
- To validate that the payload-free package has successfully installed, log into a macOS device that is included in the assignment you configured earlier. Look on the desktop for a file called textfile.txt.
Note: If you have just logged into your macOS device, it might take a few minutes for the app install to complete. - You can also check the installation status in the Workspace ONE UEM console by selecting Devices and then List View.
- Click a macOS device in the list, and then select Apps.
- Look for the app you created earlier. In this example, you will look for Create-Text-File. Check the App Status. If it was successful, the status will be Installed.

Note: If the App Status is Not Installed, try refreshing the screen. It may take a few minutes for Intelligent Hub to update Workspace ONE UEM on the status of the installation.
Summary and additional resources
This operational tutorial provided steps to distribute scripts using two different methods available in Workspace ONE UEM. The methods discussed included using the Scripts resource to execute scripts on devices and using Internal Apps to deploy a payload-free package that executes your script.
Procedures included:
- Creating and assigning scripts using the Scripts resource.
- Creating a payload-free package.
- Preparing a payload-free package for deployment.
- Deploying a payload-free package in Workspace ONE UEM.
Additional resources
For more information on managing macOS devices with Workspace ONE UEM, see Configuring Basic macOS Management.
You may also wish to read these additional operational tutorials from macOS on Omnissa Tech Zone.
- Deploying a Third-Party macOS App
- Onboarding Options for macOS
- Using Workspace ONE to Manage Operating System Updates on macOS Devices
- Enforcing macOS Security Compliance Project Baselines
Changelog
The following updates were made to this guide:
Date | Description of Changes |
|---|---|
| 06/13/2025 |
|
| 06/05/2024 |
|
| 03/27/2024 |
|
| 12/09/2022 |
|
| 03/30/2019 |
|
About the author and contributors
The latest version of this tutorial was written by:
- Michael Bradley, Product Specialist, Omnissa.
This tutorial was originally written by:
- Robert Terakedis, Omnissa alumni.
Questions and feedback
For questions or feedback, send to tech_content_feedback@omnissa.com.

