

Configuring basic macOS management in Workspace ONE UEM
Overview
Omnissa Workspace ONE® UEM offers a comprehensive management solution for macOS devices, supporting operating systems version 10.9 and above. It enables enterprises to manage Corporate-Dedicated, Corporate Owned, or Employee Owned (BYOD) devices, providing the flexibility to cater to their employees’ needs at any level.
Purpose of this tutorial
Omnissa offers this operational tutorial to assist you in managing your Workspace ONE® environment. This tutorial covers enrolling a macOS device, configuring restrictions and dock profiles, setting up a device lock, and deploying macOS volume-purchased applications.
Prerequisites
The instructions provided in this tutorial were developed using the following software versions. While it may be possible to use older versions of the required software, it is strongly recommended that you use the versions listed below or higher. Please note that the processes described in the tutorial may differ if older software is used.
- Workspace ONE UEM version 2506 or later
- Apple device running macOS version 15.7 (Sequoia) or later
- Retrieve the Group ID from Workspace ONE UEM Console
- Local macOS account with administrator permissions
Audience
This operational tutorial is intended for IT professionals and Workspace ONE administrators of existing production environments.
Both current and new administrators can benefit from using this tutorial. Familiarity with macOS, XML, and basic scripting is assumed.
Knowledge of additional technologies such as Omnissa Intelligence and Workspace ONE® UEM is also helpful.
macOS management with Workspace ONE UEM
Before you start managing macOS devices with Workspace ONE UEM, it’s crucial to comprehend the various components involved in Apple device management. While some are provided by Apple, others offer enhanced functionality and are part of the Omnissa solution stack. These components encompass client-side components and management clients installed on macOS devices, as well as server-side components and management services utilized within the Workspace ONE solution stack. A comprehensive diagram provides a visual representation of the Workspace ONE solution stack and the communication pathways between its components.
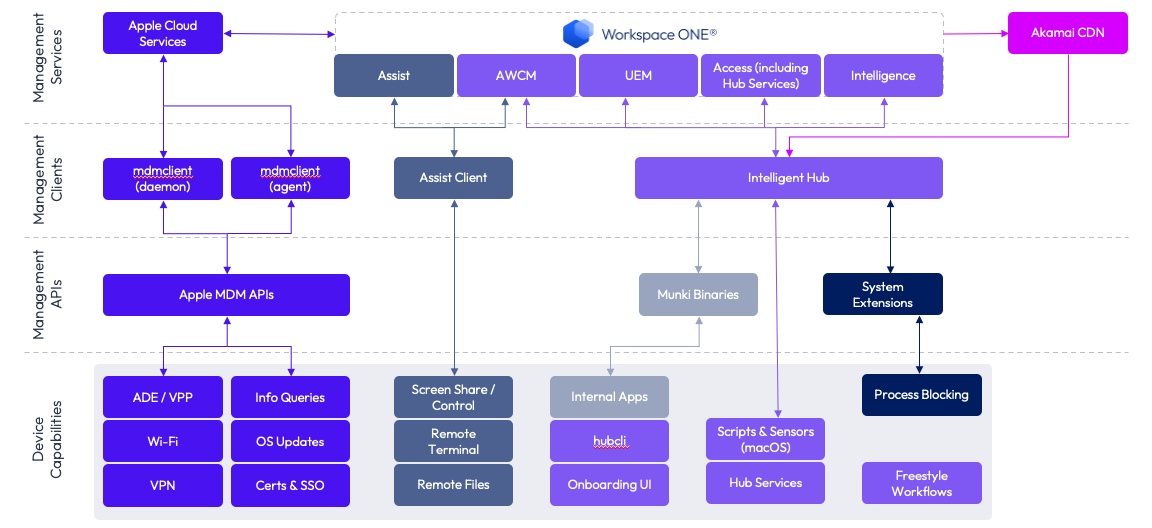
Client-side components
Workspace ONE relies on several client-side components installed on macOS devices to manage them. These components provide MDM management, application deployment, remote assistance, and other functionalities.
The following table details each client component, its function, and the supplier (Apple or Omnissa).
| Client Component | Supplier | Use(s) |
| mdmclient (process) | Apple (built-in to the OS) | Native MDM client running in two modes: as a daemon (root) and as an agent (user). This client implements all functionality defined in Apple’s MDM specifications, including profiles, apps, enrollment, and more. Workspace ONE communicates with these two processes through Apple Push Notification Services (APNS). |
| dasd | Apple (built-in to the OS) | The Duet Activity Scheduler daemon is a process that monitors the system’s health. While it’s essential for system stability, it can occasionally interrupt or delay normal activities and service startup. In certain scenarios, this can impact features like out-of-the-box enrollment. |
| appstored | Apple (built-in to the OS) | The App Store download daemon, responsible for downloading apps from the App Store (for instance, volume-purchased apps) and bootstrap packages, is part of macOS 11 Big Sur and later versions. |
| Workspace ONE Intelligent Hub for macOS | Omnissa (installed) | Workspace ONE communicates with Intelligent Hub using AirWatch Cloud Messaging (AWCM) to provide value-add functionality, profiles, configuration, employee experience, and internal apps. |
| Workspace ONE Assist Client | Omnissa (installed) | Workspace ONE Assist Client enables remote control, file management, and the execution of remote shell commands from Workspace ONE. It communicates outbound to the Workspace ONE Remote Management server and AWCM. |
| Unified Logging | Apple (built-in to the OS) | Most processes within macOS no longer write to the system.log file. Instead, they write to a binary file that needs to be queried and exported as human-readable text using command-line tools. |
Server-side components
MacOS management in Workspace ONE relies on various server and cloud-based components. It’s crucial to ensure that macOS has network connectivity to each of these components, as outlined in the following lists of network requirements.
- Using Apple Products on Enterprise Networks
- If your Apple devices are not getting Apple push notifications
- Workspace ONE ports and DNS names
Management services
Workspace ONE leverages multiple services for macOS management. Each service plays a vital role in the overall functionality of your Workspace ONE environment. If any of these services are unavailable, macOS management will be affected and/or restricted until the impacted services are restored. The services included are:
- APNS (Apple Push Notification service) and AWCM (AirWatch Cloud Messaging) – Both of these services are used to send real-time notifications to devices.
- Workspace ONE UEM (including the console, device services, and API servers) – These are the core services of the Workspace ONE solution. This provides the management console, device communications, integration into Apple and other services, application and profile management, and additional features.
- Workspace ONE Assist – This tool is used for remote device control, such as providing helpdesk support, and for accessing files on remote devices.
- Workspace ONE Access and Hub Services – These services support employee experience, single sign-on, and conditional access.
- Workspace ONE Intelligence – A reporting and automation (including partner ecosystems) tool for monitoring Workspace ONE.
- Horizon – A virtual desktop solution that allows macOS users to access and use Windows-based applications that require a virtual desktop environment.
Management clients
Clients communicate with Workspace ONE UEM on behalf of their devices. As you implement the entire solution stack, you’ll need to manage the following primary list of clients on each device:
- mdmclient - The built-in device management client which is part of macOS.
- Workspace ONE Intelligent Hub - The agent facilitates communication between Workspace ONE UEM and Hub Services, thereby enhancing device management. It offers value-added functionalities such as a system extension for process blocking, a unified catalog, and employee experience features.
- Assist Client - The client that facilitates remote troubleshooting sessions, including remote control, remote file access, and remote terminal access.
- Horizon Client - The client which provides access to remote datacenter-hosted applications from macOS.
Enrolling macOS Devices
Management for macOS starts when you enroll your devices in Workspace ONE UEM. This section offers an overview of the device enrollment process using Workspace ONE UEM. It also includes an exercise that guides you through installing the Workspace ONE Intelligent Hub and enrolling a macOS device in Workspace ONE UEM.
Prerequisites
The instructions provided in this tutorial were developed using the following software versions. While it may be possible to use older versions of the required software, it is strongly recommended that you use the versions listed below or higher. Please note that the processes described in the tutorial may differ if older software is used.
- Workspace ONE UEM version 2506 or later
- Apple device running macOS version 15.7 (Sequoia) or later
- Retrieve the Group ID from Workspace ONE UEM Console
- Local macOS account with administrator permissions
This exercise requires administrator and end user device authentication during enrollment. Gather the required account information and record it in the following tables. The account information provided in these tables is based on a test environment. Your account details will differ.
| Local Administrator Account Information | |
| Username | |
| Password | |
| User Account Information | |
| Username | |
| Password | |
| Email address | |
| Workspace ONE UEM Information | |
| Server URL | |
| Administrator username | |
| Password | |
Installing the Workspace ONE Intelligent Hub
Start by downloading and installing Workspace ONE Intelligent Hub on your macOS device. This exercise will outline the steps to follow.
- Log in to the macOS device with your administrator credentials.
- Enter the username. For example,
administrator. - Enter the password. For example,
Omnissa1!. - Click the arrow icon or press Enter.
- Enter the username. For example,
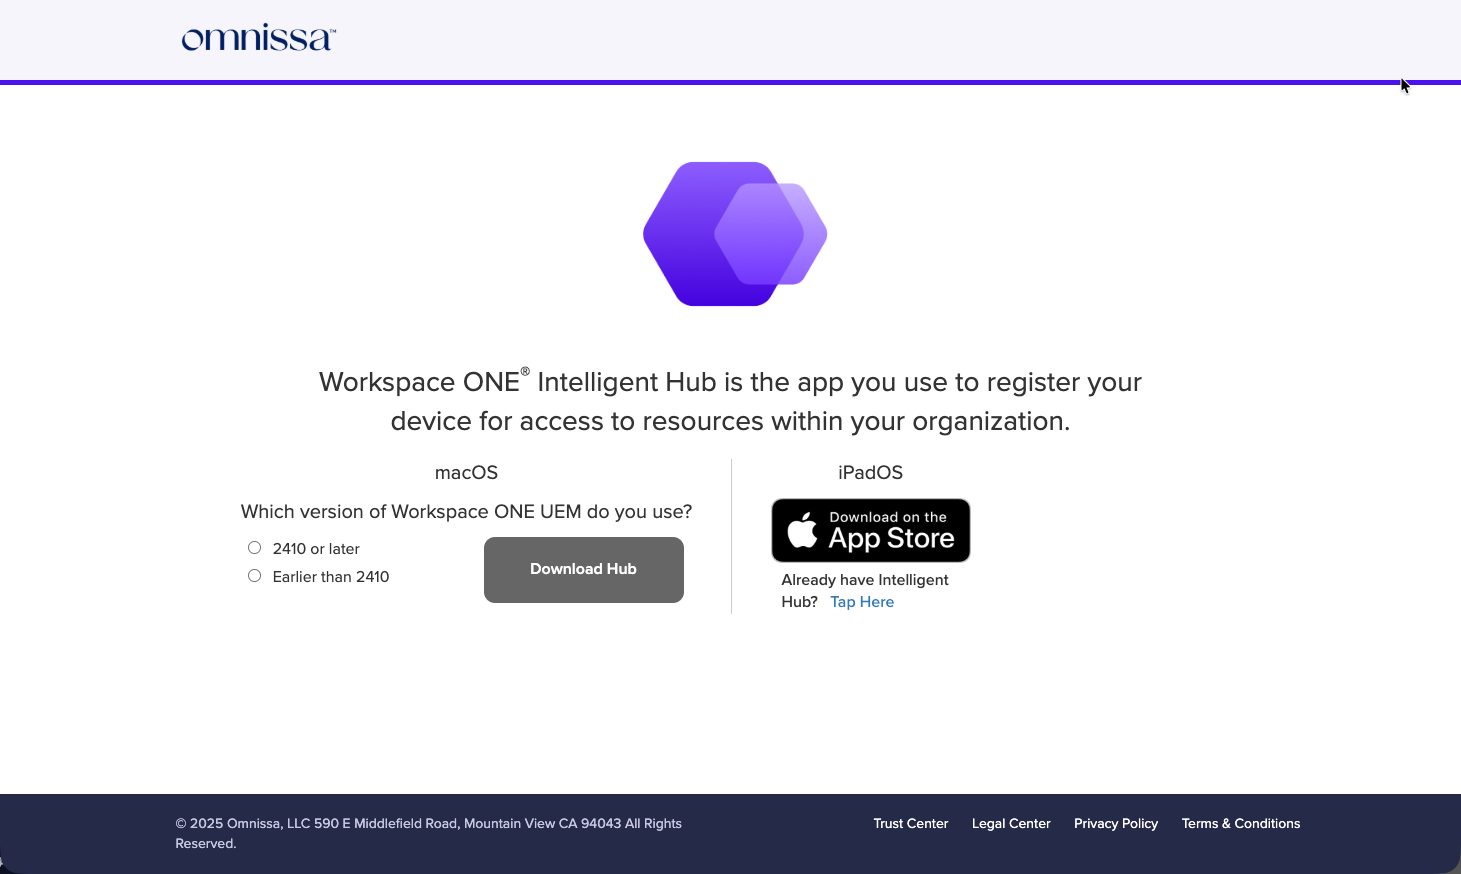
- Click the Safari icon (blue compass) to open the Safari browser.
- Enter
https://getwsone.comin the URL field, then press Enter. - Select the version of the Workspace ONE UEM console that you use. Click Download Hub beneath macOS. The Workspace ONE Intelligent Hub begins to download and will save to the Downloads folder by default.
- Launch the Intelligent Hub installer by clicking the Downloads folder in the dock (next to the Trash Bin).
- Click on the installer package you just downloaded.
- Review the Introduction. Click Continue.
- Review and Accept the Licensing Terms by clicking Continue and then click Agree (to the license terms).
- Click Install to perform a standard installation.
- When prompted, enter the admin username, for example,
Administrator. - Enter the password.
- Click Install Software.
- Click Close when the installer finishes.
- Click Move to Trash to move the installer to the trash.
Onboarding using Hub-based enrollment workflow
In this exercise, you’ll enroll a macOS device into Workspace ONE UEM. Enrollment is the process of bringing a device under Workspace ONE UEM’s management and control. There are various methods to enroll different platforms, including macOS. For this exercise, we’ll cover a basic enrollment scenario.
This enrollment flow is considered a user-approved device enrollment because the user initiates the enrollment process when they install the Intelligent Hub app on their device. There are other device enrollment methods available, but they won’t be discussed in this document. For more information about other enrollment methods, please refer to macOS Device Enrollment.
- After the Workspace ONE Intelligent Hub finishes installing, the Enrollment Wizard should start automatically.
Note: The Enrollment Wizard may take several minutes to launch. If you do not see the Enrollment Wizard immediately, be patient and wait for it to appear.
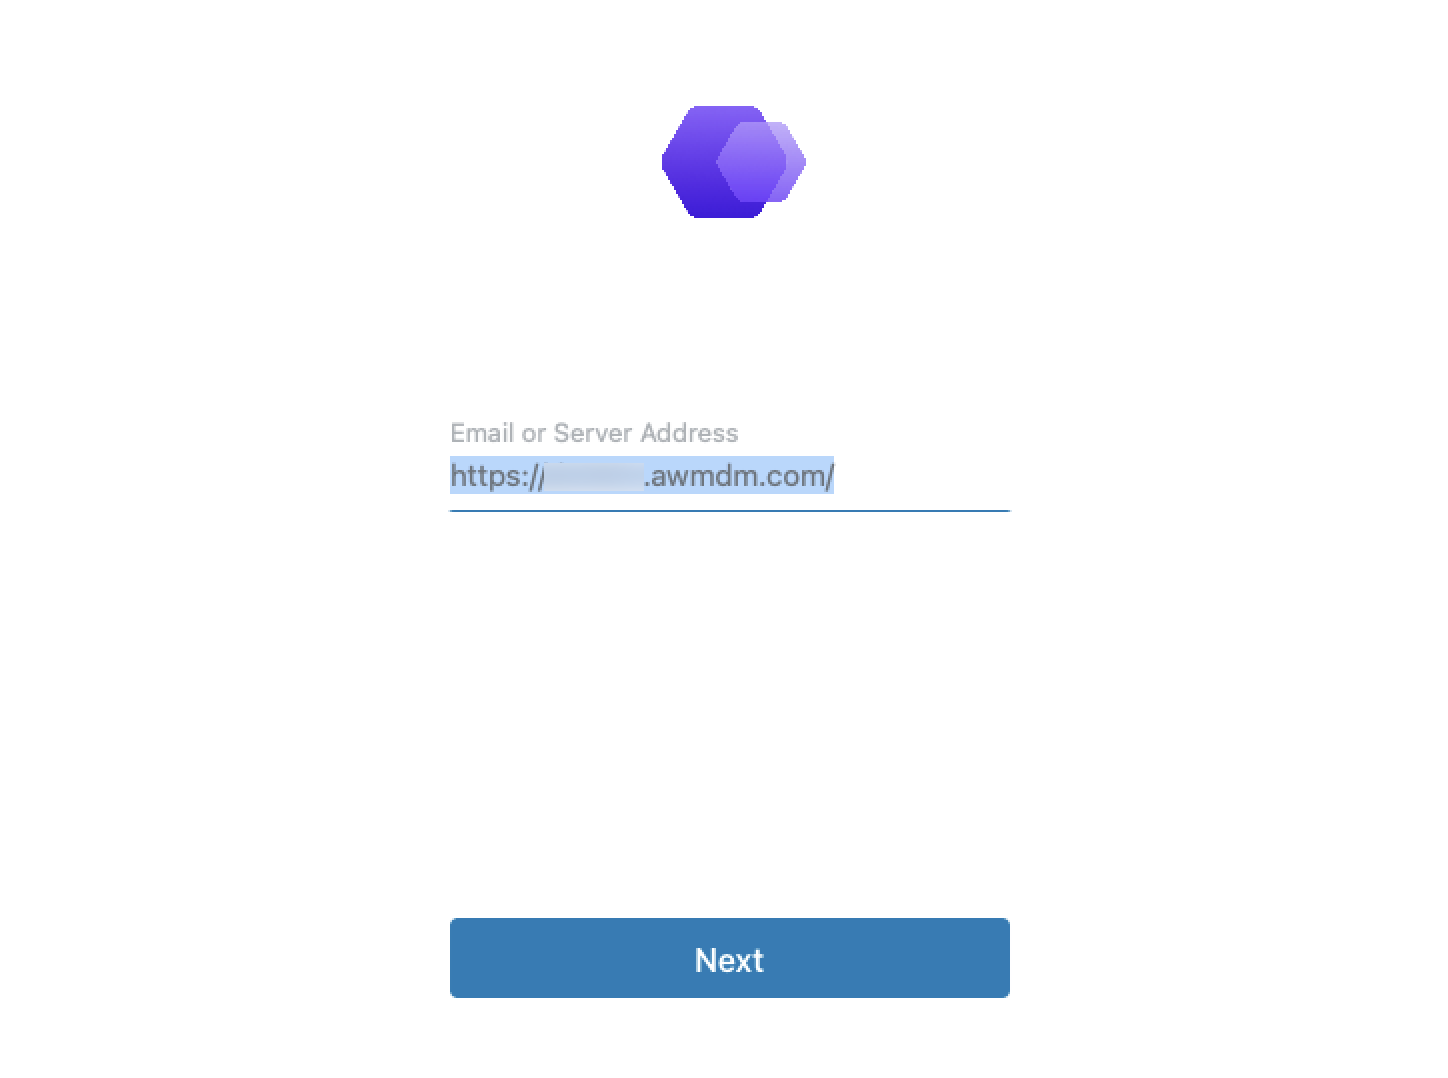
- When prompted for Email or Server Address, enter your Workspace ONE UEM URL, for example,
hol.awmdm.com. Click Next.
- Enter your Group ID. Click Next.
Note: You can find your Group ID in the Workspace ONE UEM console by navigating to Group & Settings. Click Groups, and then click Organization Groups. Select the Details view. - Click Continue.
- Enter the enrollment username. For example,
testuser. - Enter the enrollment user password. For example,
Omnissa1!. - Click Continue.
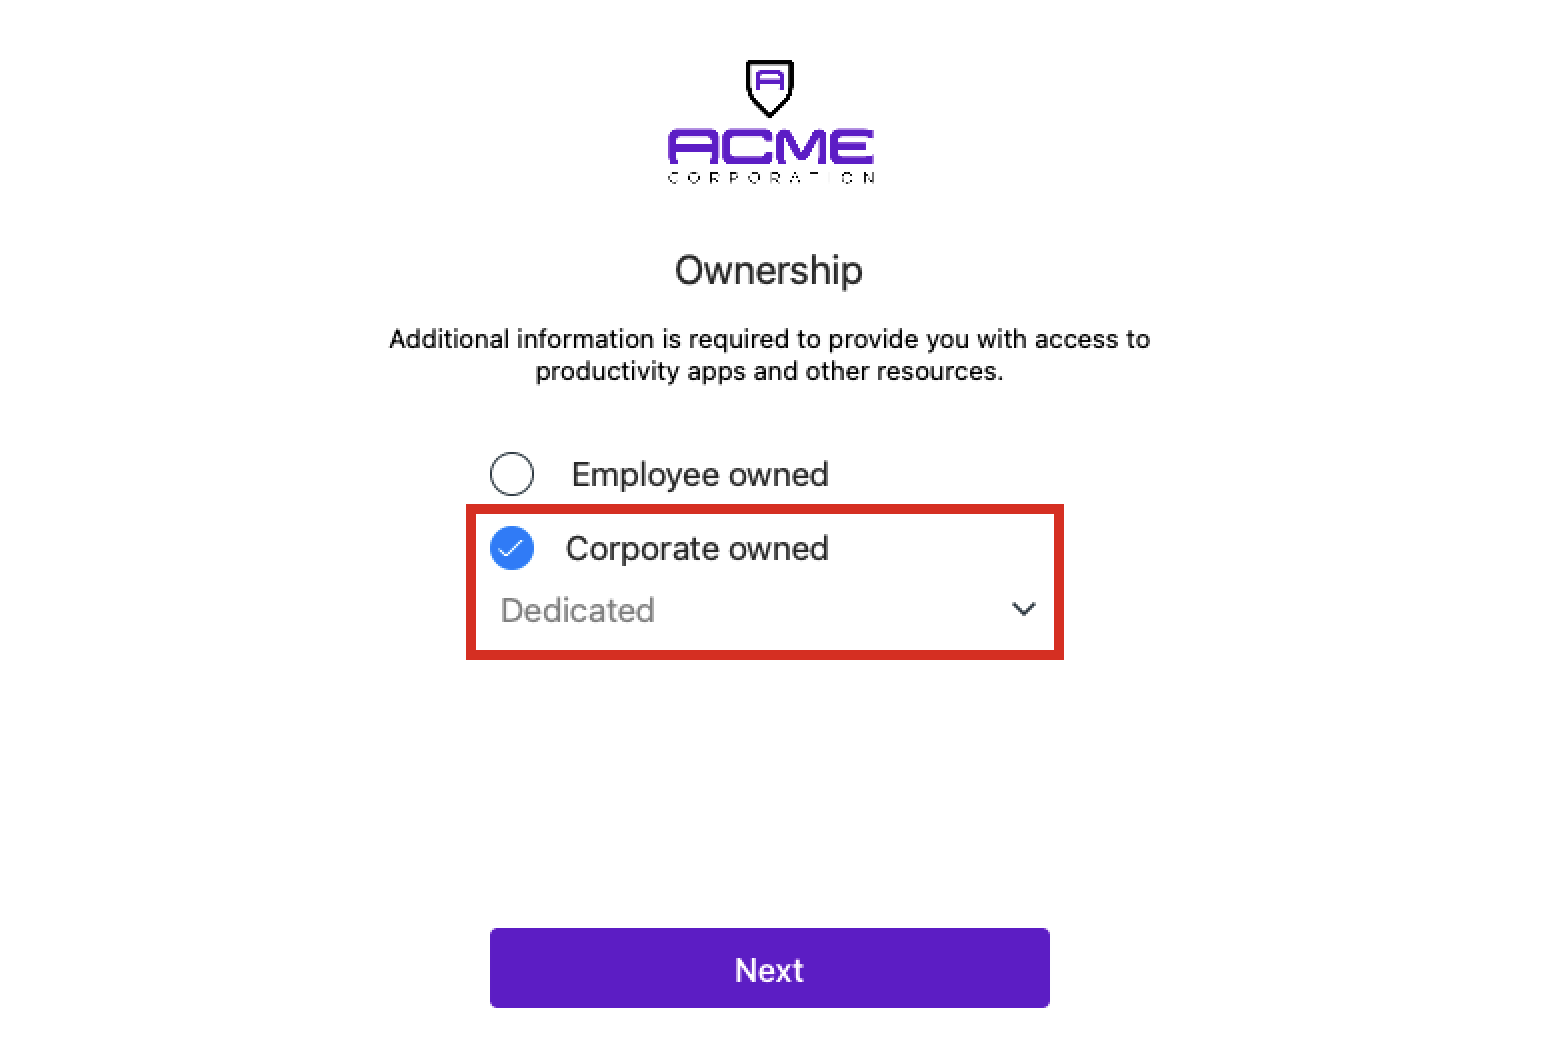
- Select the ownership type for the device. If the device is an employee-owned BYOD, select Employee Owned. If the device is a corporate-owned device, select Corporate owned. Click Next.
Note: If you select Corporate owned, you will also need to specify if the device will be dedicated to one user or shared by multiple users.
- Click Next to install Workspace Services. The installation and enablement of Device Management will begin.
- When the Profile window is displayed, double-click on the Workspace Services profile listed under Downloaded. Click Install to approve the User-Approved Enrollment Profile.

- When prompted, click Install to confirm the installation.
- When prompted, enter the password for your user account on the Mac. For example,
Omnissa1!. - Click OK.
- When the installation is complete, close the Profiles panel by clicking the red dot. Then click Done.
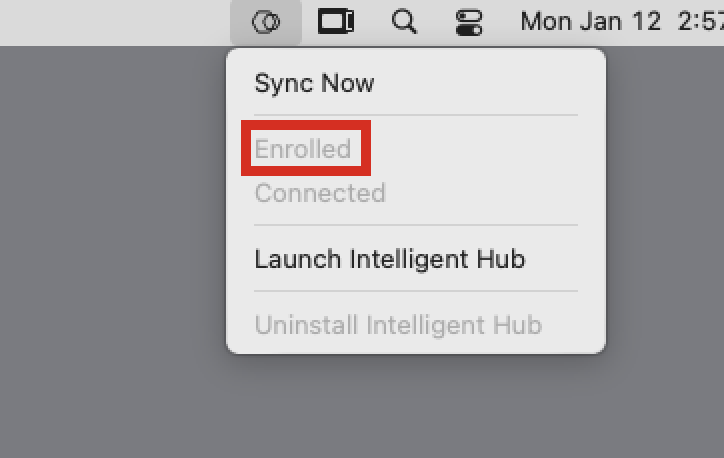
- You can validate the enrollment by clicking the Hub icon in the upper-right corner of your screen.
- In the menu that appears, you can see the device’s status as Enrolled.
Configuring macOS profiles
Profiles are the mechanism through which Workspace ONE UEM manages settings on macOS devices. Each profile comprises two primary sections: the General section and the Payload section.
- The General section specifies the profile’s name and assignment settings.
- The Payload section outlines the actions to be executed on the device.
Every profile must have all necessary fields in the General section filled out and at least one payload configured.
Workspace ONE UEM allows profile management for macOS to occur either on the device level or on the user level.
Device-level profiles impose restrictions and settings on any user logged onto the device. These profiles are typically used to control system-wide settings, such as VPN and Wi-Fi configurations, Global HTTP Proxy, Disk Encryption, and/or Directory (LDAP) integration.
In contrast, user-level profiles apply settings and restrictions to the specific user logged onto the device. These profiles usually control settings relevant to the enrolled user, such as email configurations, web clips (URL shortcuts), credentials (certificates), and content filtering settings.
Configuring a restrictions profile for macOS devices
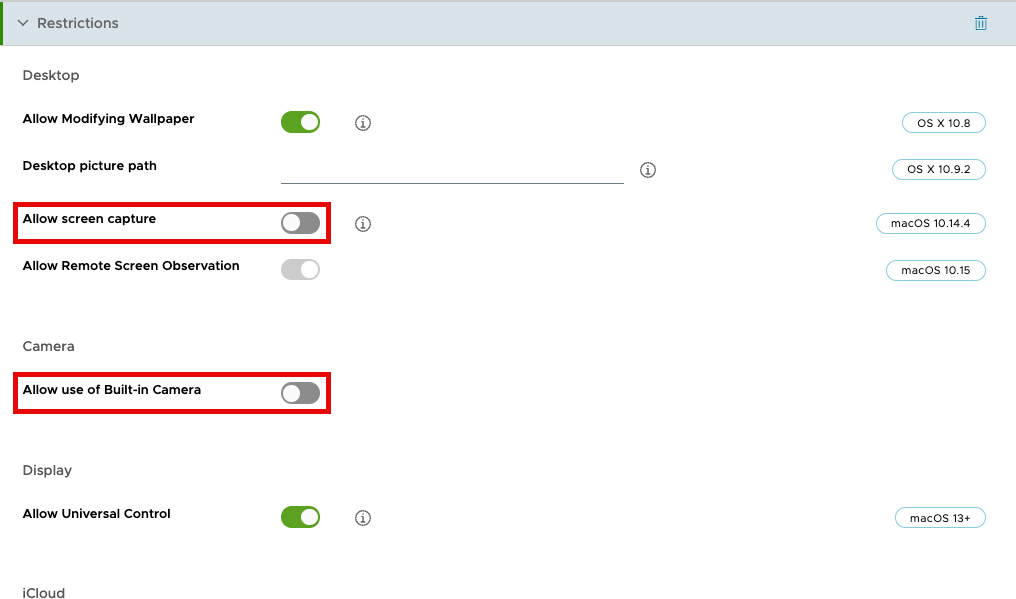
In this exercise, deactivate Allow Screen Capture and Allow Use of Built-in Camera settings on a macOS device by configuring a device-level restrictions profile. This exercise explores how to modify the macOS device behavior using profiles.
- In the Workspace ONE UEM console, select Resources. Then select Profiles.
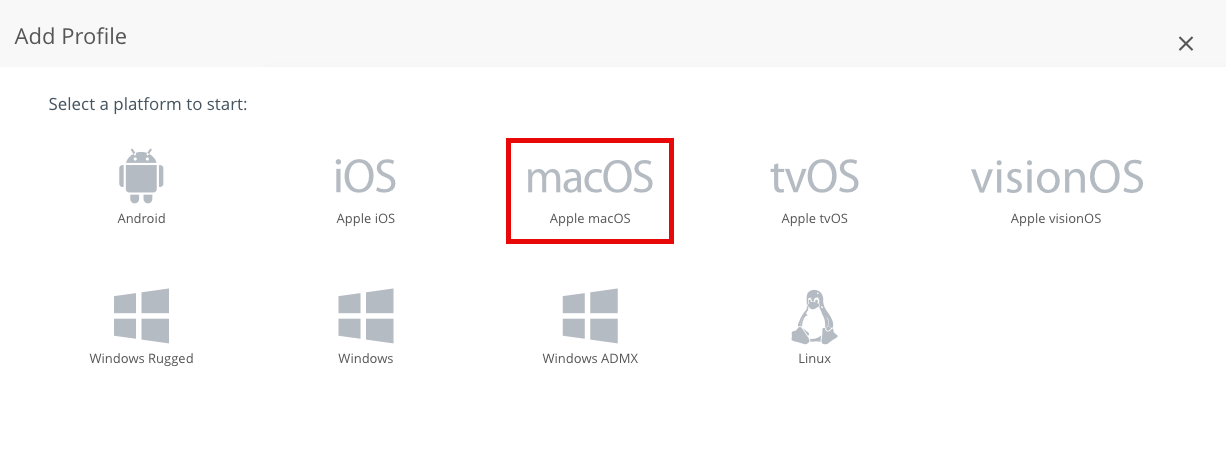
- From the Add dropdown menu, select Add Profile.
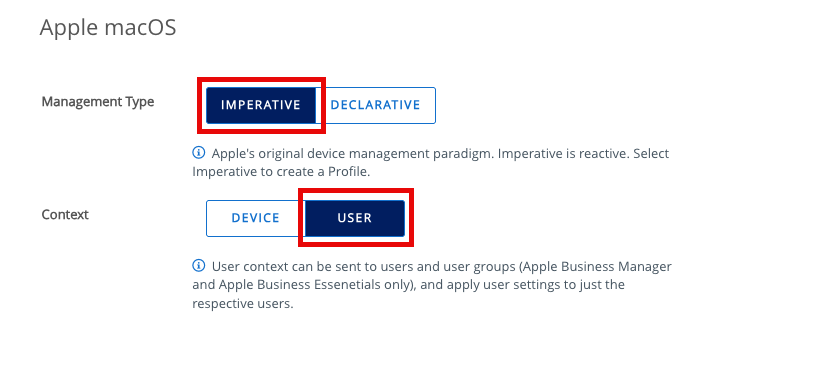
- Select Profile Platform by selecting macOS.
- For Management Type, select Imperative, and for Context, select Device Profile. Click Next.
- Enter macOS Device Restrictions for the profile name.
- Scroll down the list of payloads until you find Restrictions. Click Add.
- Under Functionality, click the button next to Allow screen capture. The button, which is green by default, should turn gray.
- Click the button for Allow use of Built-in Camera. The button, which is green by default, should turn gray.
- Click Next.
- Scroll down to view Assigned Groups and click in the search box. From the list of Assignment Groups that appear, select the appropriate group. For example, select
All Corporate macOS Devices. - Select Auto for the Assignment Type.
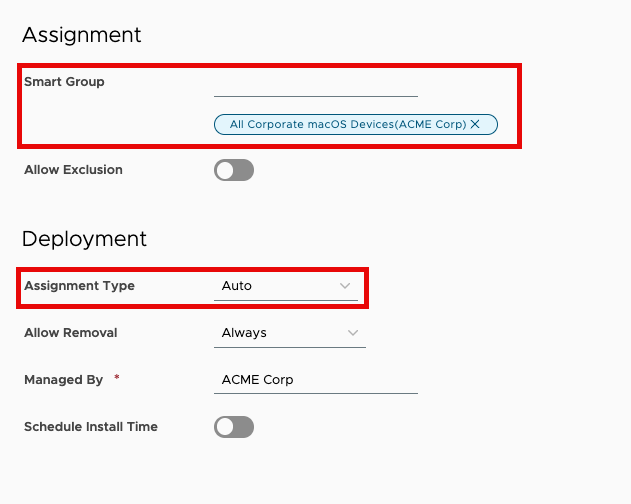
- Click Save and Publish.
You should now see your macOS Device Restrictions Device Profile within the list of the Profiles window.
Note: If you need to edit the profile, this is where you would do so. - You can validate that the profile has been applied, by logging in to your macOS device.
- Launch the Photo Booth application. The application reports that there is no connected camera.
Note: This will only work on a macOS device that has a built-in camera. - Launch the Screenshot application, which is in the Utilities folder under Applications. If the macOS Device Restrictions profile created earlier is configured and applied correctly, the Screenshot application will not launch.
Configuring an accessibility profile for macOS users
In this exercise, configure Accessibility settings for a specific, enrolled user on a macOS device by configuring a user-level profile.
- In the Workspace ONE UEM console, select Resources. Then, select Profiles.
- From the Add dropdown menu, select Add Profile.
- Select the Profile Platform by selecting macOS.
- For Management Type, select Imperative, and for Context, select Device Profile. Click Next.
- Enter macOS Accessibility for the profile name.
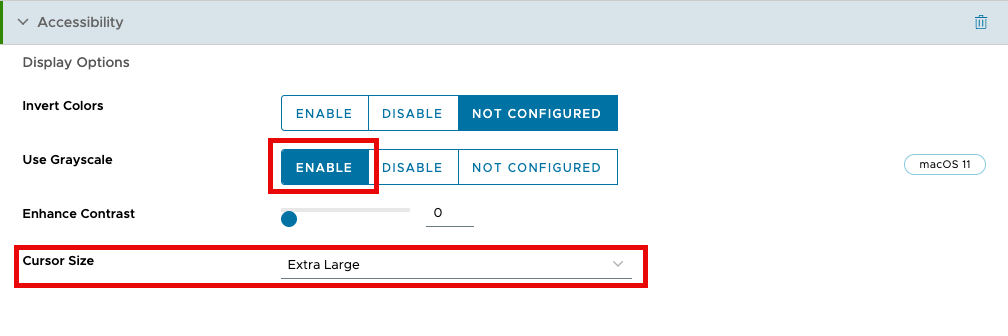
- Scroll down the list of payloads until you find Accessibility. Click Add.
- Click the Enable button next to Use grayscale.
- Change the Cursor Size to Extra Large.
- Click Next.
- Scroll down to view Assigned Groups and click in the search box. From the list of Assignment Groups that appear, select the appropriate group. For example, select
All macOS Users. - Select Auto for the Assignment Type.
- Click Save and Publish.
You should now see your macOS Accessibility User Profile within the list of the Profiles window.
Note: If you need to edit the profile, this is where you would do so. - You can validate that the profile has been applied, by logging in to your macOS device.
- The screen will be displayed as grayscale, and the cursor will be extra-large.
Configuring device lock for macOS
Device lock for macOS devices causes the machine to reboot into a firmware-lock screen. This lock screen appears before the OS boots. This exercise guides you through configuring a macOS device lock.
Note: For Mac devices running Apple silicon, macOS version 11.5 or later is required. If you try to use this feature on a Mac with Apple silicon running a version of macOS before 11.5, the device will be deactivated, and a network connection and authentication with Secure Token will be required to re-enable the device.
Configuring device lock
Workspace ONE UEM supports a firmware-based device lock for macOS. The device cannot be booted until the device lock code has been entered. This exercise helps you to configure device lock for macOS.
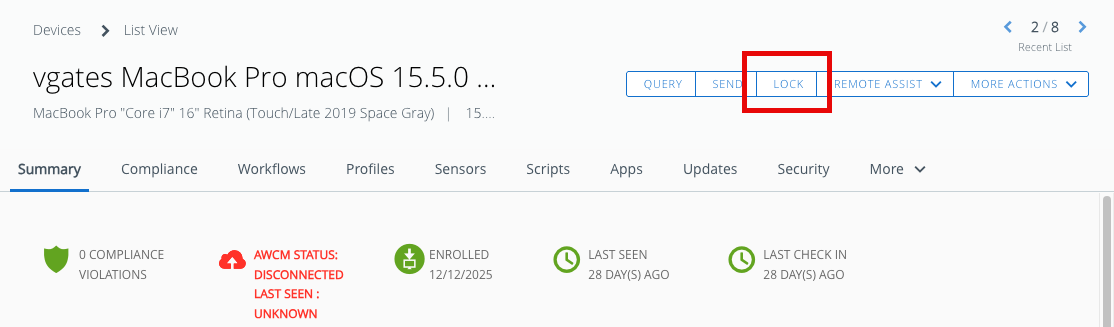
- On the Devices List View, select your enrolled macOS device.
- On the Device Details View, click Lock.
- When prompted, enter a Device Lock Code. For this exercise, enter
111111as the firmware lock code.
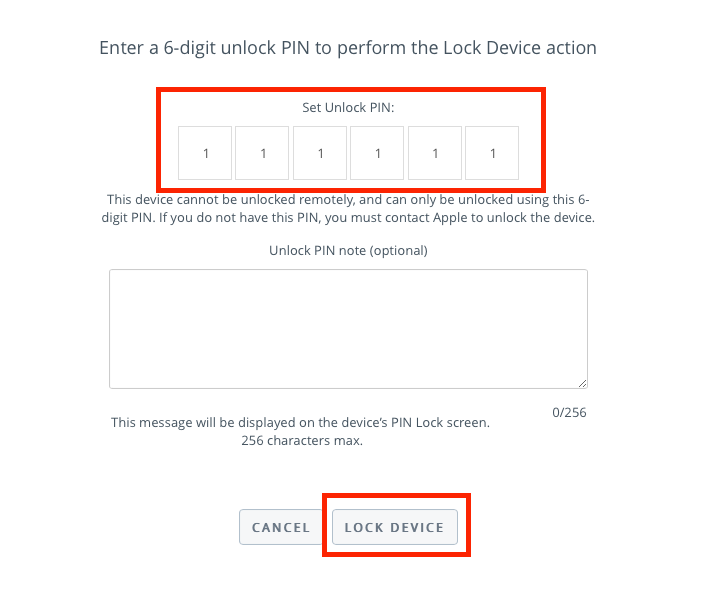
- Click Lock Device.
- The device will reboot after a short delay, and the firmware will be locked.
- To unlock the device, enter
111111at the System Lock screen.
Understanding macOS software delivery
Workspace ONE UEM offers two methods for delivering software to managed macOS devices. This section briefly discusses the methods available and guides you through the process of volume-purchasing app licenses in Apple Business Manager and assigning them to enrolled devices within Workspace ONE UEM.
The following software delivery methods are available for macOS:
- Apple Business Manager or Apple School Manager — Delivers macOS App Store applications to devices as volume-licensed, purchased applications.
- Software Distribution — Delivers third-party, non-store applications as internal apps in Workspace ONE UEM 2203 and later.
The type of software being delivered determines appropriate delivery method. The following table lists different types of software, and their recommended delivery method.
| Store Apps | Non-Store Apps |
|---|---|---|
| Delivery Methods | Apple Business Manager | Software Distribution |
| Examples |
|
|
Applications purchased through Apple’s Volume Purchase Program can be licensed in one of two ways: user-based licensing and device-based licensing.
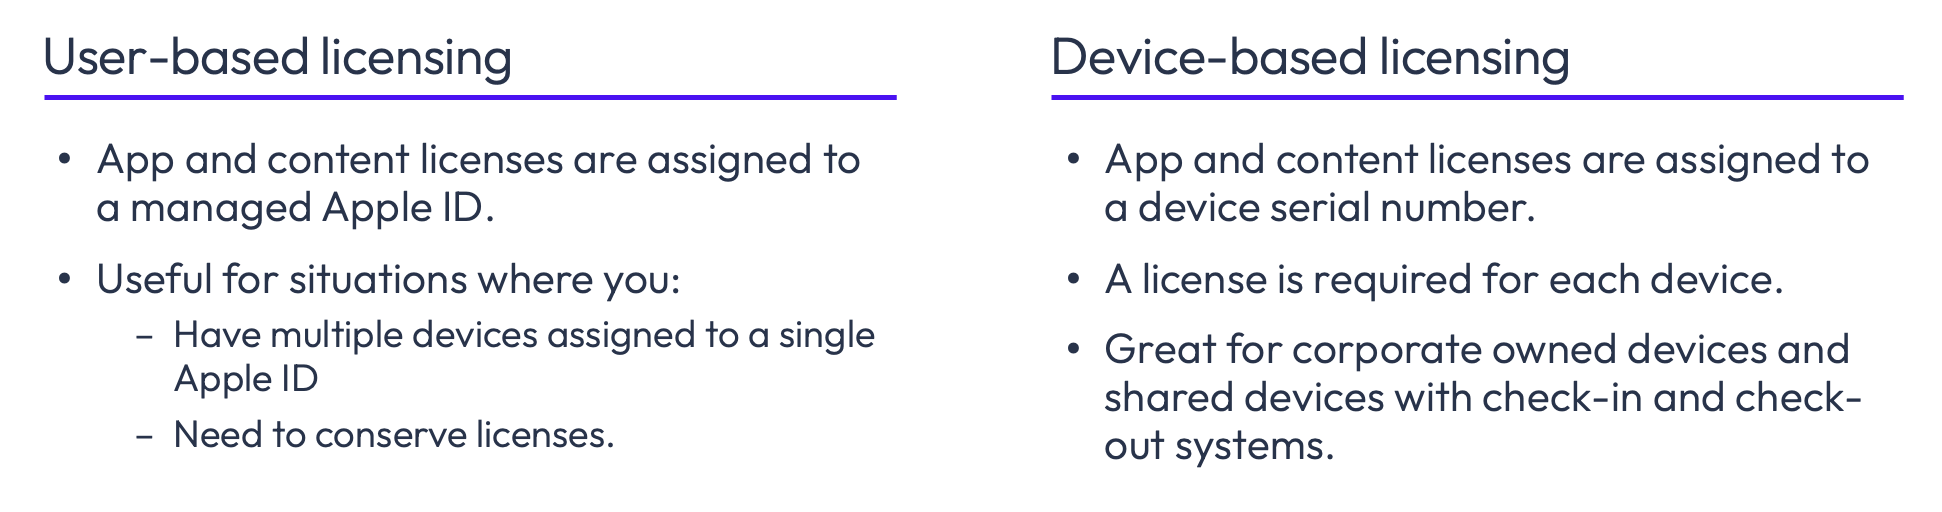
User-based licensing
With user-based licensing, the app license can be assigned to a specific Apple ID and distributed to devices linked to that ID. This allows for the installation of apps and content on any or all devices associated with that Apple ID. This approach can offer cost savings for organizations with limited license usage. Before installing an app or content, end users must accept invitations and register with VPP, which involves accepting the terms of agreement for VPP. By default, application licensing purchased through VPP is imported from Apple Business Manager into Workspace ONE as user-based licensing.
Device-based licensing
With device-based licensing, app licenses are assigned to a device serial number, requiring a license for each device where the app is intended to be installed. Transitioning from user-based licensing to device-based licensing for most applications can be done with a few simple mouse clicks. Unlike user-based licensing, end users are not required to acknowledge the terms of acceptance for the VPP. This allows administrators to silently deploy applications and content to devices without user interaction.
However, there are a few considerations to keep in mind regarding device-based licensing. Omnissa Workspace ONE UEM does not migrate assigned user-based licensing to device-based licensing. Therefore, VPP applications already assigned to Apple IDs remain assigned as such. Moreover, the migration of an application’s licensing from user-based to device-based is irreversible. Once a license has been converted to device-based licensing, it must remain in that format.
Prerequisites
Before you can perform the exercises in this tutorial, you must meet the following requirements.
- Apple Volume Purchase Program (VPP) is configured in Workspace ONE UEM
Deploying macOS volume-purchased apps
This section demonstrates how to purchase applications in bulk through the Apple Business Manager and assign them to devices using device-based licensing. However, Workspace ONE UEM also supports managing non-store, third-party software. For more information about deploying non-store applications, refer to Deploying a Third-Party macOS App: Workspace ONE UEM Operational Tutorial.
Purchase app licensing in Apple Business Manager
Before you can assign volume-purchased applications to devices, you will first purchase licenses within Apple Business Manager.
- Log in to Apple Business Manager.
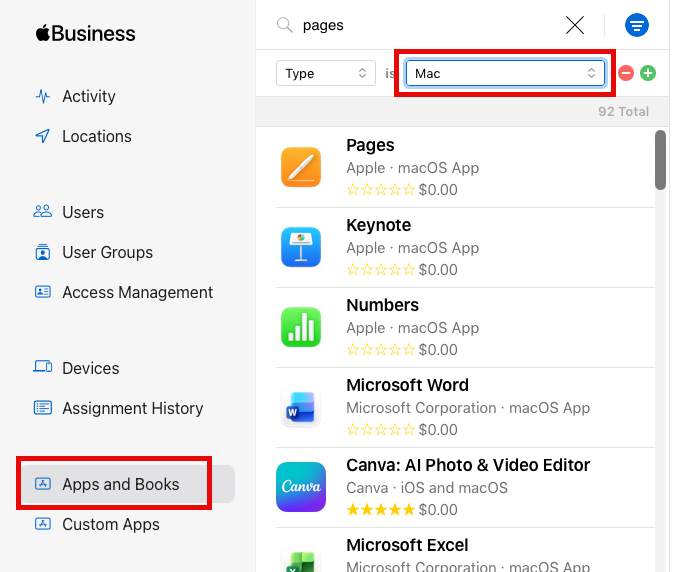
- Click Apps and Books.
- Set Type to
Macand enterPagesin the search field.
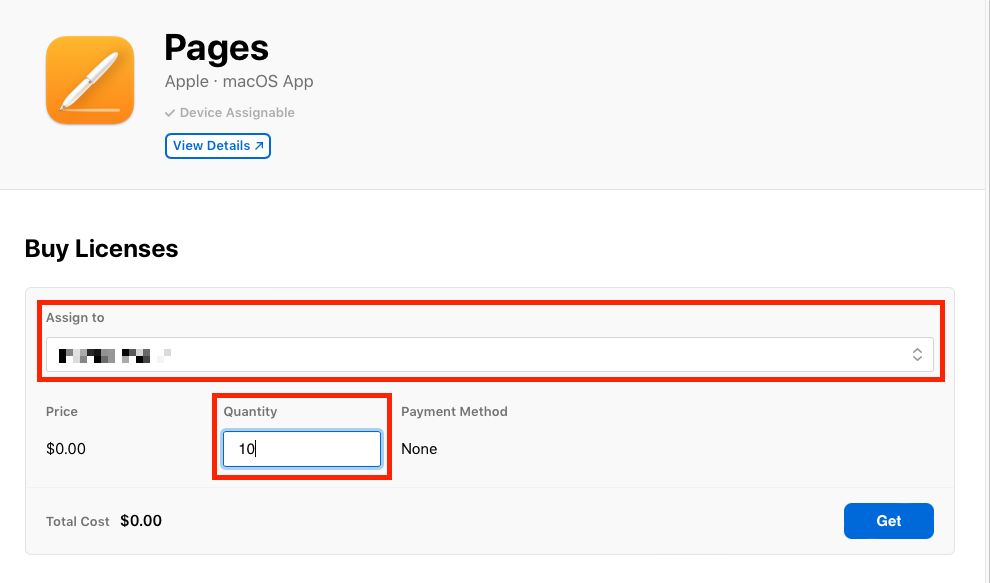
- Click Pages in the results and, using the Assign to dropdown, assign this app to your Workspace ONE UEM instance.
- Enter 10 in the Quantity field and click Get.
Configure app assignments in Workspace ONE UEM
In this exercise, you’ll enable device-based licensing for an app and assign it to a group of single-user devices. Each device will receive a single license, and an Apple ID on the device isn’t required to install the app.
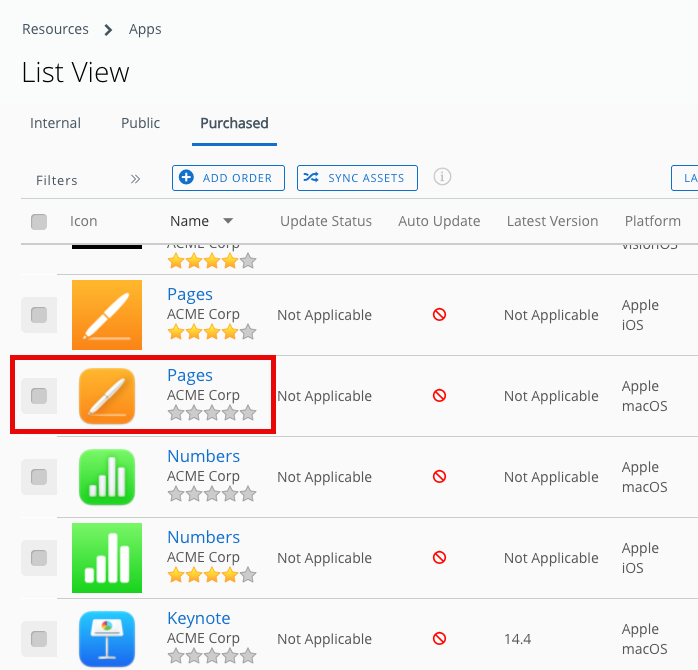
- In Workspace ONE UEM, click Resources.
- Click Native Apps.
- Click the Purchased tab. Pages should be listed among your apps.
Note: If Pages is not displayed in your app list, click Sync Assets. This will sync your app license purchases with Apple Business Manager.
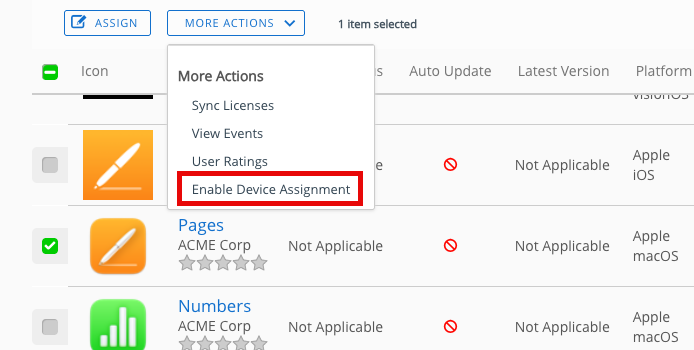
- Place a check next to Pages. The More Actions menu will appear.
- From the More Actions menu, select Enable Device Assignment.
- Click Pages. Enter 2 for Licenses on hold.
- Click Save & Assign.
- Scroll down to view Assigned Groups and click in the search box. From the list of Assignment Groups that appear, select the appropriate group. For example, select
All Corporate macOS Devices. - Enter the number of licenses to allocate to the assignment group.
- Click Create.
- Click Save.
- Click Publish.
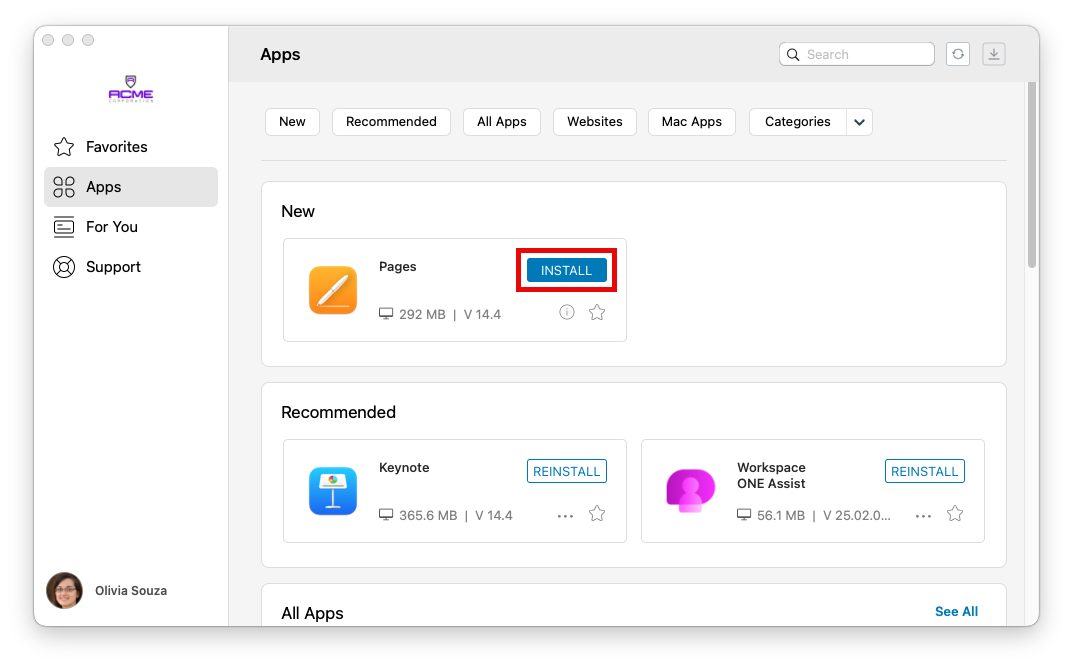
- Log in to your macOS device and launch Intelligent Hub.
- Click Apps.
- If Pages has not already installed automatically, you can click the Install button next to Pages to install the app on your macOS device.
Summary and additional resources
This operational tutorial provided basic administration steps to manage macOS with Workspace ONE UEM. Procedures included enrolling a macOS device, configuring a restrictions profile and a dock profile, configuring a device lock, and deploying macOS volume-purchased apps.
Additional resources
For more information about Workspace ONE UEM, explore the product page for Workspace ONE UEM on Tech Zone. You will find everything from beginner to advanced curated assets in the form of articles, videos, and labs.
Additionally, you can check out the Workspace ONE and Horizon Reference Architecture which provides a framework and guidance for architecting an integrated digital workspace using Workspace ONE and Horizon.
You may also want to read these additional operational tutorials from macOS on Omnissa Tech Zone.
- Using Workspace ONE to Manage Operating System Updates on macOS Devices
- Distributing Scripts to macOS Devices
- Deploying a Third-Party macOS App
- Enforcing macOS Security Compliance Project Baselines
Changelog
The following updates were made to this guide:
| Date | Description of Changes |
| 01/13/2026 |
|
| 08/22/2024 |
|
| 02/29/2024 |
|
| 08/19/2022 |
|
| 03/27/2019 |
|
About the authors
This tutorial was written by:
- Michael Bradley, Senior Product Specialist, Omnissa.
Questions and feedback
For questions or feedback, send to tech_content_feedback@omnissa.com.