

Configuring macOS Platform SSO using Microsoft Entra ID and Workspace ONE UEM
Overview
Traditionally, end-user authentication on macOS devices has relied on local accounts, posing challenges for IT admins in ensuring adherence to password best practices. Mobile device management (MDM) offers solutions, enabling organizations to enforce security policies and configure devices to sync with an LDAP domain. However, these options still present difficulties for both IT admins and end users. IT admins continue managing multiple tools and workflows for device access and security, while end users remain burdened with remembering multiple passwords for their devices and various applications.
At WWDC 2023, Apple introduced Platform Single Sign-On (SSO), a game-changer that simplifies user authentication. Platform SSO allows users to seamlessly synchronize their local account credentials with their organization’s identity provider (IdP), eliminating the need to remember multiple passwords. Users can log into their devices using their corporate account and password or even access their device without a password using other methods of authentication.

Platform authentication
Platform SSO offers IT administrators four authentication options:
- Password – This option synchronizes the end user’s local credentials with the IdP, allowing the user to log into their device using their IdP credentials.
- Secure Enclave Key – With this option, the end user can unlock their macOS device with Touch ID or Apple Watch using a Secure Enclave-backed key to authenticate with the IdP, eliminating the need for a password.
- SmartCard – The end user can use a SmartCard to authenticate with the IdP when logging into their device. This option is only available for macOS 14 and higher.
- Password with WS-Trust – A federated IdP, which facilitates federated authentication across multiple security domains, can use the local account password for authentication.
The availability of the above options is dependent on what the Identity Provider (IdP) supports in their solution.
An MDM solution, such as Workspace ONE UEM, is necessary to enable Platform SSO on macOS devices. The required applications and device profiles must be pushed to the devices. It’s worth noting that if a macOS device is unenrolled from MDM, it will also be unregistered from the configured Identity Provider.
Platform SSO device registration process
The overall Platform SSO device registration process comprises several steps and prompts the user at different stages. The process outlined below is general and may differ depending on the Identity Provider (IdP) being utilized. This process applies to macOS Ventura 13 to Sequoia 15.
The process commences when a user enrolls and logs into an MDM-managed macOS device. This initial login will be made using a local device account.

An MDM solution, such as Workspace ONE UEM, installs the necessary app or plugin from the identity provider. Subsequently, it installs the device profile, which contains the SSO extension payload to configure Platform SSO.
The user is prompted to register their device with the identity provider. During this process, the user will be required to provide their local device credentials. Additionally, the registration process involves authenticating with the user’s IdP credentials. A new account will be created on the device matching the user’s IdP credentials. If required by the IdP, the user may be prompted to enable Passkeys and Passwords in the device’s System Settings.
Once the registration is complete, the end user can log out and log back in to the device using their IdP credentials.
Microsoft Platform Credentials for macOS
In mid-2023, Microsoft announced the addition of Platform SSO support to their Enterprise SSO plug-in for Apple devices, a new feature they called Platform Credentials for macOS. The plug-in enabled device-wide single sign-on for Microsoft Entra ID users for all apps and websites. With the additional Platform SSO functionality, users can bypass their password by using Apple Touch ID (Touch ID) or Apple Watch to unlock their device and be signed into Entra ID with a device bound cryptographic key backed by the Secure Enclave built into modern macOS devices. It is important to note that in this configuration, the IdP password is not synchronized with the local account on the device.
In situations where Touch ID is not available or not preferred, Platform SSO will synchronize the user’s Entra ID password to their local device account, allowing them to use one credential to log into their device and access their apps.
Administrators can configure the end-user authentication method, either allowing users to go passwordless or using their Entra ID password.
Purpose of this tutorial
This tutorial guides you through the process of setting up the device profiles necessary to use Microsoft Entra ID as the Identity Provider (IdP) for Platform SSO on your macOS devices. Since Entra ID is a third-party platform, this guide won’t cover any configurations within Entra ID itself.
The tutorial offers two configuration options: passwordless using Secure Enclave and password sync. Although both configurations are similar in many ways, there are some key differences in the setup. The distribution of the Microsoft Company Portal app is also discussed as a pre-requisite for both options.
Additional options to manage the Company Portal app with Login & Background permissions on devices and a Custom Settings profile to automatically accept the data collection policy for the Company Portal app. Finally, you will set up a Freestyle Orchestrator workflow to sequence the distribution of the necessary profiles and the app.
This operational tutorial will outline how to use Workspace ONE UEM to configure Platform SSO with Entra ID on macOS devices.
Procedures include:
- Basic configuration
- Configure a macOS Platform SSO profile for Entra ID
- Advanced Configuration
- Configuring data collection for the Microsoft Company Portal app
- Defining the Microsoft Company Portal app as a login item in macOS
- Using Freestyle Orchestrator to sequence app and profile deployments
Audience
This operational tutorial is intended for IT professionals and Workspace ONE administrators of existing production environments.
Both current and new administrators can benefit from using this tutorial. Familiarity with macOS, XML, and basic scripting is assumed.
Knowledge of additional technologies such as Omnissa Intelligence and Omnissa Workspace ONE® UEM is also helpful.
Requirements
To perform the steps outlined in this article, you will need to meet the following requirements:
- Workspace ONE UEM version 25.06 Patch 6 or higher
- Apple macOS Ventura 13 or higher. (Entra ID has not announced support for macOS 26 as of the publication of this document)
- Microsoft Company Portal app version 5.2404.0 or higher
This document assumes you have Microsoft Entra ID already configured. It will not cover the set-up and configuration of Entra ID.
The steps outlined in this document will enable Entra ID with IdP password synchronization to the local device account. Steps may vary if you wish to enable passwordless authentication using a Secure Enclave-backed key.
Prerequisites
This section will outline the process for packaging and distributing the Microsoft Company Portal app to devices. This app is required when configuring Platform SSO using Entra ID.
Procedures discussed in the section include:
- Ensure SAML authentication is enabled in Microsoft Entra ID.
- Upload the Microsoft Company Portal app into Workspace ONE.
Enable SAML authentication in Microsoft Entra ID
To use Platform SSO, you enable SAML-based authentication with your IdP. This guide will not discuss how to configure SAML in your Entra ID instance. Please see Microsoft’s documentation for the specific configurations required to enable SAML-based authentication.
Distributing the Microsoft Company Portal app to macOS devices
To authenticate users on macOS devices using Platform SSO and Entra ID, it’s essential to deploy the Microsoft Company Portal app across all devices. The Company Portal app facilitates user authentication and single sign-on to both SaaS and native applications on the device.
To distribute the Company Portal app, you’ll need to utilize the Workspace ONE Admin Assistant tool and upload the app into the Workspace ONE UEM console. This tutorial won’t cover the process of uploading the app to the console. For detailed information on using the Workspace ONE Admin Assistant and uploading apps to Workspace ONE, refer to the Deploying a third-party macOS app on Tech Zone.
Basic configuration
This section discusses the minimum required configuration for enabling Platform SSO with Entra ID on macOS devices. There are several ways that you can configure Platform SSO with Entra ID. Which method you use is dependent on the requirement of your organization. Omnissa recommends you consult the Microsoft documentation for the appropriate method that will meet your organization’s needs. You can access Microsoft’s reference guide for Platform SSO at: https://learn.microsoft.com/en-us/intune/intune-service/configuration/platform-sso-macos.
This document will not cover all the variations available for configuring Platform SSO with Entra ID. It will focus on a configuration that utilizes a Secure Enclave key.
This basic configuration consists of a single SSO Extension profile.
Configure a macOS Platform SSO profile for Entra ID
This exercise will walk you through the process of creating the necessary device profile required for configuring Entra ID as a Platform SSO provider on your macOS devices. You will create a profile that contains one (1) payload.
Required values
The following parameters will be required to complete the following exercise.
| Parameter | Value |
| Extension Identifier | |
| Type | |
| Team Identifier | |
| URLs | |
Create the SSO Extension device profile
In this exercise, you will create a device profile to configure Platform SSO on your macOS devices. In this profile you will configure Platform SSO to use the Secure Enclave for passwordless access to devices.
NOTE: The Secure Enclave is a feature in macOS devices running Apple Silicon. If you are supporting macOS devices with Intel-based processors, you will need to select Password in step 10.
- In the Workspace ONE console, select Resources, and then click Profiles.
- From the Add dropdown menu, select Add Profile.
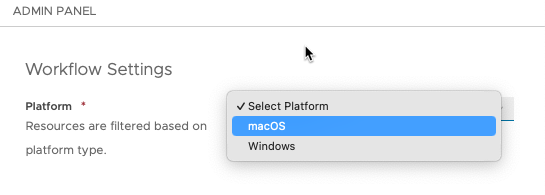
- Select the Profile Platform by clicking macOS.
- For the Context, select Device Profile.
- Enter
Entra ID Platform SSOfor the profile name. - Scroll down the list of payloads until you find SSO Extension. Click Add.
- Enter the Extension Identifier as outlined in the above table. Leave Type set to the default value of
Redirect. - Enter the Team Identifier as outlined in the above table.
- Next, enter your URLs as outlined in the above table.
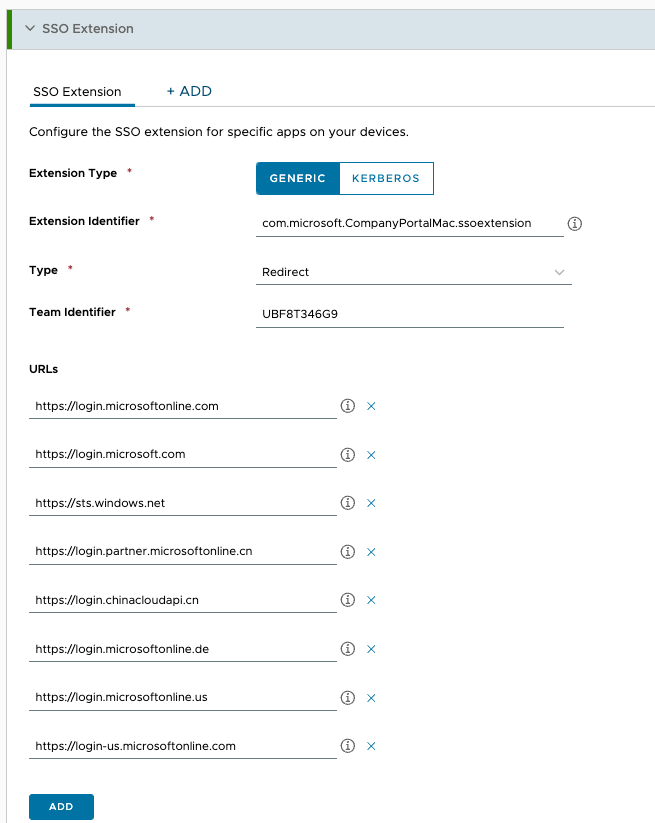
- Further down in the SSO Extension payload, you’ll encounter two drop-down menus labeled Authentication Method. If you require Platform SSO support for macOS 13 (Ventura), select
Secure Enclavefrom the first drop-down menu. To support macOS 14 (Sonoma) and subsequent versions, selectSecure Enclavefrom the second drop-down menu. You can choose to have both options selected to support multiple versions of macOS.

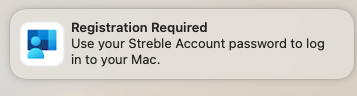
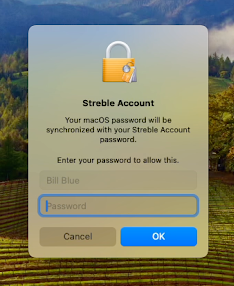
- In the Account Display Name field, enter a name for the account to be used in notification and authentication requests. For example, if the Account Display Name was set to
Streble Account, the notification might look like this:
![]()
- Click Next.
- Scroll down to view Assigned Groups and click in the search box. From the list of assignment groups that appear, select the appropriate group. For example, select
All Corporate macOS Devices (your@email.shown.here). - Select Auto for the Assignment Type.
- Click Save and Publish.
- You should now see your Entra ID Platform SSO device profile within the list on the Profiles window.
Basic configuration summary
With the Company Portal app and SSO Extension profile deployed, the end user will be prompted to register their device with Entra ID. For a detailed description of the end user experience during registration, please see Entra ID registration process later in this document.
Although this basic configuration will set up Platform SSO on your macOS devices. The end user might be prompted to allow the Company Portal app to launch at login, and for acceptance of the Microsoft data collection policy. User prompts for each of these items might be considered minor irritations to end users that administrators could overlook. However, it is possible to manage this process in such a way that the end user only ever sees the prompt for device registration, and all other prompts are hidden. These options are discussed in the Advanced configuration section below.
Advanced configuration
This advanced configuration builds upon the basic procedures discussed earlier. This section outlines additional configurations to enhance the user experience and streamline the distribution of the necessary profiles and applications. These additional configurations include setting the Company Portal app to open automatically upon login, configuring the Microsoft data collection policy to prevent end users from being prompted for acceptance, and utilizing a Freestyle Orchestrator workflow to sequence the distribution of profiles and applications to devices.
These additional procedures are optional and not mandatory for using Entra ID with Platform SSO in Workspace ONE UEM.
The procedures discussed in the section include:
- Defining the Microsoft Company Portal app as a login item in macOS
- Configuring data collection for the Microsoft Portal app
- Using Freestyle Orchestrator to sequence app and profile deployments
Configure data collection for the Microsoft Company Portal app
When the Microsoft Company Portal app first launches on a device, it prompts the user to read and accept Microsoft’s data collection policy. In this exercise, you’ll add a Custom Settings payload to the profile you created earlier that automatically accepts these terms, eliminating the user prompt altogether.
To get the desired result, perform the following steps:
- In the Workspace ONE console, select Resources, and then click Profiles.
- From the list of profiles, click the edit button next to the profile you created earlier.
- At the bottom of the page, click Add Version.
- Scroll down the list of payloads until you find Custom Settings. Click Add.
- Copy the following text into the Custom Settings field:
<dict>
 <key>AcknowledgedDataCollectionPolicy</key>
 <string>RequiredDataOnly</string>
 <key>PayloadIdentifier</key>
        <string>com.microsoft.autoupdate2.85AEB740-4739-47F8-A0FD-F98CA4F5C6B2</string>
        <key>PayloadUUID</key>
        <string>85AEB740-4739-47F8-A0FD-F98CA4F5C6B2</string>
        <key>PayloadOrganization</key>
        <string>Workspace ONE</string>
        <key>PayloadType</key>
        <string>com.microsoft.autoupdate2</string>
        <key>PayloadVersion</key>
        <integer>1</integer>
        <key>PayloadDisplayName</key>
        <string>MSFT autoupdate</string>
        <key>PayloadDescription</key>
        <string>Settings for MSFT autoupdate</string>
</dict>
- Click Next.
- Click Save and Publish.
Define the Microsoft Company Portal app as a login item in macOS
In this exercise, you will add a new payload to your existing Platform SSO profile to configure the Company Portal app as a login Item on macOS devices.
NOTE: If you already have a profile that configures login items on your macOS devices, use that profile instead. Otherwise, use the existing Platform SSO profile.
To get the desired result, perform the following steps:
- In the Workspace ONE console, select Resources, and then click Profiles.
- From the list of profiles, click the edit button next to the profile you created earlier.
- At the bottom of the page, click Add Version.
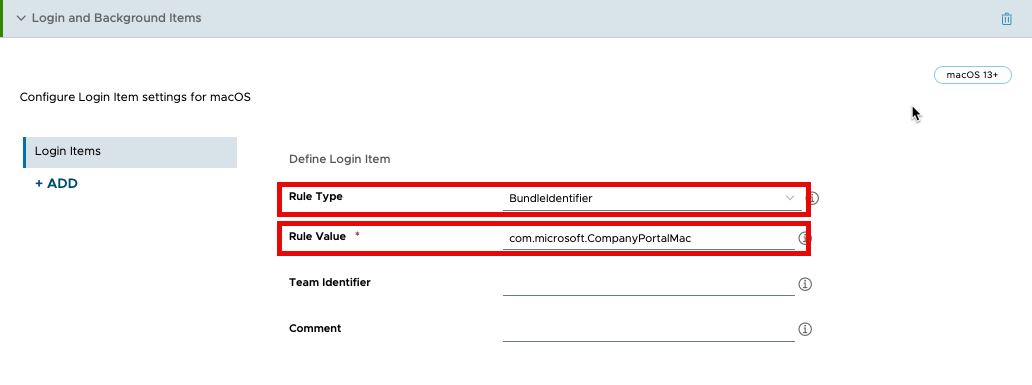
- Scroll down the list of payloads until you find Login and Background Items. Click Add.
- In the Rule Type dropdown, ensure that
BundleIdentifieris selected. - In the Rule Value field, enter
com.microsoft.CompanyPortalMac.
- Click Next.
- Click Save and Publish.
Use Freestyle Orchestrator to sequence app and profile deployments
Workspace ONE UEM delivers profiles and apps in a non-sequential manner, which could potentially lead to the installation of Platform SSO management before the Company Portal app. To ensure the deployment of the app and profiles in the correct order, you can utilize a Freestyle Orchestrator workflow to sequence the installs. It is possible to distribute all required resources without Freestyle Orchestrator. If you do not wish to create a workflow, you can assign the necessary resources to devices and skip the steps related to creating the workflow.
In this exercise, you will create a workflow in Freestyle Orchestrator to sequence the three profiles created earlier and the Microsoft Company Portal app installation.
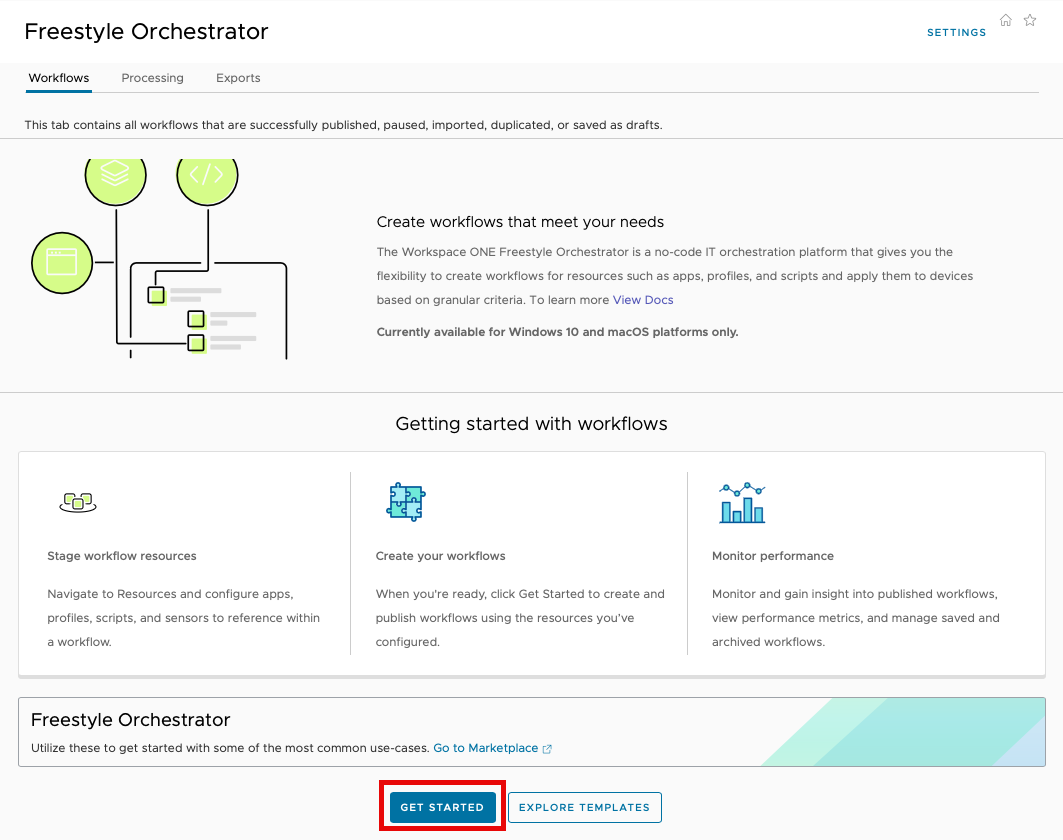
- In the Workspace ONE UEM console, select Orchestration and then Freestyle Orchestrator. Then select New.
NOTE: If this is the first time you are using Freestyle Orchestrator, you will click Get Started on the Getting Started with Workflows screen.
- Name the new workflow
Entra ID Platform SSO. - Select macOS as the platform.
- Next to Smart Groups, click in the search box. From the list of Assignment Groups that appear, select the appropriate group. For example, select
All macOS Devices (your@email.shown.here). - In the workflow UI, click the plus sign (+) and select Action.
- From the menu, choose Install Application. Search for the application you created earlier called
CompanyPortal-Install. Click Select.

- In the workflow UI, click the plus sign (+) and select Action.
- From the menu, choose Install Profile. Search for the profile you created earlier called
EntraID Platform SSO. Click Select.

19. With your workflow complete, click Publish.
Entra ID registration process
The registration process on an end user’s macOS device is straightforward. Once the Company Portal app and required profiles are pushed to the device, a notifications pop-up to remind the user that registration is required.
Clicking on the notification will begin the registration process. There is no need for the end user to launch or interact with the Company Portal app. To allow the Platform SSO configuration to be applied to their device, the end user will be prompted to authenticate with their local password.
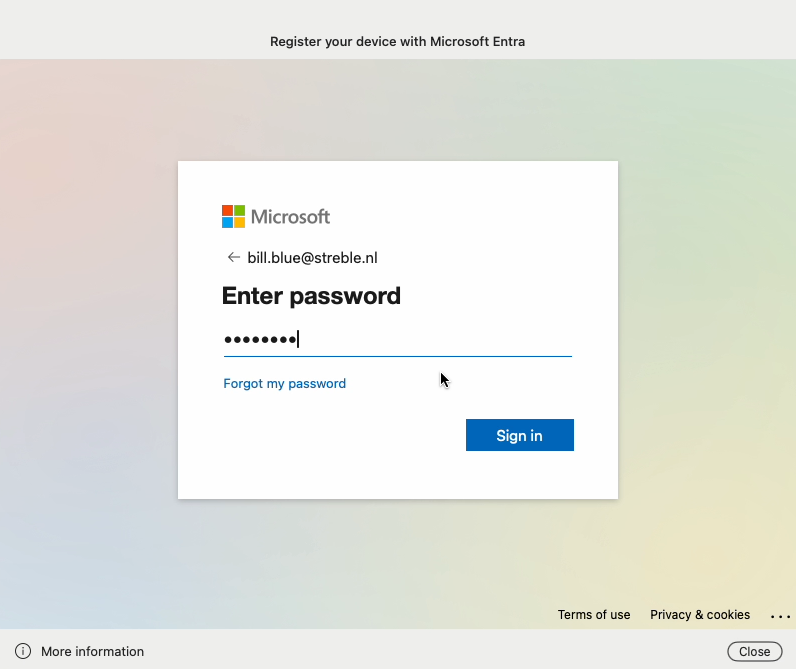
The end user will then be prompted to authenticate to Microsoft Entra using their IdP credentials to complete the device registration.
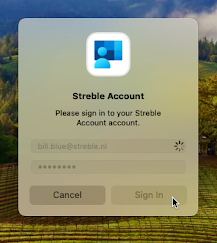
The registration process completes. If the password has not synced, the end user might be prompted to validate the password for their IdP credentials.
To confirm that Platform SSO has been configured, the end user can open System Preferences on the macOS device. Then, selecting User & Groups, the user can click the Edit button for Network Account Server. If Platform SSO is configured, the Mac SSO Extension will be listed as Registered under Platform Sigle Sign-on.

Summary and additional resources
Summary
Apple’s Platform SSO offers a more secure mechanism for logging into macOS devices, as well as providing a better experience for end users. By integrating with third-party identity providers (IdP), IT admins can increase the security of macOS devices by ensuring that end users must use their IdP password to log into their macOS devices. Microsoft Entra ID is one of several identity providers that support Apple’s Platform SSO. This operational tutorial provided details on how to use Workspace ONE UEM to configure Platform SSO with Entra ID on macOS devices.
Procedures included:
- Configuring a macOS Platform SSO profile for Entra ID
- Defining the Microsoft Company Portal app as a login item in macOS
- Configuring data collection for the Microsoft Company Portal app
- Using Freestyle Orchestrator to sequence app and profile deployments
Additional resources
You may also wish to read these additional operational tutorials from macOS on Tech Zone.
- Configuring Basic macOS Management
- Getting Started with Freestyle Orchestrator on macOS Devices
- Managing Updates with the macOS Updater Utility
- Distributing Scripts to macOS Devices
- Deploying a Third-Party macOS App
Changelog
The following updates were made to this guide:
| Date | Description of Changes |
| 10/29/2025 |
|
About the author and contributors
- Simon Elberts, Enterprise Architect, Lighthouse, Omnissa
- Bryan Garmon, Subject Matter Expert, Omnissa
- Michael Bradley, Senior Product Specialist, Omnissa
Feedback
Your feedback is valuable.
To comment on this paper, contact End-User-Computing Technical Marketing at tech_content_feedback@omnissa.com.