

Using Workspace ONE to manage operating system updates on macOS devices
Overview
Omnissa Workspace ONE® UEM provides a comprehensive management solution for macOS devices, supporting operating systems version 10.15 and later. With the ability to manage Corporate-Dedicated, Corporate Owned, or Employee Owned (BYOD) devices, Workspace ONE UEM offers enterprises the flexibility to meet their employees’ needs at any level.
One area where organizations require a significant amount of flexibility and customization is managing OS updates and patches. Apple regularly releases minor updates for macOS that include feature enhancements, bug fixes, and security patches. Major OS updates, released less frequently, often contain new functionality, and in some cases, a completely new code base for the OS itself. Apple has included a Software Update utility within the OS that typically requires user intervention to initiate.
Using a device profile, Workspace ONE UEM provides administrators with the ability to configure Software Update utility settings, such as the following:
- How to install updates (manually or automatically)
- What updates to install (all or recommended only)
- How often to check for updates
- Restart behaviors (force restart, allow deferrals, max number of deferrals, and so on)
The Software Update utility does provide organizations with the ability to maintain updates and patches on their macOS devices. However, it is limited in two ways. First, it relies on end-user interaction when it comes to updates and patches being applied. Second, it does not provide administrators with the ability to control which specific updates and patches are applied to devices.
For example, if an organization is dependent on a specialized suite of software that requires a specific version of macOS be installed, administrators may wish to control the OS updates until the software can be validated on the updated platform. It might also be necessary to keep users from updating to the latest OS version as soon as the update is released. Workspace ONE UEM provides administrators with the granular control needed to ensure that devices are patched and updated to meet corporate standards.
Workspace ONE UEM includes macOS Update Management, which provides administrators with the granular control required for deploying macOS updates to devices. Additionally, Workspace ONE UEM supports Apple’s Declarative Device Management, and specifically, the Software Update Enforcement declaration. This new option is available in Workspace ONE UEM version 2410 and later. Both options offer a framework for scheduling, downloading, and installing OS updates.
There are, however, subtle differences between that two option, which we will discuss in this article.
Purpose of this tutorial
This tutorial guides you through the process of configuring and deploying macOS updates to your devices. The following tasks are discussed:
- Introduction to macOS Update Management
- OS Updates Dashboard
- Software Update Enforcement declaration
- Addressing how Workspace ONE UEM handles conflicting updates for macOS
- Creating a software update device profile to control the behavior of the macOS native Software Update utility
- Creating a smart group to use for assigning updates to macOS devices
- Configuring and assigning updates in the Workspace ONE OS Updates dashboard
- Configuring and assigning updates with the Software Update Enforcement declaration
Audience
This operational tutorial is intended for IT professionals and Workspace ONE administrators of existing production environments.
Both current and new administrators can benefit from using this tutorial. Familiarity with macOS, XML, and basic scripting is assumed.
Knowledge of additional technologies such as Omnissa Intelligence and Omnissa Workspace ONE® UEM is also helpful.
Validation environment
The content created for this operational tutorial used the following software and hardware versions for testing:
- Workspace ONE UEM version 2306
- Workspace ONE Intelligent Hub version 2303
- Apple macOS 12.6.3 (Update from 12.6.3 to 13.4)
Managing macOS Updates
macOS Updates dashboard
When administrators use macOS Update dashboard in Workspace ONE UEM, they can easily identify available macOS versions for their managed devices and assign and publish both major and minor updates through the macOS Updates dashboard. The dashboard provides information on all available updates, such as version, release date, expiration date, and availability. These details are automatically pulled from Apple on a regularly scheduled cycle.
When assigning an update to an assignment group, administrators can configure the following options:
| Setting | Description |
| Deployment Begins | This sets the date and time when the deployment will begin. |
| Install Action | The install action tells macOS how to install the update on the device. These options are discussed in more detail in the next section. |
| Priority | You can set the scheduling priority for downloading and preparing the update. |
| User Deferral | This setting allows you to enable user deferrals for the update, as well as configure the maximum number of allowed deferrals. NOTE: This option is only available if you select InstallLater as the Install Action. |
Administrators can also monitor the deployment of updates for an individual device on that Updates tab of the device’s Details page in the Workspace ONE console. This tab shows all available updates for this specific device, as well as the status of any updates that are currently being deployed.
The following diagram explains the update execution process.
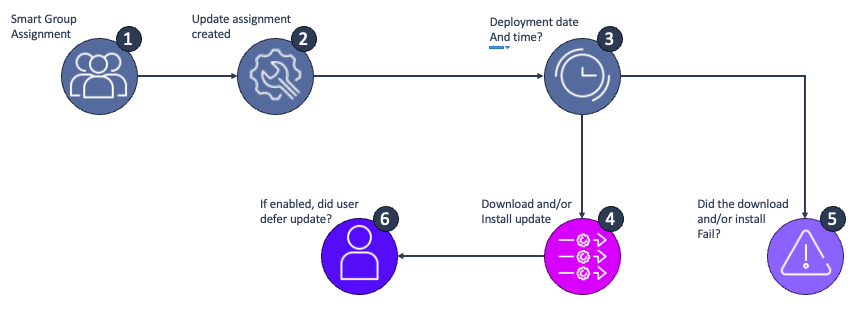
- Devices are assigned to a new or existing assignment group. This group could be filtered in whatever manner is best for your organization. In this tutorial, you create a group that includes devices with a specified version of macOS installed. As devices are updated, they are automatically removed from the group. This is only one of many possible ways to assign devices. You should evaluate what works best for your organization.
- A new assignment is created for a macOS update in the Update Management dashboard. One or more assignment groups can be assigned to the update. Administrators can configure several options for the assignment as are described later in this tutorial.
- When the selected begin date and time are reached, Workspace ONE UEM begins sending the configured commands to devices.
NOTE: The configured command is not immediately sent to devices. The command is issued as devices check in during the normal scheduled device information query. By default, this is every four (4) hours. - Depending on the configured commands, the update is downloaded and/or installed on the device.
- If the update fails to download and/or install, Workspace ONE UEM re-issues the configured commands after twenty-four (24) hours.
- If user deferrals are configured, the user can defer the update installation for a later time. When the configured maximum deferrals are reached, the update installs automatically and the device is restarted if required.
Available install actions
When you are assigning an update to a group of devices, you must define the action to be taken for the update. Apple offers several options in their MDM protocol, which macOS Update Management in Workspace ONE supports. These Install Actions give administrators control over how the update is downloaded and installed. It is important to understand the difference between the actions because each action can have a different impact on the end user. Some actions provide the end user with ability to control required device restarts, while others do not.
The available install actions are listed in the following table.
| Install Action | Description |
DownloadOnly | This action downloads the macOS update to the device without installing it. |
Default | The Default action downloads or installs the update, depending on the current state. |
InstallAsap | This action downloads the update to the device, and notifies the end user that the device will restart in 60 seconds. If the user is active on the device at the time, they can cancel the restart. |
NotifyOnly | NotifyOnly downloads the update to the device and notifies the end user that it is ready for installation. |
InstallLater | The InstallLater action downloads the macOS update to the device for later installation. If this option is selected, administrators have the additional option to set a maximum number user deferrals before the update is installed automatically. |
InstallForceRestart | This action downloads the update and forces a restart if required. NOTE: The restart does not require user consent and could result in data loss. |
NOTE: While these actions are clearly defined by Apple, the behavior of each may vary, depending on the combined selected action, macOS version on the device, and the device hardware. Omnissa strongly recommends that you test your desired commands on a small group of devices prior to deploying those commands to your entire device fleet.
Navigating the macOS Updates interface
OS updates are managed through the Device Updates user interface in Workspace ONE UEM. This section of the tutorial provides a detailed explanation of the components of the interface and their function.
Device Updates List View
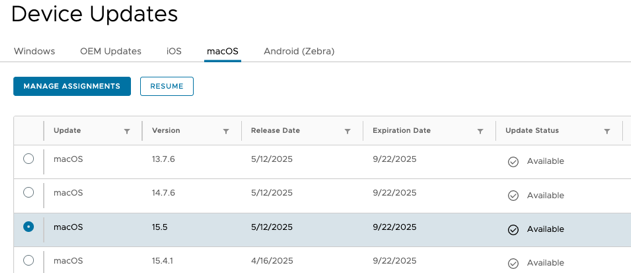
The Available Device Updates List View can be found in the Workspace ONE UEM console by clicking on Resources, then Device Updates, and selecting macOS. This section describes each column displayed.
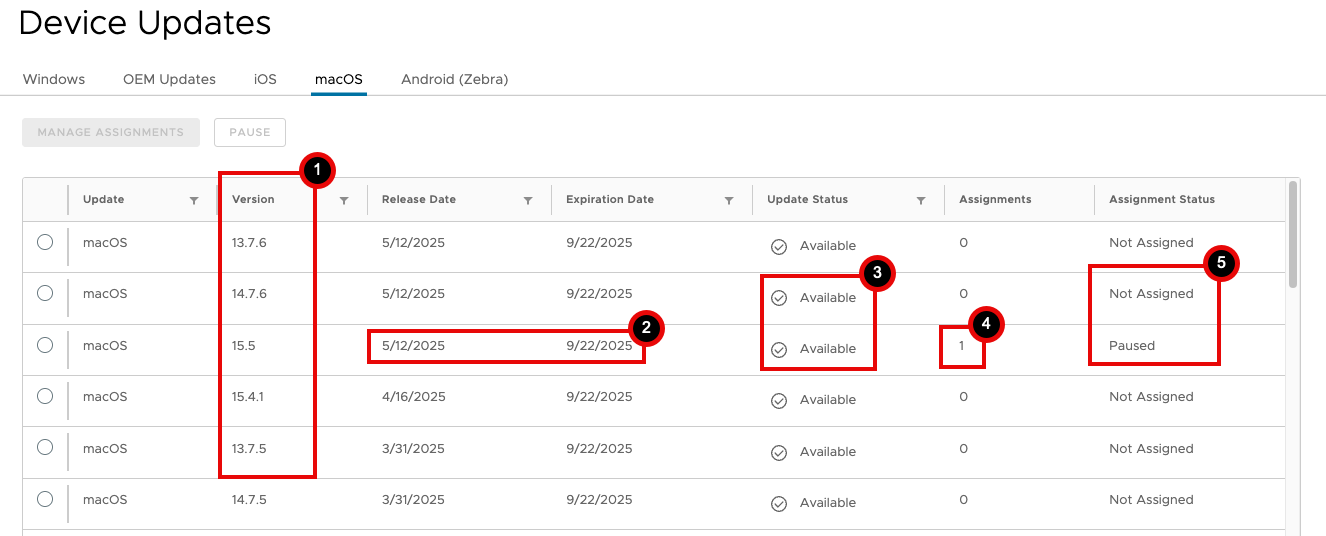
- Version – Indicates a macOS Update as discovered by the Workspace ONE UEM sync process with Apple’s product version lookup service.
- Release and Expiration Date - For each macOS update version, Workspace ONE displays the dates Apple made the update available to the public (for example, the Release Date). Workspace ONE also displays Apple's defined Expiration Date.
Note: The Expiration Date displays the date that the update signature expires, and devices no longer trust the update to apply it. Apple can expire the update earlier than this date for security or other reasons. - Update Status - The Update Status field denotes which macOS updates are Available or Not Available to deploy to devices.
Note: If an update is marked as Not Available, it will not deploy to devices and Workspace ONE disables the ability to manage assignments for the update. - Assignments - For each macOS update version, Workspace ONE displays how many assignments have been defined for that update. Assignments consist of one or more Smart Groups configured to begin receiving an update-related command after a specific date and time.
Note: The Assignments number does not necessarily equate to the number of smart groups assigned to the update. - Assignments Status – For each macOS update version, Workspace ONE displays whether that update has been Assigned to devices or Not Assigned. Additionally, if an administrator has paused an update, the update displays as Paused.
Note: If an assignment is Paused, Workspace ONE discontinues bulk command operations against any current or pending assignments. Workspace ONE cannot cancel any commands which have already been delivered to assigned devices prior to pausing the update process.
Manage Assignments View
The Manage Assignments View provides administrators with the ability to create and prioritize update assignments within their environment.
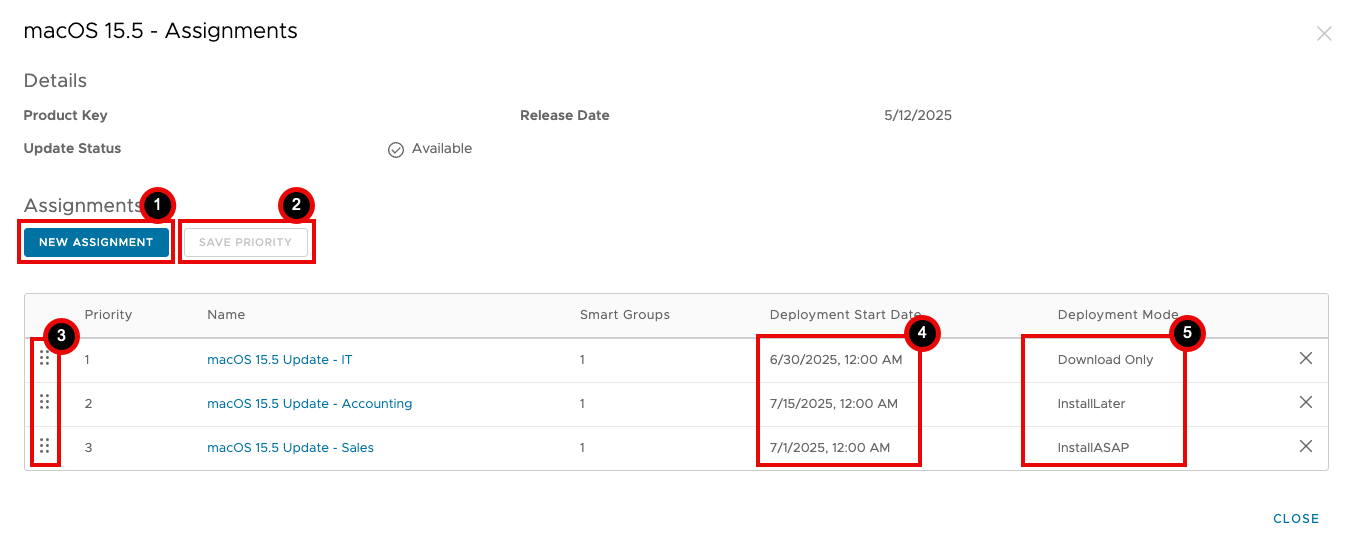
- New Assignment – Administrators use this button to assign download and install commands for this specific macOS update to one or more smart groups.
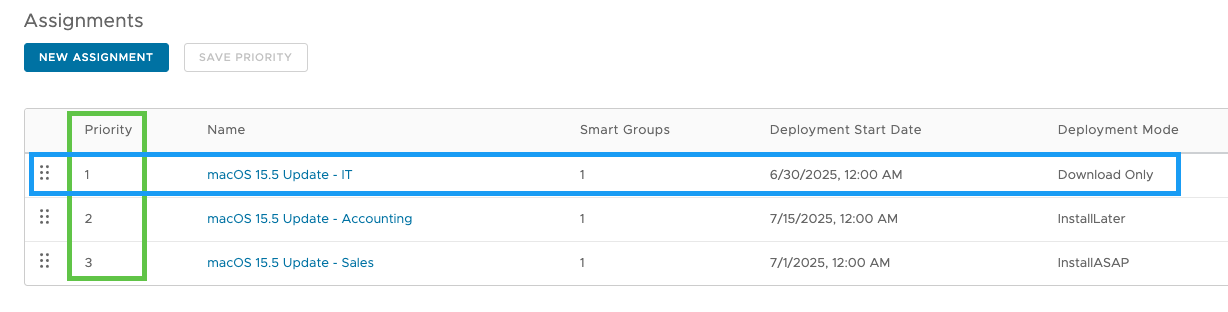
- Save Priority - Administrators use this button to save modifications to the priority they have set for assignments. Workspace ONE uses assignment priority to resolve schedule conflicts for devices in multiple assignments due to their Smart Group membership.
- Priority Drag Zone – This user interface element provides a click-and-hold space for dragging and rearranging priority.
- Deployment Start Date – The start date of each assignment is displayed for quick reference.
Note: The deployment start date is the day and time when Workspace ONE begins queueing commands to devices. It does not necessarily mean all devices in the assignment get the command at that exact point in time. Factors that affect command delivery include batching (for large device counts), devices offline or powered off, network connectivity, and so on. - Deployment Mode - This column shows at a glance which command is being delivered to the devices in that assignment.
Device Details Update View
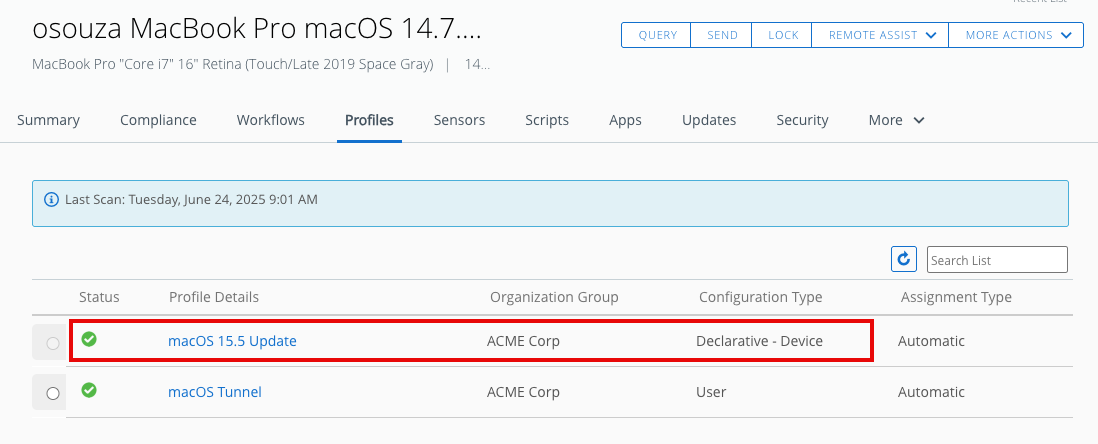
The Device Details Updates View is available by clicking Devices in the Workspace ONE UEM console, then selecting List View, and clicking a specific device. Click the tab called Updates. This tab displays any updates that the device is eligible to install. Administrators can use this tab to monitor the progress of currently assigned updates.
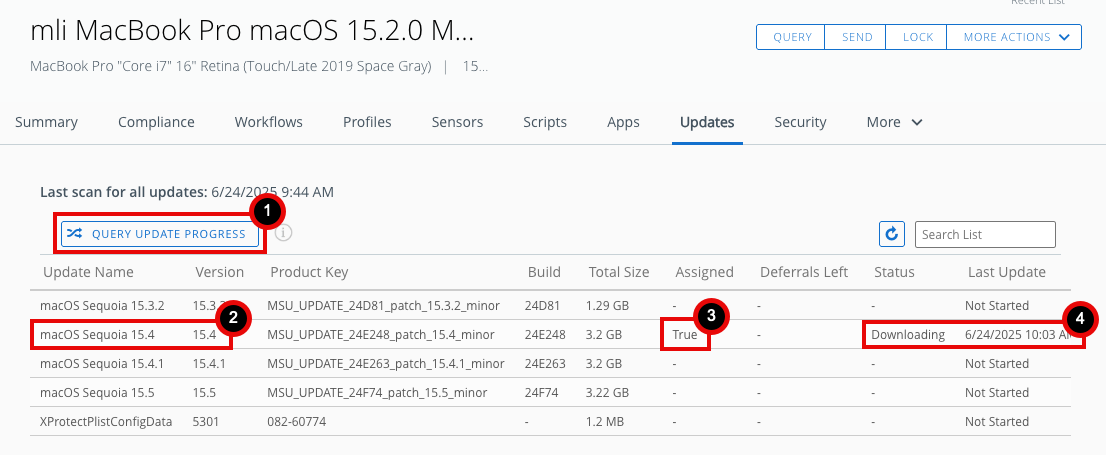
- Query Update Progress – This button queries the status of updates for this device.
- Update Name and Version - This column shows all available update versions for the device.
- Assigned – The Assigned column shows if an update has been assigned for deployment to this device.
- Progress Reporting - Workspace ONE displays update progress as it is given from the device, including install status, and the date and time of the last device status update.
Resolving assignment conflicts
In Workspace ONE UEM, devices can have membership in many different assignment (or smart) groups. Arranging devices in multiple groups is key to flexibility when managing a fleet of devices with potentially overlapping use cases and needs. Additionally, Workspace ONE UEM's organization group structure allows configurations to be defined broadly across devices or more granularly (and potentially by delegated administrators). Because devices can exist in more than one smart group (and those smart groups existing at different levels in an organization group hierarchy), it is possible to assign a single device to more than one assignment for macOS updates. This section explains how Workspace ONE resolves conflicts with respect to macOS Update assignments.
An instance might occur where a device has multiple macOS update assignments that potentially conflict with each other. The macOS Update conflicts are resolved in the following order:
- Most Recent Version Wins: The most recent macOS Update assigned to a device takes precedence.
- Closest Organization Group Wins: If the same macOS Update is assigned at different levels in the Organization Group (OG) hierarchy, the assignment closest to the OG to which the device enrolled takes precedence.
- Highest Priority Wins: If the same macOS device exists in multiple assignments for a single macOS Update in a single OG, the assignment with the highest priority takes precedence.
Each of the above scenarios is described in more detail below.
Most Recent Version Wins
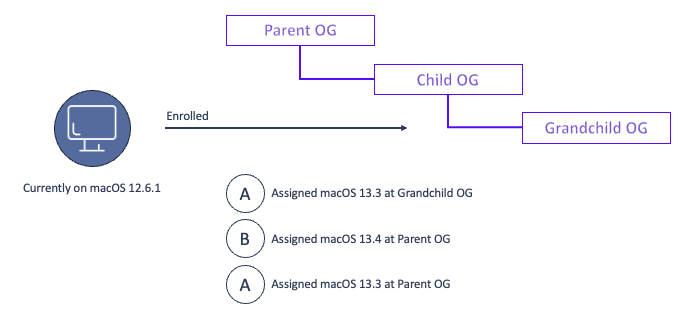
In this scenario, the device is enrolled in the Grandchild OG. A single macOS Update for 13.3 (A) has been assigned to the device at the Grandchild OG. A macOS Update for 13.4 (B) has been assigned at the Parent OG, as well as a macOS Update for 13.3 (C). In this case, Workspace ONE selects the update for 13.4 (B) because it contains the most recent macOS version assigned to the device (for example, macOS 13.4 is prioritized over macOS 13.3).
Closest organization group wins

In this scenario, the device is again enrolled in the Grandchild OG. A single macOS Update for 13.4 (A) has been assigned to the device at the Child OG. A macOS Update for 13.4 (B) has been assigned at the Grandchild OG, and a macOS Update for 13.4 (C) is assigned from the Parent OG. Workspace ONE will prioritize the update for 13.4 from the Child OG (A) because it is the most recent macOS version assigned to the device, and because the assignment is made in the Organization Group closest in the hierarchy (Child vs. Parent) to where the device is enrolled (Grandchild).
Highest priority wins

In this scenario, there are multiple macOS Update assignments (A and C) with the most recent macOS version, and both are in the same OG. One assignment is configured to only download the update (A), while the second assignment is configured to download and install the update as soon as possible (C). Workspace ONE chooses the assignment with the highest priority (A) and only sends the command to download the update.
Software Update Enforcement
Declarative Device Management
Declarative Device Management (DDM) sets itself apart from Apple’s traditional MDM protocol by granting managed devices greater autonomy. Each device becomes the sole authority in enforcing its own configuration, aligning with the desired state defined in Workspace ONE UEM. Unlike the MDM servers that trigger a repetitive cycle of commands to verify and re-verify the device state, DDM enables each device to apply management logic in response to its own state changes.
For more information on Declarative Device Management, please check out the following Tech Zone resource.
'%3E%3Cpath id='Rectangle_1' data-name='Rectangle 1' d='M0,0H800V300H0Z' transform='translate(2297 -300)' fill='%23E2F0D9'/%3E%3Cg id='Group_5' data-name='Group 5' transform='translate(-6 -3)'%3E%3Ctext transform='translate(2534 -152)' font-size='50' font-family='Roboto-Regular, Roboto'%3E%3Ctspan x='0' y='0'%3ECurated Assets%3C/tspan%3E%3C/text%3E%3Ctext transform='translate(2683 -99)' font-size='20' font-family='Roboto-Regular, Roboto'%3E%3Ctspan x='0' y='0'%3ECard%3C/tspan%3E%3C/text%3E%3C/g%3E%3C/g%3E%3C/svg%3E)
Software Update Enforcement declaration
This new mindset of autonomous devices has been applied to operating system updates through a new DDM declaration called Software Update Enforcement. With this declaration, IT admins can assign specific updates to devices and specify a date and time for enforcement, regardless of user deferrals. Let’s explore how Software Update Enforcement works in Workspace ONE UEM.
Creating a Software Update Enforcement declaration is like creating a legacy profile in Workspace ONE UEM. Once you select your platform, you’ll be presented with an option to choose a Management Type. In this case, select Declarative. Then, select Configuration as the Declaration Type, and Device as the Context.
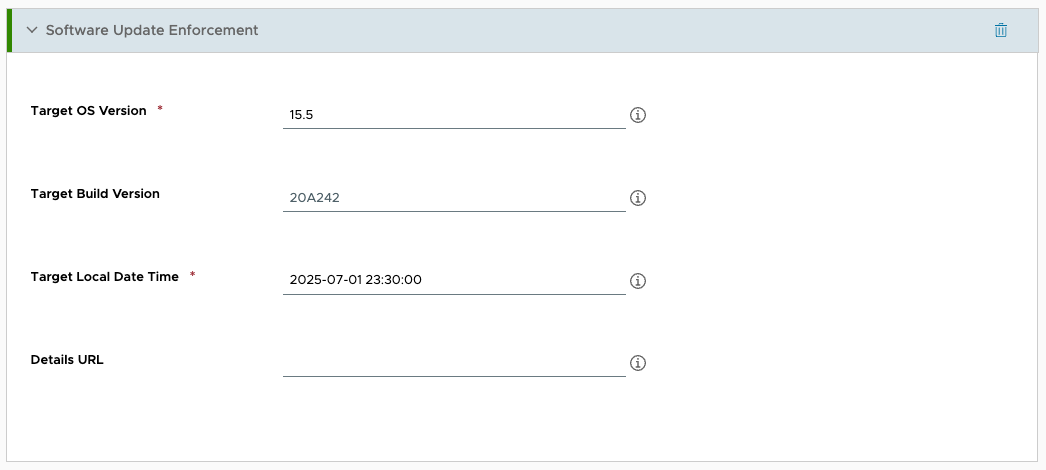
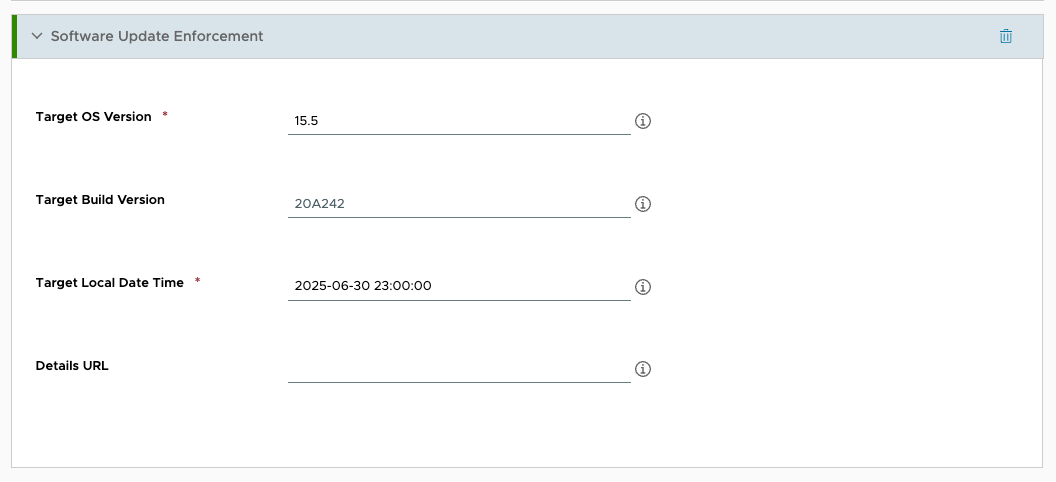
The Software Update Enforcement payload contains four configuration parameters, two of which are mandatory. These parameters determine the configured behavior for the update. The parameters are:
- Target OS Version - This is the target OS version to which you want your devices to update. This is a mandatory field. Example: 15.5.
- Target Build Version - This represents the target build version. This field is optional. Example: 20A242.
- Target Local Date Time - This is the local date and time when you want to force the installation of the update. This is a mandatory field.
- Details URL - This is a URL that you may want to direct your end users to for more information about the update. This is an optional field.
To get the correct Target OS Version and Target Build Version, you can review Apple’s operating system release details here.
Once assigned to a group, Workspace ONE sends the declaration to the devices. The devices acknowledge the declaration. From this point on, the device takes over the execution of the update task, managing the update process moving forward.
Enforcement process on the device
Once the device receives the Software Update Enforcement declaration, it initiates the download of the specified update. The subsequent actions depend on the Target Local Date Time specified in the declaration. As the Target Local Date Time approaches, the device’s behavior will gradually evolve.
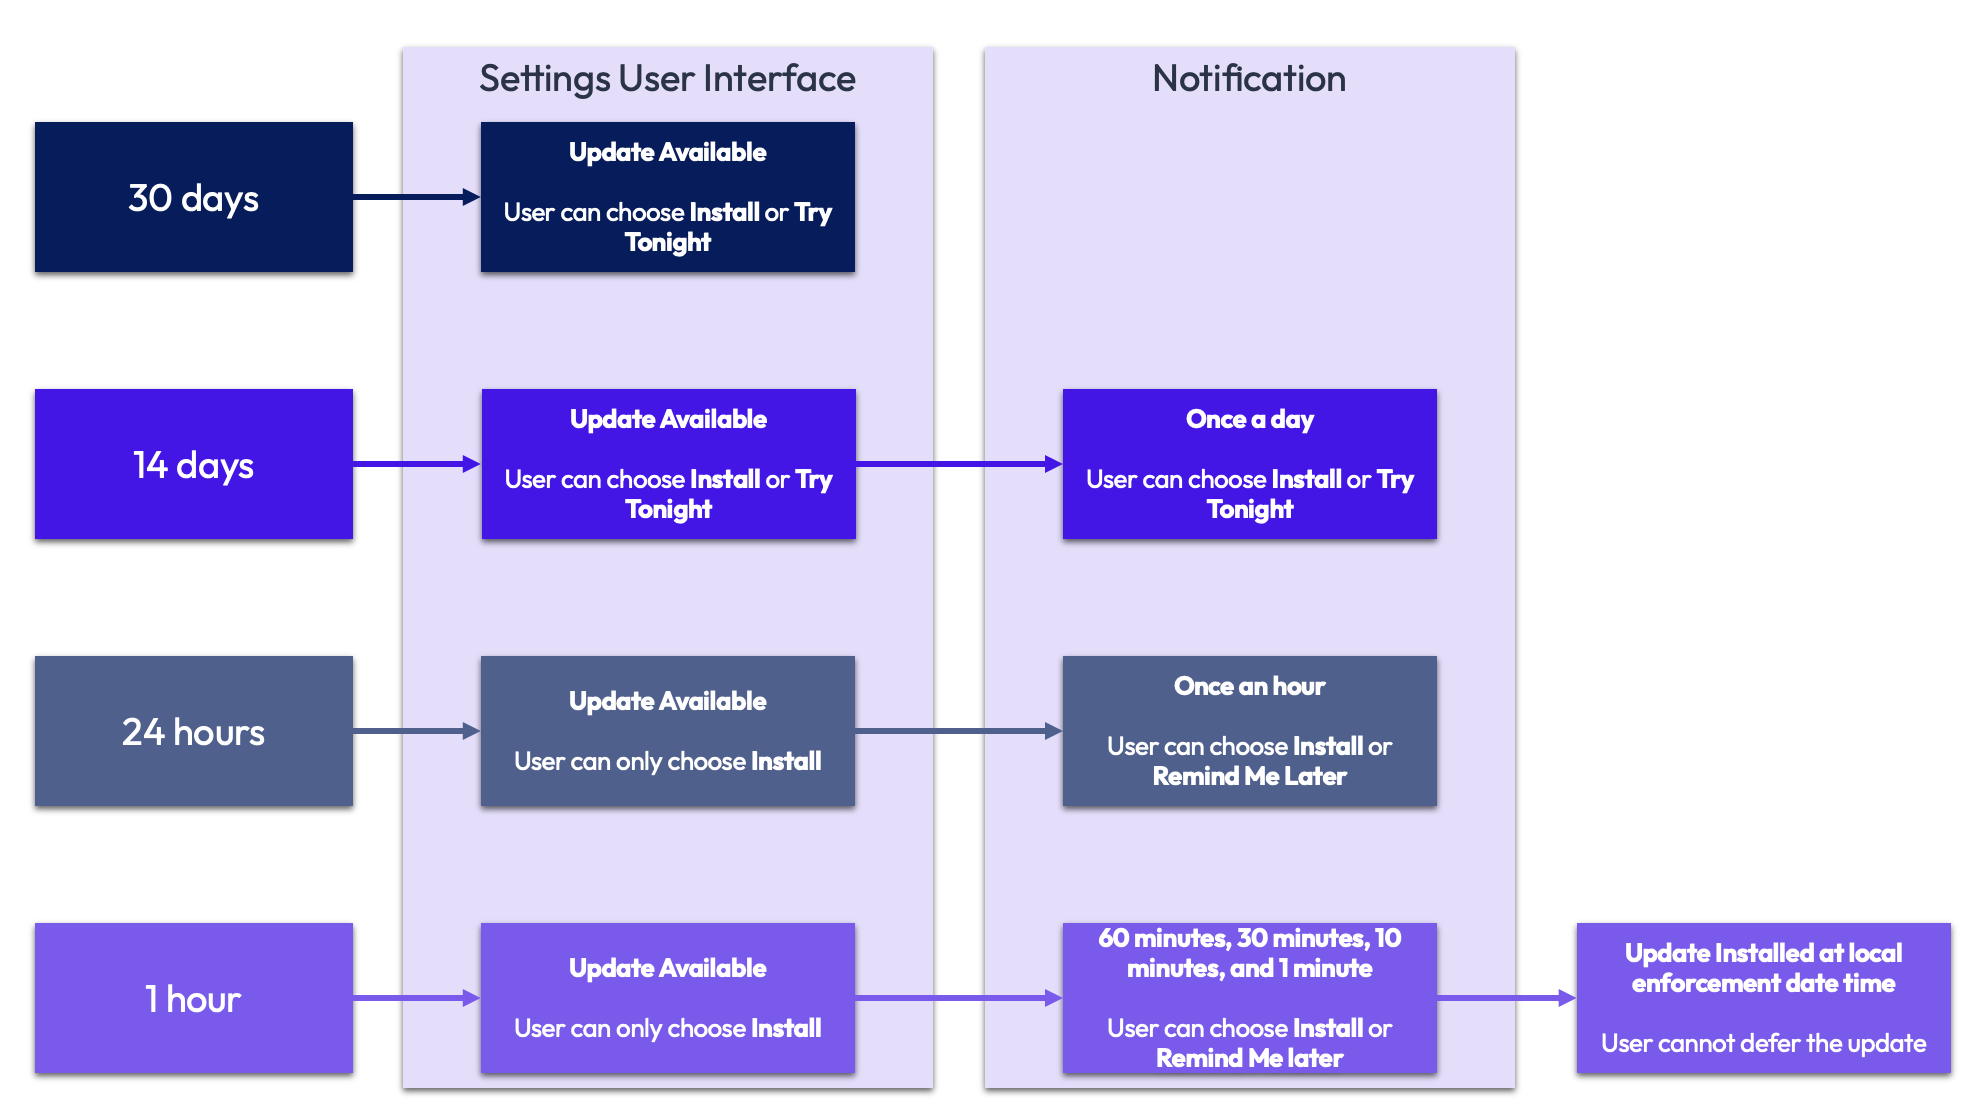
Starting 30 days prior to the Target Local Date Time. The device’s display will display an update notification under the Software Update section of the device’s Settings User Interface. The sole indication the user will receive that an update is pending is a red badge displayed on the Settings icon. The user has the discretion to install the update at their convenience within the Settings User Interface.
Within 14 days of the Target Local Date Time, the device will send a daily notification to the user, giving them the option to either install the update immediately or defer it for later. If the user defers the update, it will still be available within the Settings User Interface if they decide to install it manually later.
With less than 24 hours from the Target Local Date Time, the device initiates an acceleration process. It communicates with the user hourly, presenting the option to either install the update or defer it for a later date. Deferring the update will only postpone its installation for an hour; the user will receive another notification an hour later. Furthermore, the Settings User Interface will exclusively offer the option to install the update, eliminating the deferral functionality.
If the user persists in their refusal to update their device, the frequency of notifications will escalate during the final hour preceding the Target Local Date Time. A notification will be dispatched at intervals of 60, 30, and 10 minutes, providing the user with the opportunity to defer the update. One minute prior to the Target Local Date Time, the user will be informed that the update is pending, with no option to defer it.
Upon the arrival at the Target Local Date Time, the device will request the user to input their passcode, if enabled, before initiating the update installation.
Conflict resolution – Software Update Enforcement vs. macOS Updates
With the two methods updating macOS available in Workspace ONE, it is a real possibility that two updates might be assigned to the same device, one using the macOS Updates and the other using Software Update Enforcement. When using the Software Update Enforcement declaration in DDM, all other software update commands sent to the device are ignored. The Software Update Enforcement declaration takes precedence over all other commands.
For example, if you have used the macOS Updates interface to configure your devices to update to macOS 15.4 and then created a Software Update Enforcement declaration for the same devices to update to 15.5, the declaration would be enforced over the other command.
Software Update device profile
The macOS Software Update Utility regularly checks for updates and can be configured to automatically download and install OS updates. However, if you plan to use Workspace ONE macOS Updates, you might want to have more granular control over what updates are installed on your devices. For instance, you might want to bypass a specific update. You can manage automatic updates with a device profile in Workspace ONE UEM.
NOTE: This profile is not required to use macOS Updates in Workspace ONE UEM. This section is provided as an optional step to show how administrators can maintain strict control over what updates get applied to their devices. Without this profile, administrators can still push updates to devices using macOS Update Management. This option enables administrators to keep users from downloading updates on their own through the Software Update Utility.
Create a Software Update device profile
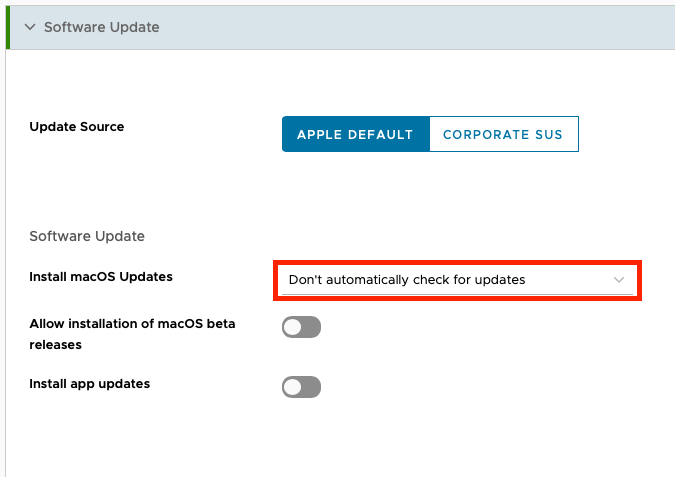
To create a device profile that configures the Software Update Utility to not automatically check for updates:
- Launch and Internet browser (i.e. Safari, Google Chrome, Firefox).
- Navigate to the Omnissa Workspace ONE UEM Console.
For example, navigate tohttps://<WorkspaceONEUEMHostname>whereWorkspaceONEUEMHostnameis the host name of the Workspace ONE UEM console. - Enter your Username, for example,
administrator. - Click Next. The Password text box is displayed.
- Enter your Password, for example,
Omnissa1!and click Login.
Note: If you see a Captcha, be aware that it is case sensitive. - Select Resources, and then click Profiles.
- From the Add dropdown menu, select Add Profile.
- Select the Profile Platform by clicking macOS.
- Select Imperative as the Management Type, and Device for the Context.
- Enter
macOS Updatesfor the profile name. - Scroll down the list of payloads until you find Software Update and click Add.
- From the Install macOS Updates dropdown, select Don’t automatically check for updates. Notice that all other options become unavailable.
- Click Next.
- Scroll down to Assigned Groups, click the search box, and from the list of assignment groups that appear, select the appropriate group, such as
All Devices (your@email.shown.here). - For the Assignment Type, select Auto.
- Click Save and Publish.
Assigning updates using the macOS Updates dashboard
To deploy an update to macOS devices, you must create an assignment group to which to assign the update and then assign the update in Workspace ONE UEM. This section assumes you already have an assignment group created to which you can assign the update.
For this tutorial, you will configure an update for macOS 15. However, this process can be used for any combination of macOS operating system from version 12 and later.
Assigning a macOS Update
To assign and publish the appropriate update to the newly created assignment group:
- In the Workspace ONE UEM console, select Devices > Device Updates.
- Select the macOS tab.
- From the list of available macOS updates, click the radio button for macOS 15.5.
- Click Manage Assignments.
- If you already created assignments for this update, they are listed here. For this exercise, there should be no other assignments listed. Click New Assignment.
- Enter the Assignment Name. For this exercise, enter
macOS 15.5 Update Assignment. - Click the search box for Select Smart Group. From the list of assignment groups that appear, select the appropriate group. For instance, you might select a group called
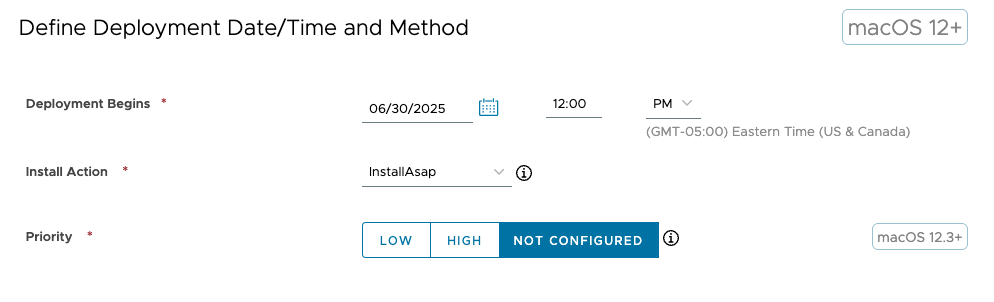
macOS 15.5 Update, and click Next. - Configure the Date that you want Workspace ONE to begin deploying the update. Click the Calendar icon and select a date, such as
June 30, 2025. - Enter the desired time that you want the update to begin, such as
12:00, and select AM or PM from the dropdown. - Click the dropdown labeled Install Action, and from the dropdown menu, select your preferred action. For this tutorial, select
InstallAsap.
NOTE: If you select theInstallLateraction, an additional option to enable User Deferral appears, which you can enable to set the Maximum Number of Deferrals allowed. - Select the Priority for this update. This option configures the scheduling priority for downloading and preparing the requested update on the device. For this tutorial, leave this option as Not Configured.
NOTE: This configuration only impacts macOS 12.3 and later devices.
- Click Next.
- You have the option to configure Notification messages to be sent to users after successful download of the update, and after successful installation. For this exercise, leave these options disabled, and click Save.
Prioritizing update assignments
In many cases, administrators need to assign multiple Smart Groups to a single assignment to cover differing deployment scenarios. For instance, you might want to have updates installed automatically and the device restarted without user intervention for most of your device fleet. However, due to concerns that a restart might interrupt a sales presentation, you might also want to give the sales team more control over when their device restarts by providing them with the option to defer the update to a later time. In these scenarios, you need to create separate assignments that are configured differently.
However, there is the possibility that a device might be a member of more than one Smart Group, which could cause a conflict and result in the incorrect assignment being applied to a device. In Workspace ONE UEM, you can change the priority of assignments, allowing the assignment with the higher priority to be applied on devices with multiple assignments.
To get the desired result, perform the following steps:
- In the Workspace ONE UEM console, select Devices > Device Updates. Click on the macOS tab.
- From the list of available macOS updates, click the radio button for macOS 15.5.
- Click Manage Assignments.
- To change the priority of the assignments, click and hold the grab area next to the assignment you want to change, and drag the assignments to rearrange their order.
- After you finish rearranging the assignments, click Save Priority to set the updated priority.

- Click Close.
Pausing and resuming assignments
Within macOS Update Management in Workspace ONE UEM, administrators can pause and resume updates without having to modify the assignments. This allows administrators to maintain visibility as to the deployments to-date while having the ability to halt further deployments for troubleshooting purposes.
To pause and resume an update assignment:
- To add an additional assignment, in the Workspace ONE UEM console, select Devices > Device Updates.
- On the Device Updates List View, select macOS from the options at the top.
- Select the row for the macOS update that you want to pause and click Pause.
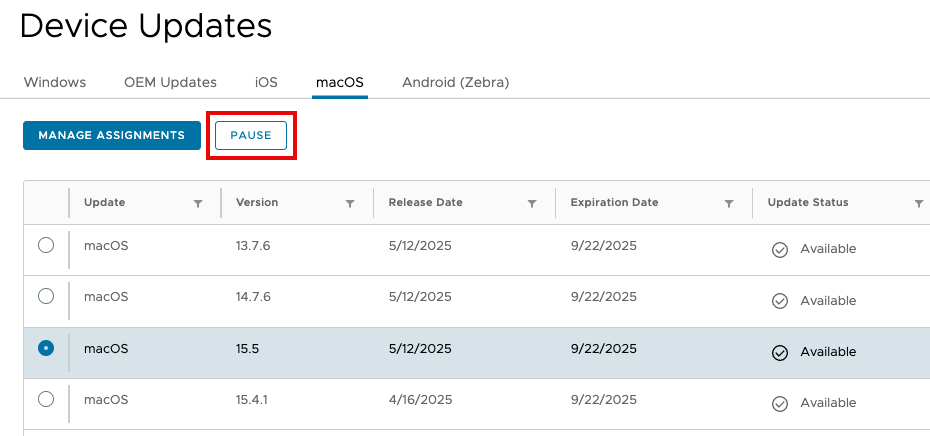
- When prompted, confirm the action by clicking Pause, causing the Update Status to change to Paused.
- To resume the macOS Update, select the row for the paused macOS update that you want to resume, and click Resume.
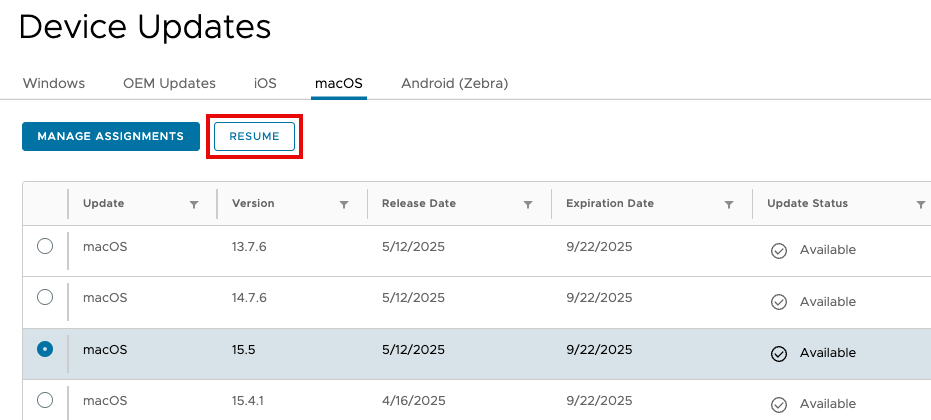
- When prompted, confirm the action by clicking Resume, causing the Update Status to change to Assigned.
Assigning updates using a Software Update Enforcement declaration
This section discusses the process for creating and assigning a Software Update Enforcement declaration to your devices. Keep in mind, this is a sperate and distinct process from that discussed in Assigning updates using the macOS Updates dashboard. If you plan to use the macOS Updates dashboard, there is no need to complete this process as well. Conversely, this process performs all necessary actions for updating the OS on your macOS device. Therefore, you are not required to perform any of the steps discussed in the earlier mentioned section.
However, it should be noted that Apple is firmly committed to Declarative Device Management as the future of modern device management. It is expected that this will become Apple’s preferred method for updating the operating system on managed macOS devices.
Creating a Software Update Enforcement declaration
To create a Software Update Enforcement declaration, perform the following steps:
- In the Workspace ONE console, select Resources, and then click Profiles.
- From the Add dropdown menu, select Add Profile.
- Select the Profile Platform by clicking macOS.
- Select Declarative as the Management Type. Set the Delcaration Type to Configuration, and Device for the Context.
- Enter
macOS 15.5 Updatesfor the profile name. - Scroll down the list of payloads until you find Software Update Enforcement and click Add.
- For Target OS Version, enter
15.5. - Enter a Target Local Date Time. The date time is formatted as
YYYY-MM-DD HH:MM:SS. For example, if you wanted the target date time to be 11:00 PM on June 30, 2025, you would enter2025-06-30 23:00:00.
- Click Next.
- Scroll down to Assigned Groups, click the search box, and from the list of assignment groups that appear, select the appropriate group, such as
All Devices (your@email.shown.here). - For the Assignment Type, select Auto.
- Click Save and Publish.
Once the declaration has been published, the update process will proceed as described in Enforcement process on the device.
Summary and additional resources
With Workspace ONE UEM, administrators can manage operating system updates to macOS devices. Administrators can automate the download and install actions or granularly control those two steps independently. With these features, Workspace ONE UEM enables automated update cycles convenient to an organization's needs.
This operational tutorial provided steps to help you understand the UI screens, assign macOS updates to devices, and manage those updates. It also discussed how Workspace ONE UEM resolves assignment conflicts.
Additional resources
For more information about Workspace ONE, explore the Omnissa Workspace ONE UEM page on Tech Zone. The page provides step-by-step guidance to help you level-up in your Workspace ONE knowledge. You will find everything from beginner to advanced curated assets in the form of articles and videos.
For additional understanding about managing macOS devices, see the following tutorials:
Changelog
The following updates were made to this guide:
Date | Description of Changes |
|---|---|
| 06/24/2025 |
|
| 06/06/2024 |
|
| 08/07/2023 |
|
About the author and contributors
This tutorial was written by:
- Michael Bradley, Product Specialist, Omnissa
Considerable contributions were made by the following subject matter expert:
- Paul Evans, Omnissa alumni.
Questions and feedback
For questions or feedback, send to tech_content_feedback@omnissa.com.