

Omnissa DEX Solution for Third-Party Managed Windows Devices
Overview
Digital Employee Experience, or DEX, is the sum of all an employee’s interactions with technology and tools they use at work. And these interactions are critical to productivity and engagement in the workplace. Especially as many organizations have shifted to hybrid work, there have been challenges delivering an optimal experience that result in business disruptions.
In order to ensure high quality experiences that empower employees to do their best work, a comprehensive DEX solution is required that enables organizations to deliver engaging experiences across the employee lifecycle, measure the experiences employees have with the technology they use, analyze issues that impact experience and productivity, and proactively remediate issues that cause disruptions.
The Omnissa DEX solution provides the necessary tools to deliver a high-quality employee experience to the end user including any app on any device, self-service resources and any support required. This end user experience is delivered by combining Workspace ONE Intelligent Hub, Hub Services, UEM, Horizon and Omnissa Access.
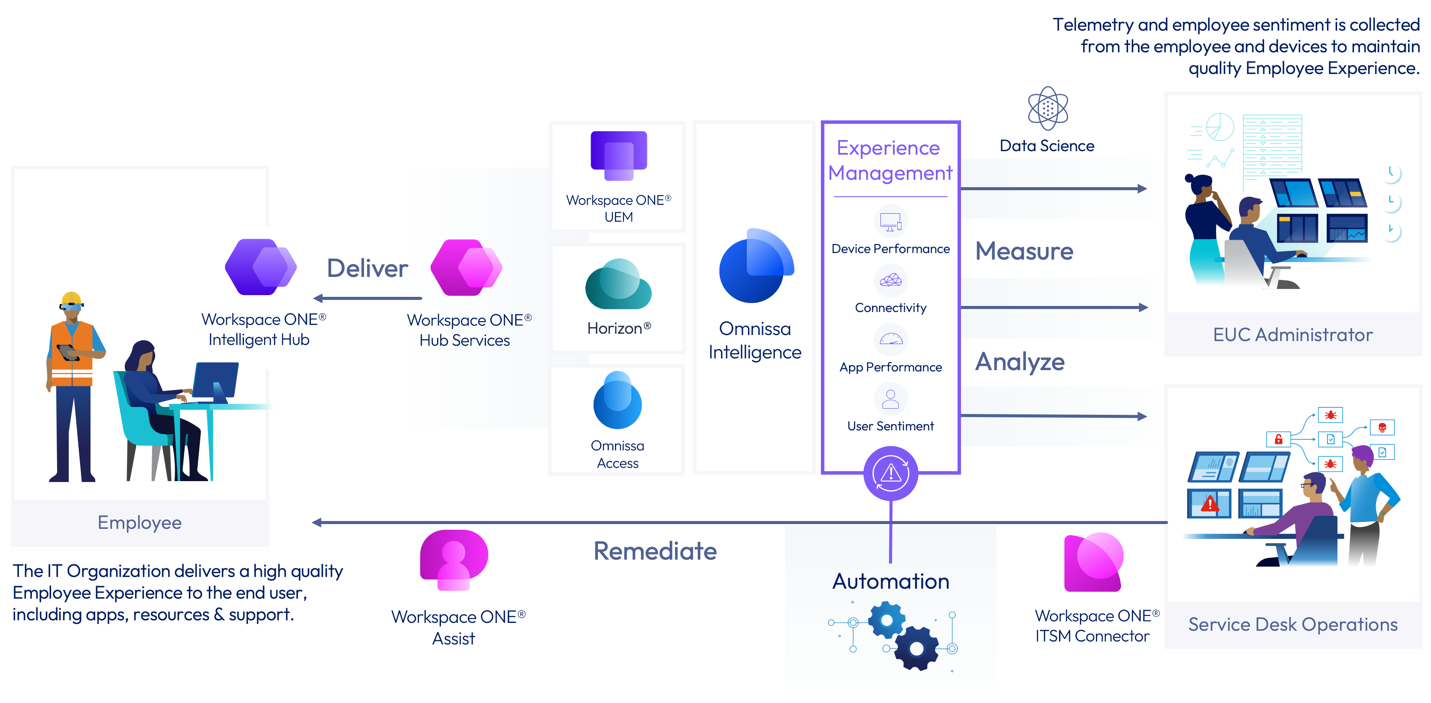
Figure 1: Omnissa DEX Solution Overview
Experience Management, which is built on top of the Omnissa Intelligence data service, enables IT to monitor device performance, connectivity, app performance, and tools to gather user sentiment and combine this data to measure the success of the employee experience delivery. Utilizing machine learning, telemetry collected from the deployment is automatically analyzed in order to surface anomalies that may impact employee experience.
The DEX solution also enables IT to provide many methods to remediate issues, whether automated remediation using Experience Management within Omnissa Intelligence, real-time remote support using Workspace ONE Assist or employee self-service tools within Intelligent Hub. The help desk can also utilize Experience Management tools within Intelligence to perform manual or guided root cause analysis, powered by machine learning.
However, many components of the DEX solution do not require the device to be fully managed by Workspace ONE UEM. In fact, the Workspace ONE DEX solution can be enabled for devices managed by Microsoft Intune/SCCM and other PCLM tools, such as Ivanti, BigFix and Tanium. Unmanaged or third-party managed Windows devices can exist in Workspace ONE UEM in a limited “Hub Registered” mode and still transmit data to the Intelligence service to analyze device and app performance, such as Zoom usability and performance metrics, and even utilize Workspace ONE Assist for real-time remote support. In addition, the Workspace ONE ITSM connector for ServiceNow can report telemetry from devices in any UEM mode and sensors and scripts are supported for unmanaged Windows devices.
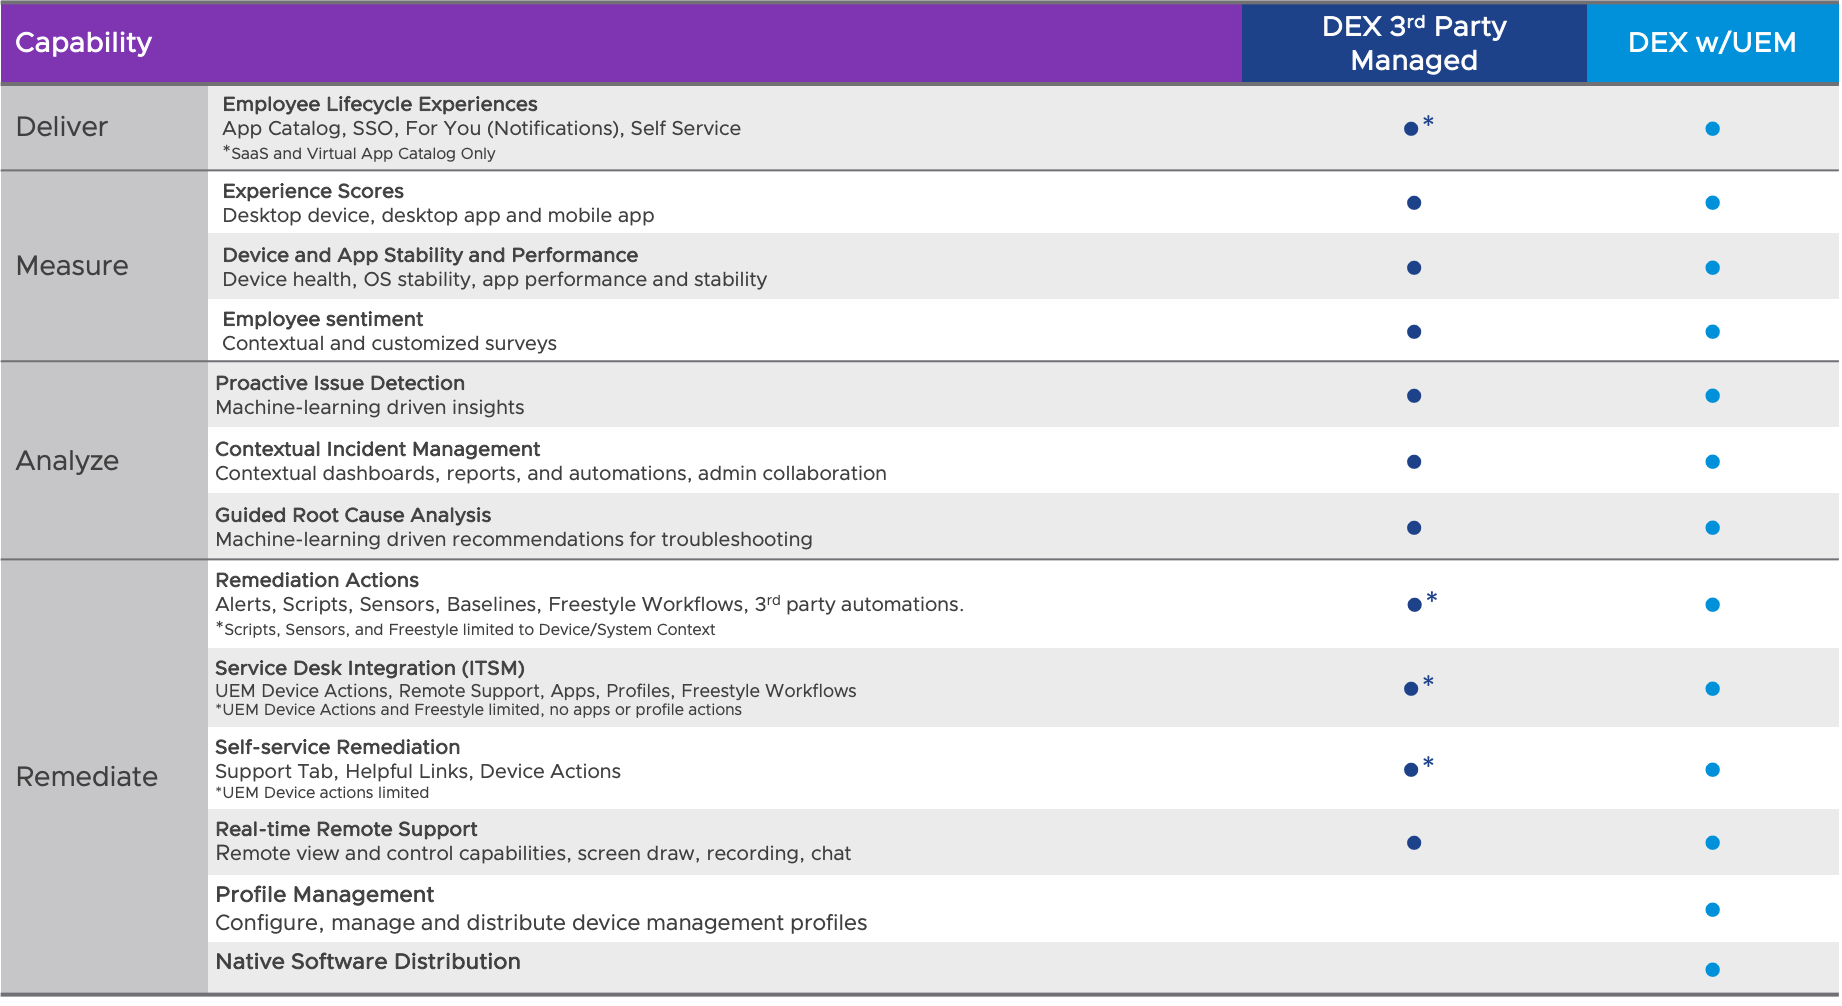
Figure 2: Matrix comparing DEX capabilities available for UEM managed Windows devices versus third-party managed
Purpose of this guide
This guide will provide the steps to deploy the Workspace ONE DEX solution on Windows devices not fully managed by Workspace ONE UEM – in other words, Windows devices in Hub Registered mode and managed by a third-party solution. To learn more about the management modes available in Workspace ONE UEM, see this overview.
Audience
This tutorial is intended for IT administrators and product evaluators who are familiar with Workspace ONE Unified Endpoint Management (UEM), Omnissa Intelligence and Experience Management. Familiarity with Windows endpoint administration is assumed. Knowledge of other technologies, such as Workspace ONE Assist and the ITSM Connector is also helpful.
Prerequisites
This guide assumes a Workspace ONE UEM tenant is already available. Also assumed is Workspace ONE Intelligence is already enabled.
It is also helpful to review the Experience Management FAQs in the product documentation to understand prerequisites for these capabilities in Workspace ONE Intelligence.
Enable Experience Management in Intelligence
Before employee experience telemetry is collected from devices, Experience Management must be enabled in Workspace ONE Intelligence. The following steps walk through how to enable these features. See this guide to learn more about Experience Management.
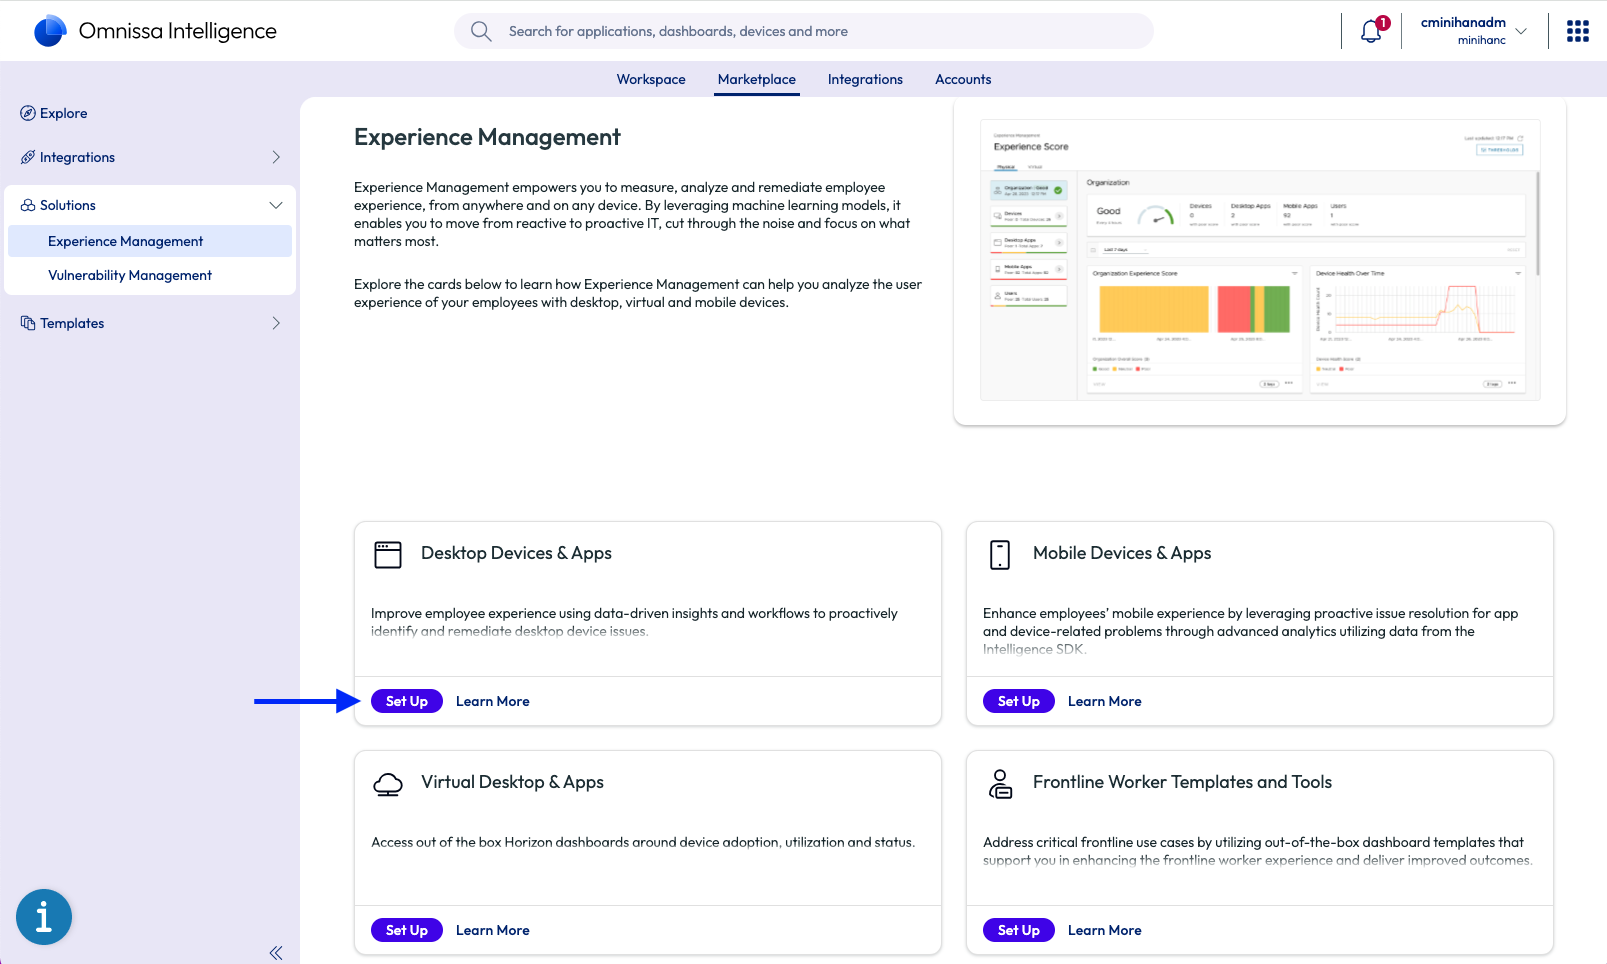
- To locate Experience Management within Workspace ONE Intelligence, navigate to the Marketplace, then Solutions.

From this landing page, you can explore Experience Management documents, videos, and other resources. This is also where Experience Management options are enabled.
The Experience Management landing page lists four options:
- Desktop Devices & Apps –Experience Management for Windows and macOS devices and apps
- Mobile Device & Apps – Experience Management for iOS and Android devices and apps
- Virtual Desktop & Apps – Experience Management for Horizon virtual desktops and apps
- Frontline Workers Add-on – Out-of-the-box templates for Frontline use cases
- To enable Experience Management for desktop devices and apps, click SET UP.
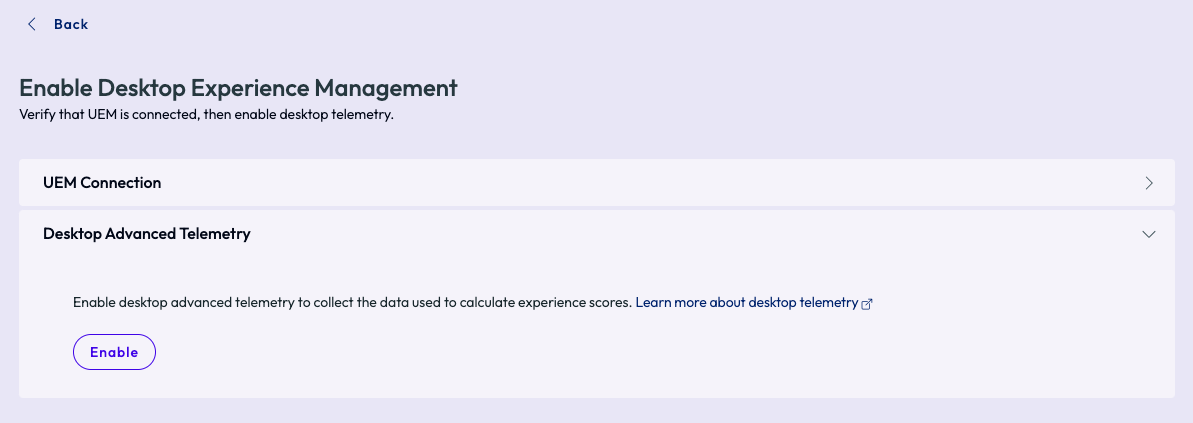
- Next, verify the Workspace ONE UEM connection status is authorized, and click NEXT. This allows Intelligence to ingest data from UEM.
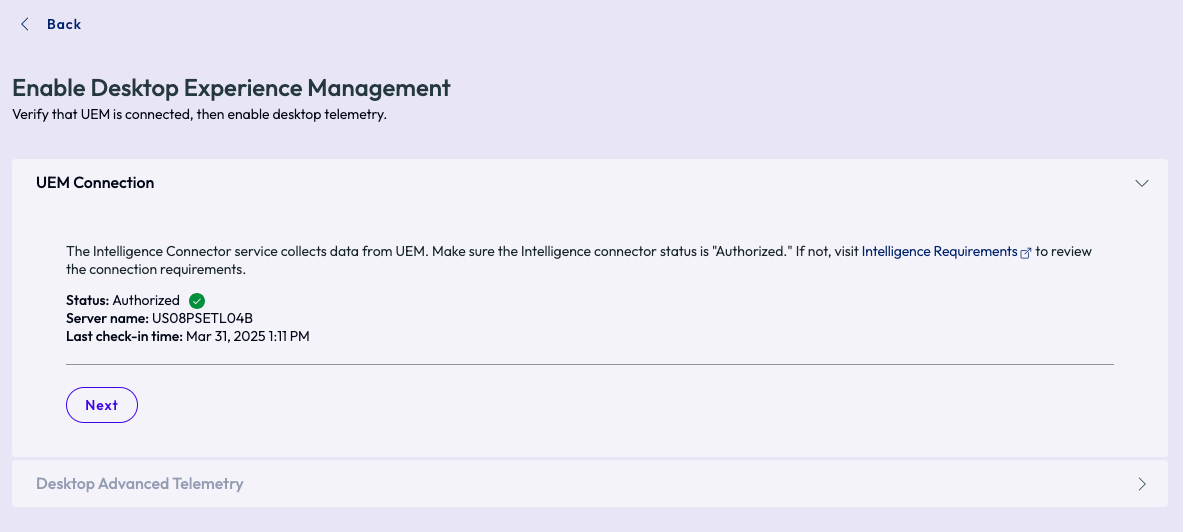
- Click ENABLE to enable Desktop Advanced Telemetry. This step enables Experience Management telemetry collection from enrolled Windows and macOS devices.
Follow similar steps to enable Experience Management for the other options as required.
- Once enabled, Experience Management options will show as Enabled on the Marketplace landing page.
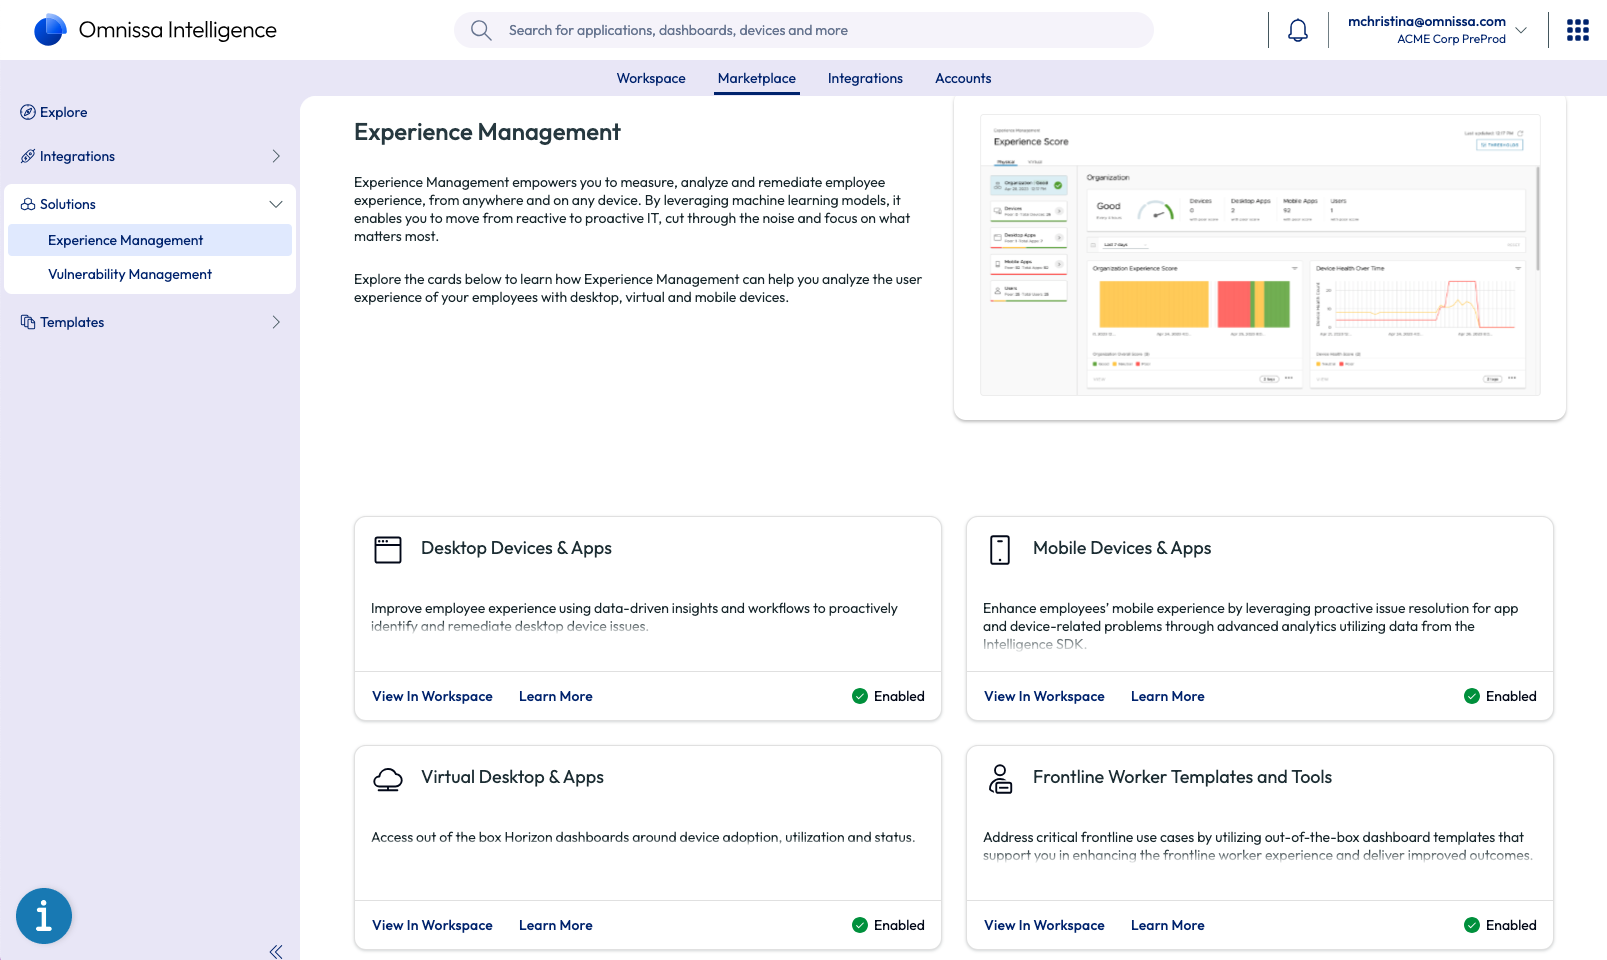
If Intelligence is not licensed for Experience Management options, the SET UP button on the cards will be grayed out.
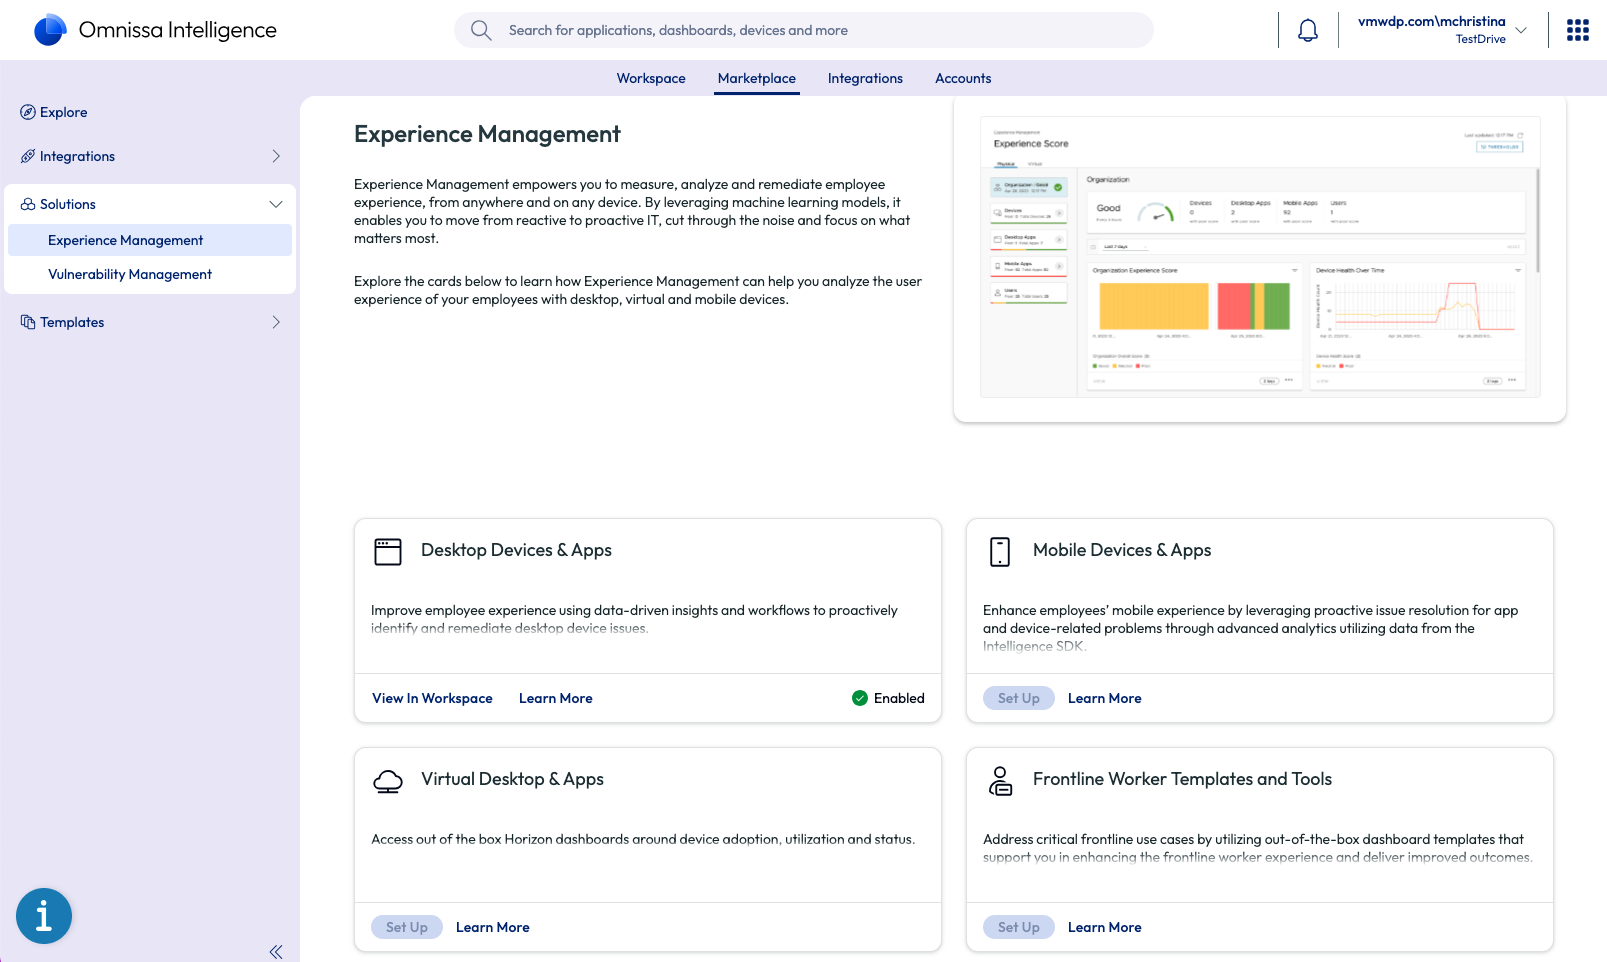
Figure 3: Experience Management options when license not active
- After Experience Management is enabled, you can find the tools and out-of-the-box dashboards under Workspace > Experience Management. If existing devices are enrolled into UEM, note that it can take at least four hours for the Experience Score dashboards to populate once Experience Management has been enabled in Intelligence.
Windows Hub Registered Mode enrollment
Introduction
Workspace ONE Unified Endpoint Management (UEM) provides many methods to manage devices depending on the device type, user persona or use case – from full-device management, which requires a device profile, to “lighter-touch” options for BYOD, such as Hub Registered mode. Please see this article for an overview of the Workspace ONE UEM management modes.
The following sections walk through enabling Hub Registered mode in Workspace ONE UEM and enrolling a Windows device using this mode.
Enabling Hub Registered Mode in Workspace ONE UEM
- In the Workspace ONE UEM admin console, first select the Organization Group where Hub Registered devices will be enrolled. Typically organizations create a new Org Group in this case since several enrollment settings will be changed. To learn more about UEM Organization Group management, see this documentation.

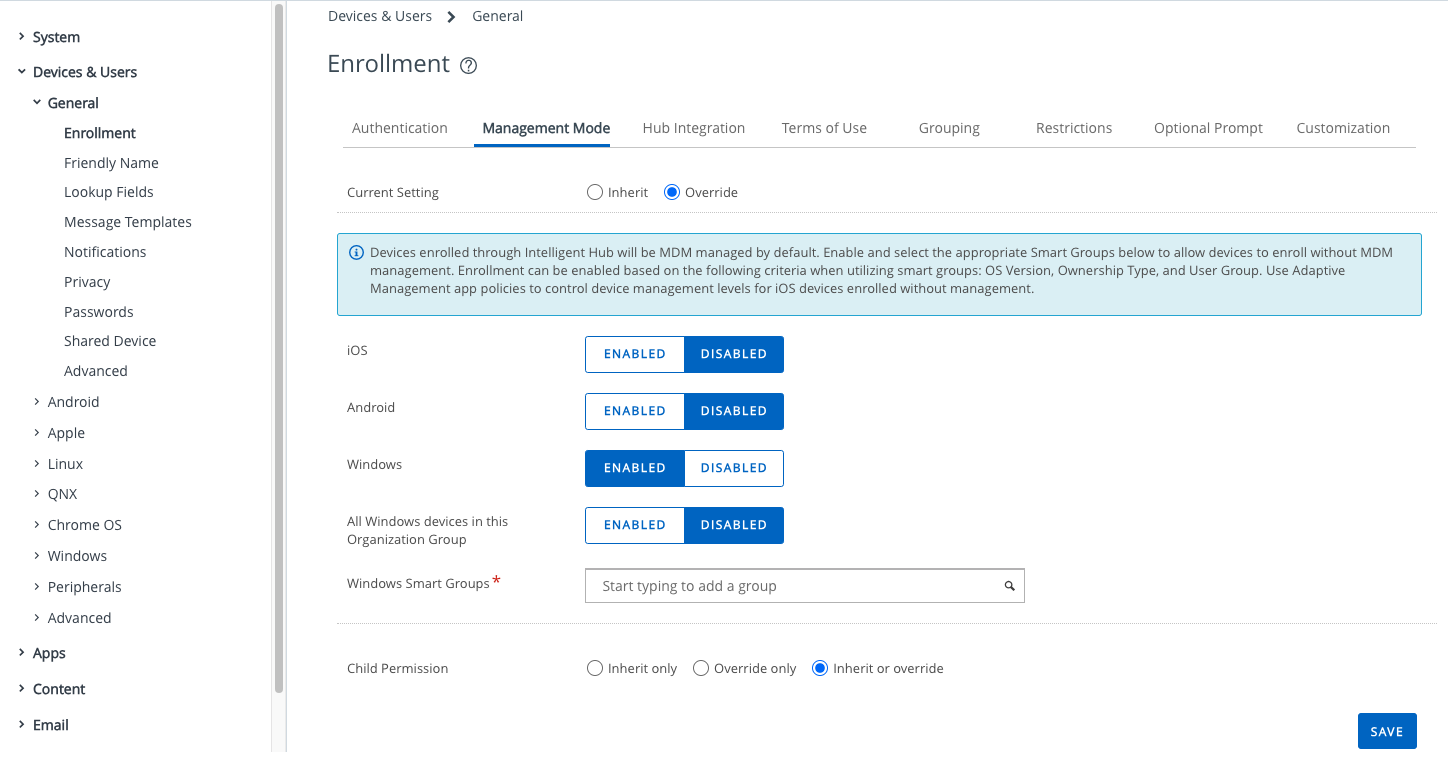
- The next step is to enable Hub Registered mode for the Windows platform in this Organization Group. Navigate to Groups & Settings > All Settings > Devices & Users > General > Enrollment > Management Mode tab. Click the Override radio button to make changes to these settings. Then select ENABLED for the Windows platform. Choose either ENABLED for All Windows devices in this Organization Group or choose specific Windows Smart Groups that contain devices that should enroll using Hub Registered Mode. See this documentation to learn more about managing Smart Groups in UEM. Click SAVE when finished.
Other recommended settings
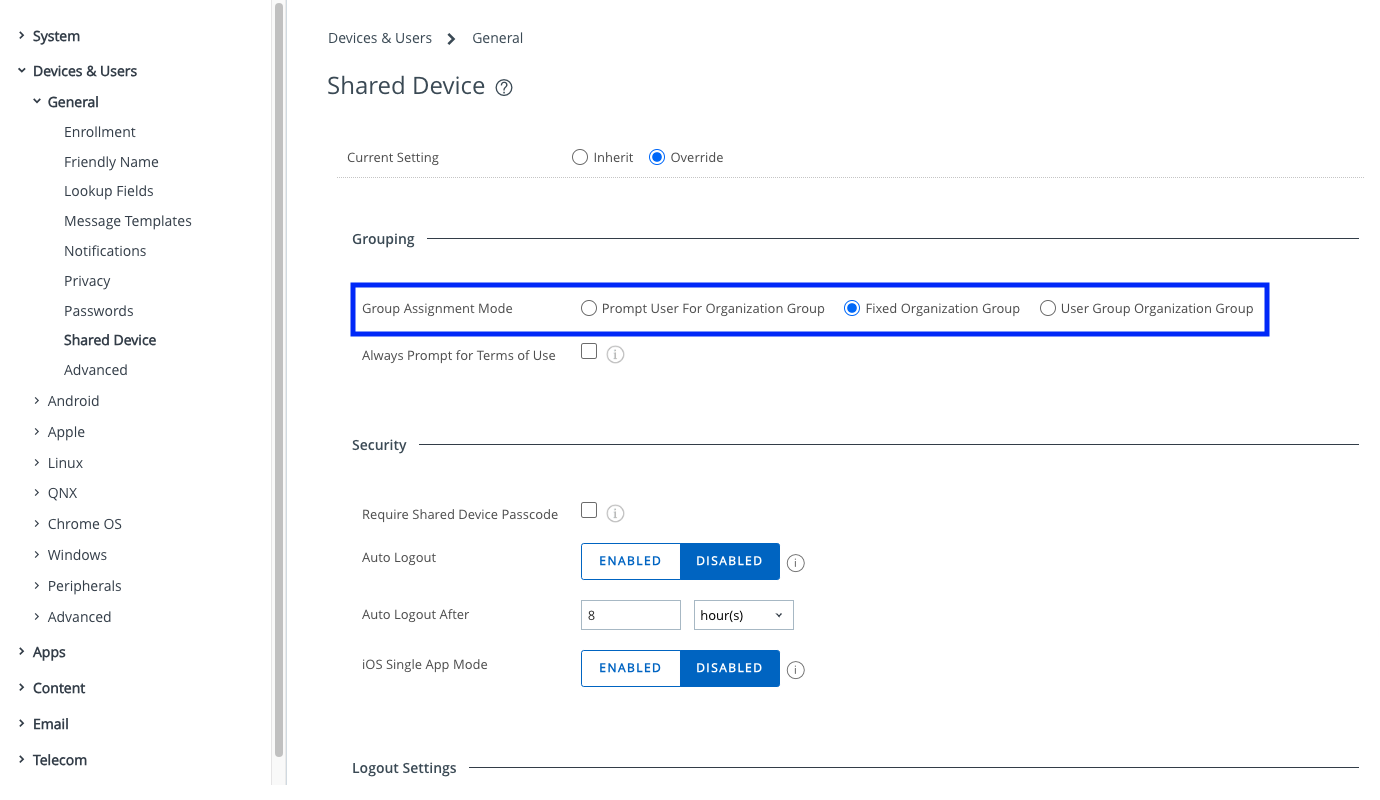
- To ensure devices enroll into this specific Organization Group, we will enable the Fixed Organization Group setting. Navigate to Groups & Settings > All Settings > Devices & Users > General > Shared Device. Click the Override radio button at the top to make changes on this screen. For Group Assignment Mode, select Fixed Organization Group.
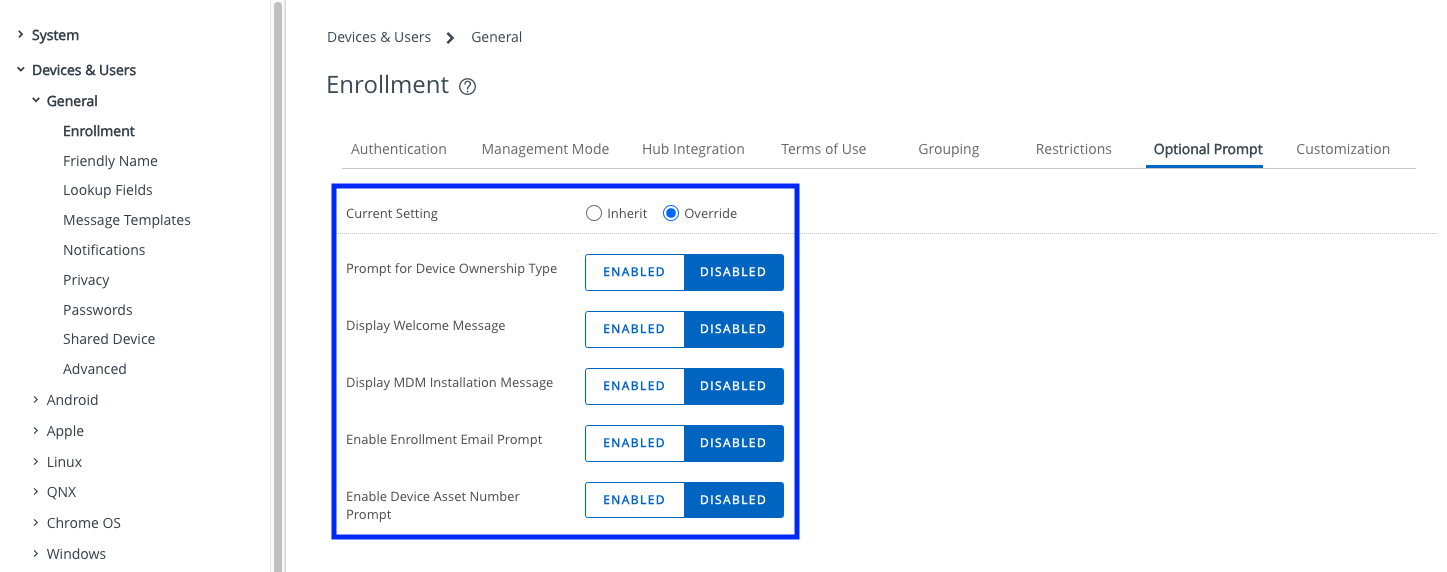
- Next ensure all additional enrollment prompts and screens are disabled by navigating to Groups & Settings > All Settings > Devices & Users > General > Enrollment > Optional Prompt tab. Select the Override radio button at the top to make changes on this screen. Ensure all the general optional prompts at the top are DISABLED. Then scroll down and ensure all Windows optional prompts are DISABLED.

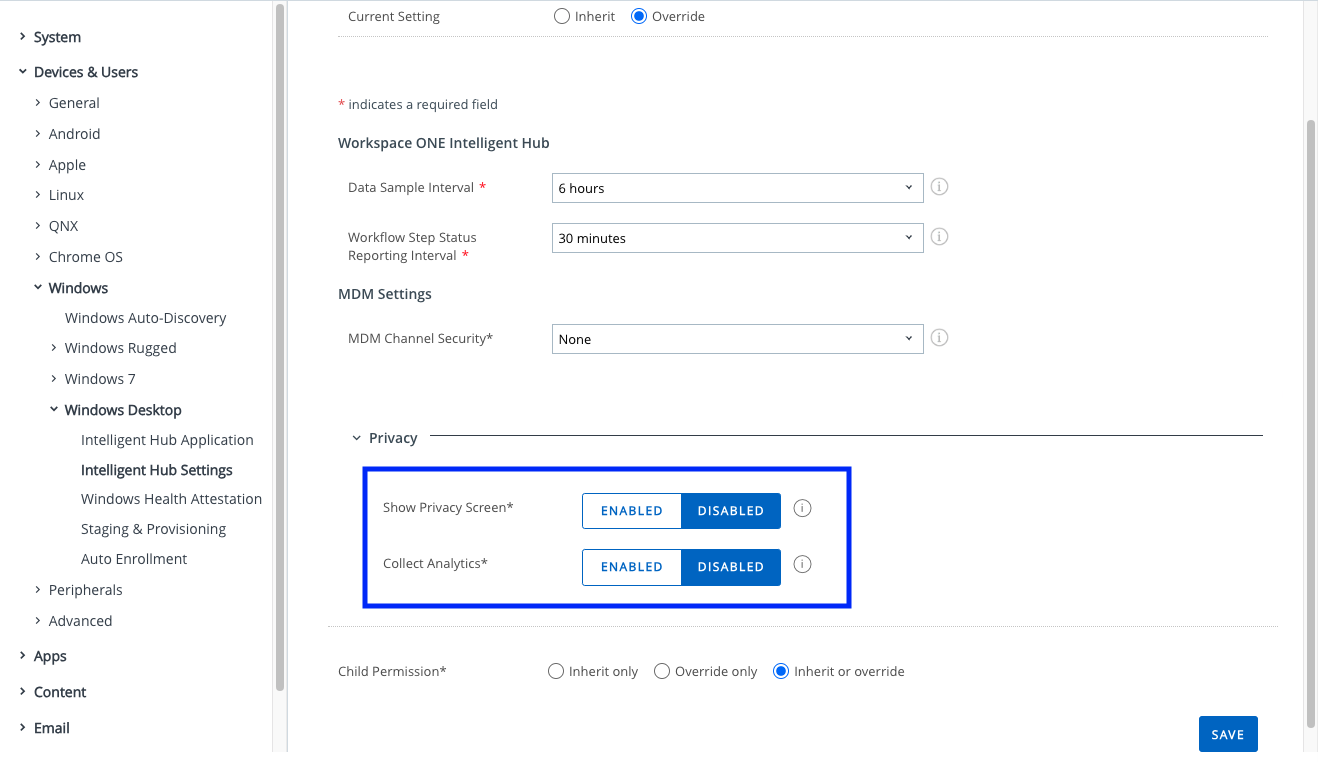
- Finally, disable the “Want an even better experience?” prompt when enrolling a device and other prompts that launch the Intelligent Hub app on devices. Navigate to Groups & Settings > All Settings > Devices & Users > Windows > Windows Desktop > Intelligent Hub Settings. Click the Override radio button at the top to change these settings. Scroll down and expand the Privacy section. Ensure both Show Privacy Screen and Collect Analytics are set to Disabled. Click Save in the bottom right if you made changes.
Create Windows staging user
Complete the following steps to create a staging user to enroll a Windows device using the Intelligent Hub app.
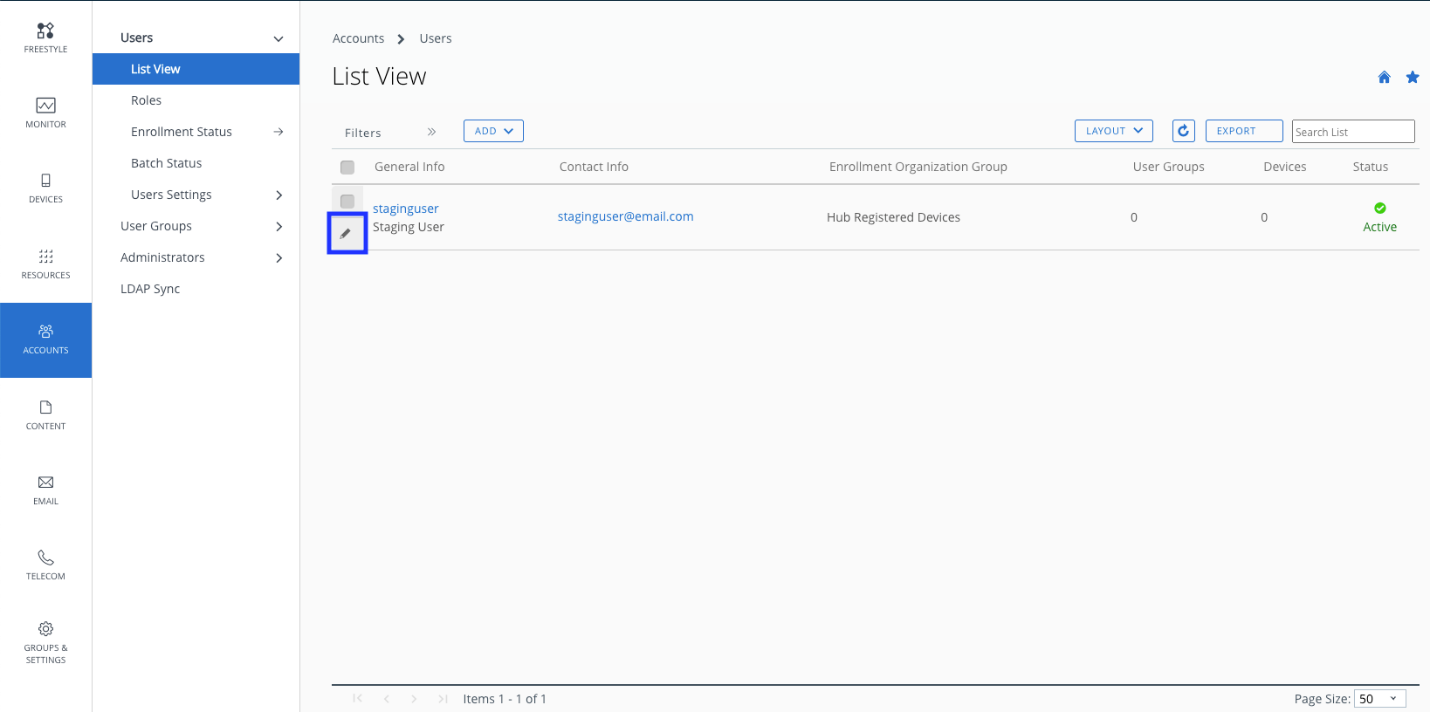
- Navigate to Accounts > Users > List View and select Edit for the user account that will be a staging user or Add a new user.
- On the Add/Edit User dialogue, select the Advanced tab.
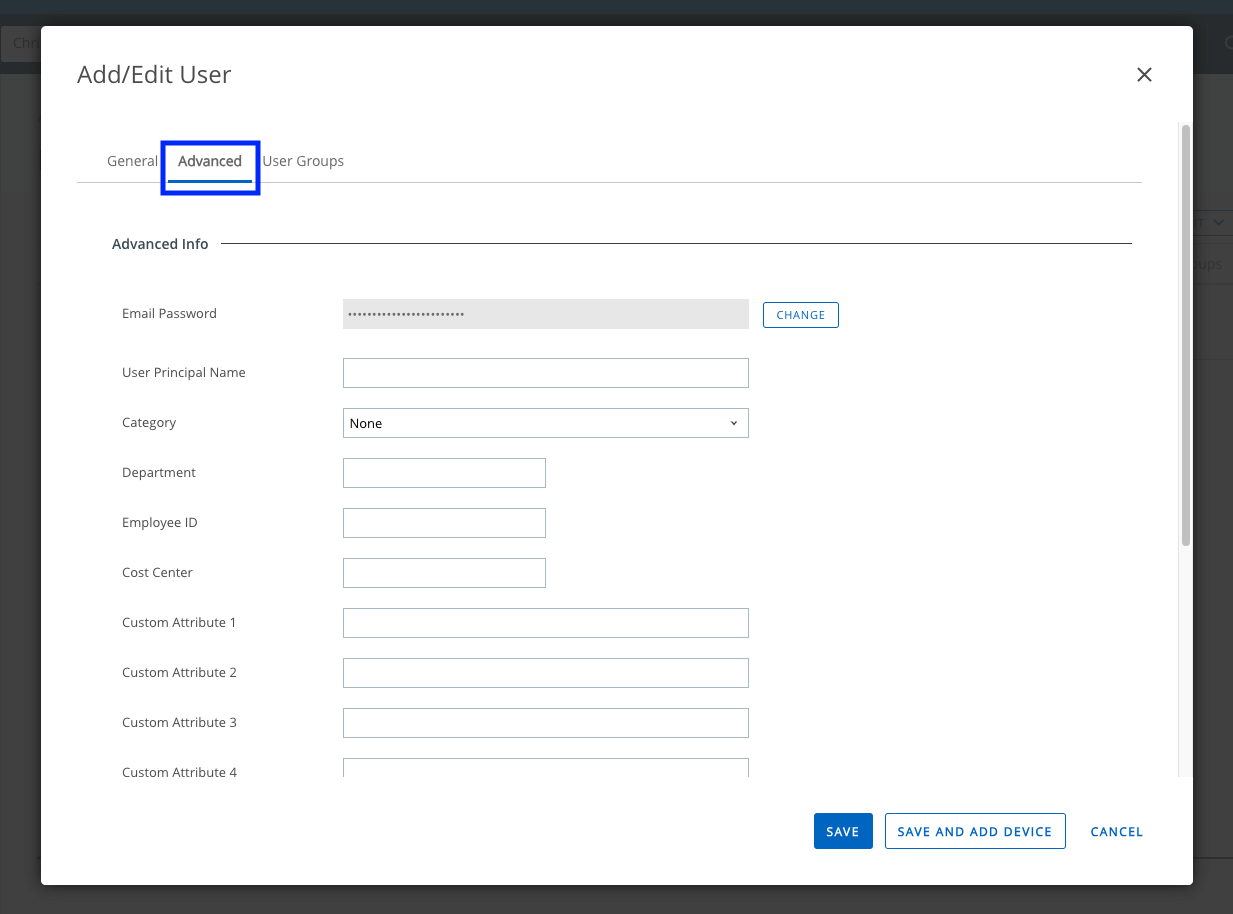
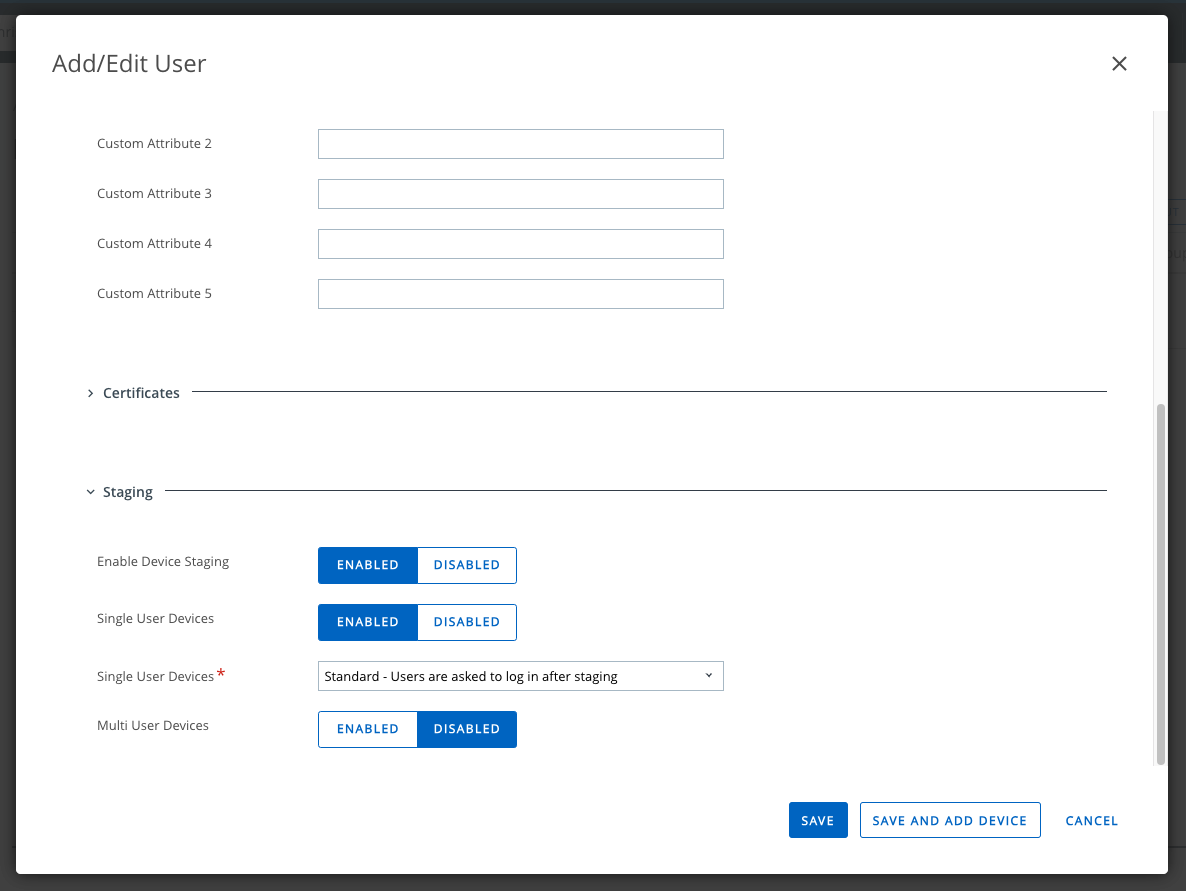
- Scroll down and expand the Staging section. Select ENABLED for Enable Device Staging. Once enabled, additional options will be shown. Set Single User Devices to ENABLED. Select Standard from the dropdown for Single User Devices. Ensure Multi User Devices is DISABLED. Click SAVE.
Intelligent Hub overview
Devices are registered with Workspace ONE UEM via the Intelligent Hub app. For Windows devices, the Intelligent Hub also contains the agent that will send experience telemetry once Experience Management has been enabled in Workspace ONE Intelligence. See this article to learn more about Workspace ONE Intelligent Hub.
Download the latest version of the Workspace ONE Intelligent Hub app from www.getwsone.com.
Review the system requirements for Intelligent Hub for each platform here and also the Experience Management requirements here.
Deploy Intelligent Hub & enroll device
There are many options to register Windows devices with Workspace ONE UEM. See this documentation for a complete list. However, this section will highlight registering Windows devices managed by a third-party.
Deploying Workspace ONE Intelligent Hub via Active Directory GPO
One option is to use Active Directory Group Policy (GPO) to deploy the Intelligent Hub MSI and a transform file.
See this video to create the transform file. This video shows how to deploy Intelligent Hub.
Intelligent Hub silent installation
Alternatively, leverage existing software distribution tools, such as Intune/SCCM, Ivanti, BigFix or Tanium to deploy Intelligent Hub silently to Windows devices that are Active Directory domain joined.
After downloading the latest version from www.getwsone.com, use the following command line to deploy Intelligent Hub:
msiexec /i “AirwatchAgent.msi” /quiet ENROLL=Y SERVER=ds###.awmdm.com LGName=groupid USERNAME=stagingusername PASSWORD=stagingpassword ASSIGNTOLOGGEDINUSER=Y
Where:
- SERVER DS is the UEM Device Services FQDN
- LGName is the group ID for the Organization Group created for Hub Registered devices
- Use the username and password for the staging user created earlier
For a complete list of command line parameters, see the documentation here.
Note: When registering Azure AD Windows devices which might be managed by Intune, those devices still can be registered into Workspace ONE UEM. However, the end user will be required to sign into Intelligent Hub with their user ID and password. This allows Intelligent Hub to switch from the staging user to the appropriate user.
Check device in UEM
Confirm the test device enrolled into Workspace ONE UEM successfully by navigating to DEVICES > Devices (List View). Make sure the device shows as Hub Registered and Enrolled.

Figure 4: Workspace ONE UEM Devices List View
Controlling Experience Management on devices
Admins can control which devices will send Experience Management data to Workspace ONE Intelligence via GPOs or by deploying a script. This is helpful for gradually deploying this functionality across the various departments in an enterprise or creating a testing group before deploying widely. Review the Experience Management for Windows documentation to learn more.
Device telemetry in Intelligence
Reading dashboard data
Once Experience Management is enabled in Workspace ONE Intelligence, it may take up to four hours for dashboards to populate with device telemetry. See this guide to learn more about the Experience Management tools available.
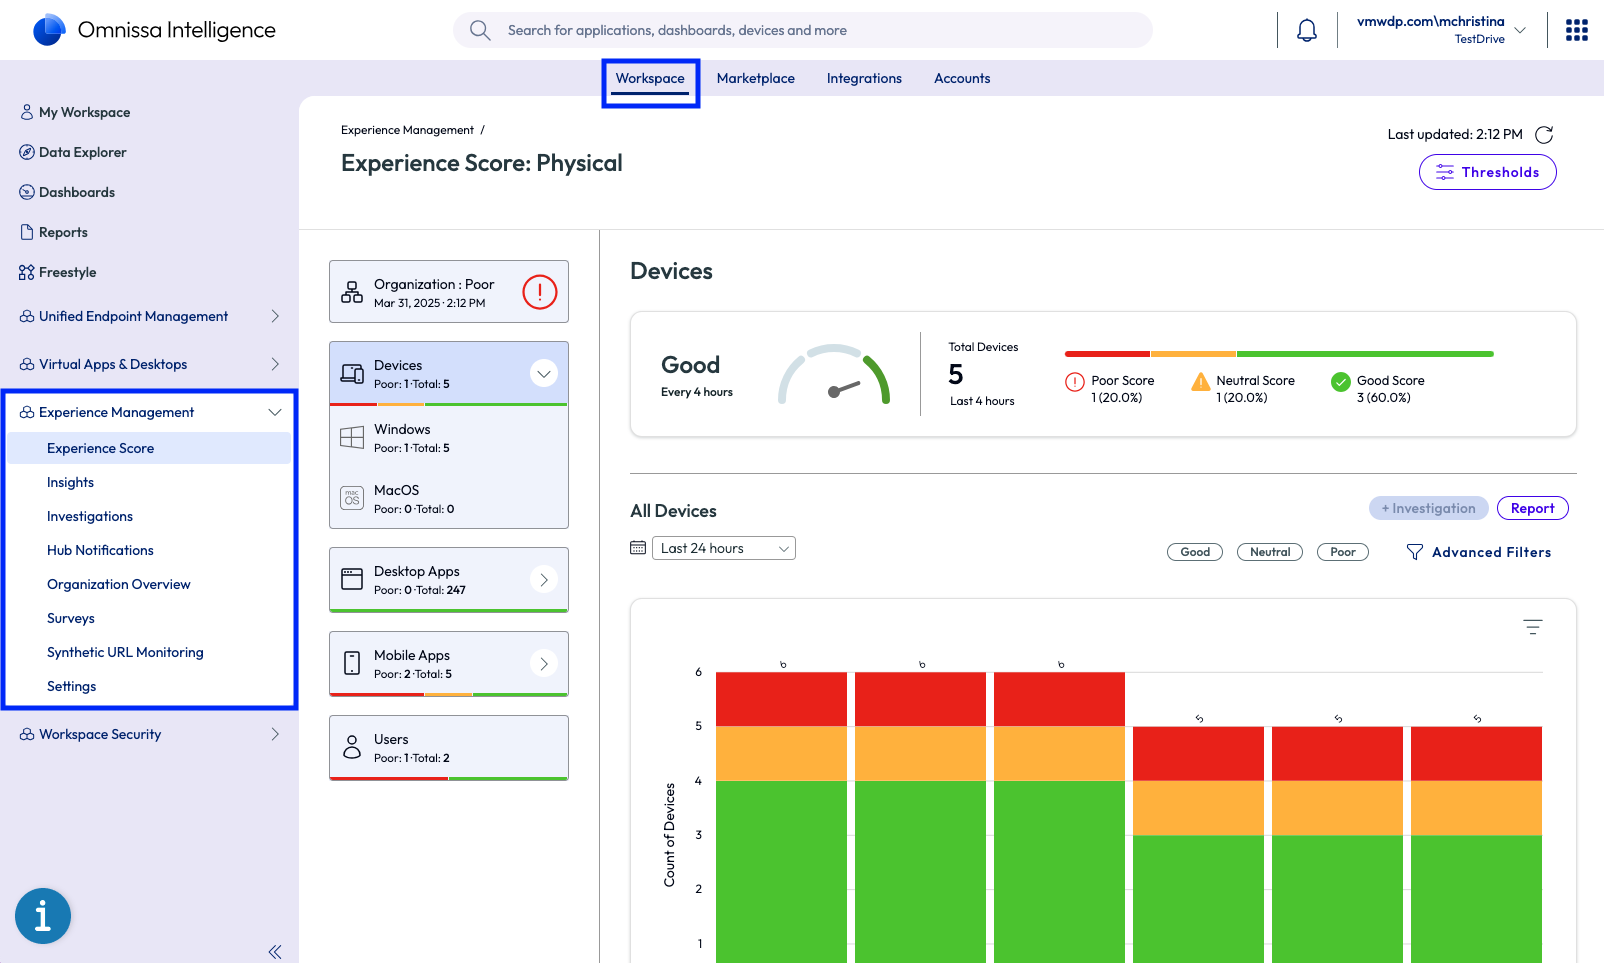
A natural starting point when understanding the current status of the deployment are the Experience Score dashboards. Note that summary information is displayed in four-hour blocks since Experience Score is calculated every four hours.
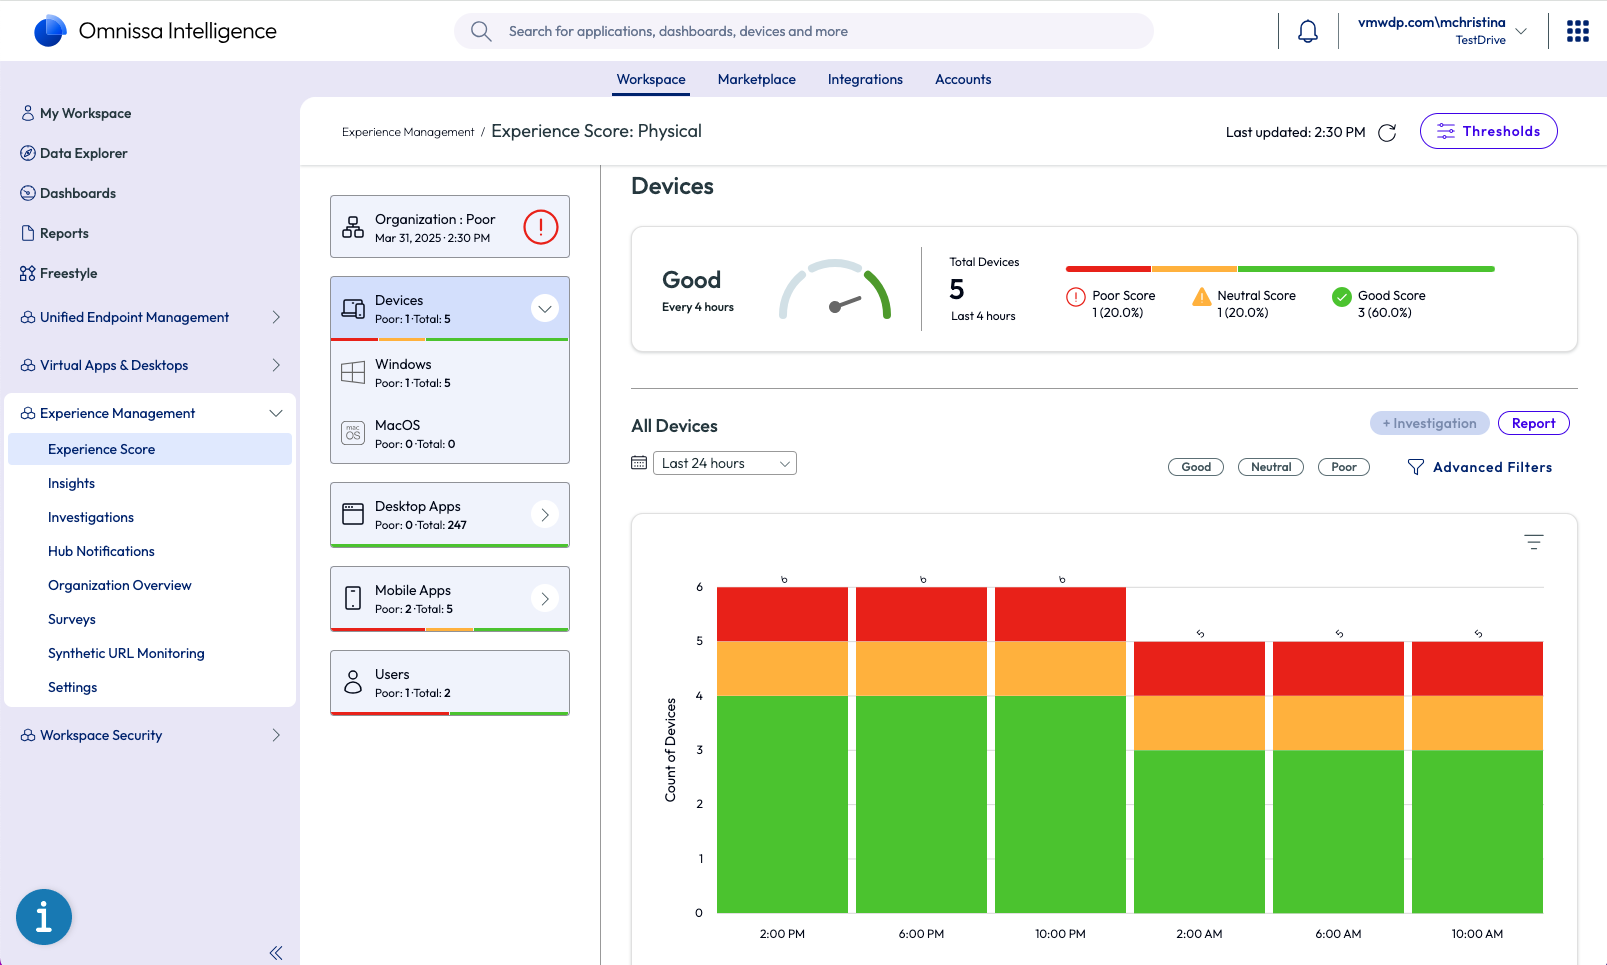
Figure 5: Physical Desktop Experience Score dashboards in Omnissa Intelligence
Software Metering
Also known as Software Asset Management, or software license optimization, Software Metering is a set of out-of-the-box dashboards to provide the data and insights required for application and licensing rationalization, and to measure and drive technology adoption. Analyze the deployment-wide portfolio of apps. Discover new and shadow IT apps across all users. Compare similar apps to analyze adoption and identify redundancy. Right size application deployments to reduce expenses and comply with vendor contracts.
The Software Metering toolset is unique in that the solution aggregates multiple data sources into a single global app identifier within a proprietary Software Application Catalog. This correlates app usage across all platforms or app versions to create a true global app adoption metric. Visit the product documentation to learn more.
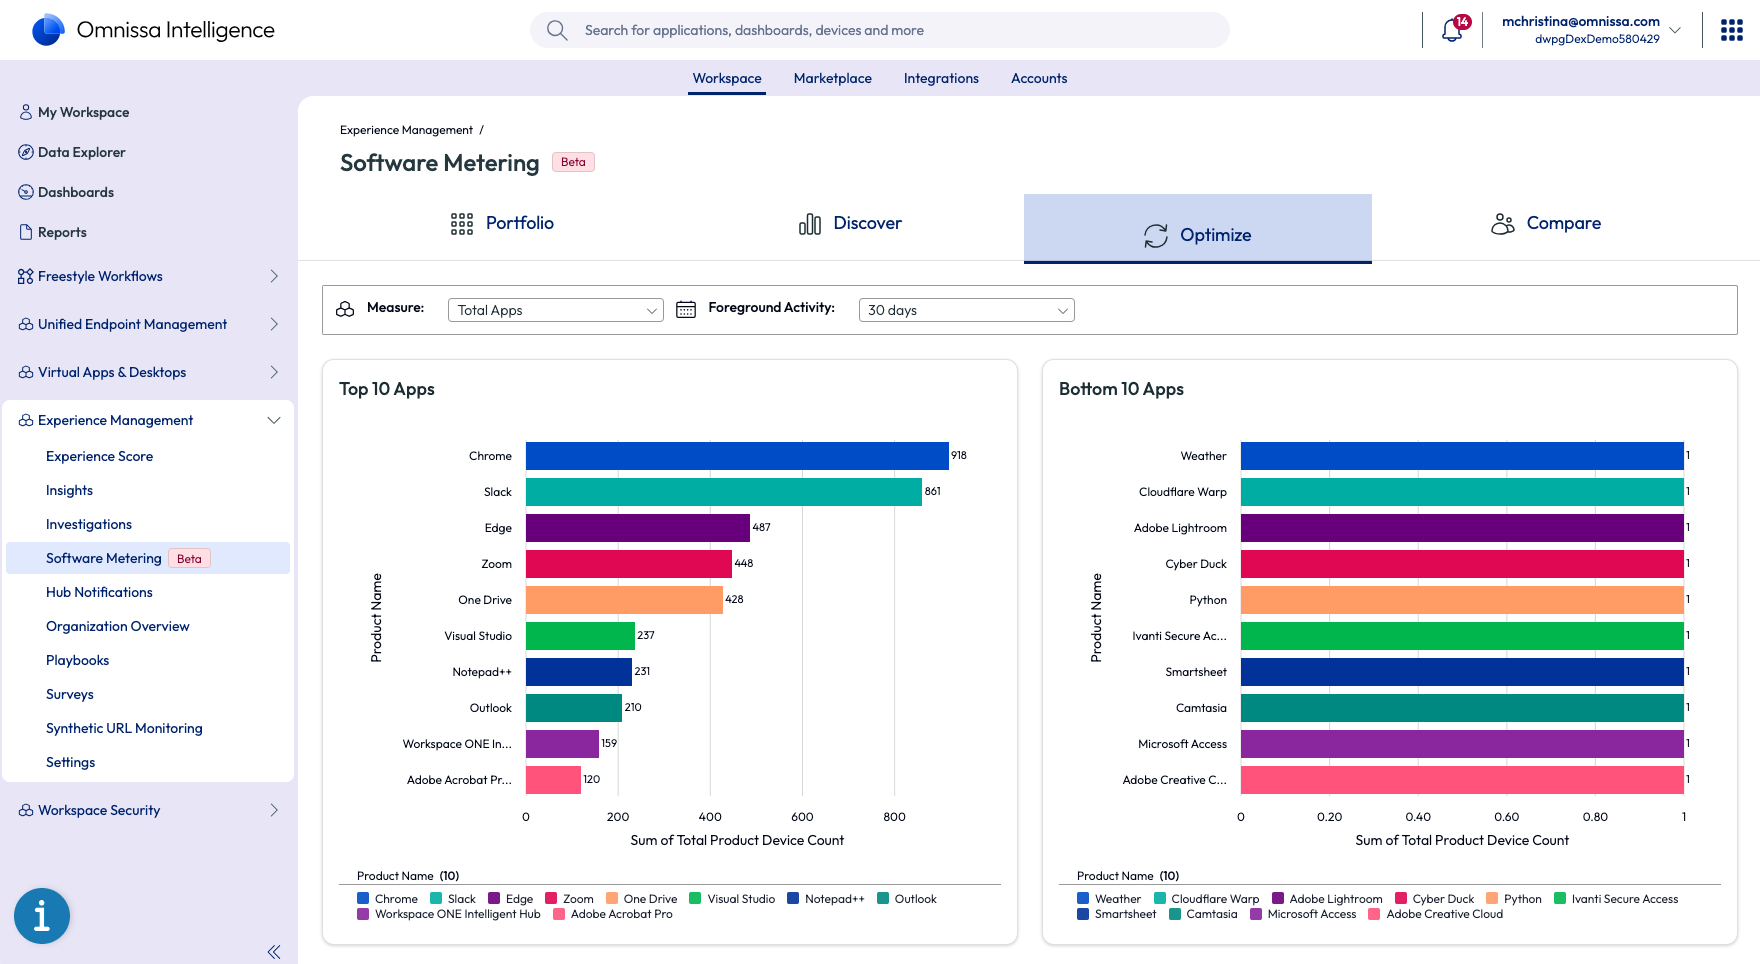
Figure 6: Software Metering dashboards in Omnissa Intelligence
Marketplace overview
The Omnissa Marketplace provides out-of-the-box integrations, tools and resources to support and enhance endpoint management and digital workspace use cases. One of the key components of the Marketplace is the library of templates available to accelerate analytics, root cause analysis and workflow development in Intelligence.
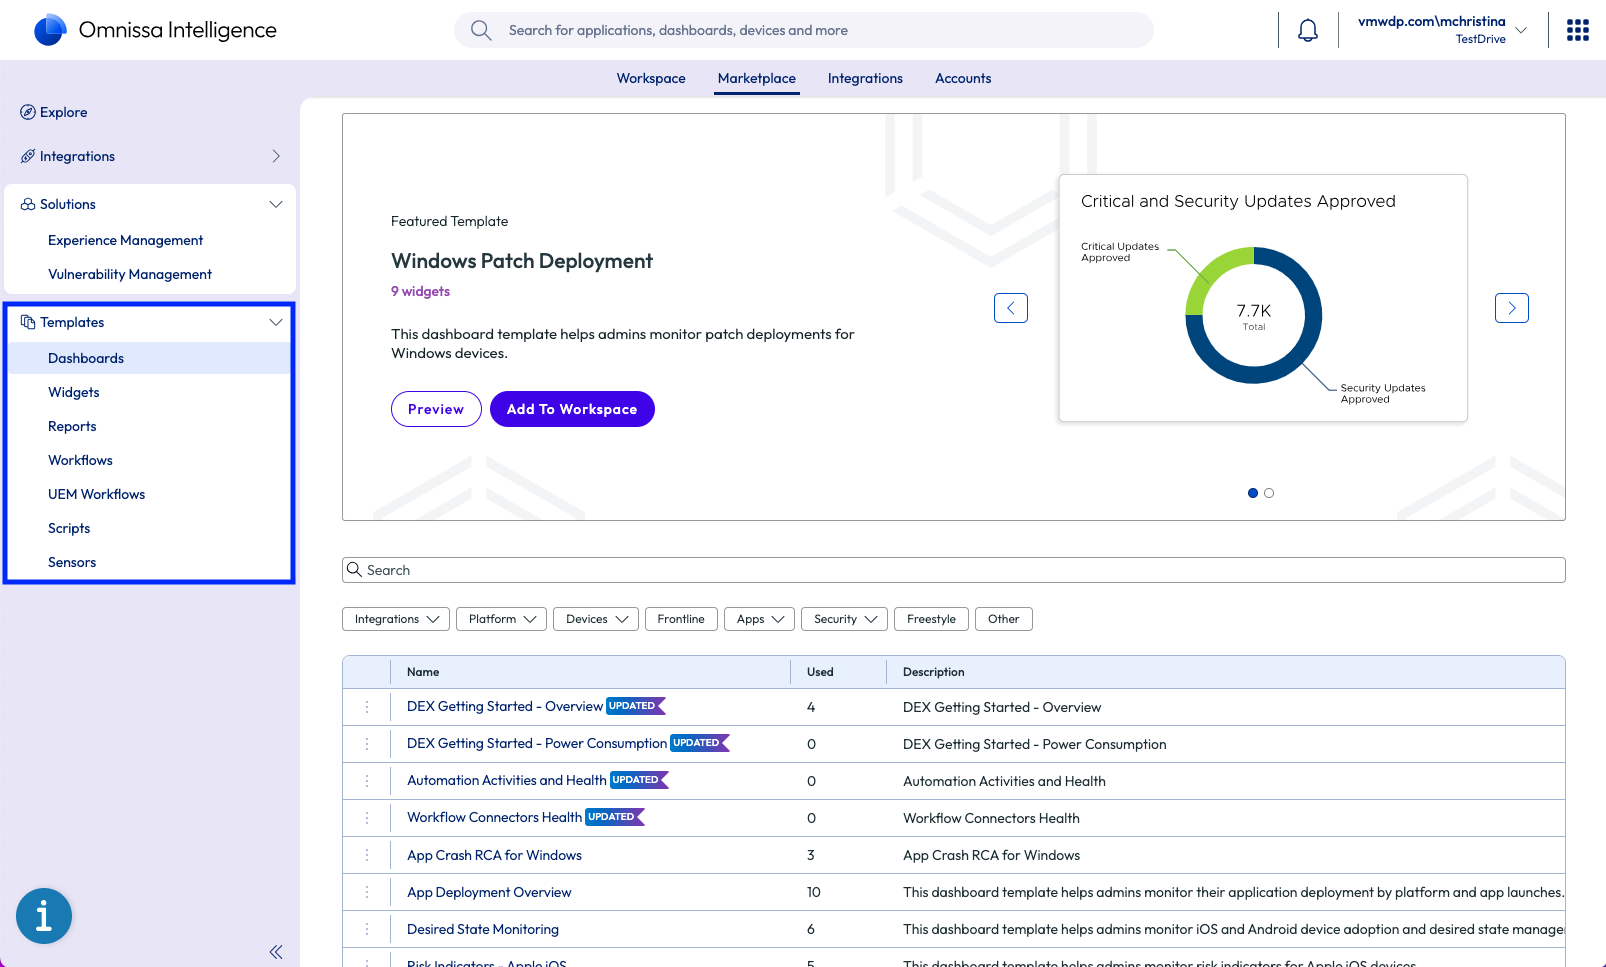
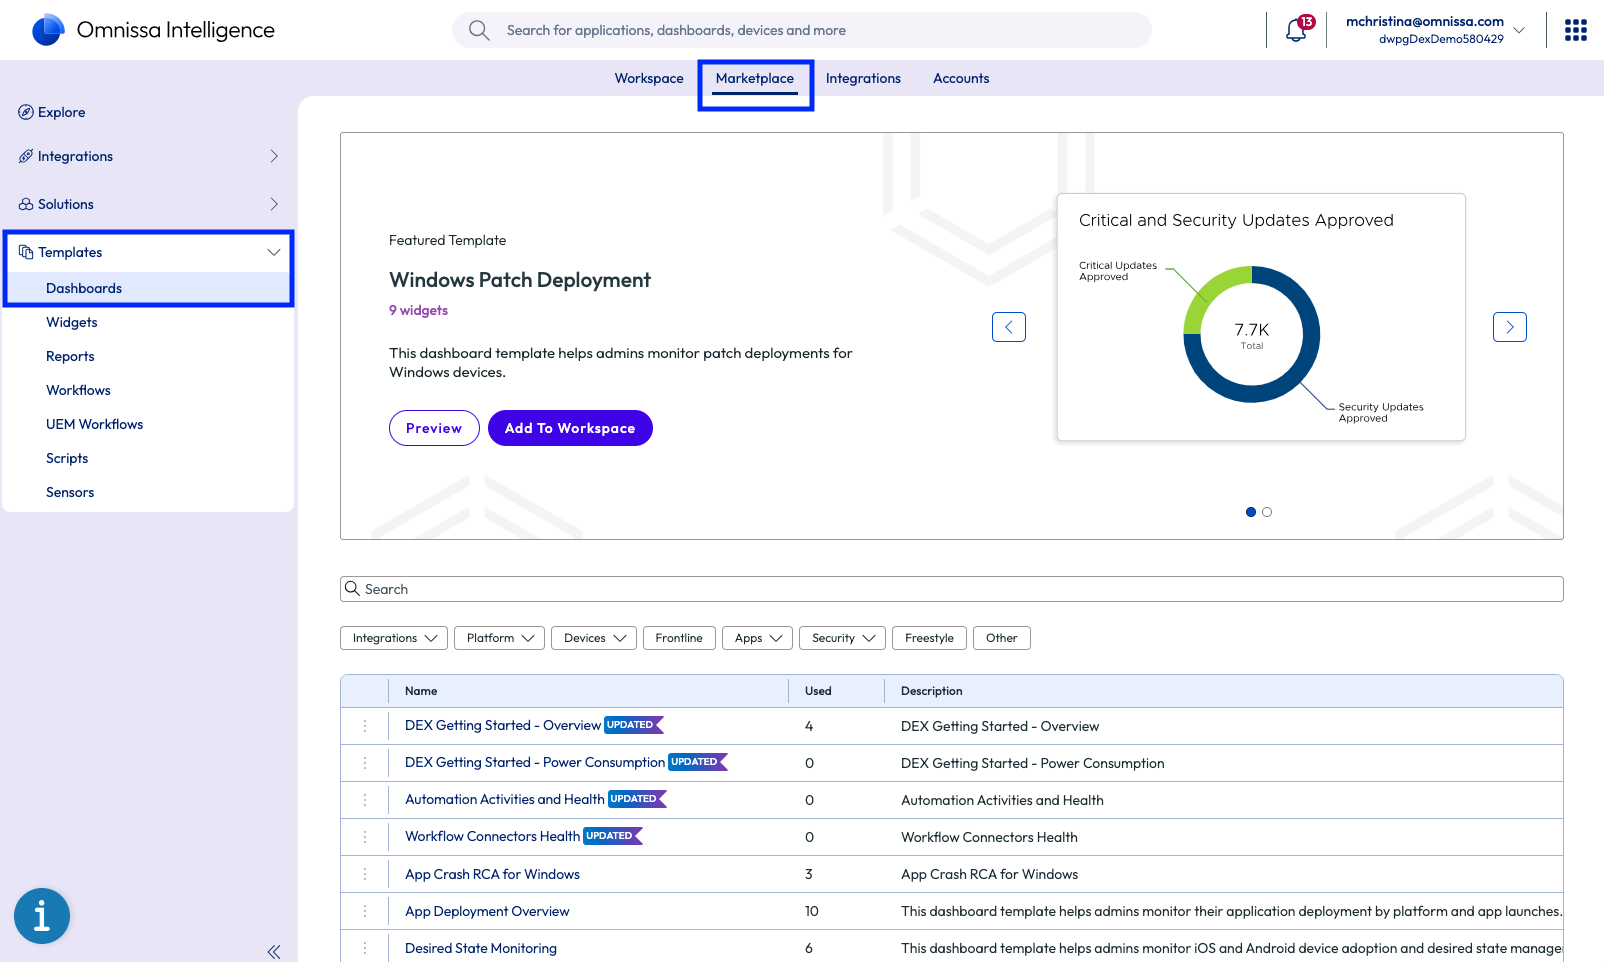
Figure 7: Templates in the Omnissa Marketplace
Dashboard templates
Pre-built dashboards are provided to get the admin up and running quickly for many use cases – such as proactive maintenance, shared device performance, root cause analysis and lost device mitigation – without building dashboards and widgets from scratch. In addition, dashboard templates provide examples for new Omnissa Intelligence users to understand data sources and tables to use when building widgets for dashboards. Although, for many organizations, the templates should be customized to be relevant for specific environments.
See this guide to learn more about Omnissa Intelligence reports and dashboards.
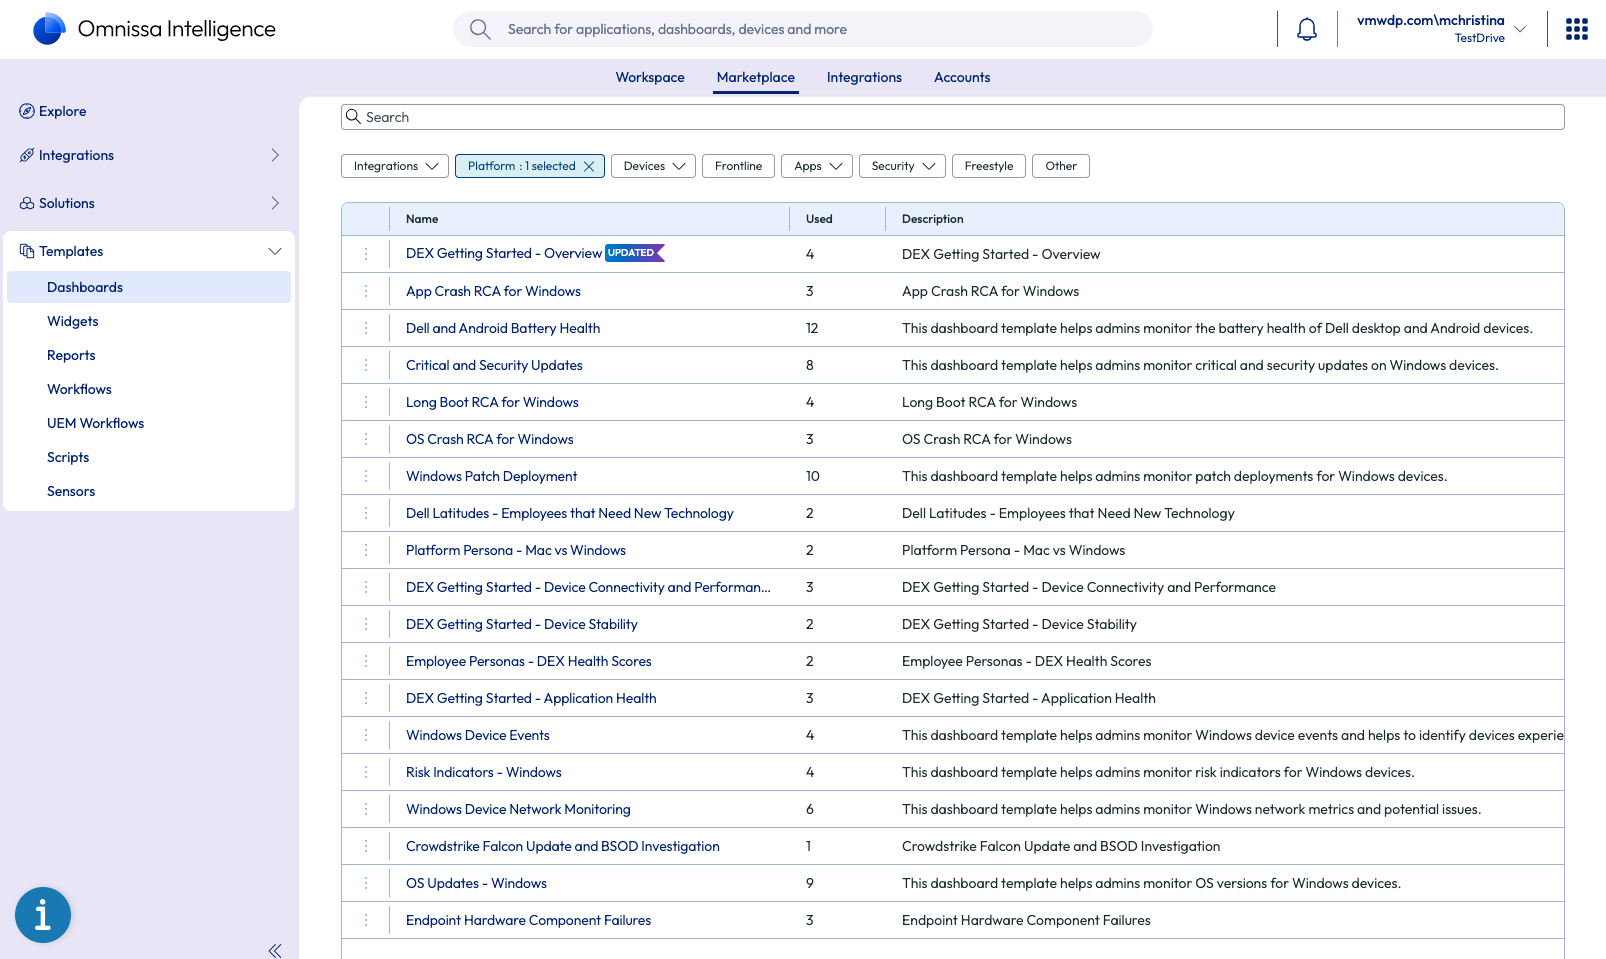
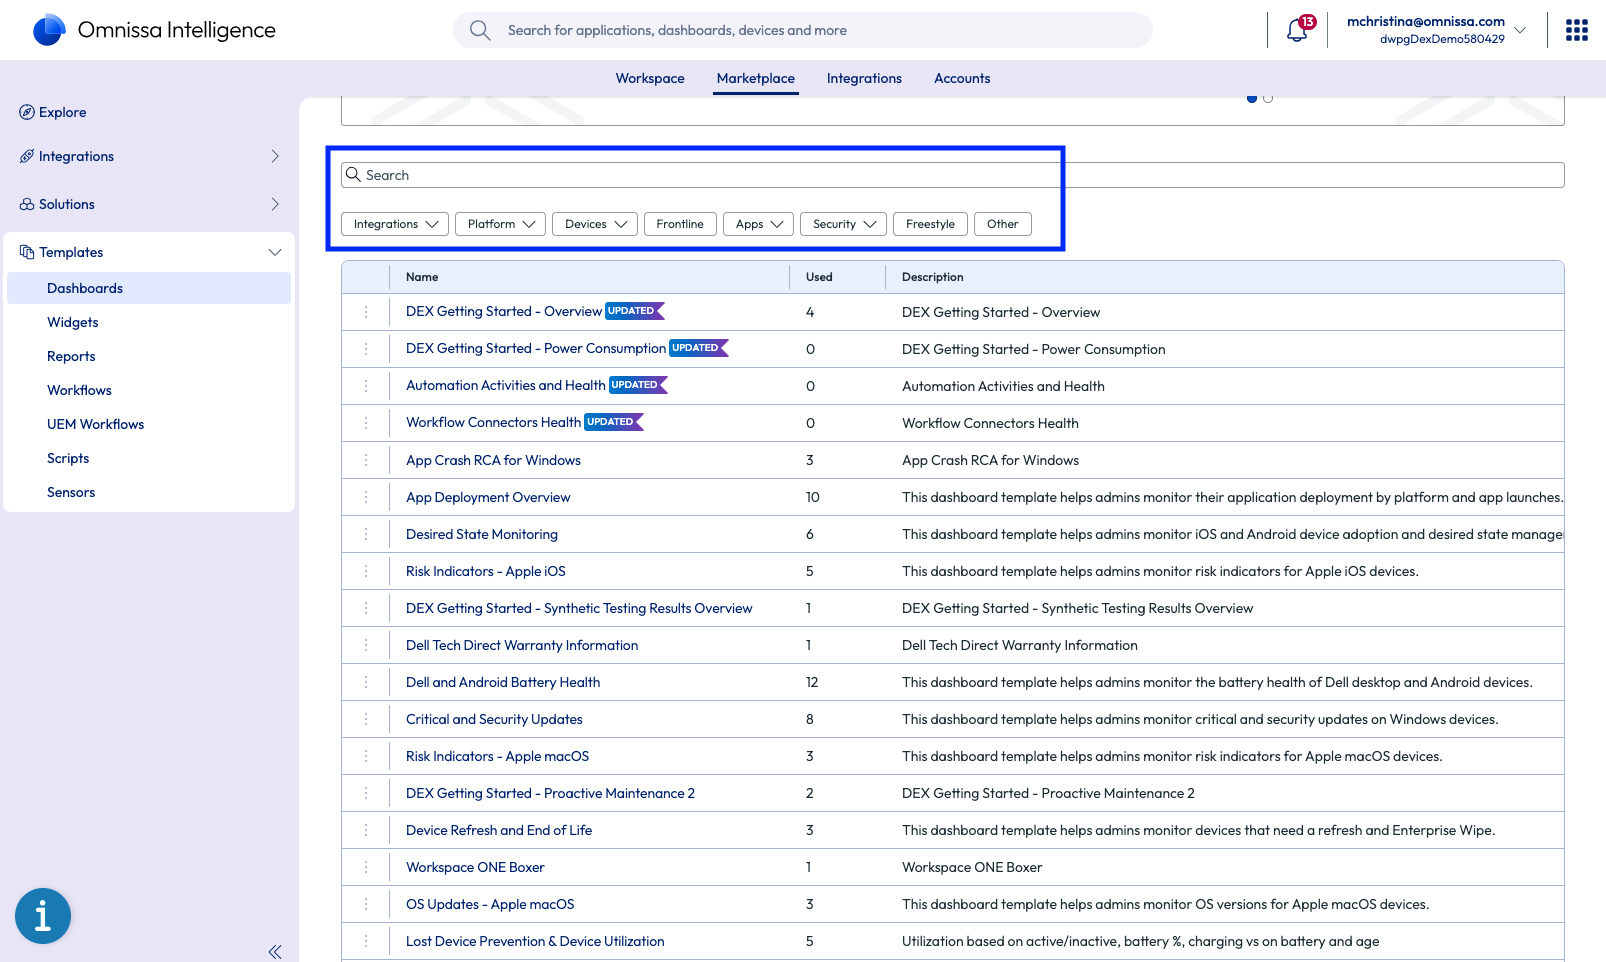
Figure 8: Example dashboard templates for Windows in the Workspace ONE Marketplace
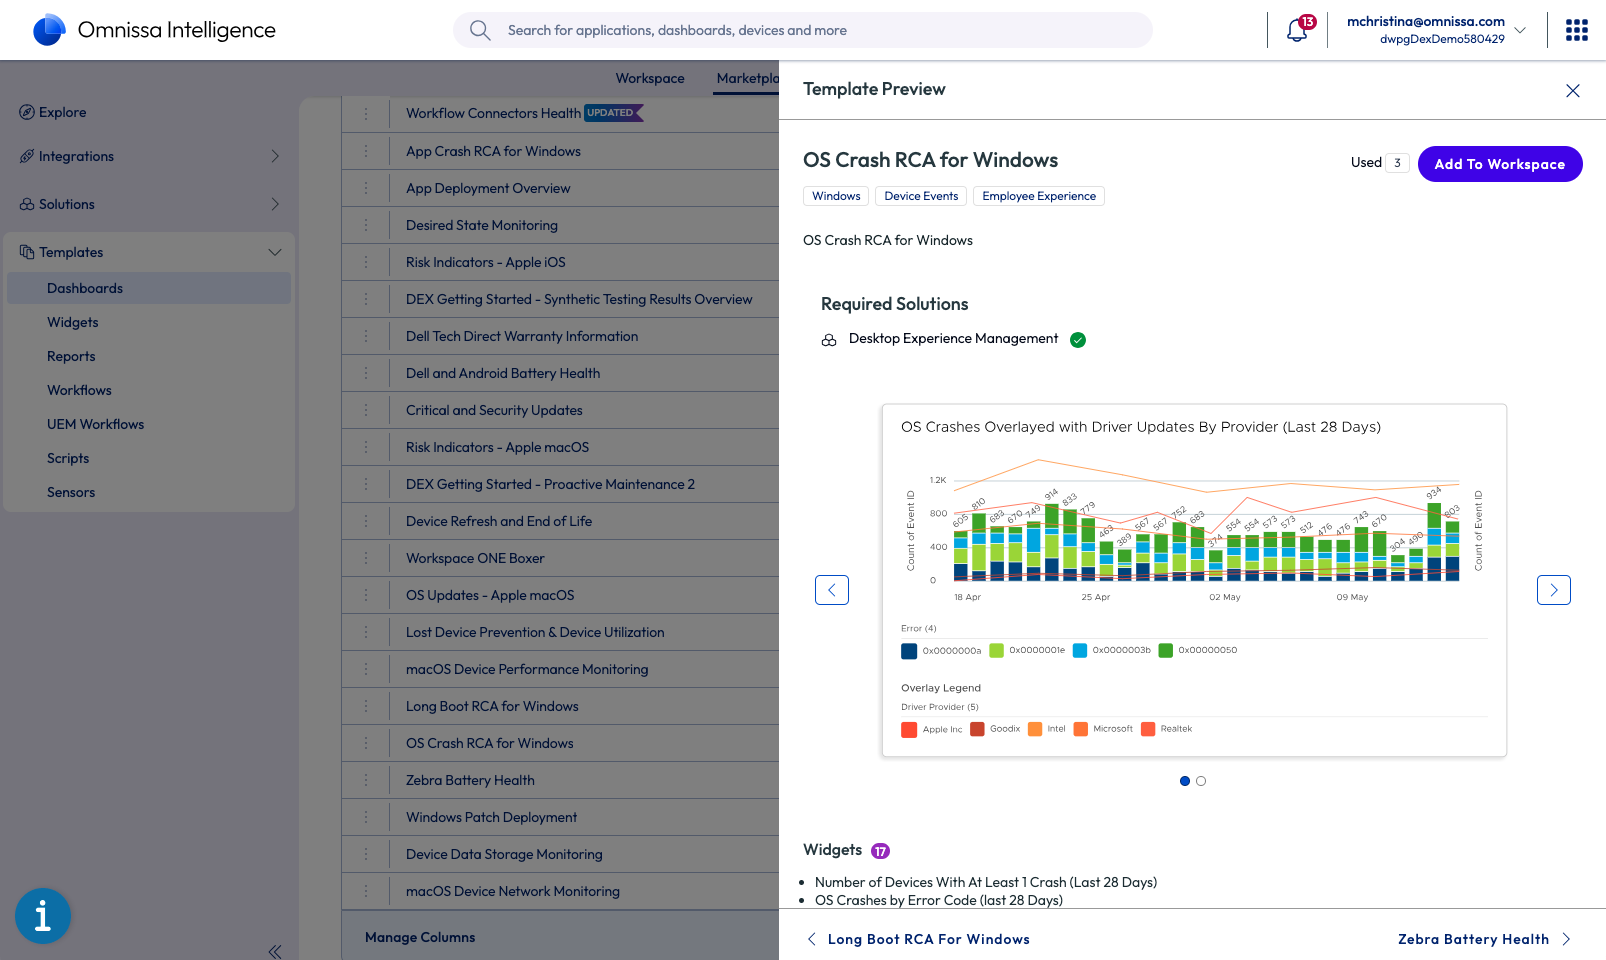
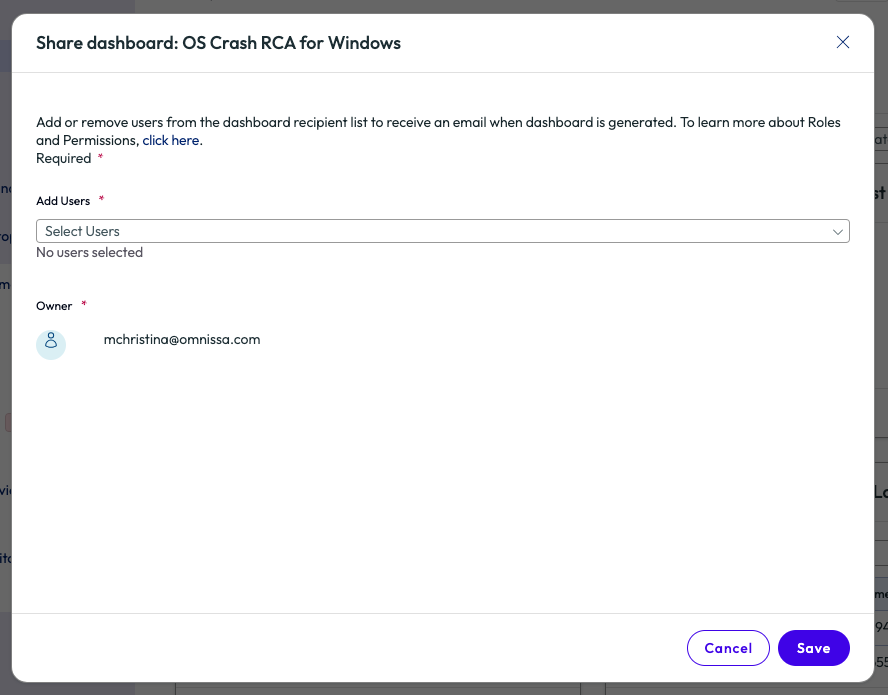
For example, the OS Crash RCA for Windows dashboard speeds up root cause analysis by correlating OS crash events with other data and possible causes, such as OS version, error code, driver updates, patches and app crashes.
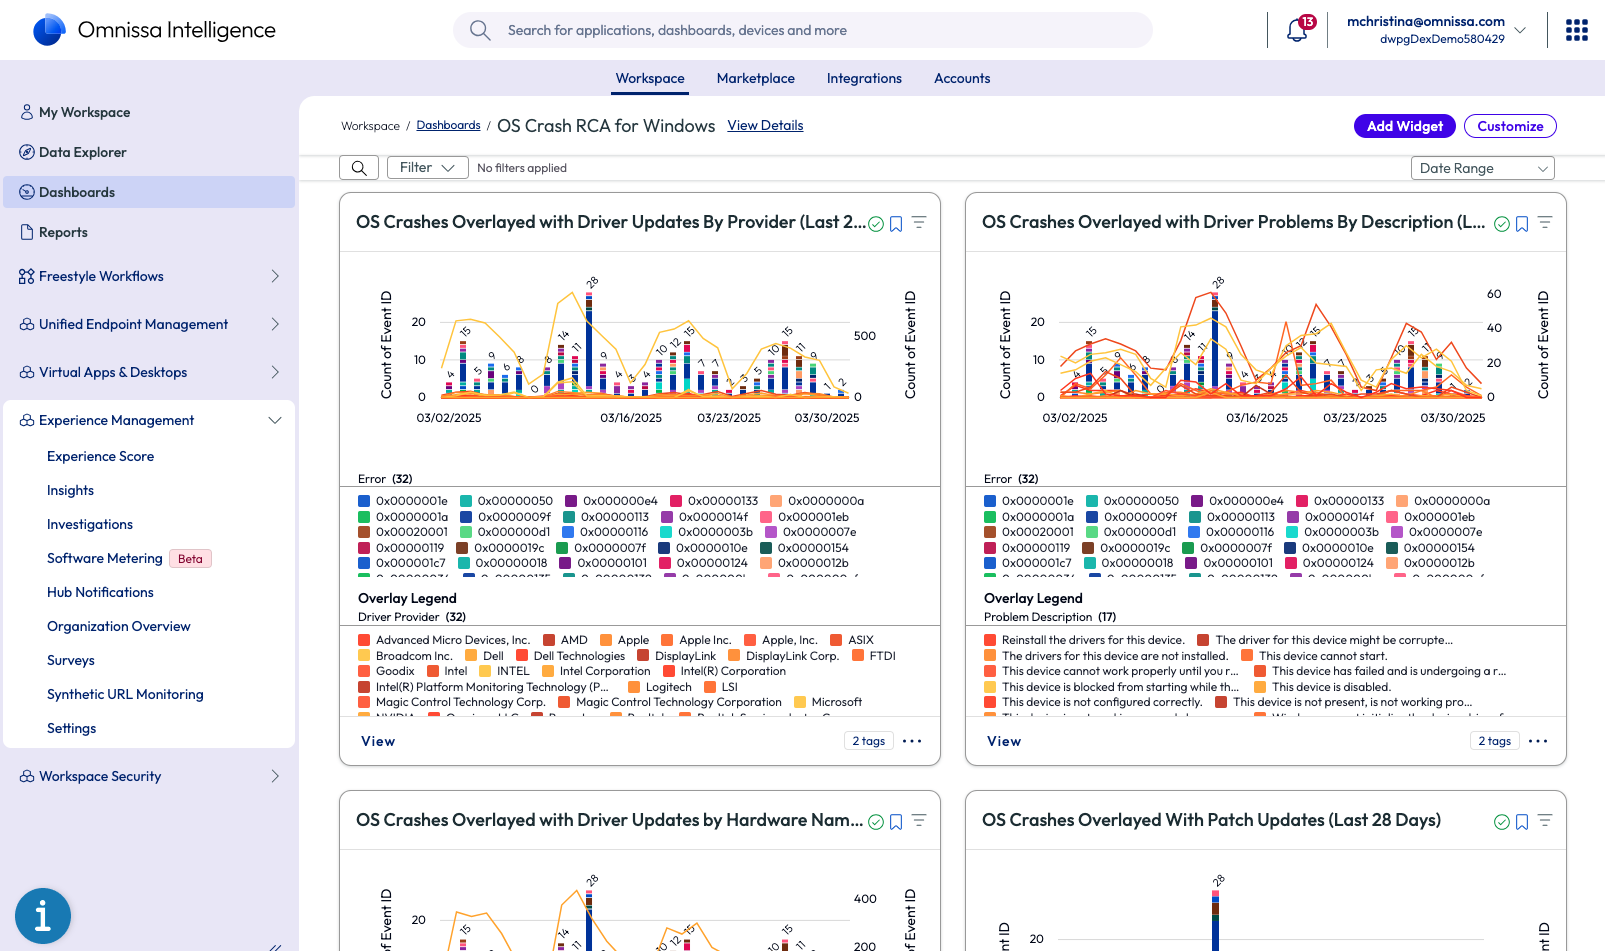
Figure 9: The OS Crash RCA for Windows pre-built dashboard found in the Omnissa Marketplace
To import a dashboard template from the Workspace ONE Marketplace into the personal workspace:
- In Workspace ONE Intelligence, navigate to Marketplace > Templates > Dashboards
- Either search for a template using the search bar or filter the templates. For example, filter by Platform (Windows, macOS, Android, iOS) or Integrations > Employee Experience.
- Select the name of the dashboard template. A panel will appear to the right. Click ADD TO WORKSPACE.
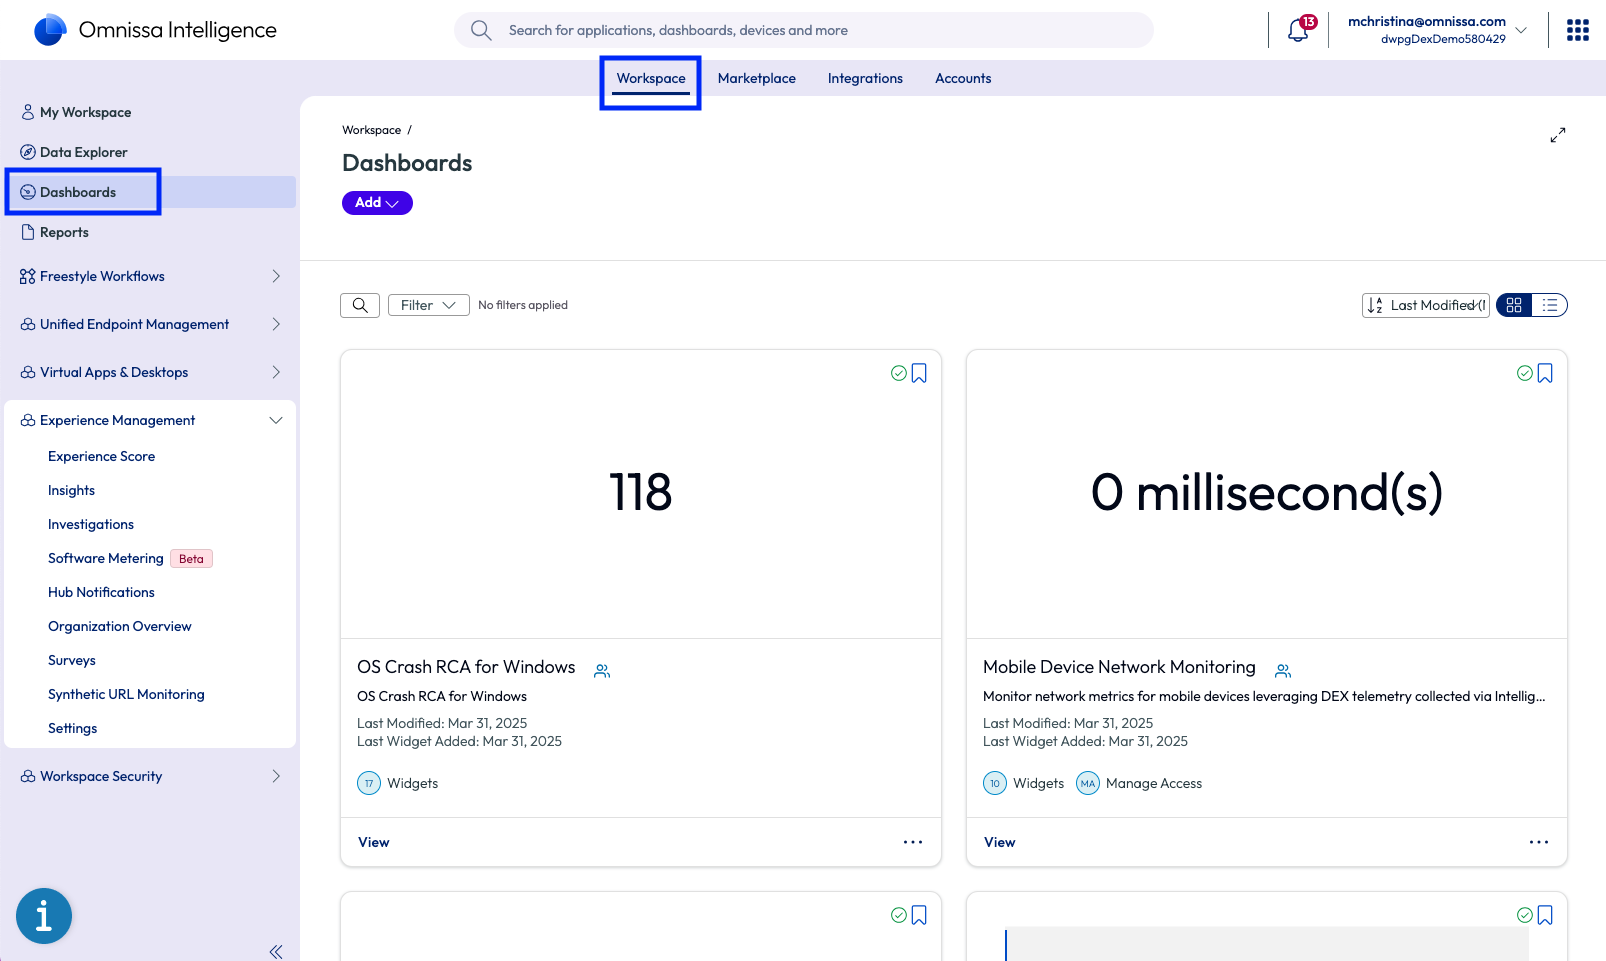
- Imported dashboard templates will appear under Workspace > Dashboards.
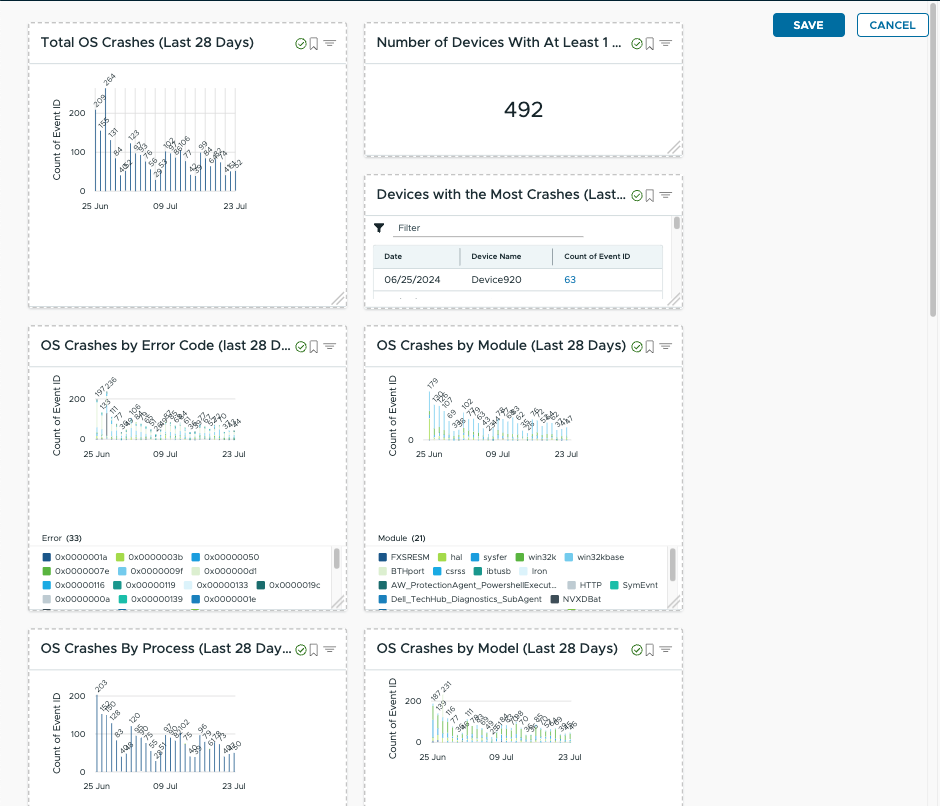
To rearrange the widgets on the dashboard template:
- Select CUSTOMIZE at the top of the dashboard.
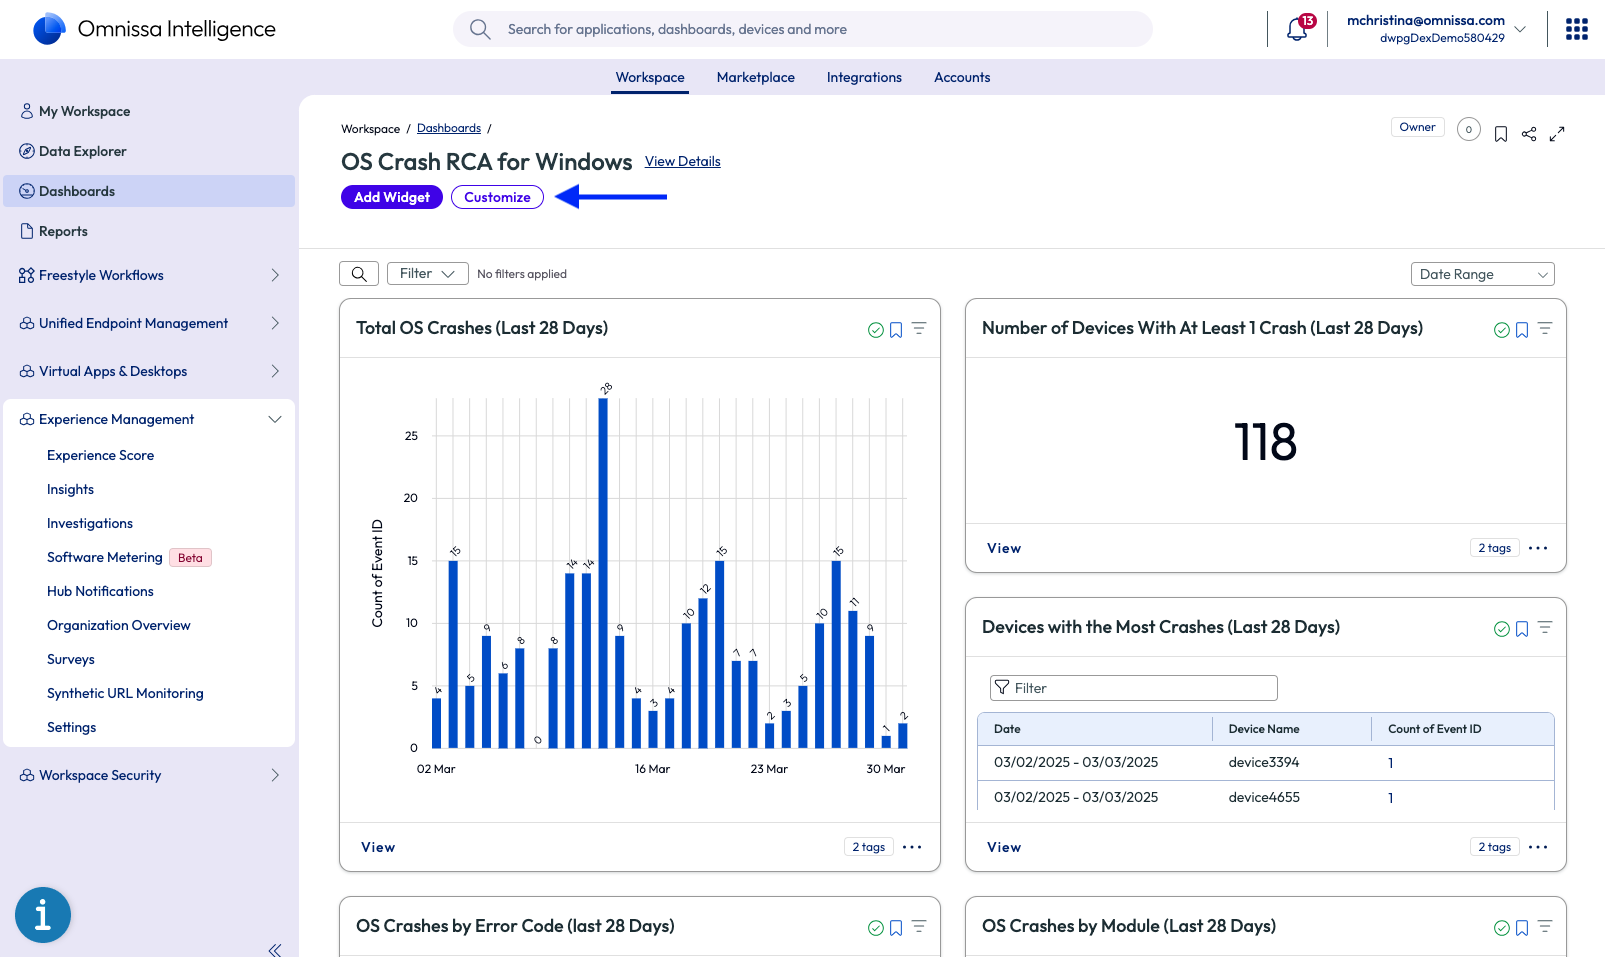
- Then drag the widgets and click SAVE.
To modify a widget on a dashboard template:
- Click the three-dot menu and the bottom right of the widget, then select Edit.
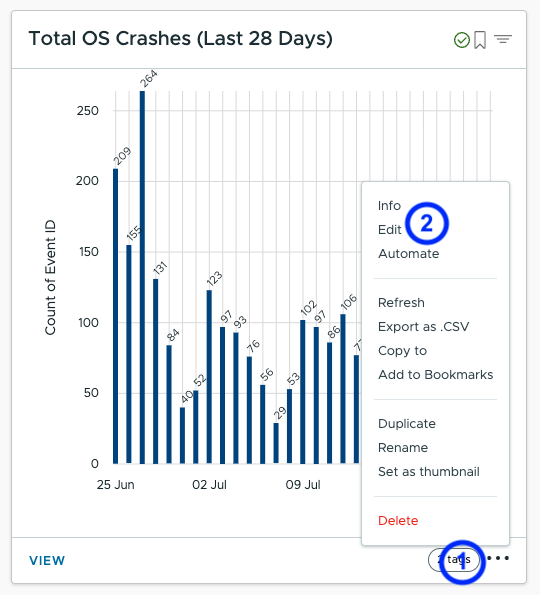
- The widget title, attributes and filters can be updated here. Then click SAVE.
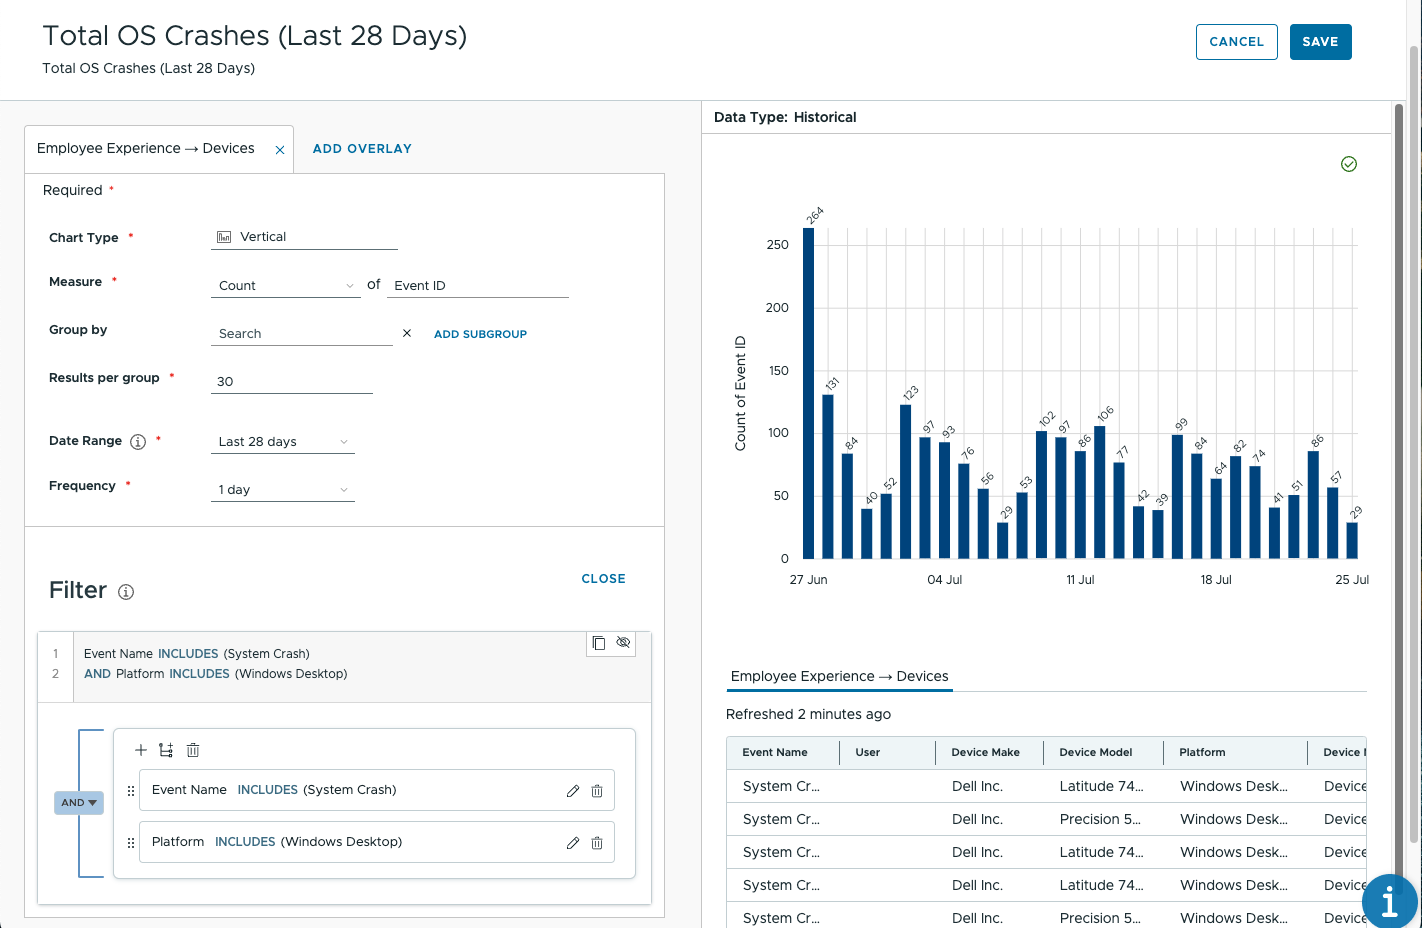
Note: UEM and Experience Management data cannot be joined, so be sure to create separate widgets for UEM and Experience Management data sources.
To share a customized dashboard with a colleague:
- Select the share icon in the top-right of the Intelligence console.
- Search for the user’s name.
Workflow templates
A library of pre-built Freestyle Workflows is available in the Omnissa Marketplace, including common alerts and automating device issue remediation.
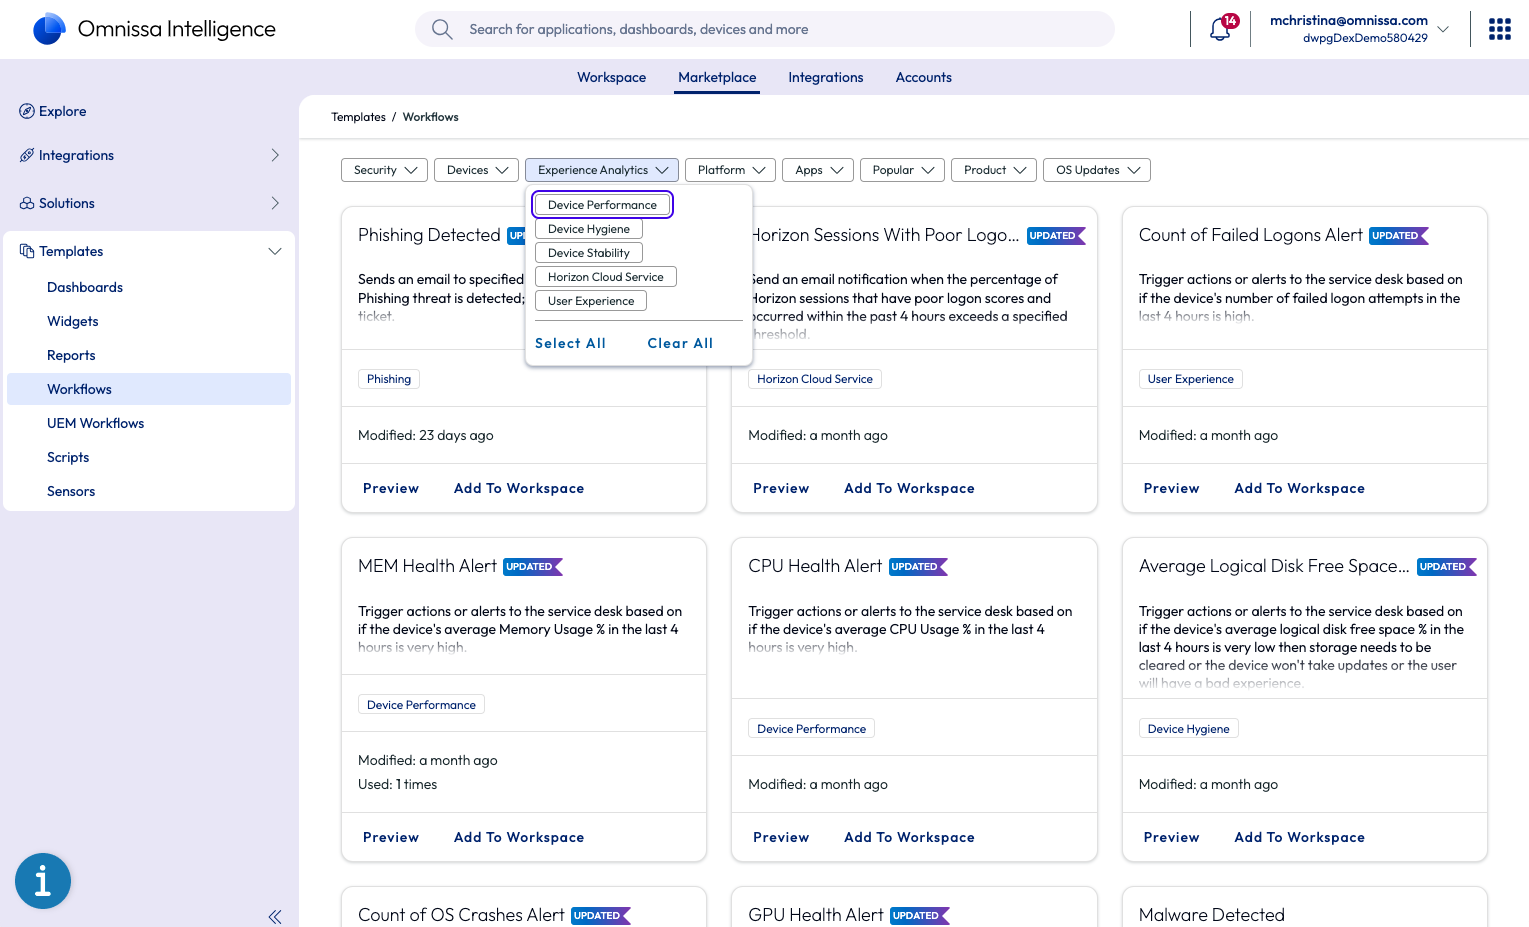
- To access the workflow templates, navigate to Marketplace > Templates > Workflows.
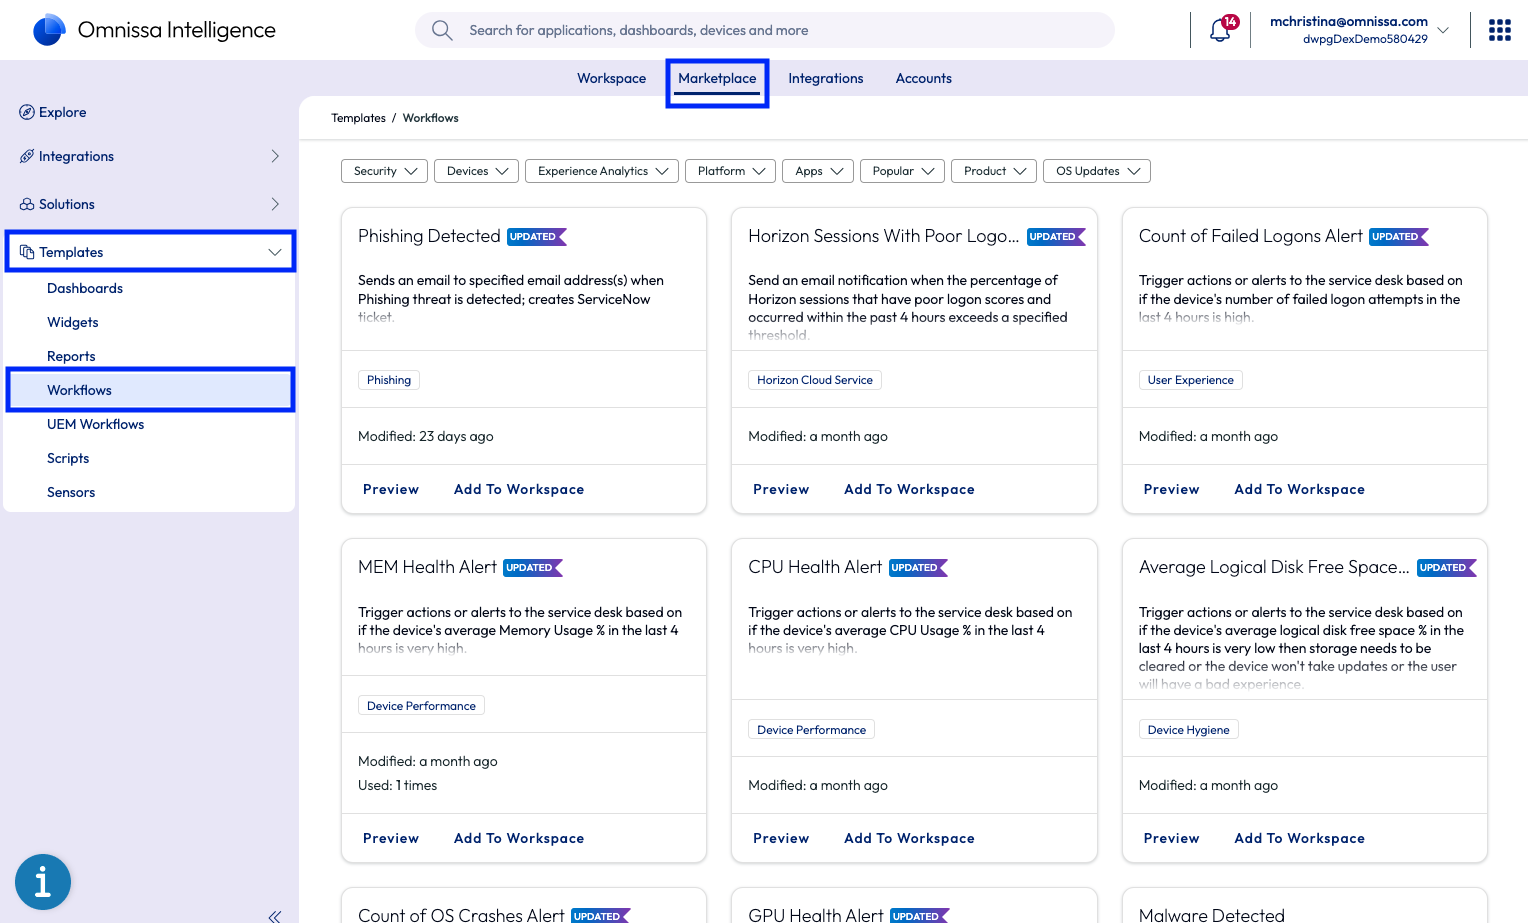
- Use the search field or the filters at the top to locate workflows for specific device platforms or use cases.
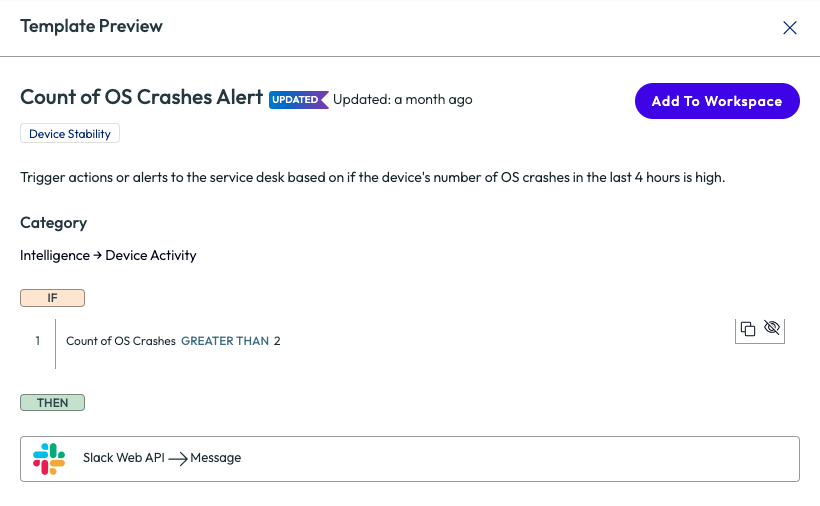
- Select PREVIEW on the workflow card to see the conditions and actions of the workflow.
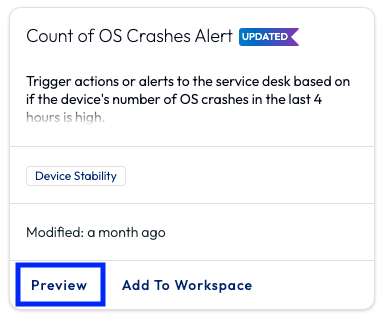
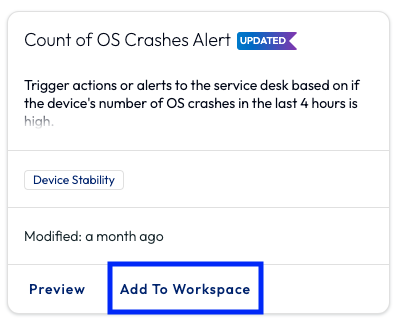
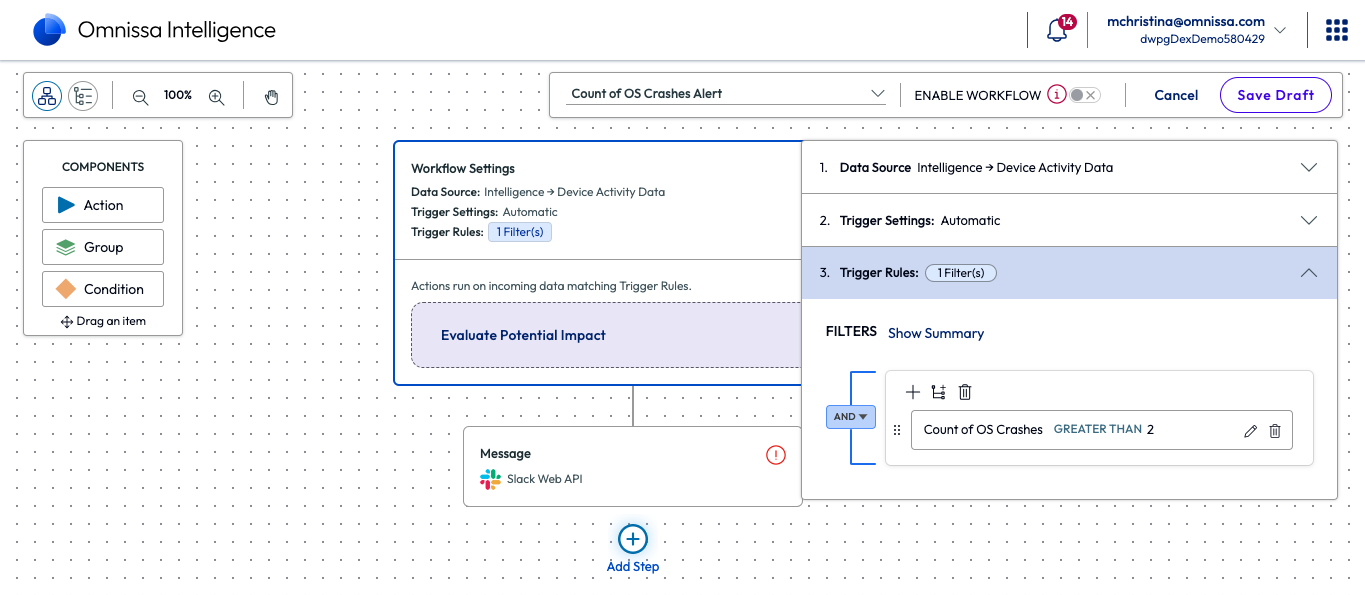
- Select ADD TO WORKSPACE to customize the workflow and save to the user’s workspace.
See the Freestyle Orchestrator product documentation for more information.
Sensors and Scripts
Custom sensors can be utilized for analytics in Omnissa Intelligence and to trigger automated workflows using Freestyle Orchestrator. In addition, scripts can be deployed based on various triggers to automate device issue remediation and provide proactive support. Pre-built sensors and scripts are available in the Omnissa Marketplace to quickly build common automated workflows.
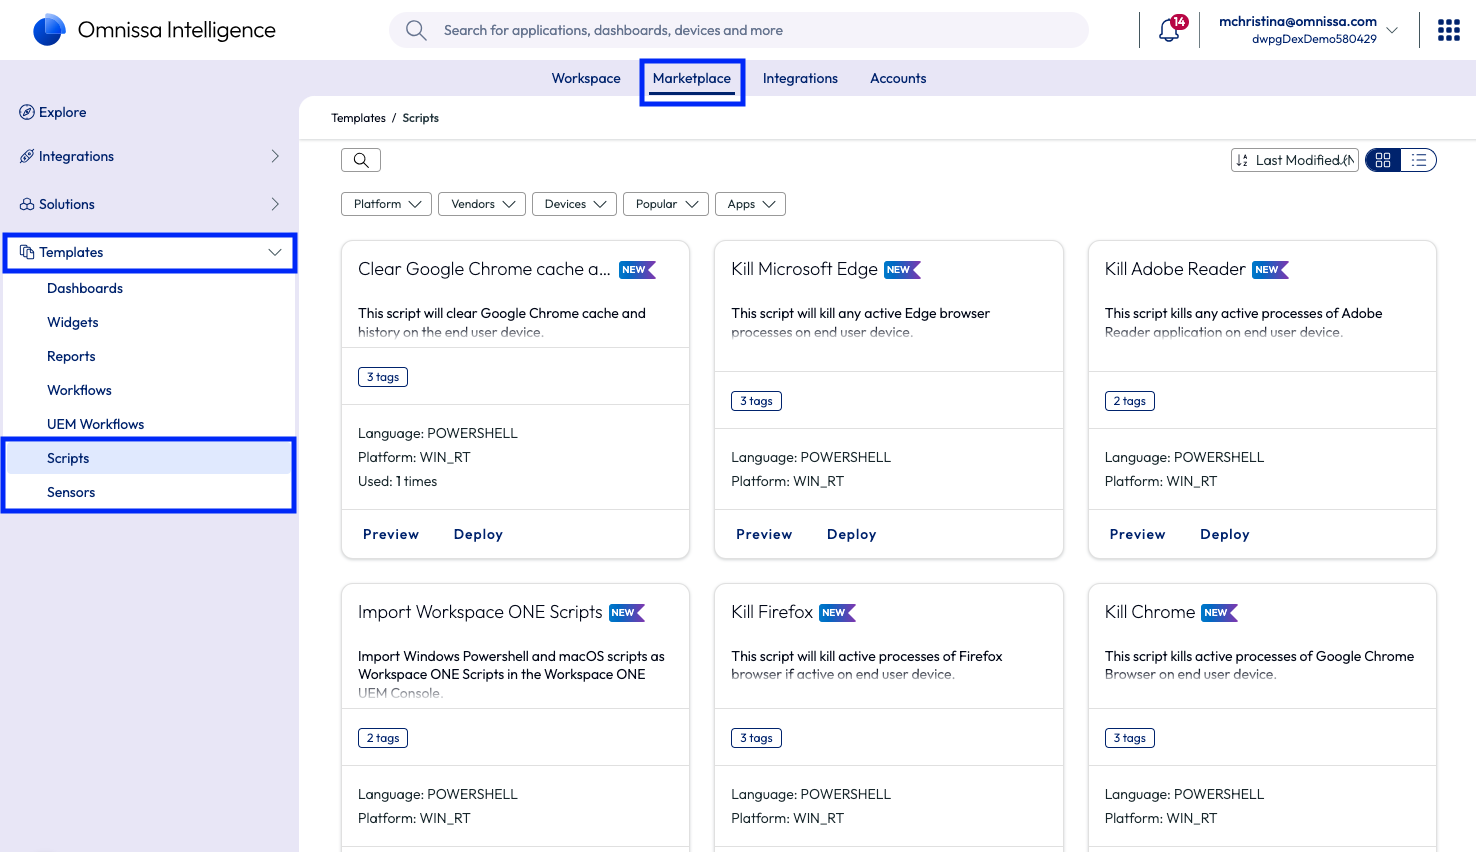
Figure 10: Templates for scripts and sensors in the Omnissa Marketplace used to create automated workflows
Tips & troubleshooting
Agent status & logs
Admins can use custom sensors to remotely retrieve the current status of the Experience Management agent on Windows devices to be displayed in Omnissa Intelligence or manually check to see if the Experience Management service, ws1etlm, is running on the device.
To assist with troubleshooting, the Experience Management Agent v22.6.0 and later includes a utility tool called tlmtool. Use the utility tool to set log levels and collect log files.
See the Experience Management for Windows documentation for troubleshooting details, including registry settings and the built-in utility tool.
Firewall rules
If some device telemetry does not seem to be captured in Omnissa Intelligence, check the firewall rules listed in the product documentation to ensure the correct URLs are trusted. Also, there is a list of URLs that must be trusted for ALL regions in addition to the URLs in the customer’s region.
Windows App Store
The Workspace ONE Intelligent Hub executable has a dependency on Windows App Store. Therefore, if the third-party management system is blocking the Windows App Store, Intelligent Hub will install but will not enroll or run properly.
Other supported DEX solution components
Omnissa Workspace ONE Assist
Workspace ONE Assist enables the service desk to remotely control Android, Windows, macOS, and Linux and remotely view iOS devices. Connect to devices in real-time to quickly troubleshoot and fix device, network, or application issues with tools like File Manager, Remote Shell, and Registry Editor. Leverage the Screen Draw feature to highlight items on the screen to guide colleagues through various tasks. View and export detailed device information and notify employees when their device screen is visible and enable the user to pause or end a remote session for enhanced privacy. In addition, securely access and service unattended corporate-owned frontline and kiosk devices between shifts or overnight, or easily record remote sessions for training purposes or escalations.
Workspace ONE Assist supports Windows devices in Hub Registered mode. To learn more, see the Workspace ONE Assist documentation.
To distribute the Workspace ONE Assist agent to devices using a third-party system, log into Omnissa Customer Connect and download the Assist agent here.
Omnissa Workspace ONE ITSM Connector
The Workspace ONE ITSM Connector enables service desk staff to view Omnissa Workspace ONE UEM device data and Omnissa Intelligence analytics, plus access scripts and workflows for automated remediation, without leaving the ITSM console. Details for any device in UEM, including Hub Registered mode devices, can be viewed directly in the ServiceNow incident screen.
See these resources to learn more about the Workspace ONE ITSM Connector:
Summary and additional resources
Document summary
The Omnissa DEX Solution enables end-to-end delivery, monitoring, analysis and remediation of the employee’s digital experience. Most of the DEX functionality does not require full management of Windows devices by Workspace ONE UEM but supports third-party managed devices as well. This guide walked through how to enable and enroll Windows endpoints in Hub Registered mode and the DEX capabilities available for third-party managed Windows devices.
Additional resources
To learn more about the Omnissa DEX solution, explore the following resources:
Changelog
The following updates were made to this guide:
| Date | Description of Changes |
| 2025/04/02 |
|
| 2024/09/26 |
|
About the author and contributors
- Christina Minihan, Product Specialists, Workspace ONE Team Lead, Omnissa.
Many thanks to these contributors:
- Eri Ang, Staff Specialist Solution Engineer
- Darryl Miles, Staff Specialist Solution Engineer
Feedback
Your feedback is valuable. To comment on this paper, either use the feedback button or contact us at tech_content_feedback@omnissa.com.