

Omnissa DEX solution for third-party managed macOS devices
Overview
With hybrid work models becoming the norm rather than the exception, IT organizations face increasing pressure to understand and improve the technology experiences of their employees. Poor device performance, unreliable applications, and connectivity issues don't just frustrate end users; they erode productivity, increase support costs, and contribute to employee disengagement.
Addressing these challenges requires more than reactive troubleshooting. IT teams need real-time visibility into how employees are experiencing their devices and applications, along with the tools to identify root causes and act before issues escalate. This is the core objective of the Omnissa® Workspace ONE™ platform.
The Omnissa Digital Employee Experience (DEX) solution brings together Workspace ONE® Intelligent Hub™, Workspace ONE Hub Services™, Workspace ONE Unified Endpoint Management™, Horizon®, and Omnissa Access™ to deliver a unified experience layer across the employee lifecycle. IT teams gain a comprehensive view of device health, application performance, and user sentiment — all integrated within a single platform.
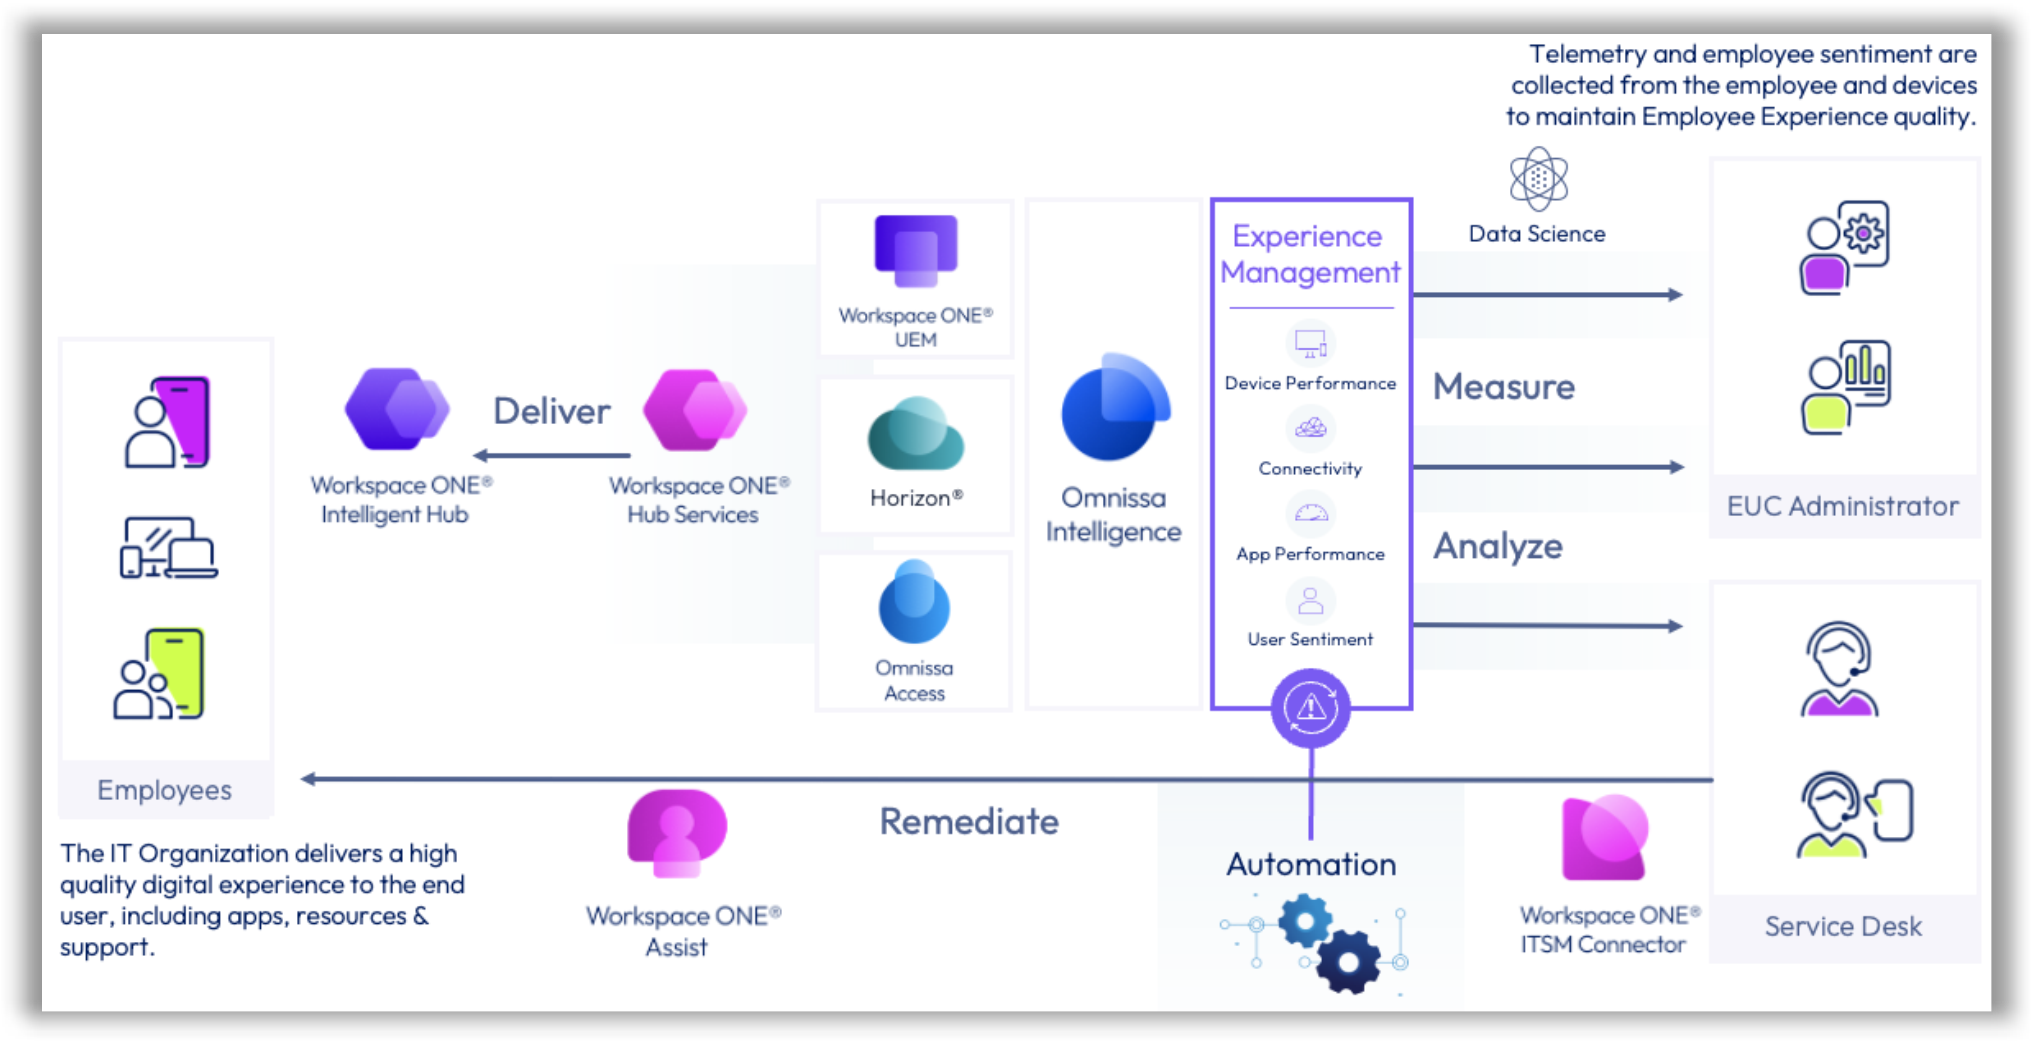
Figure 1: Omnissa DEX solution overview
At the heart of this capability is Workspace ONE Experience Management™, powered by the Omnissa Intelligence™ data service. Experience Management collects and correlates telemetry from endpoints to generate UX Scores, surface performance anomalies using machine learning, and enable IT to take targeted action — whether through automated remediation, guided helpdesk workflows, or employee self-service tools in Intelligent Hub.
Critically, the full value of Omnissa DEX is not limited to devices fully managed by Workspace ONE UEM. macOS devices managed by third-party MDM solutions can participate through a lightweight Hub Registered mode enrollment. This approach allows organizations to gain DEX telemetry, UX Score insights, and Hub Services digital workspace capabilities across their macOS fleet without changing their existing management platform or re-enrolling devices.
Purpose of this guide
This guide walks through the steps required to extend Workspace ONE Experience Management capabilities to macOS devices that are managed outside of Workspace ONE UEM. The following covers how to configure Hub Registered mode in Workspace ONE UEM, prepare and deploy a silent registration script through an existing MDM, and deploy the Experience Management agent to begin collecting telemetry.
The configuration steps in this guide use Microsoft Intune as an example MDM platform. Administrators using another supported MDM can apply equivalent steps using the tools available in their platform.
To explore all available device management modes in Workspace ONE UEM, refer to the official Workspace ONE UEM documentation.
Audience
This guide is written for IT administrators and platform engineers responsible for endpoint management, employee experience, or Workspace ONE deployments. Working knowledge of macOS endpoint administration and at least one third-party MDM platform is assumed. Familiarity with Workspace ONE UEM and Omnissa Intelligence will be helpful.
Prerequisites
Before beginning, confirm that a Workspace ONE UEM tenant is available and that Omnissa Intelligence has been provisioned and enabled for your organization.
Reviewing the Experience Management prerequisites in the Omnissa Intelligence product documentation is also recommended to ensure your environment meets all licensing and configuration requirements.
The following components must meet minimum version or configuration requirements:
| Component | Minimum Version / Configuration |
| Workspace ONE UEM | Version 2607 or later |
| Workspace ONE Intelligent Hub | Version 26.06 or later |
| macOS | macOS 12 (Monterey) or later |
| Microsoft Intune | Access to the Intune Admin Center with appropriate administrative permissions |
| Intune Company Portal | Installed on all target Mac devices |
| Workspace ONE UEM Staging Account | A staging user account configured in Workspace ONE UEM |
| Workspace ONE UEM User Configuration | SAM Account Name configured for users to support device checkout |
Important: The SAM Account Name attribute must be configured in Workspace ONE UEM to enable successful user checkout and device assignment.
Enable Experience Management in Intelligence
DEX telemetry collection requires Experience Management to be enabled in Omnissa Intelligence before any data is gathered from devices. Complete the steps below to activate these capabilities in your tenant. For more information about Experience Management, check out this Getting Started guide.
- In Omnissa Intelligence, navigate to the Marketplace, then select Solutions.

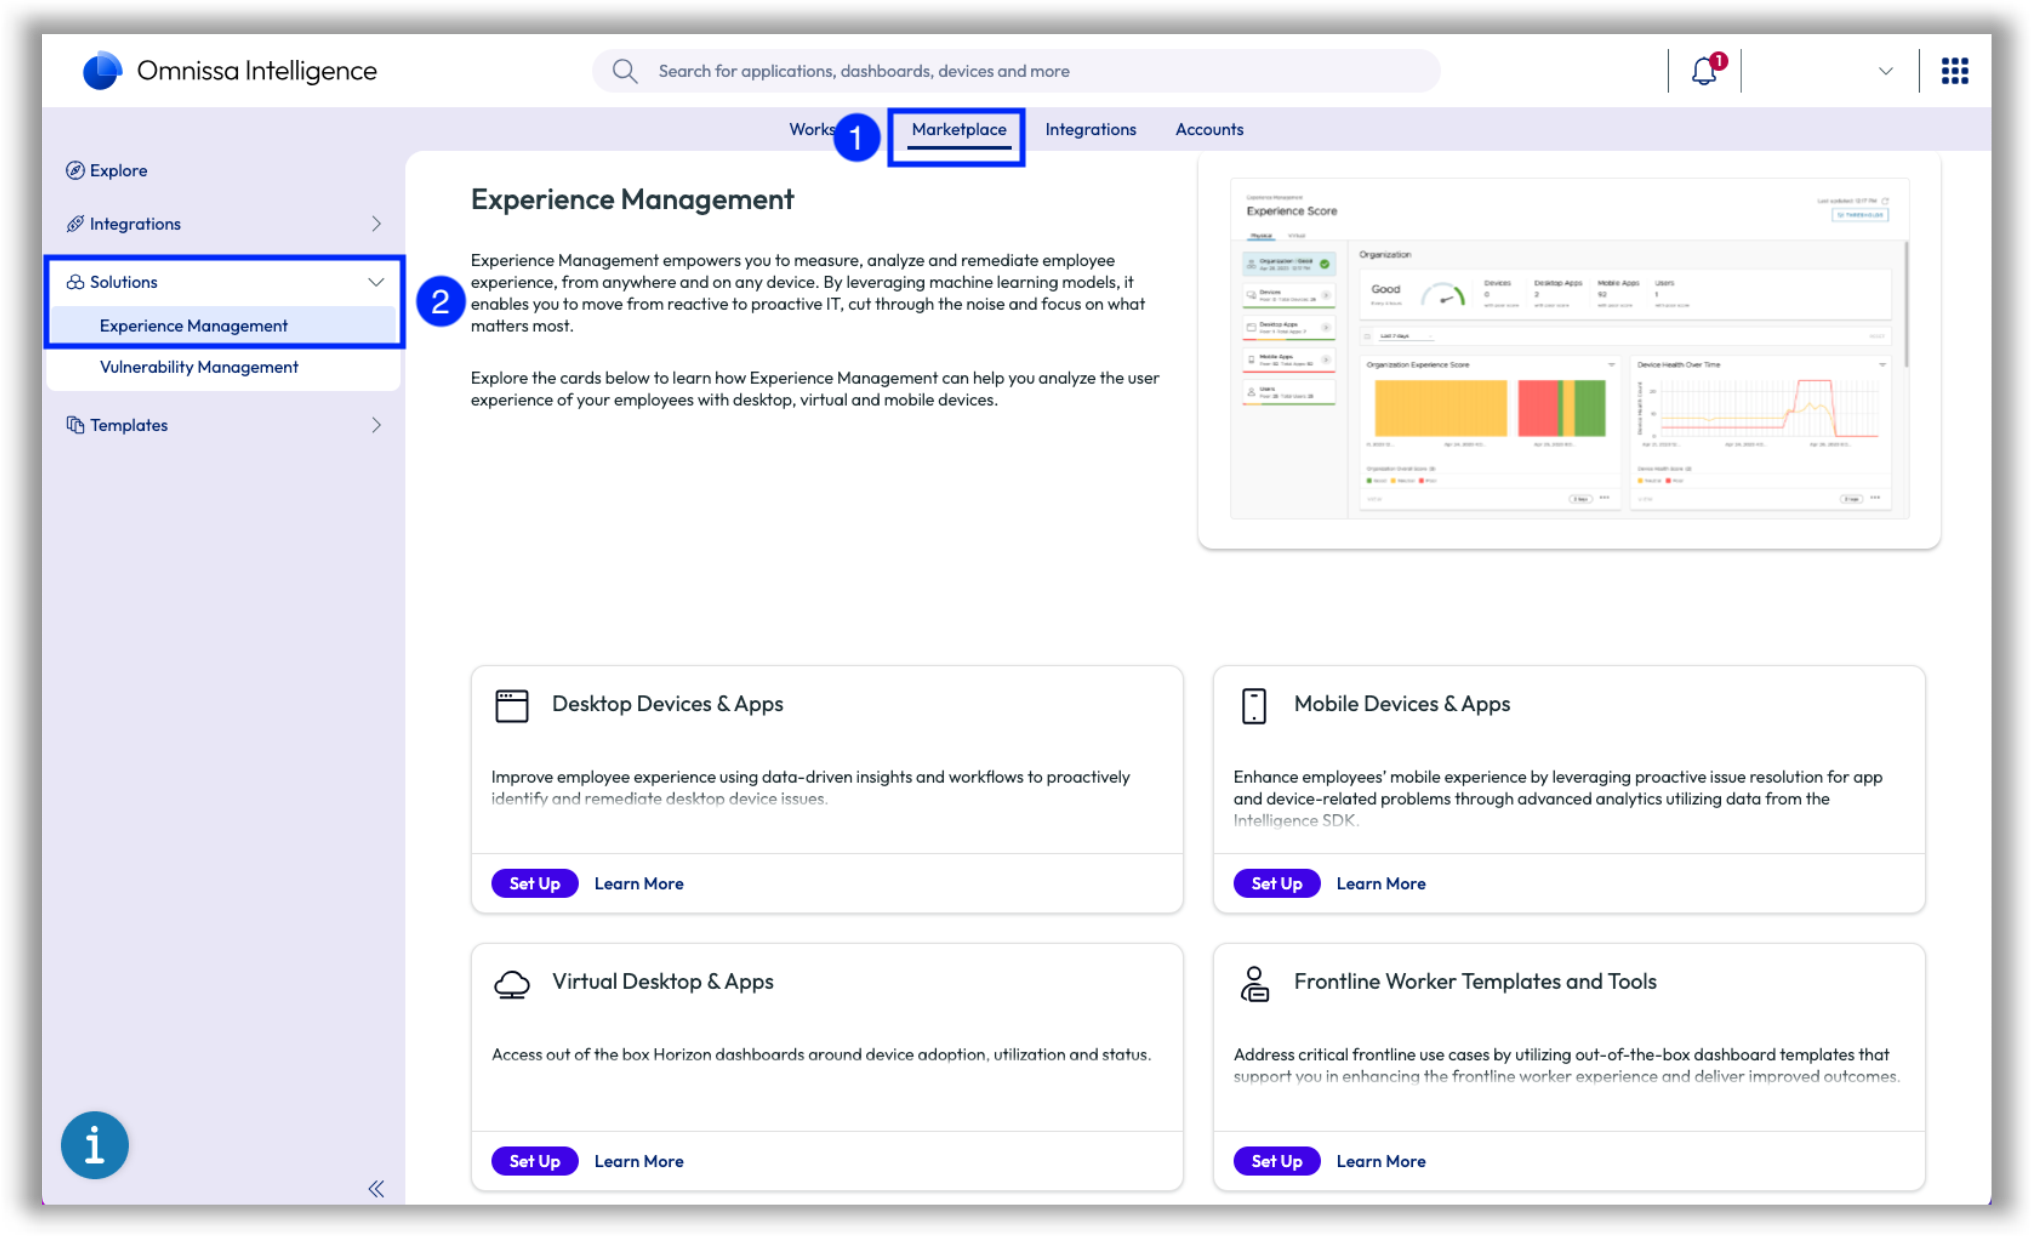
Figure 2: Omnissa Intelligence Marketplace setup page for Experience Management
The Solutions landing page serves as the entry point for enabling Experience Management. It also provides access to related documentation, videos, and feature resources.
Experience Management is organized into four capability areas:
- Desktop Devices & Apps – Covers Windows and macOS devices and applications
- Mobile Devices & Apps – Covers iOS and Android devices and applications
- Virtual Desktop & Apps – Covers Horizon virtual desktops and applications
- Frontline Workers Add-on – Pre-built templates designed for frontline worker use cases
- To enable desktop experience telemetry for macOS, click SET UP on the Desktop Devices & Apps card.
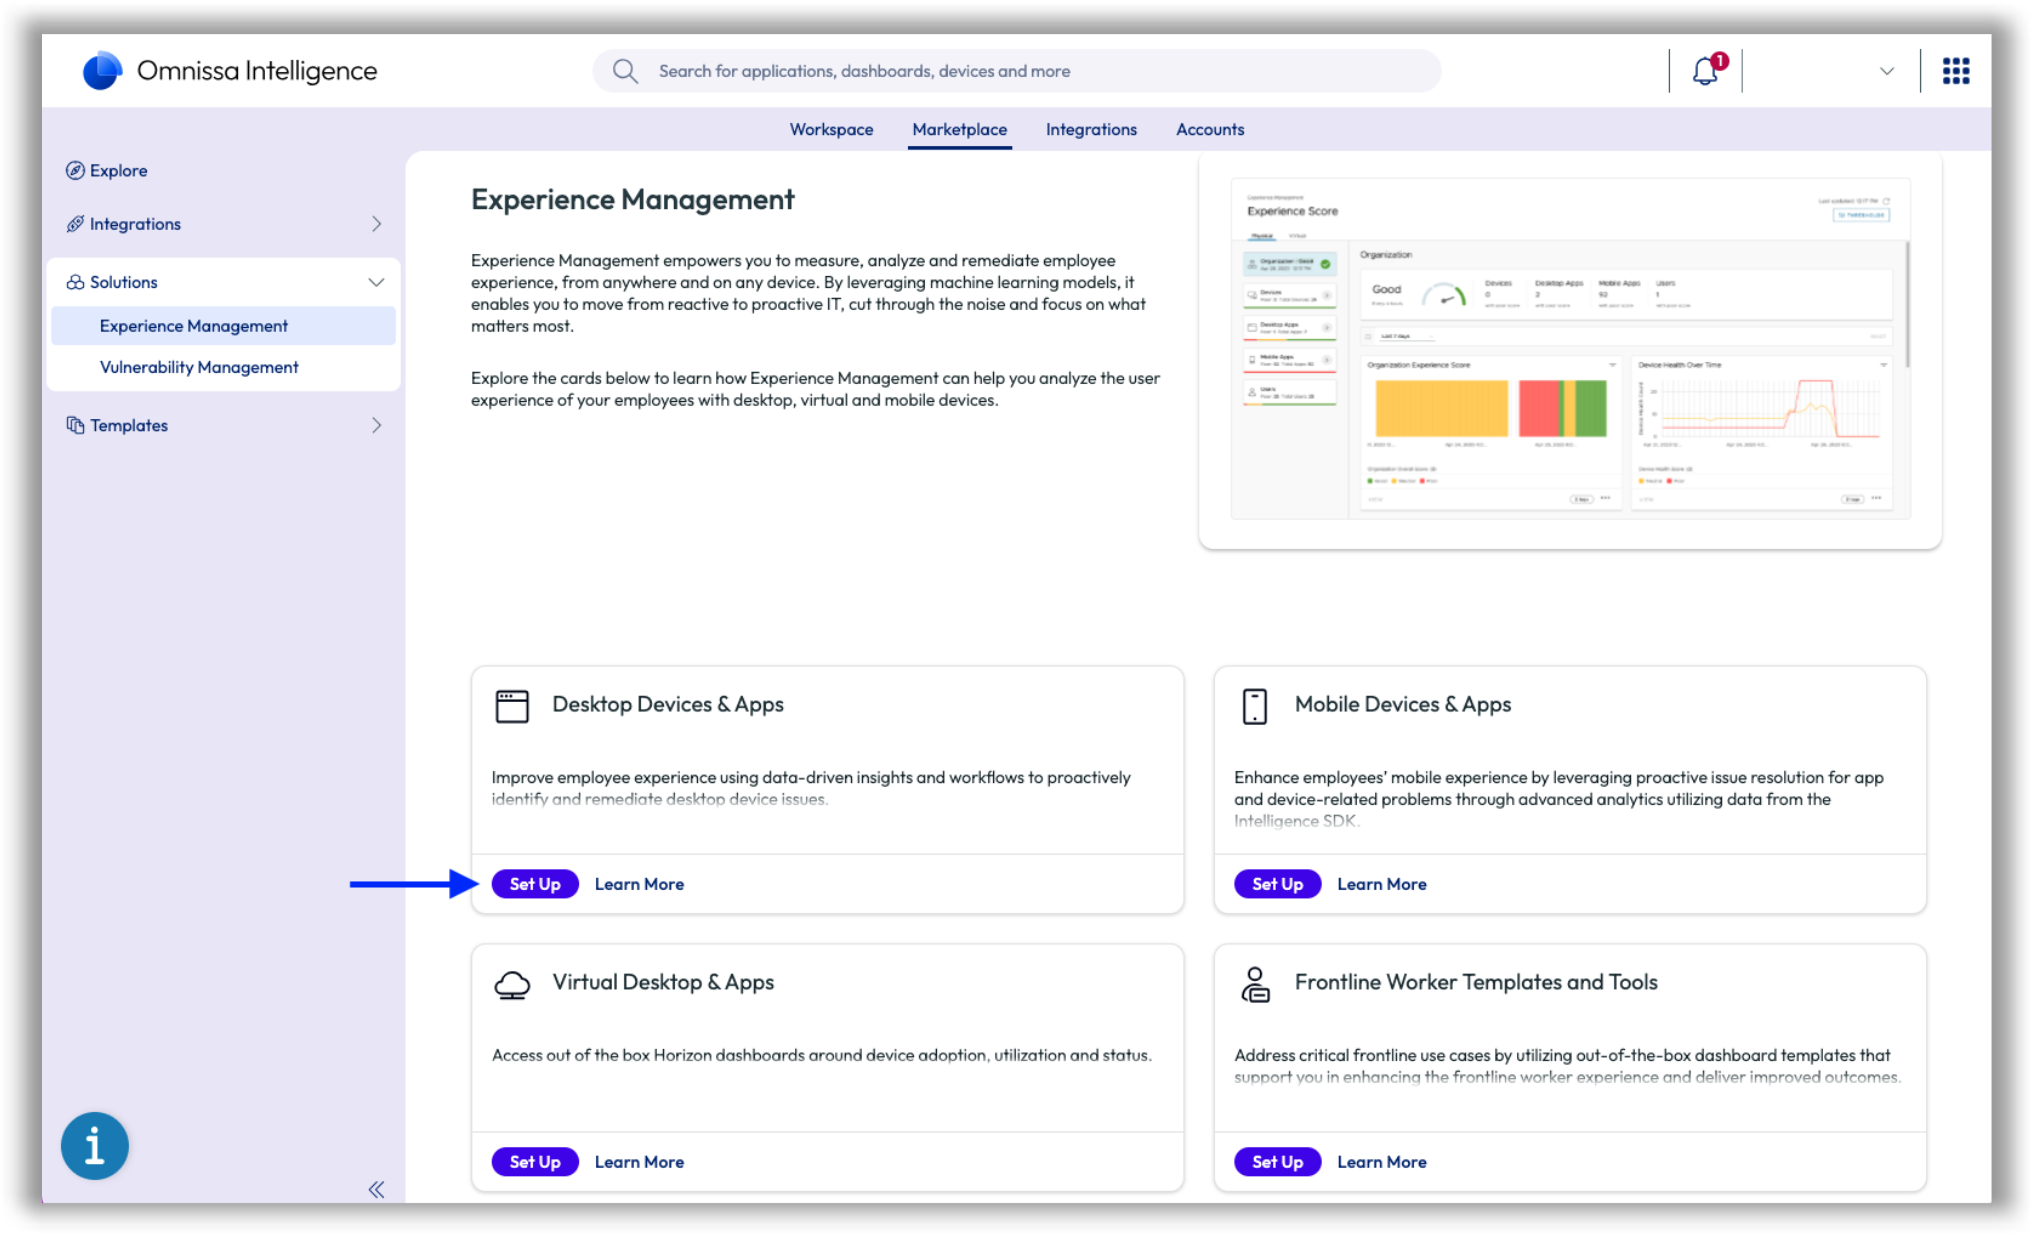
Figure 3: Desktop Devices & Apps > Set Up button highlighted
- On the next screen, confirm that the Workspace ONE UEM connection is authorized and click NEXT. This connection allows Omnissa Intelligence to receive device and application data from UEM.
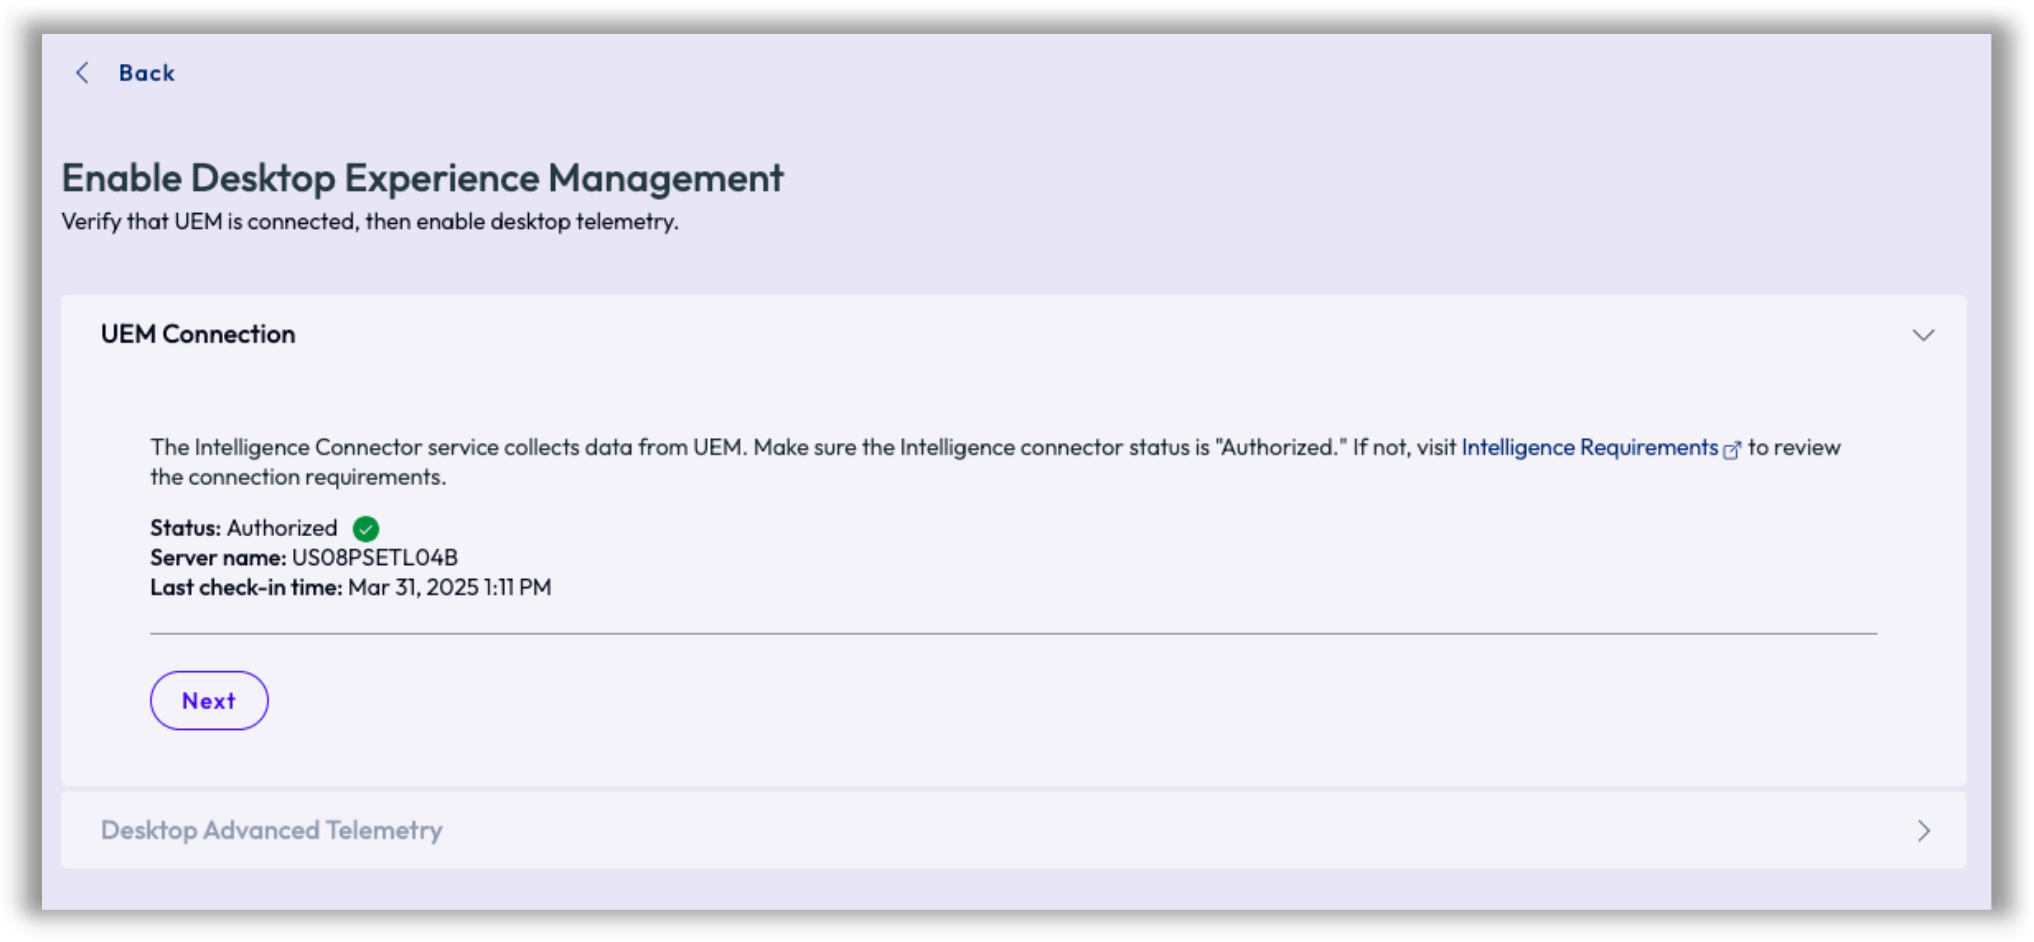
Figure 4: Verification page for UEM connection
- Click ENABLE to activate Desktop Advanced Telemetry. This turns on experience telemetry collection for desktop devices — including those enrolled into UEM via Hub Registered mode.
Note: Advanced Desktop telemetry collection will not occur until the Experience Management agent is deployed to macOS devices and devices are registered in the Workspace ONE UEM console, which is covered in the following sections of this document.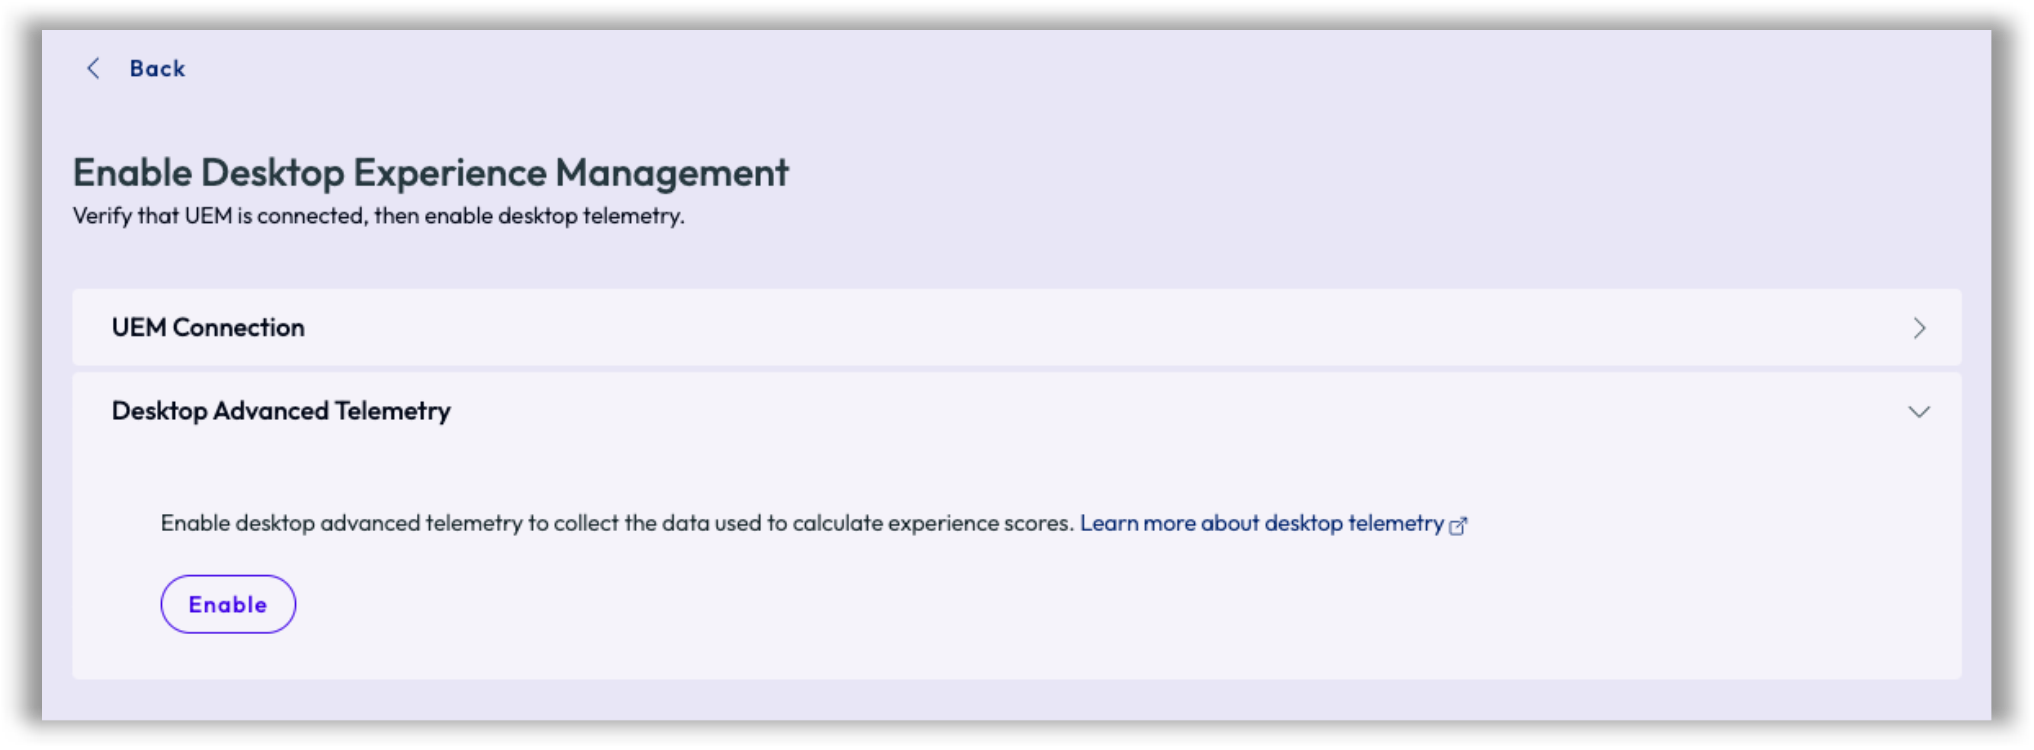
Figure 5: Desktop Advanced Telemetry enablement in Omnissa Intelligence
- Once activation is complete, the card status updates to Enabled on the Marketplace landing page.
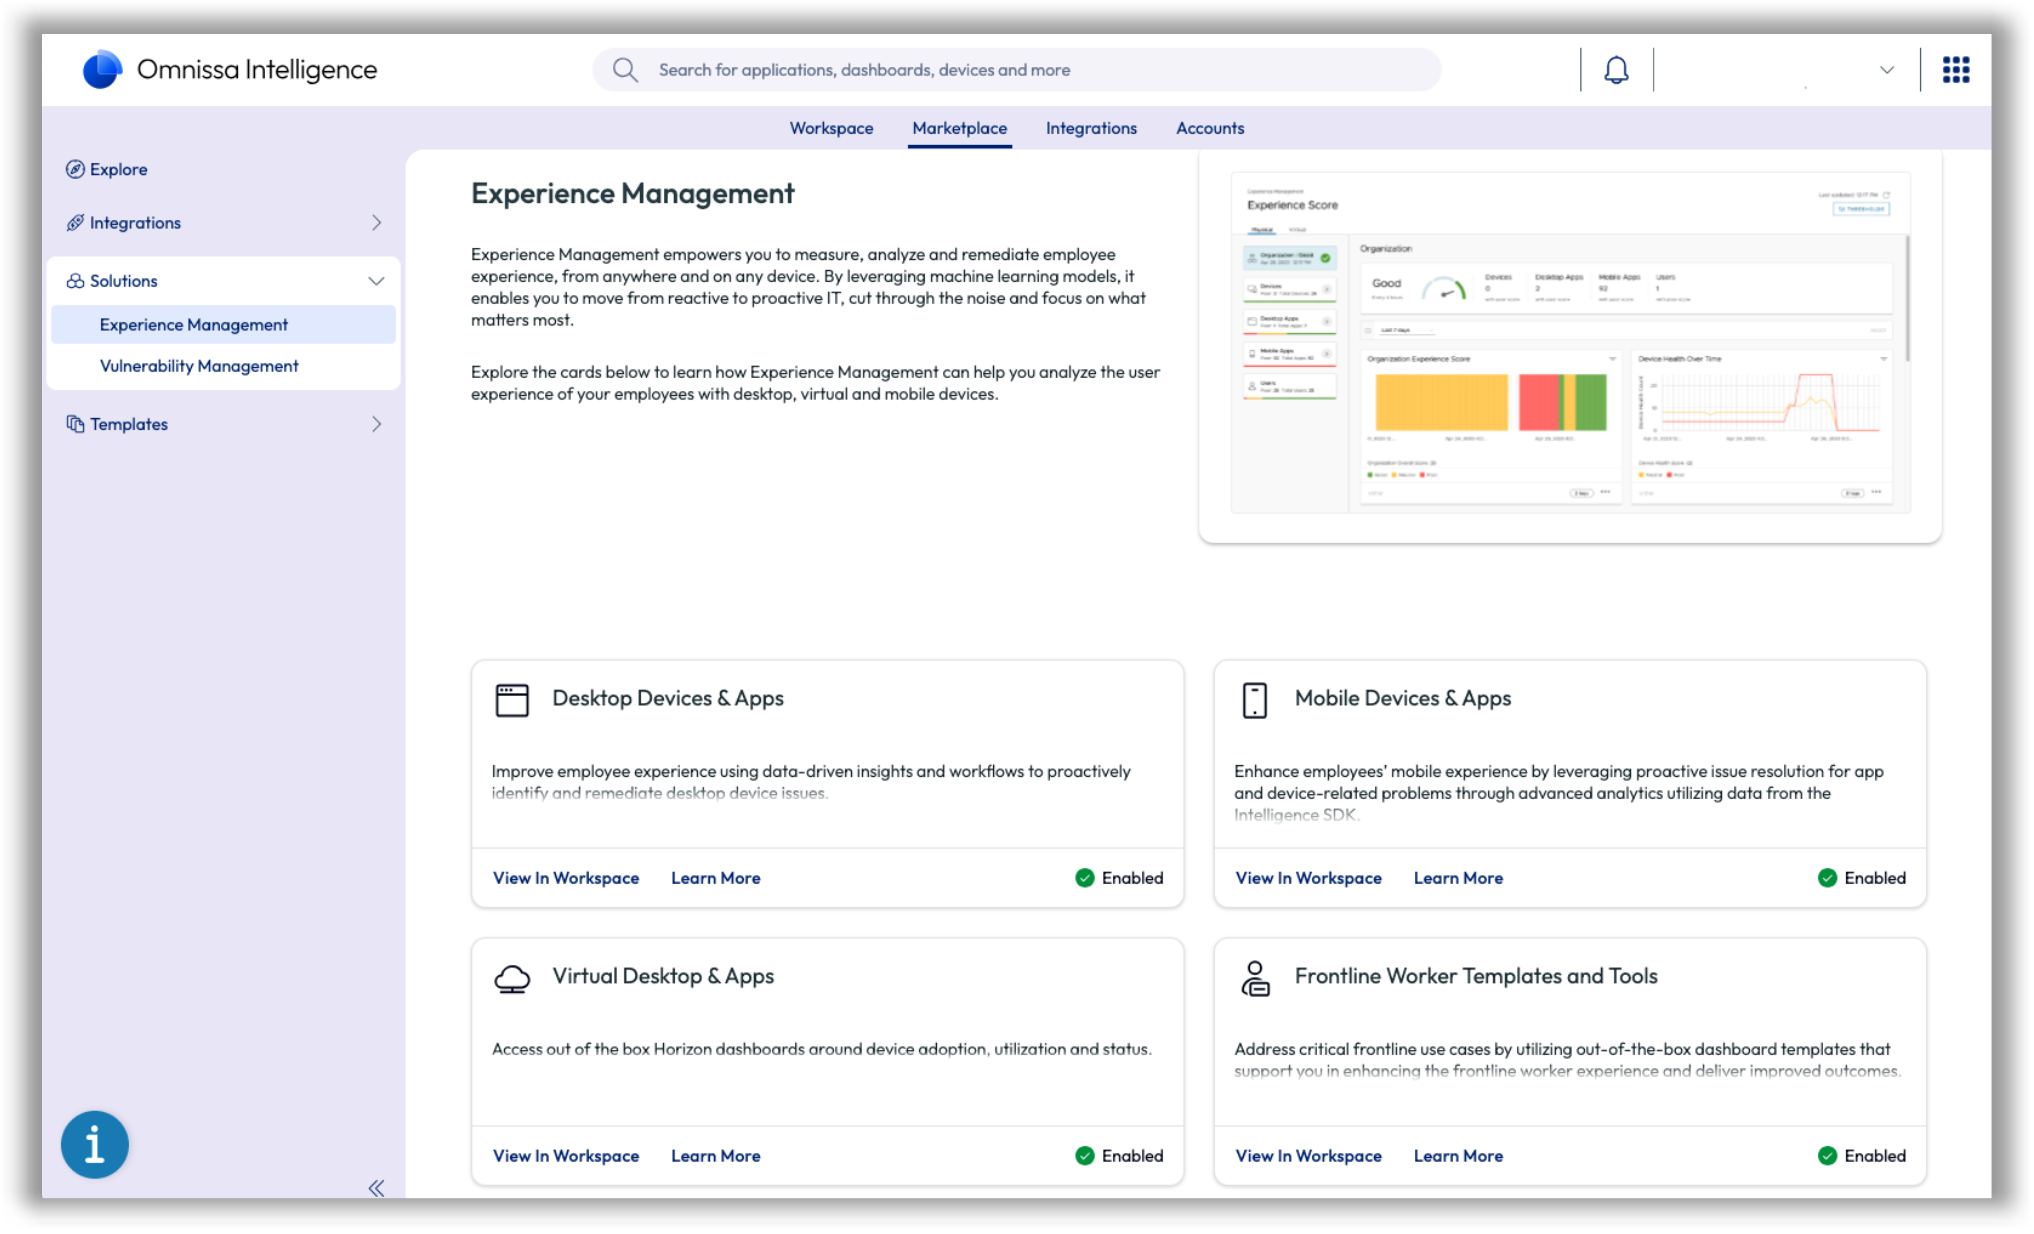
Figure 6: Desktop Devices & Apps is enabled within Experience Management
If your Workspace ONE license does not include Experience Management, the SET UP button will appear grayed out. Contact your Omnissa representative to confirm licensing.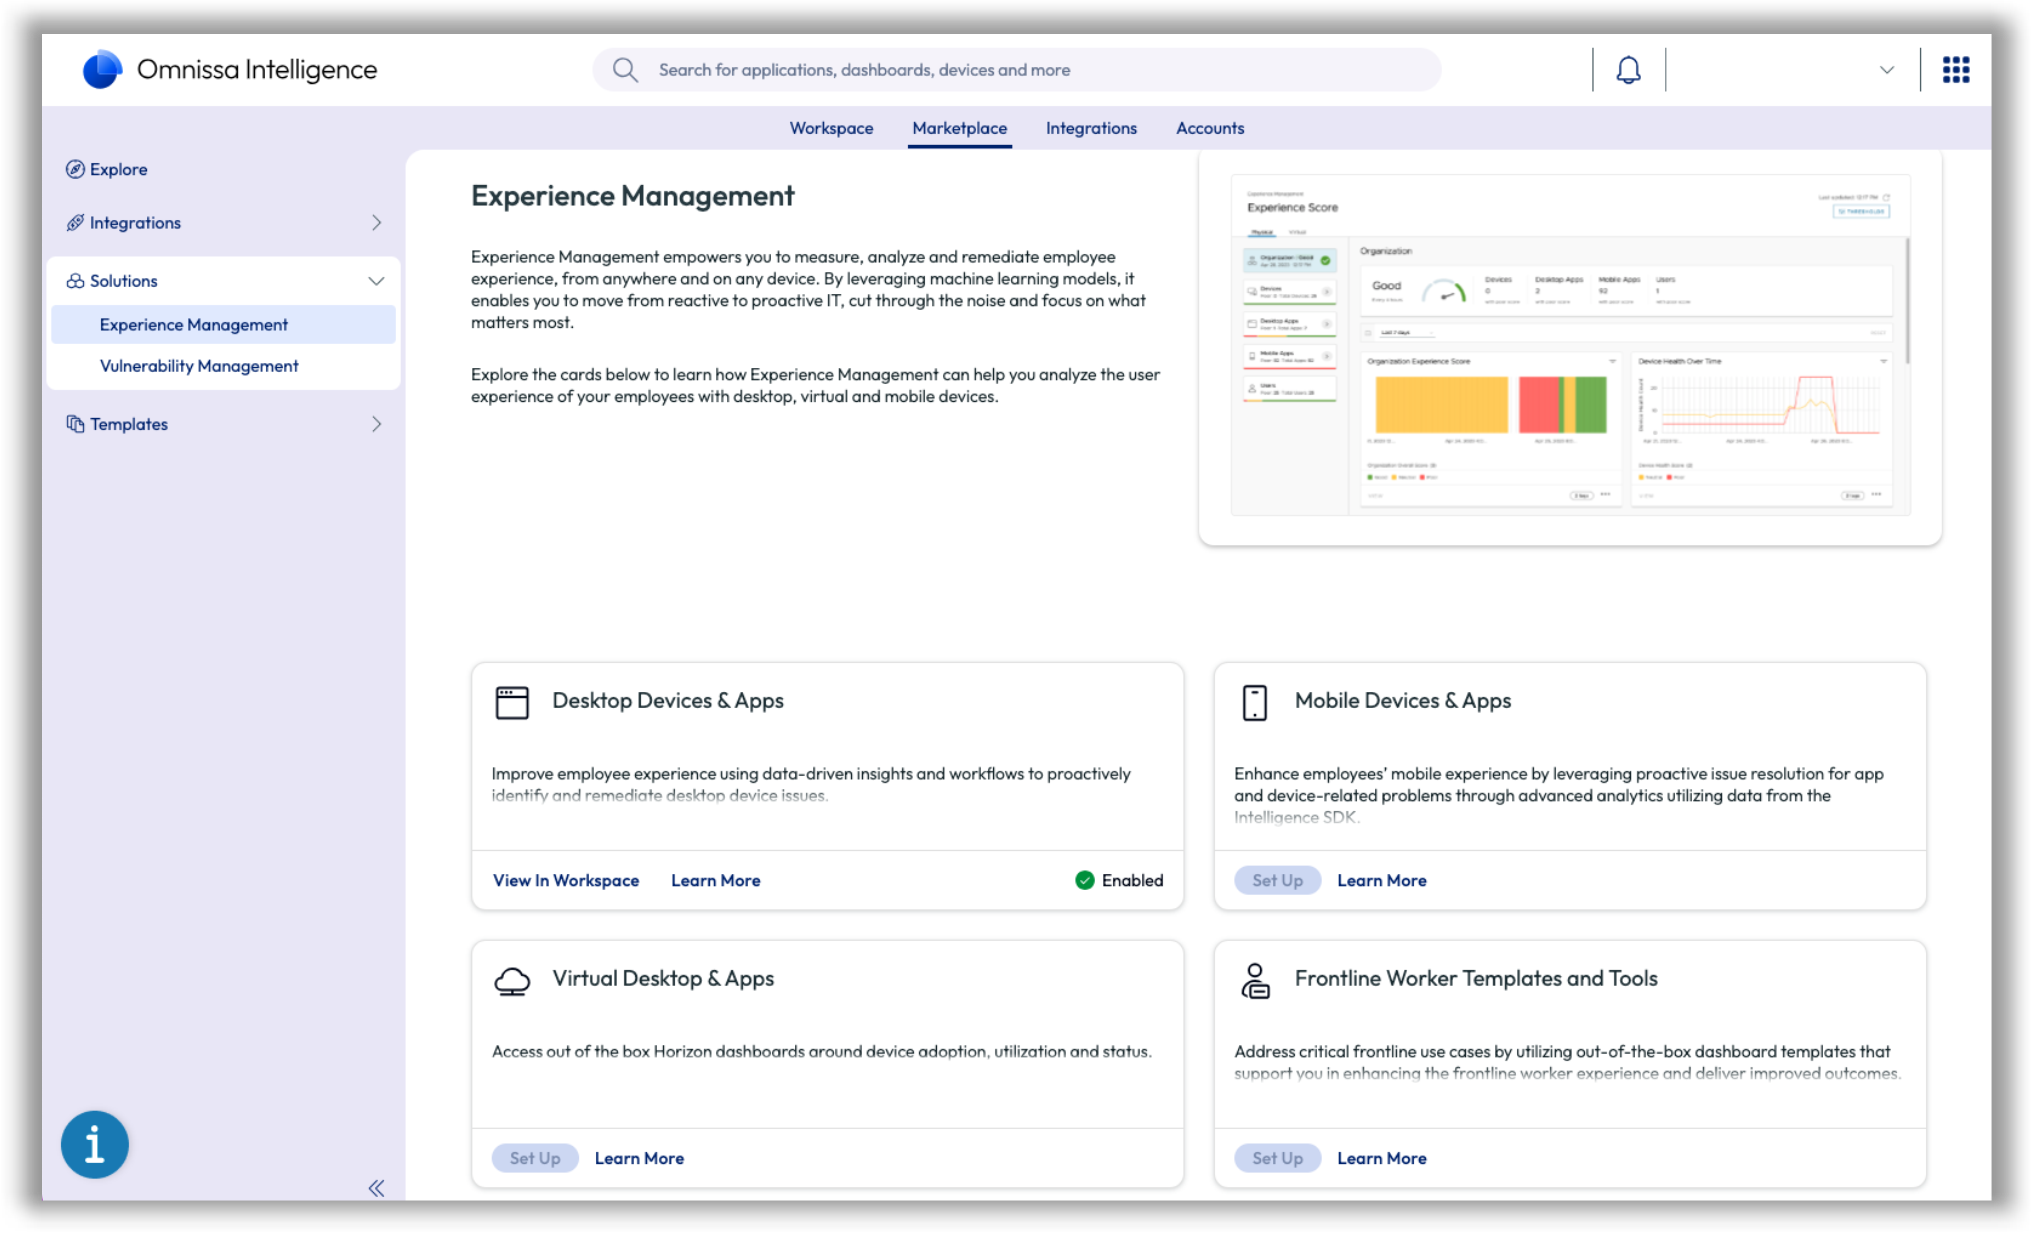
Figure 7: Illustration of missing licenses that show grayed-out Set Up buttons
- With Experience Management enabled, dashboards and investigation tools are accessible under Workspace > Experience Management. Allow at least four hours after enabling the feature and deploying the agent for Experience Score data to populate in dashboards.
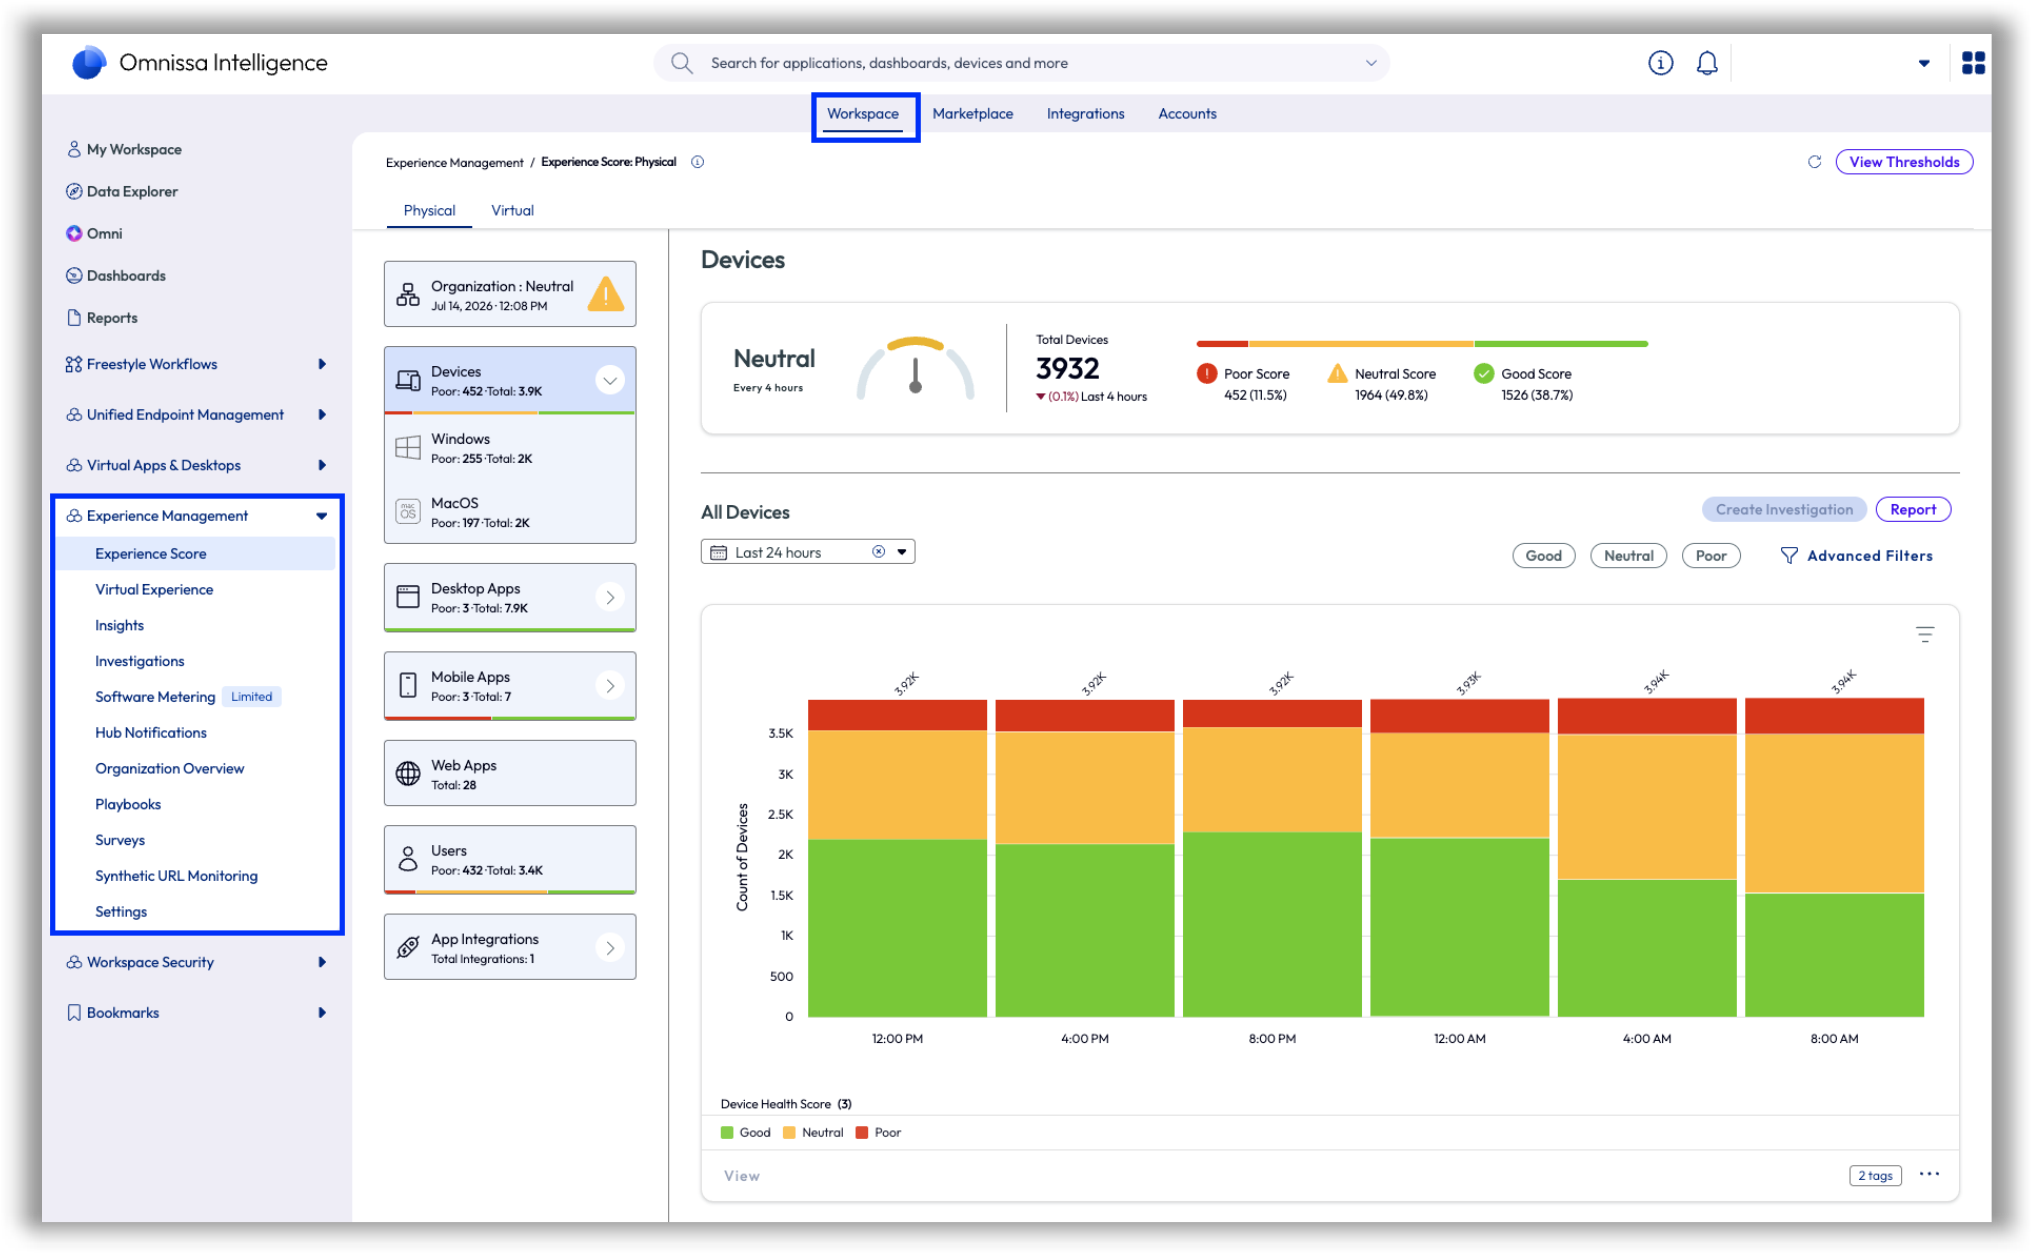
Figure 8: Omnissa Intelligence > Experience Management > Experience Score page
macOS Hub Registered mode enrollment
Workspace ONE UEM supports multiple device management modes, ranging from full MDM enrollment to lighter registration options suited for co-managed or BYOD scenarios. Hub Registered mode is specifically designed for situations where an organization wants to extend Workspace ONE capabilities — such as DEX telemetry, scripts, sensors, and Hub Services — to macOS devices that are already managed by another MDM platform.
With Hub Registered mode, devices are visible and actionable within Workspace ONE UEM without transferring MDM ownership. The organization's existing management workflows, compliance policies, and security controls remain intact while Workspace ONE operates as a complementary layer. To deep dive into the various Workspace ONE UEM management modes, see this article.
The following steps cover the full configuration process, from enabling Hub Registered mode in UEM to deploying Workspace ONE Intelligent Hub via your existing MDM and triggering silent enrollment. See macOS enrollment documentation for more information.
1. Enable Hub Registered mode in Workspace ONE UEM
Hub Registered mode must be enabled in the Workspace ONE UEM console before any macOS devices can register using this method.
- Log in to the Workspace ONE UEM Console.
- Navigate to All Settings > Devices & Users > General > Enrollment.
- Select the Management mode tab.
- Enable Hub for macOS.
- Assign the Organization Groups (OGs) or Smart Groups that should use Hub Registered mode.
- Click Save to apply the configuration.
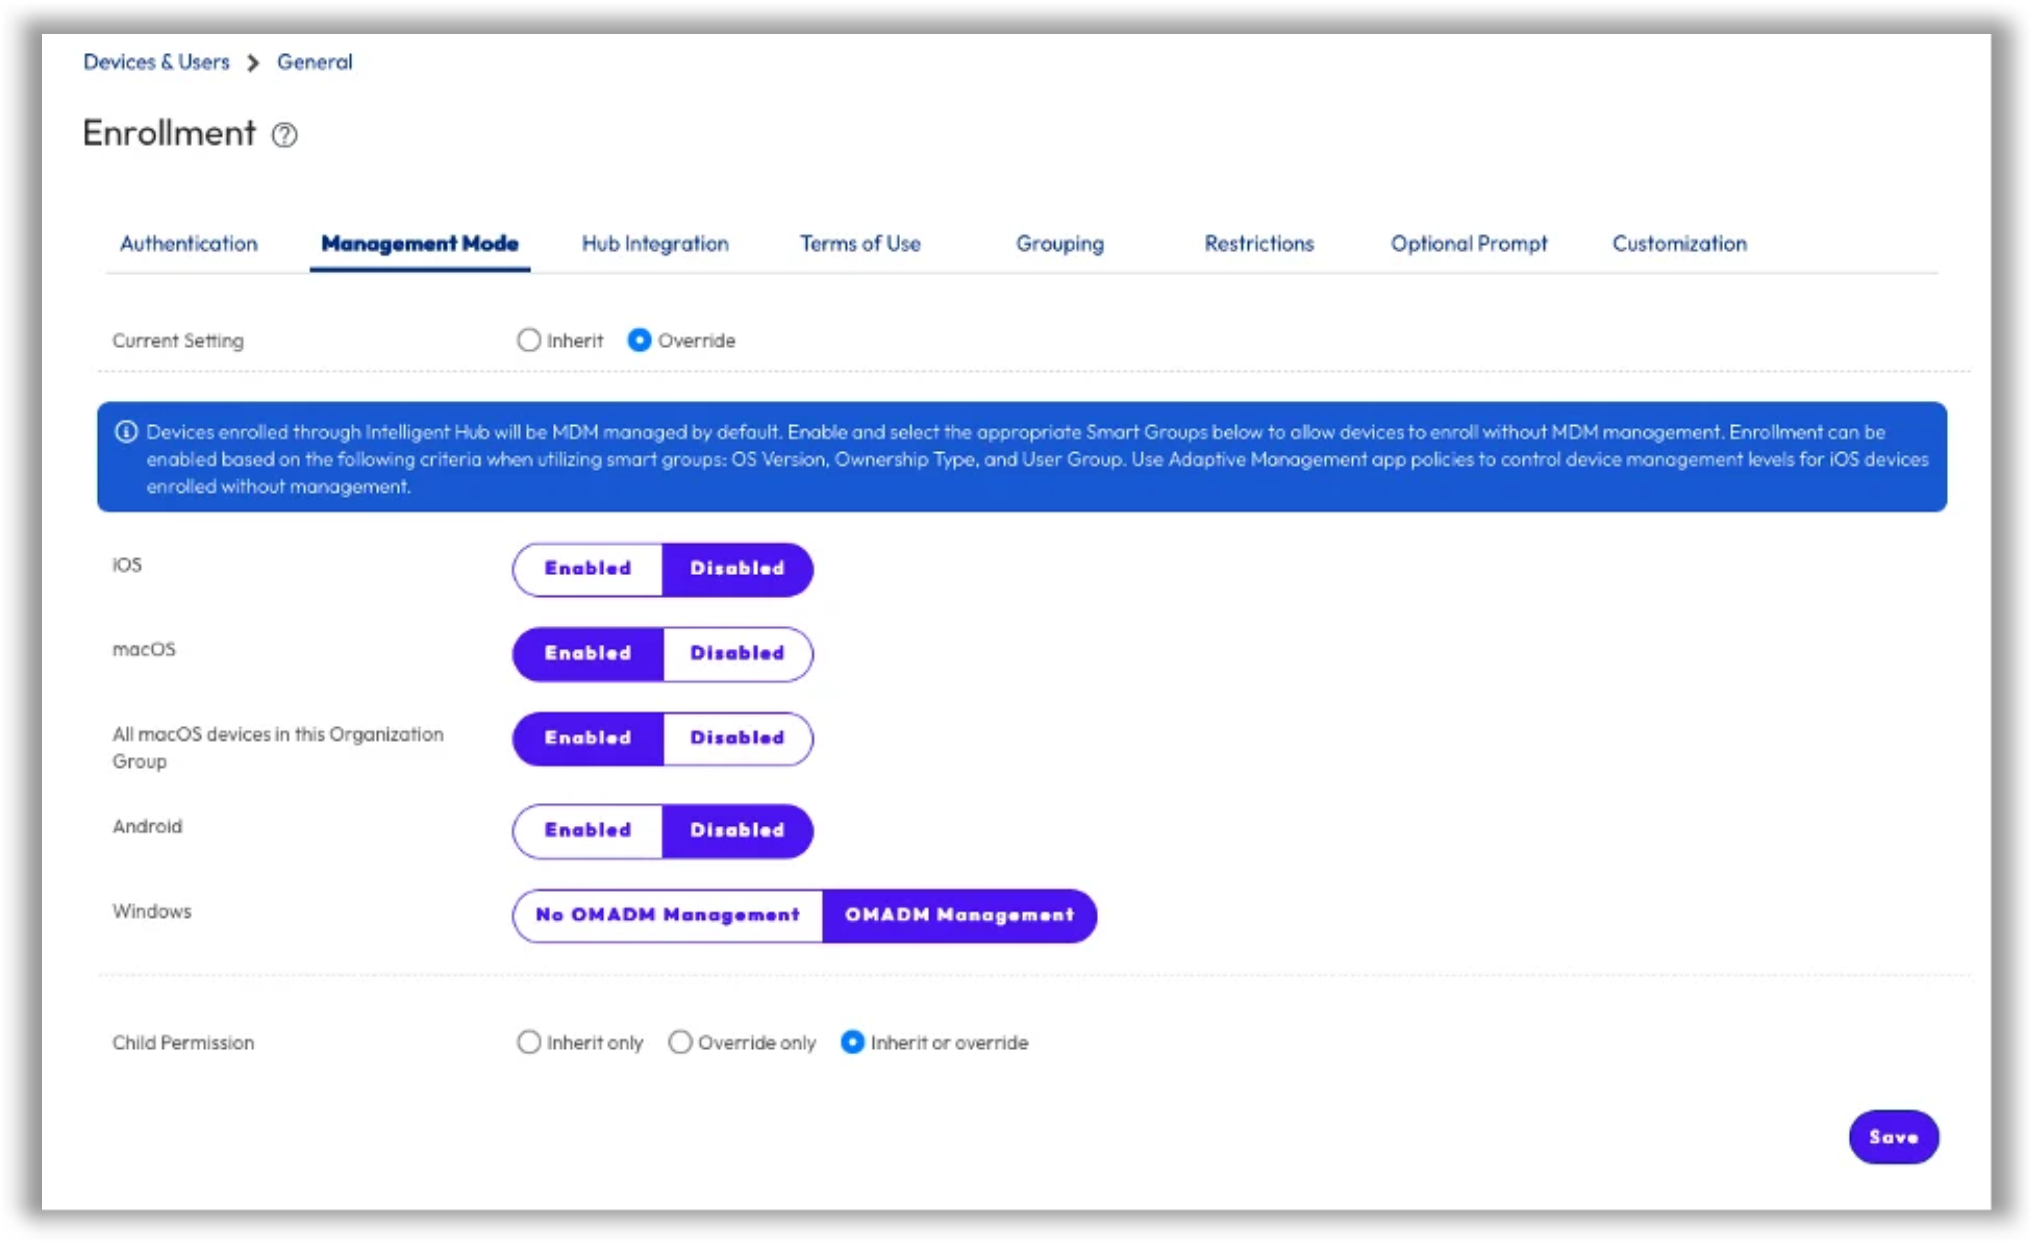
Figure 9: Devices & Users > General > Enrollment > Management Mode page
Important: Devices cannot register using this mode until it has been enabled and assigned to the relevant groups.
2. Prepare the Silent Registration script
Rather than requiring end users to manually enroll into Workspace ONE, Silent Registration automates the entire process through a post-installation script. After Workspace ONE Intelligent Hub is deployed by your MDM, the script runs in the background and uses Hub CLI to register the device with Workspace ONE UEM. The device is initially registered under a staging account and then automatically reassigned to the user currently logged in to the Mac — all without any end-user interaction.
#!/bin/sh
UEM_SERVER="<<UEM_SERVER_URL_PLACEHOLDER>>"
OG="<<OG_PLACEHOLDER>>"
STAGING_USER_NAME="<<STAGING_USER_NAME_PLACEHOLDER>>"
STAGING_USER_PASSWORD="<<STAGING_USER_PASSWORD_PLACEHOLDER>>"
LOGDIR="/Library/Logs/ws1"
LOGFILE="$LOGDIR/hub_postinstall.log"
mkdir -p "$LOGDIR" 2>/dev/null || sudo mkdir -p "$LOGDIR"
touch "$LOGFILE" 2>/dev/null || sudo touch "$LOGFILE"
# Function for writing to log
WriteLog() {
# Treat first parameter as the message if no second parameter is provided
if [ -z "$2" ]; then
TYPE="INFO"
MESSAGE="$1"
else
TYPE="$1"
MESSAGE="$2"
fi
TIMESTAMP=$(date "+%Y-%m-%d %H:%M:%S")
if [ "$(id -u)" -eq 0 ]; then
echo "$TIMESTAMP $TYPE: $MESSAGE" | tee -a "$LOGFILE" >/dev/null
else
echo "$TIMESTAMP $TYPE: $MESSAGE" | sudo tee -a "$LOGFILE" >/dev/null
fi
}
# Start logging
WriteLog "Postinstall started"
WriteLog "Starting WS1 silent enrolment..."
sleep 5
ATTEMPT=1
MAX_ATTEMPTS=5
RETRY_DELAY_SECONDS=60
while [ "$ATTEMPT" -le "$MAX_ATTEMPTS" ]; do
if command -v /usr/local/bin/hubcli >/dev/null 2>&1; then
WriteLog "INFO" "hubcli found on attempt $ATTEMPT"
sudo /usr/local/bin/hubcli enroll --server $UEM_SERVER --og-name $OG --username $STAGING_USER_NAME --password $STAGING_USER_PASSWORD --assign-to-login-user
WriteLog "SUCCESS" "Hub enrolled successfully on the device"
exit 0
fi
if [ "$ATTEMPT" -lt "$MAX_ATTEMPTS" ]; then
WriteLog "WARN" "hubcli not available on attempt $ATTEMPT. Retrying in $RETRY_DELAY_SECONDS seconds"
sleep "$RETRY_DELAY_SECONDS"
fi
ATTEMPT=$((ATTEMPT + 1))
done
WriteLog "ERROR" "hubcli is not available after $MAX_ATTEMPTS attempts"
exit 1
Before distributing the script, substitute the placeholder values with the correct details for your environment:
| Placeholder | Description |
| UEM_SERVER | URL of your Workspace ONE UEM server |
| OG | Organization Group (OG) to which devices will be enrolled |
| STAGING_USER_NAME | username of the staging account used for enrollment |
| STAGING_USER_PASSWORD | password of the staging account used for enrollment |
3. Configure Staging User & SAM Account Name mapping
Silent Registration relies on a staging account to perform the initial enrollment, then transitions device ownership to the signed-in user. Two configuration steps are necessary to make this transition happen correctly.
a. Create a Staging User in Workspace ONE UEM
Create a dedicated staging user account in Workspace ONE UEM. This account is used only during the registration process and should not correspond to a real employee. Once the device is registered, Workspace ONE automatically reassigns it to the logged-in macOS user. See this product documentation to learn more about staging users in Workspace ONE UEM.
After creating the account, update the script variables accordingly:
- STAGING_USER_NAME – Enter the staging account username
- STAGING_USER_PASSWORD – Enter the staging account password
b. Set SAM Account Name as the Unique User Identifier
For Workspace ONE to correctly match the signed-in macOS user to their Active Directory identity, SAM Account Name must be configured as the identifier attribute.
- Navigate to All Settings > Devices & Users > Microsoft > Windows > Intelligent Hub Settings.
- Under Attributes for Unique Identifier, select SAM Account Name as the Client Attribute.
- Save changes.
Important: Without this mapping, device assignment to the signed-in user may not finish correctly after Silent Registration.
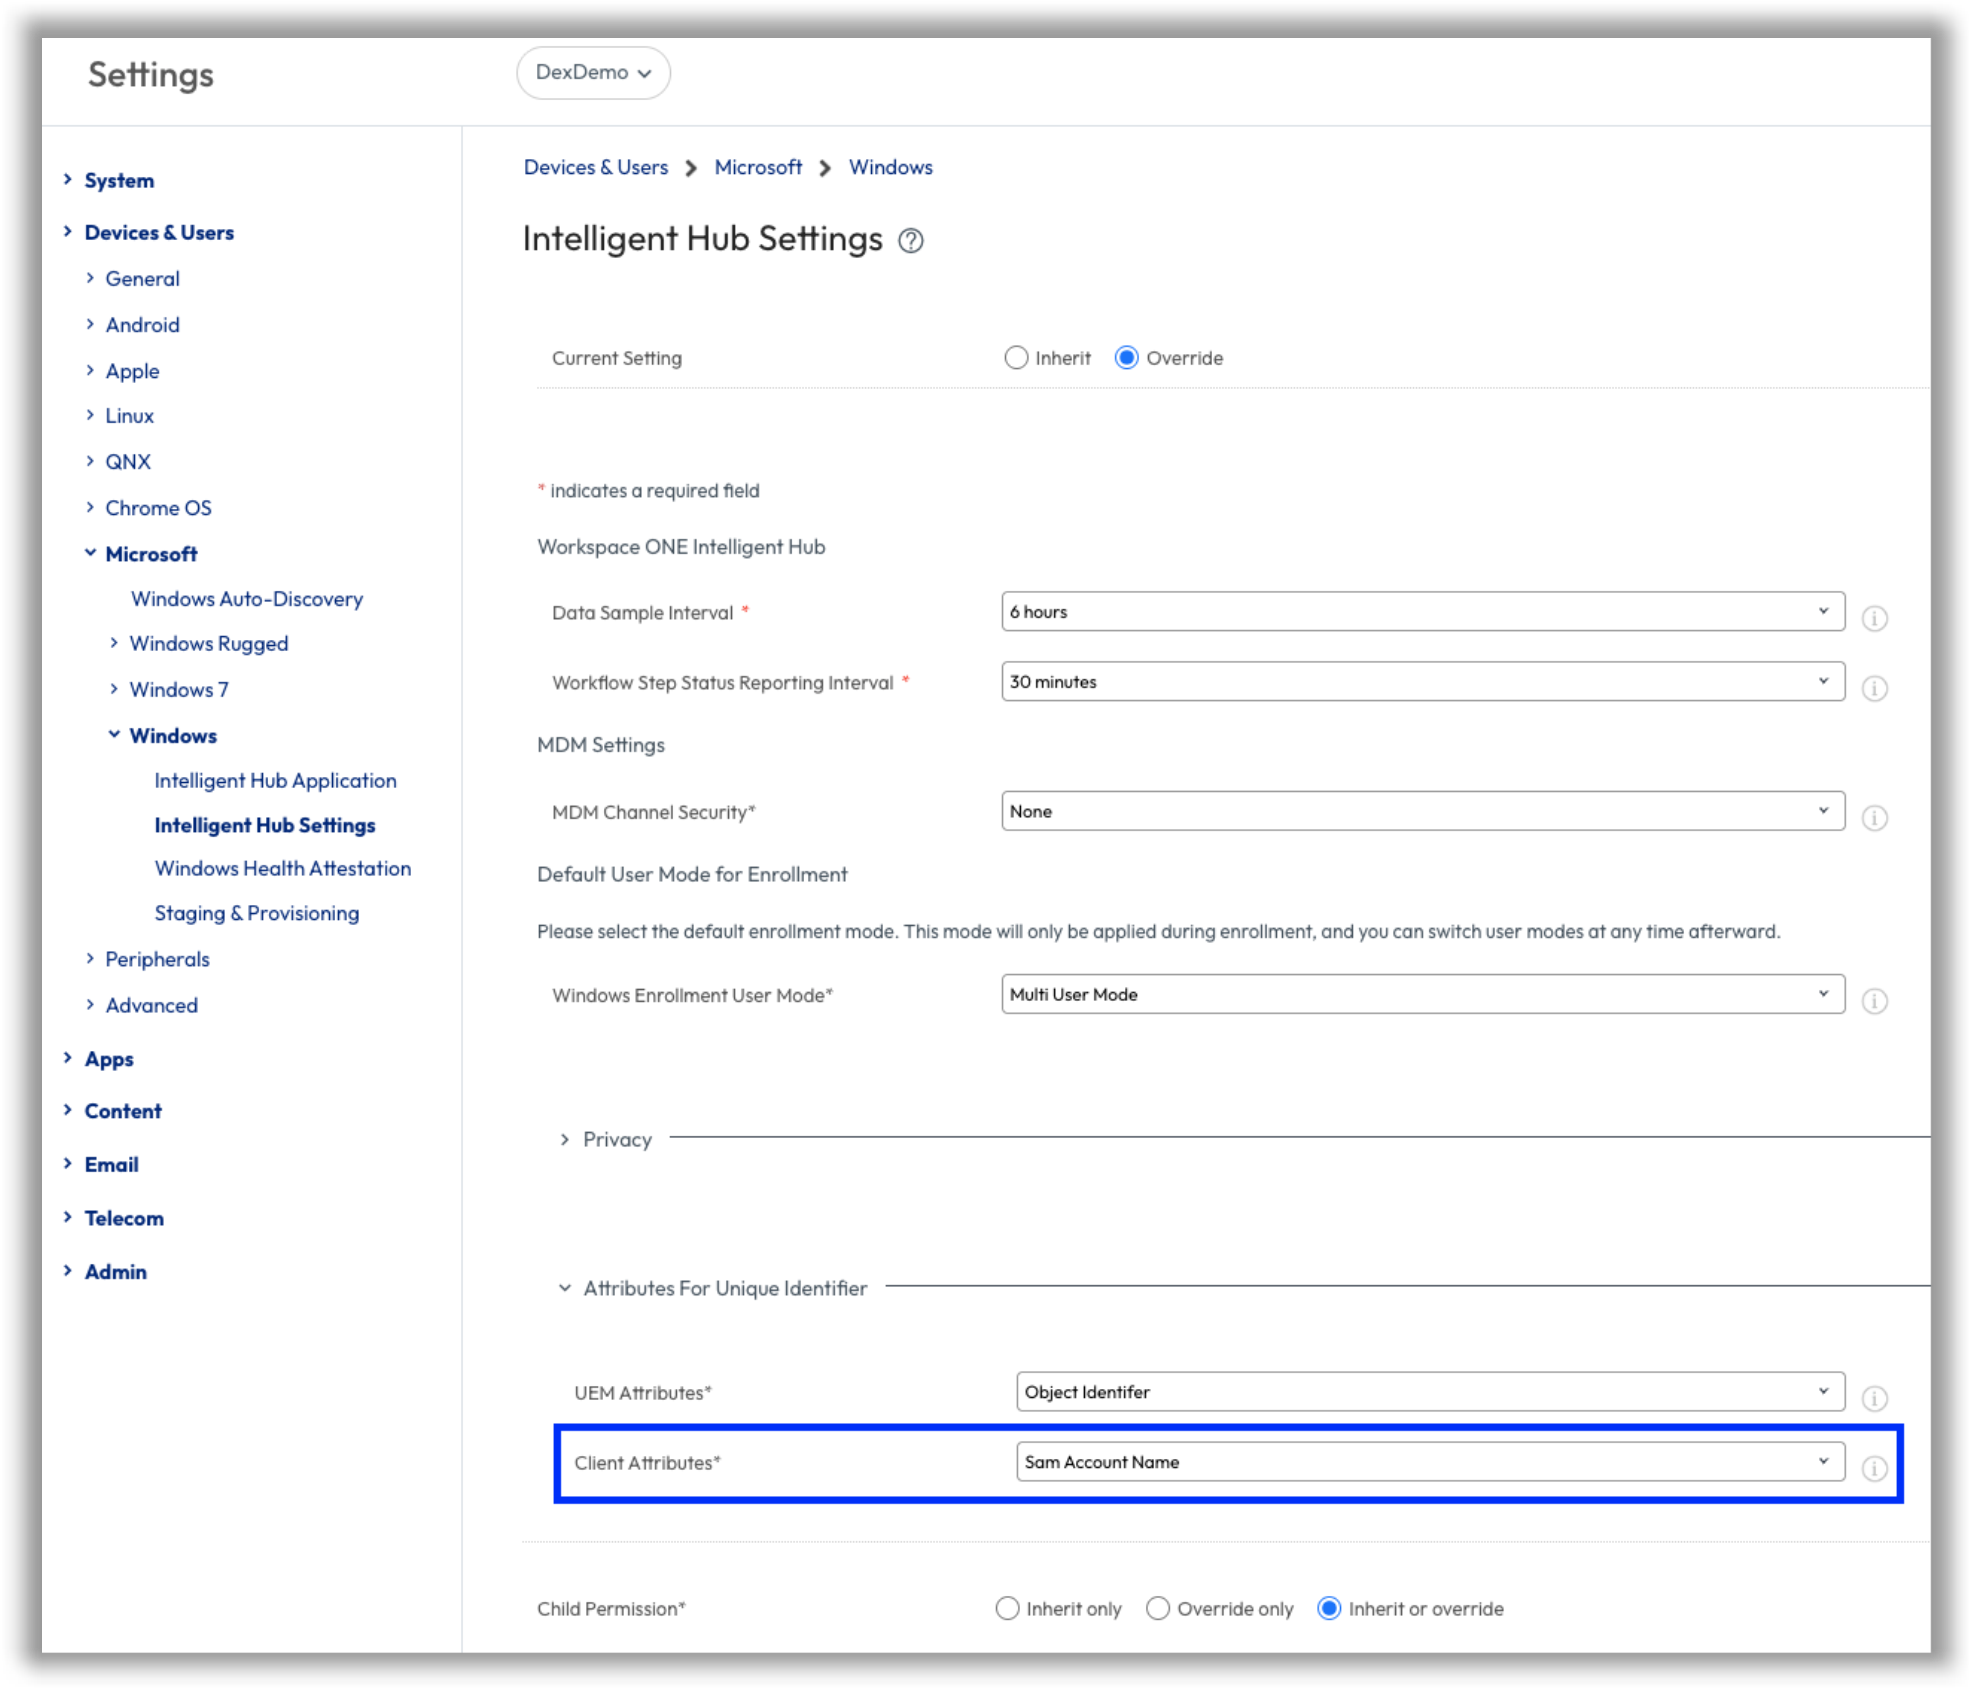
Figure 10: UEM settings to set Client Attributes to SAM Account Name
Note: This configuration path will be relocated to the macOS settings in a future UEM release.
c. Align the macOS Account Name with the Active Directory SAM Account Name
Automatic user assignment requires that the local macOS account username exactly matches the user's SAM Account Name in Active Directory. Confirm this alignment before deploying.
For example, a user with a SAM Account Name of jdoe must also have a local macOS account named jdoe.
d. Disable Optional Enrollment Prompts
Any enrollment prompt that requires user interaction can interrupt the Silent Registration flow. Review Workspace ONE UEM enrollment settings in the relevant Organization Group and disable any optional prompts prior to deployment. See this product documentation for more information on enrollment prompts in Workspace ONE UEM.
Deploy Workspace ONE Intelligent Hub
With the Silent Registration script ready and Workspace ONE UEM configured, the next step is to deploy Workspace ONE Intelligent Hub to macOS devices through your existing MDM. The steps below use Microsoft Intune as the reference platform. If your organization uses a different MDM, apply the equivalent configuration steps within that platform.
NOTE: This is an example and is not meant to replace any Intune documentation. Always reference the third-party product documentation for the most up-to-date information.
Create the macOS Application in Intune
- Sign in to the Microsoft Intune Admin Center.
- Go to Apps > macOS and select Create.
- Choose the PKG or DMG app type based on the available installer package.
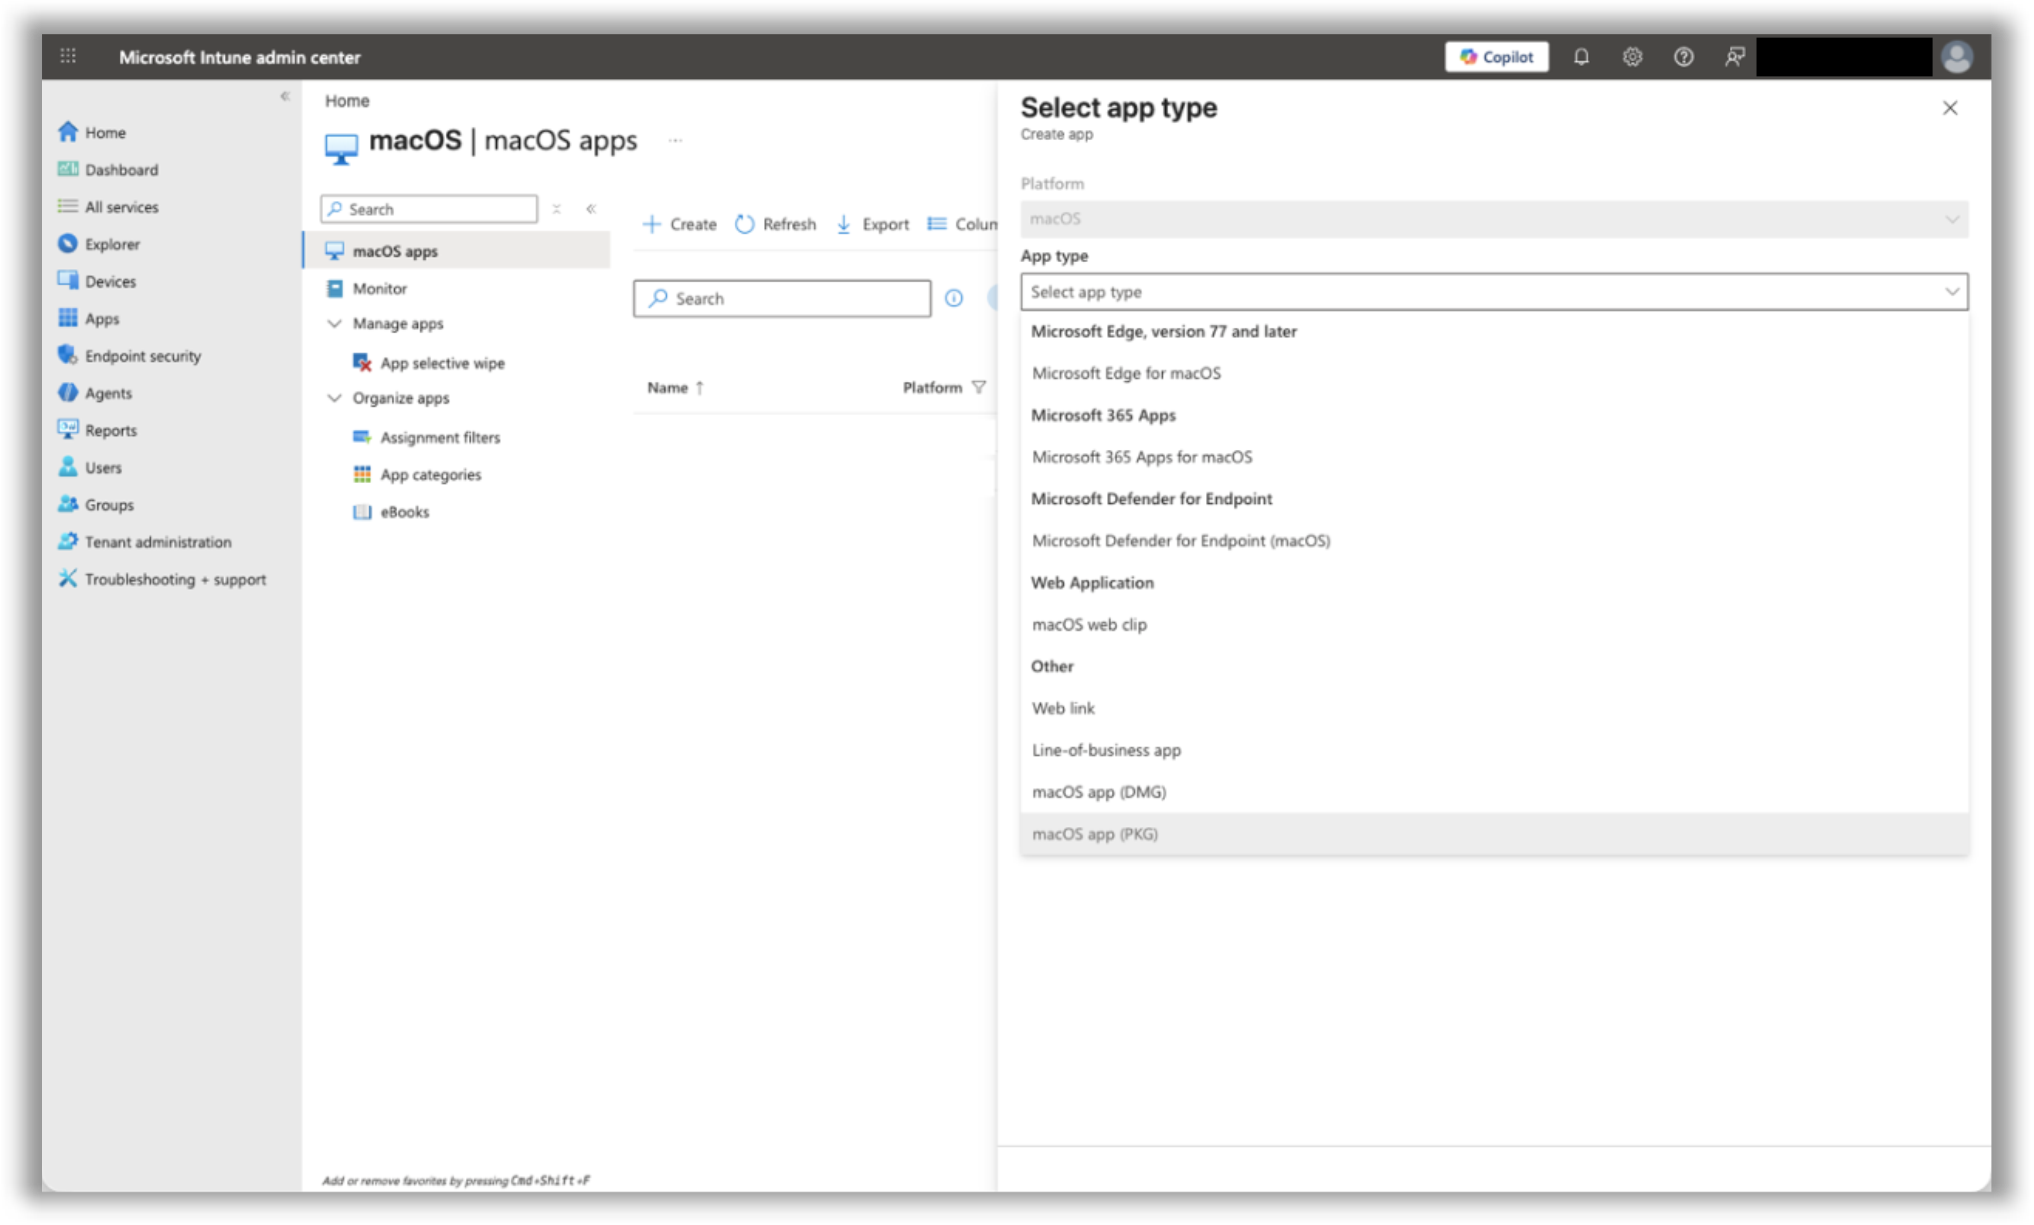
Figure 11: Select app type in Intune for upload
- Complete the App Information fields as required.
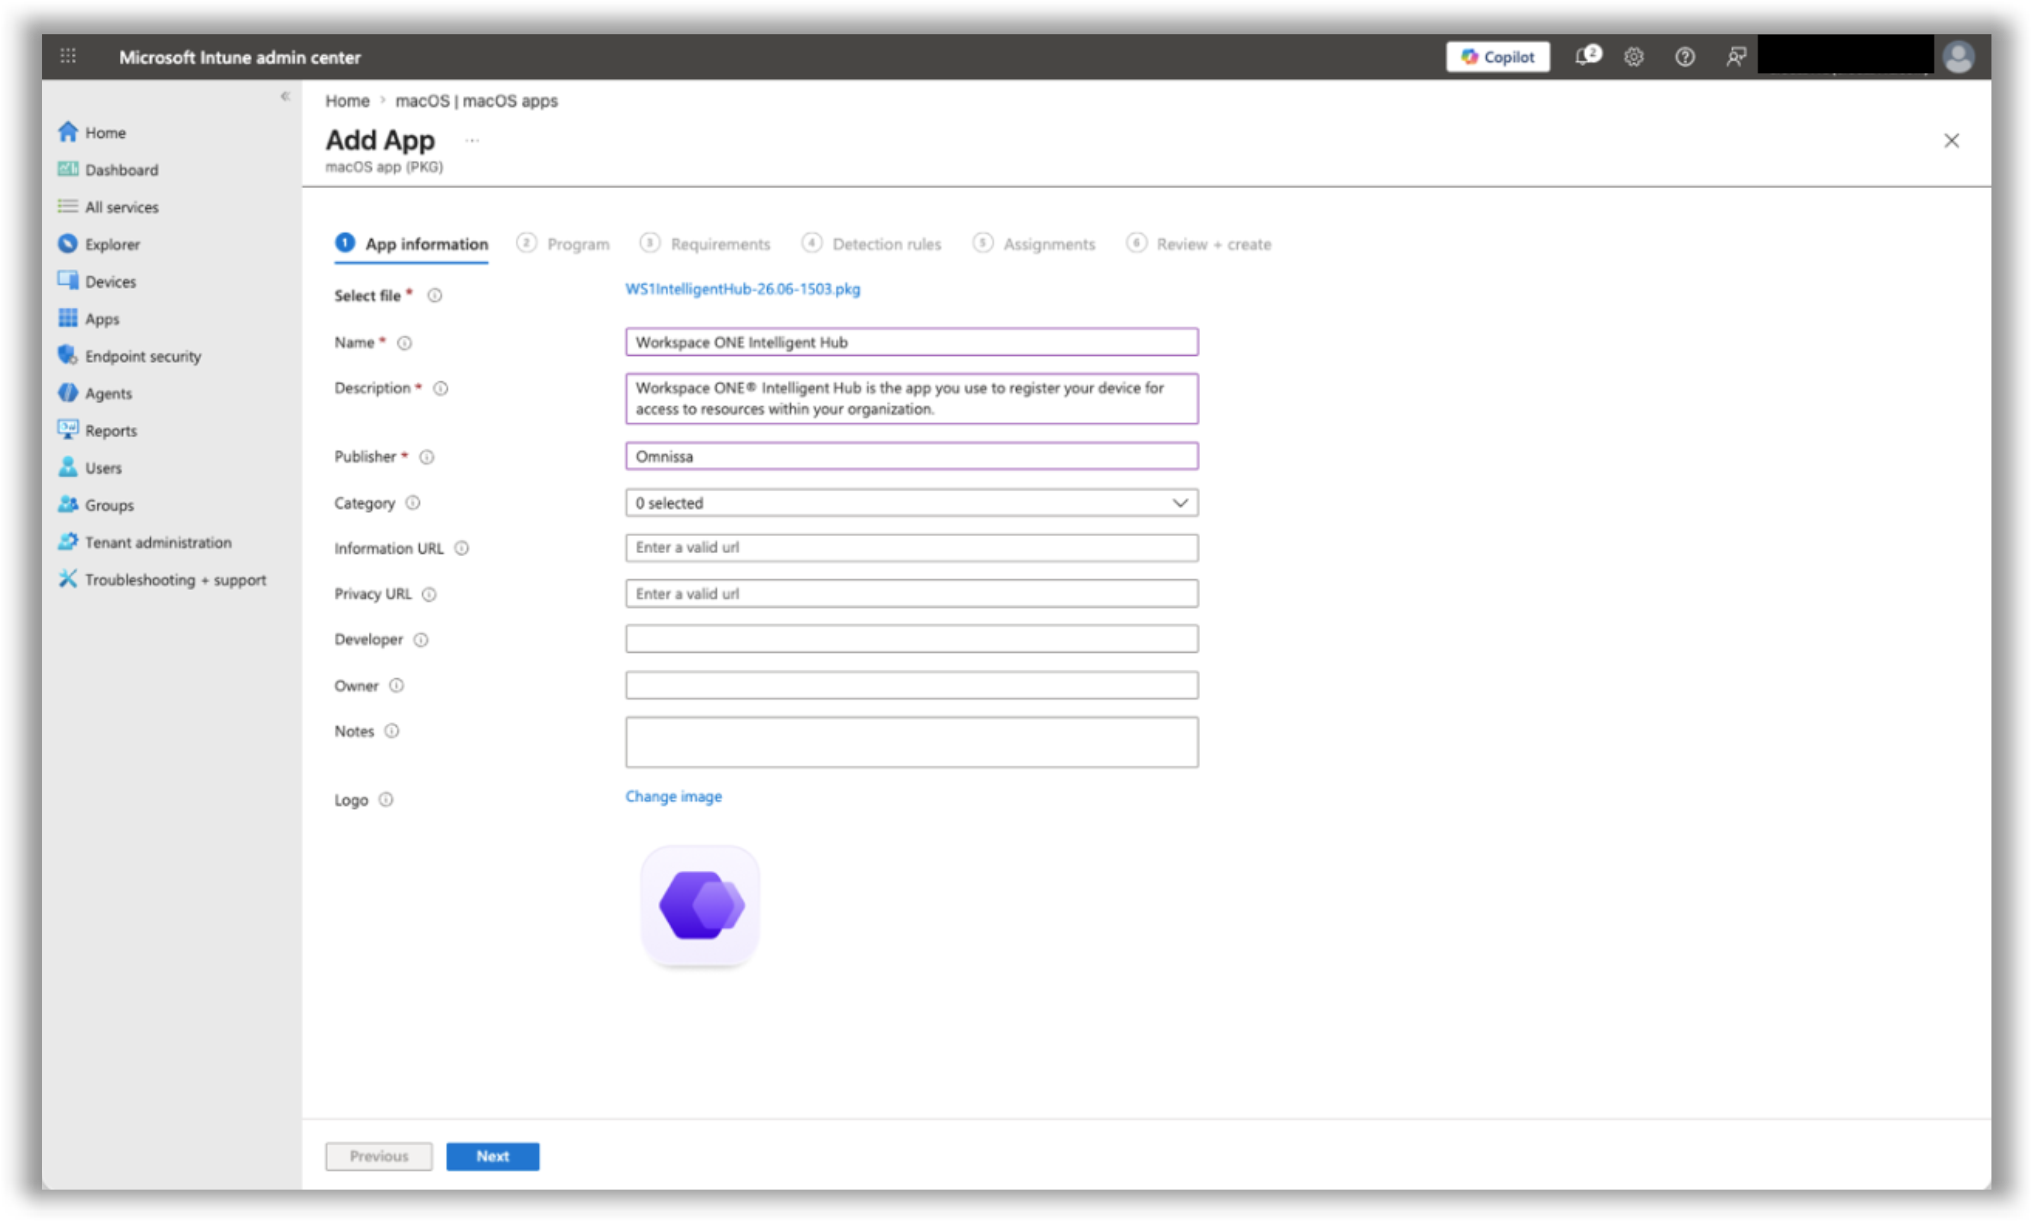
Figure 12: Add app information in Intune
Attach the Silent Registration script as a post-install script
- Open the Program tab within the application configuration.
- Paste the completed Silent Registration script (with all placeholders replaced) into the post-install script field.
- Ensure that all placeholder values have been replaced with the appropriate values for your environment.
- Proceed through the remaining configuration steps.
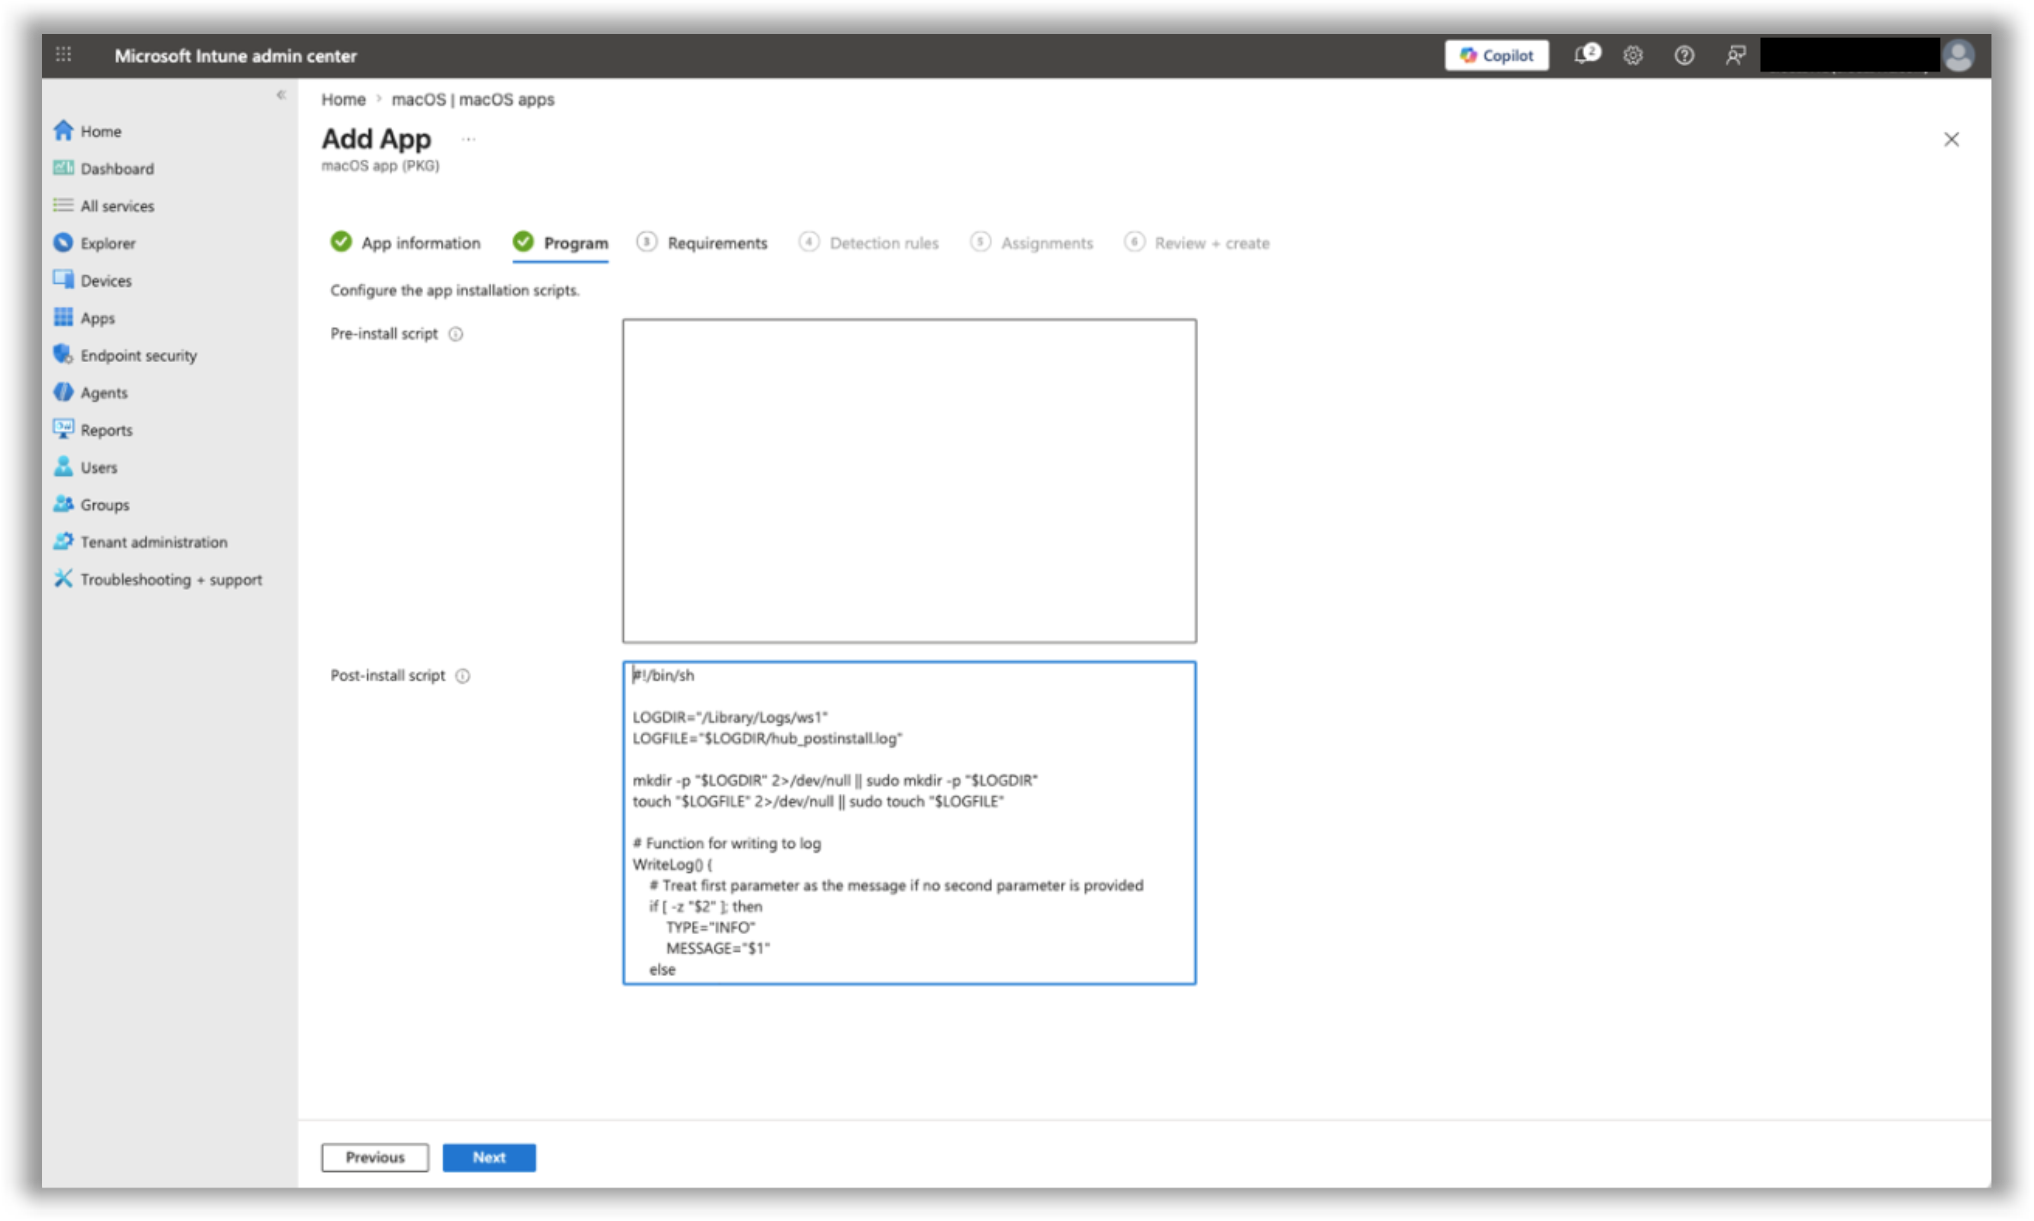
Figure 13: Add Post-install script in Intune
Set minimum OS requirements
In the Requirements section, configure macOS 12.0 (Monterey) as the minimum supported operating system to ensure the application is only offered to eligible devices.
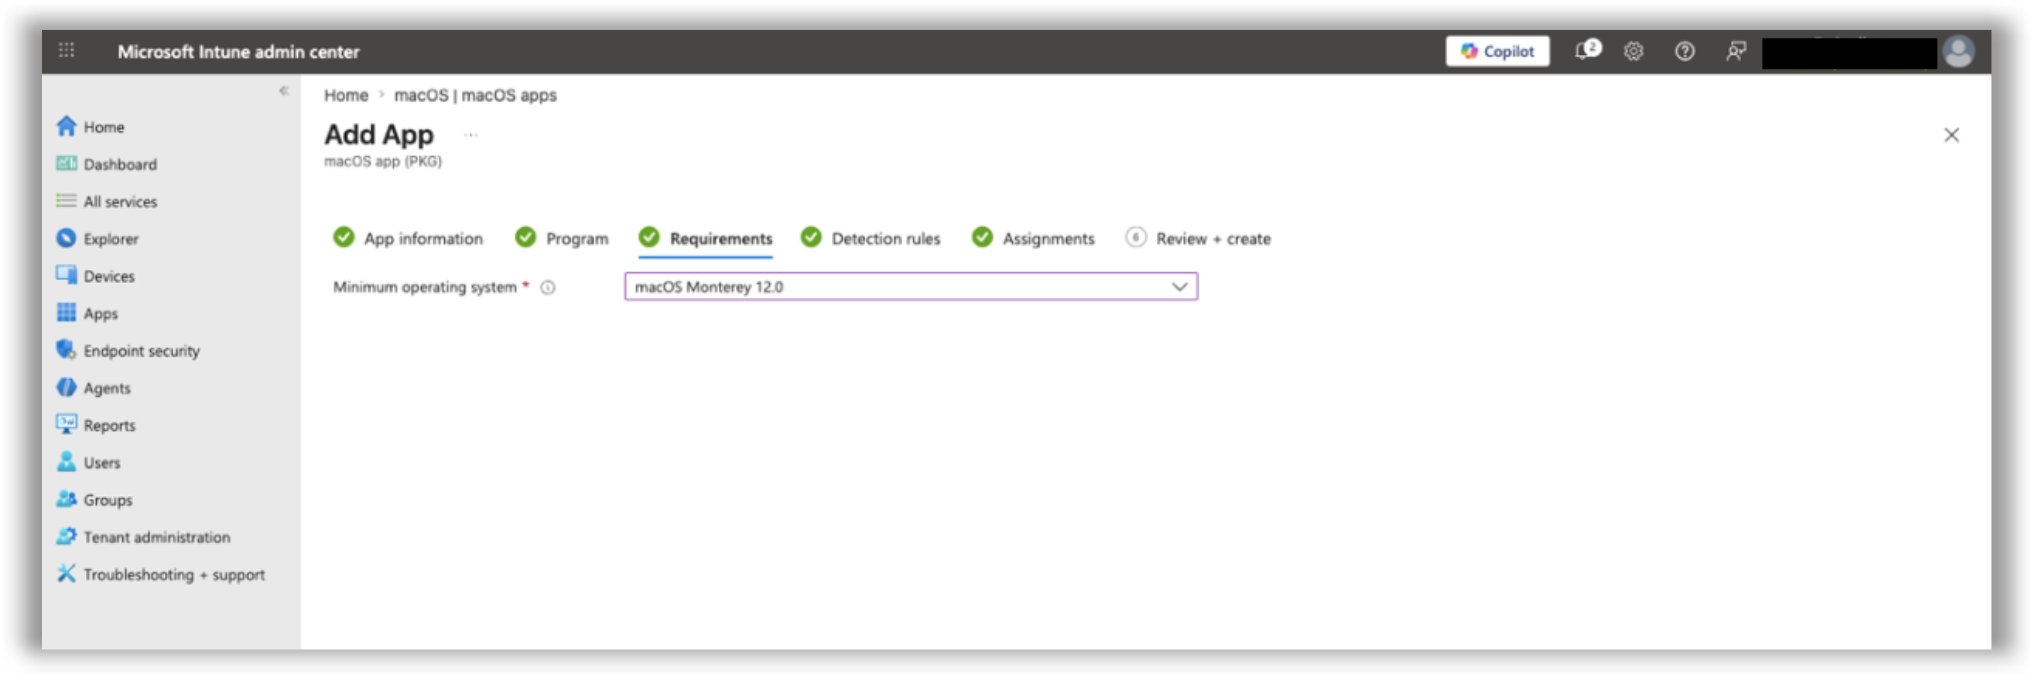
Figure 14: Selection of minimum operating system for app in Intune
Define detection rules
In the Detection Rules section, set com.ws1.hub.mac as the App Bundle ID. Clear any other Bundle IDs that may have been auto populated to prevent detection conflicts.
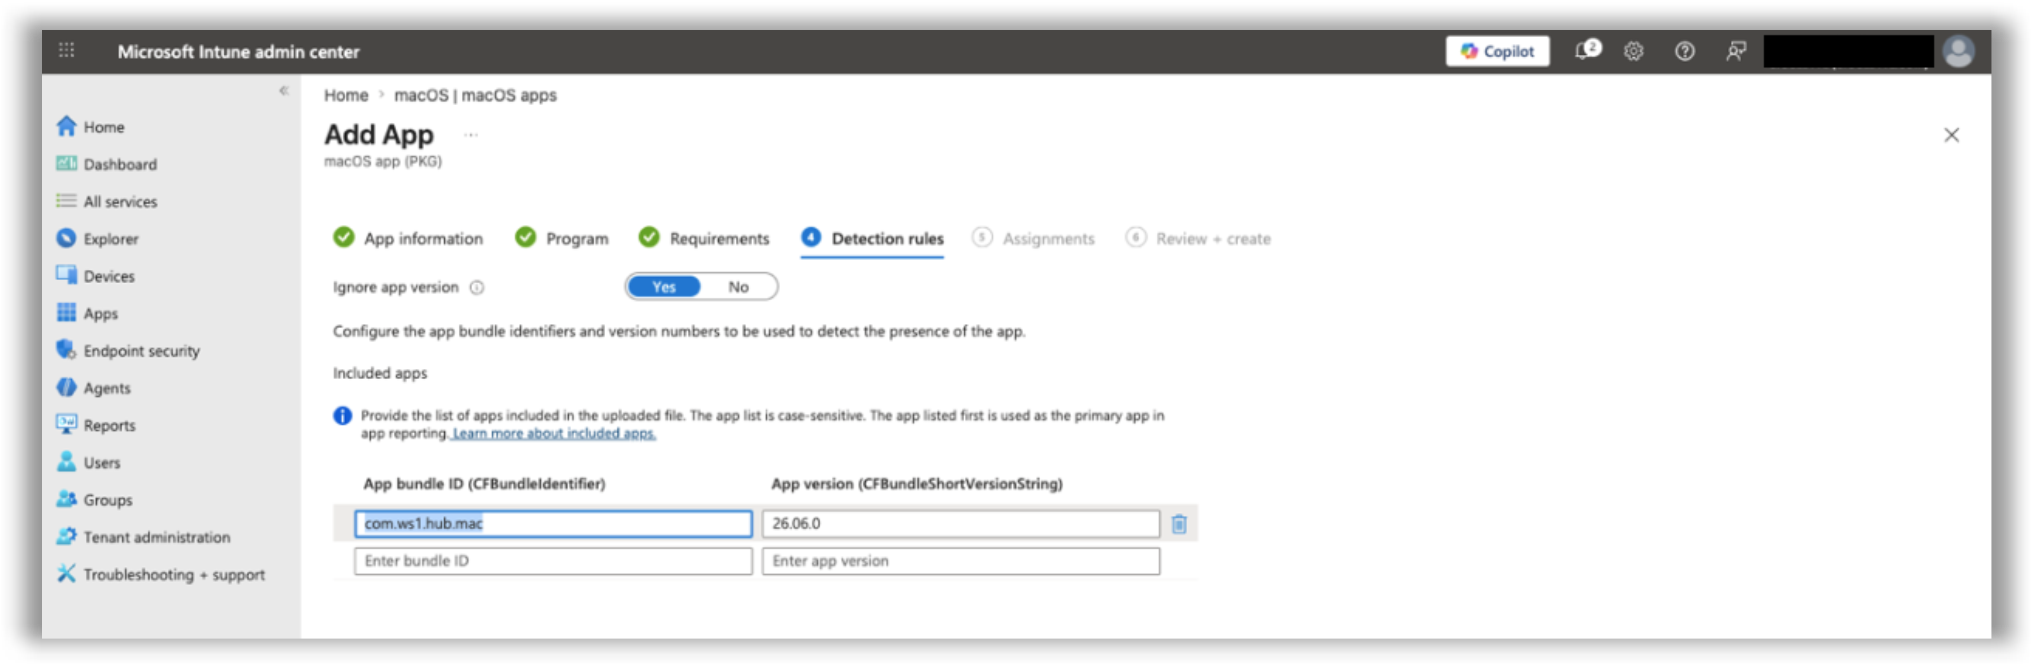
Figure 15: Designate App bundle ID and App version in Intune
Assign to application
In Assignments, select the user or device groups that should receive Workspace ONE Intelligent Hub. Ensure alignment with the Smart Groups or Organization Groups configured for Hub Registered mode in Step 1.
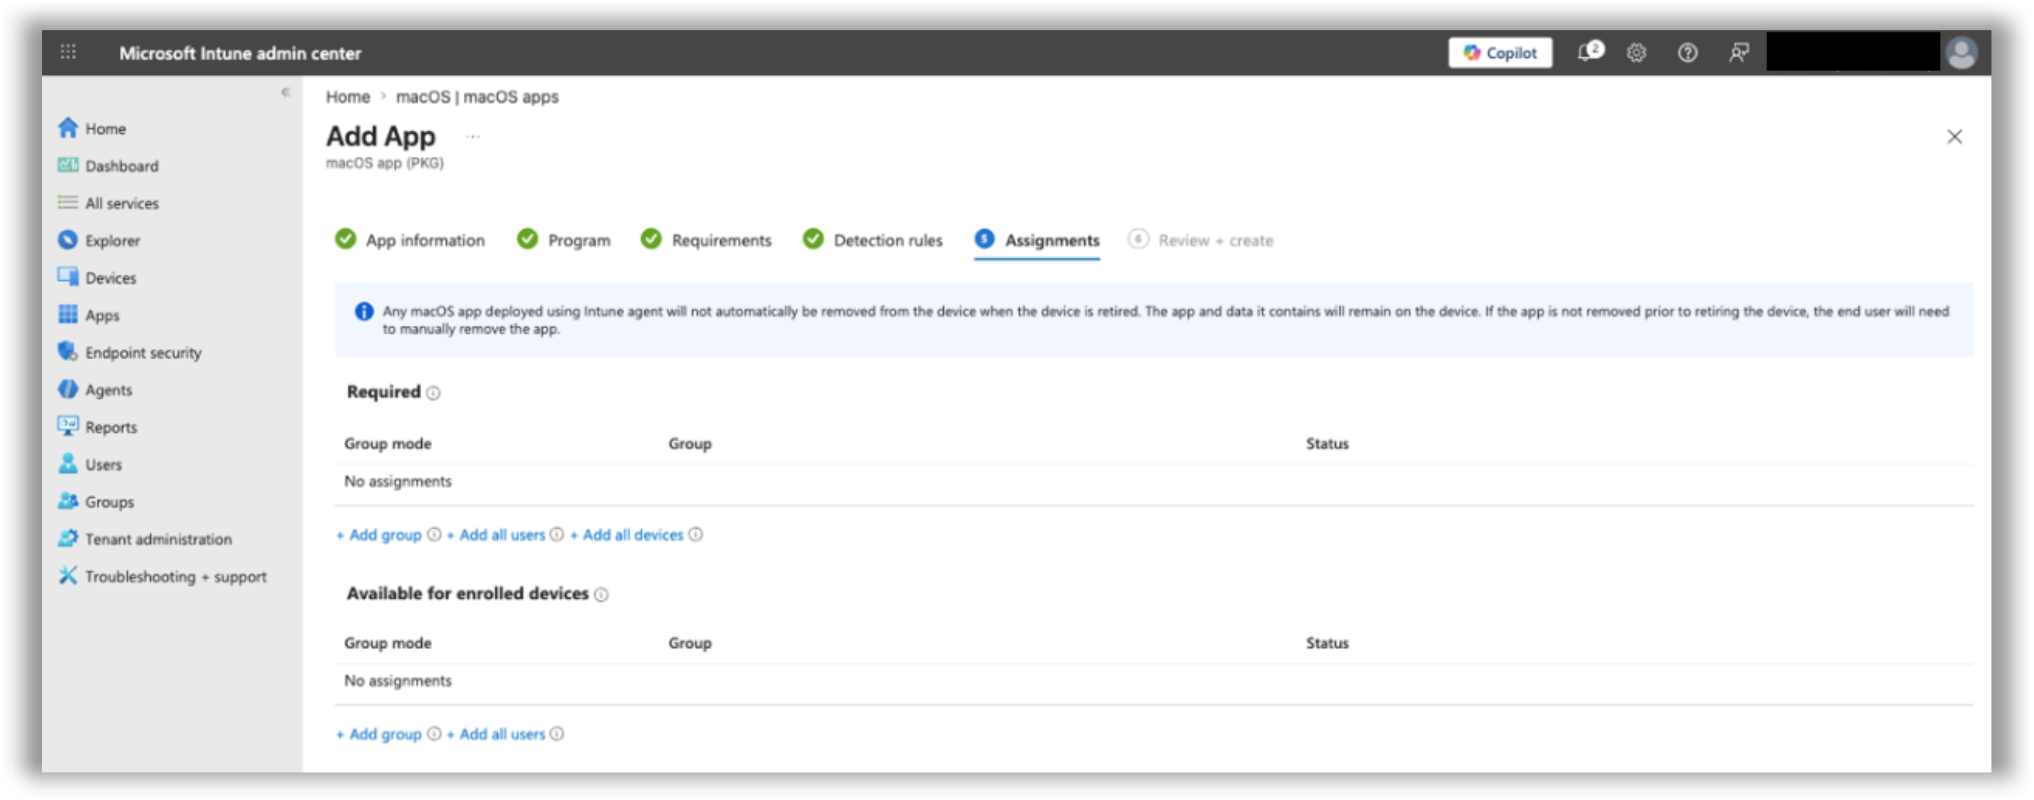
Figure 16: Select assignment for designated devices to receive the app in Intune
Review and create
Review all configuration settings on the Review + Create page. When confirmed, click Create to publish the application and make it available for deployment.
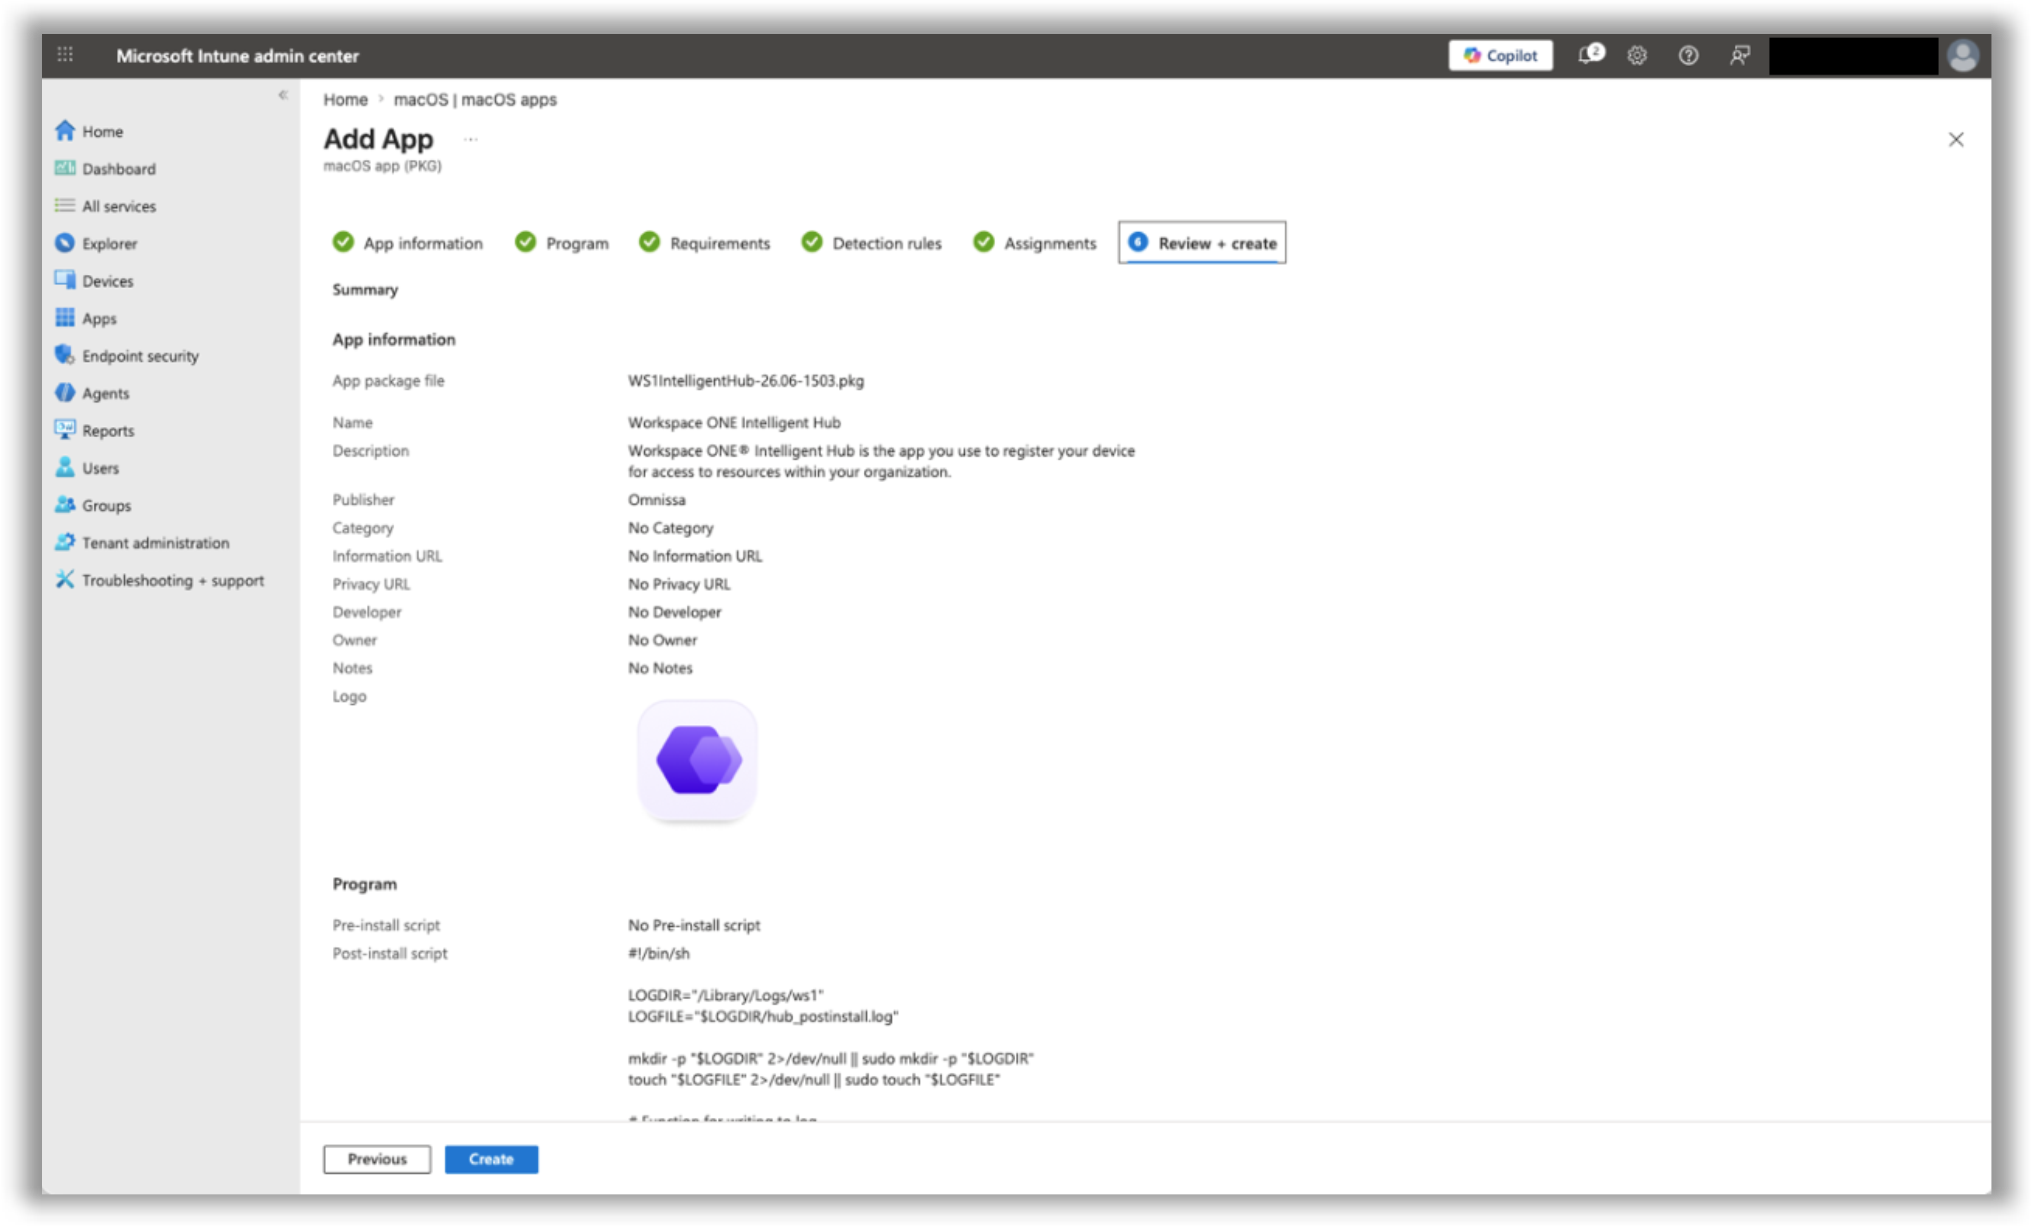
Figure 17: Verification of all app details and button to finish creating the app in Intune
Watch this demo video to see a quick overview of the previous steps.
Device telemetry in Intelligence
Validating successful Hub deployment
Once Intelligent Hub is installed by the MDM, the Silent Registration script executes automatically. Use the checklist below to confirm the process completed as expected:
- Workspace ONE Intelligent Hub launches in the tray without prompting the user for enrollment credentials.
- The device appears in Workspace ONE UEM with a management mode of Registered — not Enrolled.
- The device record in UEM is associated with the signed-in macOS user rather than the staging account.
- The post-install script ran successfully. Log details are available at /Library/Logs/ws1/hub_postinstall.log.
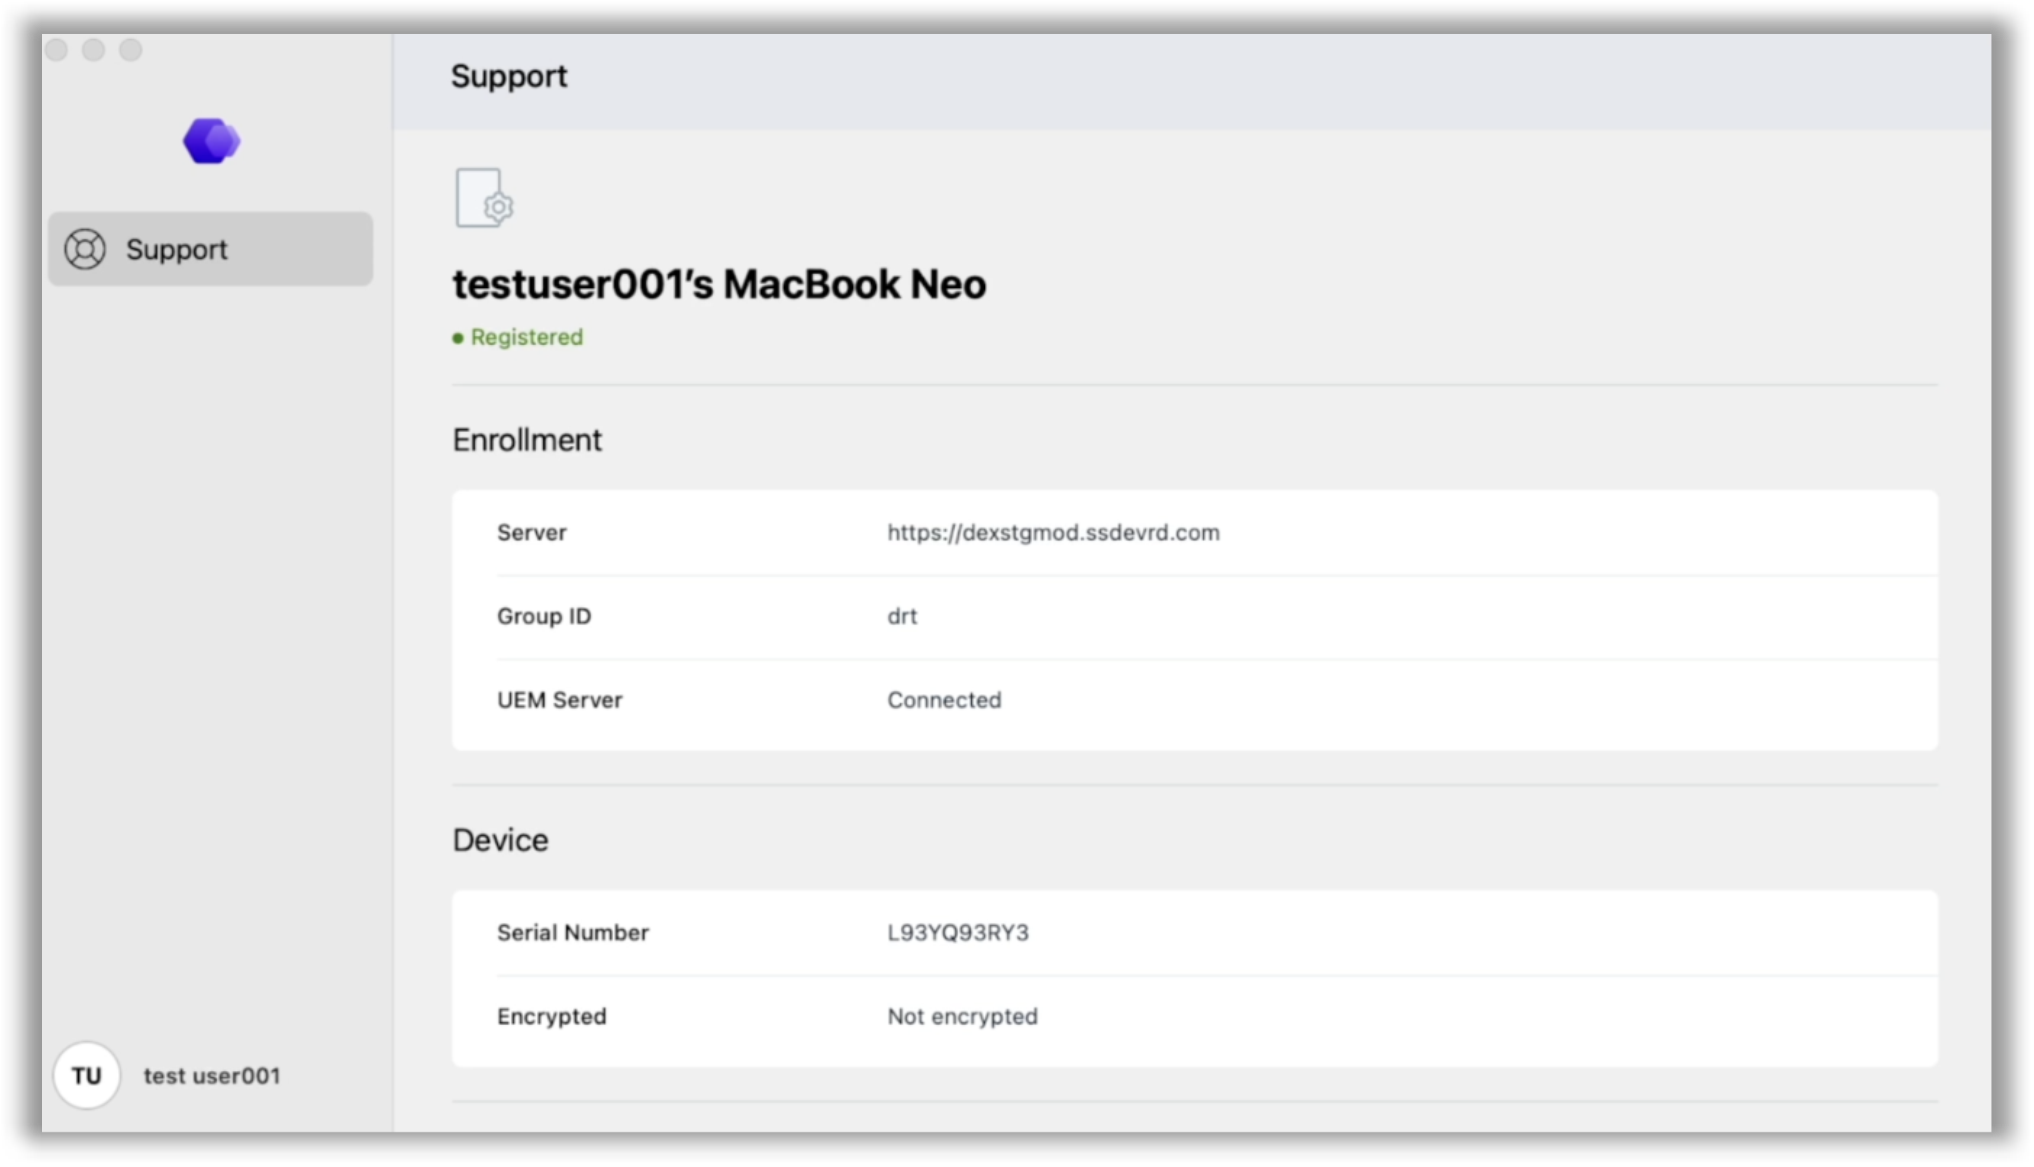
Figure 18: Device support tab in Workspace ONE Intelligent Hub app
Deploy the Experience Management agent
With devices successfully registered in Workspace ONE UEM, the Workspace ONE Experience Management agent can be deployed to macOS devices to begin collecting telemetry. The Experience Management agent is distributed as an internal application and installed silently — no end-user action is required. The Workspace ONE Experience Management agent can be found in the Omnissa Customer Connect portal.
- In the Workspace ONE UEM Console, upload the Experience Management agent package under Apps > Native Apps > Internal > Add.
- Assign the application to the Smart Groups designated for Hub Registered mode devices in Step 1.
- Publish the application to make it available for installation.
The agent installs automatically in the background after being assigned.
Monitoring experience telemetry in Intelligence
After the Experience Management agent is active and devices begin reporting, telemetry surfaces in Omnissa Intelligence under Workspace > Experience Management. The following capabilities become available for registered macOS devices:
Experience Scores – Composite scores reflecting each device's overall experience quality, factoring in performance, app reliability, and connectivity
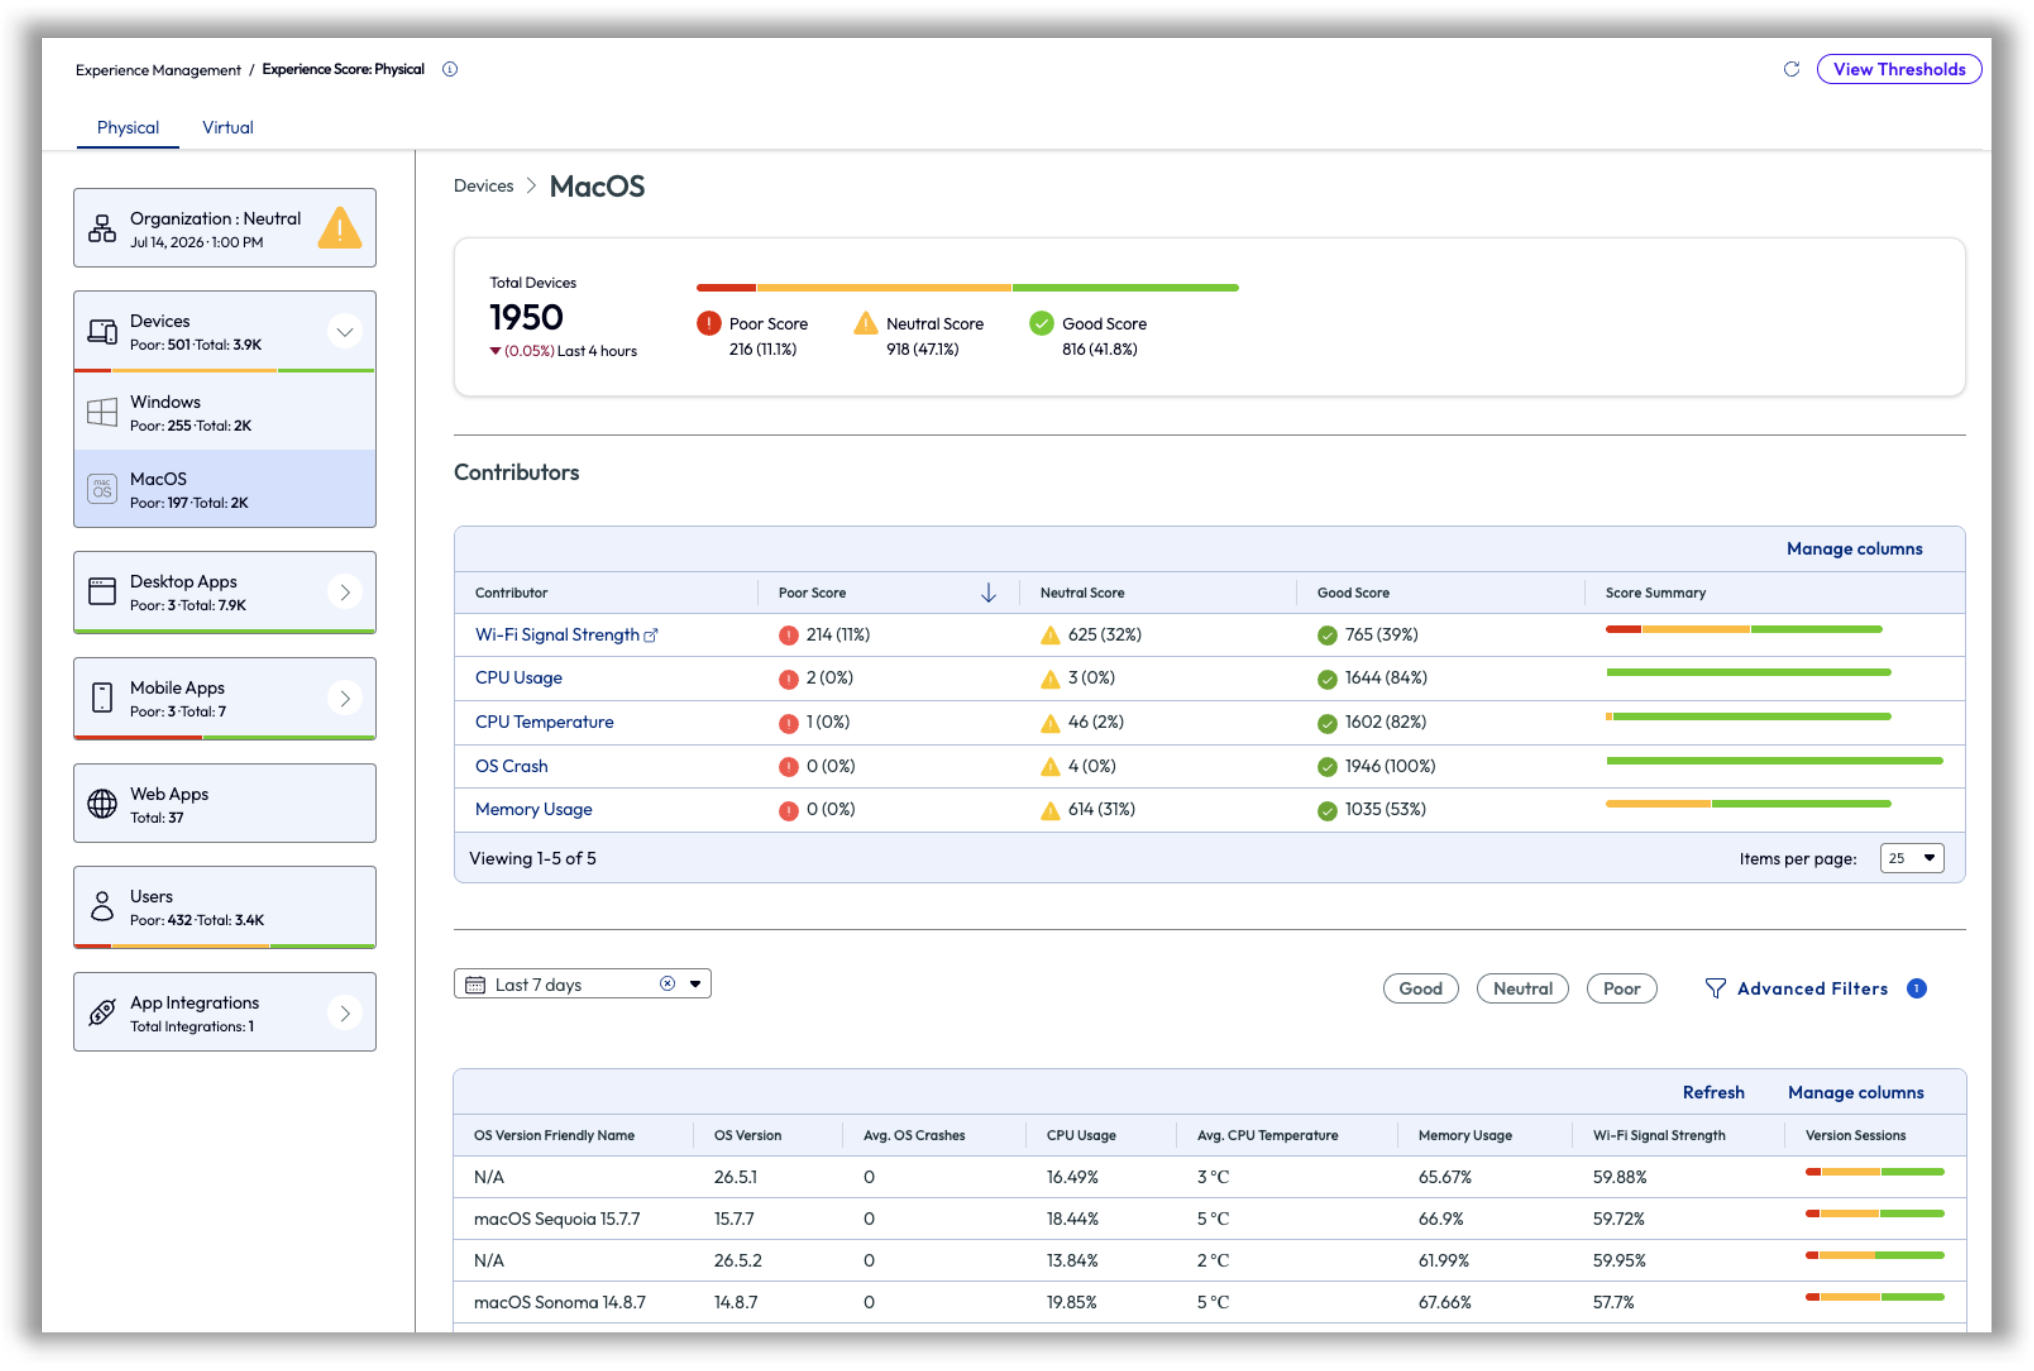
Figure 19: Experience Management > Experience Score page for macOS devices
Experience Analytics – Dashboards that highlight trends, outliers, and experience gaps across the fleet
Anomaly Detection – Machine learning automatically identifies deviations from baseline performance and flags potential issues before they become widespread problems
Allow a minimum of four hours after agent deployment for dashboards to begin reflecting data from newly registered devices as Experience Scores are calculated at this interval.
See these Tech Zone articles to learn more about using Experience Management:
Summary and additional resources
Workspace ONE UEM Hub Registered mode gives IT organizations a practical path to extending enterprise-grade DEX visibility to macOS devices without altering existing management infrastructure. Devices continue to be governed by the organization's current MDM platform while gaining access to Workspace ONE Experience Management capabilities.
Organizations that complete this configuration gain meaningful DEX visibility — including UX Score tracking, proactive anomaly detection, and experience analytics — across their entire macOS fleet, regardless of which MDM platform manages those devices day-to-day.
Additional resources
Workspace ONE UEM Documentation
Workspace ONE Experience Management for macOS
Workspace ONE Intelligent Hub for macOS Release Notes
DEX solution for third-party managed Windows devices
Getting started with Experience Management
'%3E%3Cpath id='Rectangle_1' data-name='Rectangle 1' d='M0,0H800V300H0Z' transform='translate(2297 1132)' fill='%23E2F0D9'/%3E%3Cg id='Group_5' data-name='Group 5' transform='translate(-6 -3)'%3E%3Ctext transform='translate(2534 1280)' font-size='50' font-family='Roboto-Regular, Roboto'%3E%3Ctspan x='0' y='0'%3ECurated Assets%3C/tspan%3E%3C/text%3E%3Ctext transform='translate(2611 1333)' font-size='20' font-family='Roboto-Regular, Roboto'%3E%3Ctspan x='0' y='0'%3ETile View (with image and controls)%3C/tspan%3E%3C/text%3E%3C/g%3E%3C/g%3E%3C/svg%3E)
Changelog
The following updates were made to this guide:
| Date | Description of Changes |
| 2026/10/06 |
|
| 2026/07/27 |
|
Author and contributors
This document was written by:
- Cy Whitfield, Senior Product Specialist
Contributors:
- Pushkar Kumar, Senior Product Manager – macOS Intelligent Hub
- Christina Minihan, Senior Manager, Product Specialists
Questions and feedback
For questions or feedback, send to tech_content_feedback@omnissa.com.