

Enabling BitLocker Encryption to Remote Windows Devices: Workspace ONE Operational Tutorial
Overview
BitLocker enhances Windows device system security by encrypting operating system, fixed, and/or removable data drives, and Workspace ONE UEM provides inherent functionality to maximize BitLocker security options, protections, and compliance, as well as end user self-service.
Full support for BitLocker is built into Workspace ONE UEM, and this document delves into environmental considerations, configuration options, and recommendations.
BitLocker implementation decisions
Once it has been determined that BitLocker will be implemented, ascertain that the Windows devices meet BitLocker system prerequisites. Most Windows devices actively in use today inherently support the system requirements, including TPM. For devices wherein BitLocker encryption will be managed via a Workspace ONE UEM policy, the device must have Intelligent Hub installed and enrollment completed.
There are four policy types that may be used to implement BitLocker:
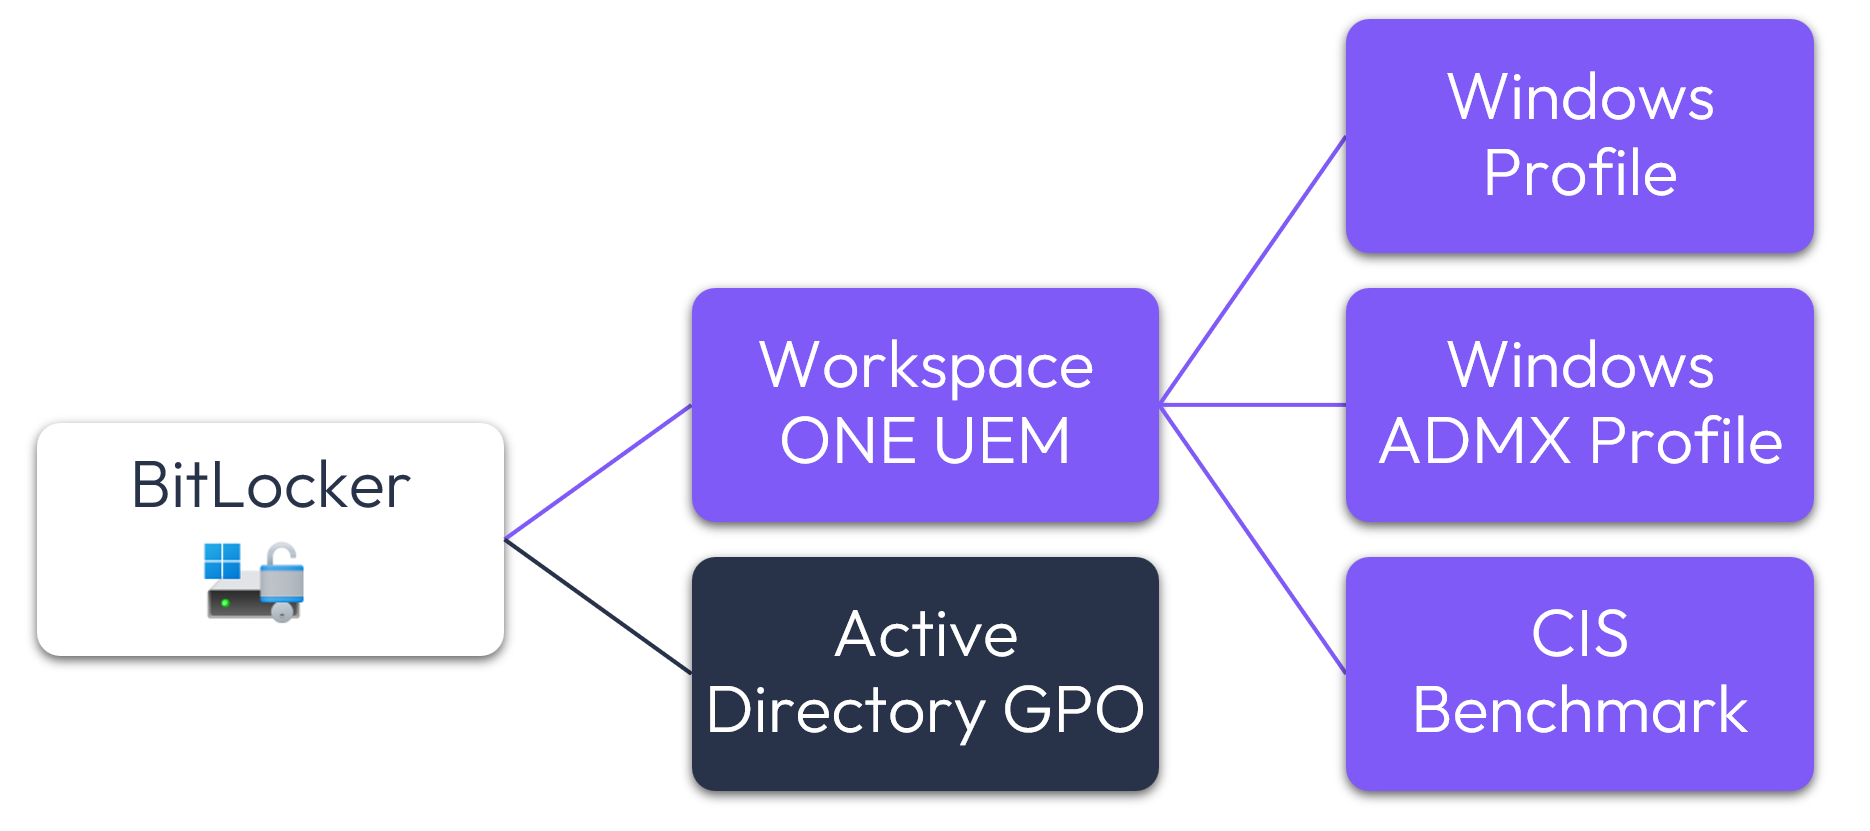
Figure 1: BitLocker configuration options
A key environmental aspect depends on the Windows device types that will be encrypted via BitLocker. As noted below, while Windows Desktops can be configured via any of the options, Windows Server is limited to only Active Directory GPOs and Workspace ONE UEM Windows ADMX Profile.
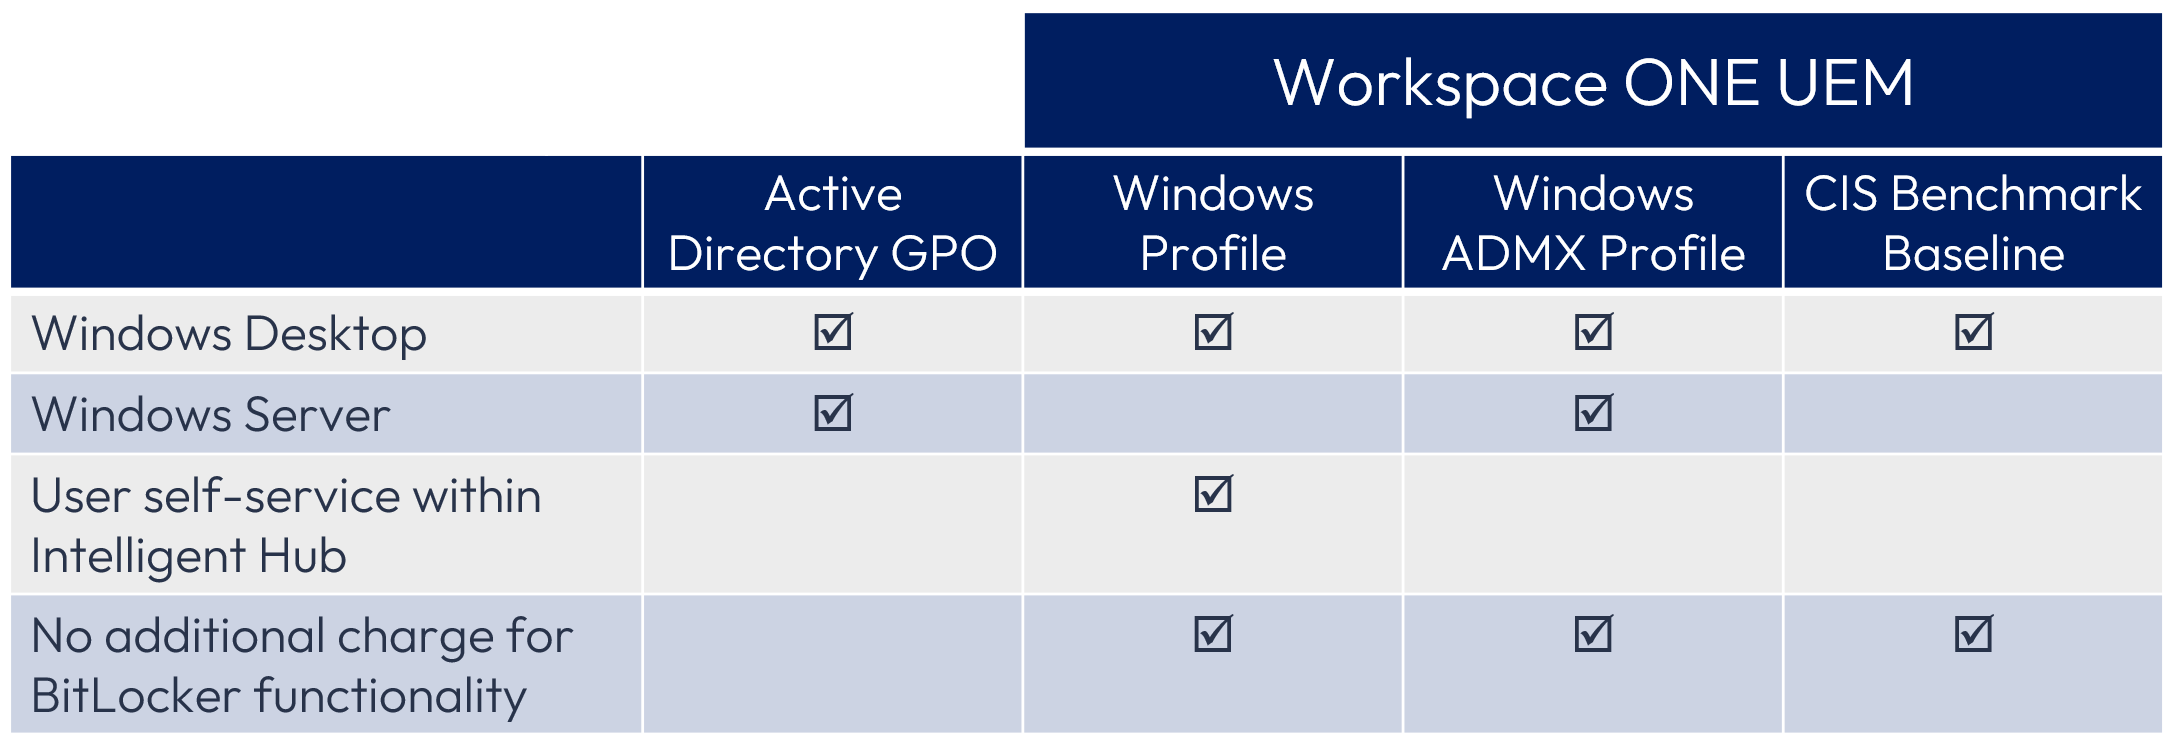
Figure 2: BitLocker options based on Windows platform and features
In general, Omnissa recommends utilizing the Windows Profile for BitLocker configuration for Windows Desktop devices.
End user self-service
Omnissa recommends enabling employees to access their BitLocker recovery key(s) via Intelligent Hub where the Windows Profile has been configured. While it is possible for users to access BitLocker recovery keys via other methods, utilizing Intelligent Hub is the easiest way to do so.
BitLocker policy options
There are four BitLocker policy options, and Omnissa recommends configuration via the Windows Profile where feasible. If this is not possible because the device type is Windows Server or for any other reason, the sequential recommendation order is as shown below.
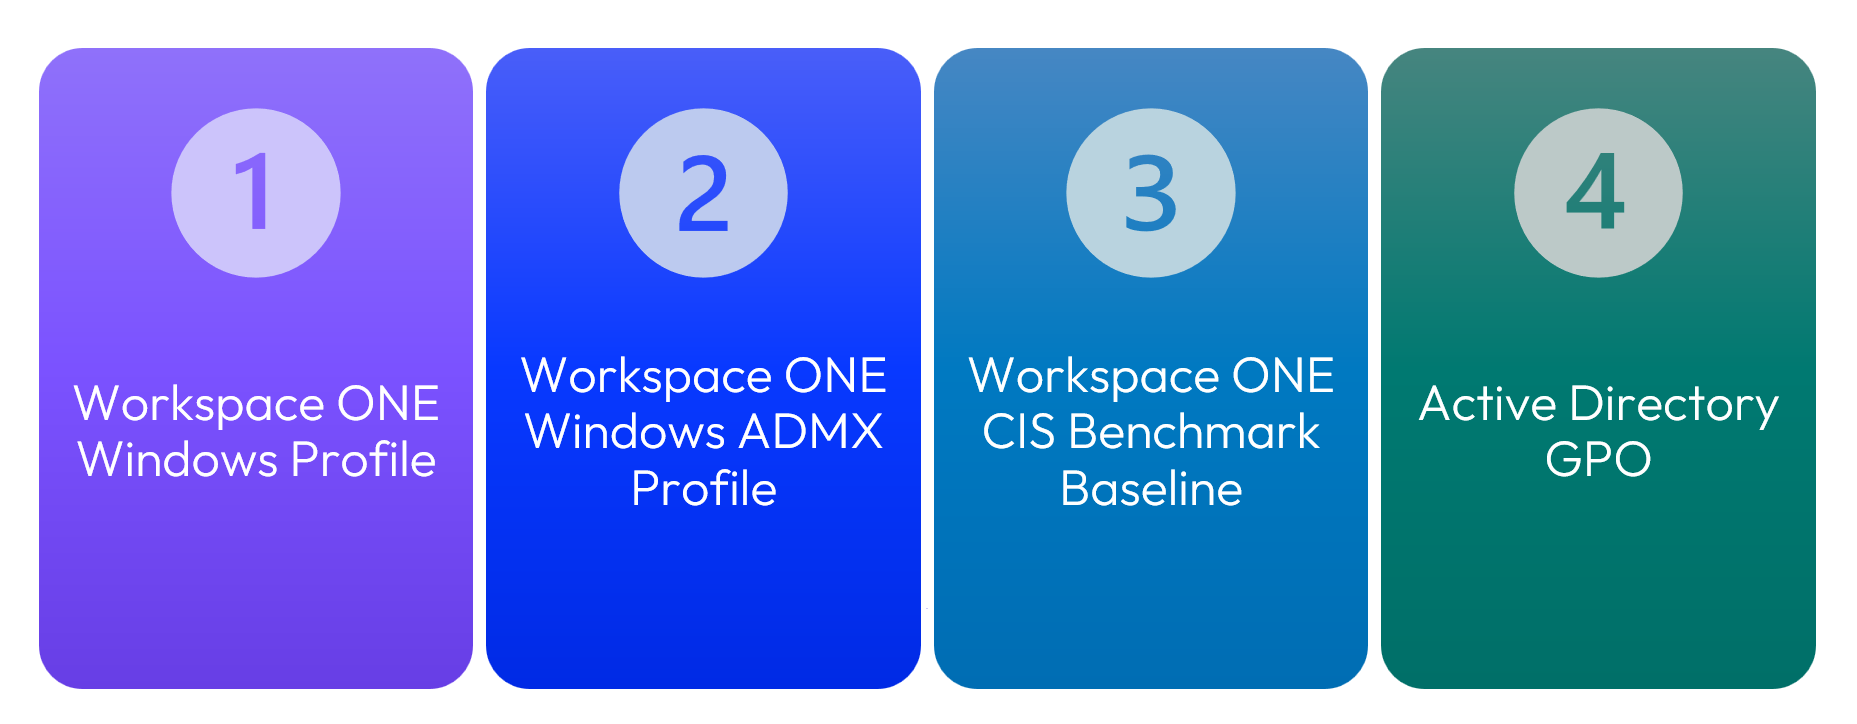
Figure 3: BitLocker policy types in sequential order of recommendation
BitLocker encryption should only be enabled within a single policy. For example, if some settings within the Windows Profile are preferred and some settings within the Windows ADMX Profile are preferred, only the profile type that supports the majority of the settings should be selected for configuration. Mixing and matching policy types can yield unexpected results.
As with all policies, Omnissa recommends collaboration with your Security team to ensure that configured settings align with corporate and security directives.
Windows Profile
Omnissa recommends configuring BitLocker for Windows Desktop devices via Windows Profile due to the robustness of the options presented. In particular, configuring BitLocker via the Windows Profile option provides secure, easy-to-access user self-service options. In addition, this is the only option that enables presents the BitLocker Recovery Key within the Workspace ONE UEM console for administrative access.
Unlike some other Windows Profile payloads, the BitLocker encryption payload is entirely controlled via Workspace ONE Intelligent Hub, as noted within the profile configuration screen, removing all reliance on OMA-DM and Microsoft CSPs.
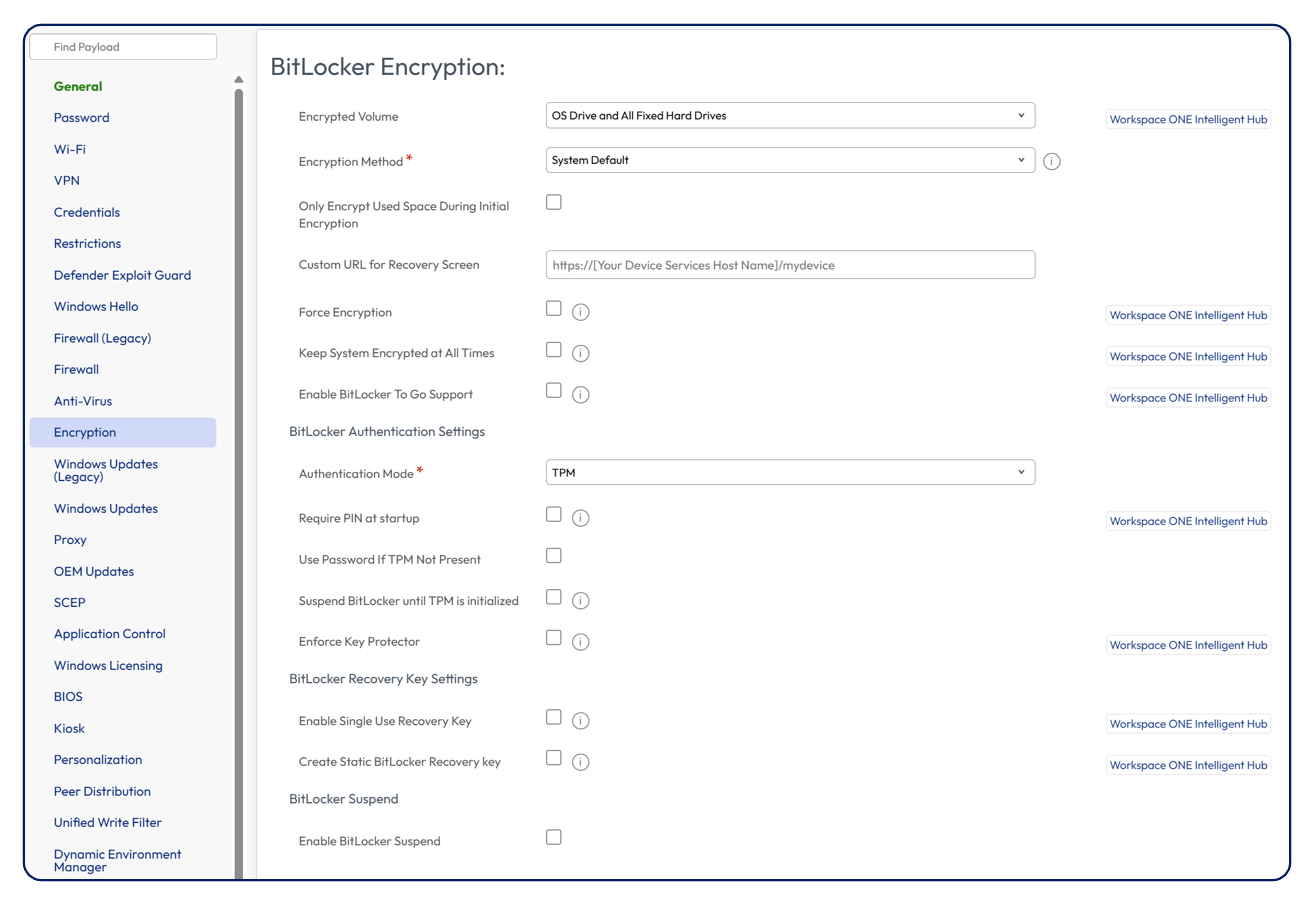
Figure 4: Go to Resources > Profiles & Baselines > Profiles > Add > Add Profile > Windows Profile > Desktop > Device > Encryption to access BitLocker configuration
For a full explanation of each setting, please see Omnissa Docs.
Key settings and respective Omnissa recommendations are explained below:
- Encrypted Volume: Omnissa recommends accepting default
- Only accessible drives can be encrypted and administratively managed, e.g., a D drive that uses passwords to unlock the drive that is not automatically unlocked via TPM must be unlocked before Workspace ONE UEM can manage
- Encryption Method: Omnissa recommends accepting default
- If the device is already encrypted, the same method or the default method must be selected
- Only Encrypt Used Space During Initial Encryption: Omnissa recommends enabling
- Causes only used space to be encrypted
- Force Encryption*: Use with caution!
- Causes BitLocker to re-encrypt if BitLocker is disabled; may cause issues during device wipe
- Keep System Encrypted at All Times*: Use with caution!
- Causes drive(s) to remain encrypted even if this profile is removed or device is wiped/unenrolled
- Enable BitLocker To Go Support: Omnissa recommends enabling for corporate devices
- Enhances security by requiring encryption of removable drive(s), e.g., USB thumb drives, as well as a password for write access
- Authentication Mode: Omnissa recommends keeping TPM default
- TPM provides secure authorization and pre-startup OS integrity
- Require PIN at startup: Omnissa recommends with single-user devices only; do not use with multiuser devices!
- Provides MFA and prevents OS auto-resume; however, PIN must be known
- Use Password if TPM Not Present: Likely not necessary
- All new Windows computers produced after 2016 have TPM
- Suspend BitLocker until TPM is initialized: Omnissa recommends enabling
- Ensures that encryption does not fail if TPM is not initialized
- Enforce Key Protector: Omnissa recommends enabling
- Maximizes security
- Enable Single Use Recovery Key: Omnissa recommends to maximize security and compliance
- Existing recovery key expires after use, and new recovery key is generated
- Create Static BitLocker Recovery Key: Omnissa does not recommend enabling
- Enables same key to decrypt all encrypted devices
- Enable BitLocker Suspend: Omnissa recommends enabling as necessary
- Useful for scheduled maintenance
*Note: The Force Encryption and Keep System Encrypted at All Times settings should only be enabled with judicious planning. Whereas all other Workspace ONE UEM BitLocker policy options result in drive decryption if the respective policy is removed, Intelligent Hub is uninstalled, and/or an enterprise wipe occurs, these two settings may cause BitLocker encryption to persist.
Windows ADMX Profile
For Windows Servers and/or where administrators wish to configure all BitLocker settings for both Windows Desktops and Windows Servers via the same policy, Omnissa recommends utilizing the BitLocker payload within the Windows ADMX Profile option.
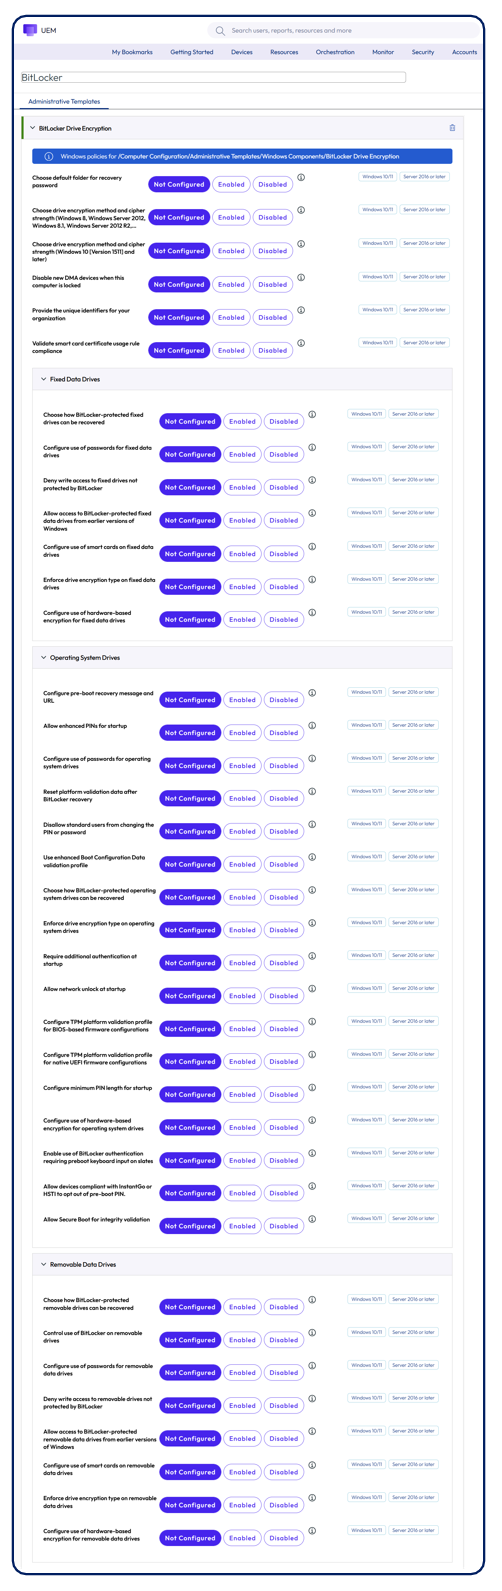
Figure 5: Go to Resources > Profiles & Baselines > Profiles > Add > Add Profile > Windows ADMX Profile > Device Profile > BitLocker Drive Encryption to configure BitLocker via Windows ADMX Profile
All Windows ADMX Profile BitLocker policy settings are presented exactly the same as the AD GPO BitLocker ADMX template; however, the management and distribution differs.
CIS Benchmark Baseline
Where strict adherence to the published CIS Benchmark is required, the CIS Benchmark Baseline may be an appropriate choice for Windows Desktop devices. In general, Omnissa does not recommend this approach because it will cause multiple Baselines to remain in effect and may cause confusion.
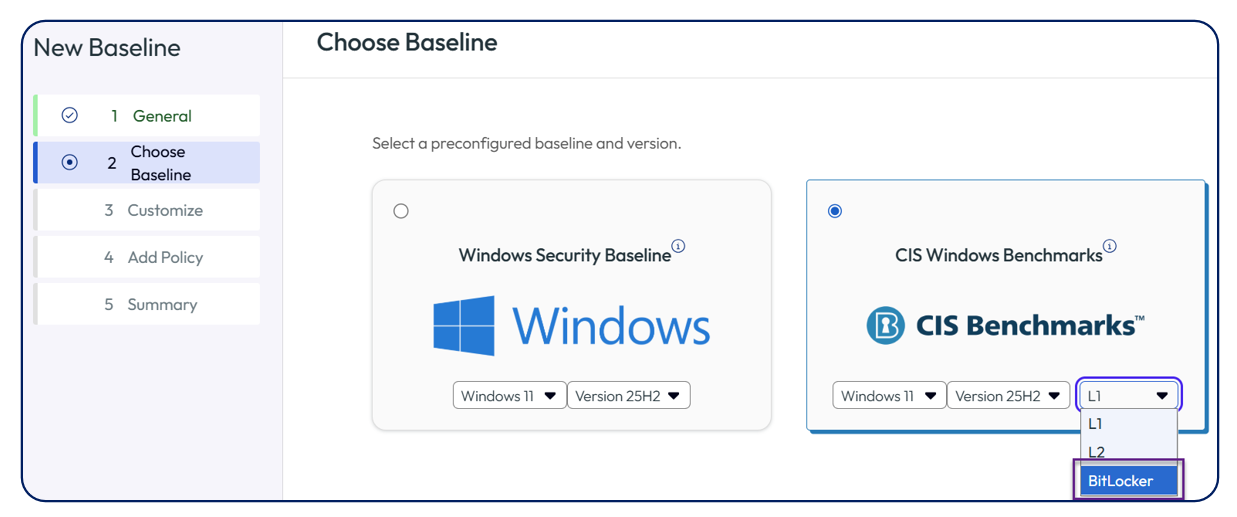
Figure 6: Go to Resources > Profiles & Baselines > Baselines > New > Desktop > Use template > CIS Windows Benchmarks > BitLocker to configure BitLocker settings via CIS Benchmarks
When the CIS Benchmarks BitLocker Baseline is enabled, all related settings are pre-configured and enabled based on CIS Benchmarks. As such, it may be necessary to modify settings as appropriate, keeping in mind that each change creates a deviation from the CIS Benchmarks standard.
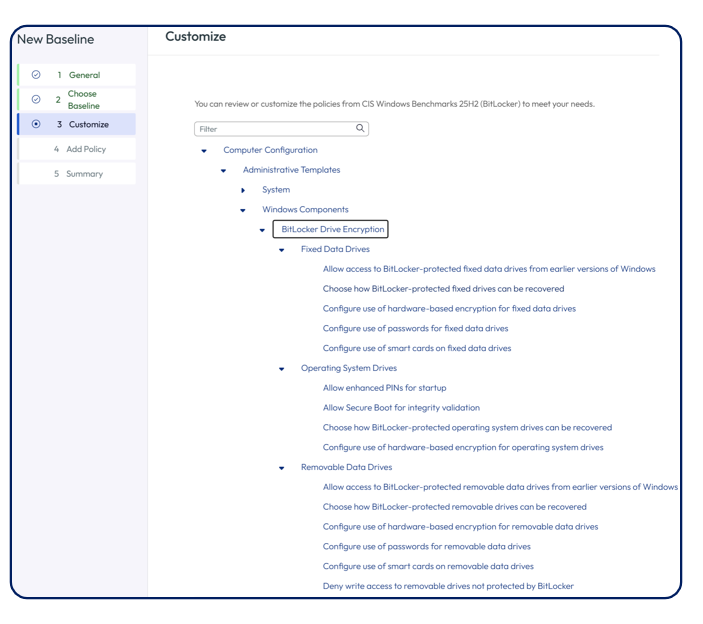
Figure 7: BitLocker settings can be customized within the CIS Benchmarks Baseline
Active Directory GPOs
While it is possible to implement BitLocker via Active Directory GPOs, Omnissa provides more robust solutions that enable end user self-service.
For example, if a BitLocker-encrypted Windows device becomes enveloped in an endless loop bluescreen due to a corrupt channel file that causes fatal Windows kernel errors, the end user would be able to securely access BitLocker encryption key(s) and remedy the issue when the Encryption payload within a Workspace ONE Windows Profile has been enabled.
Configuration of BitLocker via Active Directory GPOs looks like this:
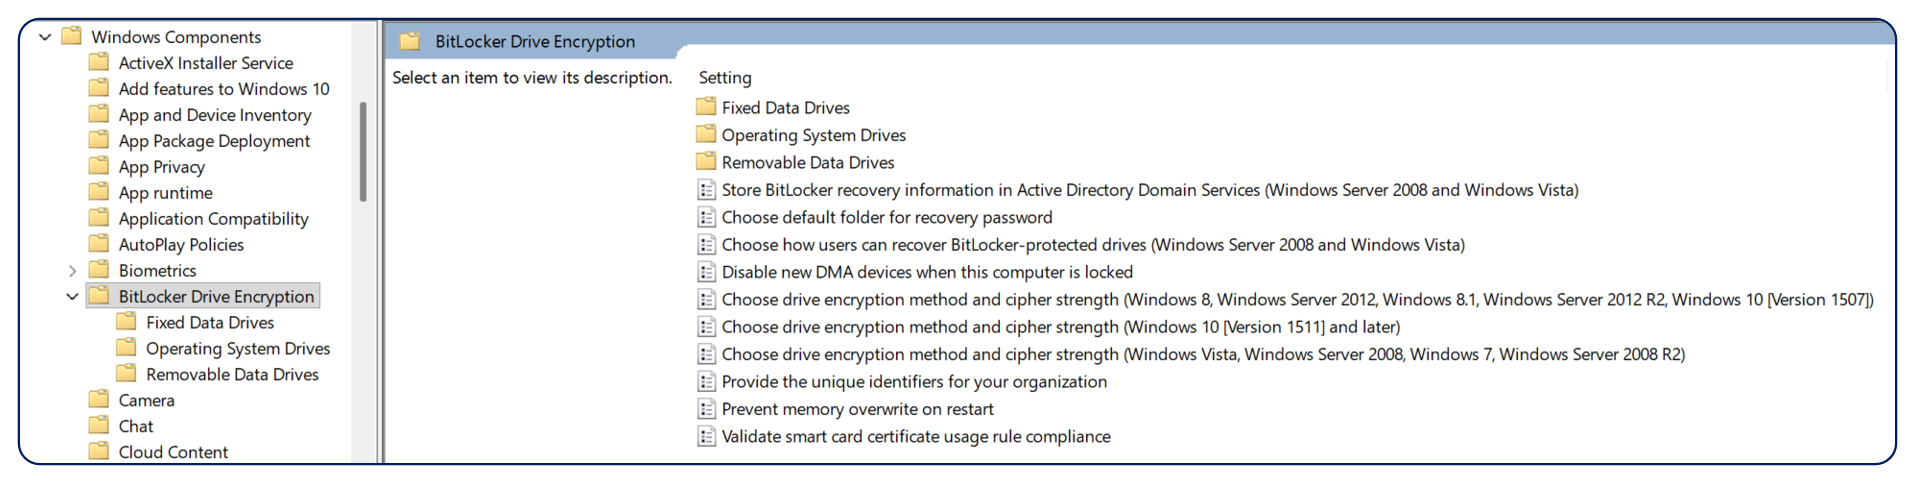
Figure 8: BitLocker configuration via Active Directory GPOs
Active Directory GPO settings exactly replicate Windows ADMX Profile configuration options with a key difference being how these settings are applied. Active Directory GPOs rely on line-of-sight applicability, whereas Windows ADMX Profiles are distributed via Intelligent Hub.
Accessing BitLocker recovery key(s)
Recovery key access options depend on the policy type that is used to enable BitLocker.
- Workspace ONE Windows Profile: Intelligent Hub application if enabled
- Workspace ONE Windows ADMX Profile, Workspace ONE UEM CIS Benchmark Baseline, and Active Directory GPO: Microsoft account
- For Active Directory devices, stored in AD
- For Entra ID devices, stored in Entra ID
BitLocker self-service via Intelligent Hub
For users to be able to access BitLocker recovery key(s) via Intelligent Hub, Employee Self-Service must be enabled within Hub Services. Note that this functionality depends on BitLocker configuration within a Windows Profile only.
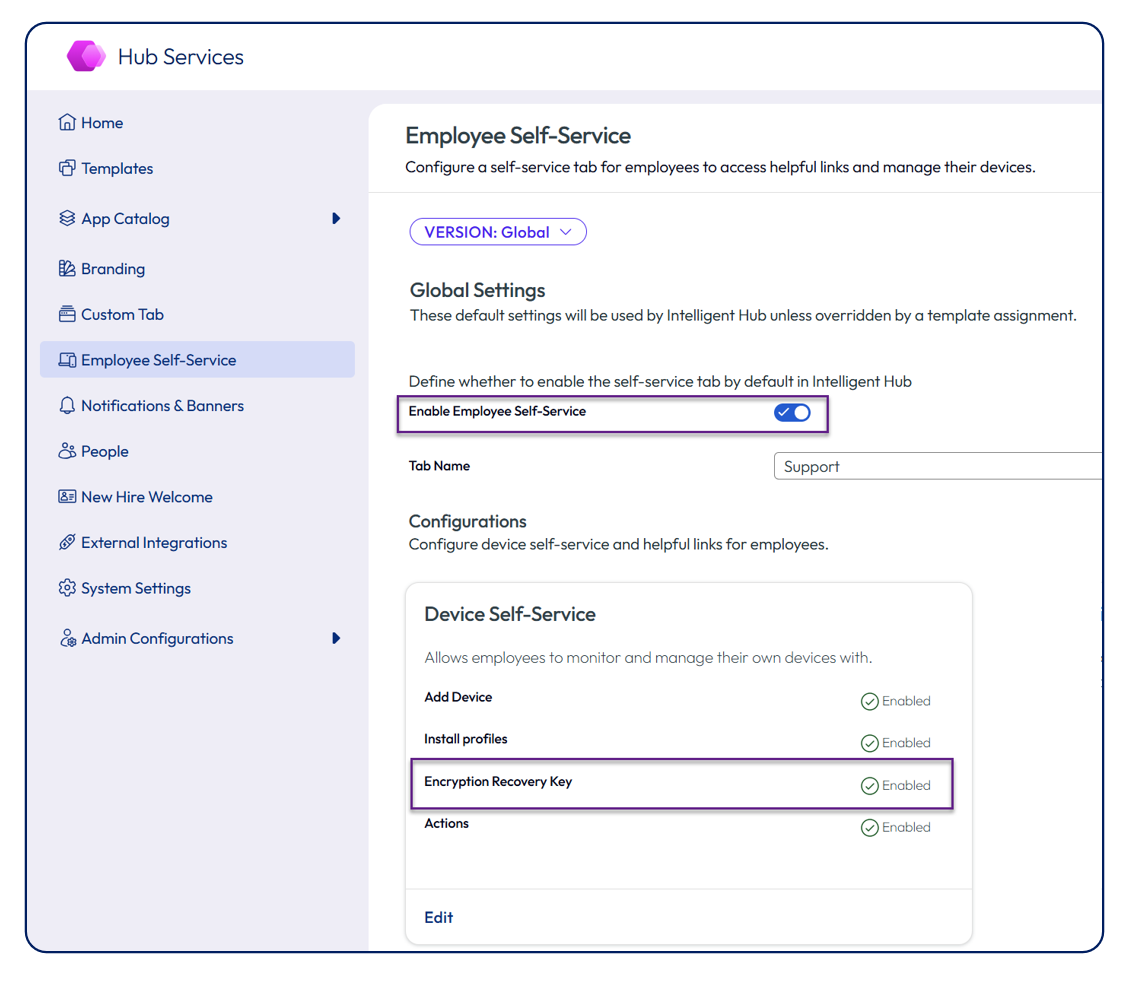
Figure 9: Go to Hub Services > Employee Self-Service to enable Encryption Recovery Key
Once Employee Self-Service has been enabled within Hub Services, if the user encounters a system request for the BitLocker recovery key, it can easily be accessed directly from Intelligent Hub after the user has securely authenticated from another device.
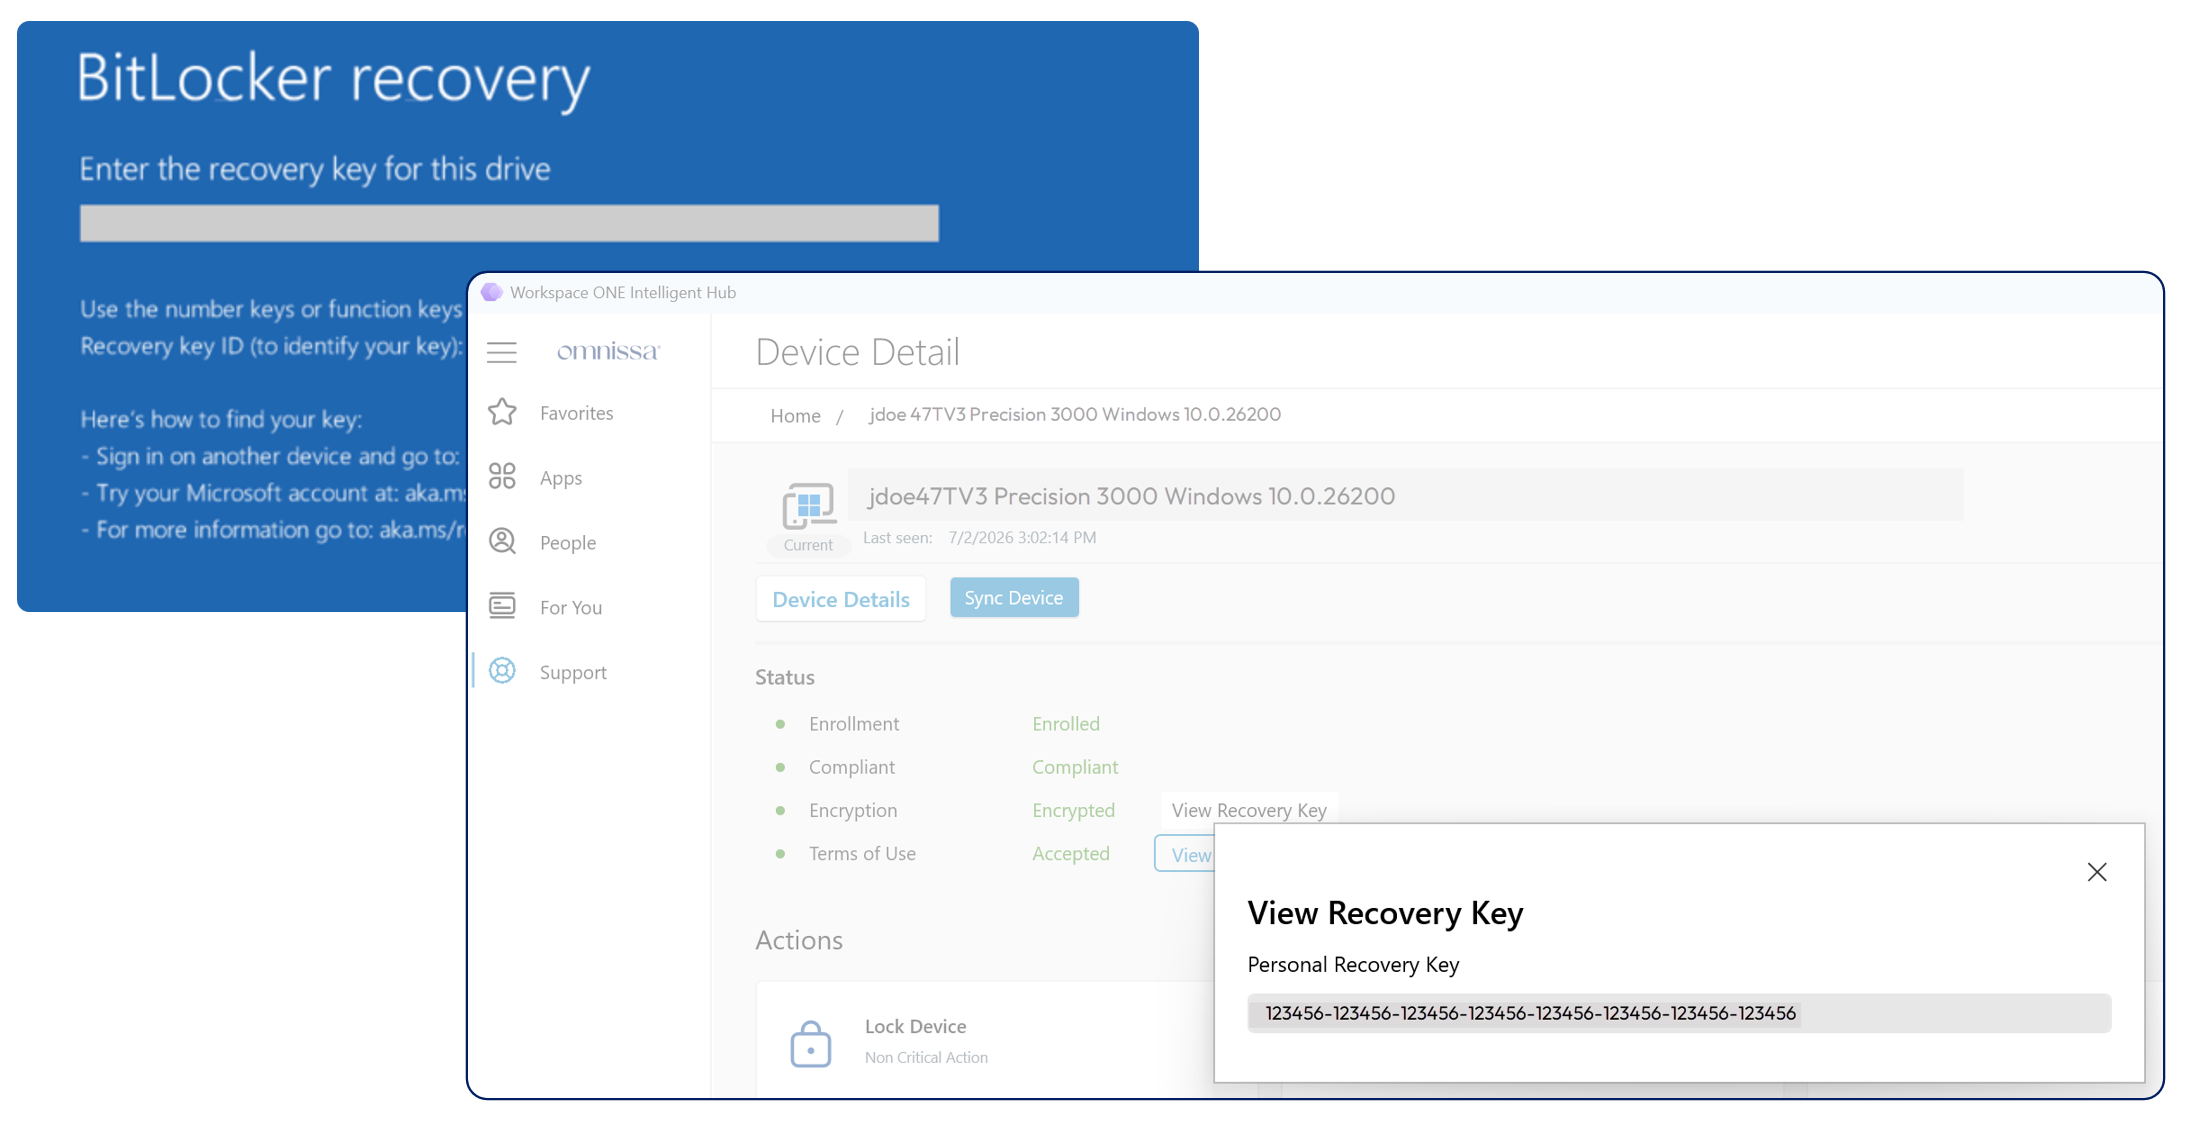
Figure 10: BitLocker Recovery Key self-service from the Intelligent Hub > Support > Device Detail > Encryption screen
Alternatively, an administrator can provide the recovery key as presented from the Workspace ONE UEM console.
BitLocker self-service via Microsoft
Where an alternative to the Workspace ONE UEM Windows Profile has been configured, BitLocker Recovery Key(s) can be accessed by users via https://aka.ms/myrecoverykey. For detailed instructions, please see the Find your BitLocker recovery key article.
After authentication, the user is presented with one or more assigned devices and can then select the appropriate device and subsequently the BitLocker recovery key.
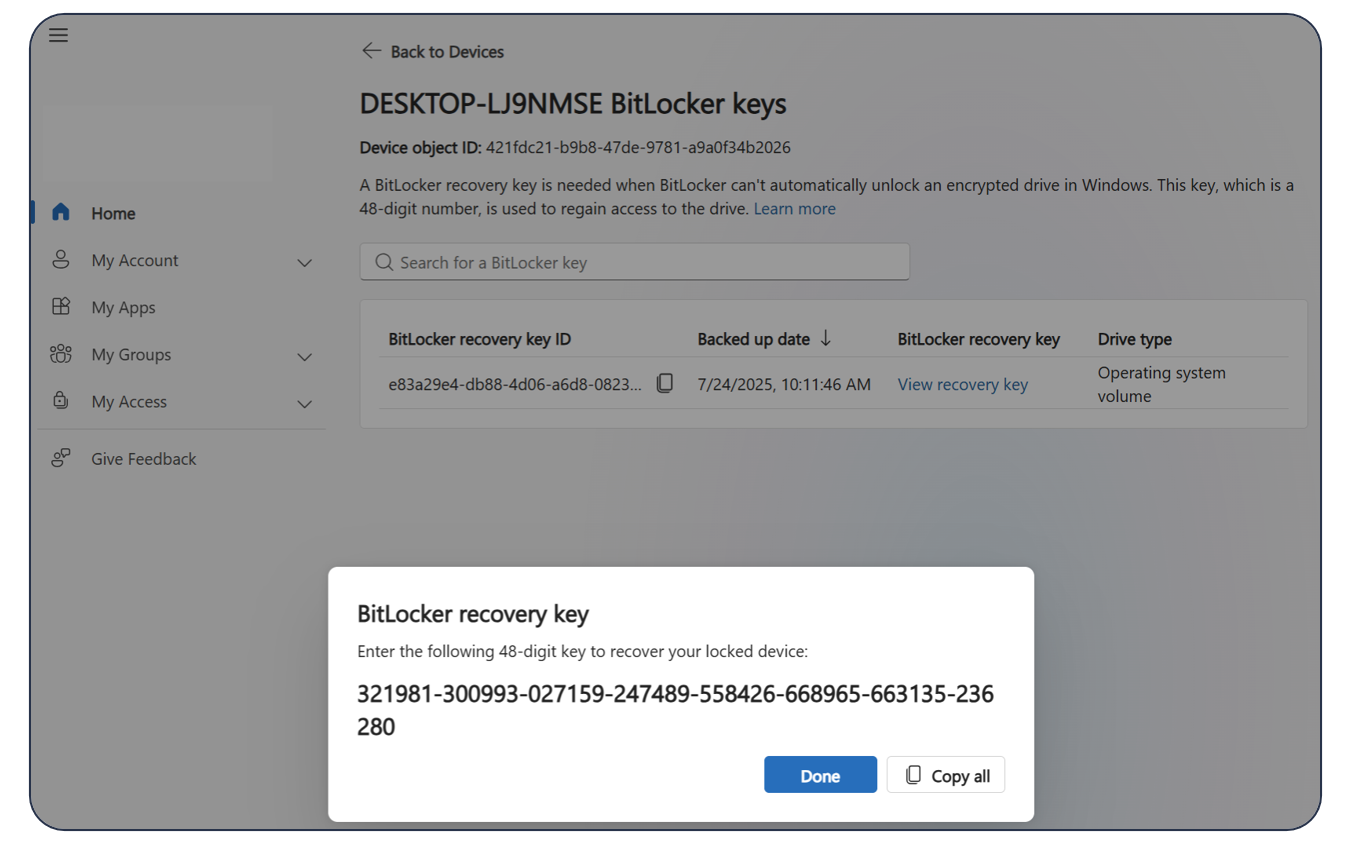
Figure 11: BitLocker recovery key accessed via Microsoft account
Validation and Troubleshooting
After BitLocker has been enabled, status should be validated within the Workspace ONE UEM console. These same validation steps, as well as additional troubleshooting steps, can be used to address BitLocker issues.
BitLocker status in console
Within the Workspace ONE UEM console Devices > List View screen, BitLocker status can be readily seen. If the status shows as Encrypted, an administrator has the option of viewing the Recovery Key as shown below.
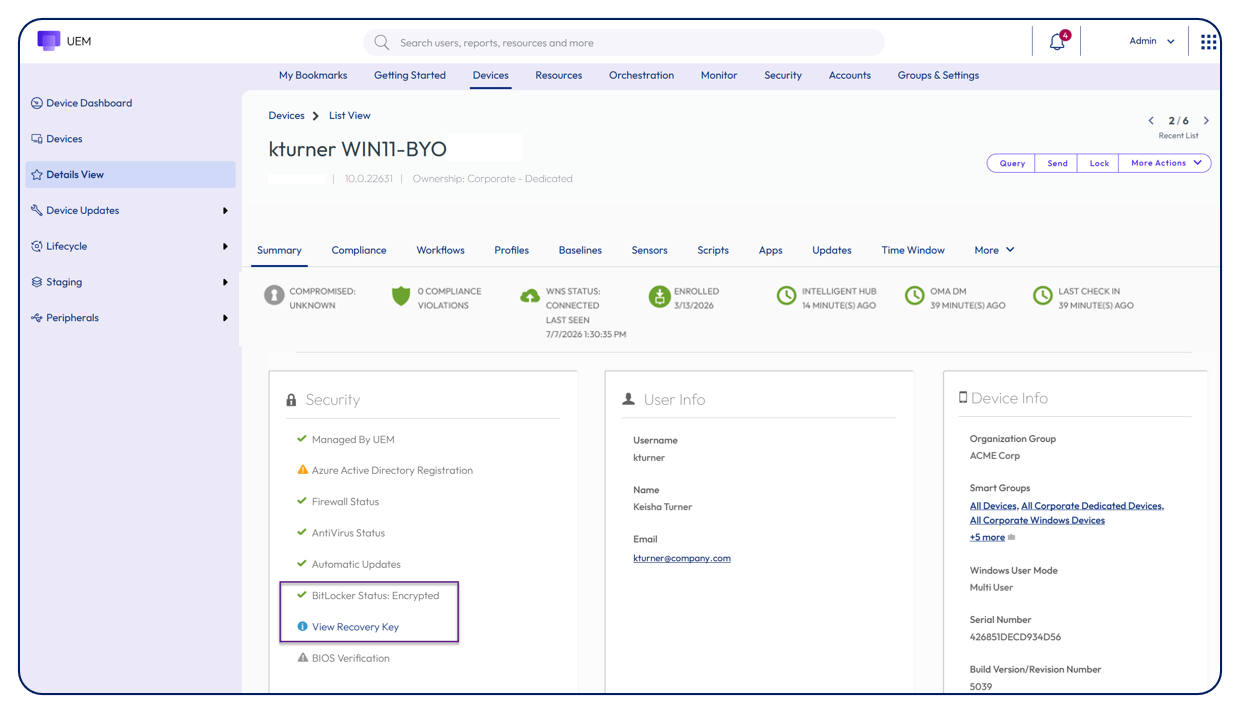
Figure 12: Within the Workspace ONE UEM console, administrators can validate BitLocker encryption status and view recovery keys
If the Recovery Key is administratively accessed, this action will be shown within the Event Log.
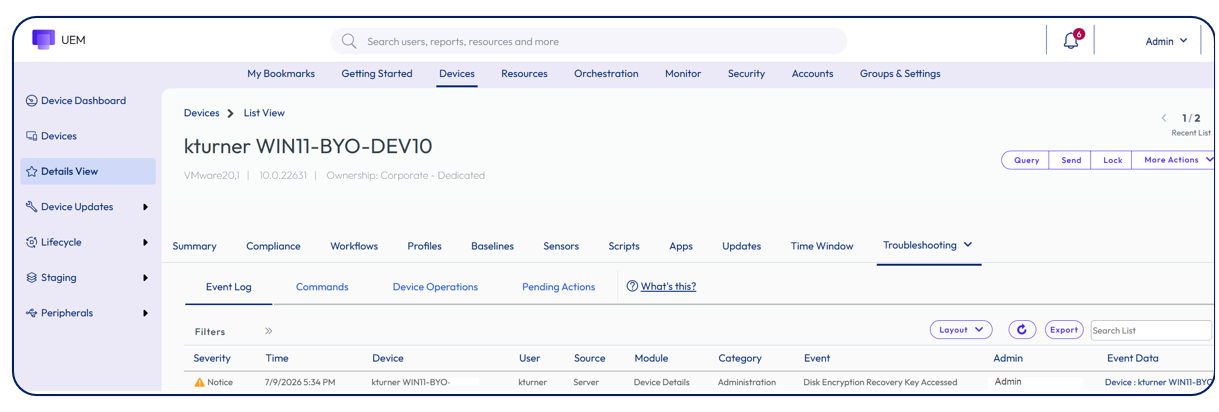
Figure 13: Via the Troubleshooting tab, Event Log information including administrative access to BitLocker recovery keys can be tracked
However, if the device is not encrypted, then status shows as Not Encrypted, including a red triangle shown within the Security block.
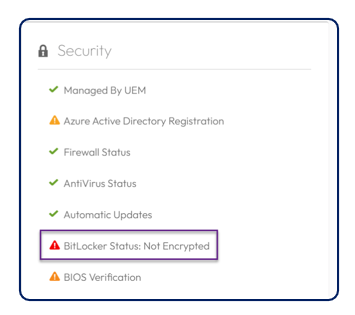
Figure 14: When BitLocker status is not encrypted, a red triangle is shown
Removable drives
If BitLocker To Go is enabled within a Workspace ONE encryption policy, removable drives can be tracked within the Workspace ONE UEM console.
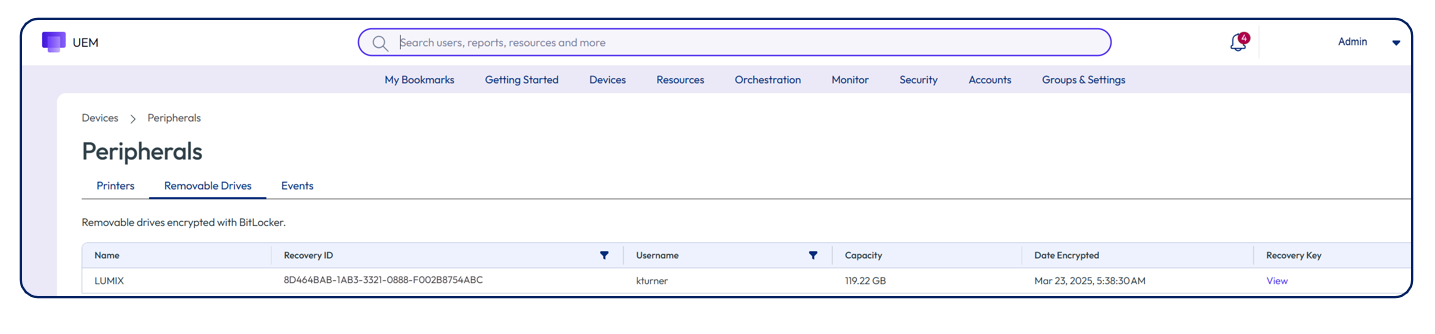
Figure 15: Go to Devices > Peripherals > Peripherals > Removable Storage to see BitLocker-encrypted removable drives
BitLocker status on local device
Regardless of how BitLocker is enabled, encryption can easily be confirmed on the local device.
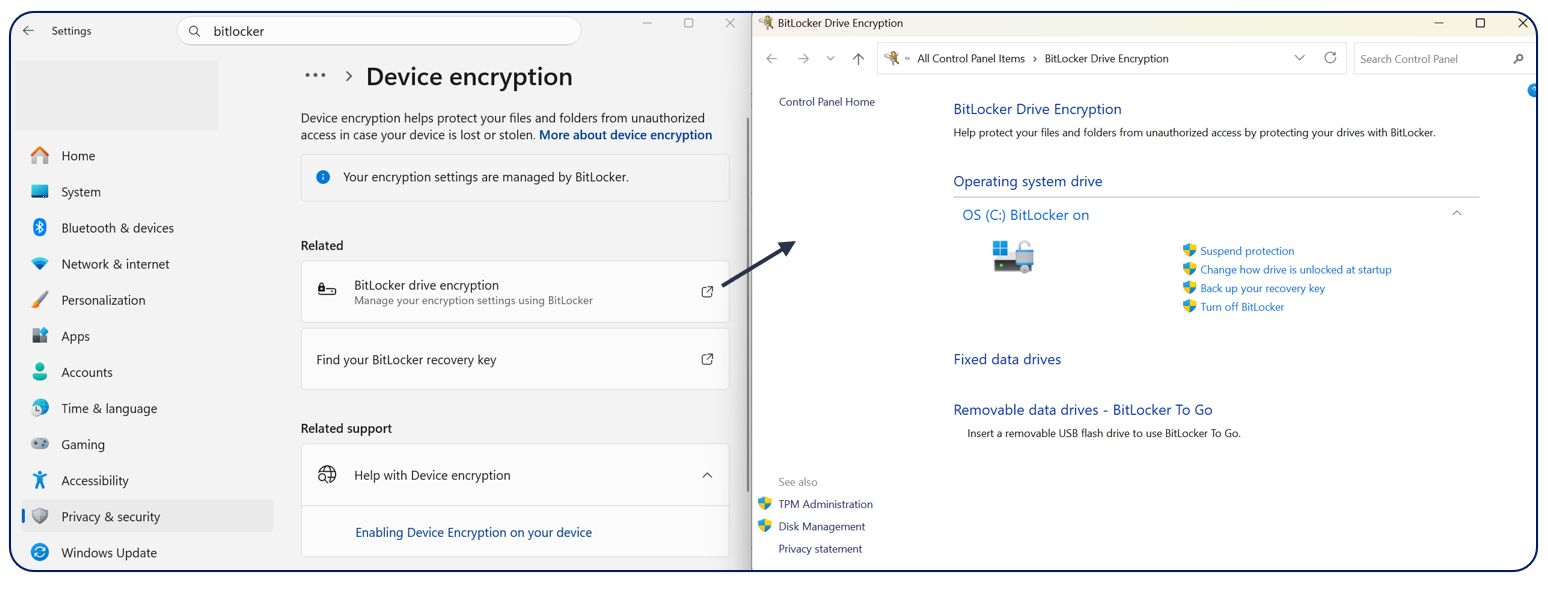
Figure 16: Go to Settings > Privacy & security > Device encryption to see BitLocker status on local device
In the example above, encryption of the operating system drive is confirmed, and encryption of fixed data and removable data drives can likewise be validated.
Administrative actions
Administrators can temporarily suspend BitLocker on individual devices from the Workspace ONE UEM console.
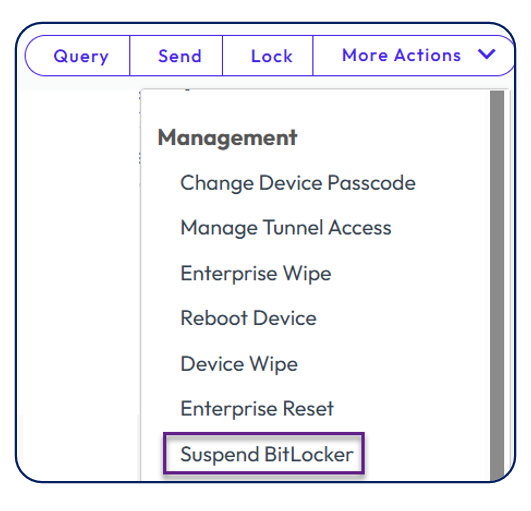
Figure 17: Go to Devices > List View > More Actions > Management to suspend BitLocker on the Windows device
For example, a user device undergoing a BIOS update that impacts the TPM may cause the Windows computer to bluescreen, and the administrator wishes to suspend BitLocker to stabilize the device.
After clicking Suspend BitLocker, the administrator is presented with the option to select the length of the suspension based on the number of reboots.
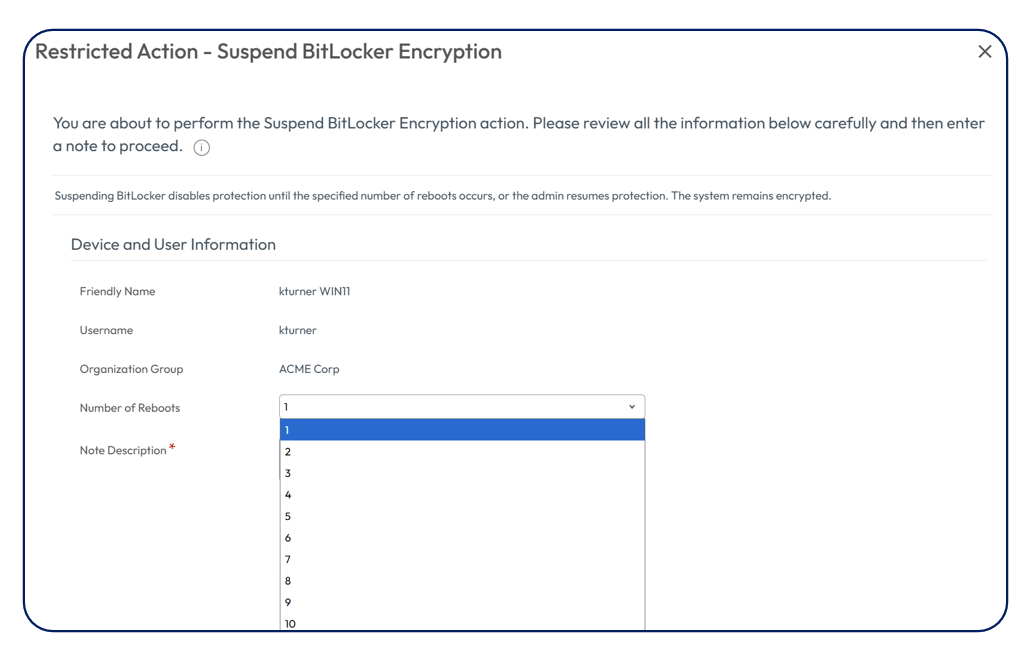
Figure 18: Temporary BitLocker suspension can be enabled based on number of reboots
The Suspend BitLocker option morphs to Resume BitLocker during the suspension. Resume BitLocker can manually be selected to override the designated reboot cycles.
Compliance policy
BitLocker encryption can be validated and enforced via Compliance Policy configuration:
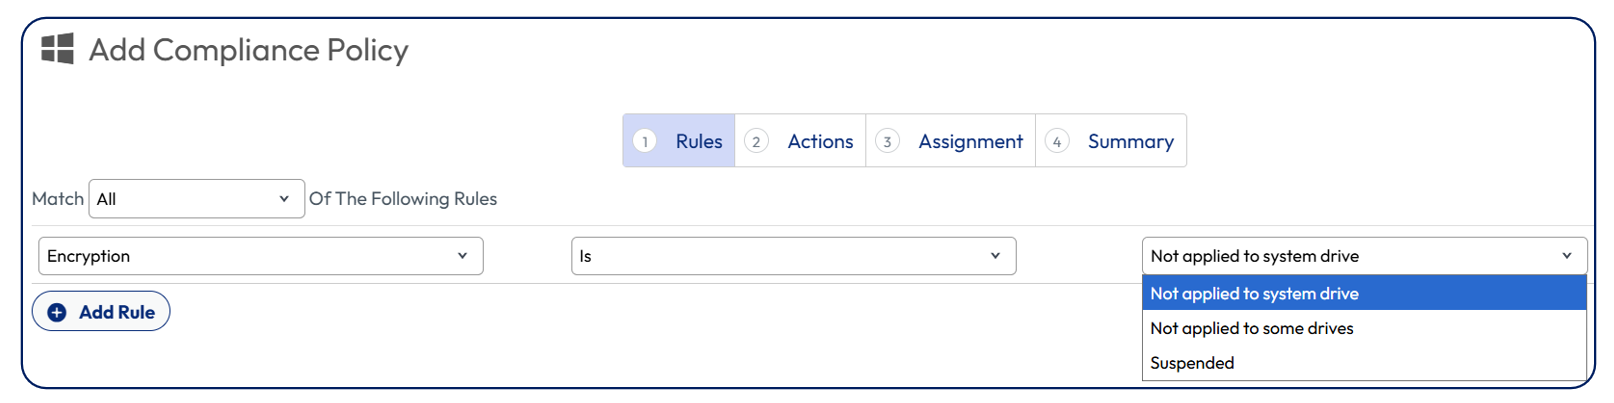
Figure 19: Go to Security > Compliance Policies > Add > Windows > Windows > Select Encryption to create a BitLocker rule and subsequent action
Please note that if the subsequent action causes the installation of a compliance profile, BitLocker may be enabled and disabled in an infinity loop.
Additional troubleshooting
| Issue | Potential solution |
| Drive(s) cannot be decrypted | Windows Profile may be configured with Force Encryption and/or Keep System Encrypted at All Times enabled |
| User does not have another Windows device to extract BitLocker recovery key | Can be accessed from Intelligent Hub on any Workspace ONE managed device, including mobile |
| Security team requires encryption status report | Within Intelligence, add the Windows Desktop Encryption Status report |
| Drive(s) may not contain compatible partitions | On user device via an administrative prompt, enter: manage-bde -status, see also other parameters |
| Event Logs on local device | Applications and Services > Microsoft > Windows > BitLocker-API |
Figure 20: Additional troubleshooting steps
Summary and additional resources
BitLocker encryption is a powerful policy that maximizes device security and compliance. User self-service and administrative access are possible but vary depending on how BitLocker is configured.
Omnissa recommends utilizing the Windows Profile for BitLocker configuration of Windows Desktop devices. For Windows Server devices and/or where the Windows Profile is not suitable, the Windows ADMX Profile should be the secondary choice.
Additional resources
The following additional resources may be useful:
- Configuring Workspace ONE Windows Baselines and Profiles
- Managing Windows Updates for Windows Devices
- Deploying Workspace ONE applications to Windows devices
- Troubleshooting Workspace ONE Windows Devices
Changelog
The following updates were made to this guide:
| Date | Description of Changes |
| 2026/07/15 | Total document rewrite |
About the author and contributors
- Jo Harder, Principal Product Specialist, Omnissa
- Michael Bradley, Principal Product Specialist, Omnissa
- Grischa Ernst, Senior Product Manager, Omnissa
Feedback
Your feedback is valuable, and recommendations for updates are welcomed.
To comment on this paper, contact Omnissa at tech_content_feedback@omnissa.com.