Enrolling Windows Devices using Entra ID
Overview
Note: This content was created for Windows 10, but the basic principles and tasks outlined also apply to your deployment of Windows 11.
Omnissa provides this operational tutorial to help you with your Omnissa Workspace ONE® environment. This tutorial provides you with practical information and exercises to help you set up Windows device onboarding to your Workspace ONE UEM environment, in conjunction with Microsoft Entra ID (formerly Azure AD) for authentication.
Audience
This operational tutorial is intended for IT professionals and Workspace ONE administrators of existing production environments.
Both current and new administrators can benefit from using this tutorial. Familiarity with Windows Out of Box Experience (OOBE), Microsoft Active Directory (AD), and Microsoft Entra ID is assumed.
Knowledge of additional technologies such as Omnissa Intelligence and Omnissa Workspace ONE® UEM is also helpful.
Integrating Microsoft Entra ID with Workspace ONE UEM
Entra ID Integration Use Cases
TIP: Workspace ONE Drop Ship Provisioning enhances Autopilot functionality!
Workspace ONE Drop Ship Provisioning supports the following Active Directory (AD) Types (use cases):
- Active Directory Domain Join
- Ability to join the on-premises active directory domain. The device needs access to the domain when booting up for the first time in order to join the domain successfully.
- Entra ID Basic
- Ability to join AAD without a premium license and still enroll in Workspace ONE UEM
- Entra ID Premium
- Ability to join AAD with the option of using Autopilot as well.
- Workgroup
- Enrolls device into Workspace ONE UEM using a local Windows account.
For more information on Workspace ONE Drop Ship Provisioning, see the Drop Ship Provisioning Operational Tutorial on Tech Zone.
Workspace ONE UEM integrates with Microsoft Entra ID (Azure AD), providing a robust selection of onboarding workflows that apply to a wide range of Windows desktop use cases. However, Entra ID licensing requirements stipulate that you must purchase an additional Entra ID Premium license to complete this integration.
Enterprises that are leveraging Entra ID typically use one of the following on-boarding options:
Corporate-Owned Devices | Employee-Owned Devices |
|---|---|
|
|
Prerequisites
Microsoft Entra ID is generally used for onboarding new devices and may already be used to co-manage existing SCCM-managed devices. As you perform this tutorial, ensure that separate Active Directory groups are configured when configuring integration with Entra ID and Workspace ONE UEM.
Before you can perform the procedures in this tutorial, verify that your system meets the following prerequisites:
- Workspace ONE UEM Admin Account.
- Microsoft Entra ID Premium P1 or greater license, or any Microsoft bundle which includes this license.
- Microsoft Entra ID Admin Account to configure integration with Workspace ONE UEM.
- To integrate a custom (or non-Omnissa) Workspace ONE UEM domain, e.g., https://*.awmdm.com, then ensure that your custom domain is validated in Entra ID. In the Entra ID portal, add a custom domain for your domain name with Microsoft Entra ID. You can follow Microsoft's documentation: Add your custom domain name using the Entra ID portal. For further details, refer to the Workspace ONE UEM On-Premises or Dedicated SaaS Environments section of this guide.
Planning your Implementation
Understanding Entra ID Integration Methods
Entra ID supports 2 main integration and sync options to directory services. These include:
- Entra ID Cloud Authentication including
- Entra ID password hash synchronization. Users can use the same credentials that they use on-premises without having to deploy any additional infrastructure. Some premium features of Entra ID, like Identity Protection and Entra ID Domain Services, require password hash synchronization, no matter which authentication method you choose.
- Entra ID Pass-through Authentication. Provides a simple password validation for Entra ID authentication services by using a software agent that runs on one or more on-premises servers. The servers validate the users directly with your on-premises Active Directory, which ensures that the password validation doesn't happen in the cloud.
- Federated authentication
- When you choose this authentication method, Entra ID hands off the authentication process to a separate trusted authentication system.
- This system can be an on-premises Active Directory Federation Services (AD FS), or an Identity Provider (IDP) which supports both WS-Trust and WS-Fed protocols, to validate the user’s credentials.
These methods are important to understand as this is how the user will sign into the device when using OOBE or Autopilot.
Integrating AAD into Workspace ONE
Integration with Entra ID in Workspace ONE UEM has a dependency on information in traditional Windows Active Directory environments. This information is synced from AD to Entra ID, Workspace ONE UEM, and Workspace ONE Access. It provides a common attribute that the systems depend upon to perform certain operations in Workspace ONE Intelligent Hub and between the services.
Customers who require the entire operation of Workspace ONE Intelligent Hub, including the Workspace ONE unified app catalog, should sync user accounts from Active Directory with the appropriate sync tools or connectors from Omnissa and Microsoft. This is also the recommended method from Omnissa.
Example:
- Workspace ONE UEM Directory Connector - AirWatch Cloud Connector
- Omnissa Access to Active Directory Omnissa Access Connector
- For more information on Entra ID sync to Active Directory, see
- Microsoft Docs: Choose the right authentication method for your Microsoft Entra hybrid identity solution
- Microsoft Docs: Microsoft Entra Connect: Design concepts
This guide will use the Hybrid Entra ID Integration method and will obtain an Source Anchor attribute. This Immutable ID attribute is required in later steps.
Entra ID Integration Flow with Workspace ONE UEM

Figure 1: Entra ID integration flow with Workspace ONE UEM
- The administrator configures the integration between Entra ID and Workspace ONE UEM.
- End-users begin one of the Entra ID-based onboarding flows. Based on the user's email/UPN, Entra ID retrieves the authentication endpoint (managed/federated) and redirects users to authenticate and provide MFA if configured.
- After the user is successfully authenticated, Entra ID sends the JWT token along with the Terms of Use and Enrollment URLs to the device.
- Device redirects to Workspace ONE UEM and enrollment restrictions are checked, if enabled. Workspace ONE UEM parses the JWT token to obtain Entra ID directory ID (TID), Object ID (OID), and the UPN for the user. Workspace ONE UEM uses these attributes to query Entra ID for the user’s attributes, including the Immutable ID if present.
- Workspace ONE UEM prompts for any optional enrollment prompts or terms of use if configured after a successful match.
- Entra ID sends Access Token to the device which is forwarded to Workspace ONE UEM. Workspace ONE UEM parses token and saves the device into the database, keeping track of the Entra ID Device ID.
- Lastly, Workspace ONE UEM performs any additional configured enrollment restrictions. If triggered the device is wiped, if not the device has successfully joined Entra ID and enrolled into Workspace ONE UEM.
Integrating Entra ID with Workspace ONE UEM
This exercise walks you through the procedures for configuring enrollment for both SaaS and On-Premises applications. Screenshots are from the Microsoft Azure tenant available at the time this document was written and it might be slightly different in the new Entra portal, but both are still accessible.
Warning: Microsoft has made some recent under-the-hood changes to how the integration of Entra ID works with 3rd party MDMs.
If you are experiencing issues with the integration, check the following Omnissa KB:
Omnissa KB: UEM Integration with Entra ID On-Premises MDM App fails (86237)
Microsoft Docs: Add your custom domain name using the Entra ID portal
Enable (Entra ID) Azure AD for Identity Services in Workspace ONE UEM
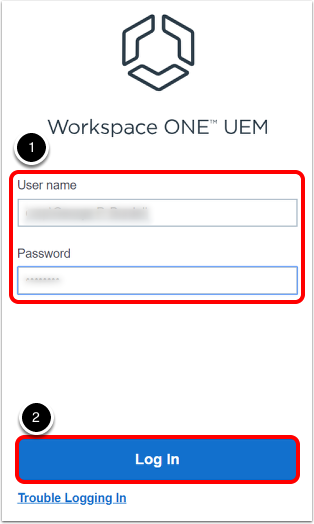
Log in to the Workspace ONE UEM console
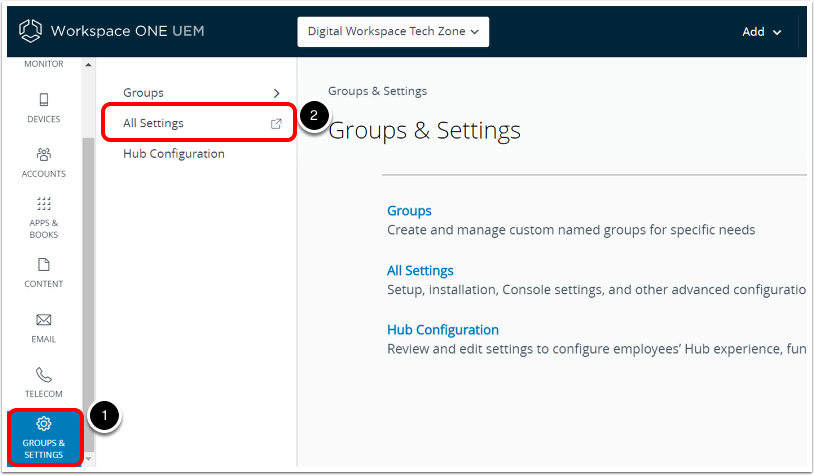
Navigate to All Settings.
Navigate to Directory Services.
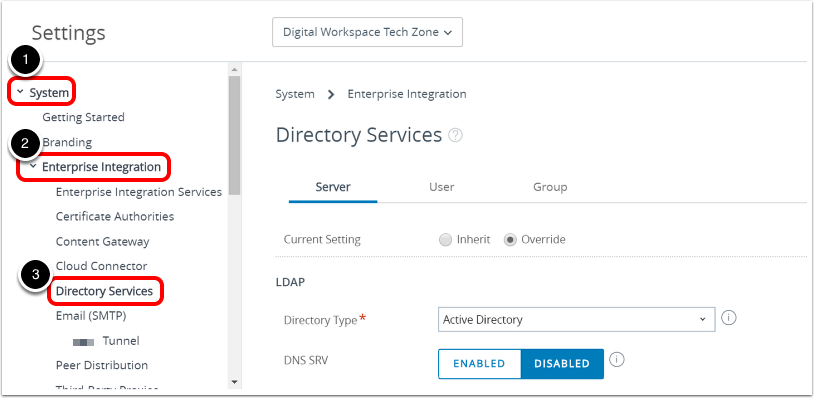
- In the left-hand navigation bar, click System.
- In the System menu, click Enterprise Integration.
- In the Enterprise Integration menu, click Directory Services.
Important: Configure and Save LDAP First If you are setting the Current Setting to Override on the Directory Services system settings page in Workspace ONE UEM, you must configure and save the LDAP settings before enabling Entra ID for identity services.
Enable Azure AD for Identity Services.
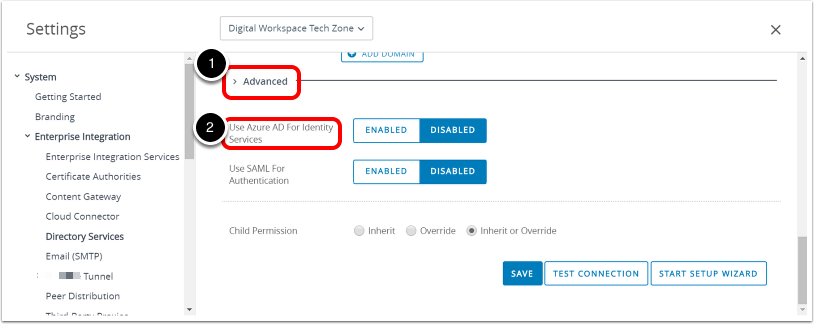
- Scroll down to the Advanced options.
- Click Use Azure AD For Identity Services.
Locate and copy Workspace ONE URLs.
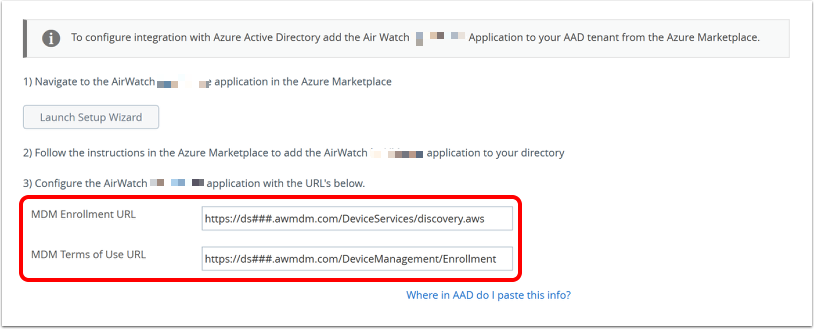
- In the organization group configured to enroll Windows desktop devices, copy the following:
- MDM Enrollment URL
- Terms of Use URL
- Save the URLs to a text file.
Entra ID Admin Console Configurations
Navigate to the Azure/Entra portal.
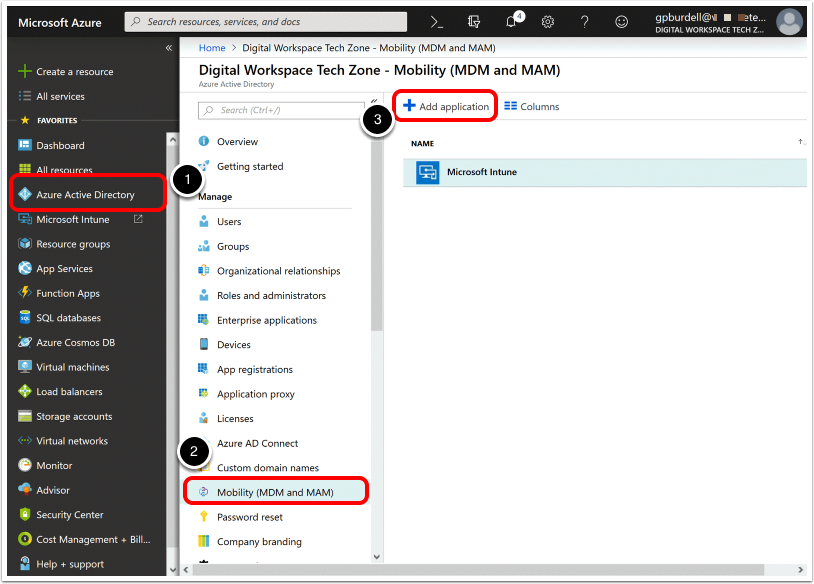
- Log in to the Microsoft Entra tenant, and in the navigation bar on the left, click Azure Active Directory.
- Click Mobility (MDM and MAM).
- Click Add application.
Note: Make sure that you do not assign the same users to both Workspace ONE and other third-party MDM providers.
Add AirWatch by Omnissa MDM application.
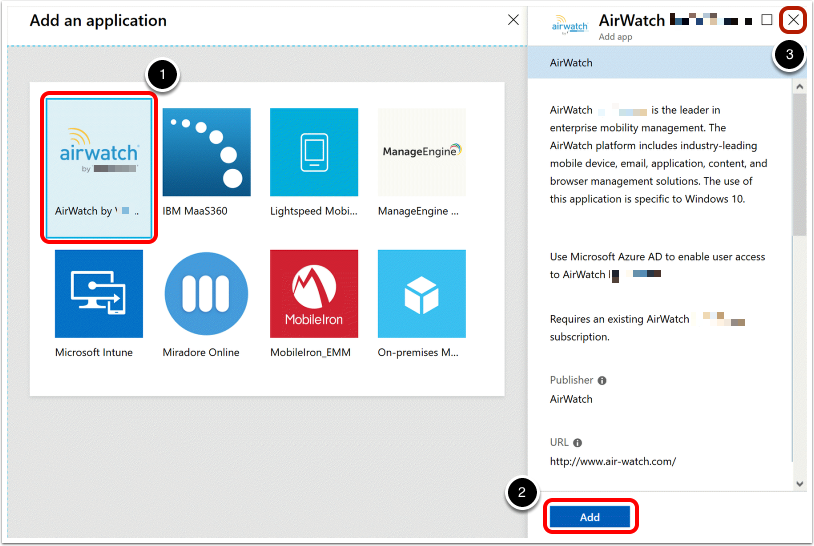
Note: If you are using a *.awmdm.com or any Omnissa owned domain then ONLY configure the AirWatch by Omnissa MDM application, customers using custom domains will have to leverage the On-Premises MDM application (covered in the next section) and add your custom domain name using the Entra ID portal.
- Select the AirWatch by Omnissa MDM app.
- Click Add.
- Close the Add an application window, after the application has been added.
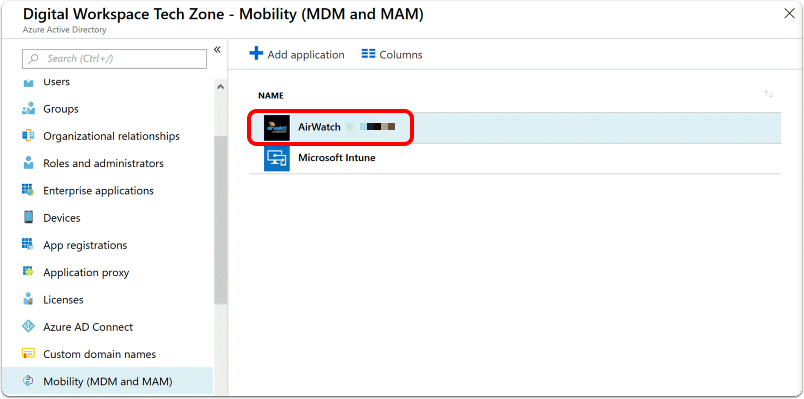
You are taken back to the Mobility (MDM and MAM) page. Select the AirWatch by Omnissa MDM app which you just added, to begin configuration.
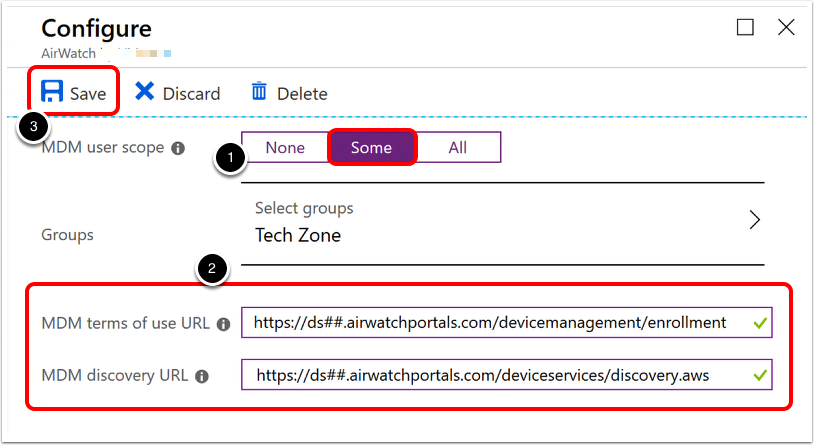
- Assign the proper MDM user scope. You can select All or Some and choose a group of users.
- Complete the following:
- Paste your MDM Terms of Use URL from the Workspace ONE UEM console into the MDM terms of use URL field in Entra ID.
- Paste your MDM Enrollment URL from the Workspace ONE UEM console into the MDM discovery URL field in Entra ID.
- Click Save.
Add On-Premises Application (On-Premises Deployments using Custom Domain)
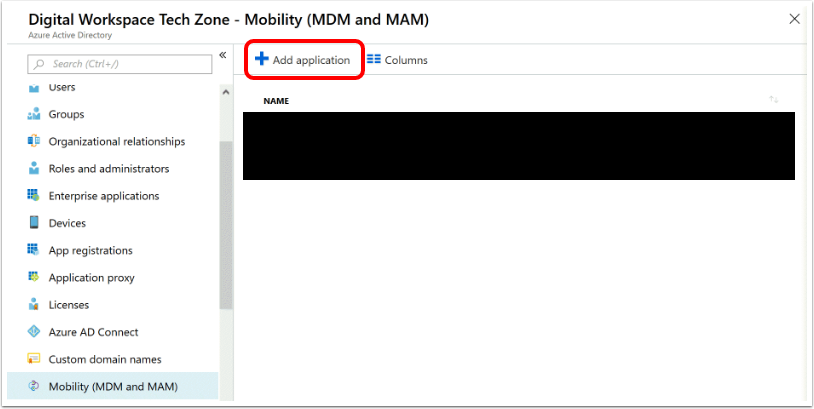
Click Add Application.
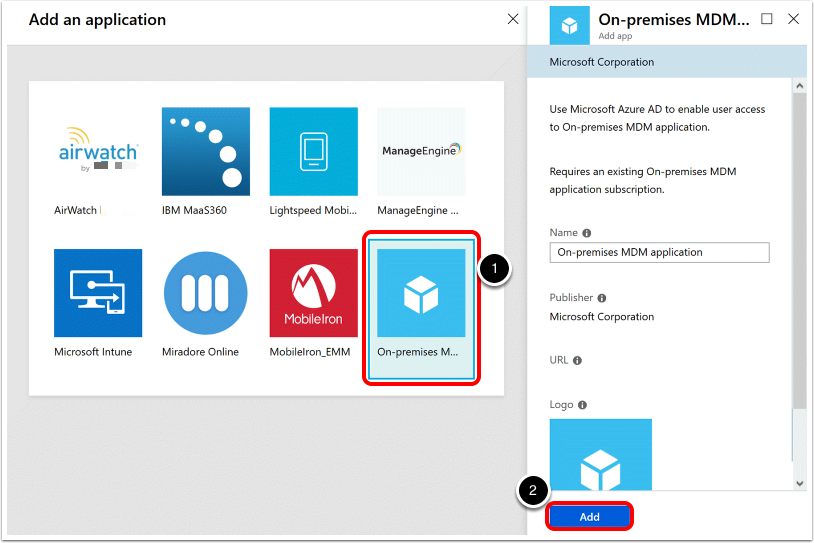
- Select the On-premises MDM application.
- Click Add.
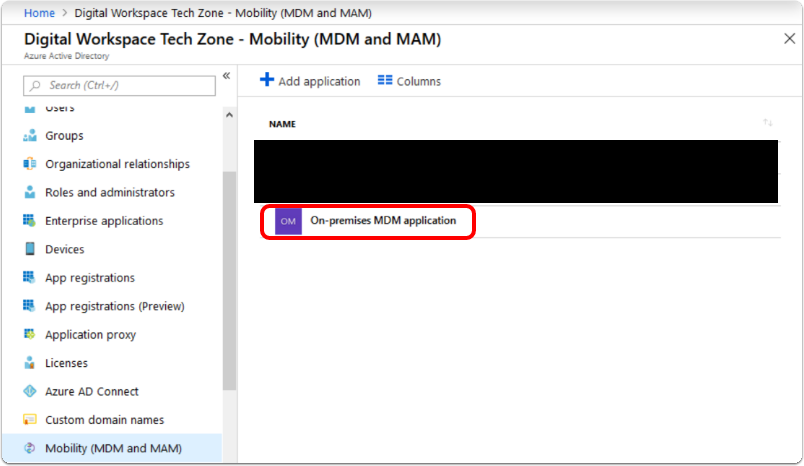
Click On-premises MDM application, which was just added, to begin configuration.
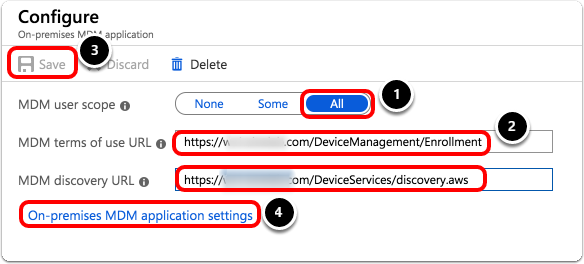
- Assign the proper MDM user scope. You can select All or Some and choose a group of users.
- Complete the following:
- Paste your MDM Terms of Use URL from the Workspace ONE console into the MDM terms of use URL field in Entra ID.
- Paste your MDM Enrollment URL from the Workspace ONE console into the MDM discovery URL field in Entra ID.
- Under Configure, click Save.
- Click On-premises MDM application settings
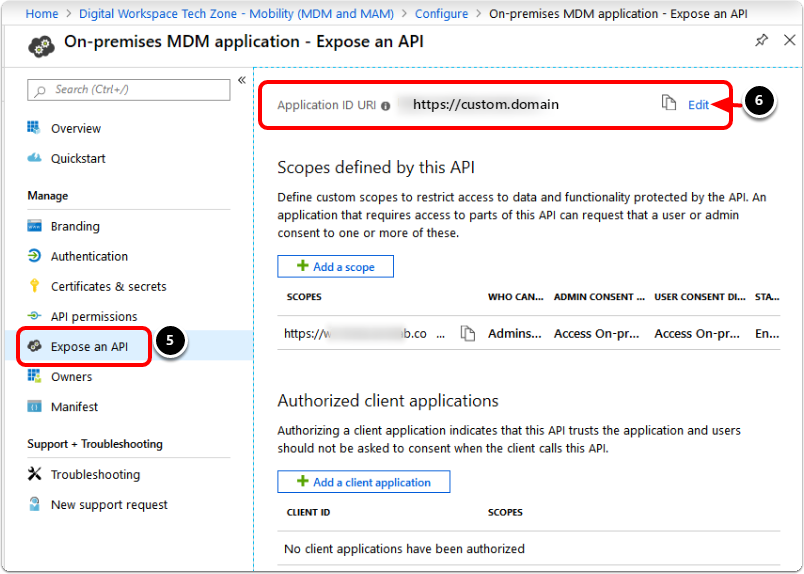
- Click Expose an API.
- Click Edit next to Application ID URI.

- Enter your Device Services URL (hostname of the other URLs) into the Application ID URI text box.
- Example https://custom.domain
- Click Save.
Confirm User has correct number of licenses.
Navigate to Licenses.
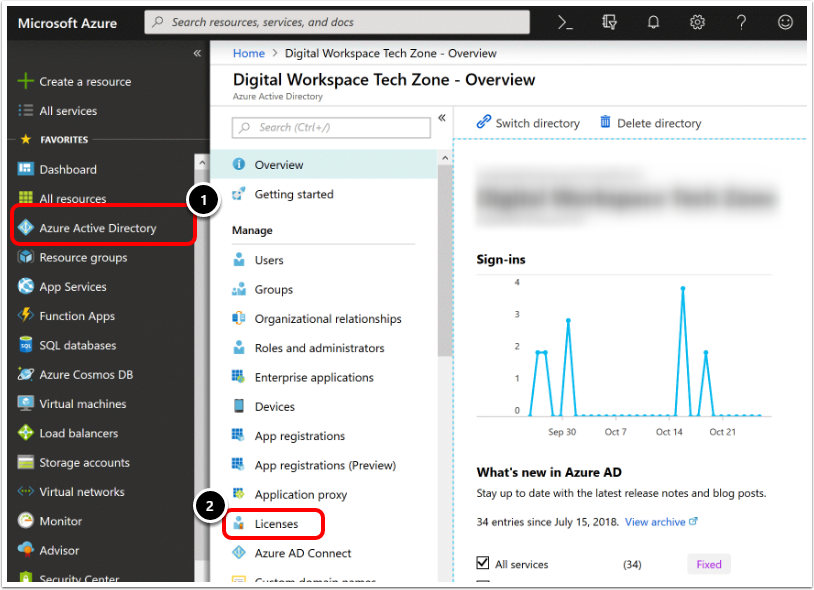
- Click Azure AD.
- Click Licenses.
Select Premium Licenses.
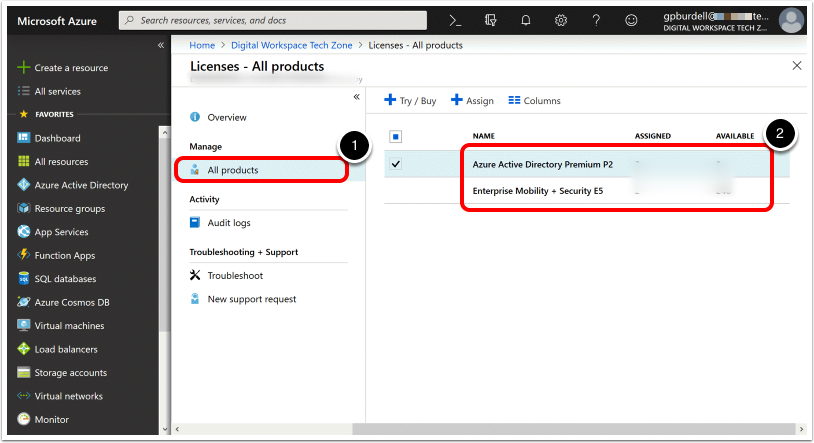
- Click All Products.
- Select the proper license (onboarding requires Entra ID Premium P1 or later, or any bundle which includes this license).
Assign Premium Licenses to Users.
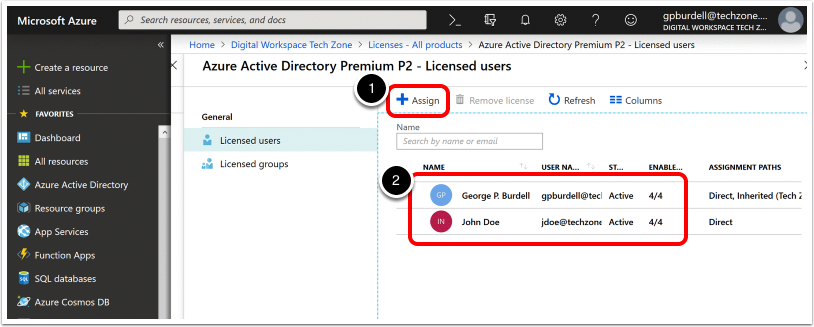
- Click Assign.
- Choose the users or groups to add and click Assign.
Note: Assigning Licenses to Users can also be done directly in the M365 Admin Console as well.
Copy Entra ID Tenant Properties
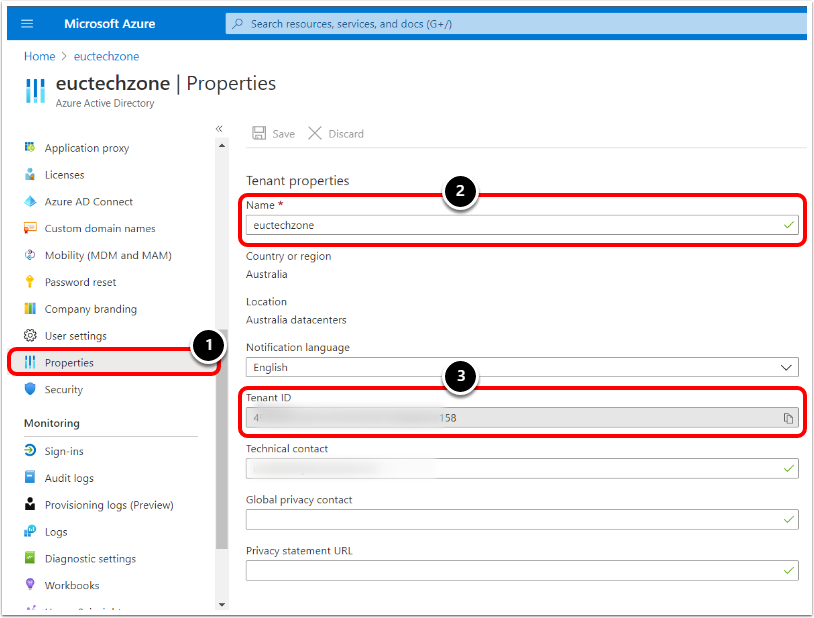
Copy the Entra ID Tenant Properties to enter into Workspace ONE UEM shortly.
- Click Properties.
- Under Tenant Properties, copy the Tenant Name. This will typically be a text field.
- Under Tenant Properties, copy the Tenant ID. This will generally be a long list of numbers.
Paste Entra ID Details in Workspace ONE UEM
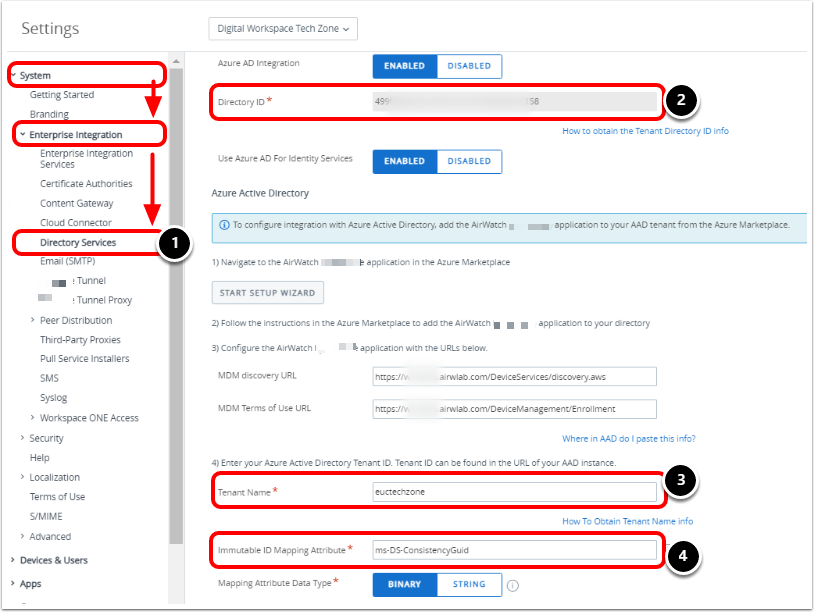
Return to the Workspace ONE UEM Console.
- Navigate back to System>Enterprise Integration>Directory Services and scroll down to Azure integration.
- Paste the copied Tenant ID from Entra into the Directory ID text box in Workspace ONE UEM.
- Paste the copied Tenant Name or ID (both work the same) from Entra ID into the Tenant Name text box in Workspace ONE UEM.
- Update the Immutable ID Mapping Attribute if needed and Click Save
- Specify the AD attribute Source Anchor in Entra ID Connect. The Source Anchor is mapped to the Immutable ID in Entra ID. Workspace ONE UEM uses this to assign devices to AD users during enrollment through Entra ID.
Note: By default, objectGUID is used for the Immutable ID Mapping Attribute.
However, this value will differ if the sourceAnchor attribute was changed when setting up Entra ID Connect or if using a third-party user source.
You must match the sourceAnchor attribute being sent to Entra ID with the Immutable ID Mapping Attribute in the Workspace ONE UEM console.
The most common attribute used after the default objectGUID is mS-DS-ConsistencyGuid. For more details about sourceAnchor attributes, see Microsoft Entra Connect: Design Concepts.
Workspace ONE UEM On-Premises or Dedicated SaaS Environments
In the majority of cases, you will use the AirWatch by Omnissa MDM application in the Entra ID application gallery. This application includes all permission required for integration.
The AirWatch by Omnissa MDM application includes a list of Workspace ONE UEM SaaS Environments. Therefore, shared SaaS customers and dedicated SaaS customers without a custom domain should only leverage the AirWatch by Omnissa MDM application.
If you have Workspace ONE UEM On-Premises or a Dedicated SaaS Environment with a custom domain, you will need to add the On-Premises MDM application. This is required to create trust between the Workspace ONE UEM instance and Entra ID.
To summarize, if you are using a *.awmdm.com or any Omnissa owned domain then only configure the AirWatch by Omnissa MDM application, customers using custom domains will have to leverage the On-Premises MDM application and add your custom domain name using the Entra ID portal.
Note:
If you run into any issues while adding the AirWatch by Omnissa MDM application and your Workspace ONE UEM environment is:
- Shared SaaS or
- Dedicated SaaS without a custom domain
Reach out to your Omnissa support representative.
Device Onboarding using Entra ID
Enroll with Windows Autopilot (most common method)
What is Autopilot?
Windows Autopilot is a capability from Microsoft that allows pre-configuration for Windows desktop devices in conjunction with the Out-Of-Box-Enrollment (OOBE) experience. One of the most significant capabilities is that you can directly ship a Windows desktop device to an end-user. As soon as it is powered on, it shows the user a customized login screen during OOBE requesting the user to enter their credentials. After successful authentication, the device is joined to Entra ID, automatically enrolled into Workspace ONE, and all the user's apps and configurations are automatically installed.
With every Autopilot deployment, devices do the following by default (you can create deployment profiles to customize additional options):
- Skip OneDrive, and OEM registration setup pages
- Automatically set up for work or school
- Get a customized Sign-In experience with the company or school branding
You can use Windows Autopilot to simplify device enrollment, and to set up and pre-configure new devices for productive use, or to reset, re-purpose, or recover devices. You can avoid the need to build, maintain, and apply custom operating system images to the devices.
For more information from Microsoft, see Microsoft Docs: Manage Windows device deployment with Windows Autopilot Deployment.
Autopilot Prerequisites
Before you can perform the procedures in this exercise, verify that the following components are installed and configured:
- A Windows 10 or 11 Professional, Enterprise, or Education device (physical or virtual) running version 1703 or later with internet access
- Entra ID Premium P1 or P2
- Entra ID integrated with Workspace ONE UEM (see Integrating Entra ID with Workspace ONE UEM section above)
- Users must have permission to join devices to Entra ID
- Check this in your Entra ID Portal at Entra ID > Devices > Device Settings and allow everyone, no-one, or a specific group. You can also configure adding other administrator accounts to the device during Entra ID join here.
- A functional Entra ID tenant and an Entra ID admin account that can log in to portal.azure.com
Dell, HP, and Lenovo are examples of Original Equipment Manufacturers (OEMs). When a new computer is purchased from an OEM, before the device leaves the OEM, the device has had several configuration tasks applied to it. These tasks include the initial installation of the Windows desktop Operating System (OS). Part of this process involves running an EXE file named Sysprep in Audit Mode.
Audit Mode allows the OEM to install drivers, add applications, change windows settings, and generally get the PC ready to ship directly to an end-user. Understanding the details behind Sysprep and Audit Mode is beyond the scope of this tutorial. What a Omnissa Workspace ONE UEM Administrator needs to understand is that when a person takes the computer out of the box and powers on the device for the first time, Sysprep has just exited Audit Mode. Thus, the first thing the end-user is going to see on the device is a series of questions from Microsoft that are designed to finish the configuration of the computer. Microsoft named the Q&A section of the Windows Setup process the Out of Box Experience (OOBE). The purpose of Windows Autopilot is to reduce the number of questions the end-user is asked during OOBE by letting the IT Administrator pre-answer some of the questions.
The exact number of questions seen by the end-user during OOBE varies per OEM. Each OEM can choose to add more questions to the list based on the services they are providing with the computer. The specific version of Windows also plays a factor in which questions are presented. The total number of questions seen by the end-user also varies based on if the user already has existing Windows desktop devices. It also varies based on how Windows Hello is configured. Regardless of the total number of questions asked, we can all agree that the fewer questions an end-user must answer to start using Windows, the better the experience will be for everyone.
The Windows installation generates a unique hardware identifier. For Autopilot to start, the hardware identifier must be registered with Microsoft. Each OEM has a different process to handle this for all new hardware purchases made directly with the OEM. If a new computer is purchased from a retail store, or the IT admin is using virtual machines, then the IT administrator is responsible for registering these systems with Microsoft.
Register Device Hash for Windows Autopilot
For Autopilot you have to pre-register Devices in the Microsoft Endpoint Manager admin center so they will be linked to your Entra ID directory and allow you to assign profiles to customize the OOBE(Out of the Box Experience). This portal lists all devices for your organization so that you can assign an Autopilot profile. The easiest method is purchasing a device from participating OEM, and they will automatically be added to your device portal.
If your OEM is not listed here or you have existing devices, it is still possible to get the required information to upload these devices to the Microsoft Endpoint Manager admin center manually or directly from a device for testing purposes.
Boot Device into OOBE and Run PowerShell script
During the OOBE (Out of the Box Experience) you also can initiate the hardware hash upload by launching a command prompt (Shift+F10 or Shift Fn+F10 for Virtual instances) and entering the following commands.
Powershell.exe
Install-Script -name Get-WindowsAutopilotInfo -Force
Set-ExecutionPolicy Unrestricted
Get-WindowsAutoPilotInfo -Online
Enter in Microsoft Endpoint Manager Credentials
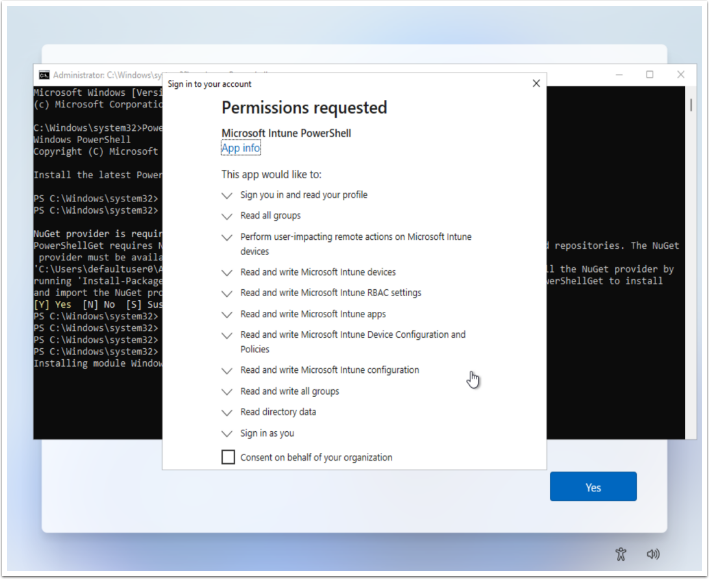
At this point you will be prompted to sign in. Sign in with an account with the Intune Administrator Role, accepts the permissions as shown, and the device hash will then be uploaded automatically in Microsoft Endpoint Manager.
Confirm Device Registered in Microsoft Endpoint Manager
Navigate to https://endpoint.microsoft.com/#home then Devices, Windows, Windows Enrollment, then Devices. Confirm your device serial number as registered and an Autopilot Profile is Assigned.
This Autopilot Profile contains configuration for the Out-Of-Box-Experience (OOBE).
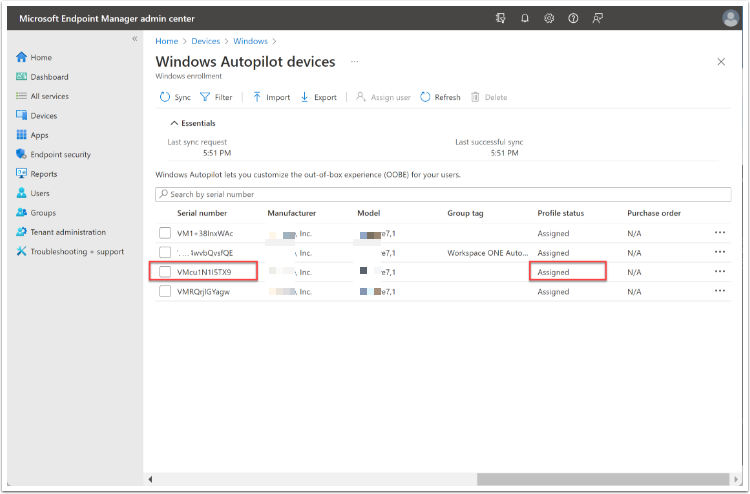
You can see the Device serial number from the Command Prompt session used to run the Autopilot registration Script. You can also find the device serial number locally on the machine. Open Command Prompt and enter:
wmic bios get serialnumber
You have successfully configured Windows Autopilot to work with Omnissa Workspace ONE UEM and your Windows desktop device. The next step is to power on your Windows desktop device or virtual machine to see the benefits of streamlining the OOBE process for your end-users. Remember that the OOBE process will look different depending on the build version, keep this in mind when creating end-user documentation.
Enroll using Entra Out-of-Box Experience (without Autopilot)
This enrollment option is used primarily for new company-owned devices that are not domain-joined and is triggered the first-time end-user power on a device. The user joins the device to the Entra ID cloud domain as part of the initial setup process. This workflow does not require end-users to have admin privileges.
Note: If you are leveraging Microsoft Windows Autopilot, the end-user configuration is simplified and streamlined but requires having the original equipment manufacturer (OEM) of your device preregister these devices with Microsoft.
When end users’ power on a device for the first time, they respond to the following device prompts:
- Enter corporate credentials.
- Set up Hello for Business (requires multi-factor authentication).
Note: In most cases, end users are prompted to provide a phone number for a call or text or use of the Authenticator app on a mobile device. Windows Hello for Business saves the information that MFA was used during the setup and provides advanced on device methods such as facial recognition, retinal scanning, or creating a unique PIN.
Devices then join the Entra cloud domain and register with Omnissa Workspace ONE UEM for management.
Enroll using Entra ID Join or Enroll with Office Applications (BYOD)
Enroll using Entra ID Join
This enrollment option is triggered from the device settings. Also referred to as cloud-domain join, this workflow is typically used for existing company-owned devices that are not already joined to an on-premises domain. End users must have admin privileges and use their corporate credentials to join the device to the Entra ID cloud domain.
- From System Settings, users complete the following tasks:
- Enter corporate credentials.
- First-time Entra ID account users are prompted to provide a phone number for account recovery.
- Register for Windows Hello for Business by creating a unique PIN.
Note: In most cases, end users are prompted to provide a phone number for a call or text or use of the Authenticator app on a mobile device. Windows Hello for Business saves the information that MFA was used during the setup and provides advanced on device methods such as facial recognition, retinal scanning, or creating a unique PIN. Configure a Passport for Work profile to specify this PIN’s complexity.
Devices join the Entra ID cloud domain and register with Workspace ONE UEM for management.
Enroll with Office Applications
This enrollment option is primarily used for existing company-owned or personal-owned devices that are not domain-joined and is triggered when end users open a Microsoft Office app for the first time. End users must have admin privileges and connect their Entra ID accounts to the device. Use this workflow if you already have Entra ID Premium licenses and do not want to join the device to the Entra ID cloud domain.
- End users open a Universal Windows Platform version of any Office 365 app, which connects their Entra ID account to the device.
Enrollment begins.
Troubleshooting Common Workspace ONE UEM Enrollment Issues
To address the most common enrollment-related issues, the following checks should be undertaken first.
Check Date and Time
Especially when virtual machines have been deployed, check whether the date and time on the device are correct, especially when using a virtual machine.
Check Internet Connection and Endpoints
Next, verify internet connectivity to all endpoints, including validation of the Omnissa-required ports and protocols.
Verify Network and Internet Settings
Ensure that the device has an active internet connection. If connected to a Proxy or VPN, make sure that access to Workspace ONE UEM endpoints or Microsoft endpoints is not affected.
Verify Endpoints
Ensure that you have a trusted connection to all Workspace ONE UEM and Microsoft endpoints. You must satisfy the following requirements:
- Workspace ONE UEM Device Services URL over port 443
- Windows Auto-Discovery URL (optional) over port 443; Cloud WADS: EnterpriseEnrollment.awmdm.com
- Workspace ONE UEM Auto-Discovery over port 443; discovery.awmdm.com
- Entra ID needs access to Microsoft Login Servers: https://login.microsoft.com and https://login.microsoftonline.com
- Windows Notification Service (WNS) uses port 443: *.notify.windows.com for example, bn1 or bn2.notify.windows.com
Note: If you need to enable Telnet, add the Telnet Client using Turn Windows Features On or Off.
A few more uncommon endpoints to check for are:
- Device Health Attestation
- Secure Boot protects the platform until the Windows kernel is loaded. Then protections like Trusted Boot, Hyper-V Code Integrity, and ELAM take over. A device that uses Intel TPM or Qualcomm TPM gets a signed certificate online from the manufacturer that has created the chip and then stores the signed certificate in TPM storage. If you filter Internet access from your client devices, you must authorize the following URLs:
- For Intel firmware TPM: https://ekop.intel.com/ekcertservice
- For Qualcomm firmware TPM: https://ekcert.spserv.microsoft.com/ more specifically https://ekcert.spserv.microsoft.com/EKCertificate/GetEKCertificate/v1
- For AMD firmware TPM: https://ftpm.amd.com/pki/aia
- To provision AIK certificates and filter Internet access, you must authorize the following wildcard URL: https://*.microsoftaik.azure.net
- Both device and Workspace ONE UEM servers must have access to has.spserv.microsoft.com using the TCP protocol on port 443 (HTTPS).
- Secure Boot protects the platform until the Windows kernel is loaded. Then protections like Trusted Boot, Hyper-V Code Integrity, and ELAM take over. A device that uses Intel TPM or Qualcomm TPM gets a signed certificate online from the manufacturer that has created the chip and then stores the signed certificate in TPM storage. If you filter Internet access from your client devices, you must authorize the following URLs:
- Microsoft License Activation: For more information, see Windows activation or validation fails with error code 0x8004FE33.
- Windows Notification Service: For more information, see Microsoft Download Center.
- Windows Autopilot: Windows Autopilot depends on a variety of internet-based services. For more information, see Windows Autopilot networking requirements.
Troubleshooting Console Settings and Enrollment for Windows
- Navigate to System > Advanced > Device Root Certificate and verify a PFX Device Root Certificate generated (NOT a CER).
- Confirm that the Hub app is published Devices & Users > Windows > Windows Desktop > Intelligent Hub Application.
- Staging workflows (command-line, PPKG, and so on.) where the device is auto-reassigned to the end user need to have "Fixed Organization Group" or "User Group Organization Group" set at Devices & Users > General > Shared Devices.
- For Entra ID-based enrollment, ensure Immutable ID Mapping Attribute is correctly set. Most commonly objectGUID or mS-DS- ConsistencyGuid. Ensure that Binary is used for objectGUID and String for any non-GUID value.
Check Accounts
For Access Work or any end-user-driven enrollment, verify you are using an account with administrator access. Ensure you are not using the built-in administrator account as this account cannot enroll into MDM. For more details, refer to Enrollment Scenarios Not Supported.
Check Staging Accounts
When using any of the command-line options or any other staging workflow, you must use a staging account to enroll first before the device gets reassigned. You can either use the built-in staging account that Workspace ONE UEM creates when you first navigate to Settings > Devices & Users > Windows > Windows Desktop > Staging & Provisioning, or you can create a new staging account. Ensure your staging account's staging options match the settings in the screenshot.
Note: The staging account that Workspace ONE UEM creates will always be in the following format: staging@{GroupID}.com for the UPN and staging{GroupID} for the username. You must have a Group ID assigned to the organization group you plan to enroll and stage devices.
Check Device Root Certificate and Application Certificate
After successful enrollment, you should have two certificates from Workspace ONE UEM. The Enrollment certificate is located in Certificates - (Local Computer) > Personal > Certificates and the Application certificate is located in Certificates - Current User > Personal > Certificates, as shown in the screenshots. Verify that these certificates are not present before enrolling or your enrollment will fail (delete all certificates then re-enroll). Previously, we confirmed that the Device Root Certificate was generated.
Enrollment Certificate:
- Subject Name Format - AW::{Token}::{Device Services URL}::{Token}
- Issued by AwDeviceRoot
- Workspace ONE Intelligent Hub will not successfully check-in without the Enrollment Certificate
Application Certificate:
- Subject Name Format - {Device UUID}:{Enrollment UPN}:{Device Services URL}:{One Time Token}:{Group ID}
- Used by Workspace ONE applications to retrieve device and environment information.
- Ensure that the Device ID, Enrollment UPN, Device Services URL, and Group ID are correct, or you will receive errors when attempting to use any of the Workspace ONE applications.
Check OS Activation and Build
Inconsistent behavior has been noted on non-activated Windows devices and developer editions of Windows devices, therefore ensure you are running an activated version of Windows. Also, ensure you are using the latest general release build of Windows for the best results. Knowing which Windows edition is being used is helpful as not all editions support all features such as deploying apps and installing several profiles. For example, you cannot deploy software to Windows 10 Home.
Important: Workspace ONE UEM cannot guarantee 100 percent functionality on Windows Insider or TAP program builds which are not general release builds.
Check Required Services
If you enroll the device or configure the device to communicate with Workspace ONE UEM, then ensure the following services are running; DmEnrollmentSvc and dmwappushservice. These services do not run if there is no active attempt to enroll or sync the device. However, they should not be deactivated.
Note: By default, Device Management Enrollment Service (DmEnrollmentSvc) should be set to Manual and the WAP Push Message Routing Service (dmwappushservice) should be set to Auto. The services run by default as LocalSystem and only start on-demand from a request by the user, an app, or another service. Attempting to enroll or sync the device automatically starts both services.
Note: Both DmEnrollmentSvc & dmwappushservice are dependent on Remote Procedure Call (RPC) service, therefore ensure that the PRC service is not deactivated.
Also, DiagTrack (Connected User Experiences and Telemetry) and Schedule (Task Scheduler) must be running on the device to ensure enrollment and other management features properly function. BITS (Background Intelligent Transfer Service) should not be deactivated as this is used to download various packages.
You can leverage the local log collection using Workspace ONE Intelligent Hub to quickly obtain troubleshooting logs. On the Windows device, click Troubleshooting, then Hub Status to see the status of the above services after the device is enrolled.
Summary and Additional Resources
This tutorial introduces you to the device enrollment functionality of Workspace ONE UEM and explains how to use this functionality to enroll Windows 10 devices. A set of exercises describe the process of configuring the Microsoft Entra ID onboarding method, including the procedures for configuring enrollment for both SaaS and On-Premises applications, and how to select the best enrollment option to meet your business needs. The result is your ability to manage the Windows 10 device enrollment through the Entra ID.
Additional Resources
For more information about Windows Modern Management with Workspace ONE, you can explore the following resources:
Windows Onboarding
Windows Security and Policy Management
Windows Application Management
Windows OS Patching
Windows Troubleshooting
Windows Compliance integration with Entra ID
Changelog
The following updates were made to this guide:
| Date | Change |
| 2024/10/17 |
|
| 2022/07/22 |
|
| 2022/01/31 |
|
| 2021/10/20 |
|
| 2021/07/30 |
|
About the Author and Contributors
This tutorial was written by:
- Sascha Warno, Staff Solution Architect, Technical Marketing, Omnissa
- Hannah Jernigan, Technical Marketing Manager, Technical Marketing, Omnissa
Considerable contributions were made by the following subject matter experts:
- Saurabh Jhunjhunwala, EUC Customer Success Architect, Omnissa
- Bryan Garmon, Sr. Solutions Engineer, End-User-Computing, Omnissa
Feedback
Your feedback is valuable.
To comment on this paper, contact End-User-Computing Technical Marketing at tech_content_feedback@omnissa.com.

