

Deploying Workspace ONE UEM applications to Windows devices
Overview
This guide focuses on how to use Omnissa Workspace ONE UEM to successfully deploy and manage applications on Windows devices, with focus on MSI, EXE, and ZIP file deployment. In addition, other tools, such as App Volumes, Freestyle Orchestrator, and Enterprise App Repository, are discussed.
Applications may be installed as part of initial Windows device provisioning or after device enrollment. This guide assumes that the Workspace One Intelligent Hub is already installed, as well as successful device enrollment. For information about installing applications during initial provisioning, please see the TechZone article Provisioning, enrolling, and onboarding Windows devices.
Although still supported, Product Provisioning is considered legacy for Windows Desktop and is not recommended, nor will it be addressed herein. Omnissa recommends adopting Freestyle Orchestrator as the replacement.
Key topics covered within this document include:
- Windows Software Distribution processes
- Key configuration settings, as well as assignment
- New functionality, including App Volumes integration and ADMX Profiles
- Validation and troubleshooting
Considerations and notes
Please note the items below:
Multiuser impact on applications
The new Windows Multiuser default can have a significant impact on applications installed on Windows Desktop devices.
Web apps
This document primarily focuses on the installation of native apps onto Windows devices. Web apps such as Salesforce and Jira are often referred to as SaaS apps and can easily be enabled for any Workspace ONE managed device, not just Windows. To enable Web apps, select Resources > Web Links. For more information about configuring Web apps, please see Omnissa Docs. These apps should then be presented to users alongside native apps within the Workspace ONE App Catalog.
Win32 API references
The term Win32 Apps is often used to describe all Windows applications when in fact, those applications are no longer just 32-bit applications but also have evolved to 64-bit applications. However, Win32 API continues as the name of the interface that supports both 32- and 64-bit applications.
Microsoft has ceased support for 32-bit Windows operating systems as well as Windows 10; thus, this guide focuses on Windows 11 64-bit and ARM operating systems that run both 32- and 64-bit applications, as well as Windows Server.
What is Windows Software Distribution?
Windows Software Distribution, often represented as SfD or SFD, focuses on downloading and deploying native applications locally onto Windows computers. Whether applications are administratively forced onto the Windows device or selected for installation by the user through the Intelligent Hub, the result is that the application is installed onto the Windows device.
Note that the terms software distribution and application deployment are used interchangeably throughout this document.
Software Distribution steps
Workspace ONE UEM securely and methodically deploys applications to Windows devices. On the Windows device, four key steps occur:
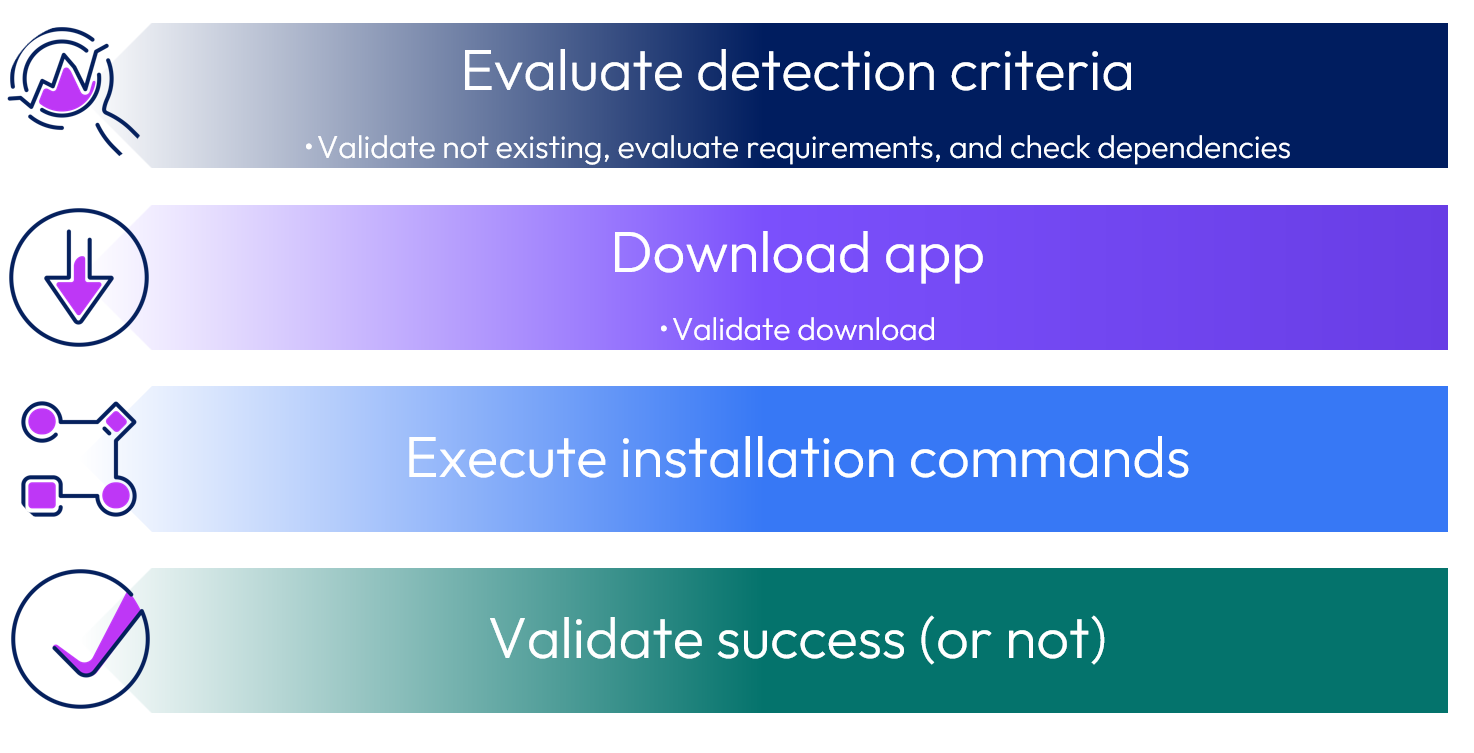
Figure 1: Software distribution process on Windows device
Application installation process
The complete Windows application installation process is depicted below.
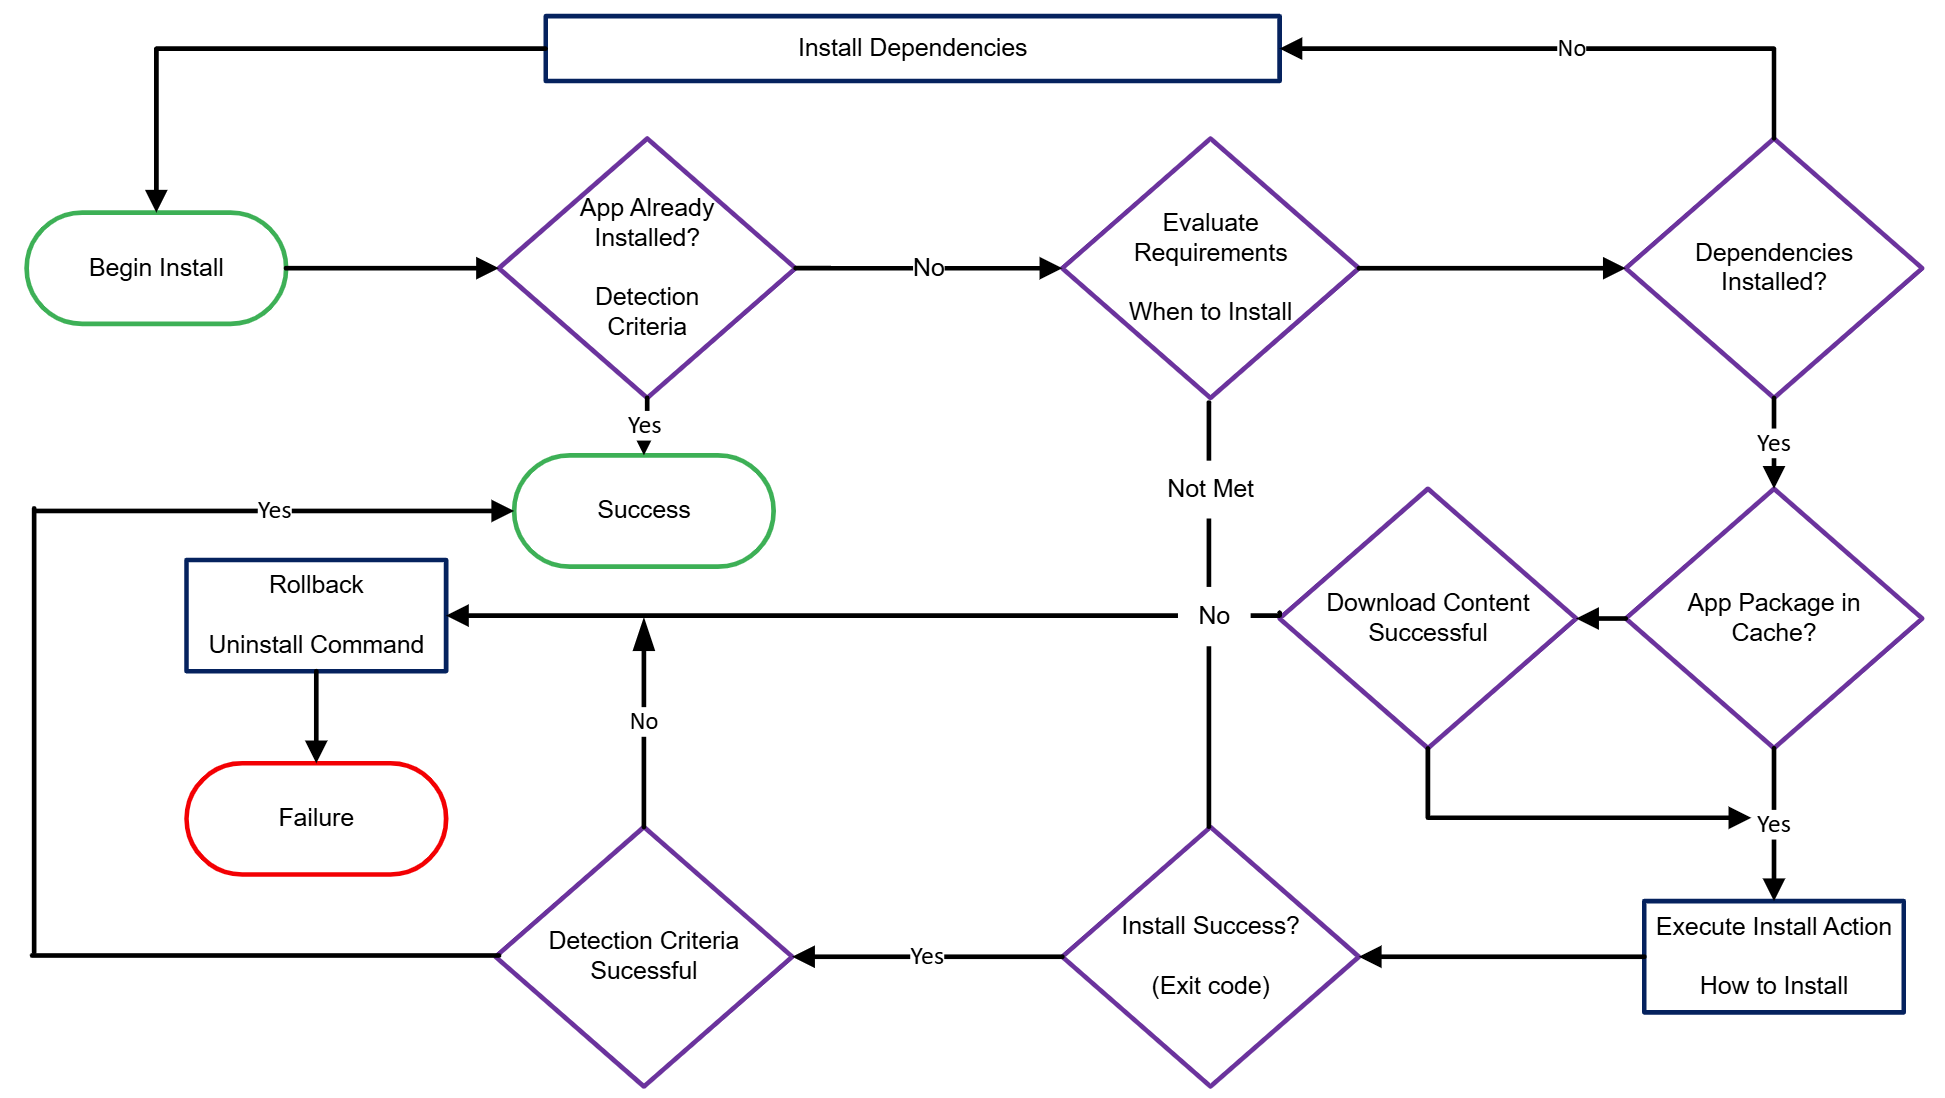
Figure 2: Workspace ONE Windows application installation process
When an application is deployed via Workspace ONE, the file(s) are stored within this path on the Windows device:
C:\ProgramData\AirWatchMDM\AppDeploymentCache
As such, the Windows device hard drive must have sufficient space to house these installation files. Please note that it is not possible to change this path.
Workspace ONE UEM does more than simply install application packages. As shown in the flow chart above, numerous checks occur during application installation to maximize success; however, if an app cannot be successfully installed, it is rolled back. Additional actions such as reboots can be incorporated into the software distribution process; the graphic above only shows the base process flow.
For more details regarding the device-side processes, please see the troubleshooting section.
Software distribution tools
Omnissa provides several features and tools that may be used to facilitate Windows application deployment, including:
- Enterprise App Repository is a built-in catalog of popular ready-to-go applications that minimize the need for app configuration.
- Application File is the most commonly used way to configure application deployment.
- Freestyle Orchestrator, which streamlines appending steps and processes, such as if/then steps or the installation of dependencies, as part of the application workflow.
- App Volumes may be integrated with Workspace ONE UEM to output application MSI packages for simplified software distribution ingestion.
- Fetch is a GitHub utility that enables bulk application management.
Each of these tools are discussed later in this document.
In addition, third-party vendor products such as Flexera may be used for creating and managing application packages; however, the use of such tools is beyond the scope of this document.
Before deploying applications
Prior to deploying applications, consider how Intelligent Hub and application sourcing will be enabled. Windows software distribution and Content Delivery Network (CDN) deployment are automatically enabled for SaaS deployments.
Prerequisites: Intelligent Hub and Software Package Deployment
When Workspace ONE Intelligent Hub is installed on a Windows device, the Software Distribution Agent (SFDAgent), which is used for application deployment, is now subsequently pushed to the device; no additional client-side components are necessary. Intelligent Hub and Software Distribution Agent must be installed before application deployment can commence.
Intelligent Hub can be installed manually by the user from https://getwsone.com or automated as part of Windows device provisioning; please see the Provisioning, enrolling, and onboarding Windows article for information about this functionality.
Administrators should ensure that Intelligent Hub is published for users and updated by configuration within Groups & Settings > All Settings > Devices & Users > Microsoft > Windows > Intelligent Hub Application.
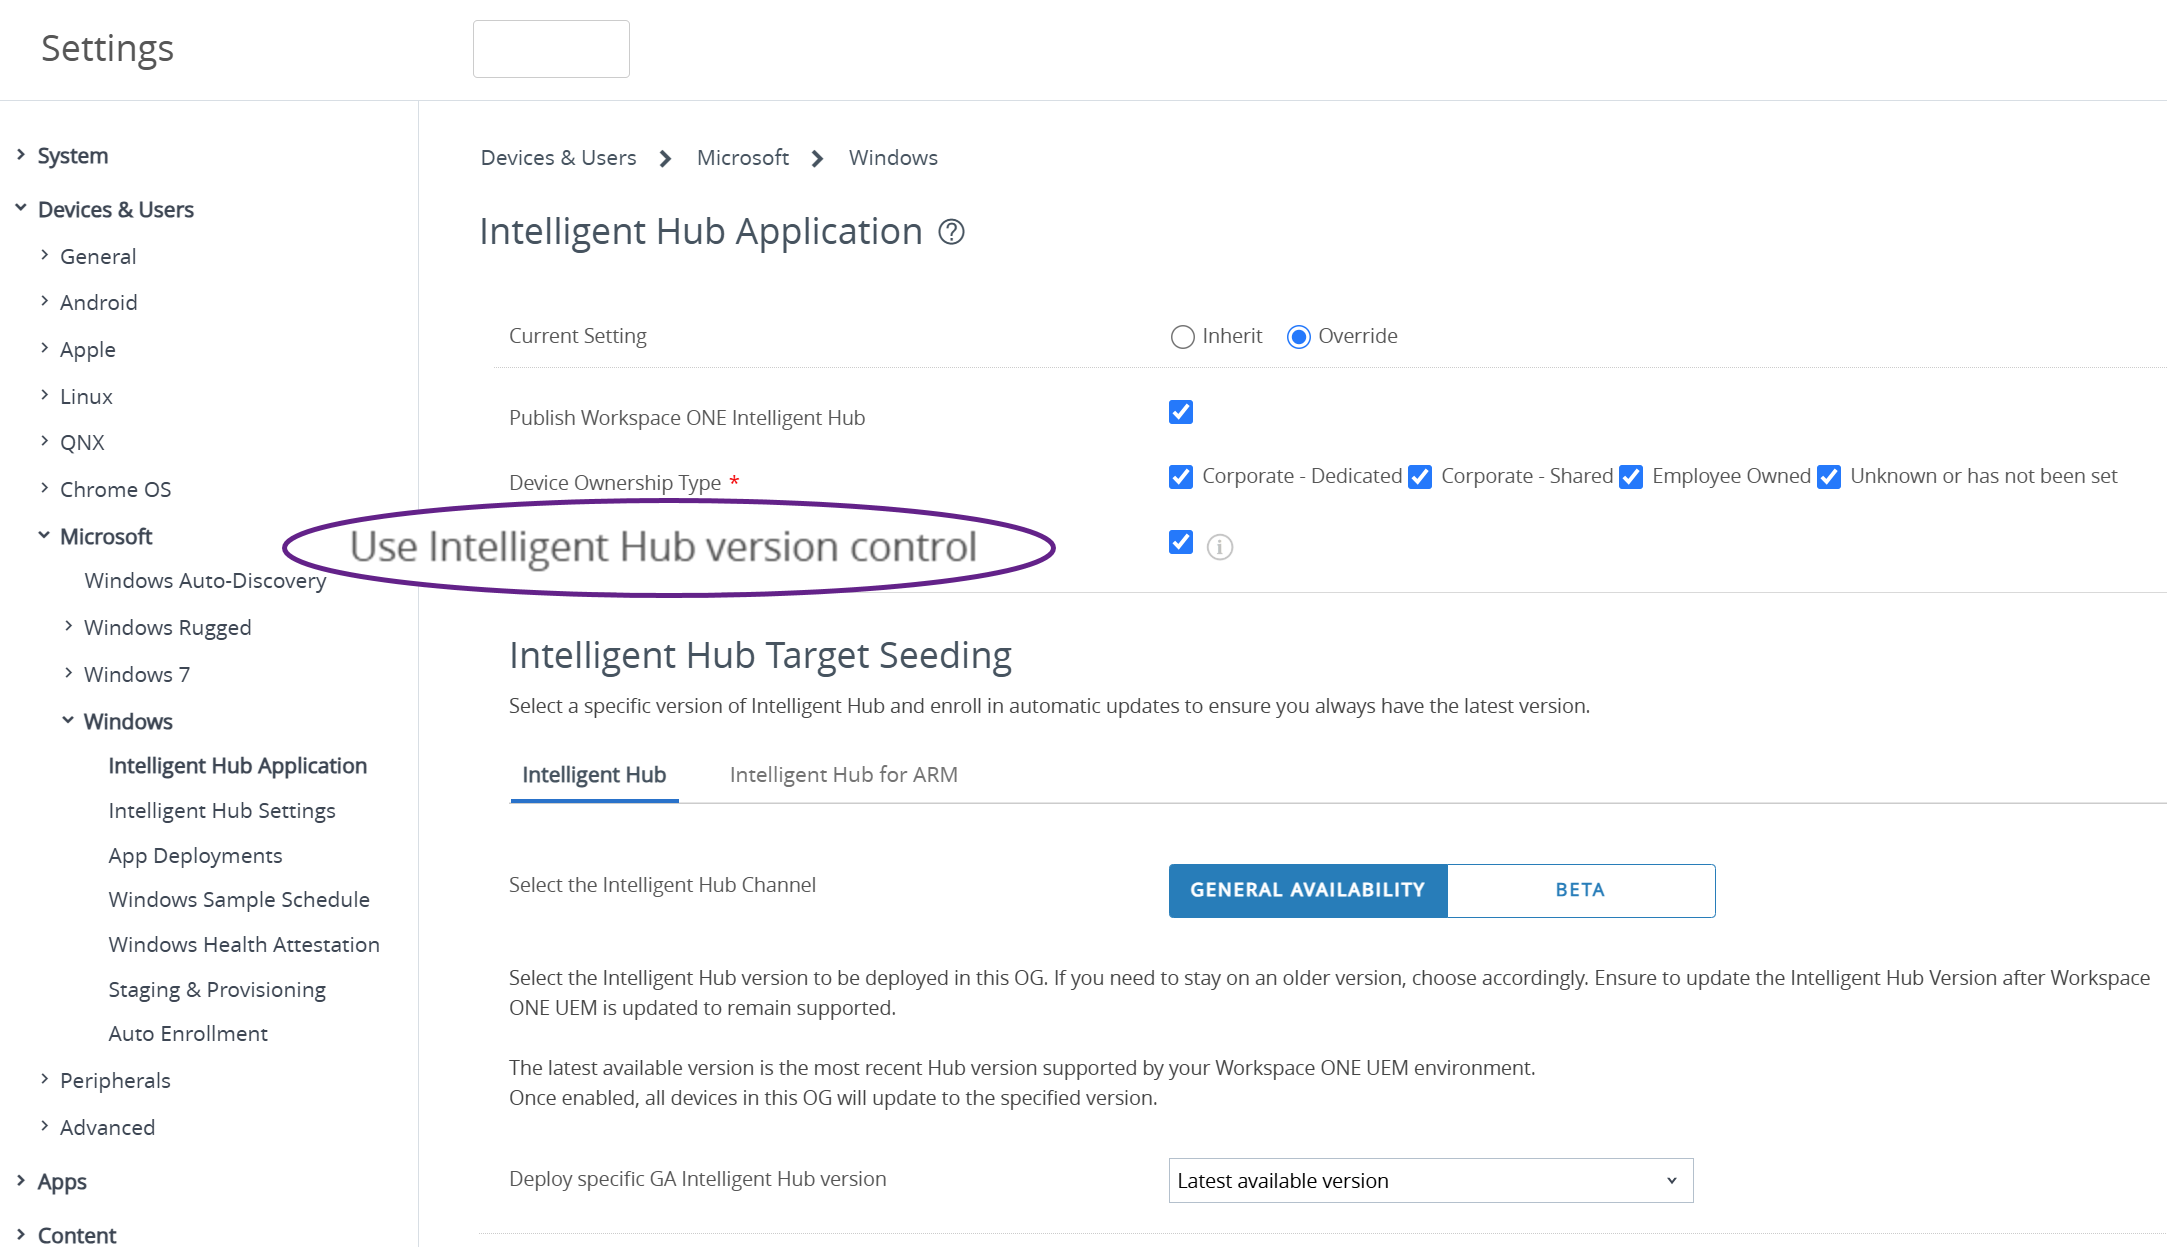
Figure 3: Intelligent Hub settings
When Use Intelligent Hub version control is enabled, seeding options are presented, thus enabling version selection.
By default, Software Package Deployment is enabled; it is required for application functionality. Note that Airwatch Admin rights are necessary to view Software Deployment status; console admins cannot see this tab.
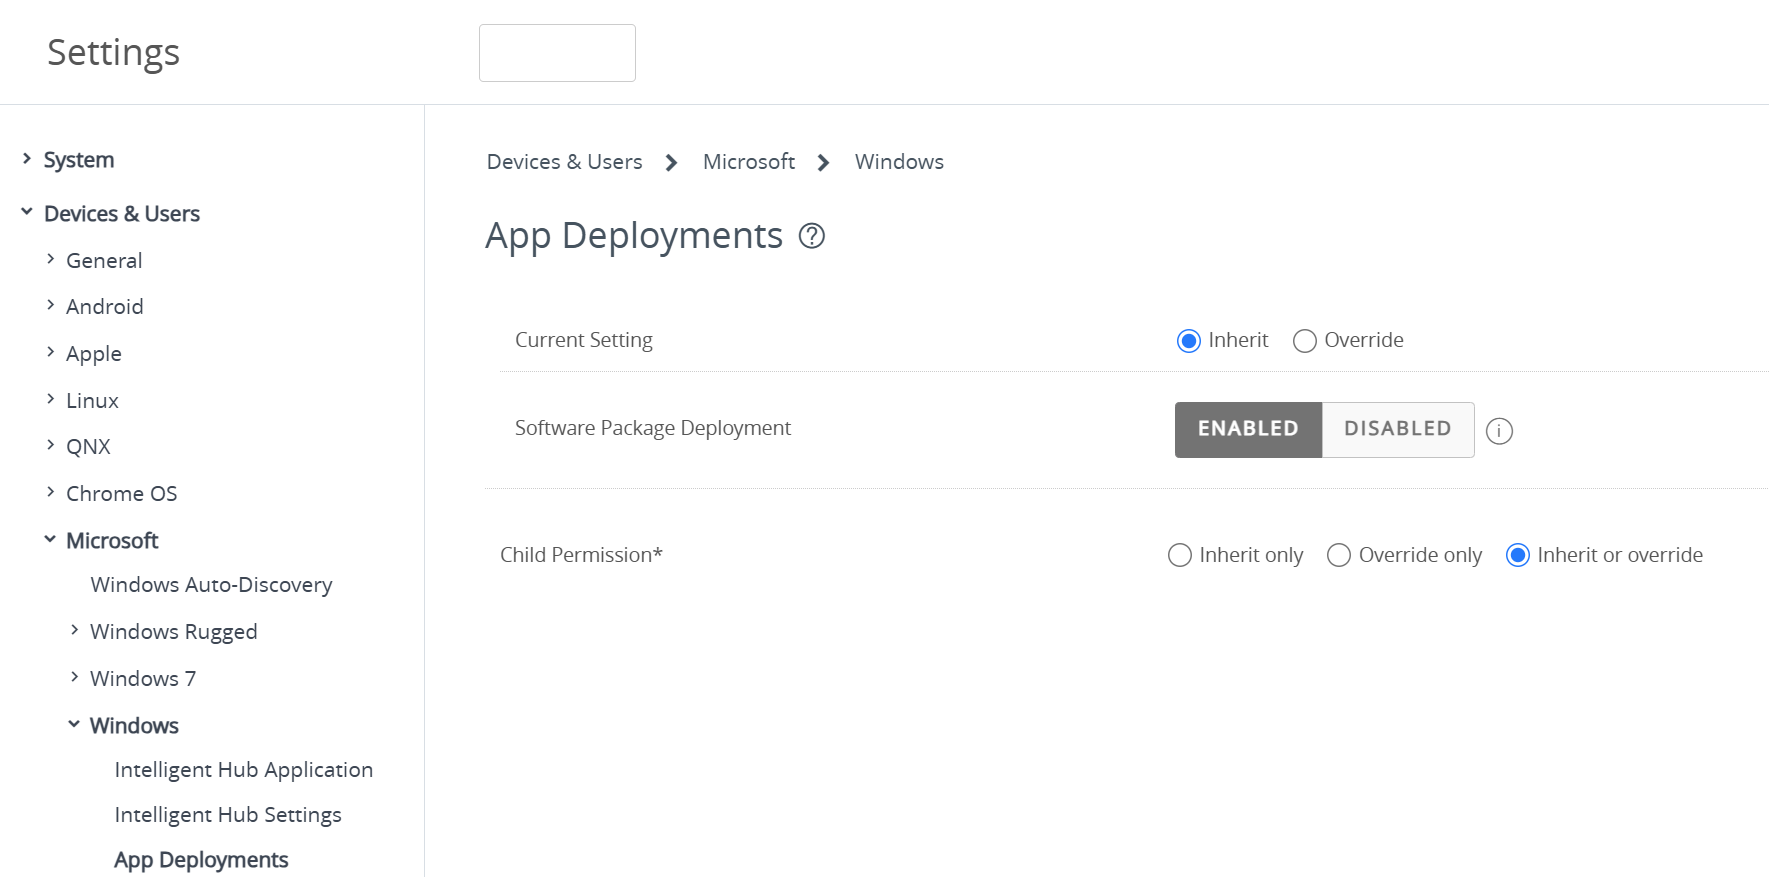
Figure 4: Software package deployment configuration
CDN + Peer Distribution + Deployment Rings
As a best practice, Omnissa recommends combining Content Distribution Network functionality with Peer Distribution Distributed Mode and Deployment Rings to distribute applications in a structured, low-risk and low-bandwidth usage approach.
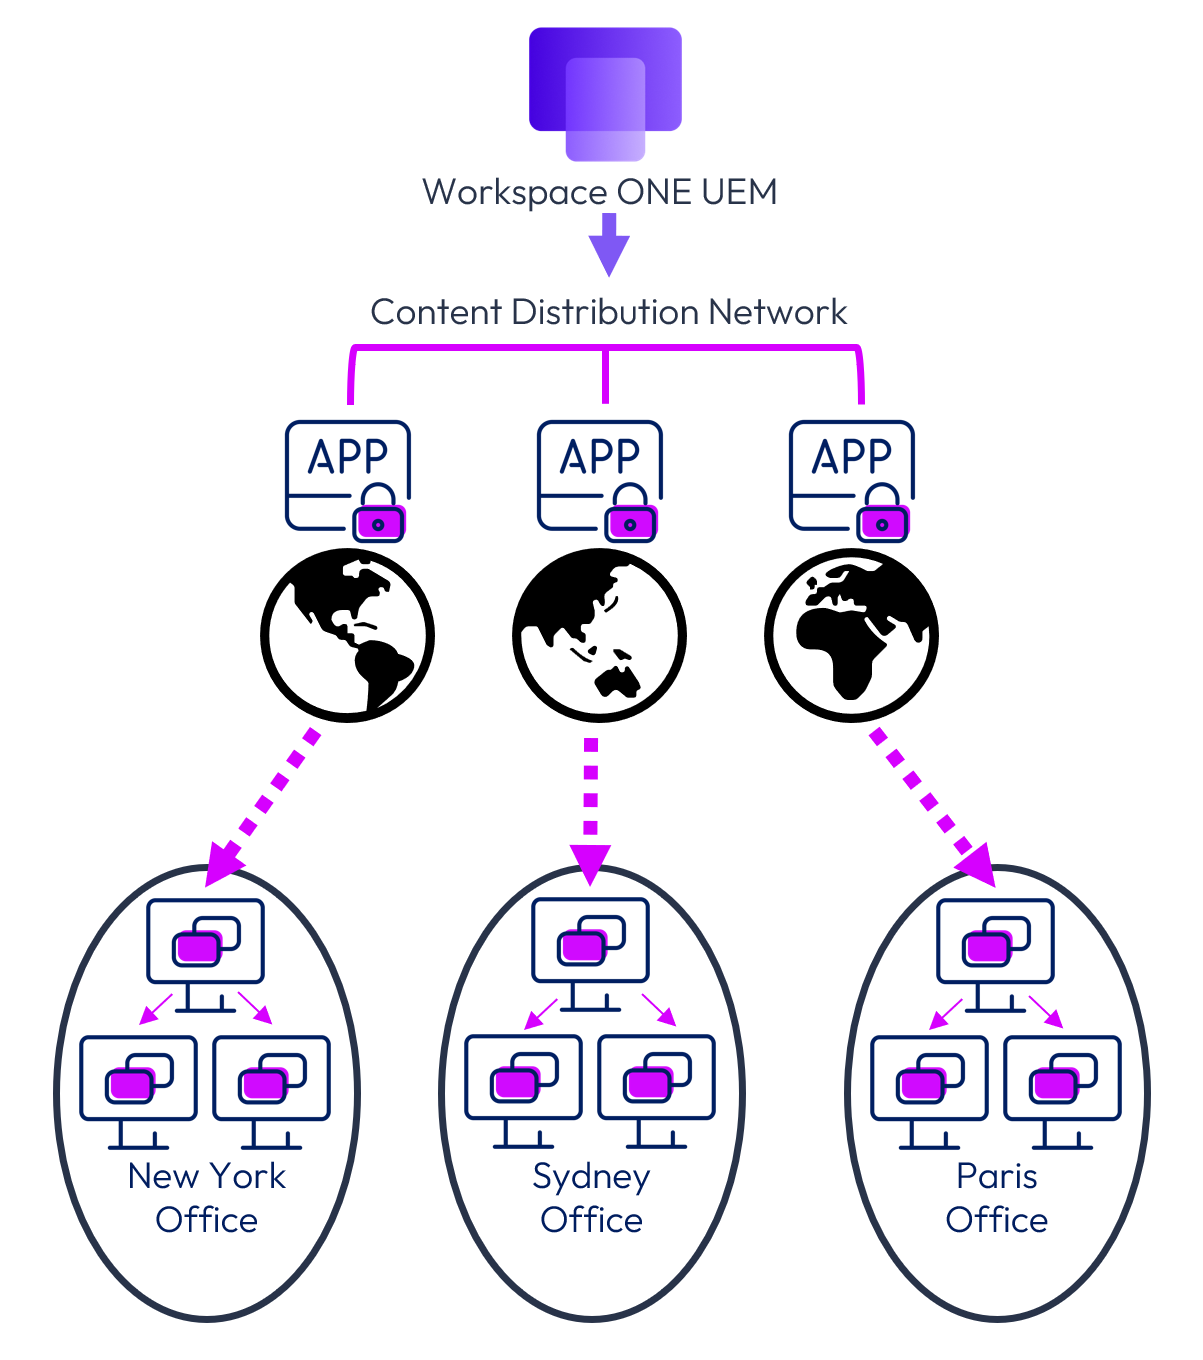
Figure 5: CDN and Peer Distribution example
In the example above, one device within each office (New York, Sydney and Paris) is a member of the Test Devices Smart Group. Once the application is assigned to the Smart Group, the first device within each office begins downloading and installing the application. Once subsequent Smart Groups are enabled, Windows devices within each subnet will pull the respective application file from a device that already has the application file available, eliminating the need for the entire file to traverse the worldwide network. This methodical approach provides the following advantages:
- Reduces the risk of a new application deployment affecting the entire company, an entire office or business unit
- Allows IT to assign new applications to ‘friendly’ users or application SMEs
- Minimizes disruption if there is a problem with the application
- Reduces the work effort on Service Desk if there is a problem with the application
- Reduces bandwidth usage at that point in time within each office
- Allows devices that are roaming outside the office network or in a different office to continue to receive these applications
Devices within the next Deployment Ring will download the application installer from devices within their respective subnet (peers), and proceed with deployment, thereby reducing bandwidth, and speeding up application deployment.
The process continues with each subsequent ring targeting more devices and leveraging an ever-larger cache of application installers from local peers and then becoming peers themselves for other devices. This is shown in the following diagram:
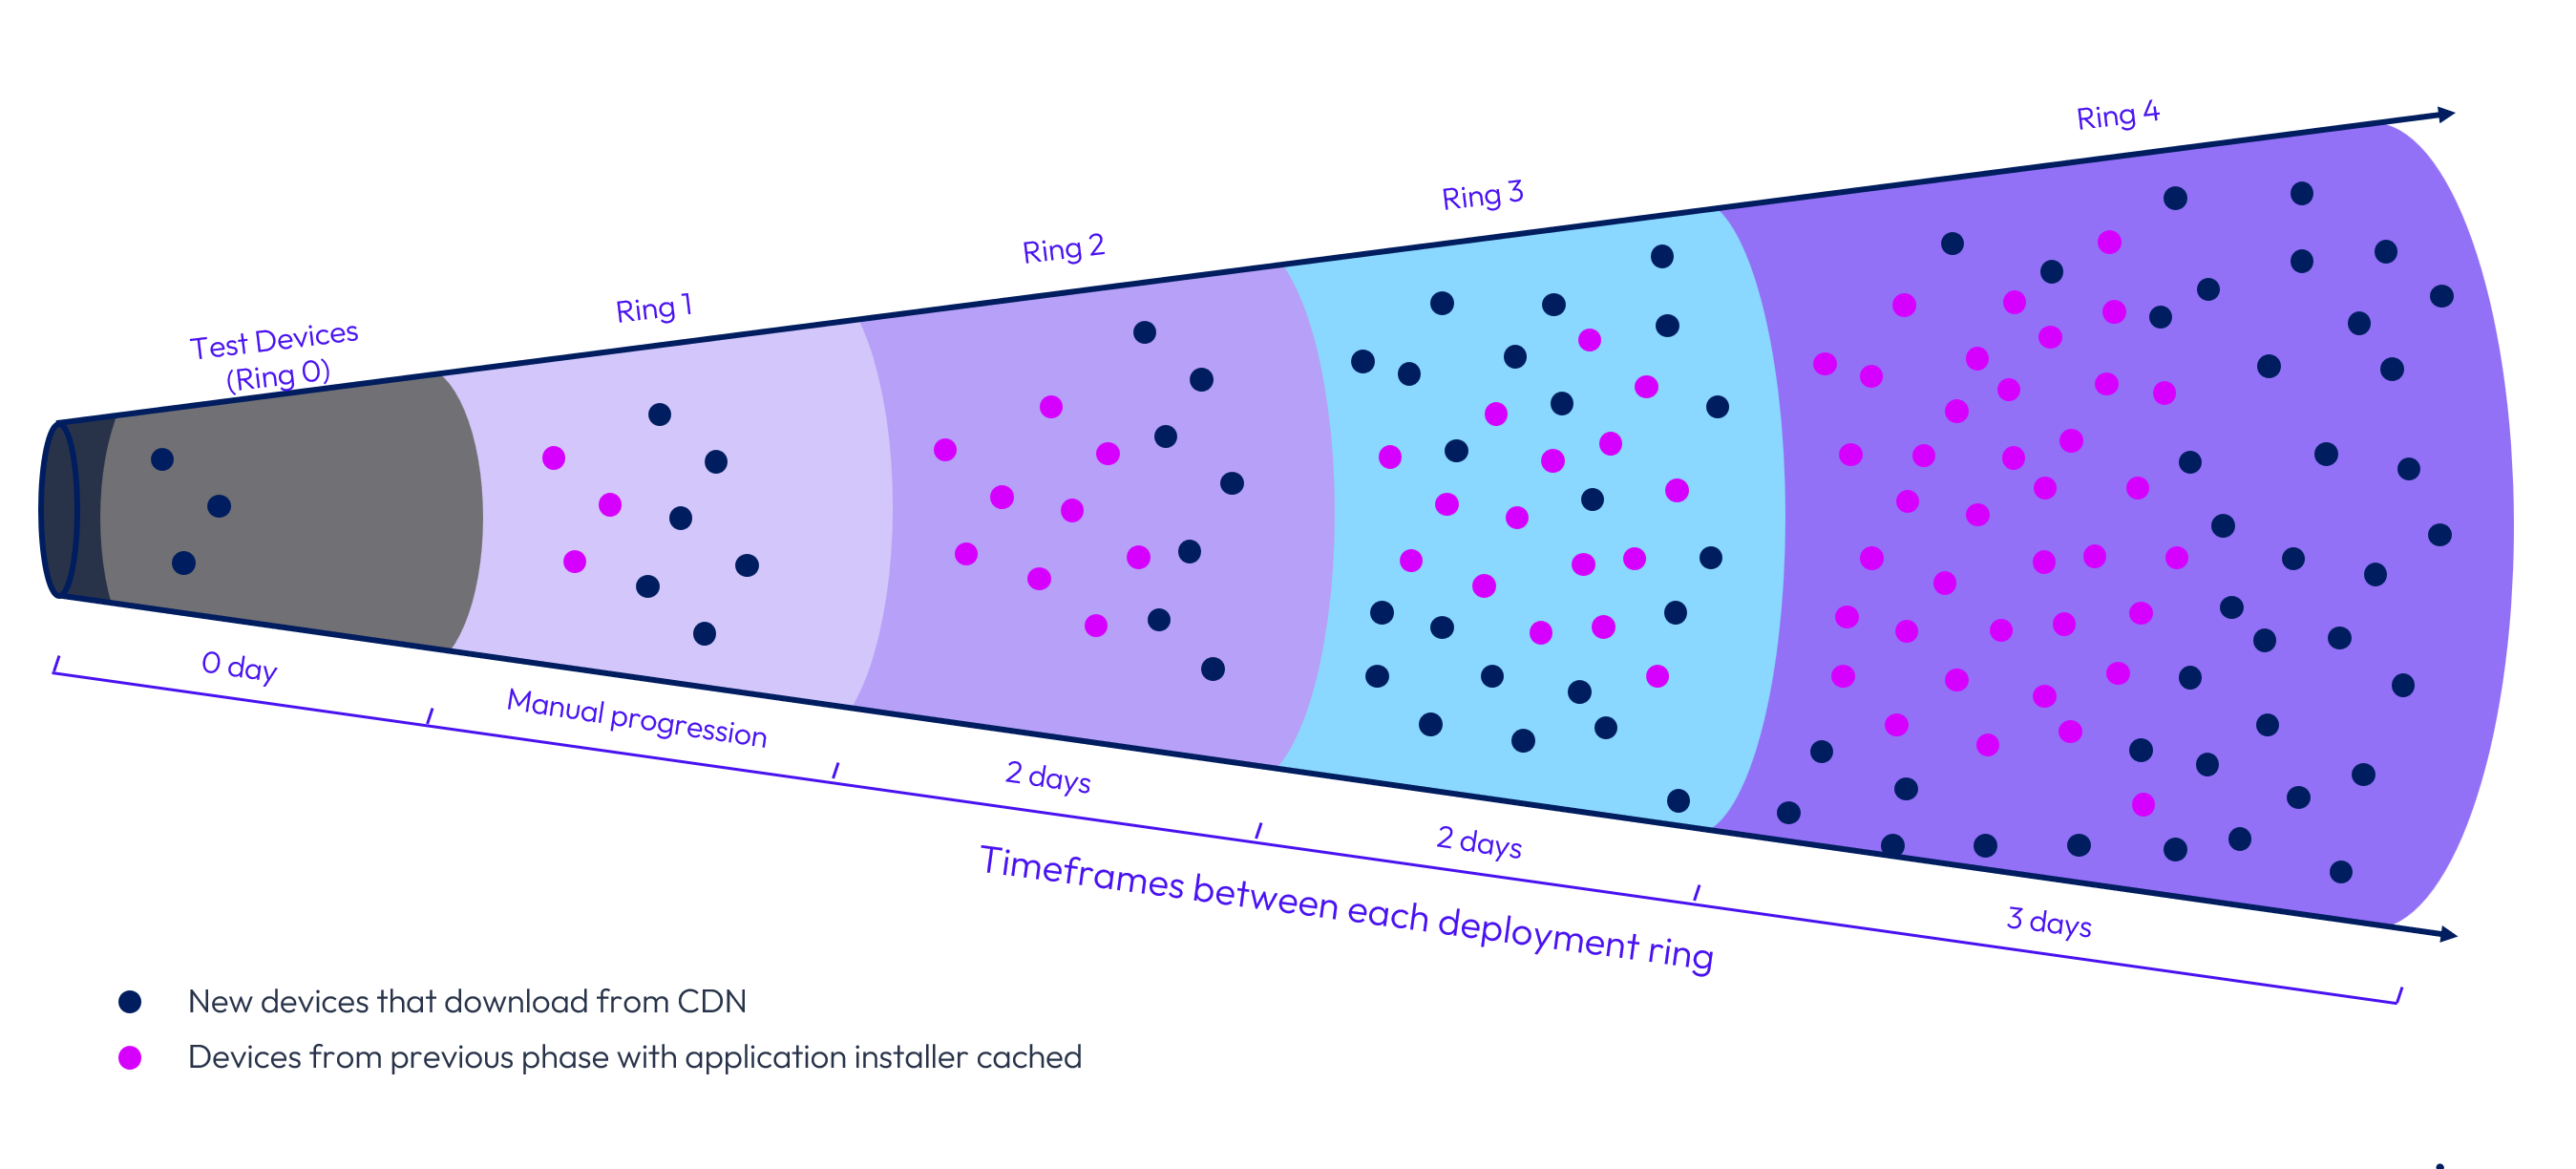
Figure 6: Application deployment to subsequent deployment rings
CDN/Relay Server, Peer Distribution, and Deployment Ring decisions
Workspace ONE Saas environments are automatically granted 500 GB for application package storage. Additionally, the maximum size for individual files uploaded as application installers is 10GB. Storage space and file size can both be increased upon request through Global Customer Support or your Omnissa account team.
Especially in large environments, application files should be dispersed by means of a Content Distribution Network (CDN), as well as Peer Distribution.
Distribution via Content Distribution Network (CDN) or Relay Server
By default, SaaS environments make use of Omnissa’s worldwide CDN functionality for application deployment to minimize latency. This is automatic for SaaS tenants but must be configured for on-premises customers. Not only does CDN provide efficient distribution of installation binaries, but it also provides secure storage for those binaries and installation commands.
The CDN URL that is autogenerated and used for accessing the application installation binaries now automatically refreshes, eliminating timeout issues. For example, if a user is on vacation for two weeks and a new app has been assigned to that device during that timeframe, the application can still be successfully deployed because the CDN URL will not go stale.
Alternatively, Relay Server(s) may be enabled to address your content distribution requirements. Relay Server is a distribution mechanism for applications and updates based on secure FTP (SFTP) server functionality. For those customers that do not wish to make use of the inherent CDN, Relay Servers present an internal-only option that is entirely managed and controlled by the enterprise.
For more information about Relay Servers, please see Omnissa Docs.
Third-party options
Third-party technologies such as Adaptiva Peer-to-Peer Content Distribution or 1E Nomad can be utilized in place of Peer Distribution to provide additional capabilities. Please refer to Peer-to-Peer Software Distribution with Adaptiva and Peer-to-Peer Software Distribution with 1E Nomad for additional information.
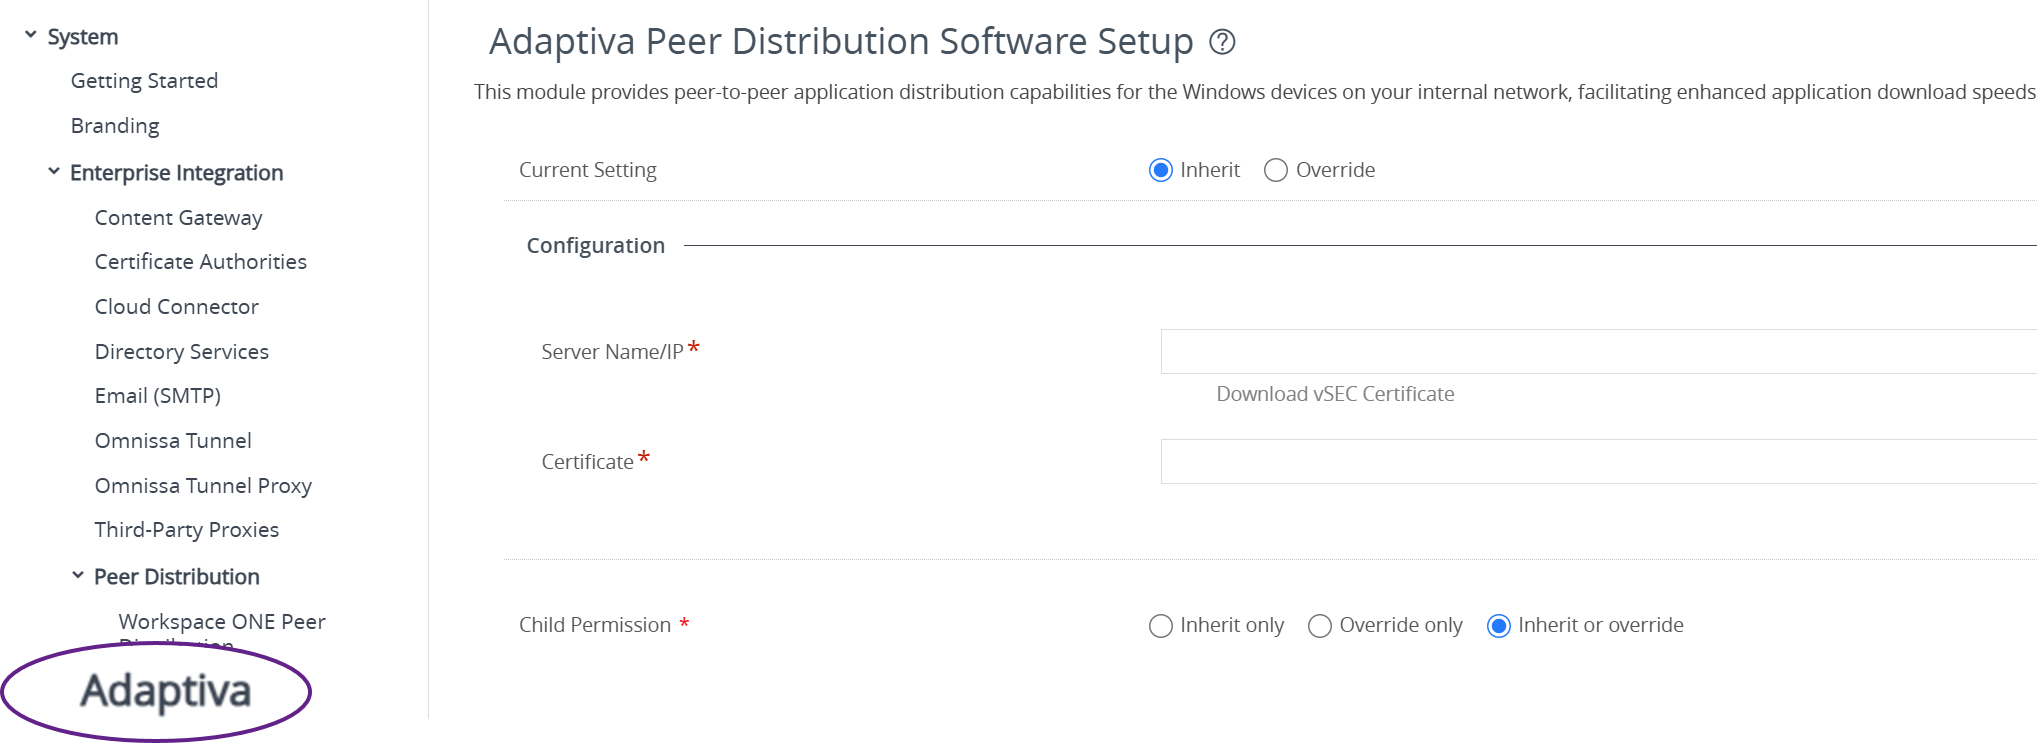 Figure 7: Adaptiva Peer Distribution
Peer Distribution
Omnissa recommends enabling Peer Distribution as a Windows device profile to minimize bandwidth; specifically, the Distributed option should be selected, as depicted below. As shown in the previous graphic referencing three geographically dispersed offices, this functionality enables peer-to-peer application distribution and minimizes network bandwidth. This is also known as BranchCache.
Cache settings should also be configured to ensure that deployed files are not unnecessarily archived and do not consume an excessive amount of space.
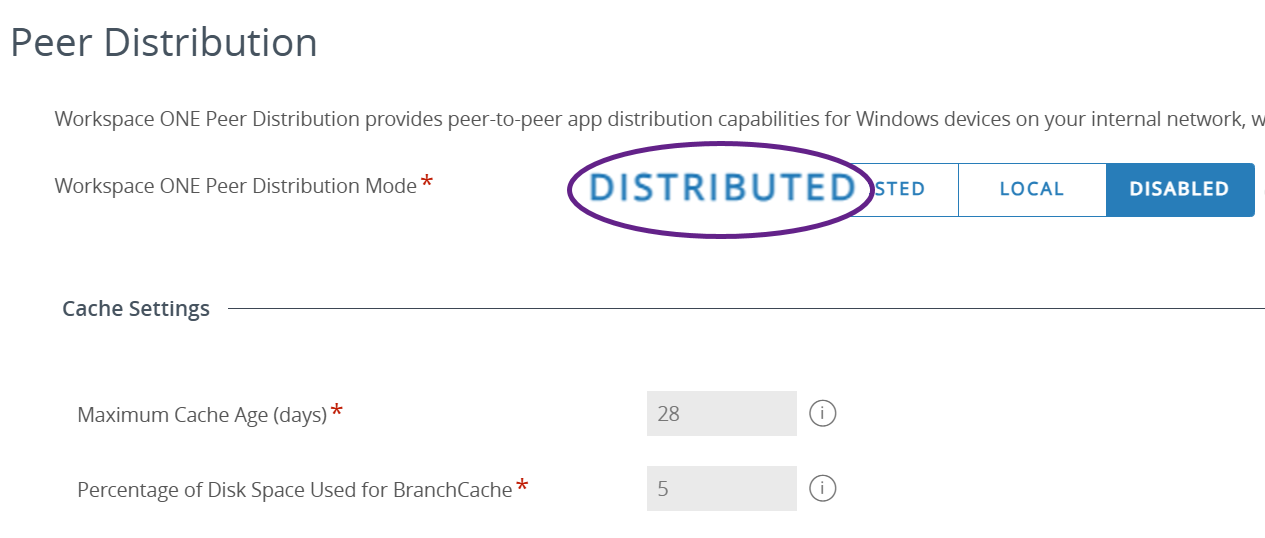
Figure 8: Peer Distribution configuration configured via Resources > Profiles > Add > Add Profile > Windows > Windows > Desktop > Device Profile > Peer Distribution
Application deployment: Native Apps
Windows application packages are created as Native Apps. As shown below, three options are presented: Internal, Public, and Purchased. Windows apps can only be configured as Internal. There are two options presented after selecting Resources > Native Apps > Internal > Add:
- Application file, which is the most common way to deploy all applications
- Enterprise App Repository, which offers pre-configured basic packages for a multitude of applications
Other means for deploying applications will be discussed later in this document.
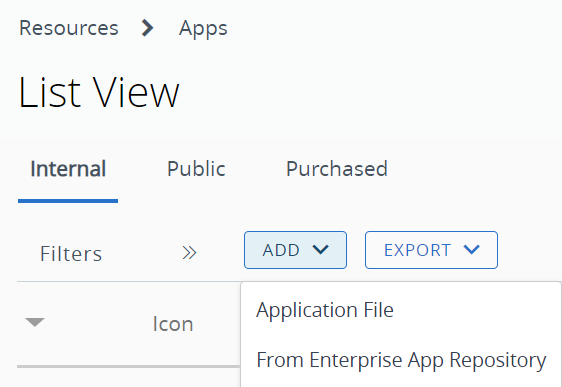
Figure 9: Options for adding a new Windows application
For simplicity, this section will walk through the steps to deploy a basic package to Windows endpoints by accepting the defaults. These processes will be addressed first via the Enterprise App Repository and then as an Application File.
Enterprise App Repository
After selecting this option and choosing an application from the repository, simply follow the wizard. Details such as install context, install command, and admin privileges are automatically pre-configured but can be altered as necessary
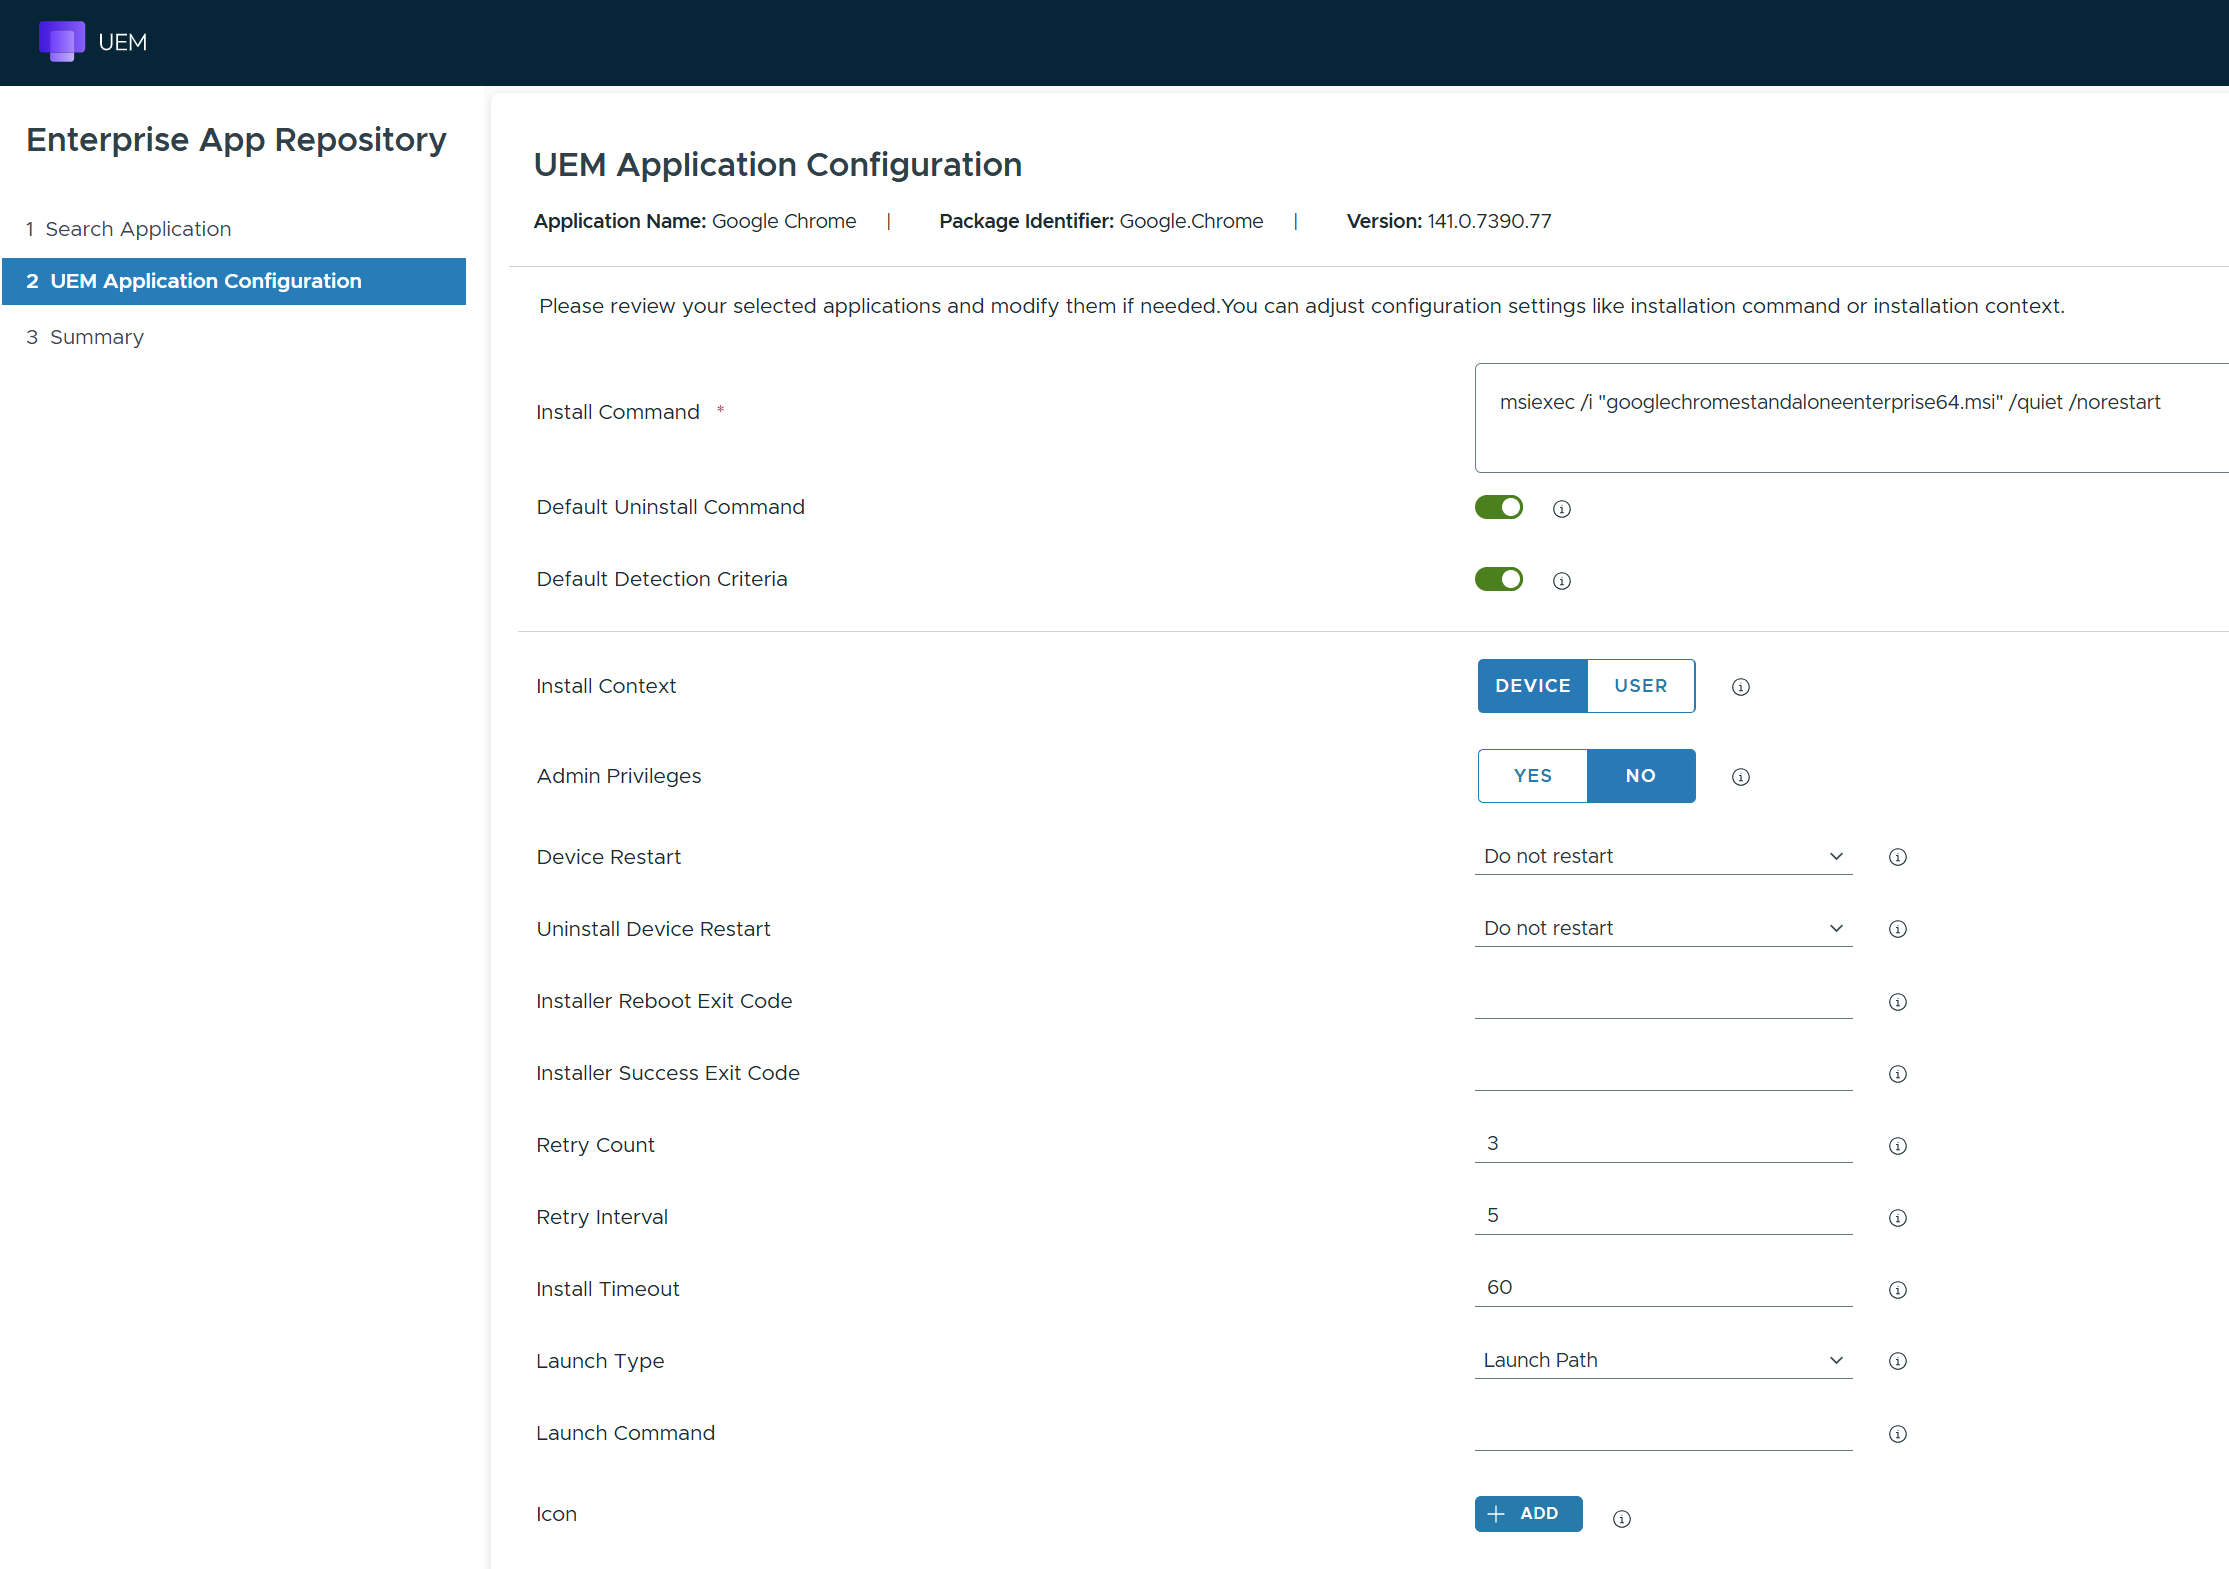
Figure 10: Adding an application from Enterprise App Repository
After the package is created, two additional actions may be undertaken:
- Edit the package if necessary
- Assign the appropriate Smart Group(s)
An updated version of this application can then be added from the Enterprise App Repository at a later time.
The Enterprise App Repository was refreshed in late 2025 and provides approximately 10,000 applications and newer versions of existing applications. If you require applications not available within the Enterprise App Repository, please reach out to your account team to make this request.
Edit Enterprise App Repository package (if necessary)
It may be necessary to modify one or more settings within the pre-configured application package. For example, you may wish to modify the app icon or designate terms of use. After scrolling through the five tabs and making any needed changes, click Save and Assign.
Assign Smart Group(s)
After designating the Smart Group(s) to which this package should be assigned and reviewing the distribution settings, click Save and Publish.
Application File method
The most common means of deploying applications is via Application Files. Before creating an Application File, note that four key items are required:
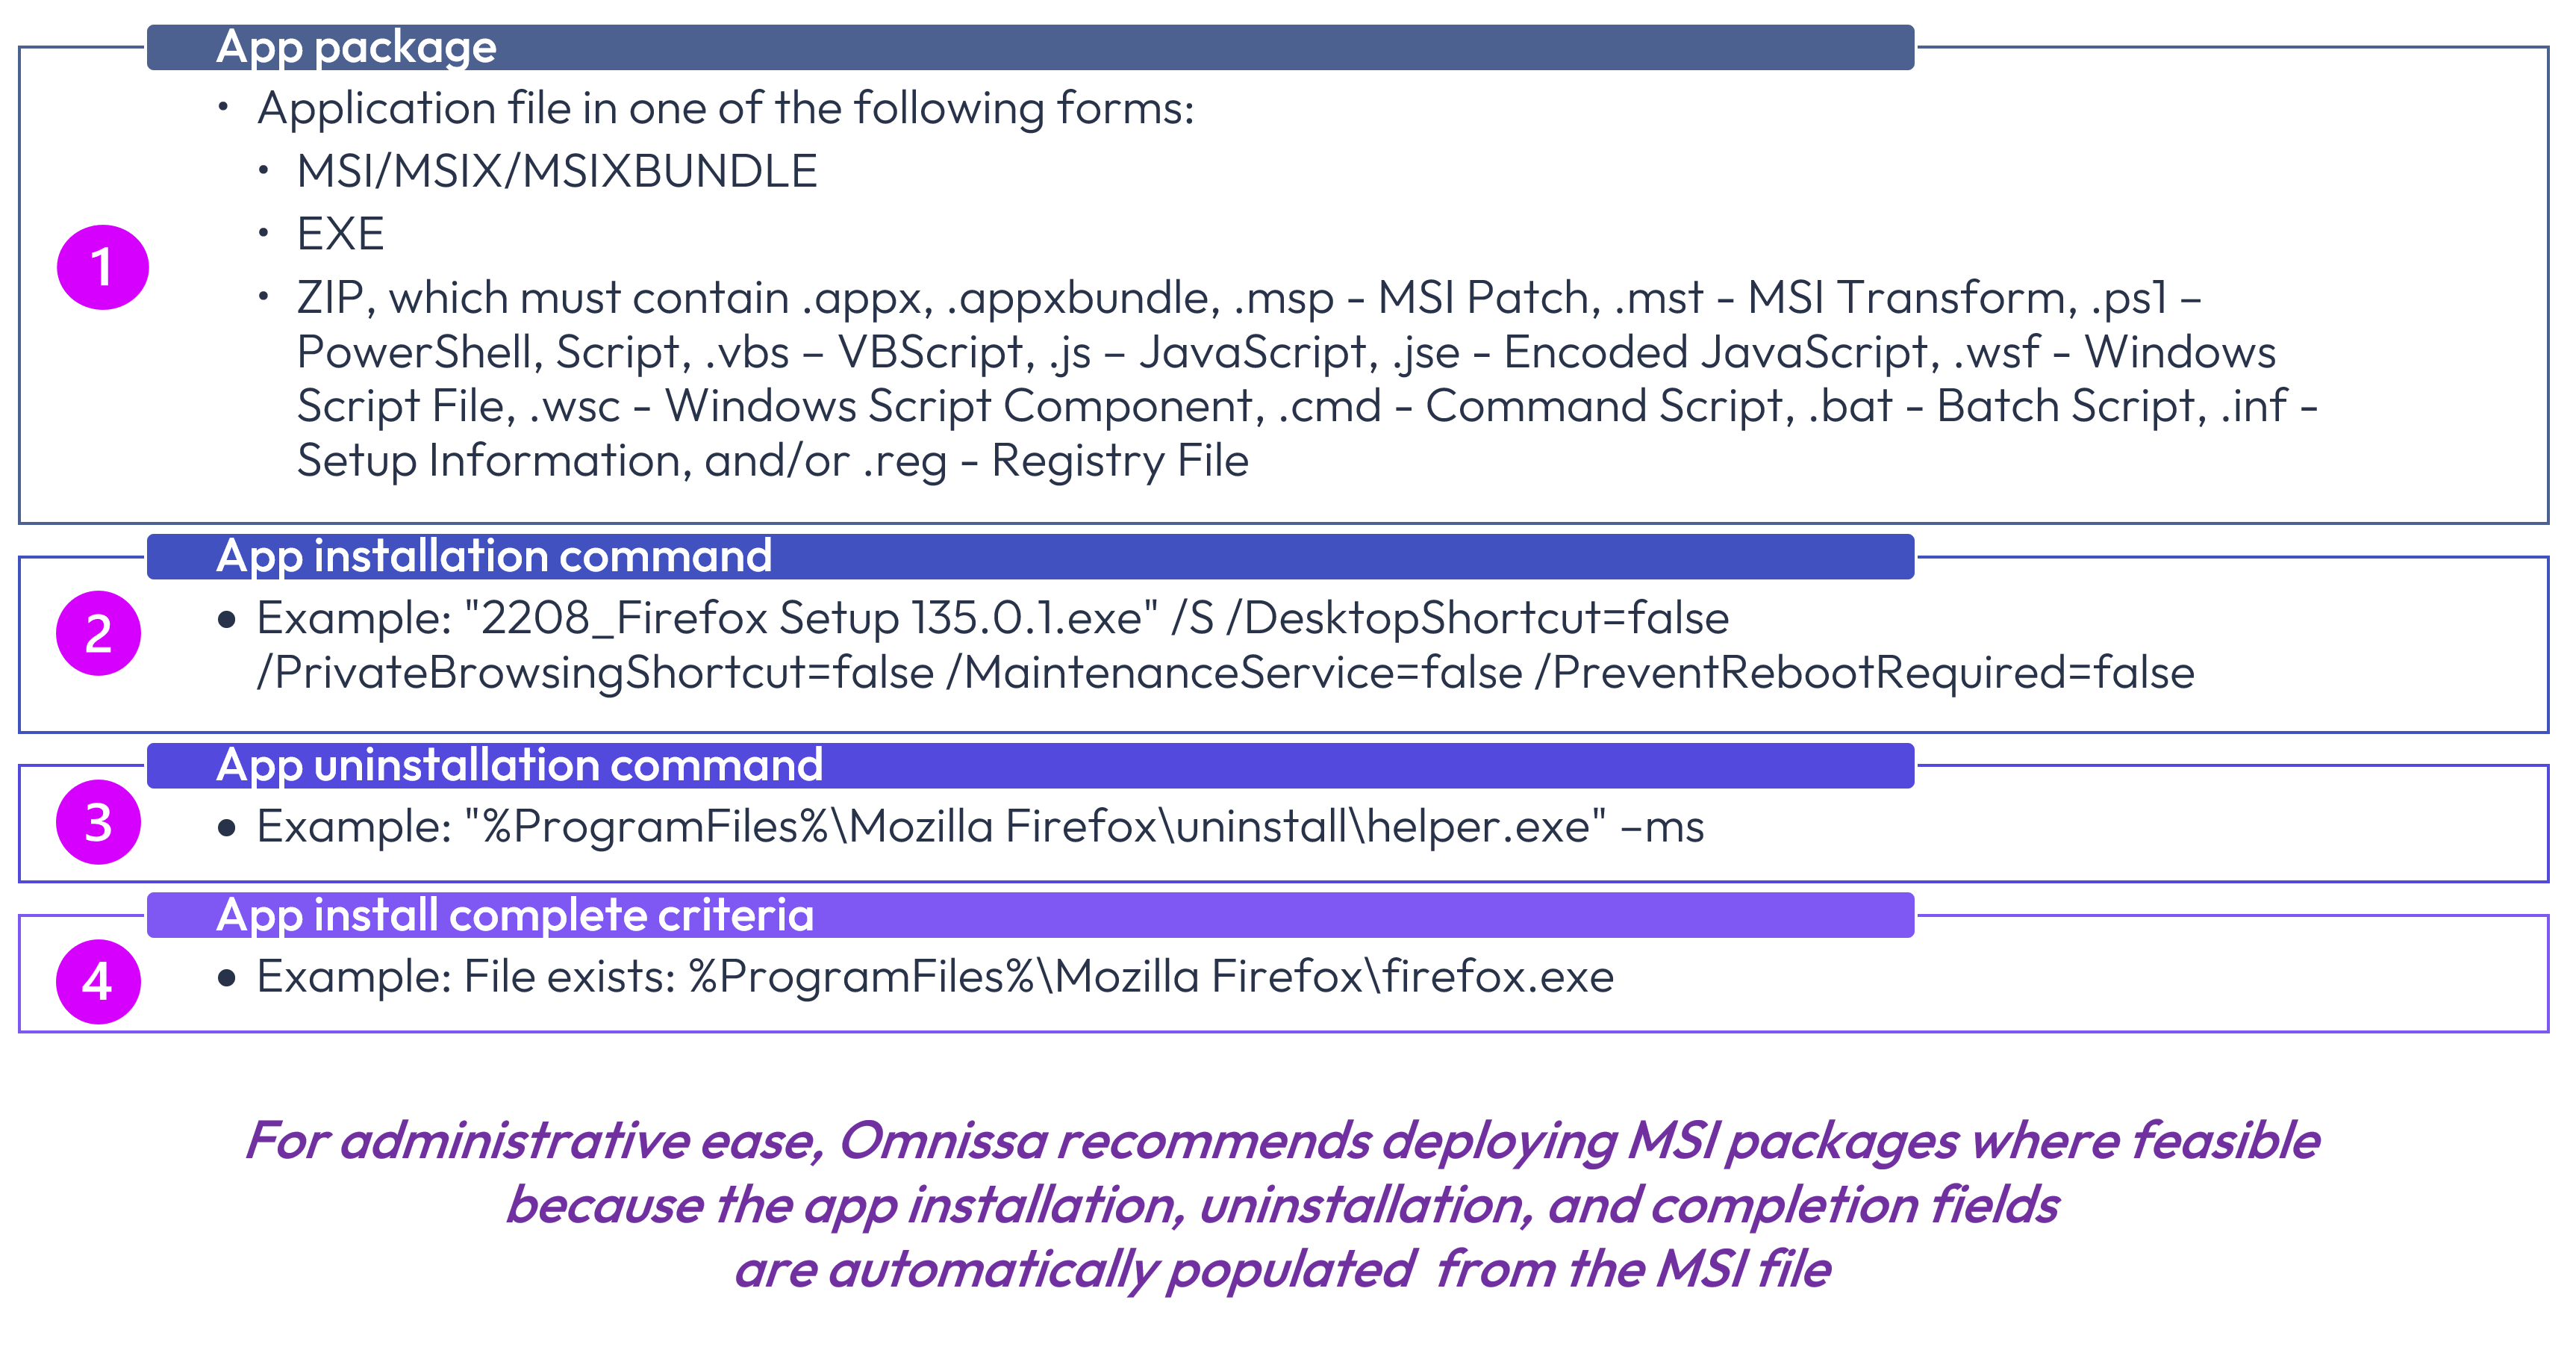
Figure 11: Minimum requirements for creating new Application File
MSI applications automatically populate the App Install Command, App Uninstall Process, and When to Call Application Complete (indicates deployment success or failure) fields, whereas EXE and ZIP files do not. In addition, an application icon is strongly recommended to maximize familiarity but not required.
Aside from the requirements discussed above, administrators have many options when configuring application files. For an explanation of every option presented within each tab of the application file, please see Omnissa Docs. Key options and recommendations are discussed below as part of the creation of a new Application File, which is based on the following steps:
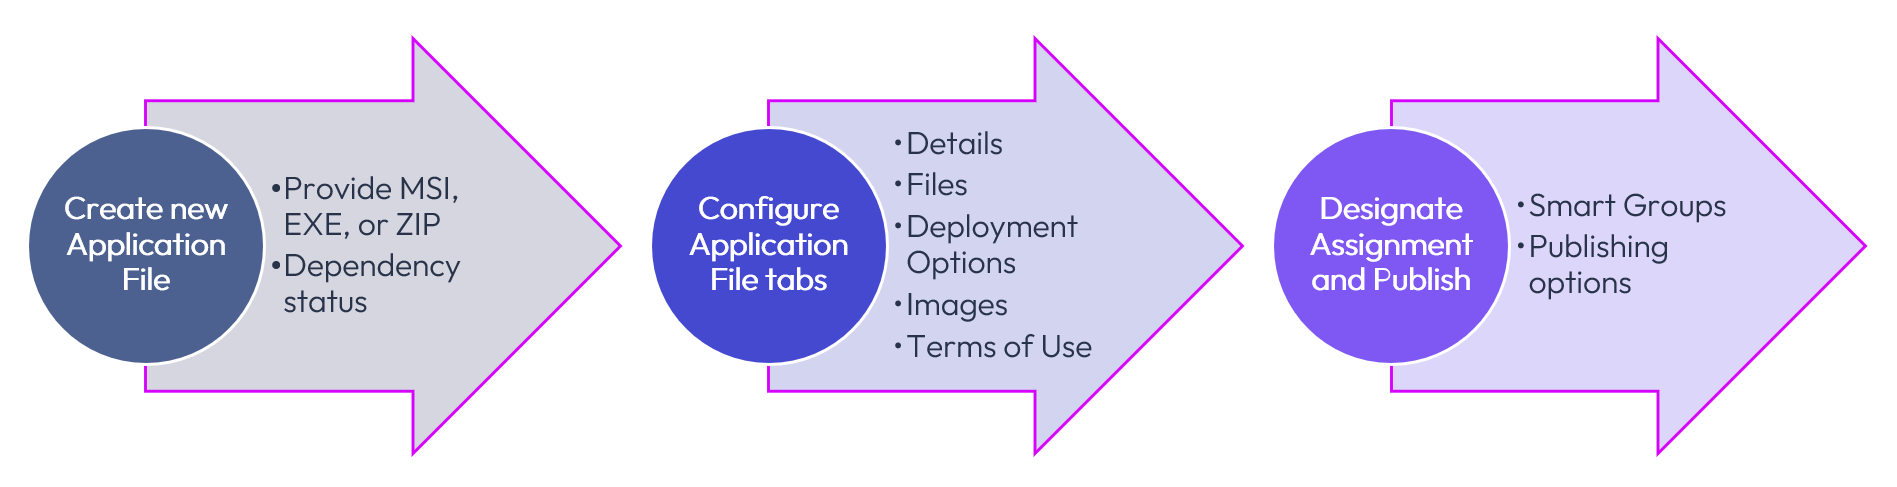
Figure 12: Process for creating a new application file
Creating a new Application File
When creating a new Application File, several key considerations include:
- File type based on whether the package is based on MSI/MSIX, EXE, or ZIP
- Dependency app implying whether other applications may have a dependency on this app
While a Dependency app may be designated as part of an Application File, a better solution is to use Freestyle Orchestrator to create an application installation workflow. Not only does Freestyle Orchestrator provide more flexibility, but maintenance is also greatly simplified.
File type
The file type should be considered initially because it cannot be changed later. For example, if an application is initially deployed via an EXE file and an MSI later becomes available, the newer version cannot be deployed with the “Add Version” wizard. To address this use case, customers can utilize Freestyle Orchestrator to uninstall the old version and install the new version as separate applications.
MSI packages are the simplest deployment option and should be used where feasible. EXE applications are the secondary preference. ZIP packages are supported, however due to the nature of ZIP packages and limited visibility to SFDAgent to the processes being executed within the package, deployment of ZIP packages should be a last resort.
When EXE and ZIP files are selected, it is necessary to enter additional commands.
MSI files
Most applications are available as MSI packages which are generally easier to deploy. Where an MSI is used, standard MSI command line options are available to add or adjust the default command line. The default Install Command, Uninstall Command and When to Call Install Complete criteria (Detection Criteria) can be changed if required.
Workspace ONE also supports MST files as a method of changing the MSI install parameters.
Note: MSIX is similar to MSI and is a supported application package format. MSI is much more common and thus will be the focus within this document.
EXE files
EXE files may use a wide variety of parameters, so understanding the options available for each specific application from the respective vendor is necessary. Deployment of EXE- and ZIP-based packages is more complex, require additional manual configuration, and may require significant testing.
Correctly designating the Install Command, Uninstall Command and Detection Criteria for EXE application installers is a requirement for successful deployment. Testing these commands locally on a small number of test devices allows configuration modification and redeployment without impact on users. This is strongly recommended before wide-scale deployment via Workspace ONE.
ZIP files
ZIP files can be used where an MSI or EXE is not applicable. For example, if you need to deploy a script or multiple files, ZIP file can be used for this purpose. Deploying ZIP files is more complex and prone to error, so using this type of file for software deployment should be a last resort. Alternatively, Freestyle Orchestrator can provide many of the capabilities of a ZIP file deployment in a more streamlined fashion.
When creating a ZIP file, the bundle of files must contain one of the aforementioned file types shown in Figure 11. Without this, the system cannot ascertain the platform and thus the upload will fail.
Note: ZIP packages that are greater than 4GB in size must be created with 7-Zip. The native Windows compressor is not suitable. In addition, the ZIP file should not be encrypted, as this prevents SFDAgent from unencrypting and accessing the contents.
Beginning with Intelligent Hub 2410 and Workspace ONE UEM 2410, the behavior of ZIP files after successful application installation has changed. Where a ZIP App File has been deployed, the ZIP is downloaded to the C:\ProgramData\AirWatchMDM\AppDeploymentCache folder on the Windows device. The ZIP is then extracted, and the application is installed. Following installation, the extracted folder and files are removed, but the ZIP file remains.
This process is depicted as follows:
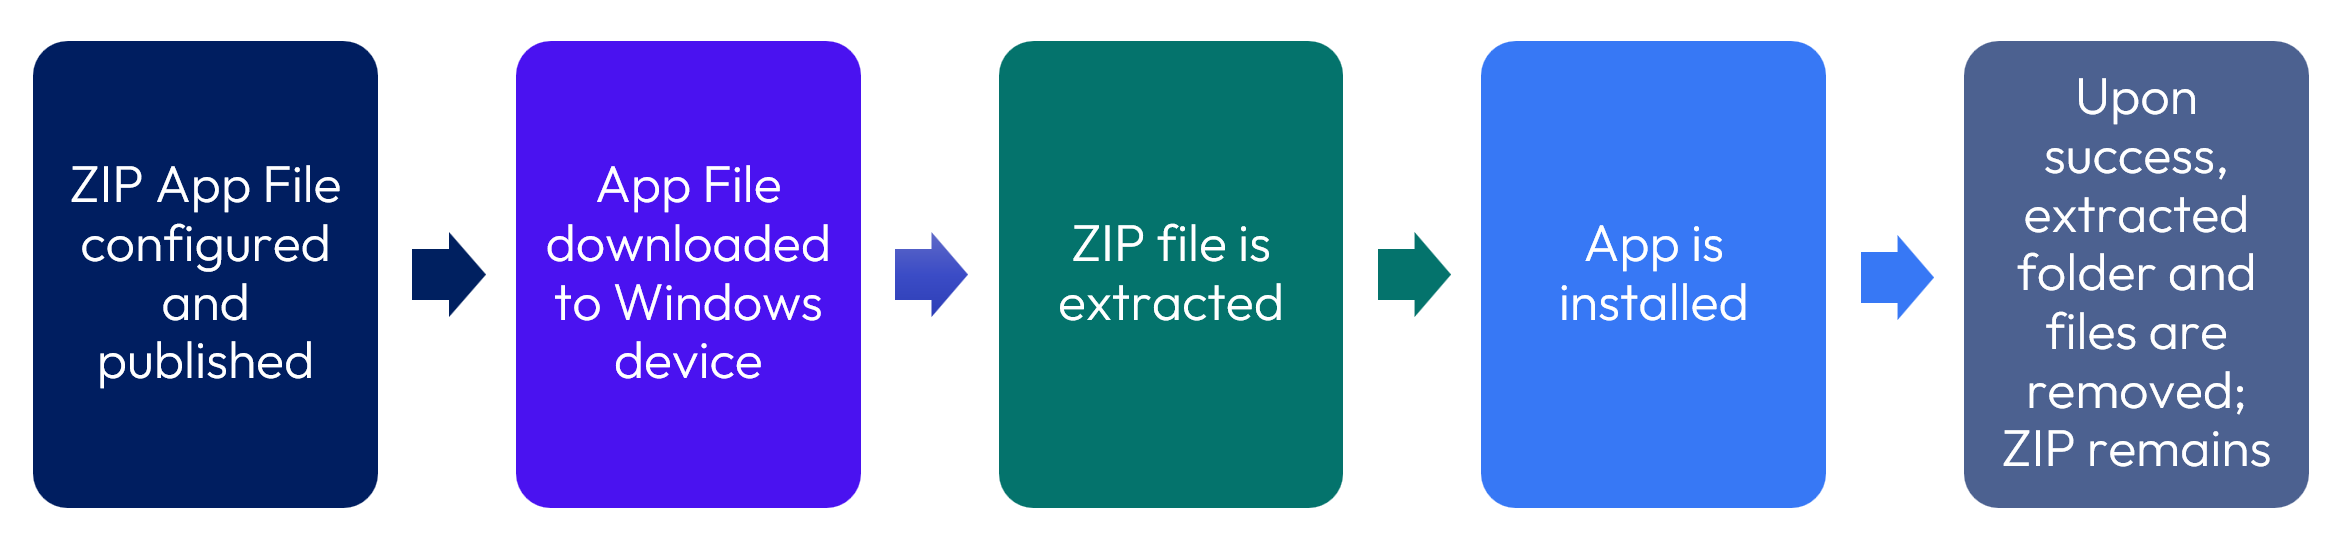
Figure 13: ZIP App File deployment process
If the installation fails, the extracted folder and files remain on the device. If desired, the cache can be cleaned by means of the following registry key:
- HKLM\SOFTWARE\AirWatchMDM\AppDeploymentAgent\Common\{00000000-0000-0000-0000-000000000000}
For information regarding the specific settings, please see Omnissa Docs.
Dependency app
Dependency apps such as utilities or runtimes are sometimes used by applications to provide needed functionality. Dependency apps can be selected as requirements for other apps during configuration. This causes Workspace ONE to check that the dependency app is pre-installed on the device. Dependency apps cannot be accessed standalone. Some examples of dependency apps include:
- .NET Framework
- Microsoft C++ Redistributable
Note: Although dependency apps can be designated as part of an Application File, Omnissa recommends using Freestyle Orchestrator to manage complex application install sequencing and dependency application installs.
When an application is designated as a dependency app, fewer options are subsequently presented within the Application File configuration.
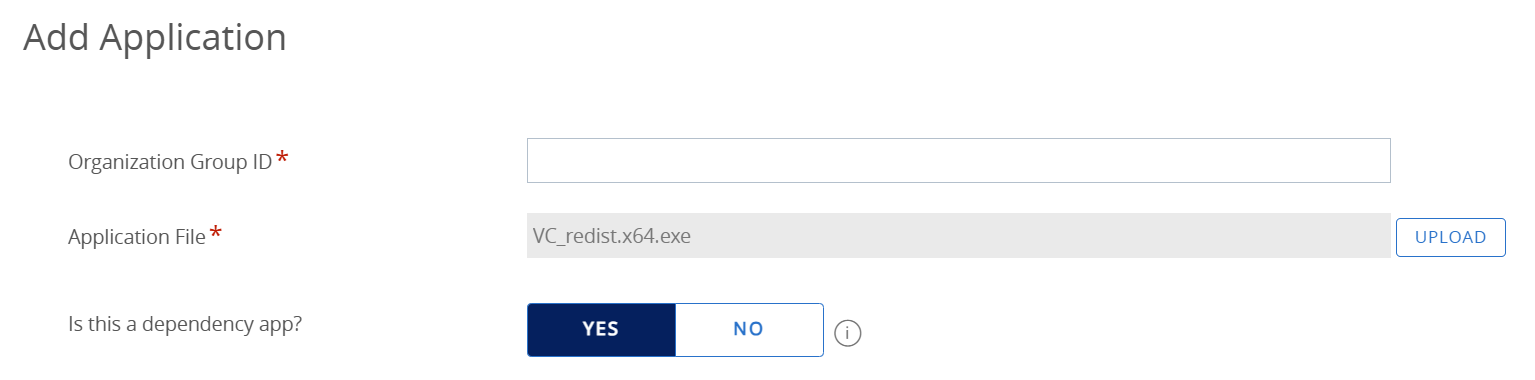
Figure 14: Dependency apps are invoked by other applications, e.g., Microsoft Visual C++ redistributable
Now that the application media has been uploaded and dependency has been designated, the next step is to configure the Application File. Because dependency apps present fewer options, the remainder of this section will focus on standard apps that have not designated as dependency apps.
Configure Application File
Once the application package has been uploaded, five tabs are presented within the Application File configuration.

Figure 15: Application File configuration tabs
Key items within each of these tabs will be discussed below in sequential order. All fields marked with an asterisk are required. For a review of all settings, please see Omnissa Docs.
Details pane
The Details pane contains much of the metadata for an application. Metadata such as Name, App Version, Supported Processor Architecture and Supported Models will be discussed below as they are required for deployment.
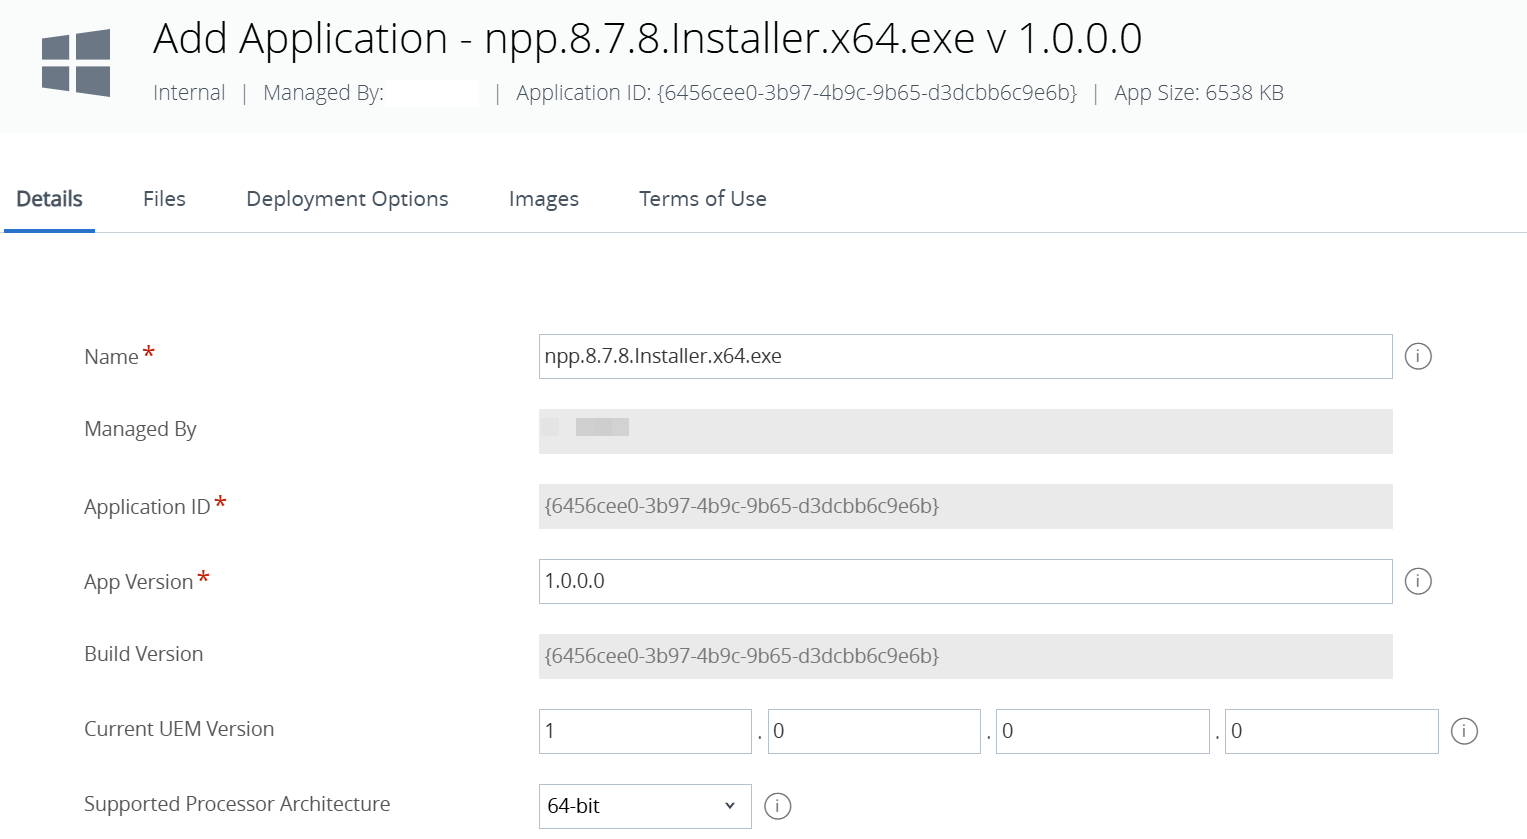
Figure 16: Application file Details pane default settings for Notepad++ EXE
Name and application version
The name and app version for MSI files will populate automatically; however, EXE and ZIP files default to the file name and version 1.0.0.0, as shown above. Omnissa recommends modifying the Name field as this will become the Display Name of the application in the Workspace ONE console and Intelligent Hub catalog. Additionally, the App Version field should be changed to the actual version of the application for EXE and ZIP installers.
Application ID
The Application ID is a 32-character GUID that uniquely identifies the application. When an MSI has been designated, the Application ID is automatically extracted from the installation file MSIPRODUCTCODE parameter.
When an EXE or ZIP Application File is added, the Application ID is generated by Workspace ONE. The first version of the application added also uses the generated Application ID as the Build Version GUID. Subsequent versions of the application added via the Add Version wizard, keep the same Build Version GUID and receive a new Application ID GUID, thereby linking the versions.
The Application ID should be noted because it may need to be incorporated as part of the app uninstall command.

Figure 17: The Application ID is a unique 32-character GUID
32-Bit vs. 64-Bit applications
Many applications are offered in both 32-bit and 64-bit versions. Two key differences are:
- 64-bit applications can access over 4GB of RAM and are less likely to crash
- 32-bit apps install into C:\Program Files (x86) whereas 64-bit apps install into C:\Program Files
As of September 30, 2024, support for 32-bit Windows 10 ceased and support for Windows 10 ceased on October 14, 2025, so it is likely that all Windows endpoints within your environment are based on Windows 11 64-bit architecture. Unless your environment has ARM devices, standard 64-bit applications should be deployed where feasible to provide a better experience for your users.
Both ARM and ARM64 are also presented as options for ARM-based processor devices.
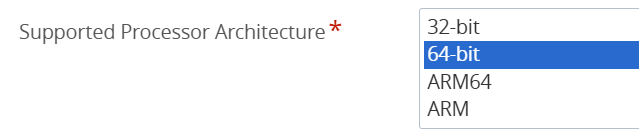
Figure 18: 64-bit applications should be selected unless you have ARM-based devices within your environment
Further, the Smart Group designation(s) must align with these selections.
Supported models
As part of the Application File configuration, the Supported Models field determines whether an application will be installed on Windows Desktop and/or Windows Server. By default, Desktop is selected as the supported model for Windows apps.
The new Workspace ONE Windows Server functionality introduces the ability to deploy applications to Windows Servers. Having the ability to deploy applications uniformly for both Windows Desktops and Windows Servers is particularly useful for common applications such as PDF readers and browsers.

Figure 19: Application details > supported models field
Files pane
While the App Uninstall process is the only required field on this screen, app dependencies as well as transforms and patches may optionally be configured. In order for a dependency app to appear in the dropdown for selection, it must first be selected as a Dependency App when creating a new Application File.
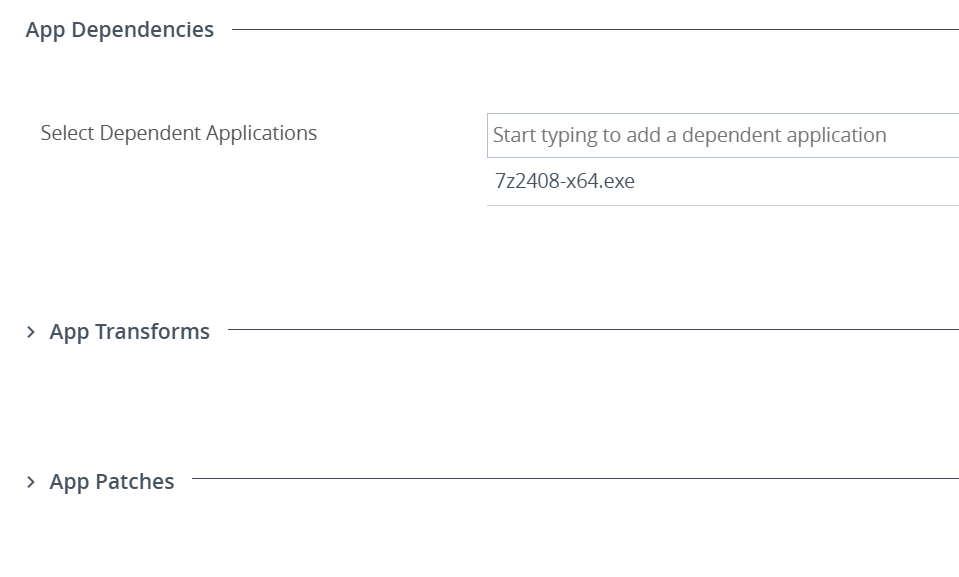
Figure 20: Options to designate app dependencies, app transforms, and app patches
App transforms (MST files)
App transforms (MST) files contain a collection of settings applied during application installation. Because each transform can be associated with different assignment groups, multiple transforms can be uploaded into the same MSI to provide distinct functionality. For example, one or more language packs may be added for multi-lingual support, with an MST assigned to the respective assignment group.
Note that if the transform file selection is changed after the app is installed, the MST is not applied to member devices. Only the newly added devices which do not have the app installed receive the updated transform.
App patches (MSP files)
App patches (MSP) files append to the MSI application installation; they are self-contained packages that contain all the information required to update the application. App patches can be:
- Cumulative. Patch file is inclusive of all the changes from previous patches.
- Additive. Patch file is not inclusive of all the changes from previous patches and must be applied in addition to last patch files.
App uninstall process
The application Uninstall Command is automatically populated for MSI files when the default Use Custom Script for MSI = NO; however, it can be manually adjusted if required by selecting YES.
MSI files by default utilize the standard uninstall command based upon the MSIPRODUCTCODE. This code should be unique for each version of each application; however, this code must match what is actually installed on the device. Workspace ONE reads the MSIPRODUCTCODE and stores it as Application ID in the metadata of the uploaded MSI application installer, and uses the default MSIEXEC uninstall command line, for example:
msiexec.exe /X {23170F69-40C1-2702-0000-000004000000} /qn
By selecting Use Custom Script for MSI = YES, you can also specify a command line or provide a script to initiate the uninstall process. The uninstall command line can be modified to include additional MSIEXEC parameters such as /norestart. Simply select Use Custom Script for MSI = YES, Custom Script Type = INPUT and provide an Uninstall Command: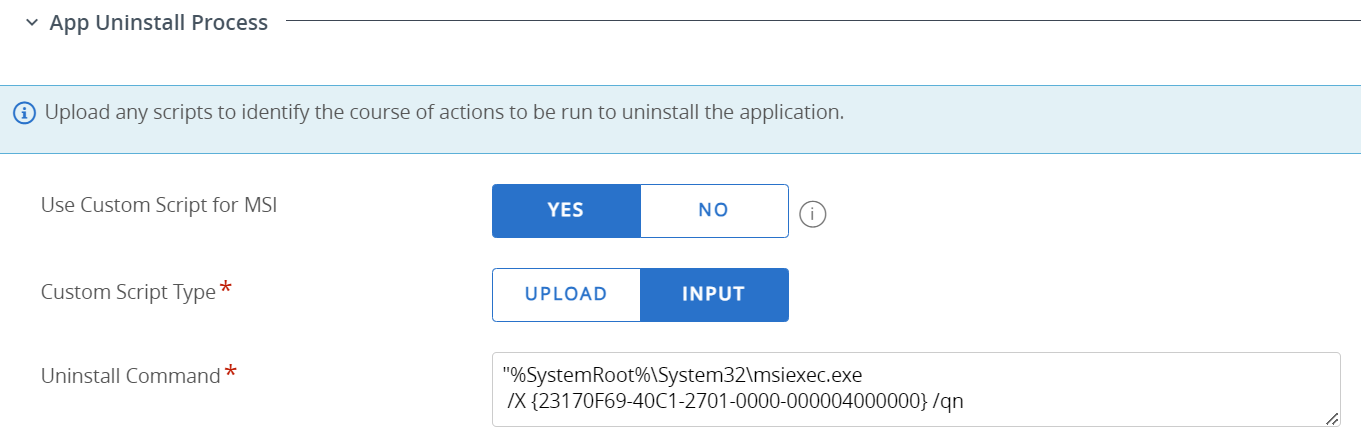
Figure 21: Sample MSI custom uninstall command, which includes the Application ID from the details tab, as well as parameters
EXE and ZIP installers require Administrators to provide the Uninstall Command because they are not embedded in the metadata of the installer files, unlike MSI files. For example, the Uninstall Command for Notepad++ is shown below using the default selection of Custom Script Type = INPUT, and then designating the Uninstall Command string.
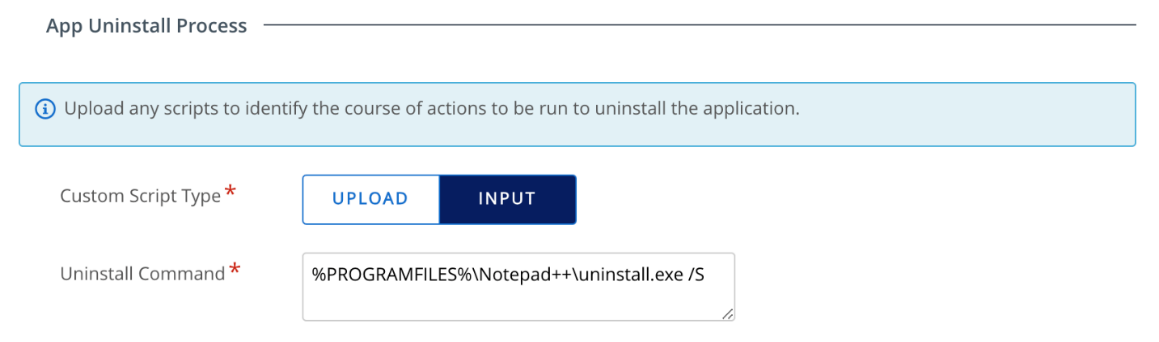
Figure 22: App uninstall process configuration
In many cases, the syntax “C:\Program Files\{app name}\uninstall.exe” /S is suitable for EXE files. Long file names should also be encased within double or single quotation marks, and environment variables such as %PROGRAMFILES% are valid to use. Additionally, native OS command lines can be used such as:
-
cmd.exe /c del /F /S /Q "C:\wsone\BGInfo" -
Remove-Item -LiteralPath "C:\wsone\BGInfo" -Force -Recurse
Uninstall Commands are stored in the registry and can be obtained by following this general process:
- Install the application on a test device
- Open a Powershell window and run the following commands:
Get-ItemProperty HKCU:\Software\Microsoft\Windows\CurrentVersion\Uninstall\* |Select DisplayName, DisplayVersion, Publisher, UninstallString, QuietUninstallString, PSChildName | ogv
Get-ItemProperty HKCU:\Software\Wow6432Node\Microsoft\Windows\CurrentVersion\Uninstall\* |Select DisplayName, DisplayVersion, Publisher, UninstallString, QuietUninstallString, PSChildName | ogv
Get-ItemProperty HKLM:\Software\Microsoft\Windows\CurrentVersion\Uninstall\* |Select DisplayName, DisplayVersion, Publisher, UninstallString, QuietUninstallString, PSChildName | ogv
Get-ItemProperty HKLM:\Software\wow6432node\Microsoft\Windows\CurrentVersion\Uninstall\* |Select DisplayName, DisplayVersion, Publisher, UninstallString, QuietUninstallString, PSChildName | ogv
- Alternatively, look at the uninstall key in the registry:
HKCU\Software\Microsoft\Windows\CurrentVersion\Uninstall
HKCU\Software\WOW6432Node\Microsoft\Windows\CurrentVersion\Uninstall
HKLM\SOFTWARE\Microsoft\Windows\CurrentVersion\Uninstall\{GUID}\UninstallString
HKLM\SOFTWARE\WOW6432Node\Microsoft\Windows\CurrentVersion\Uninstall\{GUID}\QuietUninstallString
Simply find your application and the corresponding Uninstall String in the UninstallString or QuietUninstallString column. Note that some MSI-based applications prefix their UninstallString with MsiExec.exe /I{GUID} rather than MsiExec.exe /X {GUID}. Simply adjust the Uninstall Command to utilize MsiExec.exe /X.
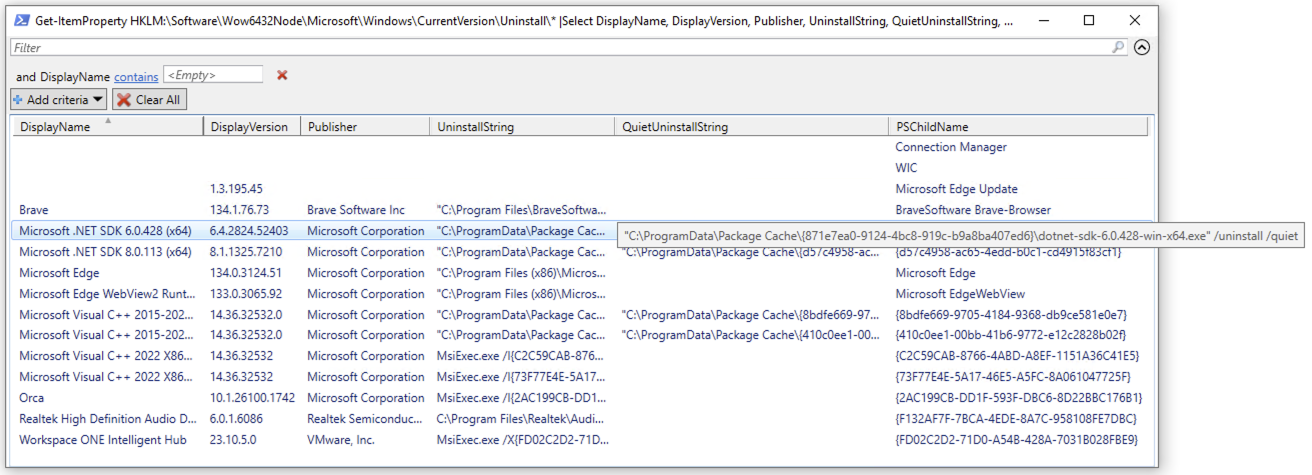
Figure 23: The PSChildName column shows the GUID of the application
If UPLOAD is selected, a script must be uploaded and designated as the uninstall command. Also designate the script runtime in the Uninstall Command and the appropriate parameter to specify the script file. For example, if using a Powershell script to uninstall Notepad++:
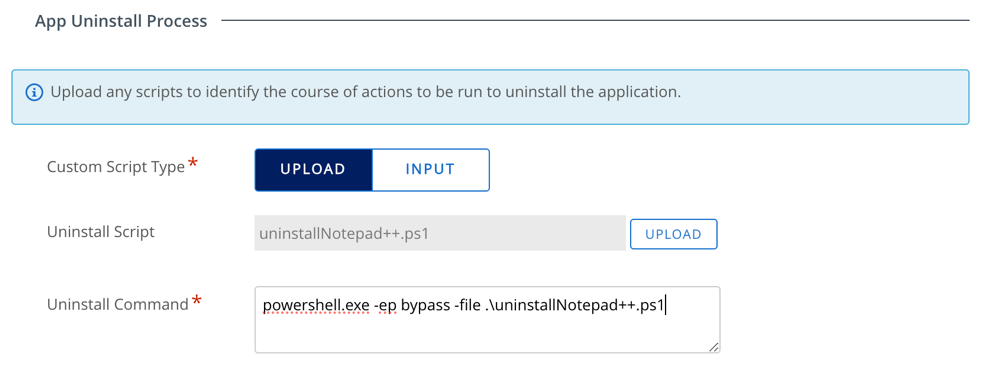
Figure 24: App uninstall Process configuration with uploaded custom script
Deployment options pane
The Deployment Options pane contains the controls for the deployment, including the install pre-requisites (When to Install), install behavior (How to Install) and how to determine that the installation is complete (When to call Install Complete).
When to install
Within the initial When to Install section, keeping the resource requirements at 0 is the most common approach, meaning the Software Deployment agent will not validate if the device meets the Disk Space Required, Device Power Required, and RAM Required levels. However, if resources are restricted on target devices or the application being deployed is a significant size, the Disk Space Required, Device Power Required, and RAM Required fields should be utilized.
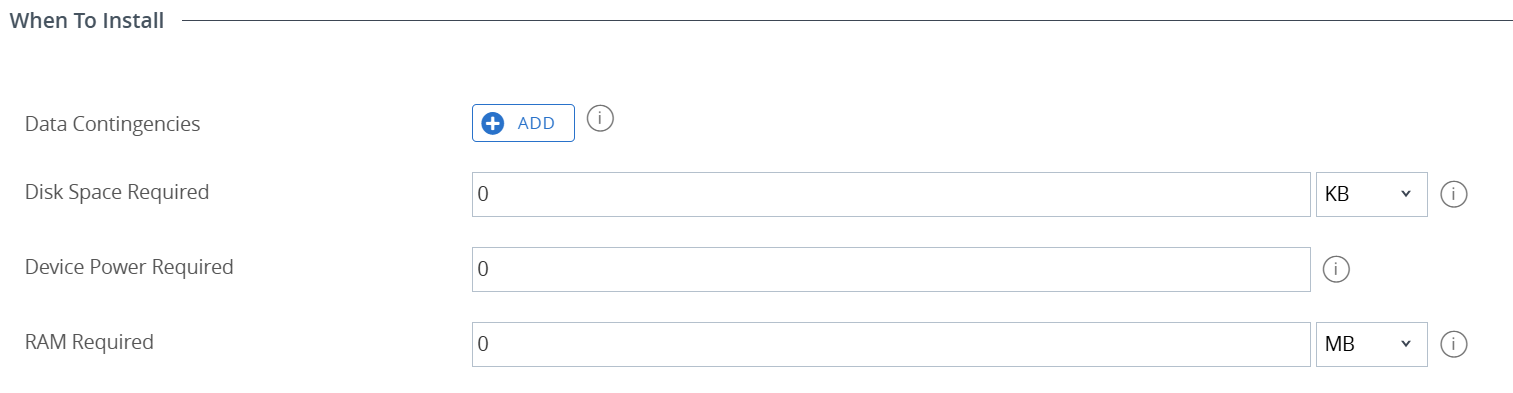
Figure 25: When to install resource checks
These values will be evaluated prior to application installation and reported in the SFDAgent deployment log as part of the requirements evaluation process.
How to install
The How to install section contains several required and optional fields that greatly impact application installation behavior.
To avoid confusion regarding the admin privileges setting, be aware that the Software Deployment Agent (SFDAgent) runs as a System service and will install applications using System level privileges in System Context. Because applications are deployed administratively, users do not require local admin permissions. This behavior is not impacted by the Admin Privileges setting.

Figure 26: Permissions for app installation
The install context and admin privileges options are often misunderstood and will be explained in detail.
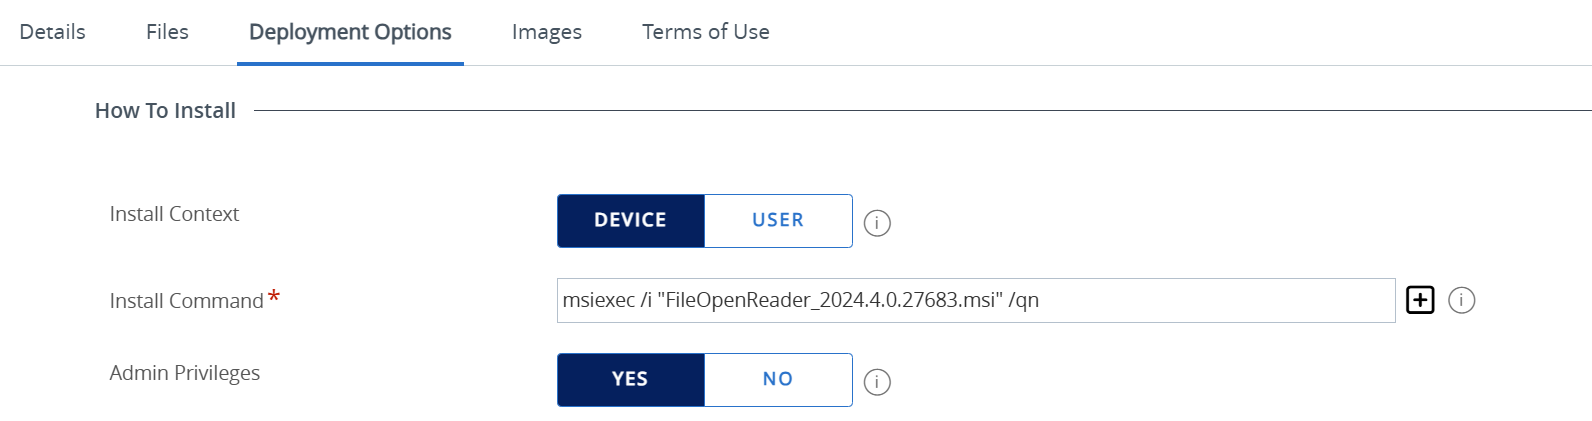
Figure 27: Deployment options > how to install
Install context and admin privileges options
Most applications install into HKLM registry keys and areas in the file system that are subsequently available to all users of the device; this is called Device Context. When the application installs within HKCU and the user profile, this is called User Context. Only a small percentage of applications install into the User Context.
The application installer governs where an application installs, not Workspace ONE. The Install Context and Admin Privileges settings merely provides permissions for SFDAgent to access the appropriate file system and registry hives.
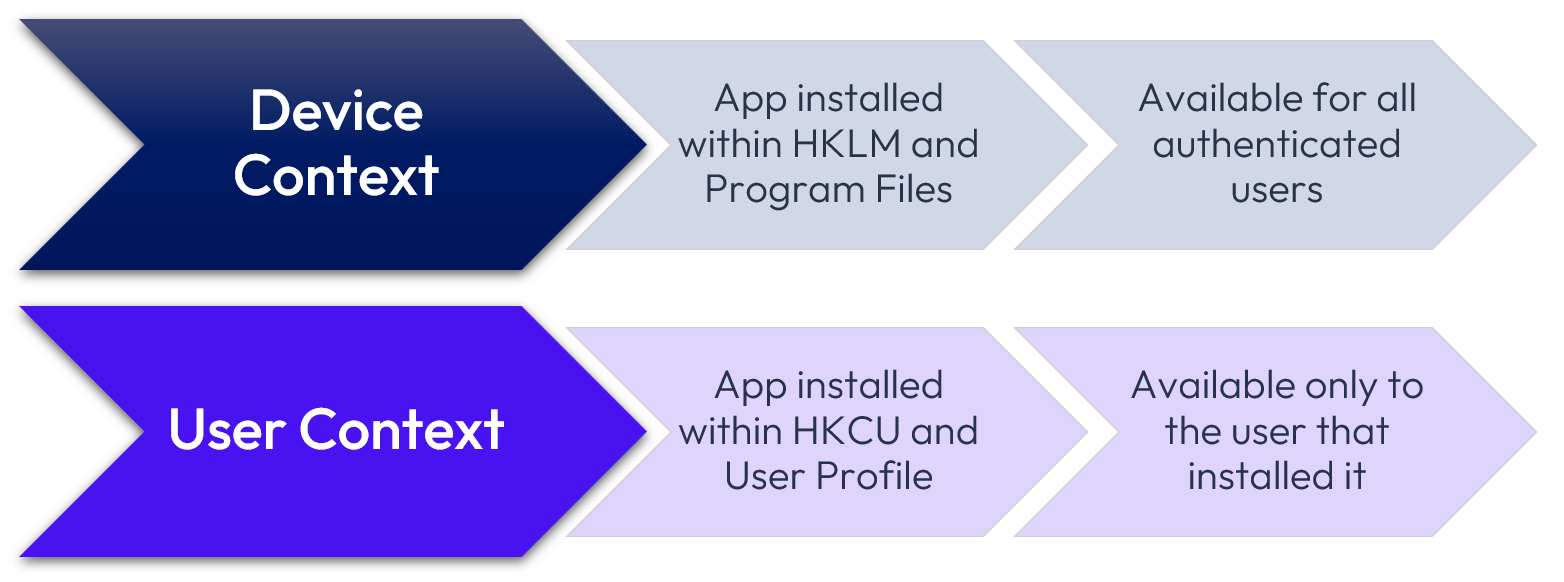
Figure 28: Device context vs. user context, especially important for multiuser
The SFDAgent provides the ability to leverage the inherent permissions of the SFDAgent running with SYSTEM privileges to:
- Install applications into device context
- Impersonate a user running an installation within user context
- Provide temporary privilege elevation to install components in both contexts
This is particularly useful for manual install scenarios and application installs that require permissions to both the device and user context, where the user is a standard user and where UAC is enabled on the device.
Be sure to configure the application for the correct install context based on the application’s requirements. In general, Omnissa recommends selecting device context, especially when the inherent application installation behavior is unknown.
When install context = device is selected, processes running in SYSTEM context, such as an application installation, will not be visible to the logged on user. Because the installation process is not visible, it is vitally important to ensure the installation process is completely silent and requires no user interaction. This is necessary for most MSI, EXE, and ZIP applications.
For those applications that install into the User Profile, select install context = user. Because the SFDAgent is running as a service in SYSTEM Context, when install context = user is selected, SFDAgent will create a session token in the logged in users’ session to begin the application installation, which allows the installation process to install application files and registry settings within the user profile and HKCU registry hive.
The application process still has SYSTEM context privileges, allowing the application installation to also write files and registry settings outside the user profile. However, this process may require an administrator access token and popup a user account control (UAC) prompt if the user is a standard user and does not have local administrative permissions.
If admin privileges = yes in conjunction with install context = user, SFDAgent creates an administrator access token that will allow the SFDAgent to provide consent to the User Account Controls (UAC) prompt, elevating the session permissions so that the install process has temporary admin rights. This is required when the currently logged on user is a standard user or when UAC prompts are enabled as part of the local security policy for the device.
If the UAC prompt is required to be displayed based on a company policy or other reasons, then set install context = user and admin privileges = no. If the user is a Standard User and they cannot provide credentials for a user within the local Administrators group, the install process will fail. Additional information on UAC is provided in the How User Account Control works article.
Install context = user also allows the application installation process to be visible to the user. For example, the installation process requires user interaction when:
- Displaying a custom prompt prior to starting the installation within a Powershell script
- A manual installation wherein the application installation is not automated and requires user input
Where you have a requirement to deploy User Context applications, Omnissa recommends deploying applications with temporarily elevated admin privileges to ensure that installation occurs without permissions issues or UAC prompts.
The following table outlines the expected behavior for each combination of Install Context and Admin Privileges settings and is an extension to the table provided in the Win32 Application Installation Behavior documentation. Note that the application installer governs where an application installs. The Install Context and Admin Privileges settings provide permissions for SFDAgent to access the appropriate file system and registry hives.
| Install Context | Admin Privileges | User Privileges | Application Installs To * | Behavior | Notes |
| Device | Yes or No | Administrator or Standard User | HKLM and Program Files | Installation succeeds silently (e.g., no UAC prompts) | Requires silent installation parameter |
| Device | Yes or No | Administrator or Standard User | HKCU and User Profile* | Installation fails silently | Device Context cannot access HKCU and user profile |
| User | Yes or No | Administrator User | Program Files, User Profile, HKLM and HKCU* | Installation visible with user action | Administrator user already has administrator access token |
| User | Yes | Standard User | Program Files, User Profile, HKLM and HKCU* | Installation visible with user action | Installation completes without any prompts |
| User | No | Standard User | HKLM and Program Files* | Installation fails | User Context cannot access HKLM and Program Files |
| User | No | Standard User | HKCU and User Profile | Installation succeeds | Installation proceeds if the application does not require an administrator access token |
Figure 29: Install context and admin privileges
* Note: Application Installs to column describes the requirements of the application and not the configuration within Workspace ONE UEM. In some cases, the application installs files and registry keys to locations that differ from the expected behavior.
Multiuser considerations
Multiuser Windows devices provide many benefits, including the management and cost savings associated with sharing devices amongst users. Multiuser capabilities within Workspace ONE are affected by the Install Context selection and targeting of those applications.
Some key considerations as to the Install Context and where applications are assigned:
- Applications installed to Device Context can be installed and uninstalled administratively, independent of any user session.
- Applications installed to User Context can be installed and uninstalled only when the assigned user is logged onto the device.
- Applications assigned to the Device are available to all users on that device.
- Applications assigned to the User are only available to those specific users and accessible upon logon. This requires the application to support User Context (HKCU) installation.
- Device Context applications not assigned to the logged in user will be uninstalled.
Note: User context applications that only install into the user profile cannot be uninstalled by multiuser. Because the second user does not have the application assigned, the logon process will experience increased CPU, memory and disk utilization, which may negatively affect the logon user experience.
Multiuser scenario
When user A logs in, the device has Office assigned and user A has Notepad++ and 7-Zip assigned. In this case, Office is already installed. Notepad++ and 7-Zip are not available and will install on logon as they are assigned to UserA.
UserA then signs out and Office, Notepad++, and 7-Zip applications remain on the device.
UserB logs in and has an assignment for Notepad ++ and Postman. Notepad++ is already installed and is available for use, while Postman will install in the user context, as it is a true User Context application. 7-Zip is a device context application installing to %PROGRAMFILES% and therefore it will be uninstalled.
UserB signs out, and Office, Notepad++, and Postman applications remain on the device.
UserA logs in again, and even though they do not have an assignment for Postman, Postman is not uninstalled as Postman was installed into the user context (user profile) of UserB and is not available for UserA to use. Additionally, 7-Zip is reinstalled as it was previously uninstalled and UserA is assigned 7-Zip.
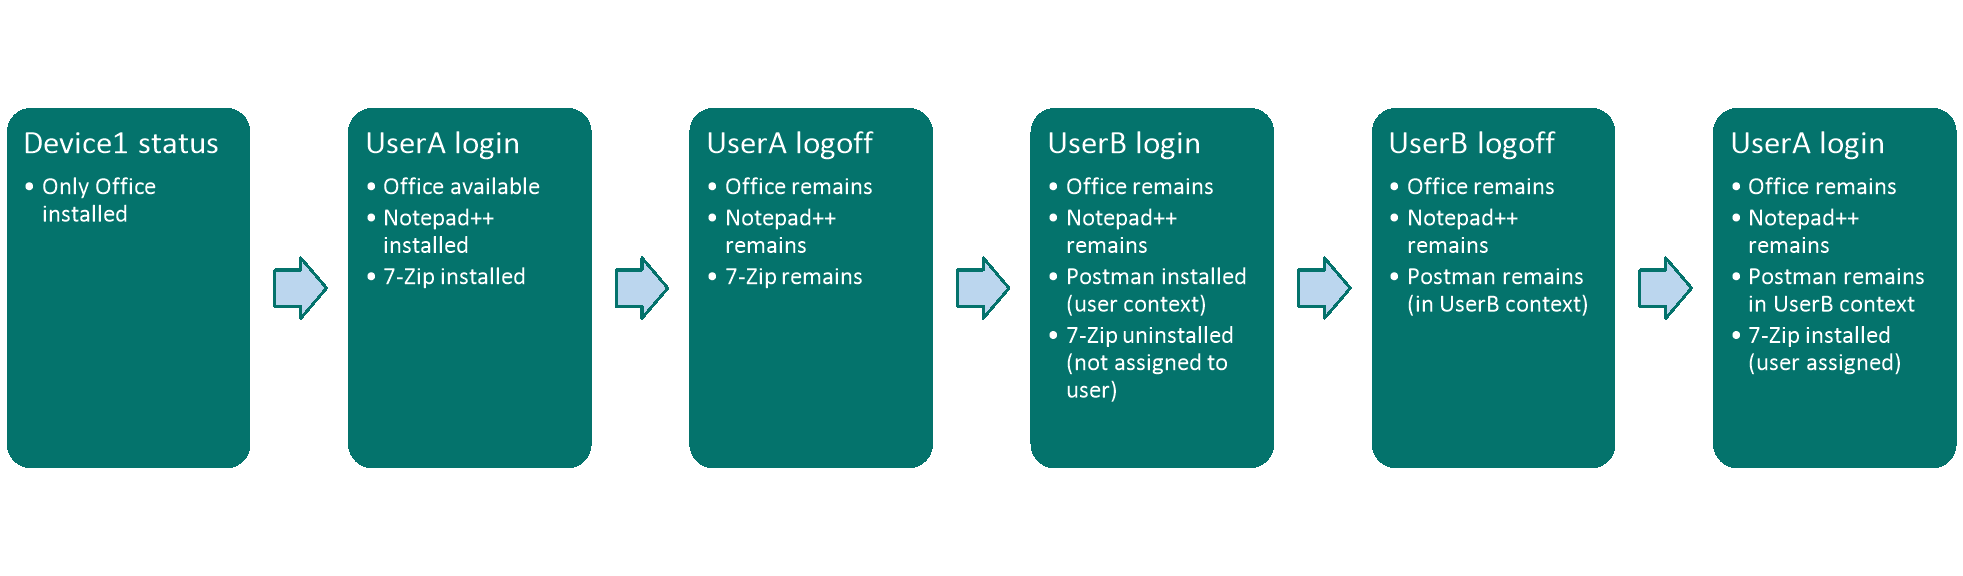
Figure 30: Multiuser example
Note that 7-Zip is uninstalled when UserB logs in because it is not assigned and was installed in device context. Postman cannot be uninstalled during UserA logon because it only exists in user B’s user context.
This scenario highlights the importance of ensuring that your application deployment strategy aligns with the application install context and your Multiuser or shared device requirements.
Best Practices for Multiuser application installation
Assuming that the application installs into the HKLM hive, applications are most commonly installed under device context on Multiuser devices, and control of those apps is addressed via Smart Groups. In addition, silent installation should be enabled where possible.
Where an application inherently installs into the HKCU hive, it is necessary to install via user context.
Thorough testing of the application should be undertaken to ensure that the best option is selected.
Install command
MSI files
The install command for MSI-based applications is populated automatically. As with the uninstall command, the install command can also be modified if required. For example, the default install command of msiexec /I “AppName” /qn used for a MSI installer may automatically restart the device. To prevent this from occurring, simply edit the install command and add /norestart to the end.
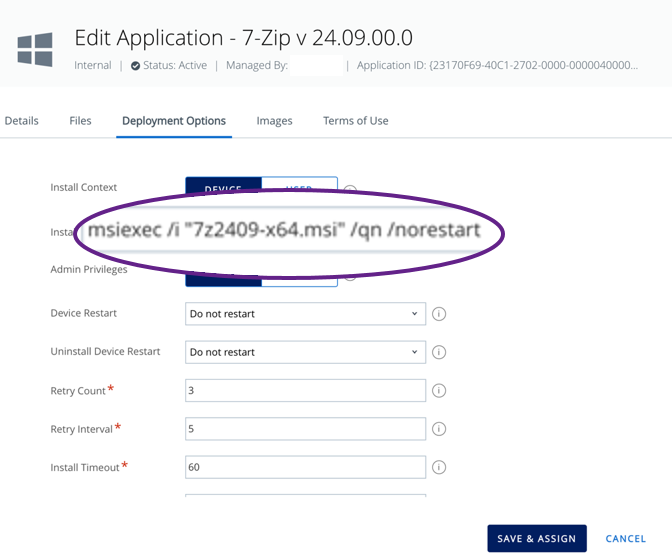
Figure 31: Install command
EXE files
For EXE installers, Administrators are required to provide the install command because they are not included in the metadata of the installer file. The application vendor documentation should provide details regarding the syntax or parameters required to install silently. However, if this documentation is not available, it may be possible to run the installer with either ?, -?, /?, /h or /help parameters and have the installer display a dialog box with all of the available installer commands.
Additionally, there are many third-party websites that provide installer parameters for applications.
As with Uninstall Commands, long file names should be encased within double or single quotation marks, and environment variables such as %PROGRAMFILES% are valid to use.
ZIP packages
ZIP packages can contain files, scripts and even other ZIP files to serve as the source for the application installation. The SFDAgent will download a ZIP package to a subfolder within the C:\ProgramData\AirWatchMDM\AppDeploymentCache folder, unzip the contents and then execute the Install Command specified.
The install command could be any executable or script within the expanded ZIP package folder. For example, the ZIP package may contain an EXE installer and support files, and the install command could be setup.exe /s.
Additionally, native OS command lines can be used such as:
- powershell.exe -ExecutionPolicy Bypass -File install.ps1
- powershell.exe -Command "New-Item -ItemType Directory -Path C:\wsone; Copy-Item -Path .\HUBWTT.exe -Destination C:\wsone\HUBWTT.exe"
- mkdir c:\wsone\BGInfo && copy /Y *.* c:\wsone\BGInfo && c:\wsone\BGInfo\Bginfo.exe c:\wsone\BGInfo\LabBGInfo.bgi /TIMER:00 /SILENT /NOLICPROMPT
Device retry count, retry interval, install timeout, and device restart
The values for Retry Count, Retry Interval, and Install Timeout options for Windows applications affect the length the system takes to report a failed installation process. The default values are shown below and can be modified:
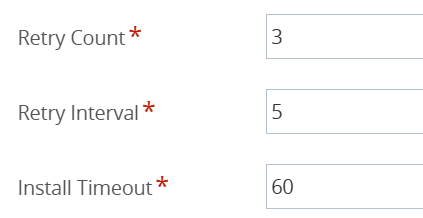
Figure 32: Retry and timeout settings
Although most customers accept these default settings, they can greatly impact the success or failure of application installation. The default values for the above options work in the following timeframes for a single failed installation process:
| 60 minutes (one hour) | 65 minutes (one hour and five min) | 125 minutes (two hours and five min) | 130 minutes (two hours and 10 min) | 190 minutes (three hours and 10 min) | 195 minutes (three hours 15 min) |
| Windows app fails to install and reaches an install timeout of 60 minutes. | System retries the installation (retry count #1) at a retry interval of 5 minutes. | Windows app fails to install and reaches an install timeout of 60 minutes. | System retries the installation (retry count #2) at a retry interval of 5 minutes. | Windows app fails to install and reaches install the timeout of 60 minutes. | System retries the installation (retry count #3) at a retry interval of 5 minutes. |
Figure 33: Default device retry timeframes
After 3 hours and 15 minutes, the system reports that the application installation has failed. Then, the system installs the next application.
The above values should be configured to complement the application and desired timeout for a failed installation.
Fast installation example
A browser application installs on a device in four minutes. Consider setting these values for this application:
- Retry count: 2 times
- Retry interval: 5 minutes
- Install timeout: 5 minutes
The system reports the failure of this application within 20 minutes. Then, it installs the next application.
Slow installation example
A large productivity application installs on a device in 30 minutes. Consider these values for these applications.
- Retry count: 3 times
- Retry interval: 5 minutes
- Install timeout: 35 minutes
The system might report the failure of this application within 120 minutes. Then, it installs the next application.
Had these same setting been applied to a browser application that installs quickly, deployment time for subsequent applications would be very slow.
Considerations for device restart for your Windows applications
The values for device restart for Windows applications allow the user to defer the device reboot and associate a deadline time, up to which the user can defer the reboot. The values allow admins and end users to have more control over restarts to prevent a user from losing unsaved data or negatively affecting productivity.
Device restart helps you configure the following settings:
- Prompt users before the device restarts so that they can save their file and close applications.
- Prompt users when a device restart is required.
- Allow users to snooze the device and restart it as per their convenience.
- Allow administrators to force the device to restart.
- Allow administrators to set a deferral deadline after which the users cannot snooze the restart.
The Workspace ONE Intelligent Hub shows notifications regarding device reboots at various stages. The deferral notification allows the user to restart or snooze. Workspace ONE Intelligent Hub updates the reboot data for snooze or restart and shows that notification according to the time selected by the user.
The following table shows notifications that are displayed at various stages:
| System Alert | Description |
| During the application installation | Notifies the user to save the files and close the application. |
| After application installation | Displays the first alert and notifies the user about the system restart. |
| 48 Hours before the restart deadline | Displays the second alert and warns the user about the force restart. |
| 15 minutes before the restart deadline | Displays the third alert and warns the user about the force restart. |
| 5 minutes before the restart deadline | Clear system prompts that indicate the date and time of the planned force restart. |
Figure 34: Intelligent Hub device restart notification times and exit codes
Installer reboot exit code and installer success exit code are used for determining the success of the installation. For MSI files, these codes are automatically populated as necessary.
EXE files do not automatically populate these fields. Typically, the success exit code is blank or 0, and the failure exit code is 1. The most common exit codes are shown below, and you should modify exit codes as necessary.
| Error action | Code | Description |
| ERROR_SUCCESS | 0 | The action was completed successfully. |
| ERROR_SUCCESS_REBOOT_INITIATED | 1641 | The installer has initiated a restart. This message indicates a successful action. |
| ERROR_SUCCESS_REBOOT_REQUIRED | 3010 | A restart is required to complete the installation. This message indicates a successful action. This does not include installations where the Force Reboot action is run. |
Figure 35: Common exit codes
When to call install complete
Under the When to Call Install Complete section, successful installation of the application can be determined based on a DEFINING CRITERIA or USING CUSTOM SCRIPT. DEFINING CRITERIA is sometimes referred to as detection criteria and if selected, one or more criteria must be designated.
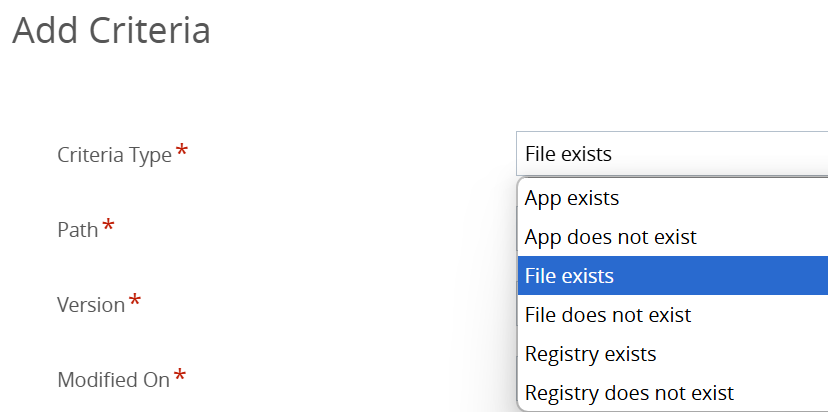
Figure 36: Criteria for determining whether the application has been successfully installed
Option types include app exists/does not exist, file exists/does not exist, and registry exists/does not exist, as well as additional criteria based on the specific selection.
When the SFDAgent detects the specified criteria, the installation will be deemed successful. However, if the detection criteria fails, SFDAgent uses the Uninstall Command to uninstall the application.
If the USING CUSTOM SCRIPT option is selected, the following script types are supported:
- Javascript:
*.js, *.jse - Powershell:
*.ps1, *.ps1xml, *.psc1, *.psd1, *.psm1, *.pssc, *.cdxml - VBScript:
*.vbs, *.vbe, *.wsf, *.wsc
Images pane
On this tab, ensure that the Icon subheading is populated for use with Windows devices. Any icons populated under mobile or tablet images will not be accessed by Windows devices.
If the application icon file needs to be inserted or modified, click or drag a .jpg, .jpeg, .png, .gif, or .bmp file to Images > Icon.
Terms of use
If application terms of use are required, users must accept the agreement to access the application(s). Terms of use can be configured via Groups & Settings > All Settings > System > Terms of Use.
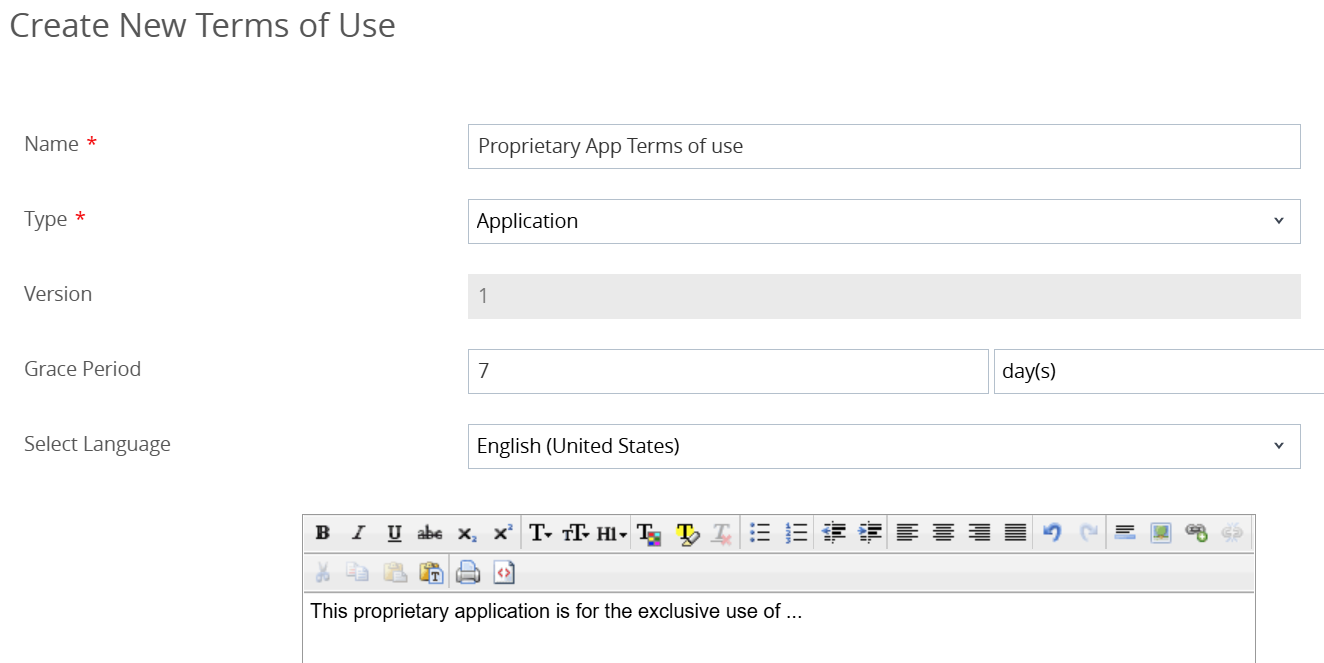
Figure 37: Application terms of use
After creating a terms of use entry, enforce it for the application by selecting the terms of use tab and designating it there. Once saved, users will be required to accept those terms of use prior to accessing the application. If Application terms of use are invoked after the application has been installed, the user must accept on next use. By default, a corresponding email is also sent.
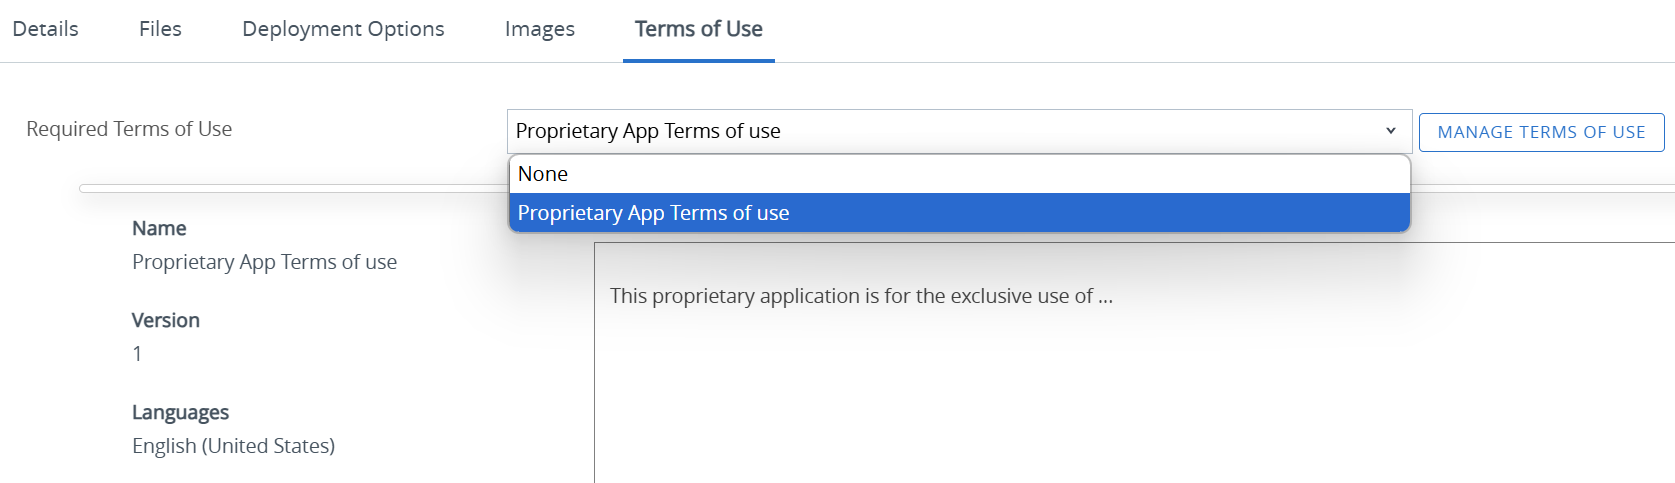
Figure 38: Applying Terms of Use to an application
Assignment of applications
Regardless of whether applications are created based on the Enterprise App Repository or App File, it will need to be assigned. Assigning resources such as applications to devices or users can be carried out by clicking Save & Assign once all the application installation, detection and uninstall parameters have been provided.
Omnissa recommends that administrators thoroughly test application installations, uninstallations, and version upgrades on a small subset of test devices using an Assignment Group (Smart Group). Smart Groups are customizable groups within Workspace ONE UEM that determine which platforms, devices, and users receive an assigned application, sensor, script, profile, baseline or workflow. Smart Groups can be static or dynamic, and therefore membership can change over time. Additionally, devices can be members of one or many smart groups.
Distribution settings
When configuring the Distribution settings for an assignment, a specific time, as well as whether the app must be installed automatically on devices or on demand. If you add multiple assignments, prioritize the importance of the assignment by placing the most important assignments at the top of the assignments list and/or moving the least important ones to the bottom of the list.
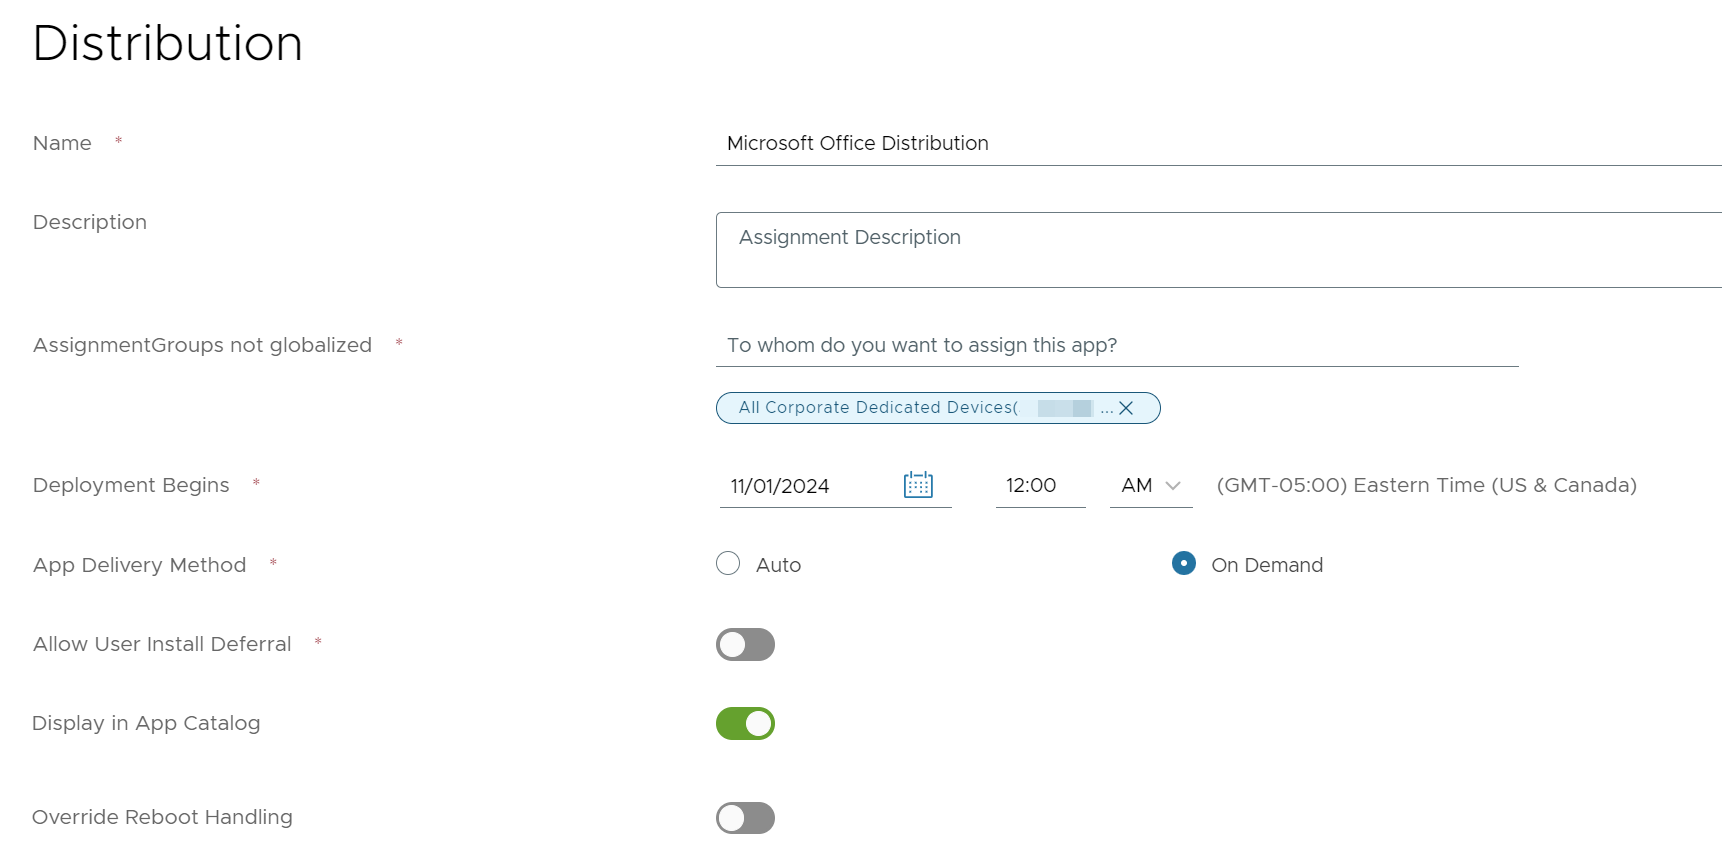
Figure 39: Assignment distribution settings
Assignment distribution settings include:
- Deployment begins should align with a time when network usage is light and users will not be adversely impacted, e.g., Monday morning at 8:00 AM is likely not optimal. Note that the time designated is based on the administrator time zone as set within the Workspace ONE UEM console.
- App delivery method determines whether the application is forced or optional. Within most environments, auto is selected to force application deployment. Note that this setting is one of two that are required in order to enable Desired State Management.
- Hide notifications enabled will prevent installation and uninstallation notifications from appearing. This may be useful applications that update frequently, system tools or security software.
- Allow user install deferral may be important for applications that users access on a schedule, e.g., users may need to delay a Zoom update due to customer meetings. Omnissa recommends changing this setting to On (green) so that users may defer application installation as necessary.
- Display in app catalog is necessary for on-demand deployments so that users can select the app(s); however, this may be disabled for auto deployments. Disabling can be useful for hiding applications that may confuse users, such as previous versions or system tools.
- Override reboot handling may be necessary to ensure that users are able to continue working and not be inconvenienced with a forced reboot. For applications that require a reboot, Omnissa recommends changing this setting to On (green) and set to User-engaged restart with at least 1 day before automatic reboot.
Application installation will be initiated based upon these settings. Note that if the device does not check-in prior to the deployment begins time, the deployment will begin after the device check-in time.
Restrictions
Restrictions allow an administrator to:
- Make app MDM managed if user installed causes a user-installed app to become managed by Workspace ONE (this does not apply to BYOD devices) where the application matches the detection criteria. Please Omnissa Docs for criteria details.
Desired state management, causes reinstallation if the app is uninstalled by a user or other process, thus forcing the app onto the device. Starting with Workspace ONE version 2509, Desired state management is the default and is no longer optional. For prior versions, this setting is only available if both app delivery method is set to auto and make app MDM Managed if user installed are enabled; otherwise, it is grayed. Desired state management is useful from a security perspective.
Exclusions
Exclusions like assignments, are used to ‘un-target’ the particular application and version. Exclusions remove devices or users from being assigned an application if they are a member of an excluded Smart Group. Additionally, if the device or user already has the application, the application will be uninstalled.
When configuring exclusions, it is necessary to set exclusions for every app version. Prior to the transition to Modern SaaS, an older exclusion would prevail; however, this is no longer the case.
Exclusions are an excellent way to migrate to different applications, prevent applications from being installed that conflict with another application, or block inheritance of applications assigned at a higher level within the Workspace ONE UEM hierarchy. For example, if all devices are assigned CutePDF Reader at the top Customer OG, and a business unit requires Adobe Acrobat, an exclusion can be used to prevent CutePDF Reader from deploying to devices within that business unit.
Deleting, removing, or rolling back an application
Carefully consider whether an application should be removed in its entirety, removed from a subset of devices, or rolled back. Workspace ONE provides mechanisms to deactivate, retire and delete applications from the console and devices. Each provides a different behavior.
Deactivating applications
Deactivating an application results in the application being uninstalled from assigned devices and marked as Inactive in the Workspace ONE console, thereby removing the ability to assign the application to other devices. Any previous versions of the same application will be marked as Inactive also.
To deactivate an application, from within the application Summary page select more actions > deactivate. For Modern SaaS environments, deactivate is now a button within the application summary page.
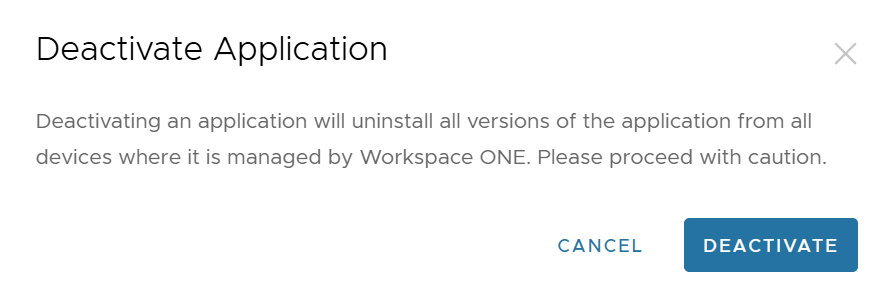
Figure 40: Deactivating an application causes it to be deleted in its entirety
Re-activate applications
To re-activate an application from the inactive state:
- Change the status filter within the resources > apps > native > internal > list view to inactive
- Select the version you want to reactivate by clicking on the name of the application to enter the application summary page
- Select more > activate. This will activate the selected version of the application and make it visible within the resources > apps > native > internal > list view and allow assignments.
Note: Previous versions of the same application will be marked as retired. As with inactive state, applications can be unretired.
Removing an application from a subset of devices
To keep the application intact but remove it just from a subset of devices, simply modify the application assignment Smart Group(s) or create exclusions.
Application Rollback: Retiring an application version
Application rollback is a new feature of Workspace ONE UEM Intelligent Hub 24.10. The only requirements are Workspace ONE UEM 24.10 and Modern SaaS enablement.
Retiring applications is similar to deactivating applications, except that it is version specific. Only the version designated when retire is selected is marked as retired, and the next older version is automatically reassigned and reinstalled.
In previous versions of Workspace ONE prior to 2410, when retire application was selected, the retired application was unassigned and uninstalled, but the next lower version was not automatically installed, similar to having only a single version. The application would have a Last Action Detail of “Install Command Ready for Device” which could be selected and an Install sent to those devices. While this functionality is available within the Workspace ONE UEM console by means of numerous administrative actions, Application Rollback as an extension to the Retire application function and cuts the process down to just two key steps.
Sample retire / rollback scenario
If Workspace ONE UEM has Notepad++ versions 8.7.4.0, 8.6.7.0 and 8.6.1.0 and each version has an assignment including the entire Windows Desktops Smart Group, version 8.7.4.0 will be the only version deployed to devices. Any new devices will have v8.7.4.0 deployed, and devices with any previous version will have the current version upgraded to v8.7.4.0.
If a problem is detected with Notepad++ v8.7.4.0, that version can be retired. That version will be unassigned, uninstalled from any assigned devices, the next lower version, which is v8.6.7.0, will be assigned to those same devices and installed. Notepad++ v8.7.4.0 can be Unretired using the process described in Re-active Applications section once the issues are remedied.
How Application Rollback works
Application Rollback allows administrators to seamlessly uninstall the current application version and install (revert back to) the previous version. Note that the new application file type must be the same as other(s) within that same application file. If attempted, an error will be presented. For example, if an application file contains a Firefox EXE, a newer Firefox MSI file cannot be appended to it.
While this functionality is available within the Workspace ONE console by means of numerous administrative actions, Application Rollback cuts it down to just two key steps, as we’ll walk through below.
Behind the scenes, the process works in this way:
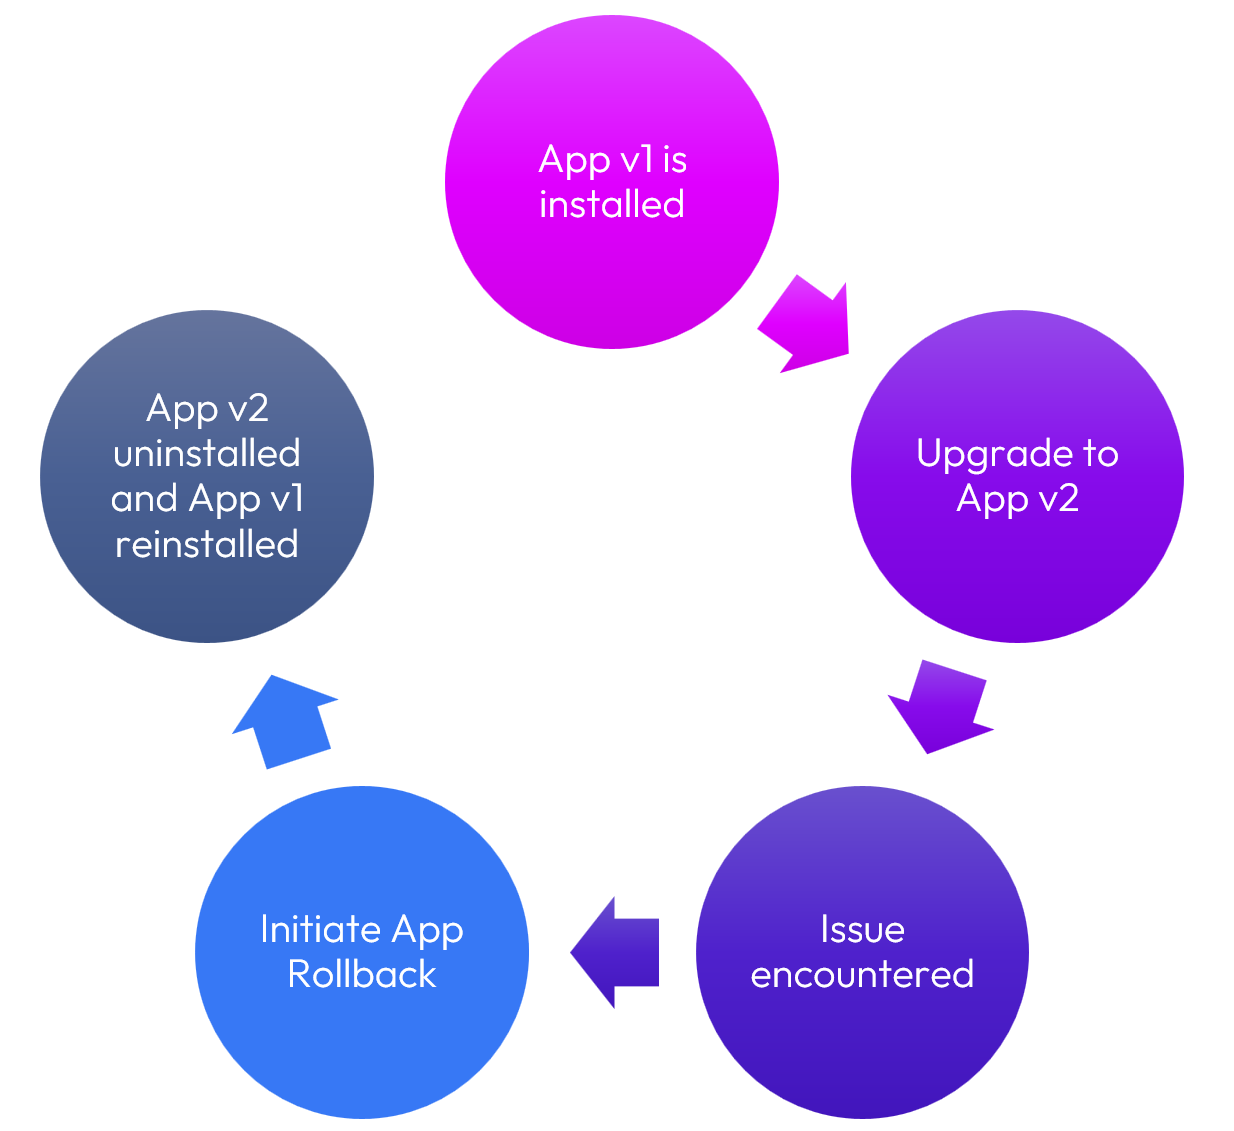
Figure 41: Application Rollback process
Thus, if you learn that there is an issue with a newer version of an application, it can be remedied quickly and easily with application rollback.
Process
Below are the steps to roll back a newer version of a Windows application.
Before attempting application rollback, there must be at least two versions of the application that have been configured as Workspace ONE Windows native apps for success. An earlier version must already be deployed by means of the add version button.
If only one version of an app exists, and retire is clicked as shown below, the application will be retired and removed from assigned devices.
Step 1: After the newer version of the app has been deployed, select the version of application and choose Retire under more actions to initiate Application Rollback.
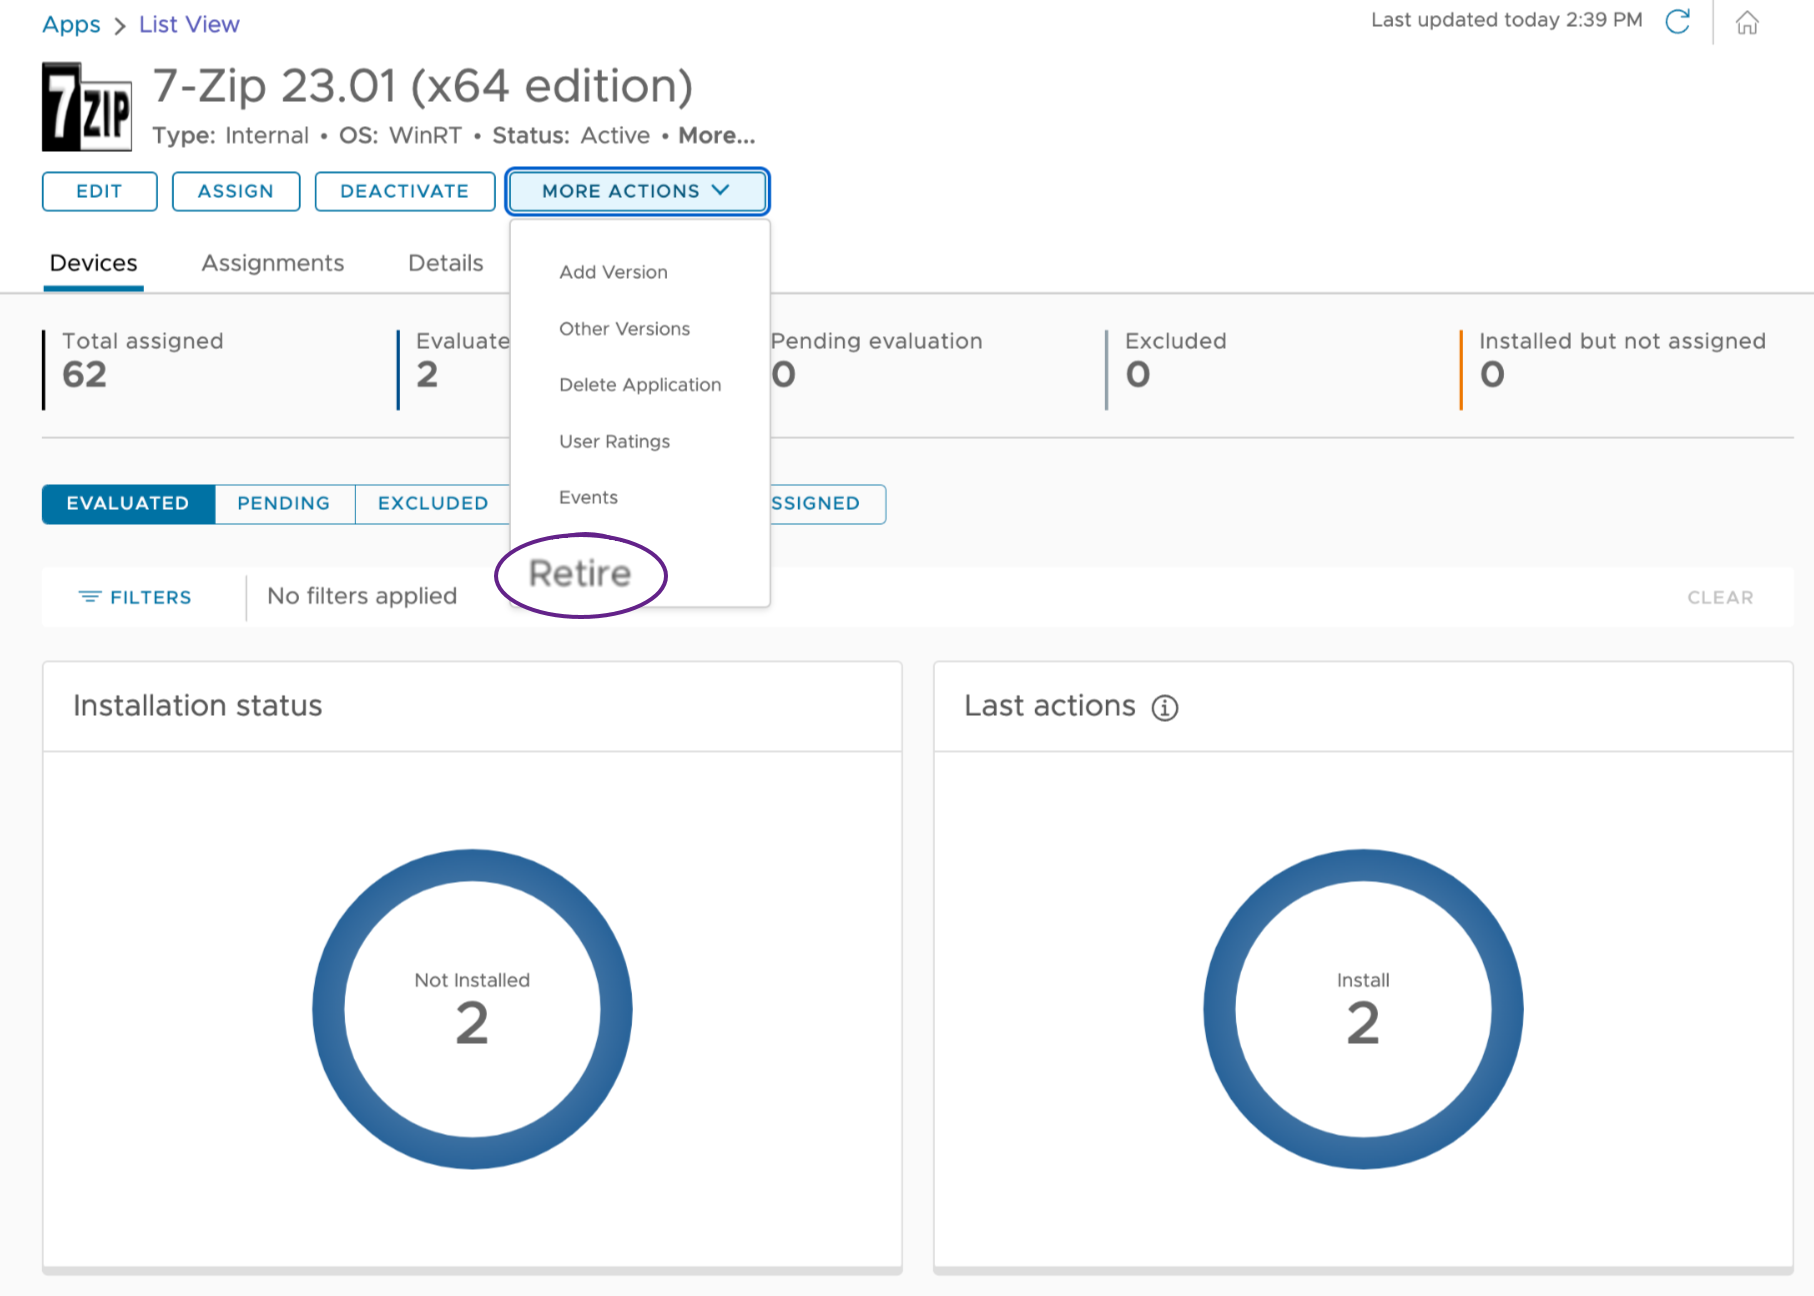
Figure 42: Click Retire to roll back the application version.
Step 2: When presented with the Retire application confirmation screen, click Retire.
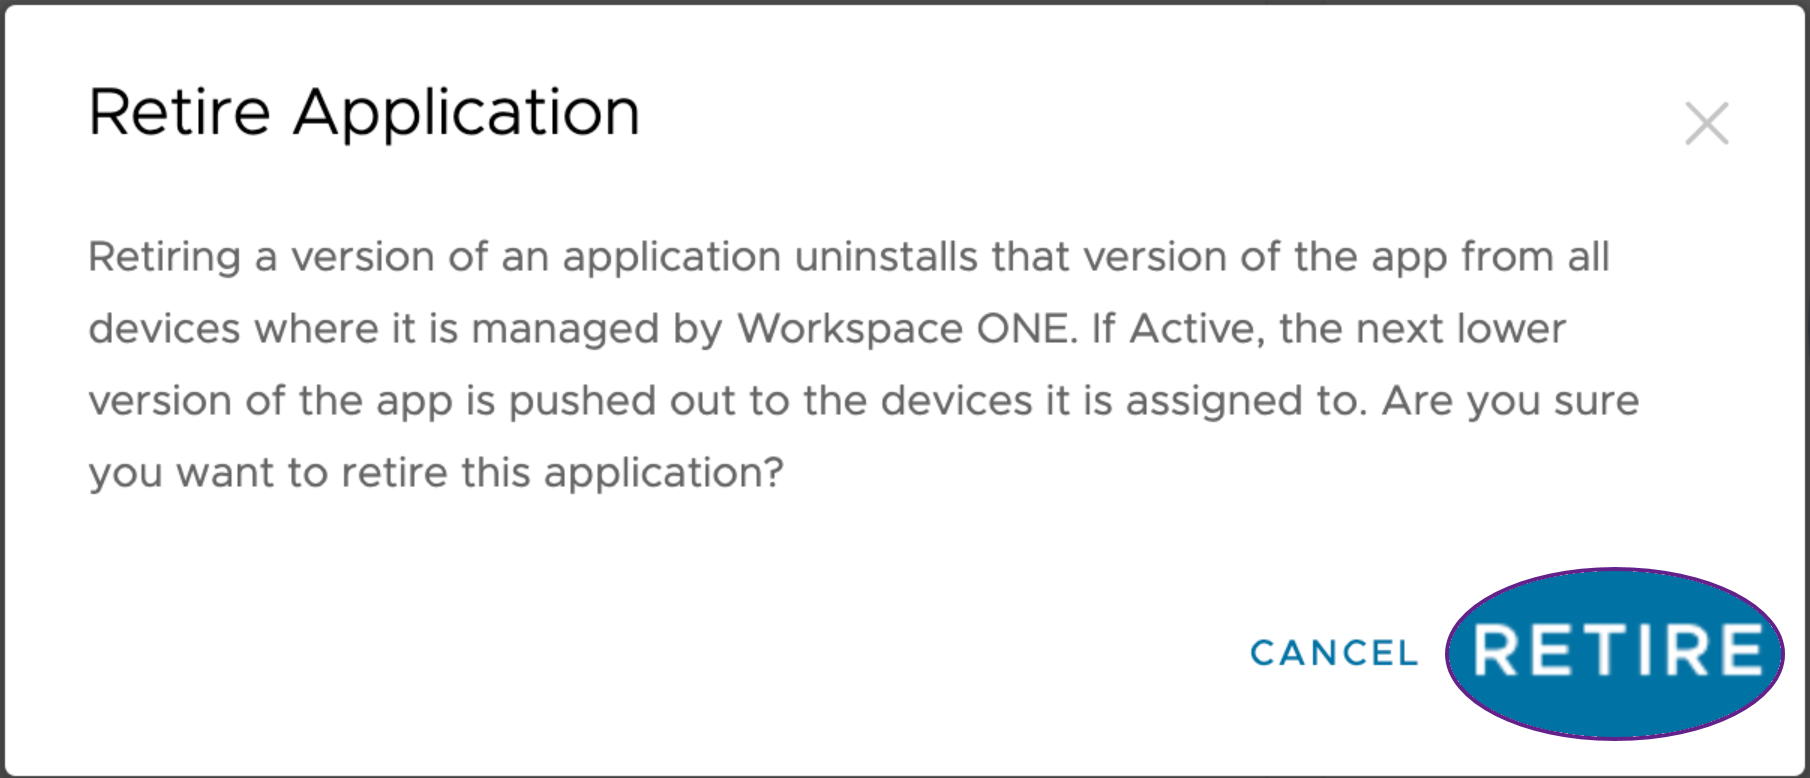
Figure 43: Click Retire again to confirm
Note that within the administrative interface, the term “Retire” is used.
Deleting applications
Deleting an application deactivates the application and removes it completely from the Workspace ONE UEM console. It is a destructive operation that cannot be recovered. If the version is the latest active version and a Freestyle workflow includes this application set to Latest Version, then you must change the version of the application used within the workflow first, before deleting.
This action is typically used where an old version of an application needs to be removed in its entirety.
Deploying applications via Freestyle Orchestrator
Freestyle Orchestrator can be used for many aspects of Windows management. For more technical information about Freestyle Orchestrator, please see Getting Started with Workspace ONE UEM Workflows for Desktop Devices.
This section will touch only on application installation and uninstallation features. Omnissa recommends the use of Freestyle Orchestrator for application deployment where complex conditions and sequencing are required. Simple application deployment should utilize the standard Application assignment method.
Any application with conditions that require an if/then validation is ideal for deployment via Freestyle Orchestrator. Below are some key use cases:
- Applications with prerequisites such as Zoom should only to be installed if Outlook is present.
- Applications that require a sequenced installation such as when AppA, AppB, and AppC require installation or uninstallation in a specific order.
- Applications that must be removed prior to installation of a new version or another application.
- Scripts that must be run before or after an application is deployed.
- Profiles that must be installed after an application is installed.
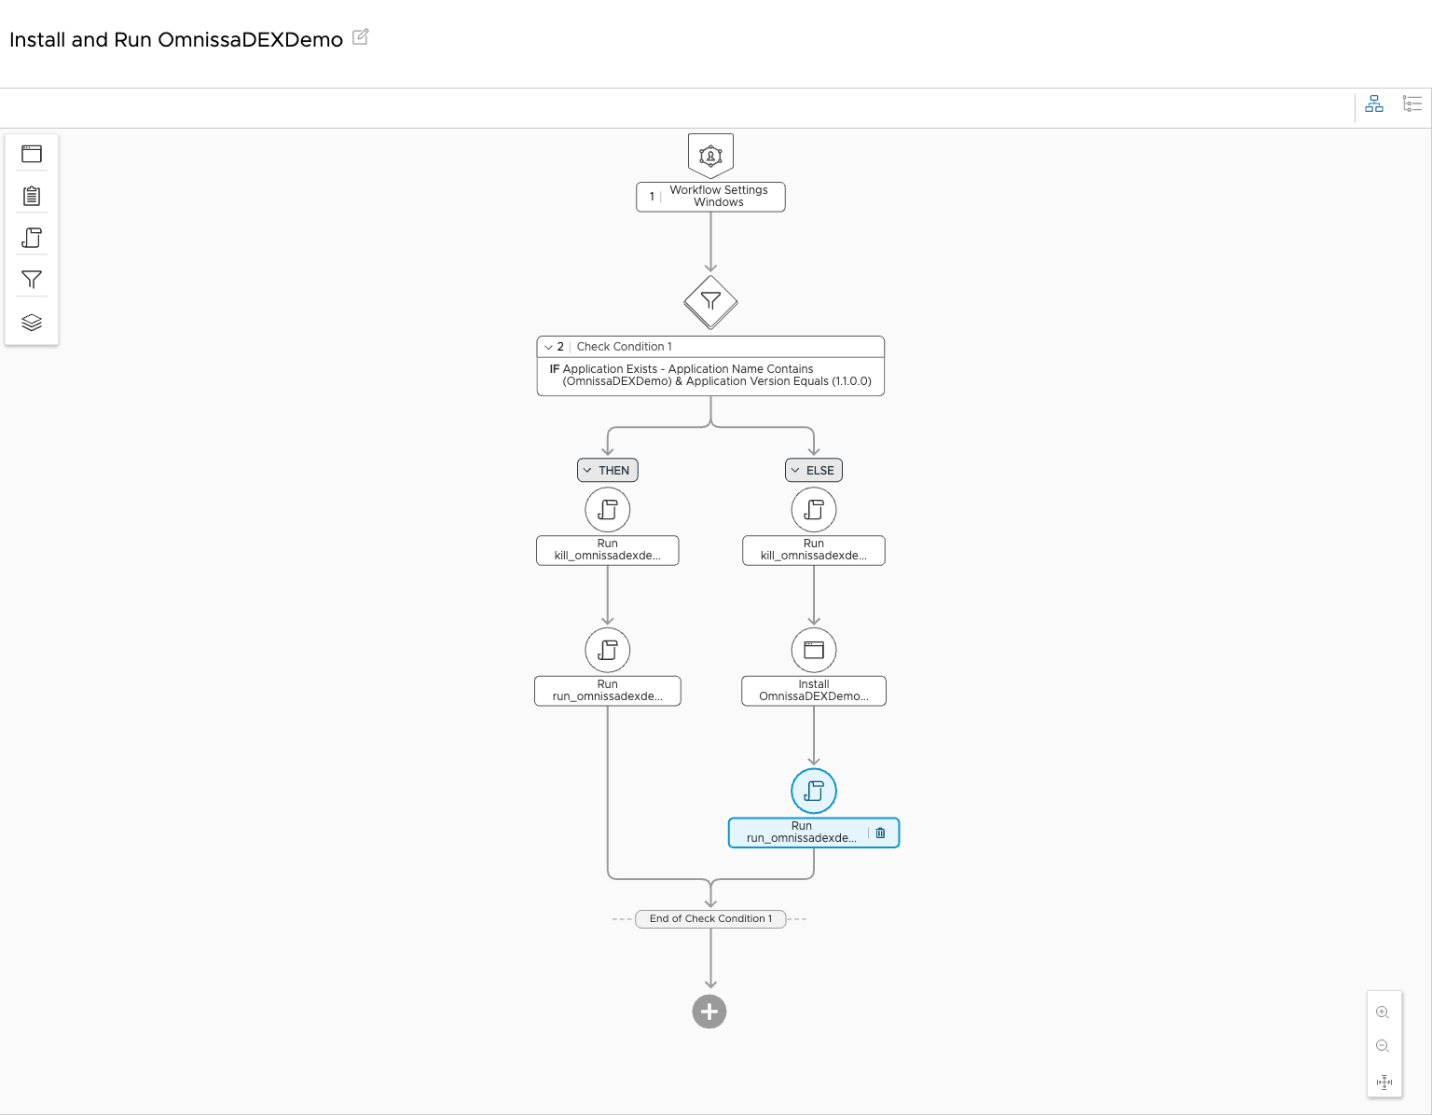
Figure 44: Freestyle Orchestrator example
The example workflow above checks if the OmnissaDEXDemo v1.1.0.0 application exists, using the managed application inventory for each device. If the application exists on the device, it will run a script to kill the running process of that application, then install the new version of the application (v1.2.0.0) then run a script to run the new version. If the application does not exist on the device, the workflow would simply install the new version (v1.2.0.0) and then run the script that runs the application.
Actions, as shown in the graphic above, are similar to “then” statements. Freestyle Orchestrator includes the following actions:
- Install application
- Remove application
- Install profile
- Remove profile
- (Run) Script
Conditions are similar to “if” statements and are useful to ensure that application conditions and prerequisites are addressed. Freestyle Orchestrator includes the following conditions:
- Application does/does not exist
- File does/does not exist
- Registry key does/does not exist
- Sensor equals/does not equal; less than/less than or equal to; greater than/greater than or equal to; between/not between
- Time window
When evaluating a condition, note that there are two additional settings presented:
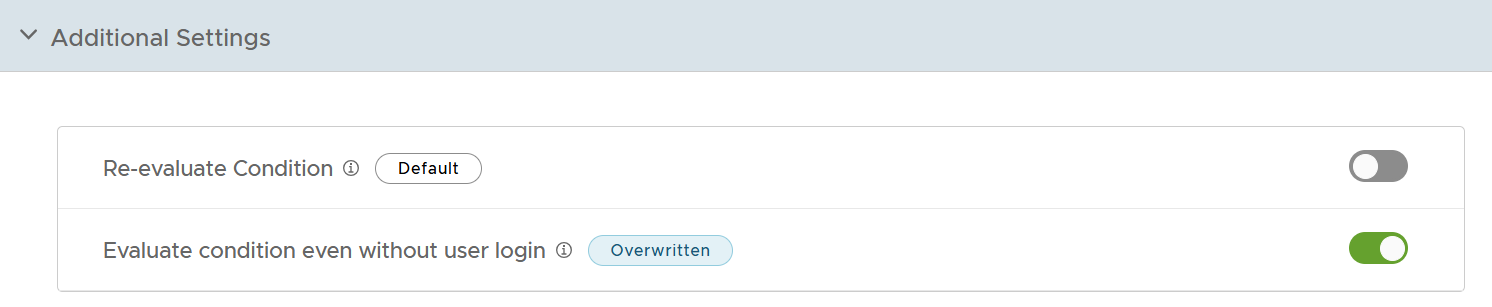
Figure 45: Additional conditional settings
Re-evaluate condition causes a system check every four hours. In the case of application deployment, this is rarely needed but may be required where parallel operations may change a condition. The second item, evaluate condition even without user login, should be utilized where a workflow can deploy without a user being logged in. Note that if multiuser is enabled, workflows will be run upon user login.
Additional options for application deployment
Several additional options are available for application deployment, including:
- Automating user app requests via ServiceNow
- Fetch utility
- Creation of MSI files via App Volumes integration
Automating user app requests
Access to additional applications is a common user request. By automating app requests via ServiceNow and Intelligence, approval can be streamlined.
From the user perspective, the process begins by initiating a request within Workspace ONE Intelligent Hub. After processing and approval, the application is assigned and deployed to the user.
For more information about automating application requests, please see Omnissa Docs.
Bulk administration of applications with Fetch
Fetch is a GitHub utility that integrates with the Microsoft Winget repository and is geared toward bulk application deployment. It may be used to simplify bulk imports and updates of applications into Workspace ONE UEM. Although many Workspace ONE administrators are currently using Fetch, please note that it is not officially supported by Omnissa.
Creating MSI files via App Volumes
Omnissa customers that have procured App Volumes licensing can maximize their investment by building MSI packages for deployment onto Workspace ONE UEM managed Windows devices. Once created, Workspace ONE can then ingest the MSI files generated by App Volumes in conjunction with the App Volumes Agent for deployment to Workspace ONE Windows managed devices.
For example, if your environment already uses App Volumes to create application packages for virtual desktops and/or apps, that same licensing and skill set can likewise support MSI packaging needs for Workspace ONE managed Windows devices.

Figure 46: Using App Volumes to create MSI file for Workspace ONE UEM deployment
The diagram above depicts the process for creating an MSI package with App Volumes Tools. Note that the App Volumes Agent version 2412 or higher is a prerequisite for installing MSI packages generated by App Volumes.
Omnissa recommends deploying MSI packages generated by App Volumes via one of the following methods:

Figure 47: Using Application Files or Freestyle Orchestrator to install App Volumes-generated MSI packages
For more information about using App Volumes to create MSI files for use with Workspace ONE UEM Windows devices, please see the App Volumes Reference Architecture.
Managing applications
Two key tools for managing Windows applications include:
- ADMX Profiles
- Omnissa Intelligence
Management of common apps via ADMX Profiles
In addition to the standard ADMX Profiles that provide general policy management, new application-based ADMX templates enable the configuration of several common applications. As part of the new Administrative Template Profile functionality, the following applications can be managed:
- Adobe Acrobat
- Mozilla Firefox
- Microsoft Edge
- Google Chrome
- Microsoft 365
- Windows Defender
- Zoom
- Slack
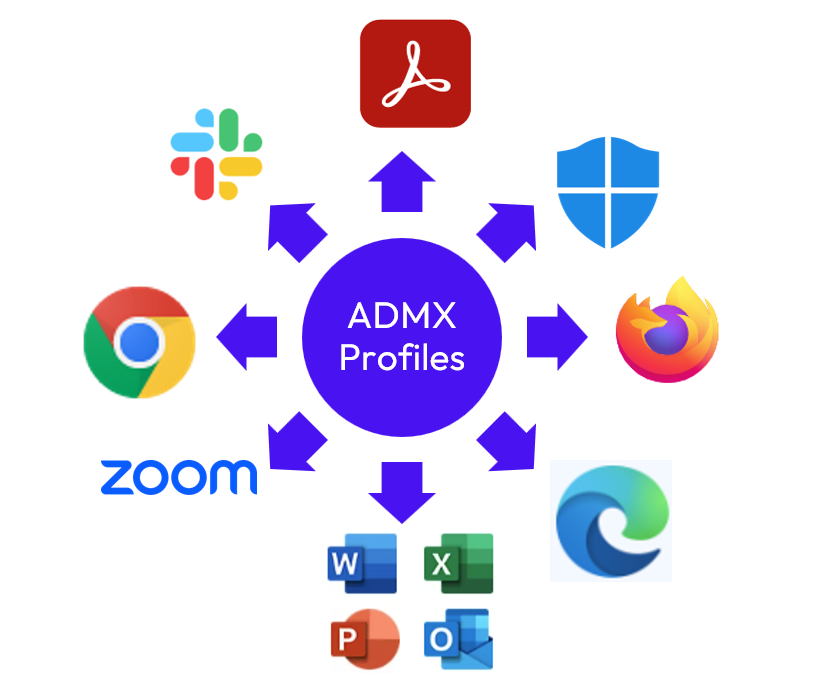
Figure 48: Apps that can be managed via ADMX Profiles
The settings presented within each respective administrative template profile directly align to vendor ADMX files and are managed exclusively via Workspace ONE Intelligent Hub. In time, other applications will be added.
For example, management of Google Chrome is easily facilitated with administrative template profile options that consist of hundreds of settings, a few of which are shown below:
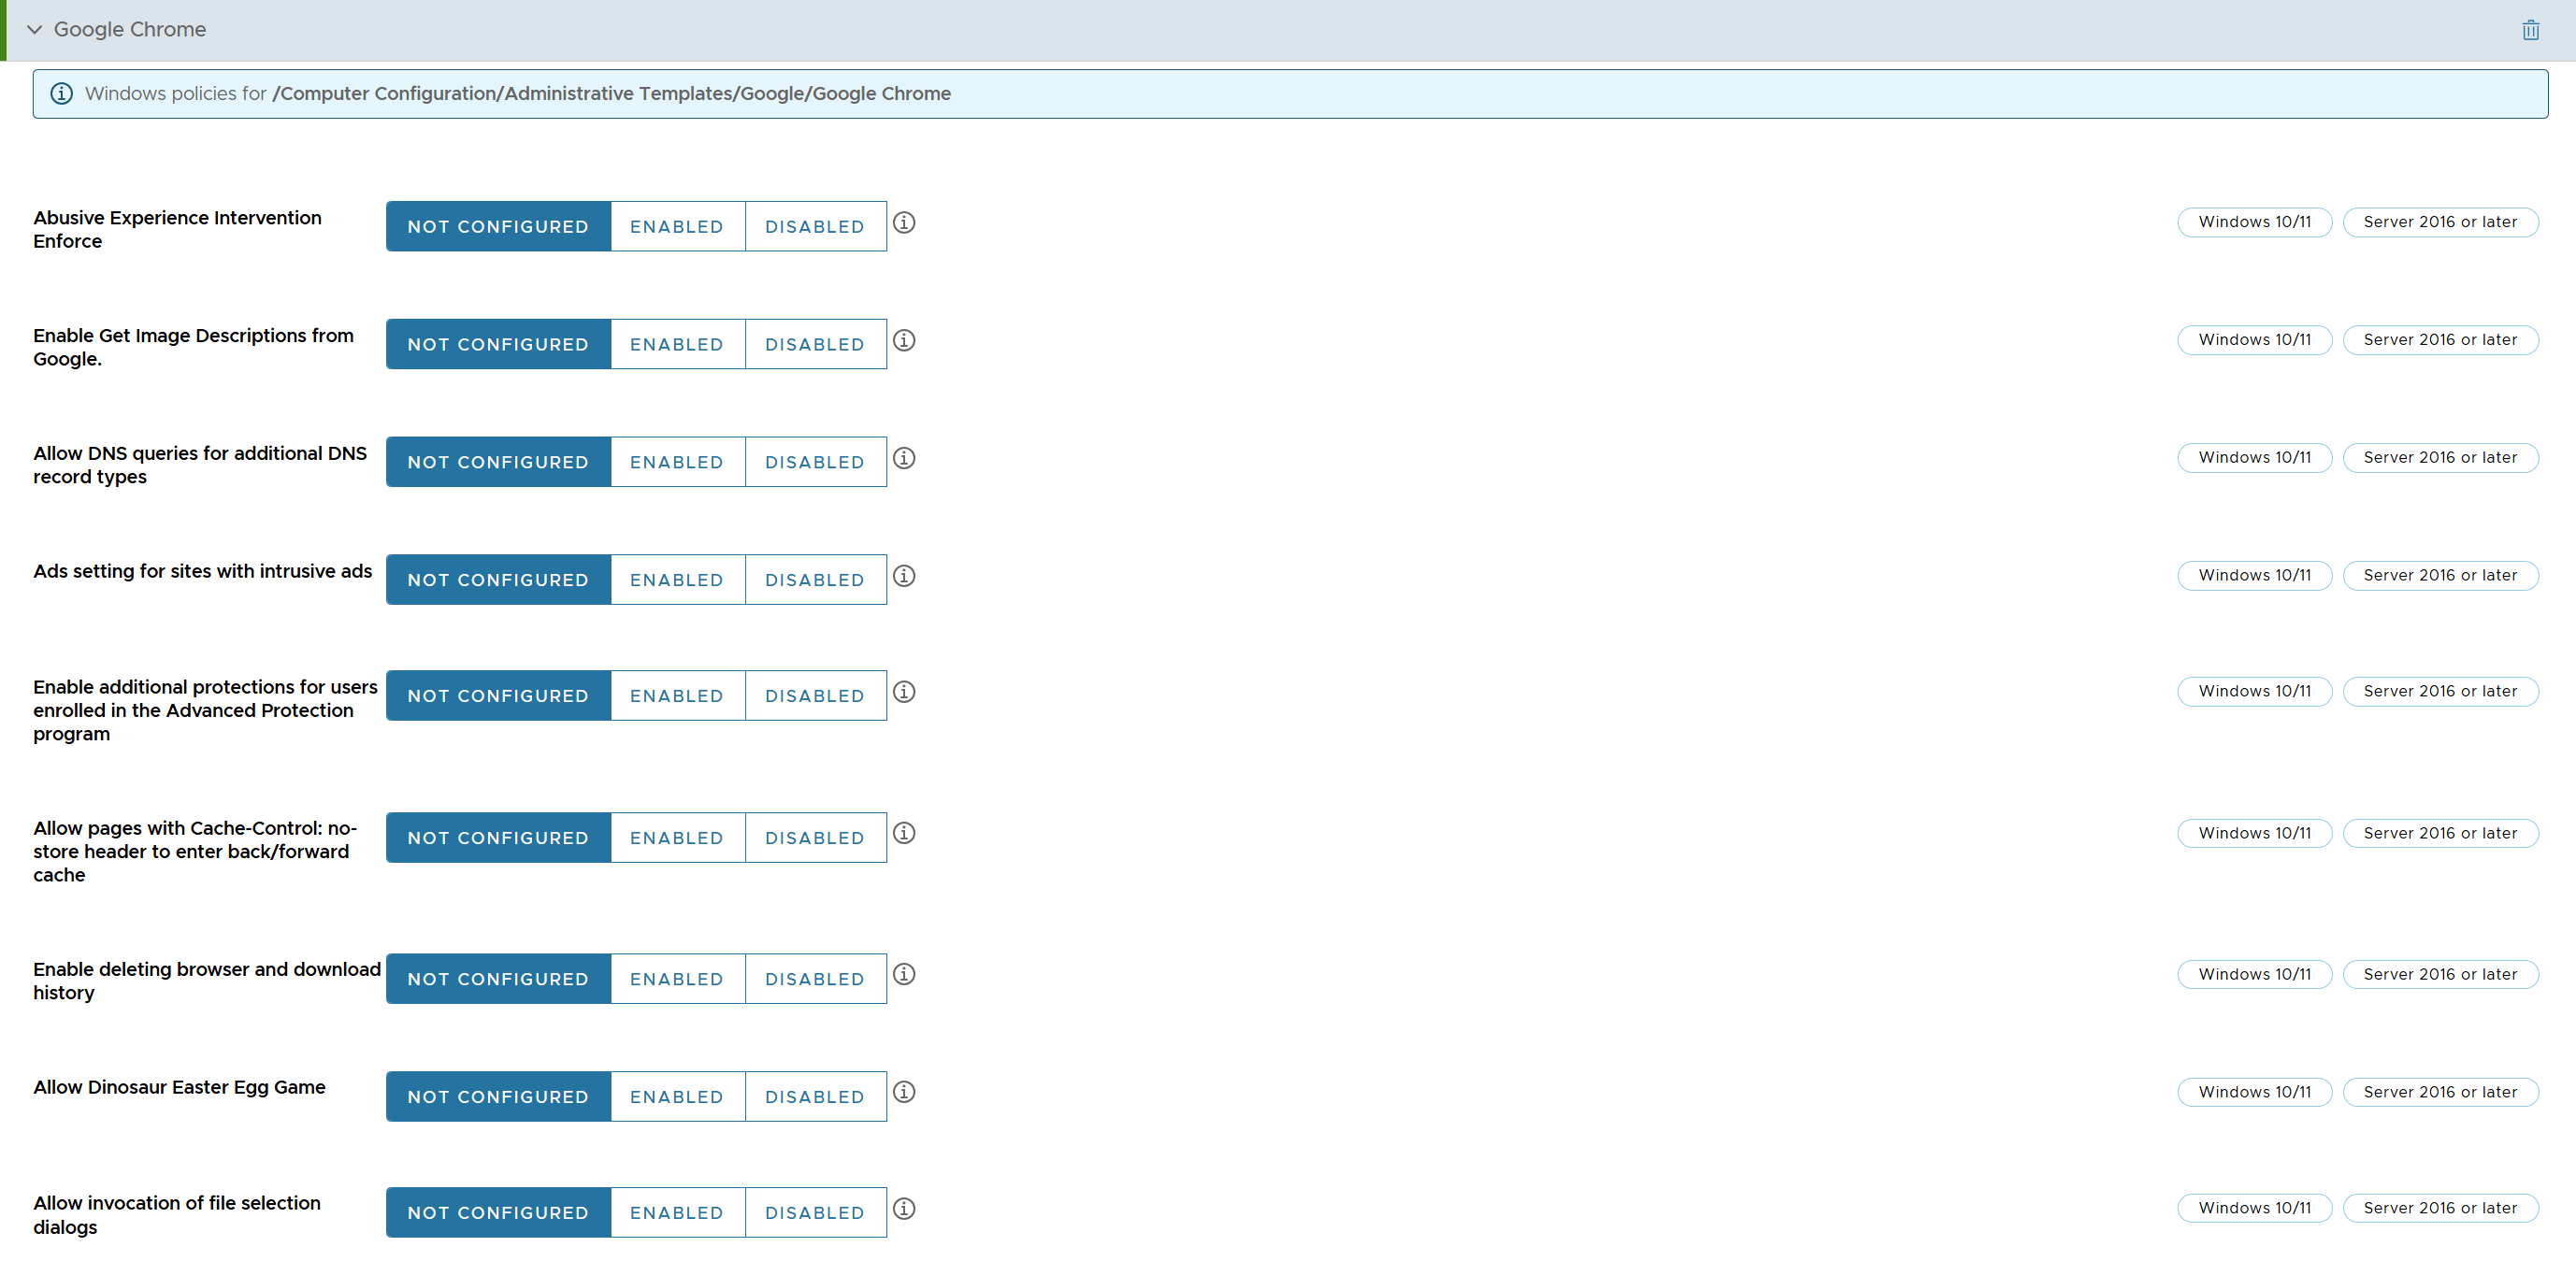
Figure 49: Subset of Google Chrome ADMX template configuration options
Note that the equivalent GPO settings are presented as part of the profile configuration. These embedded templates will provide an easy-to-use solution for managing common applications, irrespective of domain type.
Omnissa Intelligence
IntelligenceOmnissa Intelligence is a valuable tool for viewing historical and snapshot inventory and telemetry data. You can leverage the pre-built dashboards or create a custom dashboard to suit your specific needs. An example of a pre-built dashboard is the Top 10 Installed Native Apps by Platform. To view this dashboard, from within Omnissa Intelligence, select Unified Endpoint Management > Apps from the left menu.
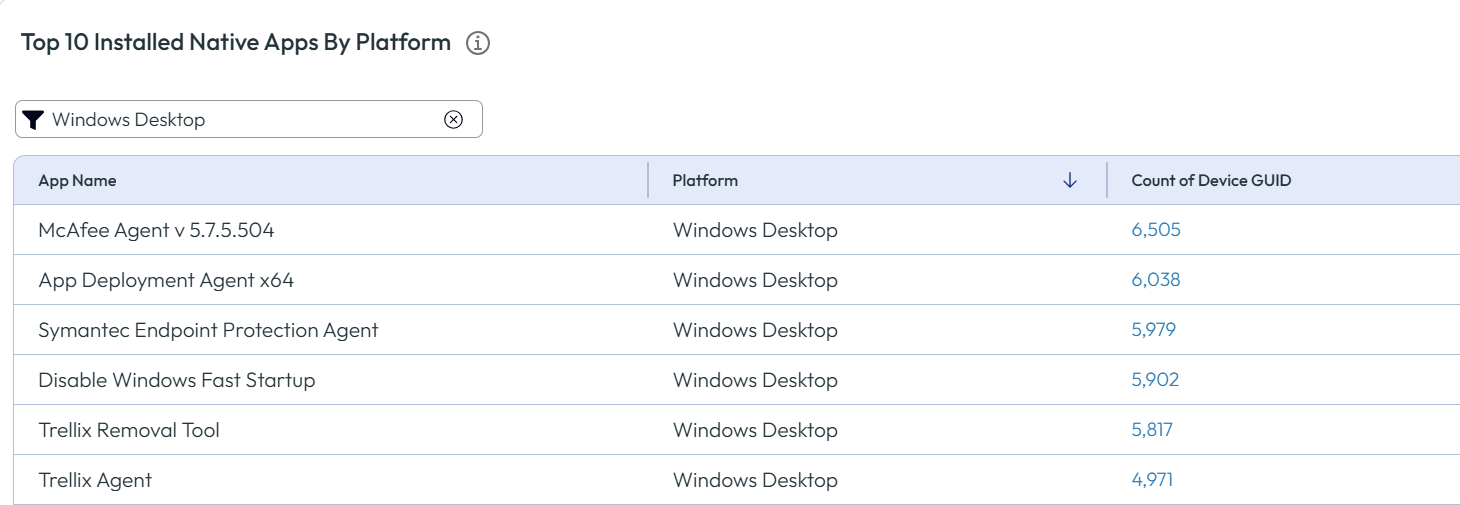
Figure 50: Top apps list with Windows Desktop filter
Delving into the usefulness of Omnissa Intelligence is beyond the scope of this document; however, you are invited to review the Getting Started with Workspace ONE Intelligence Tech Zone article.
Validation and troubleshooting
The status of applications can be determined from the Workspace ONE UEM console, as well as the user device. Omnissa recommends utilizing the Workspace ONE UEM console to minimize disruption, rather than asking the user to provide details.
Application File typos
Typos and errors within the Application File are a common issue. In particular, please check the following fields:
- Application Install
- Application Uninstall
- When to Call Application Complete criteria or script
Assigned applications by Smart Group
Because applications are assigned based on Smart Groups, centrally viewing application assignments to validate that the correct applications were assigned to the correct Smart Group(s) may be useful.
By opening the Smart Group, the assigned applications can be viewed. Specifically, Groups & Settings > Assignment Groups > [select Smart Group] > Edit > Next > Applications, the following information is presented:
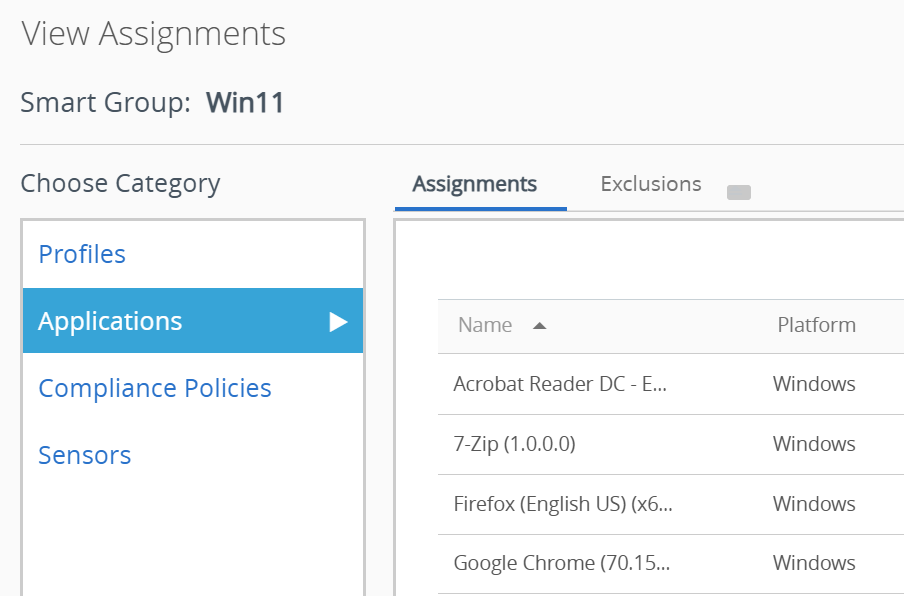
Figure 51: Application assignments by Smart Group
Application events
A plethora of application details can be gleaned from the Apps > List View screen. As an example, device and console events can be viewed via More Actions > Events:
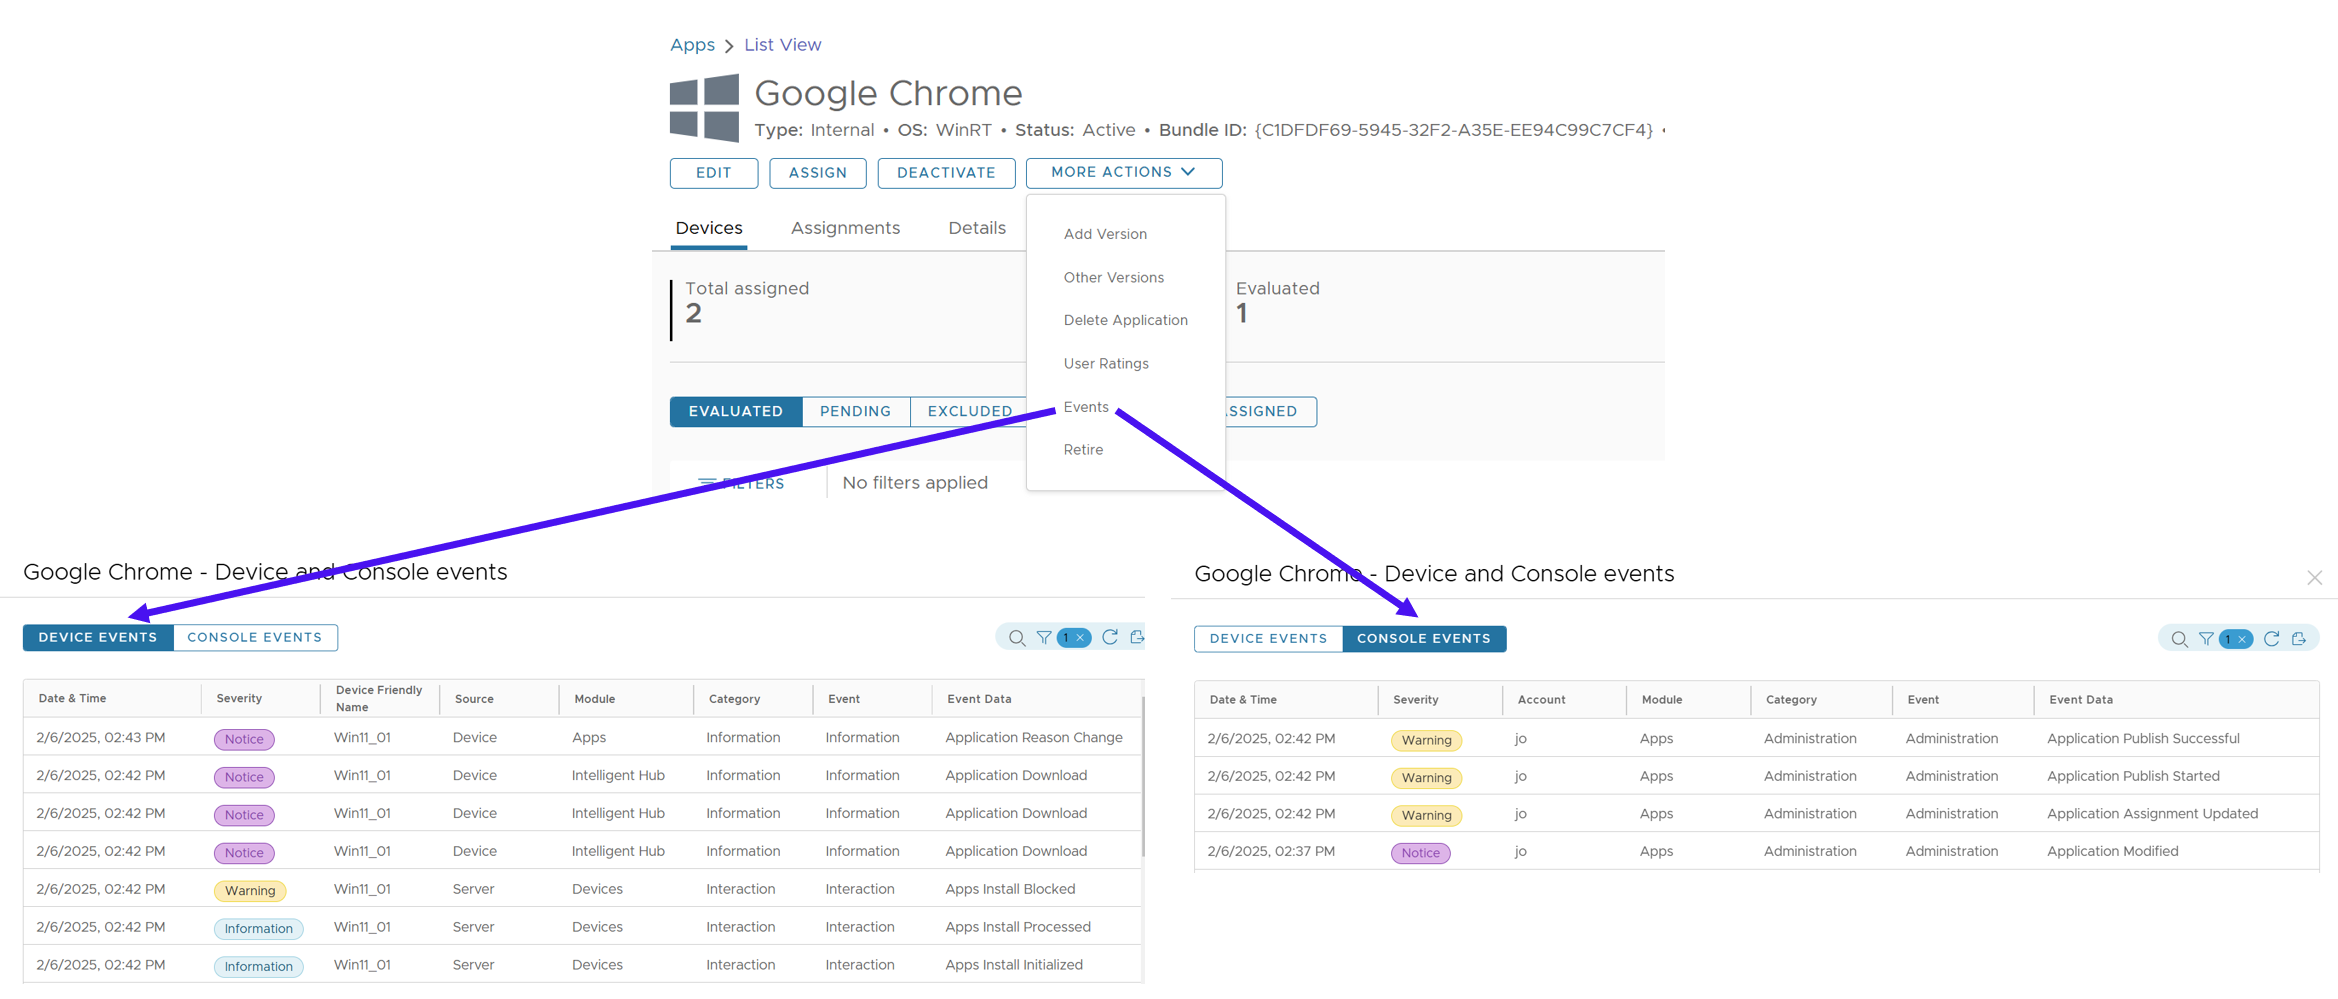
Figure 52: Validation via device and console events
Application status
From the Workspace ONE console, administrators can easily validate the status of applications installed on specific Windows devices. From Devices > Details View > Apps, details specific to application status on a chosen device can be viewed.
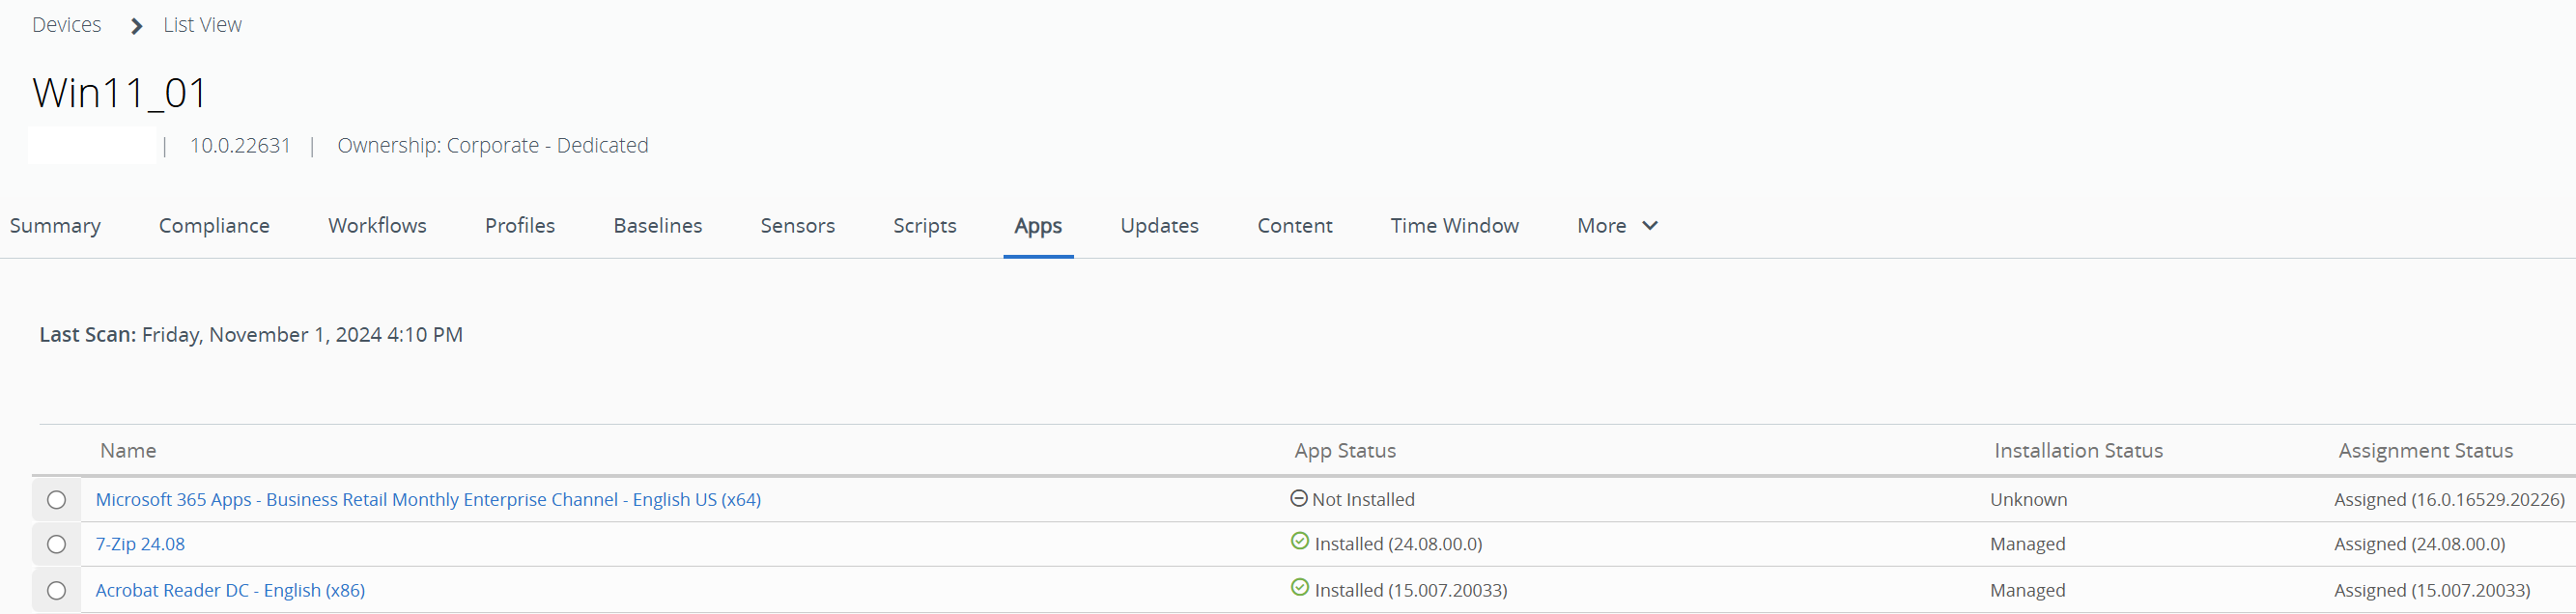
Figure 53: Console view of applications
By clicking on an app, the administrator can see additional details.
In addition, the Troubleshooting tab provides some information about application status.
In the example below, installation of 7-Zip initialized but was then blocked.
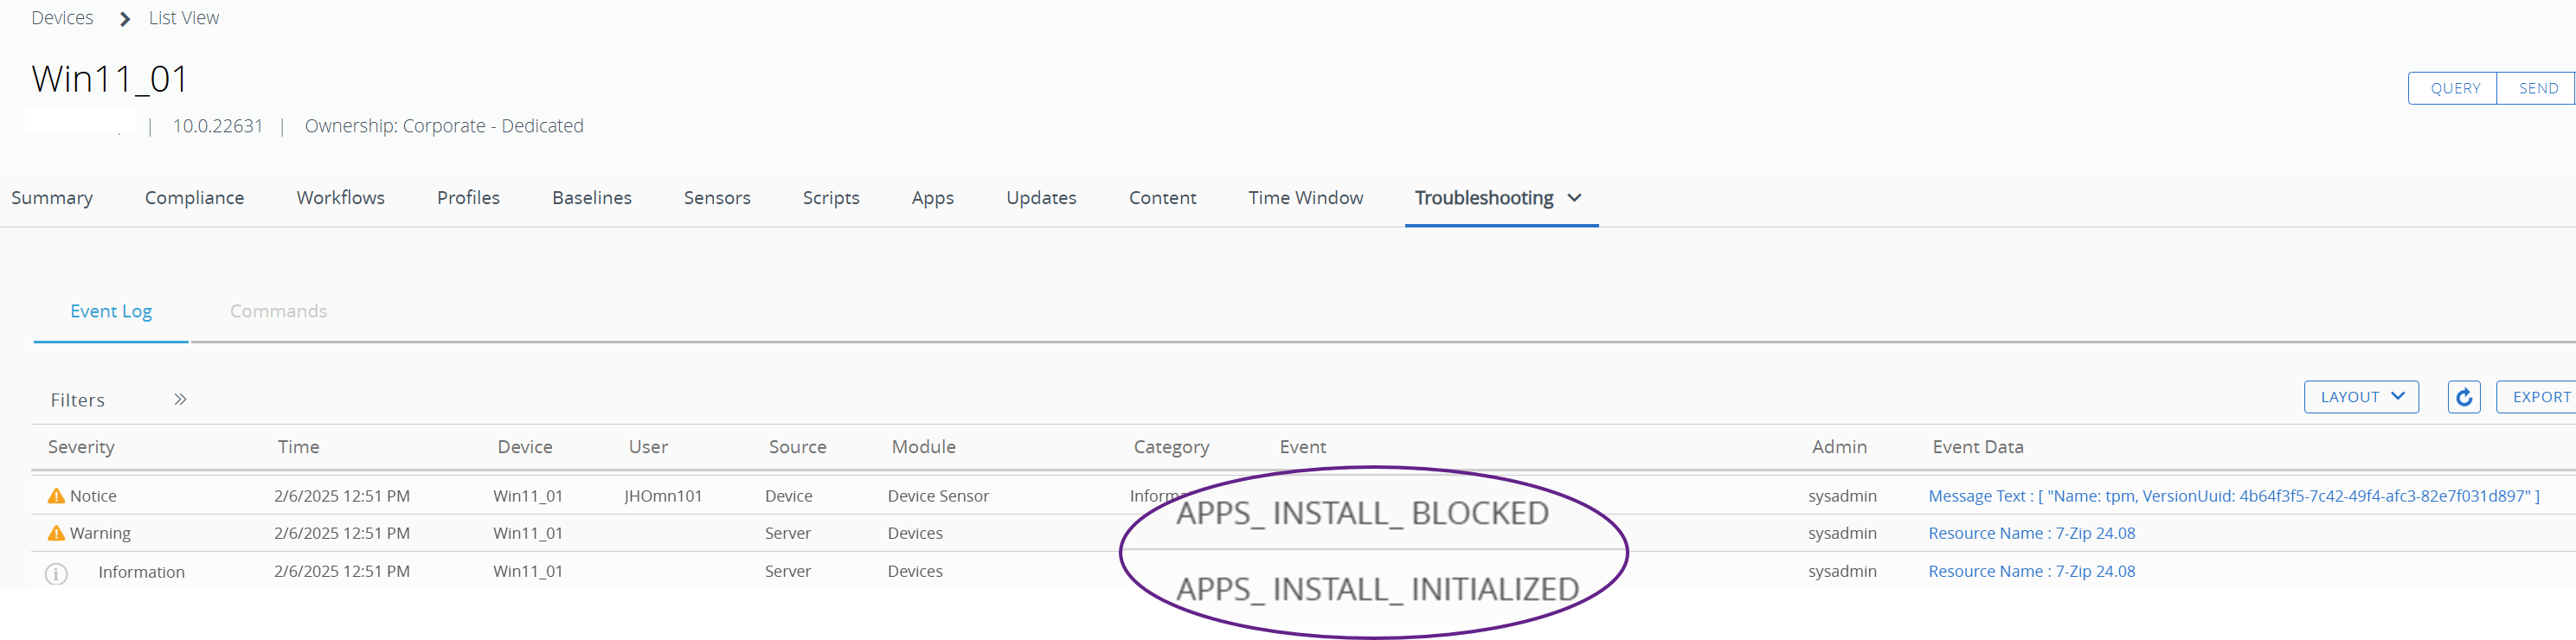
Figure 54: Application information available from troubleshooting tab
Please note that the data presented may be impacted by Intelligent Hub settings. As shown below, the default sampling interval is 6 hours, and the reporting interval is 30 minutes. It may be necessary to adjust the frequency of one or both settings to provide the desired administrative insight.
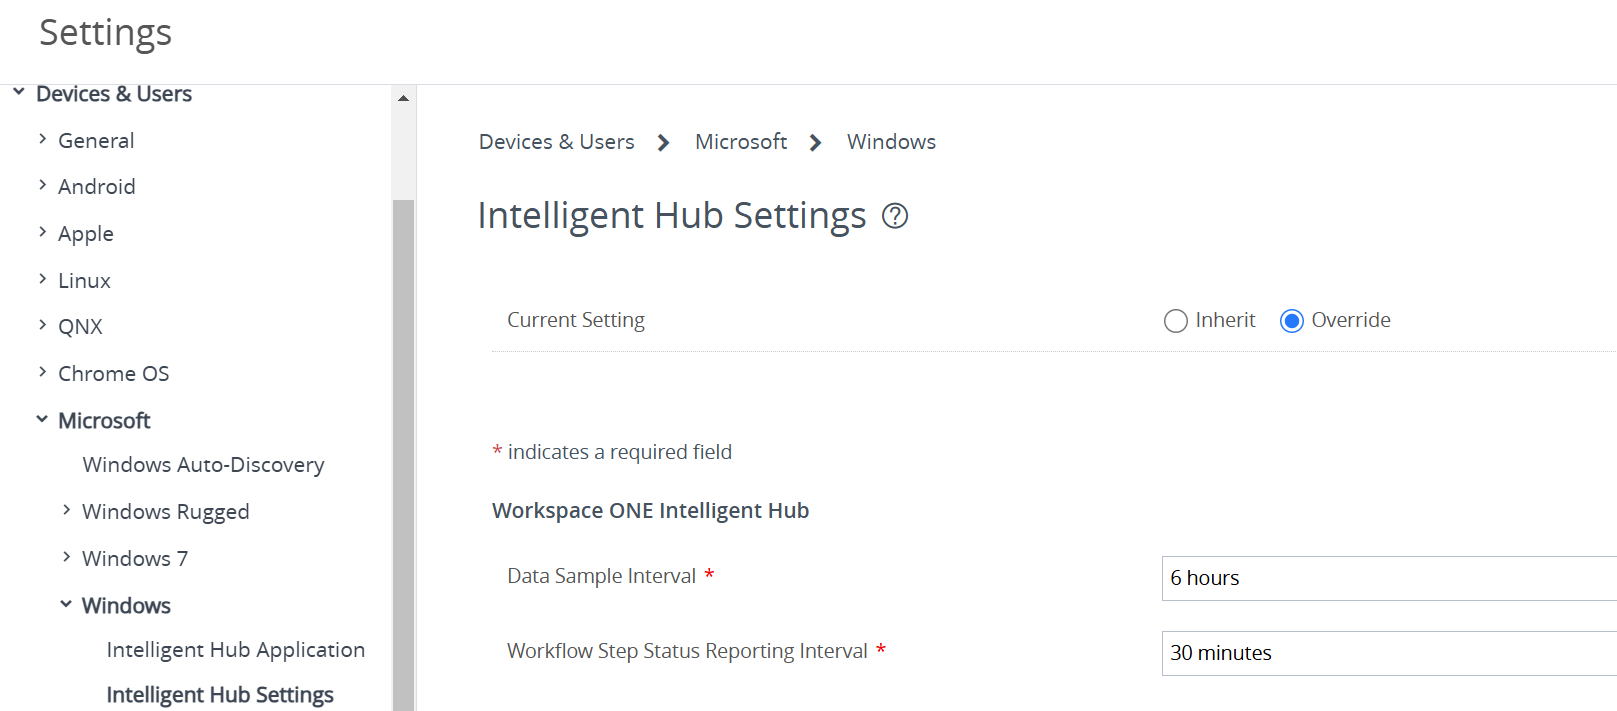
Figure 55: Intelligent Hub settings
To adjust these settings, go to Groups & Settings > All Settings > Devices & Users > Microsoft > Windows > Intelligent Hub Settings.
When looking at the console troubleshooting logs, status messages may provide additional clues. The following list describes status messages:
- Install command ready for the device: The install command has been queued for the device, but the device has not yet checked into Workspace ONE UEM and consumed the command.
- Install command dispatched: The device has checked into Workspace ONE UEM and consumed the command. At this point, the registry should have entries in the AppManifests, ContentManifests, and Queue folders for this application.
- Installed: The application has finished installing on the device and the detection criteria provided successfully confirms the installation status.
- User installed: Detection criterion was fulfilled before Workspace ONE UEM-driven deployment began, indicating that the application was externally installed. As a result, it is reported as installed but unmanaged.
- Failed: Some part of the process (download, requirement evaluation, dependencies, install, detection, and so on) was unsuccessful. Note that if the installation was successful but detection failed, the client will roll back the installation of the application using the provided uninstall command.
- MDM removed: The application has successfully uninstalled following the initiation of the application removal through Workspace ONE UEM.
From the Windows device
On the Windows device, four key steps occur:
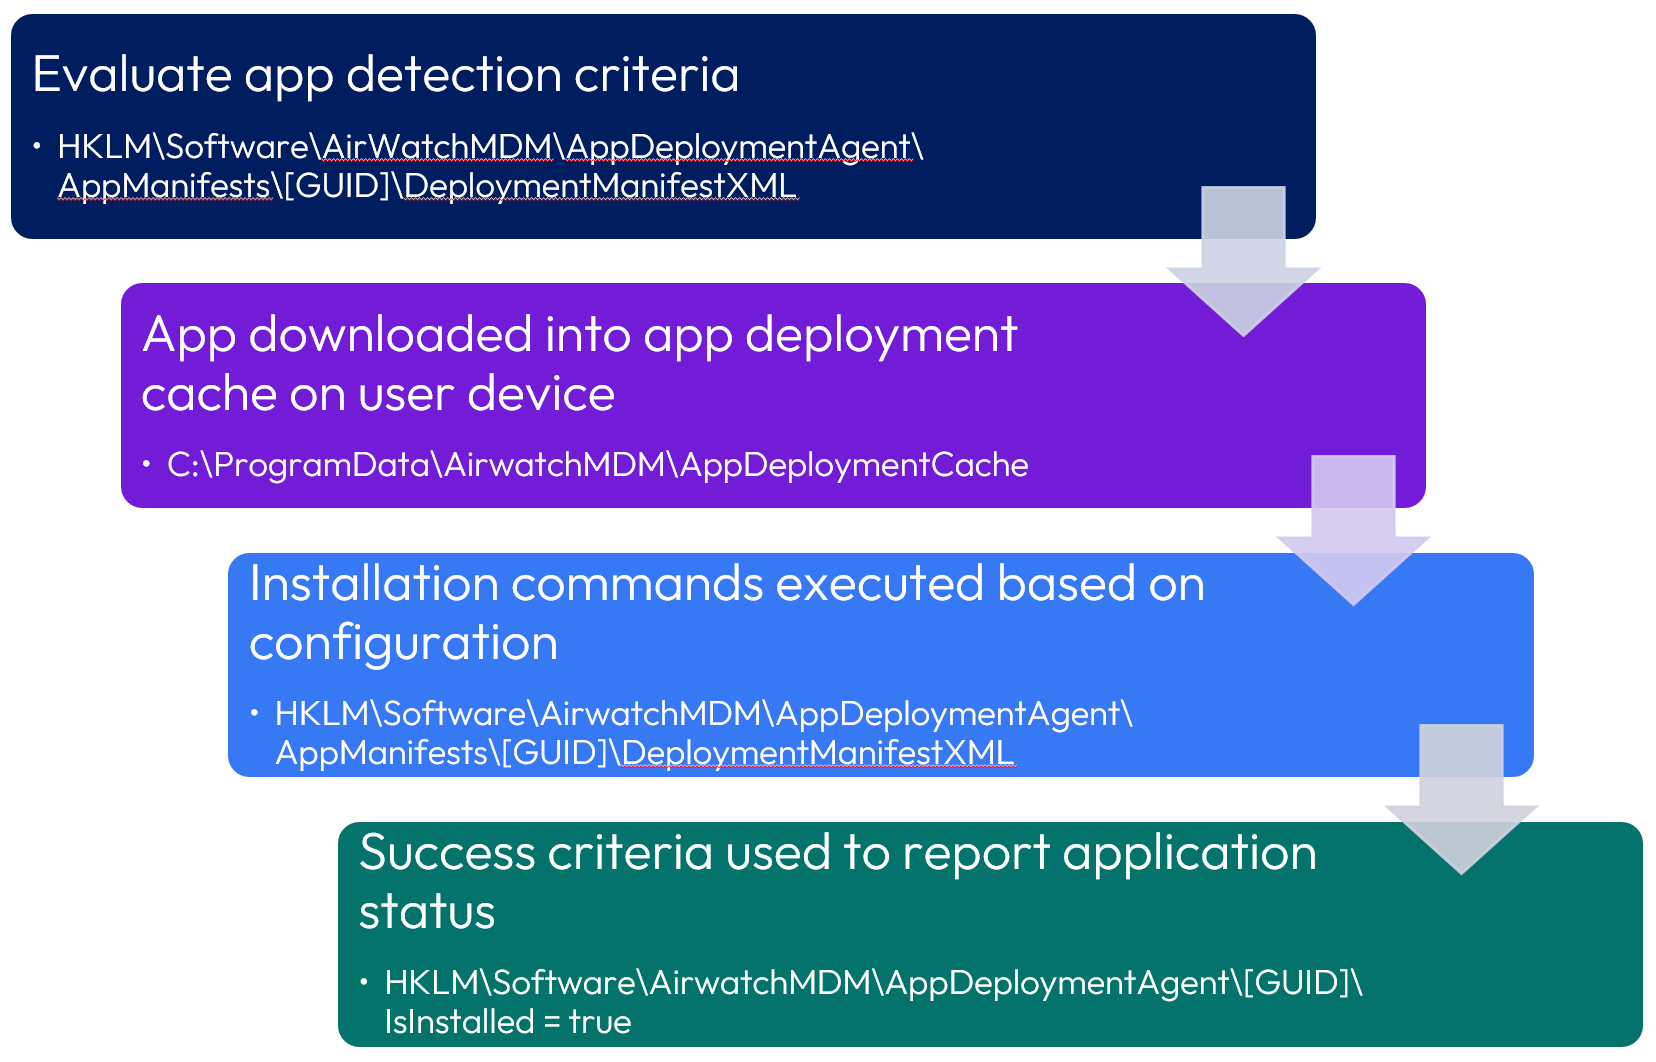
Figure 56: Device-side application installation steps
Assuming that the app detection fails because the deployment manifest is not already present, verify that the application has been successfully downloaded to the C:\ProgramData\AirWatchMDM\AppDeploymentCache folder.
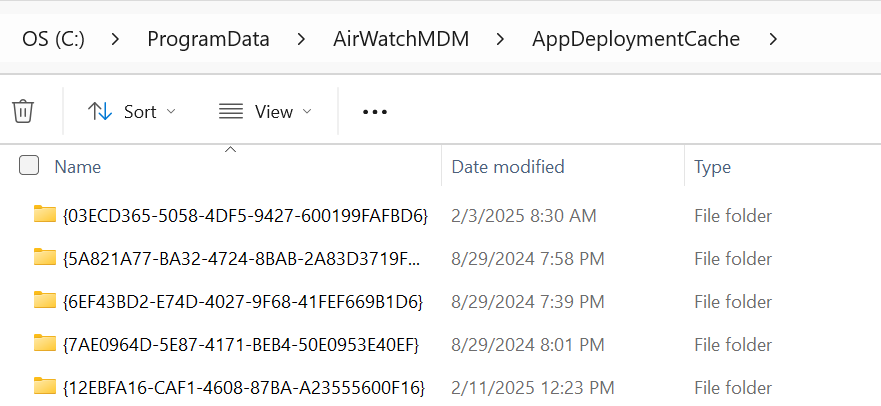
Figure 57: AppDeploymentCache folder on Windows device
If the app did not download successfully, you can re-push the application from the Workspace ONE console or restart the Task Scheduler. To do the latter, open Windows Task Scheduler and navigate to Task Scheduler Library > WorkspaceONE > SfDAgent.
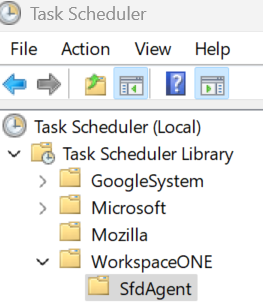
Figure 58: Task scheduler
Select both tasks (Install Validation Task and Software Distribution Queue Task), right-click and select End. Then select both tasks, right-click and select Start.
In Regedit, delete all the paths under the AppDeploymentAgent path related to the specific application GUID in HKLM\SOFTWARE\AirWatchMDM. For example, if the installation of 7-Zip failed and its GUID is 23170F69-40C1-2702-2409-000001000000, the following entry would be removed:
- HKLM\SOFTWARE\AirWatchMDM\AppDeploymentAgent\AppManifests\{23170F69-40C1-2702-2409-000001000000}
Send the Install command to the device again from the Workspace ONE UEM Console by navigating to Devices > List View > [Select Target Device] > Apps > Select App > Install.
Registry keys
On the Windows device, the status of application installation can be verified within various registry keys.
HKLM\Software\AirWatchMDM\AppDeploymentAgent
Specifically, three folders under HKLM\Software\AirWatchMDM\AppDeploymentAgent may be useful:
- AppManifests
- ContentManifests
- SIDs
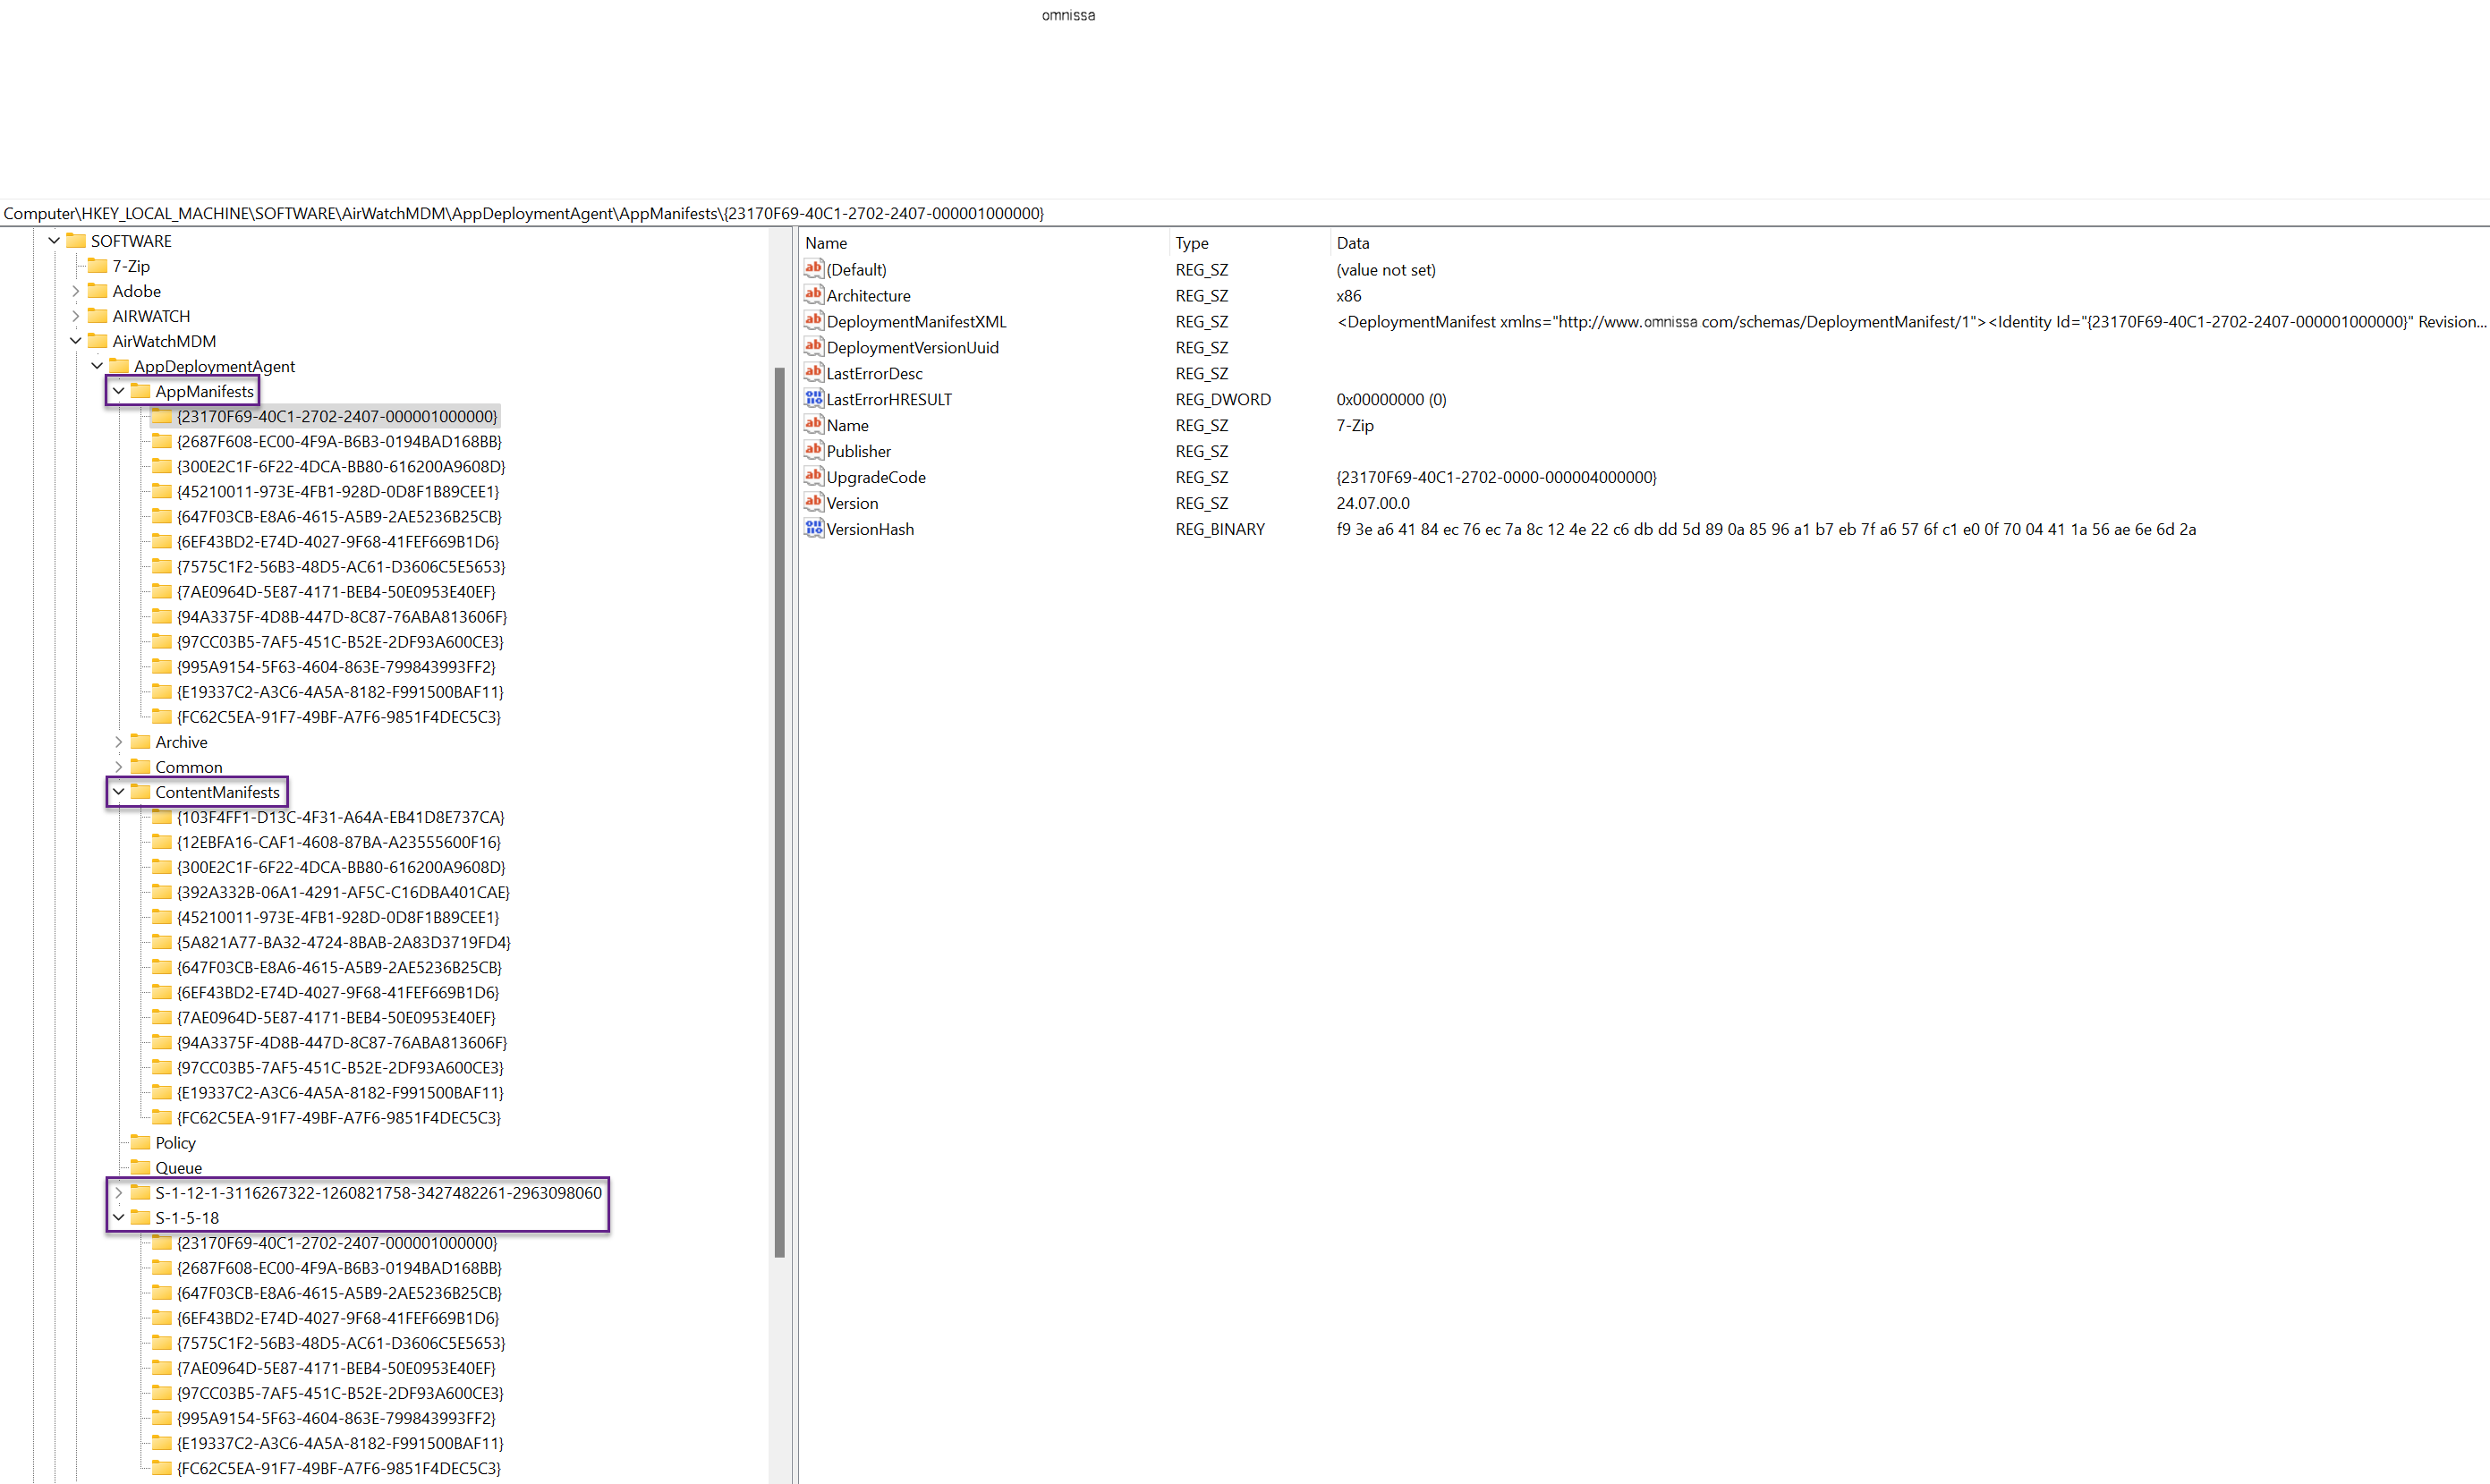
Figure 59: Verification of application status via registry
Within the AppManifests folder, the DeployManifestXML field displays the app metadata, and all application configuration settings are shown.
Within the ContentManifests folder, the ContentManifestXML field displays the URLs associated with the application deployment, including the Content Distribution Network (CDN) and peer-to-peer details. The URLs automatically securely and automatically refresh to prevent application timeouts.
HKLM\SOFTWARE\AirWatchMDM\AppDeploymentAgent\Queue
In addition, review the Queue path under HKLM\SOFTWARE\AirWatchMDM\AppDeploymentAgent\Queue. If present, check the LastDeploymentLog and StatusCode entries for additional details.
The DeploymentLog entry contains the log of the current deployment, including any error codes and a description of the last error, if applicable
The StatusCodeEntry is a mapping to which part of the process the client is currently performing, e.g., download, dependency evaluation, installation, etc.
The following list details StatusCode entries.
- 0x000: Deployment operation queued
- 0x100: First detection in progress
- 0x101: First detection failed
- 0x102: First detection successful
- 0x200: Check reference count in progress
- 0x201: Check reference count failed
- 0x202: Check reference count successful
- 0x300: Requirements evaluation in progress
- 0x301: Requirements evaluation failed
- 0x302: Requirements evaluation successful
- 0x400: Dependency deployment in progress
- 0x401: Dependency failed
- 0x402: Dependency successful
- 0x500: Sanitize cache in progress
- 0x501: Sanitize cache failed
- 0x502: Sanitize cache successful
- 0x600: Pending network connectivity
- 0x601: Download in progress
- 0x602: Pending download retry
- 0x603: Download content failed
- 0x604: Download content successful
- 0x700: Transform cache in progress (decompressing zip packages)
- 0x701: Transform cache failed
- 0x702: Transform cache successful
- 0x800: Pending user session
- 0x801: Install in progress
- 0x802: Pending deployment retry
- 0x803: Deployment failed
- 0x804: Deployment successful
- 0x805: Pending reboot
- 0x900: Final detection evaluation in progress
- 0x901: Final detection failed
- 0x902: Final detection successful
- 0xC0000000: Deployment operation suspended
- 0xC0000602: Deployment suspended — pending download retry
- 0xC0000802: Deployment suspended — pending install retry
- 0x40000000: Deployment operation failed
- 0x40000603: Deployment failed — download failed
- 0x40000803: Deployment failed — installation failed
- 0x80000000: Deployment operation succeeded
- 0x80000402: Application is externally installed
- 0x80000902: Deployment succeeded — final detection passed
Lastly, Queue/S-1-5-X folders contain the install status and logs for each application, where S-1-5-18 contains apps assigned to the device and S-1-5-21-X contains apps assigned to users.
- InstallCount value indicates the following:
- 0: The application is not installed and is not actively being deployed.
- 1: The application is installed, or installation is being attempted. If it is a dependency application, the dependency is installed and only one package depends on it.
- 0x8000001: The application (or dependency application) is externally installed, and assume management is not applied.
- 2+: The dependency is installed and has x applications dependent on it, for example, if InstallCount for a dependency is 3, it is installed, and three individual application packages depend on it.
HKLM\SOFTWARE\Microsoft\EnterpriseDesktopAppManagement
The MSI folder below this key contains subfolders or keys as GUIDs for SFDAgent and Intelligent Hub pushed to a device on enrollment via OMA-DM. It is not used for Windows apps installed with SFDAgent.
Checking status codes in the registry may be helpful. Navigate to HKLM\SOFTWARE\Microsoft\EnterpriseDesktopAppManagement and expand the MSI folder. The MSI folder contains keys (GUIDs) for applications sent down from Workspace ONE UEM via OMA-DM.
If there are entries in the MSI folder before enrolling and the GUIDs (Product Version key) match a folder that already exists, then it will fail to install because it will appear that the application is already installed, i.e., ProductVersion field or the GUID folder name matches the build version GUID in the Workspace ONE UEM console. To find this build version, click edit on the application and see the build version.
Note the following information:
- CommandLine: The command line arguments sent down by Workspace ONE UEM. By default, /quiet is always sent, to perform a silent install.
- CurrentDownloadURL: The device services/content delivery network (CDN) URL that the device is using to download the application. To verify that the application successfully uploaded to the console, manually copy and paste the URL into the browser and the application should download.
- DownloadLocation: The file path where applications are downloaded.
- LastError: Error code for failures. If you see a code, you will also see a new entry called ErrorDescription with details.
- Status: Code of the current status.
The following table describes status codes for errors 10 to 120.
| Status Code | Description |
| 10 | Initialized |
| 20 | Download in progress |
| 25 | Retrying download |
| 30 | Download failed |
| 40 | Download complete |
| 50 | Install in progress |
| 60 | Install failed |
| 70 | Install complete |
| 80 | Uninstall in progress |
| 90 | Uninstall failed |
| 100 | Uninstall complete |
| 110 | Hash mismatch |
| 120 | Sideloading is not enabled |
Figure 60: Error status codes
Note: The most common error deals with error code 30—download failed. If you get a status of 30, then ensure that:
- If using a CDN, the user is not blocking access to (users with restricted networks should not use CDN)
- A proxy server configuration does not hinder downloads.
- Certificate Revocation Lists (CRLs) and Online Certificate Status Protocol (OCSP) URLs are accessible because, by default, devices must verify the validity of the SSL certificate.
- Time synchronization is not correct.
Also check the BITS log in Event Viewer for details as these applications are downloaded using BITS.
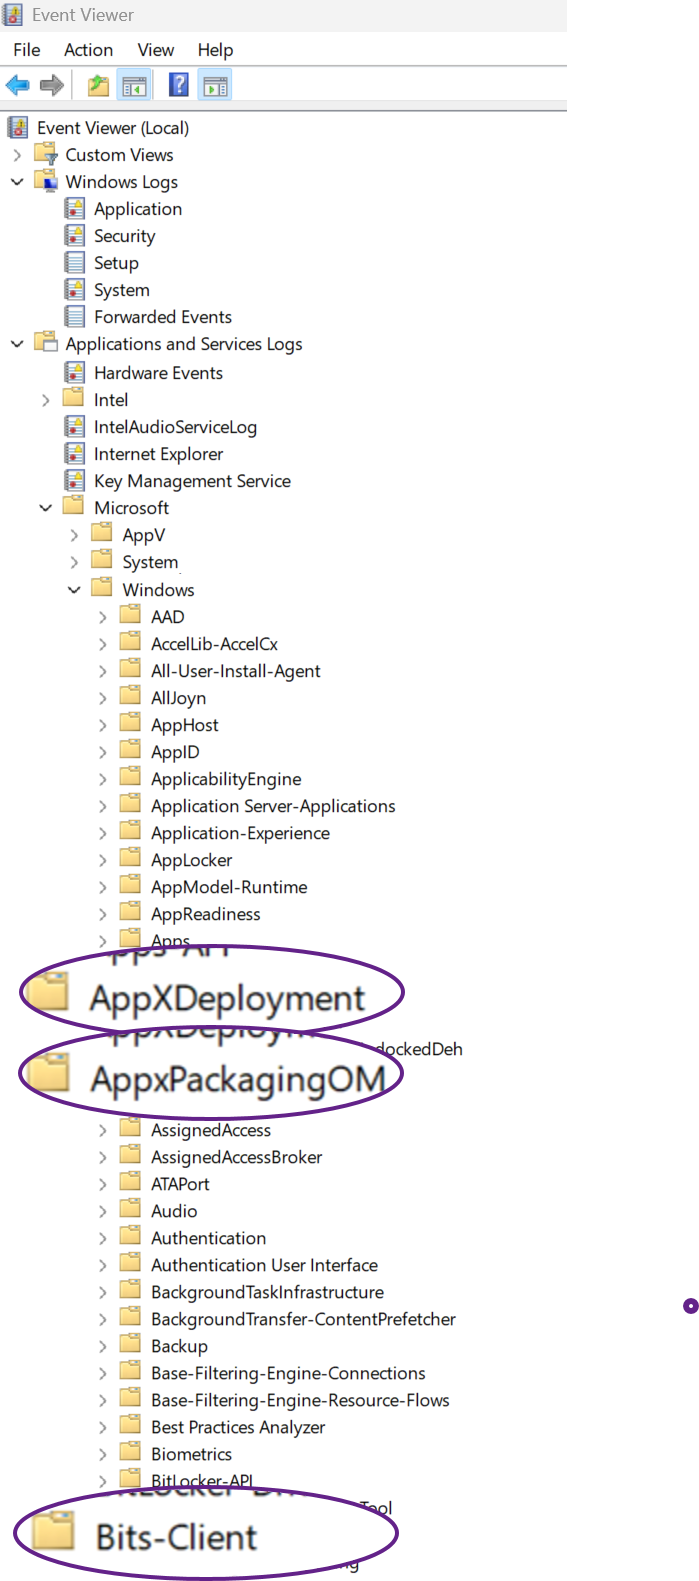
Figure 61: Useful Event Viewer entries
MSI installer and Event Viewer logs
Detailed application-specific logs are stored within C:\Windows\Temp.
Event Viewer logs can be viewed in Applications and Services Logs > Microsoft > Windows > AppXDeployment-Server and Microsoft-Windows-AppxPackagingOM
CDN performance and issues
CDN configuration is managed by Omnissa for SaaS tenants. The Akamai Edge Server is responsible for caching and distributing files based on geographic location, as well as authentication. The Workspace ONE (AirWatch) Content Domain is the domain mapping to the configured Akamai Edge Server using CNAME (DNS plus *.edgekey.net), so firewall configuration may be necessary.
Additional troubleshooting items
In addition, some issues that you may encounter:
| Issue | Likely Cause | Check |
| Fewer configuration options presented within Application File | Application was designated as a Dependency app | Application File tabs: all will have fewer options as compared with other apps |
| User confirmation requested during installation | Application File not configured to install with Admin privileges | Application File > Deployment Options > Admin Privileges |
| Application does not install properly | Error during installation | HKLM\Software\AirwatchMDM\AppDeploymentAgent\[GUID]\
Copy contents of LastDeploymentLog and paste into Notepad to view detailed logs |
| Application installation does not initiate | App not downloaded to device |
|
| Application does not download | Validate CDN and P2P settings | HKLM\SOFTWARE\AirWatchMDM\AppDeploymentAgent\[GUID]\ContentManifests |
| Application exclusions not respected | Exclusions not designated for all app versions | After Modern SaaS upgrade, all versions of an application must detail exclusions, not just a previous version |
| Applications not downloaded | Validate network connectivity | Check for proxy server communication, firewall configuration, and bandwidth. |
Figure 62: Additional troubleshooting issues
Omnissa recommendations and best practices
To align with Omnissa best practices, please consider the following:
- Deploy MSI packages where feasible. MSI files are significantly easier to deploy, offer the best deployment options with Workspace ONE UEM, including the ability to utilize MSP and MST files per assignment group, and should be used where feasible. EXEs applications are the next preference. ZIP packages are supported, however due to the nature of ZIP packages and possible customization of the package, deployment details may be limited compared to MSI and EXE applications.
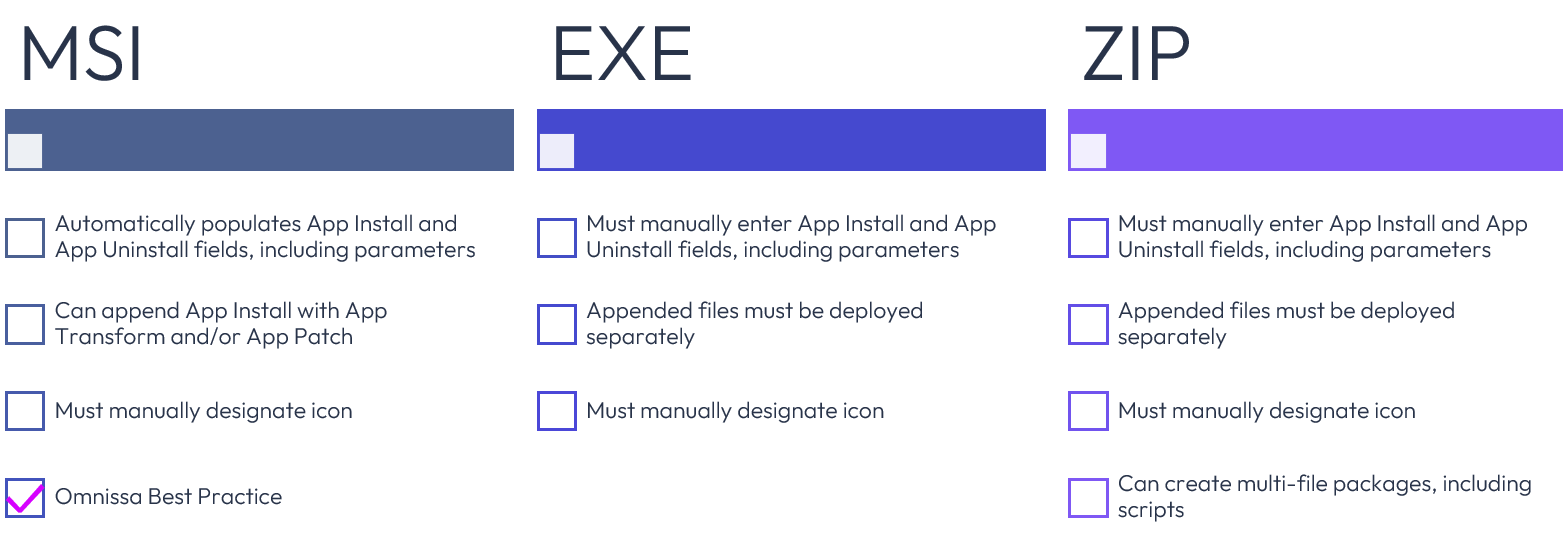
Figure 63: File type comparison
- Application distribution. Content Delivery Network (CDN) and Peer-to-Peer (P2P) in conjunction with Smart Groups configured as Deployment Rings, provide the most efficient software distribution. In addition to minimizing network bandwidth, applications are deployed to user devices at remote offices in logical groups reducing risk, improving user efficiency, reducing download waste by surviving network disconnects with automatic congestion throttling and download restarts where the downloads left off.
- Application deployment time. Initiate application deployment to occur at a day and time where usage is generally lighter and consider that the time setting within the Workspace ONE UEM console governs this setting, not the local time on the user device. Unless the application update is critical, allow users to defer application installation.
- Multiuser. Applications assigned to multiuser devices are available to all users on that device, whereas applications assigned to users are only available to those users. In addition, new application assignments will be installed upon logon, and uninstallations can also occur based on configuration, thereby utilizing CPU, memory and disk resources during the user logon process. This may negatively affect the logon user experience. As such, ensure that your application deployment strategy aligns with your multiuser device requirements.
- Freestyle Orchestrator. Where complex conditions and sequencing are required, Omnissa recommends using Freestyle Orchestrator to configure application rollout. Simple application deployments should utilize the standard App File method.
- Testing and Deployment Rings. All applications should be fully tested prior to full deployment. Consider utilizing a deployment ring methodology, i.e., initially deploying applications to small logical groups of devices, with ever increasing numbers of devices in subsequent logical groupings. This methodology reduces the business impact of the change, reduces the risk of a bad deployment, and works in conjunction with the previously mentioned application distribution methodology.
- Application installation timeout settings. The default is 60 minutes, but this should be reconfigured to a shorter time for smaller installations so as not to block the device for a full hour if there is an issue with the installation.
- Application metadata. Ensure application details such as Supported Processor Architecture and Supported Models are configured appropriately for that application. Supported Processor Architecture can be used in Smart Groups to target those specific device types. This is particularly important for ARM64 devices.
- Supported models. This is important for targeting the correct Windows device type. By default, Windows Desktop is selected for new devices. Windows Server can also be designated instead of or in addition to Windows Desktop.
- Add version. Utilize Add Version to add a new version of the same application. This provides benefits such as copying assignments, and rollback to previous version using the Retire function. Note, Omnissa recommends to not select Retire Previous Version when appending a new version as this prevents rollback to the previous active version.
- Application Rollback. Utilize More Actions > Retire to rollback an application to the previous version.
Additional resources
For more information about Windows Modern Management with Workspace ONE, you can explore the following resources:
Windows Security and Policy Management
Windows Baselines and Profiles
Windows Troubleshooting
Changelog
The following changes impact this guide:
| Date | Description of Changes |
| 06/29/2026 |
|
| 11/06/2025 |
|
| 5/26/2025 |
|
| 3/24/2025 |
|
| 3/12/2025 |
|
About the author and contributors
This tutorial was written by:
- Jo Harder, Senior Technical Marketing Architect, Omnissa
- Phil Helmling, Lighthouse Architect, Omnissa
With significant contributions from:
- Saurabh Jhunjhunwala, Lighthouse Architect, Omnissa
- Michael McGuinness, Competitive Technical Specialist, Omnissa
- Grischa Ernst, Senior Product Manager, Omnissa
- Stephane Foucher-Jan, Senior Sales Engineer, Omnissa
- Sujay Gopalan, Senior Technical Marketing Architect, Omnissa
Feedback
Your feedback is valuable.
To comment on this paper, either use the feedback button or contact us at tech_content_feedback@omnissa.com.