Device Posture in Okta using Workspace ONE Access, Tunnel, and APIs
Zero Trust for Okta Overview
In today's increasingly connected and decentralized work environment, traditional perimeter-based security models are no longer sufficient. The Zero Trust approach revolutionizes access control by assuming that any connection to sensitive data is inherently untrusted, regardless of its origin. This philosophy, coined 'Zero Trust' by Forrester Research analyst John Kindervag in 2010, requires strict verification and authentication of every user and device attempting to access network resources.
The Zero Trust framework consists of five core pillars:
- Verify identities
- Use least privilege
- Implement micro-segmentation
- Monitor and audit
- Enforce device posture
These pillars provide a comprehensive foundation for implementing Zero Trust.
To achieve effective Zero Trust integration and secure access to sensitive data, it is crucial to integrate with identity providers like Okta. This tutorial explores three options for implementing device posture with Okta, providing a practical guide for technical professionals seeking to enhance their organization's security posture.
There are different possibilities to achieve Zero Trust and secure access to sensitive data through integrating with identity providers like Okta. This tutorial lays out three options to implement device posture with Okta.
Audience
This tutorial is intended for IT professionals and Workspace ONE® administrators of existing production environments. Familiarity with Active Directory, identity management, and directory services is assumed. Knowledge of other technologies, such as Okta, is also helpful.
If you are new to Workspace ONE, review the Evaluation Guide: Managing Apps and Devices with Cloud-Based Workspace ONE which has step-by-step exercises implementing features like mobile single sign-on (SSO) in UEM and Omnissa Access™.
Device Posture Integration Overview
With Workspace ONE, we have a comprehensive solution for managing and securing enterprise devices. Not only does it maintain an inventory of devices used within the organization, but it also defines the desired state for those devices, including monitoring installed applications and applying settings and controls. This capability is further enhanced by integrating with security tools like Mobile Threat Defense (MTD) and Trust Network data, creating a robust data lake to inform compliance decisions.
Given this rich source of device posture information, it is natural to leverage this data for informed access control decisions when connecting to resources and data from those endpoints. The following guidance will explore three approaches to achieve Zero Trust integration with Okta:
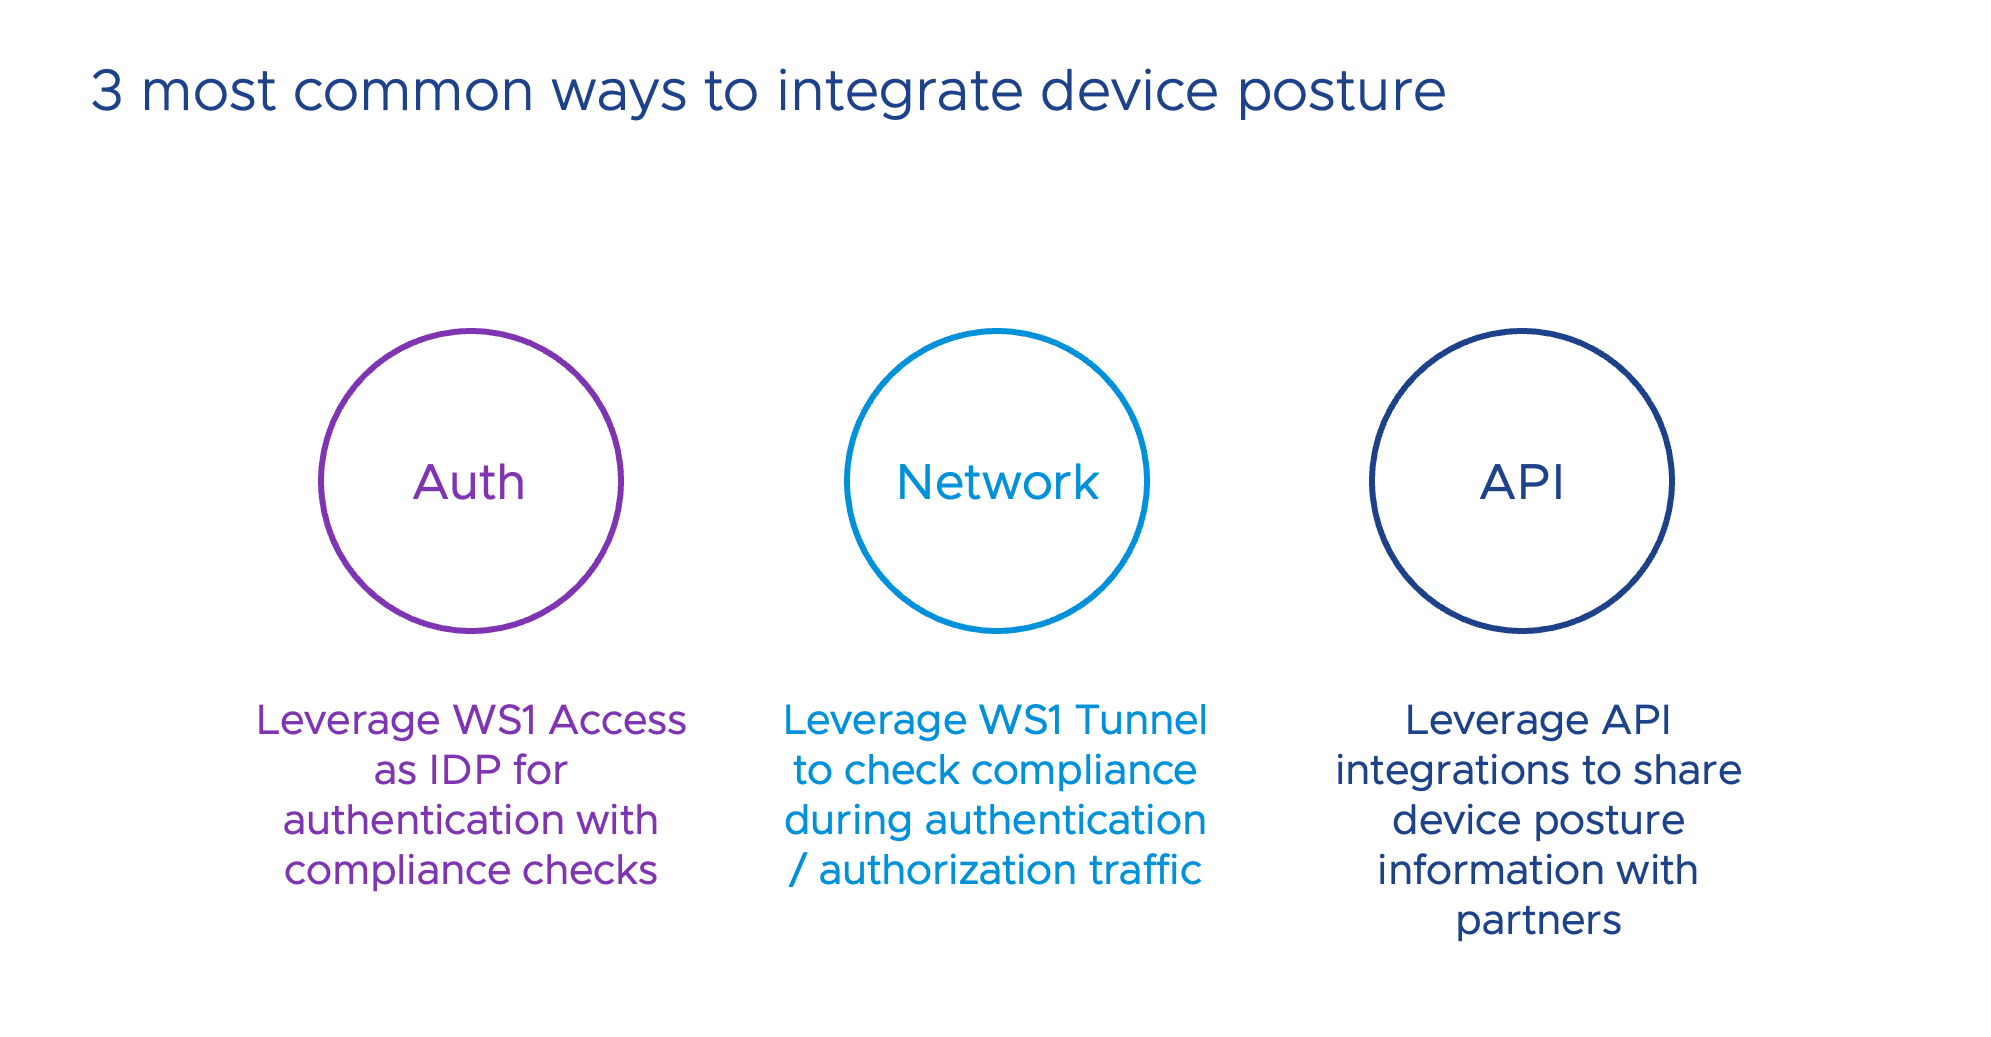
Figure 1: Common ways to integrate device posture
The first method integrates Omnissa Access into the authentication flow by federating it with the resource or an existing Identity Provider (IdP). This allows us to capitalize on the synergy between UEM and Access, enabling compliance checks during authentication.
The second approach utilizes the Tunnel Service, which can be deployed on devices to secure authentication and authorization traffic. By leveraging its integration with UEM for direct compliance checks, we can indirectly share this information with the resource or IdP by allowlisting the Tunnel Service's egress IP addresses as accepted sources for authentication and authorization.
Lastly, we examine the possibility of using APIs to exchange device posture information between Okta and Workspace ONE. To achieve this, both systems must be able to identify devices and share a common identifier, allowing us to update the right device record. Although custom integrations and vendor-specific APIs are currently required, the Shared Signals Framework (SSF) Continuous Access Evaluation Protocol (CAEP) profile may provide a standardized way to exchange security events between vendors in the future.
Zero Trust during Authentication Point In Time
This approach integrates Omnissa Access with the authentication flow of Okta to leverage device posture information during the initial authentication process.
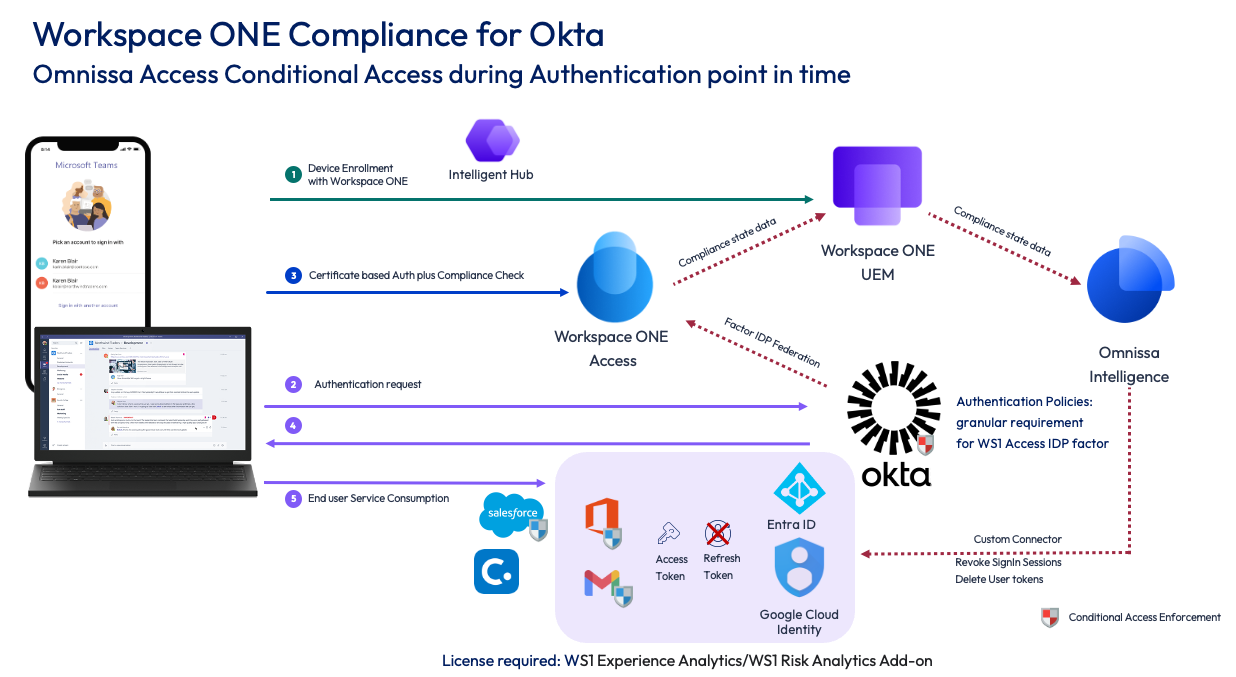
Figure 2: Device posture during authentication point in time using Access
Workspace ONE Access can be configured to use the compliance status from Workspace ONE UEM when signing into any application using SAML or OIDC federated to Access. Okta can use Workspace ONE Access as an IdP Authenticator (see Configure the IdP authenticator in Okta Docs) to invoke the compliance check in an existing authentication flow or implement Access as an IdP for SSO (see Add a SAML 2.0 IdP in Okta Docs) and force applications to use it with routing rules (see Configure identity provider routing rules in Okta Docs). Using a factor allows more flexibility so this technique is used during this guide.
When Access is integrated with Okta, whenever a user signs in to a service provider federated with Okta, the authentication will pass by Access—which is configured to use a certificate-based authentication method, configured by Unified Endpoint Management (UEM)—and uses a certificate that includes user and device information in the form of the Device UDID. This allows Access to not only check the validity of the certificate and the user it’s created for but also the device's management and compliance state before sending the user back to Okta. We do not know which service that is federated to Okta will request the factor, so we apply one specific policy set in Access.
Further, this works during initial authentication, but not when authorizing the user to the specific apps, services like Entra ID and Google Identity issue ID, Oauth2 Access, and Refresh tokens. The Access token is a short-lived authorization valid for 1 hour by default and the Refresh token is valid for a longer period, often extending unless it is not used. So, any time the Access token runs out the Refresh token is used with the token auth endpoint to receive a new token. No new authentication is required in this flow and during that time, no check on compliance would happen and non-compliant devices would still have access to resources and services. To mitigate this, you can revoke the Refresh token used by the application by revoking the sessions for a specific user. This requires the user to sign in again as soon as the Access token time-to-live ends. Because of the seamless sign-on with certificates, the reauthentication on compliant devices is transparent to the user. This process can be automated and triggered on compliance changes to the users’ devices with Workspace ONE Intelligence’s Custom Workflow Connectors and Automations leveraging available endpoints with services like Entra ID and Google.
The following flowchart depicts the steps involved during authentication with the solution.
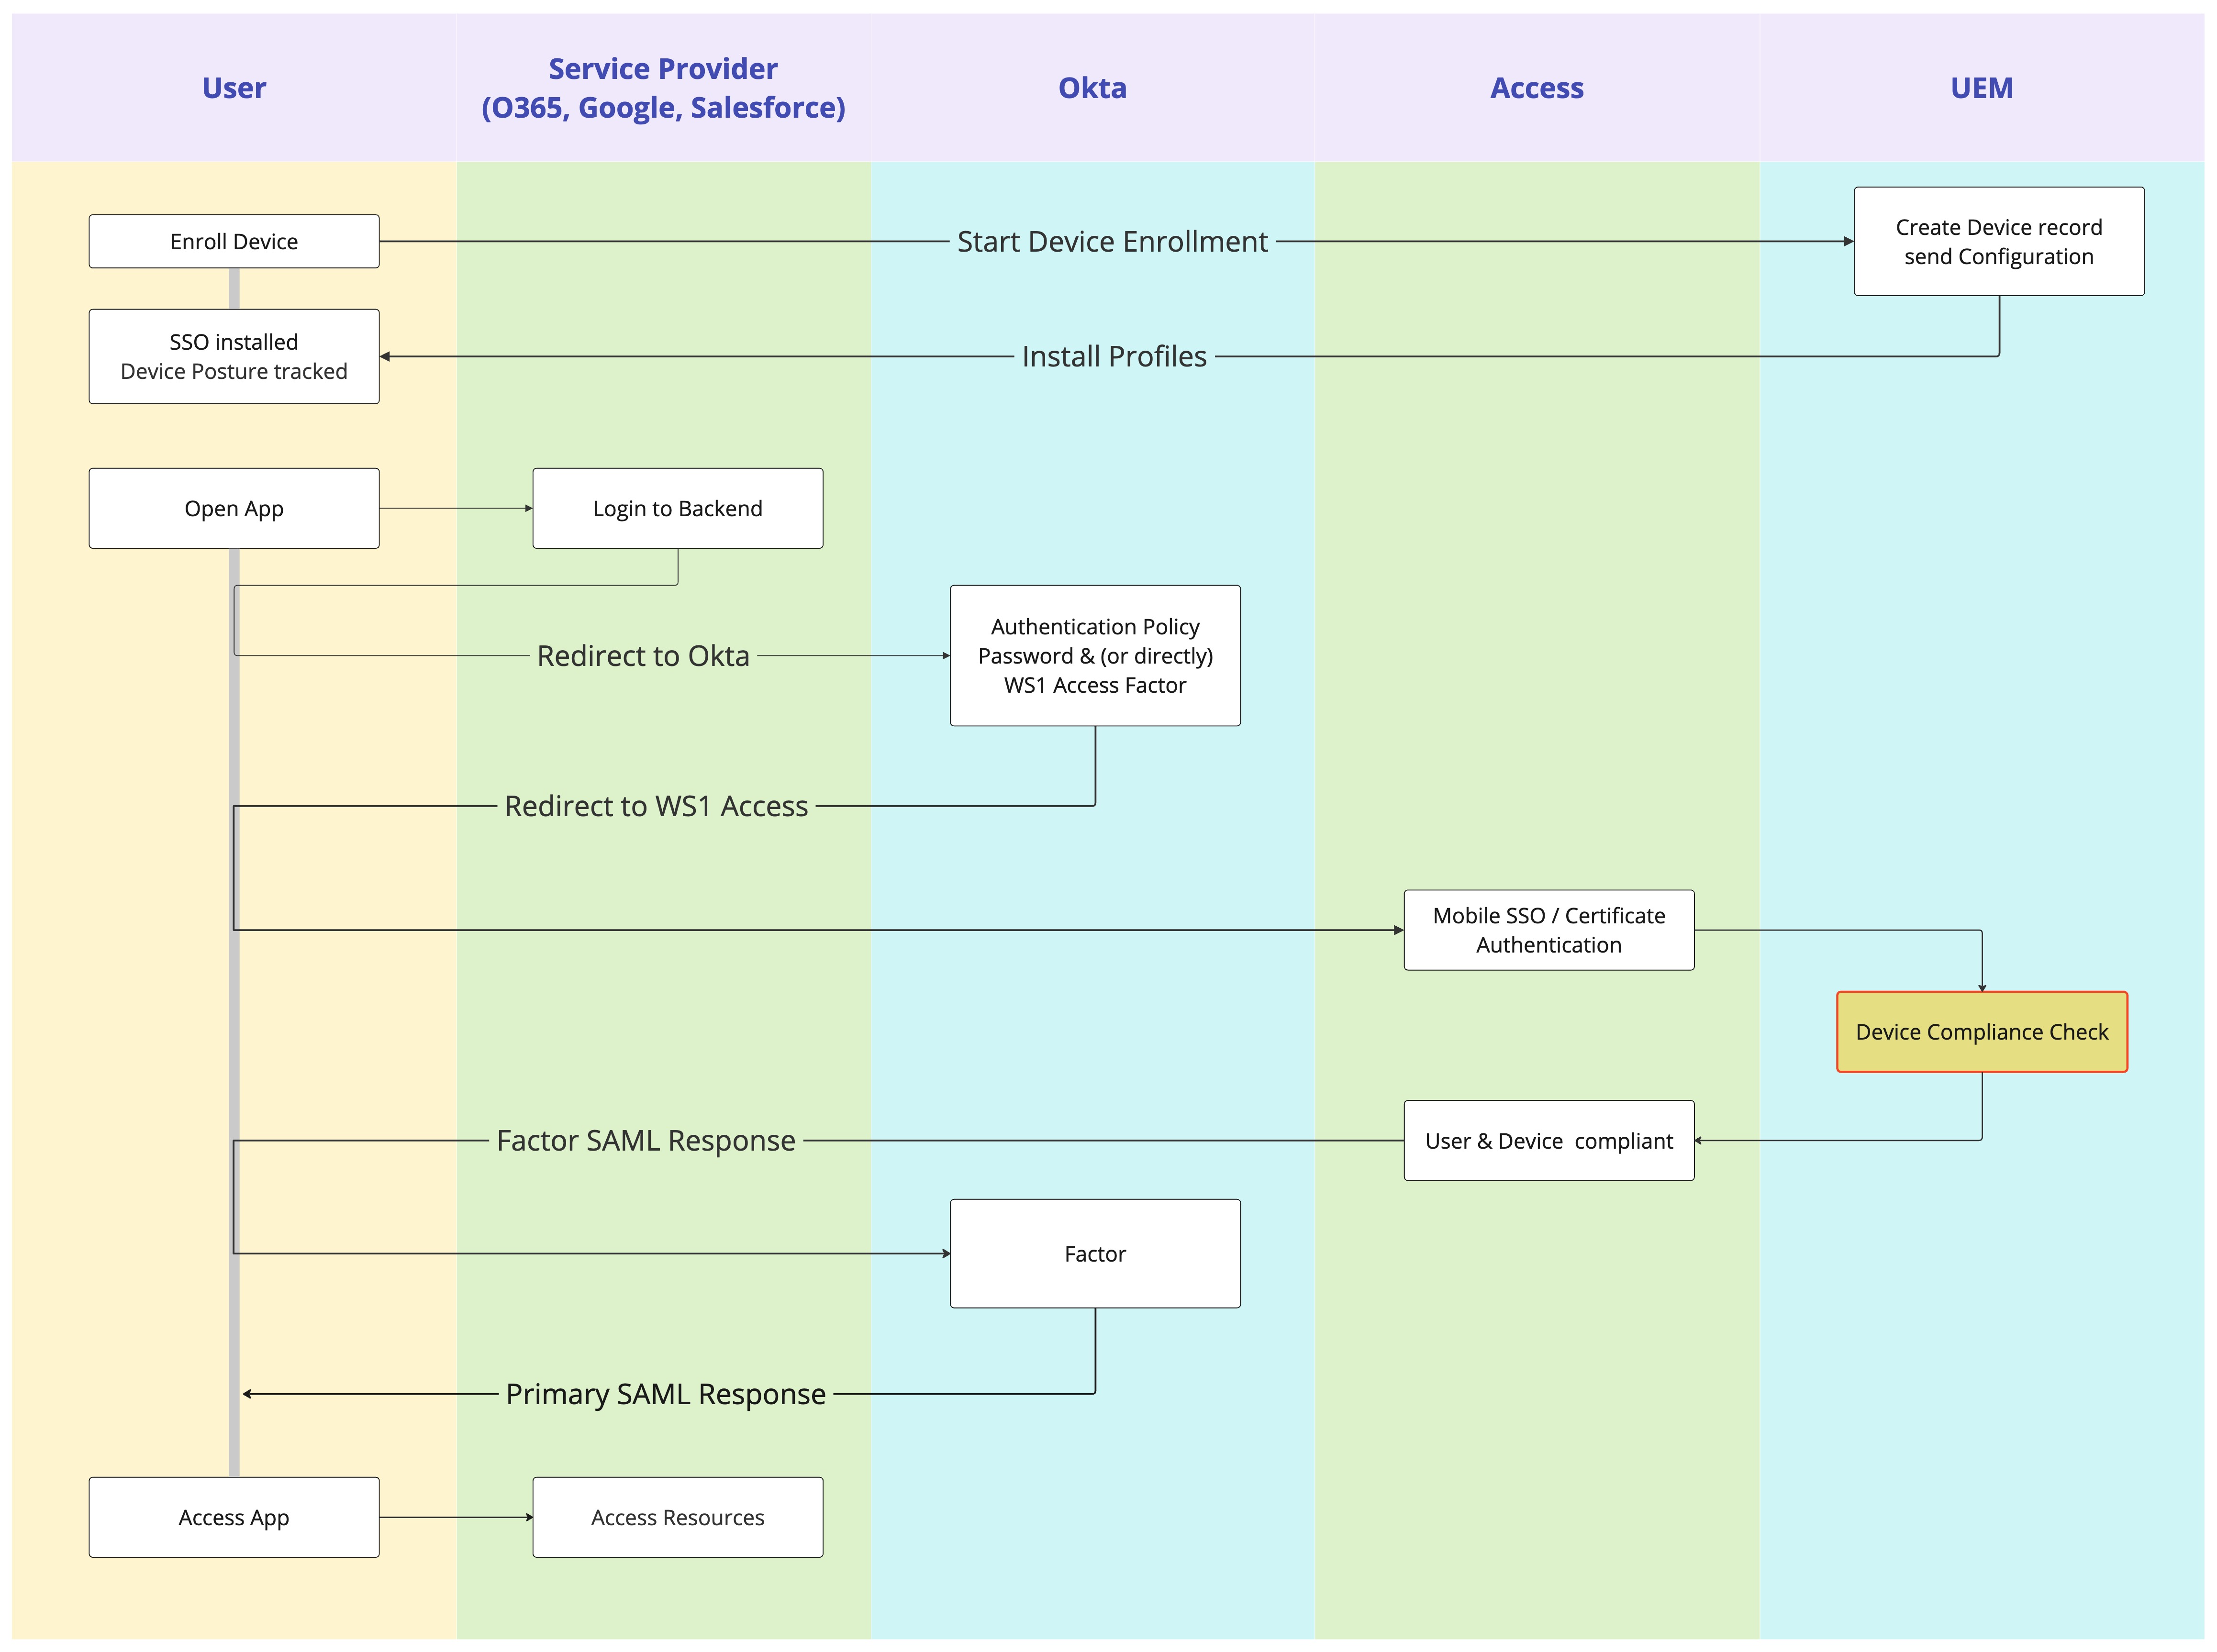
Figure 3: Authentication flow with Access as IdP Authenticator
Should you require further factors during authentication, you can set that up in Access by adding Okta as an IdP (in some cases even additional IdP) to Access and redirecting specifically to that authentication method for the use of Okta Verify. The following graphic outlines the flow.
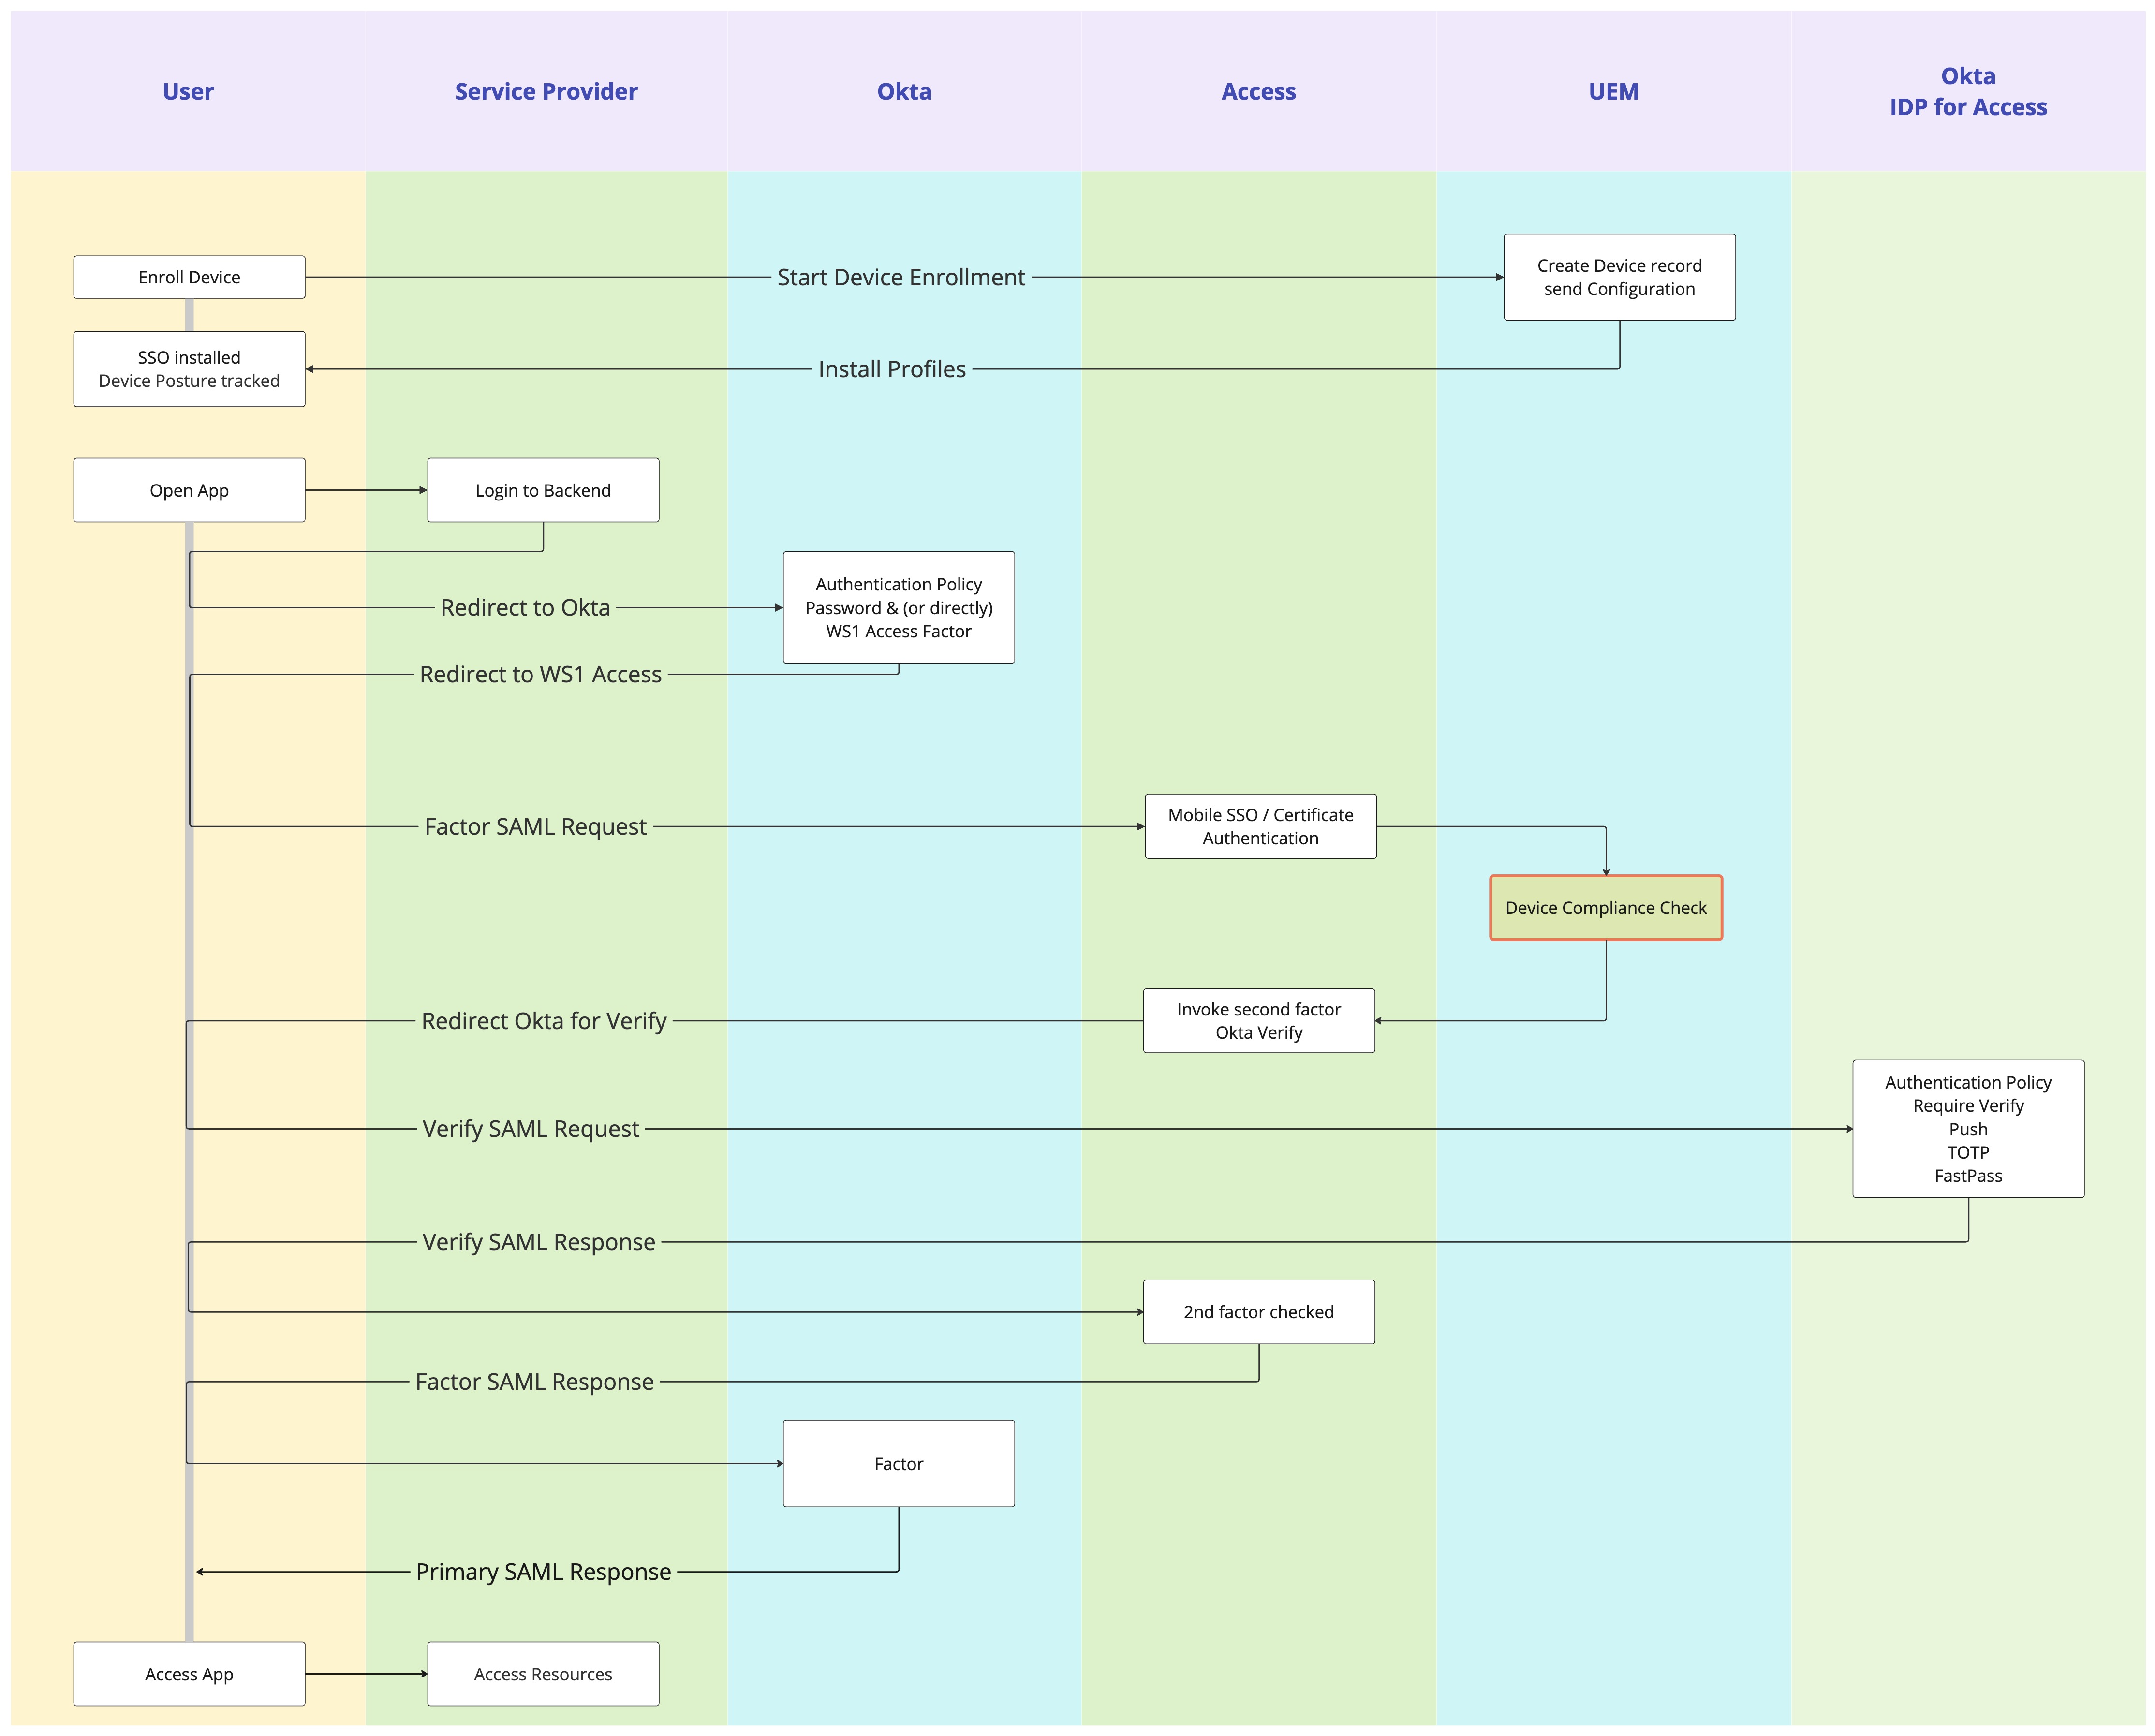
Figure 4: Authentication flow with Access as IdP Authenticator and additional Okta Verify MFA in the flow
Requirements for Workspace ONE UEM and Workspace ONE Access
Before you can proceed, you must have the following components installed and configured:
- An existing Workspace ONE environment
- Completed integration of Workspace ONE UEM and Workspace ONE Access
- Set up Certificate Authority in Workspace ONE UEM
If you have a new environment that automatically comes with UEM, Access, and Hub Services set up and connected, you must complete the integration between Workspace ONE UEM and Workspace ONE Access.
See the documentation on integrating Workspace ONE Access and UEM and setting up Certificate Authorities in UEM.
If you have already completed the integration, this means that Workspace ONE Access can make the required API calls to UEM for the device’s compliance state. Workspace ONE Access acts as an identity broker and connects your identity source enabling enhanced Hub Services inside Intelligent Hub.
Devices are enrolled into Workspace ONE UEM, and UEM sets the configuration and tracks the compliance state during the lifecycle. UEM has a built-in certificate authority that provides the certificates used for SSO on all device types as well as integrations into all common enterprise certificate authorities and templates to use internal certificates for the use case.
Set Up Seamless Single Sign-On
Every device platform supports a targeted SSO method that uses certificates and can be set up in a seamless way. For iOS, set up certificate authentication in an Apple Single Sign-On profile targeting a cloud KDC. See the product documentation, Implementing Mobile Single Sign-On Authentication for Workspace ONE UEM-Managed iOS Devices.
On Android, use the Tunnel app and configuration to proxy the Workspace ONE Access authentication requests through the CertProxy service. Use the authentication certificate set up for the Tunnel service. See the product documentation, Implementing Mobile Single Sign-On Authentication for Workspace ONE UEM Managed Android Devices.
For both Windows and macOS, system certificates are directly used for authentication. Those certificates are delivered through the credential or SCEP payload for each platform.
To automate the process of selecting the certificate on macOS, you can send further configurations down to the device. See the Tech Zone blog post, Managing Identity Preferences to Streamline Single Sign-On for macOS.
On Windows, you can use ADMX policies to manage all kinds of browsers. See Certificate picker for SSO on Windows browsers for more information.
Using Workspace ONE Access as IdP Authenticator in Okta
In Okta, you configure other IdPs to be used as possession factors during authentication. When users sign in to Okta they are presented with the factor as an option, complete the verification using Mobile SSO, Certificate Authentication, and optionally biometric checks (as with Mobile SSO for Apple) and then they are redirected to Okta. More about using IdPs as possession factor authenticators can be found in the Okta documentation.
To give you an overview of the steps involved when performing this integration with Workspace ONE, we outline them in the following sample configuration to secure access to Office 365 which is federated to Okta.
Add IdP in Okta
Start by adding the IdP in Okta.
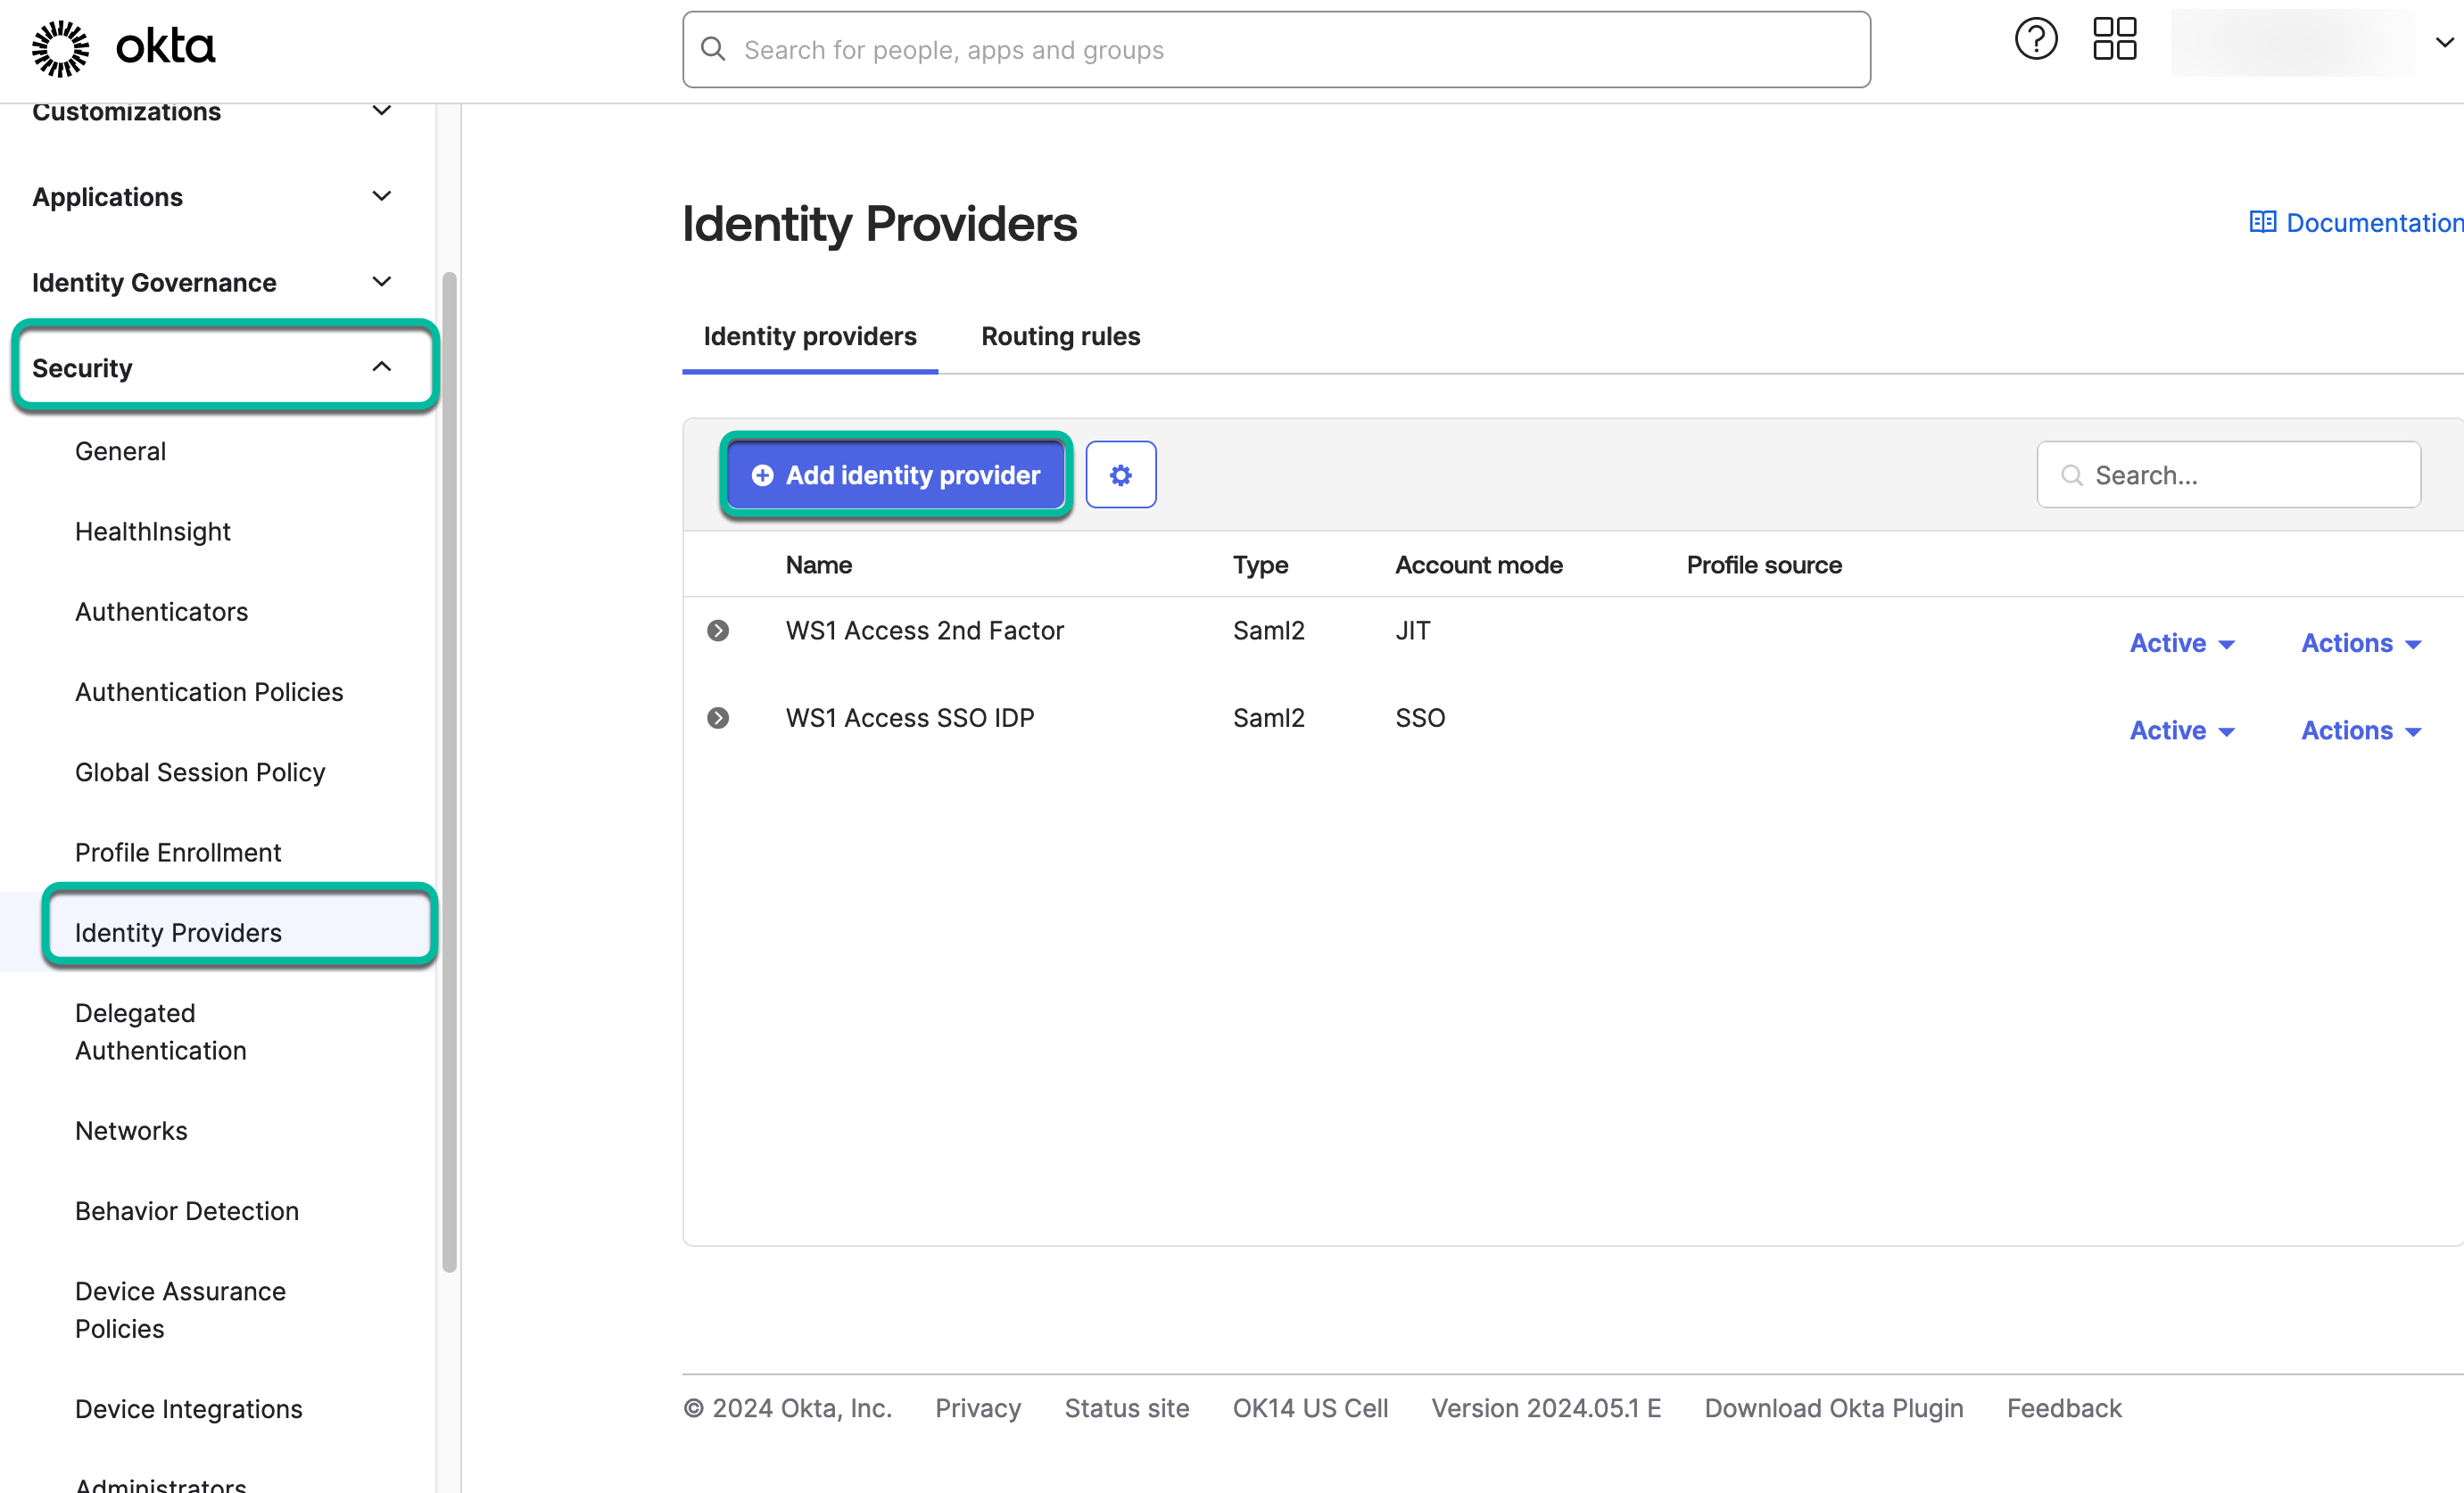
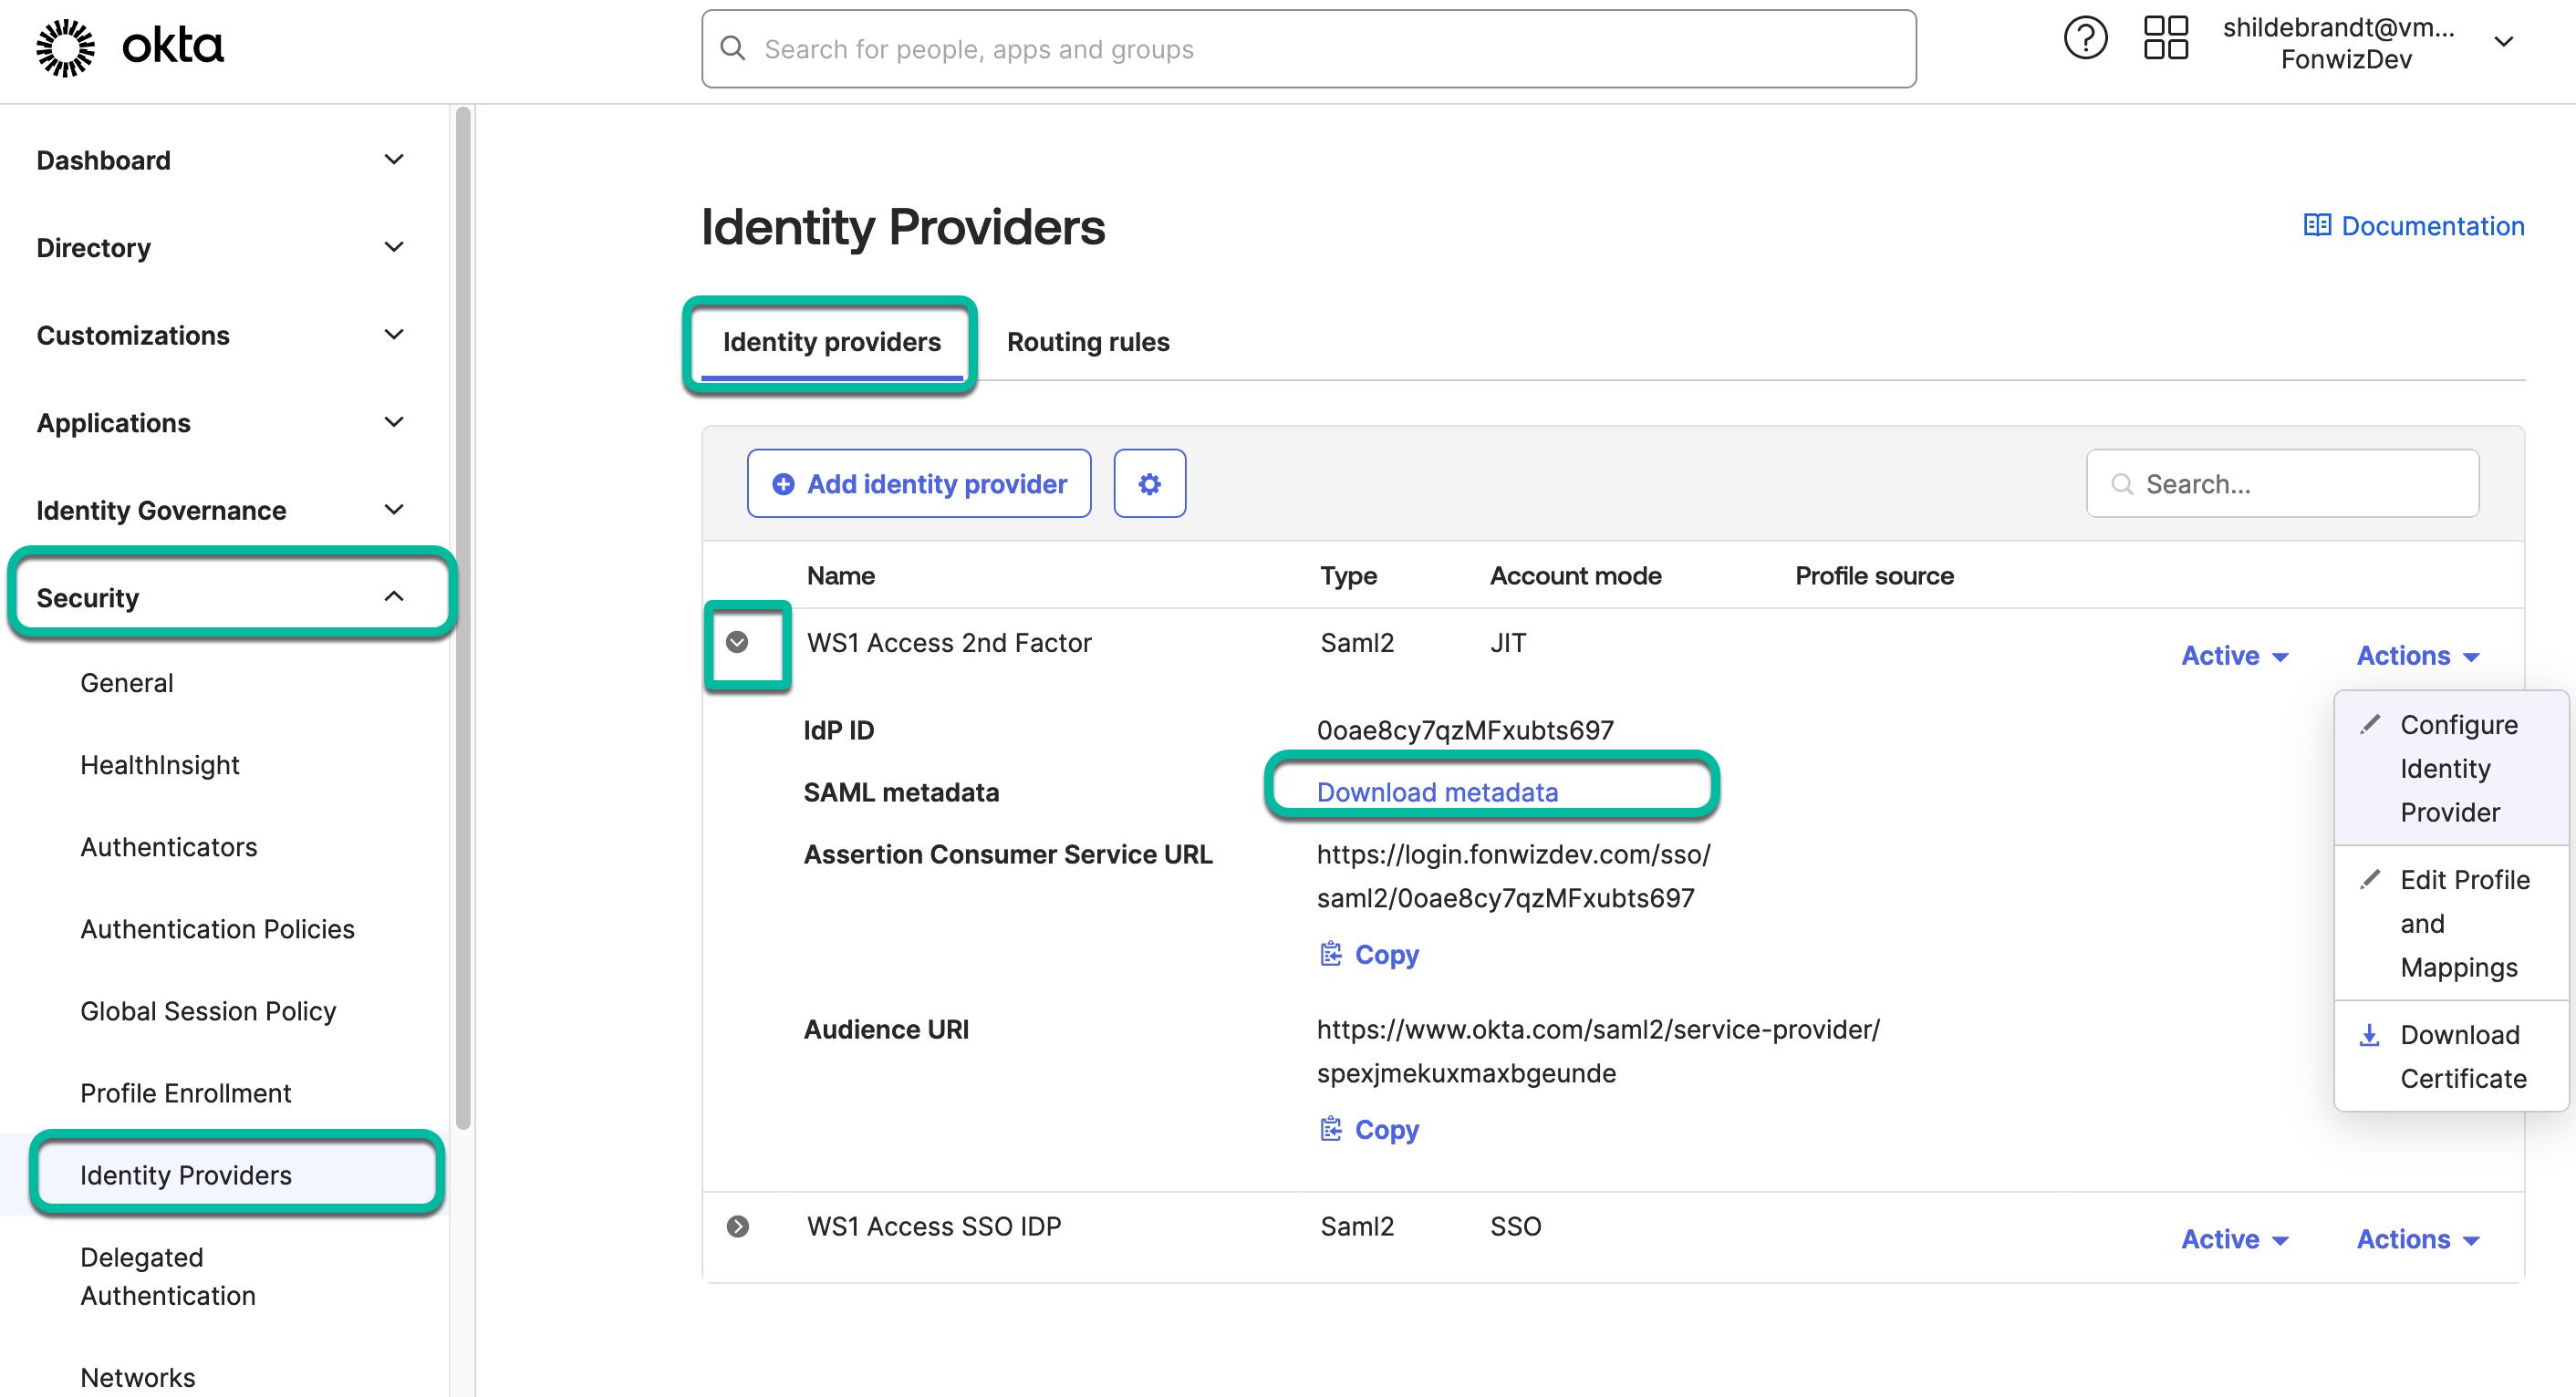
- In the Okta admin portal, navigate to Security > Identity Providers and click Add Identity Provider.

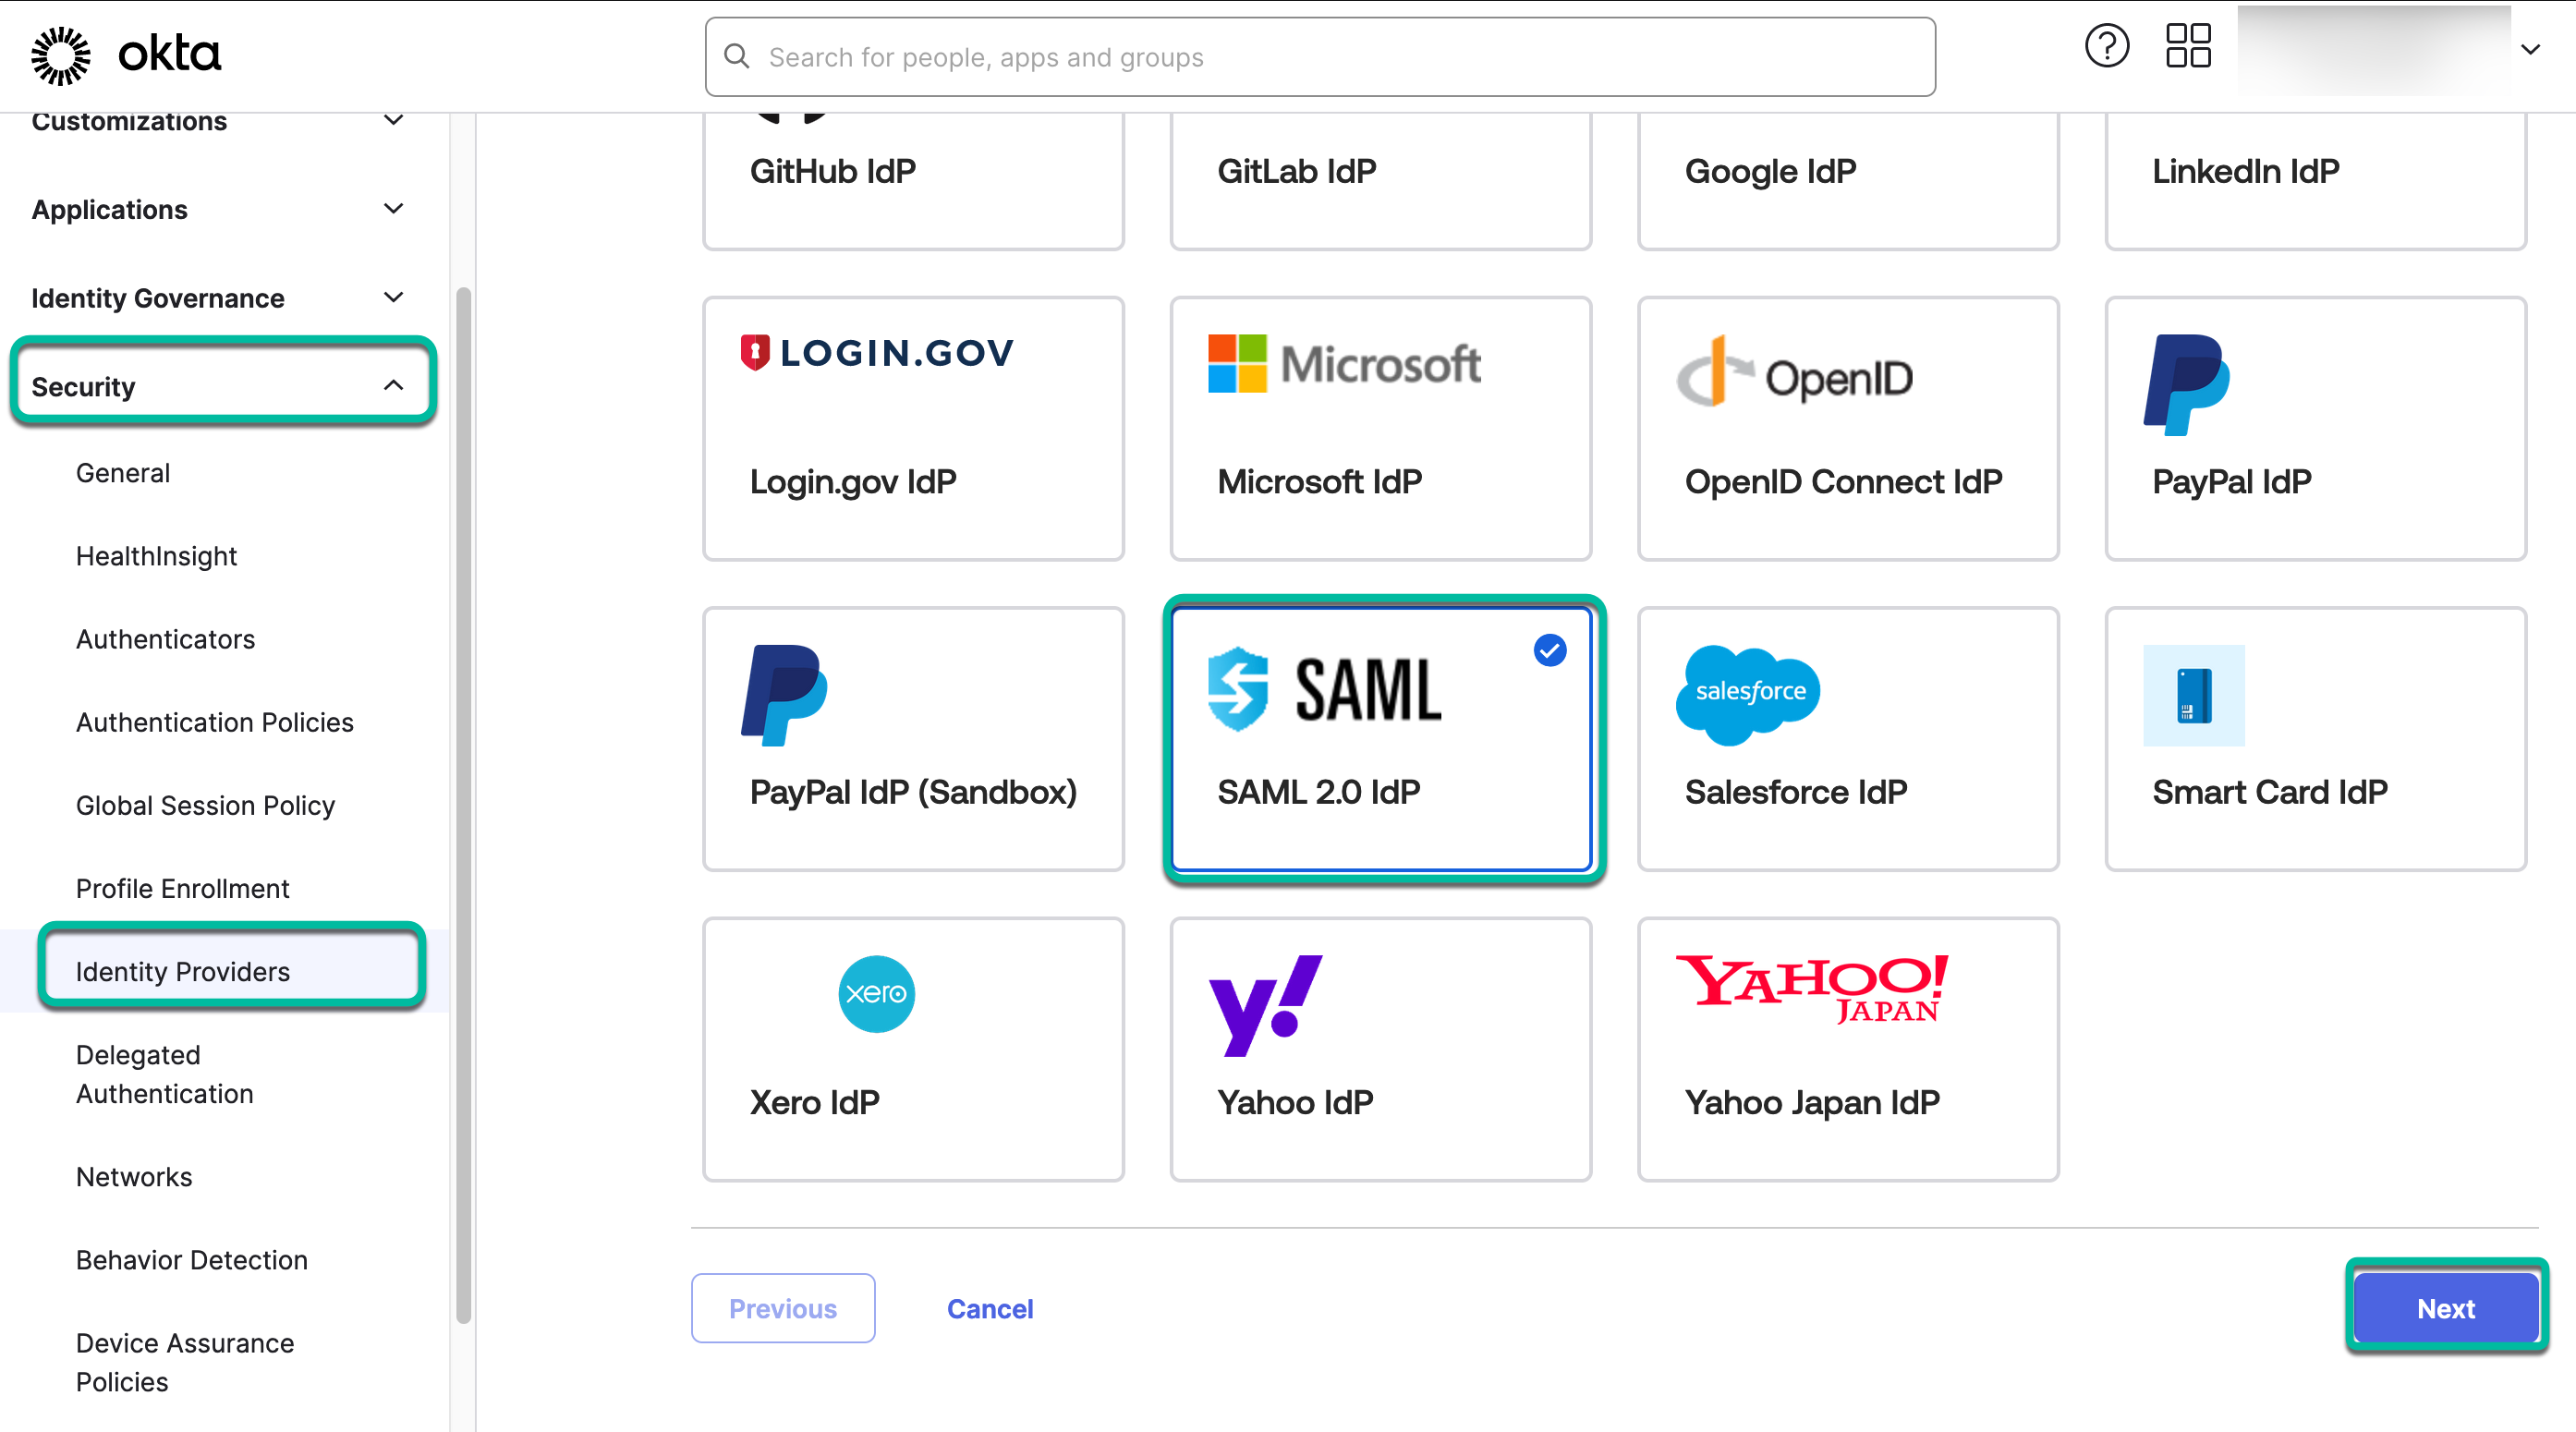
- In the next menu, select either the OpenID Connect or SAML 2.0 IdP option. In this example, SAML 2.0 was used. Click Next.

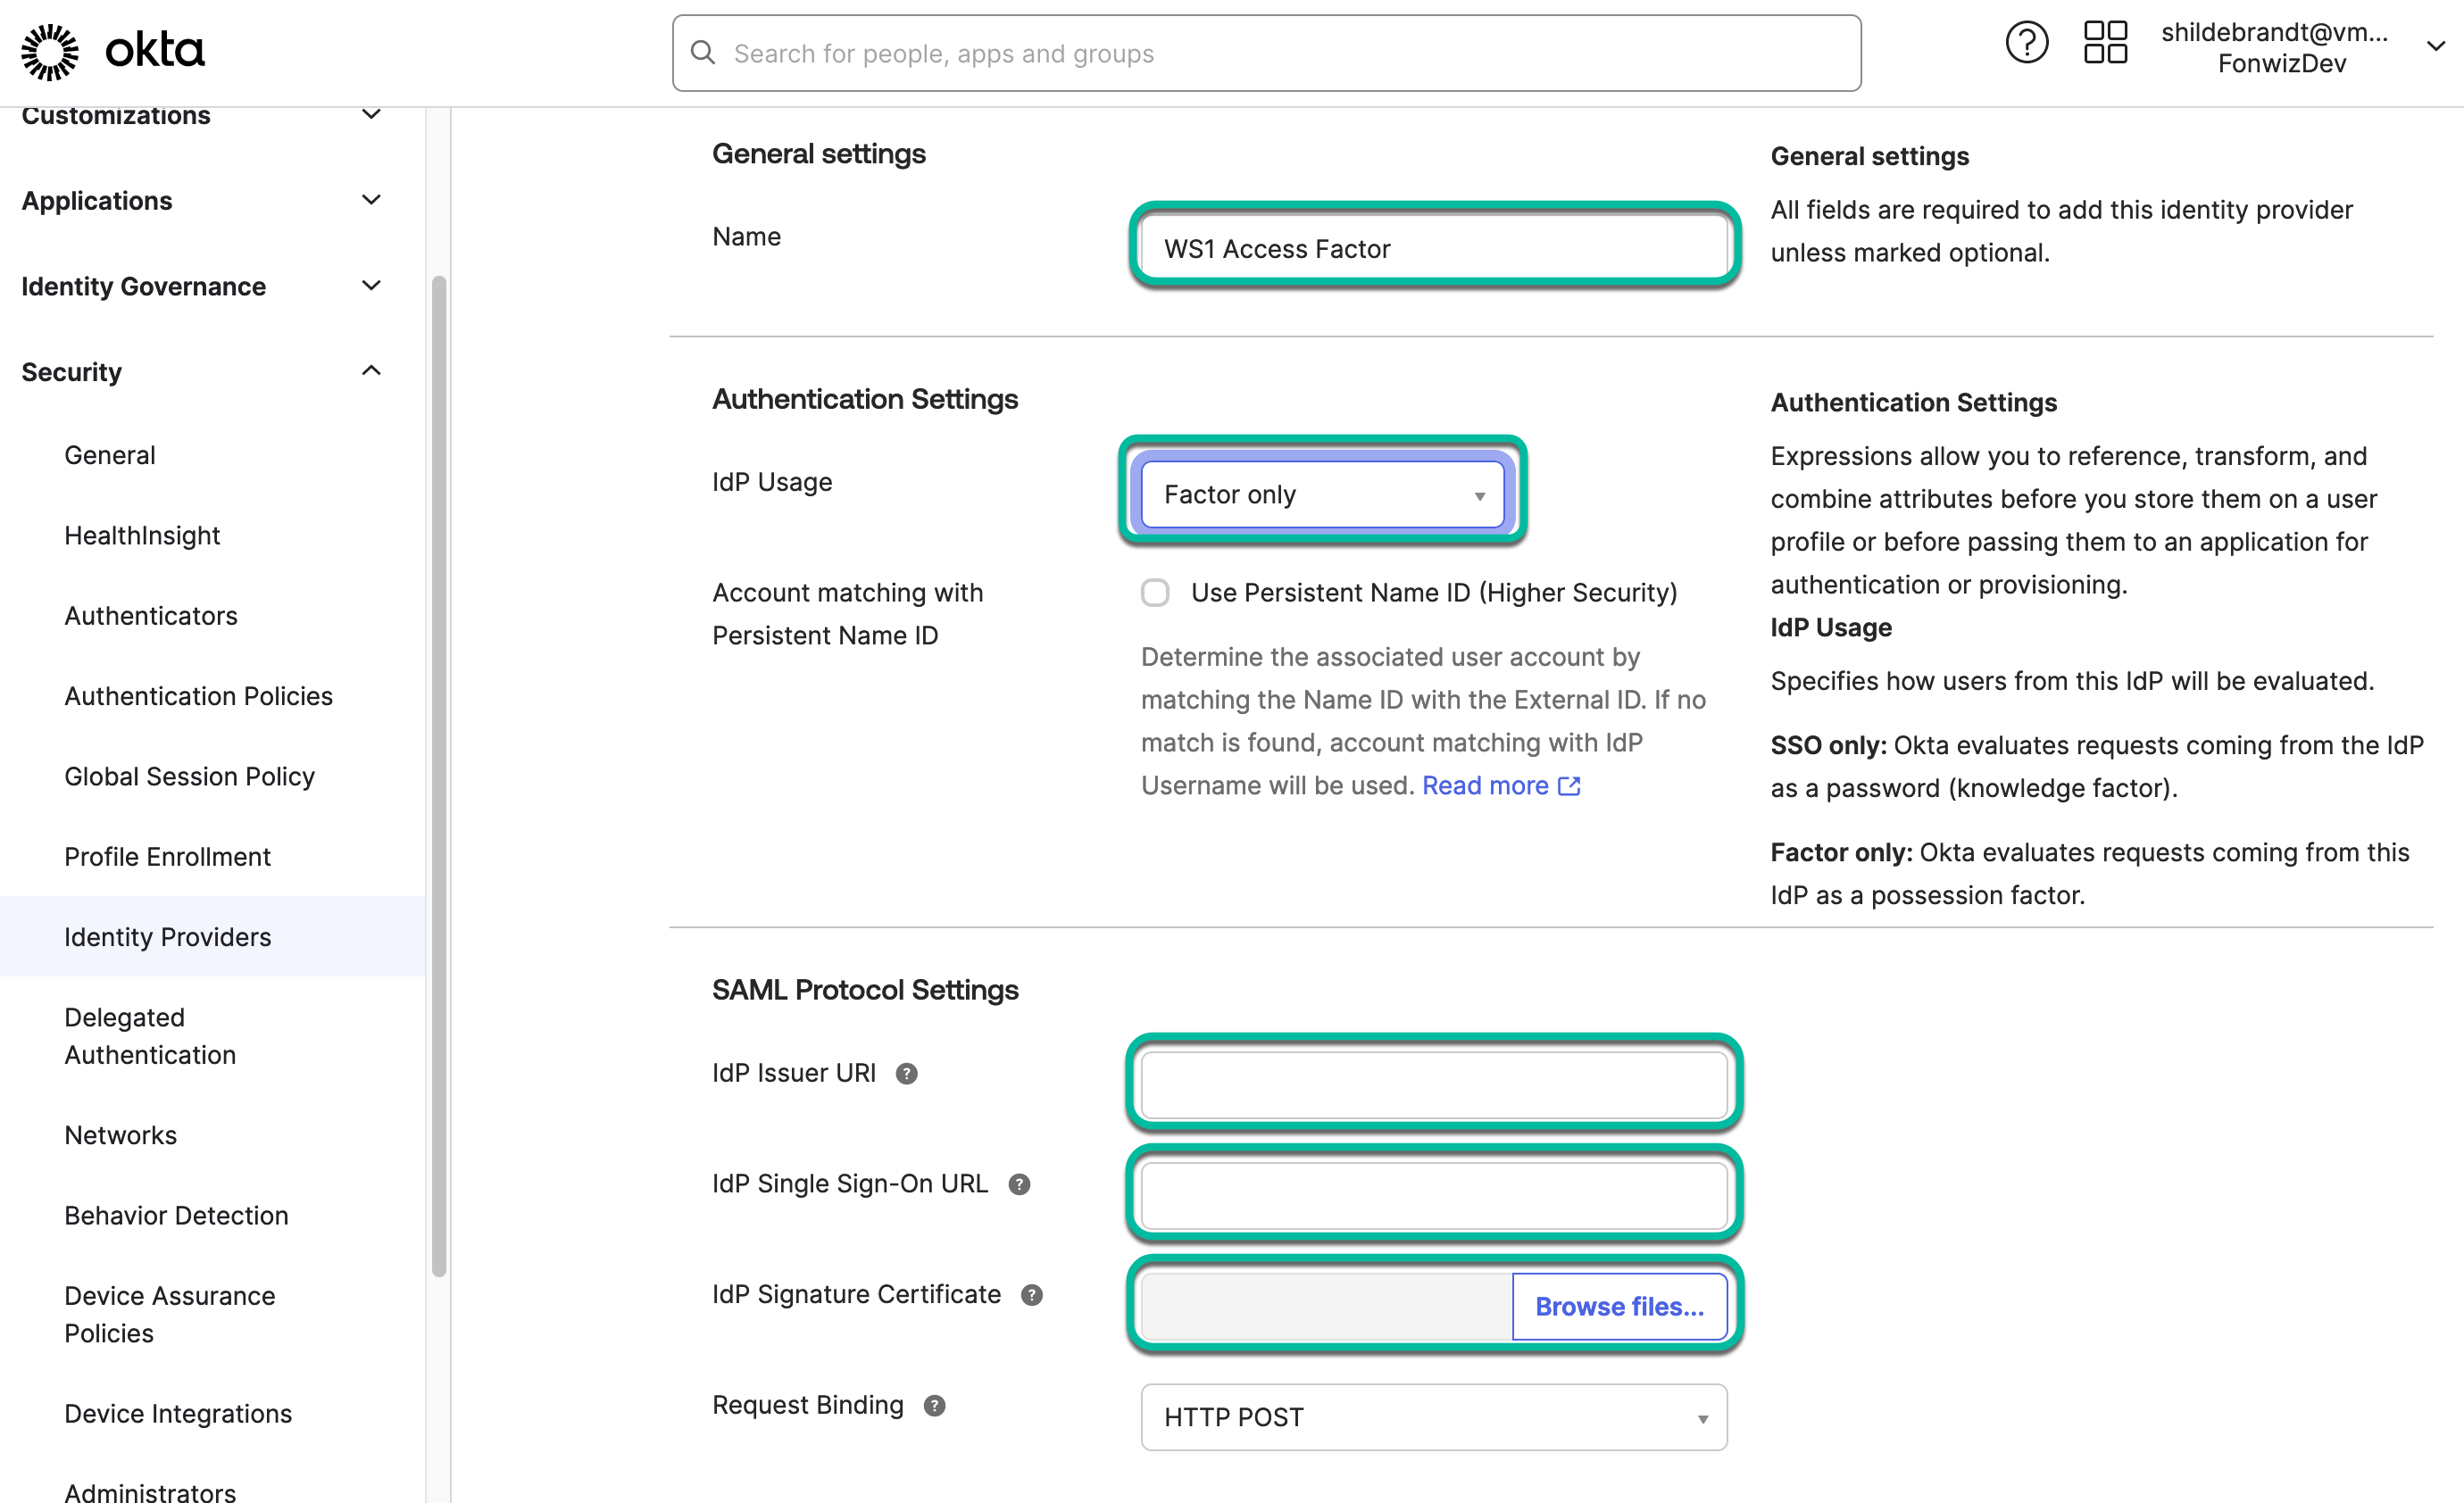
Here we set a name for the IdP and define the IdP usage; in this case, Factor only. You have the option between Factor only and SSO only. Optionally, you can define another IdP setting for SSO only later if you want to leverage the catalog integration in Hub, for example. See Configure Okta Applications in Workspace ONE Access in the product documentation.
- For the SAML protocol settings, go to the Access console to collect the required IdP metadata information.
- Set IdP usage to Factor only and add the required information.

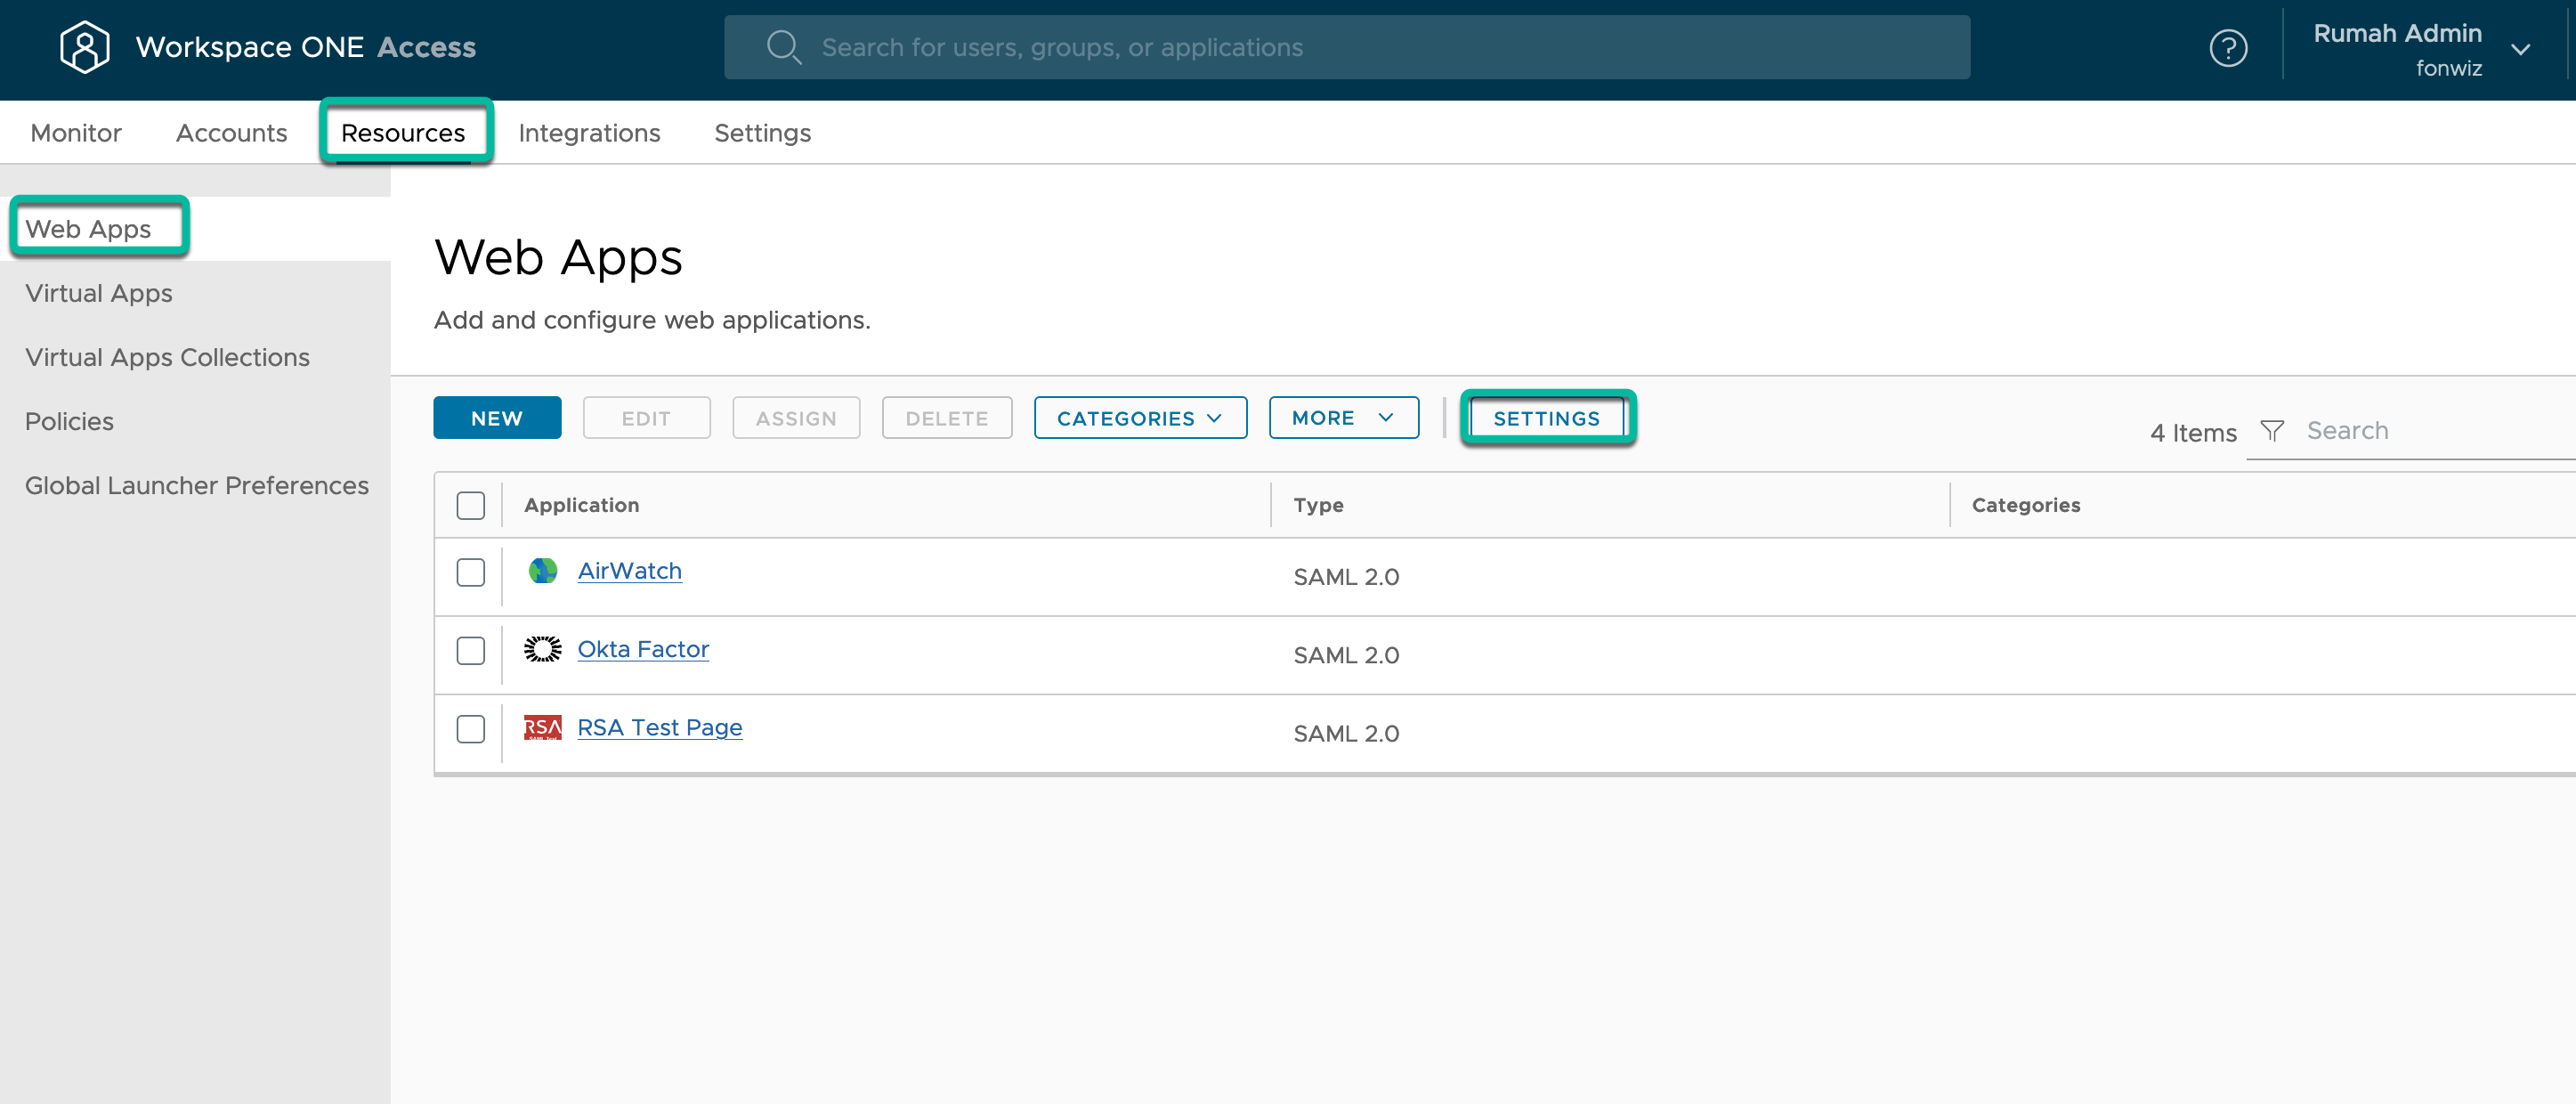
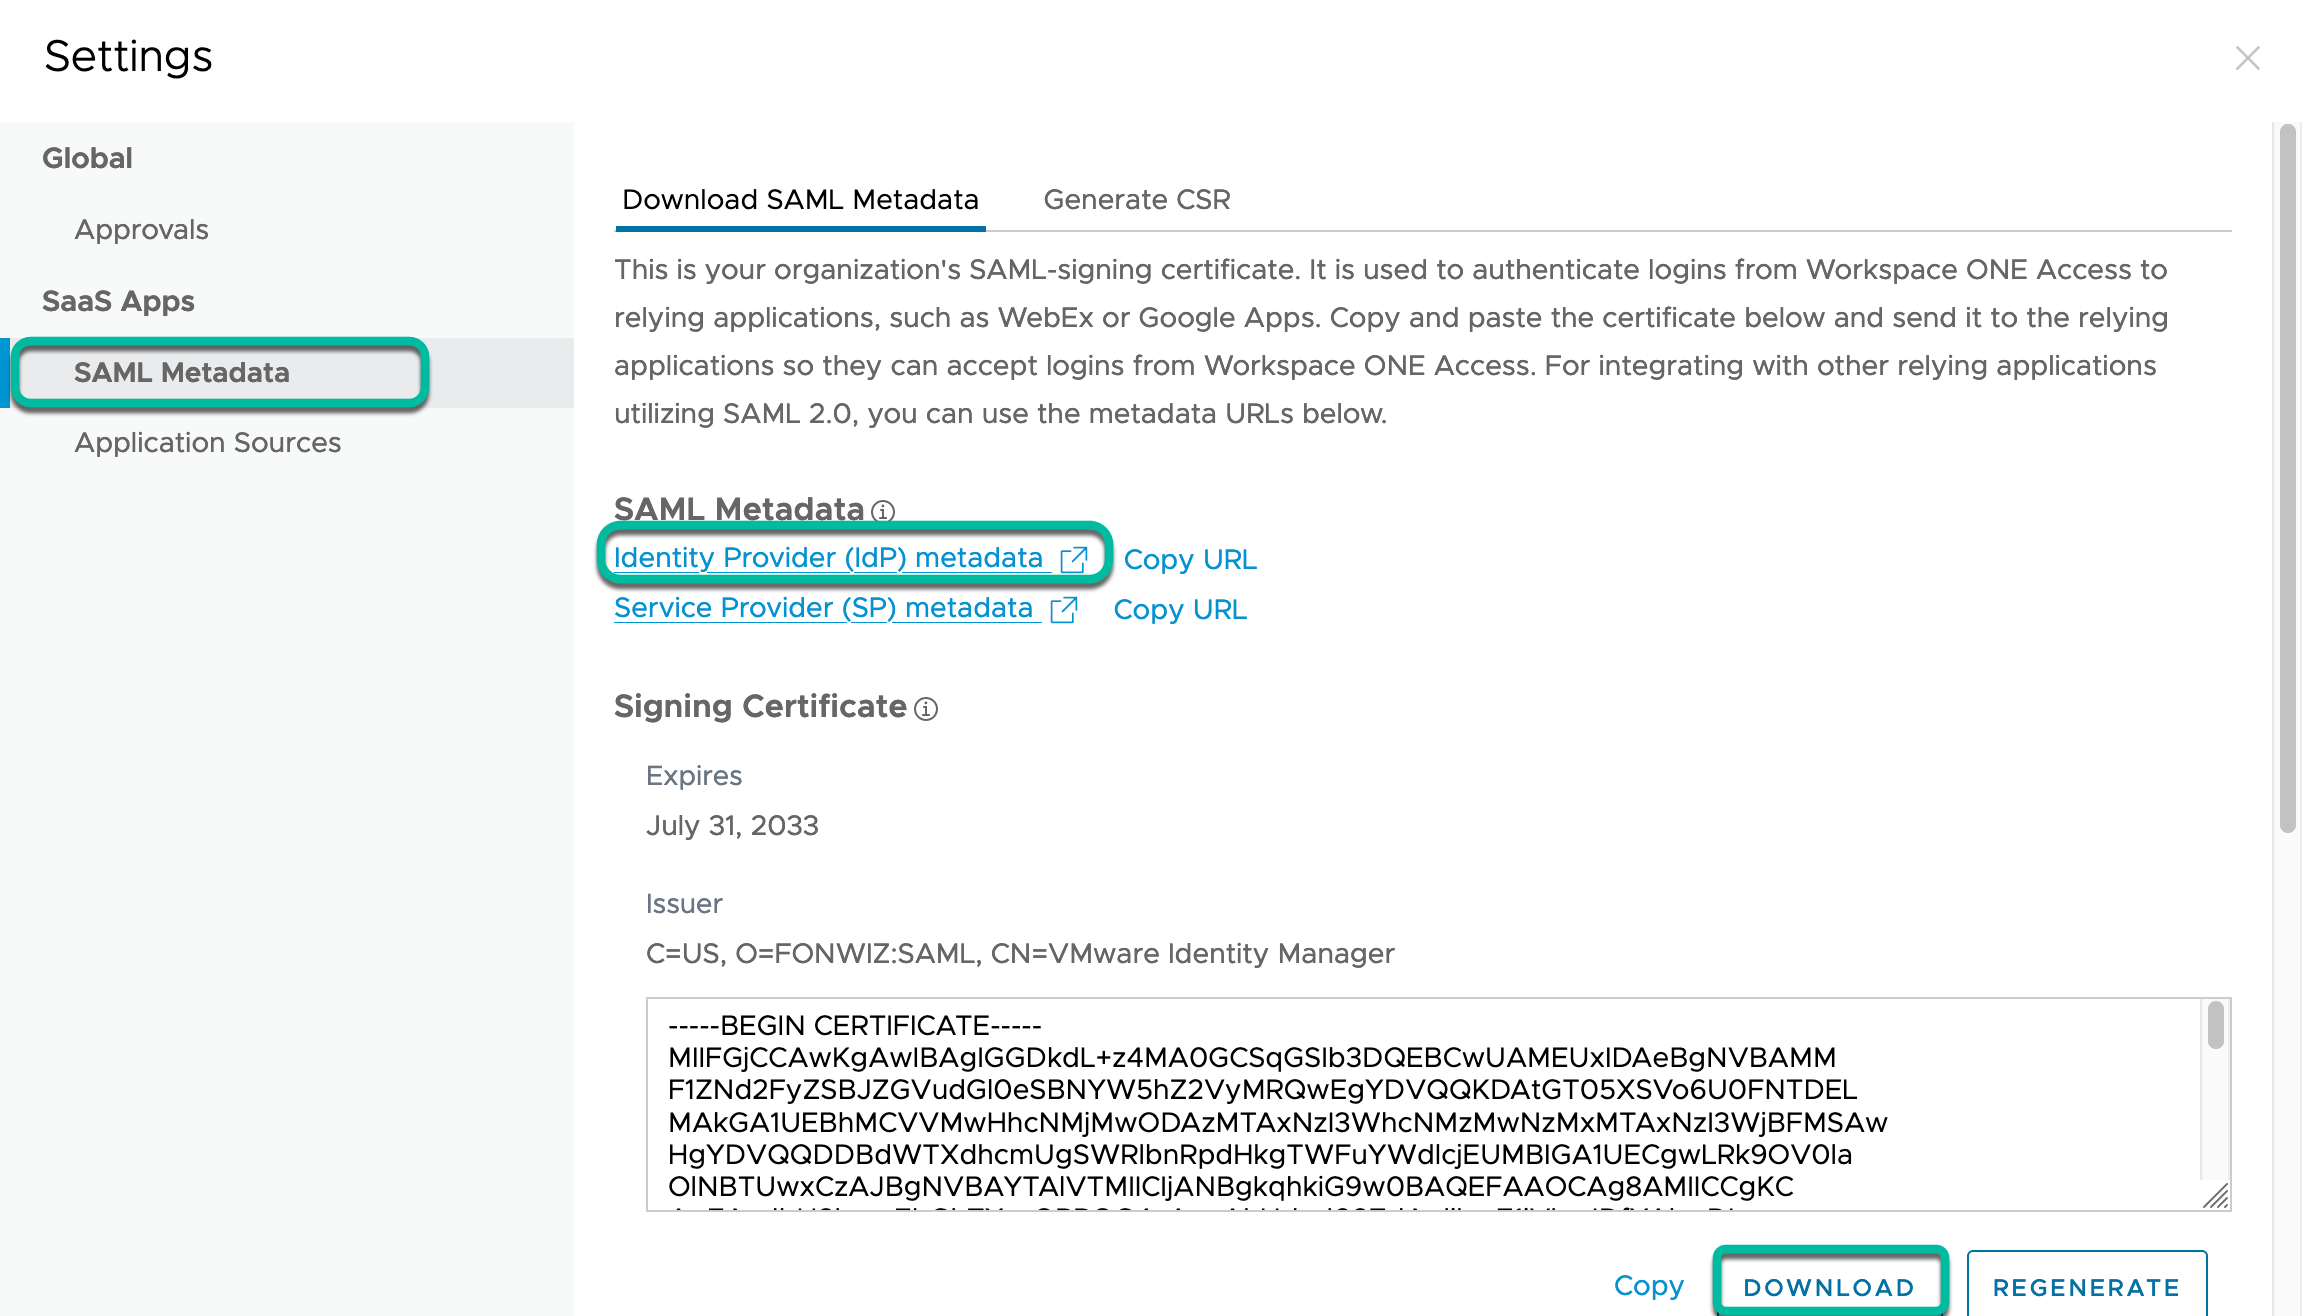
In the Access console, navigate to the Web Apps settings, which hold generic data used across integrations like the IdP and SP metadata and signing certificates.
- Navigate to Workspace ONE Access metadata under Resources > Web Apps > Settings.

- Open the Identity Provider (IdP) metadata in a new tab and download the Signing Certificate.

- From the metadata, copy the
entityIDvalue which usually comes in the format:https://<AccsstenantURL>/SAAS/API/1.0/GET/metadata/idp.xmlinto the Okta IdP Issuer URI and theSingleSignOnService Locationvalue which comes in the format:https://<AccsstenantURL>/SAAS/auth/federation/ssointo the Okta IdP Single Sign-On URL field. - Upload the downloaded signing certificate into the IdP Signature Certificate field and save the configuration.
- Retrieve the required metadata to finish the federation between both services by expanding the newly created IdP and clicking Download metadata.

Add Web App in Access for IdP
In Access, you can now add the required Web App. The process is described in detail in the product documentation: Providing Access to Web Applications in Workspace ONE Access.
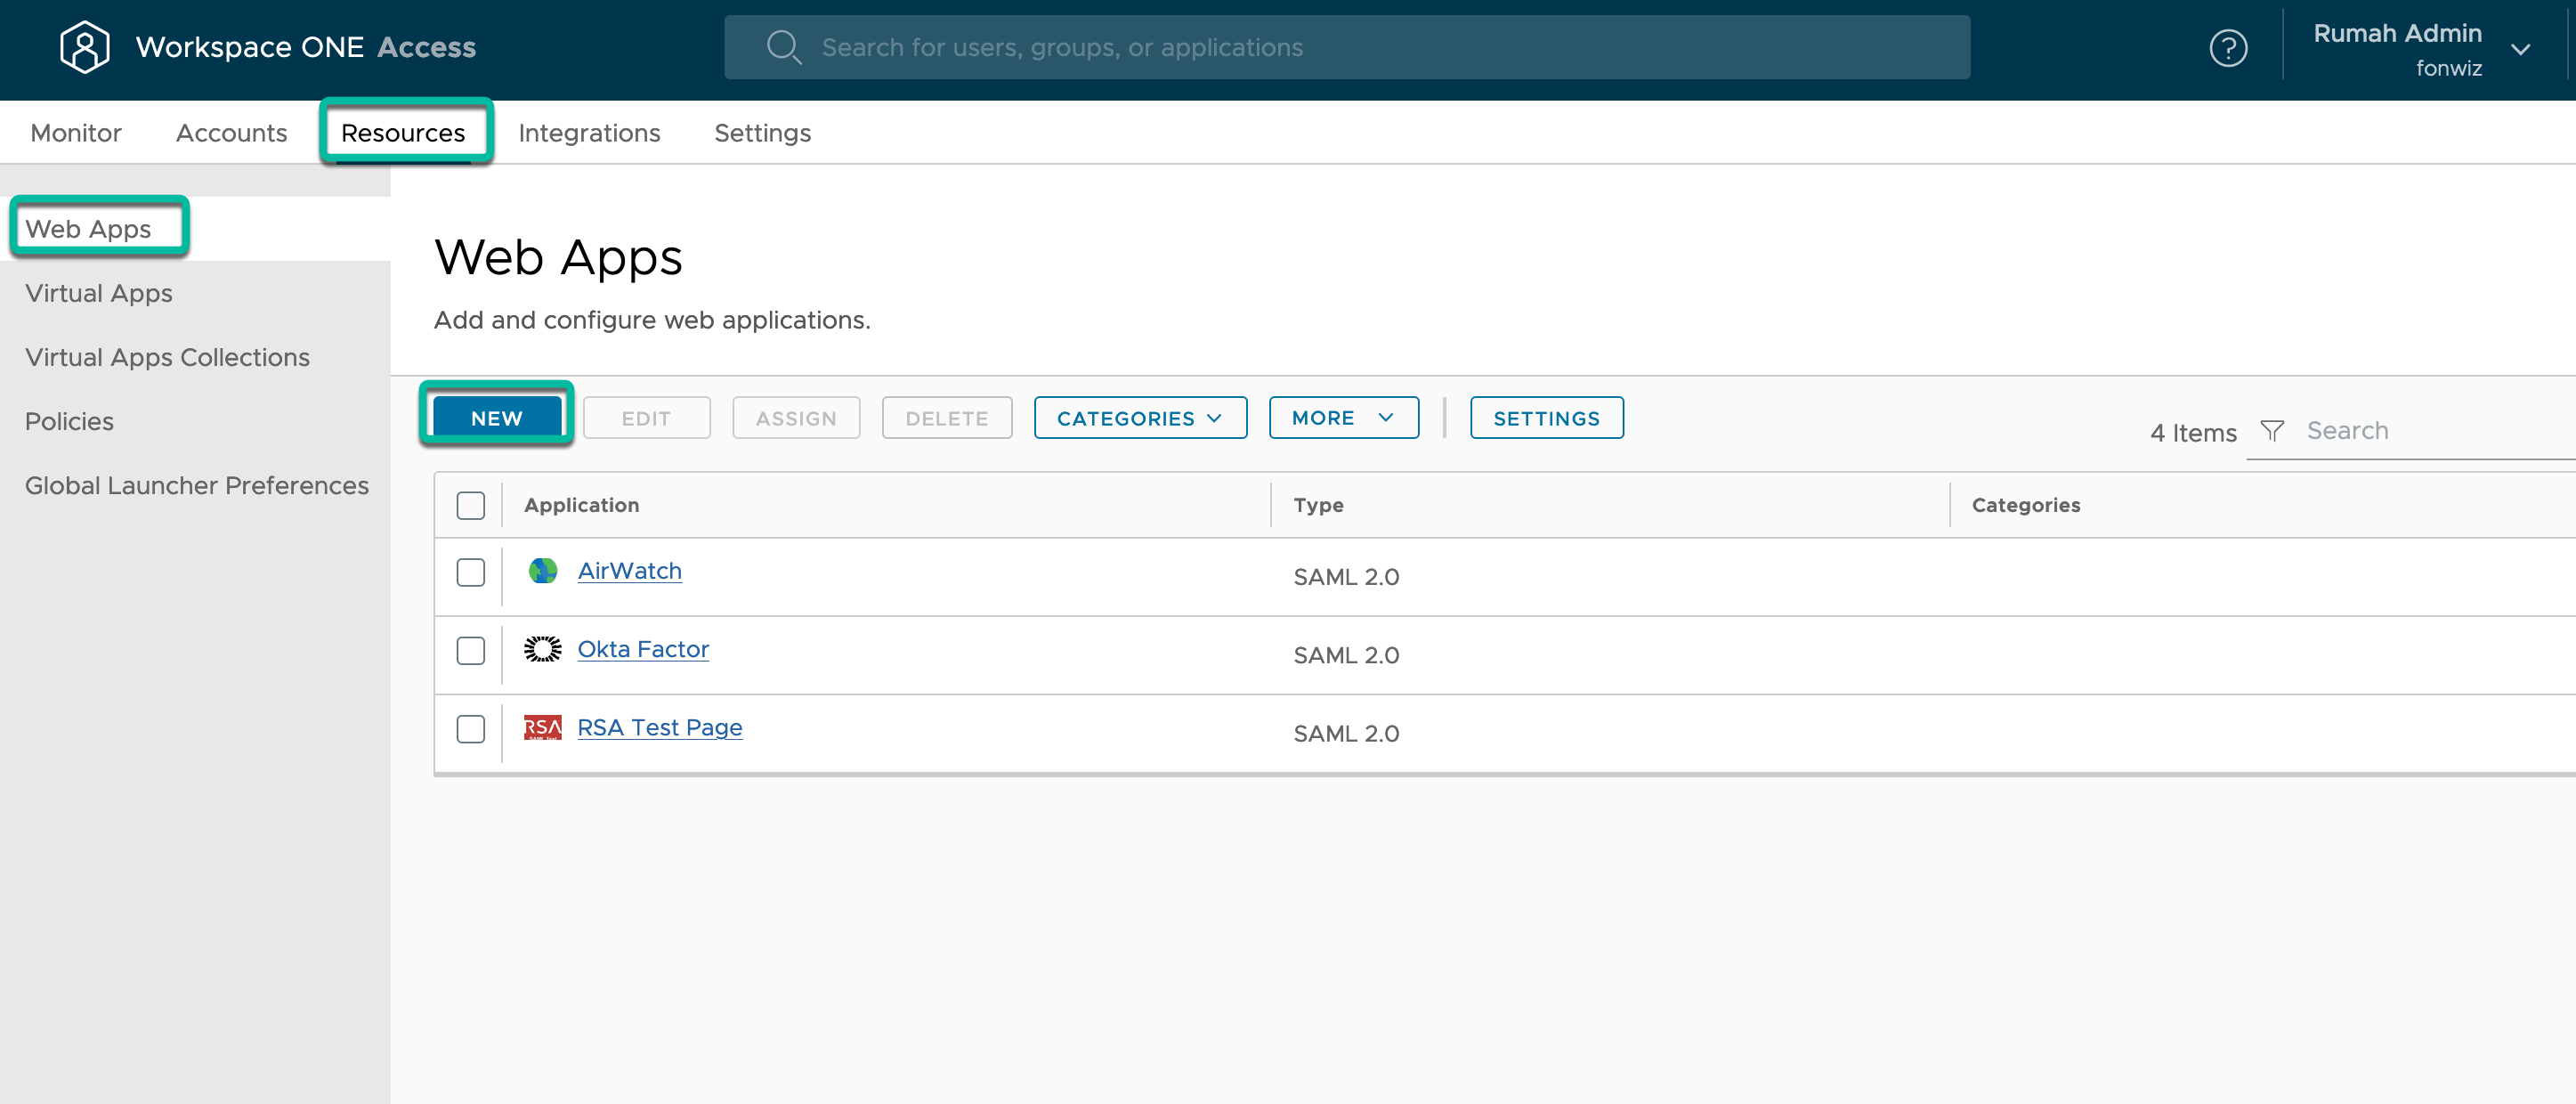
- In the Access console, navigate to Resources > Web Apps and Click New to add the Okta Factor application.

- Enter a name and description, and click Next to choose the Authentication type.
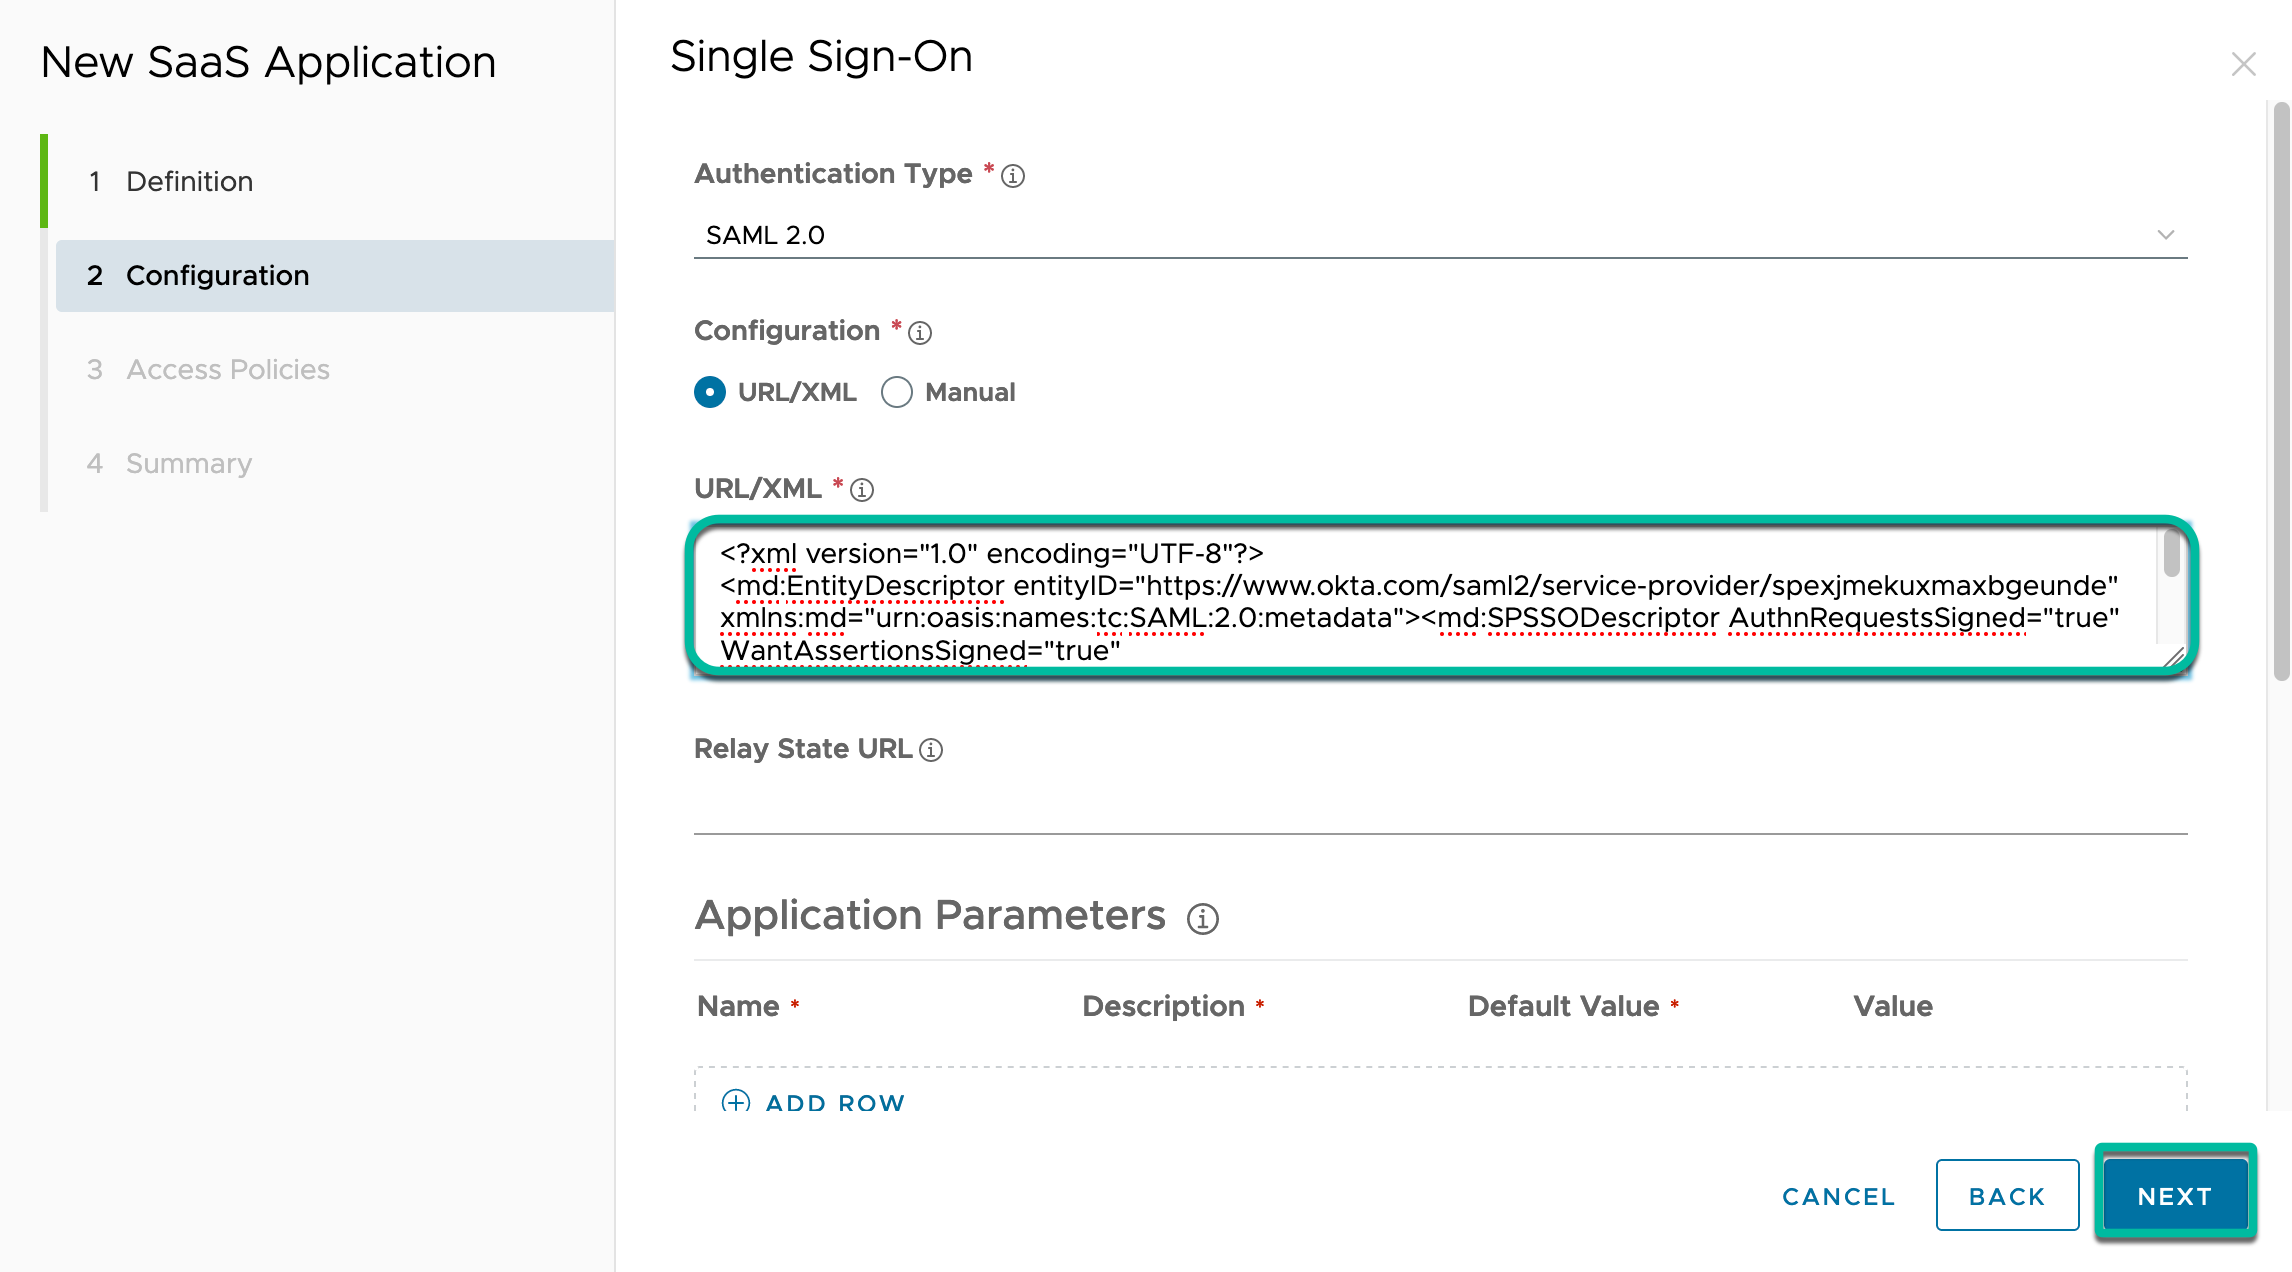
- In the configuration, copy and paste the content of the metadata XML file that you just downloaded from Okta into the URL/XML field and click Next and Save. Access can read and fill the configuration with the attributes and values from the XML.

Add Authentication Policy in Access
Another required step is to add a policy in Access to use with the new Web App. This policy will enforce a certificate-based authentication method and compliance check when using the Okta Factor IdP app. Access policies can be granular based on device type, group membership, and other attributes. To learn more about policies, see the Workspace ONE Access FAQ on Tech Zone and the product documentation.
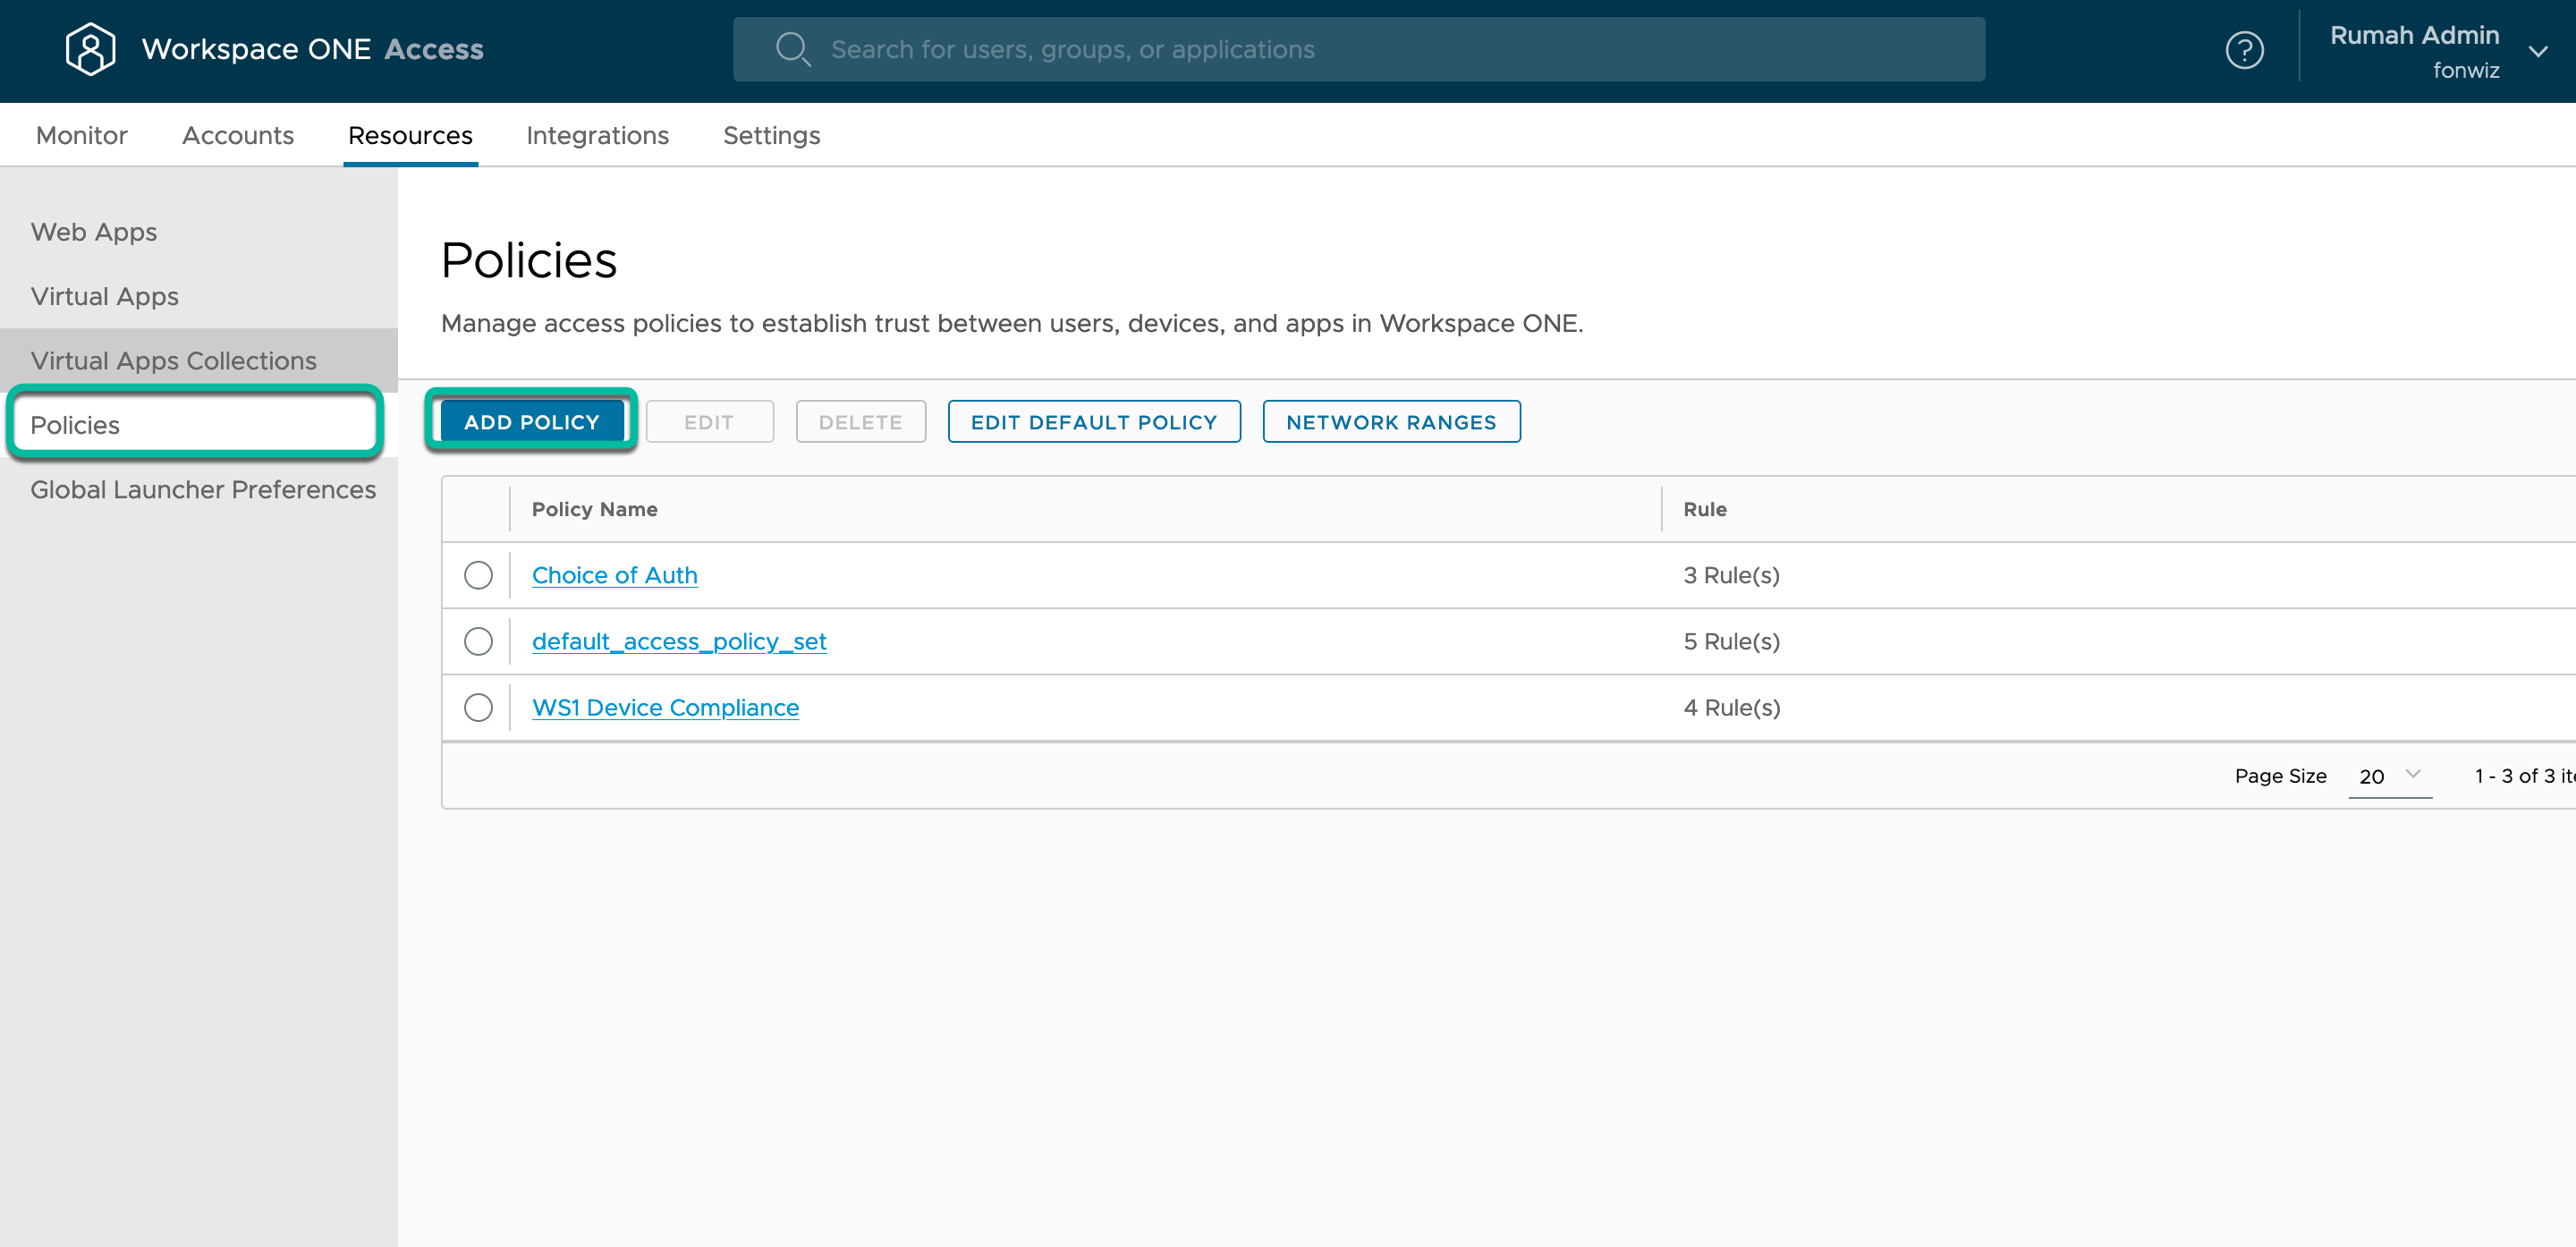
- Navigate to Policies, click Add Policy, then add a name and description.

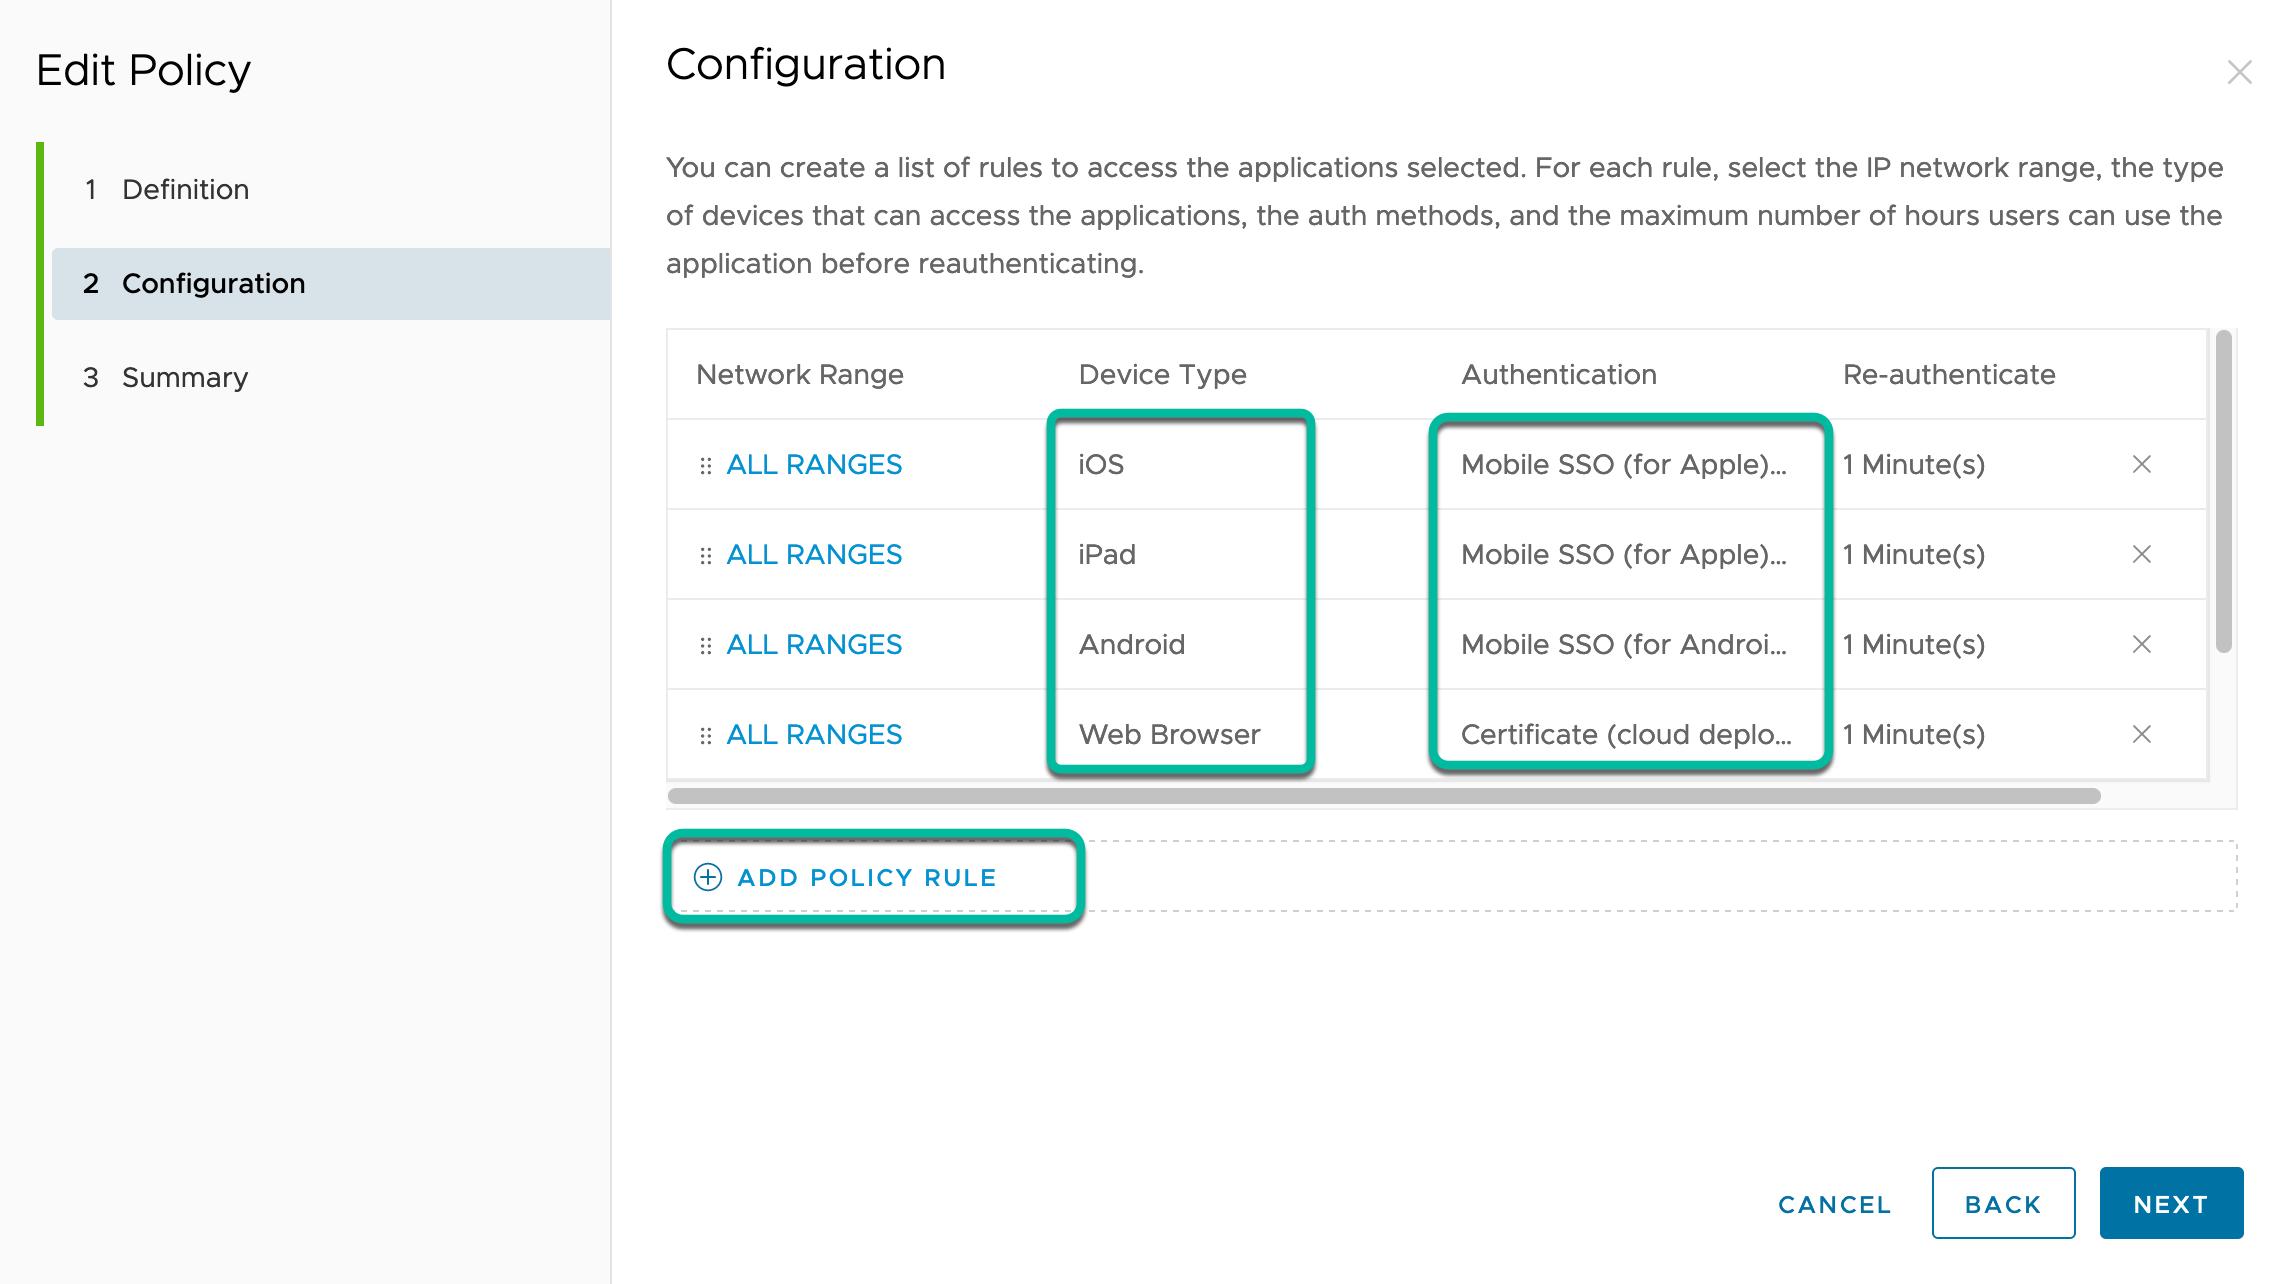
- Under Configuration, add the policy rules for all device types managed. The rules are evaluated from top to bottom to check if they apply to the authentication request. For this reason, we usually create them from very specific to broad to catch all.

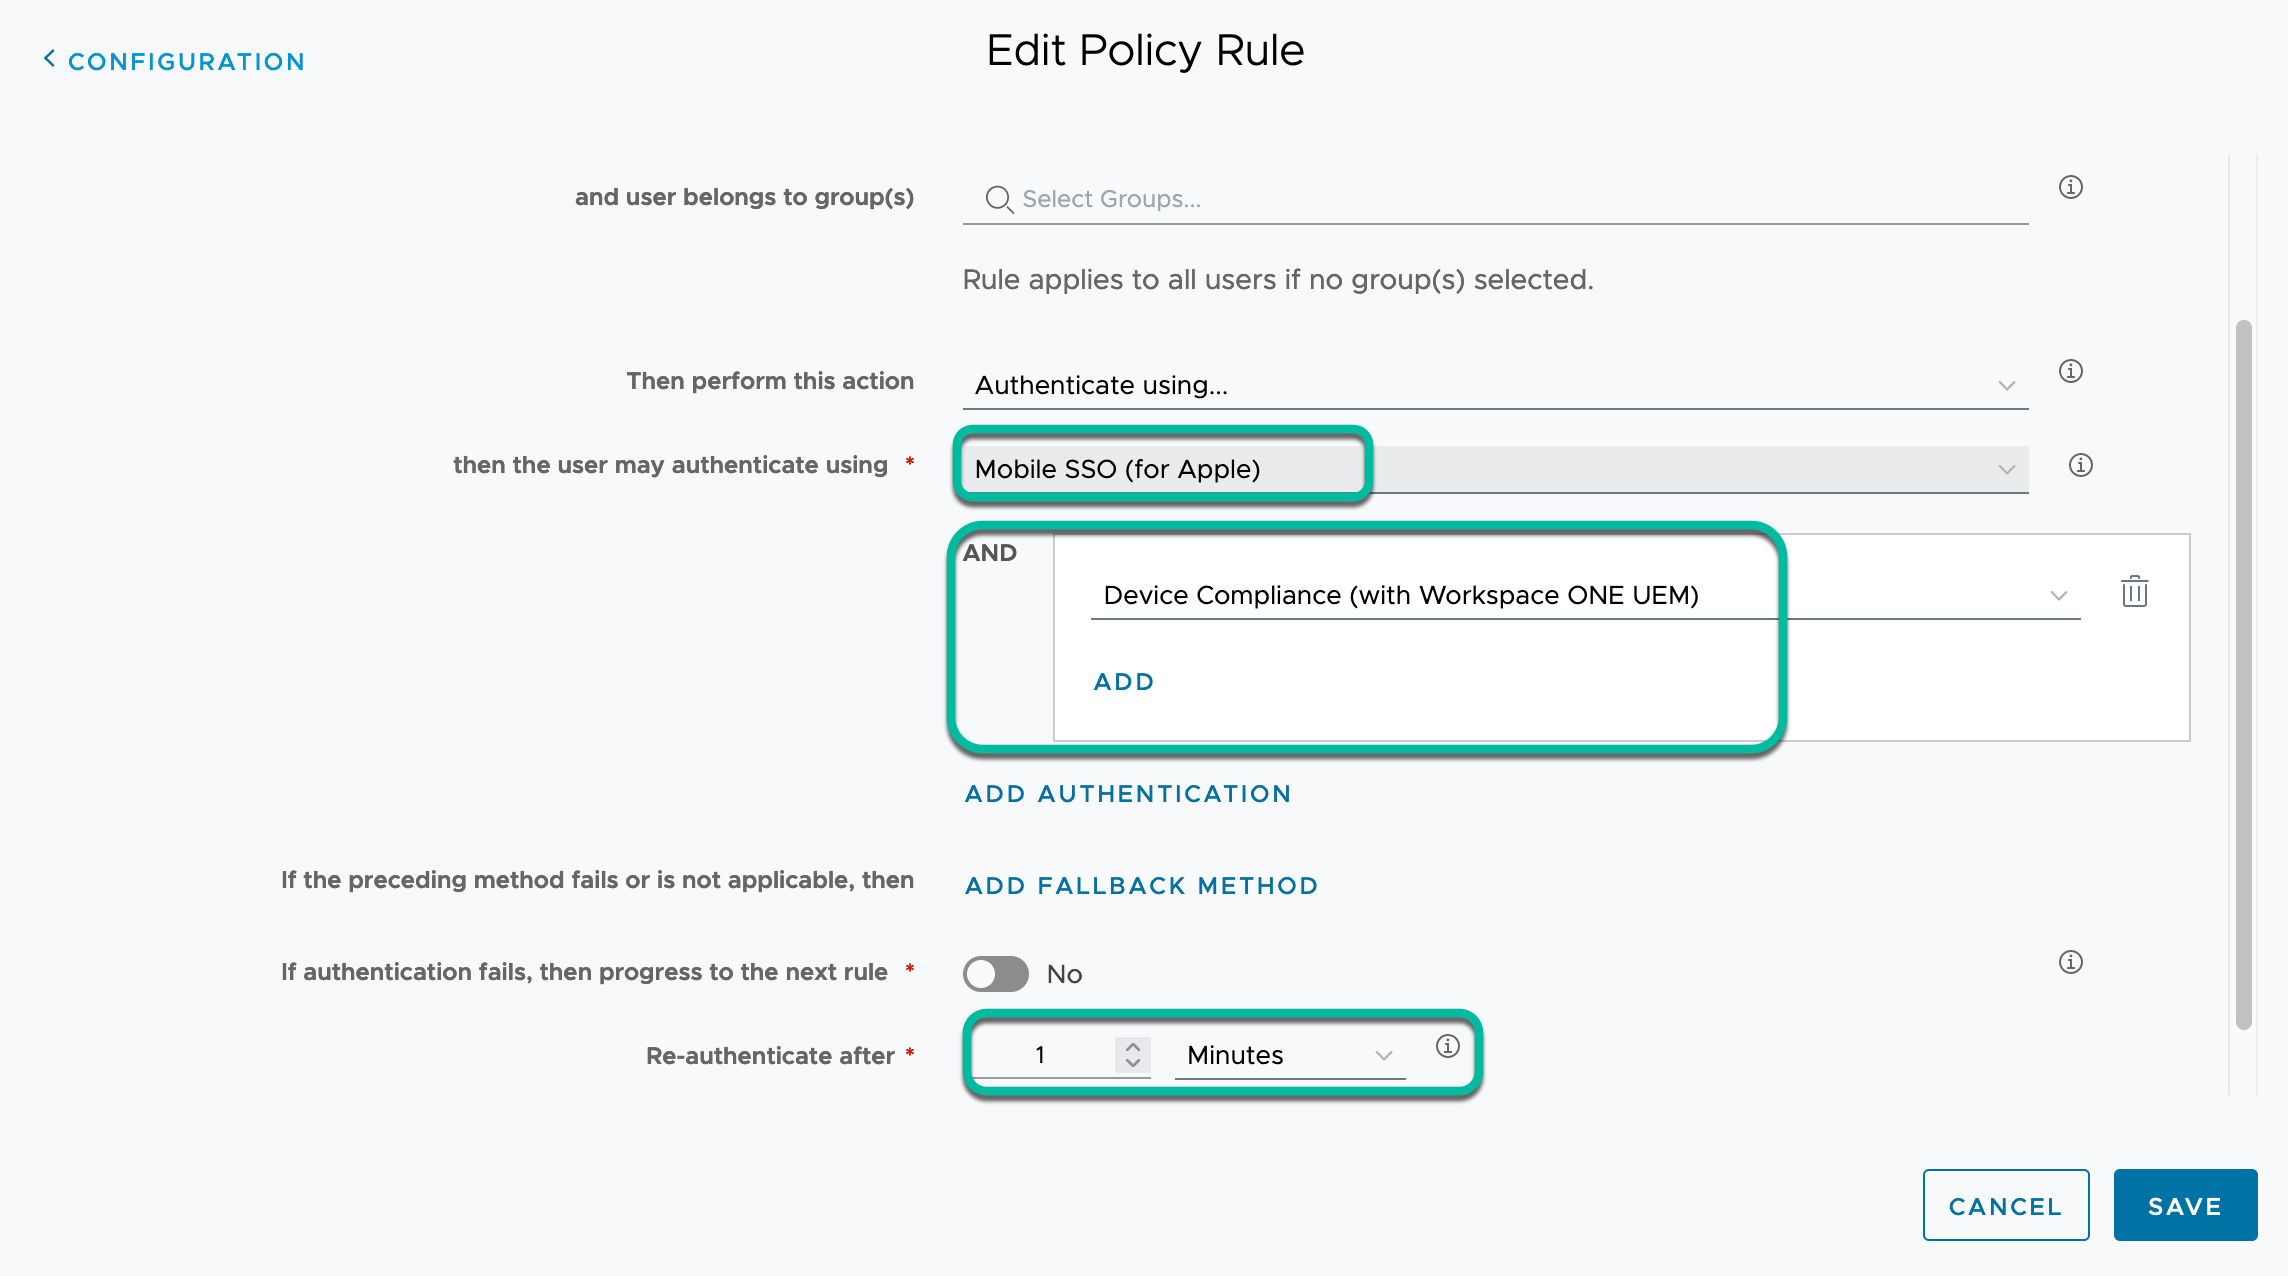
In each rule, choose the specific device type and specify the required certificate-based authentication method to authenticate with, combined with the Device Compliance method to further check the device posture during authentication. Optionally, add other methods for MFA if required by using Add Authentication again. Set re-authenticate after to a low value, so the authentication method and compliance will be checked on every occasion.
- Specify the certificate-based authentication method together with the Device Compliance method.

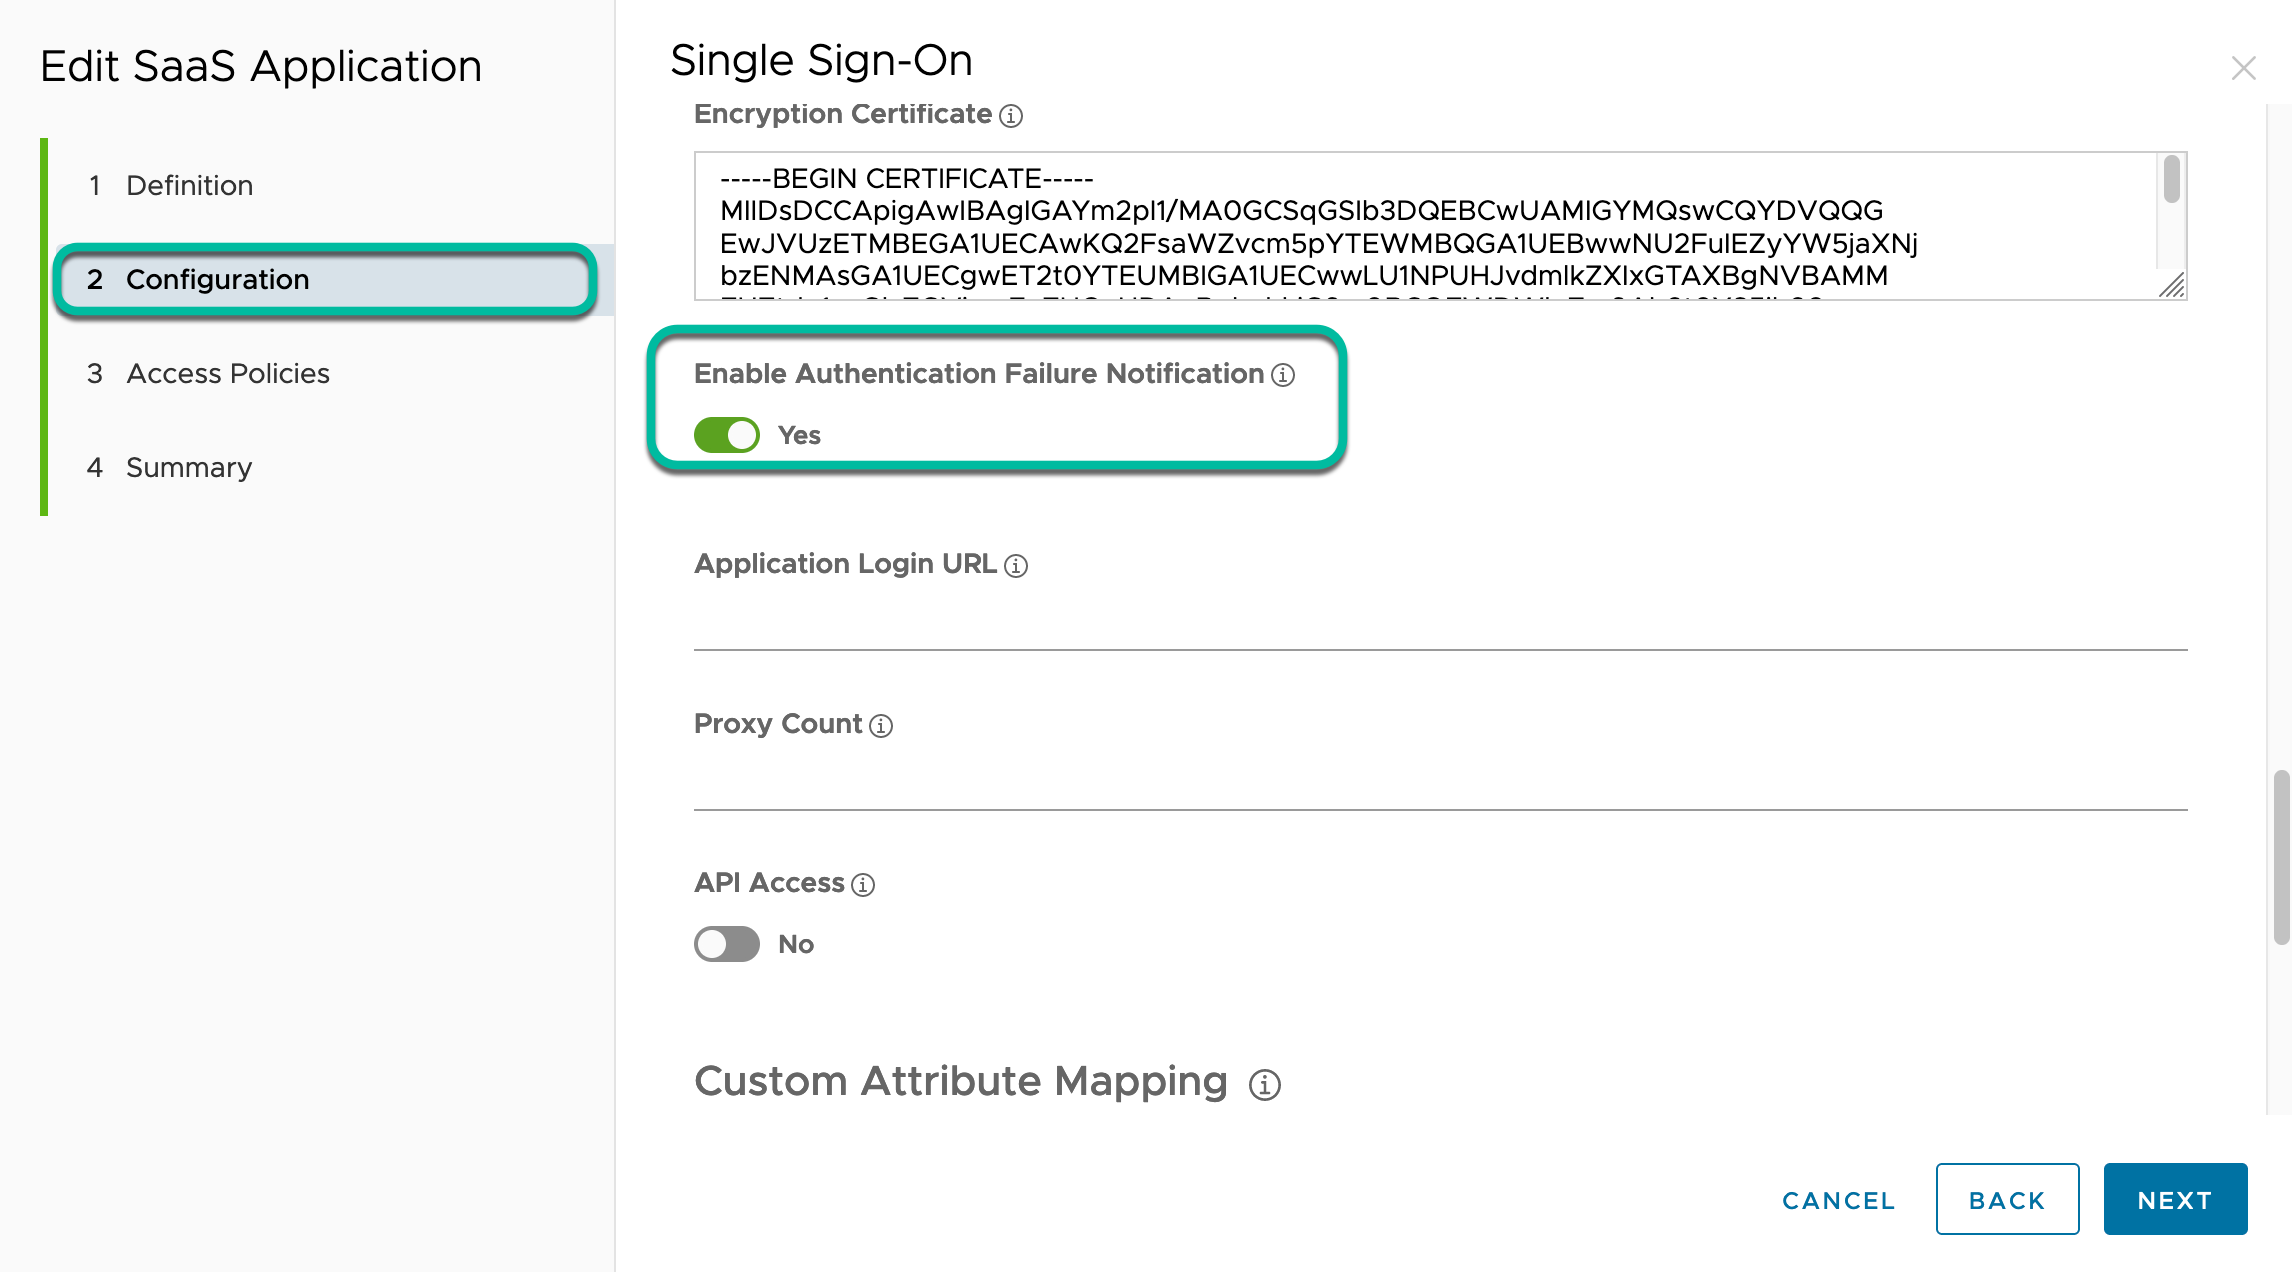
After saving the access policy configuration, you must assign it to the Okta Factor web app. You can now also decide on the behavior in case of a failed device posture check. In the Web App configuration under Advanced properties, set the Enable Authentication Failure Notification option. If this option is turned off, a failure to authenticate will end the authentication flow on the Access side and display an error. When enabled, a SAML assertion is sent stating failed authentication to Okta and an error will be displayed. Choose the option that applies best to your environment.
- Edit the application and set the Authentication Failure Notification option.

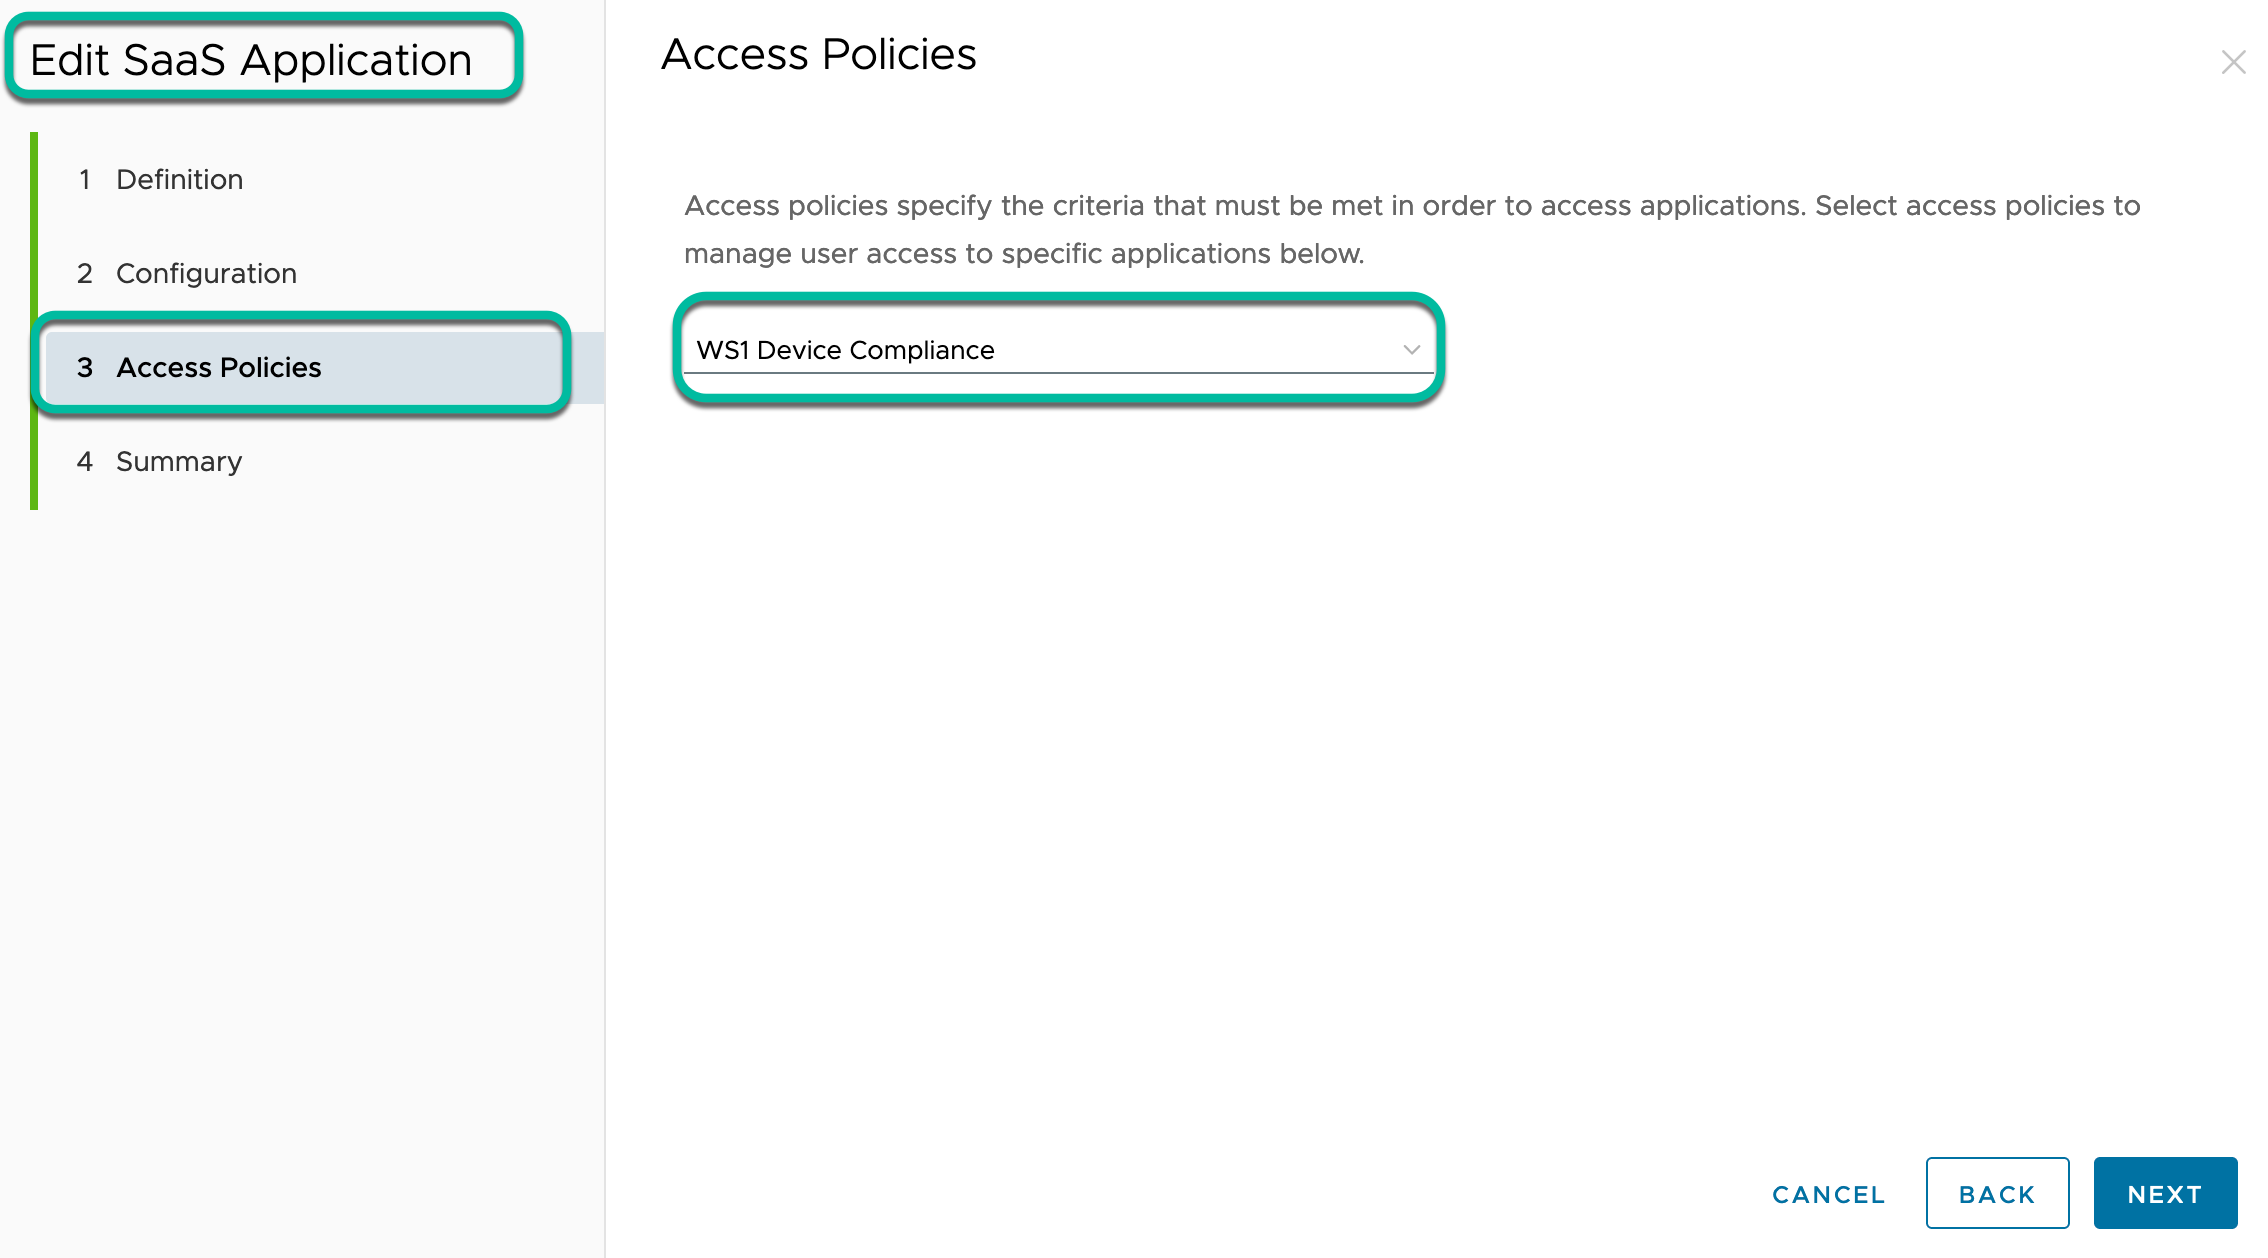
- Next, in the Access Policies section of the Web App configuration, select the newly created access policy from the drop-down menu.

- Save and assign the app to all users who should leverage the application as a factor in Okta.
Add IdP as Authenticator in Okta
The next step is to add the now configured IdP as possession authenticator.
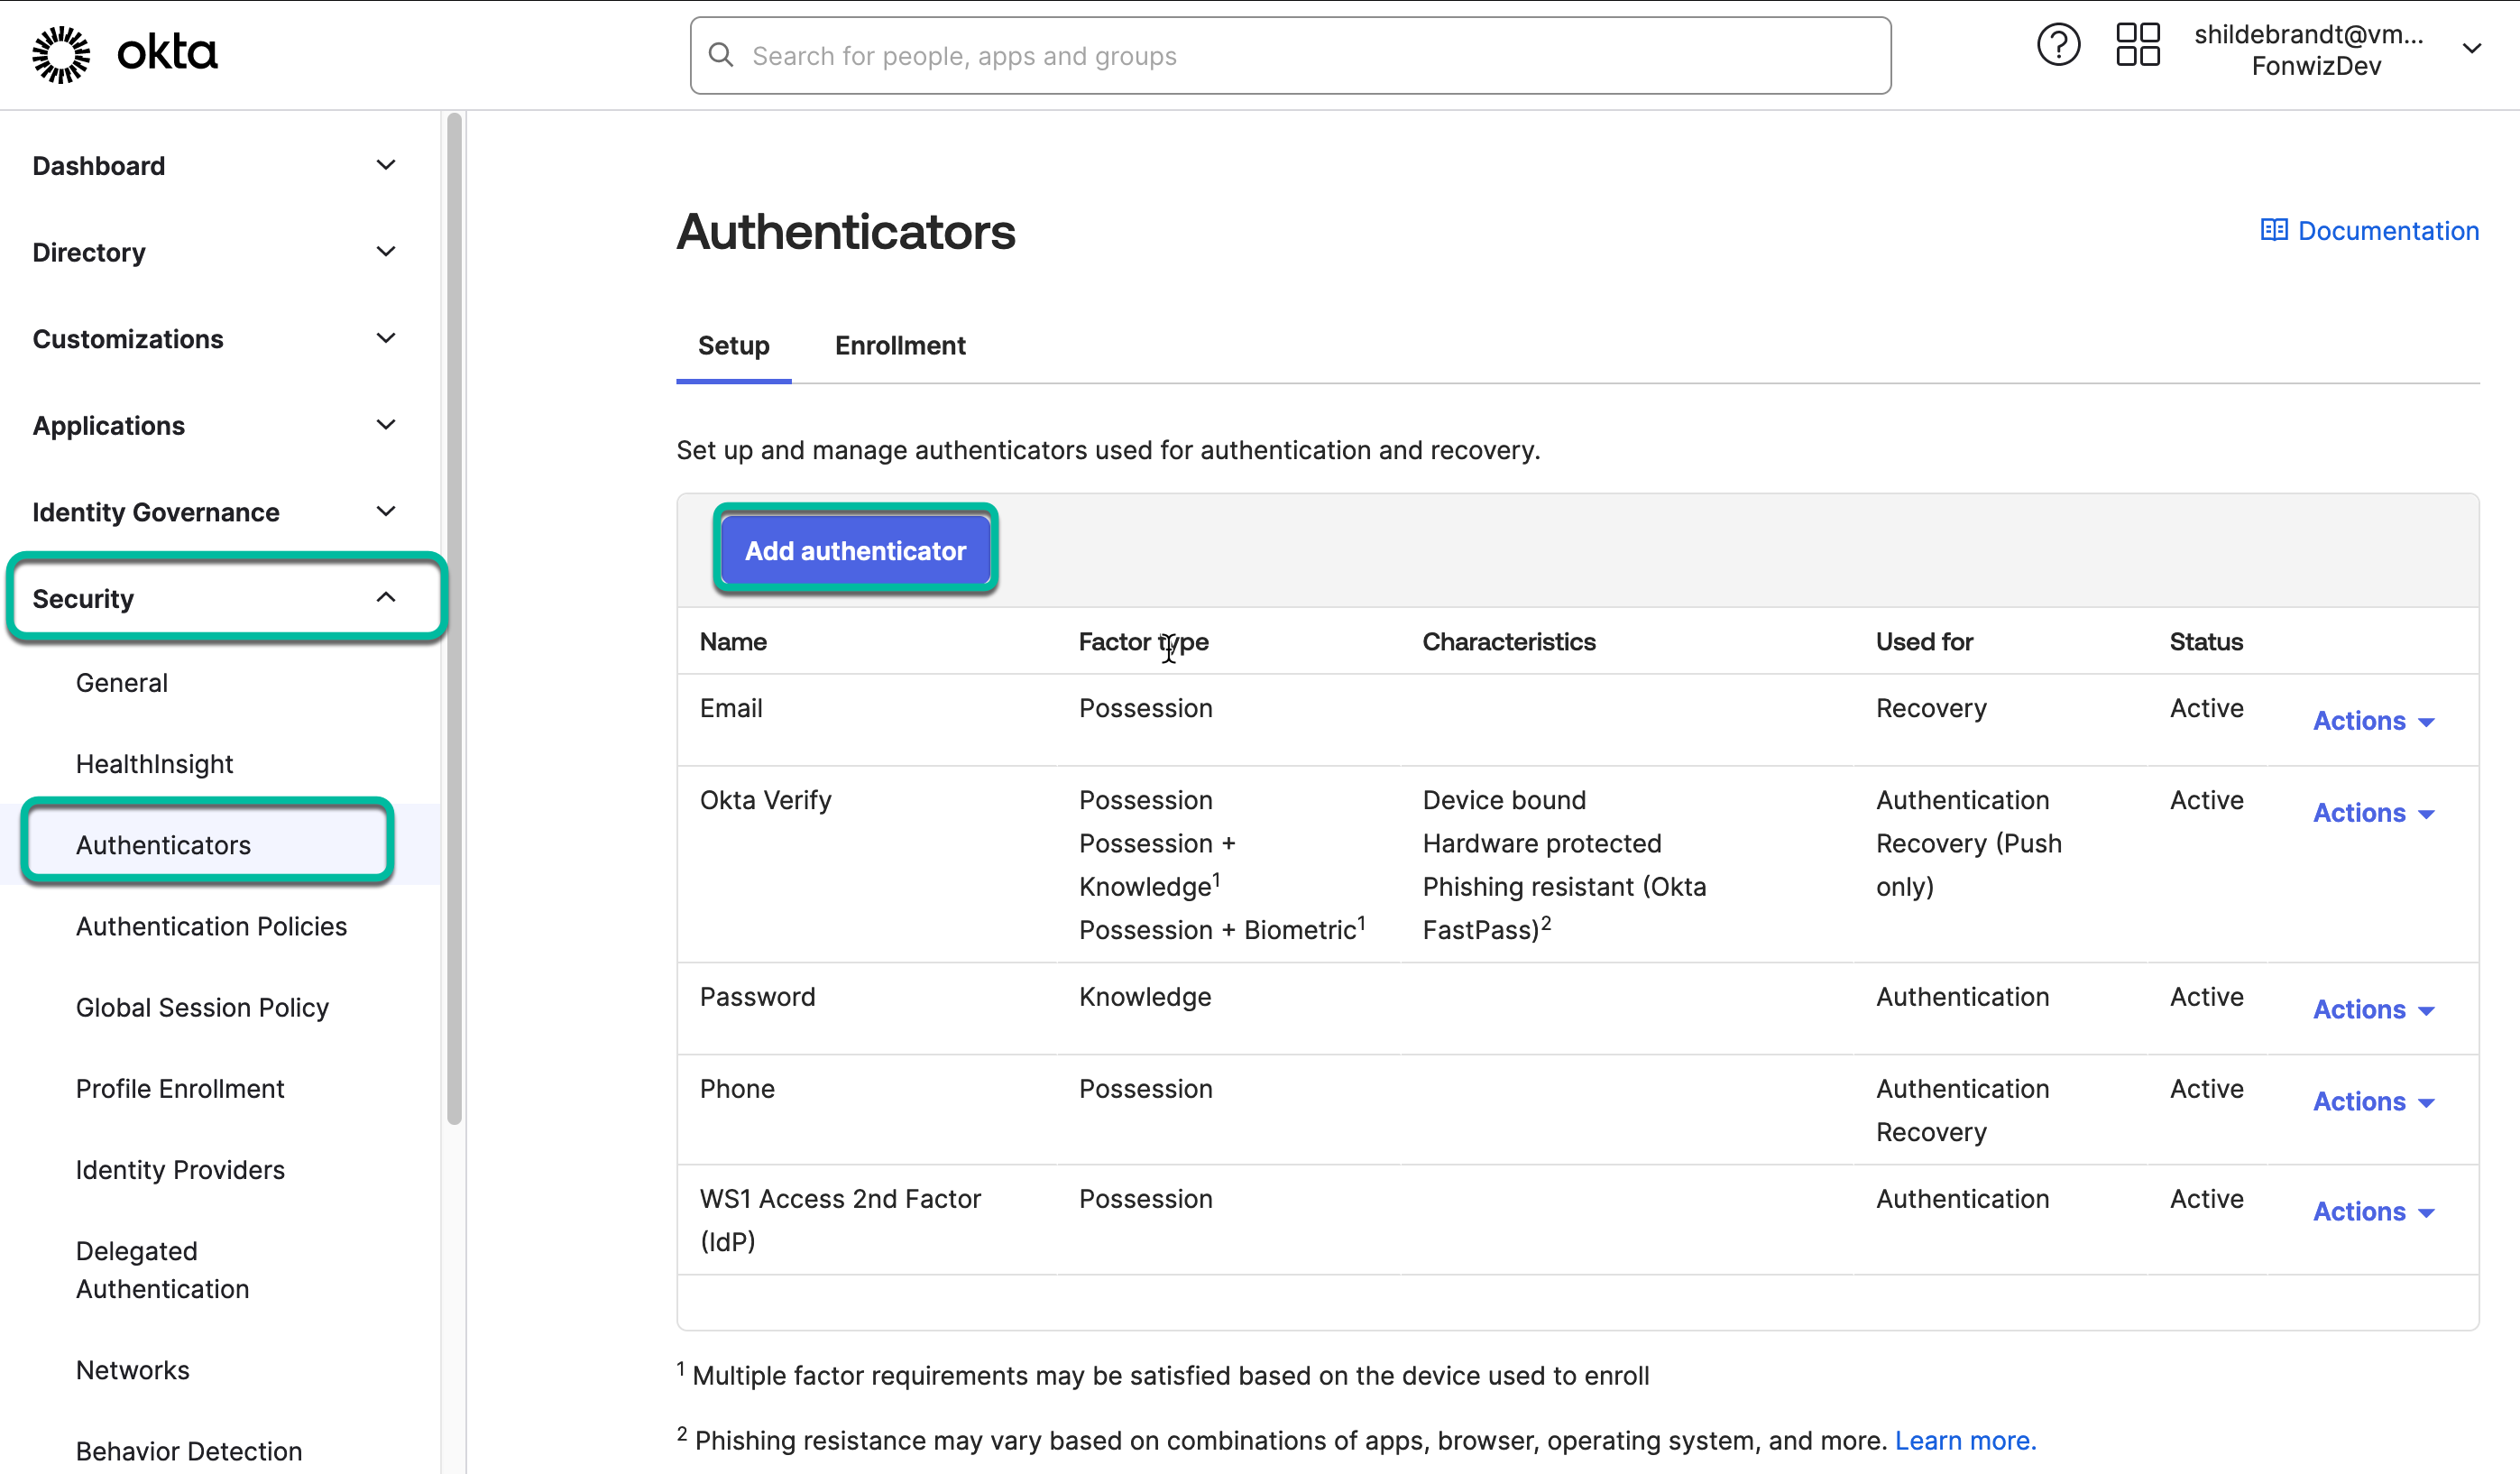
- In the Okta admin portal, navigate to Security > Authenticators and click Add authenticator.

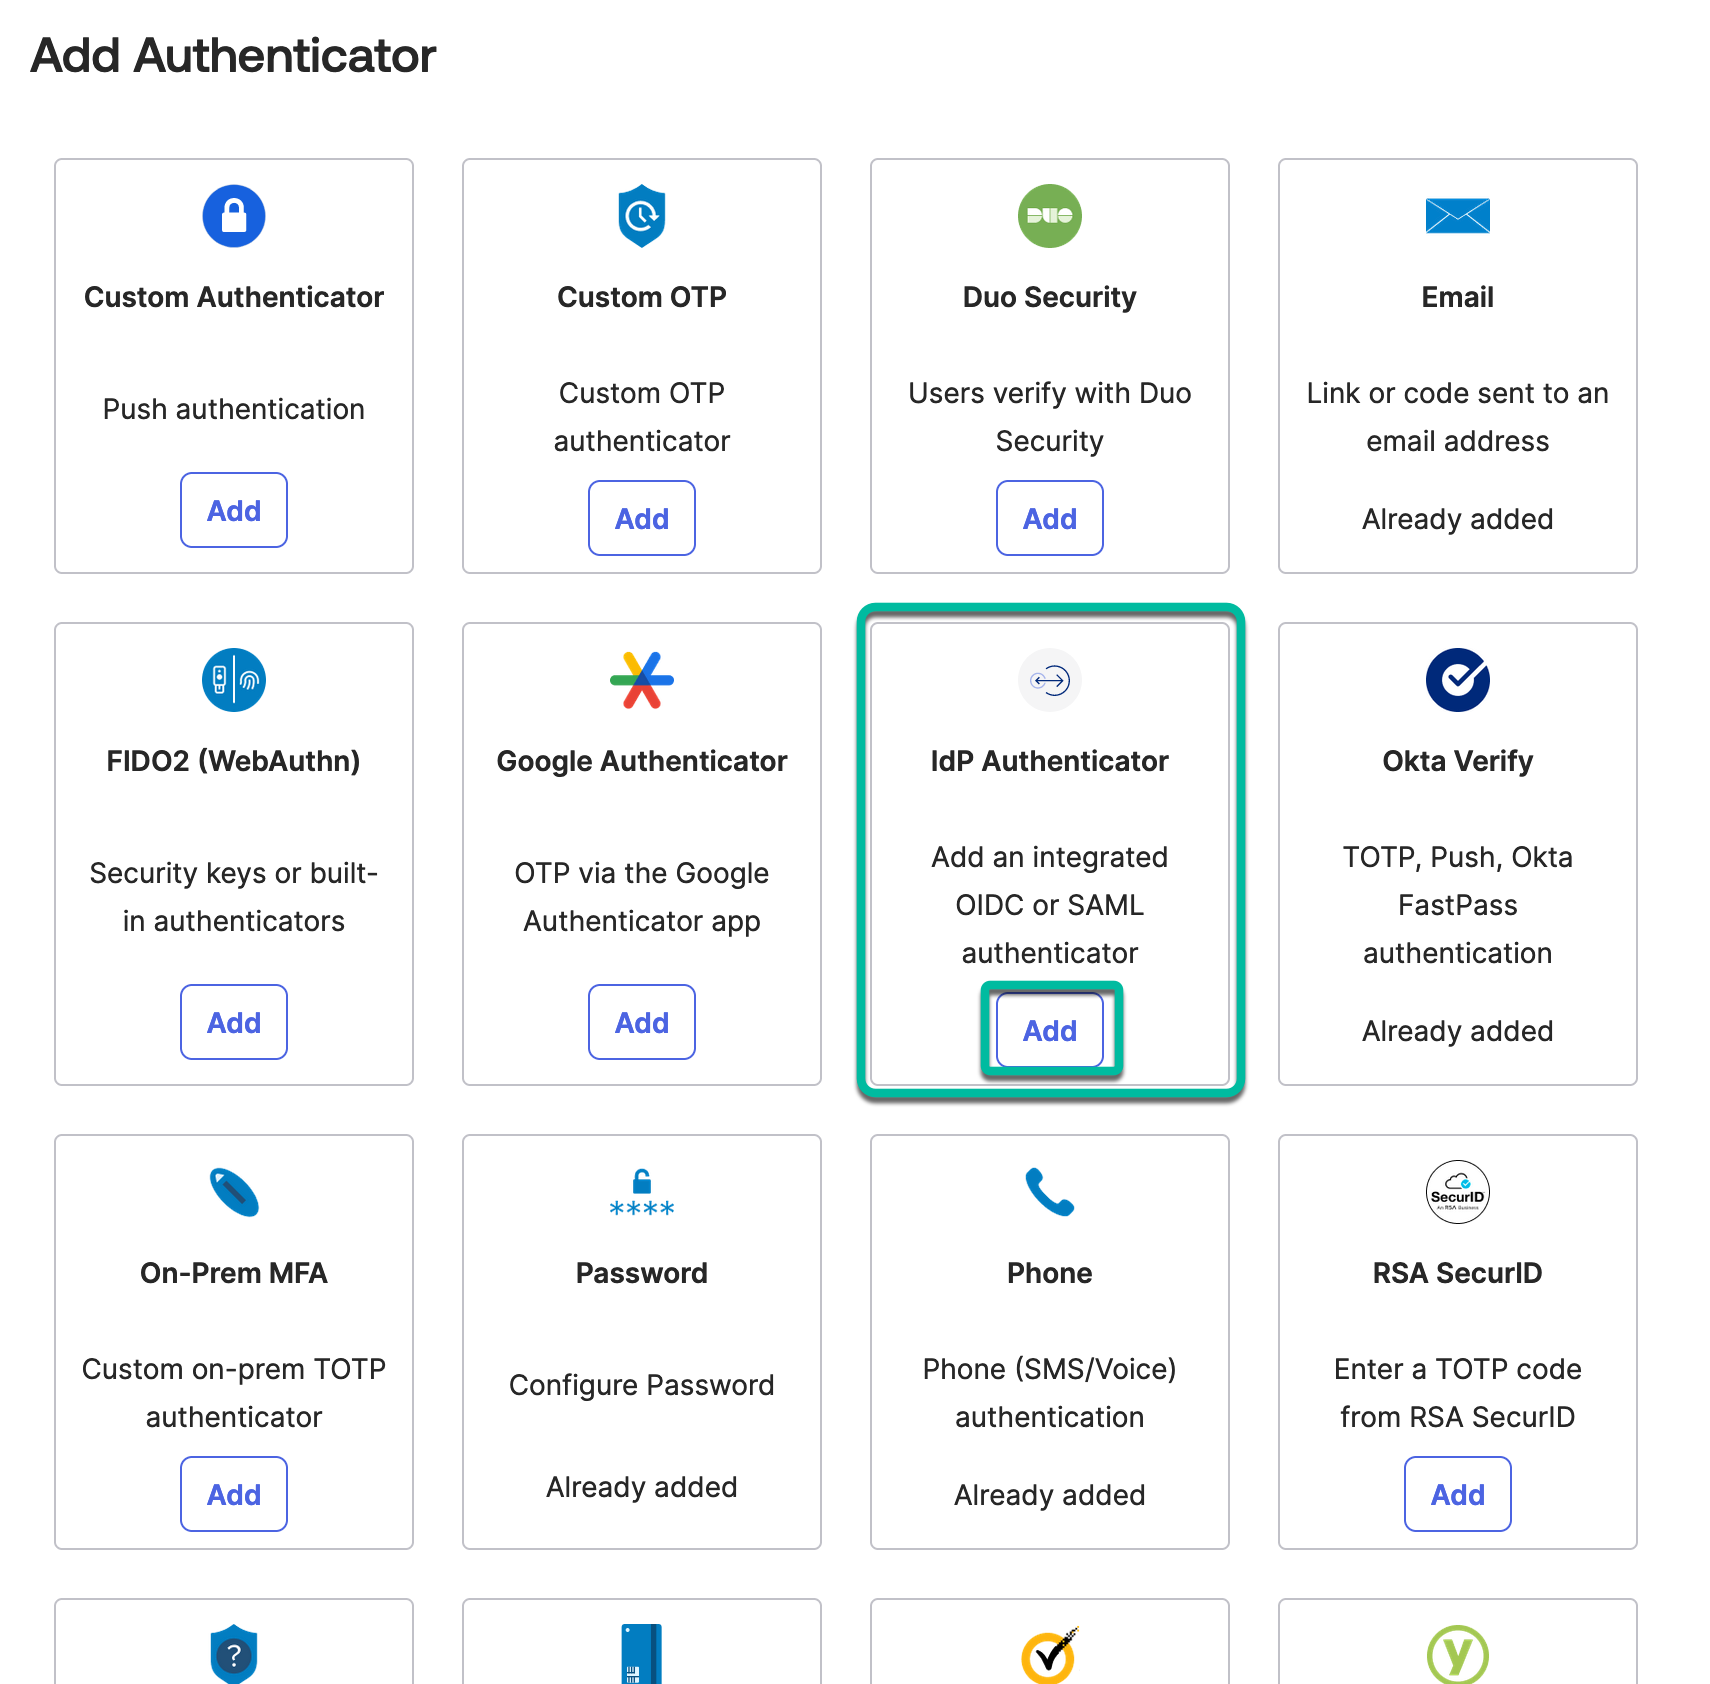
- Select IdP Authenticator type.

From the options, choose IdP Authenticators which will present you with the configured SAML 2.0 or OIDC factor IdPs to set up as authenticators. Be aware that Okta allows you to set up several IdP authenticators but does not allow you to further distinguish between them in their authentication policies. So, if you want to enforce device compliance, you need to only set up Access as IdP authenticator and if you need to use other IdPs as factors, configure them within Access as third-party IdPs and leverage device types, network ranges, or group membership to trigger them if needed.
Add Enrollment Policy for Authenticators in Okta
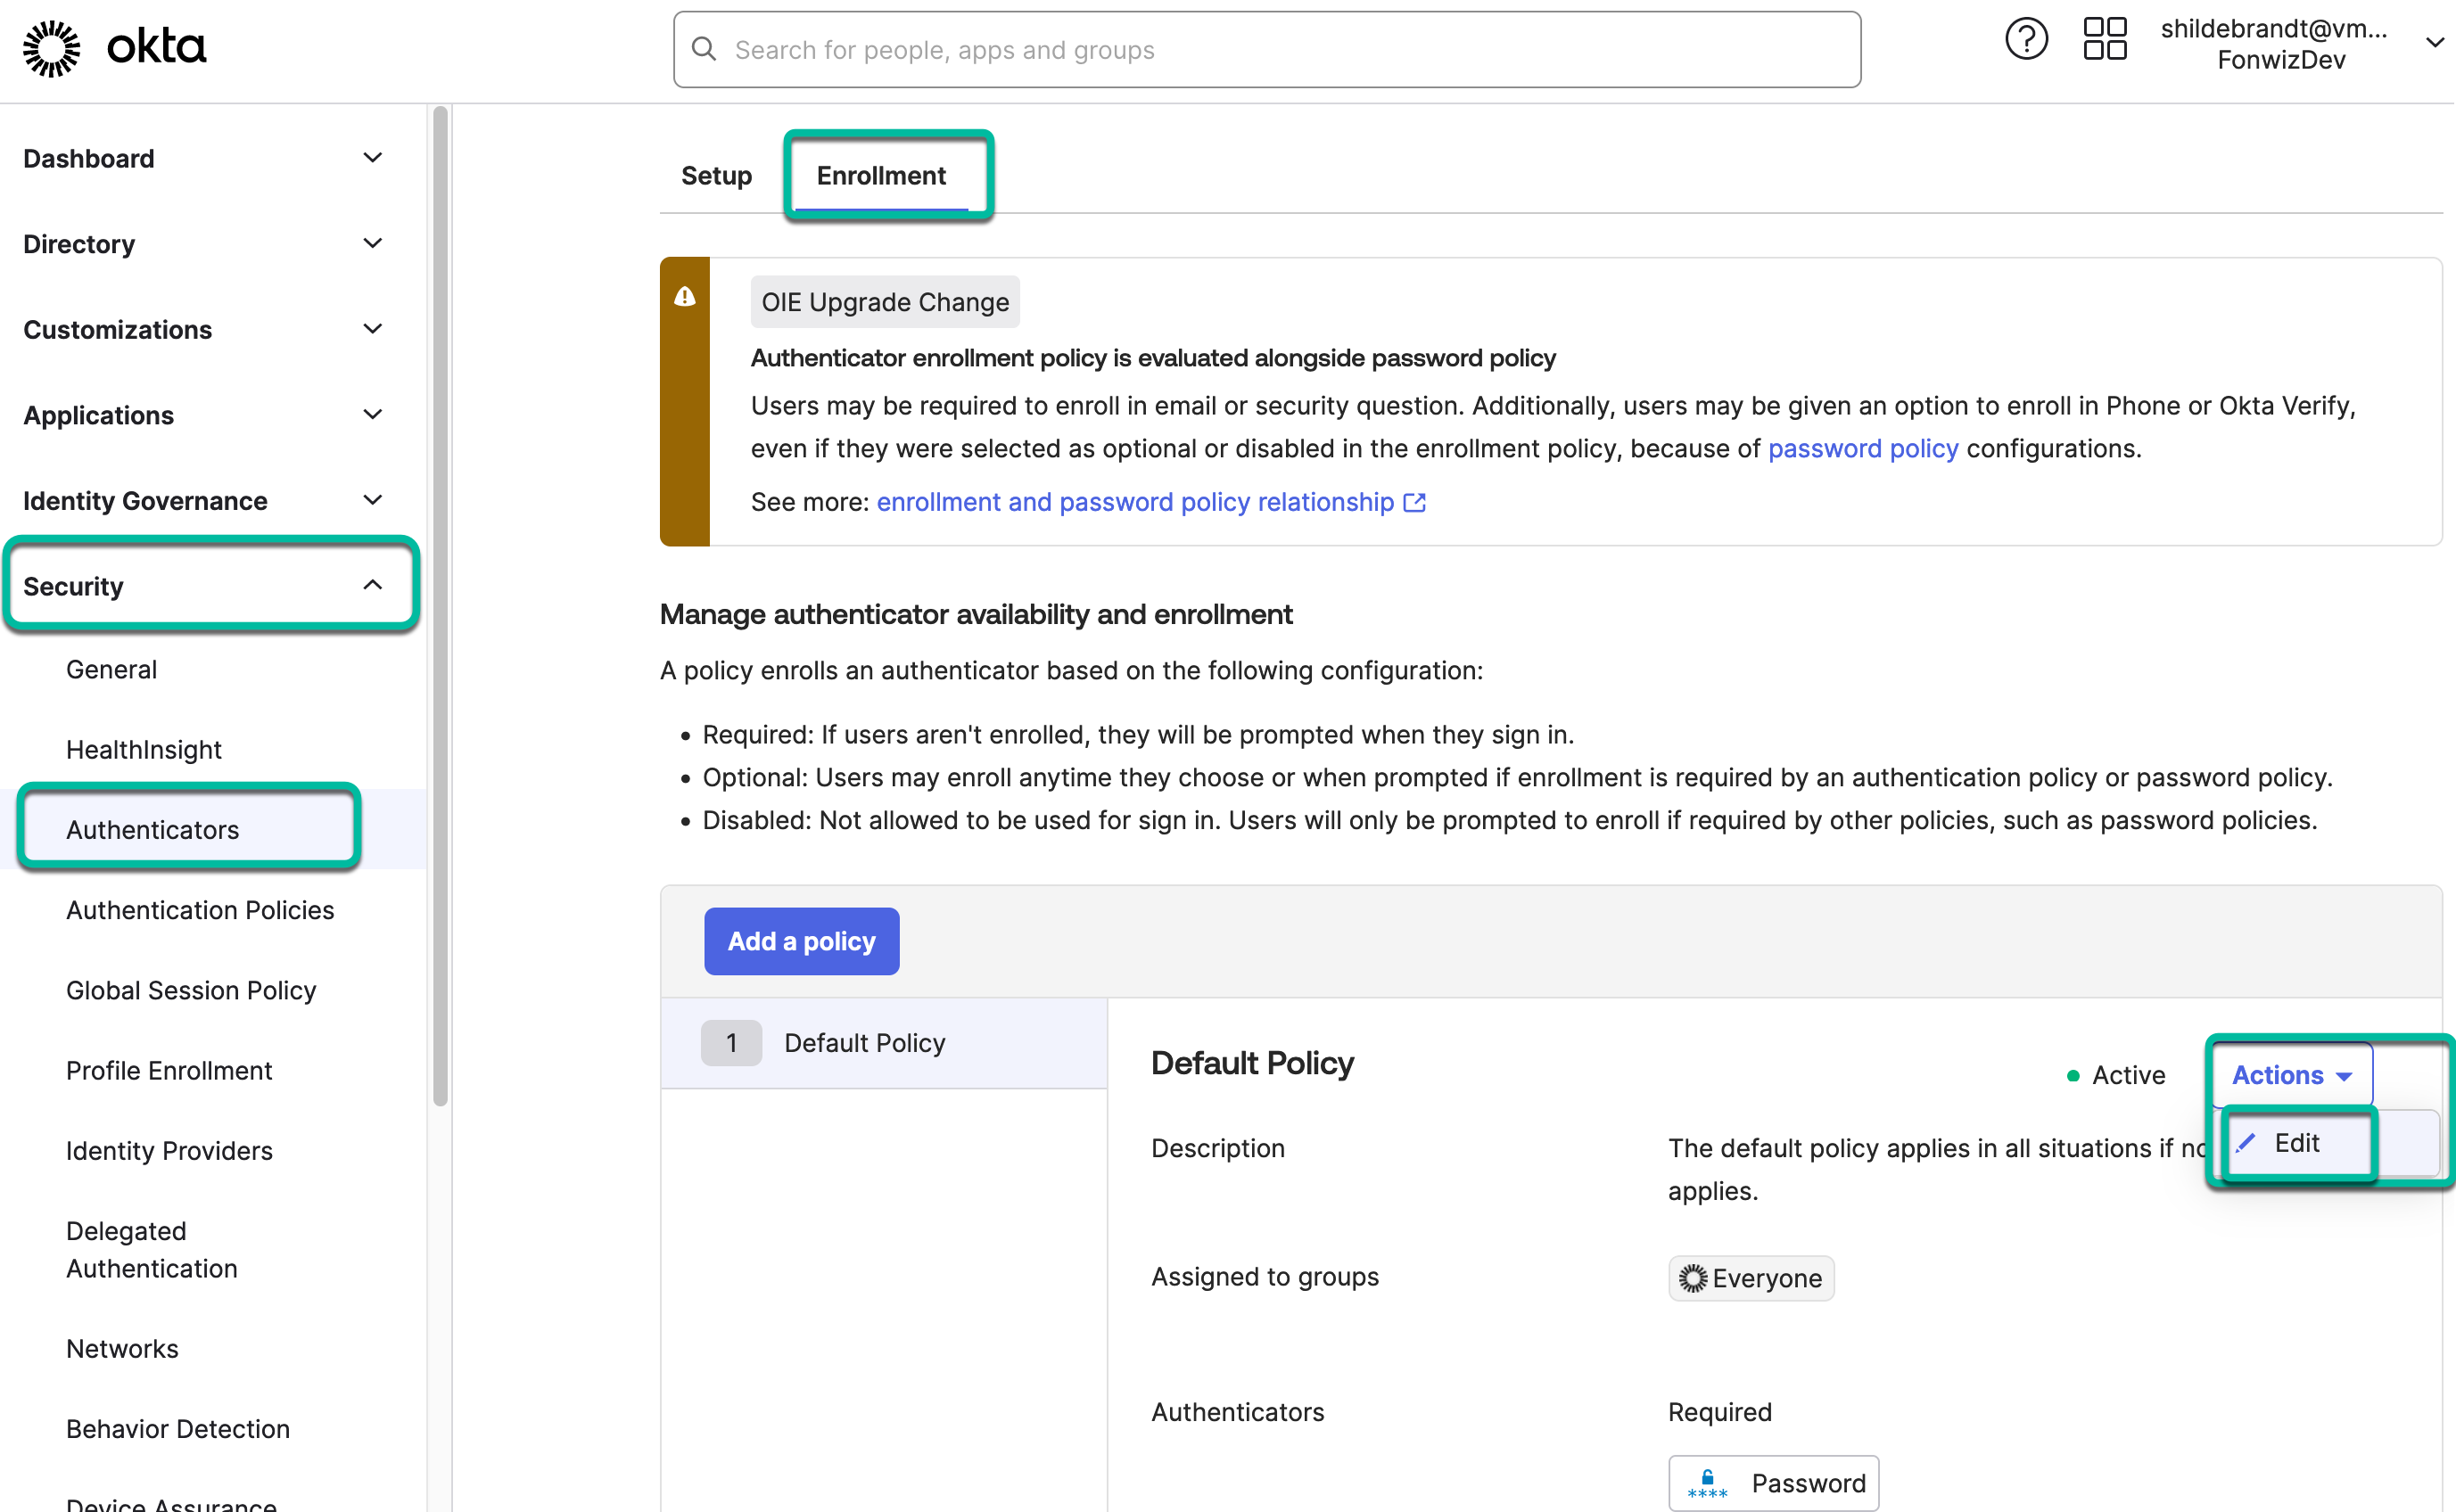
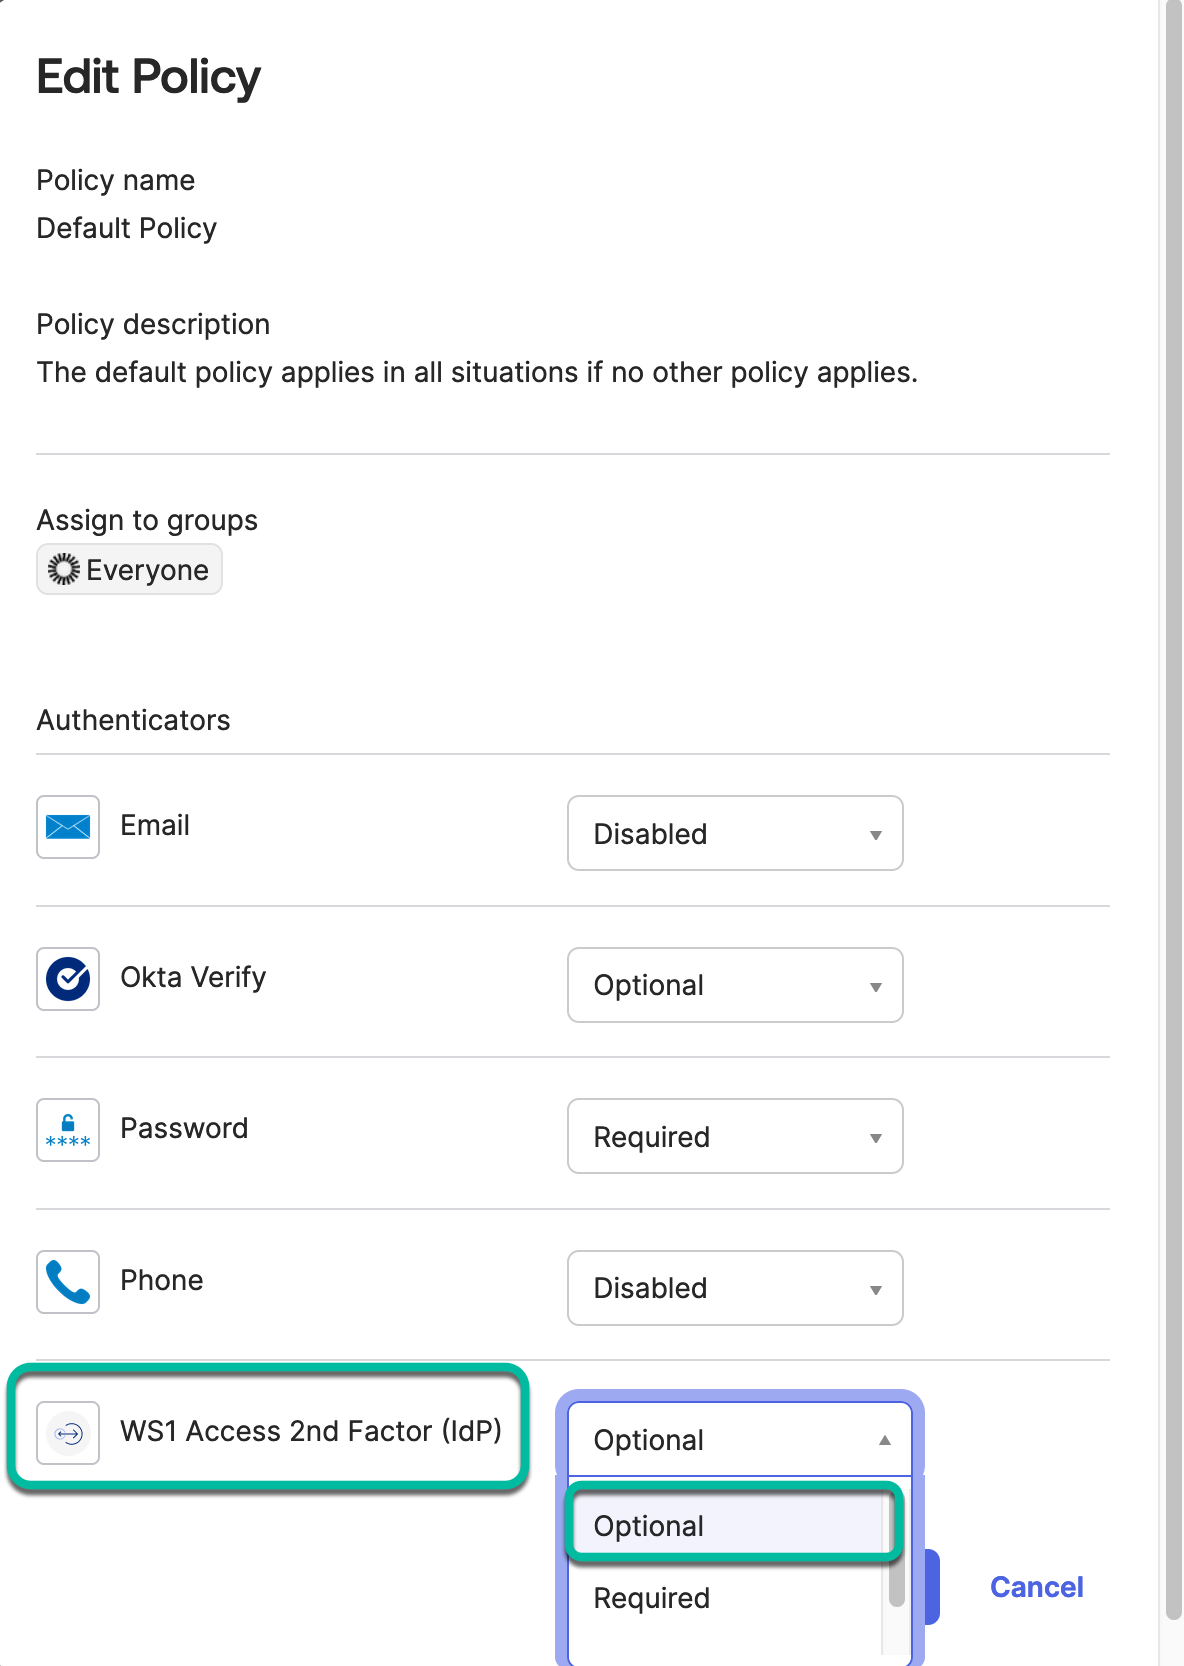
To use the newly added authenticator, you must add it to an existing or new enrollment policy. You can specify it, for example, as a required (or optional) authenticator for high-assurance applications in whose authentication policies you plan to use the Access Factor authenticator.
- Add new enrollment policy or edit an existing policy.

- Specify the factor IdP as required or optional, this will decide if the user can choose to set that factor up or is forced to enroll the factor as part of the auth flow into specific applications.

Configure Application-Specific Authentication Policies
Now, create the rule to enforce the device posture factor during authentication into applications.
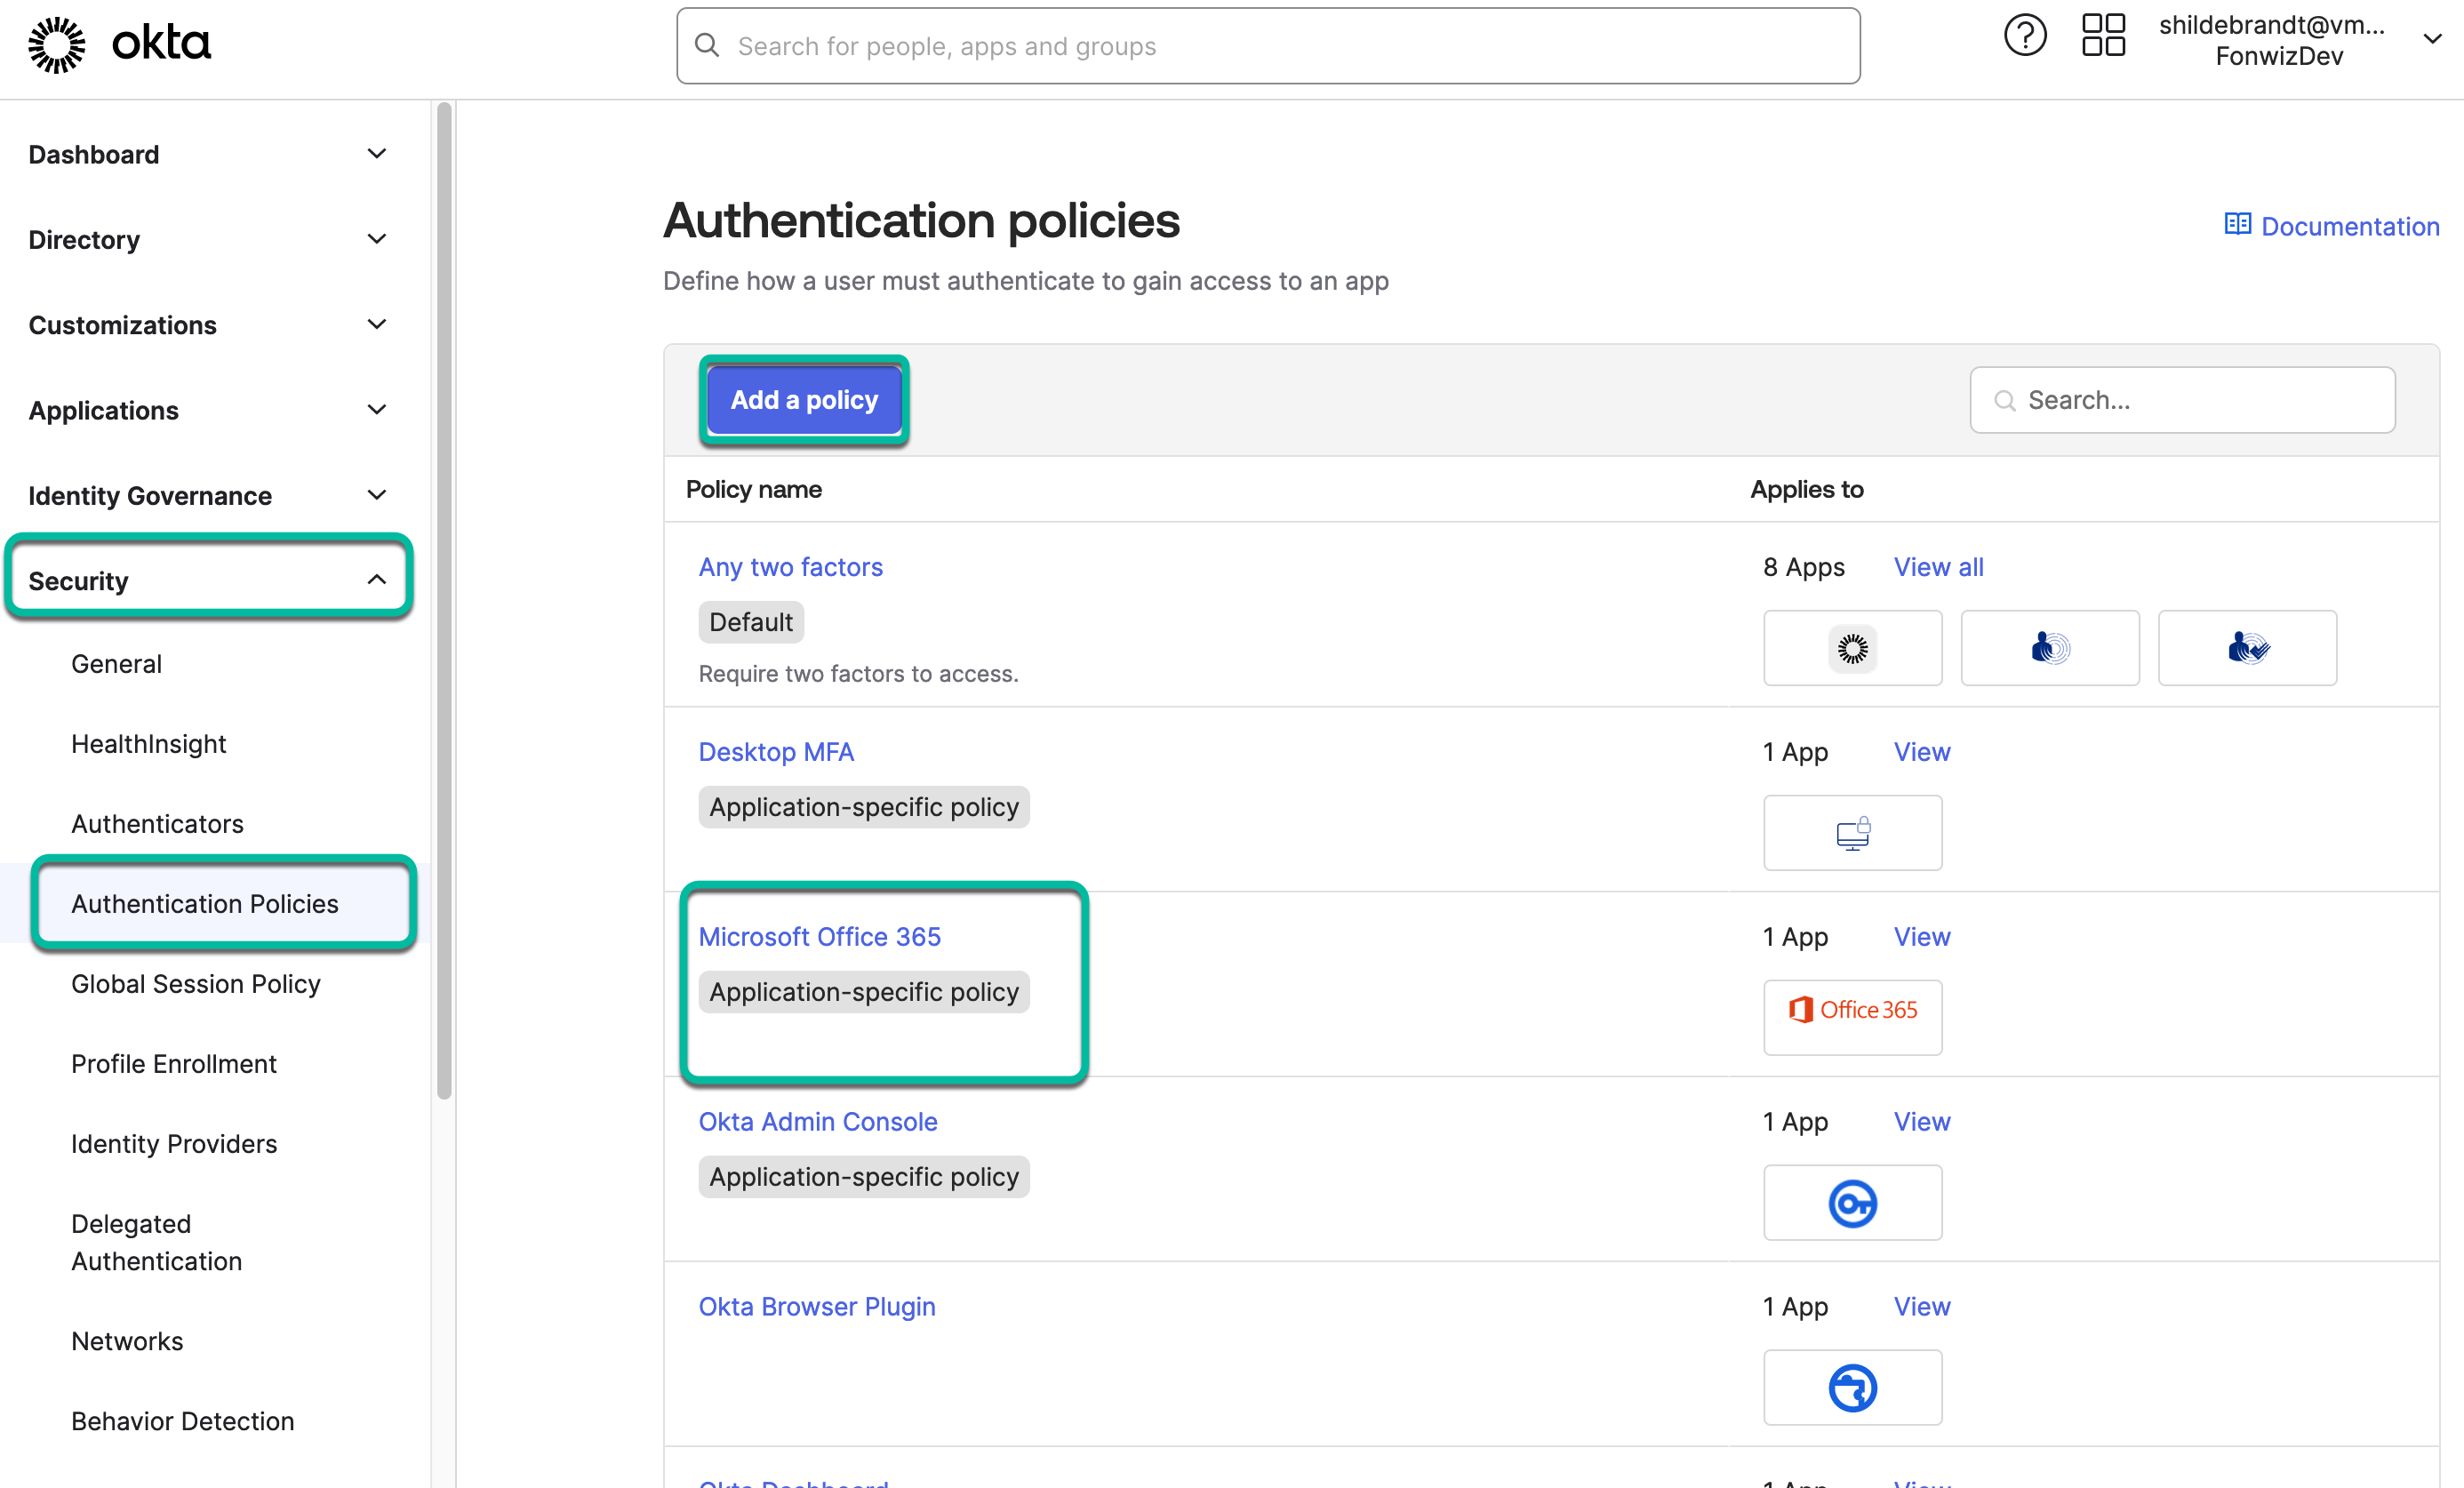
- Navigate to Security > Authentication Policies in the Okta admin portal.

- In this example, edit the policy set created for the Microsoft Office 365 application and create a rule for all modern authentication and web browser logins. Legacy auth or Windows Autopilot should have their own rules as we cannot enforce compliance during those flows.
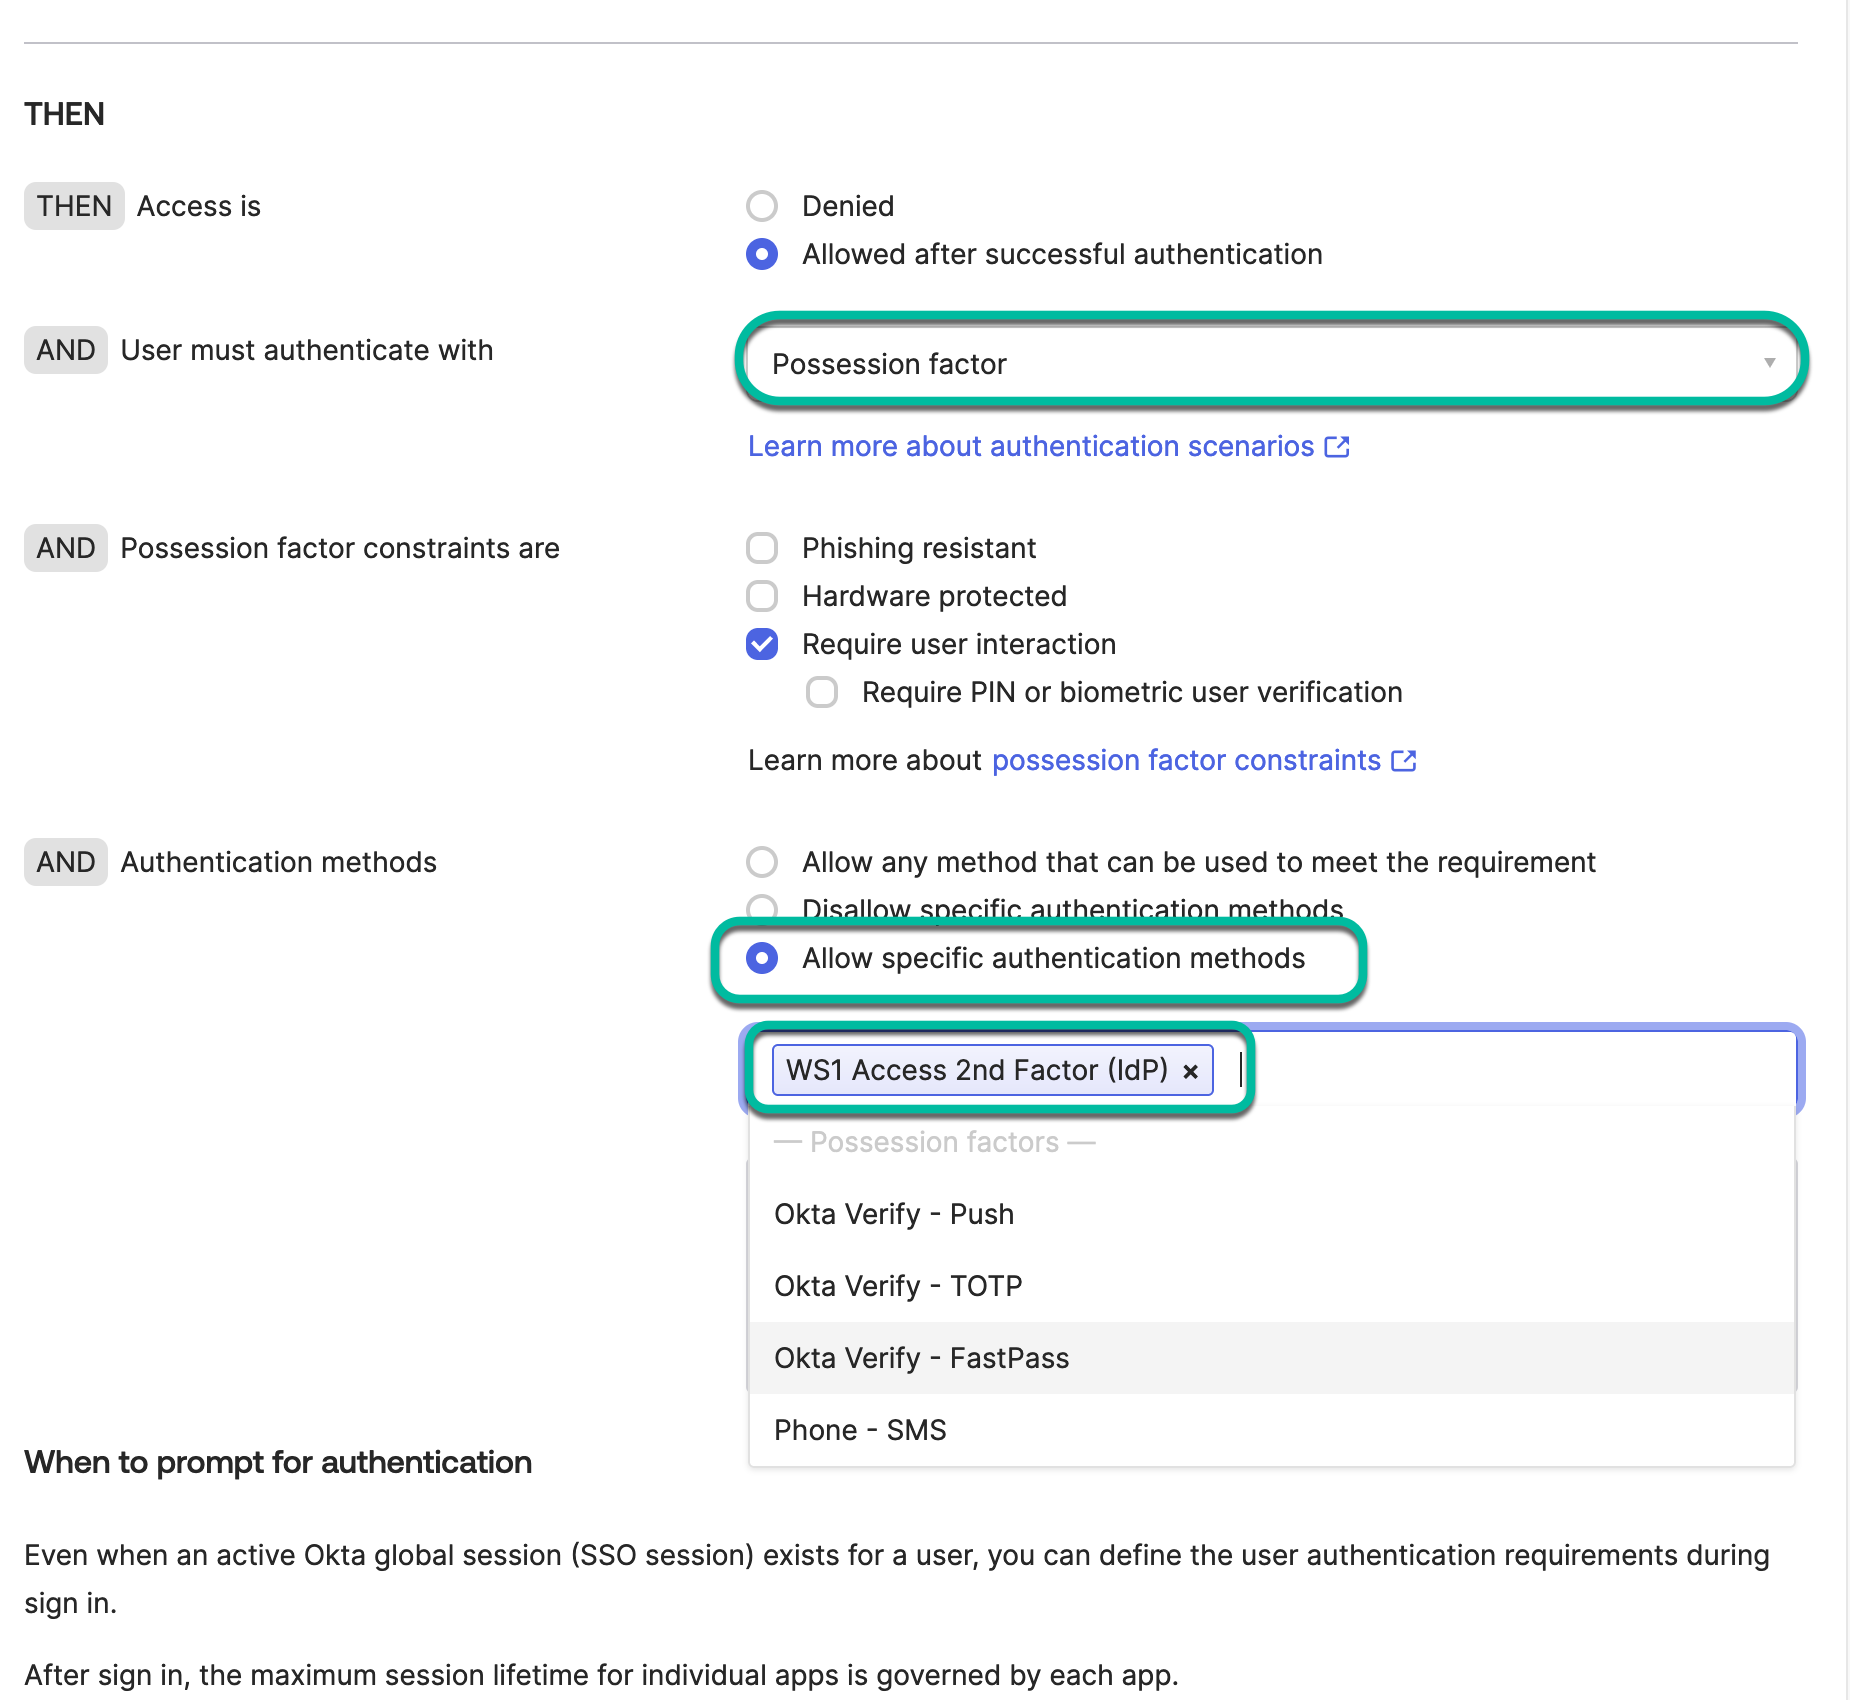
In the new rule, we mostly care about the THEN section in which we enforce the use of the IdP possession factor either as only a factor or together with Okta Password in a 2-factor configuration.
- To pin it down to just our WS1 Access factor, use the
Allow specific authentication methodsoption and select our configured authenticator. This creates a rule in Okta to enforce the use of an IdP-type possession factor, without specifically pointing to one configuration, which explains the issue if you had set up several IdP authenticators. - Set up the Access IdP authenticator as the only authentication method to be used and click Save.

- Save the configuration.
The next time the user authenticates into the resource they will be prompted to enroll the factor, for which they need to go through the MFA authentication into Okta to enroll an authenticator followed by the Mobile SSO and compliance check flow and finally access to the application.
Check the demo section for the end-user experience of that flow.
At this point, you have secured the authentication into an application, but if you want to also enforce compliance during the ongoing authorization into applications, you must set up an automation that enforces the re-authentication on non-compliant devices if the application supports it. For Office 365, you can either set that up with compliance policies in UEM for iOS and Android or with Intelligence for all platforms. An example of how you can achieve that with Intelligence can be seen in this video:
https://youtu.be/vcEzmTTMs2c?t=181
End-User Experience Flow
For the end user, this configuration will provide the following experience. It will start with the initial Authenticator enrollment. This demo uses Access with Apple SSO and additionally Okta MFA. Finally, you can see the failed factor on a non-compliant device.
Zero Trust through Controlled Network Access
Another way to leverage the device posture during authentication and authorization flows is the use of Tunnel. Control of authorization works with applications that receive it directly from Okta or that support a form of IP allowlisting like Entra ID.
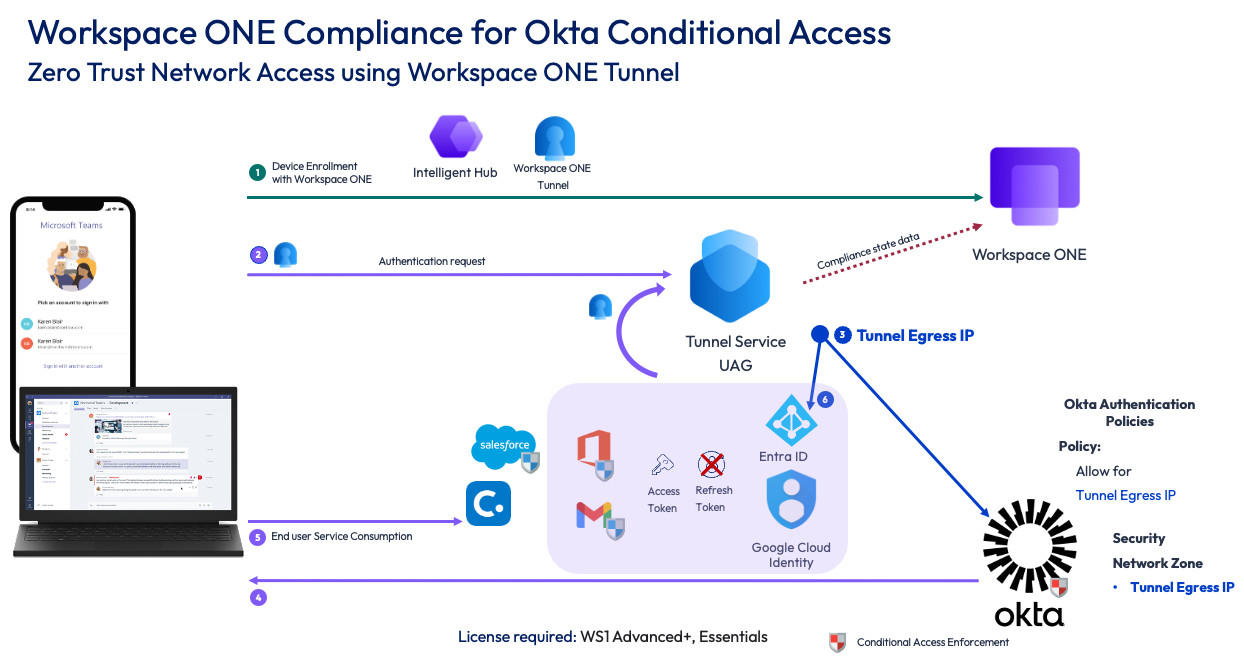
Figure 5: Device posture using Tunnel as network access control
Workspace ONE Tunnel Service is built to allow managed compliant devices access to internal resources through a client application, a per-app or full device VPN configuration, and the Tunnel Service as a VPN gateway controlling the sessions. Tunnel offers more than just plain VPN or split tunneling—you can configure Device Traffic Rules (DTR) which further control what traffic is tunneled, proxied, or bypassed. This allows you to detect very specific endpoints that an app has communicated with and not bottleneck the rest of the application traffic.
Tunnel service can be deployed in your data center (vSphere®, Hyper-V), cloud (Azure, AWS) or can run as a hosted service offering. Tunnel clients are available for the most common device platforms: Android, iOS, macOS, and Windows.
This section covers how to use these features to enable granular conditional access to Okta. The solution works with any form of authentication into Okta, be it customer tenants using an Okta password and MFA or having other IdPs federated with Okta. The devices are again enrolled into Workspace ONE UEM which controls the configuration and compromised/compliance state of the device. You also push the Tunnel app and configuration which includes the rule to tunnel the authentication traffic of applications. This part allows you to block non-compliant devices from authenticating.
To finish the configuration and target non-managed devices, configure the egress IP address of the Tunnel service as a trusted zone in the Okta Security Networks settings and allow access to a select choice of apps by creating authentication policies requiring the configured zone for them. Because the authentication request of the managed compliant device now comes from the egress IP of the Tunnel Service, the authentication is successful on the Okta side and the application receives the authorization for the web services in the form of the already discussed OAuth Access and Refresh tokens.
Now, this network access-based solution can also cover the ongoing authorization scenario by configuring Entra or Okta authorization endpoints in the device traffic rules as well; whenever the Refresh token is used to request a new Access token, Entra/Okta evaluate their rulesets and requires the same configured Named Location/Trusted Zone as the source of the request.
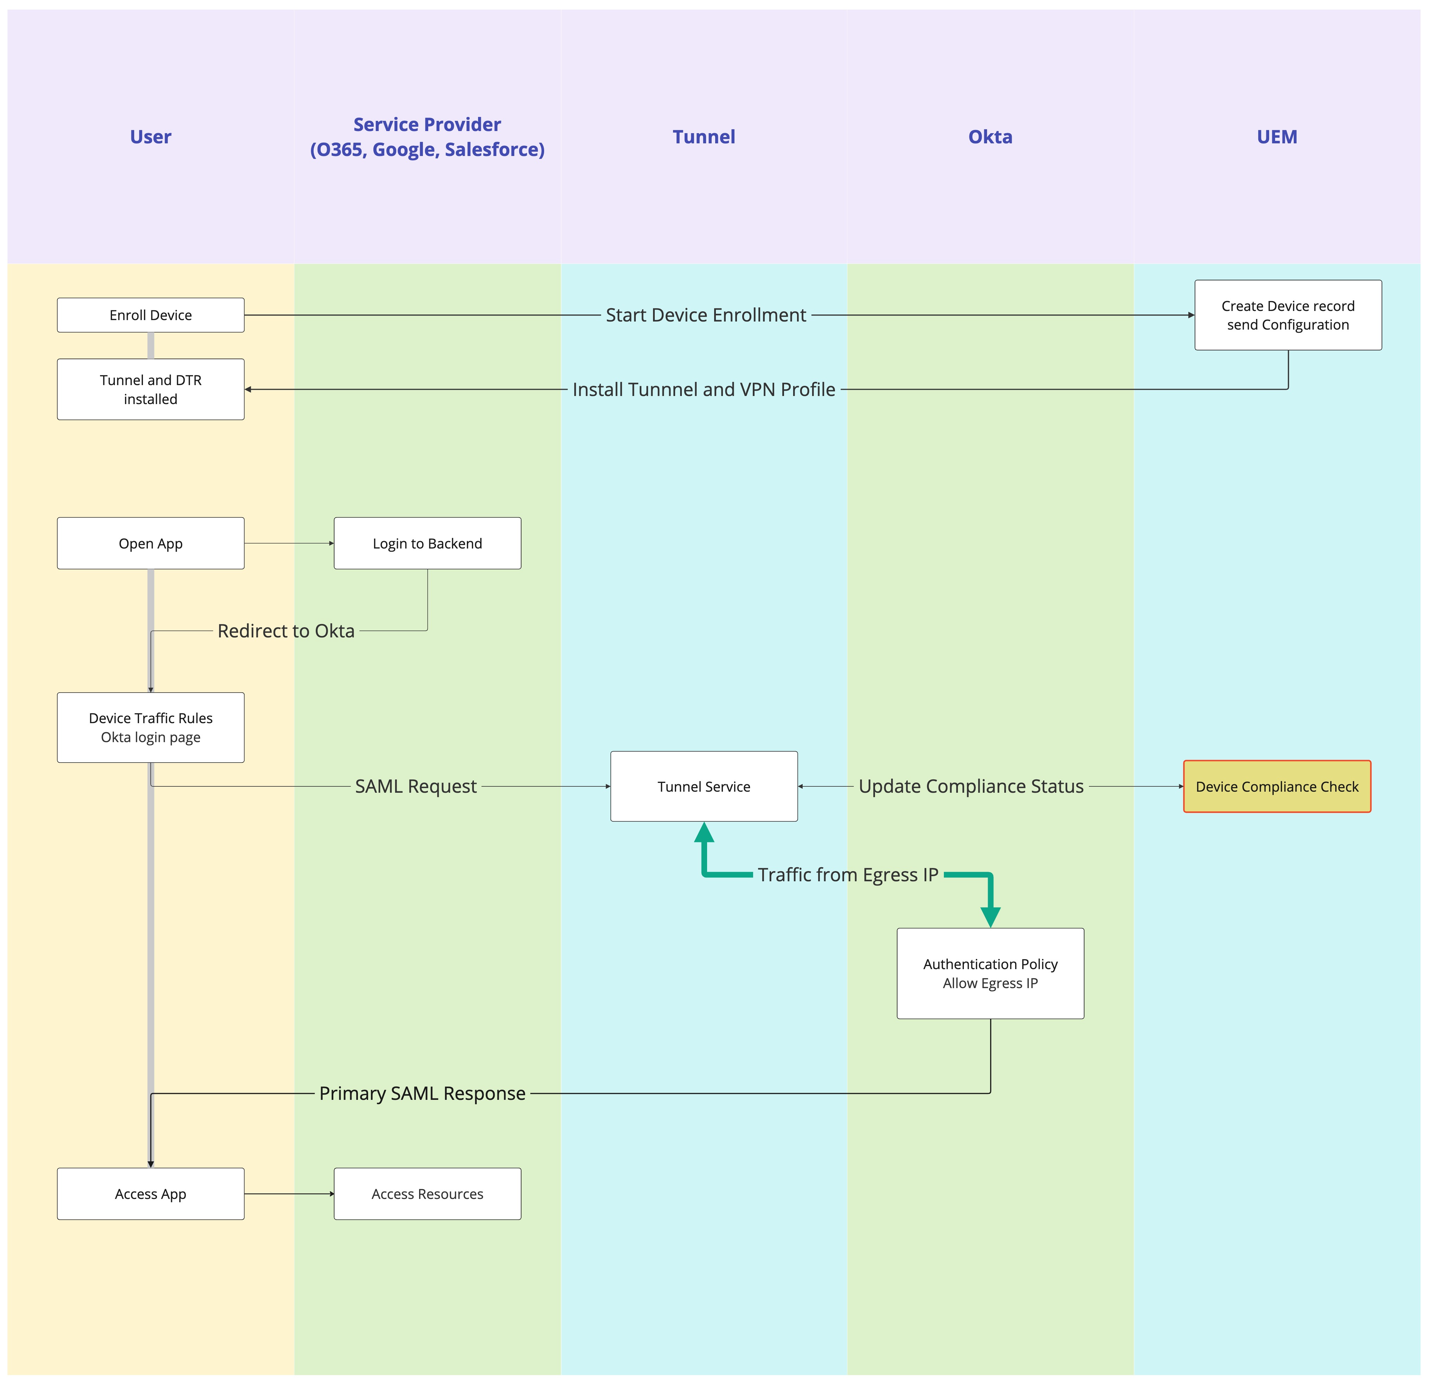
Figure 6: Device posture using Tunnel flow chart
Requirements for Workspace ONE UEM and Workspace ONE Tunnel
Before you can proceed, you must have the following components installed and configured:
- An existing Workspace ONE environment
- A Unified Access Gateway™ (UAG) with Tunnel Edge Service deployed or
- SASE with Secure Access configured
Devices are enrolled into Workspace ONE UEM, and UEM sets the configuration and tracks the compliance state during the lifecycle. In UEM, you also configure the Tunnel service, setting up authentication, architecture, and device profiles. UEM has a built-in certificate authority that provides the certificates to authenticate with Tunnel as well as integrations into all common enterprise certificate authorities and templates to use internal certificates for the use case.
Set Up Device Traffic Rules
This section focuses on the required settings to configure Tunnel Edge Service for compliance integration use case. For detailed instructions on how to set up Tunnel Edge Service in general and other use cases, see the following comprehensive guides on Tech Zone:
- Configuring the Tunnel Edge Service: Workspace ONE Operational Tutorial
- Deploying Workspace ONE Tunnel: Workspace ONE Operational Tutorial
Using Tunnel with Network IP Zones in Okta
Our goal is to send all authentication traffic for Okta applications on managed devices through Tunnel Edge services. Besides any other configuration you might use for internal resources, you must add the Okta login destinations given in the table below to your DTR.
| Application | Action | Destination |
| All Applications cover all iOS and Android Not needed for Full Devices Rules for Windows 10 or macOS | TUNNEL | *tenant.okta.com *branding.customdomain.com Other services like Entra *login.microsoftonline.com, *login.windows.net, *login.microsoft.com, *sts.windows.net, *myip.com |
Warning: This works only for applications that can be tunneled. Native email on iOS/iPadOS uses the settings app to request the OAuth token; not the Safari WebView. Because of that, Tunnel cannot apply the DTR. So, for email, you can only apply this solution for third-party apps, like Boxer, that can be tunneled.
For Android and iOS, specify Per Application rules adding the given URL, and wildcard them to catch any subdomains. Later, you will need the egress IP address of the Tunnel Edge service itself, i.e., the gateway address that the Tunnel uses to communicate to the Internet. If you do not know the egress IP, include a service like privateinternetaccess or whatismyipaddress to find it. The final rule is a Bypass rule for wildcards (*) which allows application traffic to bypass the Tunnel and access their destination directly.
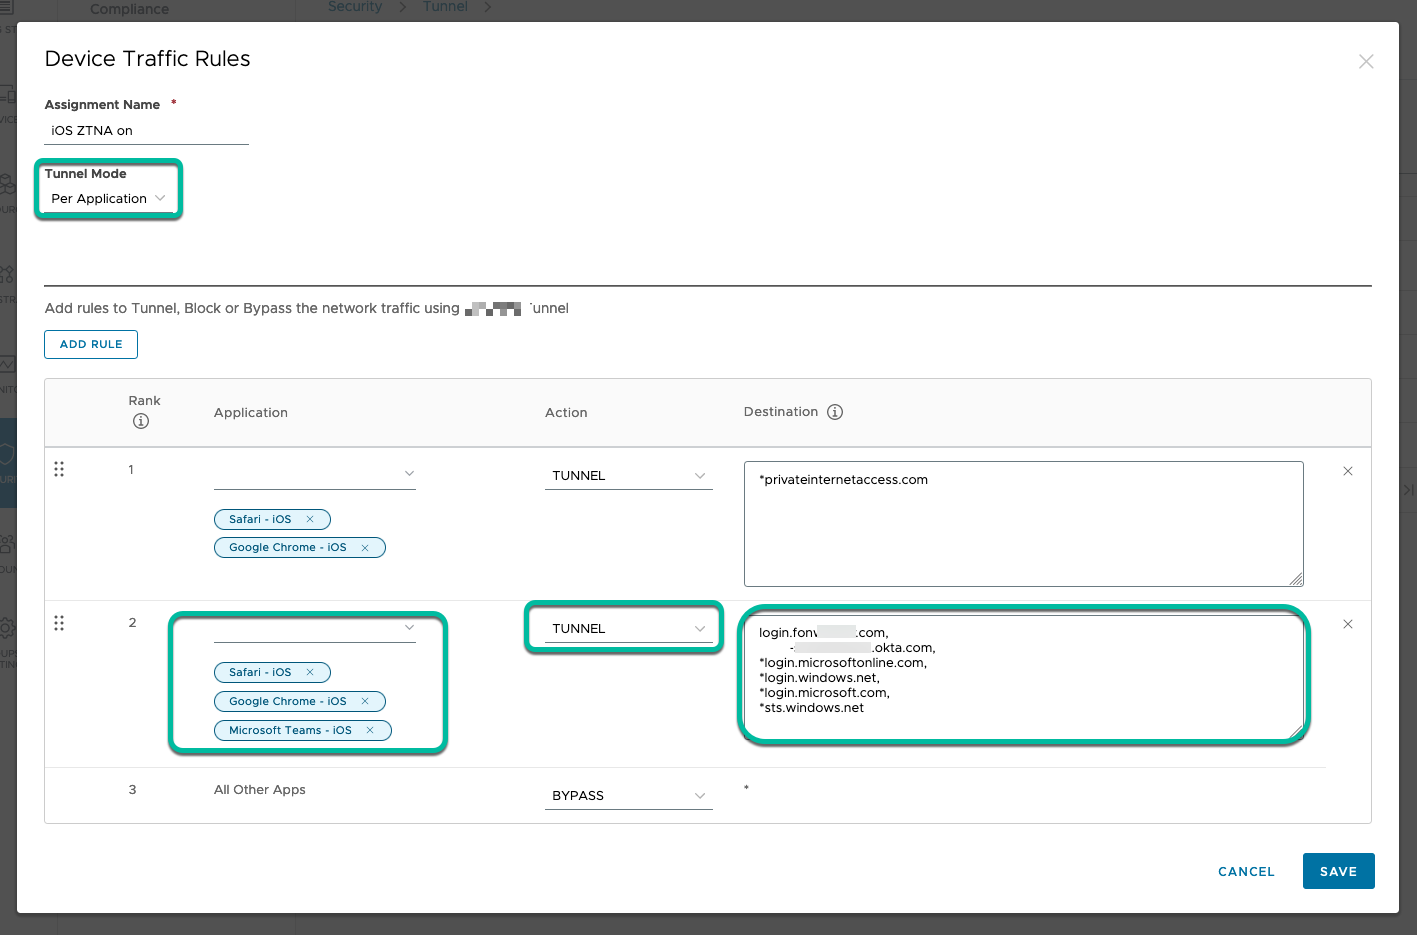
Figure 7: Per Application - Device Traffic Rules
If you use tunnel only for this use case you can also specify All Applications, which will apply the rule to all applications that have the VPN profile with this specific DTR configured even if you add more applications later. For the Office 365 use case, the authentication is going through Microsoft Authenticator (iOS) or Microsoft Authenticator /Company Portal (Android), but it is not enough to only tunnel those apps as the authorization is happening from the application itself and the IP address is evaluated at that point as well.
For Windows and macOS, specify a Full Device rule that applies the rules to all applications running on the managed device.
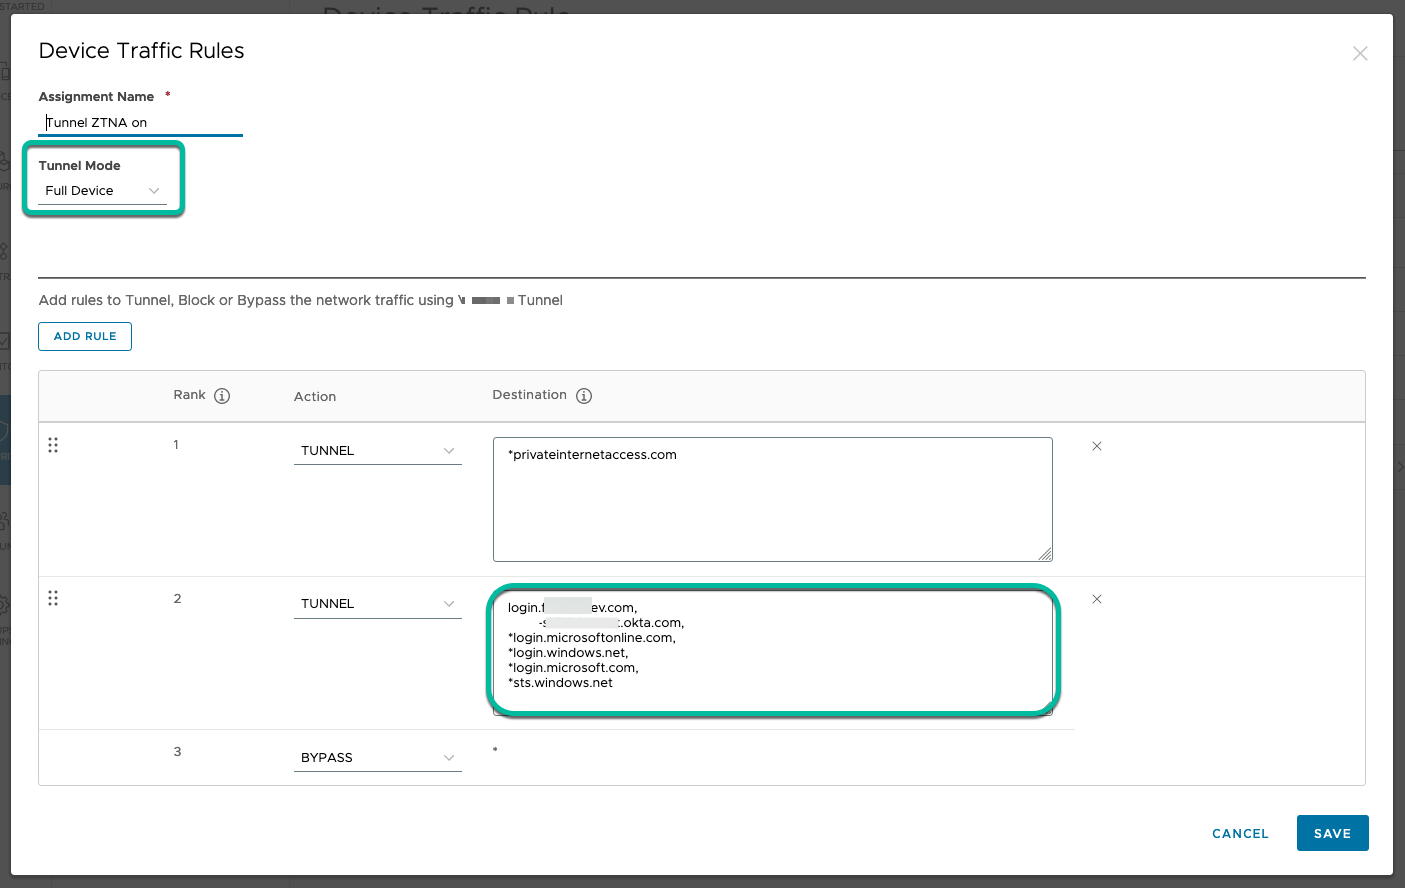
Figure 8: Full Device - Device Traffic Rules
Create VPN Profiles
The DTR rules are then applied to the VPN profiles configured for the respective platforms. For example, the iOS VPN profile as shown in Figure 9.
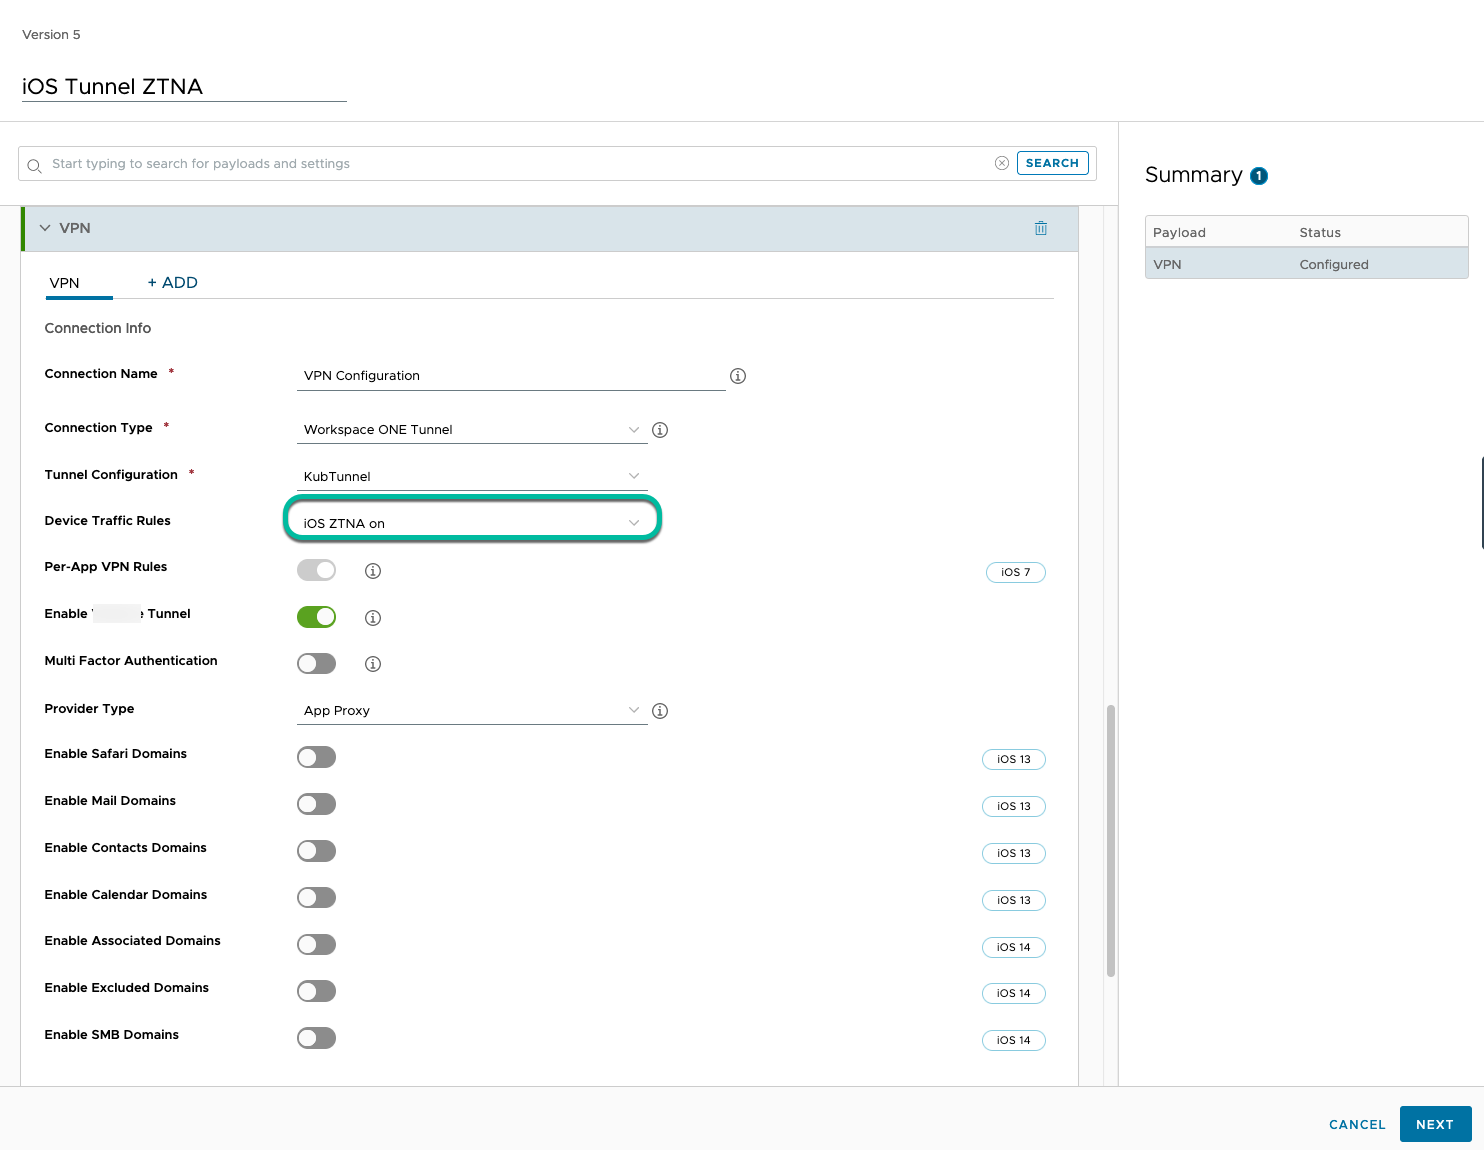
Figure 9: iOS VPN profile
To make sure users don’t accidentally remove the Tunnel client application and block themselves from accessing Okta services, you can add an Automation to Workspace ONE Intelligence to re-push the application in case it is removed by the user. Workspace ONE Freestyle can be considered as another option to enforce this desired state when it comes out of Preview for mobile platforms.
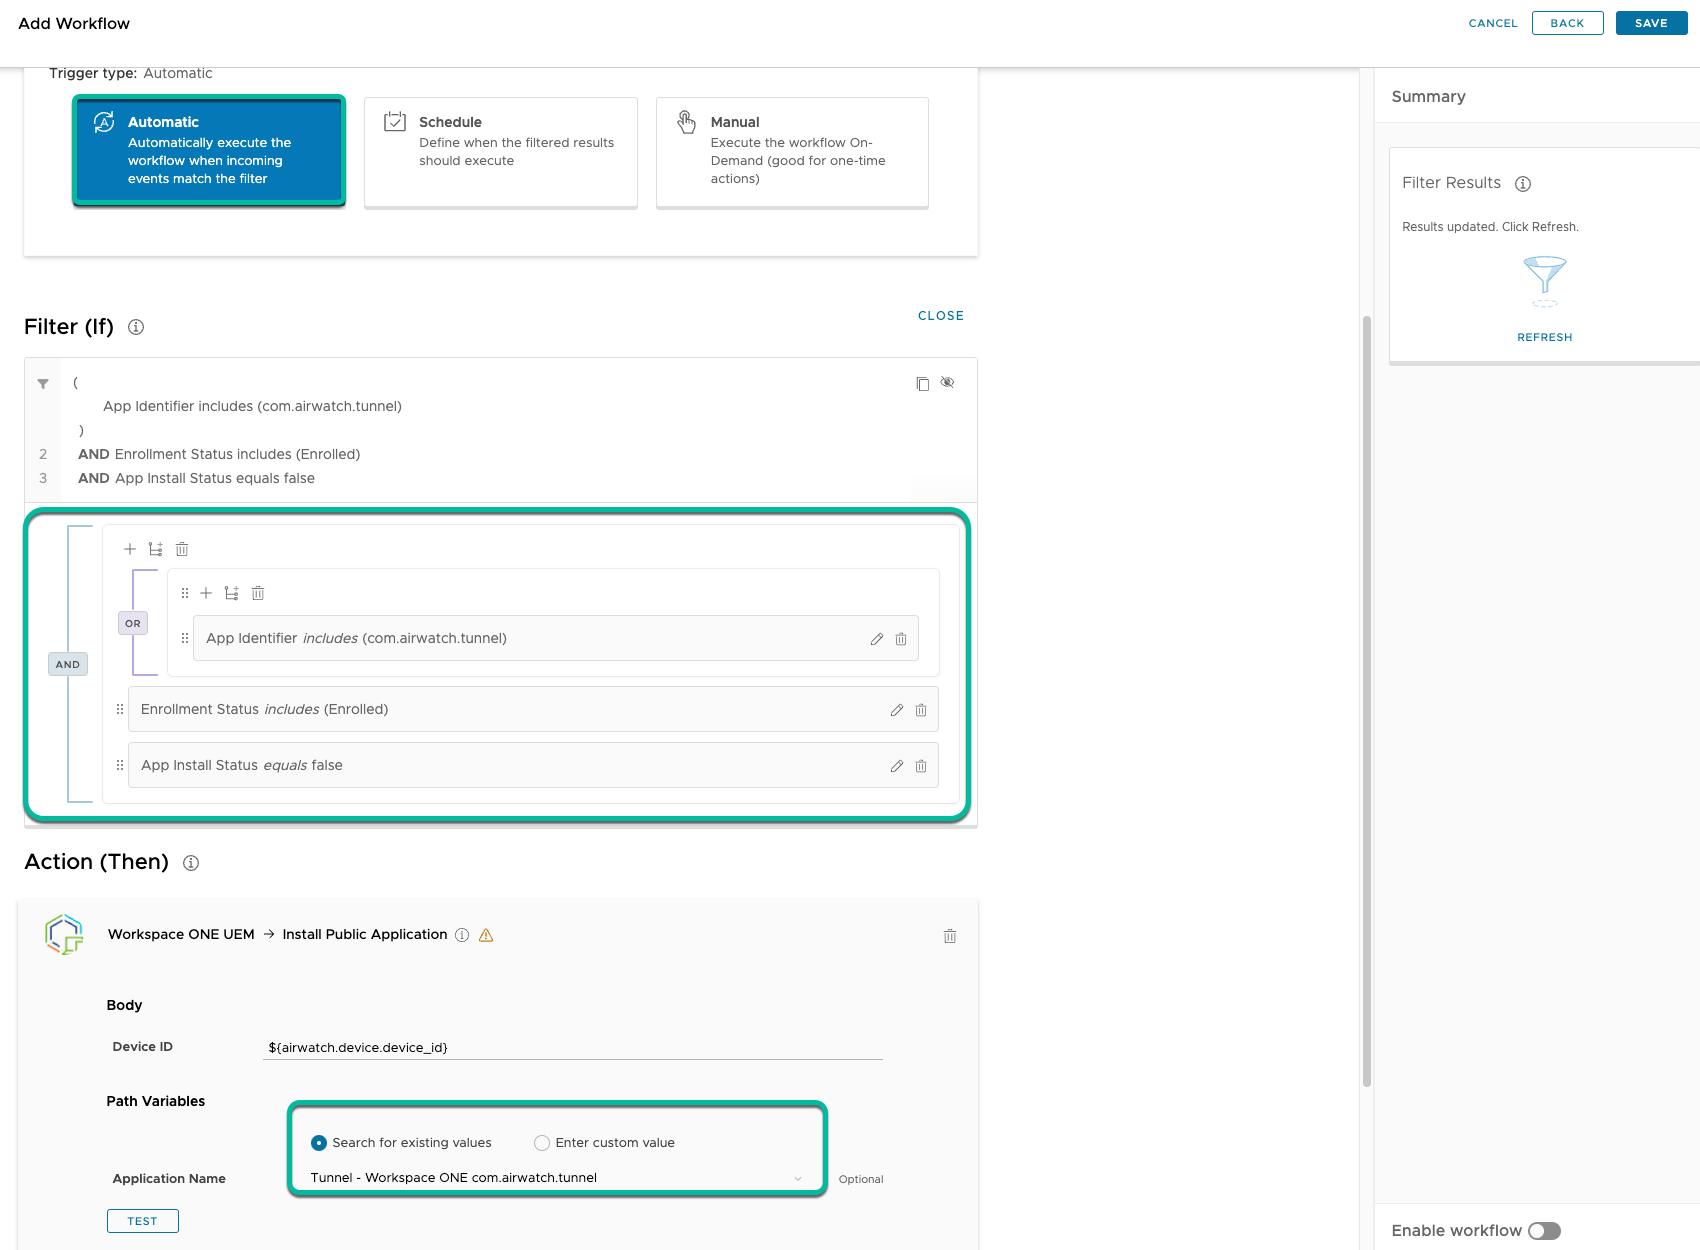
Figure 10: Workspace ONE Intelligence Automation example – reinstalling uninstalled app
Create Compliance Policies in UEM
To avoid seeing network timeouts when the user tries to authenticate on a non-compliant device, set an action inside the compliance rules to remove the VPN profile from the device, or if you have reasons to still have it connected somewhere, install a compliance VPN profile which does not include DTR rules to tunnel authentication traffic with Okta.
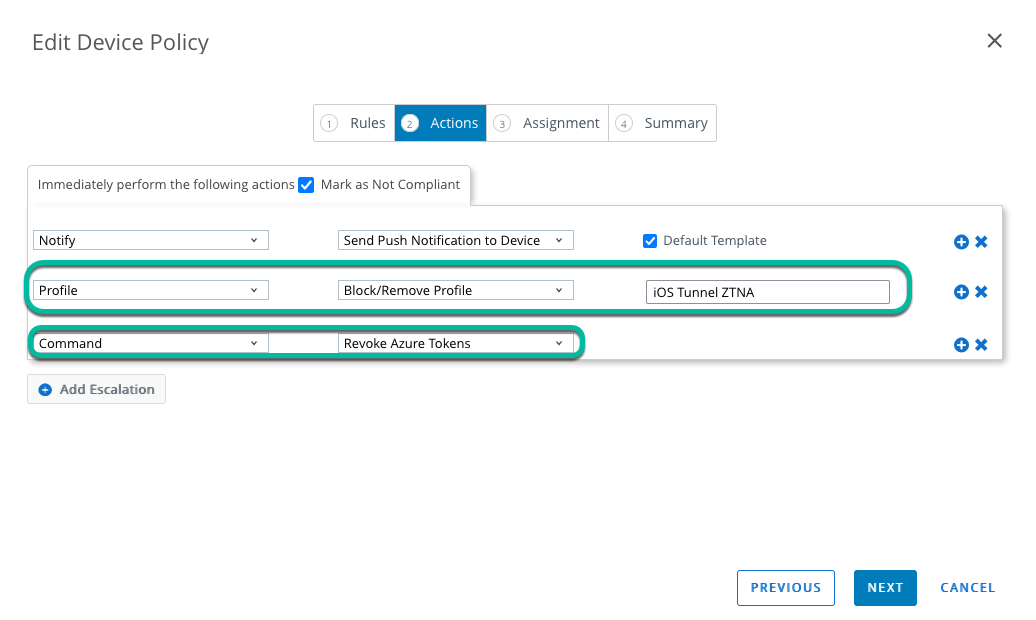
Figure 11: UEM Compliance policy remove profile
For the Office 365 use case, if you have an integration with Entra ID set up in UEM you can also revoke the Azure Tokens from compliance policies for iOS and Android to trigger Microsoft’s Continuous Access Evaluation (CAE) and force a re-authentication.
Set Up Okta Authentication Policies
In the Okta admin portal under Security, find all the settings you need to configure.
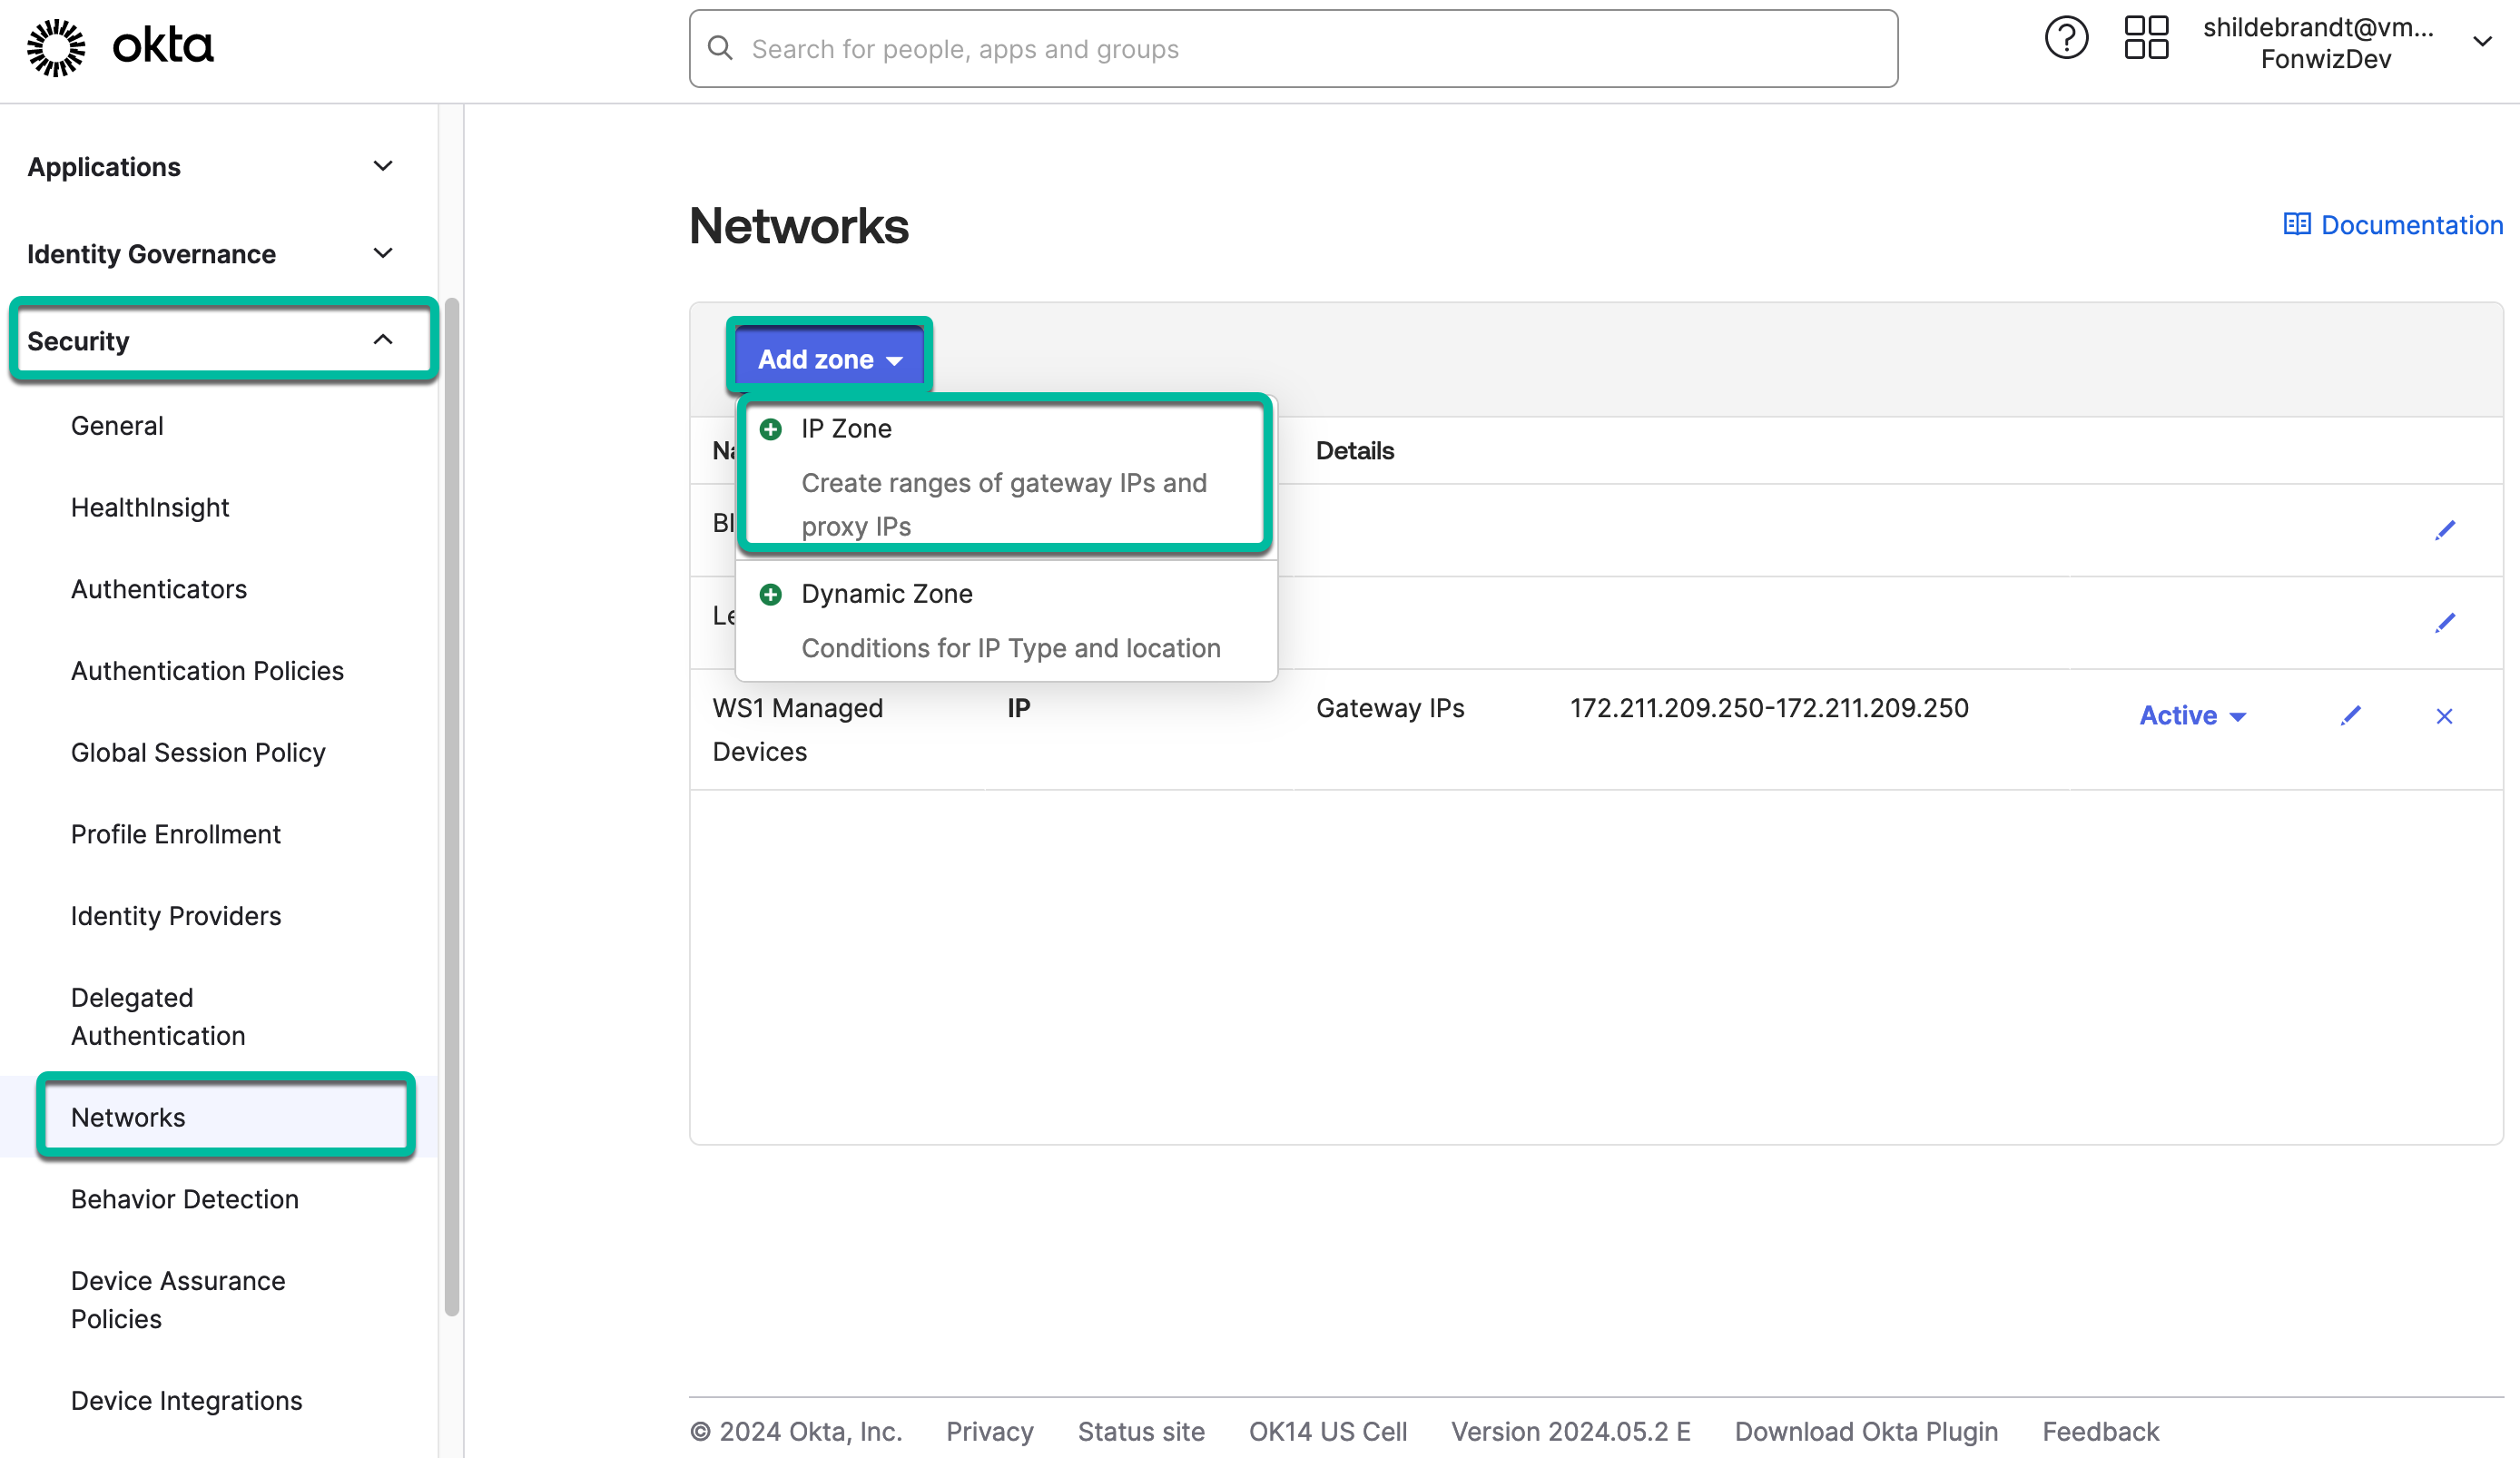
- Navigate to Security > Networks. The Networks feature allows you to specify zones of network ranges or even country locations that you can use later within Authentication Policies.
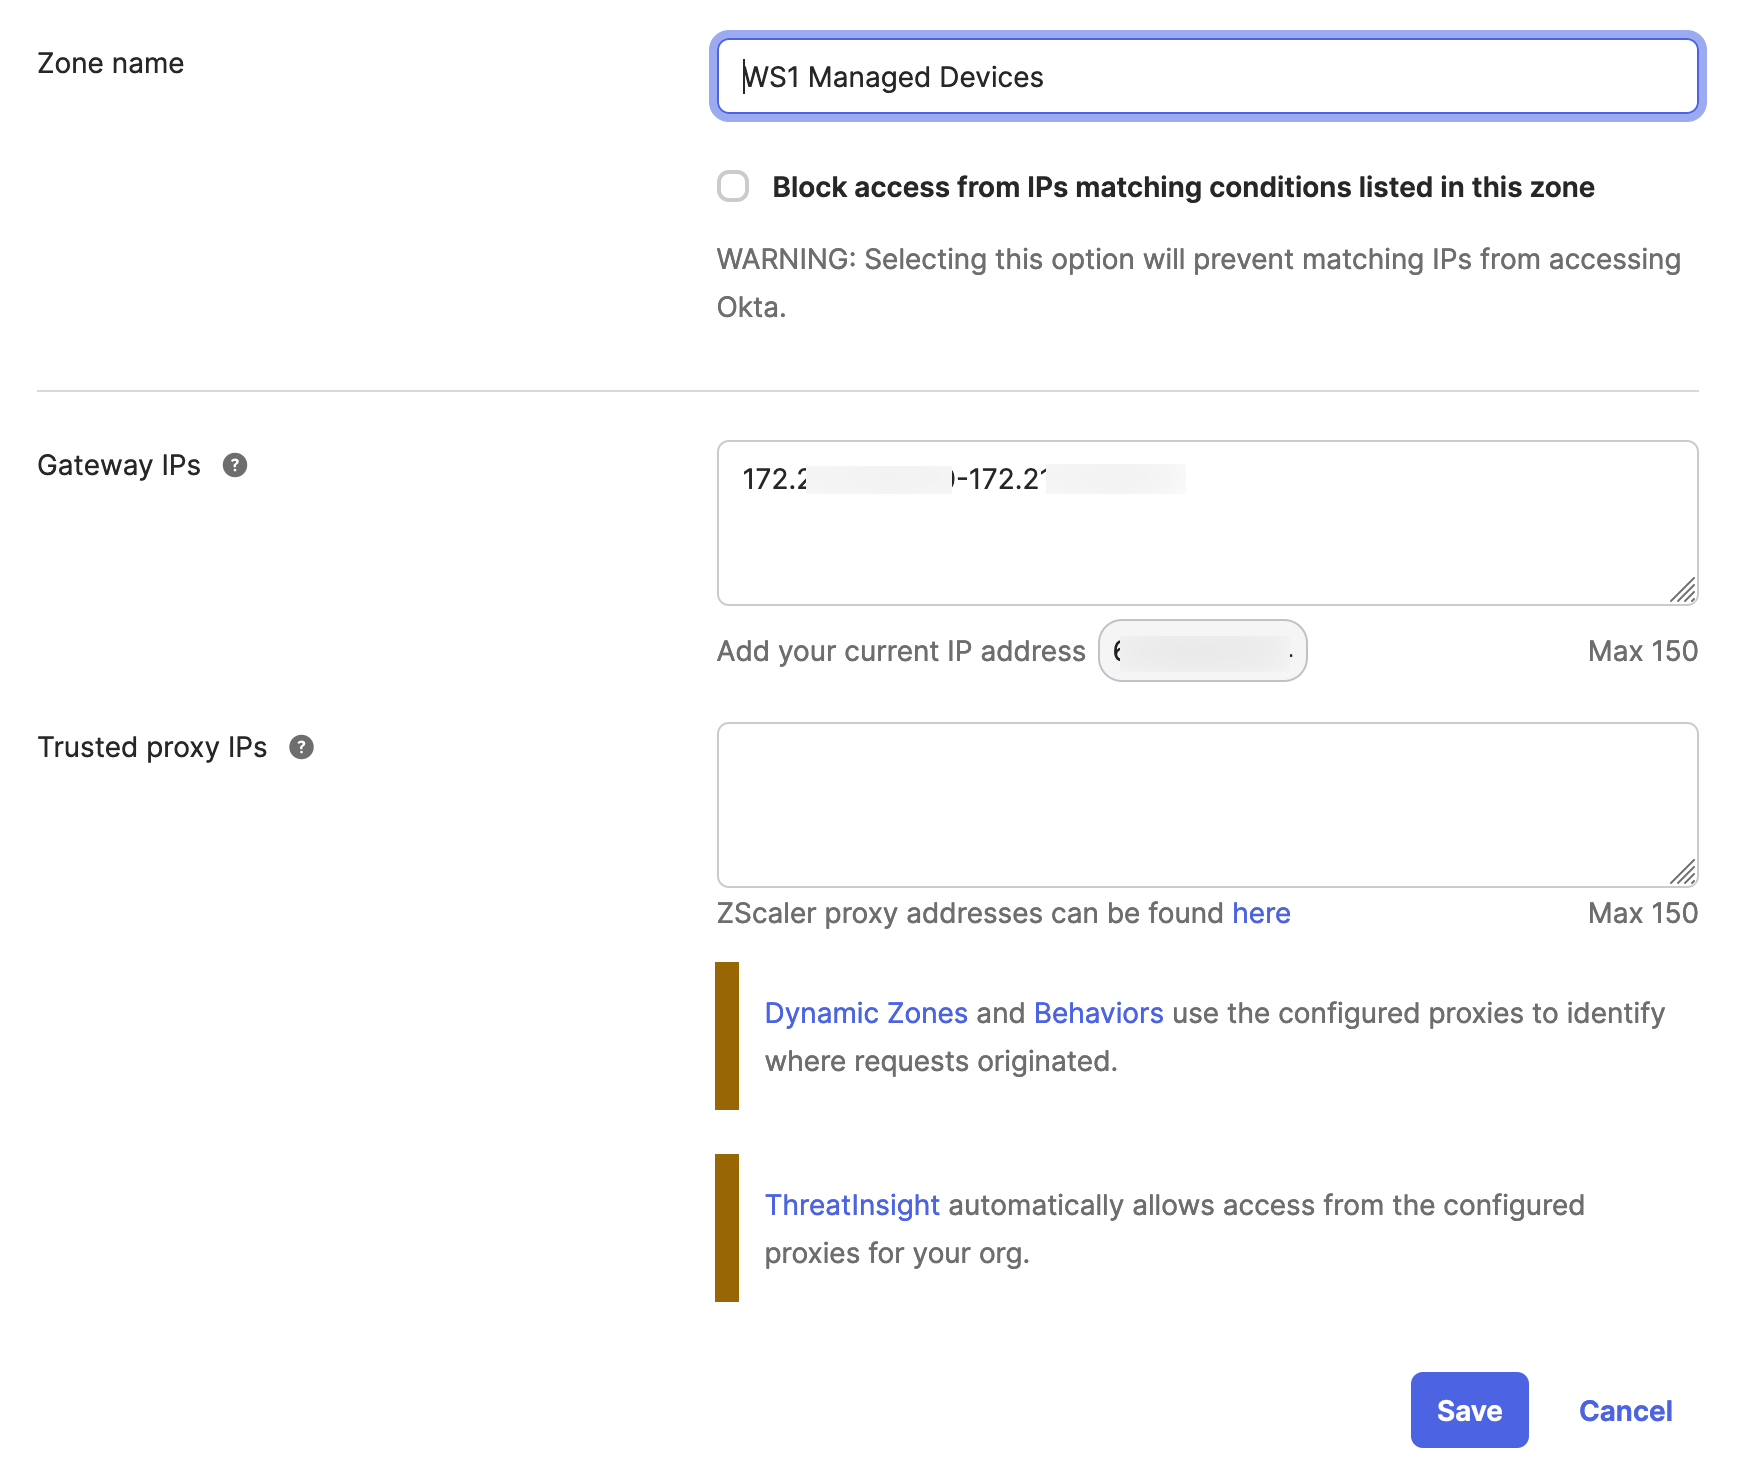
- Add a new IP zone that will include the Tunnel Edge services egress IP addresses.

- Add a unique name for the new IP.
- Add the Gateway IP addresses or ranges to the field as separate IPs, ranges, or in CIDR notation separated by a new line or comma.

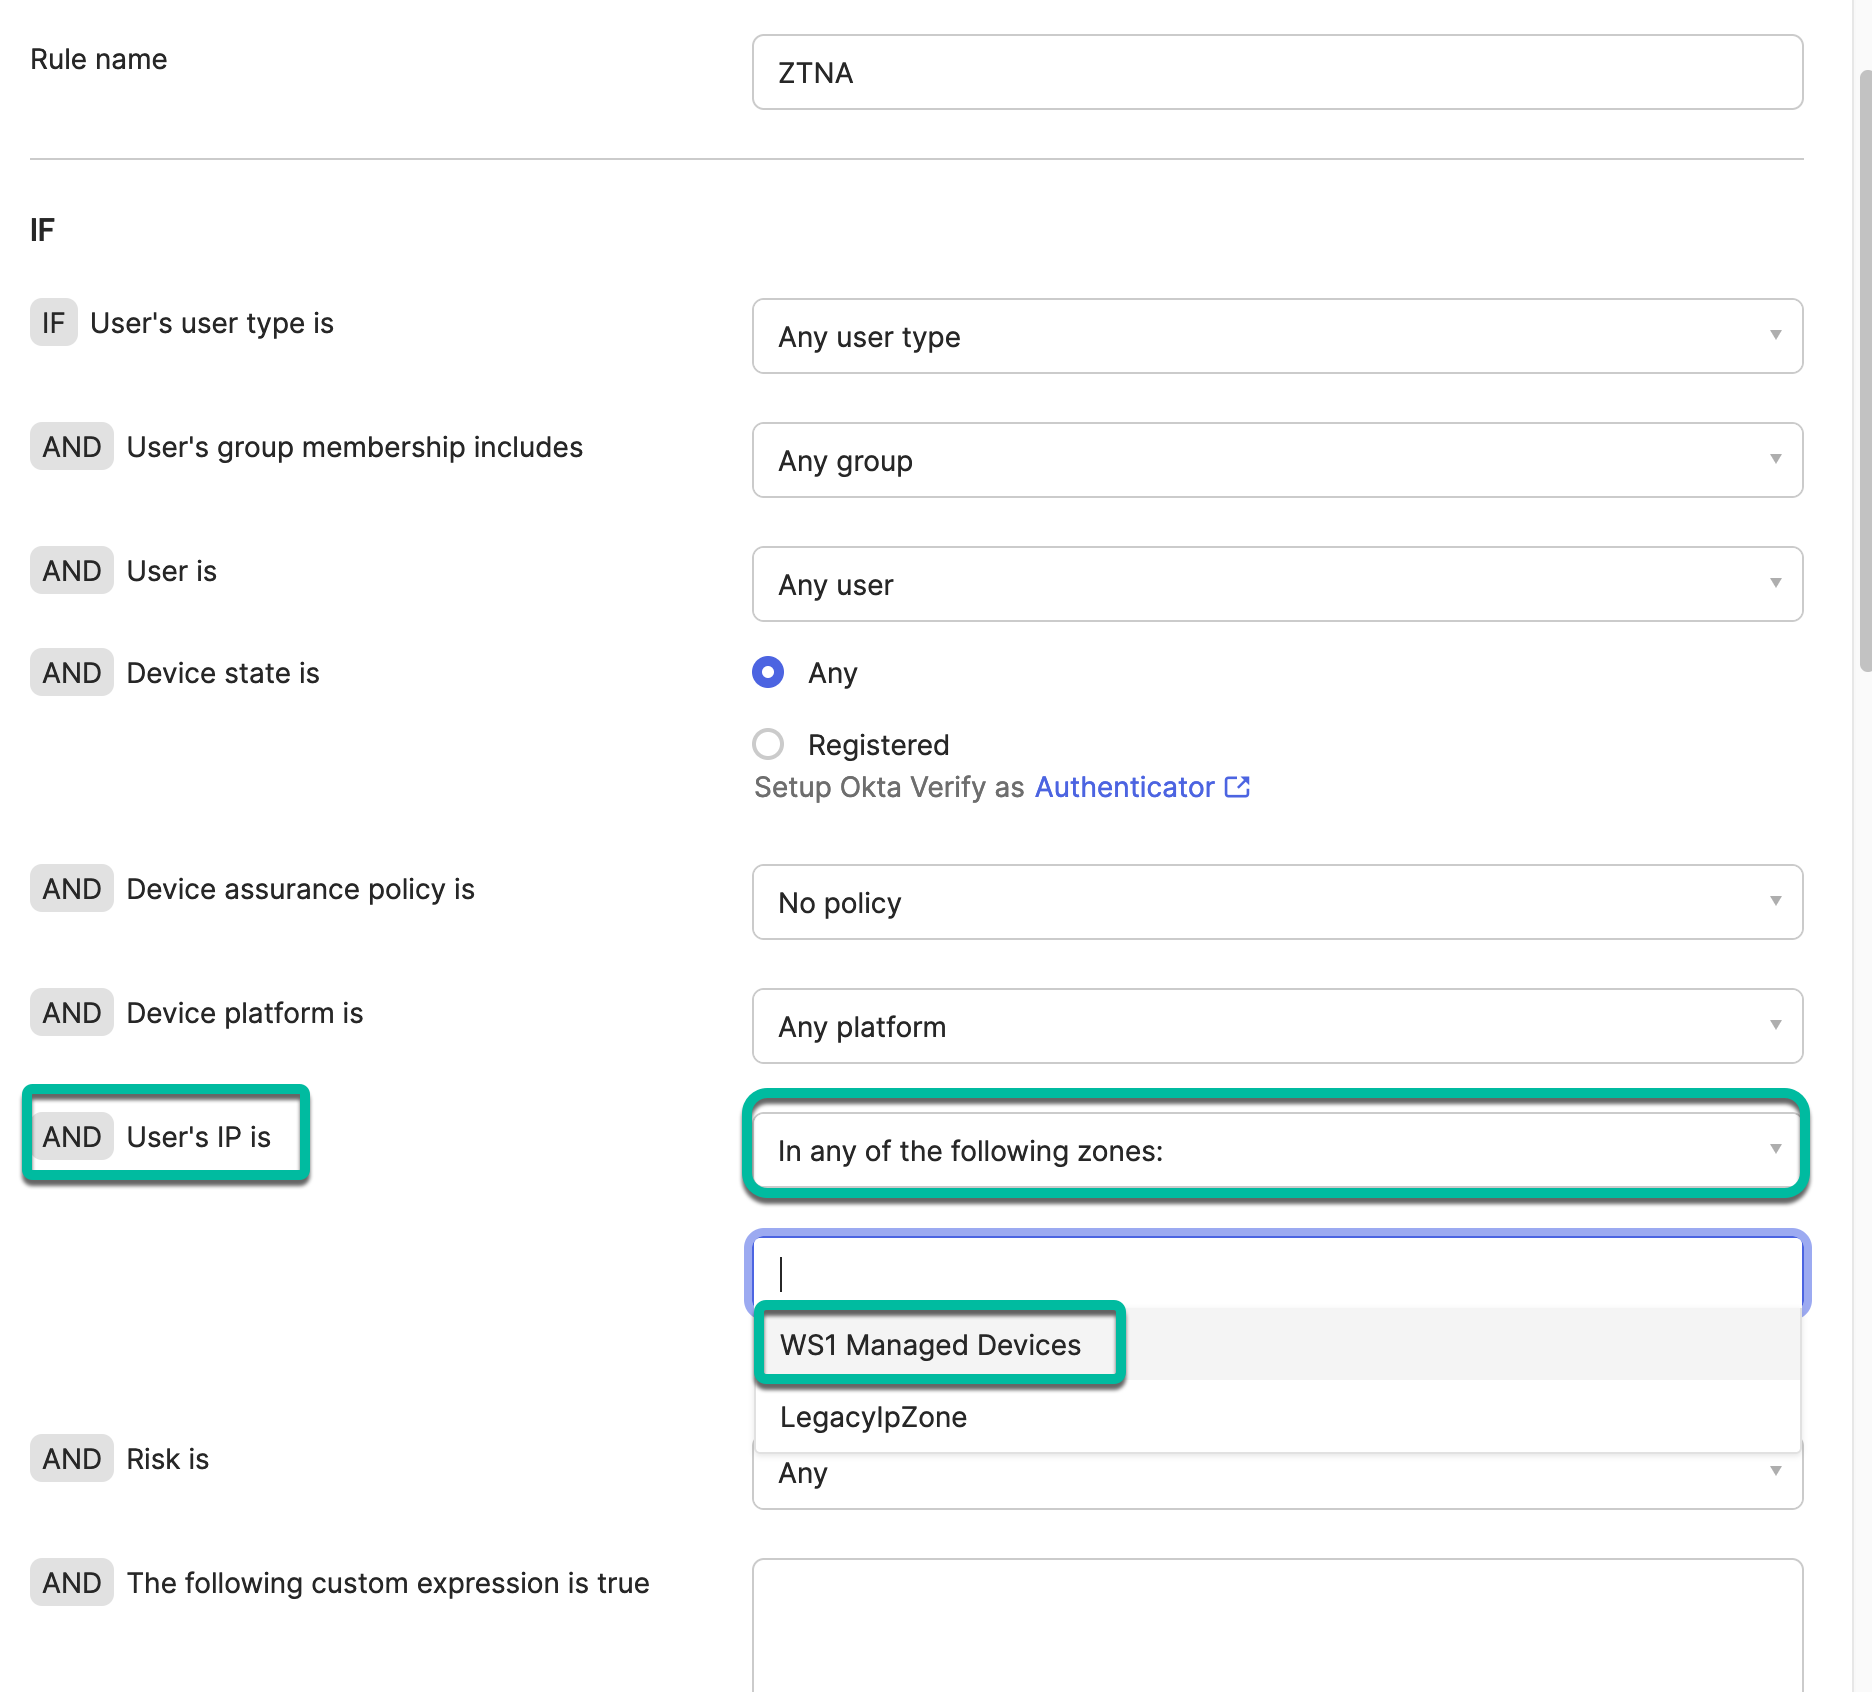
- In the Authentication policies section, add a new policy for the test case; the Office 365 application. You could combine this method with existing rules by configuring in the IF section the setting for the user’s IP and specifying the newly created zone.

Now, the policy requires the user to come from the Tunnel egress IP and it can still use any of the methods to authenticate into Okta and provide other factors like Okta Verify.
In the demo section, you can review the experience for an end user with this solution.
End-User Experience Flow
For the end user on a compliant device, this solution does not change the experience much. Tunnel is configured by UEM and invoked based on the Device Traffic Rules. When the device becomes non-compliant, the profile is removed and the user can still reach the Okta login, but as it is coming from the correct IP address, we do not have a rule to match against and are not allowed forward.
Zero Trust through API-based Integration
In API-based integrations for Zero Trust, the backends of the device management and the IdP have ways to identify the device accessing resources, share a common identifier for the device and can trigger a change of the login behavior on a change of the device posture. Okta offers Device Integrations which confirm that Okta Verify and FastPass were configured by a device management solution. That gives you the assurance that the device was managed and compliant at some point but does not reliably change on changes of the device posture.
As there is also no direct integration in the backends, we leverage existing Okta APIs and their Workflow solution to manage the status of Okta Verify on the devices based on the UEM device posture.

Figure 12: Device Integration and Device Posture API Events
The solution works on desktops and mobiles that are enrolled in UEM and for which you set up the Okta Verify app, configuring an Appconfig secret on mobiles and certificate on desktops to transport the managed state to Okta. Applications in Okta are set up with authentication policies requiring the registered and managed state, which will invoke Okta Verify on the device during the authentication flow.
With the Appconfig, you share the identifier to Okta for mobiles to later identify them and for Desktops, you use the serial number as an identifier collected by the Okta Verify application. On compliance change, you can send an event from UEM to Okta Workflow which triggers a flow that suspends the Okta Verify app on the affected device, revokes all sessions for the user in Okta and through integrations, for example with EntraID also for the Office 365 applications. A re-authentication is triggered which will fail on the non-compliant device as the Okta Verify app is suspended.
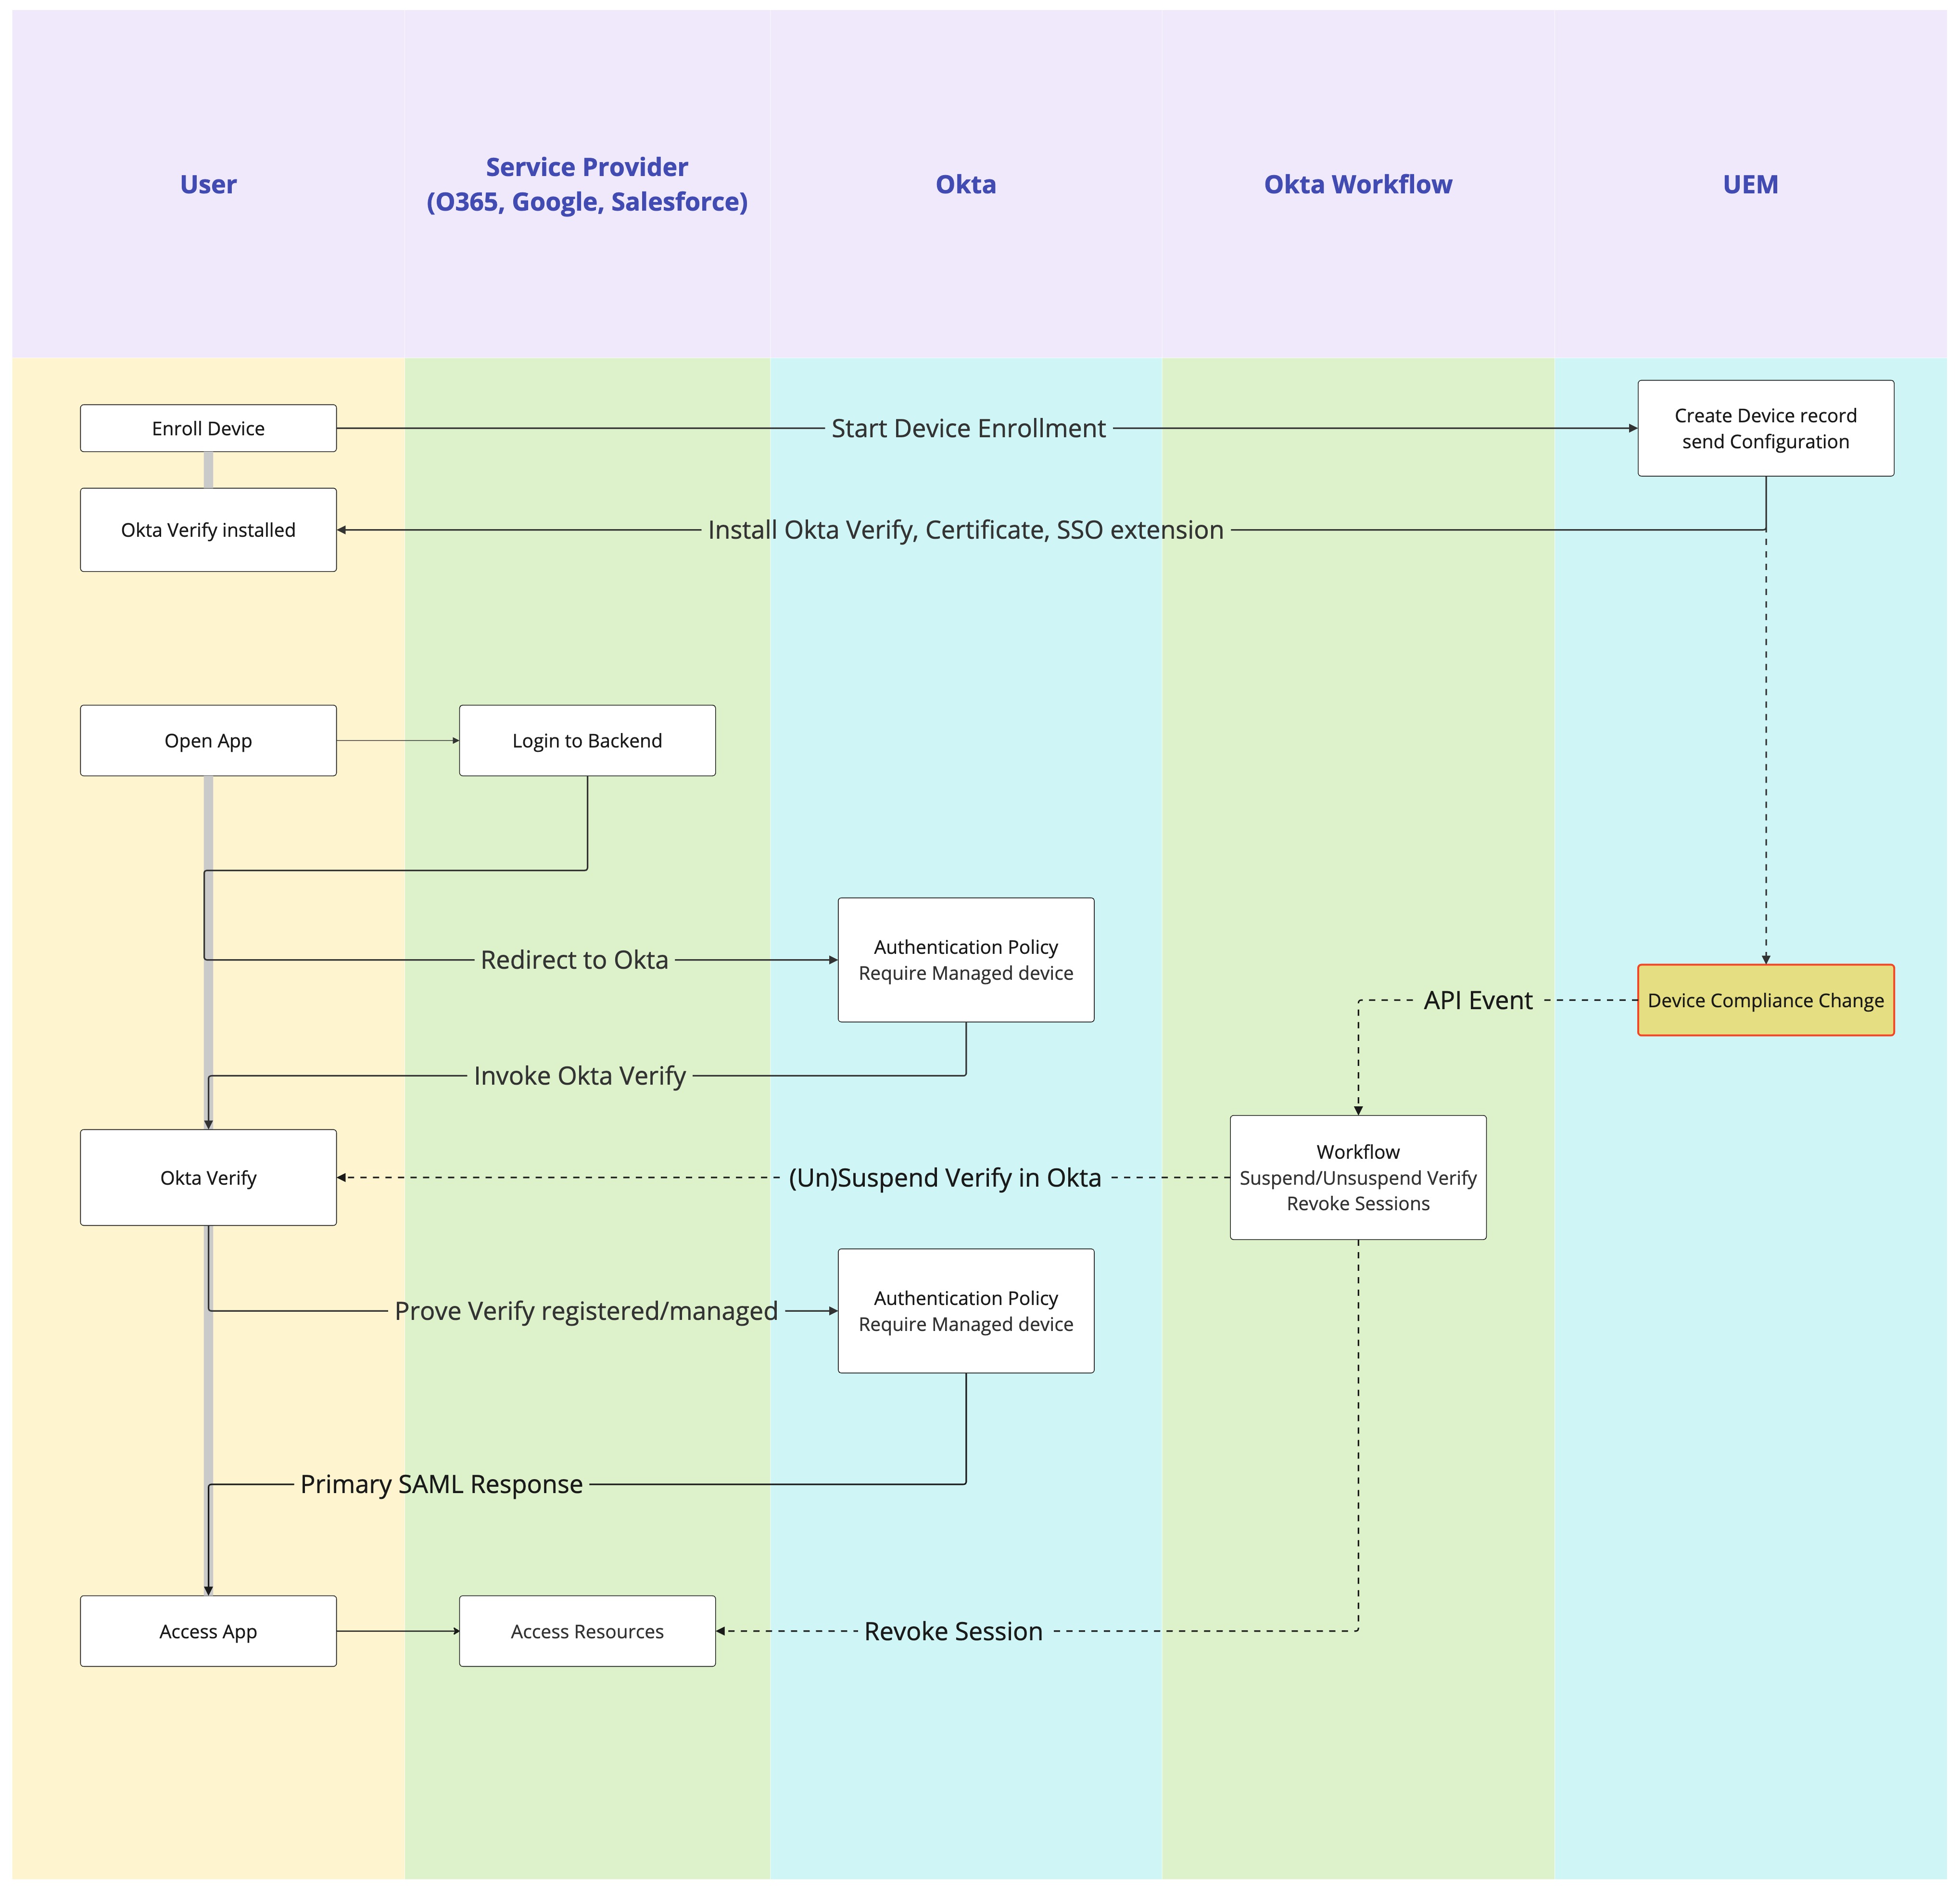
Figure 13: Device posture using API Events flow
Requirements for Workspace ONE UEM and Workflow API
Before you can proceed, you must have the following components installed and configured:
- An existing Workspace ONE environment
- Okta Workflow
Devices are enrolled into Workspace ONE UEM, and UEM sets the configuration and tracks the compliance state during the lifecycle. UEM has a built-in certificate authority that provides the certificates used for SSO on all device types as well as integrations into all common enterprise certificate authorities and templates to use internal certificates for the use case.
Using UEM API Events together with Okta Workflow and Okta Device Integration
There are two phases to this integration; first, set up Okta’s Device Integrations in Okta and UEM to enforce the registered and managed checks in the Okta authentication policies.
The following sections provide a high-level overview of the steps as focus is on the solution.
Enable Device Integration for iOS and Android in Okta
There are 2 integrations involved here; for mobile devices, follow the flow outlined in the Okta documentation.
The main steps are performed in the Okta admin portal under the Security section > Device Integrations.
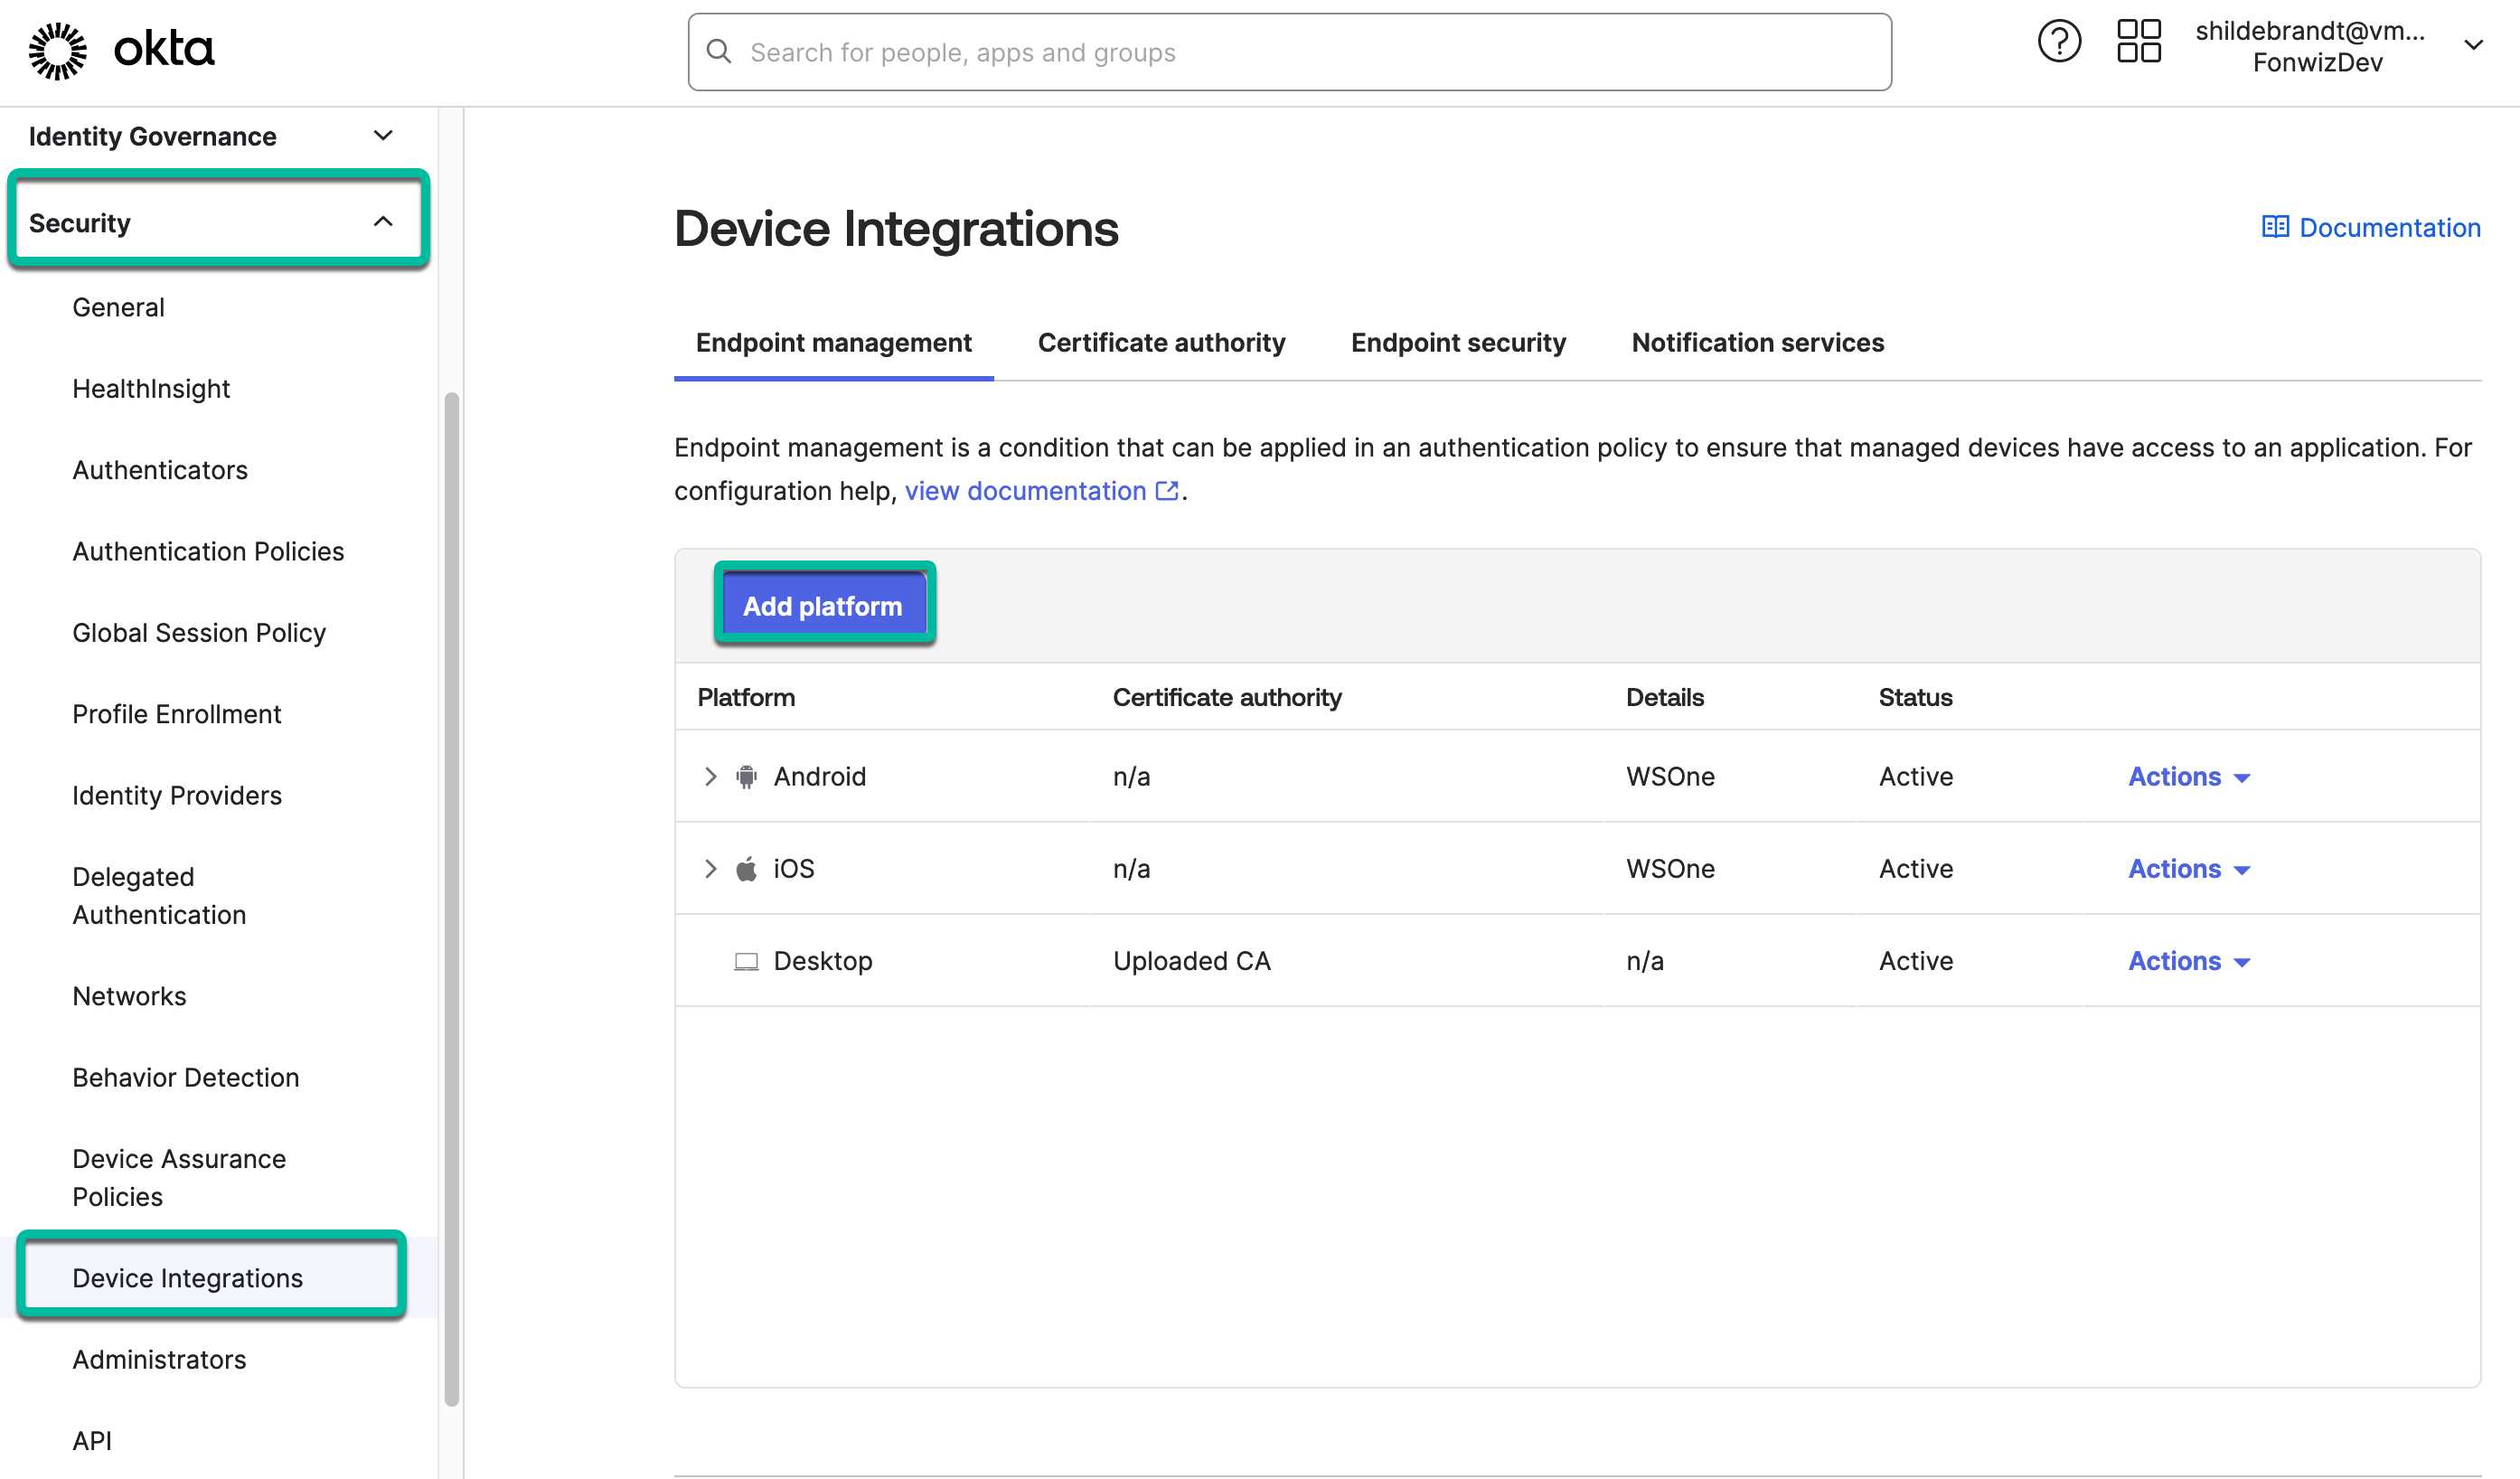
Figure 14: Add device integrations in Okta portal > Security
For iOS and Android, you have to add separate configurations but you can configure the same secret across both to keep the setup simple. Copy out the Secret key value to be used in the UEM Appconfig for the Okta verify assignments.
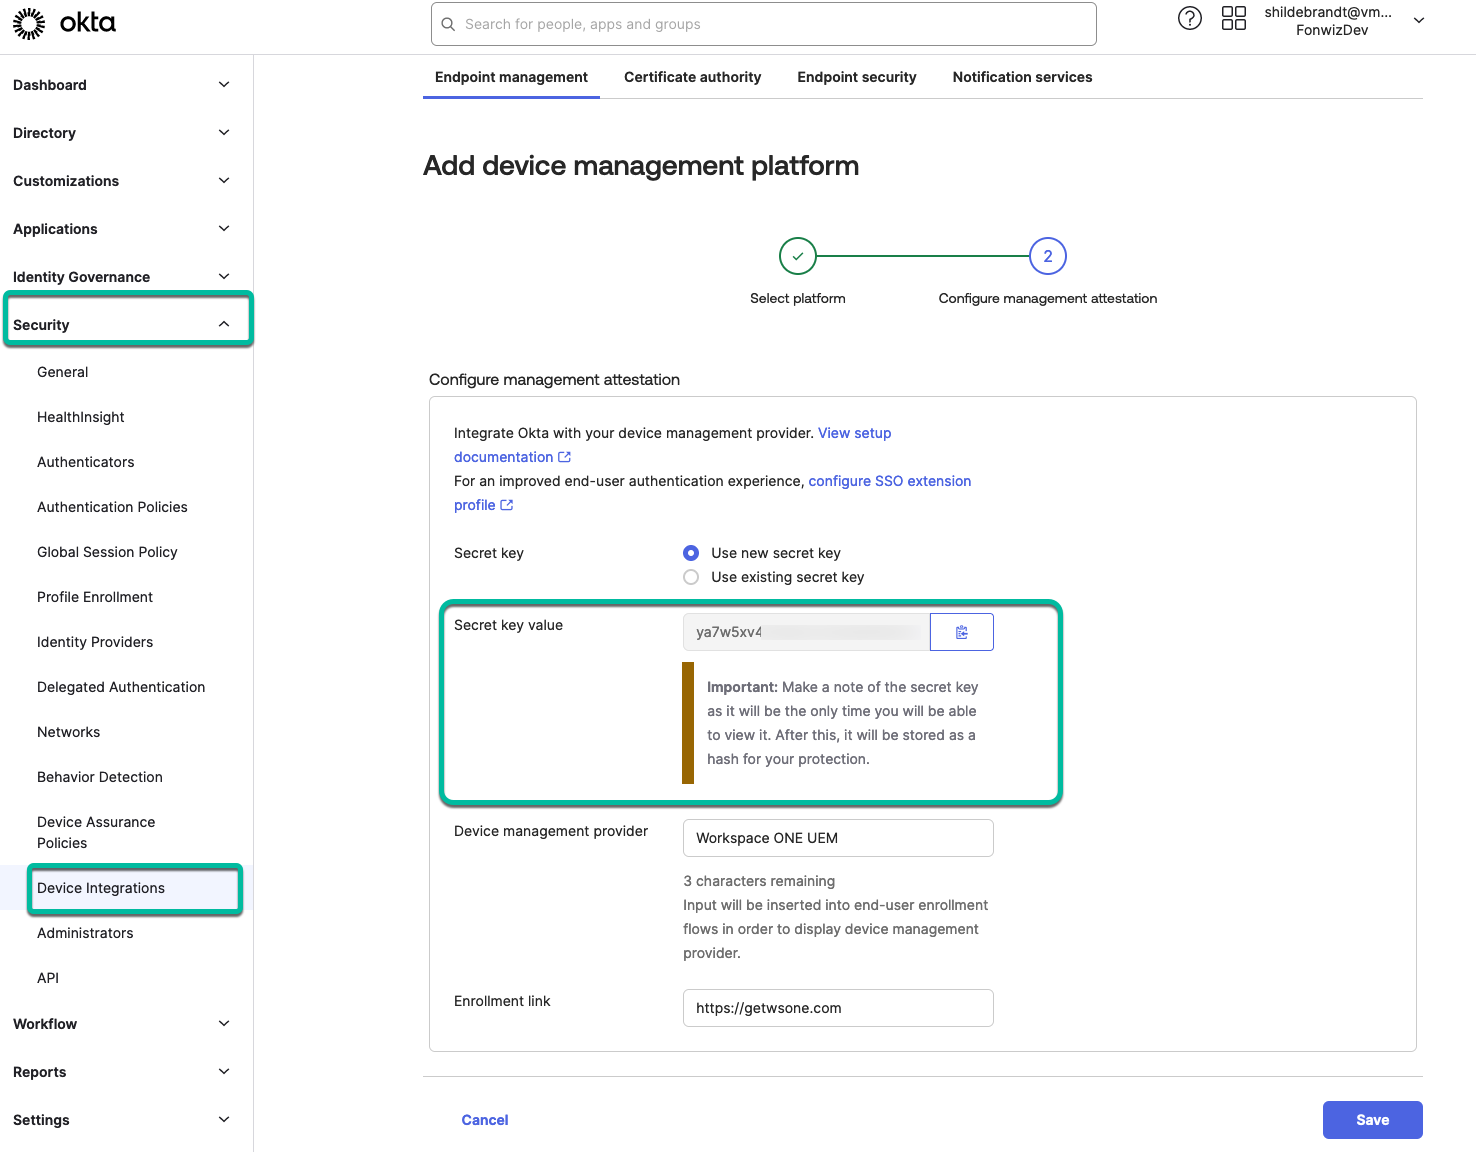
Figure 15: Add device integrations for mobile using a Secret key
Deploy Verify and SSO Extension Profiles for Mobile in UEM
In the Assignment for Okta Verify in UEM for iOS and Android, activate the Application Configuration setting and configure the value for the managmentHint with the Secret Key you retrieved from the Device Integrations setting in Okta. Based on this, Okta can match the keys and assume that the Verify application was installed on a managed device, as only MDM solutions can set the application configuration KVP (key value pairs). You also send the KVP for UDID and SerialNumber based on lookup values in UEM to later identify the devices in our API integration. Okta will save those values with their device record.
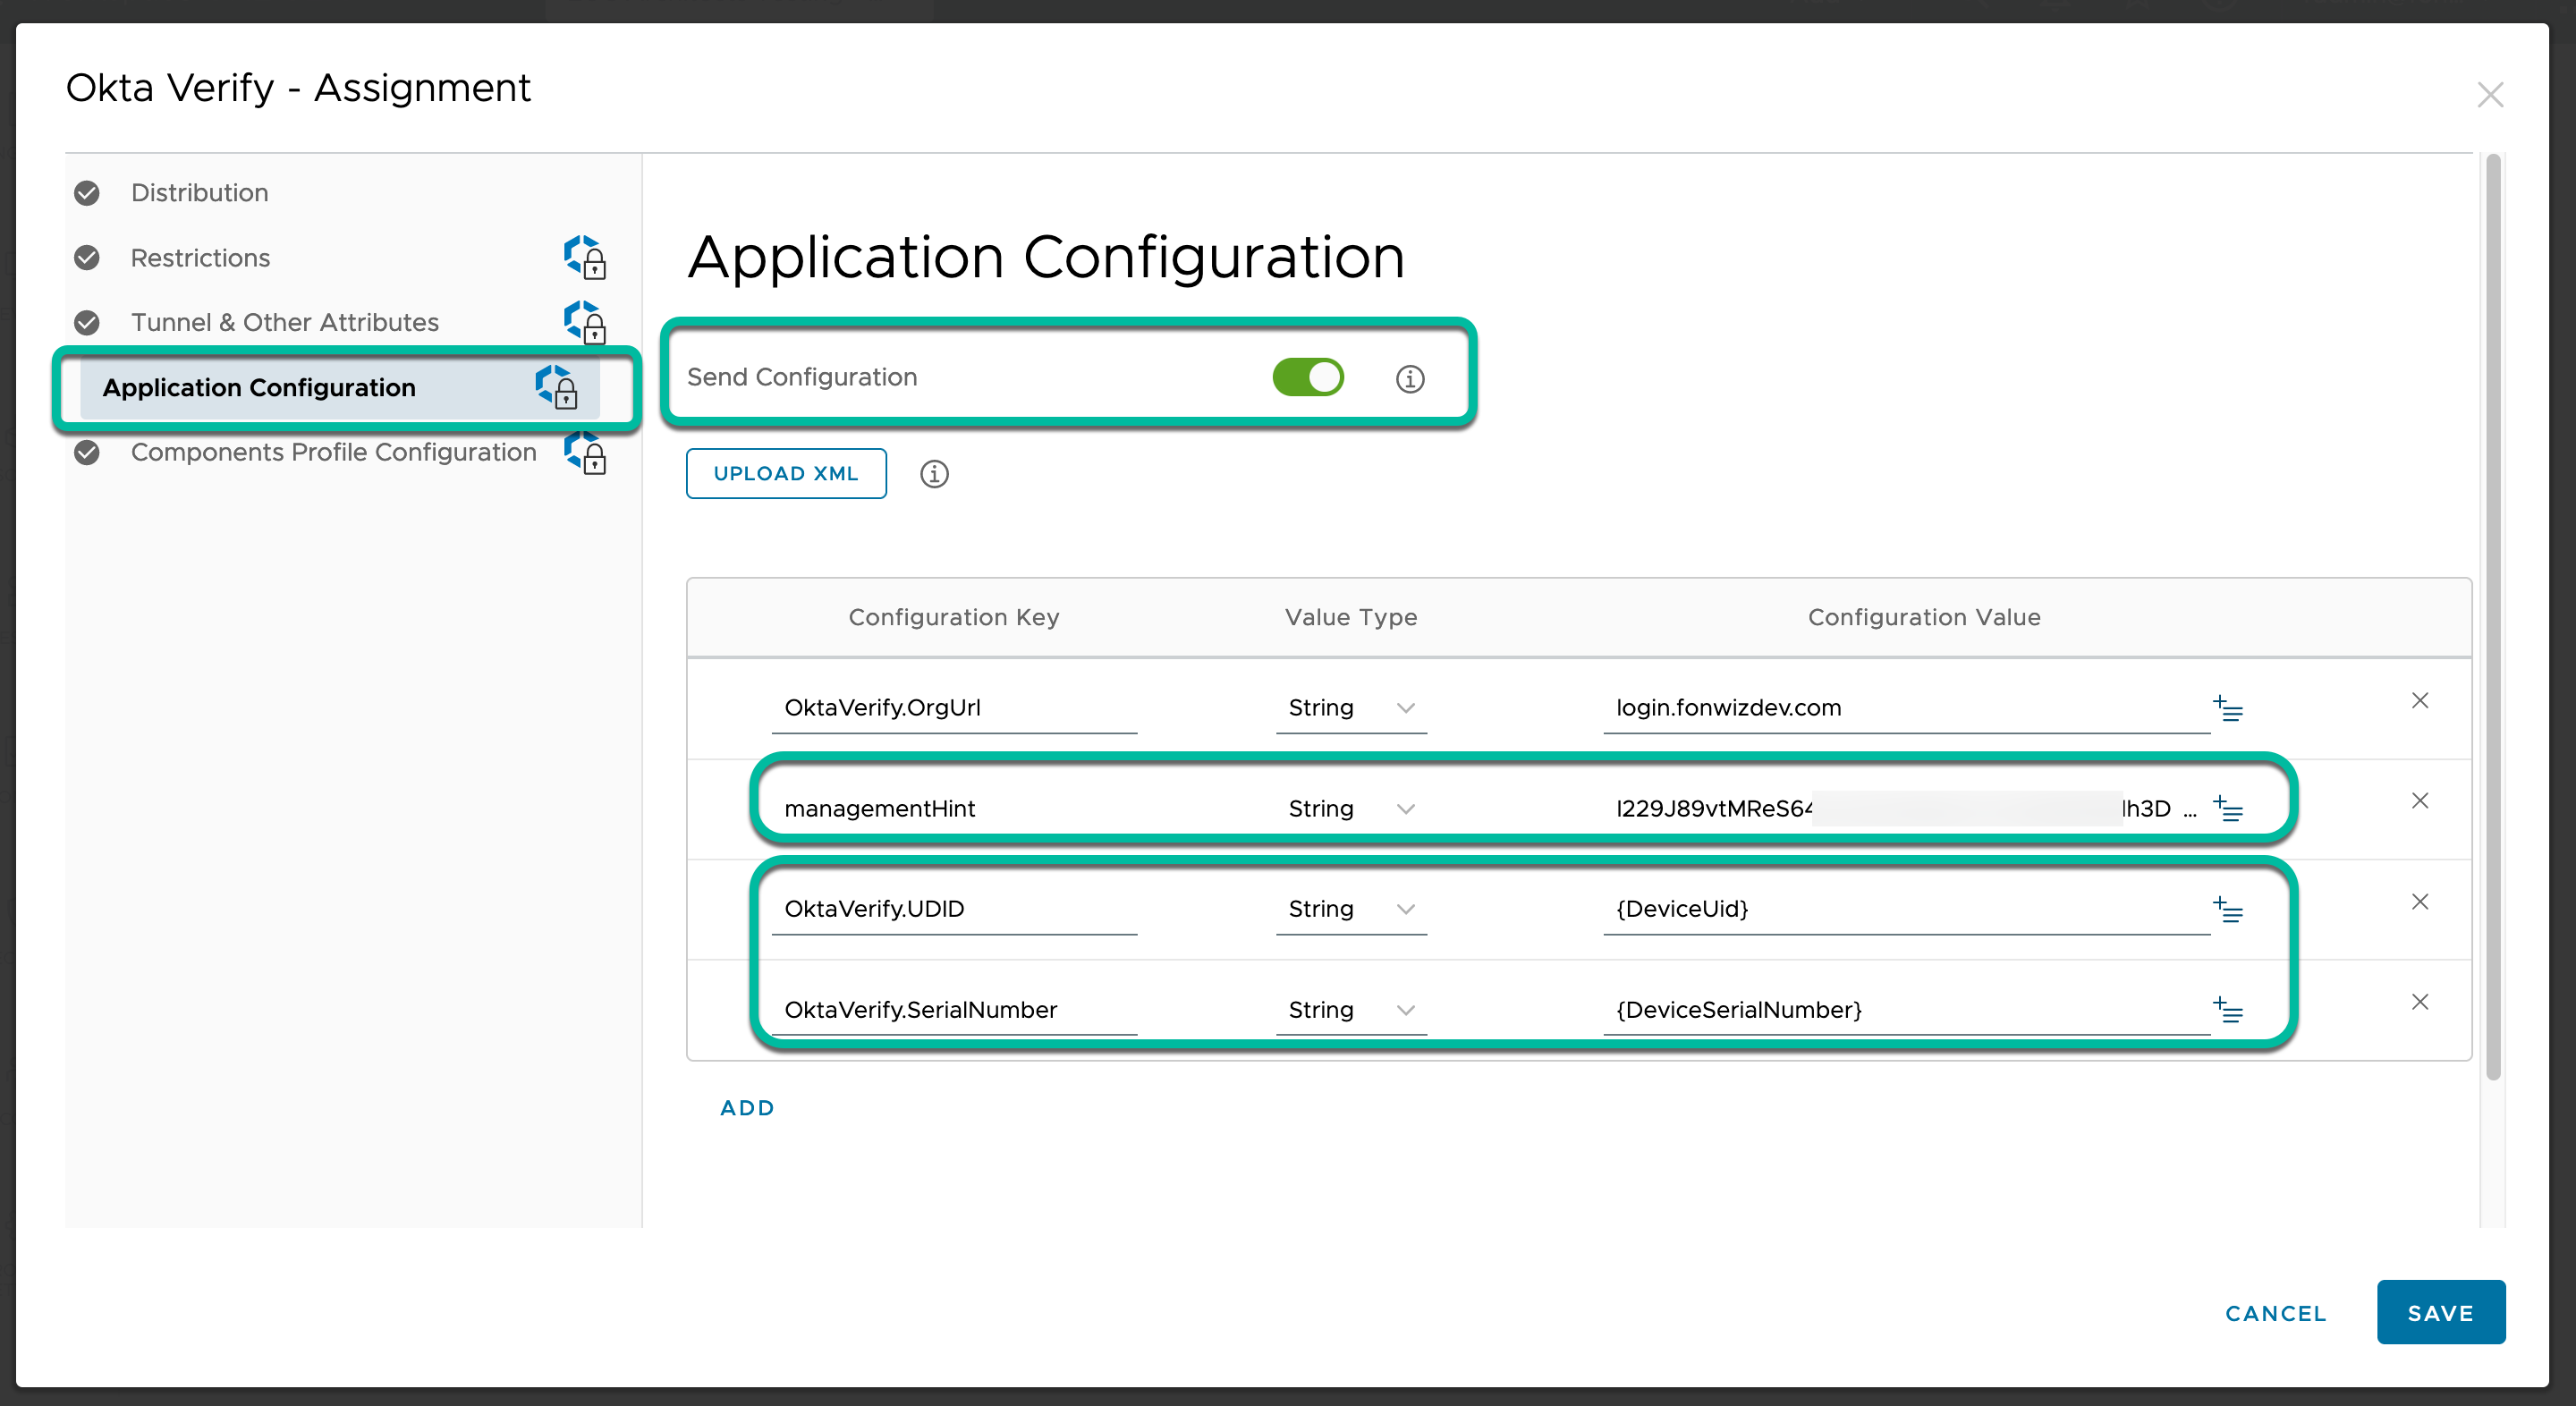
Figure 16: Add Secret key as managementHint String value
To enhance the login experience on iOS, configure an SSO extension device profile based on the documentation by Okta. In the custom XML, point to the management hint and send the device UDID. See Configure an SSO extension on iOS devices in the Okta documentation.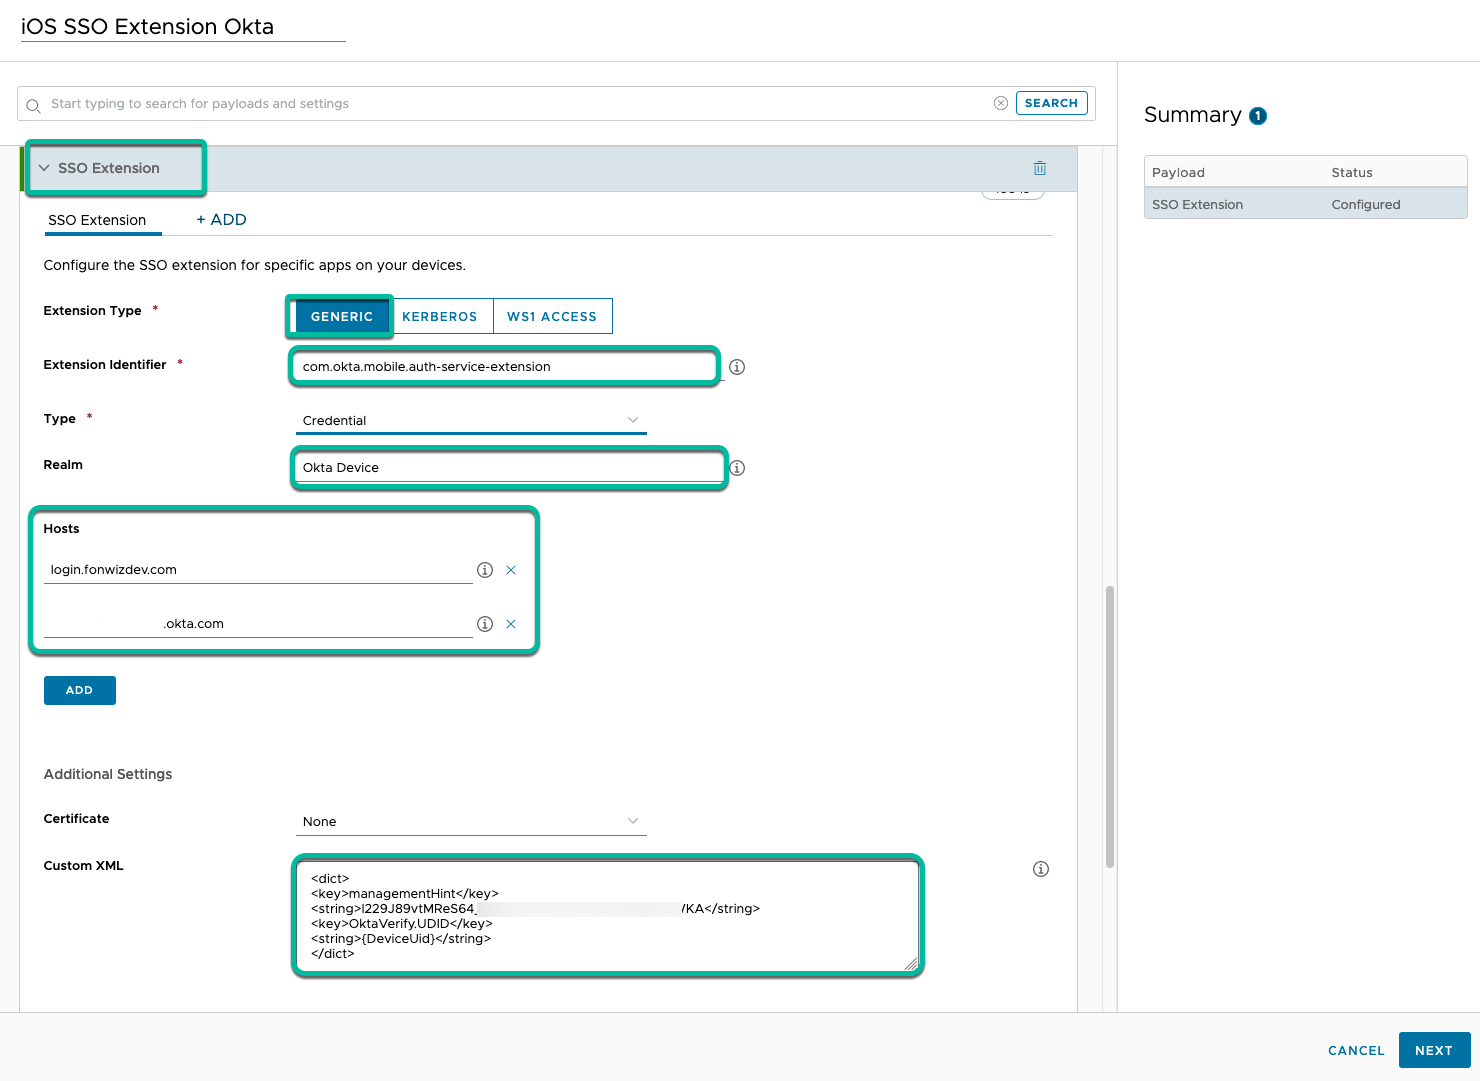
Figure 17: configure SSO extension profile for iOS
Export UEM Internal CA Issuer Certificate
While you are in the UEM console, retrieve the issuer certificate of the built-in CA (certificate authority) to leverage for Desktop device integration which you will set up next in Okta. The CA is used for certificate authentication and Mobile SSO with Workspace ONE Access usually, so you can find the issuer certificate under Settings > Enterprise Integration > Workspace ONE Access > Configuration. The download will have the .cer extension; to import it into Okta, change the extension to .pem.
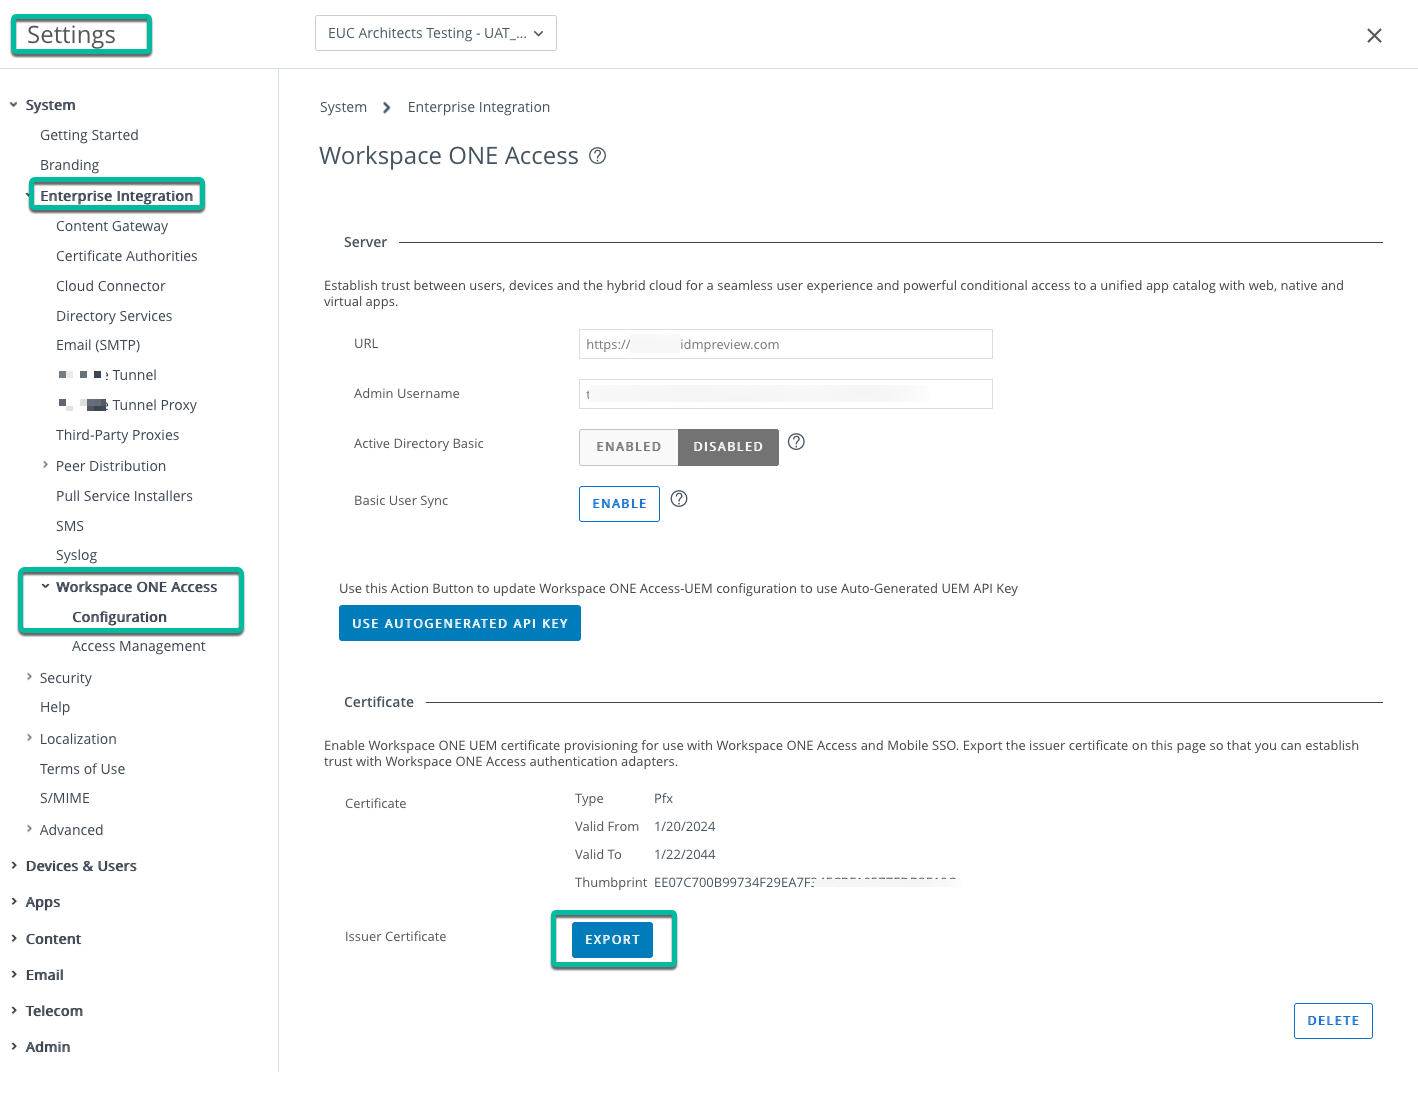
Figure 18: Export the UEM CA issuer certificate
Enable Device Integration for Desktops in Okta
The certificate itself is already in the required base64 format. Upload it under the Security > Device Integrations > Certificate authority section of the Okta admin portal.
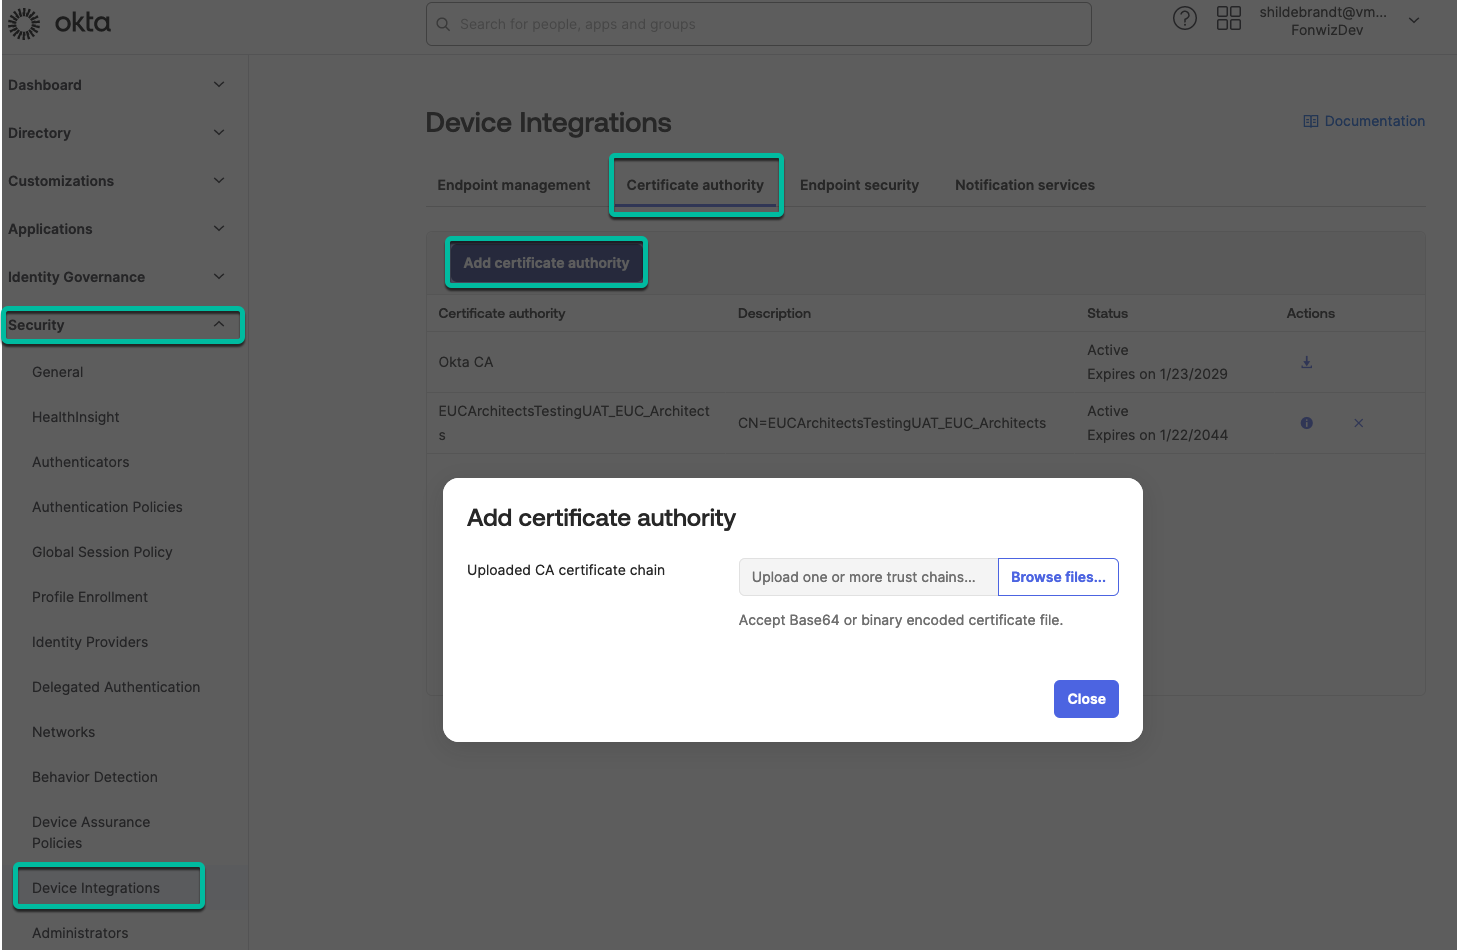
Figure 19: Upload the issuer certificate for the Workspace ONE CA
With the certificate authority saved, we can go to endpoint management again and through Add platform, we configure the Desktop setting and choose Use my own certificate authority before saving.
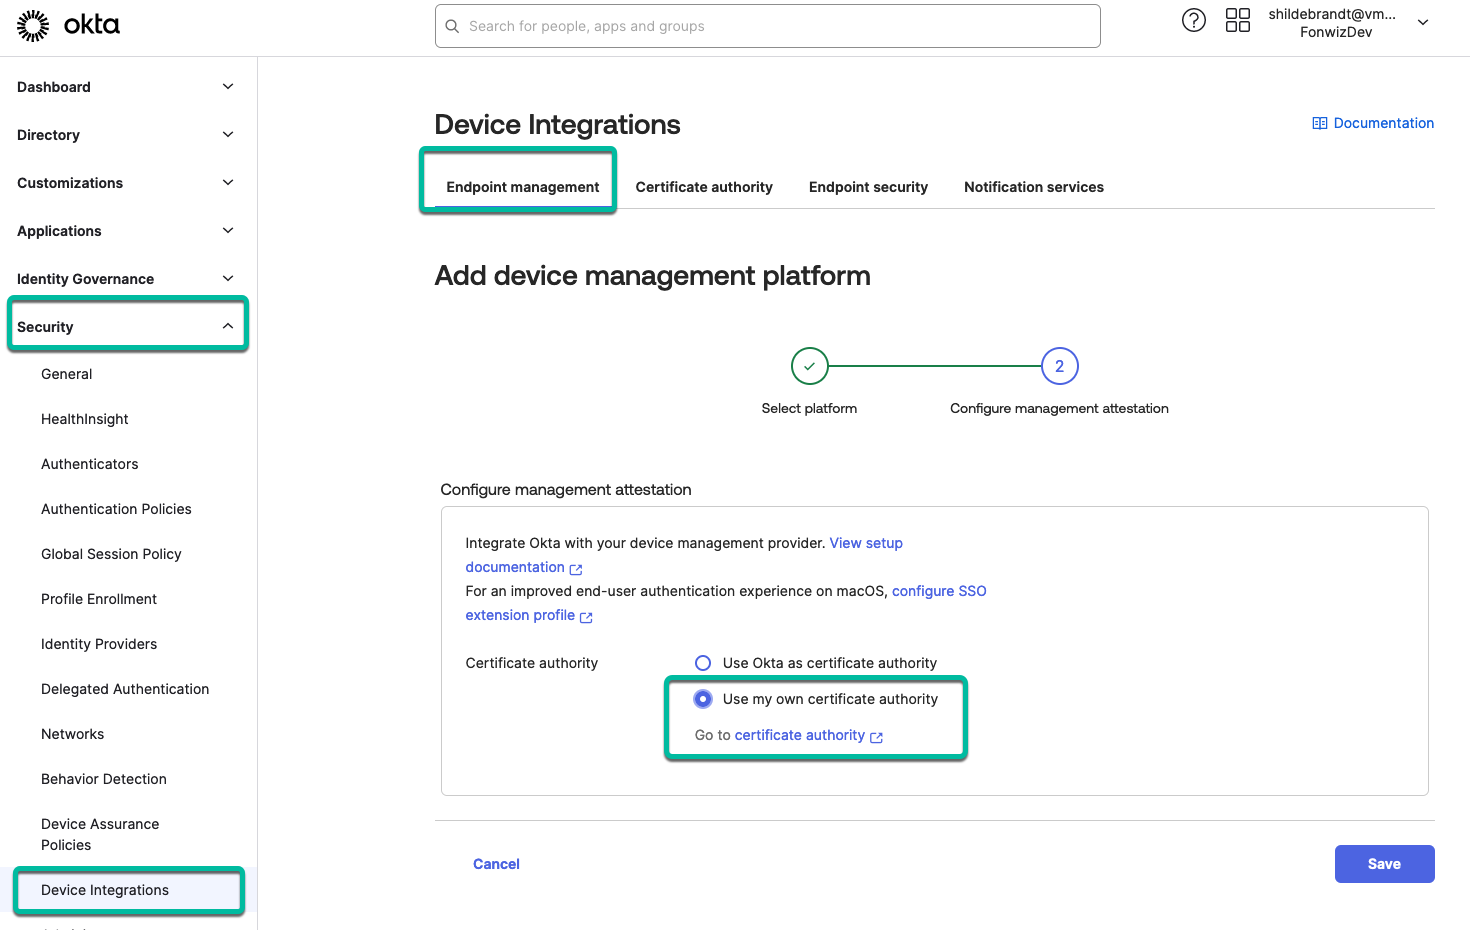
Figure 20: Add platform > Desktop & Use my own certificate authority option
Deploy Verify and SSO extension profiles for desktop in UEM
In UEM, configure the app packages to install Verify on Windows and macOS. For Windows, add the command line to quietly install Okta Verify and point directly to the tenant.
OktaVerifySetup-x.x.x.x-yyyyyyy.exe /q OrgUrl=https://{org}.org.com
For more details, see Deploy Okta Verify to Windows devices in the Okta Docs.
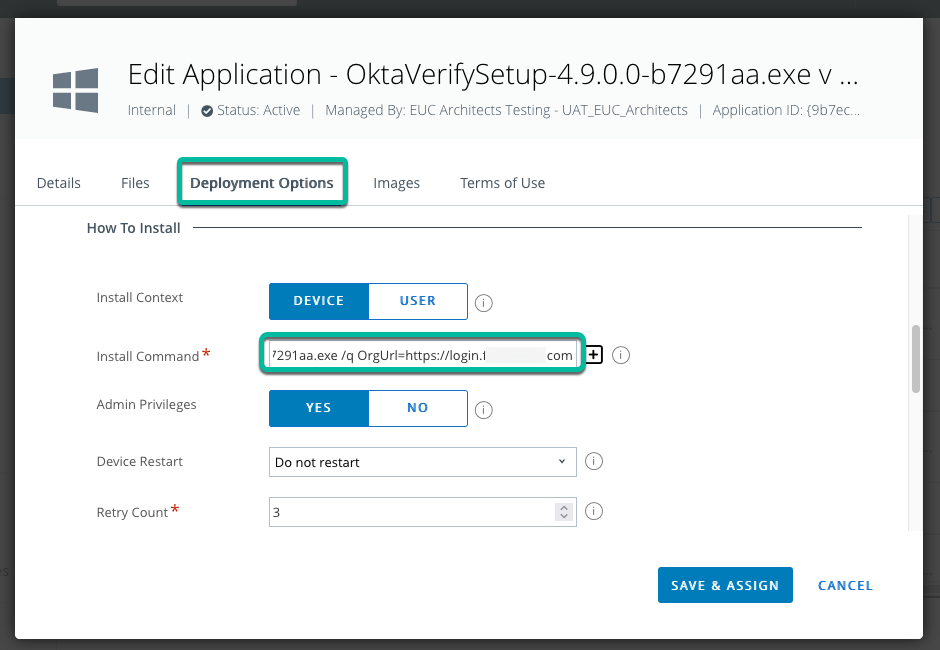
Figure 21: Add Verify package for Windows
For macOS, push the app through Appstore or app package and configure those settings through a custom xml profile. See Okta Verify configurations for the macOS devices for all the available settings.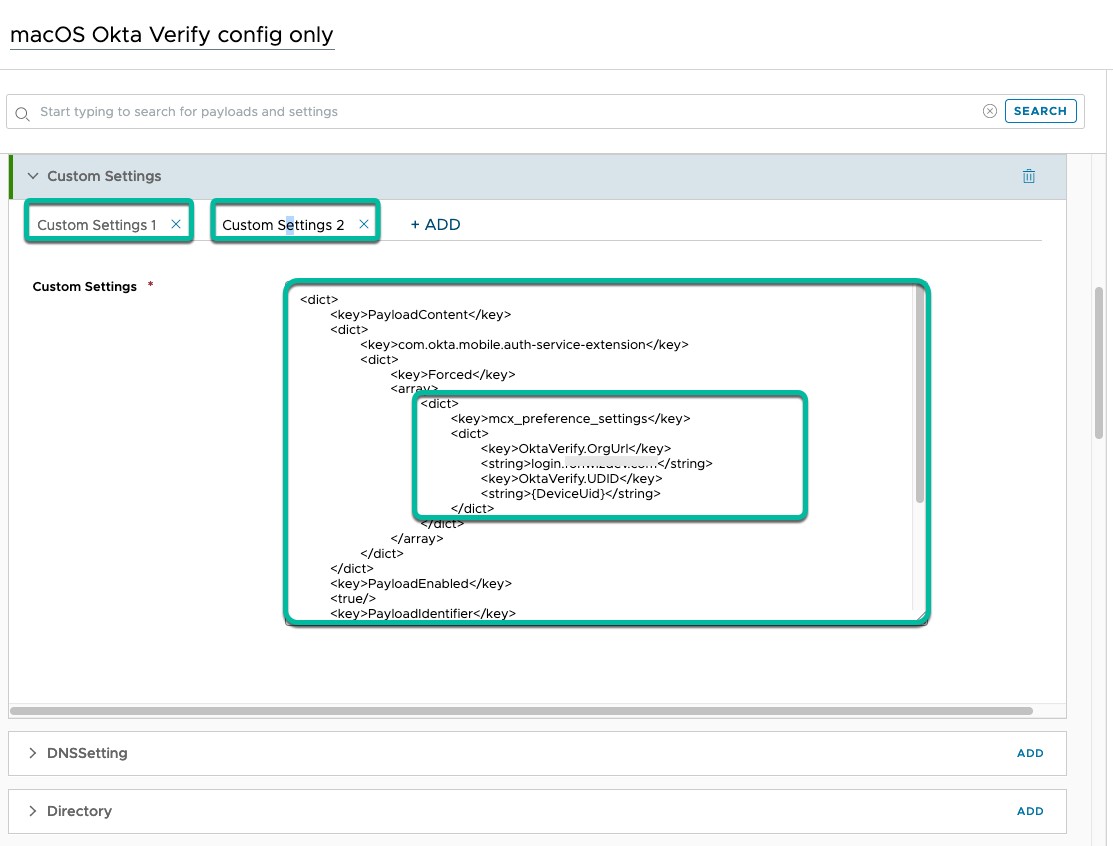
Figure 22: Custom XML settings to set OrgURL
For macOS, you also set up the SSO extension profile to provide a more seamless experience when invoking Verify for FastPass. See Configure an SSO extension for managed macOS devices in the Okta Docs.
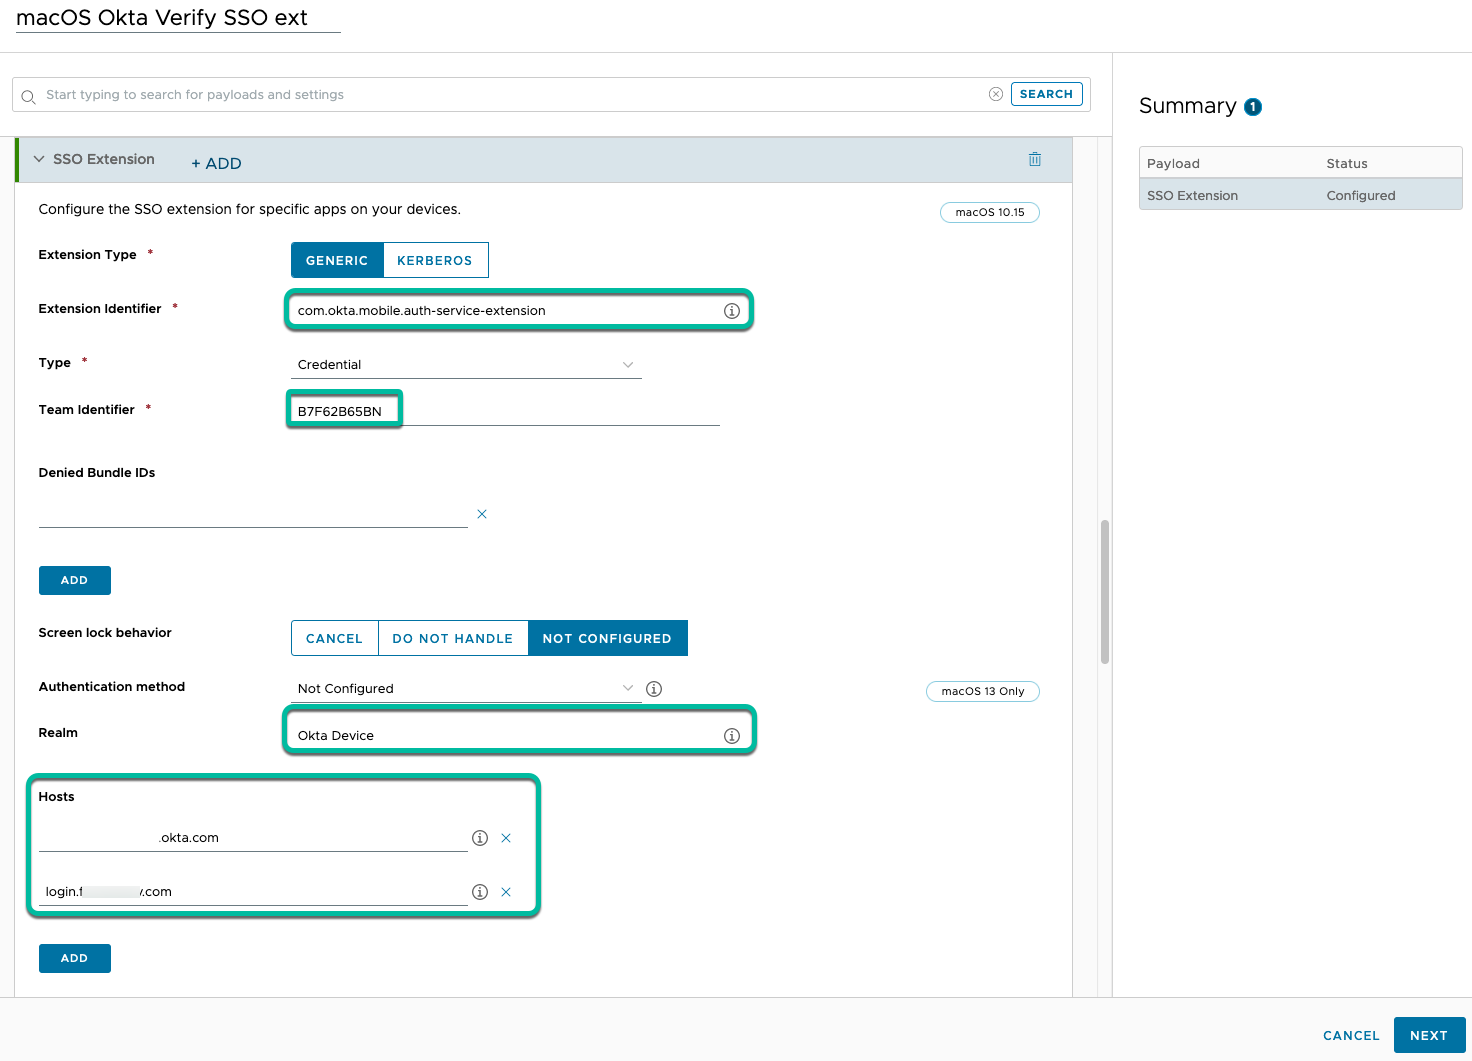
Figure 23: SSO extension profile for macOS
Finally, push the certificate to the devices to be used by Verify during authentication, by configuring SCEP certificate profiles for both macOS and Windows.
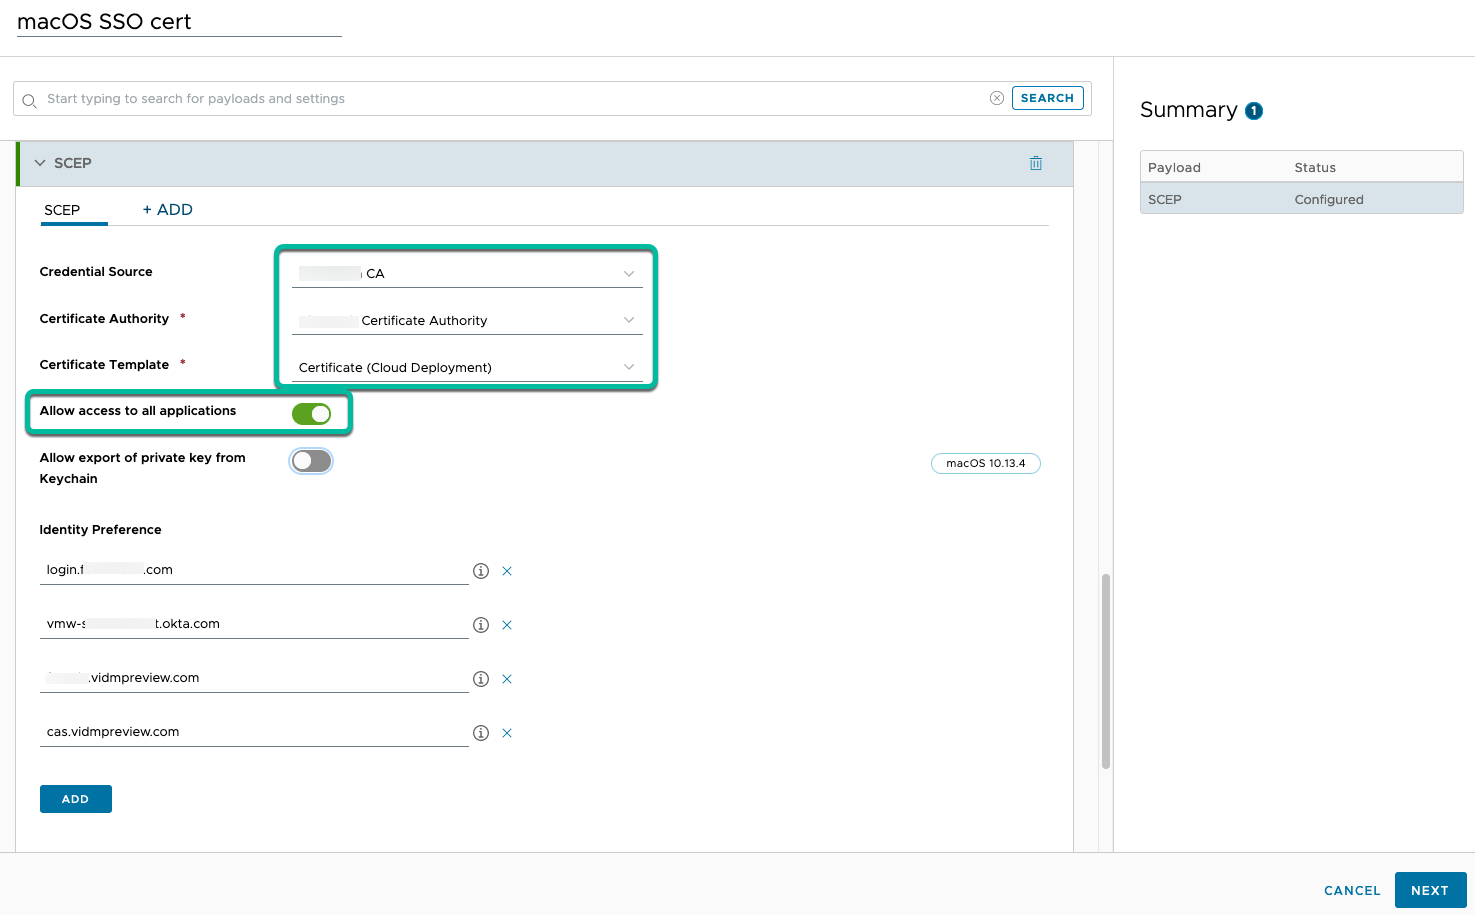
Figure 24: SCEP certificate profile for macOS
Configure Authentication Policy in Okta
With the configuration in place, you can set up the Authentication policy for Office 365 in Okta to require registered and managed devices. Add a new rule in the authentication policy for that app and require the Device state as Registered and Device management as Managed.
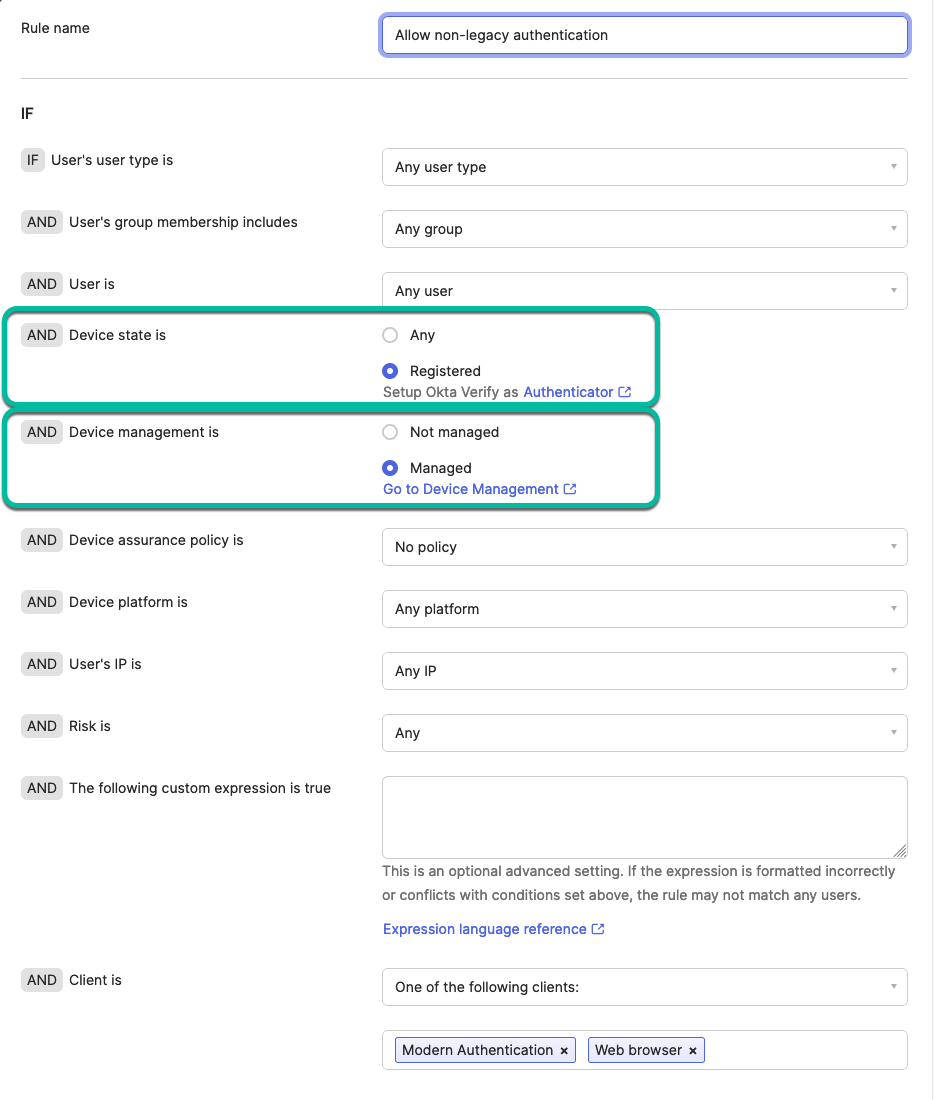
Figure 25: Authentication Policy rule enforcing managed device state
If everything is set correctly, users will use FastPass during the next login to Office 365 on the devices and that will create a device record inside the Okta directory under Devices with the state as Active and Managed. In the System Logs, you can also troubleshoot by searching for UDIDevice events.
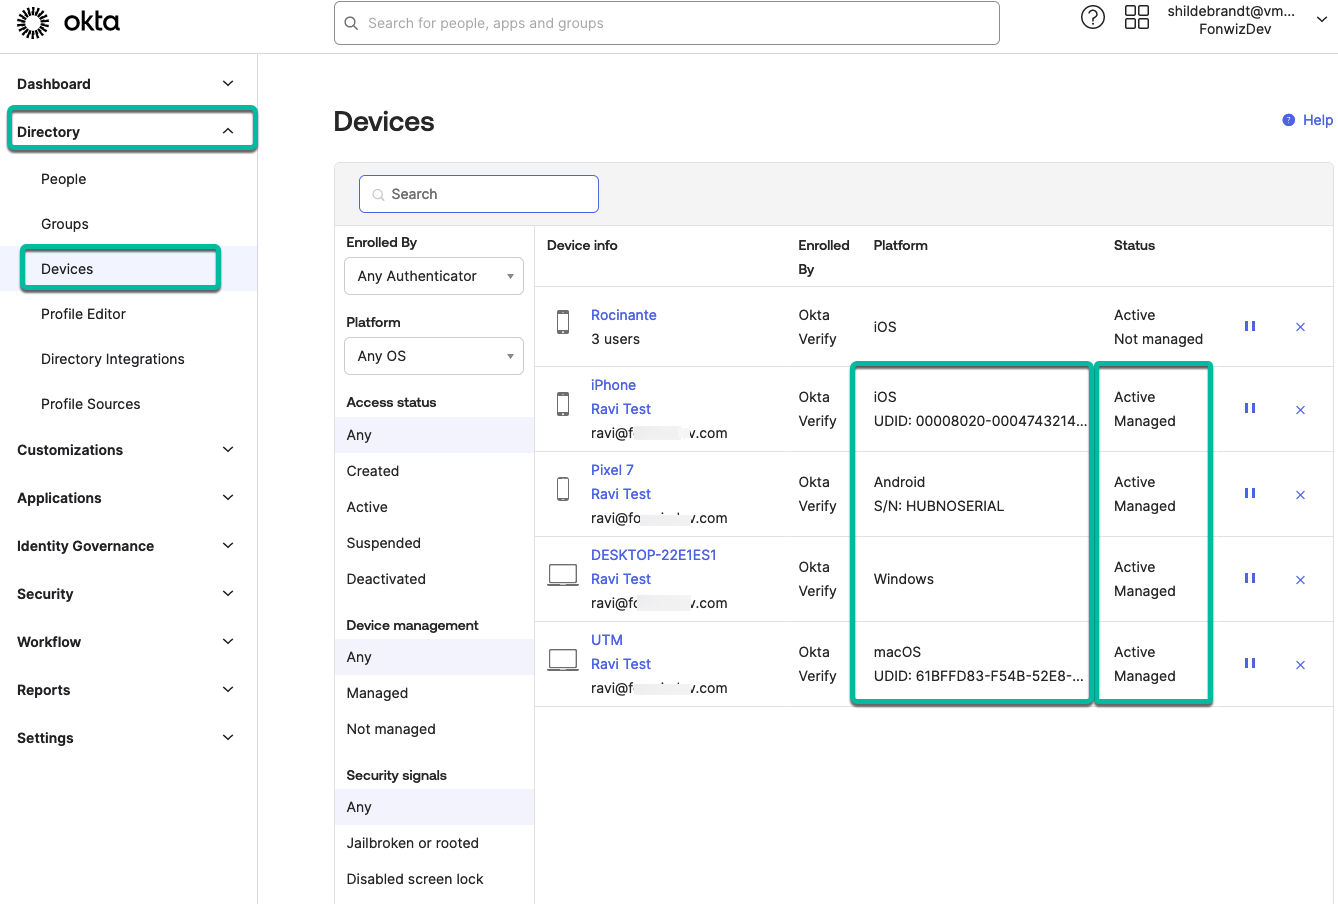
Figure 26: Device record in Okta Directory
This helps to assure the managed state, but you also want to control access based on the device posture and compliance state in UEM.
Integrating UEM API Events with Okta Workflow
Okta allows for the Verify app on a specific device to be deactivated as we can see in the admin console and this functionality is also exposed through their API. See Overview of Credential Escrow Gateway in the product documentation.
 Figure 27: Suspend Verify on device action
For Rest API integrations, we usually leverage Workspace ONE Intelligence, but in this case, we do not know the Okta deviceID required for the API call to suspend Verify. There are APIs to search the device based on the identifiers we do know, UDID and Serial Number, but Intelligence cannot work with return values so far.
So, we need another tool to automate suspending non-compliant devices. Okta offers a tool for that with Workflows which can handle the complete automation flow and we only need to trigger it by sending it the required identifiers and device status.
UEM allows you to send webhooks to predefined receivers when certain device events happen. See the Tech Zone blog to get acquainted with it: Let’s Git Committed to Dev Resources.
I created an example flow that you can download from Github and import into your Okta Workflow console.
The flow has a branch for mobile and desktop devices that uses different identifiers. For mobiles, we use UDID as for Android for Work for example the serial number will not be reported to either WS1 UEM or Okta. For Desktops, the shared identifier is the serial number, so both flows start with different queries.
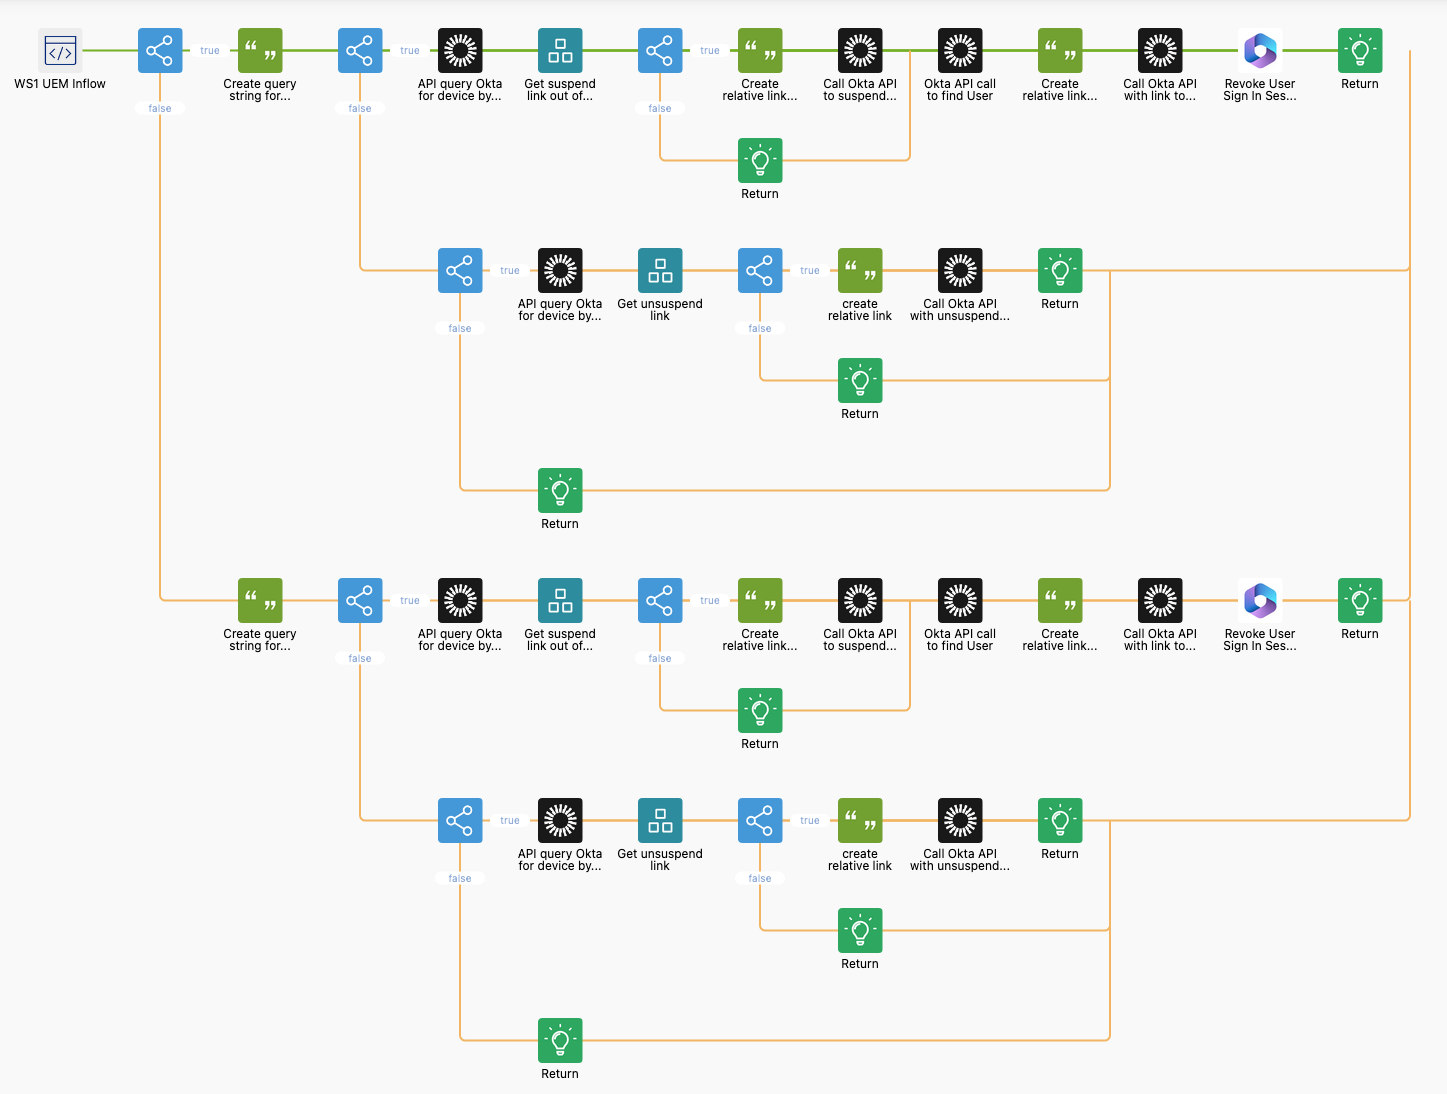
Figure 28: Full flow with Mobile and Desktop flow branches
The following steps walk through the flow of one branch.
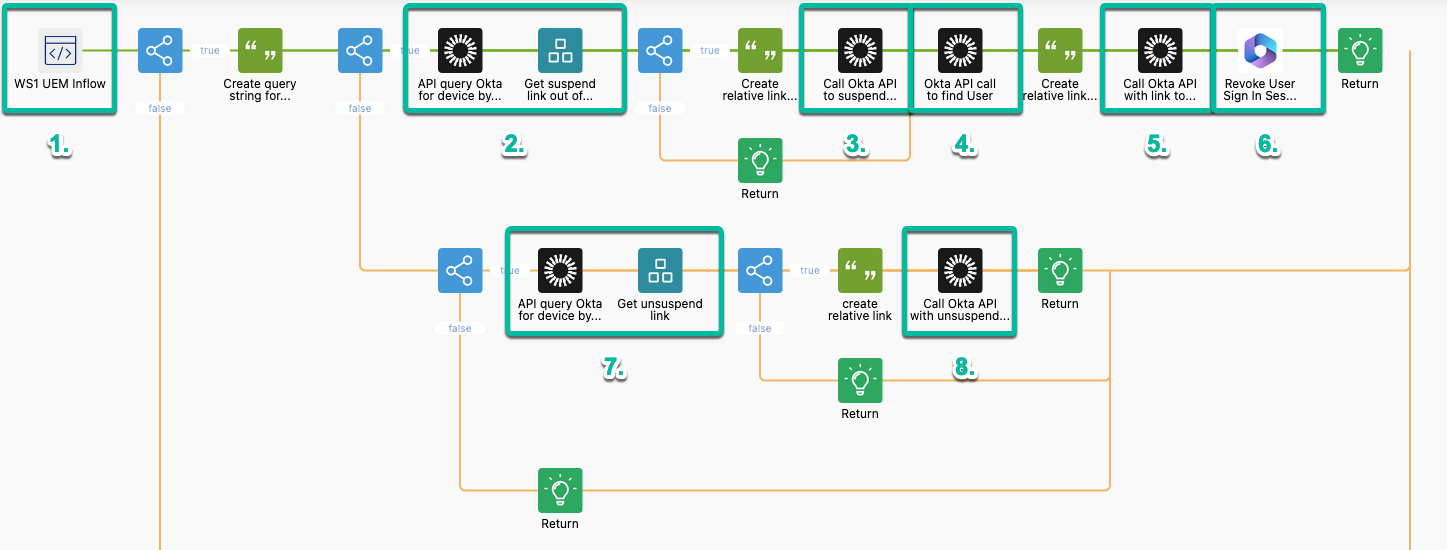
Figure 29: Detailed flow steps
- API endpoint; we start with an API endpoint and define which values we expect in the body. In this case, ComplianceStatus, UDID, SerialNumber, Platform, and EnrollmentEmailAddress. We use those values in some if branching elements.
- Okta API query to get the device; if the ComplianceStatus is non-compliant we create a query string with the value UDID (SerialNumber for Desktop) and send that to the Okta API then parse the returned body for the suspend link reference.
- Okta API query to suspend Verify; we create a relative link out of the reference and send that against the Okta API to suspend Okta Verify on the device.
- Okta Find User API; using the EnrollmentEmailAddress we can find the user account and use the ID from the response.
- Okta API query to revoke sessions; using the ID we create a relative link and send that to Okta to revoke all sessions and optionally all OAuth tokens.
- Azure Active Directory (Entra ID) API call; as Office 365 is our test application, we use the EnrollmentEmailAddress to send an API to Entra ID to revoke the users’ sessions there as well.
- Okta API call to get the device; if the ComplianceStatus is changing to compliant we again create a query string with the UDID (SerialNumber for Desktop) to send to the Okta API and query for the unsuspend link this time
- Okta API query to unsuspend Verify; we create a relative link out of the reference and send that against the Okta API to unsuspend Okta Verify on the device.
From the API endpoint specified in Step 1, we get the Invoke URL to use in the event notification settings in WS1 UEM.
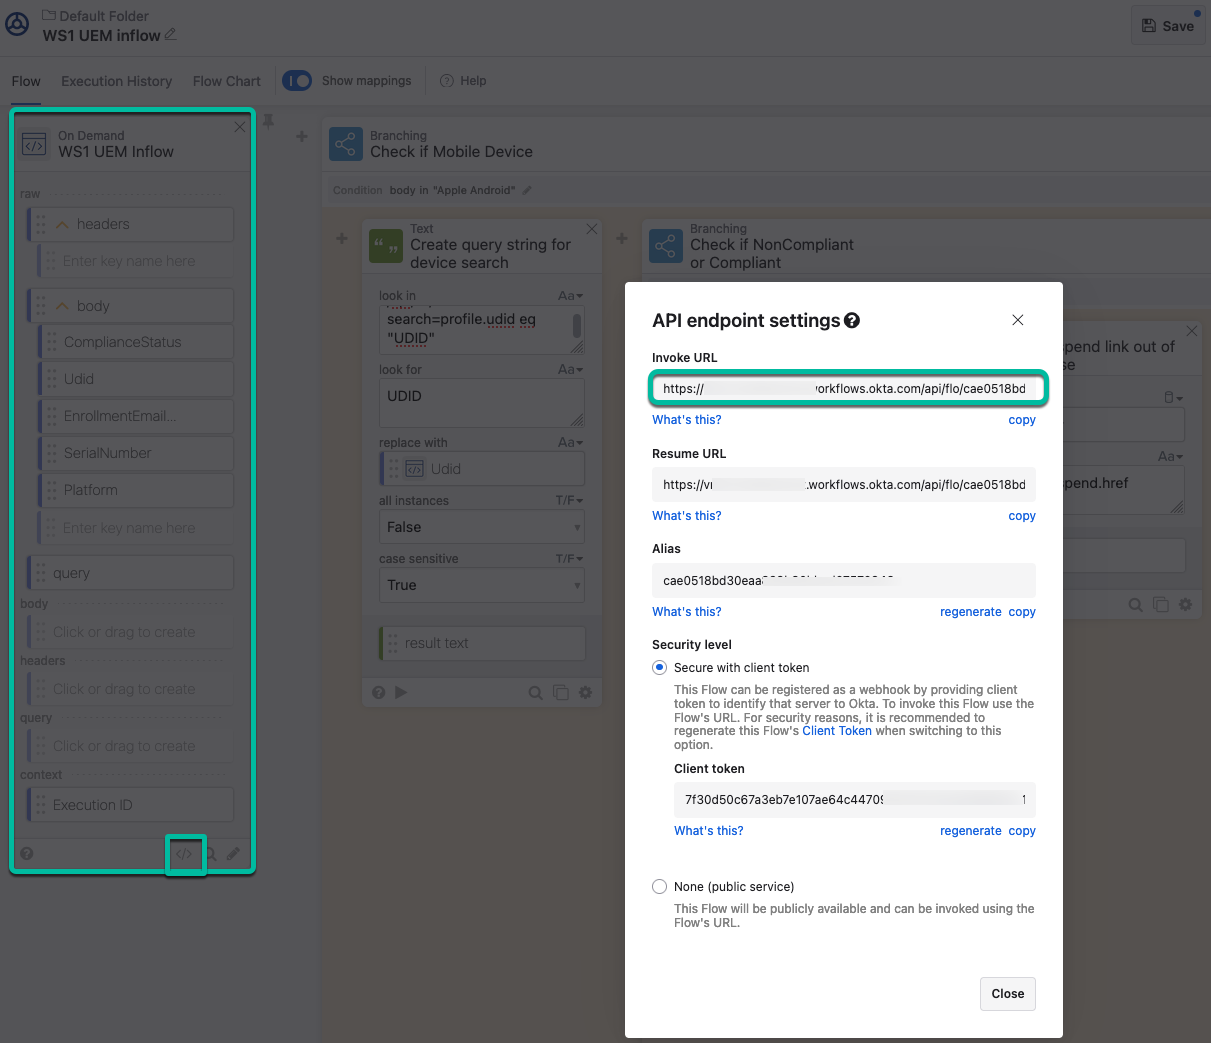
Figure 30: API endpoint settings > Invoke URL
This URL is then added in a new Event Notifications setting as Target URL under System > Advanced > API and also activates it for the events important for our use case. Initially, it is activated for Device Compliance Status Change, but we could extend the flow to also include Check In and Out, Device Wipe, or Delete events.
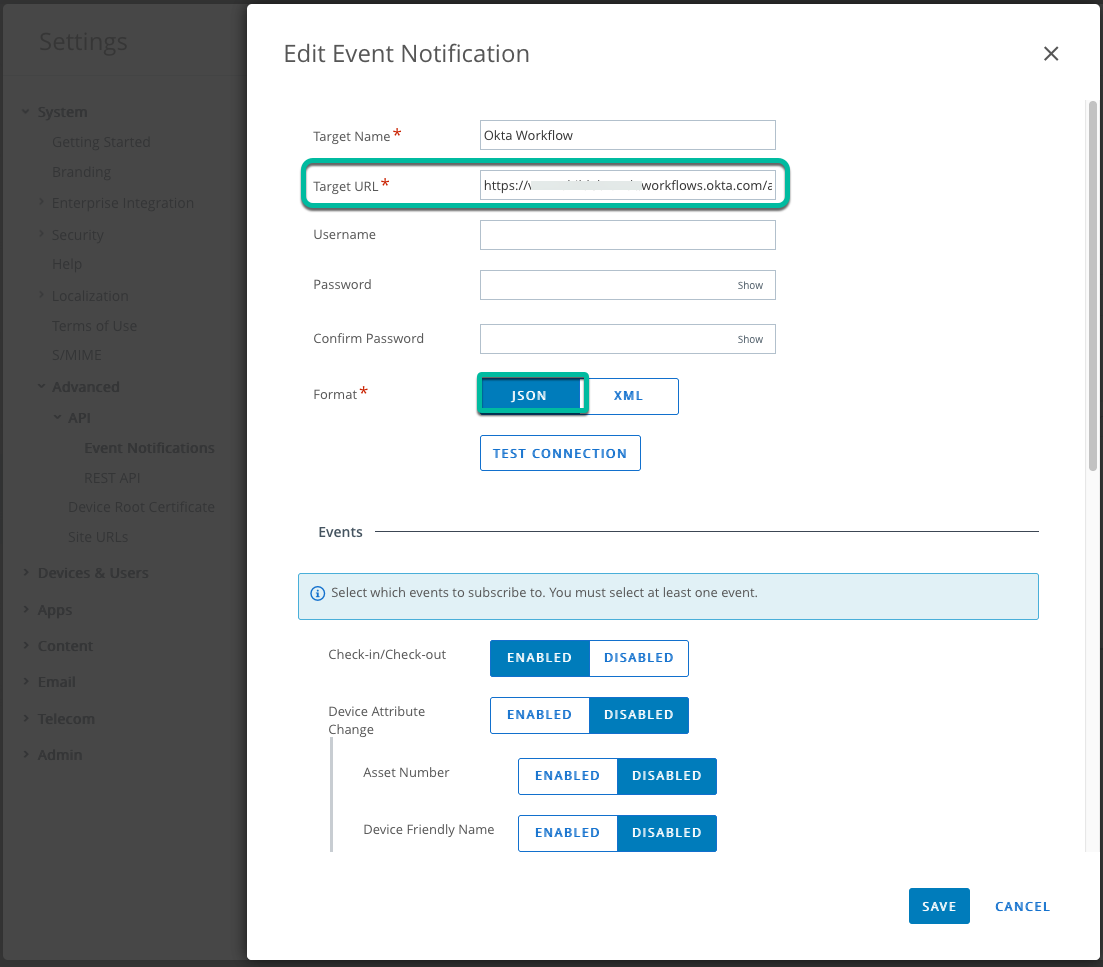
Figure 31: Event Notification settings
With this configuration, every compliance change in UEM will be reflected in Okta allowing you to control the authentication more effectively.
End-User Experience Flow
For the end user, the experience again is transparent in that they can use the usual login methods but Verify will be invoked during authentication to check the device managed state. On a non-compliant device, Okta Verify is suspended and will throw a verification failed error message during authentication.
Summary and Additional Resources
This document outlined three optional integration options for integrating Workspace ONE with Okta, enabling Zero Trust authentication, and validating device posture information during the authentication process. These options include integrating Workspace ONE Access as an Identity Provider (IdP) Authenticator, tunneling authentication traffic through Workspace ONE Access, or using event notifications and automation with Okta Workflow.
By exploring these integration options in detail, this document has shown how to ensure that only devices that meet specific compliance criteria are granted access, thereby enhancing the overall security posture of your organization. Our goal has been to provide a comprehensive roadmap for integrating Workspace ONE with Okta, empowering you to successfully deploy a Zero Trust authentication strategy that meets the evolving needs of your organization.
Additional Resources
- Device Posture in Entra ID using Omnissa Access [part 1]
- Device Posture in Entra ID using Workspace ONE Tunnel [part 2]
- Device Posture in Entra ID using API [part 3]
- Device Posture in Entra ID using Omnissa Intelligence
Changelog
The following updates were made to this guide:
| Date | Description of Changes |
| 2024/11/15 |
|
| 2024/06/25 |
|
About the Author
This document was written by:
- Sascha Warno, Staff Architect Identity & Security Solutions
Feedback
Your feedback is valuable.
To comment on this paper, contact End-User-Computing Technical Marketing at tech_content_feedback@omnissa.com.


