Device Posture in Entra ID using Omnissa Access
Workspace ONE UEMOmnissa Access
Omnissa Intelligence
Zero Trust for MS Office 365 Overview
The concept of Zero Trust assumes that any connection to sensitive data is untrusted even coming from a corporate device and requires further checks during authentication and access. The concept specifies 5 pillars that need to be addressed when implementing Zero Trust.
There are different possibilities to achieve Zero Trust and secure access to sensitive data in productivity suites like Office 365, and this tutorial is part 1 of a 3-part series. Part 1 will walk you through the first scenario; using Omnissa Access™ as an IdP to authenticate all users by federating it to Entra ID and during the authentication also check on the device compliance posture.
This guide covers setting up authentication-based compliance integration with Microsoft Office 365 in Omnissa Workspace ONE® Unified Endpoint Management (UEM), Omnissa Access, Omnissa Intelligence™, and Entra ID.
The following topics will be covered:
- Overview components required for Zero Trust during authentication
- Setting up single sign-on
- Federating Entra ID to Omnissa Access as an IdP
- Compliance, monitoring, and automation
Audience
This tutorial is intended for IT professionals and Workspace ONE administrators of existing production environments. Familiarity with Active Directory, identity management, and directory services is assumed. Knowledge of other technologies, such as Entra ID and Postman, is also helpful.
If you are new to Workspace ONE, review the Evaluation Guide: Managing Apps and Devices with Cloud-Based Omnissa Workspace ONE which has step-by-step exercises implementing features like mobile single sign-on (SSO) in UEM and Access.
Zero Trust during Authentication - Architecture
With Access, we can integrate with Workspace ONE UEM which manages the users’ devices and leverage that compliance status during authentication into any application using SAML or OIDC federated to Access. Microsoft Office 365 is authorized through Entra ID which can be federated to Access for users synced from an external source like an on-premises AD or another identity source. A benefit of this solution is that it does not require advanced Microsoft licenses to be enabled.
The Device Posture in Entra ID using Omnissa Access - Architecture video explains the flow of components involved to create this solution.
To recap, Entra ID is federated with Access as an IDP, and whenever a user signs into a service integrated with Entra ID, the authentication passes through Access and uses a certificate that includes user and device information in the form of the Device UDID. Access is configured to use this certificate-based authentication method in Workspace ONE UEM. This allows Access to not only check the validity of the certificate and the user it is created for but also the device’s management and compliance state before authenticating the user to Entra ID. One caveat with this; we authenticate to Entra ID and not the service itself, without knowing which specific service (Teams, Exchange Online, SharePoint) we authenticate for. Only blanket conditional access policies can be applied, with no granular policies per service.
Further, this works during initial authentication but when authorizing the user to the specific service, Entra ID uses ID, OAuth2 Access, and Refresh tokens. The Access token is a short-lived authorization by default valid for a random value between 60-90 minutes and the refresh token is also constantly renewed and has a maximum inactive time of 90 days. So, any time the Access token runs out, the Refresh token is used with the token auth endpoint to receive a new token. No new authentication is required in this flow and during that time no check on compliance would happen and non-compliant devices would still have access to resources and services.
To mitigate this, we can revoke the Refresh token used by the application by revoking all sign-in sessions for a specific user. This will require the user to sign in again as soon as the Access token time-to-live ends. Because we use seamless sign-on with certificates, the reauthentication on compliant devices is transparent to the user. Entra ID also has a feature called Continuous Access Evaluation (CAE) which allows applications that support it, like Exchange Online and SharePoint, to subscribe to an event feed and near instantly revoke access after receiving the API call to revoke the user sessions.
This process is automated and triggered on compliance changes to the users’ devices by leveraging Intelligence’s Custom Workflow Connectors and Automations.
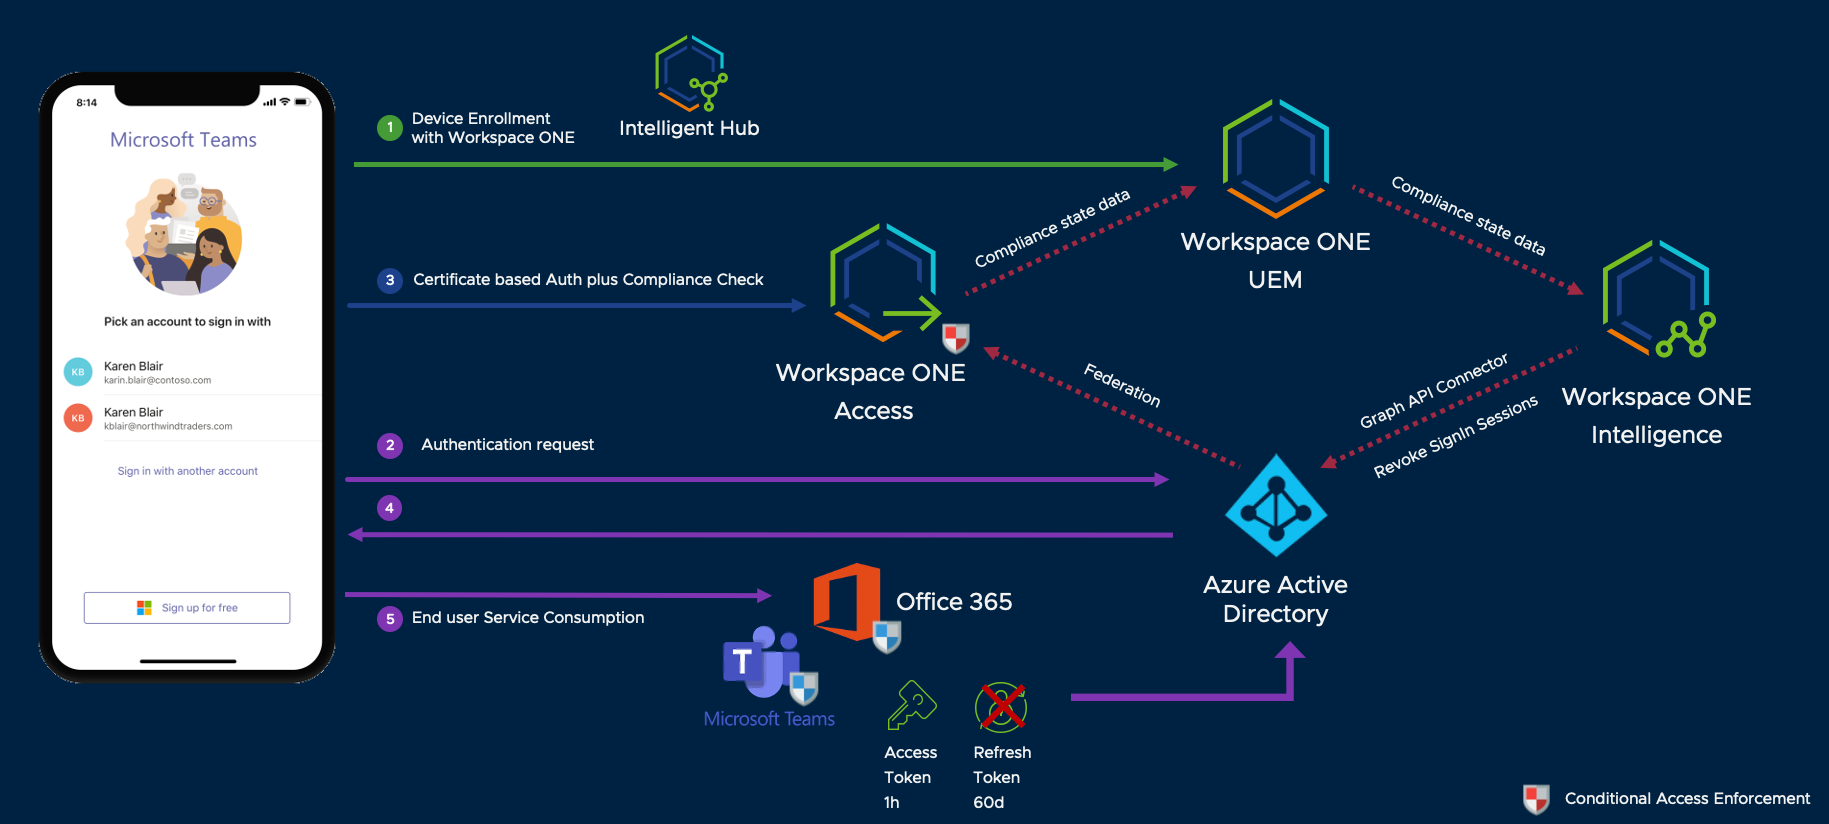
Figure 1: Compliance using Authentication based integration
Now, we will walk through the required steps to set up the solution in UEM, Access, Intelligence, and Entra ID.
Requirements for Workspace ONE UEM and Access
The Device Posture integration Entra ID using Omnissa Access - Setup Seamless SSO video provides an overview of basic requirements and also walks through single sign-on (SSO) setup.
< Device Posture integration Entra ID using Omnissa Access - Setup Seamless SSO.mp4 >
Before you can proceed, you must have the following components installed and configured:
- An existing Workspace ONE environment
- Completed integration of Workspace ONE UEM and Access
- Set up Certificate Authority in Workspace ONE UEM
If you have a new environment that automatically comes with UEM, Access, and Hub Services set up and connected, you must complete the integration between Workspace ONE UEM and Access.
See the documentation on integrating Access and UEM and setting up Certificate Authorities in UEM.
If you have already completed the integration, this means that Access can make the required API calls to UEM for the device’s compliance state. Access acts as an identity broker and connects your identity source enabling enhanced Hub Services inside Intelligent Hub.
Devices are enrolled into Workspace ONE UEM, and UEM sets the configuration and tracks the compliance state during the lifecycle. UEM has a built-in certificate authority that provides the certificates used for SSO on all device types as well as integrations into all common enterprise certificate authorities and templates to use internal certificates for the use case.
Setting Up Seamless Single Sign-On
As mentioned in the Requirements section, the SSO configuration is discussed in the following video:
On every device platform, we support a targeted SSO method that uses certificates and can be set up in a seamless way. For iOS, we set up certificate authentication in an Apple Single Sign-On profile targeting a cloud KDC. See the Omnissa documentation, Implementing Mobile Single Sign-On Authentication for Workspace ONE UEM-Managed iOS Devices.
On Android, we leverage the Tunnel app and configuration to proxy the Access authentication requests through the CertProxy service. We leverage the authentication certificate set up for the tunnel service. See the Omnissa documentation, Implementing Mobile Single Sign-On Authentication for Workspace ONE UEM Managed Android Devices.
For both Windows and macOS, system certificates are directly used for authentication. Those certificates are delivered through the credential or SCEP payload for each platform.
To automate the process of selecting the certificate on macOS you can send further configurations down to the device. See the Tech Zone blog post, Managing Identity Preferences to Streamline Single Sign-On for macOS.
On Windows, we can use ADMX policies to manage all kinds of browsers. See Certificate picker for SSO on Windows browsers for more information.
Federating Entra ID to Access as IDP
The Device Posture in Entra ID using Omnissa Access - Setup Federation and Compliance video demonstrates how to federate Entra ID with Access and set up conditional access policies.
The following content is not the most recent way to do the federation setup. Instead of the msolservice API leverage the Microsoft.Graph Powershell module and the New-MgDomainFederationConfiguration configuration. This also allows for more granular MFA capability configurations.
In Access, select the Office 365 application from the catalog to start the integration. Specify your tenant domain and the issuer which you require when enabling or changing the federation settings in Entra ID. This is usually done using PowerShell and the MSolservice API. Figure 2 depicts a sample PowerShell script that can be run in PowerShell ISE line by line.
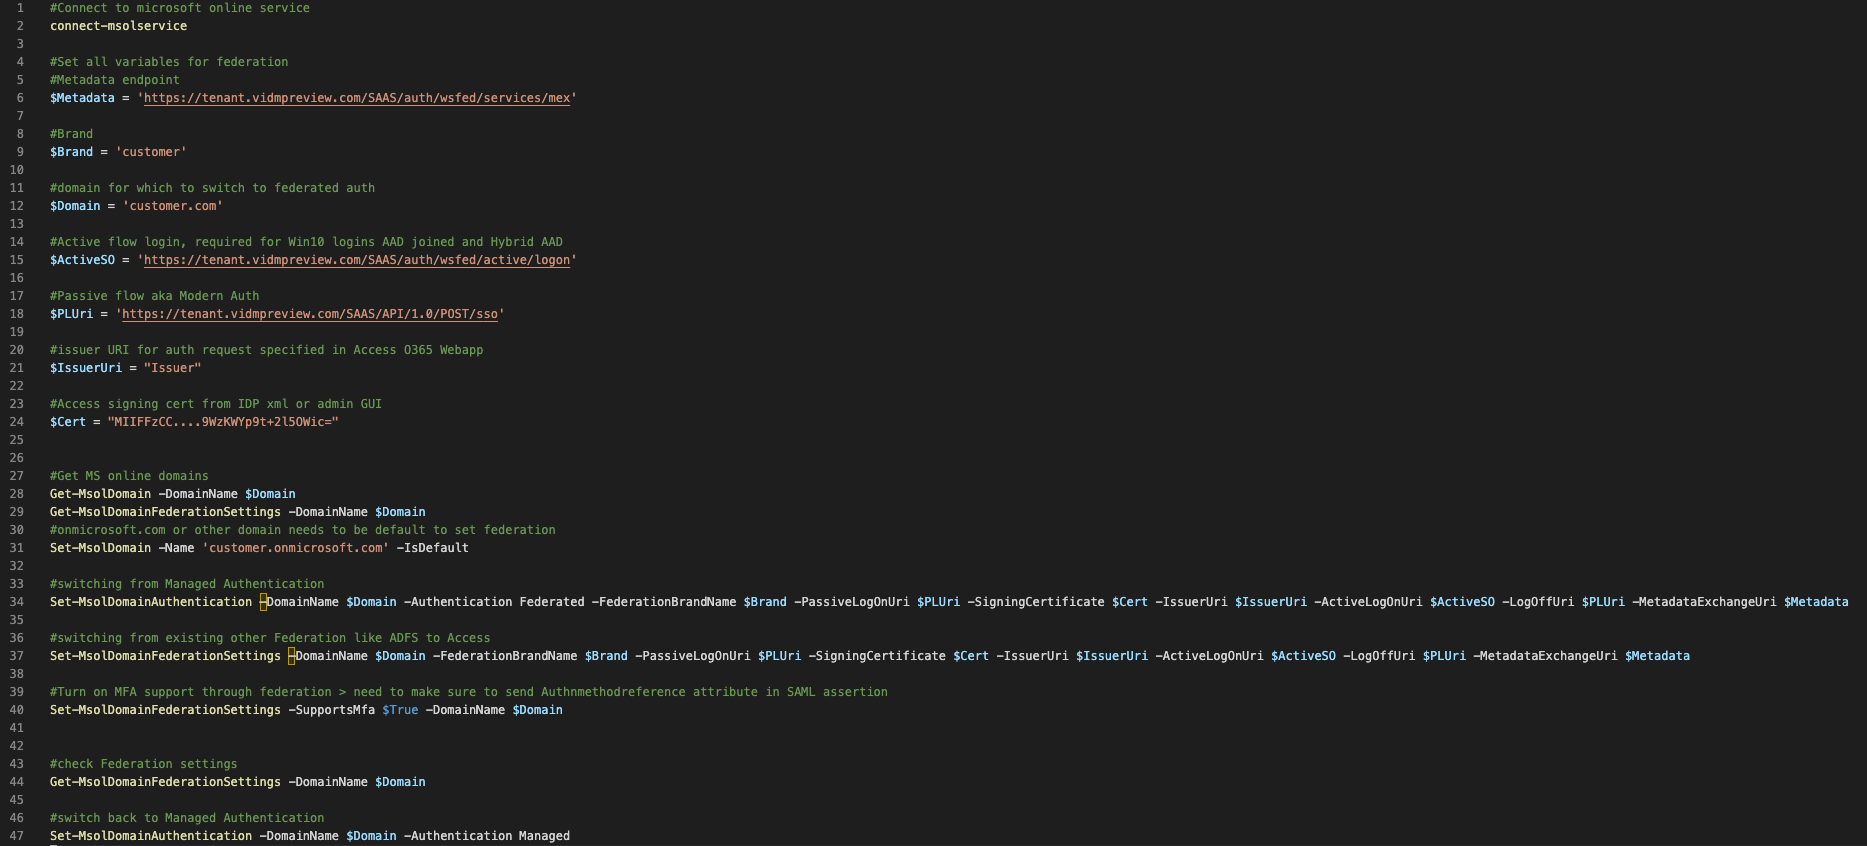
Figure 2: Code PowerShell sample Azurefederation.ps1
If you want to copy the sample Azurefederation.ps1 file, we have included the text:
#Connect to microsoft online service
connect-msolservice

#Set all variables for federation
#Metadata endpoint
$Metadata = 'https://tenant.vidmpreview.com/SAAS/auth/wsfed/services/mex'

#Brand
$Brand = 'customer'

#domain for which to switch to federated auth
$Domain = 'customer.com'

#Active flow login, required for Win10 logins AAD joined and Hybrid AAD
$ActiveSO = 'https://tenant.vidmpreview.com/SAAS/auth/wsfed/active/logon'

#Passive flow aka Modern Auth
$PLUri = 'https://tenant.vidmpreview.com/SAAS/API/1.0/POST/sso'

#issuer URI for auth request specified in Access O365 Webapp
$IssuerUri = "Issuer"

#Access signing cert from IDP xml or admin GUI
$Cert = "MIIFFzCC....9WzKWYp9t+2l5OWic="

#Get MS online domains
Get-MsolDomain -DomainName $Domain
Get-MsolDomainFederationSettings -DomainName $Domain
#onmicrosoft.com or other domain needs to be default to set federation
Set-MsolDomain -Name 'customer.onmicrosoft.com' -IsDefault

#switching from Managed Authentication
Set-MsolDomainAuthentication –DomainName $Domain -Authentication Federated -FederationBrandName $Brand -PassiveLogOnUri $PLUri -SigningCertificate $Cert -IssuerUri $IssuerUri -ActiveLogOnUri $ActiveSO -LogOffUri $PLUri -MetadataExchangeUri $Metadata

#switching from existing other Federation like ADFS to Access
Set-MsolDomainFederationSettings –DomainName $Domain -FederationBrandName $Brand -PassiveLogOnUri $PLUri -SigningCertificate $Cert -IssuerUri $IssuerUri -ActiveLogOnUri $ActiveSO -LogOffUri $PLUri -MetadataExchangeUri $Metadata

#Turn on MFA support through federation > need to make sure to send Authnmethodreference attribute in SAML assertion
Set-MsolDomainFederationSettings -SupportsMfa $True -DomainName $Domain

#check Federation settings
Get-MsolDomainFederationSettings -DomainName $Domain

#switch back to Managed Authentication
Set-MsolDomainAuthentication -DomainName $Domain -Authentication Managed
Whilst we are setting up the integration, we must add another attribute to the Office 365 Web app within Access. For certain actions, Entra ID requires a higher level of authentication verification like multi-factor authentication (MFA) or certificate authentication. This includes setting up Hello for Business during OOBE enrollments. To avoid additional prompts, we send information in the SAML assertion to Entra ID letting it know we have completed further forms of authentication.
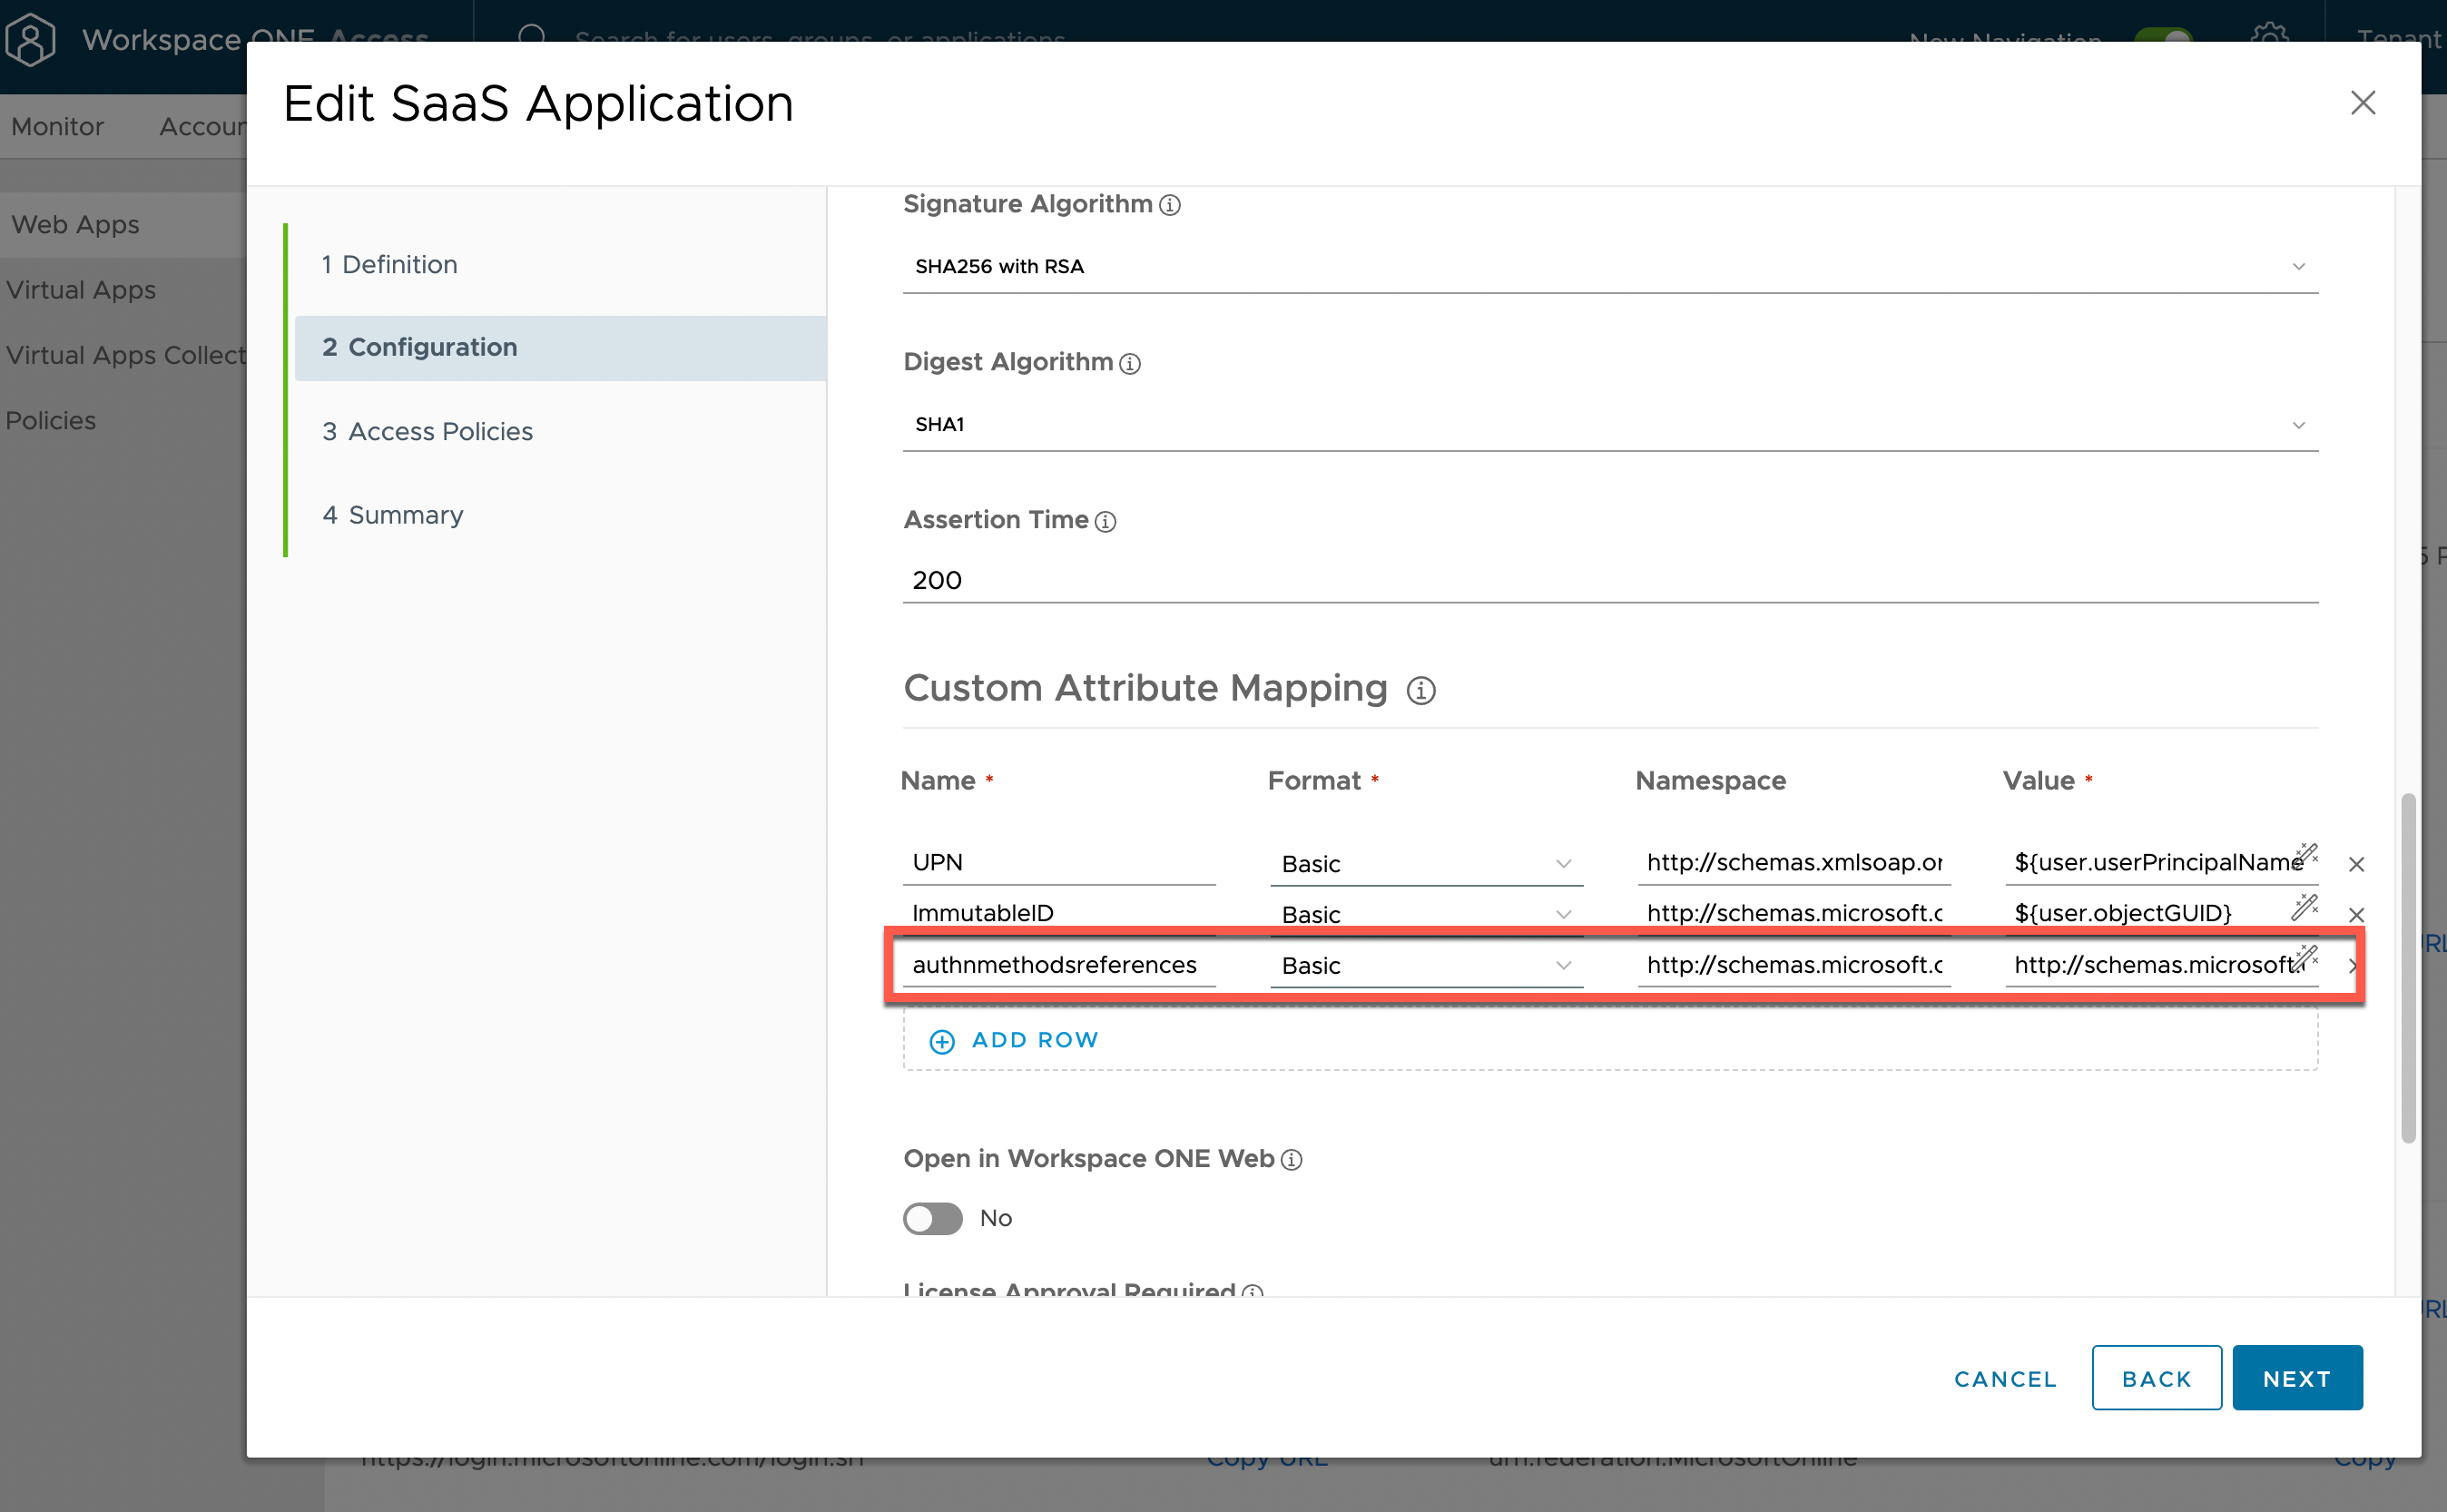
Figure 3: Office365 Web App configuration
In the Custom Attribute Mapping under Advanced Properties, we add the following values:
- Name – authnmethodsreferences
- Namespace – http://schemas.microsoft.com/claims
- Value - http://schemas.microsoft.com/claims/multipleauthn
Finally, we must set up the specific Access policy for Office 365 authentication requests specifying the seamless authentication methods before combining it with the compliance check against UEM.
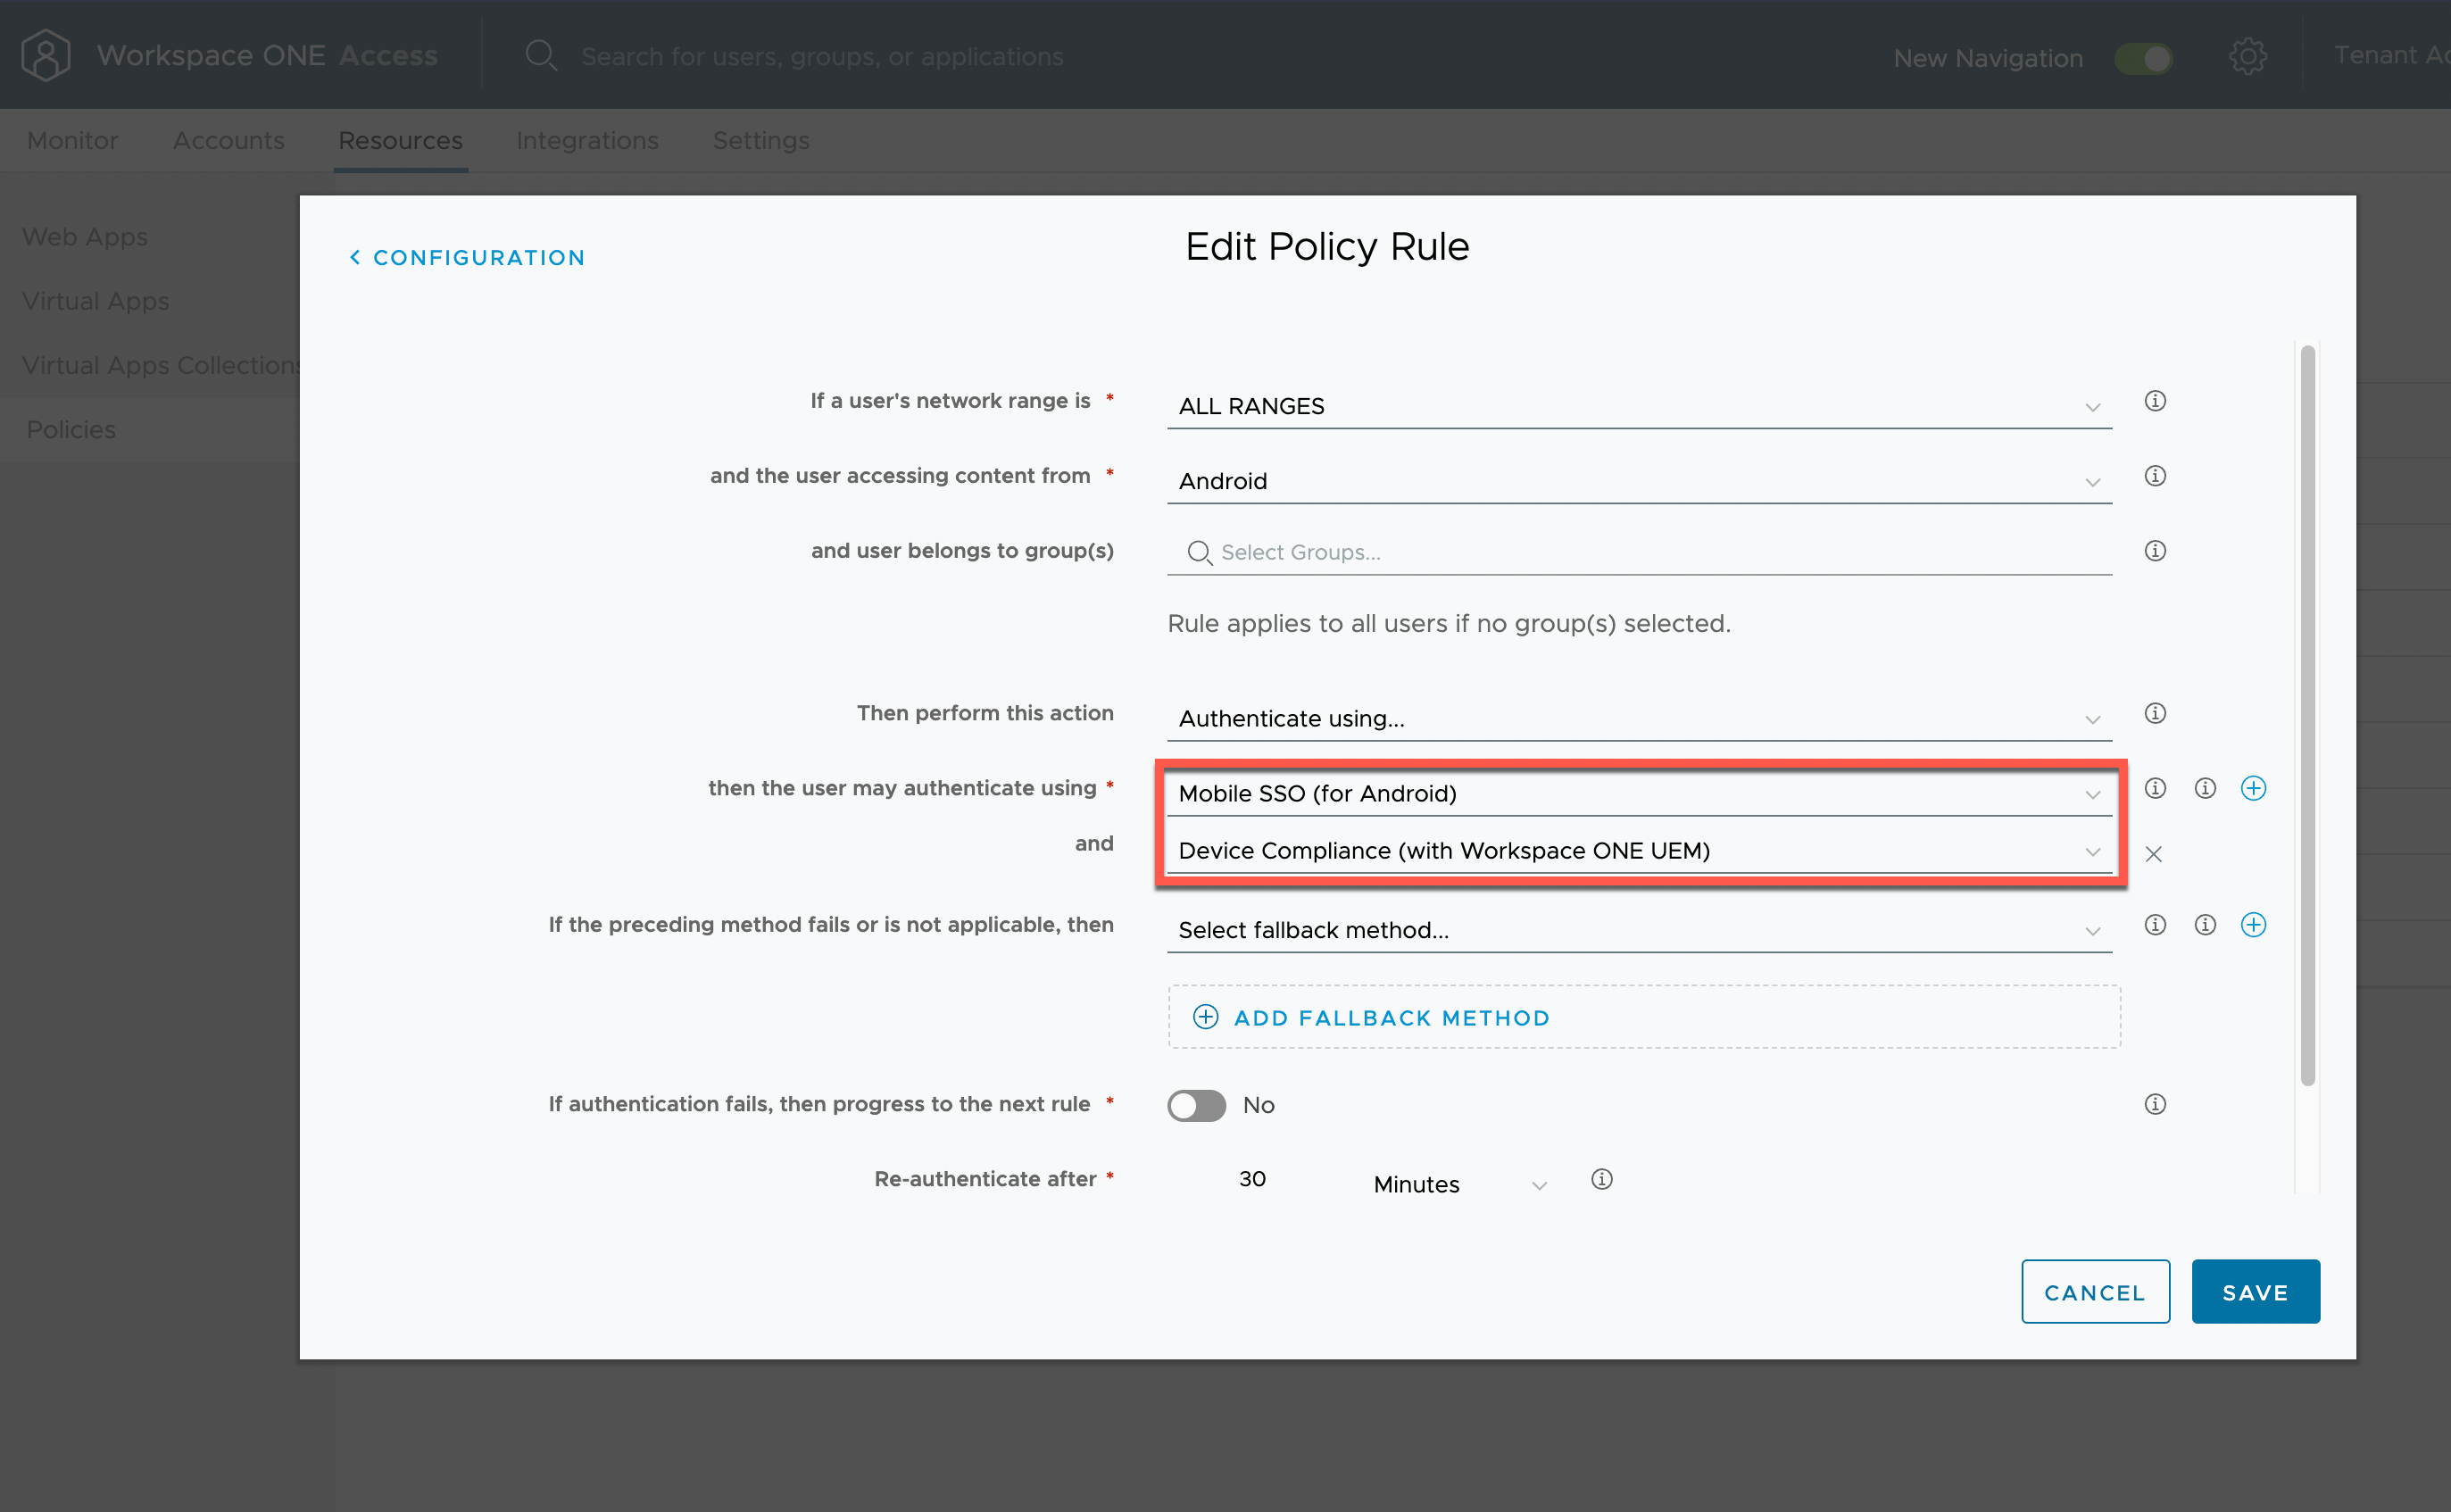
Figure 4: Office 365 Access policy using Android SSO and Compliance
Rules must be set up for the different device types, with Web Browser covering macOS and Windows 10. Some older applications (particularly older dot Net apps) will use user agents that are not covered (in the rules listed above Any device type), but the Any device type should catch those user agents if required. The only rule that does not use the certificate-based authentication and compliance check is the Windows 10 Enrollment as this covers OOBE or Entra ID join events during which the device is not yet enrolled, configured with certificates, and compliant. It is important to require authentication with strong MFA in this case.
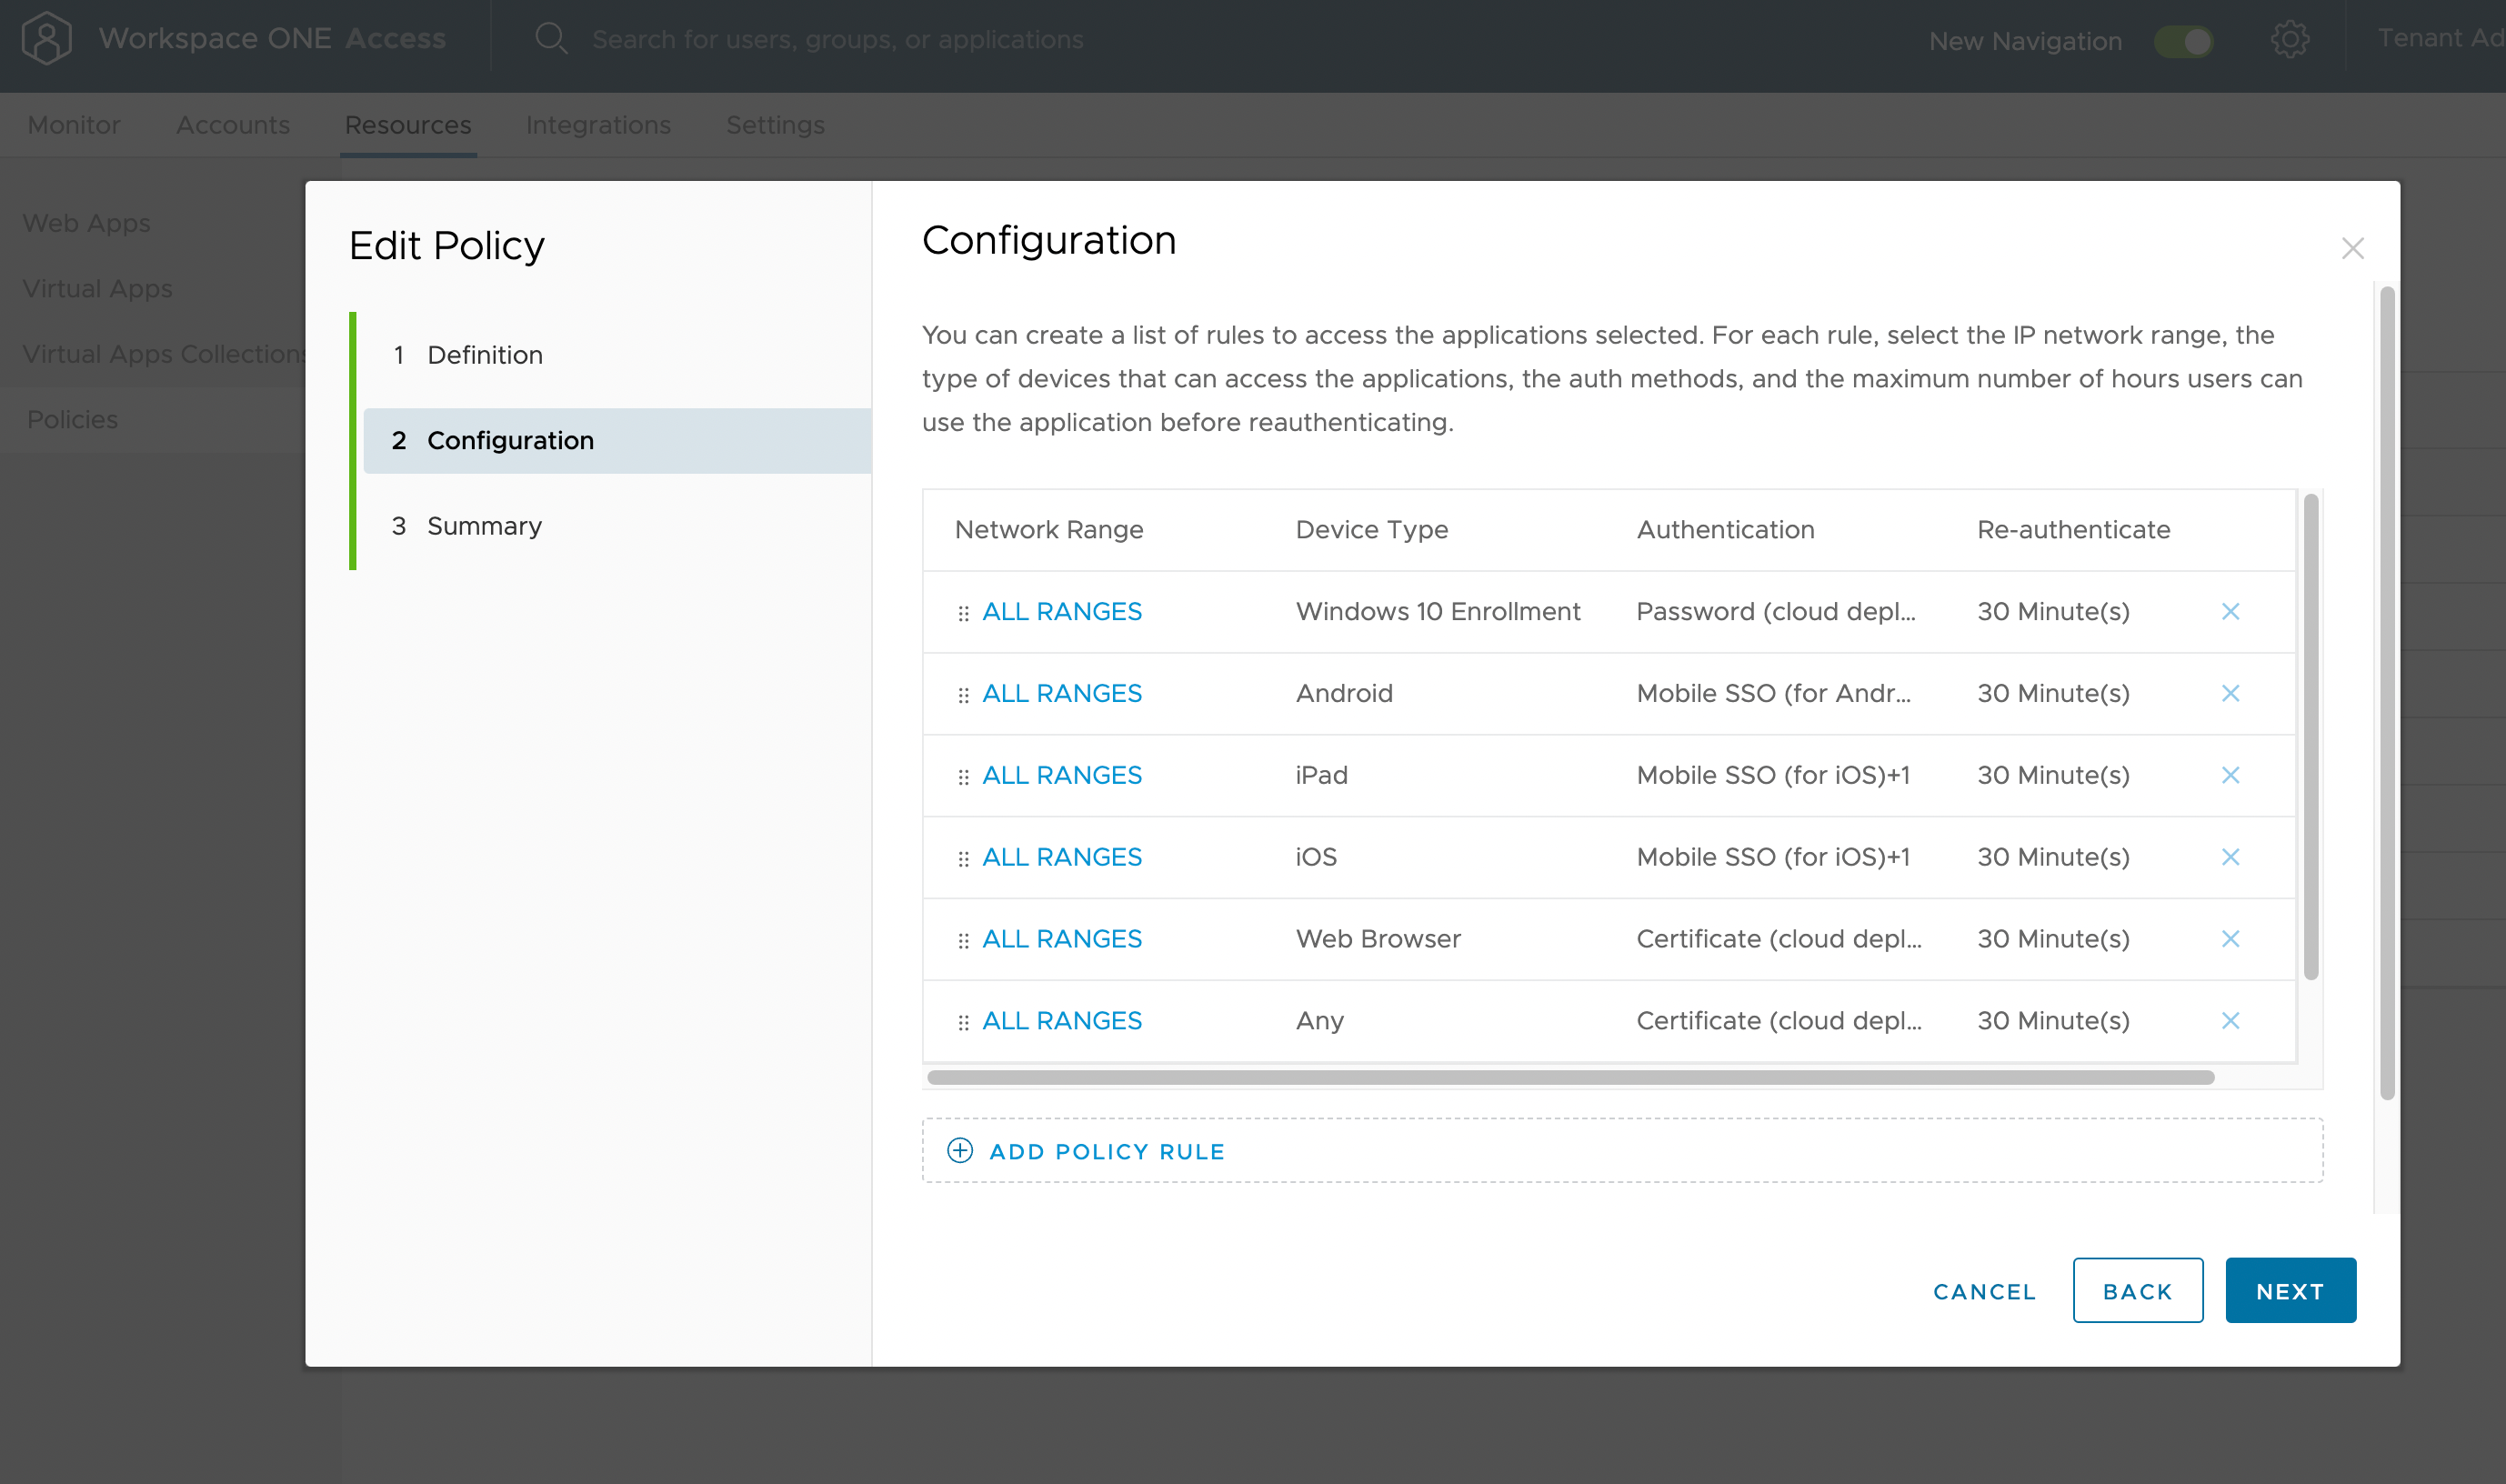
Figure 5: Office 365 Access policy rules list
Compliance, Monitoring, and Automation in Omnissa Intelligence
The following video covers the setup in Intelligence for Compliance and Automation.
Now that everything is in place to initially authenticate with compliance into Office 365 (or more accurately, all apps that are federated to Entra ID), we must set up the rules to control the compliant state of the device and react to changes of that state. In UEM, there are a set of parameters from basics like the device passcode to compromised state or encryption, that are reported back by the device and evaluated by the compliance engine. See Managing Devices - Compliance Policies in the Omnissa Documentation to configure these policies.
If a device is marked as non-compliant by a policy, the authentication through Access will be blocked. But as we previously discussed, this only happens during authentication, and devices might already use authorization tokens to access Office 365 resources. This is where Intelligence comes into play, which has enhanced capabilities to bring together all kinds of data sources besides UEM and Access, integrating Trust Network partners like Carbon Black or MTD to create dashboards and reports to stay on top of all the relevant security information. But more importantly, Intelligence allows for integration with other tools and the creation of workflows to automatically react to issues in the environment.
Our goal is to invalidate the OAuth refresh token on a non-compliant device. Entra ID keeps track of all refresh tokens and their validity and although we cannot target one specific OAuth token, we can revoke all active Refresh/session tokens of a specific user using the revokeSignInSessions API.
See Microsoft documentation for details, Graph API user: revokeSignInSessions.
The user will have to sign in again to all services to receive a new set of OAuth Access and Refresh tokens. On a non-compliant device, this authentication will fail. Using the revokeSignInSessions API, we must set up Intelligence to automatically call that API with the right user. First, we need to create an app that Intelligence can call in our Entra ID tenant. We must register an app that allows us to give it the required API permissions and create client secrets for Intelligence to request an OAuth token to call the Graph API.
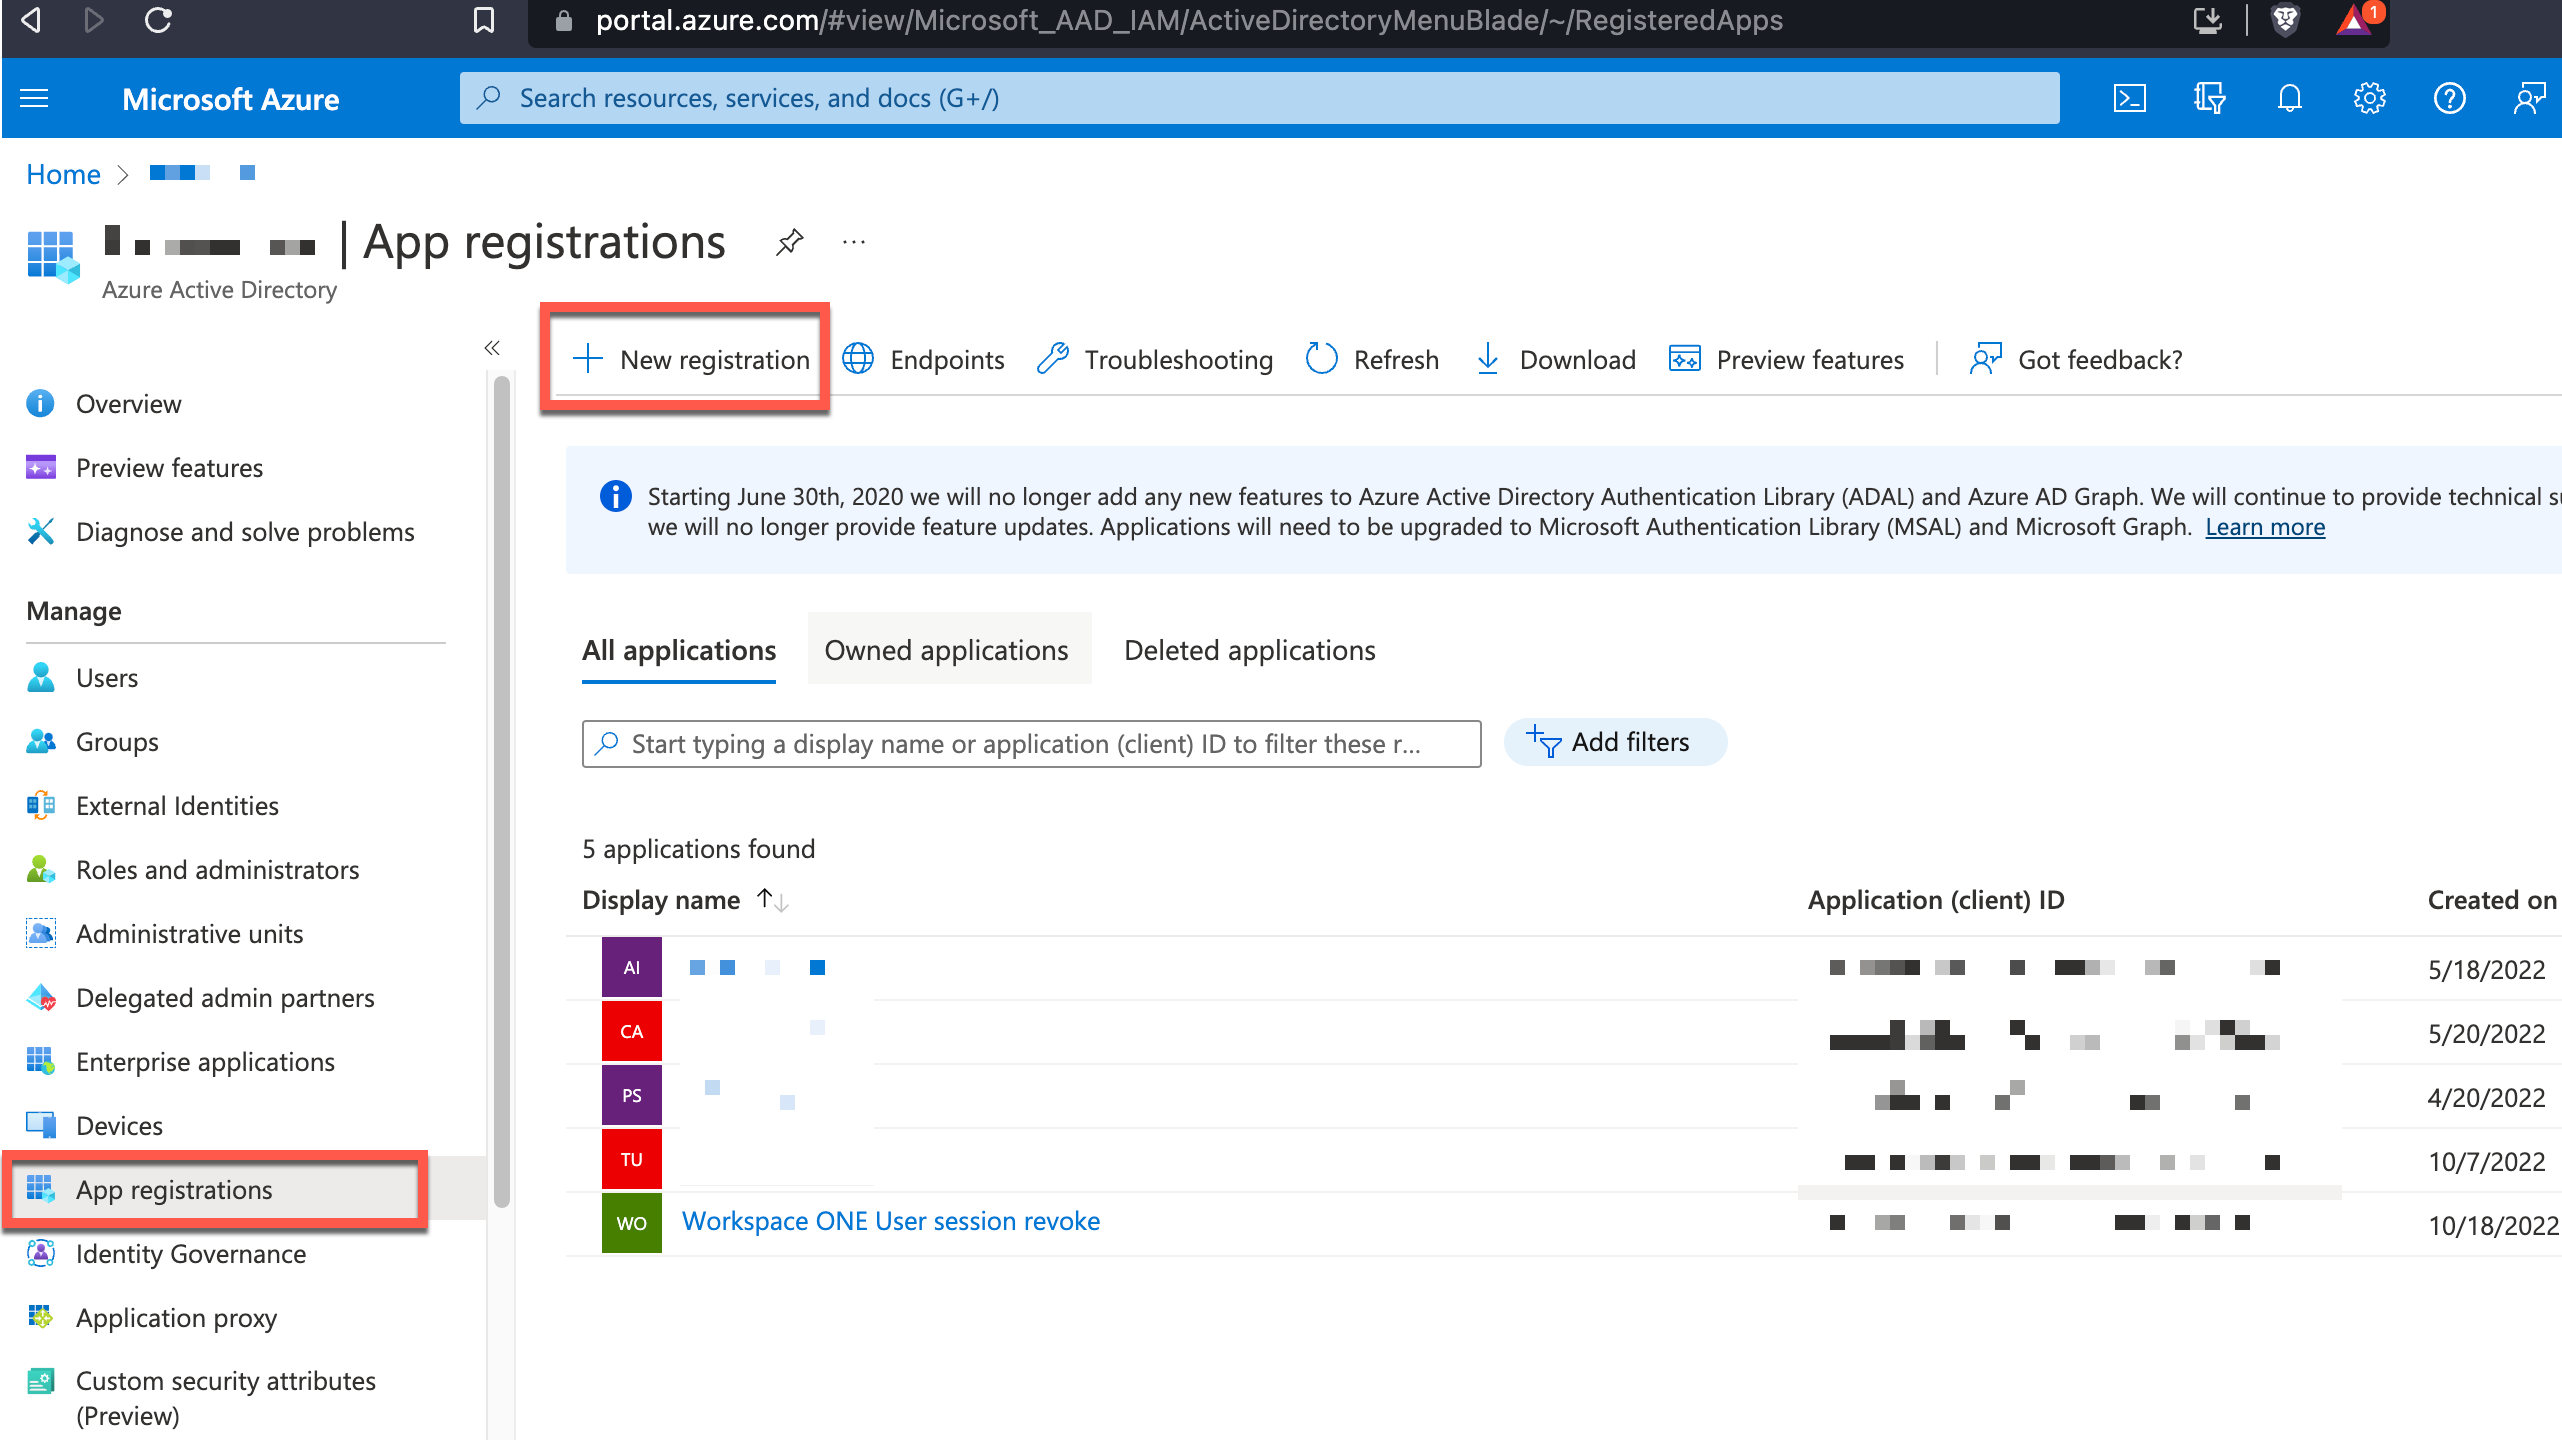
Figure 6: Add an App registration - single tenant
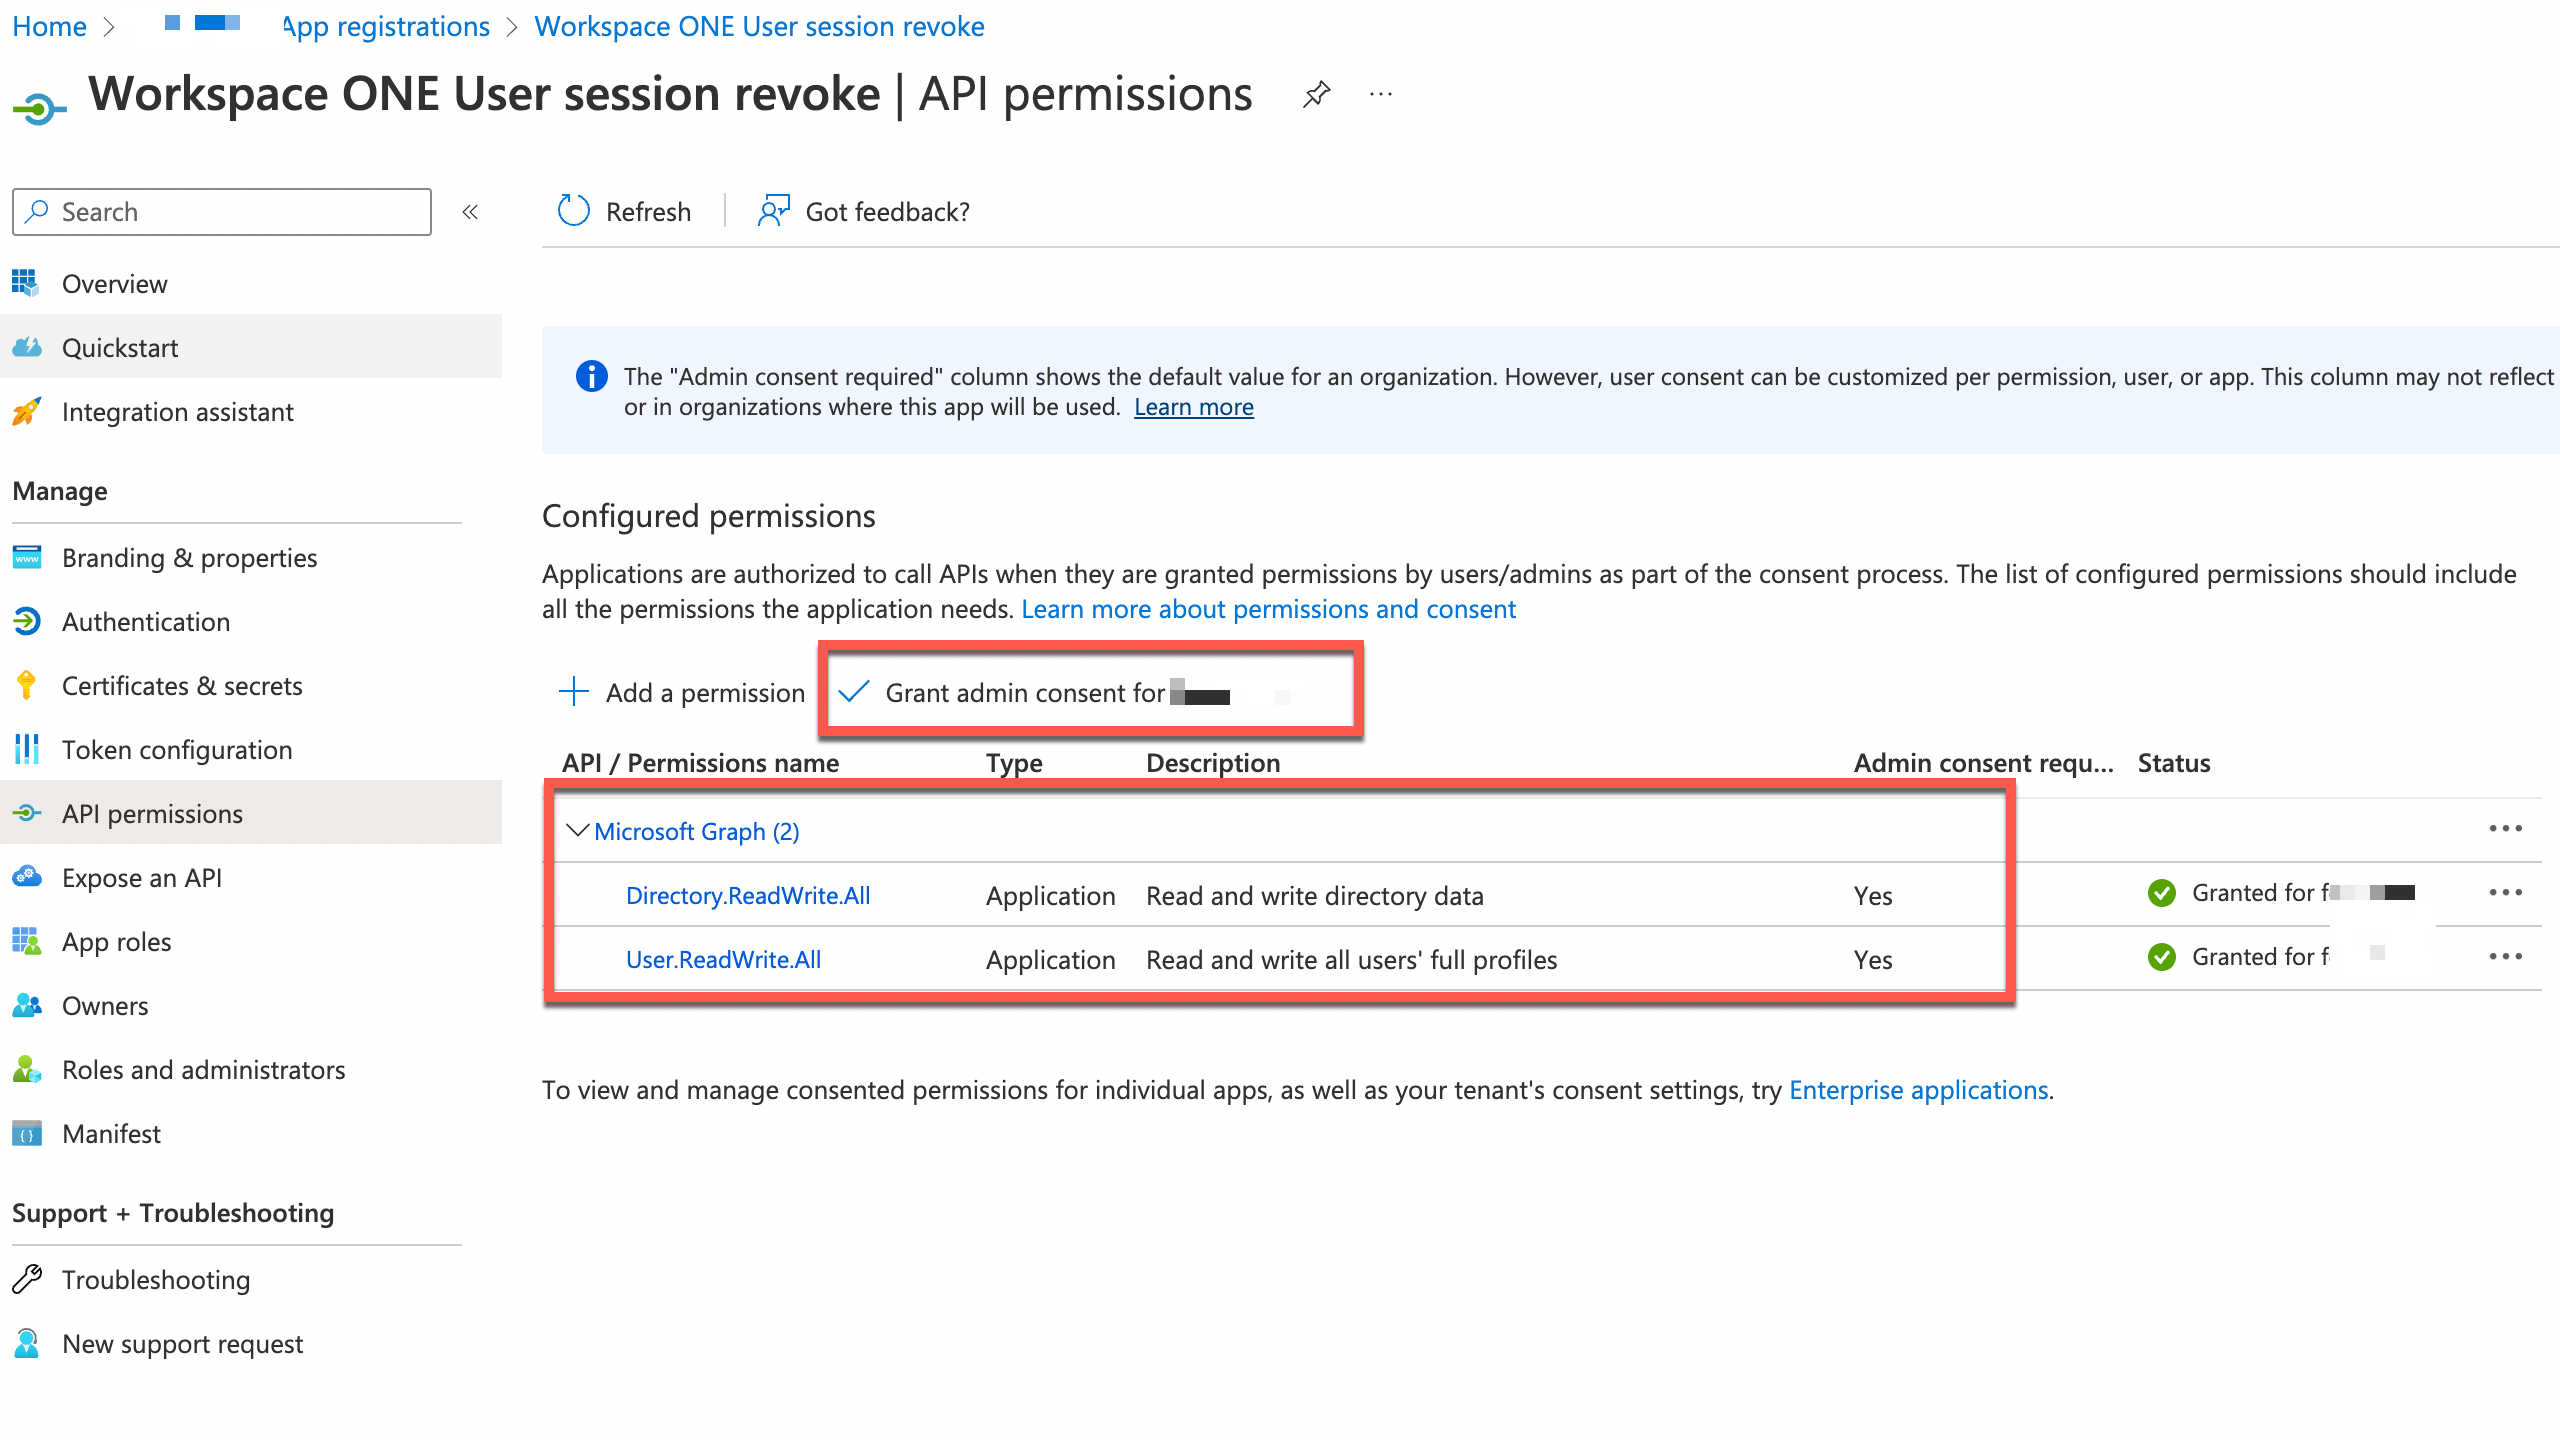
Figure 7: Provide API permissions and grant admin consent
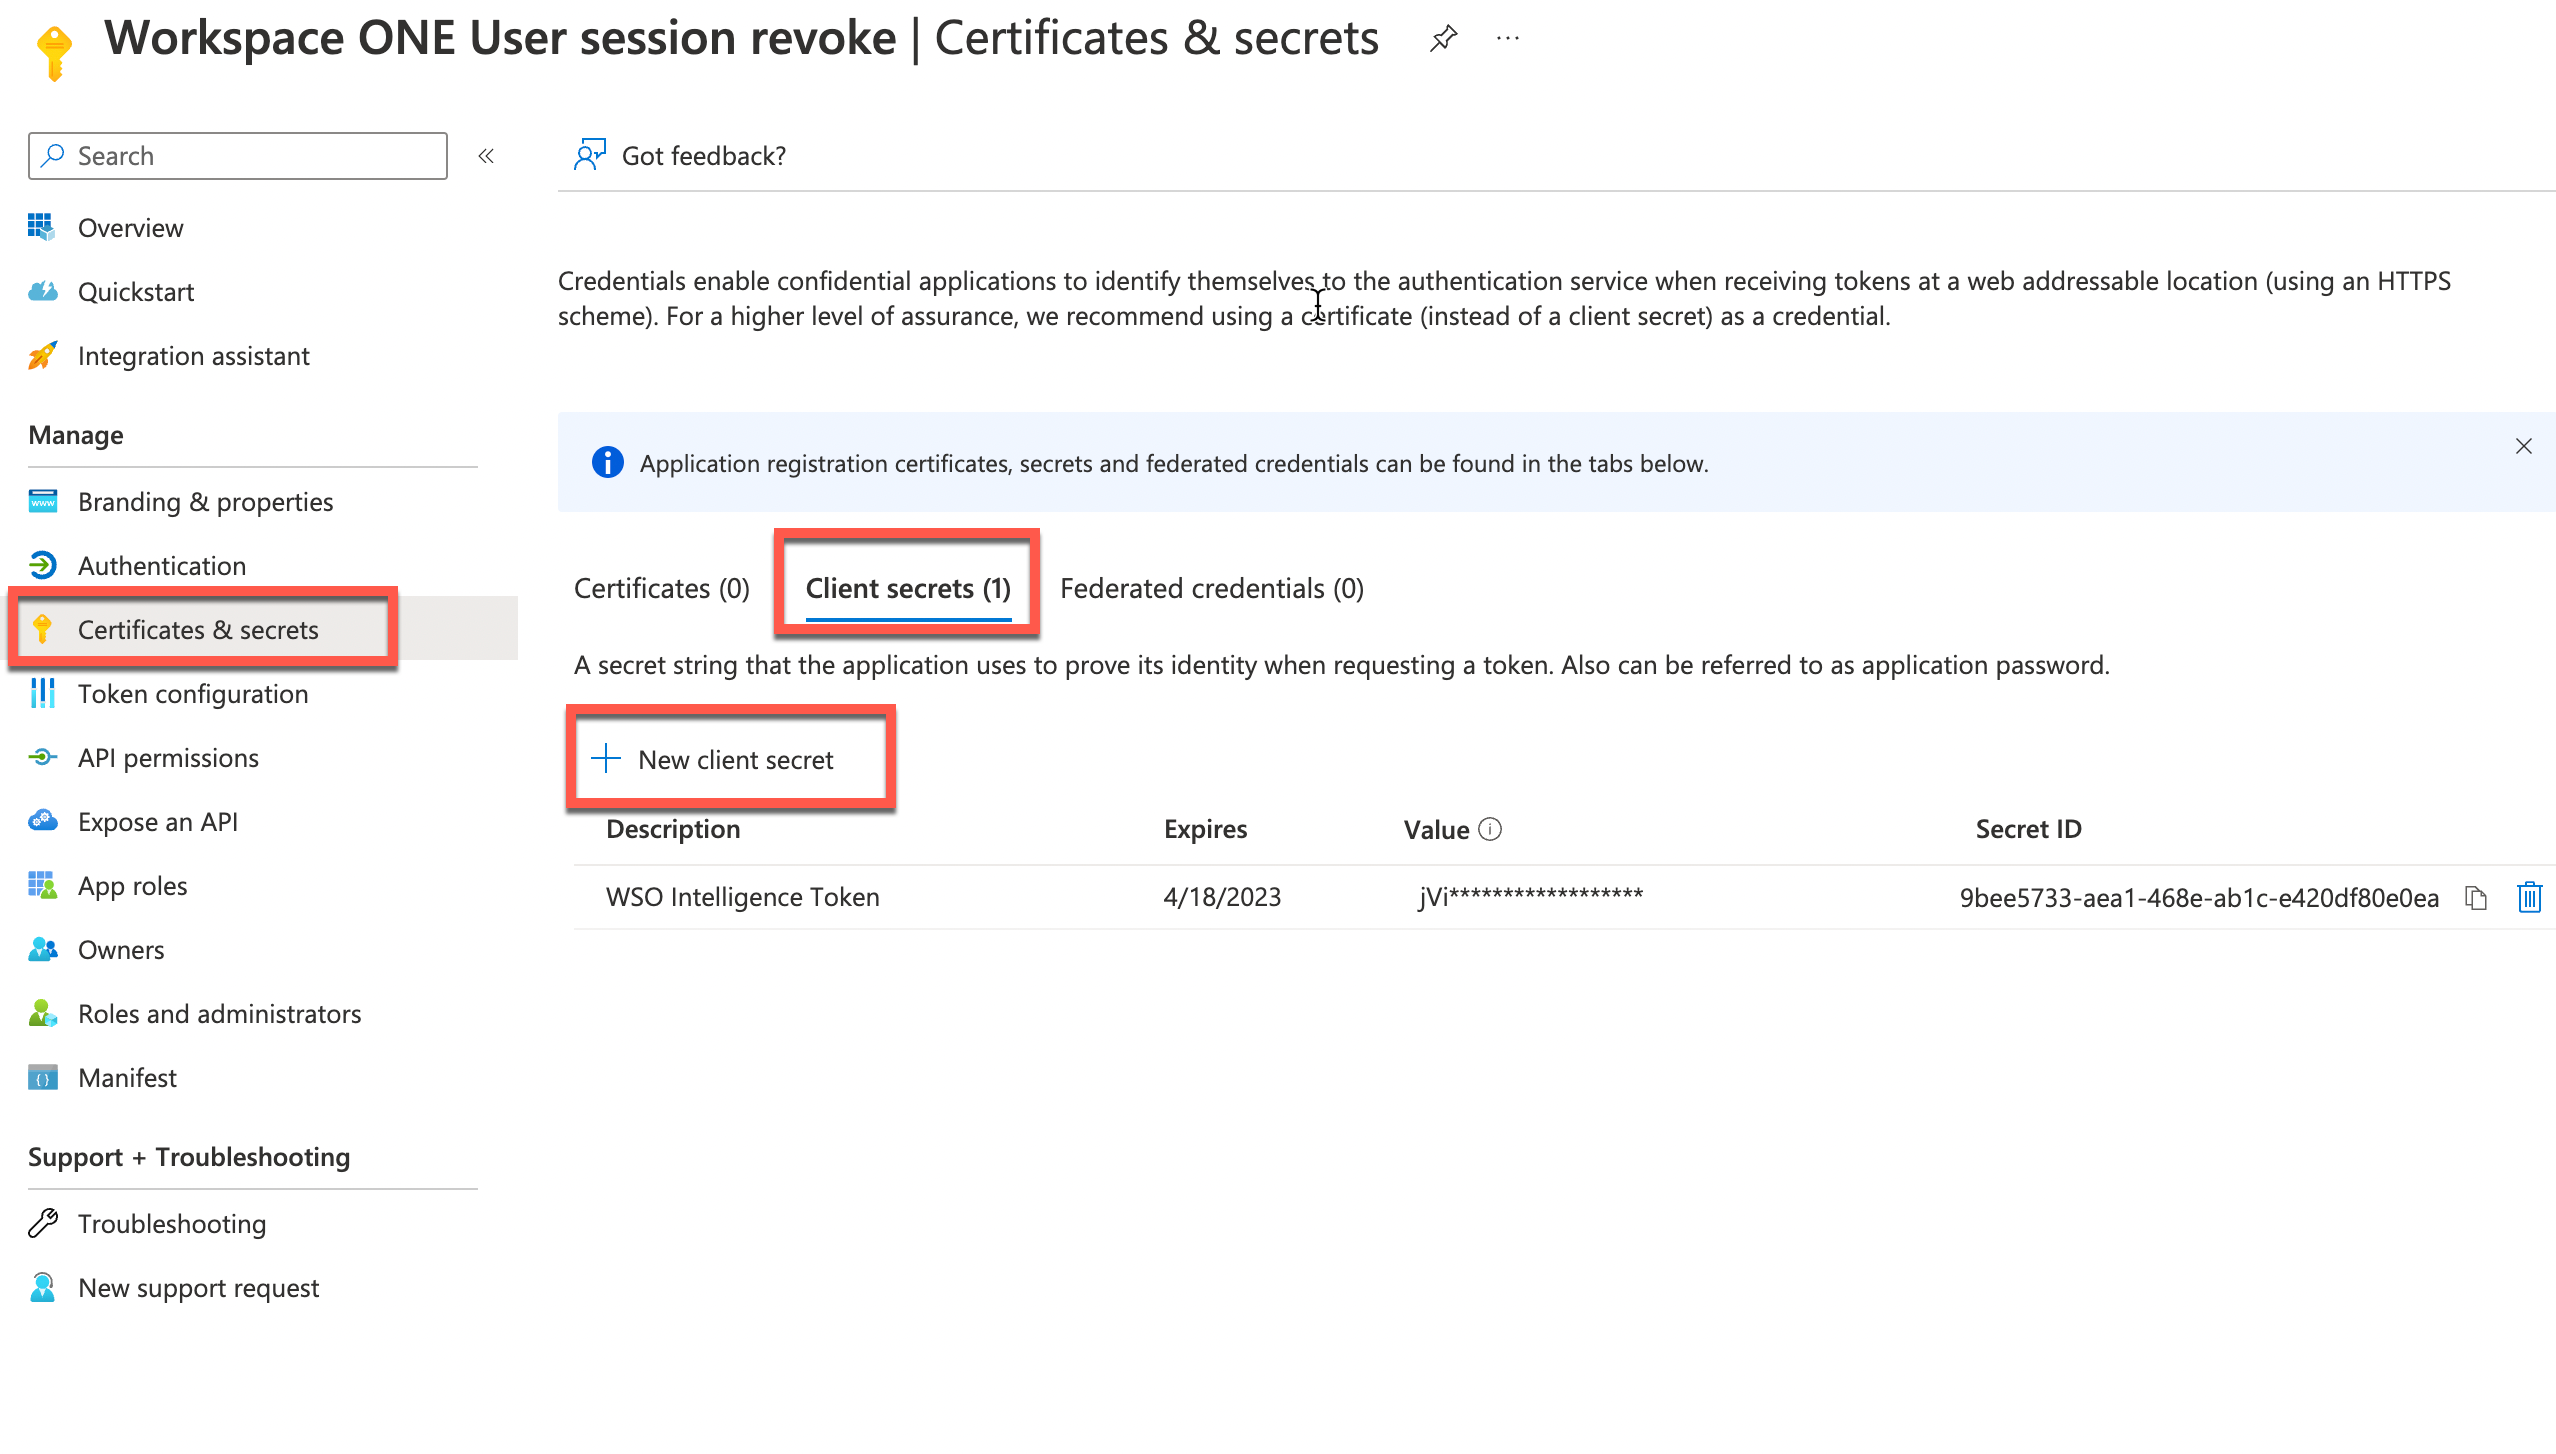 Figure 8: Create the client secret, specify validity of token, and copy value, not accessible afterward
In Intelligence, you can set up custom connectors that leverage REST API endpoints like this Graph API. For more details, see Intelligence - Custom Connectors in the Omnissa documentation.
A requirement to set up the custom connector is to prepare the set of APIs to call in a Postman collection. To learn about the Postman tool, see the following Tech Zone posts:
In this specific case, we need to create a small collection with just one POST request. The :UPN specifying a path variable will be replaced by Intelligence and {{baseUrl}} will also be replaced by a value configured in Intelligence.
{{baseUrl}}/v1.0/users/:UPN/revokeSignInSessions |
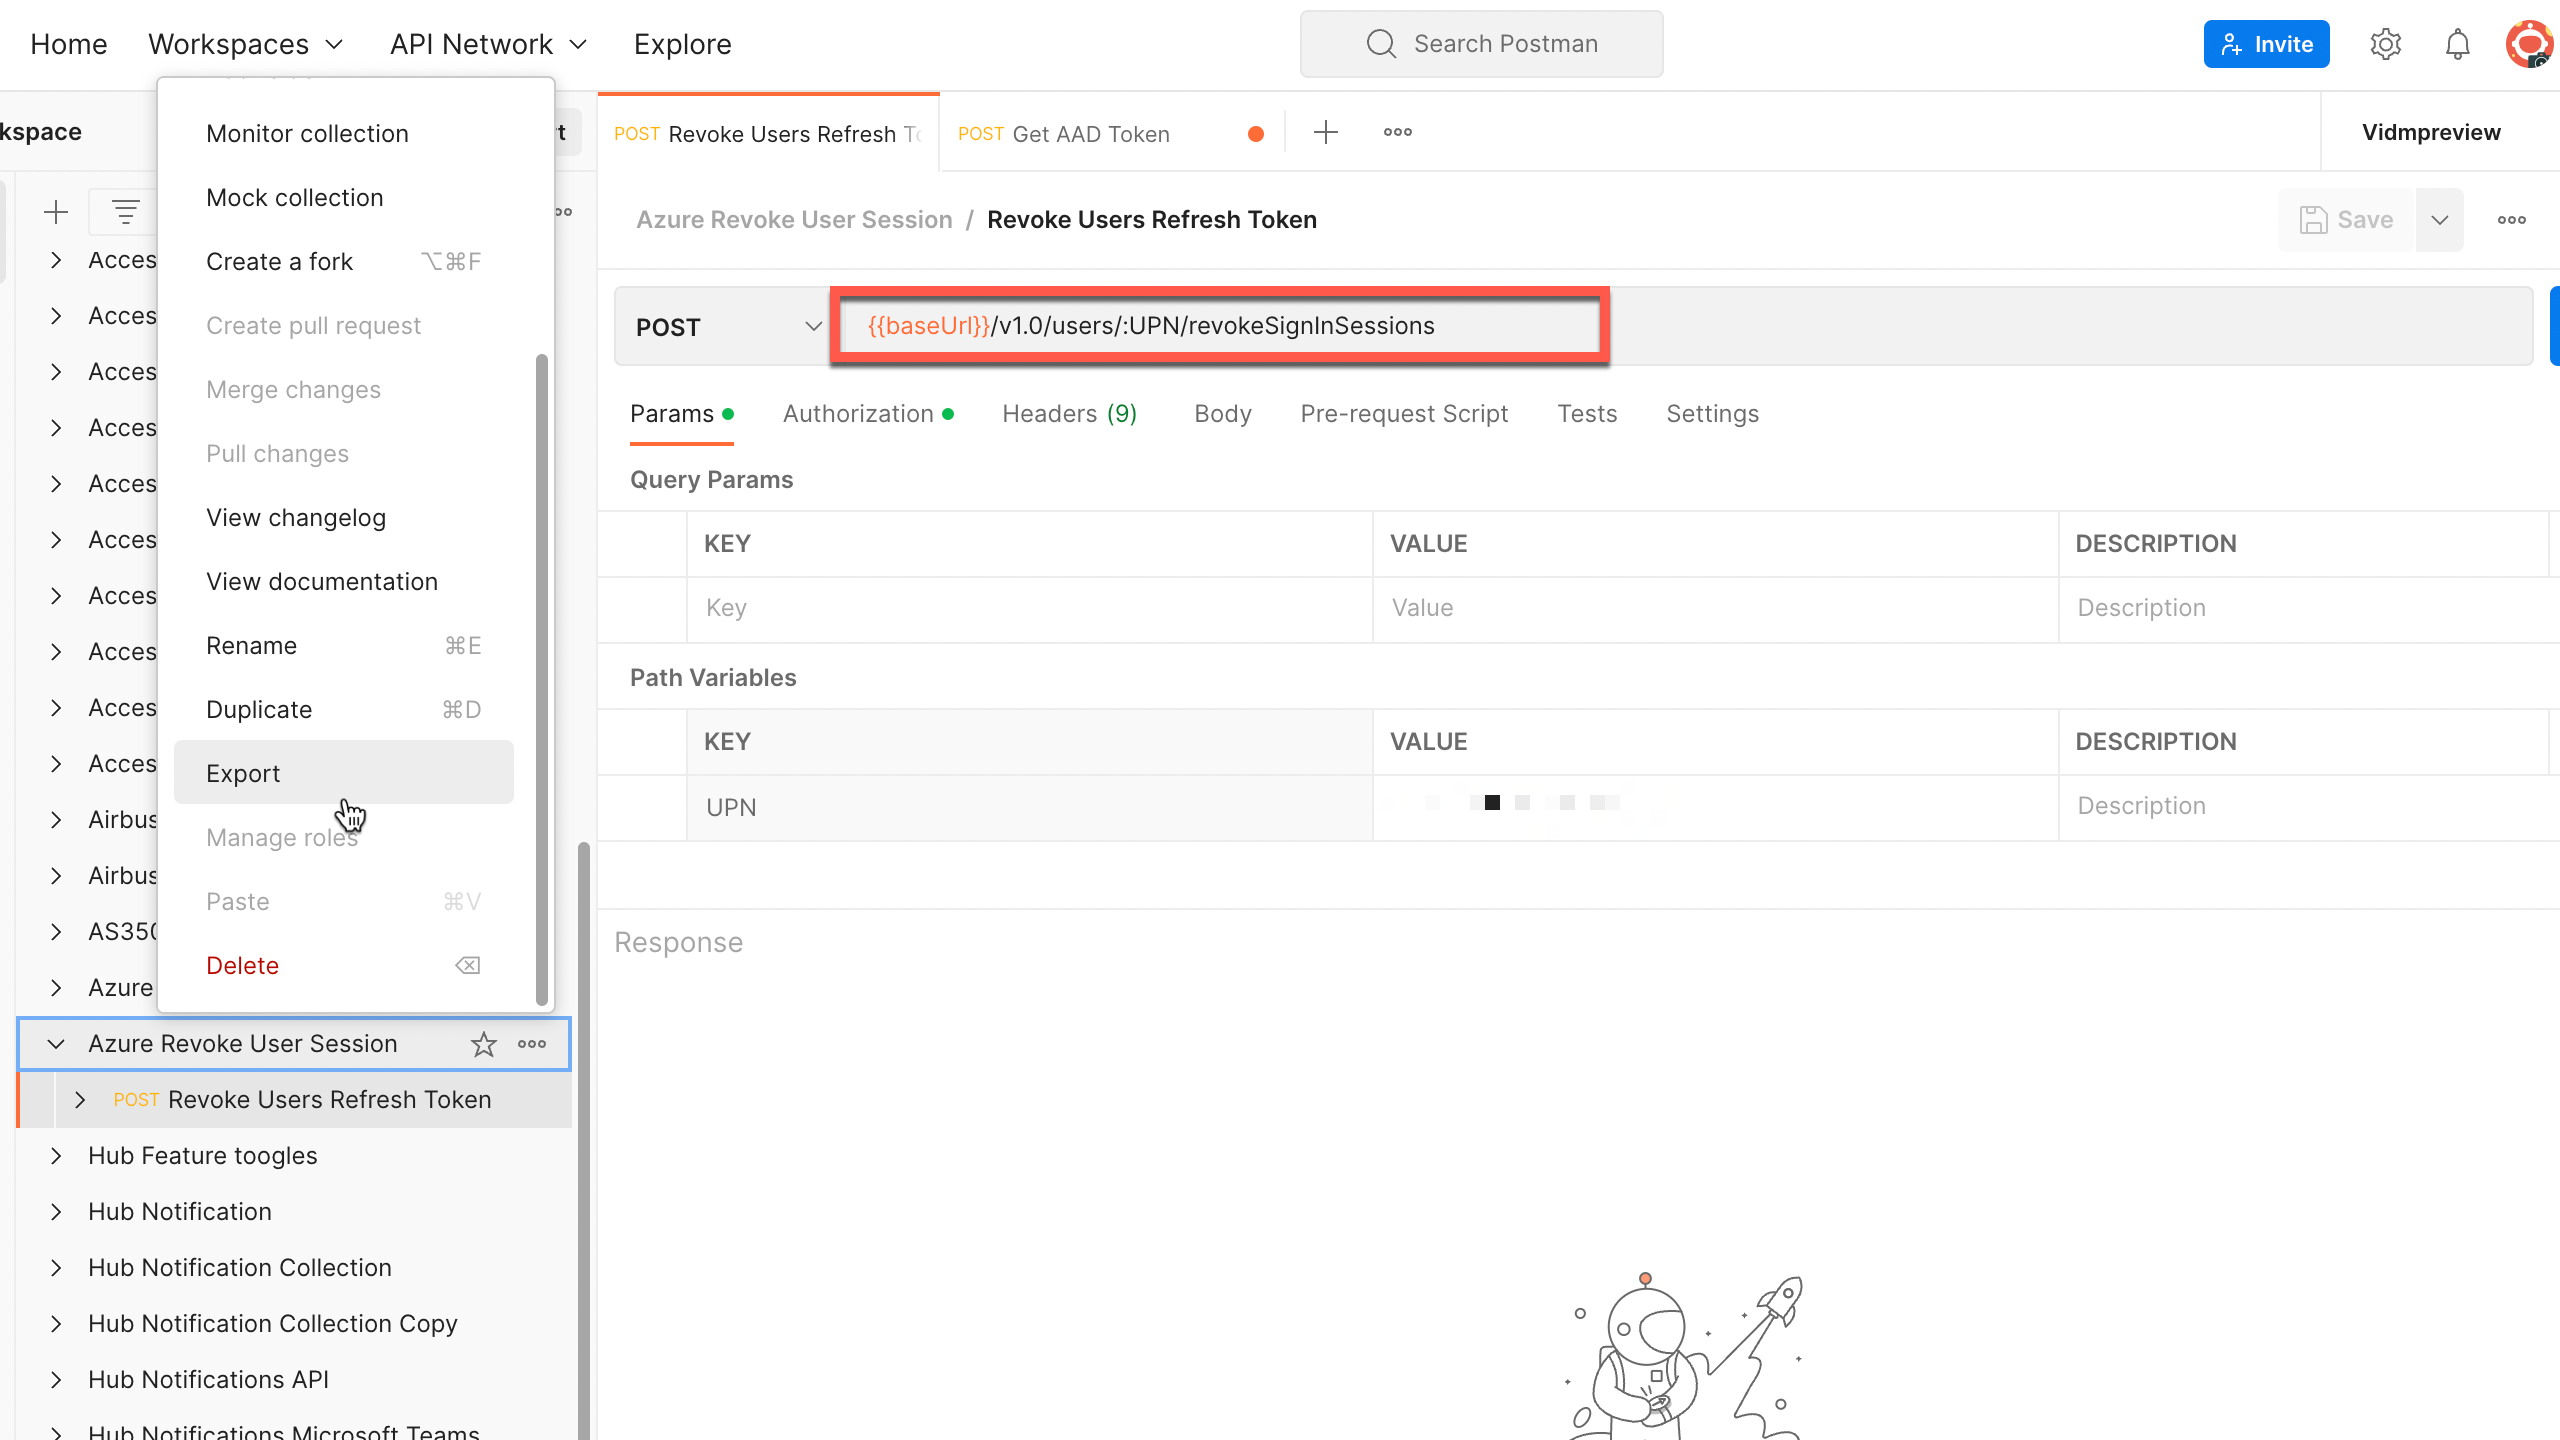
Figure 9: Specify the POST request
After you specify the POST request, you can set up the custom connector in Intelligence. Under Integrations > Workflow Connectors, add a custom connector, which will guide us initially through the authorization part. We use the Entra ID tenant information, the App ID, and the client secret.
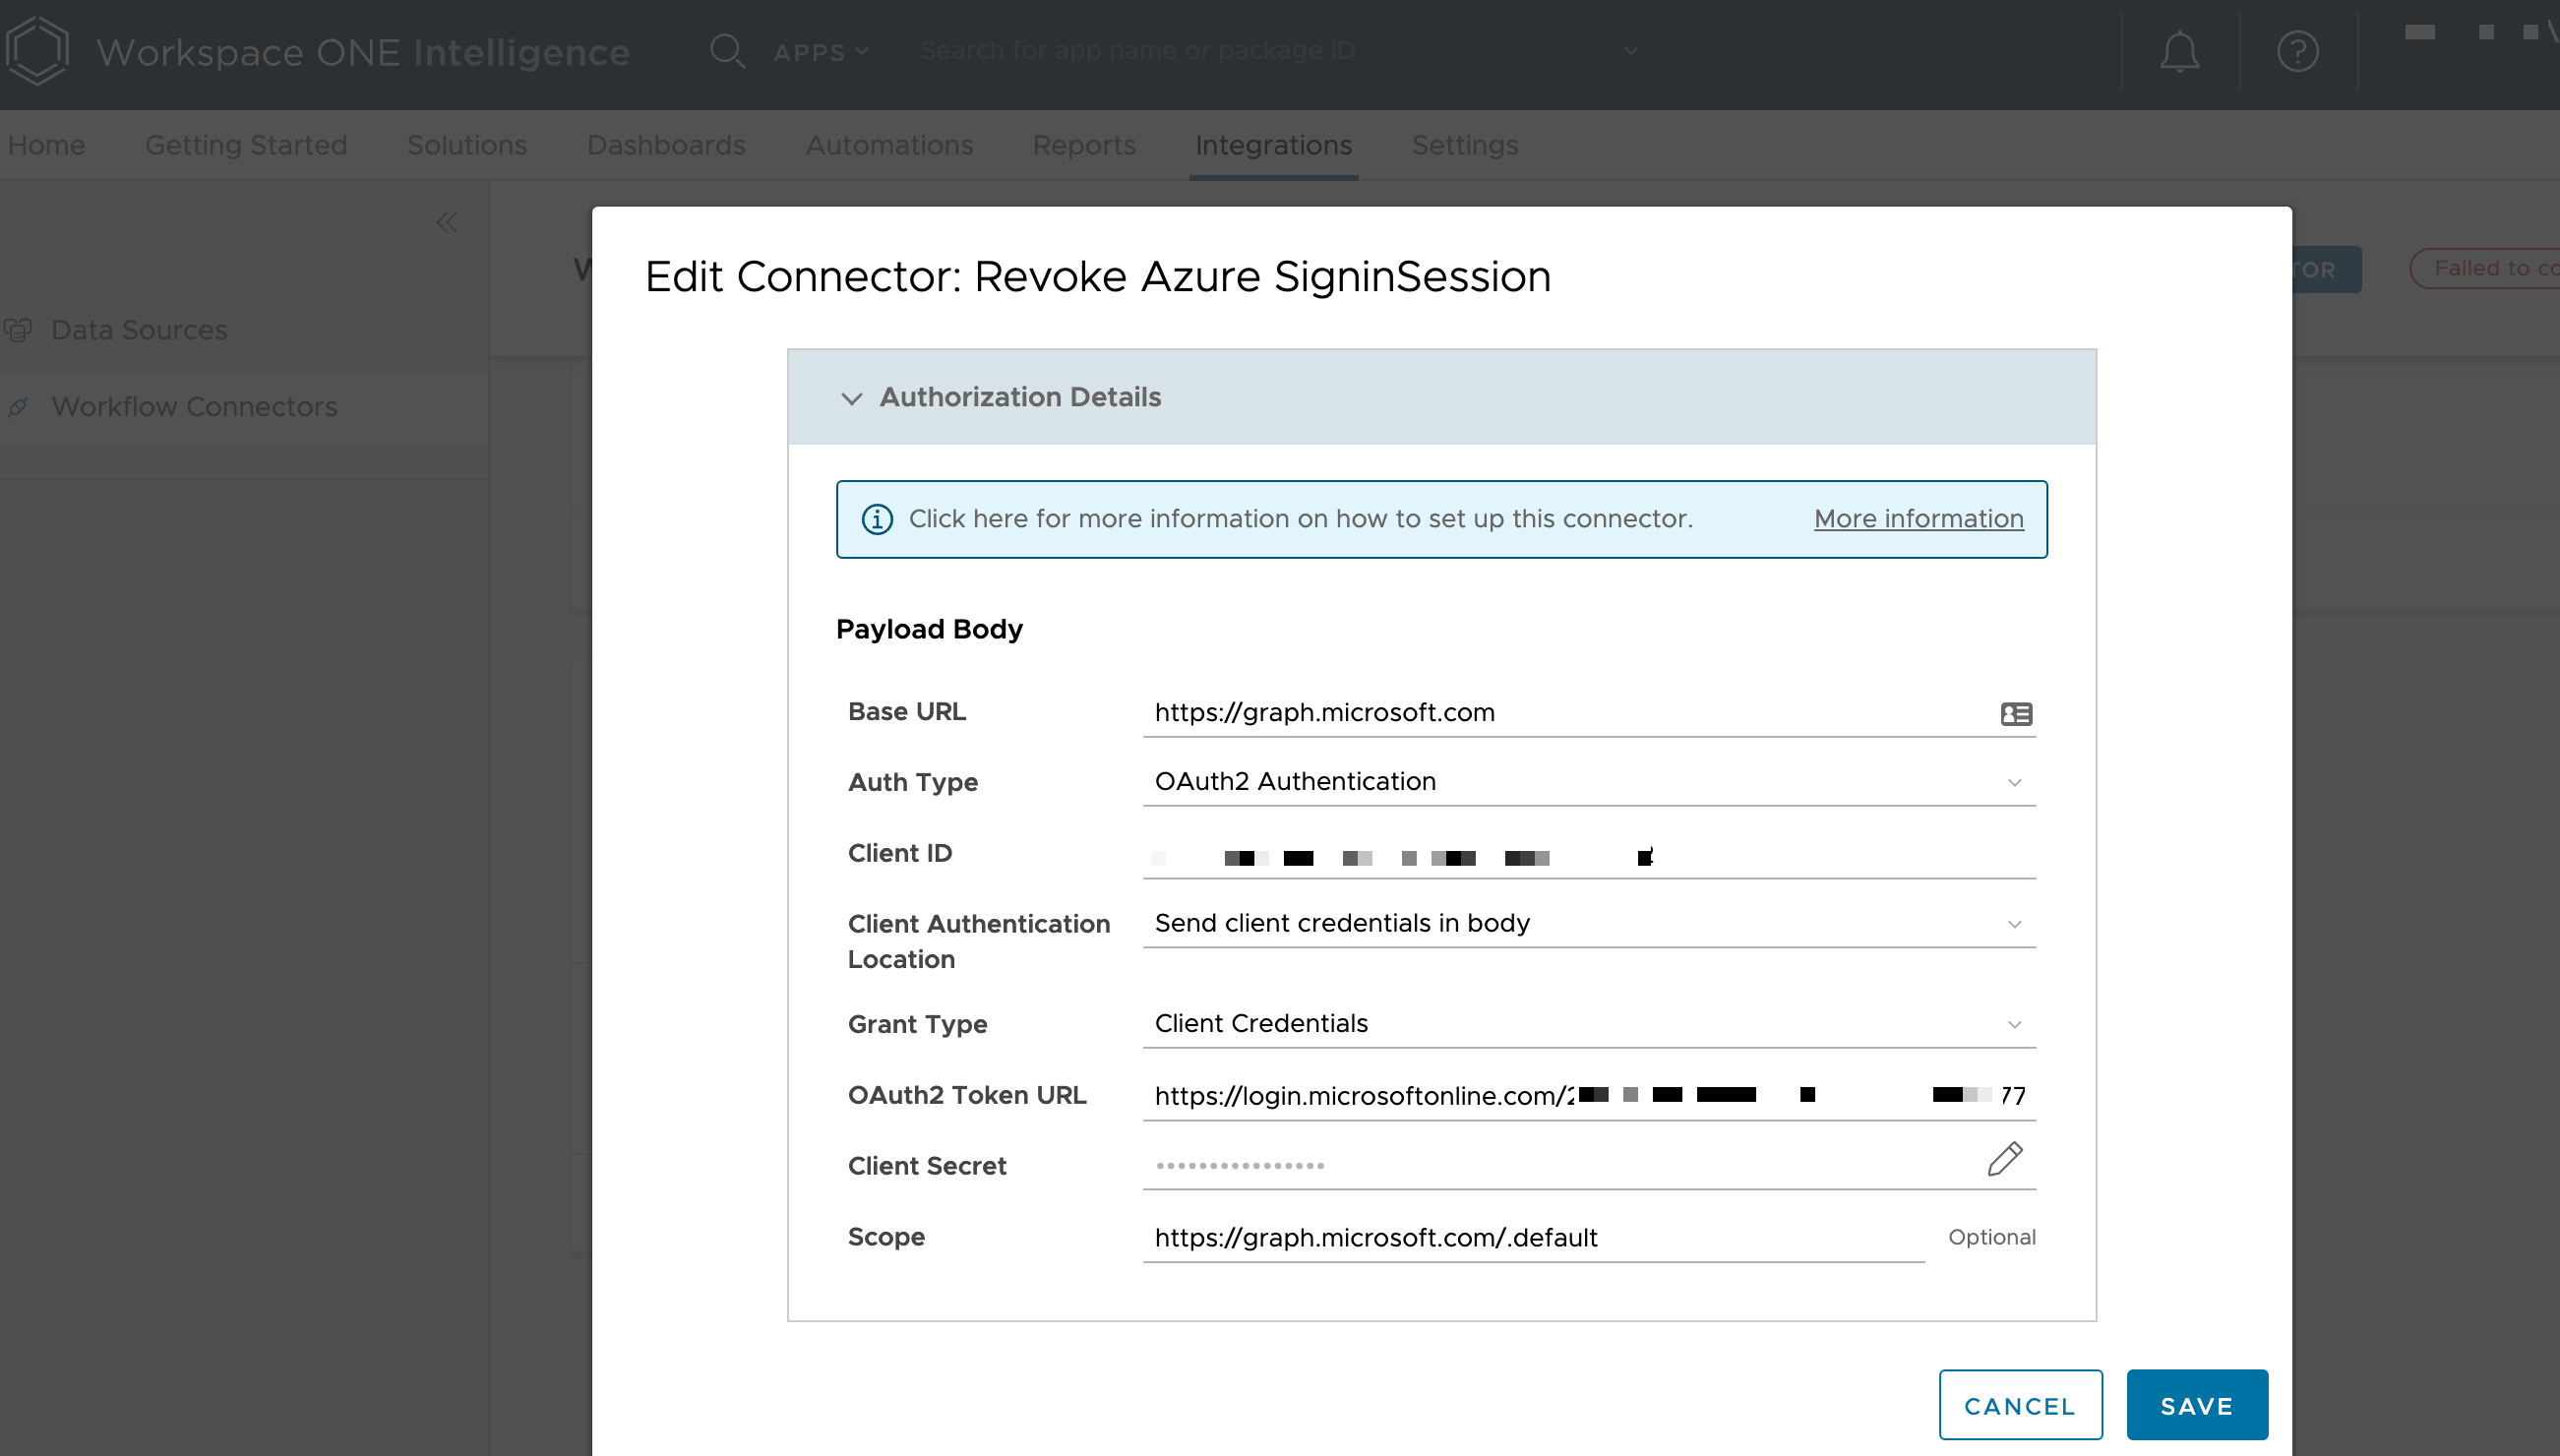
Figure 10: Set up Custom Connector Authorization
The following table describes the values required when setting up the authorization details for the custom connector.
| Base URL | https://graph.microsoft.com |
| Auth Type | OAuth2 Authentication |
| Client ID | Application ID |
| Client Authentication Location | Send client credentials in body |
| Grant Type | Client Credentials |
| OAuth2 Token URL | https://login.microsoftonline.com/EntraIDTenantID/oauth2/v2.0/token |
| Client Secret | Client Secret |
| Scope | https://graph.microsoft.com/.default |
Then, we import our postman collection.
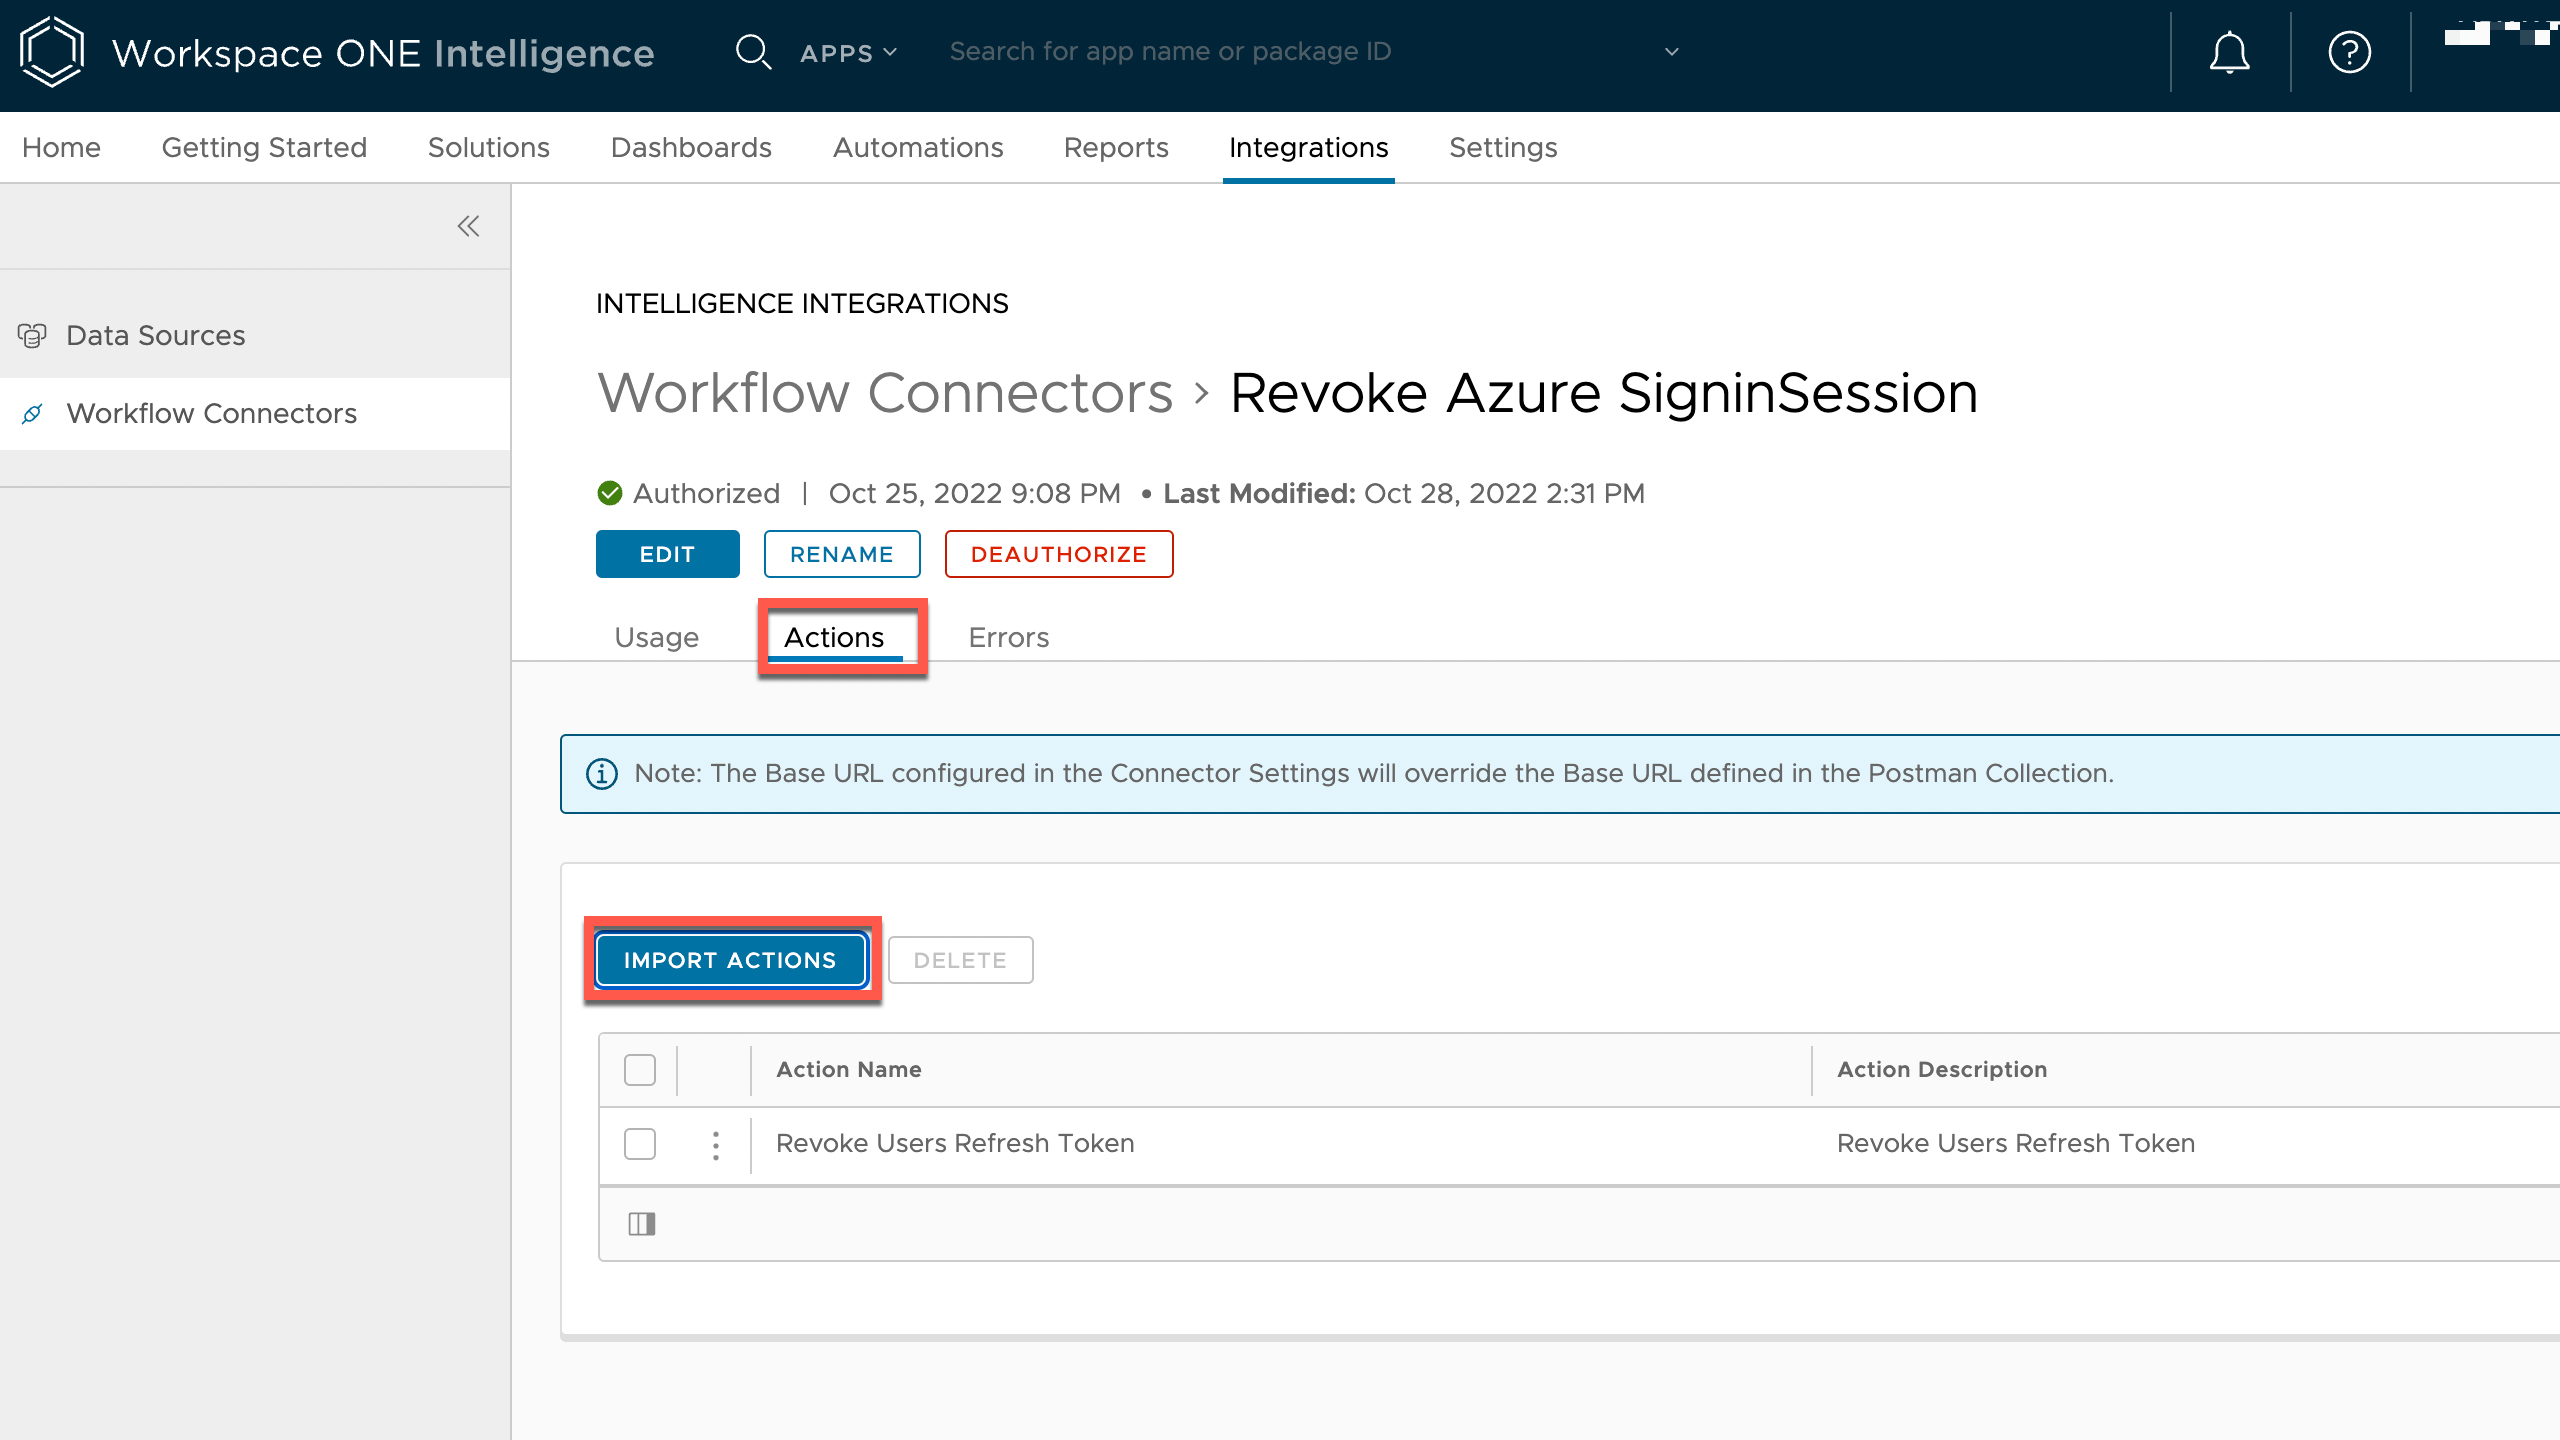
Figure 11: Import Actions, select saved postman file
Under Automations > Workflows, we can now create a custom workflow in the Workspace ONE UEM > Devices category. In the workflow, we specify the filter to find all devices for which the compliance status changed to NonCompliant, and the Enrollment Status is Enrolled. This will trigger the automation to send a Hub notification informing the user of the compliance violation and the revocation of all session tokens as well as trigger our Graph API custom connector with the user principal name variable.
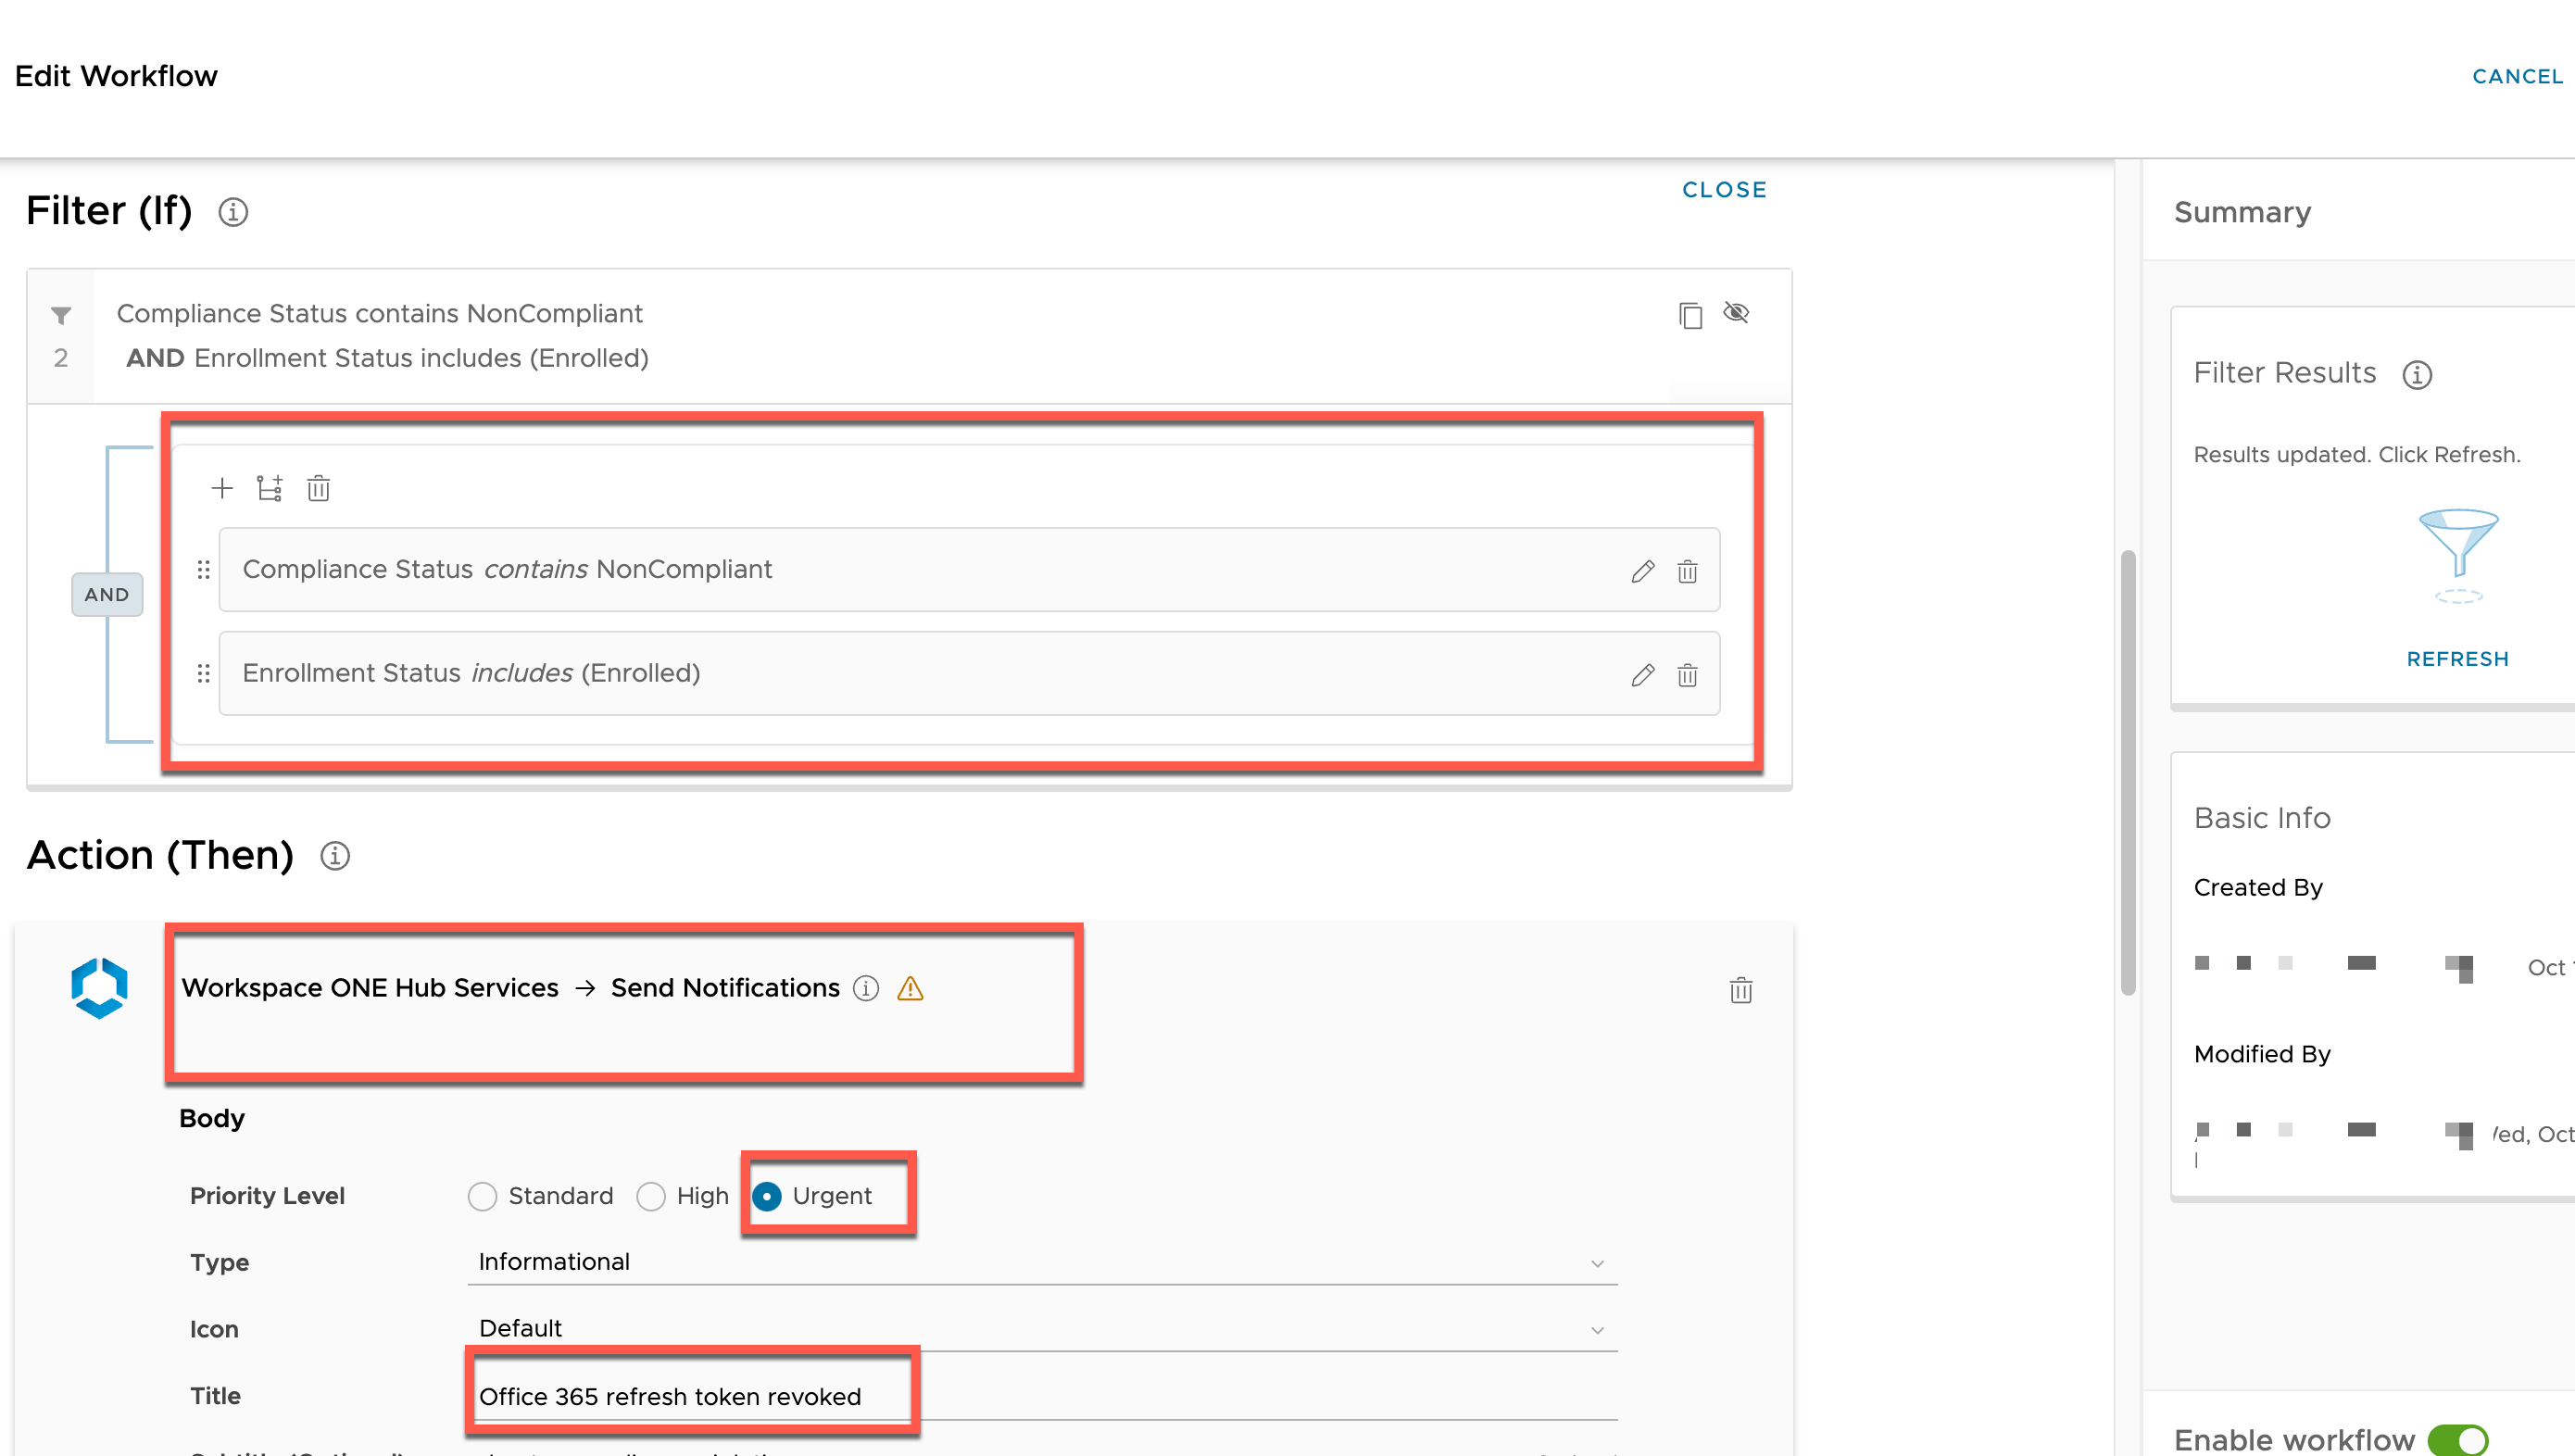
Figure 12: Intelligence Automation configuration Filter and Action part 1
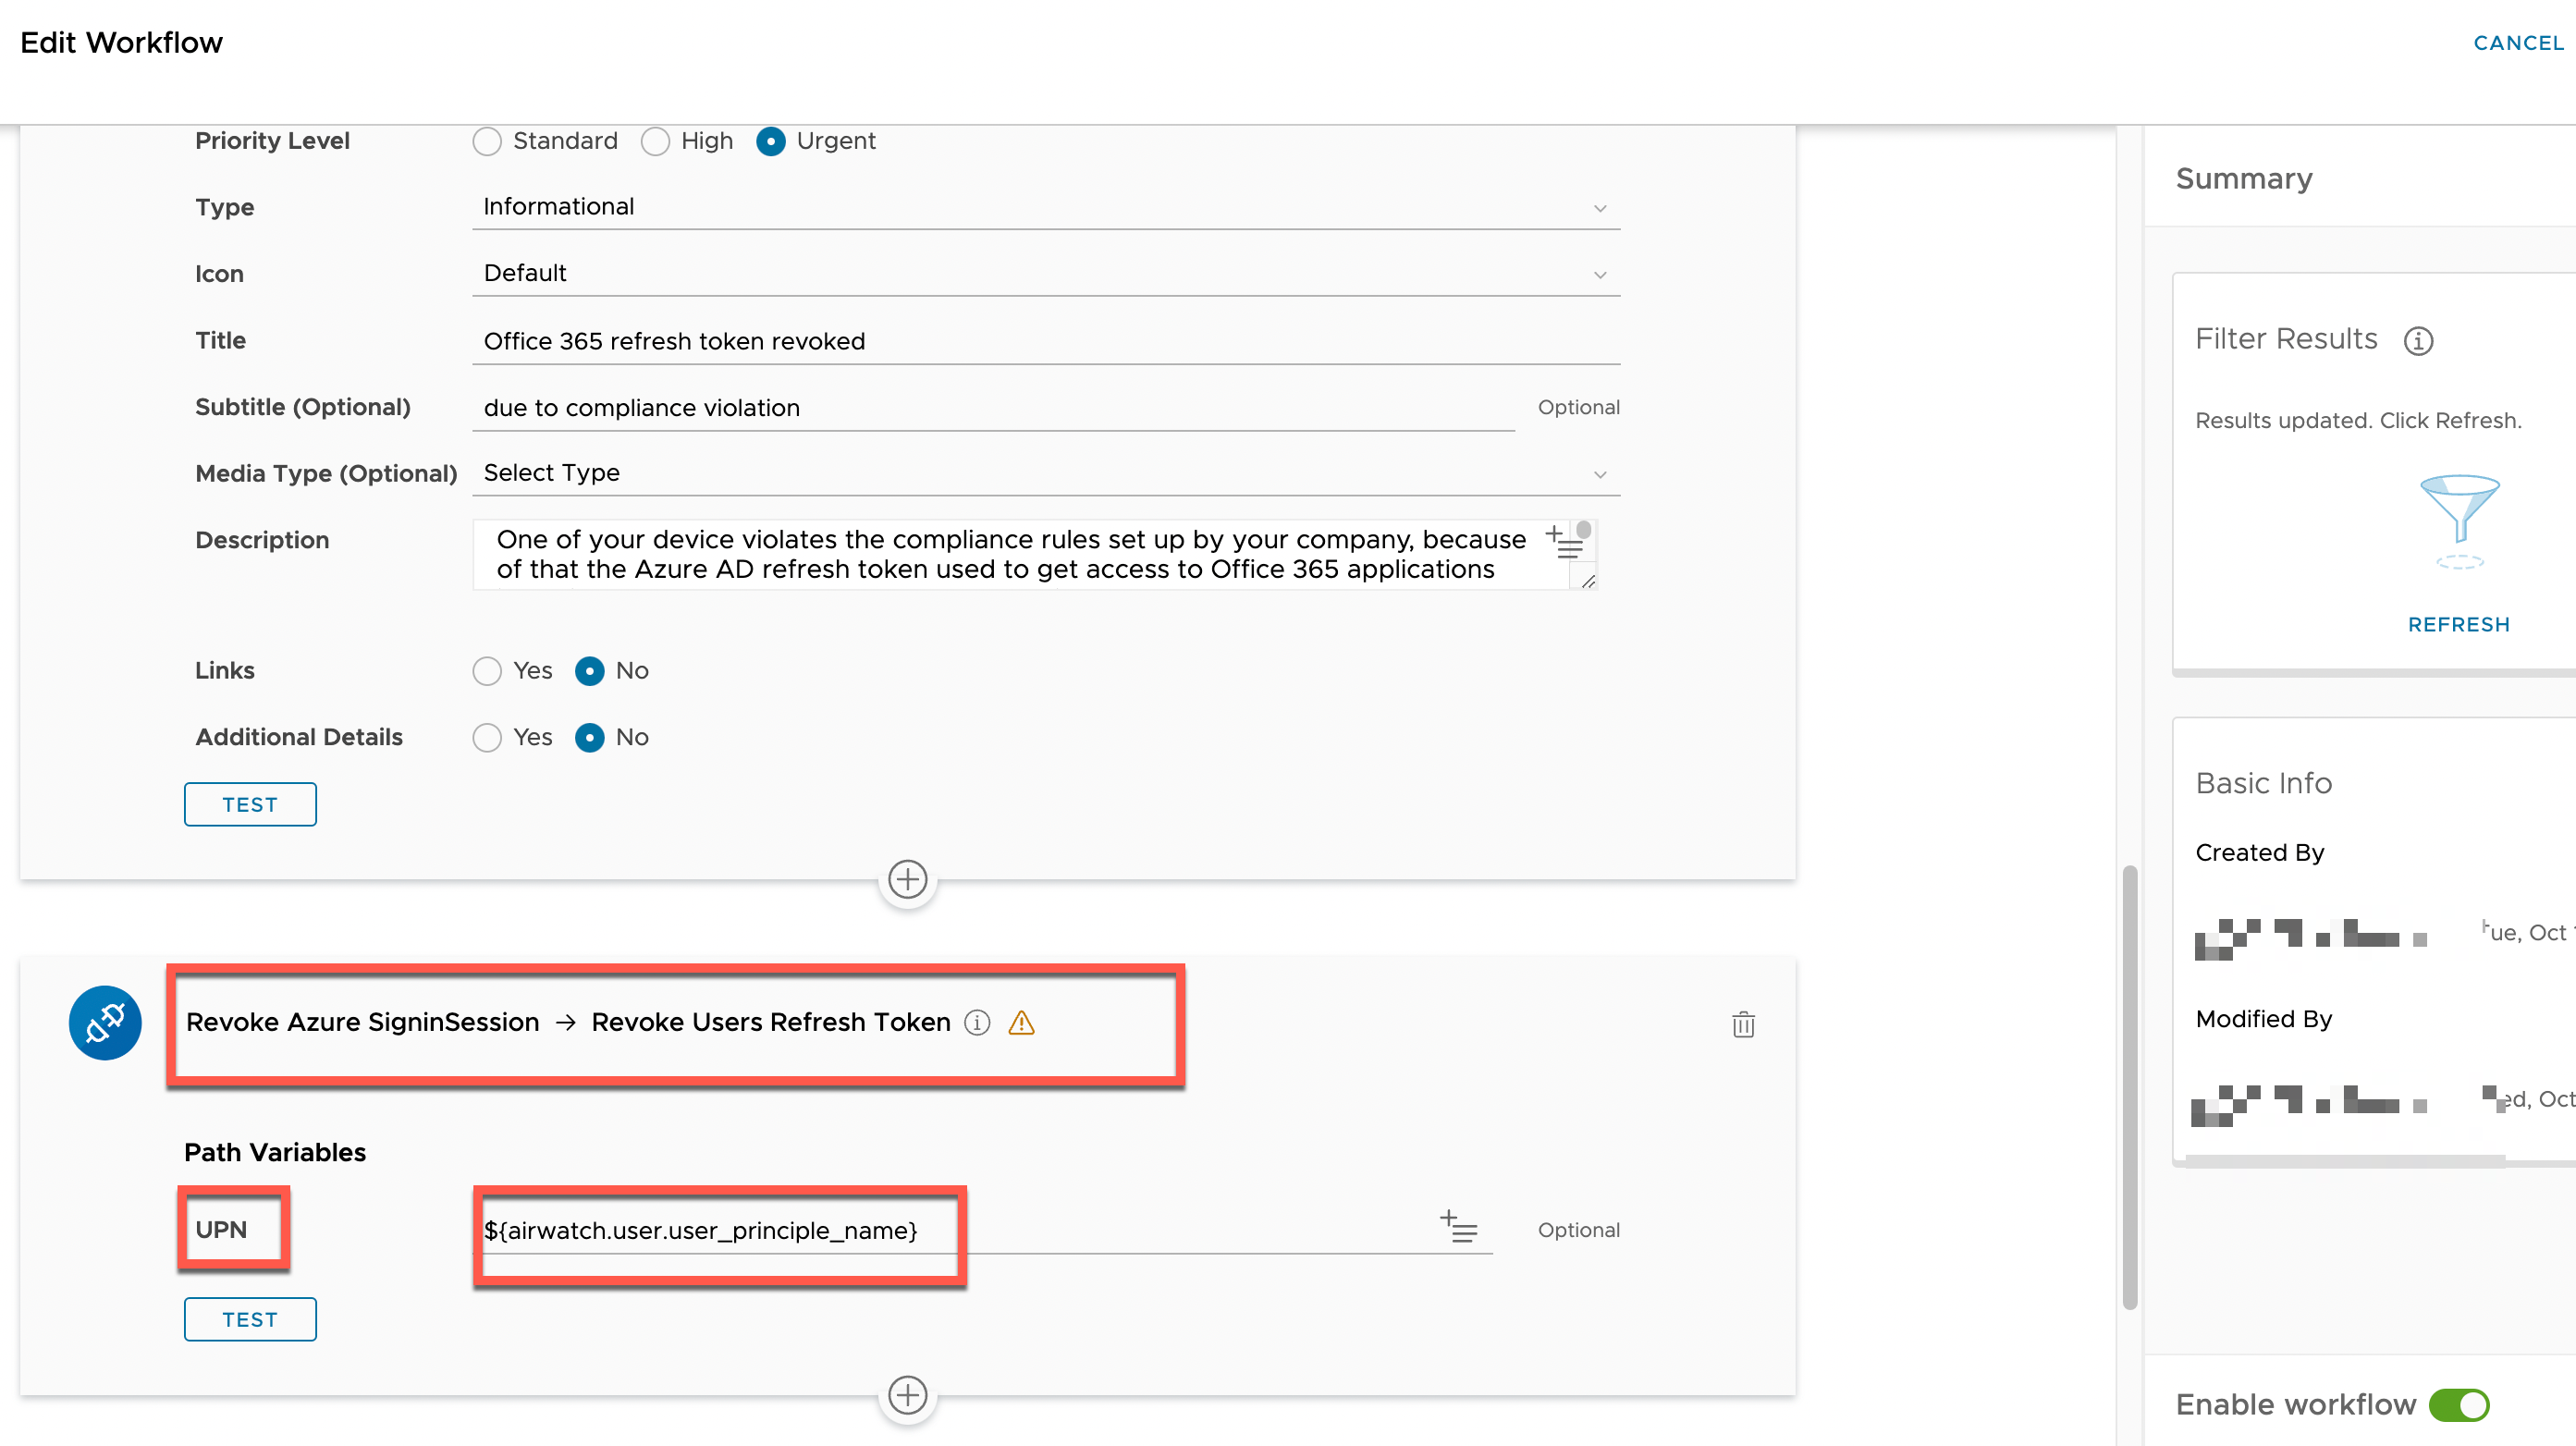
Figure 13: Intelligence Automation Revoke Session action
Because of the available integrations for Trust Network, more automation options are possible, which is the benefit of having a flexible solution for monitoring and automation.
Workspace ONE Conditional Access Device Demos
Now that the setup is complete from the administrator side, let’s review the experience for the end user.
Starting with an unmanaged device, we should have no access at all, then we follow up with managed devices and finally check if the automation is working as expected and block the user on a non-compliant device.
The Device Posture in Entra ID using Omnissa Access - Demos video covers the end-user experience.
Summary and Additional Resources
As you can see, together with the Workspace ONE suite you can achieve Zero Trust access to your Office 365 suite of apps. But what if you want to build granular access across the applications inside of Office 365 and Entra ID, securing access to specific services only from managed devices whilst allowing access to uncritical services from any type of device? Next, we will use Zero Trust Network Access (ZTNA) with Omnissa WS1 Tunnel integrated with Entra Conditional Access policies for more granular access.
Additional Resources
For more information about Zero Trust, you can explore the following resources:
- Device Posture in Entra ID using Omnissa WS1 Tunnel [part 2]
- Device Posture in Entra ID using API [part 3]
- Device Posture in Entra ID using WS1 Intelligence
- Device Posture in Okta
Changelog
The following updates were made to this guide:
| Date | Description of Changes |
| 2024/11/6 |
|
| 2022/11/16 |
|
About the Author
This document was written by:
- Sascha Warno, Staff Architect Identity & Security Solutions, EUC Technical Marketing, Omnissa
Feedback
Your feedback is valuable.
To comment on this paper, contact Omnissa End-User-Computing Technical Marketing at tech_content_feedback@omnissa.com.

