

Onboarding Options for macOS
Overview
Omnissa Workspace ONE® UEM offers a comprehensive management solution for macOS devices, supporting macOS 10.15 and later. It allows enterprises to manage Corporate-Dedicated, Corporate Owned, or Employee Owned (BYOD) devices, providing flexibility to meet employees’ needs at any level.
To fully utilize Workspace ONE UEM’s management options, macOS devices must be onboarded and enrolled. Enrollment is mandatory before a device can receive profiles, applications, and access internal content and resources. IT administrators have several enrollment workflows to choose from, including Hub-based enrollment, staging enrollment, automated enrollment, and web-based enrollment. The appropriate workflow depends on the specific enrollment requirements. Organizations often need multiple workflows to accommodate different device scenarios, such as single-user corporate-owned devices, BYO devices, and shared corporate devices.
Purpose of this tutorial
This tutorial explores the various enrollment workflows available in Workspace ONE UEM, empowering IT administrators to make well-informed decisions regarding macOS device onboarding. The following topics are presented:
- Enrollment user types
- Overview of enrollment workflows
- Hub-based enrollment
- Web-based enrollment
- Staging enrollment
- Automated enrollment
For more information about Workspace ONE UEM and macOS management, see Omnissa’s product documentation. You can also find additional operational tutorials and videos on techzone.omnissa.com.
Audience
This operational tutorial is intended for IT professionals and Workspace ONE administrators of existing production environments.
Both current and new administrators can benefit from using this tutorial. Familiarity with macOS is assumed.
Knowledge of additional technologies such as Omnissa Intelligence and Omnissa Workspace ONE® UEM is also helpful.
Understanding macOS enrollment
This section offers a comprehensive overview of the macOS enrollment processes available in Workspace ONE UEM. It delves into the four enrollment methods and the different macOS user types.
Understanding macOS user types
Before delving into the various enrollment methods, it’s crucial to comprehend the different user types involved in the enrollment process. macOS devices support multiple discrete user accounts, each with its own data and settings. While macOS is inherently a multi-user system, the mdmclient process built-in to macOS (utilized by Workspace ONE UEM) lacks multi-user capabilities unless the device is connected to a directory service (such as Active Directory). When discussing enrollment methods, it’s essential to define three distinct user types.
Workspace ONE UEM Enrollment User - Workspace ONE uses this user account to determine membership in assignment groups and assign devices to them.
- If a device is not being staged, this is a user account (either basic or directory-based) within Workspace ONE UEM (found under Accounts > Users) whose credentials were entered when the device was enrolled.
- If staging a device, this is the user account to which the device is assigned within Workspace ONE UEM (found on the User tab on the Device Details View for any enrolled device).
macOS Logged-On User - This is a user account that is currently logged in and active on the device. It can be local to macOS, based on a directory service like Active Directory, or it can be from a Platform SSO-supported Identity Provider (IdP).
Workspace ONE Managed User - This is the user account (either local to macOS or from a network account server) that was logged in and active on the device when the enrollment process took place. For Workspace ONE to deliver the assigned items to the Workspace ONE UEM enrollment user, this account must be logged in within macOS. Additionally, Workspace ONE UEM can also send Apple Push Notifications to this account when it is the logged-in user.
Workspace ONE enrollment methods
Before a device can be managed, it must be enrolled in your organization’s Workspace ONE UEM instance. Enrollment grants IT administrators the ability to push user and device profiles that configure macOS to align with corporate standards. These profiles ensure secure access to internal content and resources, deliver applications to devices, monitor security and device compliance, and perform numerous other tasks.
Workspace ONE UEM offers four methods for device enrollment.
- Hub-based Enrollment
- Staging Enrollment
- Automated Enrollment
- Web-based Enrollment
The most suitable enrollment method depends on the type of device you’re using: corporate-dedicated, corporate-shared, or employee-owned (BYOD).
Corporate-Dedicated – This is a corporate-owned device provided to and intended to be used by a single user.
Corporate-Shared – This is a corporate-owned device that is configured to be shared among multiple users, such as a device used by frontline workers in a retail location.
Employee Owned (BYOD) – A personal device owned by the employee, not the corporation. This device might contain personal user data, apps, and photographs that the corporation should not have access to.
Hub-based enrollment
Hub-based enrollment employs the Workspace ONE Intelligent Hub to initiate the enrollment process. This type of enrollment is commonly referred to as user-initiated device enrollment, as the end user is responsible for initiating and approving the enrollment process. Hub-based enrollment is most frequently associated with employee-owned (BYOD) devices.
With Hub-based enrollment, the macOS device is enrolled with the credentials of the Workspace ONE UEM user (enrollment user). The currently logged-in macOS user (logged-on user) becomes the Workspace ONE managed user. However, profiles and applications assigned to the user are only applicable when the specific macOS user is logged in. If the managed user logs out of the device and another macOS user logs in, Workspace ONE will not apply any user-specific items to the new logged-in user. User profiles will not be applied to the device until the managed user logs in again.
Note: The single local user limitation is defined within the Apple MDM protocol. The local user that installed the MDM profile will be managed, but no other local user will be managed.
Staging enrollment
Staging enrollment enables IT administrators to prepare corporate-owned macOS devices and assign them to the appropriate users in Workspace ONE UEM before end users receive the devices. This process is particularly beneficial for administrators who need to deploy a fleet of macOS devices.
There are two types of staging enrollments available to IT administrators: single-user staging and multi-user staging.
Single-user staging
With single-user staging, IT administrators can provision a device for a single user. This requires either the macOS device to be LDAP-bound or pre-registered in Workspace ONE UEM.
In an LDAP-bound scenario, Workspace ONE UEM receives a notification at a network user’s login event. This notification allows Workspace ONE to correlate the newly logged-in user (a network user in macOS) with the enrollment user. Since the network account in macOS and Workspace ONE UEM are known to be the same (as they originate from the same source, LDAP), Workspace ONE UEM can change the managed user to the new logged-on user.
In single-user staging scenarios, Workspace ONE UEM associates the device with the enrollment user only during the first network user login (for instance, the managed user). Subsequent network user login events are ignored, and the assigned user for the device remains unchanged. Consequently, any user-based assignments (user-level profiles and apps) are only sent to macOS when the managed user (matching the enrollment user) is logged in to the device.
Note: If a domain-bound macOS device is enrolled but not receiving user profiles/configurations, the logged-in user in macOS may not be the Workspace ONE UEM managed user.
In a pre-registration scenario where LDAP binding isn’t utilized, Workspace ONE UEM can only manage the local user who installs the enrollment profile. Any staging scenario without LDAP binding must ensure that the local macOS user account responsible for installing the enrollment profile is the same as the end-user’s local macOS user account. IT administrators can enroll devices and assign them to users without needing to know the end-user’s domain credentials by pre-registering a user to a device manually or through bulk import. The end-user can then receive the device with only a known set of local macOS login credentials.
Multi-user staging
With multi-user staging, IT administrators can provision devices that will be shared by multiple users, such as point-of-sale devices in retail or devices used by shift-based healthcare workers. Workspace ONE UEM dynamically assigns a new user to the device each time a different network user logs in.
In multi-user staging scenarios, Workspace ONE UEM associates the device with a new enrollment user every time a network-based user account (like the managed user) logs in. With each network user login, Workspace ONE UEM updates the enrollment user to match the newly logged-in user account. Consequently, Workspace ONE UEM sends any apps and configurations assigned to the newly logged-in user.
Note: Multi-user staging is dependent on both the staging user configuration and the domain bind.
Automated enrollment
Automated Device Enrollment simplifies large-scale deployments of Apple devices by enabling over-the-air setup and configuration. This eliminates the need for staging services or physically accessing each device. IT admins can stage devices using Apple Business Manager with Automated Device Enrollment (formerly known as the Device Enrollment Program). This feature allows IT admins to customize the Apple Setup Assistant, enforce device enrollment, and streamline the enrollment process for end users. Additionally, a non-removable MDM profile can be installed on devices, and macOS devices enrolled through Apple Business Manager can be provisioned in supervised mode, enhancing security and configuration options.

Automated Device Enrollment offers IT admins the following features:
- Mandatory and lockable MDM enrollment – Automated Device Enrollment can automatically enroll Apple devices into Workspace ONE UEM ensuring that users receive all required configurations and locking the devices in MDM for ongoing management.
- Wireless supervision – Supervision offers a higher level of device management, providing additional device configurations and features, and allowing additional restrictions to be applied to devices, such as turning off iMessage, AirDrop, or Game Center.
- Zero-touch configuration – Automated Device Enrollment makes large-scale deployments of Apple devices easier with over-the-air setup and configuration, eliminating the need for staging services or physically accessing each device.
- Streamlined Setup Assistant – When using Workspace ONE UEM with Apple’s Automated Device Enrollment, IT admins can streamline the built-in Setup Assistant by specifying which screens are displayed to guide users through the activation process.
For devices to be eligible for Automated Device Enrollment, they must be purchased from one of the following channels:
- Directly from Apple
- Participating Apple Authorized Resellers
- Cellular carriers
Alternatively, you can add a device to Apple Business Manager using Apple Configurator. For instructions on how to manually add devices to Apple Business Manager with Apple Configurator, see the Apple Business Manager User Guide.
For more information on configuring Automated Device Enrollment in your Workspace ONE UEM environment, see Using Apple Automated Device Enrollment with Workspace ONE UEM on Omnissa Tech Zone.
Web-based enrollment
The web-based enrollment workflow is similar to the hub-based enrollment process. However, instead of initiating the enrollment through Intelligent Hub, users begin by navigating to https://<mdmenrollment.url.com>/enrollment in a web browser. Here, mdmenrollment.url.com is the fully qualified domain name for your Workspace ONE UEM MDM enrollment URL.
Like hub-based enrollment, web-based enrollment requires the end user to acknowledge and approve the device management.
Enrollment workflows
This section delves into the workflows associated with the previously mentioned enrollment methods. It outlines the prerequisites for each method and provides a high-level overview of the workflow itself. This section is not intended to be step-by-step instructional material but rather to offer an understanding of how the workflows function and the distinct differences between them. It categorizes the workflows into three types: user-initiated enrollment, single-user staging enrollment, and multi-user staging enrollment.
Prerequisites
You must meet the following prerequisites, before configuring any type of macOS enrollment workflow:
- To manage an Apple device with Workspace ONE UEM, you must generate an APNS certificate for your Workspace ONE UEM environment.
- Create a basic user account or directory user account to Workspace ONE UEM as enrollment ties a device to an enrollment user account.
- To correlate the logged-on macOS user to a directory-based user account, you must integrate Workspace ONE UEM with your Directory Service.
- To enable Device Enrollment integration, you must sign up for an Apple Business Manager (or Apple School Manager) account.
- To enroll devices using Apple Business Manager or Apple School Manager, you must perform the following:
User-initiated enrollment
As explained earlier, hub-based enrollment and web-based enrollment are both considered user-initiated enrollment types because the end user initiates the enrollment process either by downloading the Intelligent Hub app or visiting your Workspace ONE UEM MDM enrollment URL. User-initiated enrollments are most often associated with employee-owned devices (BYOD). Although it is possible to allow this type of enrollment for corporate-owned devices, it creates more risk in that this method relies on the end user not only performing the initial enrollment but also keeping the device enrolled. With user-initiated enrollment, the user has the option to unenroll the device at their leisure, placing corporate-owned devices at risk.
Enrollment with macOS Intelligent Hub
The hub-based enrollment process establishes a secure connection between the macOS device and your Workspace ONE UEM instance.
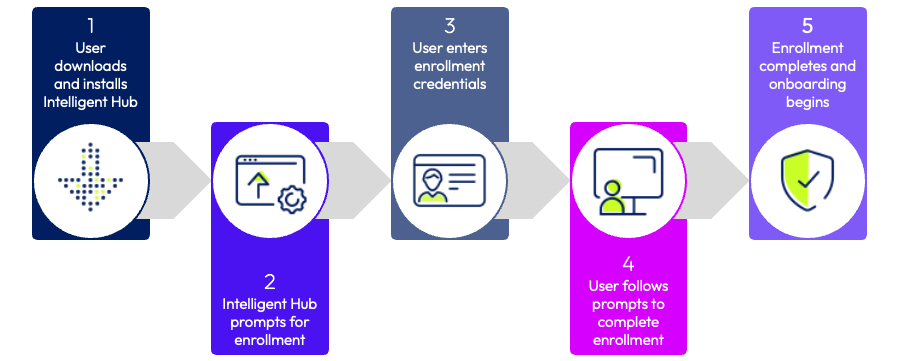
- To begin enrollment using the macOS Intelligent Hub, the end user must first download the Workspace ONE Intelligent Hub installer from https://getwsone.com.
Note: The macOS logged-on user must be an admin account on the macOS device. - Once installed on the macOS device, Intelligent Hub will launch automatically and prompt for enrollment.
- The end user will be asked for either the enrollment URL and Group ID or their email address.
Note: What the user needs to enter during enrollment will depend on how you have configured your Workspace ONE UEM instance. If you have enabled email autodiscovery, the end user can simply enter their email address. Otherwise, IT admins will need to supply the user with the enrollment URL and Group ID. For more information, see Autodiscovery Enrollment. - The user will follow the system prompts. Because this is a user-initiated enrollment, the end user will need to approve the installation of the MDM profile on the device by entering their username and password.
- The Intelligent Hub will notify the user when the enrollment is complete, and launch the Onboarding Experience UI, which displays the status of ongoing active tasks, such as profile and app installations.
Note: The Post-Enrollment Onboarding Experience must be enabled in Workspace ONE for the Onboarding Experience UI to be displayed. For more information, see Enable Post Enrollment Onboarding Settings.
Web-based enrollment
The web-based enrollment process is similar to the hub-based enrollment we discussed earlier. However, the key difference is that the end user initiates the enrollment process from a web browser, rather than starting it in Intelligent Hub.
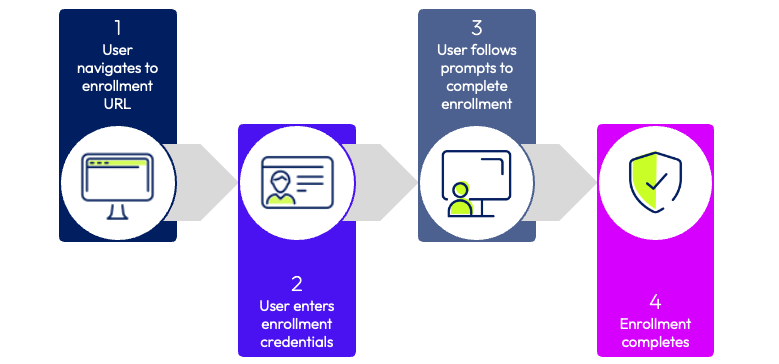
- To begin enrollment, the end user opens a web browser (i.e. Google Chrome or Safari) and navigates to
https://<mdmenrollment.url.com>/enrollmentin a web browser (wheremdmenrollment.url.comis the fully qualified domain name for your Workspace ONE UEM MDM enrollment URL).
Note: The macOS logged-on user must be an admin account on the macOS device. - The end user will be asked for either the enrollment URL and Group ID or their email address.
Note: What the user needs to enter during enrollment will depend on how you have configured your Workspace ONE UEM instance. If you have enabled email autodiscovery, the end user can simply enter their email address. Otherwise, IT admins will need to supply the user with the enrollment URL and Group ID. For more information about email autodiscovery, see Autodiscovery Enrollment. - The user will follow the system prompts. Because this is a user-initiated enrollment, the end user will need to approve the installation of the MDM profile on the device by entering their username and password.
- The web UI will notify the user when the enrollment process is complete.
Note: You can configure Workspace ONE Intelligent Hub to be automatically installed after web-based enrollment is complete. This can be configured under Groups & Settings > All Settings > Devices & Users > Apple > Apple macOS > Intelligent Hub Settings.
Single User Staging enrollment
IT administrators can prepare corporate-owned devices for a single user using device staging. This process involves loading a staging profile on a macOS device before assigning it to a user. Single User Staging supports both domain-bound and non-domain-bound macOS devices and allows user pre-registration in Workspace ONE UEM.
Pre-registration enables IT administrators to pre-assign a user to a device either manually or through a batch import process. Administrators don’t need to know the end user’s directory credentials to pre-register a macOS device. Once the user receives the device, they can log in using a known local macOS account.
This section covers the three most common scenarios in which single user staging enrollment can be used.
Prerequisites
The following steps need to be performed in Workspace ONE UEM for single user staging enrollment to work.
- Create a basic Workspace ONE UEM user account configured for Single-User Staging.
- Create a Device Enrollment Profile with the following options:
- Set Authentication setting to ON.
- Set Await Configuration to ENABLED.
- Set Account Setup to SKIP (as you are forcing the end-user to log in with network credentials).
- Set Create New Admin Account to YES and configure the Admin Account details.
Domain-bound web and Hub-based macOS enrollment
The following steps describe how to configure single-user staging for devices enrolling through the web or Intelligent Hub:
- Configure a macOS device profile with the Directory Payload assigned to your devices that must be staged.
- On your macOS device, create a local administrative macOS account.
- Log in to macOS using the local macOS account and follow one of the following two processes. When asked for credentials, use the staging account you created in the prerequisites.
- For Hub-based enrollment - Enrollment with macOS Intelligent Hub.
- For Web-based enrollment – Web-based Enrollment.
- To check if the device is domain bound, perform the following steps:
- Navigate to Terminal.app.
- Enter
id '<intended user's AD username>'.
The command returns information about the user.
- Log out of the local administrative macOS account.
- At the macOS Login window, the end-user must log in with their domain-based username and password.
Workspace ONE UEM assigns the device to the end user and begins sending profiles and apps that are assigned to the user.
Domain-bound macOS enrollment with Apple Business Manager
The following high-level process helps you to successfully configure single-user staging for devices enrolling with Apple Business Manager:
- Configure a macOS Device Profile with the Directory Payload assigned to your devices that should be staged.
- Note the Client ID field can be populated with a lookup value by clicking the [+] (plus sign). Ensure you choose a field that contains data allowable for a computer name (for example, conforms to NetBios Naming Restrictions for Microsoft Active Directory), such as {DeviceSerialNumber}.
- Unbox the macOS device and power it on. Then, navigate through the Setup Assistant and select the option to have the device managed by Workspace ONE UEM.
- Authenticate to Workspace ONE UEM using the user account configured for Single User Staging (created in the prerequisites).
- When the device enrolls during the Setup Assistant, the profile containing the directory payload will be installed during the Await Configuration phase. This binds macOS to your network-based directory service (such as Microsoft Active Directory).
- Any other profiles and apps assigned to the device using the assignment group are sent to the device.
- At the login window, ensure network accounts are available.
- Let the intended end-user log in with their domain-based username and password.
- Workspace ONE UEM assigns the device to the end user and begins sending profiles and apps that are assigned to the user.
Note: As a reminder, when the device is enrolled in the Single User Staging user, the logged-in user is not yet linked to the enrollment user. After the first network directory-based account logs in to the macOS device, Workspace ONE UEM associates the logged-in user with a user account in Workspace ONE UEM. Consequently, the newly created directory account becomes both the enrollment user and the managed user.
Important: Although it is possible to set the Authentication setting to OFF in your Device Enrollment profile, this is not recommended. This setting creates a potential security hole that would allow malicious actors to configure a virtual machine with a serial number of a device from your organization to obtain applications, certificates, and so on.
Non-domain macOS enrollment
When staging without domain binding, Workspace ONE UEM can only manage the local user who installs the enrollment profile. Apple’s MDM protocol stipulates that the MDM server will never receive requests from a local user other than the one who has installed the enrollment profile. Therefore, any staging scenario without domain binding must ensure that the local macOS user account that installs the enrollment profile is the same as the local macOS user account that the end user will be using.
IT administrators can pre-register devices either manually or through a bulk import process. This allows for the enrollment and assignment of the device without requiring the end user’s directory credentials. The user can then receive the device and log in with a local macOS credential provided by the IT administrators. Alternatively, devices can be pre-registered in Workspace ONE using Apple Business Manager enrollment. Additionally, a Workspace ONE UEM REST API is available to manage device-to-user assignments.
There are four options available to IT administrators for single user staging for non-domain bound macOS device enrollment. These options are:
- Hub/Web for Local Users with Pre-Registration
- Hub/Web for Local Users with API
- Apple Business Manager for Local Users with Pre-Registration
- Apple Business Manager for Local Users with API
The following sections delve into the four aforementioned options for single-user staging of non-domain macOS enrollment.
Hub/Web for Local Users with Pre-Registration
- Bulk Import the Device-to-User registration record within the Devices > Registration page:
- Click Add > Batch Import and use the Simple template and example for users and/or devices listed on the Batch Import page.
- Modify the sample CSV (starting in row 2 of the CSV template) by entering only the Username, FirstName, LastName, GroupID, Security Type (Directory or Basic), and DeviceSerial.
- Unbox the Mac and power it on. Proceed through the Setup Assistant as normal.
- Create a local, administrative macOS account as part of the Setup Assistant.
- Ensure the local macOS account created is the username you want to give the end-user of the machine.
- Log in to macOS as the local macOS account created during Setup Assistant.
- Enroll with macOS Hub using the Staging User credentials you created in the prerequisites of this section.
- When the device enrolls, Workspace ONE UEM assigns the device from the staging user to the user you specified in step 2 using bulk import.
- Any profiles and apps assigned to the enrollment user specified by bulk import are sent to the device when the local macOS user account you used in step 5 is logged in.
Hub/Web for Local Users with API Check-Out
The process of checking out a device to an enrollment user can be employed when the device-to-user assignments are not predetermined (for instance, devices stored in a depot and subsequently assigned to users). This is generally considered an advanced use case, where the code mentioned in step 4 is integrated into a larger onboarding workflow or a native application.
- Unbox the Mac and power it on. Proceed through the Setup Assistant as normal.
- Create a local, administrative macOS account as part of the Setup Assistant.
- Ensure the local macOS account created is the username you want to give the end-user of the machine.
- Log in to macOS as the local macOS account created during Setup Assistant.
- Enroll with macOS Intelligent Hub using the Staging User credentials you created in the prerequisites of this section.
- While logged in as the user that enrolled in step 3, call the Workspace ONE UEM Rest API to check-out the device to the correct enrollment user.
REST API Details:https://<API_Server>/api/help/#!/DevicesV2/DevicesV2_CheckOutDeviceToUser
PATCH /api/mdm/devices/{id}/enrollmentuser/{enrollmentuserid}
* {id} - AirWatch Device ID
* {enrollmentuserid} - AirWatch User ID
* Accept - application/json:version=2
- The API call is typically embedded in a workflow control application or script.
- Every time the end-user logs in with the username created during the Setup Assistant, Workspace ONE UEM considers that local macOS user the managed user and sends apps/profiles targeted to the enrollment user.
Note: The web-based enrollment flow is similar to agent-based, except that the admin would initiate their enrollment by navigating to https://<mdmenrollment.url.com>/enrollment in a web browser (where mdmenrollment.url.com is the fully qualified domain name for your Workspace ONE UEM MDM enrollment URL).
Apple Business Manager for Local Users with Pre-Registration
Configure single-user staging for local users with pre-registration using Apple Business Manager enrollment.
- In your Device Enrollment profile, set the following options:
- Authentication setting: OFF
- Staging Mode: Single User Device
- Default Staging User: Basic User
- Await Configuration: ENABLED
- Account Setup: DON'T SKIP
- Optionally, set Create New Admin Account to YES and configure Admin Account details for a hidden IT administrator account.
- Validate the device record has synced from Apple Business Manager:
- Navigate to Devices > Registration in the Workspace ONE UEM console and change the layout to Custom.
- Ensure the device to be staged has synced from Apple Business Manager.
- Ensure that Token Type is Apple Enrollment.
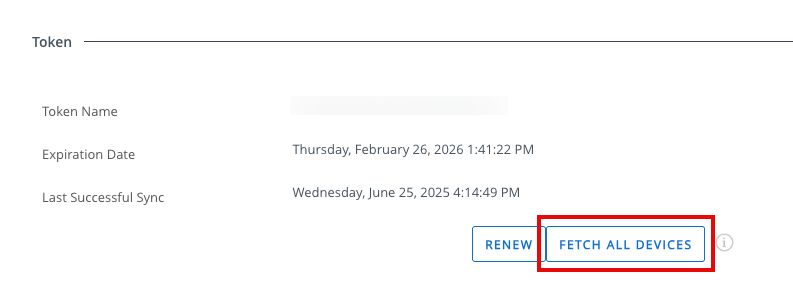
- If the device has no Token Type, navigate to Groups & Settings > All Settings > Devices & Users > Apple > Automated Device Enrollment and click Fetch All Devices.
- Validate the device record has the correct Device Enrollment profile:
- Navigate to Devices > Registration in the Workspace ONE UEM console and change the layout to Custom.
- Ensure that the Profile Name matches the profile you created in Step 1.
- If Profile Name is incorrect, select the check box next to the devices to be enrolled and navigate to More Actions > Assign Profile > select the profile you created in Step 1 > Save.
- Bulk import the Device-to-User registration record within the Devices > Registration:
- Click Add > Batch Import and use the simple template and example for users and devices listed on the Batch Import page.
- Modify the sample CSV by entering only the Username, FirstName, LastName, GroupID, Security Type (Directory or Basic), and DeviceSerial.
- Note: Devices can be manually added individually from the Enrollment Status page by clicking Add > Register Device and entering the same required information described above.
- Reload the Enrollment Status page and ensure that the device to be staged has a username assigned and still has a Token Type of Apple Enrollment.
- On your Mac device, proceed with the enrollment process in Setup Assistant and when the device enrolls, Workspace ONE UEM automatically assigns the device from the staging user to the user you specified using bulk import (enrollment user).
Apple Business Manager for Local Users with API
Configure single-user staging for local users with pre-registration using Apple Business Manager enrollment.
- In your Device Enrollment profile, set the following options:
- Authentication setting: OFF
- Staging Mode: Single User Device
- Default Staging User: Basic User
- Await Configuration: ENABLED
- Account Setup: DON'T SKIP
- Optionally, set Create New Admin Account to YES and configure Admin Account details for a hidden IT administrator account.
- Validate the device record has synced from Apple Business Manager:
- Navigate to Devices > Registration in the Workspace ONE UEM console and change the layout to Custom.
- Ensure the device to be staged has synced from Apple Business Manager.
- Ensure that Token Type is Apple Enrollment.
- If the device has no Token Type, navigate to Groups & Settings > All Settings > Devices & Users > Apple > Automated Device Enrollment and click Fetch All Devices.
- Validate the device record has the correct Device Enrollment profile:
- Navigate to Devices > Registration in the Workspace ONE UEM console and change the layout to Custom.
- Ensure that the Profile Name matches the profile you created in Step 1.
- If Profile Name is incorrect, select the check box next to the devices to be enrolled and navigate to More Actions > Assign Profile > select the profile you created in Step 1 > Save.
- Use the Workspace ONE UEM REST API to check out the device from the staging user to the correct enrollment user.
REST API details:https://%3CAPI\_Server%3E/api/help/\#!/DevicesV2/DevicesV2\_CheckOutDeviceToUser
PATCH /api/mdm/devices/{id}/enrollmentuser/{enrollmentuserid}
* {id} - Workspace ONE UEM
* {enrollmentuserid} - Workspace ONE UEM Enrollment User ID
* Accept - application/json:version=2
Multi-user staging enrollment
With multi-user staging, a macOS device is configured for use by more than one user. These devices are typically corporate owned and shared with multiple users, such as frontline shift workers in retail or healthcare. Device assignment in Workspace ONE UEM is dynamically changed as different network users log into the device.
Prerequisites
The following steps need to be performed in Workspace ONE UEM for multi-user staging enrollment to work.
Multi-user staging using Hub-based enrollment
The following high-level process helps you to successfully configure multi-user staging for devices enrolling without Apple Business Manager:
- Configure a macOS Device Profile with the Directory Payload assigned to your devices that should be staged.
- Note the Client ID field can be populated with a lookup value by clicking the [+] (plus sign). Ensure you choose a field that contains data allowable for a computer name (for example, conforms to NetBios Naming Restrictions for Microsoft Active Directory), such as
{DeviceSerialNumber}.
- Note the Client ID field can be populated with a lookup value by clicking the [+] (plus sign). Ensure you choose a field that contains data allowable for a computer name (for example, conforms to NetBios Naming Restrictions for Microsoft Active Directory), such as
- Unbox the macOS device and power it on, then proceed through the Setup Assistant as normal.
- Create a local, administrative macOS account as part of the Setup Assistant.
- Log in to macOS as the local macOS account created during Setup Assistant.
- Enroll with macOS Hub using the Staging User credentials you created in the prerequisites.
- When the device enrolls, the profile containing the directory payload is installed. This binds macOS to your network-based directory service (such as Microsoft Active Directory).
- Any other profiles and apps assigned to the device using assignment group are sent to the device.
- Validate the device is domain bound:
- Open Terminal.app.
- Enter the command
id <intended user's AD username>and ensure the command returns information about the user.
- Log out of the local, administrative macOS account.
- At the login window, let the intended end-user log in with their domain-based username and password.
- Workspace ONE UEM assigns the device to the end user and begins sending profiles and apps which are assigned to the user.
- Log out of the domain-based user, and log-in with another domain-based user.
- Workspace ONE UEM assigns the device to the new end user and begins sending profiles and apps which are assigned to the new user (if different from the previously logged-in user).
Multi-user staging using Apple Business Manager
The following high-level process helps you to successfully configure multi-user staging for devices enrolling with Apple Business Manager:
- In your Device Enrollment Profile, set the following options:
- Set Authentication setting to ON.
- Set Await Configuration to ENABLED.
- Set Account Setup to SKIP (as you are forcing the end-user to log in with network credentials).
- Set Create New Admin Account to YES and configure Admin Account details.
- Configure a macOS Device Profile with the Directory Payload assigned to your devices that should be staged.
- Note the Client ID field can be populated with a lookup value by clicking the [+] (plus sign). Ensure you choose a field that contains data allowable for a computer name (for example, conforms to NetBios Naming Restrictions for Microsoft Active Directory), such as
{DeviceSerialNumber}.
- Note the Client ID field can be populated with a lookup value by clicking the [+] (plus sign). Ensure you choose a field that contains data allowable for a computer name (for example, conforms to NetBios Naming Restrictions for Microsoft Active Directory), such as
- Unbox the macOS device and power it on, then proceed through the Setup Assistant as normal.
- Authenticate to Workspace ONE UEM using the user account configured for Multi-User Staging (from prerequisites).
- When the device enrolls during the Setup Assistant, the profile containing the directory payload is installed during the Await Configuration phase. This binds macOS to your network-based directory service (such as Microsoft Active Directory).
- Any other profiles and apps assigned to the device using the assignment group are sent to the device.
- At the login window, let the intended end-user log in with their domain-based username and password.
- Workspace ONE UEM assigns the device to the end user and begins sending profiles and apps that are assigned to the user.
- Log out of the domain-based user and log in with another domain-based user.
- Workspace ONE UEM assigns the device to the new end user and begins sending profiles and apps which are assigned to the new user (if different from the previous logged-on user).
Note: As a reminder, when the device is enrolled with the multi-user staging user, it is currently checked out to that user. After the first network directory-based account logs in to the Mac, Workspace ONE UEM associates the logged-in user with a user account in Workspace ONE UEM. This is reflected in the Workspace ONE UEM console, where the device is assigned to the network-based user. The new directory account becomes both the enrollment user (in Workspace ONE UEM) and the managed user (in macOS). A subsequent network logout and login event re-assigns the device to the new enrollment user (in Workspace ONE UEM) and begins managing the newly logged-in macOS user (the managed user).
Summary and additional resources
This tutorial discussed the different enrollment workflows available in Workspace ONE UEM and provides IT administrators with the knowledge required to make informed decisions about macOS device onboarding. The following topics were presented:
- Enrollment user types
- Overview of enrollment workflows
- Hub-based enrollment
- Web-based enrollment
- Staging enrollment
- Automated enrollment
For more operational tutorials on using macOS with Workspace ONE UEM, check out the Omnissa Tech Zone.
Additional resources
You may also wish to read these additional operational tutorials from macOS on Omnissa Tech Zone.
- Configuring Basic macOS Management
- Managing Updates with the macOS Updater Utility
- Distributing Scripts to macOS Devices
- Deploying a Third-Party macOS App
Changelog
The following updates were made to this guide:
| Date | Description of Changes |
| 12/3/2025 |
|
| 06/18/2024 |
|
| 11/13/2023 |
|
| 03/30/2019 |
|
About the author and contributors
The latest version of this tutorial was written by:
- Michael Bradley, Senior Product Specialist, Omnissa.
This tutorial was originally written by:
- Robert Terakedis, Omnissa alumni.
Questions and Feedback
For questions or feedback, send to tech_content_feedback@omnissa.com.