Enforcing macOS Security Compliance Project Baselines with Workspace ONE
Overview
The macOS Security Compliance Project (mSCP) is a collaborative effort between the National Institute of Standards and Technology (NIST), National Aeronautics and Space Administration (NASA), Defense Information Systems Agency (DISA), and Los Alamos National Lab (LANL). The project’s objective is to develop and maintain security guidance that can be used by organizations that require adherence to specific security compliance frameworks and policies. By taking a programmatic approach, the project leverages a library of rules designed to enhance security by mapping said rules to existing security guides and policies. This method allows for the accelerated updating of security guidance through unified standards.
The goal of the project is to provide the necessary files an IT admin would need to secure macOS. The rules and baselines included in the mSCP are written in YAML and can be parsed using Python scripts. The resulting output is a customized set of guides that contain the rule files needed for implementation.
With Omnissa Workspace ONE UEM, IT admins can utilize the mSCP to create and enforce desired security baselines for managed macOS devices. This tutorial will detail how to generate a baseline from the mSCP and deploy the baseline using Workspace ONE UEM.
To learn more about the macOS Security Compliance Project, see the mSCP wiki.
Purpose of this tutorial
This tutorial will guide you through the process of creating, deploying, and enforcing a baseline security profile from the macOS Security Compliance Project. The following processes will be discussed:
- Required prerequisites for using the macOS Security Compliance Project.
- Creating a security baseline for macOS.
- Deploying the baseline using Workspace ONE UEM.
- Configuring automated remediation of the security baseline.
- Checking the baseline status on devices.
Audience
This operational tutorial is intended for IT professionals and Workspace ONE administrators of existing production environments.
Both current and new administrators can benefit from using this tutorial. Familiarity with macOS, XML, and basic scripting is assumed.
Knowledge of additional technologies such as Omnissa Intelligence and Workspace ONE® UEM is also helpful.
Prerequisites
Several tasks need to be performed before you can proceed with generating and deploying an mSCP Security baseline to your macOS devices. This section will outline the prerequisites required to complete this tutorial. The required prerequisites are as follows:
- macOS device – This device will be used for generating the security baseline. During the most recent update of this tutorial, macOS Sequoia (15.3) was used to validate each step.
- Download the required modules from the mSCP repository – These modules contain all of the files required for generating baselines. These should be downloaded to the macOS device listed previously.
- Install the Workspace ONE Admin Assistant tool – This tool is used to package the mSCP compliance script as an application that can be imported into Workspace ONE.
- Install and Configure the Workspace ONE mobileconfig Importer tool – This tool is used to import the PLIST audit file to create the required device profile.
The following sections will guide you through the tasks to perform each of the prerequisites. These are required to complete the other tasks discussed in this tutorial.
Download the required modules from the mSCP repository
To begin, you must clone the mSCP repository to your macOS device. To get the desired result, perform the following steps:
- On your macOS device, open Finder, and select Applications. Click the Utilities folder. Launch Terminal.
- Enter the following command and press Enter.
git clone https://github.com/usnistgov/macos_security.git
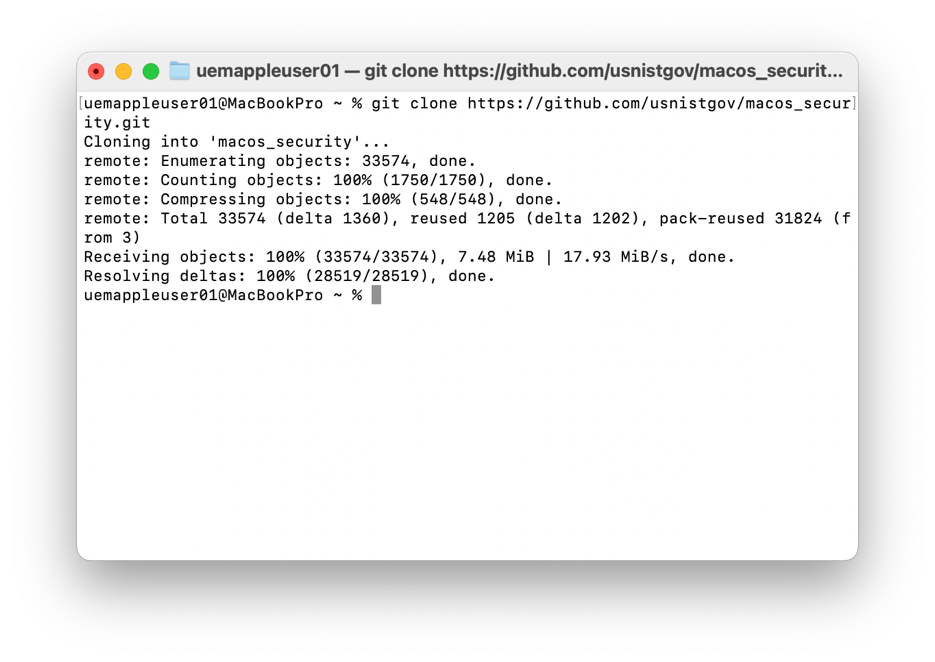
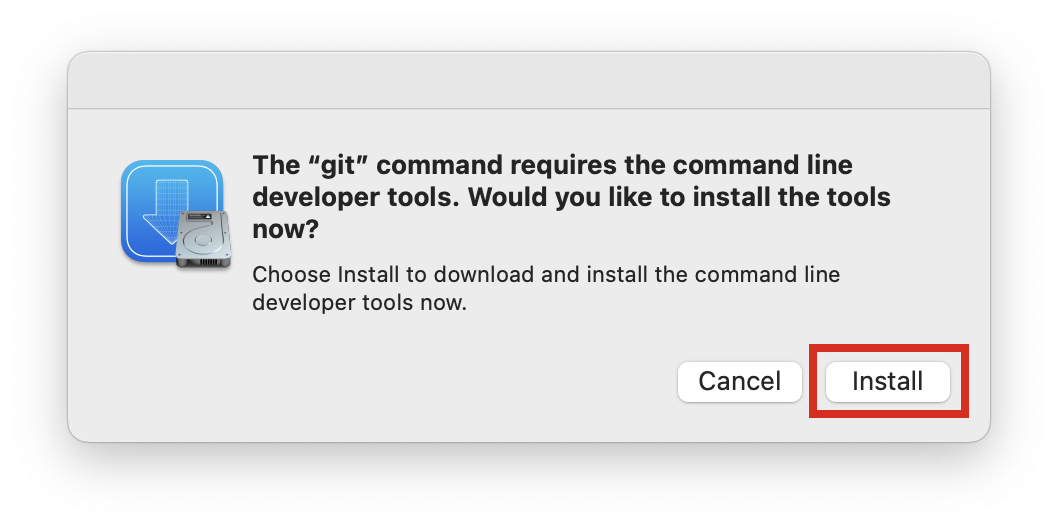
NOTE: You may receive a message stating that “No developer tools were found, requesting install.” If you do, click Install in the pop-up window to download and install the “git” command line developer tools.
- Change to the
macos_securitydirectory using the following command.
cd macos_security
- Now, you will install the required Python3 modules. Enter the following command into Terminal.
pip3 install -r requirements.txt --user
- Enter the following command into Terminal to install the required Ruby gems.
bundle install --binstubs --path mscp_gems
Install the Workspace ONE Admin Assistant tool
In this exercise, you will download and install the Workspace ONE Admin Assistant Tool. You will use this tool later in this tutorial to package the mSCP compliance script.
To get the desired result, perform the following steps:
- On a macOS device, launch an Internet browser (i.e. Safari, Chrome, or Firefox).
- Navigate to the Omnissa Workspace ONE Admin Assistant Tool download website.
At the time of this document’s creation, the URL for the website was: https://customerconnect.omnissa.com/downloads/info/slug/desktop_end_user_computing/omnissa_workspace_one_admin_assistant/latest.
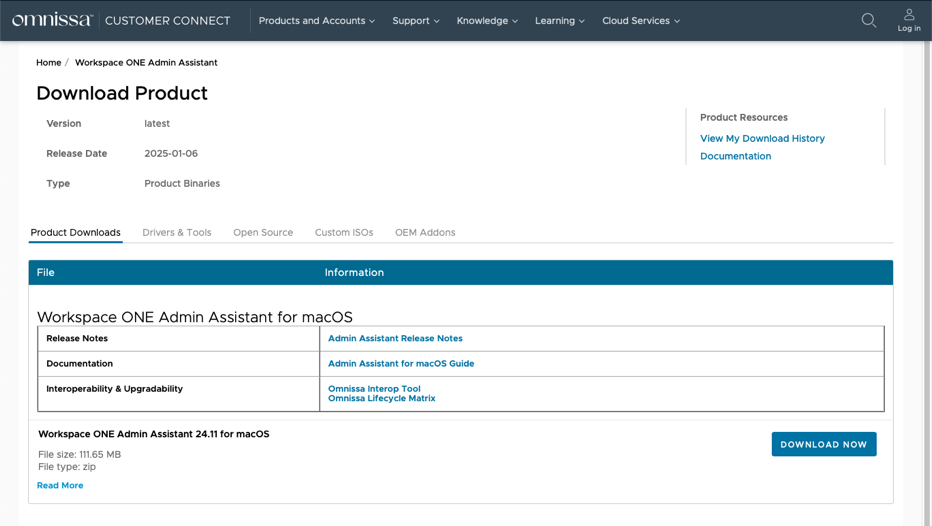
- Click Download Now.
NOTE: You might be required to log into Omnissa Customer Connect.
- Launch the downloaded DMG file and double-click the Omnissa Workspace ONE Admin Assistant package file.
- Accept the default options for installation and install the application on your macOS device.
Install and configure the Workspace ONE mobileconfig Importer
In this exercise, you will download and configure the Workspace ONE mobileconfig Importer Tool. You will use this tool later in this tutorial to create the required audit device profile.
NOTE: The Workspace ONE mobileconfig Importer is an unsupported tool provided “as-is” with no guarantees that it will be error-free or compatible with future version of Workspace ONE UEM.
To get the desired result, perform the following steps:
- On a macOS device, launch an Internet browser (i.e. Safari, Chrome, or Firefox).
- Navigate to the Workspace ONE mobileconfig Importer download website. Click the Download Raw File icon to download the Workspace ONE mobileconfig Importer.

- Once downloaded, navigate to the download location, and launch the tool by double-clicking the icon. In the menu bar, click Workspace ONE mobileconfig Importer and select Settings.
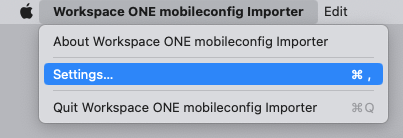
- You need to configure the API Settings so that the importer can communicate with your Workspace ONE UEM instance. Enter all the required information and click Test Connection.
| Field | Description |
| URL | This is the REST API URL for Workspace ONE UEM. You can find this in your Workspace ONE UEM console under Groups & Settings > All Settings > System > Advanced > API > REST API. NOTE: Remove the |
| Key | This is the API key, which can be found in the Workspace ONE UEM console under Groups & Settings > All Settings > System > Advanced > API > REST API. You may use an existing one or create a new API key specifically for the mobileconfig Importer. |
| Username | The username of a Workspace ONE UEM administrator account that has REST API permissions. You can use an existing administrative account or create one specifically for the mobileconfig Importer. To learn what permissions are required to use the REST API, please see Create a Role That Can Use REST APIs in the Workspace ONE UEM product documentation. |
| Password | This is the password for the account mentioned above. |
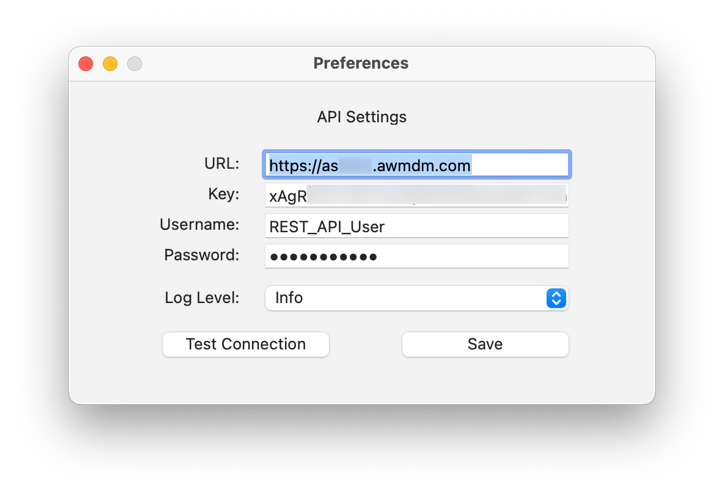
Note: You can find the API URL and the API Key in your Workspace ONE UEM console under Settings > System > Advanced > API > REST API. The user must be a UEM administrator account.
- Click Save.
Creating a security baseline for macOS
The mSCP provides baseline files to support the following U.S. Federal published guidelines:
- NIST 800-53 (Low, Medium, and High)
- DISA-STIG
- NIST-800-171
- CNSSI 1253
- CIS (Level 1 and Level 2)
- CIS Controls V8
For this tutorial, you will work with the CIS Level 1 baseline. The process documented in this tutorial can be applied to the other baselines as required.
There are two specific steps to creating a security baseline from the mSCP files. The first step is to generate a baseline. In the case of the mSCP, there are already several baselines created that align with the above-mentioned list. You do have the option to customize any of these baselines or use them as they are currently configured.
The second step is to generate guidance, which creates the necessary profiles, scripts, and files (AsciiDoc, HTML, and PDF) required to deploy the baseline in Workspace ONE UEM.
Generate a baseline
If you plan to create your own baseline or modify an existing one, you use the generate-baseline.py command to generate the baseline YAML files. Because you will use an existing baseline in this tutorial, there is no need to generate a new one. For this exercise, you only use this command to list all the available baselines from the mSCP.
- If you are not already in Terminal, open Finder, and select Applications. Click the Utilities folder. Launch Terminal.
- Change to the
macos_securitydirectory by entering the following command:
cd macos_security
- In Terminal, list the available baselines using the following command:
./scripts/generate_baseline.py -l
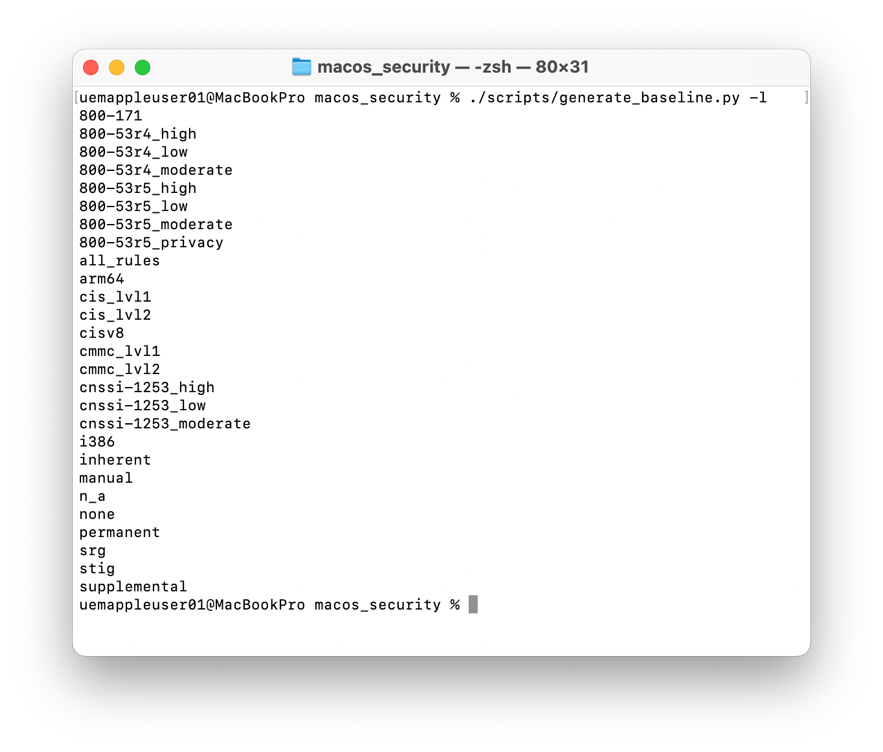
- You will see a list of all the available default baselines. For this tutorial, you will use the
cis_lvl1baseline.
Understand the rules YAML format
The mSCP provides a library of YAML files that map to specific compliance requirements as outlined in various security guides and policies. The YAML files are found in the rules folder and can be viewed and edited in most code editors (such as Xcode or BBEdit). Each file is broken down into specific fields that contain key information required for generating and deploying a security baseline to macOS devices. These fields are pre-populated with the appropriate configurations. The following table outlines the purpose of each field.
| Field | Description |
| id | This is the name of the rule. It should match the name of the YAML file without the yaml file extension. For example, if the file name is |
| title | This is the title of the rule in a human-readable format. For example, |
| discussion | This field is used for documenting the specific rule. It can be used to document the intended use of the rule, as well as any additional notes about the control to which the rule relates. |
| check | Every rule should have a mechanism for validating and checking that the rule is applied. This is usually a shell-based check. |
| result | This is the expected result for the check configured in the previous field. This is typically |
| fix | This field documents the method to be used to remediate the rule if the expected result listed above is not met. If this field contains a shell-based command, the fix will be included in the compliance script. |
| references | This field contains the Common Configuration Enumeration (CCE) and mappings to the specific security frameworks, guidance, and controls to which this rule is mapped. For more information about the Common Configuration Enumeration, see https://ncp.nist.gov/cce. |
| macOS | This is the version of macOS on which the rule has been validated. |
| tags | Tags are used to help categorize and identify the baseline(s) into which a rule falls. However, this can also be used to provide additional information to make the rules easier to search for when using index-based searching. |
| mobileconfig | A |
| mobileconfig_info | This contains information required for creating the mobileconfig configuration profile. This must be populated if |
Although these fields are pre-configured in each rule file, having an understanding of what each value means will be helpful for IT admins who must make modifications to the mSCP baselines to align with specific organizational policies.
Generate guidance
Generating guidance from the YAML file creates the necessary profiles, scripts, and files (AsciiDoc, HTML, and PDF) to deploy in Workspace ONE UEM. To generate guidance, you will utilize the generate_guidance.py command.
- If you are not already in Terminal, open Finder, and select Applications. Click the Utilities folder. Launch Terminal.
- Change to the
macos_securitydirectory by entering the following command:
cd macos_security
- Generate guidance by entering the following command:
./scripts/generate_guidance.py -p -s baselines/cis_lvl1.yaml
The addition of the -p flag within the command generates the necessary configuration profiles and PLIST files needed for deployment with Workspace ONE UEM.
The -s flag will generate a script that can be used for compliance checking.
- When the command completes, open Finder and browse to the
macos_securitydirectory. If you used the default options, the folder should be in the current logged in user’s home folder. Then click theBuildfolder. You should see a new folder calledcis_lvl1.
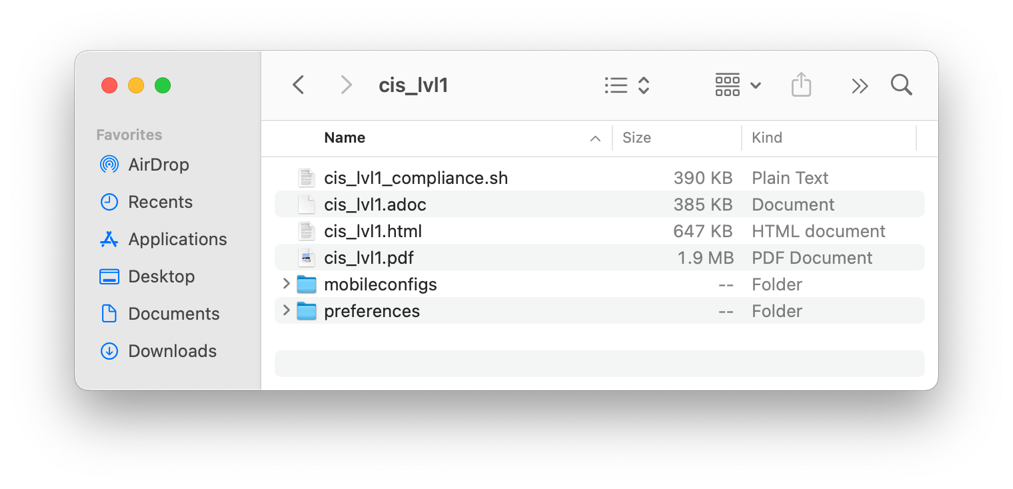
- You will see a list of all the available default baselines. You now have all the files required to deploy with Workspace ONE UEM.
Customize a baseline
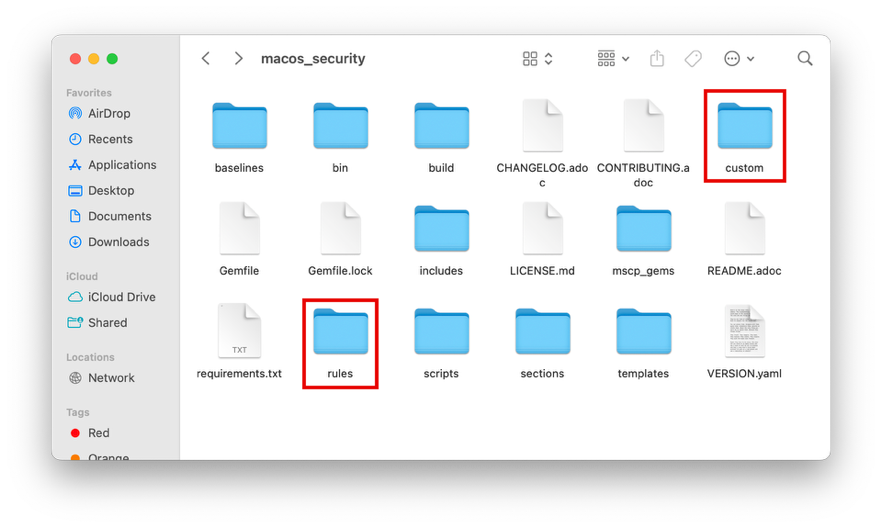
Although you will not be customizing a baseline in this tutorial, it is important to understand how to make changes to the existing baselines to meet your organization’s specific requirements. The process for customization requires that you make a copy of the existing rule file and only customize the required fields. Rule files are found in the rules folder.
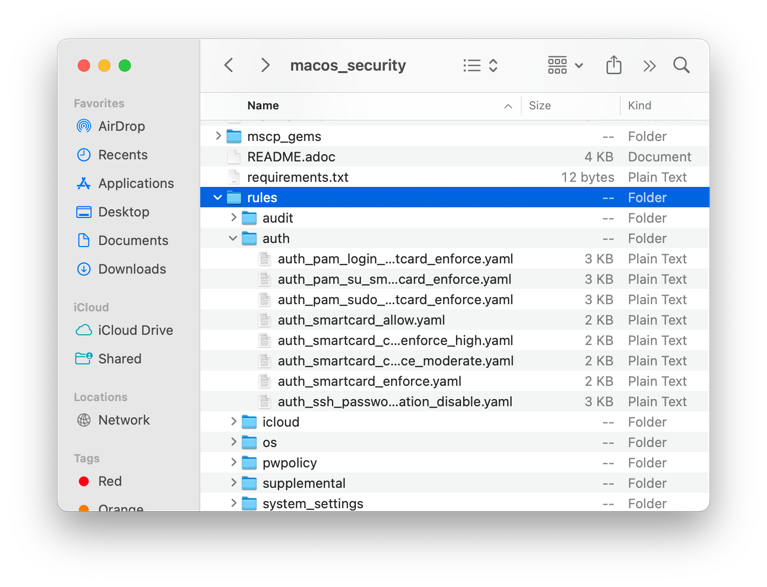
- To modify an existing rule, you will start by copying the existing rule file from the rules folder into the custom folder.
Note: Do not change the file name. The file name must be the same as the original file.
- Right-click the YAML file and select Open With.
- Select your script editor (such as BBEdit or Xcode).
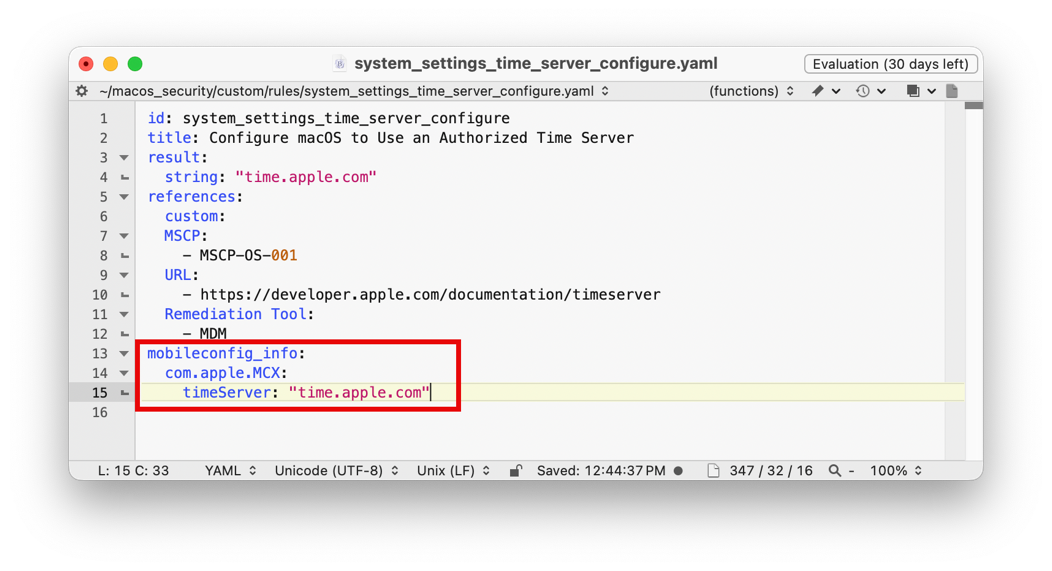
- To customize the rule, remove any fields from the YAML file that you don’t need to modify. Then, modify the fields that need to be set to meet your organization’s policies. In the next screenshot, you will see the rule file
system_settings_time_server_configure.yamlopen in BBEdit. In this example, you will notice that the time server has been set totime.apple.com.
In the following screenshot, com.apple.MCX represents the payload type as defined by Apple. The payload property called timeServer is a string defined by Apple to represent the NTP server to which the macOS device should connect.
You can learn more about the various payloads and properties available from Apple at: https://developer.apple.com/documentation/devicemanagement.
- After you have completed the necessary edits, save the file. Then, follow the steps in Generate guidance to create the necessary files for the baseline.
For more information on modifying the YAML files, see the macOS Security Compliance Project wiki.
Deploying baselines using Workspace ONE UEM
After you have generated the baseline files, you will use them to create the security baseline within Workspace ONE UEM. There are three distinct components to a security baseline for macOS devices. Let’s discuss each component individually.
Profiles
The command you executed earlier to generate guidance creates an audit PLIST file and a series of mobileconfig files that are used to create profiles within Workspace ONE UEM. The audit PLIST file is located in the ../build/{baseline}/preferences directory. You use this file to set exemptions to rules based on your company policies. Each mobileconfig file contains the required parameters for creating each configuration profile.
Scripts
The compliance script is used to validate and remediate your managed macOS devices. When executed, the script utilizes the PLIST file from the previous section to determine what rules have been exempt. This script can be found in ../build/{baseline}/{baseline}_compliance.sh. You will package this script as an app and import it into Workspace ONE to be deployed to your managed devices.
Sensors
Workspace ONE UEM sensors will be used to run the compliance scan periodically as well as collect data from your devices. Although there are numerous data points available for collection, for this tutorial you will collect the following data:
- Non-compliant rule count
- Last compliance scan/date
Note: For customers who are running an older version of Workspace ONE UEM that does not support the Sensors resource, the compliance script can be executed using Custom Attributes profiles. This tutorial will not cover this option.
Create the mSCP audit profile in Workspace ONE UEM
Start by creating the required audit file device profile. The audit file is used to set exemptions to rules based on your company policies. You will create a macOS device profile using the contents of the PLIST audit file.
To create the audit file, perform the following steps:
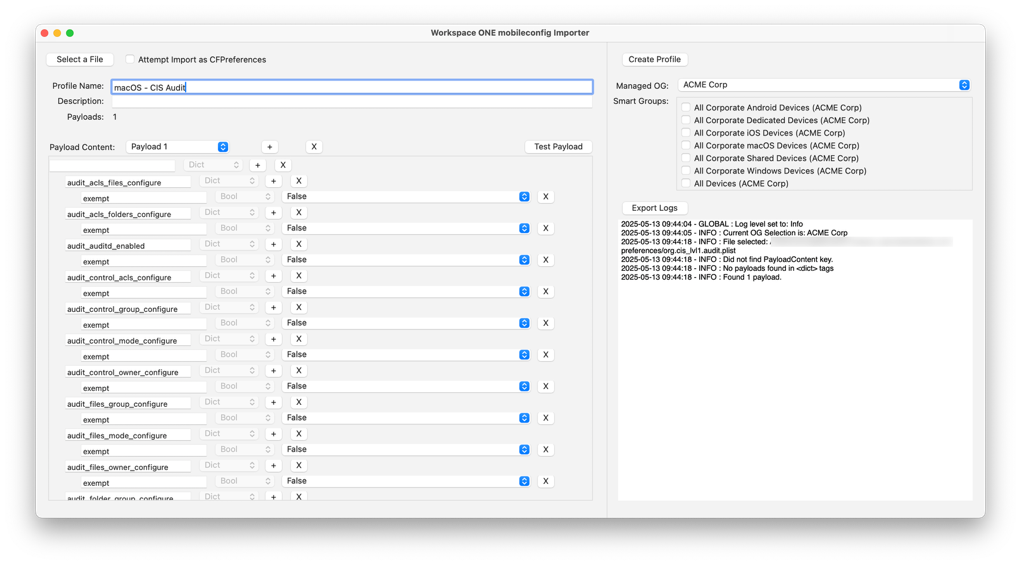
- Launch the Workspace ONE mobileconfig Importer.
- Click Select a File and navigate to the PLIST audit file in the
../build/{baseline}/preferencesdirectory. Click Open. - Enter macOS – CIS Audit for the profile name.
- Click Create Profile.
- On your desktop, launch an Internet browser (i.e. Safari, Google Chrome, Firefox).
- Navigate to the Omnissa Workspace ONE UEM Console.
For example, navigate to: https://<WorkspaceONEUEMHostname> where WorkspaceONEUEMHostname is the host name of the Workspace ONE UEM console.
- Enter your Username, for example,
administrator. - Click Next. The Password text box is displayed.
- Enter your Password, for example,
Omnissa1!. Click Login.
Note: If you see a Captcha, be aware that it is case-sensitive.
- In the Workspace ONE UEM console, select Resources, and then click Profiles & Baselines.
- Select Profiles.
- From the list of profiles, click the pencil icon next to the macOS – CIS Audit profile.
- At the bottom of the screen, click Add Version.
- Scroll down the list of payloads until you find Custom Settings. Expand the payload until you see the XML in the text box.
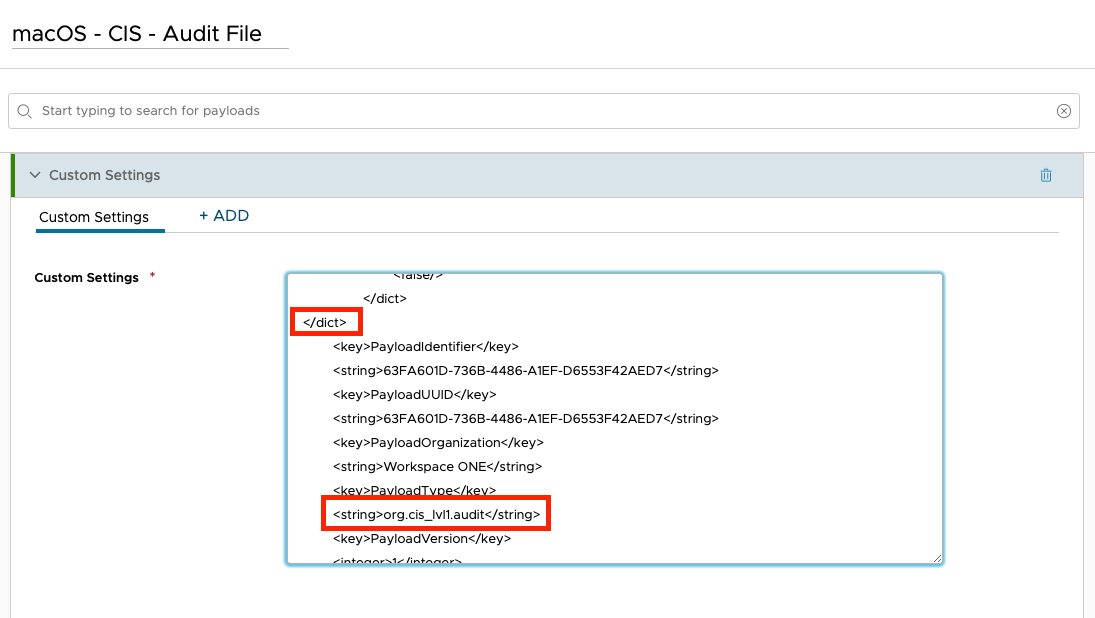
- Remove the first
<dict>tag from the XML. - Scroll toward the bottom of the XML and delete the
</dict>tag from the line before<key>PayloadIdentifier</key>. - Edit the string for
<key>PayloadType</key>from<string>com.apple.managedClient.preferences</string>to<string>org.cis_lvl1.audit</string>.
- Click Next.
- Select one or more smart groups to which you want to assign the profile.
- Click Save & Publish.
Deploy the mSCP profiles to Workspace ONE UEM
You will now deploy the mobileconfig files into Workspace ONE UEM. These files will create the device profiles that are required for the baseline.
To get the desired result, perform the following steps:
- In the Workspace ONE console, click Resources. Then expand Profiles & Baselines, and select Profiles.
- Click Add, then select Upload Profile.
- Select macOS.
- Select Device Profile.
- Click on Upload.
- Select Choose File.
- Navigate to
../build/{baseline}/mobileconfigs/unsignedand select the first mobileconfig file in the list. Click Upload. - Click Save.
- Click Continue.
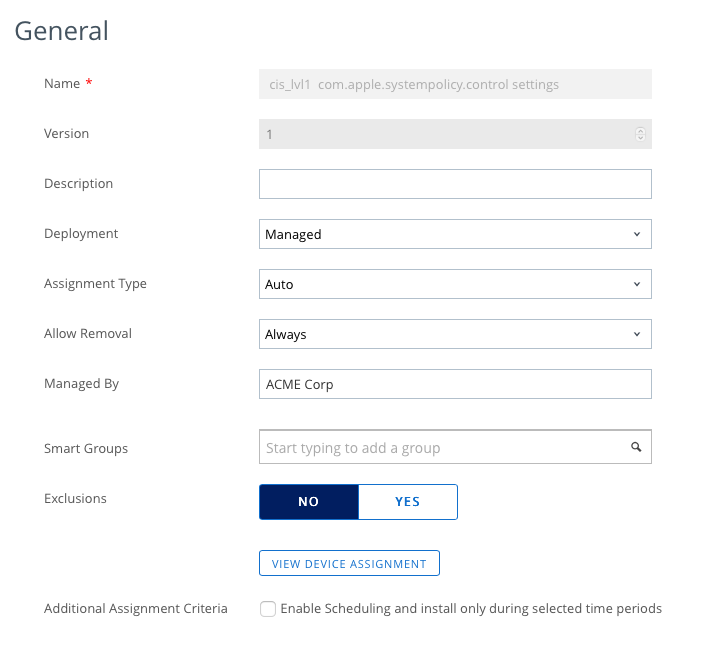
- Configure the General Settings as follows:
- Deployment – Managed
- Assignment Type – Auto
- Allow Removal – Never
- Select one or more smart groups to which you want to assign the profile.
- Click Save & Publish.
- You will repeat steps 6 through 14 for each mobileconfig file in the folder. In the case of this exercise, there are 14 profiles for the CIS Level 1 baseline.
Configure the mSCP compliance script in Workspace ONE UEM
In this exercise, you configure the mSCP compliance script in Workspace ONE UEM. This script scans devices, remediates any compliance issues, and reports compliance statistics. You package the script and deploy it as an Internal App in Workspace ONE UEM.
To get the desired result, perform the following steps:
- Select the Finder icon on the dock.
- Create a new folder with the script's intended function in the location of your choice. In this example, the package folder structure is located in
~/Desktop/cis_lvl1. - Create the necessary folder structure for the package as shown in the next screenshot.
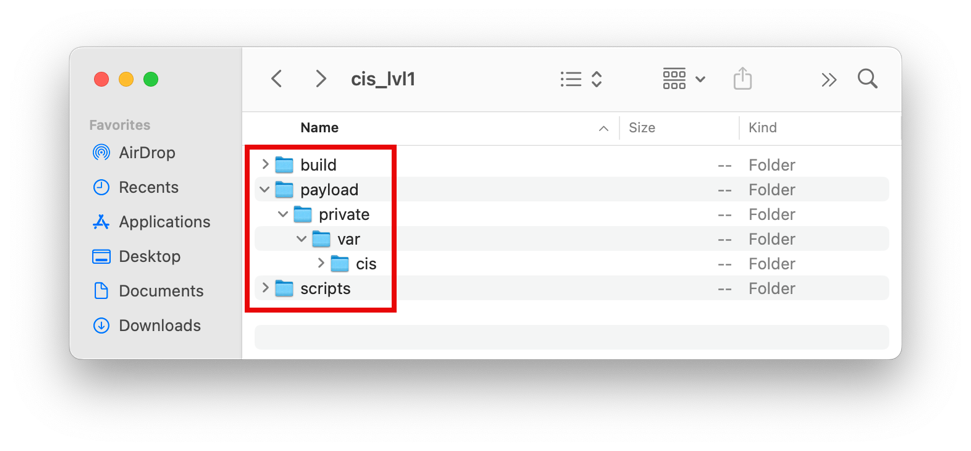
- Copy the compliance script into the new
cisfolder you just created. In Finder, navigate to./macos_security/build/cis_lvl1/. Copy the{baseline}_compliance.shfile to thecisfolder you created in the previous step. - If you are not already in Terminal, open Finder, and select Applications. Click the Utilities folder. Launch Terminal.
- Change to the
cisdirectory by entering the following command:
cd desktop/cis_lvl1
- Now you will build a package. Enter the following command into Terminal. Enter the administrative password if prompted.
pkgbuild --install-location / --identifier “<package_identifier>” --version “<package_version>” --root <package_root_directory> --scripts <package_scripts_directory> <output_package_name>
Note: In the pkgbuild command line, supply the following modified values as appropriate (bolded in the previous command line):
<package_identifier> - Generally in the format of com.<company>.<script purpose>. For this example, you will use com.omnissa.cisbaseline.
<package_version> - The version of the package being deployed. For this example, you will use 1.0
<package_root_directory> - Filesystem location of the payload folder. For this example, you will use ./payload.
<package_script_directory> - Filesystem location of the scripts folder. For this example, you will use ./scripts.
<output_package_name> - Filesystem location and name of the built package. For this example, you will use ./build/CISbaseline.pkg.
- Launch the Workspace ONE Admin Assistant located in your Applications folder.
- Drag and drop the PKG file you created in step 7 into the Admin Assistant tool. When the tool has finished parsing, click the folder icon next to the listed PKG file.
Note: The default location for all packages created by the Workspace ONE Admin Assistant is ./Documents/Workspace ONE Admin Assistant.
- Now, upload the newly created package to Workspace ONE UEM.
- In the Workspace ONE UEM console, select Resources. Then select Apps.
- Select Native Apps, and then click Internal.
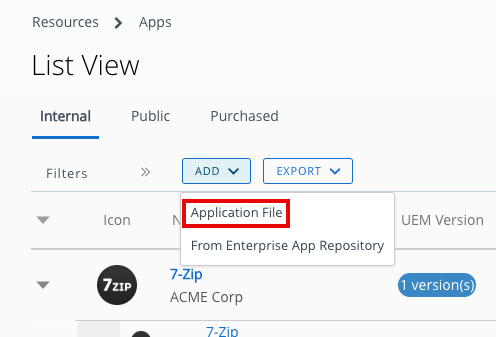
- From the Add drop-down menu, select Application File.
- Click Upload and select Choose File. Navigate to the folder that was created by the Workspace ONE Admin Assistant. Choose the PKG file and click Upload.
- Click Save.
- After the upload has completed, click Continue.
- To upload the metadata file, click Upload and select the PLIST file from the same folder. Click Save.
- After the upload has completed, click Continue.
- Click Scripts.
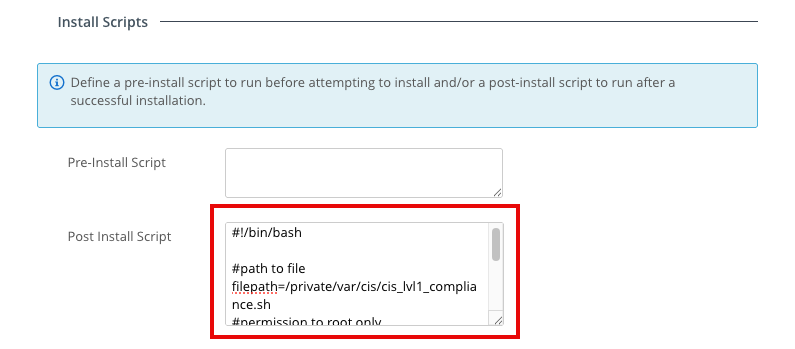
- Under Install Scripts, paste the following script sample into the Post Install Script window.
#!/bin/bash

#path to file
filepath=/private/var/cis/cis_lvl1_compliance.sh
#permission to root only
chmod 000 $filepath
#make hidden
chflags hidden /private/var/cis
chflags hidden $filepath

exit 0
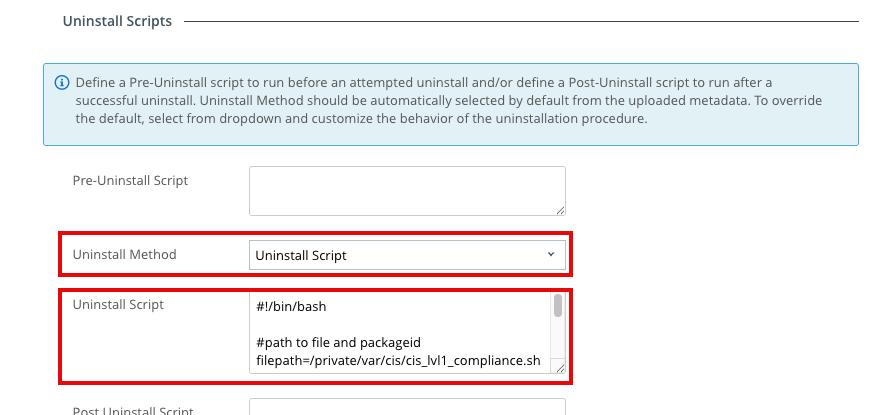
- Under Uninstall Scripts, change the Uninstall Method to Uninstall Script.
- Paste the following script sample into the Uninstall Script window.
#!/bin/bash

#path to file and packageid
filepath=/private/var/cis/cis_lvl1_compliance.sh
pkgid=com.vmware.cisbaseline

rm -rf $filepath
/usr/sbin/pkgutil --forget $pkgid

exit 0
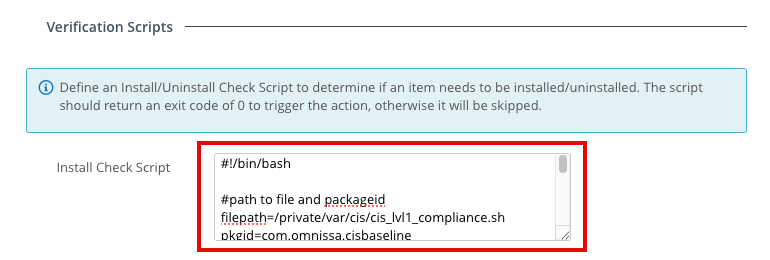
- Under Verification Scripts, paste the following script sample into the Install Check Script window.
#!/bin/bash

#path to file and packageid
filepath=/private/var/cis/cis_lvl1_compliance.sh
pkgid=com.omnissa.cisbaseline

# version of baseline being deployed - correlates to receipt version in munki plist
target_version=1.0

# Check if baseline script is installed first
if [ -f $filepath ]; then

  #convert version number to individual
  function version { echo "$@" | /usr/bin/awk -F. '{ printf("%d%03d%03d%03d\n", $1,$2,$3,$4); }'; }

  # Grab current CIS Baseline version installed via pkg receipt
  current_version=$(/usr/sbin/pkgutil --pkg-info $pkgid | /usr/bin/grep version | /usr/bin/awk '{print $2}')
  echo CIS Baseline current version: $current_version

  # Compare with the version we are expecting
  if [ $(version $current_version) -lt $(version $target_version) ]; then
    # version installed is not current
    echo CIS Baseline not installed
    exit 0
  else
    # version installed is current or newer
    echo CIS Baseline is installed
    exit 1
  fi

else
  # baseline is not installed - need to install
  echo CIS Baseline not installed
  exit 0
fi
- Click Save & Assign.
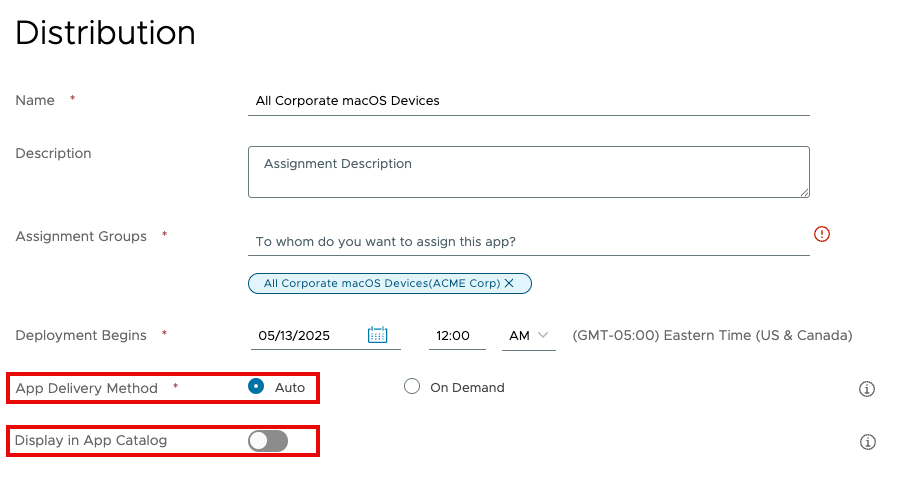
- Enter a name for the assignment. For example,
All Corporate macOS Devices. - Click in the Assignment Group section and select an assignment group. The selected group appears underneath the text box.
- Select a time and date to begin the deployment if you do not want to begin immediately.
- Select Auto to deliver the app automatically.
- Deactivate Display in App Catalog.
- Click Create.
- If additional assignments are required, click Add Assignment and repeat the process you just stepped through. When all assignments have been created, click Save.
- Click Publish.
Configure compliance sensors in Workspace ONE UEM
You will use sensors in Workspace ONE UEM to trigger the compliance scan on a periodic basis. In this exercise, you configure the sensors to run every four (4) hours. However, when implementing this in your production environment, you can configure whatever duration is required by your organization’s security policies.
There are two data points collected by the sensors.
- Non-compliant rule count
- Last compliance scan date/time
These values will be displayed in the Sensors tab under the device Details View.
To get the desired result, perform the following steps:
- In the Workspace ONE UEM console, select Resources. Then select Sensors.
- Click Add and select macOS from the drop-down menu.
- Enter cis_compliancescan for the sensor name. Click Next.
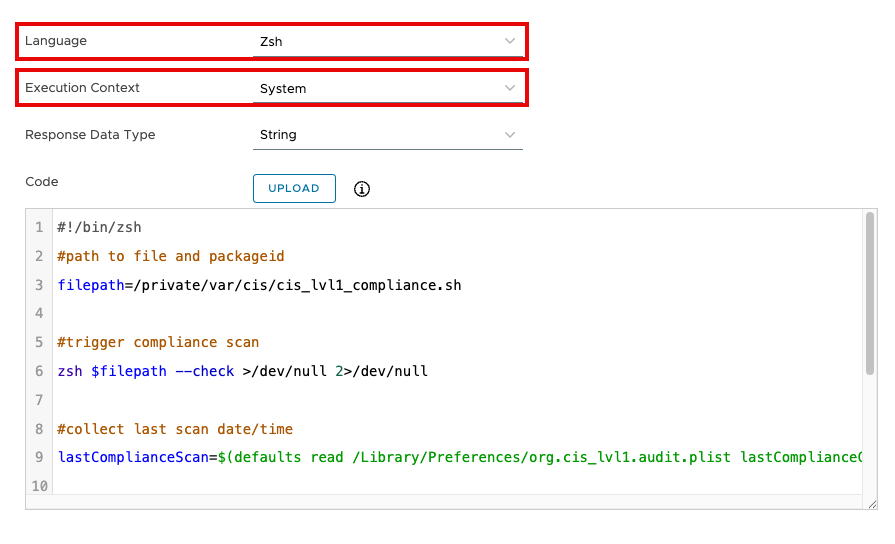
- For Language, select Zsh.
- Select System for Execution Context.
- Enter the following into the Code text box:
#!/bin/zsh#path to file and packageid
filepath=/private/var/cis/cis_lvl1_compliance.sh

#trigger compliance scan
zsh $filepath --check >/dev/null 2>/dev/null

#collect last scan date/time
lastComplianceScan=$(defaults read /Library/Preferences/org.cis_lvl1.audit.plist lastComplianceCheck)

if [[ $lastComplianceScan == "" ]];then
    lastComplianceScan="No scans have been run"
fi

echo "$lastComplianceScan"
- Click Next.
- Click Save & Assign.
- Select New Assignment.
- Enter a name for the assignment. For example,
All Corporate macOS Devices. - Click in the Assignment Group section and select an assignment group. The selected group appears underneath the text box.
- Click Next.
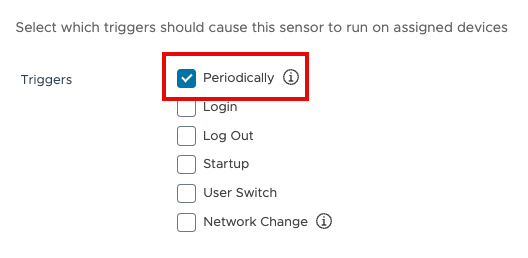
- On the Deployment tab, select Periodically as the trigger.
Note: The interval on which this will run is based on the configured Intelligent Hub data sample interval schedule as defined in your environment.
- Click Save. Then, click Close.
- Now, create a sensor to collect the non-compliant rule count. In the Workspace ONE UEM console, select Resources. Then select Sensors.
- Click Add and select macOS from the drop-down menu.
- Enter cis_noncompliant_count for the sensor name. Click Next.
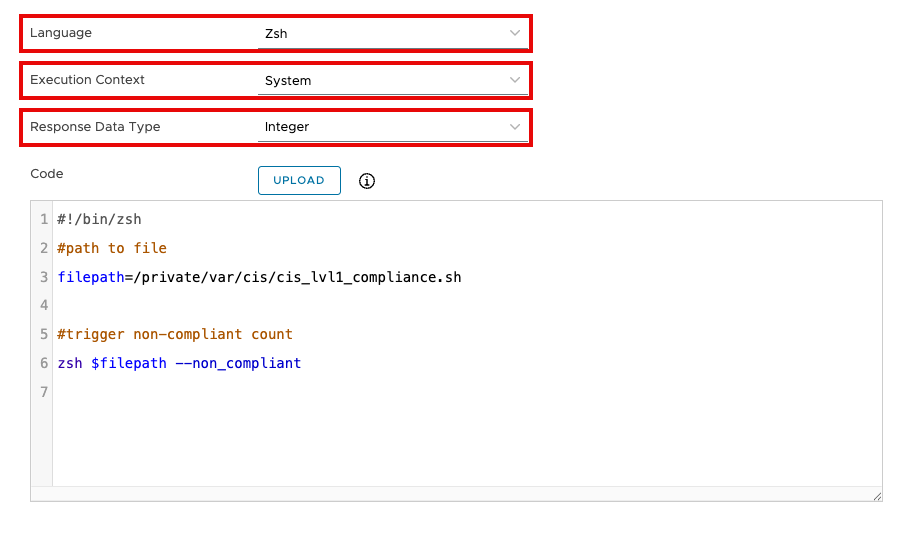
- For Language, select Zsh.
- Select System for Execution Context.
- For Response Data Type, select Integer.
- Enter the following into the Code text box:
#!/bin/zsh#path to file
filepath=/private/var/cis/cis_lvl1_compliance.sh

#trigger non-compliant count
zsh $filepath --non_compliant
- Click Next.
- Click Save & Assign.
- Select New Assignment.
- Enter a name for the assignment. For example,
All Corporate macOS Devices. - Click in the Assignment Group section and select an assignment group. The selected group appears underneath the text box.
- Click Next.
- On the Deployment tab, select Periodically as the trigger.
Note: The interval on which this will run is based on the configured Intelligent Hub data sample interval schedule as defined in your environment. - Click Save. Then click Close.
Configuring automated remediation of the mSCP baseline
To ensure that managed macOS devices remain compliant, you will configure the compliance script to execute using the --fix parameter. With this parameter, the script will remediate any non-compliant configuration on your managed devices. However, you do not need to continually call the fix function when it is not required. You will utilize a Freestyle Orchestrator workflow to trigger the remediation script whenever a non-compliant count is greater than 0.
Note: If you do not have Freestyle Orchestrator enabled, you can perform this same task using a sensor. This tutorial will cover how to implement both methods.
Automated remediation with Freestyle Orchestrator
In this section, you will build a workflow in Freestyle Orchestrator that will trigger the remediation script whenever a non-compliant count is greater than 0.
To get the desired result, perform the following steps:
- In the Workspace ONE UEM console, select Resources. Then select Scripts.
- Click Add and select macOS from the drop-down menu.
- Enter cis_remediation for the sensor name. Leave App Catalog Customization deactivated. Click Next.
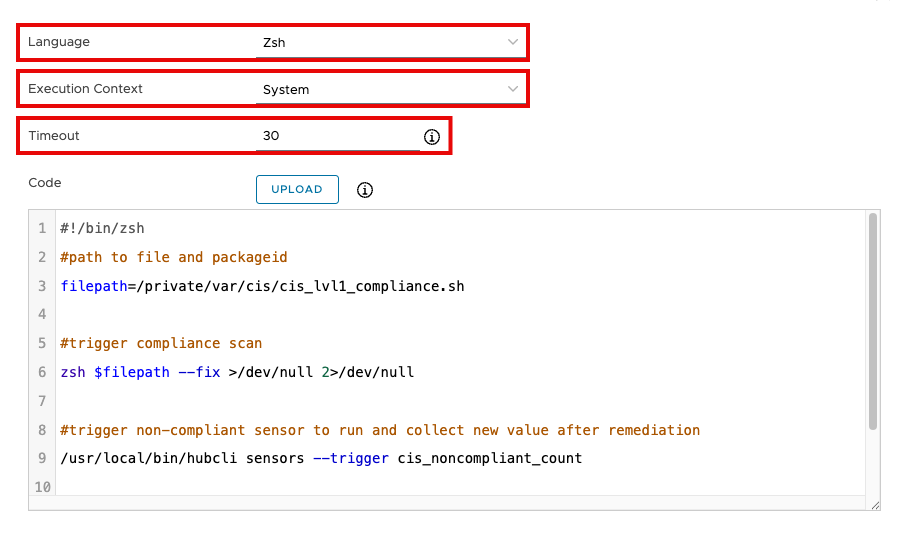
- For Language, select Zsh.
- Select System for Execution Context. Leave Timeout set to the default of 30.
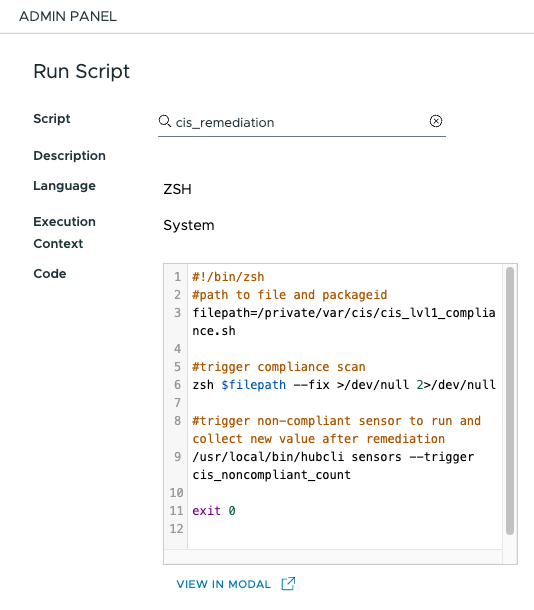
- Enter the following into the Code text box:
#!/bin/zsh
#path to file and packageid
filepath=/private/var/cis/cis_lvl1_compliance.sh

#trigger compliance scan
zsh $filepath --fix >/dev/null 2>/dev/null

#trigger non-compliant sensor to run and collect new value after remediation
/usr/local/bin/hubcli sensors --trigger cis_noncompliant_count

exit 0
- Click Next. Then click Save.
- In the Workspace ONE UEM console, select Orchestration and then Freestyle Orchestrator. Then select New.
- Enter a name for the workflow. For this example, enter macOS CIS Remediation.
- Select macOS as the platform for the workflow.
- Click in the Smart Group section and select an assignment group. The selected group appears underneath the text box.
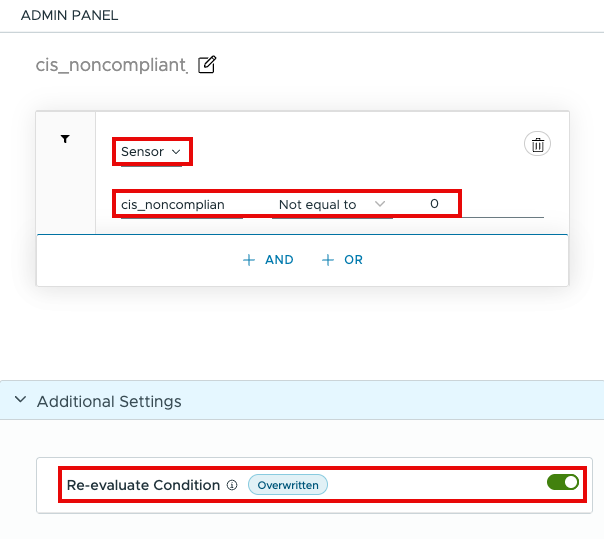
- In the workflow UI, click the plus sign (+) and select Condition. For this example, name the Condition cis_noncompliant_count.
- From the Select drop-down menu, choose Sensor. Search for the sensor you created earlier called cis_noncompliant_count. Select Not equal to and enter 0.
- Under Additional Settings, enable Re-evaluate Condition. Click Then.
- Click Add. select Action and then click Script.
- Search for the script you created earlier called cis_remediation. Click Select.
- Click Publish.
Automated remediation without Freestyle Orchestrator
If you are not licensed to use Freestyle Orchestrator, it is still possible to perform the same remediation using a sensor.
Note: If you have implemented the tasks in Automated remediation with Freestyle Orchestrator, you do not need to perform this section of the tutorial.
To get the desired result, perform the following steps:
- In the Workspace ONE UEM console, select Resources. Then select Sensors.
- Click Add and select macOS from the drop-down menu.
- Enter cis_remediation for the sensor name. Click Next.
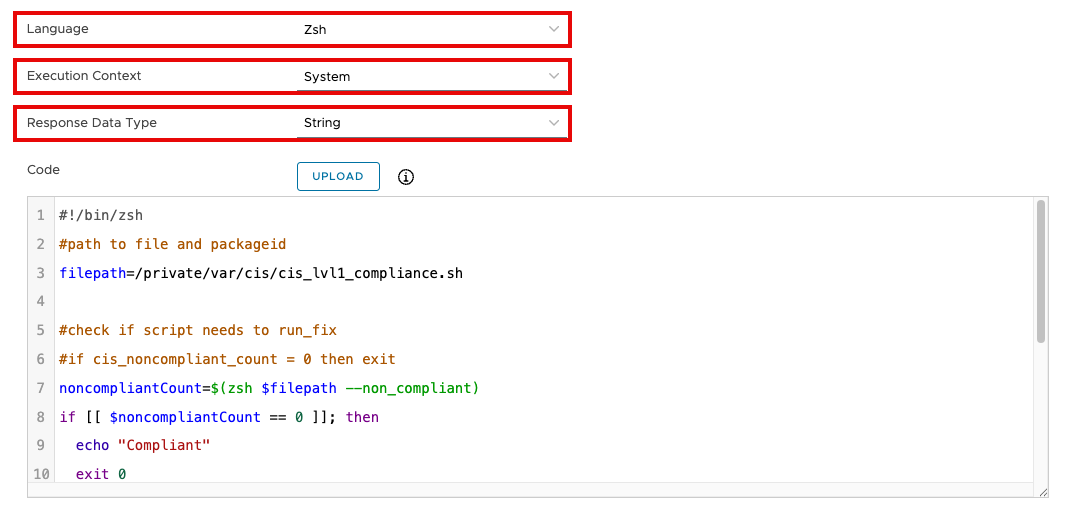
- For Language, select Zsh.
- Select System for Execution Context.
- Set the Response Data Type to String.
- Enter the following into the Code text box:
#!/bin/zsh
#path to file and packageid
filepath=/private/var/cis/cis_lvl1_compliance.sh

#check if script needs to run_fix
#if cis_noncompliant_count = 0 then exit
noncompliantCount=$(zsh $filepath --non_compliant)
if [[ $noncompliantCount == 0 ]]; then
  echo "Compliant"
  exit 0
fi

#trigger run_fix
zsh $filepath --fix >/dev/null 2>/dev/null

echo "Remediation in Progress"

exit 0
- Click Next. Then click Save & Assign.
- Select New Assignment,
- Enter a name for the assignment. For example,
All Corporate macOS Devices. - Click in the Assignment Group section and select an assignment group. The selected group appears underneath the text box.
- Click Next.
- On the Deployment tab, select Periodically as the trigger.
Note: The interval on which this will run is based on the configured Intelligent Hub data sample interval schedule as defined in your environment. - Click Save. Then click Close.
Checking baseline status for devices
Although the automation you configured in the Configure automated remediation of the mSCP baseline section should maintain the security baseline on your macOS devices, you may need to check the status of a particular device. You can easily do that within the Workspace ONE UEM console.
- In the Workspace ONE UEM console, click Devices.
- Select List View and select the macOS device you used for this exercise.
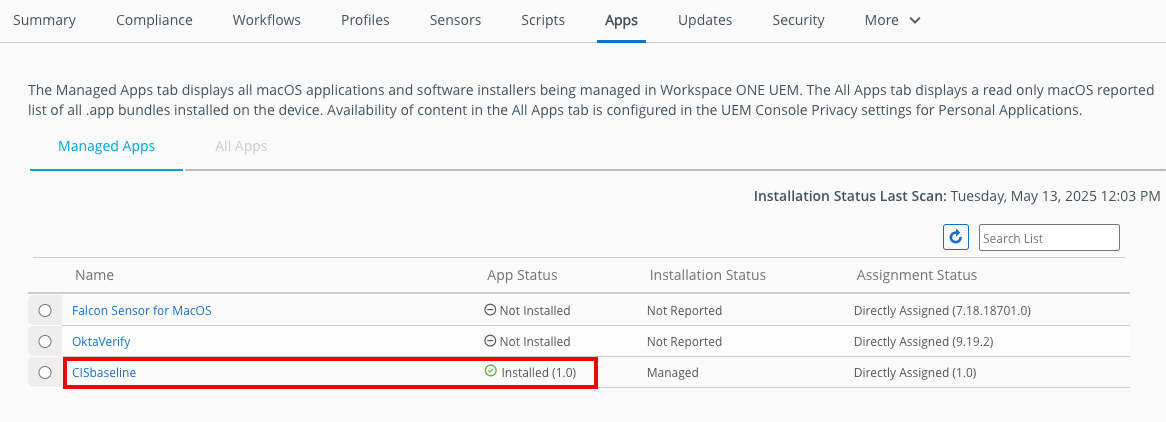
- Click Apps. Check to see that the CISbaseline app you created earlier is installed on the device.
- Click Profiles. You will see the status of all the profiles assigned to the device.

- Click Sensors. Look for the two sensors you created earlier, cis_compliancescan and cis_noncompliant_count. You will see the latest sensor value and the last time the sensor was executed on the device.

Summary and additional resources
This operational tutorial provided the steps to configure and implement security baselines using the macOS Security Compliance Project. After a brief introduction to the mSCP, this tutorial covered the following procedures:
- Required prerequisites for using the macOS Security Compliance Project.
- Creating a security baseline for macOS.
- Deploying the baseline using Workspace ONE UEM.
- Configuring automated remediation of the security baseline.
- Checking the baseline status on devices.
Additional resources
For more information about Workspace ONE UEM, explore the product page for Workspace ONE UEM on Tech Zone. You will find everything from beginner to advanced curated assets in the form of articles, videos, and labs.
You may also want to read these additional operational tutorials from macOS on Tech Zone.
- Configuring basic macOS management
- Getting started with Freestyle Orchestrator on macOS devices
- Managing updates with the macOS Updater Utility
- Distributing scripts to macOS devices
- Deploying a third-party macOS app
Changelog
The following updates were made to this guide:
| Date | Description of Changes |
| 05/14/2025 |
|
| 03/12/2025 |
|
| 07/26/2024 |
|
| 02/29/2024 |
|
| 05/23/2023 |
|
| 04/11/2023 |
|
| 01/30/2023 |
|
About the author and contributors
This tutorial was written by:
- Michael Bradley, Product Specialist, Omnissa.
- Matthew Zaske, Senior Product Manager, Omnissa.
Questions and feedback
For questions or feedback, send to tech_content_feedback@omnissa.com.

