

Provisioning, enrolling, and onboarding Windows devices into Workspace ONE UEM
Overview
Choosing the most appropriate solution for initiating Windows device management depends upon your environment and requirements, as well as whether those devices are new/rebuilt or existing. Understanding the architectural options, as well as the pros and cons of each, plays an important role in determining the optimal solution for your organization.
New Windows devices are often provisioned complete with enrollment, including Workspace ONE policies, applications, and configurations, whereas existing devices are typically enrolled or registered to initiate Workspace ONE management. For purposes of this discussion, provisioning, enrollment, and onboarding will be compartmentalized in this way and based on these generalities. However, these lines are not concrete. For example, registering new Windows devices can be completed simply via enrollment, and existing devices can be redeployed as if new.
Definition of provisioning, enrollment, and onboarding
There are numerous options for provisioning, enrolling, and onboarding Windows devices into Workspace ONE UEM. Because there is some confusion regarding these terms, below is a crisp definition of each, as well as applicability to new and/or existing devices:

Figure 1: Windows device management phases
There are numerous ways to address provisioning, enrollment, and onboarding of Windows devices, as well as multiple options as shown below:

Figure 2: Provisioning, enrollment, and onboarding options
This document provides a deep dive into the various phases and options, including new capabilities, and the following key sections will be covered:
- Provisioning
- Enrollment
- Onboarding
Provisioning
Provisioning is not a required step for integrating new or rebuilt Windows devices; however, administrators find that pre-staging provides the best user experience. With the ultimate goal of providing users with a new Windows device that is work ready, several options are available:

Figure 3: Provisioning options
As part of determining which Provisioning option(s) may be best for your environment, it’s necessary to align with domain membership requirements as shown below:

Figure 4: Options based on domain type
For example, if Entra ID is the standard within your organization, Drop Ship Online would not be an option, whereas it would be if Hybrid Domain Join were utilized.
Please note: Some interfaces within Workspace ONE have not yet transitioned to the new name for Azure Active Directory, which is Entra ID.
Directory Services integration
Configuring or modifying the Directory Services integration screen is necessary for aligning with your Entra ID, Hybrid Domain Join, or Active Directory domain. Automatic MDM enrollment is available only for Microsoft Entra ID Premium subscribers.
While Active Directory is integrated via the AirWatch Cloud Connector, Entra ID must be configured within both the Workspace ONE and Entra ID interfaces. The Workspace ONE side of the Entra ID configuration is performed within the Groups & Settings > All Settings > System > Enterprise Integration > Directory Services screen.
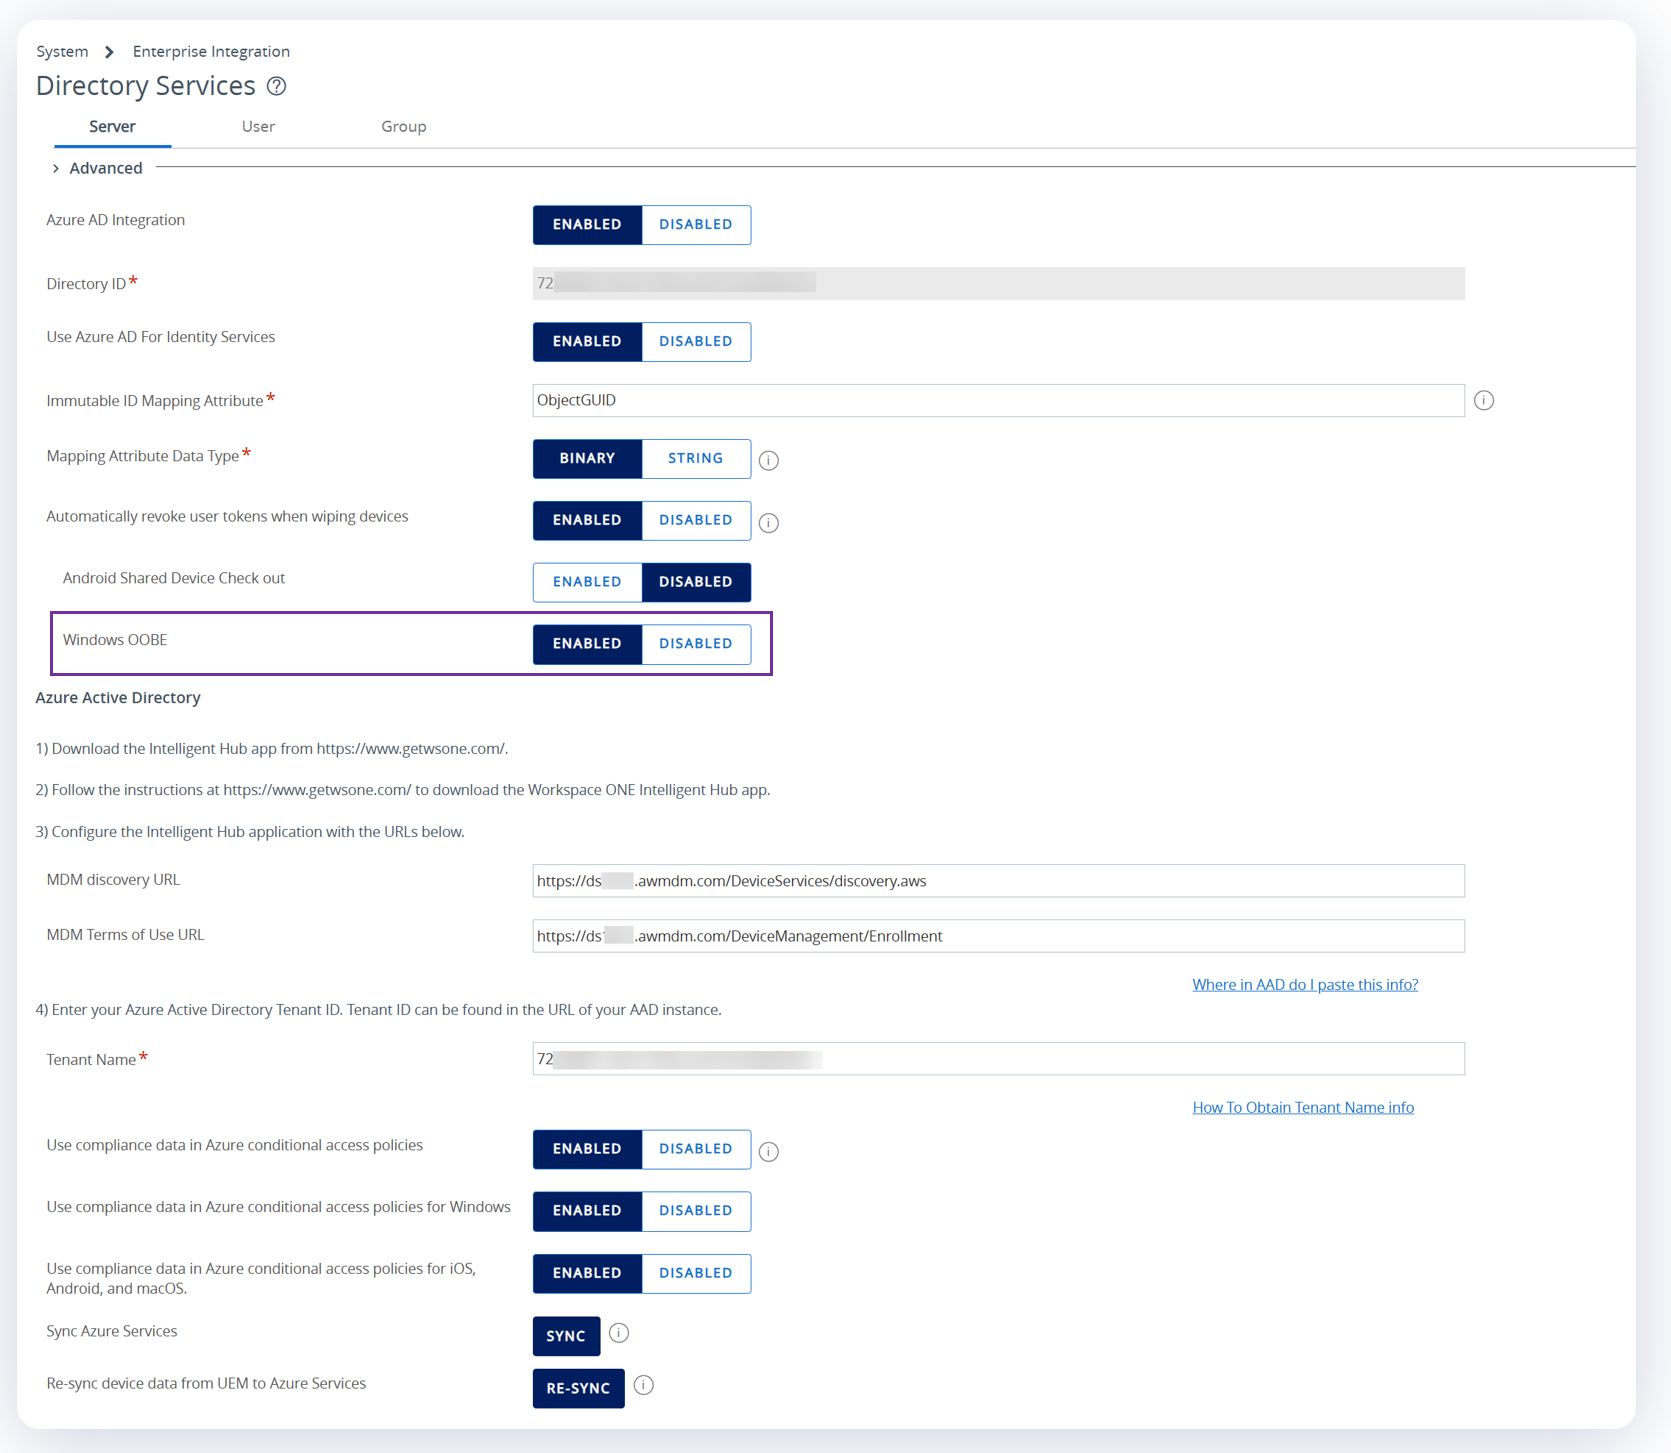
Figure 5: Directory Services configuration for Azure Active Directory (Entra ID)
Note: Windows OOBE should be set to enabled as it is disabled by default. This will be important as we proceed with discussing device setup in the next section.
In addition, "Use compliance data in Azure conditional access policies” should be set to enabled if you intend to use that functionality. This setting causes your environment to use device compliance data from Workspace ONE UEM as required by Azure AD conditional access policies.
The Workspace ONE UEM Directory Services configuration integrates with the AirWatch by Omnissa MDM app within the Entra admin center. In addition to entering the appropriate URLs to link back to the Workspace ONE configuration, the MDM user scope should be set to target the correct Entra ID user groups.

Figure 6: AirWatch by Omnissa app configuration within Entra admin center
If your environment is based on an on-premises Workspace ONE implementation or uses a vanity URL for Workspace ONE SaaS, such as https://company.awmdm.com, it is necessary to configure a Custom MDM app by clicking “Create your own application”. This application works like the Airwatch by Omnissa MDM app and redirects enrollment requests to the correct on-premises Workspace ONE tenant.
For a complete walkthrough of all steps required for Entra ID integration, please see Enrolling Windows devices using Entra ID within Omnissa TechZone.
OOBE
For new devices, customization of the initial user logon relies largely on OOBE (Out-of-Box Experience) configuration. OOBE incorporates settings such as operating system language, region, and keyboard. To streamline the user experience as a prelude for Workspace ONE enrollment, these settings can be customized via Workspace ONE Drop Ship Provisioning Offline and/or Autopilot.
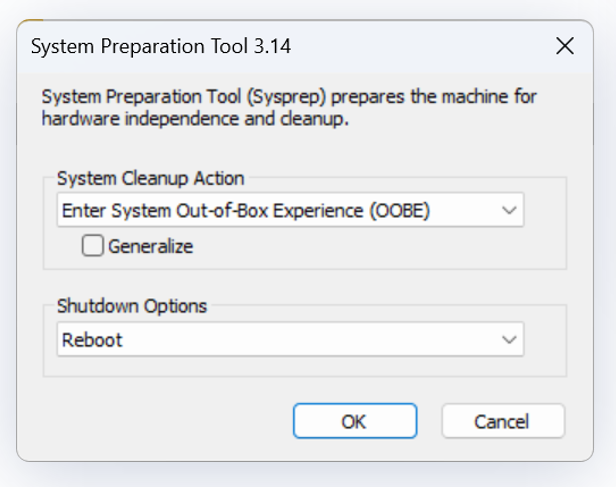
Figure 7: OOBE (Out-of-Box Experience) initiation via the SYSPREP tool
Entra ID join: OOBE + Drop Ship Provisioning Offline and/or Autopilot
Entra ID join assignment, plus the various OOBE configuration settings, can be configured via Drop Ship Provisioning Offline and/or Autopilot. Although technically possible, both should not be used together to reduce troubleshooting complexity.
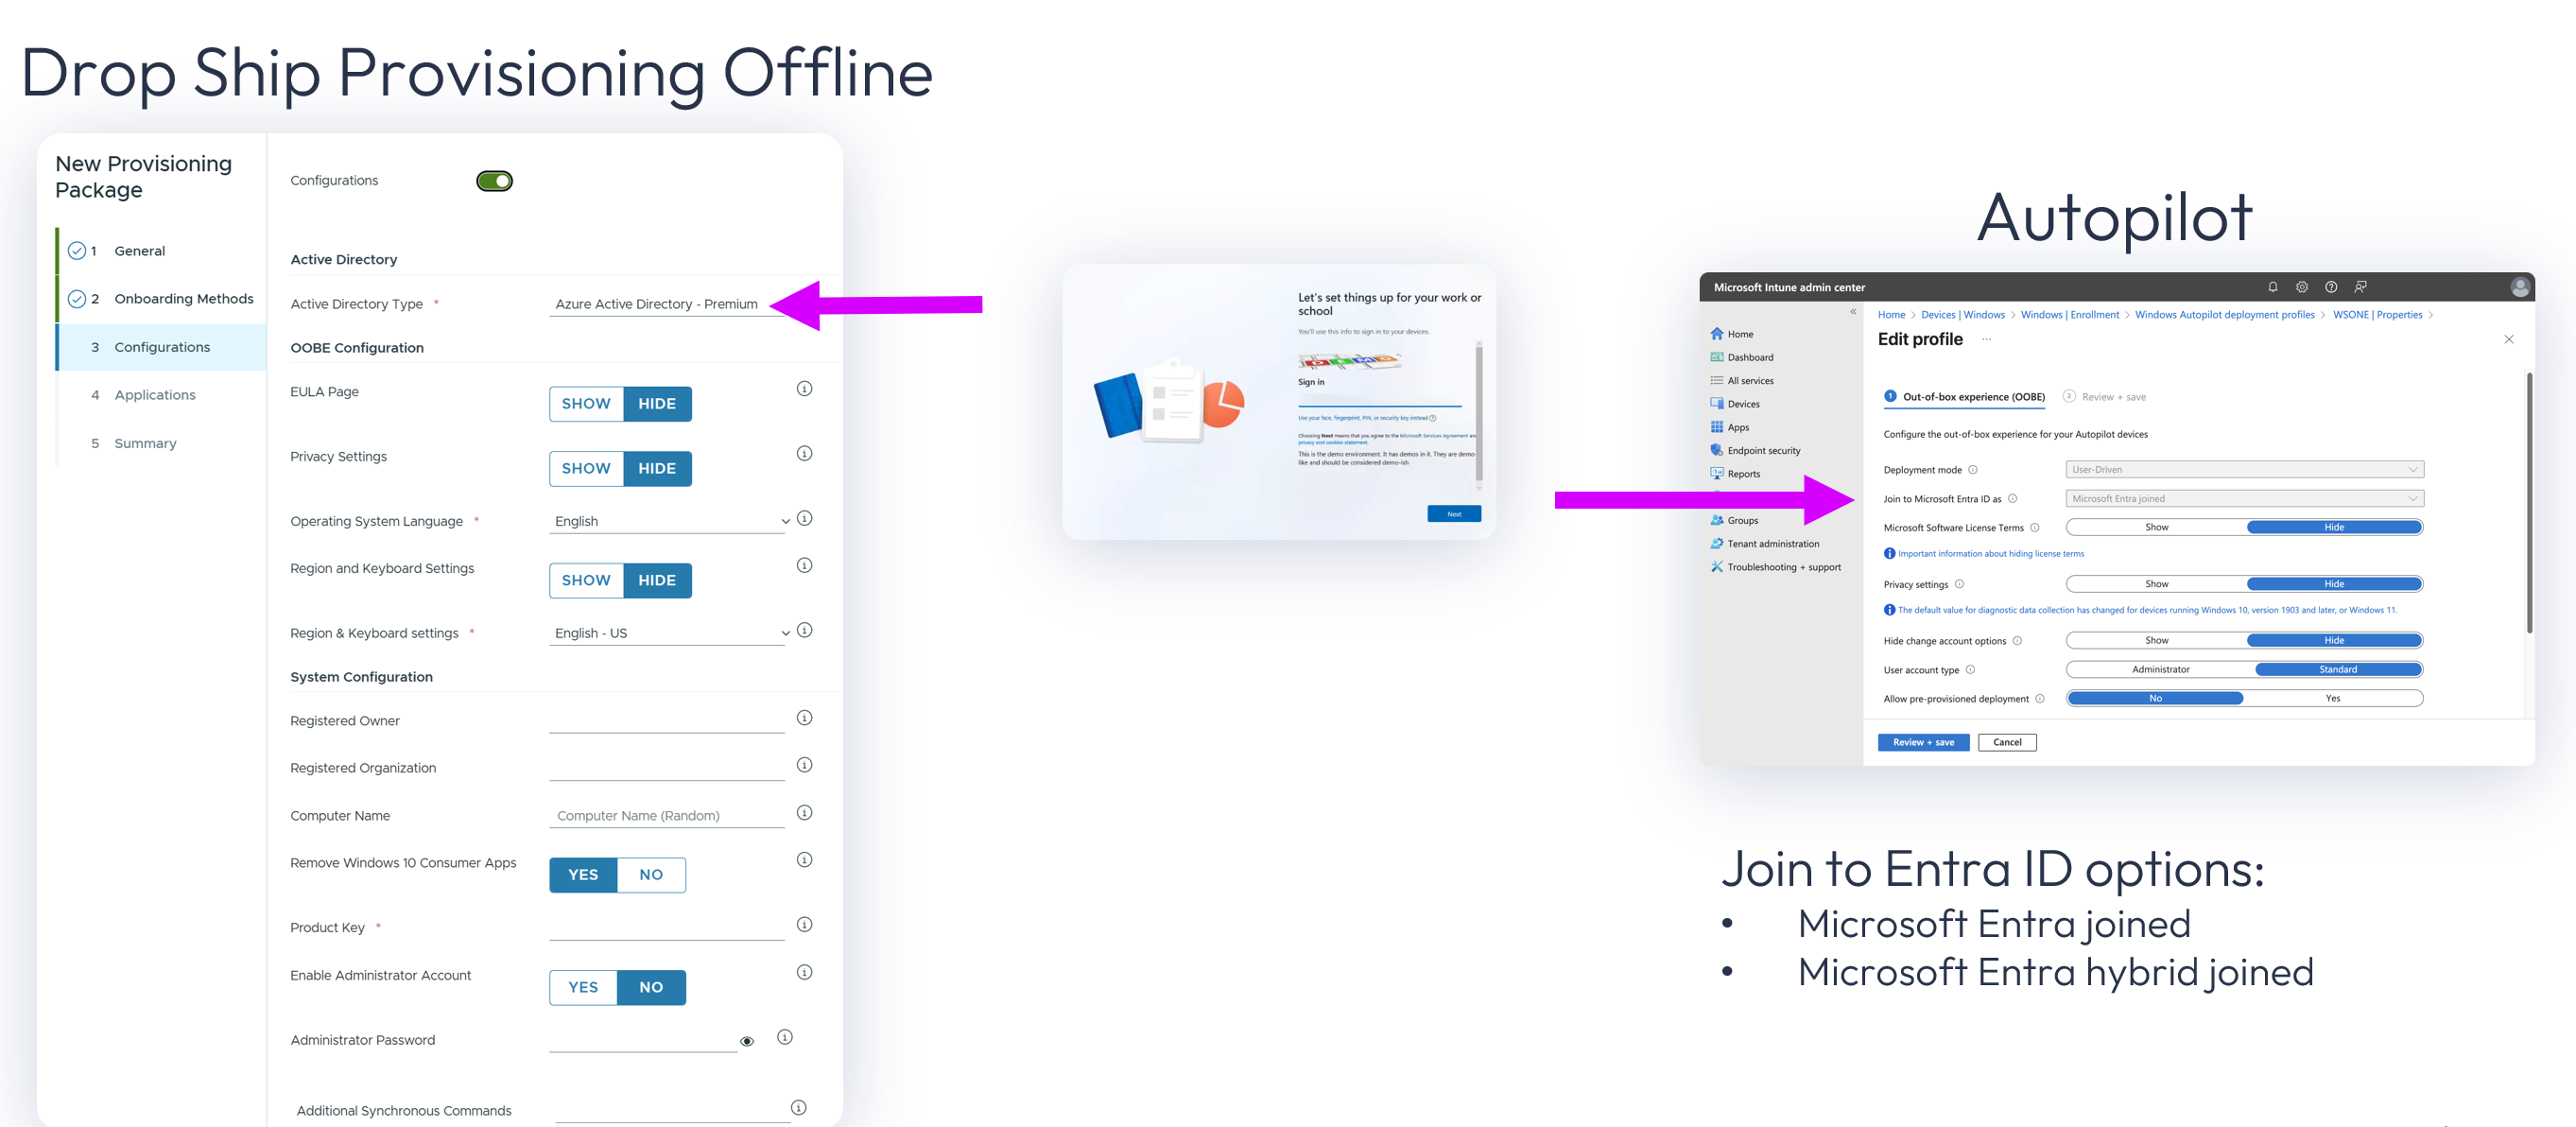
Figure 8: Configuration of OOBE settings and Entra ID join via Drop Ship Provisioning and/or Autopilot
Drop Ship Provisioning
Workspace ONE Drop Ship Provisioning provides users with the best seamless initial experience. While Provisioning is not required, many initial configurations can be embedded to minimize user effort and issues.
Workspace ONE UEM provides three Drop Ship Provisioning options to deploy new, fully configured Windows devices.

Figure 9: Drop Ship Provisioning options
Please note that the item listed as Desktop Staging within the console is typically referenced as Drop Shop Provisioning Offline and includes the Encrypted Package option.
The key difference between Drop Ship Offline and Drop Ship Online is the source of configuration settings and files, including application files.
- Drop Ship Offline, including Encrypted Package: The hardware vendor or partner receives pre-packaged files as media. Note that the Encrypted File option is a form of Drop Ship Offline, with additional password protection.
- Drop Ship Online: The hardware vendor or partner accesses a designated online repository from which the actual files can be obtained.
With both Drop Ship Offline and Drop Ship Online, administrators are encouraged to include as many common applications as possible so that the initial application download and installation process is minimized. For example, large application files such as Microsoft 365 that are allocated to all users are best included within the provisioning package, rather than the first post-enrollment application download, to save time and bandwidth resources.
Drop Ship Provisioning Offline, including Encrypted Package
Drop Ship Offline packages (PPKG) contain the Intelligent Hub for Windows and apps that are to be installed with the Workspace ONE Provisioning Tool. An unattend.xml file is also created and works in conjunction with the PPKG to configure the device, domain join, and initiate the installation and staging enrollment of Intelligent Hub.
The Encrypted Package contains the above PPKG within a password protected and encrypted file.
These files can be provided to the in-house build team or hardware partner to run as part of the device build process.

Figure 10: Drop Ship Provisioning Offline, including Encrypted Package
The two methods provide the same basic configuration capabilities. All domain options are supported with Drop Provisioning Offline/Encrypted Package. Based upon the domain join type, slightly different options are presented.
For example, Azure Active Directory No Premium does not support Autopilot, so that option would be necessary if Entra ID P1 or higher licensing is not available; selecting this option adds silent enrollment entries to the unattend.xml that configures the device. Azure Active Directory Premium does not include these settings since it is assumed that the Airwatch by Omnissa MDM app would be used to enroll devices.
Configuration
The configuration of Drop Ship Offline and Encrypted Package is as follows:
- From Devices > Desktop Staging > select Add > give your new provisioning package a Name and select the desired Onboarding Method. Note that both Drop Ship Offline and Encrypted Package export populated packages, the key difference is that Encrypted requires a password.

Figure 11: Drop Ship Offline/Encrypted Package Step 1: Select Onboarding Method
Encrypted packages require the password to be edited; Next is grayed until the password is entered.
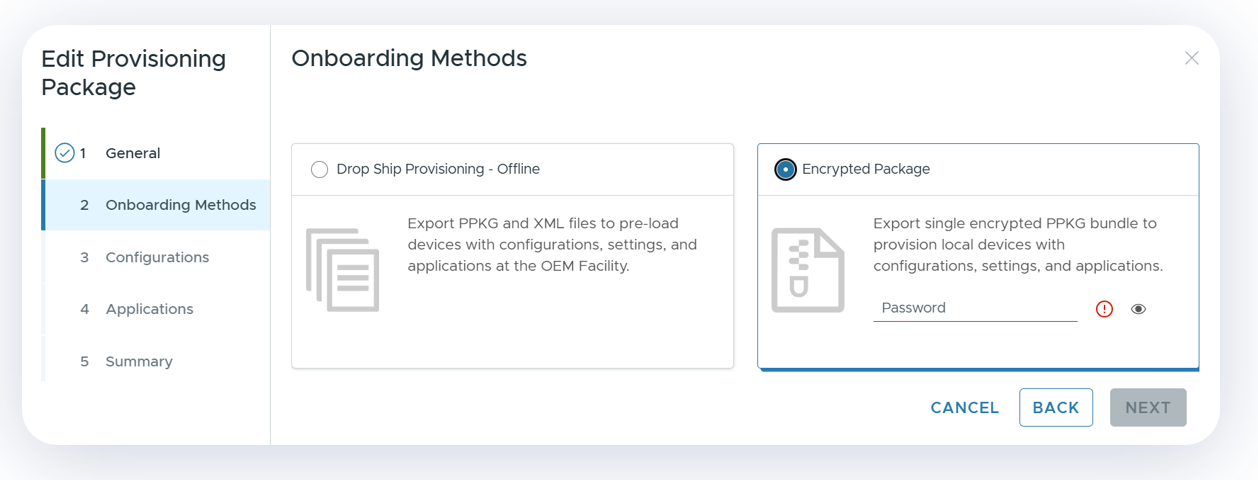
Figure 12: Encrypted package required password to edit
- On the next screen, the Configuration options vary based on Directory type selection:
- Active Directory requires Domain Name, Domain Username, and Domain Password with join rights
- Only Azure Active Directory - Premium does not include integrated Workspace ONE enrollment config
- User Account Control option only presented within the Active Directory and Workgroup join types as Azure Active Directory – Premium and Azure Active Directory – No Premium automatically create the first user in the local Administrators group
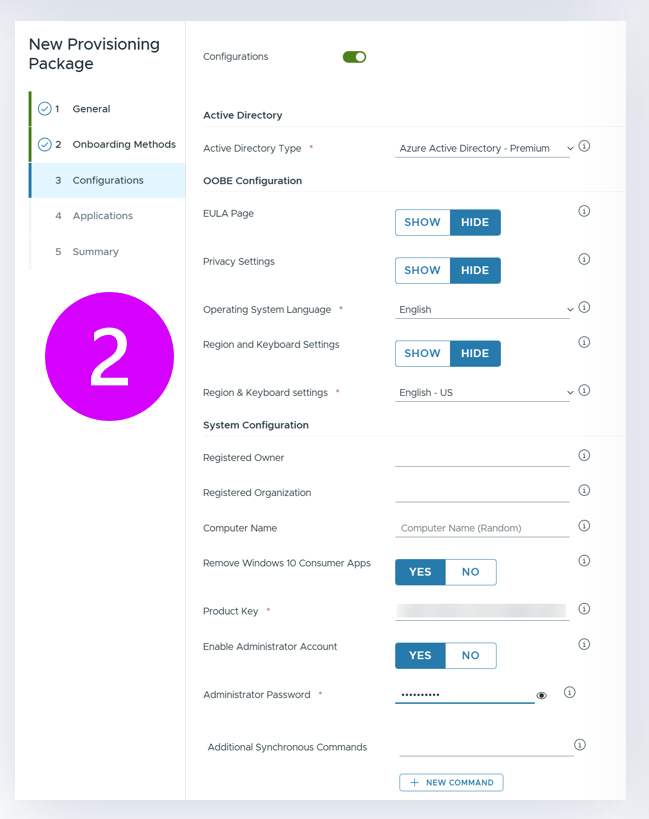
Figure 13: Drop Ship Offline/Encrypted Package Step 2a: Options presented when Azure Active Directory Premium is selected as Active Directory type
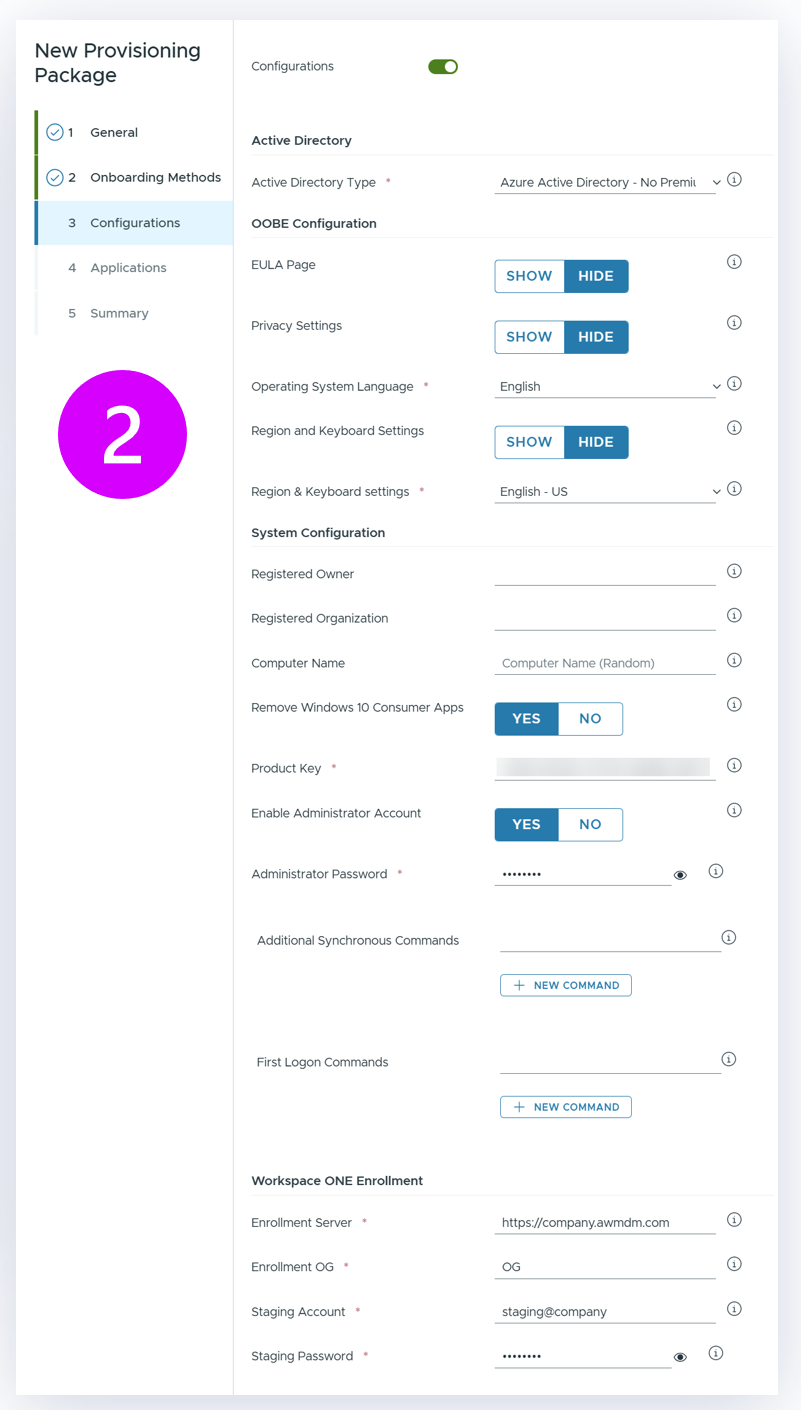
Figure 14: Drop Ship Offline/Encrypted Package Step 2b: Options presented when Azure Active Directory No Premium is selected as Active Directory type
- Lastly, application selection is presented to include pre-installed apps within the package.

Figure 15: Step 3: Application selection
Note: Only applications that install to the device and not user profile are supported.
Both package types contain the same components, including the Intelligent Hub for Windows, applications to install, as well as device configuration, domain join, and enrollment configuration.
These packages are saved and available for download at a later time and can be edited if required. Old packages should be updated after each major platform upgrade so that the Intelligent Hub for Windows is subsequently updated within the package.
Upon completion of the package, an email will be sent to the administrator as shown below noting the package is ready for download.
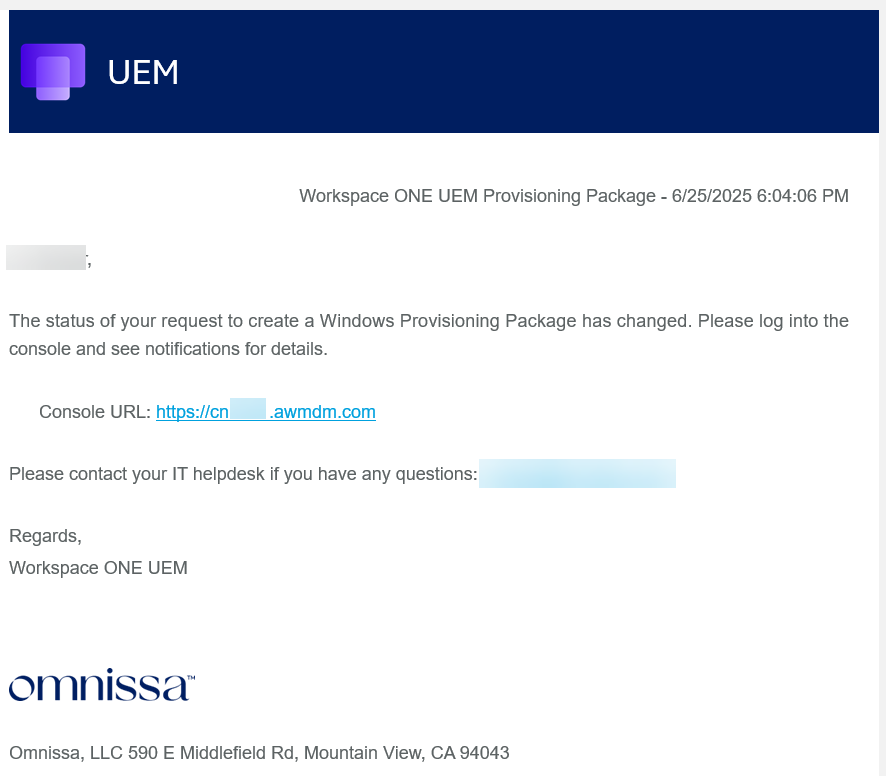
Figure 16: Provisioning Package email notification
In addition, the package will appear within the Desktop Staging page.
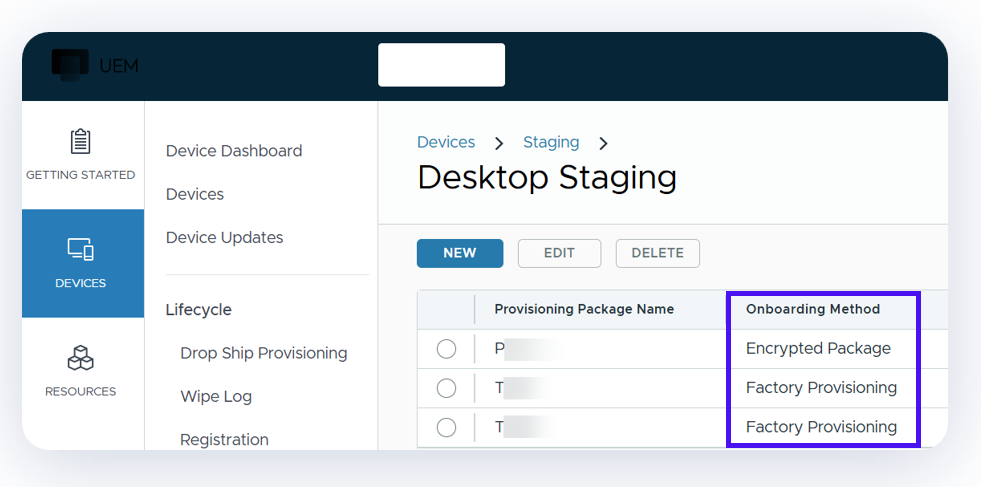
Figure 17: Completed Drop Ship Offline and Encrypted Packages
Note that the Onboarding Method description shown in the console aligns as follows:
- Factory Provisioning = Drop Ship Offline
- Encrypted Package = Drop Ship Offline with password required
Drop Ship Provisioning Online
Drop Ship Provisioning Online provides direct over-the-air integration with Workspace ONE UEM and is the preferred method. Unlike the packaged export requirement of Drop Ship Offline, Drop Ship Online is designed to remove the need to download packages and keep those packages up to date.
The process is based on registering the serial number of devices to be provisioned and assigning a tag, which associates the device with a Smart Group that has resources assigned.
However, note that Drop Ship Online doesn’t support Entra ID domain join.
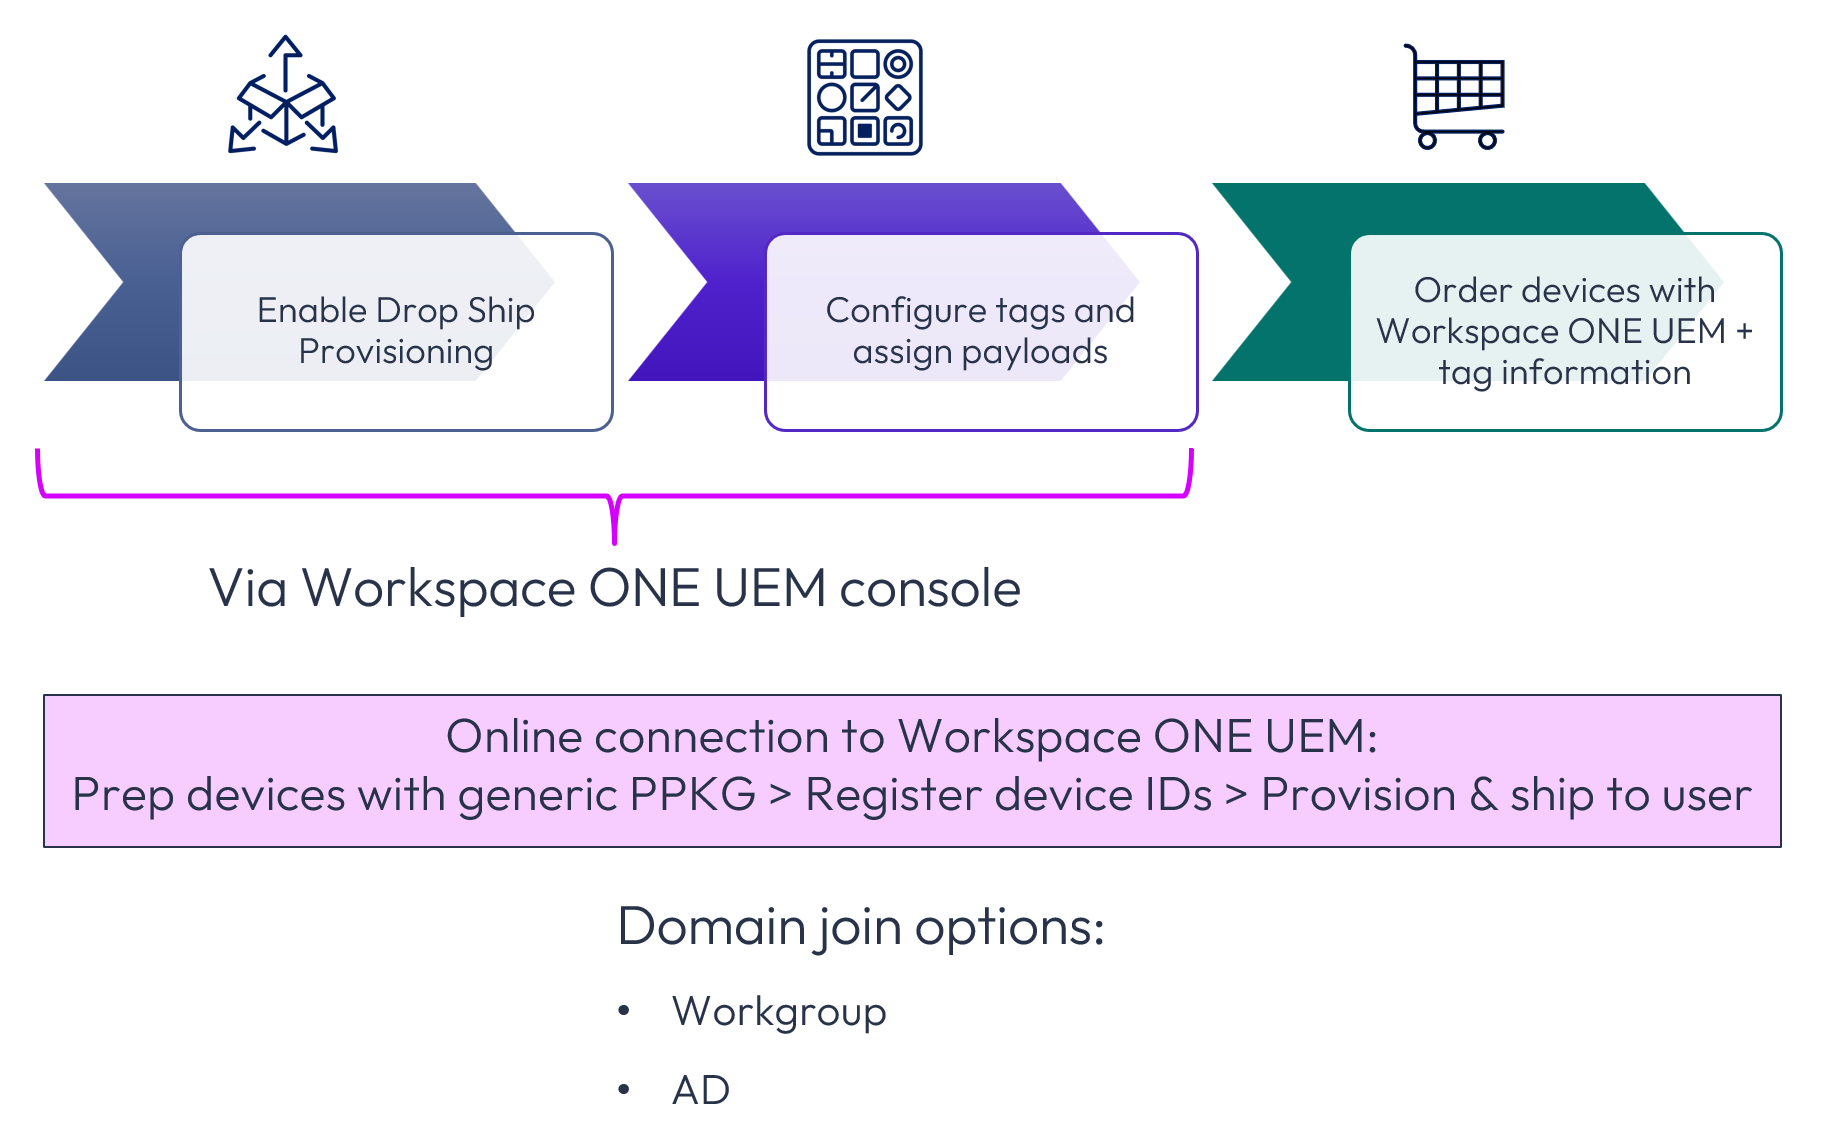
Figure 18: Drop Ship Provisioning Online
When the OEM, partner company, or internal IT team build the device and run the Workspace ONE Factory Provisioning Tool, the device is registered to the Drop Ship OEM Provisioning Service (OPS) and provides details regarding the enrollment environment and assigned resources. The flow is designed to work with a cache, which is a simple IIS Service running on a server within the build network that devices will download their application packages from.
Below is a sample of how the Drop Ship Online process would flow:
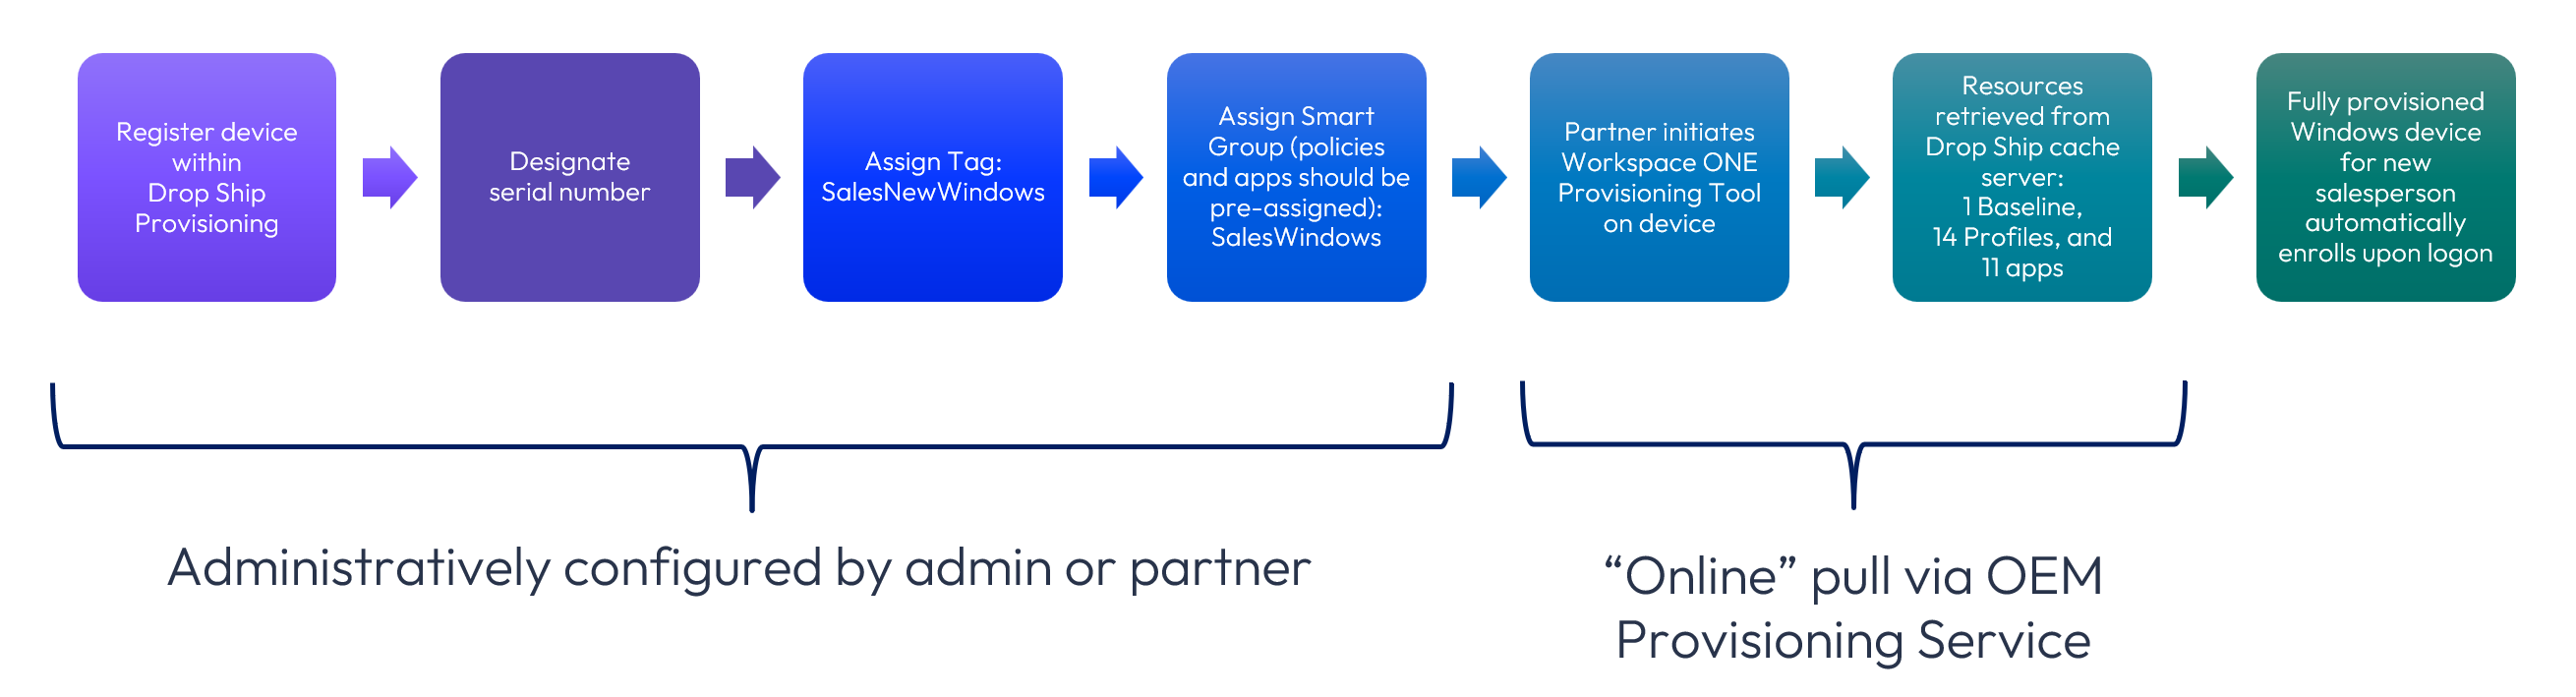
Figure 19: Sample Drop Ship Online process flow for new Windows device for new salesperson
Configuration
The configuration of Drop Ship Online is straightforward. Recommendations and requirements are as follows:
- Tag is shown within the UI as optional, but it is strongly recommended to align the Smart Group membership and resources
- Intelligent Hub must be published
- SSL Pinning must be enabled to enhance security; this is the default for SaaS environments
- Device serial number must be pre-registered, as shown within Devices > Drop Ship Provisioning:
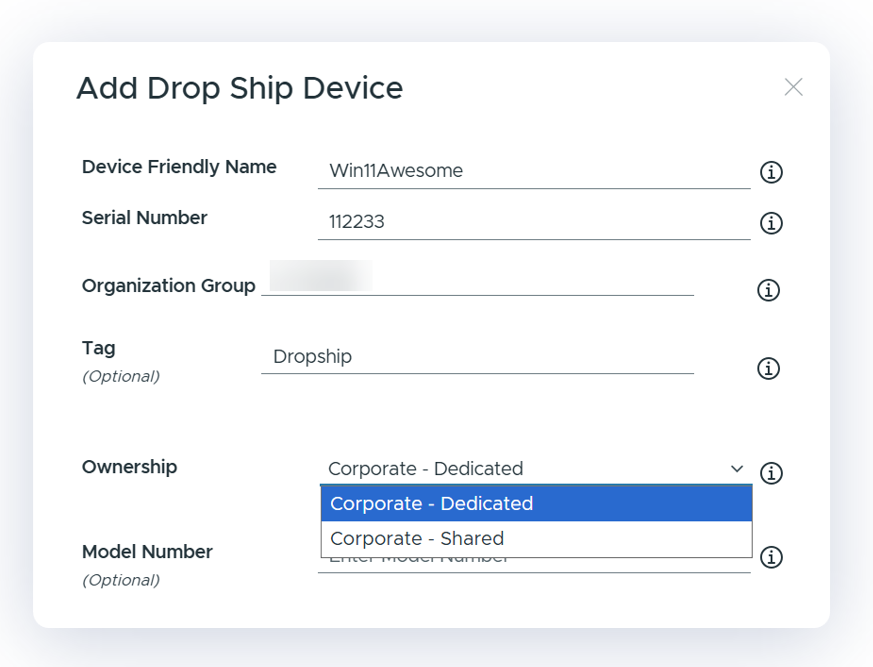
Figure 20: Drop Ship Online device registration
For more information, please see the Drop Provisioning Online article in TechZone.
Drop Ship Prerequisites (applicable to all options)
The staging account and Online Dropship Cache Server URL are important settings found within Groups & Settings > All Settings > Devices & Users > Microsoft > Windows > Staging & Provisioning screen. Validate that the Staging account is correct and ensure that the Online Drop Cache Server URL has been properly designated. The Staging account will be discussed in detail within the Enrollment section.
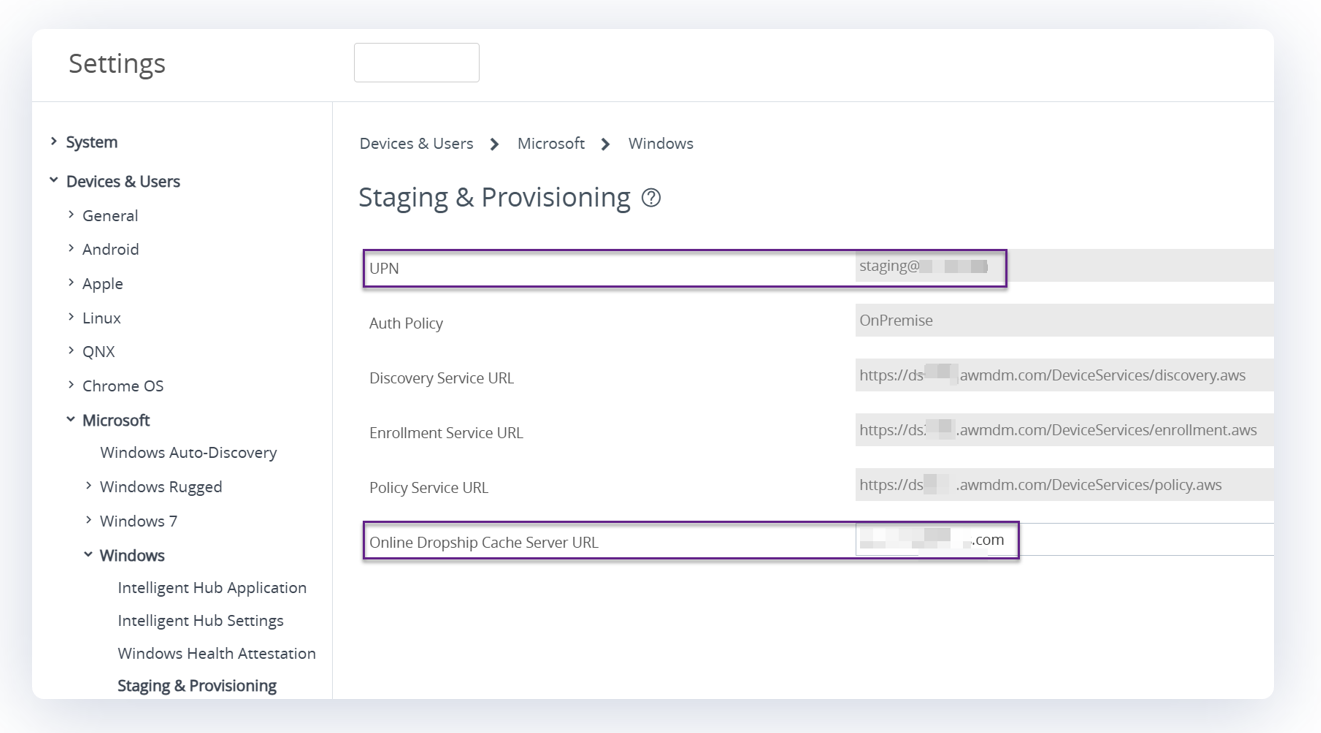
Figure 21: Settings > Devices & users > Microsoft > Windows > Staging & Provisioning settings
Lastly, download the correct Workspace ONE Provisioning tool from Customer Connect via Downloads > All Products > Workspace ONE Provisioning Tool > View Download Components > Go to Downloads.
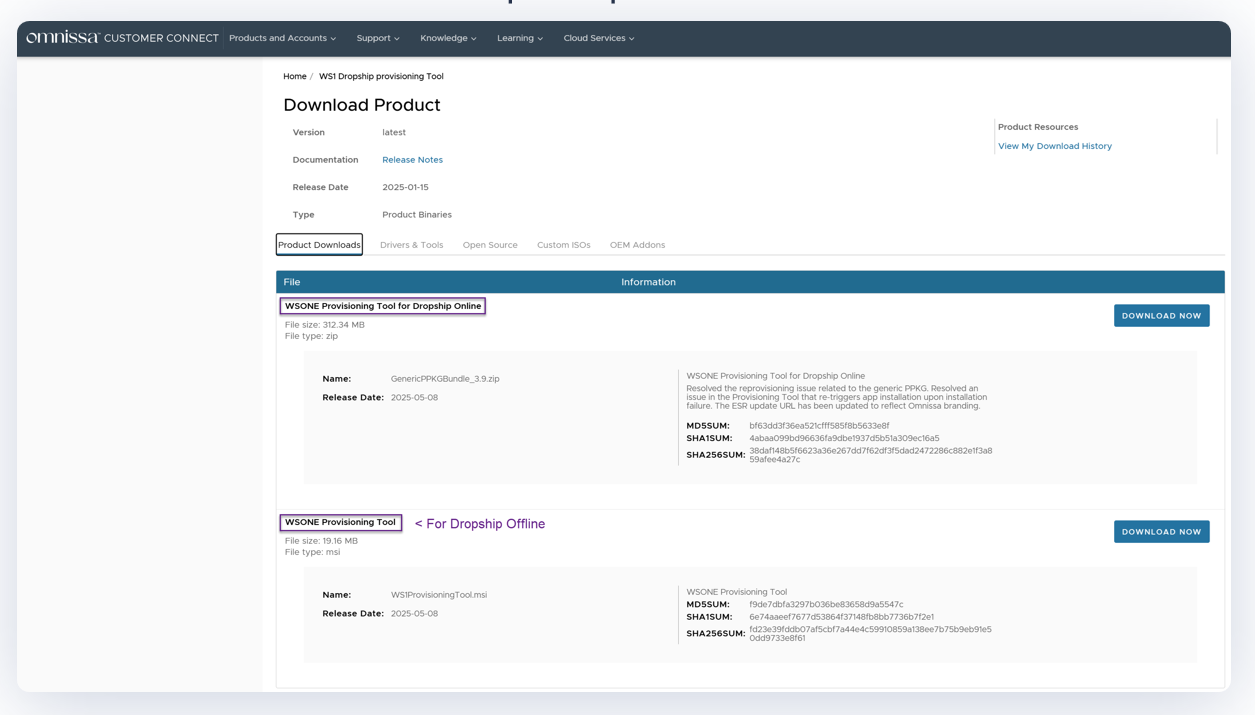
Figure 22: Workspace ONE Provisioning tool downloads
Run the respective Provisioning tool on the machine and invoke the batch file, and then click on the Provisioning Tool to start the process.
Summary of Drop Ship Provisioning options
Below is a side-by-side comparison of the three Drop Ship Provisioning options:
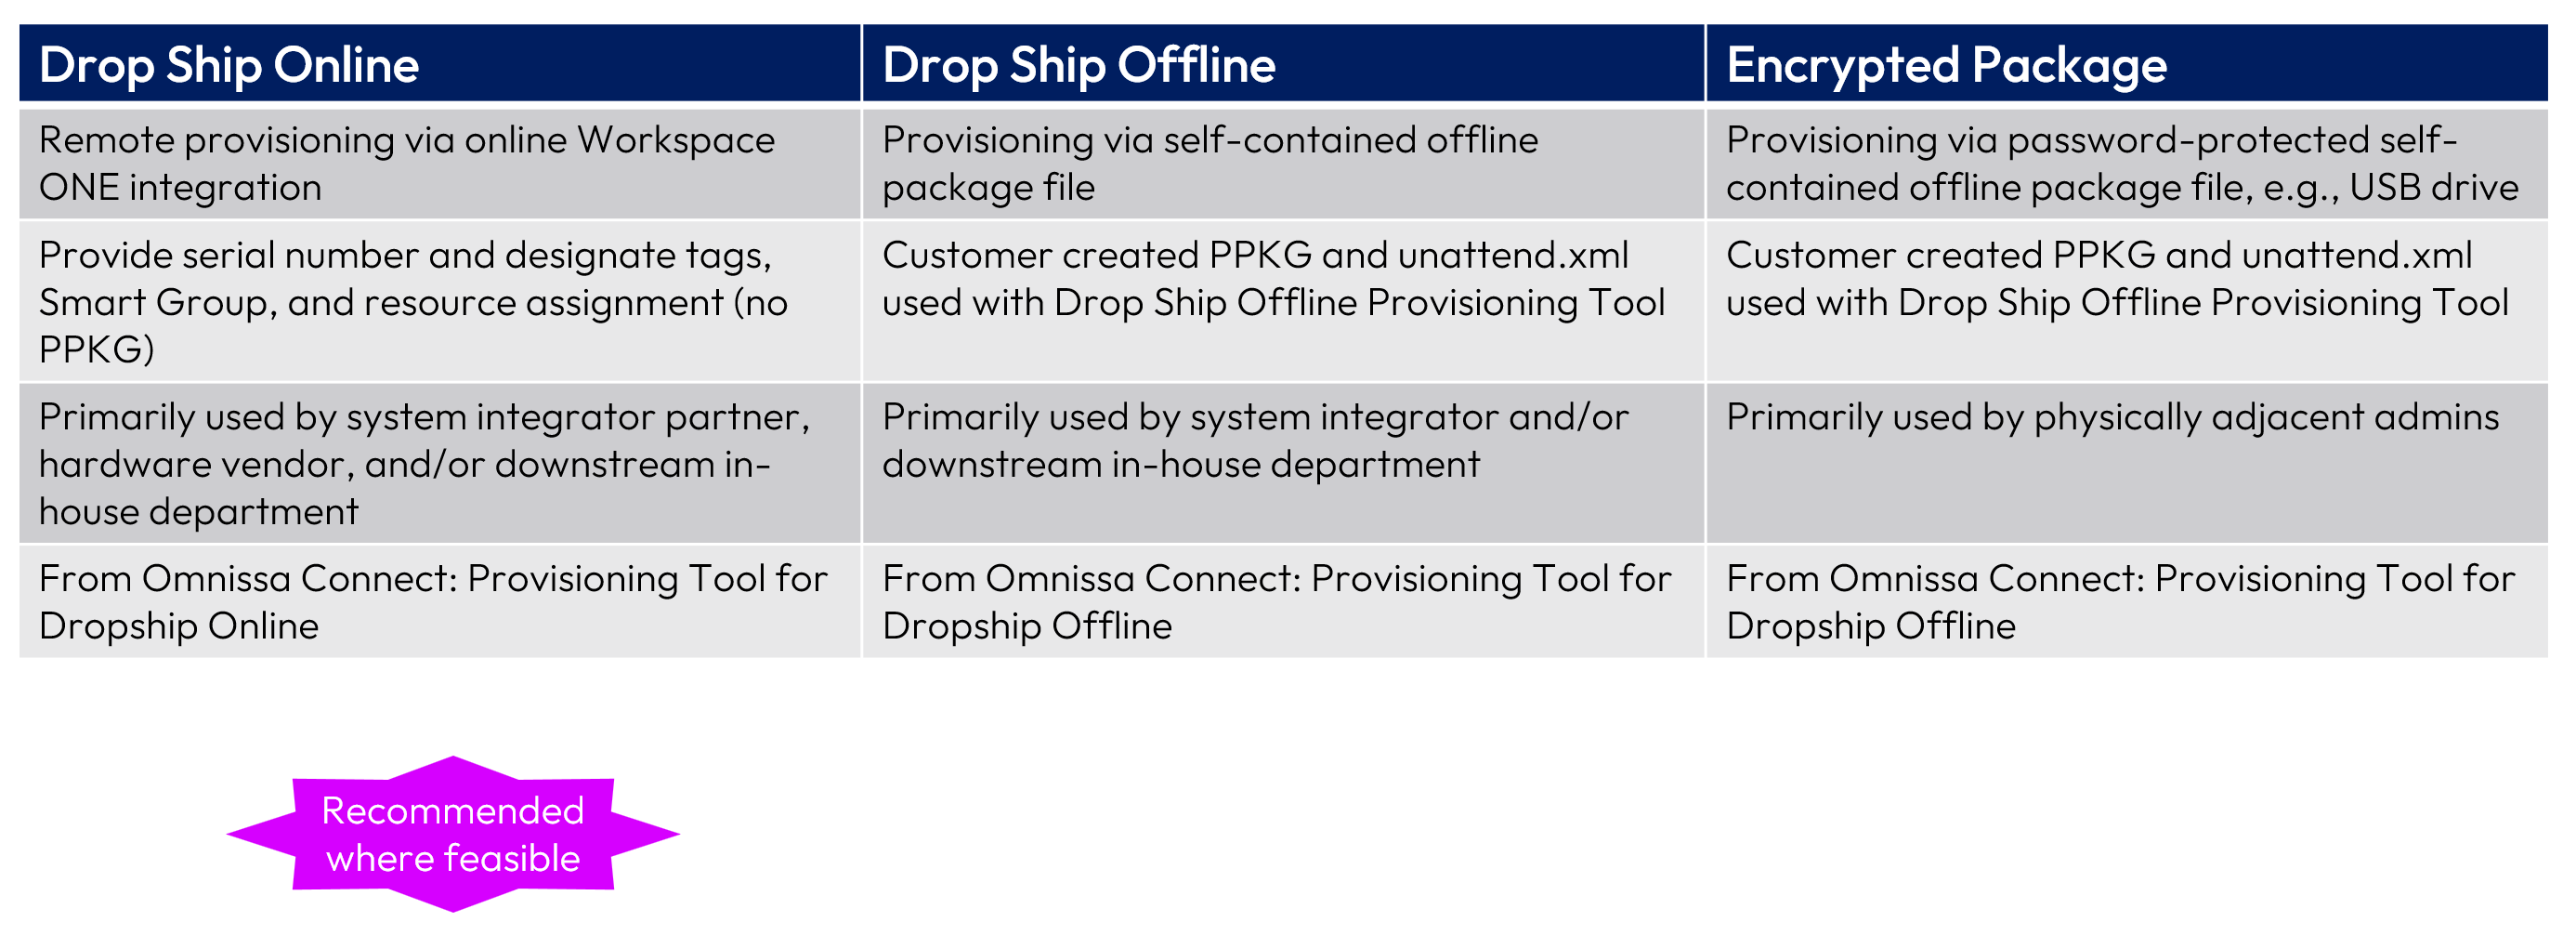
Figure 23: Drop Ship Provisioning options
Enrollment
Multiple options exist for enrolling Windows devices, as well as dependencies. This section will review all options, including new functionality.
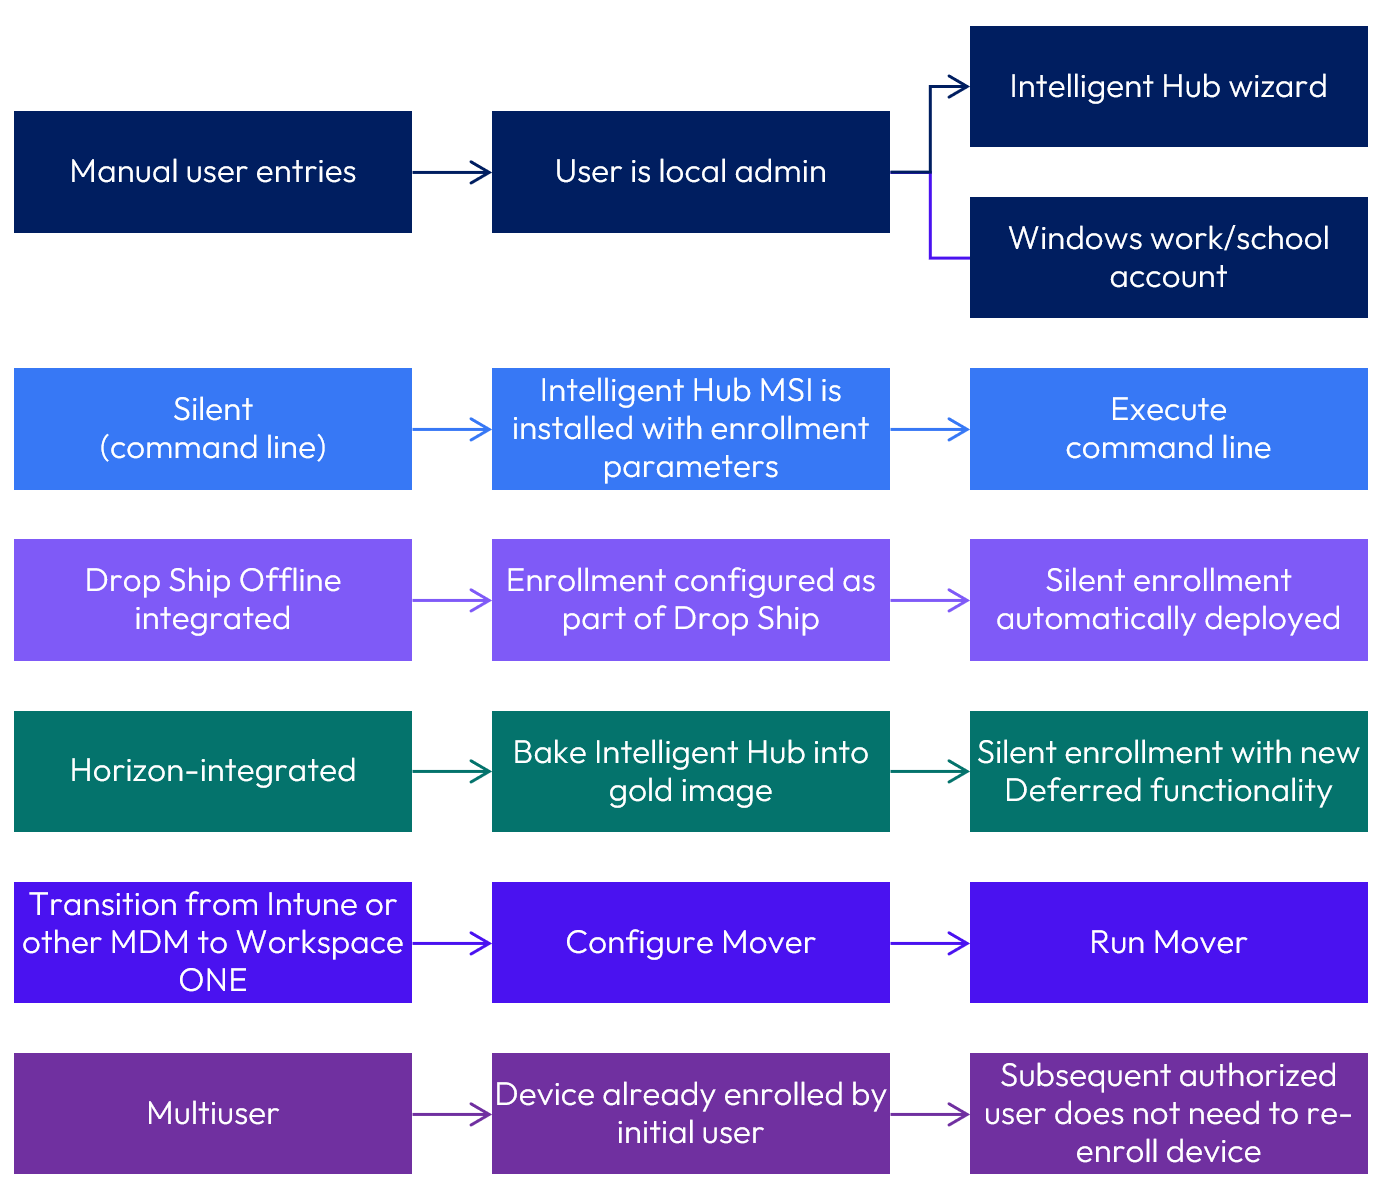
Figure 24: Intelligent Hub for Windows enrollment options
A key decision point for determining enrollment option(s) suitability is based on whether the device is corporate owned or employee owned. Domain and device settings, as well as other configurations, can be pushed to corporate devices, whereas administrators don’t have the same level of authority over employee-owned computers that will be enrolled into Workspace ONE. As a result, the options for enrollment of employee-owned computers are limited.
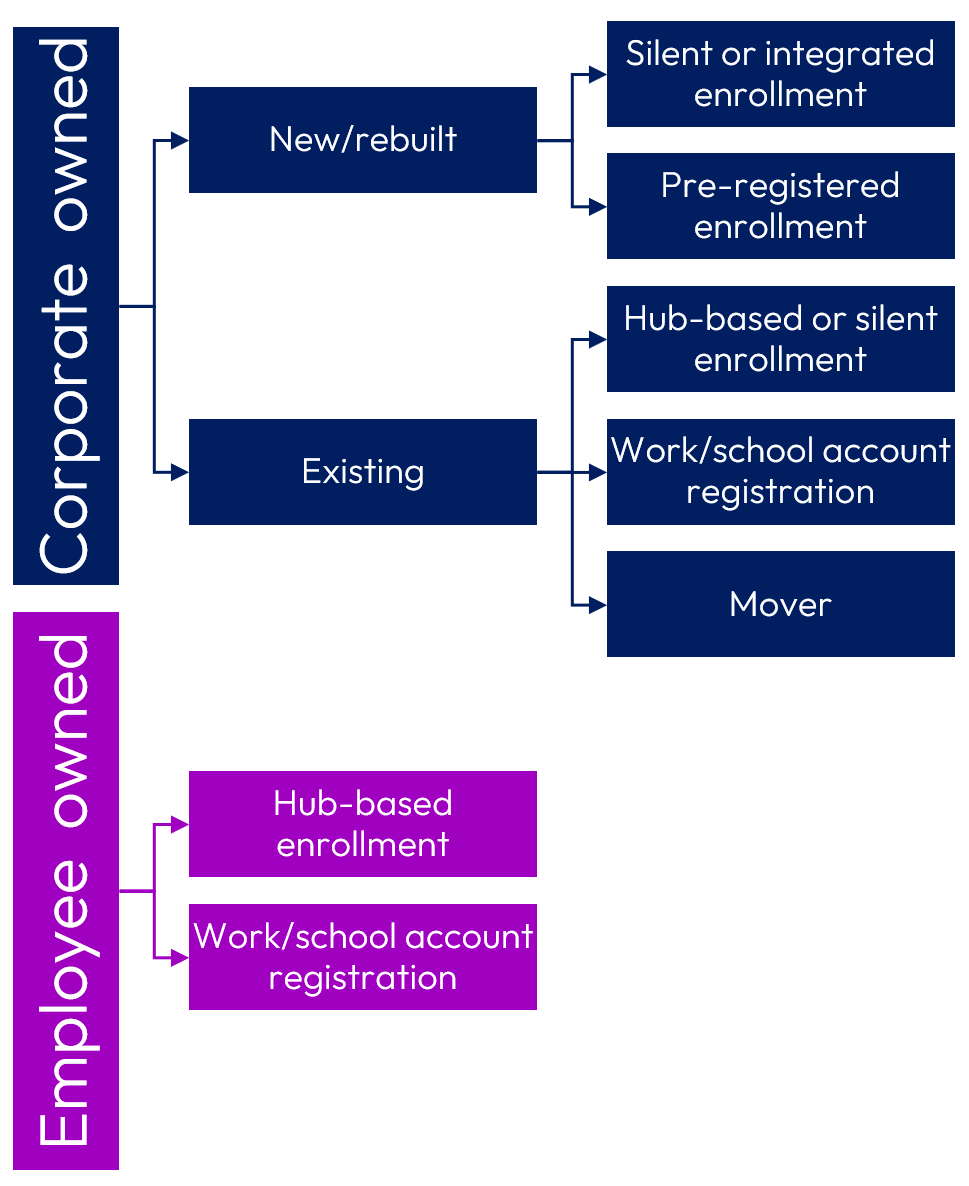
Figure 25: Options for corporate-owned vs. employee-owned computers
Intelligent Hub agent-based enrollment
Users with local admin rights can manually enroll their device into Workspace ONE. The process for manually enrolling a device via the Intelligent Hub for Windows may follow the standard prompts or may be customized.
- Download AirWatchAgent.msi from https://getwsone.com or otherwise obtain the installation file.
- Double click the AirWatchagent.msi to begin installation.
- Unless administratively customized, the following installation screens and prompts will be presented:
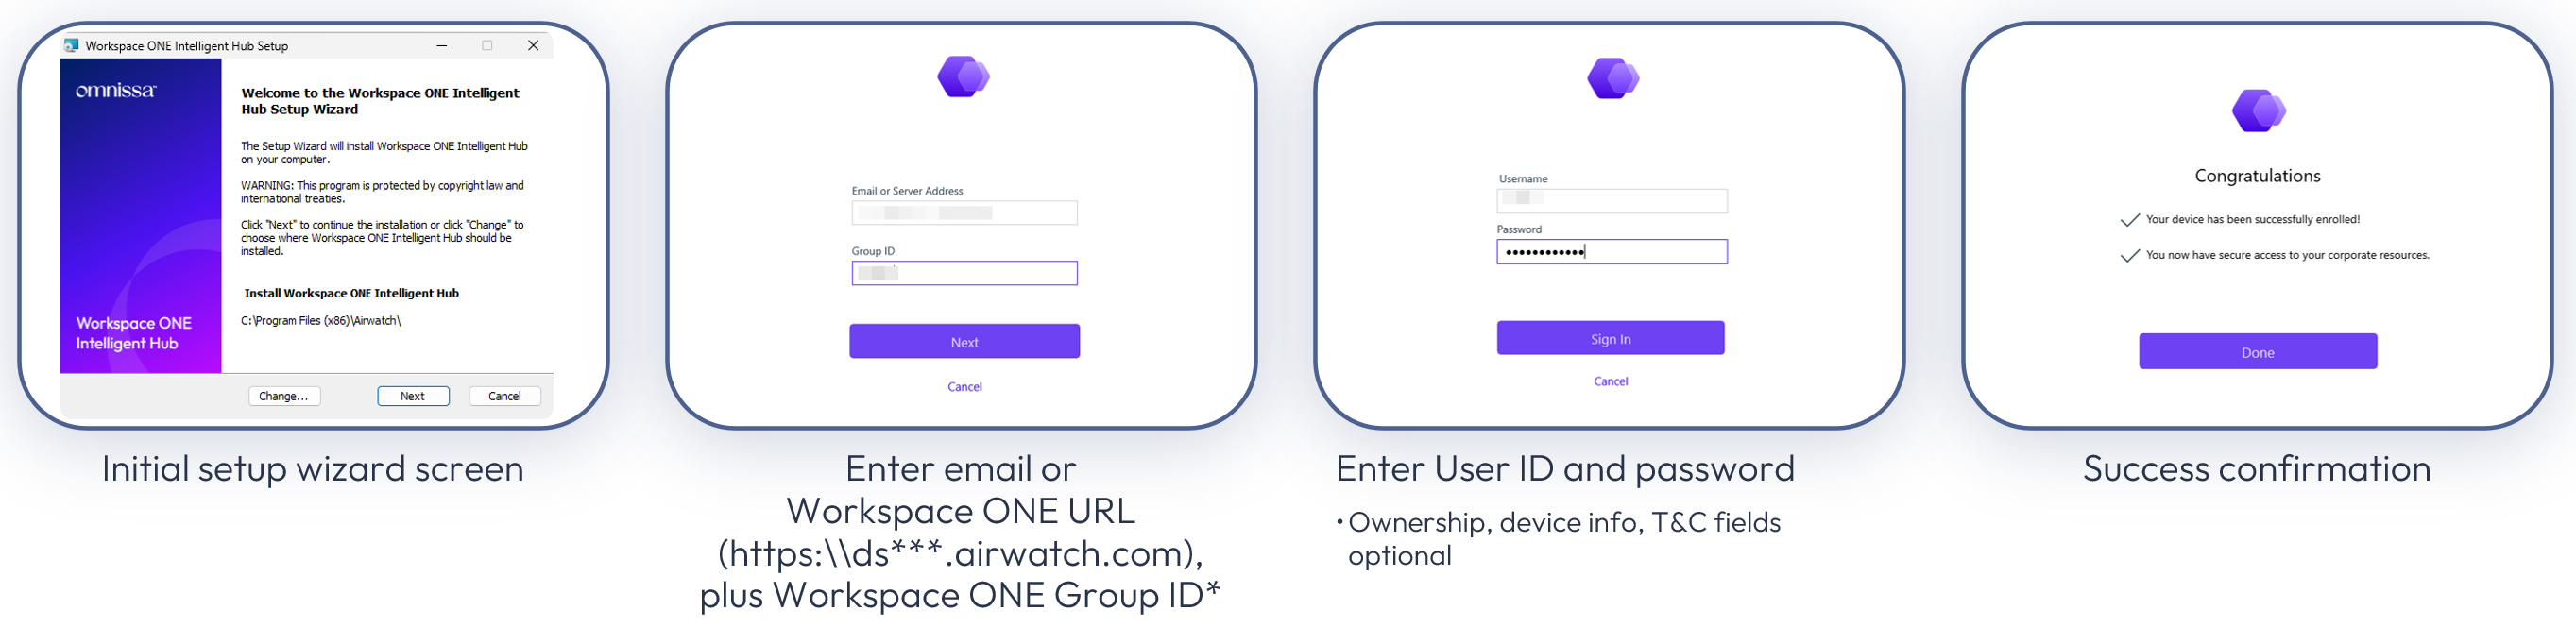
Figure 26: Intelligent Hub for Windows manual installation
Note: *Group ID is not necessary if Devices & Users > General > Enrollment > Authentication email domain is registered because URL and Organizational Group is automatically gleaned from email entry. This works in conjunction with Enrollment > Group ID Assignment mode set in Grouping tab, as well as Shared Device > Grouping.
Device enrollment eligibility, as well as the prompts presented and messages, are configured within the Settings > Devices & users > General > Enrollment interface. All tabs and individual settings within Enrollment should be reviewed and customized for your environment.
Amongst other settings, the Authentication tab is where you can:
- Set email domain to eliminate Group ID prompt
- Determine whether all or only registered devices can enroll
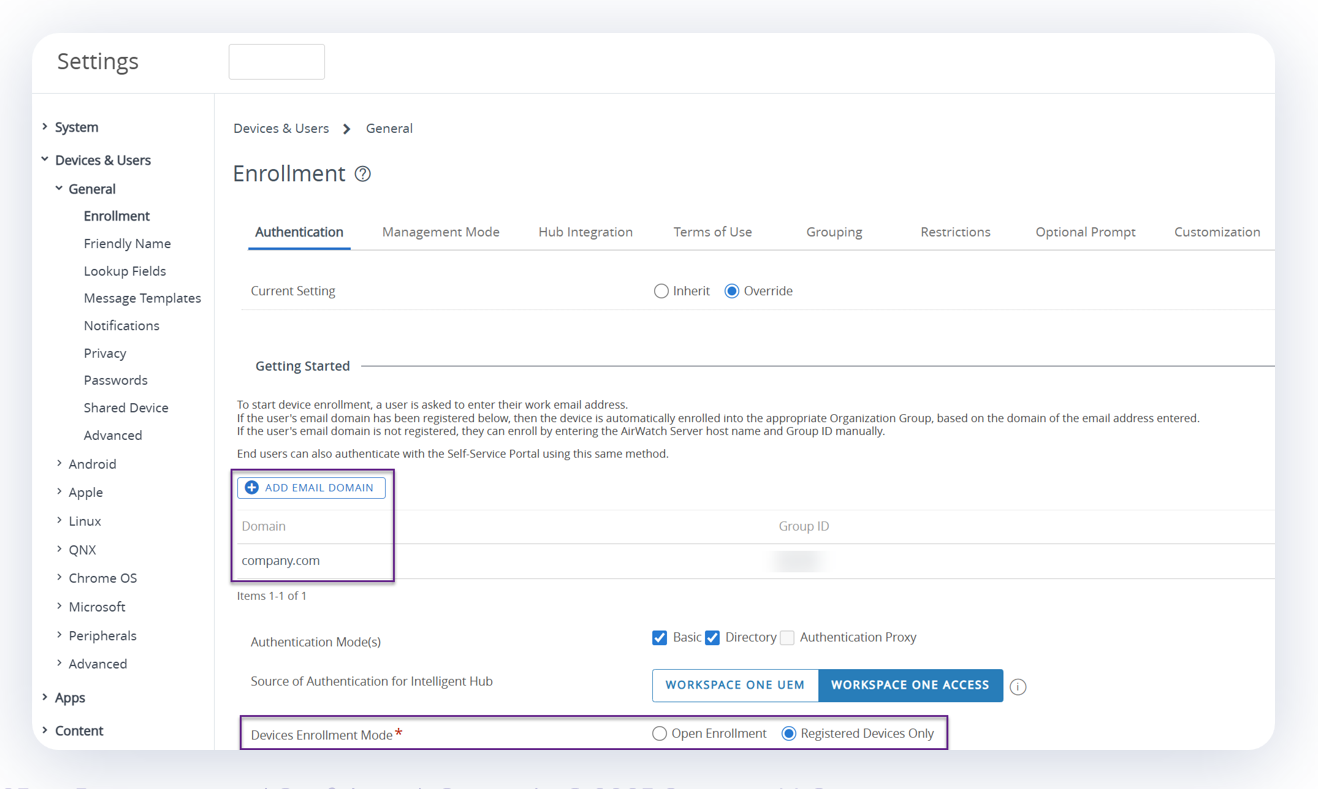
Figure 27: Settings > Devices & users > General > Enrollment > Authentication
In addition, the Optional Prompt tab is where the Intelligent Hub installation experience can be customized. In particular, the following settings can be configured:
- Designate Intelligent Hub installation prompts
- Control OOBE and provisioning/enrollment experience
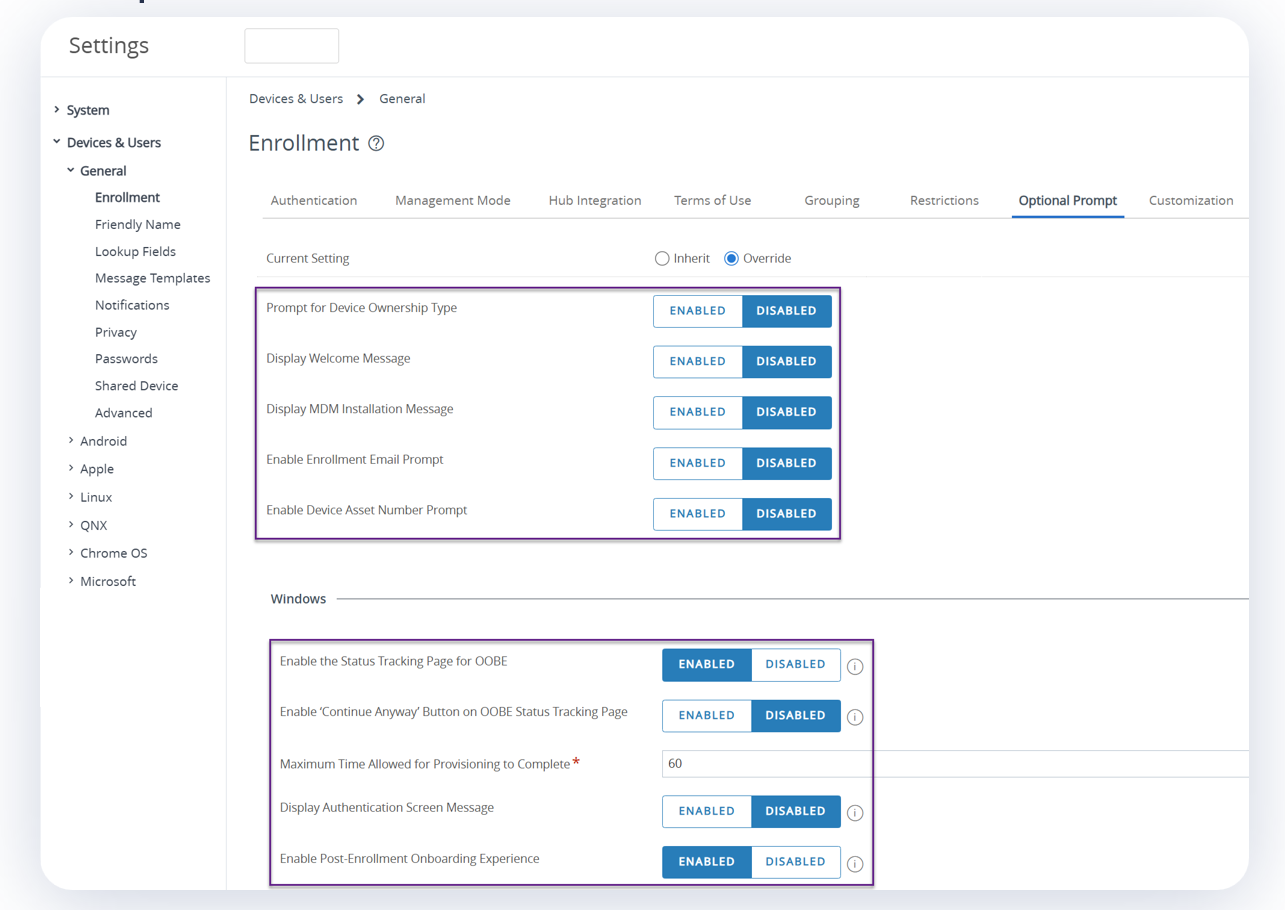
Figure 28: Settings > Devices & users > General > Enrollment > Optional Prompt
For example, if device ownership and asset number were enabled, users would be presented with these additional prompts during the Intelligent Hub enrollment process.
Windows work/school account
From the Windows device > Settings > Accounts > Access work or school, users with local admin rights can enroll Entra joined devices into Workspace ONE. Auto-enrollment must be configured within the Intune administrative interface.
Omnissa does not recommend this method of enrollment because it is confusing to users and requires more complex administrative configuration.
Silent enrollment
Silent enrollment automates the Intelligent Hub installation process and prompt responses by means of command line parameters, as well as invoking a staging account that is later flipped to the user at first logon. Although it is possible to enroll the device to a specific user, this is rarely done.
The most common enrollment process is as follows:

Figure 29: Silent enrollment process
Configuration
Standard MSI command line options can be used, such as /q and /qn.
An example of basic silent enrollment is as follows:
msiexec.exe /i <path_AirWatchAgent.msi> /q
ENROLL=Y SERVER=ds###awmdm.com LGName=<groupID> USERNAME=<staginguser> PASSWORD=<stagingpassword>
ASSIGNTOLOGGEDINUSER=N
These required parameters must be present:
ENROLL=Y
SERVER= and LGNAME=
USERNAME= and PASSWORD=
- Staging account credentials
ASSIGNTOLOGGEDINUSER=
- Y=Switch from staging user to currently logged in user
- N=Automatically switch upon next logon
- Must be the last field!
Key optional parameters include:
DEVICEOWNERSHIPTYPE=
- CD is corporate dedicated; CS is corporate shared; EO is employee owned
Multiple parameters for EOBO (enrolled on behalf of) user
For a complete list of all parameters, see Omnissa KB 78733.
Staging account
A staging account is applicable to all types of silent enrollments. While a staging account is automatically created with your Workspace ONE account, changes to that account and/or adding accounts are common.
Staging accounts are created and maintained with Accounts > Users > Add/Edit. New accounts can be created here, as well as existing account maintenance.
In particular, the “Allow user to enroll into additional Organization Groups” configuration should be reviewed under Accounts > Users > Add/Edit > General > Enrollment.
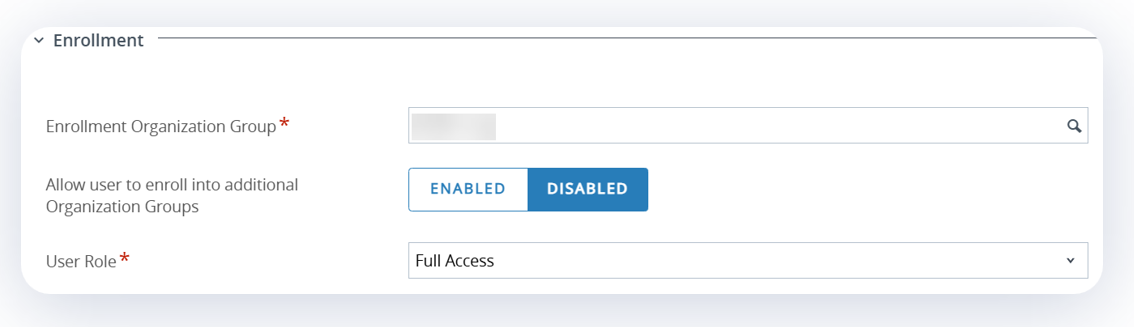
Figure 30: Staging account OG and permissions
In addition, the staging configuration should be reviewed under Accounts > Users > Add/Edit > Advanced > Staging. Specifically, ensure that “Enable Device Staging” is enabled (note that it is disabled by default) and set the “Single User Devices” to Standard. This causes users to be asked to login after staging has completed. On this screen, note that “Multiuser Devices” setting is for mobile platforms and not Windows Multiuser functionality.
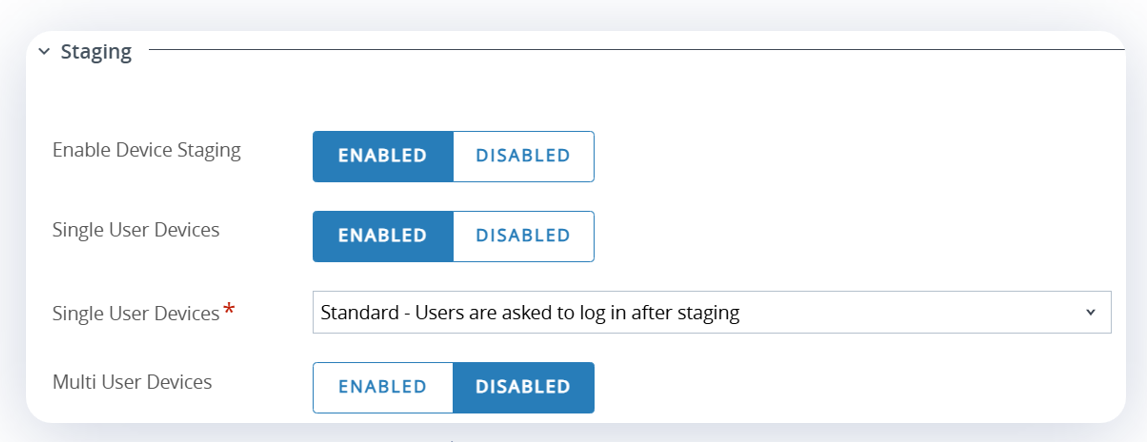
Figure 31: Staging account enablement and configuration
Drop Ship Offline integrated enrollment
As part of Drop Ship Offline configuration, the required fields include enrollment configuration for the following Active Directory types:
- Active Directory
- Workgroup
- Azure Active Directory - No Premium
If Azure Active Directory Premium is selected, then enrollment settings are configured within the Entra ID interface by adding the “Airwatch by Omnissa” MDM app.
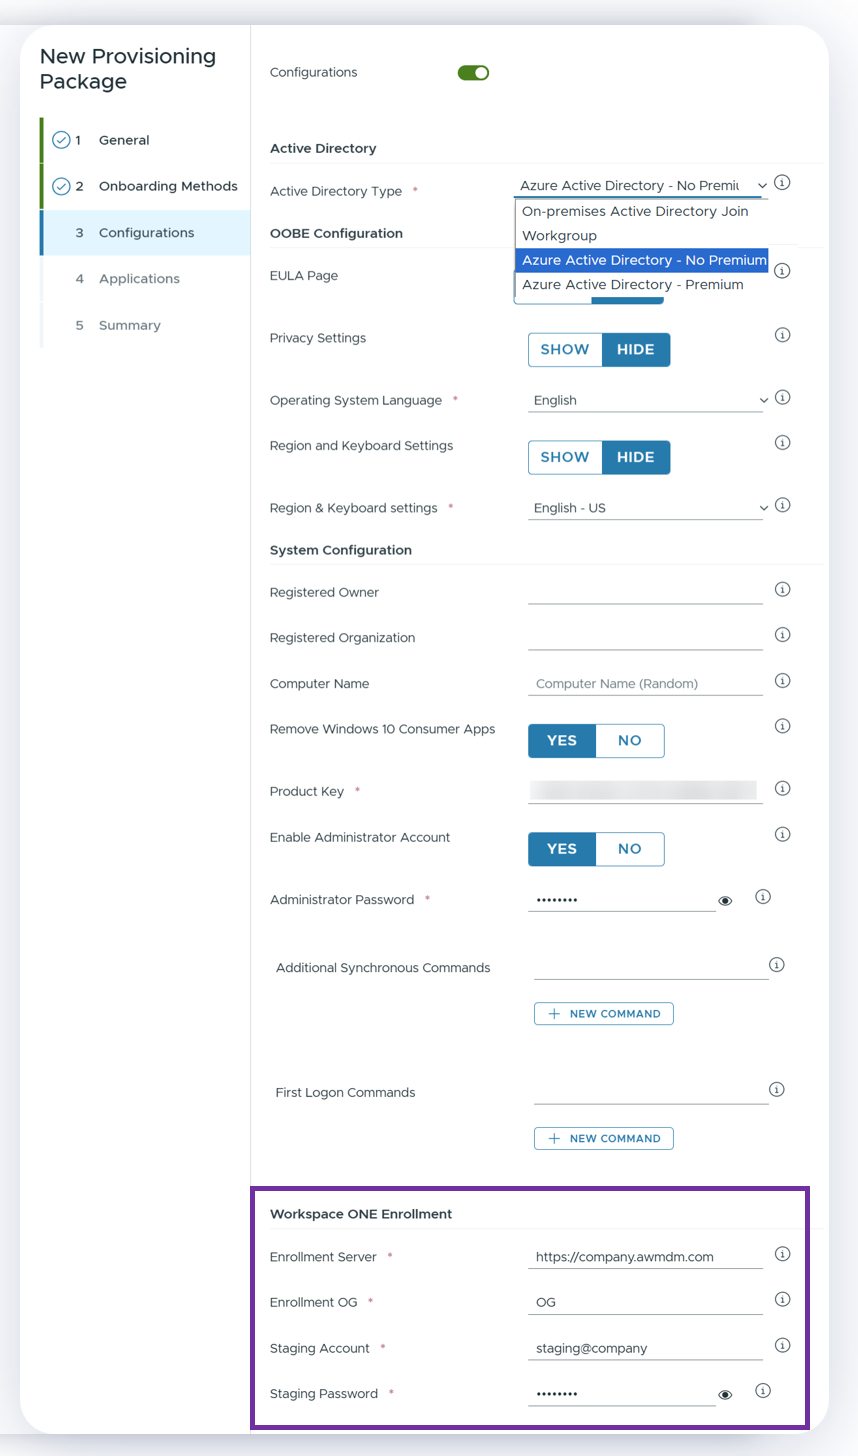
Figure 32: Workspace ONE enrollment integrated with most Active Directory selections
Mover
Mover provides zero-touch device migration to a Workspace ONE tenant. It automates migration for the following scenarios:
- Intune ➔ Workspace ONE
- Workspace ONE tenant➔ Workspace ONE tenant
There are three key steps to Mover functionality:
- Admin configures new Workspace ONE settings in appsettings.json file
- Deploy Mover with existing tool
- Device auto-runs processes
- Unenroll from Intune or other MDM
- Enroll into new Workspace ONE tenant
Note that Mover is a GitHub utility and not an official Omnissa tool. More information about Mover can be found here: https://github.com/tbwfdu/mover
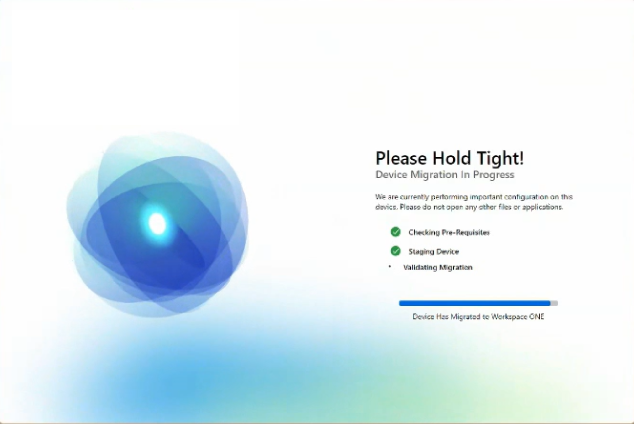
Figure 33: Mover transitioning device to Workspace ONE
Deferred enrollment designed for Horizon implementations
Deferred enrollment is a new feature that provides automated enrollment of Horizon Cloud VMs to Workspace ONE UEM, enabling virtual desktops to enroll immediately upon login. This streamlined functionality eliminates embedded installers, scripts, and credentials and supports dedicated pools, i.e., 1:1 or 1: many. This is how Deferred enrollment works at a high level:
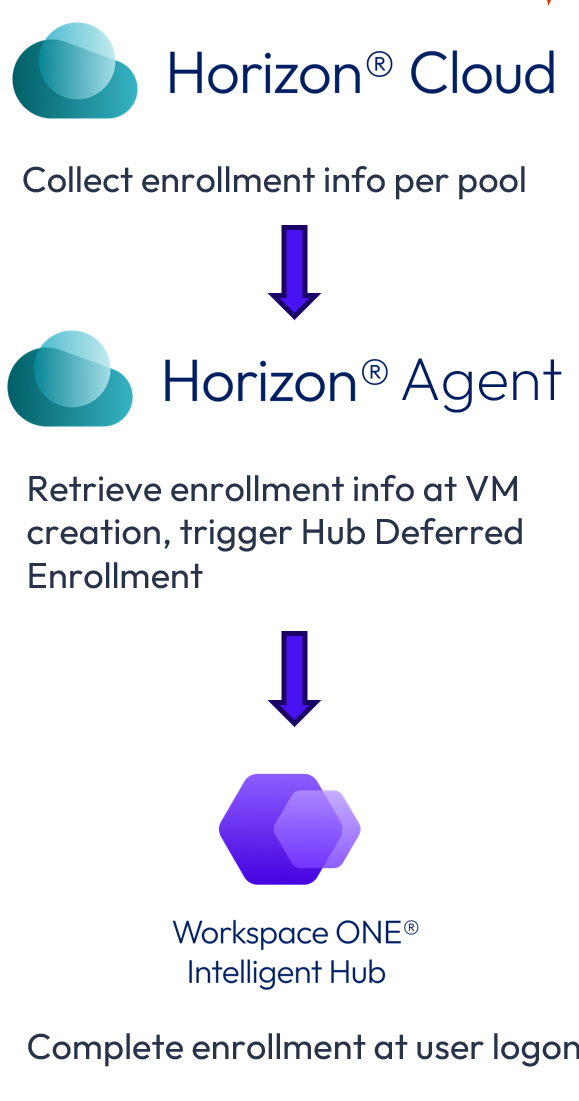
Figure 34: New Deferred Enrollment integration process
In conjunction with Horizon components, Deferred enrollment delays enrollment until first user login. To support this, two new Silent Enrollment parameters have been created to integrate with Horizon implementations:
- DEFERENROLLMENT=Y
- Cache enrollment info at computer boot (no user session)
- Delays automated enrollment of VDI until first active user session
- Typically used in conjunction with cmd line enrollment
- If no interactive Windows user session, enrollment info cached
- If interactive Windows user session, enrollment completes
- PROVISIONHUB=Y
- Enables Intelligent Hub to survive SYSPREP
- Used to embed Hub in template or gold image
- Typically used in conjunction with cmd line enrollment or Deferred Enrollment
- Interactive Windows user session required to complete enrollment
From an administrative standpoint, the process for embedding Intelligent Hub and enrollment integration is as follows:

Figure 35: New Workspace ONE + Horizon Deferred Enrollment process
Note that both DEFERENROLLMENT and PROVISIONHUB are recommended for use together.
Multiuser
Multiuser is a Workspace ONE technology that enables multiple users to use a device asynchronously. Enrollment is automatically switched to the newly logged in Windows user at logon based on successful authentication. As such, Windows devices that have already been enrolled, can be securely accessed by subsequent users without re-enrollment.
Use cases for Windows Multiuser include:
- Kiosk devices
- Loaner laptops
- Shift workers
- Includes Horizon Floating Assignment pools
In the example below, Tom is currently accessing a Windows Multiuser device. When Tom logs off, and a new user, Lee, accesses this computer, the device does not need to enroll once again. The existing enrollment will transfer, and once Lee authenticates, the proper applications and settings will be pushed to this device.
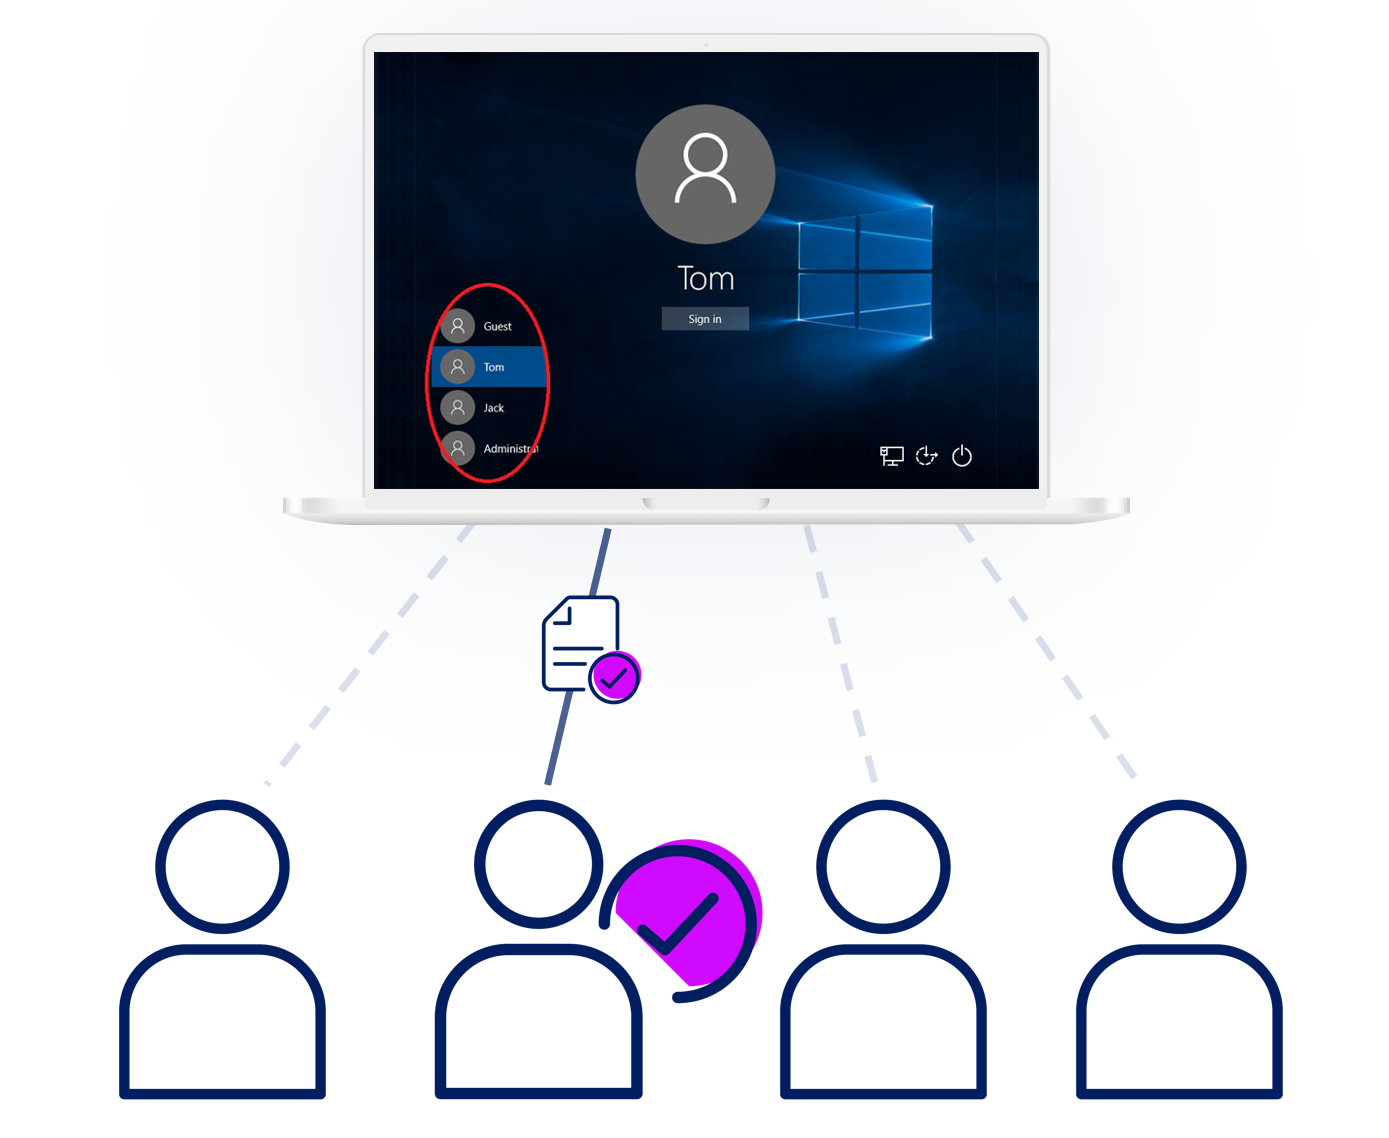
Figure 36: Multiuser devices do not enroll for each new user
There may be groups of users for whom enrollment onto Multiuser devices should not occur. For example, a help desk or admin accessing a device to address an issue would not need full Multiuser functionality. By configuring “Windows Multiuser Checkout Restrictions within the Settings > Devices & users > General > Enrollment screen, one or more Smart Groups can be excluded from enrolling on Multiuser devices.

Figure 37: Windows Multiuser User Checkout Restrictions disallows enrollment for specified groups
Depending on when Windows devices are enrolled, the default setting may be Single user or Multiuser. Single user devices can be changed to Multiuser individually or in bulk.
Starting with Release 25.06, administrators can choose whether devices are initiated as Single User or Multiuser within the Settings > Devices & users > Microsoft > Intelligent Hub settings screen.
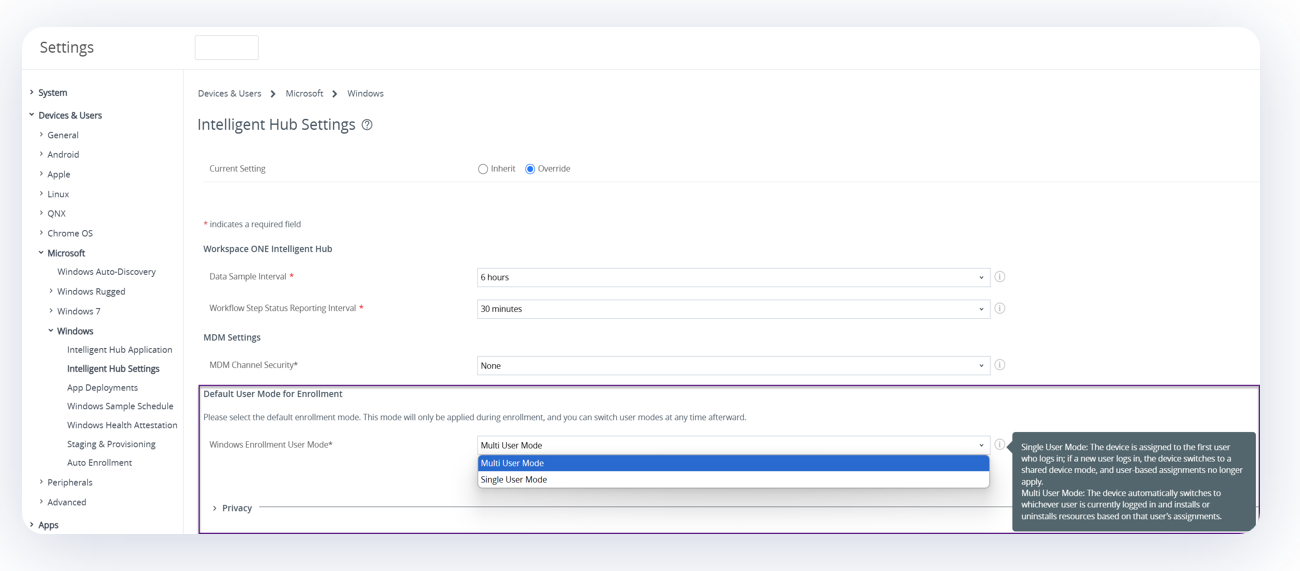
Figure 38: Administrative select Single user or Multiuser as default
Please see Workspace ONE UEM Windows Multiuser article in TechZone for more information about Multiuser functionality.
Onboarding
This new feature enables administrators to apply one or more Freestyle Orchestrator workflows after enrollment, prior to any other workflows, configuration or resource deployments.
This step is optional, and designated workflow(s) will be executed only once on newly enrolled devices. As with all Freestyle Orchestrator workflows, administrators can determine whether the workflow continues if a failure is encountered or whether the workflow ceases executing.

Figure 39: Freestyle Orchestrator Onboarding phase
For example, a sensor may be run to ascertain whether the new Windows computer is equipped with an Intel vPro processor. If yes, a subsequent step may include the installation of the Intel vPro driver that enables Chip-to-cloud functionality.
In addition, Offline Domain Join can be enabled as a part of an Onboarding workflow.
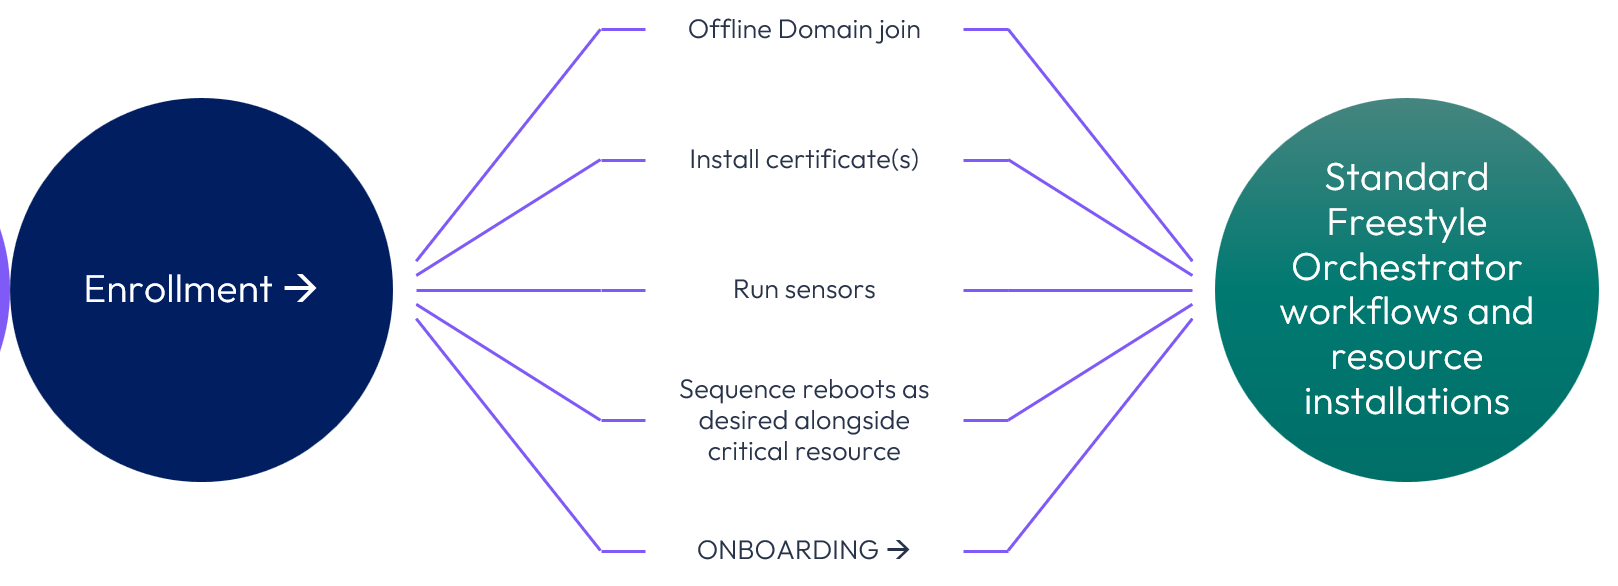
Figure 40: Running a Sensor, installing a certificate, and other activities can be performed during the Freestyle Orchestrator Onboarding phase
Windows Server
Due to the inherent differences between Windows Desktop and Windows Server operating systems, not all initiation functionality is possible with Windows Server.
Specifically, Drop Ship and Autopilot are not supported on Windows Server. However, Enrollment and Onboarding are applicable as shown below:
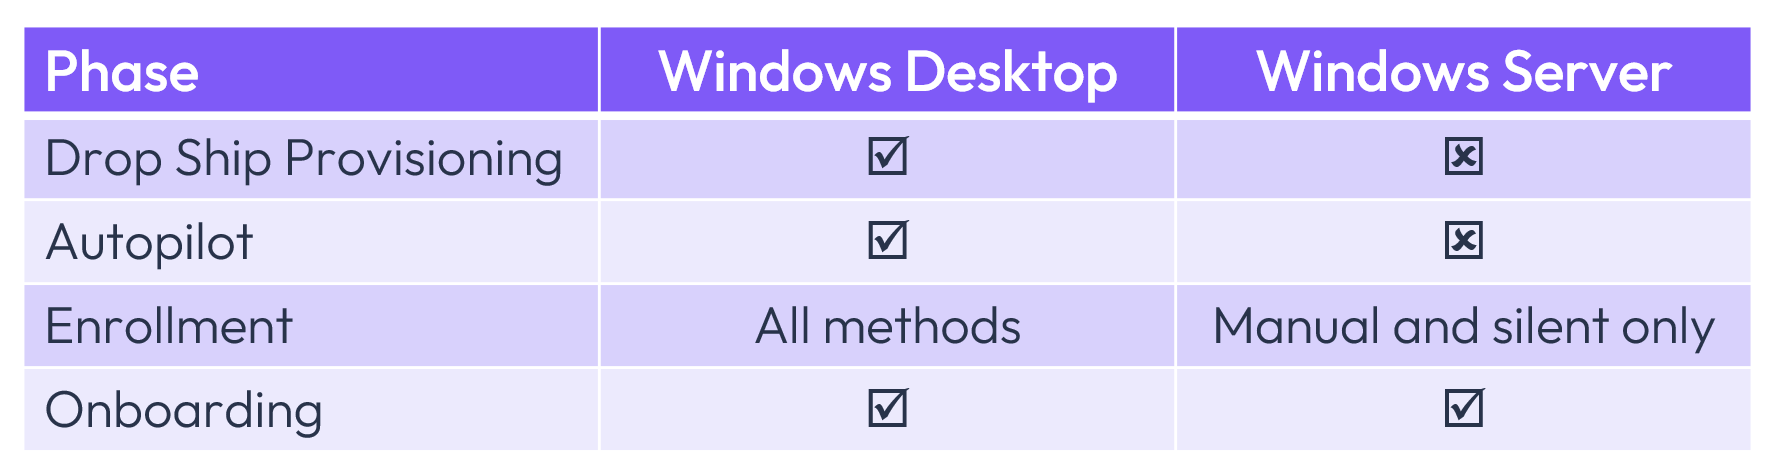
Figure 41: Comparison of Windows Desktop and Windows Server functionality
Summary
There are many options for provisioning, enrolling, and onboarding Windows devices into Workspace ONE UEM. A key aspect is crisply defining these terms:
- Provisioning: New/rebuilt devices, including domain join
- Enrollment: Workspace ONE device registration
- Onboarding: One-time post-enrollment workflow, including offline domain join
The options for each of these three phases are largely dependent upon the domain type and device ownership, and these are summarized below:
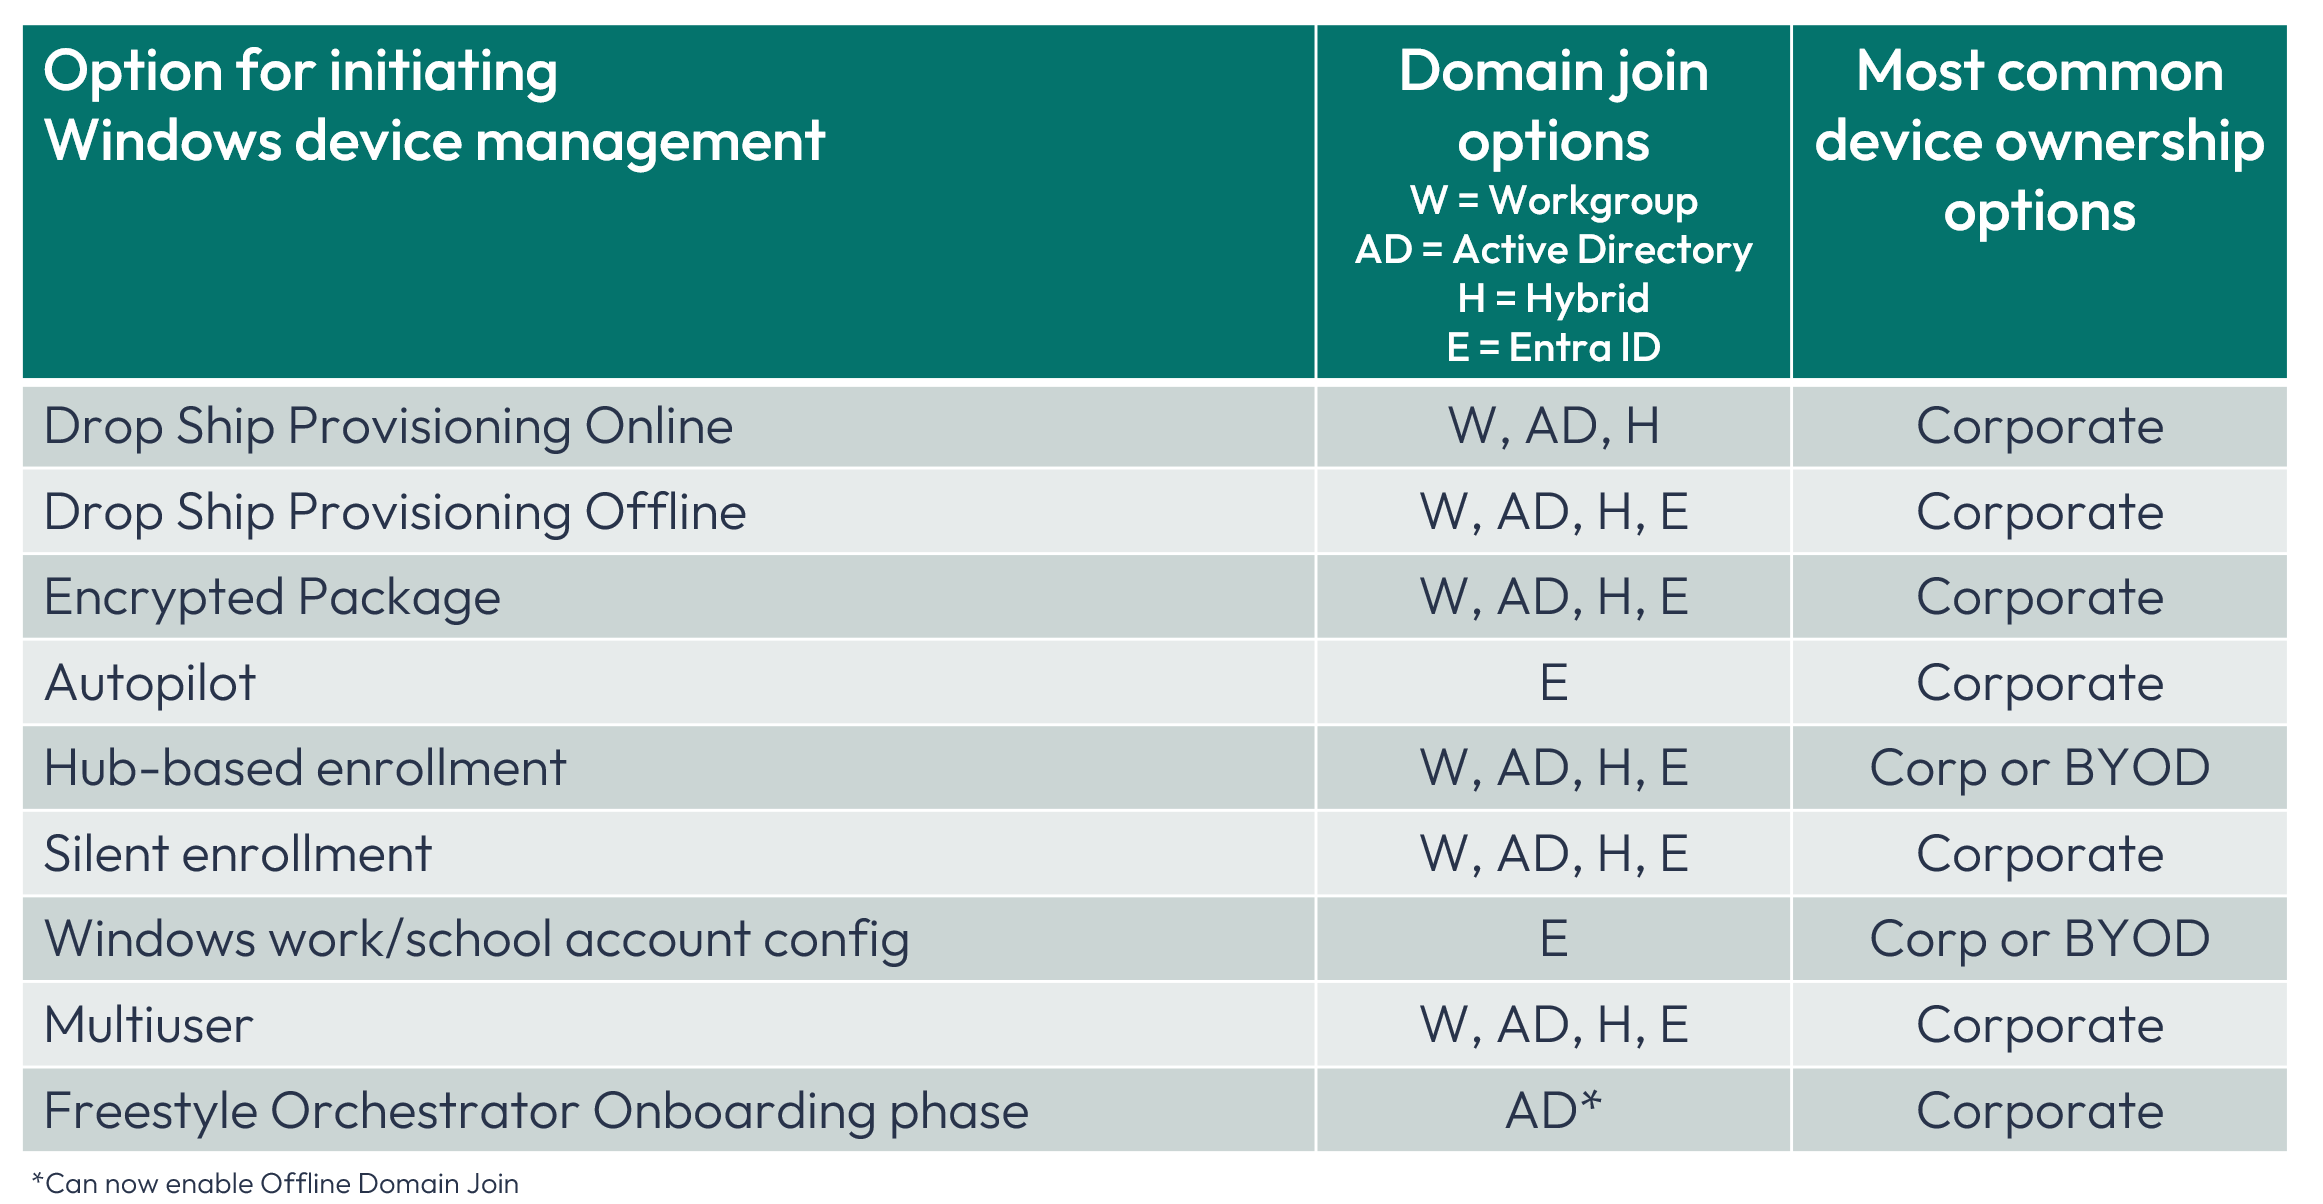
Figure 42: Options for Windows devices based on Domain and ownership
Additional resources
For more information about Workspace ONE UEM Windows management, please see the following TechZone articles:
- Enrolling Windows devices using Entra ID
- Drop Provisioning Online
- Workspace ONE UEM Windows Multiuser
Changelog
The following updates were made to this guide:
| Date | Description of Changes |
| 07/22/25 |
|
About the author and contributors
- Jo Harder, Sr. Technical Marketing Architect, Omnissa
- Phil Helmling, Adoption Product Manager, Omnissa
- Josh Spencer, Sr. Product Manager, Omnissa
Feedback
Your feedback is valuable.
To comment on this paper, contact End-User-Computing Tech Zone team at tech_content_feedback@omnissa.com.