Workspace ONE UEM Windows Multiuser
Overview
Windows Multiuser functionality enables Workspace ONE UEM management of Windows devices for multiple users on a single physical or virtual device, including Horizon persistent pools. Windows Multiuser addresses not only technical and security requirements for shared Windows devices, but it can also decrease the number of physical and/or virtual devices deployed, resulting in cost savings.
This document will walk through the following topics:
- What is Windows Multiuser?
- Technical requirements
- Settings and options
- Resource assignment, including applications
- Validation and troubleshooting
What is Windows Multiuser?
Workspace ONE Windows Multiuser functionality allows two or more users to share a single device asynchronously, each with their own unique login experience. Whether the Windows endpoint is accessed as a physical kiosk-type device, virtual endpoint within a call center, manufacturing shop, or other shared environment, each user can log in and out without impacting subsequent users. 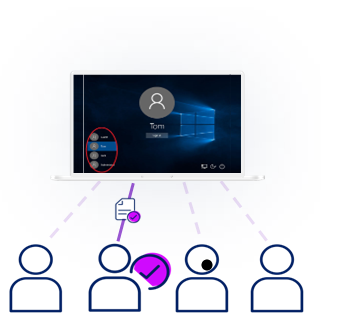
Figure 1: Multiuser enables multiple users to access the same physical or virtual desktop
In the example above, Tom’s desktop is likely different than Jack’s desktop due to permissions, applications, and other settings, but they can each log onto the same device with a distinct logon experience.
Important: Multiuser functionality implies multiple users logging into the same Windows device at distinct times, i.e., asynchronously. Multiuser is not the same as multisession, wherein multiple users access the same virtual desktop at the same time.
To clarify, the two modes are defined as follows:
- Single user: Only one user who is enrolled on the device. The enrolled user will not be updated if another user signs into Windows.
- Multiuser: Enrolled user of the device will be updated based on the current logged in Windows user.
Use Cases
Some ideal use cases for Windows Multiuser include:
- Horizon VDI
- Call centers
- Preferred-seating office space
- Manufacturing shop shift workers
Multiuser is suitable within any environment wherein multiple users need to asynchronously access a single Windows device.
Technical requirements
The technical requirements for Windows Multiuser are:
- Workspace ONE UEM version 2406 or later
- Workspace ONE UEM modern architecture
- Workspace ONE UEM Intelligent Hub 2404 or later

Figure 2: Technical requirements for Windows Multiuser
Workspace ONE version 2406
Workspace ONE version 2406 was made available in August 2024, and this release automatically enables Multiuser functionality. However, Workspace ONE version 2406 is not the sole requirement.
Workspace ONE UEM modern architecture
The new Workspace ONE UEM modern architecture is also a requirement for Multiuser. As part of this new underlying architecture, the feature flag for Windows Multiuser will automatically be enabled.
Workspace ONE SaaS customers will be upgraded to the modern architecture platform starting in August 2024, with rollout extending several months.
Workspace ONE Intelligent Hub version 2404
Lastly, Workspace ONE Intelligent Hub version 2404 or later is required.
Multiuser settings and options
This section will provide detailed information about Multiuser-related setting and options, as well as recommendations, and will be broken down into the following subsections:
- Device enrollment
- Shared device settings
- Multiuser mode settings
- User attributes
- Resource assignment, including profiles and applications
For basic Windows Multiuser step-by-step configuration instructions, see Omnissa Docs.
Device enrollment
Several options exist for Windows device enrollment. When Windows Multiuser was first released and all technical requirements were met, Windows Multiuser mode was automatically enabled as the default for all new Workspace ONE managed Windows devices.
Starting with the 2506 release, administrators can choose the default user mode for newly enrolled Workspace ONE Windows devices. Note that changes made to this default setting do not apply to existing devices; these devices would need to be transitioned to the desired mode.
To change the default setting, go to Groups & Settings > All Settings > Devices & Users > Microsoft > Windows > Intelligent Hub Settings > Default User Mode and select the desired option.
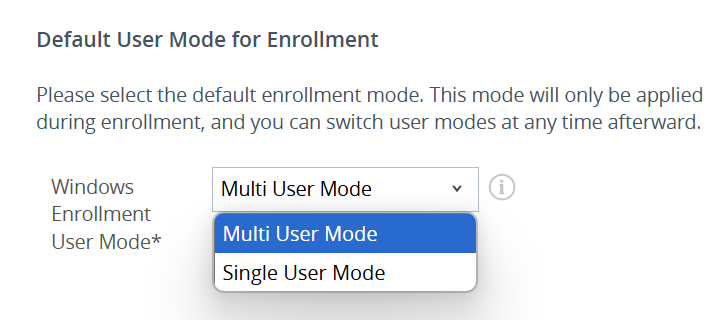
Figure 3: Default user mode: Multiuser or Single user
In addition, the method used to enroll devices may impact Multiuser steps and options.
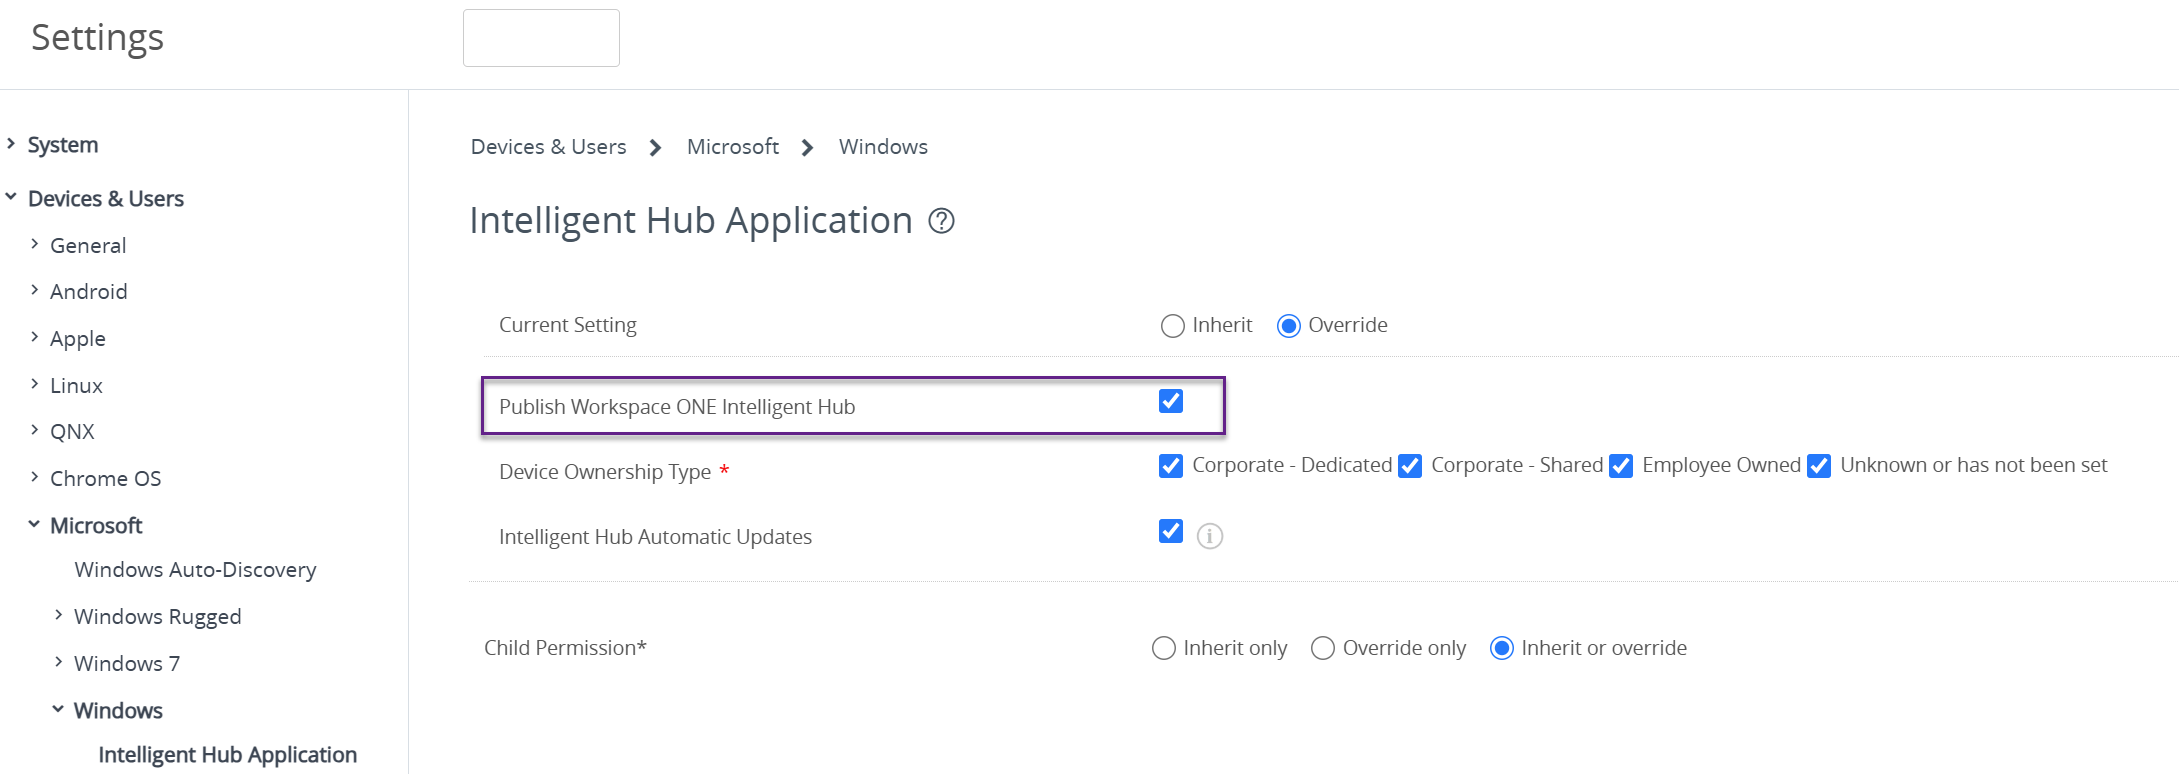
Figure 4: Publish Workspace ONE Intelligent Hub setting
Enrollment flow options and steps:
- Out-of-Box Experience: Devices enrolled via the Microsoft Out-of-Box Experience using Autopilot are supported. Ensure that the “Publish Intelligent Hub" option is selected in System Settings.
- Agent Enrollment: No additional configuration is required.
- Workspace ONE Enrollment: Ensure that “Publish Intelligent Hub” option is selected in system settings.
- Dropship provisioning (online and offline): No additional configuration is required.
- Staging enrollment flows: Any user can now become a staging user. Administrators are no longer required to pre-configure a user to be a dedicated staging user. If common resources are created in the device context and assignments are configured for all users of the device, resources will not be re-installed.
Impact on Multiuser switching
Note that Multiuser switching behaves differently depending on the enrollment flow selected.
Where silent enrollment, i.e., script or command line, are used, a staging account is required. This means that the username/password combination of the account used to enroll needs to be marked as "staging" in the Workspace ONE UEM console. In addition, the ASSIGNTOLOGGEDINUSER=Y switch must be included within the script or command line that executes enrollment.
This combination allows the following behavior/scenario:
- Hub is installed on device but not enrolled (PROVISIONINGMODE=Y)
- Logon script is scheduled to run at user logon and execute silent enrollment using the staging account credentials.
- End user logs on to Windows, script executes, device is enrolled to the staging account and within seconds is switched to the logged in user. Both Intelligent Hub and the Workspace ONE UEM console will now reflect the logged in user.
- Following this, Multiuser works as expected. Intelligent Hub flips to each new user that logs in to Windows.
Silent enrollment and the new Horizon + UEM Deferred Enrollment will both function as described above.
Other enrollment flows do not require staging accounts. For example, if enrollment occurs when a user provides their credentials to Intelligent Hub, Multiuser simply works without any type of staging account.
Shared device settings
The Shared Device Grouping setting controls how to map a device to the right Organization Group. Specifically, the Group Assignment Mode option under Groups & Settings > All Settings > Devices and Users > General > Shared Device > Grouping setting defaults to Prompt User for Organization Group.

Figure 5: Shared Device > Grouping Setting
If this setting is not changed, the user will be prompted to enter the Organization Group ID. It is recommended to change this setting to “Fixed Organization Group” so that user re-assignment is silent. The device will remain in the current Organization Group.
Multiuser mode setting
Device mode status can be viewed and modified from the Devices > Devices screen. All Windows devices enrolled prior to the enablement of the technical requirements remain as Single user and may then be transitioned to Multiuser.
For example, prior to your environment becoming fully compliant with the technical requirements, you had 5,000 Windows endpoints. This week, you add 200 Windows endpoints; these are automatically enabled for Multiuser functionality. Next week, you decide to migrate all Single user devices to Multiuser. The graphic below reflects your Windows inventory at three points in time.
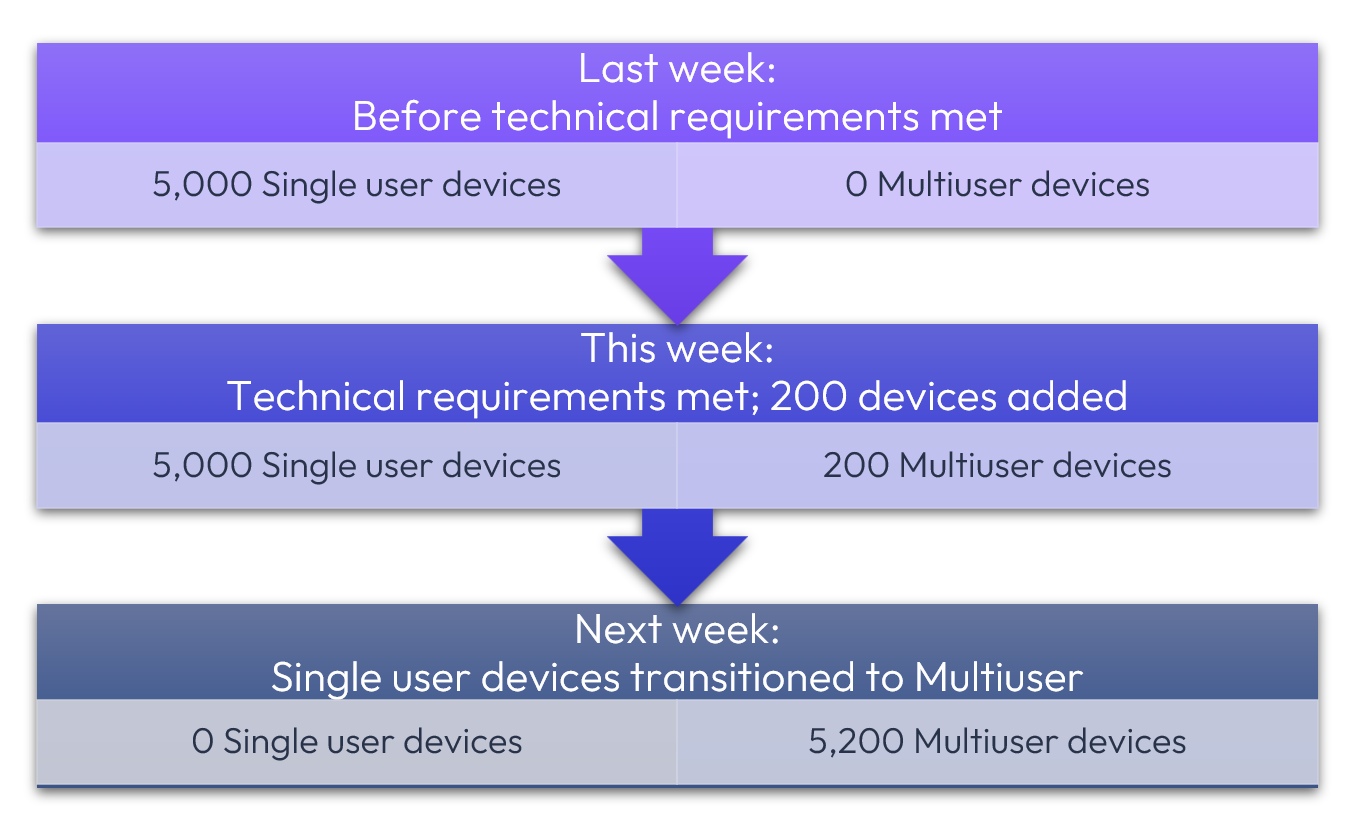
Figure 6: Automatic deployment of new Multiuser devices and transition of existing Single user devices to Multiuser
Similarly, Multiuser devices, whether initially or subsequently enabled, may later be reconfigured as Single user, as shown in Figure 5. When using the API method that is discussed shortly, designate as CHANGE_TO_SINGLEUSER.
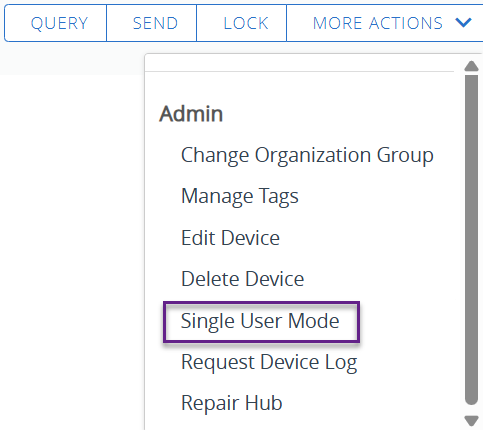
Figure 7: Existing Multiuser device presents the option to transition to Single user within Device Details > List View > More Actions > Admin screen
Note that there are two options for transitioning to Multiuser within the console. The distinction between these two options is as follows:
- Migrate to Multiuser: Switch from the legacy Single user framework to the new Multiuser framework. When using the API method, designate as MIGRATE_TO_MULTIUSER.
- Change to Multiuser: Switch between Single user and Multiuser when the device is on the new framework. When using the API method, designate as CHANGE_TO_MULTIUSER.
Note that legacy implies those Single user devices deployed prior to meeting the Multiuser prerequisites.
The option presented for each device under Devices > List View > More Actions (right corner) > Admin is dependent upon the current state of the device. For example, where a device was deployed as Single user prior to the Multiuser requirements, this option is presented:
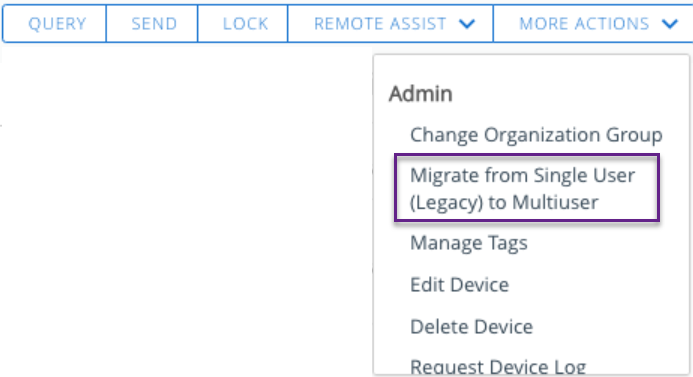
Figure 8: Pre-existing Single user device presents the option to transition to Multiuser within Device Details > List View > More Actions screen
Although the changeover often occurs within a few minutes, please note that it may take a few hours for the Windows device to consume the command.
Using this method from the Device List View, one to 100 devices can be selected for mode transition at the same time.
Multiuser mode changeover via API
If it is necessary to transition more than 100 devices at a time, the API method should be used. For example, to transition a large bulk of devices from Single User to Multiuser, the migration can be triggered with the following POST URL:
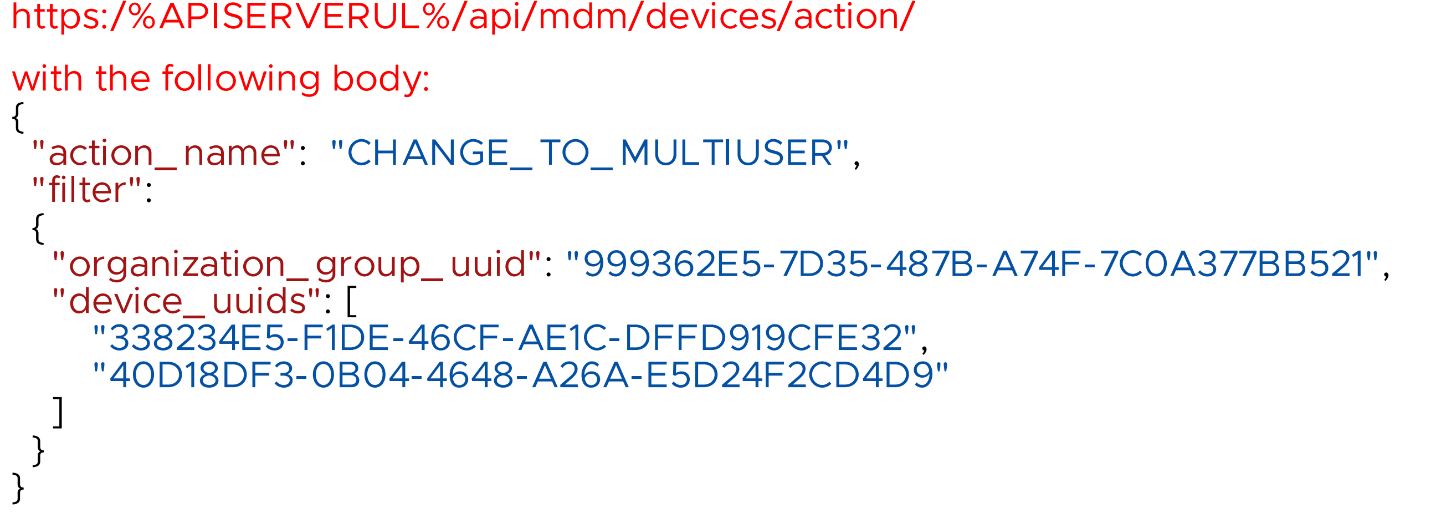
Figure 9: Example showing using the API to invoke CHANGE_TO_MULTIUSER
In this example, transitioning the existing Single user devices to Multiuser is configured via the MIGRATE_TO_MULTIUSER action to align with the description above. Other valid actions include CHANGE_TO_MULTIUSER and CHANGE_TO_SINGLEUSER.
Multiuser checkout restrictions
When a device is functioning in Multiuser mode, it may be useful to restrict specific users or groups from device enrollment, such as Administrators or Help Desk employees that may need to sign in to troubleshoot an issue. By enabling Multiuser checkout restrictions, device enrollment won’t flip to the designated user or group that only sporadically requires access to that Windows device.
This setting is configured within Groups & Settings > All Settings > Devices & Users > General > Enrollment > Restrictions > Enrollment Restrictions.
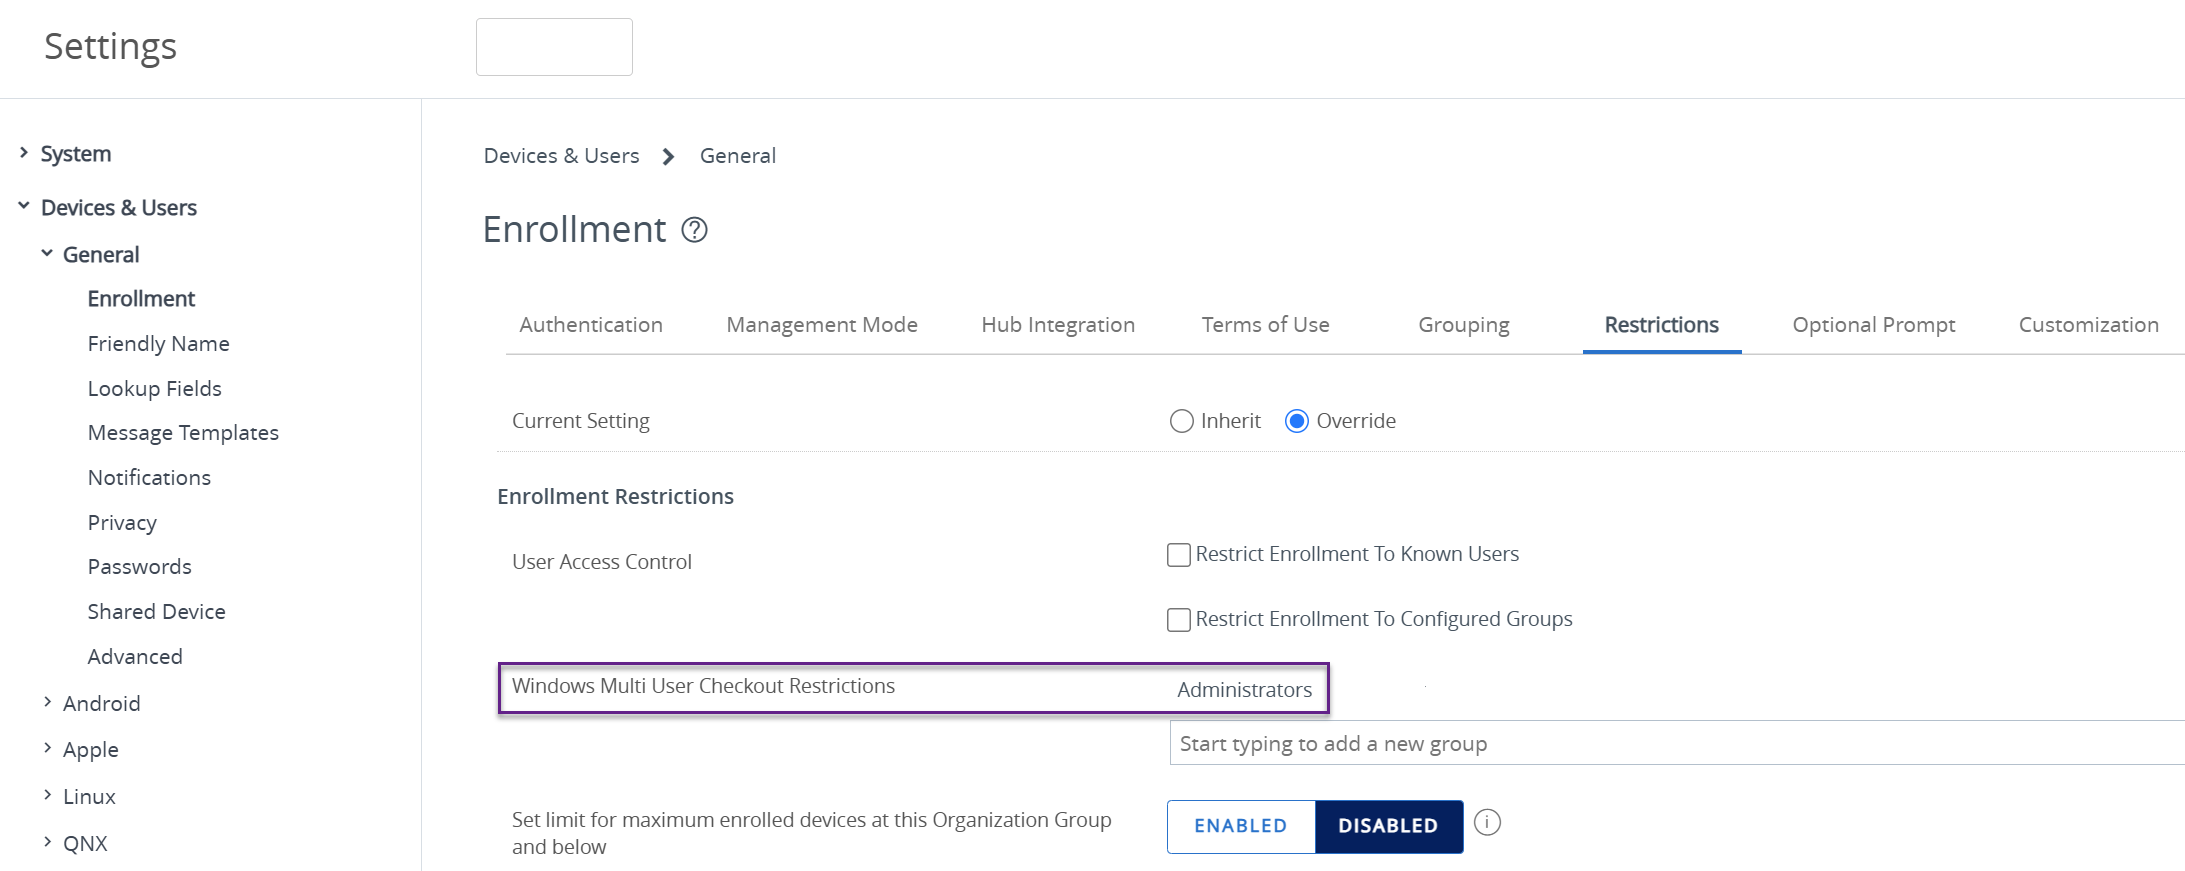
Figure 10: Restrict Multiuser checkout for Administrators and/or others.
Unique identifier attributes
It is necessary to set up the attributes used for matching to identify the currently logged in user and match to a user object in the UEM console.
To configure, go to: Groups & Settings > All Settings > Devices & Users > Microsoft > Windows > Intelligent Hub Settings > Attributes for Unique Identifier.
- In the Windows Intelligent Hub settings, pick the appropriate pair from the possible UEM User Attributes and the four attributes that the Intelligent Hub can gather from the device
- Under the Attributes for Unique Identifier, select the UEM User Attribute that aligns with the desired Client User Attribute.
By default, the unique identifier is set to Object Identifier / Object GUID. Omnissa recommends selecting User Principal Name / User Principal Name for the majority of use cases.
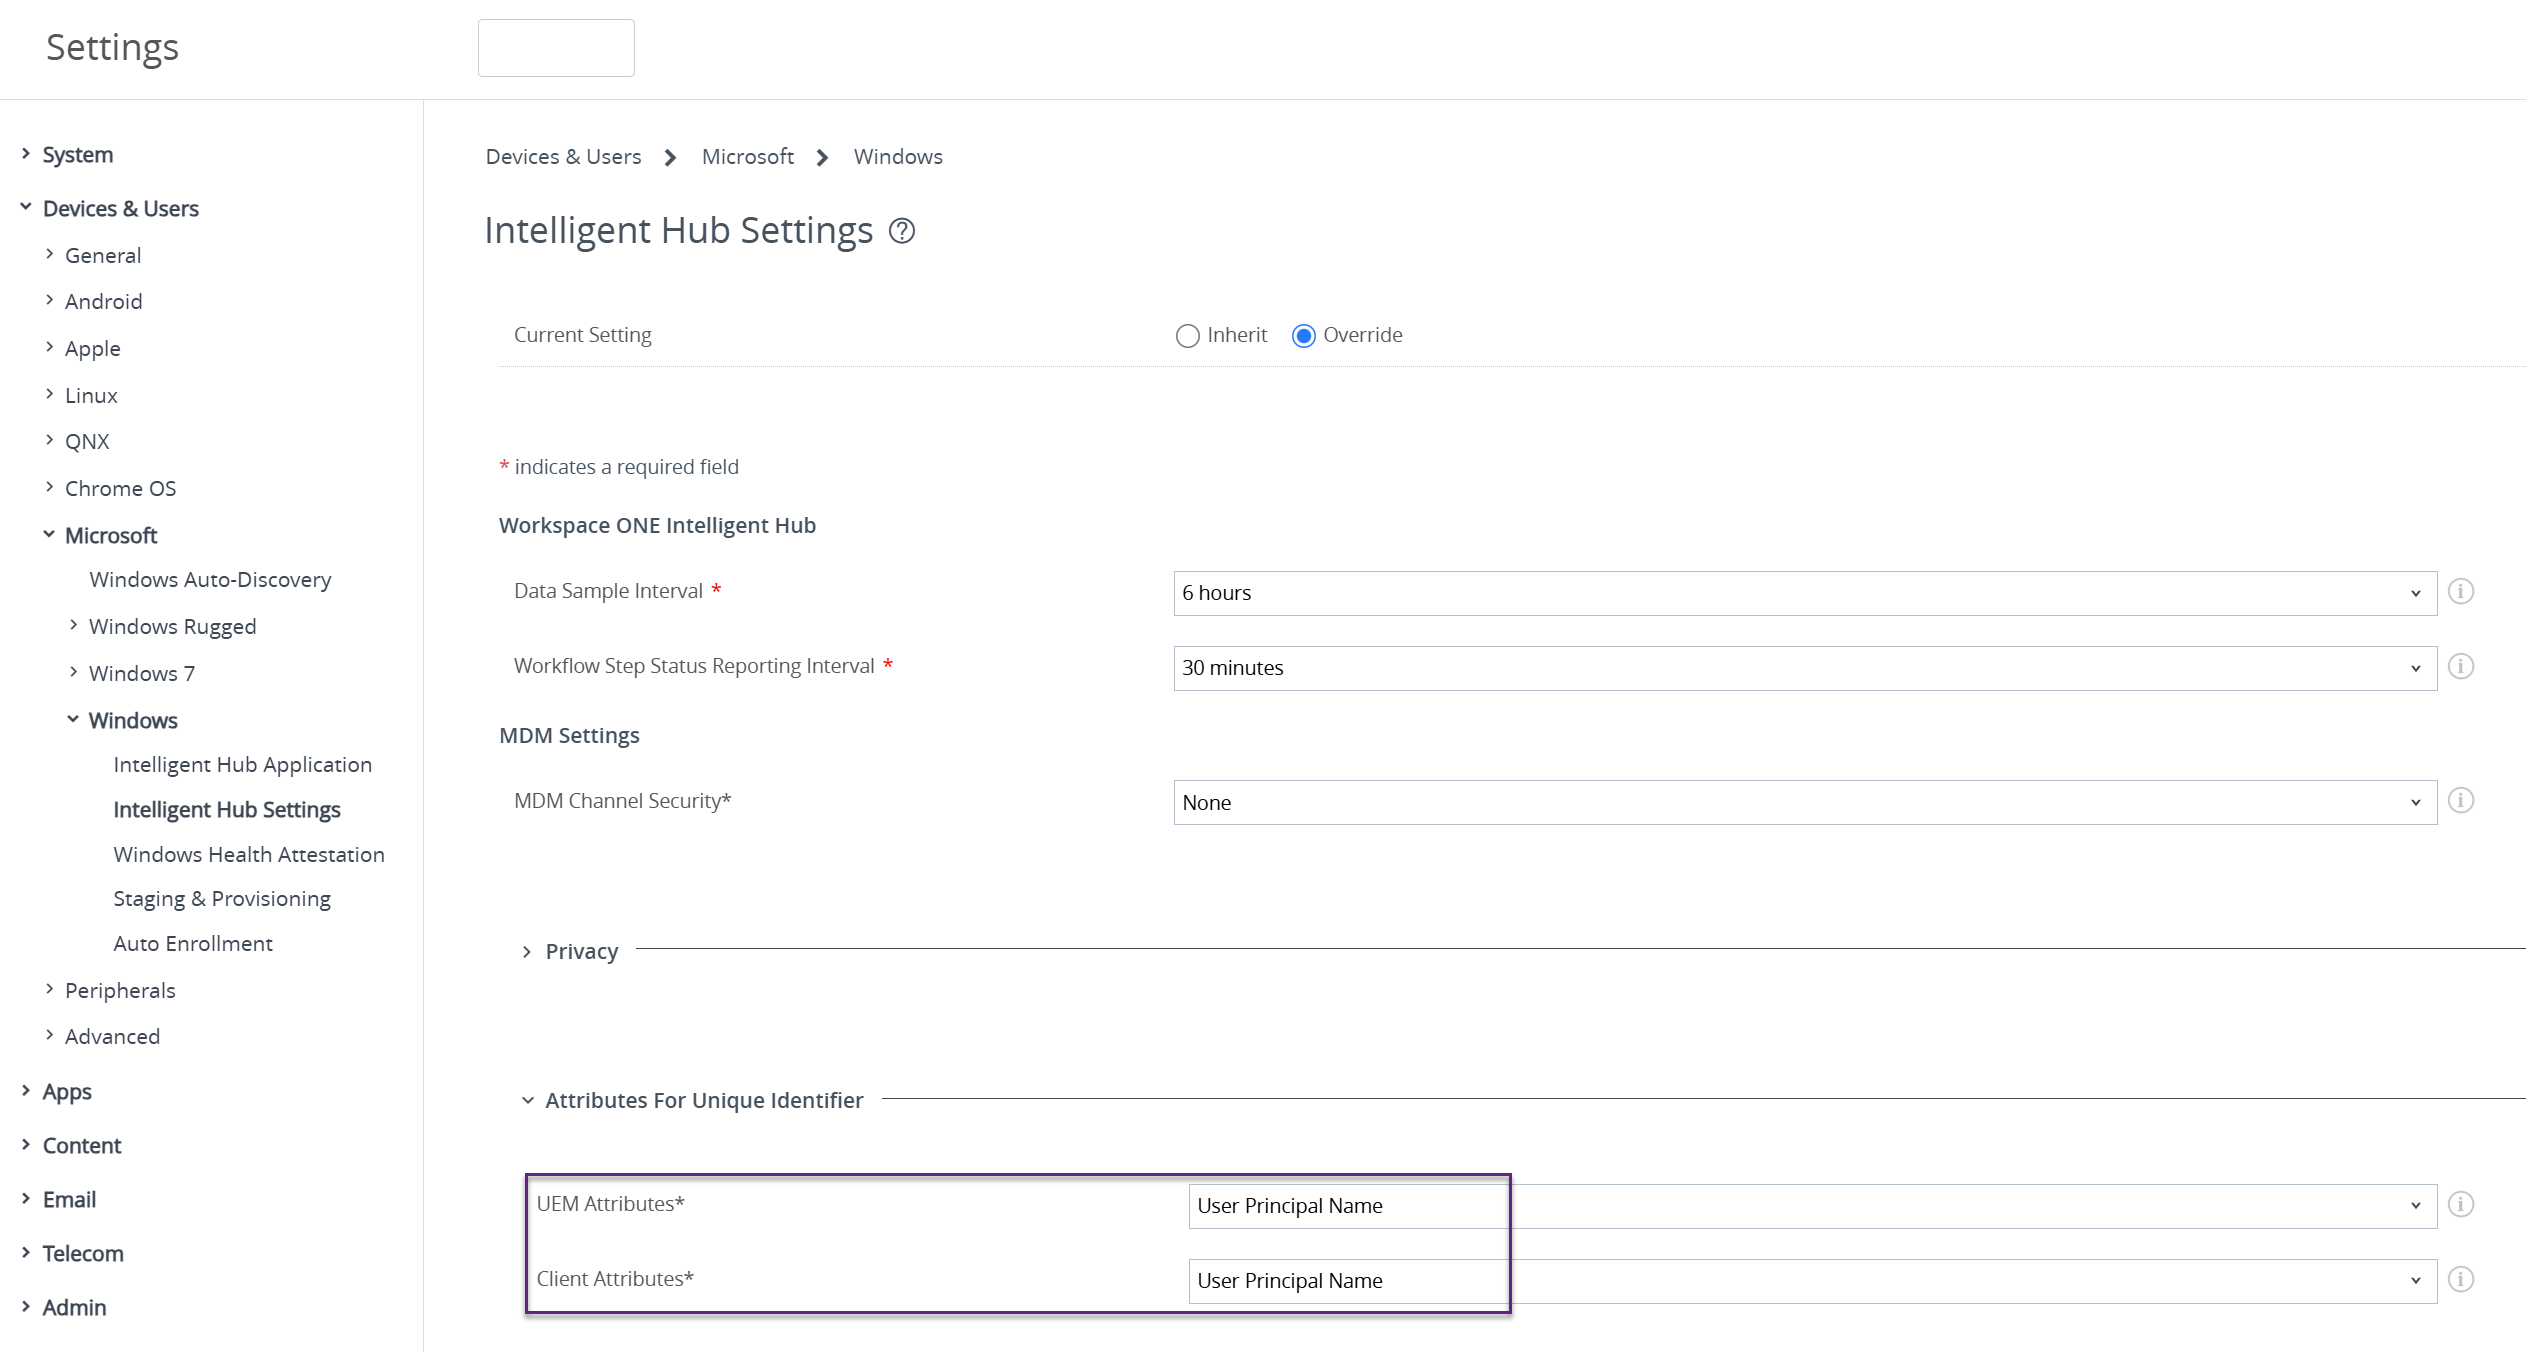 Figure 11: User attribute matching selection showing Omnissa recommendation
Resource assignment, including applications
Applications and profiles can be created in Device context or User context. When you create an app or profile in the User context, it will be written to the user's Windows profile, and this resource will only be available for that user. Other users on the device will not have access to that resource. An app or profile created in Device context will be available for assignment to all users on the device.
- User context resources will be installed for each user that signed into a device; these will be separate, distinct installs based on the user
- Device context resources will only be installed once; each assigned user will access the same installation based on user login designation
When configuring an application, the Install context can be selected within the Deployment Options screen. When editing an existing application, access via Resources > Native Apps > List View > [select application edit icon] > Deployment Options > How to Install.

Figure 12: Selecting Device or User Context.
Please note that the inherent application installation process impacts how it is actually installed onto the Windows device. Device context, which installs applications into the %ProgramFiles% folder and the HK Local Machine registry hive, is most common.
For a detailed explanation regarding the impact of selecting Device context vs. User context for Multiuser devices, please see the Omnissa TechZone article entitled Deploying Workspace ONE UEM applications to Windows devices.
Profile context works similarly in that device-level configurations are installed using Device profiles and affect all users on a device. User profiles are then used to install user specific resources like identity certificates or customizations.
Horizon VDI example
Multiuser can also be used to increase the ROI of Horizon persistent pools that are managed by Workspace ONE. Because these endpoints are virtual, the location of the physical device is not a limiting factor. Please note that this example could apply to not only a virtual desktop but also a physical desktop that is accessible by all three employees.
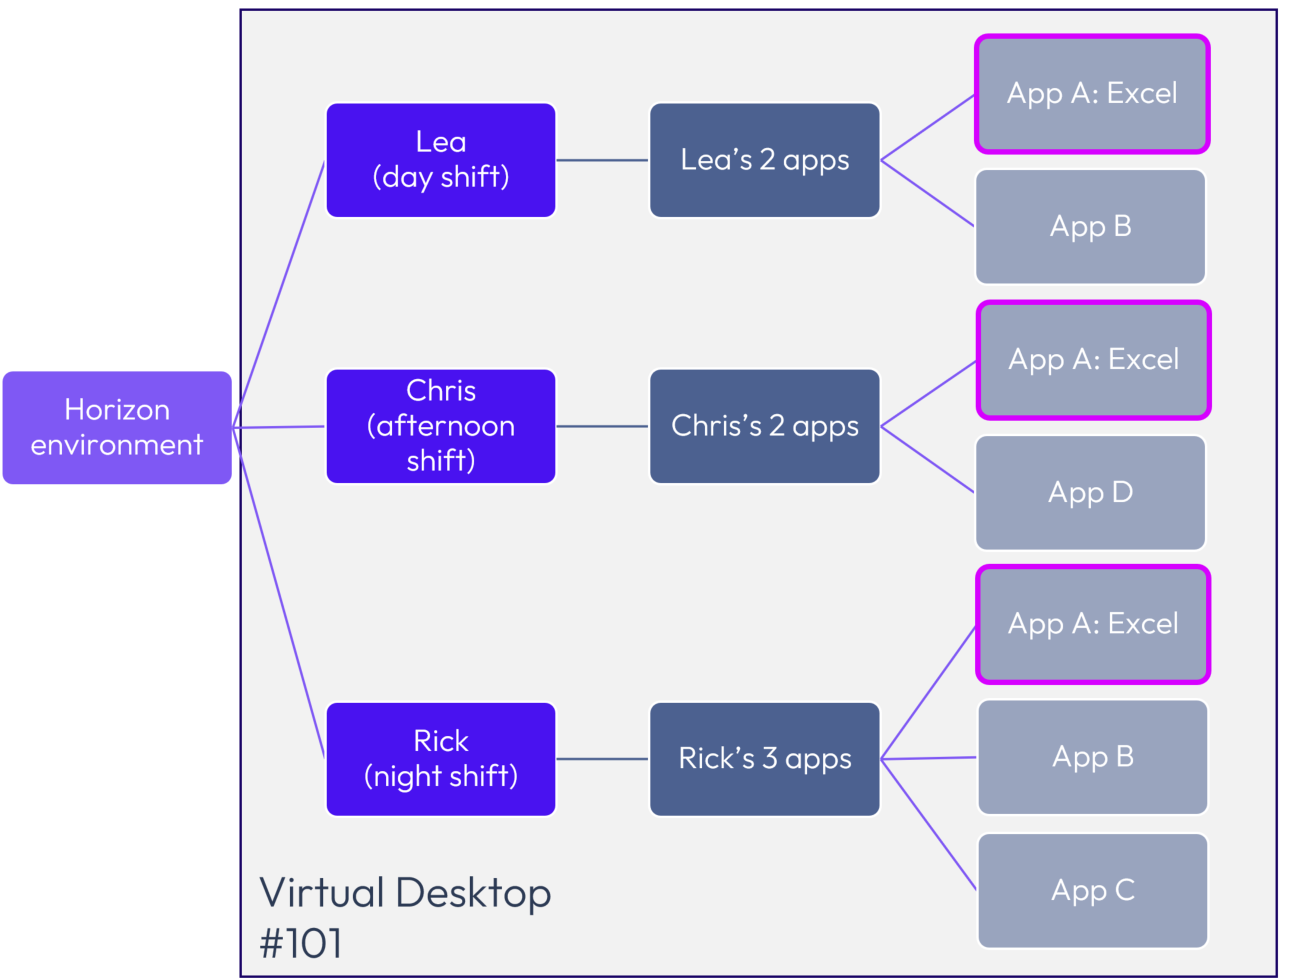
Figure 13: Windows Multiuser enables tailoring applications based on Device context and/or User context.
In the example above, Lea, Chris, and Rick work distinct shifts at a manufacturing facility, and all three access Virtual Desktop #101. Because all users need Excel, it should be installed in Device context and assigned to all three users. The other applications could be installed based on either:
- User context such that each app installs into the individual profile of each user; note that few apps inherently install into he HKCU hive, which is required
- Device context, with the assignment used to limit which users are granted access; this is the most common solution
Alternatively, App Volumes could be used to enable Apps B, C, and D on the Horizon virtual desktop based on individual logged in users, depending on administrator preference and requirements.
Assignment groups
Workspace ONE leverages Assignment groups to assign resources to devices. If a user does not have an assignment to a resource, that resource will be unavailable, even if it is installed on the device.
For all resources required, check the Assignment groups that have been designated. If you leverage User Groups, make sure they include all users; if you use Smart Groups, validate that user groups are part of the criteria and whether any user exclusions are applied.
Workflows
Workflows, with all included resources, are fully supported on Multiuser devices. The behavior of assigned Workflows is different than profiles or applications.
Workflows will be re-executed and re-evaluated with every user switch to ascertain that user context resources are applied to the currently enrolled user. Applications and profiles that are already installed on the device will not be reinstalled.
Certificates
User and Device certificates can be designated on a Multiuser device. Assigned Device Certificates are available for all users, while User Certificates are only available for the currently enrolled user.
If a user logs in the first time to the device, the User Certificate(s) will be requested and installed for the enrollment user. If the user logs in to the device again, the certificate is already installed, and there will be no new certificate request generated. Certificates that have expired will be revoked and removed from the device when the user logs in next.
User experience
Multiuser was designed to be as seamless to the end user as possible. To reassign the device to a new user, simply sign out of Windows and sign in with a different corporate user.
Domain-joined devices
On domain-joined devices (Active Directory, hybrid join, or EntraID), the user reassignment will be performed silently. To confirm that re-assignment was successful, the end user will see a Windows notification after login.
If the first attempt to sign into a domain-joined device fails, Workspace ONE will wait two minutes before trying again. This will be repeated three times. If Workspace ONE is unable to silently checkout the device, the Intelligent Hub will then prompt the user to enter credentials, and the device will subsequently be reassigned.
Workgroup-joined devices
On Workgroup-joined devices, Workspace ONE is unable to lookup the required attributes needed to silently reassign the device. On those devices, the Intelligent Hub will prompt the end user to authenticate using their corporate credentials. After successful login, the user will see a notification indicating the user is now connected to Workspace ONE and that the device has been properly reassigned.
Sign out vs. user switch
To perform user reassignment, the current user must sign out of Windows. Performing a user switch is not supported. It is recommended to leverage a policy to block user switching on devices that will be frequently changing users.
Validation and troubleshooting
Once Multiuser functionality has been enabled, the Workspace ONE UEM console shows the user mode status within the Devices > List View screen. Administrators can optionally filter devices based on the following:
- Single user (Legacy)
- Single user
- Multiuser capable
- Multiuser
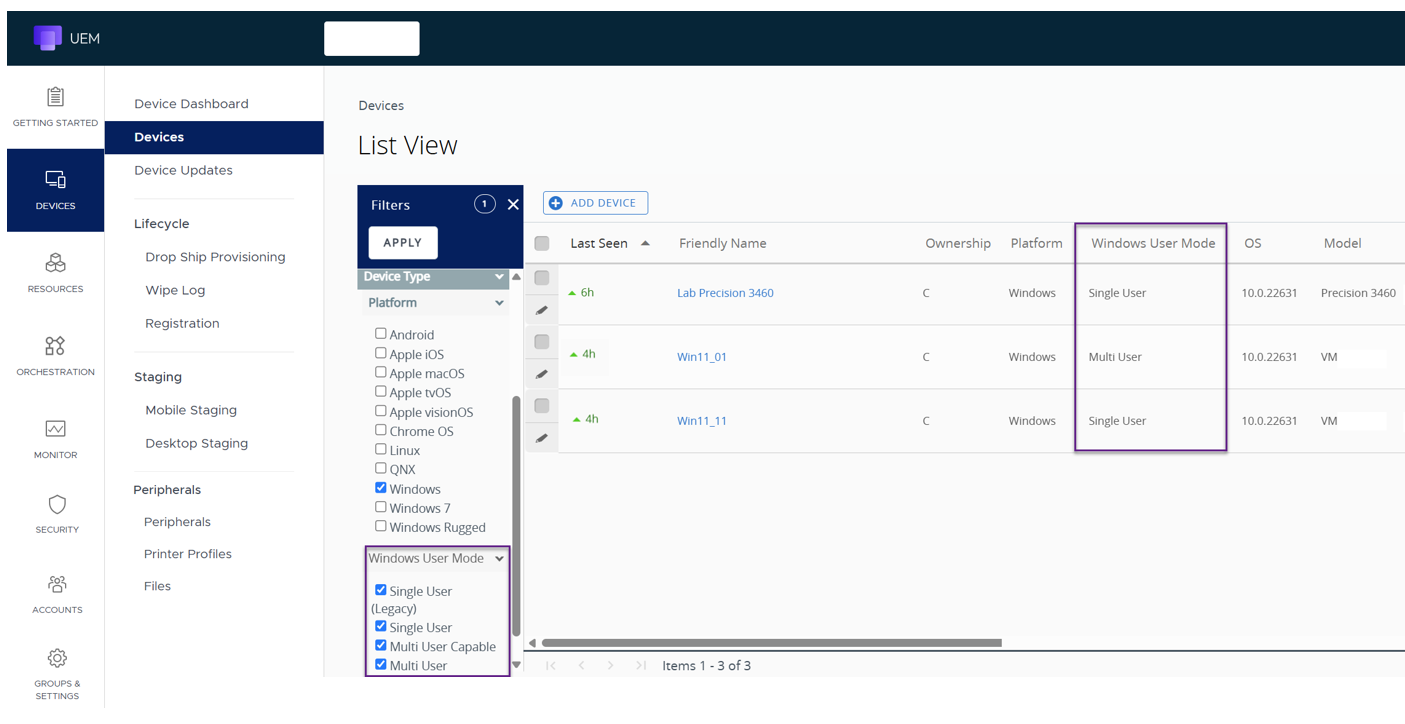 Figure 14: Device list view showing user modes
Single user (legacy) implies Windows devices that were deployed prior to the system requirements being met. Multiuser Capable means that Workspace ONE UEM and Intelligent Hub have met the system requirements, but the device is actually still in Single user mode.
If for any reason the assignment is not working even though all prerequisites are in place, initially check the device reassignment logs of the Hub agent. Logs can be found here:
C:\ProgramData\AirWatch\UnifiedAgent\Logs\DeviceReassignment-YYYYMMDD.log
This log will show entries for calls to the user switch endpoint together with the unique identifier configured in the settings. Check whether the user attribute matches the logged-in user and attribute synchronized to UEM.
Admin roles
The administrator must have access to Device Reassignment privileges and can be verified via Accounts > Admin Roles > [select role] > Device Management > Device Details > General > Device Reassignment. Although Device Reassignment is included in roles such as Console Administrator and AirWatch Administrator, note that it is not part of the Device Administrator role by default.
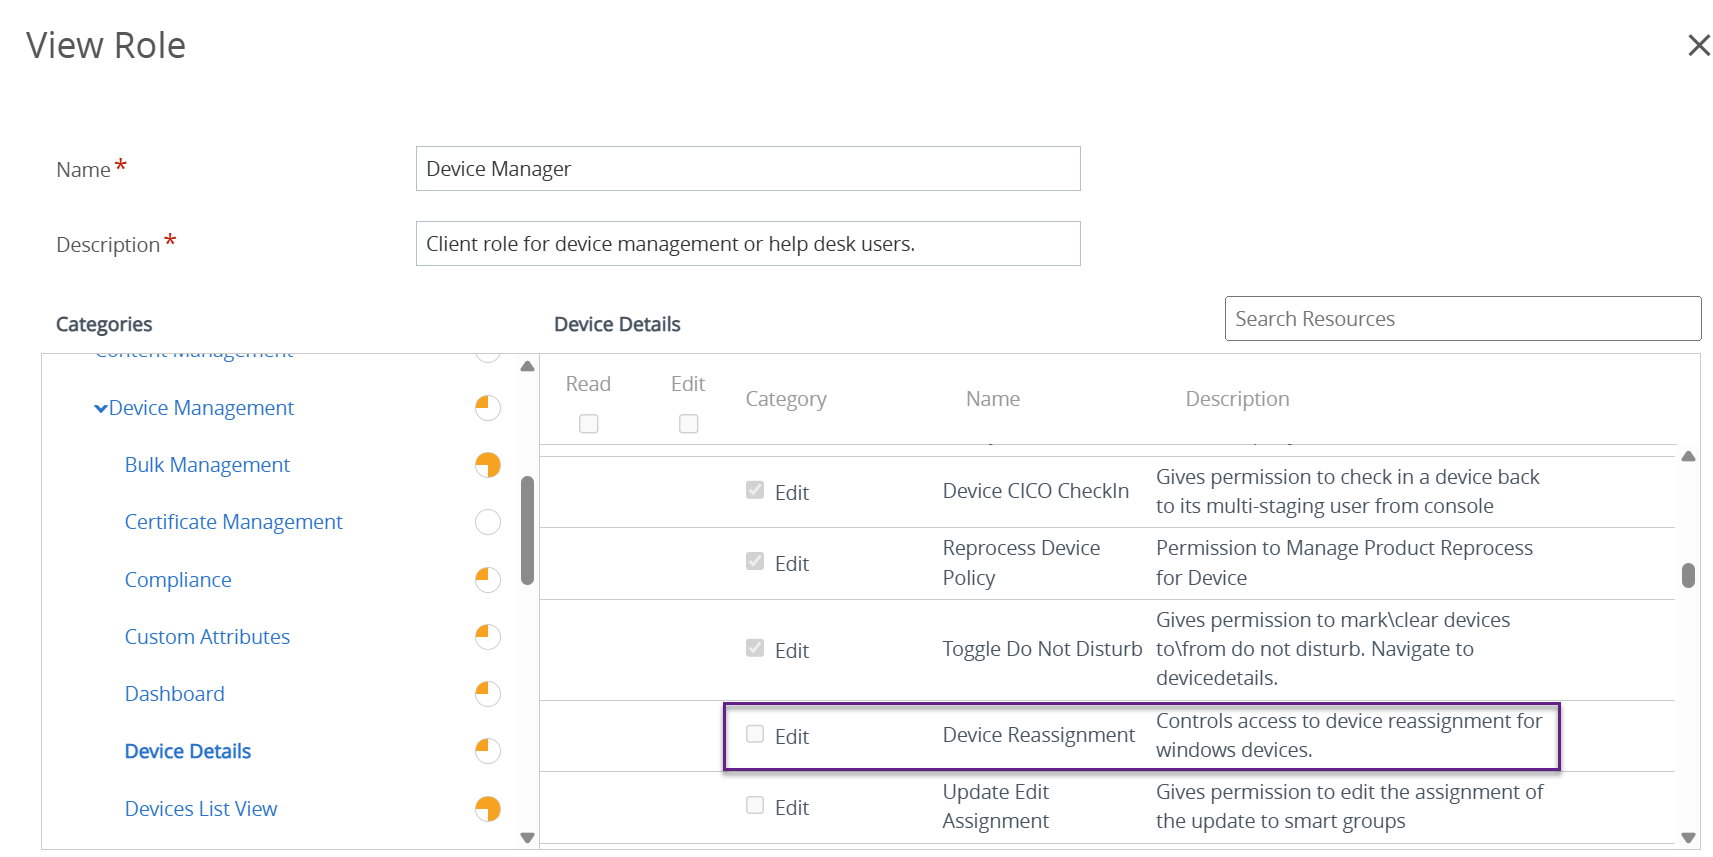
Figure 15: Device Manager role: note that Device Reassignment is not enabled by default
Summary and additional resources
Windows Multiuser functionality enables enterprises to securely manage endpoints that are accessed by multiple users. Individual user permissions, applications, and other settings can be customized and have no impact on other users that access that same device.
For Windows Multiuser step-by-step configuration instructions, see Omnissa Docs.
Additional Resources
- Configuring Windows Baselines and Profiles
- Troubleshooting Windows devices
- Deploying Workspace ONE UEM applications to Windows devices
- Managing Windows Updates
Change log
The following updates were made to this guide:
| Date | Description of Changes |
| 2025/10/06 |
|
| 2025/06/05 |
|
| 2025/05/06 |
|
| 2025/04/02 |
|
| 2024/08/26 |
|
About the author and contributors
Author:
- Jo Harder, Senior Technical Marketing Architect
Contributors and Reviewers:
- Josh Burris, Director of Product Management
- Grischa Ernst, Senior Product Manager
- Camille Debay, Senior Product Manager
- Saurabh Jhunjhunwala, Lighthouse Architect
- Josh Spencer, Senior Product Manager
Feedback
Your feedback is valuable. To comment on this paper, either use the feedback button or contact us at tech_content_feedback@omnissa.com.

