

Integrating Windows Server devices into Workspace ONE
Overview
Workspace ONE support for Windows isn’t just for Windows Desktop anymore. Omnissa has introduced Windows Server integration, and this document provides technical details to assist you with implementation.
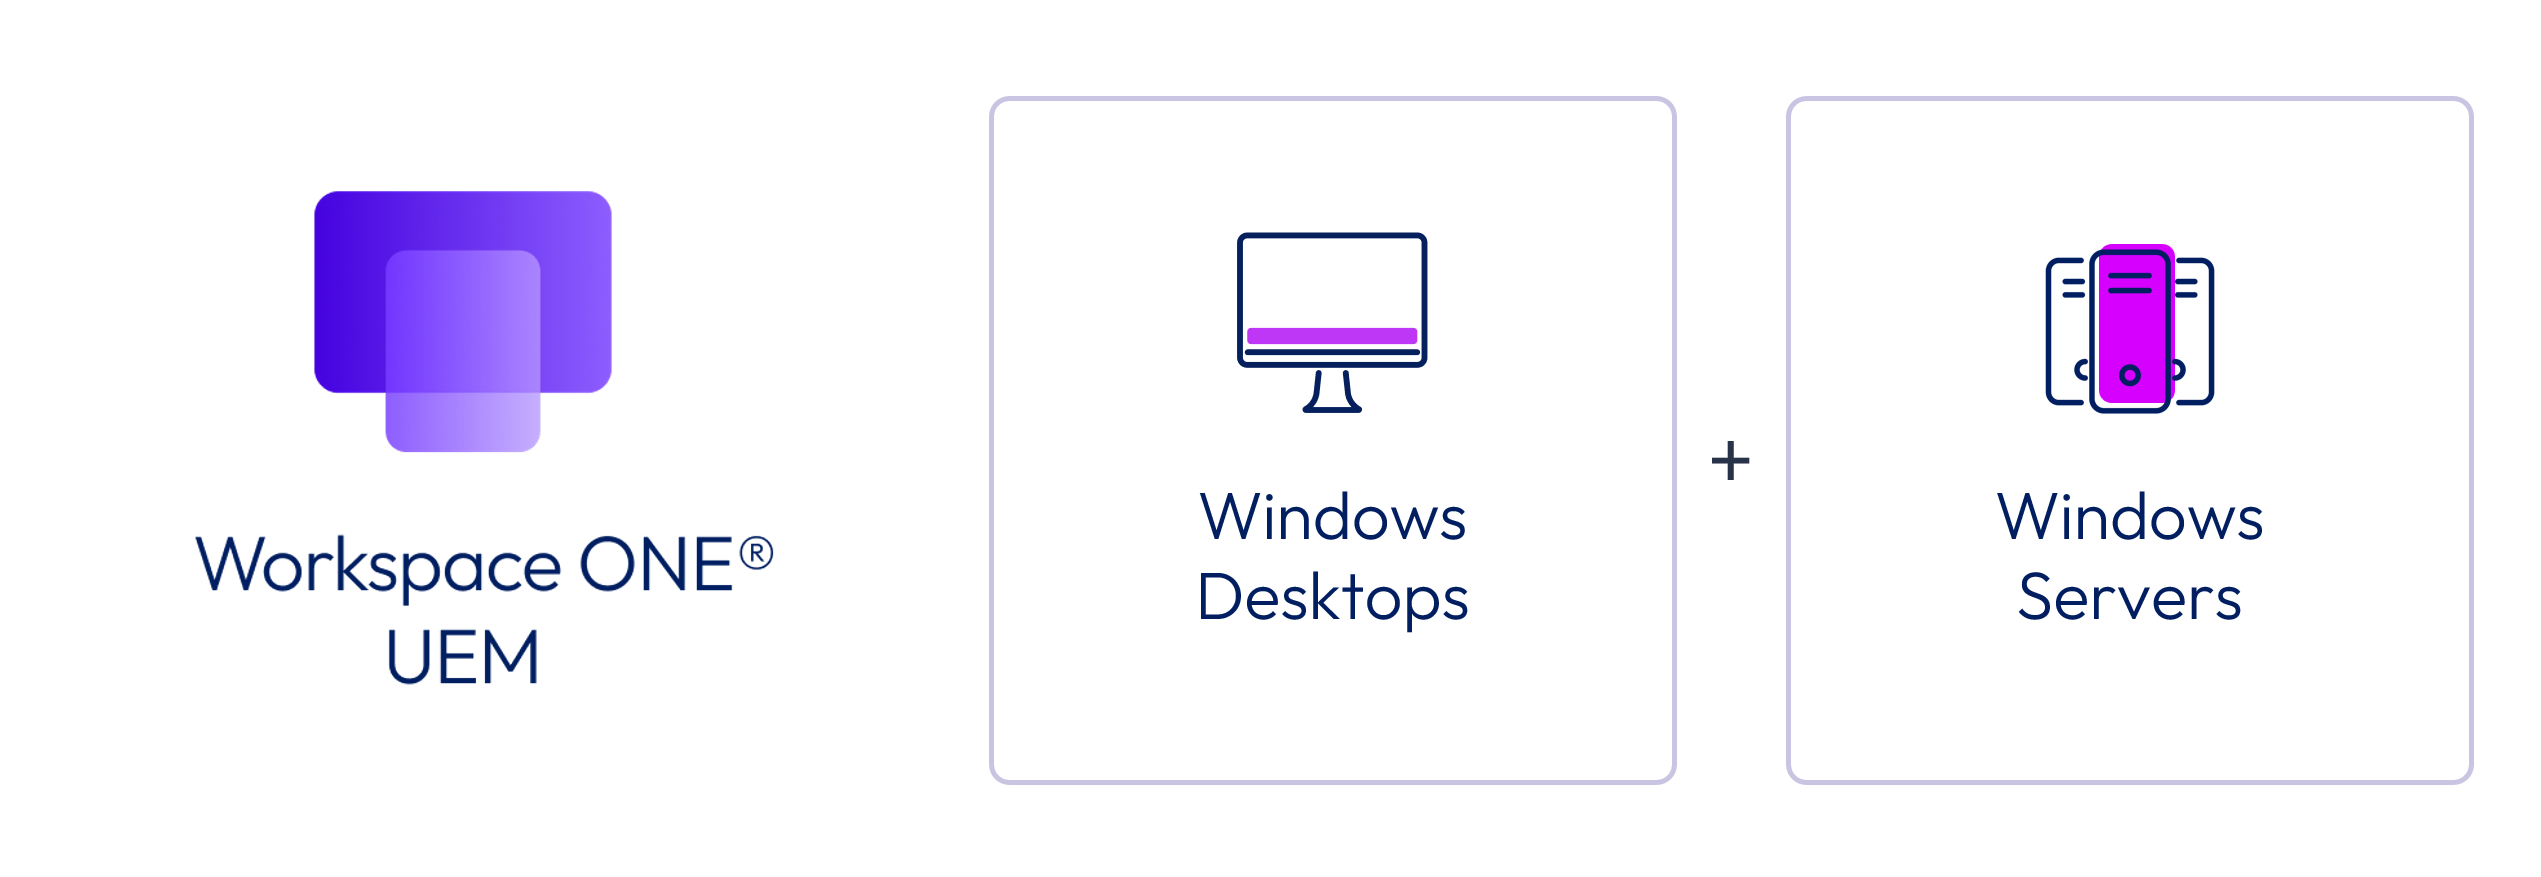
Figure 1: Workspace ONE UEM Windows device support now includes Windows Server
Windows Desktop and Windows Server use the same code base, but there are some inherent differences due to device functionality. At a high level, the list below shows the key similarities and differences.
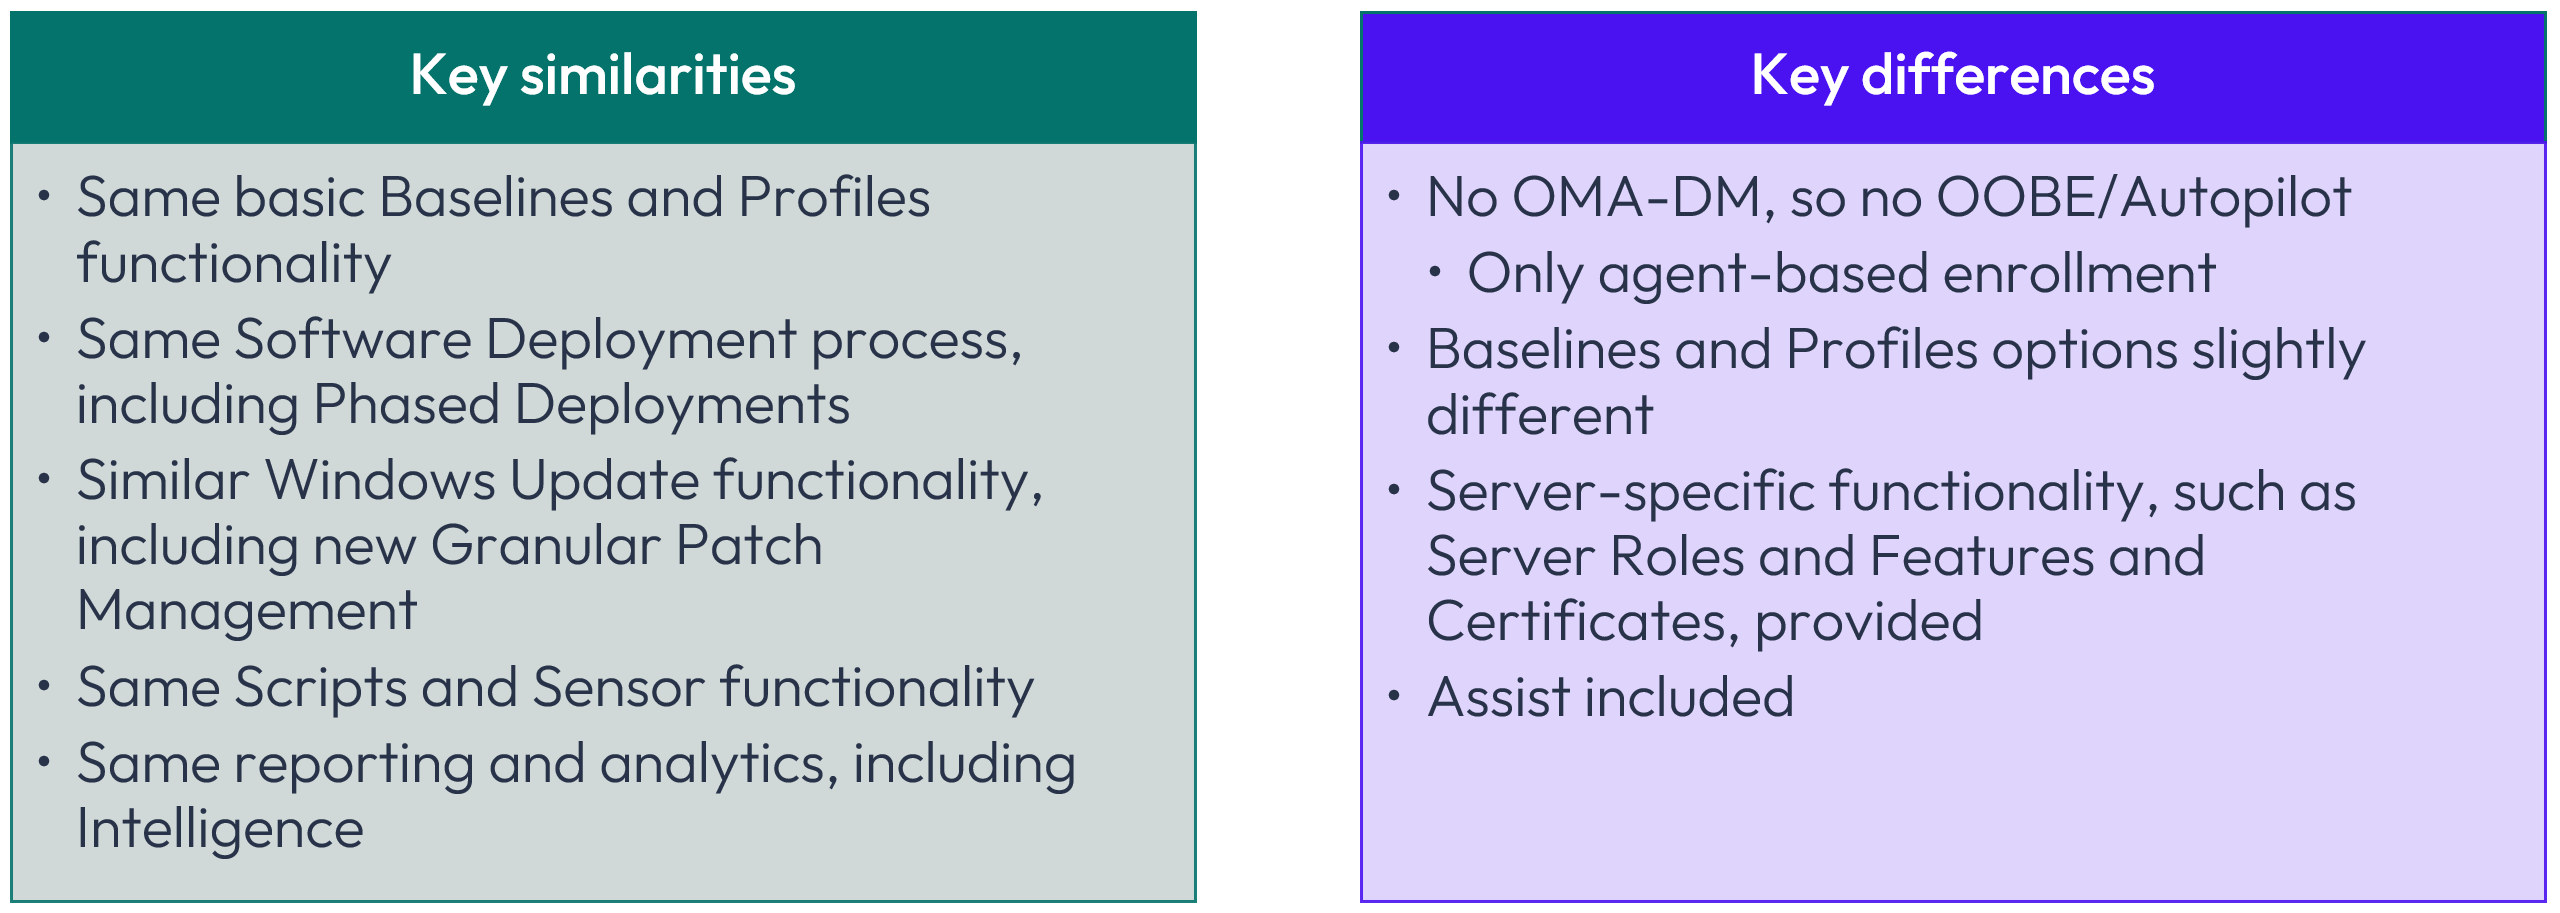
Figure 2: Key similarities and differences
In particular, the Windows Desktop operating system inherently includes OMA-DM, which is the native MDM client. Windows Server exclusively depends upon Intelligent Hub because that operating system provides no inherent OMA-DM functionality.
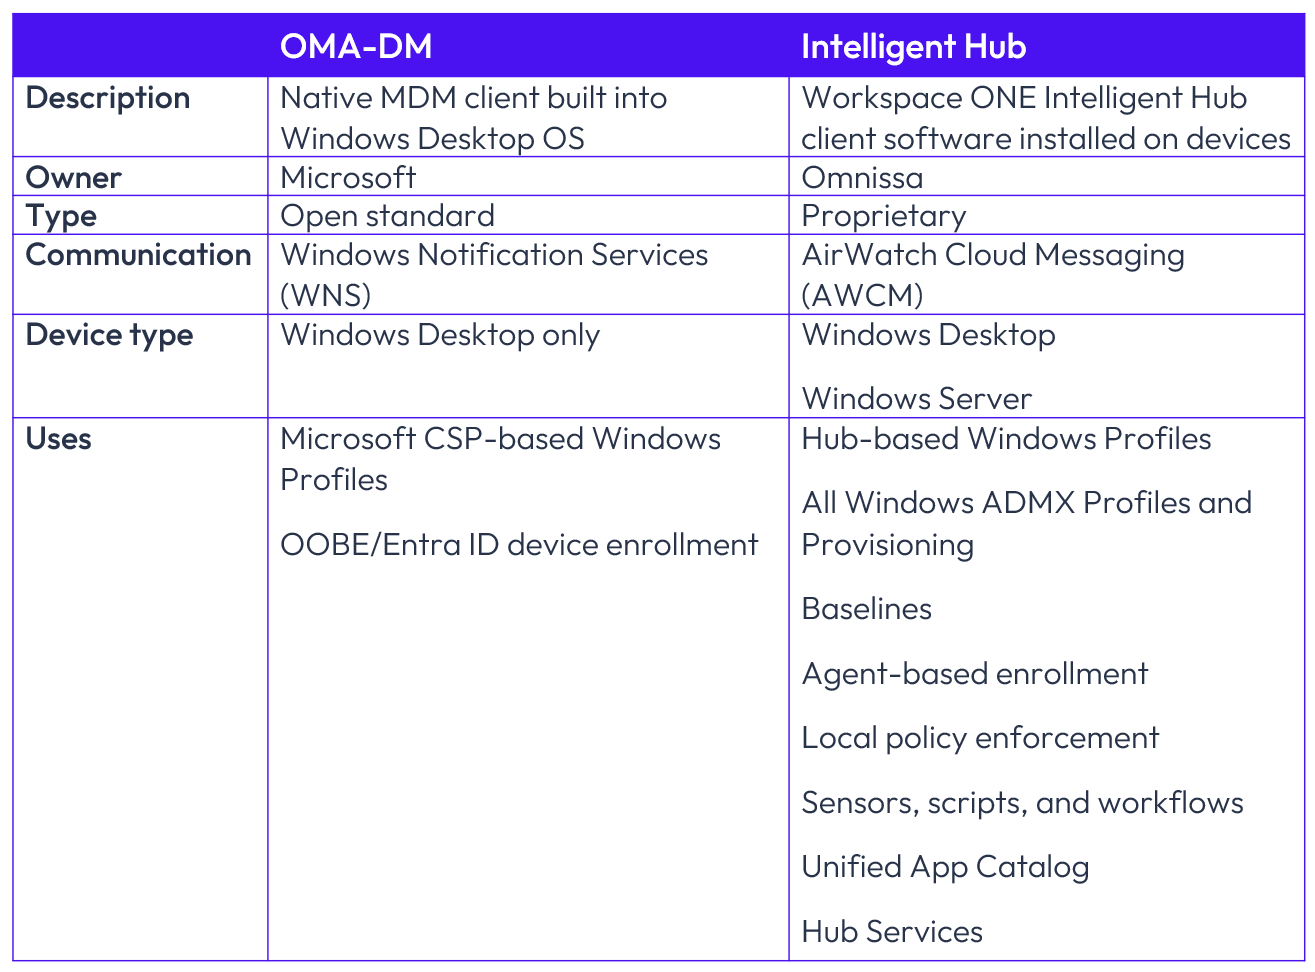
Figure 3: OMA-DM vs. Intelligent Hub comparison
Requirements
To include Windows Server devices in your Workspace ONE fleet, there are only a few requirements:
- Workspace ONE UEM SaaS version 2604 as released in April 2026
- Enabled Server Essentials SKU
- Windows Server 2016 or later (Desktop Experience or Core) devices
Note that the Server Essentials SKU includes Omnissa Assist, which will be discussed later in this article.
For network connectivity, Workspace ONE UEM includes full proxy support for environments where servers access the internet through a proxy or domain-filtered network. Ensure that the required endpoints are permitted through your firewall and proxy configuration.
Windows Server implementation
Windows Server implementation is based on five basic steps that will be explored in detail.
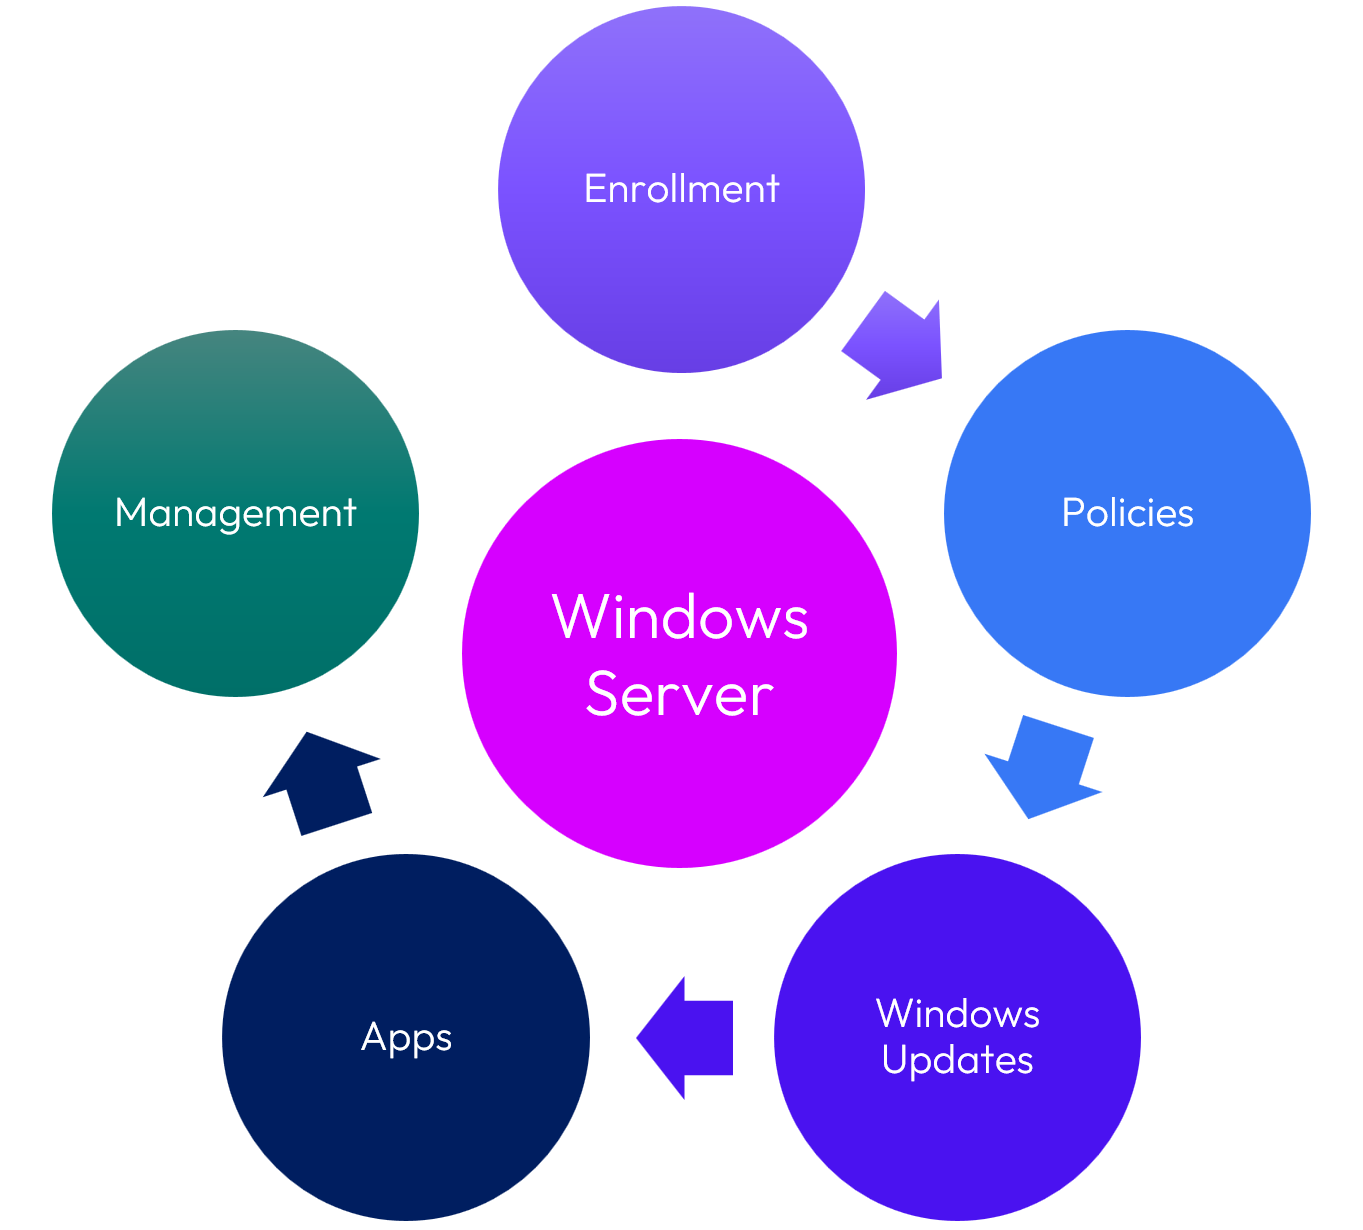
Figure 4: Windows Server implementation
Pre-enrollment and enrollment
Before enrolling Windows Server devices, Omnissa strongly recommends several pre-enrollment steps to maximize security, segregation, and functionality. While the pre-enrollment steps outlined below are optional, please consider each of them based on your environment and the reasoning as explained.
Create new Organization Group
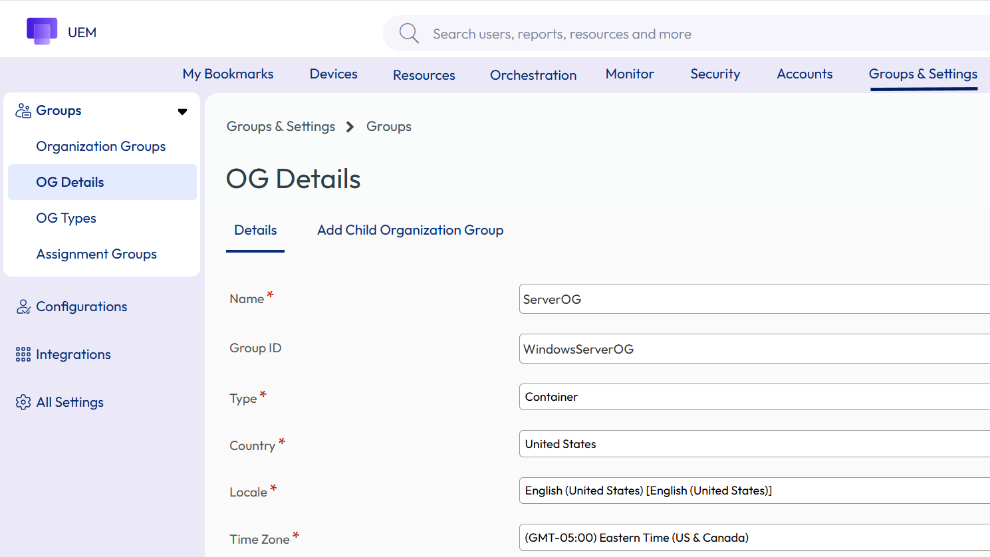
Figure 5: Create a new child OG
Windows Servers are the lifeblood of many enterprises, and a distinct Organization Group (OG) provides an effective way to segregate Windows Servers such that security is enhanced and controls are further separated from other devices. For example, role-based access, enrollment accounts, and other settings can be more granularly defined based solely on an OG that contains Windows Servers.
Within the console, go to Groups & Settings > OG Details > Add Child Organization Group to create a new OG.
While it is possible to instead designate one or more Smart Groups containing Windows Servers and use those groups as the basis for applying configurations and actions, Omnissa recommends the Child OG approach as described here for better security and applicability of OG-wide settings. Smart Groups are later discussed as a means for creating distinctions based on operating system version and other criteria.
Please note that after configuring a new OG as described here, the subsequent pre-enrollment steps described in this section should be configured within the new Server OG administrative context as shown below:
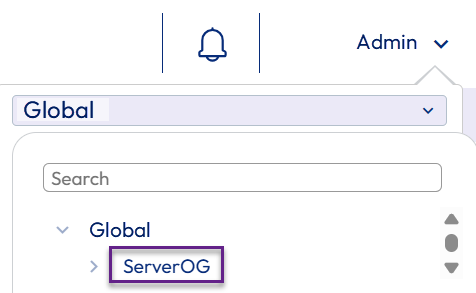
Figure 6: Administrative context for remaining configurations
New account for Windows Server enrollments
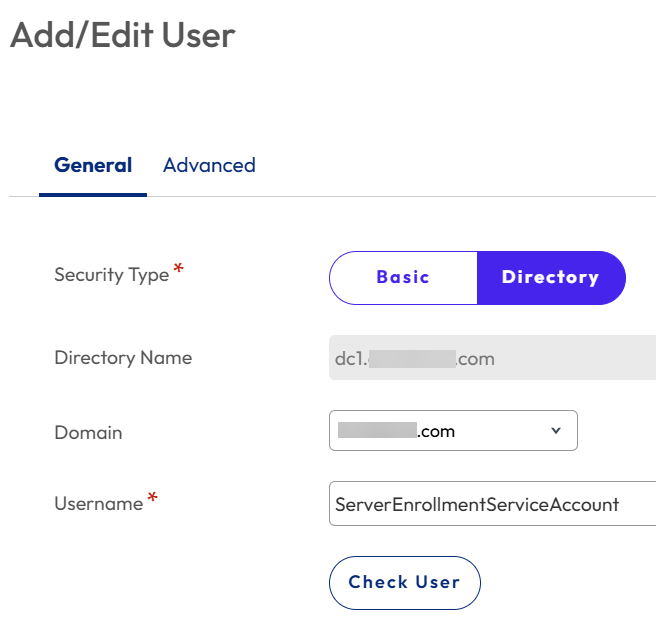
Figure 7: Add new account for Windows Server enrollments; Directory-based recommended
A new and unique account should be created for enrolling Windows Servers to maximize security. Keeping in mind that because new servers will most likely be enrolled via an automated script or process, reliance on an always-accessible account is necessary. Configuring this account as a staging account should not be necessary due to enrollment remaining in the context of this account.
While it is possible to use a basic Workspace ONE account, Omnissa recommends creating a new Directory-based account for this purpose. Why? By creating a Service Account within Active Directory specifically for enrolling Windows Servers, a permanent, centralized account is preserved and maintained within Active Directory with the same security requirements as other enterprise Service Accounts, including account and password preservation, as well as confidentiality. As shown above, this Service Account can then become the basis for a Workspace ONE Directory-based account.
After creating the new Service Account within Active Directory, Go to Accounts > Users > Add > Add User within the Workspace ONE console to add a new enrollment account.
Management Mode
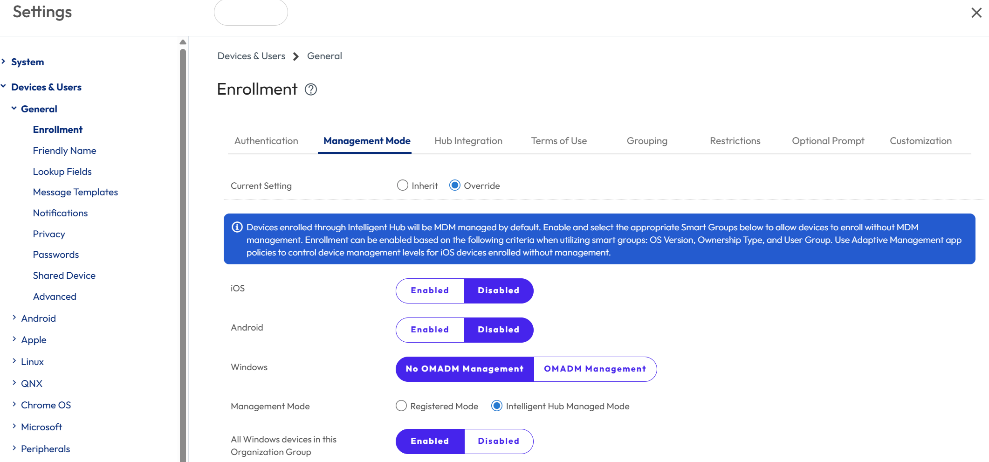
Figure 8: Enable Intelligent Hub Management Mode
Because Windows Servers have zero reliance on OMA-DM, enabling Intelligent Hub Managed Mode for the entire OG is beneficial. This ensures that OMA-DM-based settings cannot be selected for the Windows Server devices.
Go to Groups & Settings > Devices & Users > General > Enrollment > Management Mode and select No OMA-DM Management and Intelligent Hub Managed Mode, as well as Enabled, as shown above.
Where a new OG has not been designated as discussed previously, Disabled would be the optimal choice and then Smart Group(s) can be used to distinguish Windows Servers for Intelligent Hub Managed Mode.
User Mode
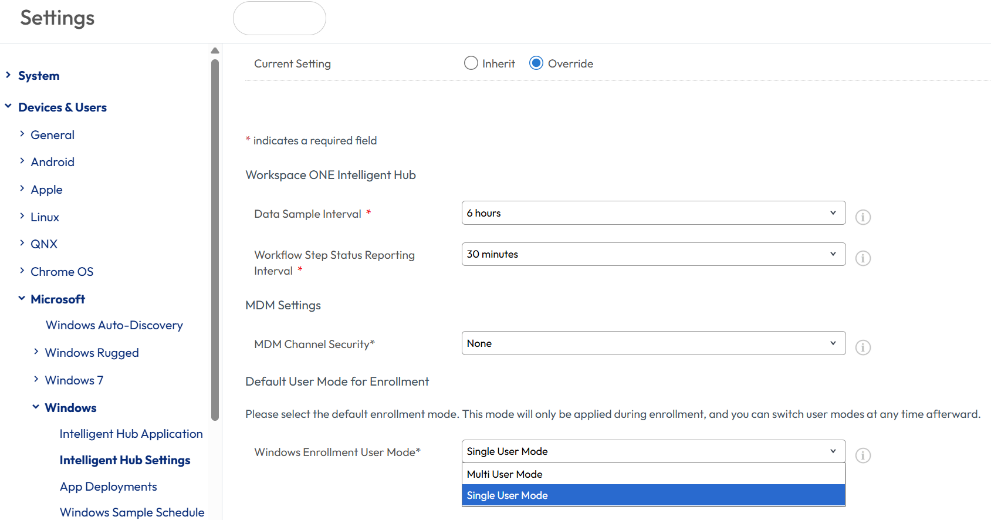
Figure 9: Set Windows Enrollment User Mode to Single User Mode
By default, new devices enrolled into Workspace ONE are enabled for Single User mode, which prevents enrollment from transferring to each new user that accesses the device. When Multiuser functionality was first released, the default was Multiuser mode, so whether due to this temporarily automated default or a manual configuration, it is possible that the current setting for your environment shows as Multiuser mode. Omnissa recommends Single User mode to ensure that device enrollment remains solely aligned with the Directory-based Service Account or Basic account defined previously.
Group Assignment Mode
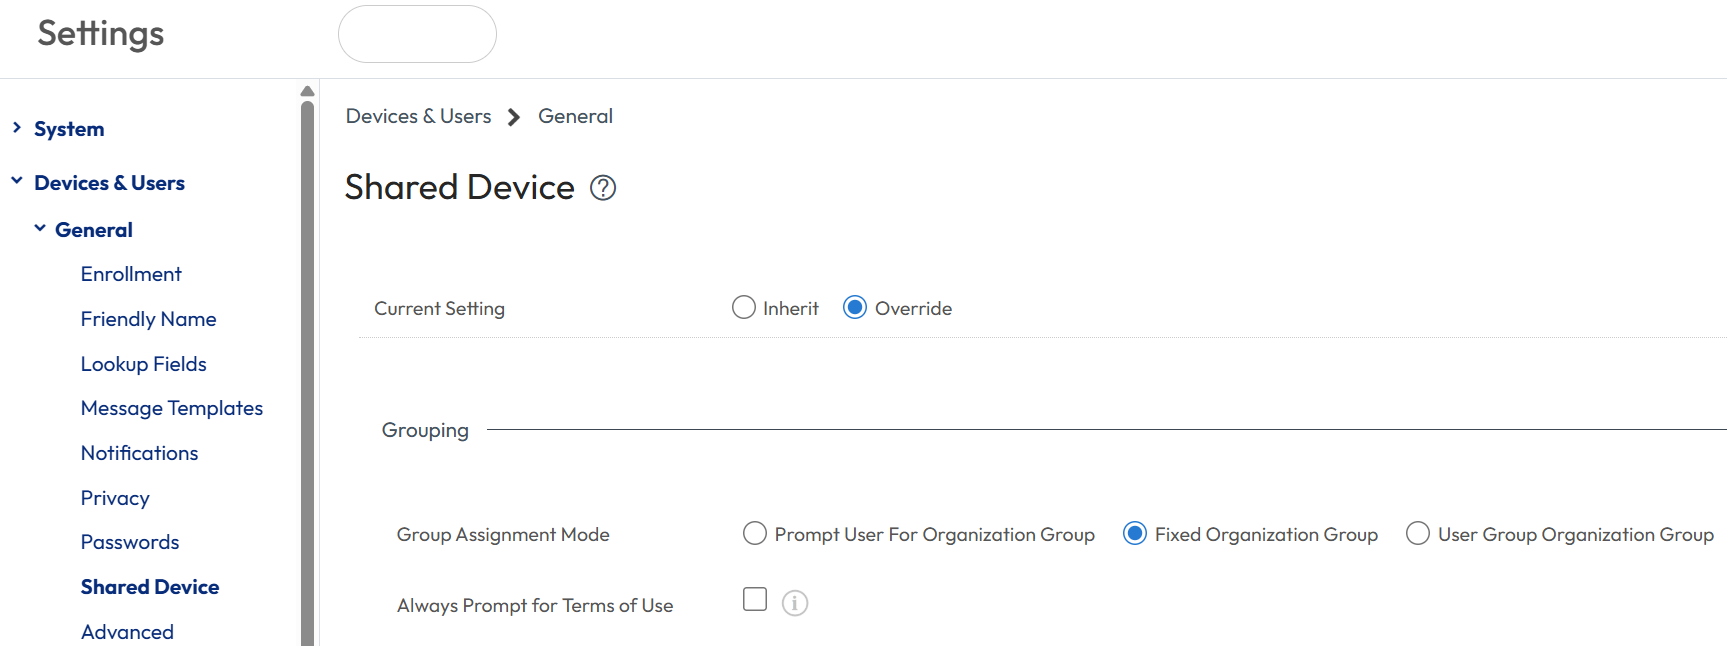
Figure 10: Set Group Assignment Mode to Fixed Organization Group
Rather than showing a prompt for the OG assignment of new devices, Omnissa recommends configuring the Group Assignment Mode as Fixed Organization Group. This setting ensures that devices become members of the OG configured within the first step without being queried.
Within Groups & Settings > Devices & Users > General > Shared Device > Grouping, configure the Group Assignment Mode as Fixed Organization Group.
Default Action for Inactive Users
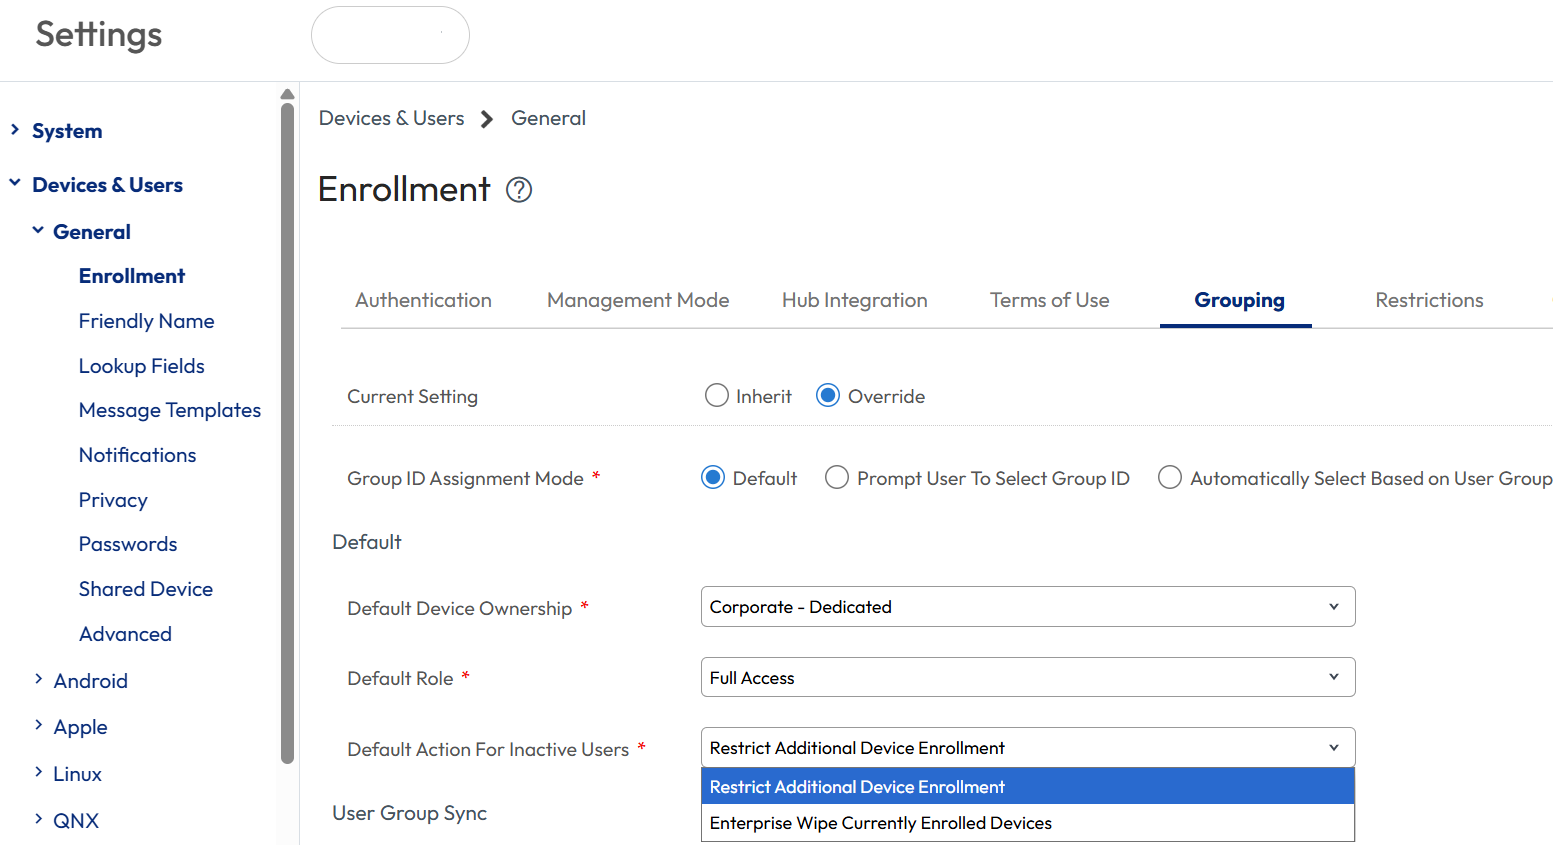
Figure 11: Set Default Action for Inactive Users to Restrict Additional Device Enrollment
Because Windows Servers may appear to be inactive for lengthy intervals, Workspace ONE may perceive them to be inactive. For example, a database server that stores tax filing data may only be active at the end of the month and quarter and be largely inactive during other periods.
To prevent these devices from an inadvertent actions due to inactivity, Omnissa recommends configuring Windows Servers to Restrict Additional Device Enrollment. The alternative option, Enterprise Wipe, could be detrimental.
To configure, go to Groups & Settings > Devices & Users > General > Enrollment > Grouping and set Default Action for Inactive Users to Restrict Additional Device Enrollment.
Enrollment
Now comes the fun part: actual enrollment of the Windows Server devices.
There are two options for enrolling Windows Servers:
- Command line/script
- Manual enrollment via the Intelligent Hub interface
Like Windows Desktop enrollment, manual enrollment consists of installing the Intelligent Hub and addressing a few prompts when presented. Alternatively, the necessary parameters can be entered via command line or scripted for silent enrollment. For a full list of Intelligent Hub silent installation parameters, please see Omnissa documentation.
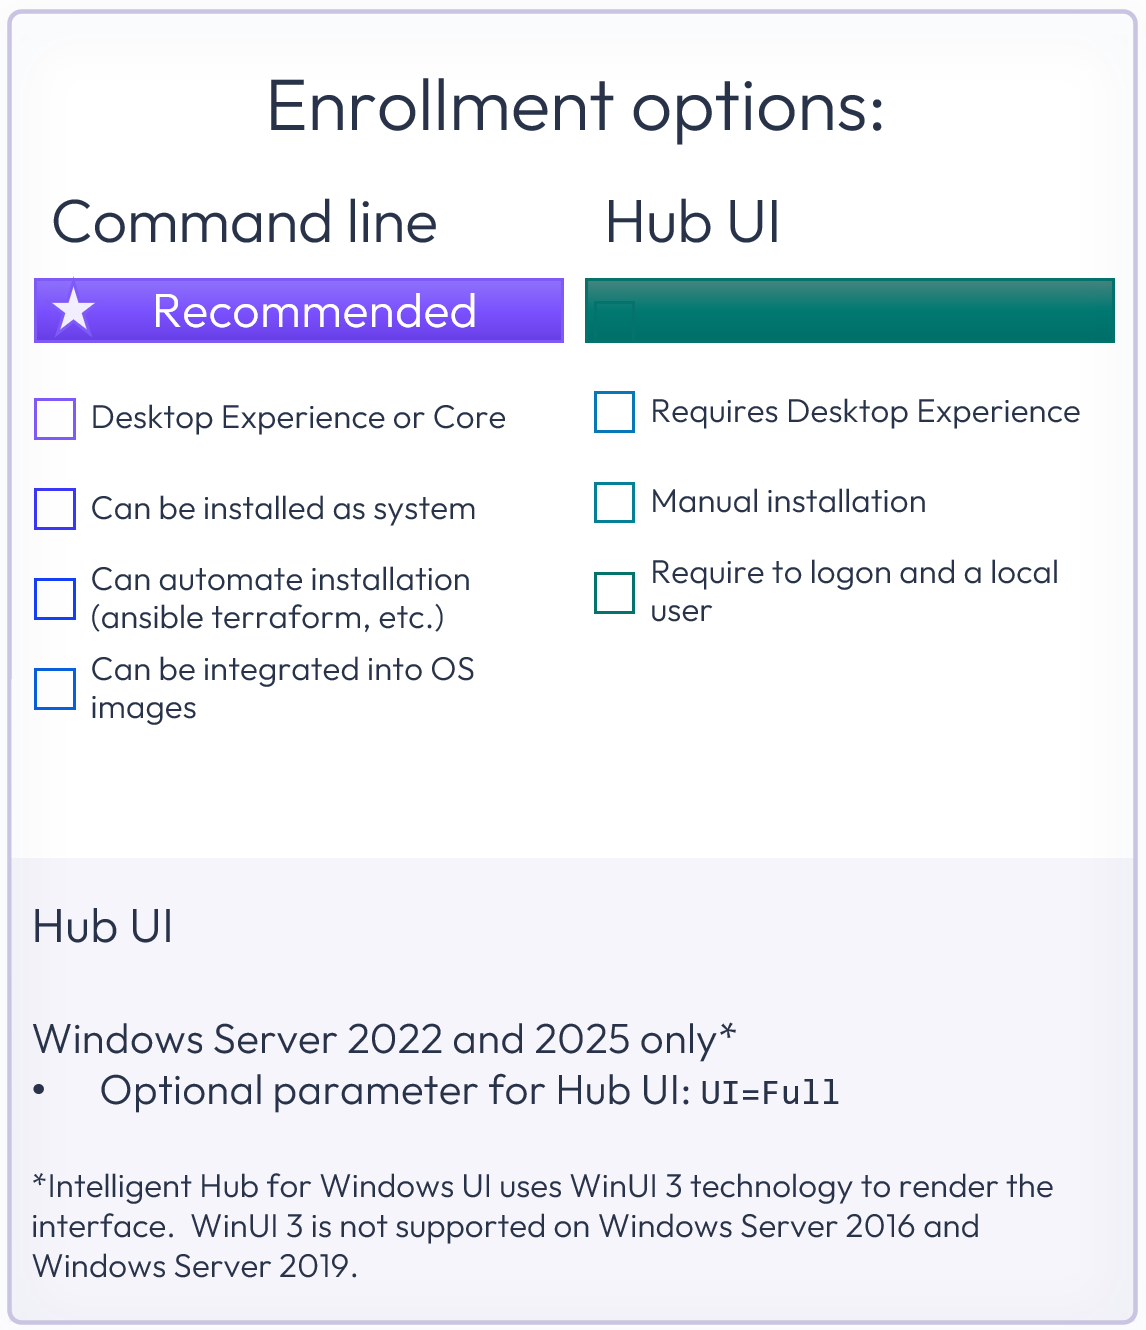
Figure 12: Windows Server enrollment options
In general, the use of the UI=Full parameter is not recommended. However, when using Windows Server for a dedicated user such as Amazon WorksSpace, UI=Full can provide a better user experience.
As shown above, note that command line/script can be used for both Desktop Experience and Core editions. Because Windows Server implementations are typically automated, use of command line/script is recommended. Installation as SYSTEM is supported.
Rather than expose the password, Omnissa recommends enveloping the command line enrollment script into a Powershell or other script type.
Windows Server Core enrollment example
To understand the process, below are the steps that would be undertaken to enroll a new Windows Server Core device.
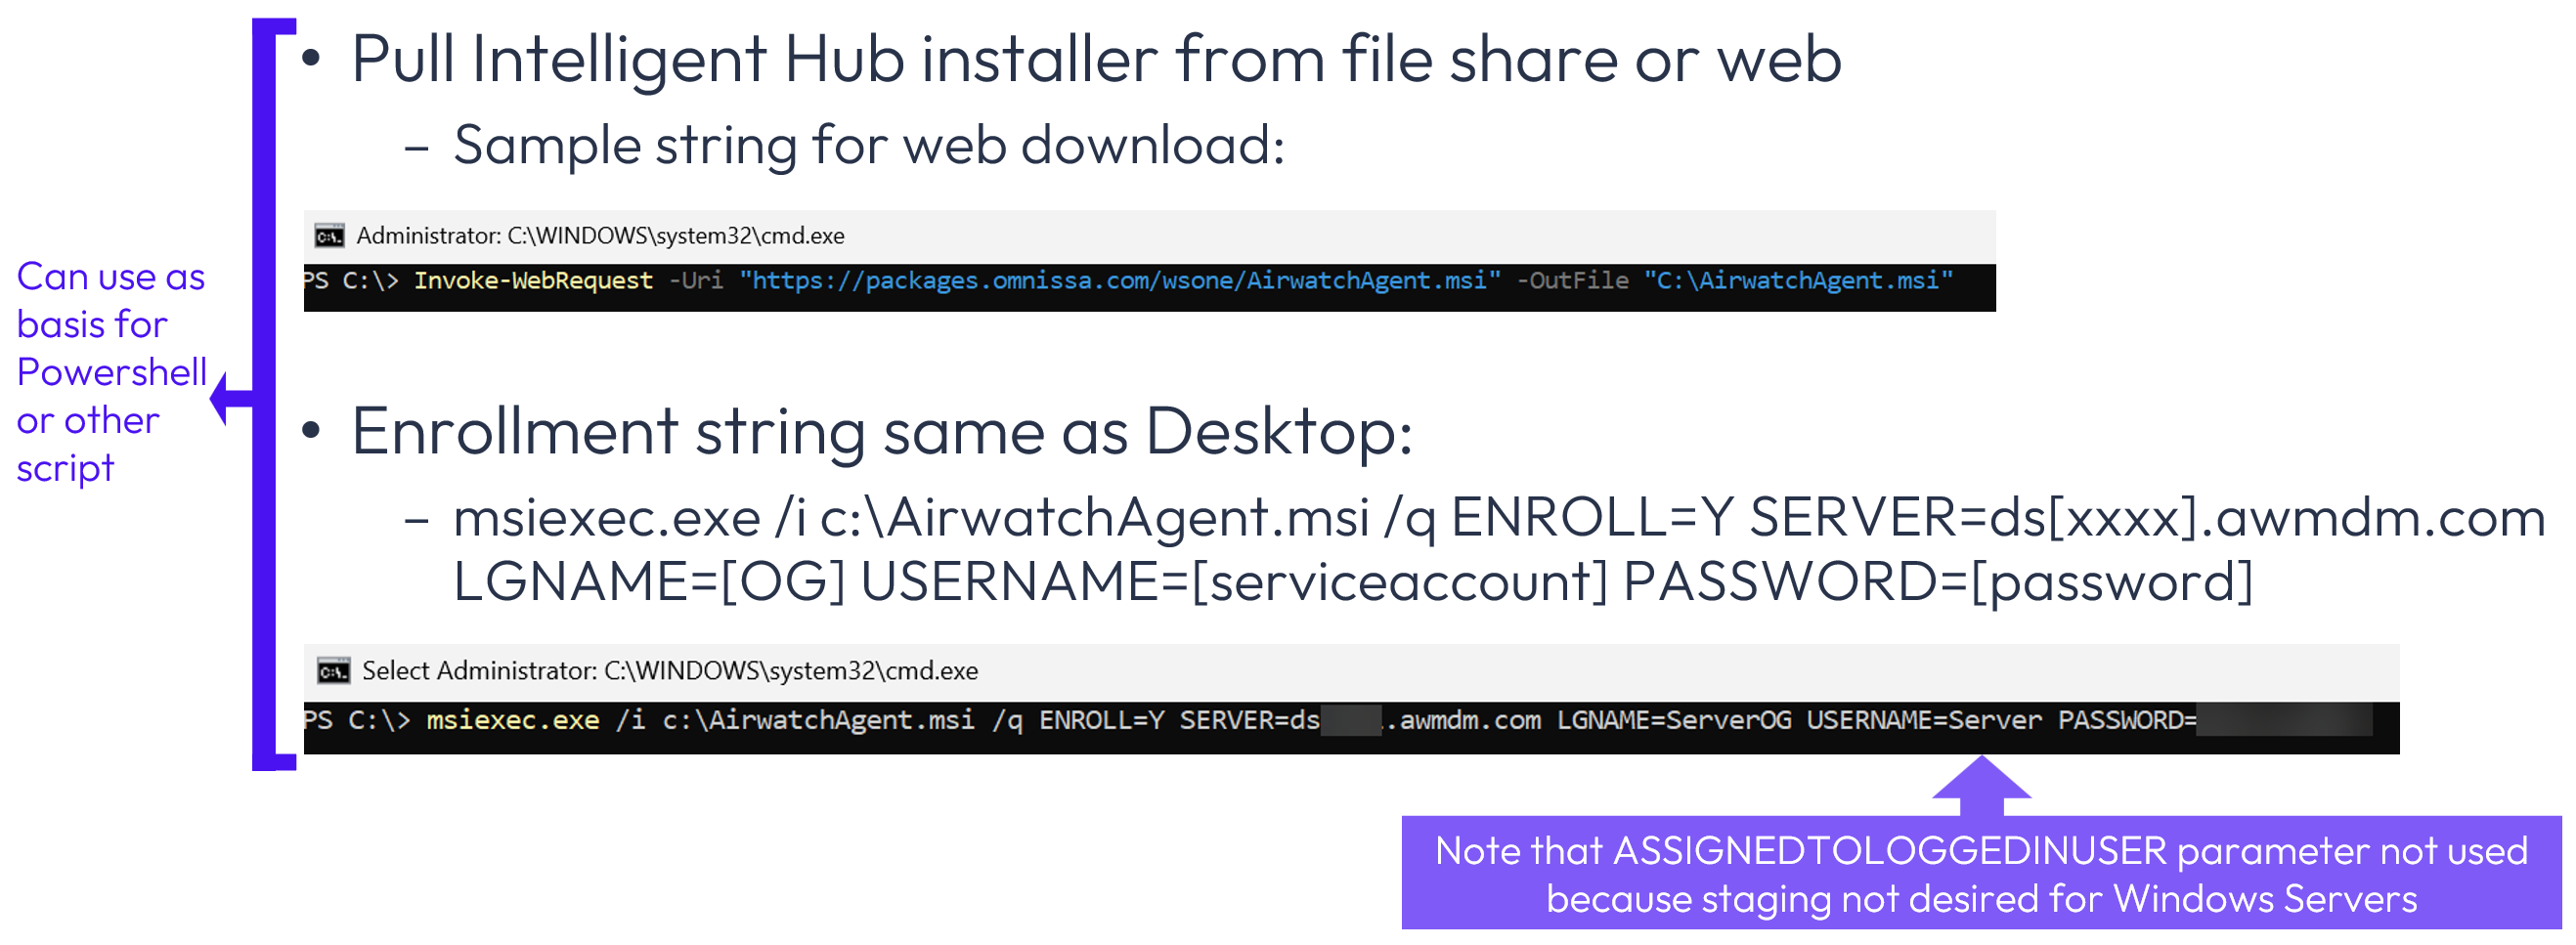
Figure 13: Windows Server Core enrollment example
The example above includes the following steps:
- Web download of Intelligent Hub installer via command line
- Command line enrollment string
Hands-on learning: Windows Server pre-enrollment and enrollment
Want to see how this works? If you’d like to step through a five-minute interactive demo where you can walk through the pre-enrollment and enrollment processes, please click here: https://techzone.omnissa.com/guided-tour-windows-server-enrollment
Policies
There are three types of policies that can be applied to Windows Servers. Please see the related Tech Zone article about Workspace ONE Windows Baselines and Profiles to gain an in-depth understanding of each policy type.
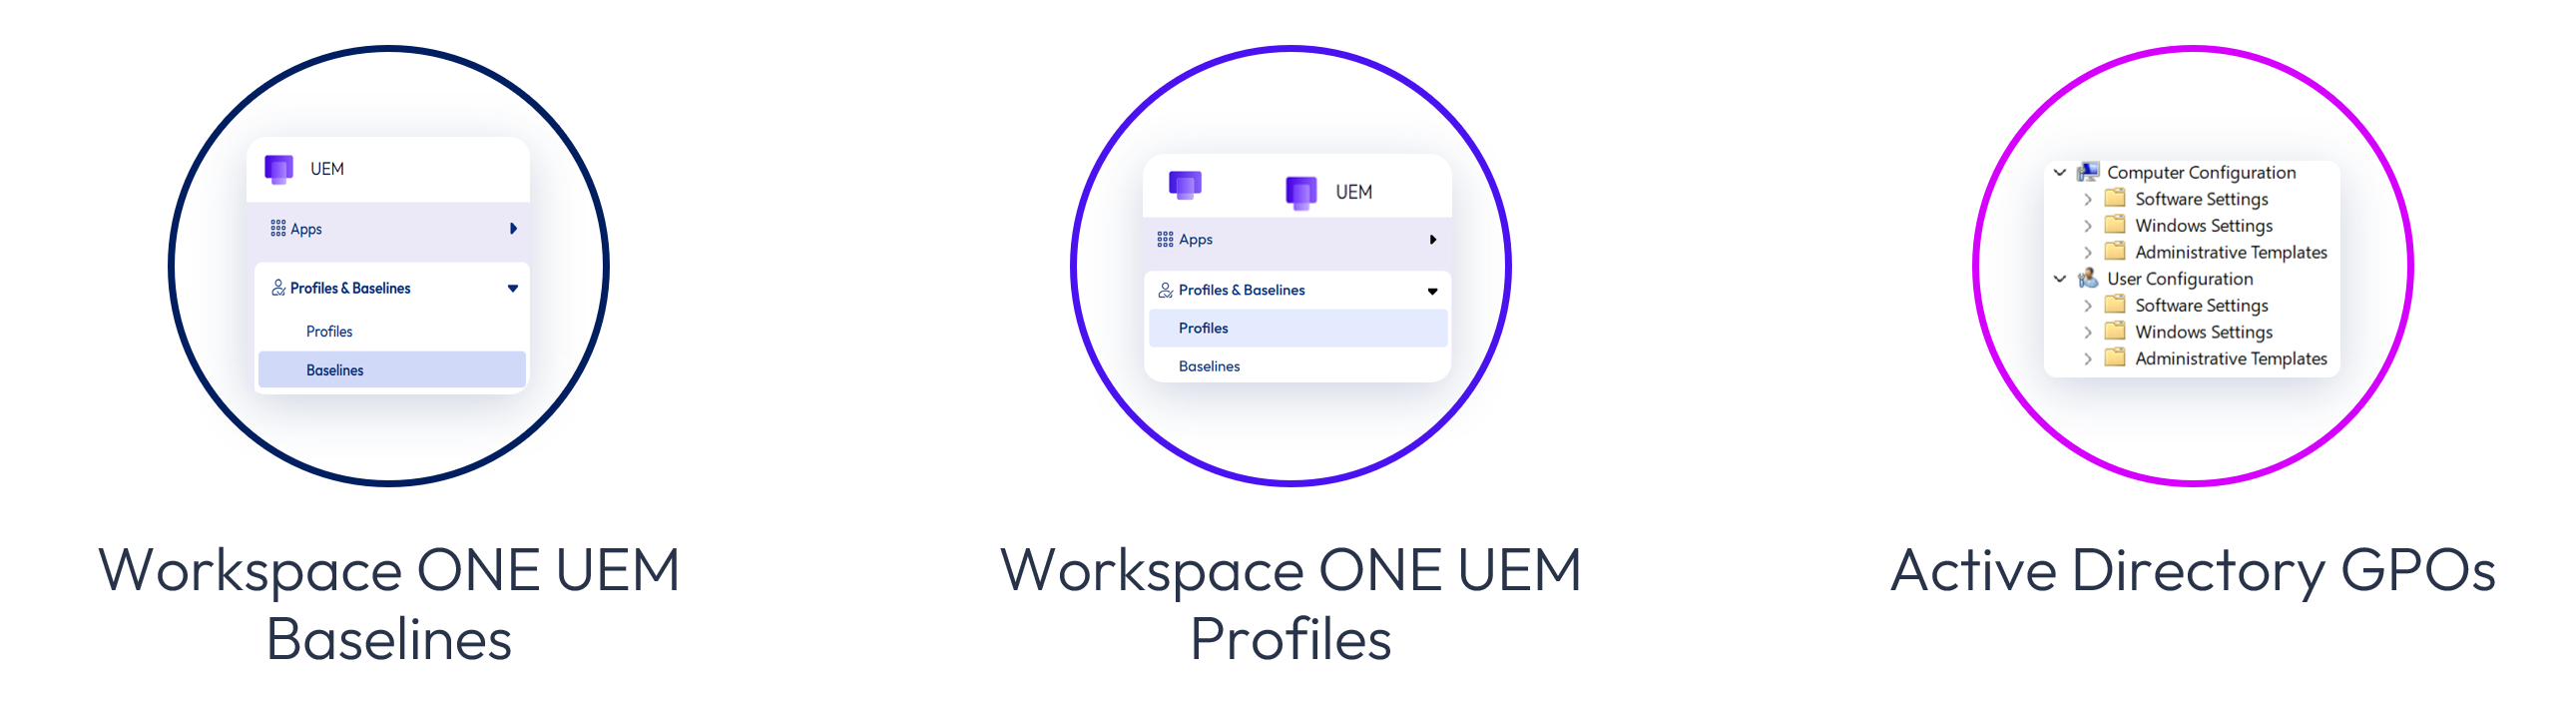
Figure 14: Policies that can be applied to Windows Servers
Baselines and Profiles will be discussed in depth shortly.
Active Directory Group Policy Objects are commonly used to manage Windows devices. While many corporate mandates require some Active Directory GPOs, these should be minimized or eliminated where possible. Workspace ONE Baselines offer several operational advantages over GPOs: built-in compliance tracking within the UEM console, automatic hourly reapplication (even without an active user session), and drift detection without requiring line-of-sight to a domain controller.
The migration path is straightforward: recreate the relevant GPO settings as Baselines or Windows ADMX Profiles in the Workspace ONE console, verify the expected configuration on a test group, and then remove the corresponding GPOs. Any GPO-applied settings that remain should be reviewed to ensure there is no duplication with Workspace ONE Baselines and Profiles because overlapping policies create inconsistent or intermittent results.
Smart Groups
Before addressing Baselines and Profiles, Smart Groups should be configured so that the respective policies can be appropriately assigned. Smart Group configuration is exactly the same as Windows Desktop, with one notable difference as related to the operating system version selection.
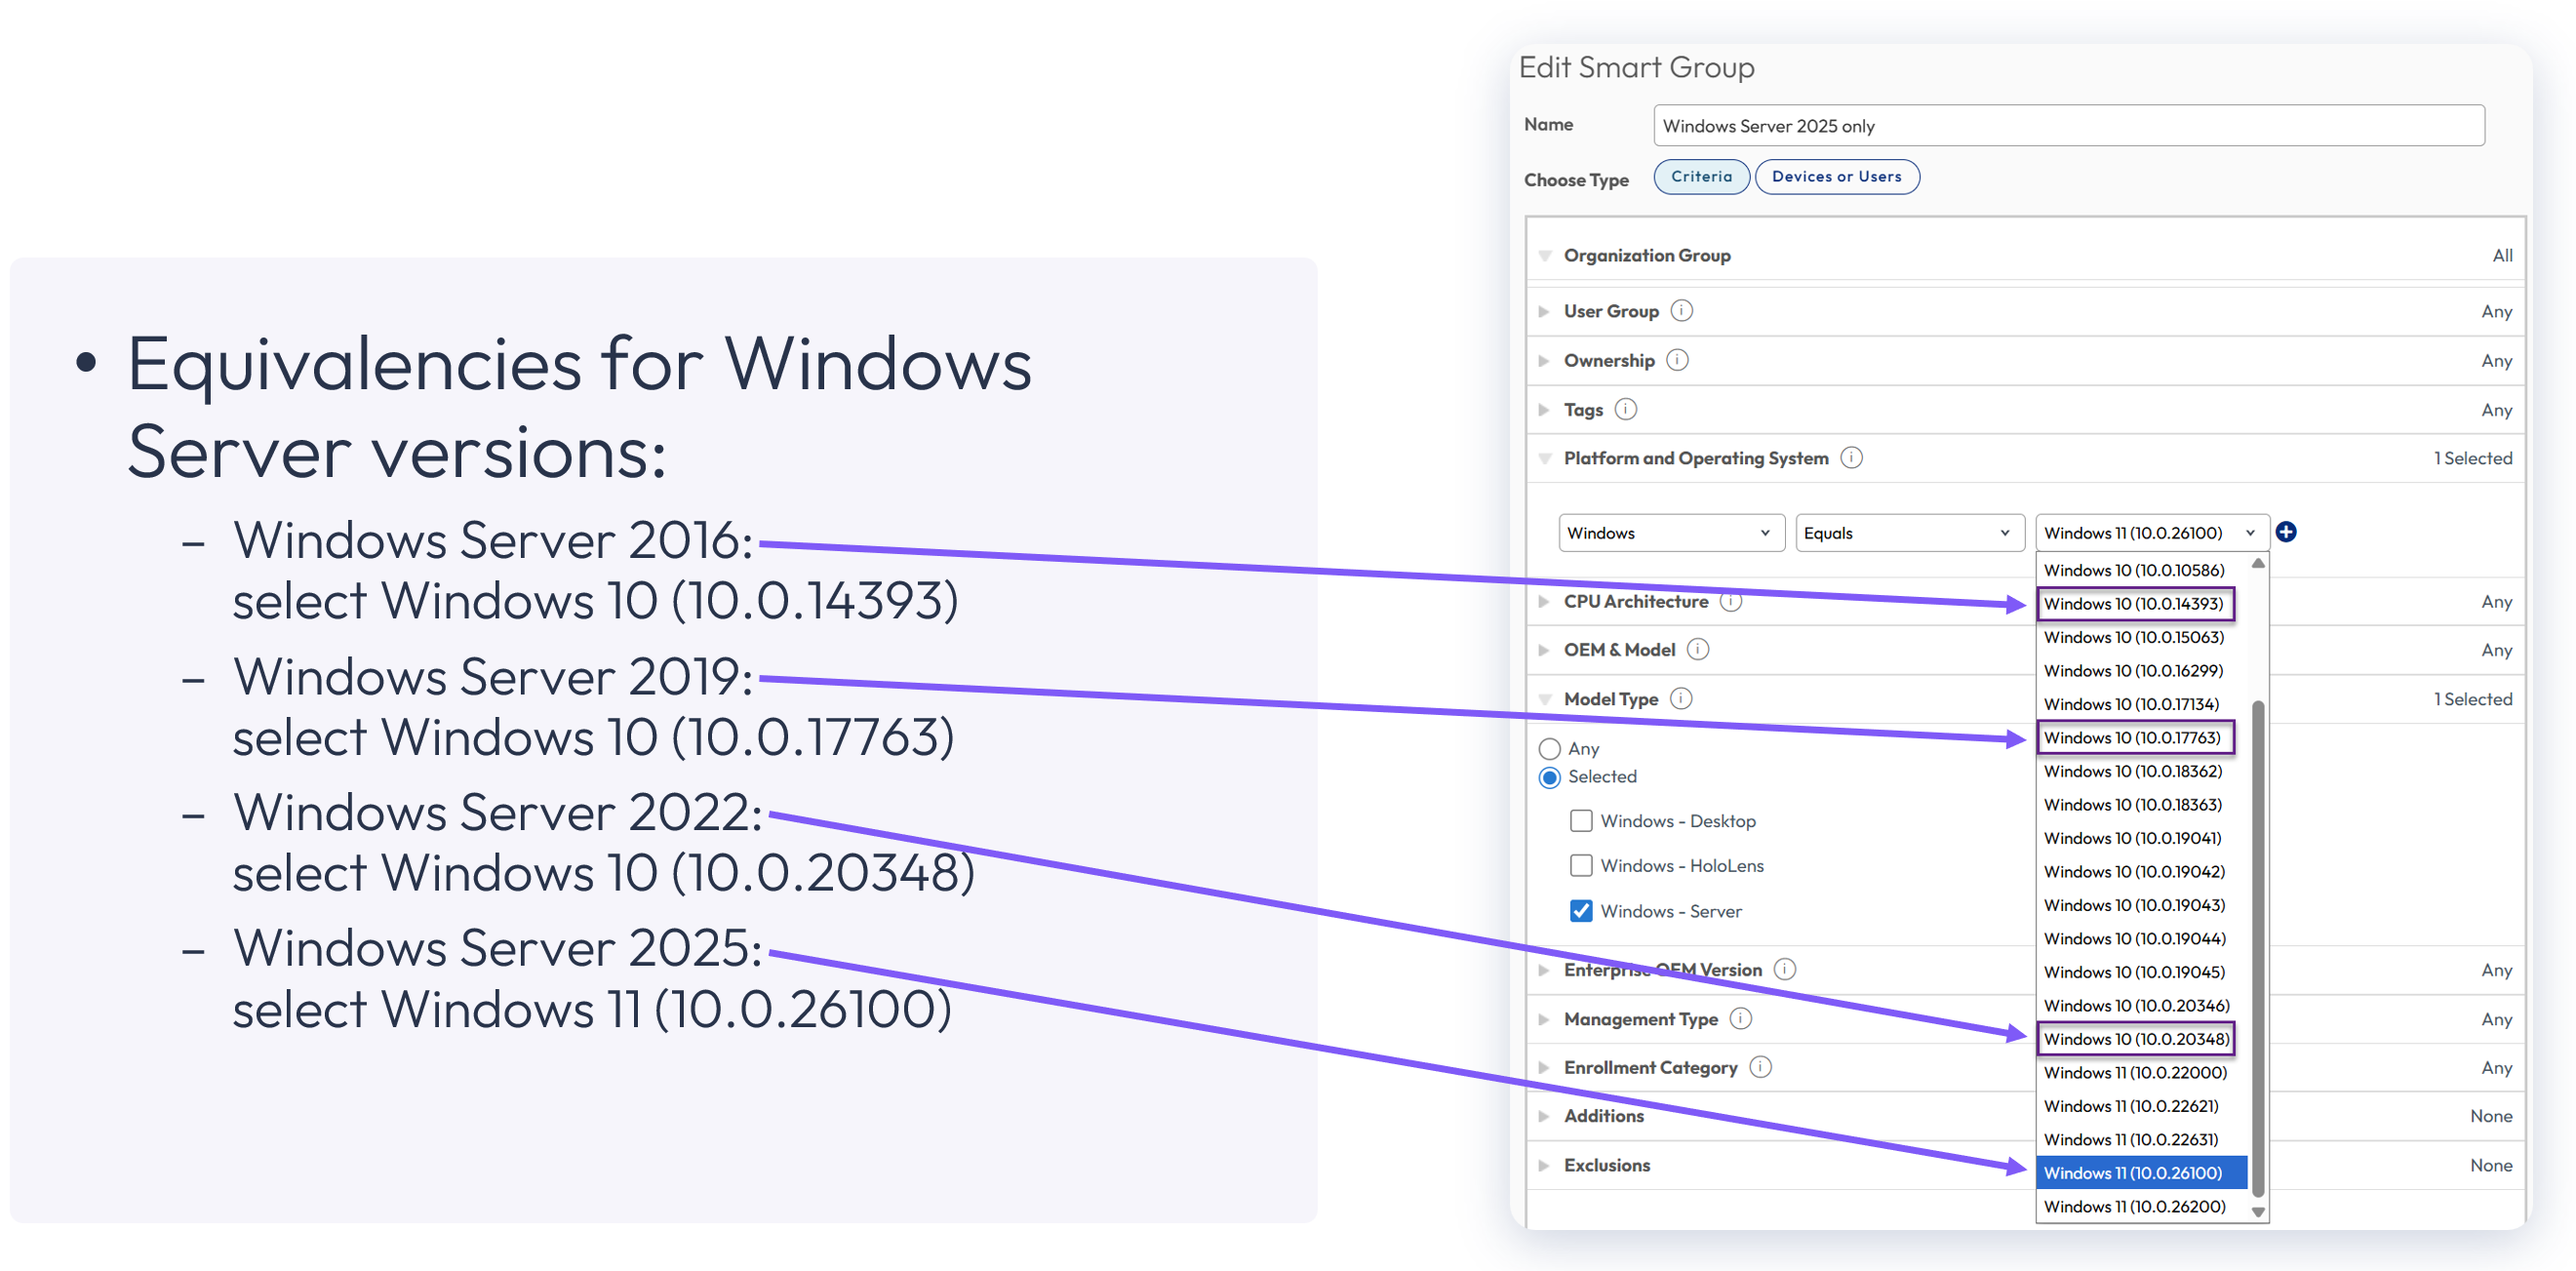
Figure 15: Windows Server equivalencies
In this example, a Smart Group has been created for Windows Server 2025 devices, and the appropriate selection from the operating system dropdown is Windows 11 (10.0.26100). The equivalencies for other Windows Server versions are as shown.
Because the policy options for each Windows Server version differ slightly, Omnissa recommends creating a distinct Smart Group for each version to facilitate assignments.
Baselines
A template Baseline should be the primary industry-standard security policy that is applied to Windows Servers because compliance can be directly tracked within Workspace ONE. Baselines are initially applied at device startup without waiting for user login, which is especially important for Windows Server wherein there is often not an actual user login. In addition, Baselines are reapplied every hour by default, even if no user session is active.
Omnissa does not recommend applying more than one Baseline to a Windows device; however, if multiple Baselines are configured and a conflict arises due to duplicate settings, the newest Baseline has precedence. In addition, Baselines have precedence over Windows ADMX Profiles, which will be discussed shortly.
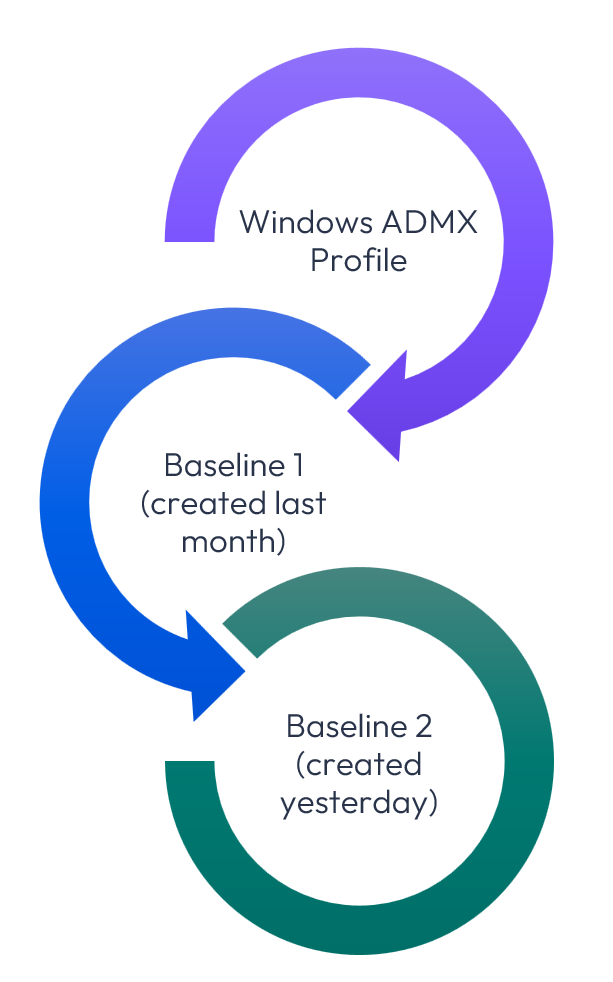
Figure 16: Baseline precedence
In the example shown, the same firewall setting was configured within a Windows ADMX Profile, an older Baseline, and a recent Baseline. Of course, configuring the same setting within multiple policy types is not recommended, but if it were to occur, the most recent Baseline would have precedence.
Windows Security Baseline supports Windows Server 2016, 2019, 2022, and 2025 Member Server or Domain Controller devices and is the recommended Baseline option. Configuration is similar to Windows Desktops with a few differences as noted below.
Note that the Create your own option is not recommended because it involves the lengthy process of manually selecting policies, plus there is no built-in adherence to an industry standard.
When configuring a Baseline for Windows Server, the first steps involve selecting Windows Server, as well as the template option.
Below is the process for these initial steps:

Figure 17: When configuring a Baseline, select Server and then Use template
After naming the Baseline, Omnissa recommends selecting the Windows Security Baseline and selecting the version and server type respective of the devices to be assigned as shown below.
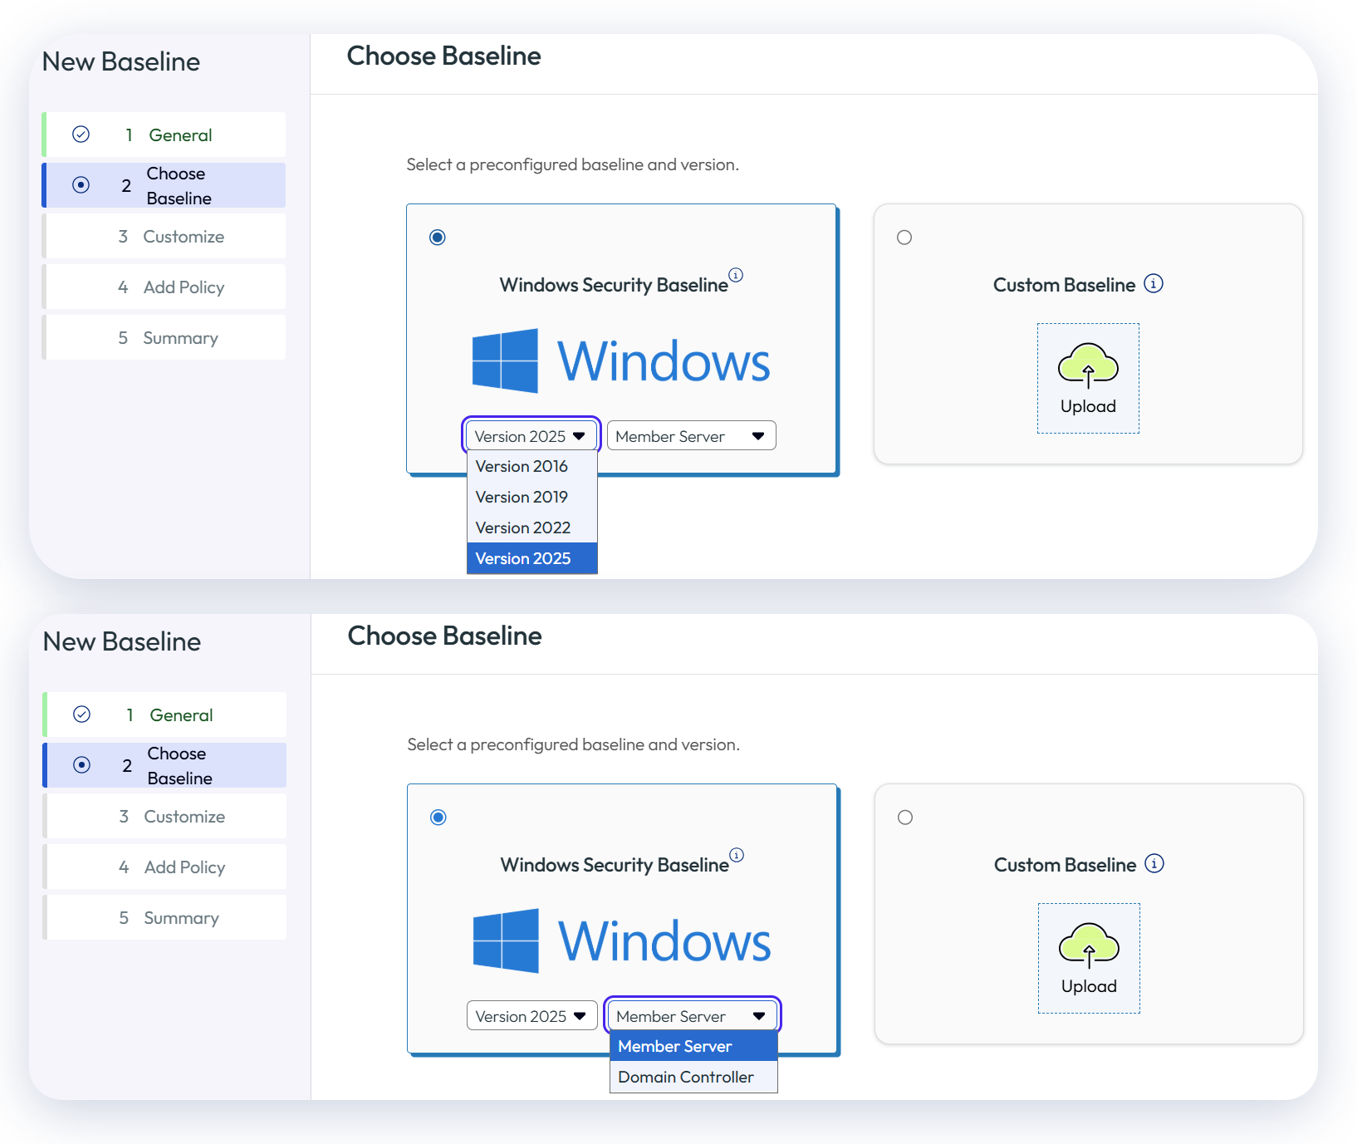
Figure 18: Select version and server type
In the following step, the Baseline template can be customized to suit your enterprise requirements; however, keep in mind that each modification to the Windows Security Baseline template causes deviation from the industry standard.
If it is necessary to add policies not included in the template option, they can be added within the Add Policy step.
Finally, the Baseline should be assigned to the appropriate Smart Group(s). Exercise caution with aligning the Baseline version and device type with the corresponding Smart Group(s). For example, if you create a Baseline based on Windows Server 2025 Member Server, it should not be applied to Windows Server 2016 devices.
Profiles
There are two inherent Profile options for Windows Server devices:
- Windows Profile
- Windows ADMX Profile
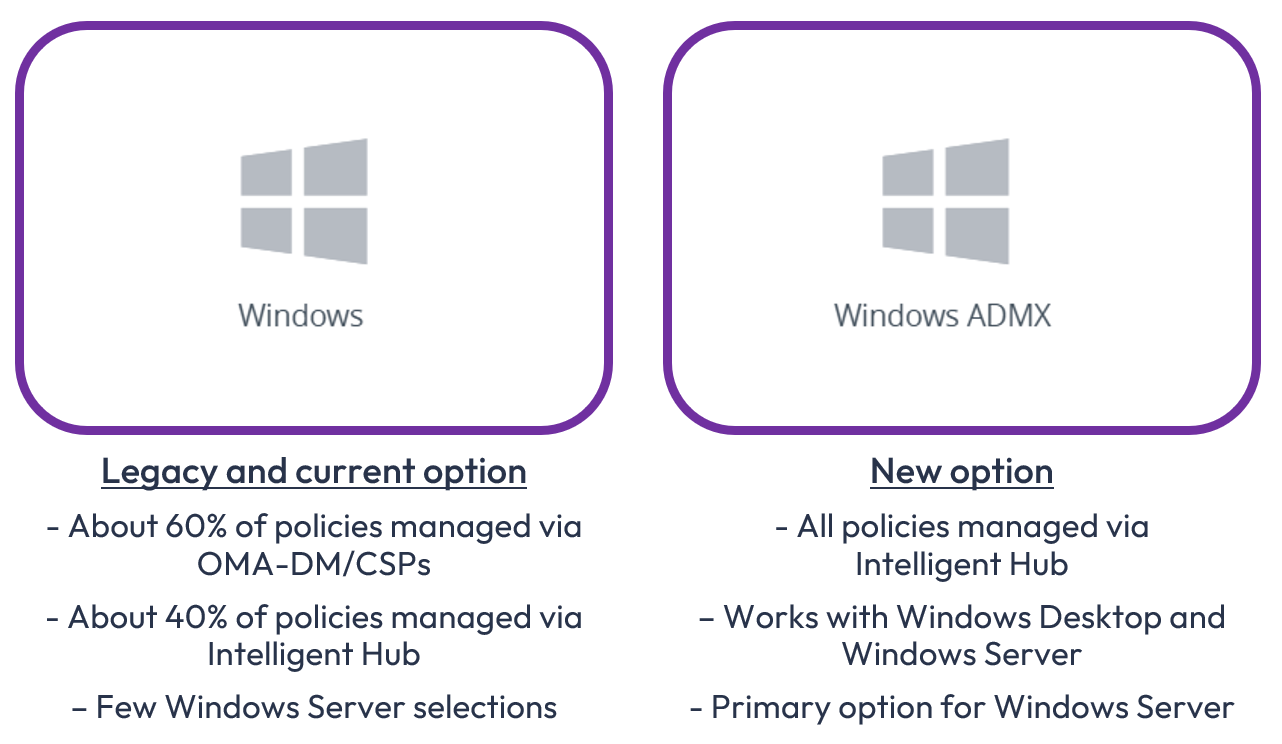
Figure 19: Profile options for Windows Server devices: Windows Profile and Windows ADMX Profile
Because only Windows Desktop devices can process OMA-DM/CSP-based commands, Windows Server devices can only be configured via Intelligent Hub-based policies. For an in-depth discussion of OMA-DM, CSP, and SyncML, please see the Workspace ONE Windows Baselines and Profiles article in Tech Zone.
Windows Profiles
With the exception of the specific policies defined below, the Windows ADMX Profile option should be selected to address Profile requirements for Windows Servers.
| Windows Server Device policy payloads | Windows Server User policy payloads |
| Credentials | Credentials |
| Managed Resources | Custom Settings |
| Custom Settings | |
| Privilege Elevation |
Figure 20: 6 Windows Server policies that can be configured using Windows Profile option
Note that the default behavior within the Managed Resources payload differs for Windows Server devices. For Windows Server devices, applications, Profiles, Baselines, and Intelligent Hub are retained by default. If you do not wish to have applications, Profiles, Baselines, and Intelligent retained on the Windows Server if it is unenrolled from Workspace ONE, select Disable for the respective items.
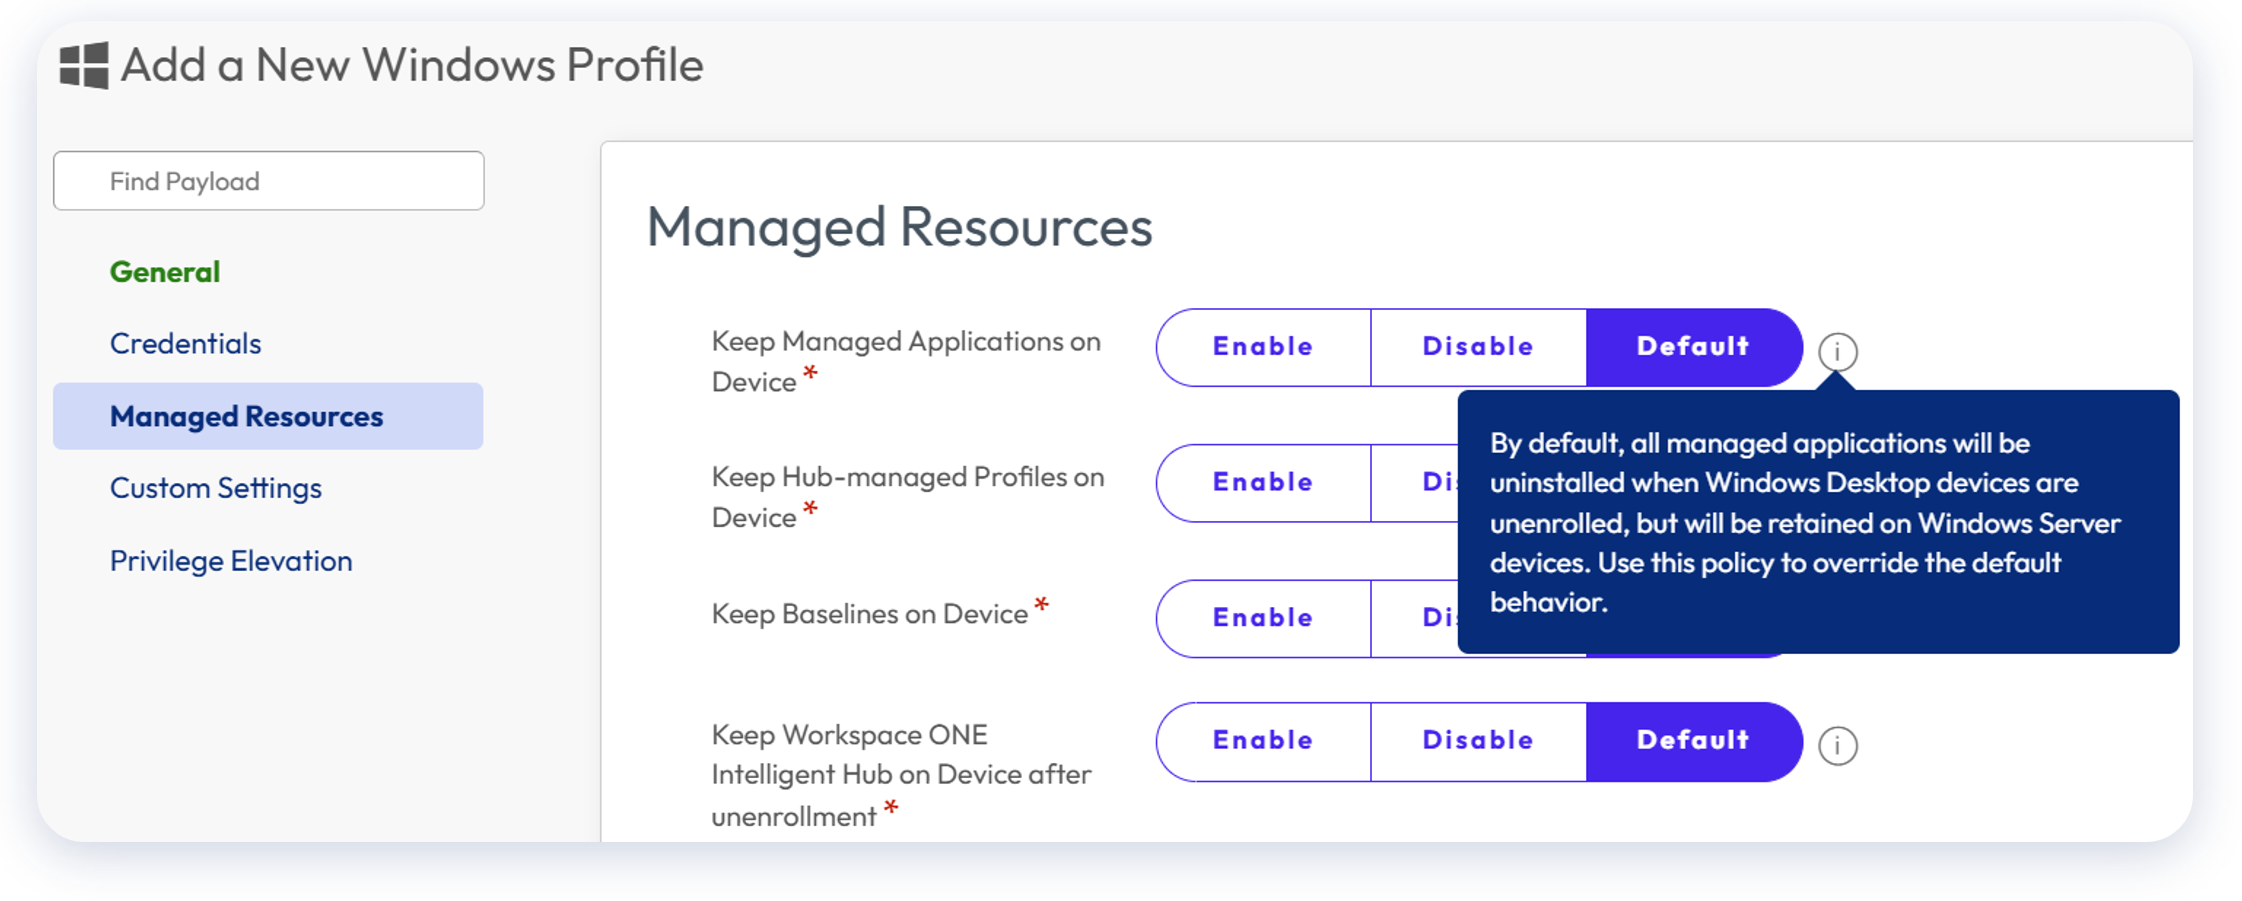
Figure 21: Default behavior of Managed Resources payload differs for Windows Server
To configure Managed Resources, go to Resources > Profiles > Add > Add Profile > Windows > Server > Device Profile > Managed Resources.
Windows ADMX Profiles
Windows ADMX Profiles provides over 350 payloads for configuration and should be the primary Profile type used for Windows Server devices. These payloads look similar to Active Directory GPOs and provide extensive options for supplementing a Baseline.
To access Windows ADMX Profiles, go to Resources > Profiles > Add > Add Profile > Windows ADMX.
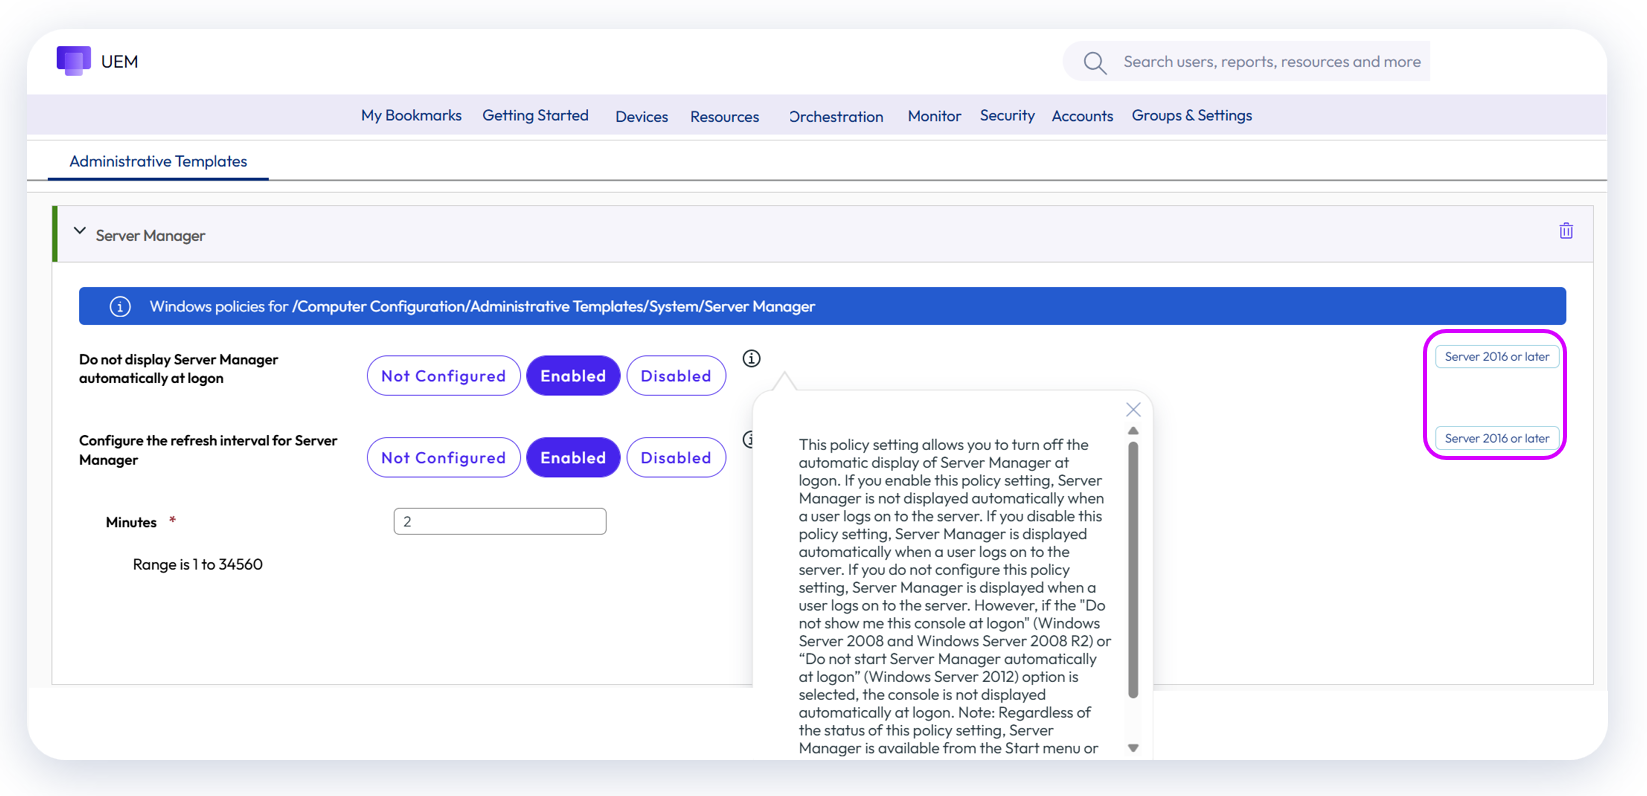
Figure 22: Windows ADMX Profile example
As you will note, Windows operating system as well as specific version suitability are noted within the configuration screen.
In addition, some common applications such as Adobe Acrobat can be managed via Windows ADMX Profiles.
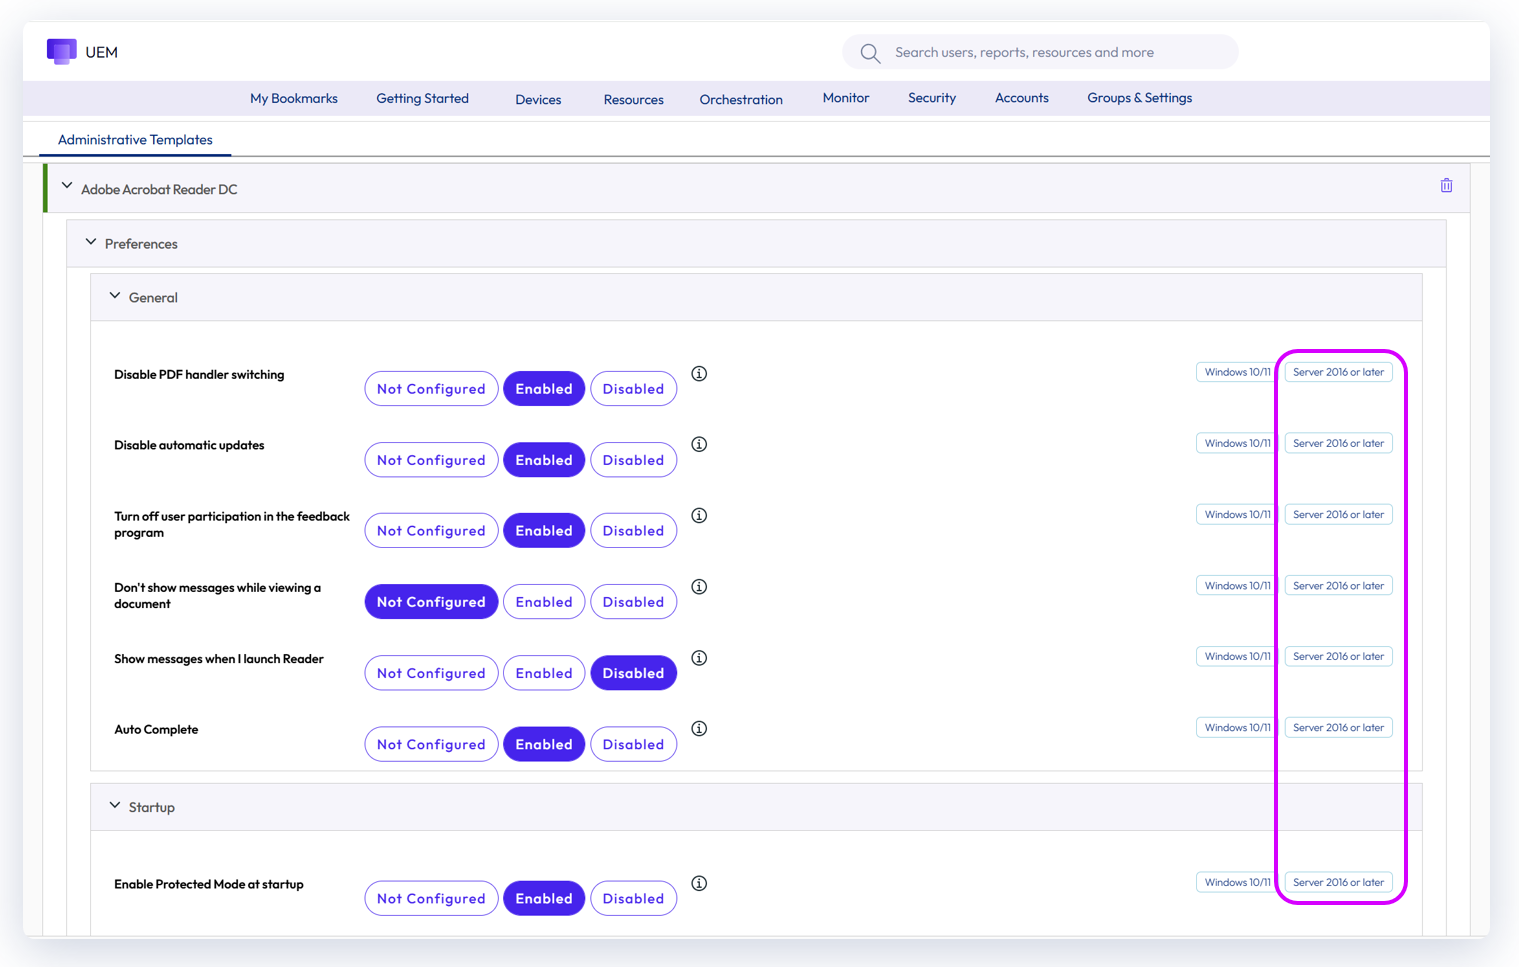
Figure 23: Windows ADMX Profiles can be used to manage common applications
Use cases for disabling RDS
Where Remote Desktop Services™ (RDS) will not be utilized for accessing Windows Servers in favor of Workspace ONE Assist™ or another tool, Omnissa recommends disabling RDS via a Windows ADMX Profile to enhance security by eliminating protocol traffic traversing over TCP/UDP 3389. Workspace ONE Windows Server licensing includes Workspace ONE Assist, which provides secure remote access over TCP 443.
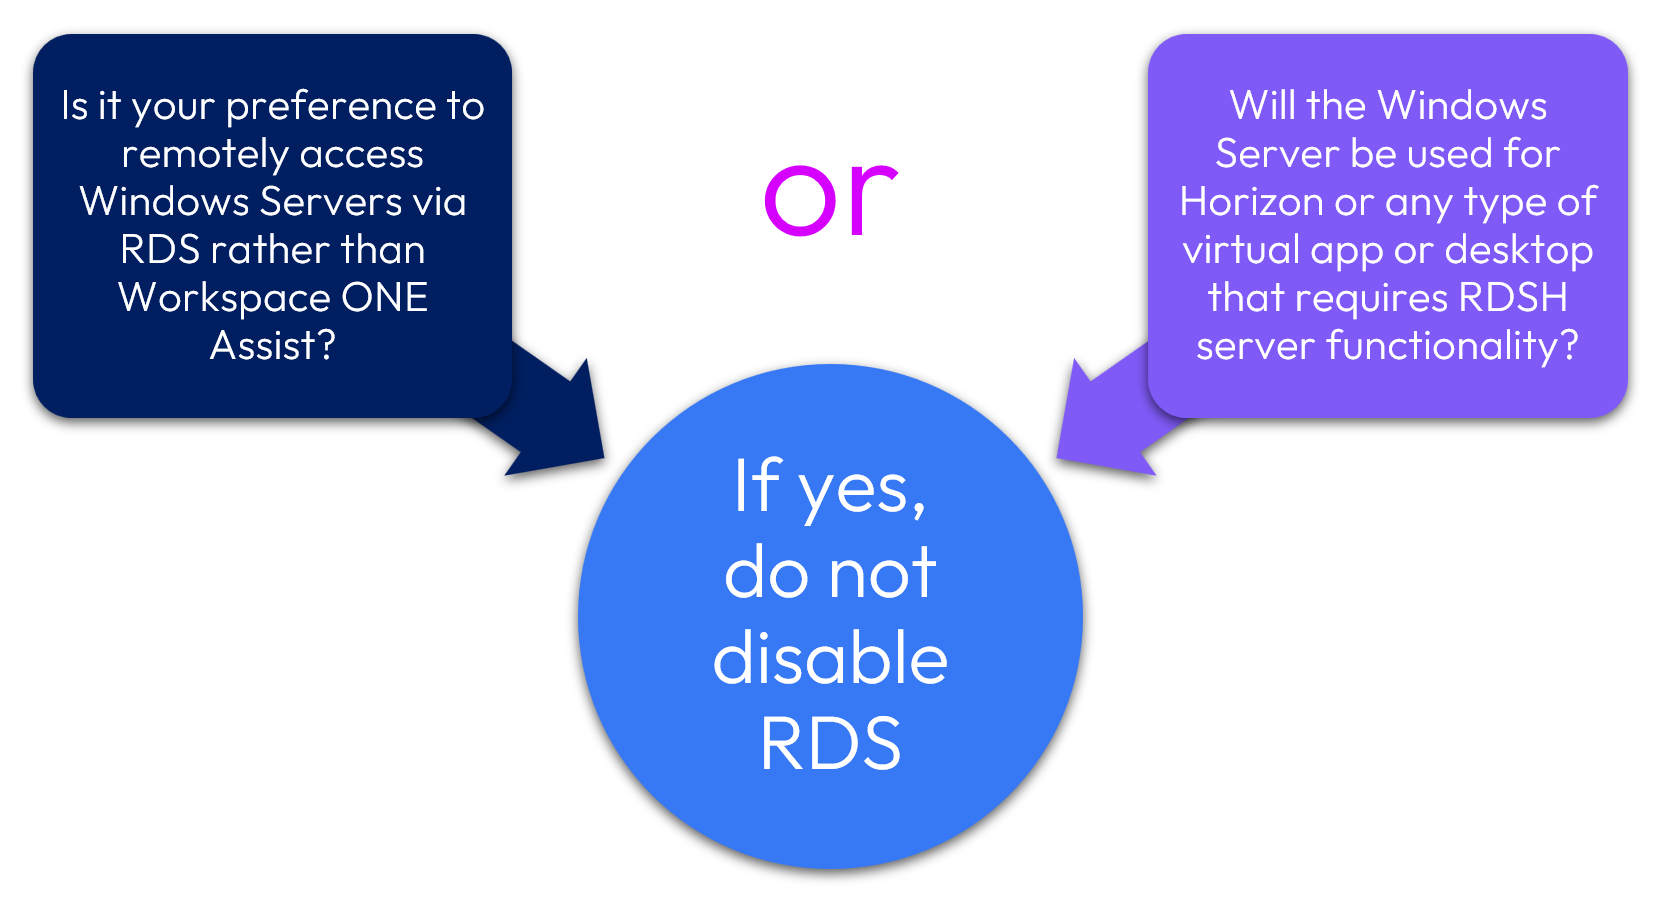
Figure 24: Is disabling RDS appropriate for your environment?
After confirming that RDS traffic is not relevant to your environment, the following Windows ADMX Profile payload should be configured as shown:
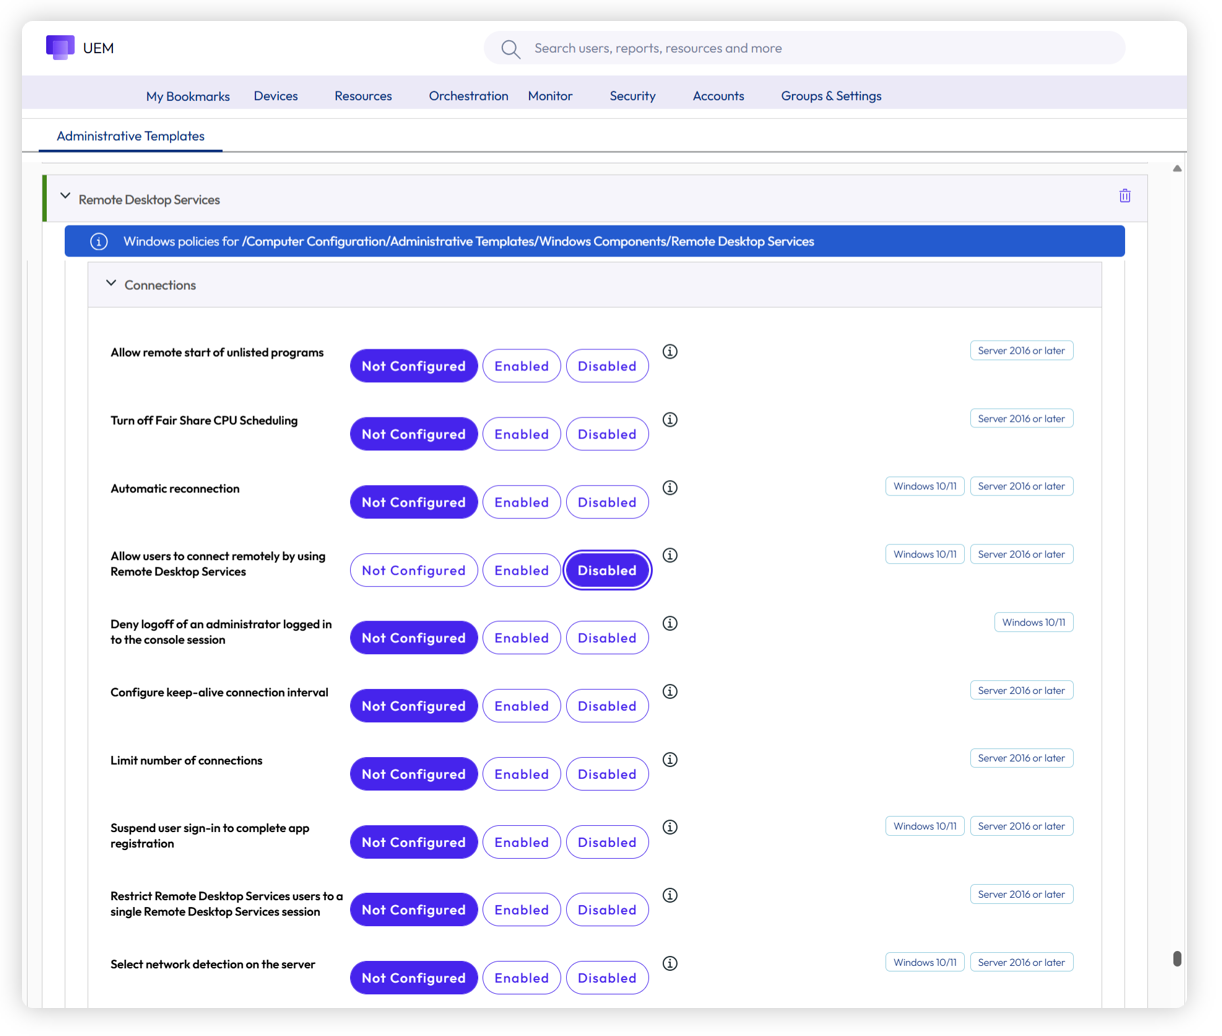
Figure 25: If appropriate, disable RDS as shown via Windows ADMX Profile payload
Hands-on learning: Windows Server policies
Want to see how this works? If you’d like to step through a five-minute interactive demo where you can walk through creating a Smart Group, a Baseline, and a Windows ADMX Profile, please click here: https://techzone.omnissa.com/guided-tour-windows-server-policies
Windows Updates
Windows Updates settings for Windows Servers should be configured as a Windows ADMX Profile. Although a payload for Windows Updates appears within Windows Profiles type, it is dependent upon OMA-DM and thus not an option for Windows Server. Active Directory GPOs should not be used for Windows Update configuration because this can add significant overhead to troubleshooting and maintenance.
For a detailed description of how to configure Windows Updates for Windows Servers, please see the Tech Zone article Managing Updates for Windows Devices.
As shown in the previous section, Windows ADMX Profiles are simple to configure. Simply select the Windows Update payload from Resources > Profiles > Add > Add Profile > Windows ADMX > Device Profile > Windows Update.
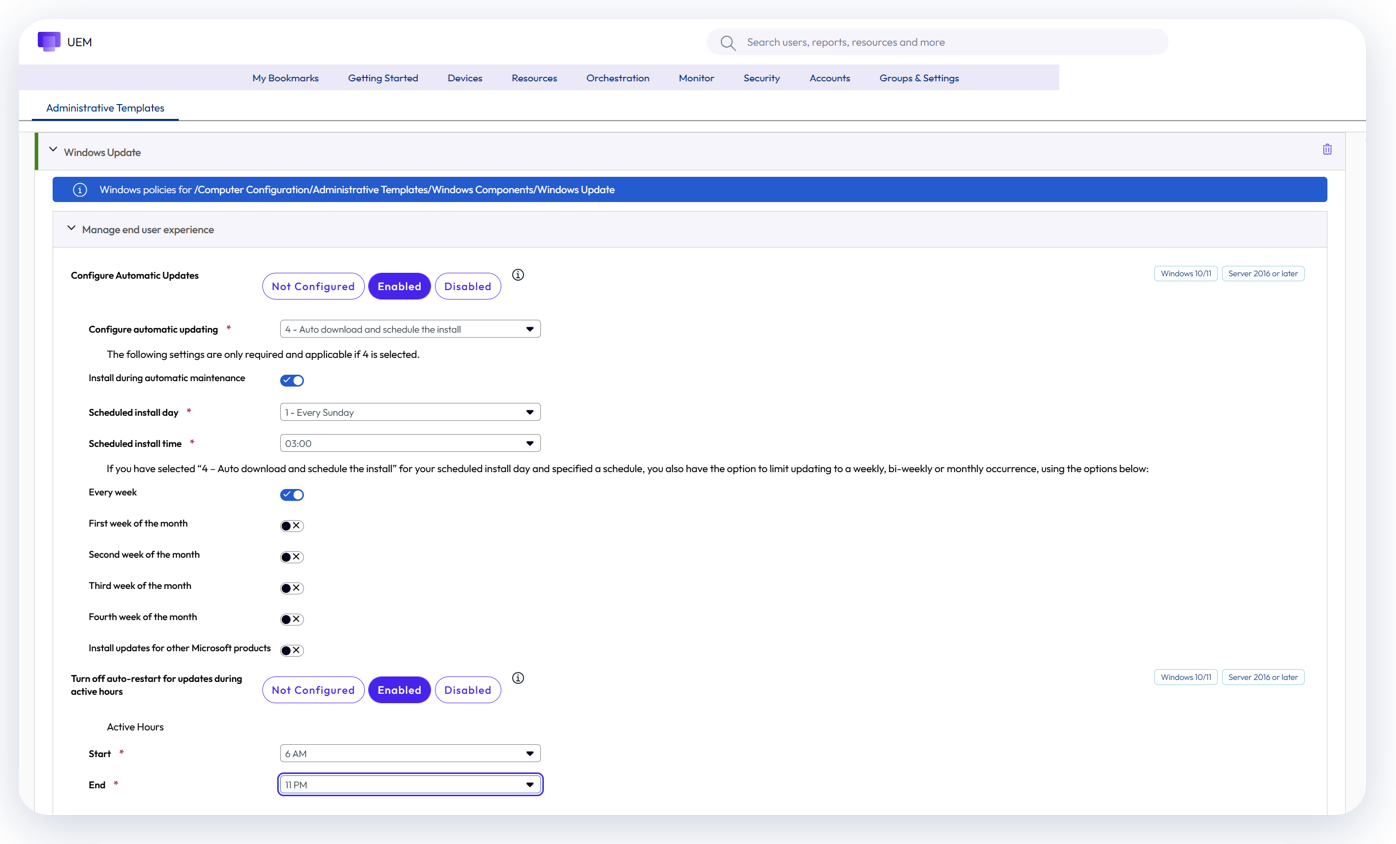
Figure 26: Windows Update configuration
Granular Patch Management
Windows Server devices provide critical business infrastructure, and as a result, applying Windows Updates is a carefully orchestrated process wherein updates can only be applied during maintenance periods, with exceptions for zero-day or other emergency patches.
Granular Patch Management addresses this exact use case for patches that cannot wait for the next maintenance period by allowing administrators to select specific patch(es) and assign for deployment.

Figure 27: Granular Patch Management
For example, if a new zero-day patch is released, the Granular Patch Management process flow would be as depicted below:

Figure 28: Granular Patch Management process flow
Applications
Software deployment for Windows Server is similar to Windows Desktop in that there are three key options for deploying apps. Listed below are special nuances applicable to Windows Server.
- Create an App File. This process is exactly the same with the exception that within the Details pane, Windows Server should explicitly be designated as the Supported Model, with or without Desktop, respectively.

Figure 29: Windows Server can be designated as the Supported Model
- Enterprise App Repository. EAR essentially automates the App File process, including media. While most of the apps within EAR are focused on Windows Desktop devices, some apps such as Adobe Acrobat may be applicable to Windows Server. For server deployments, Omnissa recommends disabling Auto-Update and Restart so that updates are not applied outside of maintenance periods. Alternatively, Auto-Update can be enabled without assigning the app for deployment; this makes the latest version available in the console so that administrators can assign it when ready.
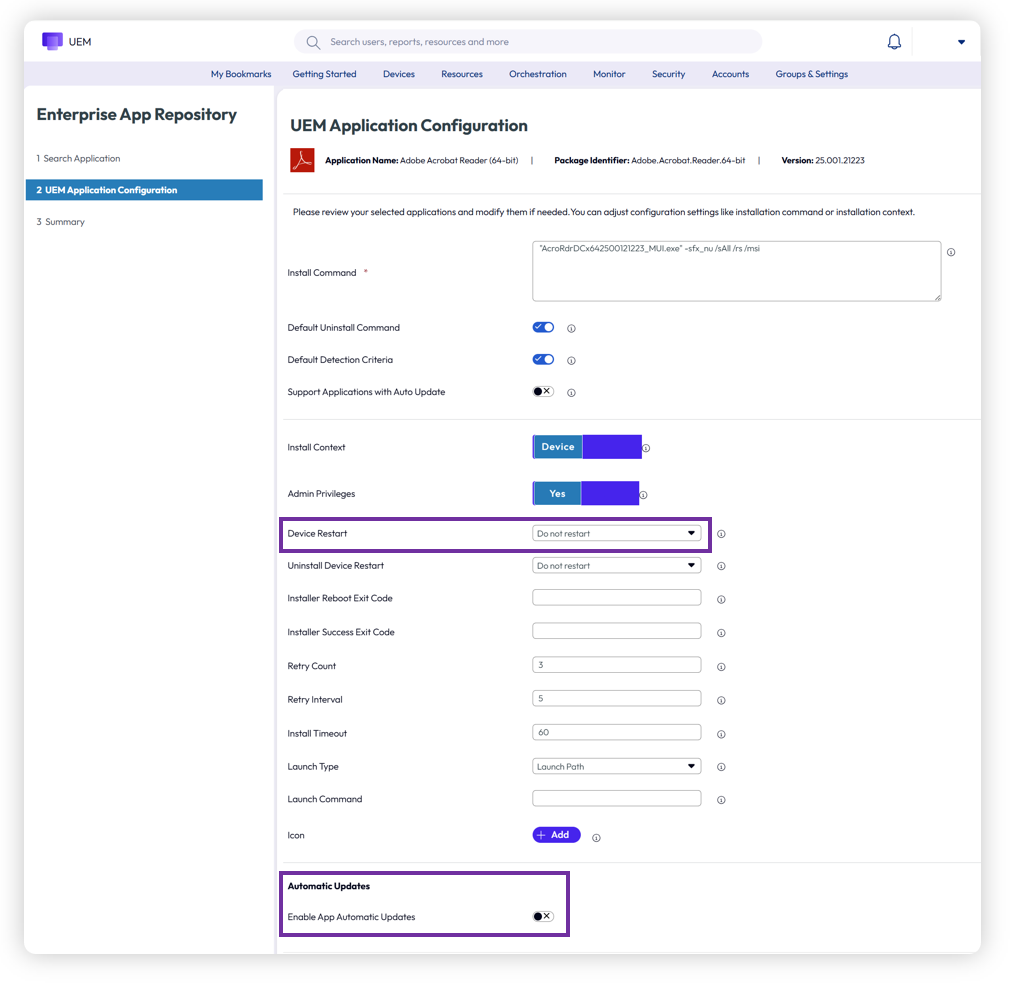
Figure 30: Recommended selections for EAR configuration
- Freestyle Orchestrator. Freestyle Orchestrator functionality is exactly the same as Windows Desktop. Workflows should be created that ensure execution during maintenance periods only.
As always, Smart Group designations determine app assignments.
For a deep-dive understanding of Workspace ONE Windows applications, please see the Omnissa Tech Zone article entitled Deploying Workspace ONE UEM Applications to Windows Devices.
Phased Deployments
Distributing applications can be done via Assignment Groups or the newest option, Phased Deployment, which is also available for Windows Server. Phased Deployment provides a valuable option that allows for the setup of sequential Smart Groups, as well as decisions regarding manual or automatic progression.
When setting up phases, one or more Smart Groups can be designated. For example, the first phase may consist of test servers. Once that phase is complete, subsequent phases, each consisting of one or more Smart Groups, can be triggered.
For Windows Servers, manual progression is likely the best option so that administrators can control exactly when the next phase is enacted. This should align with your maintenance windows.
For example, if your weekly maintenance window for Windows Servers is on Sundays between 1:00 AM and 4:00 AM, pre-configuring Phased Deployment ensures that the planned installation of applications and/or updates has already been grouped correctly and aligns with your change control process. When the maintenance period starts, execution is simply a matter of clicking Proceed to Next Phase. In addition, Manual Progress ensures that administrators have complete control over Windows Server deployments, such as when a planned deployment must be aborted due to extraneous factors.
Alternatively, automatic progression could be designated; however, the Install Rate and Wait Time rules would cause the installation to proceed without regard for the maintenance period. For this reason, Omnissa recommends using the Manual Progression option.
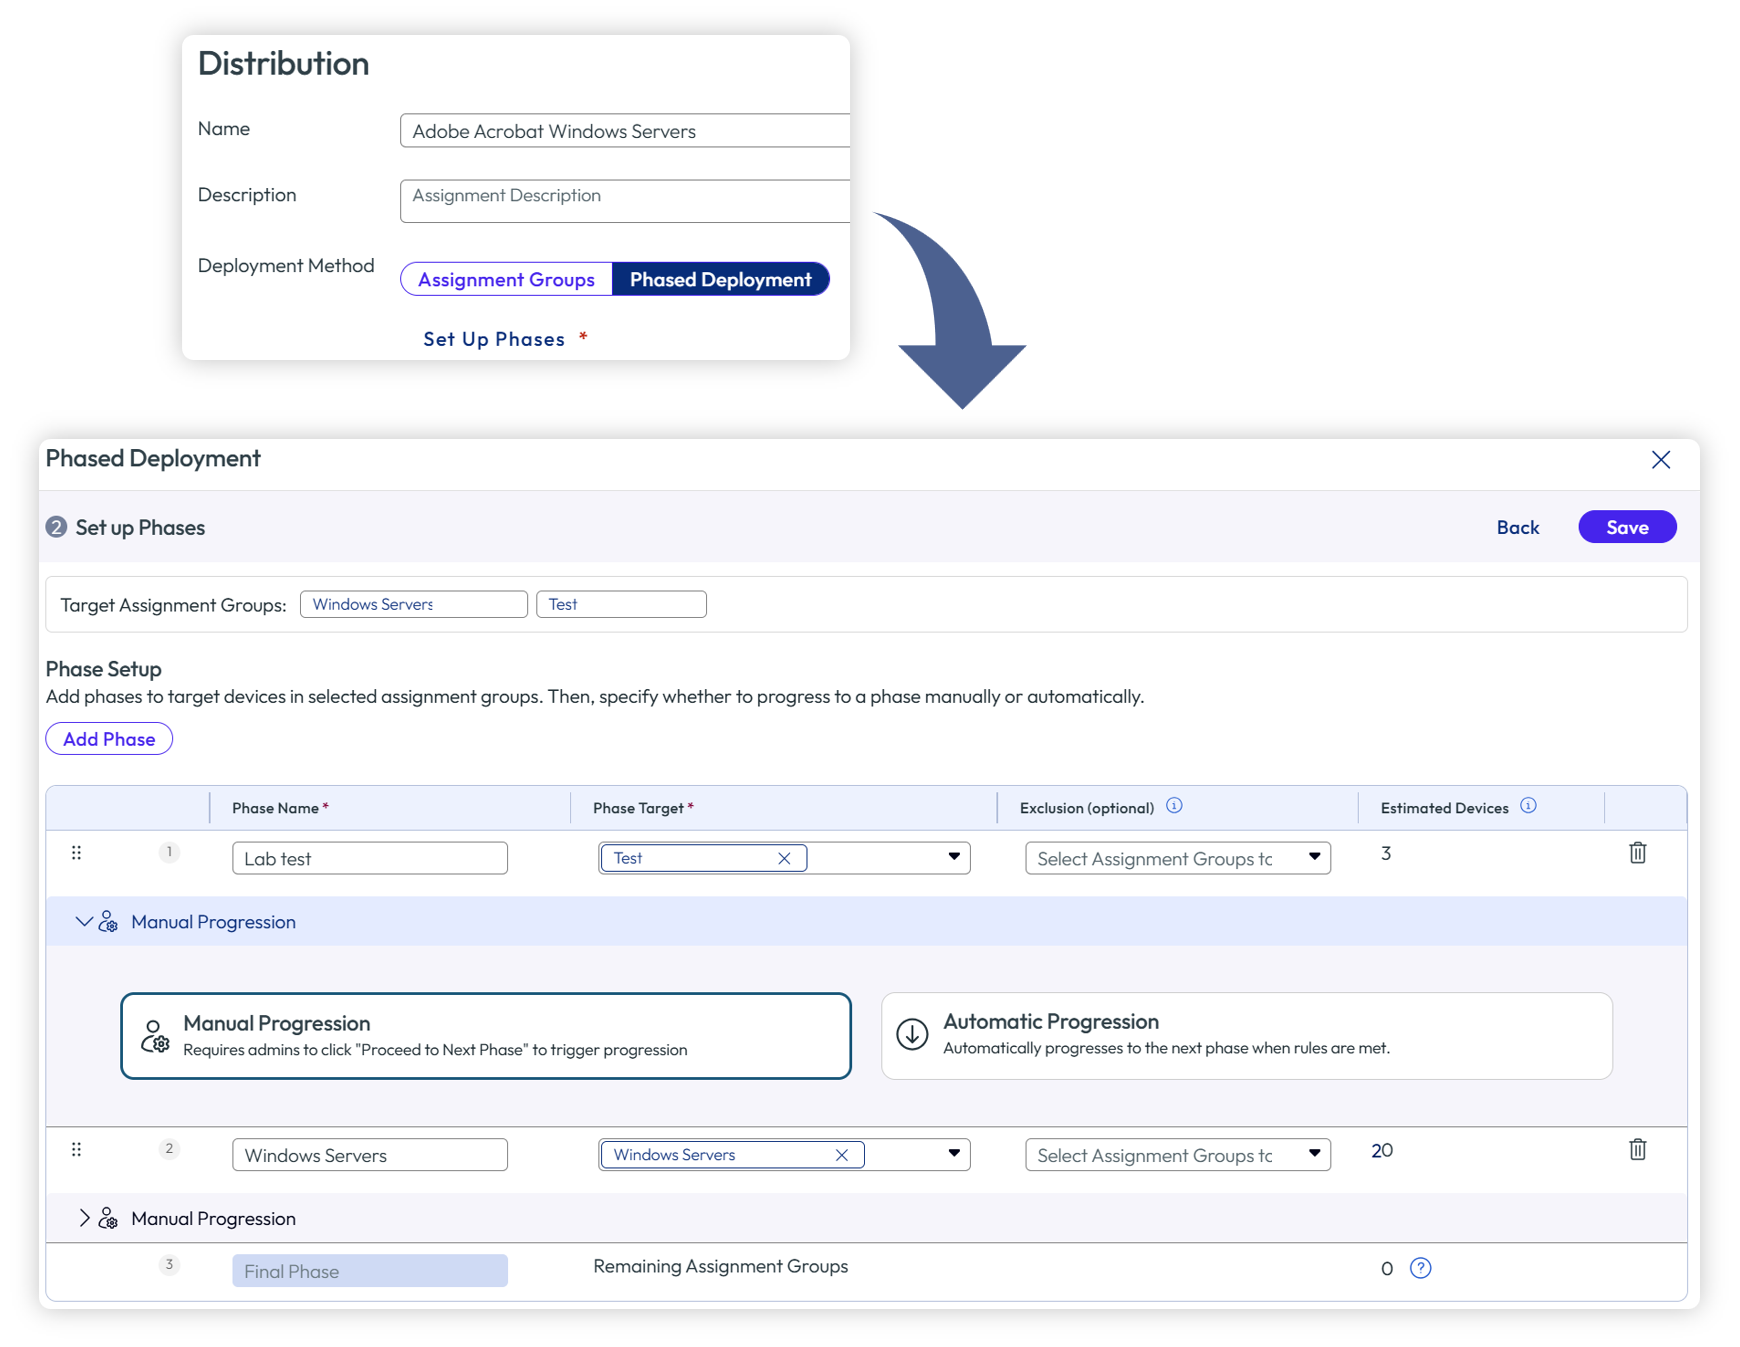
Figure 31: Phased Deployment provides manual or automatic progression of Smart Groups
Hands-on learning: Windows Server applications and Phased Deployment
Want to see how this works? If you’d like to step through a five-minute interactive demo where you can walk through creating an App file, an EAR app, as well as Phased Deployment options, please click here: https://techzone.omnissa.com/guided-tour-windows-server-app-deployment
Remediation
Remediation for Windows Servers can leverage several capabilities already discussed: Granular Patch Management for emergency patching, Freestyle Orchestrator for sequenced workflows, and Scripts for targeted fixes.
In addition, Omnissa has introduced Vulnerability Defense to address remediation of application and operating system vulnerabilities.
These capabilities are particularly important for Windows Servers due to required uptime and security, as well as stringent requirements regarding when these devices can be taken out of service.
Vulnerability Defense
Omnissa has introduced Vulnerability Defense to track, catalog, and remediate operating system and application vulnerabilities. Vulnerability Defense is available as a Limited Availability release with version 2604; Upon General Availability release, Vulnerability Defense will be fully supported on the Windows Server platform.
For technical information about Vulnerability Defense, please see the Omnissa Vulnerability Defense Community webinar.
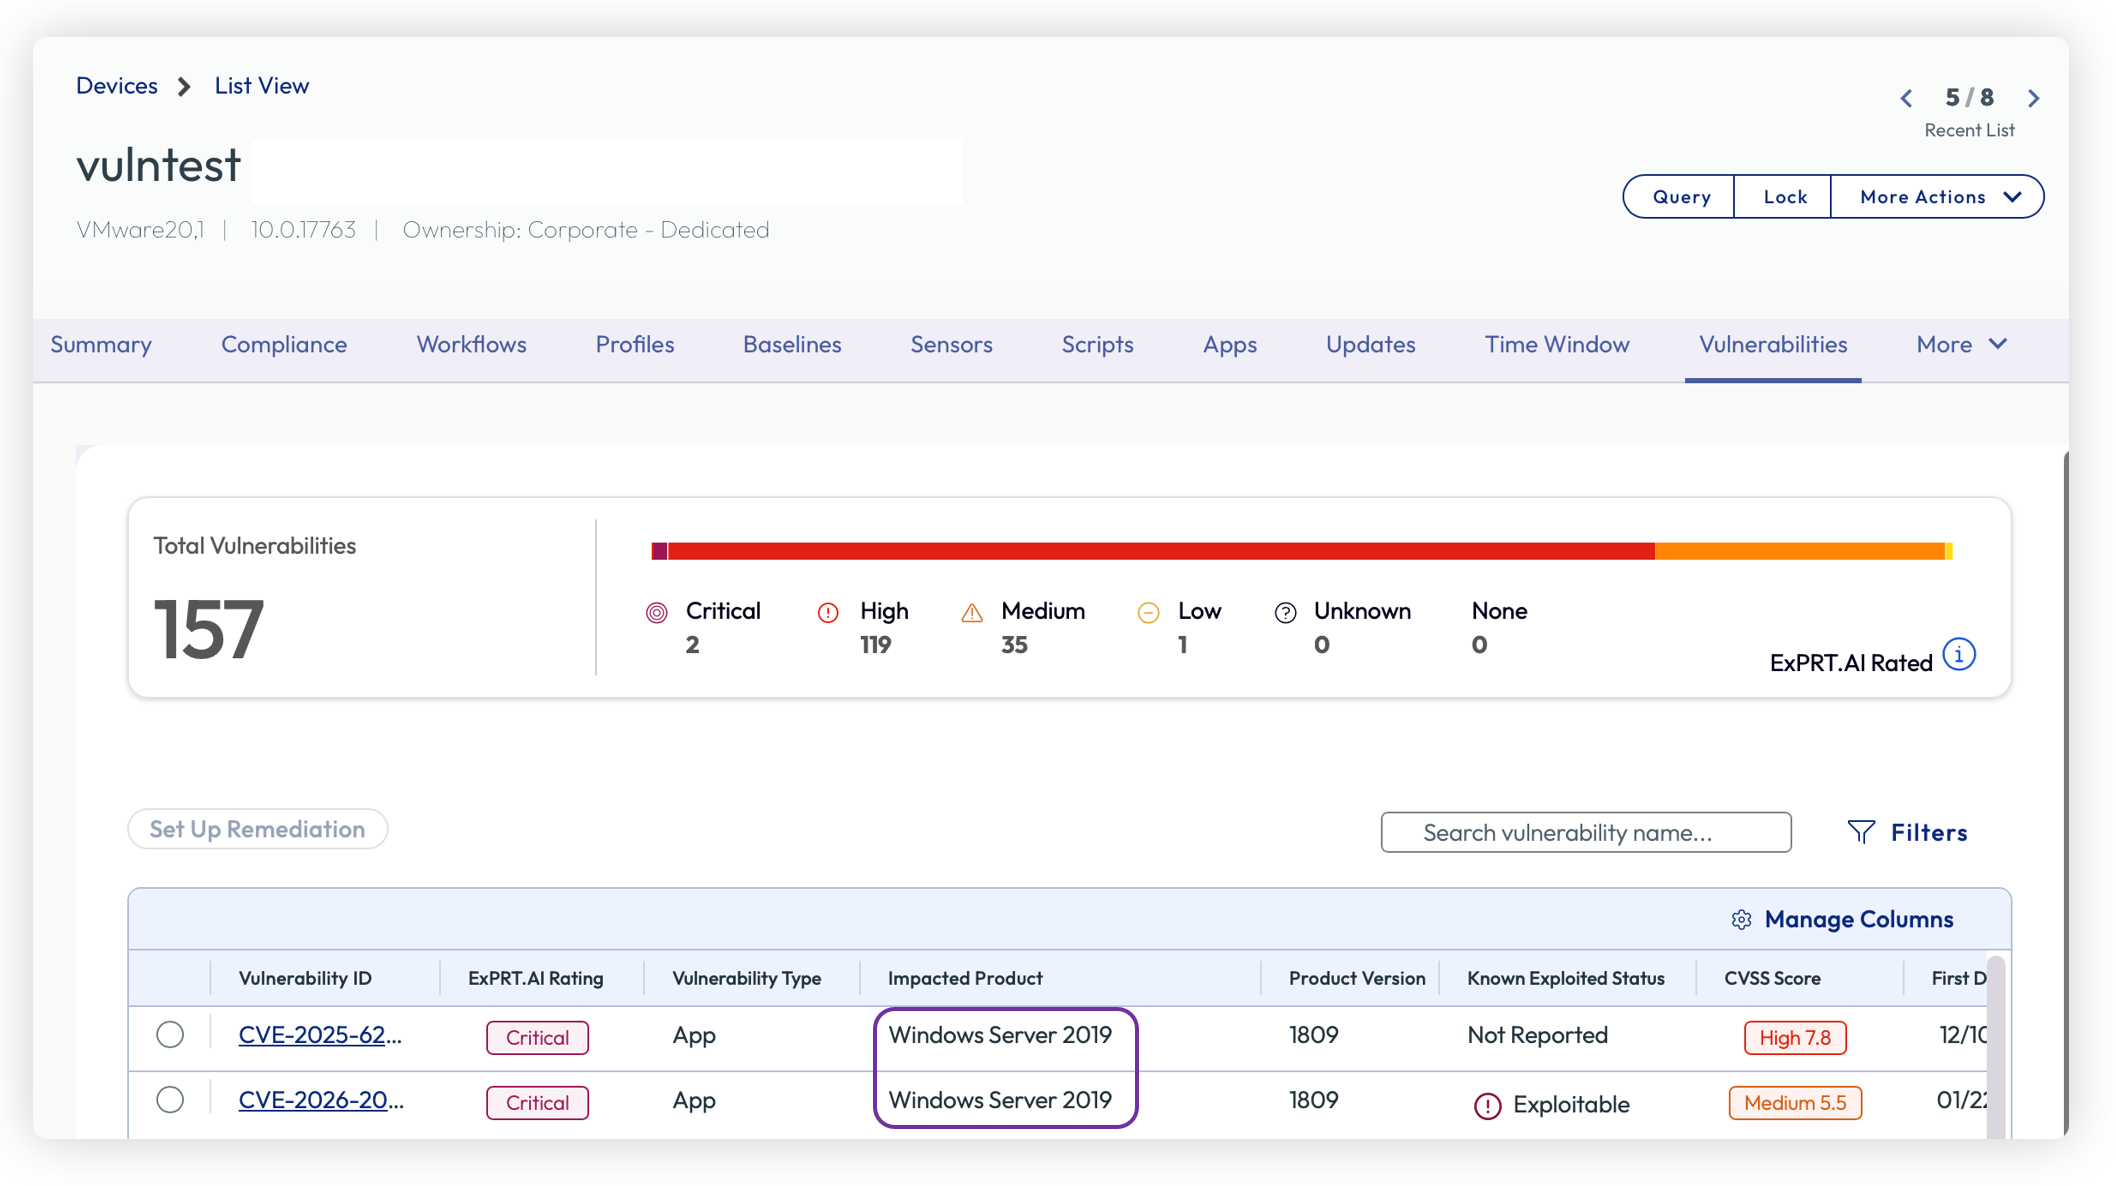
Figure 32: Vulnerability Defense supports Windows Server
Management
Management of Windows Server devices is similar to Windows Desktops. In addition to the Workspace ONE UEM console, Intelligence can be used to view data points, generate reports, and run cloud-side automation workflows. Intelligence Integration Workflows operate independently from Freestyle Orchestrator: where Freestyle executes locally on each device with strict sequencing, Intelligence workflows are cloud-side and fire-and-forget, targeting devices based on any data attribute available in Intelligence.
Scripts and Sensors for Windows Server function exactly the same as Windows Desktop. Scripts allow administrators to execute PowerShell commands on managed servers for tasks such as service management, registry modifications, and configuration changes. Sensors collect custom data points from each server; for example, disk space utilization, certificate expiry dates, or the status of critical services. Together, these capabilities provide a flexible mechanism for both querying server state and taking corrective action. For detailed configuration, see the Scripts documentation and Sensors documentation.
In addition, Server Roles and Features that have been installed on each Windows Server can be viewed within the Devices > Details View screen. This read-only sampling provides visibility across your server fleet: administrators can audit which roles are installed on which servers, identify configuration drift, and verify that decommissioned roles have been properly removed.
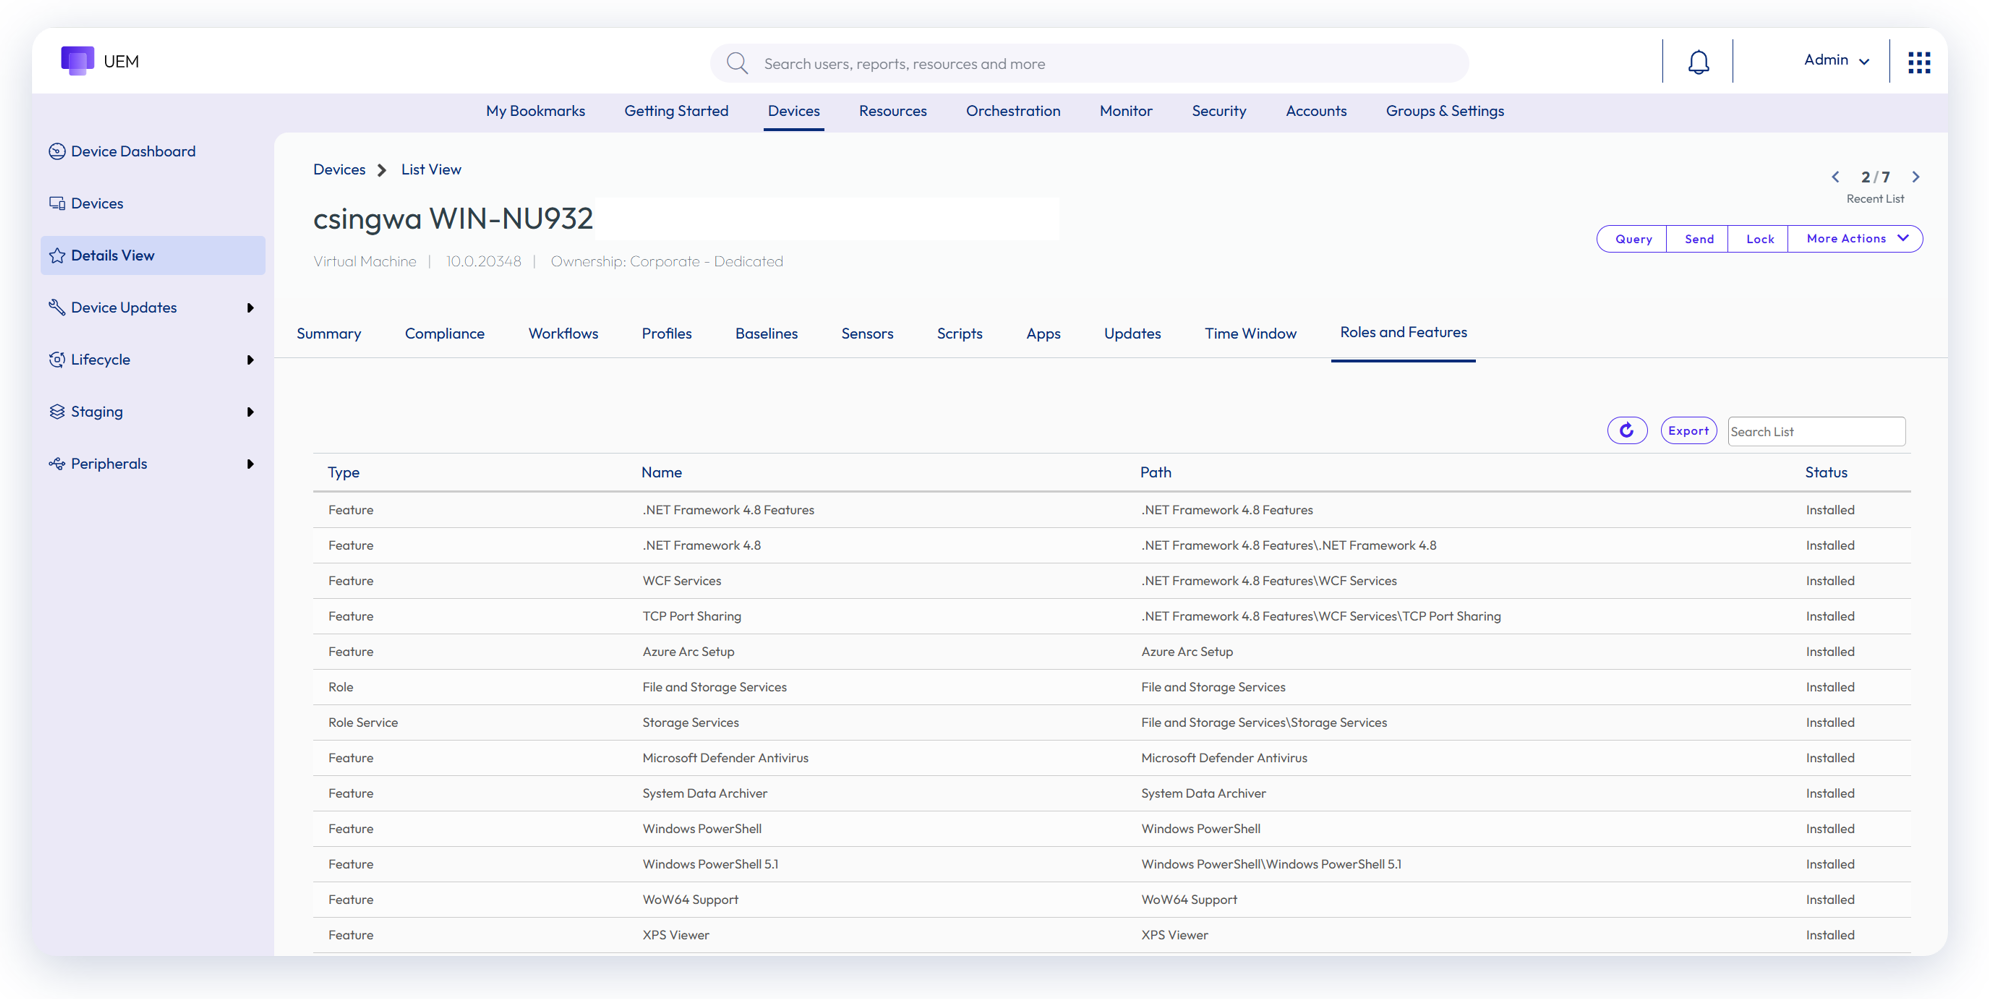
Figure 33: View Roles and Features installed on Windows Servers
Assist
Workspace ONE Assist is included with Windows Server licensing to provide administrators with a secure mechanism for remote management and access. Assist can be easily installed via the Enterprise App Repository and can eliminate the need for Remote Desktop Service (RDS) access, as well as costly third-party tools.
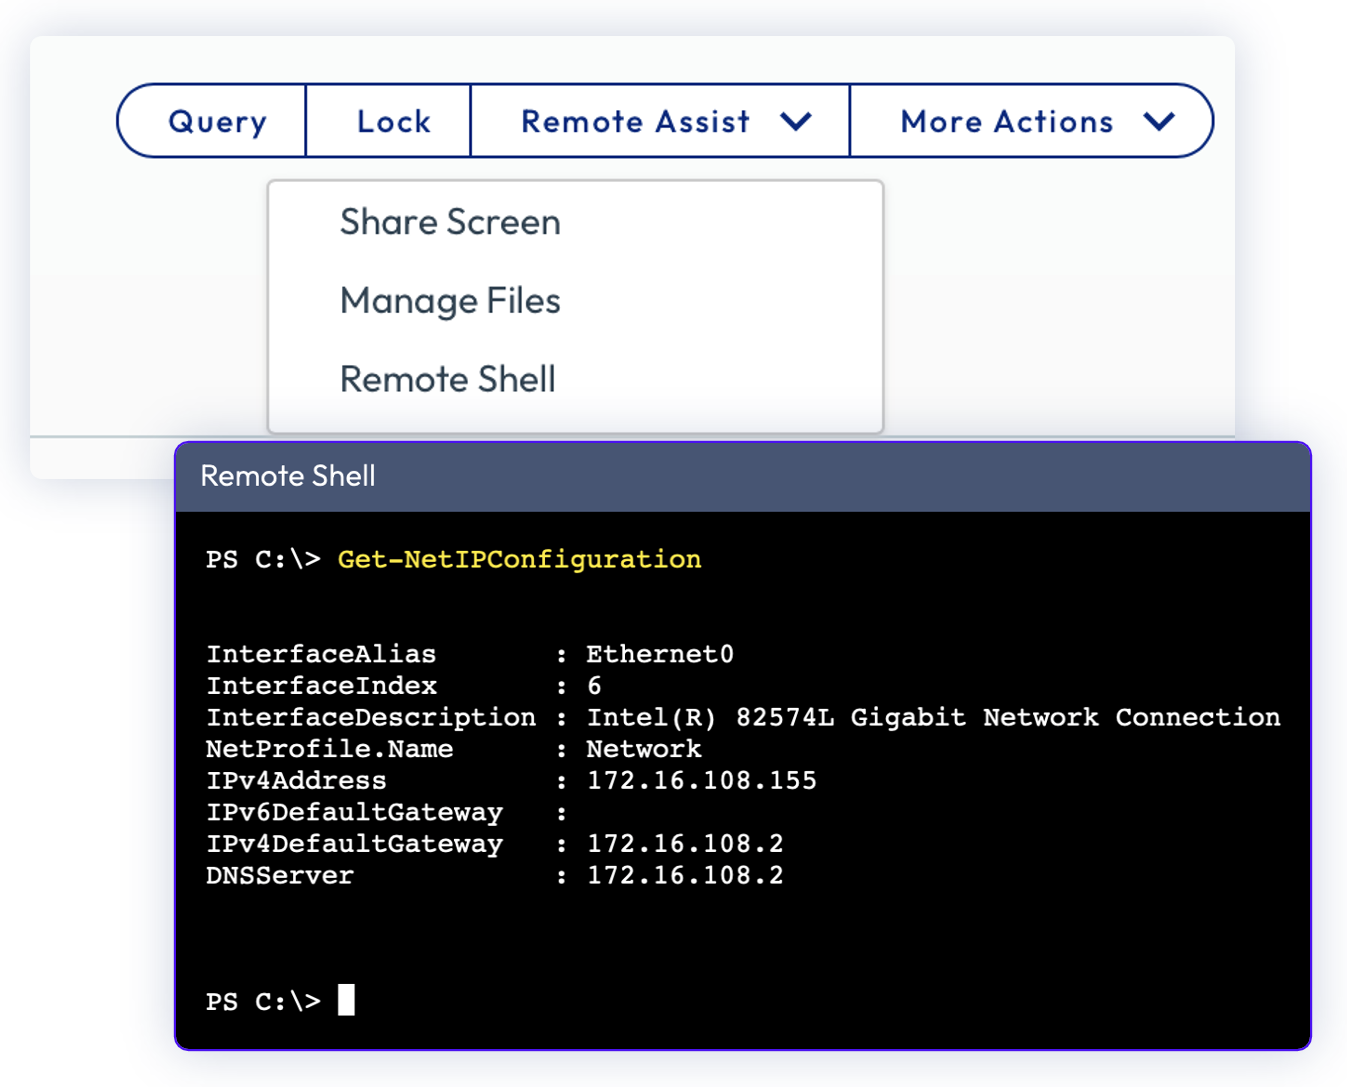
Figure 34: Workspace ONE Assist can be used for remote access (included with Windows Server licensing)
Summary and additional resources
If you are familiar with deploying and managing Windows Desktop devices, Windows Server should be easy for you. As outlined in this article, there are many similarities and some minor differences:
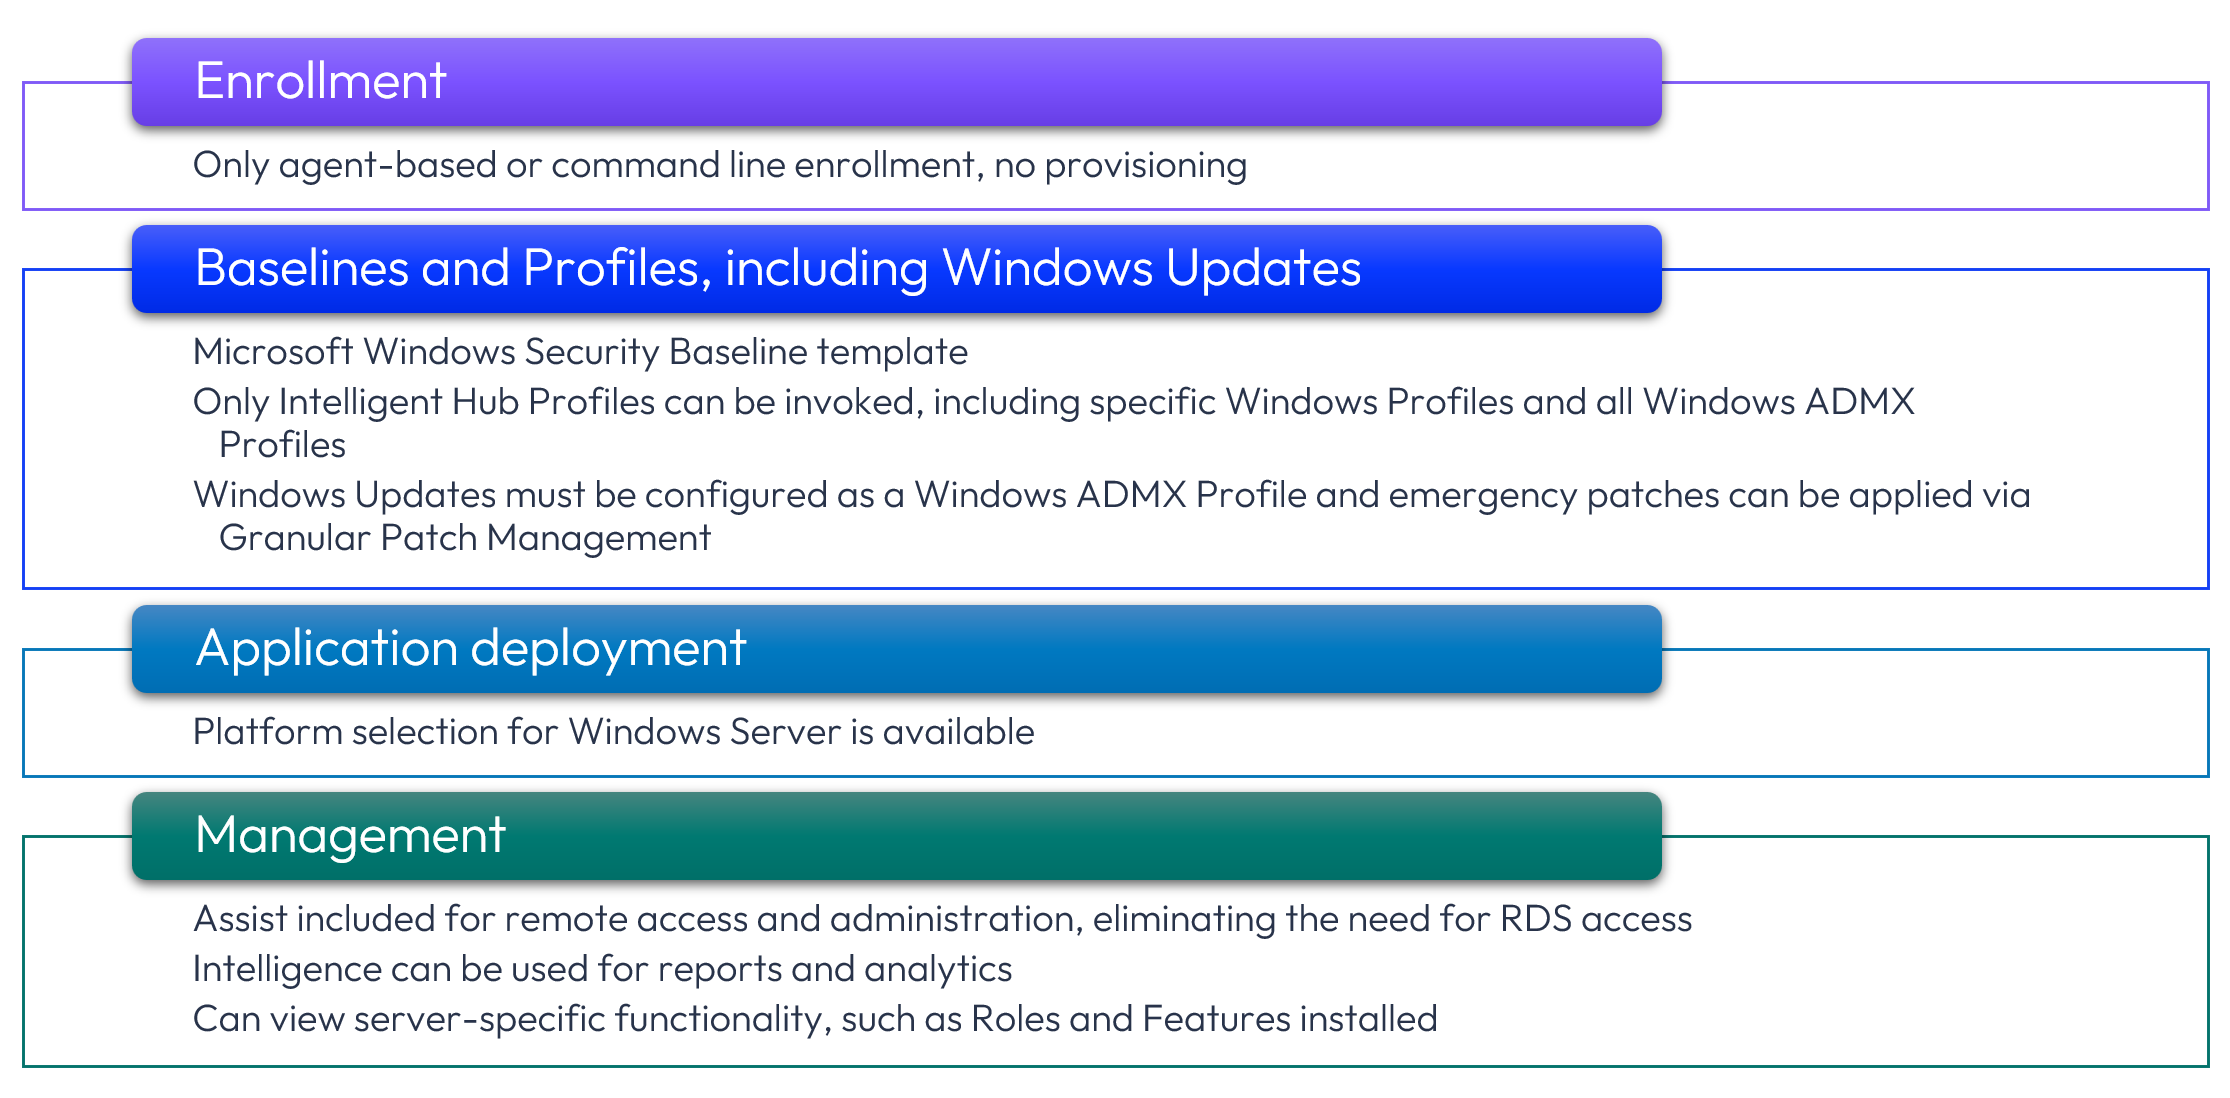
Figure 35: Summary of Windows Desktop similarities and differences
Additional resources
For more information about Workspace ONE UEM Windows devices, please explore the following resources:
- Management Mode Options for Workspace ONE Windows Devices
- Provisioning, Enrolling and Onboarding Windows Devices into Workspace ONE UEM
- Configuring Workspace ONE Windows Baselines and Profiles
- Deploying Workspace ONE UEM applications to Windows Devices
Changelog
The following updates were made to this guide:
| Date | Description of Changes |
| 2026/06/18 |
|
| 2026/05/01 |
|
Author and contributors
- Jo Harder, Sr. Technical Marketing Architect, Omnissa
- Camille Debay, Sr. Product Manager, Omnissa
Feedback
Your feedback is valuable.
To comment on this paper, contact End-User-Computing at tech_content_feedback@omnissa.com.