

App Volumes Integration with Azure Virtual Desktop App Attach
Overview
Omnissa App Volumes is a real-time application delivery system that enterprises can use to deliver and manage applications dynamically. From the release of App Volumes 2410, we unlock the capabilities to integrate with Azure Virtual Desktop App Attach. App Volumes integrates seamlessly with Azure Virtual Desktop App Attach, allowing customers to manage application lifecycle and virtualization within Azure Virtual Desktop environments. App Volumes Manager now supports Entra ID (former Azure Active Directory), which has been added as an alternative authentication method for deployments aligning with customers' move to using Modern Management.
Purpose of this Tutorial
In this document, we want to highlight the new capability and enhanced functionality of App Volumes integrated with Azure Virtual Desktops (AVD) App Attach. Start with the design, components, and integration considerations to match your environment during deployment. Followed by Application packaging, formats, and delivery mechanisms. Navigate the App Volumes Manager and the AVD App Attach consoles to target the Package version using the ‘CURRENT Marker’ functionality of App Volumes and dynamic delivery to AVD assignments.
Audience
This document is for IT practitioners who want to explore the integration of Omnissa App Volumes with Azure Virtual Desktop. It assumes working knowledge of Azure AVD as well as App Volumes. For more information on App Volumes, see Omnissa App Volumes product documentation.
Benefits of App Volumes Integrating with Azure Virtual Desktop
- Elevated app management experience for the AVD Admin
- Ease of rolling out a change as part of the application lifecycle without the need for a complete OS Image update
- Quick rollback to a previous good state
- Single application instance delivered to multiple targets
- Reduce Image Bloating, storage consumption, and app cleanup process
Deployment Architecture
The Deployment Architecture discusses the App Volumes components and infrastructure dependencies. A look at how the App Volumes Manager deploys into an Azure Subscription connects to the required resources and integrates with the Azure Virtual Desktop App Attach.
App Volumes
The Omnissa App Volumes product has two primary components: the App Volumes Manager and the App Volumes Agent. App Volumes Manager requires the following infrastructure: a storage solution providing SMB shares to store the application packages. A directory service to source the domain-joined identities of user-group/computer targets. And a SQL Database to house the App Volumes Manager configuration items.
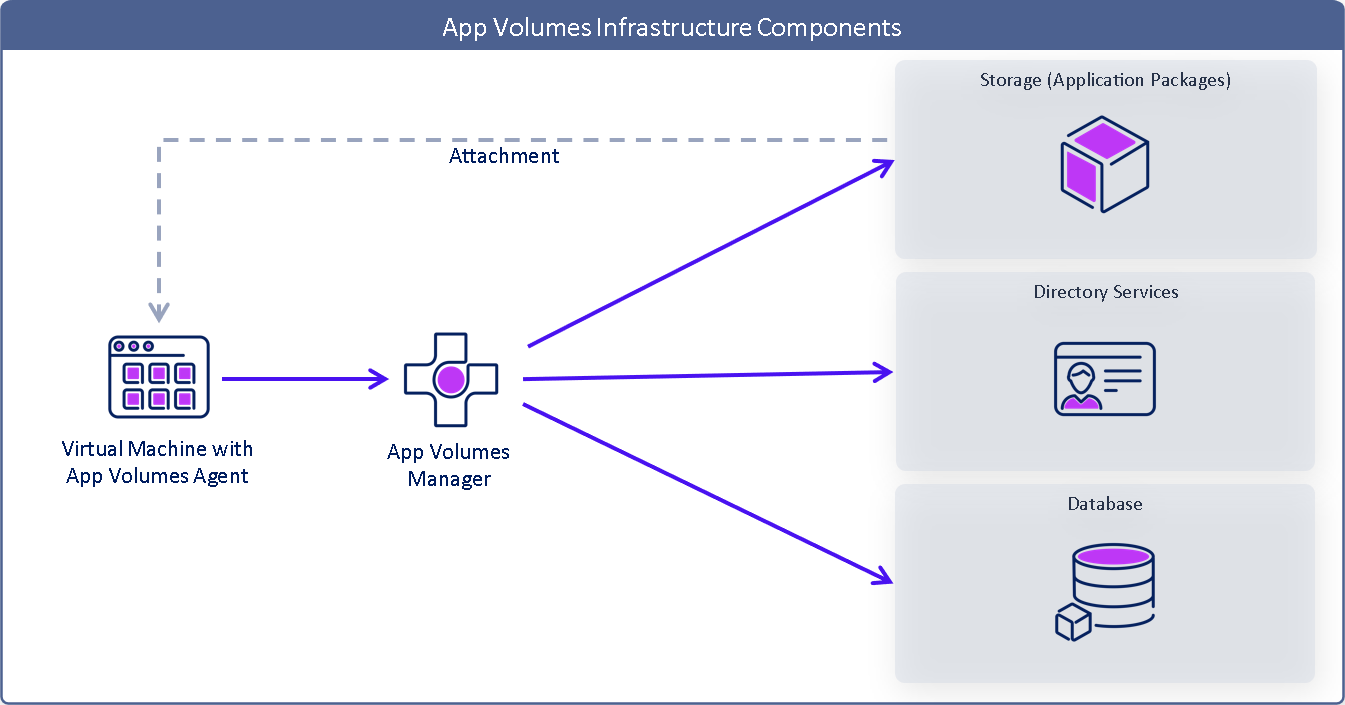
| Component | Component Name | Description |
| | App Volumes Manager |
|
| | App Volumes Agent |
|
| | Directory Services |
|
| | Database |
|
| | Application | • Logical component containing one or more packages • Used to assign EntraID / AD entities to packages • Supports marker and package assignment types |
| | Package | • Read-only volume containing applications • Virtual disk file that attaches to deliver apps to VDI or RDSH • One or more packages may be assigned per user or machine |


App Volumes Integration with Azure Virtual Desktop
Understanding the workings of App Volumes, we now look at deploying these components into your subscription from the Azure Marketplace. App Volumes components integrate and interact with the Azure and AVD components shown here.
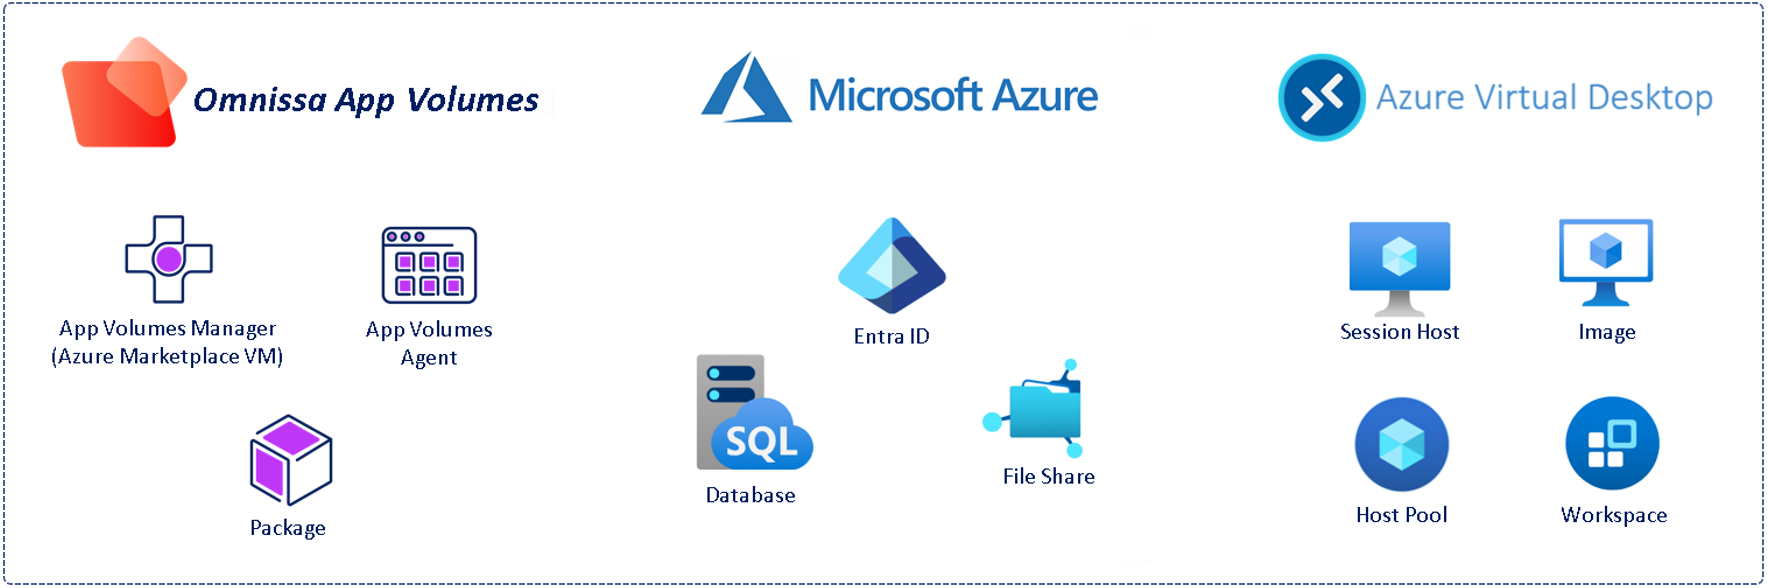
Omnissa App Volumes comprises the App Volumes Manager, the App Volumes Agent, and Application Packages. With App Volumes deployed from the Azure Marketplace, an instance of App Volumes Manager is deployed as a virtual machine. The App Volumes Agent is downloaded from the Omnissa Customer Connect Portal and installed on the AVD Golden Image. The Host Pools are updated, and App Volumes Packages can now be accepted as assigned from the AVD App Attach section.
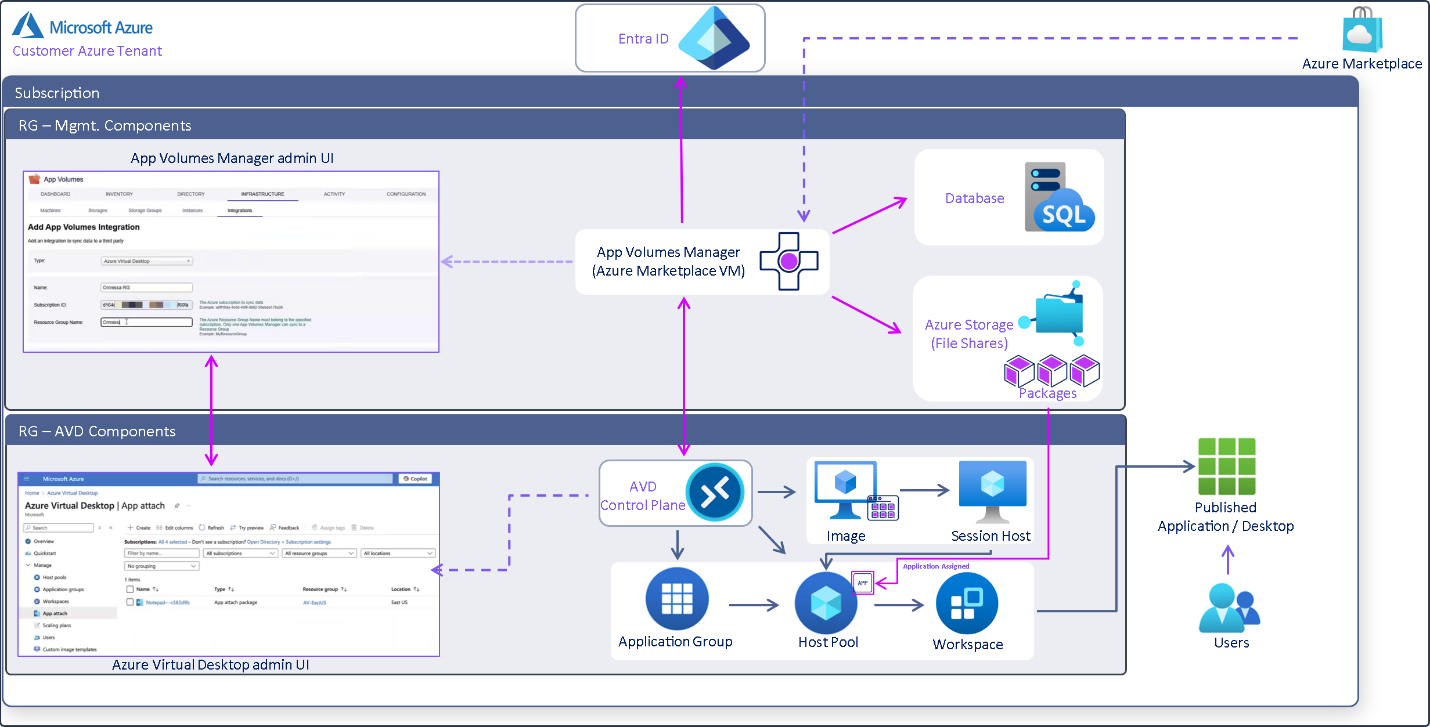
During the deployment, The App Volumes Manager must connect to an SQL Database, storage space to house the Application Packages, and Entra ID as an Identity source. To integrate with Azure Virtual Desktop, Azure subscription details like the Directory ID App Registration details will also need to be provided to be incorporated successfully into the AVD Portal. The result of a successful synchronization is when the Application Packages listed in App Volumes Manager are also listed in the AVD Portal as App Attach Packages, allowing the Azure / AVD Administrator to attach these App Volumes App Attach Packages to Users/Groups and Host Pools using the standard AVD assignment process.
Details of the resource requirement for deployment, selection options, and integration options are detailed in the Deployment Workflow - Management Components section.
Configuration Scenarios
The following table from Configuration Scenarios of Azure Marketplace Deployment of App Volumes Manager outlines the environmental considerations for App Volumes integration with Microsoft Azure Virtual Desktop, Identity, and App Attach assignment options.
You can determine which configuration scenario to choose when deploying App Volumes Manager in Azure Marketplace based on your environment and requirements.
Deployment of App Volumes Infrastructure
This section looks at deployment considerations before deploying and integrating App Volumes into your AVD environment. Prerequisites for the deployment and integration and a selection outlining the configuration items during the deployment, be it for a Proof of Concept or refer the product documentation for a Product deployment of App Volumes Manager.
Deployment Considerations
So far, we have seen the App Volumes components and infrastructure required to integrate App Volumes with the Azure Virtual Desktop App Attach. The following considerations have been outlined based on the current environment and the configuration scenarios in the previous section.
- Assumed Azure Subscription, Entra ID, and Azure Virtual Desktop infrastructure are set up and available for App Volumes to integrate.
- Azure Virtual Desktop domain integration – Entra ID, Hybrid AD, or legacy Microsoft ADDS.
- Support for App Volumes integration with AVD, using Azure Marketplace deployment automation, is supported from App Volumes version 2410 or later.
- App Volumes deployment is enabled at an Azure tenant level and deployed into a designated subscription.
- Marketplace deployment provides the choice to use;
- Existing Azure Storage and File Shares or provision new storage account and automated creation of new file shares.
- An existing SQL Database if the deployment is for production usage; otherwise, the choice to provision an SQL instance as part of the workflow automation, whereby a SQL Express instance is installed and configured within the App Volumes Manager Virtual Machine. SQL Express instance should be considered only for Proof of Concept deployments.
- Choose to integrate with Azure AVD during the Marketplace deployment workflow or input the Azure subscription details after the App Volumes Manager deployment within the Admin UI Integration tab to complete the integration process.
- Azure access and permissions;
- Sufficient privileges of the administrator deploying App Volumes Manager from the Azure Marketplace.
- The resources that are automatically deployed as part of Azure Marketplace are as follows: Azure virtual machine, public IP address, Azure virtual network, Azure storage and file share, Azure private endpoint, and network security group.
- Ensure that you are aware of these resources. The rest of the components required are as follows: resource group, subnet, network interface, Azure virtual desktop host pool, and App Volumes agent.
- Resource Group (RG) – the automation will require a target Resource Group. The Resource Group is created as part of the automation, or an existing empty Resource Group can be pre-provisioned and selected. The RG will house all the infrastructure components deployed by the automation. However, existing infrastructure will have already been sourced from their respective RGs.
- For an existing Host Pool, update the existing Image with the App Volumes Agent and rebuild the Host Pool.
- Deploy an App Volumes Packaging VM with a configuration similar to the AVD Session Host Image/Template to capture and package App Volumes Application Packages accurately.
- Follow the guidelines to capture and package EXE, MSI, or MSIX-based applications.
Preparing Azure and AVD (Preqs)
Preparing to deploy App Volumes Manager involves preparing the prerequisites for Azure to initiate the App Volumes Manager deployment from the Azure Marketplace outlined in the App Volumes Install Guide’s prerequisites section that outlines the required Azure accounts, App Registration and permissions, network and firewall, resources and components needed.
We follow this by the post-deployment configuration to integrate the App Volumes Manager and use Entra ID to authenticate it in the following section in the App Volumes Installation Guide.
The Resources Used in App Volumes Deployment on Azure outlines the Azure components deployed in the automated Azure Marketplace workflow and network security considerations.
Configure App Volumes Manager Integration with Azure Virtual Desktop, which can either be configured as part of the Marketplace deployment or post-deployment within the App Volumes Manager console UI.
When an App Volumes Package is set to ‘CURRENT’ using the ‘Marker’ functionality, App Volumes integration synchronizes the ‘Application’ to be displayed in the Azure Virtual Desktop App Attach Portal. It can delivered to target Host Pool and User/Groups via assignment. This is detailed in the App Volumes Admin guide.
Deployment Workflow - Management Components
Deploy Onmissa App Volumes from Microsoft Azure Marketplace using the following eight steps.
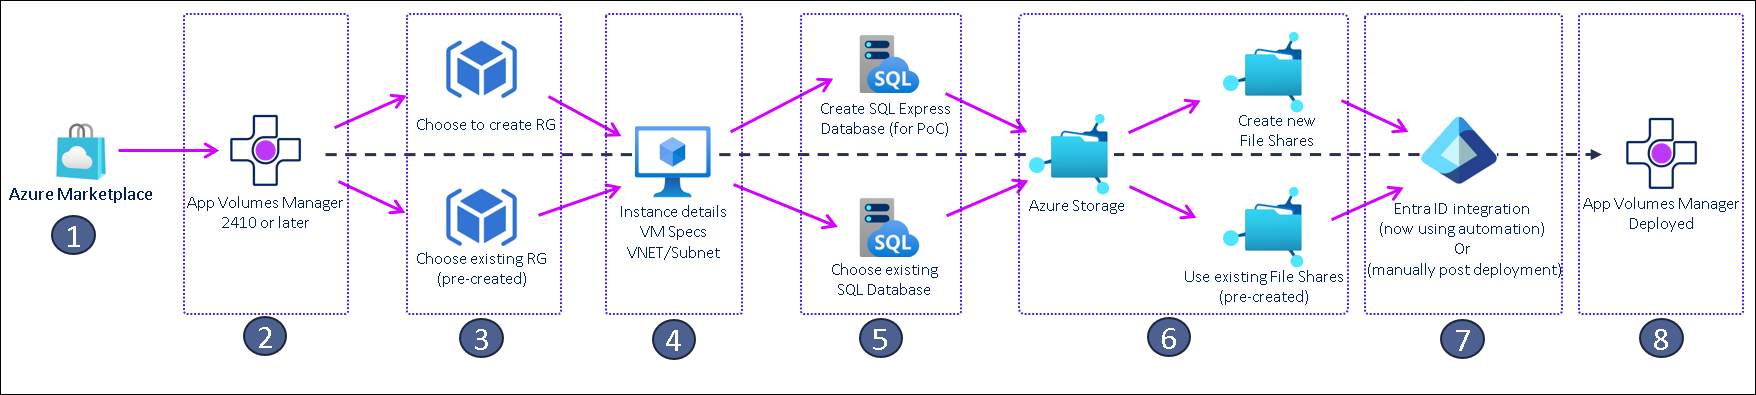
- Start by logging into the Azure Portal and navigating to the Azure Marketplace.
- Search for Omnissa App Volumes in the Marketplace store

- Select version 2410 or later and click on ‘Create’ to start
- The first tab in the Marketplace automation workflow requires information to be input, such as selecting ‘Azure Subscription’,’ Resource Group (RG)’, ‘Instance details’, and Networking.
- The RG can be pre-created or created using the deployment wizard, and VNET/Subnet needs to be provided for the region being selected for deployment.
- The next tab in the Marketplace automation workflow is the ‘App Volumes Configuration’. Here, the administrator is asked to select a SQL database.
- If you select to deploy “SQL Express”, the automated deployment will deploy an SQL Express within the App Volumes Manager VM. This is generally chosen for Proof-of-concept deployments.
- For Production deployments, select the ‘Remote SQL Server database’ option
- Next, choose to create the two File Shares required for App Volumes Manager deployed as part of the automated workflow or select pre-created shares by selecting “Use existing file shares.”
- Selecting ‘Use existing file shares’ will require the administrator to log into the App Volumes Manager Admin UI post-deployment and complete the Storage configuration.
- If you integrate the App Volumes Manager with Azure Virtual Desktop, enable the ‘AVD integration settings’ and provide the Azure Subscription details.
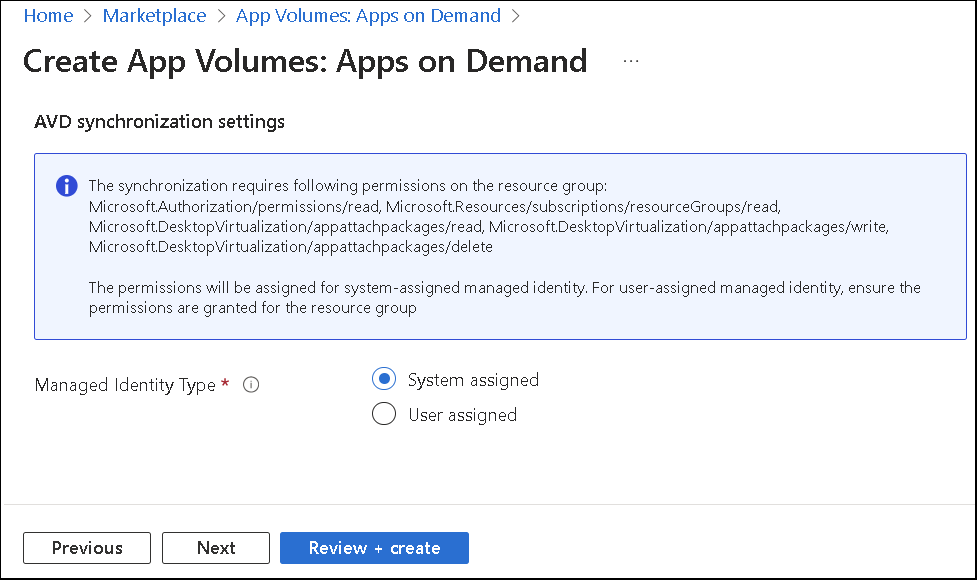
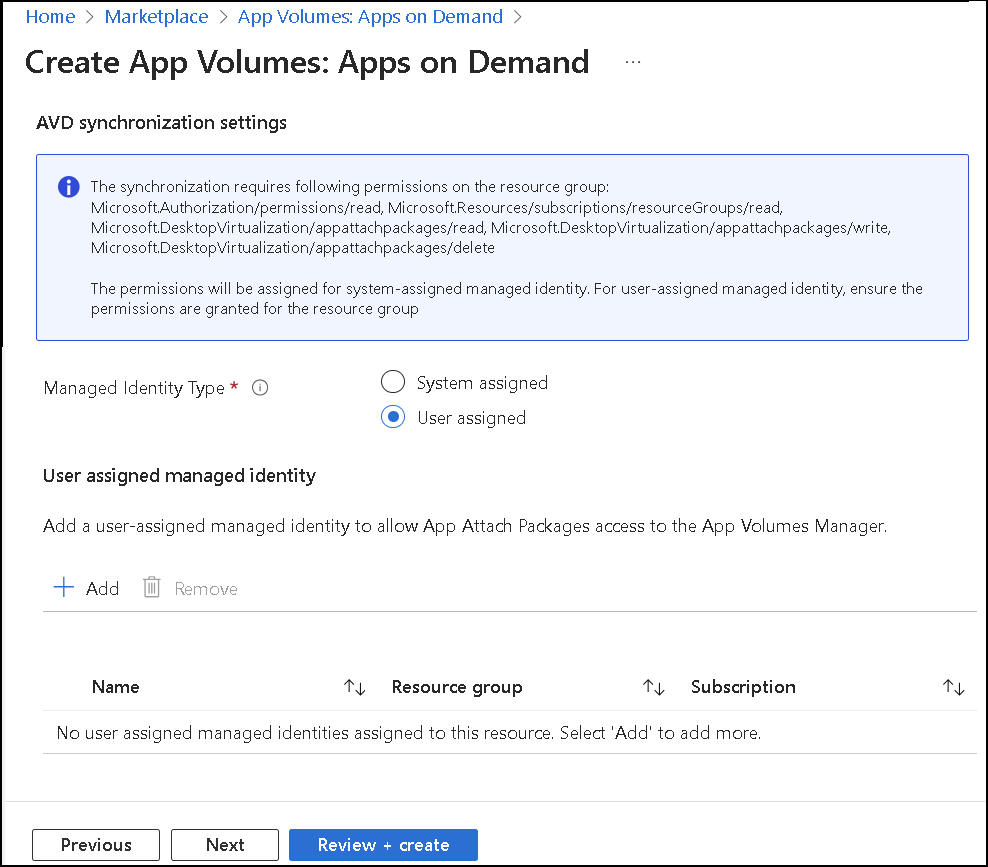
- Select the identity type to initiate the AVD synchronization by choosing from the ‘AVD synchronization settings’, a system-assigned or user-managed account.
- With all the required selections made, required permissions granted, and network/firewall in place, on successful completion of the App Volumes Manager virtual machine, you, as the administrator, can now log into the VM to complete the review of the App Volumes Manager Admin UI as well as complete post-installation tasks.
- If you cannot log in, ensure the steps below are completed before logging into the App Volumes Manager VM.
App Volumes Manager
The below configuration step is from the Prerequisites for Deploying App Volumes Manager through the Azure Marketplace section of the App Volumes Install Guide. This configuration is required to authenticate into the App Volumes Manager once deployed using Entra ID credentials.
The Windows OS joins the Entra ID domain once the App Volumes Manager VM is deployed. To allow an App Volumes Manager Administrator to log in for the first time, this account that authenticates to Entra ID should have Azure App ID registered in the Azure Portal under the Microsoft Entra ID admin center.
Navigate to the App registrations page. Here, the ‘Redirect URI (Optional)’, select ‘Platform’ as ‘Web’ and the ‘URI value’ registered as ‘https://APP_VOLUMES_MANAGER_FQDN/entra_id_callback/DIRECTORY(TENANT)_ID’, where the Tenant ID is of your registered application.
Also, Select Supported account types as ‘Accounts in this organizational directory only ()’.
Database
When you reach the App Volumes configuration tab, the first option is to select the Database location to connect the deploying App Volumes Manager to a SQL Database.
If this deployment is for a Proof of Concept to explore Omnissa App Volumes capabilities, choose ‘Local SQL Server Express database ’. As part of the automated build process, an instance of SQL Server Express installs within the deploying App Volumes Manager Virtual Machine.
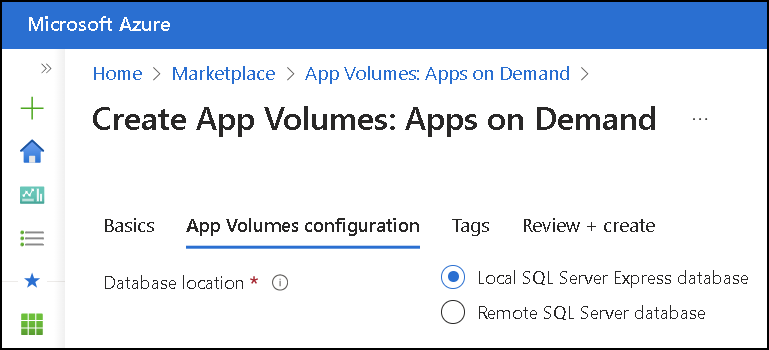
For a production deployment, you will choose to connect the deploying App Volumes Manager to a remotely hosted SQL database, as shown in the figure below. The App Volumes Installation Guide lists the supported SQL Databases.
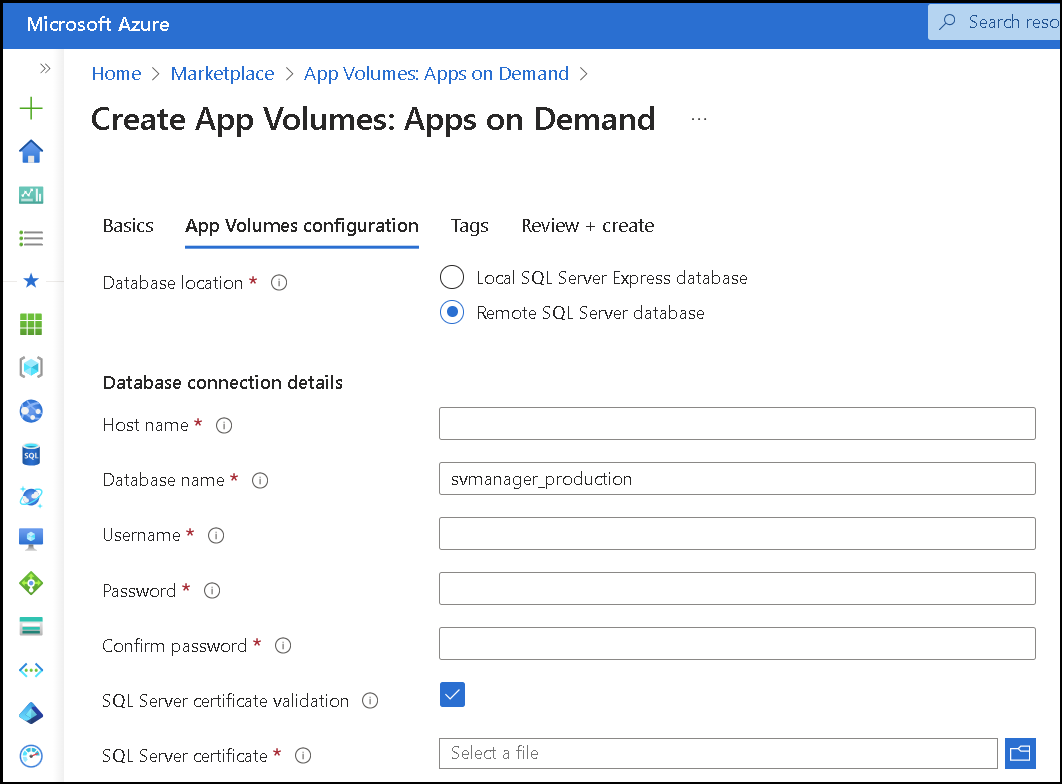
Note: The information button next to each value provides additional guidance.
Storage
When deploying Omnissa App Volumes, the administrator can either have the Azure Marketplace automation create the Azure Storage Account and the two file shares required for App Volumes Manager.
The file shares are provisioned and configured within App Volumes Manager when the administrator chooses the 'Create new file shares' option shown below.
However, if the administrator selects 'Use existing file shares', the configuration of the existing file shares will be carried out as a post-deployment task within the App Volumes Manager admin UI.
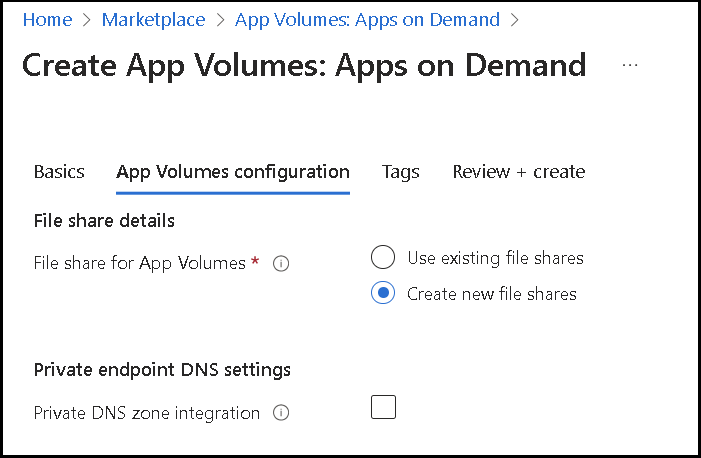
The administrator can enable the ‘Private endpoint DNS settings’ for the newly created file shares.
The Resources Used in App Volumes Deployment on Azure section in the App Volumes Install Guide provides additional details for Azure Storage and the Azure File Shares required.
Identity & Integration
Omnissa App Volumes now supports Microsoft Entra ID. When deployed from the Azure Marketplace, the App Volumes Manager uses Microsoft Entra ID as the domain to integrate with Azure Virtual Desktop. Identity selection and App Volumes capabilities are outlined in the Configuration Scenarios section.
Integrating with Microsoft Entra ID
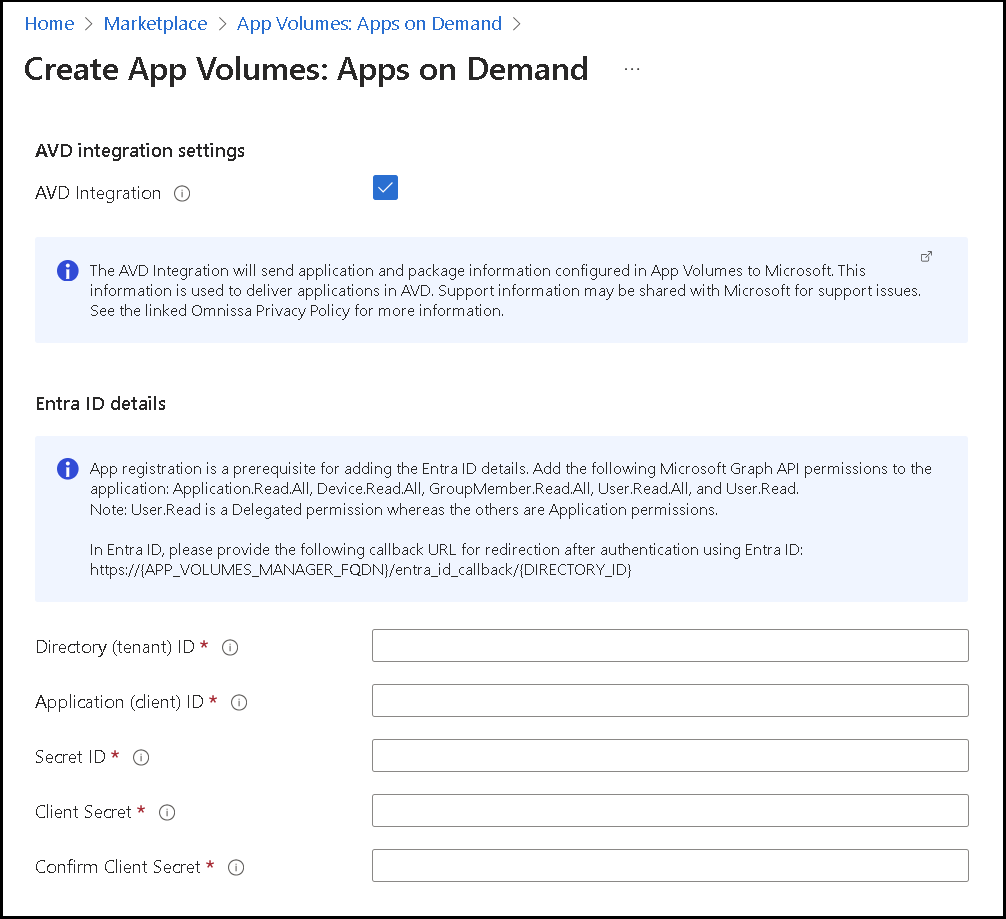
As part of the automated Azure Marketplace deployment of App Volumes, below is a screenshot of the required parameters to complete the automation of the integration of the App Volumes Manager with Microsoft Entra ID.
The App Volumes Administration Guide outlines the requirements for registering App Volumes as an Application under the Azure App Registrations section. These steps help in the collection of the information that is required to be populated. The Redirect URI must be set once the App Volumes Manager VM is deployed. Followed by granting the necessary API permissions to the registered App Volumes Application in the Azure Portal.
If you only have Active Directory, then in addition to selecting the Azure Virtual Desktop integration when deploying App Volumes Manager through the Azure Marketplace offer, you need to use Microsoft Entra Connect to synchronize entities from your Active Directory to Entra ID.
The App Volumes Install Guide table outlines the supported Directory configuration and the Configuration Scenarios of Azure Marketplace Deployment of App Volumes Manager deployments.
Azure Virtual Desktop Synchronization
The automated deployment also requires the following Azure Managed Identity parameters for the integration of the App Volumes Manager with the Azure Virtual Desktop UI, thereby allowing for App Volumes Application Packages imported into the above storage to reflect in the Azure Virtual Desktop Admin Console UI under the ‘App Attach’ section as App Volumes applications.
The administrator can choose either a ‘System-assigned’ managed identity or a ‘User-assigned’ managed identity.
The 'System assigned' option employs an automatic configuration where a system-assigned managed identity is created to grant App Attach Packages access at the same resource group level as the App Volumes Manager deployment.
The 'User assigned' option requires a manually created user-assigned managed identity to allow App Attach Packages access to the App Volumes Manager.
Note: Entra ID cannot be used with standalone desktops for application management.
Deployment Workflow - Virtual Desktop

The following steps outline steps on an existing Azure Virtual Desktop environment to update the ‘App Volumes Agent’ within the Golden/Master Image and update the target Host Pools. And proceed with the App Attach Package assignment in the AVD App Attach Portal.
Step 1: Azure Virtual Desktop – Update the Session Host Image with App Volumes Agent
- Navigate to the Azure Portal and choose from building a new Windows Image to build an Azure Virtual Desktop Host Pool that will connect to the App Volumes Manager deployed in the previous section or update an existing Image.
- Download the App Volumes Agent from the Omnissa Customer Connect Portal.
- As of this documentation, the App Volumes version available on Azure Marketplace that supports AVD integration is version 2410 or later. So, download the exact version of the App Volumes Agent from the Omnissa Customer Connect Portal, matching the deployed App Volumes Manager version.
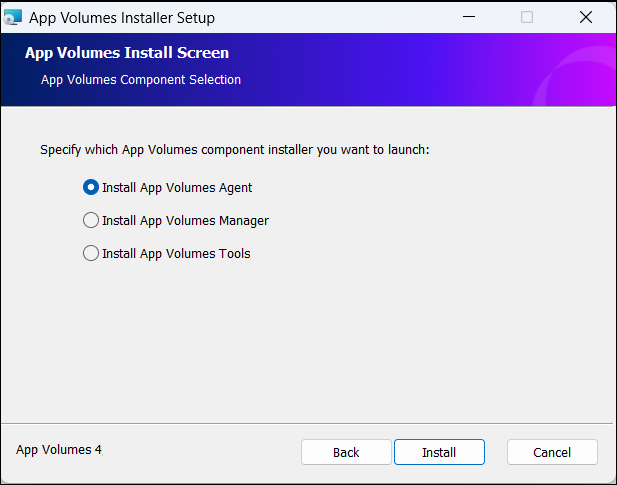
- During the Windows Image preparation, download the App Volumes Agent and follow the steps with the selections mentioned below.
- Ensure you run the installation with elevated privileges.
- Select “Install App Volumes Agent” and click " Next " to launch the installation.
- Update the IP Address of the App Volumes Manager. This information can be found in the Azure Portal under the Virtual Machines section, under the details of the newly deployed App Volumes Manager VM instance.
- App Volumes Manager and App Volumes Agent securely communicate on TCP Port 443. However, they also communicate on TCP Port 80. Ensure the Azure network and firewall ports are open for this communication between the App Volumes Manager and App Volumes Agent.
- The SSL Certificate must be updated in the App Volumes Manager in a production deployment. Details are in the App Volumes Admin Guide.
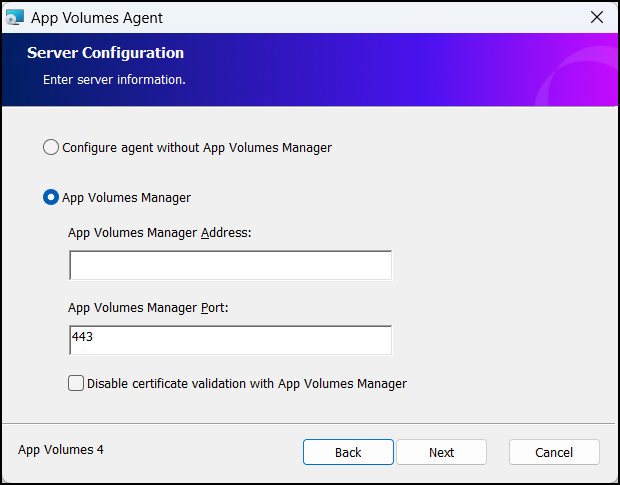
- Follow the instructions if you choose to use TCP Port 80 for communication.
- If you choose to use a Windows Multi-Session or Server Image to build out AVD Pooled Session Pools, select the “Non-persistent or multi-session machines” option for the type of machine for app delivery.
- If it’s a single image that will deploy a dedicated/persistent VDI session for AVD Personal Session Hosts/Pools, then select the “Persistent machines” option.

- Completing the App Volumes Agent installation will require a reboot of the VM, after which the Image can be sealed and ready to deploy AVD Host Pools.
Supporting Microsoft articles for Image Preparation. Create a Windows virtual machine in the Azure portal, Create and Manage Windows VMs with Azure PowerShell, and Create a VM from a generalized image version.
Step 2: Create/Update existing Session Host/Image
The following Microsoft product documentation to manage and build a Host Pool using the new image build process or from updating an existing image.
Once the Host Pool is deployed, the App Volumes Agent will connect to the App Volumes Manager and report the agent's availability and online status. This will confirm successful deployment and communication between the App Volumes Manager and the App Volumes Agent completing the deployment phase.
Step 3: App Attach Package Availability and Assignment
Before we carry out a User entitle to App Volumes based App Attach Packages, these App Volumes Application Packages will need to be uploaded into App Volumes Storage, and the Application details synchronized with Azure Virtual Desktop App Attach to reflect in the Azure Virtual Desktop App Attach Portal as App Attach Application Packages, ready to be assigned to Users and Host Pools.
Following the successful synchronization between App Volumes Manager and Azure Virtual Desktop App Attach, the steps to Entitle Applications in Azure Virtual Desktop.
Step 4: Application Assignment and User Validation
Assigning the App Volumes Package as an App Attach Application Assignment requires the entitlement process to be carried out from the Azure Virtual Desktop App Attach Portal, where the App Attach Package is assigned to the Host Pool (installed with the App Volumes Agent) and has an Application Group associated. The Application Group is assigned to the user/user group. Product documentation calls out the details under the Entitle Applications in the Azure Virtual Desktop section.
User validation is carried out using the following steps;
- Following the documented process, Get started with the Remote Desktop app
- The target device will need the Microsoft Remote Desktop App
- Login to the assigned workspace and connect to the assigned Remote Desktop/App
- The user can then launch the target AVD Entitled application.
Application Capture
An administrator can capture App Volumes Application Packages using the following methods.
- Use a Standalone App Volumes Packaging Virtual Machine installed with App Volumes Tools.
- The App Volumes Packaging VM can be built within Azure or a standalone VM, and the App Volumes Package can then be imported into Azure Storage, as shown in the next section.
- Using a Packaging Virtual Machine installed with App Volumes Agent, the App Volumes Manager UI initiates the capture process.
- If captured from a vSphere platform, the output VMDK must be converted to Azure-supported VHD using the App Volumes Tools.
Capture a standard (EXE/MSI) to an App Volumes Application Package
The Application Packager can choose from two methods to capture a standard EXE/MSI-based application in an App Volumes Application Package format. The ‘Application Packaging using the App Volumes Management Console’ uses the GUI method from a Packaging VM installed with the App Volumes Agent, and the ‘Application Packaging using the Command Line Interface’ uses the CLI method from a Packaging VM installed with the App Volumes Tools.
Import captured App Volumes Package
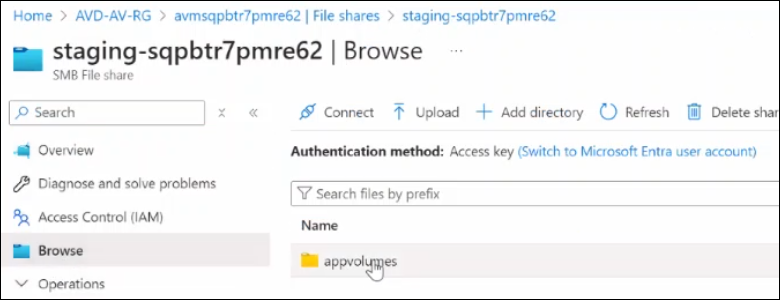
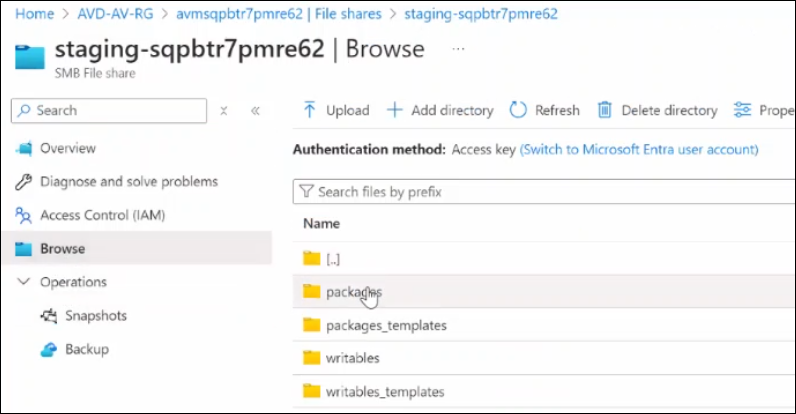
App Volumes using Azure storage recognize App Volumes Packages in the VHD format. Ensure you have captured the App Volumes Application in the VHD Package format or use App Volumes Tools to convert the App Volumes Application from the VMDK to the VHD Package format. Once done, copy the App Volumes Application Package files (VHD + JSON) to the created Azure storage share and folder path shown in the below example (Staging share >> ‘appvolumes’ >> ‘packages’).
Capture an MSIX app to an App Volumes Application Package
Capturing and converting an MSIX-based application to an App Volumes Package format requires a Packaging VM to be installed with the App Volumes Tools. This Tech Zone article describes the steps taken to capture an MSIX-based application, ‘Application Packaging and Delivery of an MSIX Application’.
Import captured App Volumes Package
Upload the output VHD and JSON files from the above MSIX capture process as output to be uploaded to the Azure storage as mentioned in the above section.
Delivery of the App Volumes Application Package
We will go through the following to understand application delivery from the App Volumes Manager to the Azure Virtual Desktop App Attach console.
Pre-requisites in place
- We have successfully deployed an App Volumes Manager in the Azure Subscription.
- We have uploaded an App Volumes Package(s) into the target storage and confirm they are registered in the App Volumes Manager UI under the ‘Applications’ and ‘Packages’ tabs.
Tasks on the App Volumes Manager UI
- The App Volumes Administrator selects the desired Package to be delivered using the ‘CURRENT Marker’ functionality if there are multiple App Volumes Packages for the same Application.
- When App Volumes Manager and Azure Virtual Desktop are integrated, events such as change in the CURRENT marker status of a package, change in application and CURRENT package properties, or CURRENT package and application deletion trigger synchronization between App Volumes Manager and Azure Virtual Desktop.
Tasks performed from the Azure Virtual Desktop App Attach Portal
- On the App Attach Portal, upon successful completion of the synchronization, the ‘App Volumes Application’ is listed as an ‘App Attach Package’ ready to assign and entitled to a Host Pool and User/Group.
- The entitlement is completed using the following process outlined in the Entitle Applications in the Azure Virtual Desktop section.
User Validation
- The target logs into the Remote Desktop assignment and can launch the App Attach assigned application.
Updating an Application
- If a newer package is available in the App Volumes Console, the App Volumes Administrator will navigate to the Packages tab, select the new Package, and set the Marker to CURRENT.
- This will ensure that with successful synchronization of Application details between App Volumes and Azure Virtual Desktop App Attach portal, users who have been assigned the App Attach Package will get to the newer application package when initiating a new session. Users already logged in must reconnect to a new session to get the updated application.
Summary and Additional Resources
This tutorial is a guide to successfully deploying and integrating an instance of Omnissa App Volumes with Azure Virtual Desktop App Attach. Understand App Volumes design requirements, deployment considerations, packaging, and delivery model.
For more operational tutorials on App Volumes, see Tech Zone.
Additional Resources
For more information about Omnissa App Volumes, explore the following resources:
- Omnissa App Volumes Documentation
- Omnissa App Volumes Release Notes
- Omnissa Knowledge Base
- Microsoft Certificate Requirements for SQL Server
- App Volumes Tools – Command Line Syntax
- Troubleshooting App Volumes Deployment on Azure
Changelog
The following updates were made to this guide:
| Date | Description of Changes |
| 2024/12/12 |
|
About the Author and Contributors
- Sujay Gopalan, Sr. Technical Marketing Architect, Omnissa.
- Nguyen Kim, EUC Adoption PM, Omnissa.
Feedback
Your feedback is valuable. To comment on this paper, contact End-User-Computing Technical Marketing at tech_content_feedback@omnissa.com.