Integrating FSLogix Profile Containers with Omnissa Horizon
Omnissa Horizon® 8Omnissa Horizon® Cloud
Omnissa Dynamic Environment Manager
Omnissa App Volumes 4
Overview
The Omnissa Virtual Desktop and Applications solution accommodates a number of desktop and application models. One of these models involves assembling disposable virtual machines with attached containerized applications and saved settings in such a way that users think they are using the same machine from one session to the next. These nonpersistent VMs provide significant improvements in speed and efficiency of desktop and application lifecycle management.
An increasing number of infrastructure platforms may be used to implement Omnissa Virtual Desktops and Applications. Horizon 8 on vSphere is available anywhere that vSphere is providing the infrastructure.
Horizon 8 and Horizon Cloud use capabilities of your chosen infrastructure platform to create and manage nonpersistent desktop models. On vSphere, nonpersistent desktop pools are provisioned with instant clone provisioning. You can read about instant clone provisioning on vSphere in this section of the Horizon 8 Architecture guide. On Azure, floating desktop assignments are created by automating native Azure full clone provisioning.
Microsoft provides FSLogix software to many of its customers as a component of several licensing models. FSLogix integrates with Omnissa technologies to complement Horizon 8 and Horizon Cloud desktop models. FSLogix Profile Containers can persist user data and user configuration data between nonpersistent desktop sessions. See What is FSLogix? for an overview and requirements of the software.
Audience
This tutorial is intended for IT administrators and product evaluators who are familiar with Horizon 8, Horizon Cloud Services,
App Volumes, and Dynamic Environment Manager. You should have a working Horizon 8 or Horizon Cloud environment running on vSphere or Azure available for testing to complete this tutorial. You will need the supporting App Volumes and Dynamic Environment Manager products as well.
Purpose of This Tutorial
This tutorial demonstrates a step-by-step method to integrate Microsoft FSLogix with the Omnissa Horizon 8 or Horizon Cloud to build a nonpersistent desktop service while providing a persistent user experience.
Disclaimer
FSLogix is one of many third-party solutions that work with the Omnissa Desktop and Applications solution While this tutorial shows example models for integration, Omnissa assumes no responsibility to provide support for the use of FSLogix software with Omnissa products. As with any profile management technology, proper design, component redundancy, backup, and other management practices are imperative to ensure a good user experience and to prevent loss of user data. Omnissa provides this tutorial to demonstrate functional compatibility of FSLogix Profile Container with Omnissa components.
For design guidance regarding Horizon, see the Omnissa Workspace ONE and Horizon Reference Architecture. For guidance on sizing, scaling, and maintaining the FSLogix components, consult Microsoft documentation.
Horizon and FSLogix Profile Container
In this tutorial, you will integrate the FSLogix Profile Container with your Omnissa Horizon implementation using one of the two variables covered in this tutorial: Horizon on vSphere and Horizon Cloud Service on Microsoft Azure.
- FSLogix Profile Container is used to persist user data and user configuration data between nonpersistent desktop sessions.
- Horizon delivers a new Windows 10 image with each user session.
- Horizon on vSphere uses instant clone provisioning technology.
- Horizon Cloud Service automates full clone provisioning on Microsoft Azure.
- Omnissa App Volumes™ application packages are used to manage and dynamically distribute applications.
- App Volumes user-writable volumes are used to persist user-installed applications.
- User-writable volumes apply only to Horizon on vSphere implementations.
- Omnissa Dynamic Environment Manager™ provides privilege elevation and other customized user environment settings, along with personalization and predefined settings as needed.
The following diagrams illustrate FSLogix Profile Container with the two variables covered in this tutorial: Horizon on vSphere and Horizon Cloud Service on Microsoft Azure.
Horizon on vSphere with FSLogix Profile Container
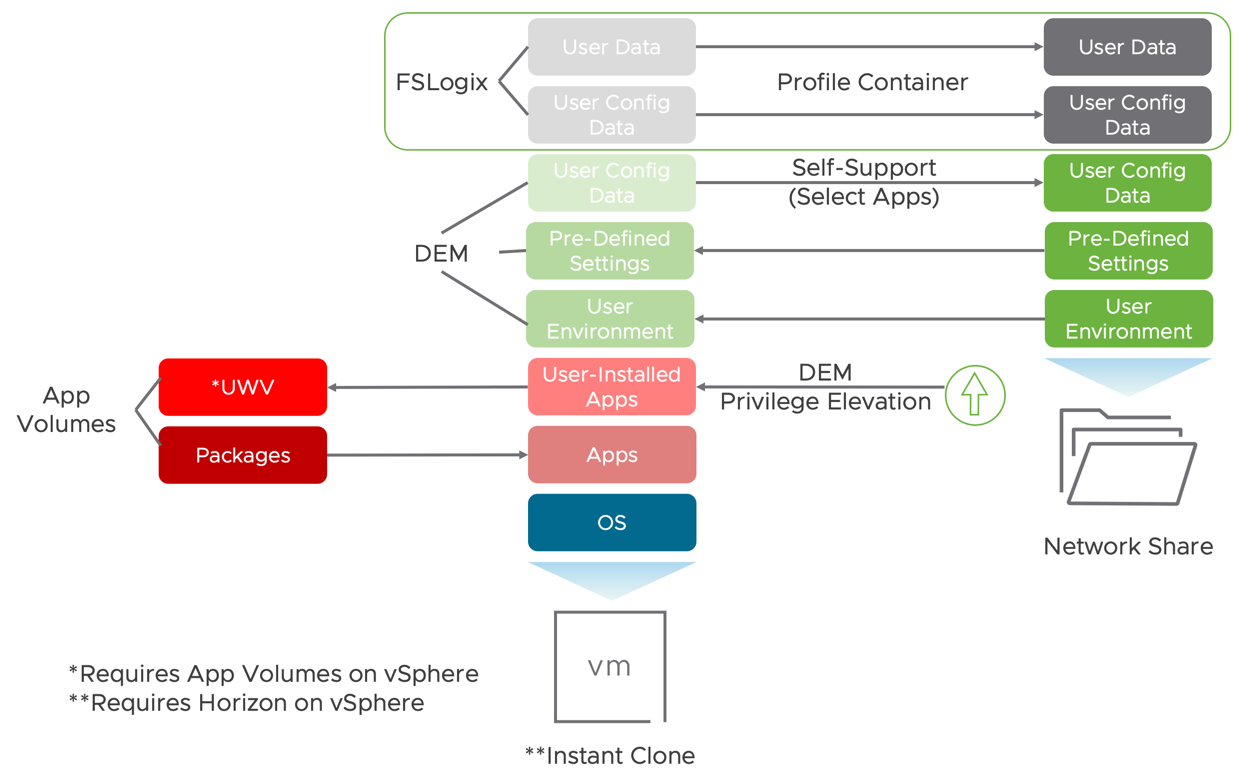
Figure 1 - Horizon on vSphere with FSLogix Profile Container
Horizon Cloud Service on Microsoft Azure with FSLogix Profile Container
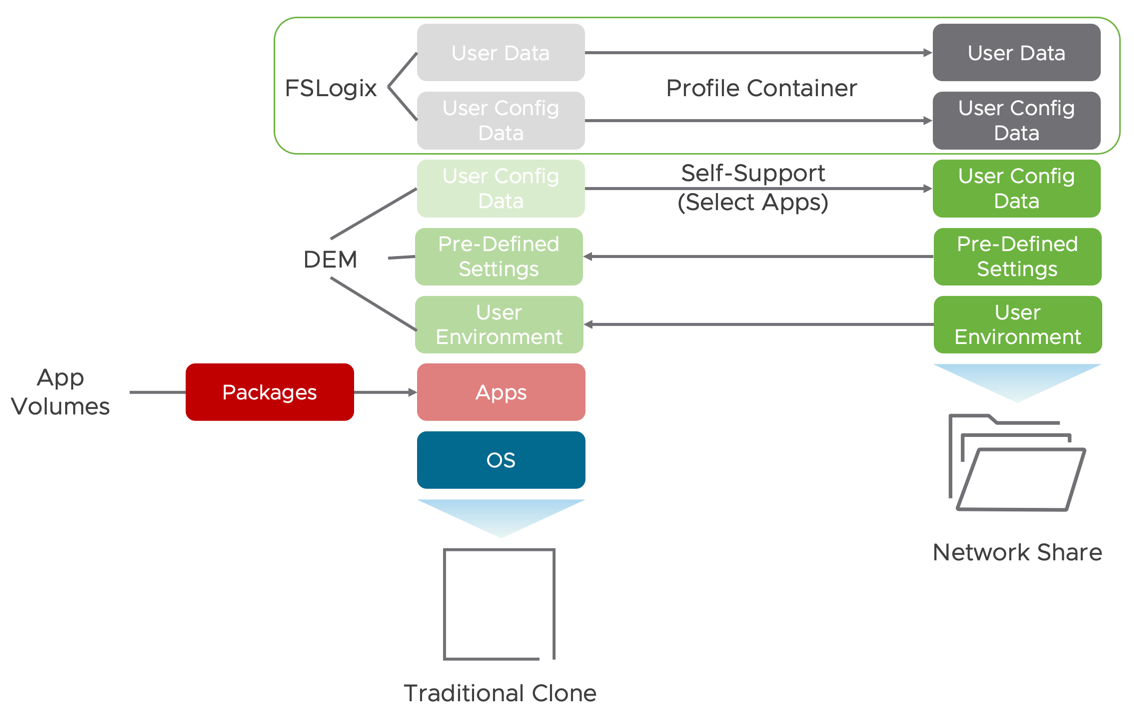
Figure 2 - Horizon Cloud Service with FSLogix Profile Container on Microsoft Azure
Each exercise in this tutorial addresses one or more components of the model described in the preceding figures. Some exercises include steps that are prerequisites for a later exercise. It is recommended that you complete the exercises in this tutorial in the order in which they are presented.
Not Covered: Omnissa Horizon and FSLogix Office Container
In addition to the Profile Container, FSLogix also offers an ODFCContainer, which persists only the areas of the profile specific to Microsoft Office, rather than persisting the entire user profile. You should understand the differences and implications of the two FSLogix Container types before choosing which to integrate with Horizon. See the Microsoft document Configure ODFC Containers for more information.
Note: The FSLogix ODFC Container is not covered in this tutorial. This section is for informational purposes only.
In this model:
- FSLogix ODFC Container is used to persist only the portions of the profile specific to Microsoft Office between nonpersistent desktop sessions.
- Horizon delivers a new Windows image with each user session.
- App Volumes application packages are used to manage and dynamically distribute applications.
- App Volumes user-writable volumes are used to persist user-installed applications (requires vSphere).
- Dynamic Environment Manager provides folder redirection for user data, persists user configuration data between sessions, enables IT to distribute customized, predefined application and Windows settings, and provides privilege elevation and other customized user environment settings.
Horizon with FSLogix Profile Container
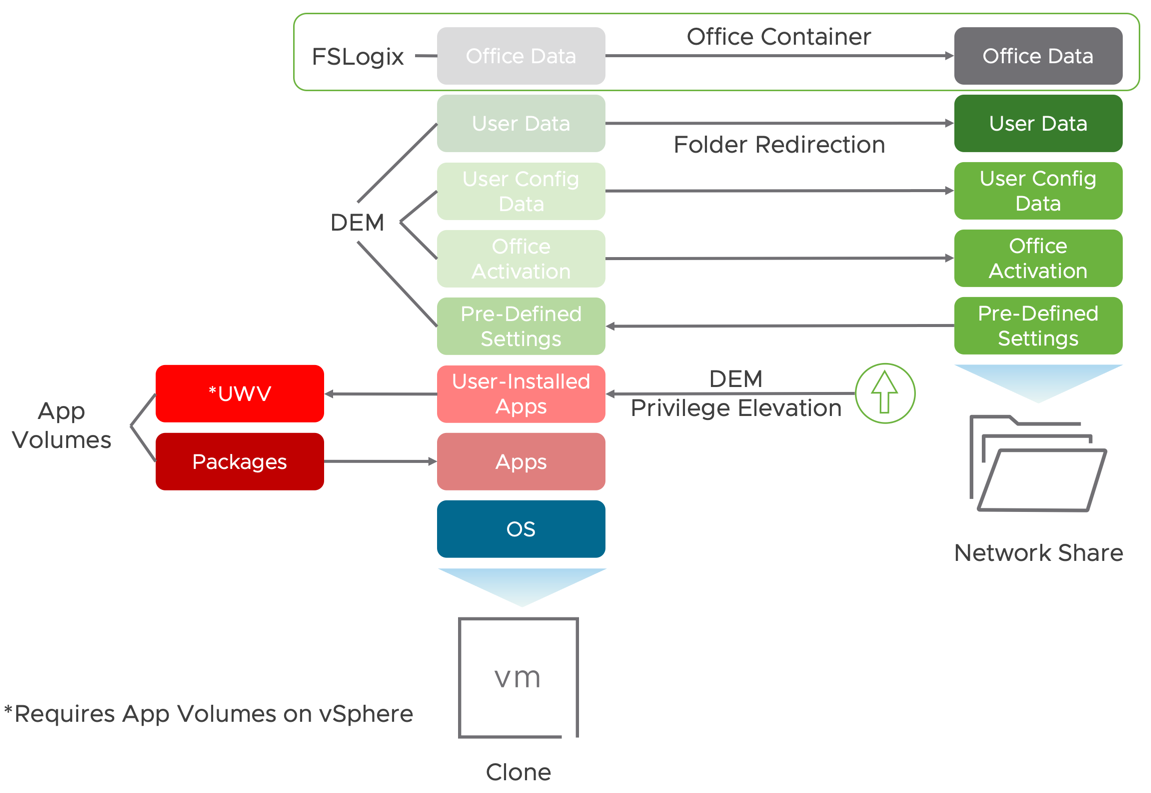
Figure 3 - Horizon with FSLogix Office Container
Integrating the FSLogix ODFC Container with your Omnissa Horizon implementation is outside the scope of this tutorial. See Best Practices for Delivering Microsoft Office 365 in Omnissa Horizon for detailed information on implementing FSLogix Office Containers with Horizon.
Prerequisites
Before beginning the exercises in this guide, verify that you have the following software and user accounts, and that you have created the necessary golden image, which is used in a later exercise.
Omnissa Platform Technologies
The following Omnissa products and features are used in the exercises in this guide. Links are included to quick-start guides, should you need to add any of these components to your environment before continuing.
- Horizon Cloud Service on Microsoft Azure: Evaluation Guide for Omnissa Horizon Cloud Service
- Horizon with instant clone provisioning: Evaluation Guide for Horizon 8
- App Volumes on vSphere: evaluation Guide for App Volumes 4
- Dynamic Environment Manager: Evaluation Guide for Dynamic Environment Manager
Golden Images for Horizon Desktops
The golden images described in this operational tutorial were created according to the following instructions:
- Horizon on vSphere - Create a Windows 10 1903 image, following the guidance in Manually Creating Optimized Windows Images for Horizon VMs. Note: This guide was prepared some tome ago. While this is the version of Windows we tested with, newer versions should have similar results. You should test with the versions you are using.
Important: This includes installing the agents for Horizon, App Volumes, and Dynamic Environment Manager. - Horizon Cloud Service on Microsoft Azure - Import a Windows 10 1903 desktop from the Azure Marketplace, following the guidance in Creating Desktop Images for a Horizon Cloud Pod in Microsoft Azure.
Important: This includes installing the agents for Horizon, App Volumes, and Dynamic Environment Manager. - install Office 365 ProPlus in the base image using shared computer licensing. Visit the Microsoft 365 Apps Admin Center for resources.
User Accounts
The following accounts and their associated roles are used throughout this tutorial. Simply substitute your own accounts from your environment to conduct the exercises in this tutorial.
- Active Directory user account for end-user access: eterple.mydomain.com
Note:eterple - Office 365 account: virtualspence@joshspencer.onmicrosoft.com
Administrator Account
For the exercises in this tutorial, make sure to provide the following:
- An account with permissions to create file shares is required.
- An account with the ability to import
ADMX
Microsoft FSLogix
Before you perform the procedures in the next chapter, obtain the FSLogix software from Install FSLogix Applications.
Installing FSLogix
Installing FSLogix involves configuring network shares, creating and configuring a group policy object (GPO) or registry settings, and installing the FSLogix agent.
Configuring Network Shares
Network shares are used to store VHD(X) files and to centralize logging information. For more information, see the Microsoft document Configure SMB Storage Permissions.
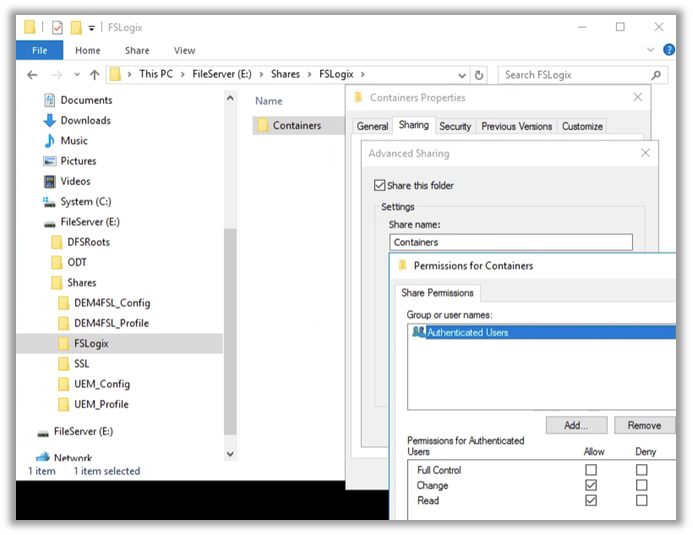
- Configure the Containers share, which will store the FSLogix Profile Containers:
Note: This share will be referred to as the Containers share throughout this tutorial.- Create a folder at the following location
\\<FileServer>\FSLogix\Containers - Share the folder and configure the following share permissions:
Authenticated Users – Change and Read
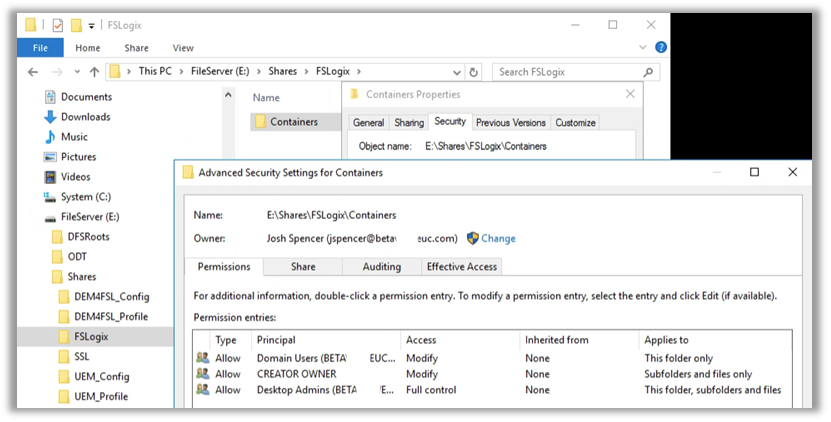
- Configure the following NTFS permissions:
- Domain Users – Modify - This folder only
- CREATOR OWNER – Modify - Subfolders and files only
- Desktop Admins – Full control - This folder, subfolders, and files
- Create a folder at the following location
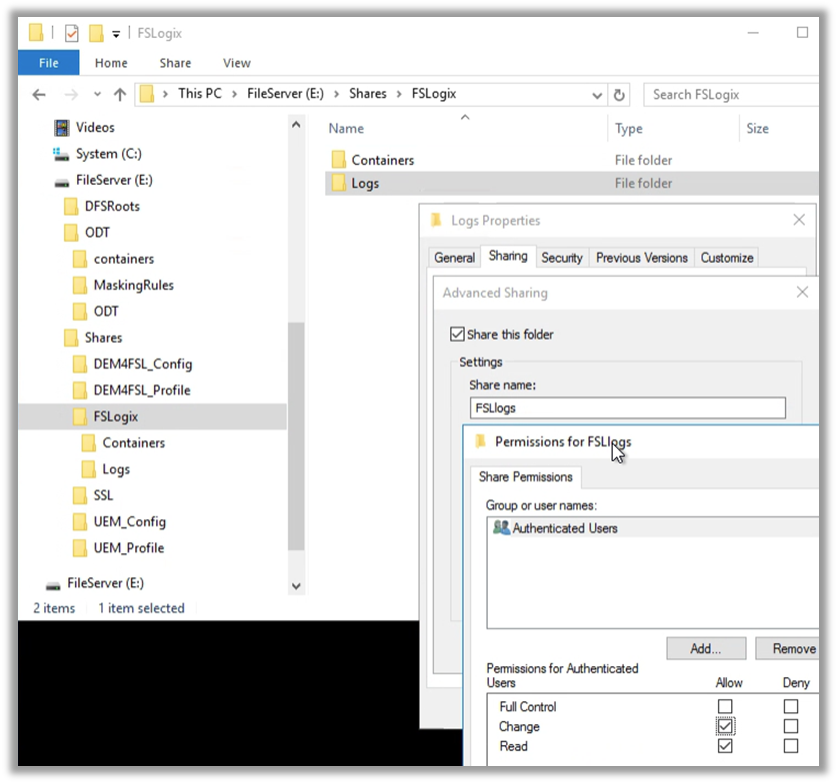
- Configure the Logs share:
Note: This share will be referred to as the Logs share throughout this tutorial.- Create a folder at the following location:
\\<FileServer>\FSLogix\Logs - Share the folder and configure the following share permissions:
Authenticated Users – Change and Read
- Create a folder at the following location:
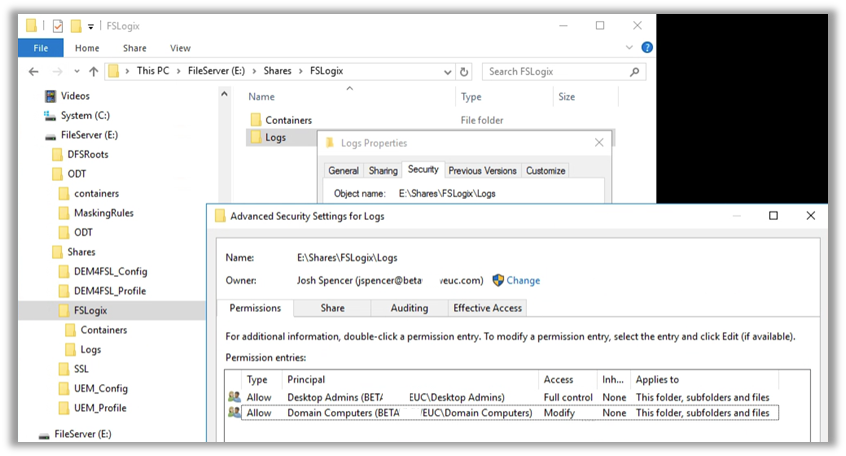
- Configure the following NTFS permissions:
- Domain Computers – Modify - This folder, subfolders, and files
- Desktop Admins – Full control - This folder, subfolders, and files
Now that the network shares are set up, you can configure a GPO so that all clones in a particular organizational unit (OU) will store their profile containers and logs in these shares.
Note: If you prefer not to use GPOs to configure FSLogix, you can modify Windows Registry values directly on the golden image. See the Microsoft document Profile Container Settings and Troubleshooting with Logging and diagnostics for registry configuration options.
Configuring a Group Policy Object for FSLogix
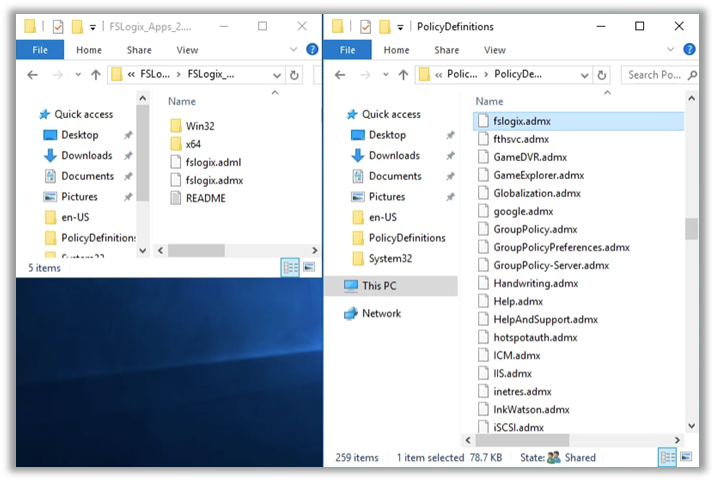
FSLogix can be configured using direct Windows Registry key manipulation or group policy. This tutorial uses the ADMX template provided with the FSLogix download bundle to configure a GPO and apply it to many computer objects at once.
This environment uses a Central Store. For more information, see the Microsoft document How to create and manage the Central Store for Group Policy Administrative Templates in Windows.
- From an administrator's machine, copy the
ADMXADMLPolicyDefinitionsfolder:- Navigate to the FSLogix download bundle.
- Copy
fslogix.admx\\DomainController\sysvol\domain\policies\policydefinitions
- Copy
fslogix.adml\\DomainController\sysvol\domain\policies\policydefinitions\en-US
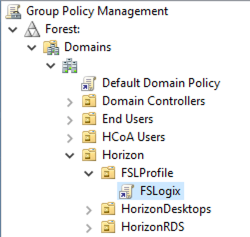
- Create and configure the GPO:
- Open the Group Policy Management console from an administrative PC.
- Navigate to the OU where the cloned VMs will reside.
- Create and link a GPO: FSLogix.

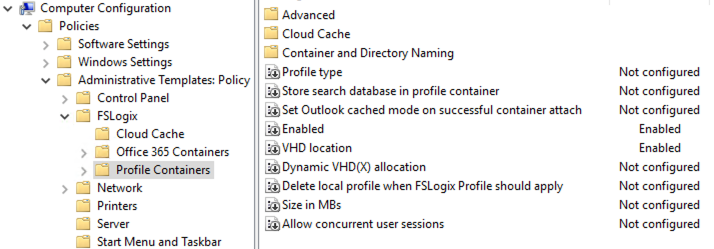
- Edit the FSLogix GPO:
- Navigate to Computer Configuration > Administrative Templates > FSLogix > Profile Containers.

- Configure the following settings:
- Enabled – Enabled
- VHD location – Enabled, with the path set to\\<FileServer>\Containers
- Navigate to Computer Configuration > Administrative Templates > FSLogix > Profile Containers.
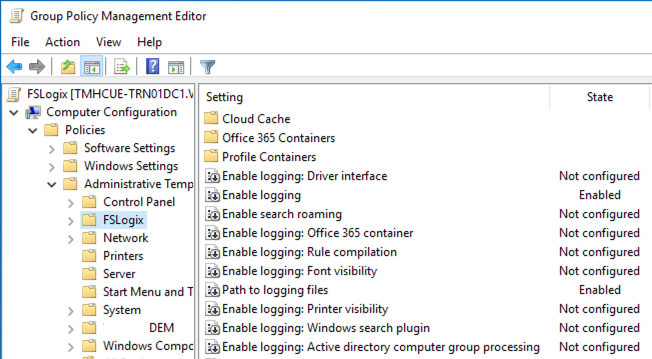
- Consider enabling and configuring FSLogix logging.

Note: See the Microsoft document Profile Container Settingsfor a list of default settings to be used for all options left not configured.
Now that the policies have been configured, you can install the agent on the golden image from which your virtual desktops will be created.
Installing the FSLogix Agent
Installing the agent on the golden desktop image is a simple matter of running the
FSLogixAppsSetup.exe file.
Note: Administrative privileges are required to install the agent.
- Log in to the machine you will use as your Windows 10 golden image.
- Copy the installer file to the system where it will run or to a location accessible to the system.
- Navigate to the FSLogix installer package.

- Run
FSLogixAppsSetup.exe - Verify that
MicrosoftFSLogixApps
Note: The following screenshots illustrate FSLogix with the two variables covered in this tutorial: Horizon on vSphere and Horizon Cloud Service on Microsoft Azure.
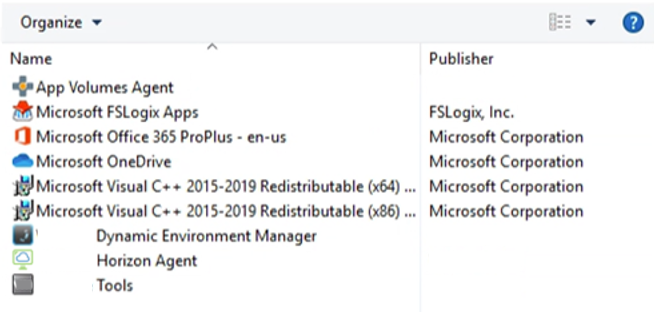
Figure 4 - FSLogix with Horizon on vSphere
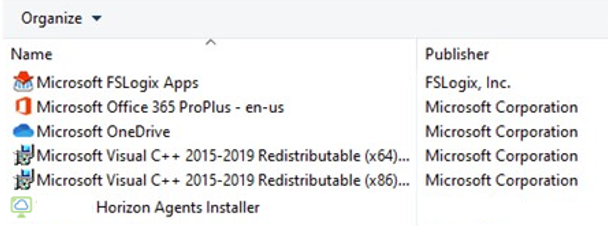
Figure 5 - FSLogix Agent with Horizon Cloud Service on Microsoft Azure
Creating and Using an FSLogix Profile Container
In this exercise, you will verify an FSLogix Profile Container VHD (virtual hard disk) is created and working properly.
Prerequisites
Before you perform the exercises in this chapter, verify that you have performed the following tasks:
- (Required) Create a golden image from which you will create a Horizon 8 floating desktop pool or a Horizon Cloud Service on Microsoft Azure floating desktop assignment. At a minimum, the image should include Windows 10, agents for Horizon, App Volumes, Dynamic Environment Manager, and the FSLogix agent. See Creating and Managing Instant-Clone Desktop Pools for Horizon 8, and Create a Floating VDI Desktop Assignment Provisioned by a Single Pod in Microsoft Azure for Horizon Cloud Service on Microsoft Azure.
- (Recommended) Install Microsoft Office or other applications in the golden image.
Note: Microsoft Office is used in this tutorial to demonstrate how files, activation, and credential data can persist from VM to VM. If Office is not available, you may substitute one or more other applications.
Provisioning Desktops
- Create a Horizon instant-clone desktop pool or desktop assignment using the following specifications:
Horizon on vSphere:
- Type – Automated desktop pool
- User assignment – Floating assignment
- Display name – HorizonFSL
- VM naming pattern – HFSL-
- AD container –OU=FSLProfile,OU=Horizon,DC=mydomain,DC=com
- Number of machines – 3
Horizon Cloud Service on Microsoft Azure:
- Assignment – Desktop
- Type – Floating
- Display name – HorizonFSL
- AD container –OU=FSLProfile,OU=Horizon,DC=mydomain,DC=com
- Number of machines – 3
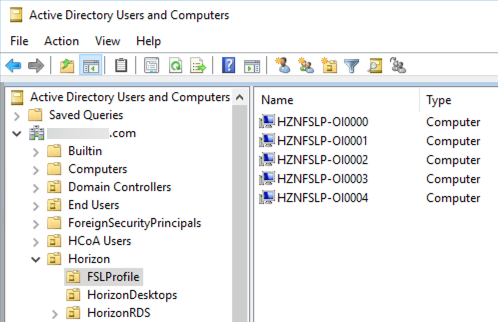
- Important: These desktops are required for all exercises in this tutorial. - Verify the VMs are created in the OU where the FSLogix GPO is applied.

Verifying Profile Container Creation
Use the Omnissa Horizon Client or HTML access to log in to a Horizon desktop.
- On the Horizon Client, authenticate to Horizon with user
eterple - Connect to the desktop with the display name HorizonFSL.

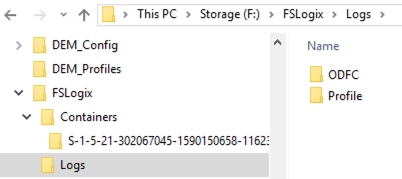
During the login process, the FSLogix Profile Container is automatically created on the Containers share. - Navigate to the Containers share and verify the virtual hard disk (
VHD
- Navigate to the Logs share and verify the logs are being written.

If the profile container was created, changes to the user profile on the cloned VM will be written to and persisted in the VHD file. - Run
CMD.EXEhostname. Make note of the VM name you are connected to.
Note: Because you are using floating desktops, the VM you connect to will be random and may have a different name than the name displayed in this screenshot. - Modify the user profile:
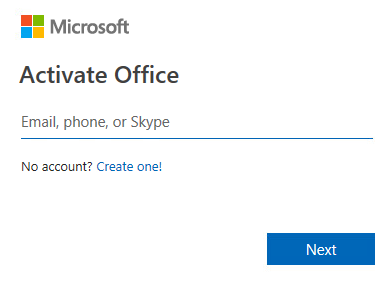
- Open one of the Office 365 applications and sign in to activate Office. In this tutorial, PowerPoint was used to activate Office.

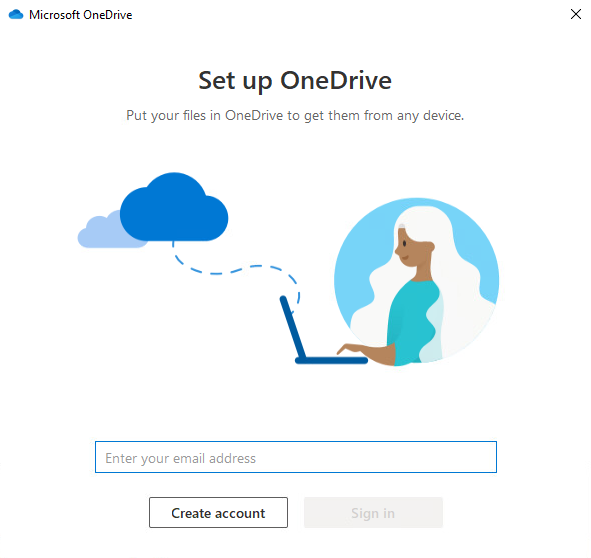
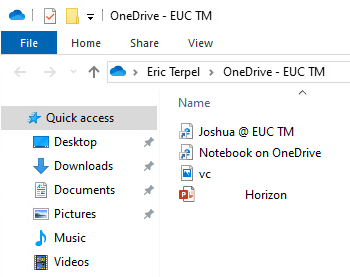
- Sign in to OneDrive using the same Office 365 credentials.

After signing in, you see the application file (for this example, PowerPoint) appear in the OneDrive folder.
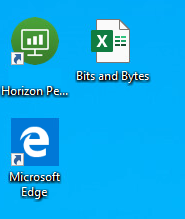
- Use Excel to create and save a spreadsheet to the Desktop.

- Open one of the Office 365 applications and sign in to activate Office. In this tutorial, PowerPoint was used to activate Office.
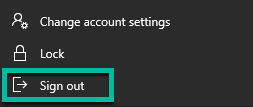
- After you finish modifying the user profile, select Sign out to disconnect and log off of the VM so it will be reset.

- On Horizon Client, authenticate to the Horizon server with the end-user account; for our example,
eterple. - Connect again to the desktop with the display name HorizonFSL.

- Run
CMD.EXEhostname.
Note: You are connected to a different VM than the last time you used this command.
- Verify that the changes you made have been persisted to the new desktop.
- PowerPoint is activated and authenticated.
- OneDrive is activated and authenticated.
- The Excel spreadsheet remains on the Desktop. - Disconnect and log off the VM.
Integrating App Volumes Packages with FSLogix Profile Container
App Volumes abstracts applications from the golden image, enabling delivery of applications to users or computers. App Volumes also persists applications, while FSLogix Profile Container persists the user configuration for the applications between nonpersistent desktop sessions.
App Volumes 4 is available in Horizon implementations on multiple infrastructure platforms. App Volumes 4 on vSphere currently includes added functionality, so some of the exercises in this tutorial will not be applicable to Horizon Cloud Service on Microsoft Azure. A table like the following is included with each exercise to indicate which infrastructure platforms are supported.
| This exercise applies to the following infrastructure platforms: | |
| App Volumes on Horizon Cloud Service | Yes |
| App Volumes on vSphere | Yes |
App Volumes 4 on vSphere is available anywhere vSphere is providing the infrastructure, App Volumes 4 is also available on native Azure (non-vSphere) as a feature of Horizon® Cloud Service™ .
In the following exercises, you will verify that user-based and computer-based application packages work with the Profile Container.
Prerequisites
Before you perform the exercises in this chapter, verify that you have performed the following tasks:
- Create a golden image that meets the requirements described in Golden Image for Horizon Desktops.
- Create Horizon desktops according to the specifications listed in Provisioning Desktops.
- Create one or more application packages.
- For instructions with App Volumes on vSphere, see Simplified Application Management with App Volumes. Consider creating at least one package to validate user-based assignments and a second for computer-based assignments.
- For instructions with App Volumes with Horizon Cloud Service on Microsoft Azure, see Horizon Cloud Service Architecture - Applications and Packages.
For the example used in this tutorial, the following application packages were created:
- Application: Notepad++, Package: Notepad++ v7.8.8
- Application: VLC, Package: VLC v3.0.8
Assigning an Application Package to an End User
This table indicates which infrastructure platforms are supported.
| Assigning an Application Package to an End Users applies to the following infrastructure platforms: | |
| App Volumes on Horizon Cloud Service | Yes |
| App Volumes on vSphere | Yes |
It is common practice to create application packages containing programs that you want to make available only to members of a group or to individual users.
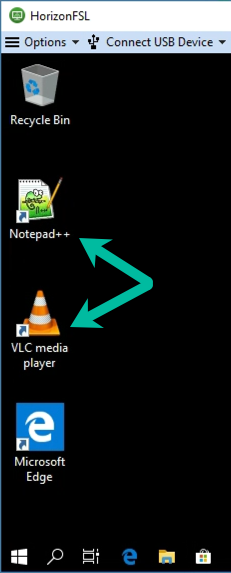
For the purposes of this tutorial, the Notepad++ v7.8.8 application package is used. The application package that you create for this exercise should be similar but need not contain the exact same program.
Assign your application (for our example, Notepad++) to the standard user account that you plan to use for this tutorial. For our example, the user account is eterple. The package is attached when the user logs in to a guest VM (instant-clone desktop).
The following screenshots illustrate FSLogix with the two variables covered in this tutorial: App Volumes on vSphere and Horizon Cloud Service on Microsoft Azure.
App Volumes on vSphere

Figure 6 - Assignment of the Notepad++ Application Package to an End-User Account on App Volumes on vSphere
App Volumes on Horizon Cloud Service
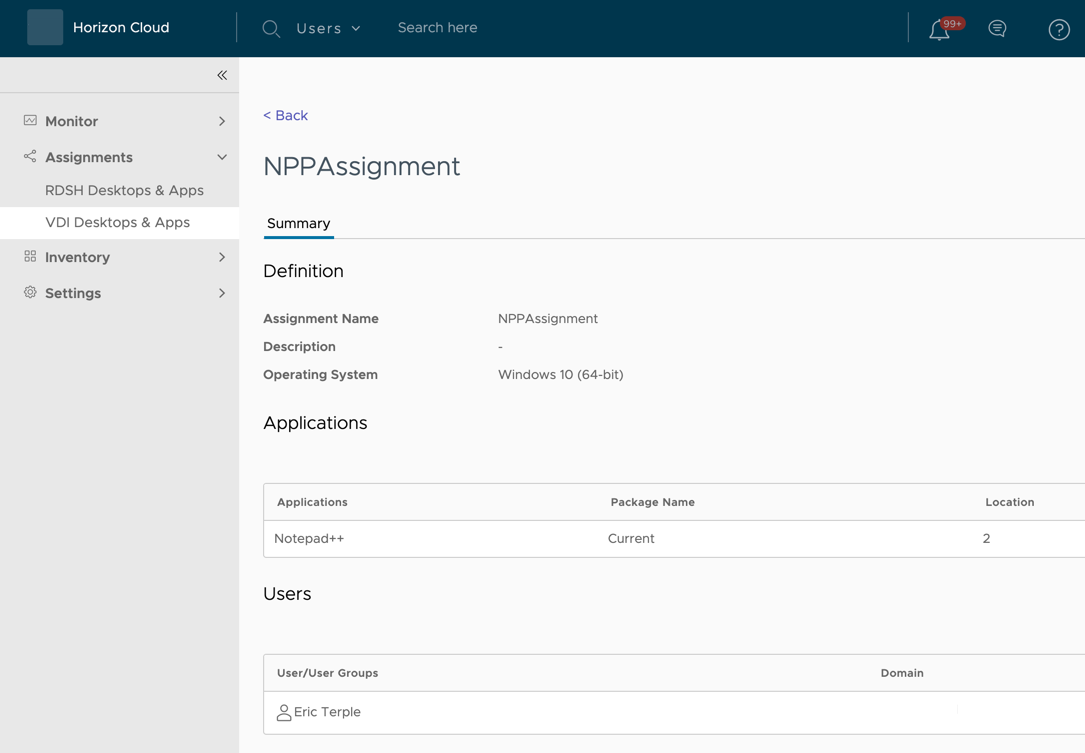
Figure 7 - Assignment of the Notepad++Application Package to and End-User Account in Horizon Cloud Service on Microsoft Azure
Assigning an Application Package to an Active Directory OU Containing Computer Objects
This table indicates which infrastructure platforms are supported.
| Assigning an Application Package to an Active Directory OU Containing Computer Objects applies to the following infrastructure platforms: | |
| App Volumes on Horizon Cloud Service | No |
| App Volumes on vSphere | Yes |
It is a common practice to create application packages containing programs that you want to make available to all users in an organization. While you can use groups containing users, you have the option of assigning packages to computer objects. There is an added benefit in that packages are attached at computer startup rather than user login.
For the purposes of this tutorial, the VLC application package is used. The package that you create for this exercise should be similar, but need not contain the exact same applications.
Assign your application package to the Active Directory OU where the computer objects of the instant-clone desktop pool machines are located. The package are attached to the VMs when they are powered on.

Figure 8: Assignment of the VLC Application Package to an OU Containing Instant-Clone Computer Objects
Recovering Instant-Clone VMs in the Desktop Pool
Initiating a recovery operation on the desktops in the instant-clone desktop pool causes them to be deleted and recreated, enabling the computer-assigned package to be attached.
- From the Horizon Console, navigate to the Machines tab of the desktop pool, select the machines, and click the Recover button to recover the machines in the desktop pool.

Verify Application Package Assignments
This table indicates which infrastructure platforms are supported.
| Verify Application Package Assignments applies to the following infrastructure platforms: | |
| App Volumes on Horizon Cloud Service | Yes |
| App Volumes on vSphere | Yes |
Use the Horizon® Client or HTML access to log in to a Horizon desktop.
- On the Horizon Client, authenticate to with user
eterple - Connect to the desktop
HorizonFSL.
- Verify that all programs included in the application packages are available.

Customizing an Application Delivered with an Application Package
This table indicates which infrastructure platforms are supported.
| Customizing an Application Delivered with an Application Package applies to the following infrastructure platforms: | |
| App Volumes on Horizon Cloud Service | Yes |
| App Volumes on vSphere | Yes |
Application Packages are read-only by design. Customizations to program configuration settings will be stored in the FSLogix Profile Container and persisted between nonpersistent desktop sessions.
- If you are not still logged in to the virtual desktop, use Horizon Client or HTML Access to log in and access the virtual desktop.
- Open Notepad++.
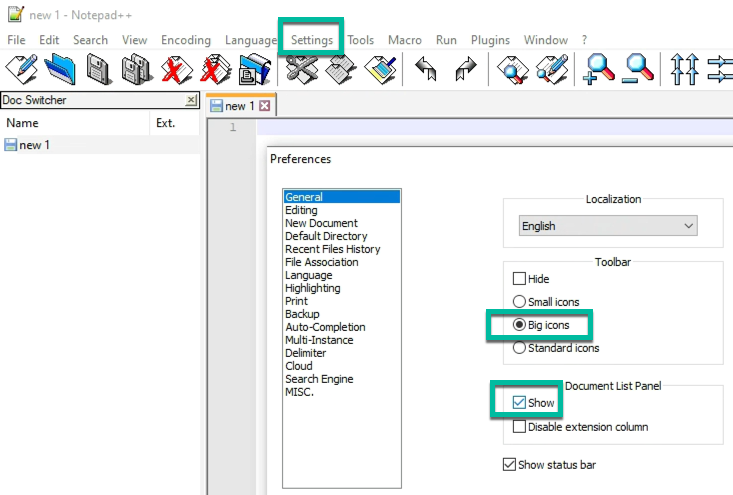
- Navigate to Settings > Preferences and customize the program:
- Toolbar > Big icons
- Document List Panel > Show
- Close Notepad++.
- Select Sign out to disconnect and log off of the VM so it will be reset.

- Use Horizon Client or HTML access to authenticate to Horizon again with the same end-user account; for our example,
eterple. - Connect to the desktop
HorizonFSL
- Open Notepad++ and verify that all customizations were persisted to the new session.
Supporting User-Installed Applications with App Volumes User-Writable Volumes
This table indicates which infrastructure platforms are supported.
| User-Writable Volumes applies to the following infrastructure platforms: | |
| App Volumes on Horizon Cloud Service | No |
| App Volumes on vSphere | Yes |
In the previous exercise, you used App Volumes application packages to deliver IT-managed applications to users and computers. You might also need to provide end users with the capability to install their own applications and have these user-installed applications persist from one nonpersistent desktop session to the next.
Although FSLogix Profile Container can persist the application configuration data in the profile, it cannot persist a user-installed application. App Volumes user-writable volumes are uniquely suited to address this requirement and integrate seamlessly with FSLogix Profile Containers. User-installed applications are persisted on the writable volume, and application customizations are persisted in the FSLogix Profile Container.
In this exercise, you will create and assign an App Volumes user-writable volume to an end user, install an application, and verify that the application and user customizations are persisted between desktop sessions.
Prerequisites
Before you perform the exercises in this chapter, verify that you have performed the following tasks:
- Create a golden image that meets the requirements described in Golden Images for Instant Clone Pool.
- Create Horizon desktops according to the specifications listed in Provisioning Desktops.
- Create an FSLogix Profile Container for a standard end-user account (for our example,
eterple) as described in Creating and Using an FSLogix Profile Container. - Create a file share with FileZilla or another application installer available.
Note: If you have an existing repository of IT-approved application installers available, you can substitute it.
Creating a User Writable Volume
From the App Volumes Manager console, create a writable volume and assign it to the end user account; for example, eterple.
Note: Be sure to select the UIA Only template. This ensures that only user-installed applications are stored on the volume.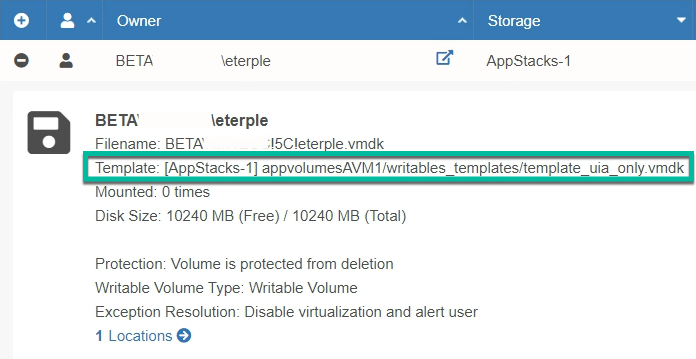
Figure 9 - Writable Volume Assigned to eterple and Created Using UIA Only Template
Configuring Privilege Elevation with Dynamic Environment Manager
Most applications require administrator privileges during installation, and some applications even require administrator privileges to run after installation. Dynamic Environment Manager provides the privilege elevation feature so that IT administrators can remove administrative privileges from standard end users, while still enabling them to install and run approved applications. To learn more about the privilege elevation feature, see the Configuring Privilege Elevation section of the Dynamic Environment Manager documentation.
The end user account eterple used throughout this tutorial has standard user privileges, preventing the installation of applications to Windows. In this exercise, we configure privilege elevation to enable eterple to install software from an IT-approved software repository.
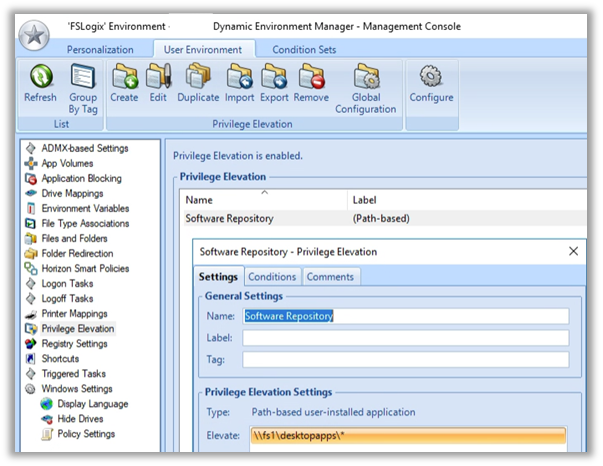
- Enable privilege elevation and create a path-based elevation rule to elevate applications installed from a network repository.
- In this tutorial, the following path is used:
\\<FileServer>\desktopapps\*
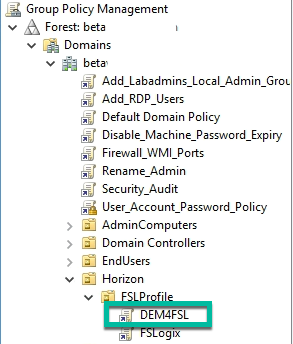
- Using either a GPO or the NoAD mode feature of Dynamic Environment Manager, apply the Dynamic Environment Manager configuration to the virtual machines and users.

Updating an Application Package Assignment
In a previous exercise, the VLC application package was assigned to an Active Directory OU containing computer objects. Because writable volumes are not supported for use with a computer- based application assignment, the package should instead be assigned to the end user.
Edit the VLC application package, remove the OU assignment, and assign the application package to the end-user account; for example, eterple.
Figure 10 - Assignment of the VLC Application Package to End User eterple
Recovering Instant Clone VMs in the Desktop Pool
Initiating a recovery operation on the desktops in the instant-clone desktop pool causes them to be deleted and recreated. The VLC application package will be detached from the desktops.
From the Horizon console, navigate to the Machines tab of the desktop pool, select the machines, and click the Recover button to recover the machines in the desktop pool.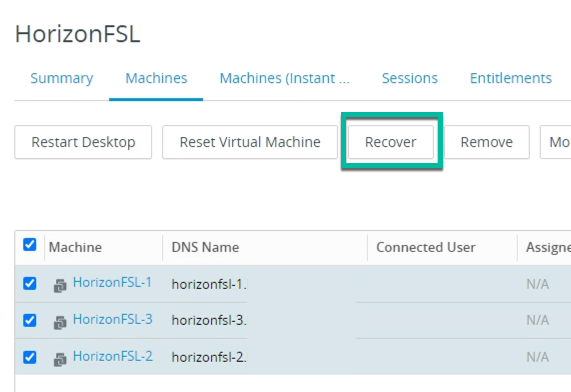
Figure 11 - Machines Tab of the HorizonFSL Desktop Pool
Installing an Application
- Use Horizon Client or HTML access to log in and authenticate to the Horizon server with the end-user account; for our example,
eterple. - Connect to the desktop
HorizonFSL.
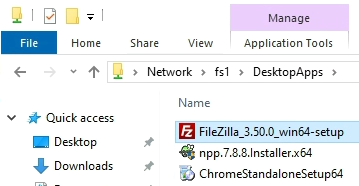
- Navigate to the file share
\\<FileServer>\DesktopApps
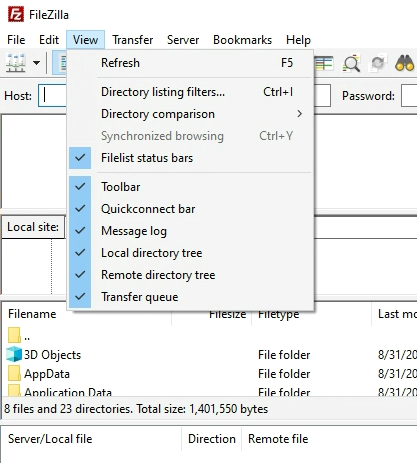
- Open the FileZilla application and customize the interface.
- Click View and modify some of the settings

- Click View and modify some of the settings
- Select Sign out to disconnect and log off of the VM so it will be reset.

- Use Horizon Client or HTML access to authenticate to Horizon again with the same end-user account; for our example,
eterple. - Connect to the desktop HorizonFSL

- Verify that FileZilla was persisted by the App Volumes writable volume.
- Open FileZilla and verify that all customizations were persisted by the FSLogix Profile Container.
Additional Integrations for Dynamic Environment Manager with FSLogix Profile Containers
This table indicates which infrastructure platforms are supported.
| These integrations apply to the following infrastructure platforms: | |
| App Volumes on Horizon Cloud Service | Yes |
| App Volumes on vSphere | Yes |
In the exercise Supporting User-Installed Applications with App Volumes User-Writable Volumes, the privilege elevation feature of Dynamic Environment Manager was used to enable a standard user account to install software.
Dynamic Environment Manager provides a variety of capabilities for Windows-based virtual, physical, and cloud-hosted computers. The features provided by the User Environment tab are recommended to simplify desktop administration and provide added functionality when using FSLogix Profile Containers with Horizon on any infrastructure platform.
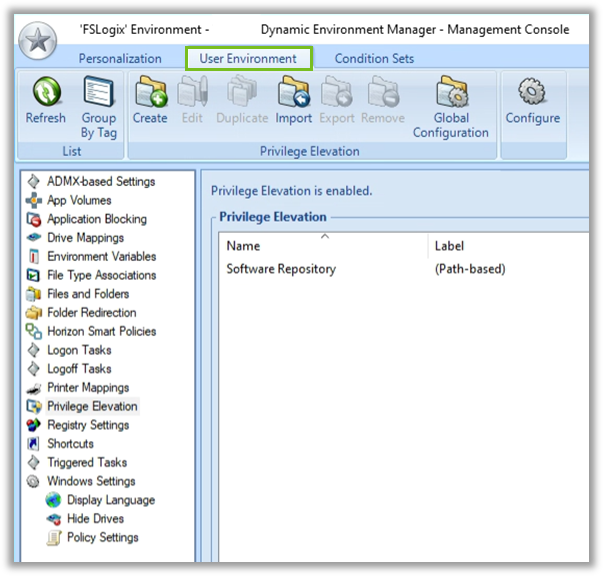
Figure 12 - Features Listed on the User Environment Tab of the Dynamic Environment Manager Console
As you have seen in this tutorial, FSLogix Profile Containers persist the entire user profile between nonpersistent desktop sessions, ensuring custom application settings are always available to the end user. Dynamic Environment Manager provides this capability through a feature called personalization. Although there is an overlap in capabilities here, enabling personalization for an application with Dynamic Environment Manager introduces additional functionality.
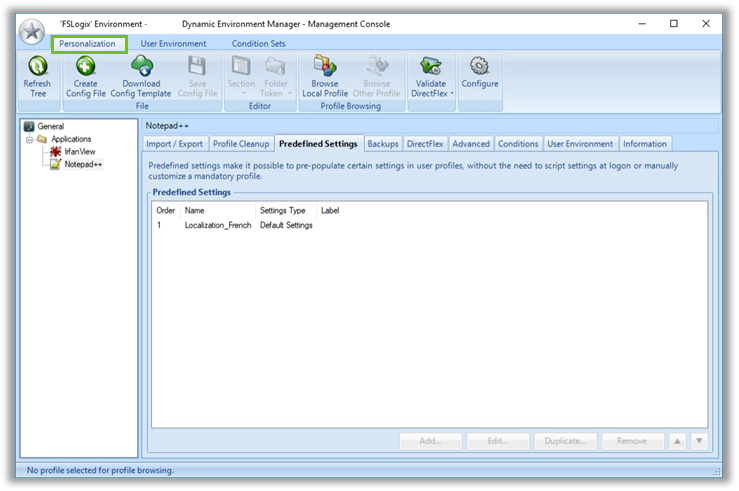
Figure 13 - Predefined Settings for Notepad++ on the Personalization Tab of the Console
Dynamic Environment Manager Self-Support
Self-support enables end users to restore application settings from a backup, or reset them to defaults, without having to contact IT for assistance. See Using Dynamic Environment Manger Self Support for more information.
Dynamic Environment Manager Predefined Settings
Predefined settings provide IT administrators with the ability to distribute custom application settings based on a variety of conditions. With a single application configuration in the base image or dynamically delivered by an App Volumes application package, predefined settings dynamically evaluate dozens of conditions and apply custom settings for end users. Whether setting app defaults and allowing end users to make changes or enforcing settings so the application works consistently with every use, the predefined settings feature adds a level of control not possible with FSLogix Profile Container alone.
Recommended Practices for Personalization with FSLogix Profile Container
Enable personalization for those applications that would benefit from predefined settings or self- support. Leverage the DirectFlex option so custom settings are read from and written to the network share at application start and stop. Any remaining application customizations will be persisted by the Profile Container.
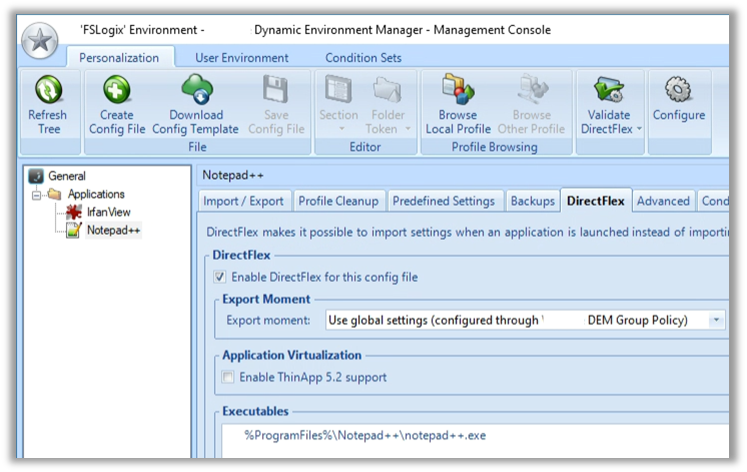
Figure 14 - DirectFlex Settings for Notepad++ on the Personalization Tab of the Console
Summary and Additional Resources
This tutorial demonstrated just how quickly and easily you can integrate Microsoft FSLogix Profile Container with Horizon, regardless of the infrastructure platform you prefer.
- App Volumes persists applications, while FSLogix Profile Container persists user data and configuration data for these applications.
- App Volumes writable volumes allow end users to install and persist their own applications, while FSLogix Profile Container persists configuration data for user-installed applications.
- Dynamic Environment Manager allows end users to install their own applications without requiring those users to have administrator (elevated) privileges.
- Dynamic Environment Manager personalization features can be used in conjunction with FSLogix Profile Container. Use Dynamic Environment Manager when you want to offer self- support to users, or when you need to enforce predefined settings for certain applications, which can be applied either at login or at application launch. Use Profile Container for any remaining application customizations you want to persist.
Additional Resources
Besides the documents previously referenced in this tutorial, be sure to check out these learning paths, available on Omnissa Tech Zone:
Author and Contributors
This guide was written by Josh Spencer, Omnissa
Contributors
Considerable contributions were provided by the following subject matter experts:
Reviewers
Assistance in reviewing was provided by the following subject matter experts:
- Jerrid Cunniff, Omnissa
- Rick Terlep, Omnissa
- William Uhlig, Omnissa
- John Kramer, Omnissa
Your feedback is valuable. To comment on this paper, either use the feedback button or contact us at tech_content_feedback@omnissa.com.


