

Chip-to-cloud management with Intel® vPro
Overview
With the new chip-to-cloud management capability embedded into Workspace ONE, administrators can now access and manage Windows Intel vPro devices directly from the Workspace ONE UEM console.
This integration is about empowering the administrator with capabilities so that in the event of a critical issue they can do something about it.
- Bluescreen? Admin can access it.
- Device turned off? Admin can wake it up.
- Keyboard, video, and/or mouse control of Windows device needed to address an issue? Admin can address it.
This new functionality is available to you at no additional cost and with no requirements for additional components.
Intel vPro integration
It’s just another Friday morning … until a few users report that their Windows devices have bluescreened. As the number of users impacted increases slowly, it becomes apparent that this issue has only been experienced on a small subset of remote Windows 10 devices that were overlooked for upgrade to Windows 11.
After an emergency meeting, you learn that an update pushed to Windows devices last evening includes a registry key that is the culprit. After immediately halting the update, you must now address the affected Windows 10 devices.
If your organization has implemented chip-to-cloud management with Intel vPro, accessing the bluescreened devices via Workspace ONE UEM is quick and easy. Let’s walk through how this works, as well as the configuration steps.
Intel vPro integration with Workspace ONE UEM
How does Intel vPro integration function? By means of Intel Endpoint Cloud Services, out-of-band management and connectivity is enabled for Workspace ONE managed Windows Intel vPro devices. There are no additional charges or components necessary to enable this integration.
Below is a diagram showing how Intel Endpoint Cloud Services integrates directly with Workspace ONE to provide the following new administrative options:
- Power on
- Power off
- Power cycle
- Reset
- Remote keyboard, video, mouse (KVM) control
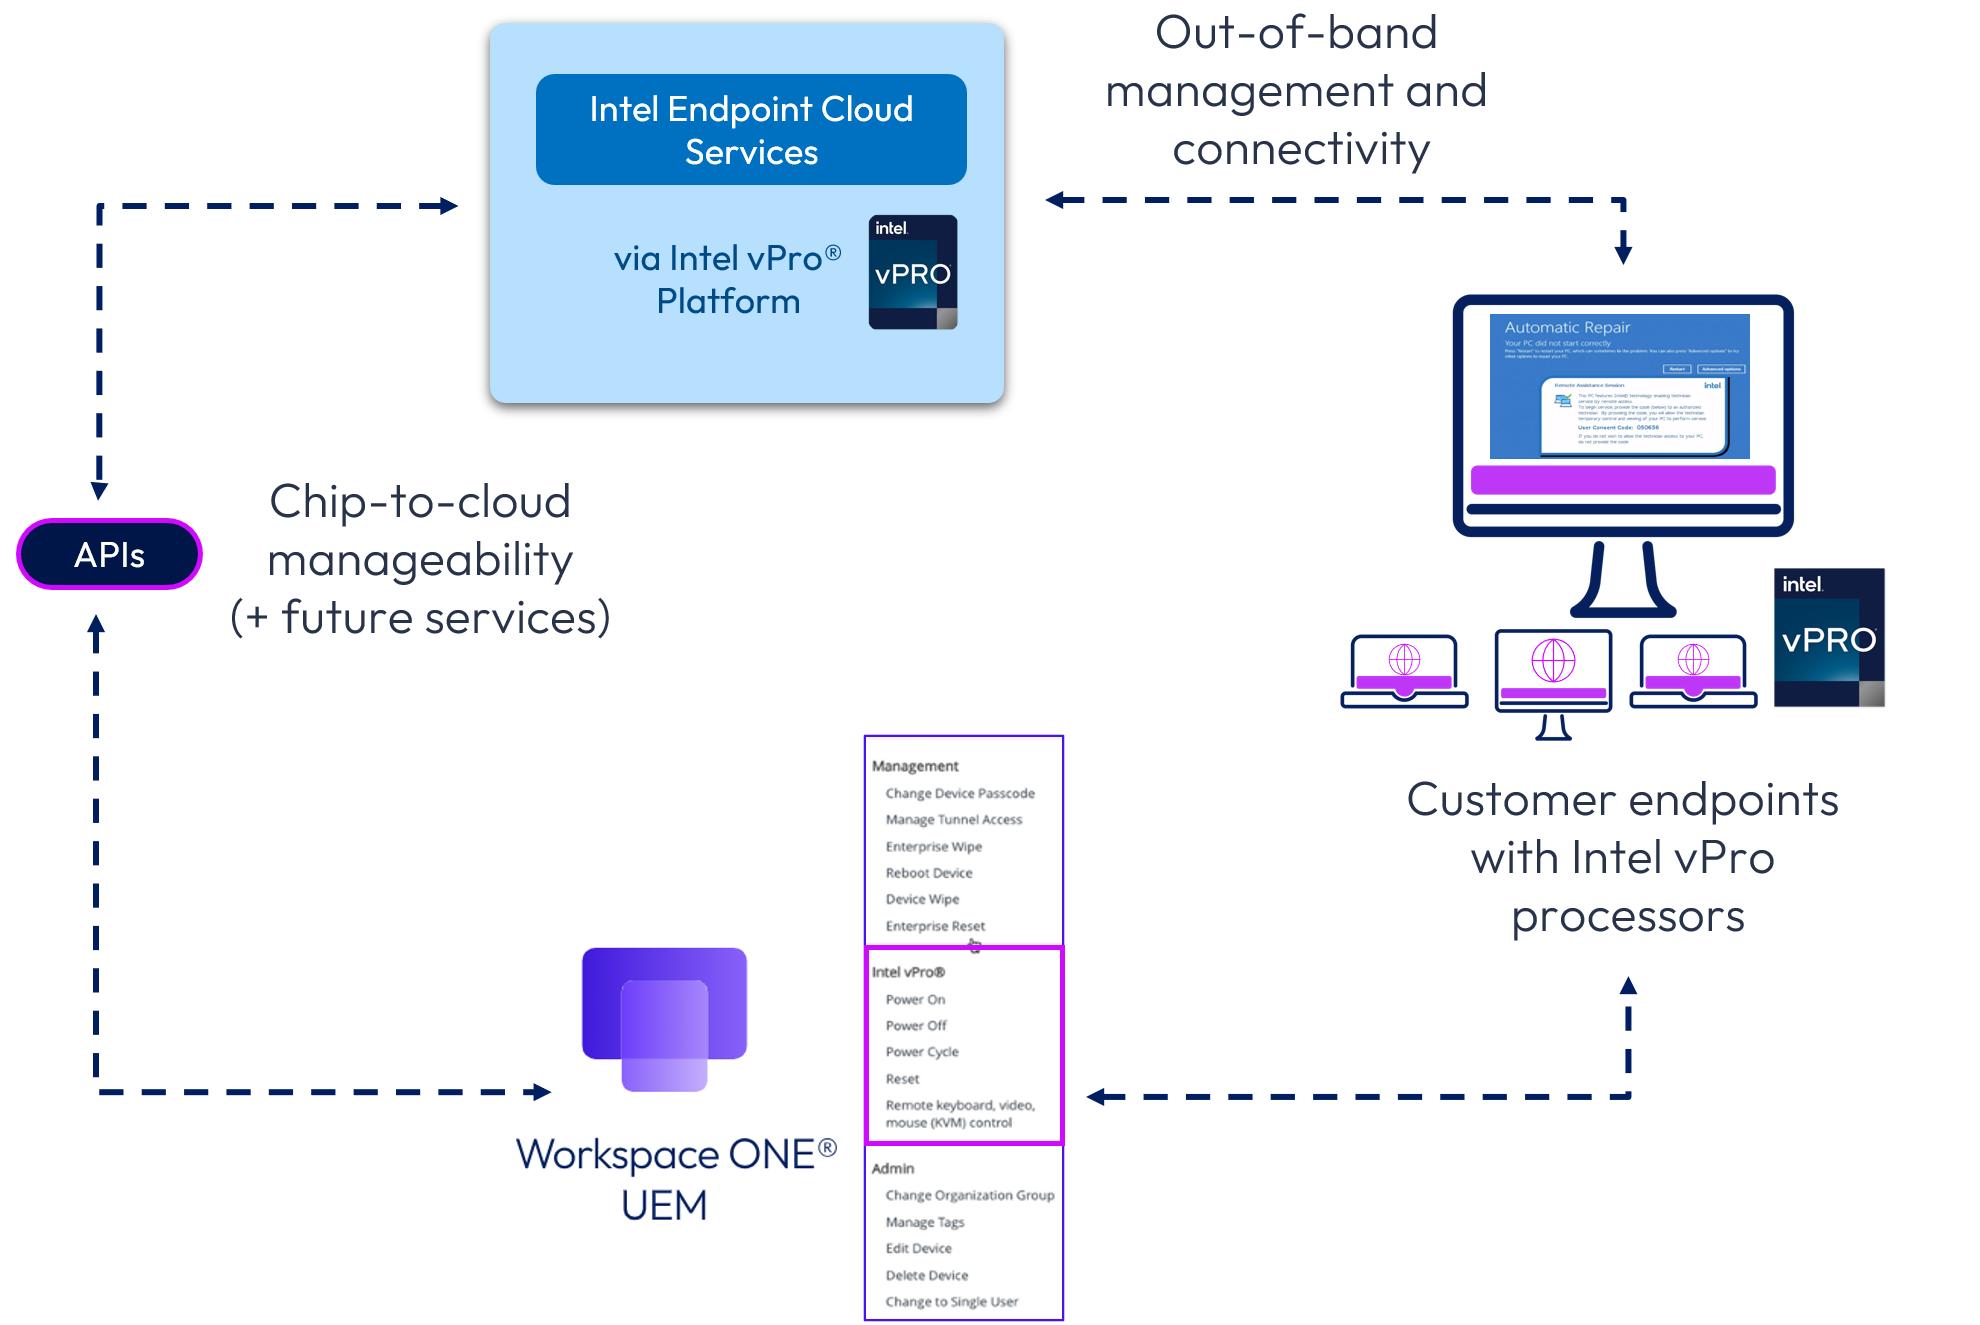
Figure 1: Windows Intel vPro devices can be managed below the OS layer via Workspace ONE.
Even if the Windows operating system fails or the device is turned off, secure remote assistance can be provided for Intel vPro devices directly from the Workspace ONE UEM console. The user must provide the consent code prior to an administrator accessing the device via keyboard/video/mouse (KVM), which ensures confidentiality and security.
Configuration
Intel vPro integration is included starting with Workspace ONE Intelligent Hub 2410, and Modern SaaS is required. No additional feature flags or components are necessary for functionality.
Please note that Intel Endpoint Management Assistant (EMA) cannot be used in conjunction with Workspace ONE. The chip-to-cloud integration replaces the EMA solution with a native cloud to cloud capability with streamlined implementation and configuration.
A few simple steps are required to enable Intel vPro integration. The first step outlined below is optional, and the remaining steps are required.
Before proceeding, Omnissa recommends the following:
- Create two Sensors to identify devices with Intel vPro processors, as well as installed Intel device driver. This step is optional but will prove to be useful as we proceed with configuration and usage.
The following Powershell script can be used to create a Sensor to identify Intel vPro devices:
try { $mei = (Get-PnpDevice -FriendlyName "Intel(R) Management Engine Interface*").Status }
catch { return $false }
if($mei -eq "OK"){return $true}else{return $false}
Alternatively, the following Powershell script can be used. When testing, both scripts were found to output equal results.
#Read SMBIOS data via WMI ###################################################################
$smbiosBytes = (Get-WmiObject -Namespace root\WMI -Class MS_SmBios).SMBiosData
$smbiosHex = ([System.BitConverter]::ToString($smbiosBytes))

#Find $AMT signature as anchor to to locate Intel(R) ME attributes ###############################
If ($smbiosHex.Contains('24-41-4D-54')) {
    [int]$signatureLoc = ($smbiosHex.IndexOf('24-41-4D-54'))
    [int]$tableLength = ([convert]::ToInt16($smbiosHex.Substring($signatureLoc - 9).Substring(0,2), 16))
    # Calculate offsets to locate Intel(R) ME attributes in SMBIOS data ###########################     # Note that offsets are different with 12th gen CPUs
    If ($tableLength -eq '20') {
        [int]$offset = 173
    } Else {
        [int]$baseOff = (($tableLength - 20) * 3)
        [int]$offset = 173 + $baseOff
    }

    # Identify Intel(R) ME SKU ###################################################################
    $skuHex = $smbiosHex.Substring($signatureLoc - 12,$offset).Substring($offset - 35,5)
    $skuInt = [convert]::ToUInt16($skuHex.Substring(3,2) + $skuHex.Substring(0,2), 16)
    If ($skuInt -band 8) {
        $skuStr = "Intel(R) Full AMT Manageability"
    } ElseIf ($skuInt -band 16) {
        $skuStr = "Intel(R) Standard Manageability"
    } ElseIf ($skuInt -band 32) {
        $skuStr = "Intel(R) Small Business Advantage(SBA)"
    } Else {
        $skuStr = "Consumer"
    }

    # Identify Intel(R) ME version ################################################################
    $version = $smbiosHex.Substring($signatureLoc - 12,$offset).Substring($offset - 23,23)
    # ME FW version in hex is in min, maj, rev, hf order, but should be written as maj.min.hf.rev
    $minVer = [convert]::ToInt16($version.Substring(3,2) + $version.Substring(0,2), 16)
    $majVer = [convert]::ToInt16($version.Substring(9,2) + $version.Substring(6,2), 16)
    $revVer = [convert]::ToInt16($version.Substring(15,2) + $version.Substring(12,2), 16)
    $hfVer = [convert]::ToInt16($version.Substring(21,2) + $version.Substring(18,2), 16)

    # Identify Intel(R) ME enabled state ##########################################################
    If ($smbiosHex.Substring($signatureLoc + 12).Substring(0,2) -eq '01') {
        If ($smbiosHex.Substring($signatureLoc + 12).Substring(3,2) -eq '01') {
            $meEnabled = $true
        } Else {
            $meEnabled = $false
        }
    } Else {
        $meEnabled = $true
    }
    # Identify non-Intel(R) vPro Platforms ########################################################
    # Note that Intel(R) vPro Essentials systems are Intel(R) Standard Manageability systems with Intel AMT version 16 and up.
    If ($skuInt -band 16) { # Intel(R) Standard Manageability
        If ($majVer -lt 16) {
            Write-Host $false
            Return "False"
            #Write-Host -ForegroundColor Yellow "Intel(R) ME SKU".PadRight(40,'.')"`b: $skuStr"
            Return
        }
    } ElseIf (!($skuInt -band 8)) { # not Intel(R) Full AMT Manageability
        Write-Host $false
        Return "False"
        #Write-Host -ForegroundColor Yellow "Intel(R) ME SKU".PadRight(40,'.')"` b: $skuStr"
        Return
    }
    # Report results ###################################################################
    #Write-Host -ForegroundColor Green "Intel(R) vPro platform".PadRight(40,'.')"`b: $true"
    #Write-Host  $true
    Return "True"
    #Write-Host -ForegroundColor Green "Intel(R) ME version".PadRight(40,'.')"`b: $majVer.$minVer.$hfVer.$revVer"
    #Write-Host -ForegroundColor Green "Intel(R) ME enabled".PadRight(40,'.')"`b: $meEnabled"
    #Write-Host -ForegroundColor Green "Intel(R) ME SKU".PadRight(40,'.')"`b: $skuStr"
    Return
    }
    Else { # $AMT signature not found in SMBIOS data
        # Report results when $AMT signature not found ################################################
        Write-Host $false
        Return "False"
    Return
}
A second Sensor may be used to identify the Intel device driver that is installed. If no driver installed, the output shows as “not found.”
# Workspace ONE Intel driver version
$regPath = "HKLM:\Software\Wow6432Node\Intel\ME"
$valueName = "Version"

try {
    $value = Get-ItemProperty -Path $regPath -Name $valueName -ErrorAction Stop
    Write-Output $value.$valueName
} catch {
    Write-Output "Not Found"
}
To create a new Sensor, go to Resources > Sensors > Add > Windows.
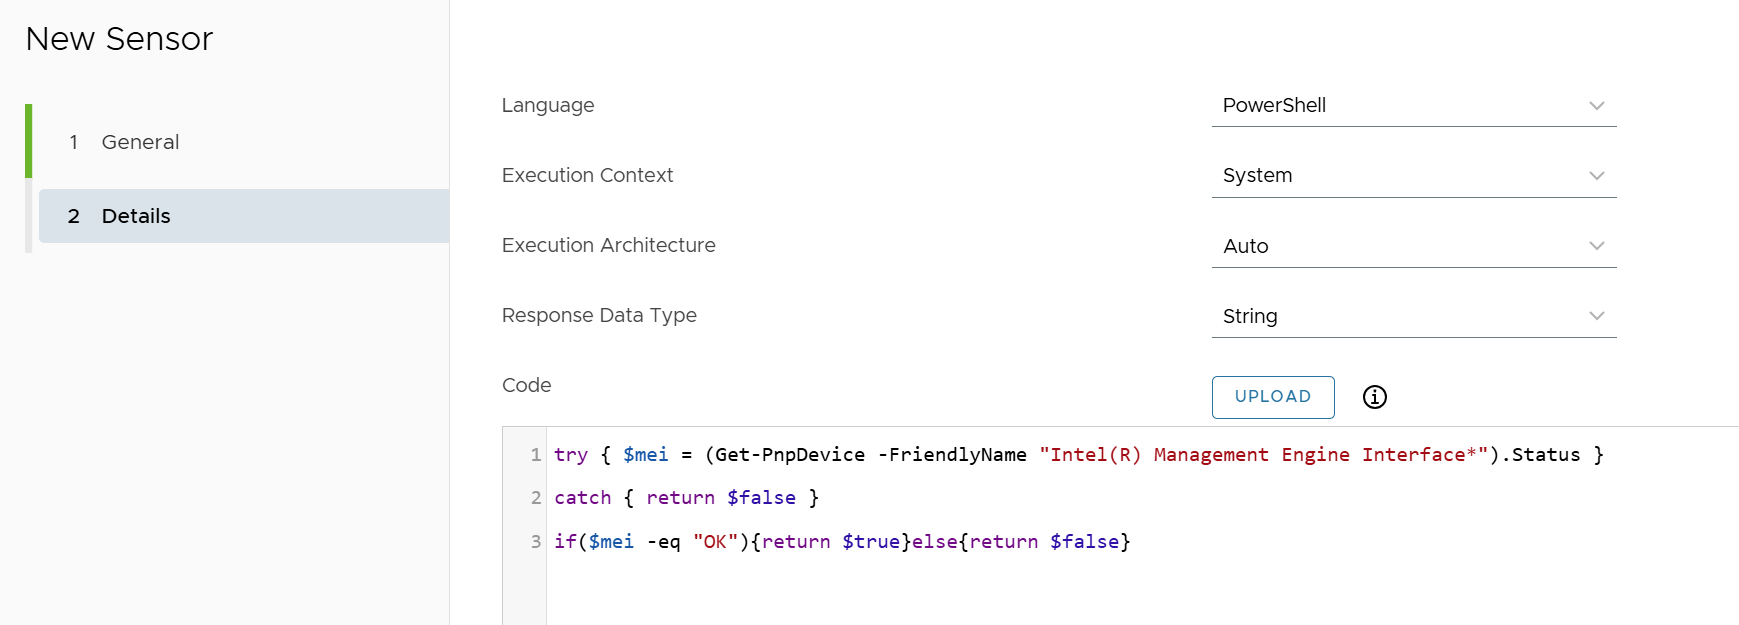
Figure 2: Sensor to identify Windows devices equipped with Intel vPro processors
These Sensors may be useful for several purposes:
- Within the Workspace ONE console Device screen, the Sensor can be run on individual computers to ascertain whether management via the new actions is feasible.
- When an administrator attempts to manage a device via the additional Intel vPro actions and sees that these are not presented, running the Sensor can confirm whether the device is equipped with an Intel vPro processor.
- Workspace ONE Intelligence can be utilized to run a report of all devices with Intel vPro processors.
- Creating a Freestyle Orchestrator workflow to install or upgrade the Intel driver.
- Required: Configure system settings, specifically:
- TCP ports: 443 and 4433
- Firewall access: *.endpointcloudservices.intel.com
- Note that there is no proxy support.
- Required: Install the Intel driver on the Windows devices, which can be downloaded from https://www.intel.com/content/www/us/en/download/682431/intel-management-engine-drivers-for-windows-10-and-windows-11.html.
After extraction, the installer is located within the Installers\Main_DCH folder. The installer is named SetupME.exe.
You may wish to push out this driver as a Workspace ONE application using the following settings:
- Uninstall command: "C:\ProgramData\Intel Package Cache {1CEAC85D-2590-4760-800F-8DE5E91F3700}\SetupME.exe" -uninstall
- Install command: setupme.exe -s -skipstartmenu -drvonly
- When to Call Install Complete defining criteria: Registry exists with path: Registry exists - HKEY_LOCAL_MACHINE\SOFTWARE\WOW6432Node\Intel\ME and configure the version based on the downloaded driver
- Required: Configure Intel vPro from the Groups & Settings > Integrations screen as shown below:
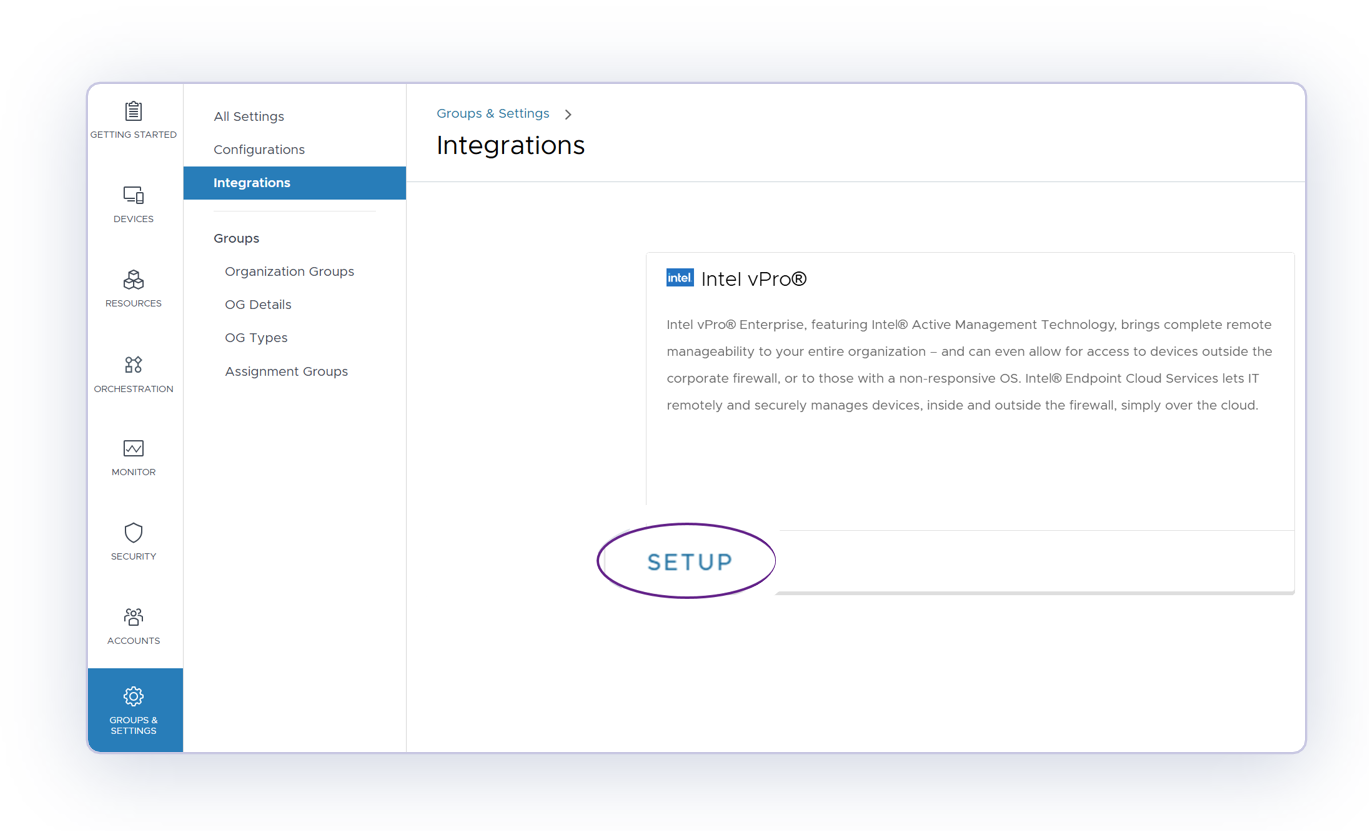
Figure 3: Configure Intel vPro from Groups & Settings > Integrations.
- Required: Create a Windows Profile to specifically enable Intel vPro. Publish that profile and apply to the appropriate Smart Group(s).
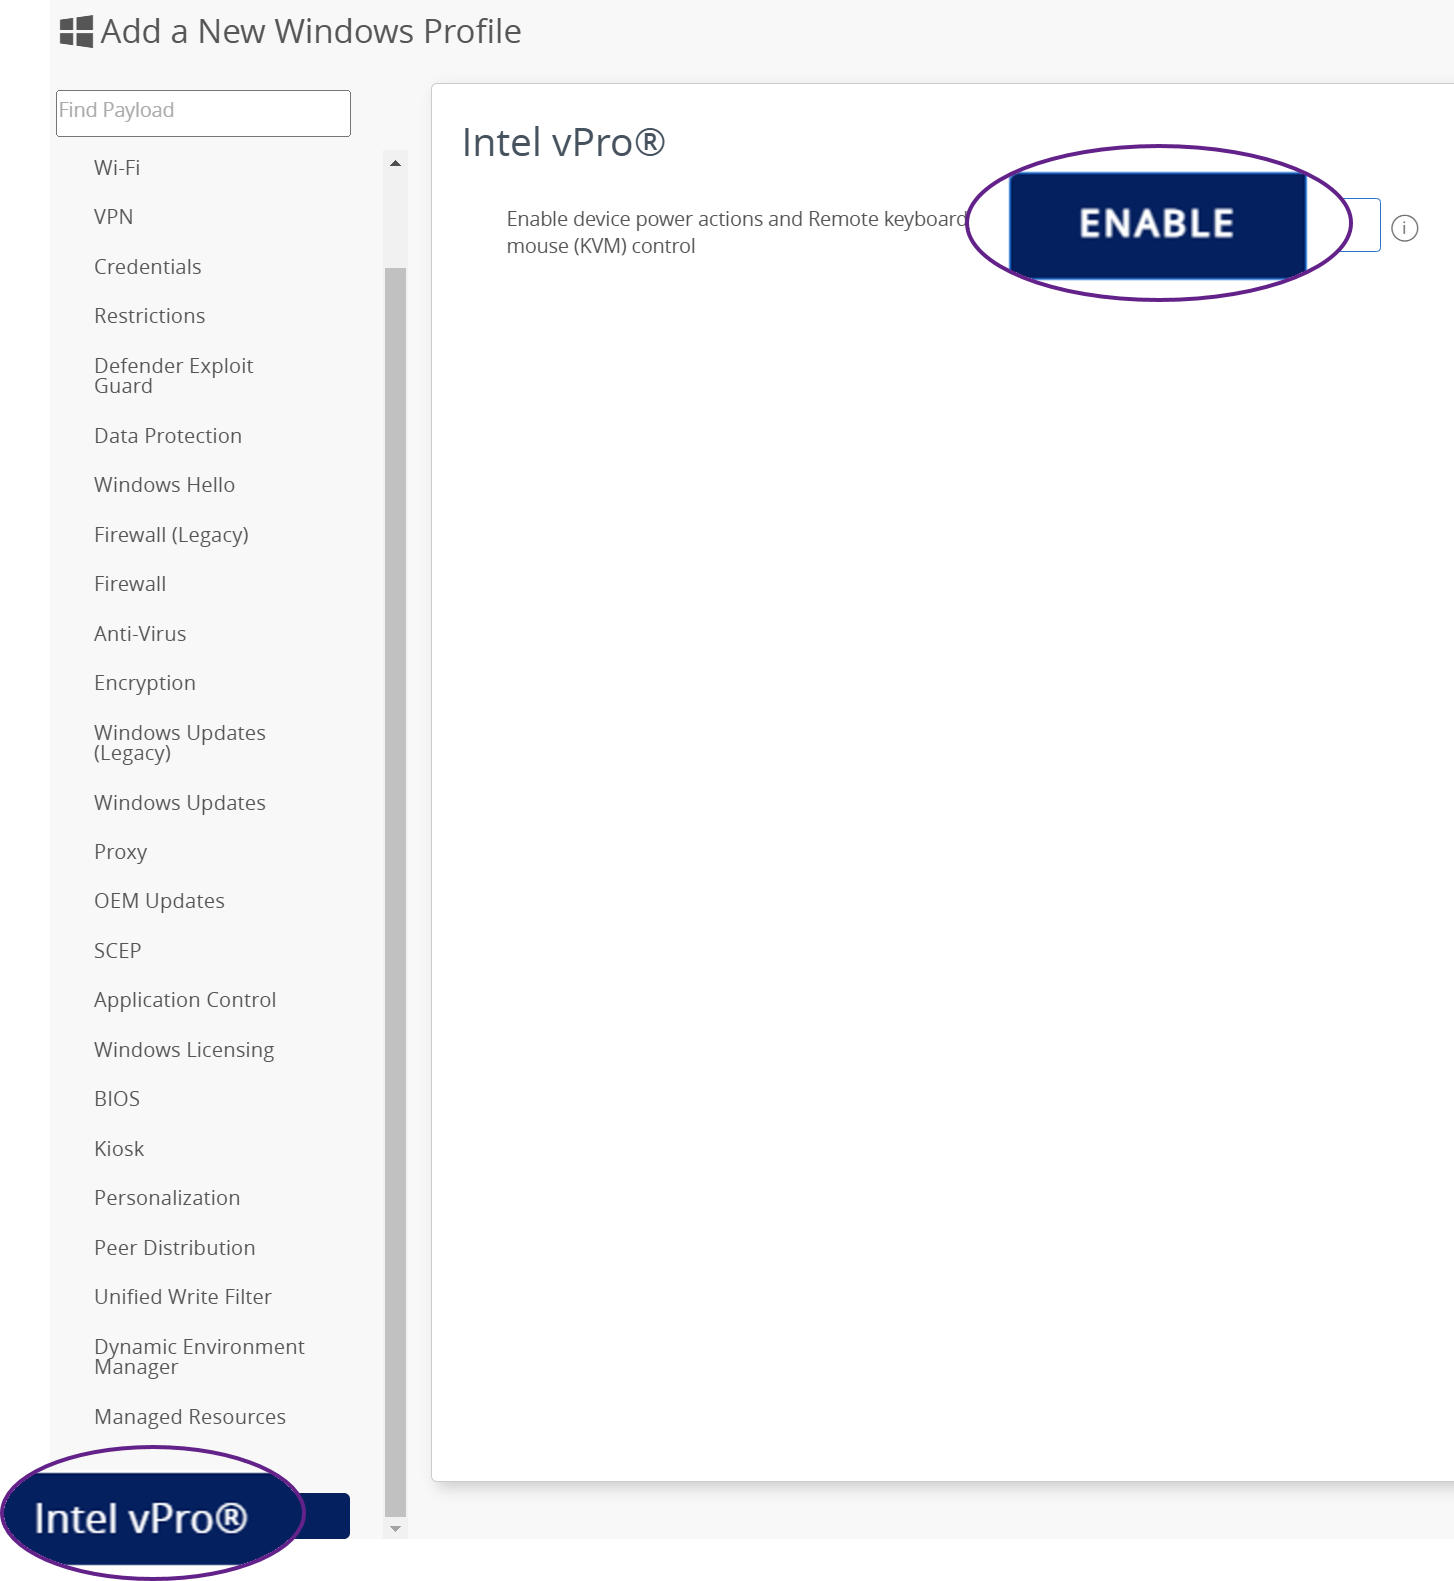
Figure 4: Create Windows Profile, publish, and apply to Smart Group(s).
At this point, Intel vPro integration has been enabled, and it will take at least an hour (but as much as four hours) for the additional Intel vPro actions to become available from the devices screen.
Note: Only devices that are equipped with Intel vPro processors will be manageable via the new action options. Devices that have other processors will not have these actions presented within the Workspace ONE console.
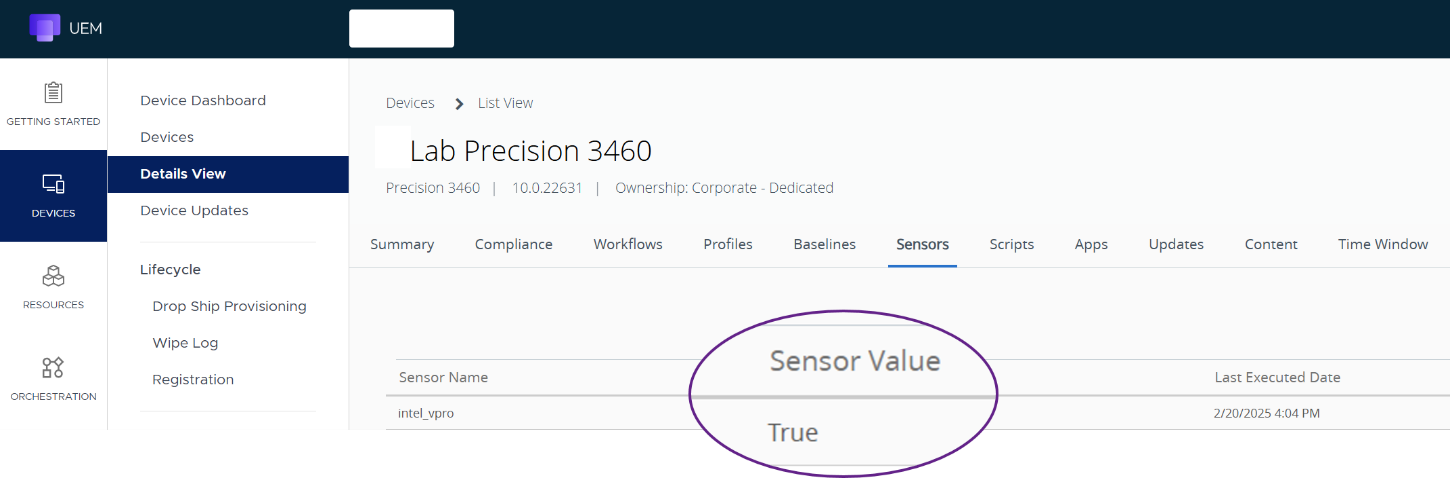
To verify whether a device is equipped with an Intel vPro processor, as well as the Intel driver installed, the Sensors created in the first step can be run.
Figure 5: Validate Intel vPro via Sensor
Remedying Intel vPro Windows devices
Back to our scenario, you learn that only a total of four Windows devices have been impacted, and your manager has asked you to quickly address each one by accessing the devices individually and repairing the registry key. Because all devices are equipped with Intel vPro processors, it’s easy!
But before you can proceed, ensure that Intel vPro rights are assigned. While the Console Administrator role has full rights to access Intel vPro-related functionality on the user device, admins with Device Administrator permissions must specifically be granted those rights.
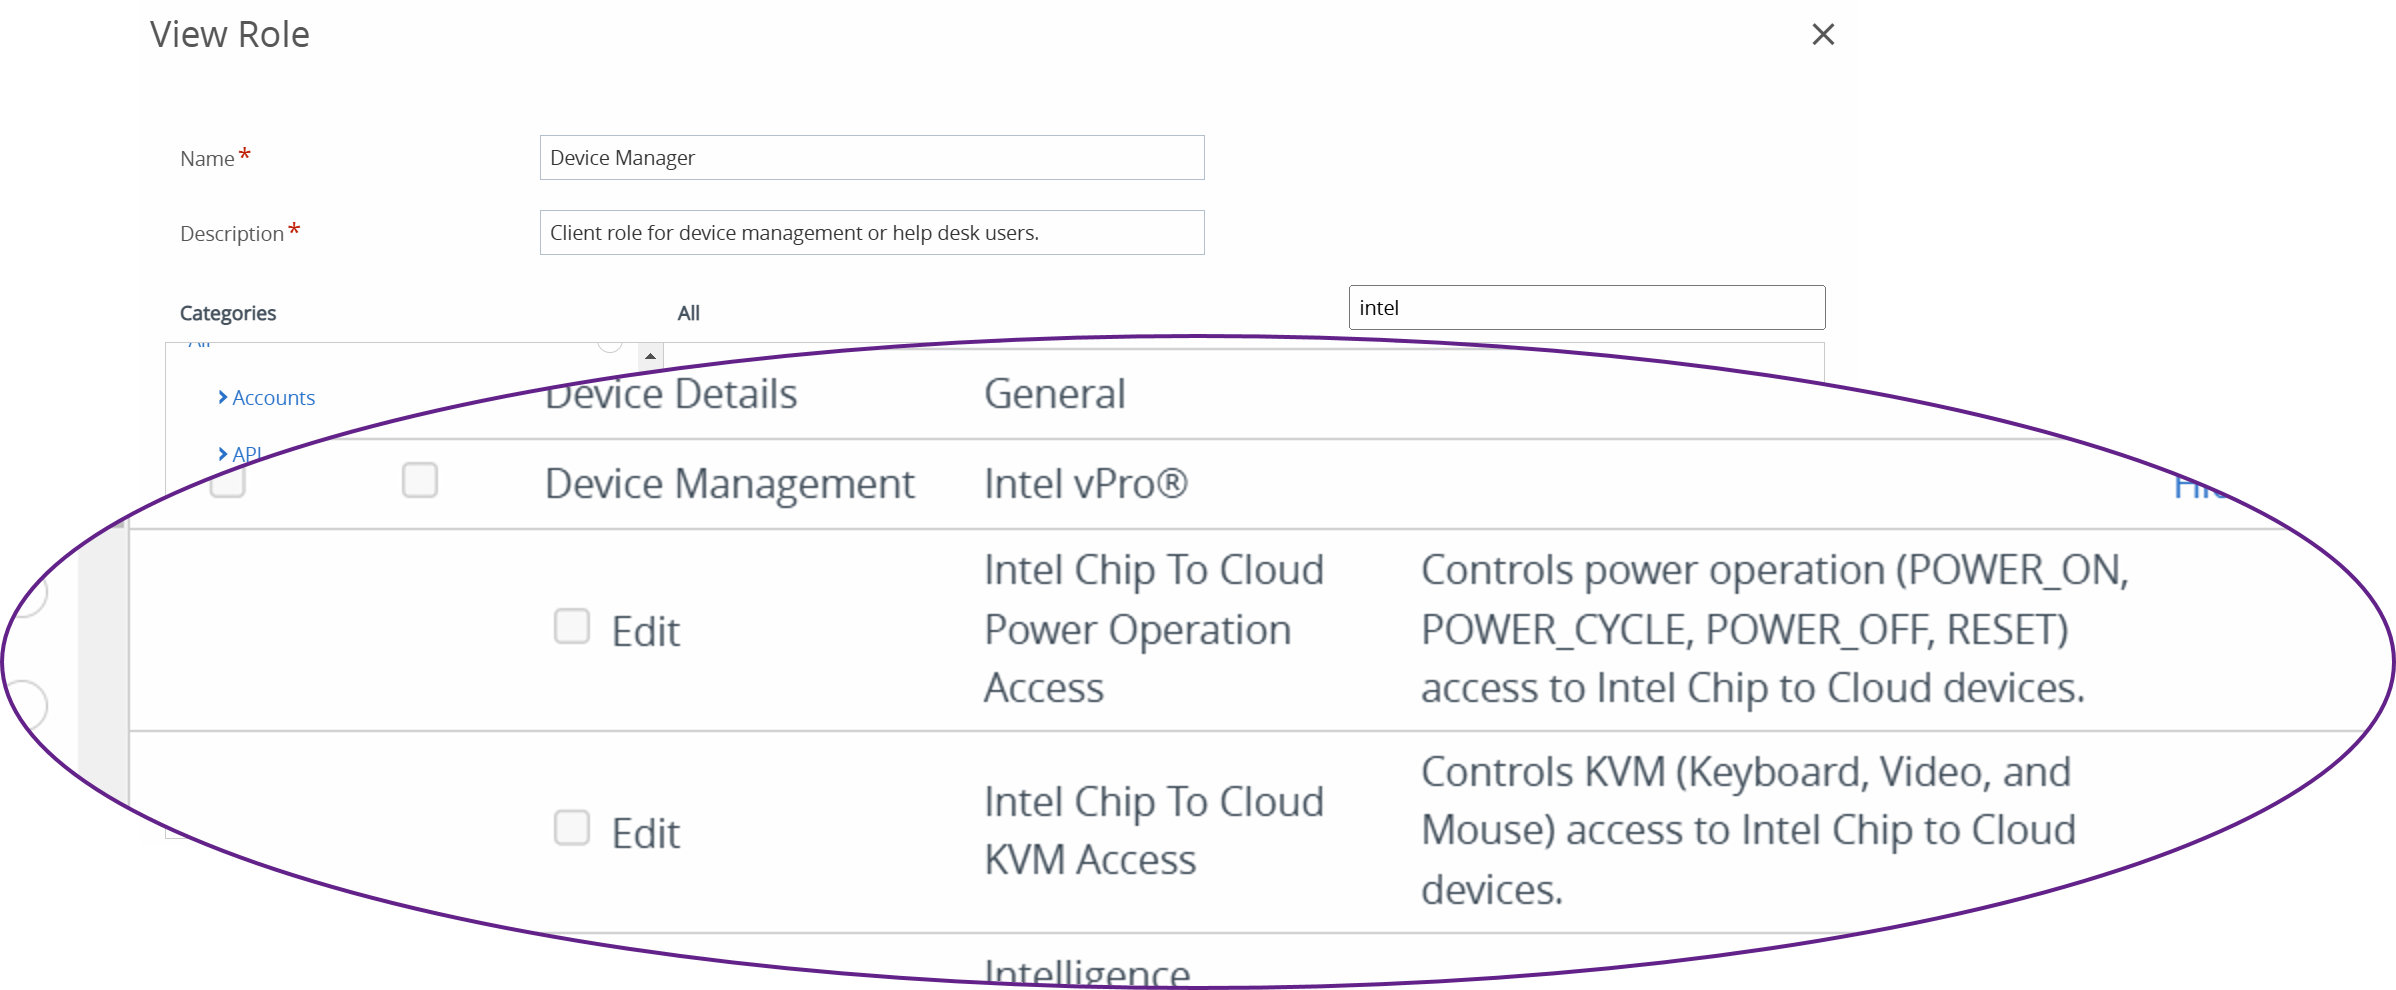
Figure 6: Device Manager rights for Intel vPro not enabled by default
By simply accessing each device within the Devices screen, you’ll see that several additional actions are presented under More Actions. Note that these additional actions are only presented if the device has an embedded Intel vPro processor. Regardless of Smart Group membership, all devices that do not have Intel vPro processors will not show these additional actions.
 Figure 7: Intel vPro actions appear within More Actions dropdown
Because you are working directly with the users, you select Remote KVM control to access the user computer. The user is presented with a consent code that must be relayed to the administrator before proceeding.
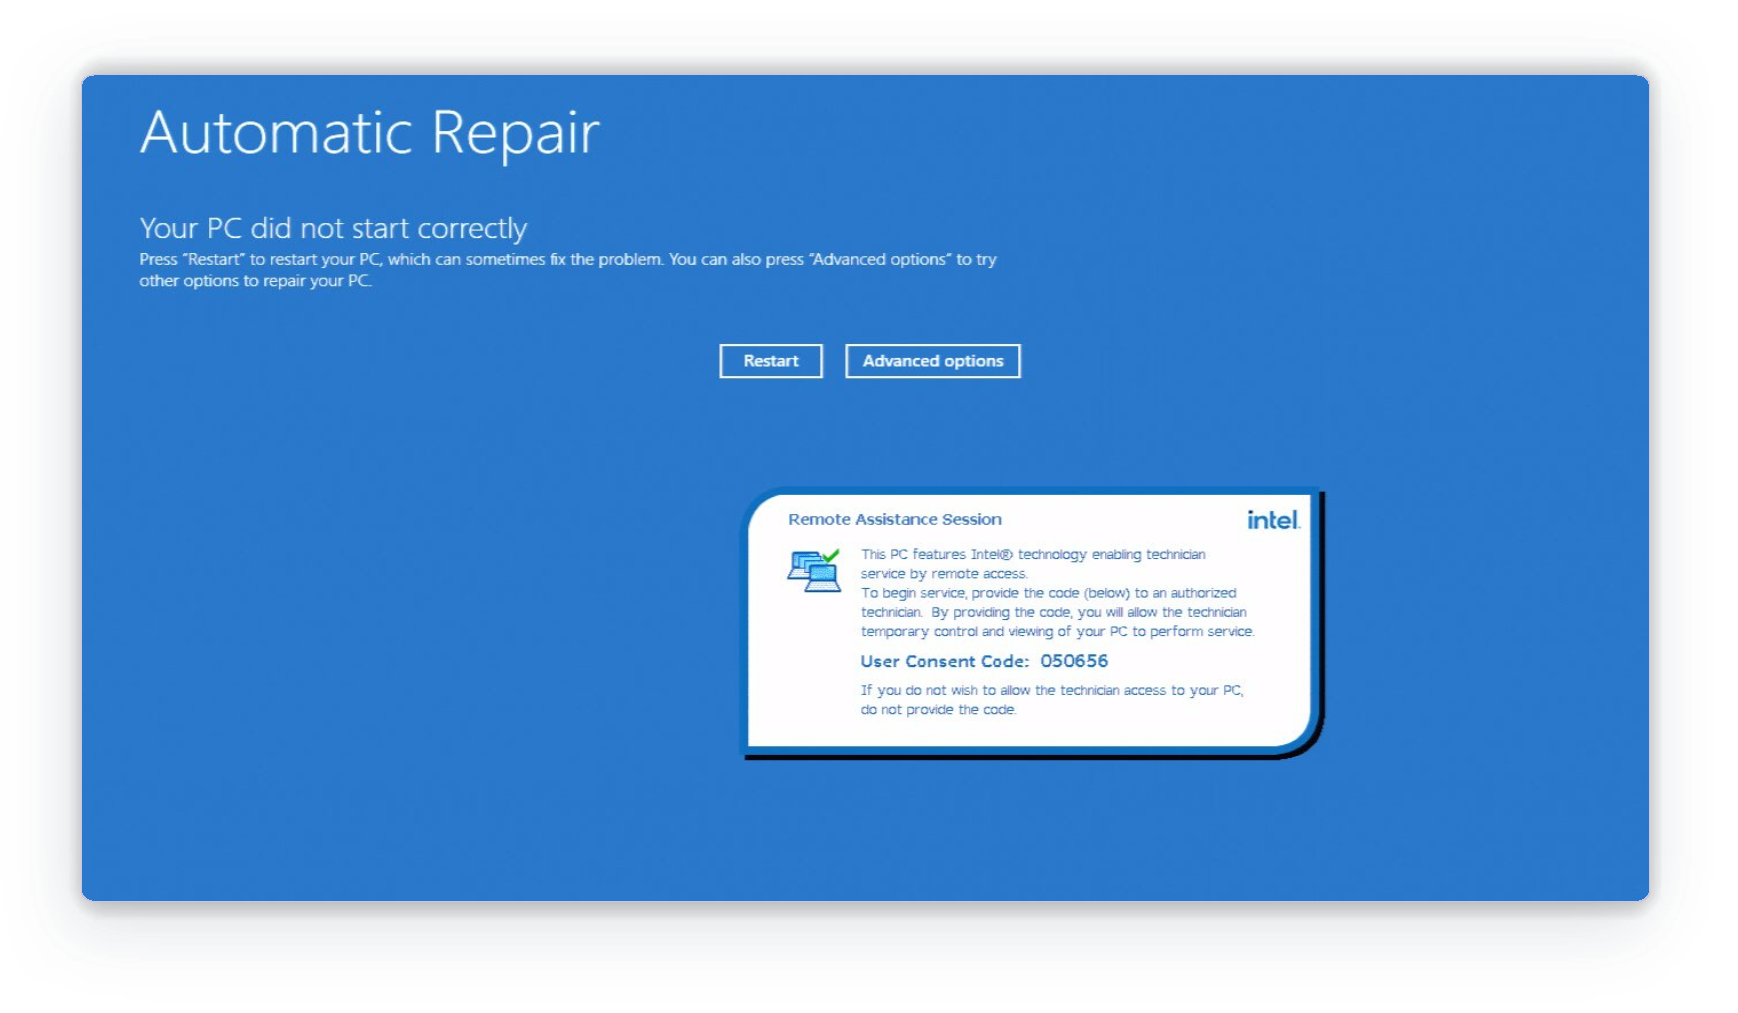
Figure 8: User device security is ensured by a code requirement
Now you can administratively repair the user device quickly and easily, even though the operating system was not functioning.
Troubleshooting
Firstly, the Troubleshooting tab should be accessed. Here, Intel vPro-specific messages are presented, including administrative actions.
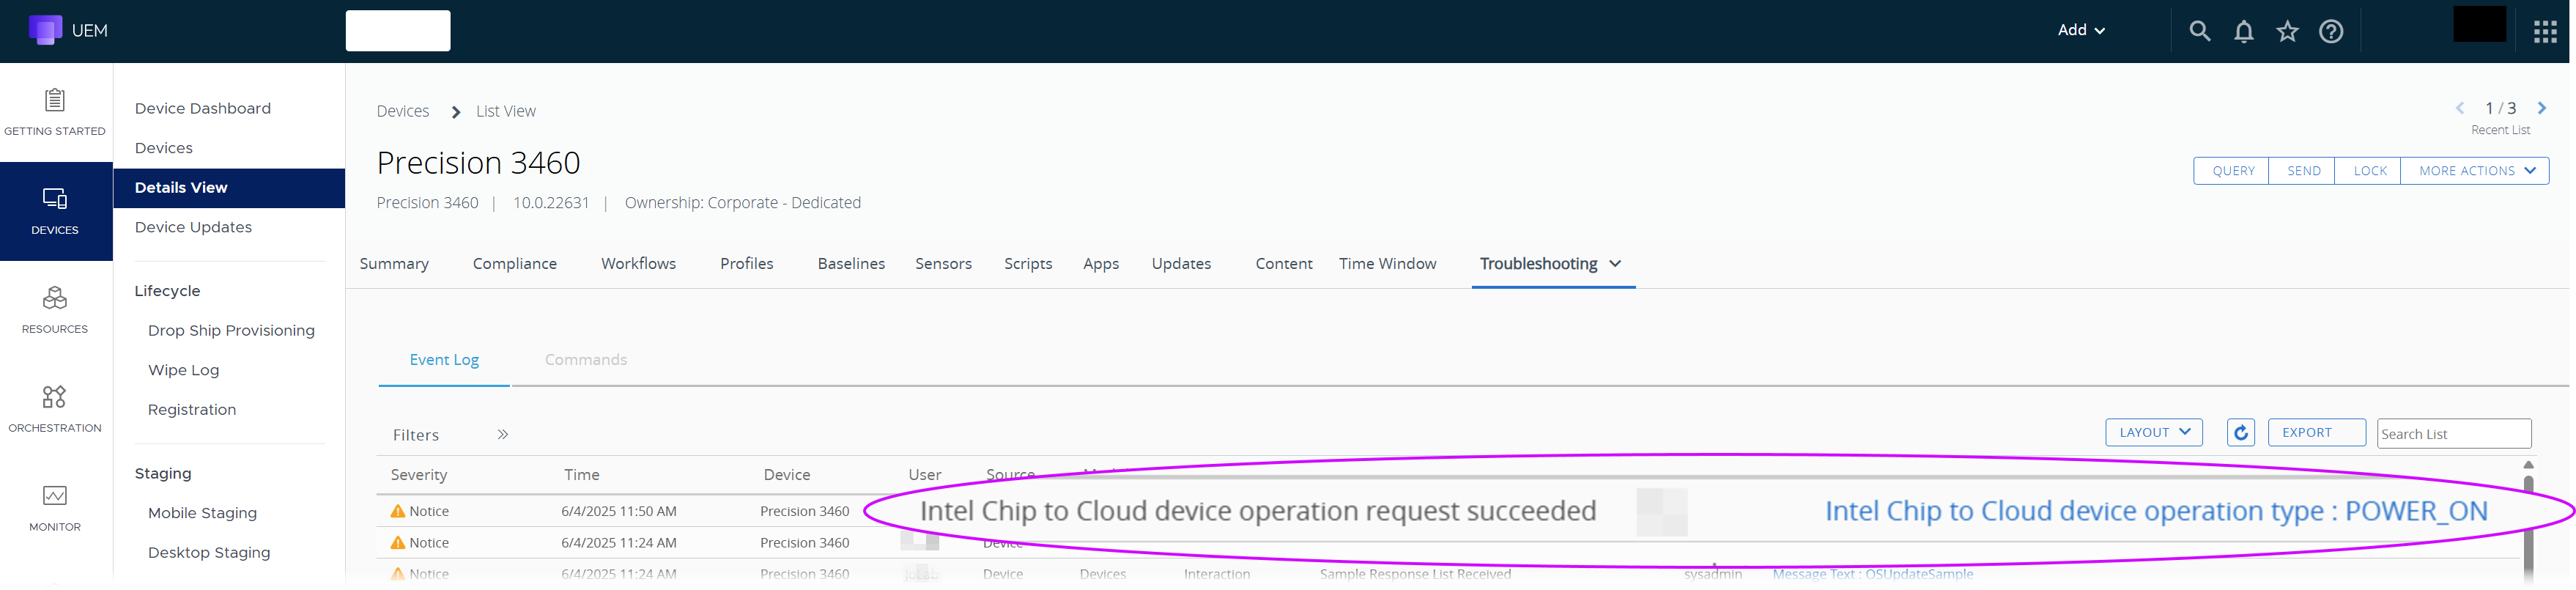
Figure 9: Intel vPro entries shown in Troubleshooting tab
General items to validate:
- Wait up to four hours after configuration for Intel vPro options to appear under More Actions.
- Validate Intel vPro Profile and Smart Group assignment.
Other troubleshooting steps include:
- Intel vPro options not presented under More Actions tab: run Sensors to confirm that device is equipped with an Intel vPro processor, as well as the Intel driver version installed.
- Administrator cannot see Intel vPro options for any devices: for Device Manager roles, validate that Intel vPro edit permissions have been granted.
Intel vPro integration with Workspace ONE UEM
This unique new functionality provides administrators with additional management options for accessing and repairing Windows devices. There is no additional licensing cost for Intel vPro integration, and no additional components are necessary. Omnissa will be announcing end of life (EOL) details soon for the deprecation of the Intel EMA implementation available in earlier releases of Workspace ONE (pre-24.06).

Additional resources
For more information about Workspace ONE UEM Window functionality, explore the following resources:
Windows Security and Policy Management
Windows Baselines and Profiles
Windows Troubleshooting
Changelog
The following updates were made to this guide:
| Date | Description of Changes |
| 06/10/25 |
|
| 03/11/25 |
|
About the author and contributors
This tutorial was written by:
- Jo Harder, Senior Technical Marketing Architect, Omnissa
With significant contributions from:
- Aaron Black, Director of Product, Security, and Ecosystem
- Camille Debay, Senior Product Manager, Omnissa
Feedback
Your feedback is valuable.
To comment on this paper, contact us at tech_content_feedback@omnissa.com.