

Android Migration Guide
Overview
Introduction
This guide follows a four-phase approach: Analysis, Requirements Mapping, Proof of Concept, and Deployment. The same phases apply whether you are migrating Android, iOS, Windows, or macOS devices, although the detailed steps differ by platform and by the solution you are migrating from. This guide covers the Android-specific steps.
Purpose of this tutorial
The main purpose of this tutorial is to help administrators plan the migration and set up their Workspace ONE UEM environment to support the migrated devices and ensure they are productive once migrated.
Audience
This tutorial is intended for IT administrators who manage Android devices in a source EMM and are planning a migration to Omnissa Workspace ONE UEM. Familiarity with Android Enterprise management modes, managed Google Play, the Workspace ONE UEM console, and directory services such as Active Directory is assumed. Knowledge of Omnissa Workspace ONE Intelligence and Omnissa Workspace ONE Access is also helpful.
Using this guide
The sections are ordered to be read sequentially, from migration planning through implementation. Each phase starts with a short description of its goal and a list of key milestones. Complete the milestones for a phase before moving on to the next one. The information gathered in each phase, such as use cases, inventory, and requirements, is carried forward and used in the phases that follow.
Migrating Android Devices to Workspace ONE UEM
Migration Concepts and Concerns
It is important to know the migration constraints of the Android platform, as they shape the migration path.
No seamless transfer between EMM solutions
Android devices are assigned a management mode during enrollment. Because no API is available to convert a device's ownership type, such as from BYOD to Corporate-Owned or Corporate-Owned Personally Enabled (COPE), or to move a device directly from one EMM solution to another, the only option is to unenroll the device from the source EMM and re-enroll it into the new solution.
To streamline re-enrollment of corporate-owned devices, administrators can use zero-touch enrollment, which Workspace ONE UEM supports. Zero-touch enrollment is available only for devices running Android 9.0 or later that were purchased from a zero-touch reseller and registered to your organization. Samsung devices can use Knox Mobile Enrollment instead. BYOD work profile devices cannot use zero-touch enrollment. For details, see Device eligibility and minimum OS.
Migration Flow Chart
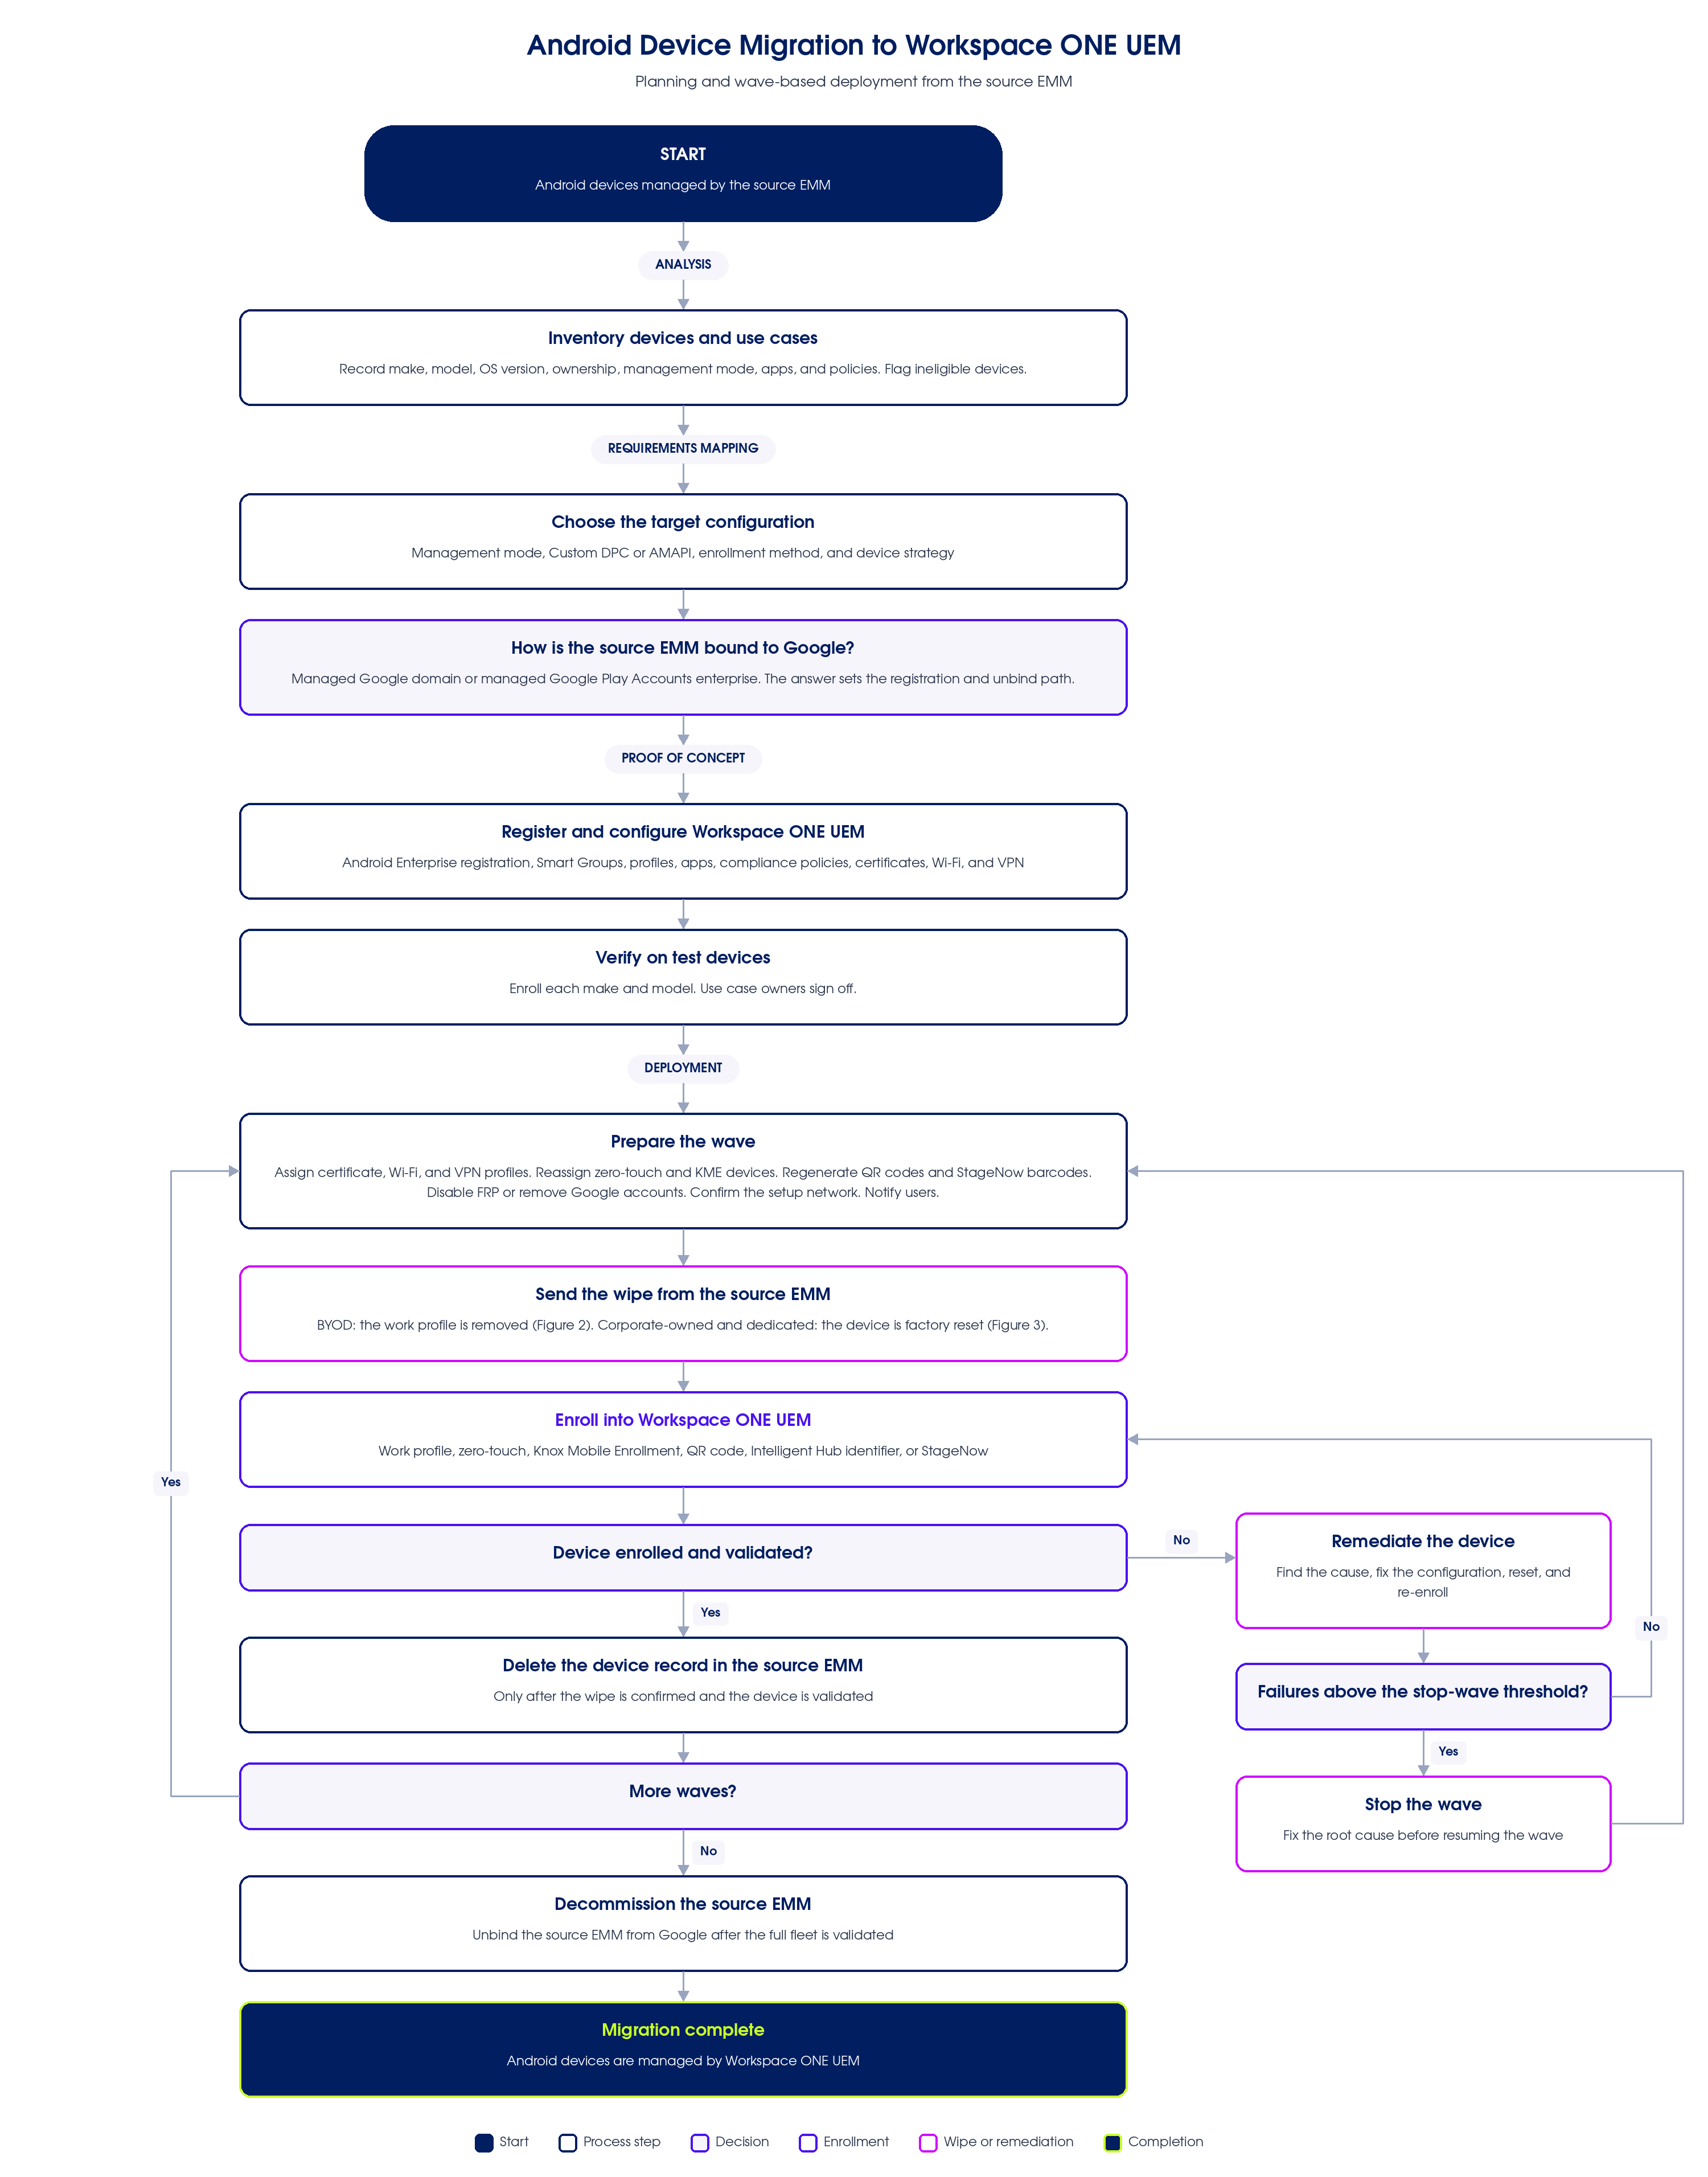
Figure 1: Android migration flow from the source EMM to Workspace ONE UEM
Phases of Migration
The migration is divided into four phases. Each phase produces information or configuration that the next phase depends on.
- Analysis - Identify the use cases and document the current environment: devices, management modes, applications, and policies.
- Requirements Mapping - Make a plan for each kind of device: management mode, enrollment method, minimum OS, policy and app mapping, and device strategy.
- Proof of Concept - Acquire licenses, set up the Workspace ONE UEM environment, build out the configurations, and verify them with a small set of devices.
- Deployment - Build a rollout plan, pilot the rollout, migrate BYOD and corporate-owned devices, and move to production.
Analysis
Before configuring Workspace ONE UEM, understand and document the current deployment. The goal of this phase is to produce enough information to determine what needs to be configured in Workspace ONE UEM and how each group of devices will be migrated.
Key milestones
- Use cases identified and documented, each with a business owner
- Device inventory created
- Ineligible devices identified
- Applications and policies documented
Identify the use cases
A use case is the set of requirements for a particular group of users or devices, such as employees using personal phones (BYOD), corporate-issued phones and tablets, frontline or shared devices, or dedicated kiosk devices. Treat each use case as a separate mini-deployment to simplify planning. Existing policy groups in the source EMM are a good starting point for identifying use cases.
For each use case, document the following:
- Use case name and business owner
- User identity source, for example Active Directory or another directory service
- Device ownership (employee-owned or corporate-owned) and current management mode, and the management type the source EMM uses Custom DPC or AMAPI
- Security, management, and usability requirements
- Devices in scope (make, model, and Android OS version)
- Applications required
Inventory Current Device Fleet
Collect all device and user information available in the source EMM as it’s important to have this information to plan a successful migration. Some of the key details required are listed below.
- Device Make and Model
- Android OS version
- What management mode is currently configured, and whether the source EMM uses Custom DPC or AMAPI. The management type affects the user experience and, in some cases, the available management features. Some EMMs use one type by default without documenting it, so record it where it is known.
- What type of device ownership is configured
- What are the applications currently managed on these devices
- What type of policies are configured
- Enumerate devices by enrollment mode - Identify how each device is enrolled: BYOD work profile, corporate-owned fully managed, or COPE.
- Identify ineligible devices - Some devices cannot be migrated. Examples include devices that do not meet the minimum Android version or do not support the management mode required by the use case. Devices managed in the legacy Device Administrator (Android (Legacy)) mode in the source EMM are not ineligible: because every device is wiped and re-enrolled, they can be enrolled with Android Enterprise modes and methods as long as they meet the minimum OS version. Document exclusions and plan an alternative path for these devices.
Document applications and policies
For each use case, record the applications and policies that are in use today. This information is used during Requirements Mapping to map each item to its Workspace ONE UEM equivalent.
- Application name and package name
- Whether the application is public (available in Google Play) or internal
- Whether the application is mandatory for the use case
- Any application configuration that must be applied
- Current app auto-update policies, and any requirements for when apps must update
- Configured policies, such as passcode, restrictions, Wi-Fi, VPN, certificates, and compliance rules
Requirements Mapping
With the current deployment documented, determine how each use case will be implemented in Workspace ONE UEM. The goal of this phase is a documented plan for each kind of device that is ready to be configured and tested during Proof of Concept.
Key milestones
- Management mode chosen for each use case
- Management type (Custom DPC or Android Management API) chosen
- Device eligibility and minimum Android OS version confirmed
- Enrollment method chosen for each use case
- Policies and applications mapped to Workspace ONE UEM
- Device strategy documented
Selecting the Management Mode
Workspace ONE UEM supports several management modes. Work profile typically suits employee-owned devices, and fully managed (work managed) mode suits corporate-owned devices. Each mode supports different enrollment methods. For details, see Android Device Enrollment.
- Work profile - For employee-owned (BYOD) devices. Creates a separate work profile for corporate apps and data; personal data stays separate, and enrollment does not require a factory reset.
- Fully managed (Work Managed) - For corporate-owned devices that require full device control. Requires a factory reset before enrollment.
- Corporate-owned personally enabled (COPE) - For corporate-owned devices that also allow personal use. Requires a factory reset before enrollment. The same separation of work and personal data as in work profile mode applies, but the organization retains greater control over the device.
Choosing Custom DPC or Android Management API
Workspace ONE UEM supports managing Android devices through Custom DPC or through Android Management API (AMAPI). The enrollment experience and the available profile settings differ between the two, so choose the management type before building configurations and enrollment instructions. See Android Profiles for Custom DPC and Android Profiles for AMAPI in the Android Device Management documentation.
Use the following criteria to choose a management type for each use case:
- Management mode - Fully managed devices, including AOSP and closed-network devices, are supported only with Custom DPC. Work profile and COPE are supported with both management types; AMAPI for COPE requires Android 11 or later.
- Enrollment experience for employee-owned devices - AMAPI supports work profile enrollment through an AMAPI enrollment URL, from Settings > Add account, or through Intelligent Hub. Custom DPC supports work profile enrollment through Intelligent Hub using an email address (auto-discovery enrollment), or by manually entering the enrollment URL and user credentials.
- Profile settings - Profiles are created separately for Custom DPC and AMAPI, and the available settings differ. Compare both profile sets against the policy mapping and choose the management type that covers the required settings.
- Scope - The management type is set per management mode and per Organization Group, so different use cases can use different management types.
Device eligibility and minimum OS
- Identify device eligibility constraints - Confirm devices run an Android version that supports the intended destination enrollment mode and that the device manufacturer supports the required Android Enterprise features.
- Zero-touch enrollment is supported on Android 9.0 or later. For Samsung devices, use Samsung Knox Mobile Enrollment.
- NFC provisioning and afw# are not available for COPE on Android 11 and later. Use QR code or zero-touch enrollment for COPE.
- If only some devices can meet the minimum OS required by a use case, consider splitting those devices into a separate use case.
Choosing an enrollment approach by use case
Android offers several enrollment flows. Choose the one that best fits each use case identified during Analysis:
- Zero-touch enrollment - Best for corporate-owned (fully managed or COPE) devices purchased through a zero-touch reseller. After a factory reset, devices enroll automatically on first boot, which makes it the easiest option for large fleets.
- OEM-specific enrollment - Enrollment options from device manufacturers for corporate-owned devices, for example Samsung Knox Mobile Enrollment, Zebra StageNow, and Honeywell Enterprise Provisioner.
- QR code enrollment - Suits corporate-owned devices that are not registered for zero-touch, and IT-staged enrollment where IT provisions devices before handing them to users, such as frontline, shared, or rugged devices.
- Intelligent Hub identifier enrollment - A fallback for corporate-owned devices where zero-touch or QR code enrollment is not practical.
- Work profile enrollment through Intelligent Hub - For BYOD devices. The user installs Intelligent Hub from Google Play and enrolls, which creates a work profile. See Migrate BYOD (Work Profile) Devices under Deployment.
Shared, dedicated, and bulk-enrolled devices
Decide early how shared and dedicated devices are used and enrolled, because the answers change what you configure and test during Proof of Concept.
- Shared devices - Are devices shared between users? If so, does the organization need to know who is using each device, and give each user a different set of apps and settings? If yes, plan for check-in and check-out with Workspace ONE Launcher. If not, a Launcher configuration without user check-out may be enough.
- Bulk enrollment - How many devices must be enrolled, and how much user interaction is acceptable? To enroll large fleets, for example 10,000 devices, with minimal user interaction, plan a flow such as zero-touch or an OEM-specific option combined with single-user staging, where IT enrolls devices with a staging account and assigns them to users or use cases.
Dedicated devices also depend on device-level configuration that must be rebuilt in Workspace ONE UEM:
- Workspace ONE Launcher - Recreate the source EMM’s kiosk or lockdown configuration as a Launcher profile in single app, multi app or template mode and assign Workspace ONE Launcher with it.
- OEMConfig and Knox Service Plugin - Add the manufacturer’s OEMConfig app, such as Zebra OEMConfig or Knox Service Plugin for Samsung devices from managed Google Play and recreate its managed configuration in Workspace ONE UEM. Settings that the source EMM applied through OEMConfig are removed by the wipe.
- StageNow - For Zebra devices, generate StageNow enrollment barcodes from Workspace ONE UEM, and retire StageNow profiles and barcodes that enroll into the source EMM.
- Product Provisioning - Recreate staging content that the source EMM delivered such as files, actions and apps as Workspace ONE UEM products. Product Provisioning is not supported on COPE enrollments.
- Unattended staging - So that devices enroll without user input, use a QR code that contains the Wi-Fi network and enrollment credentials, a StageNow barcode or zero-touch or Knox Mobile Enrollment with an enrollment account used only for staging. Consider device-based Google accounts, which suit staged and dedicated devices.
- Shared devices (check-in and check-out) - For devices shared between users, such as shift devices, enroll them in fully managed (work managed) mode with a multi-user staging account, and enable check-in and check-out in the Workspace ONE Launcher profile. Users log in to Launcher to check out the device and get only the resources assigned to them, and log out to check it in for the next user. Turn on app data clearing so that one user’s data is removed before the next user signs in.
Mapping policies and applications
- Map policies and apps - For each source configuration, identify the corresponding Workspace ONE UEM profile, compliance policy, and managed app assignment. Build a mapping table so the destination configuration is ready before enrollment begins.
Note any requirement that has no direct equivalent so that an alternative configuration can be identified and tested during Proof of Concept.
Additional planning considerations
Review the following items during planning, because each one can change the registration or rollout approach:
- Android Enterprise registration type - Record which registration type the source EMM uses (managed Google domain or managed Google Play Accounts enterprise), and whether users are currently prompted to add managed Google accounts to their devices during enrollment. Decide whether to keep that behavior in Workspace ONE UEM or change it. Workspace ONE UEM gets its own new binding, and the source EMM keeps its binding during the migration, as described in Source EMM binding and unbinding.
- Private app hosting in managed Google Play - Private apps are published to specific organizations. For private apps published from the Google Play Console, add the organization ID of the enterprise bound to Workspace ONE UEM on the app’s Managed Google Play tab (Release > Setup > Advanced settings). For private apps published through the source EMM’s managed Google Play page, see Google’s guidance on private apps in the managed Google Play iframe to make them available to the new enterprise, or deliver them as internal apps from Workspace ONE UEM.
- On-premises to SaaS considerations - If the source EMM is on-premises and Workspace ONE UEM is SaaS, review what changes. Devices must reach the new enrollment URL and Google endpoints, directory and on-premises certificate authority integrations connect through the AirWatch Cloud Connector, internal resources are reached through Workspace ONE Tunnel or Unified Access Gateway, and data residency requirements must be met by the SaaS region.
Device strategy
Using the device inventory and the minimum OS determined above, document the action required for each group of devices:
- No action - Devices meet the requirements and only need to be re-enrolled into Workspace ONE UEM.
- Upgrade - Devices can be updated to the required Android version before migration.
- Replace - Devices cannot meet the requirements and must be replaced. Confirm that replacement devices support the required Android Enterprise management mode and enrollment method.
- Age out - Devices remain on the source EMM until they reach the end of their lifecycle.
Where devices must be upgraded or replaced, you can align the migration with the normal device refresh cycle. In this approach, often called cap-and-grow, the Workspace ONE UEM environment is fully prepared, new devices are enrolled directly into Workspace ONE UEM, and existing devices are migrated when they are refreshed, repaired, or replaced.
Proof of Concept
With the requirements documented, set up Workspace ONE UEM, implement the configurations for each use case, and verify that they work as intended before any production devices are migrated.
Key milestones
- Licenses confirmed and Workspace ONE UEM environment provisioned
- Android Enterprise registration completed
- Network requirements verified
- Smart Groups created for each use case and rollout wave
- Profiles, applications, and compliance policies configured
- Configurations verified and signed off by use case owners
- End-user enrollment walkthrough completed and documented
Complete the following prerequisites before initiating a device enrollment to Workspace ONE UEM.
Acquire licenses and prepare the environment
- Licensing - Confirm Workspace ONE licenses cover the number of devices and the features required for each use case.
- Environment - Provision the Workspace ONE UEM environment and design the Organization Group structure.
- Integrations - Plan directory, identity provider, certificate authority, and email integrations.
Complete Android Enterprise Registration
Register Workspace ONE UEM as your EMM provider with Google and bind it to a managed Google domain. This binding is required for critical Android device management functionality. For the registration wizard steps, see Registering Android with Workspace ONE UEM.
Source EMM binding and unbinding
How the source EMM is bound to Google determines how Workspace ONE UEM is registered, the user experience during enrollment, and how to unbind from the source EMM at the end of the migration. If your organization uses Google identity and applications, how these resources are deployed to devices is also affected by this choice. Identify the binding type in the source EMM console or the Google Admin console, and record the enterprise ID and administrator accounts.
- Managed Google domain - The source EMM is bound to your organization’s domain, for example a Google Workspace or Cloud Identity domain. Google supports binding more than one EMM provider to a managed Google domain, so Workspace ONE UEM can be registered on the same domain while the source EMM still manages devices. For most organizations, this binding type is recommended because the organization retains ownership and control over the enterprise registration. If users use Google identity and applications, the Workspace ONE UEM registration wizard is recommended because it gives easier, more secure access to these resources. However, if Google identity and applications must be accessed from work managed devices, the Google registration wizard is required instead, and users must add their managed Google accounts to the device manually after enrollment. Unbind path: after the last wave, unbind from the source EMM console, or in the Google Admin console go to Devices > Mobile & endpoints > Settings > Third-party integrations > Android EMM > Manage EMM providers, and remove the source EMM. Google warns that removing a binding can wipe devices that the EMM still manages.
- Managed Google Play Accounts enterprise - The source EMM is bound to an enterprise owned by a Gmail account. That enterprise stays bound to the source EMM, so register Workspace ONE UEM with a managed Google domain. Ownership of an enterprise that is tied to a Gmail account is fragile, so a new managed Google Play Accounts enterprise is not recommended. Unbind path: After the last wave, unbind or unenroll the enterprise from the source EMM console. If the source EMM console is no longer available, sign in to managed Google Play as the enterprise administrator and delete the organization from Admin Settings.
Unbind the source EMM only after all of its devices are migrated and validated. Google documentation states that when an enterprise is unenrolled from its EMM, the binding is not deleted, but its EMM-managed users and all related user data are deleted after 30 days.
Confirm Network Requirements
Verify that the destination environment can reach the endpoints required for Android management, Google Play Store and Android devices. Review the Network Requirements for Android and confirm firewall and proxy rules permit the required connections. See the Network Requirements for Android.
Creating Smart Groups
Create a Smart Group for pilot users and devices to test device configuration post-migration during the pilot phase. For more information, see Smart Groups. Then create a Smart Group for each rollout wave, so that profiles, apps, compliance policies, and certificates can be assigned and monitored wave by wave.
Prepare users and enrollment settings
Before the first wave, prepare the following in Workspace ONE UEM:
- User accounts - Make sure every user in a wave exists in Workspace ONE UEM before enrollment, for example by syncing users from the directory, and is placed in the correct Organization Group. For staged and dedicated devices, create the staging accounts used for enrollment.
- Enrollment restrictions - Review the enrollment restrictions for the Organization Group so that the ownership types and Android management modes each wave needs are allowed, and unwanted enrollments are blocked.
- Terms of use - If users must accept terms of use during enrollment, create and assign the enrollment terms of use for the Organization Group before the first wave.
Create Android Enterprise Profiles
To manage devices, Workspace ONE UEM profiles are configured and published to enrolled devices.
Profiles, Policies, Applications and Compliance
Proper configuration of the Workspace ONE UEM tenant is critical to ensuring device compliance and business continuity following migration. Upon enrollment into Workspace ONE UEM, devices must receive all necessary corporate applications, security controls, and configuration settings to enable a seamless user experience. This approach minimizes disruption and ensures users are productive from Day 1 post-migration.
- Creating Android Profiles - Configure the required profiles to match what was done in the source EMM. For more information, see Android Profiles Overview.
- Publishing Applications - Ensure all the public and internal applications are assigned to the correct smart groups, so applications install immediately post-enrollment. For more information, see Managing Android Applications Using Workspace ONE UEM.
- Configuring Compliance Policies - Configure and assign the compliance policies to the smart group, so compliance check is initiated post-enrollment. For more information, see Add a Compliance Policy.
- Verify Android Enterprise Configuration - Ensure the right Android Enterprise configuration is set for the Organization group.
Feature verification
Verify every requirement documented during Requirements Mapping before moving to deployment:
- Create a checklist listing each requirement, the Workspace ONE UEM configuration that meets it, the use case owner, and the test result.
- Enroll at least one device of each make and model in the inventory and test each requirement.
- Have the use case owner confirm that each requirement works as expected.
- If a requirement is not met, identify an alternative configuration or contact Omnissa support.
End-user walkthrough and documentation
For each use case and enrollment method, complete the enrollment as an end user would, from device setup through to a fully configured device. This acts as a final end-to-end test. Document the steps with screenshots as you go; this documentation becomes the user instructions used during Deployment.
Deployment
With configurations verified, roll out Workspace ONE UEM to users in planned waves, starting small and expanding as each wave is validated.
Key milestones
- Rollout waves, timelines, and success criteria defined
- User communication and documentation ready
- Help desk briefed
- Pilot completed and success criteria met
- BYOD and corporate-owned devices migrated
- Full fleet validated in Workspace ONE UEM
- Source EMM Android management decommissioned
Build a rollout plan
- Waves and timelines - Sequence the migration in waves, typically starting with IT staff and lower-risk use cases.
- Communication plan - Prepare user notifications, instructions, and FAQs for each wave, using the documentation created during Proof of Concept.
- Support readiness - Brief the help desk, define escalation paths, and set success criteria for moving from one wave to the next.
- Certificates and certificate-based access - A wipe removes the certificates issued by the source EMM. Before each wave, confirm that the certificate authority integration and the SCEP credential, per-app VPN, and certificate-based Wi-Fi profiles are assigned to the wave’s Smart Group, so that Workspace ONE UEM re-issues the certificates at enrollment. Test them during the pilot.
- Failure handling - A device that has been wiped cannot fall back to the source EMM, so plan how to recover failures. Use a remediation loop for each failed device: identify the cause by using the Validation and Troubleshooting section, correct the configuration, factory reset the device if needed, re-enroll it, and validate it again. Set a stop-wave threshold, for example a failure rate agreed with the use case owners, or any failure that blocks a critical use case. When the threshold is reached, stop wiping devices in the wave and fix the root cause before resuming. Keep the source EMM available for devices that have not been wiped yet.
User Communication and Staged Rollout
A migration affects end users directly. Communication and phasing reduce help-desk load and enrollment failures.
- Notify users before migration - Use your existing channels, such as email or the intranet, to tell the users in each wave about the change, the date, and the action they must take.
- Monitor progress - In the Workspace ONE UEM console, use Devices > List View filtered to the wave’s Smart Group, Devices > Lifecycle > Enrollment Status, and the device and compliance reports under Monitor > Reports & Analytics. Where licensed, Workspace ONE Intelligence dashboards can also track enrollment and compliance.
Pilot the rollout
Migrate a small, representative set of users and devices for each use case before scaling.
- Pilot with a small Smart Group first - Stage a small number of devices, validate the full enrollment and policy delivery flow, then expand to the remaining fleet.
- Validate end to end - Confirm enrollment, profile and app delivery, compliance, and access to corporate resources.
- Collect feedback - Gather feedback from pilot users and the help desk, and refine configurations, instructions, and communications.
- Go / no-go - Confirm the success criteria are met before moving to production.
Migrate BYOD (Work Profile) Devices
BYOD work profile devices are the least disruptive to migrate. The work profile is removed, which deletes only corporate data and apps within the work profile; personal data on the device remains untouched. The user then enrolls into Workspace ONE UEM, which creates a fresh work profile.
Procedure overview
- Issue an enterprise wipe from the source EMM or instruct the user to remove the work profile from device settings. This removes the existing work profile and all corporate data within it. Send the wipe before you delete the device record in the source EMM.
- Confirm no partial work profile remains - A partially configured work profile from a failed or interrupted removal will block re-enrollment. Verify the work profile is fully removed before proceeding.
- Enroll the device into Workspace ONE UEM using the intended work profile enrollment method. The enrollment experience depends on whether the administrator has configured Custom DPC or AMAPI for work profile devices in the Organization Group (see Choosing Custom DPC or Android Management API). See Enroll Personally Owned Android Devices with Work Profile and the enrollment methods in the Android Device Enrollment documentation.
- Confirm the fresh work profile is created, and that assigned profiles, compliance policies, and apps land on the device.
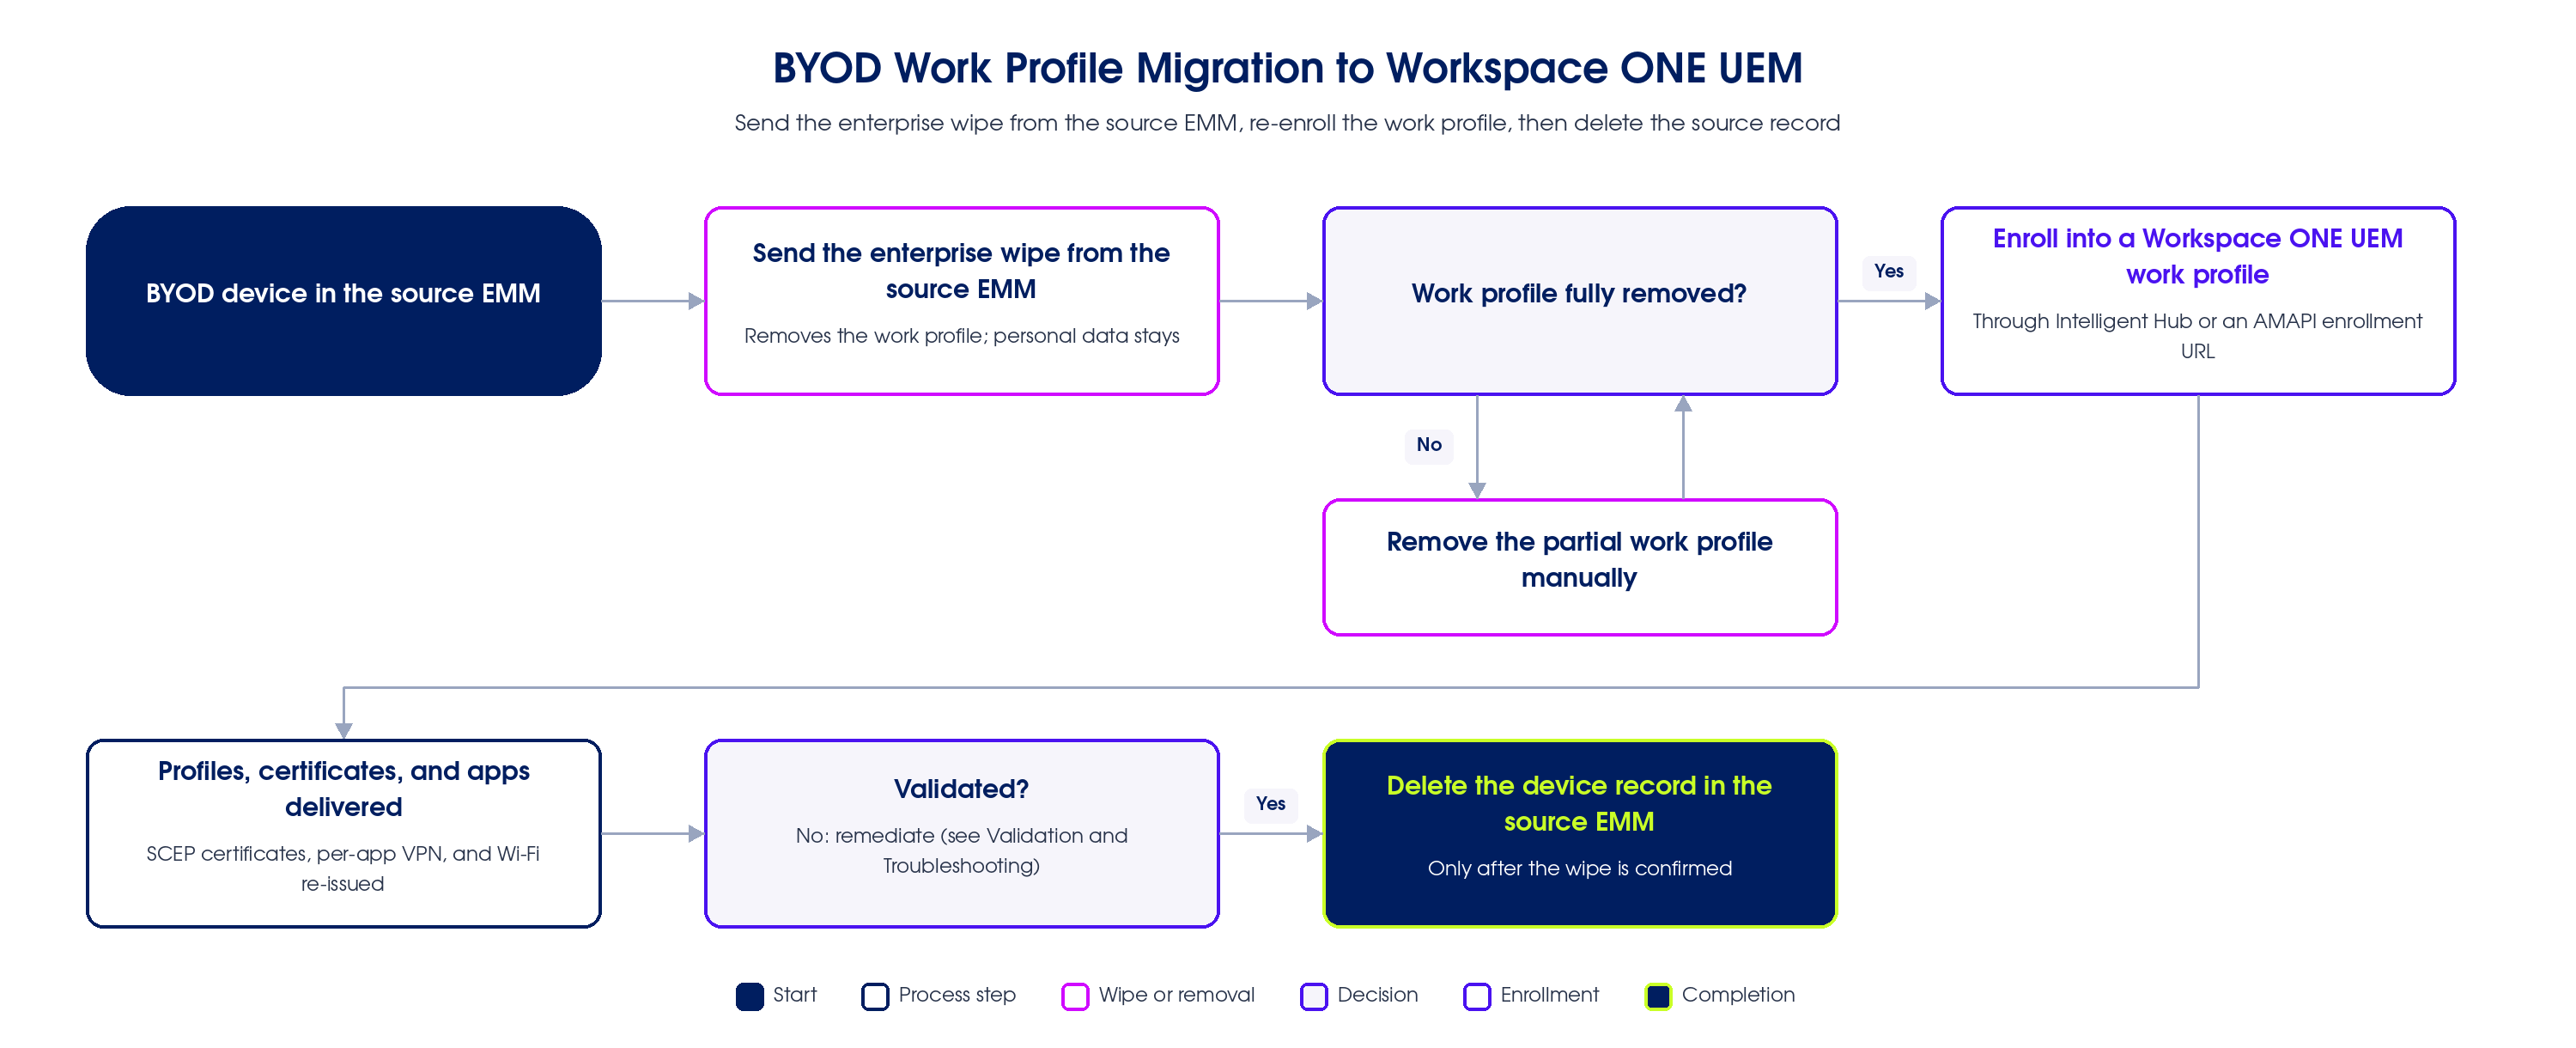
Figure 2: BYOD work profile migration flow
End-user impact: Corporate apps and data within the work profile are removed during the wipe. Personal data is preserved. Certificates issued by the source EMM, including those used for per-app VPN and certificate-based Wi-Fi, are also removed; access to those resources returns when Workspace ONE UEM re-issues the certificates after enrollment. Communicate the expected brief loss of corporate access to users before initiating the wipe.
Advising BYOD users on enrollment
BYOD users enroll their own devices, so clear guidance before the migration window is important for a smooth BYOD migration. Consider the following:
- Send instructions ahead of time - Explain what will happen, what is removed (the work profile and its corporate apps and data) and what is kept (personal data), and the steps to remove the old work profile and enroll with Intelligent Hub.
- Share the enrollment details - Provide the enrollment server URL and Group ID, or the enrollment token or link, along with the credentials users will sign in with.
- Set up MFA ahead of time - If your identity provider requires multi-factor authentication during enrollment, make sure users have registered an MFA method before migration day. If the authenticator app currently runs inside the old work profile, it is removed with the work profile, so users need an MFA method that does not depend on it.
- Back up work data - Ask users to make sure any work data that is not synced to a corporate service is saved before the work profile is removed.
- Provide self-service help - Publish an FAQ and short enrollment guide, and let users know when the help desk is available during their migration wave.
Migrate Corporate-Owned (Fully Managed & COPE) Devices
Corporate-owned fully managed and COPE devices cannot be converted in place. Plan this as a phased rollout for large fleets by leveraging zero-touch enrollment or OEM-specific enrollment (such as Samsung Knox Mobile Enrollment) to streamline reprovisioning.
Procedure overview
- Back up user data - All the required user data must be preserved. A factory reset erases all data on the device so plan a proper data backup procedure.
- Reassign zero-touch and KME devices - Before the wipe, assign each device to the Workspace ONE UEM configuration in the zero-touch portal, and assign a Workspace ONE UEM profile to it in Knox Mobile Enrollment. A device still assigned to the source EMM’s configuration re-enrolls into the source EMM after the reset. The new assignment takes effect only at the next setup, so it does not affect the device before the wipe.
- Regenerate QR codes and StageNow barcodes - QR codes and StageNow barcodes are not assigned to devices; they contain the enrollment details of the EMM that generated them. Generate new ones from Workspace ONE UEM, and retire the codes that enroll into the source EMM so that devices are not staged into the source EMM.
- Disable factory reset protection - Before the wipe, disable FRP or set enterprise FRP accounts that IT controls, or remove the Google accounts from the device. Otherwise, the device can lock at setup and ask for the credentials of a Google account that was on the device.
- Send the wipe from the source EMM - Issue the factory reset (wipe) command from the source EMM and confirm that the device has reset. Do not delete the device record in the source EMM first, because the source EMM can no longer wipe the device after its record is deleted. If the wipe does not complete, reset the device manually. Do not attempt an in-place conversion.
- Provide a network for setup - A factory-reset device has no Wi-Fi configuration or certificates. For QR code enrollment, include the Wi-Fi network name and password in the QR code payload; the Workspace ONE UEM QR code wizard supports this. For zero-touch, Knox Mobile Enrollment, and Intelligent Hub identifier enrollment, provide a staging Wi-Fi network that does not require a certificate.
- Enroll into Workspace ONE UEM - Re-provision the device into Workspace ONE UEM using the intended enrollment method:
- QR code enrollment - Scan a QR code at device setup.
- Zero-touch enrollment - Devices automatically enroll into the correct configuration on first boot after reset.
- Intelligent Hub identifier enrollment - Enter a simple identifier or hash value on a factory-reset device. See Enroll corporate Owned Devices for the granular steps.
- Knox Mobile Enrollment - Samsung devices registered in Knox Mobile Enrollment enroll automatically on first boot after reset.
- StageNow - Zebra devices enroll by scanning a StageNow barcode generated from Workspace ONE UEM at setup.
- Verify enrollment - Confirm enrollment completes and compliance reports correctly in the destination tenant.
- Delete the device record in the source EMM - After the wipe is confirmed and the device is validated in Workspace ONE UEM, delete the device record from the source EMM.
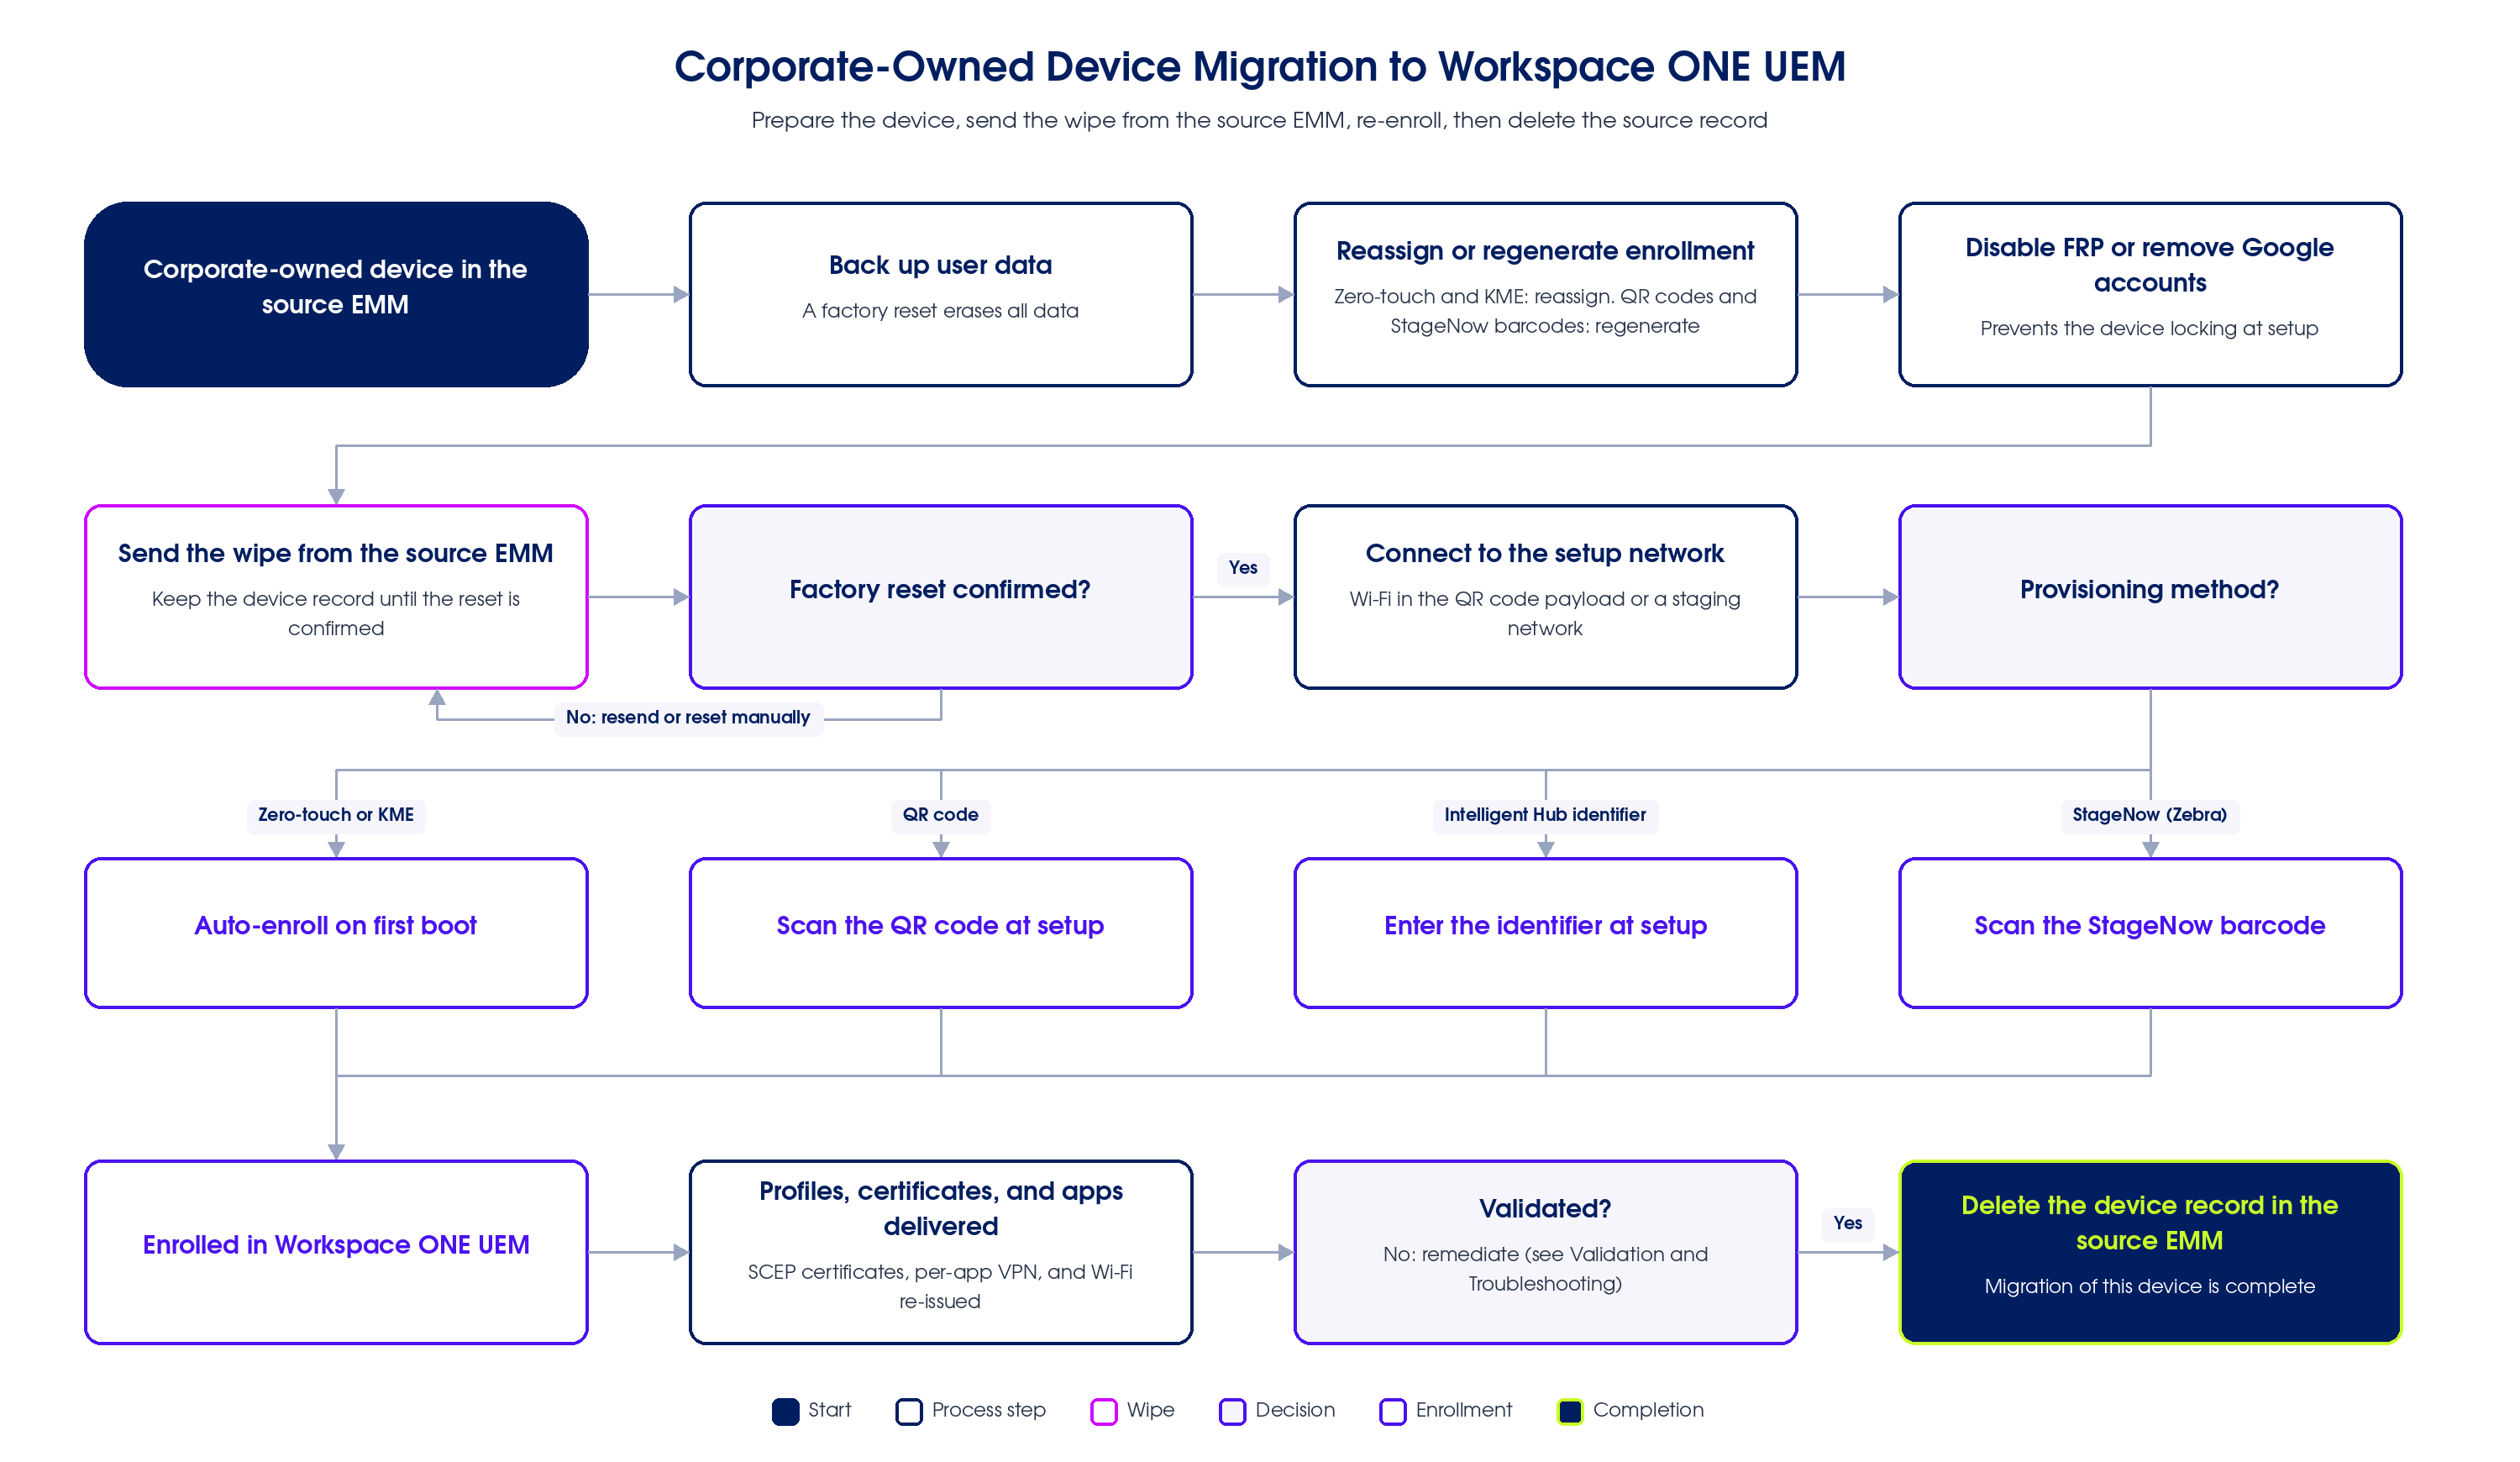
Figure 3: Corporate-owned device migration flow
Note on COPE: NFC provisioning and afw# are not available for COPE on Android 11+. Use QR code or zero-touch enrollment for COPE reprovisioning.
End-user impact: A factory reset removes all data, apps, and certificates from the device. Users lose access to corporate apps, certificate-based Wi-Fi, and per-app VPN until the device is re-enrolled and Workspace ONE UEM re-issues the certificates. Tell users what to back up and how long the device will be unavailable.
Migrate Dedicated Devices
Dedicated devices, such as kiosks, shared devices, and rugged devices, are corporate-owned and follow the corporate-owned procedure, including the reassignment, regeneration, factory reset protection, and setup network steps. Before the wave, confirm that the device-level configuration planned in Shared, dedicated, and bulk-enrolled devices (Requirements Mapping) is built and tested.
Move to production rollout
Execute the remaining waves according to the rollout plan.
- Monitor each wave - Track enrollment status, compliance, and support tickets, and address issues before starting the next wave.
- Allow time between waves - Some events, such as application updates, configuration changes, and security updates, do not happen often enough to be observed during a short pilot. Allow time between waves to observe them in production.
- Users in remote locations - Where users have no local IT support, consider zero-touch enrollment or devices provisioned by IT before shipping, so that users only need to sign in.
- Decommission the source EMM's Android management - Decommission only after the full fleet is validated in Workspace ONE UEM. Premature decommissioning leaves migrated-but-unvalidated devices without a management fallback. Then unbind the source EMM from Google as described in Source EMM binding and unbinding.
Validation and Troubleshooting
Validate each device after enrollment, and validate each wave before starting the next one. Use the checklist to confirm a migrated device, and the troubleshooting table to resolve common failures.
Validation checklist
- The device appears in Devices > List View in the correct Organization Group and Smart Group, with the expected management mode.
- Assigned profiles are installed, including passcode, restrictions, Wi-Fi, and VPN.
- SCEP certificates are issued, and certificate-based Wi-Fi and per-app VPN connect.
- Required public and internal apps are installed, and app configuration is applied.
- The device reports as compliant in Workspace ONE UEM and, where integrated, in the identity provider.
- The user can access email and other corporate resources.
- Dedicated devices start in Workspace ONE Launcher with the expected apps and OEMConfig settings.
- The device was wiped from the source EMM before its record was deleted.
Troubleshooting common issues
The following table lists common symptoms during Android migration, their likely causes, and how to resolve them.
| Symptom | Likely Cause | Resolution |
| Enrollment stuck at "Configuring something spectacular" | Configuration issue in the Google Admin Console or the Workspace ONE UEM registration wizard | Review the Google Admin Console configuration and the EMM binding. See Identifying Configuration issues with Google Admin Console and Workspace ONE UEM (6001017). |
| "Can't set up device" error on BYOD enrollment | "Enable Third Party Management" enabled in the Google Admin Console with a managed Google domain | Disable "Enable Third Party Management" in the Google Admin Console under Devices > Mobile & endpoints > Settings > Third-party. See Android employee-owned devices fail to enroll (6001320). |
| Work profile token enrollment fails for registered Android 10+ devices | Device registered with IMEI, Serial Number, or UDID before enrollment | Create or update the device registration record without those identifiers and regenerate the enrollment token. See Work profile enrollments using tokens for registered Android 10+ devices (96475). |
| Work profile enrollment fails repeatedly | Pre-existing or partially configured work profile | Remove the existing work profile from device settings before re-enrolling. Verify removal completed. |
| Enrollment fails intermittently | Unstable internet connection during enrollment | Ensure a stable connection throughout enrollment; the process downloads the management app, syncs policies, and installs assigned apps. |
| Work profile creation blocked | Managed Google domain account restrictions | Check the Google Admin console for domain-level restrictions that prevent work profile creation. |
| Device compliant in Workspace ONE UEM but non-compliant in identity provider after migration | Compliance-state sync lag between Workspace ONE UEM and identity provider | Reassign or toggle the compliance policy to force a status resync. |
Summary and additional resources
Migrating an Android fleet from a source EMM to Workspace ONE UEM is a phased deployment exercise governed by Android's platform constraints: there is no in-place transfer between EMMs, and the disruption level depends on the source enrollment mode. BYOD work profile devices migrate with the least disruption via work profile removal and re-enrollment; corporate-owned fully managed and COPE devices require a factory reset and reprovisioning. Success depends on completing the destination Android Enterprise binding, recreating Android Enterprise profiles, staging the rollout with Smart Groups, and validating enrollment and compliance before decommissioning the source EMM.
For more operational tutorials on Android Device Management, see Managing Android Devices with Workspace ONE: Operational Tutorial.
Additional resources
For more information about Android device management via Workspace ONE UEM explore the following resources:
- Manage Android Devices with Workspace ONE UEM
- Complete Android Enterprise Registration
- Enrolling Corporate-Owned Android Devices
- Android Device Enrollment Overview
- Android Profiles Overview
Changelog
The following updates were made to this guide:
| Date | Description of Changes |
|---|---|
| 2026-11-10 |
|
About the author and contributors
This guide was written by:
- Siddesh Patil, Principal Product Specialist, Omnissa
Additional contributions were provided by:
- Kevin Murray, Director Product Management ,Omnissa
- Manuel Perez, Senior Product Manager, Omnissa
- Gerrard Kennedy, Partner Management, Omnissa
Questions and Feedback
For questions or feedback, send to tech_content_feedback@omnissa.com.