

Managing Android Devices: Workspace ONE Operational Tutorial
Overview
Omnissa provides this operational tutorial to help you with your Workspace ONE UEM environment. This tutorial covers the configuration and management of Android devices using Workspace ONE UEM.
Purpose of This Tutorial
This tutorial takes you through the basic configuration and management of Android devices using Workspace ONE UEM. Throughout the tutorial, we explore the various management capabilities available on the Android operating system. We start with understanding the different management modes, then explore different device management features available based on device manufacturers (OEMs). We also learn about the tools available in Workspace ONE UEM that help streamline Android device management.
Audience
This operational tutorial is intended for IT professionals and Workspace ONE UEM administrators of existing production environments.
Knowledge of additional technologies such as network, VPN configuration, Workspace ONE Intelligence, Workspace ONE Access™, Google Workspace Suite, Google Admin portal, and the Google Zero Touch portal is assumed.
Getting Started with Android Enterprise
Android Enterprise is a solution set from Google that provides a standardized framework to help manage Android devices in the workplace. It was first introduced with Android 5.0. Workspace ONE UEM integrates with Android Enterprise APIs to enable Custom DPC configuration to provide IT administrators with the tools they need to manage their Android device fleet.
Google has introduced a new Android Enterprise management option called AMAPI, which is built on native device management APIs. Environments that already have Android Enterprise integrated will see an additional option to register AMAPI, whereas in greenfield environments, both Custom DPC and AMAPI will be available once the integration is completed. After the integration is finished, devices can be enrolled using AMAPI-based management by making the necessary changes on the enrollment settings page.
Choosing between AMAPI and Custom DPC
Google’s approach to modernizing Android device management is centered on the introduction of the Android Management API (AMAPI). As such, new device management capabilities could become available sooner or be exclusive to devices managed using AMAPI. While many organizations continue to manage Android devices using a Custom Device Policy Controller (Custom DPC), the availability of AMAPI now provides administrators with a choice between two management approaches.
With this flexibility, the decision to adopt AMAPI or Custom DPC is driven primarily by the management capabilities and features an administrator requires for their Android devices. Each approach offers distinct advantages depending on deployment scenarios, device ownership models, and organizational priorities. When deciding to deploy Android devices using Custom DPC or AMAPI, consider the following:
- Review the currently available features in AMAPI and Custom DPC here. Some device management features, especially newer ones introduced in recent OS versions, are only available with AMAPI. At the same time, as of writing, there are still capabilities that are only supported with Custom DPC.
- As of writing, AMAPI does not yet support fully managed devices (Work Managed mode). Only employee-owned (Work Profile mode) and Corporate Owned Personally Enabled (COPE) devices are supported.
- Understand your adoption path. Do you have existing Custom DPC devices that would need to be migrated over to Android Management API? As of today, devices must be re-enrolled to switch from Custom DPC to AMAPI management.
Management options
There are two main ways to manage Android devices. As these management options are known by different names, we will examine each option by names and use case, so you can best determine how to manage the device by use case. Android device management can generally be broken down based on who owns the devices.
Personally Owned (Work Profile or BYOD)
Work profile for employee-owned devices (BYOD):
These are employee-owned devices that are being used to access corporate resources.
Hug Registered Mode:
These are personally owned devices that allow users to securely access corporate resources by signing in through Intelligent Hub. The devices are not fully managed, the Console Administrator can view only limited device information.
Corporate Owned (Work Managed)
Work profile for company-owned devices (formerly known as Corporate Owned Personally Enabled (COPE):
These are corporate-owned devices issued to employees and can be used for both work and personal use. These devices have a container inflated on them that isolates personal data from company data.
Fully Managed devices:
These are devices that are solely used for work purposes and generally cannot be used for personal use.
Shared devices (with Workspace ONE Launcher):
These are devices shared by multiple frontline workers or shift-based workers that check out a device using their user credentials to perform certain tasks, then return the device upon completion.
Dedicated devices (Kiosk):
These are generally kiosk devices that serve a single dedicated purpose. They might be locked down to either a single or multiple application(s) and/or webpage(s).
Fully Managed Closed Network / Android Open-Source Project (AOSP) devices:
These are Android devices that either do not support or cannot connect to essential Google Mobile Services (GMS).
Note: AMAPI device management is only available for Work Profile and COPE.
This tutorial will help you understand and decide which Android Enterprise mode might best fit your deployment use case for your organization.
Because the Android operating system has deprecated support for legacy device management (Device Admin) mode, procedures in this document focus on device management for Android Enterprise supported devices. For a list of Android Enterprise supported devices, see Android Enterprise Solutions Directory. Alternatively, see Legacy Android Migration on Omnissa Docs.
To ensure Android Enterprise is available in your country or region, refer to the Google support article Is Android Enterprise available in my country?.
Closed Network/AOSP Support
Workspace ONE UEM supports devices that are running the Android Open-Source Project (AOSP) version of Android in Work Managed mode only. AOSP devices run the open-source version of Android that provides a common framework for device-level functionality, like call and email. AOSP, however, lacks support for essential Google Mobile Services (GMS).
GMS is a collection of Google applications and APIs pre-installed on approved devices by certain Android manufacturers under specific licensing agreements with Google. These apps include Google Search, Google Play Store, Google Maps, Gmail, YouTube, and more, which are not natively available on AOSP devices.
A closed network device here refers to a deployment environment where network rules prevent Android devices from connecting to cloud-hosted Google services.
Android Go Support
Android Go is a streamlined version of the Android mobile operating system designed for low-end hardware that can be sold at a more accessible price point. To learn more, see the official Android Go product page.
Workspace ONE UEM supports devices running Android Go in Work Managed mode only. For these devices, all device management capabilities for the Work Managed mode are supported except for the following:
- Workspace ONE Launcher
- Product Provisioning features that require accessing or modifying files or directories on the device.
- Files/Actions - Only Reboot and Run Intent Actions are supported.
- Conditions - All Conditions except Launcher are supported.
- Event/Actions - All Actions except Apply Custom Settings are supported.
Network Requirements
End-user devices must be able to reach certain endpoints for access to apps and services. The network requirements for Android are a list of known endpoints for current and past versions of enterprise management APIs.
For the most updated version of the network port list, see Workspace ONE UEM Ports and Protocols.
Key Terms
In this tutorial, we frequently use terms commonly associated with Android deployments, which might include specific Google terms as well as Workspace ONE terms. The following table describes the key terms used throughout this guide. We recommend familiarizing yourself with these terms before continuing further in the tutorial. A list of terms can also be found on Omnissa Docs: Integrating Workspace ONE UEM with Android.
| Terms | Description |
| Managed Google Account | Refers to Google domain registered accounts that are created and controlled by an organization using the Google Workspace console (formerly G-Suite). A managed Google account can be used to register/bind a Workspace ONE UEM tenant with Google. |
| Managed Google Play Account | Refers to a personally registered Google account (Gmail) which can also be used to register a Workspace ONE UEM tenant with Google. |
| Google Service Account | A Google service account is a special account that is used by applications to access Google APIs. This service account can be created in the Google Cloud console and is required in conjunction with a managed Google Account to complete the Android EMM Registration when binding Workspace ONE UEM with Google using a managed Google account. |
| EMM Token | Unique ID generated within the Google Workspace console (formerly G-Suite) that Workspace ONE UEM uses to connect with Google Workspace. EMM Token is required in conjunction with a managed Google account and a Google service account to complete the Android EMM Registration. |
| Managed Google Domain | Refers to the domain claimed and verified with Google Workspace. |
| Google Domain Setup | Google defined process for claiming and verifying the organization’s domain with Google Workspace. |
| User-based enrollment | When a device is enrolled, the Google account that is created is the same across all devices enrolled by this employee. This enrollment method is ideal for when you assign employees to devices with no staging involved. |
| Device-based enrollment | The generated Google account is unique to each device enrolled by the same user. This is ideal for a staging device or dedicated devices. |
Understanding Android Enterprise Modes
Android device management modes can broadly be classified into personally owned devices and company owned devices.
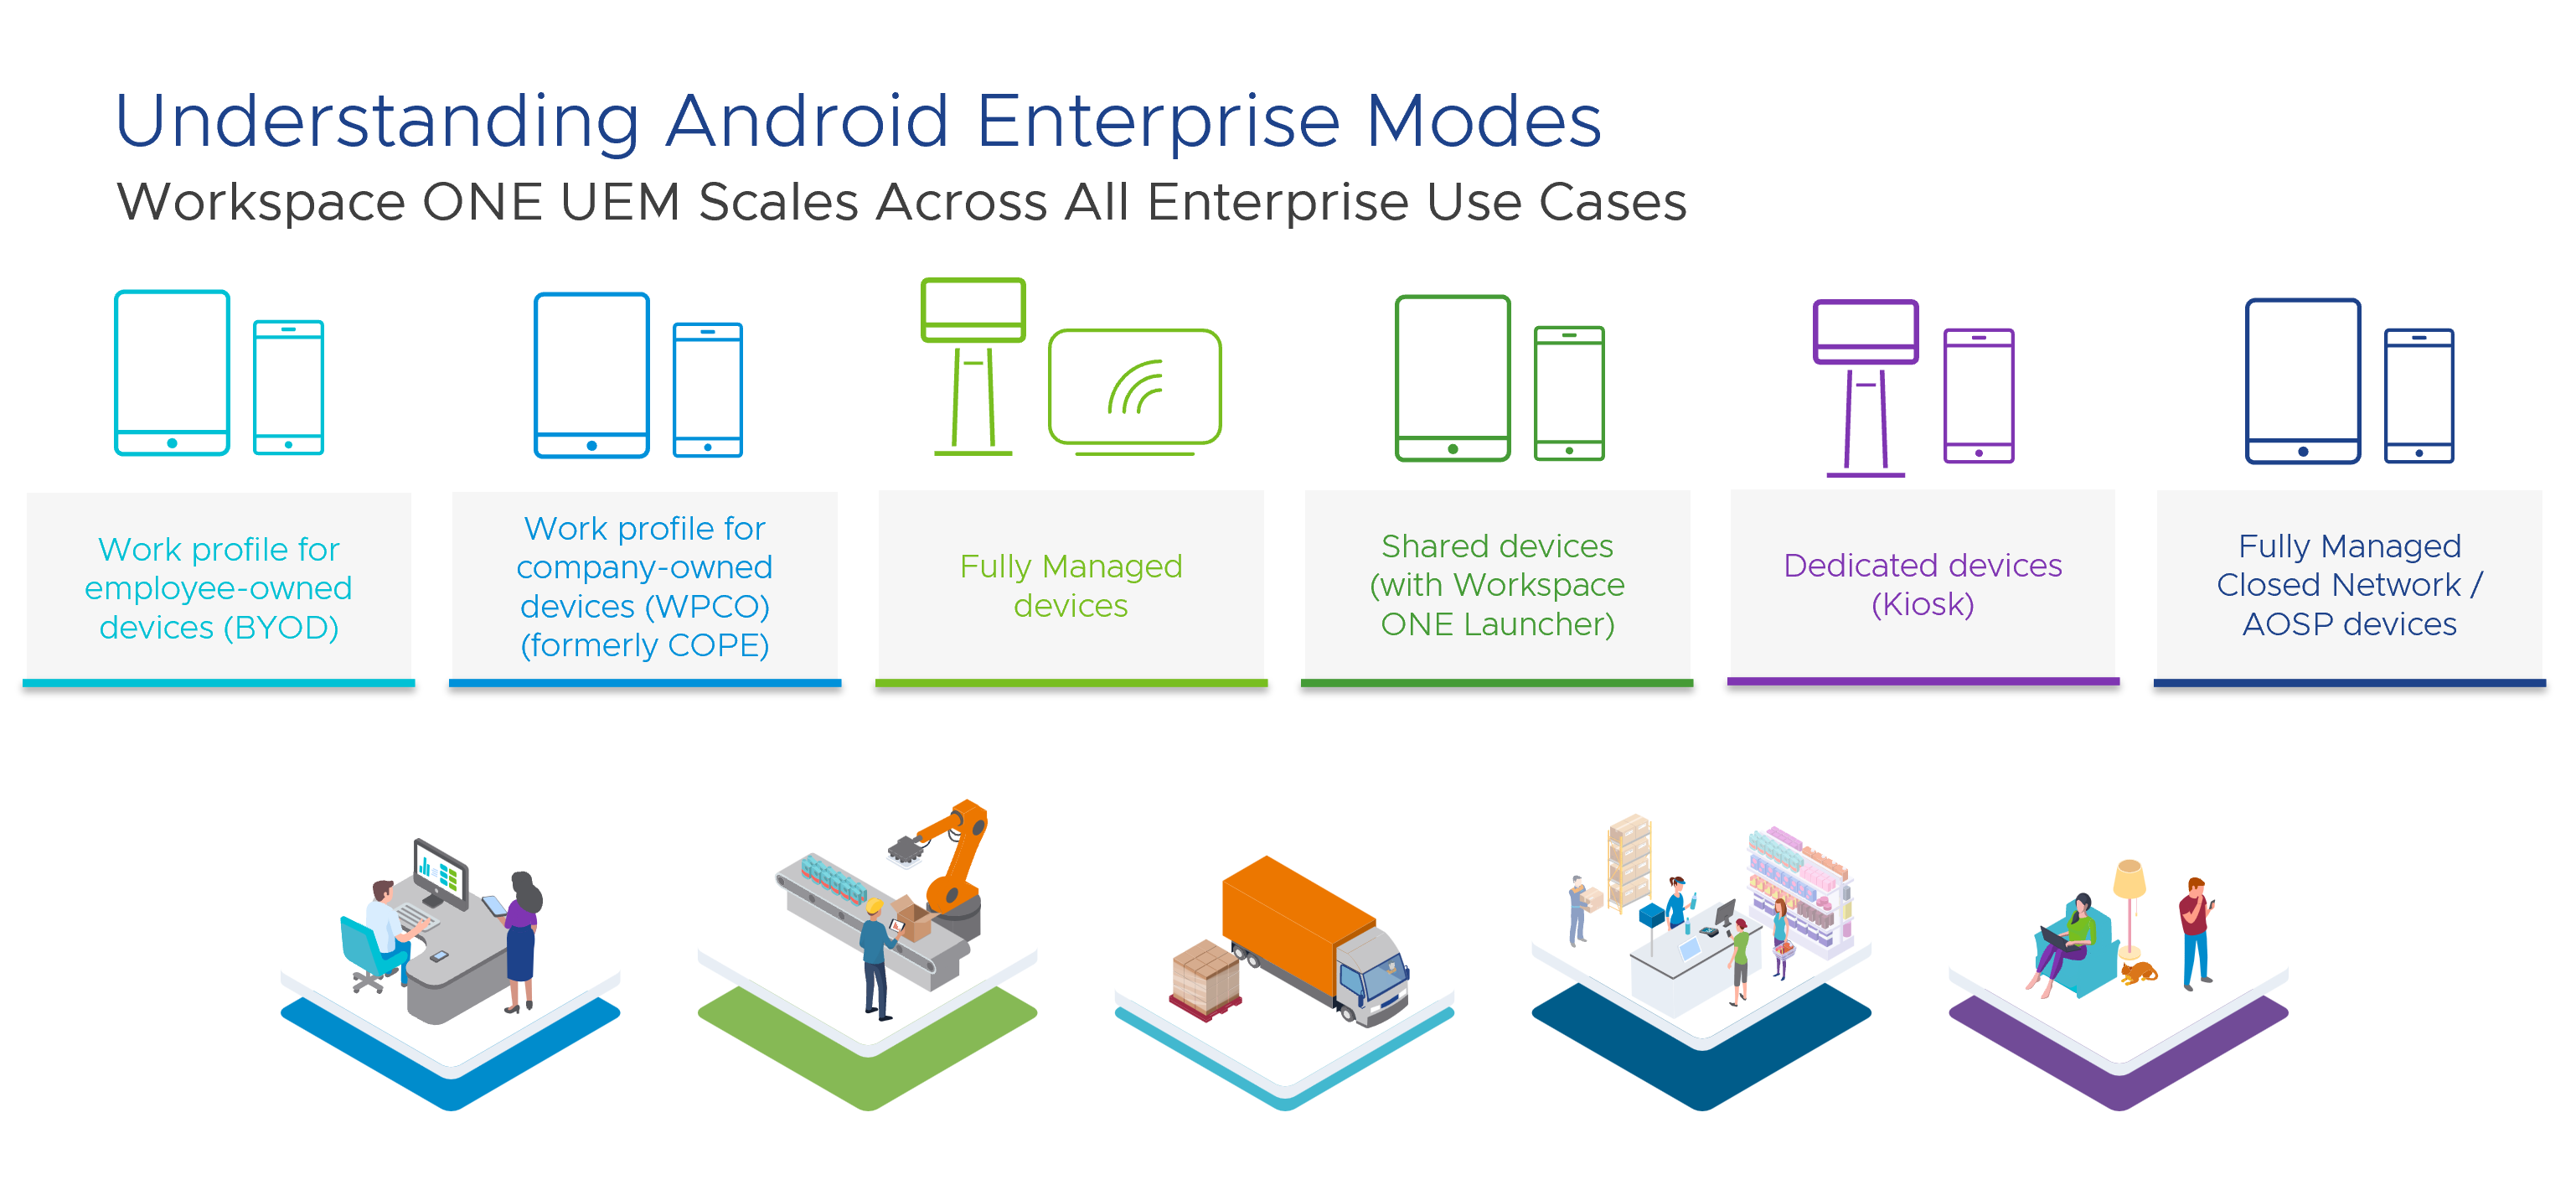
Personally owned devices have a work profile container inflated on them to help segregate work resources from personal data. This container provides the end user secure access to corporate apps and resources and keeps personal data hidden from the IT administrator.
Corporate-owned devices as the name suggests, are company-owned assets given to employees to help them with their day-to-day job functions. These devices can either be fully managed or can be configured to support both work and personal use.
Each device mode offers a unique device-side user experience and management options. To help determine which device mode best addresses your use case, let’s look at the table and descriptions below:
Table 1: Android Enterprise management mode and use case examples
| Android Management Mode | Entire Device Management | Dedicated Container for Enterprise Apps | Dedicated Personal Apps |
|---|---|---|---|
| Work profile for employee-owned devices (BYOD) | ❌ | ✅ | ✅ |
| Work profile for company-owned devices (COPE) (formerly COPE) | ❌ | ✅ | ✅ |
| Fully managed devices | ✅ | ❌ | ❌ |
Work Profile for Employee-Owned Devices (BYOD)
Work profile for employee-owned devices, more commonly known as bring your own device (BYOD), allows employees to securely access corporate data using their personal devices. A work container is created on the device at the time of UEM enrollment, which segregates work data from employees’ personal data. In this mode, IT Admins can manage apps and restrictions within the work container but do not have access to the user’s personal data and apps. Work apps on BYOD devices are denoted with a briefcase icon, so they are easily distinguishable from personal apps. When an employee leaves, IT can perform an enterprise wipe using Workspace ONE UEM, removing only the work container and resources; leaving the personal data untouched. This mode is available on Android 6.0 or later devices.
Work Profile for Company-Owned Devices (COPE)
Work profile for company-owned devices (COPE), formerly known as corporate owned personally enabled (COPE) devices, are company-owned devices that employees can use for both personal and work purposes. Like BYOD, these devices have a dedicated work profile to separate work data from personal data during UEM enrollment. COPE is available on Android 8.0 or later devices.
Starting from Android 11, Google implemented privacy-focused changes on company owned, personally enabled devices. COPE mode now restricts certain device and app management capabilities on the personal side to bolster user privacy on devices being used for both work and personal purposes. For a list of all changes, see the Omnissa Knowledge Base article Changes to COPE (COPE) in Android 11.
Fully Managed Devices
Fully managed deployments are for company-owned Android devices intended exclusively for work purposes. Organizations get complete control on how compliance policies and apps are configured, deployed, and monitored. These devices are usually assigned to specific individual users. Fully managed mode is available on Android 5.0 and later devices.
Shared Devices (with Workspace ONE Launcher)
Shared devices are a subset of fully managed devices and serve a specific purpose. These devices can be fully managed by the IT administrator and are not assigned to individual users. Instead, they can be shared between multiple users and job functions. Devices are typically available in a device pool, where users can check-out a device to perform their tasks. After use, the user can sign out and return or check-in the device back to the device pool for others to follow the same check-in check-out (CICO) process and perform their respective job functions.
Dedicated Devices (Kiosk)
Dedicated devices are a subset of fully managed devices and serve a specific purpose. Dedicated devices are typically locked, kiosk-style, to a single app or set of apps/webpages. IT administrators can deploy granular control over a device's lock screen, status bar, keyboard, and other key features, to prevent users from enabling other apps or performing other actions on dedicated devices.
Fully Managed Closed Network/AOSP Devices
As mentioned earlier, Workspace ONE UEM supports management of both AOSP and closed network devices. AOSP and closed network devices can only be fully managed, and work profile containerization is not supported. This mode is particularly suitable for intranet environments where access to Google services might be restricted due to security, demographic, or hardware constraints, or when such access is intentionally not required.
Registering for Android EMM
Registering for Android EMM helps you register Workspace ONE UEM as your Enterprise Mobility Management (EMM) provider with Google.
There are three ways to register Workspace ONE UEM as your EMM with Google:
- Managed Google Domain + Google Registration Wizard
- Managed Google Domain + UEM Registration Wizard
- Non-Managed Domain
Use the table below to determine which registration method is right for your organization:
Consideration | Managed Google Domain + Google Registration Wizard | Managed Google Domain + UEM Registration Wizard | Non-Managed Domain |
Best for | Organizations that do not use Google Workspace | Organizations that use Google Workspace (formerly G Suite) | Not recommended for Enterprise |
Google domain required | Managed Google Domain (auto created if not present) | Yes - domain must be registered and verified before setup. | No Managed Google Domain required |
Must enterprise user identities be synced into Workspace ONE UEM and Google? | No | Yes | No |
Who creates and maintains the service account and associated keys? | Workspace ONE UEM | Organization administrator | Workspace ONE UEM
|
Domain verification | Organizations are recommended to verify after registration | Organizations must manually verify before registration | Not applicable |
EMM binding | One domain can be bound to one or more Workspace ONE UEM environments
| One verified domain can be bound to one or more Workspace ONE UEM environments | One Gmail account bound to one UEM instance
|
Setup complexity | Low - quickest path to get started | Higher - requires planning around domain, service account, and user auth | Medium - but limited long-term control |
Recommended for | Organizations not using Google Workspace productivity apps and services | Organizations using Google Workspace productivity apps and services | Not recommended for production |
Managed Google Domain + Google Registration Wizard
This is the recommended approach for most organizations because it balances organizational ownership with a simple and streamlined setup. The only prerequisite is a work email address associated with the organization’s domain. If a Managed Google domain is not already in place, Google automatically creates one as part of the configuration wizard. Please note the following:
- Google Workspace licenses are not required for this setup method.
- If your managed Google domain is created as part of this setup process, please note that it is not domain-verified. It is recommended that you verify ownership of this domain after completing Android EMM Registration.
Once initiated from the Workspace ONE UEM Console, the setup wizard walks the administrator through setup, asking the user to provide their work email address and open a verification link sent to this address. An enterprise service account is automatically created.
This service account acts as the authorization layer, allowing Workspace ONE UEM to perform administrative actions within Google’s infrastructure on behalf of the organization, such as application deployment, policy enforcement, and device state management.
Managed Google Account (Google Workspace) + UEM Registration Wizard
A managed Google account is the right choice when your organization already uses Google Workspace and has a registered Google domain. In an environment with this configuration, users are prompted to add their managed Google account to the device during enrollment. Furthermore, you can prevent managed Google accounts from being added to Android devices not managed by Workspace ONE UEM.
Setting up Android Enterprise using this method requires your enterprise to register and verify a Google domain, proving ownership to Google. Because a domain can only be linked to one verified EMM account, this option requires careful planning before proceeding.
To enable Android Enterprise enrollment using Google Workspace, your organization must:
- Create a service account with Google and provide specific API access to apply configurations to managed devices.
- Define how users will authenticate into Workspace ONE UEM.
While the setup complexity is higher, this method integrates more deeply with your existing Google infrastructure and is the recommended approach for large-scale enterprise deployments.
Managed Google Play Account (Non-Managed Domain)
This is the lowest‑impact onboarding option and does not require a Managed Google Domain. It is suitable only for proof‑of‑concepts or pilot deployments and is not recommended for production use due to weaker organizational association, limited support across environments, and reduced governance controls. Organizations planning to scale beyond a pilot should ensure a defined migration path to a Managed Google Domain based approach.
The steps to configure Android Enterprise using all the three approaches are detailed here.
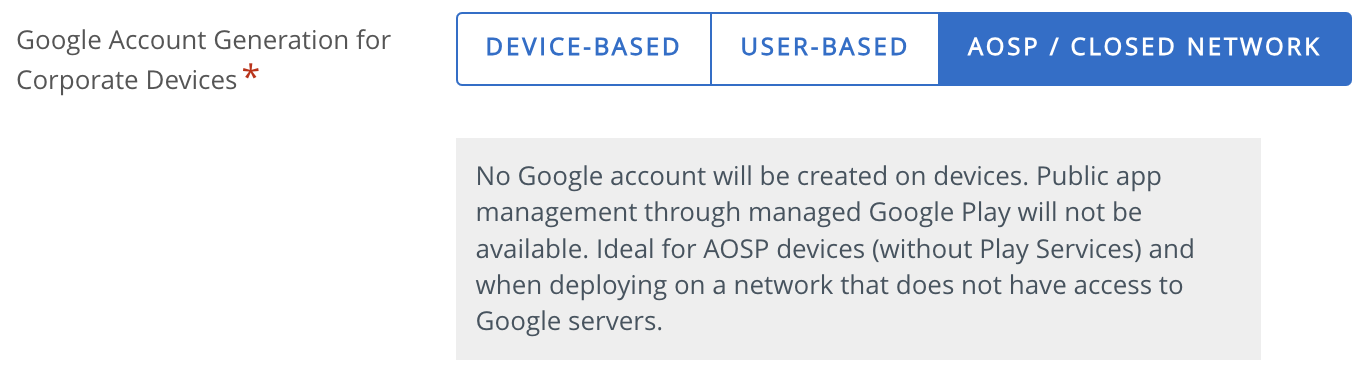
Deploy without Google on a Closed Network
Workspace ONE UEM can be configured to manage corporate-owned Android devices that are enrolled and deployed within a closed network. A closed network here refers to one in which devices cannot connect to Google services. The environment can simply be intranet or might be in a region where Google services are not available. No Google account is created on the device during device enrollment. Public app management through Managed Google Play is not available.
The Workspace ONE UEM console configuration varies based on whether all or some of your Android devices are going to be connecting behind a closed network. For detailed instructions, see Deploying Corporate Owned Android Devices on a Closed Network on Omnissa Docs.
Unbind Domain from Workspace ONE UEM
You can unbind Workspace ONE UEM’s registration with Google in case you want to change the Google accounts used or switch the organization group (OG) in which the binding was initially performed. This section walks you through unbinding your Workspace ONE UEM console’s registration as your EMM with Google.
It is important to understand what happens once you carry out an unbinding. An unbinding of Android Enterprise has significant impact, it prevents new device enrolments, disrupts application management for Custom DPC managed devices, and completely disables management for AMAPI managed devices. Android Enterprise can be reconfigured using the same Google account or domain, provided access to that account is still available. The Google registration wizard allows administrators to restore bindings that were previously removed from the UEM Console. However, if the original registration was completed using the manual Google Workspace (G Suite) method, recovery requires completing the Google signup wizard. In this scenario, previously removed bindings cannot be restored by repeating the Workspace ONE UEM setup wizard.
Note: Binding Workspace ONE UEM and Google is a prerequisite to enrolling and managing Android devices with Workspace ONE UEM.
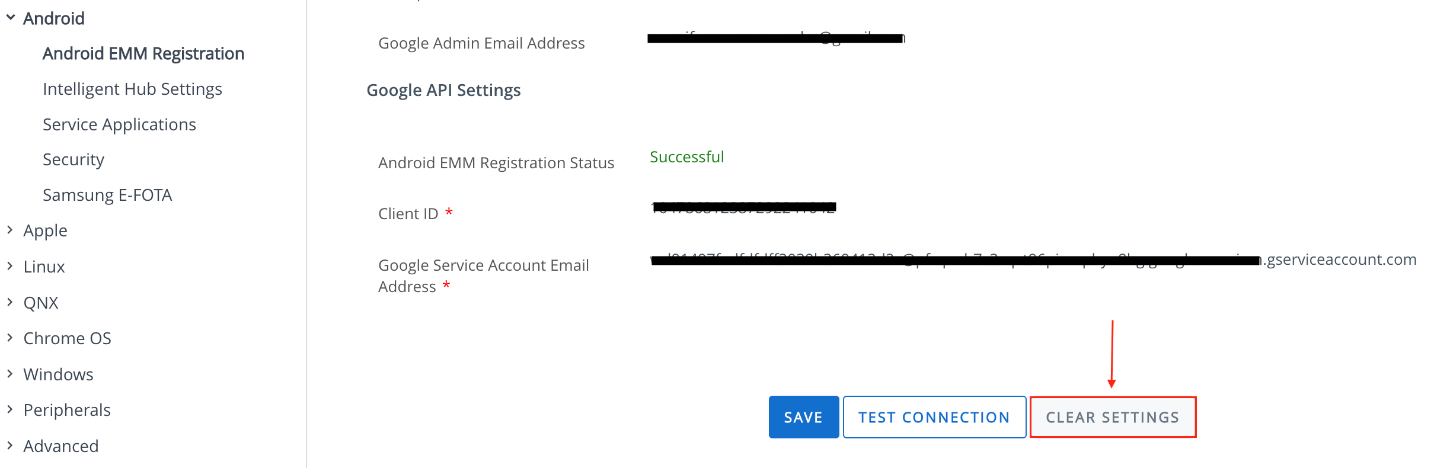
Figure 1: Android EMM Setting in the Workspace ONE UEM Console where EMM Binding was done via Google Play account
- Log in to your Workspace ONE UEM console and select the OG where Android Enterprise is configured.
- Navigate to Groups & Settings > Devices & Users > Android > Android EMM Registration.
- Click Clear Settings on the Android EMM Registration page.
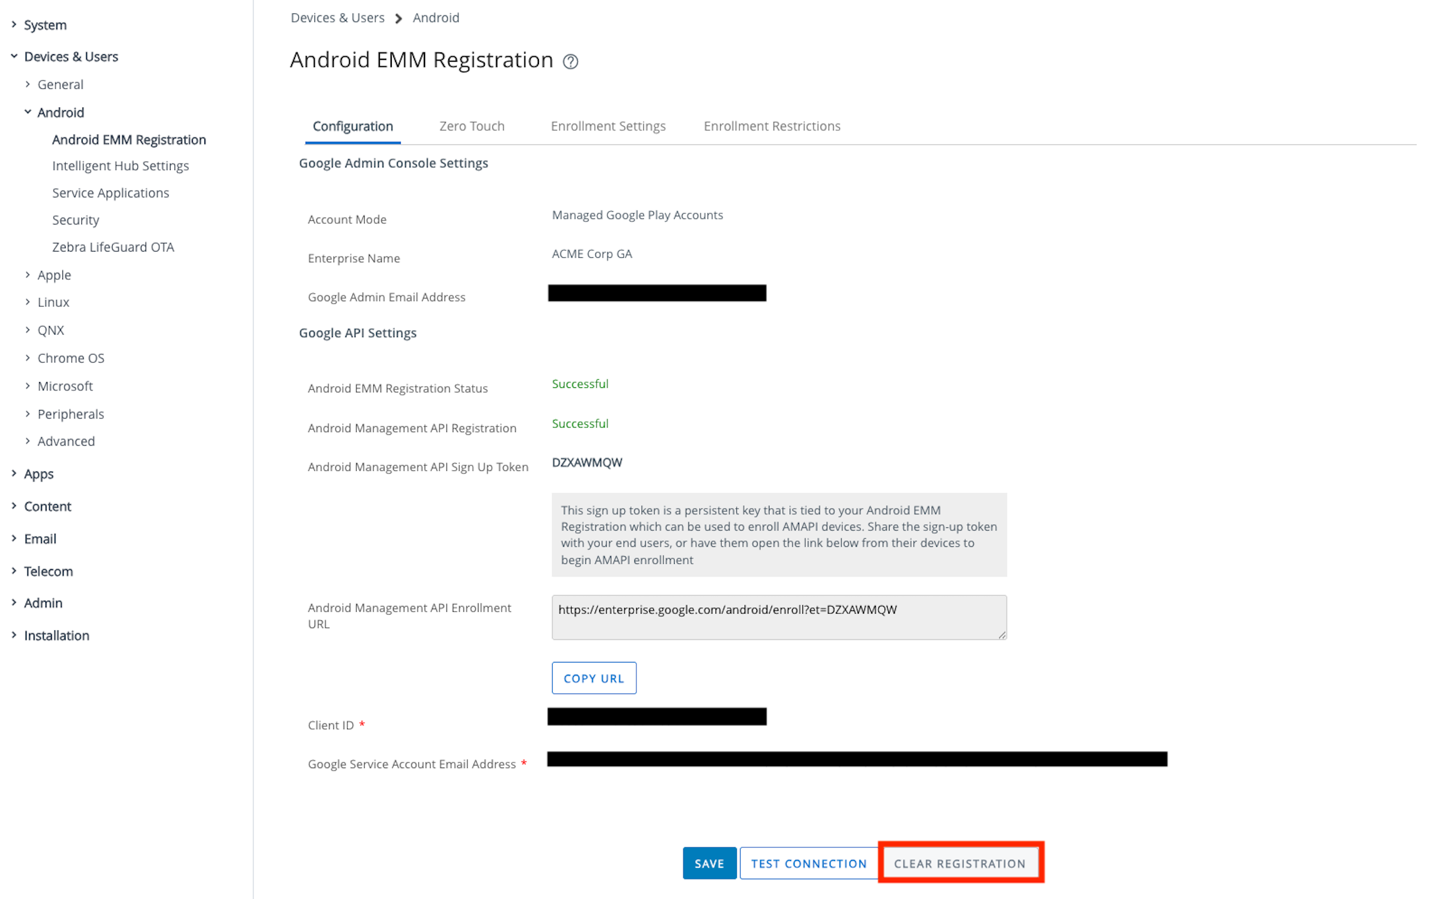
Figure 2: Android EMM Setting in the Workspace ONE UEM console where EMM Binding was done via Google Workspace (formally G-Suite)
OEM Specific Configurations and Management capabilities
Overview
Workspace ONE UEM supports a range of Android OEM-specific configurations and device management capabilities as part of its Unified Endpoint Management (UEM) platform. Certain original equipment manufacturers (OEMs) provide management configurations and lifecycle enhancements that extend the standard Android Enterprise feature set, giving administrators deeper control over corporate-owned devices.
A key enabler of these capabilities is AppConfig, which allows applications to be distributed together with their configuration profiles through the managed Google Play Store. This enables application-specific managed configurations to be deployed remotely alongside the managed app.
OEMConfig is the standardized mechanism through which OEMs expose these additional capabilities. It is an application built and maintained by the OEM and hosted on Google Play. OEMConfig leverages the AppConfig standard to present a data-driven user interface, enabling administrators to dynamically configure any setting the OEM chooses to expose. Because these settings are data-driven and app-based, no UEM console upgrades are required to access the latest settings offered by the OEM.
OEMConfig applications are published to devices through Workspace ONE UEM and silently installed via Android Enterprise Managed Google Play. Configured settings are delivered to the application during or after installation, and the application calls the corresponding proprietary APIs on the device. Available settings vary by OEM and may differ depending on the management mode in use - Work Managed, Work Profile, or COPE. Contact your OEM vendor for details on their OEMConfig support.
This section covers OEM-specific configurations and deployment procedures for Samsung, Honeywell, and Zebra.
Notes:- If any OEM settings are left blank or unselected, the UEM console does not send the corresponding key-value pair to the device, and that setting is excluded from the configuration. If an OEMConfig application is not available on Google Play, contact the OEM directly for assistance.
Prerequisites
Before performing the steps in this section, ensure the following requirements are met:
- Supported Workspace ONE UEM version.
- Android EMM registration completed for the Organization Group (OG) in your Workspace ONE UEM console.
- Android devices enrolled into Workspace ONE UEM in either a Work Managed or Work Profile state.
- Access to a supported OEM device and, where applicable, the OEM's online services and licensing portal. Contact your OEM representative if access needs to be established.
- Basic familiarity with the OEM-specific tools described in this section.
- If deploying the OEMConfig application as an internal application, the OEMConfig application APK file.
Common OEMConfig Deployment Procedure
The steps to add and deploy an OEMConfig or managed configuration application in Workspace ONE UEM follow the same pattern for Samsung KSP, Zebra OEMConfig, and Honeywell UEMConnect. The procedure below applies to all three; OEM-specific values and differences are called out in each section below.
- Log in to your Workspace ONE UEM console and select the destination Organization Group (OG).
- Add the OEMConfig application to Workspace ONE UEM:
- If distributing the application through the managed Google Play store:
- Navigate to Resources > Apps > Native > Public > Add Application.
Configure the following settings, then click Next.
5 a) Managed By:The OG with Administrative access to the profile.
5 b) Platform:Select Android from the drop-down menu.
5 c) Source:Select Search App Store
5 d) Name:Enter the application name as specified in each OEM section below.
- Click Select, then click Select for the appropriate application.
- Click Save & Assign
On Assignment Configuration page,to configure Application Configuration.
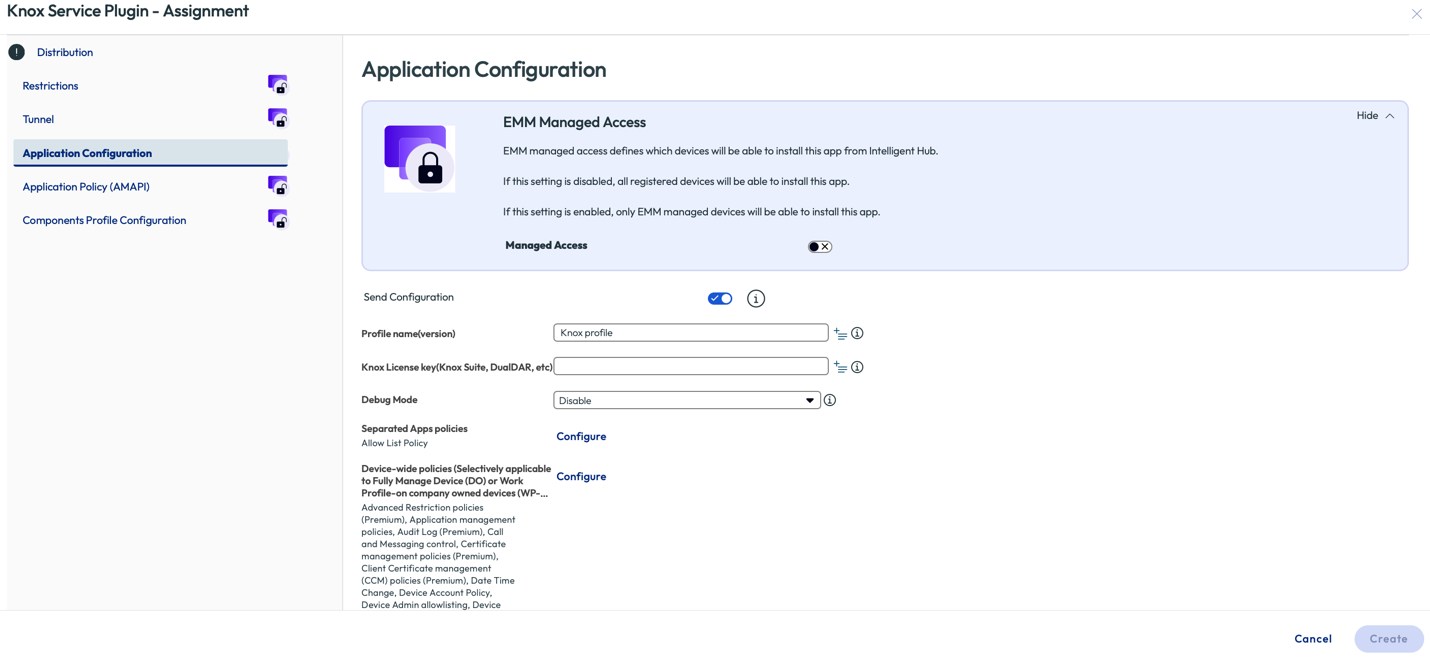
8 a) Navigate to the Application Configuration tab and activate the Send Configuration toggle.
8 b) Enter the required license key (if applicable) and configure the desired OEM settings. Refer to the documentation links provided in each OEM section.
In the Distribution configuration page enter mandatory details.
9 a )Name: Enter the Assignment Name
9 b) Assignment Group: Select the Assignment Groups that will receive the application.
9 c) App Delivery Method: Select Auto (for auto publish of the application to enrolled device ) or On Demand ( where the administrator needs to publish the application manually to each device)
9 d) Auto Update Priority: Select Default or High Priority or Postpone (90 days) as per the requirements.
- Click Create.
- Create any additional assignments as required, then set assignment priorities. Click Save.
- The Preview section displays a list of all assigned devices. Verify the selection and click Publish.
Note: The OEMConfig application can also be published as an internal application using the instruction provided here.
Samsung
The following OEM-specific configuration options are available on supported Samsung devices.
Samsung Knox Service Plugin (KSP)
The Knox Service Plugin (KSP) is an administrative tool for configuring Knox Platform for Enterprise (KPE) features on Samsung Android devices using Android Managed Configurations. Deploying KSP requires a Knox Premium license activation, which is available at no cost. For more information, see Knox Platform for Enterprise licenses in the Samsung documentation.
Note: Certain deployment scenarios may require the KSP app to be pushed as an internally managed application. In this case, you must push a profile containing the XML configuration file for the KSP application.
To deploy Samsung KSP, follow the Common OEMConfig Deployment Procedure with the following values:
App Name (Step 5d): Samsung KSP
Step 8 Configuration: If you are using features requiring a premium KPE license key, enter it here. Then, select the desired KSP configuration settings. For detailed information on available features, see Schema structure in the Samsung Knox documentation.
Samsung KSP along with its configuration is now installed on your devices.
Honeywell
The following configuration options are available on supported Honeywell devices.
Honeywell UEMConnect
Honeywell UEMConnect is an administrative tool for configuring Honeywell-specific features on Honeywell Android devices using Android Managed Configurations.
To deploy Honeywell UEMConnect, follow the Common OEMConfig Deployment Procedure with the following values:
App Name (Step 5d): Honeywell UEMConnect
Step 8 Configuration: Select and configure the desired OEM settings. For detailed information on available features, see the UEM Connect User Guide in the Honeywell documentation.
Honeywell UEMConnect and its configuration are now installed on your devices.
Zebra
The following configuration options are available on supported Zebra devices.
Zebra OEMConfig
Zebra OEMConfig is an administrative tool for configuring Zebra Mobility Extension (MX) features on Zebra Android devices using Android Managed Configurations. It interfaces with Zebra's Mobility Extensions Management System (MX) - an XML- based communication framework for managing the capabilities and behaviors of Zebra Android devices.
Version compatibility: Two versions of Zebra OEMConfig are currently available:
| Version | Android Compatibility |
| Legacy Zebra OEMConfig | Android 10 and earlier; not compatible with Android 13 and later. |
| Zebra OEMConfig Powered by MX | Android 11 and later (recommended) |
Note: Both versions are compatible with Android 11. Select the version appropriate for your device OS. For more information, see About OEMConfig in the Zebra documentation.
To deploy Zebra OEMConfig, follow the Common OEMConfig Deployment Procedure with the following values:
App Name (Step 5d): Zebra OEMConfig(Select the appropriate version of Zebra OEMConfig based on your device OS (see compatibility table above))
Step 8 Configuration: Select and configure the desired OEM settings. For detailed information on available features, see Zebra Managed Configurations in the Zebra documentation.
Zebra OEMConfig along with its configuration is now installed on your devices.
Device Enrollment Methods - Custom DPC & AMAPI
Procedures to enroll Android devices into Workspace ONE UEM with the custom DPC approach depend upon whether these devices are being enrolled as Corporate Owned (Work Managed), Work Profile (for BYO and personally enabled devices), or Closed Network/AOSP devices.
When it comes to AMAPI-based device management, enrollment is supported only for Work Profile deployments (BYOD) and Corporate-Owned personally enabled (COPE) devices.
To decide which management source - Custom DPC or AMAPI - should be used for new Android devices, the administrator needs to navigate to Groups & Settings > All Settings > Devices & Users > Android > Android EMM Registration > Enrollment Settings. When a new Android device is enrolled into Workspace ONE UEM, this setting controls whether it will be managed using Custom DPC or AMAPI. This setting does not retroactively affect devices that are already enrolled in Workspace ONE UEM.
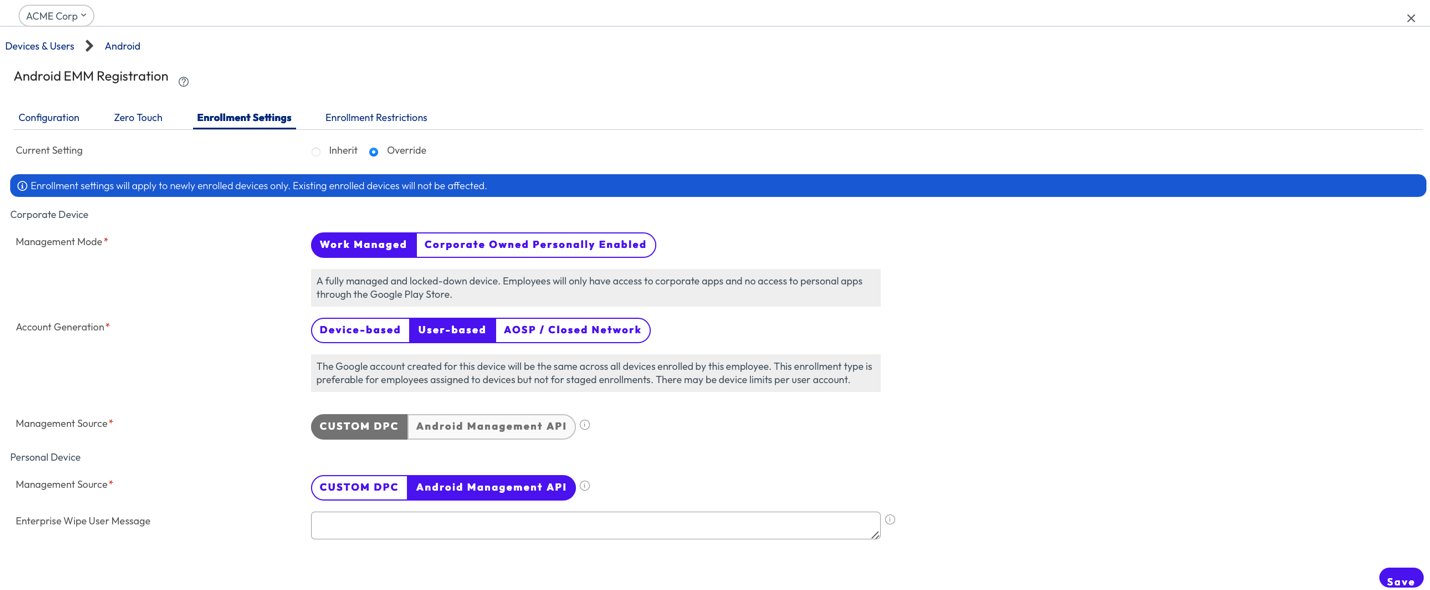
The administrator can toggle Management Source between Custom DPC and Android Management API for personal and corporate-owned devices. Since enrolling devices in Work Managed mode is not currently supported with AMAPI, the toggle to control management source for corporate-owned devices is hidden if you choose Work Managed mode in this Organization Group.
Note: Administrators can configure either Android Management API (AMAPI) or a Custom DPC per Organization Group.
Device Enrollment Methods Matrix (AMAPI)
| Android Management Mode and supported enrollment methods | Self-Onboarding with Intelligent Hub | Enrollment URL | Token | Google Zero Touch portal | Workspace ONE QR Code Enrollment | DPC Keyword afw#hub-based Enrollment | Samsung Knox Mobile Enrollment |
| Work profile for employee-owned devices (BYOD) | ✅ | ✅ | ✅ | ❌
| ❌
| ❌
| ❌
|
| Work profile for company-owned devices (COPE) | ❌ | ❌ | ❌ | ✅
| ✅
| ❌ | ✅
|
Onboarding Personally Owned (Work Profile Mode) - AMAPI
This procedure discusses enrolling Work Profile on Employee Owned (or Bring Your Own) Android devices into Workspace ONE UEM using AMAPI enrollment method. The steps are sequential and build upon one another, so make sure that you complete each step before going to the next step.
Prerequisites
Before you can perform the steps in this exercise, ensure that you have the following:
- Android devices running Android 8.0 (Oreo) or later with an associated personal Gmail account.
- Enrollment URL/Token
- Register Workspace ONE UEM as your EMM provider with Google.
- Group ID
- Basic or Directory UEM account
- Workspace ONE Intelligent Hub
Enrollment setting for AMAPI
To enforce devices to enroll to AMAPI device management , the enrollment settings on the Android EMM registration pages needs to be configured.
- Log in to your Workspace ONE UEM console.
- Select the desired organizational group (OG) in which to enroll Work Managed devices.
- Navigate to Groups & Settings > All Settings > Devices & Users > Android > Android EMM Registration > Enrollment Settings.
- Under Personal Device ,change Management Source to Android Management API if it is set to Custom DPC.
- Click Save.
Onboarding using Enrollment URL
The following steps discuss enrolling a personally owned Android device into Workspace ONE UEM in Android Enterprise’s BYOD mode using an enrollment URL. Screenshots of steps might differ based on device make and OS version.
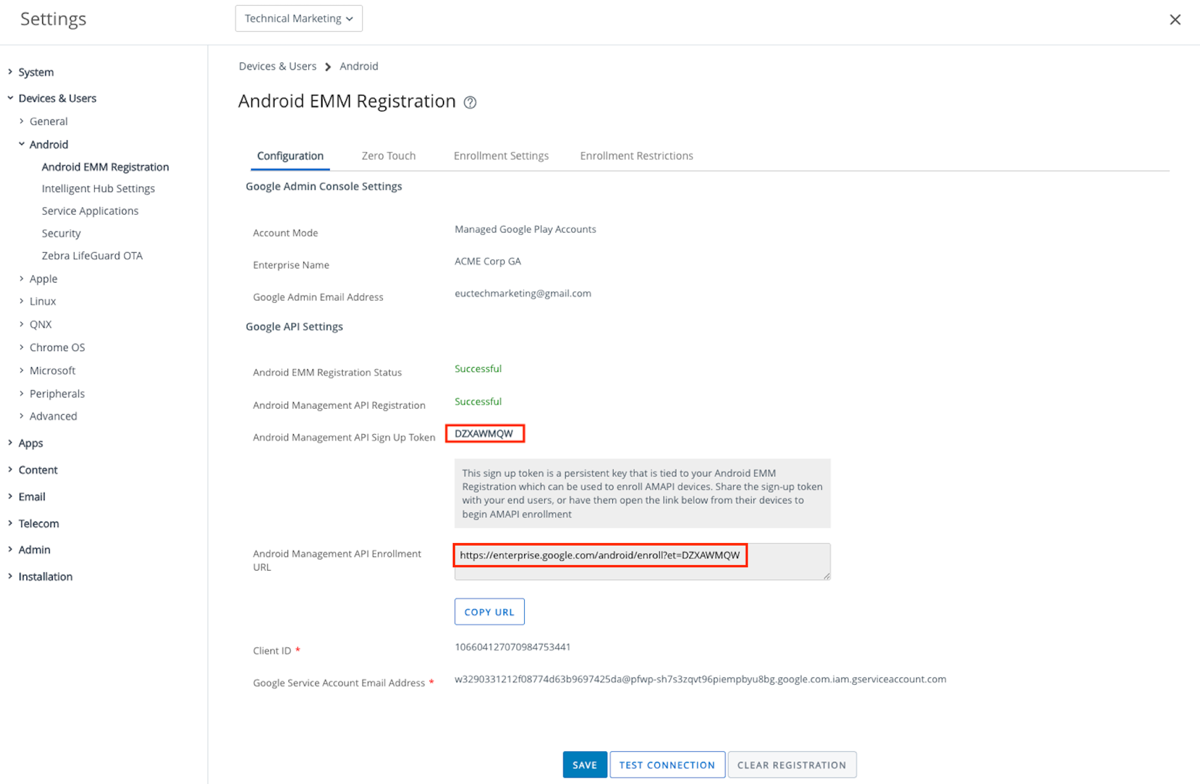
- Navigate to Groups & Settings >All Settings>Android >Android EMM Registration > Configuration.
- Copy Android Management API Enrollment URL and share it to users via email or SMS.
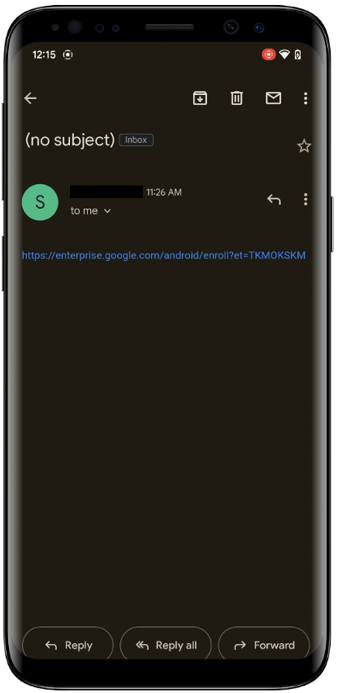
- Click Enrollment URL , user will be redirected to chrome browser.
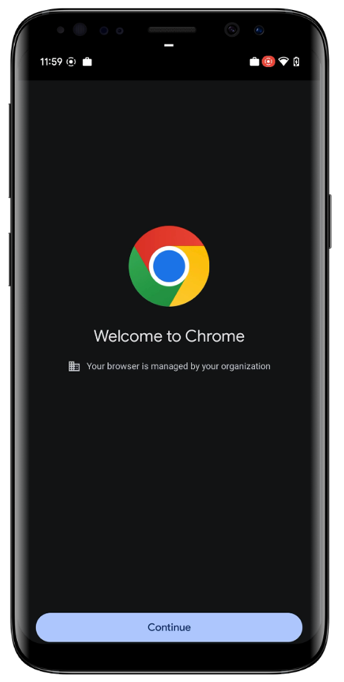
- Click Continue.
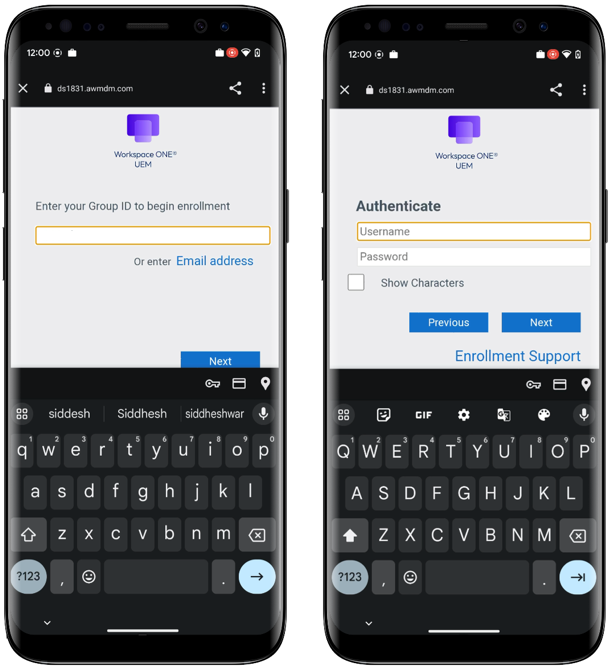
- Enter Group ID , Username & Password.
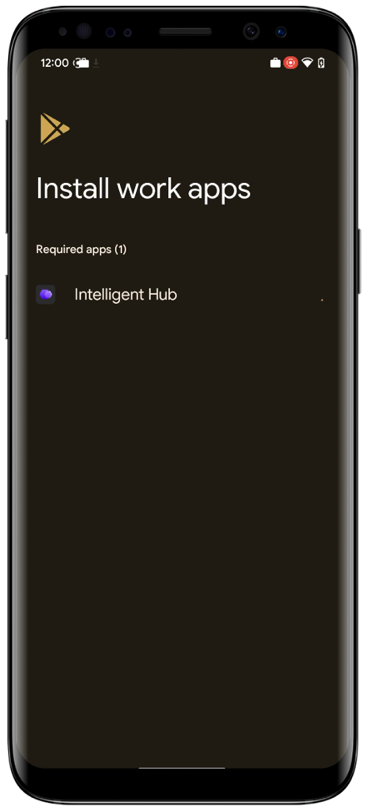
- Click to install Intelligent Hub.
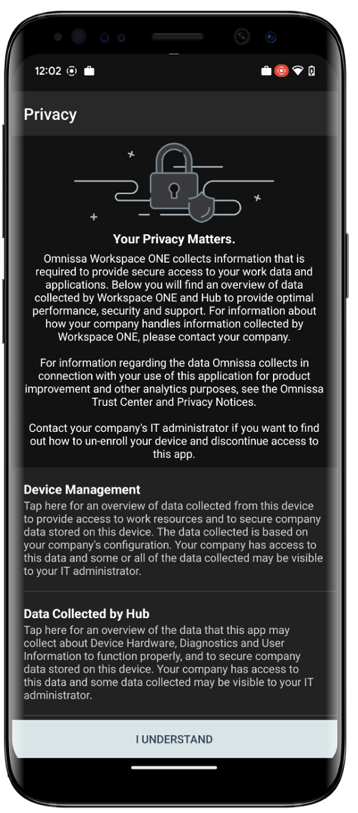
- Click I understand to accept privacy and complete enrollment.
Onboarding using Android Management API Sign Up Token
The following steps discuss enrolling a personally owned Android device into Workspace ONE UEM in Android Enterprise’s BYOD mode using the Android Management API Sign Up Token. Screenshots of steps might differ based on device make and OS version.
- Share Token with target users.
- Instruct user to navigate to Settings > Google > Setup & Restore > Select the option to enter code manually. (User can also search Setup work profile in settings)
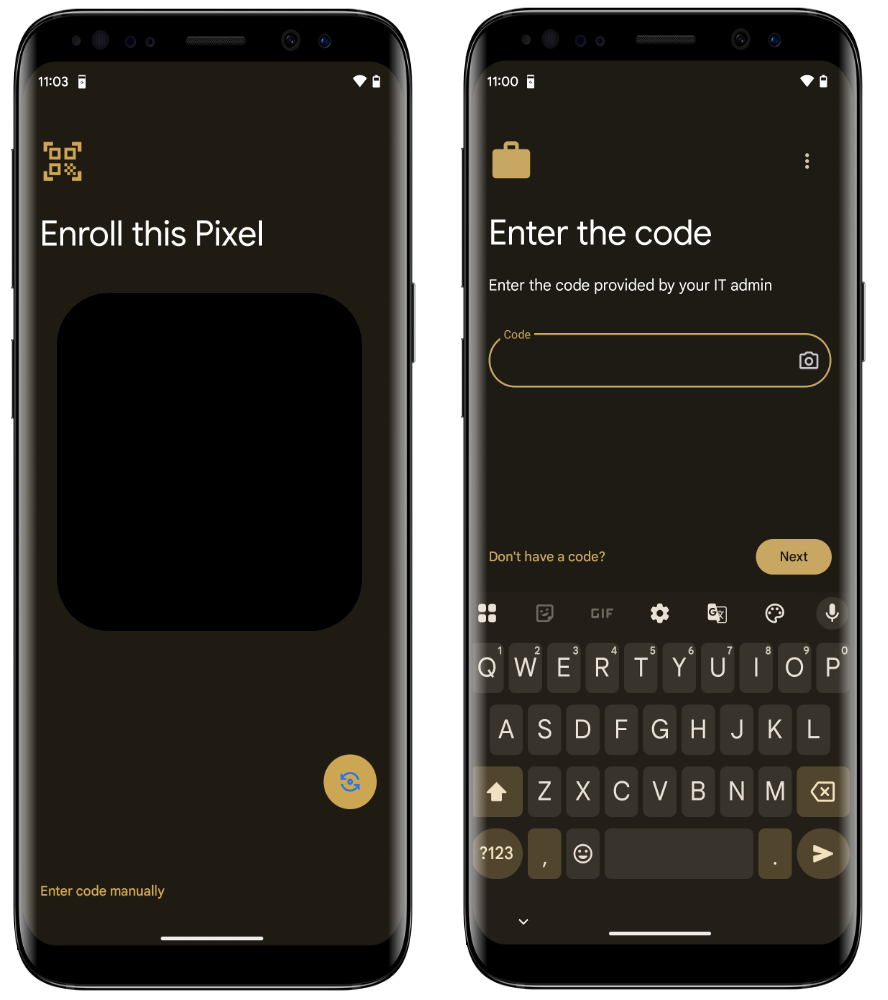
- Enter the code (the Token shared by Administrator) and click next.
- Chrome browser is launched as seen with the Enrollment URL method.
- To proceed further, follow the same steps as explained in the Enrollment URL method. Continue from Step 4 onwards to complete the enrollment process.
Onboarding using QR code
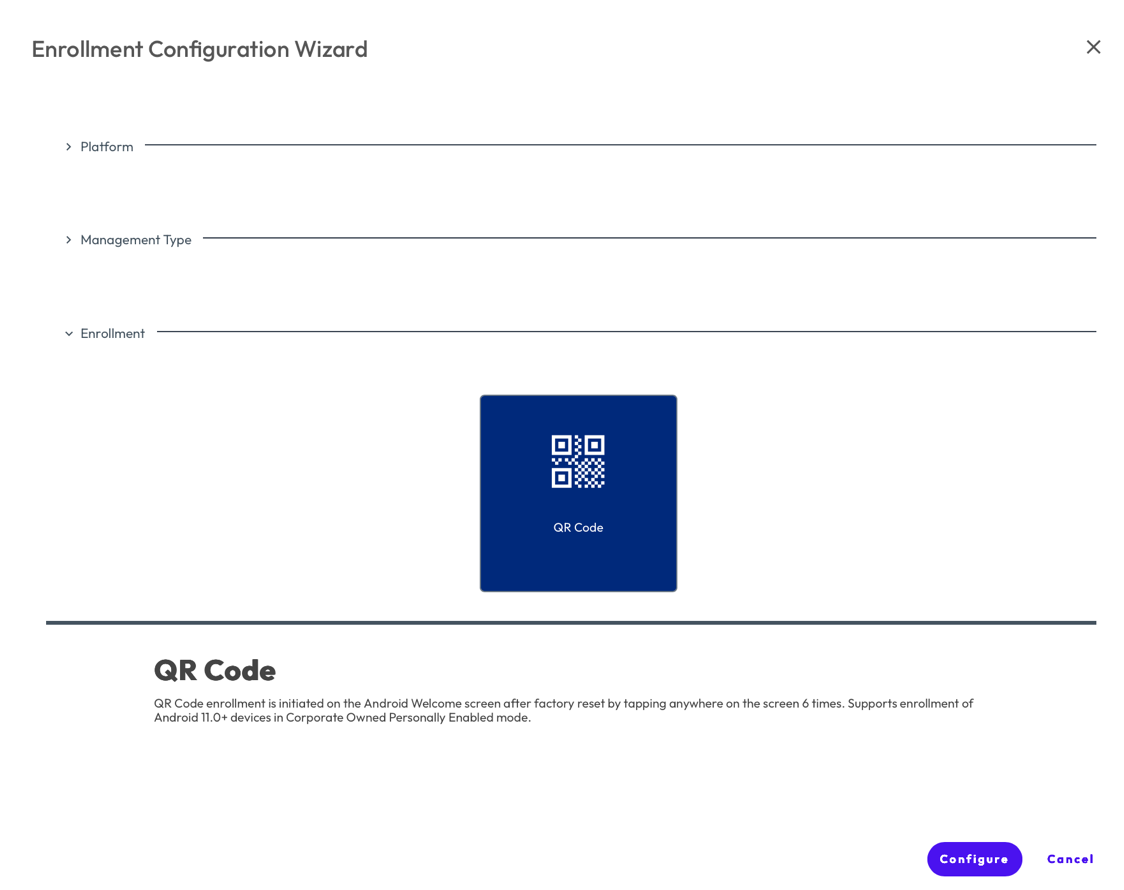
The QR code enrollment method sets up and configures Corporate Owned Personally Enabled (COPE) device by scanning a QR code generated with Workspace ONE UEM’s Enrollment Configuration Wizard.
To perform the steps in this exercise, you must satisfy the following requirements:
- Android device running Android 8.0(Oreo) or later.
- Device in factory reset / freshly out-of-the-box mode with Google Setup Wizard on the initial Start/Welcome page.
Configure Workspace ONE QR Code Enrollment
Perform the following steps:
- Log in to your Workspace ONE UEM console and select the destination OG.
- Navigate to Staging > Mobile Staging > Configure Enrollment.
- Select Android.
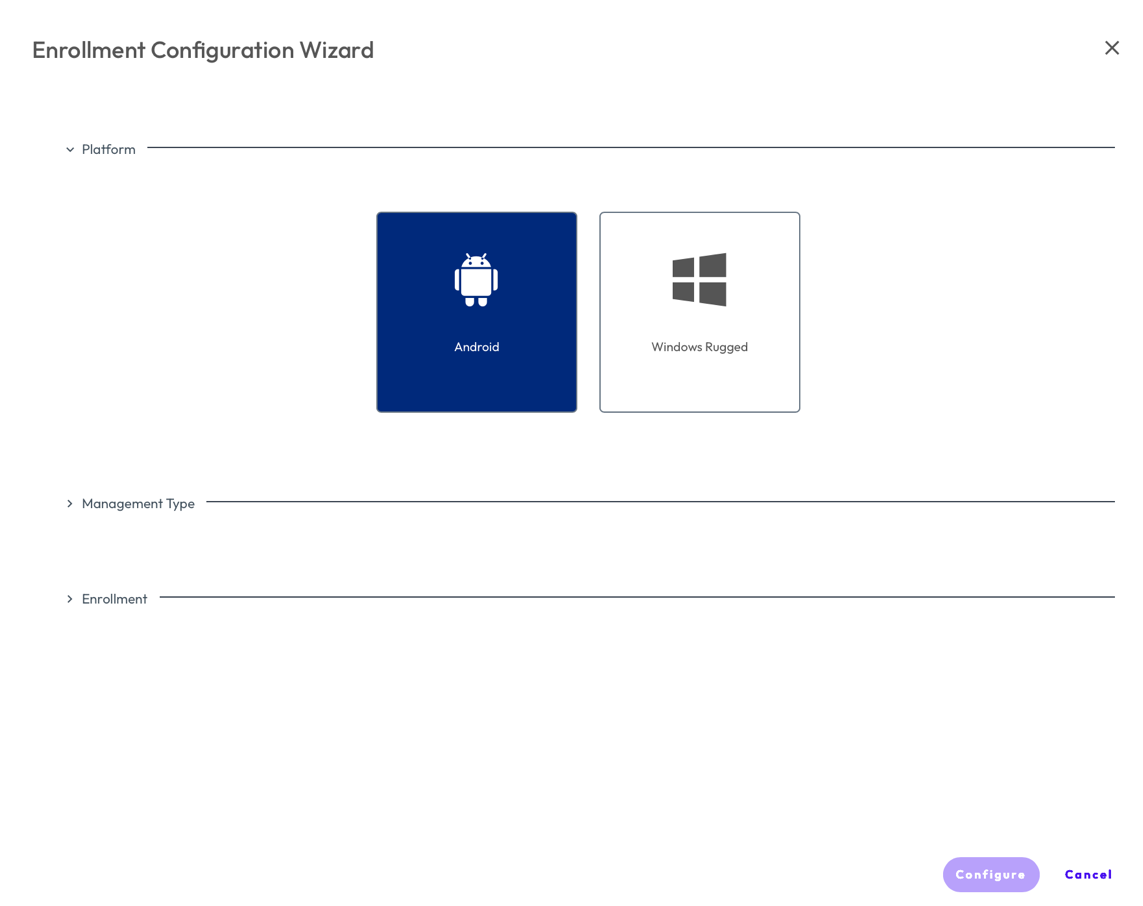
4. Select Android Management API.
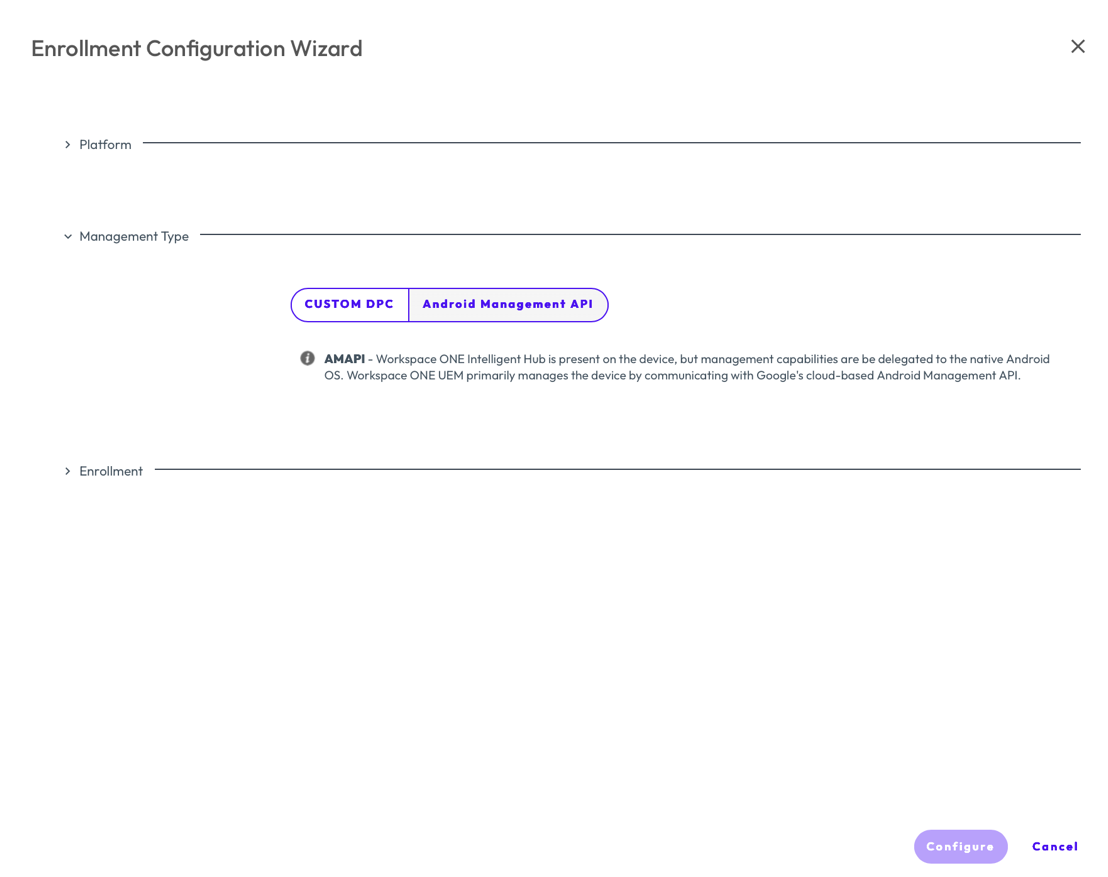
- Click Configure.
- In the Wi-Fi section, configure the optional Wi-Fi for the device to connect to before enrollment. Then click Next.
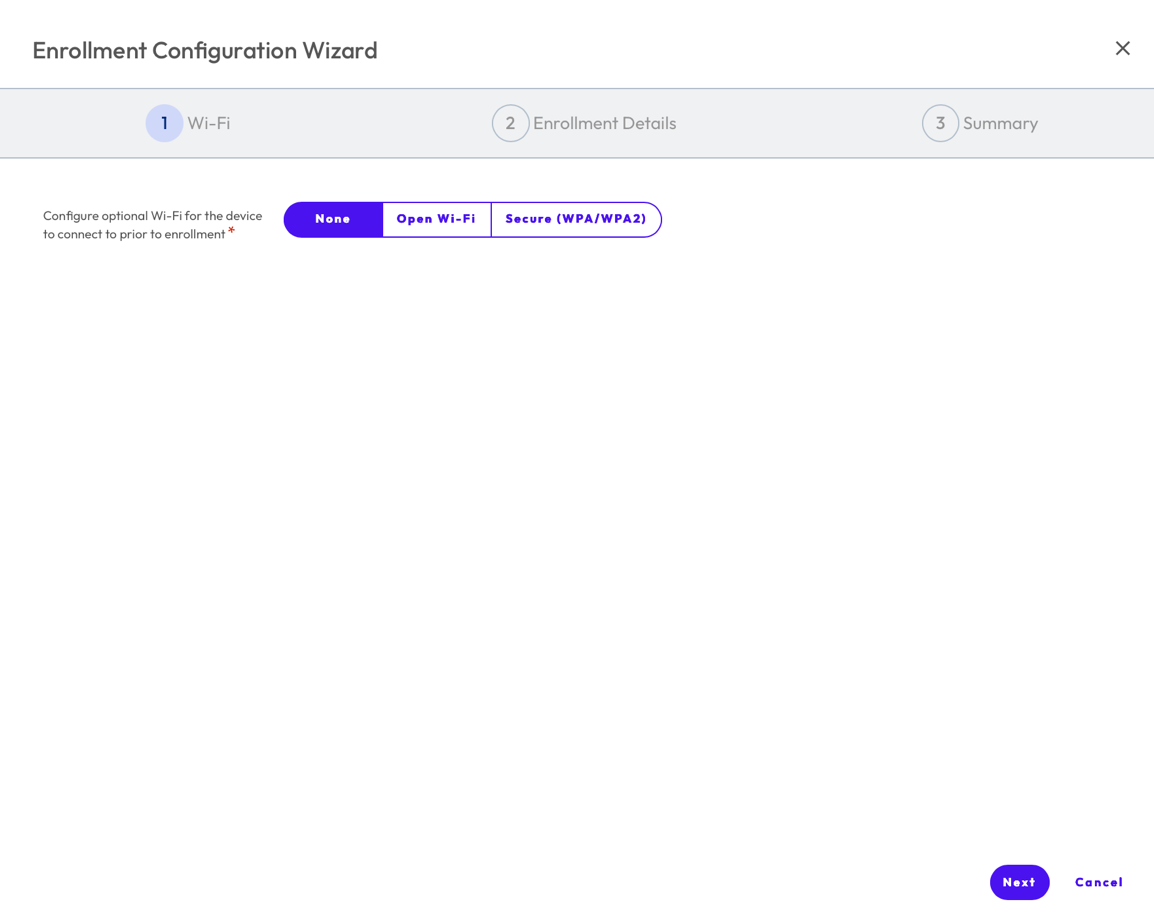
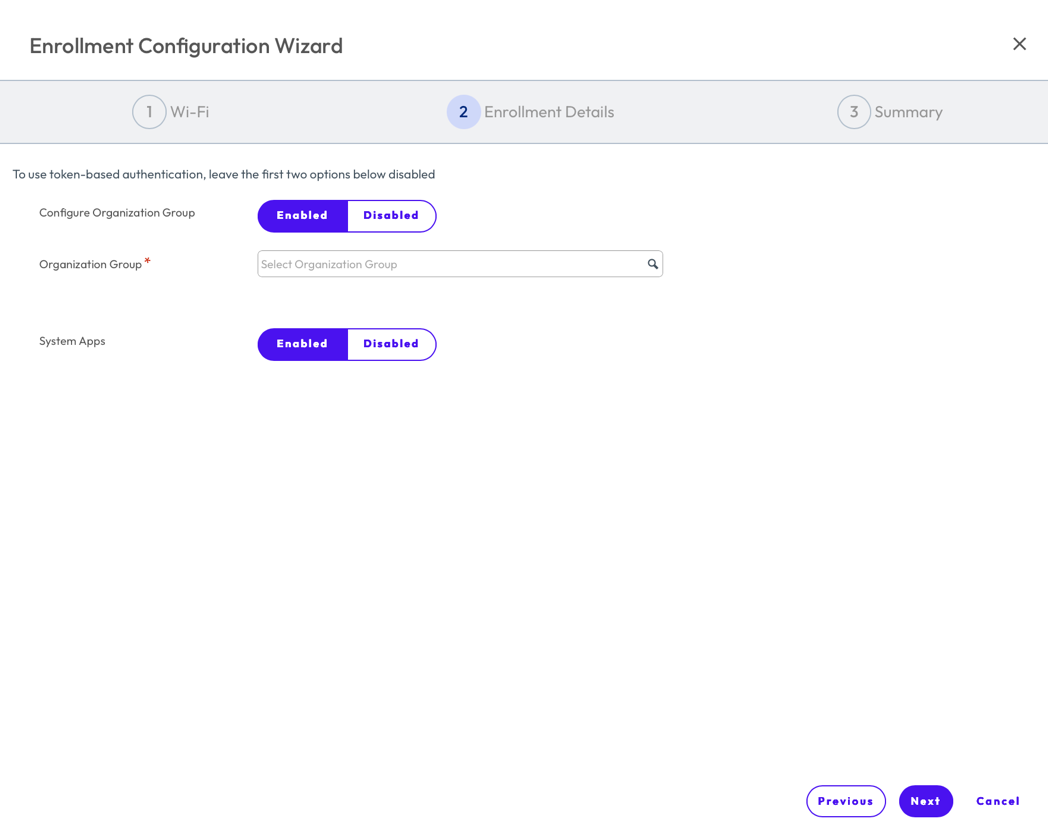
- Configure Organization group in which AMAPI has been enabled be entering Organization Group Name.
- Enable System Apps and click Next.
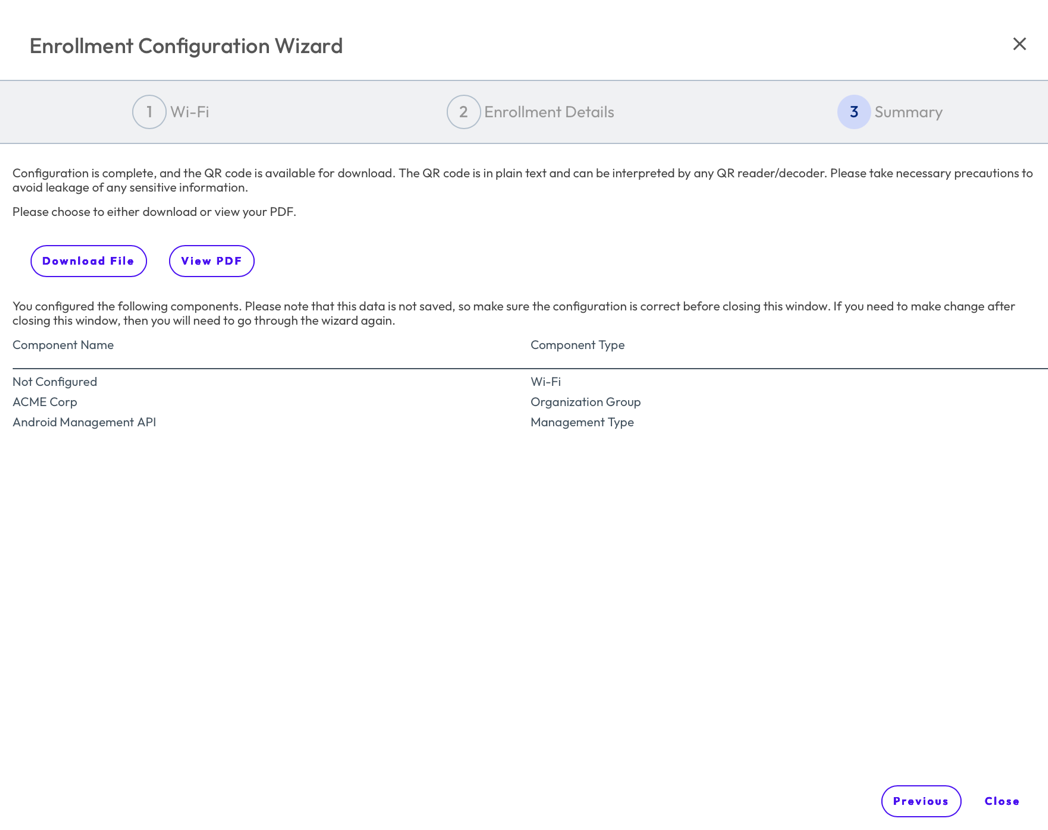
- The QR Code is ready to view or download. Note that QR codes are not automatically saved in the console and must be downloaded.
Onboarding Corporate Owned Personally Enabled (COPE) devices
The following steps need to be completed in the desired OG before devices can be enrolled into Workspace ONE UEM in COPE mode.
Prerequisites
Before you can perform the steps in this exercise, ensure that you have the following:
- Android devices running Android 11(Red Velvet Cake) or later with an associated personal Gmail account.
- Register Workspace ONE UEM as your EMM provider with Google.
- Group ID
- Workspace ONE Intelligent Hub login credentials
The following steps need to be completed in the desired OG before devices can be enrolled into Workspace ONE UEM for company-owned devices (COPE mode):
- Log in to your Workspace ONE UEM console.
- Select the desired organizational group where Corporate Owned Personally Enabled (COPE) devices will be enrolled.
- Navigate to Groups & Settings > All Settings > Devices & Users > Android > Android EMM Registration > Enrollment Settings.
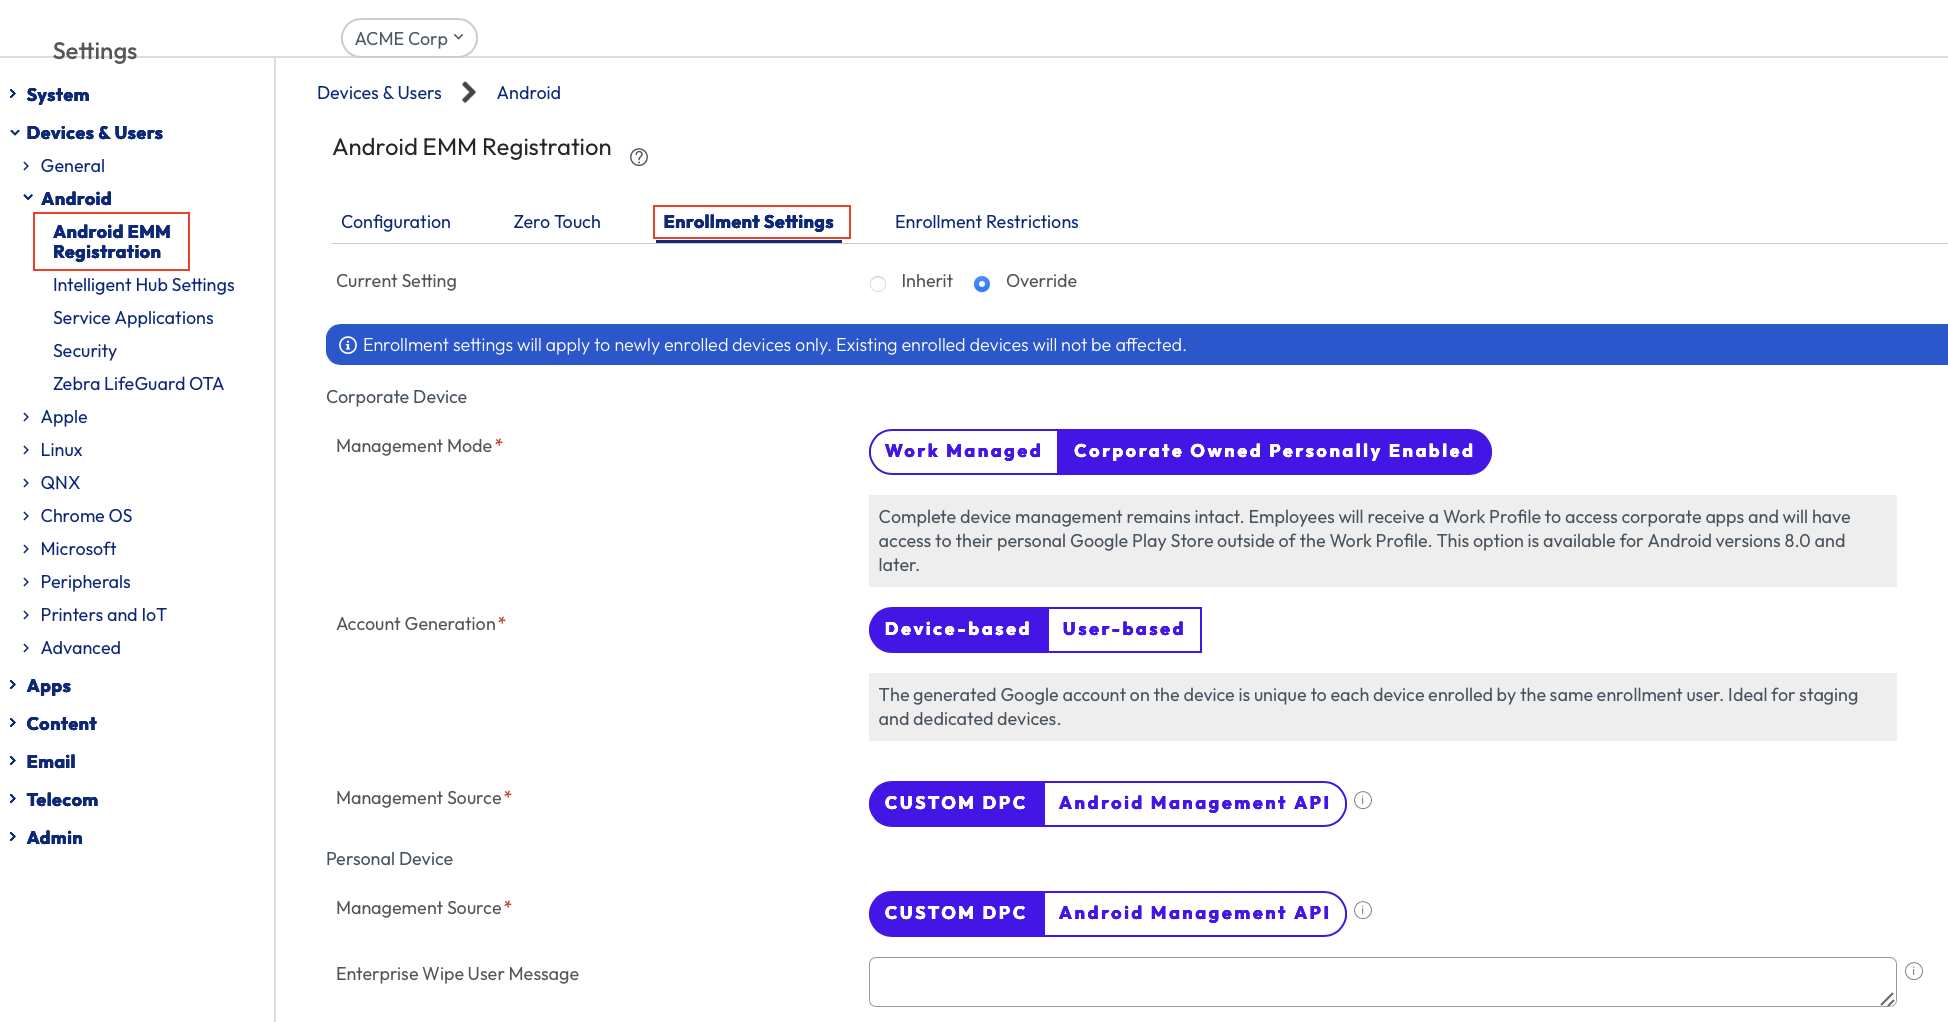
- Set Management mode to Corporate Owned Personally Enrolled.
- Set Google Account Generation for Corporate Devices to Device-Based.
- Set Management source to Android Management API.
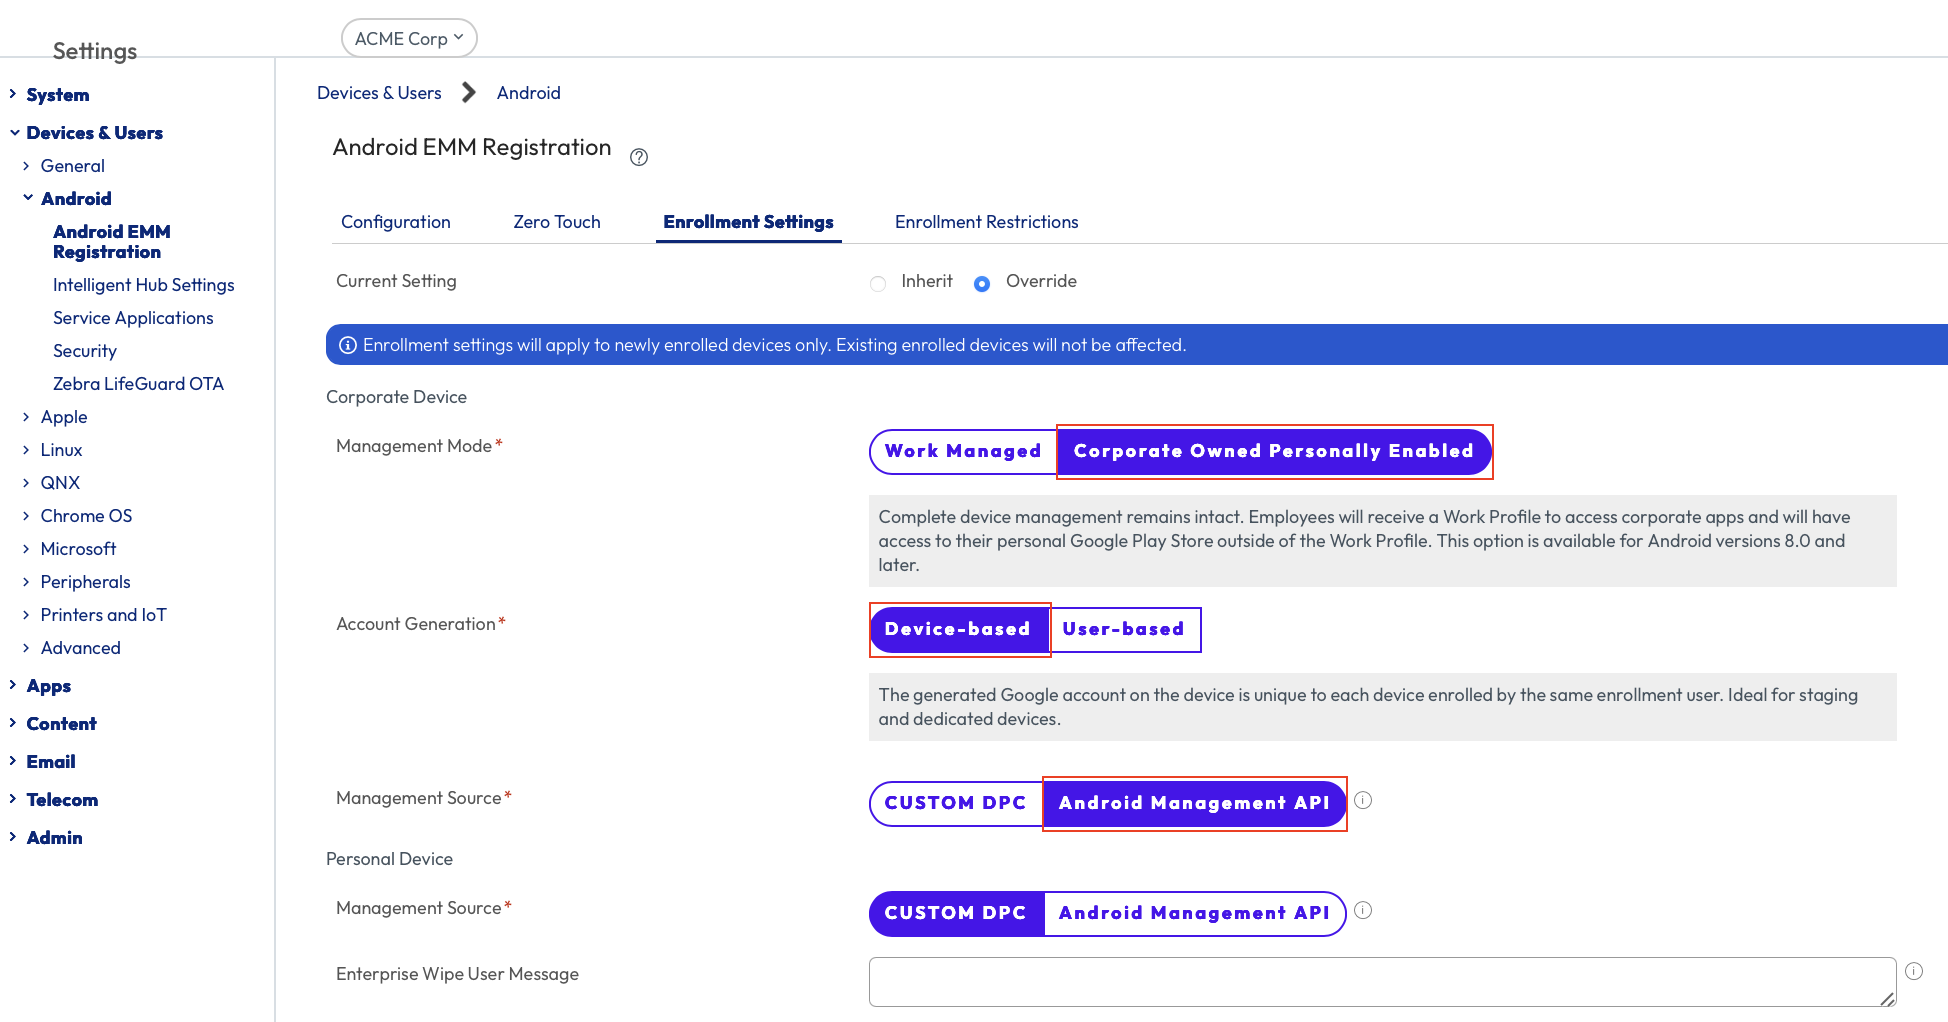
- Click Save.
Onboard device using QR code
The steps to configure a QR code and enroll using a QR code is detailed here.
Onboard device using DPC Identifier
The steps to enroll using DPC Keyword is detailed here.
Onboard device using Google Zero Touch Enrollment
The steps to enroll using Google Zero Touch Enrollment is detailed here.
Onboard device using Samsung KNOX Mobile Enrollment
The steps to enroll using Samsung Knox Mobile Enrollment is detailed here.
Device Enrollment Methods Matrix (Custom DPC)
This chart covers the different enrollment options Workspace ONE UEM offers for different Android Enterprise modes.
| Android Management Mode and supported enrollment methods | Self-Onboarding with Intelligent Hub | Google Zero Touch portal | Workspace ONE QR Code Enrollment | DPC Keyword afw#hub based Enrollment |
| Work profile for employee-owned devices (BYOD) | ✅ | ❌
| ❌
| ❌
|
| Work profile for company-owned personally enabled devices (COPE) | ❌ | ✅
| ✅
| ✅ - Android 10 and earlier ❌ - Android 11 and later |
| Fully managed devices | ❌
| ✅
| ✅ | ✅ |
| Fully Managed Closed Network / AOSP devices | ❌
| ❌
| ✅
| ❌
|
Onboarding Personally Owned (Work Profile or BYOD)- Custom DPC
This procedure discusses enrolling Work Profile on Employee Owned (or Bring Your Own) Android devices into Workspace ONE UEM. The steps are sequential and build upon one another, so make sure that you complete each step before going to the next step.
Prerequisites
Before you can perform the steps in this exercise, ensure that you have the following:
- Android devices running Android 8.0 (Oreo) or later with an associated personal Gmail account.
- Register Workspace ONE UEM as your EMM provider with Google.
- Workspace ONE UEM server URL and group ID
- Workspace ONE Intelligent Hub login credentials
The following steps need to be completed in the desired OG before devices can be enrolled into Workspace ONE UEM for Work Profile or BYOD in Custom DCP management:
- Log in to your Workspace ONE UEM console.
- Select the desired organizational group in which to enroll BYOD devices.
- Navigate to Groups & Settings > All Settings > Devices & Users > Android > Android EMM Registration > Enrollment Settings.
- Set Management source for Personal Device to Custom DPC.
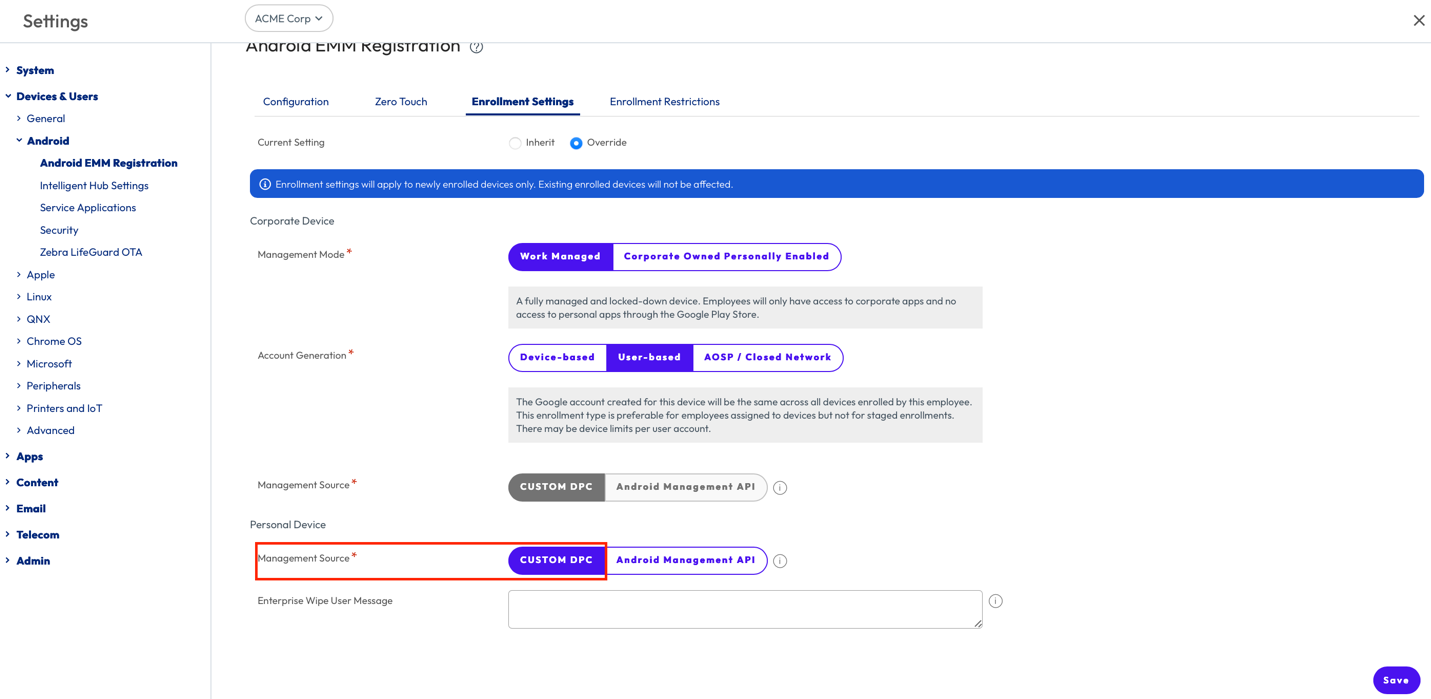
- Click Save.
Self-Onboarding with Intelligent Hub Steps
The following steps discuss enrolling a personally owned Android device into Workspace ONE UEM in Android Enterprise’s BYOD mode. Screenshots of steps might differ based on device make and OS version. To document this procedure, a Samsung S22 running Android 13 was used.
- Search for and install Workspace ONE Intelligent Hub on your Android phone.
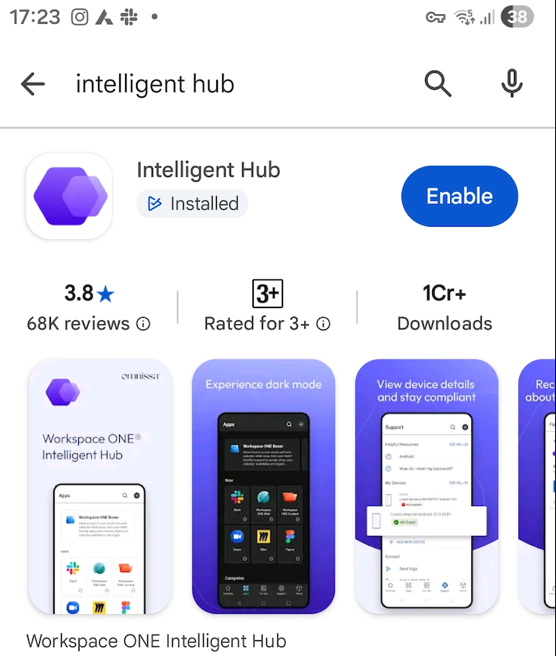
- Launch Workspace ONE Intelligent Hub.
- Enter a registered email address or your Workspace ONE UEM Server URL and click Next. If Workspace ONE UEM has been configured with simple enrollment, the next step isn’t necessary, as the server URL and group ID will be automatically populated.
- Enter the enrollment Group ID and click Next.
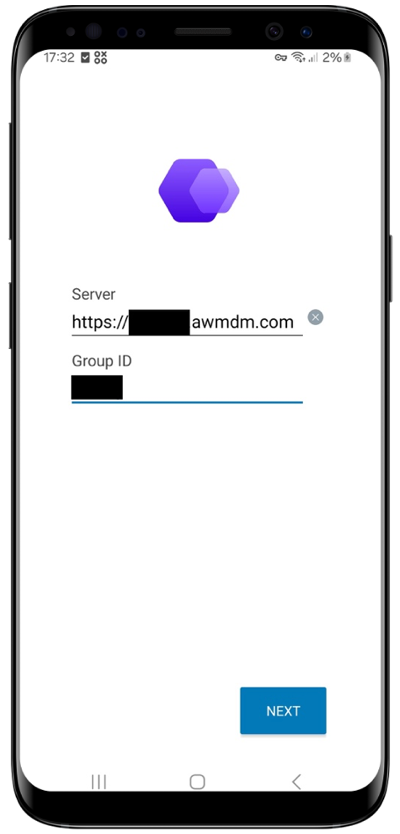
- Enter your login username and password and click Next.
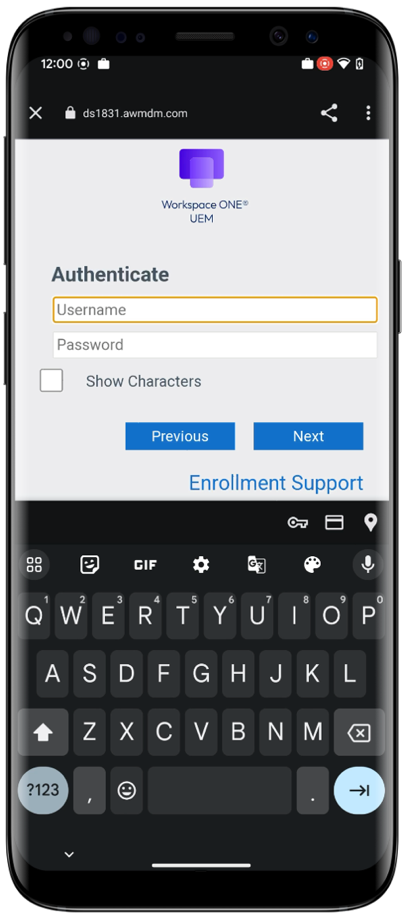
- Accept the Privacy Statement and Data Sharing conditions in the prompts that follow.
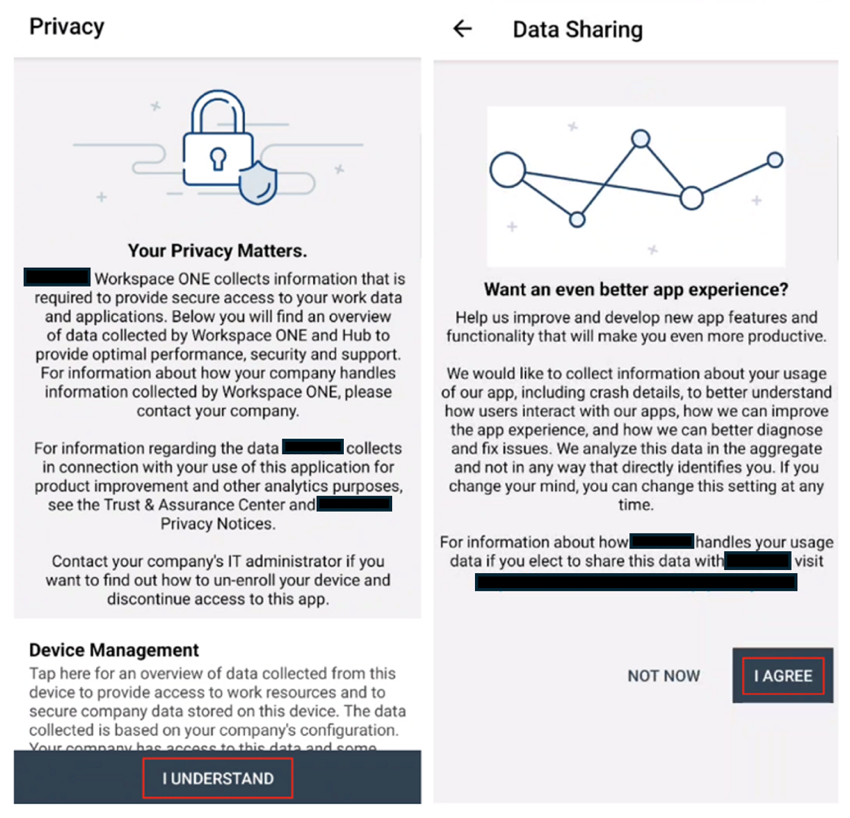
- Click Agree on the next screen to set up a work profile.
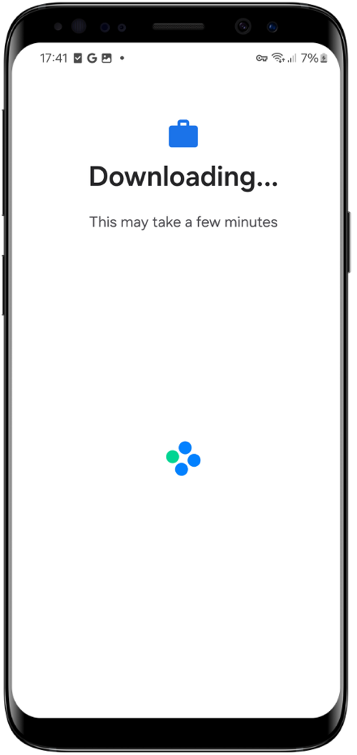
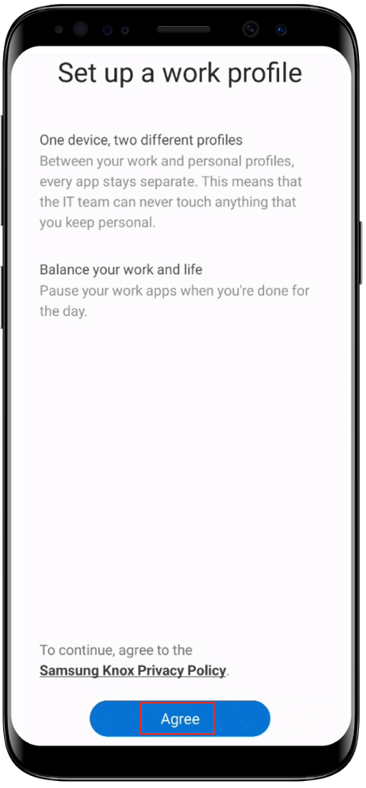
- During the enrollment process, you will see several processing screens. You will need to interact with the device further until you completion of enrollment.
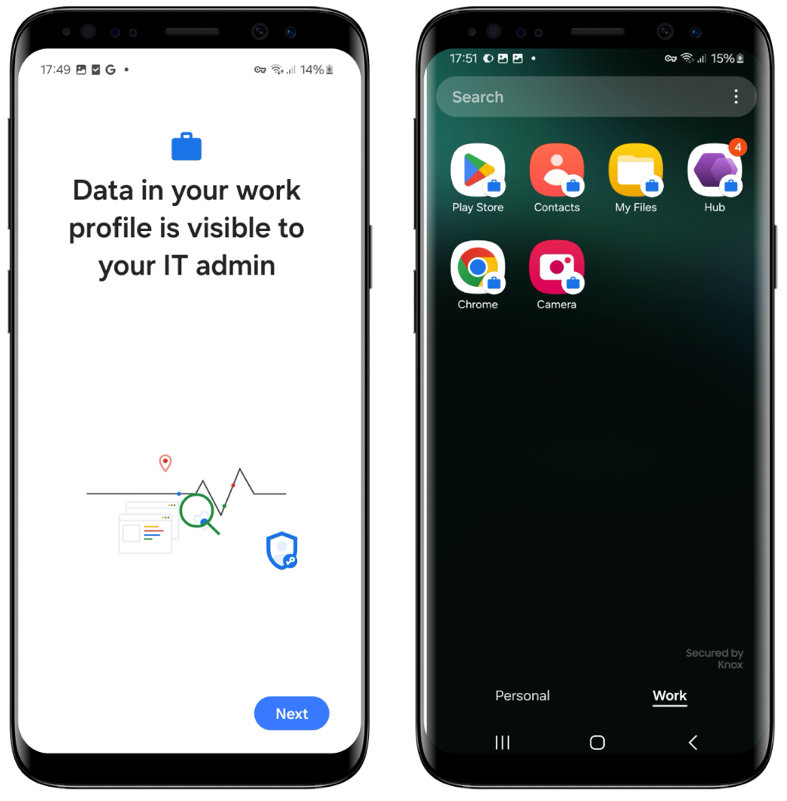
- You can see a clear segregation of Work and Personal containers with the completion of enrollment.
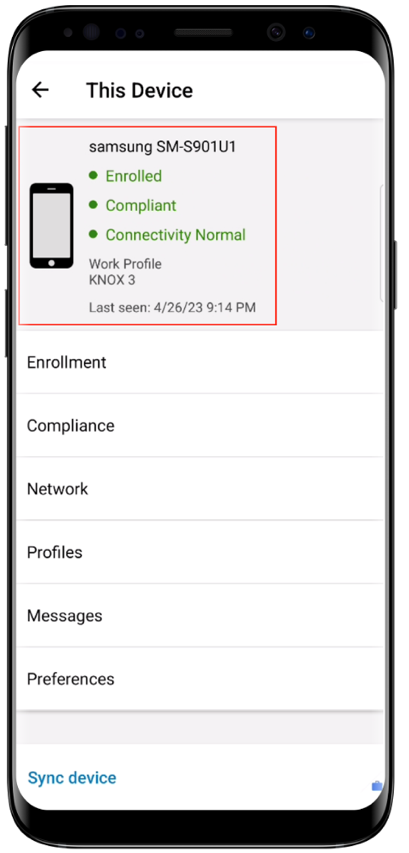
- You can also confirm Work Profile enrollment from the Intelligent Hub app by navigating to Account > This Device.
Onboarding Corporate Owned (Work Managed) Devices
This procedure discusses the various options available to enroll Corporate Owned (Work Managed) Android devices into Workspace ONE UEM such as Fully Managed devices, Shared devices (with Workspace ONE Launcher) and Dedicated devices.
Prerequisites
Before you can perform the steps in this exercise, you must meet the following requirements:
- Decide on the Work Managed Android Enterprise management mode for your use case.
- Register Workspace ONE UEM as your EMM provider with Google.
- Credentials to third-party enablement tools such as Google’s Zero Touch Portal (Optional)
- Workspace ONE UEM Enrollment URL and group ID details where applicable.
Google Account Generation for Corporate Owned Devices
Android Enterprise generates a Google account for devices once enrolled. These accounts can be device based or user based.
Device-Based accounts should be used any time more than 10 Android devices are enrolled with a single Workspace ONE UEM user account. This includes cases where a single-user staging or multi-user staging account is used to enroll devices. The generated Google account on the device is unique to each device enrolled by the same enrollment user making it ideal for staging and dedicated devices.
To enable Device-Based accounts:
- Log in to your Workspace ONE UEM console.
- Select the desired organizational group (OG) in which to enroll in Work Managed devices.
- Navigate to Groups & Settings > All Settings > Devices & Users > Android > Android EMM Registration > Enrollment Settings.
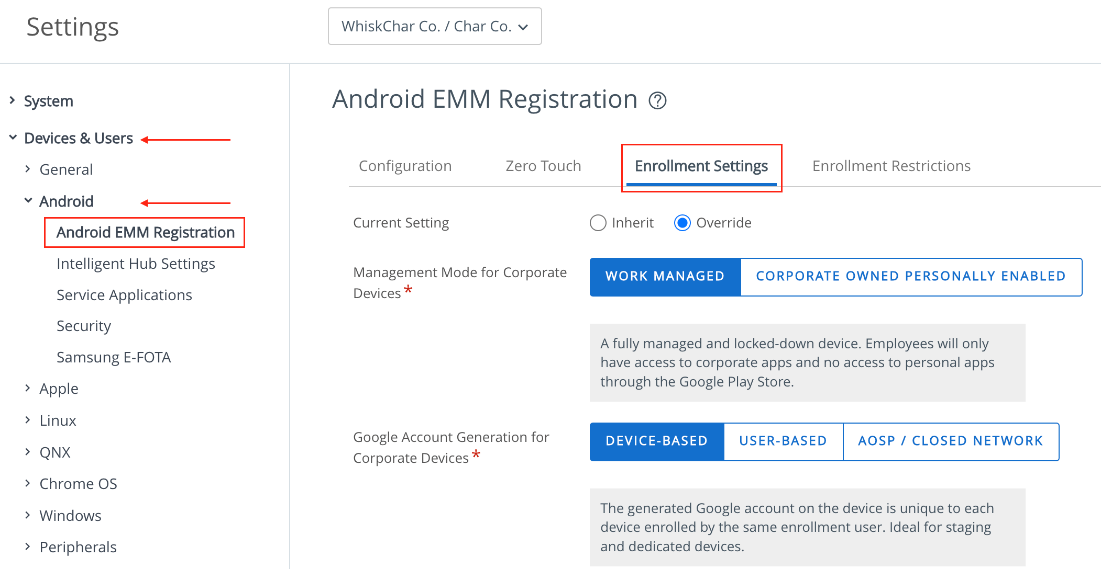
- Set Management Mode for Corporate Devices as Work Managed.
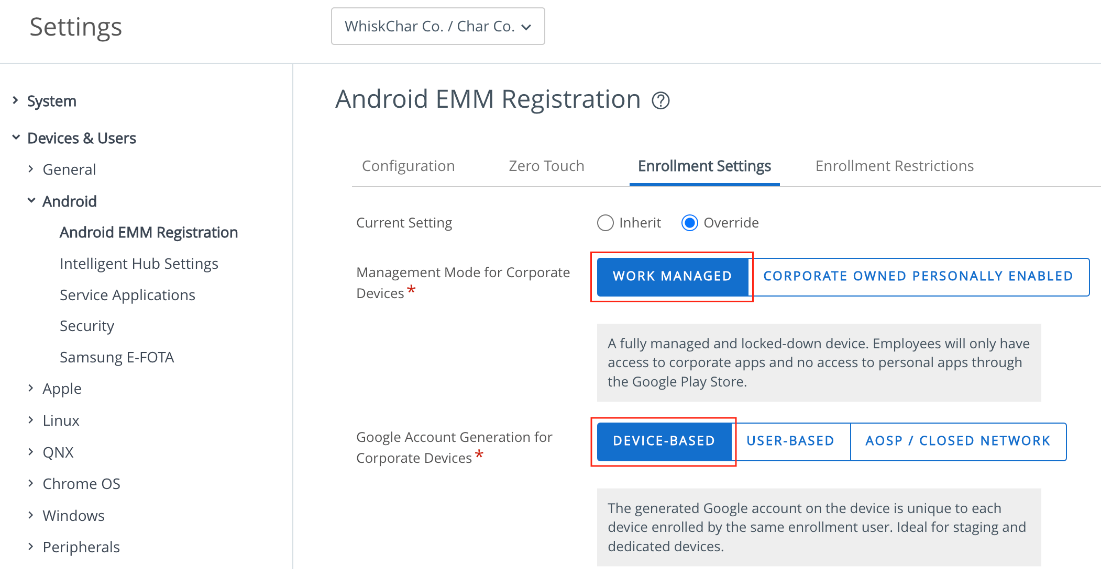
- Set Google Account Generation for Corporate Devices as Device-Based or User-Based(Recommended to use Device-Based for devices which have an OS version of 10 and above).
- For more information on User-Based and Device-Based Google Account Generation, see the Key Terms at the start of this tutorial. For Work managed devices, Device-Based would be chosen for specific purpose-built devices.
- Click Save.
Google Zero Touch Portal Integration
Zero-touch enrollment allows for Android 9.0+ devices to be configured with Workspace ONE UEM as the enterprise mobility management provider out of the box.
When the device is connected to the internet during the initial device setup, the Workspace ONE Intelligent Hub is automatically downloaded, and enrollment details are automatically passed to enroll the device with no user interaction. After you configure Zero-touch in Android’s Zero-touch Portal, you can manage zero-touch devices for your organization from the Android EMM Registration page in your Workspace ONE UEM console.
For additional information on zero-touch enrollment, see the Android support article Zero-touch enrollment for IT admins.
Quickly enrolling COPE devices into Workspace ONE UEM via Google’s Zero-Touch is supported on Android 9+ devices. Steps to enroll COPE devices using zero-touch are like enrolling Work Managed devices using Zero-Touch. For detailed instructions, jump to Google Zero-Touch Enrollment.
Google Zero Touch Prerequisites
Before you can perform the steps in this exercise, ensure that you have the following:
- Android device running Android 9.0 (Pie) or later.
- Device in factory reset / freshly out-of-the-box mode with Google Setup Wizard on the initial Start/Welcome page.
- Google Zero-Touch portal admin credentials (partner.android.com/zerotouch)
- Work with your carrier/device reseller to upload IMEI and serial numbers for your devices into the Zero-Touch portal.
Configure Google Zero Touch
Perform the following steps:
- Go to https://partner.android.com/ZeroTouch and log in using your administrator credentials.
- Navigate to the Configurations section and click the plus icon +.
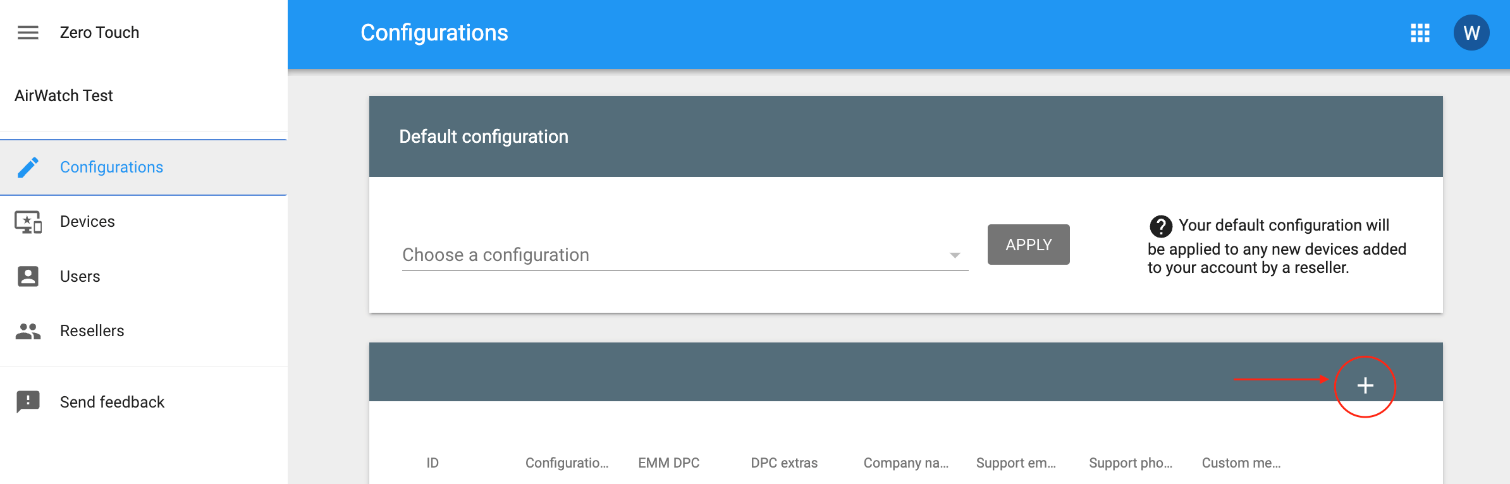
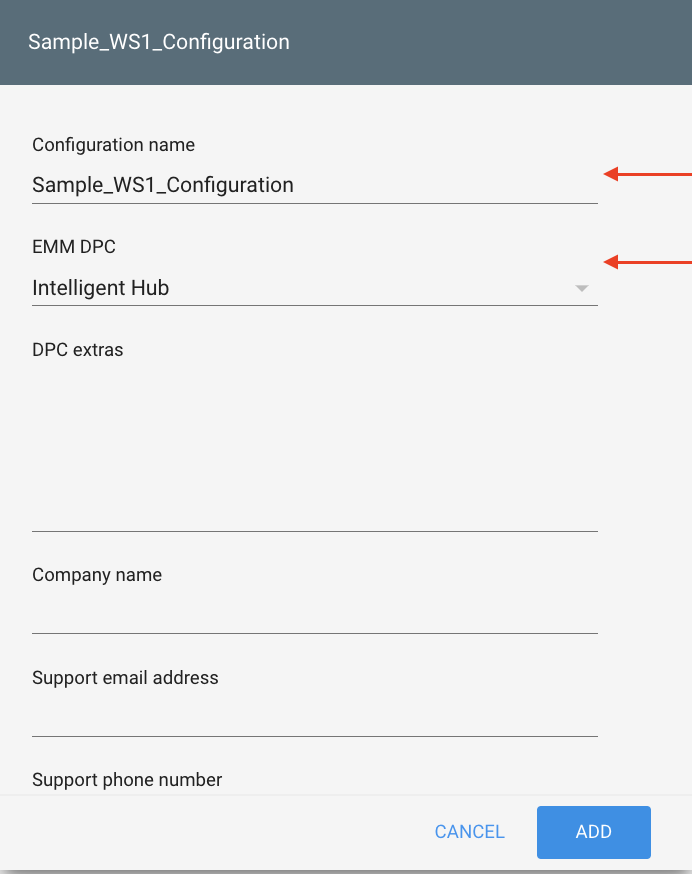
- Enter a Configuration Name and select Intelligent Hub as the EMM DPC (device policy controller) from the drop-down menu.
- Enter the enrollment credentials in the DPC extras text box. These DPC extras are configured in the Workspace ONE Intelligent Hub during enrollment. You can include the Workspace ONE UEM console server URL, group ID, enrollment username, and password. Copy the JSON-formatted text in this section.
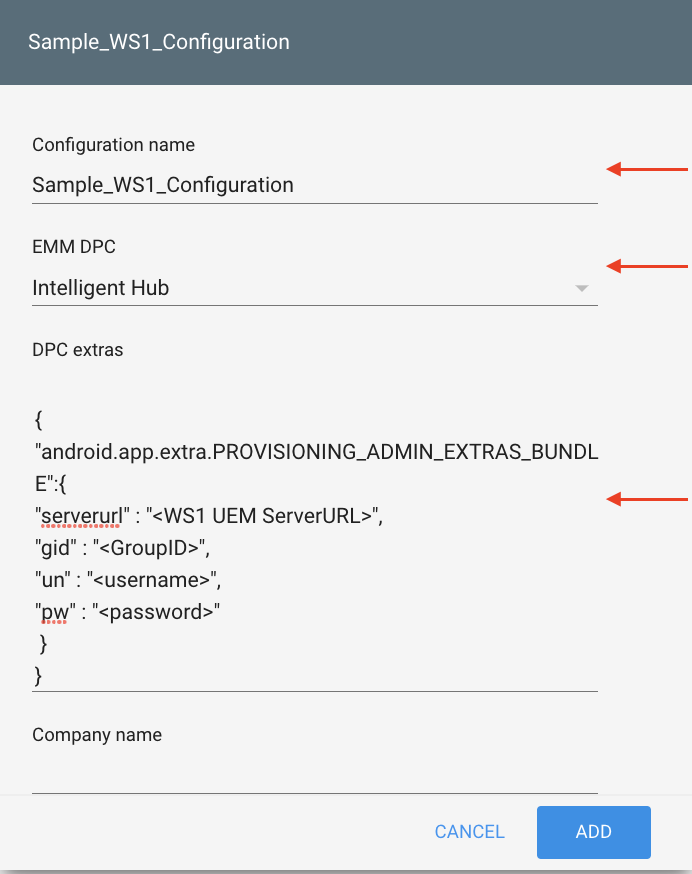
Depending on whether devices have a single staging user or are assigned to specific users, there are different DPC extras you can use for zero-touch configurations:
If end users are provisioning their own devices, exclude the username and password from the DPC extras. The user will enter them when prompted during device setup:
{
"android.app.extra.PROVISIONING_ADMIN_EXTRAS_BUNDLE":{
"serverurl":"<WS1 UEM ServerURL>",
"gid": "<GroupID>"
 }
}
If you are assigning all Zero-Touch provisioned devices to a single staging user, like for kiosk and multi-user shift worker devices, enter the staging user credentials:
{
"android.app.extra.PROVISIONING_ADMIN_EXTRAS_BUNDLE":{
"serverurl" : "<WS1 UEM ServerURL>",
"gid" : "<GroupID>",
"un" : "<username>",
"pw" : "<password>"
 }
}
For a list of additional JSON enrollment flags (DPC Extras), see Additional Supported Enrollment Flags for Android Enrollment (DPC Extras) on Omnissa Docs.
- Enter the Company Name, Support email address, and Support phone number.
- Enter the (optional) Custom message to display on the device during setup. Then click Add.
Zero-touch configuration is successfully created. You can assign zero-touch configurations to your devices from the Devices tab, by selecting the enrollment configuration just created and applying it to the devices. For detailed instructions on assigning Zero-Touch configurations to your devices, see the Google zero-touch support page Zero-touch enrollment for IT admins.
Link Google Zero Touch with Workspace ONE UEM
After you have configured your zero-touch account, you can link your Google zero-touch account and the Workspace ONE UEM console to manage your zero-touch devices and configurations from within the UEM console.
By linking your zero-touch account to the UEM console, you can set a default enrollment configuration, and edit support information directly through the Workspace ONE UEM console. This section covers the steps involved in linking your zero-touch account to Workspace ONE UEM.
Note: Before linking accounts, specify the parameters for the default zero-touch enrollment configuration. After you link these accounts, Workspace ONE UEM sets these parameters as the default enrollment configuration for the account.
- Log in to your Workspace ONE UEM console and select the correct OG.
- Navigate to Groups & Settings > All Settings > Devices & Users > Android > Android EMM Registration > Zero Touch.
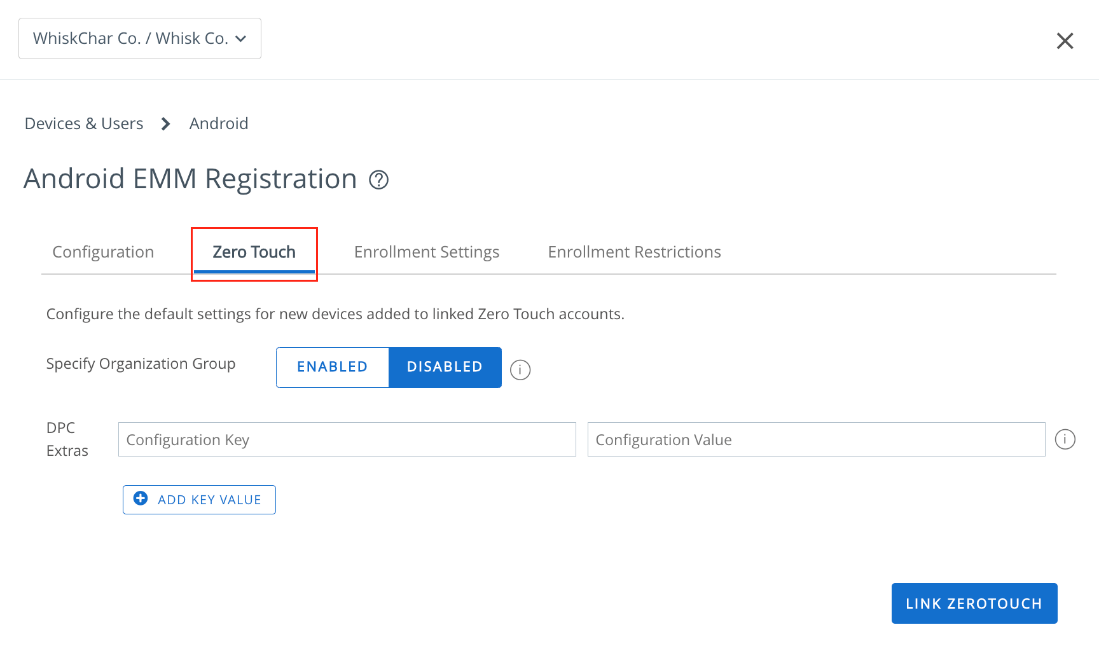
- If you would like any default zero-touch configurations to apply to a specific organization group, set Specify Organization Group to Enabled and select the desired OG. When the setting is Disabled, settings apply to all OGs.
- Enter DPC extra key and values. For a list of supported DPC extras, see Additional Supported Enrollment Flags for Android Enrollment (DPC Extras) on Omnissa Docs.
- Click Link ZeroTouch. You now can view zero-touch accounts, configuration, devices, and support information. You can also link additional zero-touch enrollment accounts.
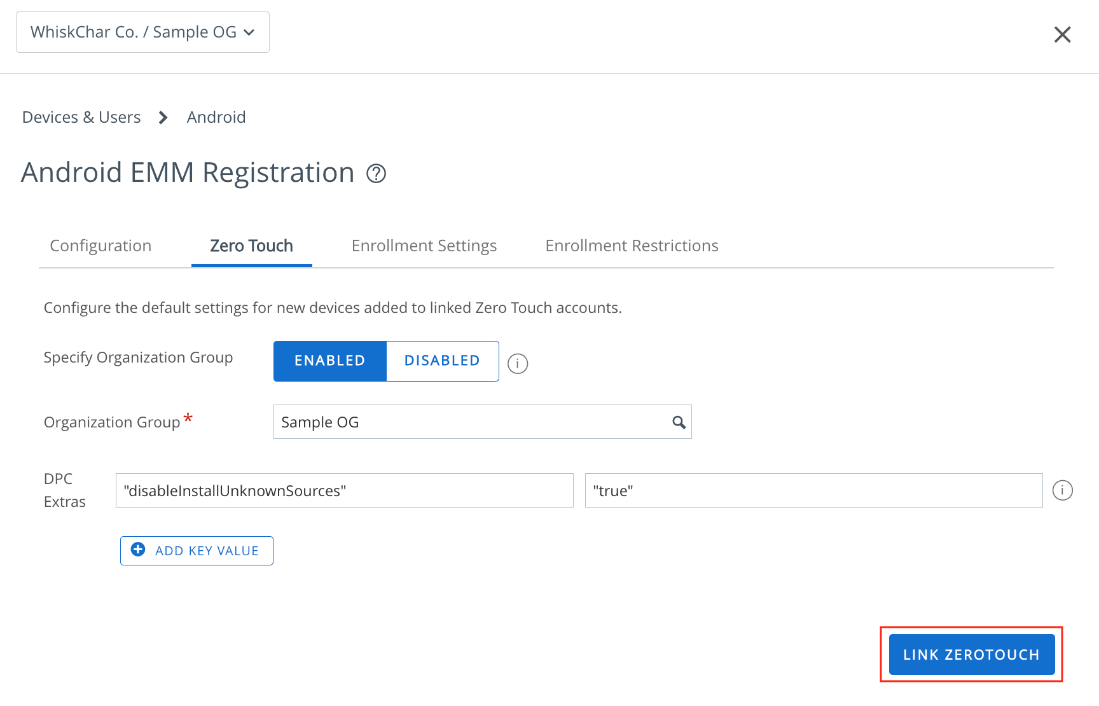
Note: To change this default configuration, unlink the zero-touch enrollment account and repeat this linking process.
Workspace ONE QR Code Enrollment
The QR code enrollment method sets up and configures Work Managed Device (as well as Corporate Owned Personally Enabled (COPE)) by scanning a QR code generated with Workspace ONE UEM’s Enrollment Configuration Wizard.
To perform the steps in this exercise, you must satisfy the following requirements:
- Android device running Android 8.0(Oreo) or later.
- Device in factory reset / freshly out-of-the-box mode with Google Setup Wizard on the initial Start/Welcome page.
Configure Workspace ONE QR Code Enrollment
Perform the following steps:
- Log in to your Workspace ONE UEM console and select the destination OG.
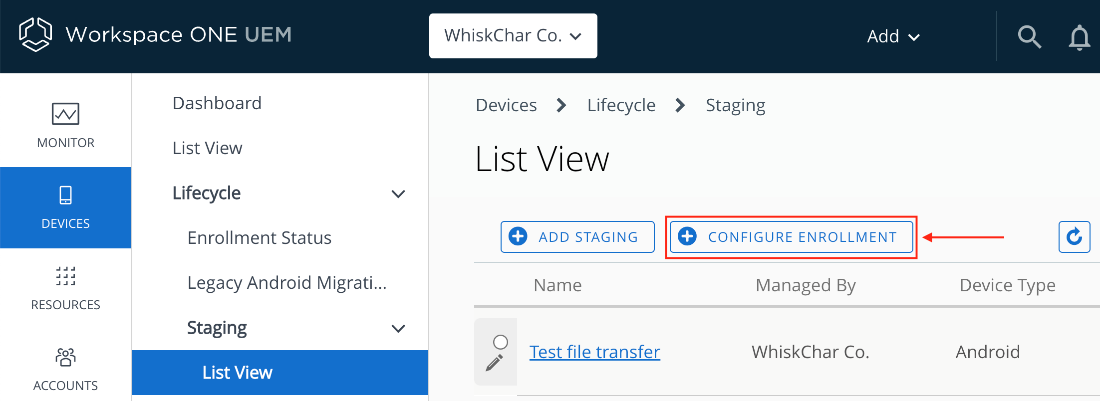
- Navigate to Devices > Lifecycle > Staging > List View > Configure Enrollment.
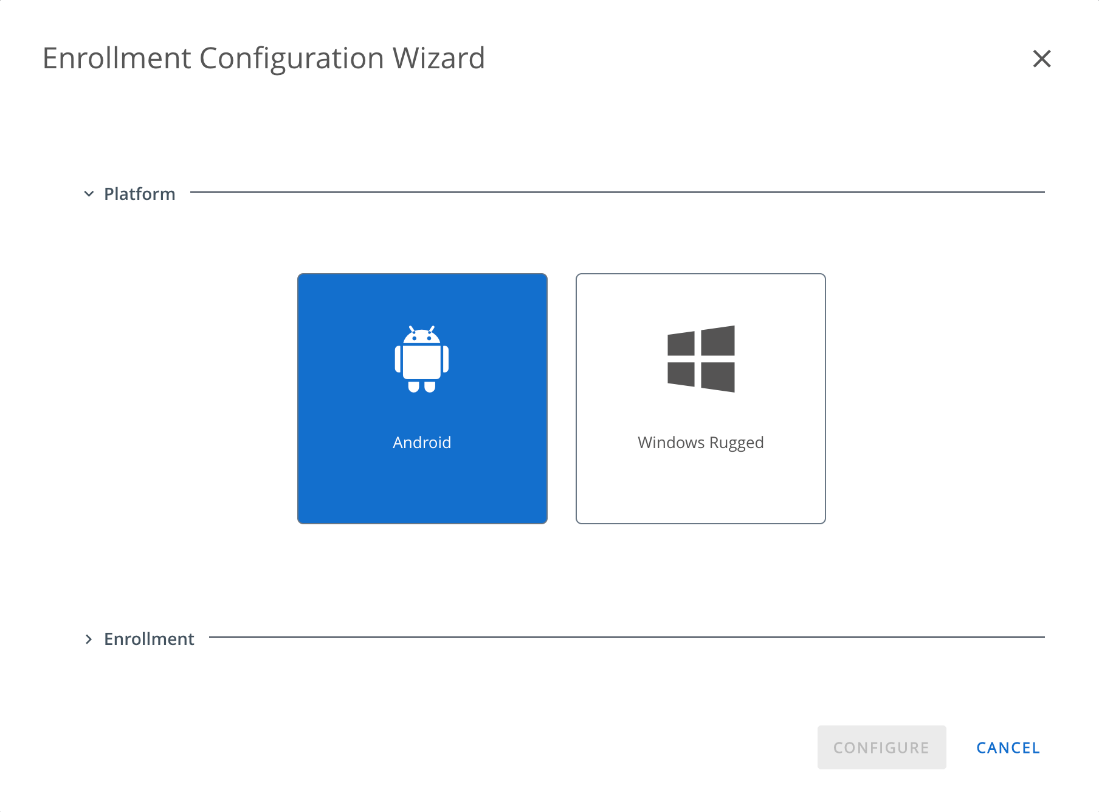
- Select Android.
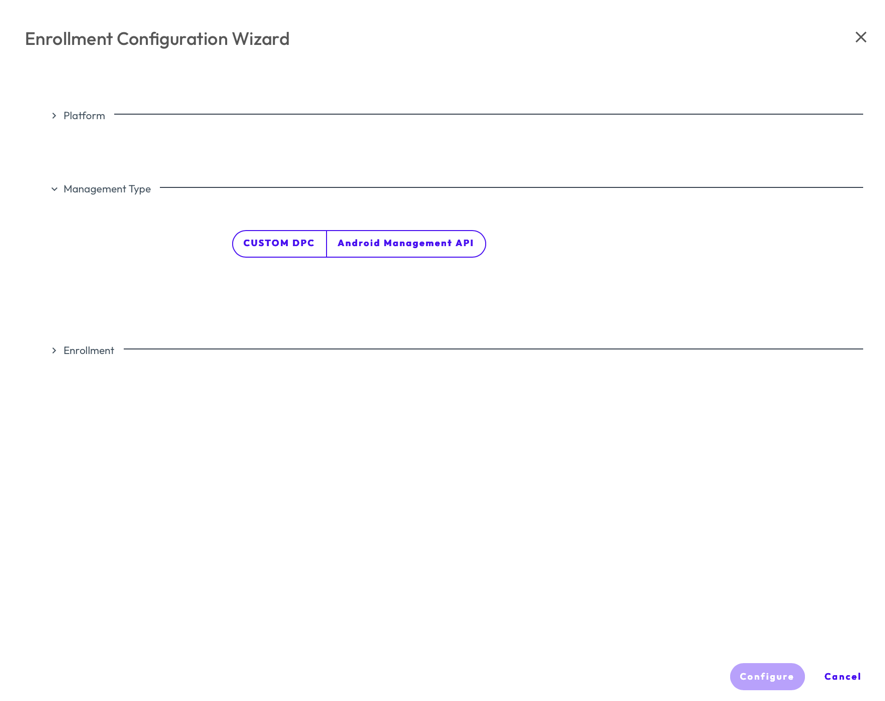
- Select Management Type as Custom DPC.
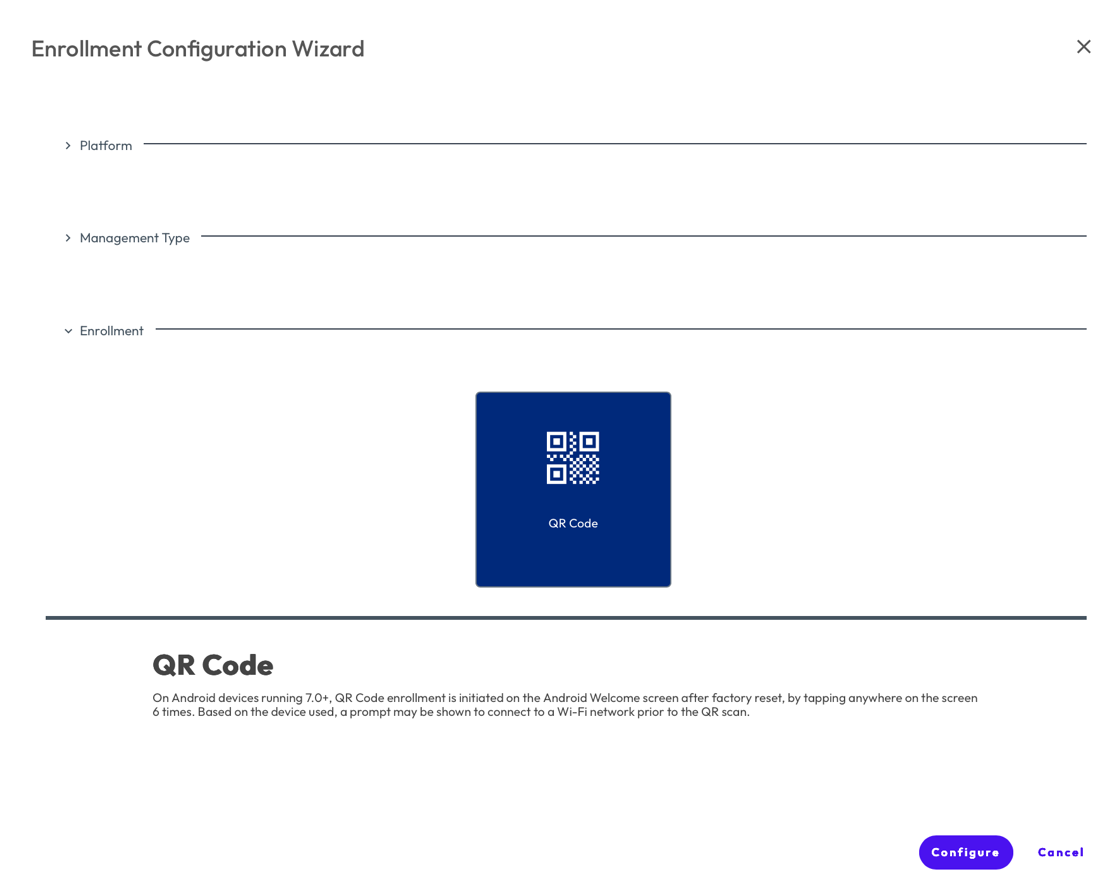
- Click Configure.
- In the Wi-Fi section, configure the optional Wi-Fi for the device to connect to before enrollment. Then click Next.
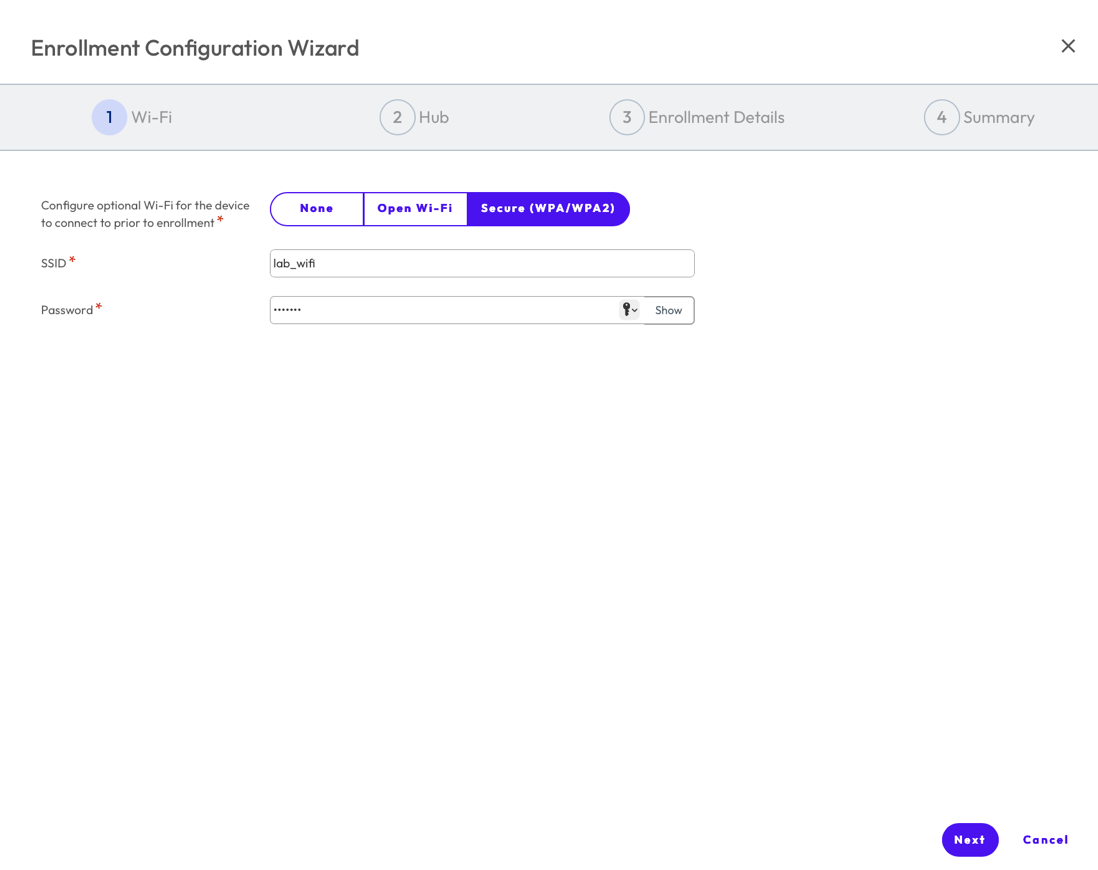
- In the Hub section, select either the latest version of the Workspace ONE Intelligent Hub or a previous/custom version hosted on an external URL. Then click Next.
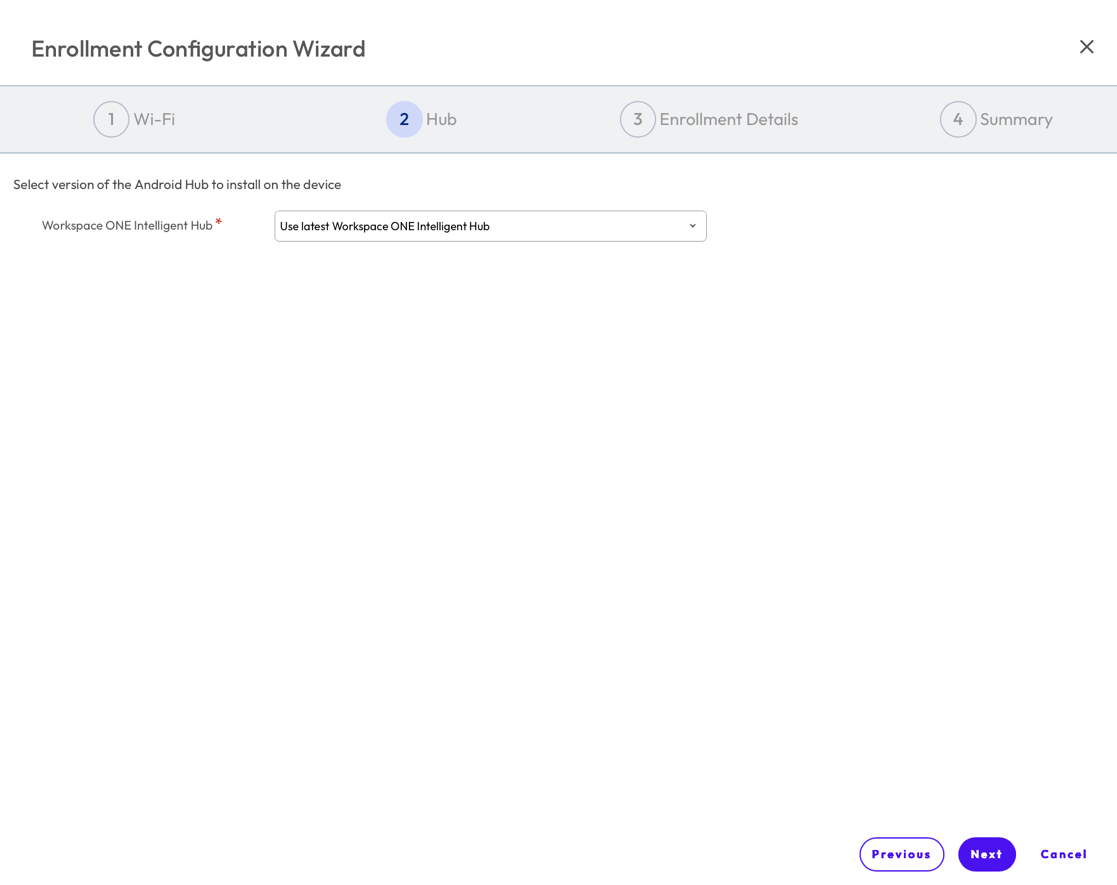
- In the Enrollment Details section, set Configure Organization Group to Enabled and select the desired OG in which to enroll devices. Then configure login credentials based on your use case. Set the desired state for System Apps availability on the device. Then click Next.
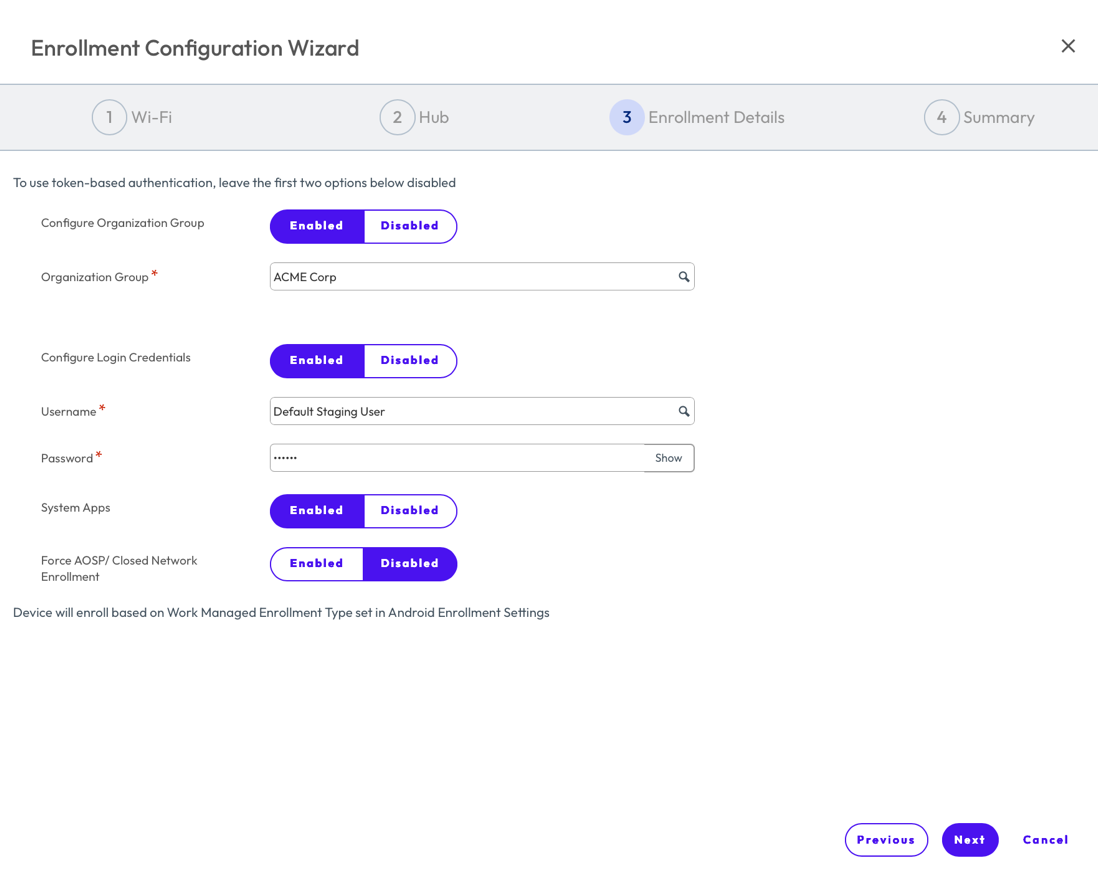
- The QR Code is ready to view or download. Note that QR codes are not automatically saved in the console and must be downloaded.
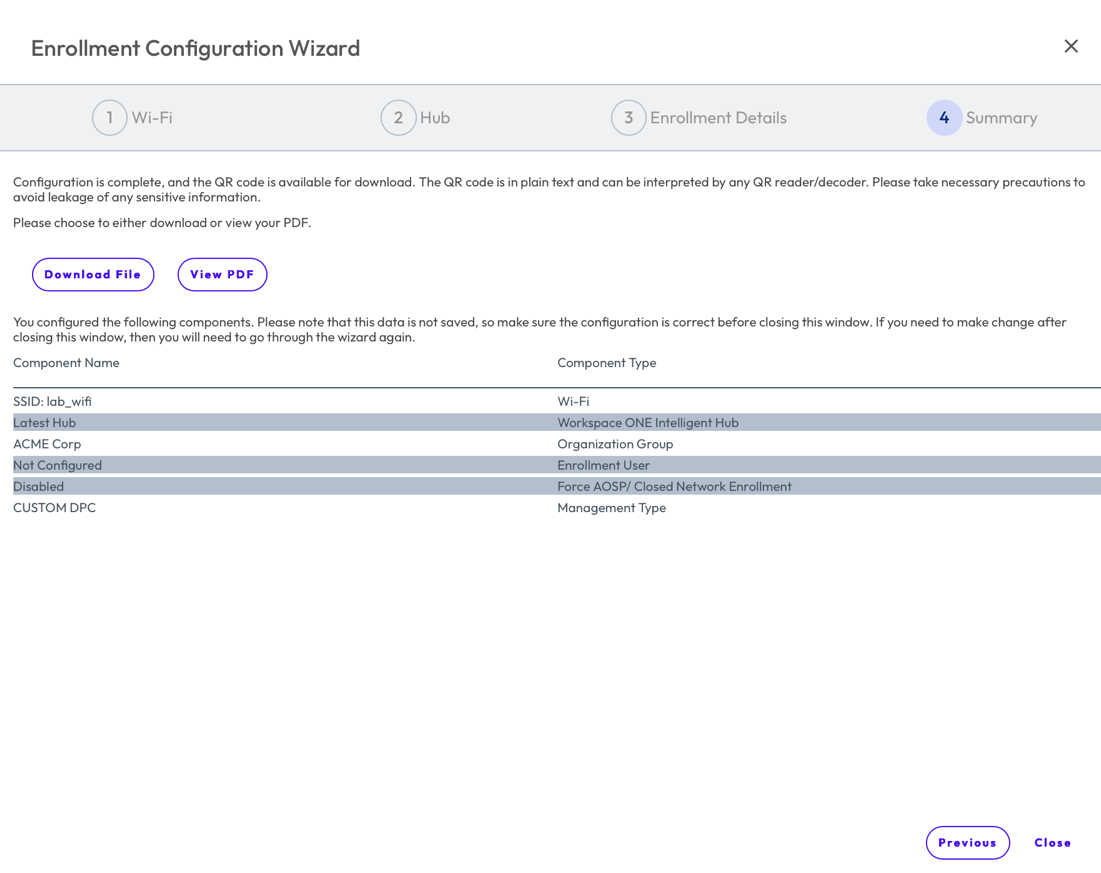
DPC Keyword afw#hub-based Enrollment
During Work Managed device enrollments (or Work profile for company-owned devices, in some cases), the user enters a special DPC-specific identifier token when they are prompted to add a Google account as part of the Android Setup Wizard. The token for Workspace ONE UEM is afw#hub which automatically identifies Workspace ONE UEM as your EMM provider and proceeds to download the Workspace ONE Intelligent Hub on the device before prompting the user to configure the Intelligent Hub.
DPC Keyword-based enrollment is supported on Android 8.0 (Oreo) or later devices.
DPC Keyword-based enrollment for Work profile for company-owned devices has been deprecated on Android 11 and later devices. For more information, see the Omnissa Knowledge Base article Changes to Corporate Owned Personally Enabled (COPE) in Android 11.
For detailed instructions, see Enroll Android Devices using Omnissa Workspace ONE Intelligent Hub Identifier on Omnissa Docs.
Enroll in Closed Network/AOSP Work Managed Devices
Workspace ONE UEM can be used to manage your corporate-owned Android devices that are enrolled and deployed within a closed network. A closed network here refers to one in which devices either cannot connect to Google services or are running Android Open-Source Project (AOSP) code.
Considerations for Closed Network/AOSP Devices
- Only Work Managed enrollment is possible. Corporate Owned Personally Enabled (COPE) is not available without Google connectivity.
- Public applications cannot be deployed as there is no access to the Play Store. By extension, Public App Auto Update profiles also cannot be applied.
- Applications must be uploaded to the Workspace ONE UEM console as an internal app for deployment to devices on closed networks.
- You must use AirWatch Cloud Messaging to manage your Android devices in real time. Firebase Cloud Messaging is not supported as devices cannot connect to these servers.
- For Samsung Android devices and accessing advanced Knox capabilities, a Knox License Key must be activated on the device. Samsung offers on-premises installations of the Knox license activation servers for closed network deployment since activation requires public internet.
For detailed instructions on configuring your Workspace ONE UEM console to enroll work-managed devices on a closed network, see Configure Android EMM Settings in the Workspace ONE UEM Console on Omnissa Docs.
Samsung Knox Mobile Enrollment (KME)
Samsung Knox Mobile Enrollment (KME) provides an efficient way to enroll large numbers of corporate-owned Samsung devices with minimal end-user interaction. To prepare for KME, determine your enrollment type, configure user credentials in Workspace ONE UEM, set up the KME Console, and create the MDM profiles to be deployed to your devices.
For detailed instructions, see Samsung Knox Mobile Enrollment on Omnissa Docs.
Honeywell Enterprise Provisioner Enrollment Barcodes
Honeywell Android devices can be enrolled using a staging barcode generated directly from the Workspace ONE UEM console. The Honeywell Enterprise Provisioner is Honeywell's Android solution for staging devices and preparing them for production use.
For detailed instructions, see Enroll Honeywell Devices with Staging Barcode Android, on Omnissa Docs.
Zebra StageNow Enrollment Barcodes
Zebra Android devices can be enrolled using a StageNow barcode generated from the Workspace ONE UEM console. The StageNow staging client is Zebra's Android solution for staging devices and preparing them for production use.
For instructions on generating enrollment barcodes, see Enroll Zebra Devices with StageNow Barcode, Android on Omnissa Docs.
Configuring Android Profiles in Workspace ONE UEM
This exercise helps you understand the basics of configuring Android Profiles in Workspace ONE UEM.
Android profiles help ensure device and data compliance. Profiles serve many different purposes, from enforcing corporate restrictions on devices (both Fully Managed and Corporate Owned Personally Enabled), like disabling USB Debugging and/or Screen Capture and so on, as well as installing organization-specific policies such as Certificates and VPN configurations.
Prerequisites
To perform the steps in this exercise, you must meet the following requirements:
- Complete the Android EMM registration in your Workspace ONE UEM console.
- Enroll Android devices into Workspace ONE UEM using any of the enrollment modes mentioned before in this document.
Android Profile - Custom DPC vs Android Management API
Android profiles can now be configured through either Custom DPC or Android Management API (AMAPI), depending on the desired management type. Custom DPC profile configuration is supported for Work Profile, Fully Managed, and COPE devices, while AMAPI configuration is supported for Work Profile and COPE devices.
Some of the key capabilities of both the management types are detailed here.
Note: AMAPI profiles apply only to devices enrolled under AMAPI management, while custom DCP profiles applies to non‑AMAPI devices.
Configuring AMAPI Profile
To configure AMAPI based profiles , follow these steps:
- Navigate to Resources > Profiles & Baselines > Profiles > Add > Add Profile > Android.
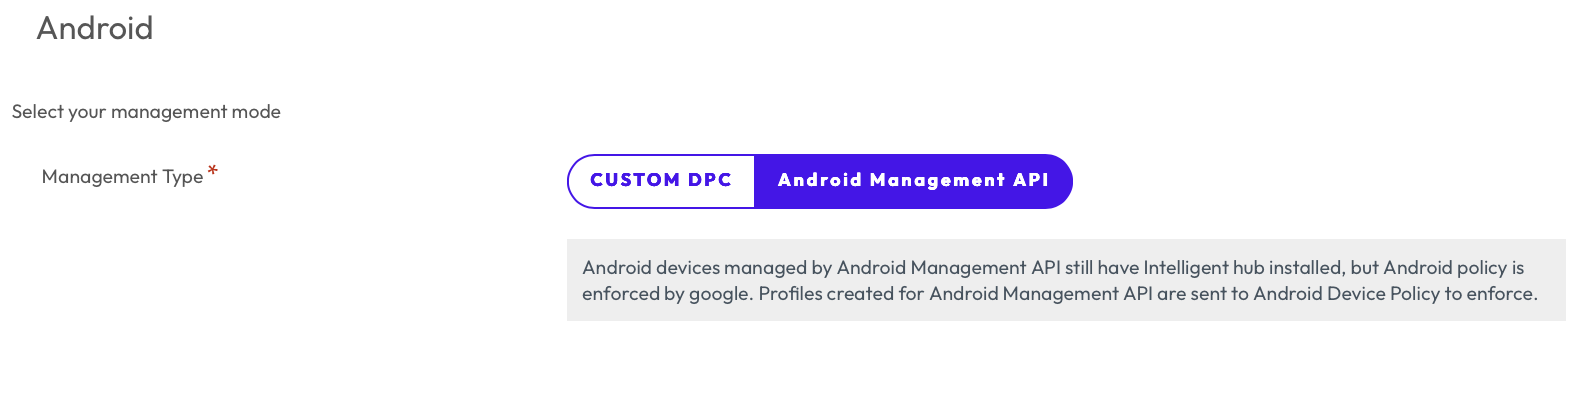
- Set Management Type to Android Management API.
- Configure the following to get started:
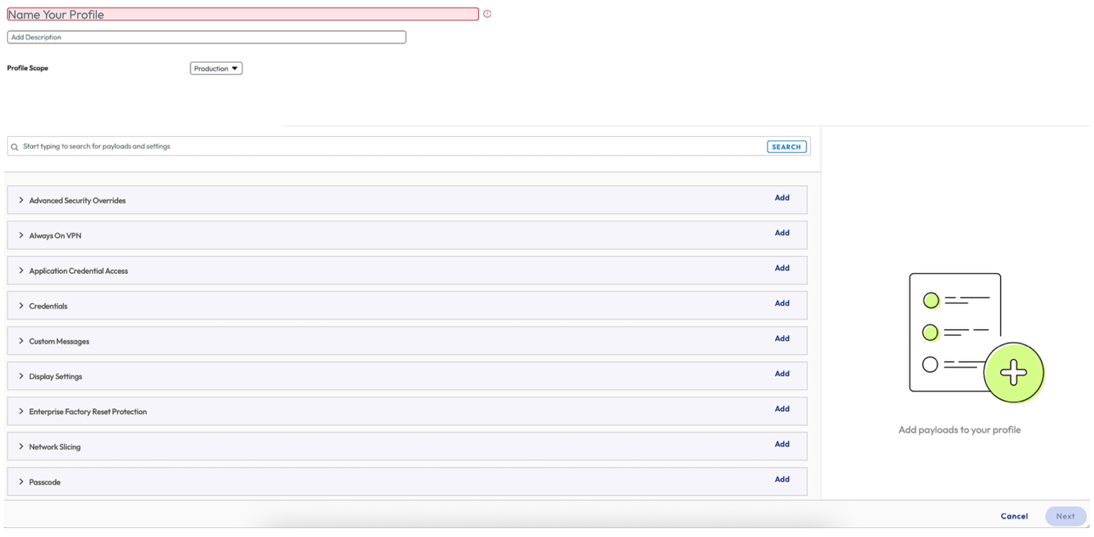
- Name – Set the name for your profile and add a description that would be easily recognizable to you.
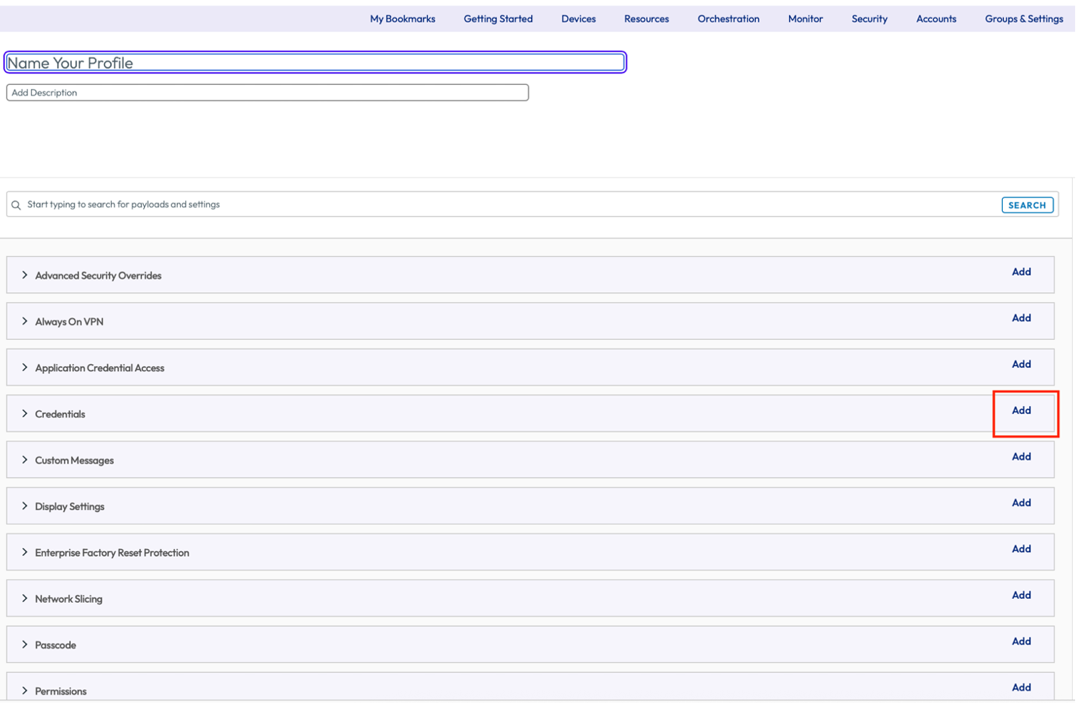
- Select the Add button next to the desired profile payload and configure the settings as desired. You can use the drop-down and preview the profile configuration settings before selecting Add.
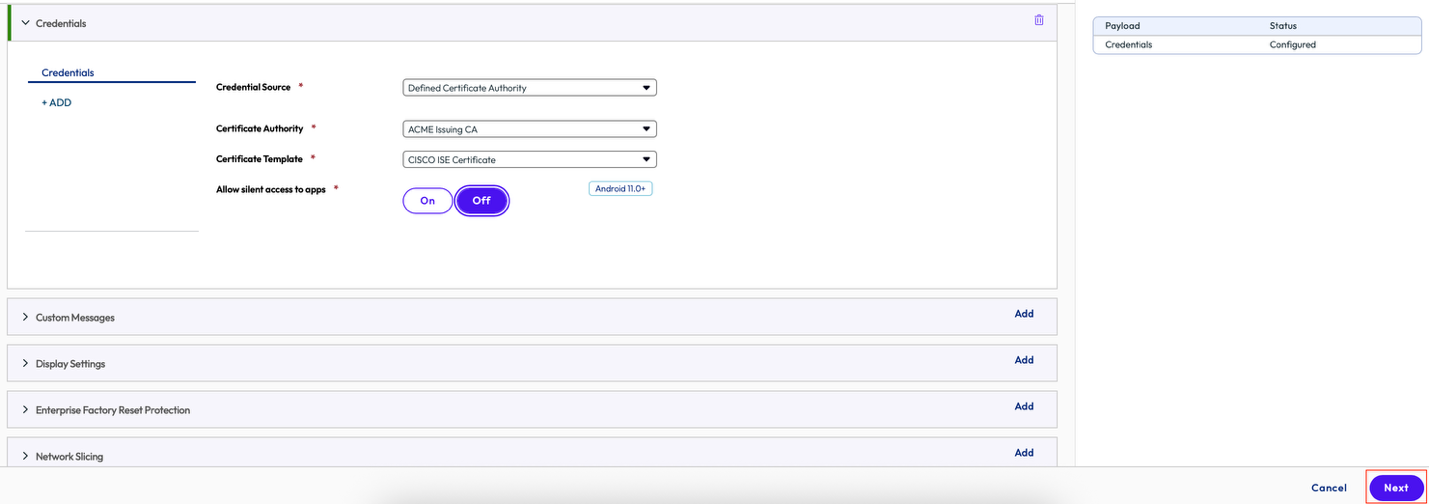
- After the profile is configured, click Next to configure the general Assignment and Deployment profile settings as appropriate.
- Configure the following settings:
Settings | Description |
Assignment
| |
| Smart Group | Select the desired Smart Group(s) that should receive the profile. |
| Allow Exclusion | When turned on, a new text box Exclude Group displays. This text box allows you to select those smart groups you want to exclude from the assignment of the device profile. |
| Deployment | |
| Assignment Type | Determines how the profile is deployed to devices:
|
| Allow-Removal | Determines whether the end user can remove the profile.
|
| Managed By | The organization group with administrative access to the profile. |
| Install Area Only | Turn on to display geofencing option: Install only on devices inside selected areas: Enter an address anywhere in the world and a radius in kilometers or miles to make a ‘perimeter of profile installation’. |
| Schedule Install Time | Turn on to configure time schedule settings: Turn on Scheduling and install only during selected time periods: Specify a configured time schedule in which devices receive the profile only within that time frame. |
| Preview | |
| View Device Assignment | After you make the desired Smart Group(s) selection, you can preview a list of all assigned devices, taking all the smart group assignments and exclusions into account. |
- Click Save & Publish.
For a detailed description of available Profile Payloads and their corresponding configuration settings, see How to Configure Android profiles on Omnissa Docs.
Configure Android Profiles using Custom DPC in Workspace ONE UEM
In the Workspace ONE UEM console, you can follow the same navigation path for each profile. The Preview section shows you Total Assigned Devices with a list view. You can also see the added profiles on the Summary tab.
To configure profiles, follow these steps:
- Navigate to Resources > Profiles & Baselines > Profiles > Add > Add Profile > Android
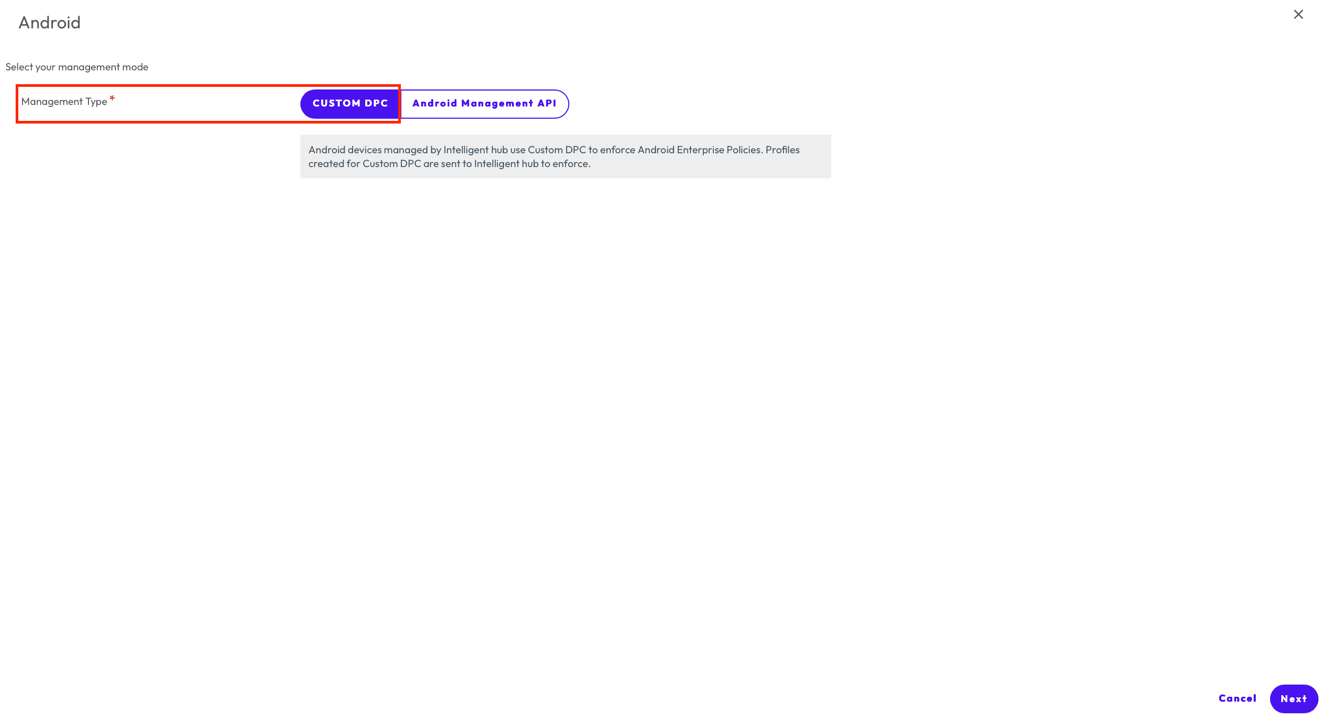
- Select Management Type as Custom DPC and click Next.
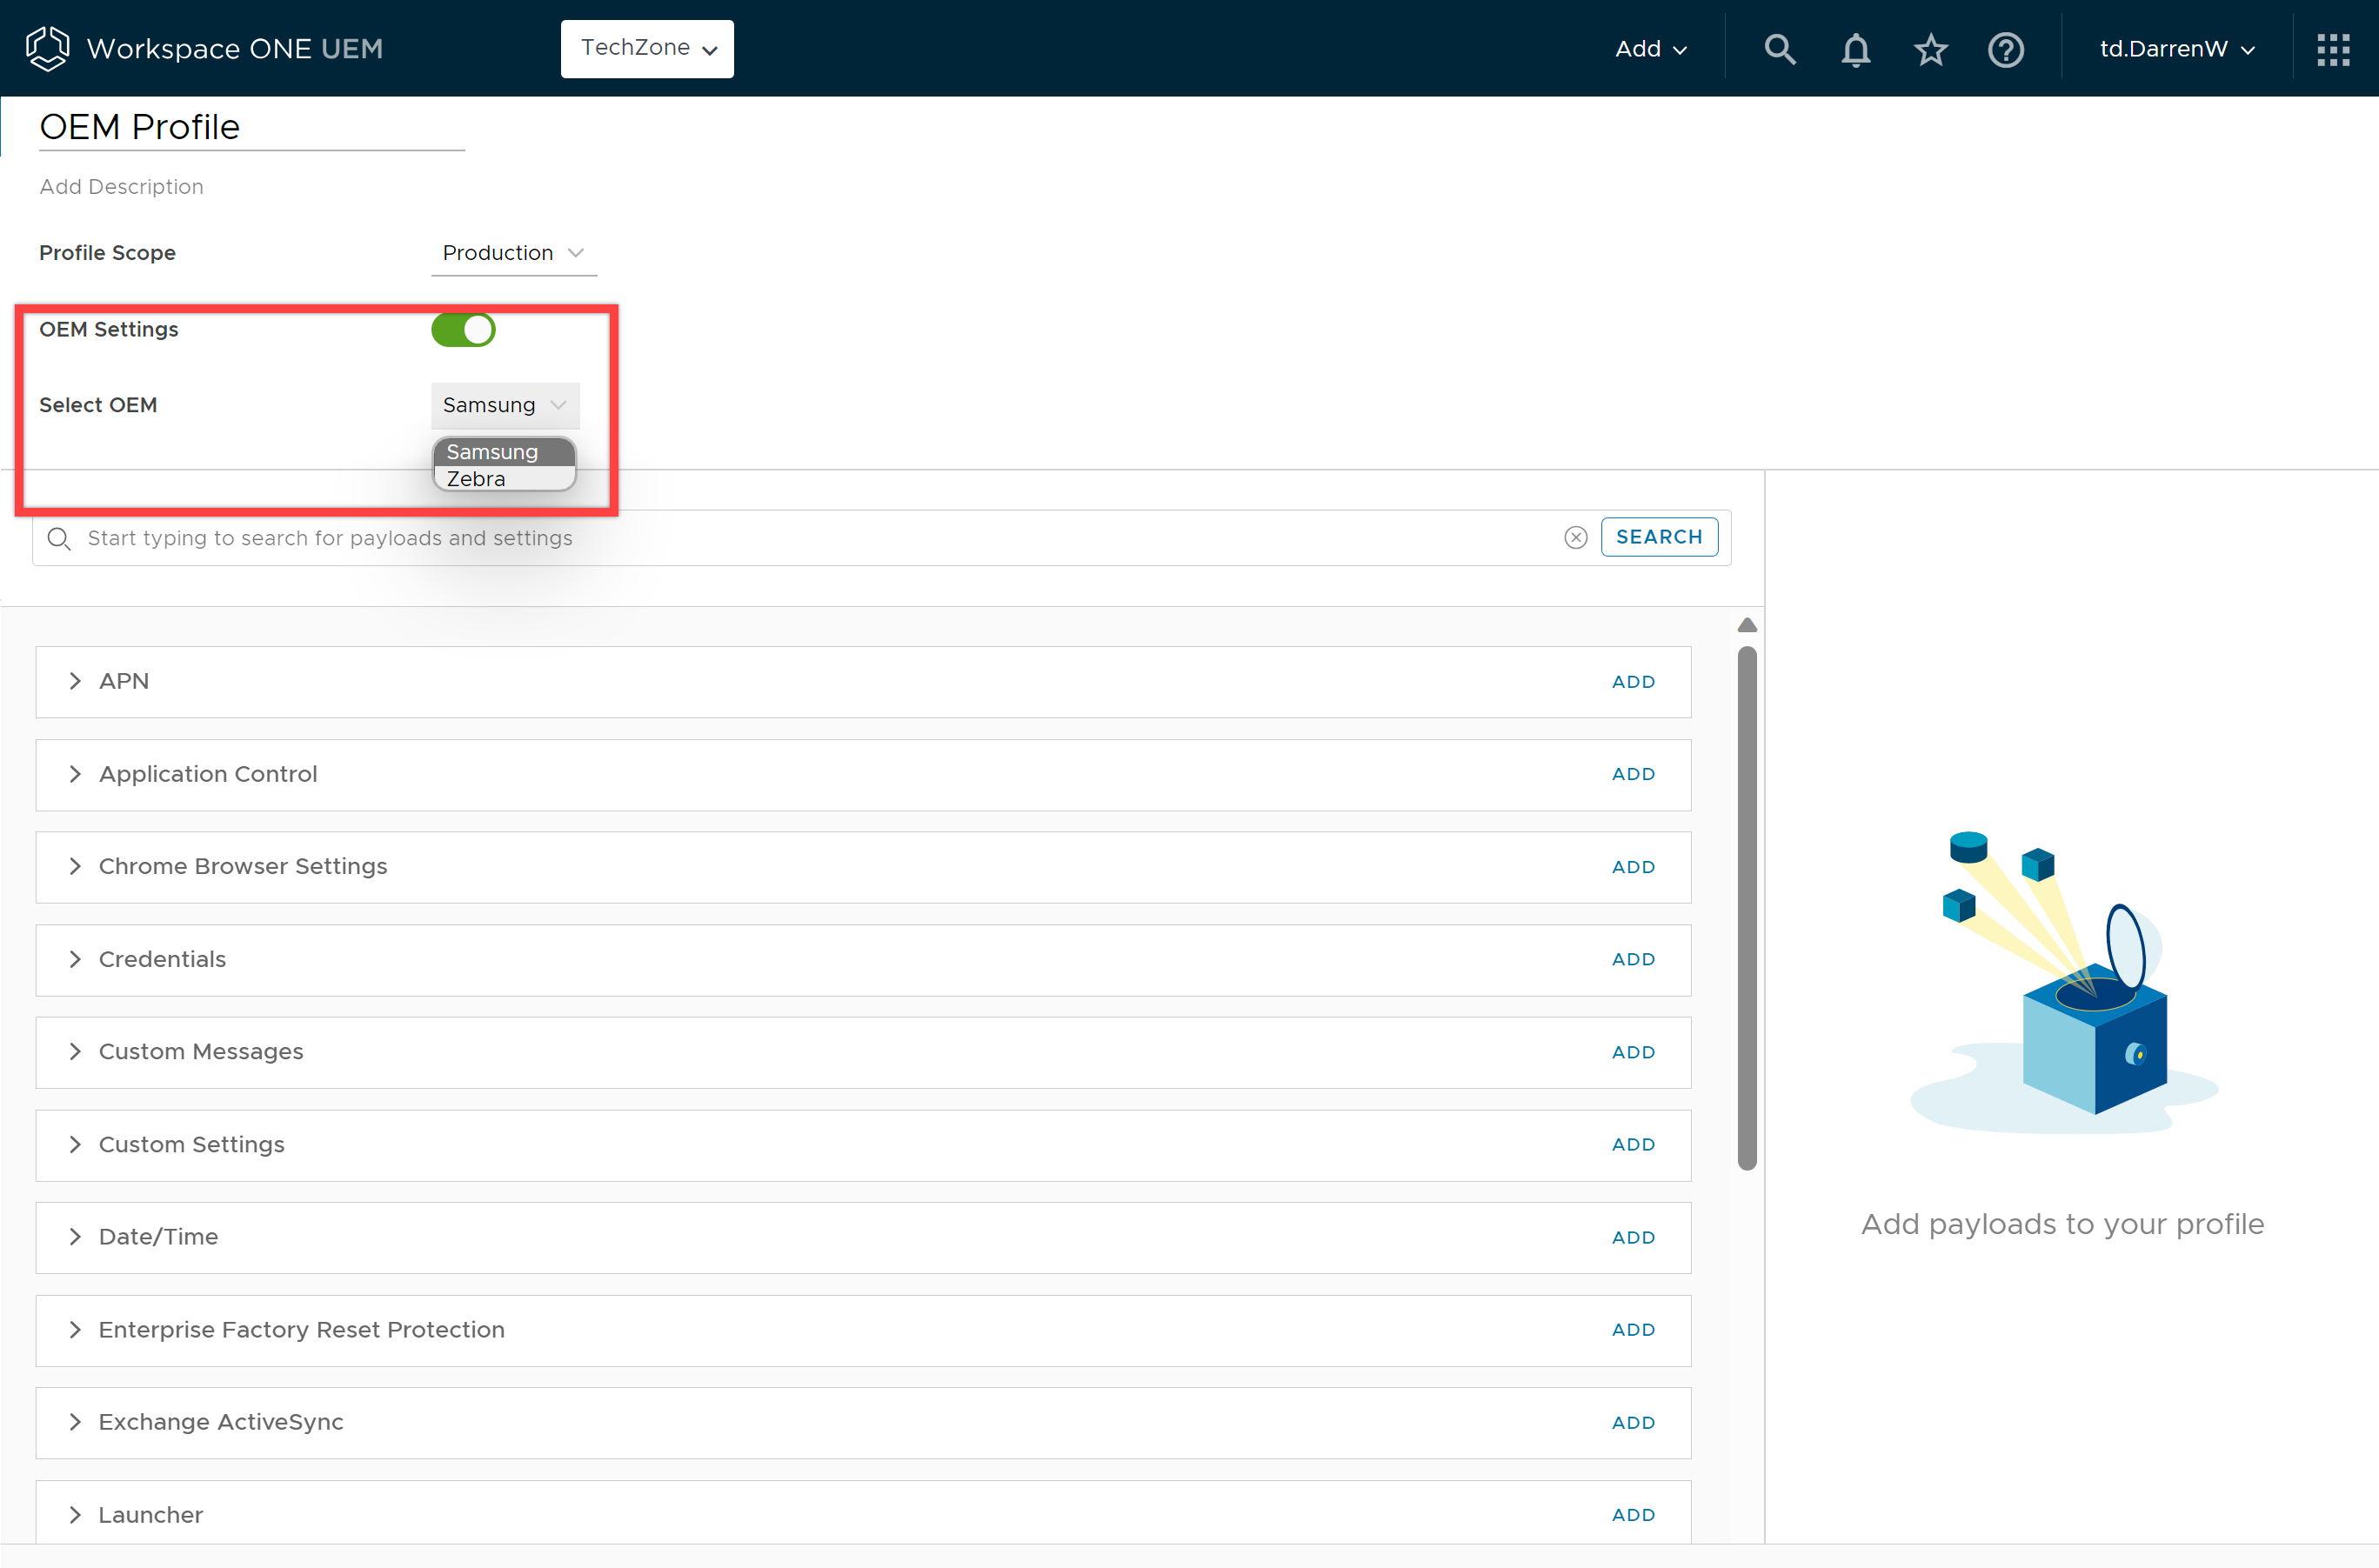
- Configure the following to get started:
- Name - Set the name for your profile and add a description that would be easily recognizable to you.
- Profile Scope - Set how the profile is used in your environment either on Production, Staging, or Both.
- OEM Settings - Turn on OEM settings to configure specific settings for Samsung or Zebra devices. After you select the OEM, you will see additional profiles and settings displayed that are unique to either OEM.
However, it is strongly advised to use Samsung KSP or Zebra OEMConfig to configure OEM-specific settings as these apps provide zero-day support for OEM-specific device configurations. For more info on OEMConfig, jump to the OEMConfig/AppConfig section of this guide.
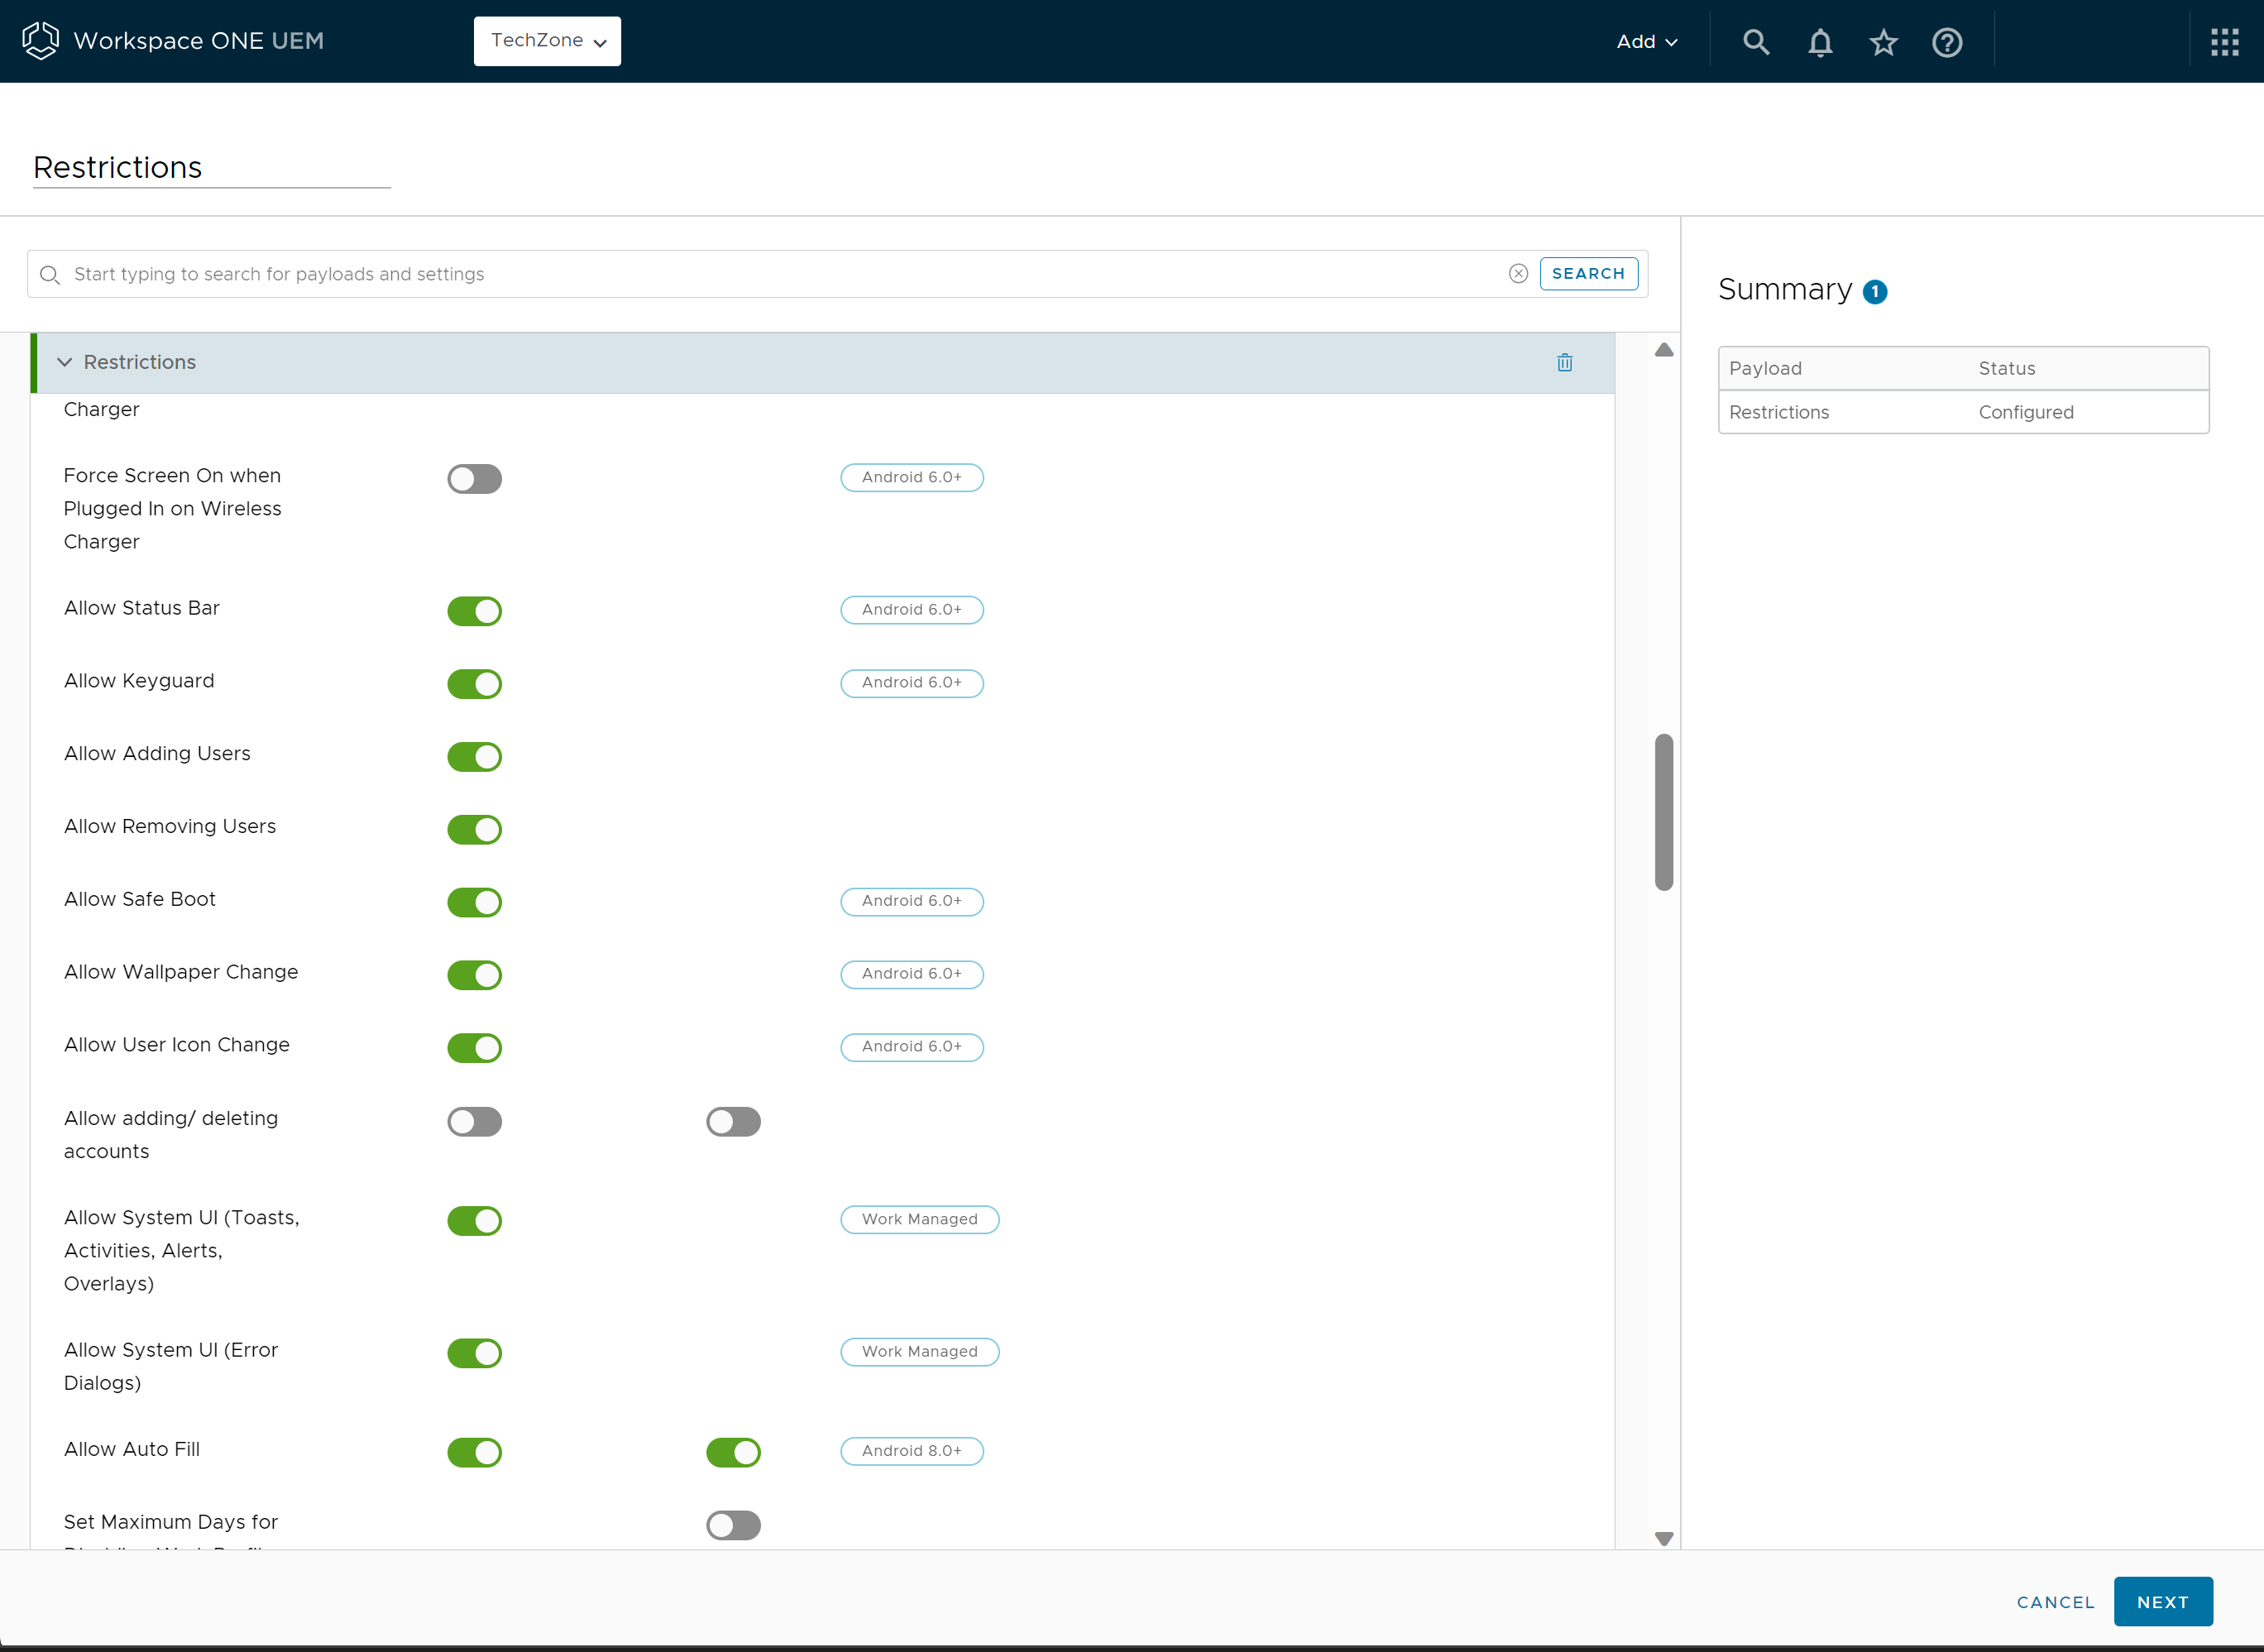
- Select the Add button next to the desired profile payload and configure the settings as desired. You can use the drop-down and preview the profile configuration settings before selecting Add. A detailed description of each profile’s payload is mentioned in the next section.
- After the profile is configured, click Next to configure the general Assignment and Deployment profile settings as appropriate.
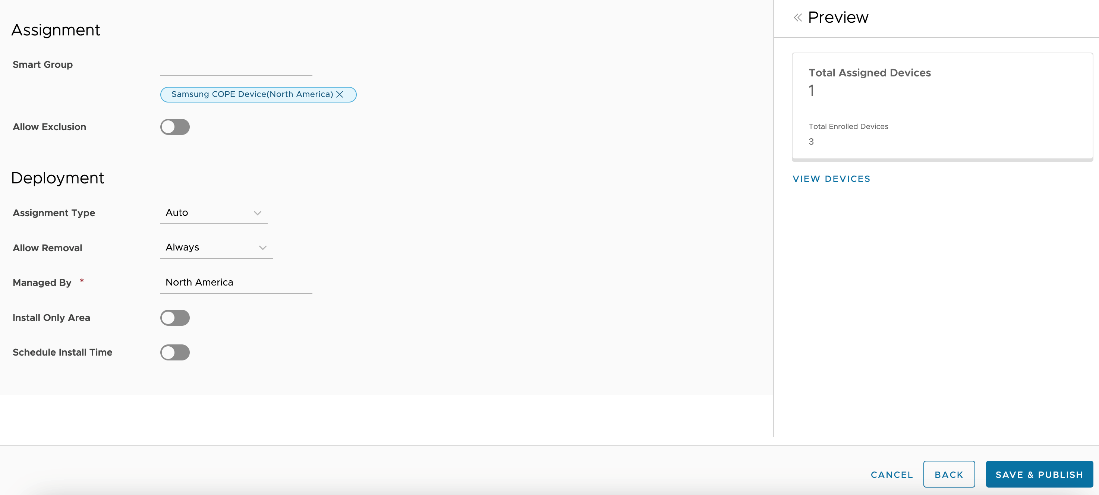
- Configure the following settings:
Settings | Description |
Assignment
| |
| Smart Group | Select the desired Smart Group(s) that should receive the profile. |
| Allow Exclusion | When turned on, a new text box Exclude Group displays. This text box allows you to select those smart groups you want to exclude from the assignment of the device profile. |
| Deployment | |
| Assignment Type | Determines how the profile is deployed to devices:
|
| Allow-Removal | Determines whether the end user can remove the profile.
|
| Managed By | The organization group with administrative access to the profile. |
| Install Area Only | Turn on to display geofencing option: Install only on devices inside selected areas: Enter an address anywhere in the world and a radius in kilometers or miles to make a ‘perimeter of profile installation’. |
| Schedule Install Time | Turn on to configure time schedule settings: Turn on Scheduling and install only during selected time periods: Specify a configured time schedule in which devices receive the profile only within that time frame. |
| Preview | |
| View Device Assignment | After you make the desired Smart Group(s) selection, you can preview a list of all assigned devices, taking all the smart group assignments and exclusions into account. |
- Click Save & Publish.
For a detailed description of available Profile Payloads and their corresponding configuration settings, see How to Configure Android profiles on Omnissa Docs.
User Experience - AMAPI vs Custom DPC Enrollment
As we have covered configuring of a profile in both AMAPI and Custom DPC , a user experience differs significantly when a device is to be brought into compliance with an applied profile. Understanding this distinction is especially important for organizations transitioning from Custom DPC to AMAPI, as the compliance enforcement model changes fundamentally.
AMAPI - Platform-Enforced Compliance
With AMAPI, compliance enforcement is handled directly by the Android platform rather than by Workspace ONE UEM. This means that when a device falls out of compliance with an applied profile, Android itself intervenes — without waiting for a UEM compliance policy to trigger.
Example: Passcode Profile
When a passcode profile is applied that requires a more complex device passcode than what is currently set by the user, the following sequence occurs automatically:
- Work Profile apps are suspended. Android immediately suspends all applications within the Work Profile, making them inaccessible to the user until the requirement is met.
- A notification is posted. The user receives a system notification informing them that action is required — in this case, that they must set a passcode that meets the required complexity.
- A countdown timer begins. Android starts a countdown during which the user must take the required action. If the device does not meet the profile requirements before the countdown expires, the device is automatically unenrolled.
This enforcement is immediate, consistent, and independent of any UEM compliance policy. The user has a clear, time-bound prompt to act, and the consequences of inaction (unenrollment) are enforced by the platform itself.
Custom DPC - UEM Compliance Policy–Driven Enforcement
With Custom DPC enrollment, the Android platform does not natively enforce profile requirements in the same way. Compliance enforcement is entirely dependent on the administrator configuring and activating UEM Compliance Policies in Workspace ONE UEM.
Example: Passcode Profile
If a passcode profile is applied but the device does not meet its requirements, nothing happens automatically. The exception is Samsung devices, where Intelligent Hub will launch the passcode setup wizard and force the user to set a compliant passcode. Aside from Samsung devices, the device remains in use, and the Work Profile remains accessible until a compliance policy explicitly detects the violation and triggers a configured action such as sending a notification, blocking access, or initiating a wipe.
This means:
- If no compliance policy is configured to check passcode complexity, the profile requirement is effectively unenforced.
- The timing and severity of enforcement actions depend entirely on the compliance policy evaluation interval and the actions the administrator has defined.
- Users may not receive any prompt or warning unless the compliance policy is specifically configured to notify them.
Work Managed vs Work Profile Tags in Custom DPC Profile
Android profiles for Custom DCP in Workspace ONE UEM display the following tags: Work Managed Device and Work Profile.
Work Managed device profiles apply to corporate-owned, fully managed devices that are enrolled from an un-provisioned state (factory reset). Workspace ONE Intelligent Hub is installed during the setup process and set as the device owner, meaning that Workspace ONE UEM has full control of the entire device.
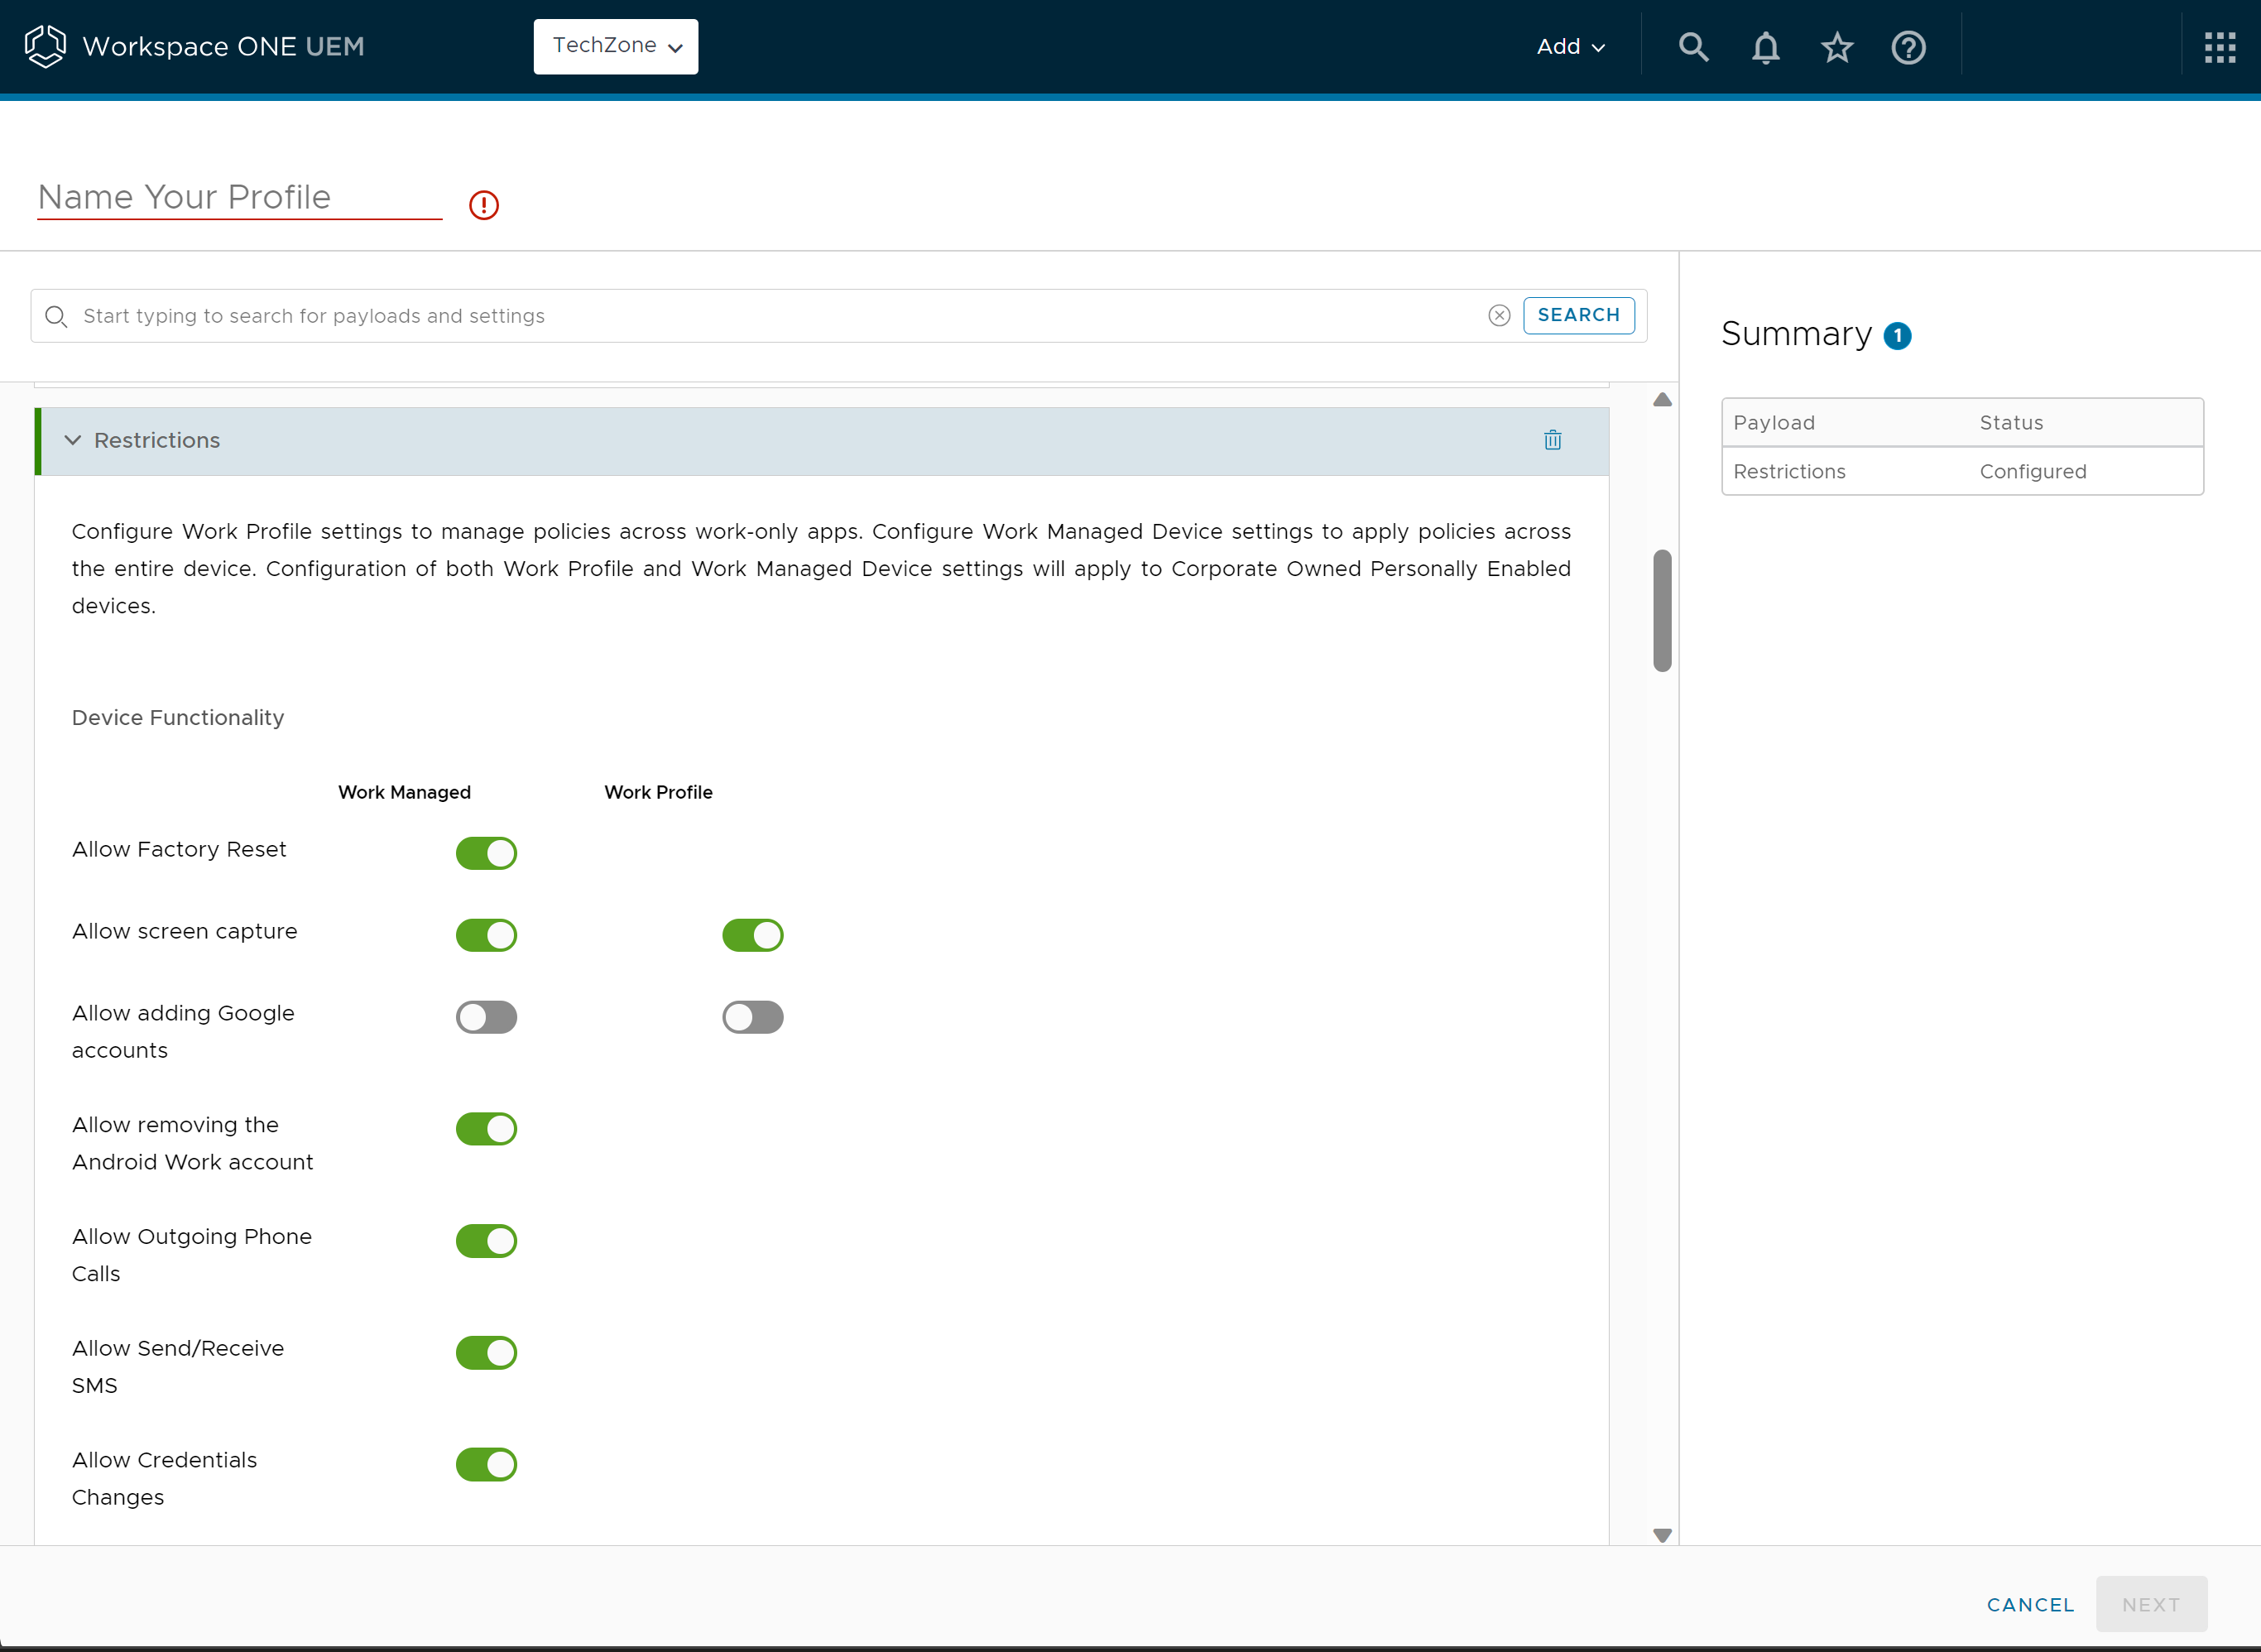
A Work Profile is a special type of administrator tailored primarily for employee-owned and company-owned personally enabled device use cases. In Android 11 and newer versions, the Workspace ONE Intelligent Hub installs within the Work Profile container and hence only controls the Work Profile. Managed apps install within the Work Profile and display an orange briefcase badge to differentiate themselves from personal apps.
In Android 11 and prior versions, specifically for Work Profile on Company Owned devices (formerly known as COPE), profile features with both Work Managed and Work Profile tags can be applied.
There are times when more than one profile needs to be implemented for various reasons. When duplicate profiles are deployed, the most restrictive policy takes priority. Therefore, if two profiles are installed, and one says to block the camera and another says to allow the camera, Intelligent Hub for Android combines the profiles and blocks the camera to choose the more secure option.
Configure OEM-Specific Policies
OEMConfig is a standard solution for Android original equipment manufacturers (OEM) to provide additional management capabilities to administrators, on top of what is natively offered by the Android Enterprise. It is an application that is built and maintained by the OEM and hosted on Google Play. The application takes advantage of AppConfig standards by allowing the administrator to dynamically configure any setting desired that the OEM offers in a data-driven user interface. Because the settings are data-driven and app-based, console upgrades are not required to access the latest settings offered by the OEM.
To apply configurations for OEM-specific devices, you must add the relevant OEMConfig application from the Google Play store and send the configuration settings.
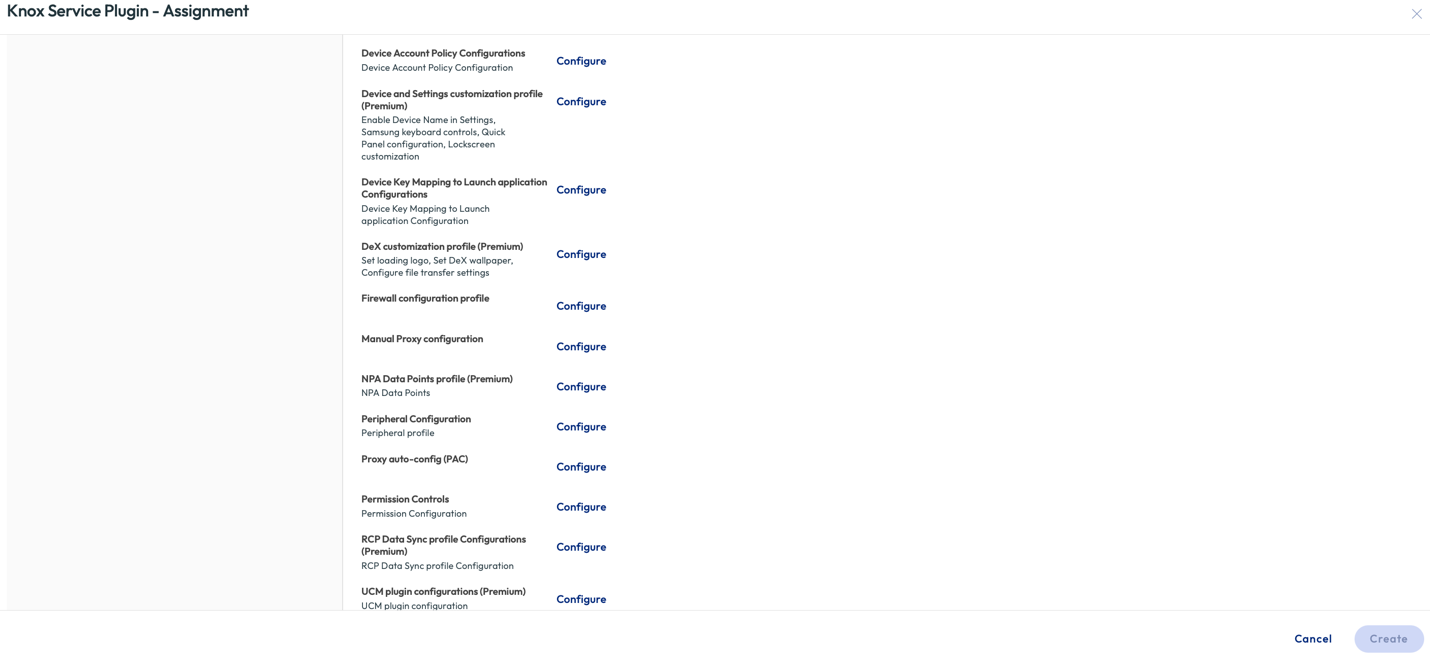
When assigning the OEM-specific application, on the Application Configuration tab, you will see configurable settings for that OEM.
The following images depict the Application config confirmation setting options.
Feedback channel
Google provides a dedicated feedback channel that enables applications to surface configuration data directly within the UEM console. While this channel supports a range of use cases, its most strategic application lies in the rapid identification and resolution of configuration errors empowering IT administrators to detect issues early, act decisively, and minimize operational disruption across the device fleet.
The UEM console consolidates feedback across all enrolled devices and supported applications, giving administrators a unified view of the configuration health landscape.
Note: Feedback retrieval from OEMConfig applications is supported exclusively for applications provisioned through Google Play as public apps.
To learn more about the pre-requisites and how to configure Feedback Channel check out Omnissa Docs here.
Android Application Management
This exercise helps you to get started with the deployment and maintenance of mobile applications on Android devices. It will introduce you to the various app delivery and update mechanisms Workspace ONE UEM offers for Android app management.
Prerequisites
Before you can perform the steps in this exercise, you must meet the following requirements:
- Complete the Android EMM registration for the destination OG in your Workspace ONE UEM console.
- Enroll Android devices into Workspace ONE UEM using any of the three enrollment options (Work-Managed, BYOD, or COPE)
Workspace ONE Tunnel
Workspace ONE Tunnel enables secure access for mobile workers and devices. Users have a simple experience and need not enable or interact with Tunnel, and IT organizations might take a least-privilege approach to enterprise access, ensuring only defined apps and domains have access to the network.
Workspace ONE Tunnel provides industry-best security and builds on TLS 1.2+ libraries, implements SSL Pinning to ensure no MITM attacks, and includes client certificates on the allowlist to ensure identity integrity. Combined with explicit definitions of managed applications and integration with the Workspace ONE compliance engine, Tunnel can help customers attain Zero Trust goals for their workforce.
For more information on Workspace ONE Tunnel, see:
'%3E%3Cpath id='Rectangle_1' data-name='Rectangle 1' d='M0,0H800V300H0Z' transform='translate(2297 1132)' fill='%23E2F0D9'/%3E%3Cg id='Group_5' data-name='Group 5' transform='translate(-6 -3)'%3E%3Ctext transform='translate(2534 1280)' font-size='50' font-family='Roboto-Regular, Roboto'%3E%3Ctspan x='0' y='0'%3ECurated Assets%3C/tspan%3E%3C/text%3E%3Ctext transform='translate(2611 1333)' font-size='20' font-family='Roboto-Regular, Roboto'%3E%3Ctspan x='0' y='0'%3ETile View (with image and controls)%3C/tspan%3E%3C/text%3E%3C/g%3E%3C/g%3E%3C/svg%3E)
Use Managed Google Play to Deploy Public Apps
You can use Workspace ONE UEM to manage the deployment and maintenance of publicly available Android applications via the managed Google Play Store. Public apps can be installed and updated on Work Managed devices and in the Work Profile container of BYOD and COPE devices. On Android 11 and older COPE devices, public apps can also be pushed to the personal side.
This configuration is not available for closed network/AOSP devices.
To add public apps from the managed Google Play store to Workspace ONE UEM and then install them on your enrolled Android devices, perform the following steps:
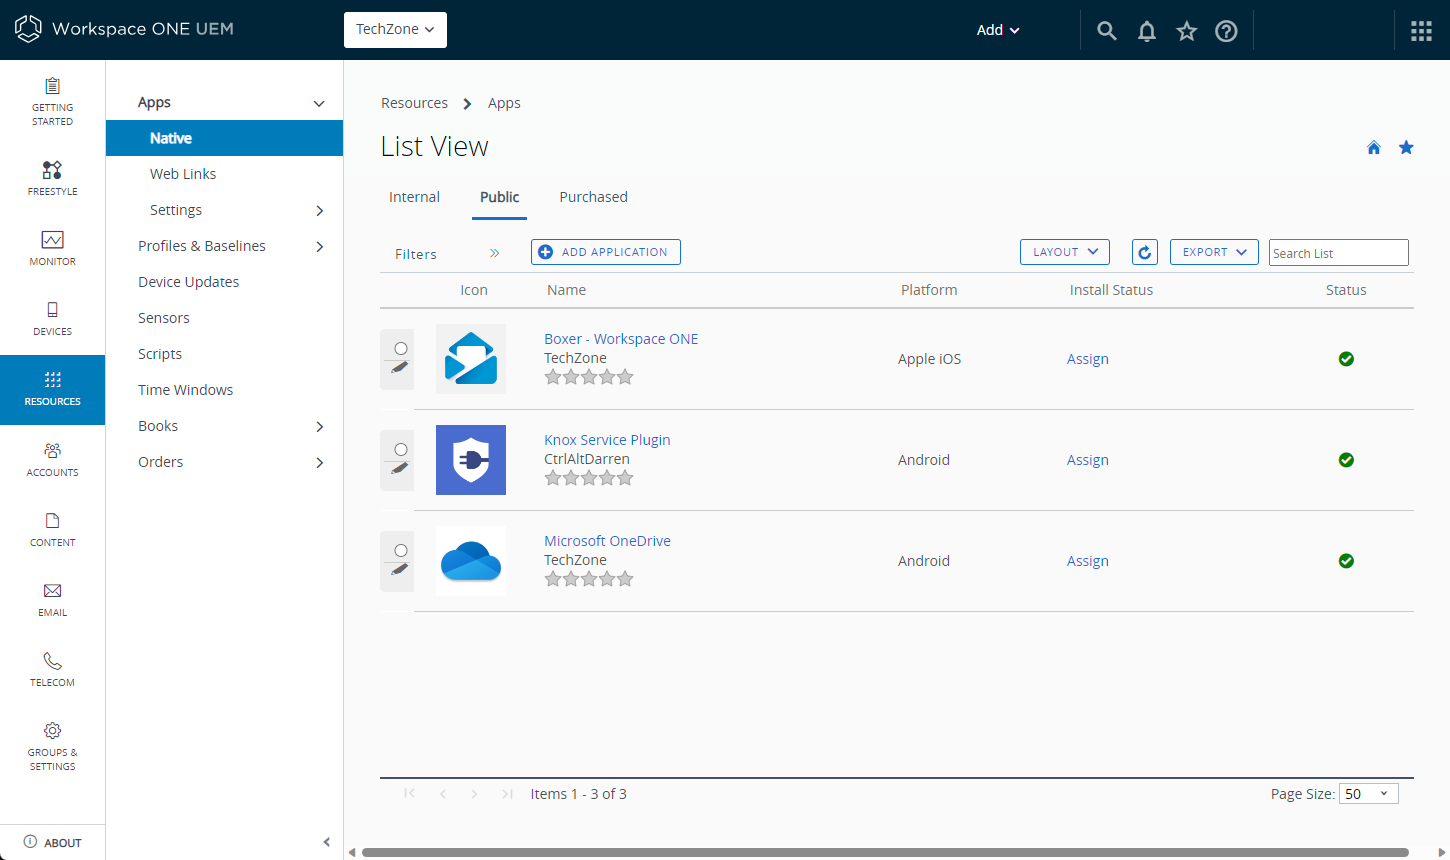
- Log in to your Workspace ONE UEM console and select the destination OG.
- Navigate to Resources > Apps > Native and select the Public tab.
- Click Add Application.
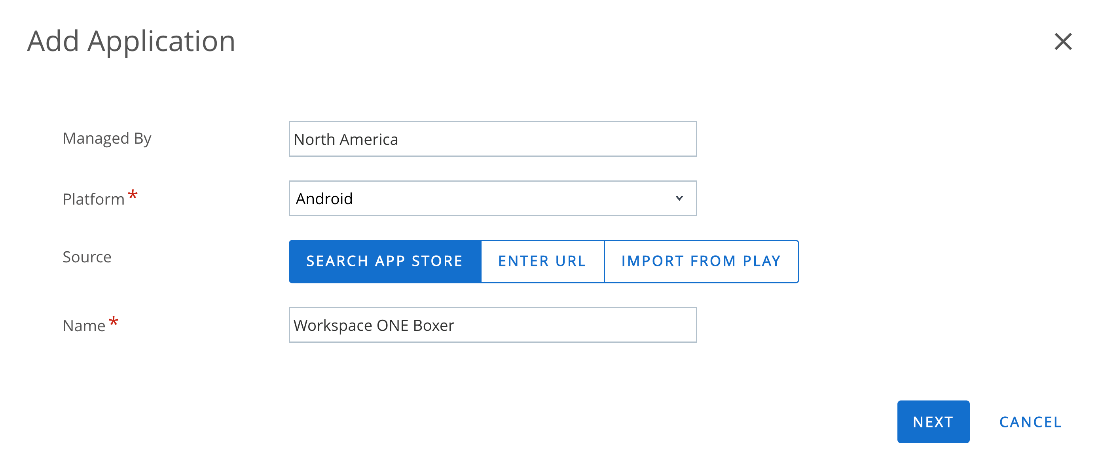
- Select Android from the drop-down menu.
- Enter the name of the application to search in managed Google Play. In this example, we are searching for Workspace ONE Boxer.
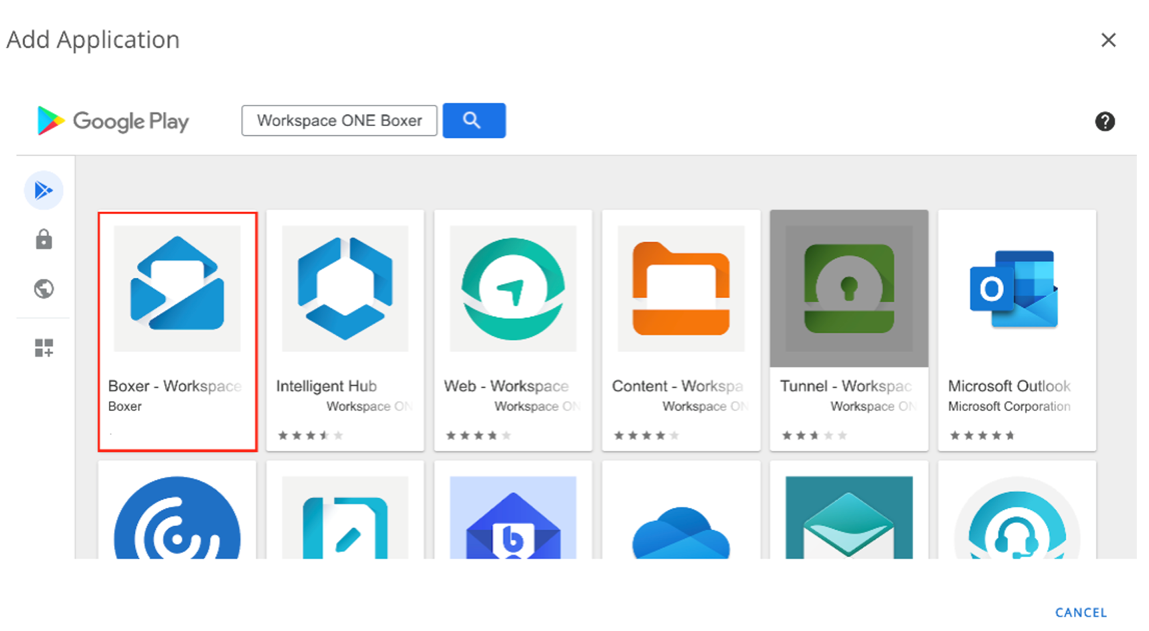
- Select the desired application from the managed Play Store iFrame pop-up window.
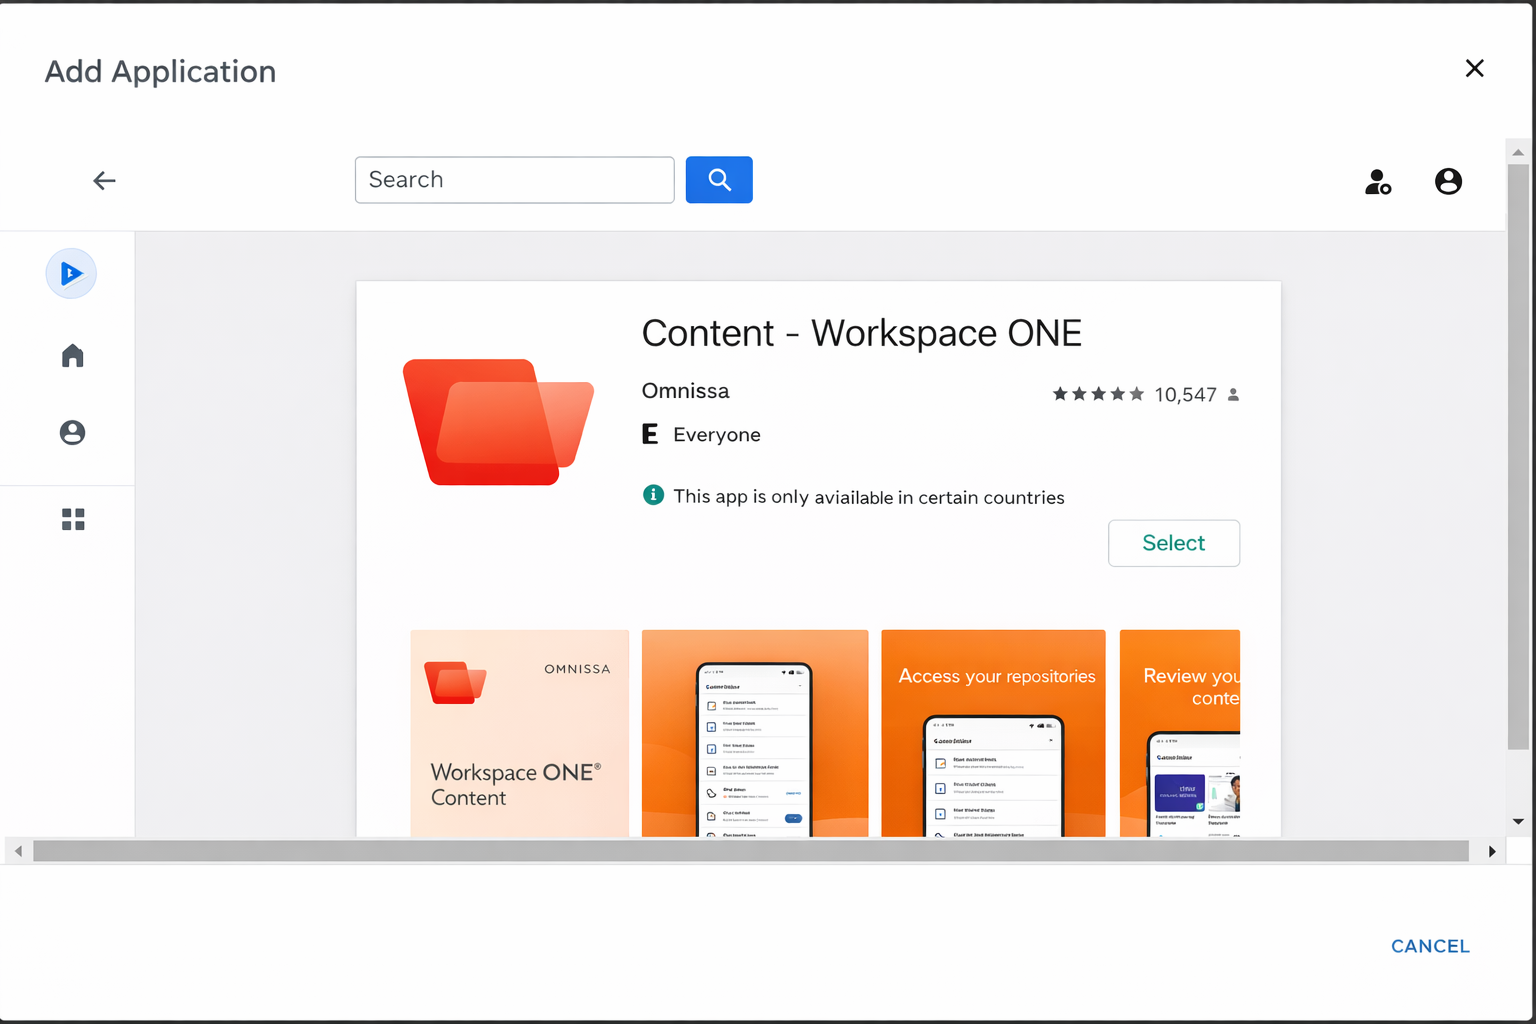
- Click Select
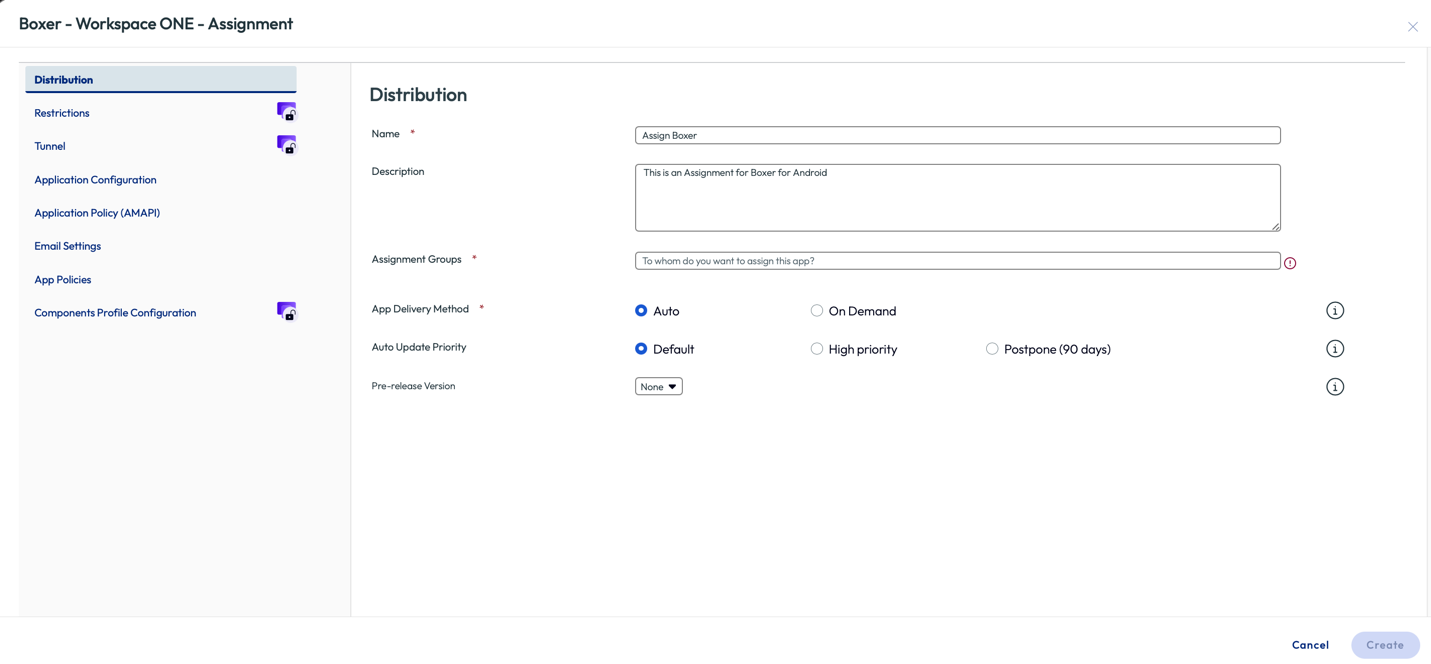
- Enter the appropriate information in the Distribution section of the Assignment page.
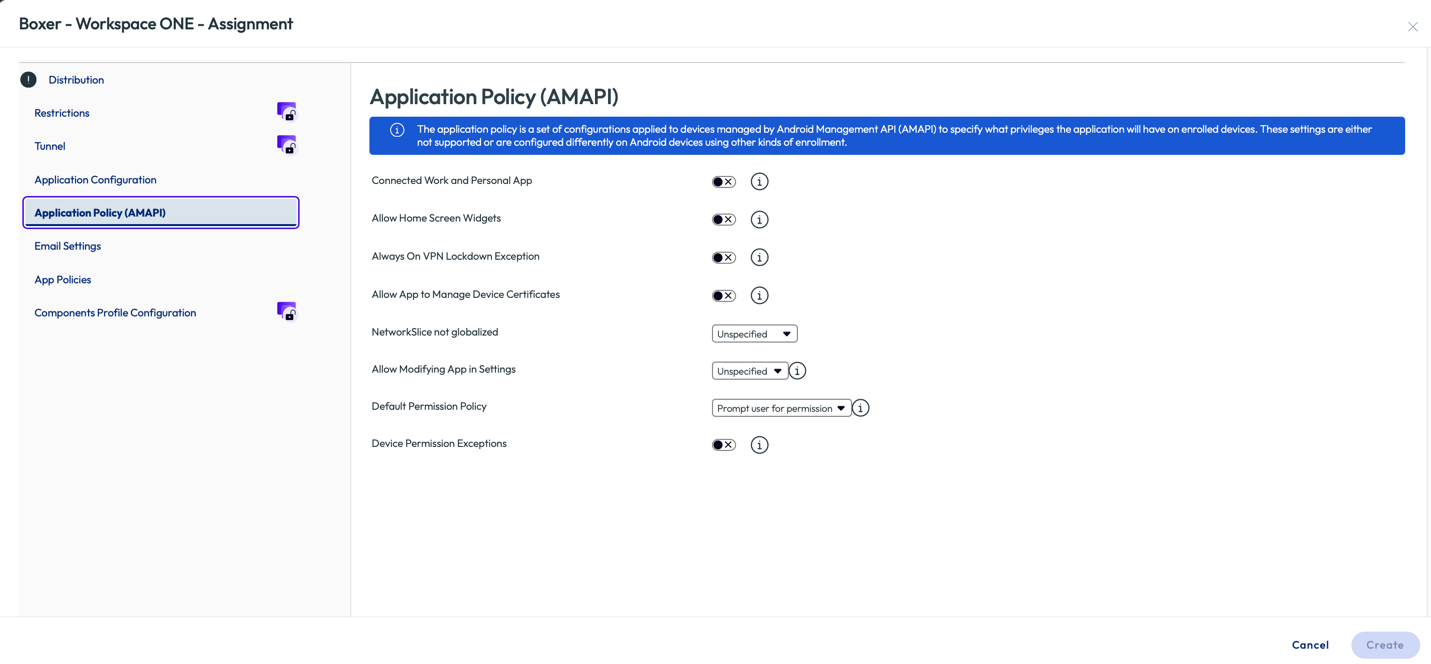
- If devices are managed using AMAPI, enable required settings in the Application Policy (AMAPI).
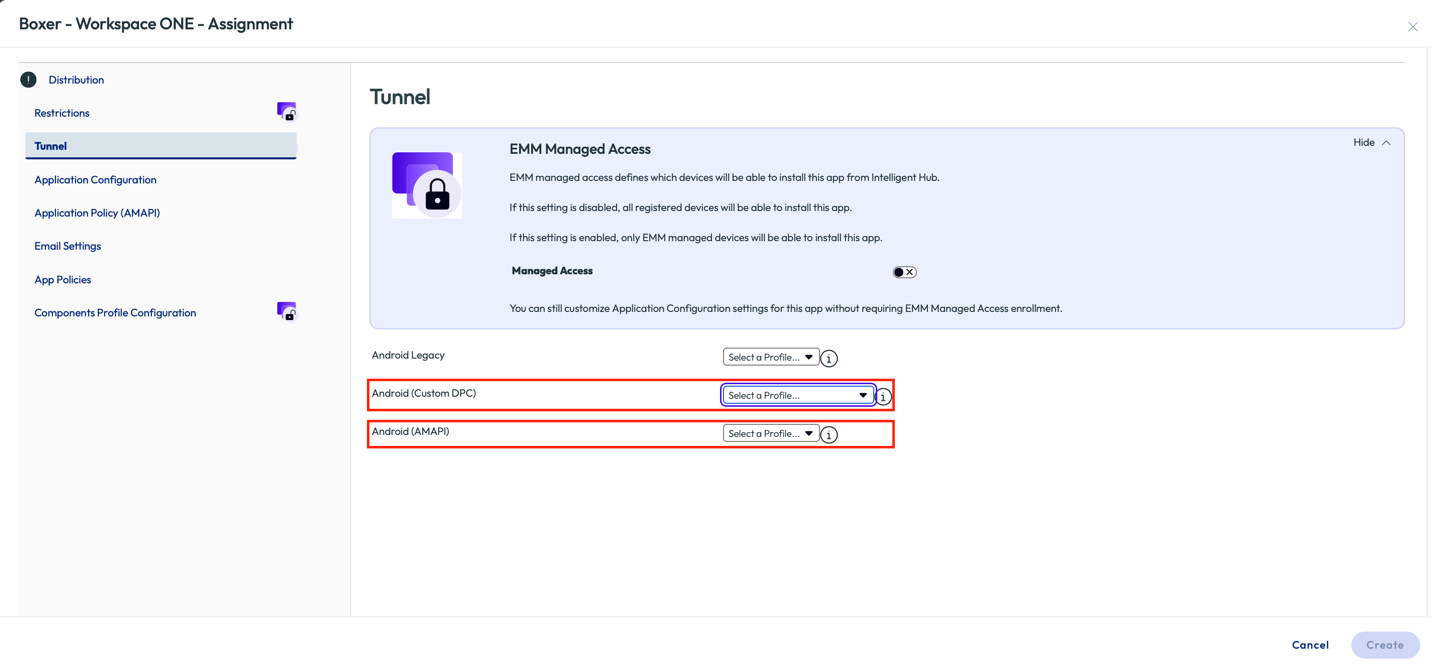
- (Optional) From the Tunnel section, select the Workspace ONE Tunnel Profile used to configure per-app VPN/MobileSSO settings for Custom DPC or AMAPI managed devices.
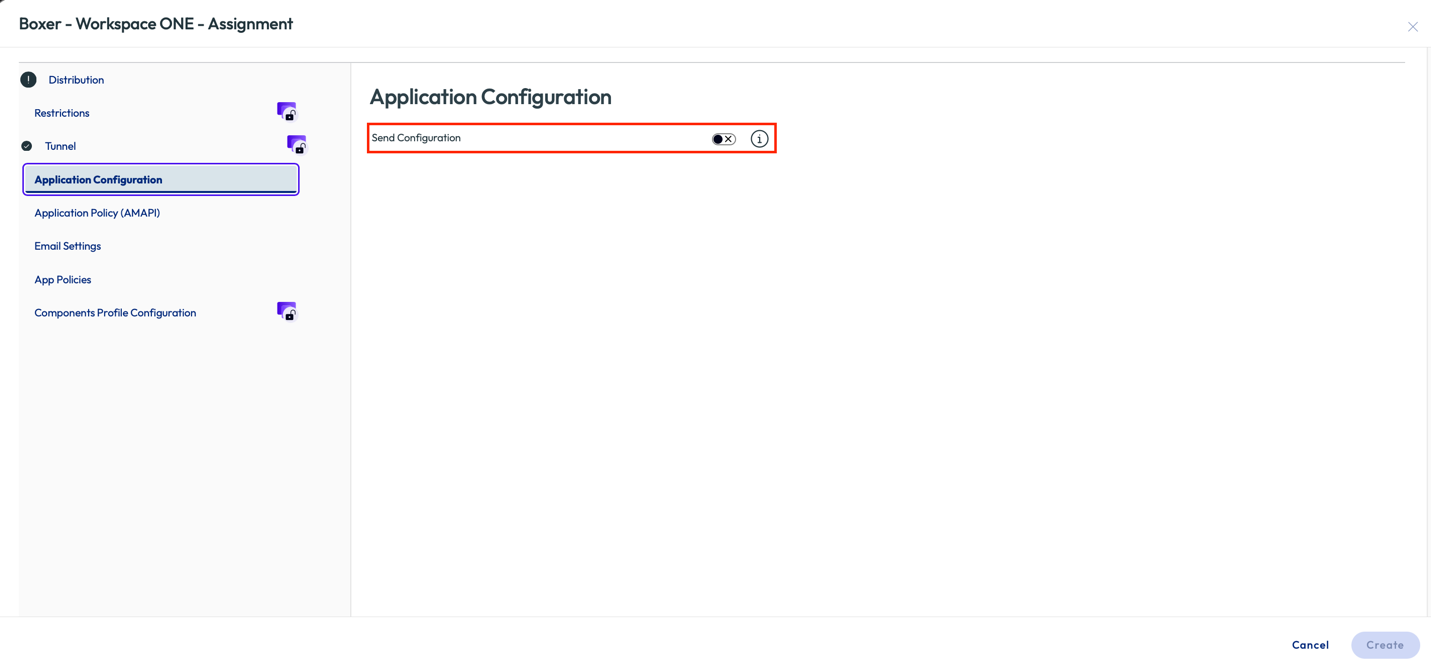
- (Optional) Select the Application Configuration section, then enable Send Configuration to send managed AppConfig settings to the devices, if applicable. For more information, jump to the OEM-specific Managed Configurations section of this guide.
- Select the Smart Group(s) of devices to assign this app in the Assignment Groups section before you click Create. You can configure the following options:
- App Delivery Mechanism: Deploy the application automatically (Auto) or manually (On-Demand) when needed.
- Auto-Update Priority: When assigning this application, an auto-update priority can be given to Google Play to raise or lower the priority with which automatic app updates are installed. Postponed updates will be delayed for 90 days.
High-priority updates will be installed within minutes of being available.
Apps not using the default auto-update priority will ignore the Public App Auto-Update Profile if one is assigned.
Note: Assignments for supported Android apps can also accompany sending managed application configurations. For more information demonstrating this procedure, jump to the OEMConfig/AppConfig section of this guide.
- Create additional assignments, if required, on the following page. Then set the priority of the assignments. When you have added all assignments, click Save.
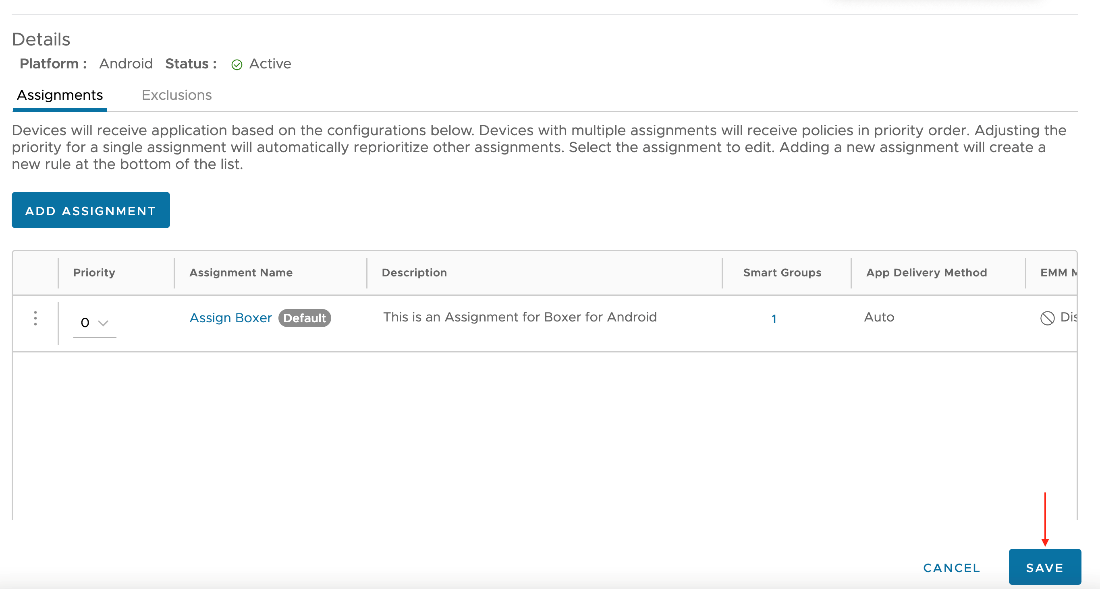
- The Preview section displays a list of all assigned devices. Verify the selection and then click Publish.
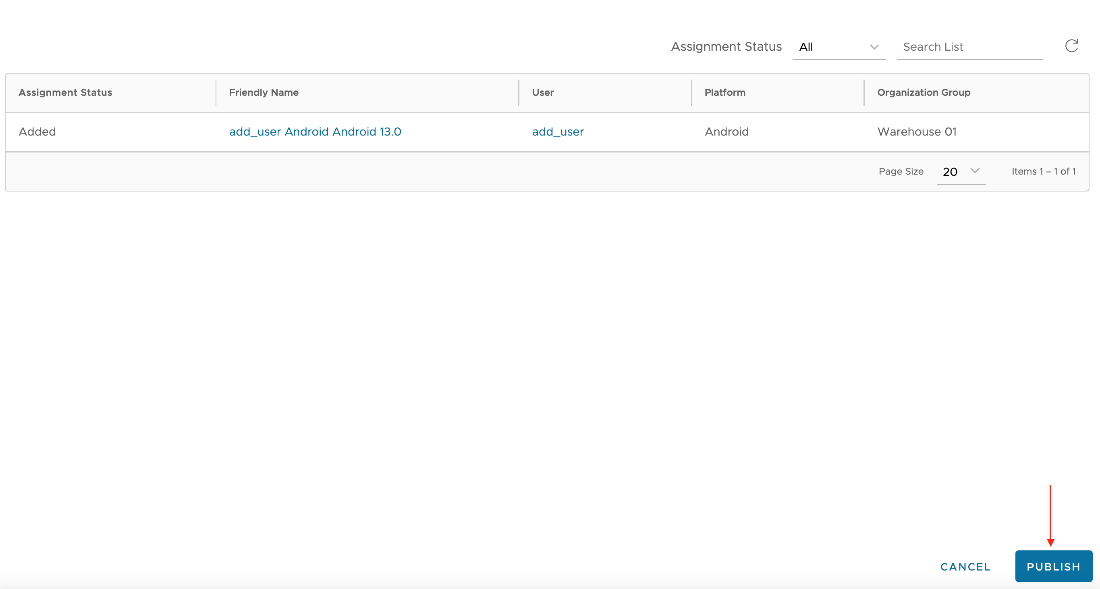
The public app is now published to your devices.
Use Google Play to Deploy Private Apps
You can publish applications developed by your organization or the applications that are developed specifically for your organization can be hosted and distributed through the managed Google Play Store. When adding a public app on an organization group with Android Enterprise enabled, the iFrame is loaded and the private apps menu is available on the left side-panel. Additional information such as a description, images, and more can be added in the Advanced options after uploading your private app’s .apk file. These applications are visible to devices managed by the enterprise but are not available publicly outside the enterprise.
Note: Private apps uploaded through the iFrame can never be visible in the public Google Play Store. If your application might eventually be made public for use outside your organization, it is recommended to publish the application directly in the Google Play Developer Console instead of using the iFrame.
A few considerations to keep in mind:
- You must verify that the private apps APK file with the same application ID is not published and publicly available in the Google Play store.
- Google publisher account has a limit of 15 APKs per day which means that you can only upload up to 15 applications per day.
- This configuration is not available for Closed Network/AOSP devices.
To upload private apps to the managed Google Play store using Workspace ONE UEM and then install those apps on your enrolled Android devices, perform the following steps:
- Navigate to Resources > Apps > Native > Public > Add Application.
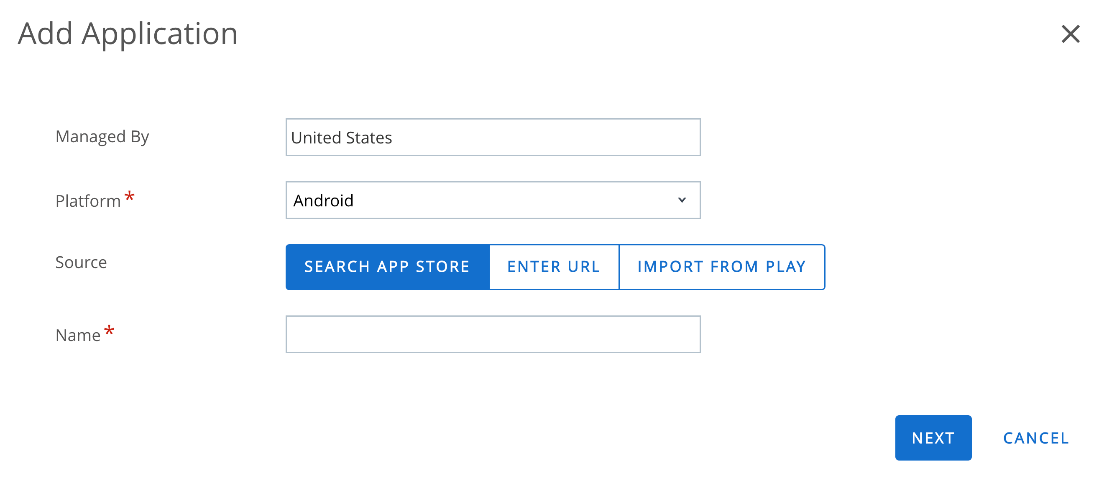
- Select Android as the Platform and leave the name blank. Click Next.
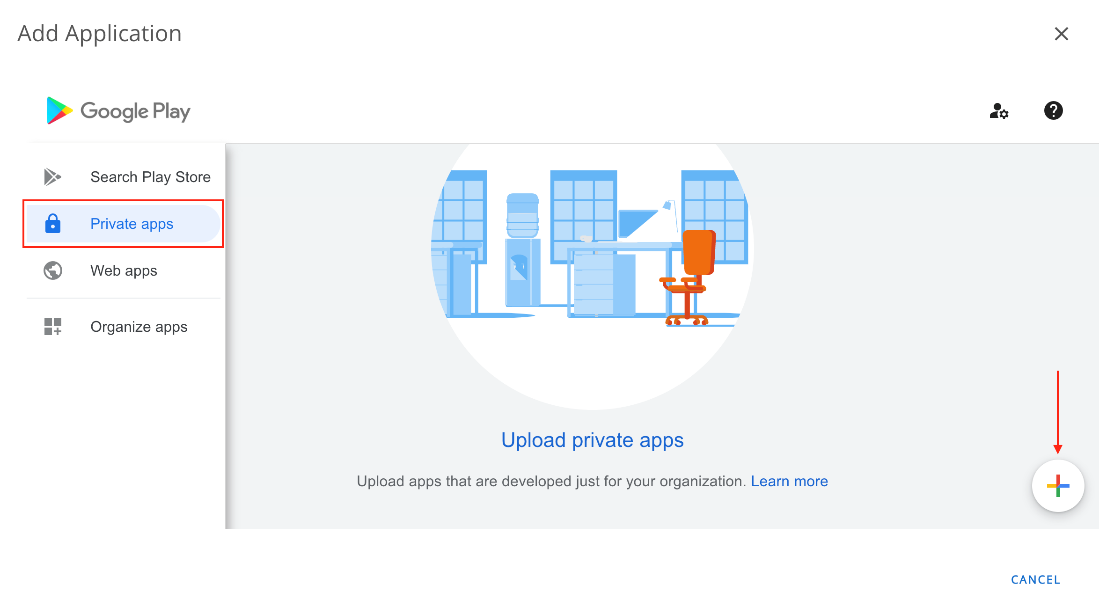
- Select the Private Apps tab from the left menu, then click the add (+) button.
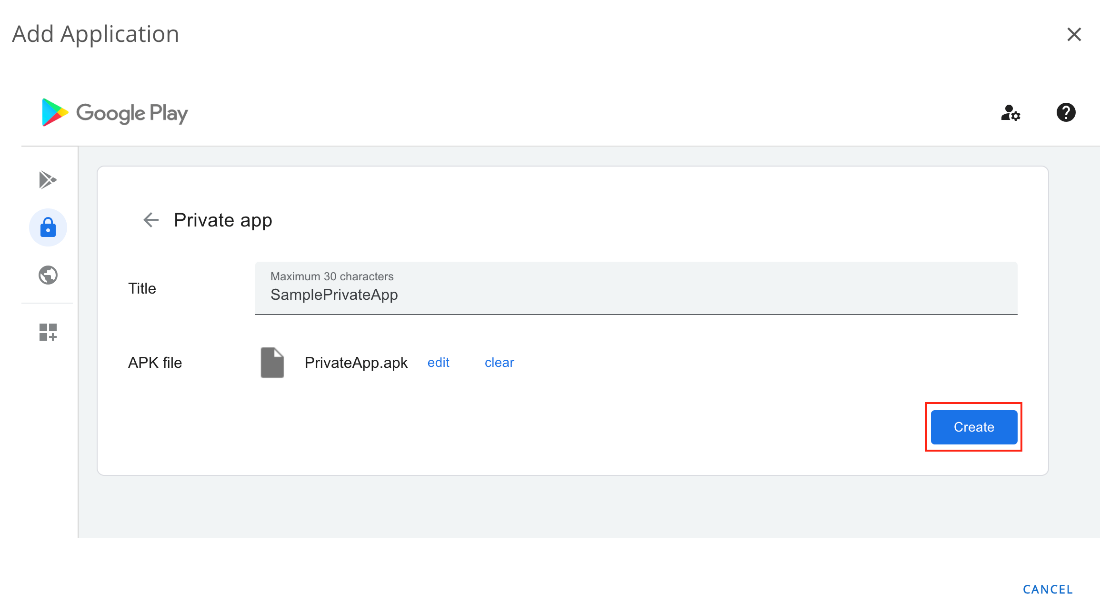
- Upload your private app’s APK file or AAB file and give it a name. Then click Create.
Note: After the APK file is uploaded and accepted, it will be listed under the Private apps section. It can take up to 10 minutes until the app is published on the managed Google Play Store.
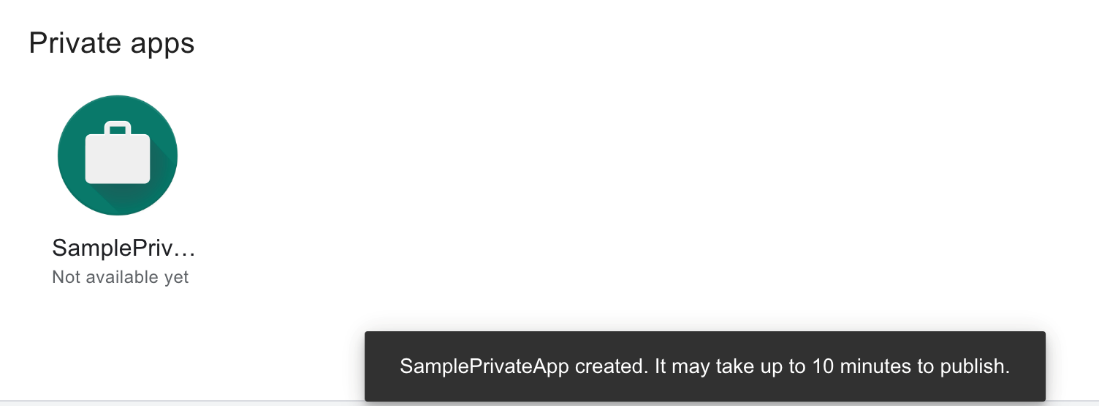
You also can add a detailed description, screenshots, and so on from the Advanced Editing Options menu.
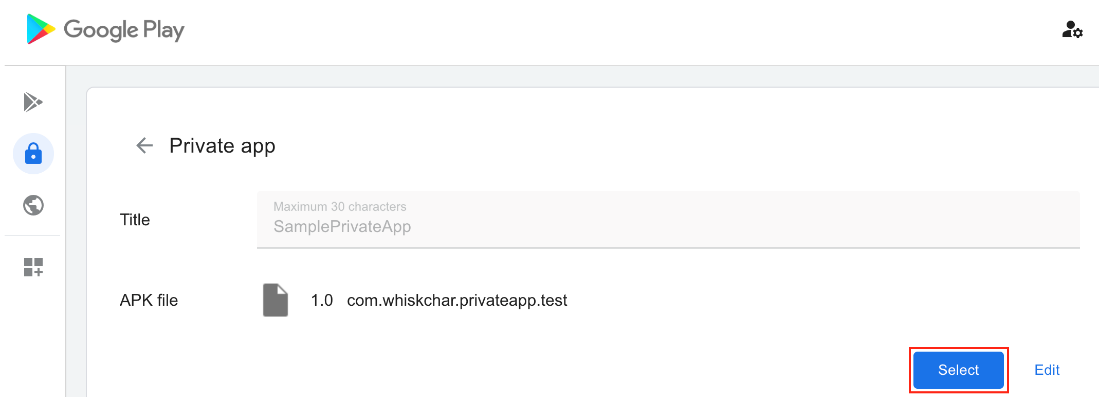
- Select the Private app (after it is published) to add the app to the Workspace ONE UEM console.
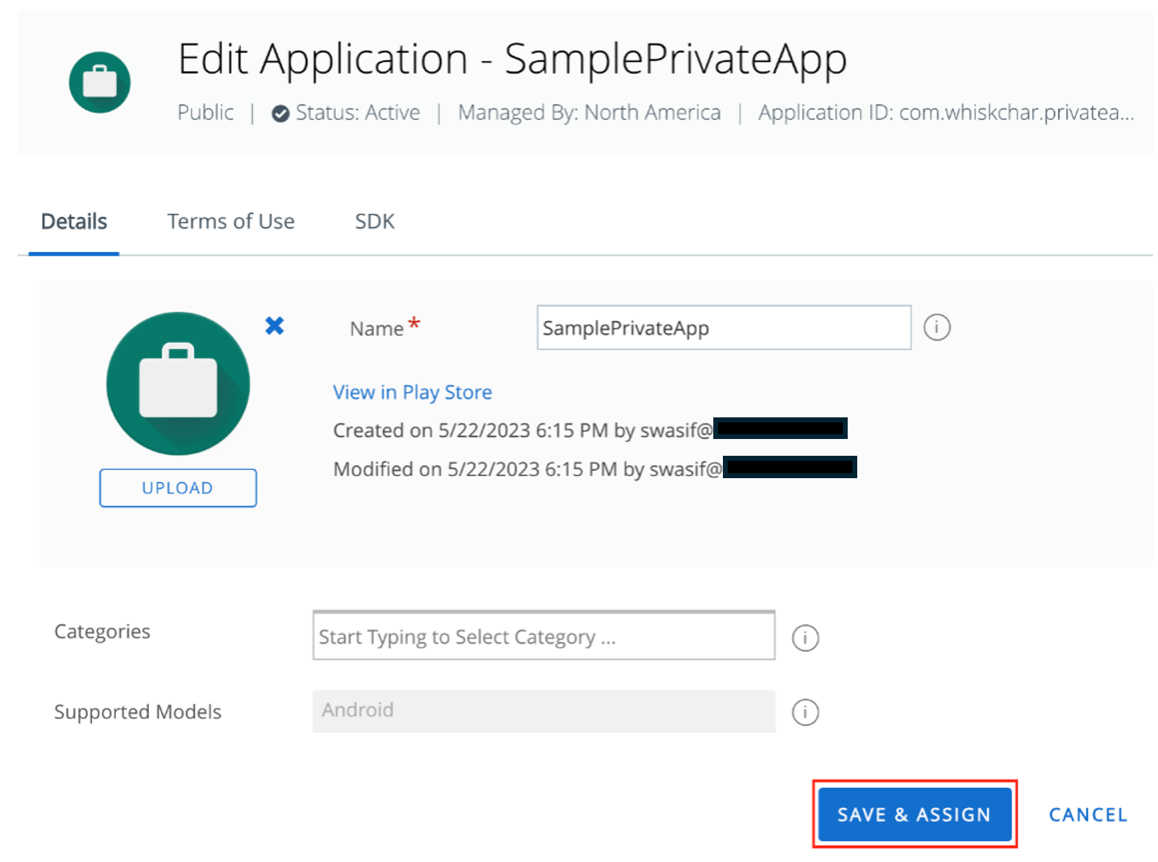
- Fill out the Edit Application section with appropriate information (optional) in the Details, Terms of Use, and SDK tabs respectively, then click Save & Assign.
- Enter the appropriate information in the Distribution section of the Assignment page. Then select the Smart Groups of devices to assign this app in the Assignment Groups section.
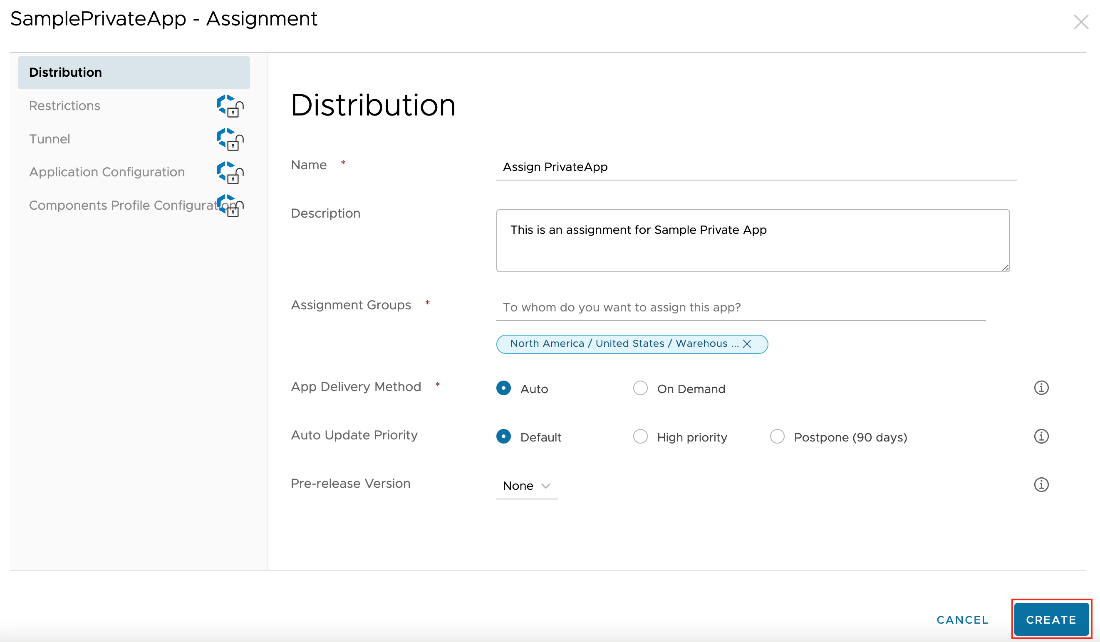
- App Delivery Mechanism: Deploy the application automatically (Auto) or manually (On-Demand) when needed.
- Auto-Update Priority: When assigning this application, an auto-update priority can be given to Google Play to raise or lower the priority with which automatic app updates are installed. Postponed updates will be delayed for 90 days. High-priority updates will be installed within 24 hours of being available, the update can occur even when being used which can disrupt user activity. Apps not using the default auto update priority will ignore the device-wide Public App Auto-Update Profile if one is assigned.
- Create any additional assignments, if required, on the following page. Then set the priority of the assignments. After you have added all assignments, click Save.
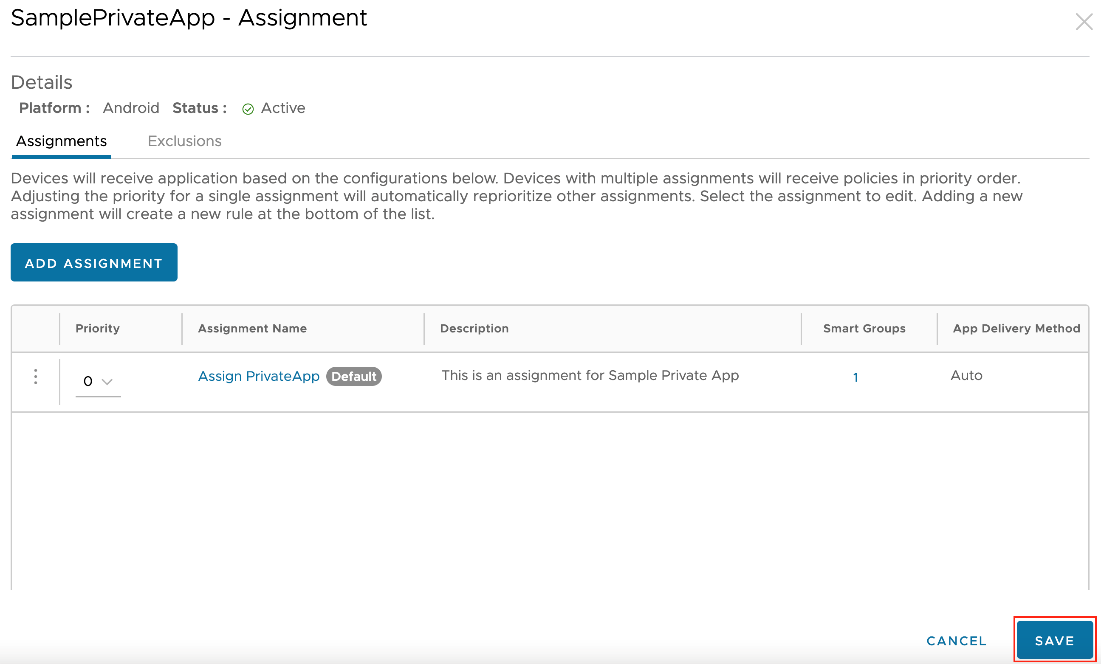
- The Preview section displays a list of all assigned devices. Verify the selection and then click Publish.
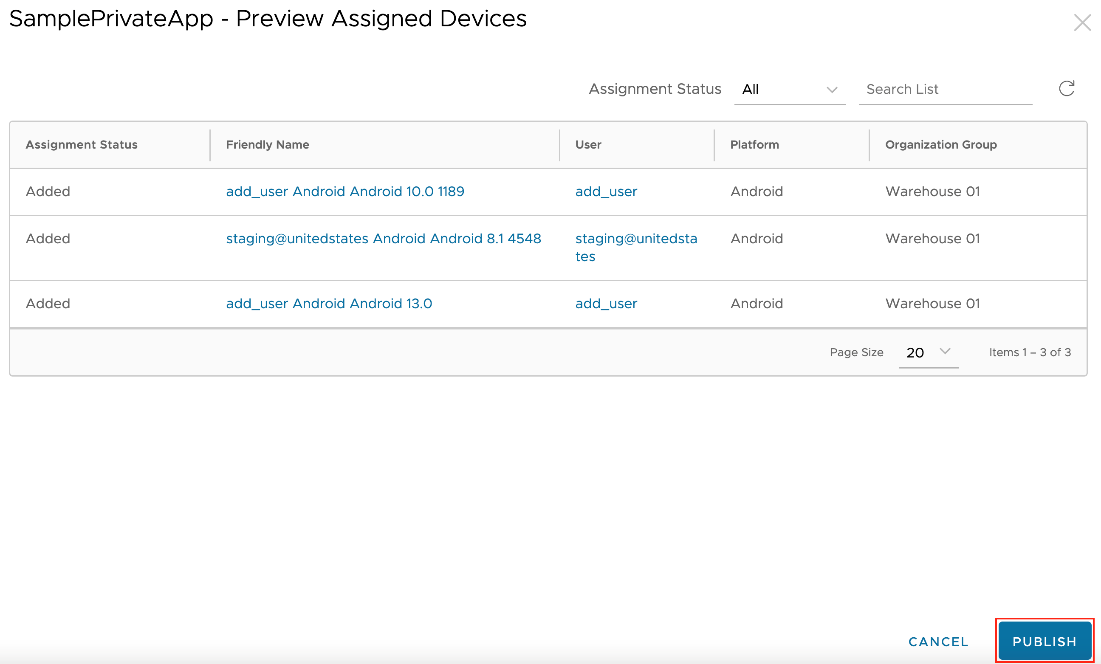
The private app is now published to your devices.
Use Google Play to Deploy Web Apps
Note: This procedure is not available for Closed Network/AOSP devices.
To create Web apps in the managed Google Play store using Workspace ONE UEM, and then deploy them to your enrolled Android devices, perform the following steps:
- Navigate to Resources > Apps > Native > Public > Add Application.
- Select Android as the Platform and leave the name blank. Click Next.
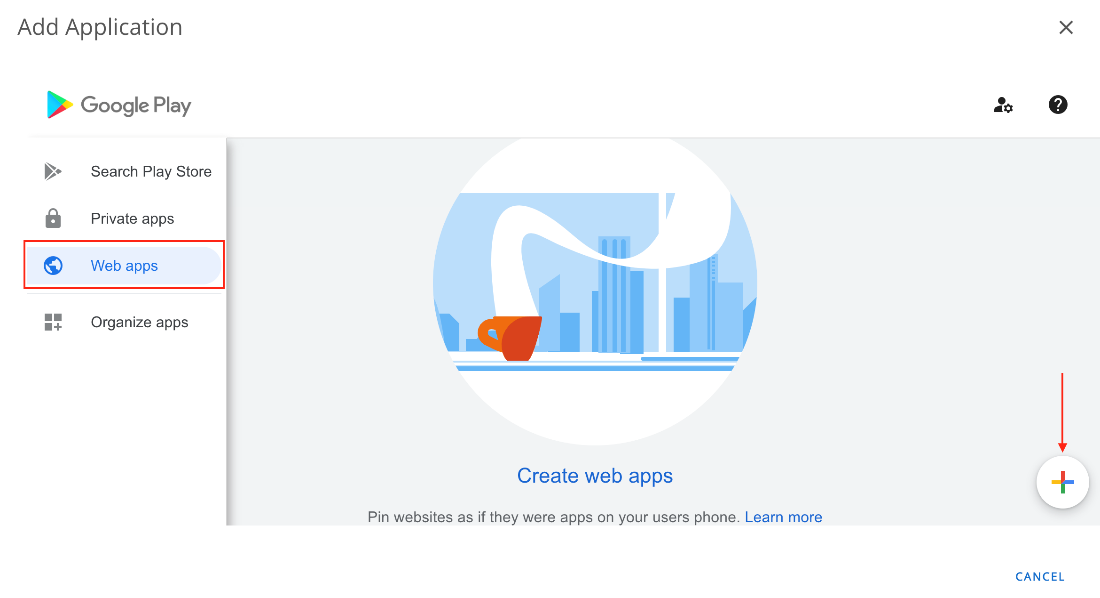
- Select Web apps from the left menu, then click the add (+) button.
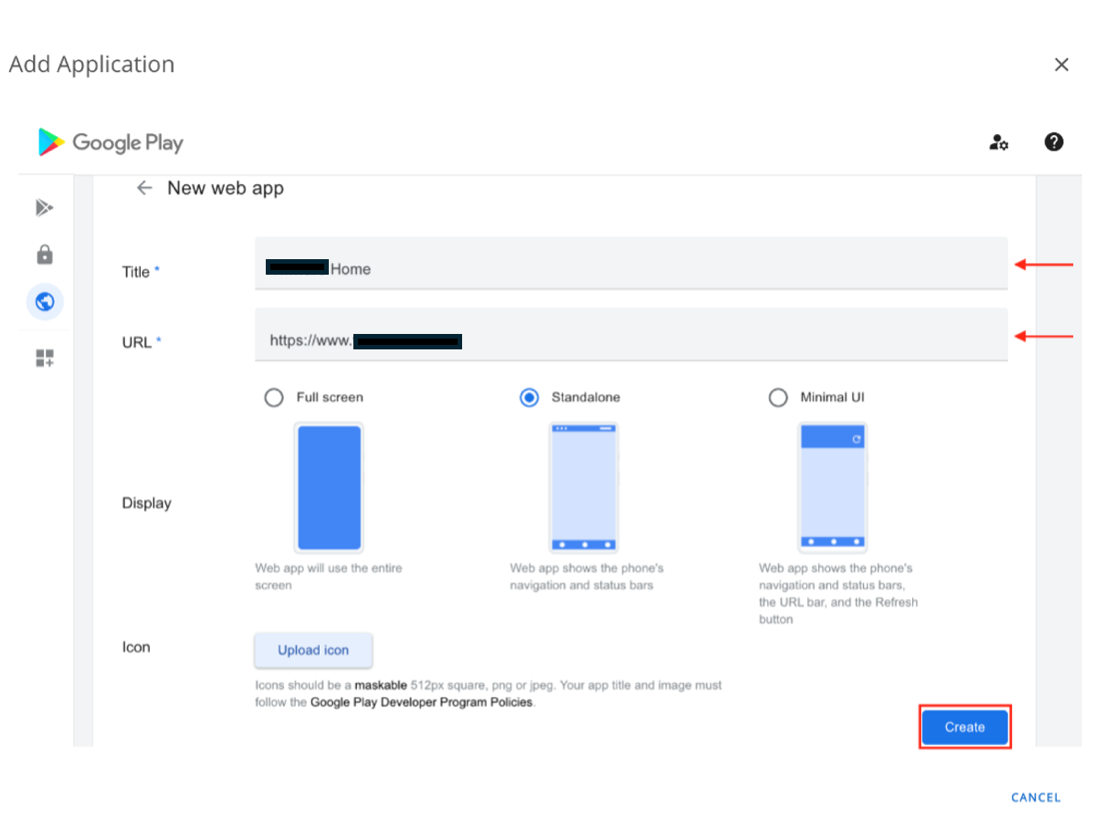
- Enter the appropriate details of the Web app in the Title and URL bars, then set the optional Display and Icon settings. Click Create when complete.
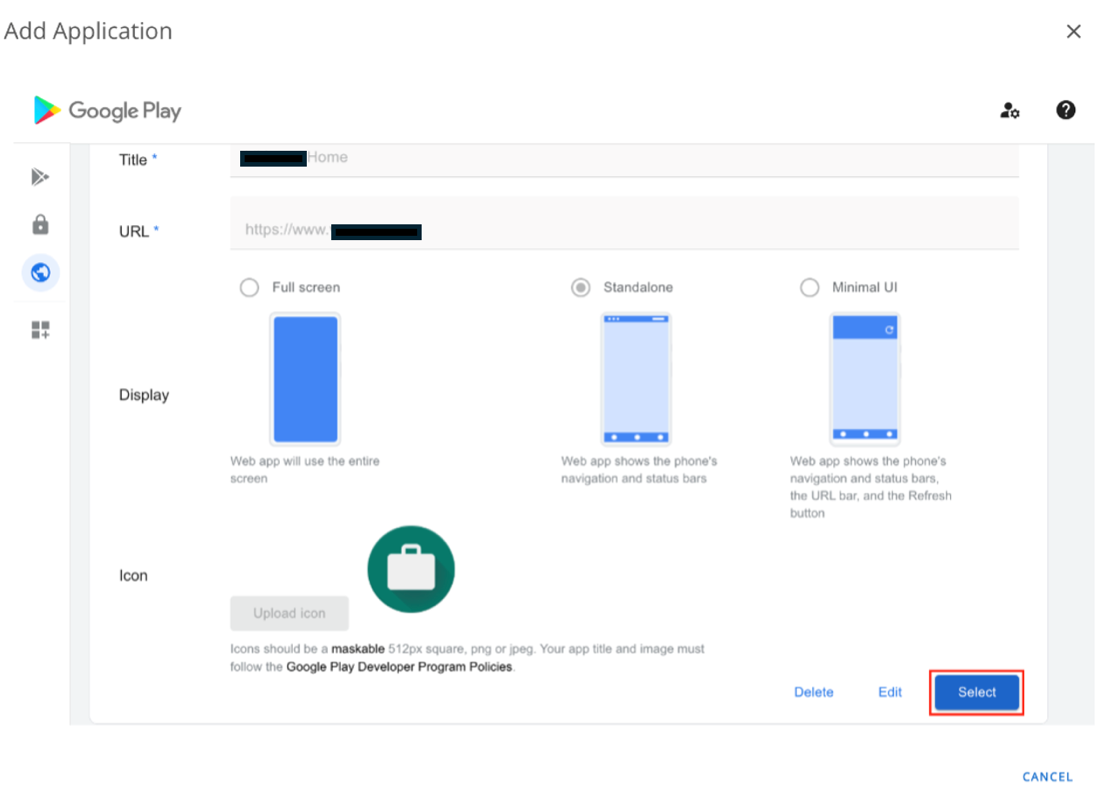
- Select the Web app to add it to your UEM console.
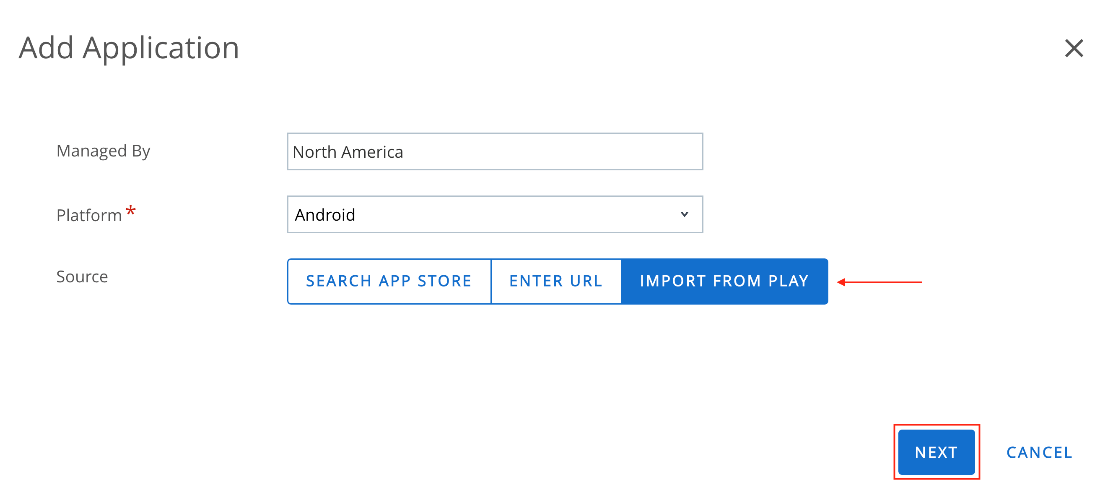
- Navigate to Resources > Native > Apps > Public > Add Application. Select Android as the platform, then select Import from Play.
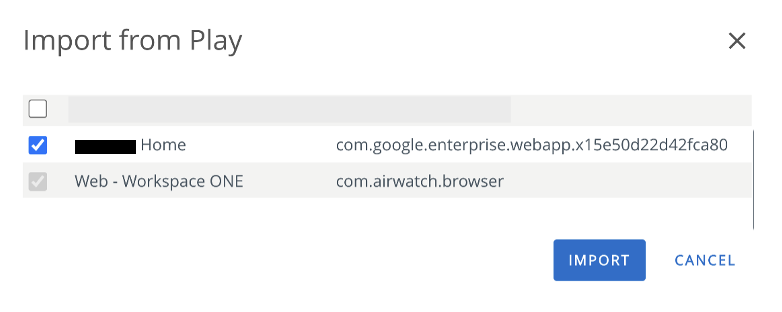
- Select the check box for the Web app listed and then click Import.
- After the app is imported, the Web app is listed in the Resources > Apps > Native > Public > List View in your UEM console. Click Assign.
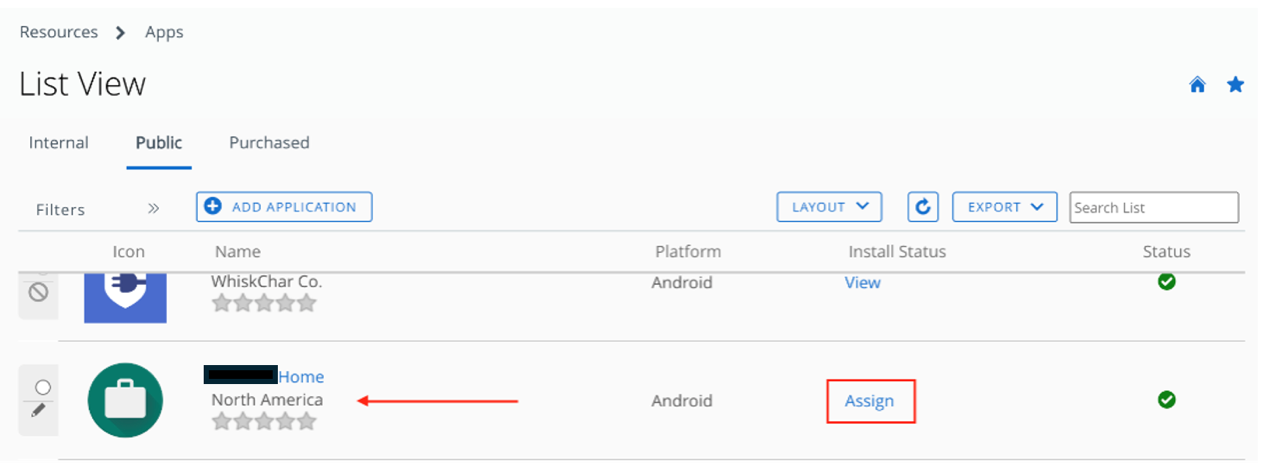
- Enter the appropriate information in the Distribution section of the Assignment page. Then select the Smart Group(s) of devices to assign this app in the Assignment Groups section. Click Create.
- Create any additional assignments, if required, on the following page. Then set the priority of the assignments. Click Save.
- The Preview section displays a list of all assigned devices. Verify the selection and then click Publish.
The Web app is now published to your devices.
Use Workspace ONE to Deploy Internal Applications
You can use Workspace ONE UEM to distribute, track, and manage your internal Android applications. These are applications built in-house and not hosted on Google Play Store. You can upload the application’s APK file(s) directly to the Workspace ONE UEM console for deployment.
Note: This procedure is only available on Work Managed Android devices including AOSP/Closed Network Work Managed Android devices.
To upload an internal application to Workspace ONE UEM, and then deploy those apps to your enrolled Android devices, perform the following steps:
- Navigate to Resources > Apps > Native > Internal > ADD > Application File.
- Click Upload to either upload the application’s APK file or to enter the URL of the hosted application file. Then click Save.
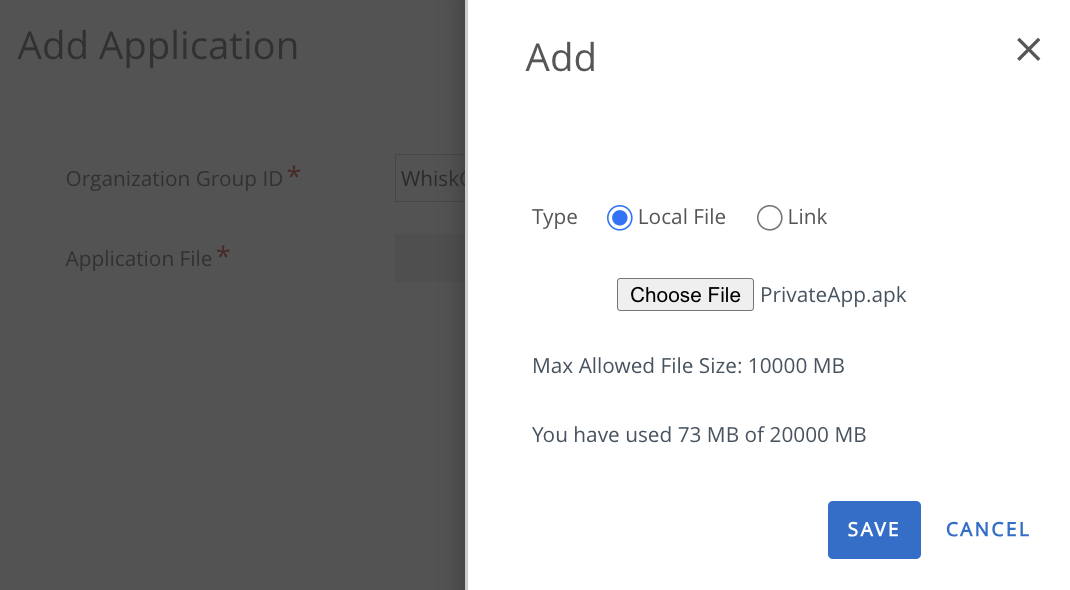
- Enter the appropriate application details, then click Save & Assign.
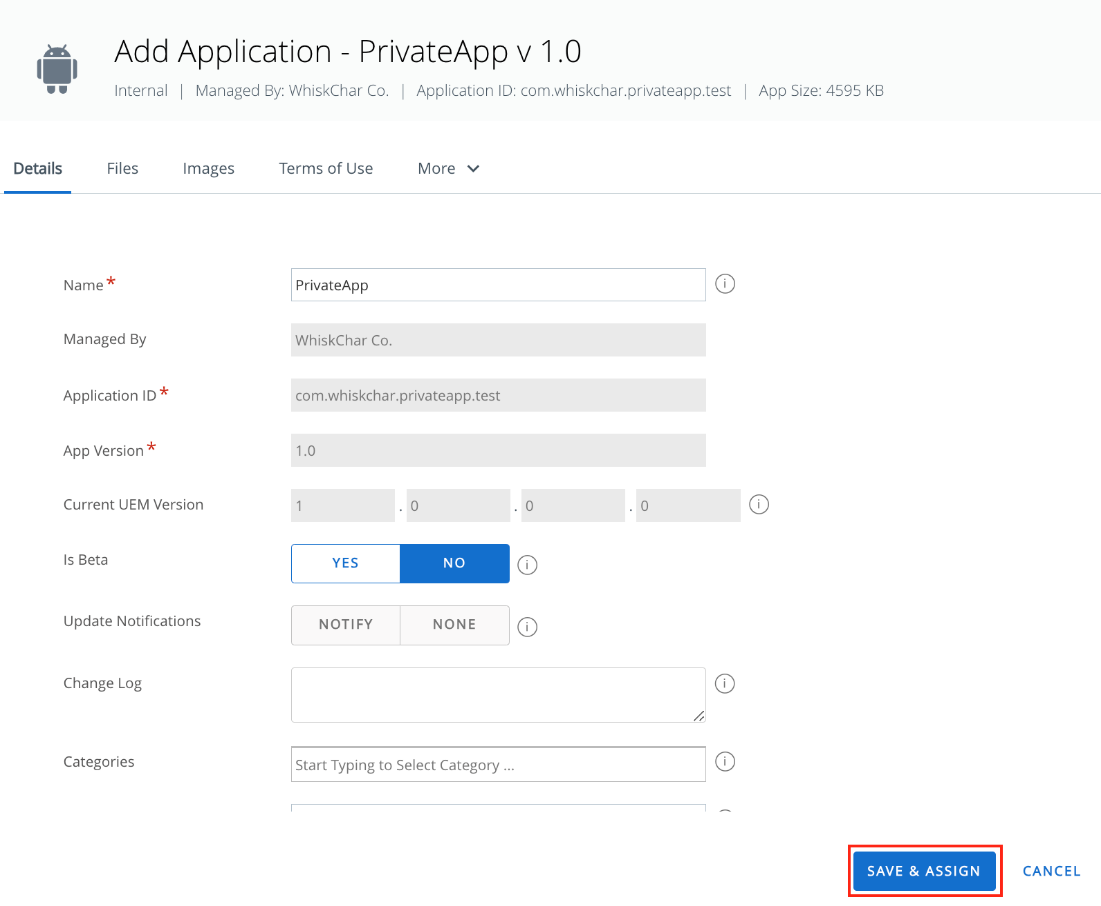
- Administrators can now choose a Phased deployment approach to publish applications to specific groups in a phased manner. To learn more about phased deployment check the link : Phased Deployment.
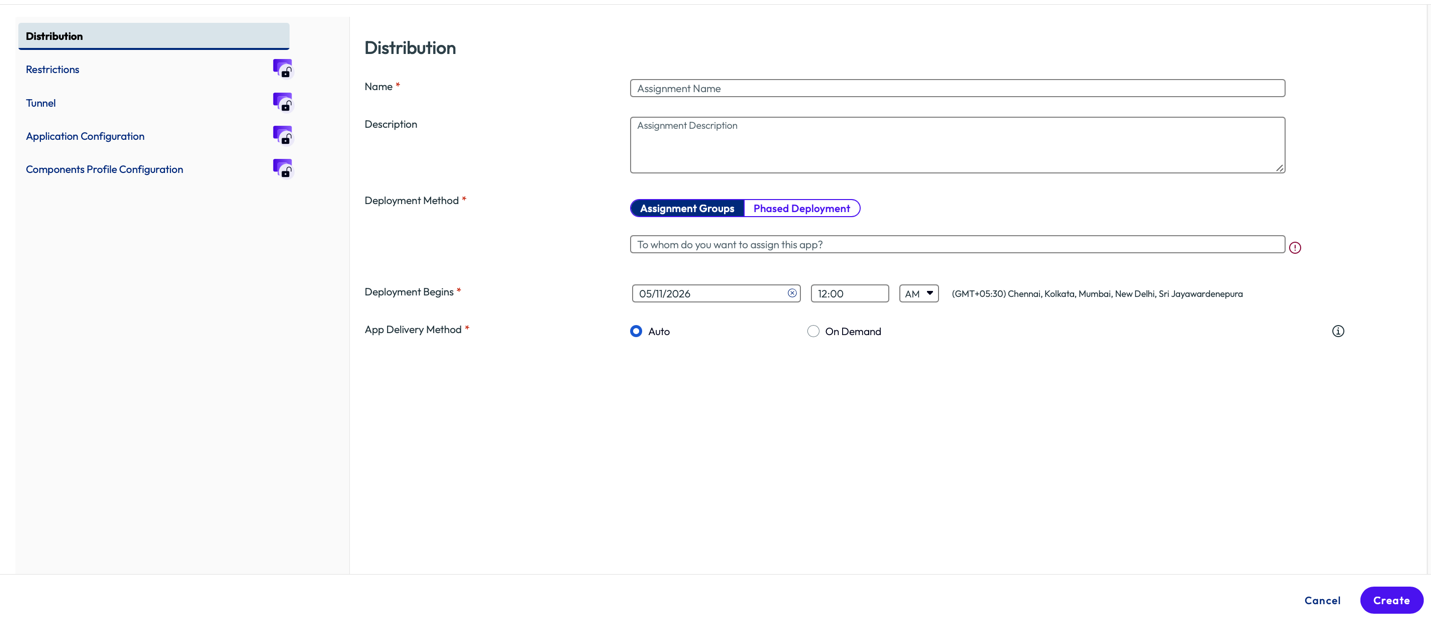
- Select Phased Deployment and choose targeted smart groups.

- Click Next
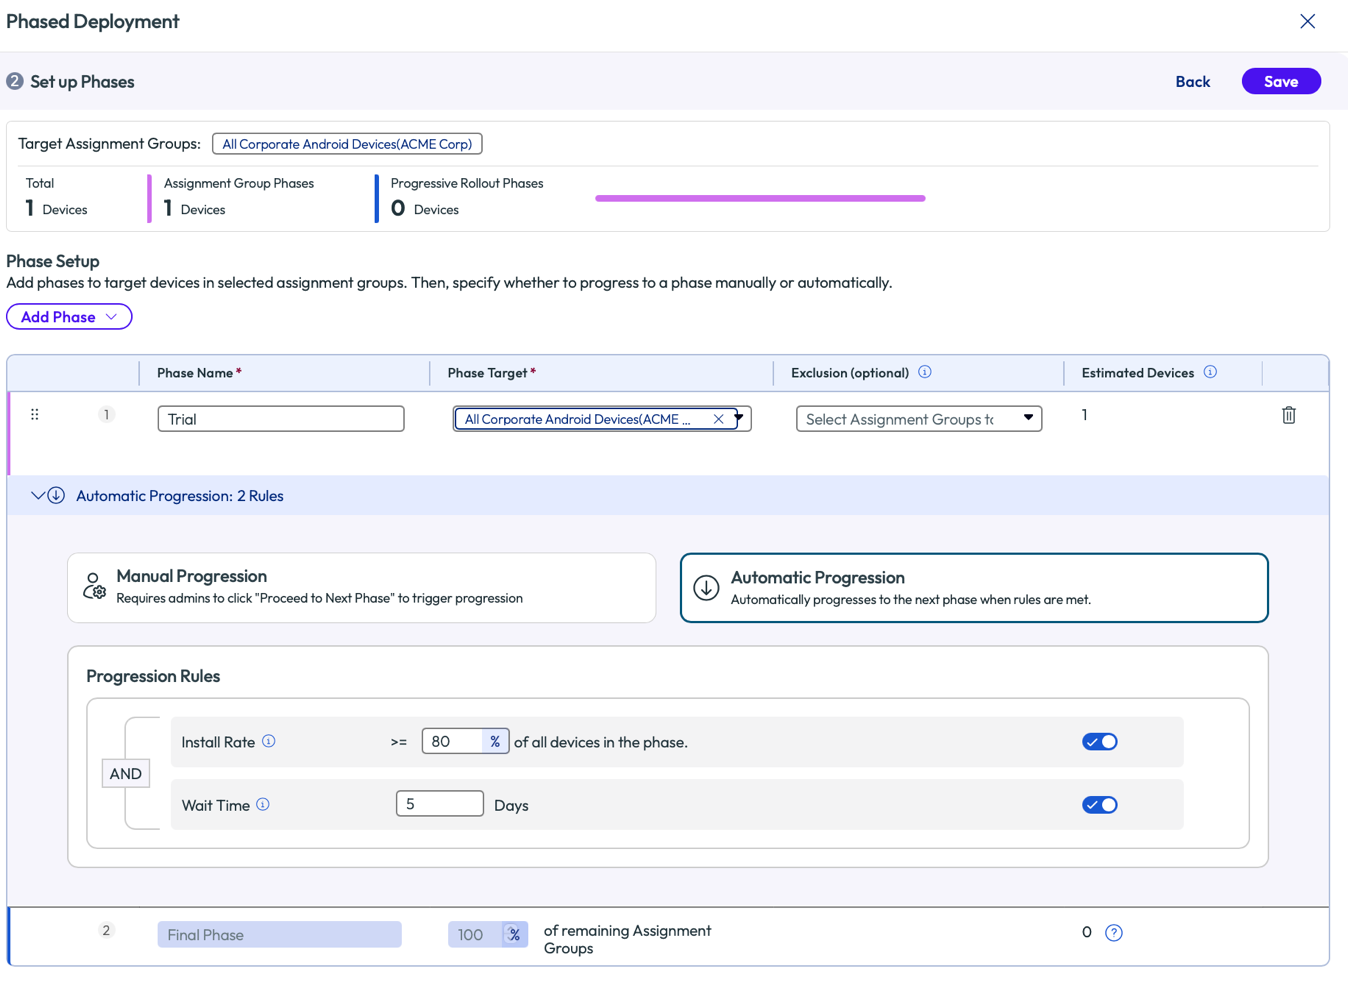
- Enter Phase Name and the target Assignment group using the drop down.
- For any groups to be excluded , select the Assignment group in the Exclusions drop down.
- Select Manual Progression if it’s preferred for Administrator to intervene to proceed to next phase of roll out and Click Save.
- Select Automatic Progression, where the next phase begins when the Install Rate and Wait Time conditions are satisfied. Set both values accordingly.
- To deploy without a Phased approach , enter the appropriate information in the Distribution section of the Assignment page. Then select the Smart Groups of devices to assign this app in the Assignment Groups section.
- App Delivery Mechanism: Deploy the application automatically (Auto) or manually (On-Demand) when needed.
- Auto-Update Priority: When assigning this application, an auto-update priority can be given to Google Play to raise or lower the priority with which automatic app updates are installed. Postponed updates will be delayed for 90 days. High-priority updates will be installed within 24 hours of being available, the update can occur even when being used which can disrupt user activity. Apps not using the default auto update priority will ignore the device-wide Public App Auto-Update Profile if one is assigned.
- Create any additional assignments, if required, on the following page. Then set the priority of the assignments. After you have added all assignments, click Save.
- Create any additional assignments, if required, on the following page. Then set the priority of the assignments. Click Save.
- The Preview section displays a list of all assigned devices. Verify the selection and then click Publish.
The Internal app is now published to your devices.
Update Policy
On managed Android devices, public applications are installed on the device through the managed Google Play Store. Likewise, Google Play can automatically update those applications over time as new versions are published to the Play Store by the developer. This section walks you through the different settings on the Workspace ONE UEM console to help you manage how these applications are automatically updated. It also provides a background on how these settings can be utilized for an application or a group of applications.
Auto Update Priority
With the release of Workspace ONE UEM 2209, administrators can use the Application auto update priority settings to prioritize the application installation. This configuration allows administrators to configure per-application auto update while overriding the global device policy set by the public app auto update profile.
The public app update profile is a Global policy that can be set to control auto update behavior for all public applications which are currently managed by Workspace ONE UEM. For more information, check Public App Auto Update in the documentation.
By setting the Auto Update Priority of an application, an administrator can override the global policy set in a public app auto update profile assigned to the same device.
Auto Update priority has three configurations available:
- Default
- High Priority
- Postpone
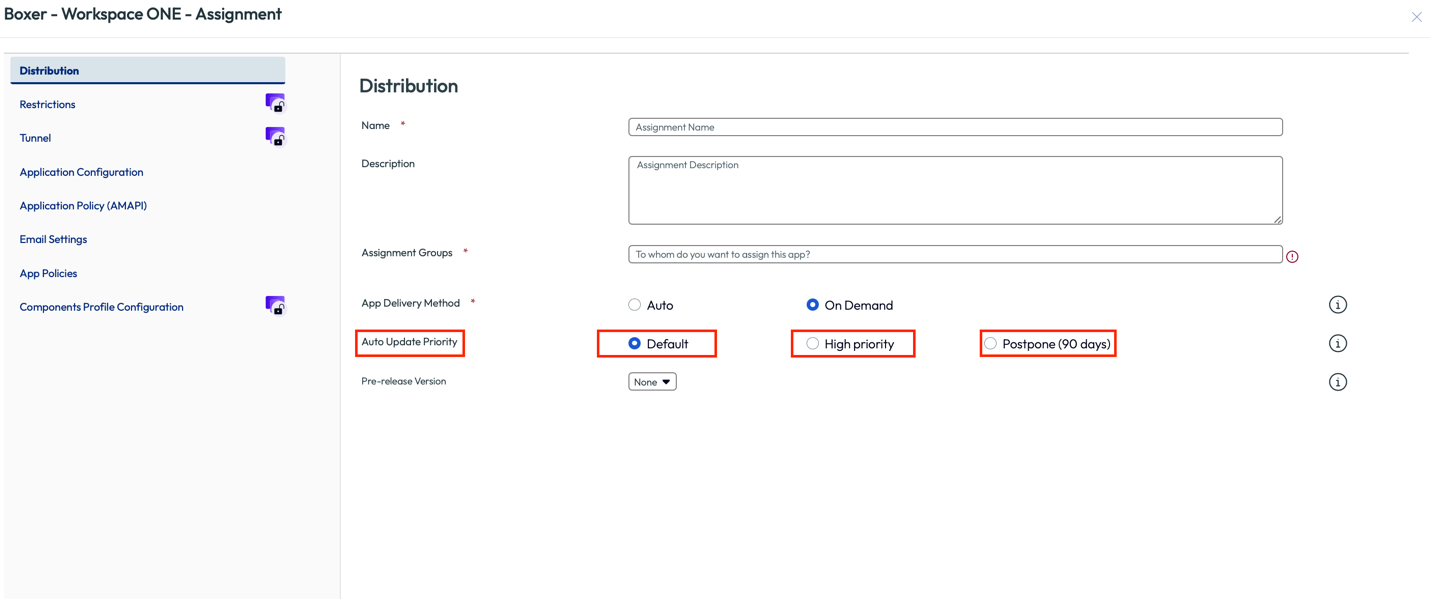
Default
By selecting the Default configuration, the application will adhere to the global update policy set via the public app auto update profile. If such a profile has not been configured, then the application will follow the Google Play Store’s default update policy. For more details, see Manage App Updates on Google support.
High Priority
Selecting High Priority mode for an application update instructs Managed Google Play to automatically update the application on the device as soon as a new version is published to the Play Store. The update must be installed within 24 hours of the new version being published. Because the update is applied regardless of the device's current status which may be interrupt the user while the application updates in the background
Postpone
The Postpone mode can be used to delay the application update for a period of time. On an Android Enterprise device, the managed Play Store application periodically checks if there are new versions of an application published by the developer. When Play Store discovers a new update, it will normally proceed to schedule that update based on the policies set on the device. If Auto Update Priority is set to Postpone for an application, the next time the managed Play Store app discovers a new update, it will postpone the update for 90 days. The application is then updated once the 90-day period is over or when the Auto Update Priority is set back to Default or High Priority. This mode is typically used when you want to carry out testing of a new application version prior to publishing it to all devices.
A few points to note:
- When the managed Play Store application installs an application update, it will always install the latest version of the application. This means that when the 90-day postponement period expires, the device will update to the latest application version that is published in the Play Store at that time. If you are postponing application updates to test a specific version of the app, the best practice is to set the Auto Update Priority for this application back to Default or High Priority to ensure that devices upgrade to this tested version. This way, devices upgrade to the application version that you tested while it is still the latest version published in the Play Store.
- Devices with outdated versions of the application might not adhere to the 90-day postponement update policy. This is because the managed Play Store might have already discovered a new version of this application available in the Play Store and have scheduled an update for the same. For these reasons, organizations looking to upgrade devices only to versions of applications that they have tested can follow the flow chart below and cycle between Postpone and High Priority modes to stop and start updates as needed.
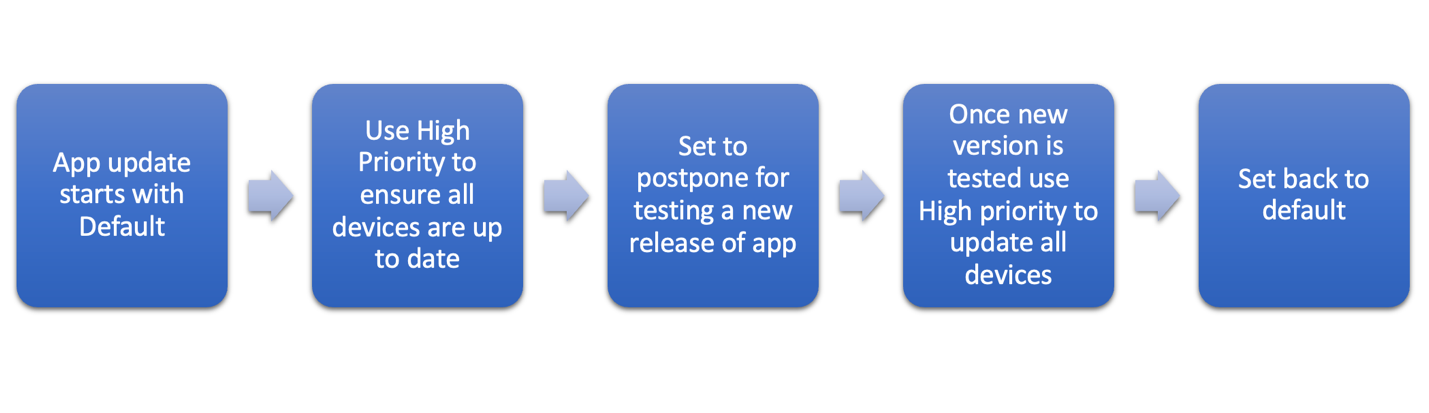
Let’s consider Acme Corp as an organization managing Android devices that requires updates for applications such as:
- Browser
- Third-party application
- Internal application published using Managed Play Store
The three applications listed have separate update requirements, the browser update can be carried out by the Public App Auto Update profile which can be set to update the application using a specific time such as 10 PM to 6 AM.
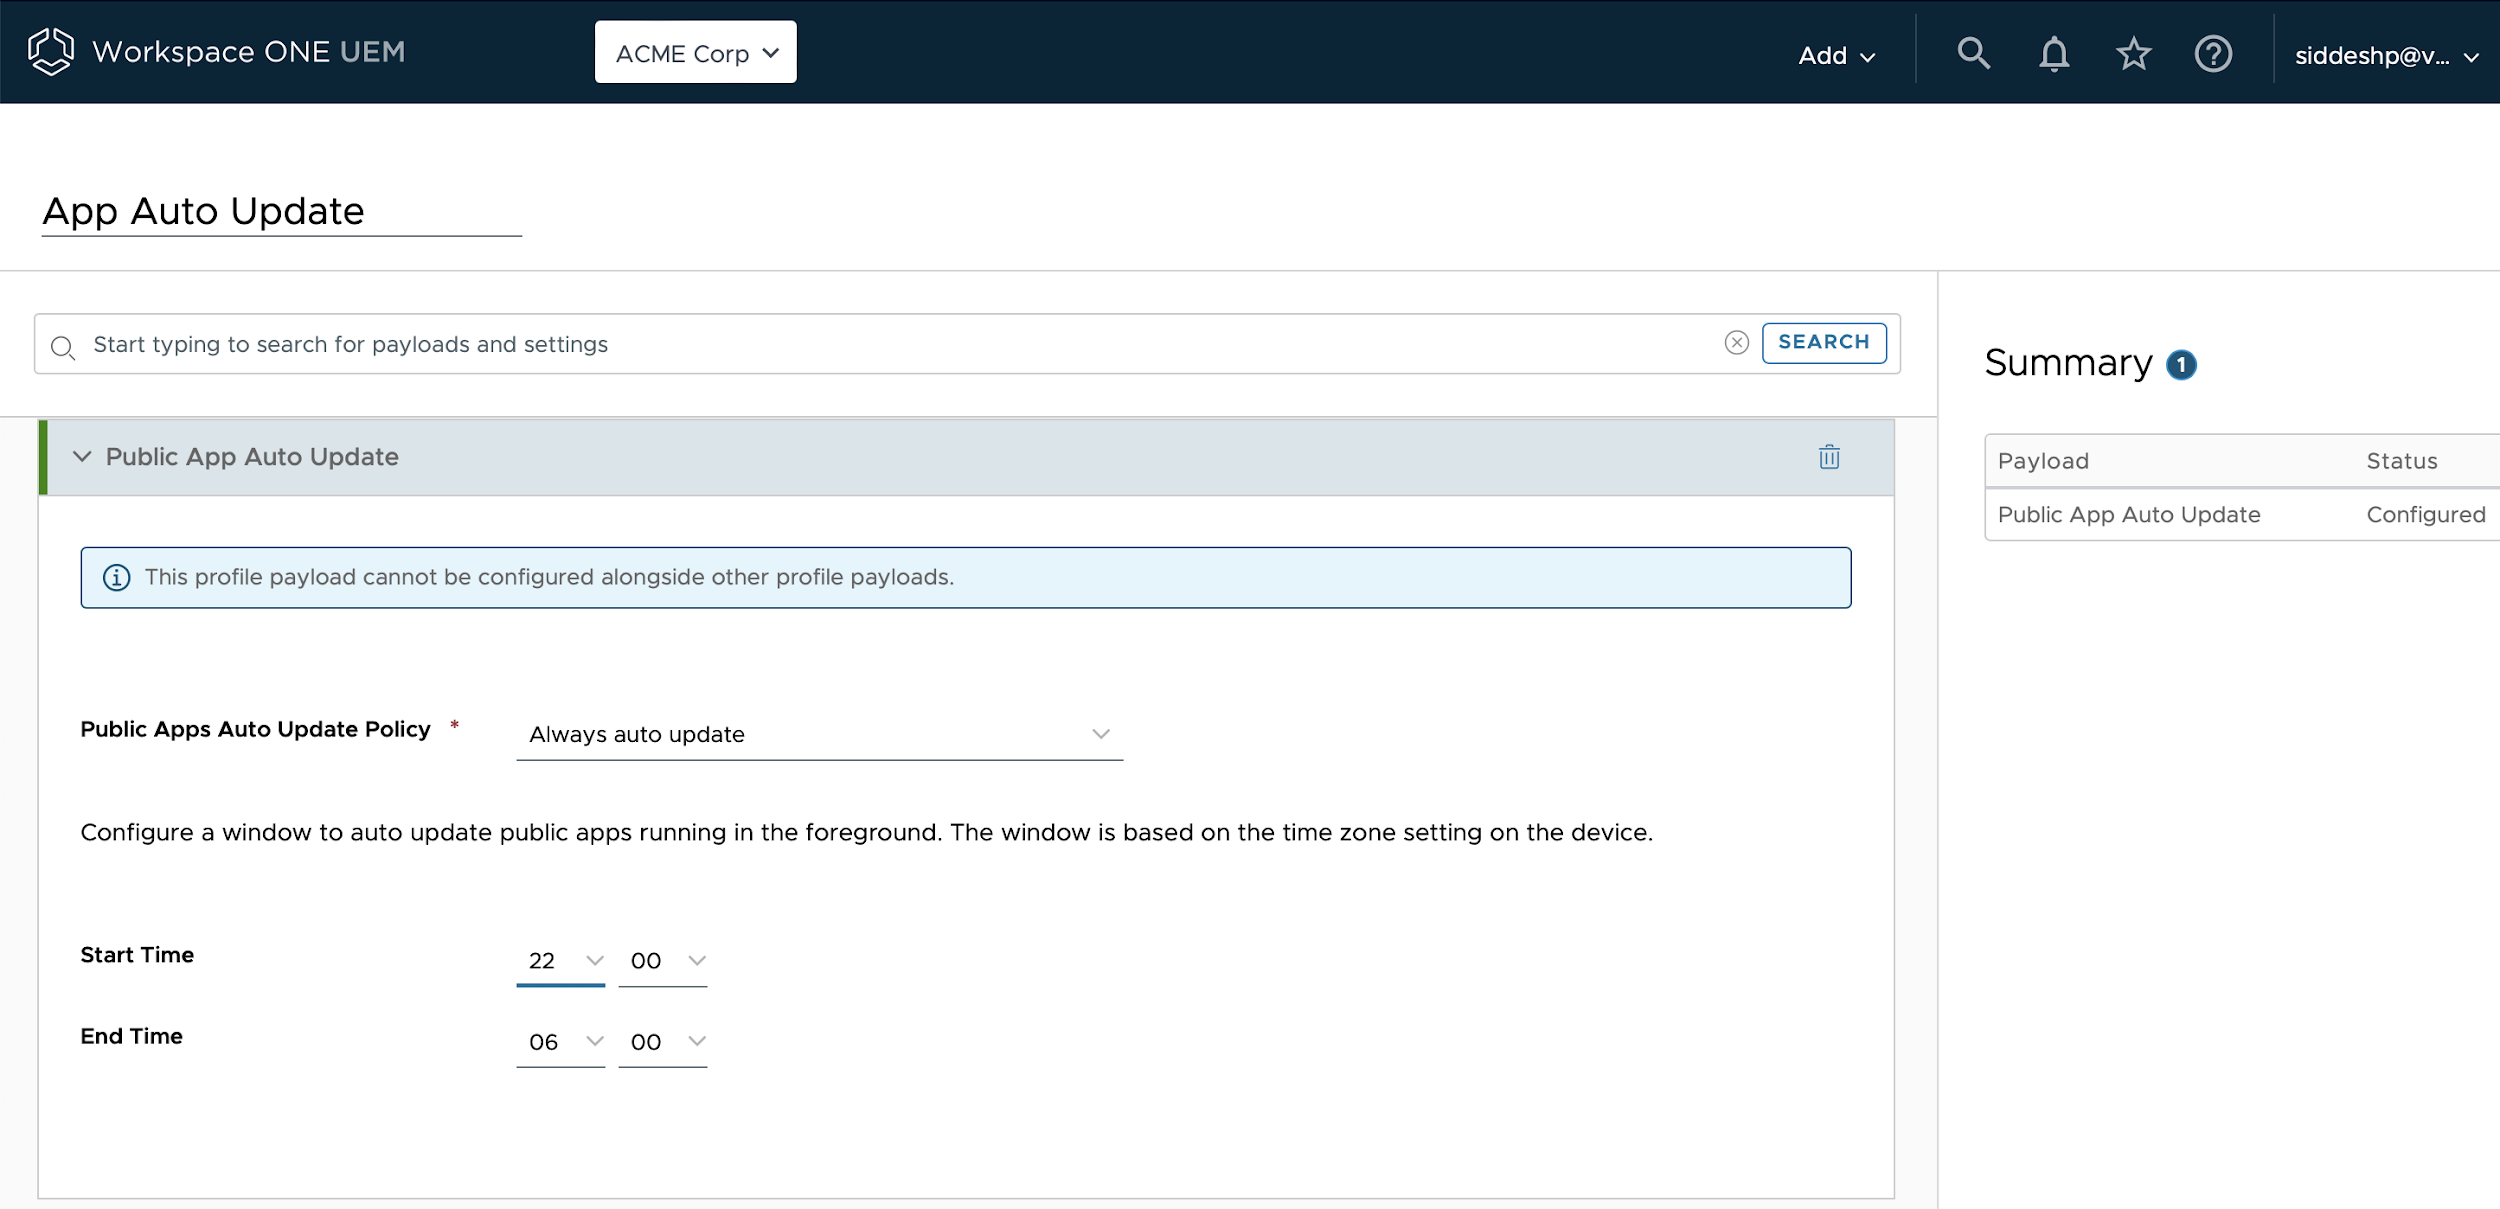
Figure: Configure Public App Auto Update payload
If the browser application has a critical update and you cannot wait for the update window, then the High Priority update setting can be utilized to ensure the application is updated immediately. Once all the devices have the updated version of the application, the App Auto update priority setting can be reset to default.
Say that the Internal application developed by Acme Corp is a critical app and is required to be updated on an immediate basis; in this scenario, you can set Auto Update priority to High priority which will ensure that the application is updated on the device.
Third-party application releases are not controlled by Acme Corp. In this case, the administrator can set the Auto update priority to postpone such that Acme Corp gets sufficient time to carry out tests and only when the release is validated, Auto Update Priority settings can be changed to High priority or Default based on the urgency.
If Acme Corp has a requirement to not allow automatic updates for any managed applications except for certain applications, Acme Corp can configure the Public Apps Auto Update Policy to Never auto update. They could then use the Auto Update Priority setting to override the global policy set by the profile and push the update using High Priority mode for the application which needs to be automatically updated on the devices.
Application Permission
In Workspace ONE UEM, the Application Permission profile allows administrators to set permissions for public applications managed within the platform. These permissions define what actions users can perform with the applications, such as installation, updating, or uninstallation. However, when it comes to internal applications, which are applications developed internally or obtained from sources other than public app stores, setting permissions requires a slightly different approach.
Custom XML is the method used to configure settings for internal applications in Workspace ONE UEM. Administrators can create custom XML files containing specific configurations and then upload these files to the Workspace ONE UEM console to apply the desired settings to internal applications.
This section will help you configure the permission profile and also cover the custom XML configuration for internal applications.
Android Permission Types
Android has different types of permissions which are categorized as:
- Install time permission
- Runtime permission
Among the listed permission types, Workspace ONE UEM can only manage the runtime permissions for applications on the device. Administrators can set a global policy to silently grant all or deny all runtime permissions requested by an application. Administrators can also add exceptions to this global policy by granting or denying specific runtime permissions for specific apps.
When administrators define exceptions in the permissions profile UI for a public application, the Workspace ONE UEM console shows the administrator a list of all the permissions declared in the application’s manifest. To learn if a permission is a runtime permission or not, you can check Manifest Permissions in the Android documentation.
However, if you are unable to determine if the permission is a runtime or other type of Android permission, an administrator will have to carry out a trial-and-error method to configure the permission for the application.
To learn more about Android permission types, check Android Permission types in the Android documentation.
Permission Profile Configuration for Public Application - Custom DPC
Although we will cover the configuration steps for a permission profile, it is important to understand the expected behavior of a Global Policy vs Exceptions.
If you set up a global policy to either allow or deny all permissions, those permissions will be applied only when the application actively requests them. However, if you use the exception feature to configure permissions, they will be granted or denied proactively regardless of whether the application asks for them or not.
Configuring permission profiles for public applications within Workspace ONE UEM involves establishing the rules that govern user actions with those apps on managed devices.
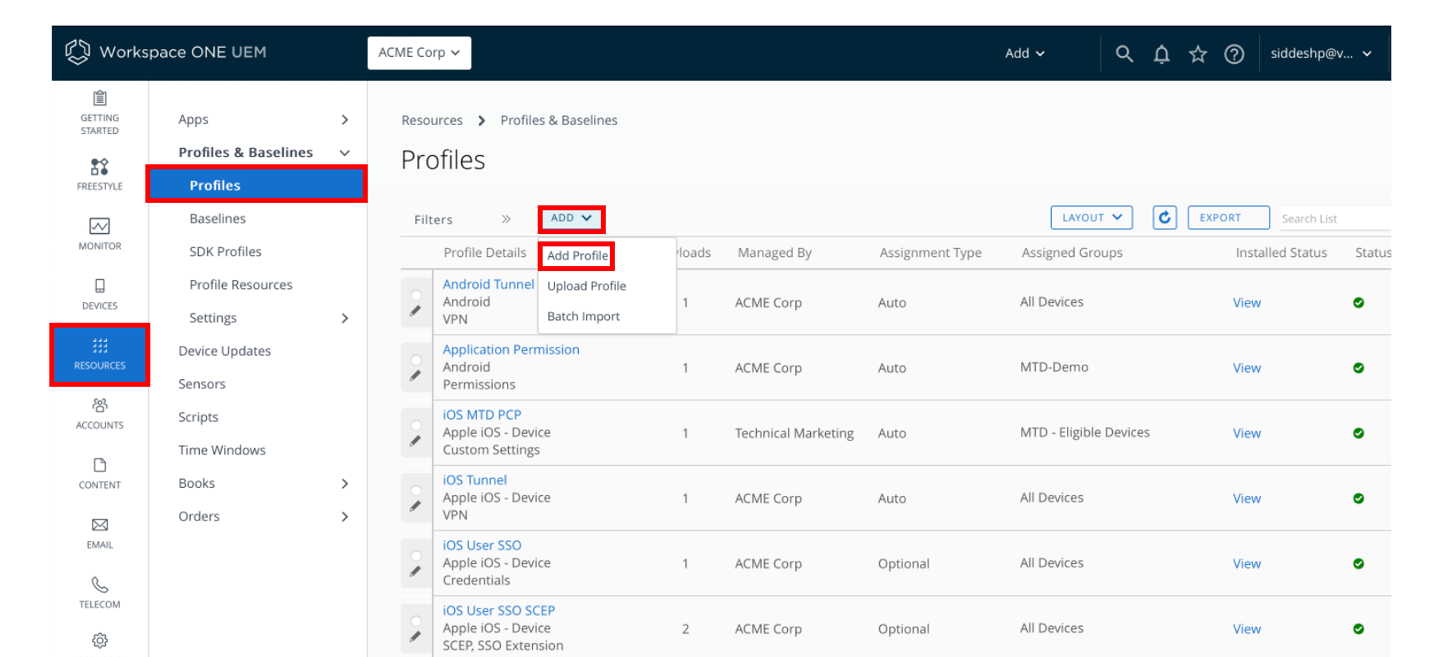
Perform the following steps:
- Navigate to Resources > Profiles > Add > Add Profile.
- Select Custom DPC and click Next.
- Enter the details as follows:
Profile Name : such as Application Permission.
Permission Policy : Select either Deny all permissions, Grant all permissions, or Prompt user for permission.
- To configure permissions for a specific application, you must add an exception to the global policy. Enter the application name to which you would like to add additional permission for. In this case, we have added Google Chrome.
Note: The public application needs to be added to the Workspace ONE UEM console prior to this step.
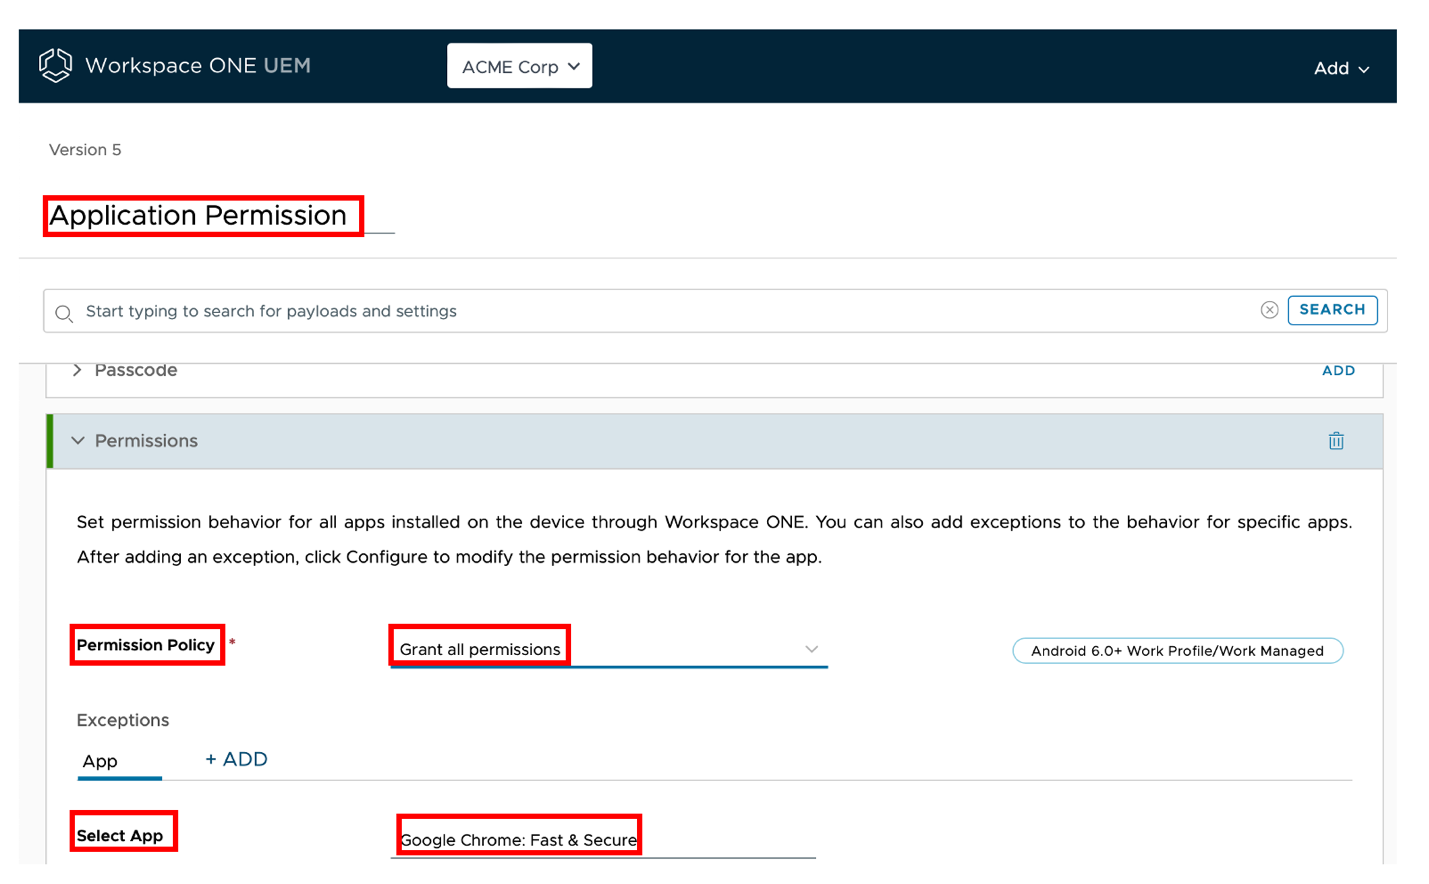
Let’s consider Acme Corp would like to restrict certain user actions such as Chrome application from accessing contacts and recording audio.
The administrator can configure the Permission type to Deny permission.


After permissions have been enabled, click Next and Save & Publish the profile.
Validate Permission on the Device
To validate if the permissions have been configured on the device, the user can navigate to Settings > Apps > Select Application (Google Chrome) > Permissions.
The user is presented with the following app permissions options:
- Allowed
- Ask every time
- Not allowed
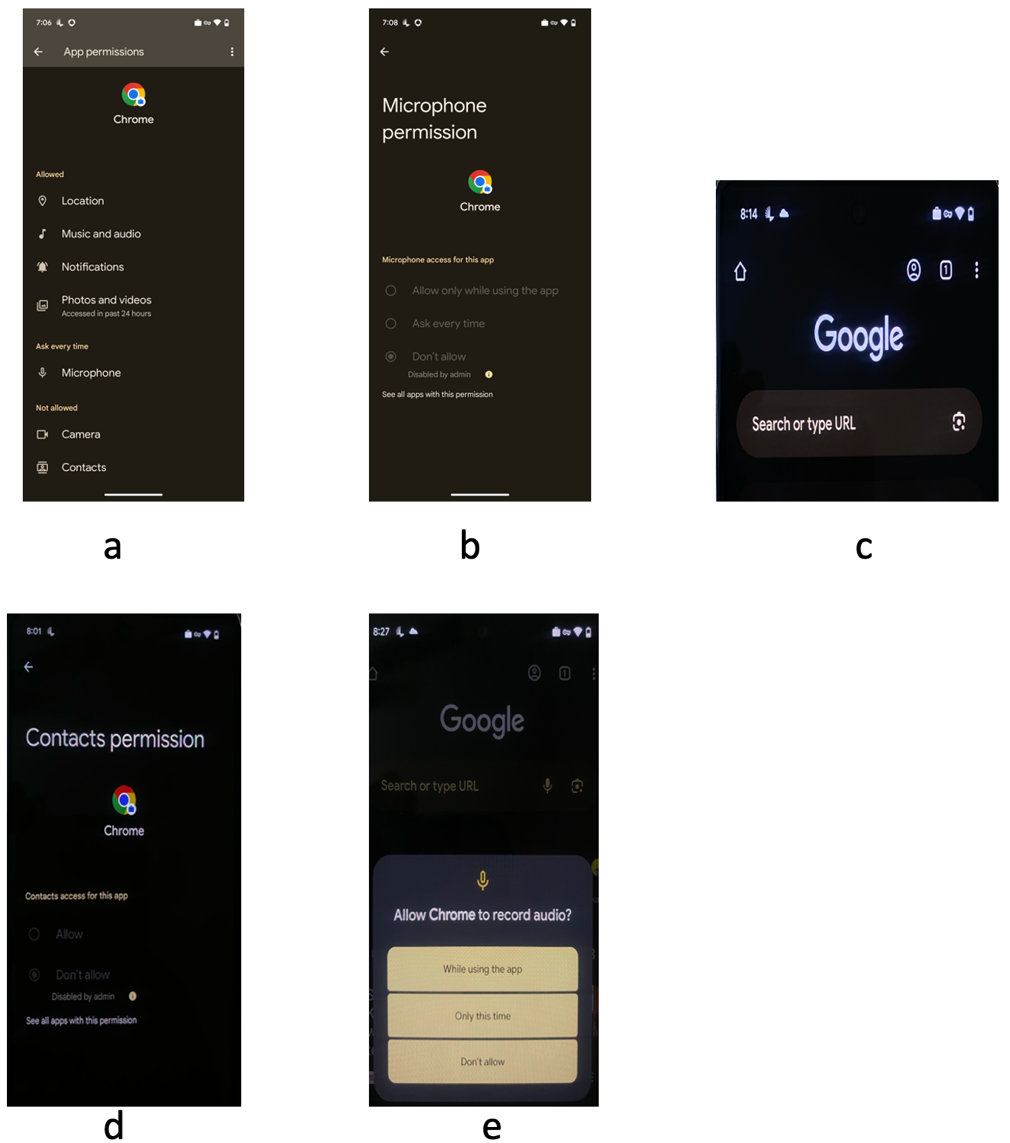
Figures a-e:
a: Displays the app permissions set for Google Chrome
b: Displays the microphone permission disallowed by admin
c: Displays the microphone icon is no longer visible
d: Displays the contact permission disallowed by admin
e: Displays the Prompt user can see when clicking the microphone symbol
If the admin set the permission to Prompt user for permission for Microphone, the end user would see the prompt as seen in Image.
Permission Profile Configuration for Public Application - AMAPI
Perform the following steps:
- Navigate to Resources > Profiles > Add > Add Profile.
- Select AMAPI and click Next.
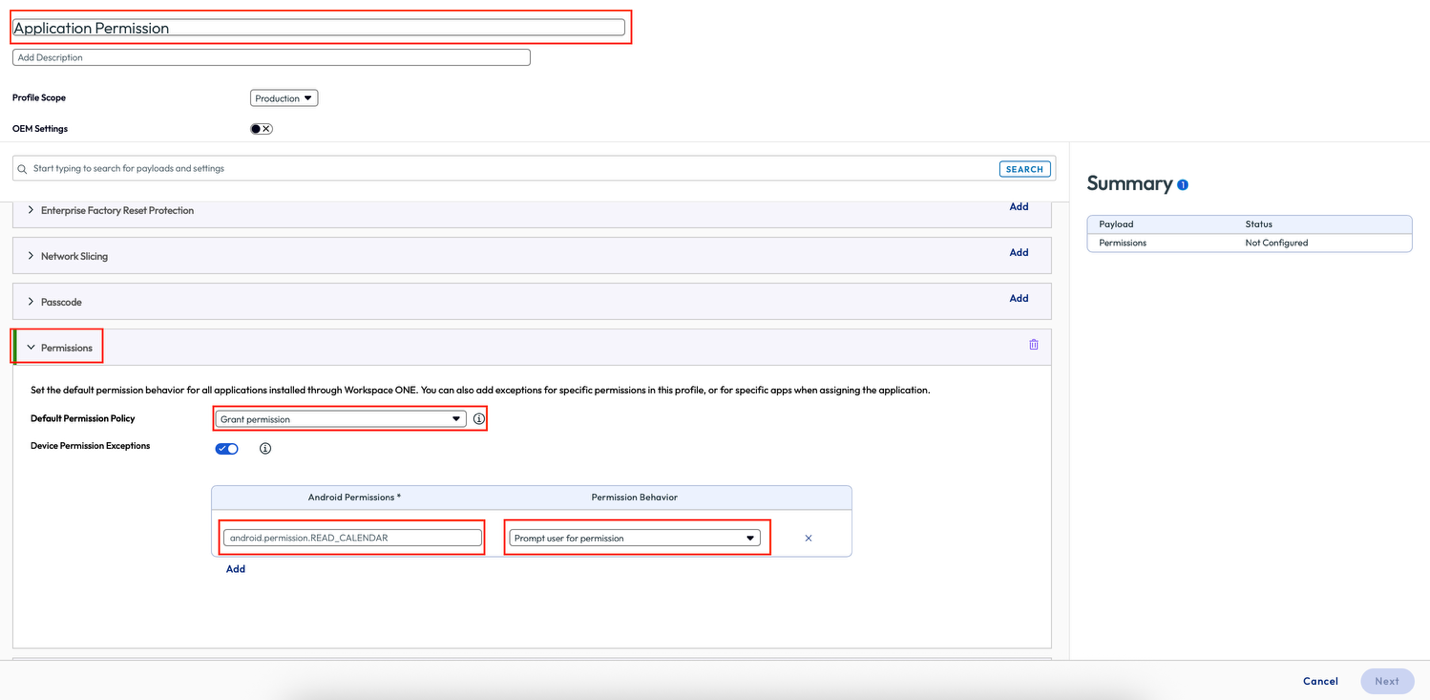
Note: Application specific permissions are configured in the Application Policy seen under the AMAPI tab on the assignment page while configuring an application.
- Enter the details as follows:
Profile Name :such as Application Permission.
Permission Policy : Select either Deny all permissions, Grant all permissions, or Prompt user for permission.
- To configure permissions for a specific application, you must add an exception to the global policy. Enter the application name to which you would like to add additional permission for. In this case, we have added Google Chrome.
Note: The public application needs to be added to the Workspace ONE UEM console prior to this step.
The application permission configuration differs slightly from what is done using a Custom DPC. In this setup, the administrator must manually configure the required permissions.
Steps:
- Enter the permission name, for example: android.permission.READ_CALENDAR.
- From the Permission Behaviour drop-down, select one of the following options: Prompt user for permission- Grant permission or Deny Permission
- To add more permissions, click Add and repeat the above steps.
- Click Next to Save and Publish the profile.
Configuration of Permission Profiles for Internal or Unmanaged Applications Using Custom DPC
The process for configuring runtime permissions for an internal or unmanaged application differs from the process for a public application. Unmanaged applications usually consist of system/pre-installed applications, such as Google Chrome on a GMS Android device. Currently, for these applications, we do not have an option to directly pull a list of permissions the applications use and configure them using the Console UI as we did for public applications. To configure app permissions for an internal/unmanaged application, we must use a custom XML and publish it using a custom settings profile to devices.
To configure permissions for the Workspace ONE Web application, perform the following steps:
- Extract the manifest of the application (This can be done using a third-party tool).
- The runtime permissions in the extracted manifest will normally start with “android.permission” (e.g. android.permission.INTERNET)
- Add
{"name":" Permission Name","value":"0"}syntax to all the permissions. - Set value to either:
- 0 – Prompt
- 1 – Grant
- 2 - Deny
- The Permission array should look like the following:
[{"packageName":"com.airwatch.browser","permissions":[{"name":"android.permission.INTERNET","value":"0"},{"name":"android.permission.ACCESS_NETWORK_STATE","value":"1"},{"name":"android.permission.READ_PHONE_STATE","value":"0"},{"name":"android.permission.WRITE_EXTERNAL_STORAGE","value":"0"},{"name":"android.permission.READ_EXTERNAL_STORAGE","value":"0"},{"name":"android.permission.FOREGROUND_SERVICE","value":"0"},{"name":"android.permission.ACCESS_FINE_LOCATION","value":"0"},{"name":"android.permission.ACCESS_WIFI_STATE","value":"0"},{"name":"com.airwatch.sdk.BROADCAST","value":"0"},{"name":"android.permission.VIBRATE","value":"0"},{"name":"android.permission.CAMERA","value":"2"},{"name":"android.permission.CHANGE_NETWORK_STATE","value":"0"},{"name":"android.permission.WAKE_LOCK","value":"0"},{"name":"com.airwatch.email.permission.ACCESS_PROVIDER","value":"0"},{"name":"com.android.alarm.permission.SET_ALARM","value":"0"},{"name":"com.google.android.c2dm.permission.RECEIVE","value":"0"},{"name":"android.permission.RECEIVE_BOOT_COMPLETED","value":"0"},{"name":"android.permission.USE_BIOMETRIC","value":"0"},{"name":"android.permission.USE_FINGERPRINT","value":"0"}]}] - The requirement here is to block the camera, so the value set is 2.
- Encode the permission array using base64.
- Take the encoded string and insert it into the
applevelruntimepermission valuefield of the following xml:<characteristic uuid="ece876fd-da7d-424f-9bab-85a1b483e95d" type="com.airwatch.android.androidwork.permissions" target="1"><parm name="MasterRuntimePermission" value="1" type="integer" /><parm name="AppLevelRuntimePermissions" value="<insert_encoded_string_here>" type="string" /></characteristic>. - Add a new profile on the Workspace ONE UEM console.
- Add a custom settings payload and insert the XML.
- Save and Publish the profile.
Validate Permission on the Device
To validate if the permissions have been configured on the device, the user can navigate on the device to Settings Apps > Select Application (Web) > Permission.
The user is presented with which app permissions are allowed, ask every time, and not allowed.
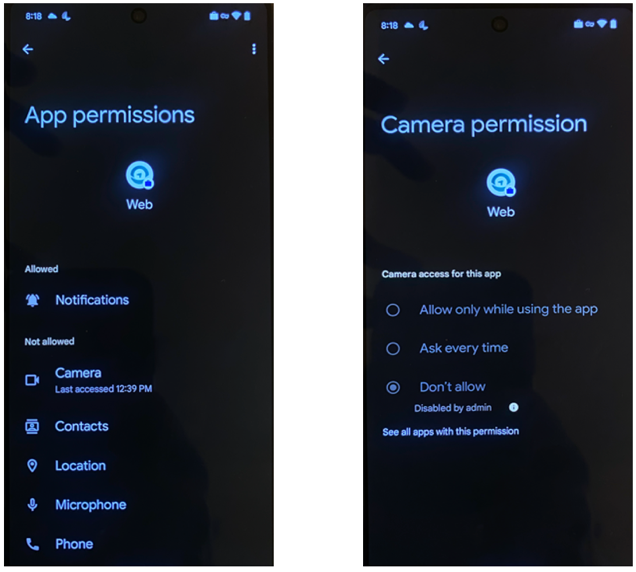
A B
Figure A: App permissions seen for the Web application
Figure B: Camera permission disallowed
Managing Operating System Updates with Workspace ONE UEM
Android devices can receive and install over-the-air (OTA) updates to the system and application software. Usually, Android notifies the device user that a system update is available, and the device user can install the update immediately or later.
Using Workspace ONE UEM, an IT admin can manage system updates for the device user. Granular controls for deploying OS updates are usually device and OEM-specific. However, the following control options are available to Work Managed and Work Profile devices through Workspace ONE UEM integration with Android Enterprise:
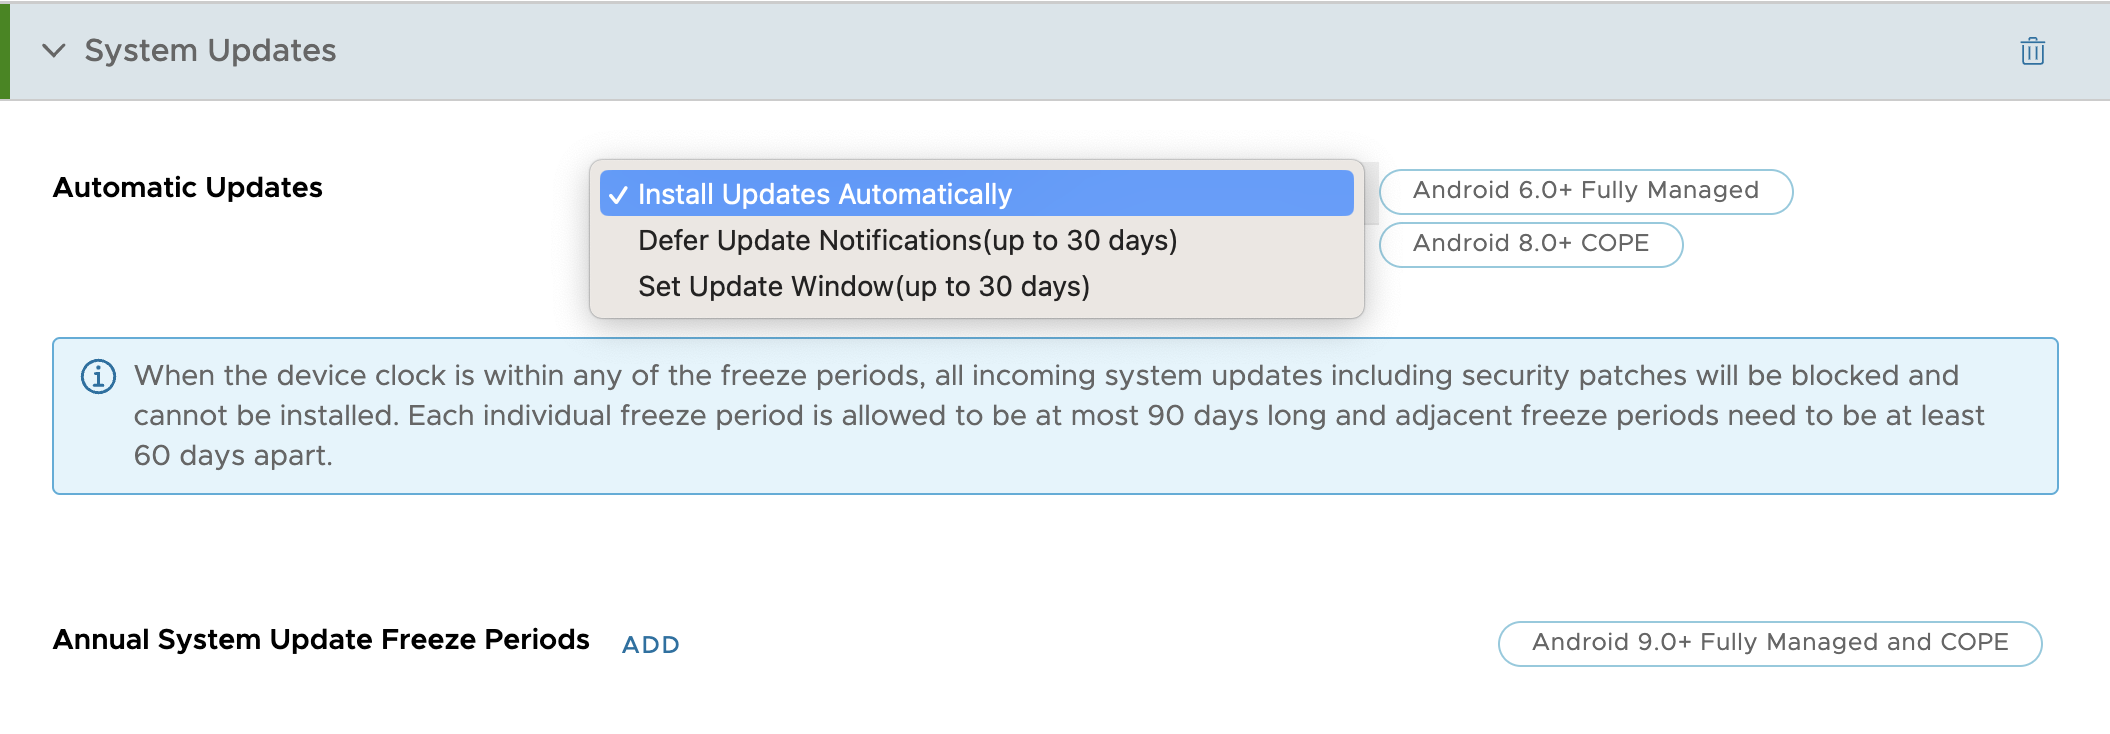
- In the Workspace ONE UEM console, navigate to Resources > Profiles & Baselines > Add > Add Profile > Android>Select Custom DPC or AMAPI.
- Select the System Updates payload.
- Use the drop-down menu for Automatic Updates to select the update policy.
| Automatic Updates — Android 6.0 ,Android 8.0and later (Work Managed and COPE devices) | |
| Install Updates Automatically | Automatically install updates when they become available. |
| Defer Update Notifications | Defer all updates. Send a policy that blocks OS updates for a maximum period of 30 days. |
| Set Update Window | Set a daily time window in which to update the device. |
| Annual System Update Freeze Periods — Android 9.0 and later (Work Managed and COPE devices) | |
| System Update Freeze Periods | Device owners can postpone OTA system updates to devices for up to 90 days to freeze the OS version running on these devices over critical periods (such as holidays). The system enforces a mandatory 60-day buffer after any defined freeze period to prevent freezing the device indefinitely. During a freeze period: • Devices do not receive any notifications about pending OTA updates. • Devices do not install any OTA updates to the OS. • Device users are not able to manually check for OTA updates. |
| Freeze Period | Use this field to set freeze periods, in month and day, when updates cannot be installed. When the time of the device is within any of the freeze periods, all incoming system updates, including security patches, are blocked and cannot be installed. Each individual freeze period is allowed to be at most 90 days long and adjacent freeze periods need to be at least 60 days apart. |
Deploy Samsung Knox E-FOTA Updates
Samsung’s Knox E-FOTA (Enterprise Firmware Over The Air) is a powerful enterprise solution that allows IT administrators to manage and control firmware (OS) updates on Samsung devices at scale. By connecting Knox E-FOTA to Workspace ONE, your organization is set to automatic one-way sync of device and smart group information from Workspace ONE to Knox E-FOTA. With this integration in place, you can manage firmware updates from within your existing Unified Endpoint Management (UEM) workflow without re-enrolling devices or duplicating effort.
The instruction below walks through the complete end-to-end process of integrating Knox E-FOTA with Workspace ONE, from initial prerequisites through creating API credentials, connecting the platforms, enrolling device groups, and deploying the required apps via Knox Service Plugin. Before you can perform the steps in this exercise, you must understand how it works.
At a high level, the integration works as follows:
- Workspace ONE serves as your primary UEM, where your Samsung devices are already enrolled and organized into smart groups.
- Knox E-FOTA connects to Workspace ONE via a REST API key, pulls in your device(Smart groups) groups, and enrolls those devices into E-FOTA licenses.
- The Knox E-FOTA One app is pushed to devices through Workspace ONE using the Knox Service Plugin, which activates firmware management on each device.
- Once registered, IT admins can create firmware update campaigns within Knox E-FOTA and target specific device groups and controlling exactly when and to which OS version devices are updated.
Prerequisites
Before beginning the integration, ensure the following are in place.
Accounts & Access
- A Samsung Knox account - Register at samsungknox.com.
- Access to Knox E-FOTA Console- Apply through the Knox portal after account creation.
- Access to Workspace ONE UEM Console.
Licenses
- Active Knox E-FOTA trial or commercial licenses - Each device in a managed group consumes one license.
- Active Workspace ONE license.
Device Readiness
- Samsung devices must already be enrolled to Workspace ONE.
- Devices must be organized into smart groups within Workspace ONE.
- Workspace ONE must be integrated with Android Enterprise before app deployment.
Steps to Integrate Knox E-FOTA and Workspace ONE UEM Console
Step 1 : Generating Rest API Key on Workspace ONE UEM Console
To configure an API key to allow Knox E-FOTA to establish a connection with the Workspace ONE, perform the following steps:
- From your Workspace ONE UEM console, navigate to Groups & Settings > All Settings > System > Advanced > API > REST API.
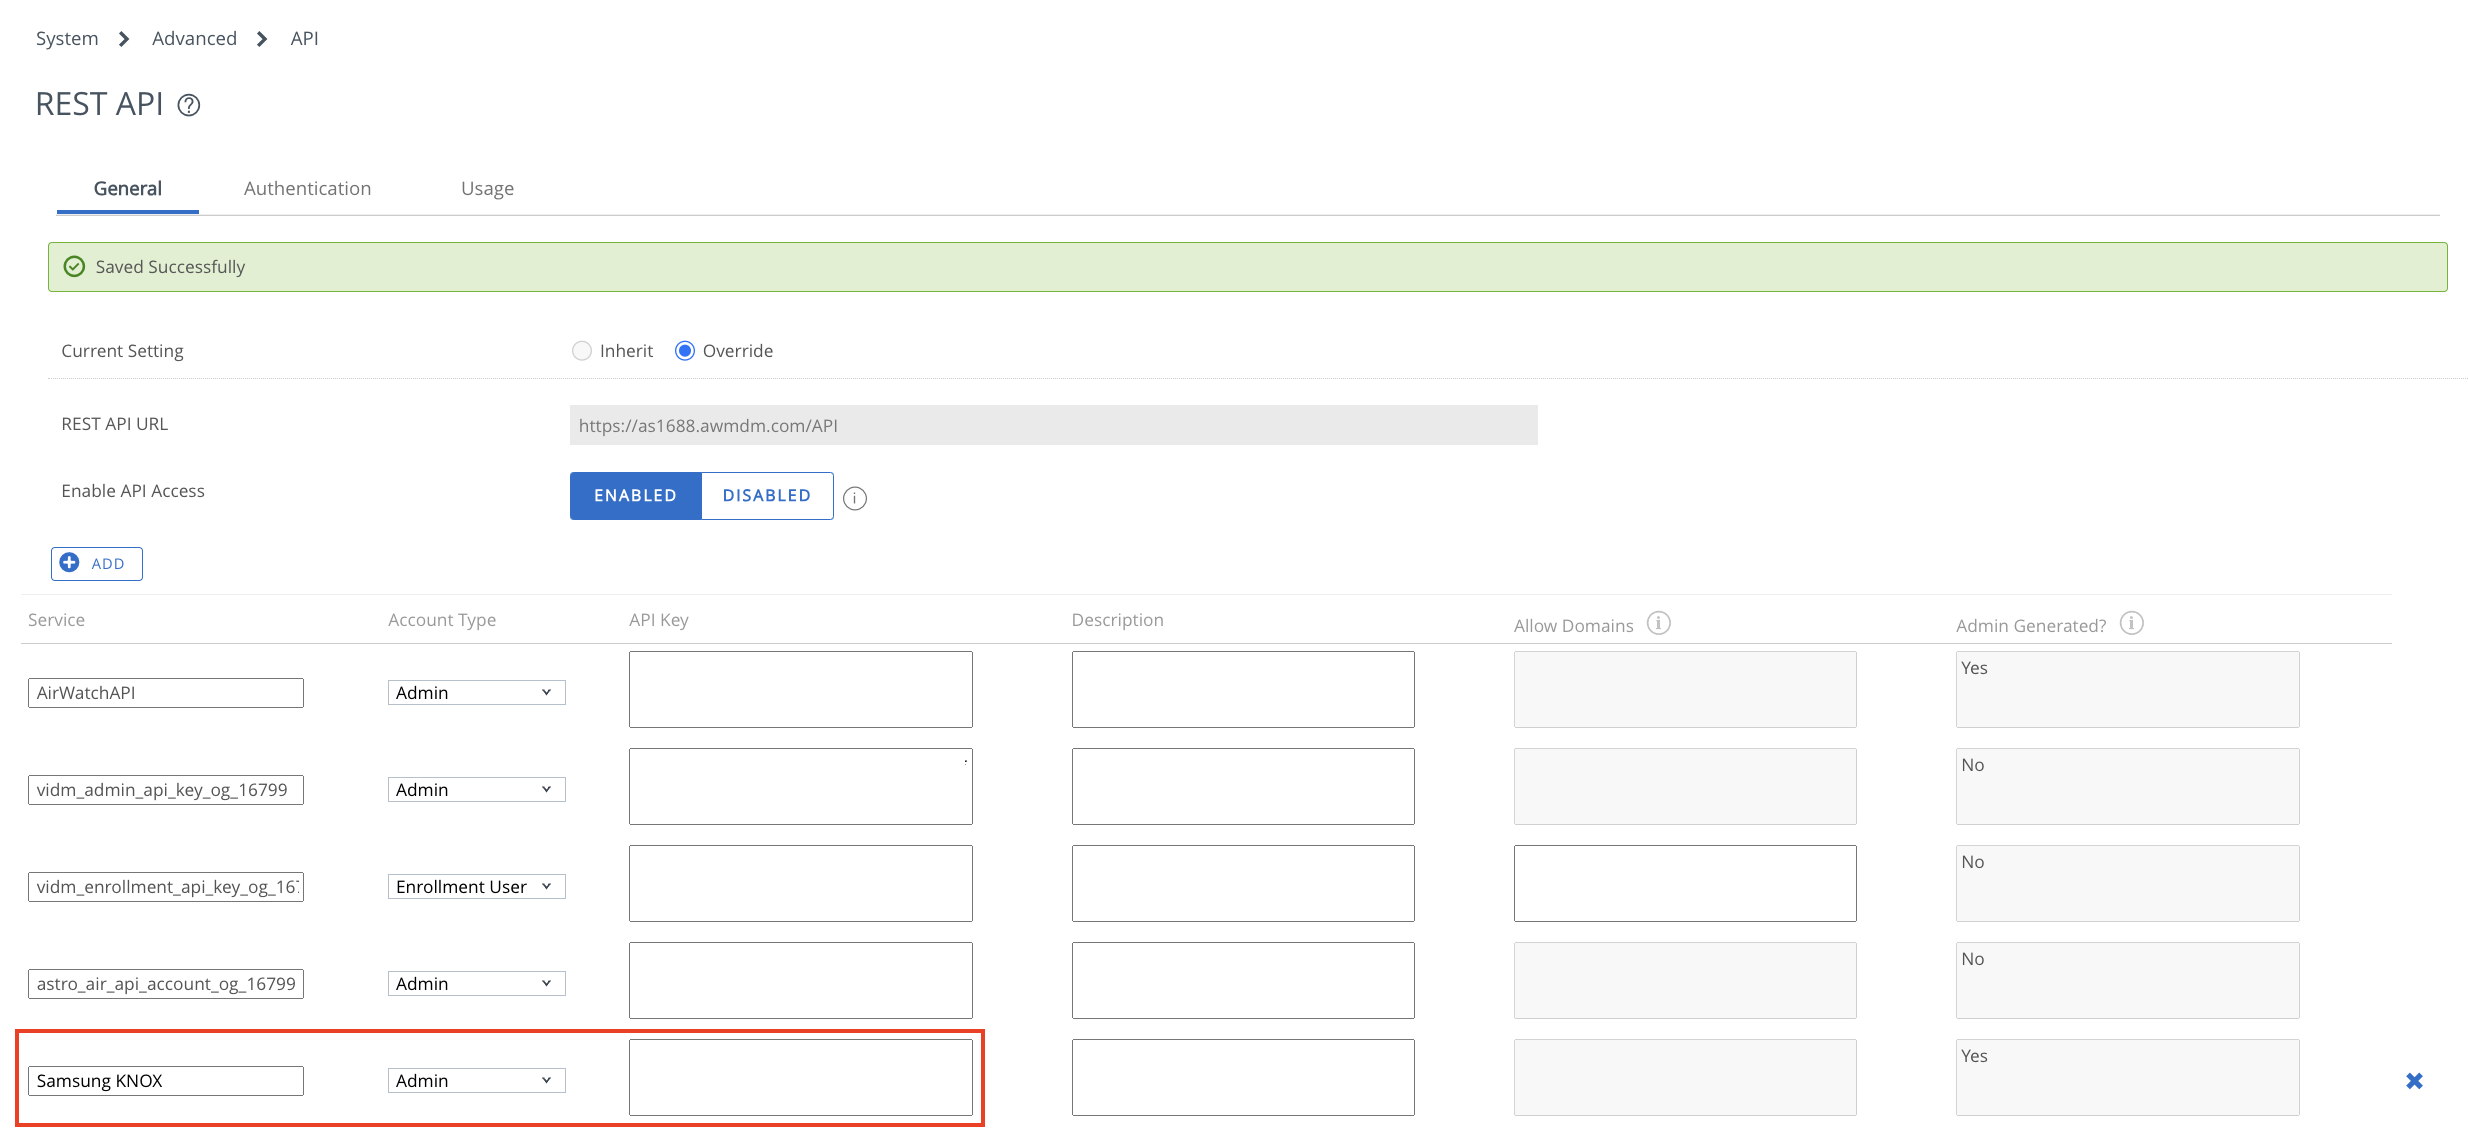
- Click Add and specify the Service Name, Account Type (Admin), then click Save.
- Copy and securely store the REST API key that is generated as you will need it in the next step.
Step 2 : Connect Knox E-FOTA to Workspace ONE
- With your REST API key ready, you can now link the two platforms inside the Knox E-FOTA admin portal.
- Launch the Knox E-FOTA admin portal.
- In the left-hand navigation, click EMM Groups.
- In the upper-right corner of the screen, click Connect EMM.
- In the Pick your EMM to manage devices menu, select Workspace ONE.
- Enter your Workspace ONE admin username and password.
- Enter the URL of your Workspace ONE Console.
- Paste your REST API key from Step 1 into the designated field.
- Click Connect.
Knox E-FOTA will authenticate and load all smart groups from your Workspace ONE environment.
Step 3 : Add Workspace ONE Device Groups to Knox E-FOTA
Once connected, you will be prompted to select which device groups to sync into Knox E-FOTA.
Note: Device groups are smart groups of Workspace ONE.
- In the Add device groups to Knox E-FOTA screen, locate your device groups.
- Toggle Sync to On for each group you want to manage via Knox E-FOTA. You can add one group or multiple groups at once.
- Click Add Knox E-FOTA groups.
The selected device groups along with all device details will be imported into Knox E-FOTA, fully synchronized from Workspace ONE.
Step 4 : Enroll the device group in Knox E-FOTA
Importing a group does not automatically enroll devices. You must explicitly enroll the group against a Knox E-FOTA license.
- In the Knox E-FOTA admin portal, navigate to the EMM Groups tab.
- Select the device group you just added.
- In the upper-right corner, click Actions > Enroll devices in groups.
- Select the Knox E-FOTA license you want to apply to this group.
- Click Done.
Step 5 : Add the Knox E-FOTA One App in Workspace ONE
The Knox E-FOTA One app is the on-device agent that enables firmware management. You need to publish it to devices via Workspace ONE.
- In the Workspace ONE Console, go to Resources > Apps>Native Apps.
- Select Public.
- Click Add Application.
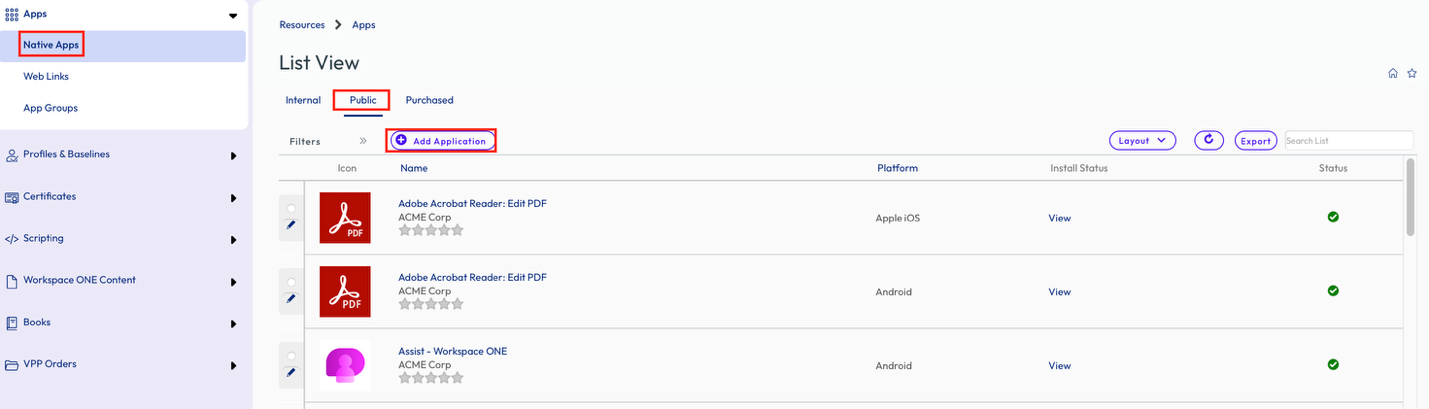
- In the Add Application screen, set Platform to Android and Source is set to Search App Store.
- Search for Knox E-FOTA and click Next.
- Select Knox E-FOTA One from the search results.
- Click on Select.
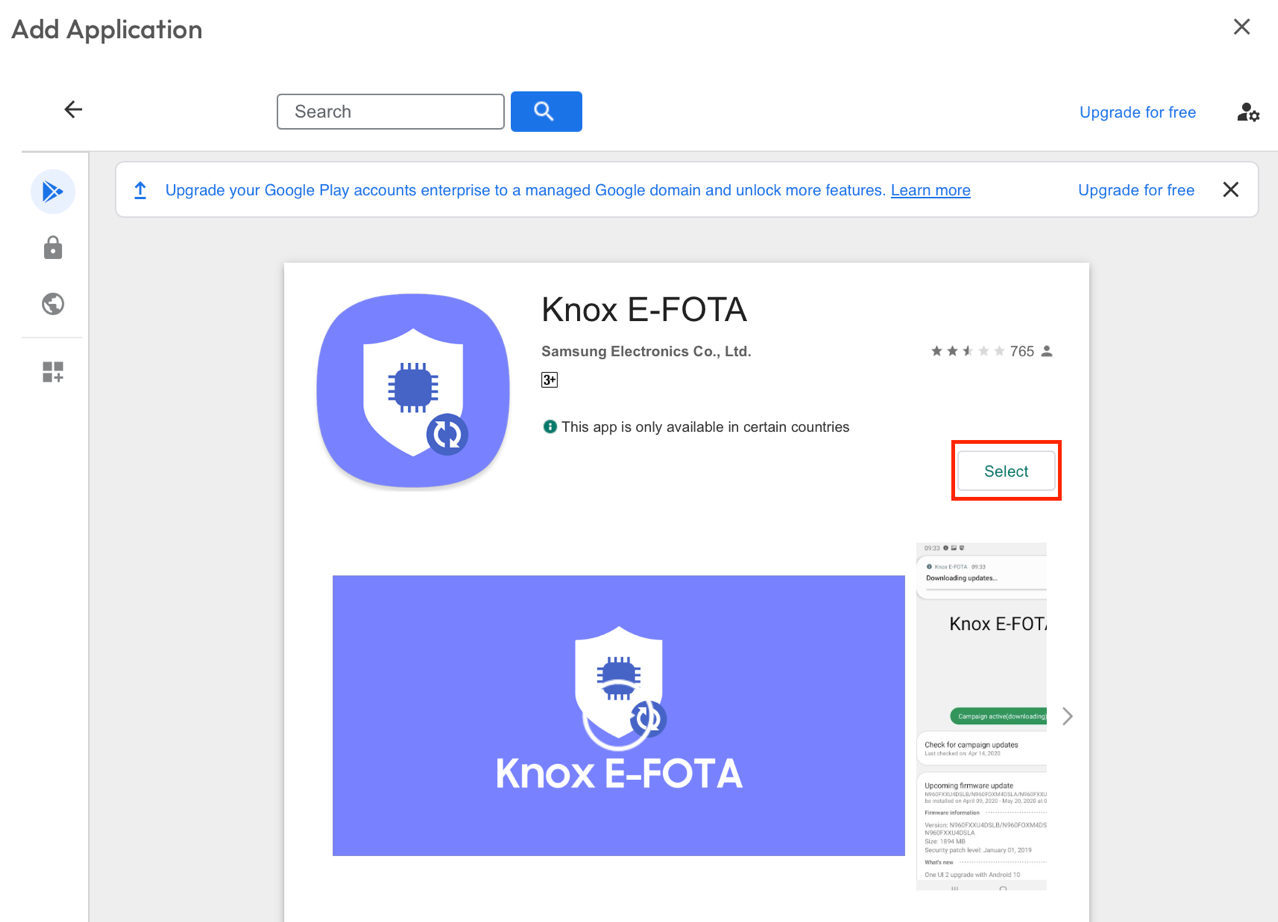
- Set the Category to Business (System).
- Click Save and Assign.
- In the Assignment screen, enter a name for the app assignment (e.g., Knox E-FOTA - Device Group A).
- Choose the smart group(device group) that matches the one you enrolled in Knox E-FOTA.
- Set the app delivery method to Auto so the app installs automatically without user action.
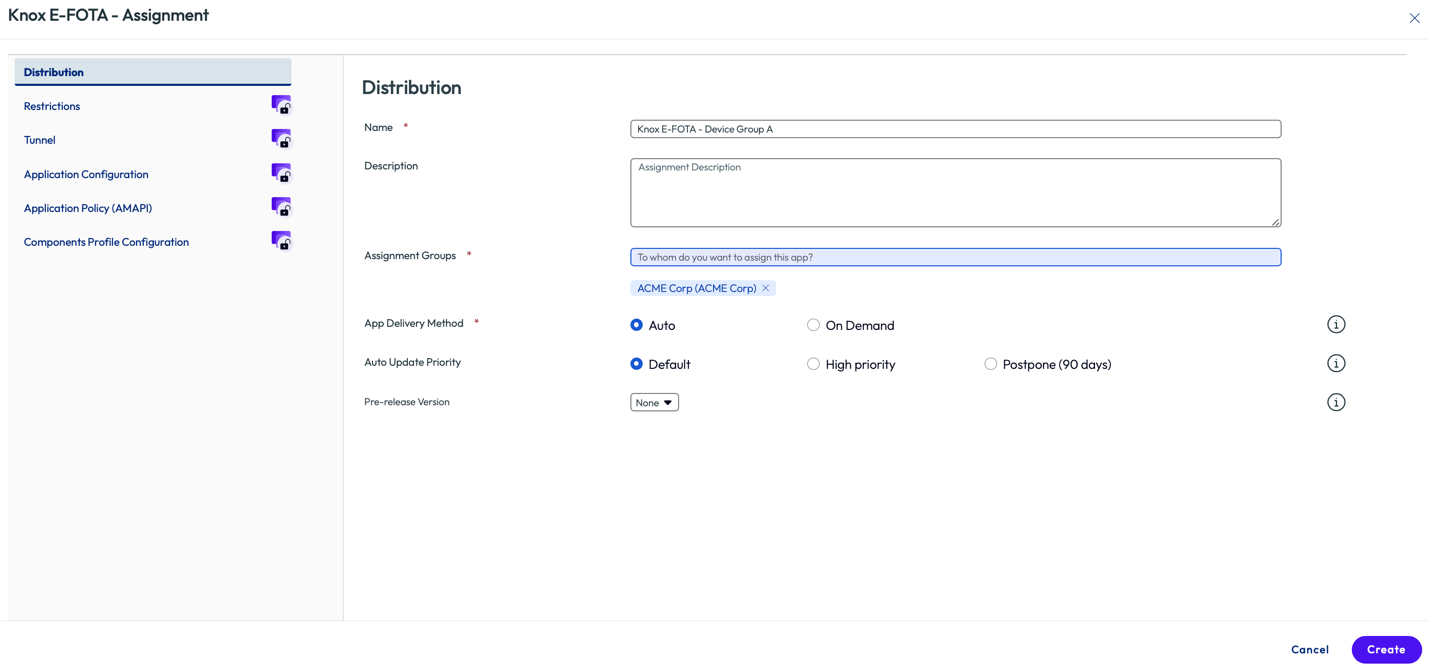
- Click Create, then click Save, then click Publish.
Step 6 : Add and Configure the Knox Service Plugin App
The Knox Service Plugin (KSP) is what triggers the Knox E-FOTA One app to launch and establishes the managed configuration needed for enrollment to complete. This is the final and most critical configuration step.
6a. Add Knox Service Plugin to Workspace ONE
- In the Workspace ONE Console, go to Resources > Apps>Native Apps.
- Select Public.
- Click Add Application.
- Set Platform to Android and Source is set to Search App Store.
- Search for Knox Service Plugin and click Next.
- Click on Knox Service Plugin from the results.
- Click on Select.
- Set the Category to Business (System).
- Click Save and Assign.
- In the Assignment screen, enter a name for the app assignment (e.g., Knox Service Plugin)
- Choose the smart group(device group) that matches the one you enrolled in Knox E-FOTA.
- Click Create, then click Save, then click Publish.
6b.To configure the Knox Service plugin, edit the application and navigate to the Assignment screen, enter a name for the KSP assignment.
- Choose the same smart group you have been using throughout.
- Set the app delivery method to Auto.
- Navigate to the Application Configuration tab.
- Enable Managed Access.
- Enable Send app configuration not globalized and Send Configuration.
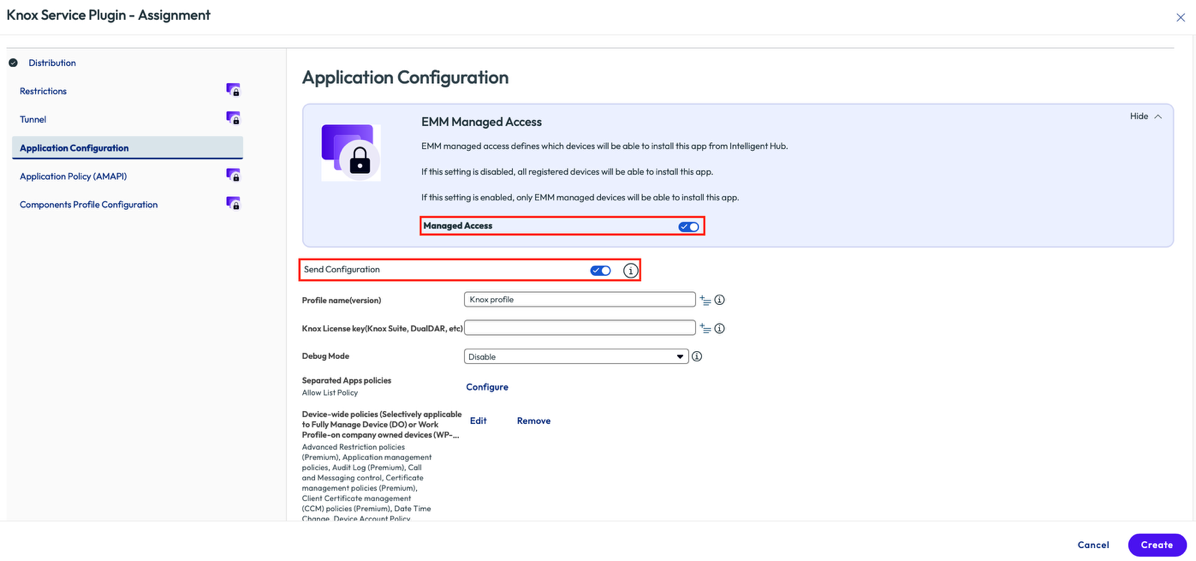
- Scroll down to Device-wide Policies and click Configure.
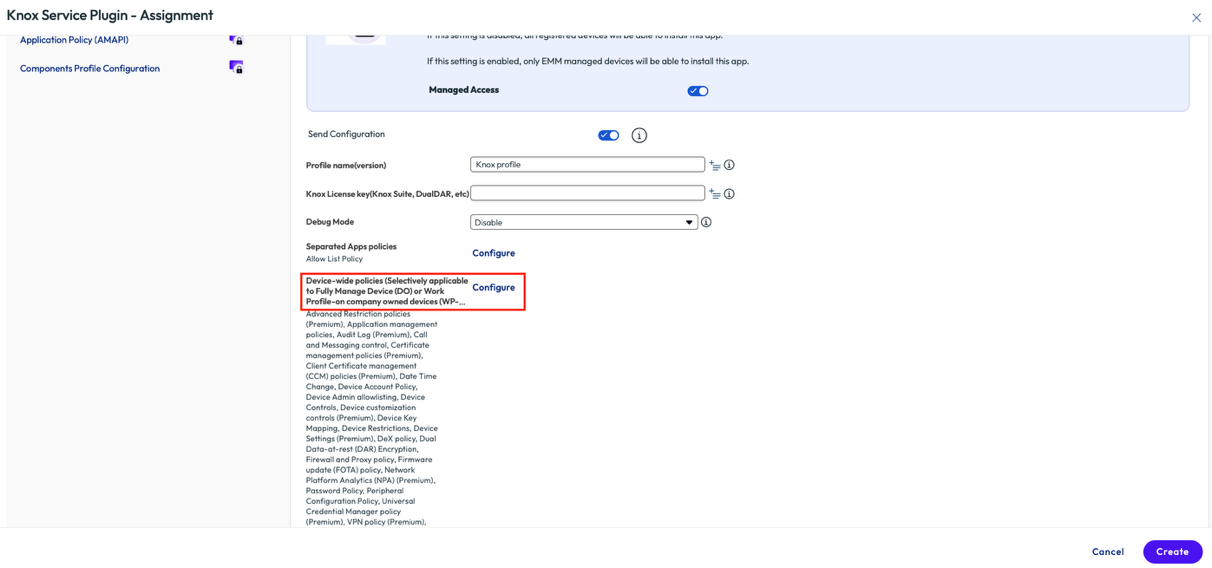
- Expand Firmware Update / FOTA Policy.
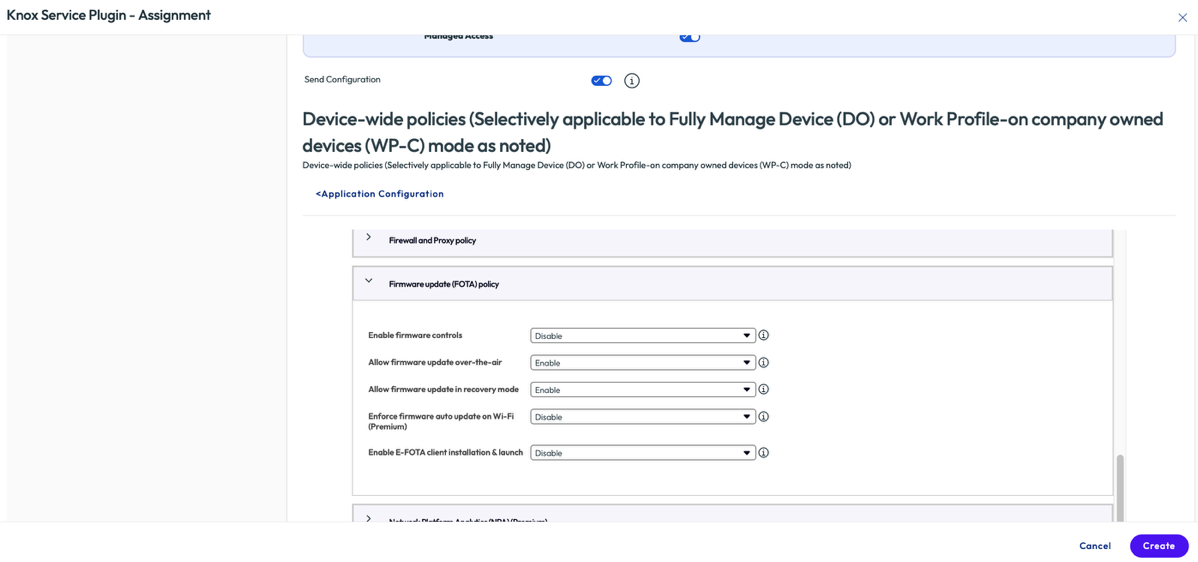
- Enable Enable firmware controls.
- Scroll down to Enable E-FOTA client installation and launch and Enable it as well.
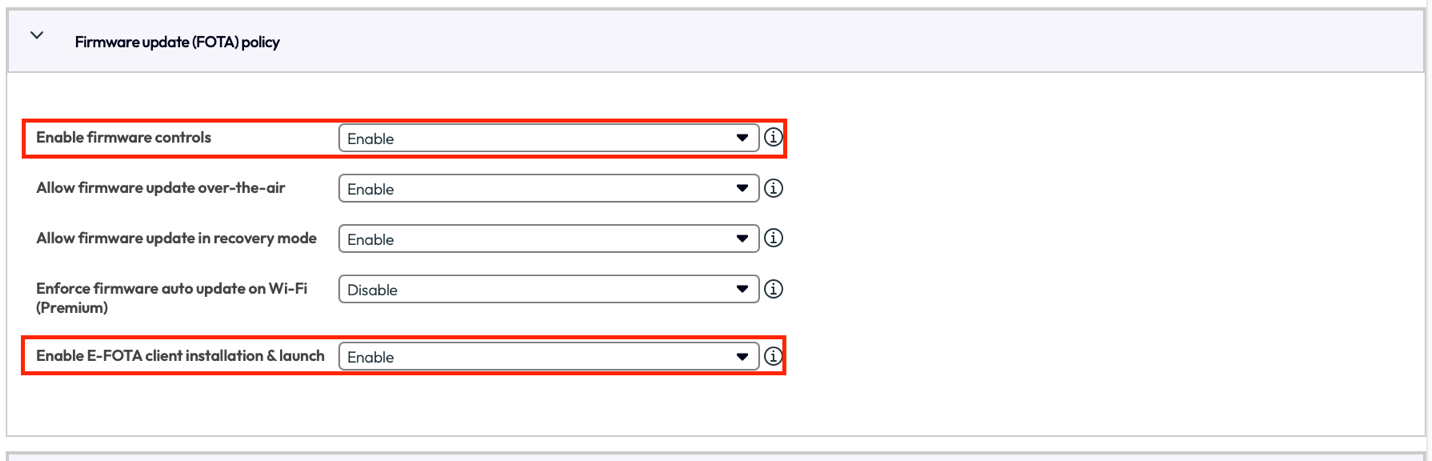
- Click Create, then click Save, then click Publish.
Once KSP pushes this configuration to the devices, the Knox E-FOTA One app will be automatically installed and launched. Enrollment is then complete and all devices in the group are fully under Knox E-FOTA management.
Step 7 : Create a Firmware Update Campaign
With devices enrolled, you can now use Knox E-FOTA to manage firmware updates across your fleet.
- In the Knox E-FOTA admin portal, navigate to the Campaigns section.
- Create a new campaign, specifying:
- The target firmware version options are lock current, latest any, latest up to ans select from list. The only firmwares released in the last 12 months are available.
- The device group to target
- The update schedule (immediate, scheduled window, or user-deferred)
3. Assign the campaign to your enrolled device group
4. Devices will receive and apply the firmware update according to the campaign schedule.
Deploy Zebra LifeGuard and OS Updates
Zebra LifeGuard is an operating system update program for Zebra Android devices meant to increase the lifecycle of a Zebra device. Administrators can install these LifeGuard update packages on enrolled Zebra devices using Workspace ONE UEM.
For managing OS updates on Zebra devices, see Zebra Android OS Update Methods(Omnissa Docs)and Zebra Android OS Update Methods(Techzone).
Workspace ONE Relay Server Integration
Relay servers are used to make product provisioning content available for local devices over the WLAN. They act as a content distribution node that provides more bandwidth and data use control in Workspace ONE UEM.
Relay servers act as a proxy between the Workspace ONE UEM server and the rugged device to transfer larger files like operating system update files. This proxy can act as an FTP / Explicit FTPS / SFTP or HTTPS server to endpoints, by distributing product provisioning content to the device, making it available for download and installation.
Relay servers also add redundancy by providing a fallback feature in case a relay server is not reachable, by making the device fall back to the next available relay server in the hierarchy until a working relay server is found. If a working relay server is not available, the content is then directly downloaded from the Workspace ONE UEM server.
Use of a relay server is optional for content distribution. In cases where relay servers are not available or not configured, the device will download product provisioning content directly from Workspace ONE UEM.
For more information about configuring relay servers, see Relay Servers on Omnissa Docs and A Guide to Design and Deploy Relay Servers on Techzone.
Deploy Honeywell OS Updates
System update files can be pushed and installed on Honeywell Android devices using Workspace ONE UEM. This procedure walks you through deploying OS updates on Honeywell Android devices using Workspace ONE UEM.
Before you can perform the steps in this exercise, you must:
- Download and install the Honeywell Enterprise Provisioner software on your Windows machine. For more information, see What is Enterprise Provisioner in the Honeywell documentation.
- Obtain the latest Enterprise Provisioner configuration bundle for the devices in question from the Honeywell downloads site.
Ensure that the correct bundle is selected based on the appropriate device chipset number (HON660 or HON4290), OS version, and Build number. - Install the appropriate version of the Workspace ONE Honeywell Service app on enrolled devices. There are three Honeywell Service APK files available for different device models:
- Next-Gen Honeywell devices (newer models including CT40 & CT60).
- Older Honeywell devices (such as EDA51).
- Intermec devices.
To install OS updates on Honeywell Android devices, follow these steps:
- Download the appropriate OS update (
.zip) file from the Honeywell download site and save the file locally. Rename the file with a friendly name, for example,OSUpdateFile.zip.
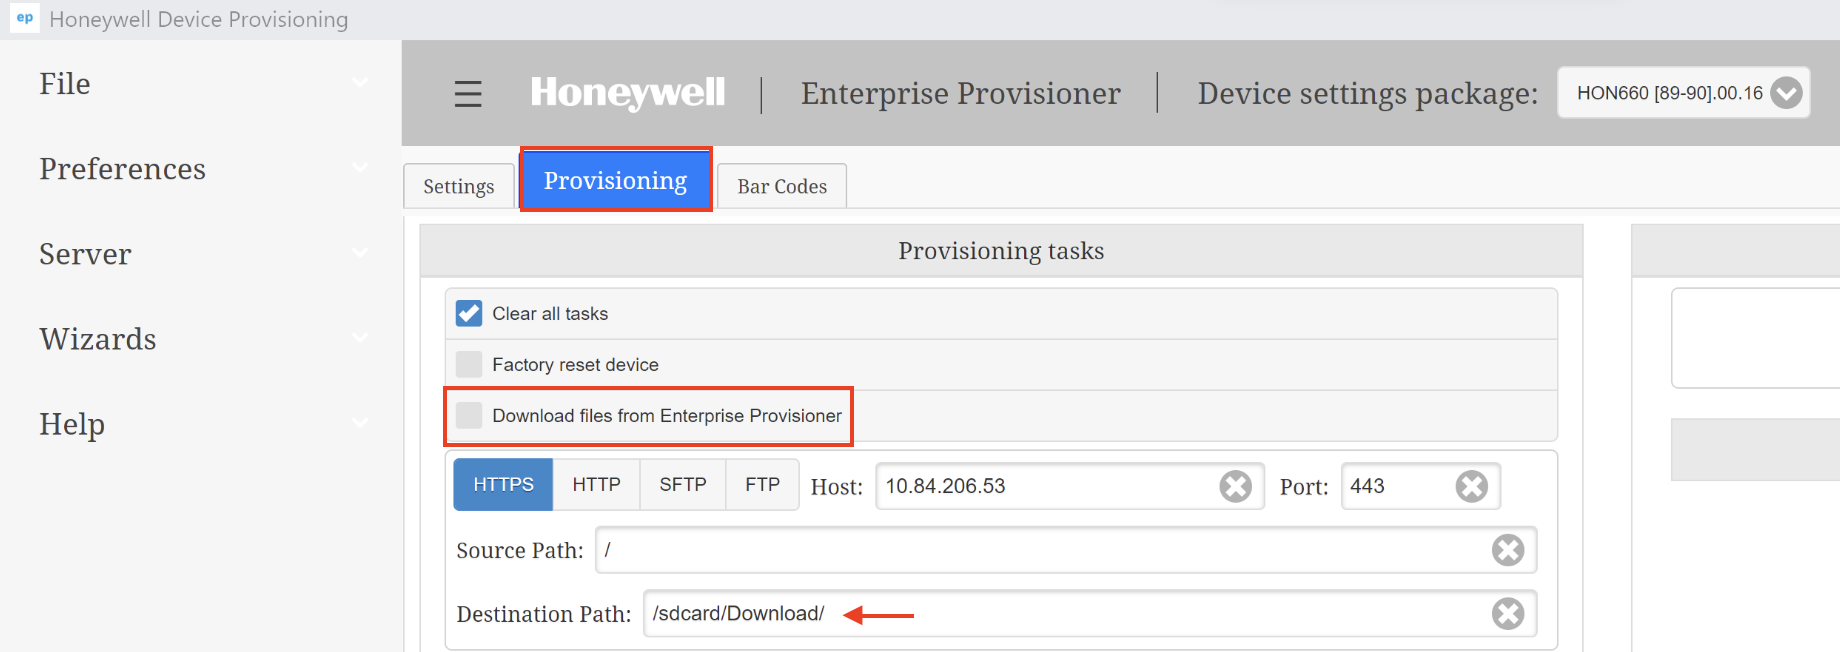
- In the Honeywell Enterprise Provisioner application, navigate to the Provisioning tab. Make sure the Download files from Enterprise Provisioner check box is deselected.
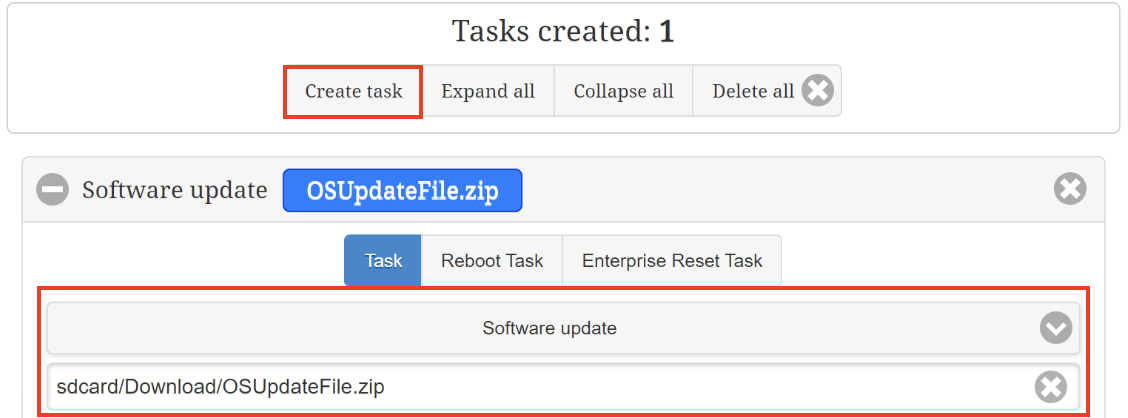
- Select Create Task, then select Software Update task from the drop-down menu. Next, specify the destination path of the
OSUpdateFile.zip, as shown in the screenshot.
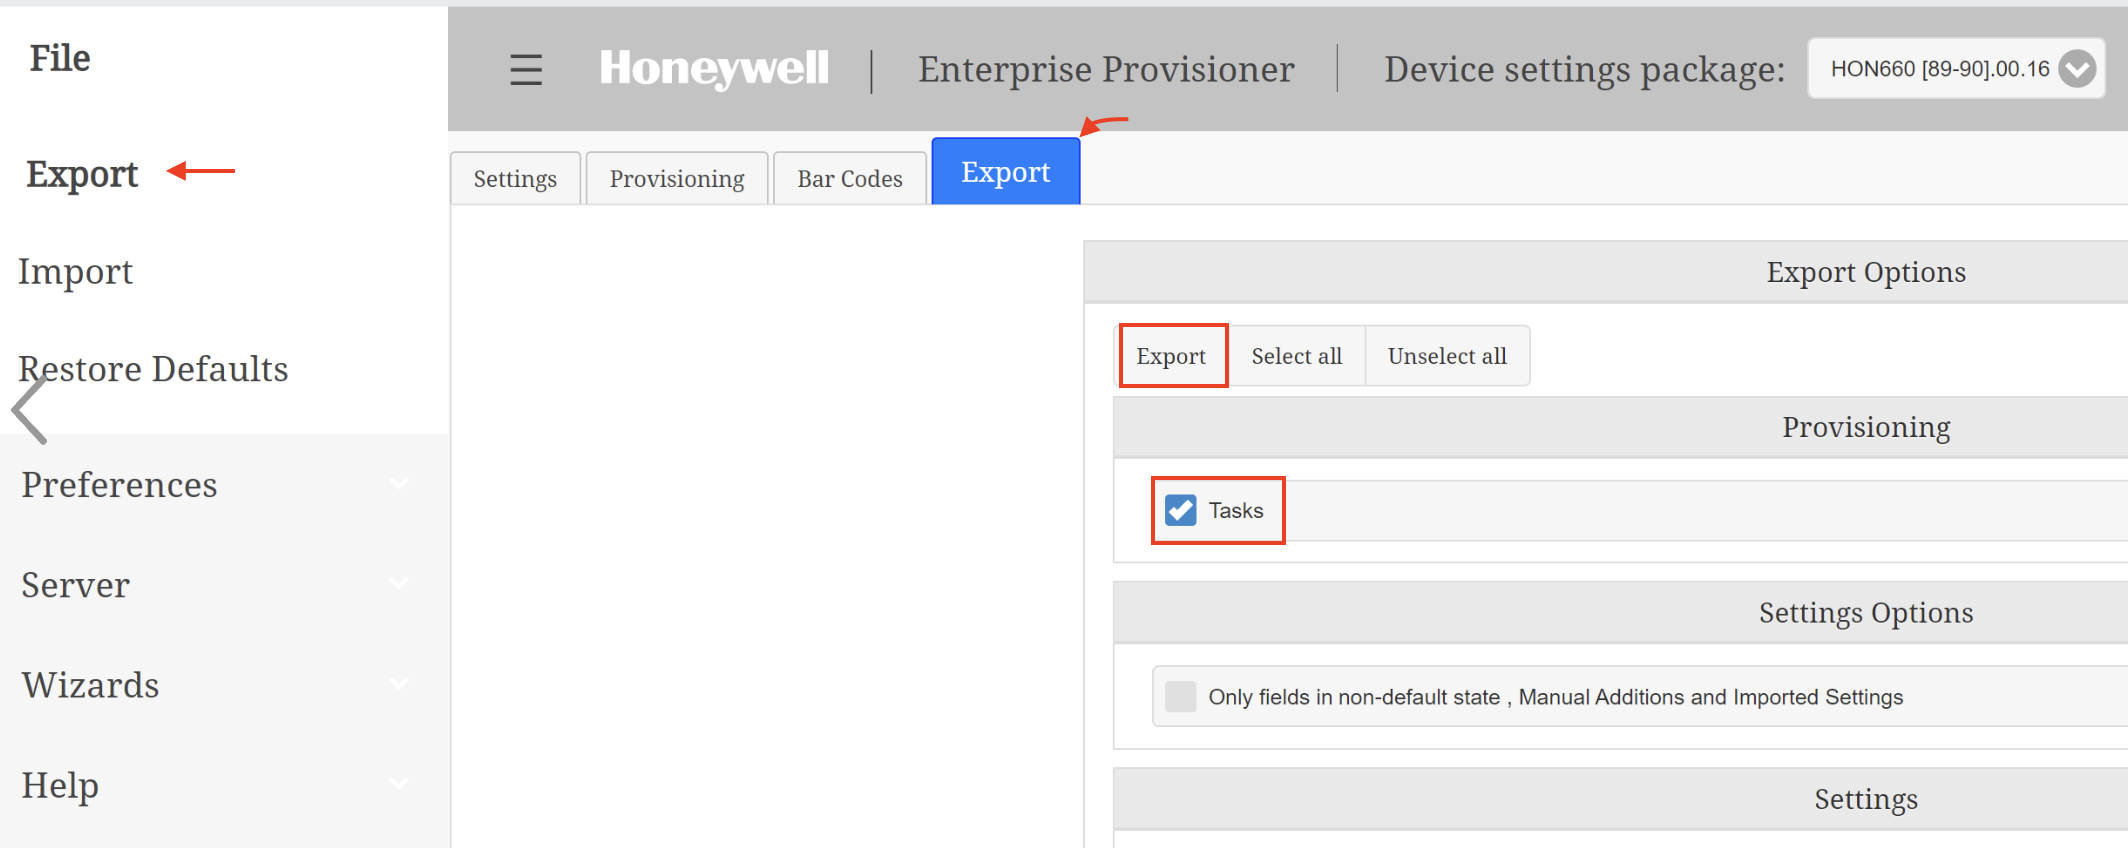
- Navigate to Files > Export, then select the Tasks check box listed under the Provisioning section. Then select Export in Export options.
- Save the
Provisioner.xmlfile locally on your computer.
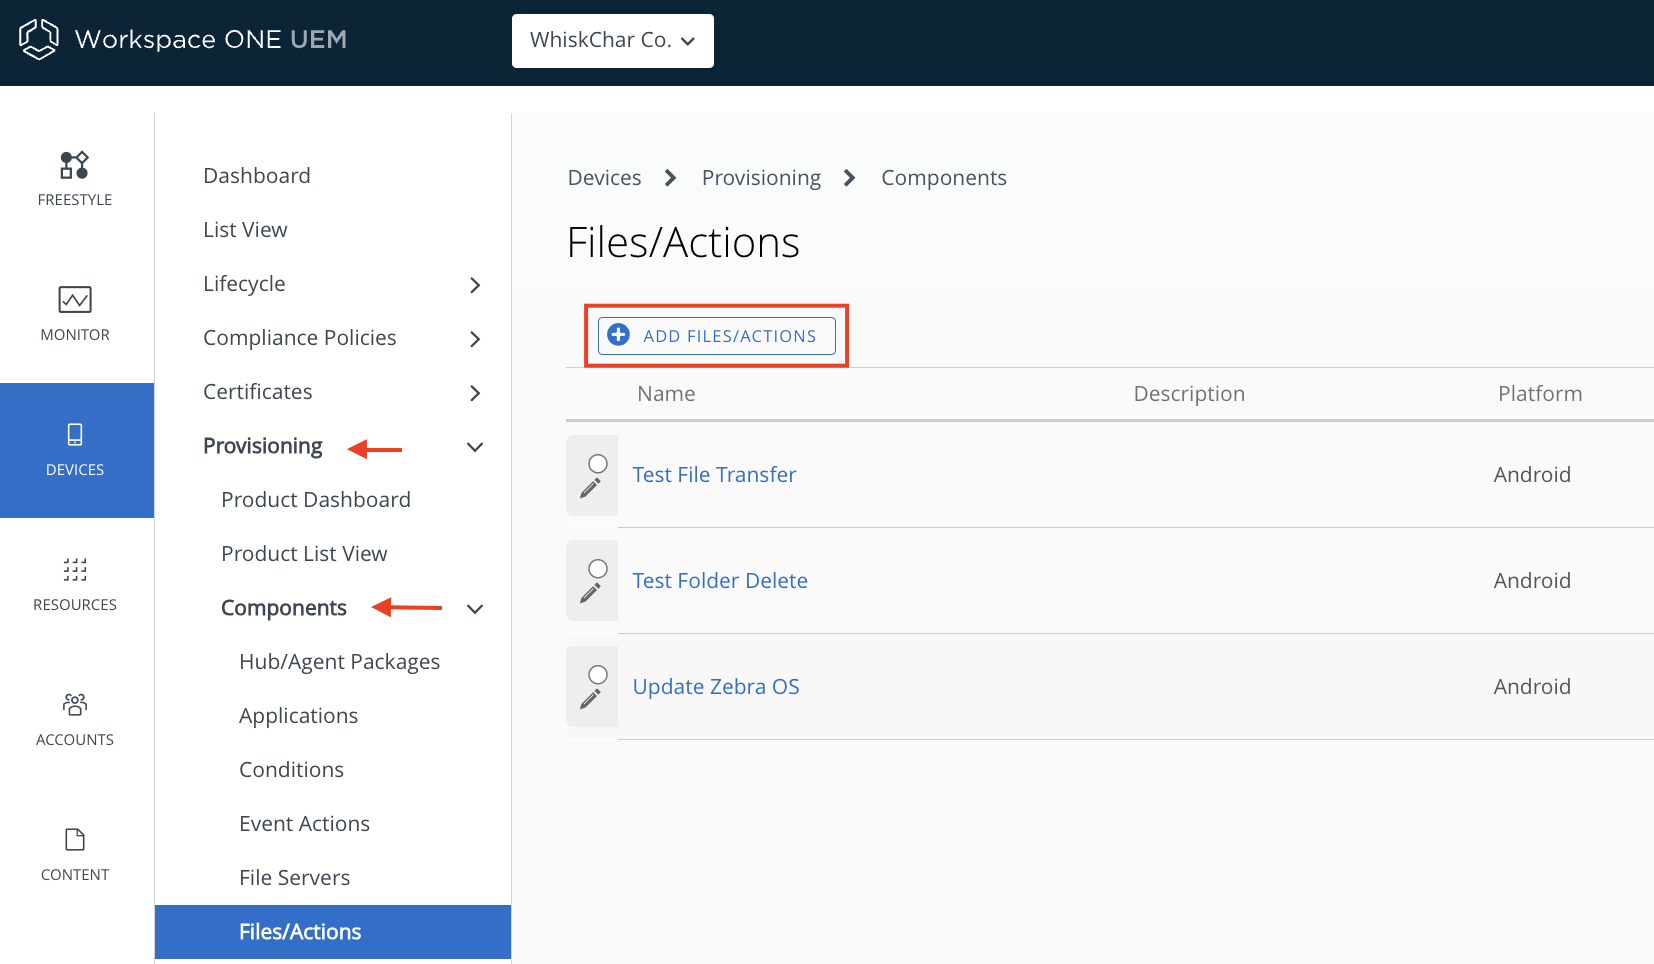
- In Workspace ONE UEM, navigate to Devices > Provisioning > Components > File/Actions > Add File/Actions > Android.
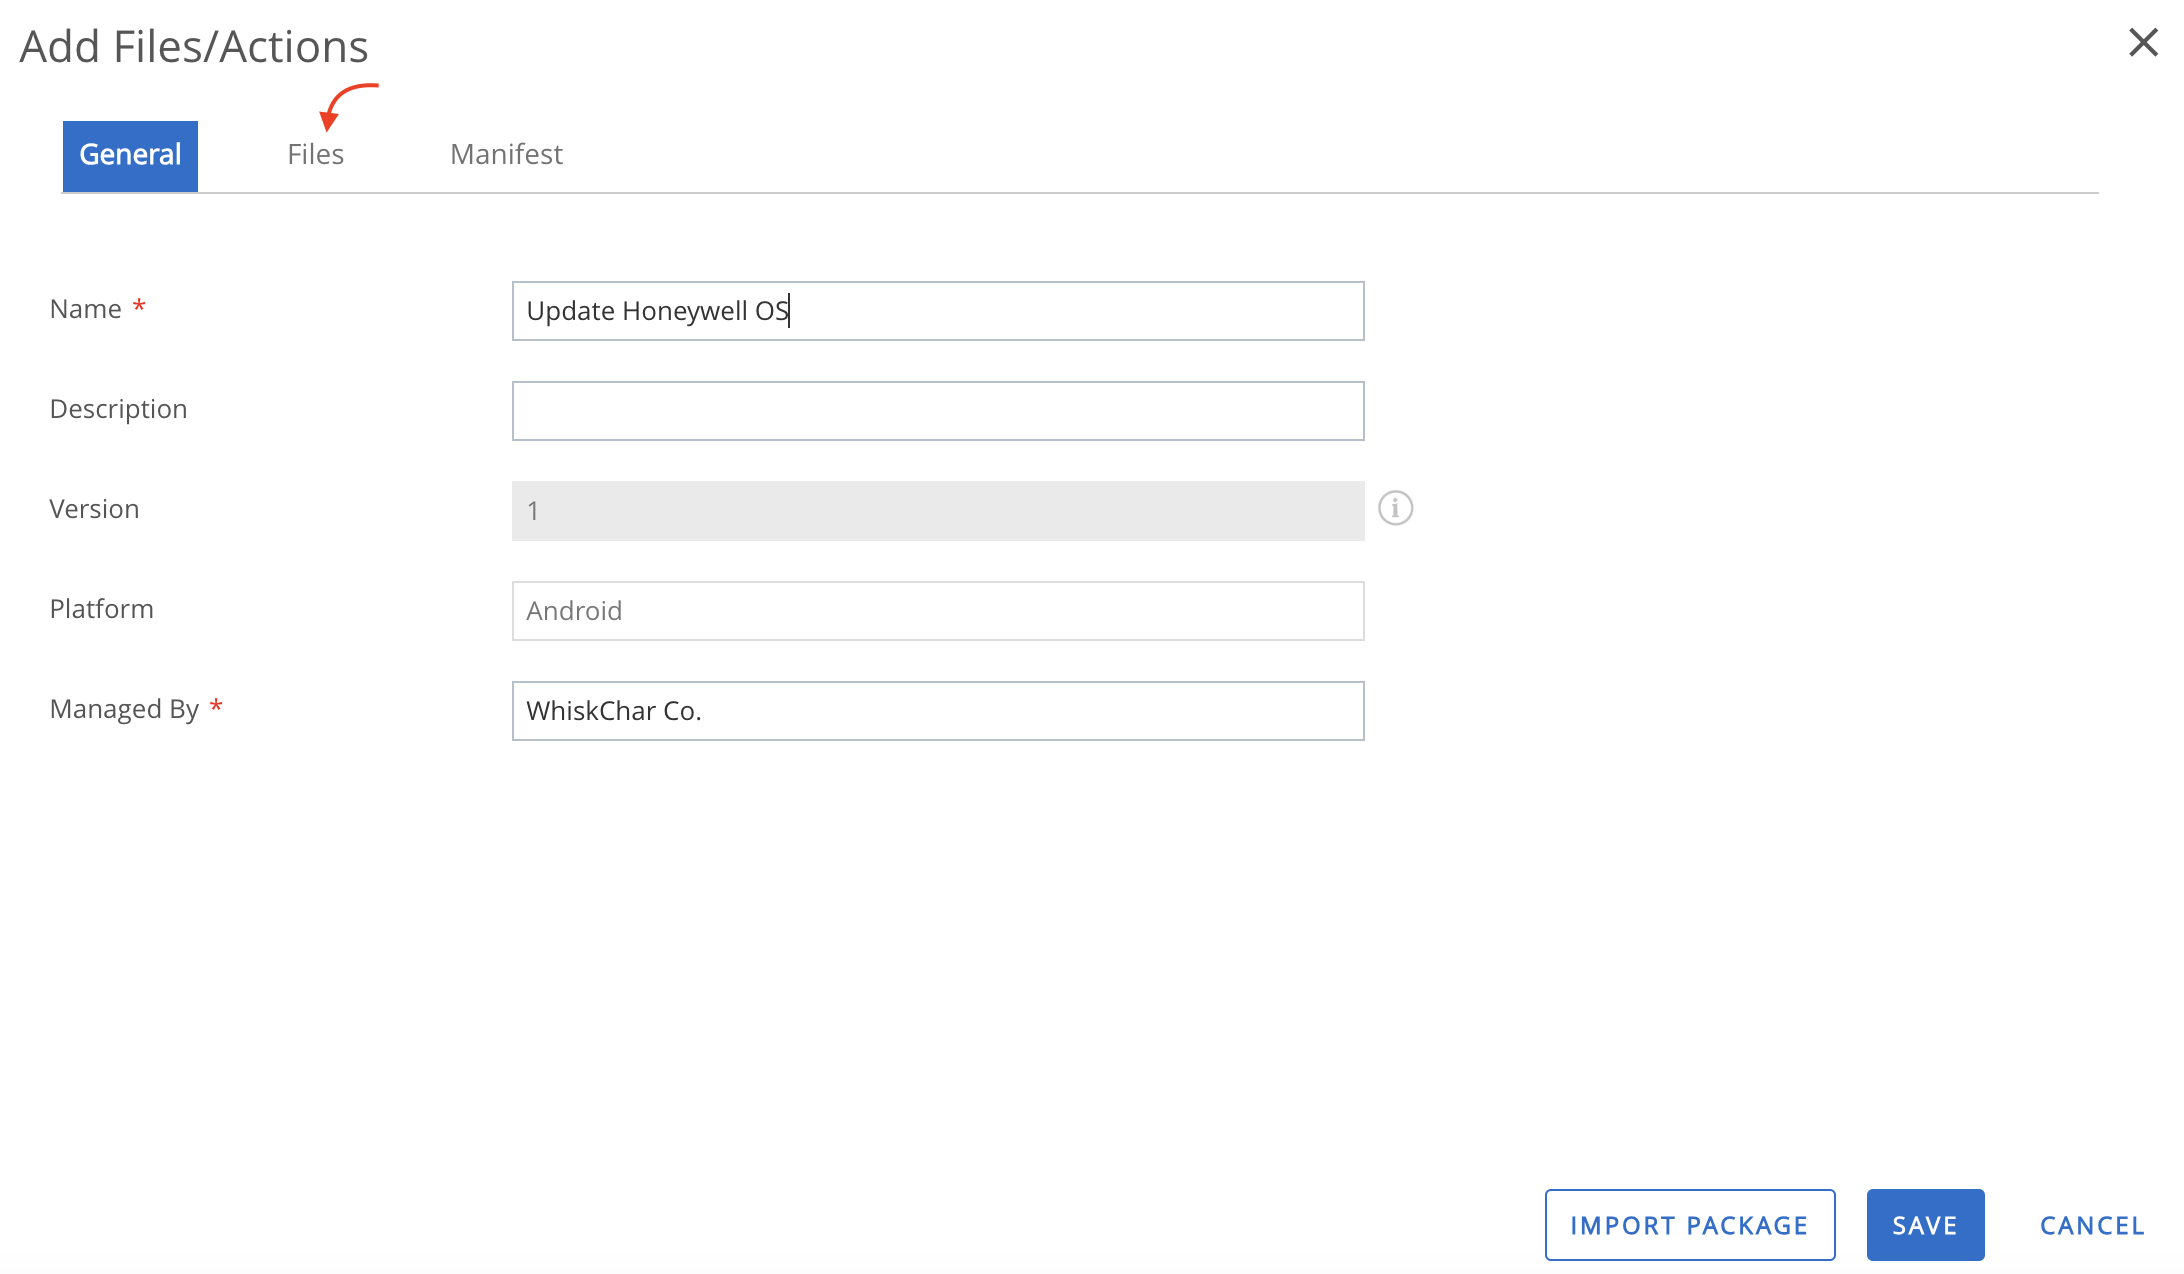
- Complete the sections in the General tab, then navigate to the Files tab.
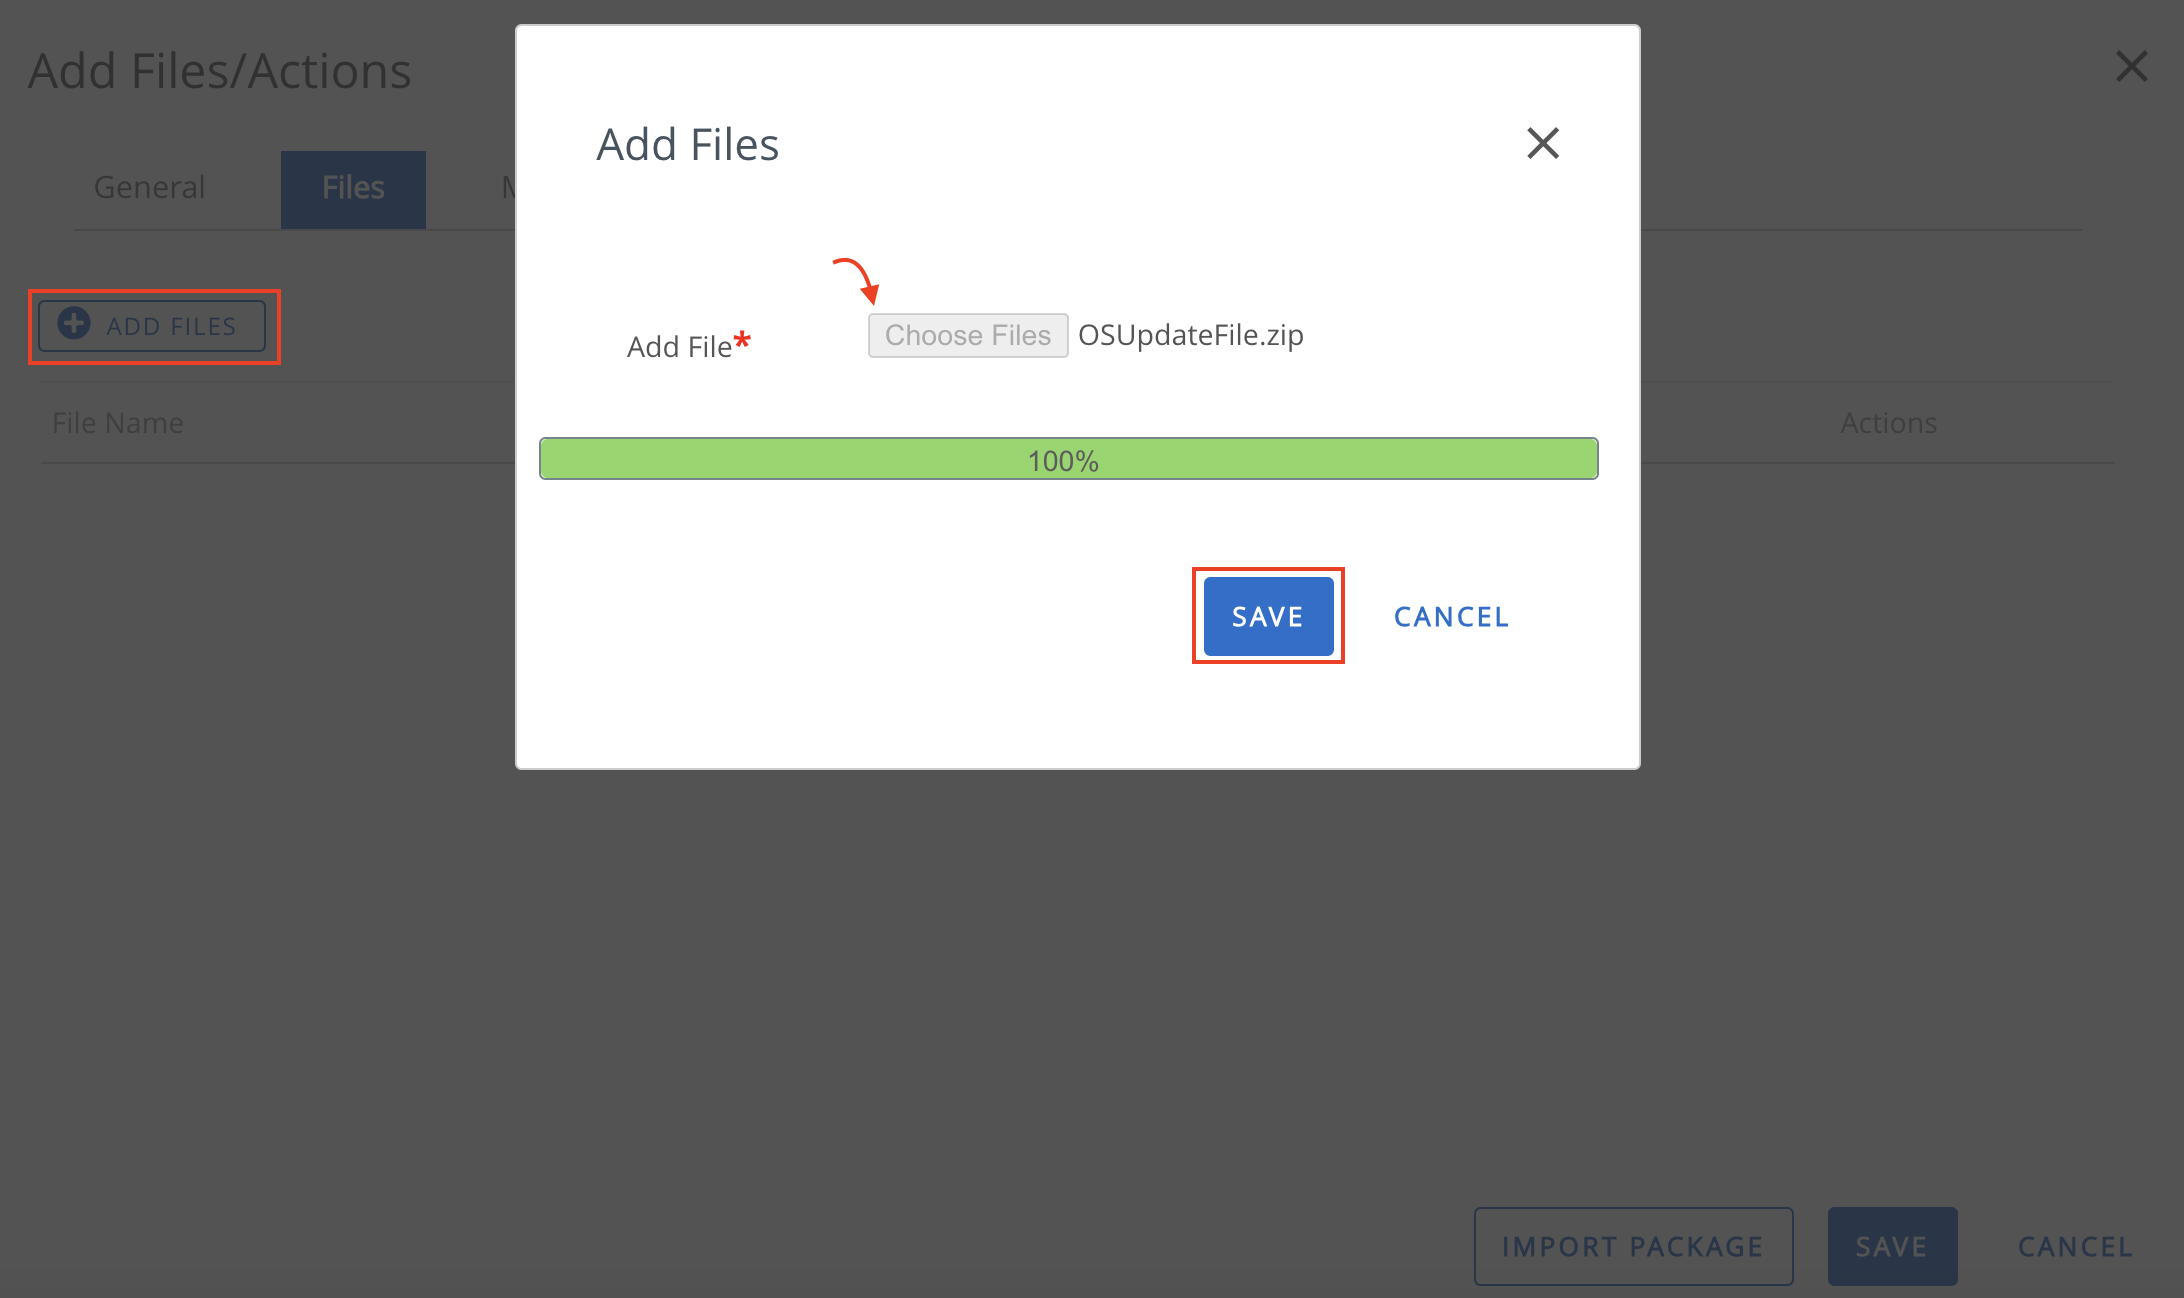
- Upload the
OSUpdateFile.zip, then click Save.
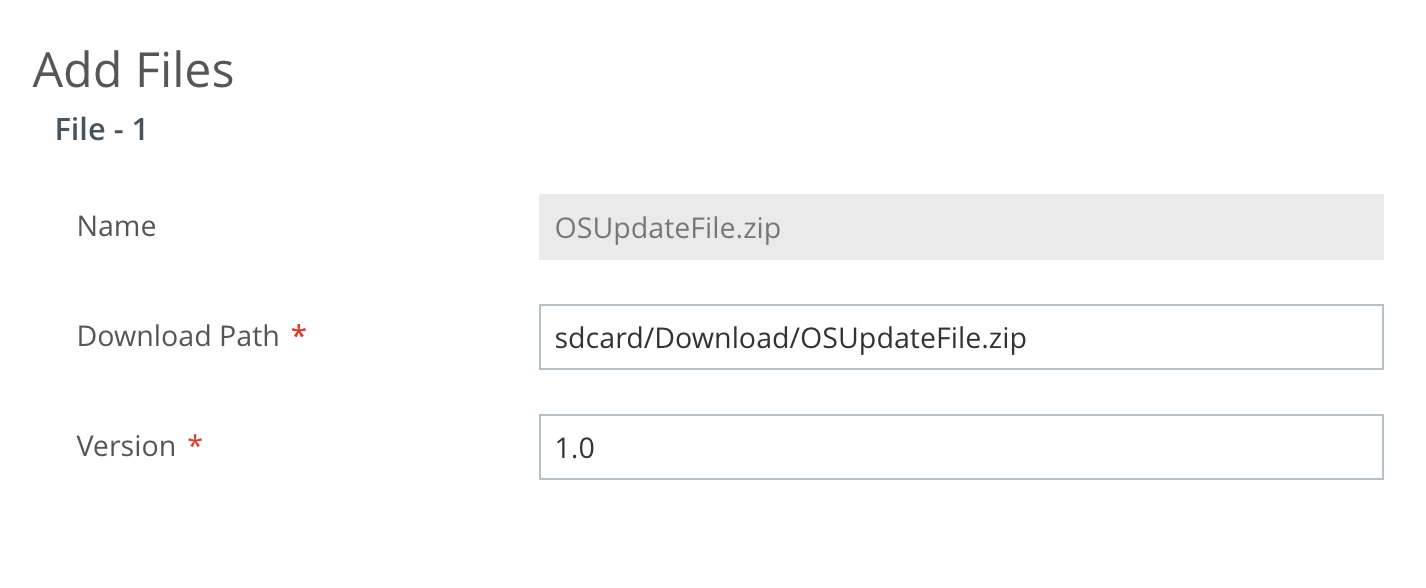
- Enter the desired Download Path. The download path entered here must match the download path mentioned in the Enterprise Provisioner Device Settings Package (e.g., /sdcard/Download/OSUpdateFile.zip). Then click Save.
- Click Add Files again and upload the
Provisioner.xmlfile previously generated in step 5. Next, set the path of this file tosdcard/Honeywell/Provisioner.xml. Then, click Save.
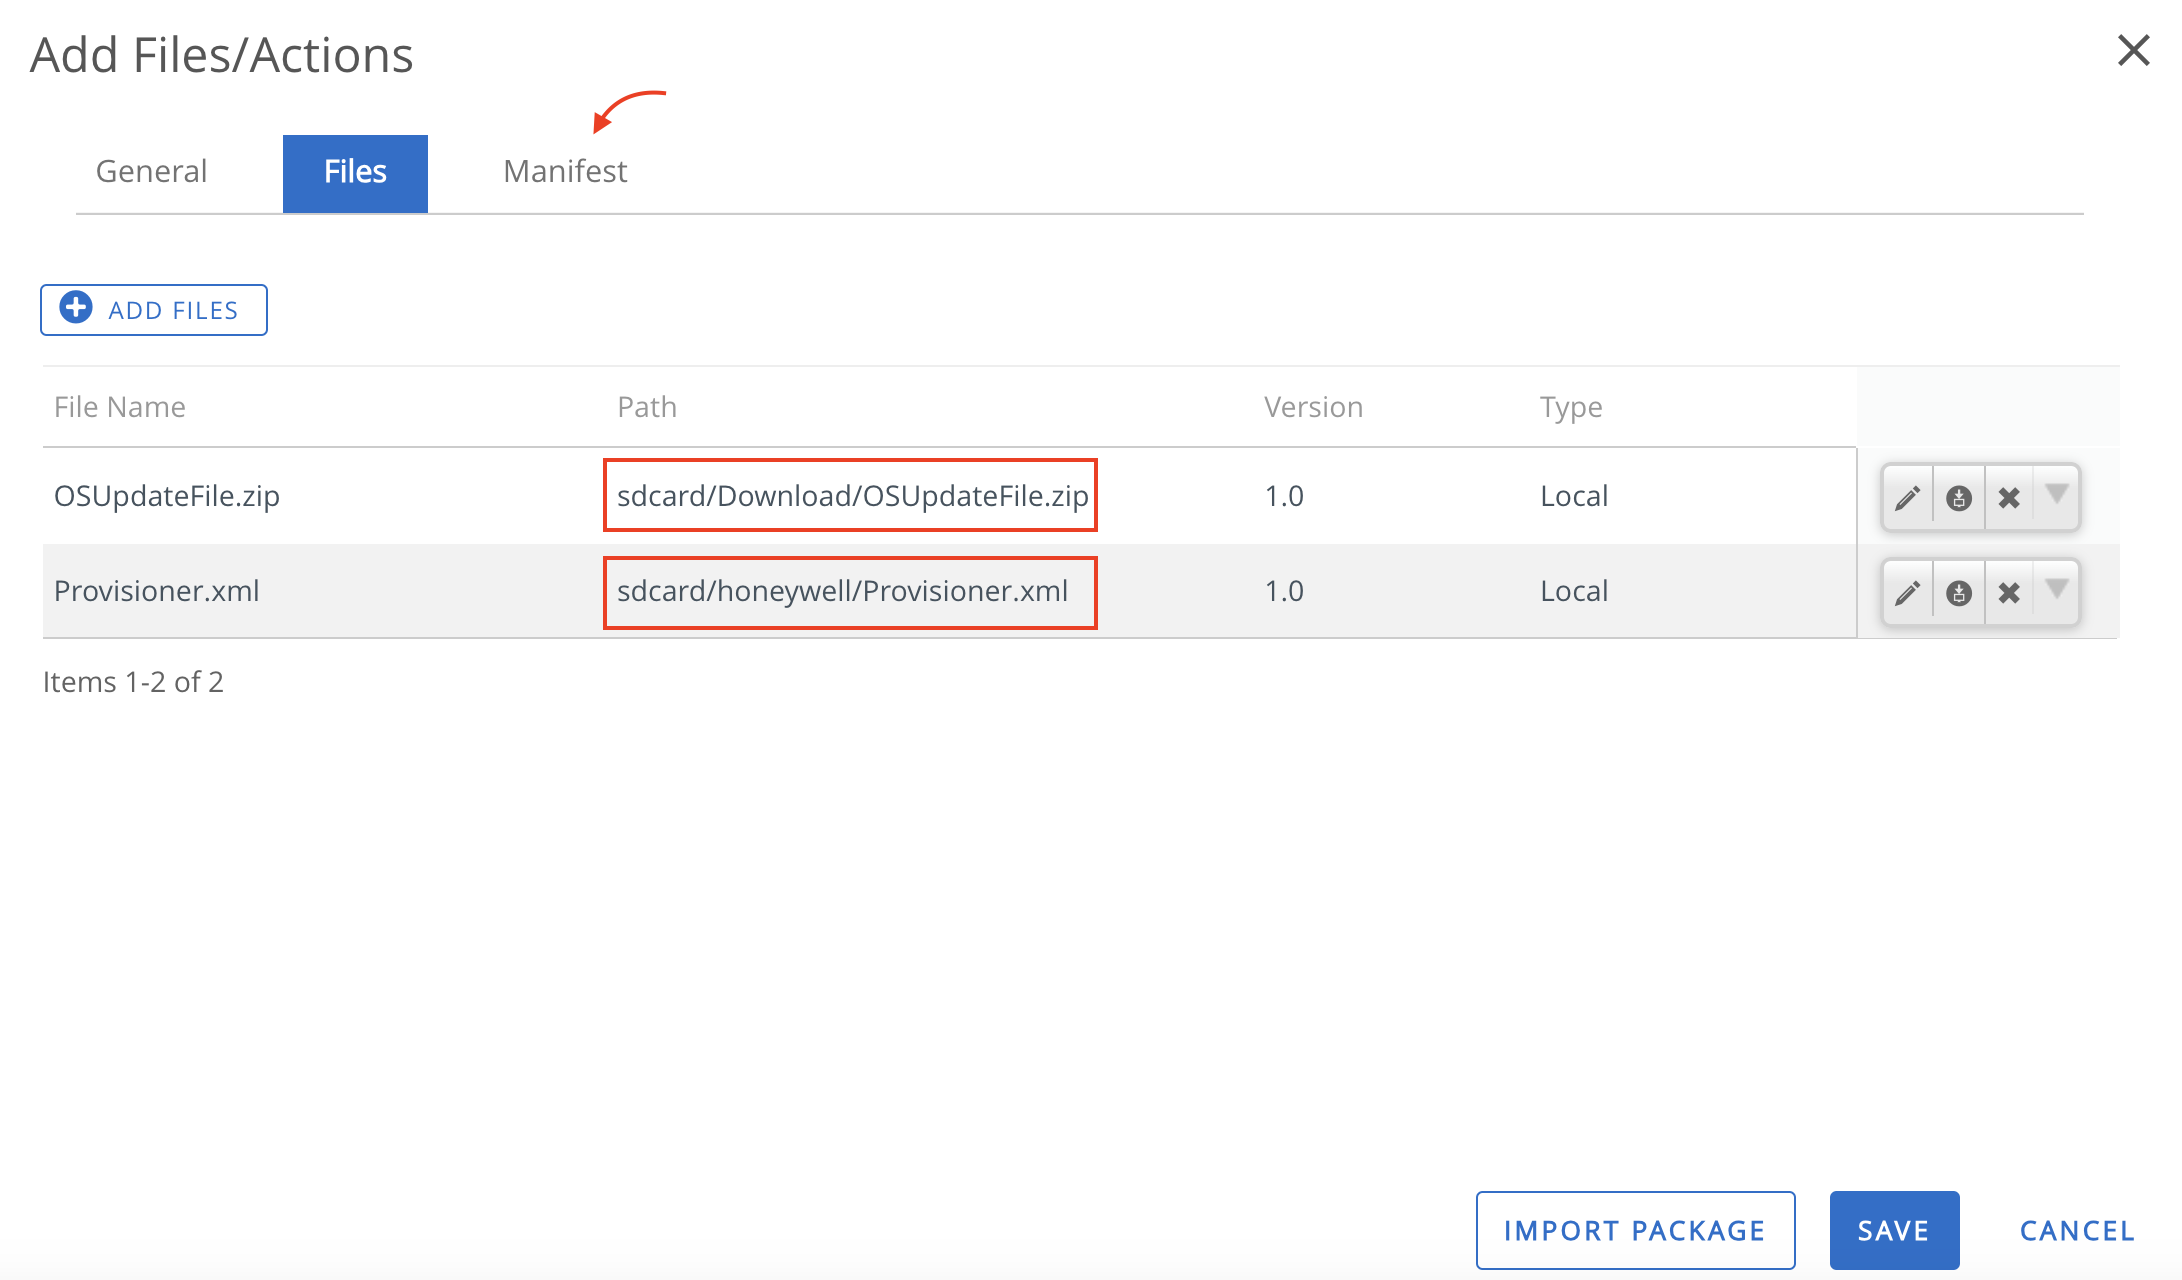
- Navigate to the Manifest tab.
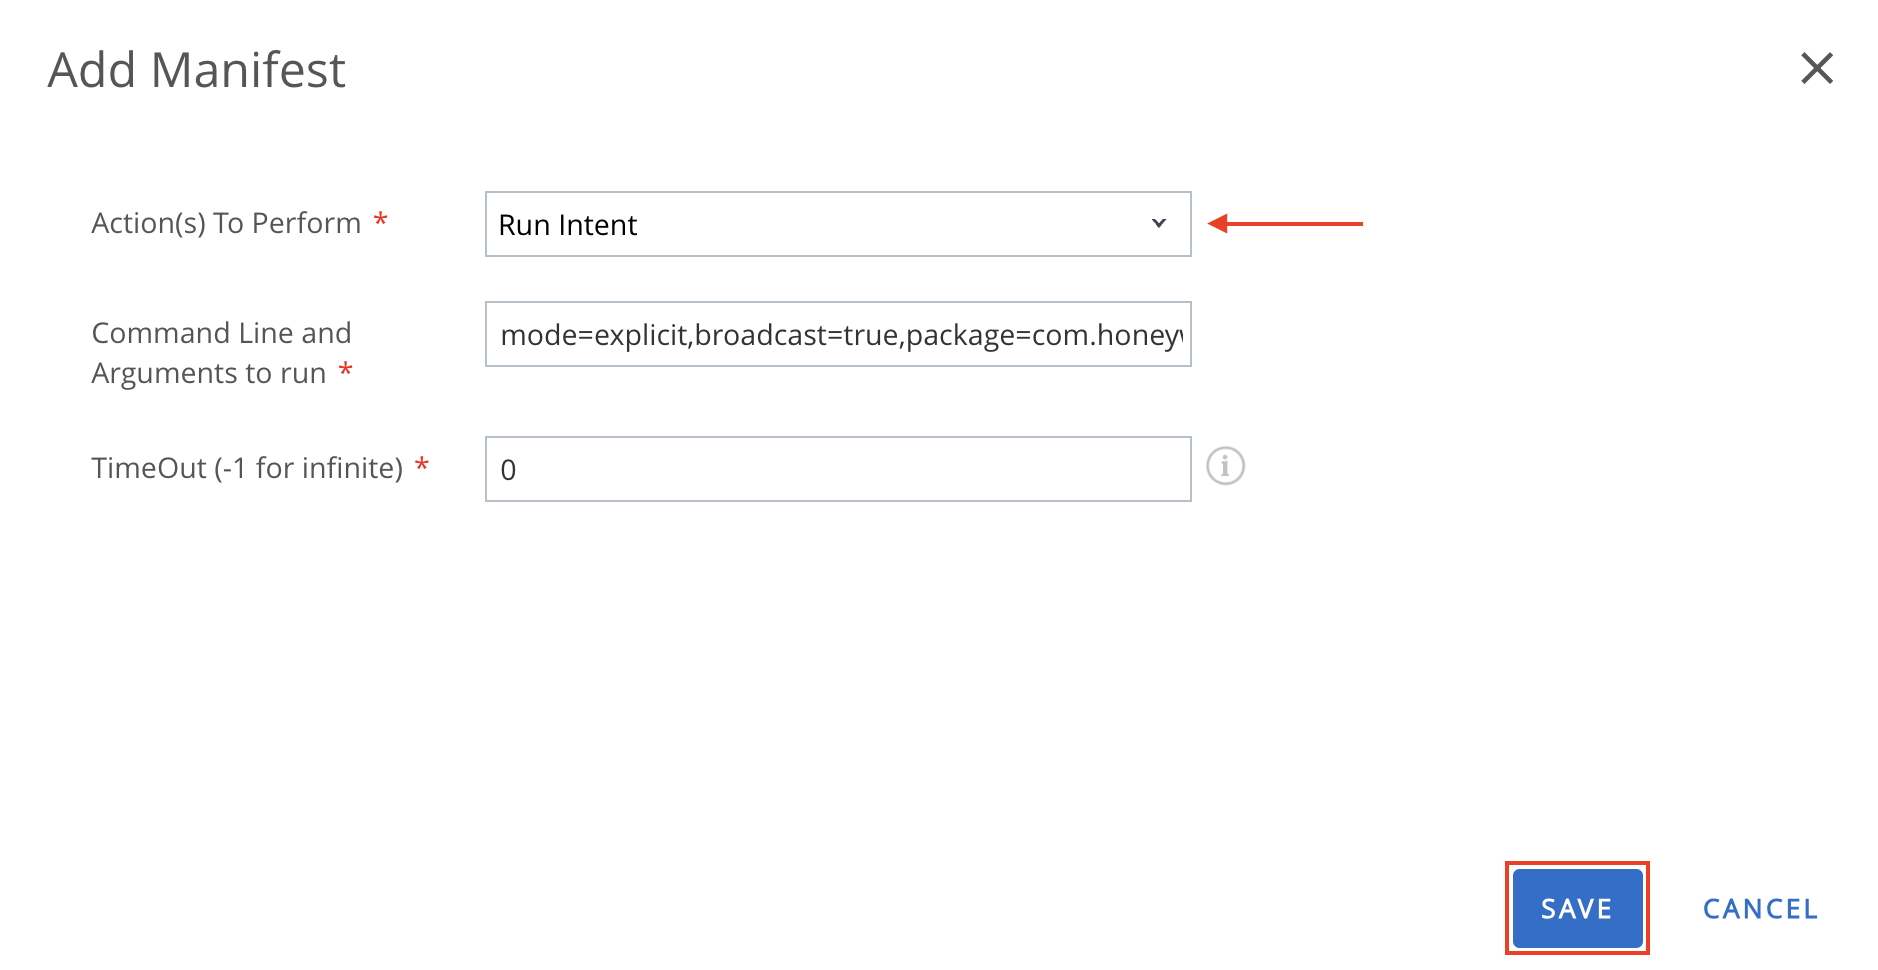
- Select Run Intent as the Action(s) to Perform and enter the following command line intent argument to run:
mode=explicit,broadcast=true,package=com.honeywell.tools.ezconfig,class=com.honeywell.tools.ezconfig.EZConfigBroker,action=com.honeywell.ezconfig.intent.action.IMPORT_XML,extraString=path=/sdcard/honeywell/Provisioner.xml
Ensure that the path of theProvisioner.xmlmatches the path selected in step 10. - Save the File/Action Component.
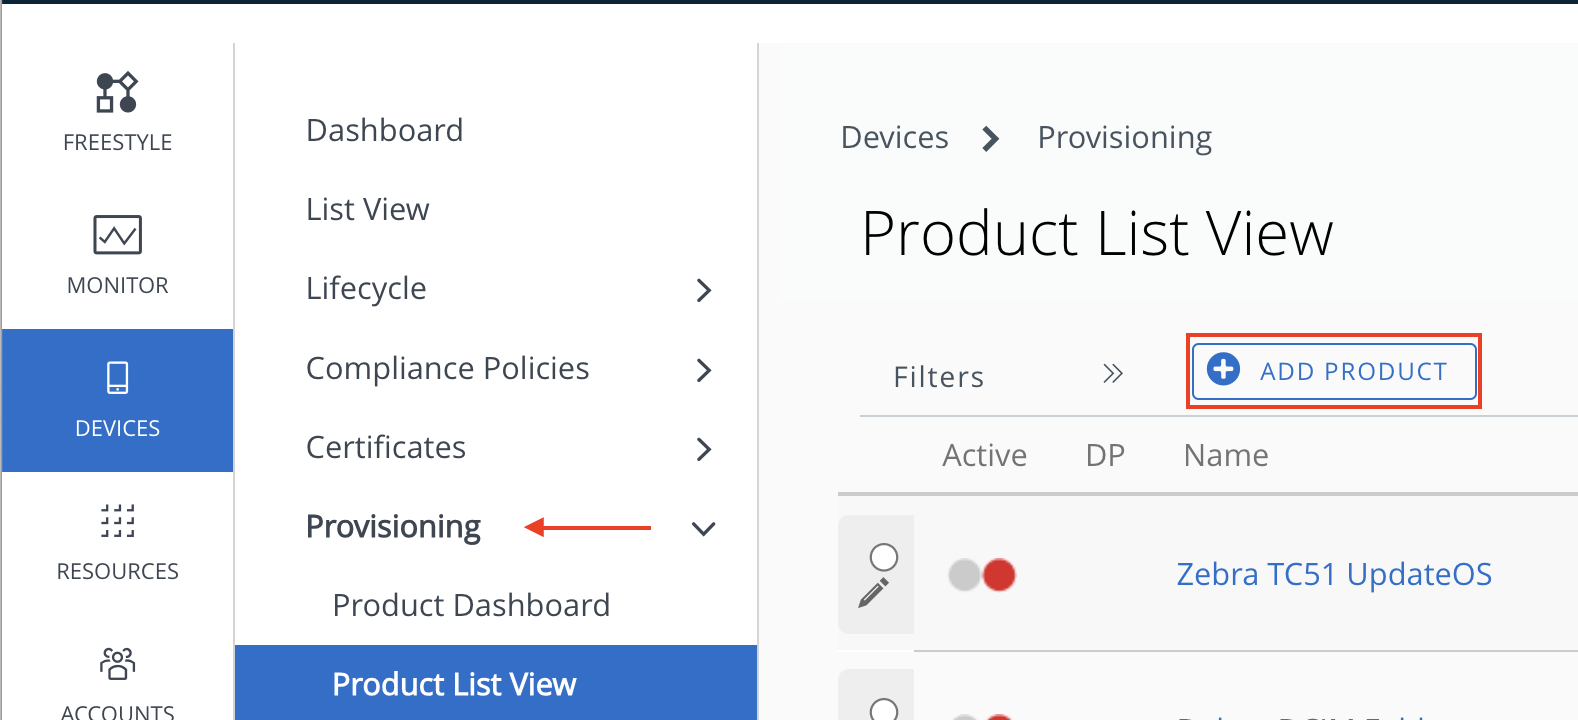
- Navigate to Devices > Provisioning > Product List View > Add Product > Android.
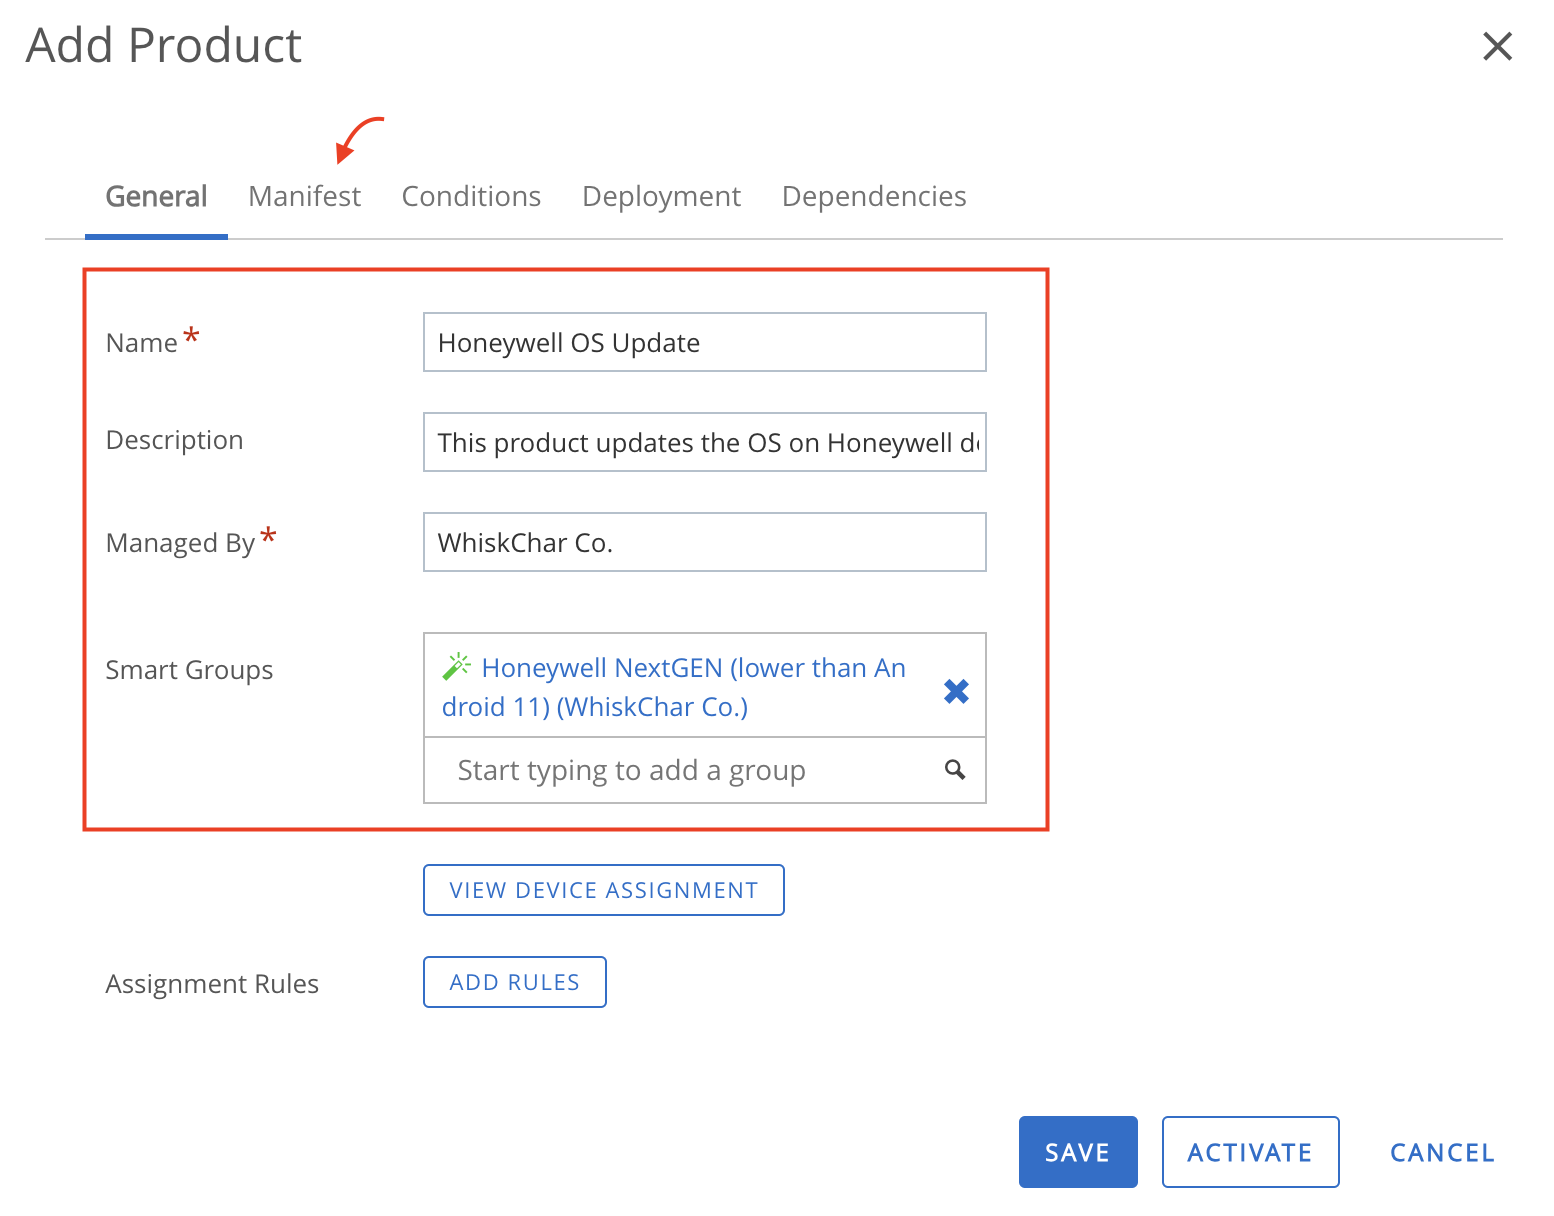
- Complete the General tab with the Name and Description of the Product. Then select the Smart Groups to assign the Product, as well as configure Assignment Rules. Navigate to the Manifest tab.
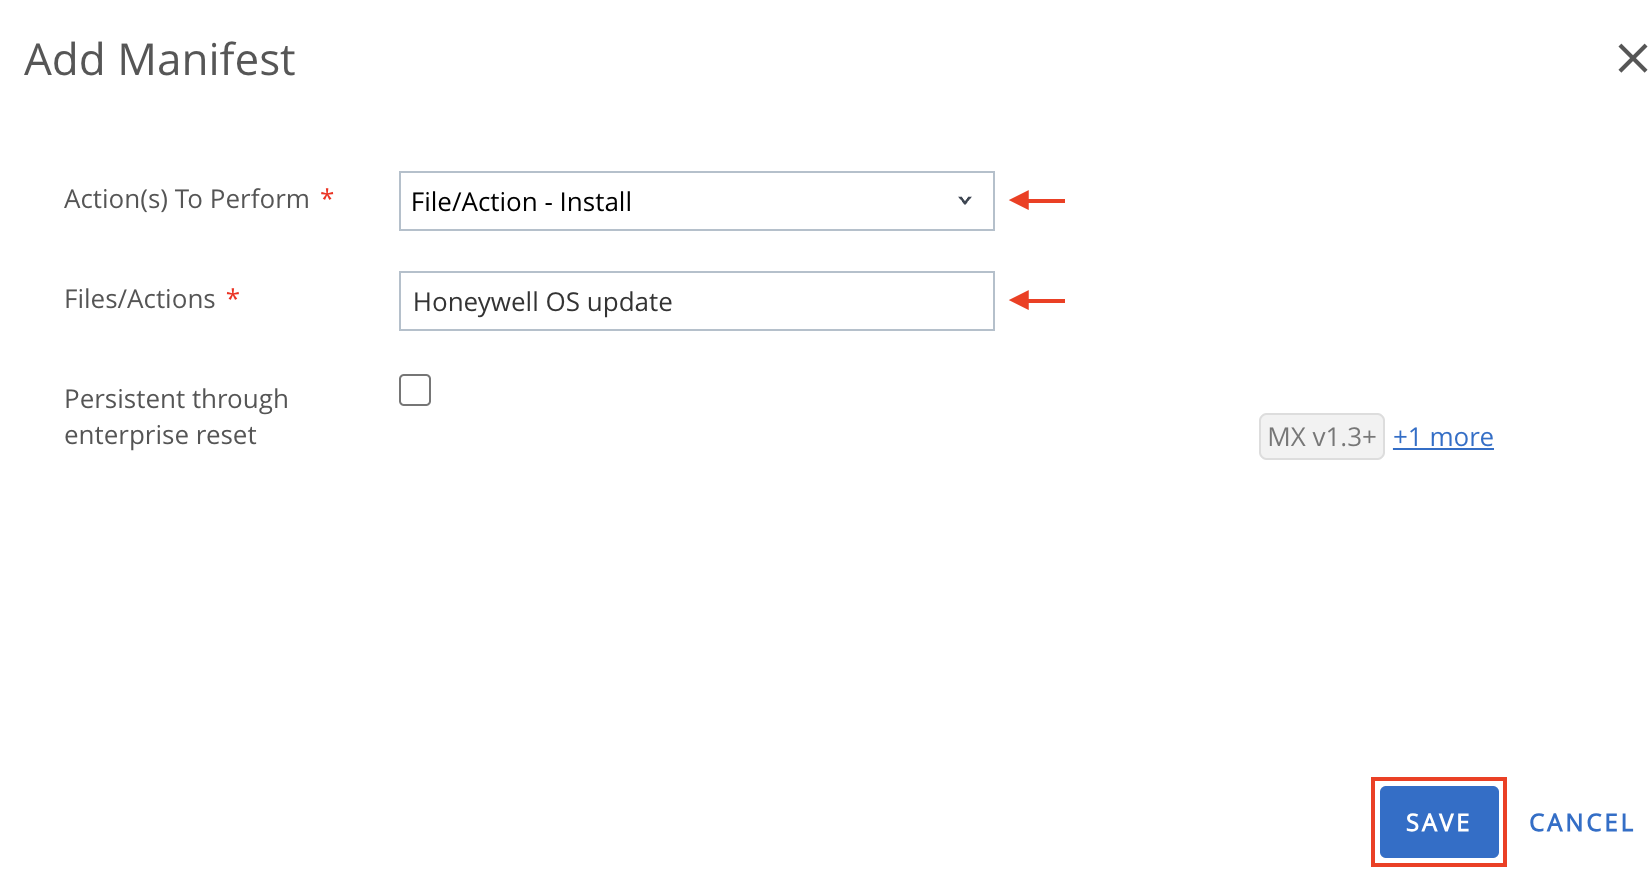
- Select File/Action Install as the Action(s) to Perform, then select the File/Actions component created in step 13.
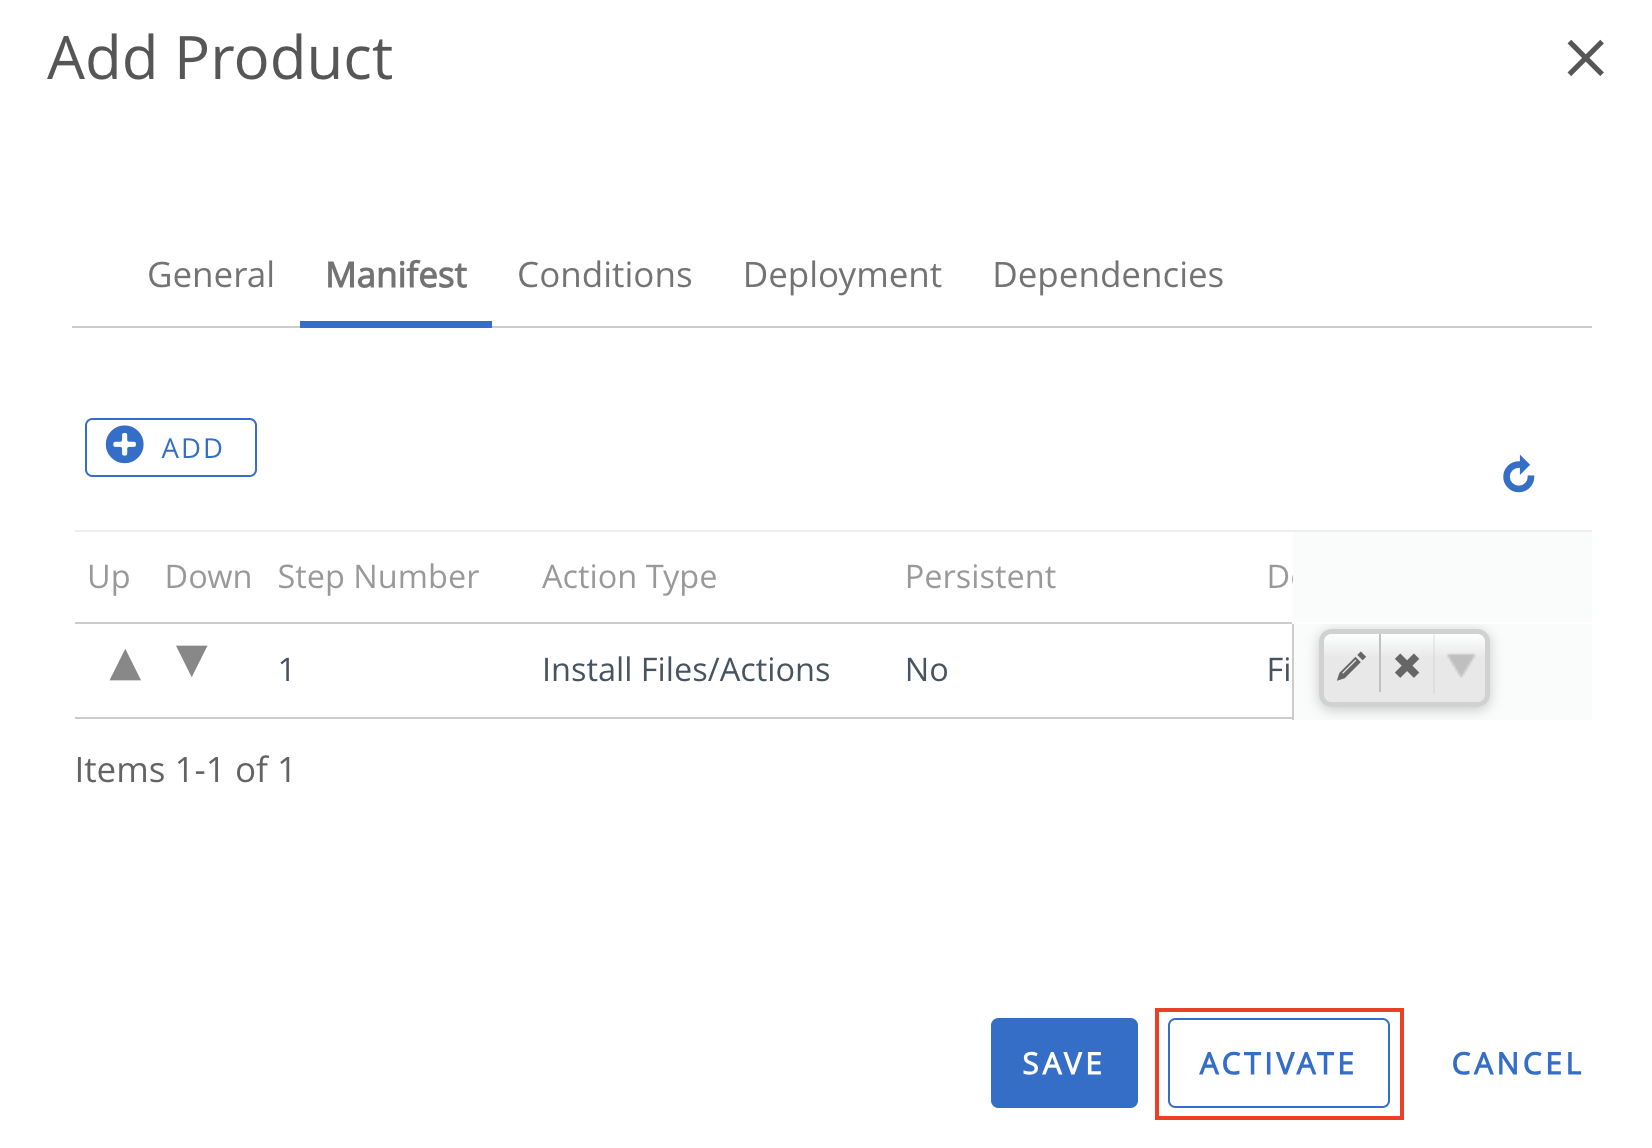
- Complete the additional tabs as needed, then click Activate to proceed to View Device Assignment.
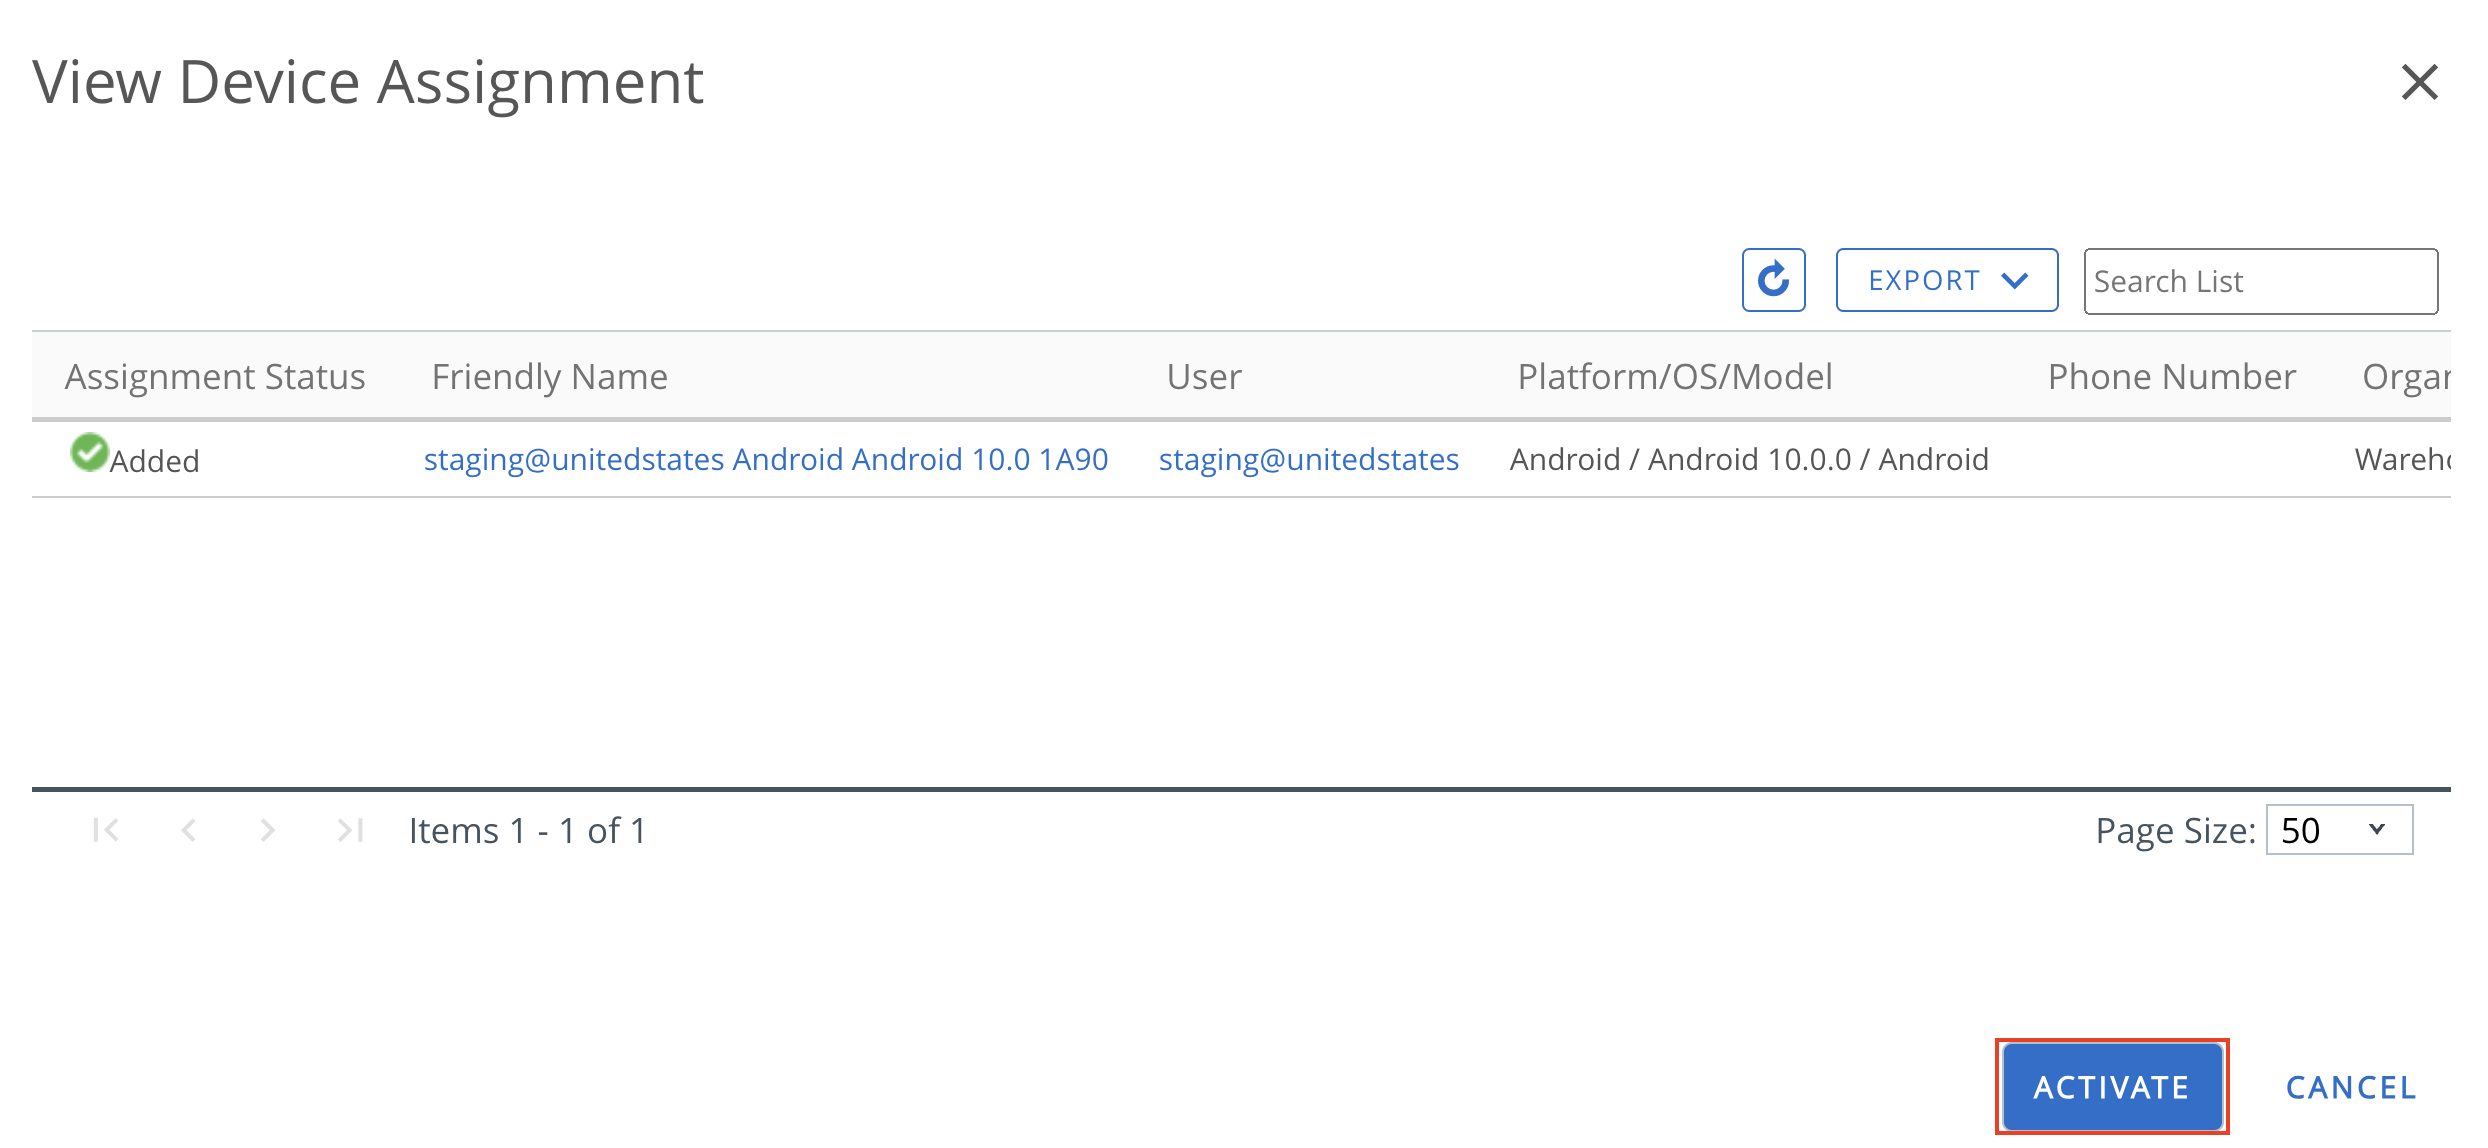
- Confirm the device assignment and click Activate.
The OS update is now installed on the device.
Summary and Additional Resources
This tutorial took you through the fundamentals of the configuration and management of Android devices using Workspace ONE UEM. Throughout the tutorial, we explored the various management capabilities available on the Android operating system.
Throughout this tutorial, we delved into the different management modes and then investigated different device management features available based on device manufacturers (OEMs). We also learned about the tools available in Workspace ONE UEM that help streamline Android device management.
Additional Resources
For more information about Windows Modern Management with Workspace ONE, you can explore the following resources:
Changelog
The following updates were made to this guide:
| Date | Description of Changes |
| 2026/07/03 |
|
| 2024/09/04 |
|
| 2024/03/04 |
|
| 2023/09/20 |
|
About the Author and Contributors
This tutorial was written by:
- Wasif Syed, Solution Engineer, Omnissa
- David Dwyer, Senior Solutions Engineer, Omnissa
- Siddesh Patil, Principal Product Specialist, Omnissa
Your feedback is valuable. To comment on this paper, either use the feedback button or contact us at tech_content_feedback@omnissa.com.