

Integrating TOPdesk ITSM with Omnissa Intelligence
Overview
Omnissa Intelligence offers valuable insights into devices and apps across the deployment, as well as powerful automations integrated with third-party business systems based on this data. Omnissa Intelligence includes prebuilt, out-of-the-box connectors for applications, such as ServiceNow and Slack, but Omnissa Intelligence can connect to any application or service that supports REST API calls. Some customers use TOPdesk, an IT Service Management (ITSM) application. The company is based in the Netherlands and is active in eleven countries globally.
Purpose of This Tutorial
This tutorial will walk you through integrating Omnissa Intelligence with TOPdesk using a custom connector to enable ITSM ticket creation and asset creation from automated workflows. Even though this document is focused on a specific third-party integration, the following sections provide examples of many aspects of the Workspace ONE platform, from creating a custom Omnissa Intelligence connector to creating sensors and scripts for desktop devices, to creating employee sentiment surveys, providing a useful resource for any Workspace ONE administrator.
Audience
This tutorial is intended for IT administrators and product evaluators who are familiar with the TOPdesk ITSM, Omnissa Intelligence, and Workspace ONE Unified Endpoint Management (UEM). Knowledge of Postman and REST APIs is also helpful.
Prerequisites to Create a Custom TOPdesk Connector
Connections to external applications are based on API access and require a connector. Some connectors are available out-of-the-box in Omnissa Intelligence, such as Slack and ServiceNow, but a custom connector can be configured for any third-party application that supports REST APIs. Any connector is built to perform one or more functions; these are called actions in Omnissa Intelligence. The following sections discuss gathering the required information and components before creating the custom workflow connector in Omnissa Intelligence. This tutorial will cover how to configure two specific actions for TOPdesk:
- Creating incidents – Incidents are the lifeblood of the service desk, keeping a record of issues, disruptions, and other requests in the organization. Incidents serve as a means of tracking and managing the lifecycle of these events, ensuring proper resolution and accountability while providing stakeholders with visibility and updates on their status.
- Creating assets – Assets are stored in the Configuration Management Database (CMDB) and consist of all hardware items in your organization. In TOPdesk this can range from laptops, desktops, and mobile devices to desks, lamps, and coffee machines. It is important to keep track of devices, their lifecycle, and usage over time, which can be linked to an employee.
Fields Required for a TOPdesk Ticket
Before configuring a custom connector, gather the details of the external application. For example, defining what use cases the connector will support and the requirements. This document focuses on creating a ticket from an automation within Omnissa Intelligence. Therefore, the minimum requirements for creating a ticket in TOPdesk should be understood first.
A TOPdesk ticket requires the following minimum fields to be populated:
- Caller – Who is making the request?
- Request – What are the details of the issue?
- OperatorGroup – Who will resolve the issue?
Every ticket is linked to a known user within TOPdesk. Usually, these will be the same active users that use the devices managed by Workspace ONE UEM. It is also possible to use a common user account for all tickets created by an external automation or to create the ticket with an unregistered caller.
We will need to know the specific Operator groups available in the system, so call the TOPdesk API and request this information via Postman. Additional information could be included, such as the asset name, so the service desk knows what device is impacted. To utilize the Asset Name field, the devices enrolled in Workspace ONE UEM need to be present in the CMDB of the TOPdesk instance.
Working with APIs in Postman
Postman is utilized to create actions for custom connectors in Omnissa Intelligence. The following information is required before starting:
- URL – Where are you connecting to? In this example: https://europe-demo-XXX.TOPdesk.net/tas/api/incidents
- Operator username and password – Superuser for TOPdesk that can be used to access the configuration and see results.
- Application name and password – The account used to perform tasks. This example will use WSONEAPI.
Note: The following information can be provided by the TOPdesk administrator at a customer organization, or you can follow the steps in this guide.
First, download the latest Postman release from the Download Postman website. After installing, open Postman and follow these steps:
Create a Collection in Postman
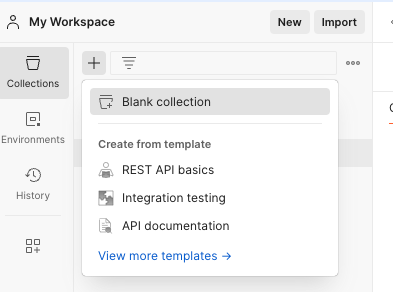
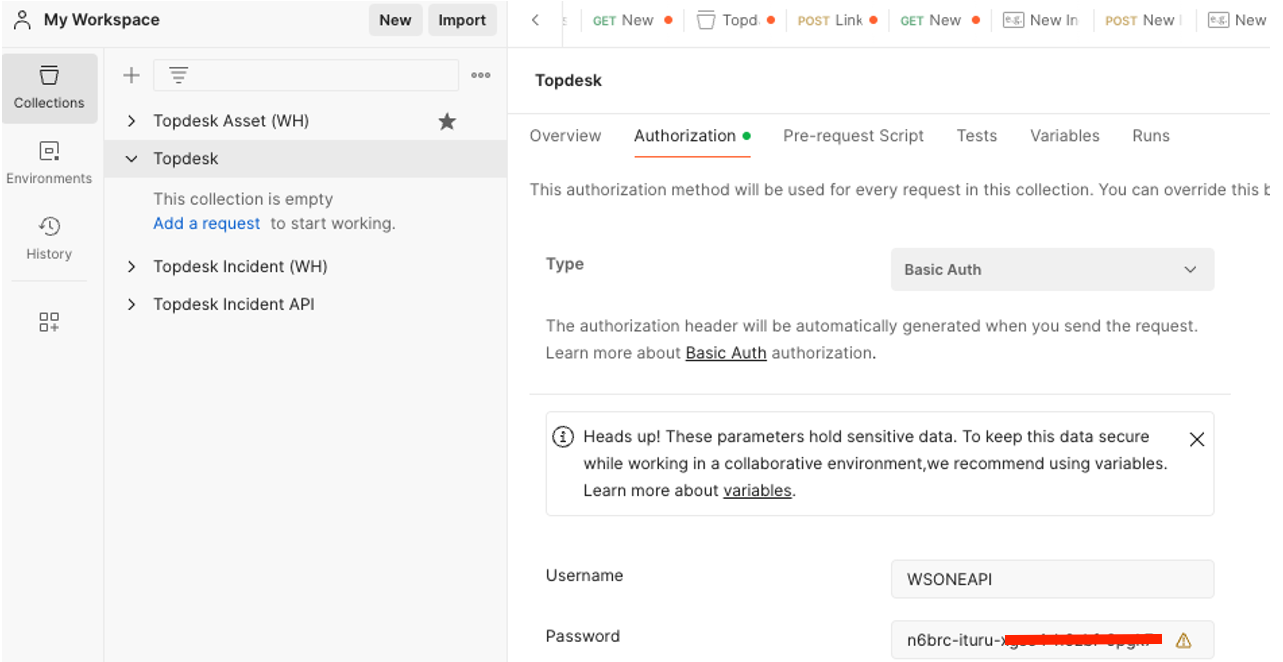
- In Collections, click the + sign to create a new collection. In this example, the collection is named TOPdesk.
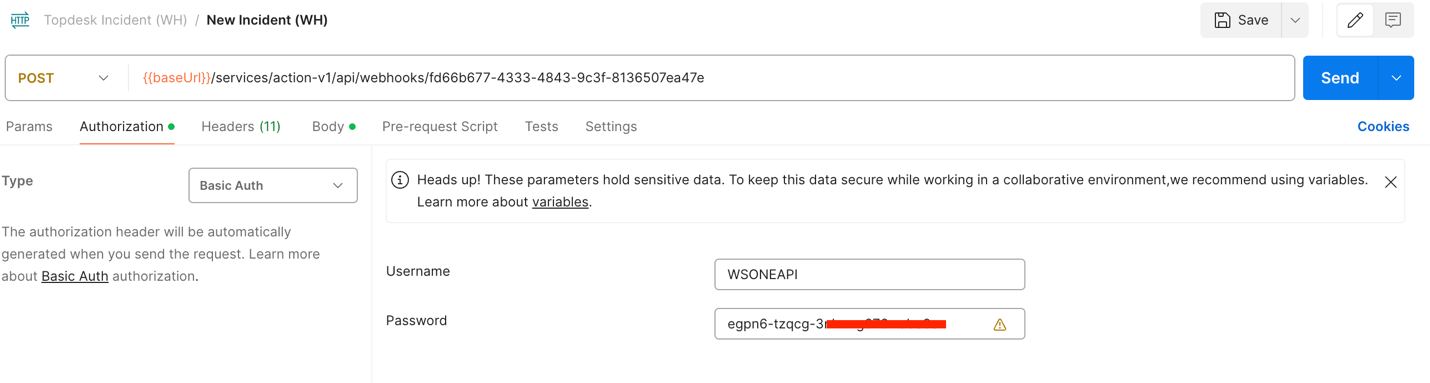
- In the newly created collection under the Authorization tab, enter the preferred authentication method. This example uses Basic Auth.
- Then enter the username and password that will be used to perform tasks in TOPdesk, which is the application name WSONEAPI and the associated password. This authentication method will inherit down to all requests under the collection.
Because reusable variables should be used whenever possible, create an environment.
- From the menu on the left, select Environments and add a new environment using the + sign called TOPdesk. Edit the environment and add the following:
Variable: baseUrl
Initial Value: In this example, https://europe-demo-XXX.TOPdesk.net

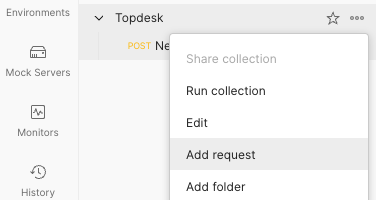
- Navigate back to Collections in the menu on the left, click the three dots menu next to the star for the newly created collection, and select Add Request.
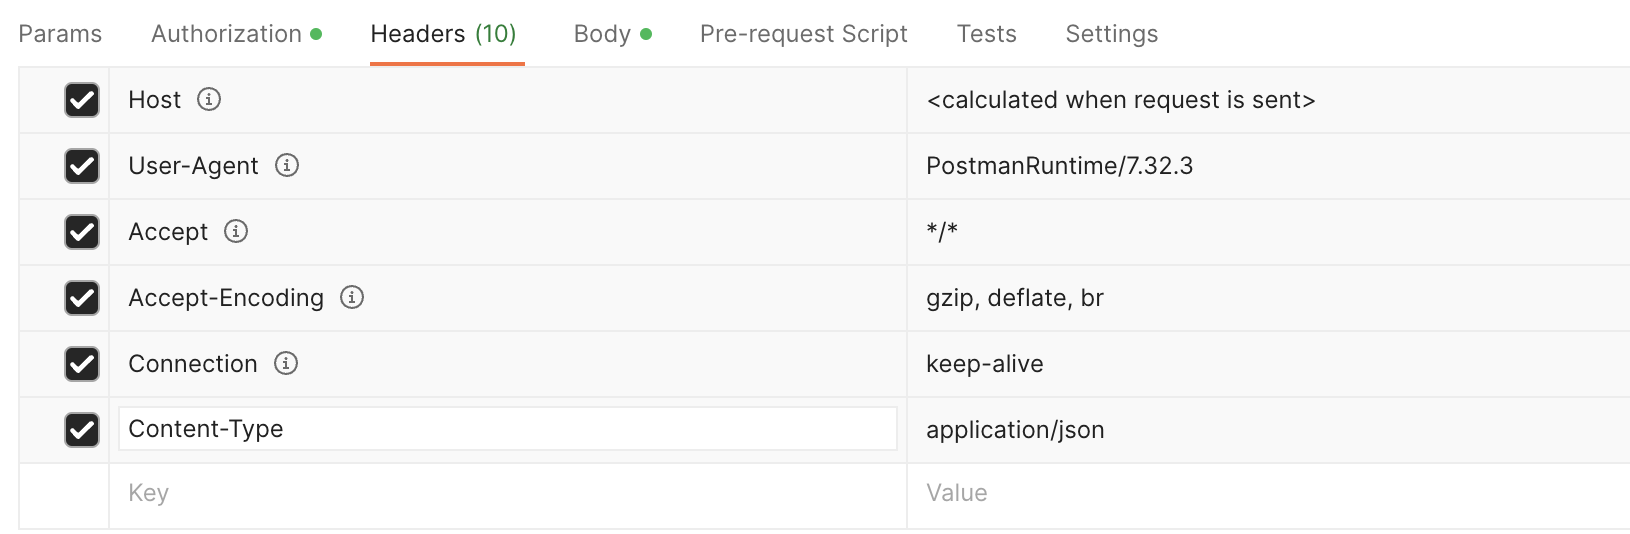
- Under the Headers tab, add Content-Type with the value application/json.
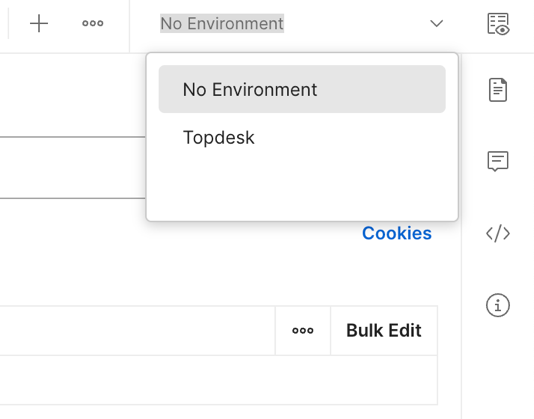
- In the top-right corner, select the TOPdesk environment created earlier.

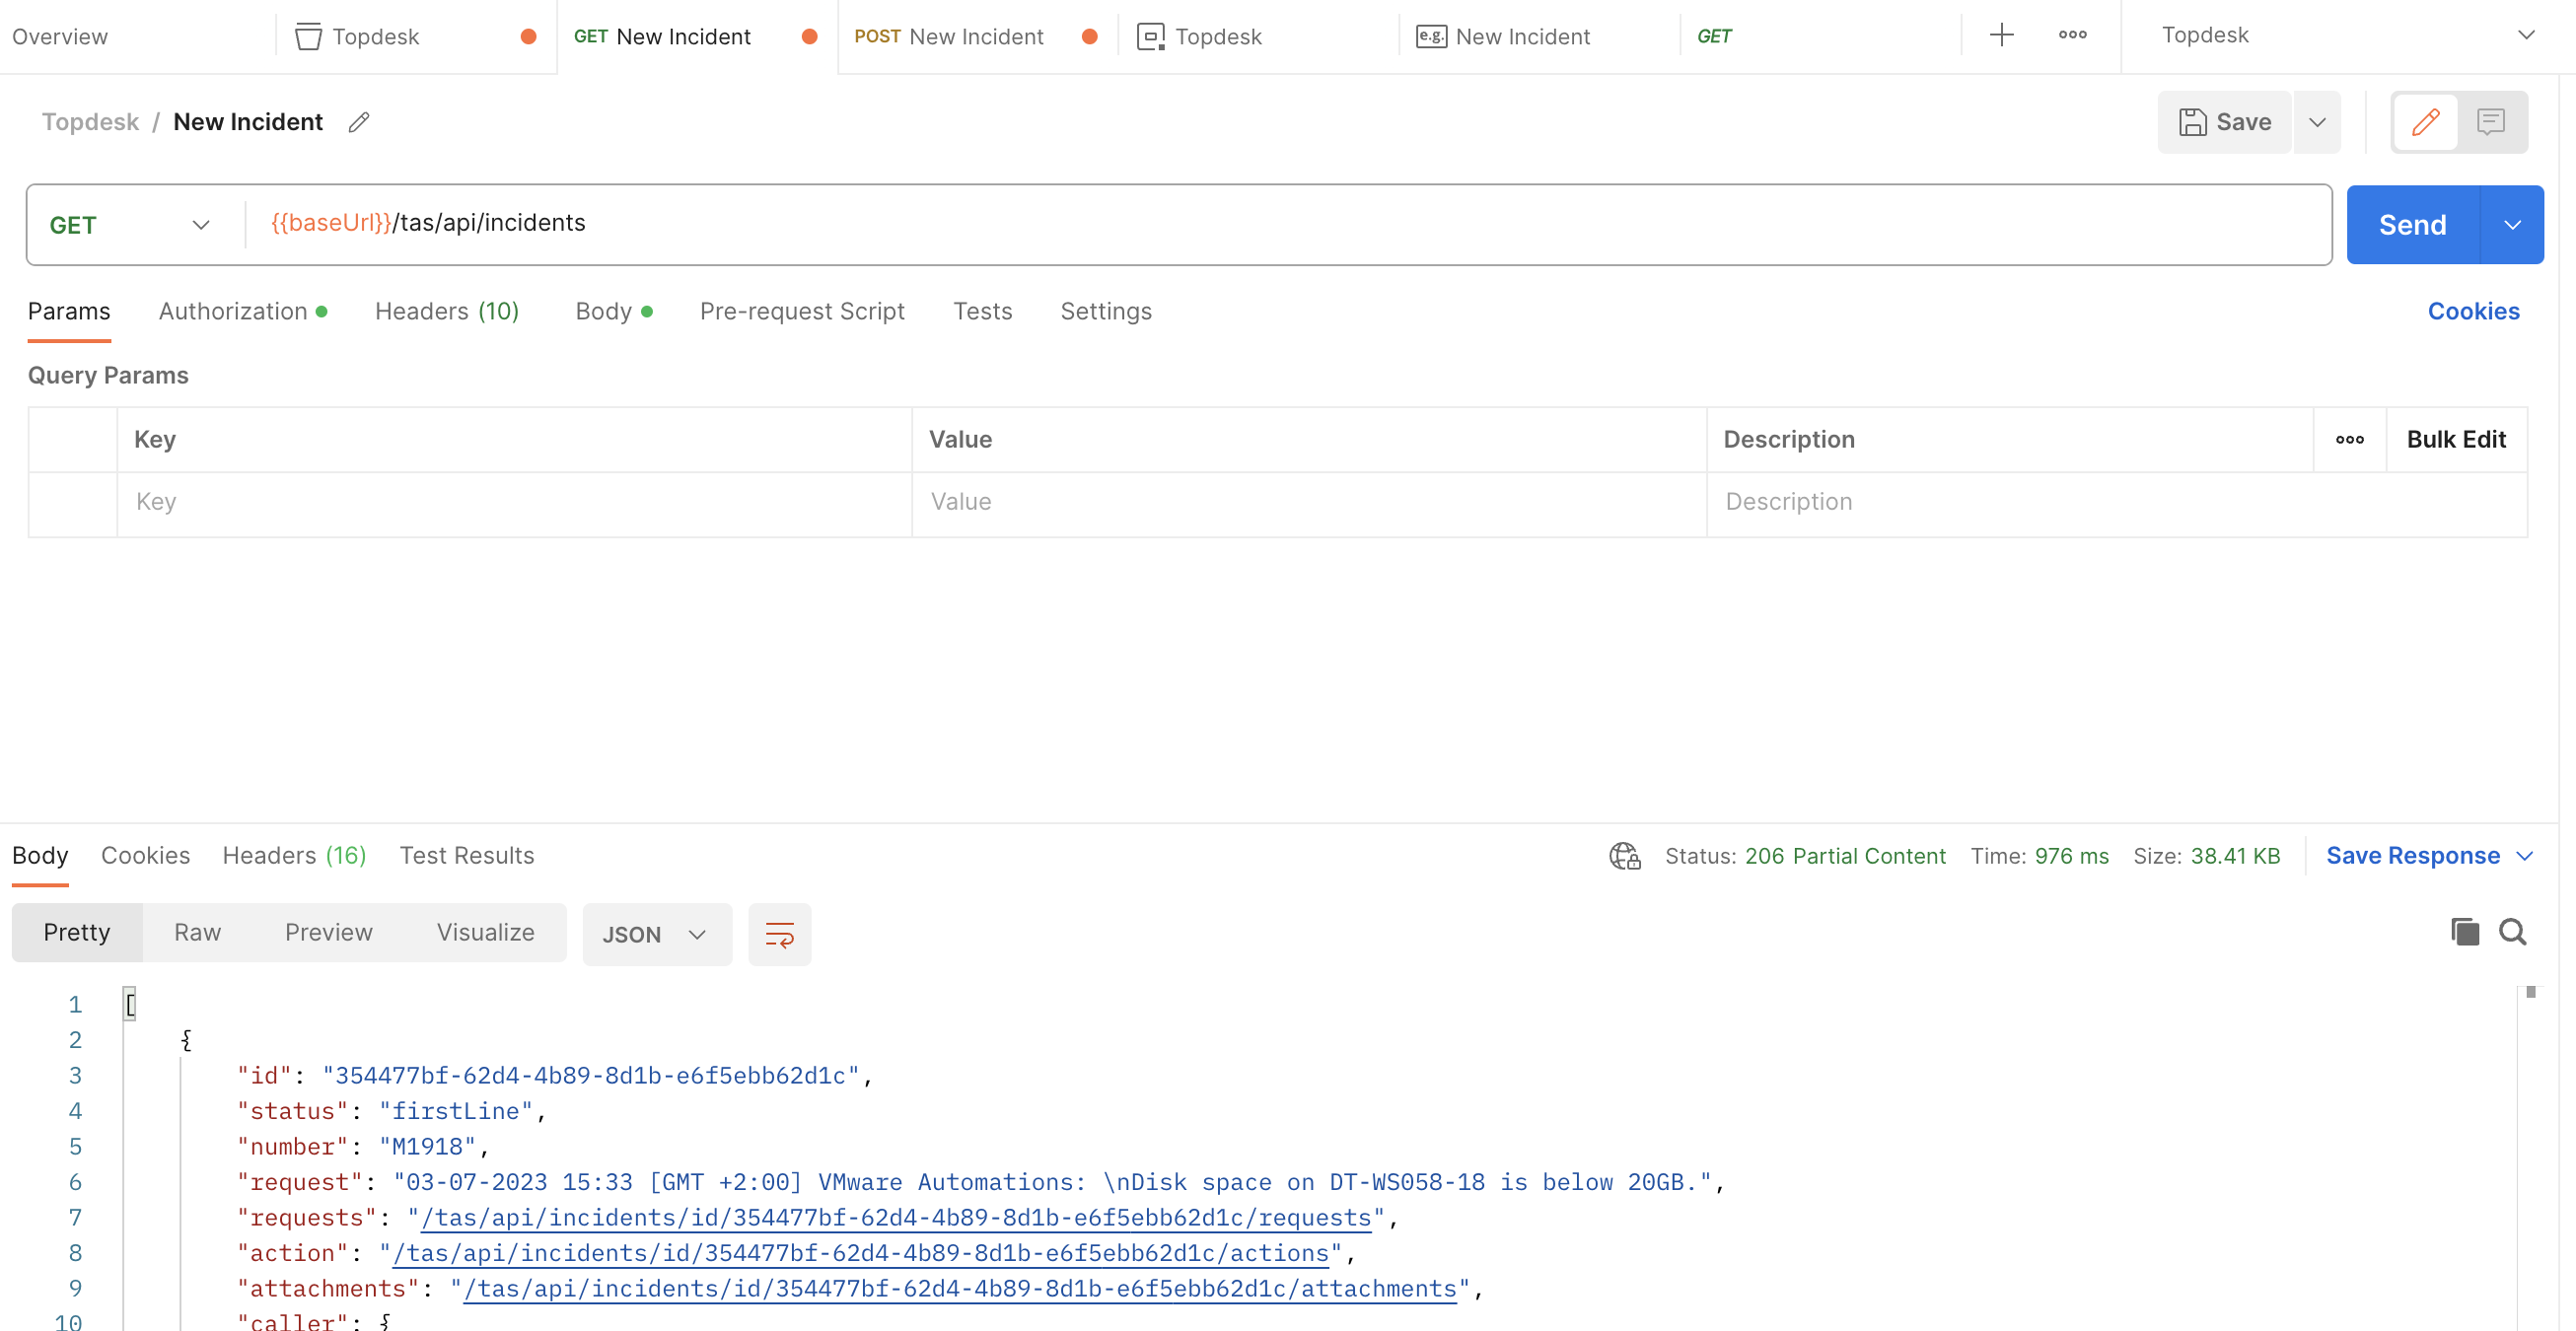
- Next, create the GET action using the variable created earlier. Enter {{baseUrl}}/tas/api/incidents and then click Send to see if the connection is working. Results will appear in the lower section of the screen.
Method 1: Using Default APIs to Create a Ticket
The following sections will guide the creation of JSON files that will be used to import actions into a custom Omnissa Intelligence connector. Two different approaches will be covered to create a TOPdesk ticket from Omnissa Intelligence. The first will utilize the default APIs and will require no action on the TOPdesk side. The second method will utilize a webhook, configured by the TOPdesk administrator, which provides a more user-friendly interface.
TOPdesk, like most applications, uses unique IDs for all entities under the hood and cannot automate using just the friendly name. Using the default APIs will require hardcoded IDs, making the action more static; a ticket will always come from the same system user, for example. Configuring the webhook will translate entered names to their corresponding IDs in TOPdesk, leading to a more flexible and user-friendly action. Although the webhook method is preferable, it requires more configuration in TOPdesk.
This section will cover Method 1: Default APIs. Start by configuring the TOPdesk side, shown in the following steps.
TOPdesk Requirements
This integration guide covers creating a ticket in TOPdesk, whereas other use cases, such as creating new assets, would require a separate webhook to be configured in TOPdesk.
Within Omnissa Intelligence, the following fields can be configured to create a ticket:
- Request
- Brief description
- Caller
- Operator Group
- AssetID*
Within TOPdesk, the following default values can be configured to create a ticket:
- First/Second line
- Entry
- Call type
- Category
- Subcategory
- Status
- Impact
- Urgency
- Duration
*The integration will look up the AssetID in TOPdesk. If the AssetID matches the value from Omnissa Intelligence, the asset will be linked to the incident in TOPdesk. The integration can only look for AssetID in TOPdesk. If it cannot find a match, the incident will not be linked to any asset.
Before integrating with Omnissa Intelligence, create an API user, set its permissions, and configure the webhook.
Create a New Permission Group
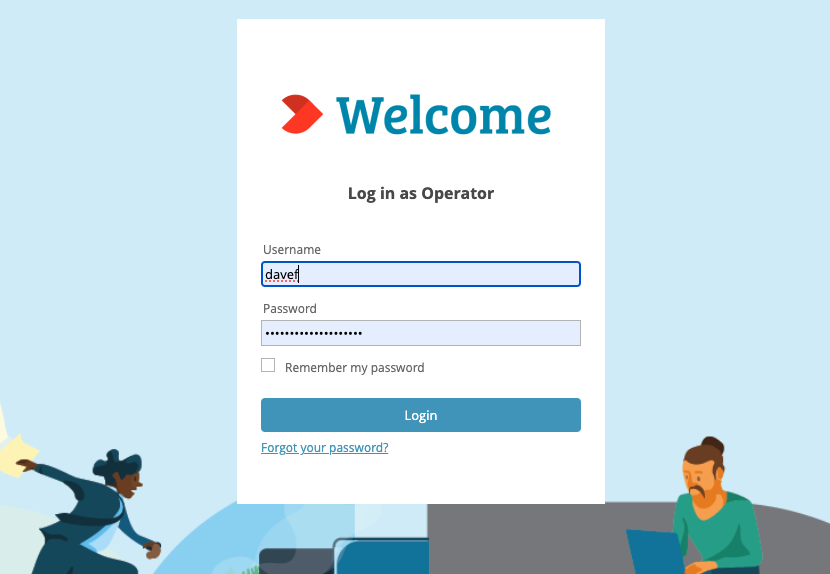
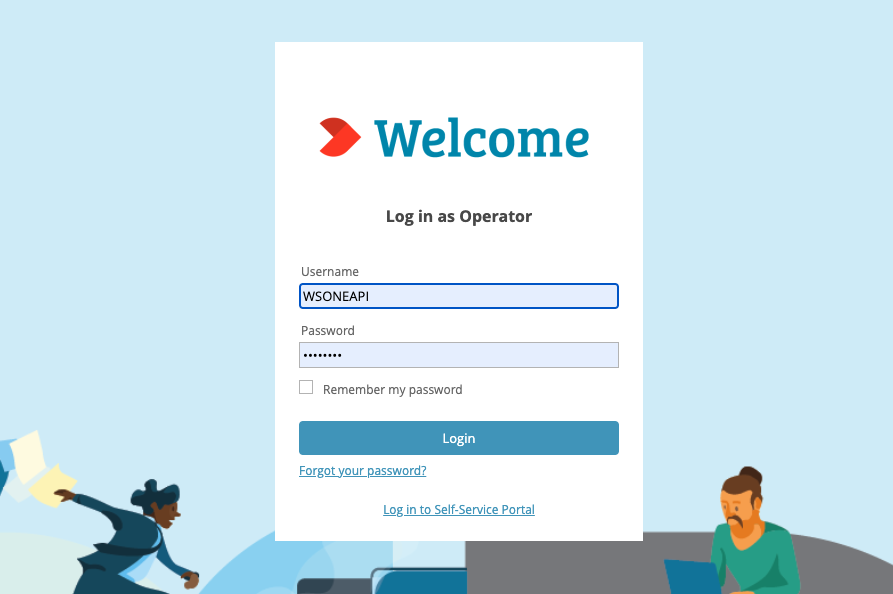
- Log in to TOPdesk using your operator account.
In order for the API account to be able to do anything, first define the permissions. Do this by creating a new Permission group.
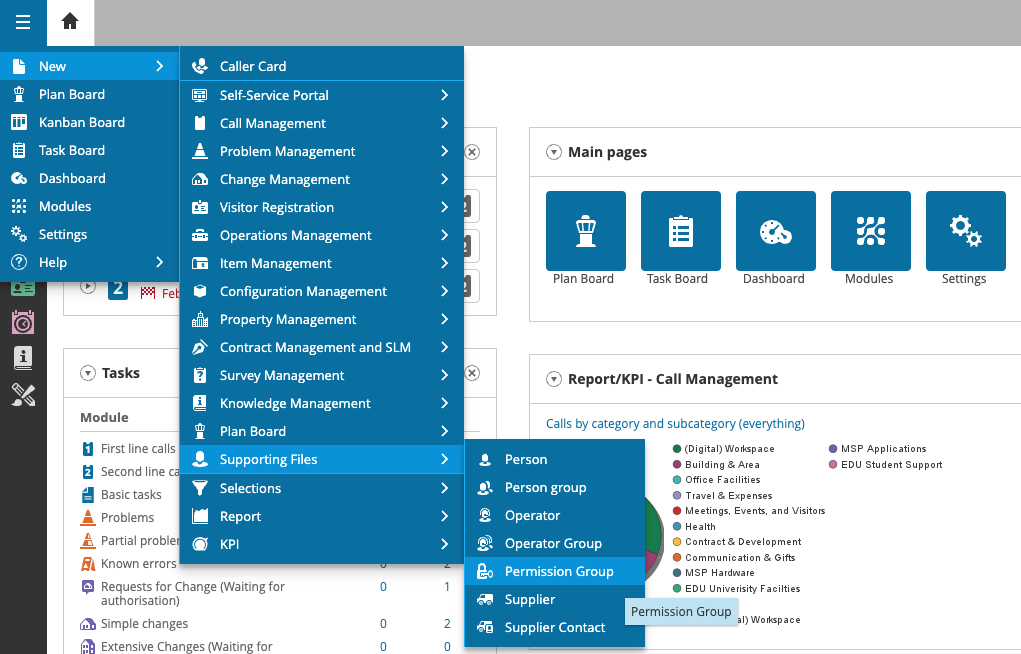
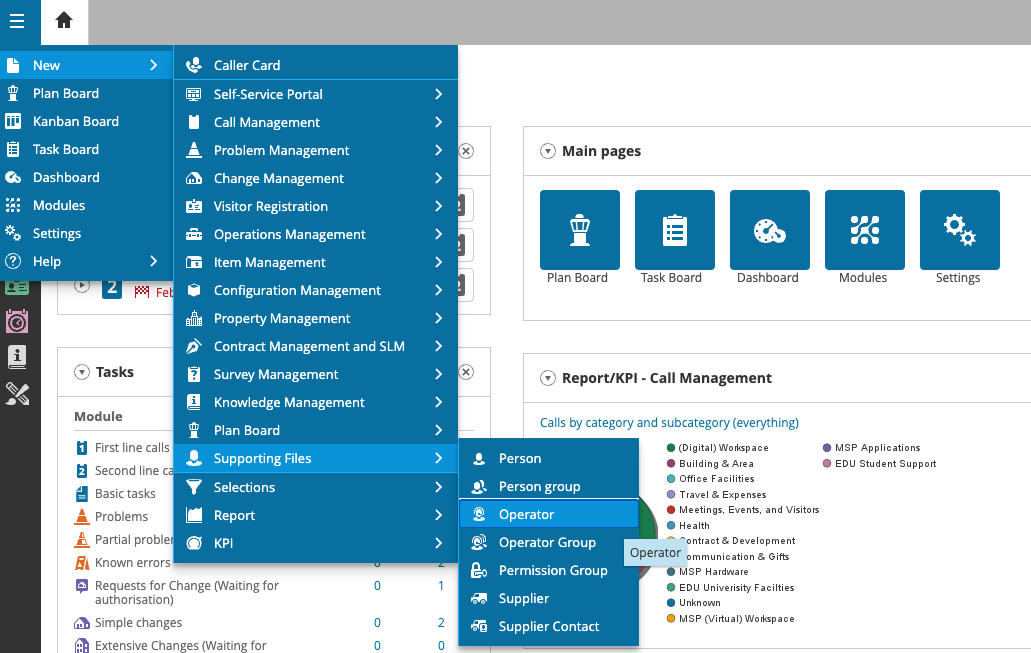
- Click the menu icon in the top-left corner and select New > Supporting Files > Permission Group.
- Enter a name for the new Permission group. For this example, Omnissa Intelligence API Permissions, and click Save.

- In the first section, Call Management, select the following permissions:
First line calls: Read, Write, Create
Second line calls: Read, Write, Create
Close calls: Write
Link object to call: Write
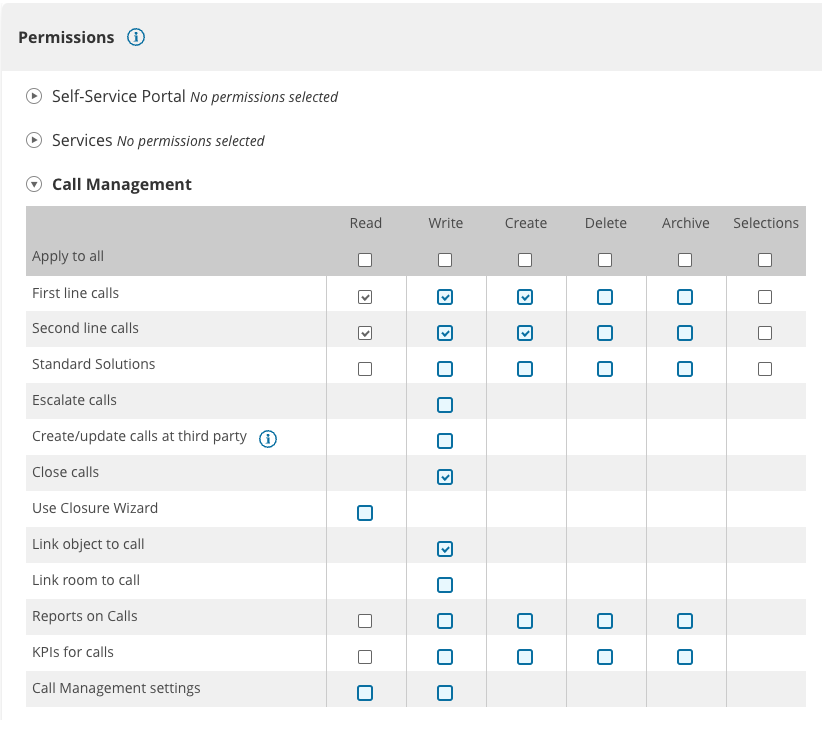
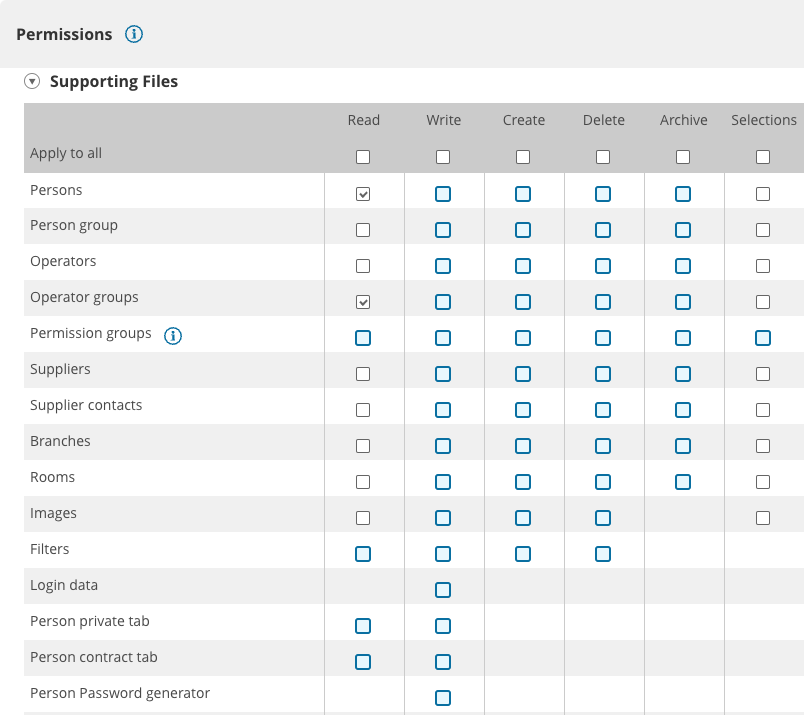
- Select the following permissions in the Supporting Files section:
Persons: Read
Operator groups: Read
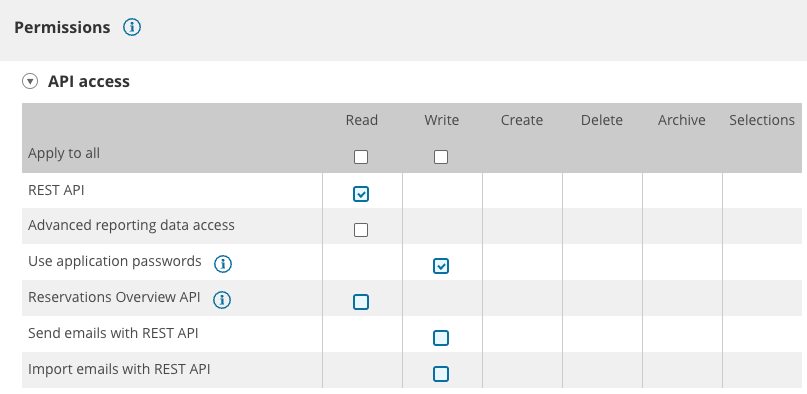
- For the API Access section, select the following:
REST API: Read
Use application passwords: Write
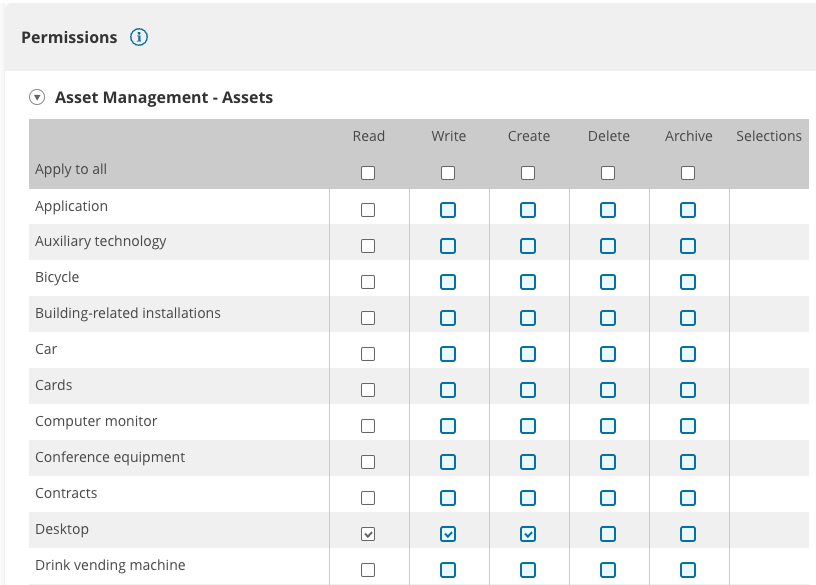
- When using the Create Asset action, Asset Management – Assets is also required, so select the assets you want to create through Omnissa Intelligence. For this example, select:
Desktop: Read, Write, Create
Laptop: Read, Write, Create
Mobile phone: Read, Write, Create
Tablet: Read, Write, Create
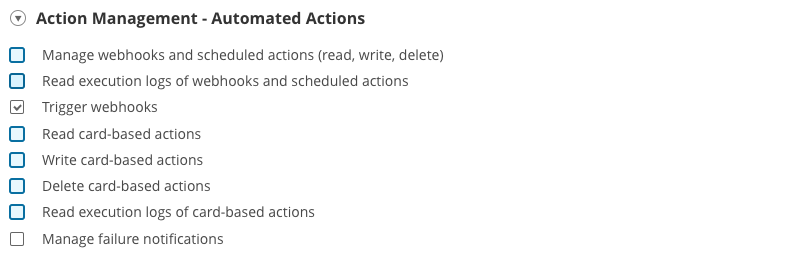
- Finally, select the permissions to run the webhook under Action Management – Automated Actions.
Create a New TOPdesk API User
- Log in to TOPdesk with your operator account and go to the menu icon in the top-left corner. Select New > Supporting Files > Operator.
- Then, fill in the details for the API user account:
Surname: Workspace ONE Intelligence API User
Branch: <Select a branch>
Login Name: WSONEAPI
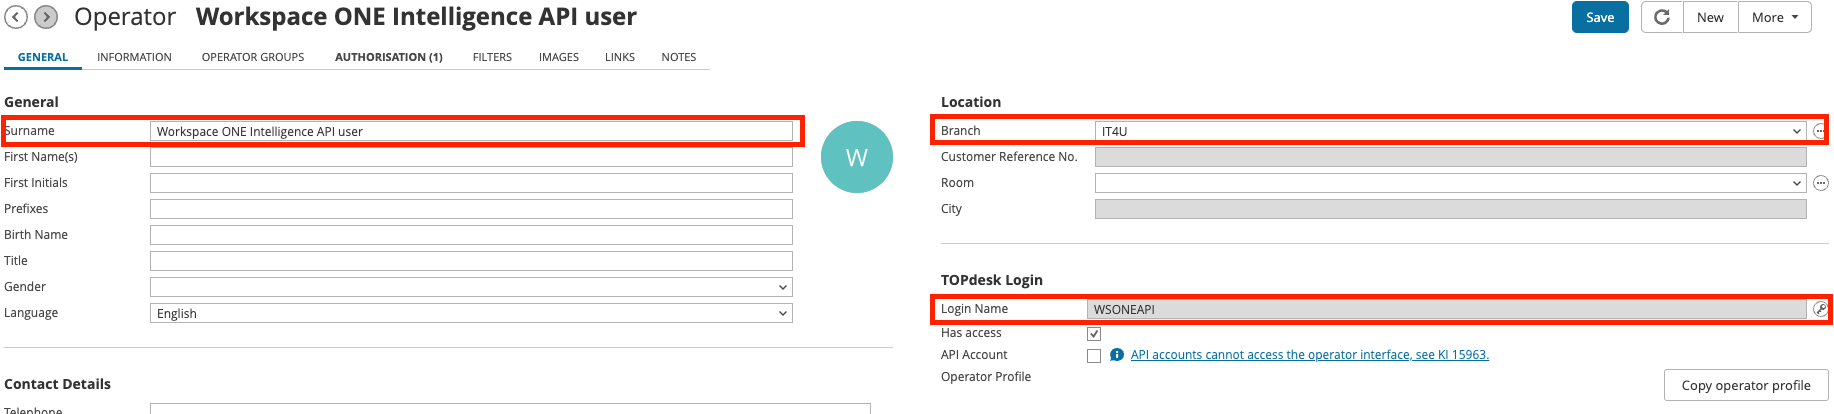
Note: Do not select the API Account check box yet — this will be done later. Selecting that box deactivates admin console access for the service account user.
- Click Save.
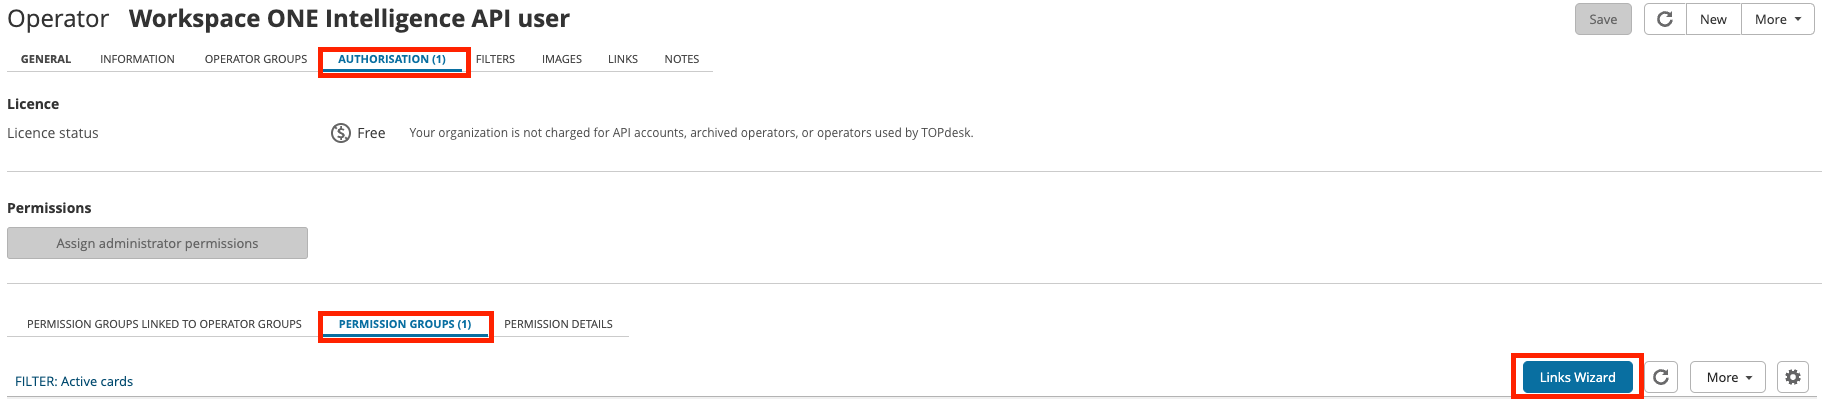
- Assign the Permission group created previously to the new Operator account. Select the AUTHORIZATION tab and click the tab PERMISSION GROUPS in the middle of the screen.
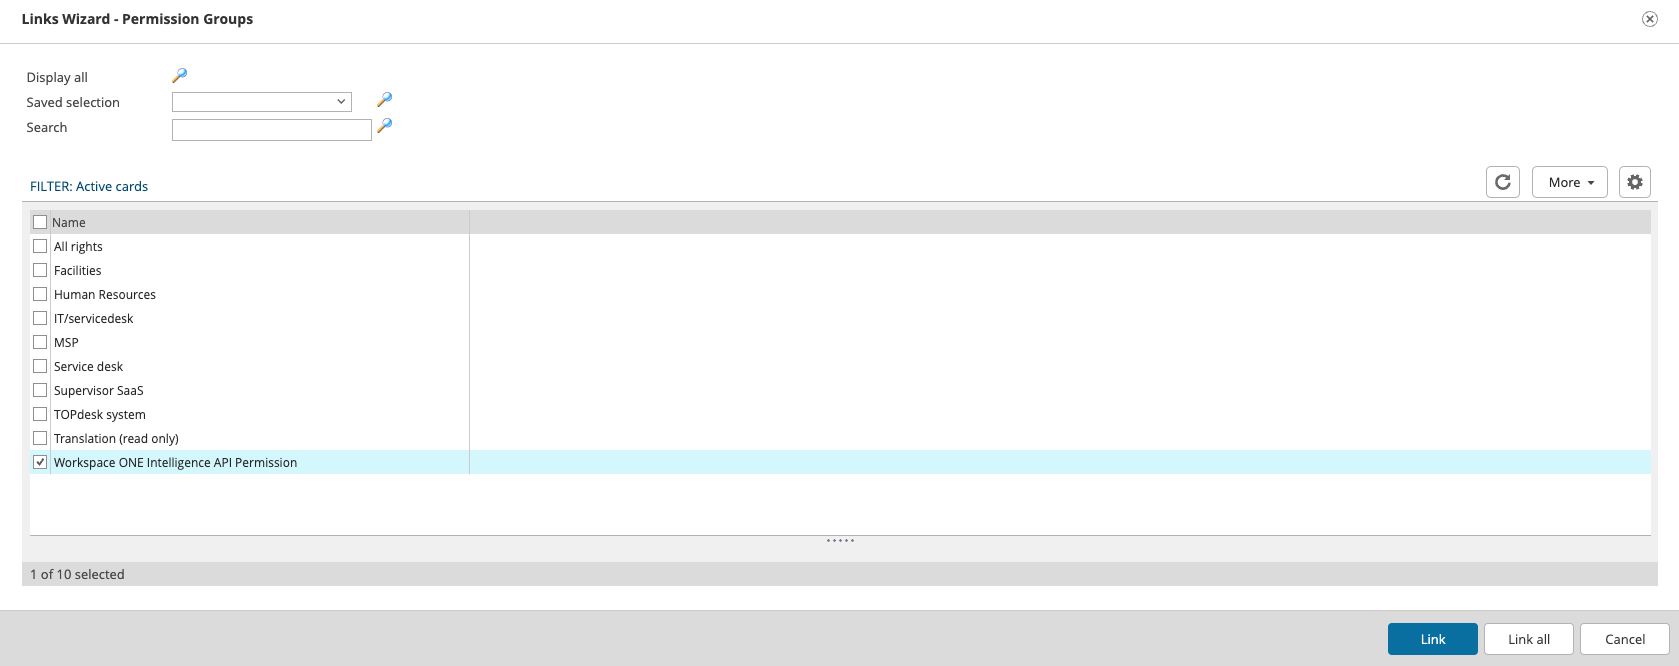
- Click Links Wizard.
- Select the Omnissa Intelligence API Permission permission group from the wizard.
- Click Link in the bottom-right corner.
- When finished, save and exit the operator page by clicking Save.
Create an Application Password
Use the following steps to create an application password.
- If you are currently still logged in as an Operator, log out first.
- Then, log in to TOPdesk with the API user account created in the previous steps.
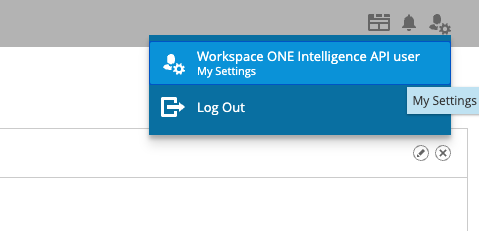
- Once logged in, click the user settings icon in the top-right corner and select My Settings.
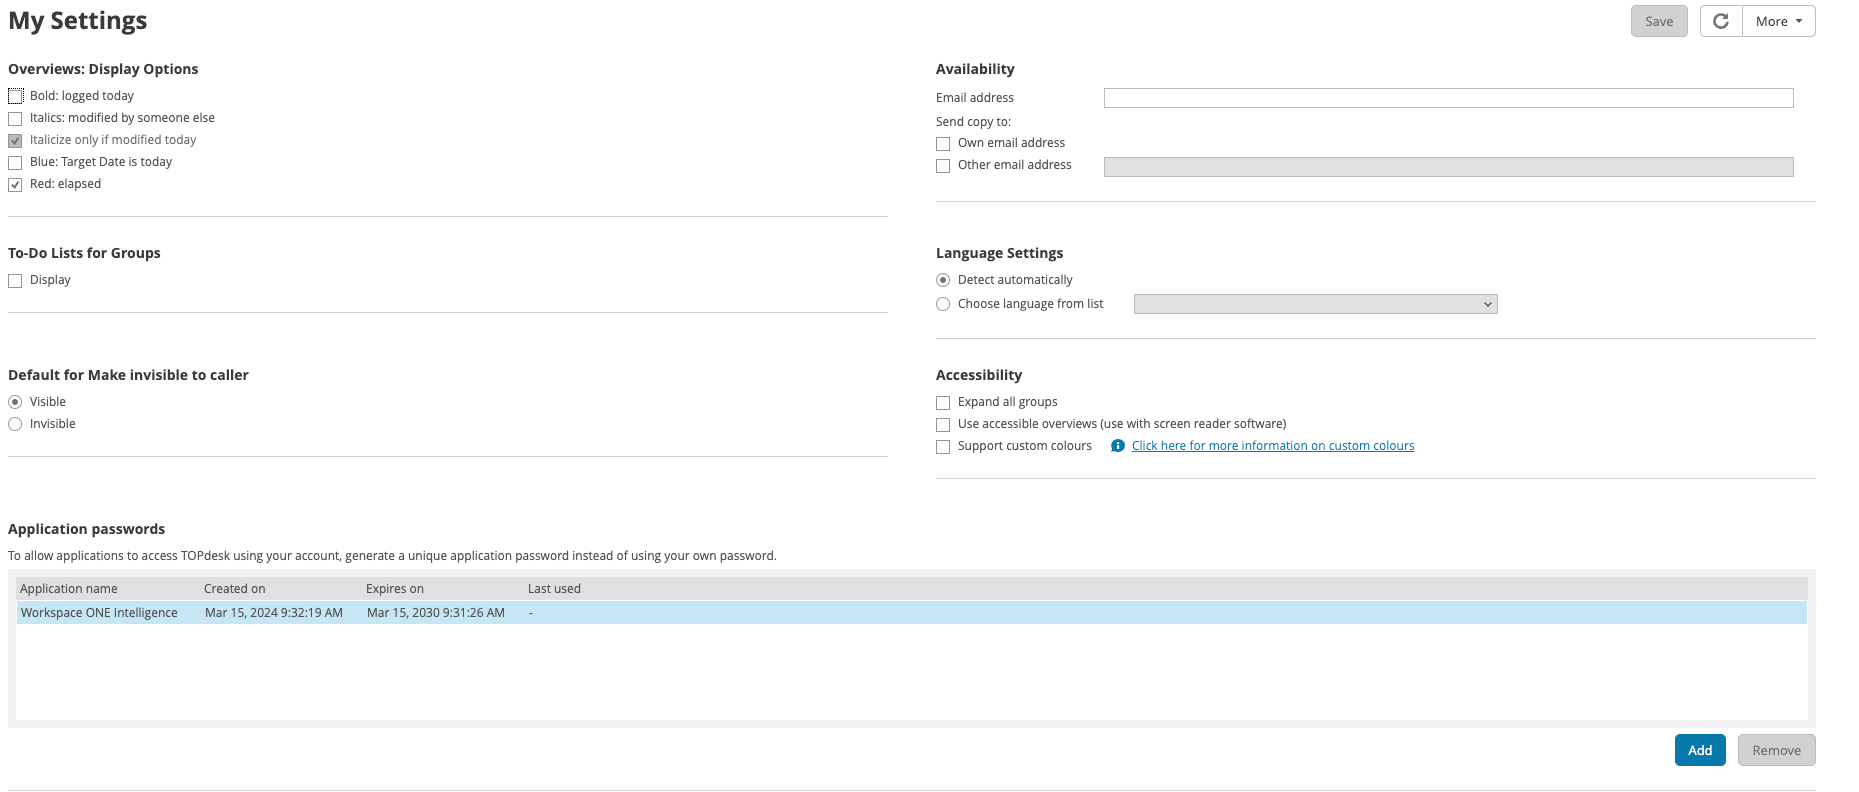
- Click Add in the bottom-right corner.
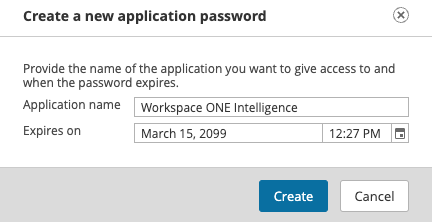
- Enter a name for the application password, Omnissa Intelligence, for example.
- Set an expiration date in the distant future, such as the year 2099, as shown below.
- Click Create.
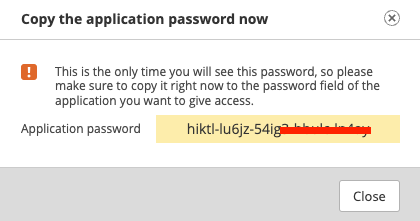
- You are now shown the application password. Copy and save the password somewhere safe. It cannot be accessed again! Should you ever need to change the password, create a new application password and update it everywhere it is used.
- Once complete, log out and log back in as the Operator.
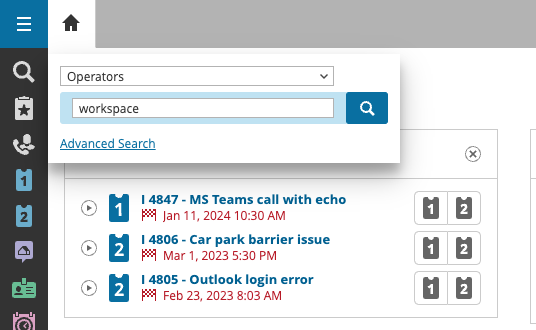
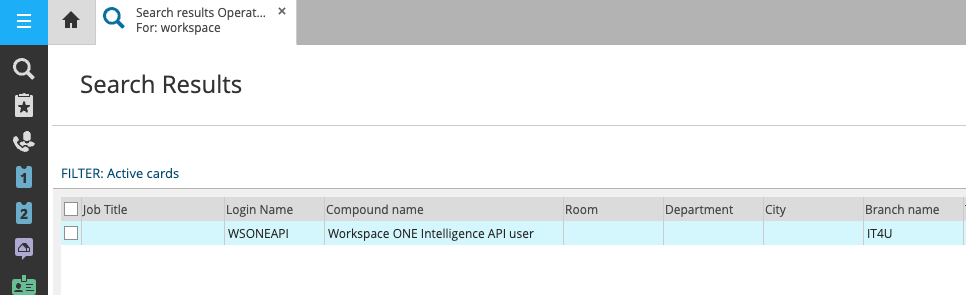
- Look up the Omnissa Intelligence API user by clicking the magnifying glass under the menu icon in the top-left corner, enter Operators in the top bar (or select it from the drop-down menu), and enter workspace in the search bar.
- Then click the magnifying glass to search.
- Double-click the user to edit.
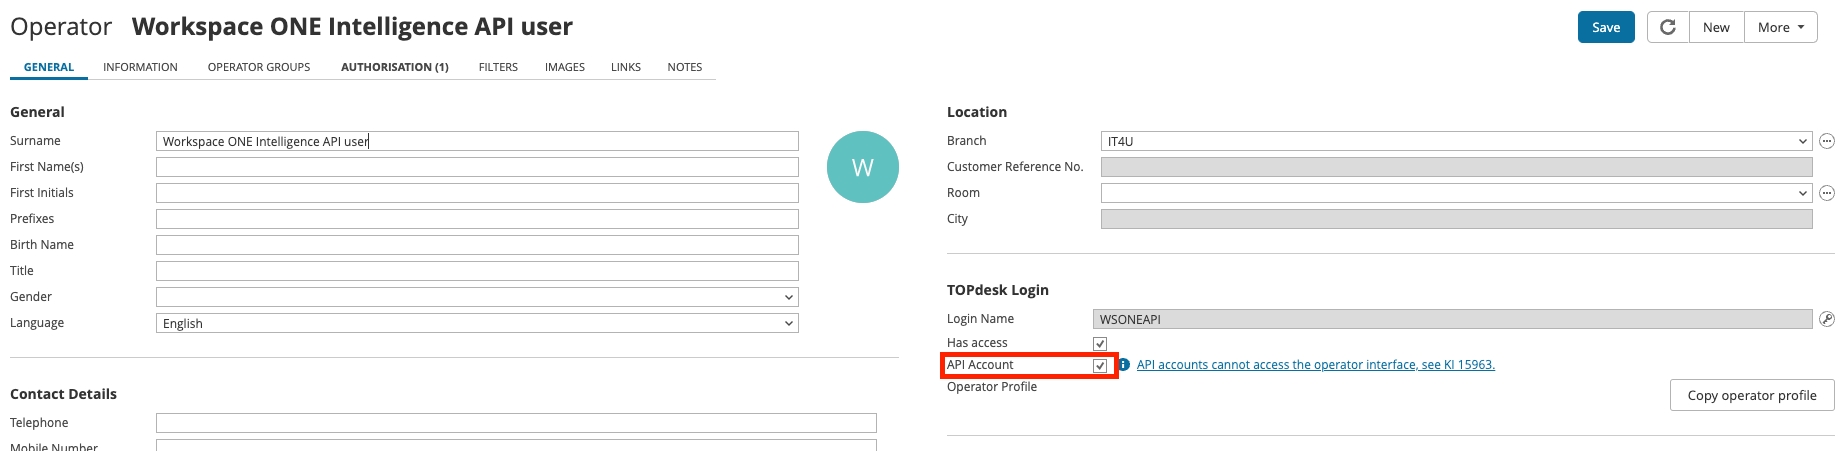
- Select the API Account check box, which deactivates the operator interface for the API account for security purposes, and close by clicking Save in the top-right corner.
The TOPdesk preparations are now complete. Go back to Postman to collect the necessary details.
Gathering Information for the API Request
Because an Operator group is required for the ticket creation, use the results of the GET command from the Create a Collection in Postman section to find an ID to use. In the results box at the bottom of Postman, under the Body tab, scroll down until you find an example with the Operator group you want to use. This example will use MSP Servicedesk as the Operator group.
Figure 1: Finding the Operator Group and Its ID
You also need a caller who will register the request, so use the same process to find the ID for a user. This example will use Lilly Aldrin. 
Figure 2: Finding the Caller Name and ID
Lastly, you need the call type to create a ticket, so search for callType.
Figure 3: Finding the callType and ID
Create a Ticket Using POST
Now that you have the required information, create a ticket in TOPdesk from Postman to test the settings.
- Change GET to POST next to the URL.

- Under the URL, switch to the Body tab, and select the raw radio button as the formatting for the data that will be sent. Paste the following in the field below the radio buttons:
{
  "request" : "What is your Request",
  "action" : "What action should be taken",
  "briefDescription": "Briefly describe the issue.",
  "callType": {
            "id": "The callType ID",
            "name": "Name of the callType"
  },
  "caller" : {
    "id" : "The Caller’s ID"
  },
  "operatorGroup" :  {
    "id" : "The Operator Group’s ID"
  }
}

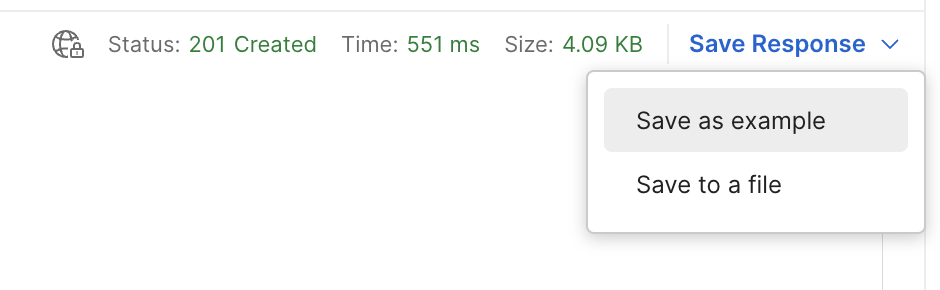
- Click Send and look for the status 201 Created to see if the POST was successful.
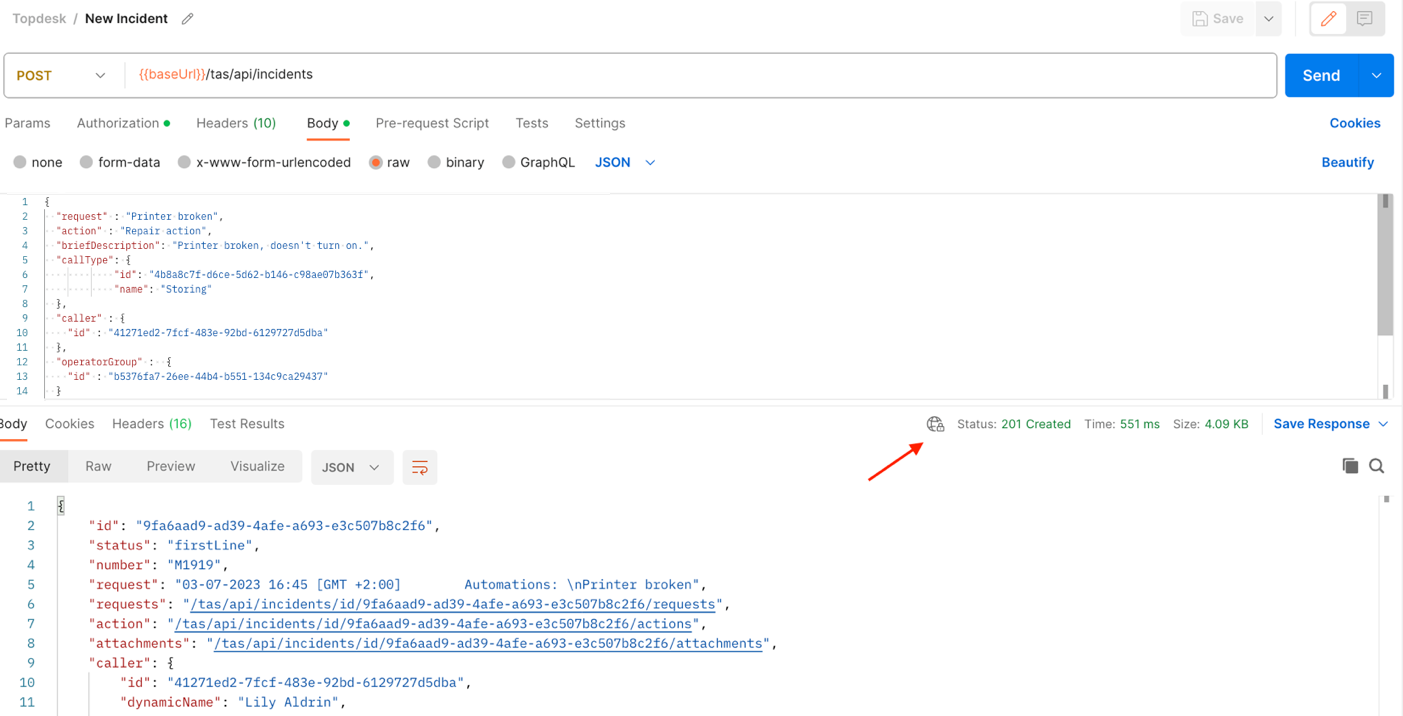
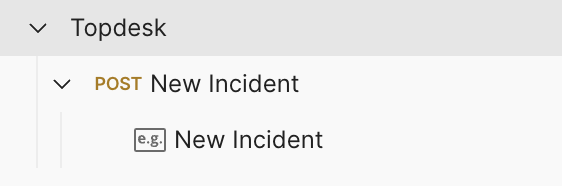
- Because this was successful, click Save Response and select Save as example. This will create a response item with the same name under the request.
Check the Result in TOPdesk
Check TOPdesk to see the results of the action:

Figure 4: Newly Created Incident in TOPdesk’s First Line Calls Overview Screen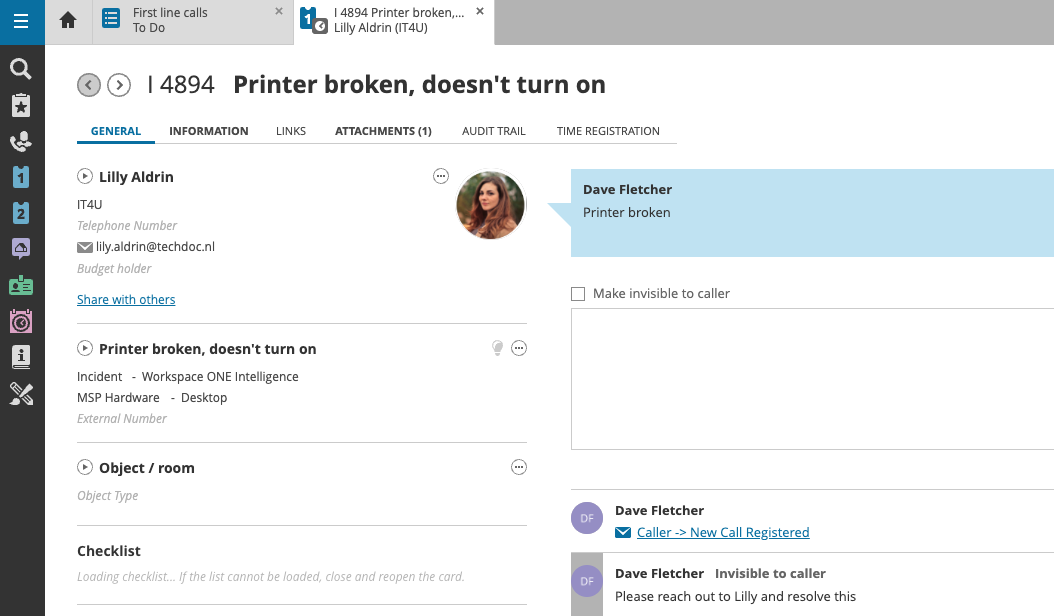
Figure 5: The Complete Ticket
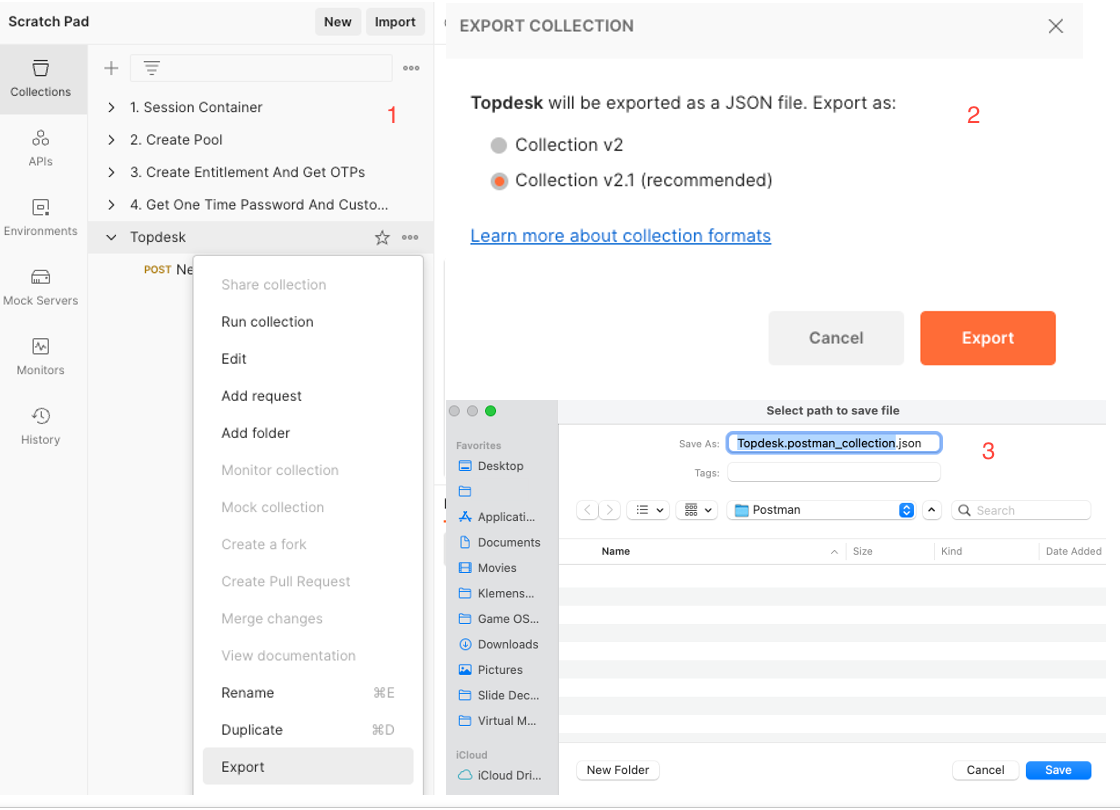
Export the JSON File
After confirming the Postman configuration is working for the default API method of integration (Method 1), export it.
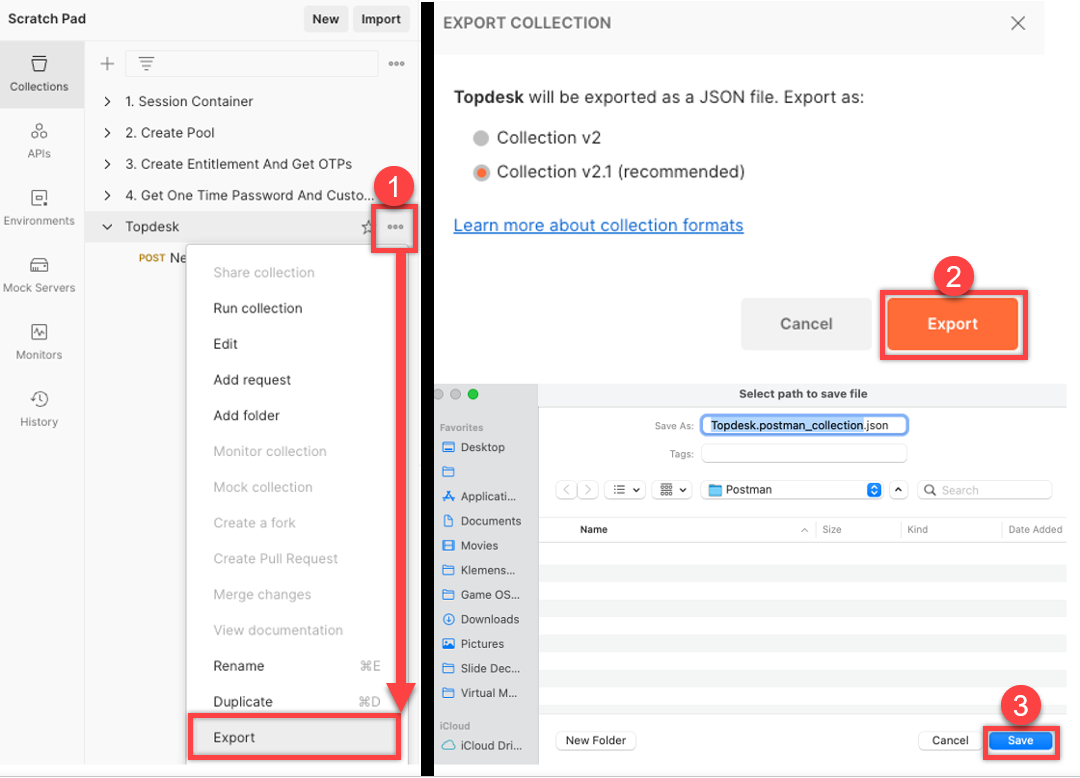
- Click the ellipses (three dots menu) next to your Postman collection, select Export.
- Select the JSON format.
- Save it to your computer.
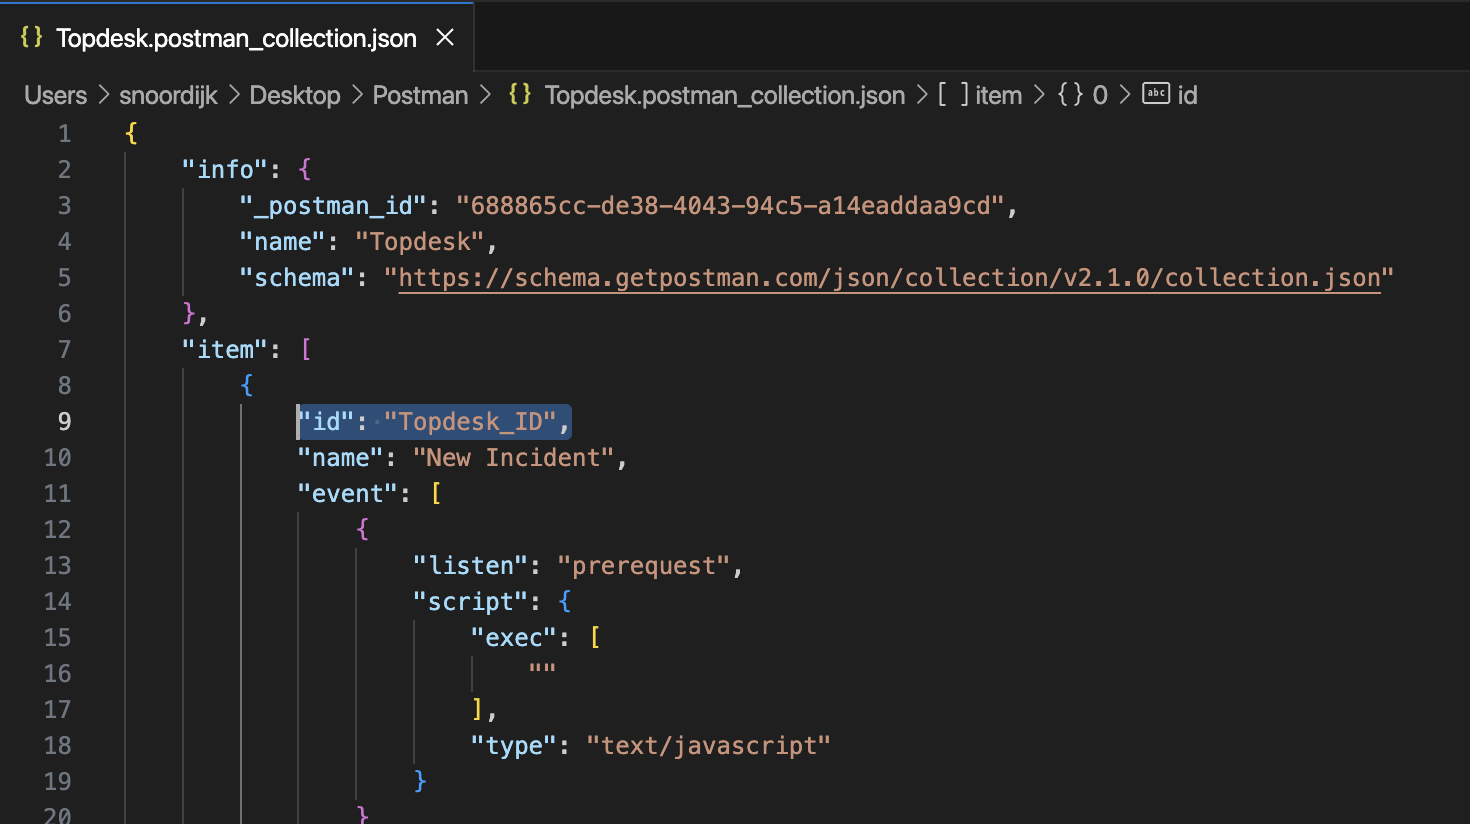
Our JSON is almost ready to go. However, Omnissa Intelligence expects an ID to be paired with every action.
- Open the JSON file in a text editor or tool like Visual Studio Code and search for “name”: “New Incident”. Above this line, add the following:
"id": "TOPdesk_ID",
Note: the ID can be anything. You can make up your own. Be sure to end the line with a comma (,).
Method 2: API Integration Using a Webhook
The following section describes how to generate the JSON file used to create actions in a Omnissa Intelligence custom connector using the webhook method of integration. As seen in the previous section, Method 1 hardcoded the ID of the Operator group; however, a more dynamic option is preferred.
The nature of the custom connector in Omnissa Intelligence does not support bi-directional traffic, so a drop-down menu with all available Operator groups is not feasible. The next best option is to send the name of the Operator group and have TOPdesk translate to the correct ID using a webhook.
This requires actions on the TOPdesk side, shown in the following steps.
TOPdesk Requirements
This section covers configuring a webhook to specifically create tickets in TOPdesk; whereas other use cases, such as creating new assets, would require a separate webhook to be configured in TOPdesk.
Within Omnissa Intelligence, the following fields can be configured to create a ticket:
- Request
- Brief description
- Caller
- Operator Group
- AssetID*
Within TOPdesk, the following default values can be configured to create a ticket:
- First/Second line
- Entry
- Call type
- Category
- Subcategory
- Status
- Impact
- Urgency
- Duration
*The integration will look up the AssetID in TOPdesk. If the AssetID matches the value from Omnissa Intelligence, the asset will be linked to the incident in TOPdesk. The integration can only look for AssetID in TOPdesk. If it cannot find a match, the incident will not be linked to any asset.
Before integrating with Omnissa Intelligence, create an API user, set its permissions, and configure the webhook.
Create a New Permission Group
- Log in to TOPdesk using your operator account.
In order for the API account to be able to do anything, first define permissions. Do this by creating a new Permission group.
- Click the menu icon in the top-left corner and select New > Supporting Files > Permission Group.
- Here, enter a name for the new Permission group. For this example, Omnissa Intelligence API Permissions, and click Save.
- Below the name, set the following permissions. In the first section, Call Management, select the following options:
First line calls: Read, Write, Create
Second line calls: Read, Write, Create
Close calls:Write
Link object to call: Write
- Select the following options in the Supporting Files section:
Persons: Read
Operator groups: Read
- Then for the API Access section, select the following:
REST API: Read
Use application passwords: Write
- When using the Create Asset action, Asset Management – Assets is also required, so select the assets you want to create through Omnissa Intelligence. For this example, select:
Desktop: Read, Write, Create
Laptop : Read, Write, Create
Mobile phone: Read, Write, Create
Tablet: Read, Write, Create
- Lastly, select the permissions to run the webhook under Action Management – Automated Actions.
Create a New TOPdesk API User
- Log in to TOPdesk with your operator account, click the menu icon in the top-left corner, and select New > Supporting Files > Operator.
- Then, fill in the details for the API user account:
Surname: Workspace ONE Intelligence API User
Branch: <Select a branch>
Login Name: WSONEAPI
Note: Do not select the API Account check box yet — this will be done later. Selecting this check box deactivates the admin UI for the service account.
- Click Save.
- Then assign the Permission group created previously to the new Operator account. Select the AUTHORIZATION tab and click the tab PERMISSION GROUPS in the middle of the screen. From here, click Links Wizard.
- Select the Omnissa Intelligence API Permission group from the wizard, then click Link in the bottom-right corner.
- When finished, save and exit the operator page by clicking Save.
Create an Application Password
Follow the next steps to create an application password.
- If you are currently still logged in as an Operator, log out first. Then log in to TOPdesk with the API user created in the previous steps.
- Once logged in, click the user settings icon in the top-right corner and select My Settings.
- Click Add in the bottom-right corner.
- Enter a name for the application password, Omnissa Intelligence, for example, and set an expiration date in the distant future, such as the year 2099, as shown below, and click Create.
- You are now shown the application password. Copy and save the password somewhere safe. It cannot be accessed again! Should you ever need to change the password, create a new application password and update it everywhere it is used.
- Once complete, log out and log back in as the Operator.
- Look up the Omnissa Intelligence API user by clicking the magnifying glass under the menu icon in the top-left corner, enter Operators in the top bar (or select it from the drop-down menu), and enter workspace in the search bar. Then click the magnifying glass.
- Double-click the user to edit.
- Select the API Account check box, which deactivates the operator interface for the API account for security purposes, and close by clicking Save in the top-right corner.
Now that you have created the permissions and a user, next configure the webhook.
Configure the Webhook in TOPdesk
Because webhooks are exportable, you can download the following JSON files to create this in TOPdesk. These files are generalized and include fields of variables to customize to your organization. The steps to do this are as follows:
'%3E%3Cpath id='Rectangle_1' data-name='Rectangle 1' d='M0,0H800V300H0Z' transform='translate(2297 1132)' fill='%23E2F0D9'/%3E%3Cg id='Group_5' data-name='Group 5' transform='translate(-6 -3)'%3E%3Ctext transform='translate(2534 1280)' font-size='50' font-family='Roboto-Regular, Roboto'%3E%3Ctspan x='0' y='0'%3ECurated Assets%3C/tspan%3E%3C/text%3E%3Ctext transform='translate(2611 1333)' font-size='20' font-family='Roboto-Regular, Roboto'%3E%3Ctspan x='0' y='0'%3ETile View (with image and controls)%3C/tspan%3E%3C/text%3E%3C/g%3E%3C/g%3E%3C/svg%3E)
- Log in to TOPdesk using your Operator account.
- Click the menu icon in the top-left corner and select Modules.
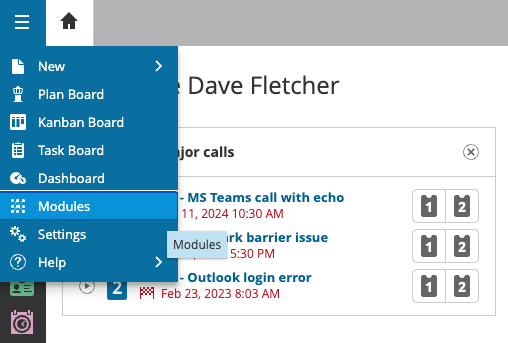
- In the navigator menu on the left, select Action Management and select Automated Actions in the overview pane.
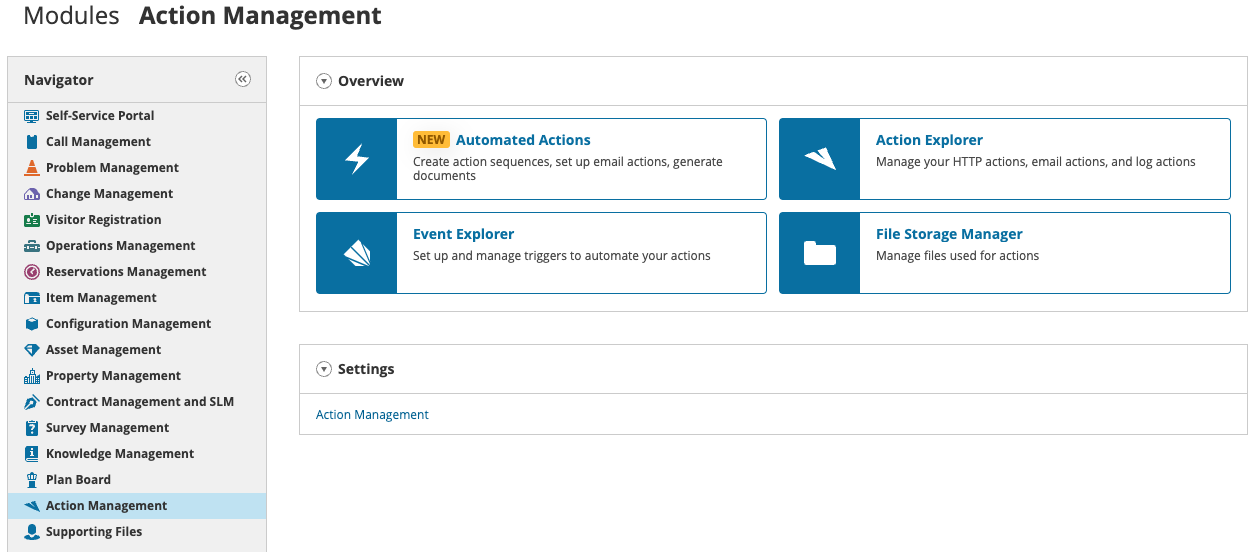
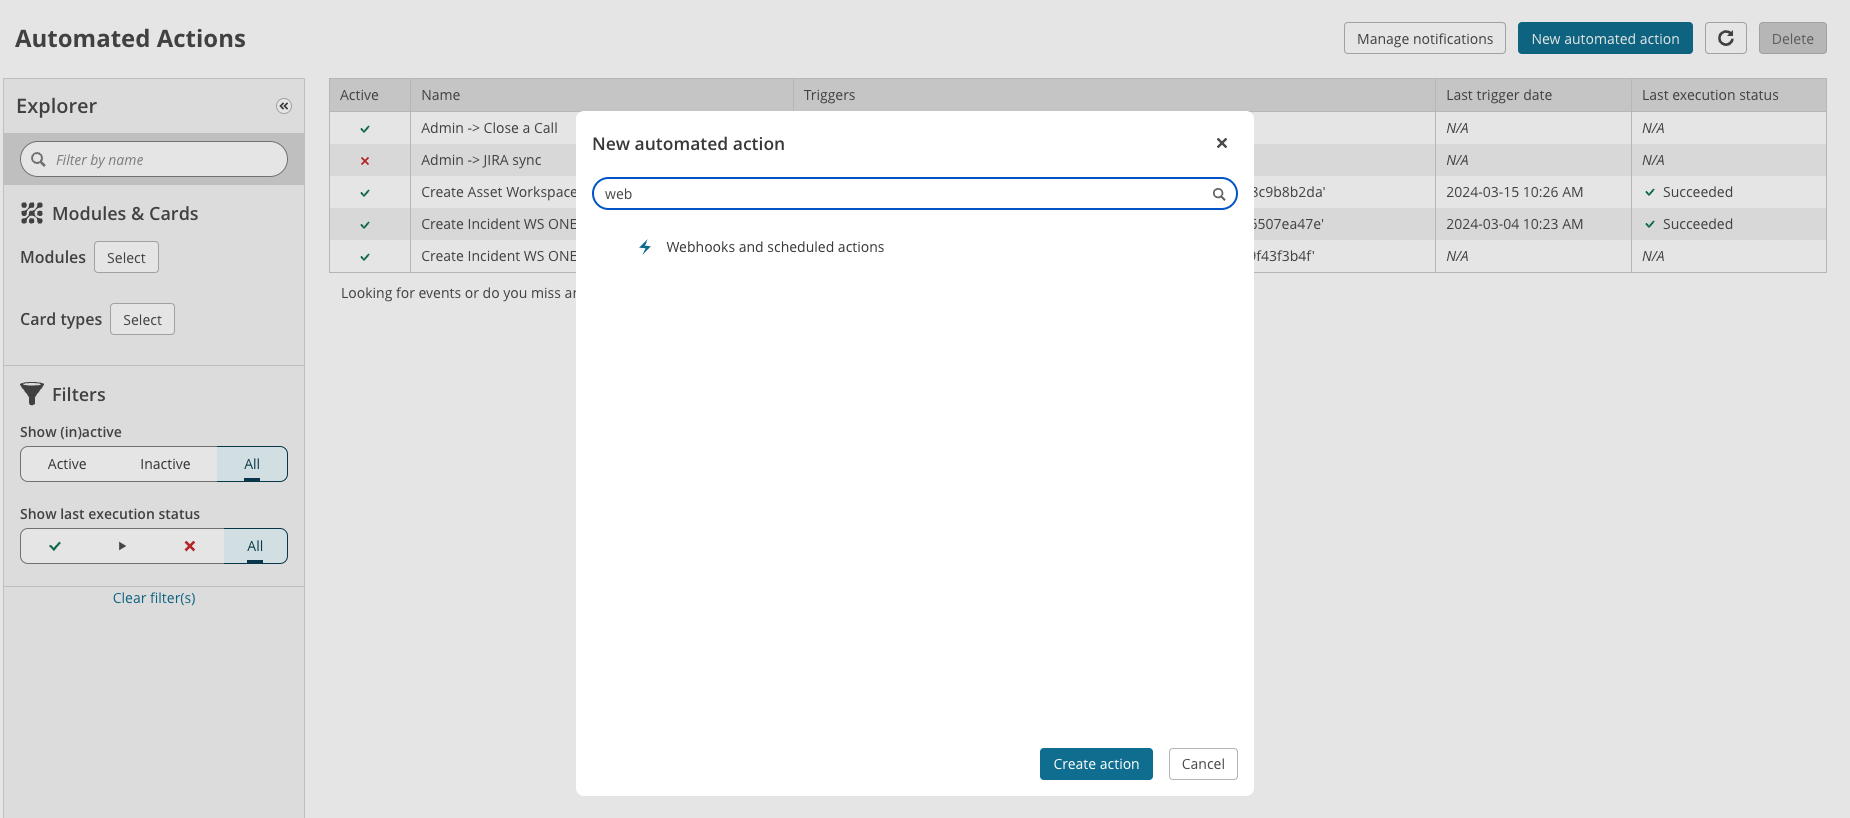
- Listed here are any existing webhooks. Click New Automated Action in the top-right corner to start.
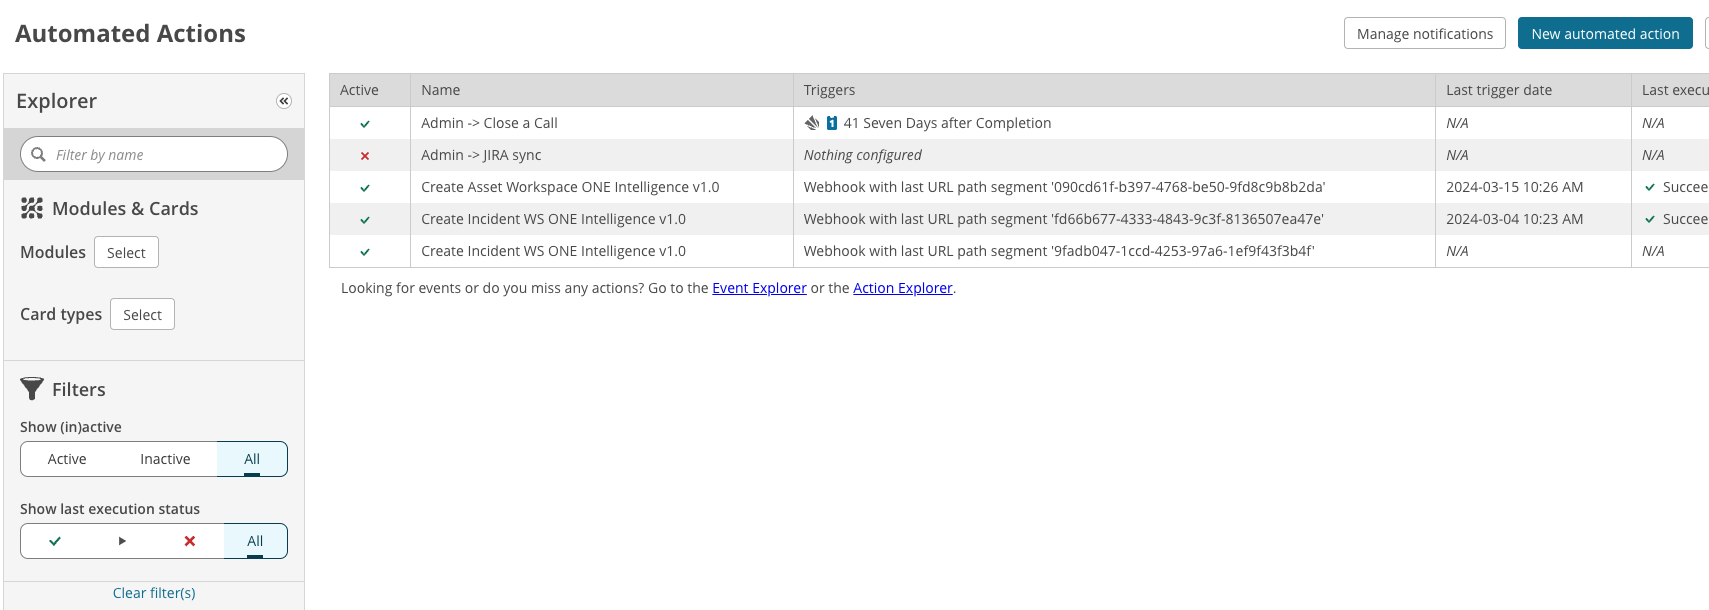
- Search for or scroll to Webhooks and Scheduled Actions, select it and click Create Action.
- Click Generate URL path segment, which completes the webhook URL. You can then copy the whole webhook URL by using the button next to the new URL.
- Next, change from the Triggers screen to the Action screen by clicking Action at the top.

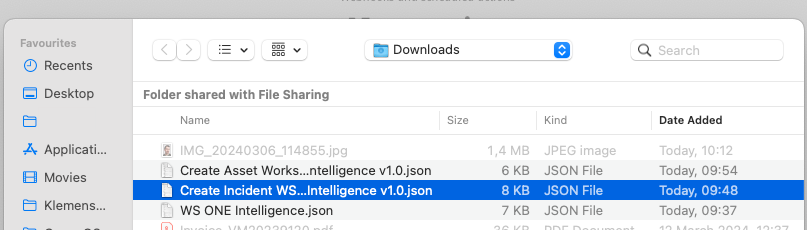
- On the Action screen, select Import an Action under Other options.

- Select the downloaded file named Create Incident JSON.
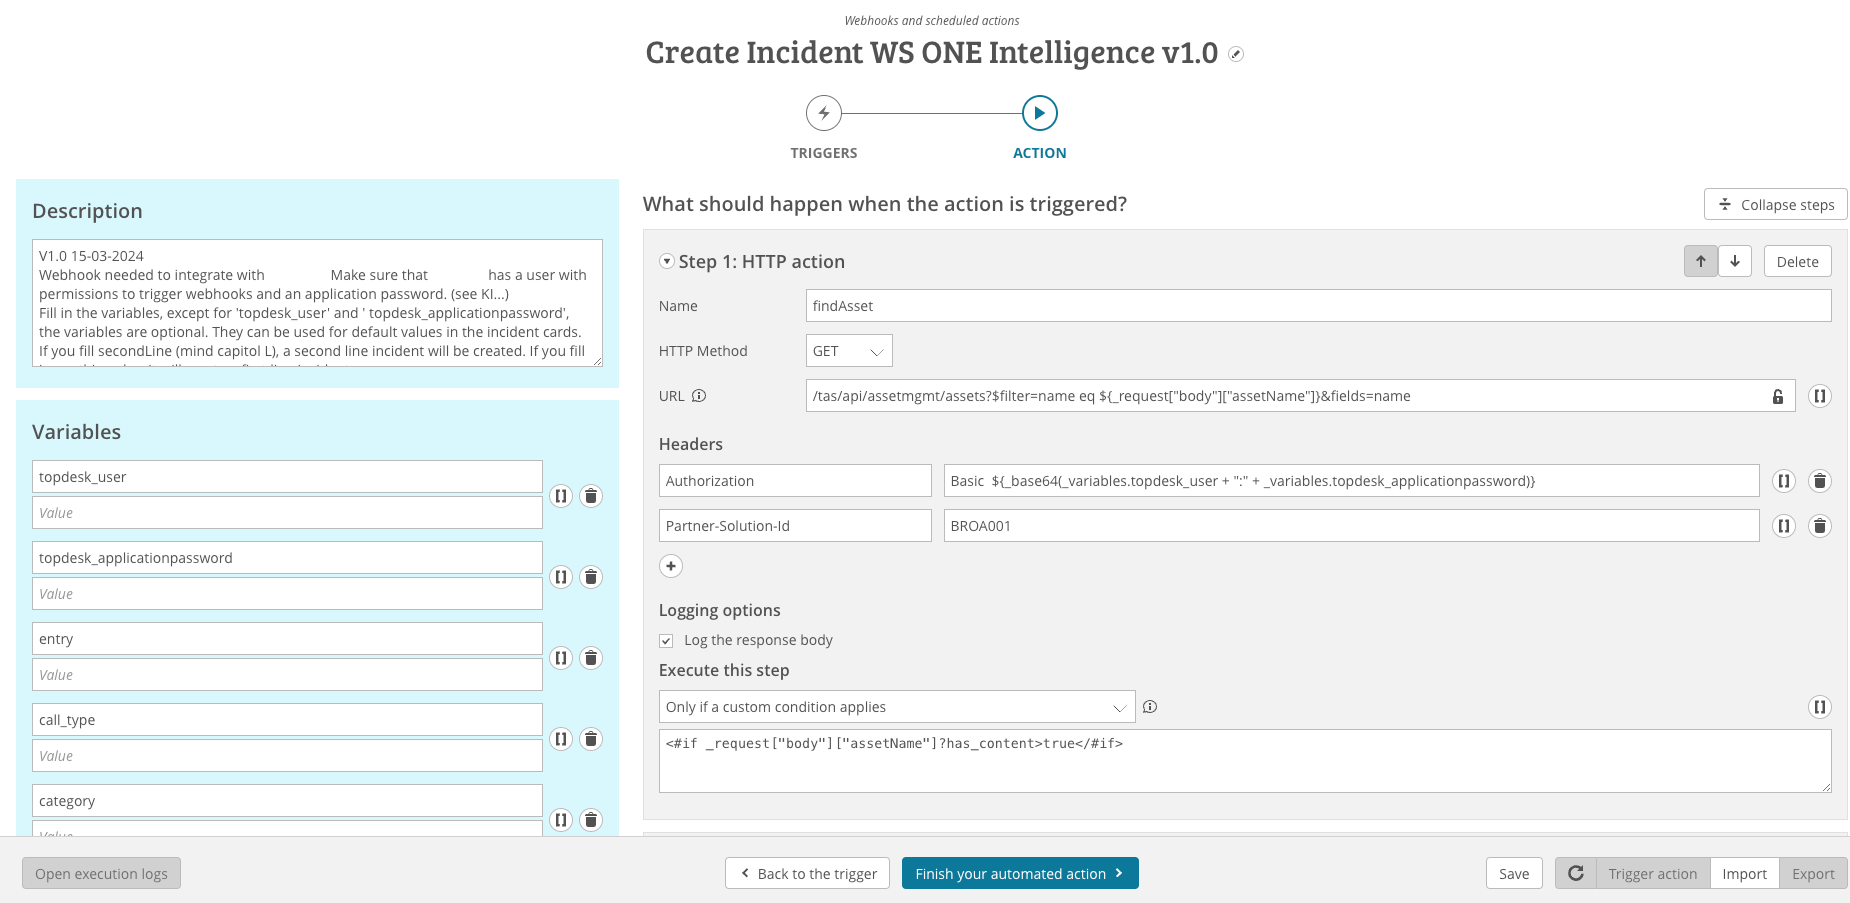
- This will fill the configuration for the webhook so you only have to enter the variables on the left side in the light blue field:
| topdesk_user | WSONEAPI |
| topdesk_applicationspassword | The application password |
These are optional, if you leave them blank it will use the default settings.
| entry | Enter your Entry, for example, Omnissa Intelligence | |
| call_type | Incident | |
| category | Enter your category, for example, (Digital) Workspace | |
| subcategory | Enter a subcategory | |
| status | Logged | |
| duration | 3 Days | |
| firstLine_or_secondLine | Enter the type of incident, be mindful of the capitalization: firstLine | |
| impact | Person | |
| urgency | Medium | |
- When done, click Finish your automated action at the bottom.
The webhook is now configured. Make sure you use the following information when setting up the integration within Omnissa Intelligence. These steps are covered in the following section.
- Username (from the API user created earlier)
- Application password (the application password created earlier)
- Webhook URL (created when setting up the webhook)
Once the webhook is configured, it requires a few adjustments to the Postman configuration.
Create a Collection in Postman
Open Postman to perform the following actions. If you have already created a collection you can skip these steps.
- In Collections, click the + sign to create a new collection and select Blank Collection. In this example the collection is named TOPdesk.
- In the newly created collection under the Authorization tab, enter the preferred authentication method; this example uses Basic Auth. Then enter the username and password that will be used to perform actions in TOPdesk, which is the API user and the associated password. This authentication method will inherit down to all requests under the collection.
Because reusable variables should be used whenever possible, create an environment.
- In the menu on the left, select Environments and add a new environment using the + sign and name it TOPdesk. Edit the environment and add the following:
Variable: baseUrl
Initial Value: In this example https://europe-demo-XXX.TOPdesk.net
- Go back to Collections in the menu on the left, click the three dots menu next to the star, and select Add Request.
- Under the Headers tab, add Content-Type with the value application/json.
- In the top-right corner, select the TOPdesk environment created earlier.
Create a Ticket Using POST
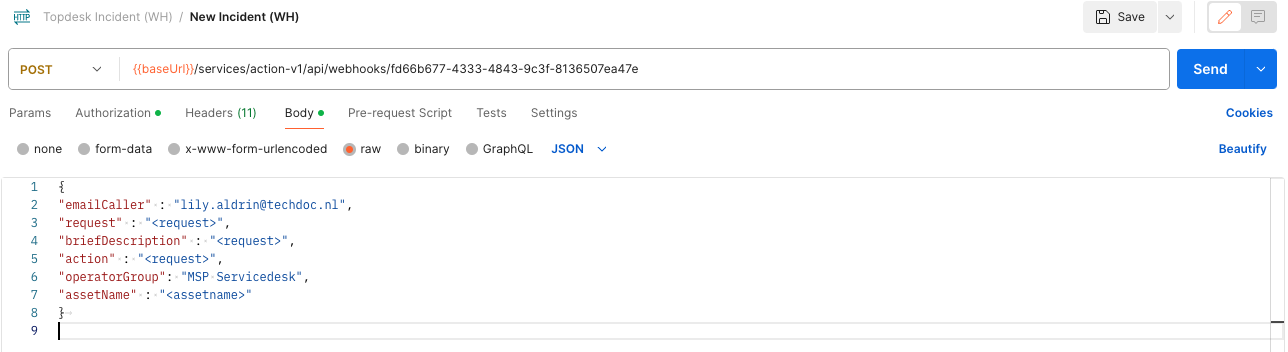
- In Postman, change the GET action to POST and enter the URL using the variable created earlier. This time use the webhook URL created previously.
{{baseUrl}}/services/action-v1/api/webhooks/<URL GENERATED FOR THE WEBHOOK>

- Now navigate to the Body tab, and select the raw radio button to enter the details of your request. This example uses a valid email address and a valid Operator group by name.
{
"emailCaller" : "lily.aldrin@techdoc.nl",
"request" : "<request>",
"briefDescription" : "<request>",
"action" : "<request>",
"operatorGroup": "MSP Servicedesk",
"assetName" : "<assetname>"
}
- Once done, click Send next to the URL to send the request.
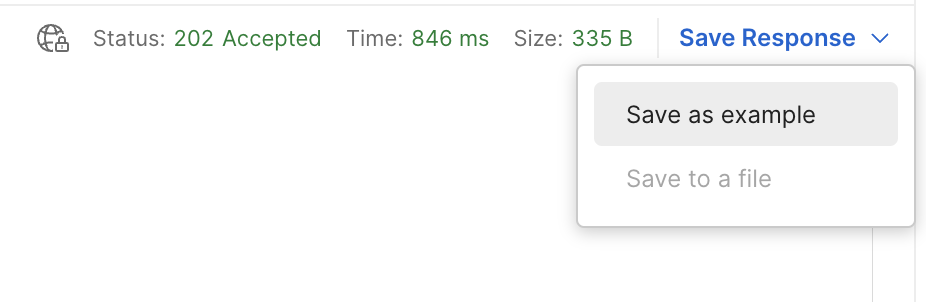
- In the lower half of the screen you can see that the request has been accepted with code 202, so save the response as an example.
Export the JSON File
Now that you confirmed the Postman configuration is working for the webhook method of integration (Method 2), export it.
- Click the ellipses next to the Postman collection and select Export, select the JSON format, and save it to your computer.
Our JSON is almost ready to go, but Omnissa Intelligence expects an ID to be paired with every action.
- Open the JSON file in a text editor or tool like Visual Studio Code and search for “name”: “New Incident”. Above this line add the following:
"id": "TOPdesk_ID",
Note: The ID can be anything; you can make up your own. Be sure to end the line with a comma (,)
Create a Custom Connector in Omnissa Intelligence
Now that you have the JSON file, which will tell Omnissa Intelligence how to create a TOPdesk ticket, you can start the custom connector configuration. The following procedure uses a SaaS Workspace ONE environment. Steps may vary slightly when using the on-premises version of Workspace ONE UEM, because you would not be starting with the Cloud Services Console. Omnissa Intelligence itself is only available as a SaaS service.
Add a New Workflow Connector
Follow these steps to add a new workflow connector.
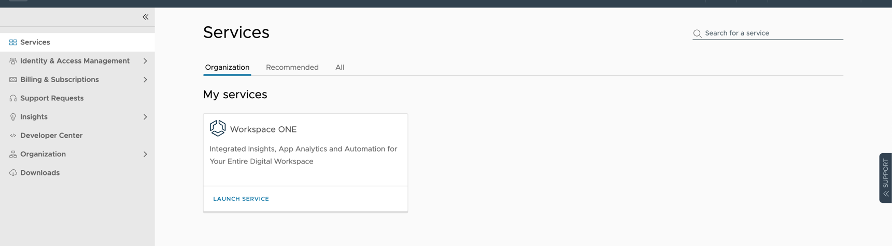
- Log in to the Omnissa Connect Cloud Services portal (https://connect.omnissa.com) and click Launch Service on the Workspace ONE tile.

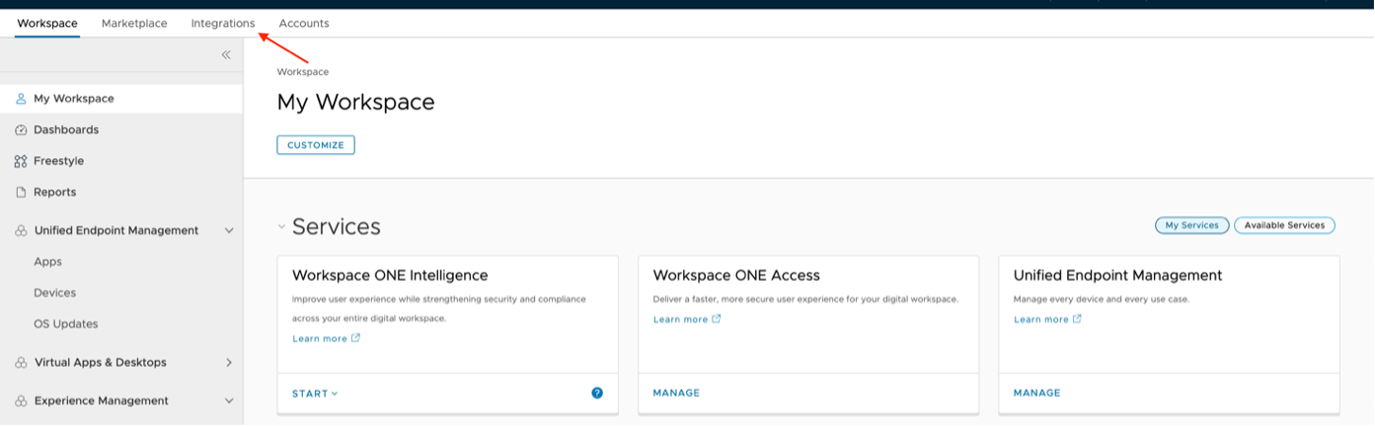
- Select the Integrations tab.
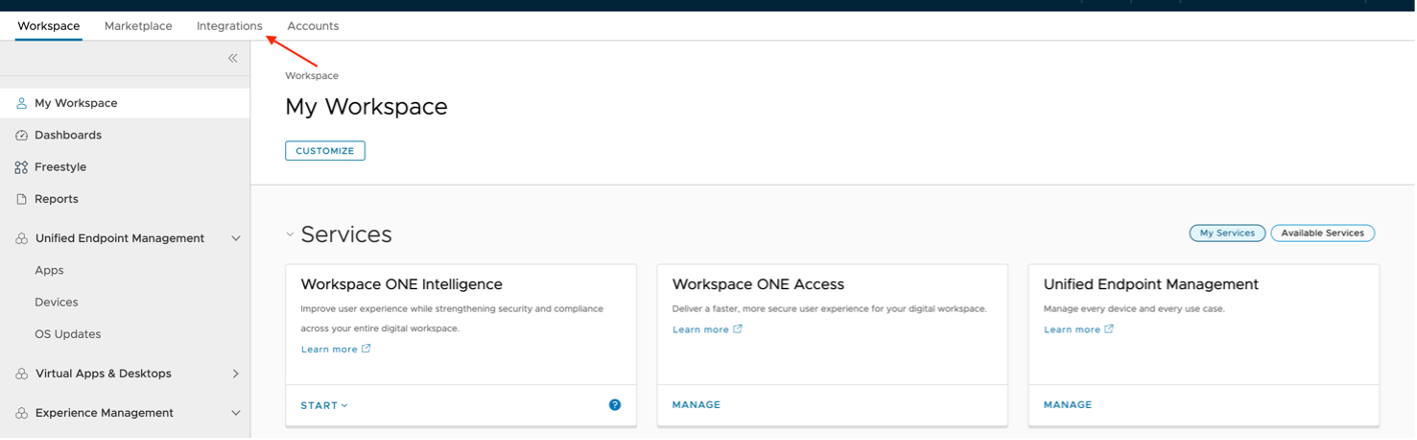
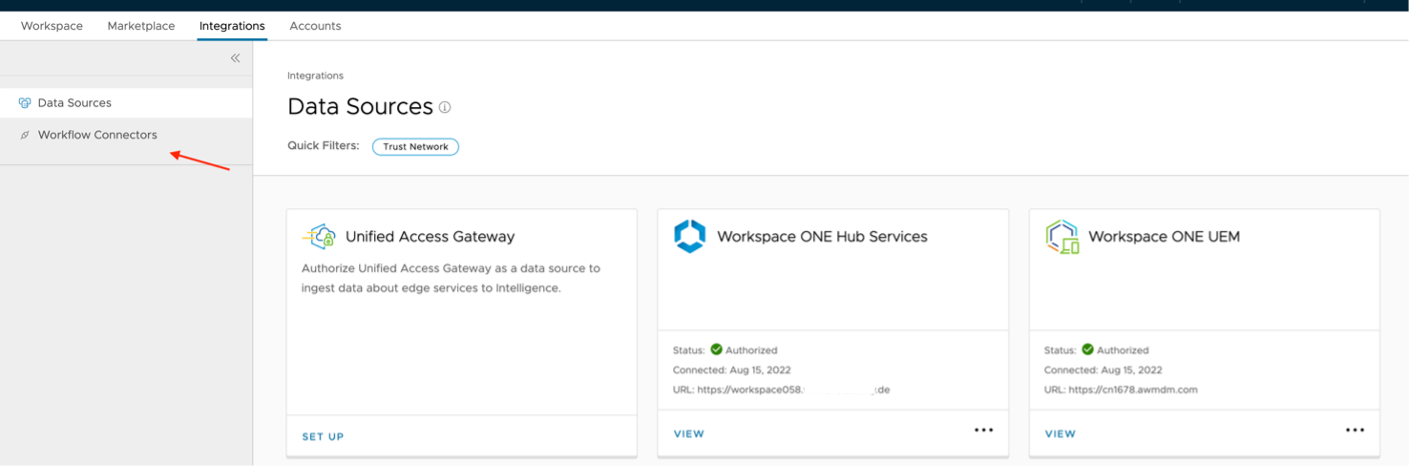
- The Integrations tab default screen shows the available Omnissa Intelligence data sources. Before moving forward, confirm that the Workspace ONE UEM data source shows as authorized. Then select Workflow Connectors in the left menu to view the various external connectors available for automated workflows.
- Click +ADD to create a new connector.
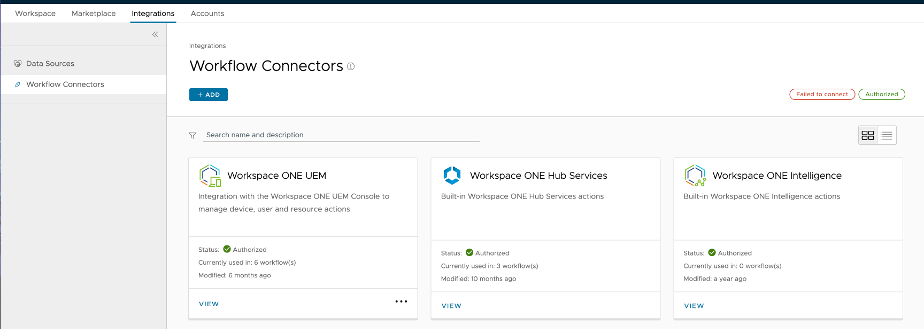
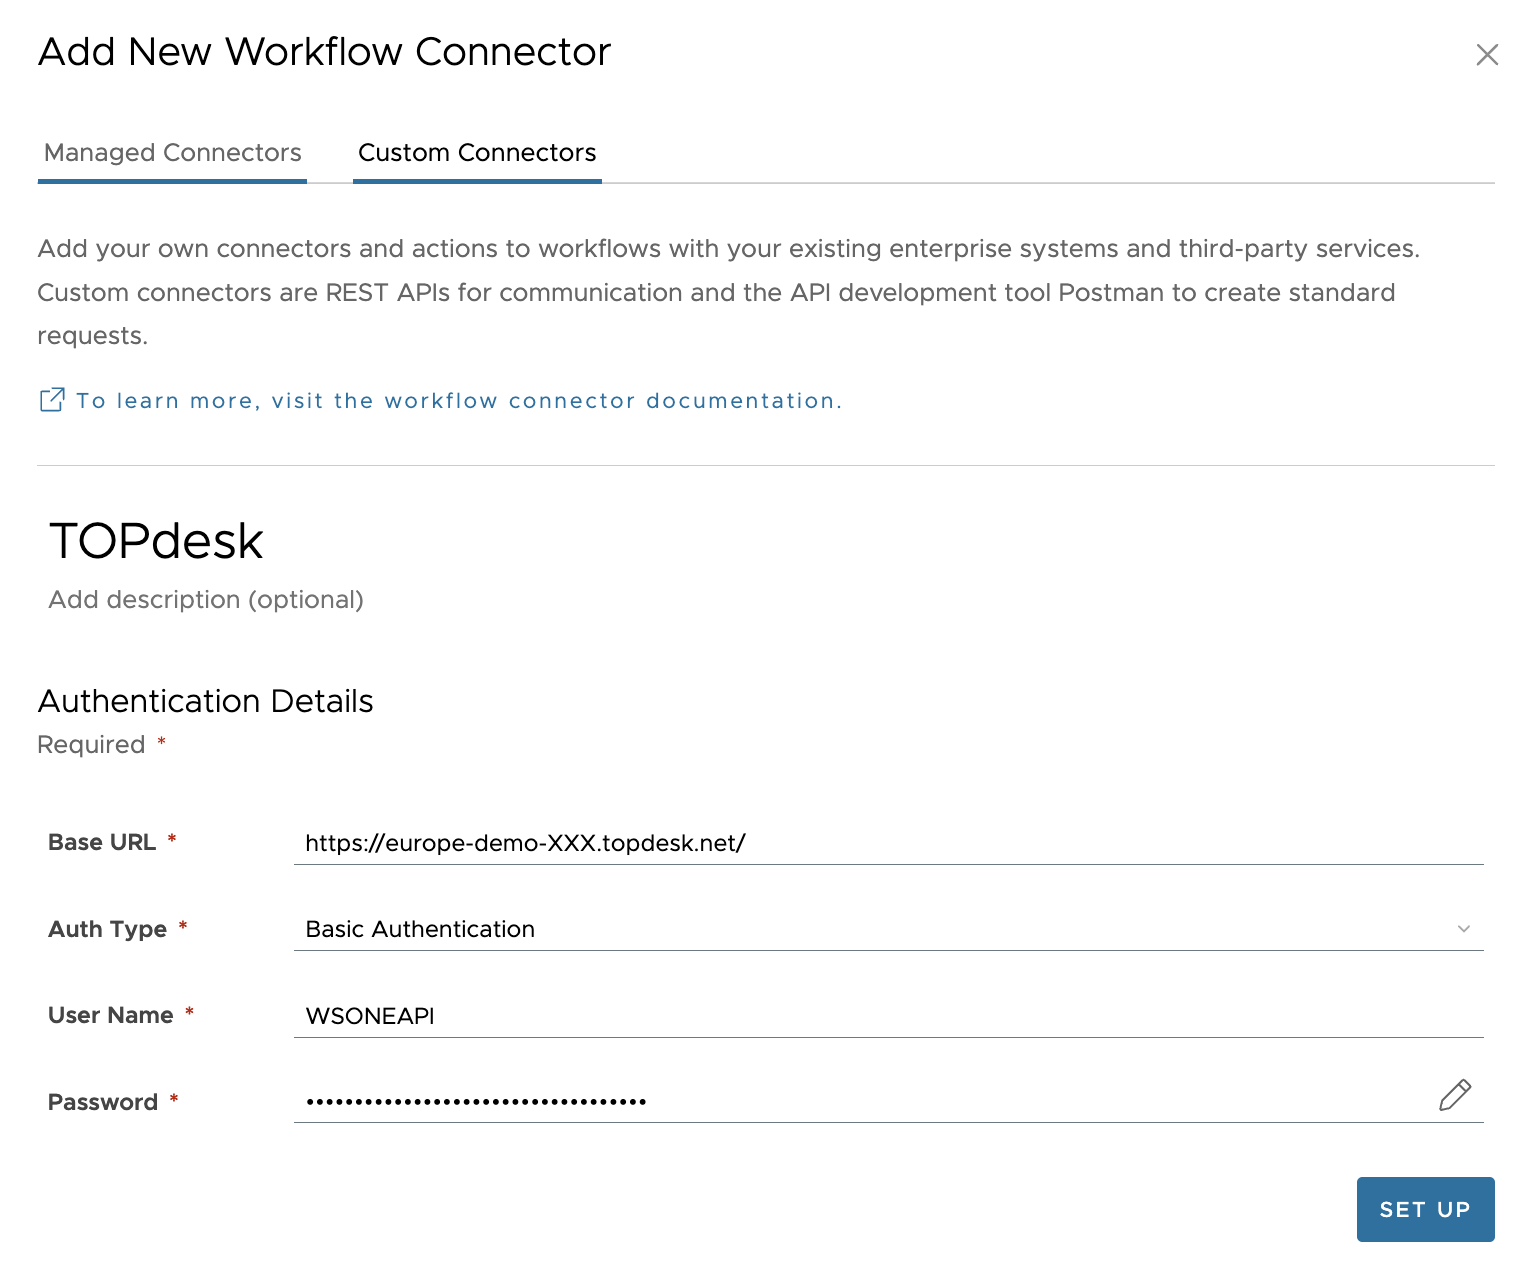
- Because you are not using a managed connector, select the Custom Connectors tab to continue.

- Enter the Base URL for the connector, which means that you remove everything after topdesk.net in the URL. Select your Authentication Type and enter a User Name and Password for the connection. Here you can either use the Application user name and password provided by the TOPdesk administrator or you can use any account in TOPdesk with the role of Super User. When finished, click SET UP.
The new workflow connector is complete. Confirm that the status shows Authorized for the TOPdesk card in the Workflow Connectors screen. Click VIEW at the bottom of the card to view the details.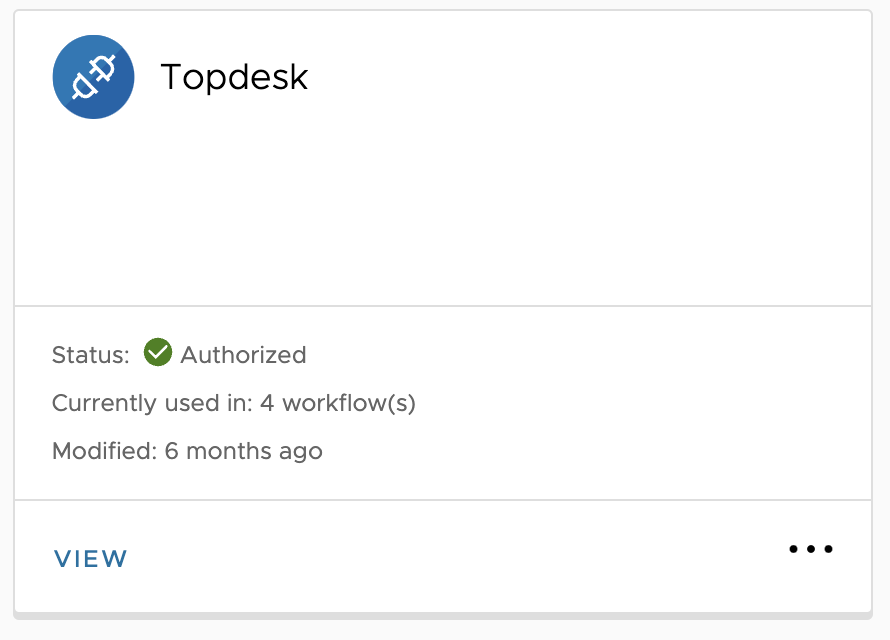
Figure 6: The completed Connector in Omnissa Intelligence
Import Action JSON Files
The next step is to import JSON files.
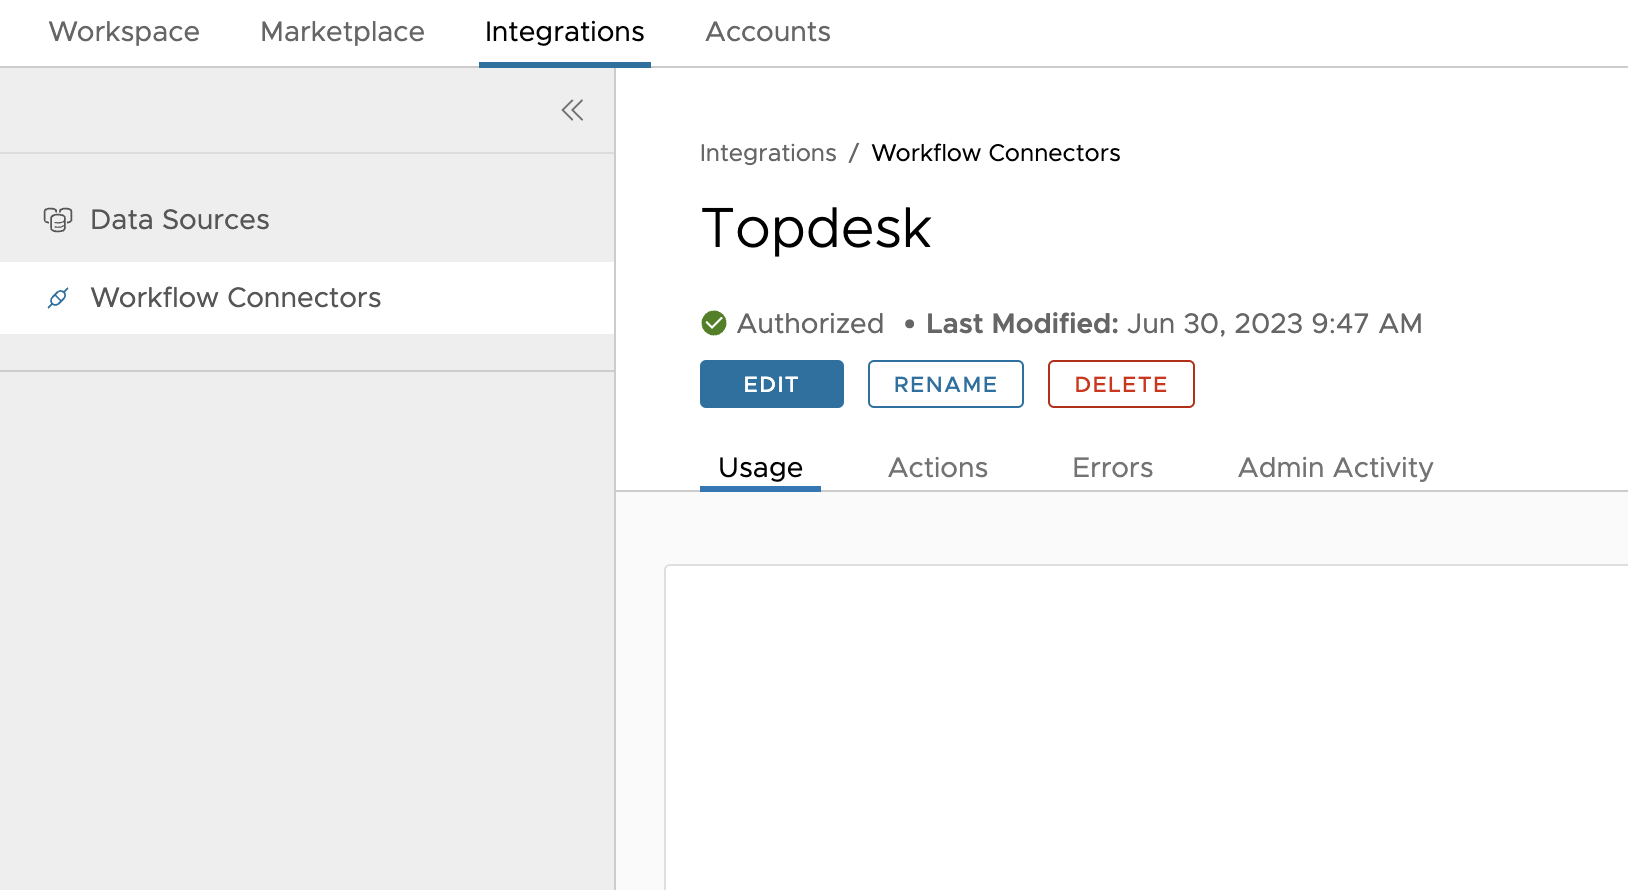
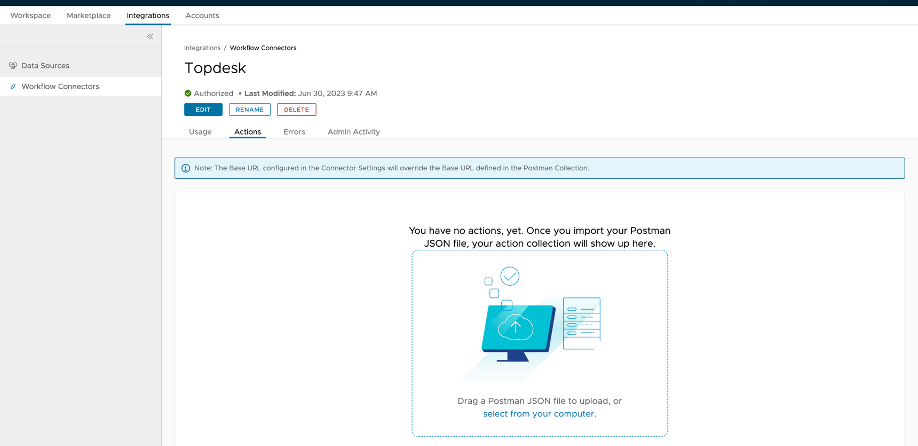
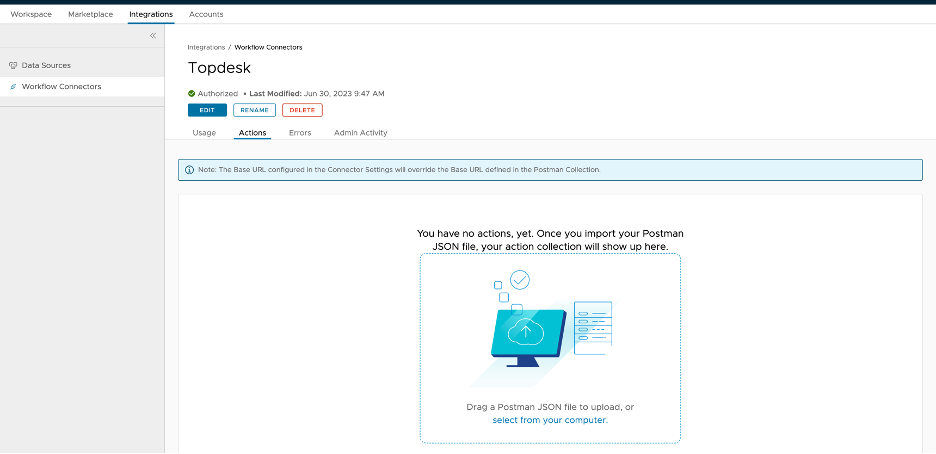
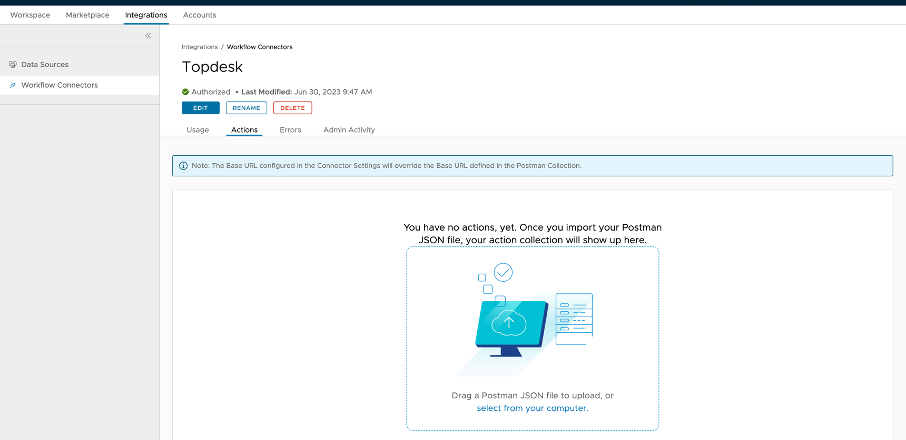
- In the connector details, you can see where the connector is used, what actions can be taken with it, any errors, and the administrator activity log. The JSON file is the set of instructions you can use under Actions, so select that tab next.
- Drag the Method 1, or default API JSON, file onto the screen or click select from your computer.
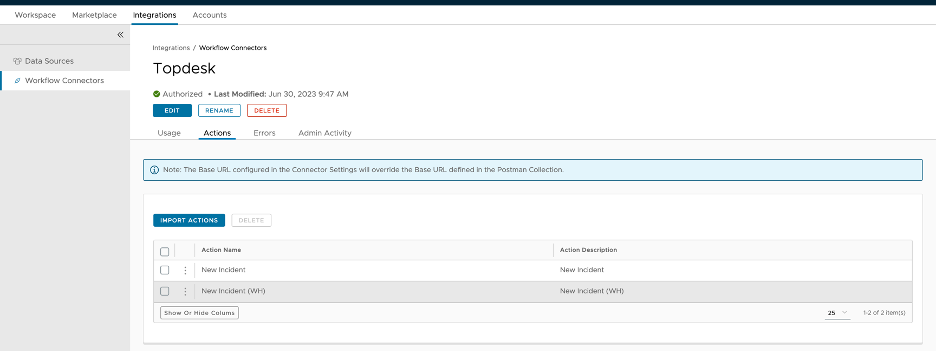
- Now you can see a new available action for the connector. This is the integration method that uses default APIs for TOPdesk (not webhook). Optionally, rename the action so the integration method is clear.
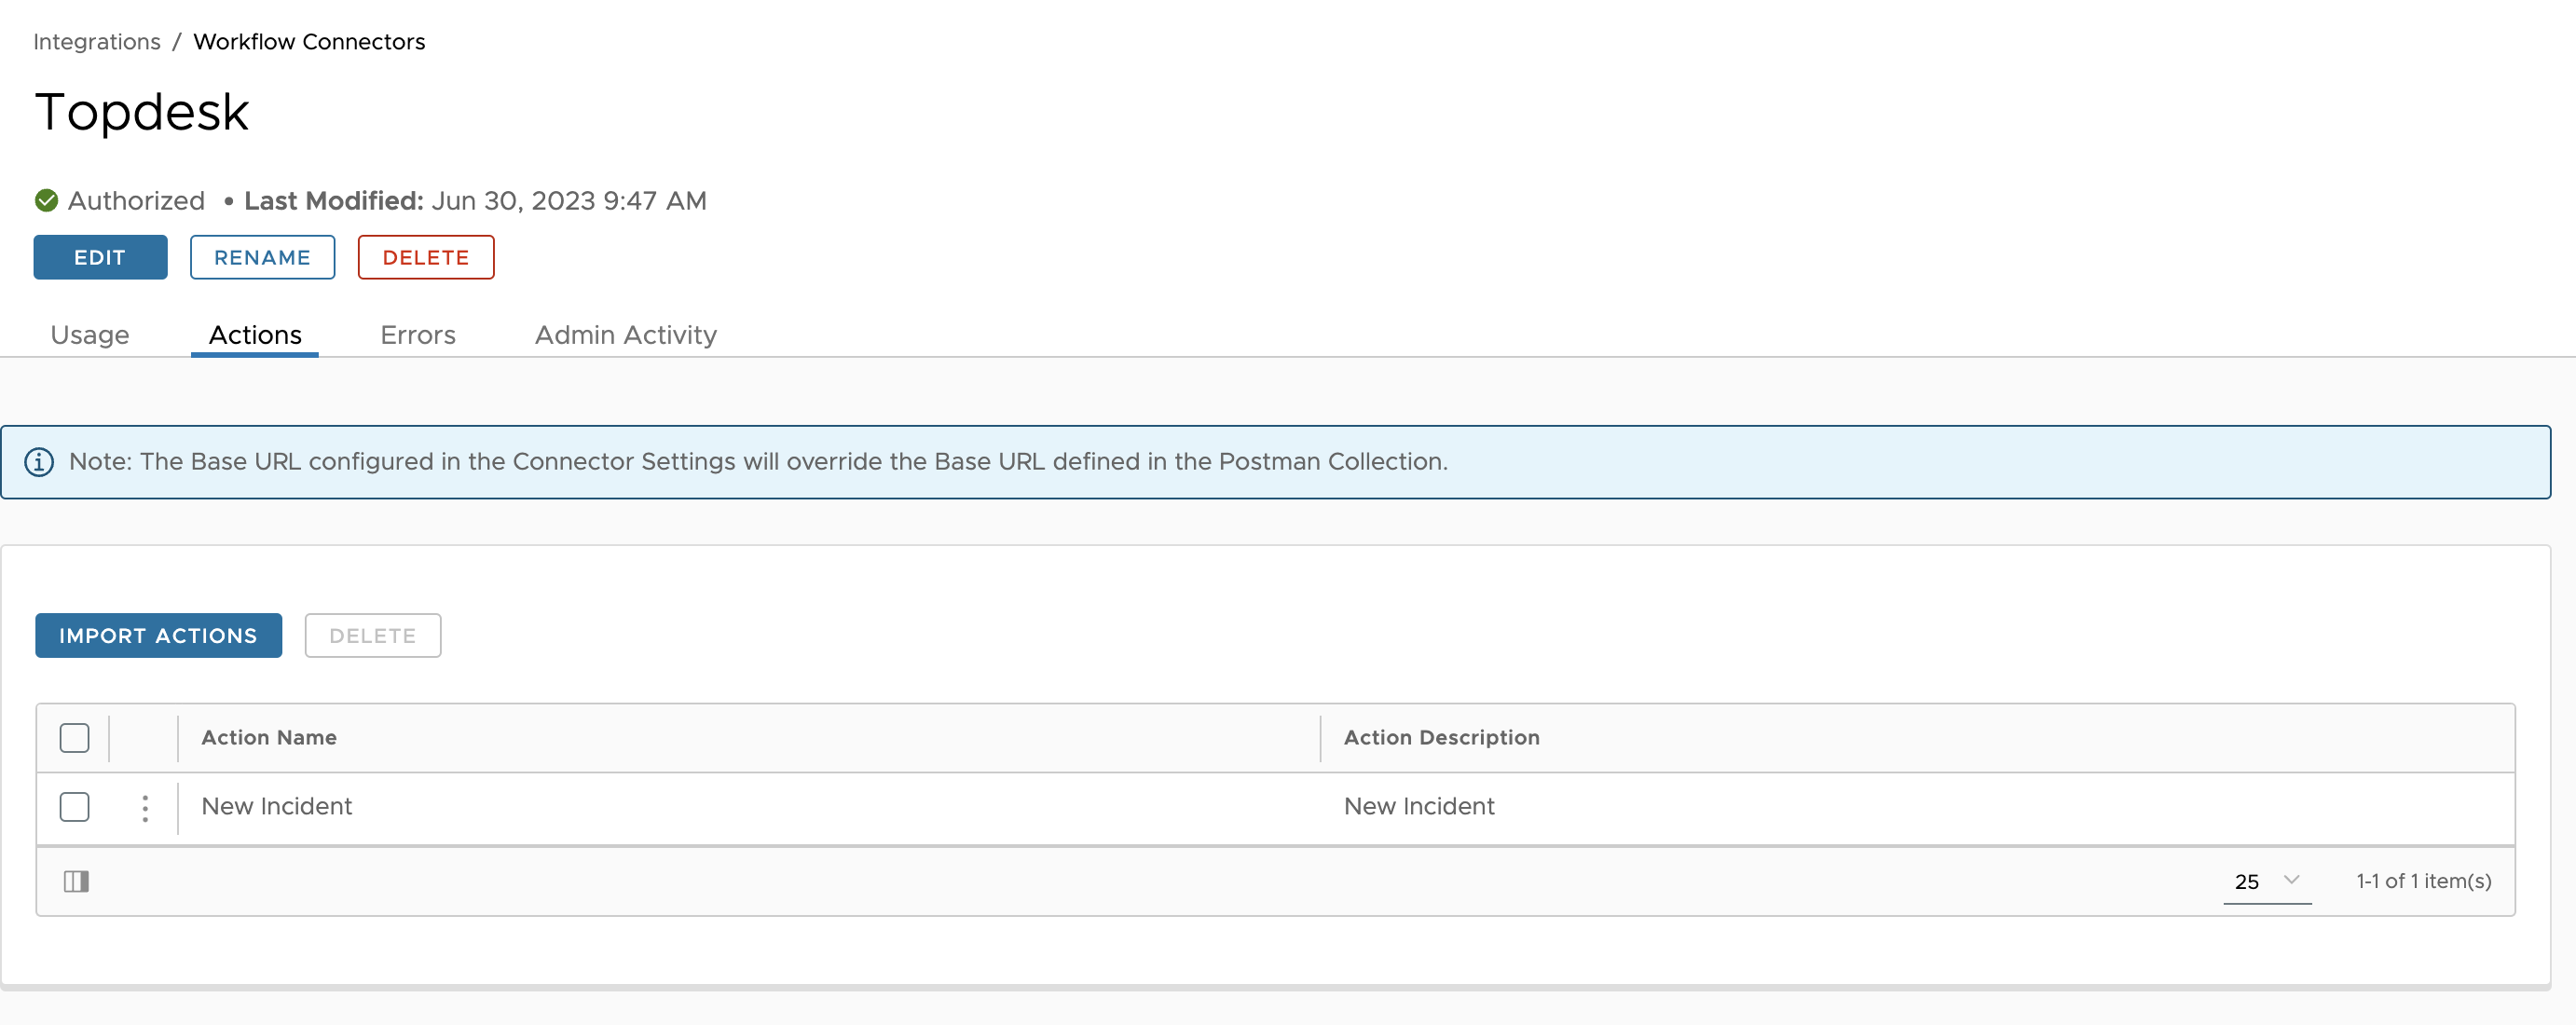
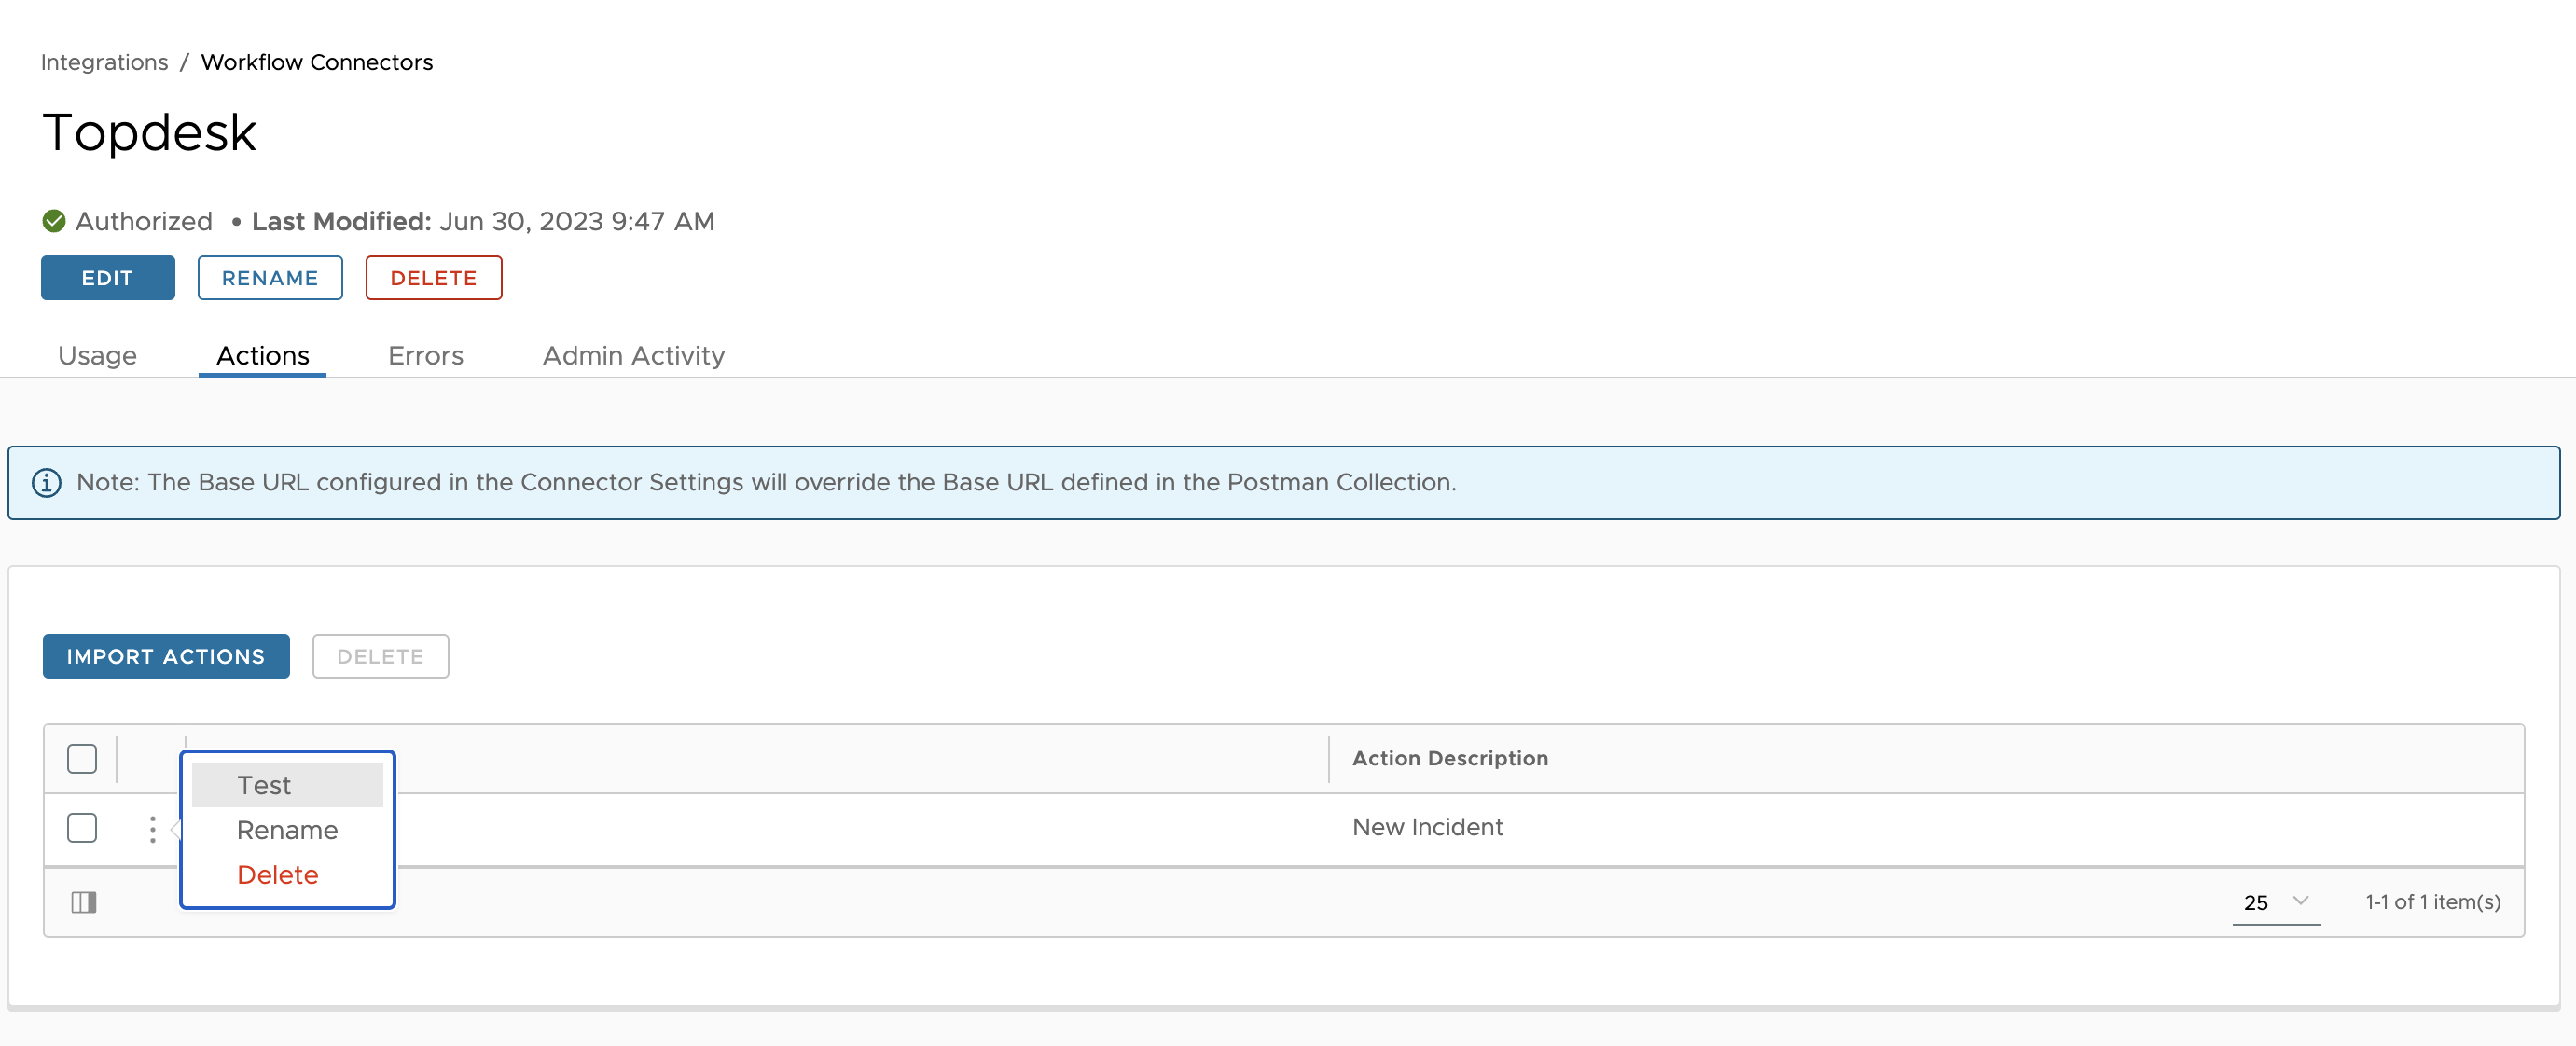
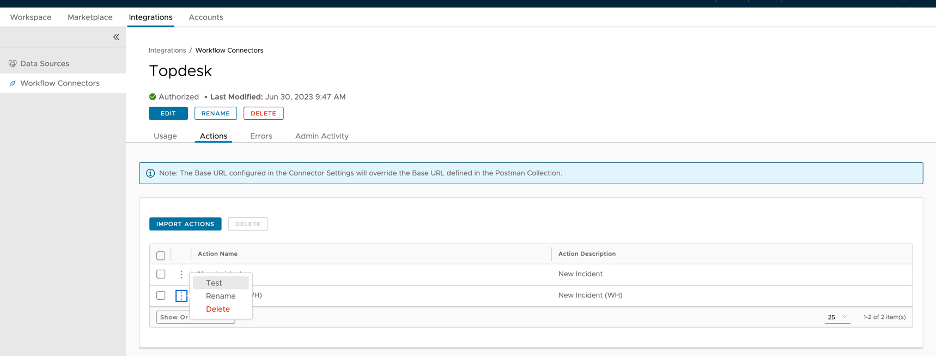
- Next, test if the connector and the action are working by clicking the ellipses to the left of the imported action and selecting Test.
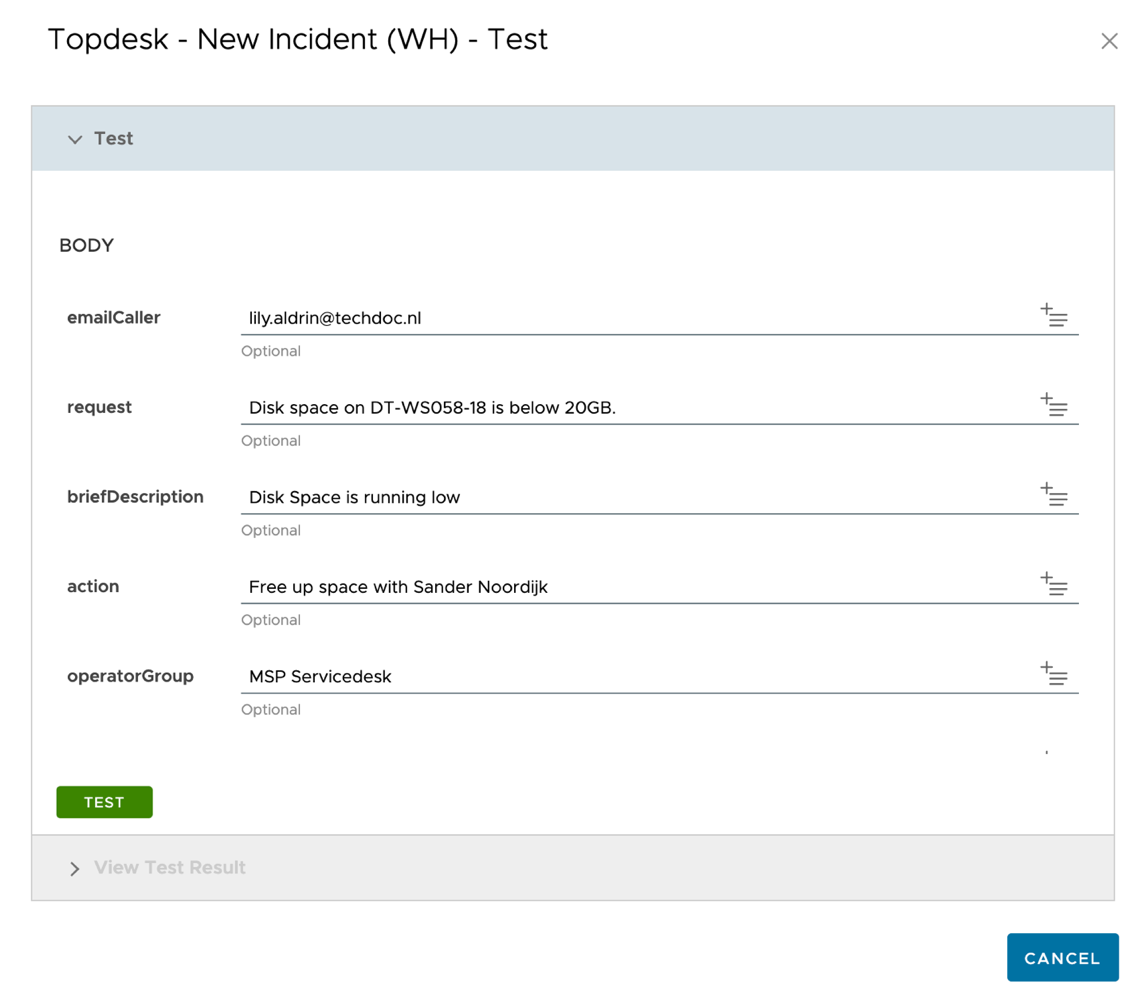
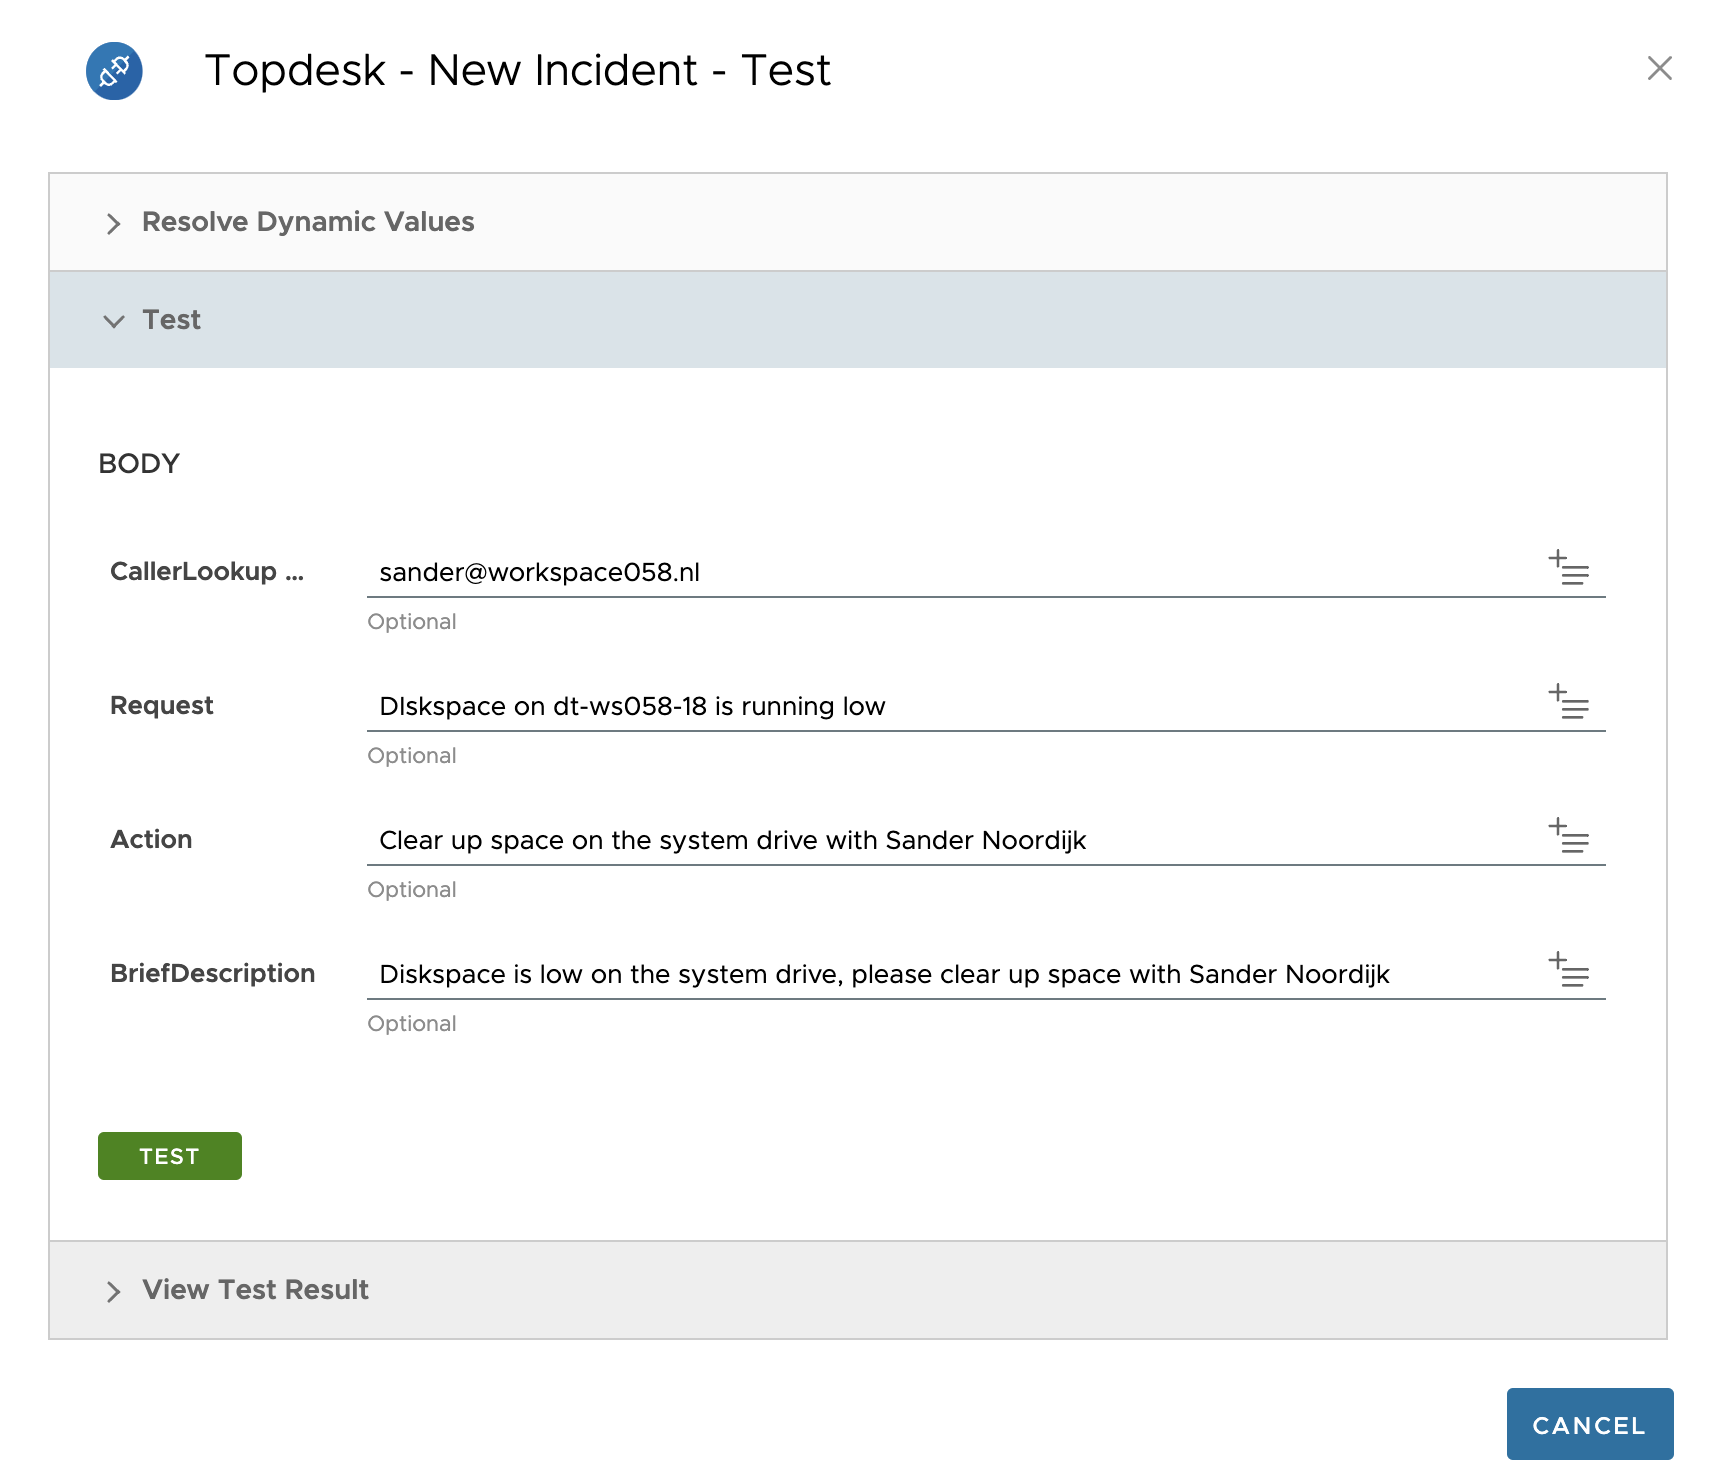
- The next screen will show the fields and values within the JSON. Click TEST to continue.
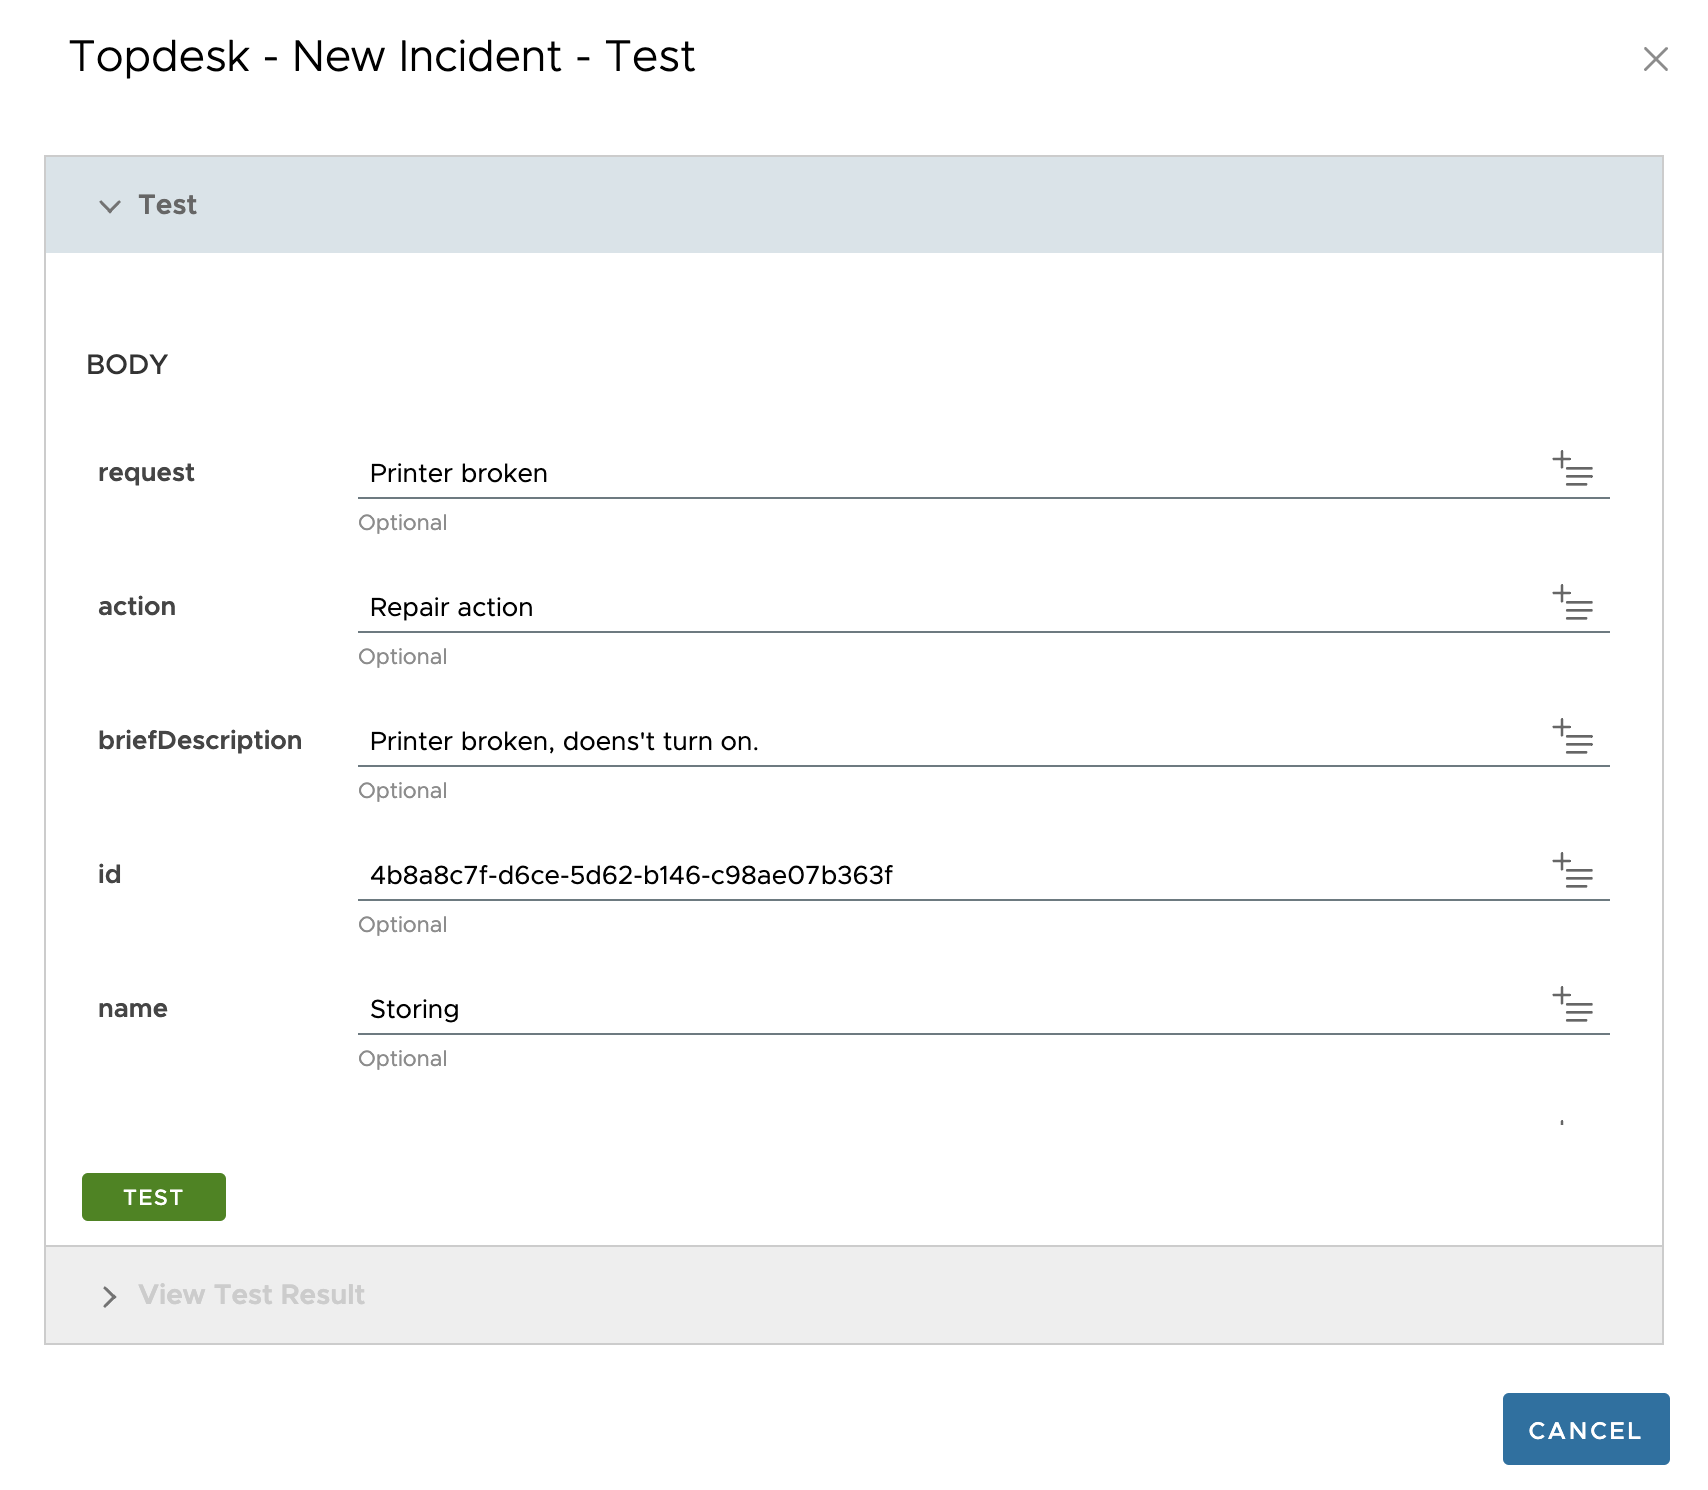
Note: The values shown here can be changed in Postman or by editing the JSON file. For example, you can provide general information, such as:
Request: <enter request>
Action:<enter action>
Description: <enter description>
In the JSON file, these values are edited under the body section shown below. These will be the default values, which can be adjusted in the automation later.

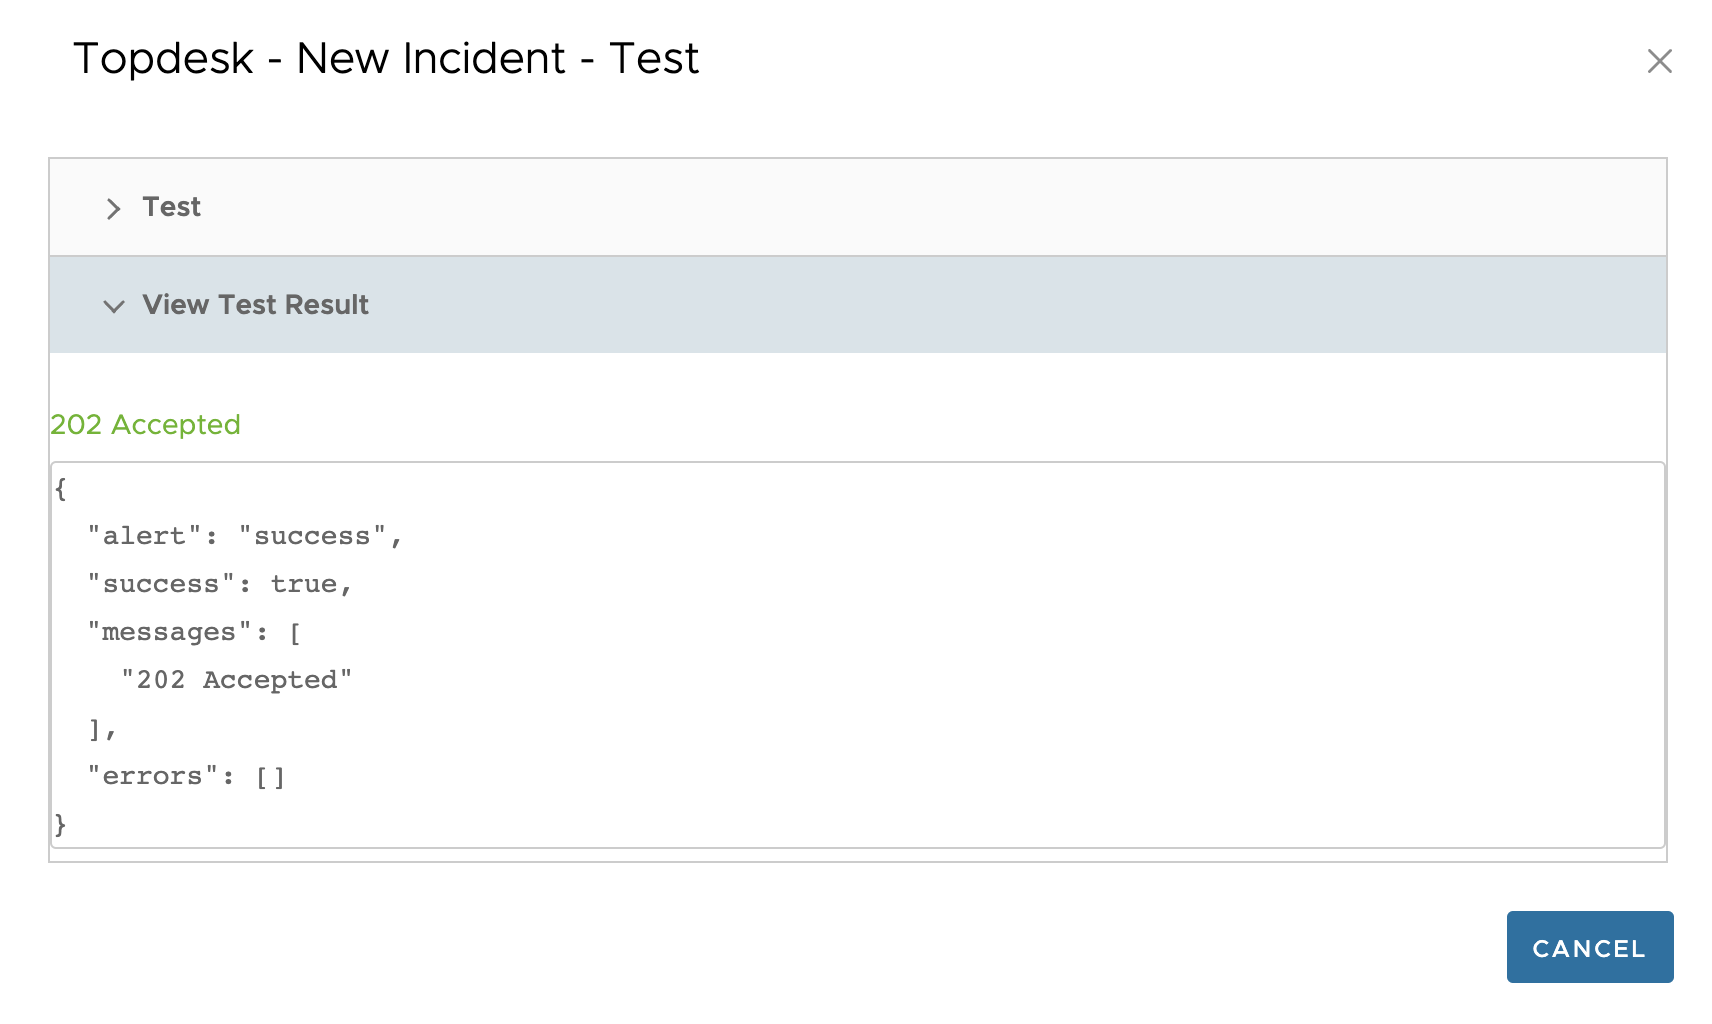
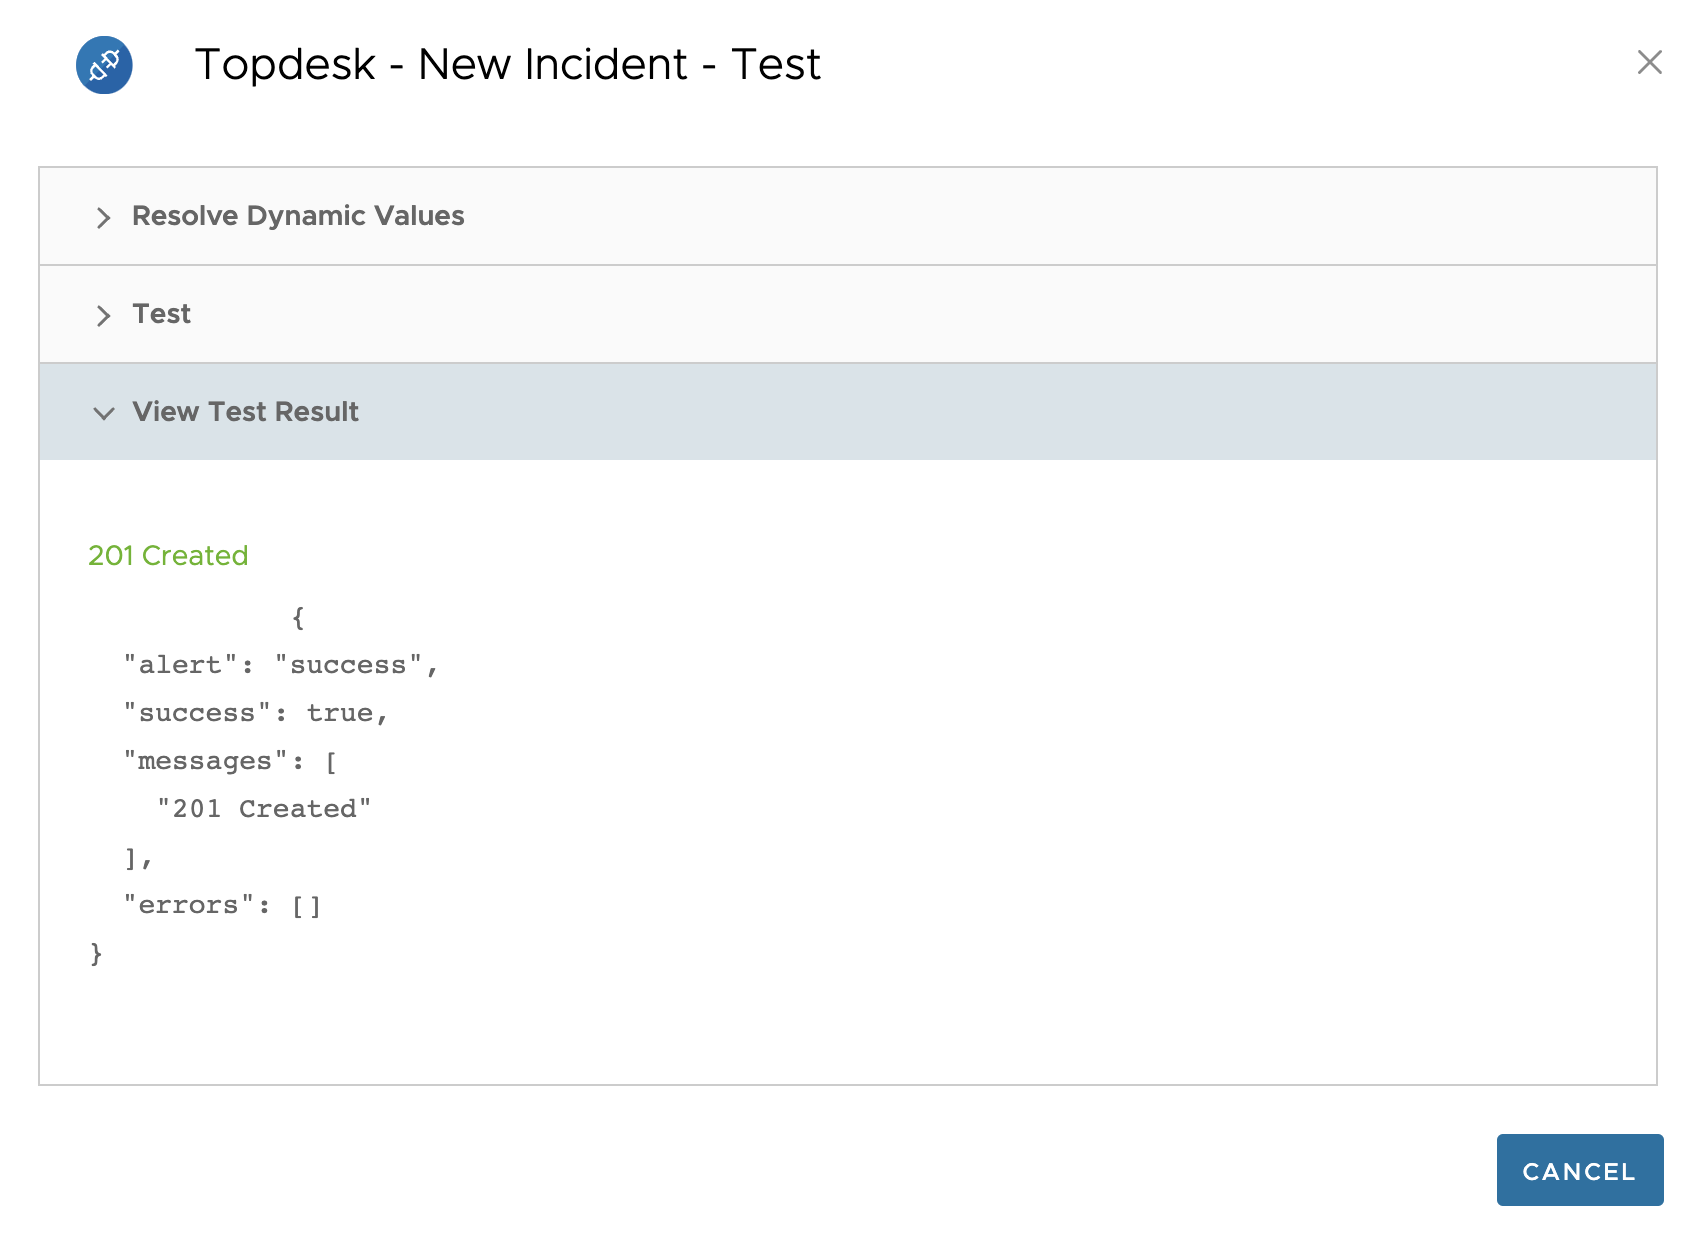
- Next, view the result of the connector test in Omnissa Intelligence. If successful, also check in TOPdesk to see if the ticket was created.
- Next, upload the JSON file to create an action for the second method of integrating with TOPdesk: the webhook method. Select Workflow Connectors on the far left, then the TOPdesk connector, and click the Actions tab.
- Upload the second JSON file (for the webhook integration method) either by dragging the file onto the screen or clicking select from your computer.
- Optionally, rename the second action so the integration method is clear. This example uses “WH” for webhook method.
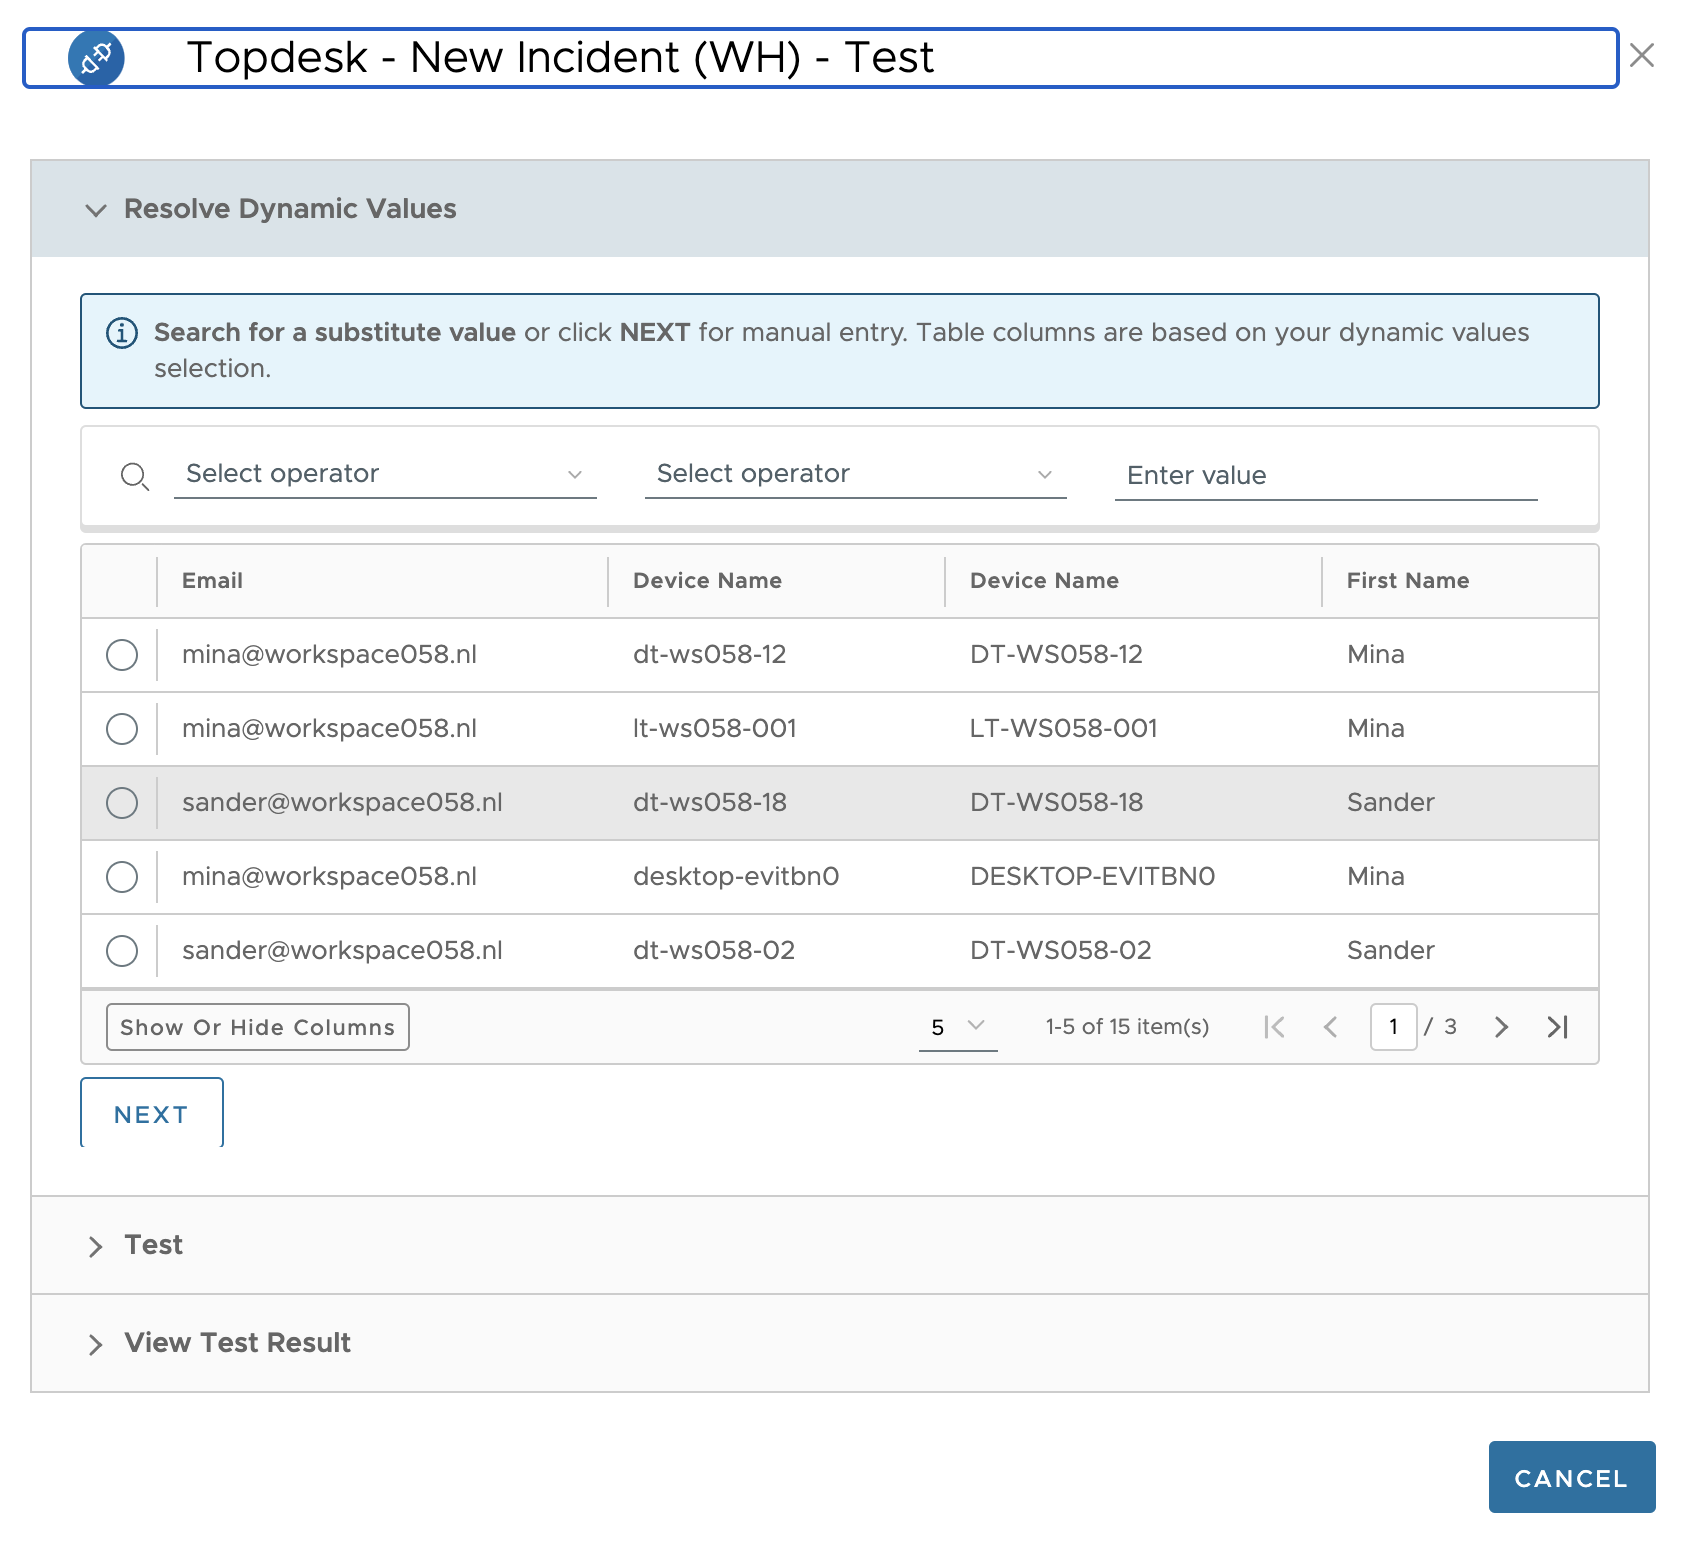
- When finished, click the ellipses before the new action “New Incident (WH)” to test the new action.
- Enter the values for each field and click TEST.
- Verify the action is successful.
Create a Workflow Using a Connector
Now that Omnissa Intelligence is ready to create a TOPdesk ticket, workflows can be developed that automatically create a service desk ticket based on various triggers, such as proactive support when a failing battery is detected or enforcing compliance when a required application is not present on a device. Automated workflows can be created from any dashboard or report in Omnissa Intelligence. However, this document will walk through two specific examples:
- Automatically create a TOPdesk ticket when free disk space falls below a certain threshold
- Automatically create a TOPdesk ticket when an employee needs support with a new device
Example 1: Free Disk Space Is Low
When a PC’s storage is full, many issues can arise. So proactive alerting can significantly impact end-user experience. Workspace ONE Unified Endpoint Management (UEM) already collects data regarding the device, the apps, and user. You can easily view if the disk is encrypted, and if all security profiles are installed and directly connected to the machine (whether macOS, Windows, Linux, iOS, or Android) using Workspace ONE Assist.
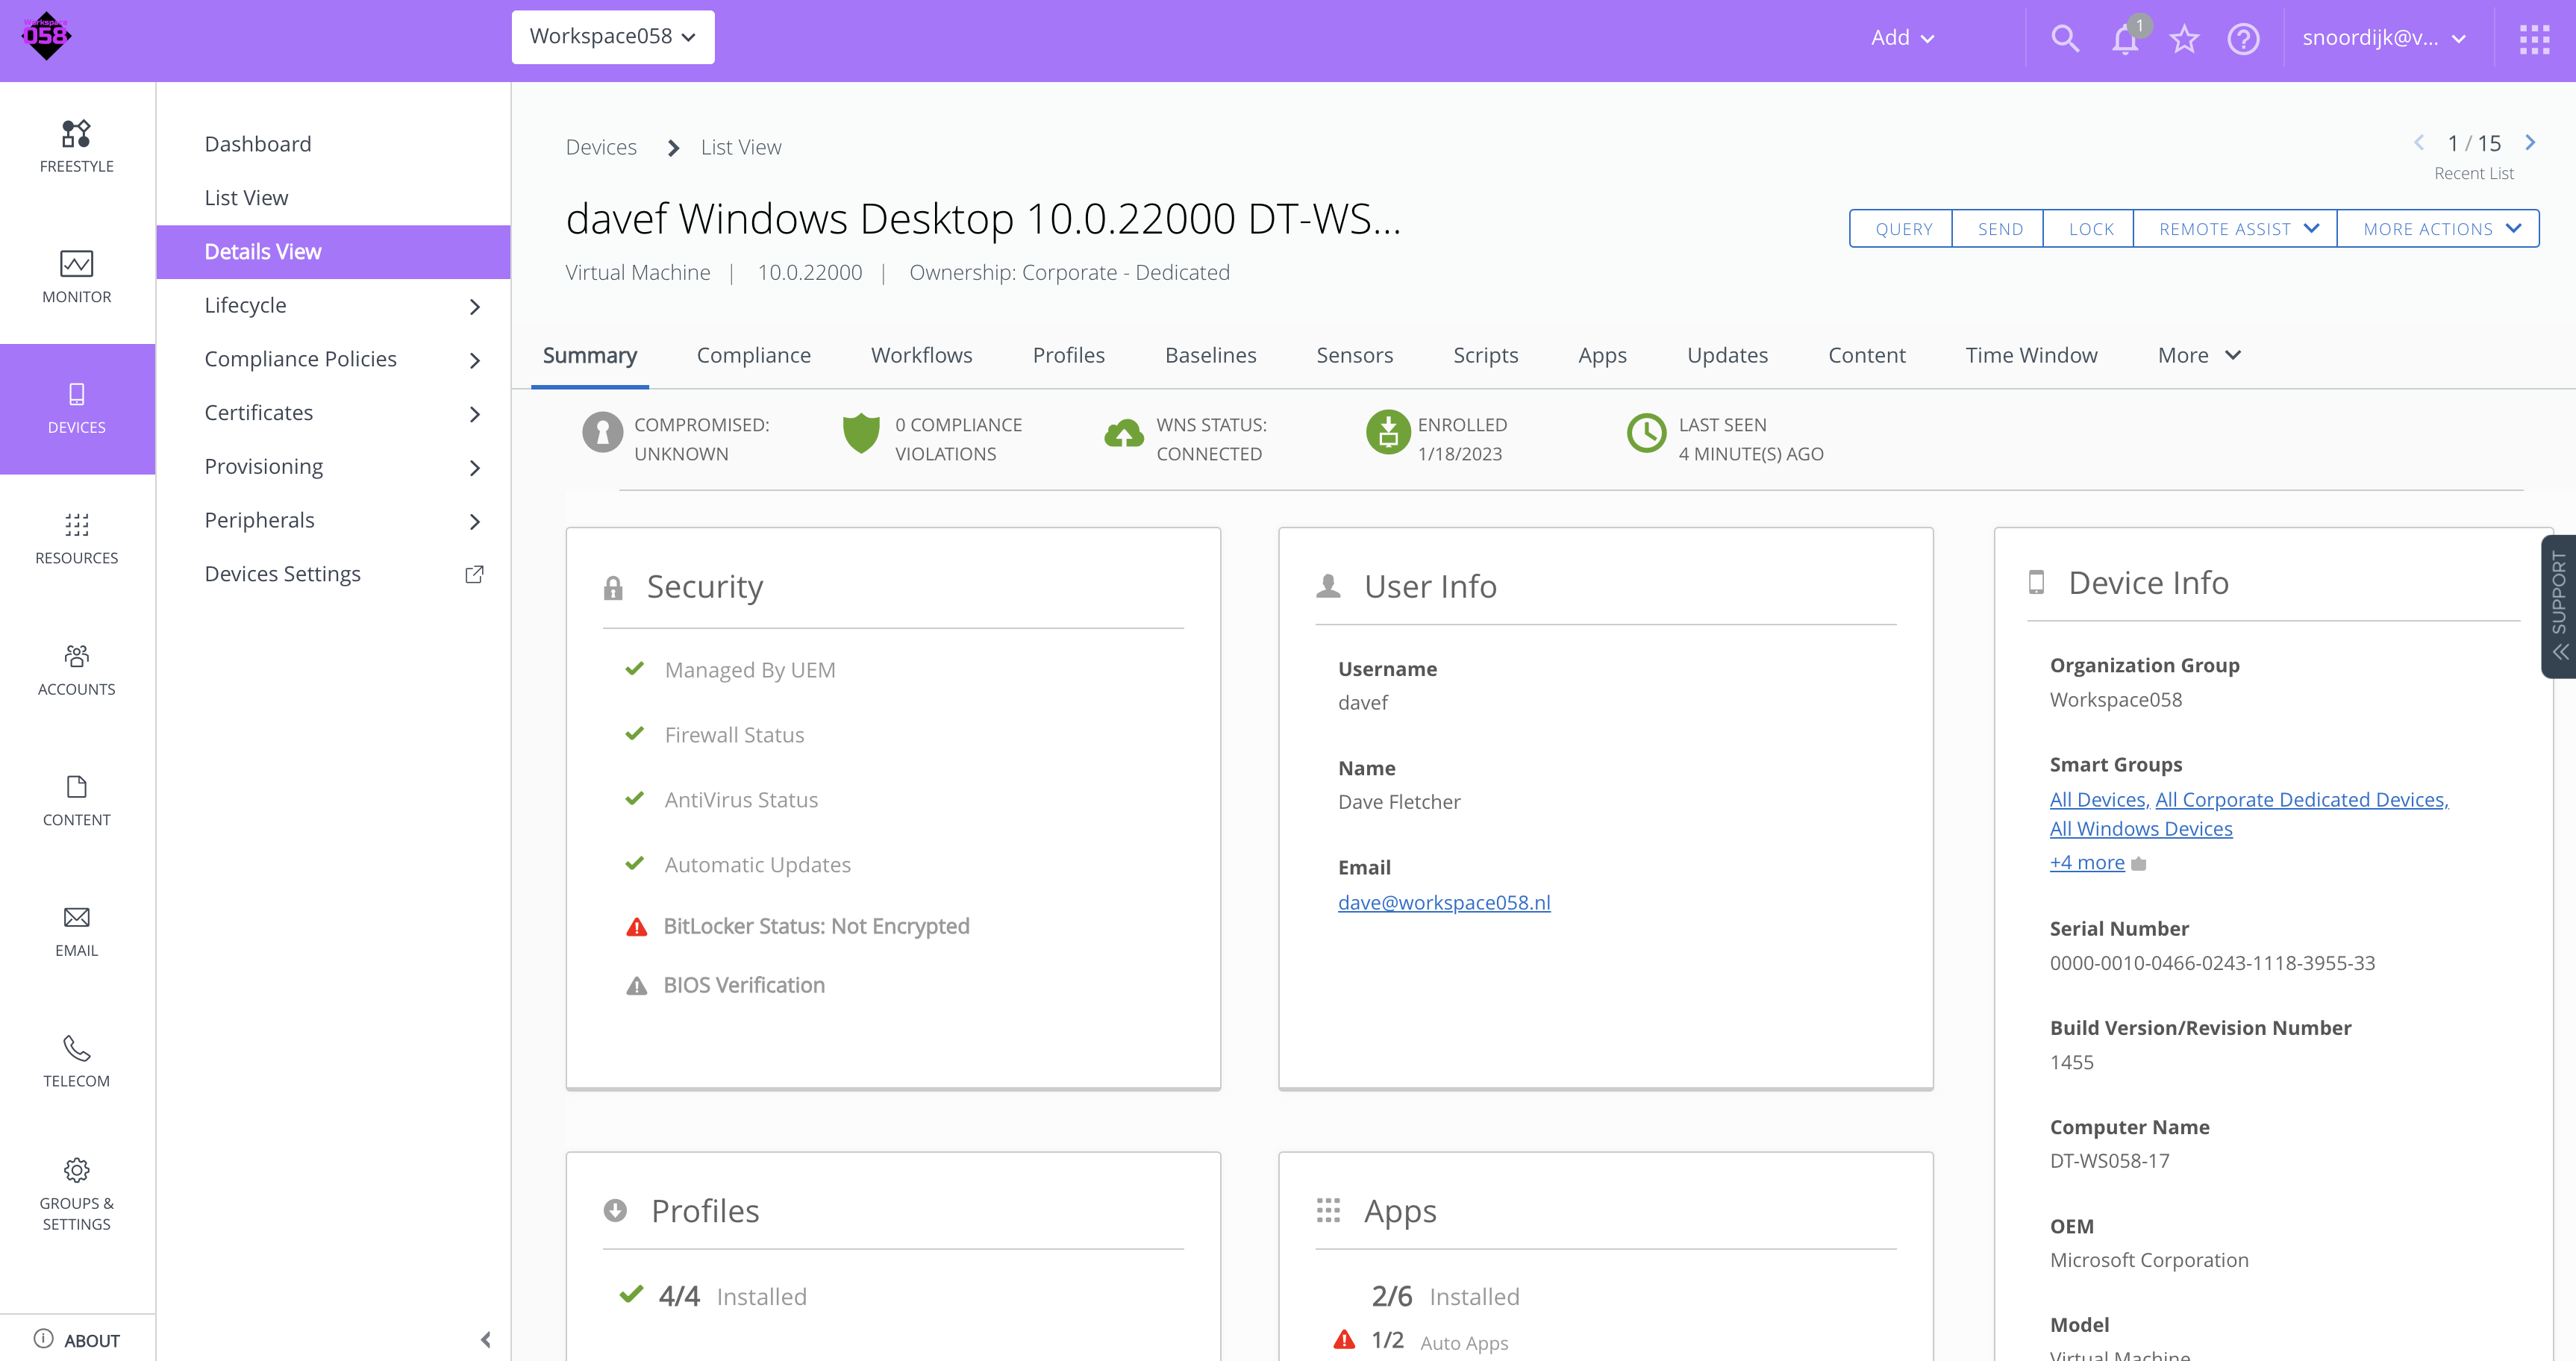
Figure 7: Device Details Screen in Workspace ONE UEM
For telemetry that is not retrieved automatically by UEM or Intelligence, you can use sensors, which are scripts that return the information to the Workspace ONE UEM console, which in turn will sync to Omnissa Intelligence. Start by creating a script that checks for the free disk space on the system drive. If you already have a similar sensor, this step can be skipped.
Create a Windows Sensor for Free Disk Space
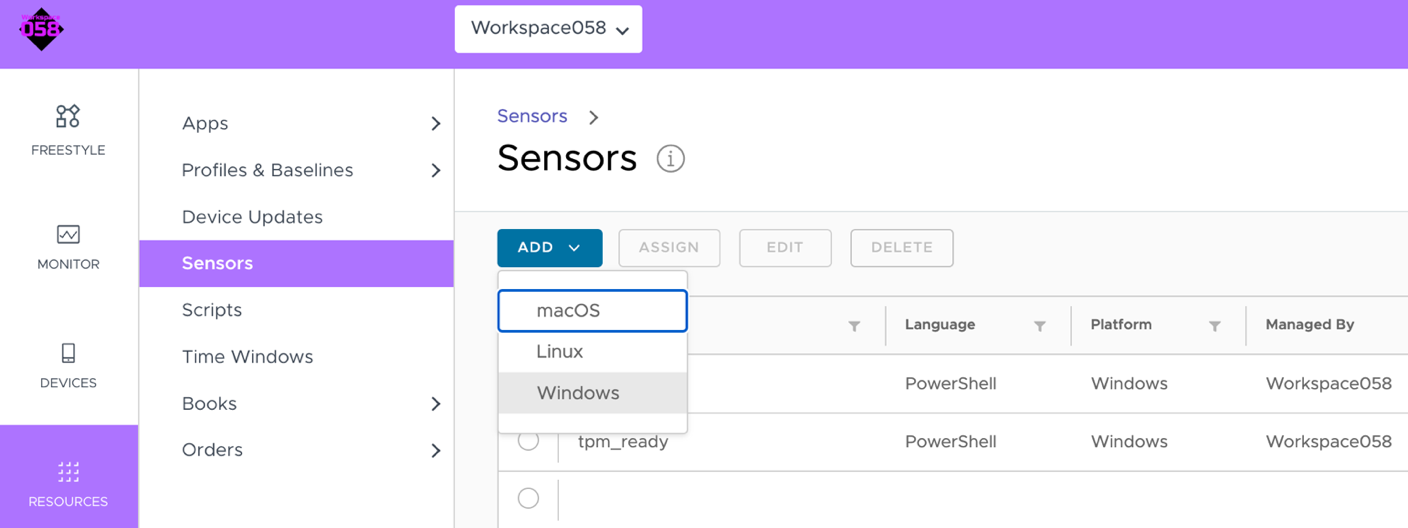
- In Workspace ONE UEM, navigate to Resources and then Sensors in the left menu. Then click ADD to create a new sensor and select the platform. Start with Windows.
- Give the sensor a name and an optional description. The sensor name must be between 2 and 64 characters, using only a combination of lowercase letters, numbers, and underscores. The first character must be a lowercase letter.
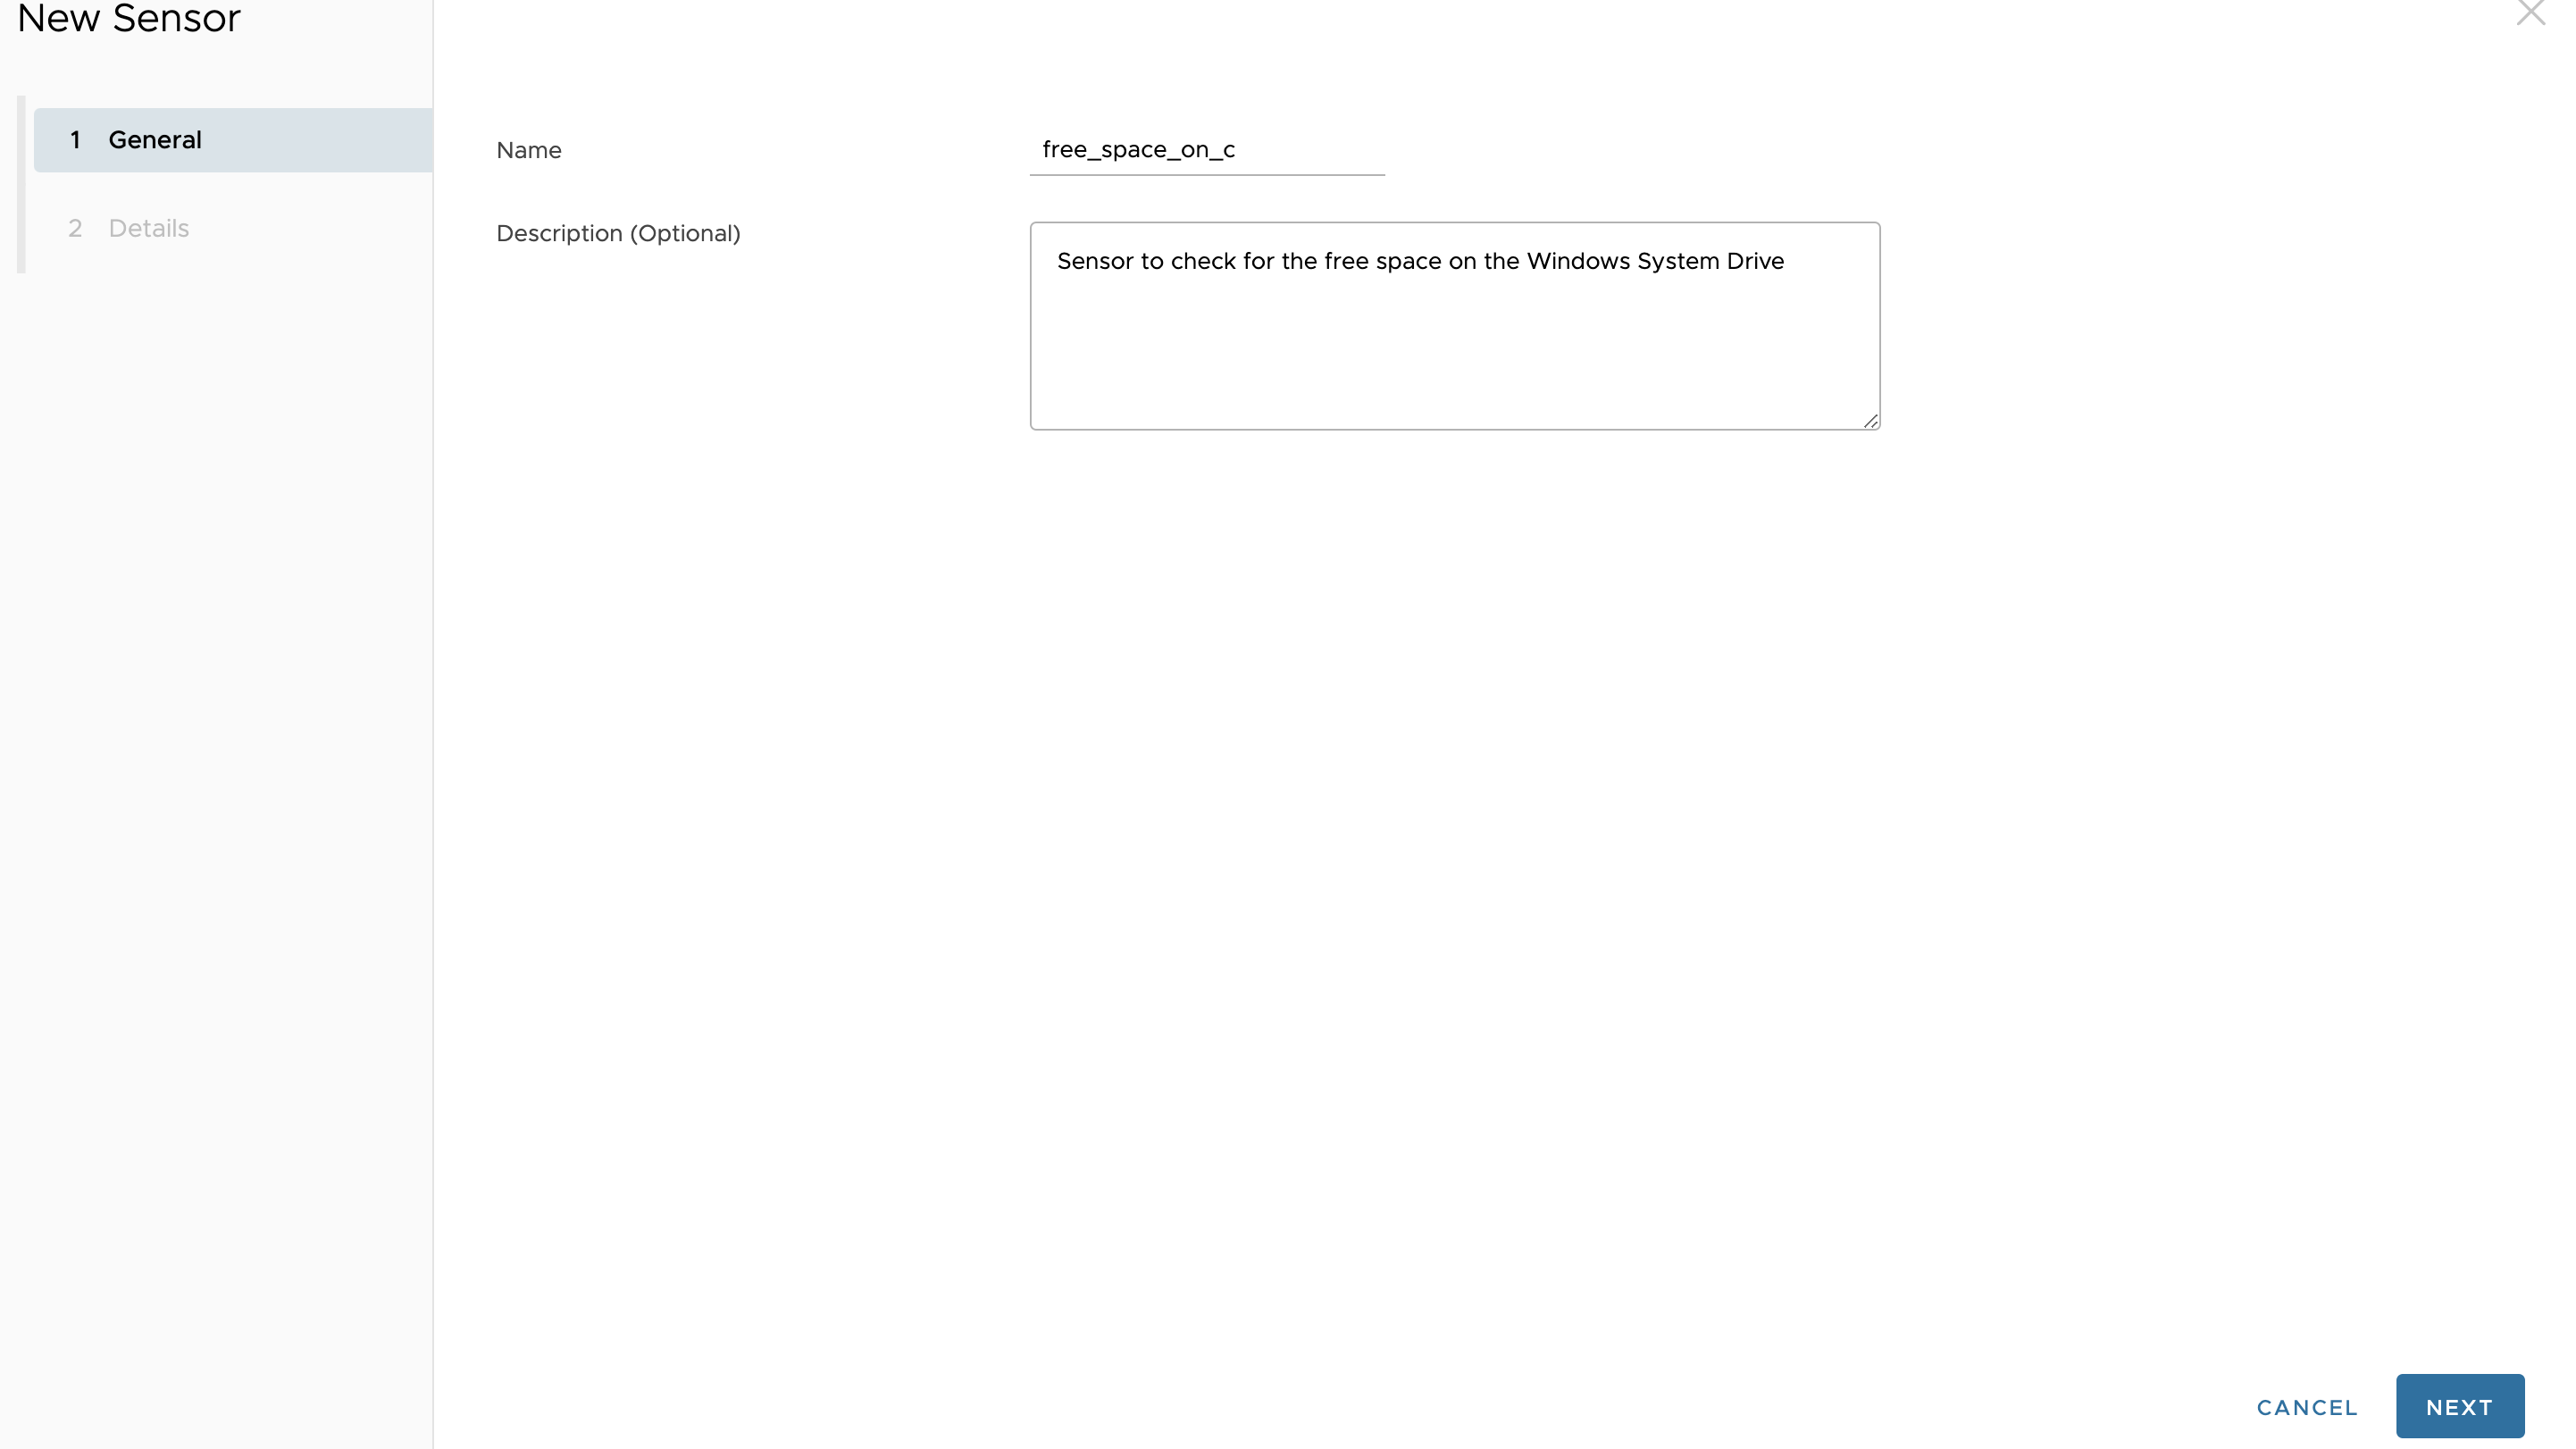
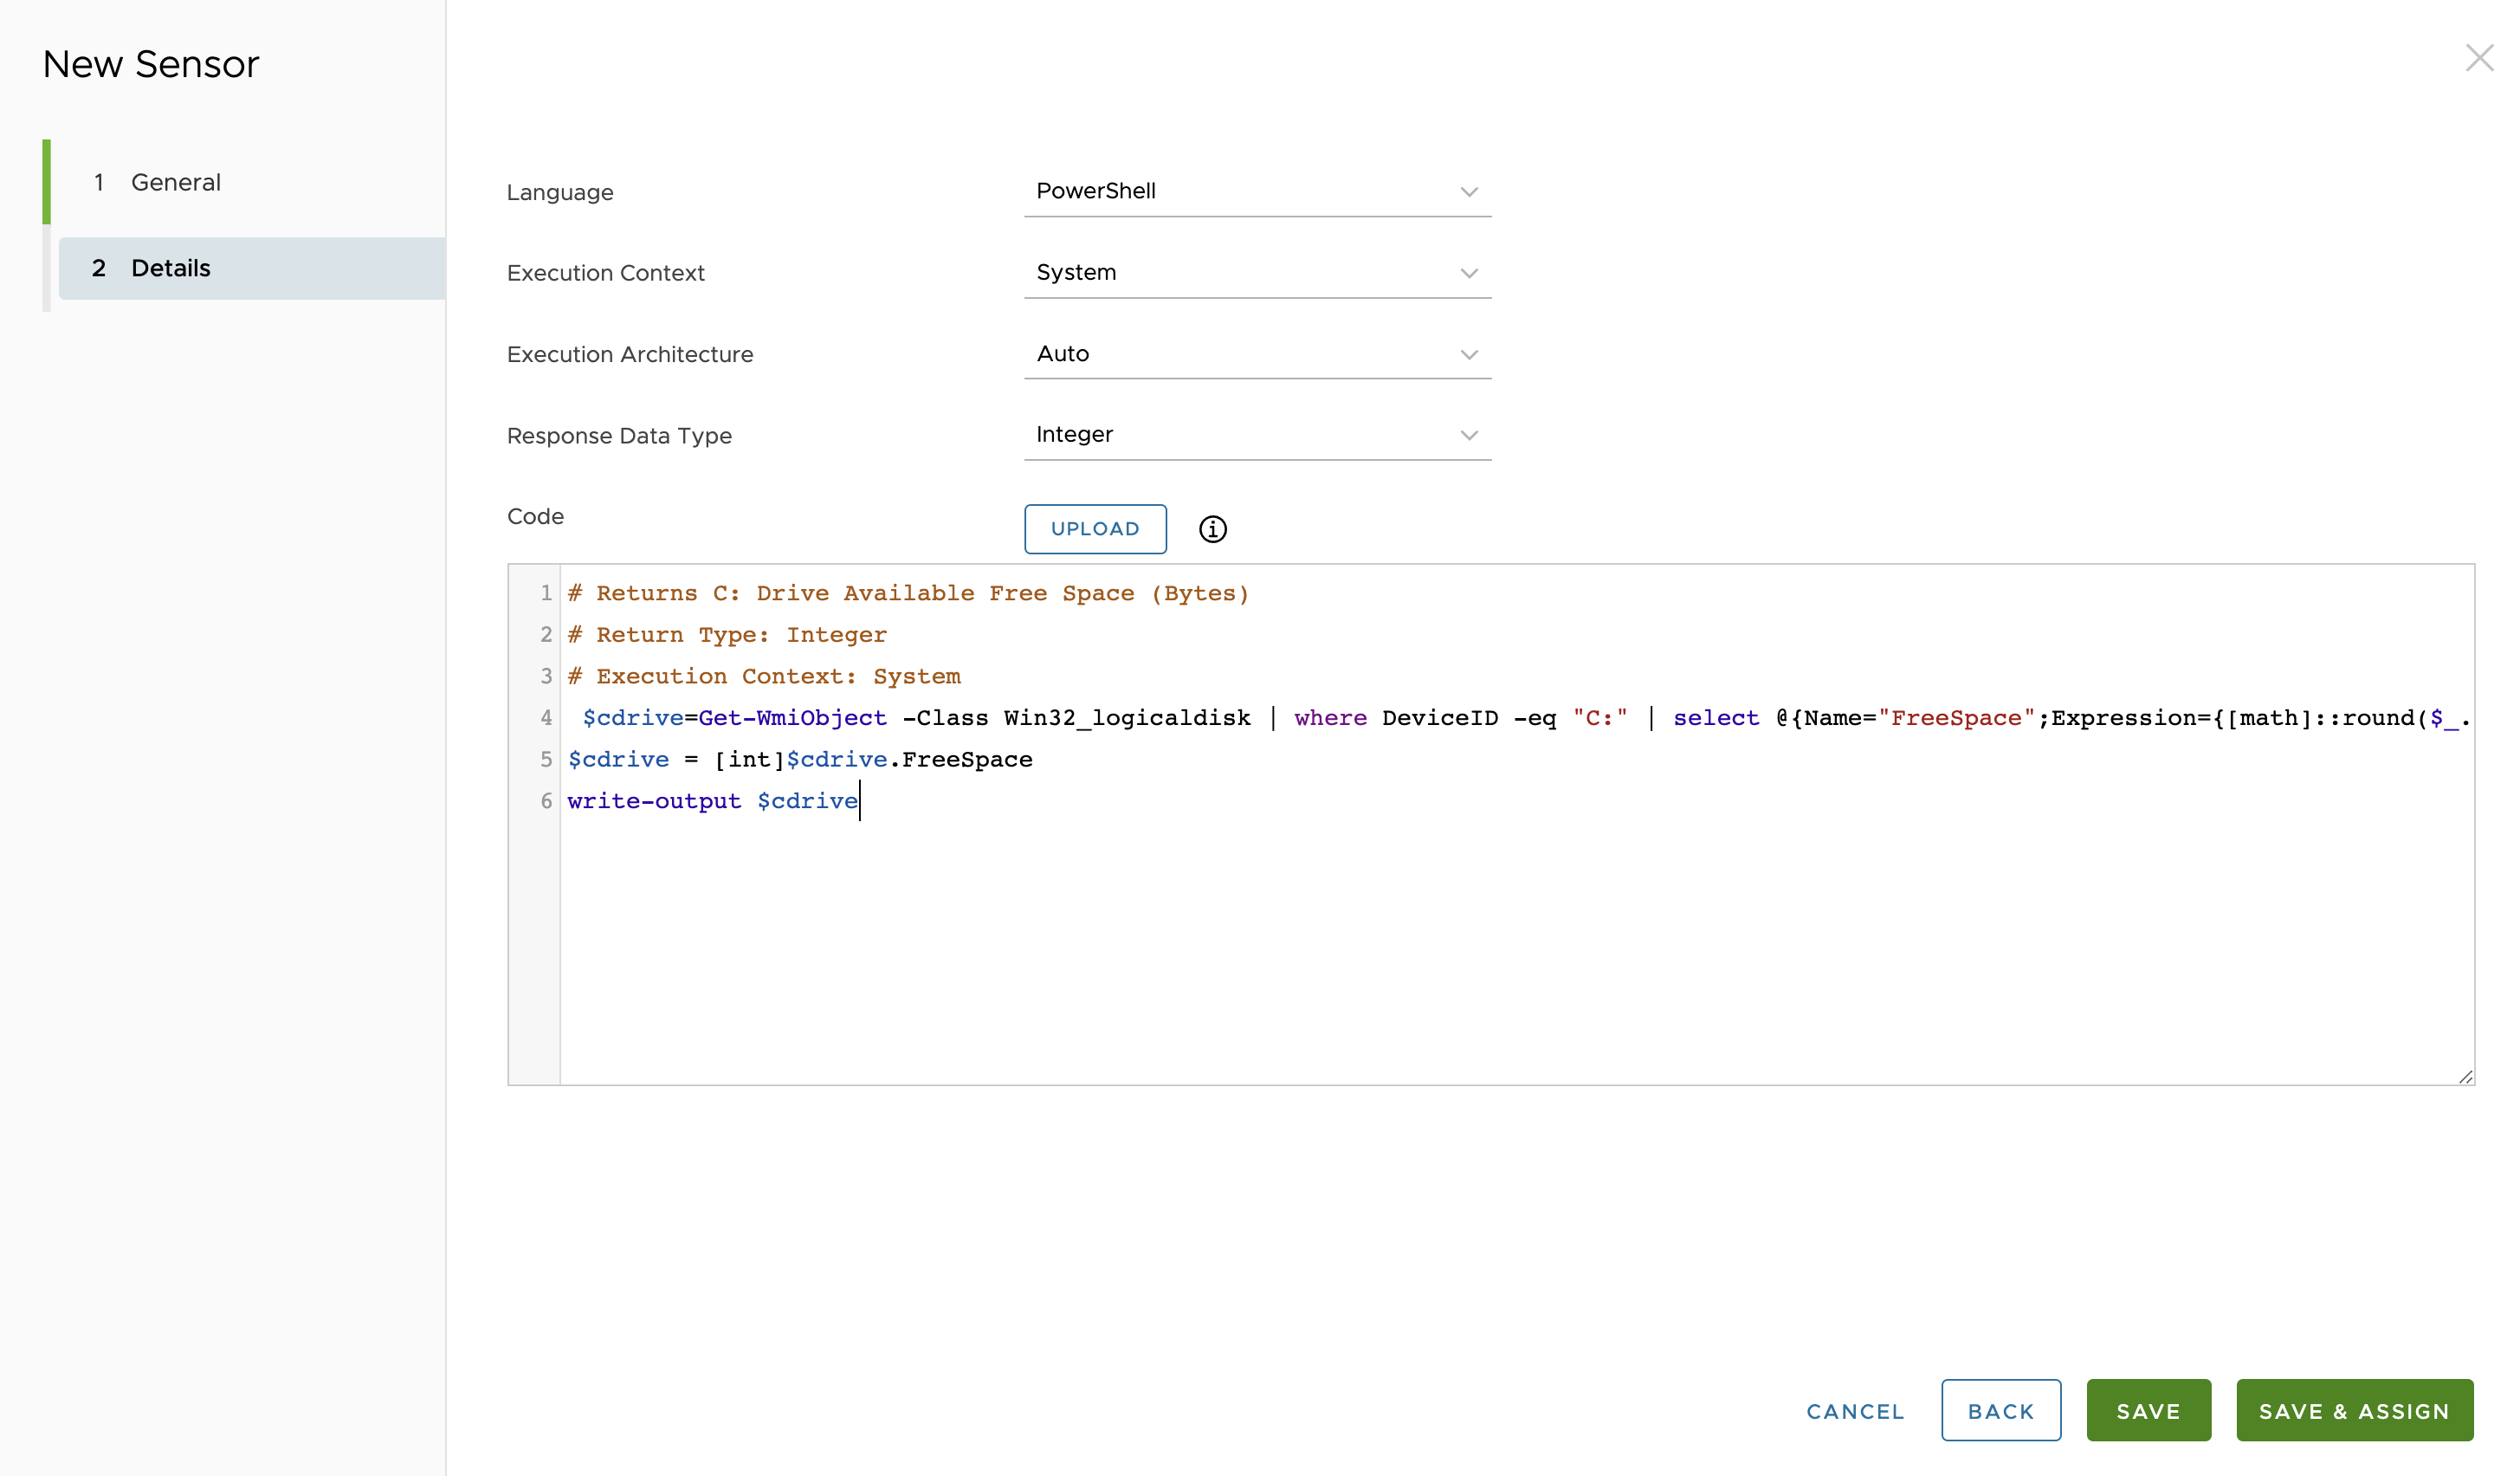
- Now enter the details of the script using the values shown below. The following includes all options, but this sensor will use the highlighted values.
Language: PowerShell
Execution Context: System or Current User
Execution Architecture: 32 bit (forced), 32 bit, 64 bit or Auto
Response Data Type: String, Integer, Boolean, Date Time
Note: Response Data Type impacts what can be done in Omnissa Intelligence. For instance, a string is just text, but an integer is recognized as a number and can therefore trigger selections such as greater than, less than, or between two values, versus if the value returned is just text. - Underneath, enter the script code:
# Returns C: Drive Available Free Space (Bytes)
# Return Type: Integer
# Execution Context: System
$cdrive=Get-WmiObject -Class Win32_logicaldisk | where DeviceID -eq "C:" | select @{Name="FreeSpace";Expression={[math]::round($_.FreeSpace/1GB, 2)}}
$cdrive = [int]$cdrive.FreeSpace
write-output $cdrive
- When done, click Save & Assign.
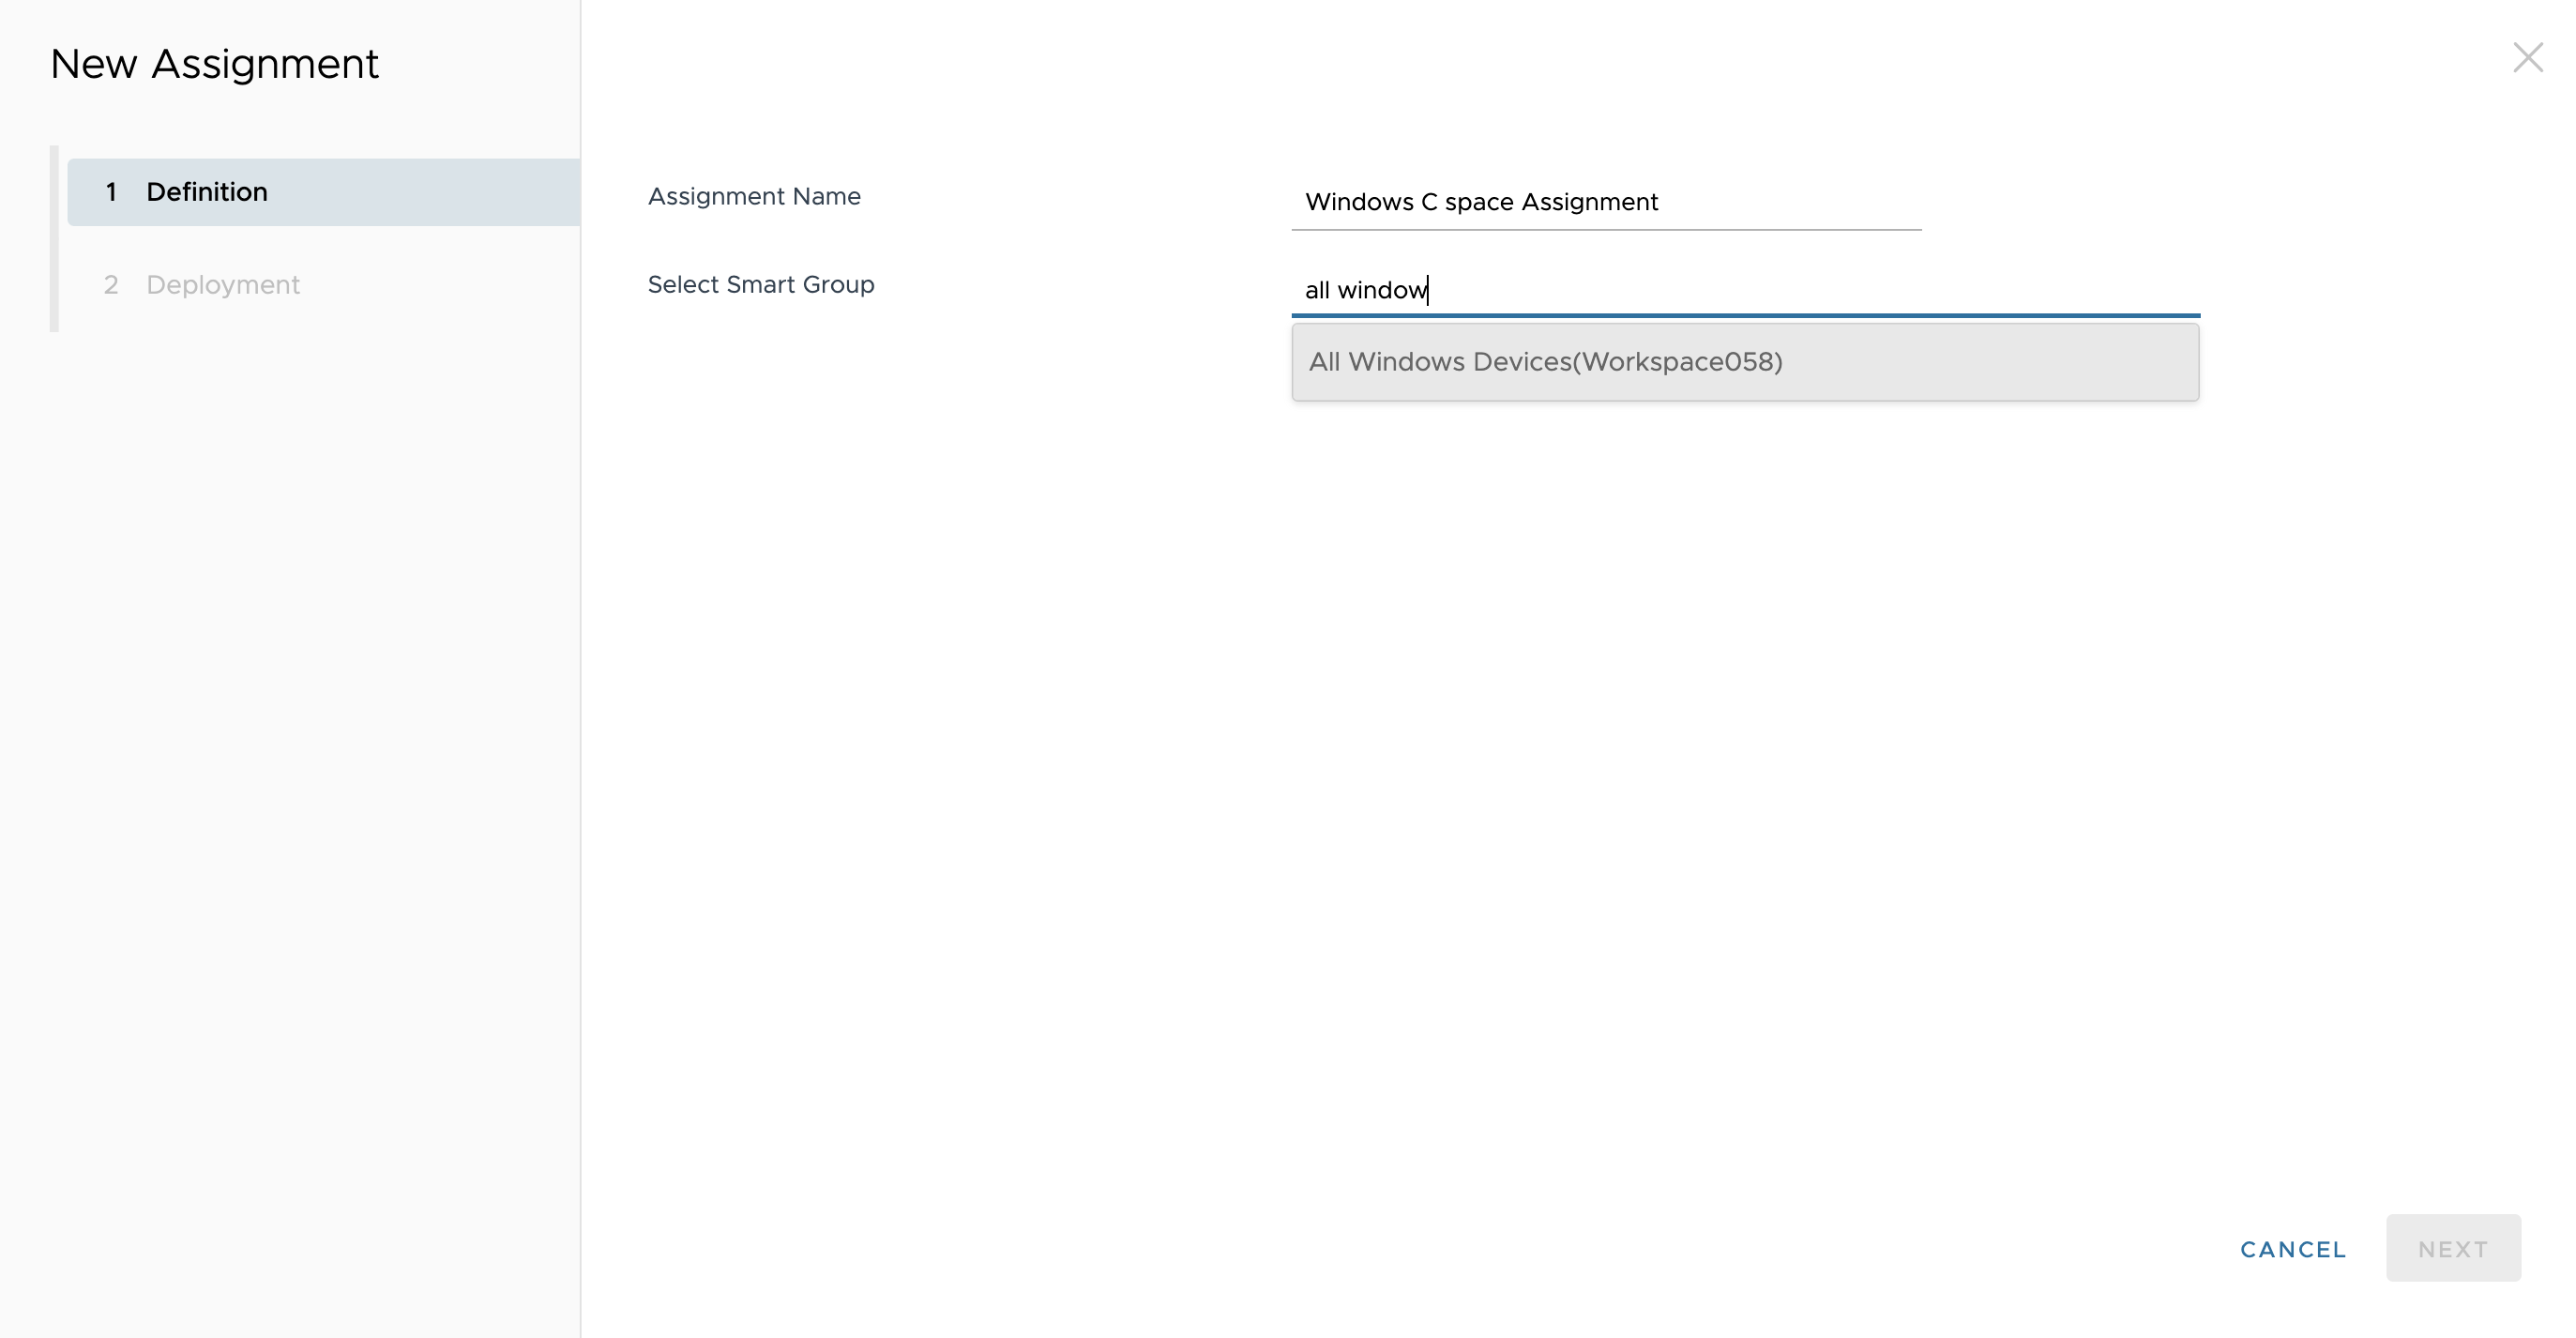
- Next, click NEW ASSIGNMENT to assign the sensor to devices.

- Name the assignment and select a smart group. Then click NEXT in the bottom right.
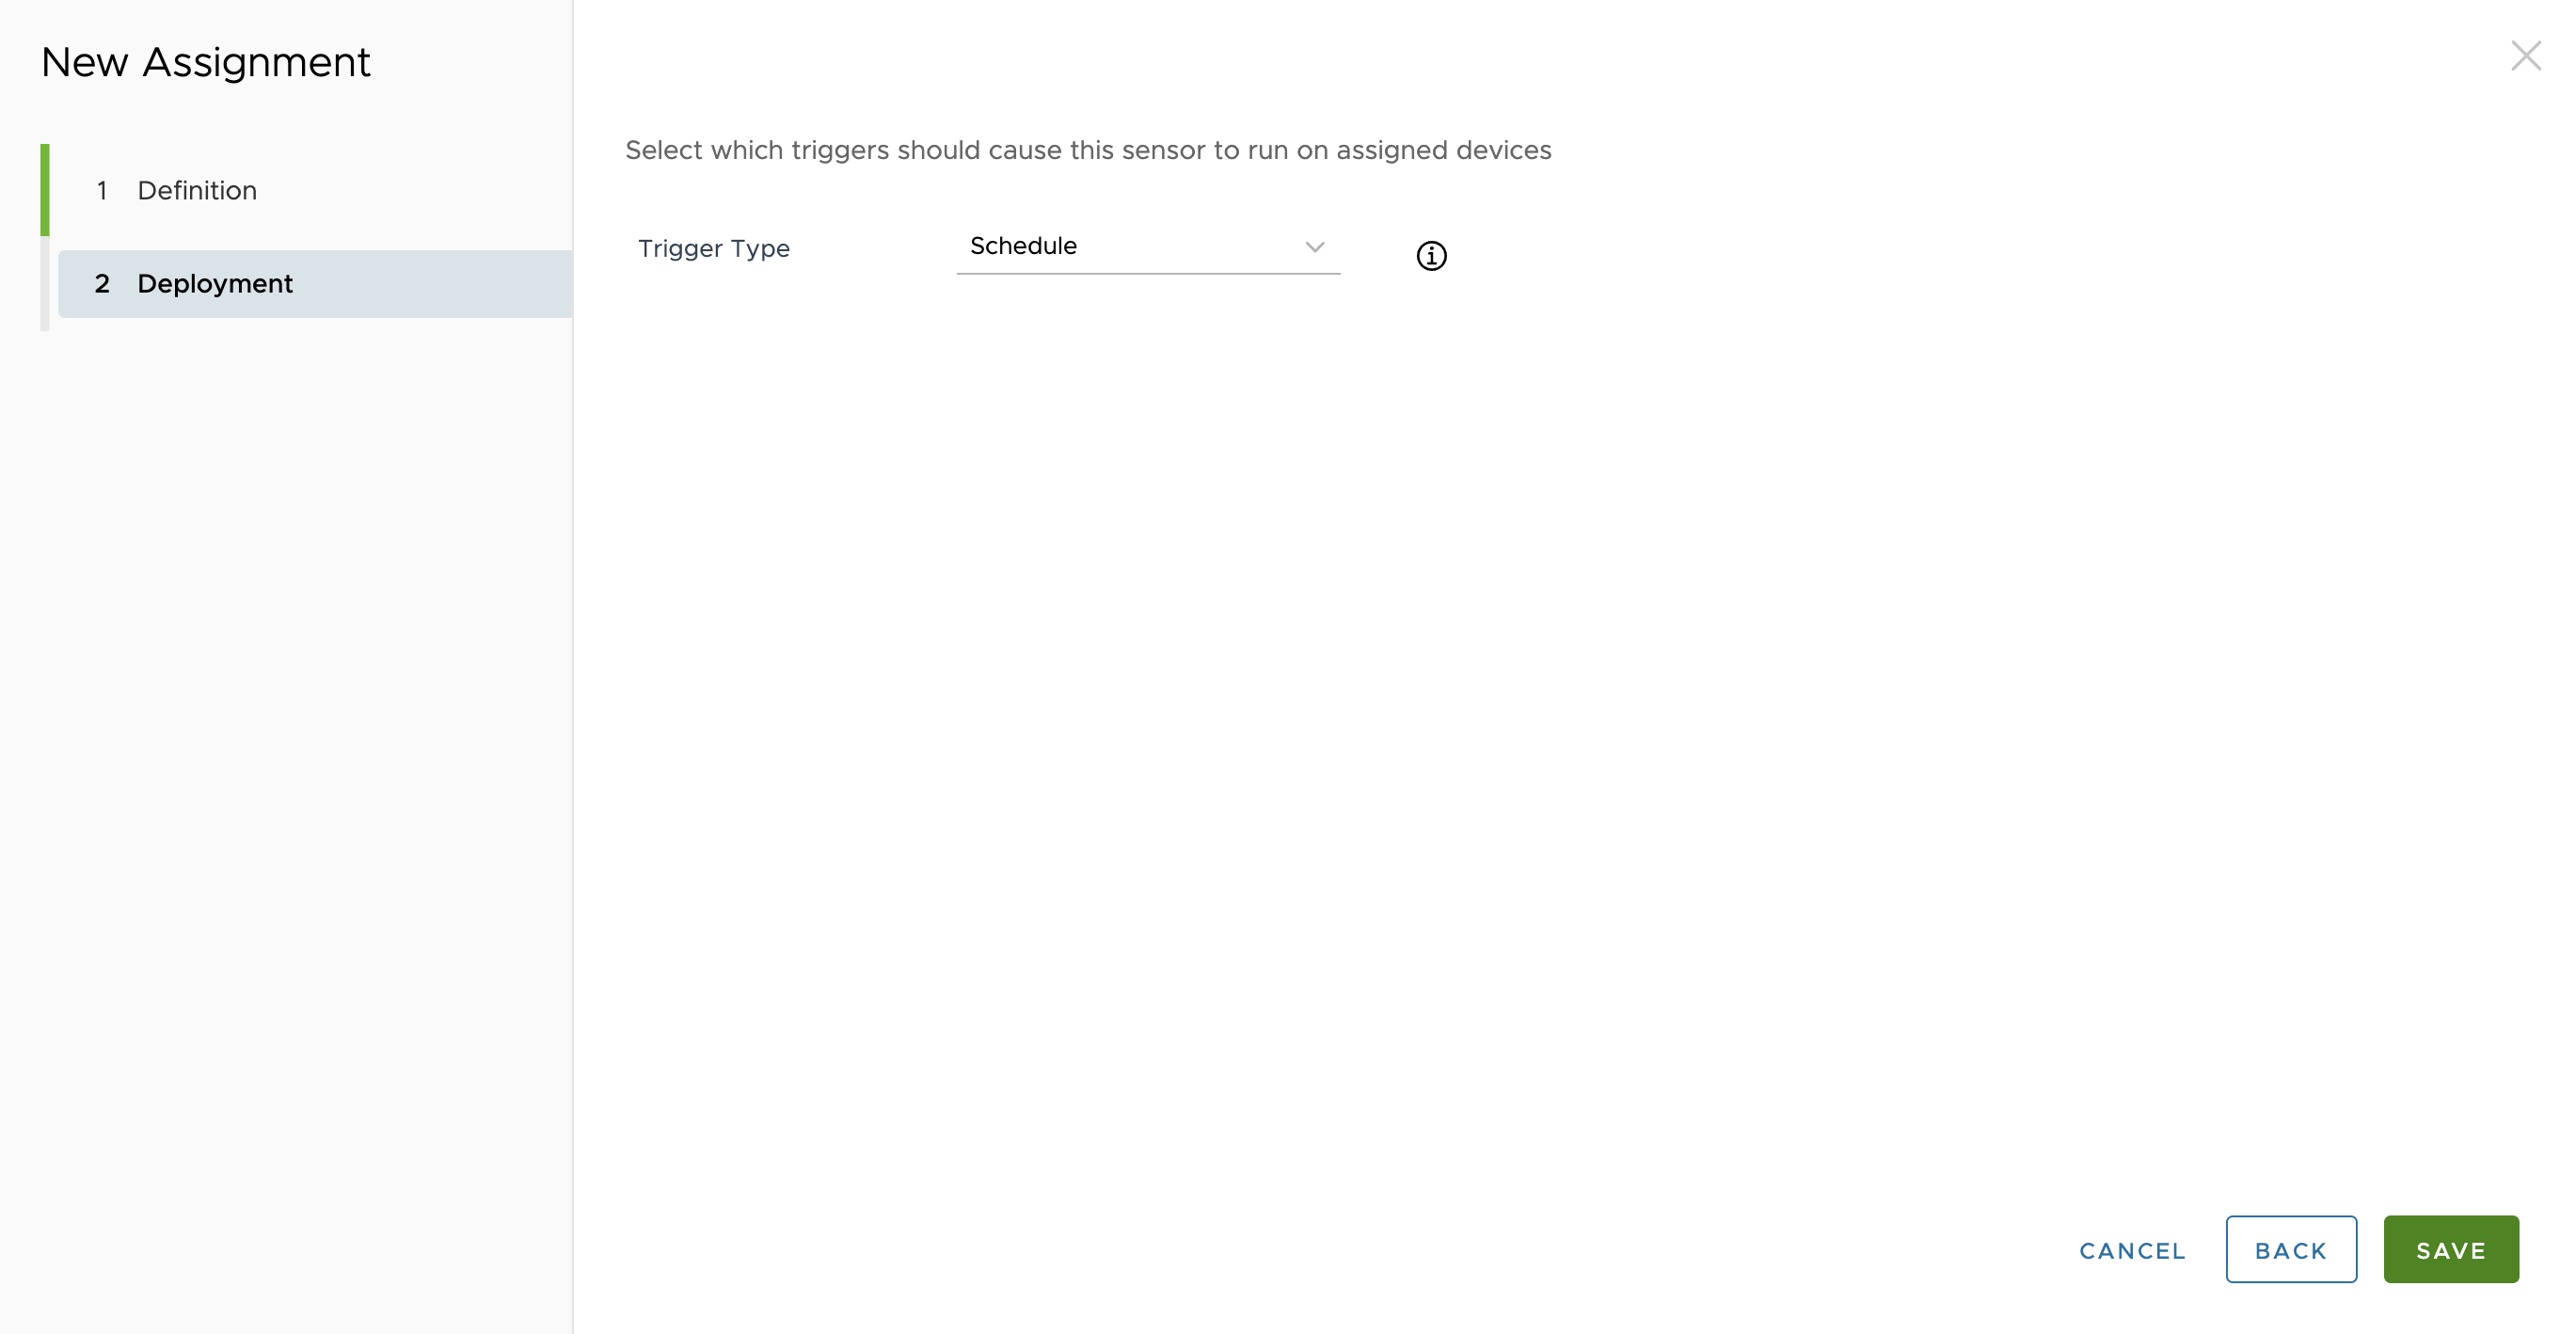
- Set the trigger type to Schedule and not based on an event. Click SAVE to continue.
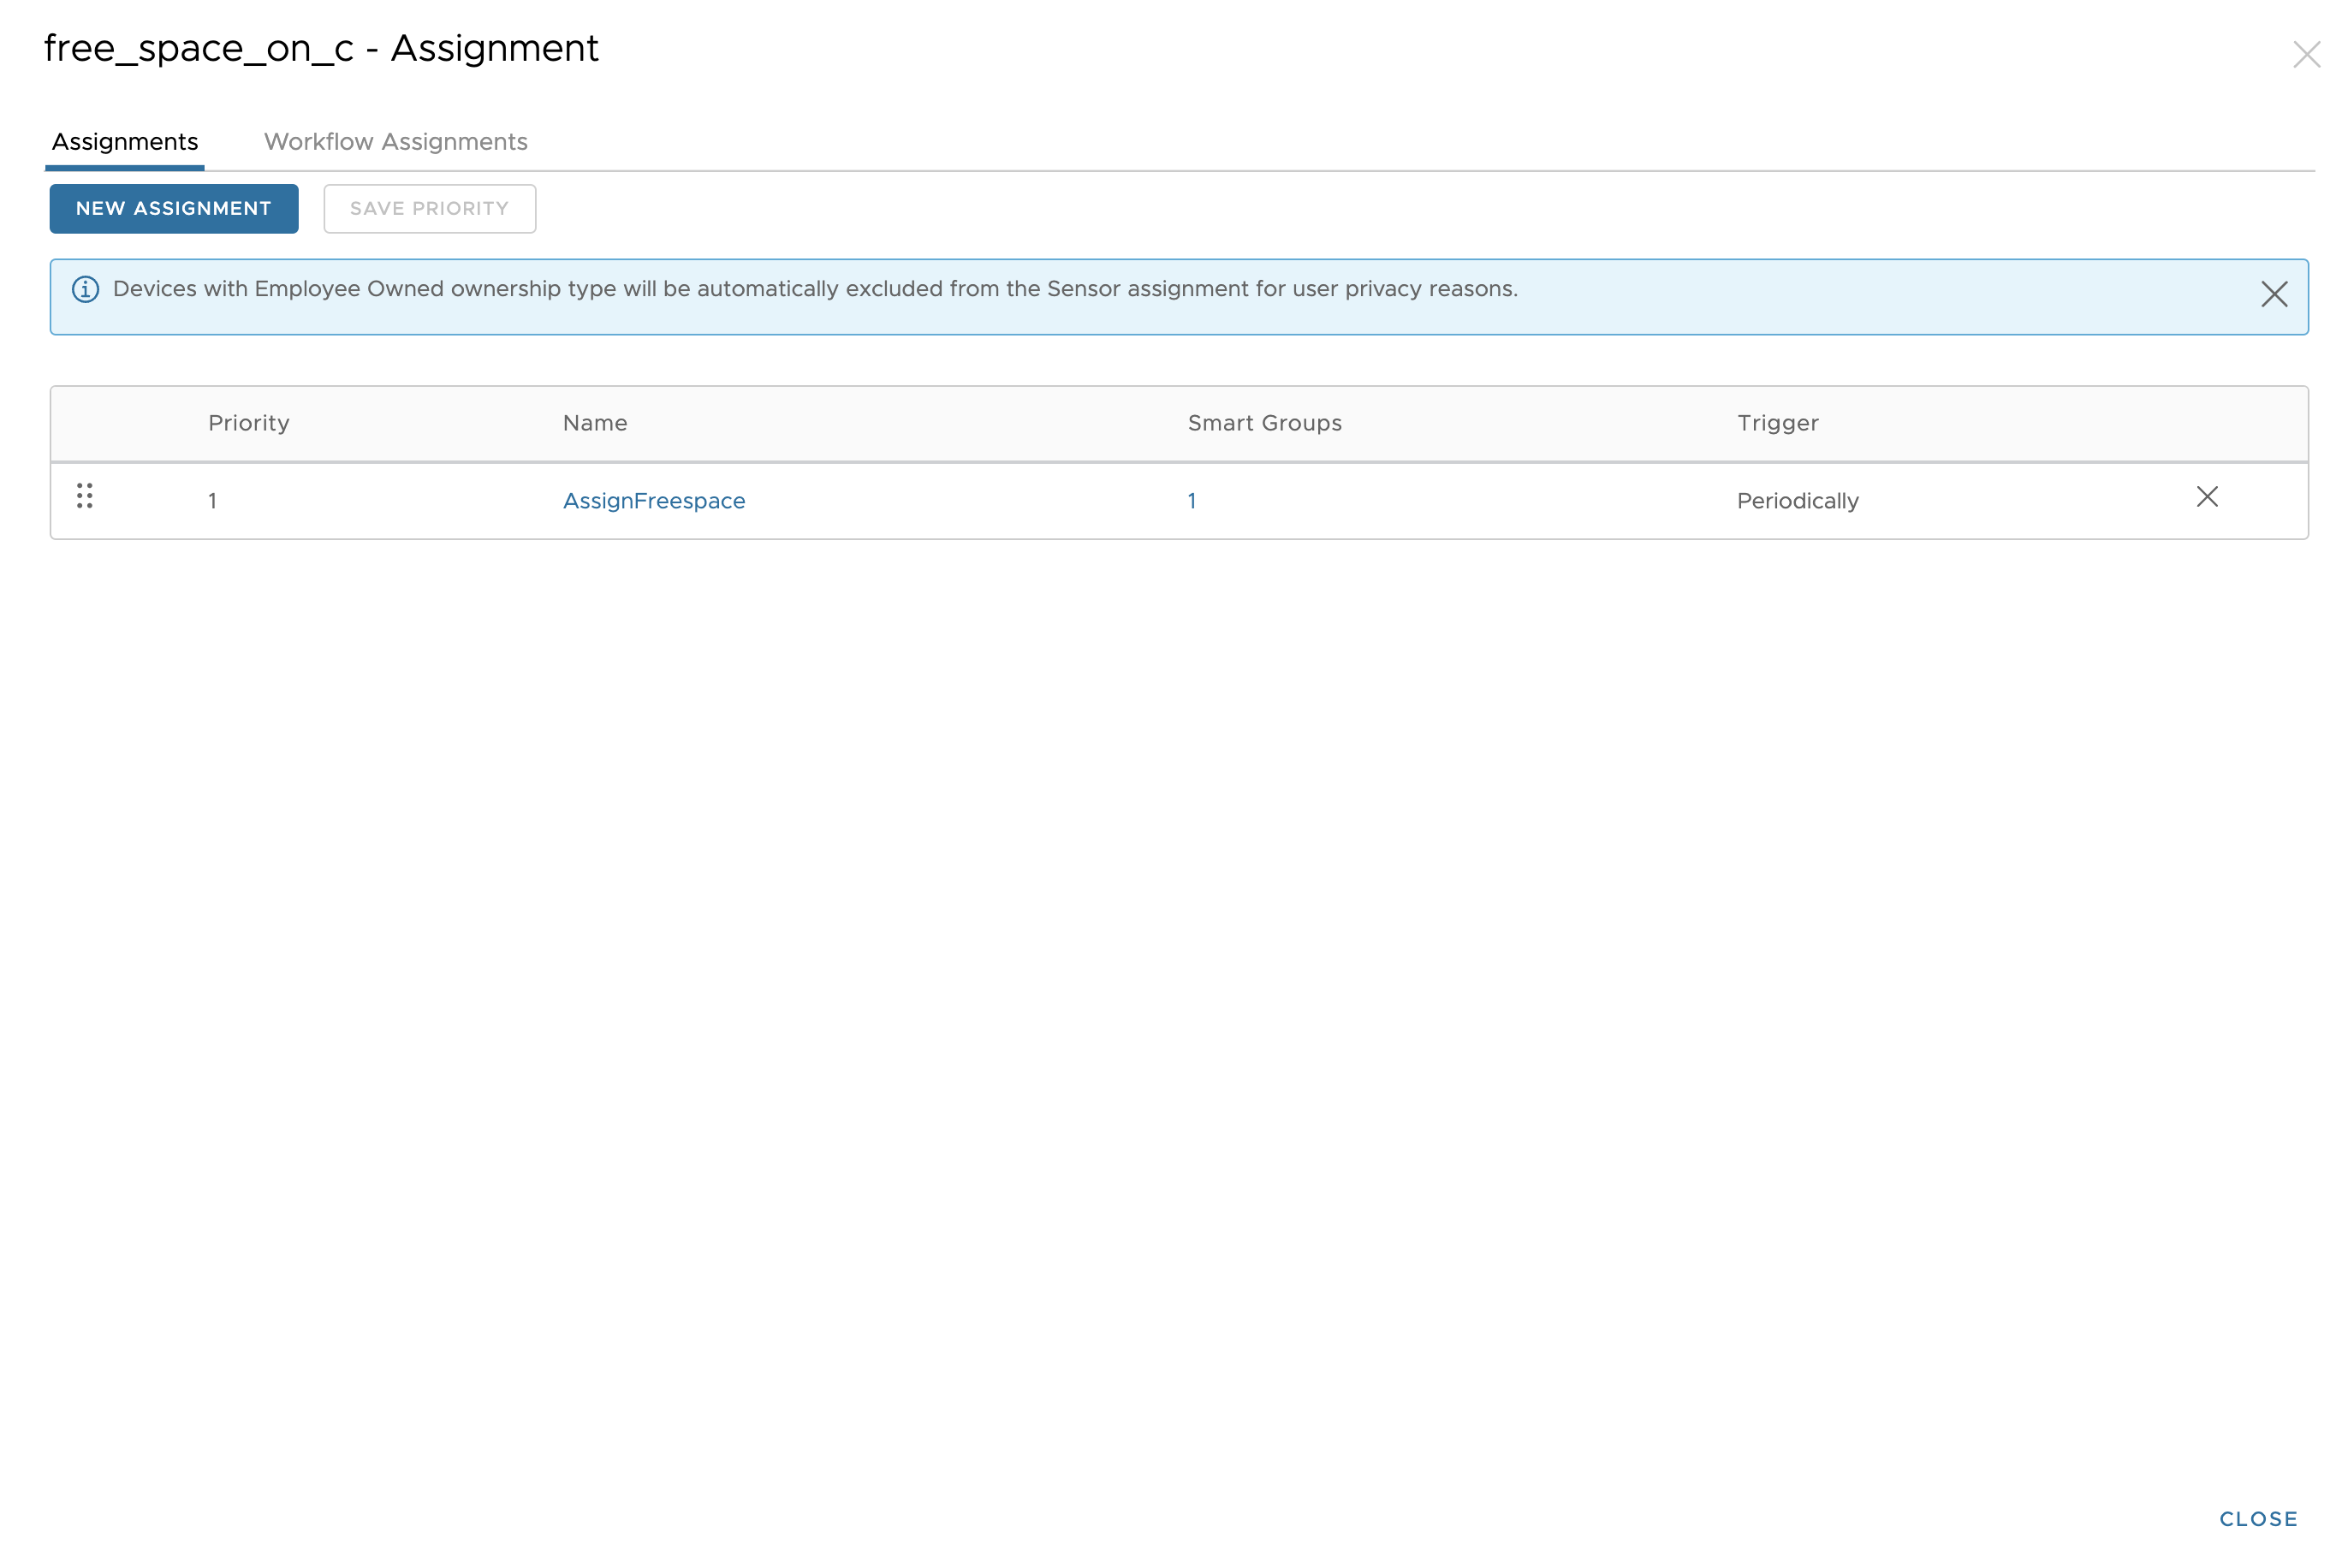
- The assignment list is then displayed. Click Close in the bottom-right corner to close the sensor configuration.
Create a macOS Sensor for Free Disk Space
You can create a sensor for macOS using similar steps as for Windows.
- This time select macOS instead of Windows after clicking ADD in Sensors. Enter a name and description as before and click NEXT.
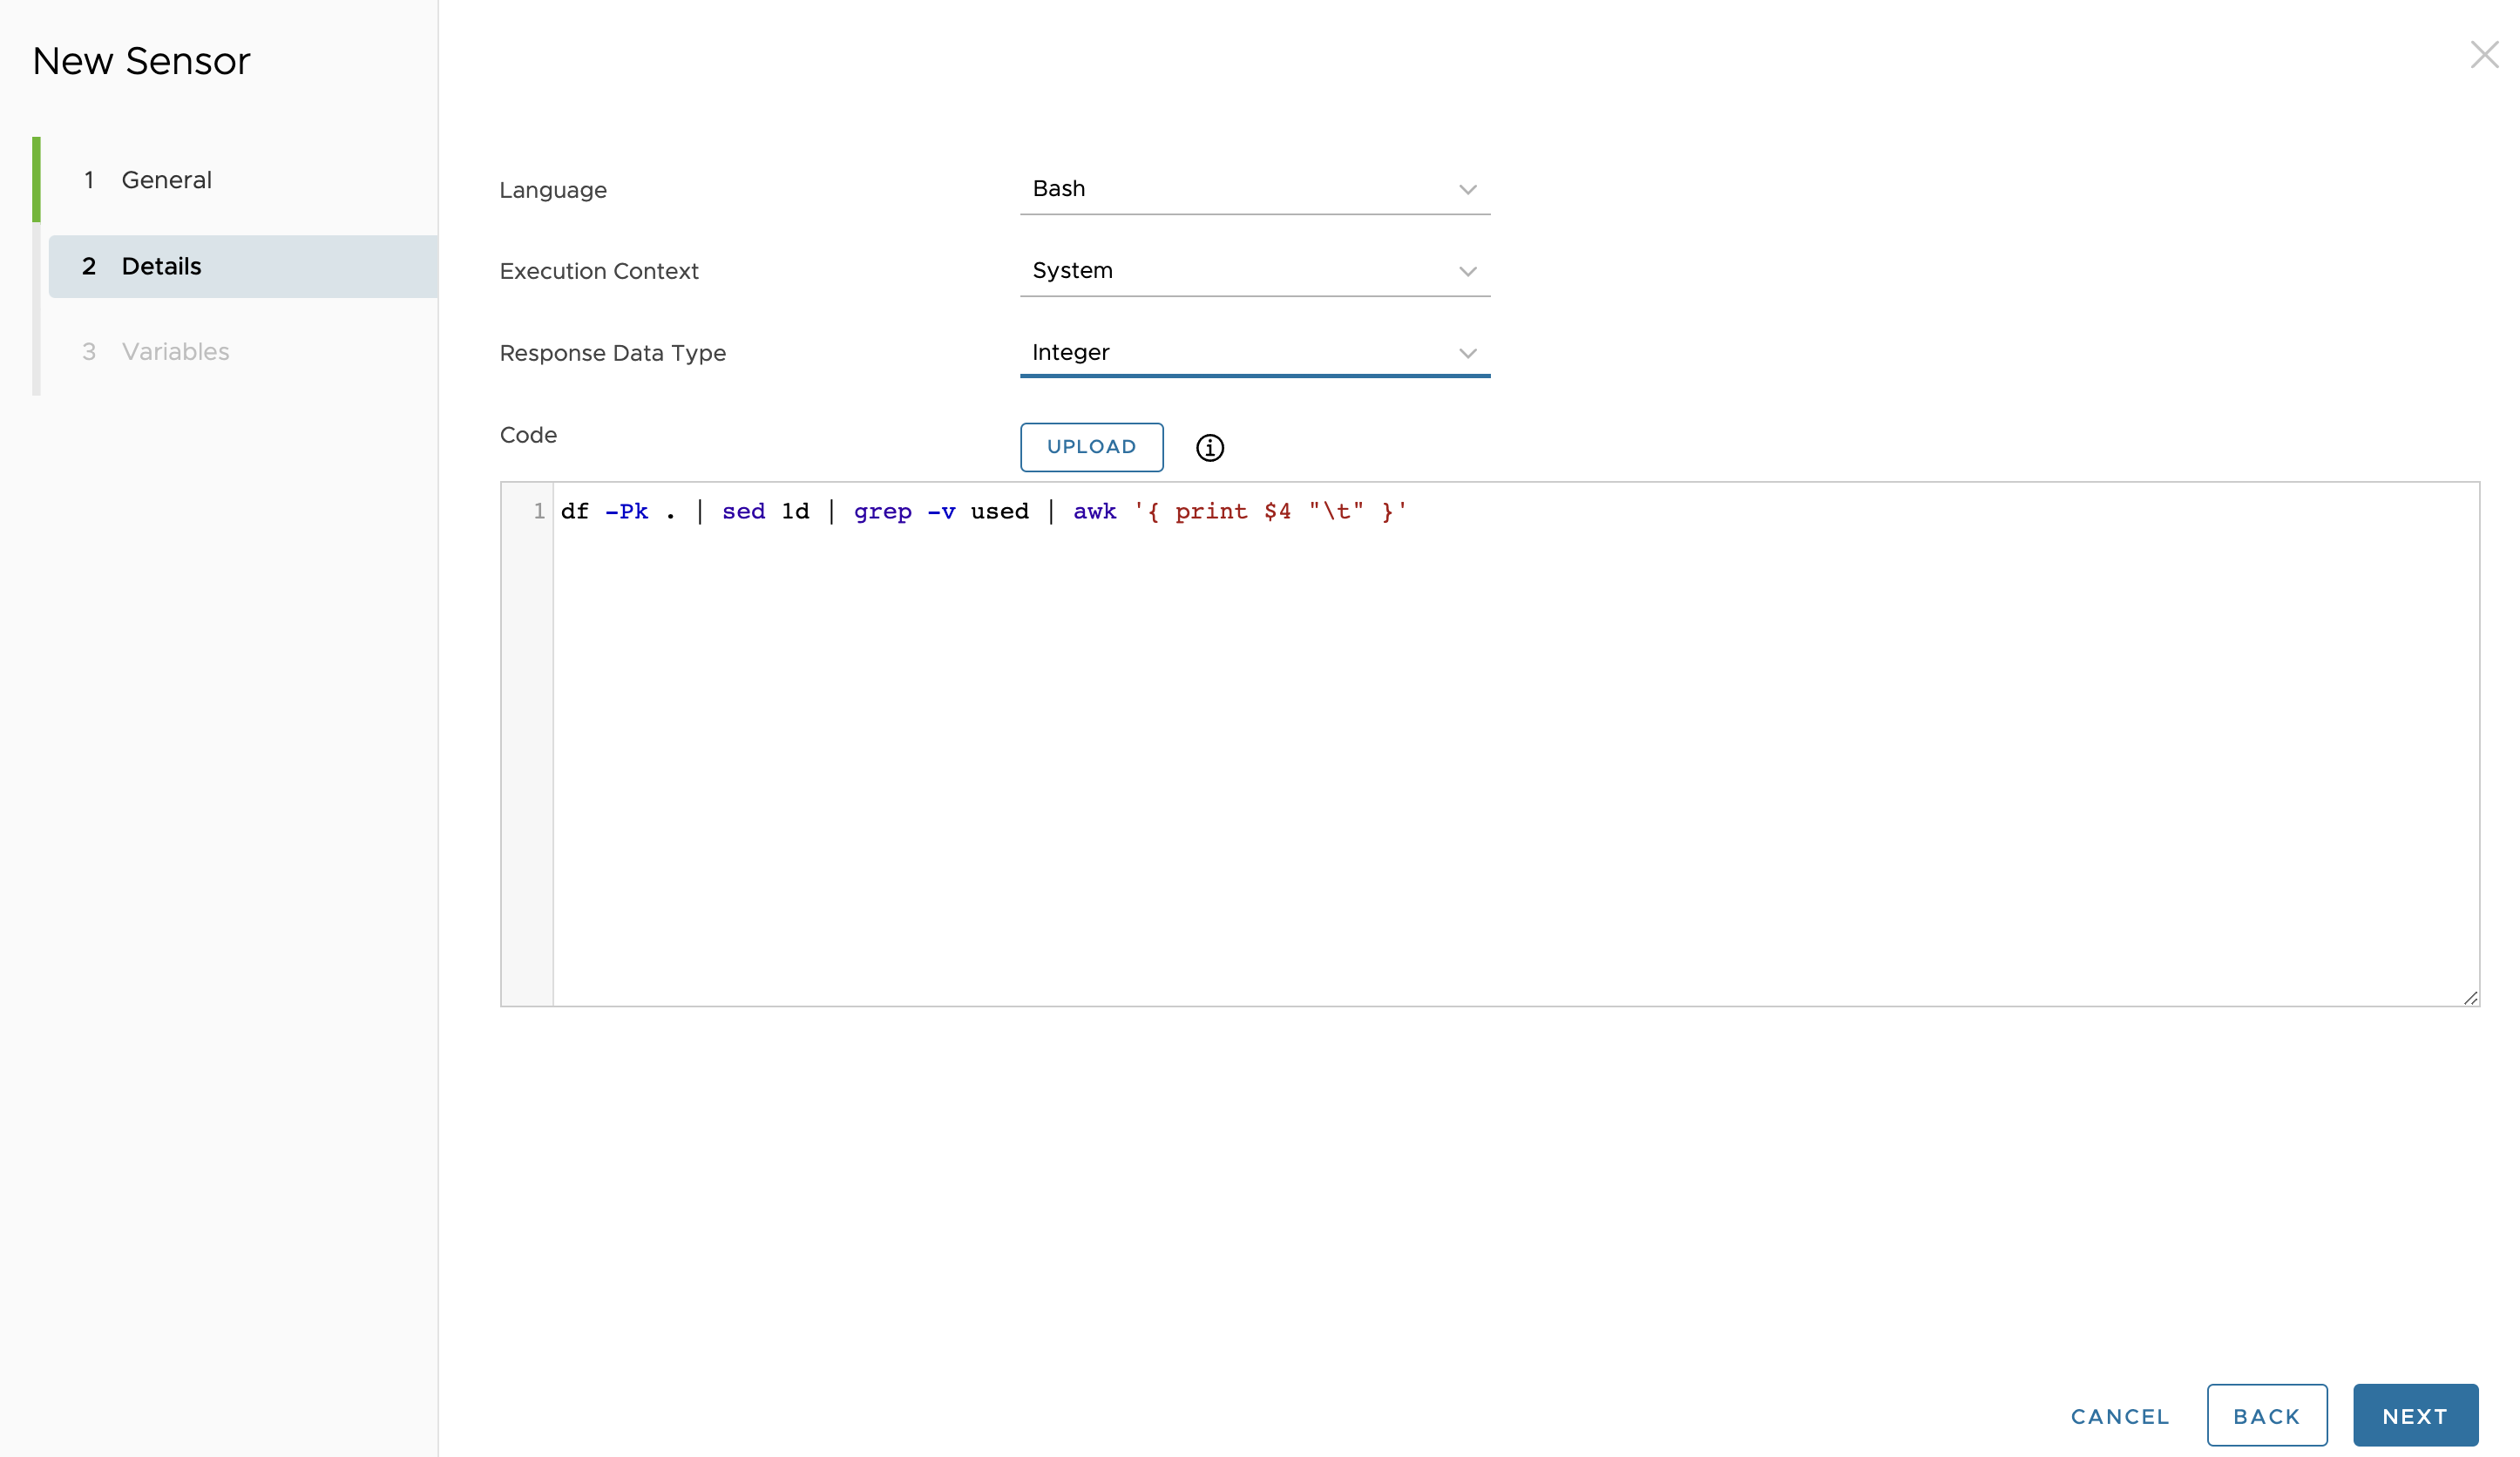
- In the details section, enter the following items highlighted below.
Language: Bash, Python 3, ZHY
Execution Context: System or Current User
Response Data Type: String, Integer, Boolean, Date Time - And in the Code text box, enter:
df -Pk . | sed 1d | grep -v used | awk '{ print $4 "\t" }'
Then click NEXT.
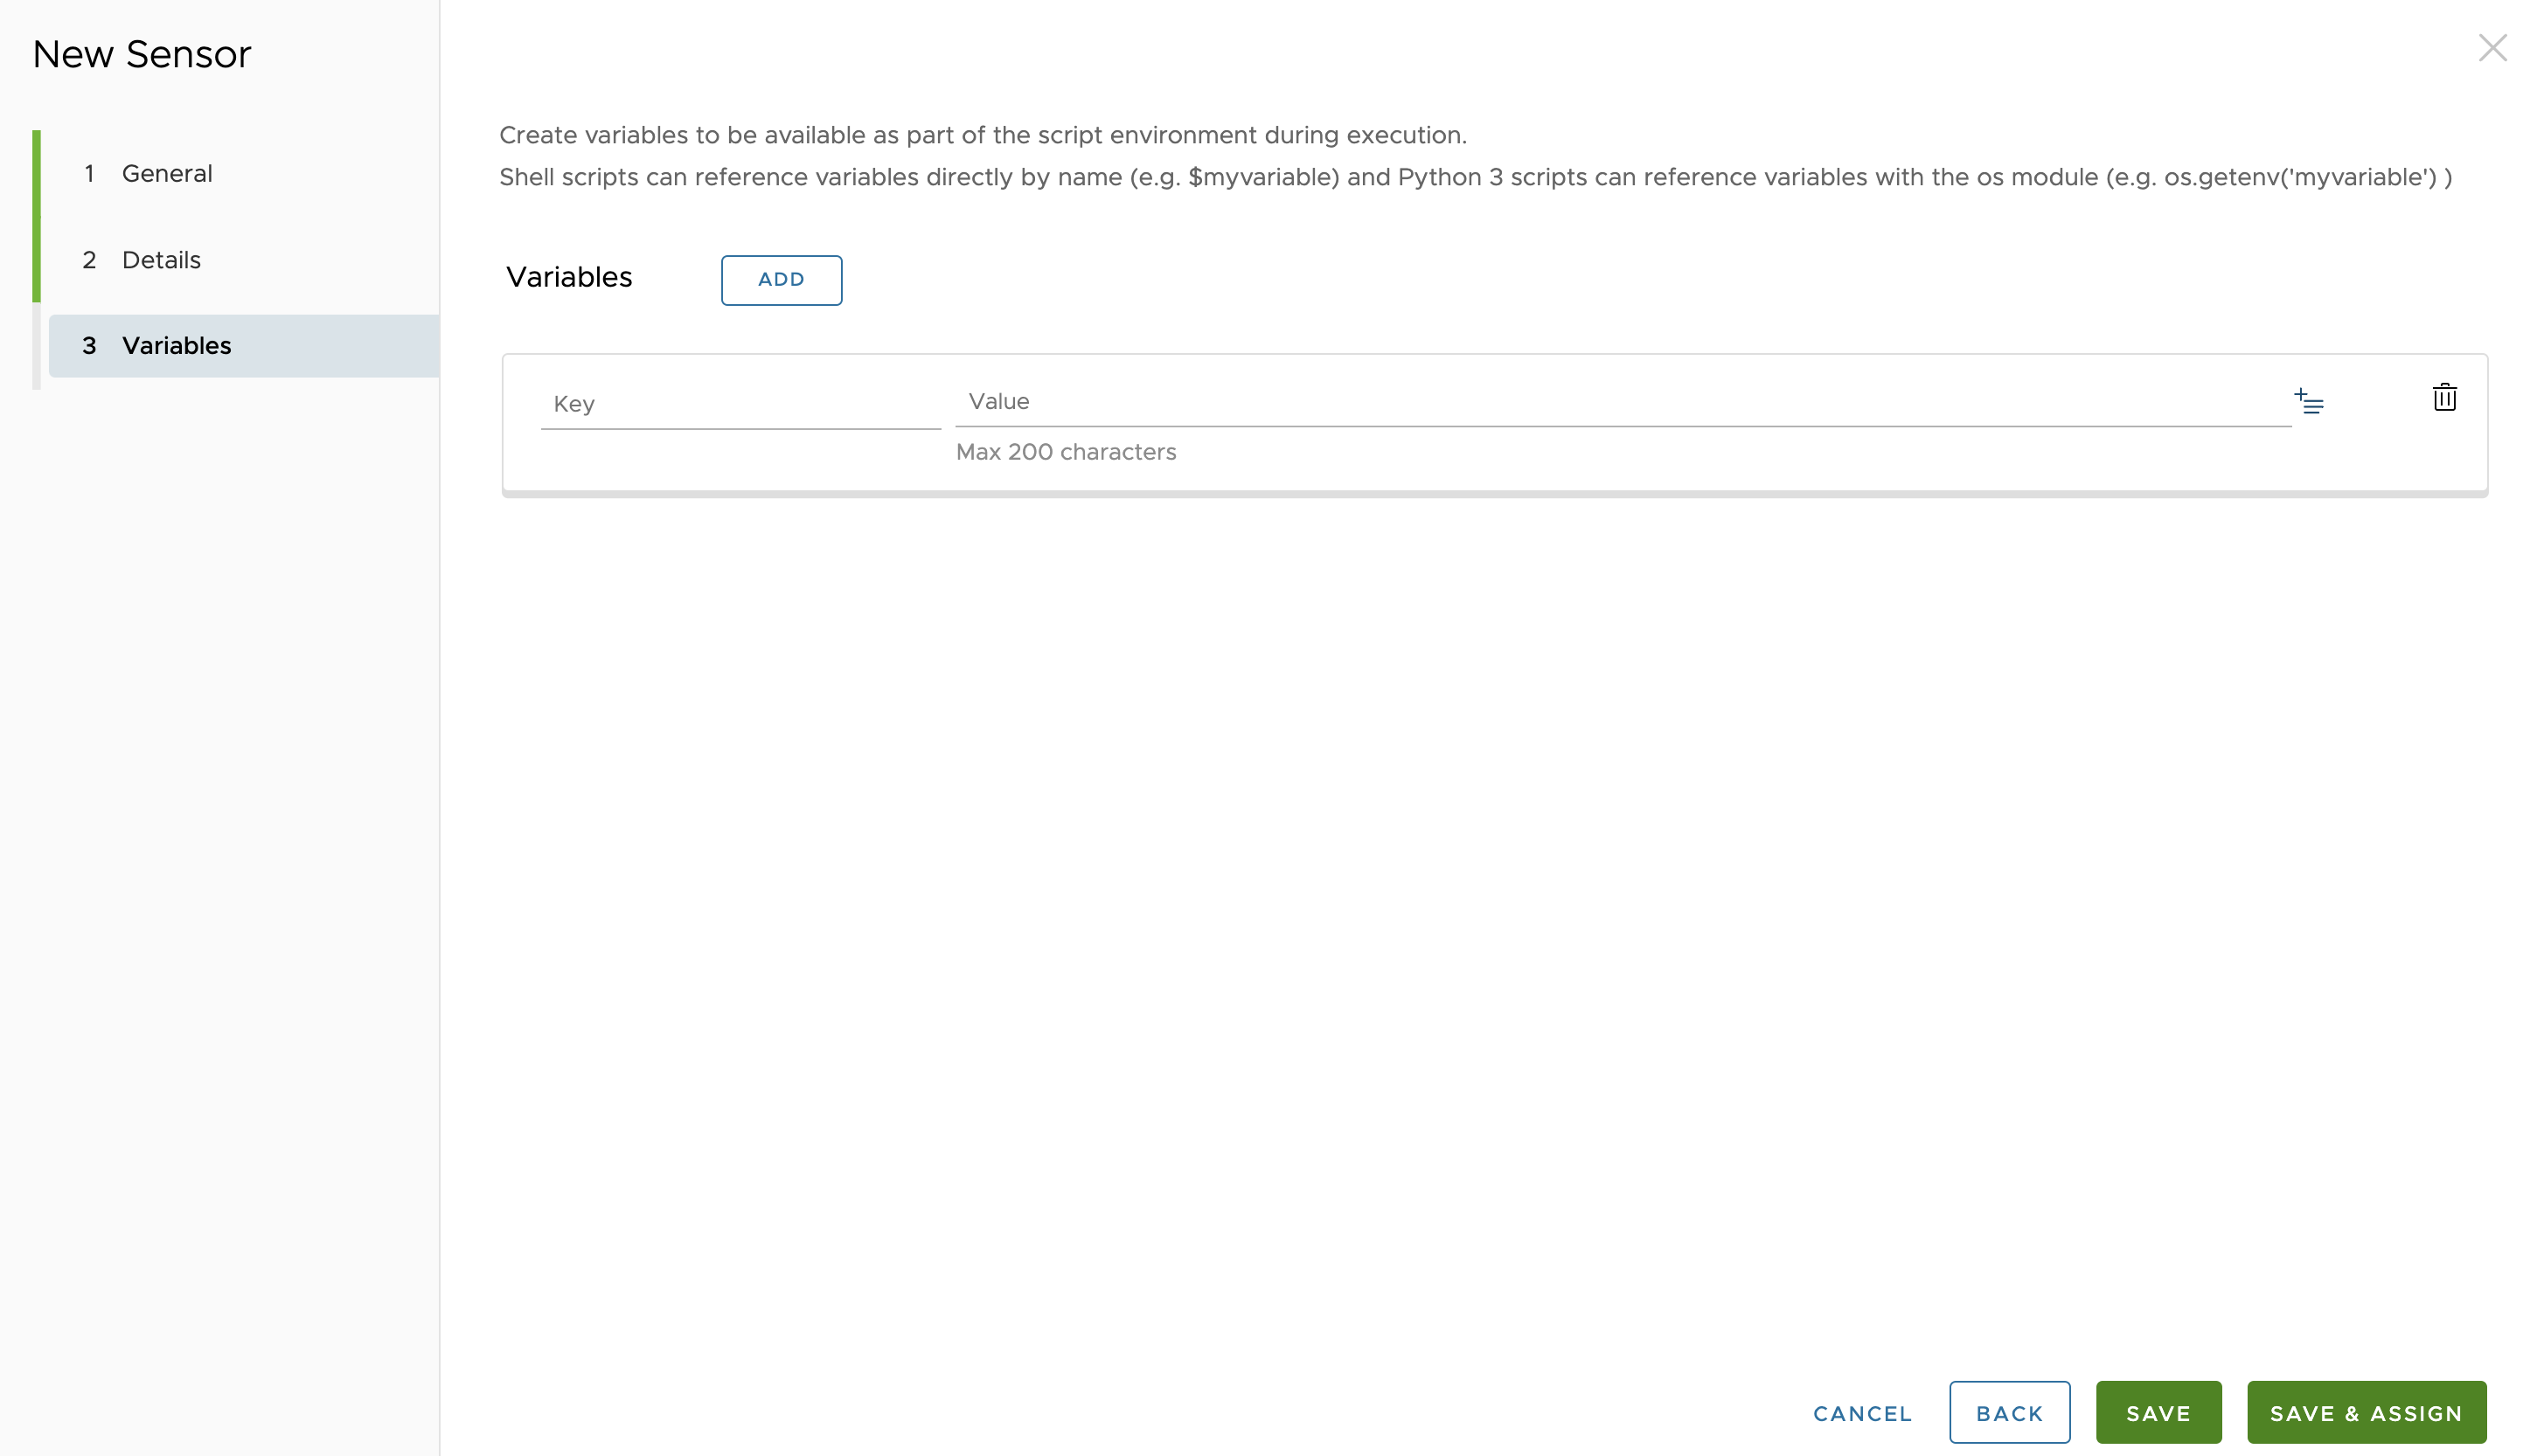
- There are no variables in this example, so, click Save & Assign.
- Follow the steps used for the Windows sensor to assign this sensor to a smart group, such as All MacOS Devices in My Organization.
Sensor Values in the Workspace ONE UEM Console
To find the sensor values in the Workspace ONE UEM console, navigate to Devices then List View and select a device that applies to the sensor. On the Device Details screen, select the Sensors tab and check that the free_space_on_[disk] sensor name is listed. 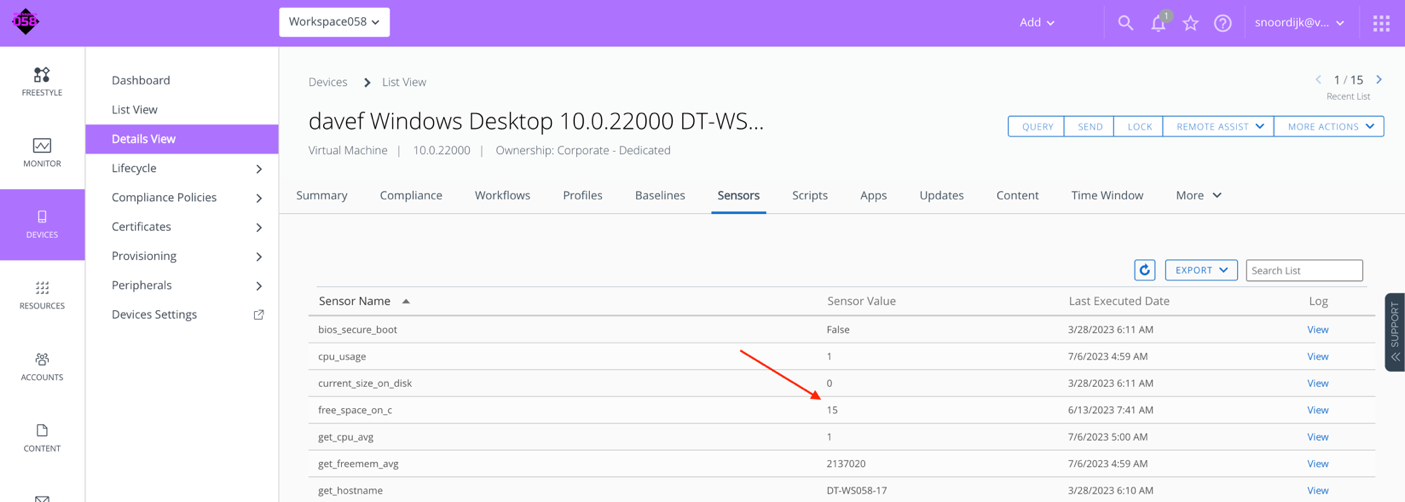
Figure 8: The Sensor Returning 15 Gigabytes of Free Disk Space on the C: Drive
Create a Tag
Lastly, this example will use a tag to mark the devices.
- In the menu on the left, navigate to Groups & Settings then All Settings.
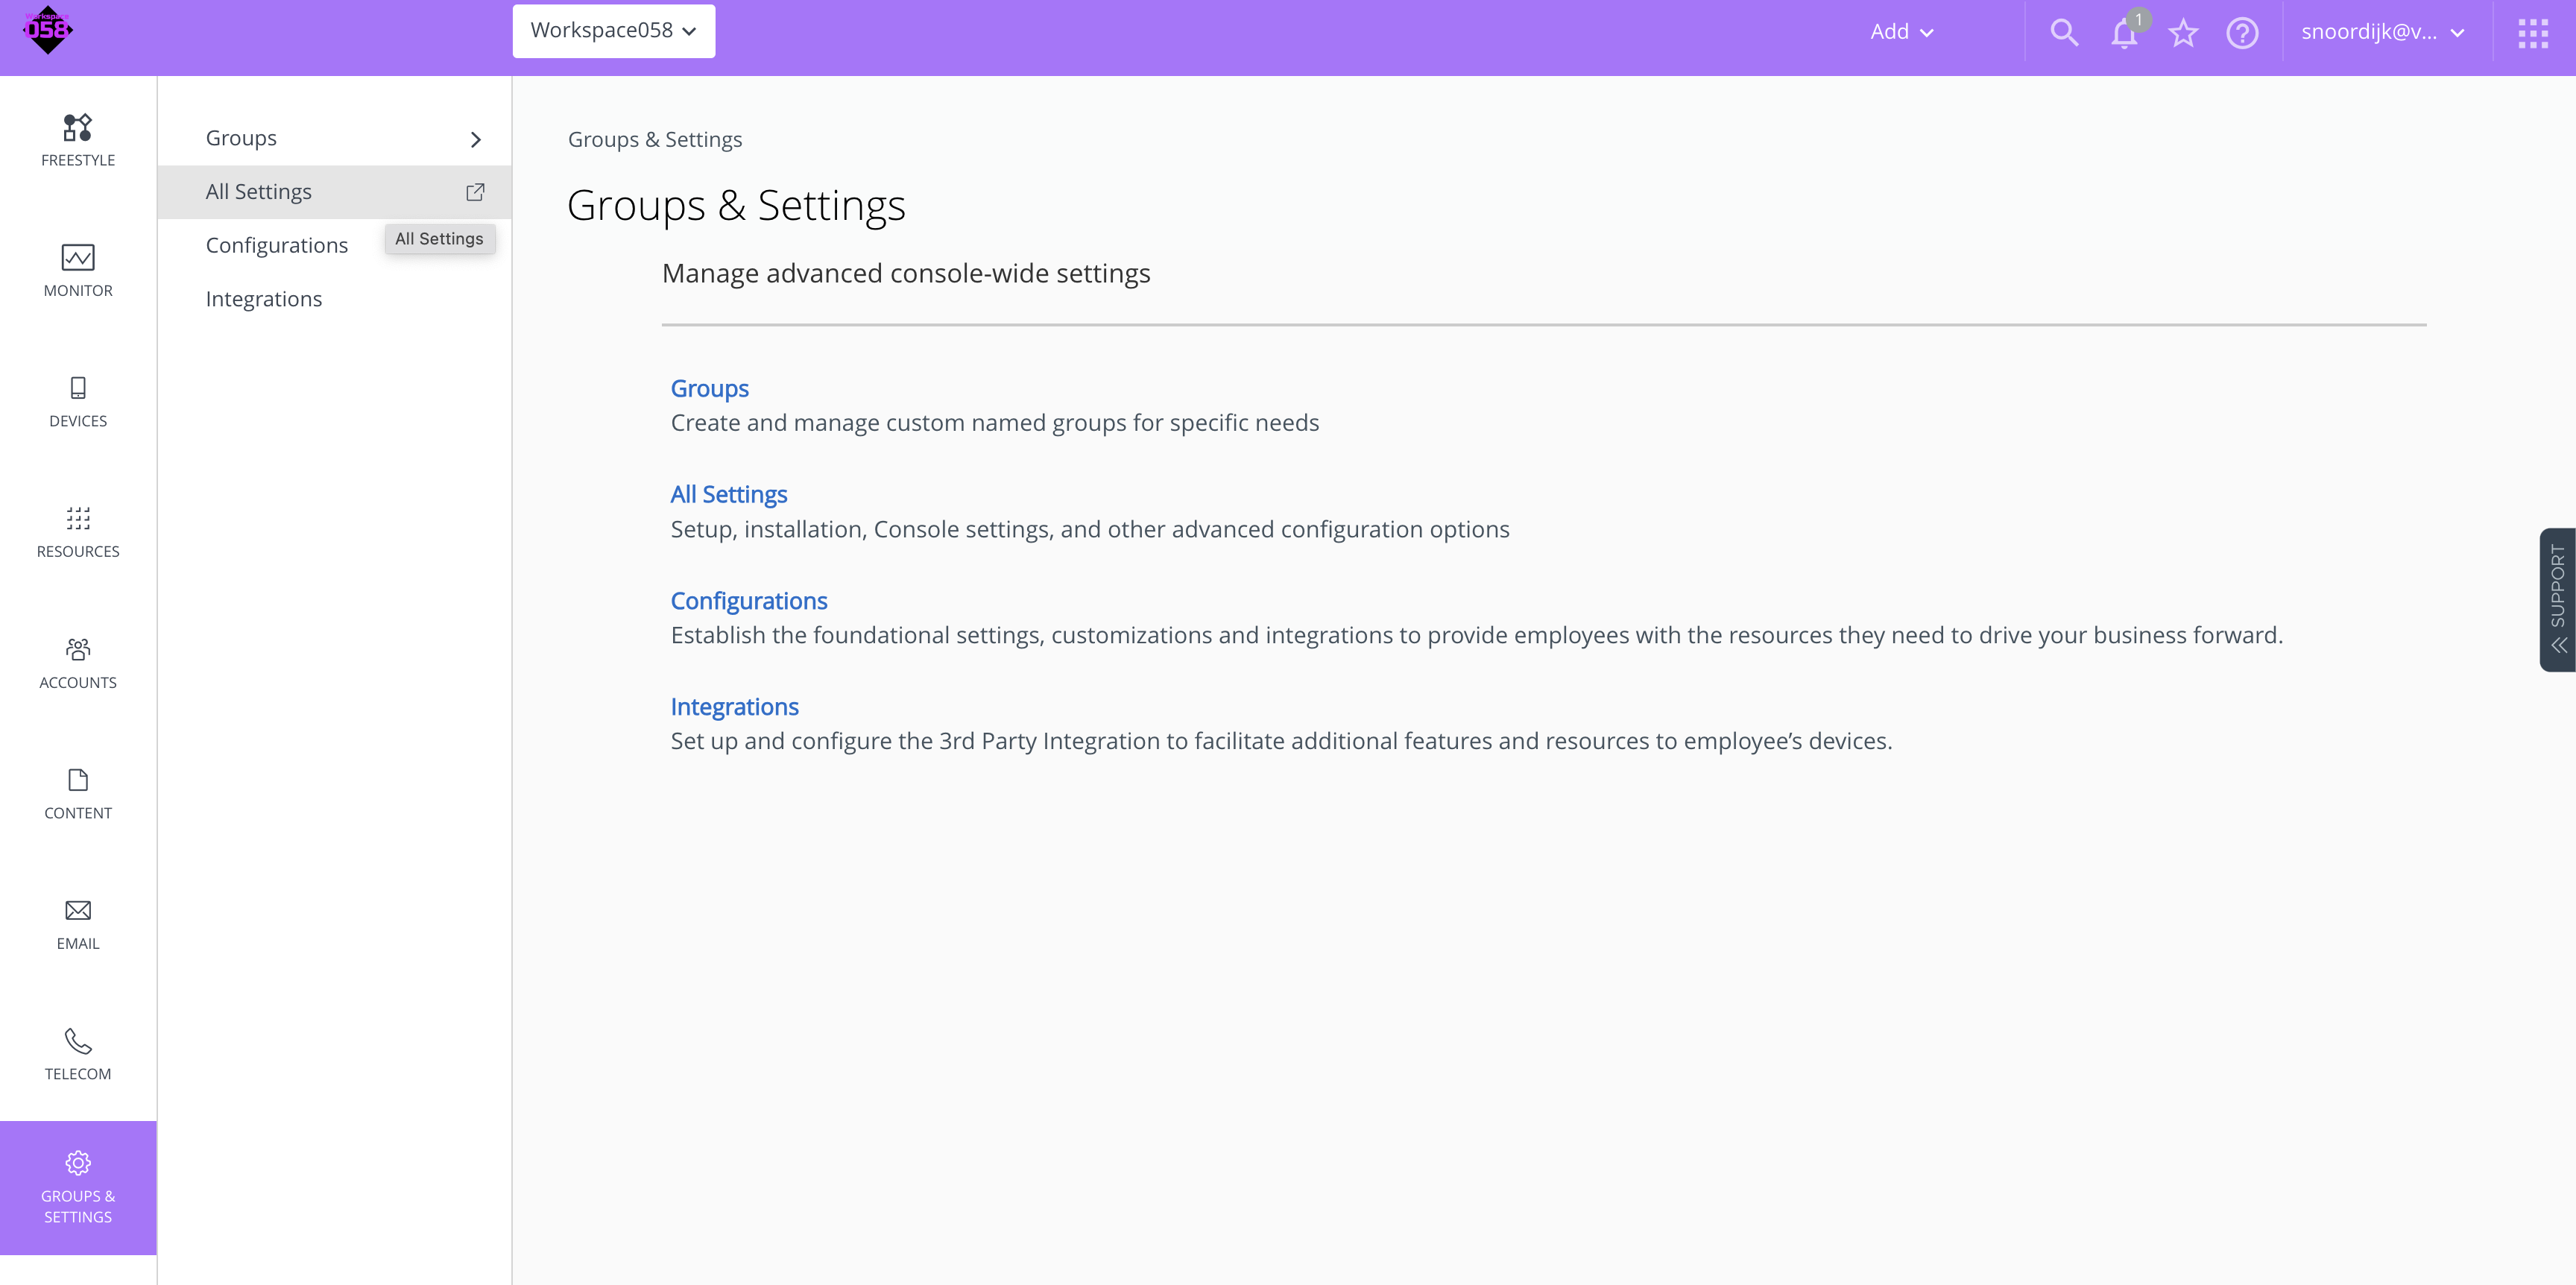
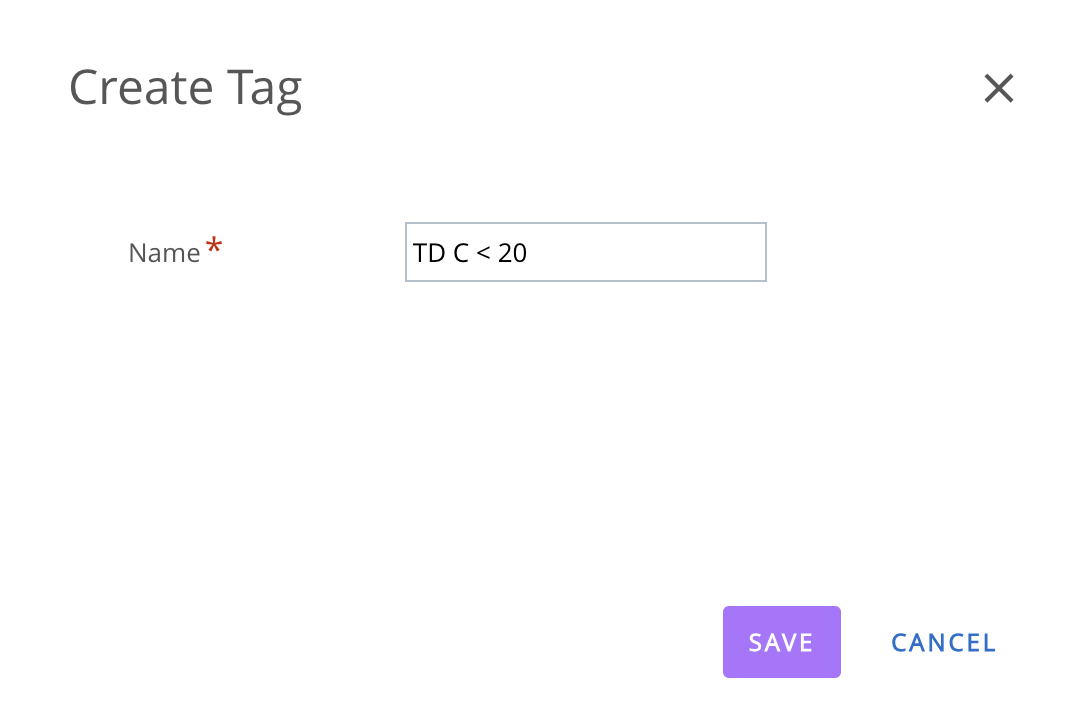
- Within the All Settings panel on the left, navigate to Devices & Users > Advanced > Tags to see a list of the existing tags. Click CREATE TAG to create a new tag.
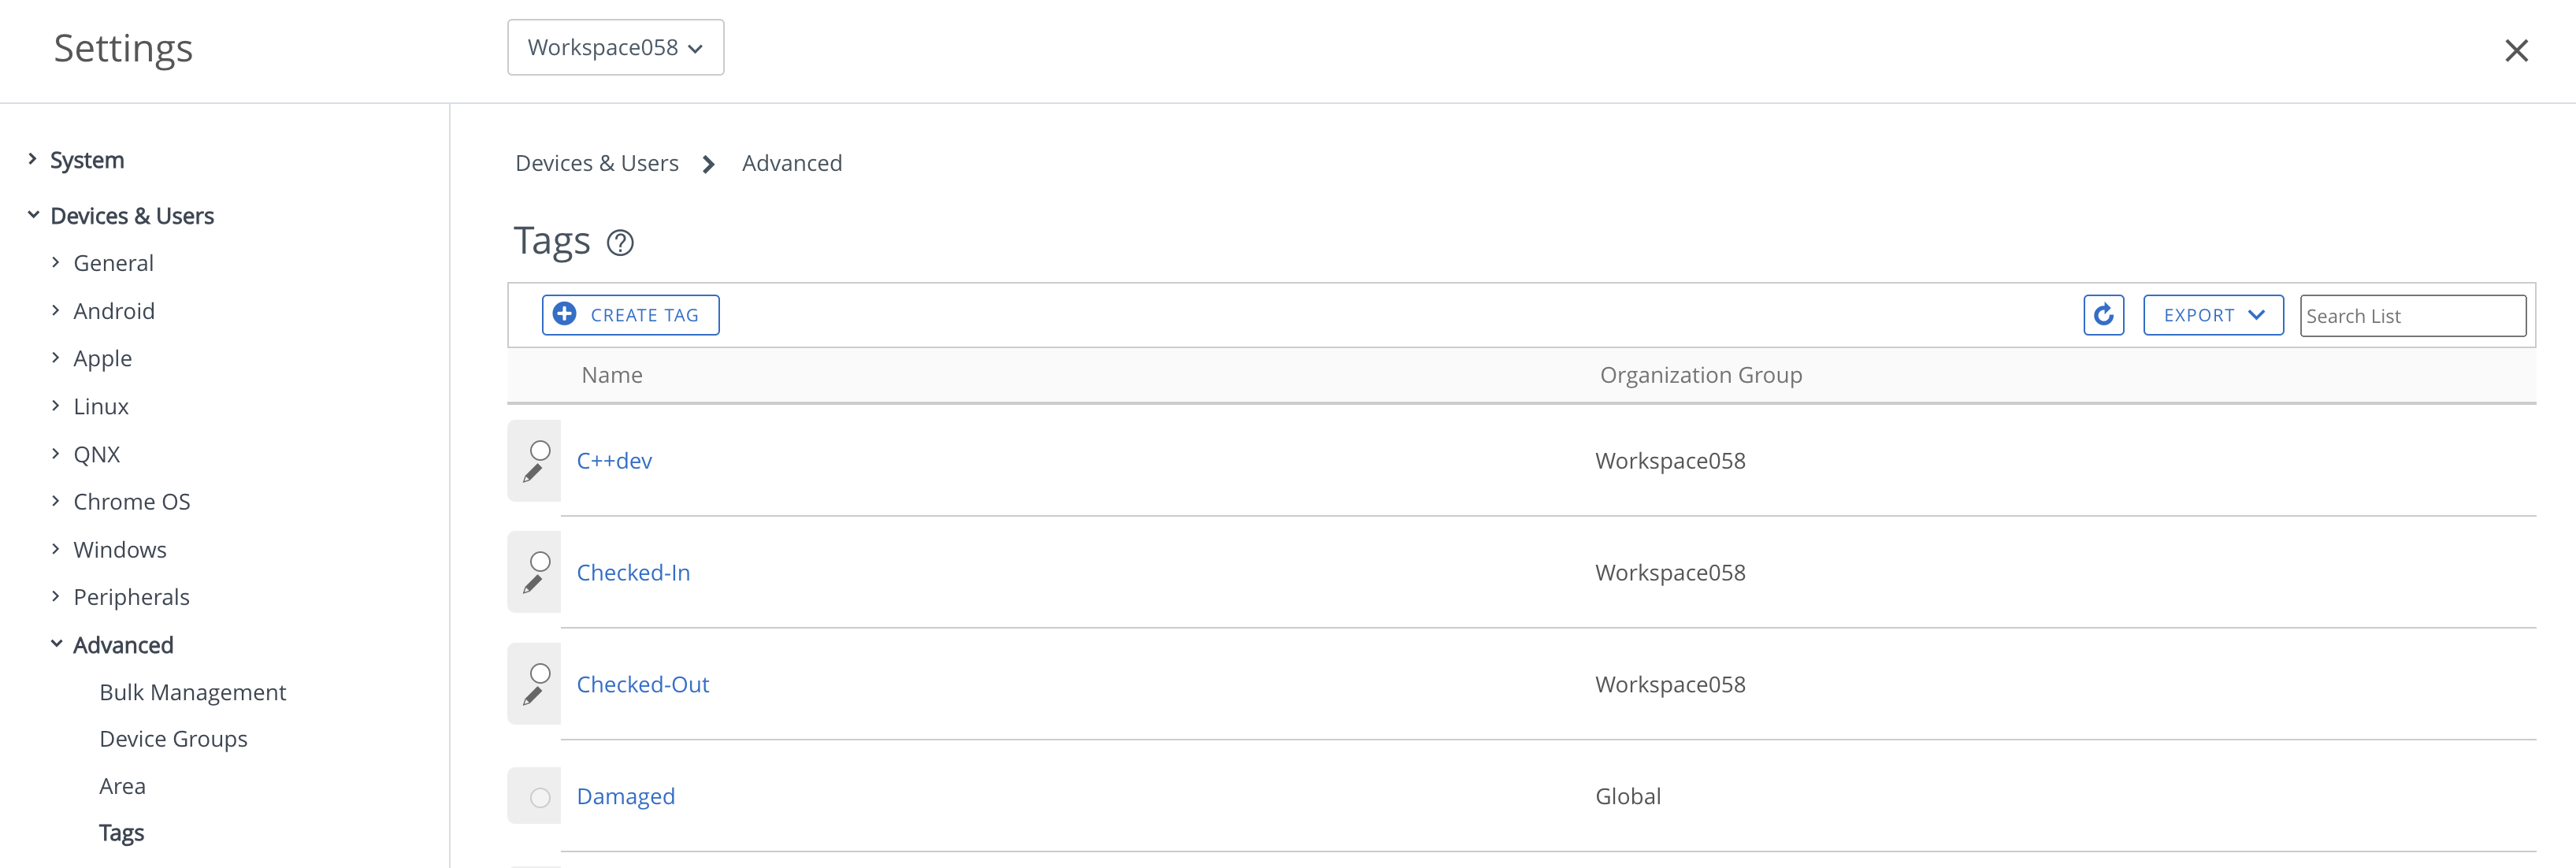
- Name the tag. For example, the initials for TOPdesk and C: drive less than 20 GB. Then click SAVE.
Create an Automation Triggered by Sensor Data
Now that you have the required components, an automated workflow can be created in Omnissa Intelligence. This example automation creates a ticket in TOPdesk when the free disk space of the system drive falls below 20 GB.
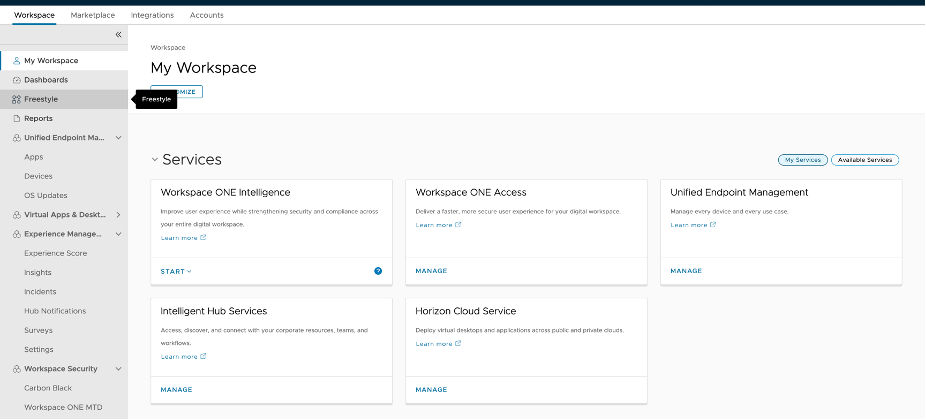
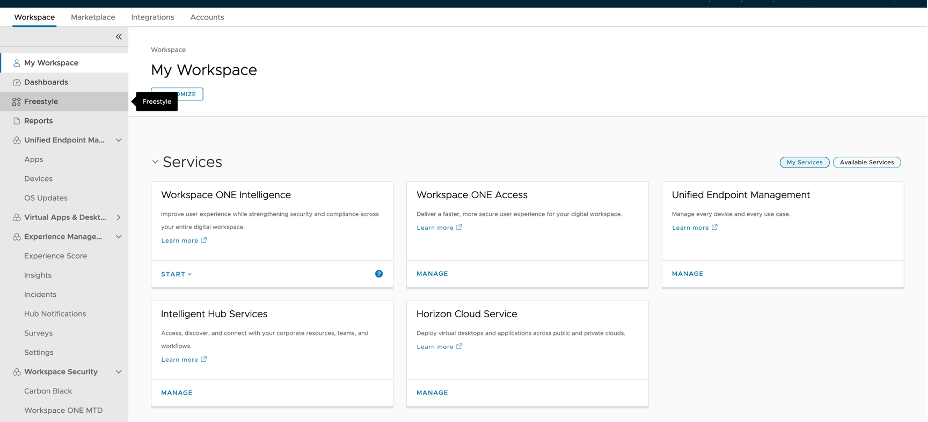
- Open the Cloud Services Console and launch the Workspace ONE service as in the Add A New Workflow Connector section of this guide. In the left menu, click Freestyle.
- Click ADD WORKFLOW to create a new workflow.

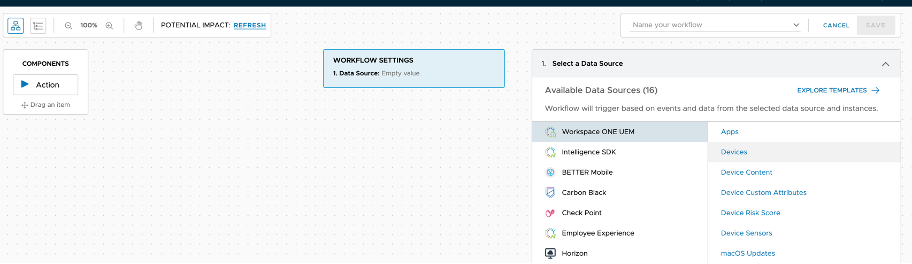
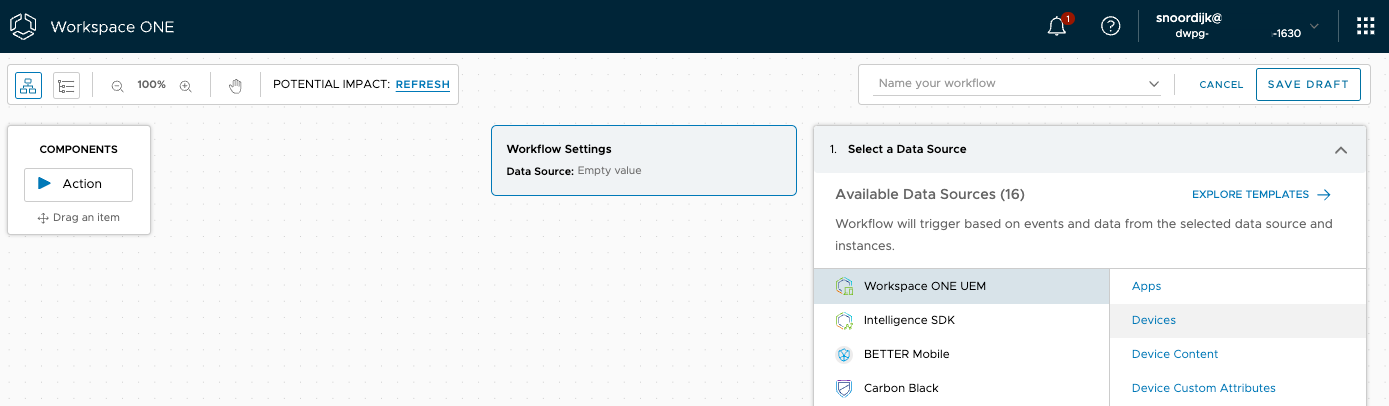
- When creating a workflow, start by selecting the data source. This example uses information from UEM, so select the Workspace ONE UEM data source and then select Devices.
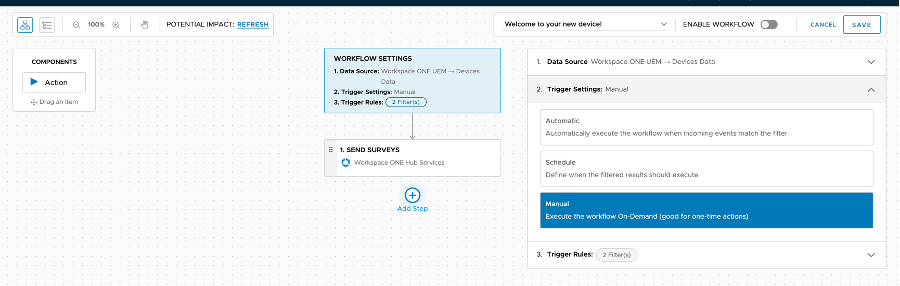
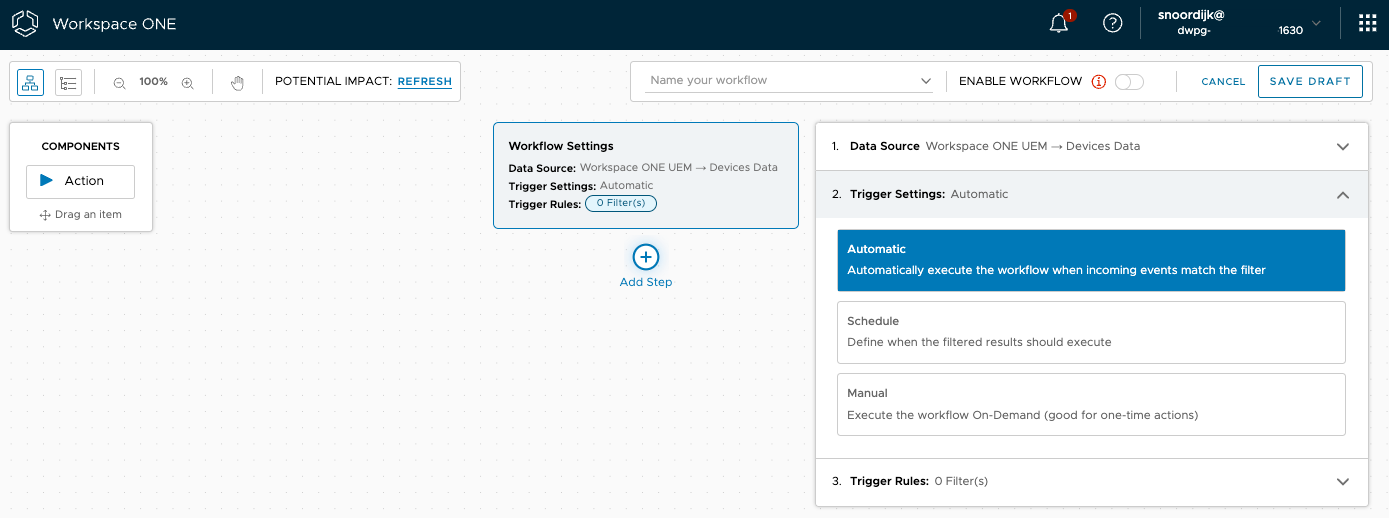
- Now select when the automation will check for the condition. Select Automatic, which will run the automation as soon as the condition (for example, low disk free space) is detected. Other options are checking for the condition on a schedule or running the workflow manually. Click the third step, 3. Trigger Rules, to continue.

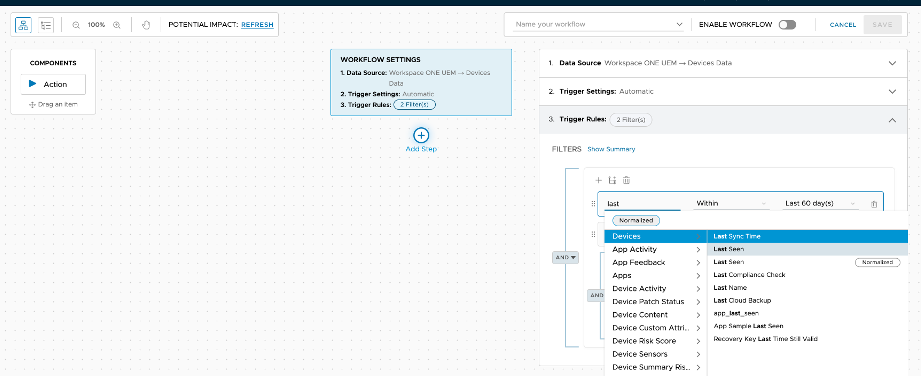
- 3. Trigger Rules is where you filter data, such as finding specific devices or users, and enter the condition to trigger the workflow. The following explains which Omnissa Intelligence data to select so you don’t have to search.
Select the filters in the following table.
Table 1: Add the First Two Data Filters
| Field 1 | Field 2 | Field 3 |
| Devices -> Last Seen | | Last 60 Days |
| Devices -> Enrollment Status | Includes | Enrolled |
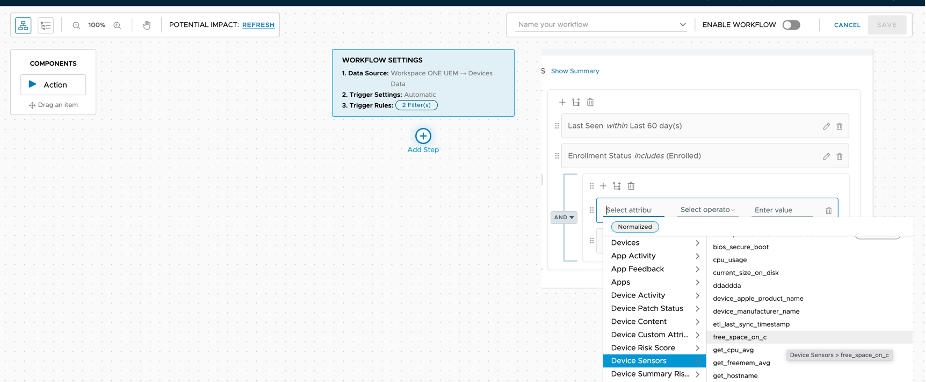
- Because you have two platforms to check for the condition (Windows and macOS) and therefore two sensors, click the forked Add Ruleset button and change AND to OR.

- Select the two sensors and configure them to show less than or equal to 20 GB. Note that the macOS sensor reports back in kilobytes. To make these values more consistent, optionally you can edit the bash script to convert to gigabytes.
Table 2: Add These Device Sensors to the Trigger Rules
| Field 1 | Field 2 | Field |
| Device Sensors -> free_space_on_c | | 20 |
| Device Sensors ->mac_get_free_space | | 2000000 |
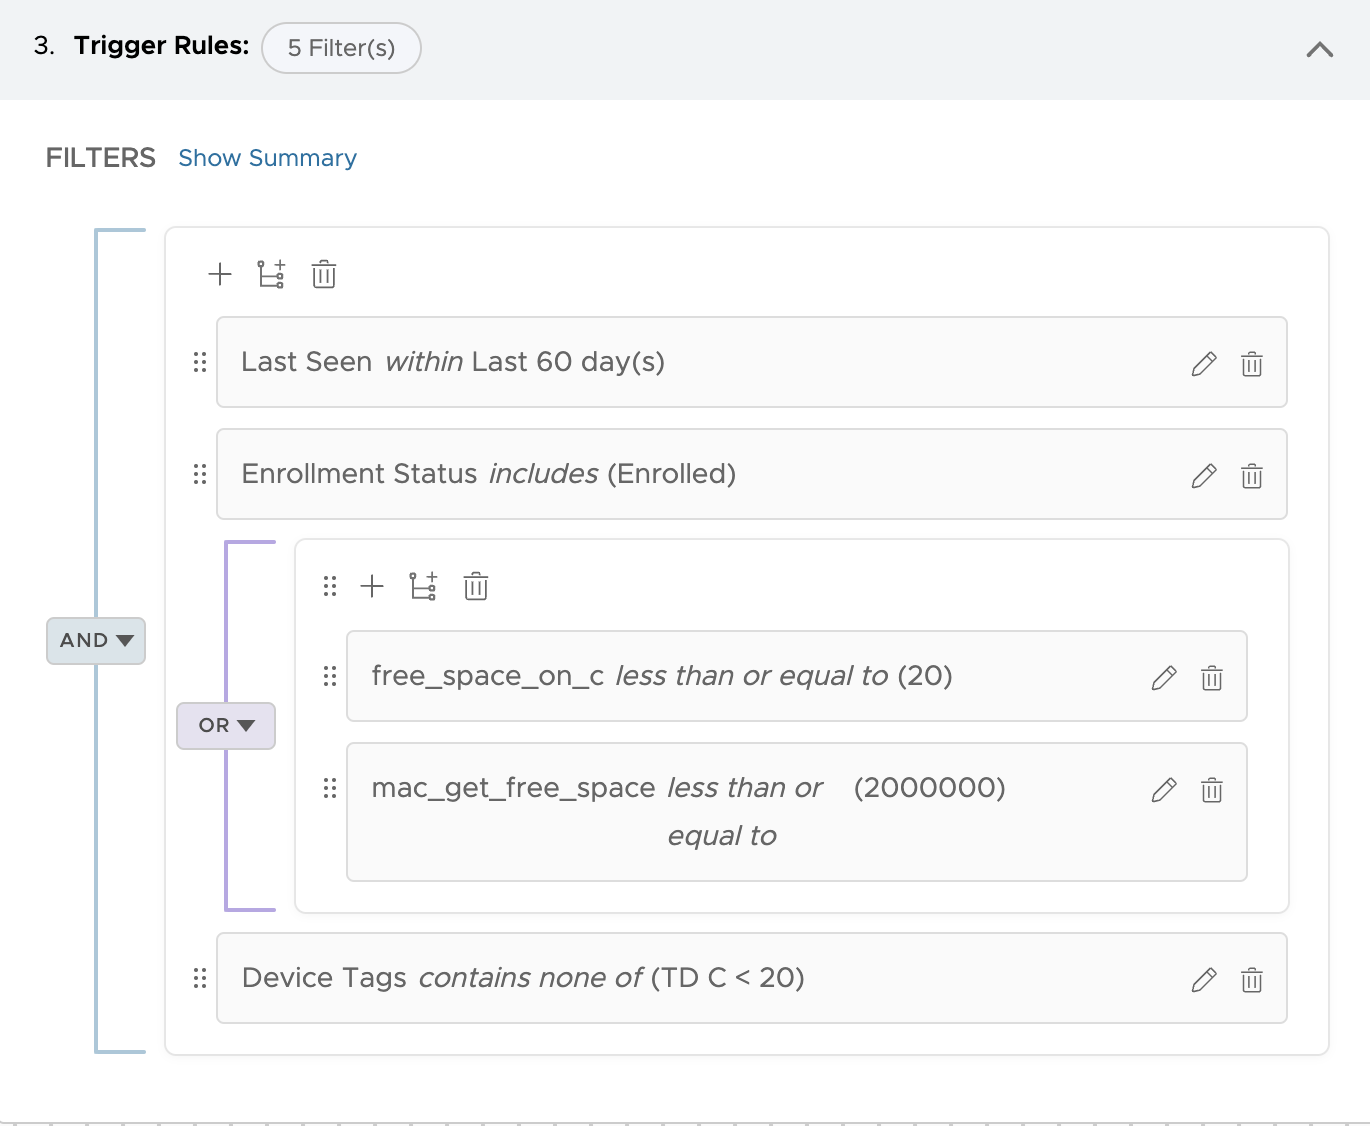
- Because you do not want the automation to keep creating tickets for the same devices over and over, check for the tag you created first.
Table 3: Add This Check to the Trigger Rules
| Field 1 | Field 2 | Field 3 |
| Device Sensors -> Device Tags | | TD C > 20 |
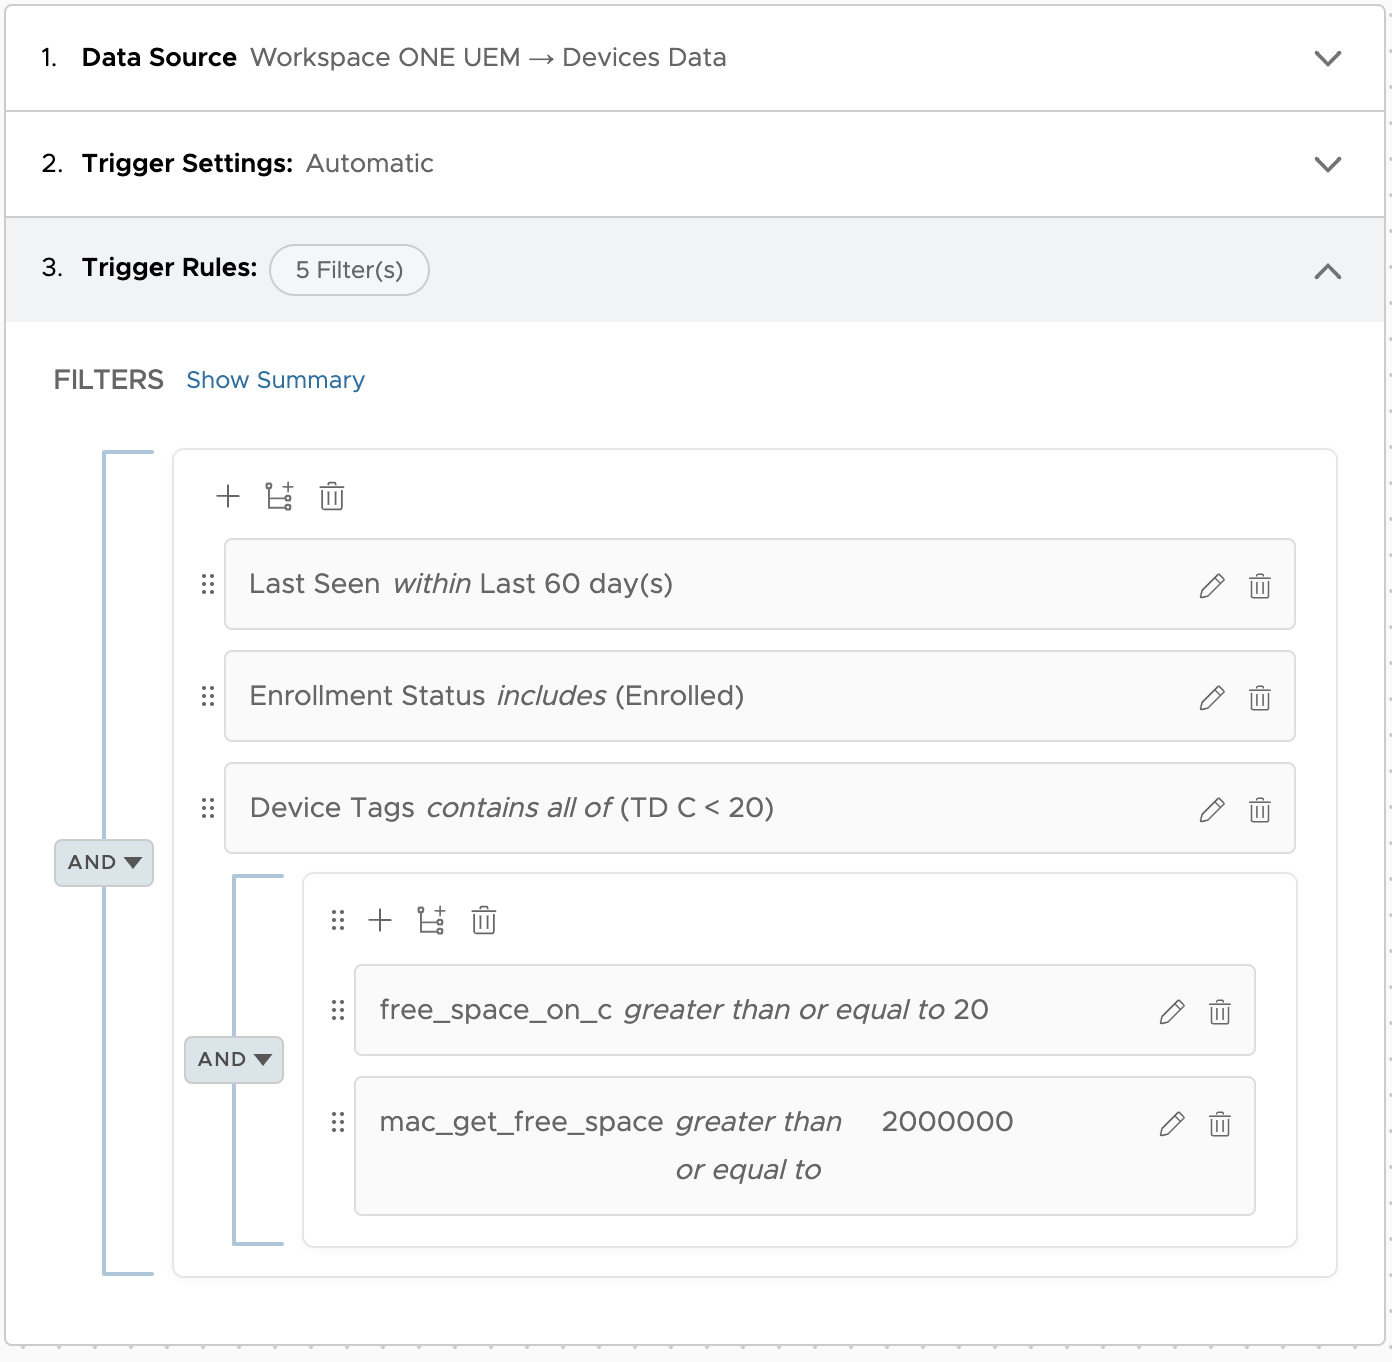
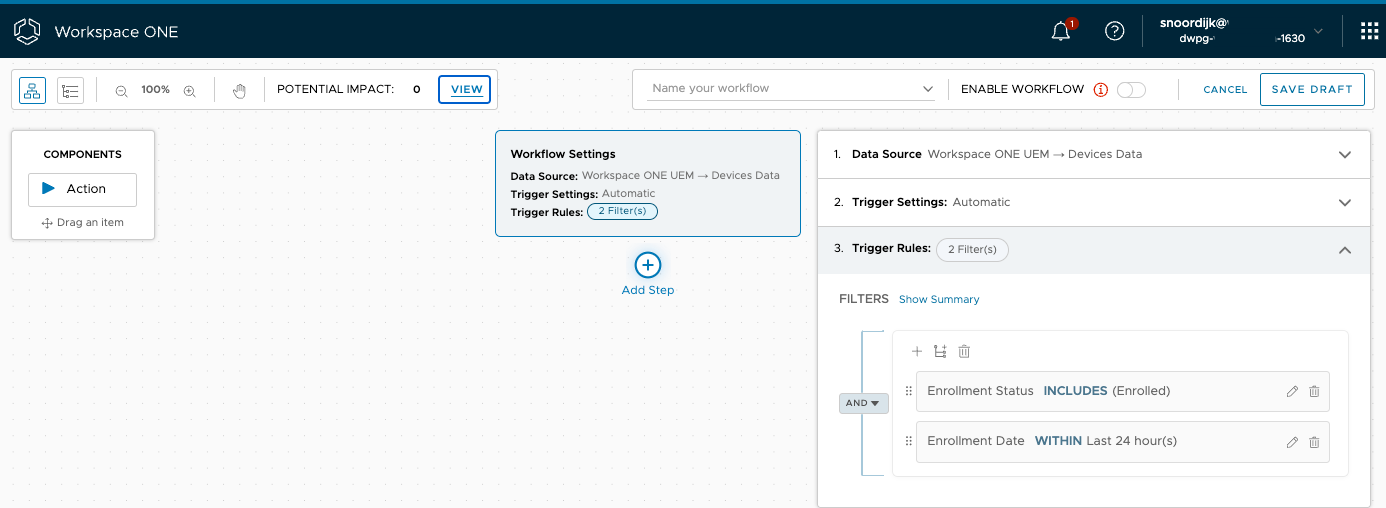
- When done, the trigger rules should look like the image below.
- Confirm the trigger rules are working correctly by checking and refreshing the Potential Impact link in the top left of the Freestyle Workflows workspace. Click VIEW to see which devices are found using these filters.
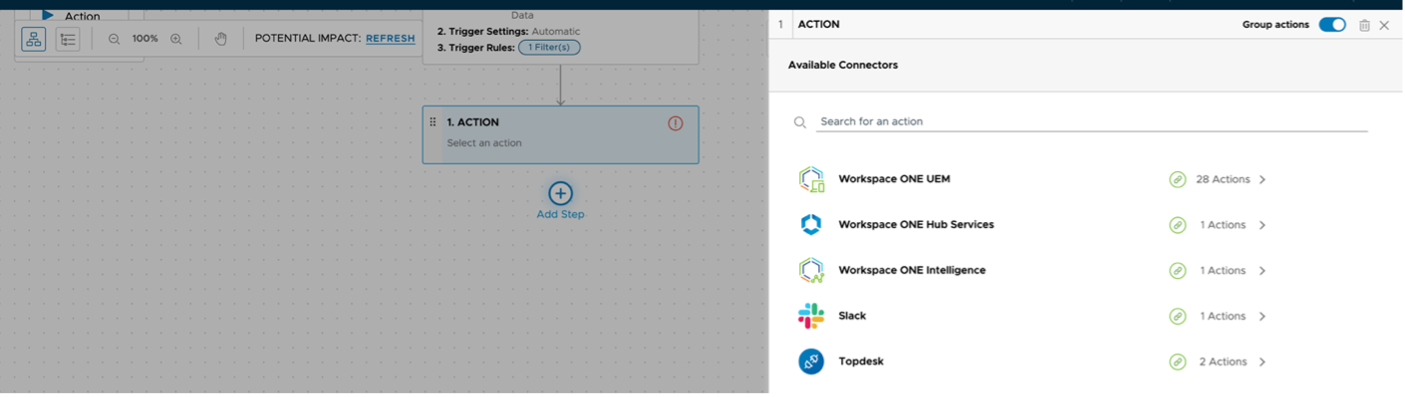
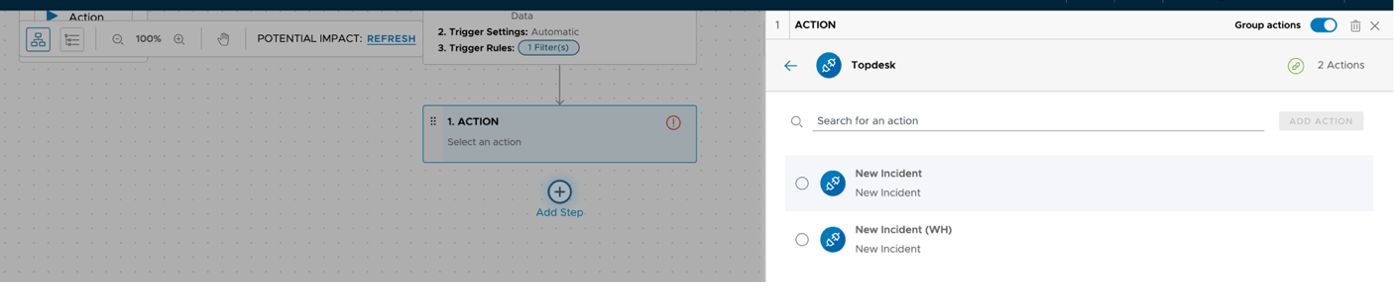
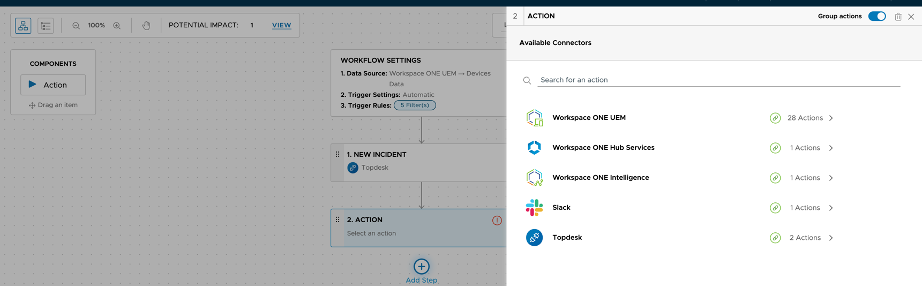
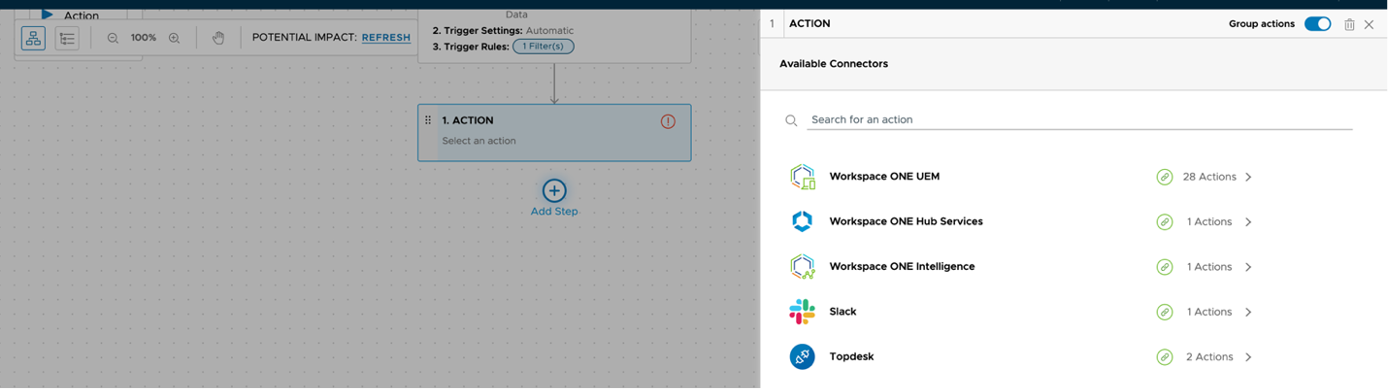
- Now configure the action if the condition is met. Under the Workflow Settings box in the center of the screen, click the Add Step plus sign and click Action. Displayed are all available connectors for actions. Select the TOPdesk custom connector.
Method 1: Action with Default APIs
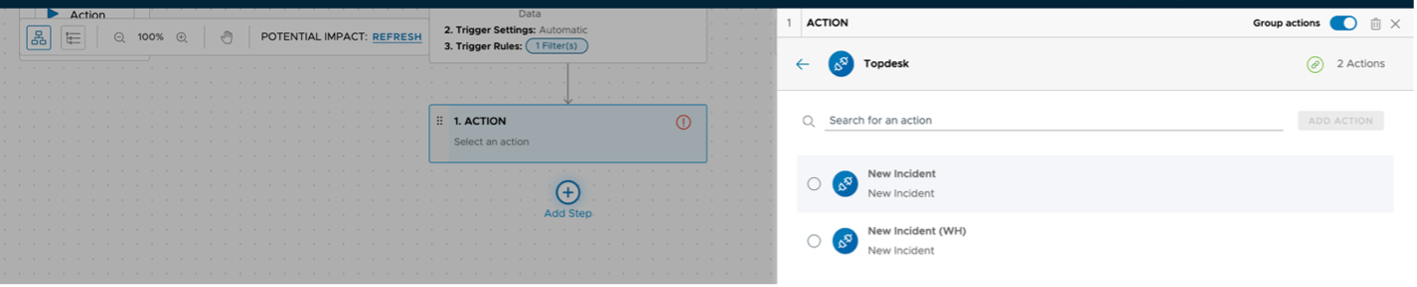
The two actions to create a TOPdesk ticket are listed: Method 1, New Incident, using default APIs, and Method 2, New Incident (WH), using a webhook. This section will cover Method 1 (New Incident). For the New Incident (WH) variant, see Method 2: Action Using the Webhook.
- Select the New Incident action to continue.
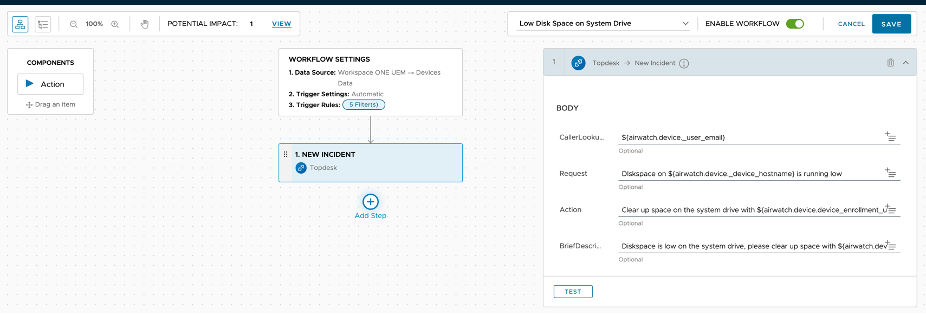
- The next screen lists the fields that you provided in the connector. Field values can consist of plain text or lookup values from data in Omnissa Intelligence. Lookup values are easily inserted by clicking the + sign with lines under it at the end of the field. Enter the following for this example:
CallerLookup: ${airwatch.device._user_email}
Request: Diskspace on ${airwatch.device._device_hostname} is running low
Action: Clear up space on the system drive with ${airwatch.device.device_enrollment_user_display_name}
BriefDescription: Diskspace is low on the system drive, please clear up space with ${airwatch.device.device_enrollment_user_display_name} - When finished, click TEST.
- Next, select an example user to test this request and click NEXT.
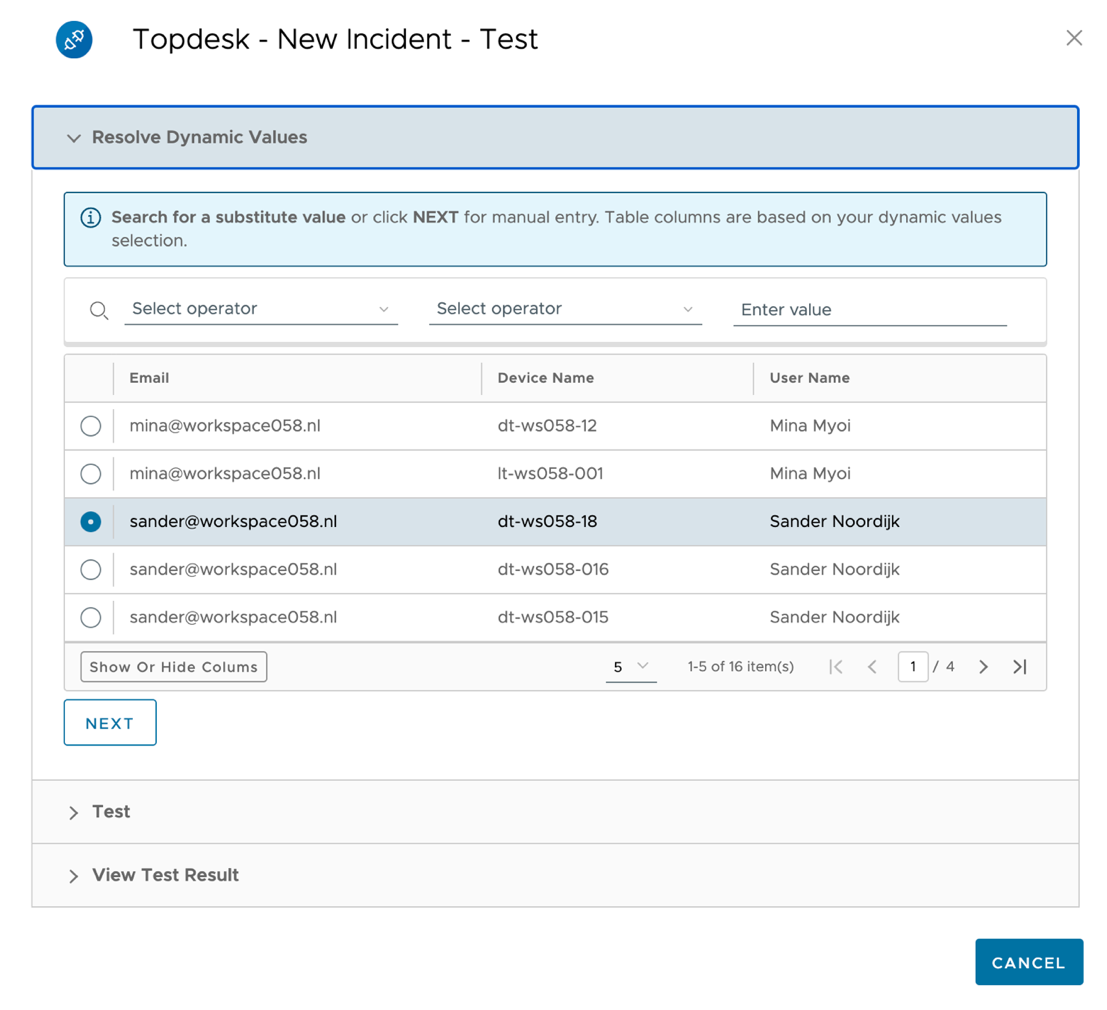
- This will test if the lookup values are fetched correctly and what the ticket should include. Click TEST to send the actual command.
- The ticket should be created successfully using this test. Verify this in TOPdesk.
Method 2: Action Using the Webhook
- Alternatively, select the action that uses the webhook integration method, in the following example, New Incident (WH).
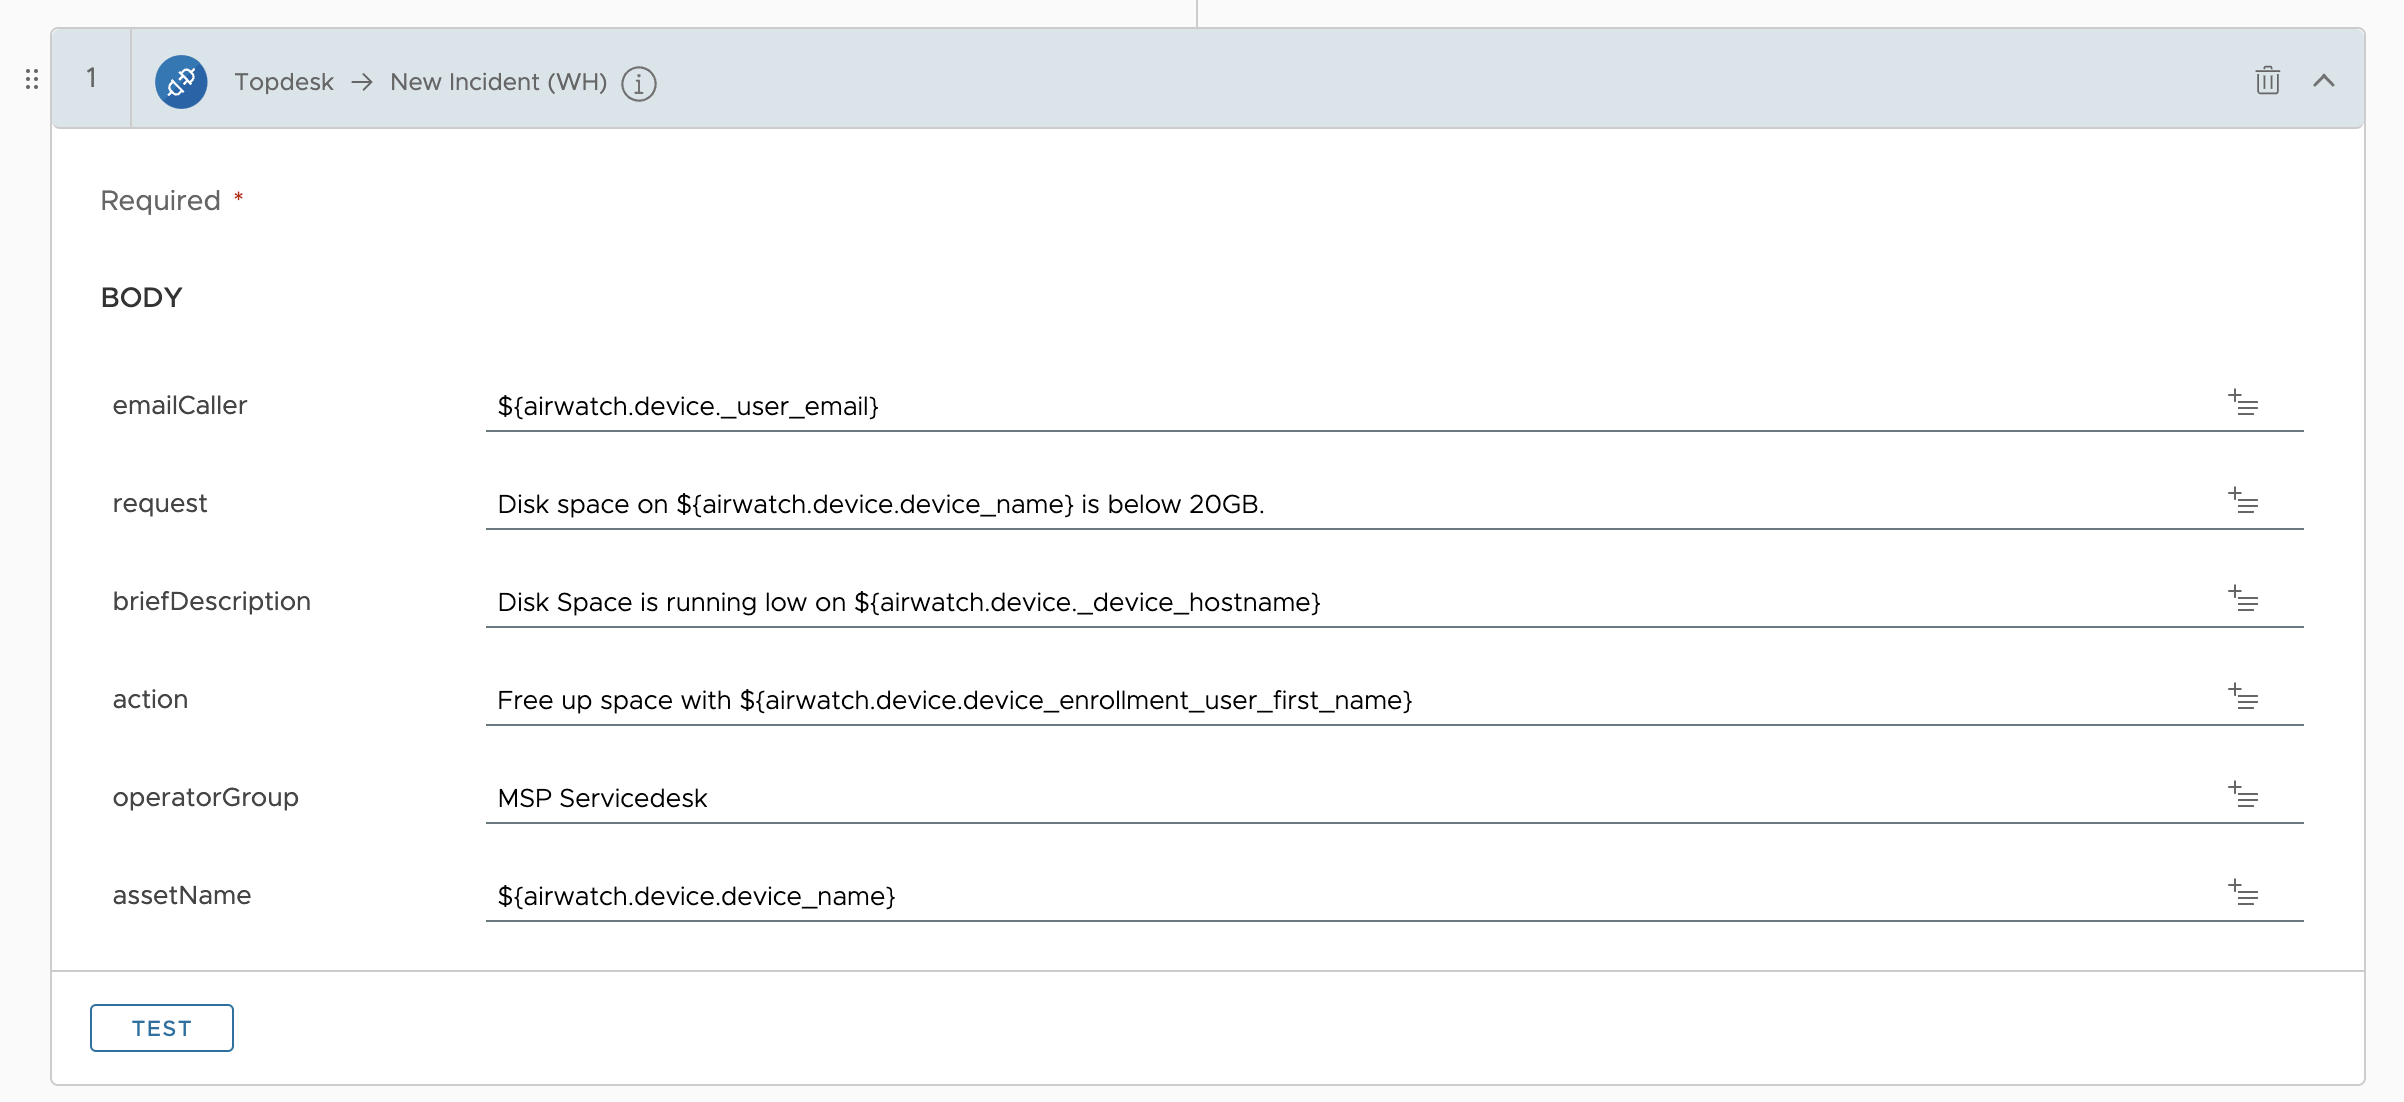
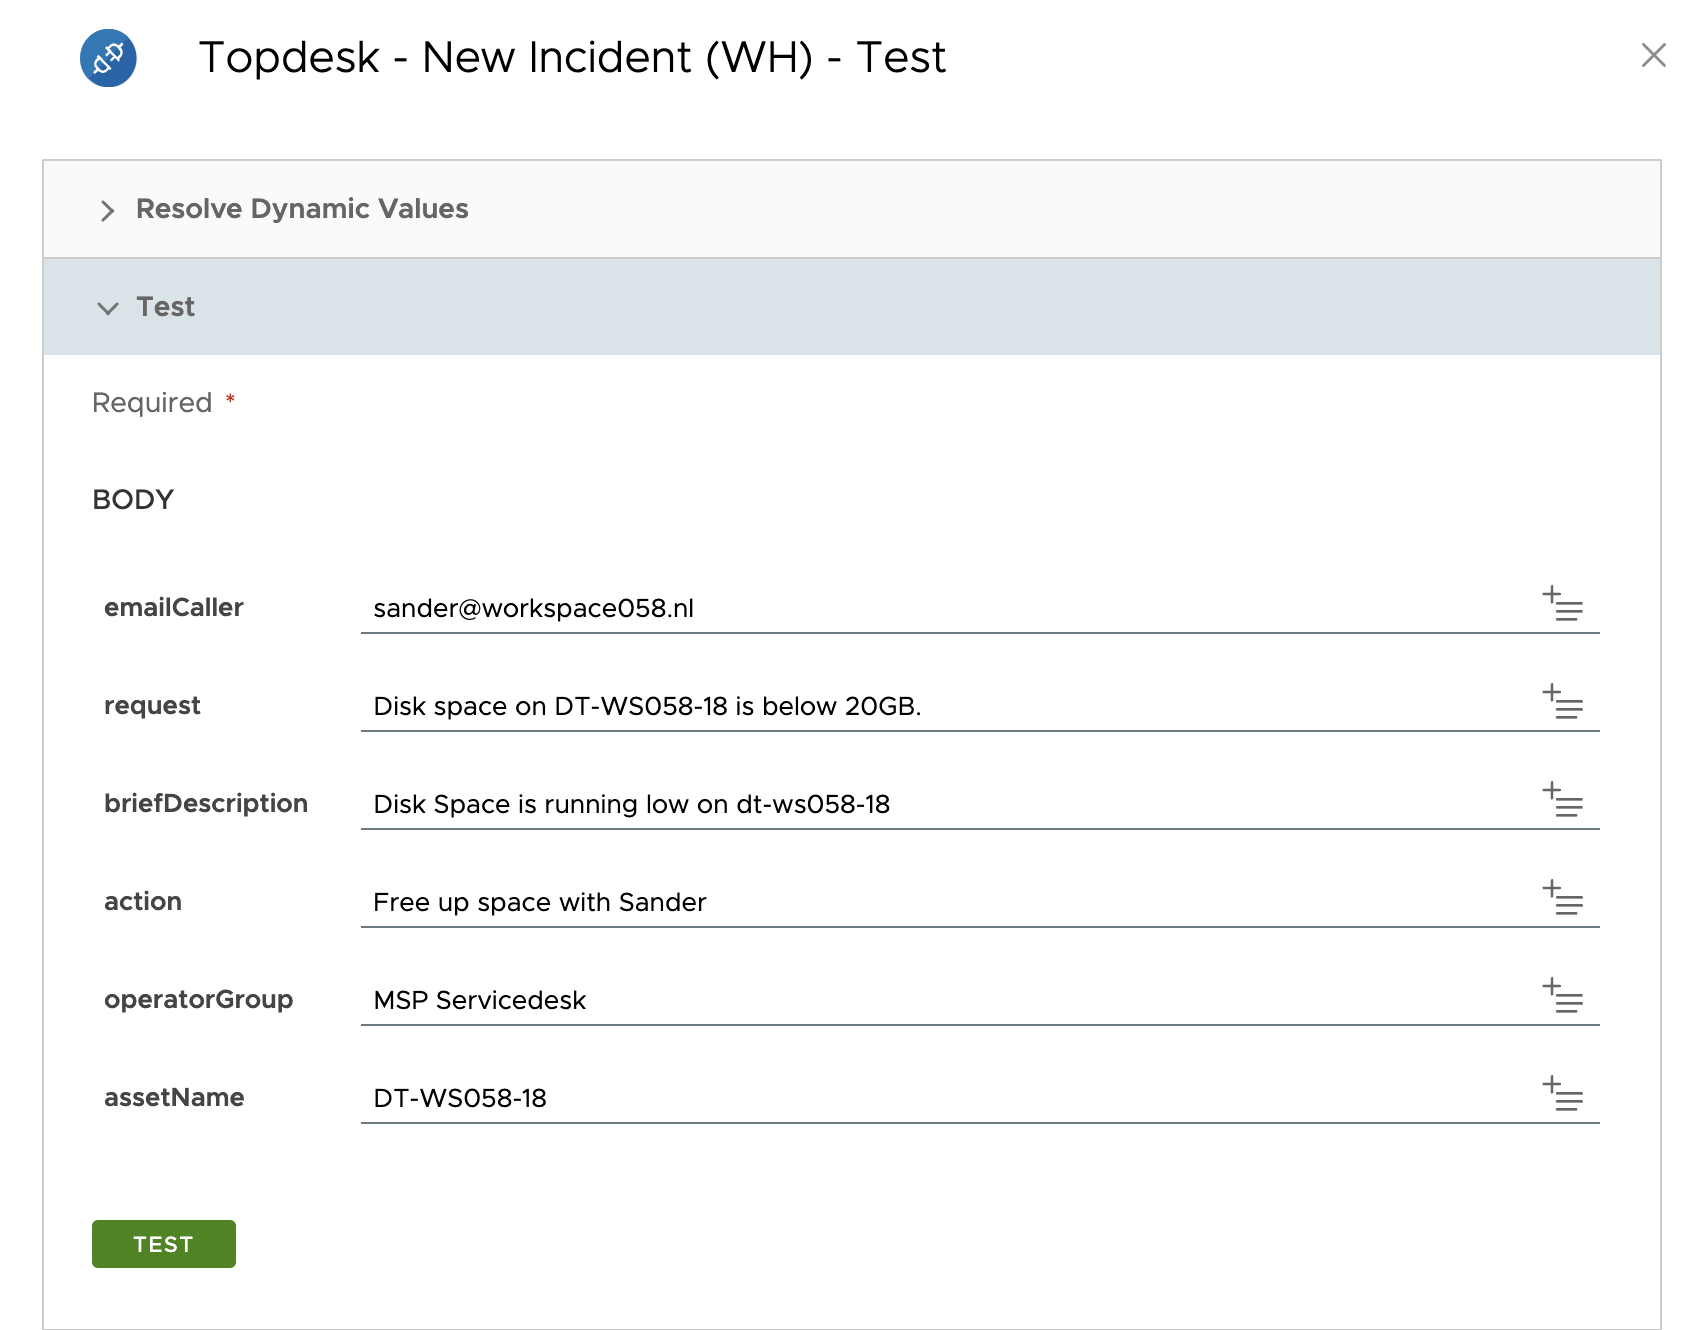
- The next screen lists the fields you provided in the connector. Values for these fields can consist of plain text or lookup values from data in Omnissa Intelligence. Lookup values are easily inserted through the + sign with lines under it at the end of the field. Enter the following values:
emailCaller: ${airwatch.device._user_email}
request: Disk space on ${airwatch.device._device_hostname} is below 20GB
briefDescription: Disk space is running low on ${airwatch.device.device_enrollment_user_display_name}
action: Free up space with ${airwatch.device.device_enrollment_user_display_name}
operatorGroup: <Operator Group Name>
assetName: ${airwatch.device.device_name} - When finished, click TEST.
- Select a user to test and click NEXT to continue.
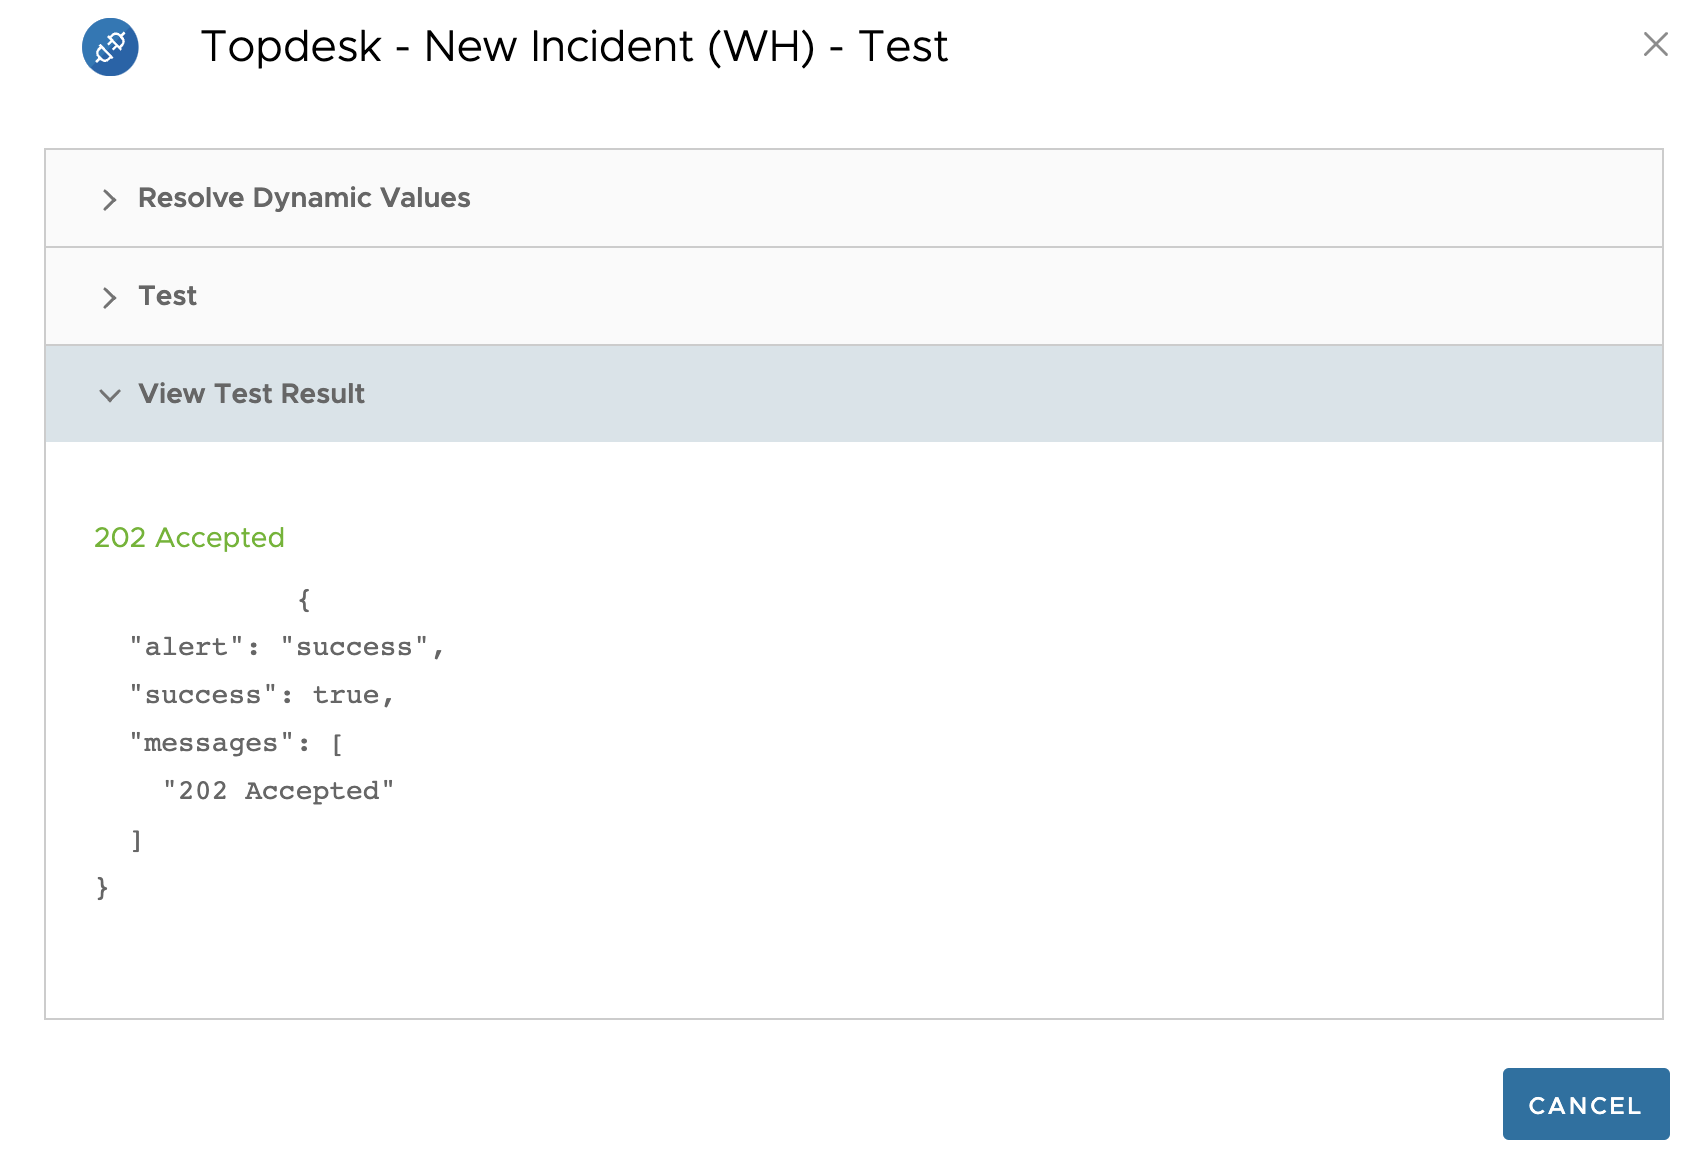
- The next screen shows if the lookup values for each field were fetched correctly. Then click TEST to run the action.
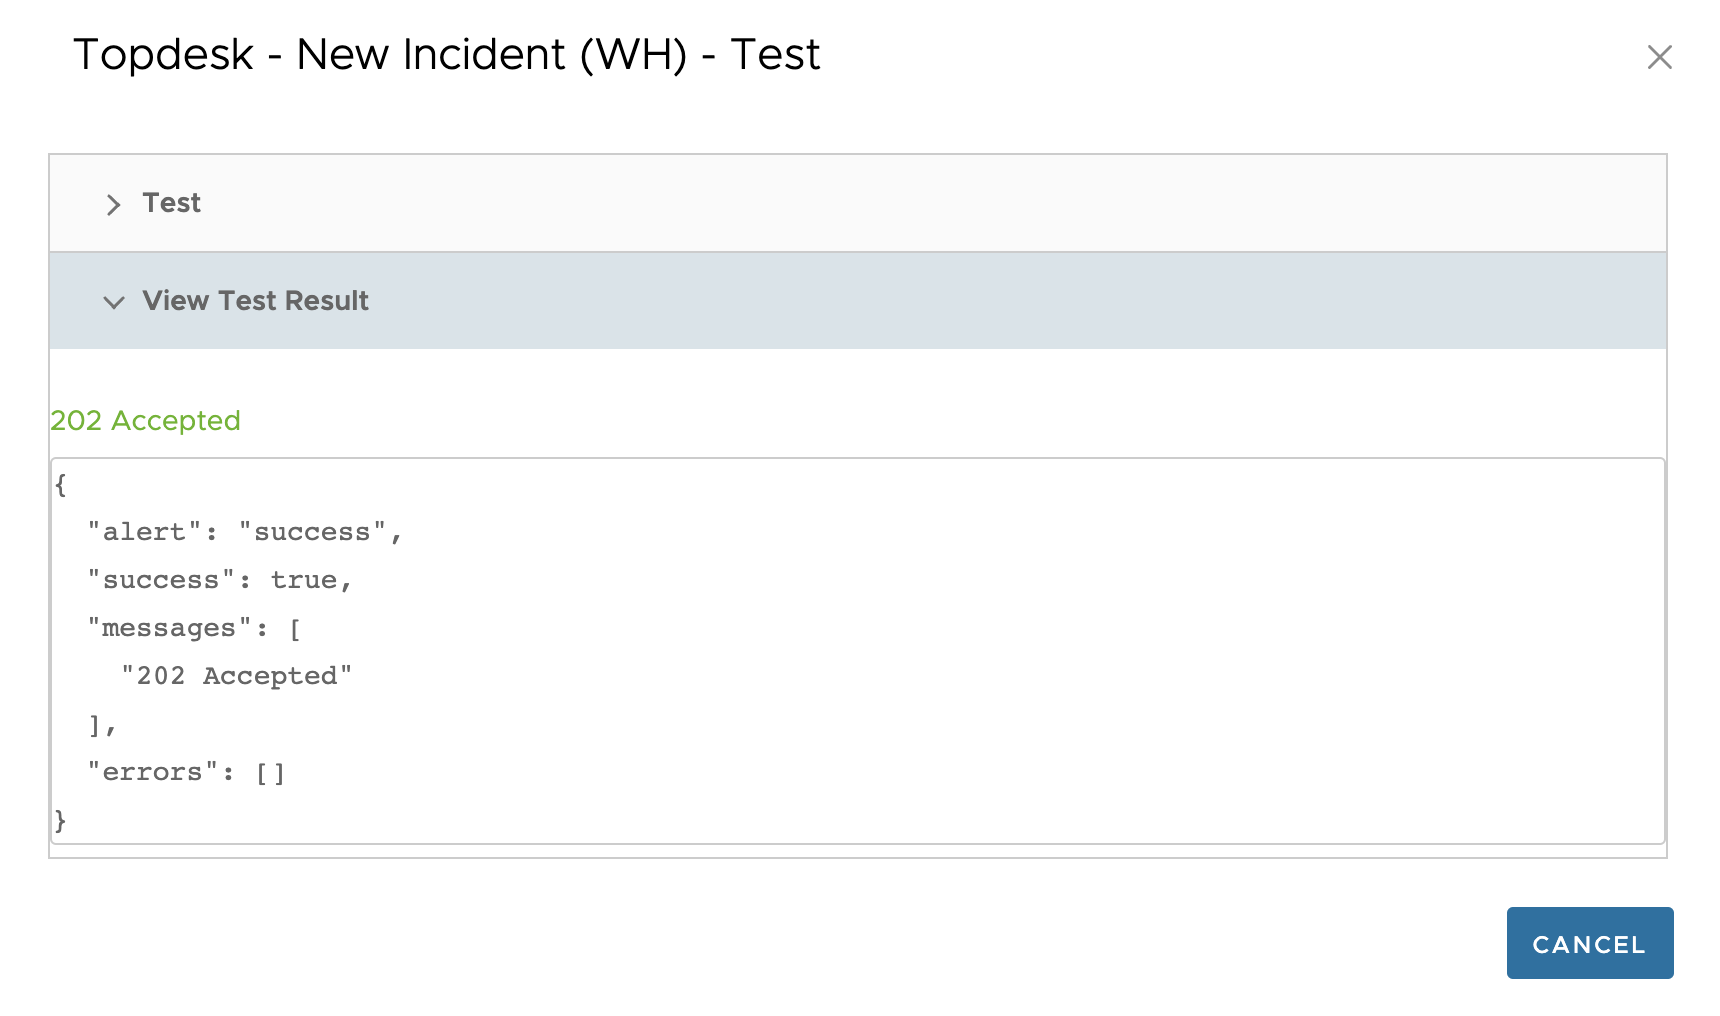
- A successful test will return a 202 Accepted response. Click CANCEL to continue.
Add a Tag After the Workflow Runs Successfully
For the final step of the workflow, add a tag to the device to indicate that the ticket has been created.
- Click the + sign under the last action to add a step and select Workspace ONE UEM from the available connectors.
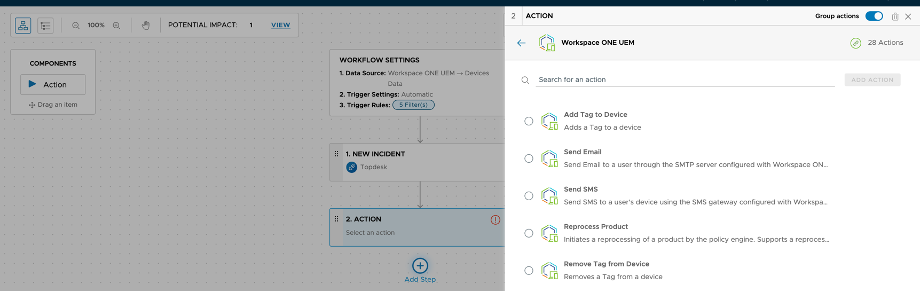
- The next screen shows the list of all possible actions for the Workspace ONE UEM connector. Select Add Tag to Device. You can also search for an action using the search bar. Click ADD ACTION when finished.
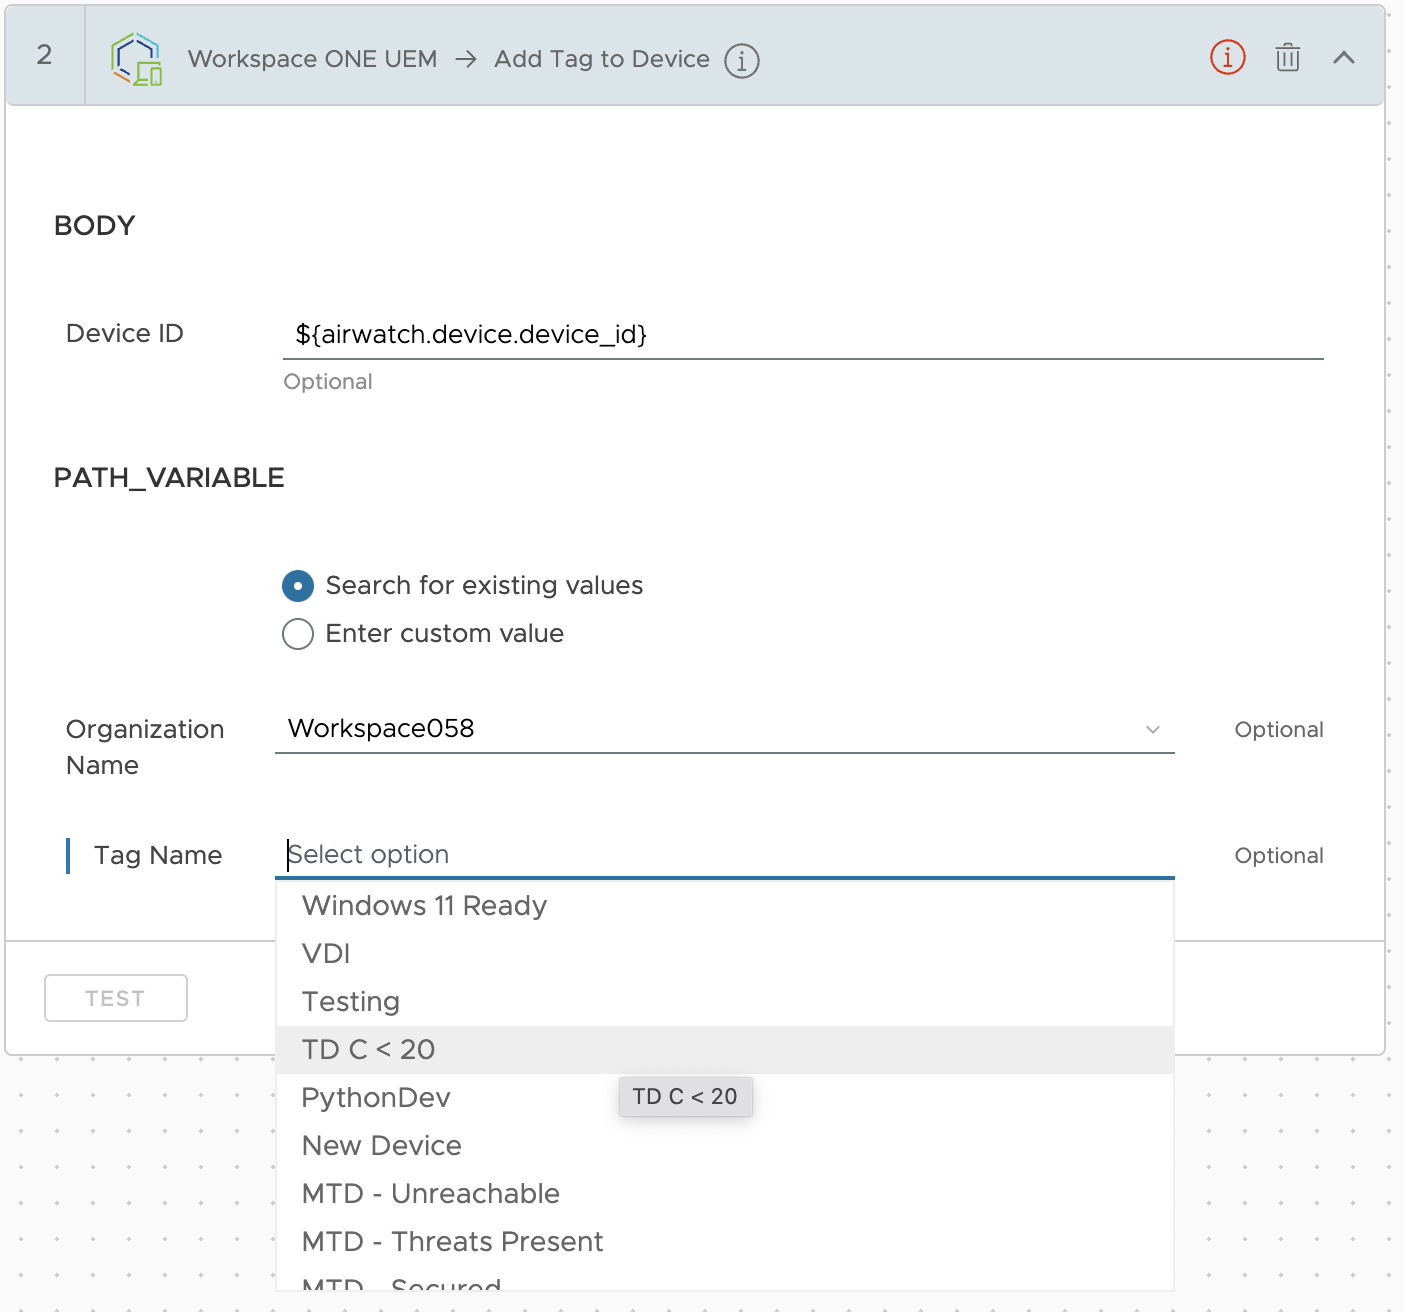
- Select the organization name and tag name from the list, or enter them manually.
Organization Name: <Your OG>
Tag Name: TD C < 20
This automated workflow is now complete.
Create an Automation to Remove the Device Tag
The previous workflow adds a tag to a device to indicate a ticket has been created and the automation does not need to repeat. Now assume that the service desk has resolved the storage issue with the end user and the tag now needs to be removed. The following automation will remove the tag.
- Navigate to Freestyle and click ADD WORKFLOW like you did in the Create an Automation Triggered by Sensor Data section of this document.
- First, select the data source. This example uses Workspace ONE UEM data, so select Workspace ONE UEM then Devices. Then select Automatic for the trigger settings.
- Next, use the following to complete the trigger rules.
Table 4: Filters for Trigger Rules
| Field 1 | Field 2 | Field 3 |
| Device -> Last Seen | | Last 60 days |
| Device -> Enrollment Status | | Enrolled |
| Device -> Device Tags | | TD C < 20 |
| Device Sensors -> free_space_on_c | | 20 |
- Add a rule set using the fork with plus sign button to include the Windows and macOS sensors you created, and check for the value in kilobytes for macOS.
- Next, add an action to the workflow to remove the tag from devices that no longer have low storage. Click + ADD STEP and select Action.
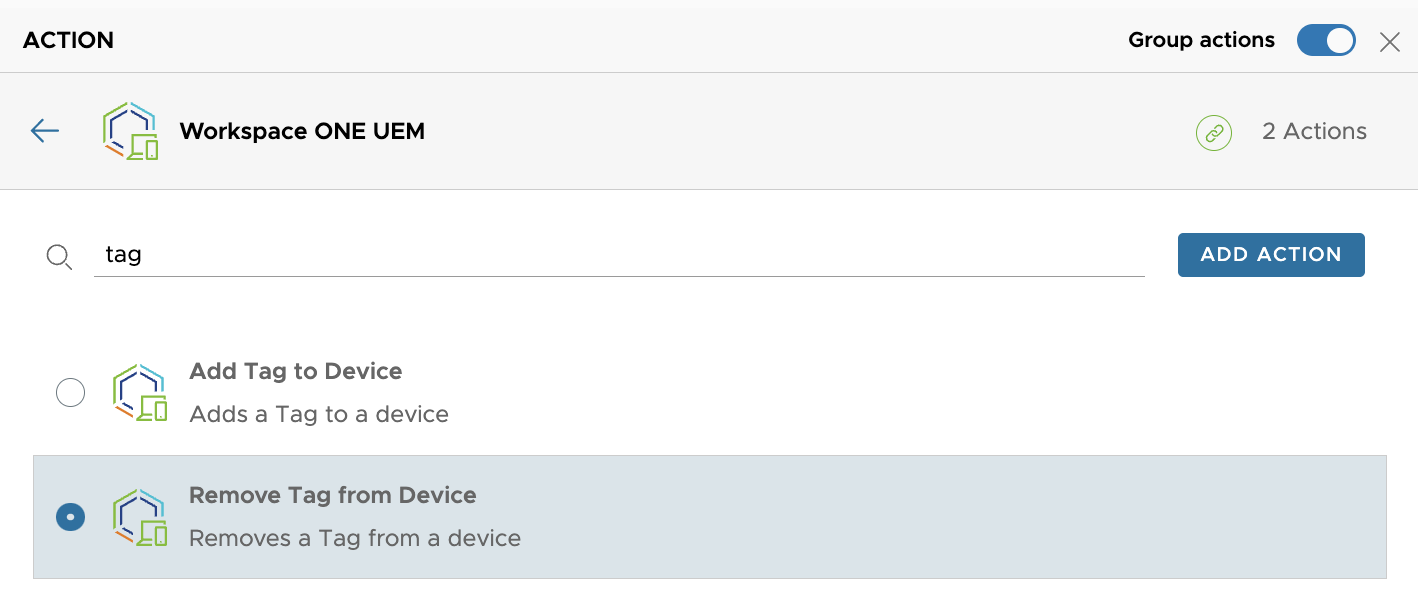
- Enter tag into the search box and click Workspace ONE UEM where two actions are found.

- Now click the radio button for Remove Tag from Device and complete this step by clicking ADD ACTION.
- Expand the new Workspace ONE UEM Remove Tag from Device item and use the drop-down menus to select the organization name and the tag name used in the previous automation.
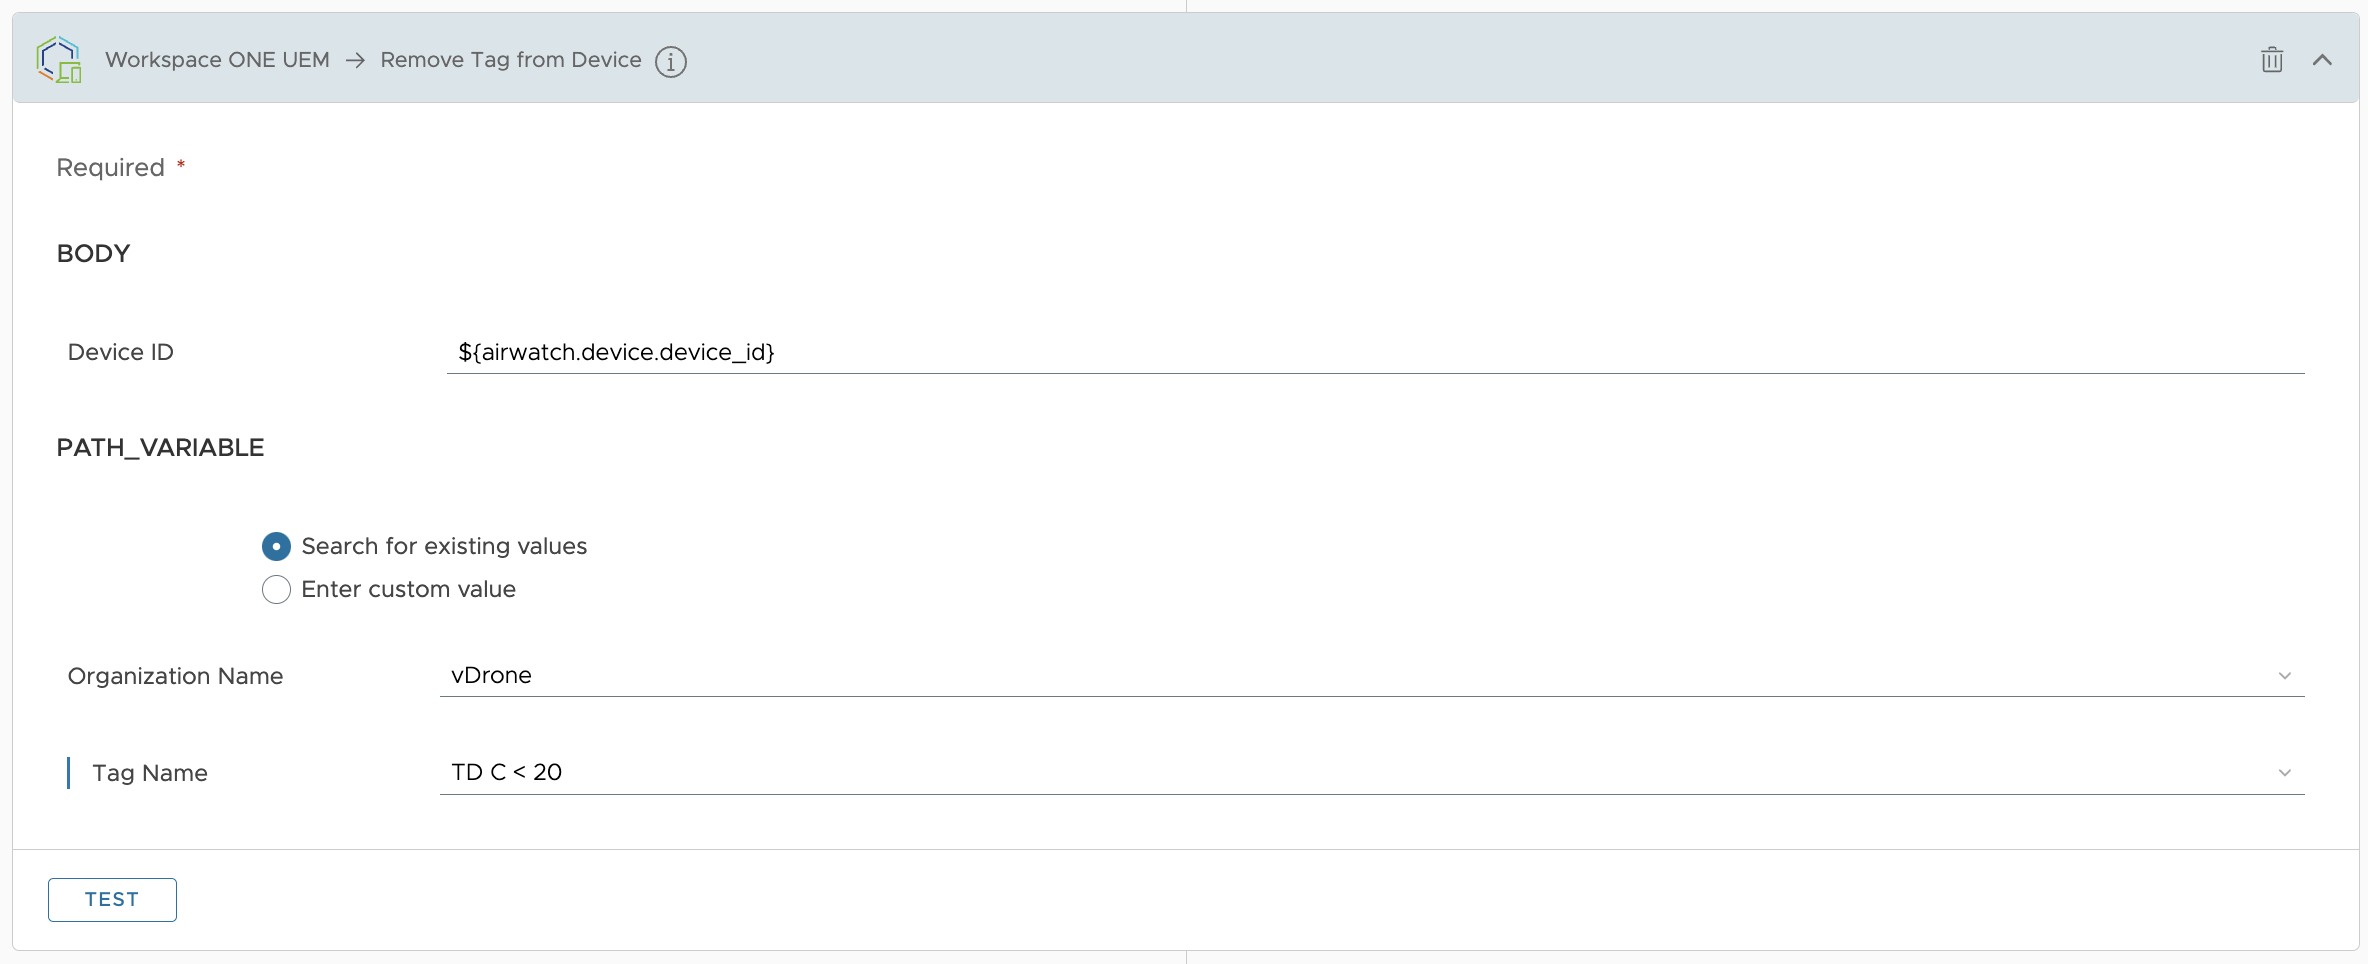
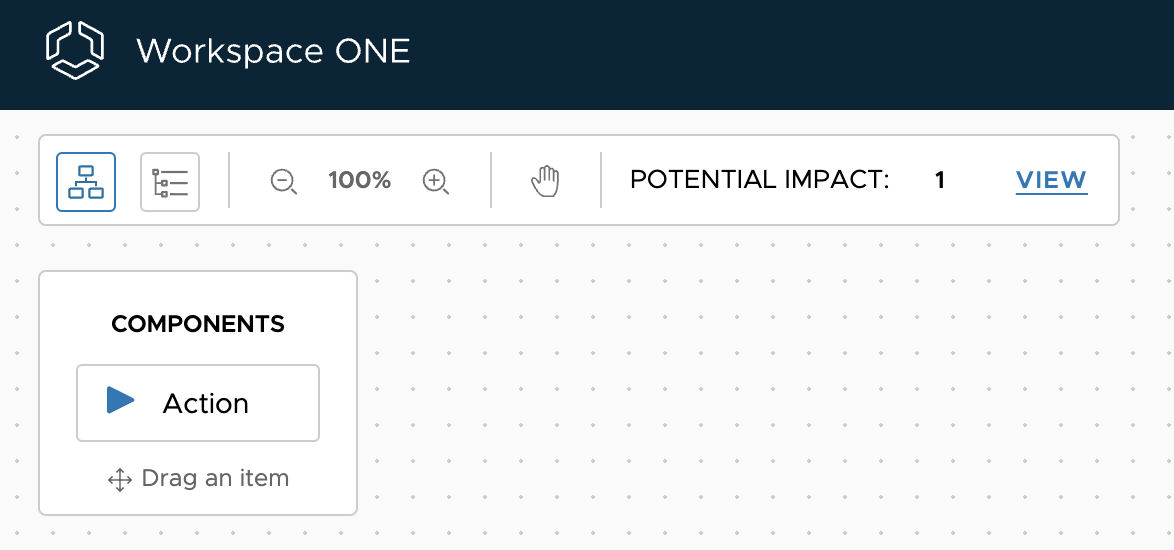
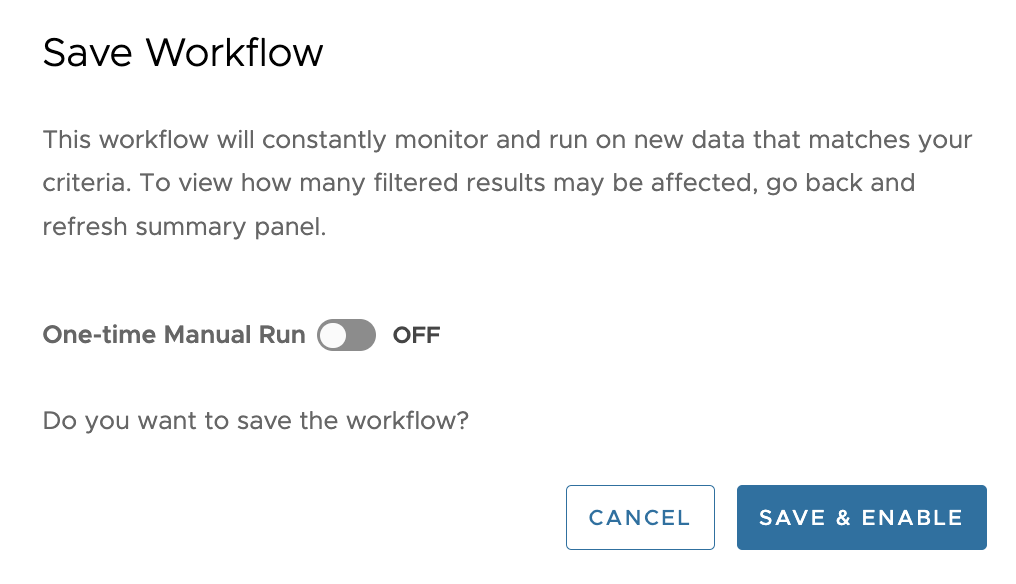
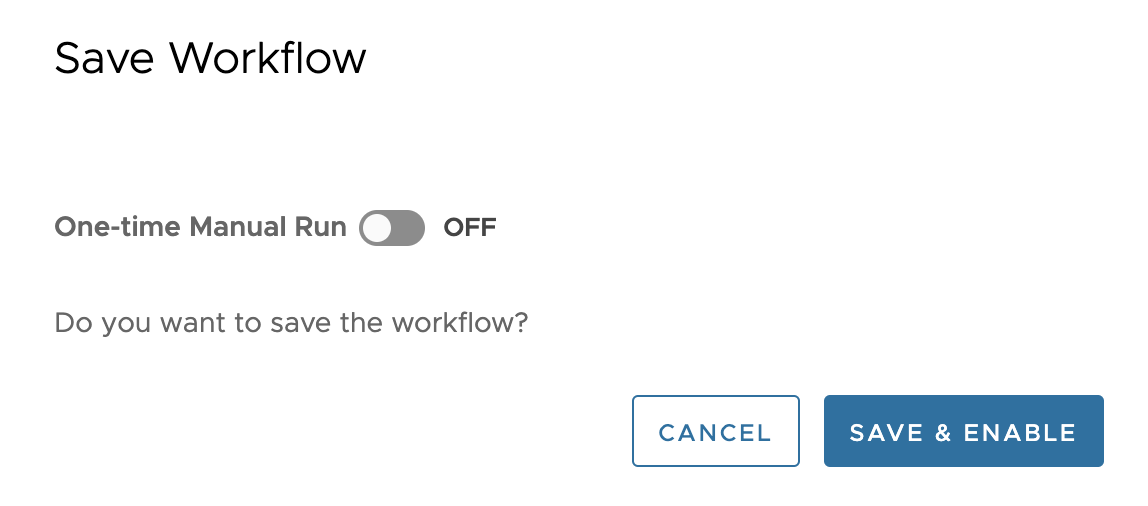
- In the top bar, verify POTENTIAL IMPACT, AUTOMATION NAME, and ENABLE WORKFLOW are correct before saving the workflow.
![]()
- Lastly, you can optionally turn on One-time Manual Run and complete the configuration by clicking SAVE & ENABLE.
Example 2: Employee Sentiment Survey
Understanding employee sentiment is critical to optimizing the experience with technology. Gathering information about user sentiment also enables the service desk to provide proactive support so that employees do not face challenges silently. Omnissa Intelligence enables service desk teams to collect user sentiment data via micro surveys delivered directly to employees by the Workspace ONE Intelligent Hub native app on devices and through a browser. Survey results can be used to trigger a workflow automation. This example will ask a new employee if they need assistance after their device is initially enrolled into Workspace ONE UEM.
Create a Survey
- Open the Omnissa Connect Cloud Services portal (https://connect.omnissa.com) and click Launch Service on the Workspace ONE tile.
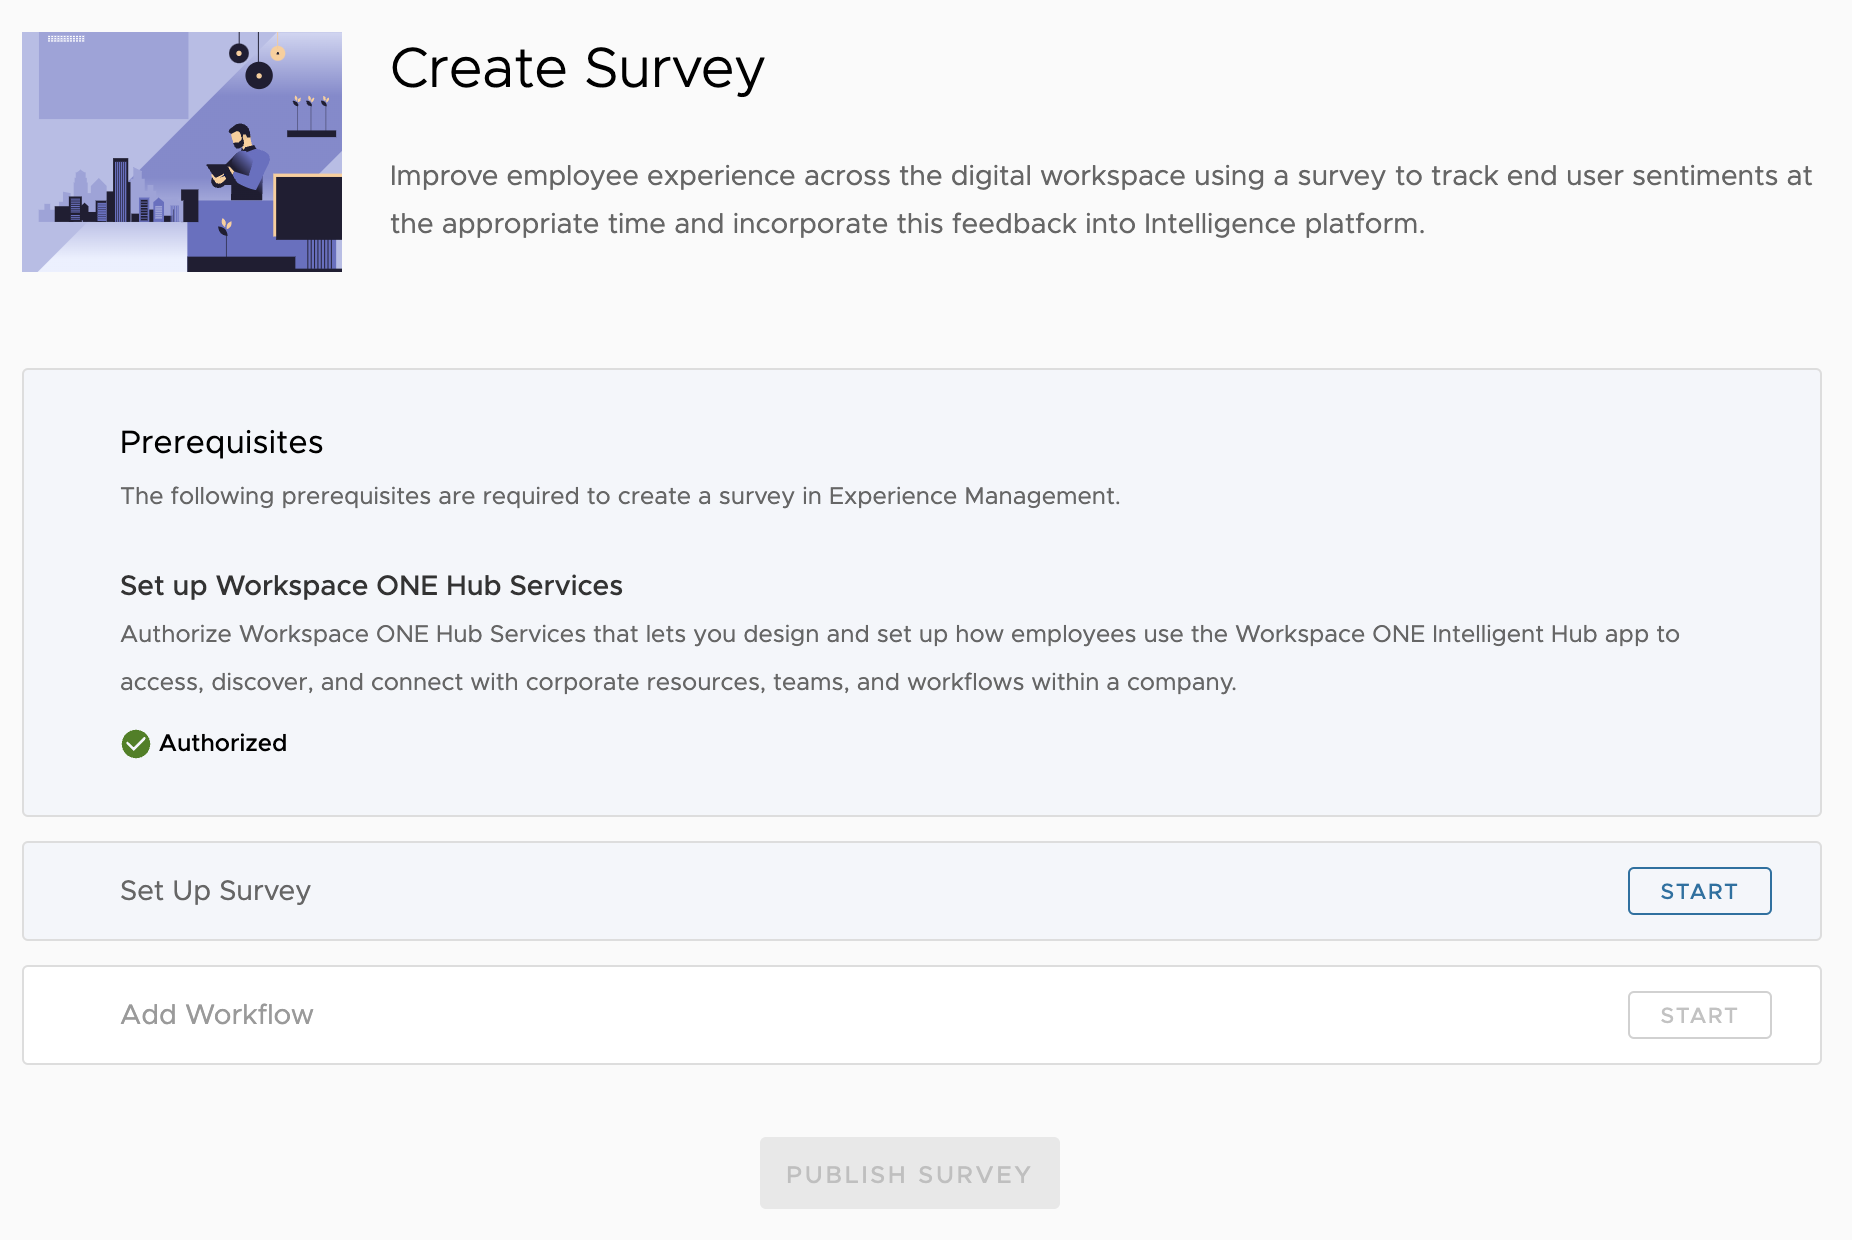
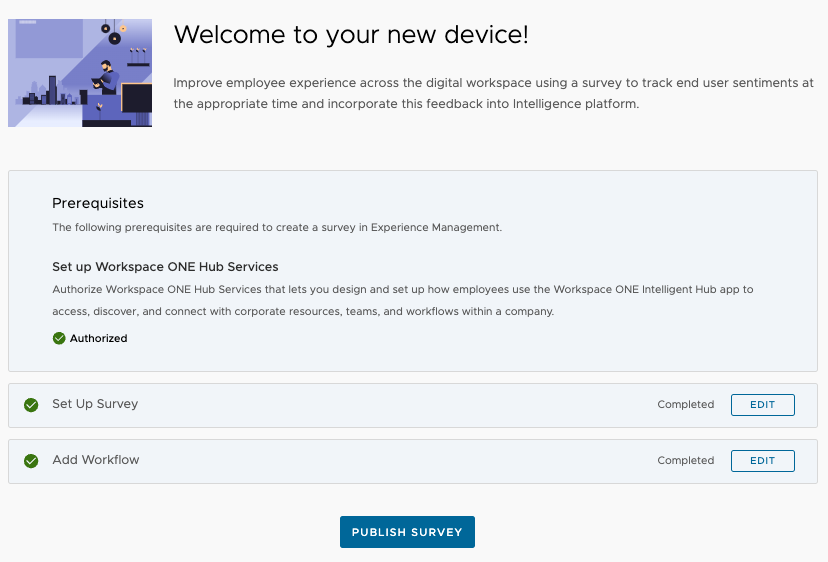
- In the left menu under the Workspace tab, navigate to Experience Management and then Surveys. Click CREATE to start a new survey.
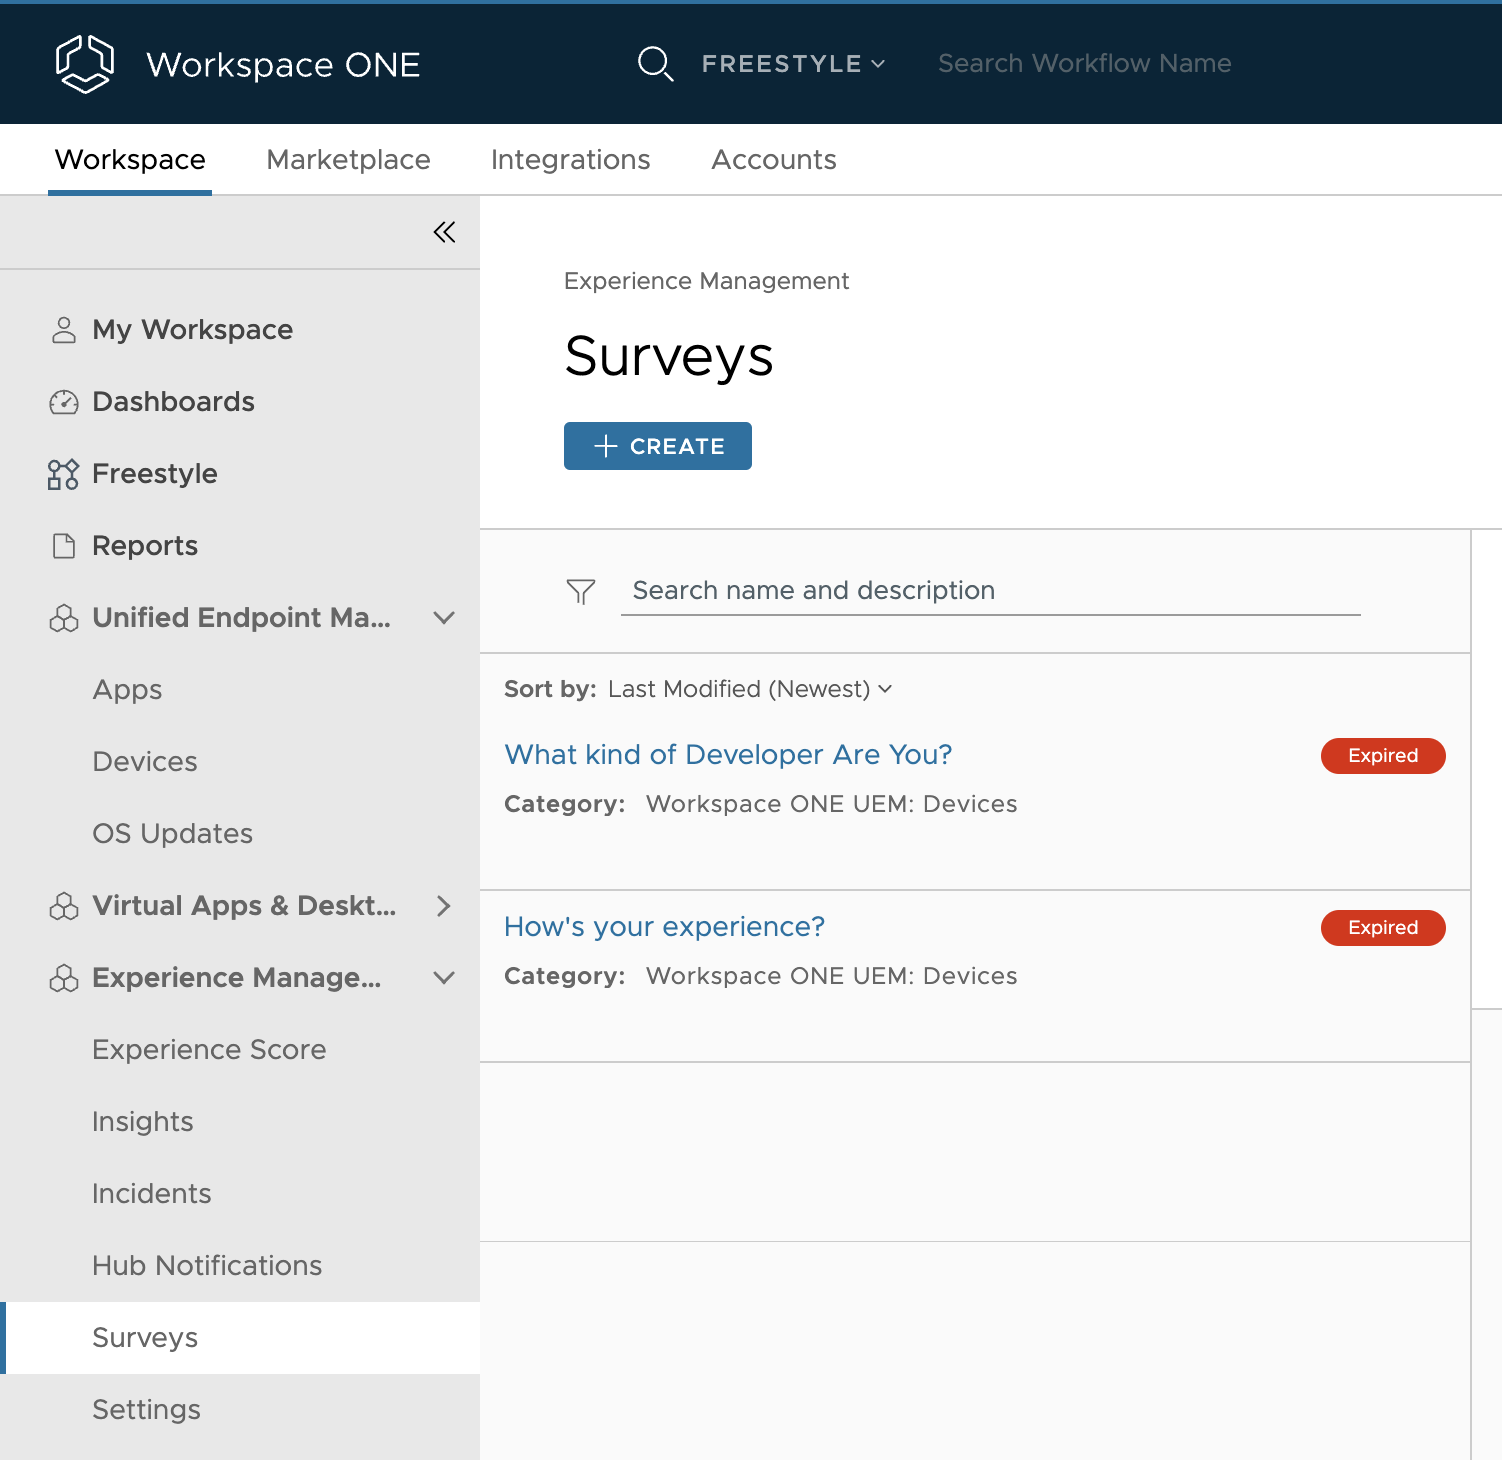
Note: If Experience Management has not been configured yet in your Omnissa Intelligence tenant, you will not see Experience Management in the menu on the left under the Workspace tab. Navigate to the Marketplace tab > Solutions > Experience Management to enable these tools in your Omnissa Intelligence tenant. See this Getting Started Guide to learn more about Experience Management in Omnissa Intelligence.
- The following screen shows that the integration with Workspace ONE Hub Services is required before creating surveys. After confirming Hub Services is authorized, click START to start configuring a survey.
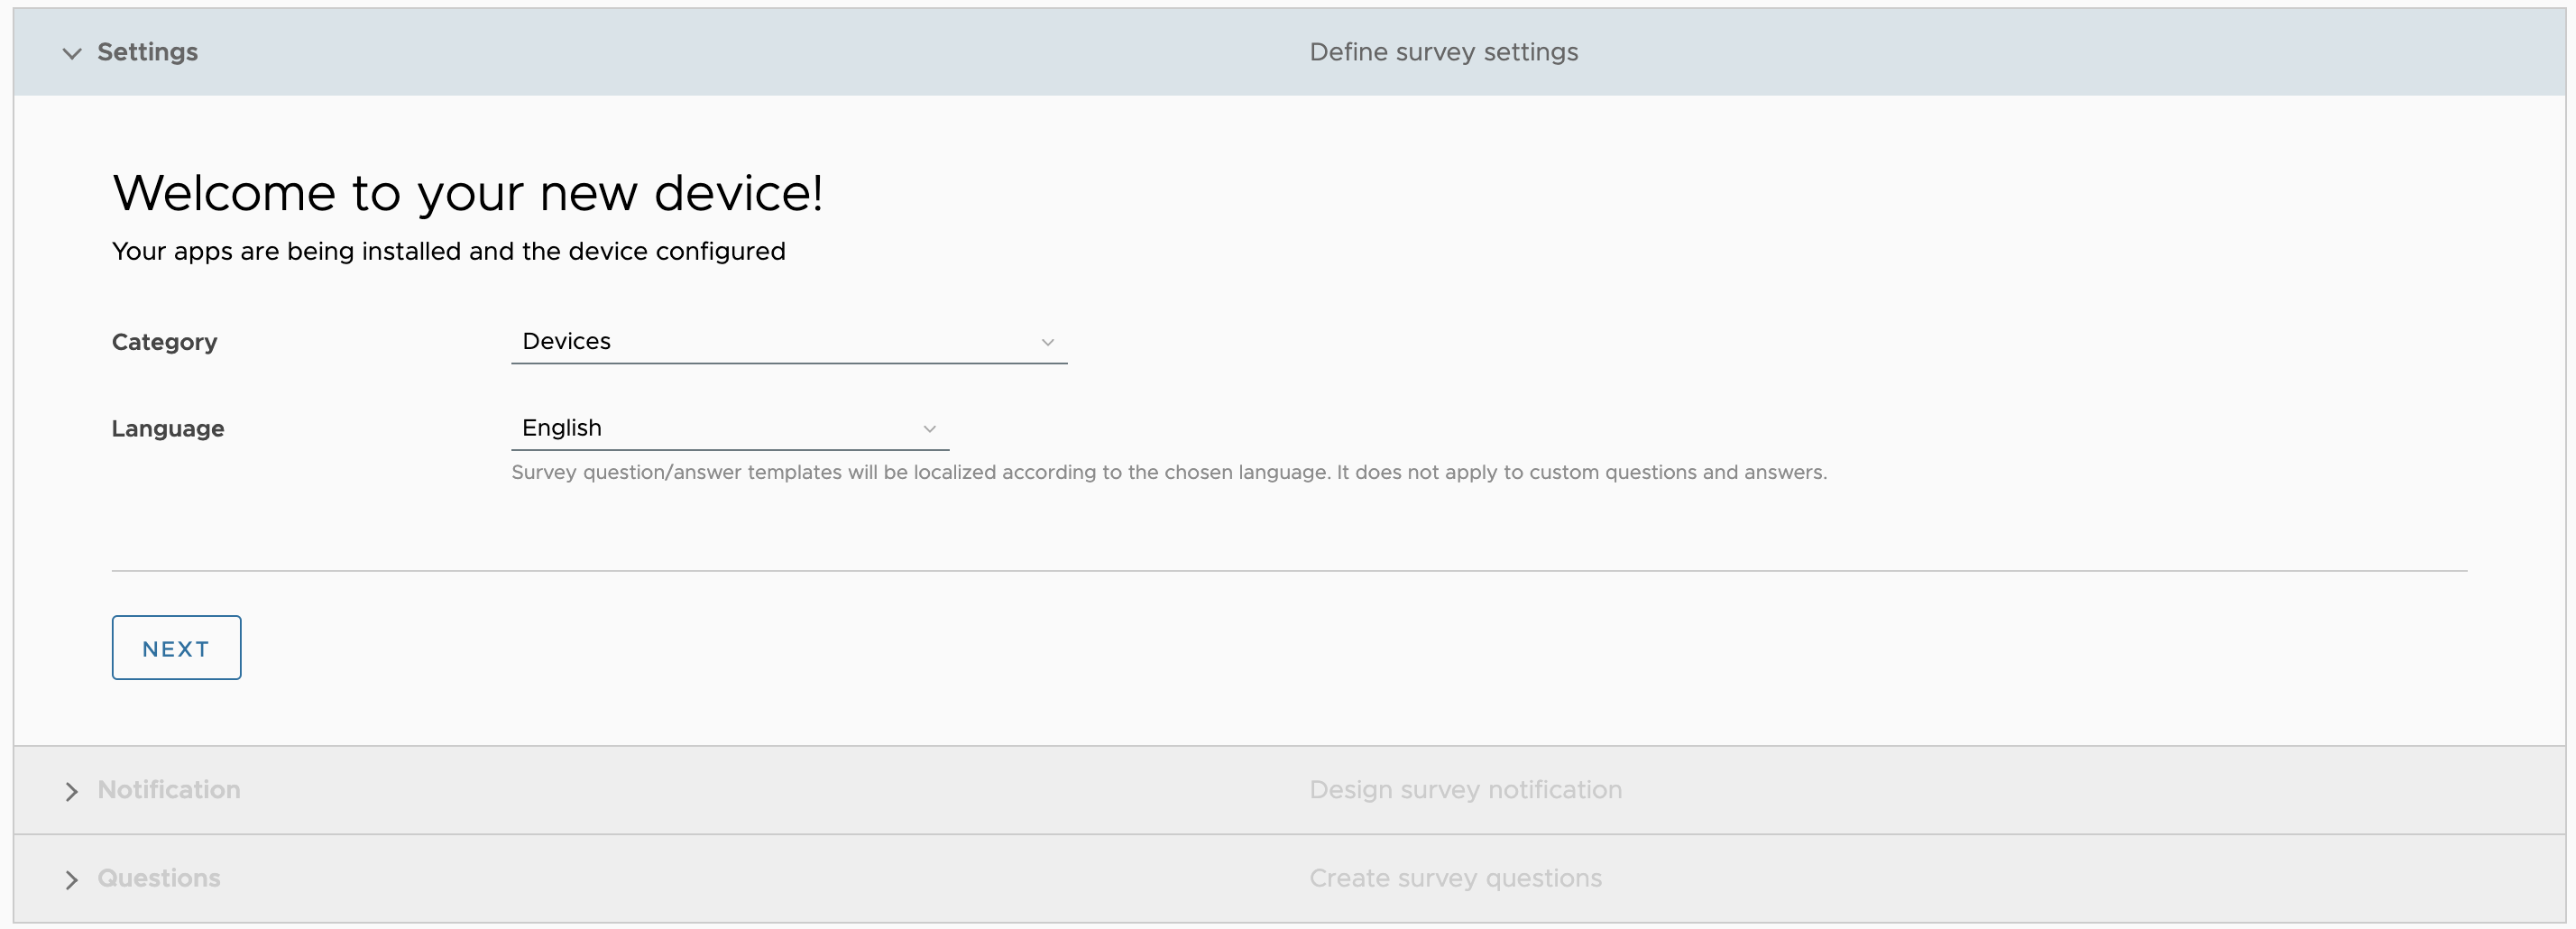
- Enter a title for the survey and optionally a subtitle. Select the category, for this example, select Devices and leave the default language. When finished, click NEXT.
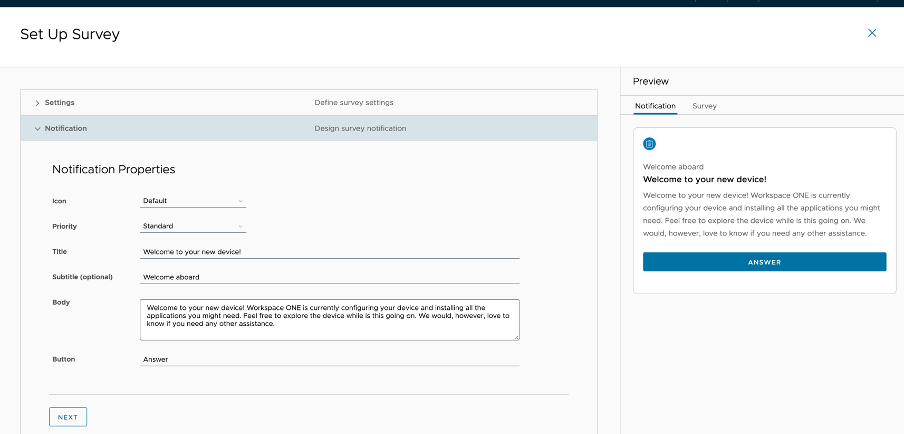
- Design how the user will be notified of the survey in the Intelligent Hub app under the For You tab. This example uses the following settings:
Icon: Default or URL
Priority: Standard or High Priority or Urgent
Title: Enter the title of your survey
Subtitle: Enter an optional subtitle
Body: Enter the body of text used in the notification tile
Button: Enter the title on the button to start the survey
Note: All changes are immediately reflected on the right Preview pane. - Click NEXT to continue.
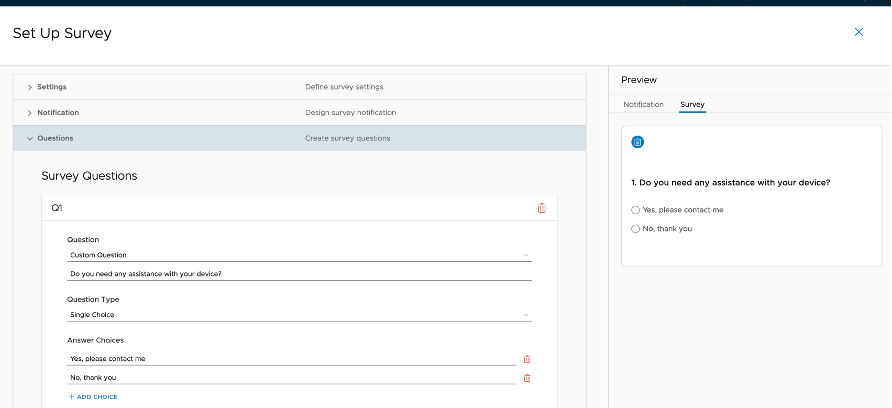
- Here you can add questions to the survey. Click ADD QUESTION to continue.
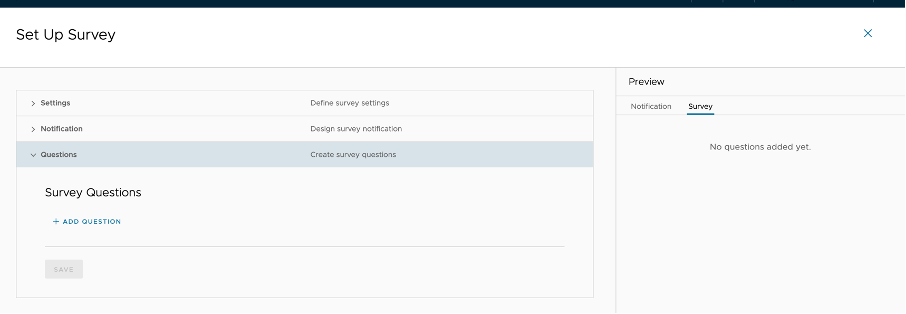
- Configure the questions and answer options. There are many templates and options to explore on your own. In this example, select:
Custom Question: Enter your question
Question Type: Single Choice
Answer Choices: Enter your options - Click SAVE when finished.
- After configuring the survey, assign the survey to users. The Add Workflow step is now active. Click START to continue.

- This will open the Freestyle Orchestrator workflow canvas.
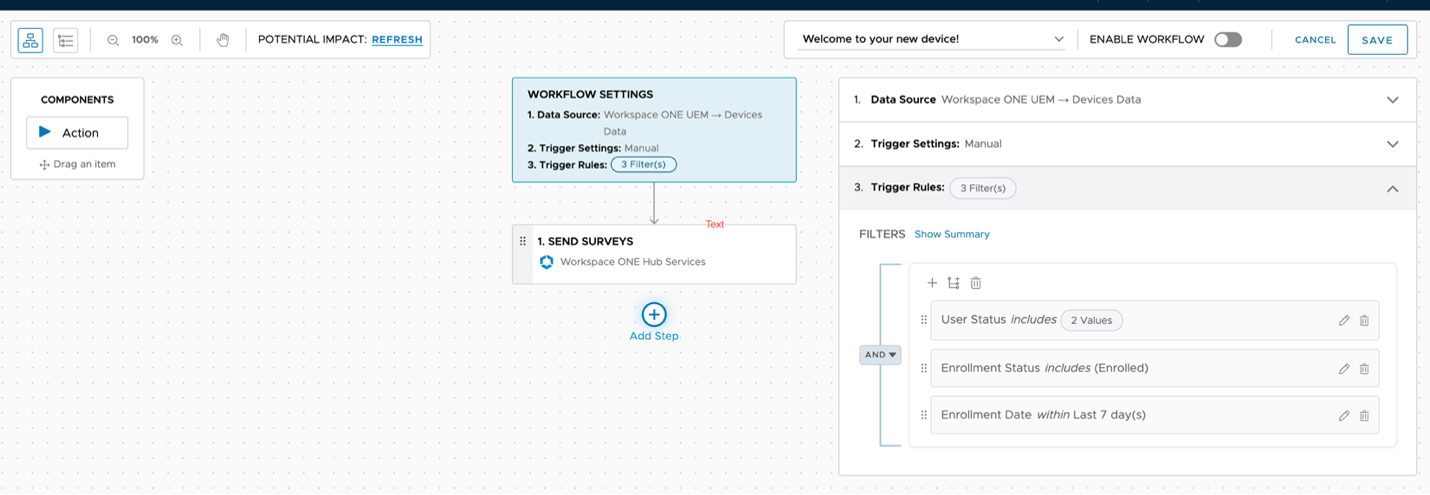
- In the Trigger Rules section, you can filter employees that will receive this survey. Leaving defaults will send the survey to all enrolled devices. If the survey should only be sent to newly enrolled devices, enter the following filters:
Table 5: Filter for Survey
| Field 1 | Field 2 | Field 3 |
| Device -> Enrollment Date | | The last 7 days |
- When the filters are complete, toggle the ENABLE WORKFLOW switch in the top right of the canvas to make the survey live.
- Before moving on, click the action 1. SEND SURVEYS box to find the survey ID that will be used later.
- Click SAVE & ENABLE.
- Now that the survey is set up and the workflow has been added, finish this action by clicking PUBLISH SURVEY.
Create an Automation from Survey Results
- The following steps cannot be completed until a survey has been submitted by an end user, so verify with a device that the survey is delivered successfully (one that meets the criteria from the workflow) and answer the question by selecting Yes.
- Now that the survey will be delivered to users, create an automation using the results. Navigate to Freestyle in the left navigation pane and click ADD WORKFLOW.

- For the data source, select Workspace ONE Hub Services and then Survey.
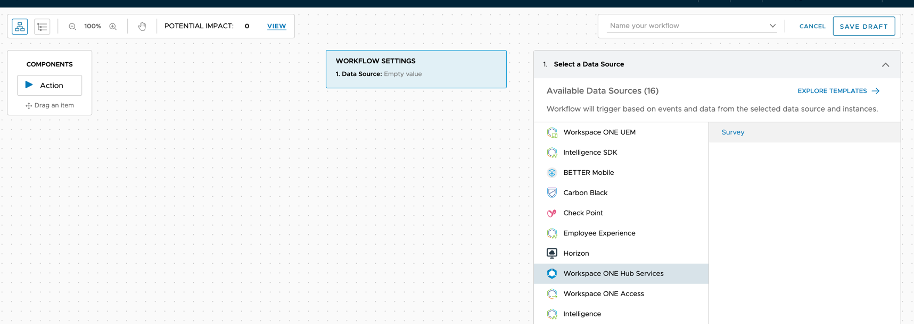
- Leave the trigger settings as Automatic and enter the following in the trigger rules:
Table 6: Example Trigger Rules for Survey Automation
| Field 1 | Field 2 | Field 3 |
| | | |
| | | |
| | | |
Note: Complete the information for trigger rules using the survey details you created. Your results may differ from this tutorial.
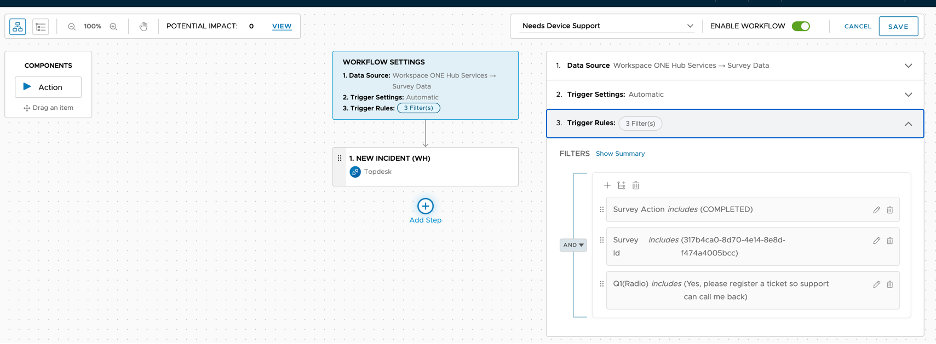
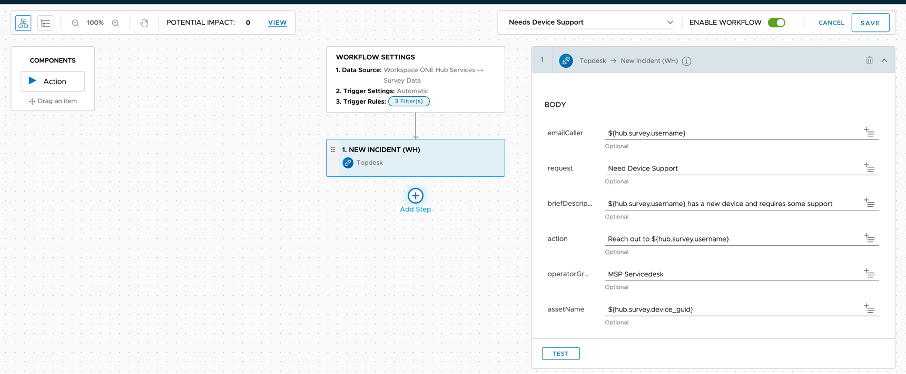
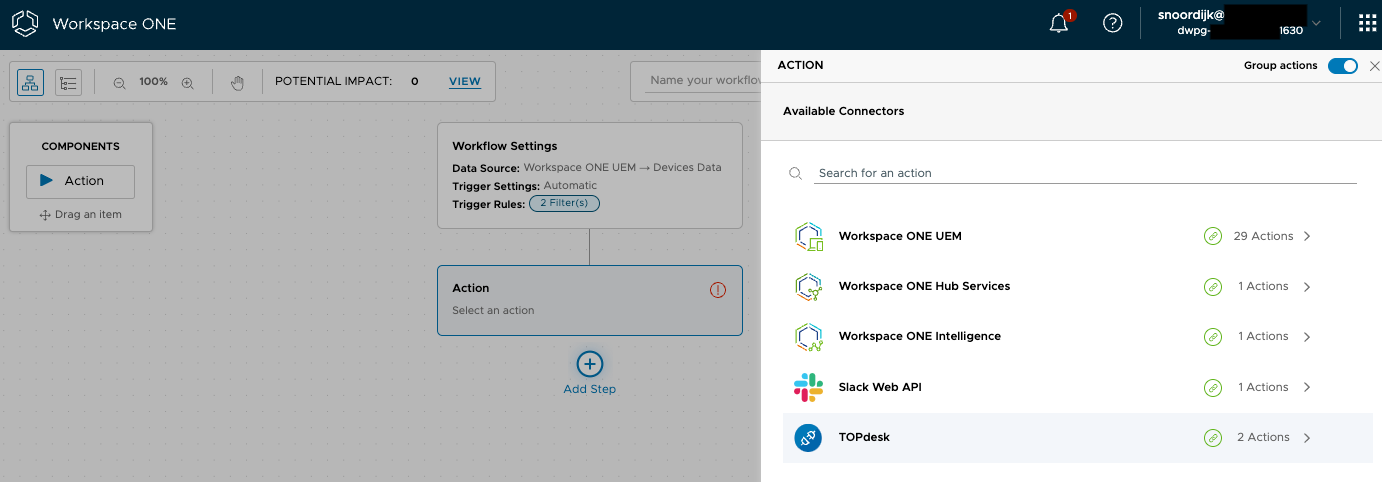
- After completing the trigger rules, add an action to take based on the survey results. Click the Add Step plus sign in the center of the screen and select Action. Listed are all the connectors available for actions. Select the TOPdesk connector.
- Select the New Incident (WH) action.

- Enter values for the list of fields you added to the custom connector. Values can consist of plain text or lookup values from data in Omnissa Intelligence. Lookup values are inserted using the + sign with lines under it at the end of each field. The benefit of using the webhook integration method is that you can enter plain text to look up the correct Operator group ID, in this example, MSP Servicedesk.
- Click TEST to test the action.
- When the workflow is complete, toggle the ENABLE WORKFLOW switch to make the workflow active, and click SAVE in the top-right corner.
- Finally, check the workflow on a device. In this example, you created a survey that is sent to newly enrolled devices. So, check for the survey on a device that has been enrolled into Workspace ONE UEM in the last 7 days.
Creating Assets Using a TOPdesk Webhook
Onboarding new employees is essential and a task IT organizations typically spend a lot of time doing. New devices are configured with the correct applications and settings via Workspace ONE UEM, but there are other tasks required before the device can be distributed to a user.
One of those steps is registering the device into the CMDB of the ITSM tool, where the device name and details are stored and linked to the device user. Using Omnissa Intelligence together with TOPdesk, this process can be automated.
When the user enrolls the device, the device should be registered in TOPdesk with the device name as the asset ID and linked to the employee who initiated the enrollment. This workflow is achieved with a webhook, and the JSON is provided here:
Configure the Webhook in TOPdesk
Follow the steps to configure the webhook in TOPdesk.
- Log in to TOPdesk using your operator account.
- Click the menu icon in the top-left corner and select Modules.
- In the navigator menu on the left, select Action Management and select Automated Actions in the overview pane.
- Any existing webhooks are listed here. Click New Automated Action in the top-right corner to start.
- Search for or scroll to Webhooks and Scheduled Actions, select it and click Create Action below.
- Click the Generate URL path segment button, which completes the webhook URL. You can copy the whole URL by clicking the button to the right of the new URL. Change from the Triggers screen to the Action screen by clicking Action at the top.
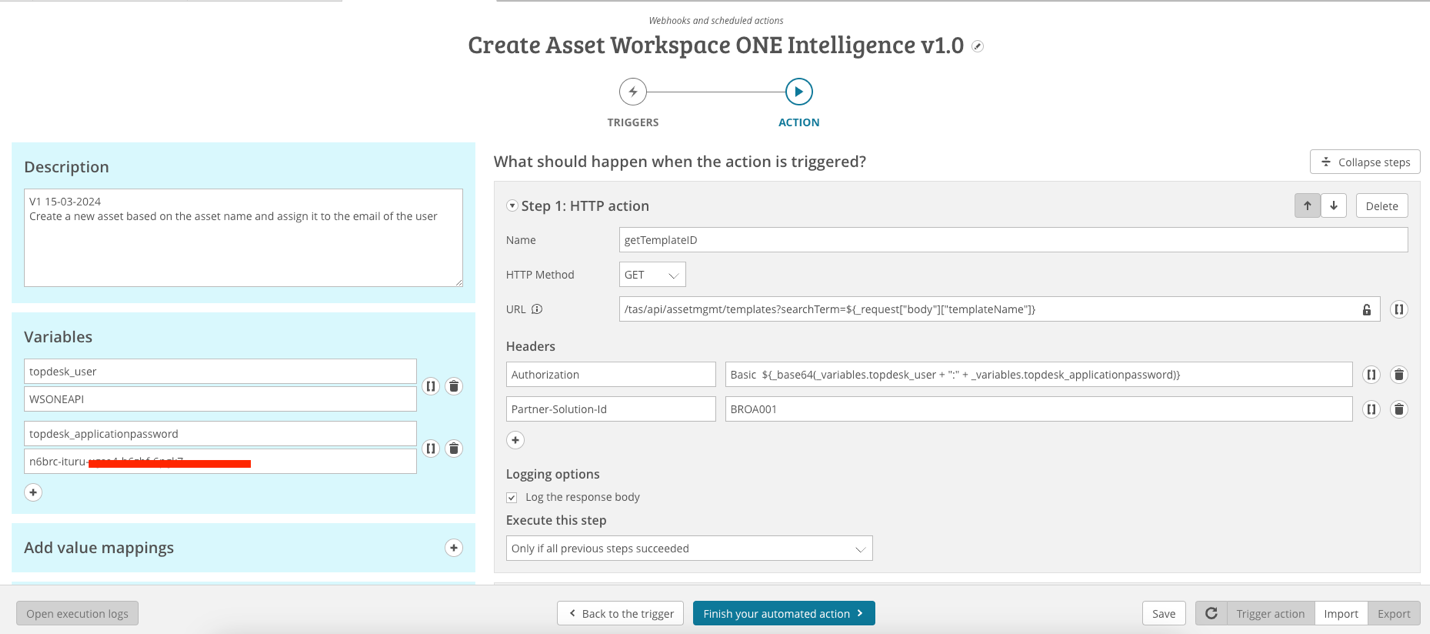
- On the Action screen, select Import an Action under Other Options.
- Select the downloaded Create Asset JSON.
- On the left side there are only two variables to be filled, topdesk_user and topdesk_aplicationpasswords. Use the credentials of the API user created in the previous exercise and save the action by clicking Finish your automated action at the bottom.
Create a Collection in Postman
Next step is to create a collection in Postman.
- In Collections, press the + sign to create a new collection. In this example the collection is named “TOPdesk Asset.”
- From the new collection, click the three dots menu next to the star, select Add Request, and name this TOPdesk Asset as well.
- In the newly created collection under the Authorization tab, enter the preferred authentication method. This example uses Basic Auth. Then enter the username and password that will be used, which is the application name WSONEAPI and the associated password. This authentication method will inherit down to all requests under the collection.
- Because reusable variables should be used whenever possible, create an environment. In the menu on the left, select Environments and add a new environment using the + sign called TOPdesk. Edit the environment and add the following:
Variable: baseUrl
Initial value: In this example, https://europe-demo-XXX.TOPdesk.net
- Go back to Collections in the menu on the left and select the Headers tab. Modify Content-Type with the value application/json.
- In the top-right corner, select the TOPdesk environment created earlier.

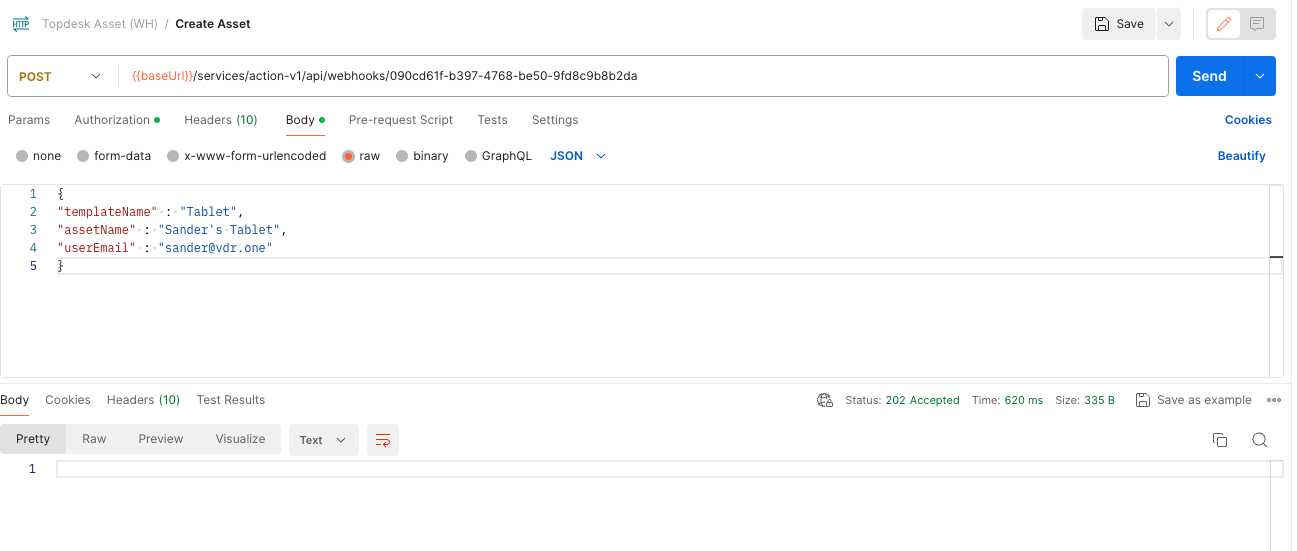
- Next to the POST action, use the variable created earlier. Enter {{baseUrl}}/services/action-v1/api/webhooks/<url generated for the webhook>
- Next, select the Body tab and select the raw radio button. In the area below, enter the following to test the webhook:
{
"templateName" : "<Device Type>",
"assetName" : "<Device Name>",
"userEmail" : "<user’s email>"
}
- Then click Send. This should return a 202 Accepted status below the body.
- After a successful POST, click Save as Example, which saves the response under your Request and Collection.

Export the JSON
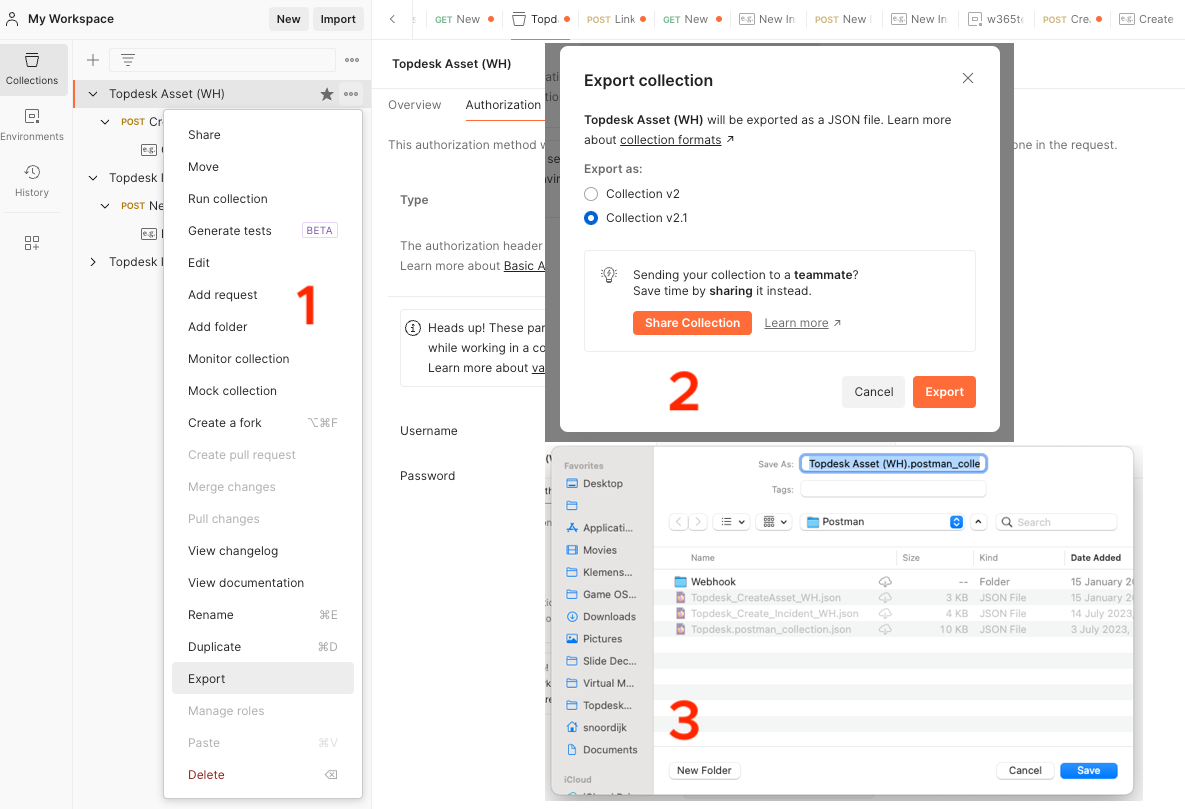
Now export the JSON to be used in Omnissa Intelligence.
- Click the three dots menu next to the collection and select Export. In the screen that follows, select Collection v2.1 and click Export, after which you choose where to save the file.
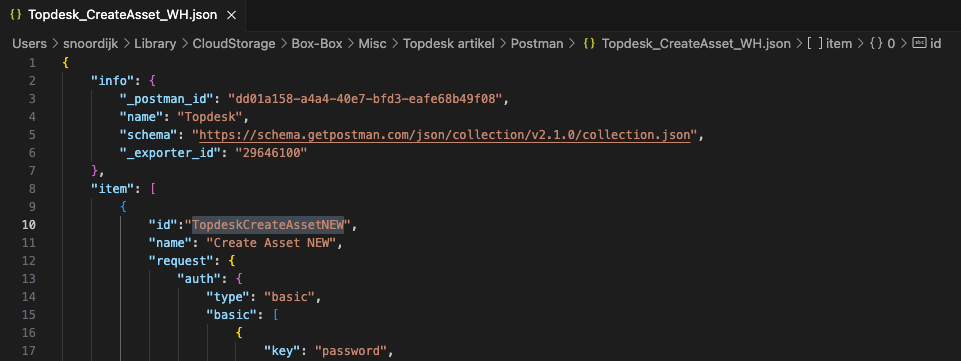
- Our JSON is almost ready to go. However, Omnissa Intelligence expects an ID to be paired with every action. Open the JSON file in a text editor or tool like Visual Studio Code and search for “name”: “New Incident”. Above this line add the following:
"id": "TOPdeskCreateAsset",
Note: The ID can be anything; you can make up your own. Be sure to end the line with a comma (,).
Create a Custom Connector in Omnissa Intelligence
Now that you have the JSON file, which will tell Omnissa Intelligence how to create a TOPdesk ticket, you can start the custom connector configuration. The following procedure uses a SaaS Workspace ONE environment. Steps may vary slightly when using the on-premises version of Workspace ONE UEM, because you would not be starting with the Cloud Services Console. Omnissa Intelligence itself is only available as a SaaS service.
- Log in to the Omnissa Connect Cloud Services portal (https://connect.omnissa.com) and click Launch Service on the Workspace ONE tile.
- Select the Integrations tab.
- The Integrations tab default screen shows the available Omnissa Intelligence data sources. Before moving forward, confirm the Workspace ONE UEM data source shows as authorized. Then Select Workflow Connectors in the left menu to view the various external connectors available for automated workflows.

- Click +ADD to create a new connector.

- Because you are not using a managed connector, select the Custom Connectors tab to continue.

- Enter the base URL for the connector, which means that you remove everything after topdesk.net in the URL. Select your authentication type and enter a user name and password for the connection. Here you can either use the application user name and password provided by the TOPdesk administrator or you can use any account in TOPdesk with the role of Super User. When finished, click SET UP.

- The new workflow connector is complete. Confirm the status shows Authorized for the TOPdesk card in the Workflow Connectors screen. Click VIEW at the bottom of the card to view the details.
- In the connector details, you can see where the connector is used, what actions can be taken with it, any errors, and the administrator activity log. Your JSON file is the set of instructions that you can use under Actions, so select that tab next.
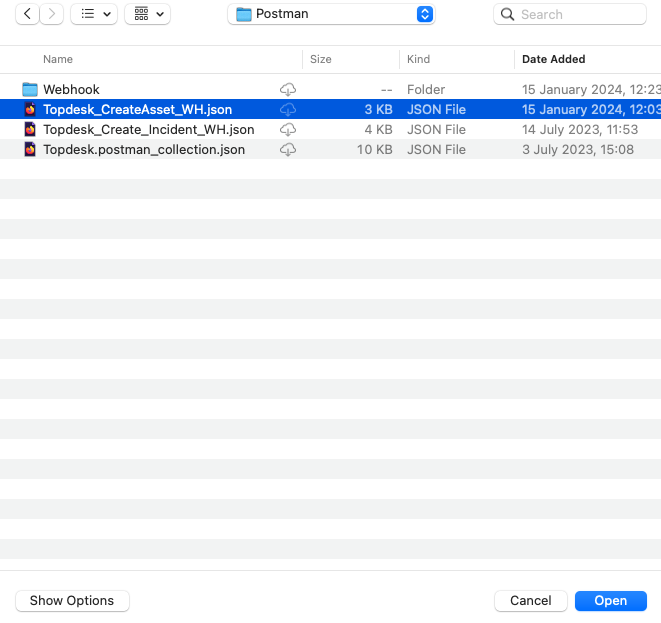
- Drag the create asset JSON file that you created and edited earlier onto the screen or select it from your computer.
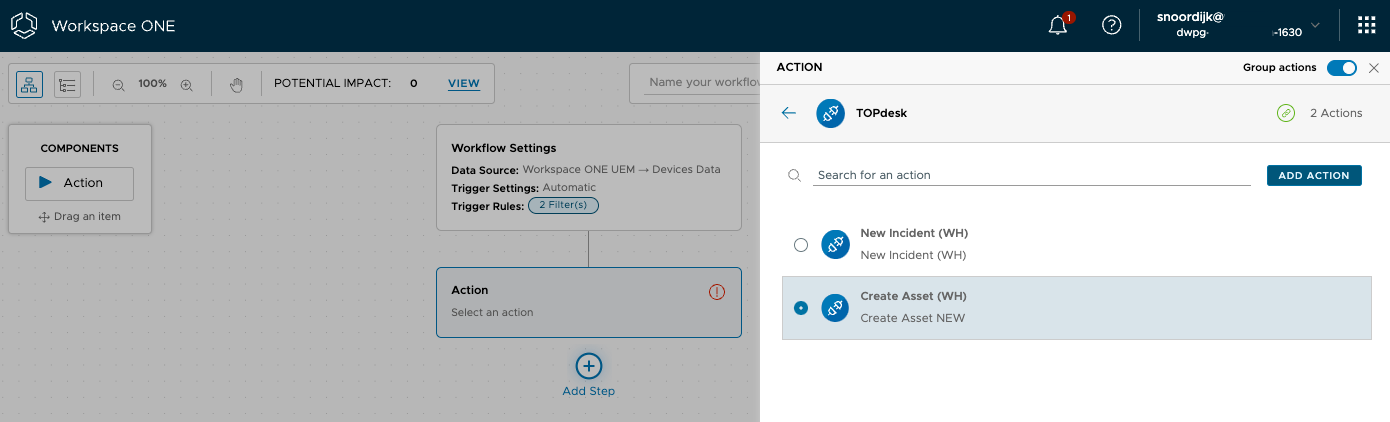
The action Create Asset (WH) now shows under Actions for the connector and is ready for use. 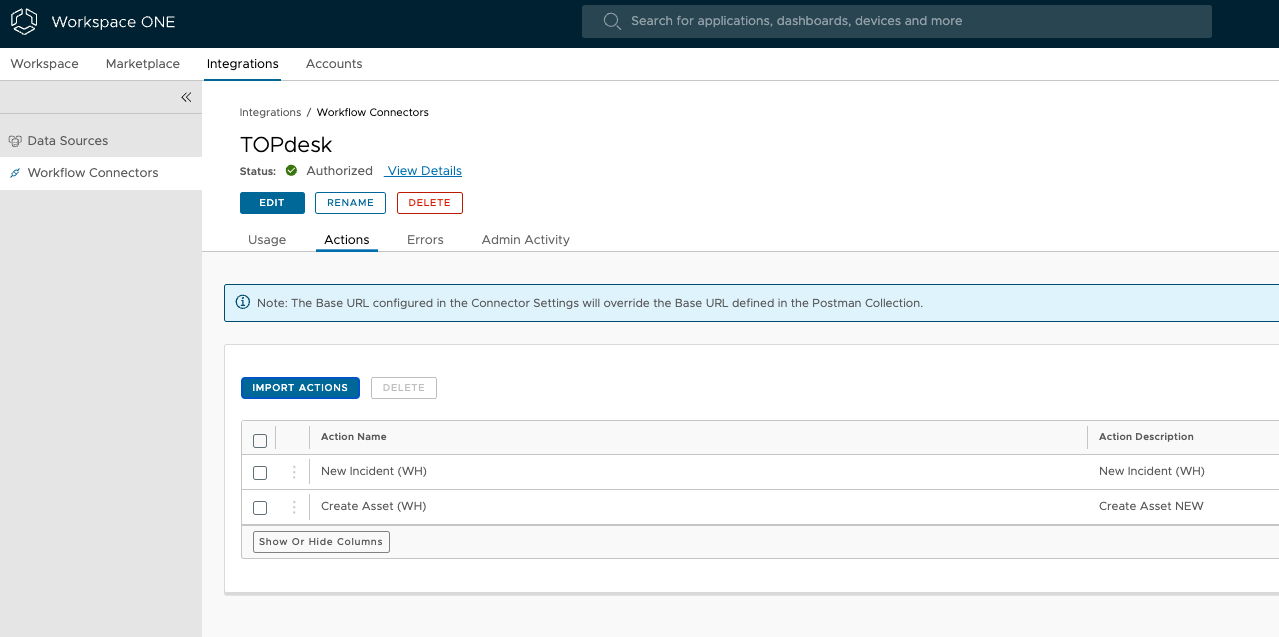
Figure 9: List of Actions for the Custom Workflow Connector
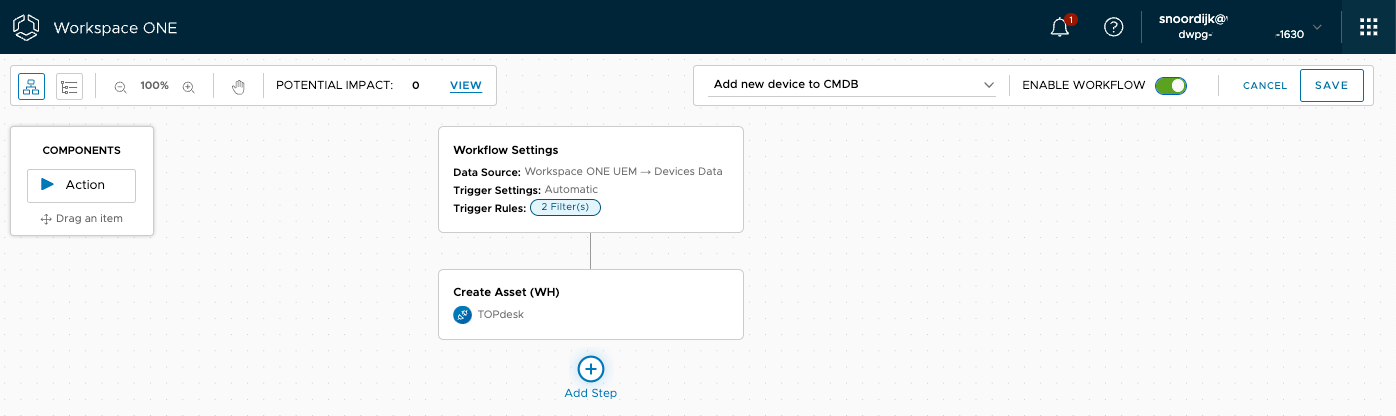
Example Workflow: Create an Asset upon Enrollment
Now create a workflow to automatically create an asset in the TOPdesk CMDB when a device is enrolled into Workspace ONE, and link the asset to the active user. To achieve this, use Freestyle Orchestrator within Omnissa Intelligence.
- Open the Cloud Services Console and launch the Workspace ONE service as in the Add A New Workflow Connector section of this guide. In the left menu, click Freestyle.
- Click ADD WORKFLOW to create a new workflow.
- When creating a workflow, start by selecting the data source. This example uses information from Workspace ONE UEM, so select the Workspace ONE UEM data source and then select Devices.
- Next, select Automatic for the trigger option to make sure that this automation is run as soon as the new device is detected. Alternatively, it’s possible to select Schedule or Manual.
- Then add the following trigger rules.
Table 7: Filters for Trigger Rules
| Field 1 | Field 2 | Field 3 |
| Devices -> Enrollment Status | | Enrolled |
| Devices -> Enrollment date | within | Last 24 Hours |
- When done, click the + Add Step button below the Workflow Settings in the center of the screen and select Action.
- Next select TOPdesk, from the available Connectors.
- Then select the action just added. In this example, it is listed as Create Asset (WH). And then click ADD ACTION in the top-right corner.
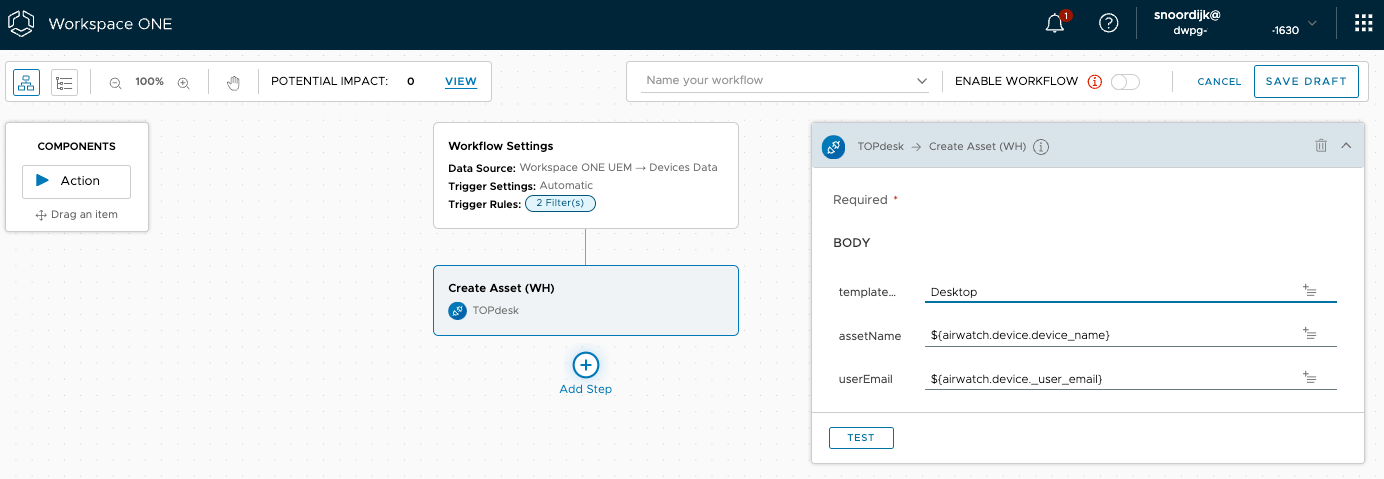
- Now enter the values for the action. Start by picking a device type, which was defined earlier in the Create a New Permission Group section of this document. (Of course, you could also use Omnissa Intelligence to identify what is a desktop, a mobile phone, or a tablet.) For this example, pick one and use lookup values to populate the device name and email address. Lookup values are inserted using the + sign with lines under it at the end of each field.
template: Desktop
assetName: ${airwatch.device.device_name}
userEmail: ${airwatch.device._user_email}
- In the top bar, click Name your workflow to name this workflow and click DONE.

- Click the ENABLE WORKFLOW slider and click SAVE.
Now test this in your environment by enrolling a new device into Workspace ONE UEM and searching for the new asset in TOPdesk.
Summary and Additional Resources
This operational tutorial provided the steps to integrate TOPdesk ITSM with Omnissa Intelligence so that automated workflows can be created.
Two actions were created to interact with TOPdesk: creating a ticket and creating an asset. Also, two integration methods were covered: default APIs and webhook. And finally, three example workflows were created in Freestyle Orchestrator:
- Automatically creating a TOPdesk ticket when a device has low available storage
- Automatically creating a TOPdesk ticket when a user needs help with a new device
- Automatically creating an asset in the TOPdesk CMDB when a user enrolls a device into Workspace ONE UEM
Additional Resources
To learn more about Omnissa Intelligence, check out these resources:
- Getting Started with Omnissa Intelligence
- Mobile Device Use Cases for Omnissa Intelligence
- Getting Started with Experience Management
Changelog
The following updates were made to this guide:
| Date | Description of Changes |
| 2024/10/16 |
|
| 2024/04/10 |
|
Author and Contributors
This tutorial was written by:
- Sander Noordijk, Senior Solution Engineer
Contributors to this document include:
- Christina Minihan, Staff Architect, Technical Marketing
Feedback
Your feedback is valuable.
To comment on this paper, contact End-User-Computing Technical Marketing at tech_content_feedback@omnissa.com.