Blocking unwanted apps on managed iOS devices
Overview
Omnissa Workspace ONE® UEM provides a comprehensive management solution for iOS devices, supporting operating systems version 11.0 and later. With the ability to manage Corporate-Dedicated, Corporate Owned, or Employee Owned (BYOD) devices, Workspace ONE UEM offers enterprises the flexibility to meet their employees’ needs at any level.
Organizations, both in the public and private sectors, are increasingly concerned about data exfiltration. The loss of confidential company data, such as intellectual property, personal data about customers or employees, or financial data, can destroy a company’s reputation and cost millions in containment efforts, lawsuits, and penalties. Hackers use numerous methods to gain access to a company’s data, such as:
- Phishing emails
- Brute force attacks
- Stolen credentials
- Malware, such as keyloggers installed on unsecured devices
Many organizations have adopted a multi-pronged strategy to protect confidential data through staff training, intrusion detection, and implementing data loss prevention software and policies.
Of increasing concern among security experts is the proliferation of unauthorized applications that potentially collect user data and log every keystroke on corporate-owned devices. Such malicious applications could be used by hackers or foreign entities to gather passwords, credit card data, or other sensitive user data. IT admins face the challenging effort of blocking and removing unwanted mobile applications from corporate devices.
Workspace ONE provides the tools required to assist organizations with strengthening their application security posture on iOS devices. By using application groups, compliance policies, and restriction profiles, IT admins can effectively block malicious and unauthorized applications from being downloaded and installed on corporate-owned iOS devices.
Purpose of this tutorial
This tutorial guides you through the process of using Workspace ONE to restrict malicious and unauthorized applications on iOS devices. The following tasks are covered in this tutorial:
- Create an application group and a compliance policy to identify any drift from application baselines on iOS devices.
- Create a restrictions profile to block app downloads from the Apple App Store.
- Configure restricted mode to only allow installation of apps from Workspace ONE Intelligent Hub.
- Use a restrictions profile to hide installed apps.
The four processes discussed in this tutorial are not dependent upon each other and can be implemented individually. Each plays an important role in protecting your iOS devices from unauthorized applications. Where the application group and compliance policy monitor your devices for unauthorized apps, the restrictions profiles and restricted mode can block apps from being installed and launched on the devices. Implementing a multi-pronged approach to application management is a prudent way to ensure that your organizational and user data is safe from potentially malicious and unauthorized applications on your iOS devices.
Audience
This operational tutorial is intended for IT professionals and Workspace ONE administrators of existing production environments.
Both current and new administrators can benefit from using this tutorial. Familiarity with iOS, XML, and basic scripting is assumed.
Knowledge of additional technologies such as Omnissa Intelligence and Workspace ONE® UEM is also helpful.
Validation environment
The content created for this operational tutorial used the following software and hardware versions for testing:
- Workspace ONE UEM version 2306
- Apple iPad – iOS version 16.6
The content in this tutorial might apply to earlier Workspace ONE UEM and Hub versions but this was not specifically tested.
Managing application groups and compliance policies
Application groups work in conjunction with compliance policies to ensure that devices remain compliant with organizational baselines. An application group is a defined collection that identifies allowed, denied, or required applications on devices. A compliance policy provides IT admins with insight into devices that might have unauthorized applications installed and can take defined automated action on those devices. Application groups can be applied to iOS and Android devices. This tutorial focuses on iOS devices only.
Note: It is possible to create a compliance policy for single apps without using an application group. However, when dealing with a multiple app list, it is more efficient to include an application group as part of your compliance policy.
Application groups
Application groups give IT admins the ability to group specific applications together to give or restrict user access to said applications. There are three types of application groups into which you can place applications. The following table outlines the three types available in Workspace ONE.
| Application Group | Description |
| Allowlist | This application group identifies apps that managed devices can install from the Workspace ONE catalog. Applications not included in this list are not permitted on devices. |
| Denylist | Installation of apps on a denylist application group is not permitted on managed devices. |
| Required | A required application group lists apps that end users are required to install on their devices. These apps can be installed from the Workspace ONE catalog. |
Compliance policies
With compliance policies, IT admins can enable a specific set of actions to occur when Workspace ONE detects that a device does not comply with configured standards. These policies can include security configurations such as password requirements and passcode strength to denying certain apps and requiring regular device check-in intervals. If a device is non-compliant, the compliance engine can notify end users that a compliance issue requires addressing. Limitations can be placed on non-compliant devices, such as loss of access to certain corporate content, inability to install apps, and even locking down the device.
Note: The configured Privacy settings for personal applications can alter the expected results of compliance policies. If you have set the privacy setting to Do Not Collect, Workspace ONE does not collect personal app data from the device. This can cause compliance policies in Workspace ONE to label devices incorrectly for compliance. For instance, if a device contains apps from a denylist application group, Workspace ONE may not mark the device as non-compliant. Conversely, if a device contains apps from a required application group, Workspace ONE might mark the device as non-compliant.
Configuring an application group
In this exercise, you create a denylist application group that includes the social media apps for Facebook, Instagram, TikTok, and X (formally known as Twitter).
To get the desired result, perform the following steps:
- On your desktop, double-click the Google Chrome icon.
- Navigate to the Omnissa Workspace ONE UEM Console.
For example, navigate tohttps://<WorkspaceONEUEMHostname>where WorkspaceONEUEMHostname is the host name of the Workspace ONE UEM console. - Enter your Username, for example,
administrator. - Click Next. The Password text box is displayed.
- Enter your Password, for example,
Omnissa1!. Click Login.
Note: If you see a Captcha, be aware that it is case-sensitive. - Select Resources and click App Groups.
- In the App Groups window, click Add Group.
- From the Type drop-down menu, select Denylist.
- Select Apple iOS from the Platform drop-down menu.
- In the Name field, enter
Social Media Denylist.
- Now, begin to add applications to the group. Click Add Application.
- In the Application Name search field, enter
Facebook, and click the search icon. - When the search results appear, click the Select button next to the Facebook app.

- Repeat steps 12 through 14 to add
Instagram,X, andTikTokto the application group.
- After you have added all four apps to the application group, click Next.
- From the Device Ownership drop-down menu, select Corporate – Dedicated.
- You can additionally target devices by model, operating system, organization group, and user group. For this exercise, leave all other fields as default. Click Finish.
Creating a compliance policy
In this exercise, you configure a compliance policy to take automated action on any iOS device that has one or more of the applications listed in the application group installed.
To get the desired result, perform the following steps:
- In the Workspace ONE console, select Security, and then select on Compliance Policies.
- Click Add.
- Select Apple iOS as the platform.
- Choose Application List from the first drop-down menu. Then, select Contains Denied App(s) from the second drop-down menu.

- Click Next.
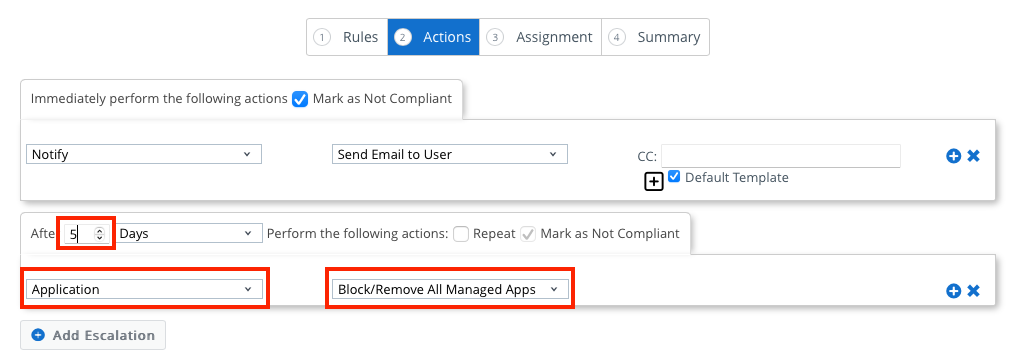
- Leave the default Notify action and create a second escalation by clicking Add Escalation.
- Set the number of days to 5. Then, select Application from the drop-down menu and leave the action as Block/Remove All Managed Apps.

Note: The action Block/Remove All Managed Apps blocks and removes apps that are managed through Workspace ONE. It does not block or remove the applications that have been identified as out of compliance, such as those in the denylist application group. - Click Next.
- Select Smart Groups and click in the search box. From the list of assignment groups that appear, select the appropriate group. For example, select
All Corporate iOS Devices (Organization Name). - Click Next.
- Enter
Social Media Denied Appsin the Name text box. - Enter a description for this policy. For example, enter
Policy to check for unauthorized social media apps on devices. - Click Finish & Activate.
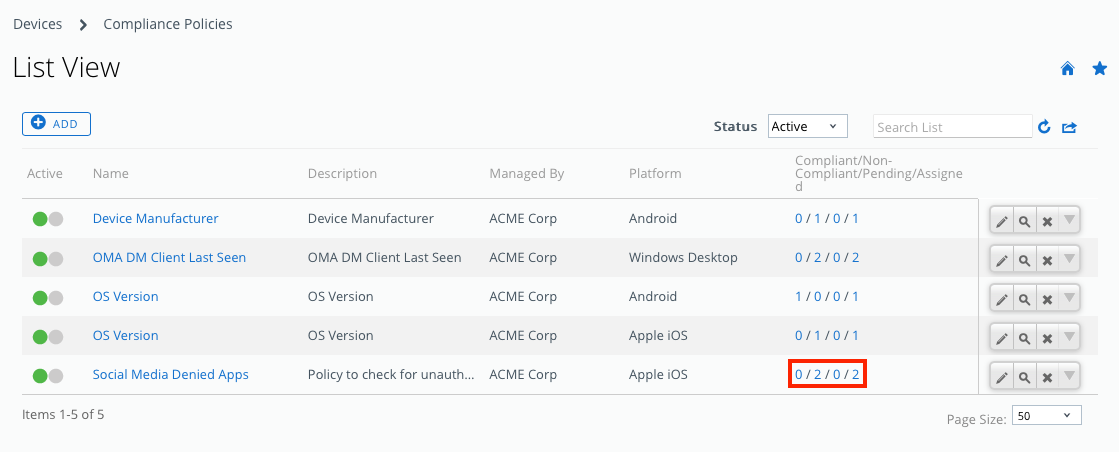
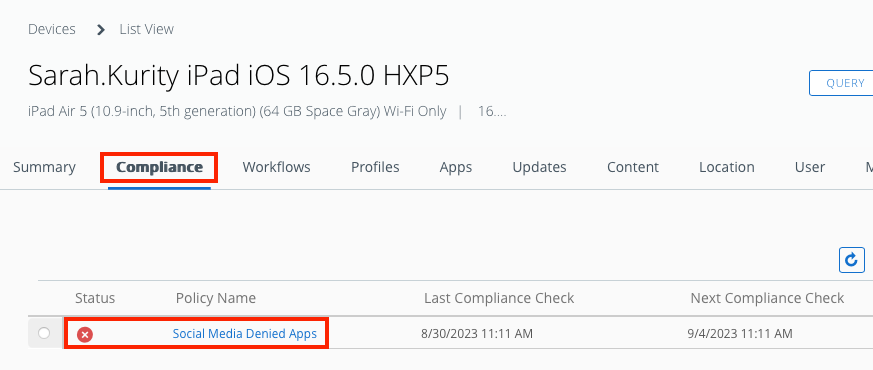
- You can now see the new compliance policy in the Compliance Policies List View.
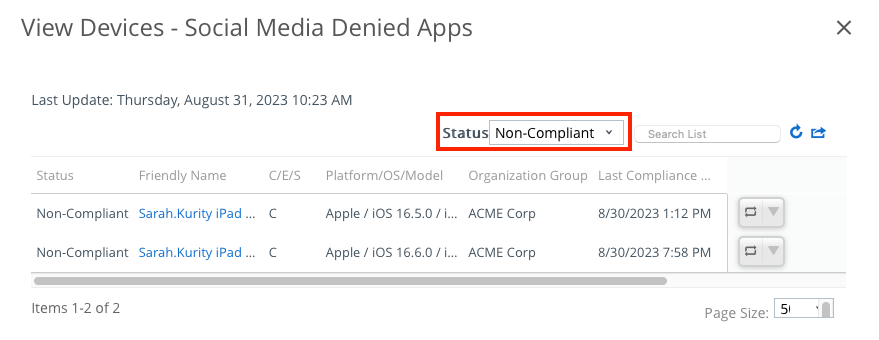
- By clicking the policy statistics, you can view a complete list of devices that are compliant, non-compliant, pending, and assigned.

- Using the Status drop-down menu, you can filter the list accordingly.

Restricting Apple App Store downloads
Although the compliance policy alerts you to non-compliant devices, it does not keep end users from downloading restricted applications from the Apple App Store. Some end users might use the Apple App Store to circumvent stated corporate policies, or hackers might try to trick end users into installing an app by sending an Apple App Store link through a text or email. With the vast number of apps in the Apple App Store, IT admins would be hard-pressed to maintain a denylist application group for all apps that might be considered malicious or unauthorized on corporate devices. In addition to the previously mentioned compliance policy, IT admins may also want to block access to app downloads from the Apple App Store on corporate-owned iOS devices.
Two methods can be used to block the download of applications from the Apple App Store.
- A restrictions profile to block Apple App Store downloads.
- Restrict the app installs to assigned public apps only.
Each of these methods addresses the issue of restricting users from downloading apps from the Apple App Store. It is not necessary to implement both options simultaneously.
Using a restrictions profile to block Apple App Store downloads
By using a restrictions policy, IT admins can prevent users from downloading public applications from the Apple App Store. This restrictions policy removes the Apple App Store from the home screen and restricts the user’s ability to install apps from the App Store.
Note: Although the end user is restricted from installing apps from the Apple App Store, they still can install apps assigned through Intelligent Hub.
There are two specific settings available for restricting the Apple App Store. The following table outlines each.
| Restriction | Configuration | Description |
| Allow App Store icon on Home screen Supported in all supervised iOS 9+ devices. | Deactivate | Removes the Apple App Store icon from the device, and deactivates the App Store so the end user cannot install public applications. Note: Apps can still be installed using Workspace ONE UEM, iTunes, or Apple Configurator. |
| Activate | Allows the Apple App Store on the device, and the device user can install any public free applications using the App Store. | |
| Allow installing public apps Supported on all iOS 4-12 devices, and supervised iOS 13+ devices. | Deactivate | Deactivates the Apple App Store so end users cannot install or update their apps. |
| Activate | Allow the Apple App Store on the device and the device user can install any public free applications using the App Store |
Note: To use these two restrictions settings, your iOS device must be supervised through Apple Business Manager. These restrictions are not applied to unsupervised devices, such as end-user-owned iOS devices.
Configuring a restrictions policy to block Apple App Store downloads
In this exercise, you configure a restrictions policy to remove the Apple App Store icon from the home screen and restrict device users from installing public applications from the App Store.
To get the desired result, perform the following steps:
- In the Workspace ONE console, select Resources, and then click Profiles & Baselines.
- Select Profiles.
- From the Add drop-down menu, select Add Profile.
- Select the Profile Platform by clicking Apple iOS.
- For the Context, select Device Profile.
- Enter
iOS – Block App Storefor the profile name. - Scroll down the list of payloads until you find Restrictions. Click Add.
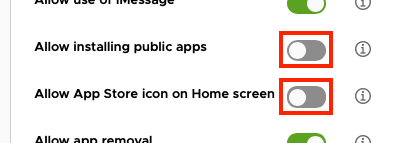
- Scroll through the list of options until you find Allow installing public apps. Select the button to deactivate this option.
- Scroll through the list of options until you find Allow App Store icon on Home screen. Select the button to deactivate this option.

- Click Next.
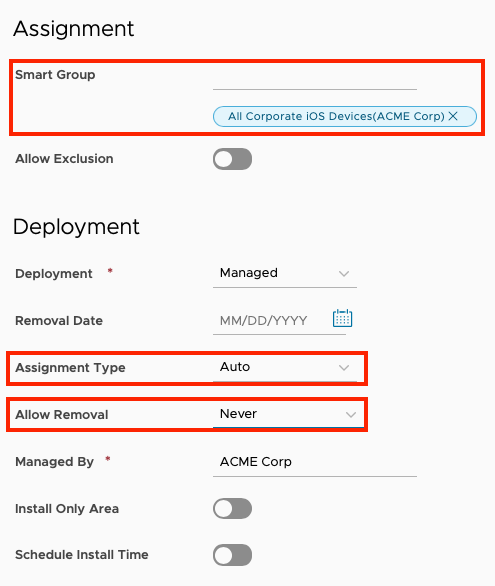
- Click the text box for Smart Group. Scroll down to view Assigned Groups and click in the search box. From the list of assignment groups that appear, select the appropriate group. For example, select
All Corporate iOS Devices (Organization Name). - Select Auto for the Assignment Type.
- Select Never for Allow Removal.

- Click Save & Publish.
- You should now see your iOS – Block App Store device profile within the list on the Profiles window.
Restricting devices to only install assigned public apps
Another option available to IT admins is Restricted Mode for Public iOS Applications setting in Workspace ONE UEM. This setting allows users to download public applications that are assigned through Intelligent Hub but restricts access to the Apple App Store. This mode restricts users from downloading any application that has not been approved by your organization. Enabling this option in Workspace ONE UEM, automatically restricts access to the Apple App Store, meaning that it is not necessary to have a separate restrictions profile configured.
Note: This setting requires that iOS devices be supervised by Apple Business Manager. The setting is not applied to unsupervised devices, such as user-owned iOS devices.
Configuring Restricted Mode for Public iOS Applications
In this exercise, you configure Restricted Mode for Public iOS Applications in Workspace ONE UEM.
To get the desired result, perform the following steps:
- In the Workspace ONE console, click Groups & Settings. Then select All Settings.
- Expand Apps, then expand Workspace ONE.
- Click App Restrictions.
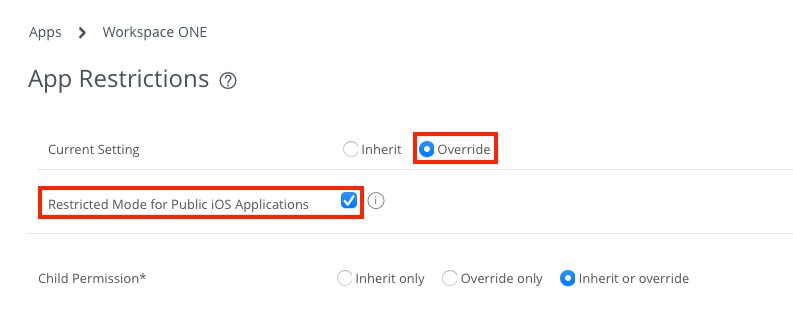
- Ensure that Current Setting is set to Override.
- Select the check box next to Restricted Mode for iOS Public Applications to enable the option.
- Click Save.
Hiding and restricting installed apps
For organizations that do not wish to limit the Apple App Store on managed iOS devices, another alternative option exists for restricting access to unauthorized applications. By using a Restrictions profile, IT admins can configure application-level restrictions by hiding and restricting the launch of specific applications. These restrictions leave the Apple App Store available on the device and allow end users to download public applications while also giving IT admins control over the execution of certain applications.
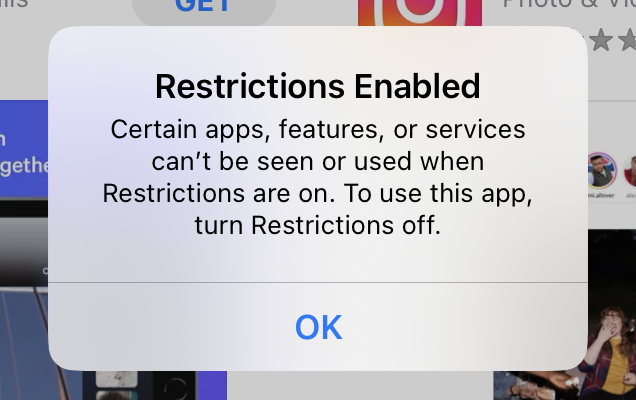
The Blocked Apps restriction, not only hides the app icon on the device, but also restricts execution in cases where the end user tries to serendipitously launch the hidden app, either through an app link or other means. If an attempt is made to launch a hidden app, a notification message is displayed explaining that restrictions are enabled and that the app cannot be used.
Note: One caveat to this specific Restrictions Profile is that the apps you wish to restrict must be synced from Apple’s Volume Purchase Program (VPP). For instance, if you want to restrict the Facebook app (which is a free public app), you need to “purchase” a license in Apple Business Manager and then perform a sync through Workspace ONE to ensure that the Facebook app appears in your app catalog.
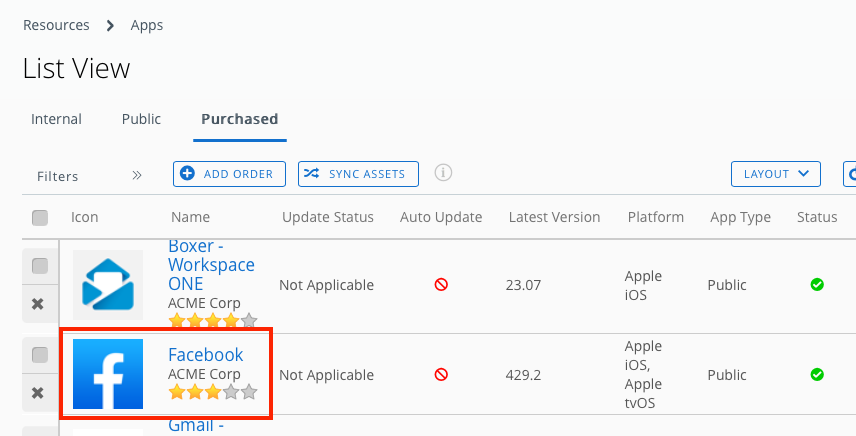
This tutorial assumes that you have Apple Business Manager and VPP configured in your Workspace ONE environment. The process for purchasing apps through VPP is not discussed.
Configuring a restrictions policy to hide apps
In this exercise, you configure a restrictions profile to hide the social media apps for Facebook, Instagram, X (formerly known as Twitter), and TikTok.
To get the desired result, perform the following steps:
- In the Workspace ONE console, select Resources, and then click Profiles & Baselines.
- Select Profiles.
- From the Add drop-down menu, select Add Profile.
- Select the Profile Platform by clicking Apple iOS.
- For the Context, select Device Profile.
- Enter
iOS – Social Media App Restrictionsfor the profile name. - Scroll down the list of payloads until you find Restrictions. Click Add.
- Click the Applications tab.

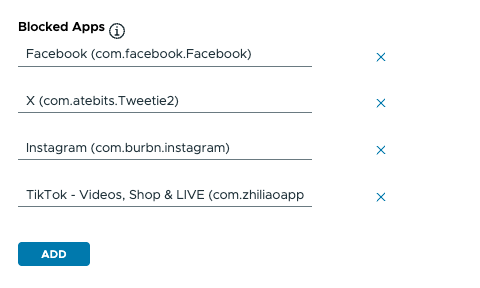
- Scroll down the list of options until you find Blocked Apps.
- In the search field, begin by typing the first few letters of the app name. In this exercise, enter
Fa. - You can see a list of apps that meet this search criteria. Click Facebook (com.facebook.Facebook).
Note: If you do not see the app you are searching for listed, ensure that the app is in your Purchased Apps List View. If the app is not listed, you should sync your Workspace ONE instance with Apple Business Manager. If the app still does not appear, confirm that you have purchased at least one (1) license for the app.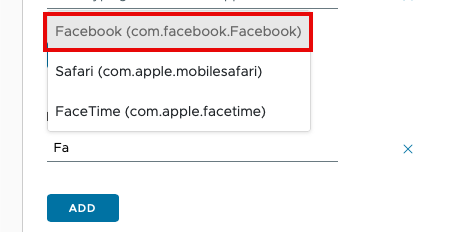
- After you have selected your desired app (in this case,
Facebook), you add additional apps by clicking Add. Follow the same process as outlined in steps 11 through 12 to add other apps. For this exercise, repeat the process to addInstagram,X, andTikTok.
- Click Next.
- Click the text box for Smart Group. Scroll down to view Assigned Groups and click in the search box. From the list of assignment groups that appear, select the appropriate group. For example, select
All Corporate iOS Devices (Organization Name). - Select Auto for the Assignment Type.
- Select Never for Allow Removal.

- Click Save & Publish.
- You should now see your iOS – Social Media App Restrictions device profile within the list on the Profiles window.
Summary and additional resources
This tutorial detailed the process of using Workspace ONE to restrict malicious and unauthorized applications on iOS devices. The following tasks were covered in this tutorial:
- Creating an application group and a compliance policy to identify any drift from application baselines on iOS devices.
- Creating a restrictions profile to block app downloads from the Apple App Store.
- Configuring restricted mode to only allow installation of apps from Workspace ONE Intelligent Hub.
- Using a restrictions profile to hide installed apps.
Additional resources
For more information about Workspace ONE, explore the Workspace ONE UEM on Tech Zone. The page provides resources to help you level-up in your Workspace ONE knowledge. You will find everything from beginner to advanced curated assets in the form of articles, videos, and labs.
You may also wish to read these additional operational tutorials for iOS on Tech Zone.
Changelog
The following updates were made to this guide:
| Date | Description of Changes |
| 10/28/2025 |
|
| 05/21/2024 |
|
| 09/07/2023 |
|
About the author and contributors
This tutorial was written by:
- Michael Bradley, Senior Technical Marketing Architect, Omnissa.
- Wayne Bridges, Senior Solution Engineer, Omnissa.
Considerable contributions were made by the following subject matter expert:
- Christopher Reed, Director, Omnissa.
Feedback
Your feedback is valuable. To comment on this paper, either use the feedback button or contact us at tech_content_feedback@omnissa.com.


