Managing iOS Updates with Workspace ONE UEM
Overview
Omnissa Workspace ONE® UEM includes functionality to manage operating system updates on managed, supervised iOS devices. The OS update management feature provides administrators a view of all available updates and allows for granular assignment of those updates across an organization’s devices. With OS update management, admins gain the ability to maintain security updates through regular patching while minimizing the impact on customer-facing devices.
The OS update management feature provides functionality that allows administrators to:
- Block updates – Configure devices to not detect specific updates from Apple for up to 90 days.
- List available updates – List all available updates from Apple and report which devices are eligible for those updates.
- Publish iOS updates to devices – Define the action to be taken on devices for updates. Available actions include download only, install only, or download and install immediately.
- Monitor updates – Displays the status of OS updates on assigned devices.
Devices must meet the following minimum requirements prior to any update being initiated by iOS update management:
- Supervised iOS 11.3 or later
- Battery must be charged to at least 50 percent
- Enough storage space available to download the update
- Network access to Apple’s update servers
When managing iOS updates with Workspace ONE UEM, administrators can use the following chart as an approximation for expected behavior during an upgrade.
| iOS 9 – 10.2.1 | iOS 10.3 – 11.2.6 | iOS 11.3 – iOS 12.x | iOS 13+ | |
| Requires Supervision | Yes | Yes | Yes | Yes |
| Requires Automated Enrollment (DEP) | Yes | No | No | No |
| Device Password | Device cannot have a passcode. | User is prompted for device passcode upon receiving update command. | User is not prompted for device passcode if locked. iOS downloads update in background if locked. | User is prompted for device passcode prior to upgrade being performed. |
| Applicable Updates | Can only update device to the latest supported update. | Can only update device to the latest supported update. | Can update to any supported update that has not expired. | Can update to any supported update that has not expired. |
Purpose of this tutorial
This tutorial details how to effectively use the iOS update framework in Workspace ONE UEM to keep iOS devices up to date. The tutorial covers the following topics:
- Provides an overview of the UI for managing iOS updates.
- Addresses how Workspace ONE UEM handles conflicting updates for iOS.
- Details the steps for assigning updates for iOS devices.
- Explains additional management options for changing assignments and monitoring the status of an update on iOS devices.
- Details how to use the Software Update Enforcement declaration to push updates to devices.
Audience
This operational tutorial is intended for IT professionals and Workspace ONE UEM administrators of existing production environments.
Knowledge of additional technologies such as network, VPN configuration, Omnissa Intelligence, and Omnissa Workspace ONE® UEM is also helpful.
Navigating the Device Updates UI screens
OS updates are managed through the Device Updates user interface in Workspace ONE UEM. This section of the tutorial will provide a detailed explanation of the components of the interface and their function. You can use this whenever necessary as a reference.
Device Updates List View
The Available Device Updates List View can be found in the Workspace ONE UEM console by clicking Devices, then Device Updates, and selecting iOS. This section describes each column displayed.
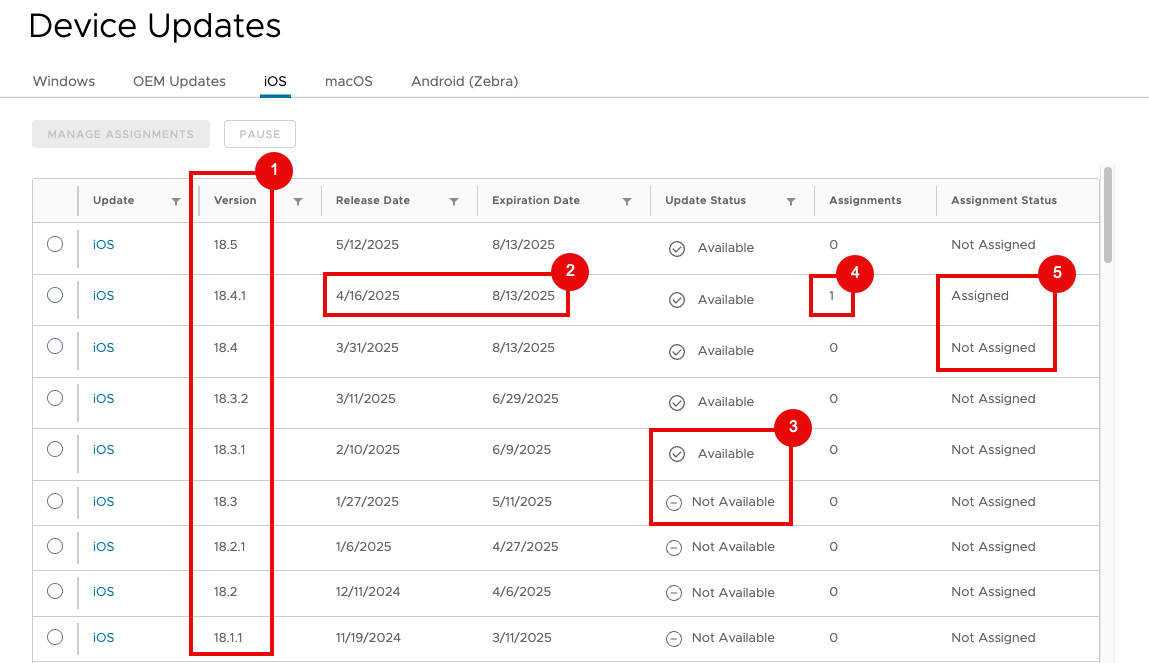
- Version - Indicates an iOS Update as discovered by the Workspace ONE UEM sync process with Apple’s product version lookup service.
- Release and Expiration Date - For each iOS update version, Workspace ONE displays the dates Apple made the update available to the public (for example, the Release Date). Workspace ONE also displays Apple's defined Expiration Date.
Note: The Expiration Date displays the date that the update's signature expires, and devices will no longer trust the update to apply it. Apple can expire the update earlier than this date for security or other reasons. - Update Status - The Update Status field denotes which iOS updates are Available or Not Available to deploy to devices.
Note: If an update is marked as Not Available, it will not deploy to devices and Workspace ONE deactivates the ability to manage assignments for the update. - Assignments - For each iOS update version, Workspace ONE displays how many assignments have been defined for that update. Assignments consist of one or more Smart Groups configured to begin receiving an update-related command after a specific date and time.
Note: The Assignments number does not necessarily equate to the number of smart groups assigned to the update. - Assignments Status – For each iOS update version, Workspace ONE displays whether that update has been Assigned to devices or Not Assigned. Additionally, if an administrator has paused an update, the update displays as Paused.
Note: If an assignment is Paused, Workspace ONE discontinues bulk command operations against any current or pending assignments. Workspace ONE cannot cancel any commands which have already been delivered to assigned devices prior to pausing the update process.
Update Details View
The Update Details View provides Workspace ONE administrators with additional details about the specific iOS update and its deployment status across the device fleet. To access the Update Details View, select an individual iOS update in the Available Device Updates View.
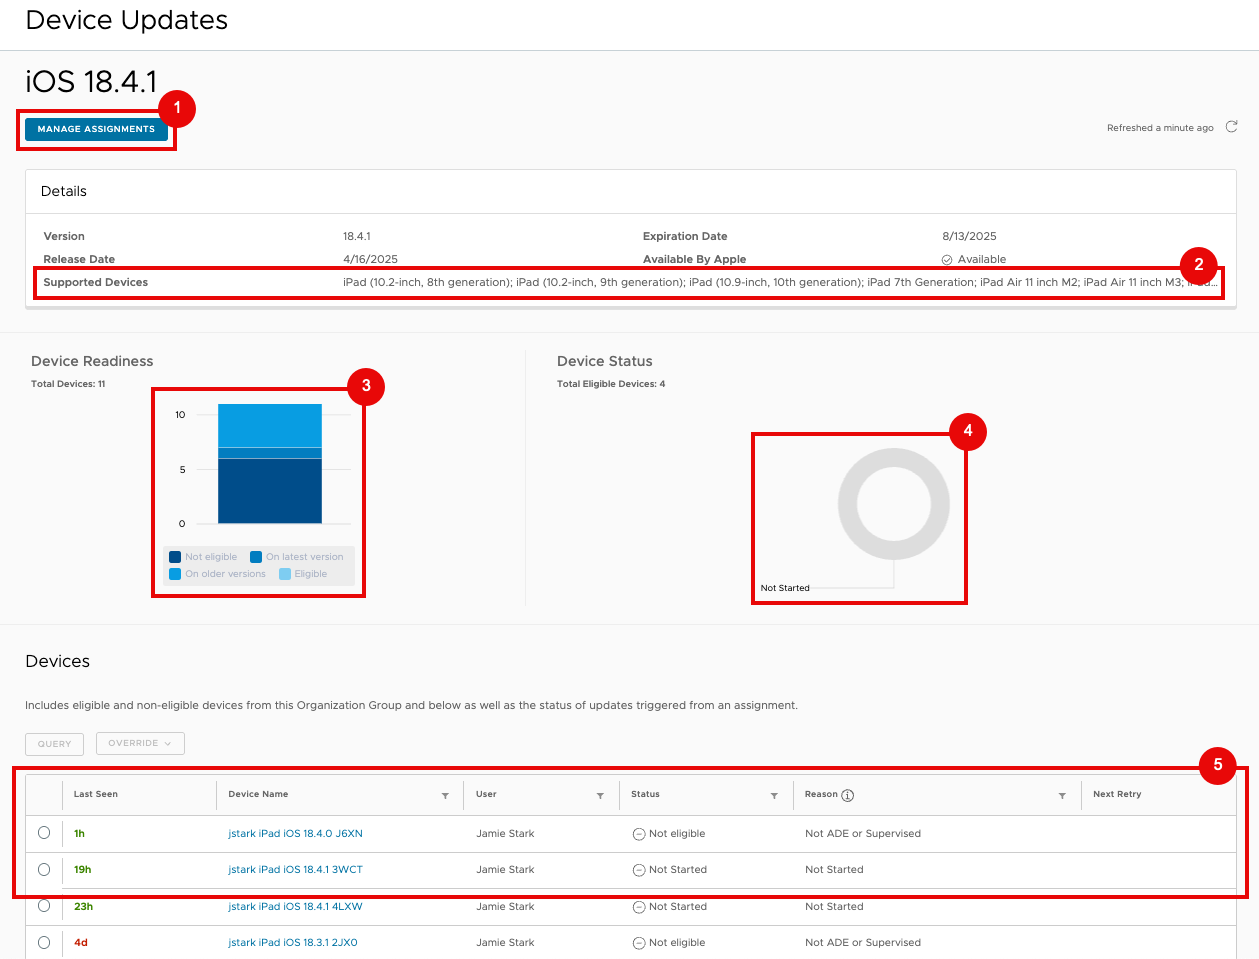
- Manage Assignments - This button launches the Manage Assignments view which allows administrators to create and prioritize assignments.
- Supported Devices - The update metadata returned from Apple contains a list of supported devices for each update. Workspace ONE converts the model identifiers (such as
iPad8,8) into human-readable model information. - Device Readiness - The device readiness graph shows the at-a-glance device eligibility (in that organization group and all child organization groups) to take that specific iOS update. Note the four available statuses:
- Eligible: On an earlier iOS version and can install the update.
- Not Eligible: On an earlier iOS version but cannot install the update (due to hardware incompatibility, non-supervised, and so on).
- On This Version: iOS devices currently running this version of iOS.
- On Higher Version: iOS devices that have upgraded to a newer version of iOS.
- Device Status - The device status graph displays the status of assigned eligible devices that are installing updates. Admins use this chart for at-a-glance tracking the progress of the iOS update across the assignments.
- Devices - The devices list displays updated statuses for all eligible devices based on assignment. Administrators can also select individual devices to initiate a query or download/install commands directly to that device, overriding any settings from an assignment.
Note: Sending an Override command does not affect any current assignments. If you override a device to send the Download command, but the Download/Install command is assigned for later that day, Workspace ONE still sends the Download/Install command at the assigned time.
Manage Assignments View
The Manage Assignments View provides administrators the ability to create and prioritize update assignments within their environment.
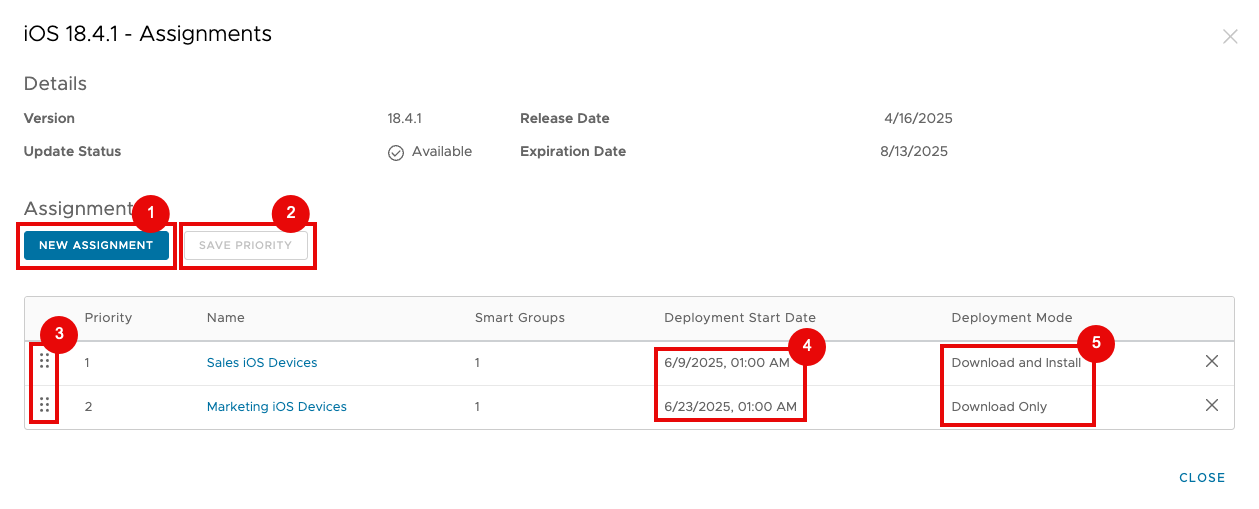
- New Assignment – Administrators use this button to assign download and install commands for this specific iOS update to one or more smart groups.
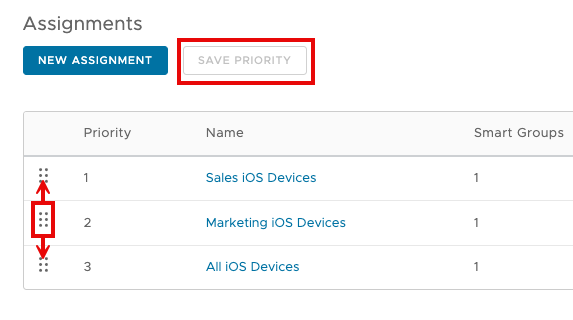
- Save Priority - Administrators use this button to save modifications to the priority they have set for assignments. Workspace ONE uses assignment priority to resolve schedule conflicts for devices in multiple assignments due to their Smart Group membership.
- Priority Drag Zone – This User Interface element provides a click-and-hold space for dragging and rearranging priority.
- Deployment Start Date – Each Assignment's start date is displayed for quick reference.
Note: The deployment start date is the day and time when Workspace ONE begins queueing commands to devices. It does not necessarily mean all devices in the assignment will get the command at that exact point in time. Factors that affect command delivery include batching (for large device counts), devices offline or powered off, network connectivity, and so on. - Deployment Mode - This column shows at-a-glance which command is being delivered to the devices in that assignment. Possible values include:
- Download: Instruct the device to download the update locally but not install it.
- Install: Instruct the device to install a downloaded update. If the update is not downloaded, the device starts downloading the update.
- Download and Install: Instruct the device to both download the update and then install it upon download completion. If the device already has the update downloaded, it begins installing the update.
Device Details Updates View
The Device Details Updates View is available by clicking Devices in the Workspace ONE UEM console and clicking a specific device. Click the tab called Updates. This tab displays any updates that the device is eligible to install. Administrators can use this tab to publish the download and install commands directly to the device.
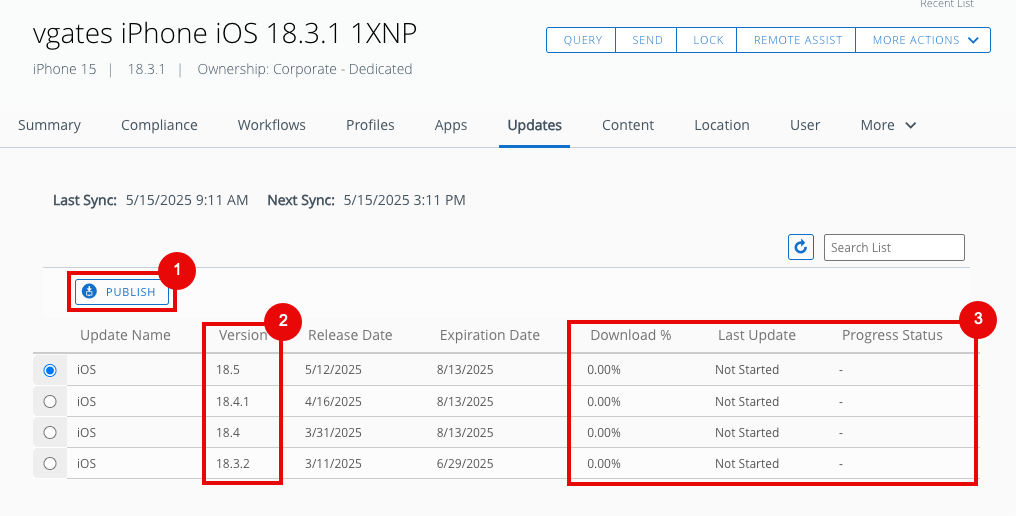
- Publish – This button publishes the selected iOS update to the device.
- Version - This column shows all available update versions for the device.
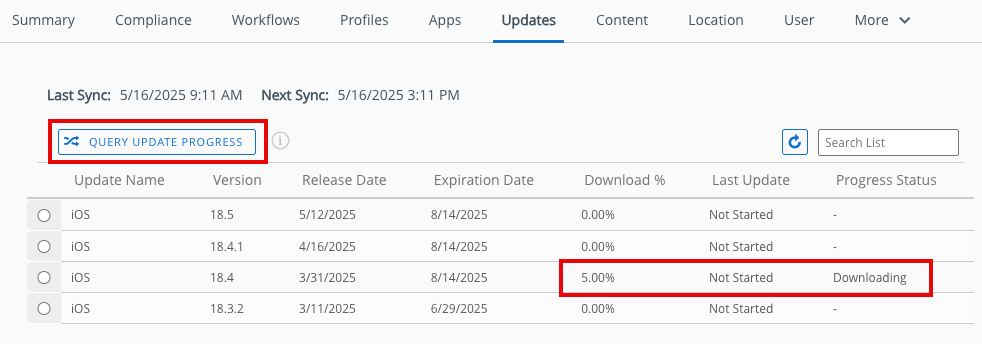
- Progress Reporting - Workspace ONE displays update progress as it is given from the device, including download percentage and install status.
Understanding assignment conflict resolution
In Workspace ONE UEM, devices can have membership in many different assignments (or smart) groups. Arranging devices in multiple groups is key to flexibility when managing a fleet of devices with potentially overlapping use cases and needs. Additionally, Workspace ONE UEM's organization group structure allows configurations to be defined broadly across devices or more granularly (and potentially by delegated administrators). Because devices can exist in more than one smart group (and those smart groups exist at different levels in an organization group hierarchy), there is a possibility to assign a single device to more than one assignment for iOS Updates. This section explains how Workspace ONE resolves conflicts with respect to iOS Update assignments.
Resolving assignment conflicts
There might come an instance when a device has multiple iOS update assignments that potentially conflict with each other. iOS Update conflicts are resolved in the following order:
- Most Recent Version Wins: The most recent iOS Update assigned to a device takes precedence.
- Closest Organization Group Wins: If the same iOS Update is assigned at different levels in the Organization Group (OG) hierarchy, the assignment closest to the OG to which the device is enrolled takes precedence.
- Highest Priority Wins: If the same iOS device exists in multiple assignments for a single iOS Update in a single OG, the assignment with the highest priority takes precedence.
Each scenario is described in more detail below.
Most recent version wins
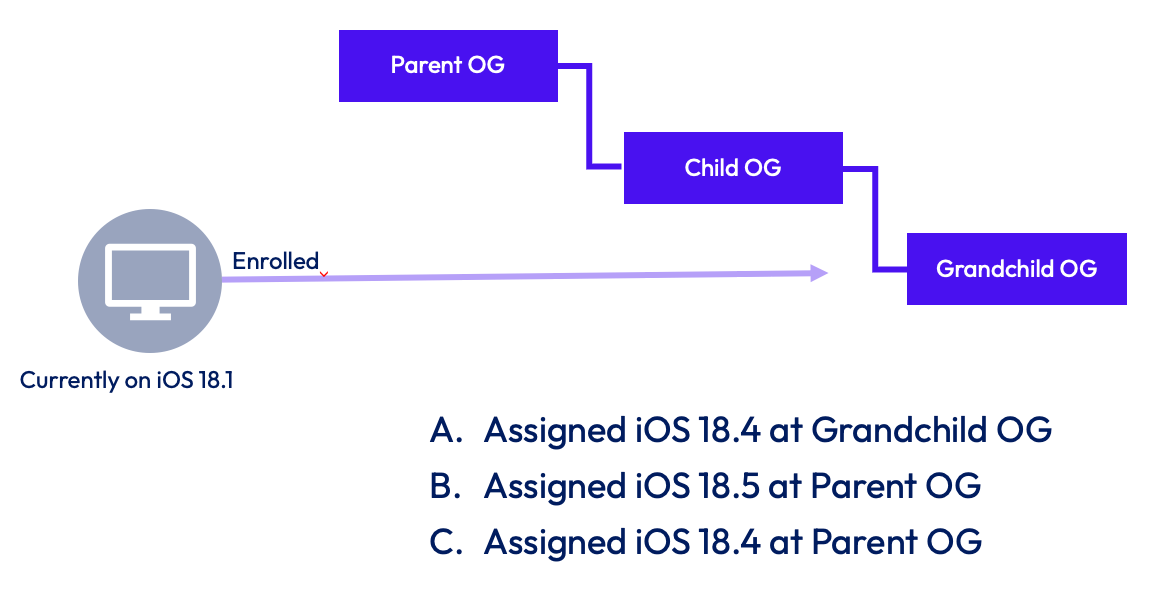
In this scenario, the device is enrolled in the Grandchild OG. A single iOS Update for 18.4 (A) has been assigned to the device at the Grandchild OG. An iOS Update for 18.5 (B) has been assigned at the Parent OG, as well as an iOS Update for 18.4 (C). In this case, Workspace ONE selects the update for 18.5 (B) because it contains the most recent iOS version assigned to the device (e.g. iOS 18.5 is prioritized over iOS 18.4).
Closest organization group wins
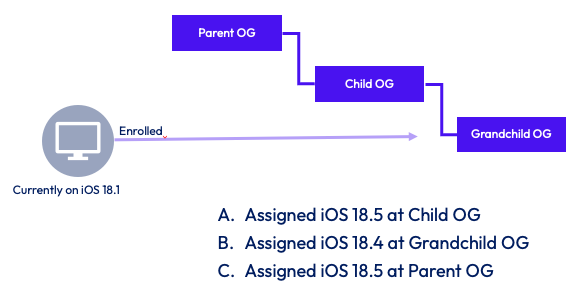
In this scenario, the device is again enrolled in the Grandchild OG. A single iOS Update for 18.5 (A) has been assigned to the device at the Child OG. An iOS Update for 18.4 (B) has been assigned at the Grandchild OG, and an iOS Update for 18.5 (C) is assigned from the Parent OG. Workspace ONE will prioritize the update for 18.5 from the Child OG (A) because it is the most recent iOS version assigned to the device, and because the assignment is made at the Organization Group closest in the hierarchy (Child vs. Parent) to where the device is enrolled (Grandchild).
Highest priority wins
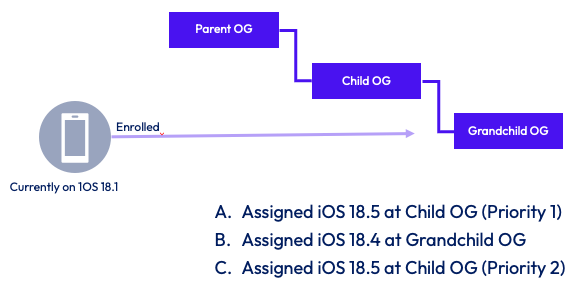
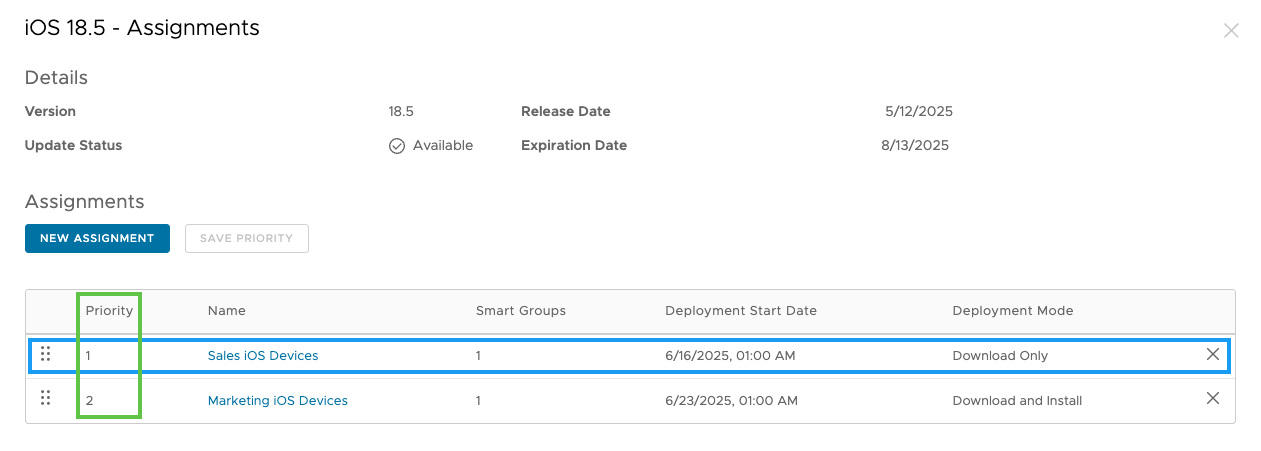
In this scenario, there are two iOS Update assignments (A & C) with the most recent iOS version, and both are in the same OG. One assignment is configured to only download the update (A), whereas the second assignment is configured to download and install the update (C). Workspace ONE will choose the assignment with the highest priority (A) and will only send the command to download the update.
Assigning iOS updates to devices
In this exercise, you will create and configure a new assignment from the iOS Updates List View.
Assign updates from the iOS Update List View
To get the desired result, perform the following steps:
- On your desktop, launch an Internet browser (i.e. Safari, Google Chrome, Firefox).
- Navigate to the Omnissa Workspace ONE UEM Console.
For example, navigate tohttps://<WorkspaceONEUEMHostname>where WorkspaceONEUEMHostname is the host name of the Workspace ONE UEM console. - Enter your Username, for example,
administrator. - Click Next. After you click Next, the Password text box is displayed.
- Enter your Password, for example,
Omnissa1!. Click Login.
Note: If you see a Captcha, be aware that it is case-sensitive. - In the Workspace ONE UEM console, select Devices. Then select Device Updates.
- On the Device Updates List View, select iOS from the options at the top.

- Select the row for the iOS update you want to deploy. Click Manage Assignments.
- Click New Assignment. Enter a name for the assignment. For example,
All iOS Devices. - For Select Smart Group, click in the search box. From the list of Assignment Groups that appear, select the appropriate group. For example, select
All iOS Devices (your@email.shown.here). - Click Next.
- For Deployment Begins, enter a date (or use the calendar picker) for the deployment to begin and enter a time and choose AM/PM.
- Select the Deployment Method you want to use for the assigned devices:
- Download and Install (for example, do both actions to automate the process)
- Download Only (for example, stage the update locally on the device)
- Install Only (attempts to trigger the install)
- Click Next.
- Click to activate the Notification for Download Success.
- Enter a message for Push Notification. For example, enter
A new iOS Update has been downloaded. - Click to activate the Notification for Install Success.
- Enter a message for Push Notification. For example, enter
A new iOS Update has been installed. - Click Save.
Add additional assignments and prioritize
There will be instances where you need to have multiple assignments for an iOS Update, as well as adjust the priority for specific assignments. This section will detail how to add additional assignments and change the priority of existing assignments.
- To add another assignment, in the Workspace ONE UEM console, select Devices. Then select Device Updates.
- On the Device Updates List View, select iOS from the options at the top.
- Select the row for the iOS update to which you want to add an assignment. Click Manage Assignments.
- Click New Assignment. Enter a name for the assignment. For example,
All iOS Devices. - For Select Smart Group, click in the search box. From the list of Assignment Groups that appear, select the appropriate group. For example, select
All iOS Devices (your@email.shown.here). - Click Next.
- For Deployment Begins, enter a date (or use the calendar picker) for the deployment to begin and enter a time and choose AM/PM.
- Select the Deployment Method you want to use for the assigned devices:
- Download and Install (for example, do both actions to automate the process)
- Download Only (for example, stage the update locally on the device)
- Install Only (attempts to trigger the install)
- Click Next.
- Click to activate the Notification for Download Success.
- Enter a message for Push Notification. For example, enter
A new iOS Update has been downloaded. - Click to activate the Notification for Install Success.
- Enter a message for Push Notification. For example, enter
A new iOS Update has been installed. - Click Save.
- To change the priority of the assignments, click and hold the grab area next to the assignment you want to change and drag the assignments to rearrange their order.
- After you have finished rearranging the assignments, click Save Priority to set the updated priority.
- Click Close.
Pause and resume assignments
Within the iOS update framework in Workspace ONE UEM, administrators can pause and resume updates without having to modify the assignments. This allows administrators to maintain visibility as to the deployments to date while having the ability to halt further deployments for troubleshooting purposes.
In this exercise, you learn how to pause and resume an update assignment.
- To add another assignment, in the Workspace ONE UEM console, select Devices. Then select Device Updates.
- On the Device Updates List View, select iOS from the options at the top.
- Select the row for the iOS update that you want to pause. Click Pause.

- When prompted, confirm the action by clicking Pause. The Update Status will change to Paused.
- To resume the iOS Update, select the row for the paused iOS update that you want to resume. Click Resume.

- When prompted, confirm the action by clicking Resume.
- The Update Status will change to Assigned.
Managing updates
This section covers how to manage updates for individual devices, as well as how to override existing assignments.
Publish updates for individual devices
- In the Workspace ONE UEM console, select Devices.
- Select the device for which you want to manage updates.
- Click the Updates tab.
- Select an OS Update from the list displayed and click Publish.
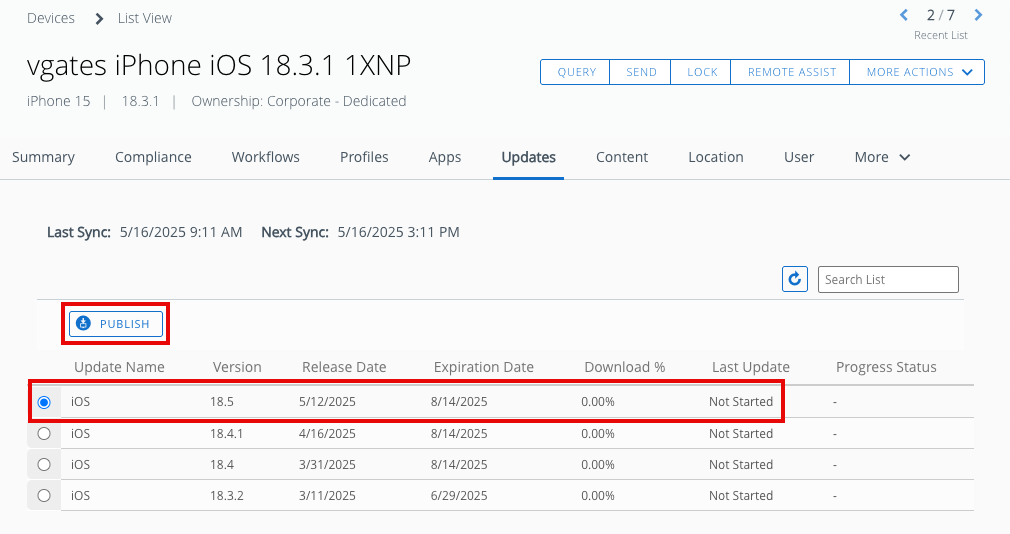
- The Update page will appear. Click the preferred Device Installation Method.
- Download: Instruct the device to download the update locally but not install it.
- Install: Instruct the device to install a downloaded update. If the update is not downloaded, the device starts downloading the update.
- Download and Install: Instruct the device to both download the update and then install it upon download completion. If the device already has the update downloaded, it begins installing the update.

- Click Send to publish the OS Update to the device.
- To monitor the status of the OS Update, you can click the Query Update Progress button. Review the Download % and Progress Status in the Updates tab.
Override assignments
In this exercise, you will override the settings for an existing assignment for individual devices.
- To override an existing assignment, in the Workspace ONE UEM console, select Devices. Then select Device Updates.
- On the Device Updates List View, select iOS from the options at the top.
- Click the iOS link on the row containing the update where you want to manage devices.
- Scroll down the screen until you see the list of devices assigned to this OS Update. Select a device from the list, and click the Override dropdown.
- Select the command you want to send to the device.
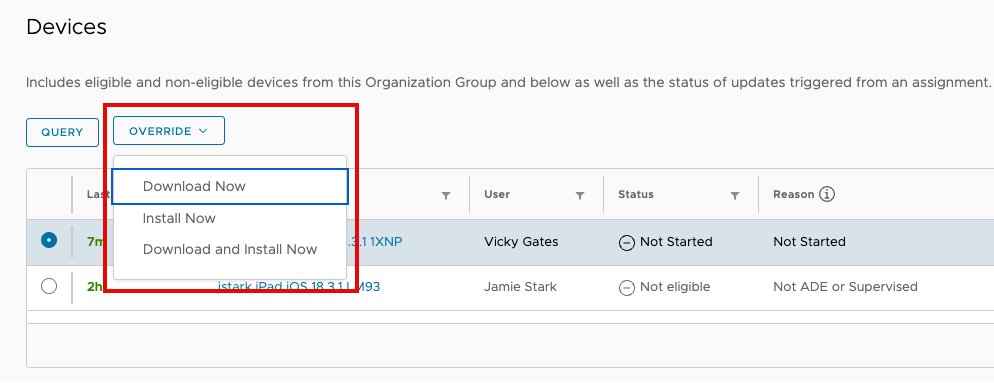
- A warning message will be displayed. Review the Override choice you selected to ensure it is correct. Click Yes to perform the override.
Software Update Enforcement declaration
With the release of Workspace ONE UEM, version 2406, Omnissa announced support for Apple’s new Declarative Device Management for iOS devices. This support includes the new Software Update Enforcement declaration, which allows IT admins to assign specific updates to devices and specify a date and time when the update will be enforced on the device regardless of user deferrals.
For more information about Declarative Device Management, please see this Tech Zone resource.
NOTE: Support for Declarative Device Management is part of the new Workspace ONE UEM Modern SaaS Architecture, which is currently in the rollout phase with version 2406 to SaaS tenants around the globe. It will be introduced to your tenants in the coming months as the rollout proceeds. If you don’t see it in your tenant now, be patient. It will get there soon enough.
Using the Software Update Enforcement declaration
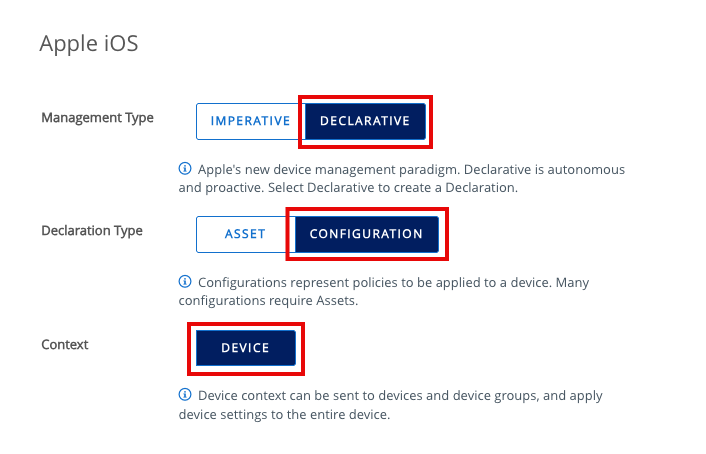
The process for creating a Software Update Enforcement declaration is similar to creating a legacy profile in Workspace ONE UEM. Once you select your platform, you are presented with the option to select a Management Type. In this case, you would choose Declarative, and select Configuration for the Declaration Type and Device for the Context.
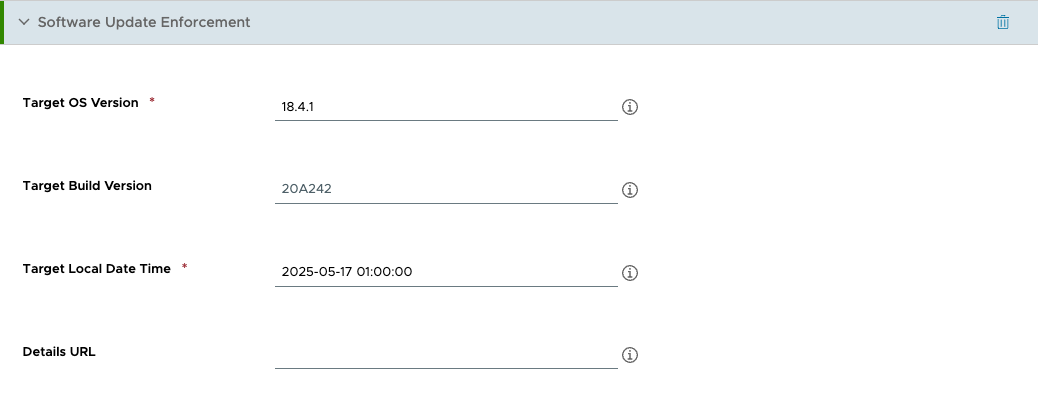
The Software Update Enforcement payload contains four configuration parameters, two of which are mandatory. These parameters determine the configured behaviour for the update. The parameters are:
- Target OS Version - This is the target OS version to which you want your devices to update. This is a mandatory field. Example: 18.4.1.
- Target Build Version - This represents the target build version. This field is optional. Example: 20A242.
- Target Local Date Time - This is the local date and time when you want to force the installation of the update. This is a mandatory field.
- Details URL - This is a URL that you may want to direct your end users to for more information about the update. This is an optional field.
To get the correct Target OS Version and Target Build Version, you can review Apple’s operating system release details here.
Once assigned to a group, Workspace ONE sends the declaration to the devices. The device will acknowledge the declaration. From here, execution of the update task is delegated to the device, which will manage the update process going forward.
Update enforcement process on an iOS device
Once the device receives the declaration, it begins downloading the specified update to the device. What happens after that depends on the Target Local Date Time set in the declaration. The behavior on the device will progressively change as the Target Local Date Time draws near.
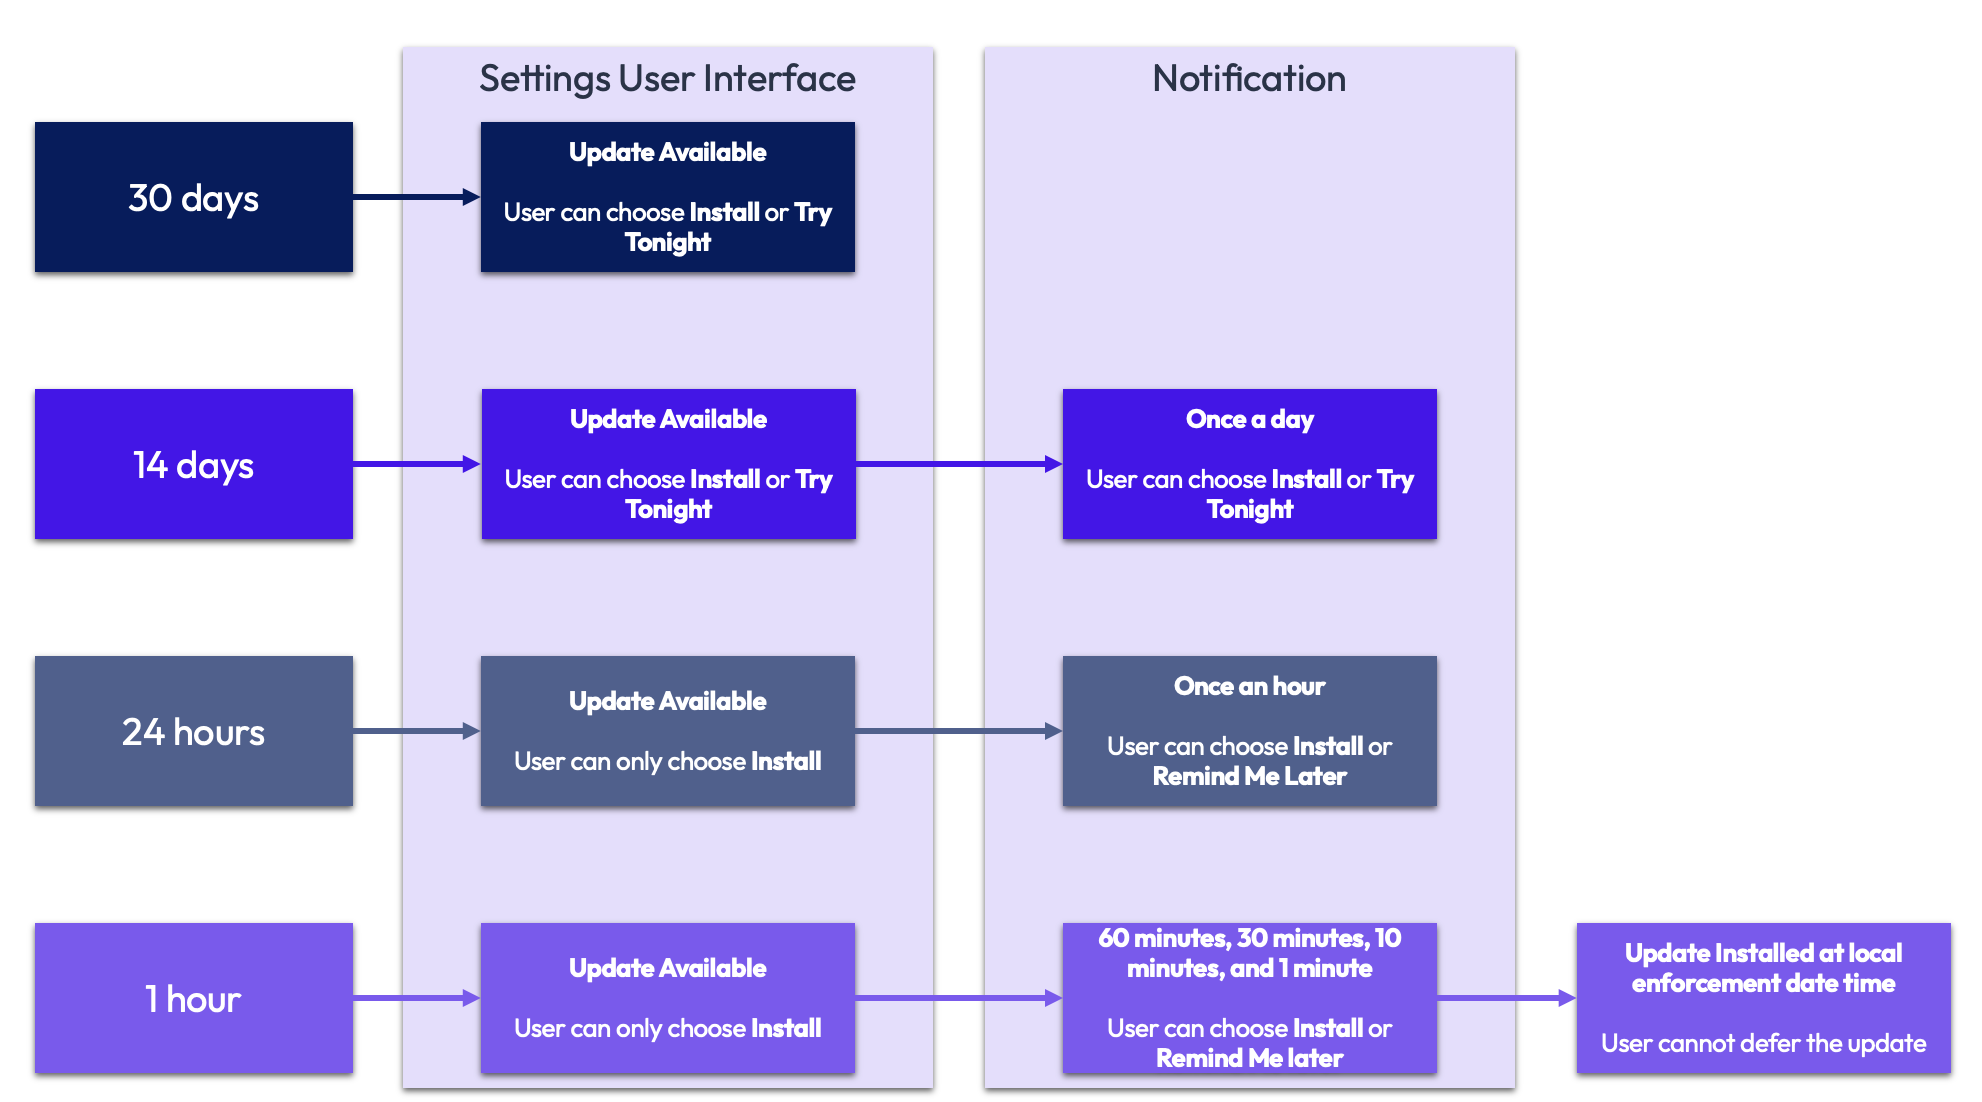
Let’s start 30 days out from the Target Local Date Time. The device display the update on the Software Update in the device Settings User Interface. The only indication the user will have that an update is pending will be a red badge on the Settings icon. The user has the option to install the update at their convenience in the Settings User Interface.
Within 14 days of the Target Local Date Time, the device will send a notification to the user once a day. This notification will give the option to either install immediately, or defer the update for later. The update is still available within the Settings User Interface if the user chooses to install the update manually.
Things begin to accelerate once we are less than 24 hours from the Target Local Date Time. The device notifies the user once an hour, giving the option to either install the update or defer it for later. Deferring the update will only defer it for an hour. The user will receive another notification an hour later. Additionally, the Settings User Interface will only provide the option to install the update. There is no longer an option to defer the update.
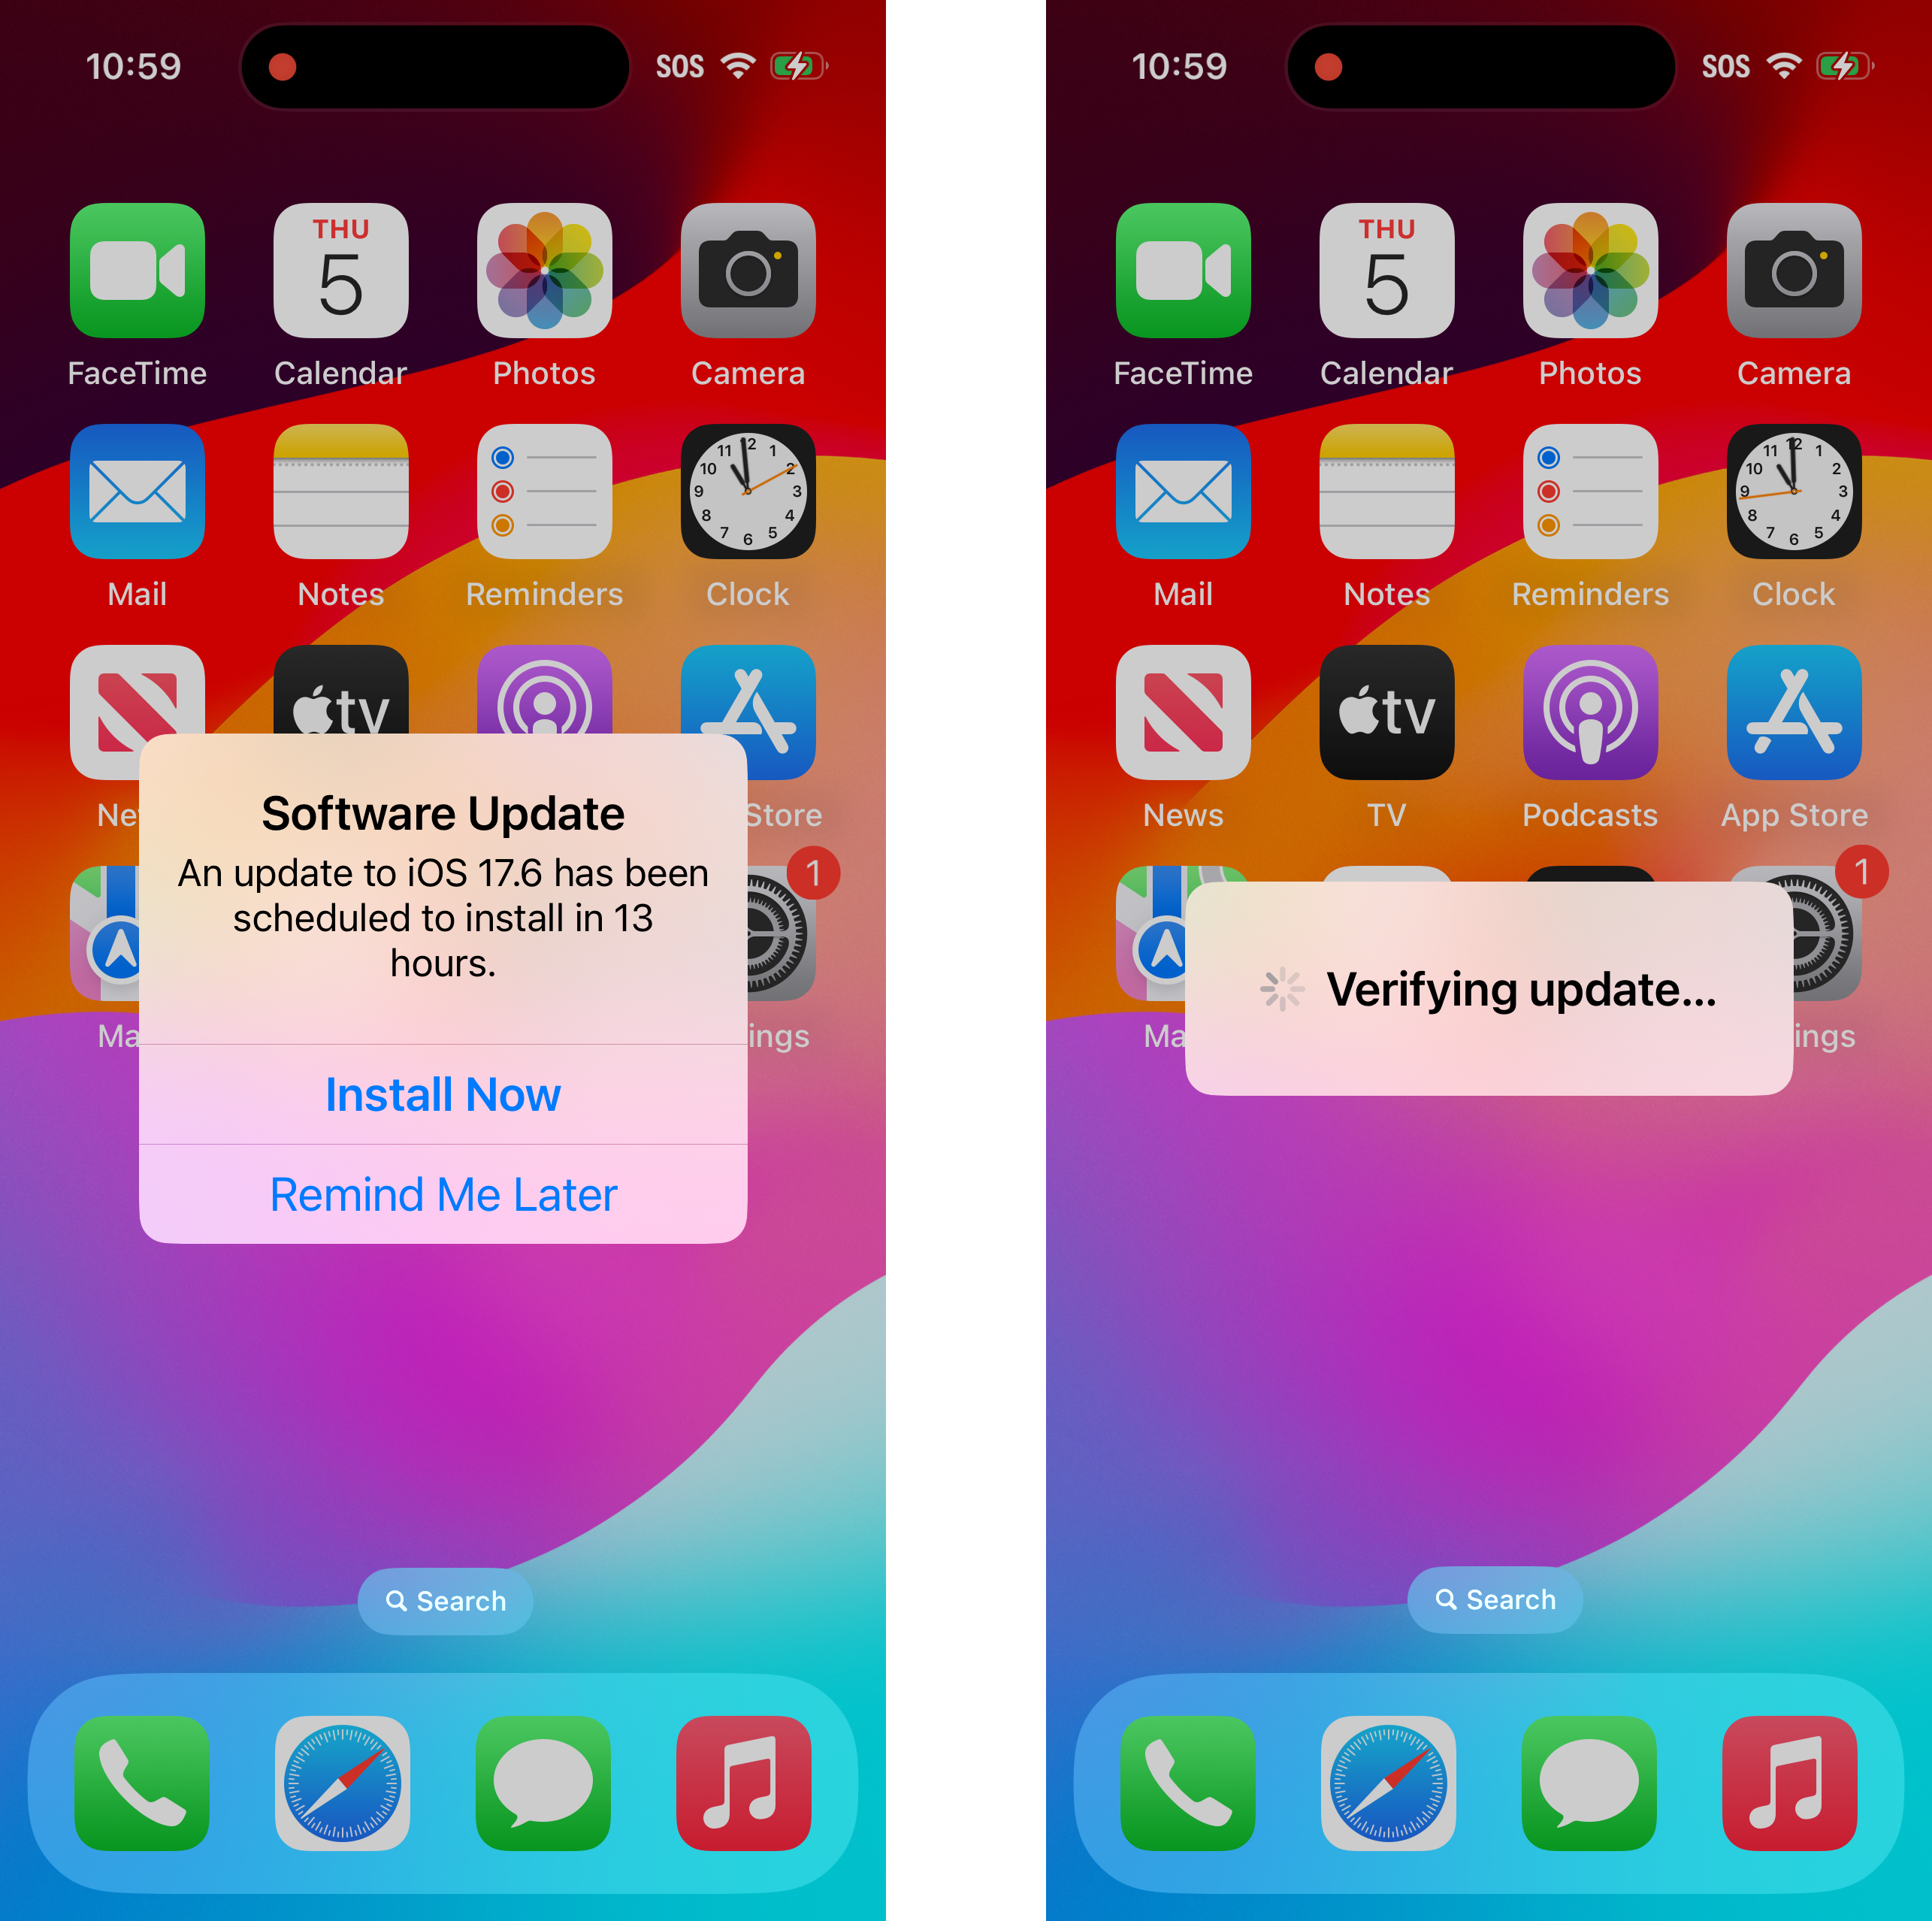
If the user remains stubborn and still refuses to update their device, the notifications will increase during the final hour before the Target Local Date Time. A notification will be sent at 60 minutes, 30 minutes, and 10 minutes. Each of these will give the user the option to defer the update. One minute prior to the Target Local Date Time, the user will be notified that the update is pending. They will have no option to defer the update.
When the Target Local Date Time arrives, the device will force the user to enter their passcode if one is set on the device, and then begin the update installation.
NOTE: The built-in iOS Updates functionality discussed above in this document utilizes Apple’s legacy update commands to initiate updates on devices. When using the Software Update Enforcement declaration in DDM, all other software update commands sent to the device are ignored. The Software Update Enforcement declaration takes precedence over all other commands.
Creating a Software Update Enforcement declaration
To create a Software Update Enforcement declaration, perform the following steps:
- In the Workspace ONE console, select Resources, and then click Profiles.
- From the Add dropdown menu, select Add Profile.
- Select the Profile Platform by clicking iOS.
- Select Declarative as the Management Type. Set the Delcaration Type to Configuration, and Device for the Context.
- Enter
macOS 18.4.1Updatesfor the profile name. - Scroll down the list of payloads until you find Software Update Enforcement and click Add.
- For Target OS Version, enter
18.4.1. - Enter a Target Local Date Time. The date time is formatted as
YYYY-MM-DD HH:MM:SS. For example, if you wanted the target date time to be 1:00 AM on May 17, 2025, you would enter2025-05-17 01:00:00.

- Click Next.
- Scroll down to Assigned Groups, click the search box, and from the list of assignment groups that appear, select the appropriate group, such as
All Devices (your@email.shown.here). - For the Assignment Type, select Auto.
- Click Save and Publish.
Once the declaration has been published, the update process will proceed as described in Update enforcement process on an iOS device.
Summary and additional resources
With Workspace ONE UEM, administrators can manage operating system updates to iOS devices. Administrators can automate the download and install actions or granularly control those two steps independently. With these features, Workspace ONE UEM allows for automated update cycles convenient to an organization's needs.
This operational tutorial provided steps to help you understand the UI screens, assign iOS updates to devices, and how to manage those updates. It also discussed how Workspace ONE UEM resolves assignment conflicts.
Additional resources
See the following for additional resources related to iOS update management with Workspace ONE UEM:
Additionally, you can check out the Omnissa Workspace ONE and Omnissa Horizon Reference Architecture which provides a framework and guidance for architecting an integrated digital workspace using Omnissa Workspace ONE and Omnissa Horizon.
Changelog
The following updates were made to this guide:
Date | Description of Changes |
|---|---|
| 06/30/2025 |
|
| 05/19/2025 |
|
| 09/27/2024 |
|
| 06/18/2024 |
|
| 08/11/2022 |
|
| 12/13/2019 |
|
About the author and contributors
The latest version of this document was written by:
- Michael Bradley, Product Specialist, Omnissa.
Questions and feedback
For questions or feedback, send to tech_content_feedback@omnissa.com.

