

App management for Apple devices
Overview
Omnissa Workspace ONE UEM provides comprehensive application management capabilities for Apple iOS, iPadOS, and macOS devices. It empowers IT administrators to manage apps throughout their entire lifecycle, from initial distribution to ongoing configuration updates and eventual retirement. Workspace ONE UEM’s ability to manage apps on both supervised and unsupervised devices offers administrators the flexibility needed for various deployment scenarios. And its seamless integration with Apple Business (AB) and Apple School (AS) facilitates easy app distribution of apps purchased through Apple’s Volume Purchase Program (VPP).
Introduction
As enterprise mobility expands across organizations of all sizes, the ability to efficiently deploy, configure, and manage applications on Apple devices has become a crucial IT function.
This guide delves into how Omnissa Workspace ONE UEM offers a comprehensive and unified approach to application lifecycle management across Apple iOS, iPadOS, and macOS devices. It covers three core application types: Internal, Public, and Purchased.
The document guides IT administrators through the key capabilities and deployment methods available within the platform, from initial app onboarding and configuration to ongoing updates, security enforcement, and eventual retirement. Whether managing proprietary enterprise apps, App Store titles, or volume-licensed software acquired through Apple Business, Workspace ONE UEM empowers administrators with the tools and workflows necessary to maintain governance, ensure compliance, and provide a consistent experience across the entire Apple device ecosystem.
Purpose of this tutorial
This overview provides an in-depth look at the essential features, deployment strategies, and management capabilities offered by Apple device app management within Workspace ONE UEM. While it’s not intended to be an exhaustive resource, it highlights key areas and emphasizes the value of leveraging specific capabilities within Workspace ONE UEM.
Audience
This operational tutorial is intended for IT professionals and Workspace ONE administrators of existing production environments.
Both current and new administrators can benefit from using this tutorial. Familiarity with macOS, XML, and basic scripting is assumed.
Knowledge of additional technologies such as Omnissa Intelligence and Omnissa Workspace ONE® UEM is also helpful.
Introduction to app management in Workspace ONE UEM
Omnissa Workspace ONE UEM offers comprehensive application management capabilities for Apple devices. It empowers IT administrators to manage apps throughout their entire lifecycle, including initial distribution, ongoing configuration updates, and eventual retirement.
Application lifecycle
Applications undergo several critical lifecycle stages, beginning with onboarding and deployment, continuing through updates, and eventually reaching retirement. Each stage presents unique challenges related to security, user experience, and operational overhead.
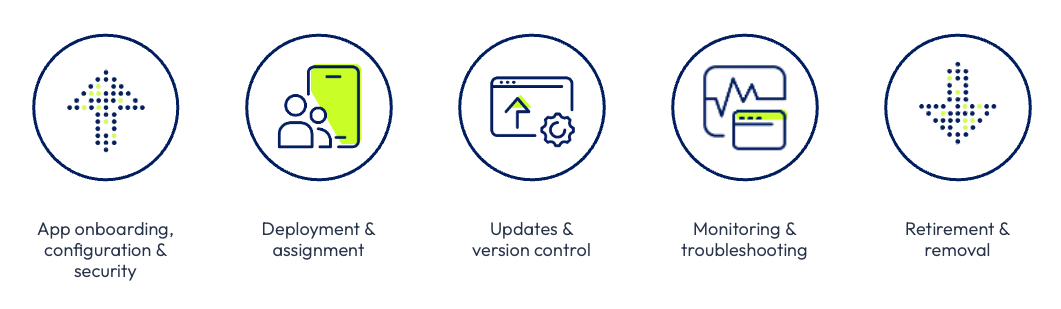
Figure 1: Application lifecycle
The initial phase is app onboarding. Workspace ONE UEM manages a diverse range of apps, including internal apps, public store apps, VPP-purchased apps, and web apps across various platforms. During configuration and security, it’s crucial to set up apps correctly from the outset. Admins can leverage the Workspace ONE SDK and AppConfig to push app settings, enforce data protection policies, and control authentication without altering app binaries. Note that the Workspace ONE SDK and AppConfig are only available for iOS apps.
For deployment and assignment, Workspace ONE UEM employs smart groups, flexible deployments, and automation to ensure that the appropriate apps are delivered to the right users at the right time.
Updates and version control pose another significant risk area. Workspace ONE UEM supports multiple active versions, beta testing, controlled rollouts, and rollback capabilities, effectively minimizing downtime and user disruption.
Ongoing monitoring and troubleshooting are simplified through deployment tracking dashboards, real-time status reporting, and SDK-based application logs. This enables admins to proactively identify and resolve issues.
Finally, during retirement or removal, Workspace ONE UEM ensures the safe decommissioning of apps by implementing safeguards such as app removal protection. This prevents accidental outages of critical business applications.
Overall, Workspace ONE UEM transforms application lifecycle management from a manual, error-prone process into a policy-driven, automated, and secure workflow. This improvement enhances both IT efficiency and the end-user experience.
App classifications
Workspace ONE UEM offers application management functionality for managing the deployment of applications to your Apple devices. This functionality supports various application types and deployment scenarios. Apps in Workspace ONE fall into three classifications:

Figure 2: App classifications in Workspace ONE UEM
- Internal Apps – Internal apps are non-app store apps that are directly uploaded into Workspace ONE UEM. These apps can be internally developed, imported from an external app repository, or downloaded from the internet and packaged for distribution through Workspace ONE.
- Public Apps – Public apps are uploaded by software vendors into the Apple App Store. These apps are imported and updated in Workspace ONE from the app store. Public Apps are only supported on iOS and iPadOS devices.
- Purchased Apps – Purchased apps are applications acquired through Apple’s Volume Purchase Program (VPP) or custom business-to-business (B2B) apps. These apps are volume-licensed and purchased via Apple Business.
NOTE: Workspace ONE UEM also can deploy web app to devices. Web apps are links on the menu of the end-user’s device that give them easy access to a URL or web app. This document will focus on apps that run natively on Apple devices. Web apps will not be discussed.
Internal apps
Internal apps are applications that aren’t available in the Apple or macOS App Stores. These apps can be developed in-house by development teams to meet specific customer needs or downloaded from external developers or software vendors. For instance, the Google Chrome browser is an example of an internal app.
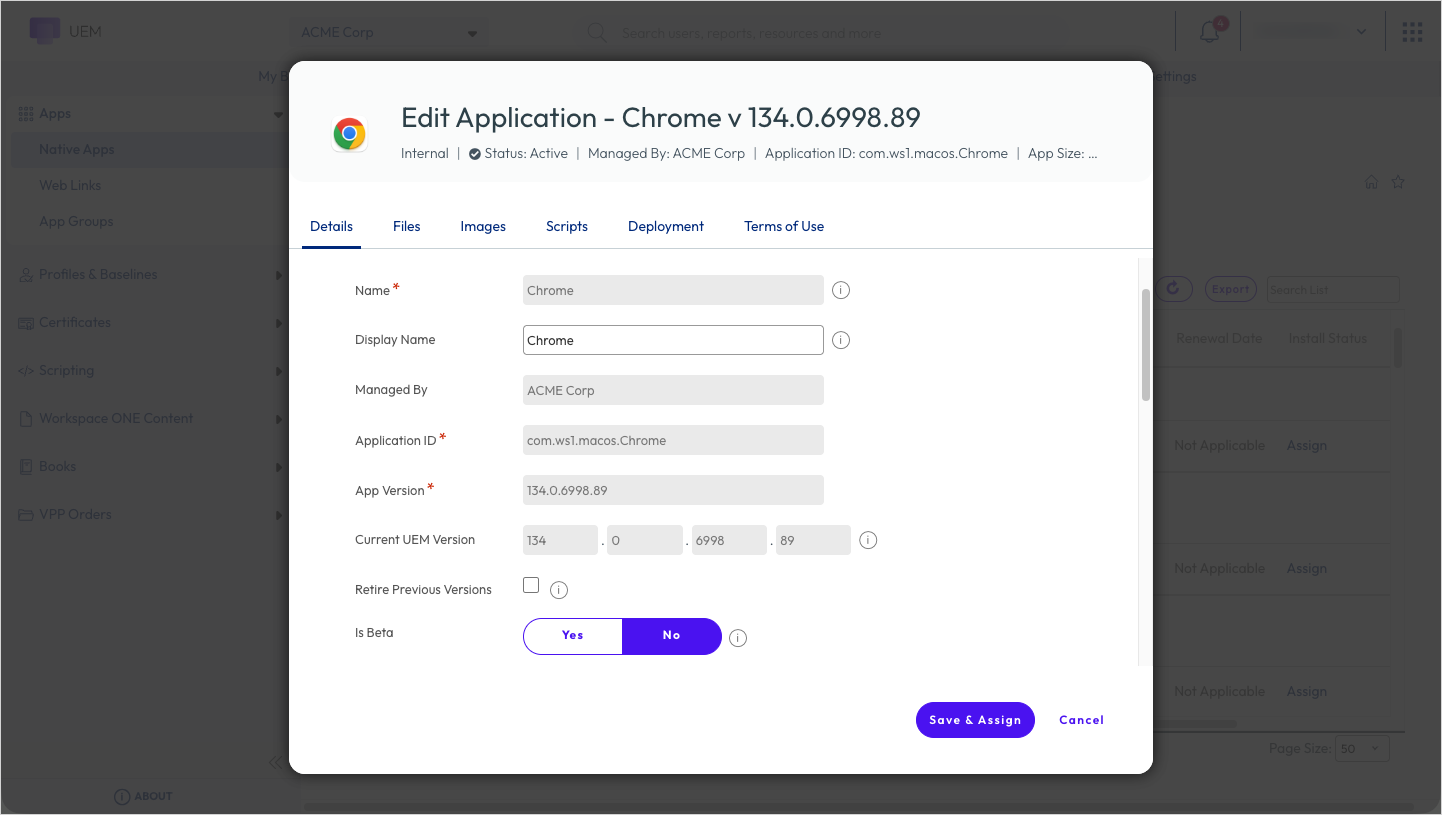
Figure 3: App configuration screen
For iOS and iPadOS apps, Workspace ONE UEM uses the Apple MDM protocol for internal app distribution. This enables organizations to deploy non-app store apps to their devices. Additionally, Workspace ONE UEM integrates with the open-source tool Munki, allowing it to deploy and manage all macOS application types.
NOTE: Workspace ONE UEM employs a subset of the open-source Munki client. Consequently, not all Munki features or commands are supported in Workspace ONE.
Supported file types
Workspace ONE UEM supports the following application file types for Apple devices.
Table 1: Supported app file types
| Platform | Supported file types |
| Apple iOS / iPadOS | IPA |
| Apple macOS | DMG / MPKG / PKG / APP |
| Apple tvOS | IPA |
Enabling software management for macOS
To deploy macOS internal apps (non-app store apps) through Workspace ONE UEM, you must enable Software Management for Apple macOS. This can be enabled in Groups & Settings > All Settings > Devices & Users > Apple > Apple macOS > Software Management.
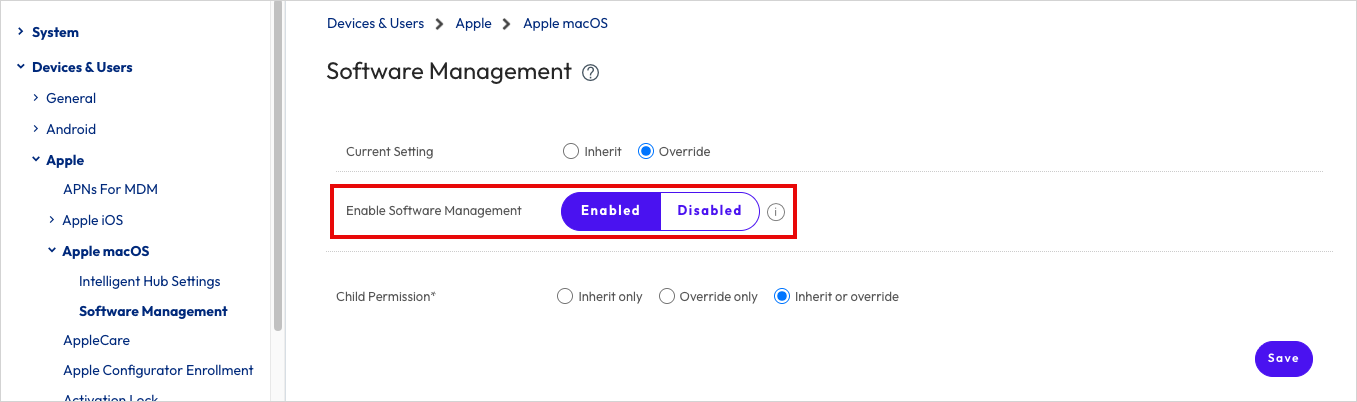
Figure 4: Enabling macOS Software Management
NOTE: If you are using a SaaS-based version of Workspace ONE UEM, this feature is already enabled by default.
Internal app deployment
While the process of deploying internal apps is generally similar for both iOS and macOS, there are some subtle differences between the two platforms.
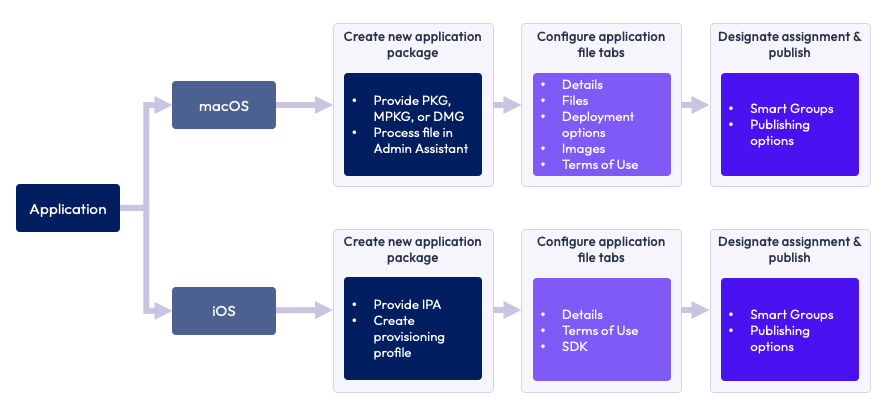
Figure 5: Internal app deployment process for Apple devices
Notice that iOS has an additional requirement of a provisioning profile, and less options than macOS for the application file configuration. For macOS applications, an additional requirement is a metadata file and an optional icon file. These files can be obtained by processing the installation package through the Workspace ONE Admin Assistant app. For more information about the Workspace ONE Admin Assistant, see Packaging macOS internal apps.
Application files are uploaded in the Workspace ONE console from the Add menu from Internal tab in Resources > Apps > Native Apps.
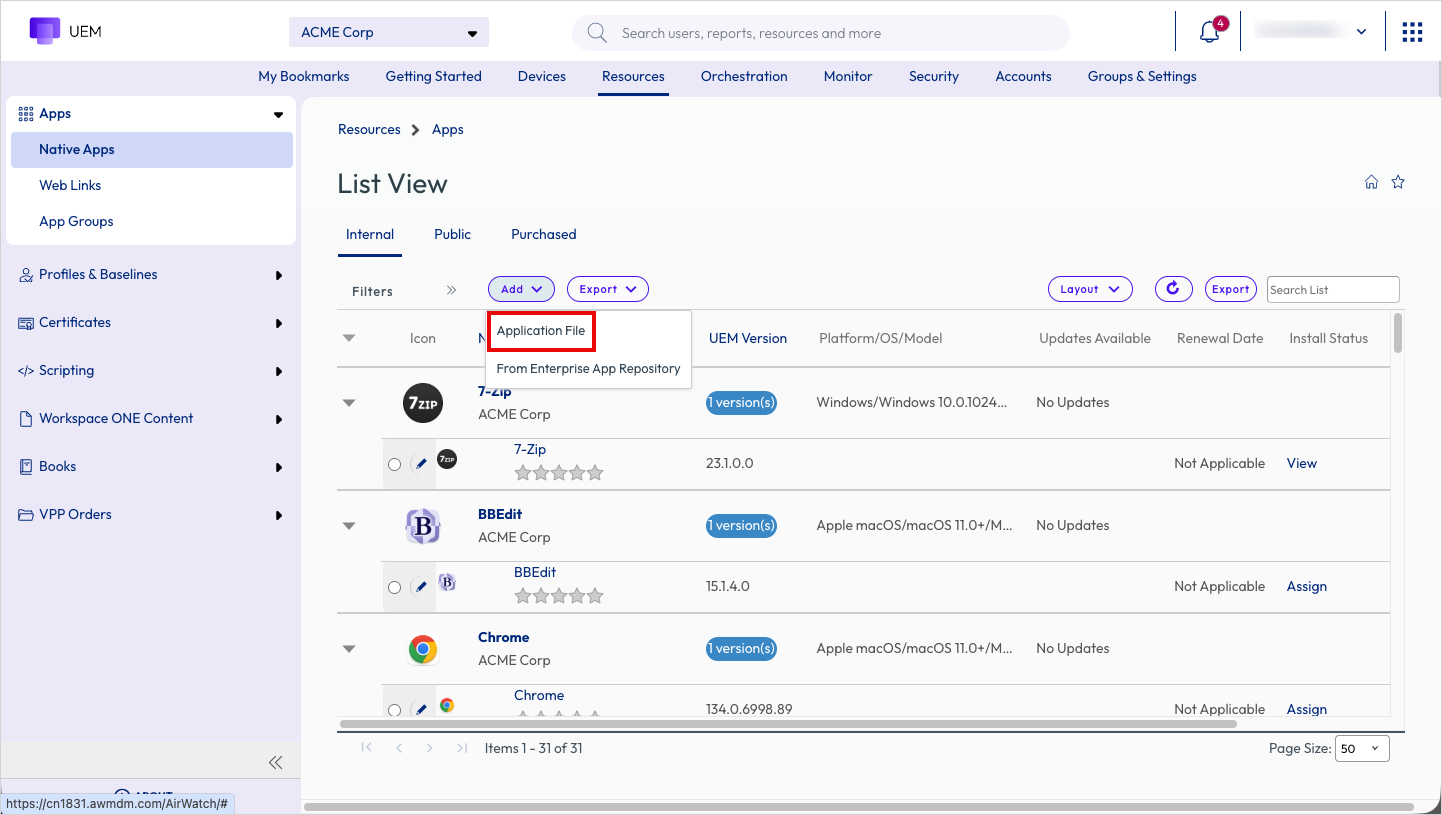
Figure 6: Adding internal applications into Workspace ONE UEM
iOS provisioning profile
An iOS provisioning profile is a cryptographically signed certificate from Apple that enables applications to run on designated devices. This profile serves as a security mechanism that links an app's identity with developer credentials and approved devices, ensuring only authorized applications can execute on iOS hardware.
To deploy an internal Apple iOS application, each target device must have the corresponding provisioning profile installed. Every profile includes three critical components: iPhone Development Certificates, Unique Device Identifiers, and an App ID. Testing is restricted to devices listed in the profile and can only be performed by developers whose certificates are embedded within it. Note that individual devices can accommodate multiple provisioning profiles simultaneously.
For comprehensive information about provisioning profiles, refer to the documentation on Provisioning Profiles for an Internal iOS Application.
Packaging macOS internal apps
Workspace ONE UEM requires a metadata file and the application installer file to manage the deployment of macOS applications in the UEM console. The Omnissa Workspace ONE Admin Assistant tool assists in generating the necessary metadata for uploading to Workspace ONE UEM.
The Admin Assistant app utilizes the makepkginfo tool from Munki to extract metadata from macOS software installers into a plist file, also known as a metadata file or pkginfo file. This tool is built using Munki components to facilitate the parsing of application installers for the required metadata. Additionally, the Admin Assistant app attempts to extract an icon image file that can be optionally uploaded to the UEM console. The Admin Assistant app provides a convenient way to upload .dmg, .pkg, .mpkg, and .app files.
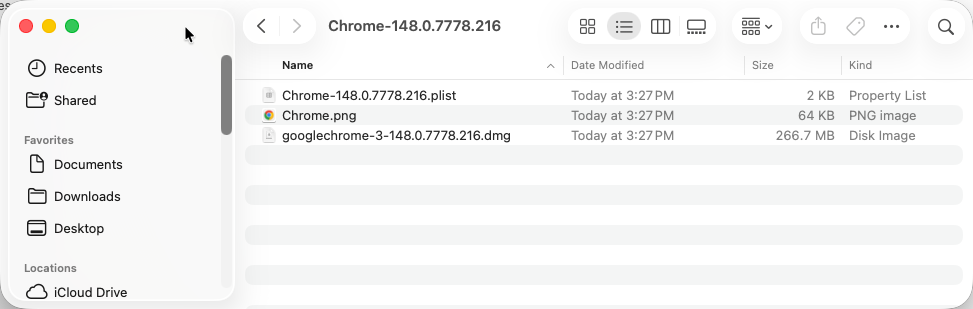
Figure 7: File output from the Workspace ONE Admin Assistant
The Workspace ONE Admin Assistant can be downloaded from Omnissa Customer Connect at: https://customerconnect.omnissa.com/downloads/info/slug/desktop_end_user_computing/omnissa_workspace_one_admin_assistant/latest
For further information about Munki, please see the Munki website.
To learn more about the Workspace ONE Admin Assistant, please see Introduction to Workspace ONE Admin Assistant for macOS.
Anatomy of a PLIST file
The Workspace ONE Admin Assistant generates a PLIST file that contains the metadata for the app you need to upload to the Workspace ONE UEM console. This file includes crucial information that you should be aware of.
The following example code comes from a PLIST created by the Workspace ONE Admin Assistant for Google Chrome. We will breakdown the key sections within the file.
Metadata section
The metadata section of the PLIST file provides information about its creation, including the user who created it, the date of creation, the version of the Munki framework used, and the version of macOS on which the Admin Assistant was executed. It’s important to note that the Munki framework is an integral part of the Workspace ONE Admin Assistant and cannot be selected by the end user during execution.

Figure 8: Metadata section of the PLIST file
Deployment configuration
The deployment configuration determines the catalogs, categories, and other details of the software package. These settings are made by the Workspace ONE Admin Assistant and don’t need any changes. One crucial key is the display_name. This is the default name that will appear in the Display Name field in Workspace ONE UEM when the app is uploaded to the console. Customarily, an uploaded app’s display name matches its actual name. However, it may need to differ if an organization uses a custom-branded business app known by a different name among its end users. If necessary, you can modify this in the PLIST file.
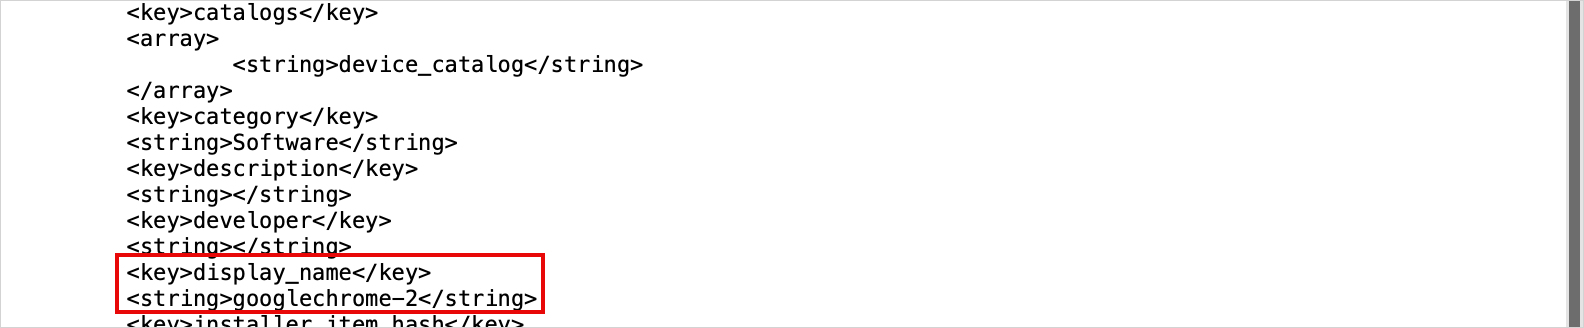
Figure 9: Deployment configuration in the app PLIST file
Installation details
The installation details provide crucial information about the installer file, including its name, hash, size, and type. The hash is particularly significant as it can be used to verify the authenticity of the installer file. The installer type specifies the actions the installer will take to install the app on the device. For instance, the copy_from_dmg option in the provided code indicates that the app will be extracted from the disk image file and copied to the designated folder on the macOS device.

Figure 10: Installation details in the app PLIST file
App installation configuration
The app installation configuration determines how macOS identifies the presence of an application. This configuration includes the app’s bundle ID, version, installation path, and other relevant details. These default values are set by the Workspace ONE Admin Assistant based on metadata within the installer package.The installs array is a key-value pair in the PLIST file that specifies identifying information about a binary or file, which should be directly compared to determine if the correct version of an app is installed. The installs list can contain any number of items.

Figure 11: App installation configuration in an app PLIST file
Copy instructions
This section outlines the steps to be taken during the installation process, specifically detailing the files that need to be copied and their respective destinations. The destination_path can be modified if necessary. However, it’s crucial to ensure that any changes made to the installation path are reflected in the path key within the App Installation Configuration section of the PLIST file. This is essential to ensure Workspace ONE UEM can correctly identify when the app is installed.

Figure 12: Copy instructions in the app PLIST file
Uninstall configuration
The uninstall configuration determines whether the app can be uninstalled and specifies the method for uninstalling it, such as removing the copied items.

Figure 13: Uninstall configuration in the app PLIST file
NOTE: Any modifications made to these sections may affect the proper installation of the software. Some of the keys discussed are dependent on others within the PLIST files.
Key options for internal apps
Workspace ONE UEM provides administrators with various options for configuring internal apps for deployment. While not all options will be covered in this section, an explanation of each option within each tab of an internal app can be found in the Omnissa Product documentation.
Below, we’ll discuss key options and recommendations for creating a new internal app.
Details tab
The Details tab provides administrators with the ability to set a wide range of information for Internal Apps, including app category, key words for app search, contact details for support, and many others. Two key options include Display Name and Uploaded UEM Version.
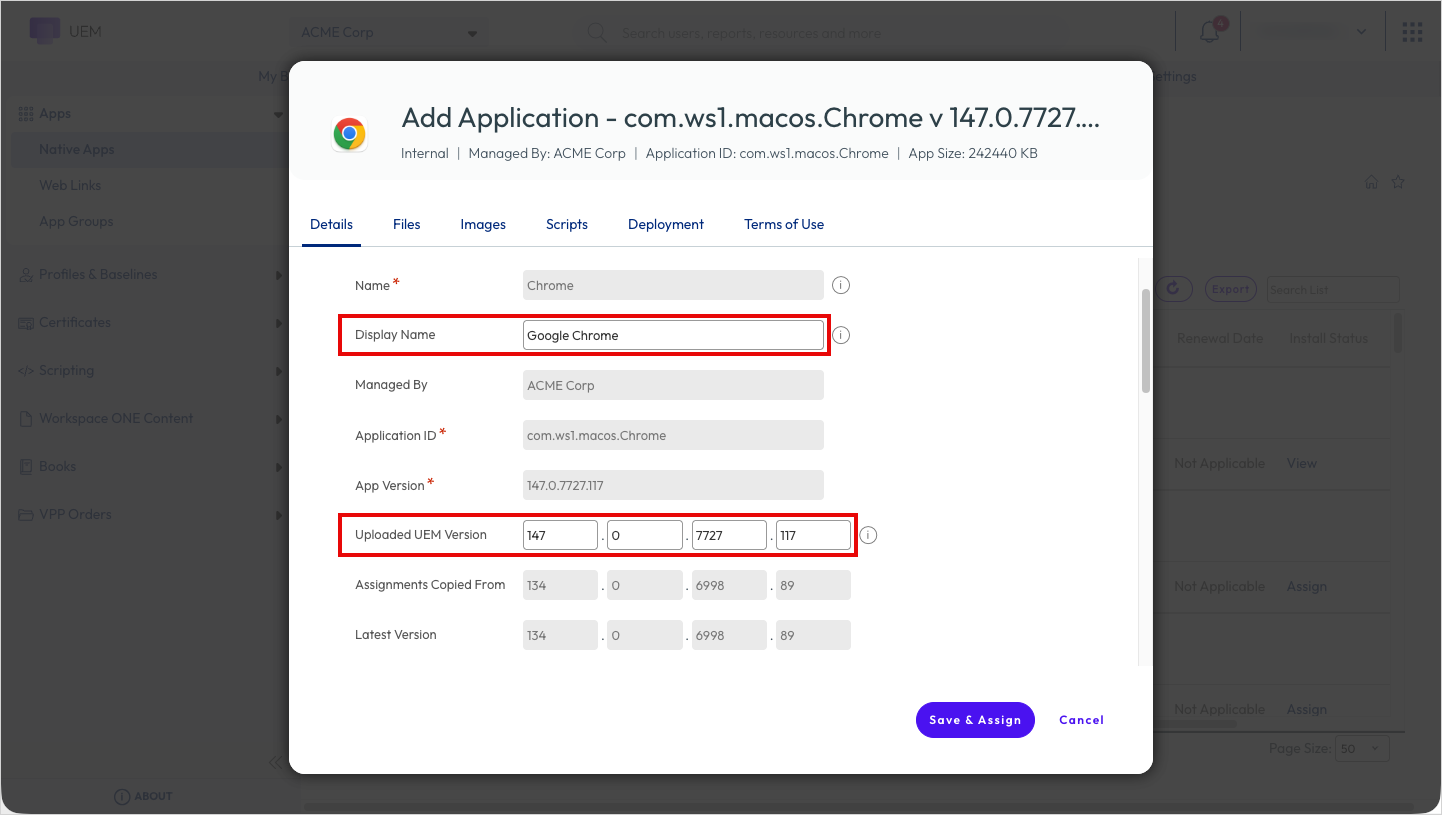
Figure 14: Details tab for Internal Apps
- Display Name – Customarily, the display name of an uploaded app matches its actual name. However, there are instances where the name needs to differ from the app’s actual name. For instance, if an organization uses a custom-branded business app that is known by a different name among its end users. In such cases, an administrator can change the app’s display name in Intelligent Hub to the name that is most commonly known by the users. This change can help reduce confusion among the end users.
- Uploaded UEM Version – Similar to Display Name, the Uploaded UEM Version commonly matches the version number of the uploaded app. However, it might be necessary to assign a different version number that is specific to Workspace ONE UEM. This is most common in situations where a commercial app has been customized to fit certain corporate requirements. The core app version would not match the version organization’s version of the customized app.
Scripts tab
Custom scripts can be added to perform specific tasks during the app installation or removal process. These scripts can be configured to execute before or after the installation or uninstallation of an application. Scripts must be written in bash (using the command #!/bin/bash).
Common examples of pre-install scripts include staging a configuration file or license key for use during the application installation. Post-install scripts can be used to trigger configurations or specific application processes after the application has been installed.
Another option is the Verification Scripts feature, which can be used for both installation and uninstallation. Verification Scripts help administrators verify whether specific applications are installed and determine the conditions under which software should be deployed or updated.
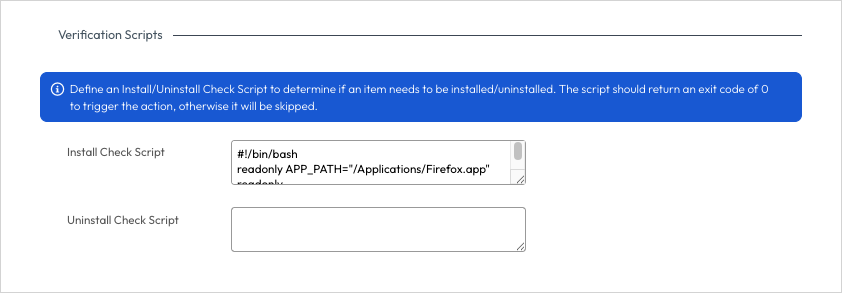
Figure 15: Verification scripts
Install Check Script can confirm that an application is installed and can use conditional logic to check for specific conditions. Uninstall Check Script can validate that the application has been successfully removed from the device. When creating an Install Check Script, it’s crucial to ensure that the script returns an exit status of 0 to signify that an application installation is necessary. Similarly, when creating an Uninstall Check Script, an exit status of 0 should indicate that an uninstall is required.
Some examples of reasons to use Install and Uninstall Check Scripts include:
- Checking if the application is installed before offering an update.
- Preventing the installation of conflicting applications based on existing installed software.
- Verifying that systems meet specific compliance requirements before updates.
The following is an example of a macOS Install Check Script that checks if the app is installed in its configured app path:
#!/bin/bash
APP_PATH="/Applications/<app_name>.app"
if [ -d "$APP_PATH" ]; then
  echo "<app_name> is installed."
  exit 1
else
  echo "<app_name> is missing. Install required."
  exit 0
fi
The following example macOS Install Check Script validates the app version to detect if the correct app is installed:
#!/bin/bash
APP="/Applications/<app_name>.app"
REQUIRED_VERSION="5.4.2"
if [ ! -d "$APP" ]; then
  echo "App is missing. Install required."
  exit 0
fi
INSTALLED_VERSION=$(/usr/bin/defaults read "$APP/Contents/Info.plist" CFBundleShortVersionString 2>/dev/null)
if [ -z "$INSTALLED_VERSION" ]; then
  echo "Could not determine installed version. Install required."
  exit 0
fi
if [ "$INSTALLED_VERSION" != "$REQUIRED_VERSION" ]; then
  echo "Installed version is $INSTALLED_VERSION. Required version is $REQUIRED_VERSION. Install required."
  exit 0
fi
echo "Required version is installed."
exit 1
NOTE: The Scripts tab is unavailable in iOS and iPadOS applications because of the restrictive nature of those operating systems.
Deployment tab
The Deployment tab provides administrators with options for controlling the deployment of the app to devices. They can define Blocking Applications, which will prohibit installation of the app if specified apps or processes are already running on the device. Defined applications must be closed before installation, and end users are notified through the Intelligent to Hub to close specified apps. After an app is uploaded, UEM automatically selects it as a blocking application to ensure that the app is closed before the installation attempt.
Some running apps and processes can hinder software upgrades by consuming system resources. This can slow down the installation process and lead to performance issues. Additionally, these applications might conflict with the update, causing errors or incomplete installations.
Administrators can also control the Restart Action for the app installation if applicable.
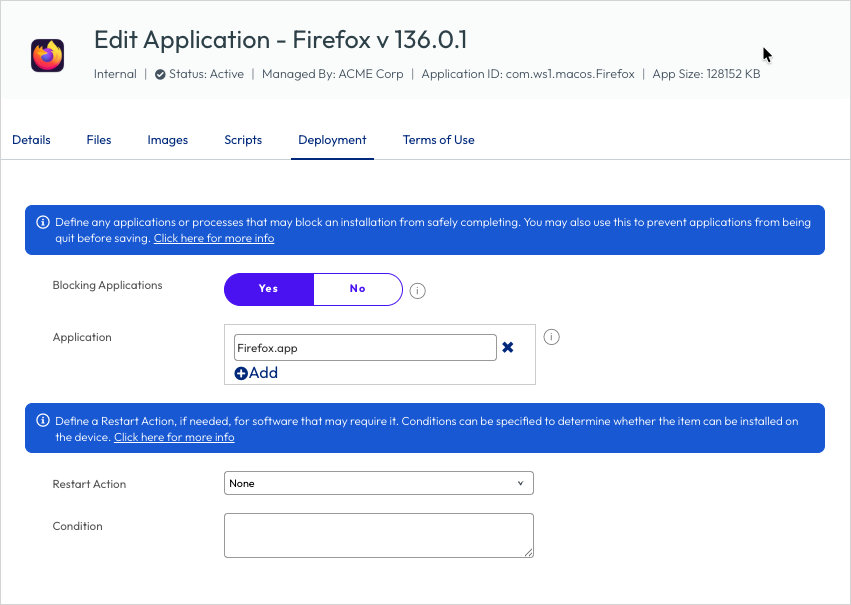
Figure 16: Application Deployment tab
The Deployment tab is unavailable in iOS and iPadOS applications because of the restrictive nature of those operating systems.
Considerations for using internal apps instead of VPP
Most apps available on the Apple and macOS App Stores can be purchased through Apple’s Volume Purchase Program (VPP), which will be discussed in more detail later. Occasionally, an app may be available both through VPP and direct download from the Internet. In such cases, organizations must decide the most suitable deployment method for these apps. Microsoft Office 365 applications are excellent examples of apps that organizations might prefer to deploy as Internal Apps instead of through VPP.
The following table provides guidance on when to use each method.
Table 2: Considerations for using Internal apps instead of VPP
| Using Volume Purchase Program | Using Internal App |
|
|
The table above outlines common reasons for choosing one app deployment method over another, but it’s not exhaustive. Organizations should carefully assess which method best aligns with their deployment scenarios. It’s common for organizations to use a combination of methods for deploying apps to their Apple devices.
Public apps
Public apps are applications sourced directly from the Apple App Store and distributed to managed devices through Workspace ONE UEM without the organization hosting or modifying the app binary itself. Unlike internal apps, the organization never takes possession of the .ipa file. Workspace ONE UEM functions as an orchestration layer on top of the store’s existing delivery infrastructure.
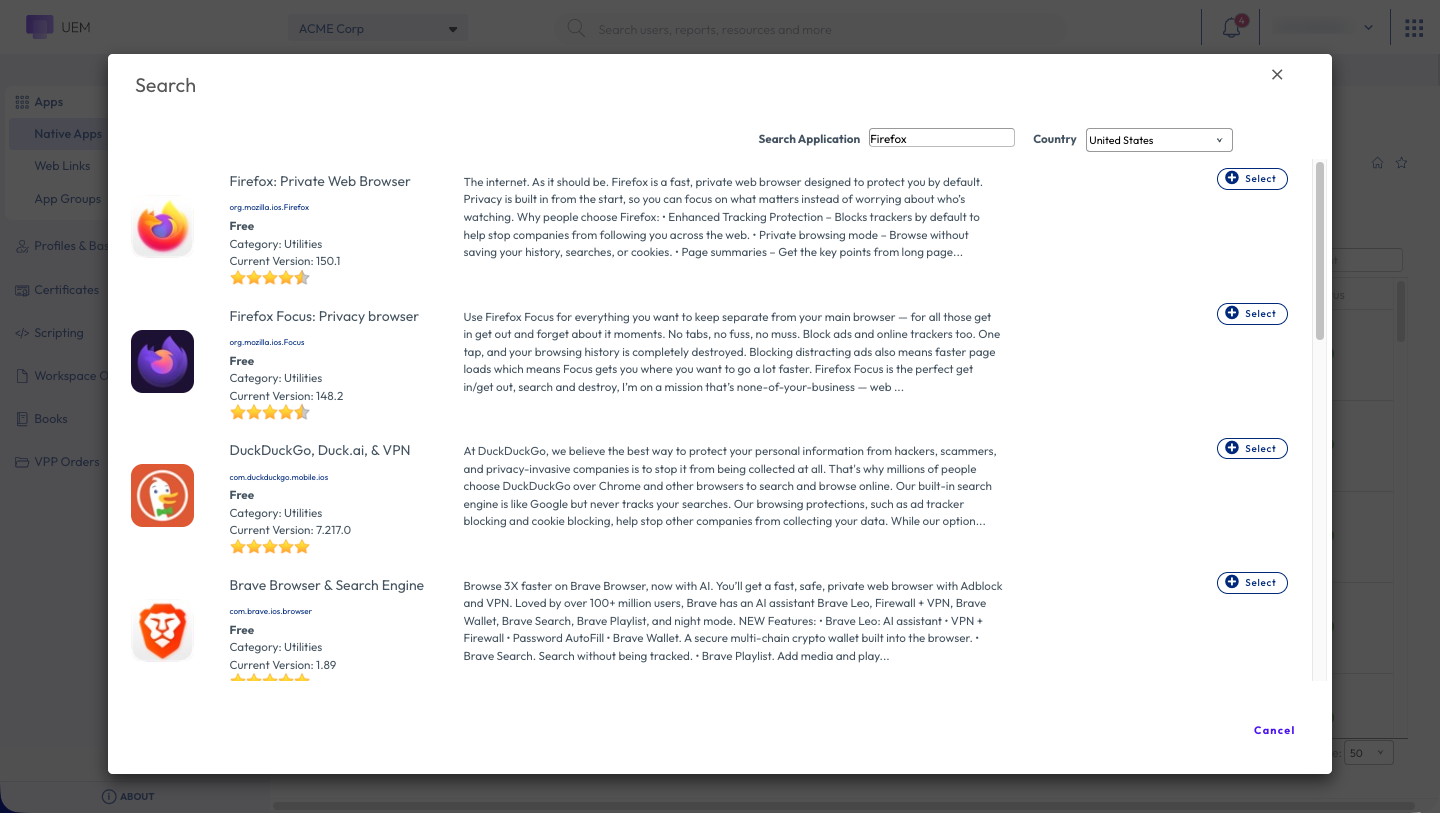
Figure 17: Searching for public apps in Workspace ONE UEM
Administrators can search for applications in the Apple App Store and import them into Workspace ONE. When a public app is added to UEM and assigned to a smart group, Workspace ONE does not download and redistribute the app binary. Instead, it issues a managed install command to the device, instructing the operating system’s Mobile Device Management (MDM) framework to fetch the app from the store on the device’s behalf.
Administrators do not have as many configuration options with Public Apps as they do with Internal Apps and Purchased Apps. Options available for Public Apps include configuring a custom Terms of Use, and SDK and Application profiles.

Figure 18: Public App configurations
NOTE: Public Apps are only available for iOS / iPadOS devices.
Purchased apps
Purchased apps are applications and content acquired in bulk through Apple’s Volume Purchase Program. These apps are compatible with macOS, iOS, iPadOS, and visionOS.
Introduction to Volume Purchase Program
Apple Business empowers organizations to purchase Apple App Store applications and content in bulk, as well as custom applications (both free and paid) at a predetermined price set by the developer.
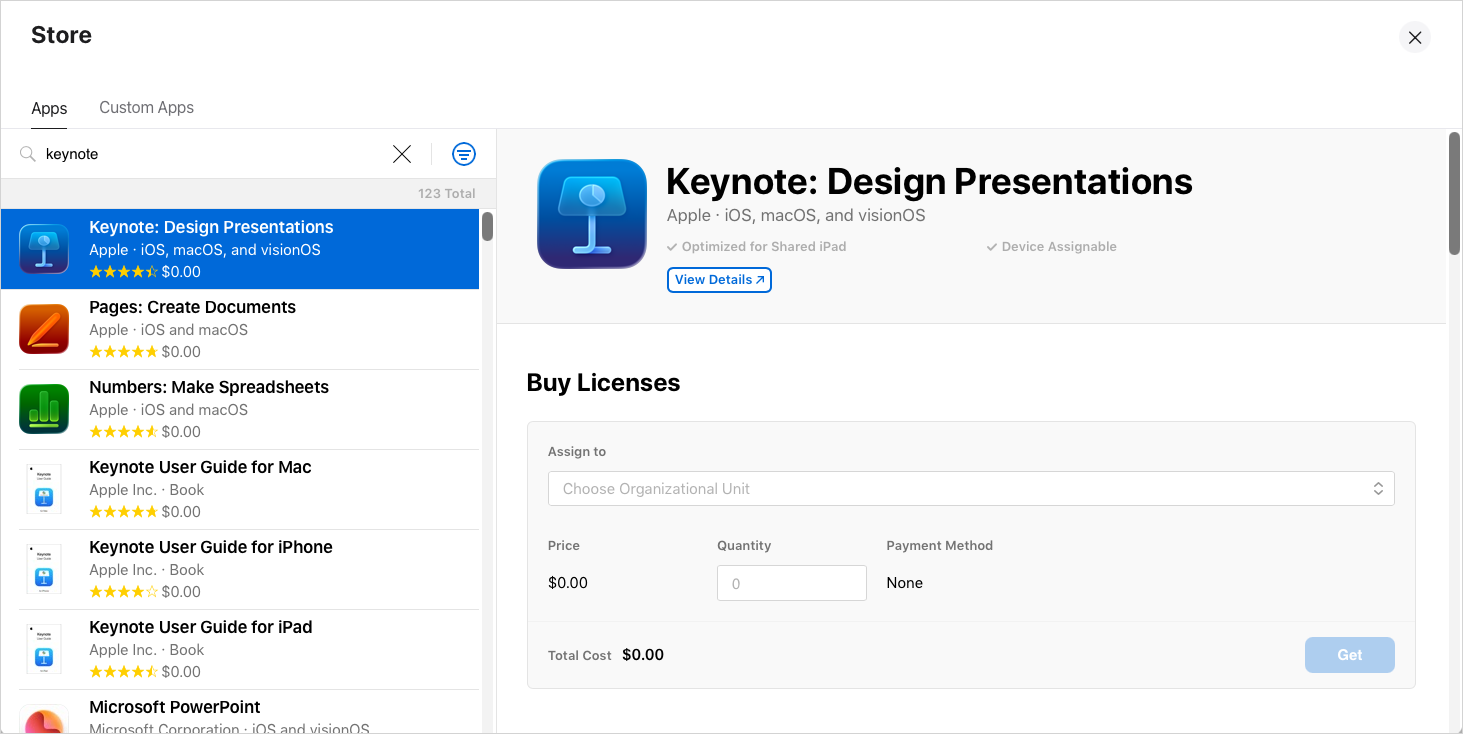
Figure 19: VPP store within Apple Business
Licensed applications and content acquired through Apple Business are seamlessly integrated with Workspace ONE, simplifying their deployment to devices. Organizations can utilize existing Smart Groups or create new ones to assign applications and content to end users and devices. Moreover, applications and content can be configured to automatically update, and administrators can initiate device updates as required. Additionally, Workspace ONE streamlines purchased licensing management by providing comprehensive insights into license allocation and revocation.
Applications synchronized from VPP are listed on the Purchased tab under Resources > Apps > Native Apps.
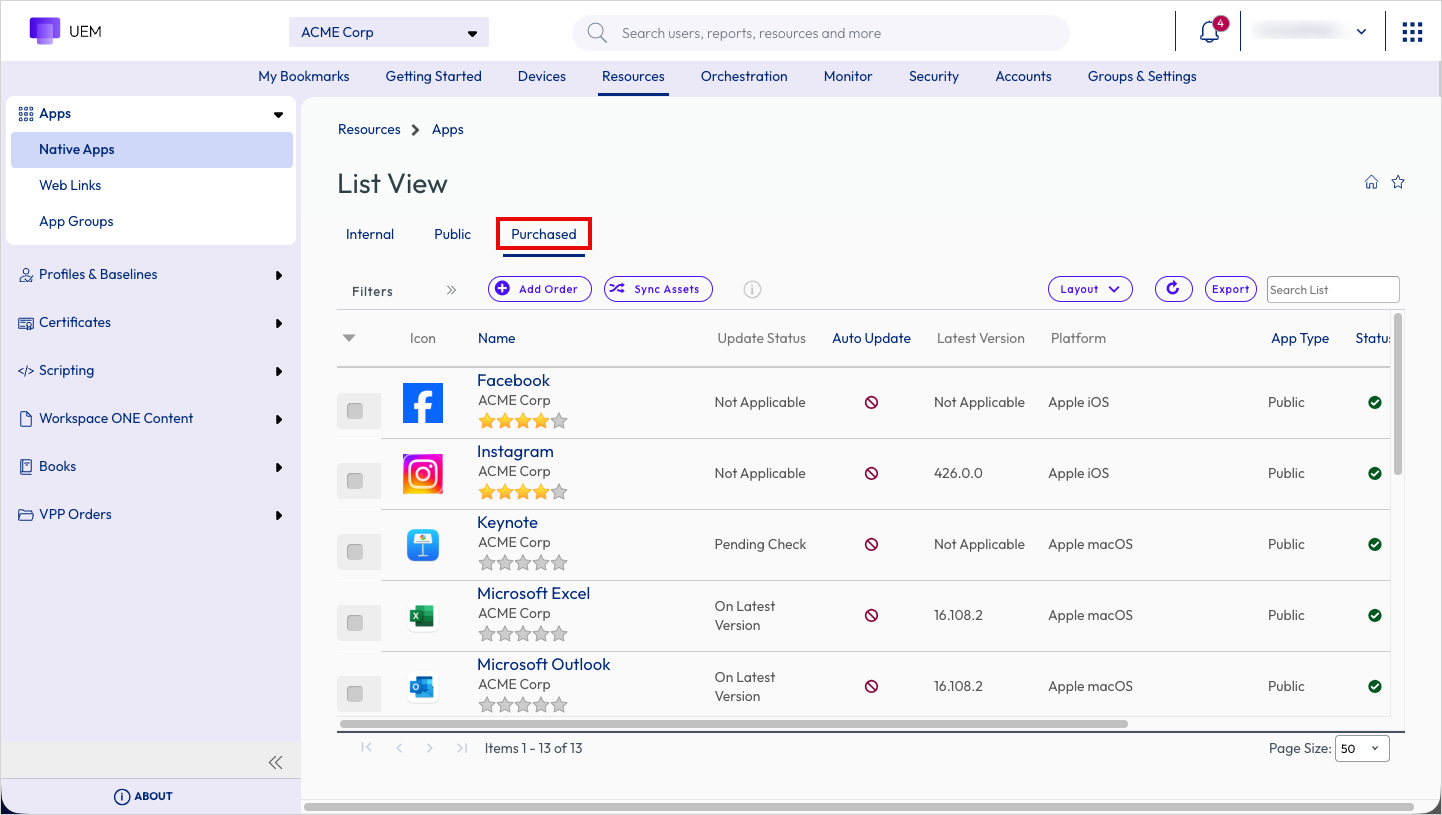
Figure 20: Purchased Apps tab in Workspace ONE UEM
App and content licensing
There are three types of licensing available for applications and content purchased through VPP.
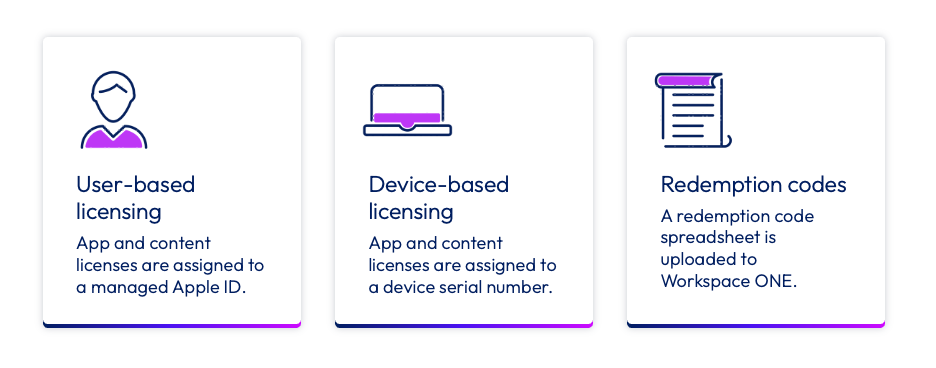
Figure 21: App and content licensing types
User-based licensing assigns applications and content to a managed Apple ID, making it suitable for scenarios where end users have multiple devices and need access to the licensed application or content on all those devices.
Device-based licensing, on the other hand, assigns an application or content to a device serial number, requiring a license for each device. This option is particularly advantageous for corporate-owned devices or devices shared among multiple users, such as frontline workers.
Lastly, there are redemption codes. This approach doesn’t involve managed distribution and has several limitations. Workspace ONE can allocate licenses but not revoke them. The process is manual and involves uploading a spreadsheet into Workspace ONE. We won’t delve into redemption codes in this document.
User-based licensing
By default, application and content licenses purchased through VPP are imported from Apple Business into Workspace ONE as user-based licenses. These licenses can be assigned to a specific Apple ID and distributed to devices associated with that Apple ID. This allows for the installation of apps and content on any or all devices linked to that Apple ID. This approach can offer cost savings for organizations with limited license usage. While Workspace ONE has the ability to revoke licenses for applications, it lacks the same functionality for content. Before installing an app or content, end users must accept invitations and register with VPP, which involves agreeing to the terms of service for VPP.
Device-based licensing
If your VPP deployment involves iOS 9+ or macOS 10.11+ devices, consider enabling the assignment of VPP applications based on device serial numbers. This approach eliminates the need to invite users to VPP. With device-based licensing, app and content licenses are assigned to a device serial number, requiring a license for each device where the app is intended to be installed. Licensing for most applications can be easily transitioned from user-based to device-based licensing with a few simple mouse clicks. Unlike user-based licensing, end users are not required to acknowledge the Volume Purchase Program terms of acceptance. This allows administrators to silently deploy applications and content to devices without user interaction.
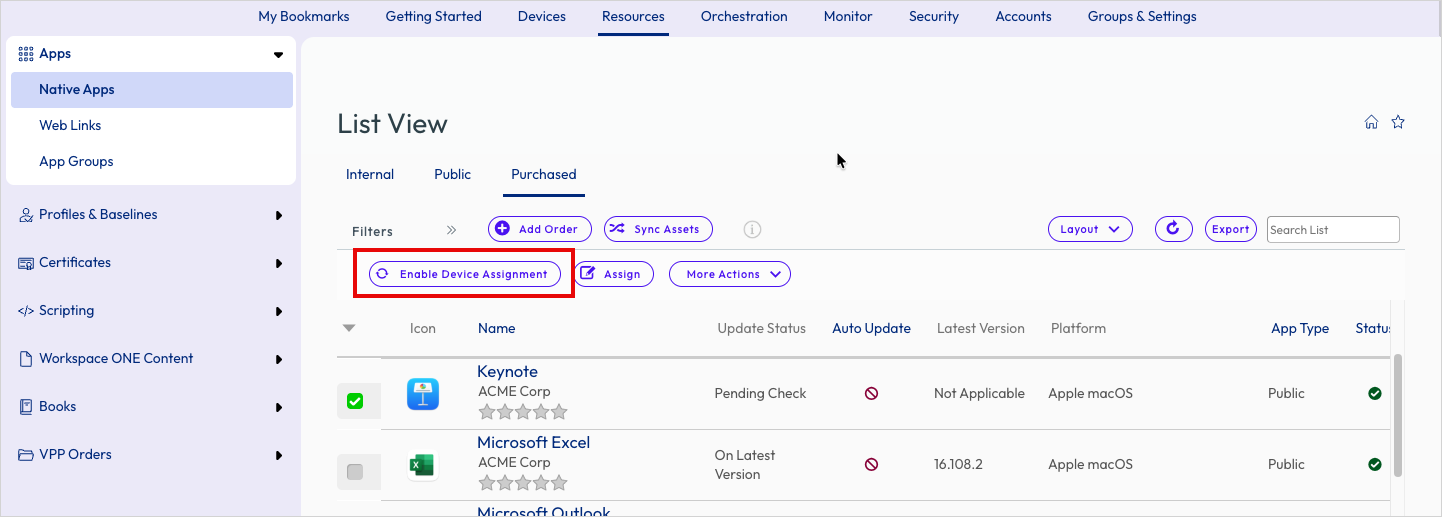
Figure 22: Enabling device-based licensing
However, there are a few considerations to keep in mind regarding device-based licensing. Omnissa Workspace ONE UEM does not migrate assigned user-based licensing to device-based licensing. VPP applications already assigned to Apple IDs remain assigned as such. Additionally, the migration of an application’s licensing from user-based to device-based is irreversible. Once a license has been converted to device-based licensing, it must remain in that format.
macOS Enterprise App Repository
The macOS Enterprise App Repository (EAR) simplifies adding and managing frequently used, publicly accessible enterprise applications for administrators. By importing applications from the EAR, administrators can seamlessly integrate them into their environment as internal applications. Once added, these applications can be conveniently distributed and installed on devices directly from the console.
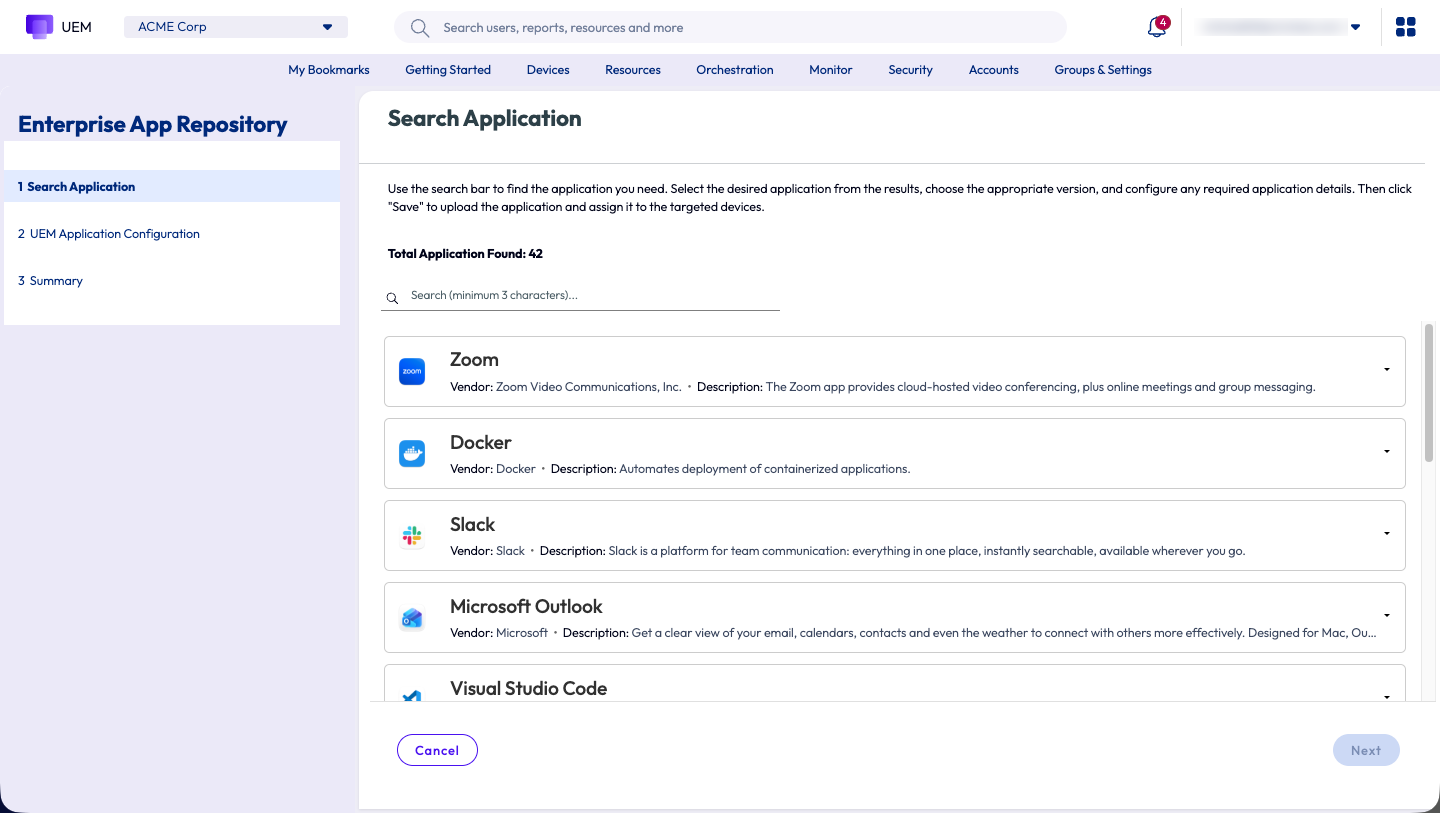
Figure 23: macOS Enterprise App Repository
The EAR serves as a centralized repository for applications from trusted third-party providers. Automating the retrieval of application metadata and deployment configurations, the repository significantly reduces manual effort and simplifies application management across your organization. This streamlined approach simplifies packaging and facilitates easy scaling across various environments.
When applications are added to the EAR, the Enterprise App Repository automatically generates application information, install and uninstall scripts, and install check scripts. Administrators can customize these scripts and the uninstall method to meet specific application requirements.
To import macOS apps from the EAR, administrators can access the Add menu in Resources > Apps > Native Apps > Internal.
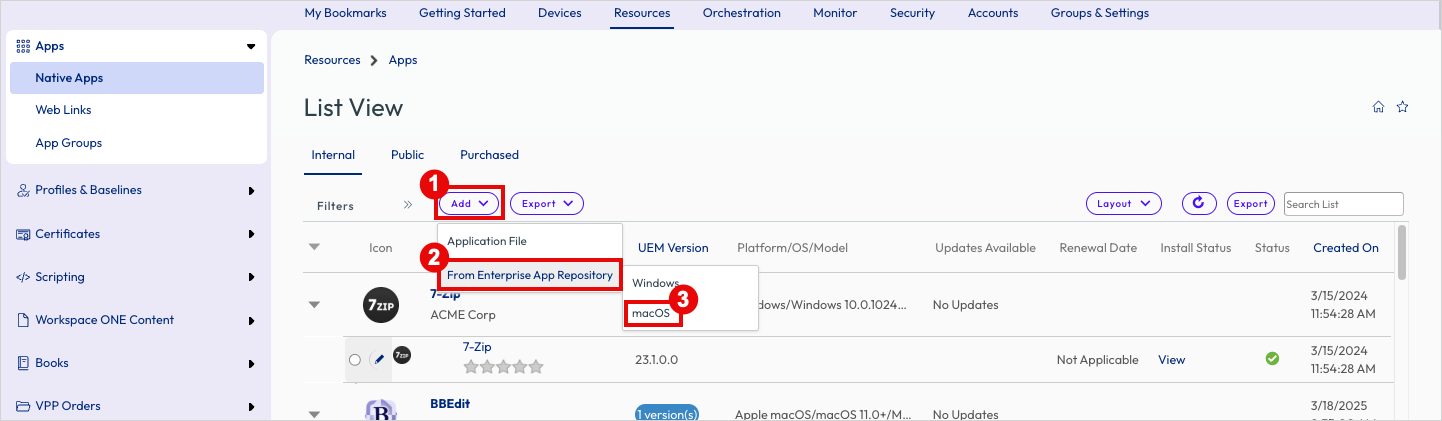
Once an app has been imported from the EAR, administrators have the same configuration options that they would for any internal app.
App security and validation in the macOS Enterprise App Repository
The macOS EAR is hosted and managed by Omnissa, which handles all app security, validation, and packaging. Each app undergoes a rigorous multi-layered validation and security vetting process before being added to the macOS EAR.
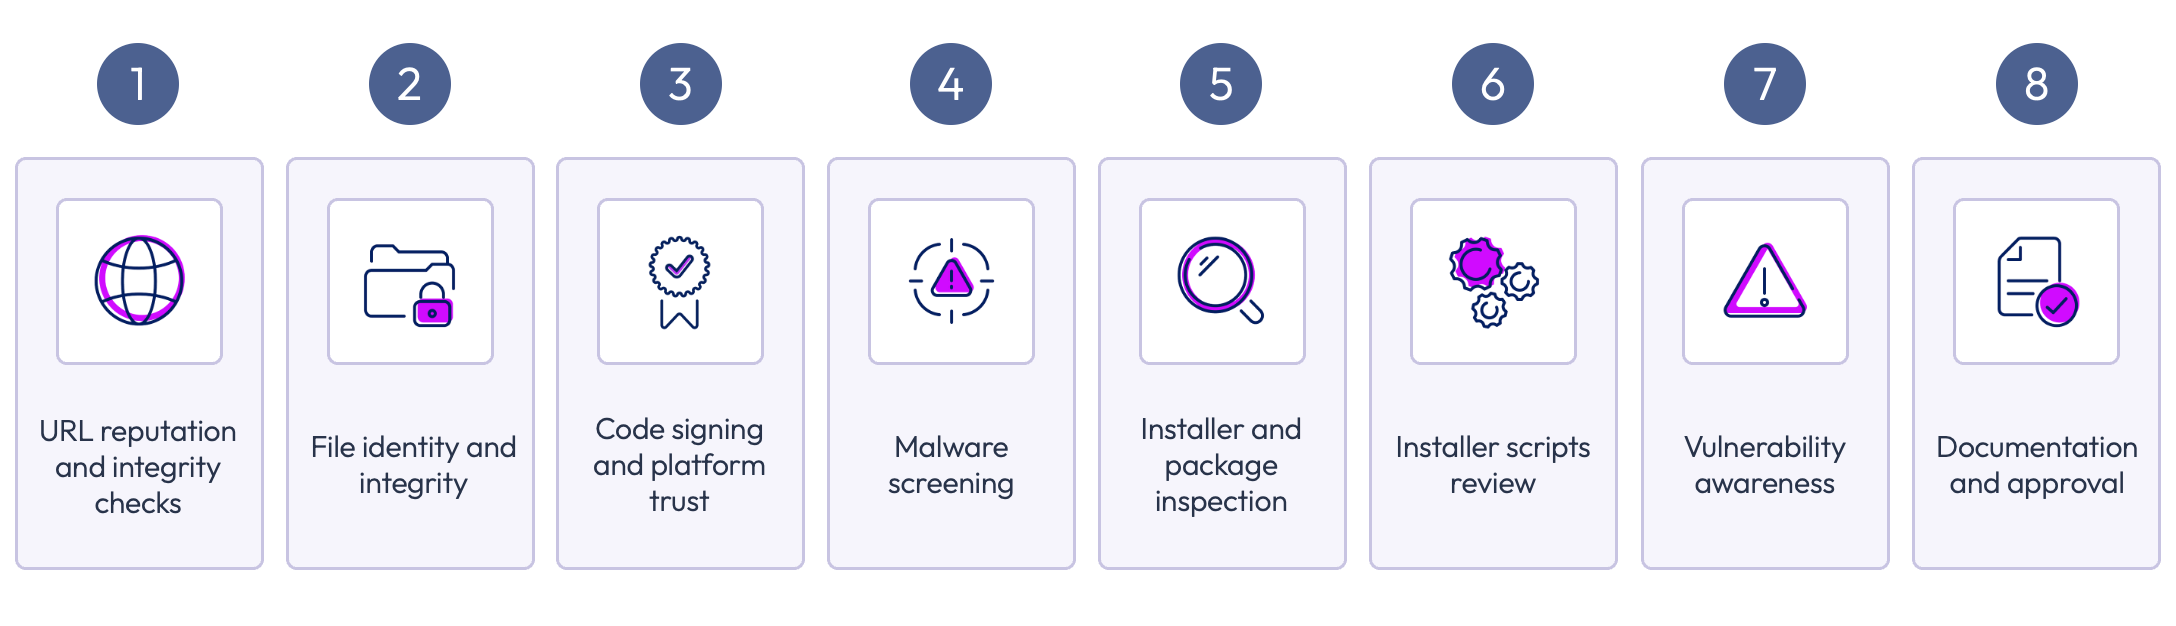
Figure 24: App security and validation process for the macOS Enterprise App Repository
- URL reputation and integrity checks - Omnissa validates all external URLs associated with the application, including installer download links, publisher websites, and licensing references. These checks employ reputation and integrity validation services to ensure that no installer is hosted on a compromised or untrusted domain.
- File identity and integrity – For every binary submitted, a checksum is generated and validated against the vendor-supplied checksum value. If the vendor checksum is unavailable, the generated checksum is validated against the app’s PLIST file. This ensures that the file has not been tampered with or modified by anyone other than the app vendor.
- Code signing and platform trust - This three-step process guarantees the signing and trust status of the binaries. The steps involved in the code signing and platform trust validation are as follows:
- The binary undergoes validation to ensure that it is code-signed and that the signing authority aligns with the vendor’s name.
- A macOS Gatekeeper validation checks if the binary source matches the developer ID.
- A notarization check verifies that the code is notarized by Apple.
- Malware screening - Each app binary undergoes independent security scanning to detect malware, trojans, or other suspicious patterns.
- Installer and package inspection - The installer’s contents are unpacked and thoroughly reviewed to ensure the absence of any obfuscated or concealed files.
- Installer scripts review - A review is conducted of the pre-install and post-install scripts employed by the package to ensure the absence of potentially hazardous commands, permission manipulation, security disabling, unexpected downloads from the Internet, concealed post-install scripts, or unforeseen root-level modifications.
- Vulnerability awareness - The version is extracted from the metadata and used in a review of vendor security advisories. Additionally, a separate review of critical CVEs for this version is conducted.
- Documentation and approval - A final review of the documented results from the steps outlined above is conducted. Based on the findings of the validation and security review, an approval or rejection decision is made.
App distribution and management settings
When administrators assign apps to Smart Groups in Workspace ONE UEM, they have several options for managing app distribution and configuration. The available settings depend on various factors, such as the app platform and source.
App distribution
When configuring distribution settings, administrators can manage various options, including the deployment start date and time, the chosen app delivery method, and whether the app appears in the Intelligent Hub App Catalog.
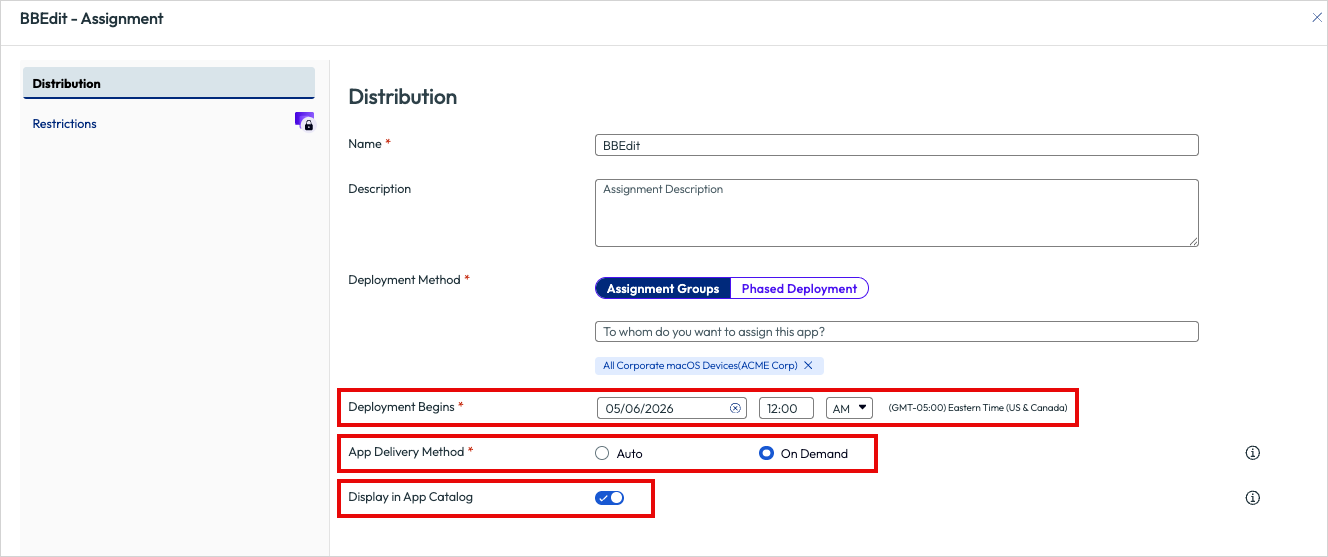
Figure 25: App distribution options in Workspace ONE UEM for macOS
Deployment Begins
For macOS Internal applications, administrators can set the date and time when the app deployment commences. It’s crucial to understand that this represents the date and time when the app assignment becomes available for installation on devices. The actual installation date and time will vary based on the configured device check-in cycle in Workspace ONE UEM. For instance, if devices check in every eight hours, it’s possible that some devices might not receive the app deployment until eight hours after the configured date and time.
App Delivery Method
App Delivery Method determines how the app is delivered to the devices. Setting this to Auto will deploy the application to devices automatically on the Deployment Begins date. Use this method to push out mandatory apps to devices with minimal end user intervention.
On Demand does not automatically deploy the app to devices. Instead, the app is available in the Intelligent Hub for end users to install when required. End users can click the provided Install button to initiate the deployment of on demand apps.
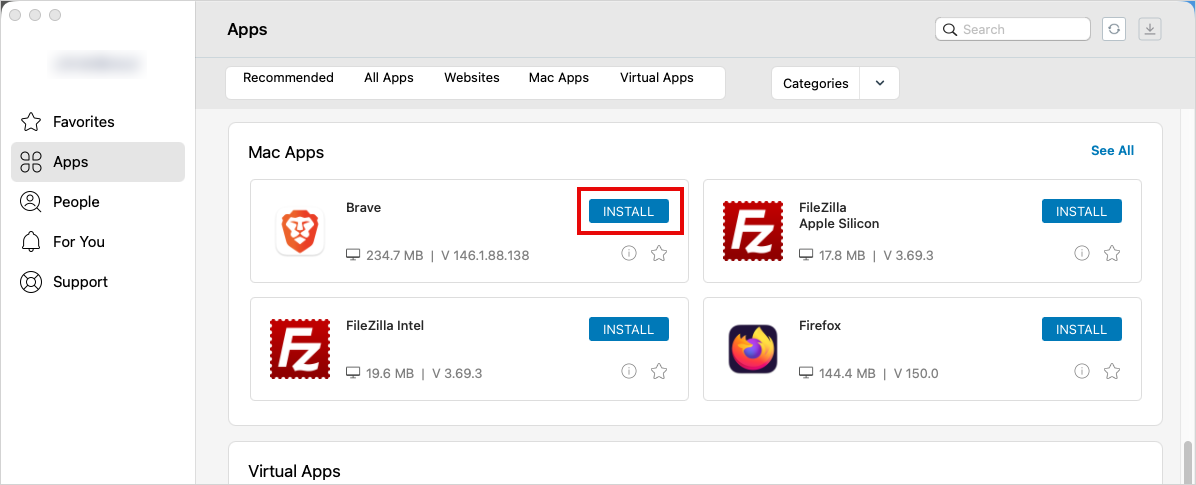
Figure 26: Users can click Install to initiate On Demand deployment of apps
Instead of pre-installing apps on all devices, the On Demand option enables end users to install apps only when and if they need them.
NOTE: App Delivery Method applies to all device and app types.
Phased Deployments
Administrators have two options available for app deployment methods: Assignment Groups and Phased Deployment, catering to diverse rollout strategies. Assignment Group-based rollouts allocate resources for installation upon device check-in. This approach is suitable for extensive deployments of stable, thoroughly tested resources.
On the other hand, Phased Deployment allows for a gradual and controlled deployment of resources across your device fleet. By deploying in phases, administrators can proactively identify and mitigate potential risks, minimizing their impact on a larger group of devices. Administrators have the flexibility to choose between Manual Progression and Automatic Progression.
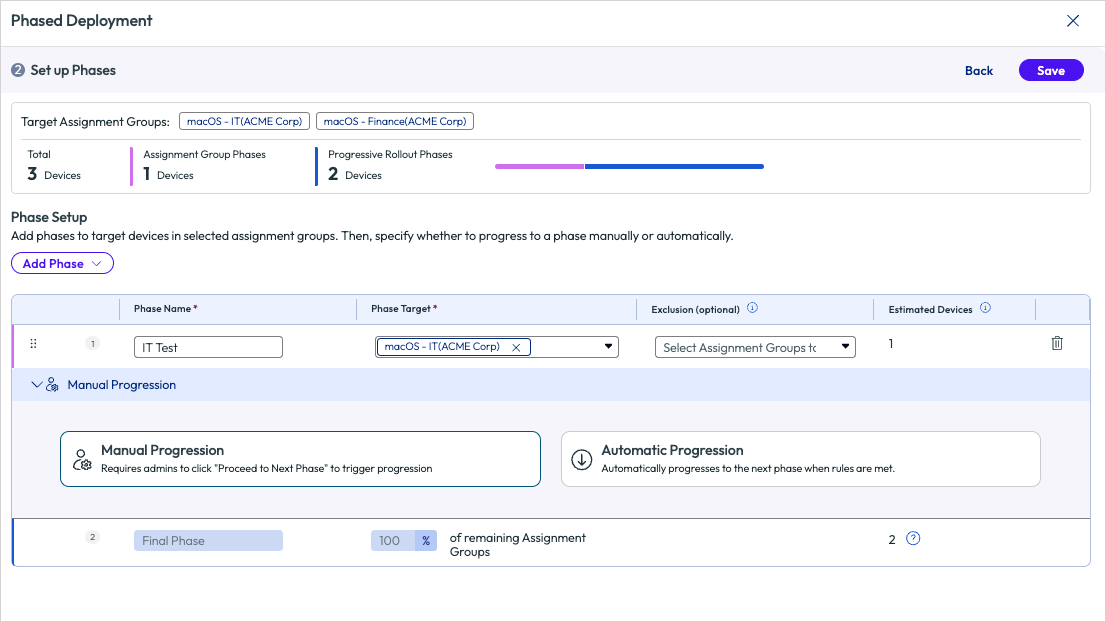
Figure 27: Configuring phase app deployments
Manual Progression requires administrators to manually trigger the next phase. This approach is recommended for critical devices groups that are restricted to specific maintenance periods, such as Sundays between 1:00 AM and 4:00 AM.
Automatic Progression, on the other hand, enables administrators to initiate the next phase once specific criteria have been met without requiring manual intervention. For instance, when rolling out an update to Adobe Acrobat for macOS devices, automatic progression can be designated once 98% of devices within the current phase have been successfully updated. At that point, the next phase would automatically commence.
NOTE: Phased Deployments are applicable to macOS Internal Apps only. It does not apply to Public or Purchased Apps or iOS devices.
For more information about Phased Deployments, please see the Omnissa Product documentation.
Other management settings
There are several other management settings available to administrators.
Restrictions
Administrators can apply specific restrictions on how apps are managed on Apple devices. The options vary depending on the device platform.
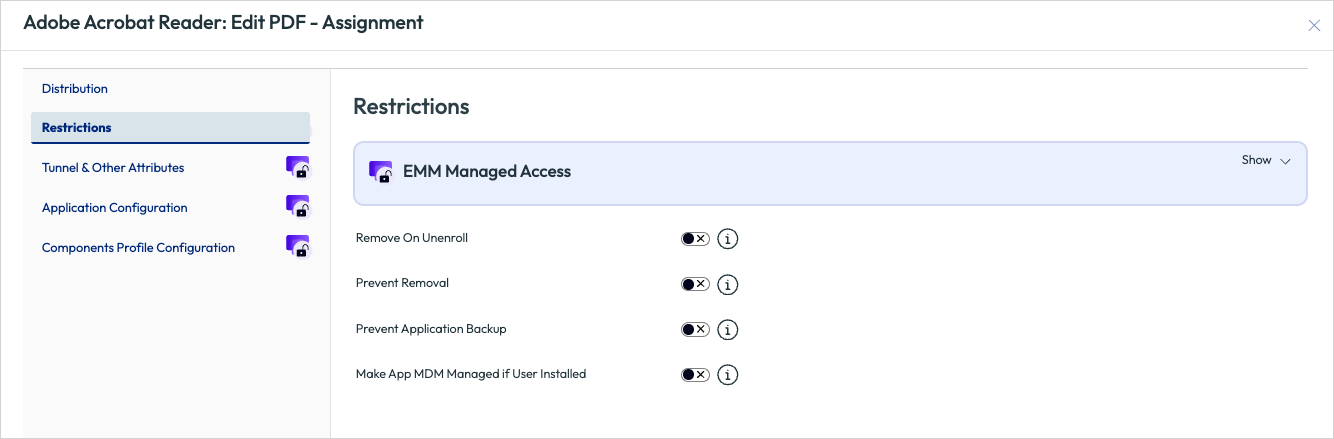
Figure 28: App restriction settings
The Restrictions available to administrators include:
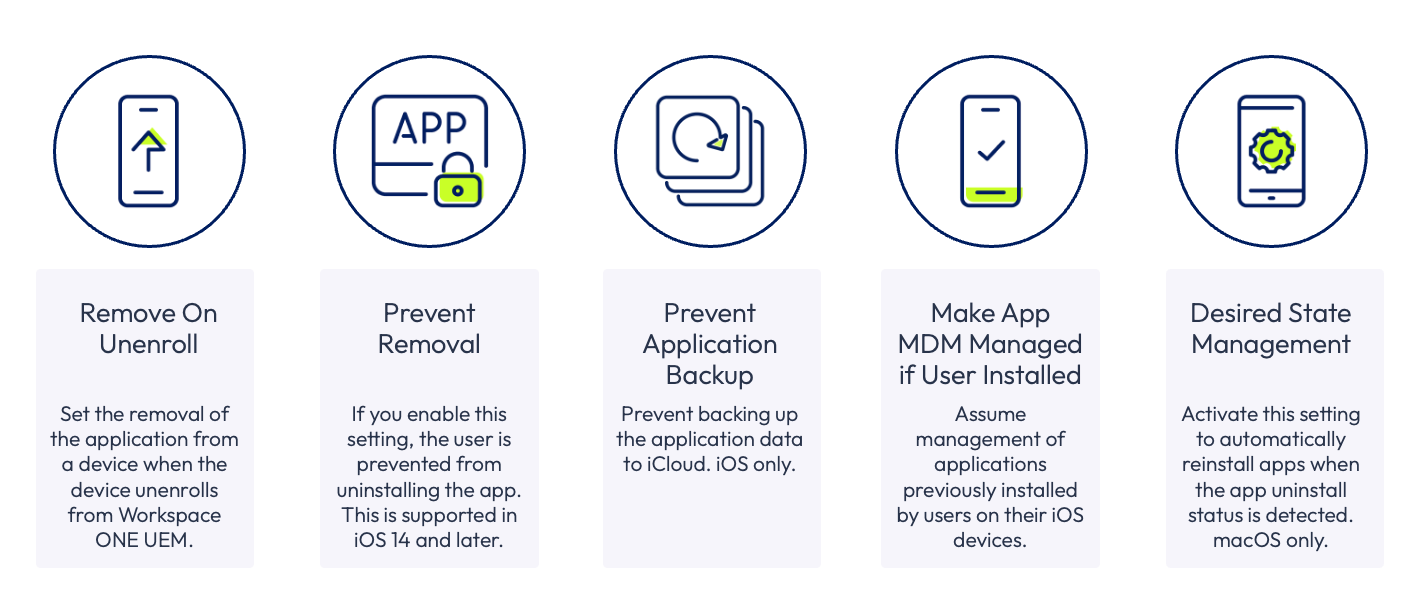
Figure 29: Available restriction options
Application configuration
Application Configuration, or AppConfig, is an industry initiative aimed at standardizing the configuration, security, and connectivity of mobile applications in enterprise environments. Unlike manually configuring settings within the app or hardcoding values during development, AppConfig enables administrators to push managed app configurations from an EMM or UEM solution like Workspace ONE.
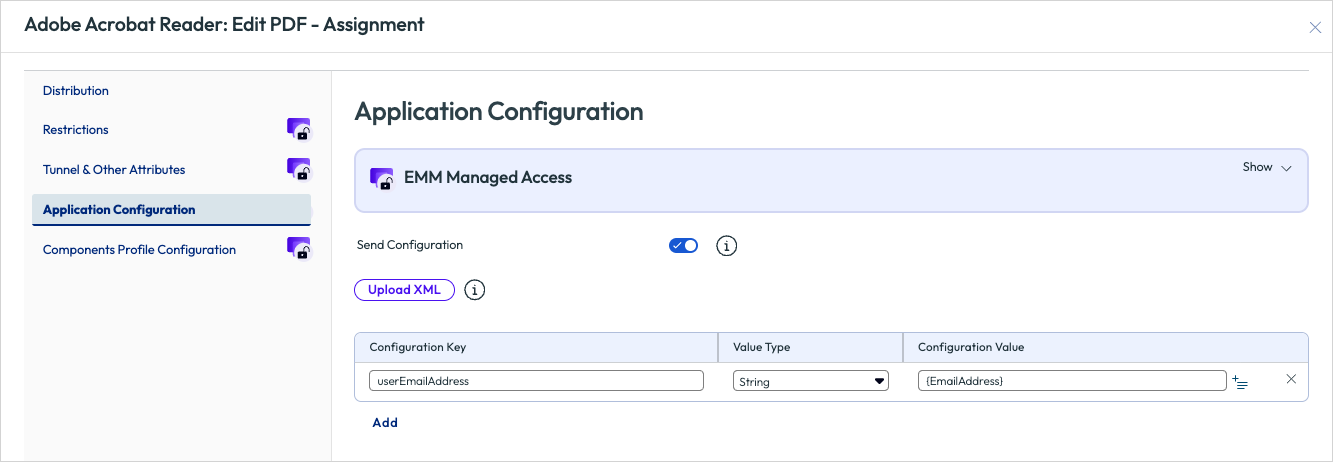
Figure 30: Application configuration settings in Workspace ONE UEM
These configurations are delivered as key-value pairs or XML, which the app consumes at runtime. This approach ensures consistency, repeatability, and scalability in configuration management.
It’s crucial to note that AppConfig may not be compatible with every app. The application developer or vendor must explicitly support AppConfig in the application code.
Currently, Workspace ONE UEM supports AppConfig for Android and iOS applications.
To determine if an app supports AppConfig, the first step is to consult the vendor’s documentation, which typically outlines the supported configuration keys and acceptable values. Another valuable resource is the AppConfig Community website (appconfig.org), where numerous enterprise app vendors publish their supported AppConfig schemas.
Tunnel & other attributes
Workspace ONE Tunnel is a secure, application-level VPN solution that grants remote devices granular access to internal corporate resources. It supports per-app tunneling, ensuring that only managed applications can access corporate data, while allowing personal traffic to bypass the corporate network, thereby enhancing both security and user privacy.
Administrators can configure specific Per-App VPN profiles and assign them to individual iOS apps. For instance, an organization has two critical applications, each hosted in a different datacenter. An administrator can create two distinct Per-App VPN profiles, each with its own set of policies, to ensure that the traffic is securely routed to the appropriate datacenter.
Administrators can also configure additional app attributes to provide device-specific information that apps can utilize. For instance, when you want to define a list of domains associated with a particular organization.
NOTE: Tunnel & Other Attributes is only available for iOS apps.
Workspace ONE SDK
The Workspace ONE SDK, available for Apple iOS and Google Android, enables developers to embed enterprise-grade security, configuration, and management directly into mobile applications.
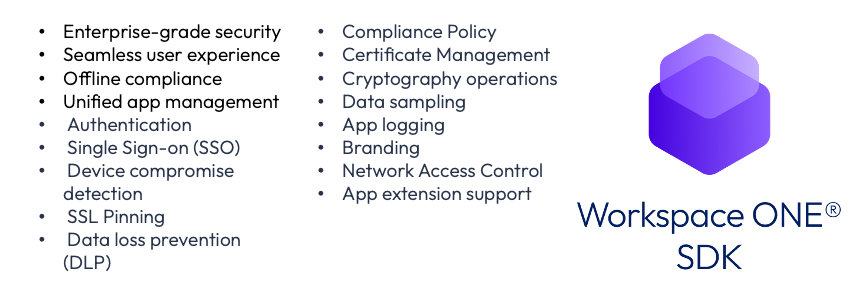
Figure 31: Benefits of the Workspace ONE SDK
Security features include authentication enforcement, data loss prevention, tunneling, and compromised device detection, ensuring apps communicate only with trusted servers and prevent access from compromised devices.
IT operations benefit from centralized policy control through the Workspace ONE UEM console, applying consistent security and compliance settings across SDK-built, productivity, and wrapped apps.
Users enjoy a frictionless experience with single sign-on, reducing repeated logins and enabling access to multiple corporate apps. Branding and offline access ensure productivity even when devices are disconnected.
Certificate management, cryptographic operations, network access control, app logging, data sampling, and app extension support secure communication, monitoring, and extensibility of enterprise apps.
The Workspace ONE SDK is used in three ways based on application delivery.
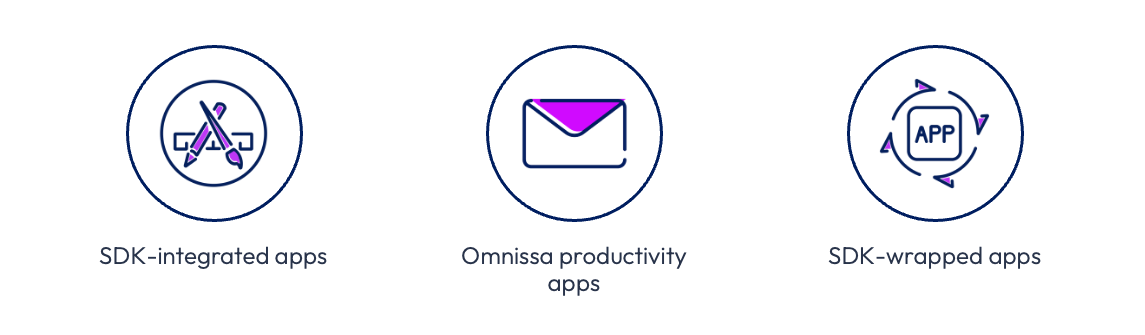
Figure 32: Available options for using the Workspace ONE SDK with iOS apps
First, developers can integrate the SDK into iOS apps for full control over security and enterprise features.
Second, Workspace ONE productivity apps like Boxer, Content, and Web already support SDKs, automatically honoring admin policies.
Third, organizations can apply SDK features to third-party or internal apps using App Wrapping, injecting SDK capabilities without modifying source code.
App wrapping
App Wrapping is a method employed in Workspace ONE UEM to apply enterprise security and management features to applications without altering their source code.
Instead of rebuilding an app using the SDK, the app wrapping engine seamlessly integrates SDK functionality into the existing application binary. This enables organizations to swiftly implement features like authentication, single sign-on, data loss prevention, and branding.
App Wrapping proves particularly advantageous for internal applications where source code modifications are impractical or for third-party applications that lack native SDK integration capabilities.
Once wrapped and assigned an App Wrapping Profile, the application functions as an SDK-enabled app, allowing for management through SDK profiles and policies within the Workspace ONE UEM console. This ensures a consistent and secure user experience across the entire enterprise.
SDK profiles
Administrators enforce SDK features using SDK profiles, configured as default (organization-wide) or custom (per application), controlling authentication, SSO, tunneling, DLP, compliance, and more without MDM enrolment.
Administrators manage configuration within the Workspace ONE UEM console. Default SDK settings are under Groups & Settings > Apps > Settings and Policies > SDK App Compliance, while app-specific configurations are under Resources > Profiles & Baselines > SDK Profiles.

Figure 33: SDK Profiles in Workspace ONE UEM
For advanced scenarios, administrators can refine behavior using Custom Settings (XML), enabling fine-grained control beyond the standard UI.
When importing an iOS app, administrators can set the SDK profile and the Application Profile on the SDK tab in the app settings screen.
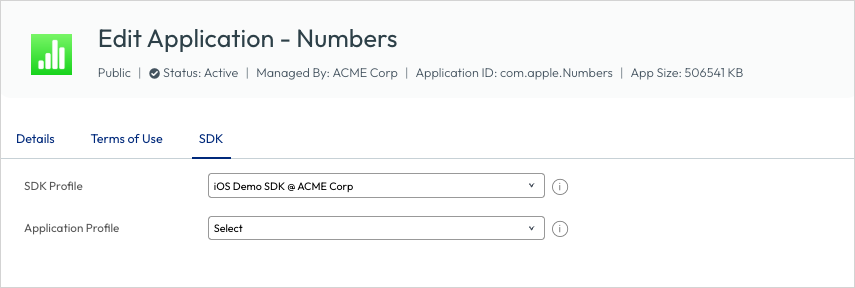
Figure 34: Setting application-specific SDK profiles
The Workspace ONE SDK is available through Omnissa’s developer documentation portal, with separate SDKs for Android and iOS. This site provides API references, sample code, and implementation guides.
Troubleshooting Apple app management
This section offers guidance on troubleshooting some common issue with managing apps for Apple devices.
Troubleshooting in the console
Workspace ONE UEM offers information about the installation status of apps within the console. You can view the installation status from both an app-level and a device-level perspective.
To check the installation status of an app across all assigned devices, simply click on the app name in the App List View. This will display the app’s status across all devices to which it is assigned. You can then select from the available statuses, including currently assigned, pending, and installed but not assigned.
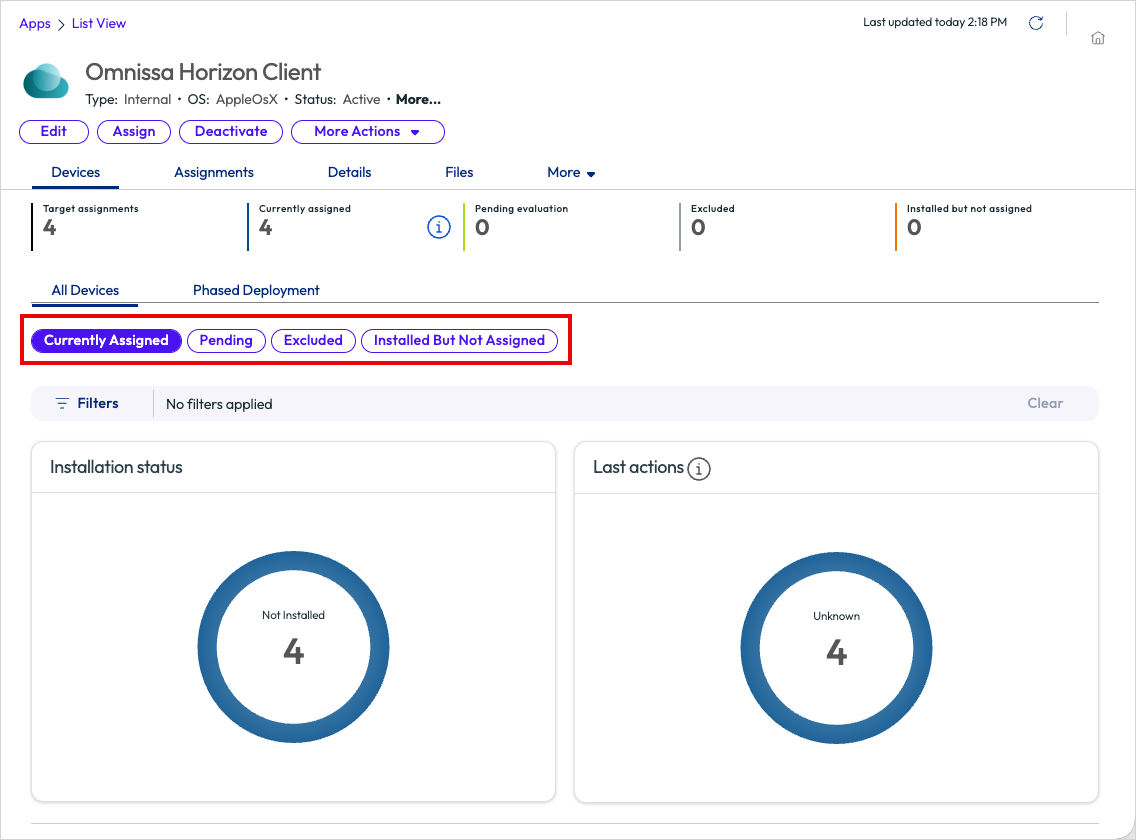
Figure 35: App Details View
Scrolling down will display a list of all devices assigned, along with the app installation status for each one.
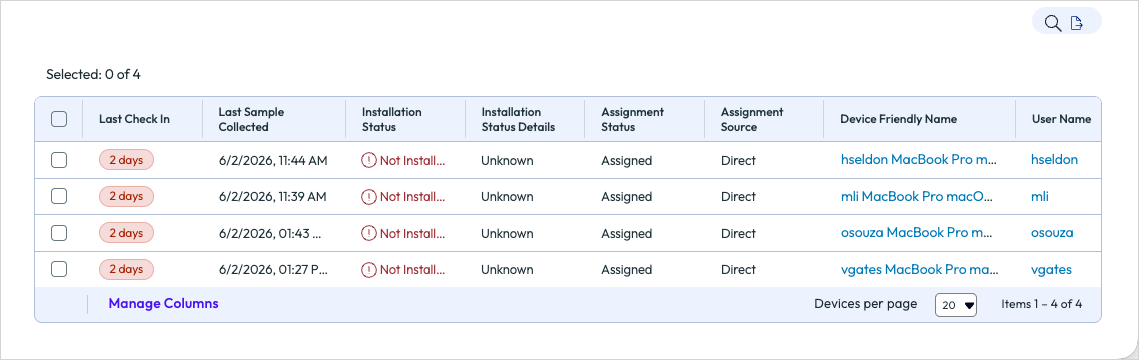
Figure 36: List of all assigned devices for an app
Administrators can also monitor the status of app installations on individual devices. By selecting a device from the Device List View, they can access the Device Details View. The Apps tab offers comprehensive information about the status of Managed Apps that are either assigned to or installed on the device. If an app is assigned but not installed, administrators can select the app and click Install to initiate an installation command to the device.
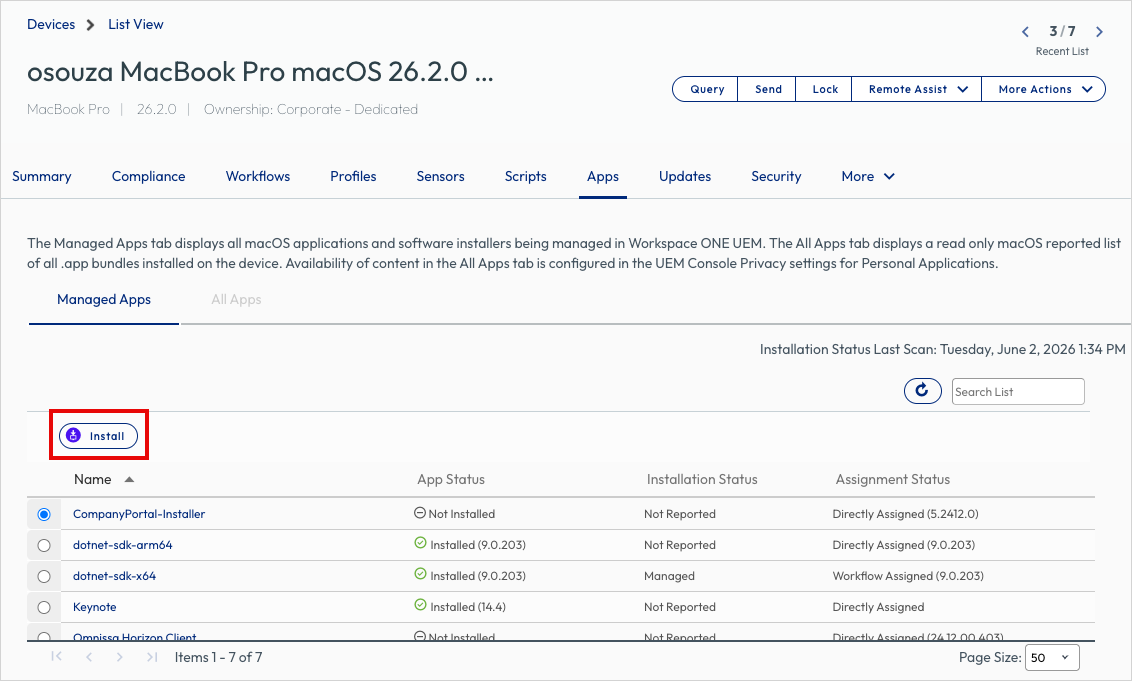
Figure 37: Apps tab on the Device Details View
Volume-purchased app troubleshooting
As organizations deliver volume-purchased apps from Apple Business, some unexpected issues may arise. This article addresses some common issues affecting volume-purchased app delivery.
Newly purchased apps not syncing to Workspace ONE UEM
This error usually arises due to one of the following reasons:
- There may be delays in Apple Business from the time you purchase the app until the licenses are allocated to the Location Token.
- Apple has released new Terms & Conditions in Apple Business.
- To resume syncing, log in to Apple Business using an account with the Administrator role and accept the updated Terms & Conditions.
- Alternatively, the location token downloaded from Apple Business and uploaded to Workspace ONE UEM may have expired.
- In this case, download a new server token from Apple Business (under Settings > Apps & Books) and upload it to Workspace ONE UEM.
Device-based licensed apps not installing
If you’ve assigned an app to a device using device-based assignment, one of the following issues might arise:
- If the user receives a prompt to log in with an Apple ID, it’s likely that an assignment was made to the user before the device-based assignment was created.
- To resolve this, unassign the app from the user completely before attempting to reassign it to the device.
- Ensure that there are enough licenses available to assign to the device.
- Verify that the device has access to vpp.itunes.apple.com.
- Check if the location token downloaded from Apple Business and uploaded to Workspace ONE UEM has expired.
- If it has expired, download a new location token for that specific location from Apple Business (under Settings > Apps & Books) and upload it to Workspace ONE UEM.
Volume-purchased apps not removing from macOS
When a VPP app for macOS is no longer scoped to the device or user, or the device is enterprise wiped, the app is not removed from macOS. This is by design in macOS versions prior to macOS 11 (Big Sur), as these earlier versions of macOS did not support any commands to remove the application.
Troubleshooting internal app deployments
Internal applications are delivered from Workspace ONE UEM by Intelligent Hub. Therefore, there are certain basic prerequisites for software delivery to function properly. If these prerequisites are not met, there may be unexpected behavior due to the specific installer package that needs to be worked around.
Internal apps require the following to work correctly:
- Supported version of Intelligent Hub installed on target devices.
- macOS Software Management features enabled (macOS only).
- AWCM (AirWatch Cloud Messaging) services installed and working.
Note: AWCM provides notifications to the Intelligent Hub to trigger real-time internal app installation. In the absence of AWCM, the Intelligent Hub reverts to a scheduled interval to check for new app installation commands.
Log files for macOS
While macOS and Workspace ONE UEM offer several log files, the primary file administrators should focus on troubleshooting internal app deployment issues with is the following file:
/Library/Application Support/AirWatch/Data/Munki/Managed Installs/Logs/ManagedSoftwareUpdate.log
This file provides comprehensive information about the app installation process. Additionally, three more log locations that may assist in troubleshooting include:
/Library/Application Support/AirWatch/Data/Munki/Managed Installs/Logs/
/Library/Application Support/AirWatch/Data/Logs/
/var/log/install.log
NOTE: Administrators can monitor the app installation process in real-time by viewing the unified log file in macOS live as the installation is executing. To do this, use the following command on the macOS device:
log stream --predicate 'process == "hubd" OR process == "mdmclient"'
Gathering logs
- Launch Intelligent Hub and click the Help menu.
- If necessary, expand Debug Session and click Start Session to enable debug (verbose) logging
- To collect hub/debug logs, click Show Logs in Finder.
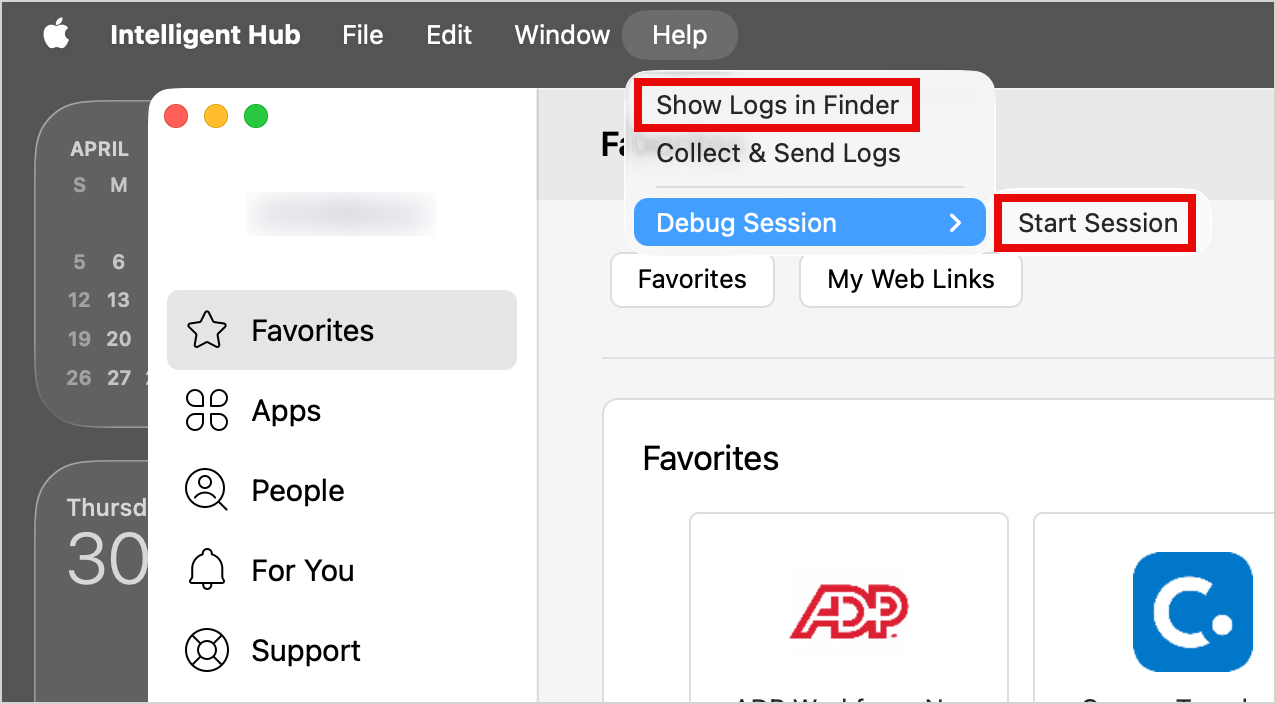
Figure 38: Gathering logs from Intelligent Hub
- After Hub collects the logs, Finder opens to
/private/tmp/. Note theHublogsfolder, and the pre-zipped archive file (containing the contents of theHublogsfolder) - Review the ManagedSoftwareUpdate.log file for errors.
- You can also send the log files to the Workspace ONE UEM console by clicking Collect & Send Logs from the Help menu in Intelligent Hub.
Note: After collecting the logs, administrators can download them from the Workspace ONE UEM console by navigating to Devices > List View. Select the desired device and click on Attachments. The log files will be located under Documents. Click on the specific log set to download it locally on your computer.
Any app logs that have been collected can also be found in the console under Monitor > Events and Logs > App Logs.
Troubleshooting internal app installer problems
This section lists some of the common problems you might encounter when installing an internal macOS app.
Incorrect application name in the application catalog
Sometimes, when an installer package is parsed by the Omnissa Workspace ONE Admin Assistant, it generates a PLIST file with an incorrect application name. Additionally, organizations may refer to software by a common or colloquial name that is easily recognizable by end users. In either scenario, administrators can modify the displayed name in the Intelligent Hub application catalog before uploading the PLIST file to Workspace ONE UEM.
- In Finder, browse to the PLIST file generated by the Admin Assistant for the application in question.
- Right-click the PLIST file and select Open With and select a text editor (such as TextEdit or BBEdit).
- Modify the string value for the name key-value pair.
![]()
Figure 39: The name key-value in an app PLIST file
For more information about editing the PLIST file, please see Anatomy of a PLIST file earlier in this document.
Installers with no package version
Sometimes, when an installer package is parsed by the Workspace ONE Admin Assistant, it generates a PLIST file with a version that says Please Edit Me. This issue needs to be resolved before uploading the PLIST file to Workspace ONE UEM.
- In Finder, browse to the PLIST file generated by the Admin Assistant for the application in question.
- Right-click the PLIST file and select Open With and select a text editor (such as TextEdit or BBEdit).
- Modify the string value for the version key-value pair.
![]()
Figure 40: The version key-value in an app PLIST file
For more information about editing the PLIST file, please see Anatomy of a PLIST file earlier in this document.
Installation is looping (always “installing”)
In certain cases, an application successfully installs, but the Intelligent Hub persistently reports it as “Installing.” If you examine the ManagedSoftwareUpdate.log file (refer to Gathering Logs), you’ll notice that the app is consistently marked for installation every time the Hub checks for installed software. This usually stems from a metadata PLIST that lacks the necessary receipt or installs arrays. In such instances, you must make one of the following modifications to the metadata PLIST generated by Workspace ONE Admin Assistant:
- Validate or add an Installs Array into the app installation configuration as discussed in the Anatomy of a PLIST file.
- Add an Install Check Script (and ensure it returns a zero (
0) value return code when an install should proceed).
Internal app won’t reinstall
In some scenarios, an internal app might need to be reinstalled on a macOS device, either as part of an app upgrade or because the end user inadvertently uninstalled the app. However, an app reinstall might fail for a variety of reasons. Administrators should consider the following when troubleshooting a failed app reinstall.
- Check if the app still installed on the device – Administrators can verify if the app is still installed on the device by using the following command:
ls -la /Applications | grep -i "<app_name>"
- Search for detection signals on the device – Since Workspace ONE relies on specific detection signals, such as receipts, app versions, and app paths, to ascertain the presence of an app, it’s crucial to verify whether any configured install logic remains active on the device. To accomplish this, utilize the following command to check for the existence of the package::
pkgutil --pkgs | grep -i "<app_name>"
Check for a matching receipt with the following command:
pkgutil --pkg-info com.<vendor_name>.<app_name>
It’s possible that the receipts might not exist or have been removed. Additionally, ensure that the expected app path, version, and install items are correctly set on the device.
- Review the software distribution log – Check the Managed SoftwareUpdate.log file for any error messages. Some key words to focus on include:
- Already installed
- Needing install
- Skipped
- Failed
- Blocked
- Pending
- Unavailable
- Not applicable
- Confirm the appropriate assignments – Check to ensure the assignments are correct for the device. Validate the device is in the correct Smart Group, the assignment is active, the app is not excluded by another assignment, and other configured settings.
- Check if the end user has manually deleted the app – Manual deletion of an app, like dragging it to the Trash, can cause a mismatch on the device, leading to issues during app reinstalls. This is because manual deletion can leave behind receipts, files, and other items that Workspace ONE might use to detect the app’s installation.
In such cases, it may be necessary to modify the Install Check script to employ a more reliable method for detecting app installation, such as identifying the app’s path.
Summary and additional resources
Omnissa Workspace ONE UEM provides a comprehensive, end-to-end solution for managing applications across Apple iOS, iPadOS, and macOS devices. By supporting three distinct app classifications—Internal, Public, and Purchased—the platform offers IT administrators the flexibility to address various enterprise deployment scenarios. This includes distributing proprietary in-house tools and managing bulk-licensed commercial software through Apple Business.
The platform’s extensive configuration options, such as provisioning profiles, metadata PLIST customization, custom scripts, blocking conditions, and Smart Group assignments, ensure accurate and consistent application deployment at scale. Complementary features like the macOS Enterprise App Repository and the Workspace ONE SDK further enhance this capability. Administrators can streamline the onboarding of trusted third-party apps, while developers can seamlessly embed enterprise security directly into mobile applications.
Ultimately, Workspace ONE UEM transforms the manual, error-prone process of managing applications into a policy-driven, automated, and secure application lifecycle workflow. From initial onboarding and deployment through version control, monitoring, and eventual retirement, the platform empowers IT teams to maintain governance and compliance while providing a seamless experience to end users across the entire Apple device ecosystem.
Additional resources
For more information about Omnissa products, explore the following resources:
- Omnissa Product Documentation
- Omnissa Workspace ONE and Horizon Reference Architecture
- Omnissa Knowledge Base
Changelog
The following updates were made to this guide:
| Date | Description of Changes |
|---|---|
| 6/3/2026 |
|
About the author and contributors
This guide was written by:
- Michael Bradley, Principal Product Specialist, Omnissa
- Jason Misleh, Lighthouse Architect, Omnissa
Additional contributions were provided by:
- Matt Zaske, Senior Product Manager, Omnissa
- Paul Evans, Senior Product Manager, Omnissa
- Chris Morelock, Senior Product Manager, Omnissa
- Bryan Garmon, Principal Technical Solution Specialist, Omnissa
- Suchitra Biju, Product Specialist, Omnissa
- Pete Lindley, Product Manager – Adoption & Early Access, Omnissa
- Sandhya US, Product Specialist, Omnissa
Feedback
Your feedback is valuable.
To comment on this paper, contact the authors at tech_content_feedback@omnissa.com.