

Workspace ONE integration with Google BeyondCorp
Overview
BeyondCorp is Google's implementation of the zero trust model. It builds upon a decade of experience at Google, combined with ideas and best practices from the community. By shifting access controls from the network perimeter to individual users, BeyondCorp enables secure work from virtually any location without the need for a traditional VPN. For more information, see Google Beyond Corp.
Omnissa Workspace ONE UEM is an industry leader in unified endpoint management (UEM) and enables IT, administrators, to manage all types of devices and gain valuable insights into device fleets such as device status, apps, and compliance.
This integration will enable Google Cloud’s context-aware access engine to consume the signals that Workspace ONE provides through its APIs. These signals will indicate whether the device is under management and meets the compliance requirements as defined by the organization that the device is accessing. Access to applications protected by Google Cloud’s context-aware access, including workloads in Google Cloud and Google Workspace (formerly G Suite) secure collaboration and productivity apps will be better protected by Workspace ONE’s rich compliance rules.
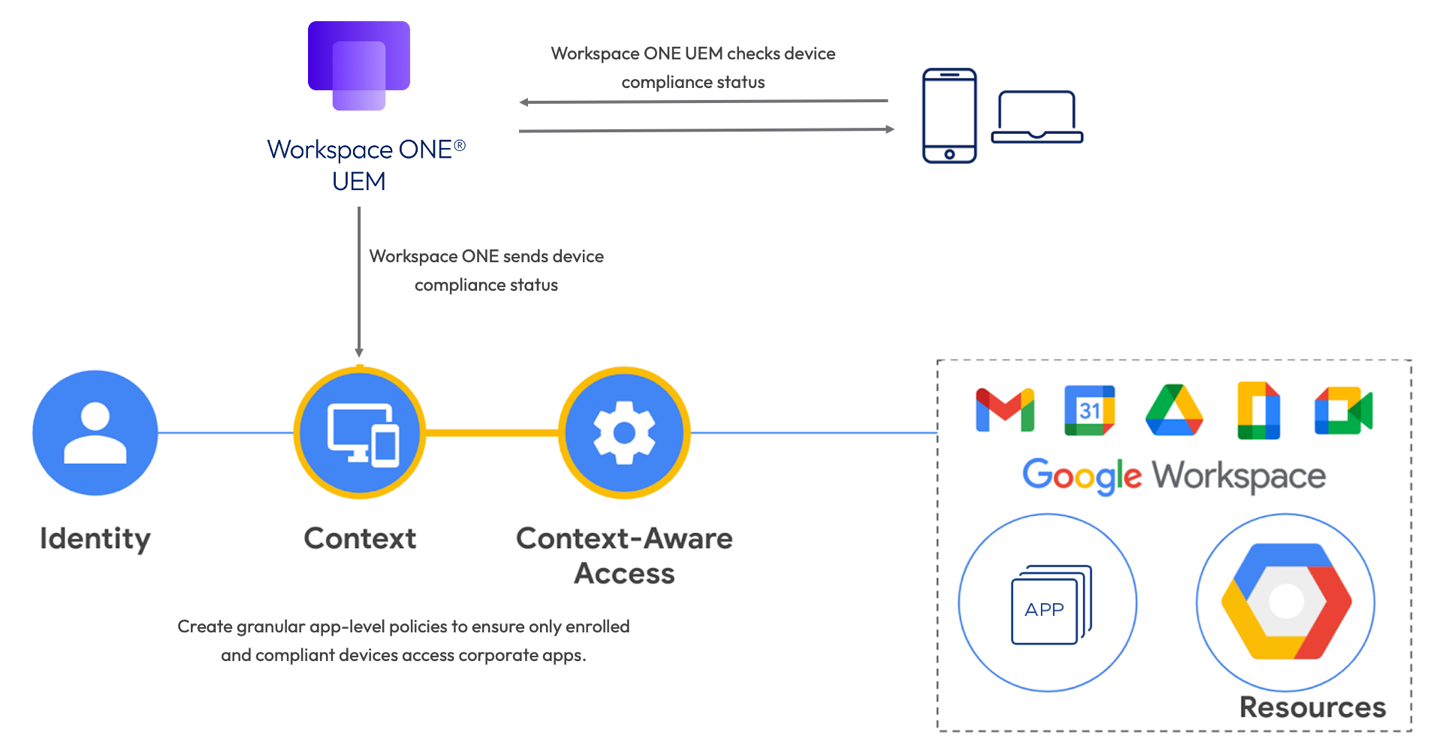
Figure 1: Integration of Google Cloud and Workspace ONE UEM
Purpose of this tutorial
You can integrate Workspace ONE UEM with Google BeyondCorp to enable context-aware access to individual Google-supported apps such as Gmail, Google Drive, Google Calendar, and so on. Android and iOS devices support this feature.
Workspace ONE UEM only passes managed, unmanaged, compliant, and non-compliant attributes to Google BeyondCorp.
This tutorial takes you through the steps to integrate Workspace ONE UEM with Google BeyondCorp to synchronize device compliance status from Workspace ONE into Google Enterprise.
This will enable Conditional Access rules based on device compliance as a factor in multi-factor Authentication (MFA). This supports the pillars of Zero trust by validating:
- MDM enrollment into Workspace ONE
- Device compliance
- User authentication on a validated device
- Access only to Google applications that are allowed for that user and device
For more information, see Omnissa Docs: Use Compliance Data in Google BeyondCorp Context-Aware Access.
Audience
This tutorial is intended for IT administrators who are familiar with Omnissa Workspace ONE UEM. Familiarity with networking, identity management, and directory services is assumed. Knowledge of other solutions, such as Omnissa Access and Omnissa Intelligence, is also helpful but not required. It is also helpful to have experience with Google Workspace and Google Cloud, as access to Google management consoles is required to perform tasks.
Setting up BeyondCorp integration in Google admin console and Google Workspace
The Beyond Corp integration with Workspace ONE UEM consists of sending device compliance data from Workspace ONE UEM to Google so that the Workspace ONE device status can be leveraged during authentication to the Google service.
This guide helps you configure the Google Cloud Console and the Google Workspace admin console to enable this integration:
- The Google Cloud Platform enables you to build, deploy, and scale applications, websites, and services on the same infrastructure as Google. To log into the Google Cloud console, navigate to https://console.cloud.google.com.
- The Google Workspace admin console is a central place to manage your Google Workspace services. Sign in to the Google Admin console to manage user accounts, configure administrator settings for your Google Workspace services, monitor Google Workspace usage in your domain, create groups, and more. To log in to the Google Workspace admin console, navigate to https://admin.google.com.
Prerequisites
To configure the BeyondCorp integration with Workspace ONE UEM, make sure the following requirements are met:
- Workspace ONE UEM 2209 or later
- Opt-in to Omnissa Intelligence
- Navigate to an organization group of type Customer, then navigate to Monitor > Intelligence to learn more and to get started.
- Workspace ONE Intelligent Hub version 2209 or later installed on Android and iOS devices
- If you plan to use Google native apps and SAML apps on Google Workspace, the license required is either Google Workspace Enterprise or Cloud Identity Premium. For more information, see Google Docs: Set up third-party partner integrations.
- If you plan to use on-premises apps and apps that are deployed on the Google Cloud Platform, you need a BeyondCorp Enterprise License.
Configuring Google Cloud Console
The Google Cloud Platform enables you to build, deploy, and scale applications, websites, and services on the same infrastructure as Google. The steps for configuration are sequential and build upon one another, so make sure that you complete each step before going to the next.
In this section, you will:
- Create a new Project in Google Cloud Console
- Enable Cloud Identity API for the project
- Create a service account for the project with appropriate permissions
- Downloading JSON file for Workspace ONE UEM
- Display where to find the Client ID of the service account (required for configuration in the Google Admin console)
| NOTE: You will need this JSON file to upload into Workspace ONE UEM in later steps. Copy the Client ID for later use when you complete the configuration in the Google admin console. |
Creating a new Project in Google Cloud Console
Make sure to verify that both the API key in Google Cloud Console and the Device Compliance Partners in Google Admin Console has been set up before proceeding.
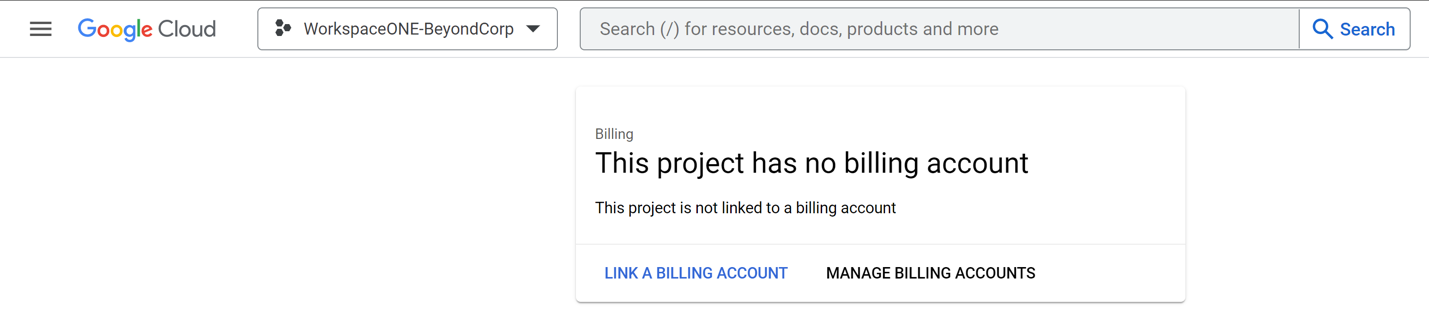
Before you can perform the steps in this exercise, you must create a new Cloud project if one doesn’t already exist. It is also important to ensure that this project has Billing enabled.
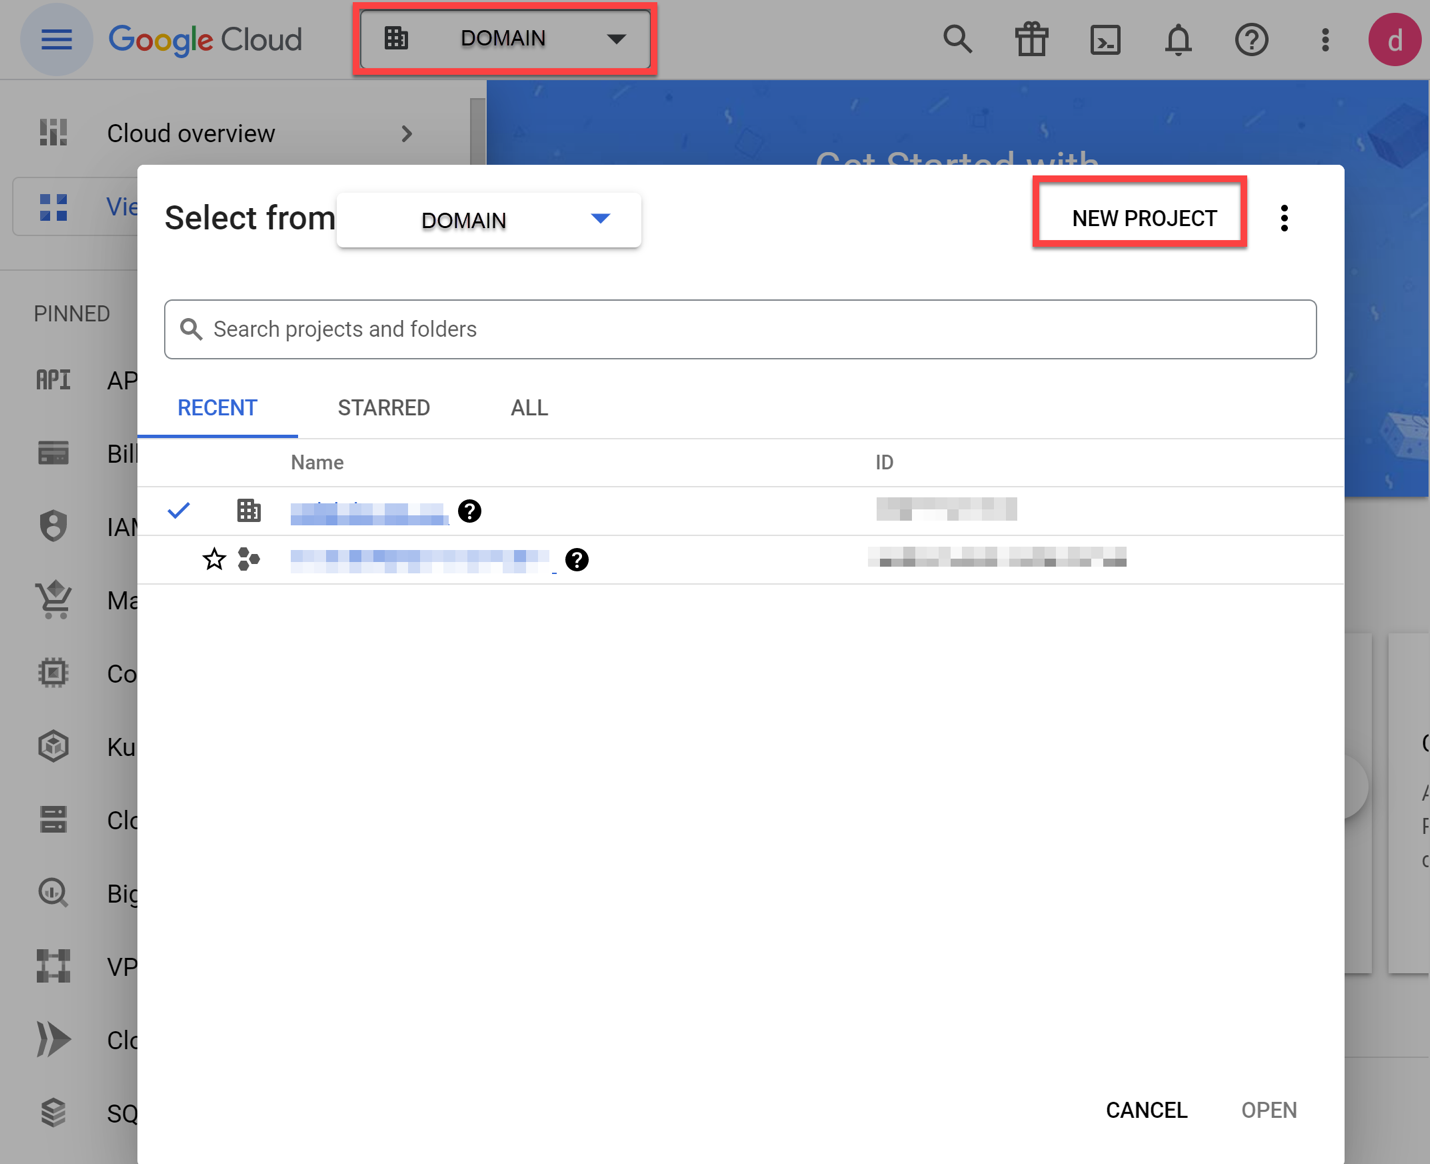
- To log into the Google Cloud console, navigate to https://console.cloud.google.com.
- Select the Organization domain at the top of the console.
- Select New Project.

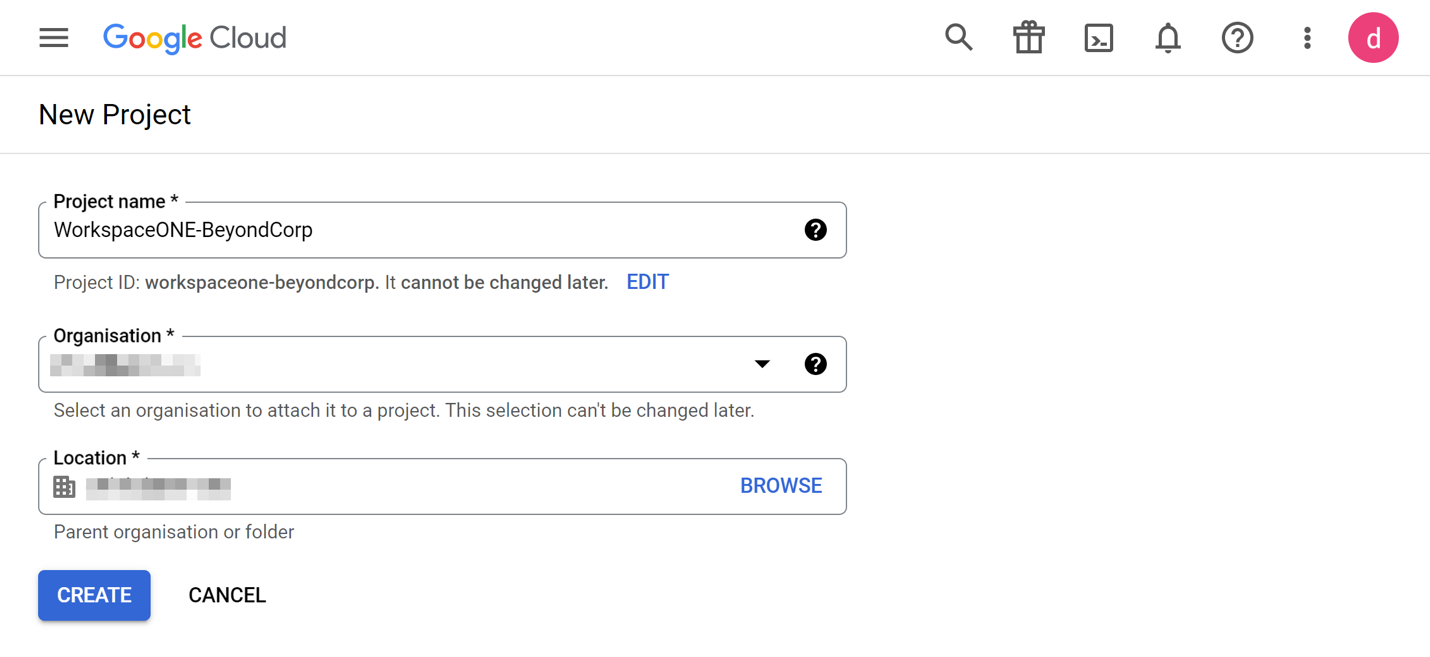
- Give the Project a name. In this example, we called it WorkspaceONE-BeyondCorp.
- Select Create.
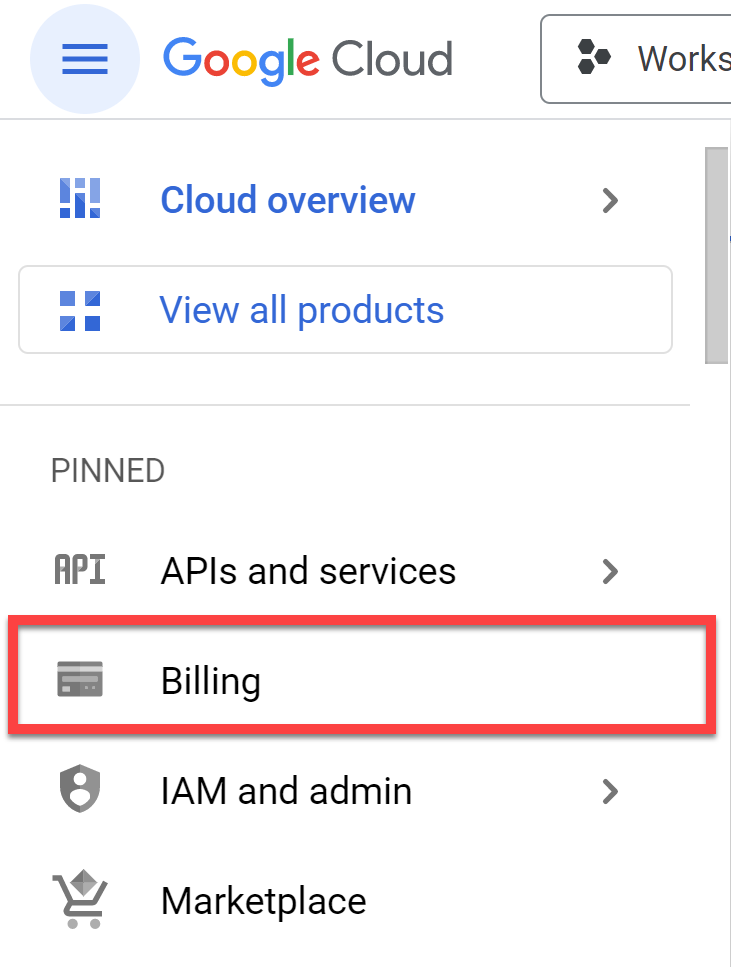
- Once the Project has been created, select the Project.
- Select the Billing tab.
- Ensure that you have Billing enabled for this project. If Billing is not enabled, link to a billing account.

Enabling Cloud Identity API for the project
To enable Cloud Identity API for the Project:
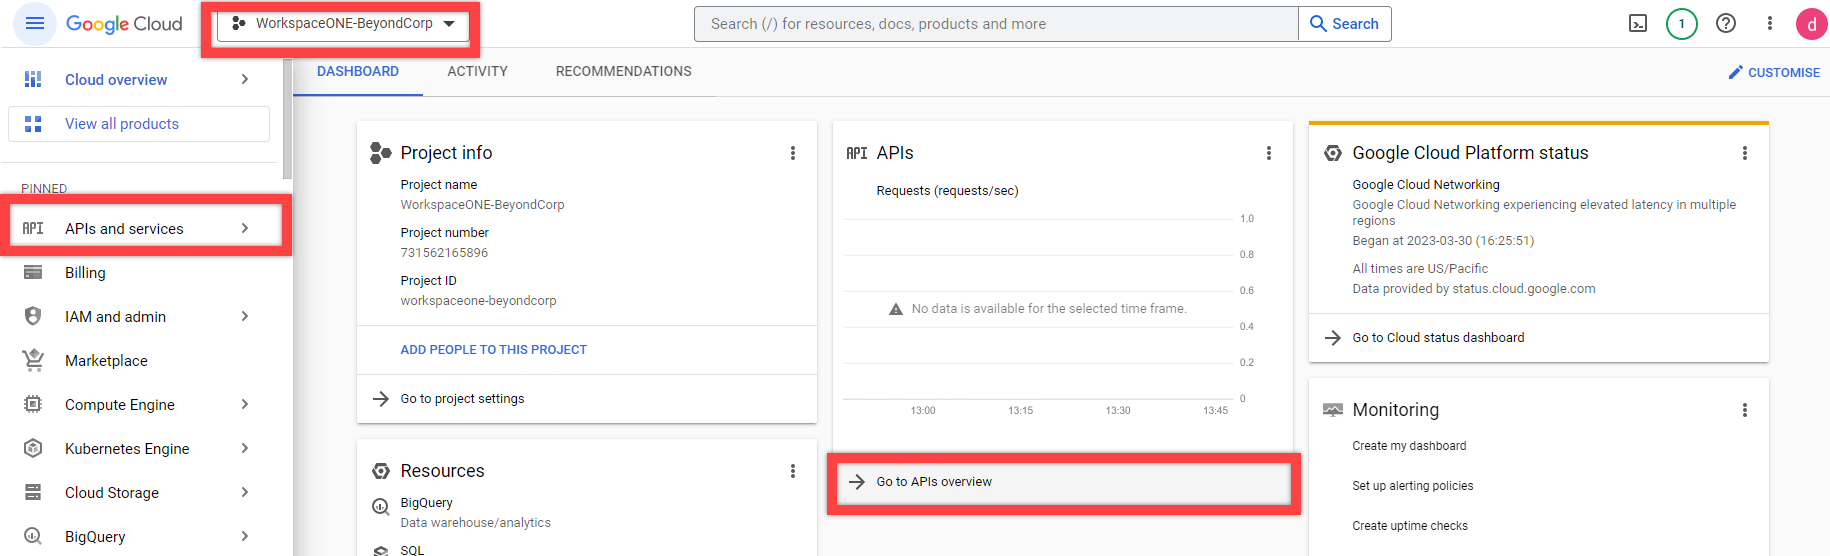
- Navigate to the Google Cloud Console at https://console.cloud.google.com.
- Select the project that you want to associate with Workspace ONE, and navigate to API & Services.
- Select Enable APIs and Services.
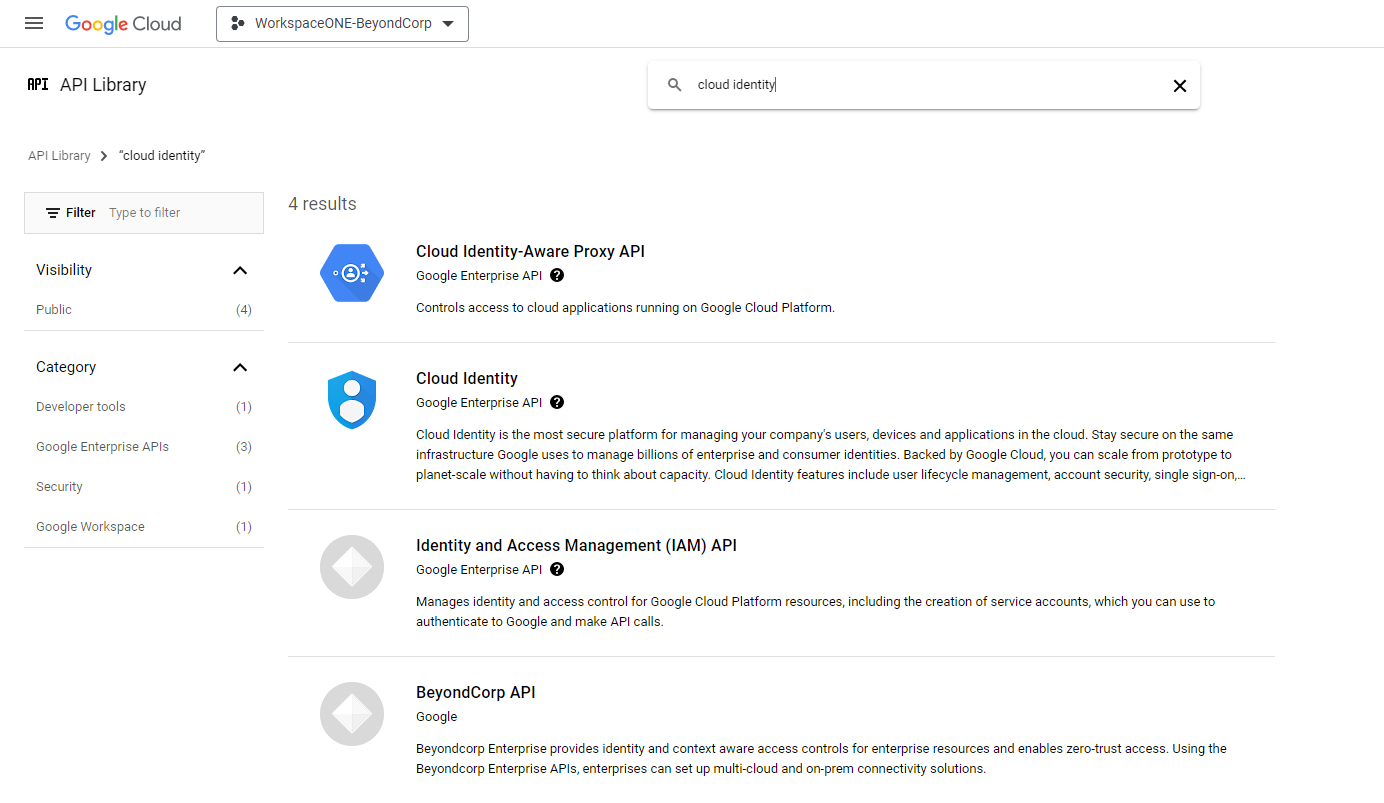
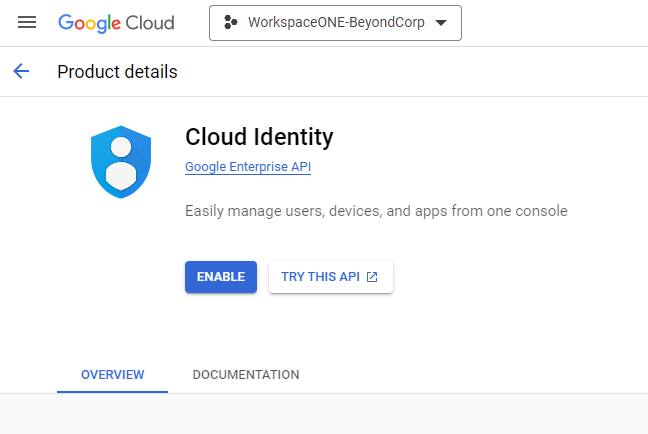
- In the search field for APIs and Services, enter cloud identity.
- Select Cloud Identity (Cloud Enterprise API), and click Enable.
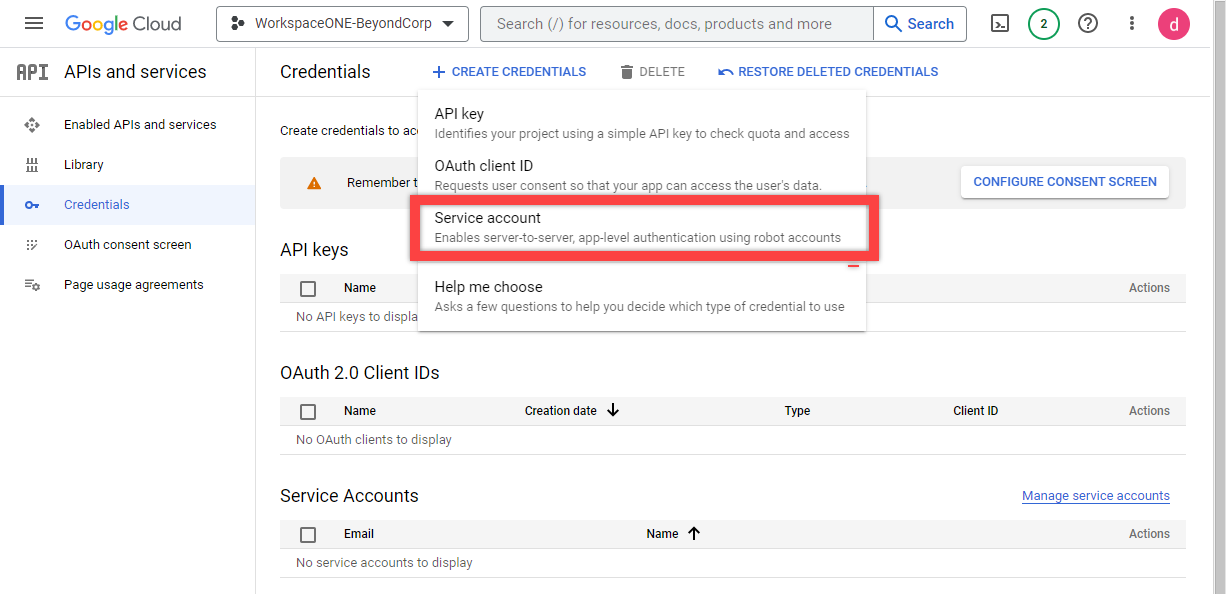
Creating a service account for the project with permissions
After enabling the Cloud Identity (Cloud Enterprise API), create a service account and assign it the appropriate permissions:
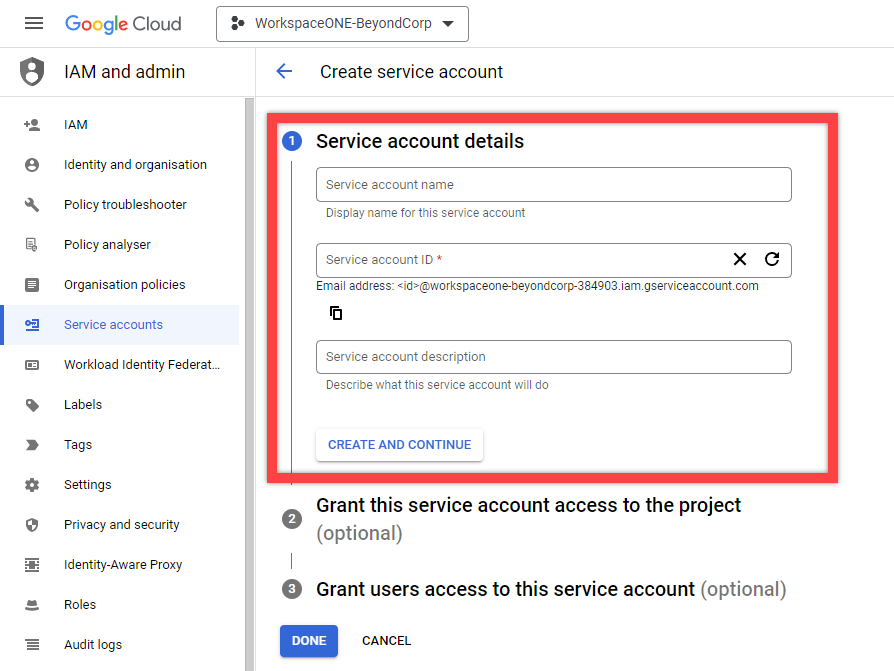
- In the Project you just created, under the API & Services menu, navigate to Credentials, select Create Credentials at the top of the page, and then select Service Account as the Type.
- Give the Service Account a Name and ID.
- Click Continue to proceed through the Service Account creation wizard, and click Done when complete.
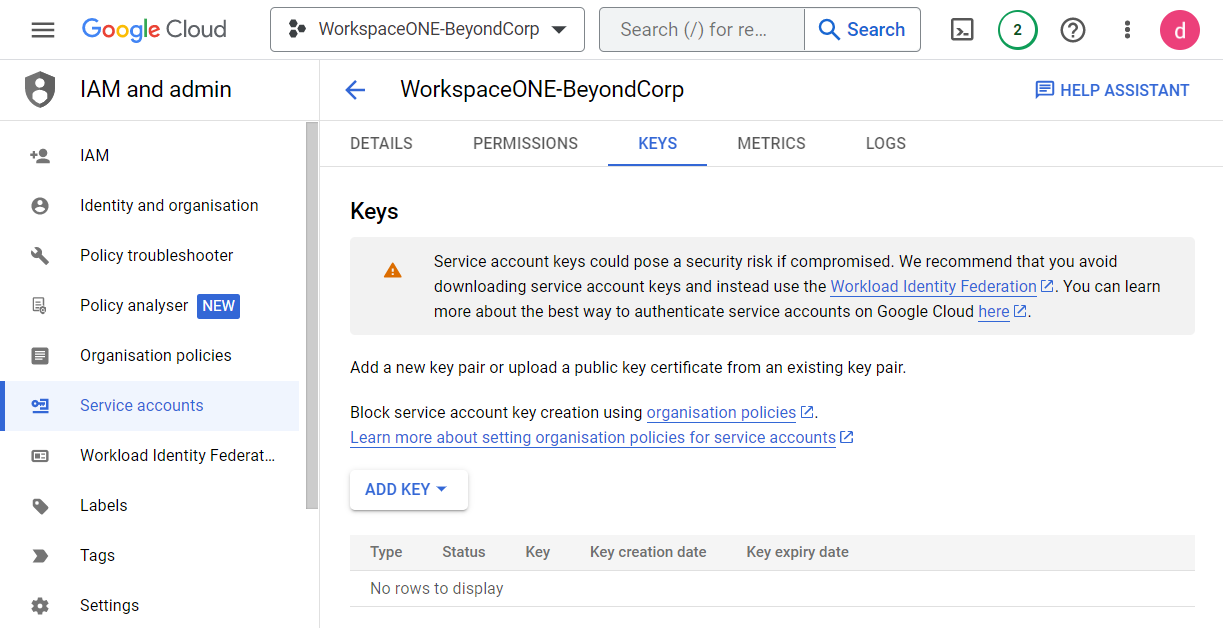
Downloading JSON file for Workspace ONE UEM
After creating the service account, download a JSON file. You must keep this file to upload into Workspace ONE UEM in later steps.
- Select the Service Account that you just created, and select the Keys tab.
- Select Add Key and Create New Key.
- Under Key Type, select JSON.
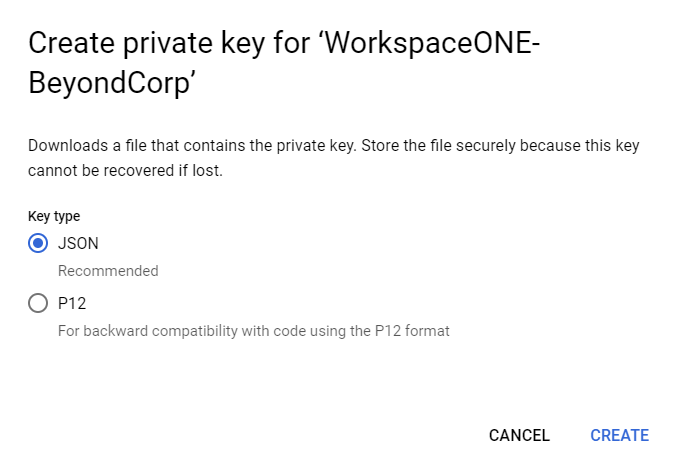
| IMPORTANT: The JSON Key should automatically download to your computer. Save this key to a safe place. You will need it later for the Workspace ONE UEM integration. |
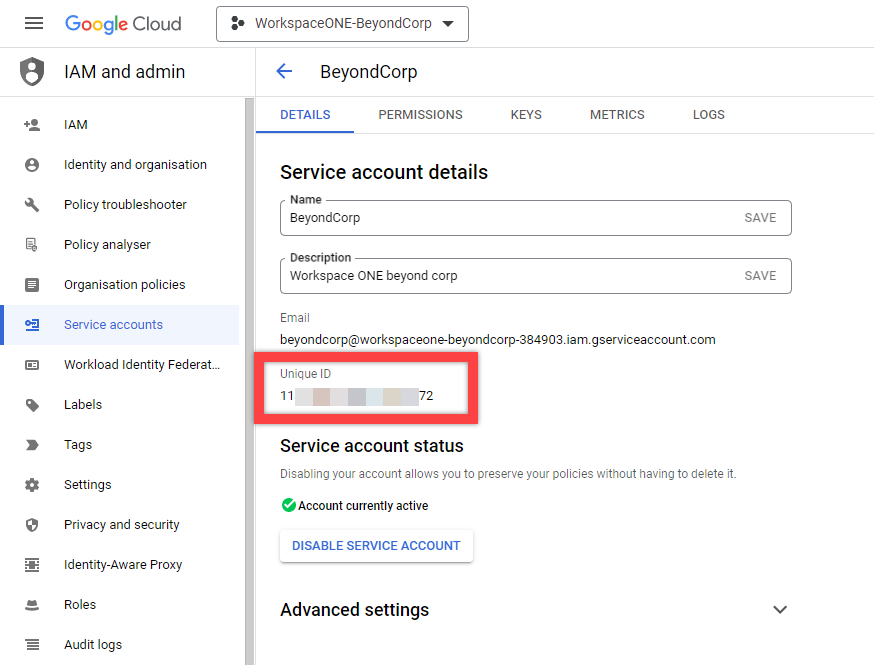
Obtaining the Client ID of the service account
Now that you have created the service account in the Google Cloud console, you need the service account Client ID to enable permissions in the Google admin console. To find the Client ID of the service account:
- In the project created earlier, navigate to Service accounts.
- Under the Details tab, locate the Client ID under the Unique ID field.
- Copy the Client ID and save it for later use, such as in Notepad.
Configuring Google Workspace
After setting up Beyond Corp Integration in Google Admin Console and Google Workspace, you need to make some configurations in the Google Workspace admin console. This sets up the integration with Workspace ONE UEM. In this section, you will:
- Enable domain-wide delegation access to the service account
- Enable Omnissa as a Security and MDM partner
- Enable and configure Google’s contextual access
- Applying Contextual Access policy to Google apps
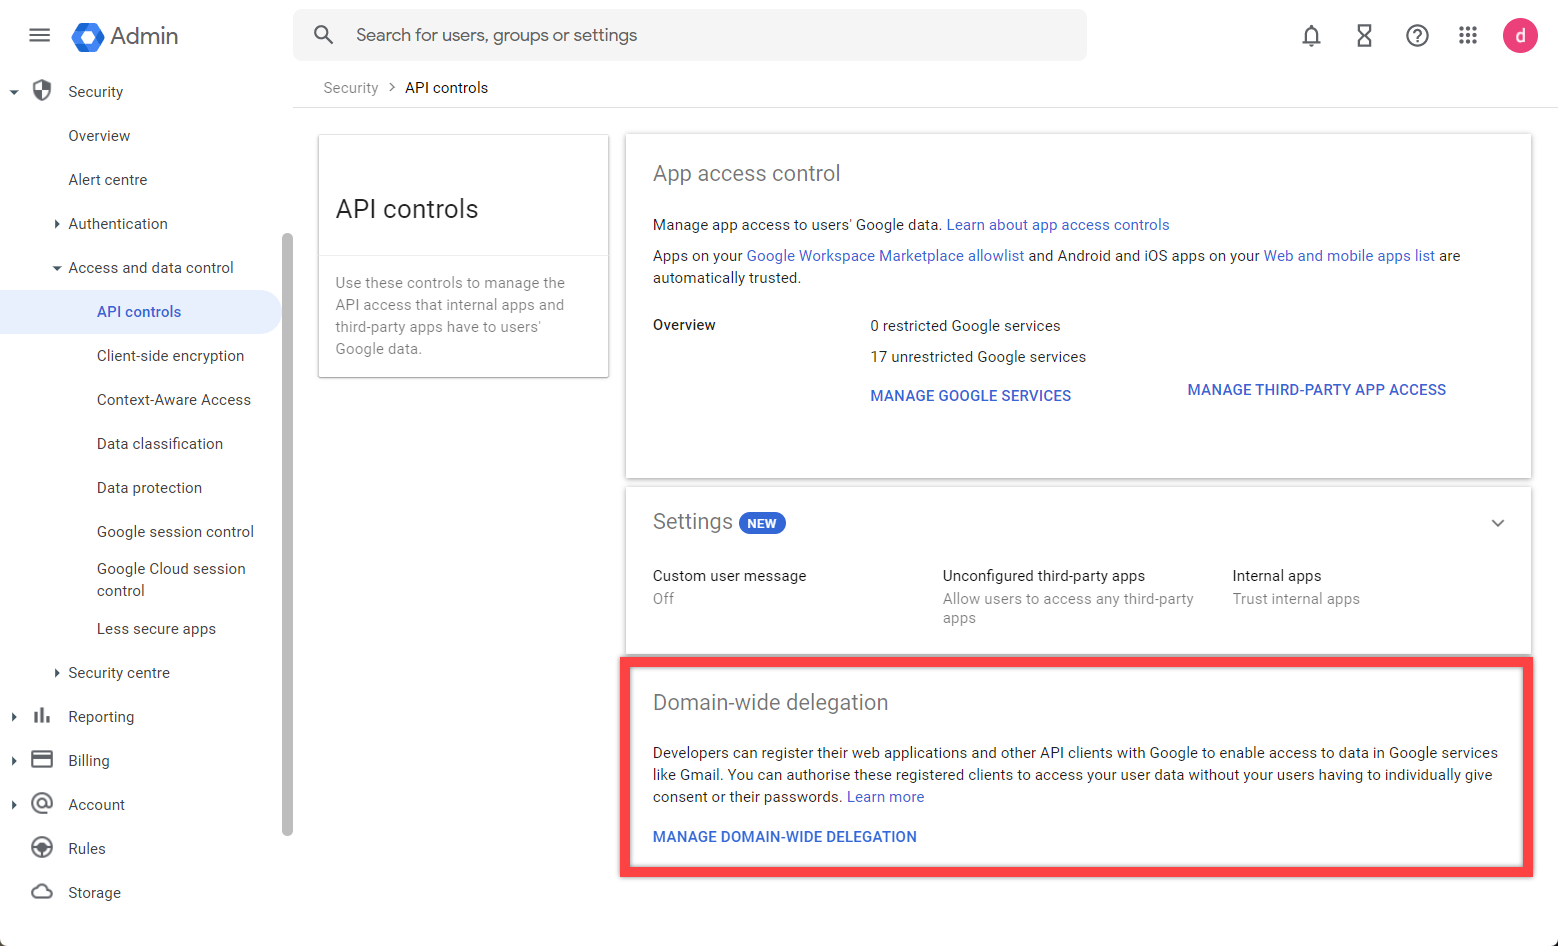
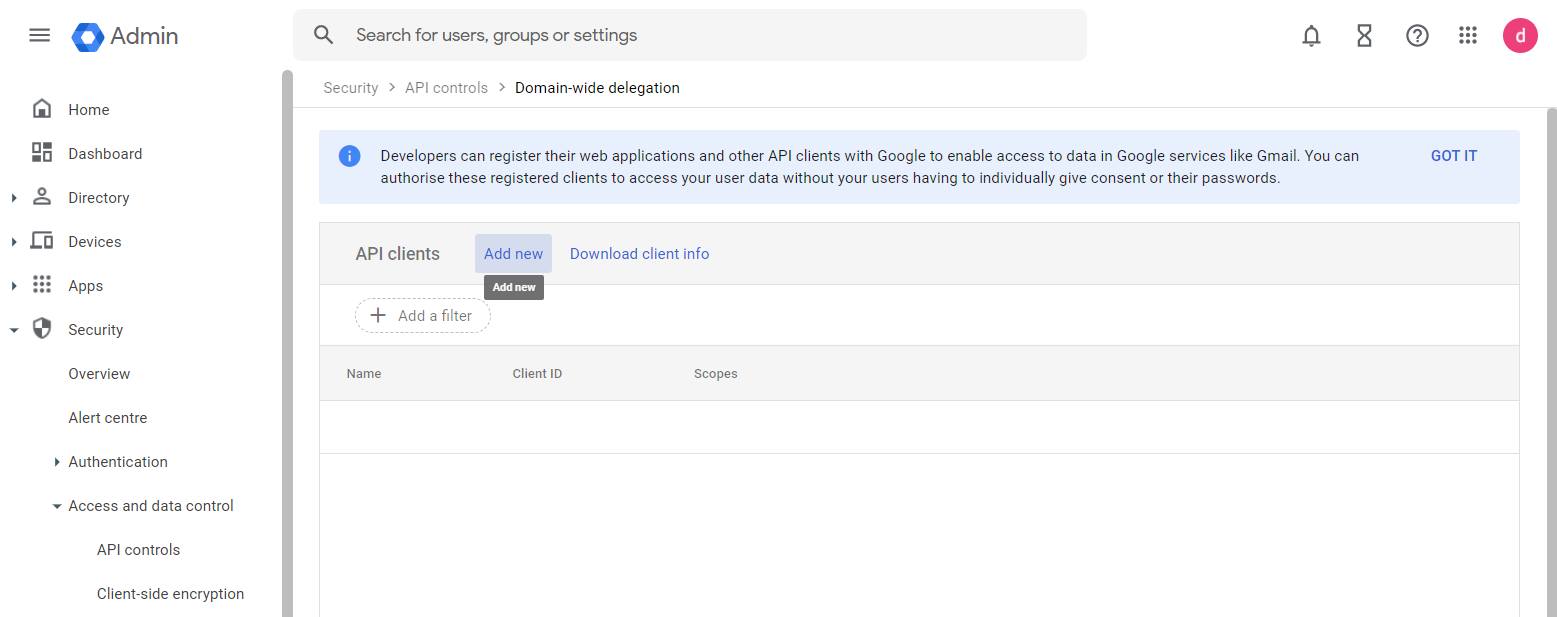
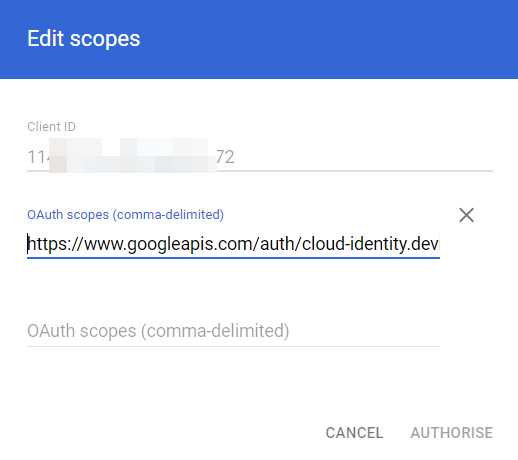
Enabling domain-wide delegation access
To enable domain-wide delegation access to the service account created earlier:
- Log in to the Google Admin Console (https://admin.google.com).
- Navigate to Security > Access and Data Control > API Controls, and select domain-wide delegation.
- Select Add New.
- Enter the client ID of the Service account created in the Google Cloud Console.
- For the OAuth scope, enter the following URL:
https://www.googleapis.com/auth/cloud-identity.devices
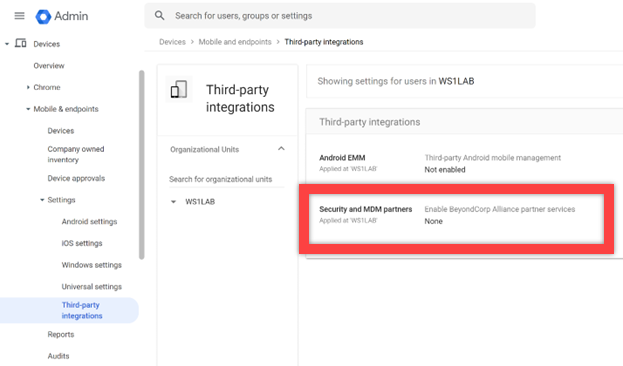
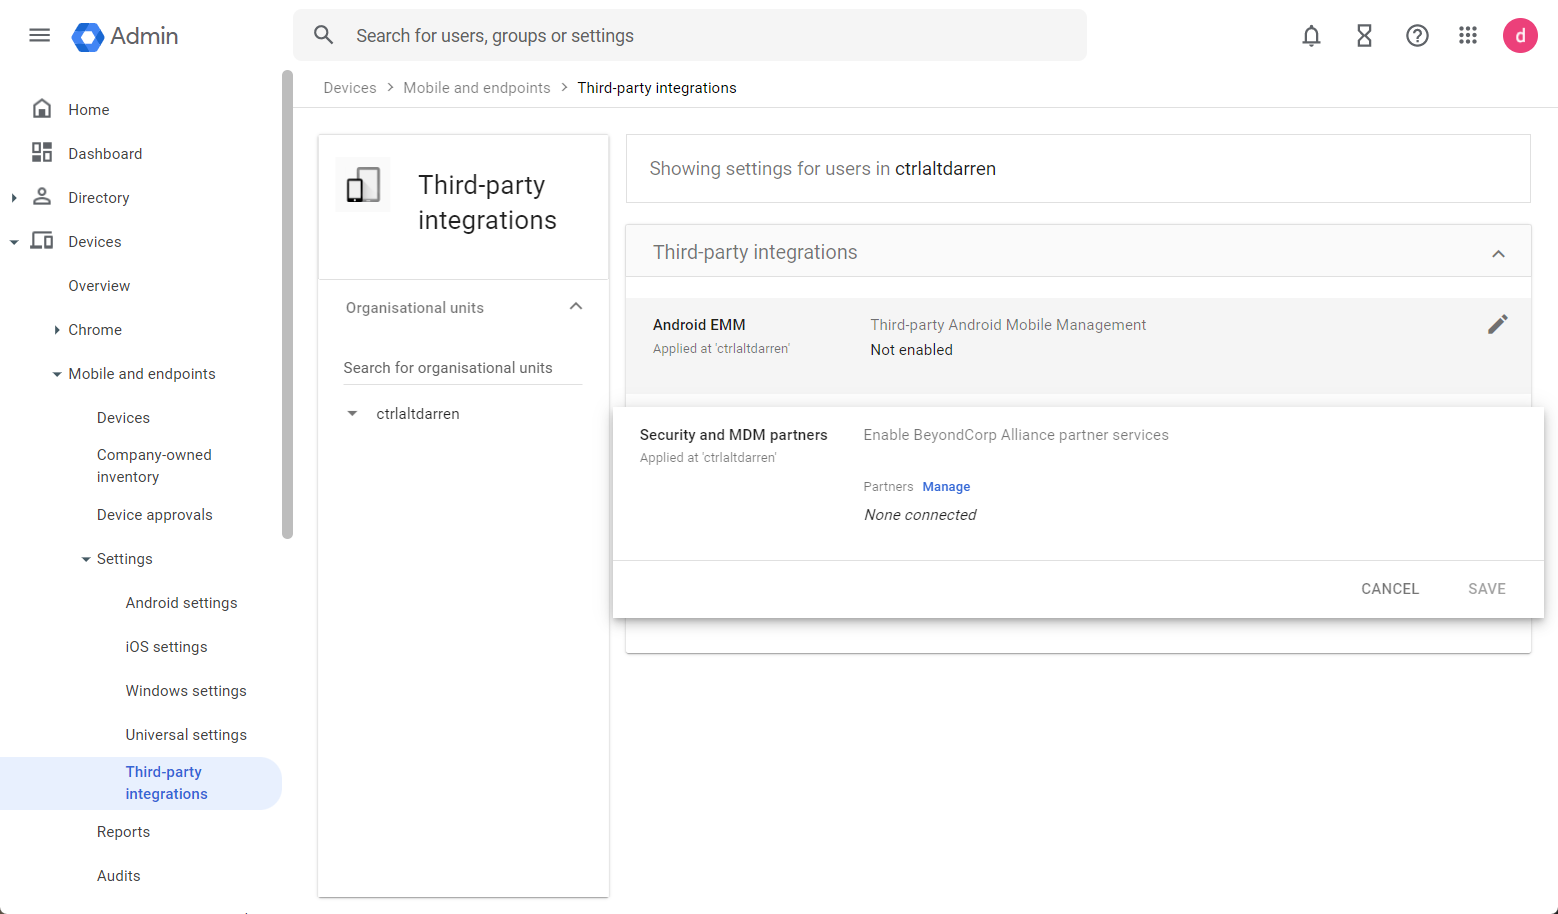
Enabling Omnissa as a security and MDM partner
After enabling domain-wide delegation access, set Omnissa as the security partner. This enables Google to obtain the device-compliant state from Workspace ONE UEM.
- In the Google Admin Console, navigate to Devices > Mobile & endpoints > Settings > Third party Integrations, and select Security and MDM partners.
- Under Security and MDM partners, select Manage.
- Select Omnissa Open Connection and close the window.
- Select the checkbox next to Omnissa.
- Make sure to Save the setting.
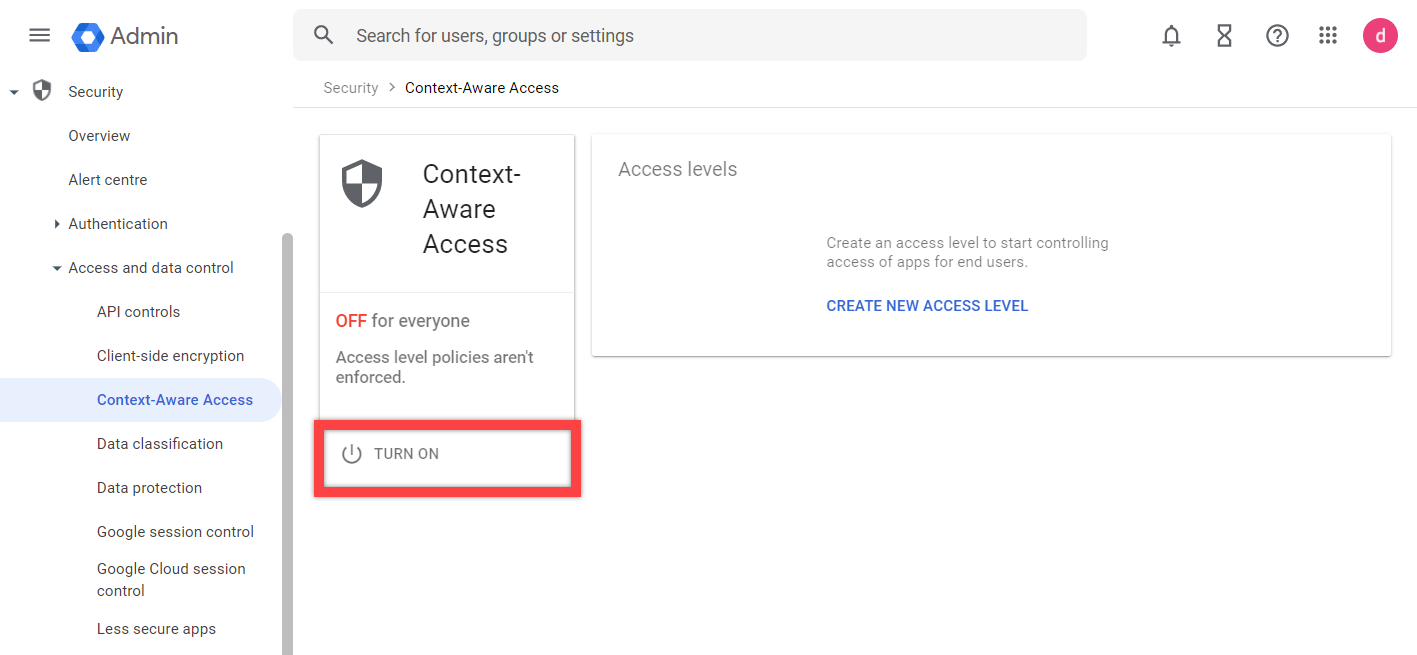
Enabling and configuring Google’s Contextual Access
After enabling Omnissa as a Security and MDM partner, you are ready to enable Google Contextual Access. This enforces the contextual access policy for the applications and device types.
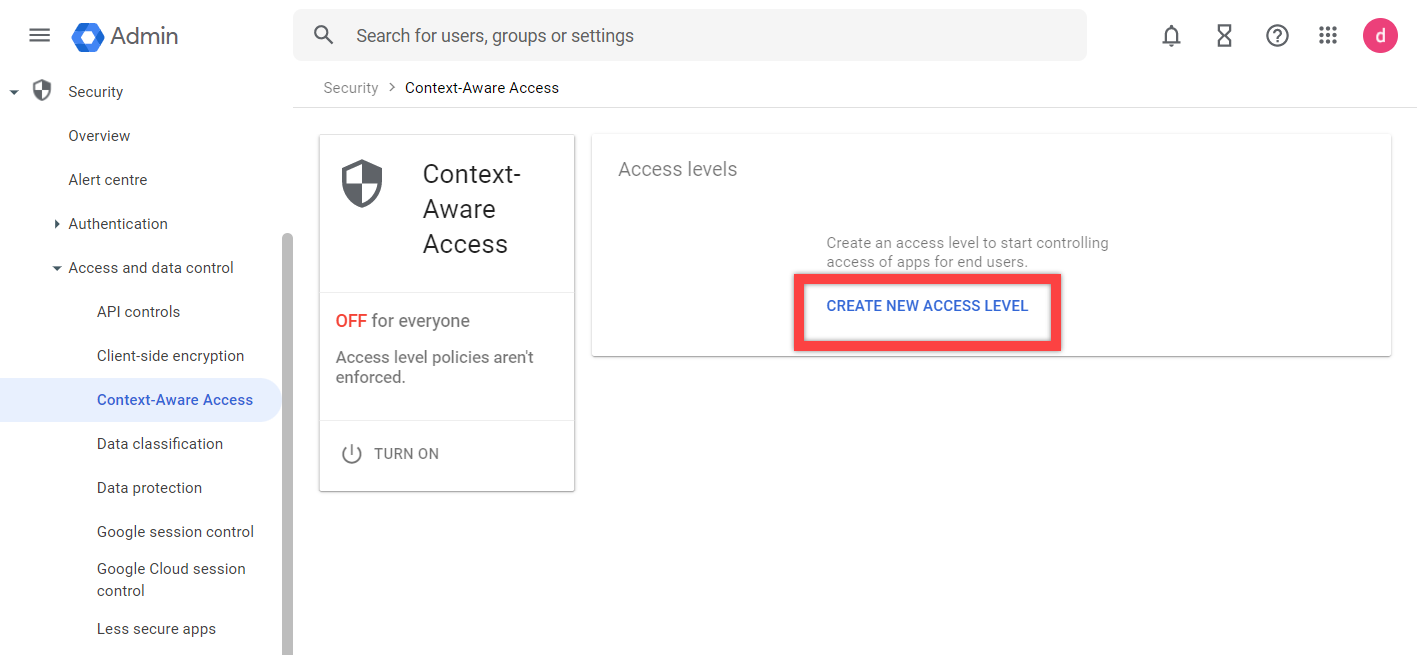
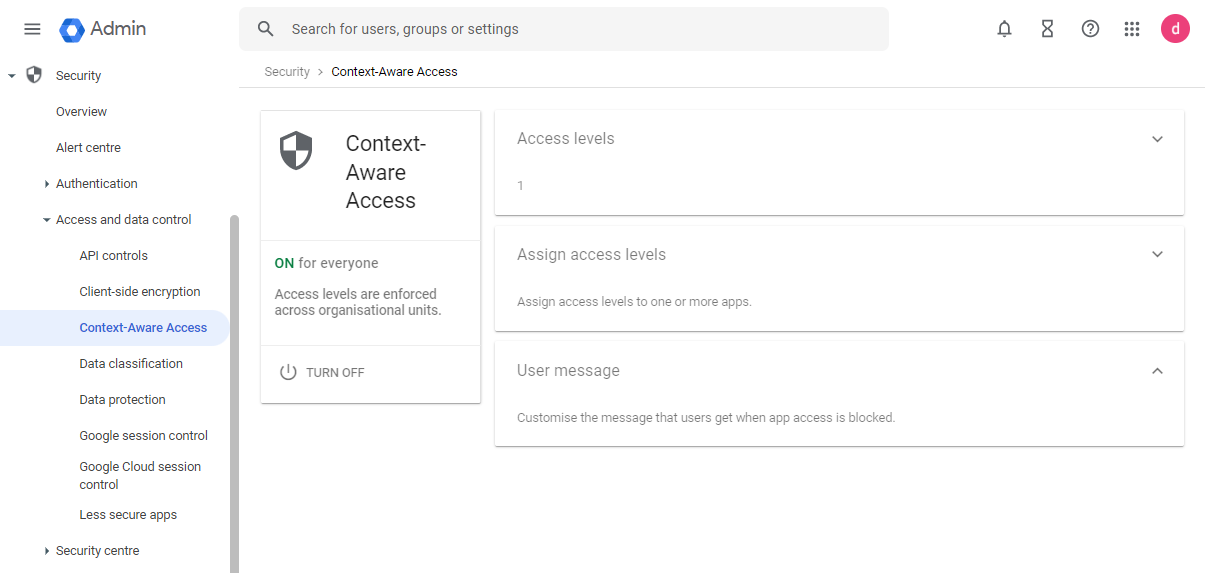
- In the Google Admin Console, navigate to Security > Access and data control > Context-Aware Access, and select Turn On.
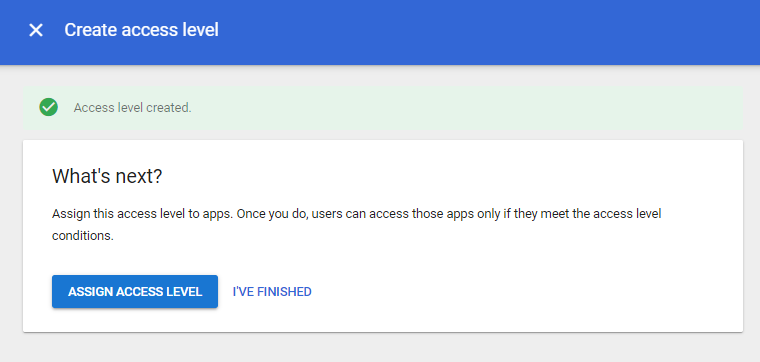
NOTE: You can configure the policy first and then come back and turn on Context-Aware Access. - Under Access Levels, select CREATE NEW ACCESS LEVEL.
- Under Details, give the Access Level a Name and Description. In this example, we named it Beyond Corp.
- Under Conditions, select the Advanced tab, enter the following code, and then click Save:
!(device.os_type in [OsType.IOS, OsType.ANDROID]) || (device.vendors["Omnissa"].is_compliant_device == true)
| NOTE: The code example above ensures that only Android and iOS devices are assigned context-aware policies. |
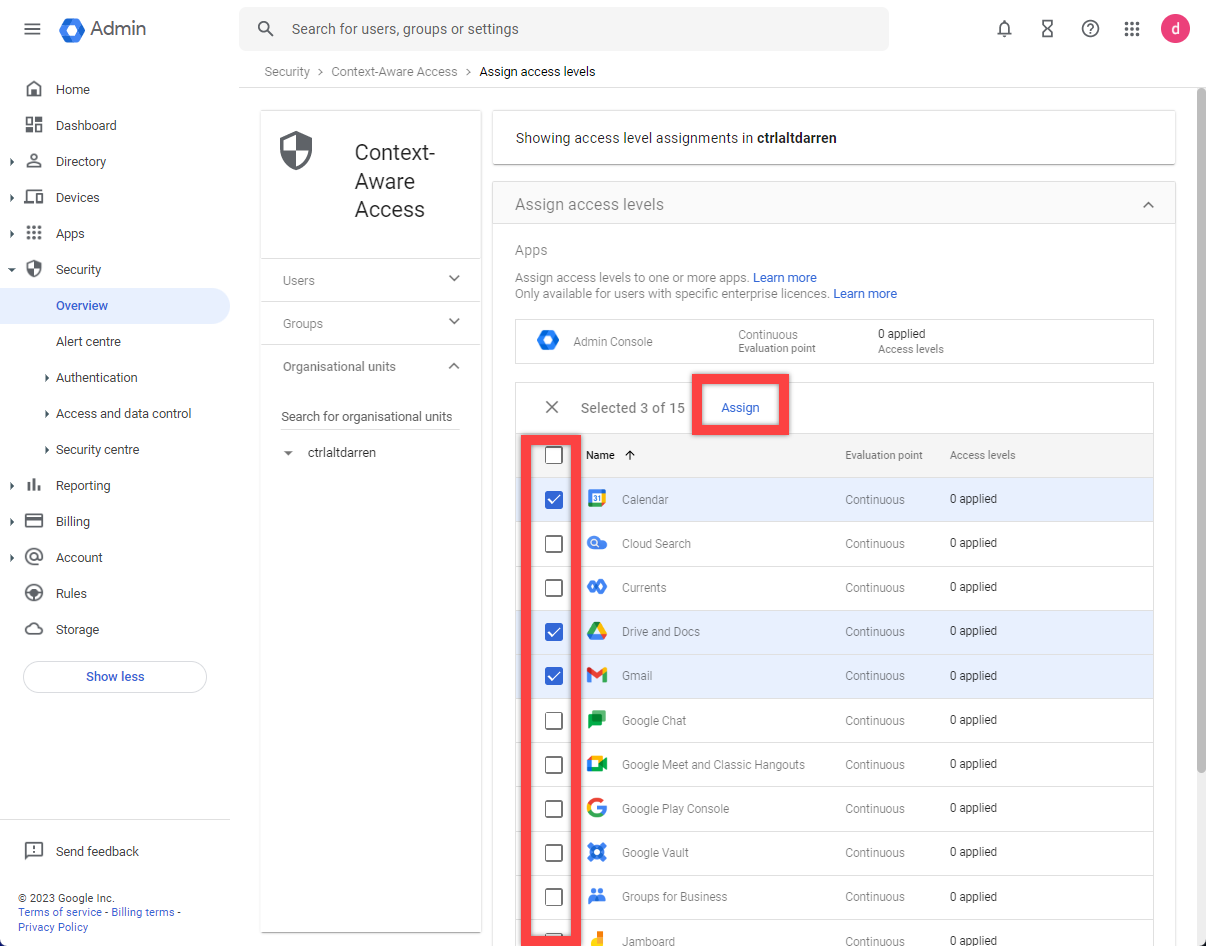
- After the code is entered and saved, select Assign access levels. You can select the apps that will require Device Compliance for access. We will go through this in the next section.
Applying contextual access policy to Google Apps
After enabling Google contextual access, you are ready to apply the policy to specific Google Workspace Applications.
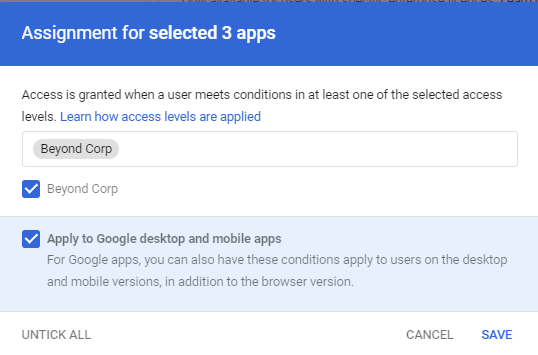
- Select the applications that require a Device Compliance rule, and select Assign.
- Review the Assignment of the policy, and select Save.
- Navigate to Security > Context-Aware Access > User Messages (https://admin.google.com/ac/security/context-aware/user-messages).
- Select Add a custom message to append to the remediation or default message.
- Enter a message similar to the following:
This device is non-compliant. Please navigate to this site to register your device:
https://{Intelligence_URL}/#/compliance/tenants/UEM_Tenant_UUID/google/remediation
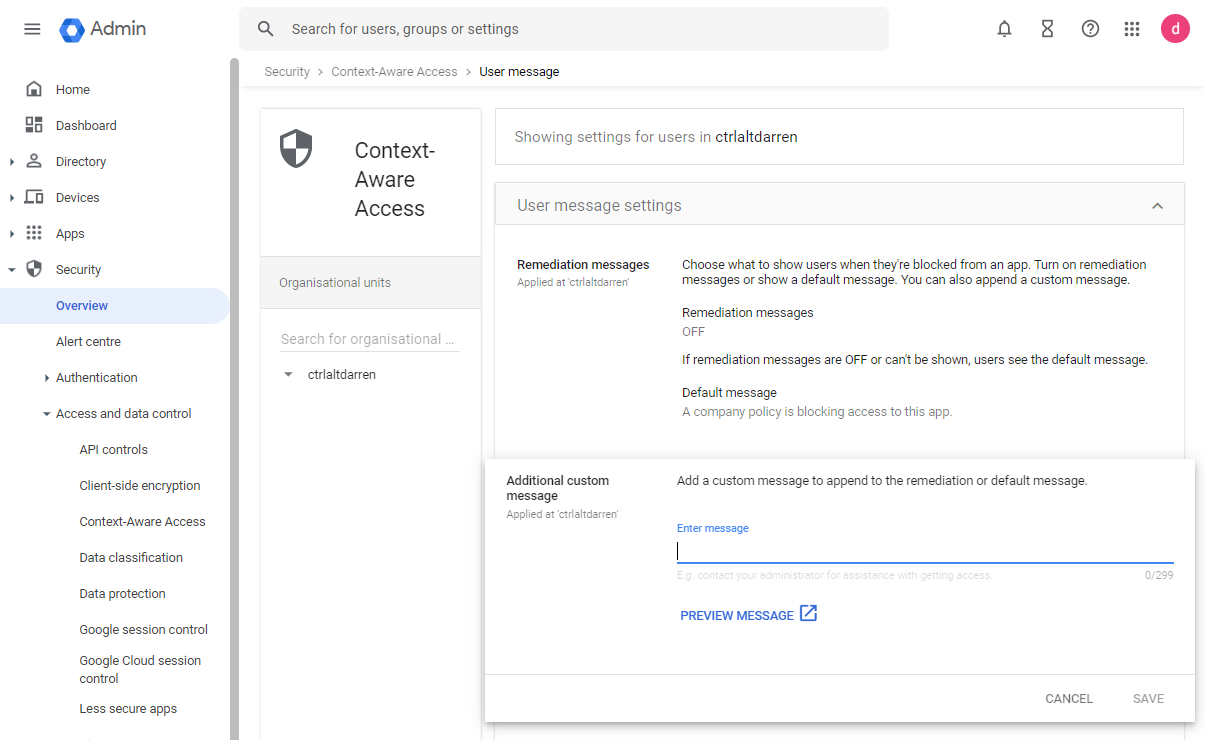
| Note: Make sure to replace {Intelligence URL} with your Omnissa Intelligence URL. You can find this URL by launching Omnissa Intelligence or in the Workspace ONE UEM console by navigating to Monitor > Intelligence. |
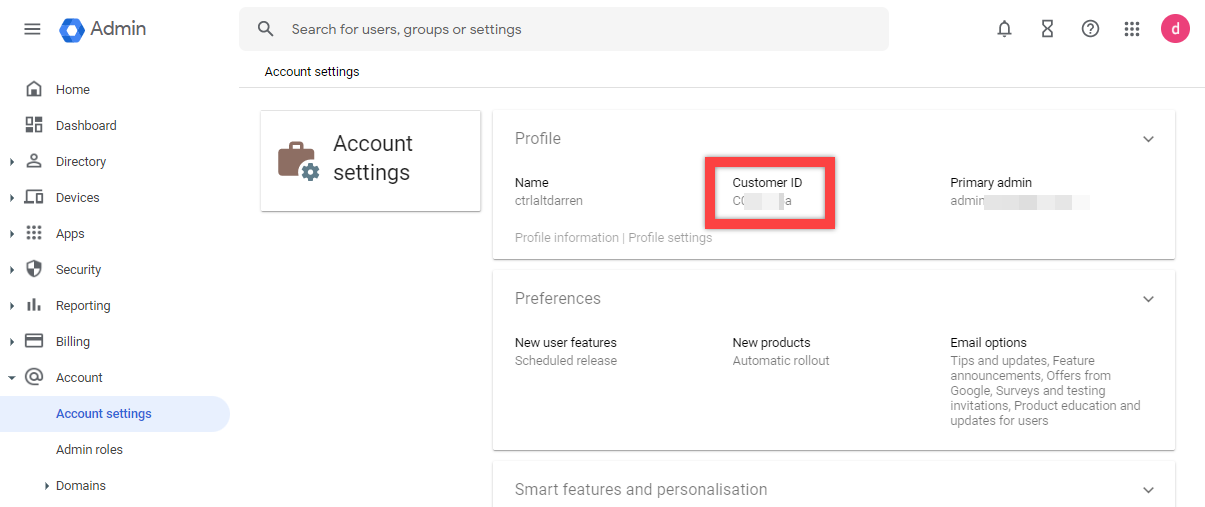
Obtaining the Customer ID
After applying contextual access policy to Google apps, the last piece of information needed for the Workspace ONE integration is the Customer ID for the Google Admin console.
- In the Google Admin Console, navigate to Account > Account Settings.
- Under Profile, make sure to make and store a copy of your Customer ID.
- Make a note of your Account Settings information, and note the Customer ID for use in subsequent exercises.
Setting up BeyondCorp integration in Workspace ONE
Now that the API key has been set up in the Google Cloud Console and the Google Workspace has been configured to accept Workspace ONE as a compliance partner, you can configure the Beyond Corp Integration within Workspace ONE.
In this section, you configure Workspace ONE UEM to send the device compliance information to Google Workspace.
Prerequisites
Verify that the API key has been set up in both Google Cloud Console and the Device Compliance Partners in Google Admin Console.
Activating Omnissa Intelligence
As part of the requirements, you need to activate Omnissa Intelligence. If you have Omnissa Intelligence activated already, you can skip this section. If not, follow these steps:
- Log into your Workspace ONE UEM admin console, navigate to Monitor, and select Intelligence.
- Verify that the Opt-In checkbox is checked to enable Omnissa Intelligence. If already enabled, the LAUNCH button is visible.

| NOTE: Omnissa Intelligence is a requirement for the integration. This feature does not require additional Intelligence licensing. |
Configuring BeyondCorp in Workspace ONE UEM
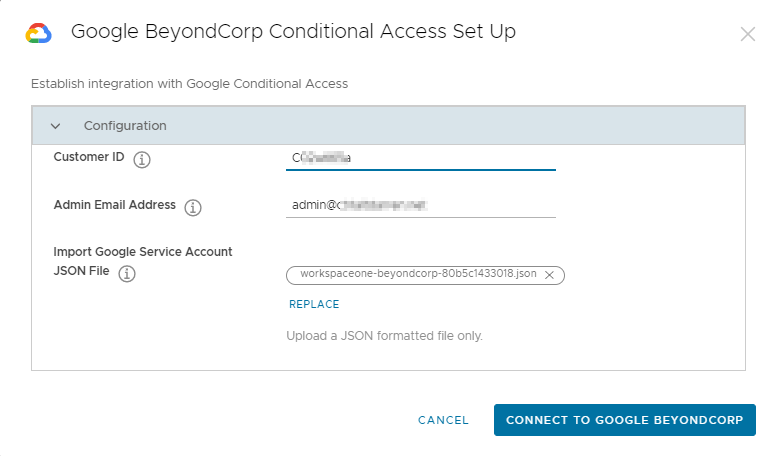
After Omnissa Intelligence activation has been confirmed, you can enter the configuration details.
- In Workspace ONE UEM, navigate to Groups & Settings, and select Integrations.
- You can now click SET UP to proceed with the Google Beyond Corp Conditional Access.
- In the Configuration window, do the following:
- Insert the Customer ID that you retrieved previously from the Google Admin Console.
- Insert the Admin Email Address that was used to create the Service Account.
- Import the Service Account JSON file that was downloaded from the Google Cloud Console.
- Select Connect to Google Beyond Corp.
- After the connection is established successfully, the new status should be reflected on the Integrations window.

Configuring device compliance in Workspace ONE UEM
Device Compliance rules are both simple and powerful to change the state of a device based on criteria that are set within the compliance rules of Workspace ONE UEM. For more information, see Compliance Policies Rules and Actions.
Note: Remember that compliance rules are very powerful. The consequence of a device being out of compliance BLOCKs a user from accessing resources if this compliance status is tied to a Conditional Access policy.
Prerequisites
There are no prerequisites for setting device compliance rules, but there are a few key concepts that it is important to understand:
- If there are NO rules, the device is marked as Compliant.
- When a device-compliance rule is triggered, the device is marked as NON-Compliant.
- If there is a failed login, the Non-Compliance Message set up in the Google Admin Console is displayed to the users.
Configuring device compliance in the Workspace ONE UEM console
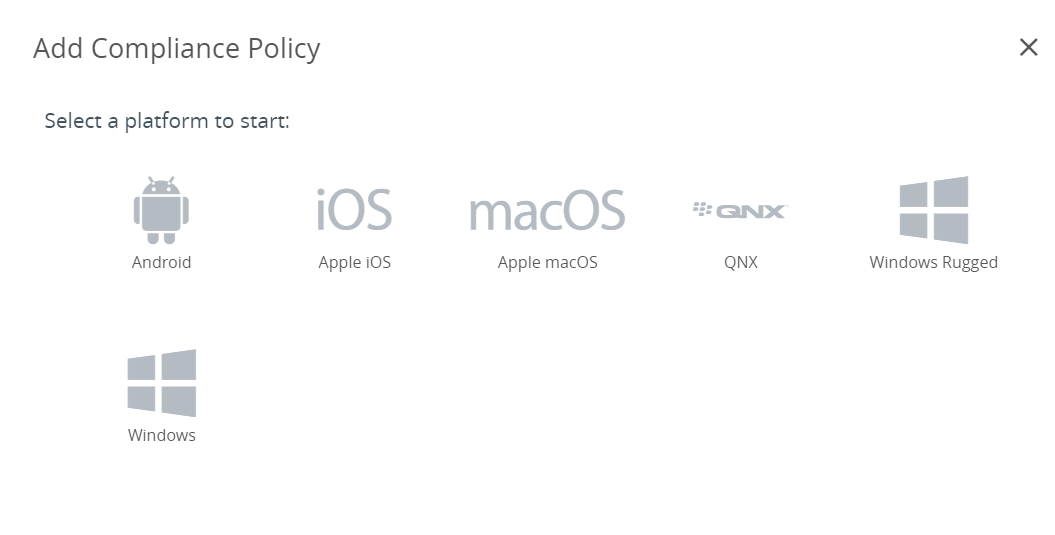
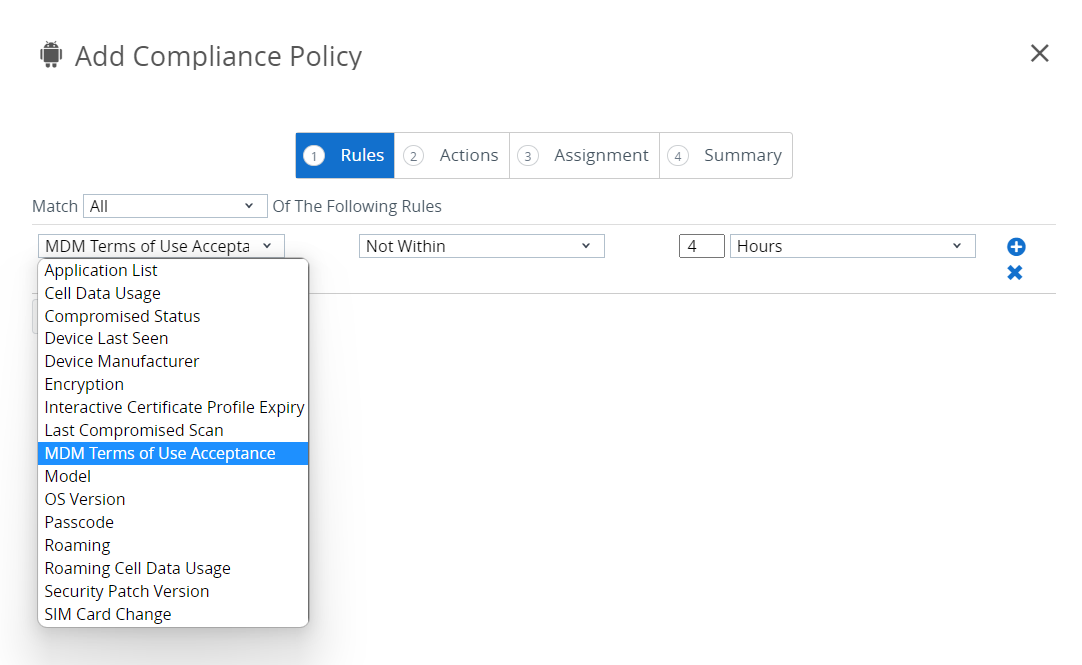
This section briefly covers device compliance in Workspace ONE UEM. Make sure to complete the compliance rule for supported devices. To configure device compliance:
- In the Workspace ONE UEM console, navigate to Devices > Compliance Policies > List View.
- You can use the Add button to create a new rule or select an existing rule to view it.
- Select the target operating system for the rule.
- Follow the compliance rule wizard to configure a compliance rule.
Note: If you already have compliance rules set up, we recommend setting up a compliance rule that triggers NON-Compliance, such as an older OS Version, and applying it to a Smart group based on a tag. This enables you to test select devices by applying a compliance rule to them for testing purposes.
For more information on creating compliance rules in Workspace ONE UEM, see:
Confirming compliance on specific devices
To confirm that the Workspace ONE device compliance rule has been set and assigned to the device:
- In the Workspace ONE UEM Console, navigate to the device, and select the Compliance tab.
| Note: Make note of the assigned device compliance policies and which policies are COMPLIANT and NON‑COMPLIANT. |
Testing Beyond Corp integration
At this point, you have completed the following:
- Configured Google Workspace
- Configured Google Admin Console
- Integrated Beyond Corp in Workspace ONE UEM
- Set up a device compliance Policy in Workspace ONE UEM
Now, all you need to do is make sure that the device is marked as non-compliant in Workspace ONE UEM. Ensure that the application(s) that have the Context-Aware Policy assigned in the Google Admin Console are installed on the device.
TIP: The Google Workspace Applications can be managed by Workspace ONE UEM. Workspace ONE can silently install and remove applications when the device is no longer under management. For more information on application management, see Omnissa Docs: Mobile Application Management.
Finally, on a device, sign in to the Google Workspace application with a Google Workspace Account. If the device is non-compliant, you should receive an error.
Summary and additional resources
Congratulations!!!
You have now integrated Workspace ONE UEM with Google BeyondCorp to synchronize device compliance status from Workspace ONE into Google Enterprise, as well as to enable context-aware access to individual Google-supported apps such as Gmail, Google Drive, Google Calendar, and more. This includes:
- Configuring Google Workspace
- Configuring Google Admin Console
- Integrating Beyond Corp in Workspace ONE UEM
- Setting up a device compliance Policy in Workspace ONE UEM
- Testing and verifying that a device cannot sign in to one of the defined Google Workspace Applications
By completing this tutorial, you have enabled Conditional Access rules based on device compliance. This supports the pillars of Zero Trust by validating:
- MDM enrollment into Workspace ONE
- Device compliance
- User authentication on a validated device
- Access only to Google applications that are allowed for that user and device
Additional resources
For more information about Zero Trust, Conditional Access, and Google Beyond Corp, you can explore the following resources:
- Google Beyond Corp Website
Changelog
The following updates were made to this guide:
| Date | Description of Changes |
| 2025/10/21 |
|
| 2024/11/05 |
|
| 2023/05/15 |
|
About the author and contributors
This tutorial was written by:
- Darren Weatherly, Omnissa alumnus
- Chris Tillier, Staff SME, Omnissa
With appreciation and acknowledgment for contributions from the following subject matter experts:
- Bhavesh Kumar, Director of Product Management, Omnissa
- Eric Stillman, Omnissa alumnus
Feedback
Your feedback is valuable. To comment on this paper, either use the feedback button or contact us at tech_content_feedback@omnissa.com.