

Workspace ONE Access: Transforming Users Between Active Directory Domains
Introduction
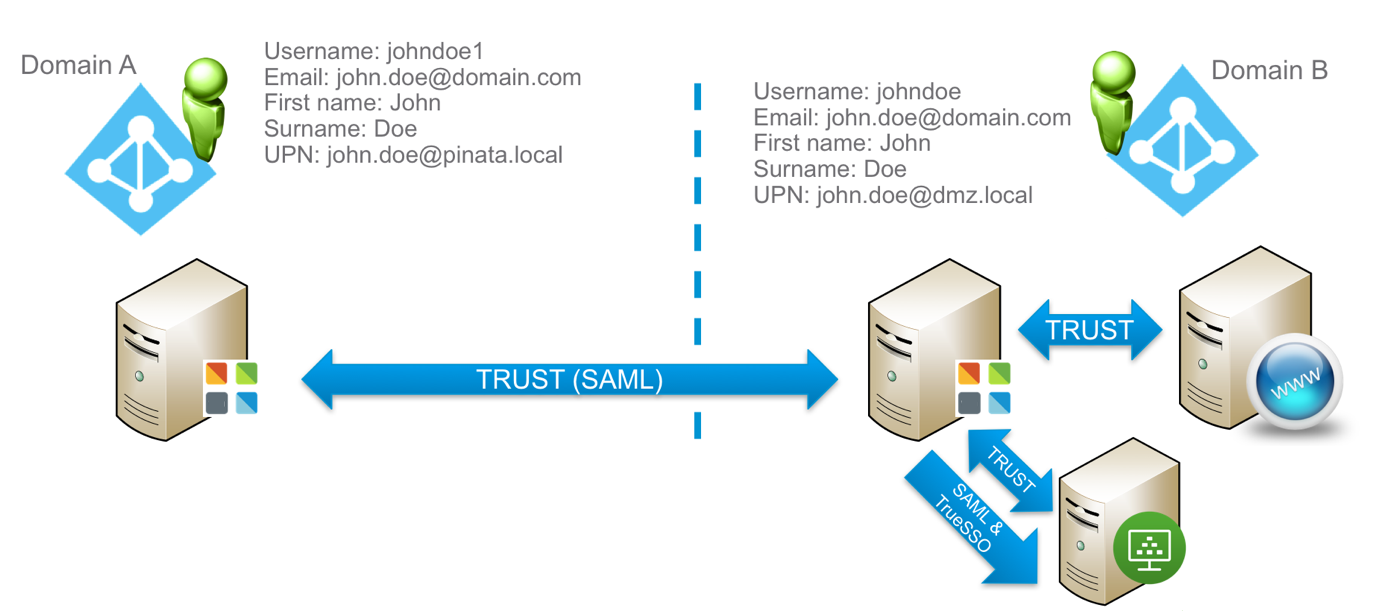
A common challenge that IT administrators face is how to solve single sign-on (SSO) between two Active Directories without establishing trust. Using the Federation protocol SAML and Omnissa Workspace ONE Access, this is easy to achieve.
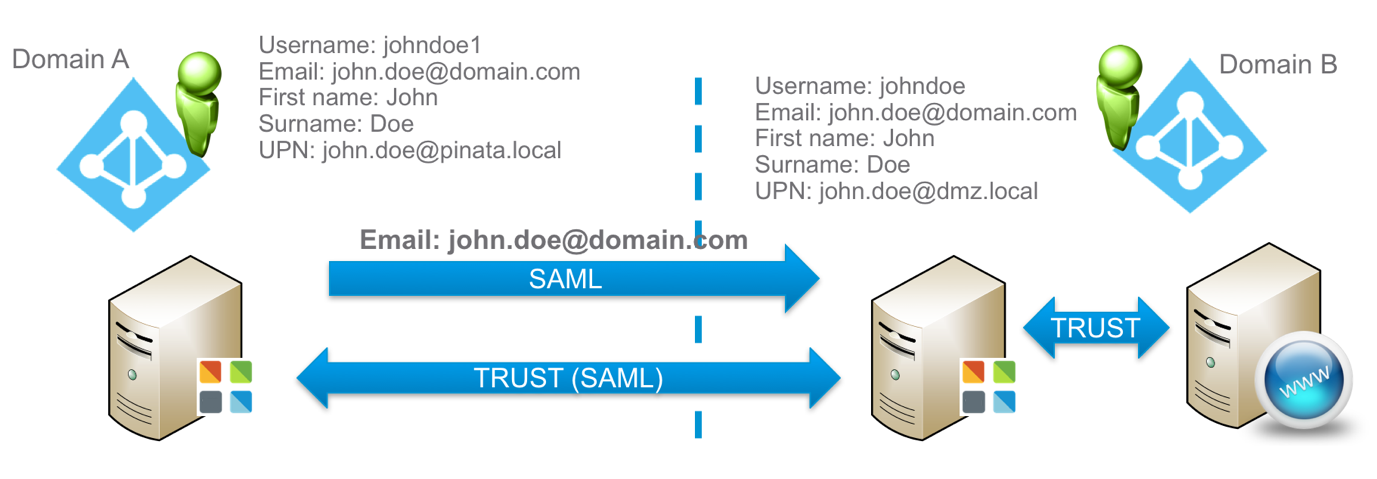
The example depicted in this guide is as follows; there are two domains, A and B. Users in Domain A want to access resources in Domain B without being prompted for username or password.
Audience
This guide is intended for experienced IT administrators of existing environments. Knowledge of Workspace ONE Access is assumed.
Prerequisites
Before you can proceed with the steps in this guide, you must have the following components installed and configured:
- Two Workspace ONE Access servers, one in each domain.
- Federate the resource (a web server in this example) in Domain B to Workspace ONE Access in Domain B.
- You can federate your application using SAML or OpenID Connect if the application supports it.
- For traditional applications, you can use the Unified Access Gateway proxy with identity bridging to support applications using Kerberos or header-based authentication.
- A user object representing the user must exist in both Domains. One user attribute must be shared across the two domains. This example uses the Email attribute. The attribute you select must uniquely identify the user.
If your resource is a Windows application, Omnissa Horizon and the True SSO feature can be used to achieve SSO access for Domain A users into a Windows application running in Domain B.
Establishing SAML-based Trust
After you have completed the prerequisites, the next step is to establish a trust between the two Workspace ONE Access servers. This trust is based on SAML and is more straightforward to establish than traditional Active Directory trust.
You establish trust by exchanging metadata.xml files between the two Workspace ONE Access servers. In this example, users from Domain A must access resources in Domain B. So, Workspace ONE Access B must trust Workspace ONE Access A as a third-party identity provider (IdP).
Add Third-Party Identity Provider
On the Workspace ONE Access server in Domain A:
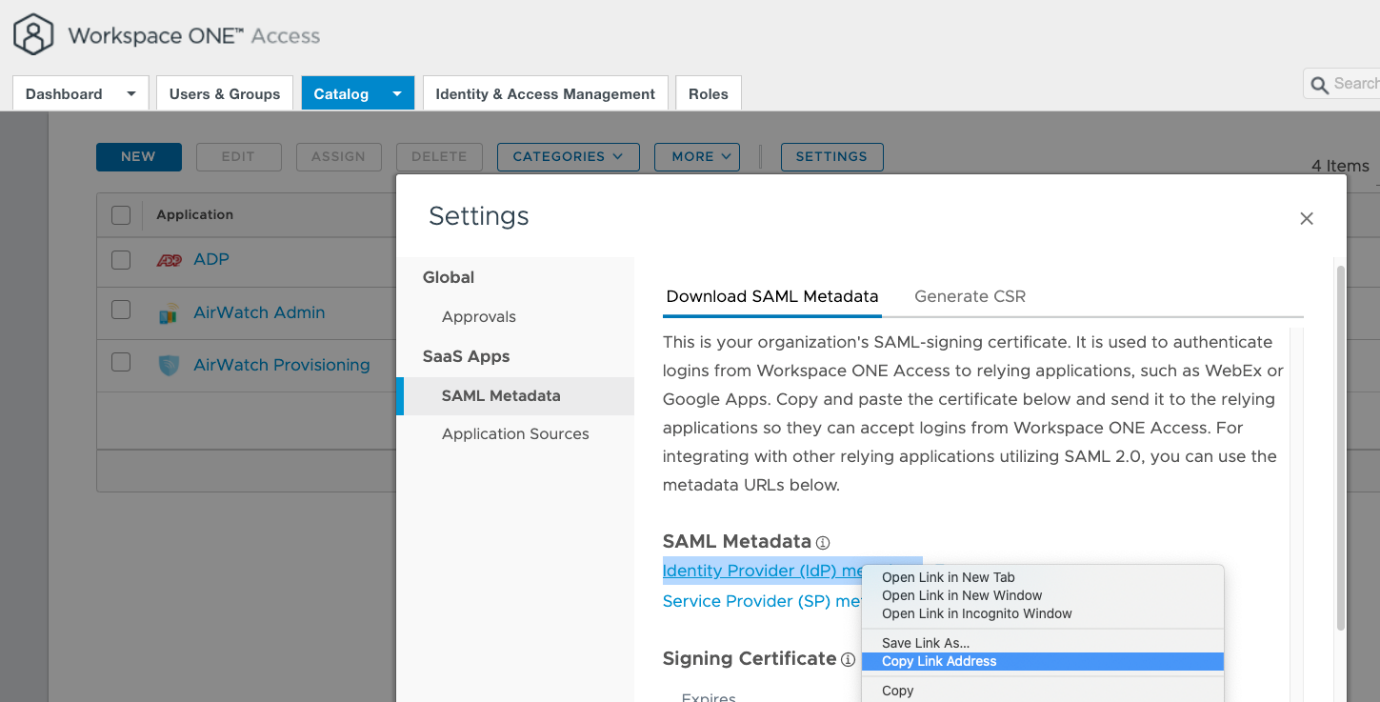
- Navigate to Catalog > Settings > SAML Metadata.
- Right-click Identity Provider (IdP) metadata and select Copy link address.
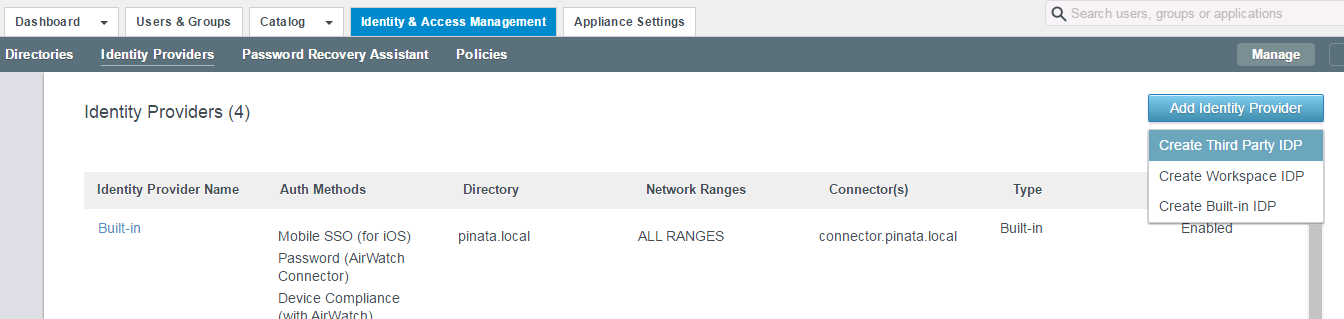
Navigate to the Workspace ONE Access server in Domain B and add a third-party IdP.

- Enter a name for the new Identity Provider and paste the link to the
idp.xmlinto the metadata text box. - Scroll down and click Save.
- After the settings have saved, you can see the settings being populated.
- This example relies on the
Emailattribute. Therefore, delete all the other Name ID Formats.
Configure the User Store
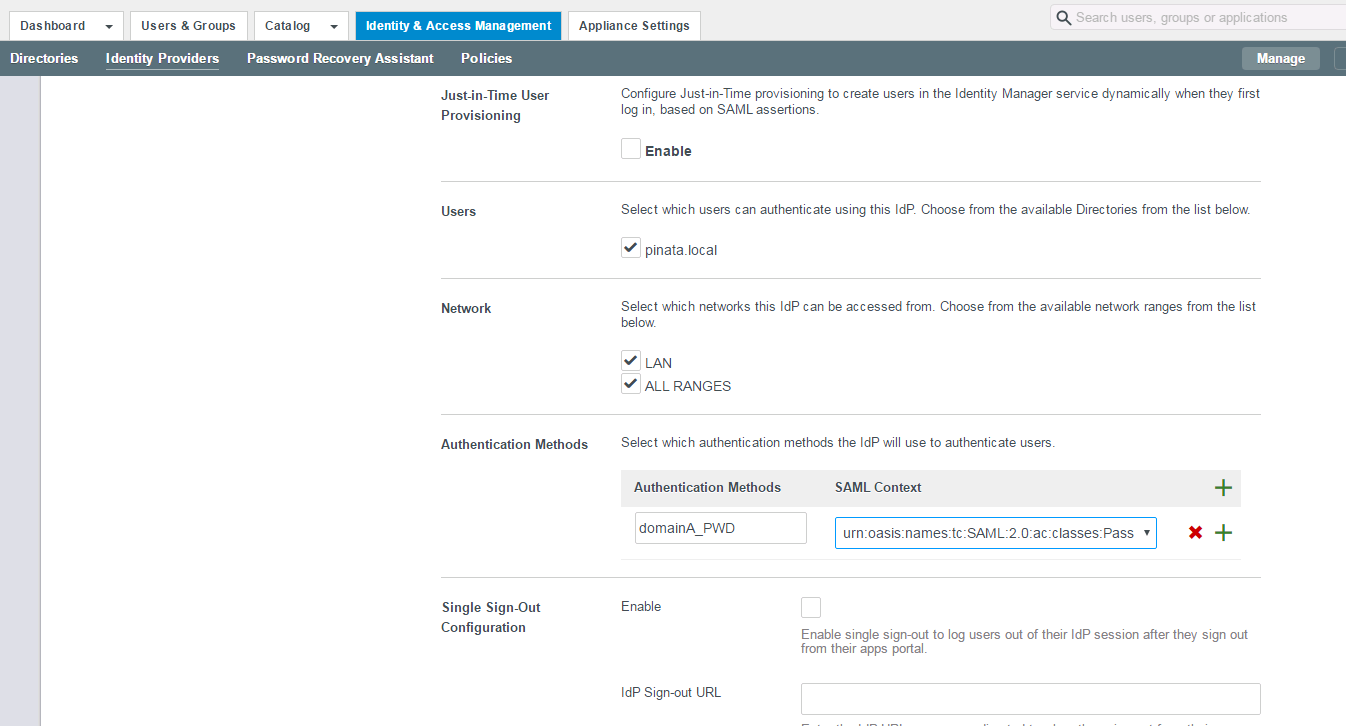
Next, configure the user store where your users are located in Domain B’s Workspace ONE Access server and which network ranges this IdP will serve.
You must create an Authentication Method.
- This example uses Password to log users in to Domain A’s Workspace ONE Access server.
- The Authentication Method is named domainA_PWD and
Passwordtypically uses SAML Context: urn:oasis:names:tc:SAML:2.0:ac:classes:PasswordProtectedTransport.
Note: Your settings must match your implementation.
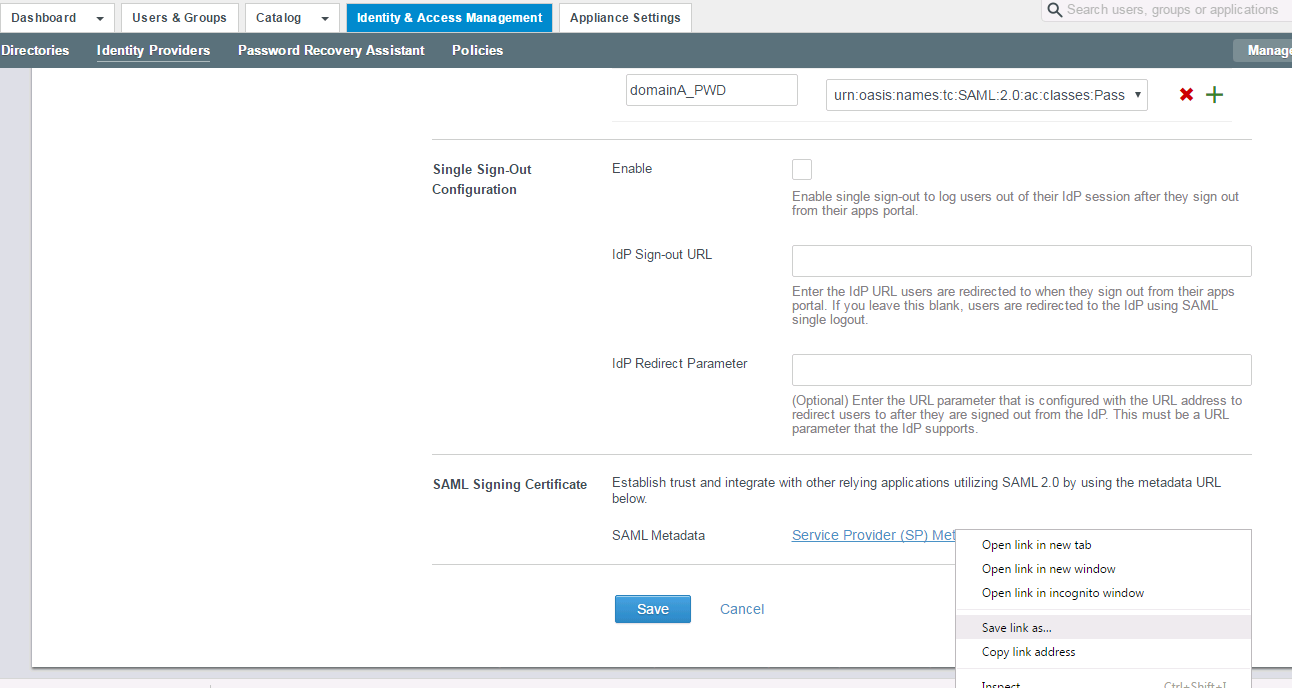
- Right-click the SAML Metadata, Service Provider (SP) metadata link and select Save link as. Now, you have downloaded a file called
sp.xml. - Click Save.
Add New Authentication Method
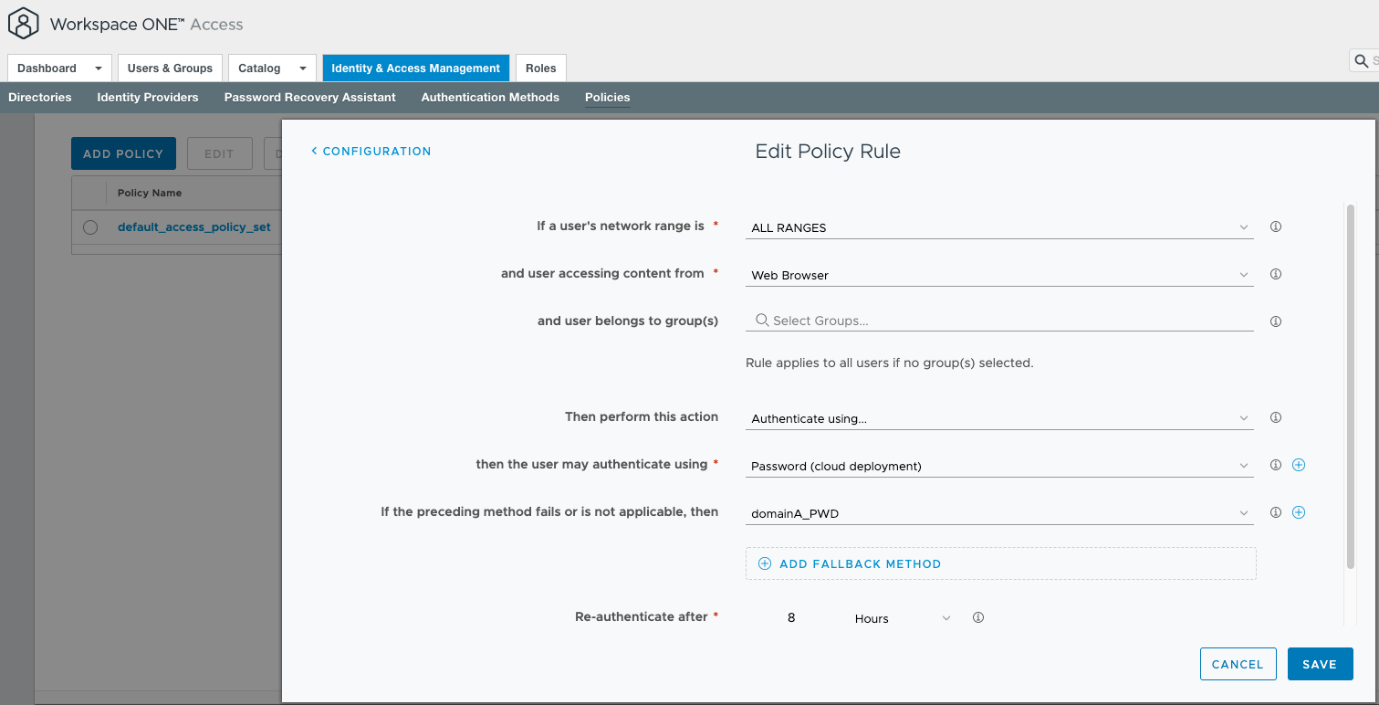
On the Workspace ONE Access server in Domain B, you must add the new Authentication Method in your access policy. In this example, it is added as the last policy. This case only supports IdP-initiated flow. If you plan to support SP-initiated flow you must think about the order of authentication methods.
In the screenshot, you can see that domainA_PWD is added as the second authentication method. (This name was given to the authentication method in the previous step.)
With these steps, a SAML-based trust has been established. Domain B’s Workspace ONE Access server trusts SAML assertions from Domain A’s Workspace ONE Access.
Configuring Users
The next step is to make sure that you have user objects in both domains sharing the same attribute. This example uses the Email attribute as the unique User Identifier.
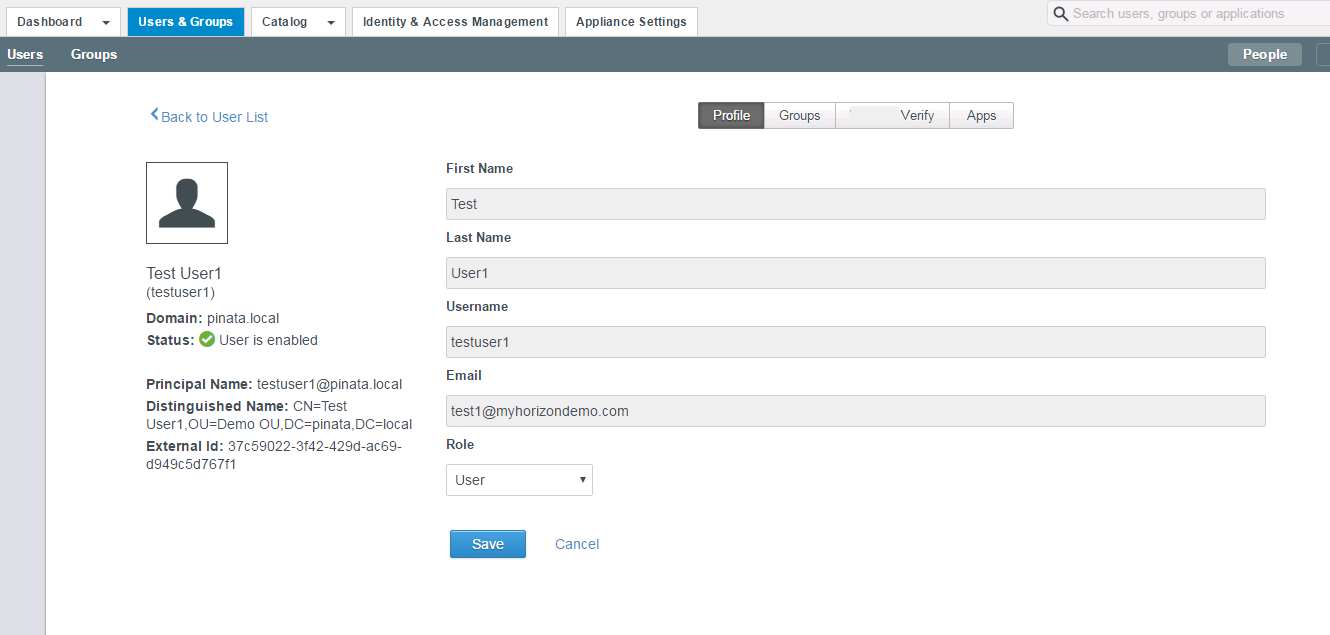
This screenshot depicts the test user synced into Workspace ONE Access in Domain B.
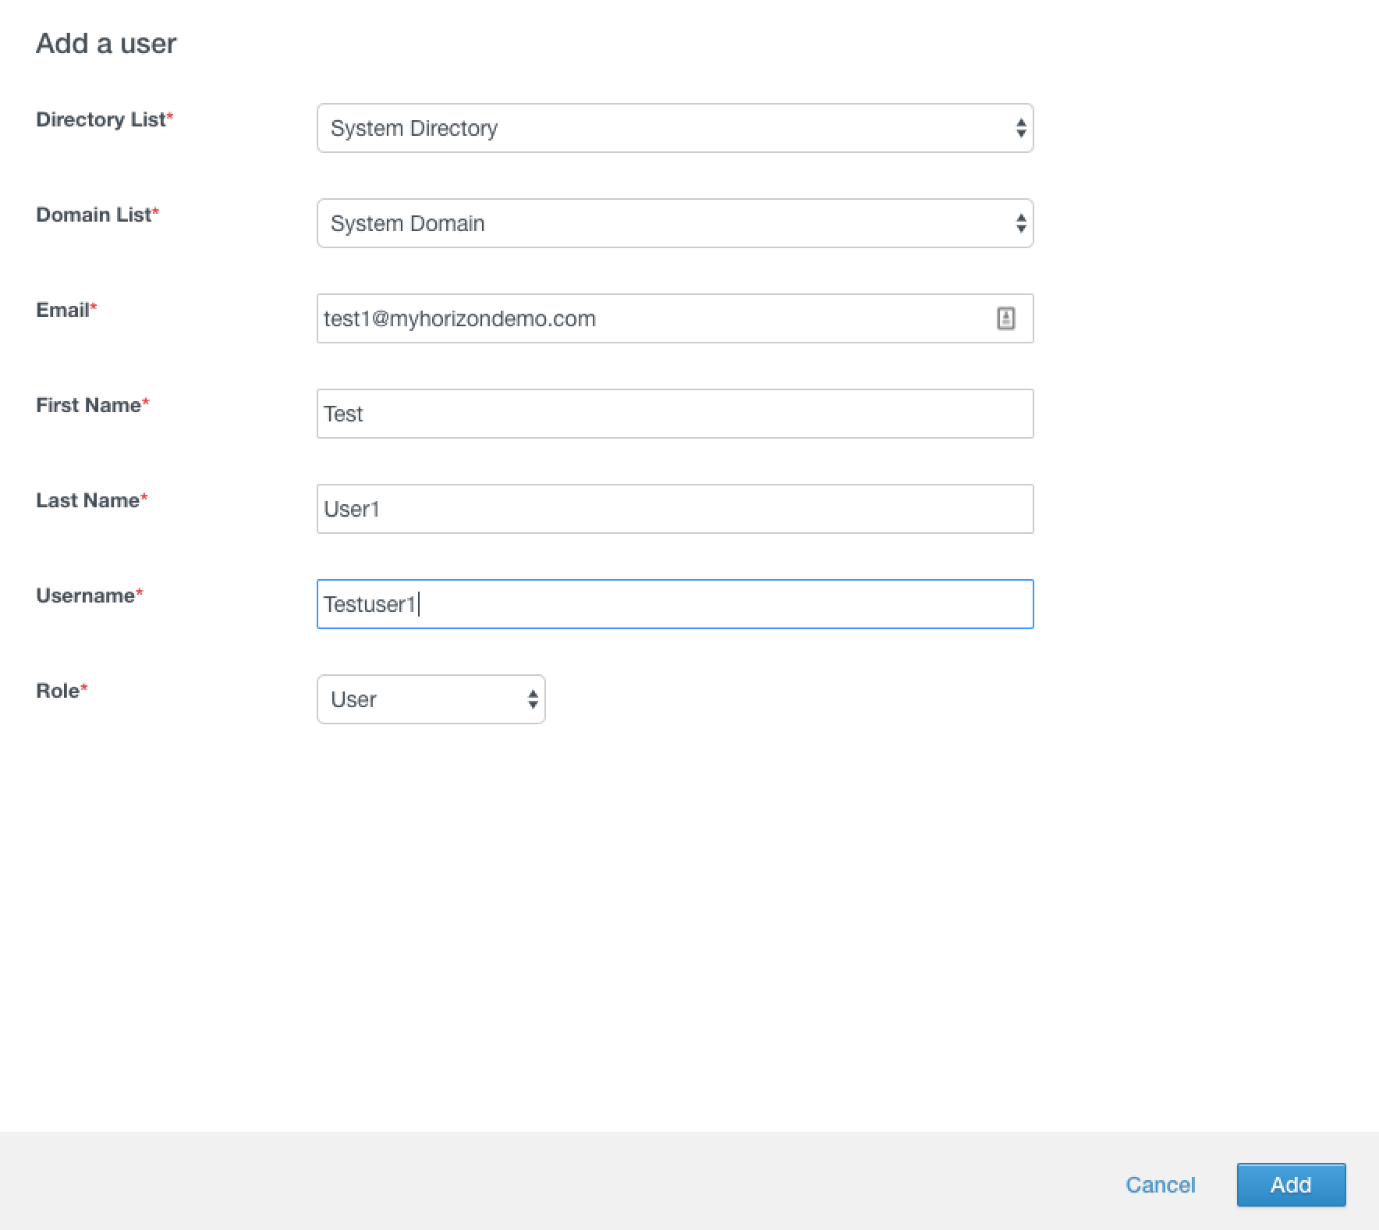
This screenshot depicts the user object in Domain A’s Workspace ONE Access.
Most attributes are similar in both domains. But the only important attribute is Email. That attribute must be identical in both Domain A and B.
Verifying the SAML Trust
In this exercise, you verify that the SAML trust works from A to B.
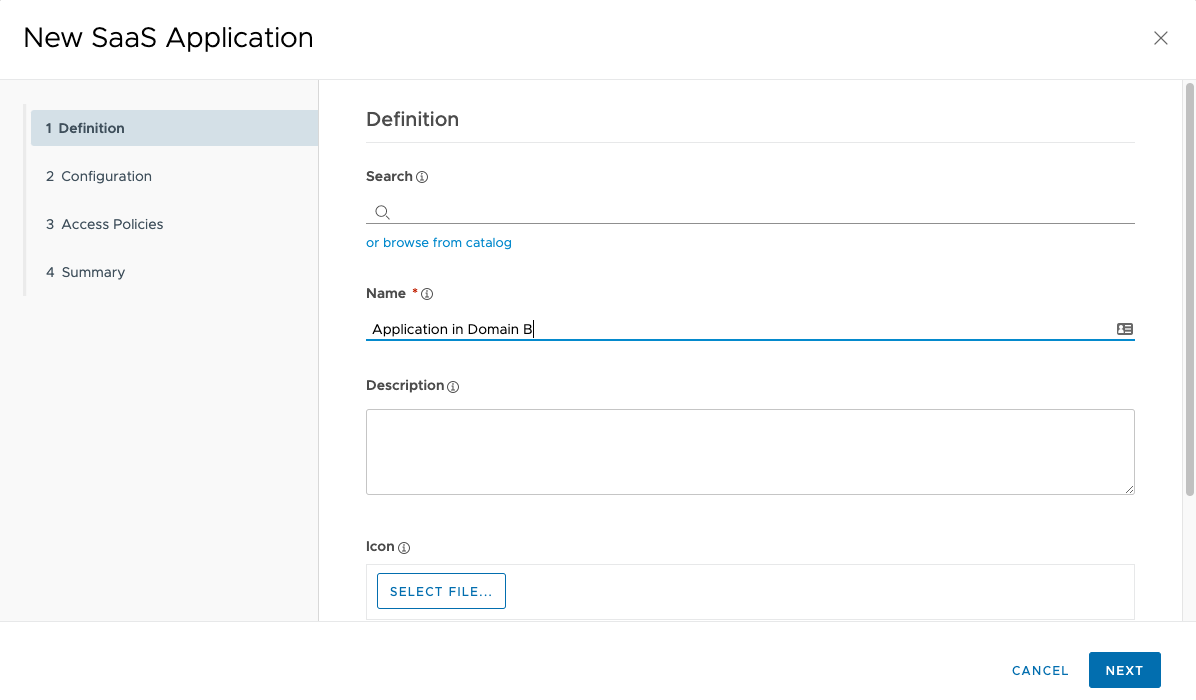
You must create an application in Domain A’s Workspace ONE Access server that represents the Workspace ONE Access server in Domain B.
Create and Configure SAML Web Application
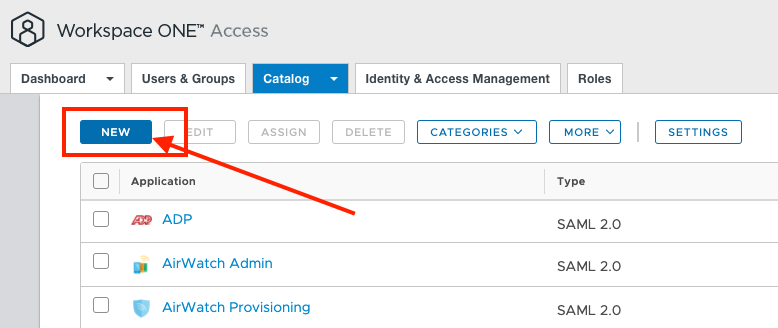
In Domain A, create a new SAML 2.0 based Web Application.

Paste the content of the sp.xml file you saved previously into the metadata XML text box, click Next twice, and Save.
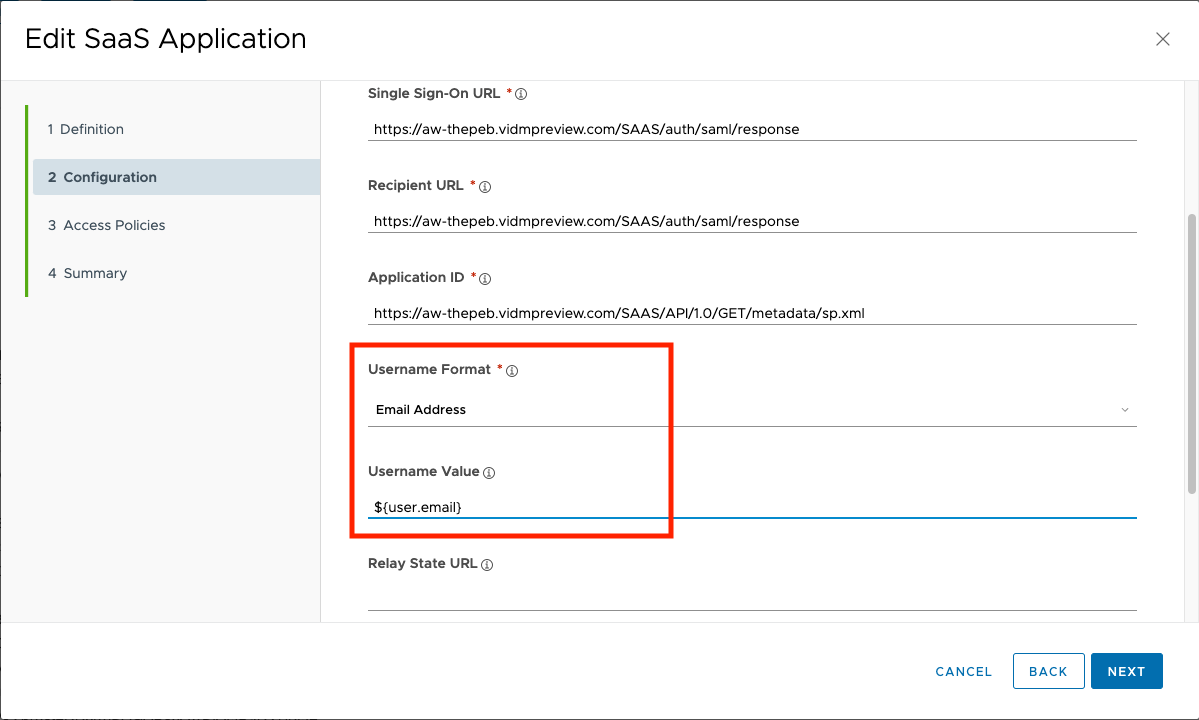
Edit the newly created application.
- Modify the Configuration to use Email instead of Username:
- Username Format: Email address
- Username Value: ${user.email}
- Click Save.
- Entitle your test user to the newly created application.
Launch Application from Domain A
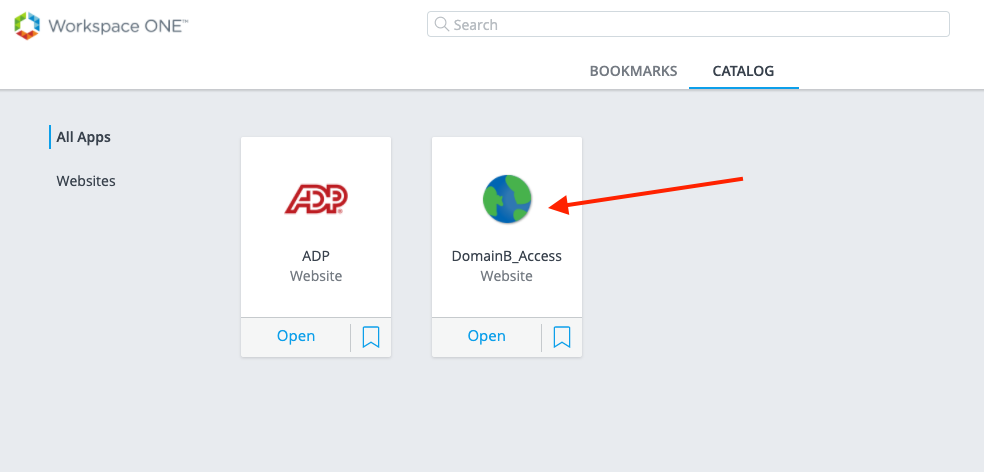
Log in to Workspace ONE Access in Domain A as your test user.
Click the application icon representing the Workspace ONE Access server in Domain B.
The SAML Assertion is generated.
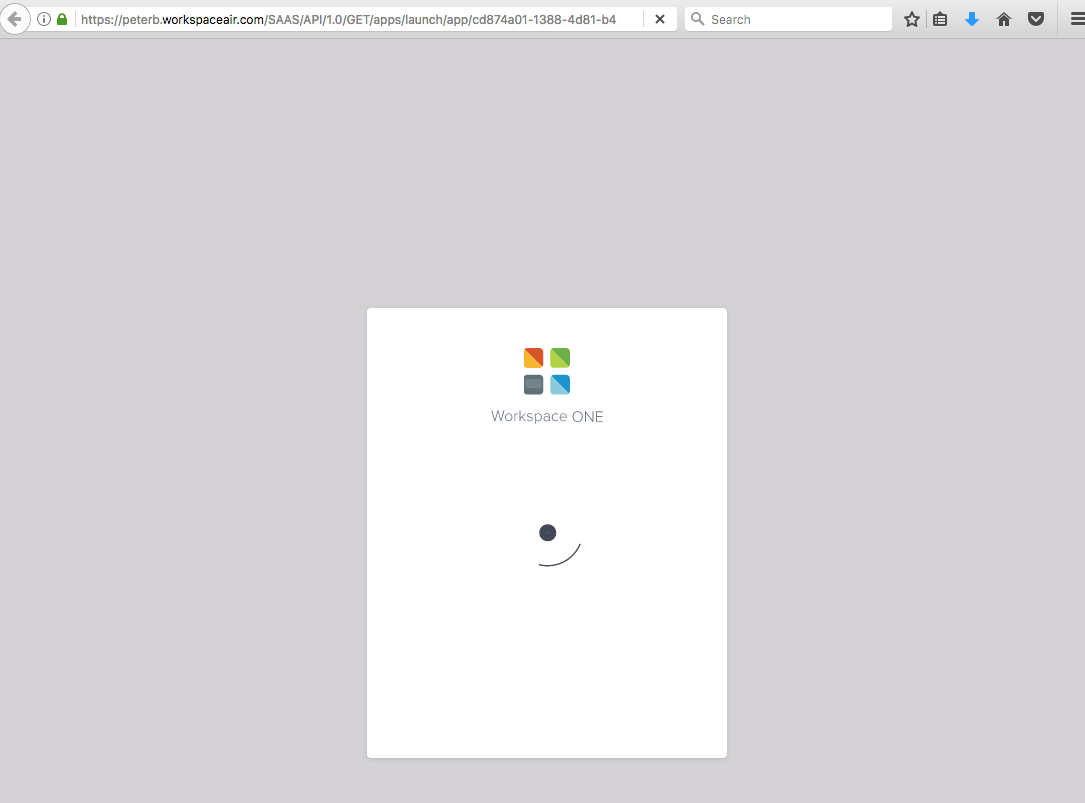
Confirm that SSO is Successful

If all is correctly configured, SSO logs you into the Workspace ONE Access in Domain B. All resources entitled to the test user in Domain B are possible to consume.
This screenshot depicts the configuration and testing to this point.
Although the test was successful, this method is not ideal from an end-user experience perspective. Users must log in to one portal before they can SSO into another portal. And then, users must launch the application. To solve this issue, you can add resources from Domain B straight into the portal in Domain A.
Adding Remote Resources in Workspace ONE Access
In Workspace ONE Access, each resource has its own unique launch URL. This URL can be used in many ways. Some customers place links to launch applications on their intranet pages and so on. But in this case, you can use it to provide a greater user experience.
Identify the Unique Launch URL

For Web Applications, you can easily find the unique launch URL by viewing the application properties.
However, this is not the case for Horizon resources. You must build your own launch URL pointing to your Horizon environment in Domain B.
For example:
https://<URL_TO_HORIZON_CONNECTION_ SERVER>/portal/webclient/index.html?applicationId=CN=Notepad-1,OU=Applications,DC=vdi,DC=horizon,DC=internal
Now that you know the unique launch URL, log in to Workspace ONE Access in Domain A and manually create the representation of the resource.
Create and Configure Web Application
Create a new SAML 2.0 Web Application in Domain A’s Workspace ONE Access server.
Configure the new Web Application:
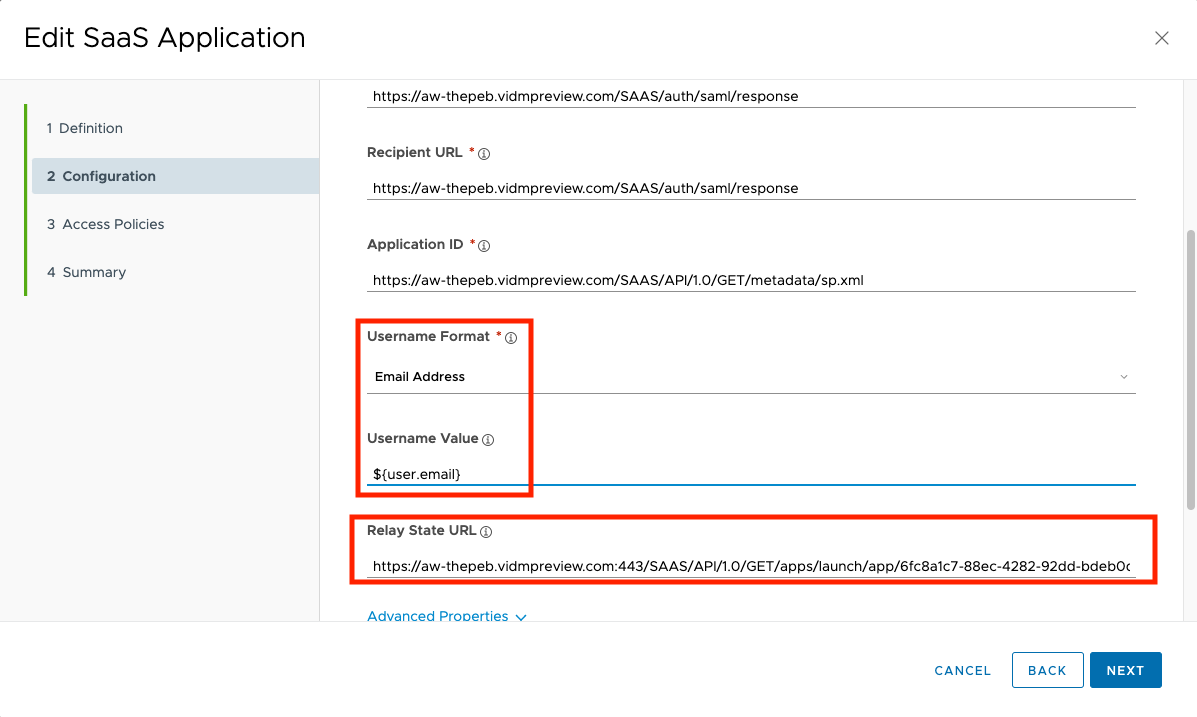
- Copy the content of the
sp.xml(This is the same file used to create the icon for the full Domain B’s Workspace ONE Access) into the metadata text box. - Select the following for username values:
- Username Format: Email address
- Username Value: ${user.email}
- For Relay State URL, enter the unique Launch URL of the application.
After the settings have been saved, entitle the new application to your test user. Before you test, ensure that you have logged out of Workspace ONE Access in Domain B.
Log in to Workspace ONE Access in Domain A and click the Application in Domain B icon. You should be redirected to Workspace ONE Access in Domain B and then immediately single signed-on into the application.
Conclusion
This brief guide demonstrated how to use the SAML federation protocol and Workspace ONE Access to allow SSO between two Active Directories without establishing trust.
For more information, see the Workspace ONE Access Product Page, that provides guidance to help you level-up in your product knowledge. You will find everything from beginner to advanced curated assets in the form of articles, videos, and labs.
About the Author
This guide was written by:
Peter Bjork, Principal Architect, Omnissa
Feedback
Your feedback is valuable. To comment on this paper, either use the feedback button or contact us at tech_content_feedback@omnissa.com.