Windows 11 Readiness operational tutorial
Overview
With Windows 10 approaching end of life, administrators need to know which devices can be upgraded to Windows 11 as is, which ones require a simple hardware change such as freeing disk space, and which ones cannot be upgraded. Of course, Workspace ONE has supported Windows 11 since its release as per Windows 11 Readiness for Workspace ONE UEM (85839).
Understanding the published specifications, you may still wonder:
- How do I take those specifications and get a simple dashboard view of my fleet?
- How do I report on which devices meet ALL those specifications?
- Which devices do not meet the hardware specifications?
- Can I identify what those devices are missing?
- Are some devices due for a hardware refresh?
In particular, the Trusted Module Platform (TPM) 2.0 hardware requirement is a common reason that Windows 10 devices cannot be upgraded to Windows 11. Windows 10 requires TPM 1.2, whereas Windows 11 requires TPM 2.0.
The excellent news is Workspace ONE sensors combined with Workspace ONE Intelligence dashboards and reports can provide you with all the information you need to inventory your current Windows 10 devices so that you can determine feasibility, project planning, and budget for upgrading to Windows 11, hardware upgrades, or hardware refresh.
Determining which devices are ready for Windows 11
By deploying sensors that retrieve the current device hardware capabilities required to meet Windows 11 and visualizing those in a dashboard, administrators can determine which devices do not meet each requirement, as well as which devices meet all requirements. The benefit is that the resolution to each requirement is different, and we can also assign a Workspace ONE Workflow action to change if that is possible.
For example, a workflow could run on each widget to tag a device with a specific requirement, such as tagging a device as not-SecureBoot. Another workflow could then be configured to enable SecureBoot.
The Windows 11 Readiness dashboard provides the basis to get you started. You can add different attributes or adjust the dashboard and create reports if there are any changes to Windows 11 requirements, or if you have additional requirements.
If you are not familiar with Sensors or Workspace ONE Intelligence custom dashboards or reports, check out these great resources on Tech Zone:
- Getting Started with Workspace ONE Intelligence Reports and Dashboards: Workspace ONE Operational Tutorial
- Getting Started with Freestyle Orchestrator
Also note that if you do not see Dashboards underneath your Workspace ONE Intelligence Workspace, then you do not have the license that enables custom dashboards. Either speak to your Omnissa representative to get the appropriate license or utilize Reports to gather the same information.
![]()
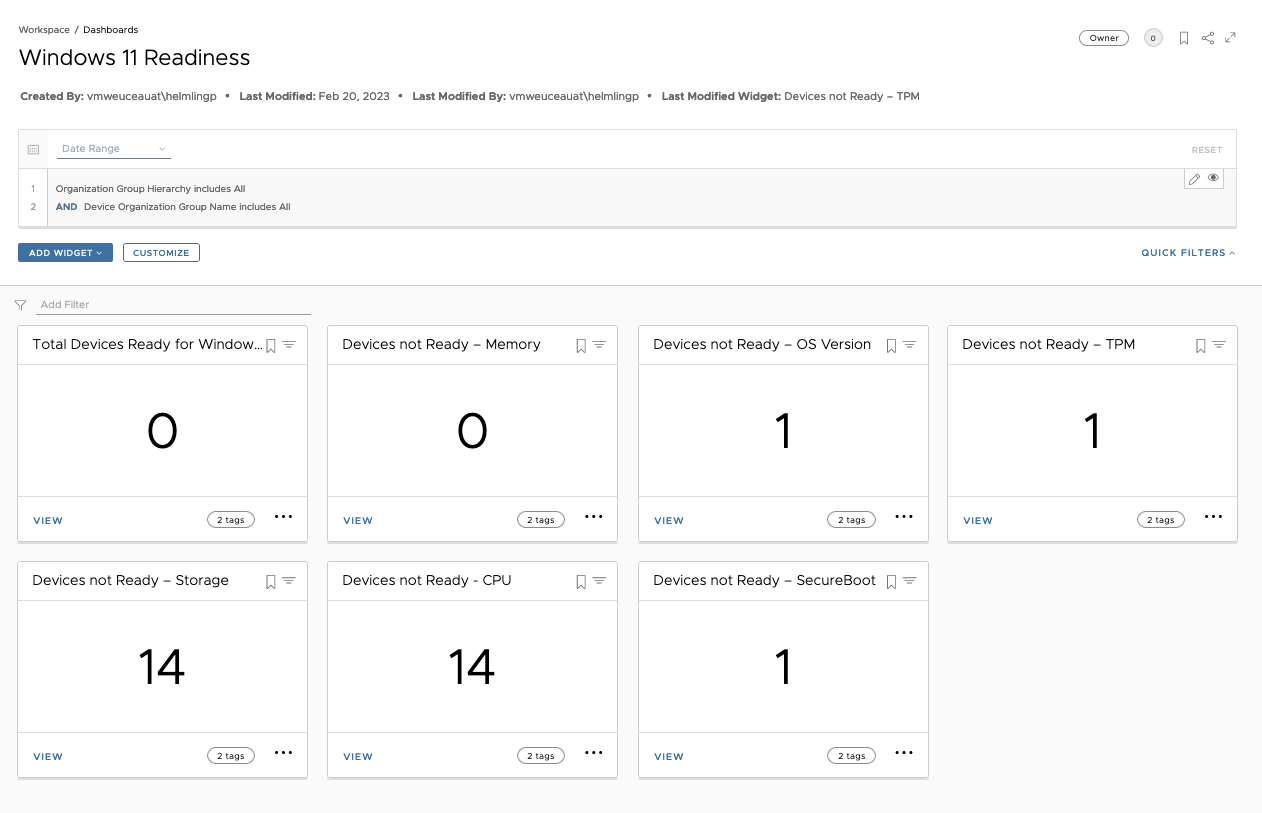
Figure 1: Sample Windows 11 Readiness dashboard
Deploying from Workspace ONE marketplace
The Dashboard shown in Figure 1 uses Workspace ONE Sensors to retrieve the relevant data from the Operating System, in line with Microsoft’s Windows 11 requirements. This means that Workspace ONE will read attributes such as OS Disk Size, OS Disk space, Memory, TPM version, and more via a Workspace ONE Sensor, to provide you with a list of devices that are Windows 11 ready.
Deploying sensors, scripts, and dashboards from Workspace ONE Marketplace is a simple process. However, this Dashboard does require the sensors to be deployed first and report into your Workspace ONE Intelligence instance. To deploy both the Sensors and Dashboard via Workspace ONE Marketplace, follow these steps:
- Log in to https://connect.omnissa.com.
- Under the Resources section, select Marketplace.
- Expand Templates from the left menu.
- Click Sensors under Templates and search for, and deploy each of the following (the name of the sensor you will select in brackets is the name of the sensor in your Workspace ONE instance):
- Get BIOS Secure Boot Status (bios_secure_boot_ps1)
- Get OS build number (os_build_number_ps1)
- Gets total size of the Windows system drive (in GB) (os_disk_size_ps1)
- Gets the free space on the Windows system drive (in GB) (os_disk_free_space_ps1)
- Returns the max clock speed of the CPU. (system_cpu_maxclockspeed_ps1)
- Determines if the CPU is supported according to https://aka.ms/CPUlist (system_cpu_supported_ps1)
- Get Number Logical Processors (system_logicalprocessors_ps1)
- Returns the total physical RAM in GB. (system_totalphysicalmemory_ps1)

- Get TPM Highest Version (tpm_highest_version_ps1)
- Click Dashboards under the Templates menu, and search for the Windows 11 Readiness Dashboard and Add to Workspace.
If you do not have all the sensors deployed or reporting yet into Workspace ONE Intelligence, you will see an error such as this when importing the Dashboard.
Figure 2: Error that may be presented if data not yet reported (<6 hours) - Deploy the sensors and wait up to 6 hours for them to report data.
Important:
A number of the above sensors have been updated in the past to allow for numeric validation. Validate each sensor against those in the Workspace ONE Marketplace or euc-samples repository.
Deploy sensors and dashboards manually
Follow the next steps to manually deploy sensors and dashboards.
Create and assign Workspace ONE sensors to devices
To determine if a Windows device meets each specification, we must deploy a Workspace ONE Sensor (Sensor) to all Windows devices.
Create a Smart Group
To ensure it gets assigned to all devices, create a Smart Group at the Customer organization group (OG) or root of your multi-tenant hierarchy.
- In the Workspace ONE UEM Console, navigate to Groups and Settings > Groups > Assignment Groups and select Add Smart Group. In this example, the Smart Group is named
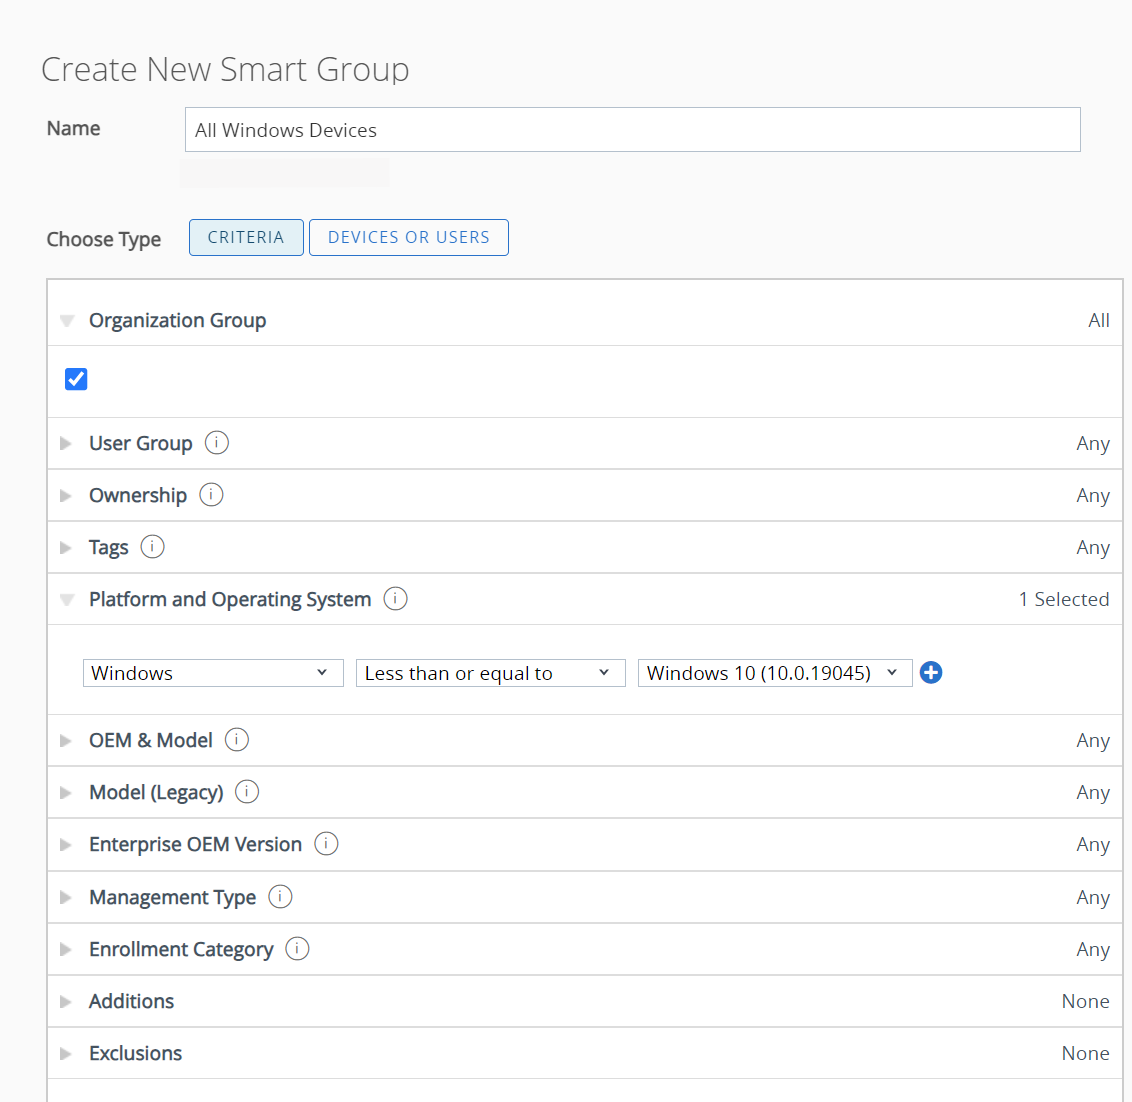
All Windows devices. - Ensure to select your filter criteria as Platform & Operating System = Windows Desktop and select Greater Than or Equal to Windows 10 (10.0.10240) so this captures all Windows 10 devices.

Feel free to change the Windows version if you like, the important point is to specifically target the Smart Group to Windows 10 devices. Note that in the graphic, less than or equal to Windows 10.0.19045 was selected, indicating all Windows devices up through Build 22H2. - When you are finished, click Save.
Create sensors
After you have created the Smart Group targeting all Windows 10 devices in your environment, the next step is to create Sensors.
- Create the Sensors using the templates provided in the EUC Samples GitHub repository.
You can find ALL the Windows Sensors in the GitHub repository. - You can either copy and paste the scripts individually into the Workspace ONE UEM Console or bulk import the scripts using the Guides on GitHub.
- Each of the following Sensors returns a value that will be used within the Workspace ONE Intelligence Dashboards and Reports. To create the Dashboard, we will need the following Sensors:
- bios_secure_boot_ps1
- os_build_number_ps1
- os_disk_size_ps1
- os_disk_free_space_ps1
- system_cpu_maxclockspeed_ps1
- system_cpu_supported_ps1
- system_logicalprocessors_ps1
- system_totalphysicalmemory_ps1

- tpm_highest_version_ps1
Assign sensors
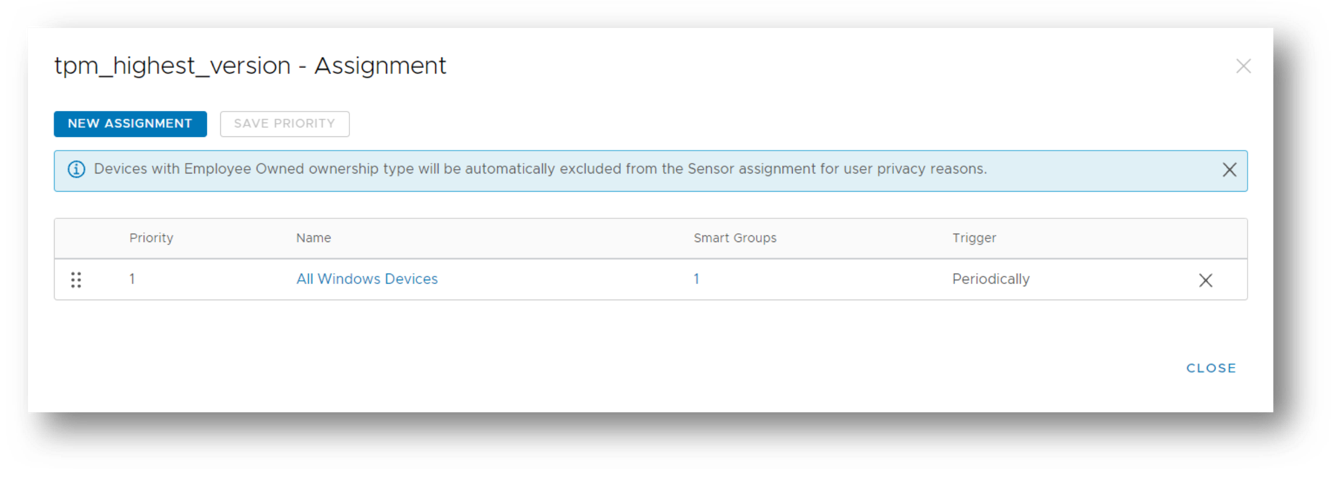
After creating the Sensors, you need to assign them.
- Select the appropriate sensor, click Assign, and assign the sensor to the Smart Group named All Windows 10 devices.

- In the Assignment deployment, you can select which triggers should cause this Sensor to run on assigned devices. This can be scheduled or by an Event such as Login, Log Out, Start-up, or User Switch.
- Select event Schedule, as this will run straight away and every 6 hours. Alternatively, if you are happy for the data to trickle in, you can select the Start-Up Event type.
It can take some time for the data to come through into Workspace ONE Intelligence, allow a few hours, and then navigate to the Workspace ONE Intelligence console to start creating your custom Dashboards and Reports.
Configure Windows 11 Readiness dashboard in Workspace ONE Intelligence
The next step is to configure your dashboard in Workspace ONE Intelligence.
-
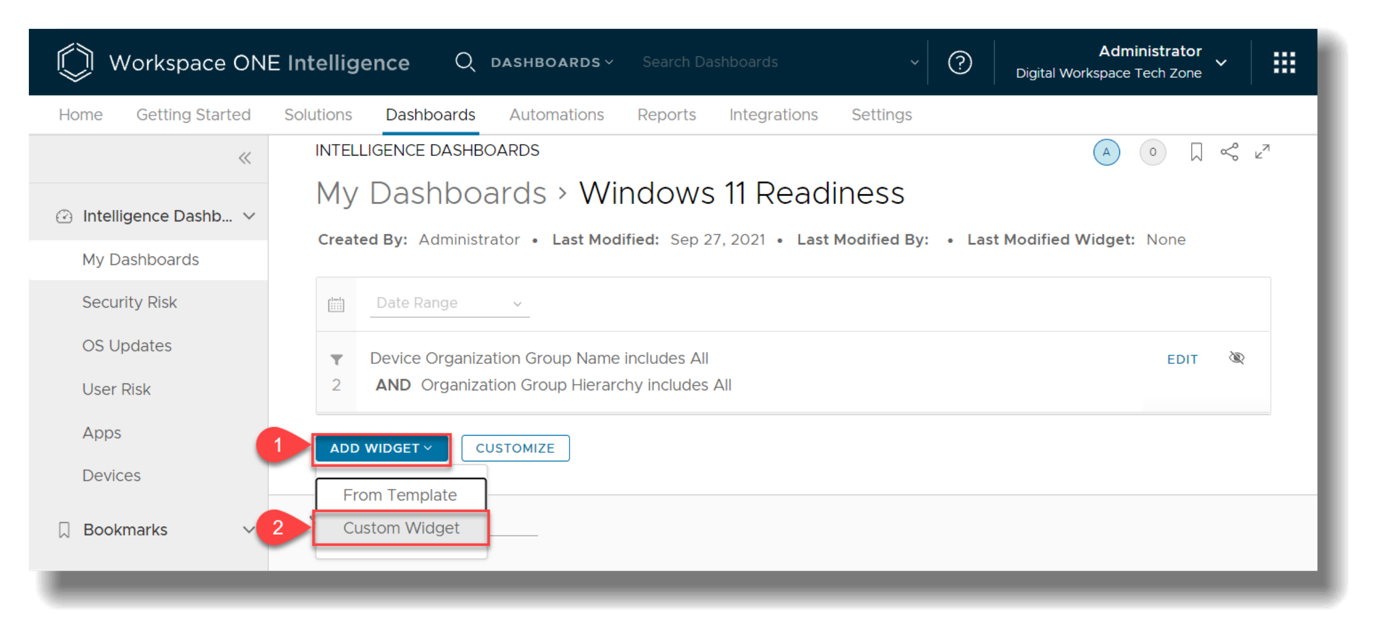
 In Workspace ONE Intelligence, create a custom dashboard under My Dashboards. In this example, the dashboard is named
 Windows 11 Readiness. - To create a Widget on the Dashboard, Select Add Widget and Custom Widget.
 The dashboard will have seven widgets. Each widget filters on one or more sensors and displays the count of devices meeting that specific filter.
 - Configure the following base settings for each widget described in the sections below, and add the specific filters and widget name:
- Using the Workspace ONE UEM: Device Sensors category.
- Name your Widget.
- Use METRIC for Chart Type.
- Under Data Visualization select Measure Count of Device GUID.
- Add filter Last Sync Time within last 60 day(s) – this filter prevents stale records from skewing the numbers.
Total devices ready for Windows 11
This widget filters on all nine sensors and counts the number of devices that match them combined.
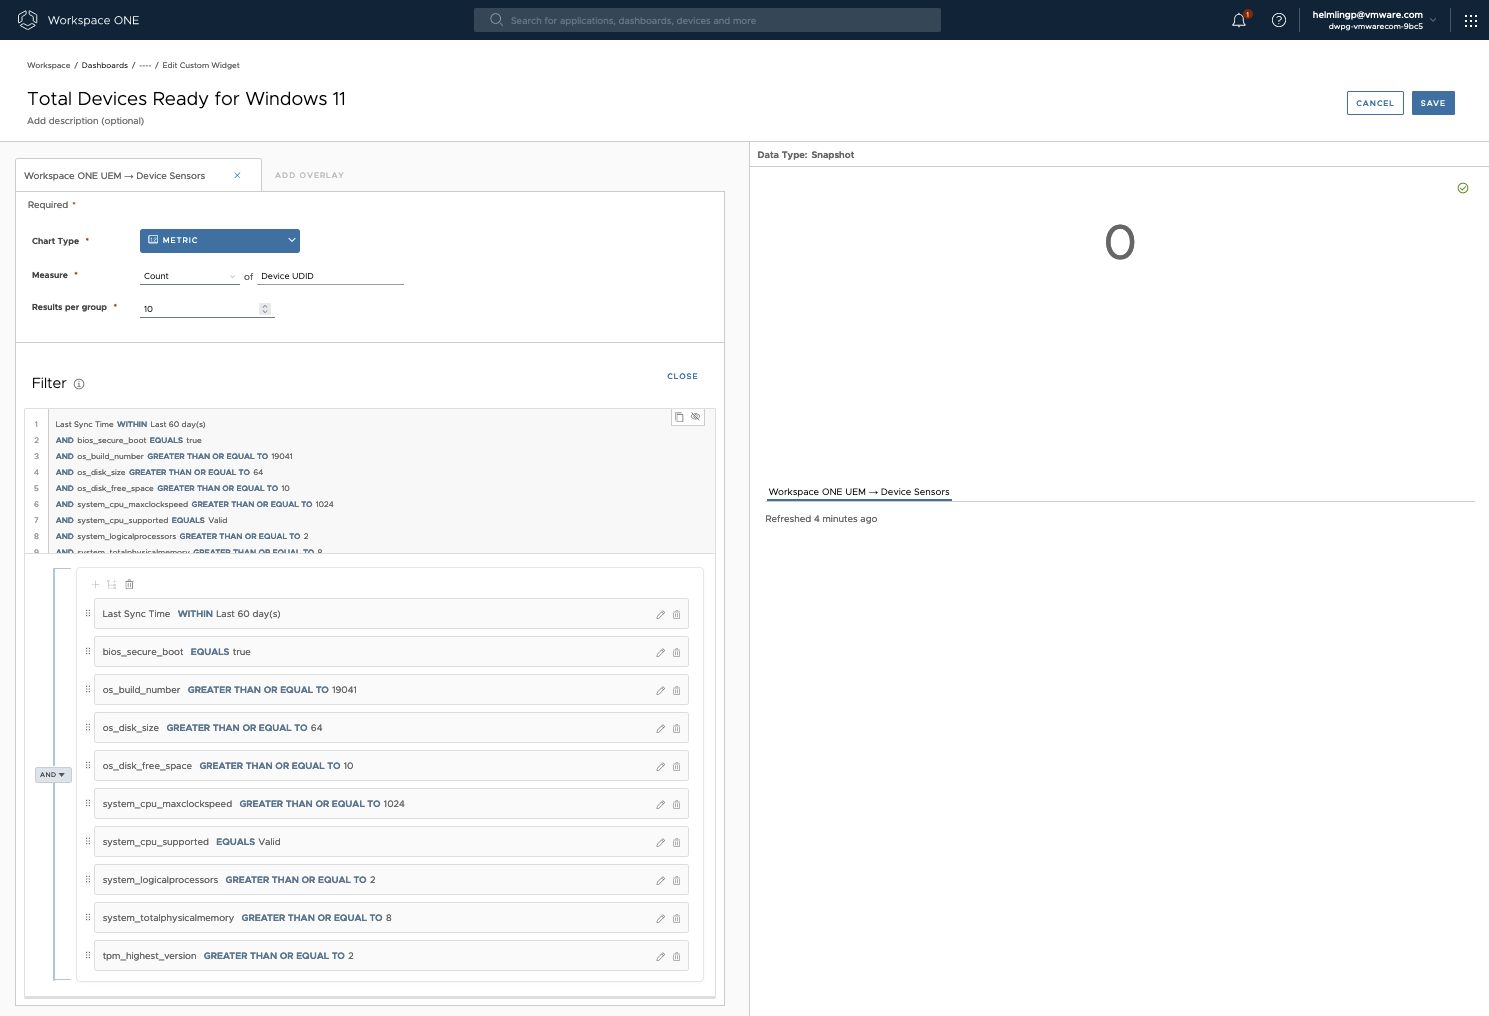
Figure 3: Total devices ready for Windows 11
Add the following ‘AND’ filters to the widget settings mentioned above:
- bios_secure_boot = true
- os_build_number >= 19041
- os_disk_size >= 64
- os_disk_free_space >= 10
- system_cpu_maxclockspeed >= 1024
- system_cpu_supported = Valid
- system_logicalprocessors >= 2
- system_totalphysicalmemory >= 8
- tpm_highest_version >= 2.0
Devices not ready – TPM
Add the following filter:
- tpm_highest_version < 2.0
Devices not ready – SecureBoot
Add the following filter:
- bios_secure_boot = false
Devices not ready – Memory
Add the following filter:
- system_totalphysicalmemory < 8
Devices not ready – Storage
Add the following filters as ‘OR’ filters:
- os_disk_size < 64
- os_disk_free_space < 10
Devices not ready – CPU
Add the following filters as ‘OR’ filters:
- system_cpu_maxclockspeed <= 1024
- system_cpu_supported != Valid
- system_logicalprocessors < 2
Devices not ready – OS Version
Add the following filters:
- os_build_number < 19041
Save your dashboard.
The dashboard will display the number of devices that are ready to upgrade to Windows 11, as well as the number of devices that do not meet each of the CPU, Storage, Memory, OS Version, TPM, and Secure Boot requirements.
Create Windows 11 readiness reports
Reports are created using the same sensors and filters, but they allow you to customize the columns displayed and include other relevant information. For example, you might want to know the device name, make and model, user assigned to the device, user email address, or first and last name, so that you can match this with your asset management processes if you need to replace the hardware.
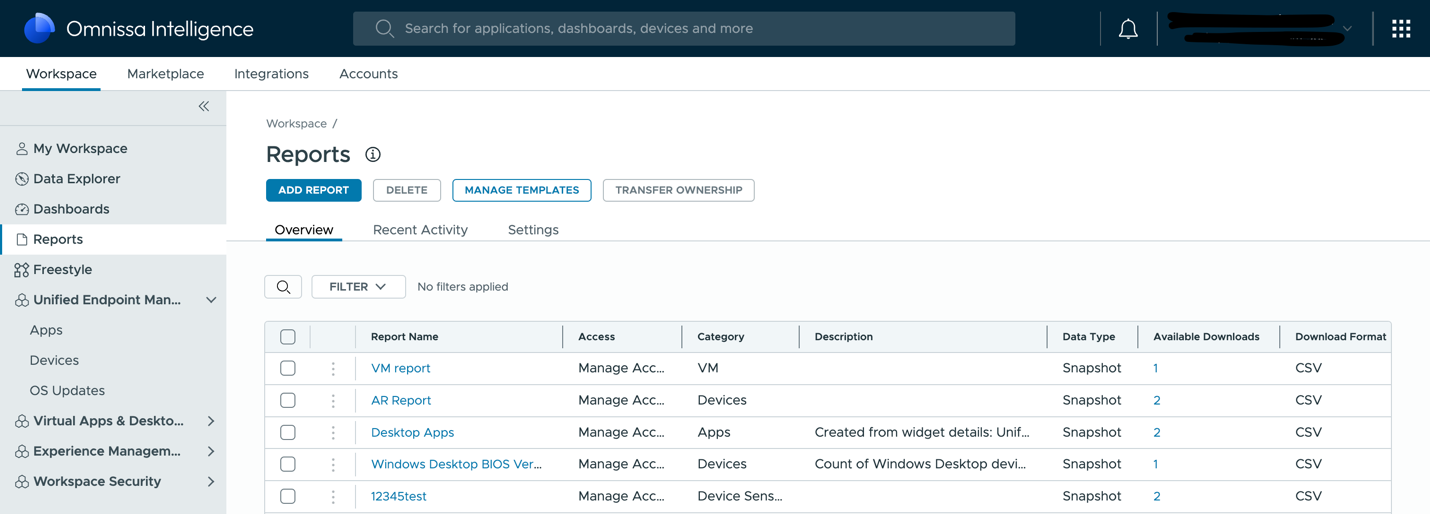 Figure 4: Creating readiness reports
- To create a report, under the Workspace ONE Intelligence > Workspace > Reports > Add Report.
- Select the Workspace ONE UEM > Device Sensors data source . Again, a filter was added to each report, to only show devices that have synced to Workspace ONE UEM within the last 60 days, to prevent stale records.
Below are some examples of reports and specific data points.
Example 1: Devices ready for Windows 11
This report filters on all ten sensors and displays the devices that match all filters.
Add the following ‘AND’ filters to the report:
- Last Sync Time within Last 60 days
- bios_secure_boot = true
- os_build_number >= 19041
- os_disk_size >= 64
- os_disk_free_space >= 10
- system_cpu_maxclockspeed >= 1024
- system_cpu_supported = Valid
- system_logicalprocessors >= 2
- system_totalphysicalmemory >= 8
- tpm_highest_version >= 2.0
Finally, add the following columns to the report:
- Device GUID
- Friendly Name
- Email Address
- First Name
- Last Name
- Manufacturer Name
- Model
- Manufacture Date
- OS Version Build
- bios_secure_boot
- os_disk_size
- os_disk_free_space
- system_cpu_maxclockspeed
- system_cpu_supported
- system_logicalprocessors
- system_totalphysicalmemory
- tpm_highest_version
- Last Sync Time
Pro tip:
With the correct license, you can create a Freestyle Workflow to Tag each device as Ready for Windows 11. This Tag can then be associated with a Smart Group and Profile to approve the Windows 11 Feature Update.
Example 2: Devices not Windows 11 ready – TPM less than 2.0
This report filters on devices sync’d within the Last 60 days and displays Windows devices that either do not have a TPM chip or have a TPM chip prior to 2.0:
- Last Sync Time within Last 60 days
- tpm_highest_version < 2.0
- Platform = Windows Desktop
The report has the following columns:
- Device GUID
- Friendly Name
- Email Address
- First Name
- Last Name
- Manufacturer Name
- Model
- Manufacture Date
- OS Version Build
- tpm_highest_version
- Last Sync Time
Example 3: Devices not Windows 11 ready – SecureBoot not enabled
This report filters on devices sync’d within the Last 60 days and displays Windows devices that have SecureBoot disabled.
- Last Sync Time within Last 60 days
- bios_secure_boot = false
- Platform = Windows Desktop
The report has the following columns:
- Device GUID
- Friendly Name
- Email Address
- First Name
- Last Name
- Manufacturer Name
- Model
- Manufacture Date
- OS Version Build
- bios_secure_boot
- Warranty Status
- Last Sync Time
Example 4: Devices not ready – memory less than 8GB
This report filters on devices sync’d within the Last 60 days and displays Windows devices with RAM less than 8 GB.
- Last Sync Time within Last 60 days
- system_totalphysicalmemory < 8
- Platform = Windows Desktop
The report has the following columns:
- Device GUID
- Friendly Name
- Email Address
- First Name
- Last Name
- Manufacturer Name
- Model
- Manufacture Date
- OS Version Build
- system_totalphysicalmemory
- Warranty Status
- Last Sync Time
Example 5: Devices not ready – storage less than 64GB and 10GB free
This report filters on devices sync’d within the Last 60 days and displays Windows devices that have less than 64 GB disk space total for the System Drive AND have less than 10 GB free space on that drive.
Add the following filters as ‘OR’ filters :
- Last Sync Time within Last 60 days
- os_disk_size < 64
- os_disk_free_space < 10
- Platform = Windows Desktop
The report has the following columns:
- Device GUID
- Friendly Name
- Email Address
- First Name
- Last Name
- Manufacturer Name
- Model
- Manufacture Date
- OS Version Build
- os_disk_size
- os_disk_free_space
- Warranty Status
- Last Sync Time
Example 6: Devices not ready – CPU supported
This report filters on devices sync’d within the Last 60 days and displays Windows devices with CPUs that are not supported by Microsoft, are not X64 architecture, have less than 2 CPU cores, or a minimum of 1GHz
Add the following filters as OR filters:
- Last Sync Time within Last 60 days
- system_cpu_maxclockspeed <= 1024
- system_cpu_supported != Valid
- system_logicalprocessors < 2
- Platform = Windows Desktop
The report has the following columns:
- Device GUID
- Friendly Name
- Email Address
- First Name
- Last Name
- Manufacturer Name
- Model
- Manufacture Date
- OS Version Build
- system_cpu_maxclockspeed
- system_cpu_supported
- system_logicalprocessors
- Warranty Status
- Last Sync Time
Example 7: Devices not ready – OS version
This report filters on devices sync’d within the Last 60 days and displays Windows devices that are not running Windows 10 2004 or higher. We use build number rather than build version here so that we can use a “Less than” operator which is only available with integers:
- Last Sync Time within Last 60 days
- os_build_number < 19041
- Platform = Windows Desktop
The report has the following columns:
- Device GUID
- Friendly Name
- Email Address
- First Name
- Last Name
- Manufacturer Name
- Model
- Manufacture Date
- OS Version Build
- Warranty Status
- Last Sync Time
Summary and additional resources
Workspace ONE Sensors and Workspace ONE Intelligence Dashboards and Reports provide a very powerful and flexible toolset. As you can see, it is easy to create custom Dashboards and Reports to help you plan for upgrading Windows 10 devices to Windows 11, as well as identify which devices require new hardware or a complete refresh.
Additional resources
For more information, you can explore the following resources:
- Getting Started with Workspace ONE Intelligence Reports and Dashboards: Workspace ONE Operational Tutorial
- Getting Started with Freestyle Orchestrator
- Windows 11 Readiness for Workspace ONE UEM (85839)
Changelog
The following updates were made to this guide:
| Date | Description of Changes |
| 2025/02/04 |
|
| 2025/01/29 |
|
| 2024/10/14 |
|
| 2024/06/12 |
|
About the author and contributors
This guide was written by:
- Phil Helmling, Adoption Product Manager, Omnissa.
Feedback
Your feedback is valuable.
To comment on this paper, contact End-User-Computing Technical Marketing at tech_content_feedback@omnissa.com.


 The dashboard will have seven widgets. Each widget filters on one or more sensors and displays the count of devices meeting that specific filter.