

Troubleshooting Omnissa Access FQDN Updates
Introduction
Many administrators encounter issues when attempting to change the Omnissa Access fully qualified domain name (FQDN).
The following error—error connecting workspace URL—is a common one.
This guide explains the Omnissa Access (aka Workspace ONE Access) workflow at a high-level and provides practical methods to troubleshoot issues when changing the Access FQDN.
Audience
This guide is intended for experienced IT administrators of existing environments. Knowledge of Omnissa Access is assumed.
Omnissa Access Overview
Access is not designed to face the Internet by itself. You should have a reverse proxy or load balancer in front of Access.
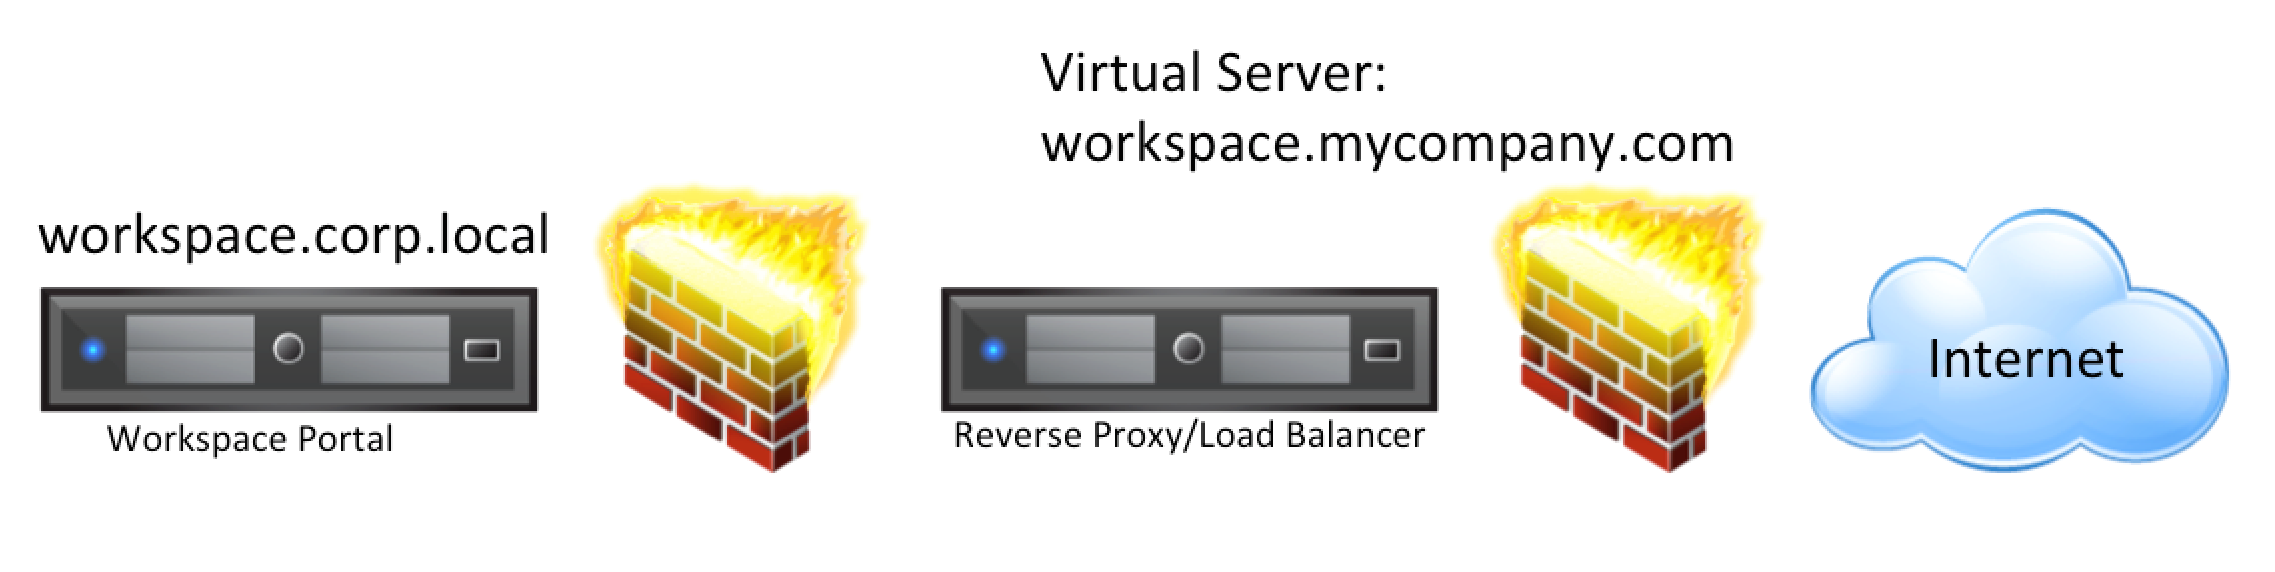
This screenshot depicts a typical example.
You should install Access using an internal hostname. In this example, a virtual server is installed on the load balancer to support external access and the external FQDN points to this virtual server.
Note: Access requires an A-record for its FQDN. CNAME is not supported.
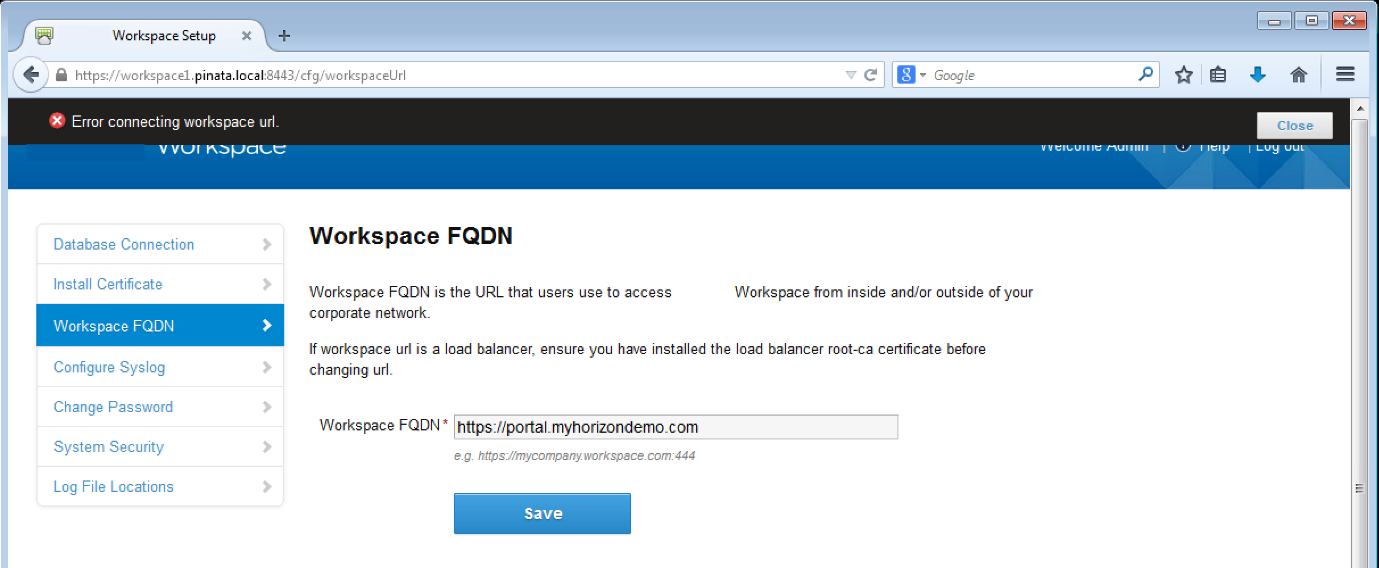
When you install Access, all URLs are internal. You must change the FQDN to use a publicly available URL. When you change the FQDN, all client access is redirected to this public FQDN. Only the Access admin pages are still accessible using the internal hostname, such as https://workspace.corp.local:8443.
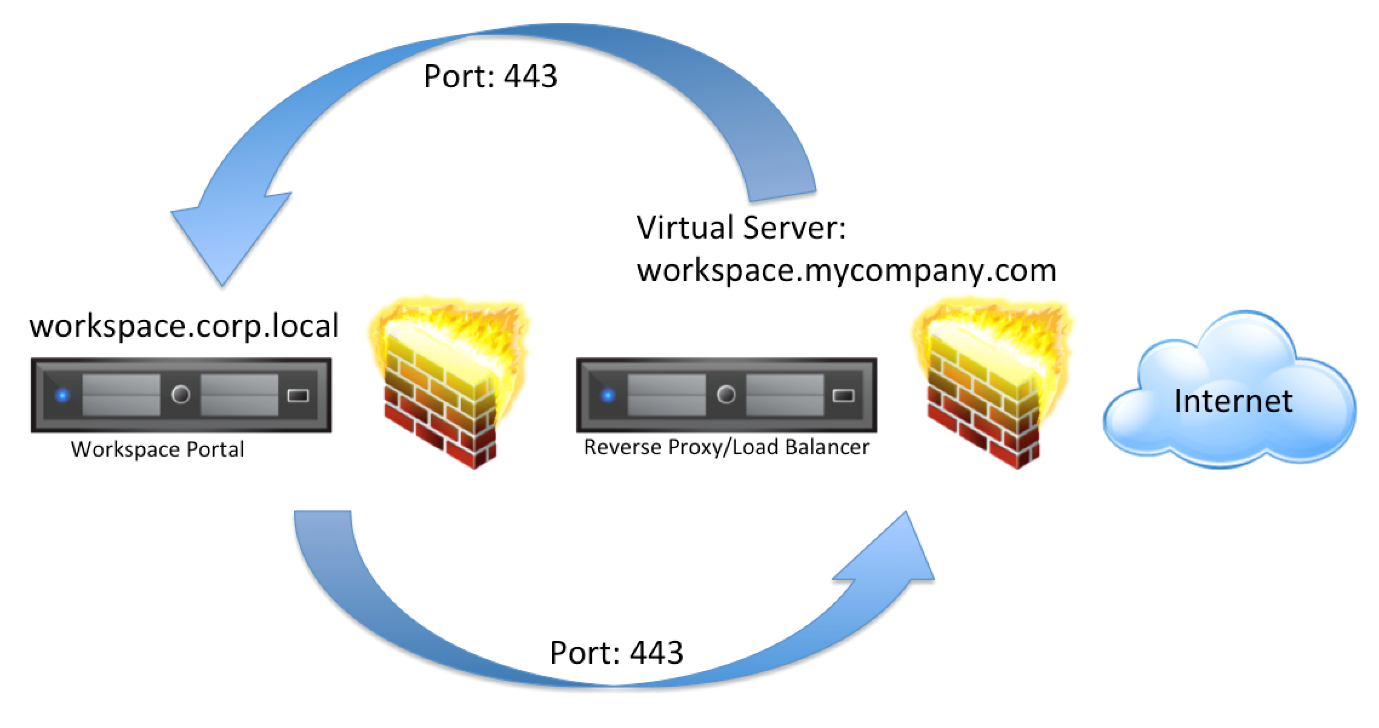
When you specify a new FQDN, the Access virtual appliance must verify that it can communicate round-trip through the load balancer and back to itself, as shown in the following screenshot.
This is where issues can arise. If Access cannot perform this round-trip communication, it refuses to change the FQDN. The appliance is attempting to access https://FQDN/SAAS/jersey/manager/api/health. If it cannot access that URL, Access displays the error message Error connecting workspace url.
Check the Access log (path as of rebranding to Omnissa) located in
/opt/omnissa/horizon/workspace/logs/configurator.log
and you might see a line similar to the following:
2019-10-10 11:05:46,223 ERROR (tomcat-http–44) [;;] ApplicationSetupService – Error validating workspace url
The error message is not very informative; however, this guide will explain how to perform some basic troubleshooting steps.
Verifying DNS Records
There are a few common reasons why Access fails to change the FQDN. The first reason is that DNS records might be missing.
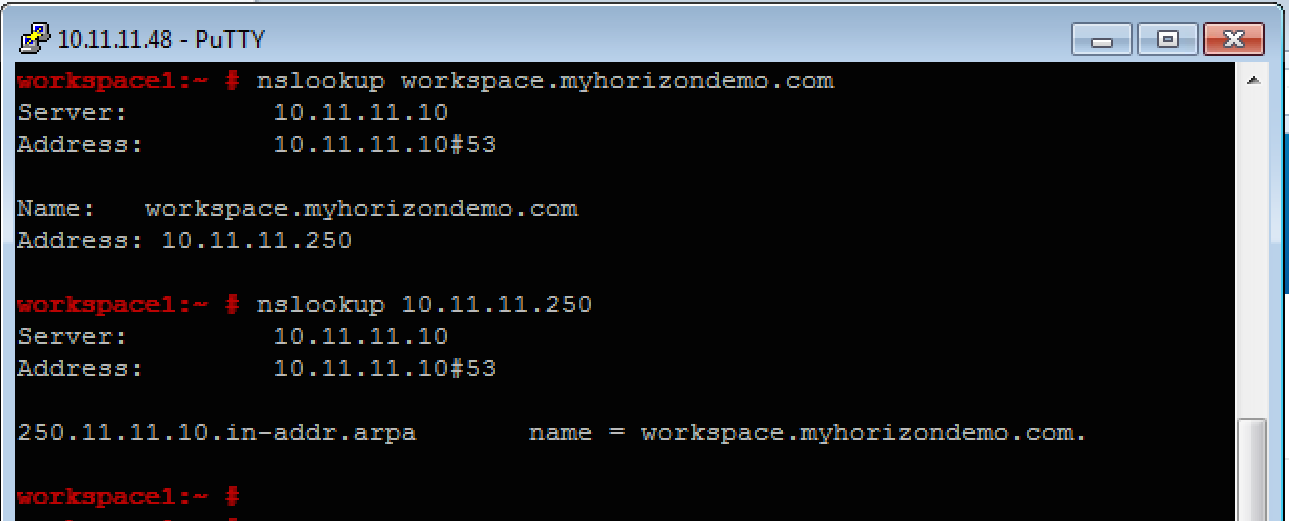
Ensure that you have forward and reverse DNS entries pointing to your load balancer’s virtual server.
You can use nslookup on the Access virtual appliance. For example, run nslookup FQDN and if this is successful, run nslookup ip-address to verify reverse lookup.
The following screenshot depicts successfully verified DNS records.
Verifying Access Communication with Load Balancer
The next possible reason for an unsuccessful FQDN update is that communication between Access and the load balancer is blocked by the firewall. You must allow port 443 traffic outbound from the Access virtual appliance to the load balancer’s virtual server.
You can troubleshoot this by running the command curl on the Access virtual appliance. For more information, see the curl documentation.
Run the command curl -v 3 -ssl https://FQDN. The result should help you to determine why Access cannot access the load balancer.
Note: The default Curl version available on Access does not support the fact that TLSv1.0 is disabled in Access. If you get the following error:
curl: (35) error:140770FC:SSL routines:SSL23_GET_SERVER_HELLO:unknown protocol
Run the following command in the console:
. /usr/local/horizon/scripts/hzn-bin.inc
(There is a SPACE after the period; that is, period SPACE /usr/local/horizon/scripts/hzn-bin.inc). The output of this command is shown in the next screenshot.
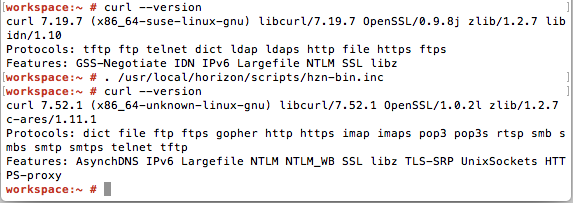
This command temporarily activates a later version of Curl and you can continue to troubleshoot.
After you log out, the settings revert so that when you next log in, the original curl version is the active one.

In this screenshot, the error message states, No route to host. This is a false error and was created using the next steps.
- Point the DNS record to a non-existing host.
- Run
ping FQDN, and note that the Access virtual machine cannot ping the destination.
By using this technique, you can spot firewalls blocking the communication.
To resolve this issue, ensure that the Access virtual machine can communicate with the virtual server of your load balancer using the FQDN.
Verifying Certificates are Trusted on the Load Balancer
Another reason for unsuccessful FQDN updates is that the load balancer has invalid or untrusted certificates.
You can also use the curl command to troubleshoot certificate issues.
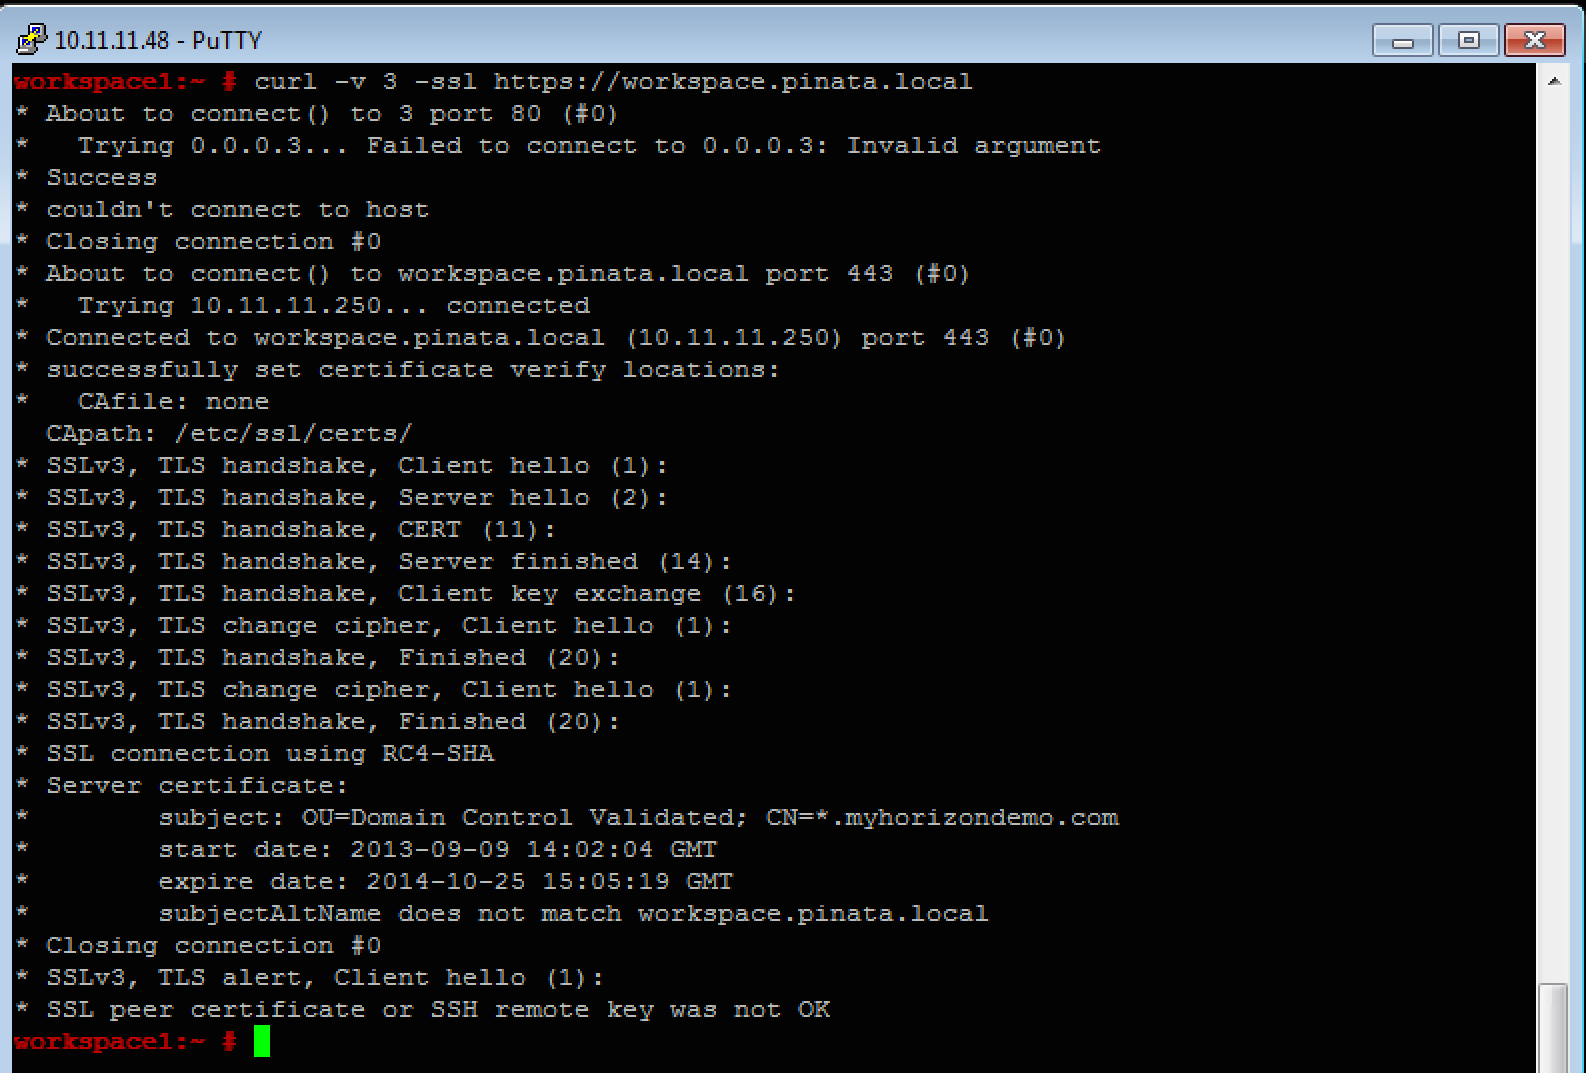
In this screenshot, Access can communicate with the FQDN but still receives an error message.
The errors are subjectAltName does not match workspace.pinata.local
and SSL peer certificate or SSH remote key was not OK.
These errors were generated for illustration purposes. The workflow is as follows:
- User attempts to access the FQDN
workspace.pinata.local. - However, the load balancer’s certificate is a wildcard for
myhorizondemo.com. - Result—the certificate is not valid. The certificate is technically valid but it does not match the FQDN, so Access refuses to accept it.
There are a couple of solutions to this problem. The first is to make sure that the certificate used by the load balancer’s virtual server is correct. The CN and subjectAltName must match your FQDN.
The next requirement is that Access must trust the certificate. Your certificate is signed by a Certificate Authority (CA). The root CA certificate must therefore be trusted.
If you are using a self-signed certificate or a certificate signed by a lesser-known CA, you must upload the root CA certificate to the Access keystore. This forces Access to trust the certificate used on your load balancer.
Use the Configurator page of Access to upload the root CA certificate.
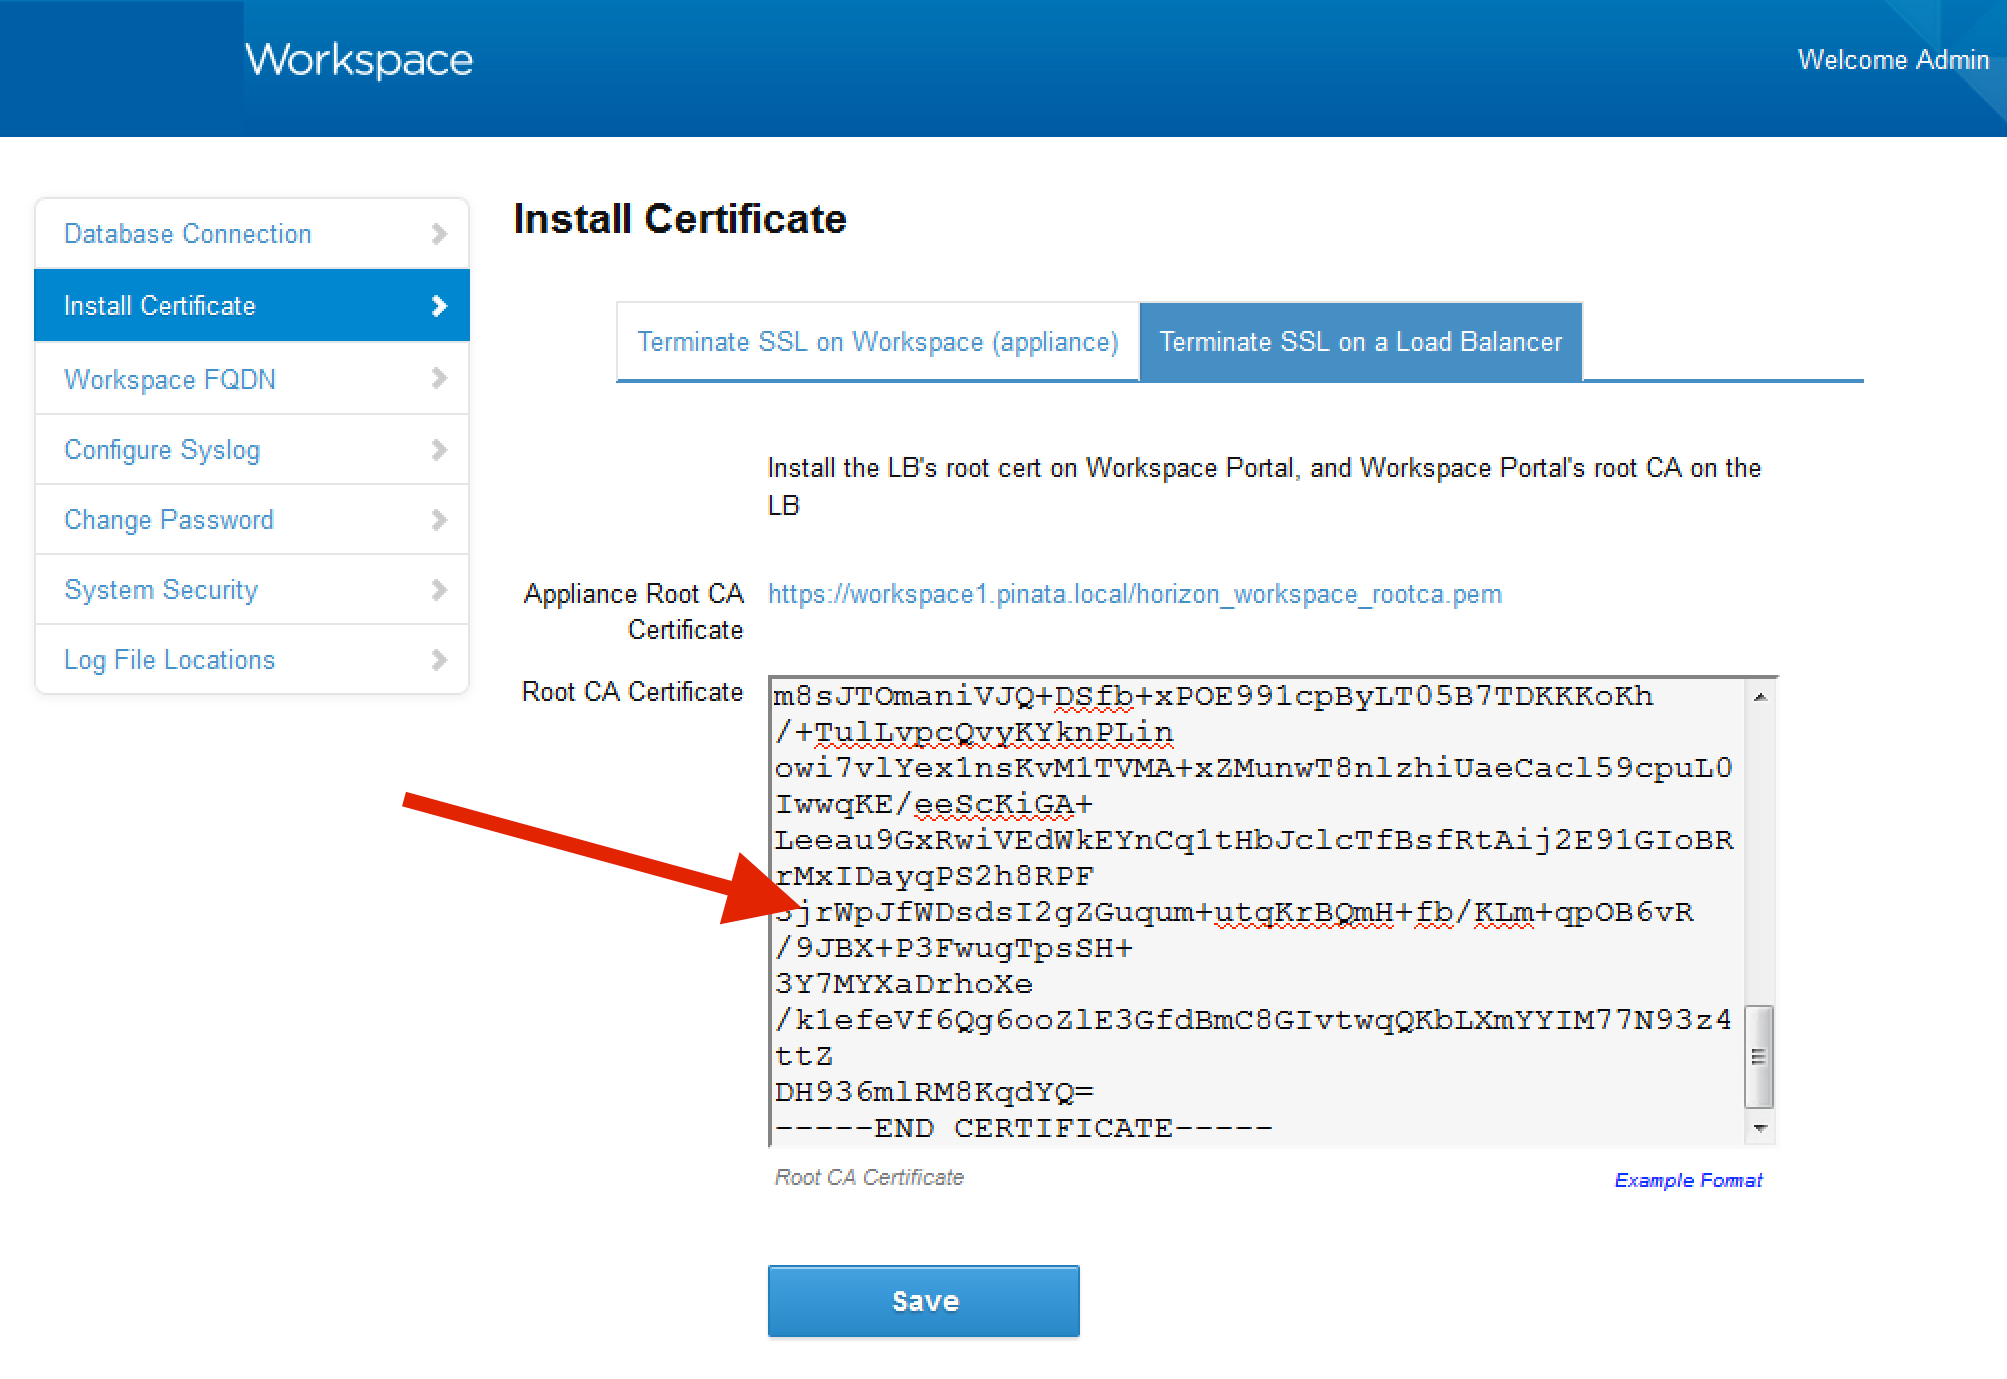
When you upload the certificate, make sure that you have the root CA certificate in a Base64 encoded format and perform the copy and paste operation using a text editor that supports ANSI formatting. Do not use notepad.exe because it is a simple text editor, however, you can use Notepad++. Any text editor that supports ANSI works with certificates.
Note: Upload the CA’s root certificate only if Access does not already trust it. Access already trusts most public CAs. Usually, you do not have to upload the Access root CA certificate to your load balancer. If your load balancer accepts the self-signed certificate used by Access, the workflow should be successful.
Access often requires the full chain of the certificate to be present on the load balancer. You can verify that the full chain is present by using SSL Checker from SSLShopper. If your instance is available from the Internet, SSL Checker can validate your certificate.
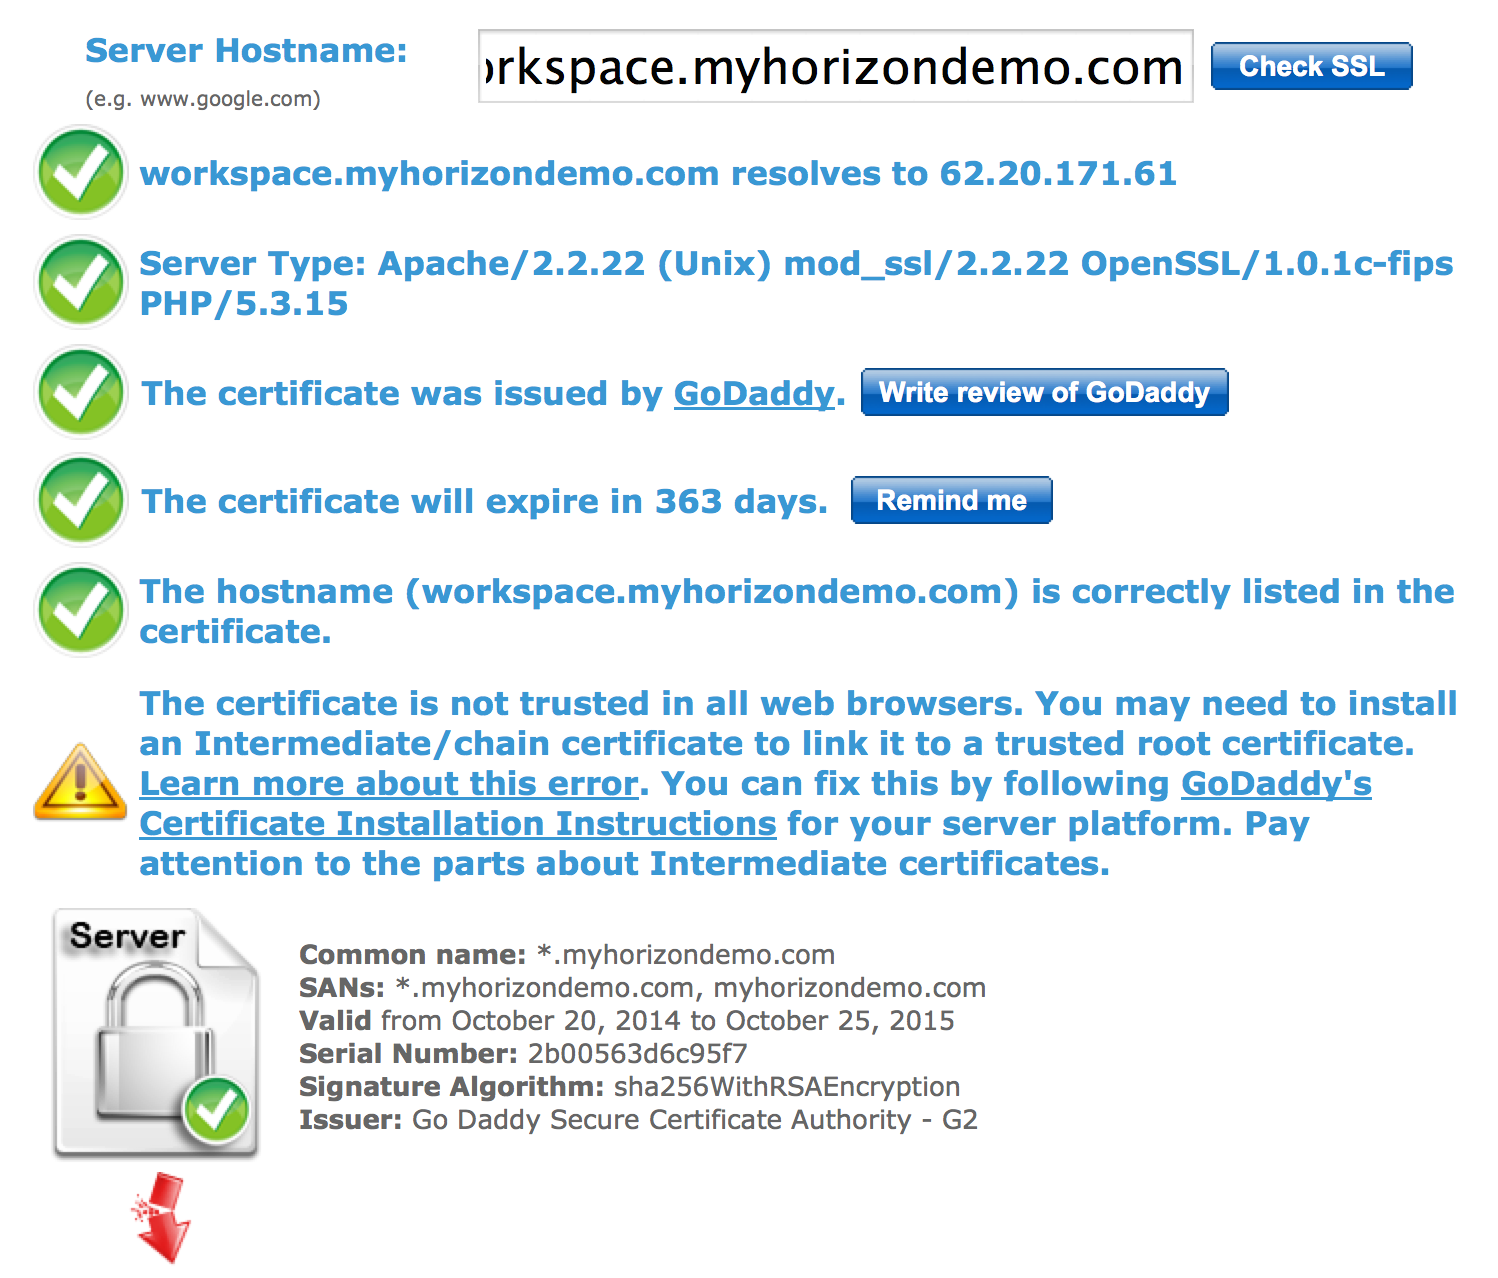
This screenshot depicts a valid certificate with a broken chain.

This screenshot depicts a valid certificate chain.
After you have confirmed that the Access virtual machine trusts the load balancer’s certificate, the curl command output should be similar to this example:
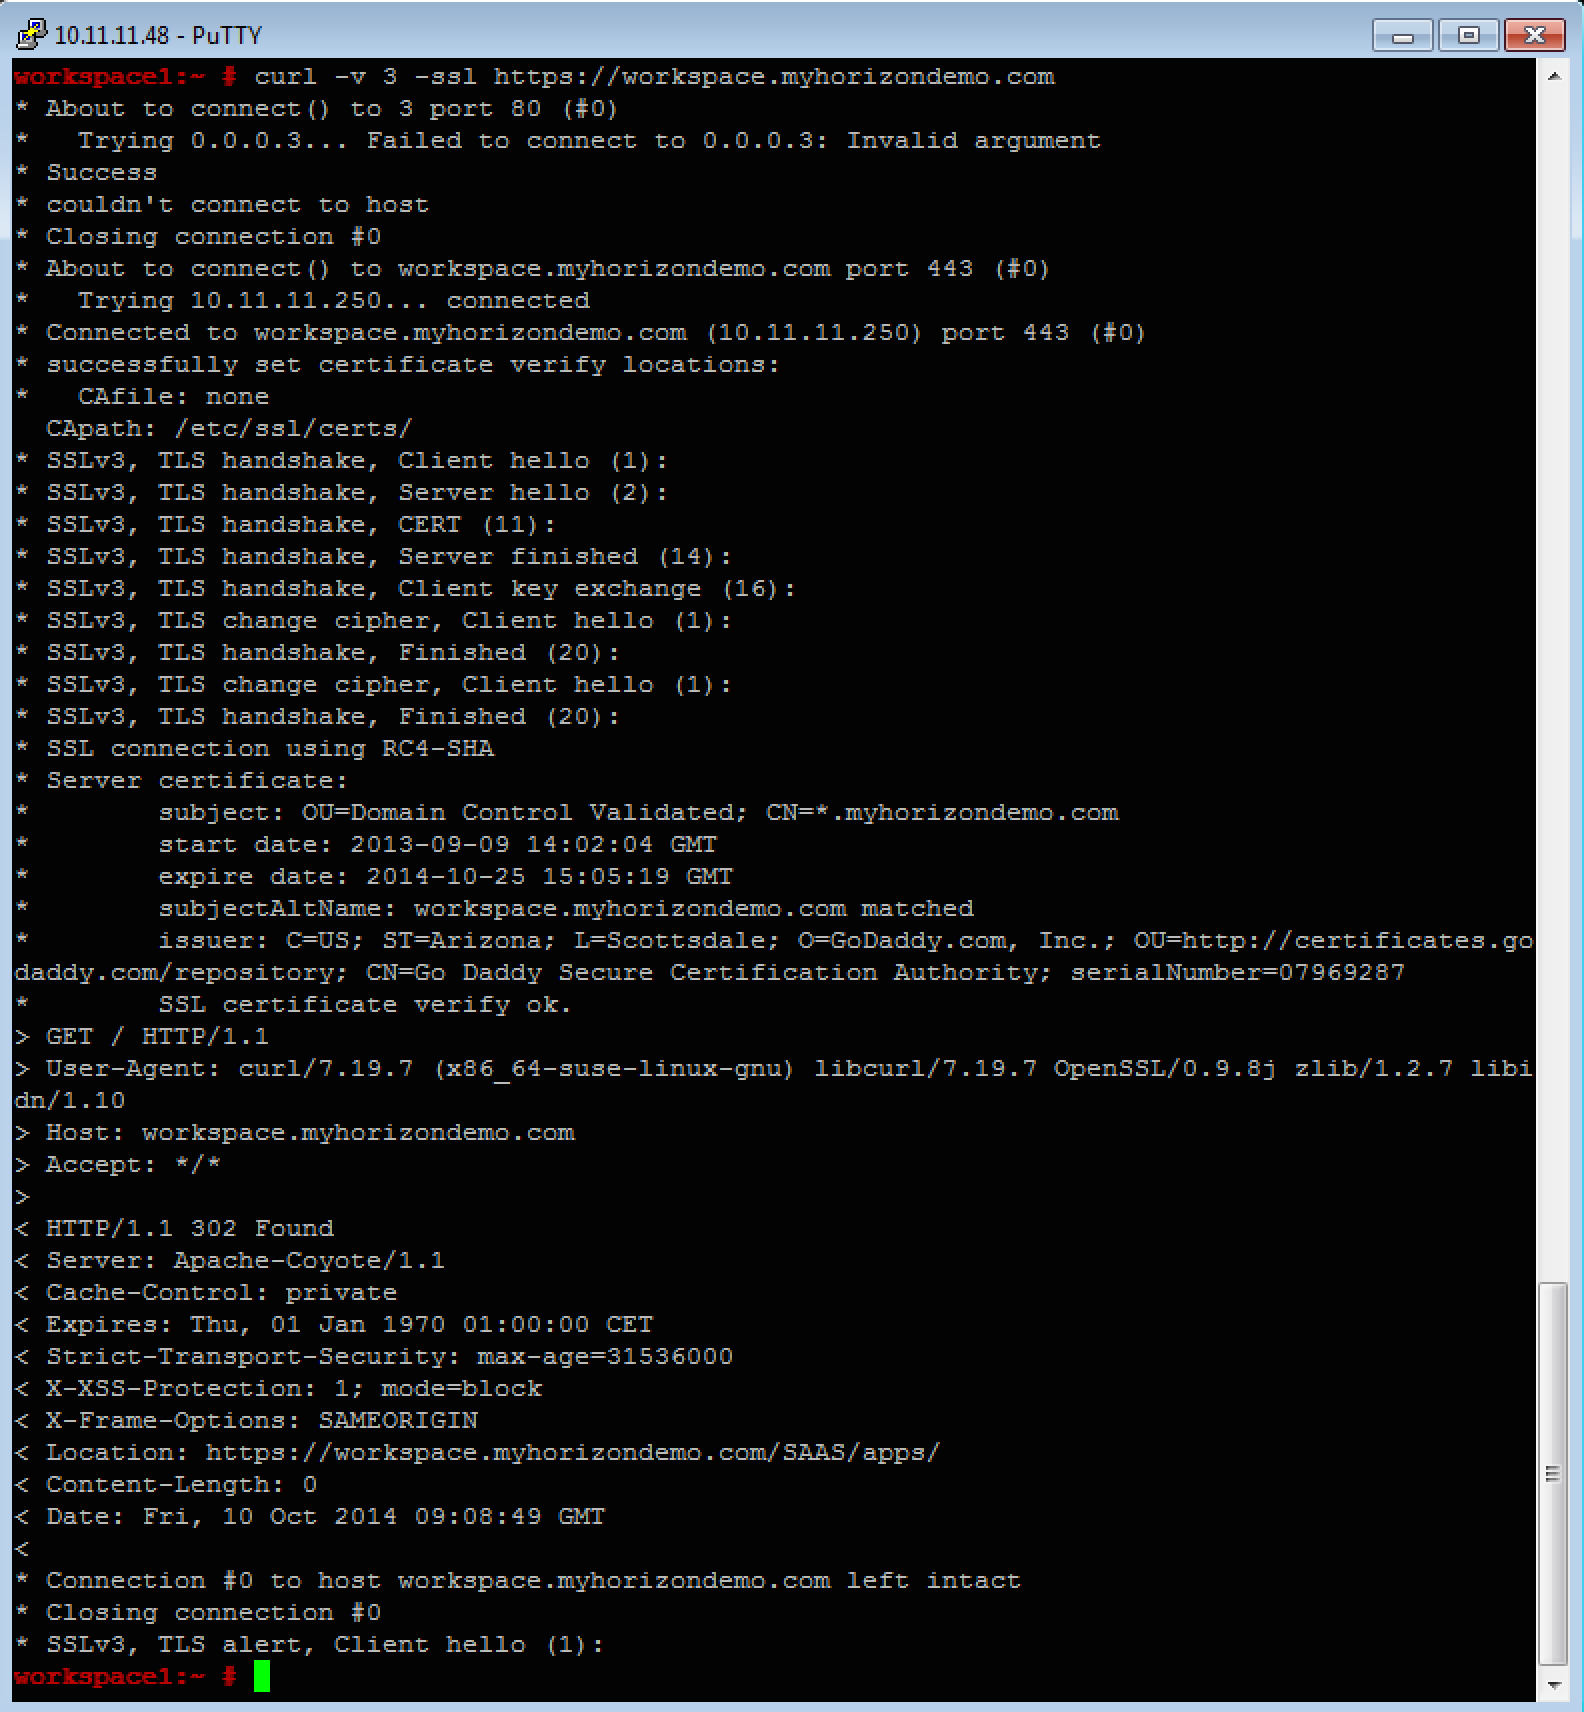
If you can successfully use curl to access the FQDN, Access will allow you to change the FQDN.
Another option is to run the following command:
vidm$ curl https://FQDN/SAAS/jersey/manager/api/health
The output is similar to the following example:
{“allOk”:true,”_links”:{“hw-health-messaging”:{“href”:”/SAAS/jersey/manager/api/messaging/health”},”hw-health-calculators”:{“href”:”/SAAS/API/1.0/REST/system/health/calculators”},”hw-health-appmanager”:{“href”:”/SAAS/API/1.0/REST/system/health”},”self”:{“href”:”/SAAS/jersey/manager/api/health”},”hw-health-analytics”:{“href”:”/AUDIT/API/1.0/REST/system/health”}}}
Note: Changing the FQDN takes about 10 minutes.
Do not navigate away from the web page or refresh it. When you can see the white box showing progress, Access has already verified that it can perform the round-trip communication with itself. For the remaining time, Access is inserting the new FQDN in other locations.
Conclusion
Before you can change the FQDN of Access, it must be possible to establish a session from Access to the load balancer and back to itself. This communication is made over port 443 and requires that the FQDN’s certificate is trusted by Access.
For more information, see the Omnissa Access Tech Zone page. Activity paths provide step-by-step guidance to help you level-up in your product knowledge. You will find everything from beginner to advanced curated assets in the form of articles, videos, and labs.
About the Author
This guide was written by:
- Peter Bjork, Principal Architect, Omnissa.
Feedback
Your feedback is valuable. To comment on this paper, either use the feedback button or contact us at tech_content_feedback@omnissa.com