Migrating from Mobile SSO (for iOS) to the New Mobile SSO (for Apple) Extension
Overview
If you are using Mobile SSO (for iOS) on iOS devices in your environment, you know that the configuration is cumbersome and requires several payloads to work properly. Workspace ONE UEM, in conjunction with Workspace ONE Access now supports the use of SSO Extensions in iOS, with support for macOS coming in a future release.
Purpose of This Tutorial
This guide introduces you to the new Mobile SSO (for Apple) SSO Extension on iOS Devices and teaches you how to enable the configuration and migrate your users with limited impact to the end-user experience. You’ll also learn about the benefits of the new extension and how it works.
Audience
This guide is intended for IT administrators who are interested in migrating from Kerberos based Mobile SSO (for iOS) on iOS devices to the SSO Extension based Mobile SSO (for Apple) on iOS devices. A future update to this guide will include information on support for macOS devices when that becomes available.
What and Why
Before you implement the SSO Extension based Mobile SSO (for Apple) on your iOS devices, it is important to understand the benefits of this new feature and the end user experience.
SSO Extension based Mobile SSO (for Apple)
The SSO Extension based Mobile SSO (for Apple) configuration is a method of performing Mobile Single Sign-On to enterprise applications which supersedes the Mobile SSO (for iOS) method. It requires little configuration from administrators and has fewer backend service requirements, which we’ll discuss in the next section. The SSO extension is installed on devices automatically with Workspace ONE Intelligent Hub and activated via a configuration profile pushed to devices using Workspace ONE UEM.
Benefits of the SSO Extension for Mobile SSO (for Apple)
There are several key benefits associated with this new SSO method when compared to the Kerberos-based Mobile SSO (for iOS) method:
- This method uses the Workspace ONE Access CAS (certificate authentication service) instead of the KDC (key distribution service), which means there are fewer services involved in your user’s authentication flow. This benefit speeds up login time and reduces the likelihood of a service outage.
- Administrators will not have to manage KDC certificates in device profiles which means profiles can be leaner and easier to manage.
- This method works on iOS and macOS (although macOS will not be supported until a later release) which will reduce the number of SSO services and configurations required for administrators.
- This method supports User Enrollment as well as Device Enrollment.
- Certificate handling is consistent with Mobile SSO (for Android) and Certificate (Cloud Deployment) which further reduces the management overhead and reduces the amount of enablement required for administrators to manage the service.
- Additionally, it supports more robust certificate features, such as CRL, and signed OSCP responses that require complex certificate chains.
- This method supports biometric device authentication at the time the certificate is being used.
- This method supports UEM check out/check in scenarios whereas, the Mobile SSO (for iOS) method did not.
- This method eliminates passing user information such as username, email address, device UDID, and more in plain text within a Kerberos message across the network.
- This method supports certificate-based authentication for any native application supporting SAML or OIDC authentication without having to modify the application (such as by using the iOS SDK or the Safari WebKit). A good example of this is Google Chrome on iOS.
- The Workspace ONE Access KDC service will be deprecated at a later date, making Mobile SSO (for iOS) unavailable. Migrating now will prepare your organization for the sunset of that service.
Implementing Mobile SSO (for Apple)
This section explains how to configure the service in Workspace ONE Access and UEM using the AirWatch Certificate Authority or your already configured third-party certificate authority and walks through steps to create the required profiles for devices. Additionally, you’ll learn about the recommended migration strategy to limit end-user impact.
For the exercises in this guide, if you choose to use your third-party certificate authority instead of the built-in AirWatch Certificate Authority, you must configure it before proceeding. If you need to configure a third-party CA, see Certificate Authority Integrations in the product documentation.
Prerequisites for Mobile SSO (for Apple)
To utilize Mobile SSO (for Apple), make sure you meet the following prerequisites:
- Workspace ONE Access SaaS tenant
- Workspace ONE UEM SaaS
- Workspace ONE Intelligent Hub app version 23.06 or later
- A third-party Certificate Authority that can issue certificates on the user’s behalf if you do not want to use the built-in AirWatch Certificate Authority
- Apple iOS / iPadOS version 13 or later
How to configure Apple Device Profile in Workspace ONE UEM
In order to use Mobile SSO (for Apple), you must create a profile with two payloads configured – one to deploy a certificate and one to configure the SSO Extension. Before you begin, create a new Smart Group to assign devices to. You will use that Smart Group to migrate users from Mobile SSO (for iOS) to Mobile SSO (for Apple). Using this new Smart Group will allow you to support both authentication types for some time while devices consume the new profile – and so you can control the user base that gets this update instead of rolling it out to the entire organization at once.
- In the UEM console, navigate to the OG where you want to create the profile and then navigate to Resources > Profiles.
- Click Add > Add Profile and select iOS > Device Profile.
- Give your profile a name, for example, iOS – Mobile SSO (Apple).
- Configure your Certificate Payloads.
- If you want to use the AirWatch Certificate Authority, select the SCEP section, then click ADD. Configure the profile so that for Credential Source and Certificate Authority, AirWatch Certificate Authority is selected. For the Certificate Template, select Single Sign-On.

- If you want to use your third-party certificate authority (CA), depending on the configuration of the CA, select either the SCEP or Credentials section, then click ADD. Configure the profile so that for Credential Source, you have chosen Defined Certificate Authority, for Certificate Authority you have selected the name of your CA, and for Certificate Template, you have selected the name of the template you have configured.

- If you want to use the AirWatch Certificate Authority, select the SCEP section, then click ADD. Configure the profile so that for Credential Source and Certificate Authority, AirWatch Certificate Authority is selected. For the Certificate Template, select Single Sign-On.
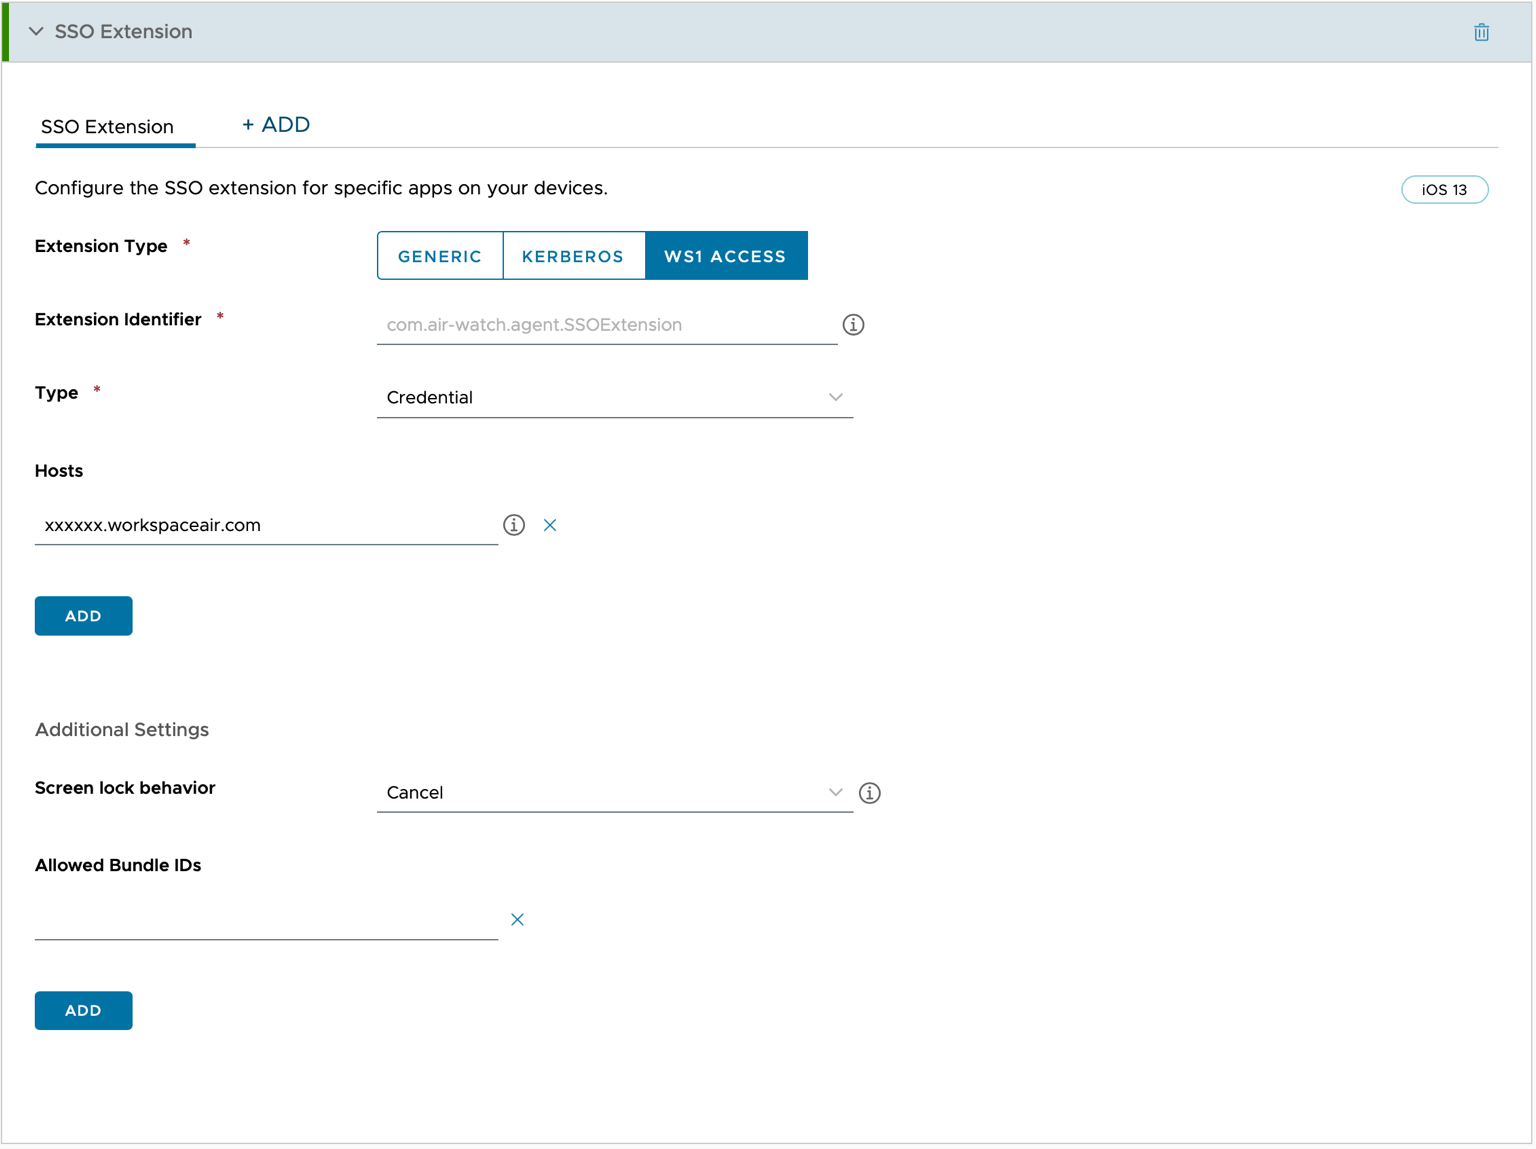
- Configure the SSO Extension Payload by selecting the SSO Extension section and clicking ADD. Configure the following settings:
- Extension Type: Select WS1 ACCESS
- Extension Identifier: If you selected WORKSPACE ONE ACCESS, this field is prepopulated.
- Type: Select Credential or SCEP, depending on which type of certificate you are deploying.
- Hosts: Enter the URL of your Workspace ONE Access Tenant without any prefix. For example, “mylab.workspaceair.com”. If you have additional hostnames that use the same certificate for authentication, click the ADD button to show more lines.
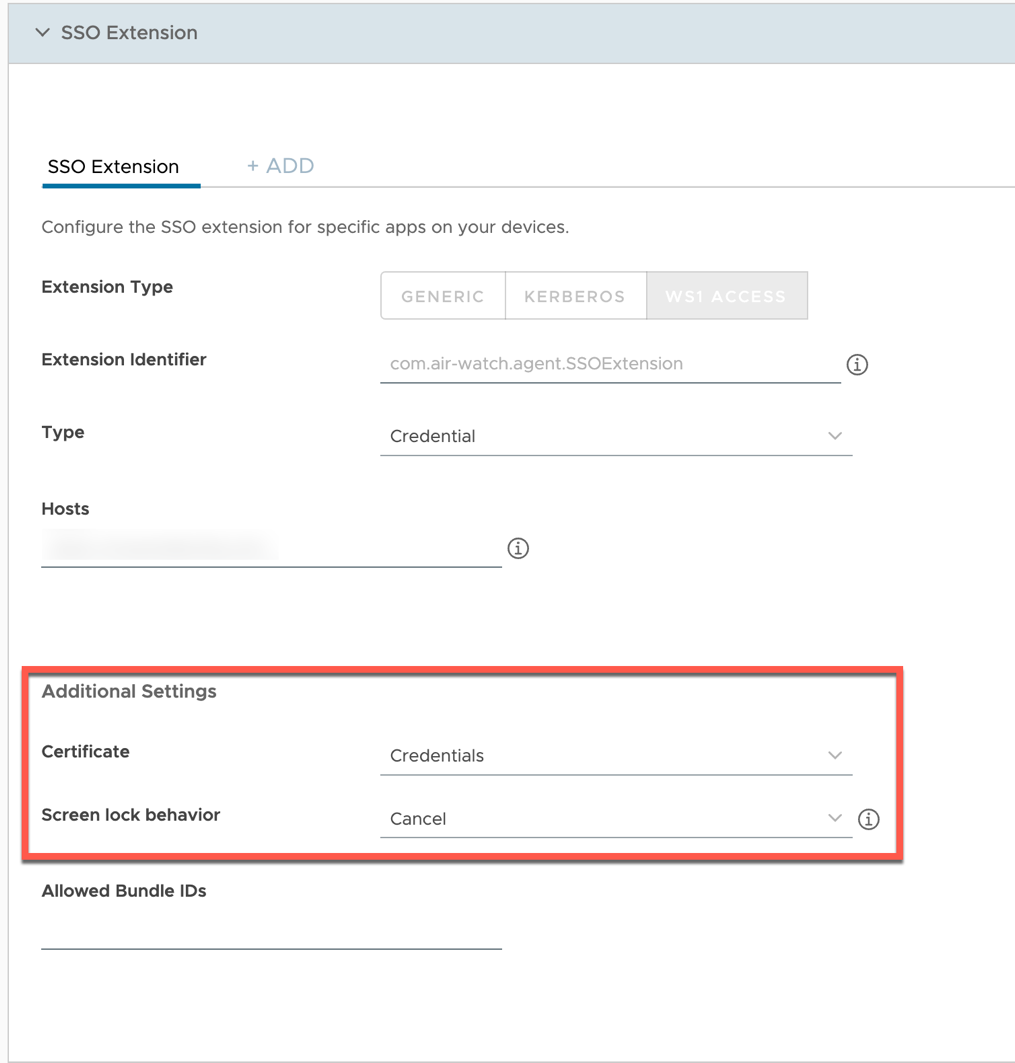
- Under Additional Settings, in the Certificate field, select Credentials or SCEP depending on which type of certificate you are deploying.
- Screen Lock Behavior determines what the extension does if the device is locked during the authentication process. Currently, only Cancel is available for Workspace ONE Access.
- The Allowed Bundle IDs section allows you to configure which applications are allowed to use the SSO Extension. To allow all apps to conduct Mobile SSO, leave this field blank.

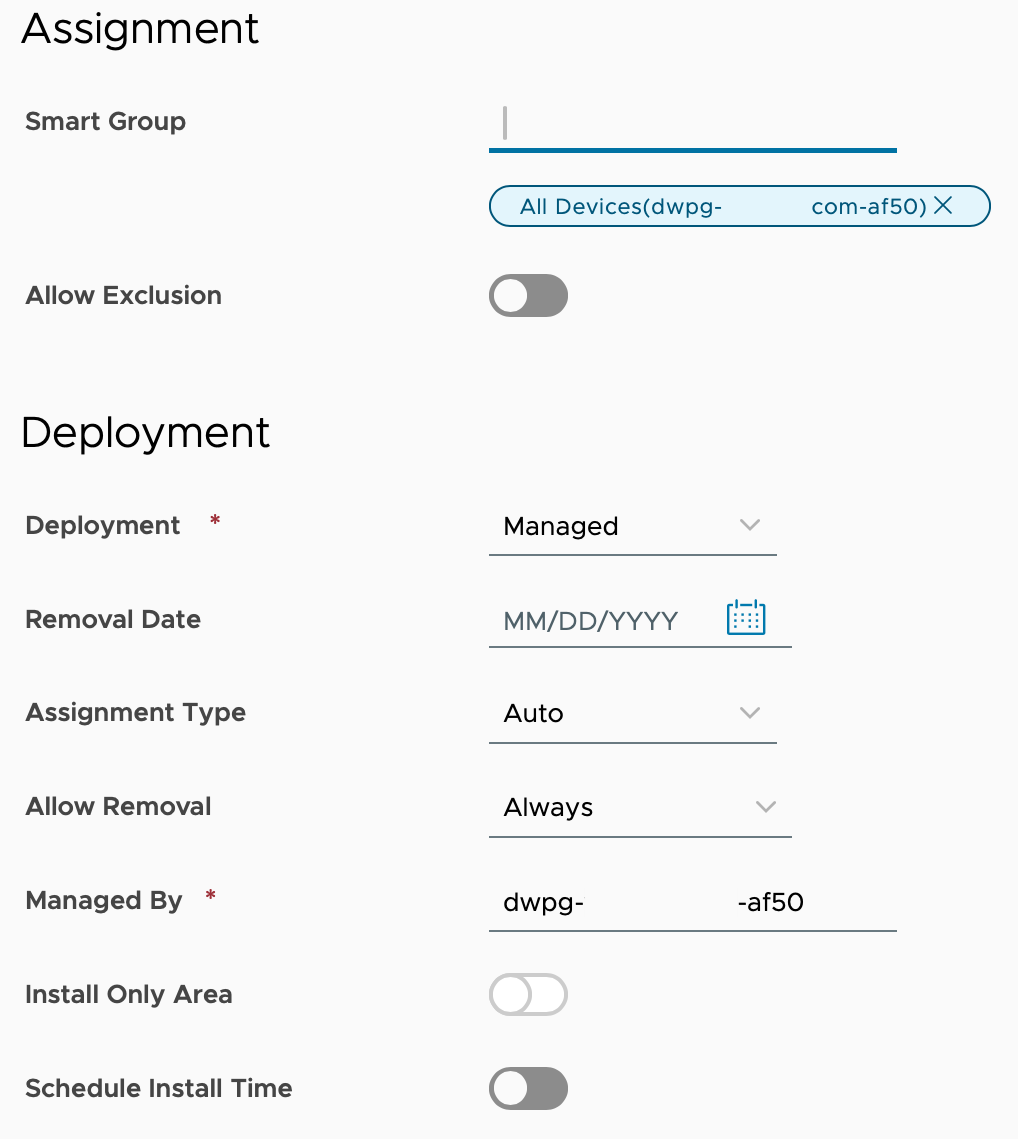
- Now that you have configured the two required payloads, click Next which will take you to the Assignment Page. In the Smart Group field, enter the name of the new Smart Group you created. It’s OK if there are no devices in this group yet. Configure the Deployment section as you see fit. This example keeps the default settings. In my lab, I am using the All Devices Smart Group for demo purposes only.

- Next, exclude your new Smart Group from your old Mobile SSO (for iOS) profile so that users don’t have both profiles on their devices.
- Find the profile that configures your Mobile SSO (for iOS) settings and click the pencil to edit. You should see your profile and its configured payloads.
- Click Next to access the Assignments Page.
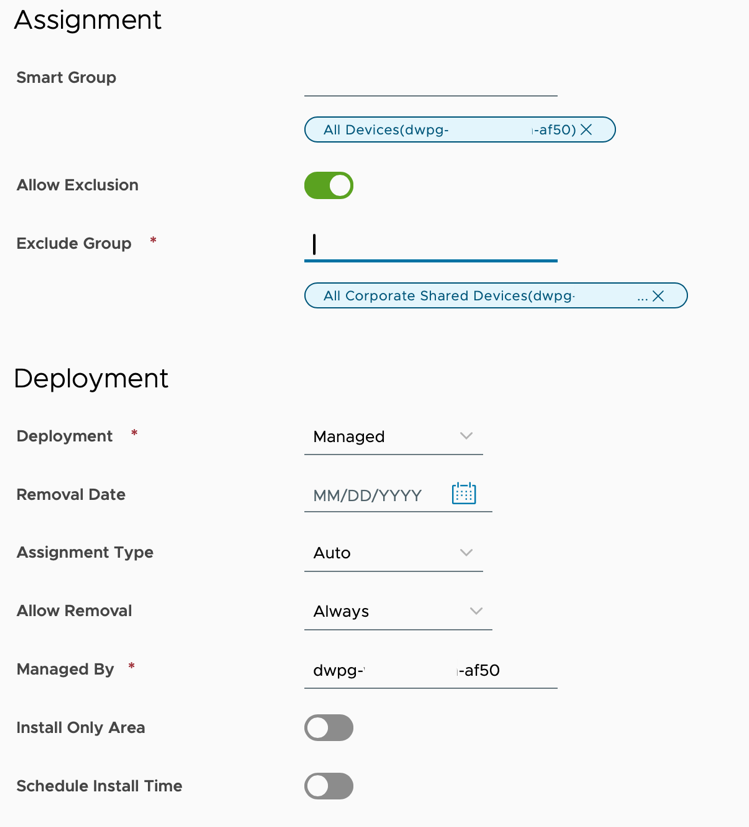
- Turn on Allow Exclusion, enter your new Smart Group name, and then click Save & Publish.

- NOTES:
- This example uses All Corporate Devices in the exclusion for demo purposes only.
- This configuration is done so that when you’re ready to migrate a user or device to the new SSO method, you can add the user or device to your new Smart Group, and UEM will remove the old SSO profile and deploy the new SSO profile automatically.
- Add in additional settings.

You have completed the required setup steps within UEM. Next, we’ll configure Workspace ONE Access.
How to configure Mobile SSO (for Apple) in Workspace ONE Access
Setting up Mobile SSO (for Apple) requires you to set up the Mobile SSO (for Apple) certificate-based authentication settings. You need to have your CA Issuer Certificate available for this section. If you are using the AirWatch Certificate Authority, you can download the issuer certificate in Groups & Settings > All Settings > Enterprise Integration > Workspace ONE Access > Configuration. At the bottom of the screen, you’ll see an Export button. Click Export and save the file for later. If you’re using a third-party CA, you can get this certificate from the CA administrator.
Log into your Workspace ONE Access tenant as an administrator and access the Administration Console by clicking your account at the top right of the portal and selecting Administration Console.
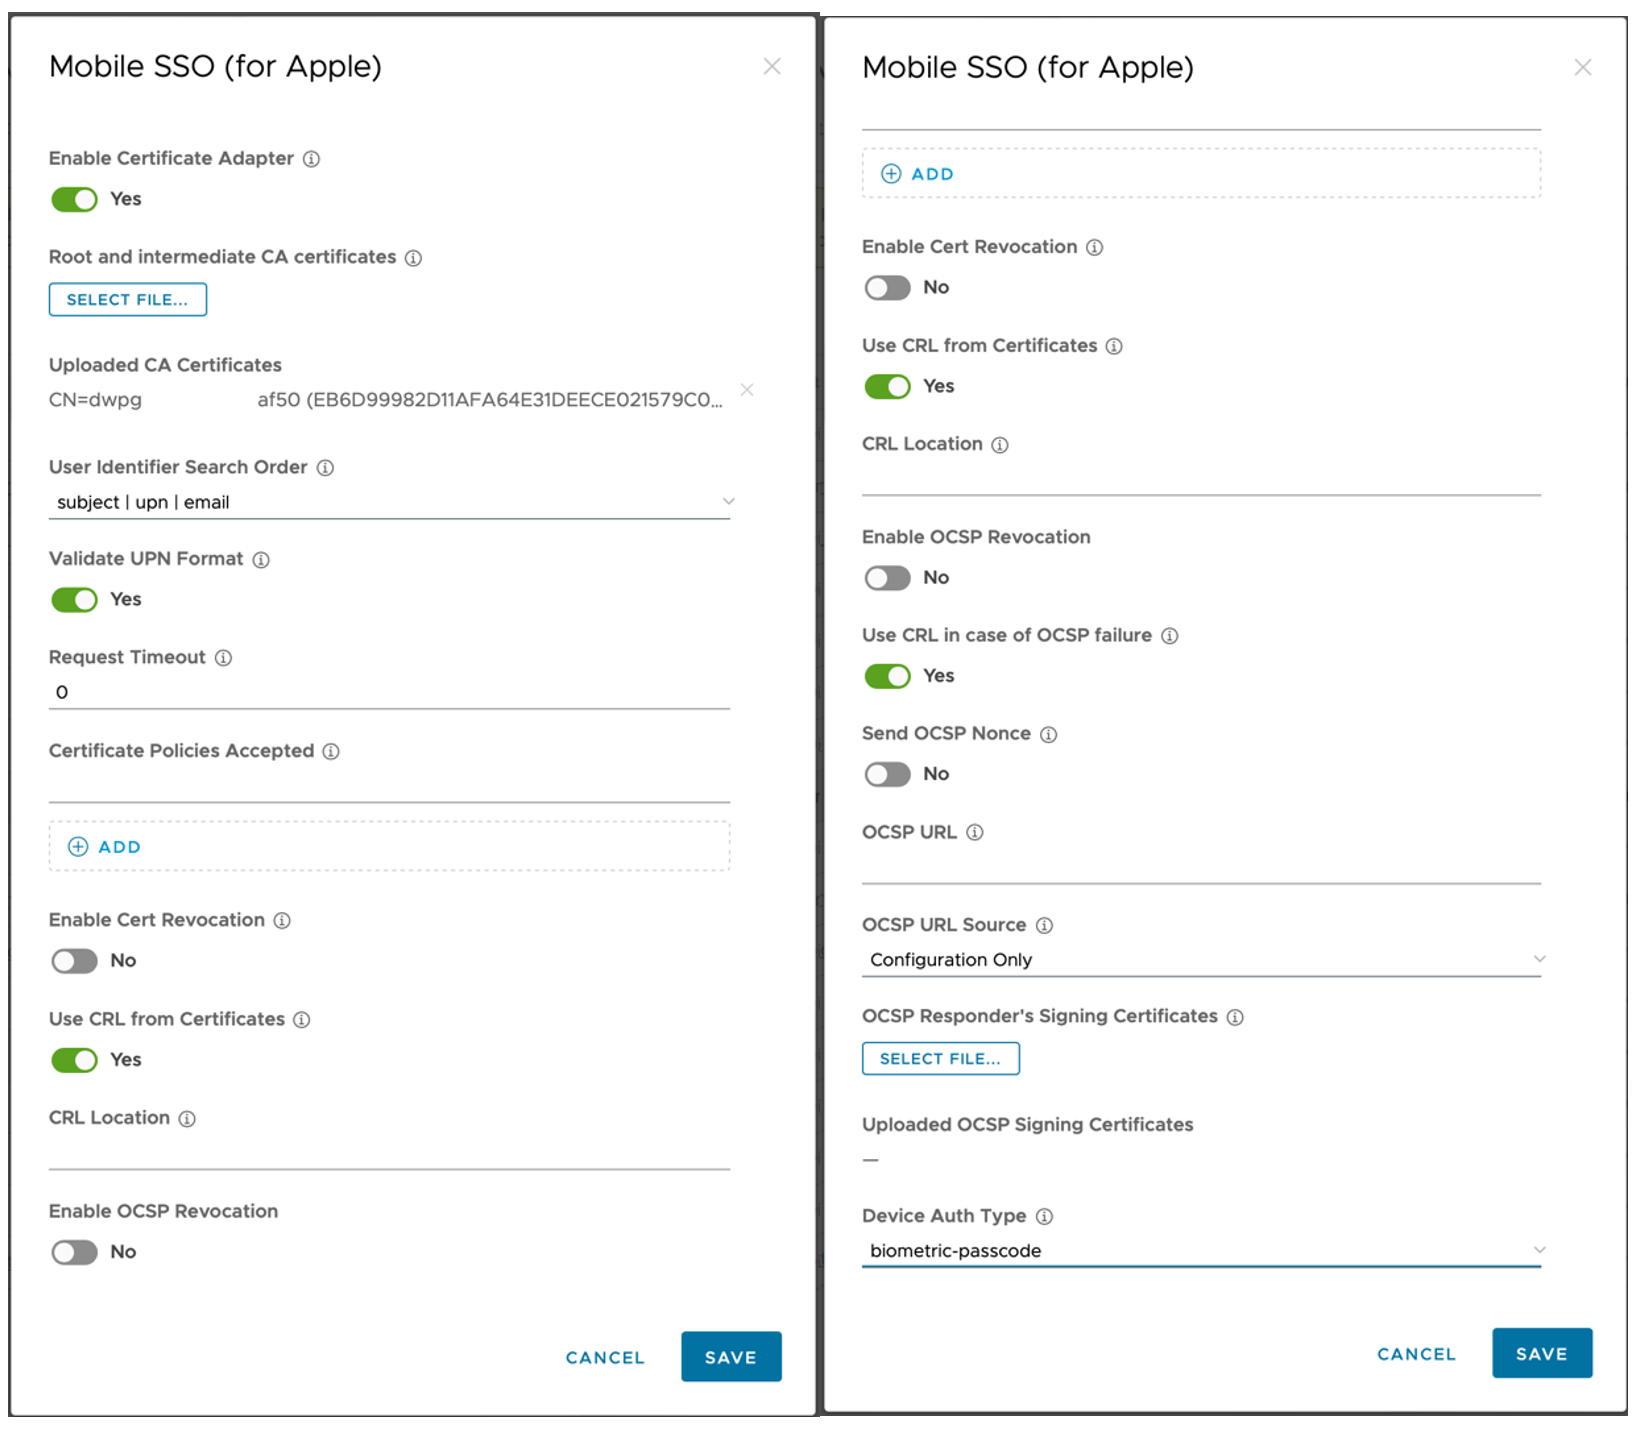
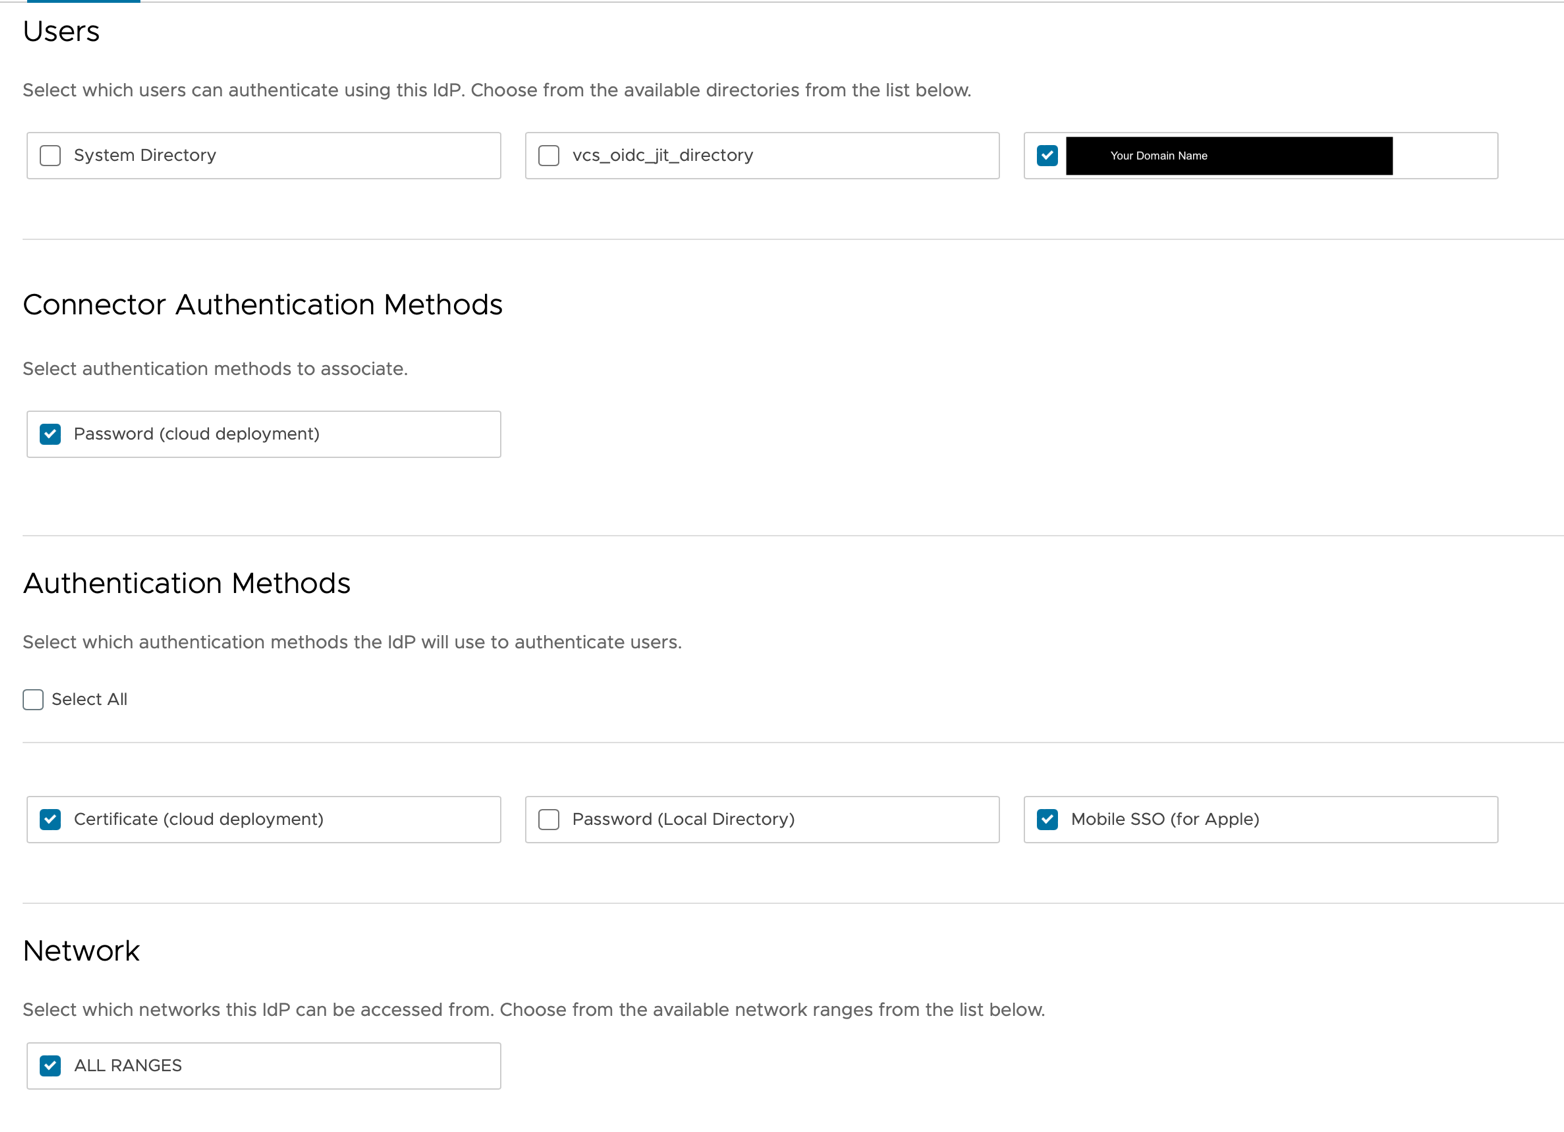
NOTE: Reference the images below the procedure for guidance.
- In the administration console, navigate to Integrations > Authentication Methods. Click the radio button next to Mobile SSO (for Apple) and then click Configure at the top of the page.
- Enable the certificate adapter by turning the switch to On.
- Under Root and intermediate CA certificates, if you are using the AirWatch CA, upload the certificate you downloaded from the UEM console. If you’re using your own CA, upload the required root and/or intermediate certificates required. You should see all of the certificates you uploaded listed in this section.
- For User Identifier Search Order, if you are using the AirWatch CA, select subject | upn | email from the dropdown list. If you are using a third-party CA, ask your CA administrator which user identifiers are provided on the issued user certificates as this may be different based on other authentication needs in your environment.
NOTE: This may also require some additional testing. - If you are using the AirWatch CA, leave the rest of the settings on their defaults. If you are using a third-party CA, get the relevant configuration from your CA administrator and populate the relevant fields.
- Configure the Device Auth Type field.
- None: The device does not require any additional authentication before the certificate is used. When a user reaches an authentication prompt that uses this certificate it will be used and the user will be signed in.
- Biometric: The device will require a biometric login, like FaceID or TouchID before the certificate is used. When a user reaches an authentication prompt that uses this certificate, they will be promoted for biometric device authentication.
- Biometric-passcode: The same behavior as above, however, if the biometric login fails, the user will be able to enter their device passcode to continue the authentication.
Recommendations: Do not use “none” for Biometric-passcode. This is because if an end user leaves their device unlocked somewhere and it is picked up by a threat actor or even a child, the user can authenticate into corporate apps without any verification. Biometric only is the most secure option, but it can present some issues if the user is wearing glasses, a mask, if their FaceID or TouchID sensors break, or if they are just failing. Biometric-passcode is the most common setting because it gives the organization the added security of a device auth before the certificate is used while giving end users a login option if their biometrics fail.
- Click Save.
How to configure the Built-In Identity Provider
On the Workspace ONE Access Identity Provider Page, you configure the Built-In Identity Provider to facilitate the SSO by matching your Certificate with a Directory User.
- From the Access Administration Console, select Integrations > Identity Providers.
- Select the IDP for your user directory. This example uses my Active Directory Domain. Yours is probably called something like “IDP for <domain>.”
- In your IDP, under Authentication Methods, select the check box next to Mobile SSO (for Apple) and save the configuration. The other settings in your IDP may look different than the example shown.

You have now configured the Authentication Method and IDP settings. Next, you will need to configure your Access Policies.
How to configure your Access Policies to enable Mobile SSO (for Apple) in Workspace ONE Access
In this section, edit your iOS rule in your default access policy.
- In the Access Admin Console, navigate to Resources > Policies. Click Edit Default Policy and then click Next to be taken to the policy configuration screen.
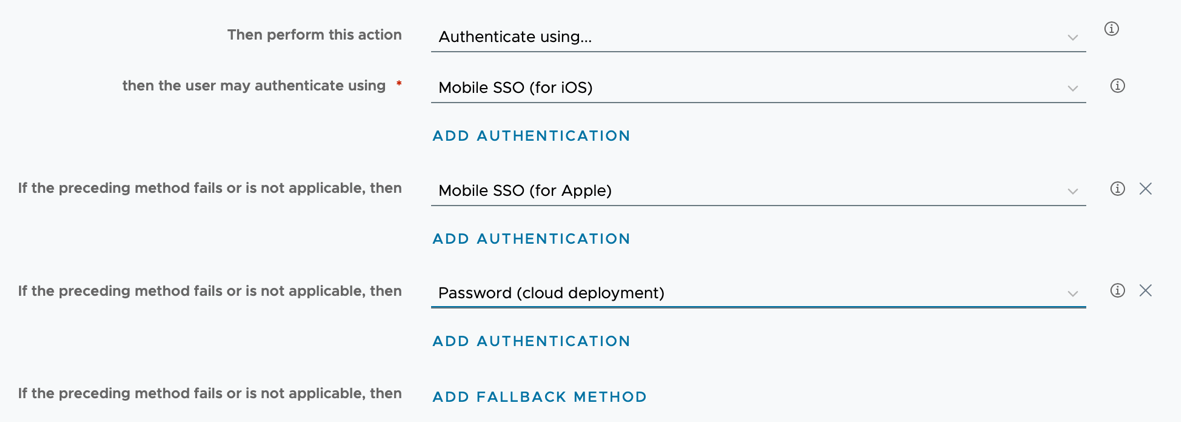
- Edit your existing iOS policy rule and take note of the current configuration of authentication steps. In my lab, I have one authentication method and one fallback method.

- Change the second method to Mobile SSO (for Apple) and add additional authentication steps and fallback methods so that the rest of your policy is complete. Essentially, you want to “insert” Mobile SSO (for Apple) after Mobile SSO (for iOS) and keep the rest of the policy rules after.

- Click Next.
- Look at the order of rules. Make sure that your iOS rule is above any Web Browser rule.
- Click Save.
How to Migrate Users from Mobile SSO (for iOS) to Mobile SSO (for Apple)
Migrating users is simple. Because you already created a new Smart Group in UEM, all you need to do is add users or devices to that Smart Group. You configured the Smart Group as an assignment in the SSO Extension Profile and excluded it from assignments in the Mobile SSO (for iOS) profile. When users and devices are added to the group, the SSO Extension Profile will be installed and the Mobile SSO (for iOS) profile will be removed.
Because you added both authentication policies in your default access policy in Workspace ONE Access, user devices will attempt to authenticate with Mobile SSO (for iOS) first. If that fails, the device will automatically move on to the next rule and try Mobile SSO (for Apple).
This will ensure that users can continue to sign in to services while you migrate users at your own pace or while devices are waiting for new profile configurations to be delivered.
After all of your devices have received the new profiles, you can edit your Workspace ONE Access Policy, decommission Mobile SSO (for iOS), and clean up your profiles in UEM.
What is the End User Experience?
End users will notice some differences in their Mobile SSO sign-in process. When Mobile SSO (for Apple) is requested by a website or app, an iOS extension will pop up and ask the user for their biometric or passcode before presenting the certificate. Think of logging into your banking application using FaceID. The first time a user authenticates to a service, they will be prompted with a security box asking if they are sure they want to present their user certificate to the website. Subsequent logins will not prompt unless the user clears their Safari Cache.
Summary and Additional Resources
This guide assisted you with configuring and migrating to Mobile SSO (for Apple), which positions your organization to provide a better end-user experience and to provide a more robust, stable Mobile SSO experience. It provided step-by-step instructions on migrating users to the new experience as well as important information on the benefits of this new method.
Additional Resources
Explore the following resources for more information:
Change Log
The following updates were made to this guide:
|
Date |
Description of Changes |
|
2024/10/14 |
|
|
2024/05/24 |
|
About the Authors and Contributors
Jason Misleh, Staff Customer Success Architect, Omnissa
Dean Flaming, Sr. Staff Solutions Architect and Engineer, Omnissa
Additional thanks to Tom Mueller for his expertise and support on this new feature and his support in writing this paper.
Feedback
Your feedback is valuable.
To comment on this paper, either use the feedback button or contact us at tech_content_feedback@omnissa.com.


