

A Guide to Design and Deploy Relay Servers
Overview
Introduction to Relay Server
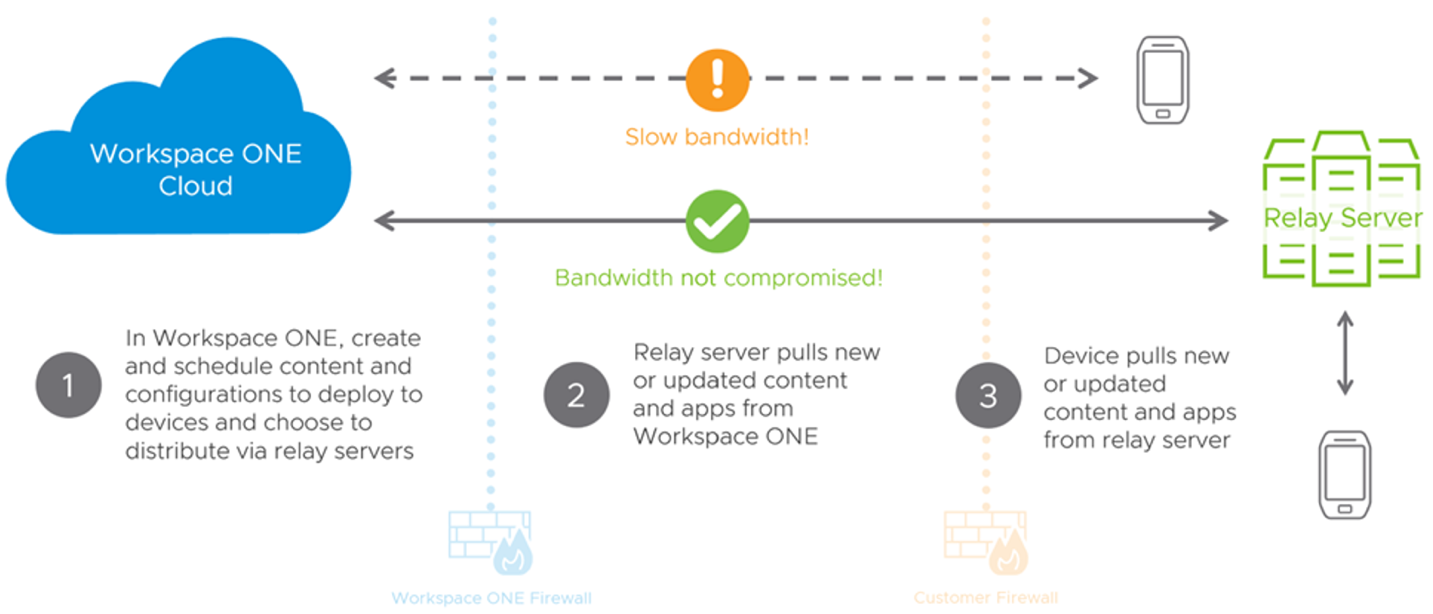
Distribution of content to managed rugged devices has long been an essential need for organizations, alongside the imperative to ensure efficient bandwidth usage. Workspace ONE UEM offers IT administrators the capability to deploy content such as applications and files to devices, utilizing either CDN or Workspace ONE servers. However, rugged devices often operate in remote or poorly connected areas, posing difficulties in app downloads via CDN or Workspace ONE URL. To address this, the Relay server serves as a proxy, enabling the publication of content to rugged devices via a Relay server which could be hosted on a Windows or Linux based Server.
Relay servers facilitate the accessibility of Product Provisioning content to local devices within the WLAN by serving as an intermediary between the Workspace ONE UEM Server and the managed endpoints. Relay server may act as an FTP / Explicit FTPS / SFTP or HTTPS server to endpoints, by distributing Product Provisioning content to the device, making it available for download and installation.
Relay servers also add redundancy through the fallback feature. If a device's relay server is down, the device will fall back to the next relay server in the hierarchy system until it finds a working server, or if needed, connects to the Workspace ONE UEM server. Since the use of a Relay Server is optional for content distribution, the device downloads apps and content directly from the Workspace ONE UEM Service responsible for content distribution if it is not deployed.
Purpose of This Tutorial
This tutorial aims to cover the fundamental concepts of Relay servers, exploring their definition, various types, and offering insights on optimal environment design to enhance content delivery efficiency through Relay servers.
Audience
This tutorial is intended for IT administrators who are aware of Workspace ONE UEM and are looking to learn about how to Design and Deploy Relay servers.
Relay Server Basics
The Relay server acts as an FTP / Explicit FTPS / SFTP / HTTPS server that distributes products to the device for download and installation. There are three ways the files are transferred from the Workspace ONE UEM console which are Pull, Push and RSCC Servers.
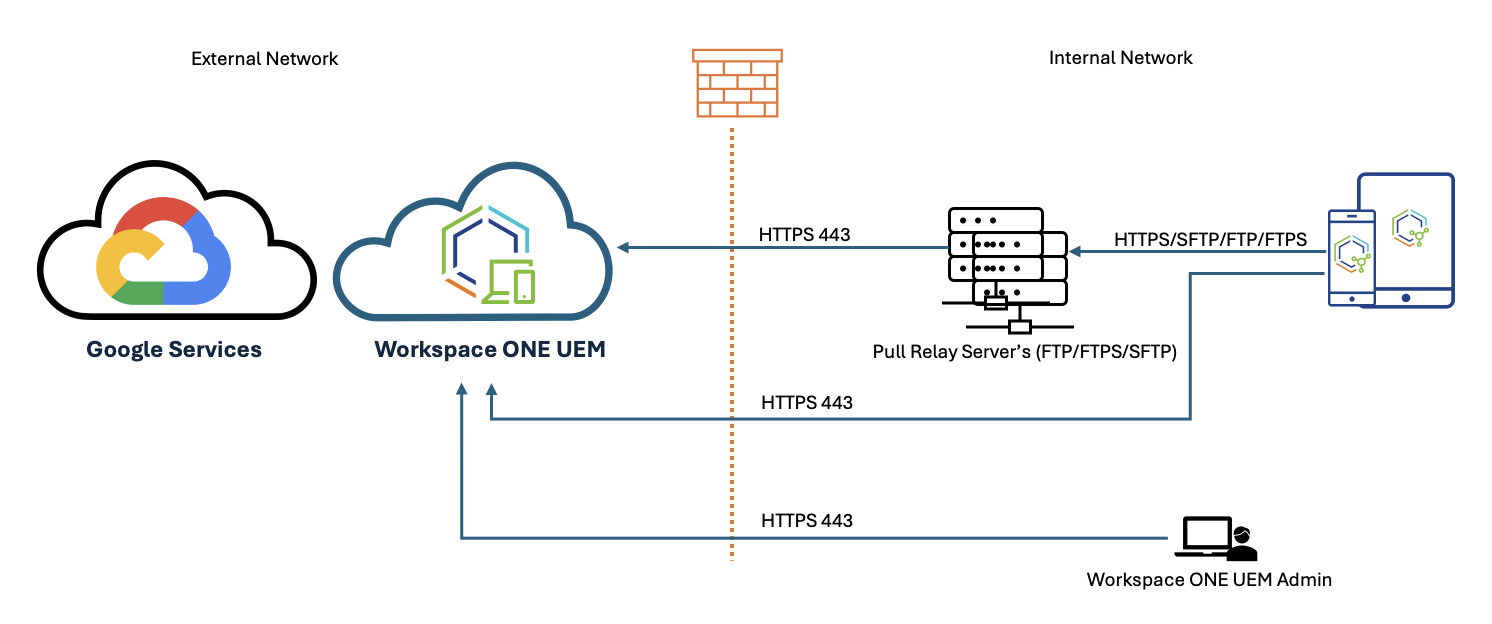
Pull Relay Server - Typically used in SaaS deployments, a pull service is installed on relay server which periodically polls for changes or addition of content on UEM console. If the Relay server finds changes or additions, then it downloads new content and applications (whether provisioned or staged) to the FTP home directory on the server through an outbound connection before pushing it to its devices. This option is ideal because the pull service itself opens the HTTPS connection to the UEM console, making the need for public connection unnecessary and not requiring any firewall ports to be opened for inbound communication.
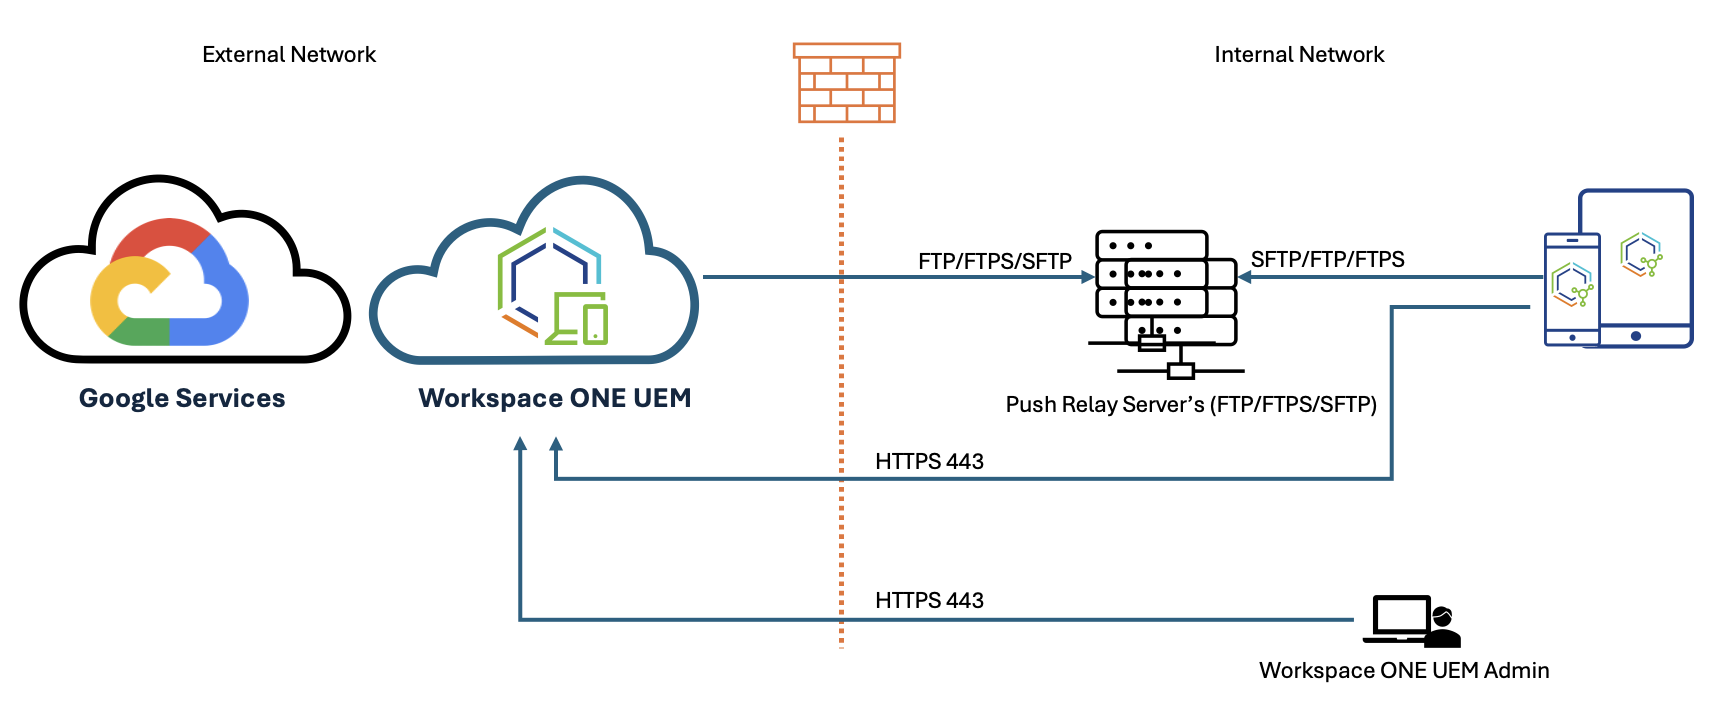
Push Relay Server- This method is typically used in on-premises deployments. The UEM console pushes content and applications contained in the product or staging to the relay server. SaaS customers interested in push relay servers must configure a public DNS to make the relay server available and allows the Workspace ONE UEM server to open the required connection to send the files. Push servers must be setup using FTP, Explicit FTPS or SFTP file servers. HTTPS is supported only for Pull Relay Servers.
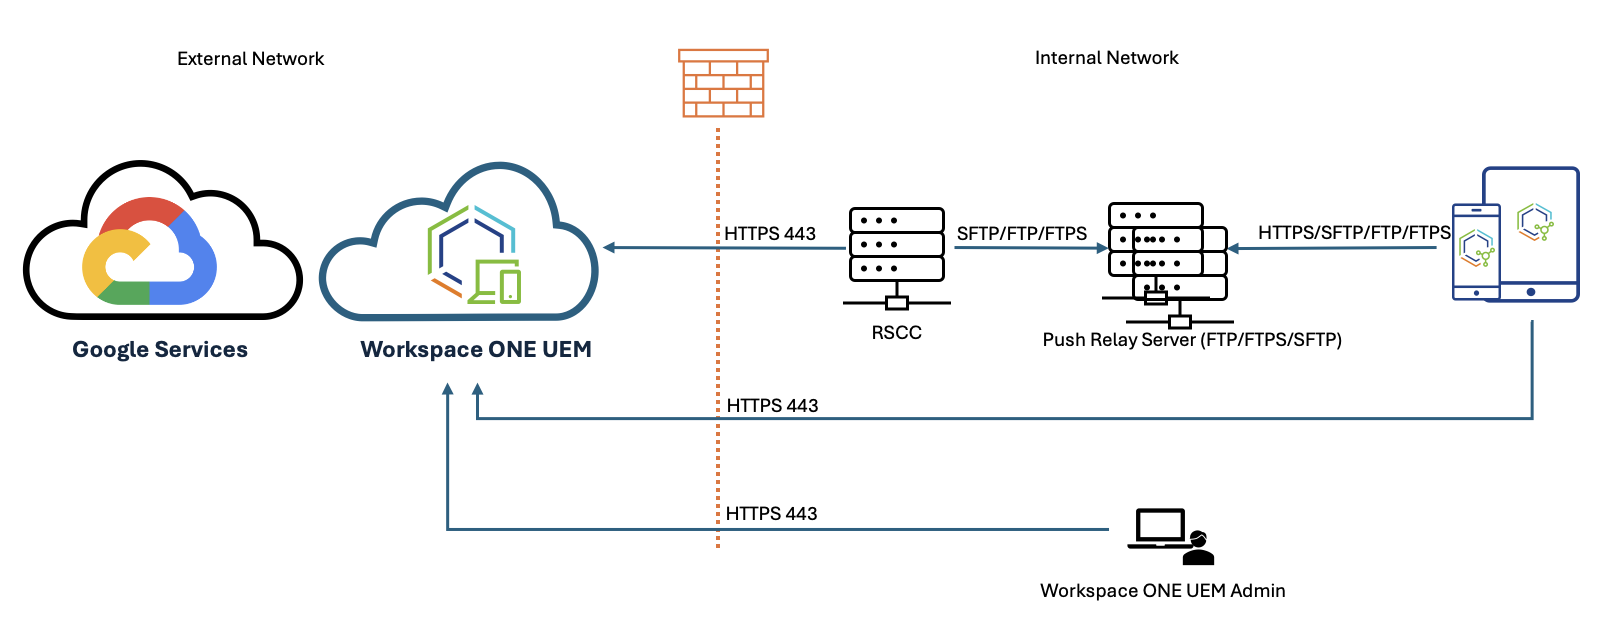
Relay Server Cloud Connector -A Relay Server Cloud Connector (RSCC) is a hybrid solution that pulls content from Workspace ONE UEM and distributes it to Push Relay servers. This design initiates an outbound connection from internal network to Workspace ONE UEM to download content for distribution.
Relay Server Communication Protocols
When setting up a Push or Pull Relay Server in the Workspace ONE UEM Console, a communication protocol needs to be selected from the "Protocol" field on both the Device Connection Screen and the Console Connection Screen (Push Relay and RSCC). This protocol determines how the Workspace ONE Intelligent Hub on the device will communicate with the local Pull or Push Relay Server, and how Workspace ONE Content Delivery Service will interact with the Push Relay Servers in the field. The selected protocol influences the security level, speed, and ease of communication setup between the client and server. Available protocol options presented in a dropdown menu include FTP, FTPS, SFTP, and HTTPS. Additionally, you must choose whether to enable Passive Mode, which is enabled by default and recommended for FTP and FTPS protocols. If Passive Mode is disabled, the FTP session will operate in Active Mode.
How to Design Relay Server
The Design Concepts will help explain on how to choose a deployment model.
Design concepts (SaaS vs On-prem)
In a Workspace ONE UEM environment, which can be hosted on either SaaS or on-premises, the deployment mode for a Relay Server is chosen accordingly. Typically, in a SaaS-based Workspace ONE UEM environment, an administrator must also manage the security policies enabled at the on-premises data center hosting relay servers. If a Push Relay server is deployed, network firewall rules must be configured to allow Workspace ONE UEM SaaS tenant to communicate with Relay Server, necessitating inbound traffic permissions, which may not be ideal. In contrast, a pull mode allows administrators to use a Relay Server by permitting only outbound communication with the Workspace ONE UEM tenant, requiring minimal firewall adjustments.
With the pre-requisites in mind an administrator can choose to select the deployment mode for a Relay server while configuring it on the UEM console.
RSCC deployment model is another option an administrator can choose to configure if the requirement is to reduce the WAN traffic toward the Workspace ONE UEM environment and have only RSCC communicate with the Workspace ONE UEM tenant and the Push Relay servers.
The other benefit of having a RSCC deployment model is to reduce the burden administrators face on upgrading pull Relay servers, since using RSCC will result in having only Push Relay servers deployed (which do not need any upgrade).
Configuring Relay Server on Workspace ONE UEM Console
To configure Relay Server, ensure the required Relay Server Pre-requisites are completed.
Configuring Push Relay Server
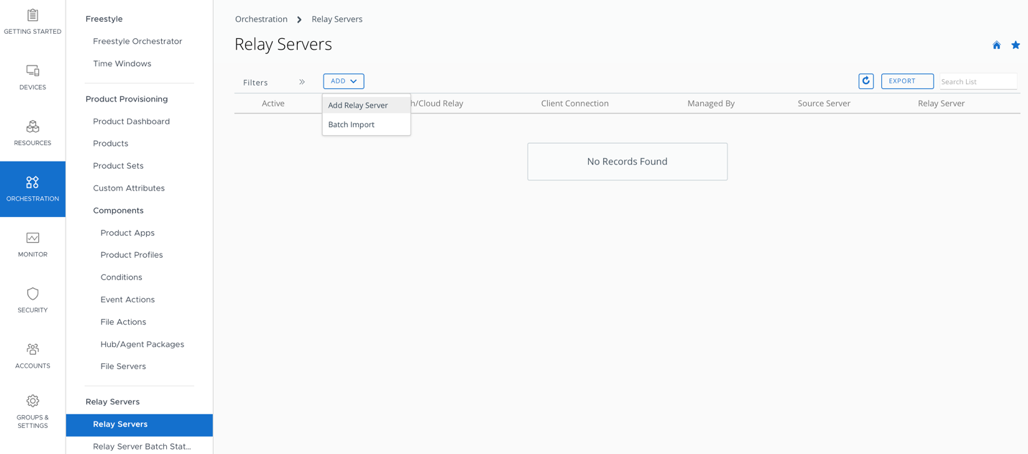
- Navigate to Orchestration>Relay Server>Add>Add Relay Server

- Configure General
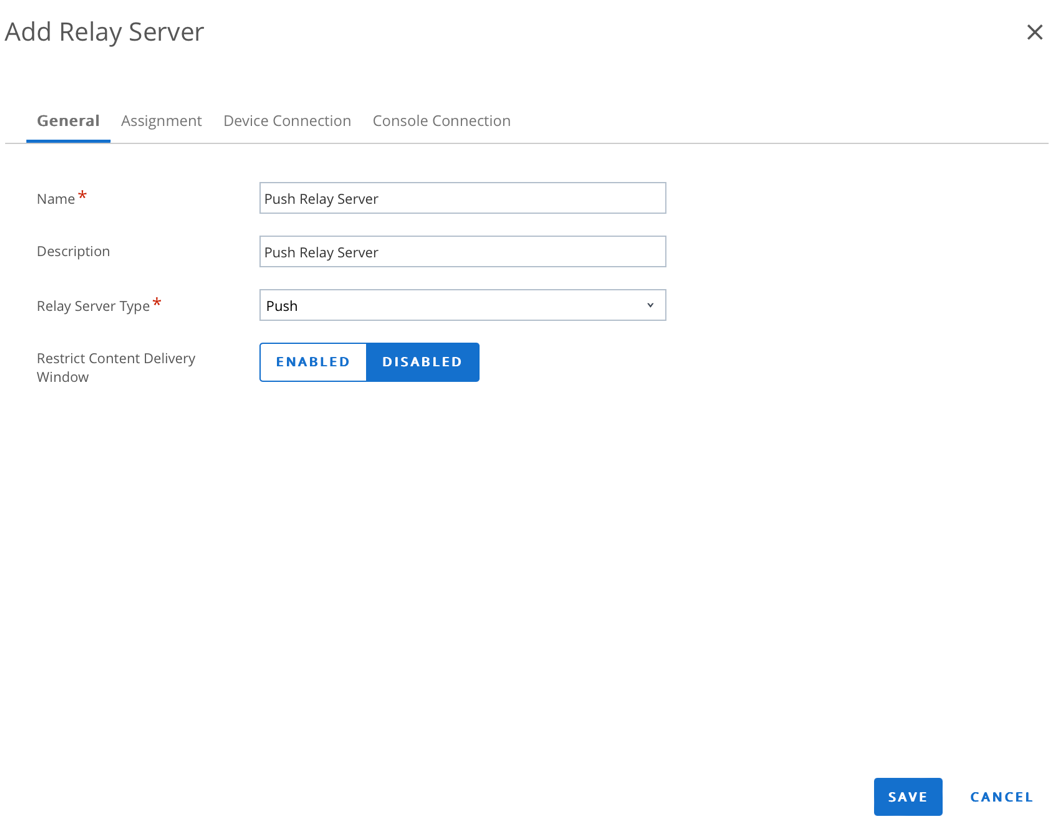
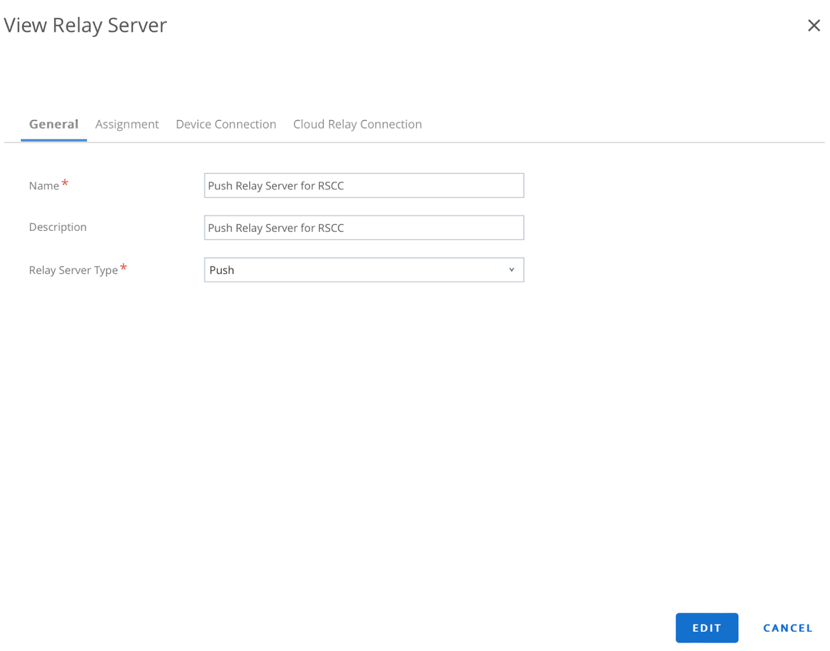
Provide the following details under General:
- Name: (like) Push Relay Server
- Description: Optional
- Relay Server Type: Select Push
- Restrict Content Delivery Window: Select either Enabled or Disabled (Enable to restrict content to be pushed to device at a given time window)
- Configure Assignment
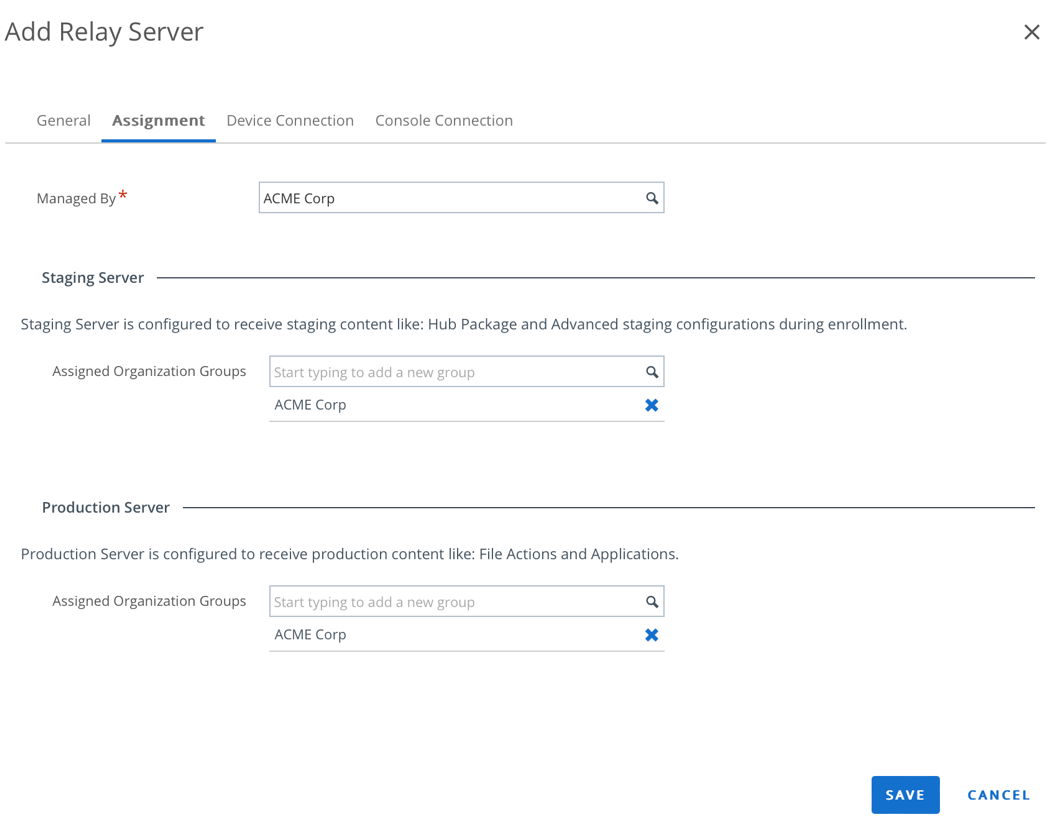
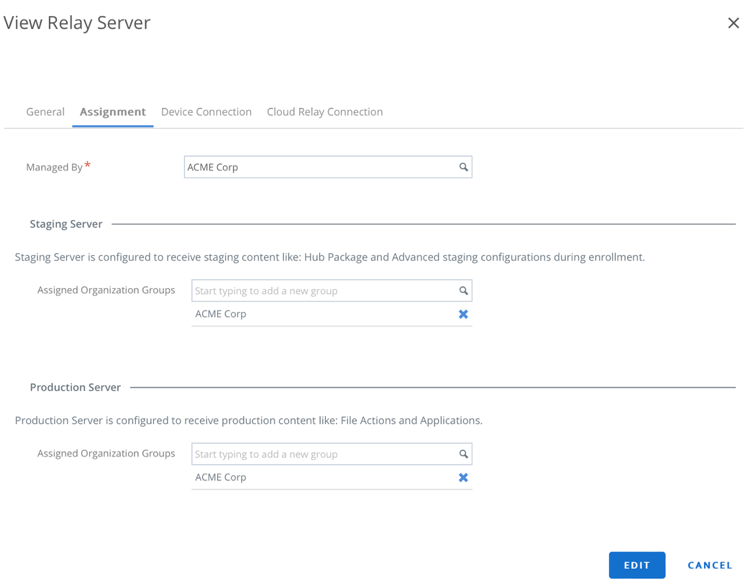
Click on Assignment tab and enter the following details:
- Managed By: Select Organization group which will manage the Relay Sever, i.e., Acme Corp.
- Staging Server-Assigned Organization Groups: Select Organization groups which will use the Relay Sever to push content such as hub packages, staging configurations, i.e., Acme Corp.
- Production Server- Assigned Organization Groups: Select Organization group which will use the Relay server to push files and applications, i.e., Acme Corp.
NOTE:
- The Staging Server setting is optional and should only be used in conjunction with a Zebra Stage Now Barcode, or Honeywell Barcode that is generated from within Workspace ONE UEM. If using a QR Code for enrollment or Zero Touch enrollment, leave this field blank.
- The Production Server setting is optional but is commonly used when content (Internal Applications or Files, such as OS Upgrades) needs to be stored locally on the Relay Server for distribution to device.
- Configure Device Connection
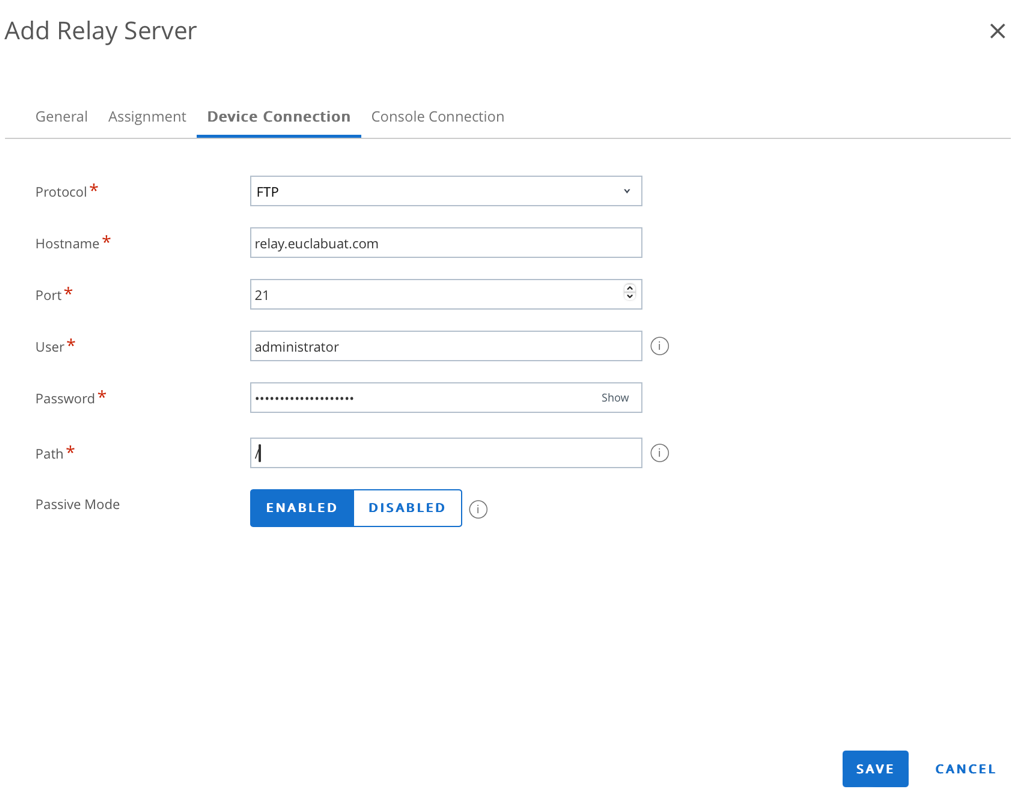
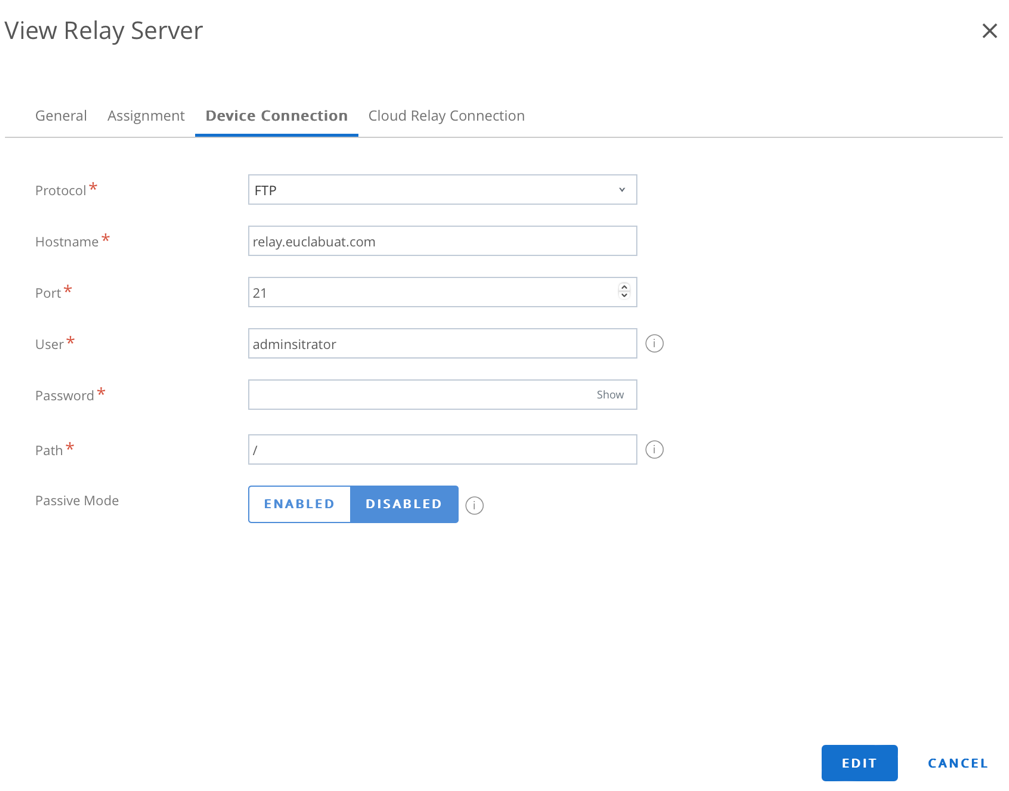
Click on Device Connection tab and enter the following details:
- Protocol -Select Protocol from drop down
- Hostname- Enter Hostname
- Port- Enter Port from drop down
- User- administrator (should have Admin privileges on Relay Server)
- Password-Enter Password
- Path-/ (Provide a path where all the files will be stored, “/” will default to root folder of the Relay Server)
- Configure Console Connection
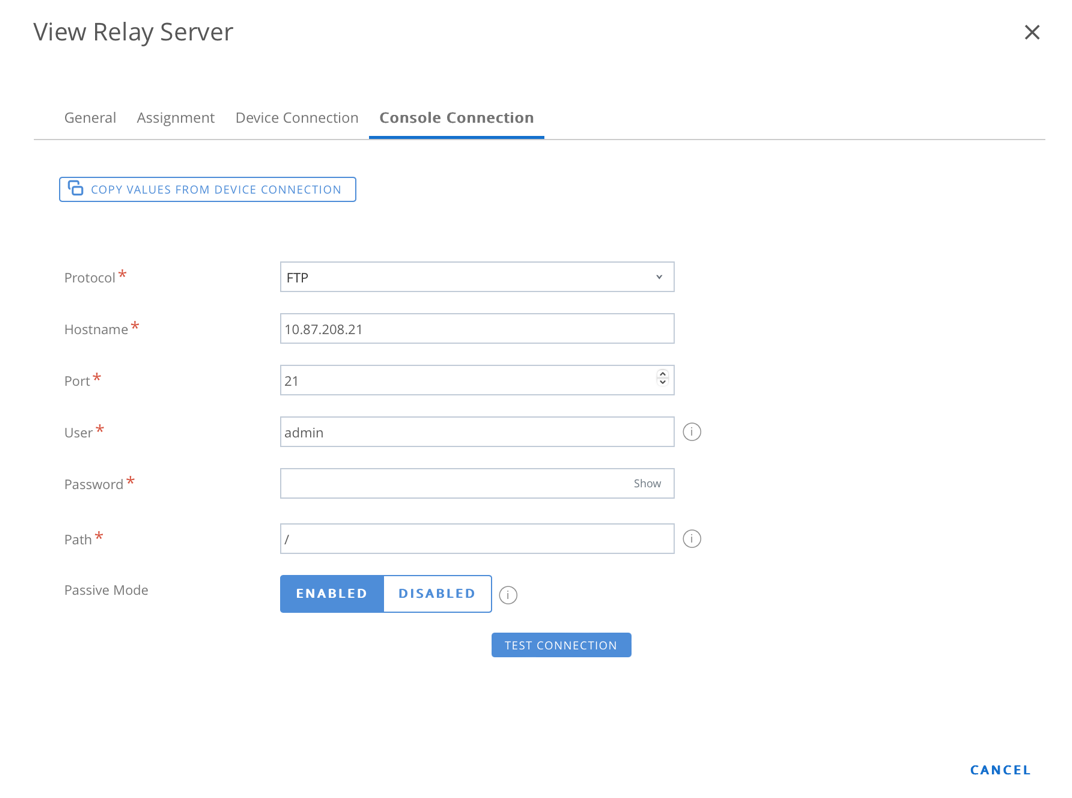
Click on Console Connection tab and enter the following details:
- Protocol -Select Protocol from drop down
- Hostname- Enter Hostname
- Port- Enter Port from drop down
- User- admin (should have Admin privileges on Relay Server)
- Password- Enter Password
- Path- / (Provide a path where all the files will be stored, “/” will default to root folder of the Relay Server)
Configuring Pull Relay Server
- Navigate to Orchestration>Relay Server>Add
- Configure General
Provide the following details under General,
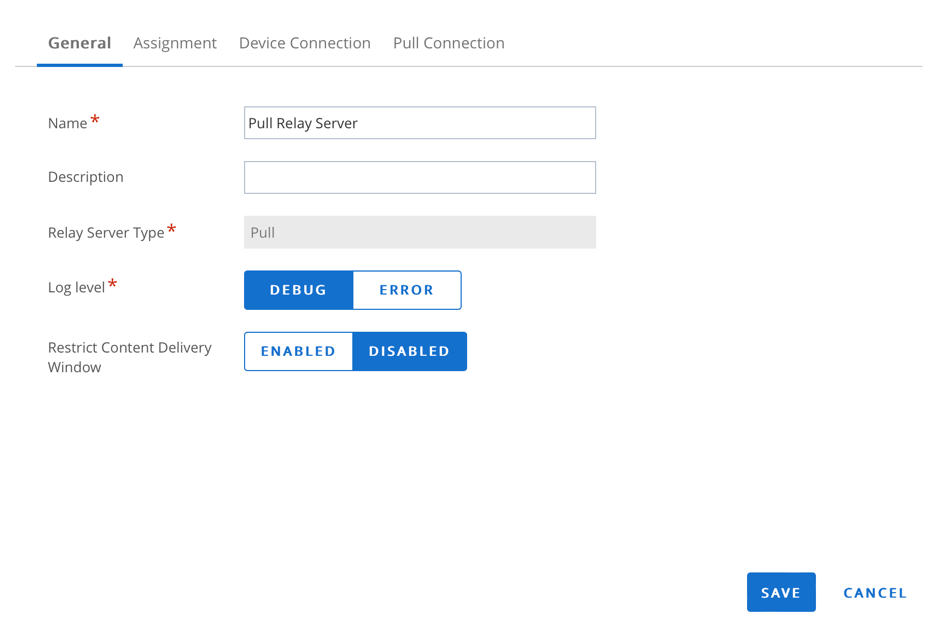
- Name: (like) Pull Relay Server
- Description: Optional
- Relay Server Type: Pull
- Log Level: Set to Either Debug or Error
- Restrict Content Delivery Window: Enable to limit content delivery during a specific time window
- Configure Assignment
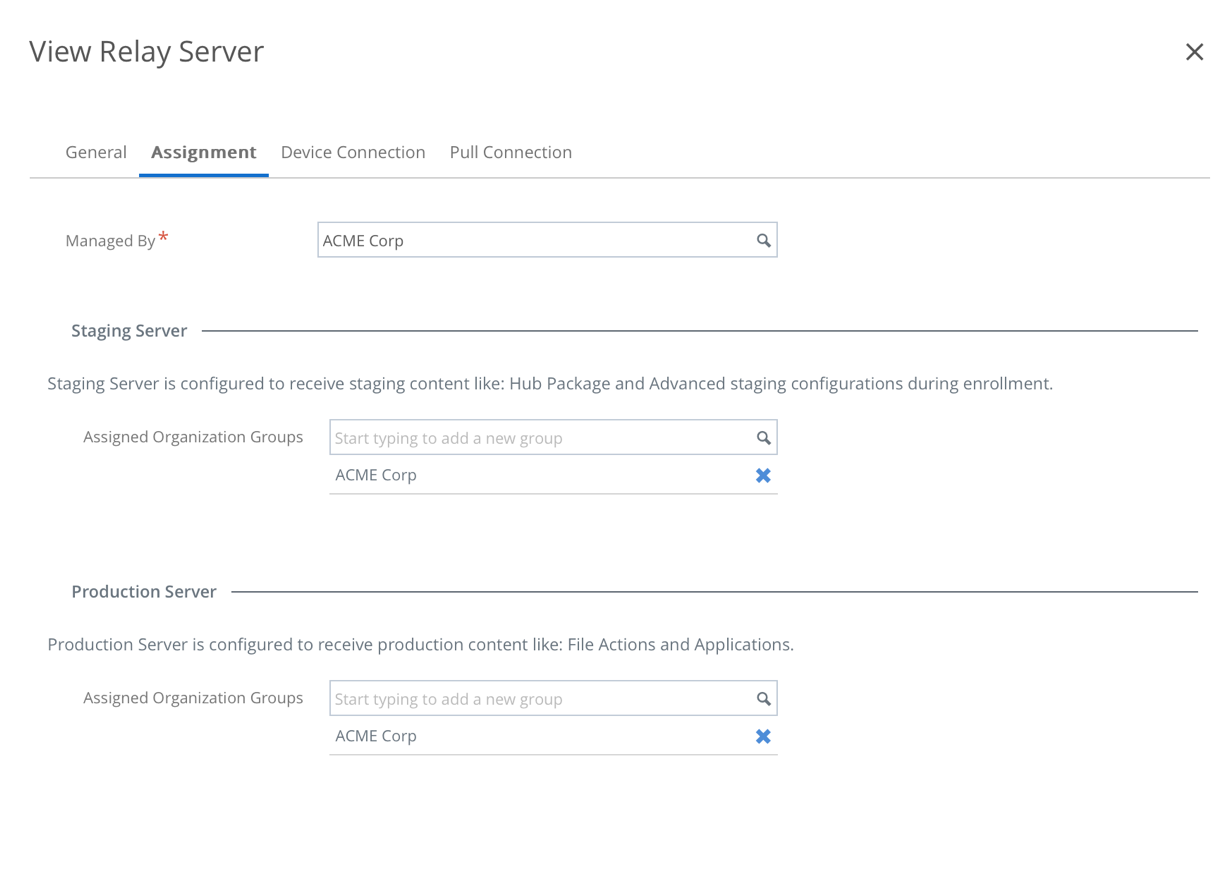
Click on Assignment tab and enter the following details,
- Managed By: Select Organization group which will manage the Relay Sever
- Staging-Assigned Organization Group: Select Organization Group
- Production Server- Assigned Organization Group: Select Organization Group
NOTE:
- The Staging Server setting is optional and should only be used in conjunction with a Zebra Stage Now Barcode, or Honeywell Barcode that is generated from within Workspace ONE UEM. If using a QR Code for enrollment or Zero Touch enrollment, leave this field blank.
- The Production Server setting is optional, but is commonly used when content (Internal Applications or Files, such as OS Upgrades) needs to be stored locally on the Relay Server for distribution to devices .
- Configure Device Connection
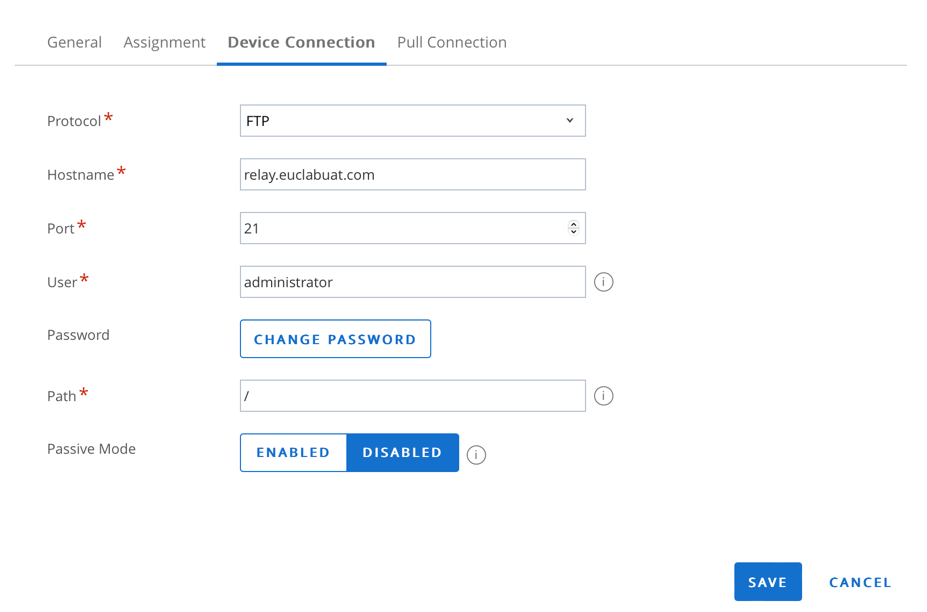
Click on Device Connection tab and enter the following details,
- Protocol: Select Protocol from dropdown
- Hostname: Enter the Hostname or IP address of the Relay Server, like relay.euclabuat.com
- Port: Enter Port
- User: Enter User
- Password: Enter Password
- Path: Enter Path for relay server (enter root directory path)
- Passive Mode: Select either Enabled or Disabled
- Passive Mode: Server will select port for data transfer
- Active Mode: Both server and device will use pre-defined port for data transfer
- Configure Pull Connection
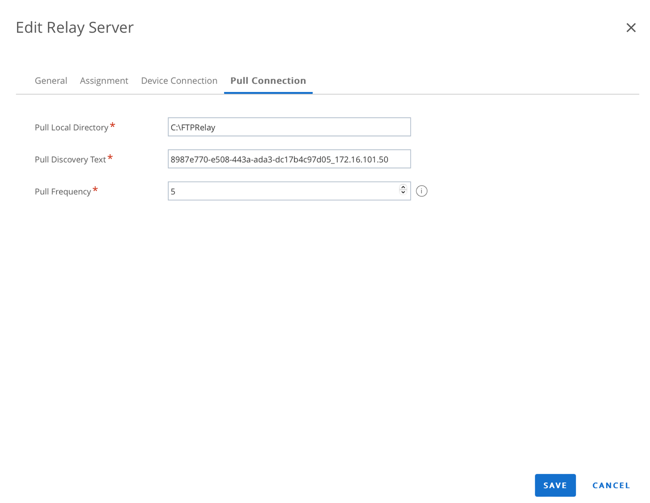
Click on Pull Connection tab and enter the following details,
- Pull Local Directory: Enter Directory path
- Pull Discovery Text: Enter Pull discovery text (enter the pull discovery text which can be copied from the appsettings.json file on the Relay Server)
- Pull Frequency: Enter Frequency
- Click Save to complete the configuration
Configure RSCC
To configure RSCC ensure the Relay Server Cloud Connector setting has been enabled, it will be in Disabled state by default.
- If not enabled navigate to Groups & Settings > All Settings > Admin > Product Provisioning
- Select ENABLE to activate Relay Server Cloud Connector settings

- Navigate to Orchestration>Relay Server>Add>Add Relay Server
- Configure General
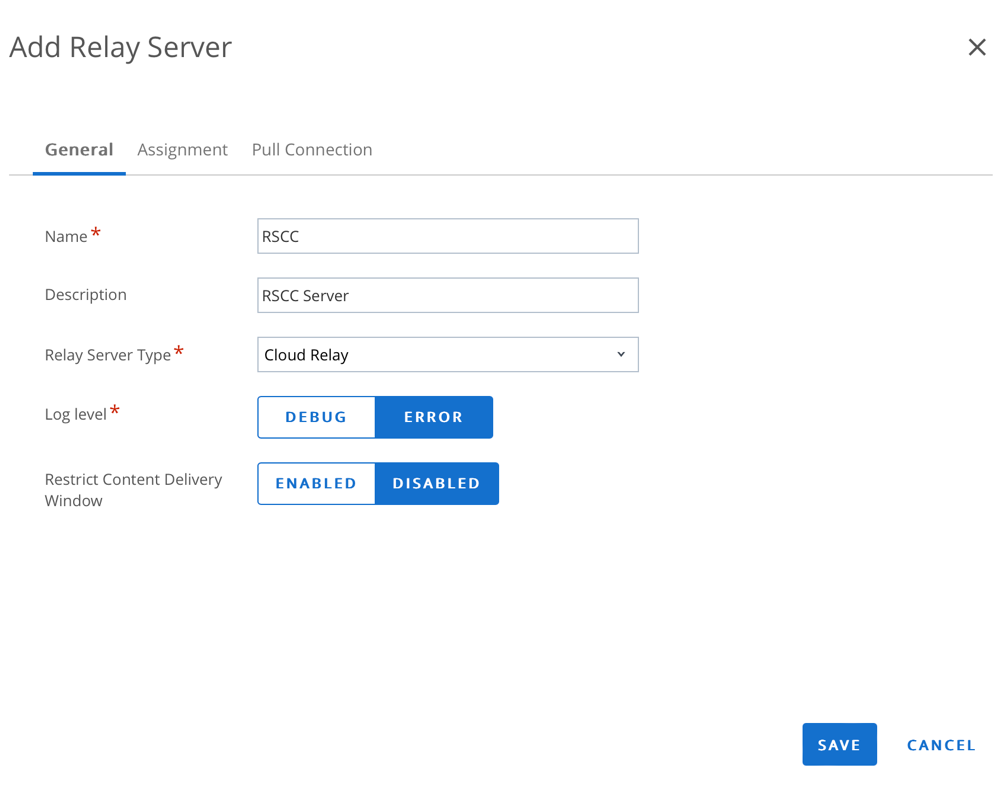
Provide the following details under General:
- Name: Enter Name
- Description: (Optional) RSCC Server
- Relay Server Type: Select Cloud Relay
- Log Level: Set to either Debug or Error
- Restrict Content Delivery Window: Enable to limit content delivery during a specific time window
- Configure Assignment
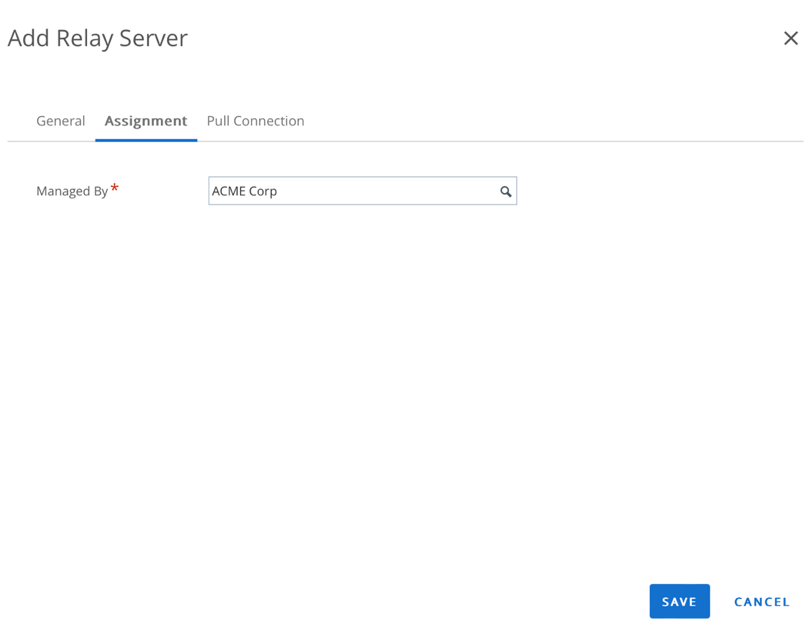
Click on Assignment tab and enter the following details:
- Managed By: Select Organization Group which will be used for managing Relay Server
- Configure Pull Connection
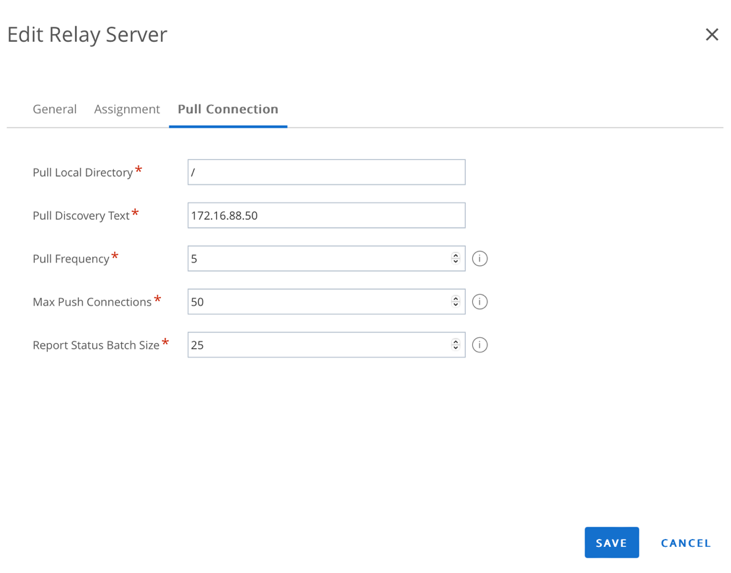
Click on Pull Connection tab and enter the following details:
- Pull Local Directory: Enter Directory path
- Pull Discovery Text: Enter Pull discovery text (enter the pull discovery text which was entered while configuring Relay Server)
- Pull Frequency: Enter Frequency
- Click Save to complete the configuration
Configure Push Relay Server for RSCC Server
- Navigate to Orchestration>Relay Server>Add
- Configure General
Provide the following details under General:
- Name: Enter Name
- Description: Add a Description
- Relay Server Type: Select Push from drop down
- Configure Assignment
Click on Assignment tab and enter the following details:
- Managed By: Select Organization group which will manage the Relay Sever
- Assigned Organization Group: Select Organization Group
- Staging-Assigned Organization Group: Select Organization Group
- Production Server- Assigned Organization Group: Select Organization Group
NOTE:
- The Staging Server setting is optional and should only be used in conjunction with a Zebra Stage Now Barcode or Honeywell Barcode that is generated from within Workspace ONE UEM. If using a QR Code for enrollment or Zero Touch enrollment, leave this field blank.
- The Production Server setting is optional but is commonly used when content (Internal Applications or Files, such as OS Upgrades) needs to be stored locally on the Relay Server for distribution to devices.
- Configure Device Connection
Click on Device Connection tab and enter the following details,
- Protocol: Select Protocol from dropdown
- Hostname: Enter the Hostname or IP address of the Relay Server
- Port: Enter Port
- User: Enter User
- Password: Enter Password
- Path: Enter path for relay server (enter root directory path)
- Passive Mode: Select either Enabled or Disabled
- Configure Cloud Relay Connection
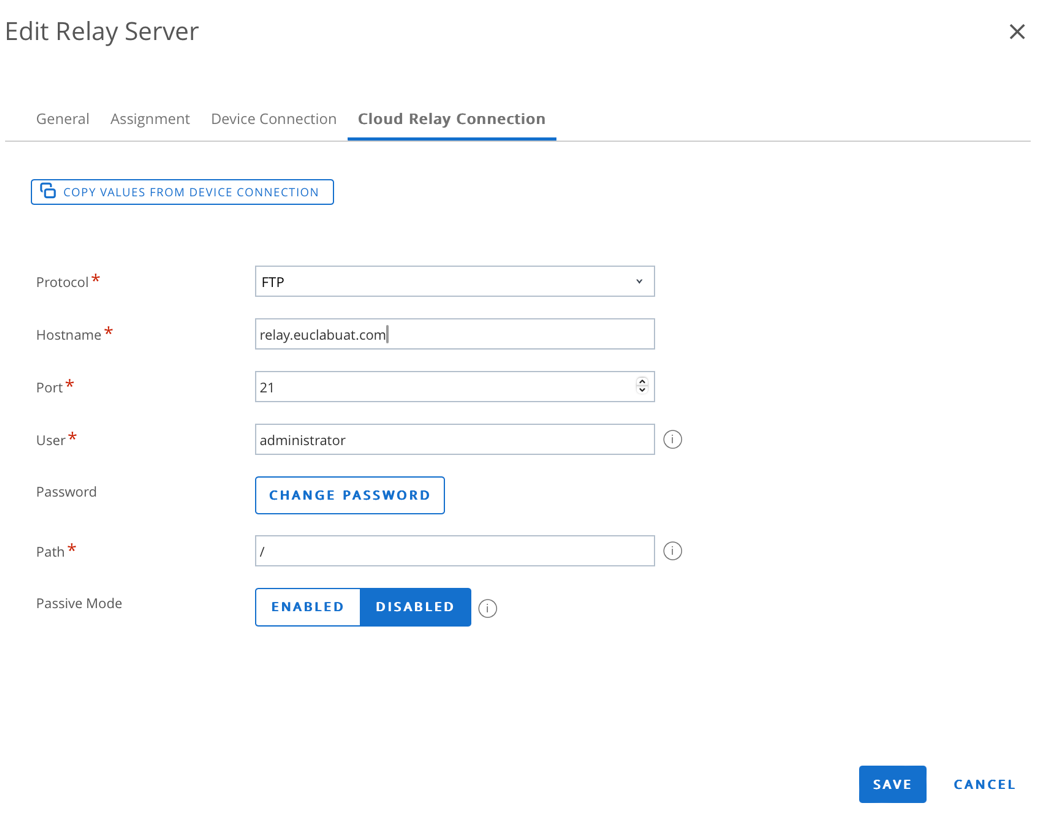
Click on Cloud Relay Connection tab and enter the following details:
- Protocol: Select Protocol from drop down
- Hostname: Enter the Hostname or IP address of the Relay Server
- Port: Enter Port
- User: Enter User
- Password: Enter Password
- Path: Enter Path for relay server (enter root directory path)
- Passive Mode: Select either Enabled or Disabled
- Complete the configurations by Clicking on Save
Deploying Relay Server
A Relay Server deployment requires an FTP service which could be configured by using IIS or FileZilla. We will be using IIS for configuring FTP.
Enable FTP Services On IIS
Step to enable FTP On IIS is detailed below:
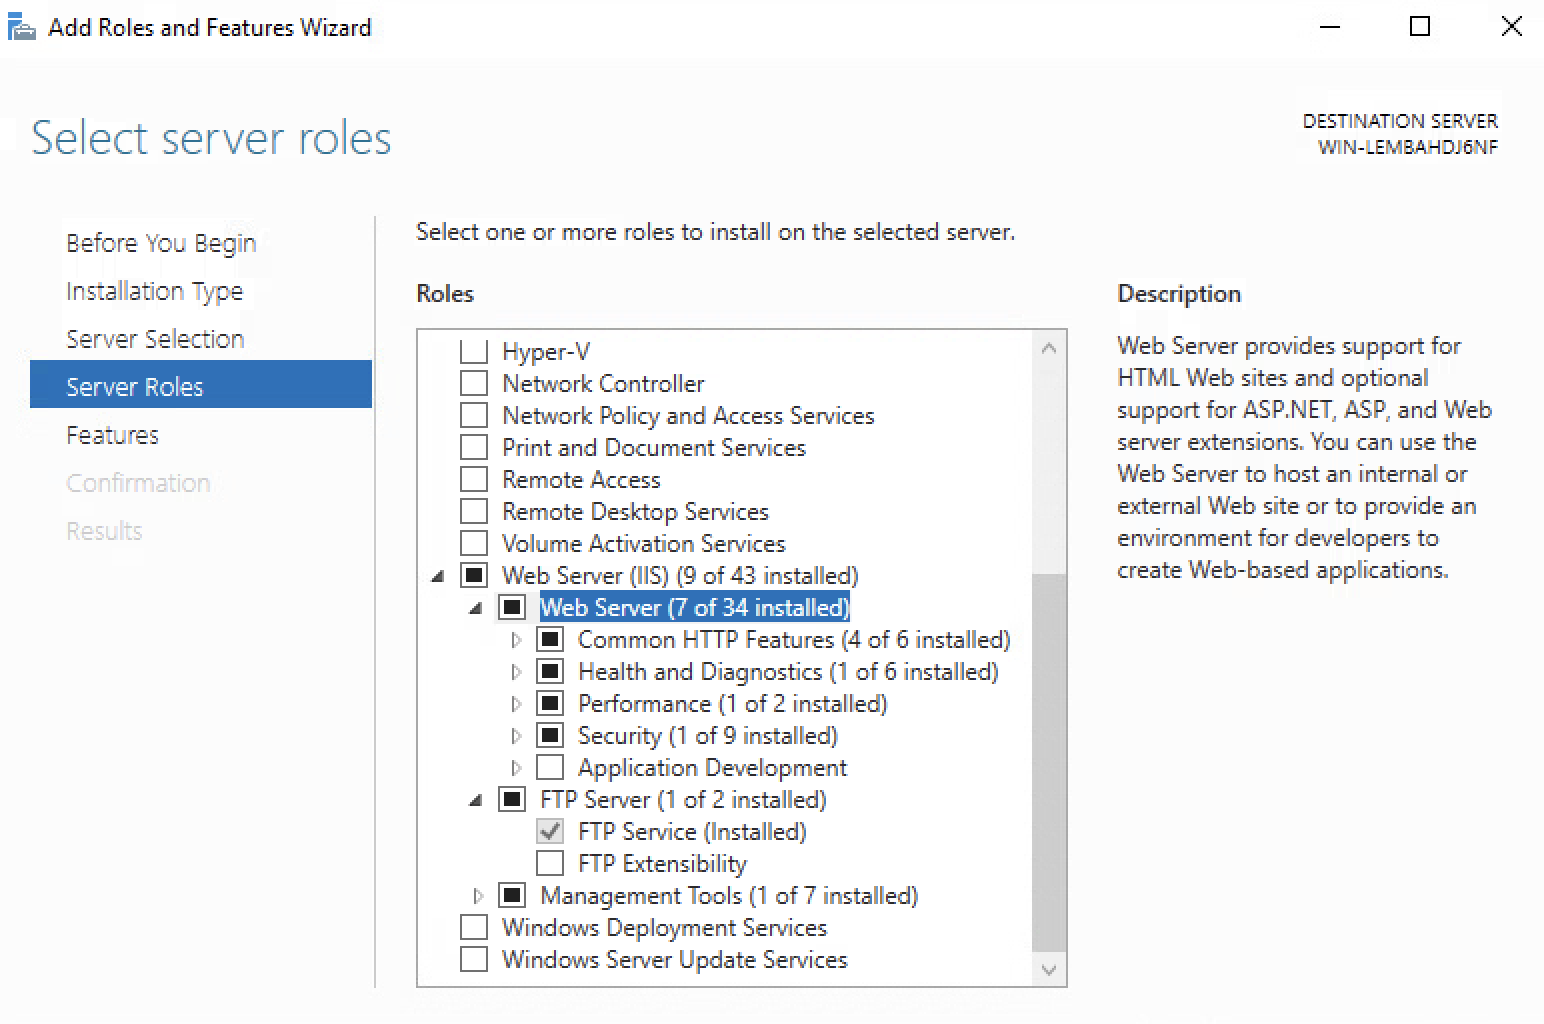
- Launch Server Manager
- Select Add Roles and Features
- Click on Next, till you reach Server Roles
- Select Web Server (IIS) and enable IIS
- Select FTP Server
- Click on Next
- Click Install
- Click Close when completed
Configuring FTP server on IIS
Follow the steps below to configure a FTP site on IIS:
- Launch IIS
- Right Click on Sites and select Add FTP Site
- Enter a Site name
- Enter a path
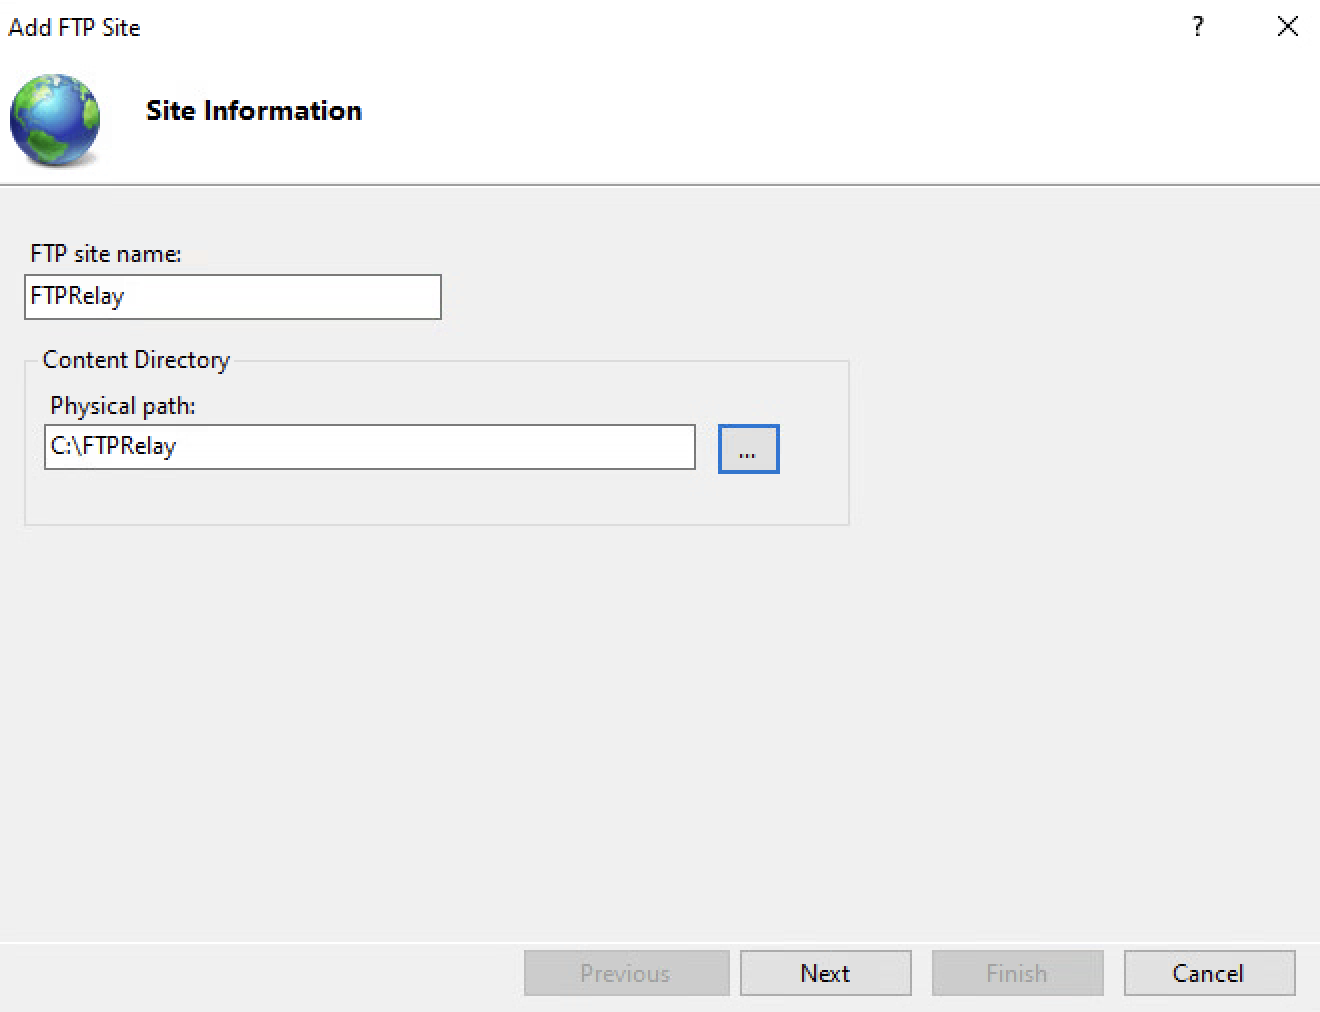
- Click on Next
- Select No SSL under SSL settings, unless you are configuring SSL for FTP Site then select Allow SSL

- Click on Next, Select Basic under Authentication
- Select Specified users and enter the username which has admin privileges to the server.
- Enable Read and Write Permission
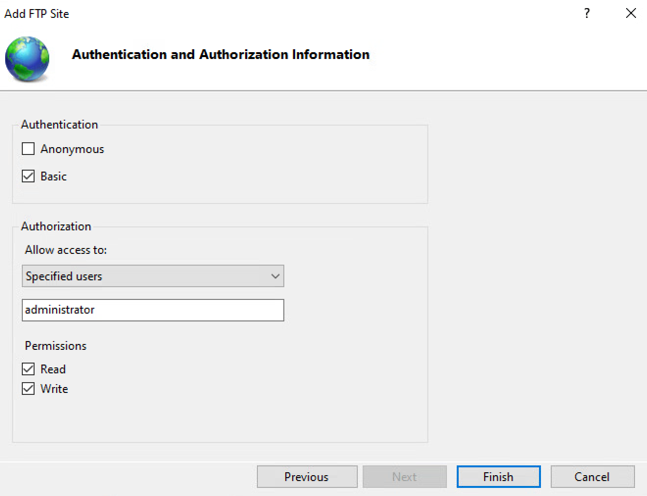
- Click on Finish to complete the setup
Carry out Test connection once the Push Relay Server is configured and the Workspace ONE UEM console side configurations are completed.
Installing Pull Relay Server configuration
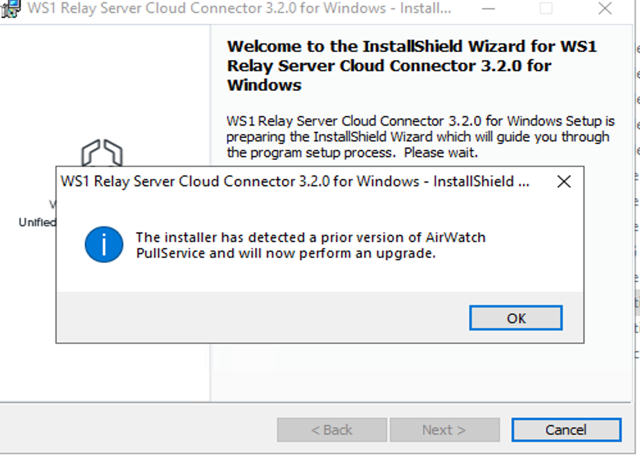
Pull Relay Servers require an additional Services called as the AirWatch Pull Services to pull content from UEM console. To install the configuration using the following steps.
- Login to Workspace ONE UEM Console and select Group & Settings > All Settings > System >Enterprise Integration > Pull Service Installers
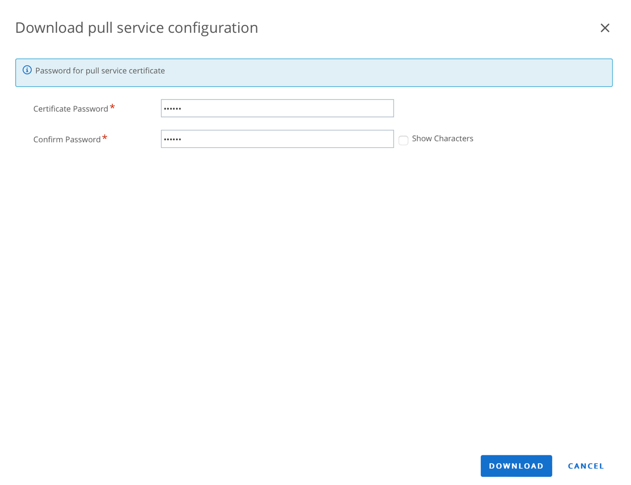
- Click on Generate if the Download Configuration is not available
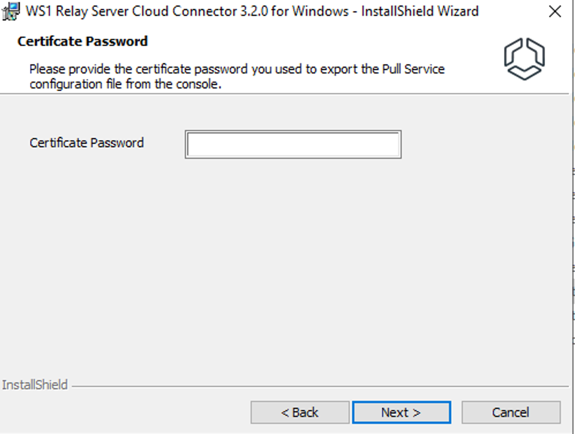
- Enter Certificate Password and Download
- Download either Windows or Linux Pull Service Installer based on which OS type you want to use to host Relay services
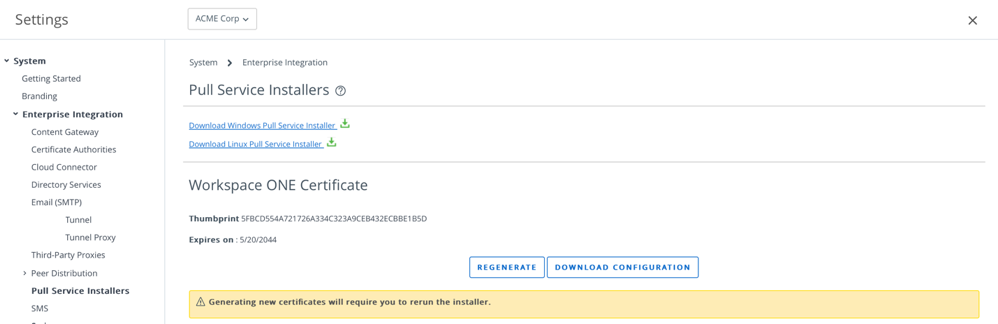
Note: This guide showcases the Windows Pull Service Installation
- Place the Windows Pull Installer and the configuration file on the Windows Server
- Run the installer and accept the prompts seen during the installation
- When prompted for Certificate password, enter the Password used to download the configurations on UEM console
- Enter Proxy server details if Relay Server requires a proxy to connect to Workspace ONE UEM Console
- When prompted for Custom Discovery Text, you have two options.
- Option A: Enter a custom text, the installer will prepend a GUID to it and save it in the appsettings.json file. (It can be found in the install directory of the Relay Server under the bin folder which can be copied as it needs to be entered in the UEM console for relay discovery to work)
- Option B: Leave it blank, the discovery of Relay server is made using the servers IP and MAC address
- Click on Install
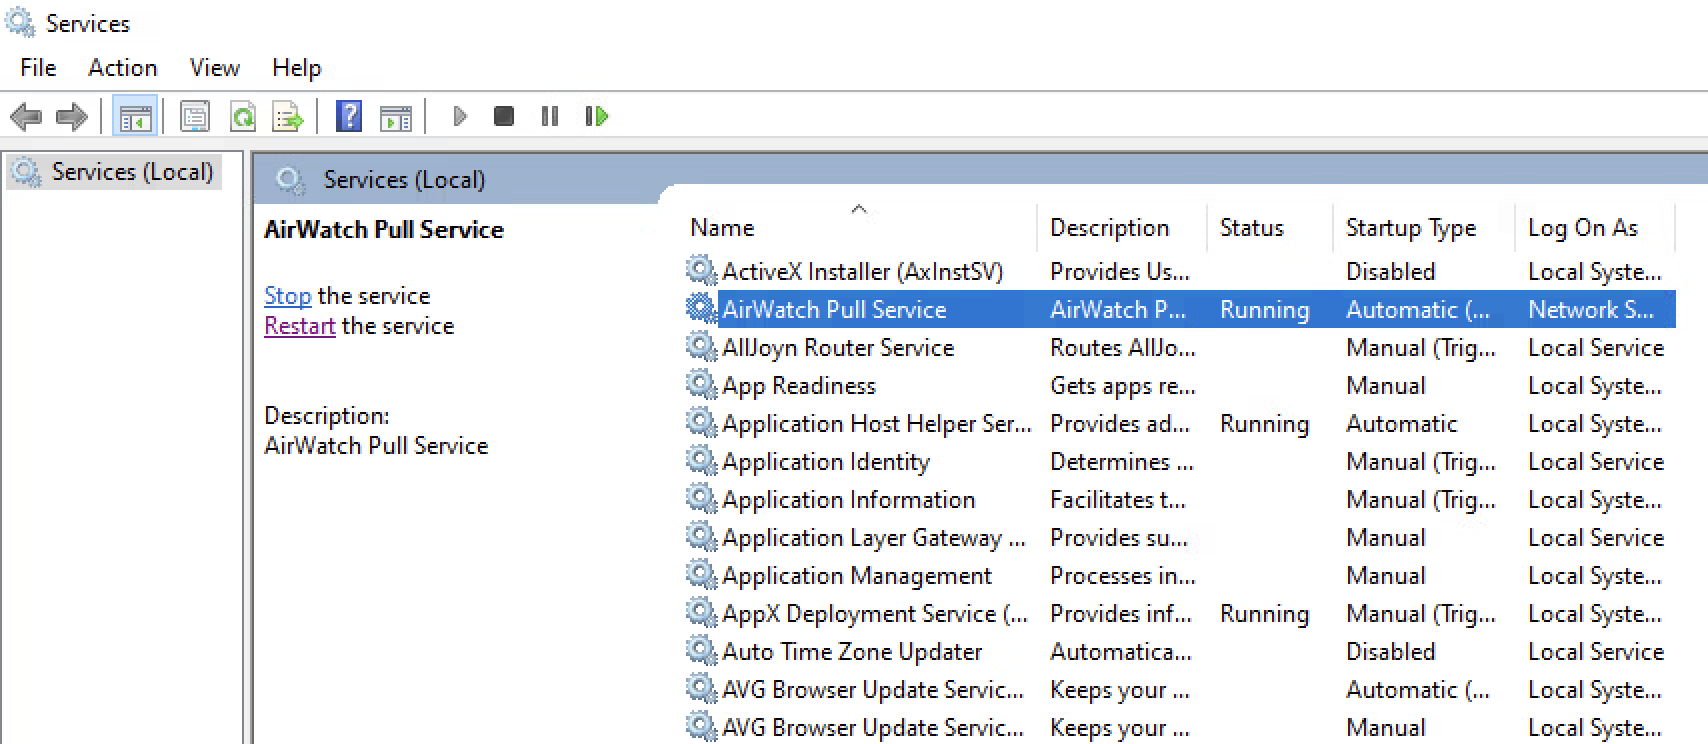
Once the Relay Server is installed, navigate to Services and check if AirWatch Pull Service is in running Status.
- Check the Relay Server Status on Workspace ONE UEM Console

- Logs can be checked at Installed Drive (Like C, D) > AirWatch > Logs >PullServicelog

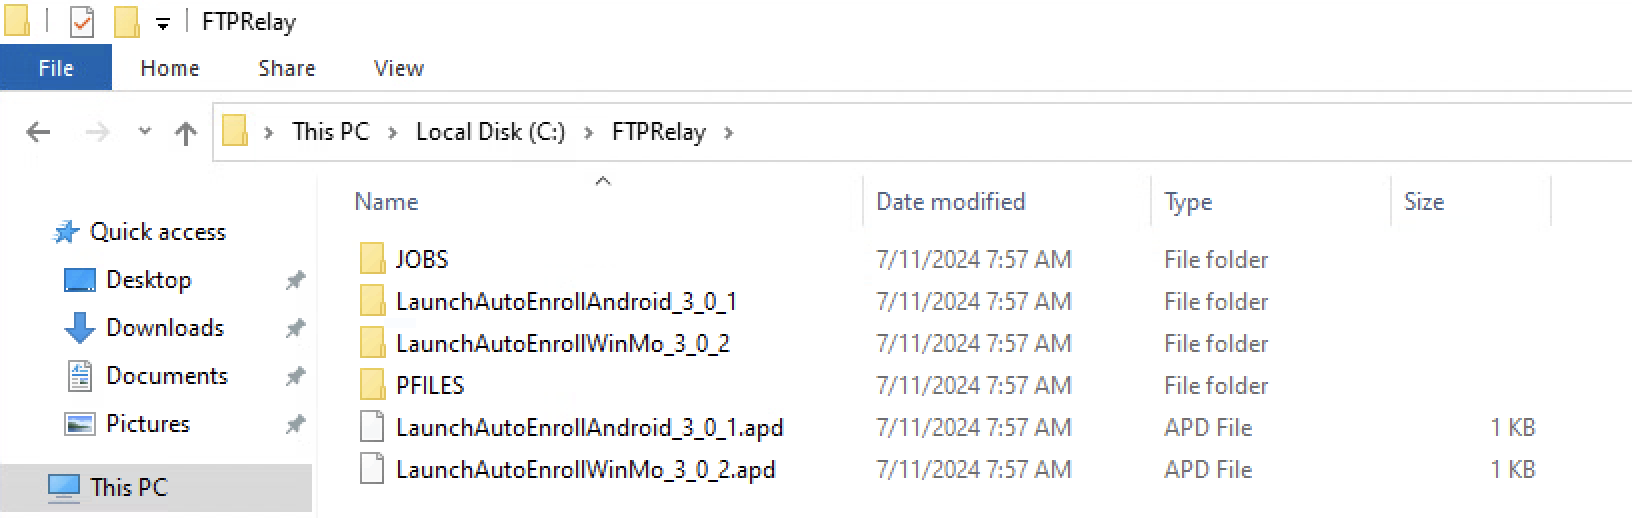
- Files and Products download by the Relay Server can be viewed in the FTP directory
Testing Relay Server
Relay Server test connection displays a lot of information which is helpful for an administrator to check if the deployed Relay server is healthy and functional.
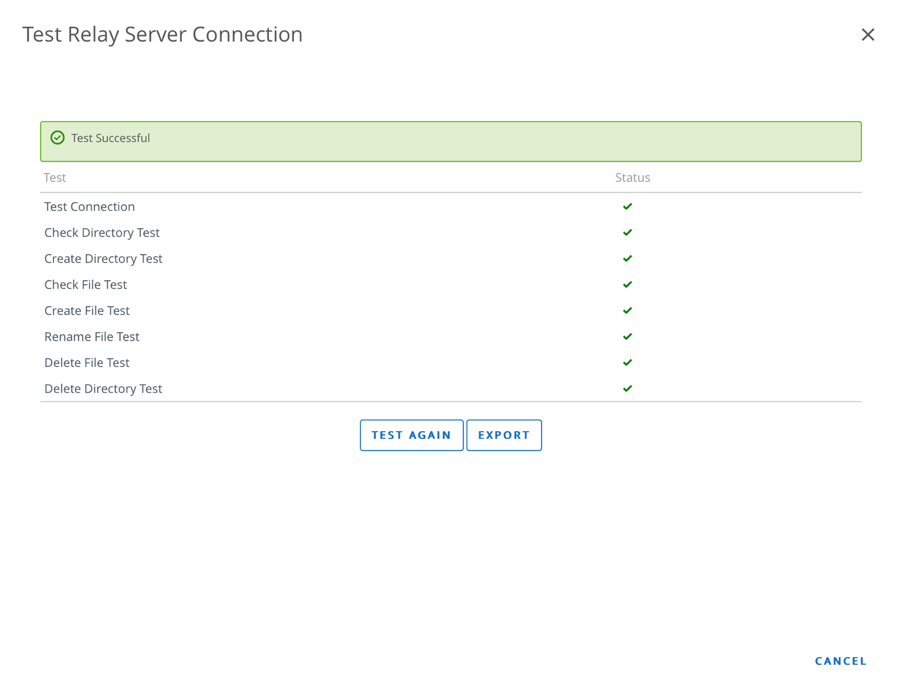
The Test carried out on a Relay server are,
- Test Connection – Testing the connectivity between Workspace ONE UEM Console and Relay Server
- Check Directory Test -This test check’s if the Console is able to access the Directory created on the Relay Server
- Create Directory Test -This test check’s if the Console is able to create a directory on the Relay Server
- Check File Test -This test check’s if the Console is able to access the Files on the Relay Server
- Create File Test -This test check’s if the Console is able to create a File on the Relay Server
- Rename File Test -This test check’s If the Console is able to rename a File on the Relay Server
- Delete File Test – This test check’s If the Console is able to delete a File on the Relay Server
- Delete Directory Test – This test check’s if the Console is able to delete a Directory on the Relay Server
Content Flow in Relay Server
Content Seeding
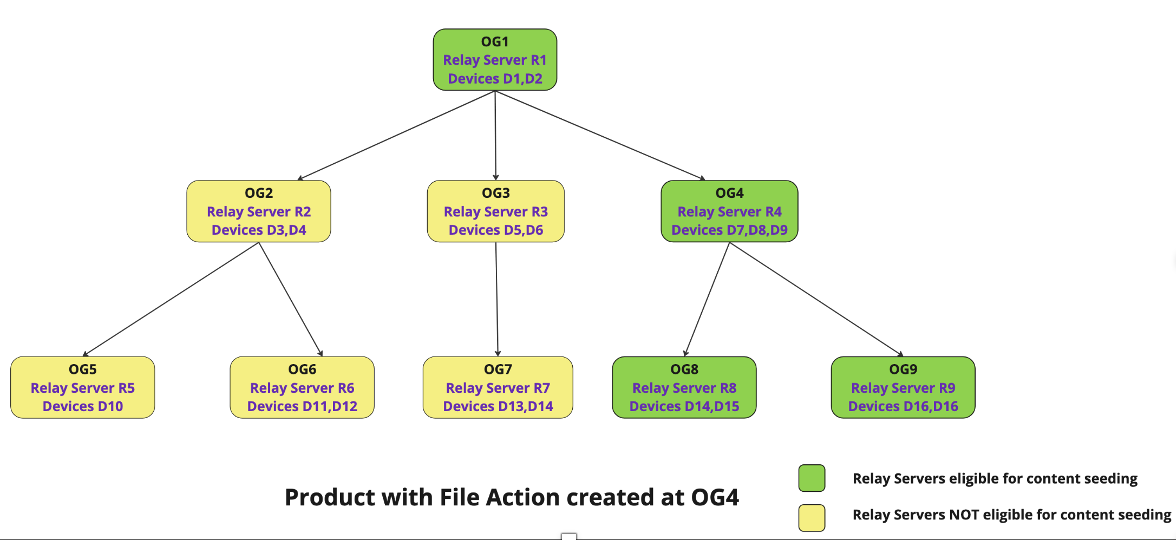
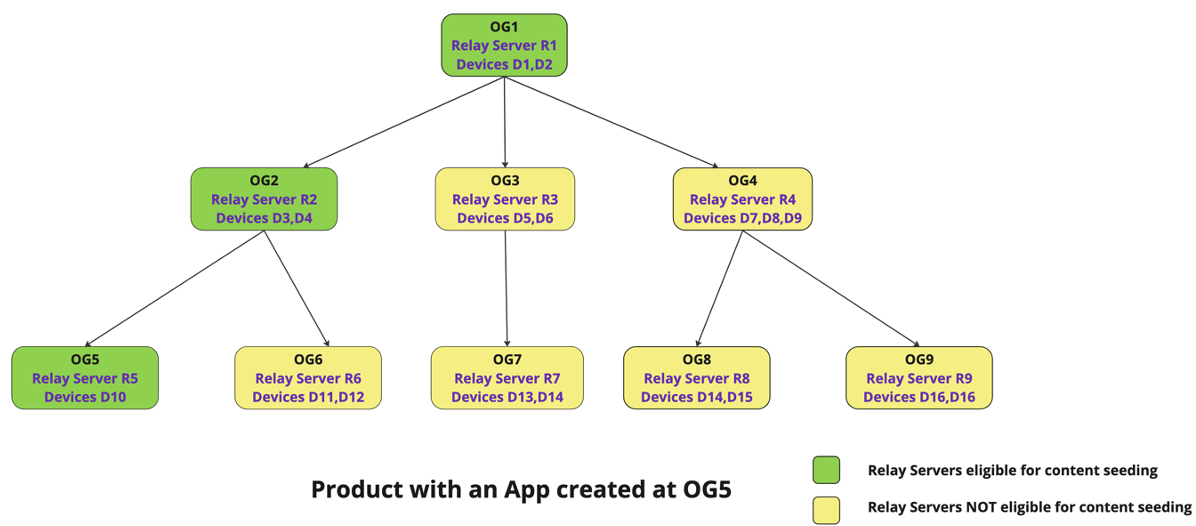
A Product created at an Organization Group will be sent to all the Relay Servers configured in its Child Organization Group and the Parent Organization Group.
e.g. A File Action created at OG4 would seed the content to four Relay Servers i.e., R4, R8, R9 and R1.
A Product with an App created at OG5 would seed the content to only three Relay Servers, i.e. R5, R2, and R1.
Content Fetching
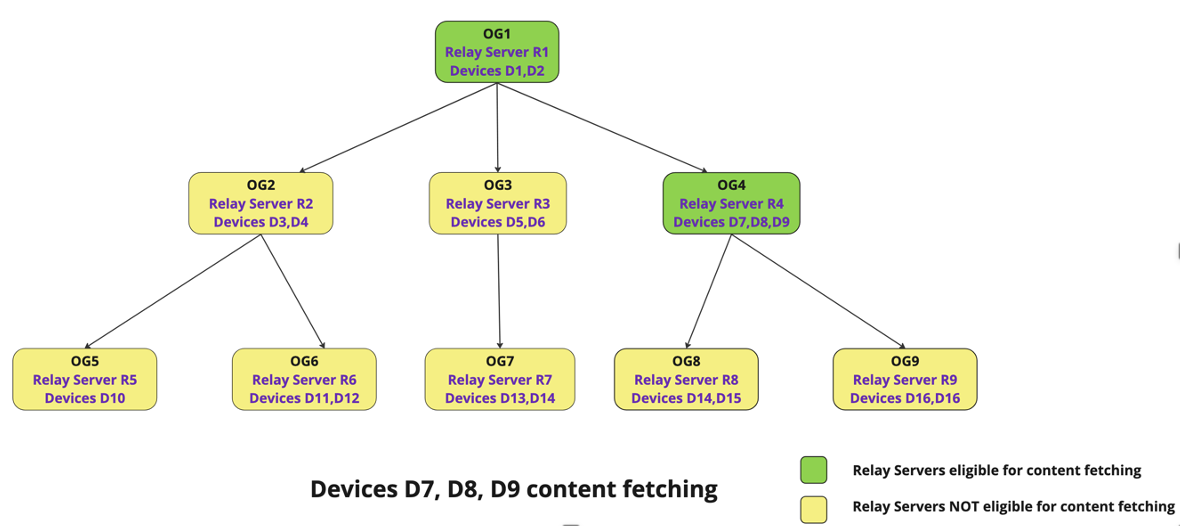
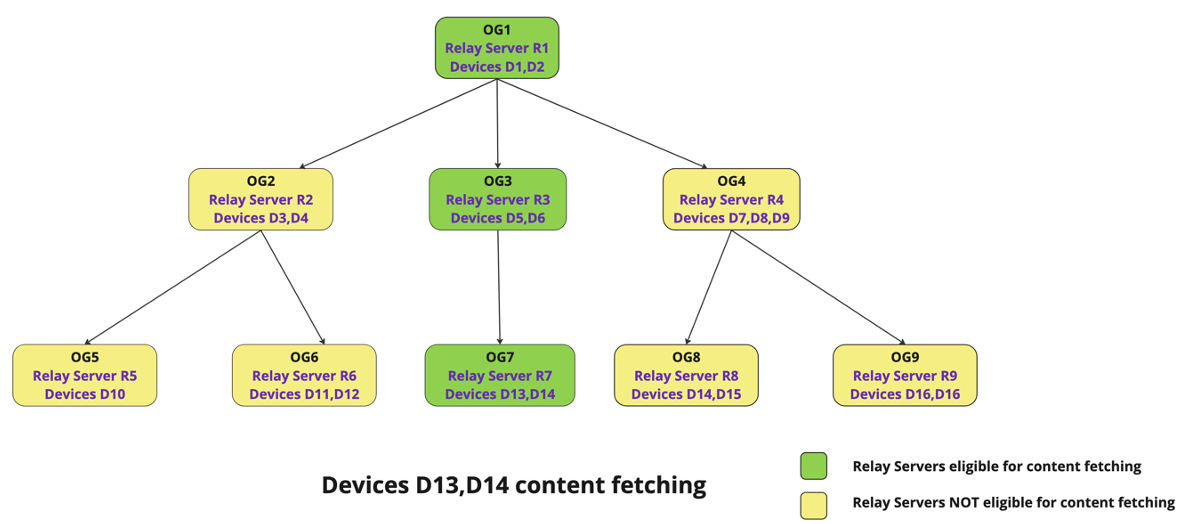
The device will look for content in the Relay Server if it exists in its own Organization Group. If the Relay Server does not exist or is nonfunctional, it will look for content in the Relay Servers configured at the Parent Organization Groups.
For example, Devices D7, D8, and D9 enrolled in OG4 will always try to fetch the content from the Relay Server R4; if R4 is non-functional, they will try to fetch it from R1.
Devices D13 and D14 enrolled at OG7 will always try to fetch the content from R7. If R7 is non-functional, it will connect with R3 and R1 in that specific order.
Migrating and Upgrading Relay Server
Relay Server Upgradation
Push Relay Server
Customers can upgrade the FTP servers in the case of Push Relay Servers. This doesn’t require any further change or re-configuration from UEM. However, the relay server availability will be disrupted briefly when the FTP server is upgraded.
Pull Relay Server
Customers can upgrade the Pull service running on the Pull Relay Servers. Please follow the following steps to upgrade the Pull service.
- Click on the Pull Service Installer on the machine on which the Relay Pull service is installed. Click on the install button. The Pull Service Version will be upgraded if an older version is installed.
- It will ask for the Certificate Password created while configuring Pull Relay Service in UEM.
- Follow the steps further to finish the installation process.
Admins can install the Pull Service using the Silent command option, available for both Windows and Linux-based platforms. They can also create a custom script that upgrades and runs the Pull Service on all the Pull Service Relay Servers.
RSCC Relay Server
Customers can upgrade the Pull service running on the RSCC Servers. Please follow the steps above for upgrading the Pull Relay Service to upgrade the RSCC service.
Relay Server Migration
UEM customers may need to migrate from one Relay Server to another due to requirements or configuration changes. On-prem customers using push relay servers may not prefer using the same when moving to a SAAS environment. In these cases, customers can migrate their existing Push-Based Relay Servers to Pull-Based Relay Servers or configure an RSCC in front of these Push-Based Relay Servers.
Push to Pull Relay Servers
Customers can migrate their Push Relay Servers by following the steps below,
- Delete the existing Push Relay Servers from the UEM console.
- Install Pull service on the Relay Server machines using the installer.
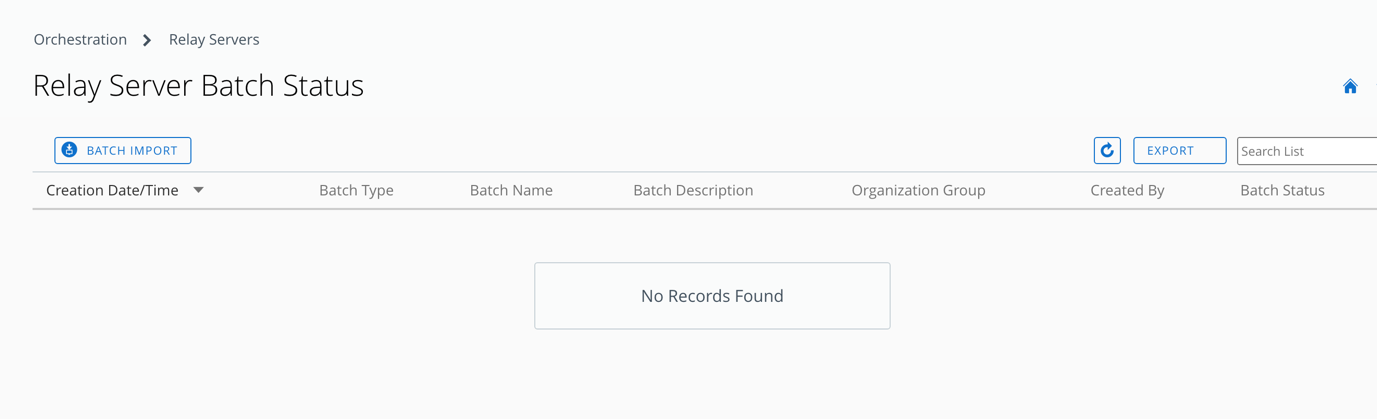
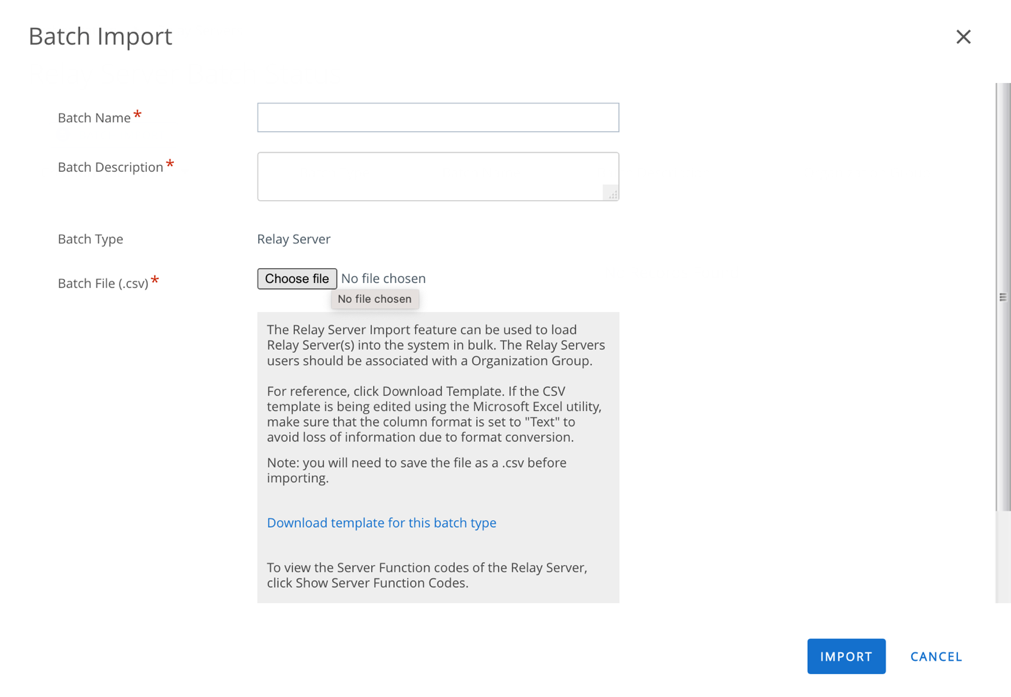
- Configure the Pull Relay Servers in the UEM console. Admins can use the Batch Import option to set up multiple Push Relay Servers simultaneously. Reference the snapshots attached below for the batch import of Relay Servers.
Push Relay Server to RSCC configuration
In case of Push Relay Server being used in the setup, admin just needs to configure an RSCC Relay Server. Please refer to the steps to configure an RSCC server here.
Pull Relay Servers to RSCC configuration
- Uninstall Pull Service from the Pull Relay Servers.
- Delete the Pull Relay Server configuration from the UEM console.
- Set up Push Relay Servers for the Relay Servers machine on which Pull service was uninstalled.
- Configure Push Relay Servers in the UEM Console. Admins can use the Batch Import option to simultaneously set up multiple Push Relay Servers.
- Install and configure RSCC Server.
Understanding Relay Servers: Functionality Across Various Scenarios
Scenario 1: Relay Servers and CDN are configured and enabled in the Environment
In this scenario, the device first attempts to retrieve content from the Relay Server. If the retrieval fails, it switches to the CDN as a fallback. Should the CDN also fail, no additional fallback options are available.
Scenario 2: Relay Servers are configured, but CDN is not enabled in the Environment
In this scenario, the device first attempts to retrieve content from the Relay Server. If its retrieval fails, it falls back to the UEM Servers. If the device cannot retrieve content from UEM Servers, the product deployment fails.
Scenario 3: Relay Servers are not configured, but CDN is enabled in the Environment
In this scenario, the device retrieves content from CDN. If the retrieval fails, there is no fallback, and the product deployment fails.
Scenario 4: Neither Relay Servers are configured nor CDN is enabled
In this scenario, the devices retrieve the content directly from UEM Servers.
FAQ
- If the product is deactivated, is the content of the Relay Server associated with the product deleted by the UEM Console?
The content is not deleted if the product is deactivated or deleted. Content on the Relay Server is deleted only when the product provisioning component (File Action, App) is deleted from the UEM console.
- In case both CDN and Relay Server are configured, is the content on Relay Server provisioned through CDN?
Yes, if both the Relay Server and CDN are configured, the content on the Relay Server is provisioned from CDN.
- What is the individual File size limit on the Relay Server?
There is no restriction of the File size associated with Relay Servers.
- Can I configure Pull Relay Servers with RSCC?
No, RSCC provides a hybrid model where content is seeded into RSCC’s, and RSCC pushes the content to Push Based Relay Servers. It is designed to work with Push Based Relay Servers.
- Can I pre-seed my Relay Server with content before assigning the products to the device?
We can seed the content in the Relay Servers before assigning the product to the devices. Please enable this in the settings. Go to Group and Settings>All Settings>Admin>Product Provisioning and Enable the setting “Queue Contents on Relay Servers without Assigned Devices”. This would enable the option “Publish on Relay Servers” on the Product List view page to publish the content on Relay Servers without assigning any device to it.
- Is Load Balancing supported on Relay Severs?
No, Relay Server does not support Load Balancing.
Summary and Additional Resources
This tutorial took you through the fundamentals of a Relay server and how to design, configure and manage it. Throughout the tutorial, we explored the various deployment and configuration options which administrators can use to efficiently utilize a relay server to publish content to a frontline device.
Additional Resources
For more information about Frontline Device Management with Workspace ONE, you can explore the following resources:
'%3E%3Cpath id='Rectangle_1' data-name='Rectangle 1' d='M0,0H800V300H0Z' transform='translate(2297 1132)' fill='%23E2F0D9'/%3E%3Cg id='Group_5' data-name='Group 5' transform='translate(-6 -3)'%3E%3Ctext transform='translate(2534 1280)' font-size='50' font-family='Roboto-Regular, Roboto'%3E%3Ctspan x='0' y='0'%3ECurated Assets%3C/tspan%3E%3C/text%3E%3Ctext transform='translate(2611 1333)' font-size='20' font-family='Roboto-Regular, Roboto'%3E%3Ctspan x='0' y='0'%3ETile View (with image and controls)%3C/tspan%3E%3C/text%3E%3C/g%3E%3C/g%3E%3C/svg%3E)
About the Author and Contributors
This tutorial was written by:
- Siddesh Patil, Senior Technical Marketing Architect, Omnissa
- Shubham Agarwal, Senior Product Manager, Omnissa
- David Dwyer, Staff Solutions Engineer, Omnissa
Feedback
Your feedback is valuable. To comment on this paper, contact Omnissa Technical Marketing at tech_content_feedback@omnissa.com.