Enabling SAML 2.0 authentication for Horizon with Unified Access Gateway and Okta
Overview
Onmissa provides this operational tutorial to help you with your Omnissa Horizon® environment. This tutorial walks through configuring a third-party SAML identity provider (IdP) integration with Unified Access Gateway™ to access Horizon virtual desktops and applications.
This tutorial covers the following:
- Configuring SAML integration with Okta
- Configuring Unified Access Gateway integration with Okta
- Configuring Horizon integration with Okta for True SSO
- Configuring Okta bookmarks for remote desktops and applications
This tutorial uses Okta as a third-party IdP. You can integrate other IdPs if they provide SAML 2.0 integration.
The steps are sequential and build upon one another, so make sure that you complete each step before going to the next step.
Audience
This operational tutorial is intended for IT professionals and Horizon administrators of existing production environments. Both current and new administrators can benefit from using this tutorial. Familiarity with networking and storage in a virtual environment is assumed, including Active Directory and Identity solutions. Knowledge of additional technologies such as Horizon is required.
Prerequisites
Before you begin, you must satisfy the following requirements:
- Deploy a Horizon 8 (or later) Connection Server and configure it with at least one application and desktop pool.
- Deploy latest Unified Access Gateway (minimum 3.10 or later) and configure the Horizon Edge service.
- Install Horizon client on a Windows 10+ or macOS client machine.
- Obtain access to an Okta environment for this integration, we assume Okta to be configured with an Active Directory integration.
These sections are sequential and build upon one another, so make sure to complete each section before moving on to the next.
Configuring SAML integration with Okta
Identity provider metadata is required to enable the integration between Okta and Unified Access Gateway, which enables the flow of communication between the service provider (SP) and IdP during the authentication process.
When integrating the Unified Access Gateway with Okta, the IdP metadata is defined based on the creation of SAML 2.0 applications.
In this section, you learn how to configure the SAML application to obtain the IdP metadata to be used in the Unified Access Gateway.
Configuring SAML 2.0 application
In this section, you create and configure a SAML 2.0 application in Okta to enable single sign-on (SSO) with Unified Access Gateway.
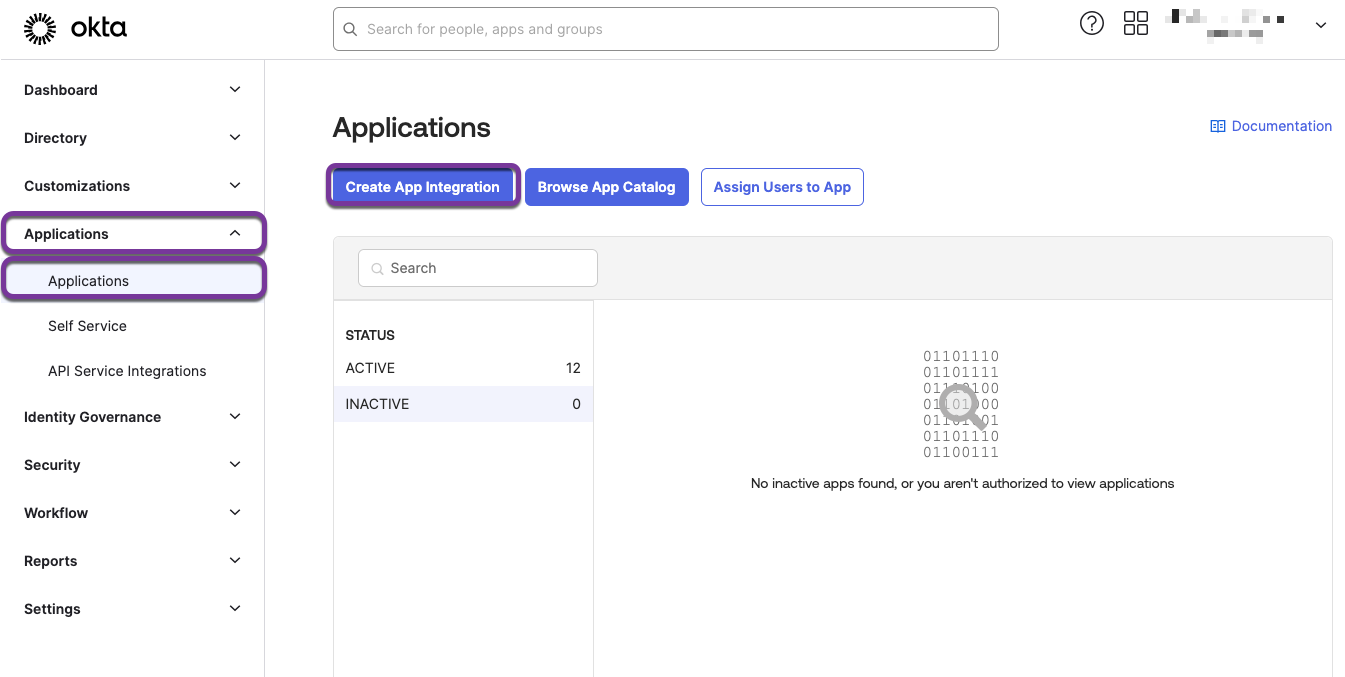
- In the Okta console, navigate to Applications > Applications > Create App Integration.

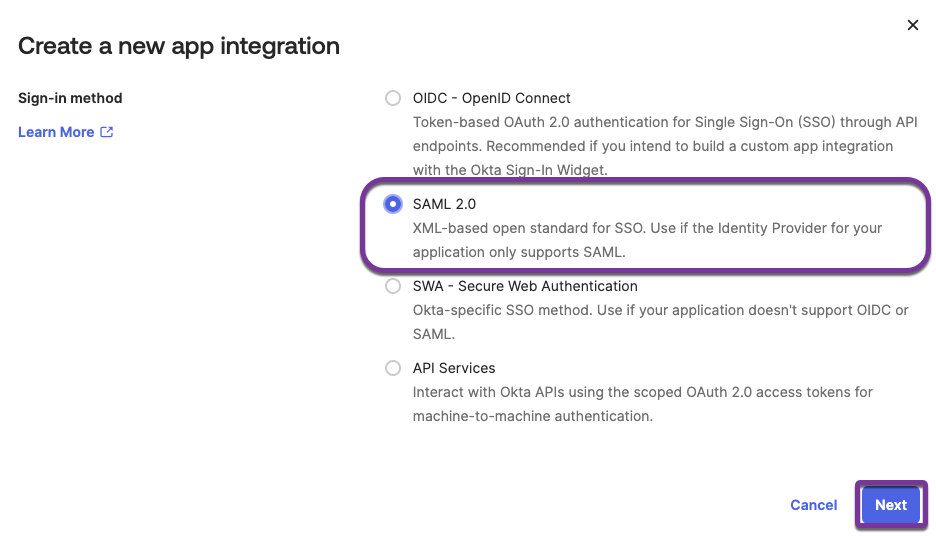
- Configure the new application integration, selecting SAML 2.0 for Sign on method.

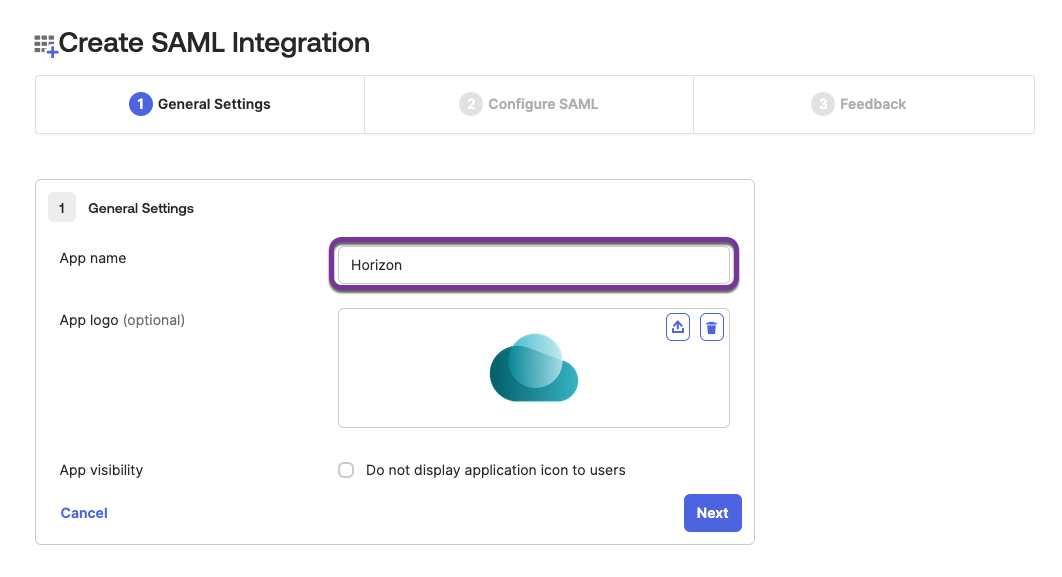
- Configure the General Settings:

- Enter the app name, for example,
Horizon. - Define an app logo – this is optional.
- Click Next.
- Enter the app name, for example,
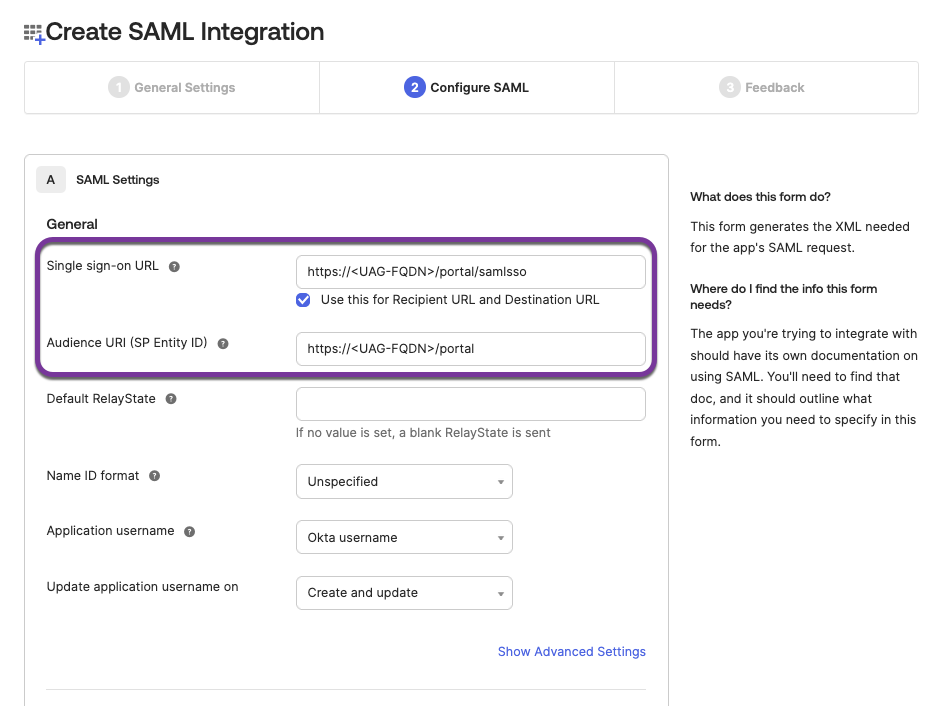
- Configure SAML settings:

Replace<UAG-FQDN>from the following parameters with the respective FQDN from your environment.- Enter
https://<UAG-FQDN>/portal/samlssofor Single sign on URL. - Select the check box Use this for Recipient URL and Destination URL.
- Enter
https://<UAG-FQDN>/portalfor Audience URI (SP Entity ID). - Scroll down and click Next.
- Enter
- Complete general settings.
- Select an option for Help Okta Support understand how you configured this application. Based on your selection, you might need to answer additional questions. Your selection will not affect the configuration of your SAML application.
- Click Finish.
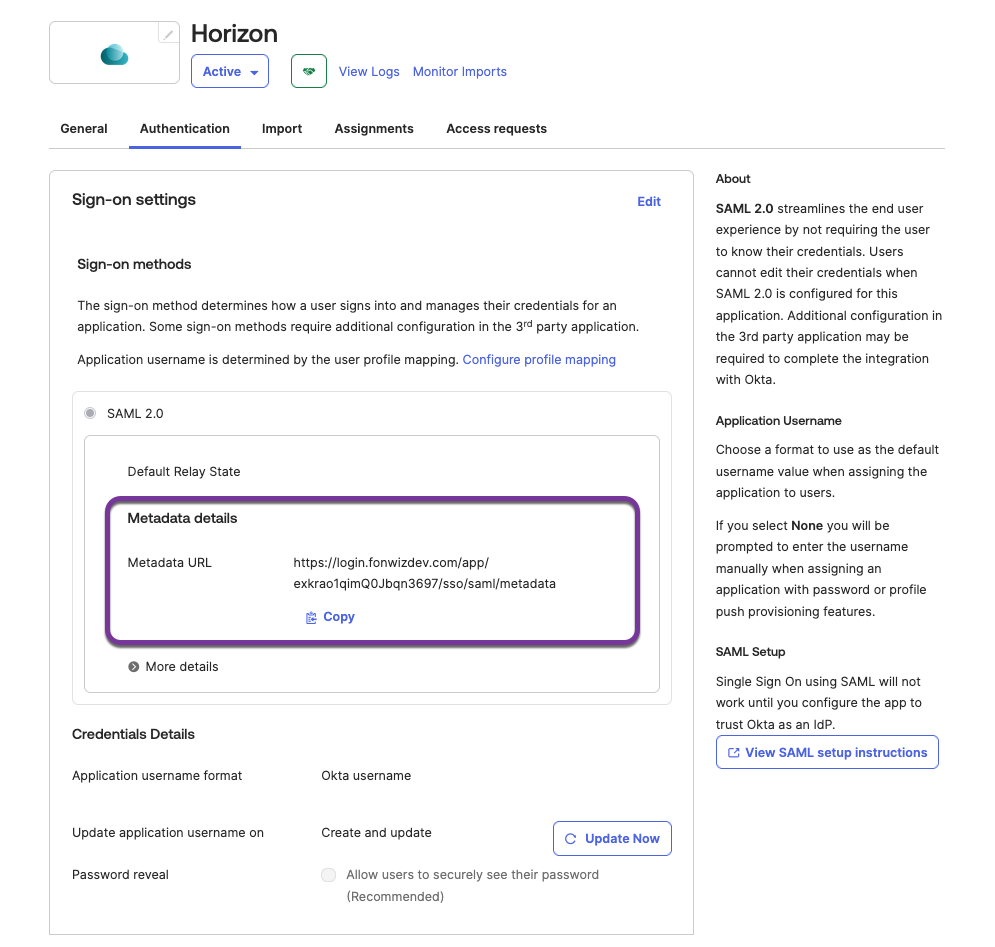
- Download identity provider metadata.

After you configure the general settings, you are redirected to the Sign On page which allows you to download the identity provider metadata. This metadata will be uploaded to Unified Access Gateway and Horizon Connection Server in a later section.- Click Copy.
- Paste the into a new browser window and save the metadata xml.
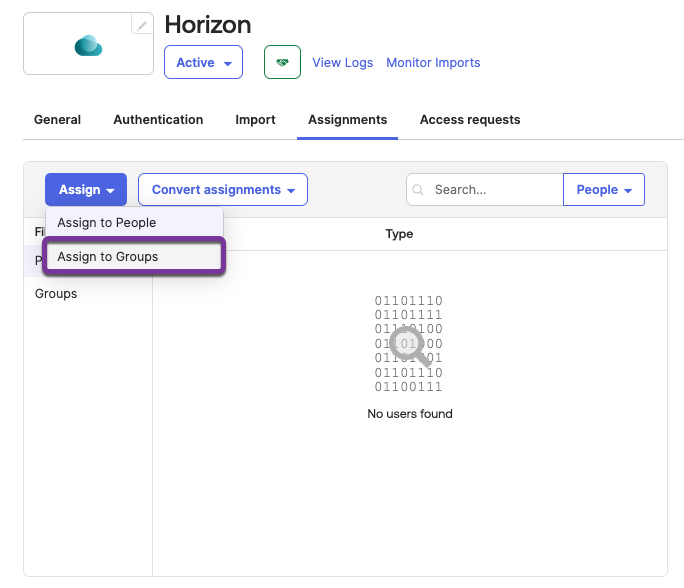
- Assign groups and users.

- Select Assignments.
- Click Assign > Assign to Groups.
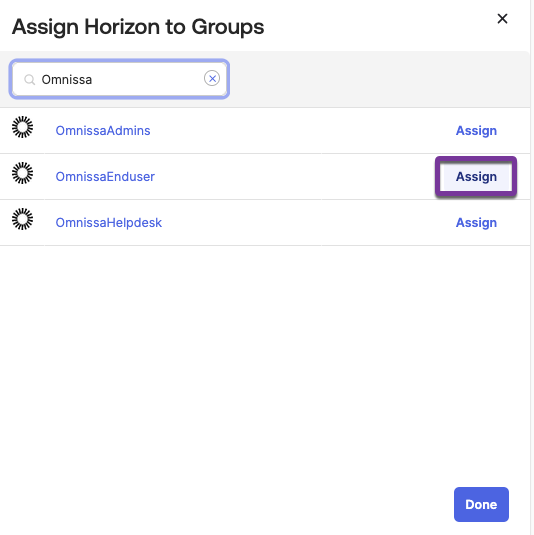
- Select a group.

- Enter a search term in the search bar.
- Click Assign for your group on the filtered list. The button label will update to Assigned.
- Click Done.
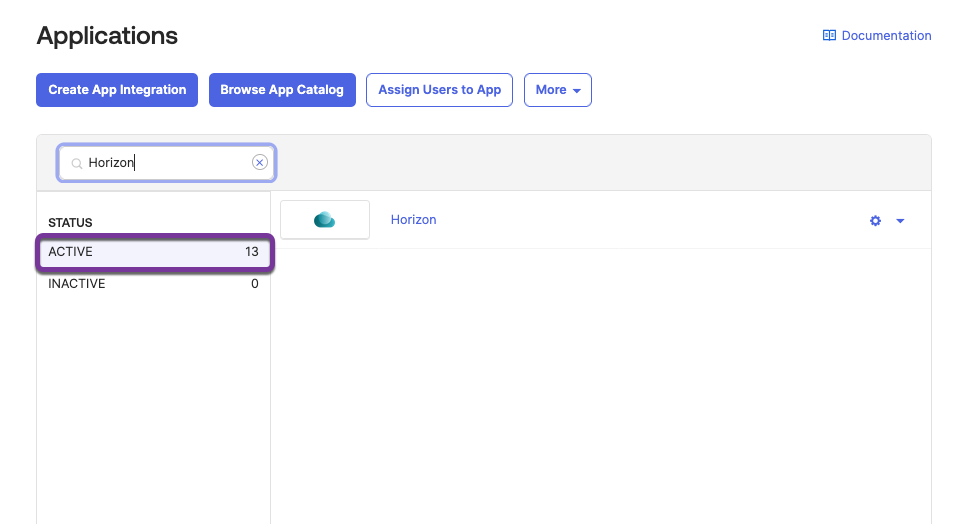
- Return to the application list.
Users who are part of the assigned group can now launch the Horizon SAML application. However, additional configuration is required and this is covered in the next part.- Click Back to Applications.
- Confirm Horizon SAML 2.0 Application is Active.

This concludes the configuration of the SAML 2.0 application where the Horizon SAML 2.0 application is now listed as active on the Okta application list. The configuration for this app can be updated at any time by clicking the gear next to the application name.
Configuring Unified Access Gateway integration with Horizon
On Unified Access Gateway, you must enforce SAML authentication and upload third-party metadata to enable third-party SAML 2.0 authentication when launching remote desktops and applications.
In this section, you learn how to upload the IdP metadata and configure Horizon Edge service for SAML authentication using the Unified Access Gateway administration console.
Uploading Okta metadata to Unified Access Gateway
In this section, you upload the Okta metadata to Unified Access Gateway to enable trust between both.
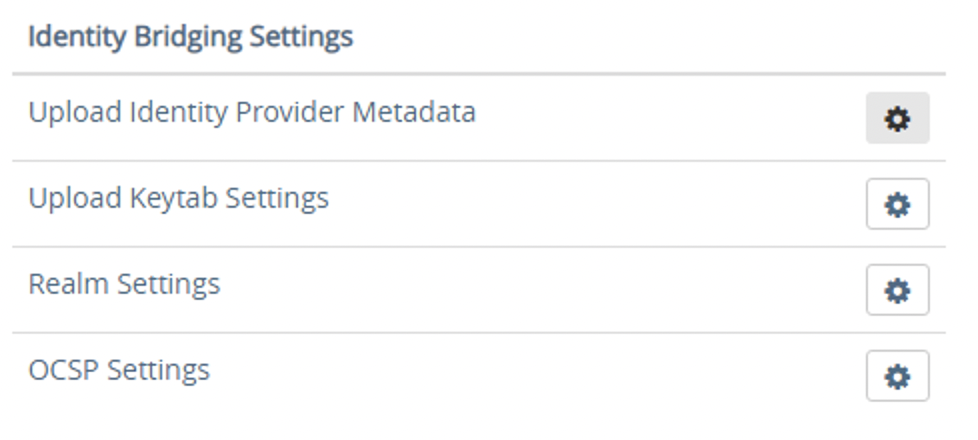
- Locate Identity Bridging Settings.

- Under Advanced Settings, click the gear next to Upload Identity Provider Metadata.
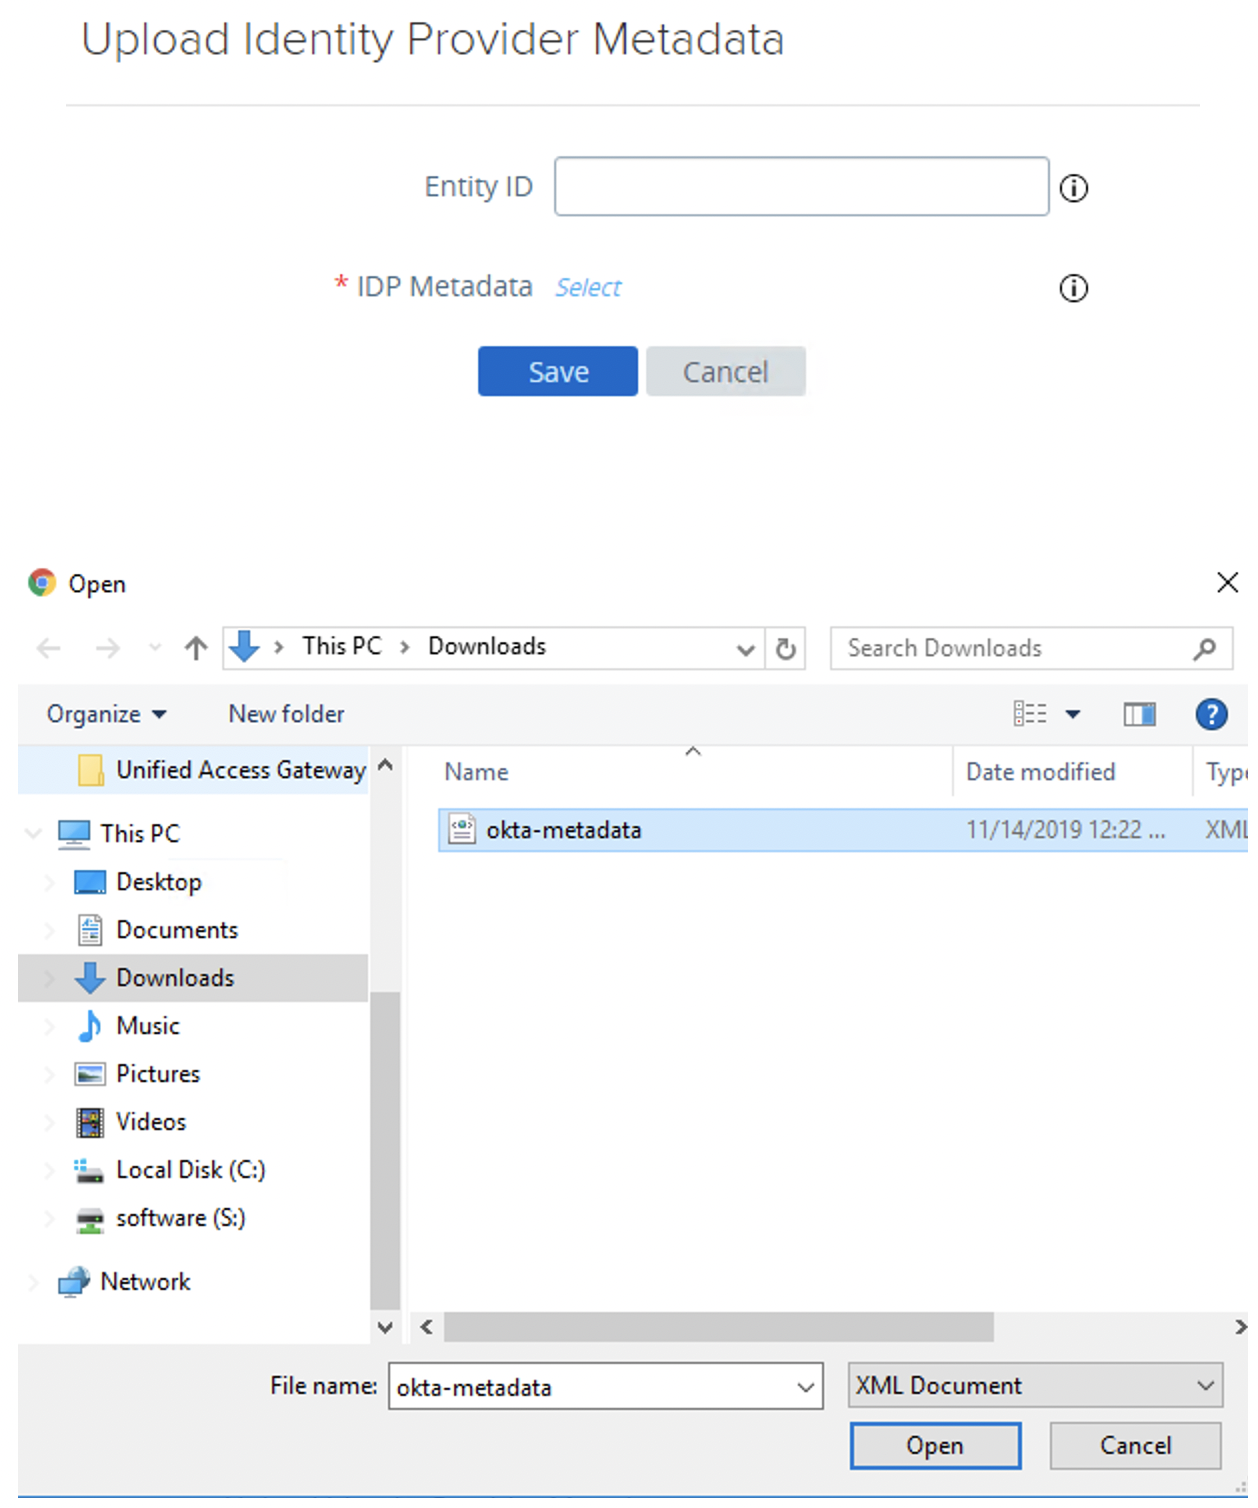
- Upload Okta metadata.

Keep Entity ID empty as this value will be defined based on the metadata XML file.- Click Select for IdP metadata.
- Select the Okta XML metadata file previously downloaded from Okta.
- Click Open and then click Save.
Configuring Horizon Edge service for SAML and passthrough authentication
In this section, you configure SAML and Passthrough as the authentication method for the Horizon service on Unified Access Gateway.
Also, you will understand the difference when using SAML and SAML and Passthrough as the authentication method for Horizon edge service.
- Access Horizon settings.

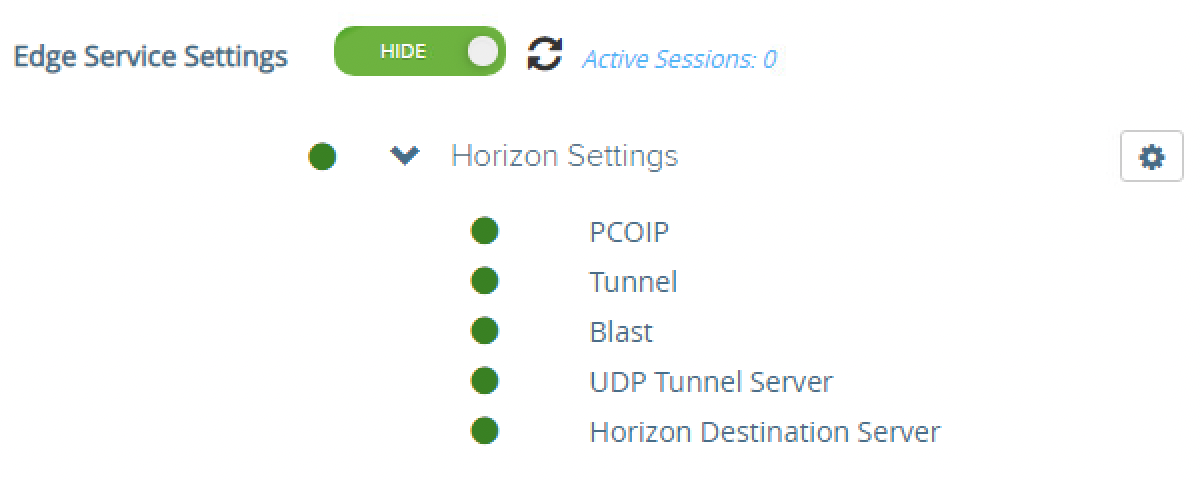
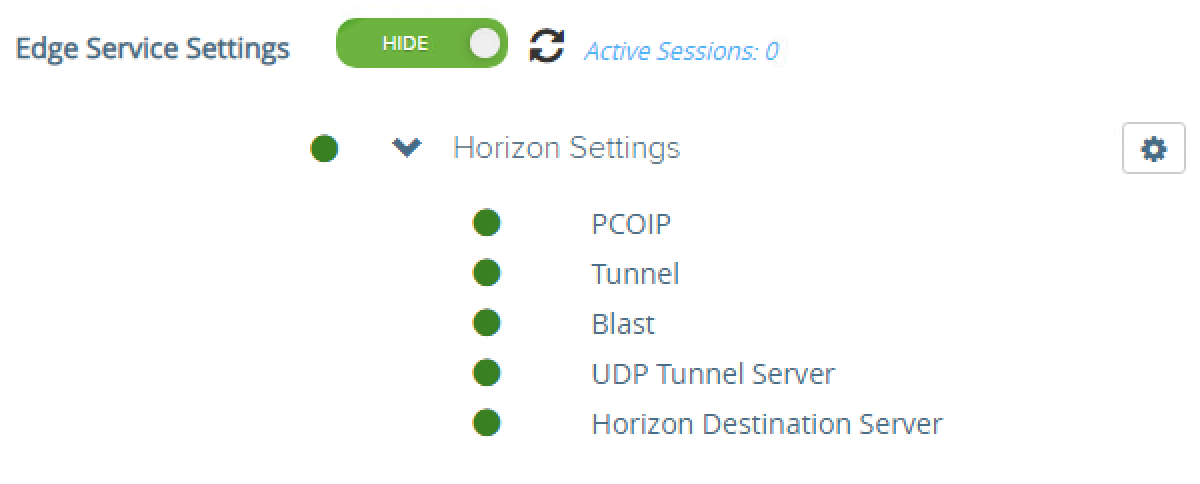
- Click the Show toggle next to Edge Service Settings. After you click, it switches to display the Hide option.
- Click the gear icon next to Horizon Settings.
All items should be green representing that the appliance can communicate with the Horizon Connection Server through the multiple protocols configured. Items not fully functional are presented in red.
- Access authentication methods configuration.
- Click More at the end of the Horizon settings.
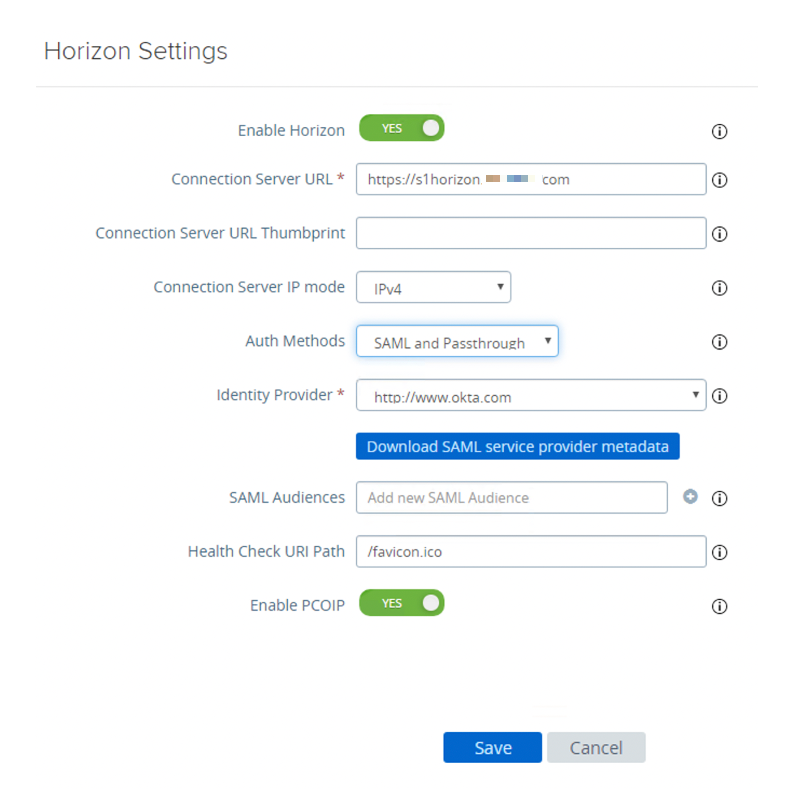
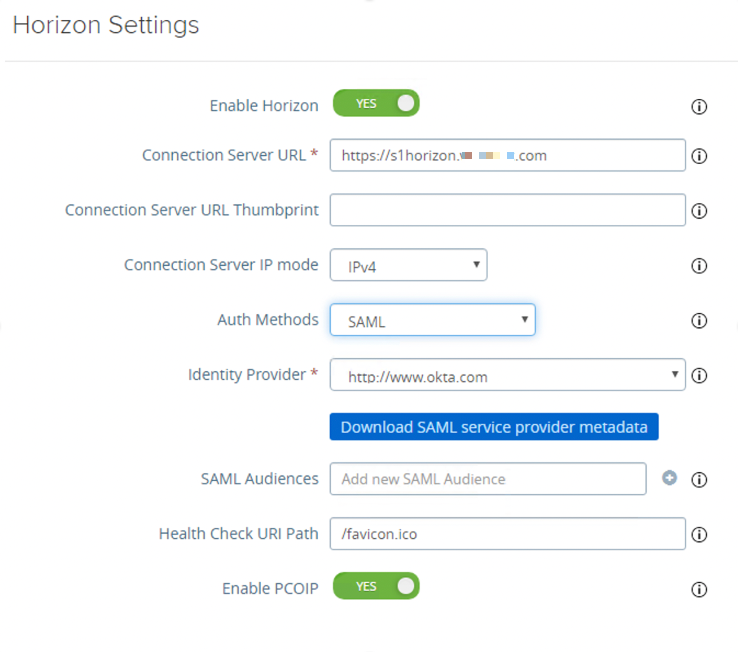
- Configure SAML as the authentication method.

- Select SAML and Passthrough for Auth Methods.
- Select http://www.okta.com for Identity Provider. http://www.okta.com is the name of the Entity ID specified in the Okta metadata.
- Scroll down and click Save.
When Auth Methods is set to SAML, the SAML assertion is validated by Unified Access Gateway and passed to the backend. User single sign-on is leveraging True SSO to the remote desktops and applications.
When Auth Methods is set to SAML and passthrough, the SAML assertion is validated by Unified Access Gateway and Connection Server authenticates the user against Active Directory when launching remote desktops and applications.
With both authentication methods, the user is redirected to Okta for SAML authentication; service provider (SP) and IdP-initiated flows are supported.
Validating Horizon client connection to a remote desktop and application
In this section, you configure the Horizon client to launch remote desktops and applications through Unified Access Gateway, and validate the SAML and passthrough authentication flow.
- Configure Horizon Client.

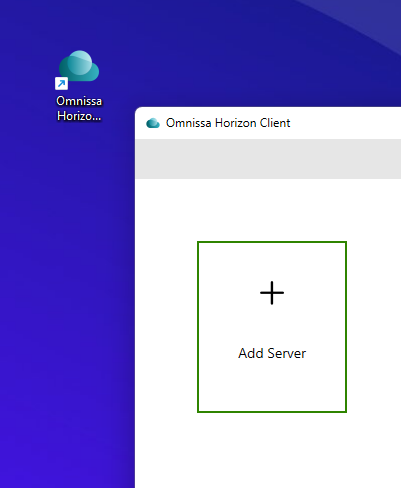
- Launch Omnissa Horizon Client.
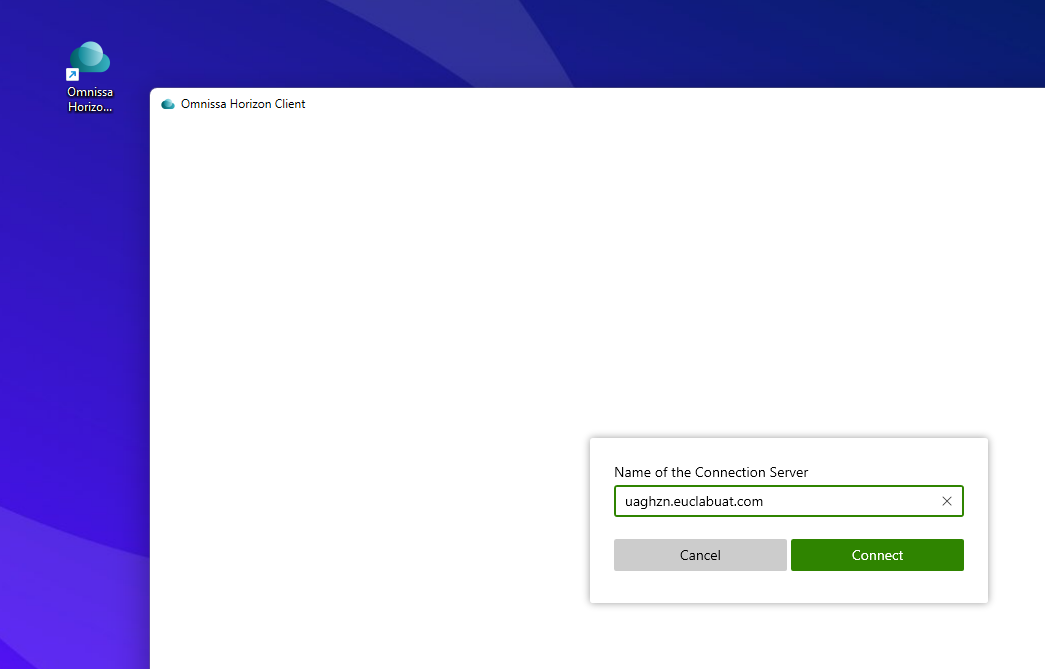
- Click Add Server.
- Enter the Unified Acces Gateway or load balancer IP or FQDN. For example,
uaghzn.euclabuat.com. - Click Connect.
- Authenticate through Okta.
User is redirected to Okta for authentication (XML-API Protocol), and after successful authentication, the user is redirected back to the Horizon client with a valid token.
This step is related to the SAML part of the SAML and passthrough authentication configured on Horizon Edge service.- Enter Okta credentials and click Sign In.
- Launch a virtual desktop or application (secondary protocol).

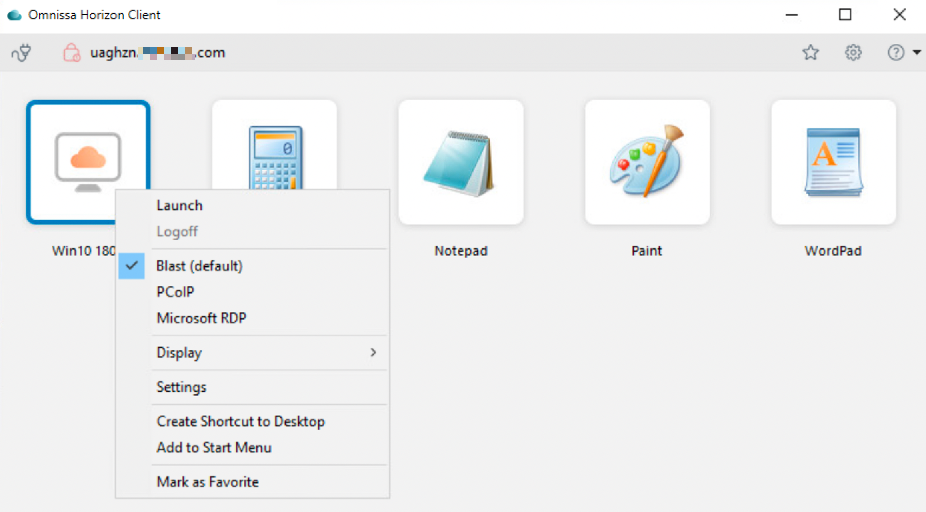
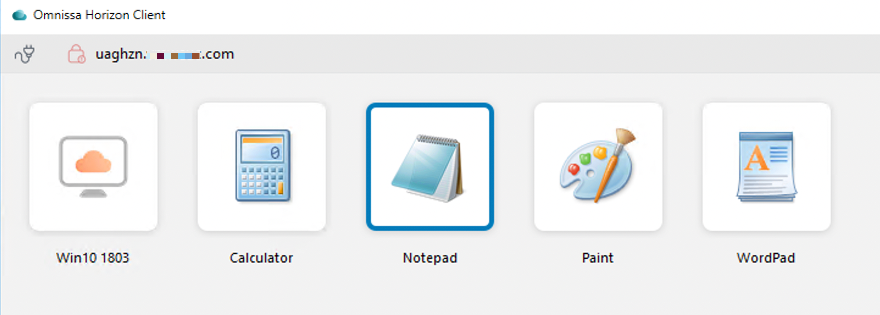
A successful connection will present the desktops and applications entitled to logged-in users. In this section, you can see one virtual desktop (Win10 1803) and four other virtual applications (Calculator, Notepad, Paint, WordPad).- Right-click the desktop or one of the applications.
- Ensure that Blast (default) is selected.
- Click Launch.
- Enter AD credentials (passthrough)
As a result of the SAML and Passthrough configuration on Horizon Edge Service, the passthrough configuration results in prompting the user to enter their AD credentials to log in to the desktop (or application).- Enter your AD credentials and click Login.
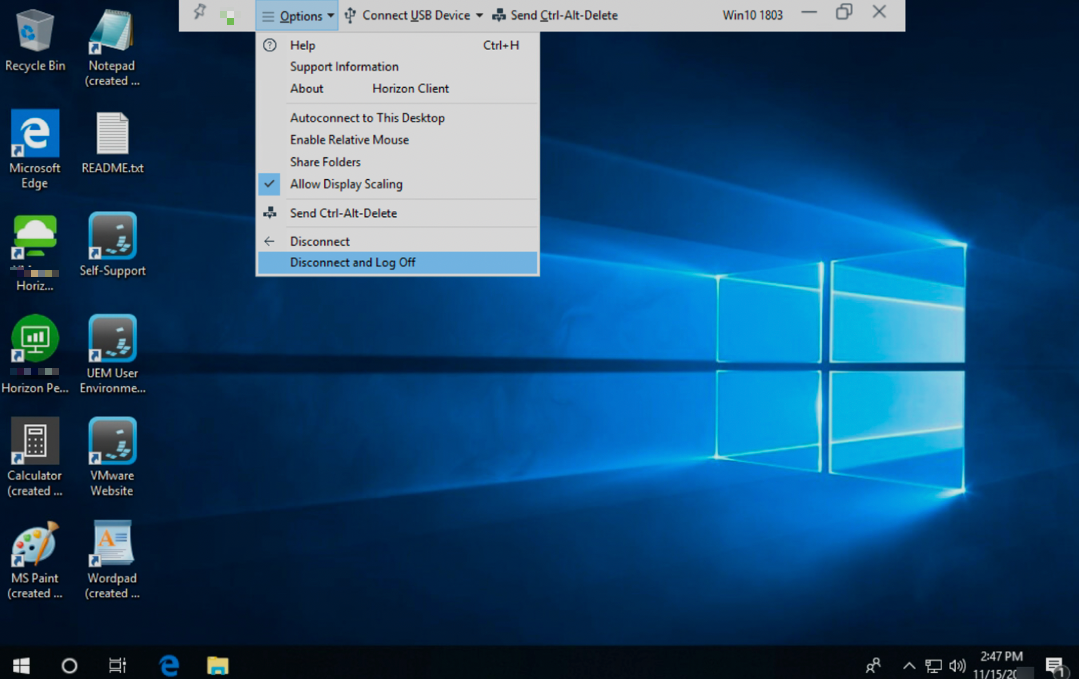
- Confirm the virtual desktop or application has launched.

As previously mentioned, you are prompted to enter your AD credentials to log in to the desktop if you configured the Horizon edge service authentication method as SAML and passthrough on Unified Access Gateway. However, if you configured it as SAML and your environment has True SSO enabled, the desktop login uses SSO.- Confirm that you have successfully launched the virtual resource.
- Click Options and then click Disconnect and Log Off.
Configuring Horizon integration with Okta for True SSO
To provide an end-to-end SSO experience to the end-user, you must configure True SSO on your Horizon environment. When True SSO is enabled, users are not required to enter Active Directory credentials in order to use a remote desktop or applications.
When Unified Access Gateway is set up to use third-party IdP and True SSO is enabled on Horizon, you must create a SAML authenticator into the Horizon administration console to provide the same end-to-end SSO experience, otherwise, the end-user will have to enter their AD credentials when logging in to the desktop or application. A SAML authenticator contains the IdP trust and metadata exchange between Horizon and the device to which clients connect.
You associate a SAML authenticator with a Connection Server instance. If your deployment includes more than one Connection Server instance, you must configure the SAML authenticator with each instance.
In this section, you learn how to create a SAML authenticator for Okta on the Horizon administration console and enable True SSO for the Okta SAML authenticator created.
If your use case DOES NOT require True SSO, there is no need to configure the SAML authenticator on Horizon and you can skip this section.
Configuring the SAML Authenticator for True SSO
In this section, you configure Okta as the SAML authenticator for Horizon.
Important: In case end-users authenticate directly against the Connection Server, they will be required to provide their Active Directory credentials even if the SAML authenticator is configured. In order to authenticate against a third-party IdP, users must connect through the Unified Access Gateway.
- Log in to Horizon administration console.
- Navigate to https://server/admin on your Web browser where server is the host name of the Connection Server instance.
- Enter the username, password, and domain, then click Sign in.
- Configure Connection Server settings.
- Click Settings.
- Click Servers.
- Select Connection Servers.
- Select the Connection Server to be used as the front-end server for Unified Access Gateway deployed in this section.
- Click Edit.
- Configure SAML authentication settings.

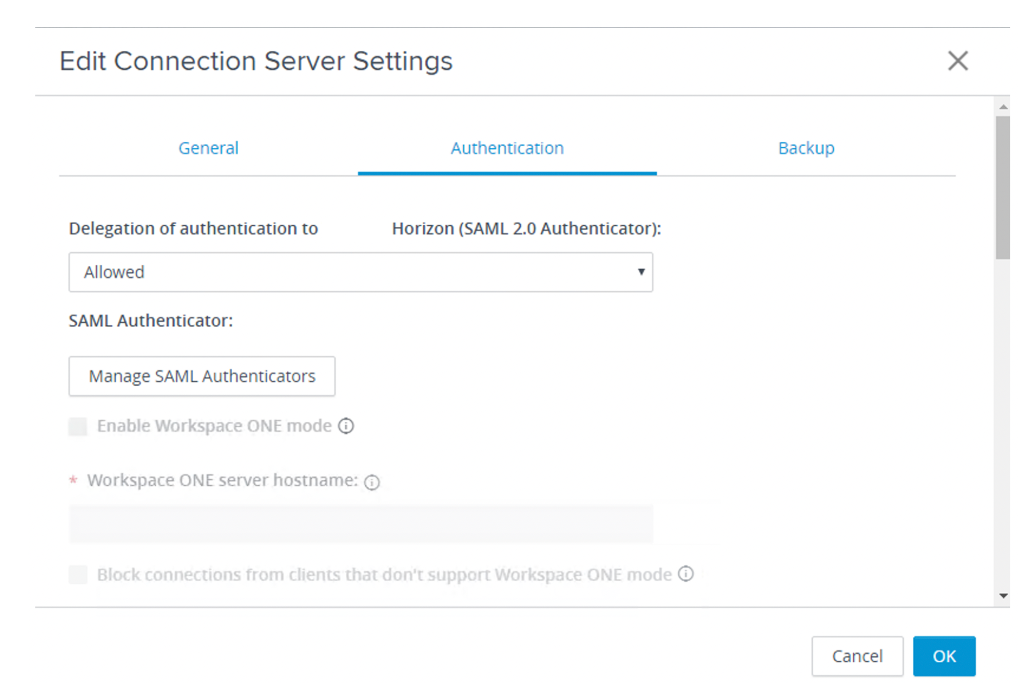
- Select Authentication.
- Select Allowed for Delegation of authentication to Horizon (SAML 2.0 Authenticator).
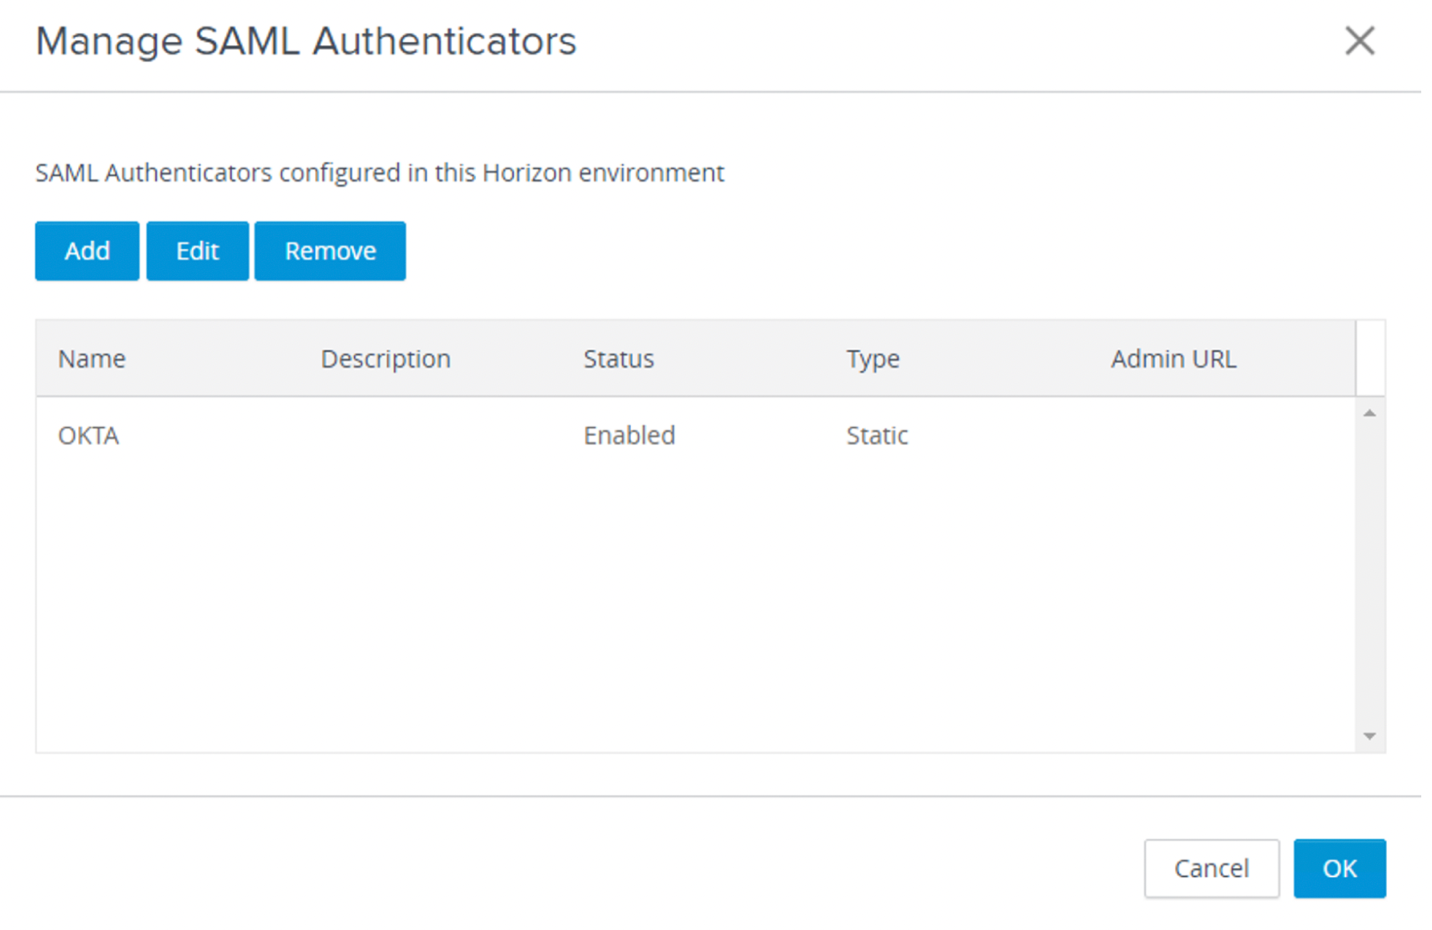
- Click Manage SAML Authenticators.
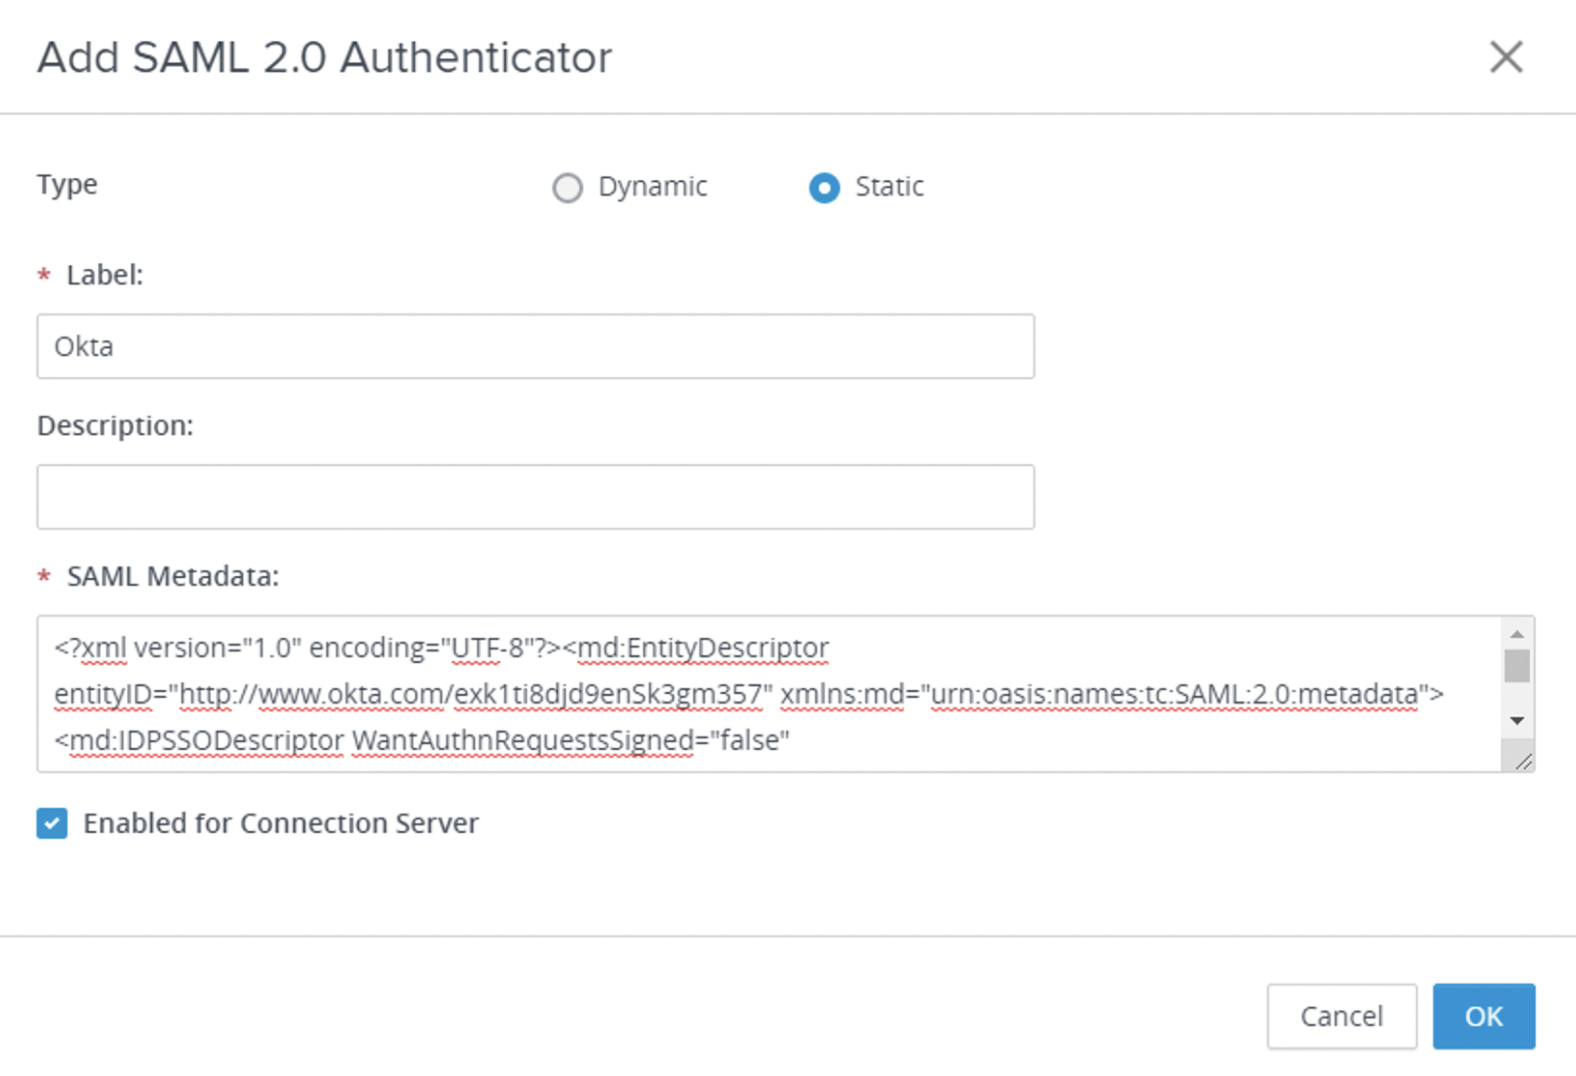
- Add SAML Authenticator – click Add.
- Configure SAML Authenticator for Okta.

- Select Static for Type.
- Enter
Oktafor Label. - Paste the content of the Okta metadata XML file you previously downloaded from Okta into the SAML Metadata text box.
- Select the check box Enabled for Connection Server.
- Click OK.
- Confirm the SAML Authenticator is enabled and click OK.

- Enable True SSO for third-party SAML Authenticator.
If your environment leverages Horizon True SSO, you must enable the Okta SAML Authenticator for True SSO.
Use the following command line to list all the authenticators and their True SSO mode status:
vdmutil --authAs <Horizon admin user> --authDomain <fqdn> --authPassword <Horizon admin password> --truesso --list –authenticator
Replace<Horizon admin user>with the Horizon administrator user<fqdn>with the fully qualified domain name for the Horizon admin user<Horizon admin password>with the password for the Horizon administrator
If True SSO mode is DISABLED for the authenticator you are trying to configure, execute the following command line to enable.
vdmutil --authAs <Horizon admin user> --authDomain <fqdn> --authPassword <Horizon admin password> --truesso --authenticator --edit --name <SAML authenticator name> --truessoMode ENABLED
After you enable True SSO, theTrue SSO modefor the authenticator you are enabling displays asENABLE_IF_NO_PASSWORD.
Configuring Horizon Edge service for SAML and True SSO authentication
This section assumes you already have True SSO setup on your Horizon environment. To provide an end-to-end SSO experience for the end-user, you must set SAML as the authentication method for the Horizon service on Unified Access Gateway.
- Access Horizon settings in the Unified Access Gateway administration console.

- Click the Show toggle next to Edge Service Settings. After you click, it switches to display the Hide option.
- Click the gear icon next to Horizon settings.
- Click the More button to access the authentication methods configuration.
- Configure SAML as the authentication method.

- Select SAML for Auth Methods.
- Select
http://www.okta.comfor Identity Provider.http://www.okta.comis the name of the Entity ID specified in the Okta metadata. - Scroll down and click Save.
Validating desktop and application through SAML and True SSO authentication
In this section, use the Horizon Client to launch remote desktops and applications through Unified Access Gateway, and validate the SAML and True SSO authentication flow.
- Launch Horizon client and add a server pointing to your Unified Access Gateway connection.

- Authenticate through Okta.
The user is redirected to Okta for authentication (XML-API protocol), and after successful authentication, the user is redirected back to the Horizon client with a valid token- Enter your username and password, and click Sign in.
- Launch a virtual desktop or application (secondary protocol).

A successful connection will present the desktops and applications entitled to logged-in users. In this section, you can see one virtual desktop (Win10 1803) and four other virtual applications (Calculator, Notepad, Paint, WordPad).- Double-click one of your desktop or applications icons to launch the resource.
- Confirm the virtual desktop or application has launched.

As a result of the SAML Authenticator and True SSO configuration in Horizon, SSO logged the user automatically.- Confirm that you have successfully launched the virtual resource.
- Click Options then click Disconnect and Log Off.
Configuring Okta Bookmarks for remote desktops and applications
Organizations using Okta as their primary IdP most likely leverage the Okta portal as the central catalog of applications for their end users.
In this section, you learn how to configure Okta bookmarks to launch Horizon virtual desktops and applications.
Configuring Okta Bookmarks
In this section, you configure an Okta bookmark to launch a Horizon desktop. You can repeat the same steps to create multiple bookmarks.
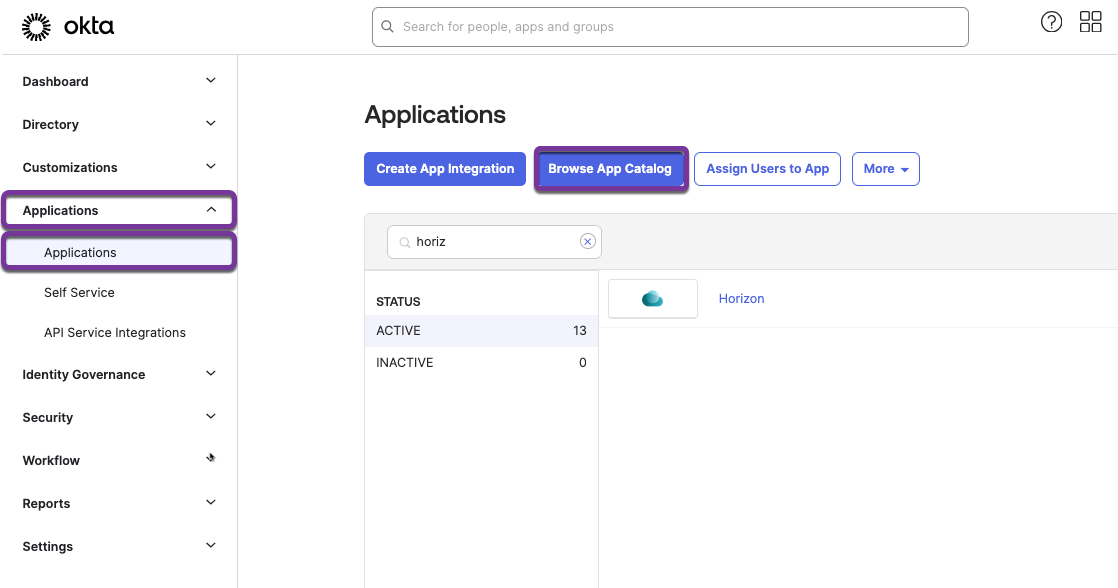
- In Okta, click Applications > Applications > Browse App catalog.

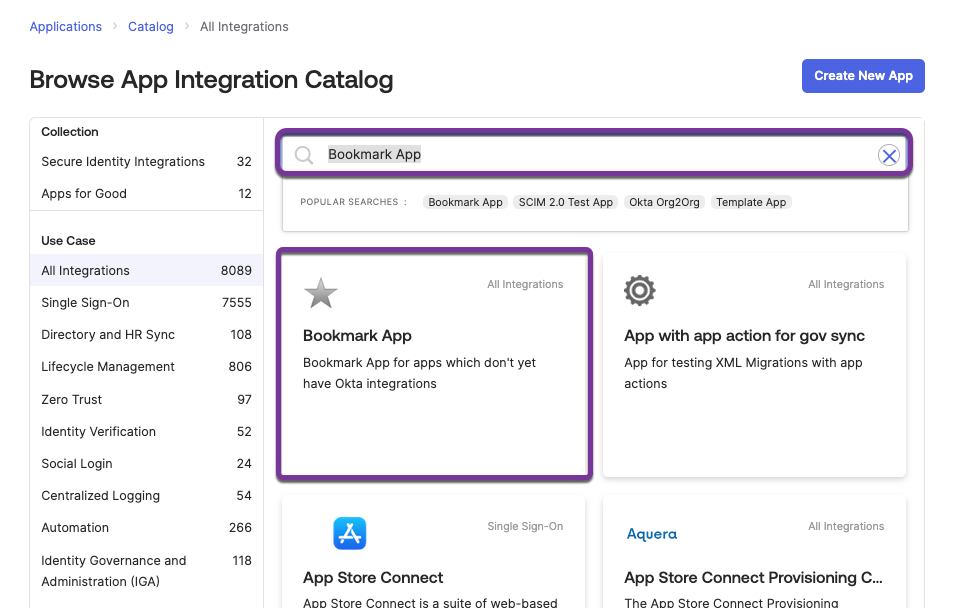
- Search for the Bookmark App

- Enter
Bookmark Appin the search box. - Click on the Bookmark App tile.
- Click Add integration.
- Enter
- Configure the Bookmark App.

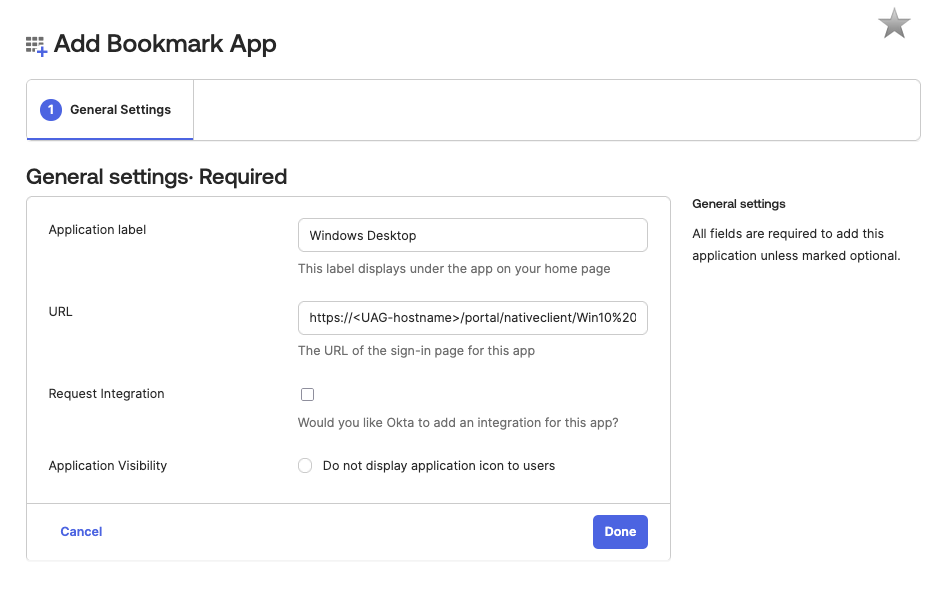
- Enter
Windows Desktopfor Application Label. - For URL add the URL to launch a desktop. For example, to launch a desktop from the Win10 1803 pool using the Native Client and BLAST protocol, use
https://<UAG-hostname>/portal/nativeclient/Win10%201803?action=start-session&desktopProtocol=BLAST - Click Done.
To learn more about the syntax and parameters that can be used as part of the URL, see Syntax for Creating horizon-view URIs.
- Enter
- Assign Groups and Users

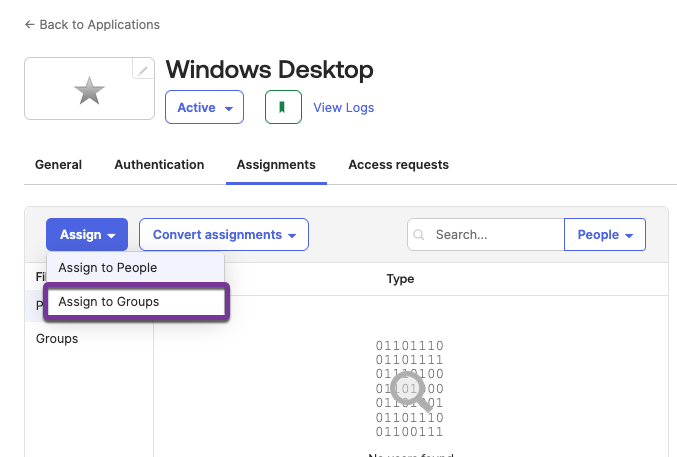
- On the Assignments tab, click Assign > Assign to Groups.
- Select a group.

- Enter a search term in the search bar.
- Click Assign for your group on the filtered list. The button label will update to Assigned.
- Click Done.
- Add a new bookmark to launch a Horizon application.
You can repeat the same steps from this section to configure a new bookmark, this time to launch a virtual application using the Horizon HTML5 client (Web Client).
For example, the URL syntax to launch Notepad from the Application Pool using an Okta bookmark would be:
https://<UAG-hostname>/portal/webclient/index.html?applicationName=Notepad
To launch a virtual desktop named Win10Desktop from the Desktop Pool using an Okta bookmark, the URL syntax is as follows:
https://<UAG-hostname>/portal/webclient/index.html?desktopName=Win10Desktop
Validating desktop and application launch from Okta portal
In this section, you log in to the Okta portal to validate the bookmark assignments and to launch remote desktops and applications through Unified Access Gateway.
- Log in to the Okta portal.
- Launch apps.
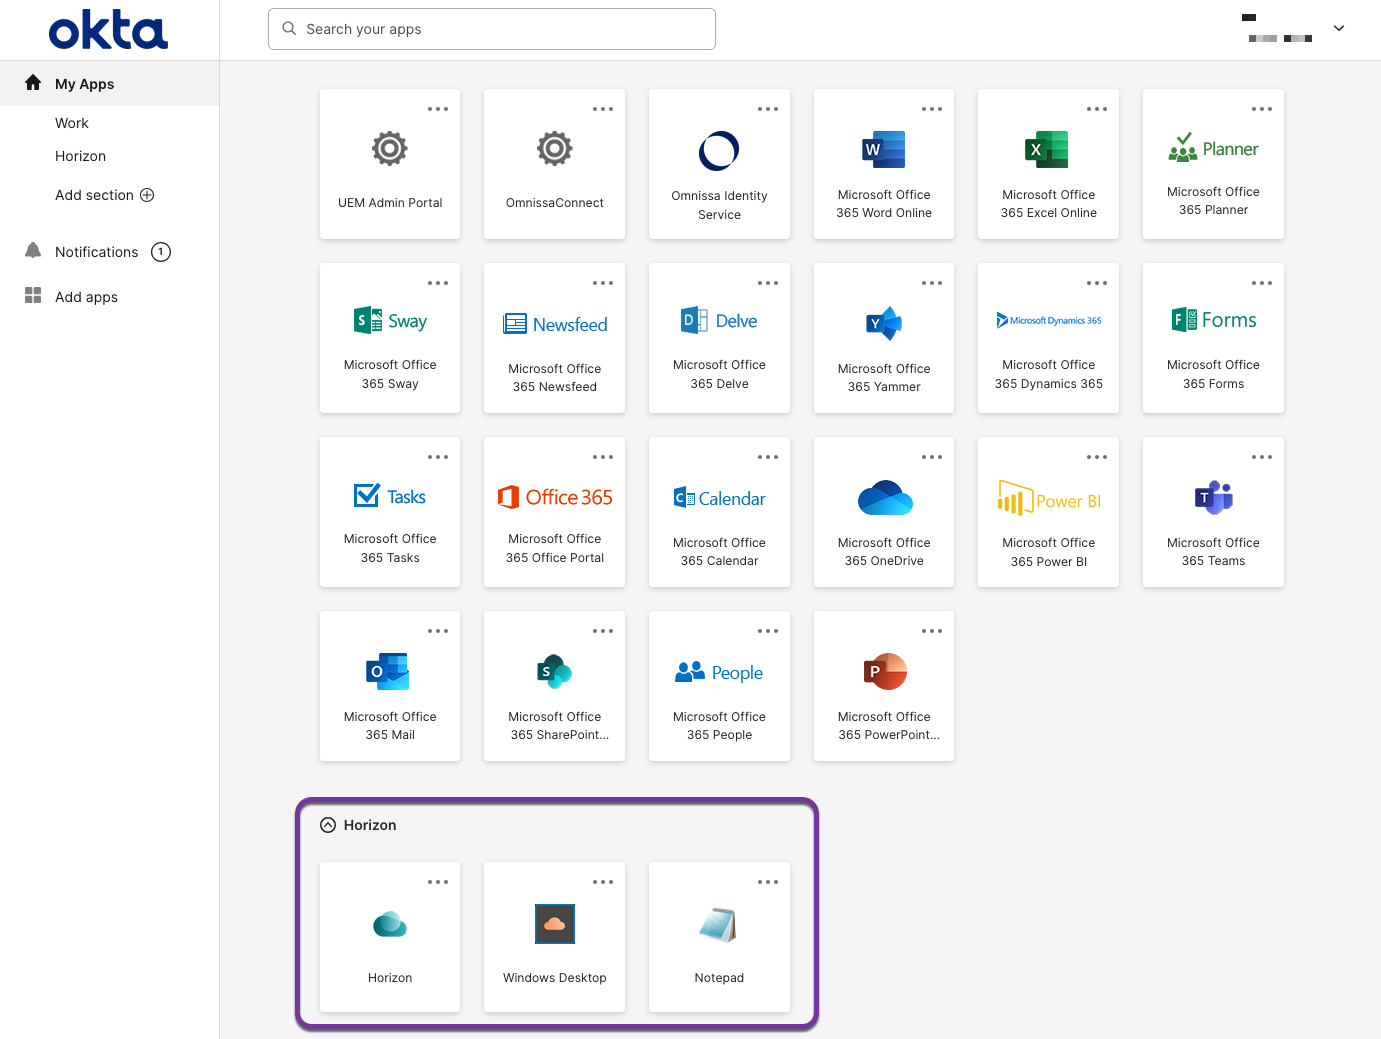
A successful login will present all the applications assigned to your account.
- Horizon — This is the SAML 2.0 application used to generate the IdP metadata. Launching this app redirects you to the Horizon HTML client. You can hide this app on the Okta administration console as previously explained.
- Notepad — Refers to the Notepad application pool, which will launch a new Notepad session.
- Windows Desktop — Refers to the Win10-1803 desktop pool, which will launch a new Desktop session.
- Select an application to launch.
- Confirm the virtual desktop or application has been launched.
- To exit, click Options and then click Disconnect and Log Off.
Summary and additional resources
This operational tutorial provided steps to integrate a third-party SAML IdP (Okta) with Unified Access Gateway to access Horizon virtual desktops and applications.
Procedures included:
- Configuring Okta SAML 2.0 integration with Unified Access Gateway
- Configuring Unified Access Gateway integration with Okta through SAML
- Configuring SAML and True SSO and SAML and passthrough for authentication
- Configuring Okta bookmarks for remote desktops and applications
Appendix: alternative methods to launch Horizon desktops and applications
Launching Horizon desktops and applications are not restricted to the third-party IdP portal.
Administrators can also launch desktops and applications using:
- The Horizon native client connected to Unified Access Gateway
- The Horizon native and web client using bookmarks
- Bookmarks on the company custom portal. See the following URL examples to launch resources from the specific Horizon clients:
- Using Horizon native client
-
https://<UAG hostname>/portal/nativeclient/index.html- to launch the native client with SSO -
https://<UAG hostname>/portal/nativeclient/Notepad?action=start-session&desktopProtocol=BLAST&launchMinimized=false- to launch the Notepad applications
-
- Using Horizon web client
-
https://<UAG hostname>/portal/webclient/index.html- to launch the web client with SSO -
https://<UAG hostname>/portal/webclient/index.html?applicationName=Notepad- to launch the Notepad app -
https://<UAG hostname/portal/webclient/index.html?desktopName=Win10Desktop- to launch the Win10Desktop
-
- Using Horizon native client
Additional resources
For more information, explore the Unified Access Gateway product page on Tech Zone.
Additionally, you can check out the Workspace ONE and Horizon Reference Architecture which provides a framework and guidance for architecting an integrated digital workspace using Omnissa Workspace ONE and Omnissa Horizon.
Changelog
The following updates were made to this guide:
| Date | Description of Changes |
| 2025/05/09 | Updated Okta steps |
| 2024/10/30 | Updated links and references to the latest documentation. |
| 2019/12/10 | Guide was published. |
About the author and contributors
This tutorial was written by:
- Andreano Lanusse, Omnissa alumni.
- Sascha Warno, Staff Architect, Technical Marketing, Omnissa.
Feedback
Your feedback is valuable.
To comment on this paper, either use the feedback button or contact us at tech_content_feedback@omnissa.com


