Configuring Workspace ONE UEM API with PKCS12 Certificates
Overview
A common customer request is to access the Workspace ONE UEM API to enhance their reporting or automated tasks. The APIs require authentication to execute any request against the Workspace ONE UEM instance, those requests can be authenticated using basic credentials (username/password), certificates, and OAuth. During the development of those reports or automated tasks, the basic credentials are used as a method of authentication. However, when moved into production, this is no longer the best practice to access the APIs because you have to share those with other team members.
The alternative methods that follow security best practices are to leverage certificates or OAuth for authentication. This guide will instruct you in one way of doing this in a secure manner using certificate-based authentication.
Purpose of This Tutorial
In this tutorial, we’ll walk you through creating a certificate in your Workspace ONE UEM console, downloading it in a secure manner, and using it in a Python script to make authenticated API calls. Additionally, we’ll show how to generate signed data and use it in Postman for API testing.
Audience
This tutorial is intended for IT professionals and Administrators who utilize Workspace ONE UEM.
Requirements
This tutorial uses Python as the language to demonstrate the features. Some great guides are online if you do not have Python installed already, below are a couple of recommendations, but these are not set in stone.
For Mac
We recommend the use of a common developer tool called Brew to handle installation on a Mac and a Brew package called pyenv to set you up to install any version of Python you like on your Mac. Open a terminal on your Mac and execute the following commands.
# Install pyenv
brew install pyenv
# This will install Python 3.10.xx ( the latest version ) as well as pip3.
pyenv install 3.10
# The local command configures your current terminal session to run this version of python.
pyenv local 3.10
# If you like this version and want to use it by default, run this command:
pyenv global 3.10
# Next you need pip to be set to default ( because tutorials don’t use pip3 ).
pip3 install –upgrade pip
# Finally, you need to install the requirements for our script, which needs the following packages: python-dotenv, cryptography, and requests.
pip install python-dotenv cryptography requests
For Windows
To make things simple, we recommend using the Microsoft Store and installing Python from there. The 3.10 version is stable and used in this tutorial, but you can use whichever version you like.
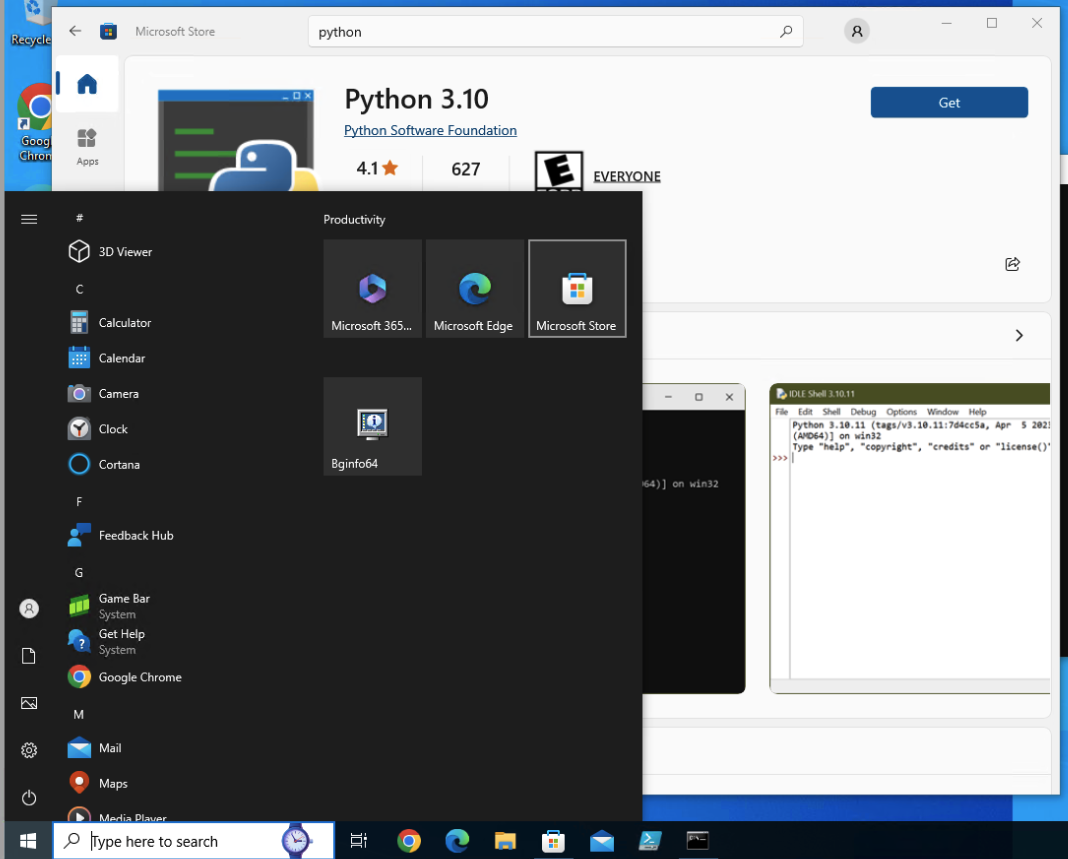
Once Python is installed you can install the packages in the same way:
pip install python-dotenv cryptography requests
Configuring Enhanced Secure Access with Workspace ONE UEM APIs
In this section, follow the steps to create your certificate in Workspace ONE and execute the Python script using an ENV file.
Step 1: Create Your Certificate in Workspace ONE Console
From the Workspace ONE UEM console, perform the following steps to create the certificate that will be used to authenticate the API calls against Workspace ONE UEM.
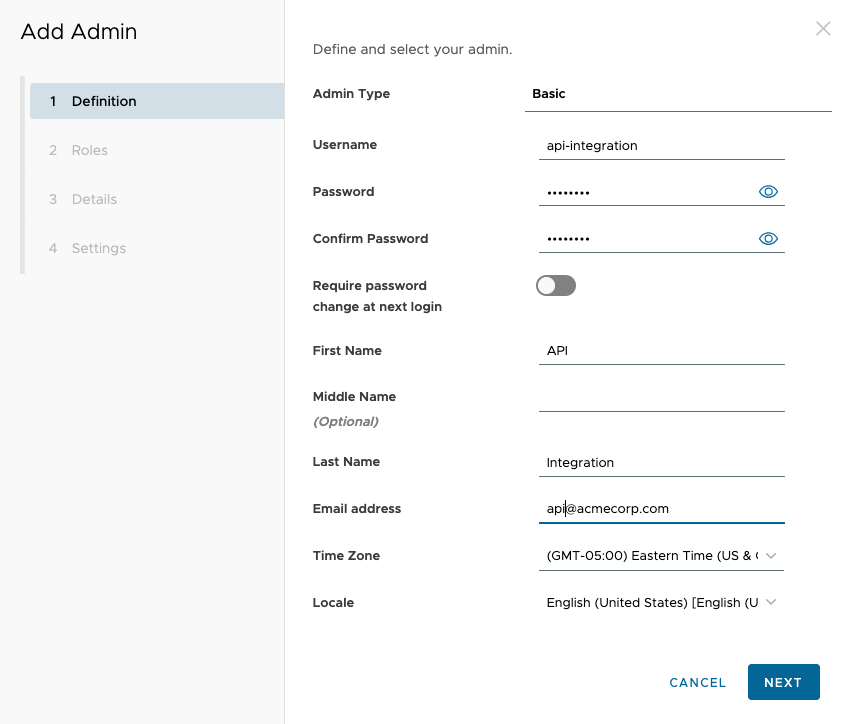
- Go to Accounts > Administrators > List View.
- Click Add > Add Admin > Basic.
- For this example, the Basic account has been used.
- Enter the Username, Password, Confirm Password, First Name, Last Name, and Email.
- Make sure to set a strong password for the certificate.
- Click Next.
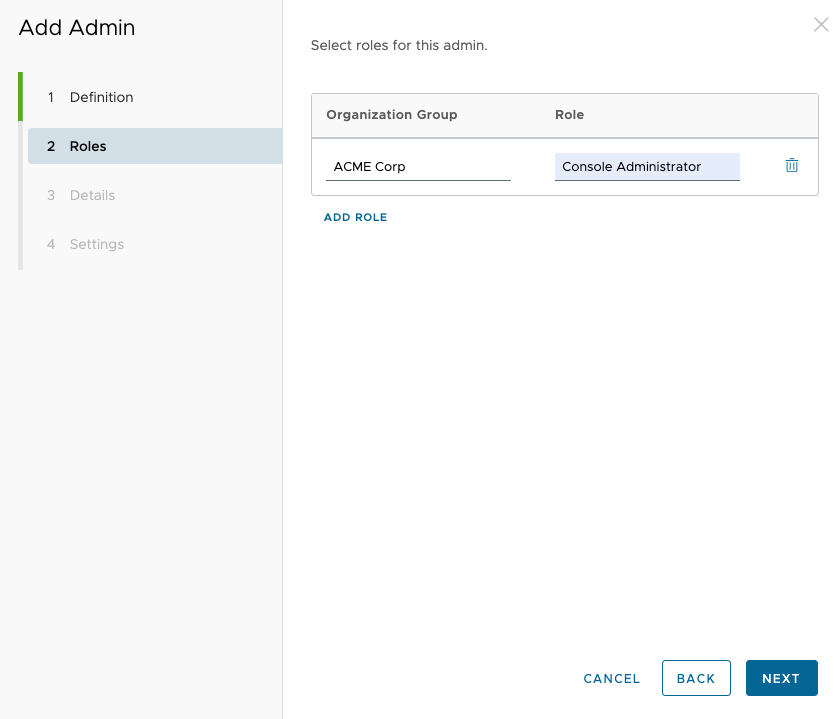
You can choose the appropriate role based on your requirements; the selected role must have access to perform API calls. For this example, Console Administrator was used, however, for production environments, use a limited role that is authorized to perform only the necessary API calls.
- Give your admin user a Role appropriate for your needs. In this example, Console Administrator has been used.
- Click Next.
- The Details screen information is optional; fill in any other details you like and click Next.
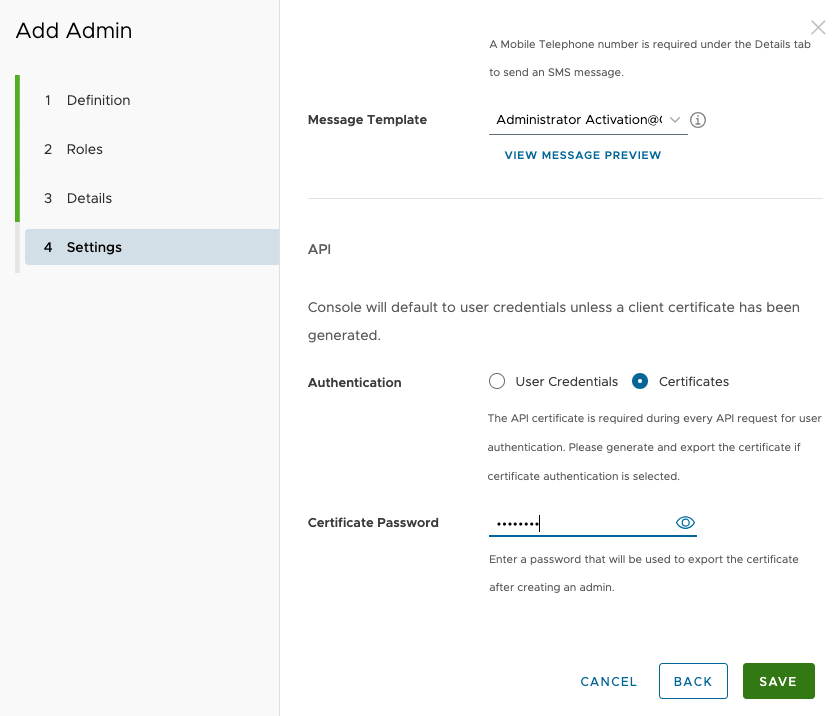
The Settings screen is a key step when creating the account–this is the step where the certificate for this account will be generated and downloaded for use later.
Perform the following steps to generate the account certificate:
- At the bottom of the Settings screen select the Certificates check box as the Authentication Method.
- On the Certificate Password field, enter a password to use as your certificate password.
- Click Save and Continue on the dialog that will pop up.

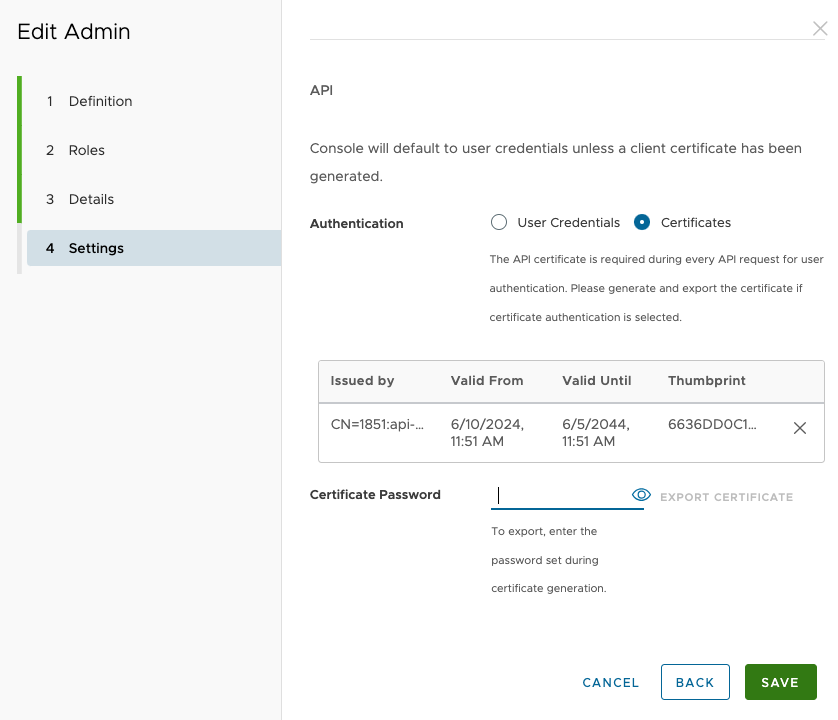
With the account created, the next step is to download the account certificate.
- Click the account you just created, and return to the Settings screen.

- Fill in the certificate password again and then click EXPORT CERTIFICATE. A file with a p12 extension will be downloaded.
- Save the certificate to your computer in a secure location such as ~/.ssh.
- Click Save.
Step 2: Create an ENV File in a Secure Folder
Using an .env file helps in managing sensitive information securely and keeping the code clean. Environment variables stored in an .env file can be easily loaded into your application without hardcoding sensitive data directly into the source code. This approach also allows you to manage different configurations for development, testing, and production environments.
Follow these steps to create the .env file:
- Create an
.envFile:- In a safe folder such as your
~/.sshdirectory, create a file named.env.
- In a safe folder such as your
- Store Environment Variables:
- Open the
.envfile in a text editor and add the following lines, replacing placeholder values with your actual credentials and file names:
- Open the
USER=the_username_you_created
HOST=hostname_of_your_workspace_one_api

APIKEY=your_api_key
CERTNAME=the_filename_of_your_certificate_without the extension
CERTPASSWORD=your_certificate_password
Step 3: Executing Python Script Using the .env File
The following code is a Python script that uses the requests library to make an authenticated API call to your Workspace ONE UE API. The script reads the certificate file from the specified path, generates signed data using the certificate, and sends the API request with the signed data in the Authorization header.
Copy the following script into a text file and save it as getlistofdevices.py, update the directory folder to where your .env and .p12 files are located.
The script will call a UEM API to get a list of all devices and print the result on the screen.
import base64
from cryptography.hazmat.primitives.serialization import pkcs12, pkcs7
from cryptography.hazmat.primitives import hashes, serialization
import requests
import os
from dotenv import load_dotenv
# Load environment variables from ~/.ssh/.env
load_dotenv('/Users/sampleuser/.ssh/.env')
cert_password = os.getenv('CERTPASSWORD')
# Update with your actual certificate path
CERTNAME = os.getenv('CERTNAME')
cert_path = f"/Users/sampleuser/.ssh/{CERTNAME}.p12"
# Host and signing data for the API call
host = os.getenv('HOST')
signing_data = "/api/mdm/devices/search"
url = f"https://{host}{signing_data}"
# Read the certificate file
with open(cert_path, 'rb') as certfile:
cert = certfile.read()
# Load the key and certificate
key, certificate, additional_certs = pkcs12.load_key_and_certificates(cert, cert_password.encode())
# Define PKCS#7 signing options
options = [pkcs7.PKCS7Options.DetachedSignature]
# Create the signed data
signed_data = pkcs7.PKCS7SignatureBuilder().set_data(signing_data.encode("UTF-8")).add_signer(certificate, key, hashes.SHA256()).sign(serialization.Encoding.DER, options)
# Encode the signed data in base64
signed_data_b64 = base64.b64encode(signed_data).decode()
# Define headers for the API request
headers = {
"User-Agent": os.getenv('USER'),
"aw-tenant-code": os.getenv('APIKEY'),
"Host": host,
"Authorization": f"CMSURL'1 {signed_data_b64}",
'Accept': 'application/json',
"version": "1",
}
# Make the API request
response = requests.get(url, headers=headers)
# Print the response content
# print the following in a table: DeviceFriendlyName, DeviceId, DeviceModel, DeviceOSVersion, EnrollmentStatus, LastSeen
print(f"""
--------------------------------------------------------------------------------------------------------------------------------
DeviceFriendlyName | DeviceId | DeviceModel | Platform | EnrollmentStatus | LastSeen
--------------------------------------------------------------------------------------------------------------------------------
""")
for device in response.json()['Devices']:
print(
f"{device['DeviceFriendlyName']} | {device['Id']['Value']} | {device['Model']} | {device['Platform']} | {device['EnrollmentStatus']} | {device['LastSeen']}")
print(f"--------------------------------------------------------------------------------------------------------------------------------")
# print the total number of devices
print (f"Total number of devices: {len(response.json()['Devices'])}")
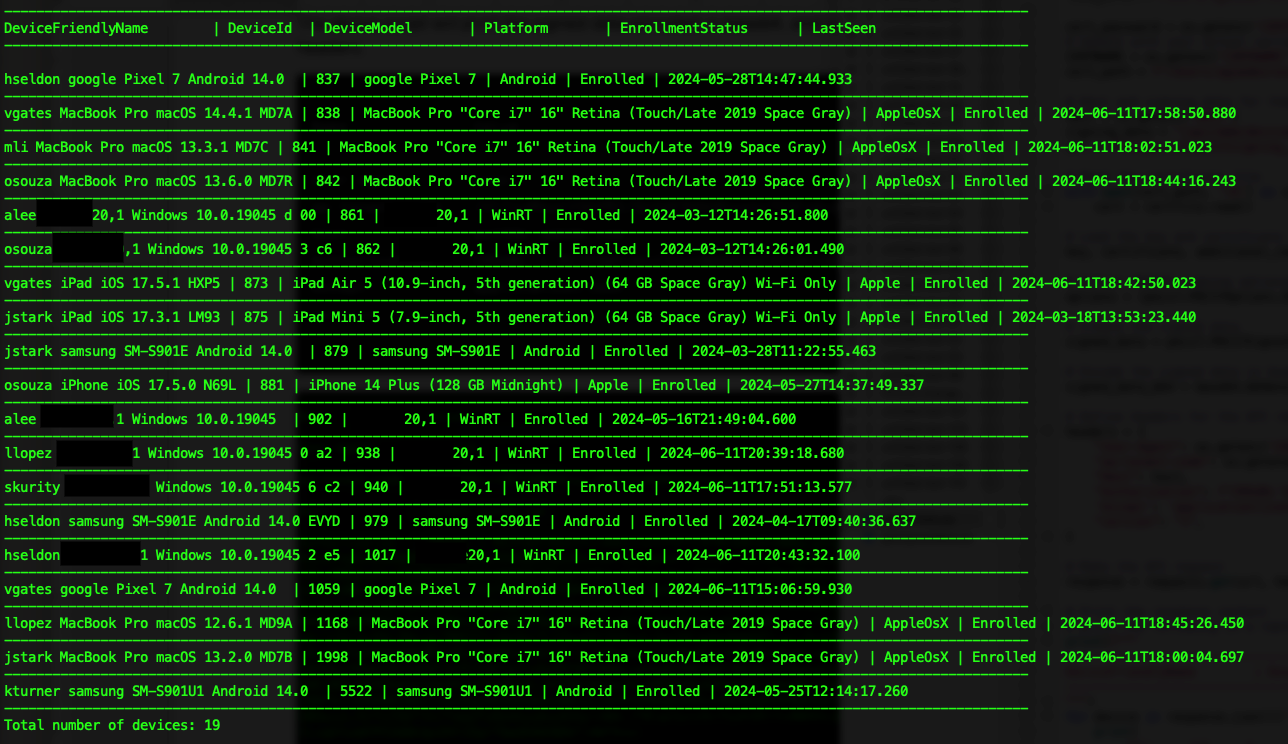
A successful script execution will print out a list of devices in a table which you can change as you need.
python3 getlistofdevices.pys
Extra Credit: Generating Signed Data and Using it in Postman
Postman is a popular API tool that helps to build, test, and modify APIs and it’s heavily used by the Workspace ONE UEM administrator, the following steps demonstrate how to generate the signed data needed for the Authorization header in your API calls through Postman tool.
Generate Signed Data with Python
Run the following Python script to generate the signed data. The signed_data_b64 variable will contain the base64-encoded signed data needed for the Authorization header in your API calls.
Copy the script into a text file and save it as getsignedata.py, update the directory folder to where is located your .env and .p12 files.
import base64
from cryptography.hazmat.primitives.serialization import pkcs12, pkcs7
from cryptography.hazmat.primitives import hashes, serialization
import os
from dotenv import load_dotenv
# Load environment variables from ~/.ssh/.env
load_dotenv('/Users/sampleuser/.ssh/.env')
cert_password = os.getenv('CERTPASSWORD')
# Update with your actual certificate path
CERTNAME = os.getenv('CERTNAME')
cert_path = f"/Users/sampleuser/.ssh/{CERTNAME}.p12"
# Host and signing data for the API call
host = os.getenv('HOST')
signing_data = "/api/mdm/devices/search"
url = f"https://{host}{signing_data}"
# Read the certificate file
with open(cert_path, 'rb') as certfile:
cert = certfile.read()
# Load the key and certificate
key, certificate, additional_certs = pkcs12.load_key_and_certificates(cert, cert_password.encode())
# Define PKCS#7 signing options
options = [pkcs7.PKCS7Options.DetachedSignature]
# Create the signed data
signed_data = pkcs7.PKCS7SignatureBuilder().set_data(signing_data.encode("UTF-8")).add_signer(certificate, key, hashes.SHA256()).sign(serialization.Encoding.DER, options)
# Encode the signed data in base64
signed_data_b64 = base64.b64encode(signed_data).decode()
#
print(f"""
------------------------------------
Name | Value
------------------------------------
User-Agent | {os.getenv('USER')}
aw-tenant-code | {os.getenv('APIKEY')}
Host | {host}
Authorization | CMSURL'1 {signed_data_b64}
Accept | application/json
version | 1
""")
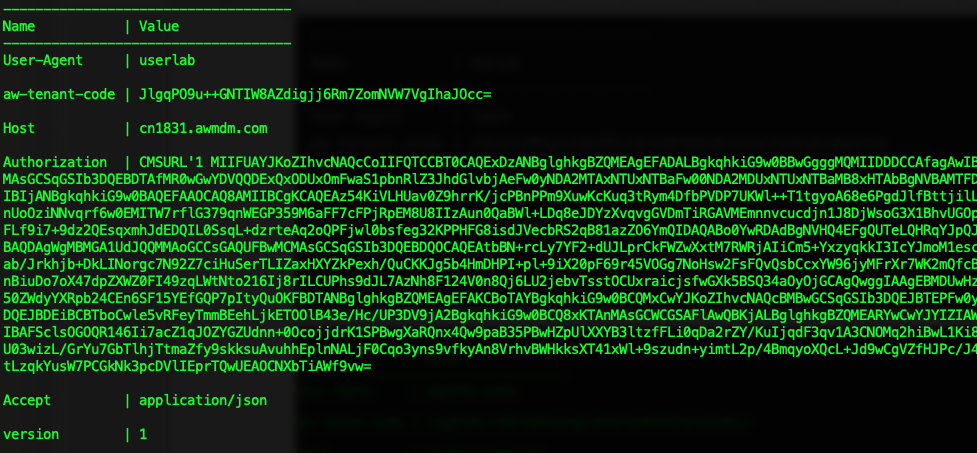
The above script will print the signed data encoded in base64, and save the result as it will be required on the headers.
python3 getsignedata.py
Use Signed Data in Postman
Open the Postman tool and perform the following steps to configure your environment to Authenticate through the certificate when calling Workspace ONE UEM APIs.
- Set up Environment in Postman:
- Go to the
Environmentstab in Postman. - Click
Addto create a new environment. - Add the following variables:
- USER
- HOST
- APIKEY
- SIGNED_DATA
- Go to the
Note: Set the values for USER, HOST, and APIKEY based on your .env file. For SIGNED_DATA, use the base64-encoded signed data generated by your Python script.
- Create a New Request:
- Create a new GET request.
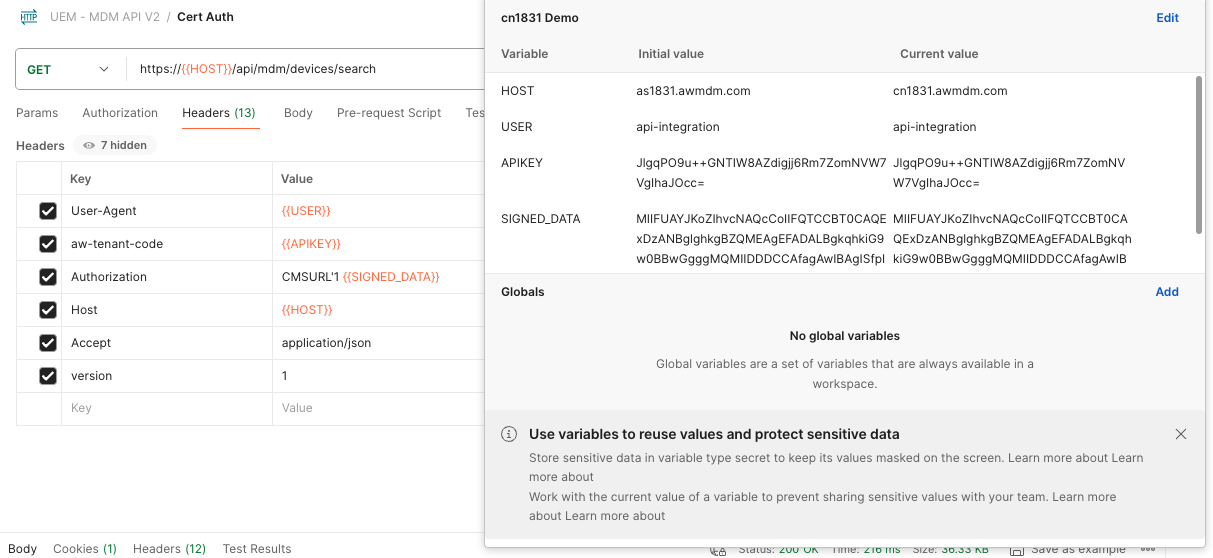
- Set the URL to https://{{HOST}}/api/mdm/devices/search.
- Add Headers:
- Add the following headers:
User-Agent: {{USER}}
aw-tenant-code: {{APIKEY}}
Host: {{HOST}}
Authorization: CMSURL'1 {{SIGNED_DATA}}
Accept: application/json
version: 1
The configuration in Postman should look like this:
- Send the Request:
- Click Send to make the API call.
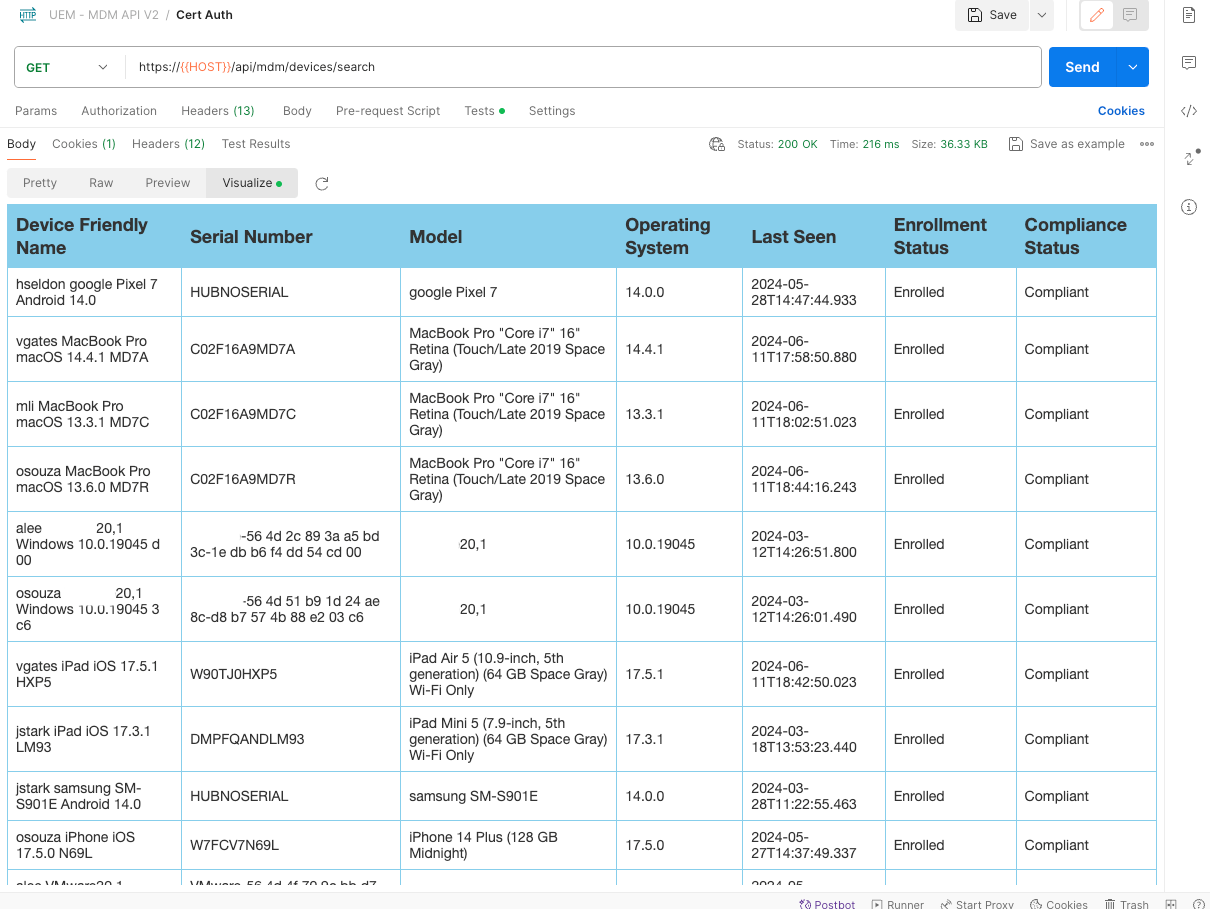
The result is a list of devices available on your UEM environment, you can see the JSON response on the Pretty tab, or in table format using the Visualize tab.
Summary and Additional Resources
In this tutorial, we have shown you how to create a certificate in your Workspace ONE console, download it in a secure manner, and use it in a Python script to make authenticated API calls and generate signed data to use in Postman. By following these steps, you can access your Workspace ONE API in a secure manner and retrieve data using signed data for authentication.
Additional Resources
To learn more about Workspace ONE UEM API and the tools used in this article, explore the following resources:
- Workspace ONE API Documentation
- Workspace ONE UEM API (which Includes a link to the UEM API Postman collection)
- Cryptography Library Documentation
- Requests Library Documentation
- Postman Documentation
- Dotenv Library Documentation
- PKCS#12 File Format
Changelog
The following updates were made to this guide:
| Date | Description of Changes |
| 2024/06/28 | Guide was published. |
About the Author and Contributors
This document was written by:
- Andreano Lanusse, Omnissa alumni.
- Leon Letto, Specialist Solution Engineer, Omnissa.
Feedback
Your feedback is valuable.
To comment on this paper, either use the feedback button or contact us at tech_content_feedback@omnissa.com


