Configuring the Content Gateway Edge Service: Workspace ONE Operational Tutorial
Overview
Omnissa provides this operational tutorial to help you with your Omnissa Workspace ONE® environment. This tutorial walks through configuring the Content Gateway edge service on Omnissa Unified Access Gateway.
Audience
This operational tutorial is intended for IT professionals and Workspace ONE UEM administrators of existing production environments.
Knowledge of additional technologies such as network, VPN configuration, content distribution and Omnissa Workspace ONE® UEM is also helpful.
Configuring Content Gateway Edge Services on Unified Access Gateway
The Content Gateway provides a secure and effective method for end users to access internal repositories. Using Content Gateway with Omnissa Workspace ONE® Content (formerly Content Locker) provides levels of access to your corporate content. End users can remotely access their documentation, financial documents, board books, and more, directly from content repositories or internal file shares. As files are added or updated within your existing content repository, the changes immediately display in Workspace ONE Content. Users are granted access to their approved files and folders based on the existing access control lists defined in your internal repository.
Workspace ONE Content not only provides access to on-premises content repositories, but also enables users to have access to multiple cloud repositories.
This section helps you to configure the Content Gateway edge service on Unified Access Gateway.
Procedures include:
- Enrolling an iOS device
- Enabling Content Gateway settings in Workspace ONE UEM
- Deploying Unified Access Gateway and enabling Content Gateway edge service using PowerShell
- Deploying Workspace ONE Content application
- Validating access to internal files with Workspace ONE Content
The steps are sequential and build upon one another, so make sure that you complete each step before going to the next step.
Content Gateway Edge Service
Before deploying the Unified Access Gateway with Content Gateway, it is important to understand the Content Gateway architecture and deployment models available to provide secure internal access to file repositories from your device fleet.
The Content Gateway works as an edge service on the Unified Access Gateway appliance, and can be configured automatically during deployment of the appliance using PowerShell or after deployment, using the Unified Access Gateway administration console.
The Unified Access Gateway appliance OVF template product, contains several edge services, beyond Content Gateway. The template includes Tunnel, Web Reverse Proxy, and Horizon. This appliance runs from a Omnissa standard hardened image.
Content Gateway Deployment Model
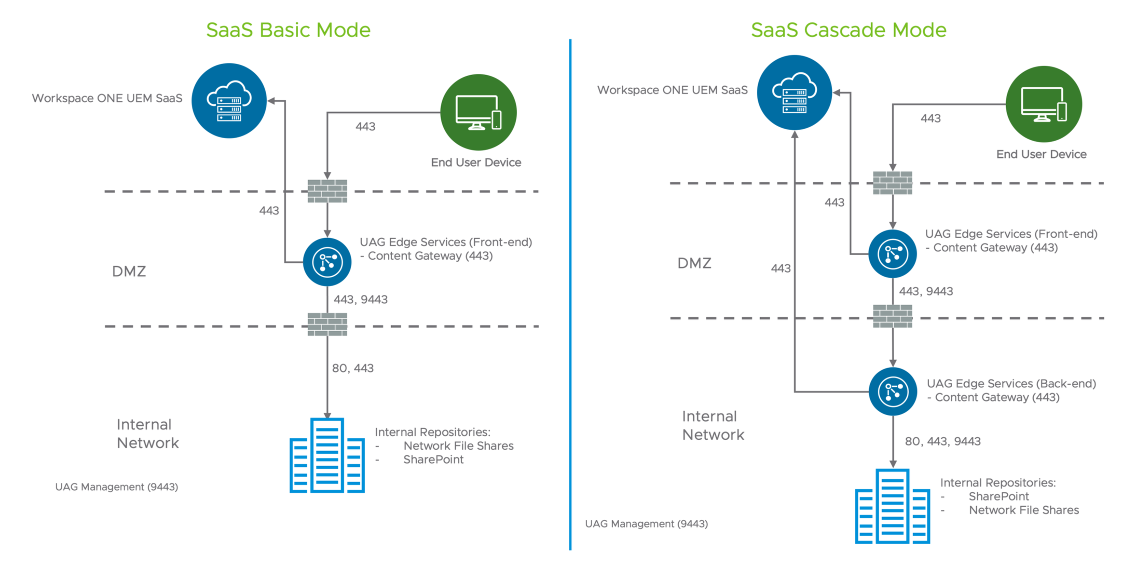
The Content Gateway can be deployed in one of two configurations:
- Basic Mode consists of a single Unified Access Gateway appliance, typically situated in the DMZ, where devices can connect to the appropriate port for each feature, authenticate with a certificate issued from the Workspace ONE UEM Console, and connect to internal sites.
- The Cascade Mode option allows devices to authenticate to the front-end Content Gateway on the Unified Access Gateway appliance located in the DMZ, then connect to the back-end Content Gateway enabled on another Unified Access Gateway appliance over a single port and then access internal resources.
Basic Model
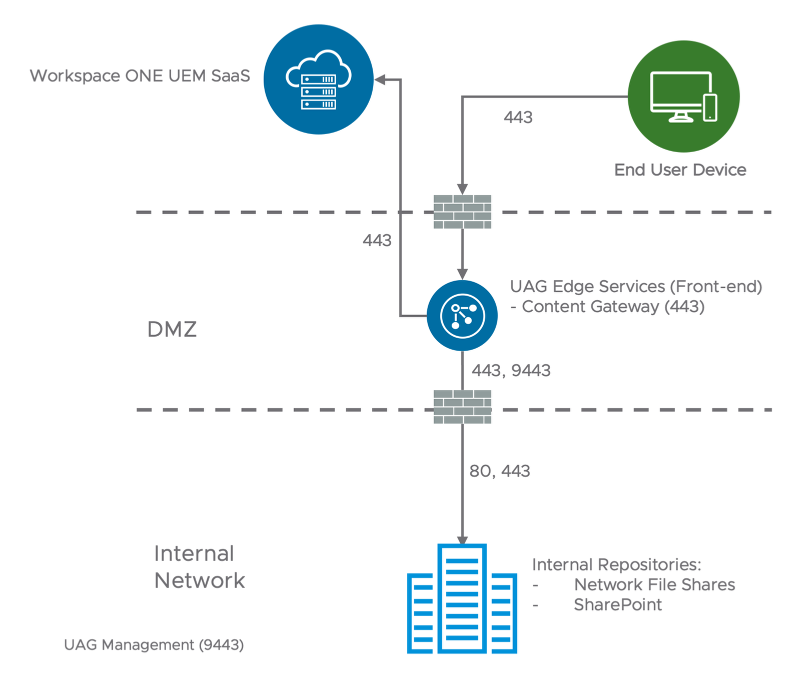
The Basic deployment model includes a single Unified Access Gateway appliance, as you can enable Tunnel on port 443 as well, Tunnel and Content Gateway require distinct host names on the Unified Access Gateway appliance.
The default port for Content Gateway is 443 as TLS Port Sharing is enabled by default on Unified Access Gateway. When TLS Port Sharing is disabled, Content Gateway listens on port 10443.
These ports are secured with a public third-party SSL certificate, which includes the subject name of the server host name.
Cascade Model
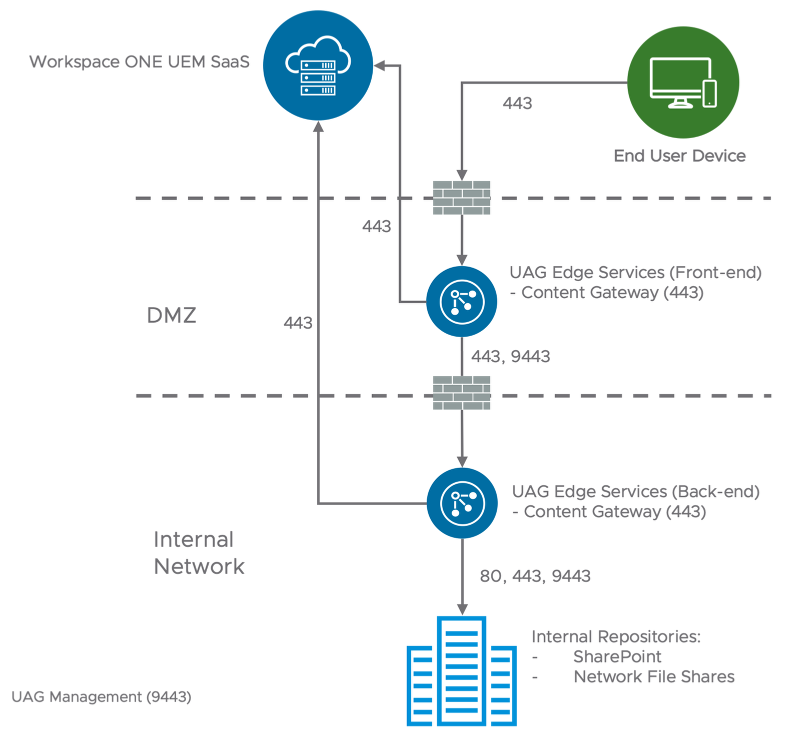
The Cascade deployment model architecture includes two instances of Unified Access Gateway with Content Gateway enabled on each. In cascade mode, the front-end server resides in the DMZ and communicates to the back-end server in your internal network.
The flow is as follows:
- The Content Gateway requests originate from port 443 when TLS Port Sharing is enabled on the front-end Unified Access Gateway, and forward the traffic to the Content Gateway service on local port 10443.
- Content Gateway authenticates the device and forward the request to the back-end Content Gateway based on the port and hostname configured on Workspace ONE UEM, and not based on 10443, which is just a local port used by Content Gateway service on the appliance
- As the back-end appliance receives the incoming traffic and use 443, it will perform the same local redirect mentioned on item #1 and then access the internal resource request by the device/users.
Architecture
The architectural diagram below shows an example environment which emulates a typical environment, including DMZ and internal networks.
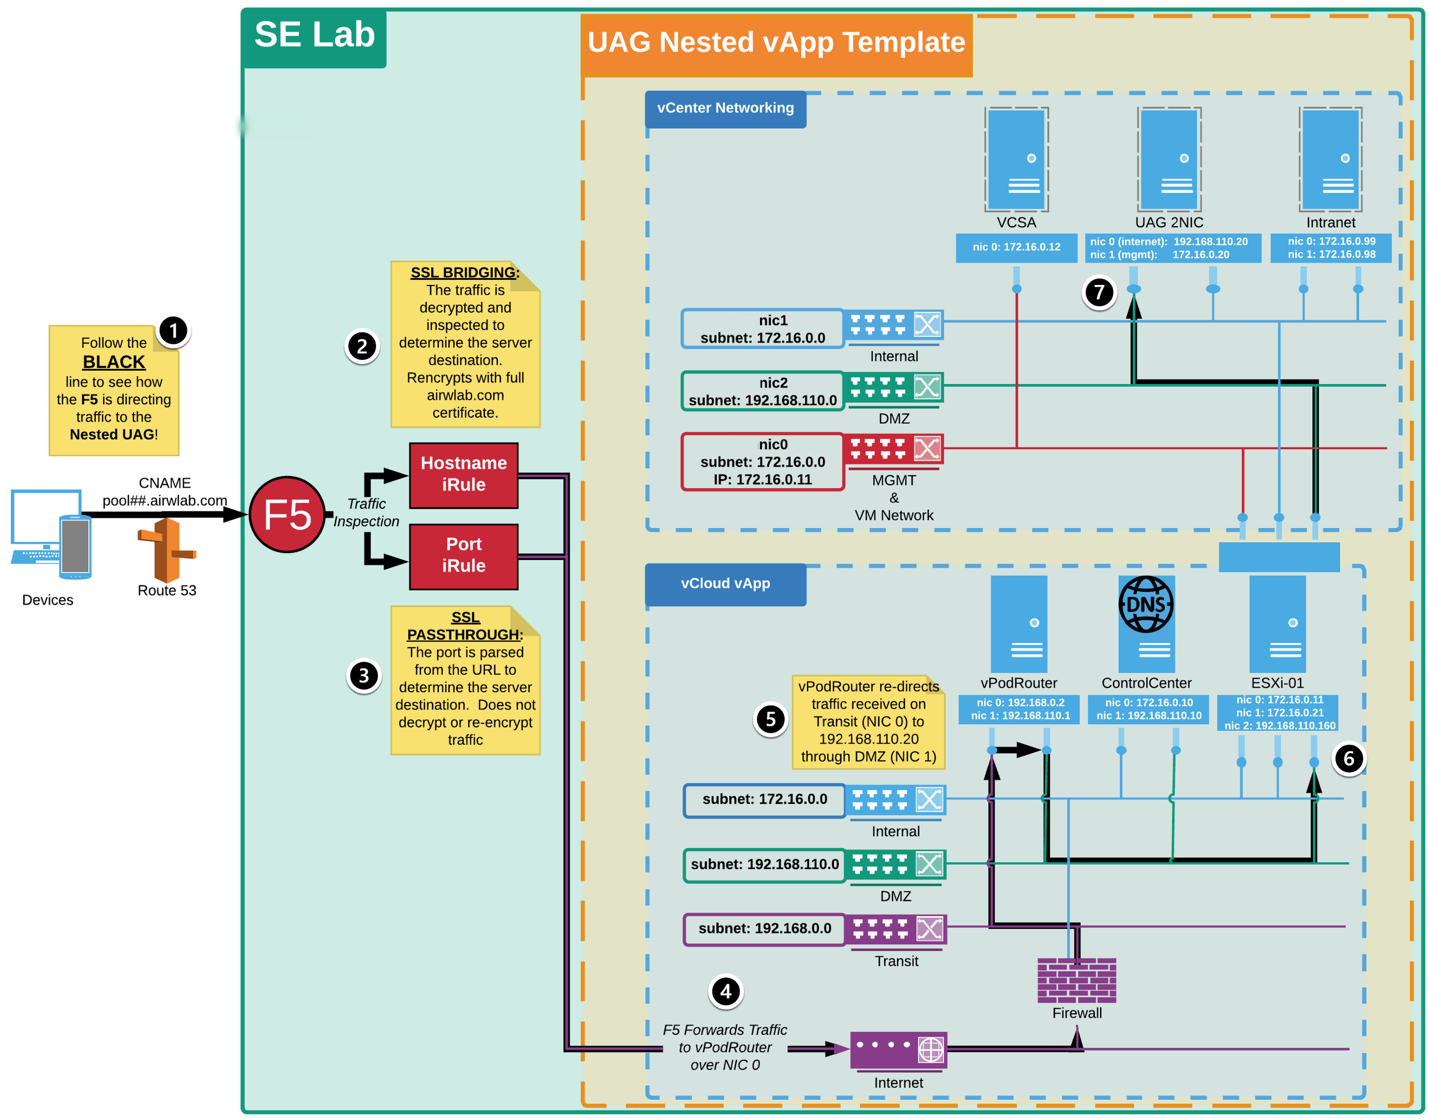
In this example, external requests to the vApp are sent to the vPod Router, which directs those requests to the appropriate resource based on the incoming port. Ports 4000-6500 are reserved for the environment components so all traffic coming in on these ports is forwarded to your Unified Access Gateway appliance's appropriate edge service. In addition, ports 443 and 9443 are forwarded to the Unified Access Gateway appliance over the respective ports.
The vApp Networks (internal, DMZ, and transit) are created within the vApp. The internal and transit networks are NATed to the SE-UCS-Network for outbound internet connectivity while the DMZ network routes through the vPodRouter for inbound and outbound access. Note that the vPodRouter does not have a NIC on the Internal network and therefore cannot route external traffic to resources on the internal network.
vPod Router | ESXi01 6.5.0 U1 | Control Center | vCenter Server 6.5 U1 deployed in the ESXi01
Architecture Overview Diagram
At the top of the diagram is vCenter Networking. At the bottom of the diagram is the vApp network required to support the environment. For these exercises, the focus is on the network hosted on the ESXi, and represented by the following three networks:
- VM Network & Management: Represents the dedicated network to access the Management Console
- Internal Network: Represents the internal network on 172.16.0.x range. The Control Center, ESXI, and vCenter are part of the internal network.
- DMZ Network: Represents the DMZ network on 192.168.110.x which is where the Unified Access Gateway appliance is to be deployed. The Unified Access Gateway Internet-facing NIC is associated to this network.
High-level Overview of Traffic Routing
The architectural diagram is based on two ports and two host names that route through the F5 load balancer. In this example, non-standard ports are used for these services in the 6000 - 6500 port range, due to F5 configuration for an internal network.
The next steps detail how the traffic is routed:
- The host names ( pool##.airwlab.com) are CNAMEs that point to the external IP of the F5. When these host names are resolved, they are routed to the F5 to be inspected and forwarded to the internal networks.
- If the request includes only the host name ( pool##.airwlab.com), the F5 uses the Hostname iRule. This Hostname iRule inspects inbound traffic to the F5 over port 443 (HTTPS). The traffic is decrypted using the *.airwlab.com SSL certificate and chain. The Hostname iRule then inspects the traffic, re-encrypts the traffic using the SSL certificate and chain, and then routes the inbound request to the appropriate destination server based on the host name of the request. This process is known as SSL Bridging, which is not supported by Per-App Tunnel.
- If the request includes the host name and port ( pool##:airwlab.com:6000), the F5 uses the Port iRule. This Port iRule inspects inbound traffic to the F5 over non-443 ports. Unlike the Hostname iRule, the Port iRule parses the request for the port number and then routes the inbound request to the appropriate destination server based on the port of the request. This process does not involve decrypting or re-encrypting the traffic; it forwards the request to the desired destination. This process uses SSL Passthrough.
- From the F5 Hostname or Port iRules, the traffic is forwarded to the configured IP address.
- The vPodRouter is configured to forward Unified Access Gateway traffic to the 192.168.110.20 IP address over the DMZ Network.
- The Nested DMZ Network (192.168.110.0 on vmnic2) is provided by NIC 2 on the ESXi-01 Host (192.168.110.160).
- The request reaches the nested Unified Access Gateway appliance deployed on 192.168.110.20.
Avoid SSL Bridging
In this example, non-443 ports are used for Workspace ONE Tunnel and Content Gateway to avoid decrypting and re-encrypting the traffic because this is not supported with Per-App Tunnel. In other scenarios, you would use the standard ports where possible. This exercise demonstrates that the ports for both services can be configured to work within the architecture.
Network Interfaces
Unified Access Gateway supports deployments with one, two, or three NICs. This means that the server can be partitioned to receive traffic on a single interface or to route traffic to different interfaces, based on the source of the request. Most often, if you need to implement multiple NICs, you already follow this standard with other web applications in your organization.
You must determine what is appropriate for your environment when selecting the number of NICs during installation. It is important for you to understand the expected behaviour when two or three NICs are enabled.
To explore these options, see Deploying Unified Access Gateway: Workspace ONE Operational Tutorial.
General Considerations
In the exercises for deploying the Unified Access Gateway server through vSphere, the vCenter setup is hosted in a nested template. This is not usually the case when working with users in a live environment.
User environments can include multiple networks and can optionally have a Network Protocol Profiles (NPP) that corresponds to the networks to connect to the Unified Access Gateway. Prior to version 3.3, NPP was a requirement. Since version 3.3, NPP is no longer required.
Note: Keep in mind that the Unified Access Gateway requires a netmask, default gateway, and subnet to be defined for each network enabled during deployment.
Prerequisites
Before you can perform the steps in this exercise, you must install and configure the following components:
- Omnissa Workspace ONE UEM SaaS or on-premises latest version
- VMware vSphere ESX host with a vCenter Server (vSphere 6® and later)
- vSphere data store and network to use
- PowerShell script running on Windows 10+ or Windows Server 2012+
- Windows machine running the latest PowerShell script with VMware OVF Tool command installed
- Unified Access Gateway PowerShell script, such as uagdeploy-VERSION.ZIP, available at my.workspaceone.com, after download extract the files into a folder on your Windows machine)
- iPhone, iPad, and iPod Touch devices running latest iOS
Ensure the following settings are enabled in the Workspace ONE UEM Console:
- Organization Group created and set as Customer Type
- Device Root Certificate issued
- REST API Key generated at the Organization Group where Workspace ONE Tunnel will be enabled
Note: To perform most of these exercises, you need to log in to:
- vSphere Web Client
- Workspace ONE UEM Console
Retrieve Group ID from Workspace ONE UEM
In the Workspace ONE UEM Console:
- To find the Group ID, point your mouse over the Organization Group tab at the top of the screen.
- Your Group ID is displayed at the bottom of the Organization Group pop up.

Enrolling iOS Device
In this section, enroll your iOS device in Workspace ONE UEM by installing the Workspace ONE Intelligent Hub. A Group ID is required to complete enrollment.
- Download and install Workspace ONE Intelligent Hub from App Store.
Note: Checked out devices will likely have the Workspace ONE Intelligent Hub already installed. You may skip this step if your device has the Workspace ONE Intelligent Hub installed.
At this point, if you are using your own iOS device or if the device you are using does not have the Workspace ONE Intelligent Hub Application installed, then install the application from the App Store.
To install the Workspace ONE Intelligent Hub application from the App Store, open the App Store application and download the free Workspace ONE Intelligent Hub application.
- Launch the Hub app on the device.
- Enter the Server URL and Tap Next.
- Tap Server Details.
- Return to the Intelligent Hub app on your device.
- Enter your Group ID and tap Next.
- Enter your user credentials and tap Next.
- The Workspace ONE Intelligent Hub prompts you to enable Workspace Services to enroll your device into Workspace ONE UEM.
- Tap Next to begin.
- If you are prompted to allow the website to open Settings, tap Allow.
- Note: If you do not see this prompt, ignore this and continue to the next step. This prompt occurs only for iOS devices on iOS 10.3.3 or later.
- Tap Install in the upper-right corner of the Install Profile dialog box.
- Tap Install when prompted on the Install Profile dialog.
- You should now see the iOS Profile Installation warning explaining what this profile installation will allow on the iOS device.
- Tap Install in the upper-right corner of the screen.
- You should now see the iOS request to trust the source of the MDM profile.
- Tap Trust when prompted at the Remote Management dialog.
- You should now see that the iOS Profile was successfully installed.
- Tap Done in the upper-right corner of the prompt.
- Your enrollment is now complete. Tap Open to navigate to the Workspace ONE Intelligent Hub.
- Tap Done to confirm the notice and continue.
- Tap Allow if you get a prompt to allow notifications for the Hub app.
- You may be prompted to install a series of applications. If prompted, tap Install to accept the application installation.
- Tap I Understand when shown the Privacy policy.
- Tap I Agree for the Data Sharing policy.
- Confirm that the Hub app shows the user account that you enrolled with.
You have now successfully enrolled your iOS device with Workspace ONE UEM. Continue to the next step.
Enabling Content Gateway Settings on Workspace ONE UEM Console
When the Content Gateway edge service is enabled on the Unified Access Gateway appliance, it retrieves the Content Gateway configuration from Workspace ONE UEM. Therefore, the Content Gateway must be configured first in the Workspace ONE UEM Console, prior to deployment of the Unified Access Gateway appliance.
This section helps you to configure Content Gateway in Workspace ONE UEM console. In the Workspace ONE UEM console, select Groups and Settings and select All Settings.
Enable Content Gateway
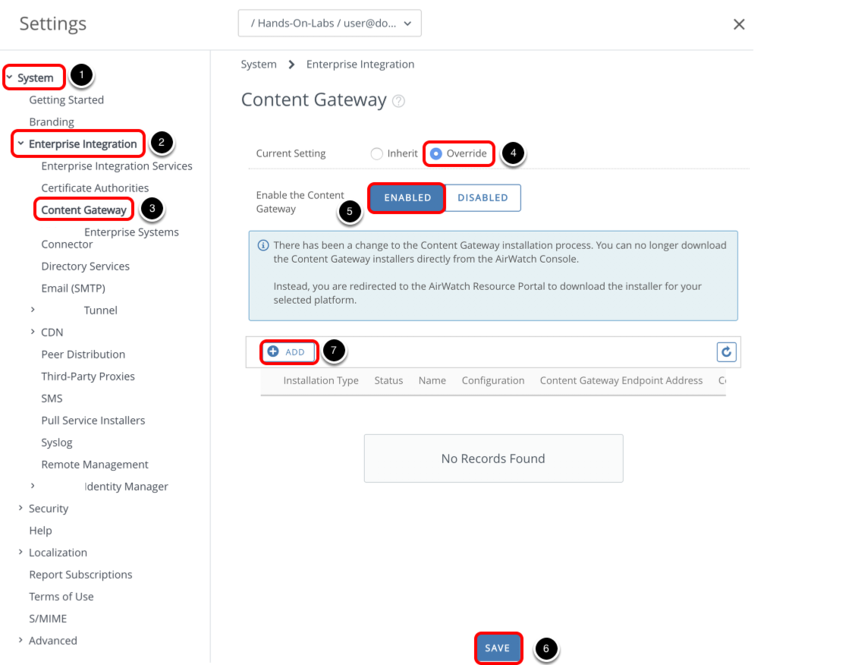
- Select System.
- Select Enterprise Integration.
- Select Content Gateway.
- Change the setting to Override.
- Select Enabled for Content Gateway.
- Click Save.
- Click Add.
Add Configuration
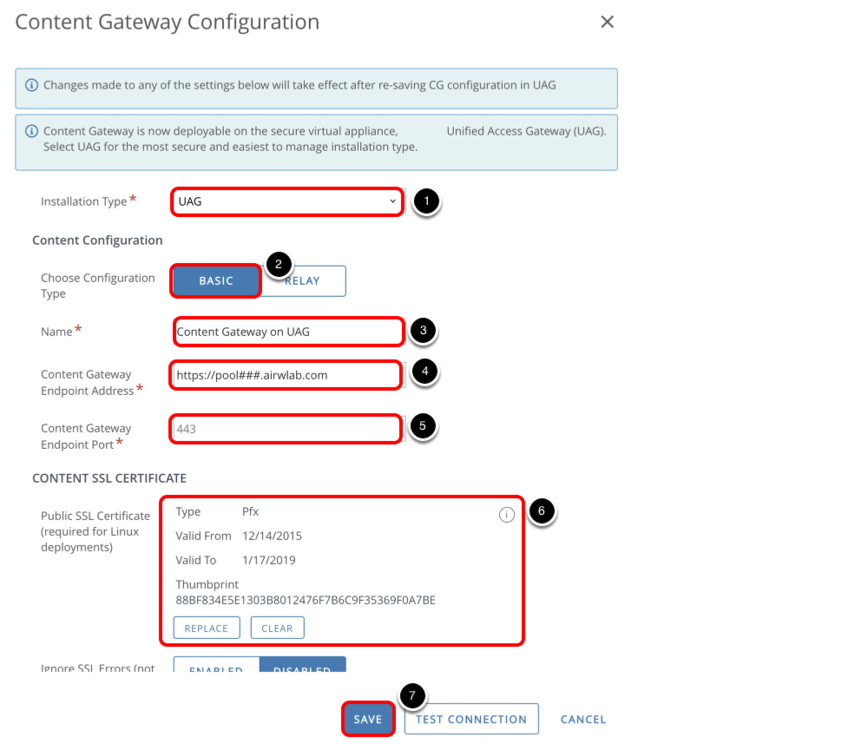
- Select UAG for Installation Type.
- Select Basic (Single-Tier) for Choose Configuration Type.
- Enter a Name, for example, Content Gateway on UAG.
- Enter the Content Gateway server host name (for example, https://contentgateway.company.com) for Content Gateway Endpoint Address.
- Enter a port number for Content Gateway Endpoint Port.
- Click Upload and select your certificate.
- Click Save.
Obtain Content Gateway Configuration GUID
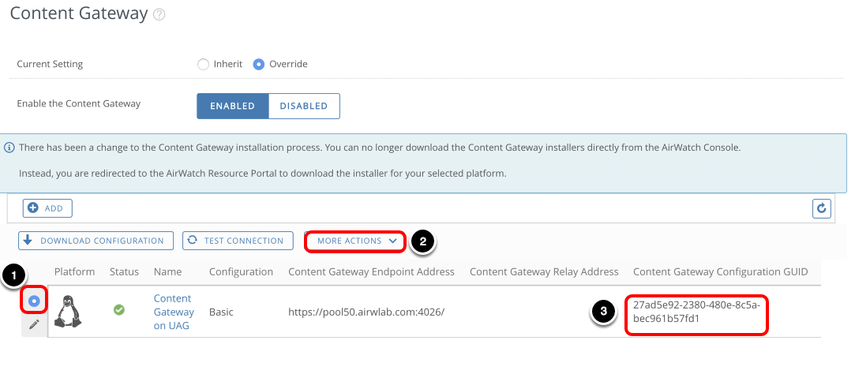
- Select the Content Gateway configuration that you just added.
- Select More Actions and select Download Unified Access Gateway, which redirects to the Workspace ONE Resources portal where the Unified Access Gateway virtual appliance OVF package is hosted.
- Copy the Content Gateway Configuration GUID—this is required to enable the Content Gateway edge service on Unified Access Gateway.
Extract the ZIP file on the Windows machine where you will install Unified Access Gateway.
The next section helps you to deploy the Unified Access Gateway appliance OVF through PowerShell and configure the Content Gateway edge service based on the settings configured in Workspace ONE UEM.
Preparing Content Gateway INI Settings for Deployment
This section covers the required INI settings to enable the Content Gateway edge service during the Unified Access Gateway appliance deployment. Ensure you are logged in to the machine where you will install Unified Access Gateway. Extract the contents of the Unified Access Gateway ZIP file on this machine.
Configure General Deployment Settings
The INI file contains all the configuration settings required to deploy the Unified Access Gateway appliance.
This exercise uses the uag-CG.ini file and is configured for a Unified Access Gateway appliance called UAG-CG, that has two NICs—NIC one is set to internet facing and NIC two for back end and management.
The INI file is located in the Unified Access Gateway installer ZIP package downloaded in the previous exercise.
Edit the INI File
Navigate to your Unified Access Gateway INI file and open the file to make some updates.
General and Network Settings
In this example, the settings are already filled out. The General section includes details such as deployment location and network configuration for the Unified Access Gateway appliance.
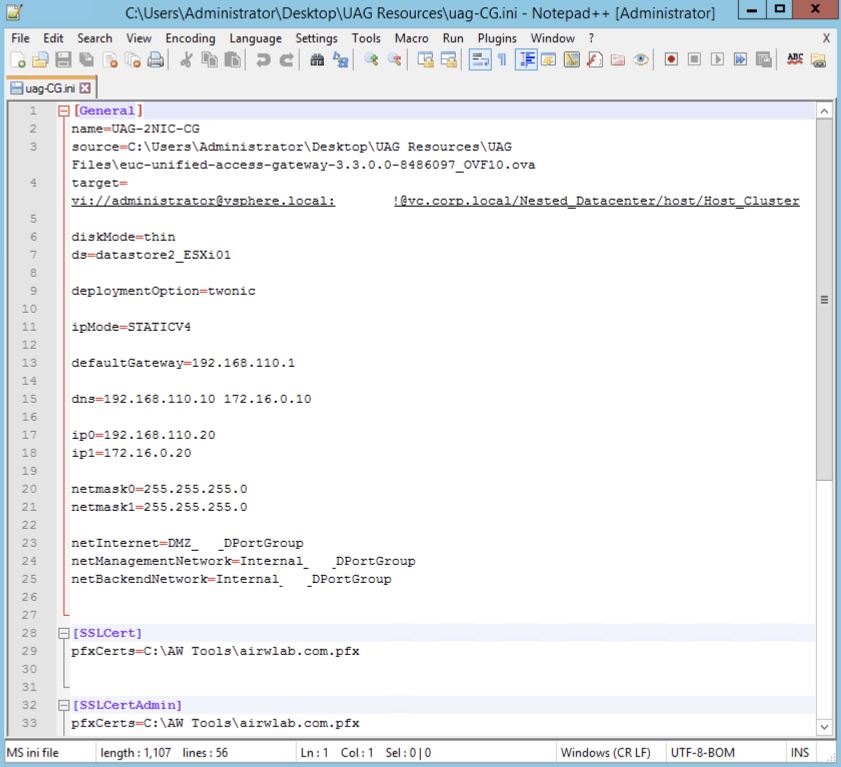
The SSLCert and SSLCertAdmin sections contain SSL certificate location for the administrator and Internet interfaces.
Configure Content Gateway Settings
The AirWatchContentGateway section contains the required parameters to enable Content Gateway edge service on your Unified Access Gateway appliance.
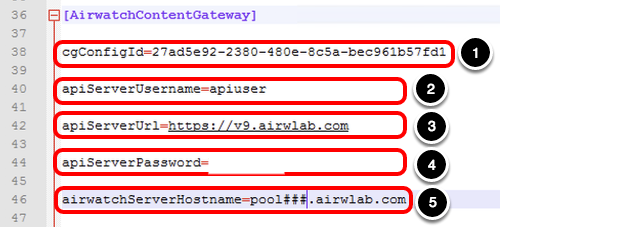
- Paste the Content Gateway configuration GUID for cgConfigId. You copied this value in the previous exercise.
- Enter the apiServerUsername, for example, apiuser.
- Enter the apiServerUrl, for example, https://v9.airwlab.com.
- Enter the apiServerPassword.
- Enter the airwatchServerHostname, for example, https://pool###.airwlab.com.
If you do not provide the apiServerPassword as part of the INI settings, the administrator must enter the password in the Unified Access Gateway administration console.
Deploying Unified Access Gateway Appliance
After you have configured the INI file for your Unified Access Gateway deployment, the next step is to run the PowerShell script passing the INI as a parameter.
Deploy Unified Access Gateway using PowerShell
- Open PowerShell.
- Navigate to the folder containing your INI file. For example, enter cd '.\Desktop\UAG Resources' then press Enter.
- Enter the following command line, replace the INI filename with the one you have used.
.\uagdeploy.ps1 .\uag-cg.ini
           -rootPwd [PASSWORD]
           -adminPwd [PASSWORD]
           -disableVerification false
           -noSSLVerify false
           -ceipEnabled yes
           -awContentGatewayAPIServerPwd <password>
- -rootPwd - set the root password for the Unified Access Gateway appliance.
- -adminPwd - set the admin password for the REST API management access.
- -disableVerification - perform validation of signature and certificate.
- -noSSLVerify - perform SSL verification for the vSphere connection.
- -ceipEnabled - Join the Customer Experience Improvement Program ("CEIP") program.
- -awAPIServerPwd - API password for the respective configured API user under AirWatch section of the INI file.
Note: 3. You might get prompted to enter the password related to the certificates defined on the SSLcert and SSLcertAdmin settings. Certificates can be passed in PEM format using the pemCerts and pemPrivKey settings for the SSLCert and SSLCertAdmin sections of the INI file.
If the -awContentGatewayAPIServerPwd is incorrect, you will get prompted to enter the correct password for the UEM API account.
The deployment starts and you can follow the progress on the same window or on your vSphere Web Client, which you opened at the beginning of this tutorial.
Confirm that PowerShell Script Deployment Completes
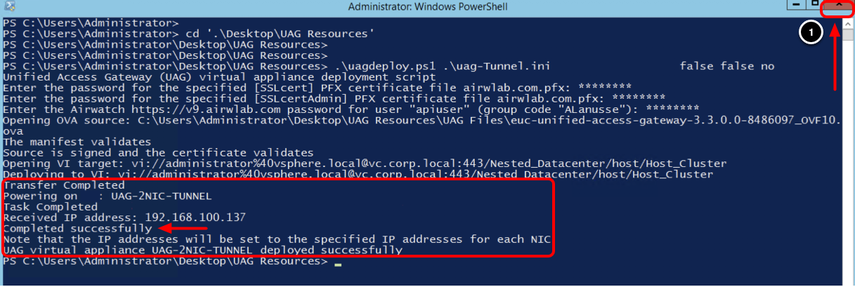
- Confirm the deployment has been completed successfully. The Completed successfully text is shown in the output.
- Click Close.
After a successful deployment, the script automatically powers on the VM UAG-2NIC-CG.
The Received IP address presented by the script log is a temporary IP; the final IPs for NIC one and NIC two are assigned to the Unified Access Gateway appliance during the first start. Return to the vSphere Web Client and validate the IP address in the next step.
Validate Unified Access Gateway Deployment
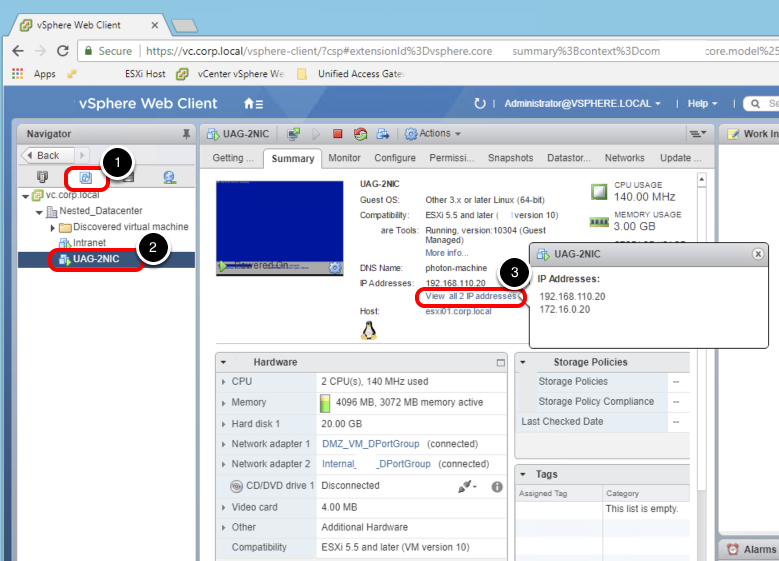
- Click VM and Templates.
- Click UAG-2NIC.
- Click View all 2 IP addresses.
Important: If the Unified Access Gateway appliance does not finalize the configuration during the first startup, you receive an error message from vSphere Web Client. If that happens, wait for the appliance to finalize, and refresh the entire Google Chrome browser.
Validating Content Gateway Settings on the Unified Access Gateway Appliance
The Content Gateway is now enabled and running based on the INI settings that you provided during the Unified Access Gateway deployment.
As an alternative to deploying the Content Gateway using PowerShell, you can use the Unified Access Gateway administration console, which allows you to enable or change the current Content Gateway settings.
This section helps you to validate the Content Gateway settings using the Unified Access Gateway administration console.
Log in to Unified Access Gateway Console
- Click the New Tab button to open a new tab.
- Navigate to the Unified Access Gateway administration console URL, for example, https://uagmgt-int.airwlab.com:9443/admin.
- Enter the username, for example, admin .
- Enter the password.
- Click Login.
Validate Configuration Settings
A successful login redirects you to the following screen. Keep this window open as you will return to the administration console later.
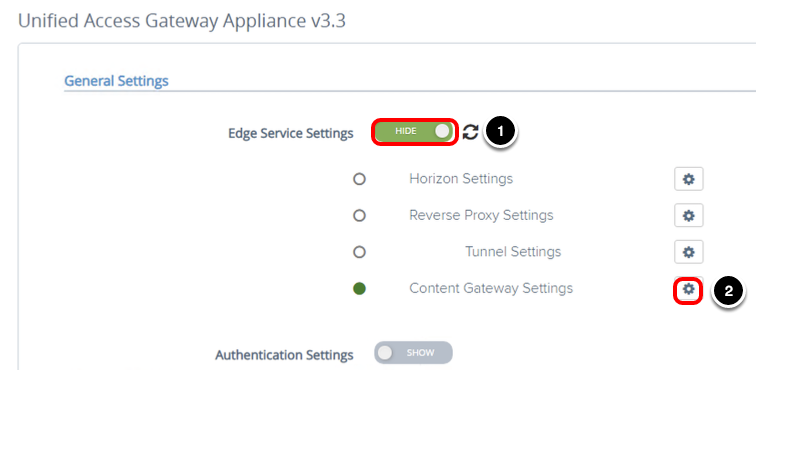
- Click Select to configure settings manually.
- Click SHOW, after you click SHOW, it changes to HIDE.
- Click the gear icon next to Content Gateway Settings. The circle should be green, which means the Unified Access Gateway appliance and Workspace ONE UEM Console can communicate.
Validate Content Gateway Settings
The Content Gateway edge service is enabled based on the configuration defined in the INI file.
You can change the configuration any time, or choose not to configure settings in the INI file and later enable the settings through the Unified Access Gateway administration console.
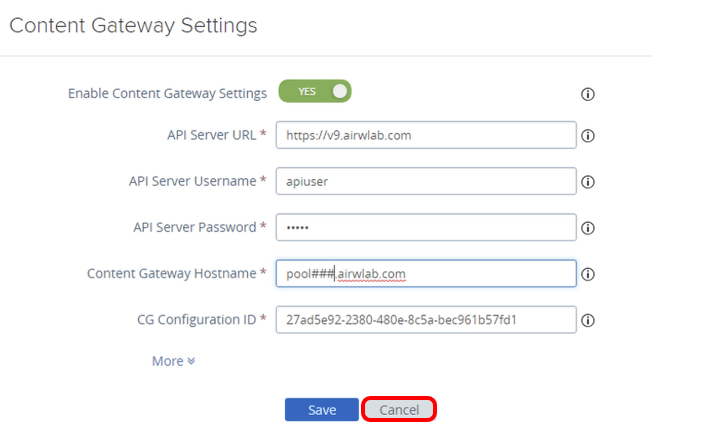
Each time you change the configuration and Save, the changes are applied to the configuration files and the Content Gateway edge service restarts automatically. Devices cannot communicate with the service during the restart.
Click Cancel.
Setting Up a Content Repository
To grant end-users access to corporate file servers from their devices and keep those files synchronized, IT administrators must configure an Admin repository, an Automatic user-added repository, or a Manual user-added repository.
Workspace ONE UEM supports integration with various corporate file servers. The syncing method support and requirement of the Content Gateway component vary by repository type.
The following are available syncing methods for repositories:
- Admin — A repository that is fully configured and synced by an administrator in the Workspace ONE UEM console.
- Automatic — A repository that is configured by an administrator in the Workspace ONE UEM console, but is synced by end users on their devices.
- Manual — A repository that gets configured in the UEM console, but relies on the end user to add the link manually and sync the repository on their device.
This exercise helps you to add a network file share as an Admin Repository and make that available to end users through the Workspace ONE Content application. In this example, the network file share is Corp Files. The folder and files names in your environment will differ.
Add Content Repository
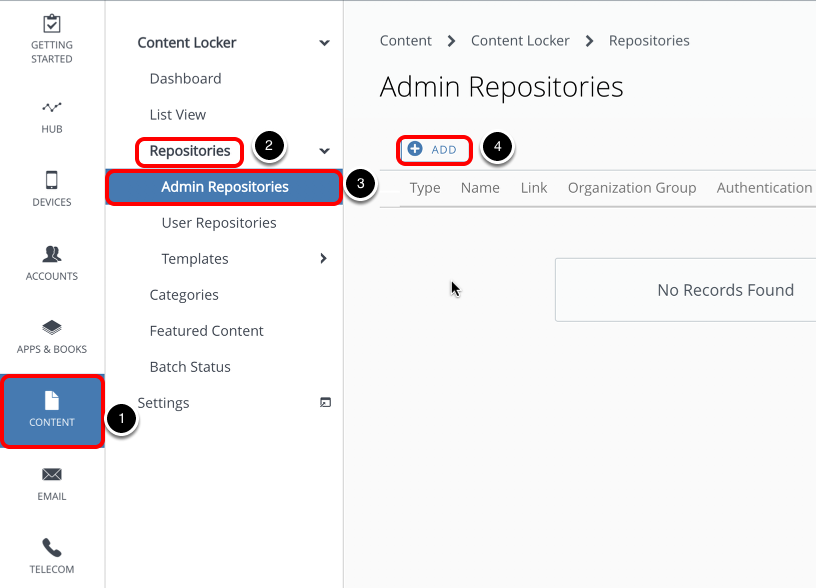
- Select Content.
- Select Repositories.
- Select Admin Repositories.
- Click Add.
Define Content Repository Details
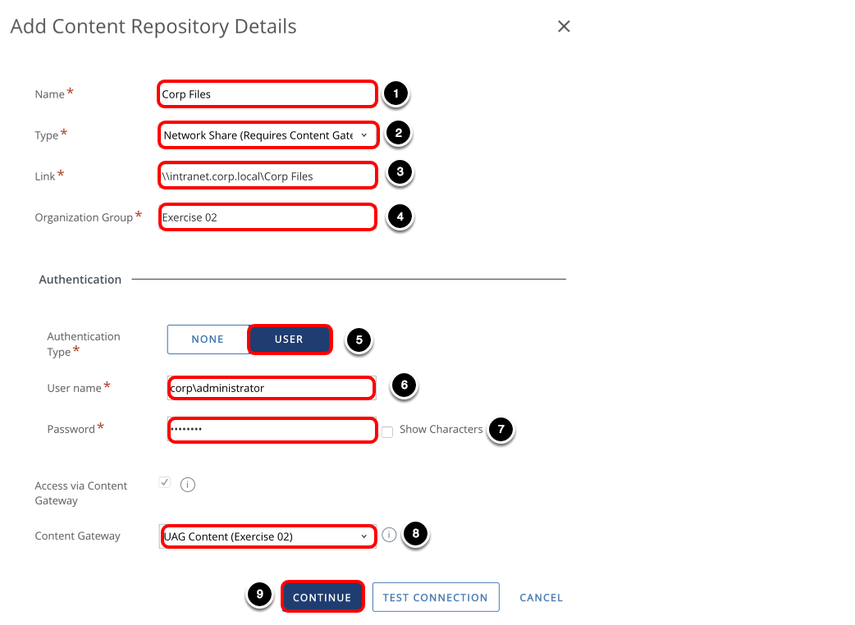
- Enter a Name, for example, Corp Files.
- Select Network Share for Type.
- Enter the Link, for example, \\intranet.corp.local\Corp Files.
- Enter the Organization Group, for example, Exercise 02.
- Select USER for Authentication Type.
- Enter the User name, for example, corp\administrator.
- Enter the Password.
- Select your Content Gateway, for example, Content Gateway on UAG. Access to this internal repository goes through the Content Gateway that you set up in the previous exercise.
- Click Continue.
- Click Save.
Navigate to Corporate File Servers
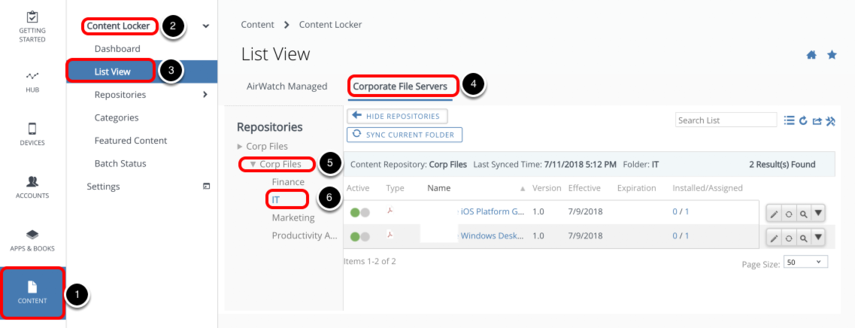
- Select Content.
- Select Content Locker.
- Select List View.
- Select Corporate File Servers.
- Select Corp Files.
- Select the IT folder.
You can see the files available in this folder and in sync with Content Management.
The Installed/Assigned column lists the number of devices where the files are available. Click the quantity to see a list of each device that can access the file.
Configure Security Properties for Corporate Folders
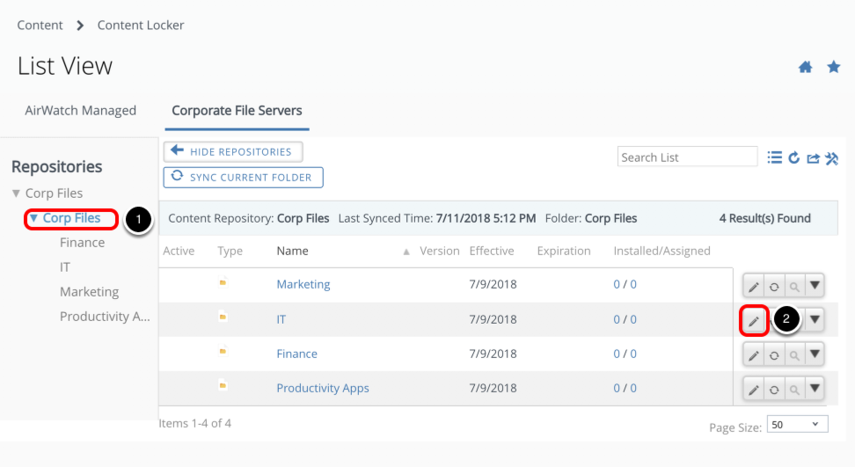
Although you configured the security configurations on the network file share, Workspace ONE UEM allows you to set up a new layer of security for the content on mobile devices.
- Navigate back to the Corp Files folder.
- Click Edit for one of your folders.
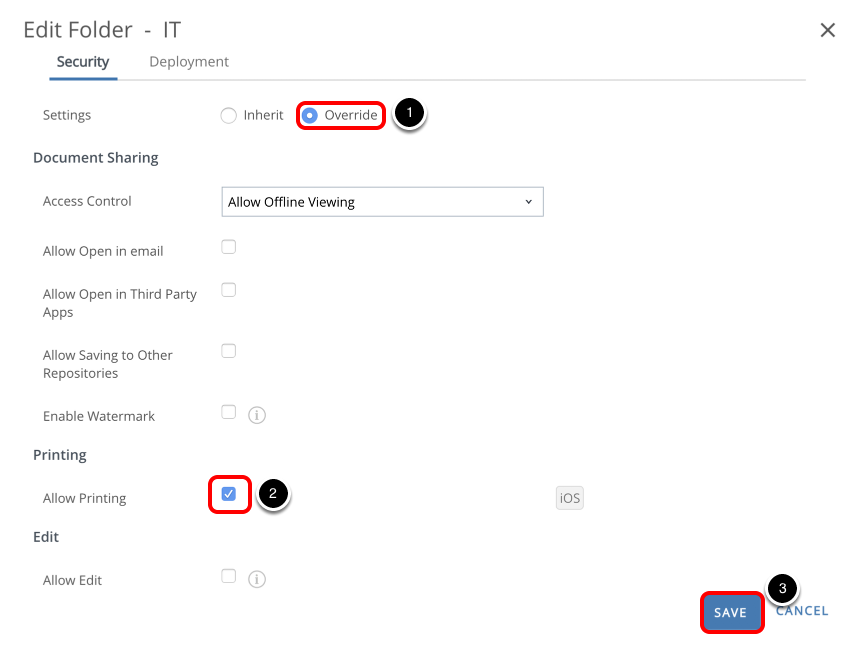
There are a number of configurations that you can apply to increase security of the asset on the mobile devices. In this example, you edit security for the IT folder, however, you can override the security properties on multiple levels, such as navigating to a specific file.
In this example, you allow the end-user to print any content under the IT Folder from a managed mobile device using Workspace ONE Content.
- Select Override.
- Select the Allow Printing check box.
- Click Save.
Deploying the Workspace ONE Content Application
This exercise helps you to deploy the Workspace ONE Content (formerly Content Locker) application on a managed device from the Workspace ONE UEM Console.
Add Application
In the Workspace ONE UEM console:
- Select Apps & Books.
- Select Applications.
- Select Native.
- Select Public.
- Click Add Application.
Find Application and Add Assignment
- Select Apple iOS for Platform.
- Enter Content Locker for Name.
- Click Next.
- Click Select.
- Click Save & Assign.
- Click Add Assignment.
Configure Assignment
- Enter your assignment group, for example, Exercise 02.
- Select AUTO for App Delivery Method.
- Select Enabled for Managed Access.
- Click Add.
Publish App to Assigned Group
Click Save & Publish and then click Publish.
After you click Publish, you should receive a prompt on your device requesting confirmation to install the Workspace ONE Content application. Confirm and launch the application after the installation completes.
Validating Access to Internal Files with Workspace ONE Content
After enrollment is complete, ensure that the Workspace ONE Content application is installed on your device. This section helps you to validate access to internal files using Workspace ONE Content.
- Tap Content to open Workspace ONE Content.
- Select Corporate Repositories.
- Tap the Repositories icon.
- Tap Corp Files.
- Provide user credentials.
- Repeat the following steps for each folder you see under Corp Files. You can see the available files in each folder.
- Tap the IT folder and tap a file to open.
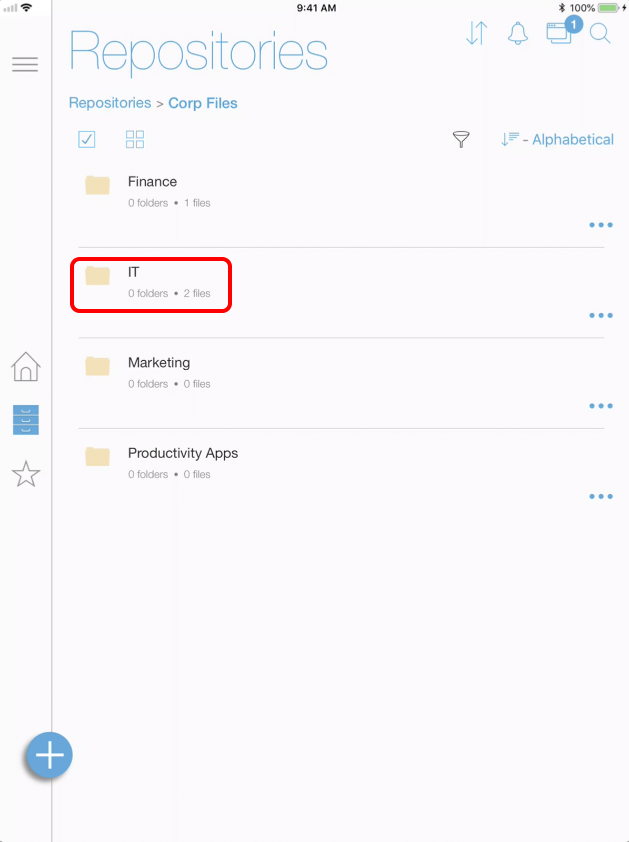
- Tap the Share icon. The Print option is available based on the security properties previously defined for the IT folder.
- Tap < to return to Corp Files.
- Tap another folder in Corp Files, for example, Finance.
- Tap a file to open it.
- The file is downloaded to your device and opened.
- Tap another folder in Corp Files, for example, Finance.
- Tap a file to open it.
- The file is downloaded to your device and opened.
- Validate printing permission.
- Tap the Share icon. The Print option is not available for this file.
- Tap < to return to Corp Files.
Summary and Additional Resources
This operational tutorial provided steps to configure the Content Gateway edge service for Unified Access Gateway in a Workspace ONE UEM environment.
The following procedures were included:
- Configure Content Gateway in the Workspace ONE UEM Console
- Deploy Unified Access Gateway enabling Content Gateway edge services through PowerShell
- Add network file share as a content repository in Workspace ONE UEM
- Define security policies for mobile devices when accessing corporate files in specific folders
- Use Workspace ONE Content application to access internal files
Additional Resources
Check out the Omnissa Reference Architecture which provides a framework and guidance for architecting an integrated digital workspace using Omnissa Workspace ONE and Omnissa Horizon.
Changelog
The following updates were made to this guide:
| Date | Description of Changes |
| 2024/09/20 | Update links. |
| 2019/07/19 | Guide was published. |
About the Author and Contributors
This tutorial was written by:
- Andreano Lanusse, Omnissa alumni.
Feedback
Your feedback is valuable.
To comment on this paper, either use the feedback button or contact us at tech_content_feedback@omnissa.com

