

Blocking unwanted apps on managed macOS devices with Workspace ONE UEM
Overview
Omnissa Workspace ONE® UEM offers a comprehensive management solution for macOS devices, supporting operating systems version 10.9 and later. With its ability to manage Corporate-Dedicated, Corporate Owned, or Employee Owned (BYOD) devices, Workspace ONE UEM provides enterprises with the flexibility to meet the diverse needs of their employees.
Organizations, both in the public and private sectors, are increasingly concerned about data exfiltration. The loss of confidential company data, such as intellectual property, customer or employee personal data, or financial data, can destroy a company’s reputation and incur substantial costs in containment efforts, lawsuits, and penalties. Hackers employ various methods to gain access to a company’s data, including phishing emails, brute force attacks, stolen credentials, and malware, such as keyloggers installed on unsecured devices.
Many organizations have adopted a multi-faceted strategy to safeguard confidential data through staff training, intrusion detection, and implementing data loss prevention software and policies.
Security experts are increasingly alarmed by the proliferation of unauthorized applications that potentially collect user data and log every keystroke on corporate-owned devices. Such malicious applications could be utilized by hackers or foreign entities to obtain passwords, credit card information, or other sensitive user data. IT administrators face the arduous task of blocking and removing unwanted applications from corporate devices.
Workspace ONE provides the necessary tools to assist organizations in fortifying their application security posture on macOS devices. By employing compliance policies, restriction profiles, and Advanced Security Controls IT administrators can effectively block malicious and unauthorized applications from being launched on corporate-owned macOS devices.
Purpose of this tutorial
This tutorial guides you through using Workspace ONE to restrict malicious and unauthorized applications on macOS devices. The tutorial covers three main processes:
- Create a compliance policy: This policy identifies any restricted applications on macOS devices.
- Configure a restrictions profile: This profile blocks end user access to the Mac App Store.
- Configure an Advanced Security Controls profile: This profile blocks the execution of restricted applications.
These three processes are independent and can be implemented individually. Each plays a crucial role in protecting your macOS devices from unauthorized applications. Implementing a multi-pronged approach to application management is a prudent way to ensure that your organizational and user data is safe from potentially malicious and unauthorized applications on your macOS devices.
Additionally, this tutorial will briefly discuss the use of a Custom Settings profile as an alternative option to an Advanced Security Controls profile. It will also briefly touch upon monitoring individual devices for restricted app launches.
Audience
This operational tutorial is intended for IT professionals and Workspace ONE administrators of existing production environments.
Both current and new administrators can benefit from using this tutorial. Familiarity with macOS, XML, and basic scripting is assumed.
Knowledge of additional technologies such as Omnissa Intelligence and Workspace ONE® UEM is also helpful.
Validation environment
The content created for this operational tutorial used the following software and hardware versions for testing:
- Workspace ONE UEM, version 2410
- Apple macOS 15.4.1
- Intelligent Hub for macOS, version 2411
Managing compliance policies
Compliance policies
The Workspace ONE UEM compliance engine ensures devices adhere to defined policies. Policies can include basic security settings like requiring a passcode and enforcing passcode strength, denylisting apps, and device check-in intervals.
When devices are noncompliant, the engine warns users to address errors to prevent disciplinary action. Devices not in compliance cannot have profiles assigned or apps installed. If corrections aren’t made within the specified time, they lose access to defined content and functions. Compliance policies and actions vary by platform.
You can automate escalations when corrections aren’t made, such as locking down the device and notifying users to contact you for unlocking. These steps, disciplinary actions, grace periods, and messages are customizable with the Unified Endpoint Management Console.
Creating a compliance policy message template
To send notifications to end users, you need to create a message template. A message template defines the language, category, message type, and text for messages sent to end users. The Message Templates settings page allows you to create and manage communication templates for use within other areas of the Workspace ONE UEM console. These communications include emails, SMS, and direct push messages. The message templates support Plain Text and HTML formats, and you can insert Lookup Values to customize the message for each end user.
For this article, you will create a message template for email and direct push notification.
To get the desired result, perform the following steps:
- In the Workspace ONE console, select Groups & Settings. Click All Settings.
- Expand Devices & Users and then expand General. Click on Message Templates.
- Click Add.
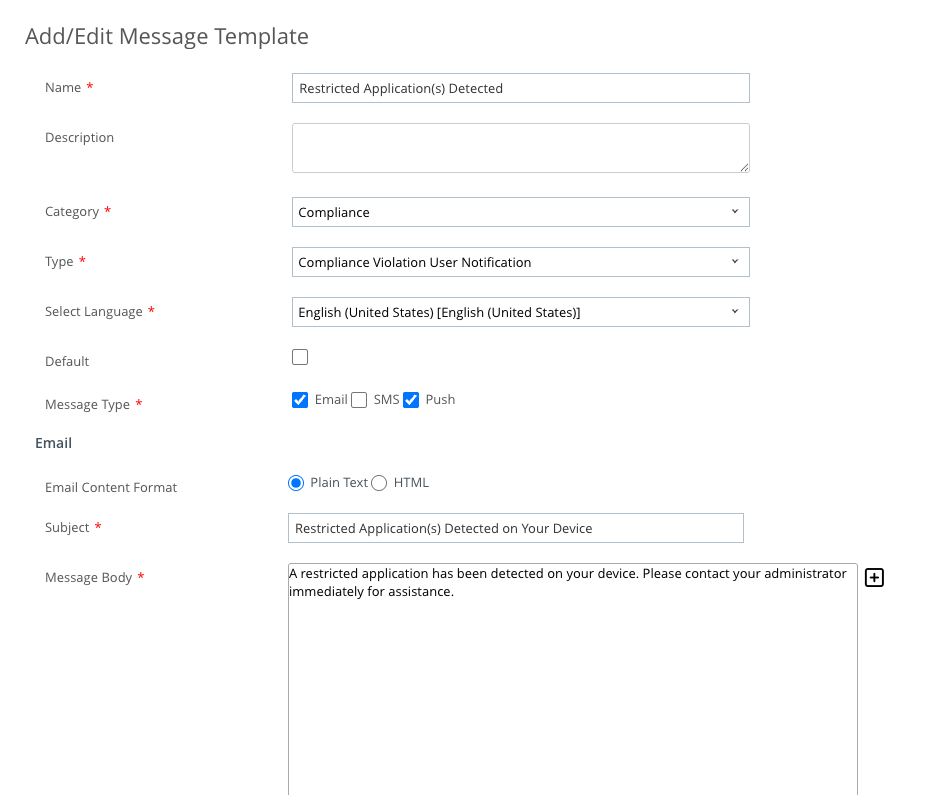
- Enter
Restricted Application(s) Detectedin the Name field. - From the Category dropdown, select Compliance.
- Select Compliance Violation User Notification from the Type dropdown menu.
- For Message Type, ensure that Email and Push are the only options selected.
- Under the Email section, select Plain Text for the Email Content Format.
- Enter
Restricted Application(s) Detected on Your Devicein the Subject field. - Enter the text you want included in the message. For example, you could enter,
A restricted application has been detected on your device. Please contact your administrator immediately for assistance.
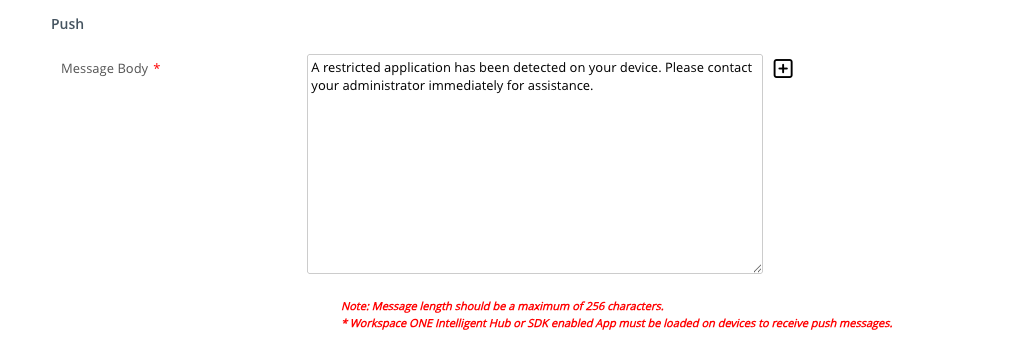
- Under the Push section, enter the text you want to include in the push notification, For example, you could enter,
A restricted application has been detected on your device. Please contact your administrator immediately for assistance.Keep in mind, the message length for push notifications is 256 characters.
- Click Save.
Creating a compliance policy
In this exercise, you will learn how to create a compliance policy that flags a macOS device as non-compliant if one or more restricted apps are detected on it. The policy will be configured with a series of automated escalations, starting with user notification to remove the restricted app from the device. If compliance isn’t met within a specified timeframe, the policy will escalate to performing an enterprise wipe on the device.
The compliance policy’s primary focus is notification and isolation, rather than app remediation. It won’t remove the restricted applications from the device, but it can notify users and administrators about the device’s non-compliance and take steps to isolate it from corporate resources and data.
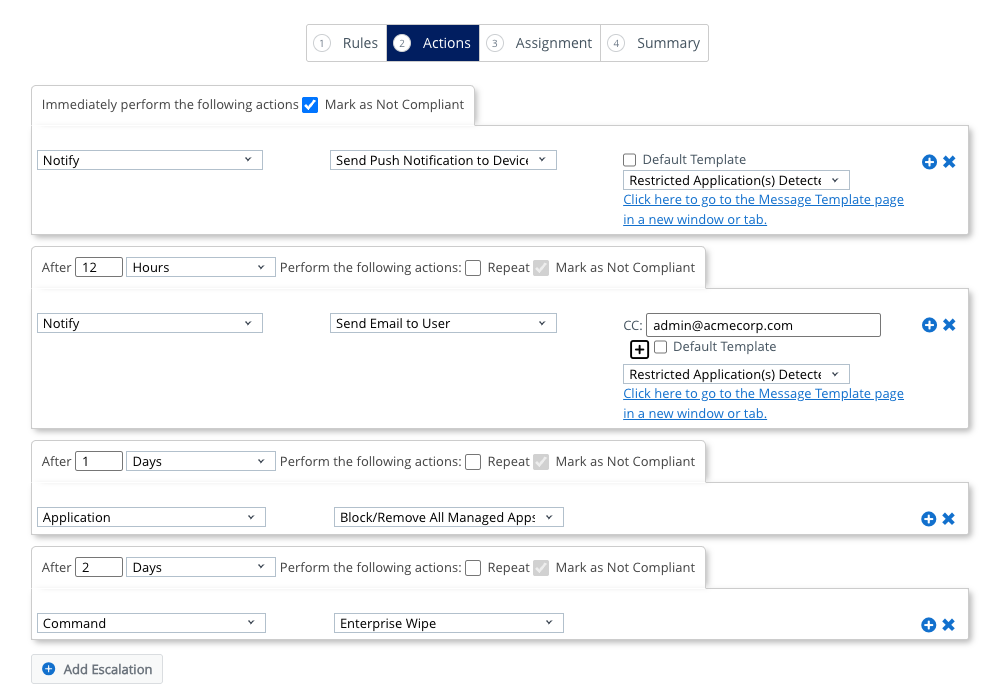
The escalation sequence you will use in this exercise is as follows:
- When a restricted app is identified on a device, the end user will be notified via push notification stating that their device is out of compliance and requesting they remove the restricted app immediately.
- If, after 12 hours, the device is still non-compliant (meaning the restricted app is still installed), an email will be sent to the user and an administrator of the non-compliant state of the device.
- If, after 1 day, the device is still non-compliant, all managed apps will be blocked and/or removed from the device.
- If, after 2 days, the device is still non-compliant, a command to Enterprise Wipe the device will be sent, requiring the end user to re-enroll the device to gain access to corporate resources again.
This escalation sequence serves as an example and can be customized to meet your organizational needs. While this article focuses on creating a single compliance policy, you can also develop multiple policies with varying escalation sequences. These policies can be more aggressive or more relaxed, depending on the risk level associated with the restricted apps.
In this example, you’ll use three sample applications: Google Chrome, BBEdit, and Webex. These applications were chosen as examples because they can be downloaded and installed from the internet without the need for the Mac App Store. However, this process will also work with applications installed from the App Store.
To get the desired result, perform the following steps:
- In the Workspace ONE console, select Security, and then click on Compliance Policies.
- Click List View, and then select Add.
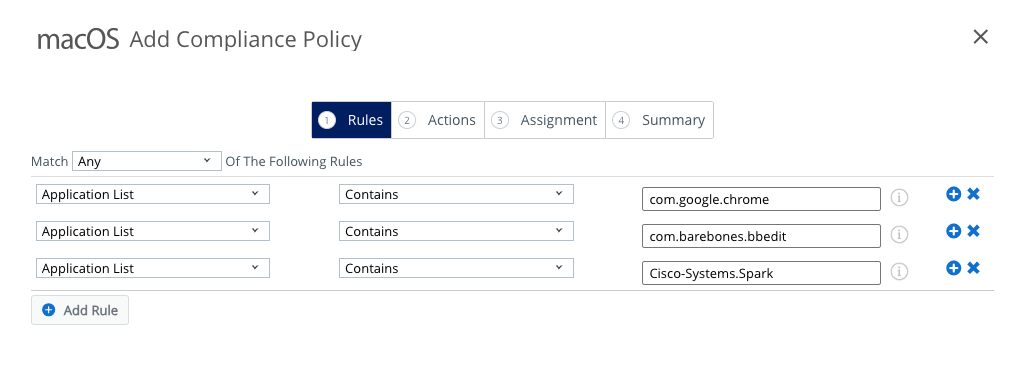
- Select macOS as the platform.
- Set the Match dropdown menu to Any.
NOTE: By setting this option to Any, a device will be flagged as non-compliant if even only one of the restricted applications is discovered. If you selected All, every application must be present before the device is flagged as non-compliant.
- Select Application List and Contains from the next two dropdown menus.
- Enter the bundle ID for the restricted application. In this example, the app is Google Chrome and the bundle ID is
com.google.chrome.
NOTE: To find the bundle ID, open Terminal and execute the command osascript -e ‘id of app “Application Name”‘. Replace “Application Name” with the name of the app you are searching for.
- Click the Add Rule button and repeat steps 5 and 6 to add the bundle ID for BBEdit and Webex.
- Click Next.
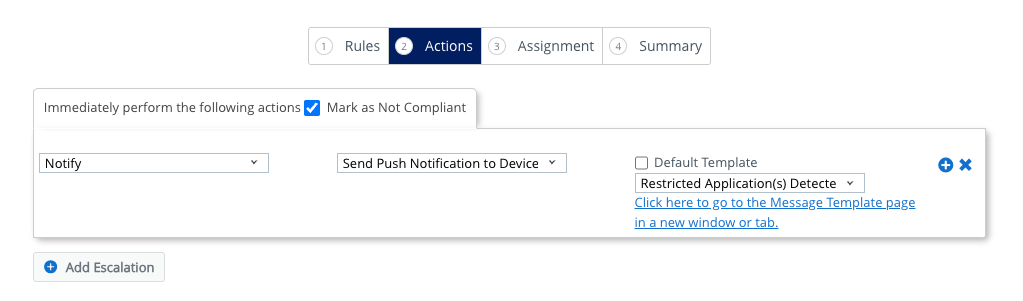
- Select Notify from the Action dropdown. Select Send Push Notification to Device from the second dropdown.
- Deselect Default Template and select the message template you created earlier called Restricted Application(s) Detected.
- Click the Add Escalation button.
- Set the new escalation to occur after 12 hours.
- Select Notify from the Action dropdown and Send Email to User from the second dropdown. Enter an administrator email in the CC: field.
- Deselect Default Template and select the message template you created earlier called
Restricted Application(s) Detected. - Click the Add Escalation button.
- Set the new escalation to occur after 1 Days.
- Select Application from the Action dropdown and Block/Remove All Managed Apps from the second dropdown.
- Click the Add Escalation button.
- Set the new escalation to occur after 2 Days.
- Select Command from the Action dropdown and Enterprise Wipe from the second dropdown.
- Click Next.
- Click in the Smart Group field and select the group to which you wish to assign the compliance policy. For example,
All Corporate macOS Devices. - Click Next.
- Change the default name to
macOS Restricted Applications. - Click Finish & Activate.
Restricting access to the Mac App Store
Mac App Store
The Mac App Store, a digital distribution platform developed and maintained by Apple, facilitates the download of desktop apps for users on its macOS operating system. Users can browse and access a vast collection of software from thousands of vendors.
Organizations frequently establish policies governing the installation of unauthorized or restricted applications on corporate devices. Nevertheless, end users retain the autonomy to utilize their personal Apple iCloud accounts for the purchase and download of applications to their devices. While Apple conducts thorough scans of all applications for malicious code prior to their release in the App Store, organizations may still harbor concerns regarding data exfiltration or device performance issues arising from applications downloaded from the Mac App Store. Implementing restrictions on end user access to the Mac App Store can effectively reduce the prevalence of unauthorized applications on corporate macOS devices.
Restrictions profile
A macOS Restrictions profile secures the native functionality on devices, safeguards corporate information, and enforces data loss prevention. The Restrictions payload restricts employee usage of their macOS devices, providing the necessary control for device lockdown if required.
Among other options, the Restrictions payload provides a configuration option for limiting access to the Mac App Store.
Creating a Restrictions profile
In this exercise, you will create a Restrictions profile that will limit end user access to the Mac App Store.
NOTE: If you have an existing Restrictions profile, you may use that to restrict Mac App Store access. Simply modify your existing payload to include the option listed below.
To get the desired result, perform the following steps:
- In the Workspace ONE console, select Resources, and then click Profiles.
- From the Add drop-down menu, select Add Profile.
- Select the Profile Platform by clicking Apple macOS.
- For the Management Type, select Imperative.
- Select Device for the profile Context.
- Click Next.
- Enter
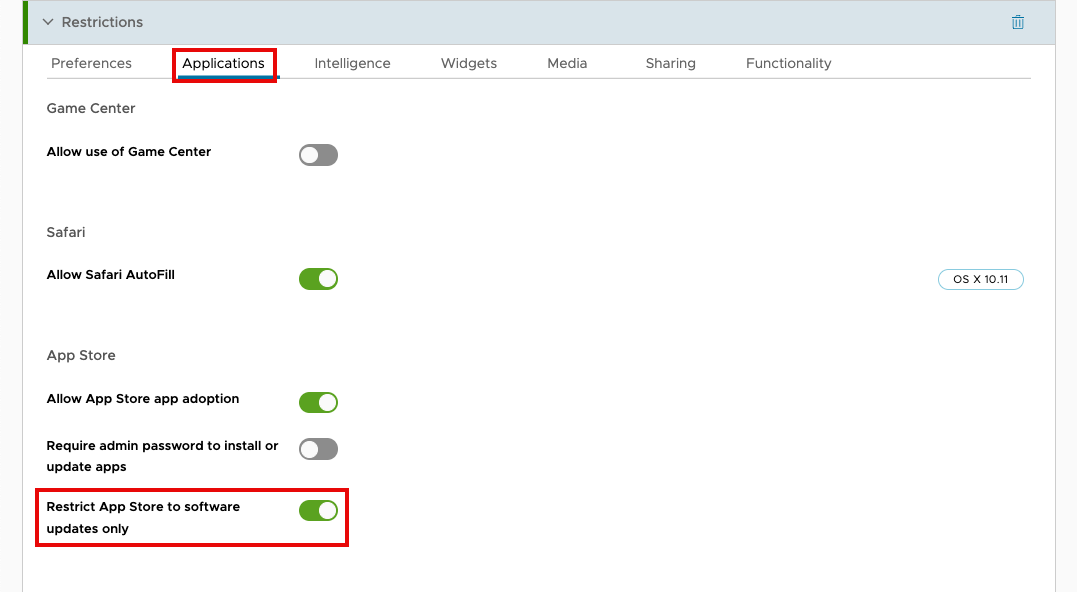
macOS – App Store Restrictionfor the profile name. - Scroll down the list of payloads until you find Restrictions. Click Add.
- Select the Applications tab. Scroll through the list of options until you find Restrict App Store to software updates only. Select the button to activate this option.
- Click Next.
- Click the text box for Smart Group. Scroll down to view Assigned Groups and click in the search box. From the list of assignment groups that appear, select the appropriate group. For example, select
All Corporate iOS Devices (Organization Name). - Select Auto for the Assignment Type.
- Select Never for Allow Removal.
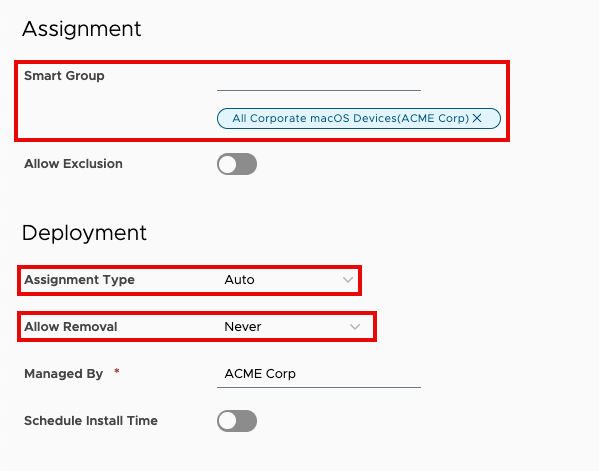
- Click Save & Publish.
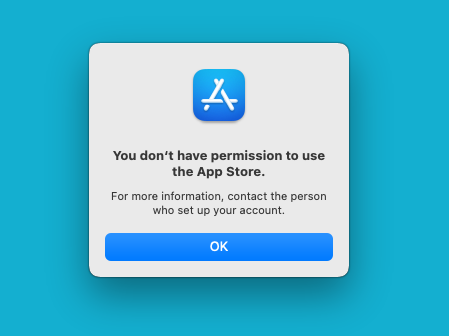
End user experience
If the end user attempts to launch the Mac App Store on their managed macOS device, they will receive a notification informing them that they do not have permission to use the App Store.
Advanced Security Controls
Intelligent Hub for macOS monitors system events to assist administrators in blocking specific software from running on managed devices. While security tools are still essential for combating malware, viruses, and other malicious software, this functionality provides basic restrictions on various applications, including games, CLI tools, messaging apps, and even OS update installers.
The Advanced Security Controls profile requires the managed device be enrolled in a Workspace ONE UEM environment running version 2410 or higher, and Intelligent Hub 24.11 or higher must be installed on the device.
Restricting apps or processes with the Advanced Security Controls
The Advanced Security Controls profile allows you to define a list of restricted apps and processes using one of several available identifiers. It is not necessary to use more than one identifier to restrict the same app. The following table details the available identifiers.
| Identifier | Description |
| BundleIDs | Any bundle identifiers associated with the app or executable that should not be launched. To find the bundle ID, open Terminal and execute the command |
| Names | The names of any app bundles or processes that should not be launched. This is the name of the app as it appears in the Applications folder. For example, |
| Paths | The path to any binaries that should not be launched. To locate the path of a macOS application, you can use Finder. Simply right-click the app icon and select Show Package Contents. This action will show the app’s internal structure, and the executable file, which is usually named the same as the app (without the “.app” extension). The executable file is typically located in the |
| CDHash values | The CDHash values of any items that should not be launched. To find the CDHash of an app, open Terminal and execute the command NOTE: The CDHash might be different or change based on the download source. |
| SHA 256 Hash values | The SHA 256 Hash values of any items that should not be launched. To locate the SHA 256 Hash, open Terminal and use the |
Creating an Advanced Security Controls profile
In this exercise, you will use the Advanced Security Controls payload to create a profile that will restrict the launch of specific applications on macOS devices. For this exercise, you will restrict the execution of three applications: Google Chrome, Audacity, and Keynote.
To get the desired result, perform the following steps:
- In the Workspace ONE console, select Resources, and then click Profiles.
- From the Add drop-down menu, select Add Profile.
- Select the Profile Platform by clicking Apple macOS.
- For the Management Type, select Imperative.
- Select Device for the profile Context.
- Click Next.
- Enter
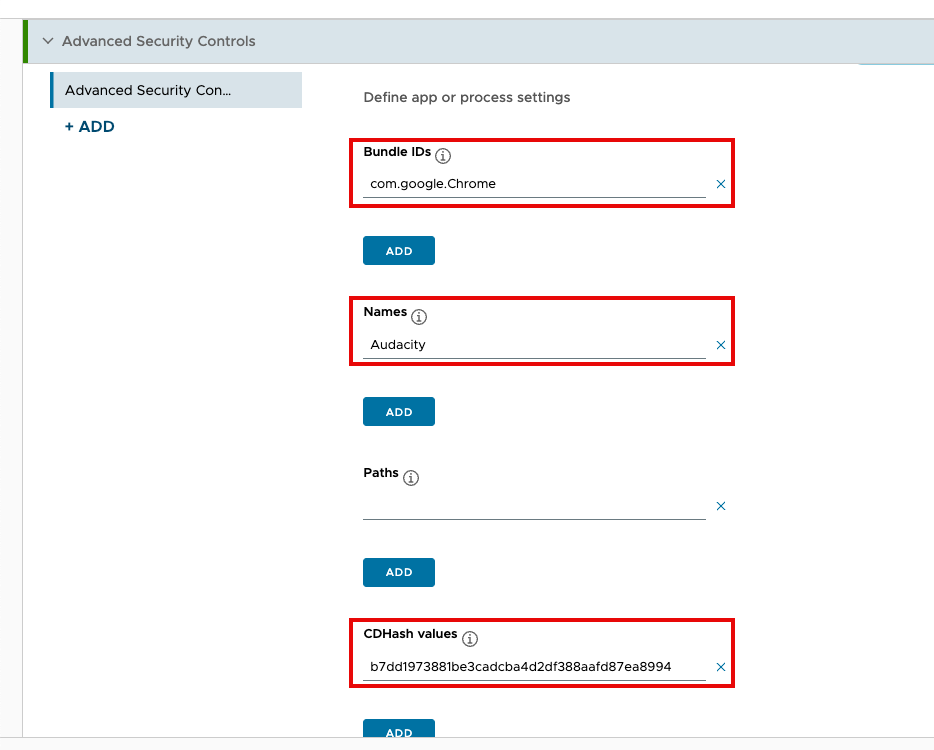
macOS – App Restrictionsfor the profile name. - Scroll down the list of payloads until you find Advanced Security Controls. Click Add.
- Under Bundle IDs, enter
com.google.Chrome. - Under Names, enter
Audacity. - Under CD Hash values, enter the CD Hash for Keynote. At the time this document was written, the CD Hash for Keynote was
4018b8220285d74951c40f349bf97373d296dd75. Confirm the CD Hash using the instructions in Restricting apps or processes with the Advanced Security Controls.
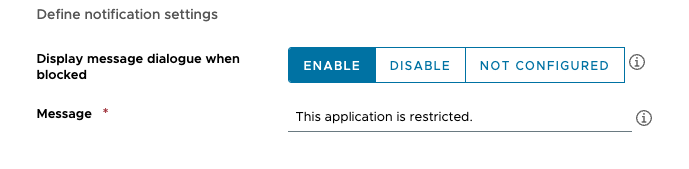
- For Display message dialogue when blocked, click Enable.
- In the Message field, enter
This application is restricted.
- Click Next.
- Click the text box for Smart Group. Scroll down to view Assigned Groups and click in the search box. From the list of assignment groups that appear, select the appropriate group. For example, select
All Corporate iOS Devices (Organization Name). - Select Auto for the Assignment Type.
- Select Never for Allow Removal.
- Click Save & Publish.
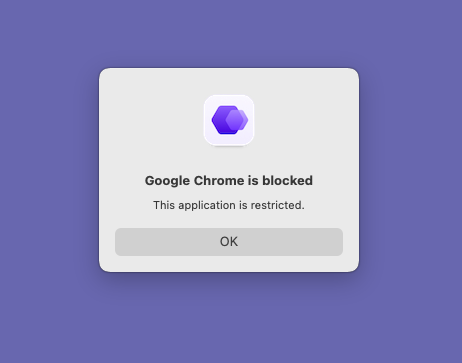
End user experience
If the end user attempts to launch an app configured in the Advanced Security Controls profile, Intelligent Hub will block the execution. The user will receive a notification that the app is blocked. Additionally, any text that you added to the Message field in the payload will be displayed.
Blocking apps with a Custom Settings profile
If you are using a version of Workspace ONE UEM that does not support the Advanced Security Controls, you can still implement app blocking using a Custom Settings profile. The Custom Settings profile provides the similar functionality to that of the Advanced Security Controls.
This option does, however, come with a few caveats. First, you must have intelligent Hub for macOS 24.11 or higher installed on your devices. Secondly, you must use Workspace ONE UEM 24.10 or higher.
It is recommended that you use the Advanced Security Controls whenever possible. But, if the Advanced Security Controls profile cannot be used, the Custom Settings profile can be a viable alternative.
Custom Settings XML
The Custom Settings payload requires XML code to enable or deactivate settings and features on Apple devices.
NOTE: To utilize the XML listed below, you must have Intelligent Hub 24.11 or higher installed on your macOS devices. The XML will not work on older versions of Intelligent Hub. Please refer to this KB article for more information about compatibility.
The XML code for blocking applications looks like this:
<dict>
 <key>Restrictions</key>
 <array>
  <dict>
   <key>Attributes</key>
   <dict>
    <key>name</key>
    <array>
     <string>[enter_app_name_here]</string>
    </array>
    <key>path</key>
    <array>
    <string>[enter_app_path_here]</string>
    </array>
    <key>bundleId</key>
    <array>
     <string>[enter_app_bundle_id_here]</string>
    </array>
   </dict>
   <key>Actions</key>
   <array>
   <integer>1</integer>
   </array>
   <key>Message</key>
   <string>[enter_your_preferred_message_here]</string>
  </dict>
 </array>
 <key>PayloadDisplayName</key>
 <string>[enter_payload_display_name_here]</string>
 <key>PayloadIdentifier</key>
 <string>HubSettings.[UUID]</string>
 <key>PayloadOrganization</key>
 <string>Omnissa</string>
 <key>PayloadType</key>
 <string>com.ws1.hub.mac.restrictions</string>
 <key>PayloadUUID</key>
 <string>[UUID]</string>
 <key>PayloadVersion</key>
 <integer>1</integer>
</dict>
There are several places in the sample XML that you will need to modify. The following table outlines each item and its corresponding placeholder text in the above XML. This will make it easier for you to identify what you need to change.
| Key | Placeholder Text | Notes |
| name | | The name key represents the name of the application. This should match the name on the app icon in the Applications folder. |
| path | | The key for path represents the path to the app’s binary executable on macOS devices. Keep in mind, this is not the *.app file you will find in the Applications folder. |
| bundleId | | The bundleID is a unique identifier for an app. |
| message | | |
| PayloadDisplayName | | |
| PayloadIdentifier | | This should be populated with a universally unique identifier (UUID). This UUID should be the same as the PayloadUUID. You can generate a UUID by using the |
| PayloadUUID | | This should be populated with a universally unique identifier (UUID). This UUID should be the same as the PayloadIdentifier. You can generate a UUID by using the |
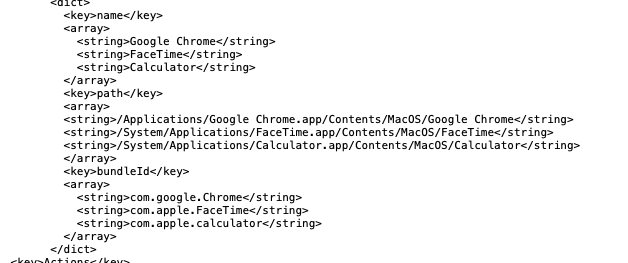
Blocking multiple apps
There is an additional caveat to using the Custom Settings profile for restricted app access: you can only have one profile for restricting apps on a macOS device at a time. So, if you need to block more than one app, you will have to add the additional apps to the XML. You might also want to use a generic message, such as “You are not permitted to use this application. Please contact IT for further assistance.”
In a situation where you need to block a different set of apps for different assignment groups, you will need to create separate Custom Settings profiles for each group. Additionally, you need to ensure that those profiles do not get assigned to the same devices. If you want to block a similar subset of apps on multiple assignment groups, you will need to duplicate that list of apps along with any group-specific apps in each Custom Settings profile.
You can add additional apps in the XML as shown below:
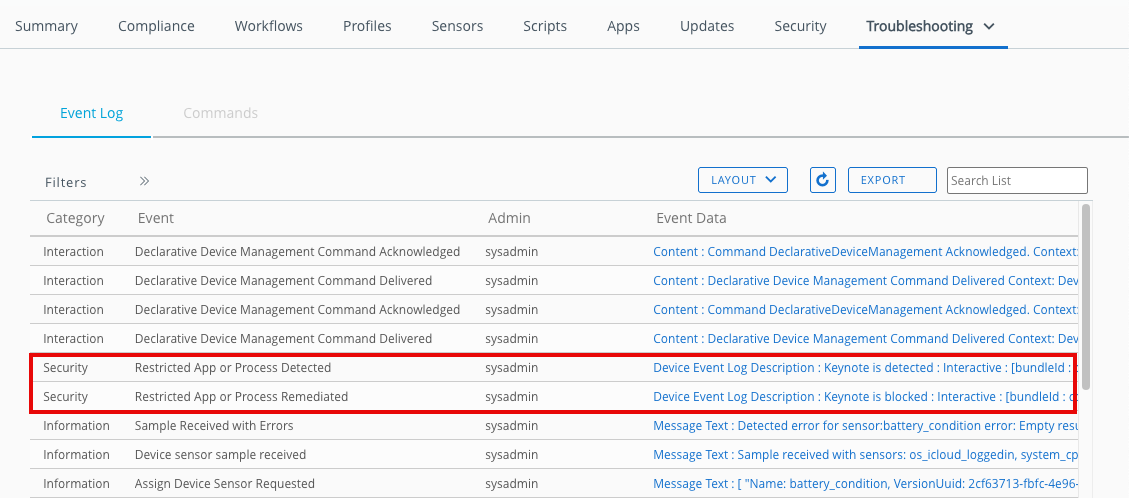
Monitoring attempted app launches
You can monitor for attempted launches of restricted apps in the Workspace ONE console. Select a specific device from the Devices list. In the Device Details View, click More and then Troubleshooting. Intelligent Hub sends event data to Workspace ONE UEM every time the launch of a restricted app is attempted.
Summary and additional resources
This tutorial detailed how to use Workspace ONE to restrict malicious and unauthorized applications on macOS devices. The tutorial covered three main processes:
- Creating a compliance policy to identify any restricted applications on macOS devices.
- Configuring a restrictions profile to block end user access to the Mac App Store
- Configure an Advanced Security Controls profile to block the execution of restricted applications.
Additionally, this tutorial discussed how to use the Custom Settings profile as an alternative to an Advanced Security Controls profile, as well as how to monitor individual devices for restricted app launches.
Additional resources
For more information on managing macOS devices with Workspace ONE UEM, check out the following resources on Tech Zone.
'%3E%3Cpath id='Rectangle_1' data-name='Rectangle 1' d='M0,0H800V300H0Z' transform='translate(2297 1132)' fill='%23E2F0D9'/%3E%3Cg id='Group_5' data-name='Group 5' transform='translate(-6 -3)'%3E%3Ctext transform='translate(2534 1280)' font-size='50' font-family='Roboto-Regular, Roboto'%3E%3Ctspan x='0' y='0'%3ECurated Assets%3C/tspan%3E%3C/text%3E%3Ctext transform='translate(2611 1333)' font-size='20' font-family='Roboto-Regular, Roboto'%3E%3Ctspan x='0' y='0'%3ETile View (with image and controls)%3C/tspan%3E%3C/text%3E%3C/g%3E%3C/g%3E%3C/svg%3E)
Changelog
The following updates were made to this guide:
| Date | Description of Changes |
|---|---|
| 06/05/2025 |
|
About the author and contributors
This tutorial was written by:
- Michael Bradley, Product Specialist, Omnissa.
Contributions were made by the following subject matter experts:
- Matthew Zaske, Senior Product Manager, Omnissa
Feedback
Your feedback is valuable. To comment on this paper, either use the feedback button or contact us at tech_content_feedback@omnissa.com.