Configuring the Horizon Edge Service in Unified Access Gateway: Horizon Operational Tutorial
Overview
Omnissa provides this operational tutorial to help you with your Omnissa Horizon® environment. Omnissa Horizon simplifies the management and delivery of virtual desktops and apps on-premises, in the cloud, or in a hybrid or multi-cloud configuration.
What is Unified Access Gateway?
Omnissa Unified Access Gateway™ is a security platform that provides edge services and access to defined resources that reside in the internal network. It acts as the security gateway for Omnissa Workspace ONE® and Omnissa Horizon deployments, enabling secure remote access from an external network to a variety of internal resources. Unified Access Gateway supports multiple use cases:
- Per-App Tunneling of native and web apps on mobile and desktop platforms to secure access to internal resources through the Workspace ONE Tunnel service.
- Secure on-premises email infrastructure that grants access only to authorized devices, users, and email applications based on managed policies. This capability leverages the Secure Email Gateway service integrated with Omnissa Workspace ONE® UEM.
- Access from Omnissa Workspace ONE® Content to internal file shares or SharePoint repositories by running the Content Gateway service.
- Reverse proxying of web applications.
- Identity bridging for authentication to on-premises legacy applications that use Kerberos or header-based authentication.
- Secure external access to desktops and applications on Omnissa Horizon® Cloud Service™ on Microsoft Azure, and Omnissa Horizon on-premises.
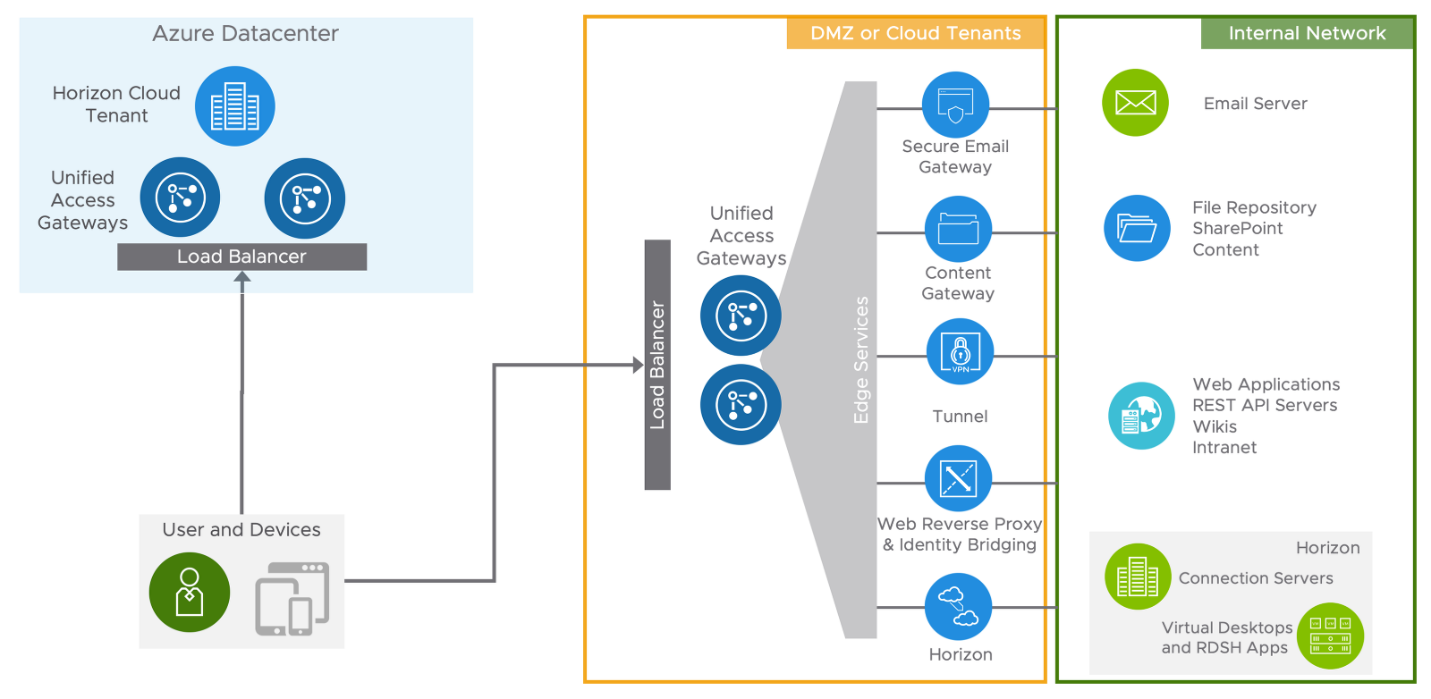
When providing access to internal resources, Unified Access Gateway can be deployed within the corporate DMZ or internal network, and act as a proxy host for connections to your company’s resources. Unified Access Gateway directs authenticated requests to the appropriate resource and discards any unauthenticated requests, it also can perform the authentication itself, leveraging additional authentication when enabled.
About this Tutorial
This tutorial walks through the deployment of the Unified Access Gateway and configuration of the Horizon edge service using a PowerShell script. The exercises also describe how to set up Horizon edge service to enable external access to internal virtual desktops and applications.
It covers Horizon, Unified Access Gateway 3.9 deployed in vSphere 6.5 U1, and is applicable to Unified Access Gateway 3.3 and later.
The steps are sequential and build upon one another, so make sure that you complete each step before going to the next step.
The Unified Access Gateway appliance deployed during this exercise contains two NICs. One NIC faces the Internet, and the second one is dedicated to management and backend access. Horizon edge service will be configured to allow external access to virtual desktop and applications hosted on the internal network.
The purpose of this tutorial is to provide a deployment option, for Unified Access Gateway appliances with the Horizon edge service, for an environment that could be used for production. If you want more information on deployment of Unified Access Gateway, see Deploying Unified Access Gateway: Workspace ONE Operational Tutorial.
Unified Access Gateway Deployment Utility
In addition to the PowerShell deployment, Unified Access Gateway can be deployed using the Deployment Utility tool. The utility is based on a wizard and perfect for those deploying the appliance for the first time.
Audience
This operational tutorial is intended for IT professionals and Horizon administrators of existing production environments. Both current and new administrators can benefit from using this tutorial. Familiarity with networking and storage in a virtual environment is assumed, including Active Directory, and directory services. Knowledge of additional technologies such as Omnissa Horizon is required.
Prerequisites
To get started, you must satisfy a few requirements. This chapter describes the minimum requirements to complete this tutorial.
Unified Access Gateway OVA and PowerShell Files
To deploy Unified Access Gateway appliances using PowerShell, download the following:
- Latest Unified Access Gateway OVA file from my.workspaceone.com.
- Unified Access Gateway PowerShell Script for the OVA file version from my.workspaceone.com.
- Download the VMware OVF Tool 4.3 or later and install on the same machine that will be used to run the Unified Access Gateway PowerShell deployment script.
- vCenter credentials with permission to create VMs, the credentials will be used to deploy the appliance.
See Omnissa Product Interoperability Matrices to determine the compatibility of Unified Access Gateway with other VM products.
Horizon Environment
To follow the steps in this tutorial, you must have access to a Horizon environment with at least one Application or Desktop pool configured.
During the tutorial, you will perform all the configuration required to launch Horizon resources through Unified Access Gateway.
Verify that you have the following requirements in place before you get started:
- Horizon Connection Server
- At least one Application or Desktop Pool available for testing
- Windows or macOS client machine with the latest Horizon Client installed
Network Considerations
Understanding of your DMZ network design and how traffic is routed is important when deploying Unified Access Gateway, and will define several settings that are required for the deployment.
Unified Access Gateway requires DNS configuration for the appliance, and netmask, default gateway, and subnet to be defined, for each network that is enabled during deployment.
Network Segmentation Options
Unified Access Gateway supports deployments with one, two, or three NICs. This means that the server can be partitioned to receive traffic on a single interface or to route traffic to different interfaces, based on the source of the request. Most often, if you need to implement multiple NICs, you already follow this standard with other web applications in your organization.
You must determine what is appropriate for your environment when selecting the number of NICs during installation. It is important for you to understand the expected behavior when two or three NICs are enabled.
Keep in mind that based on the number of NICs, Unified Access Gateway will require a netmask, default gateway, and subnet to be defined for each network that is enabled during deployment.
Two sections are provided to explore these options. As a first step toward understanding basic deployments, you can install Unified Access Gateway with one NIC using vSphere Client, described in Deploying Unified Access Gateway with One NIC Through vSphere. You can then advance to the next step and install Unified Access Gateway with two NICs as a production environment using PowerShell, described in Deploying Unified Access Gateway with Two NICs Through PowerShell.
Single NIC Deployment
In a single-NIC deployment, all traffic (Internet, backend, and management) uses the same network interface. Authorized traffic is then forwarded by Unified Access Gateway through the inner firewall to resources on the internal network using the same NIC. Unauthorized traffic is discarded by Unified Access Gateway.
Two-NIC Deployment
A two-NIC deployment separates the Internet traffic onto its own NIC, while the management and backend network data still share a NIC. The first NIC still used for Internet-facing unauthenticated access, but the backend authenticated traffic and management traffic are separated onto a different network. This type of deployment is suitable for production environments.
In this two-NIC deployment, traffic going to the internal network through the inner firewall must be authorized by Unified Access Gateway. Any unauthorized traffic is not allowed on this backend network. Management traffic such as the REST API for Unified Access Gateway uses only this second network.
If a device on the unauthenticated front-end network is compromised—for example, if a load balancer were compromised—then reconfiguring that device to bypass Unified Access Gateway would still not be possible in this two-NIC deployment. It combines layer 4 firewall rules with layer 7 Unified Access Gateway security.
Similarly, if the Internet-facing firewall is misconfigured to allow TCP port 9443 through, the Unified Access Gateway Management REST API would still not be exposed to Internet users. A defense-in-depth principle uses multiple levels of protection, such as knowing that a single configuration mistake or system attack will not necessarily create an overall vulnerability.
In a two-NIC deployment, it is common to put additional infrastructure systems such as DNS servers, RSA SecurID Authentication Manager servers, and so on in the backend network within the DMZ so that they are not visible from the Internet-facing network. This guards against layer-2 attacks from a compromised front-end system on the Internet-facing LAN and thereby effectively reduces the overall attack surface.
When the Horizon service is enabled on Unified Access Gateway, most network traffic is the display protocol traffic for Blast Extreme and PCoIP. With a single NIC, display protocol traffic to or from the Internet is combined with traffic to or from the backend systems. When two or more NICs are used, the traffic is spread across front-end and backend NICs and networks. This can result in performance benefits by reducing the potential bottleneck of a single NIC.
Three-NIC Deployment
A three-NIC deployment separates the Internet traffic onto its own NIC and separates management and backend network data onto dedicated networks. HTTPS management traffic to port 9443 is then only possible from the management LAN. This type of deployment is suitable for production environments.
Default Gateway and Static Routes
By design you can set a default gateway on Unified Access Gateway, however, you may need to route traffic to different subnets that are not possible through the current default gateway.
Unified Access Gateway supports static routes, allowing the administrator to route traffic to a specific subnet using a different gateway. The list of static routes is defined for each NIC.
The following diagram shows an example where incoming traffic uses the INTERNET gateway (default gateway) and to access the internal resources, traffic must be forwarded to the INTERNAL gateway. For that reason, a static route on NIC 1 was defined as below, where traffic into the internal subnets will be routed to the internal gateway (172.16.71.1).
routes1=172.16.76.0/22 172.16.71.1,10.0.0.0/16 172.16.71.1,10.0.1.0/16 172.16.71.1
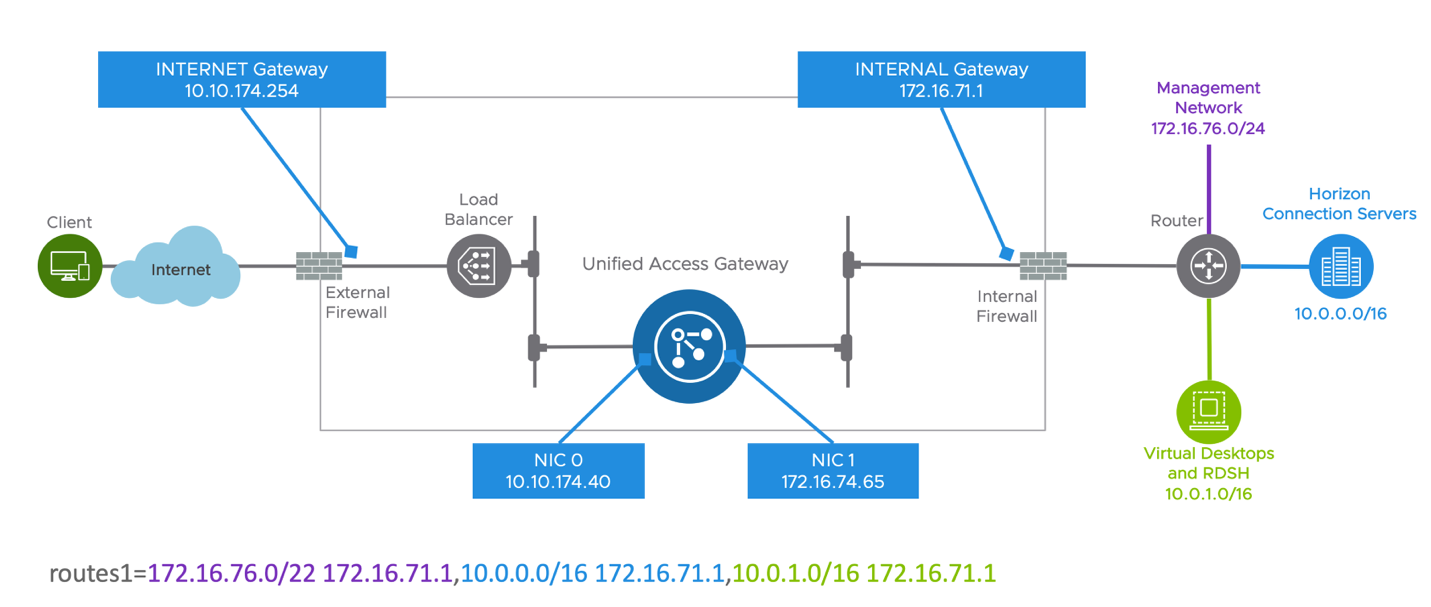
Routes can be defined during deployment using PowerShell, adding under General section the routes# parameter for the respective NIC (# network interface - 1, 2, 3) or through the administration console under Network Settings.
Connection Server Configuration Requirements
In this exercise, you configure the Horizon Connection Server for use with Unified Access Gateway.
The Unified Access Gateway runs the following gateways as part of the Horizon edge service: the Blast Secure Gateway, the PCoIP Secure Gateway, and the HTTPS secure tunnel. You must confirm that these gateway services are not also enabled on the Connection Server because this would cause a double-hop attempt of the protocol traffic, which is not supported and will result in failed connections.
Deactivating Gateway Services on Horizon Connection Server
In this activity, you confirm that gateway services are deactivated in the Horizon Connection Server.
- Log in to Horizon Administration Console.
To access the Horizon Administration Console, go to https://server/admin on your Web browser, where server is the host name of the Connection Server instance.- Enter the username and password.
- Enter the Domain.
- Click Sign in.
- Configure Connection Server settings.

- Navigate to Settings > Servers.
- Select Connection Servers.
- Select the Connection Server to be used as the front-end server for Unified Access Gateway deployed in this exercise.
- Click Edit.
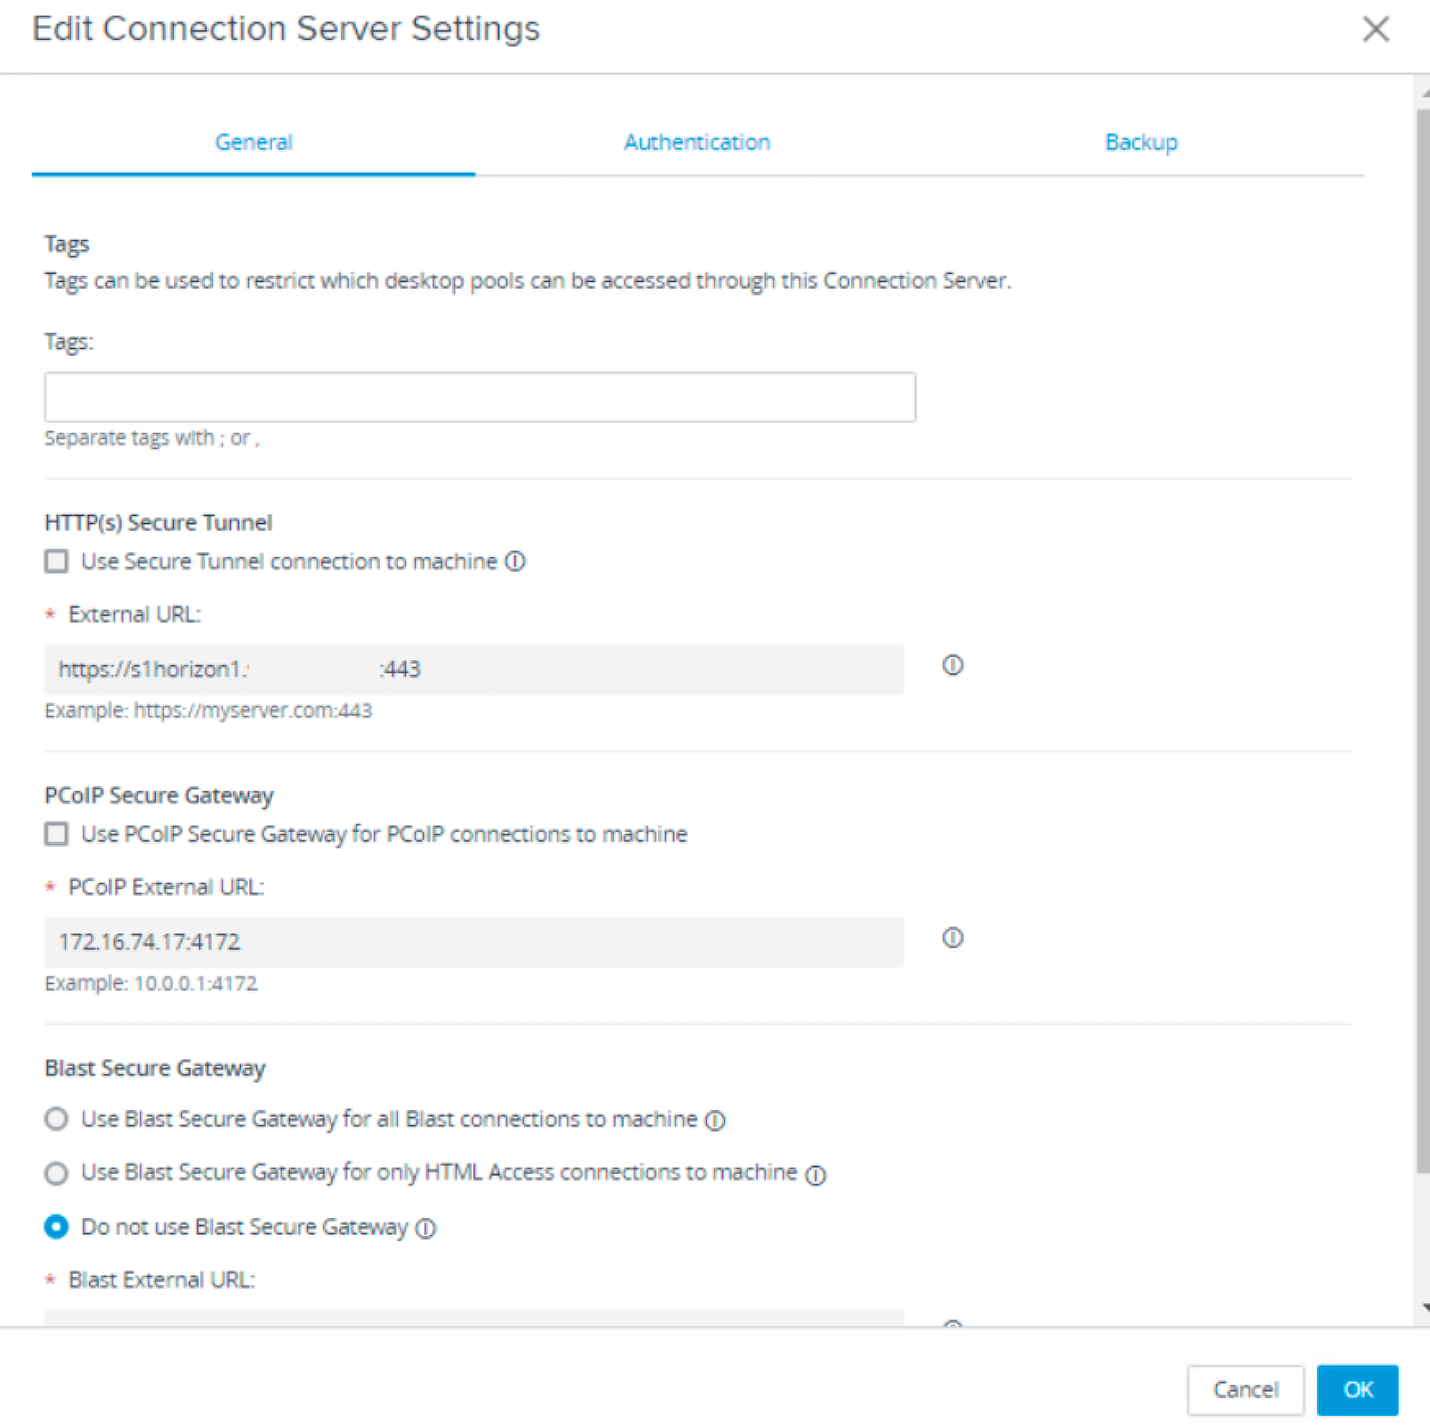
- Deactivate Gateway Services on the Connection Server.

- Select General.
- Make sure Use Secure Tunnel connection to machine is deselected.
- Make sure Use PCoIP Secure Gateway for PCoIP connections to machine is deselected.
- Make sure Do not use Blast Secure Gateway is selected.
- Click OK.
Validating Connection Server Certificate
The type of certificate used by the Connection Server has implications on the configuration of the Horizon Edge Service on Unified Access Gateway.
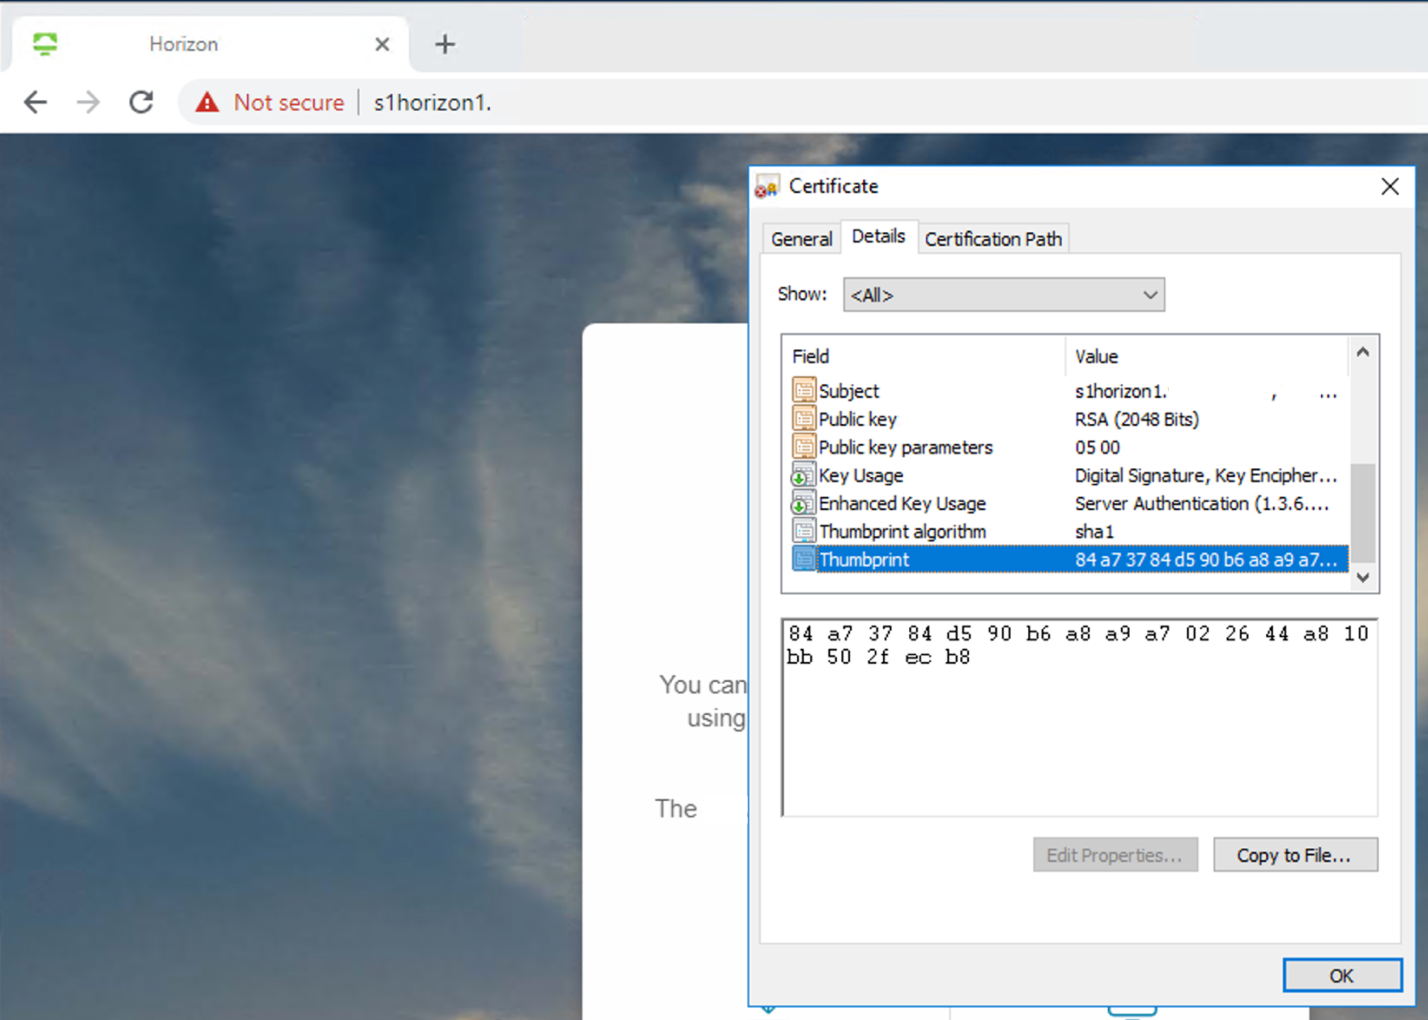
If the Connection Server uses a certificate signed by not trusted CA or is self-signed, you must save the certificate thumbprint to be used later during the Horizon Edge Service configuration, otherwise, users cannot connect through Unified Access Gateway.
- Validate the Type of Certificate Used by the Connection Server.
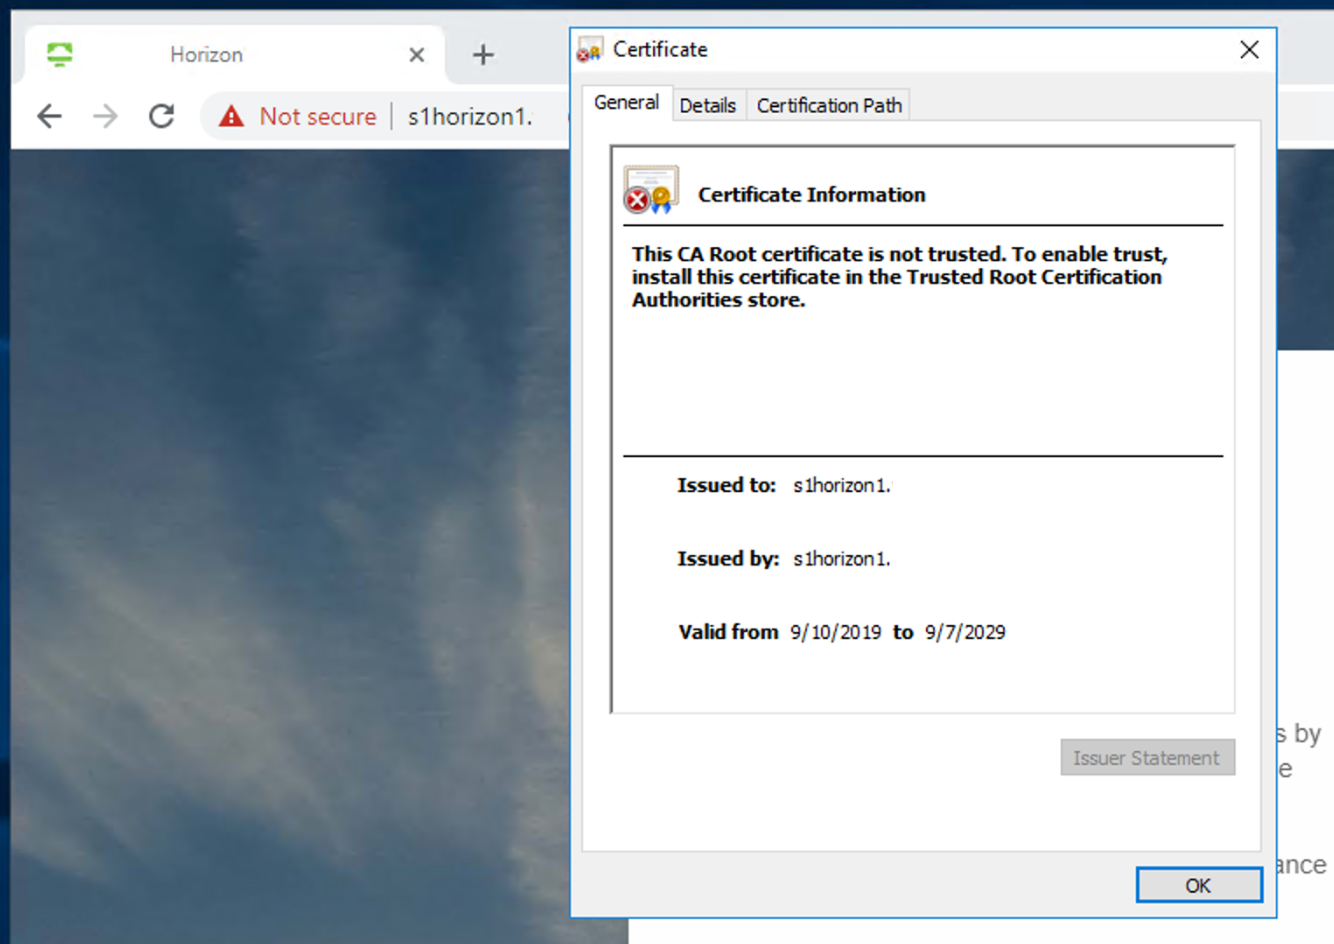
- Using a browser from a client machine (not in the connection server), access the Horizon Administration Console https://ConnectionServer.
- The Certificate Information shows if the cert is trusted or not. This screenshot shows an example of an untrusted cert.
- Save the Certificate Thumbprint.

If the Connection Server is not signed by a trusted CA follow the next steps, otherwise skip.- Select the Certificate Details tab.
- Copy the Thumbprint algorithm and Thumbprint.
- Save the Thumbprint values in a text file.
INI File Configuration
In this section, you learn how to use the INI file to deploy Unified Access Gateway including the Horizon edge service configuration using PowerShell, and how to edit the contents of the INI file for your Unified Access Gateway deployment.
An INI file containing all of the configuration settings is required to deploy the Unified Access Gateway appliance.
In this exercise, you create a file and save it as uag-Horizon.ini to provide the respective parameters for your deployment.
The Unified Access Gateway PowerShell script ZIP file contains INI samples that you can reuse. Check the uag-advanced2.ini file to use for Horizon deployments.
You deploy a new Unified Access Gateway appliance called UAGHZ in the example, which has two NICs. NIC1 is Internet-facing and NIC2 is for backend and management. The Horizon edge service will be configured and ready for use on first boot of the appliance.
Note: The values used in this section are based on a test environment. Your values will differ.
Preparing the INI File
In this exercise, you create and configure an INI file for Unified Access Gateway deployment.
- Create the INI file.
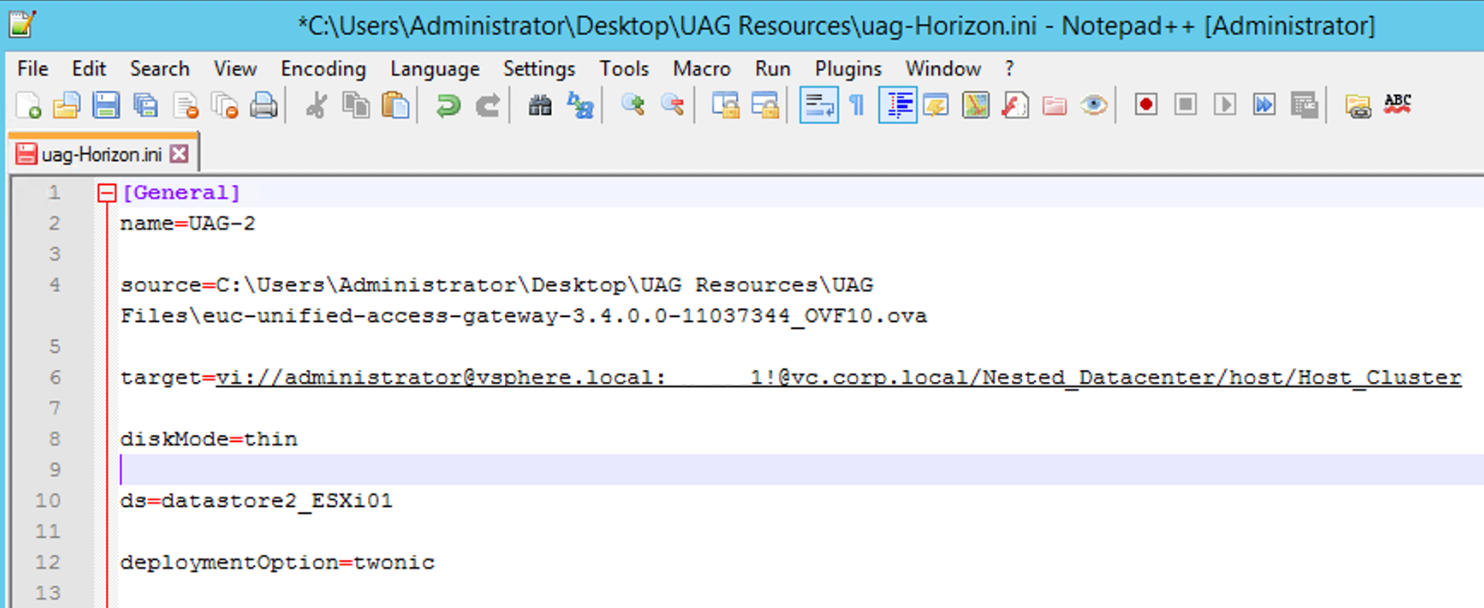
- Create an INI file and add the following sections:
- [General]
- [Horizon]
- [SSLCert]
- [SSLCertAdmin]
- Save the file as uag-Horizon.ini.
- Configure General Settings (1/2)
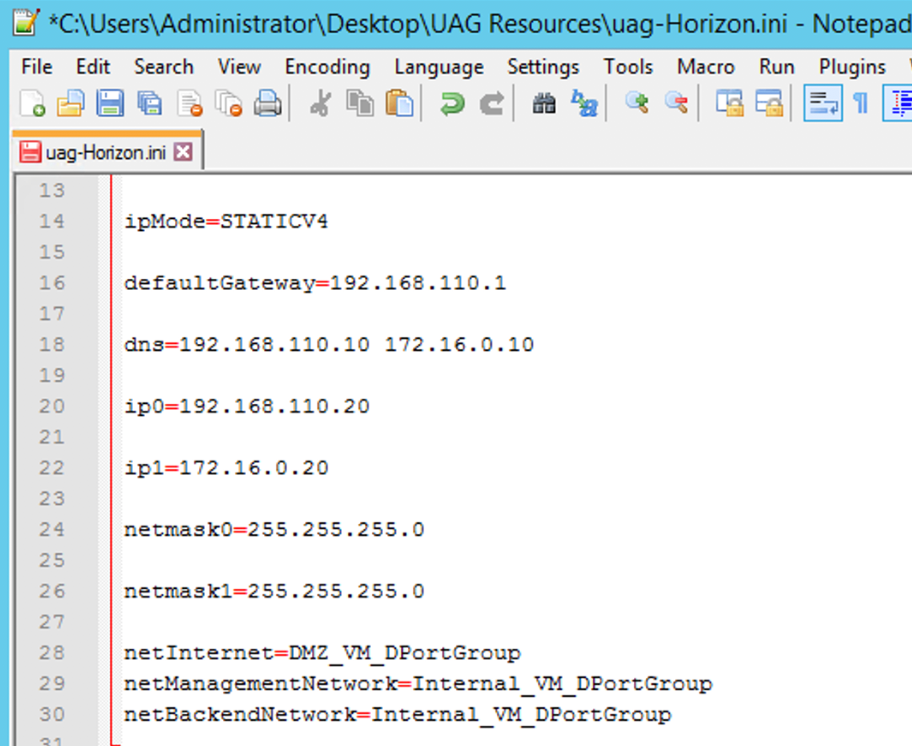
In the General section of the INI file, add the following settings and the respective values:
- For name, enter a name for VM that will be created in vCenter, such as UAG-2 in this example.
- For source, enter the path, such as C:\Users\Administrator\Desktop\UAG Resources\UAG Files\euc-unified-access-gateway-3.3.0.0-8539135_OVF10.ova, and use File Explorer to verify that the OVA file has the name indicated.
- For target, enter the destination path related to the vCenter host that you plan to deploy the appliance, such as vi://administrator@vsphere.local:Password1!@vc.corp.local/Nested_Datacenter/host/Host_Cluster.
- Note: You can replace the password with 'PASSWORD' and the script prompts for the password during the PowerShell execution.
- For diskmode, enter thin, which refers to disk provision mode.
- For ds (ds refers to data store), enter the name of the where the appliance will be deployed to, such as datastore2_ESXi01.
- For deploymentOption, enter twonic.
- Configure General Settings (2/2).
Continue the General section configuration, and set the following additional values for the parameters in the INI file, keeping in mind that ip0 is the Internet-facing NIC, and ip1 is the internally facing NIC:- For ipMode, enter STATICV4.
- For defaultGateway, enter the IP address, such as 192.168.110.1.
- For dns, enter the IP address, such as 192.168.110.10.
- For ip0, enter the IP address, such as 192.168.110.20. Important: ip0 is the Internet-facing NIC.
- For ip1, enter the IP address, such as 172.16.0.20. Important: ip1 is the internally-facing NIC.
- For netmask0 and netmask1, enter the netmask related to the ip0 and ip1, such as 255.255.255.0.
- For netInternet, enter the name of the vSphere Network for the UAG primary network, such as DMZ_VM_DPortGroup.
- For netManagementNetwork and netBackendNetwork, enter the name of the vSphere Network for the UAG backend network, such as Internal_VM_DPortGroup.
- Configure the Horizon Edge Service.

Continue to the Horizon section configuration and set the following additional values for the parameters in the INI file, keeping in mind that the following parameters enable access through the tunnel, Blast, and PCoIP protocols. For this tutorial, we will only use the Blast protocol for testing.
Under the Horizon section configure the following fields:
The first will be used by the Horizon client to communicate with Unified Access Gateway and authenticate the user.
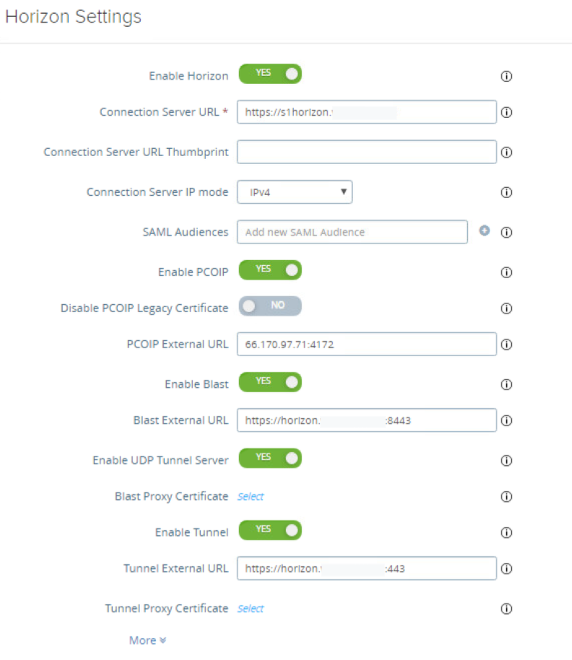
- For proxyDestinationUrl, enter the URL for the Connection Server or internal load balancer to which Unified Access Gateway directs traffic, such as https://s1horizon.domain.com.
The following settings are used by the Horizon client when the user launches an application or desktop, based on the respective protocol. - For tunnelDestinationUrl, enter the URL used by Horizon clients to establish the Horizon Tunnel session to this Unified Access Gateway appliance, such as https://horizon.mycompany.com:443.
- For blastExternalUrl, enter the URL used by Horizon clients to establish the Horizon Blast or BEAT session to this Unified Access Gateway appliance, such as https://horizon.domain.com. If the TCP port number is not specified, the default TCP port is 8443. If the UDP port number is not specified, the default UDP port is also 8443.
- For pcoipExternalUrl, enter the IP used by Horizon clients to establish the Horizon PCoIP session to this Unified Access Gateway appliance, such as 66.170.97.71:4172. It must contain an IPv4 address and not a host name.
Note: If the Connection Server (proxyDestinationUrl) uses a self-signed certificate, you must add the proxyDestinationUrlThumbprints parameter to the INI and inform the Thumbprints for the certificate used by the connection server, otherwise the Horizon Client cannot establish a connection with Unified Access Gateway.
proxyDestinationUrlThumbprints=sha1=84 a7 37 84 d5 90 b6 a8 a9 a7 02 26 44 a8 10 bb 50 2f ec b8
In case the Connection Server uses a certificated signed by a trusted authority, the proxyDestinationUrlThumbprints parameter is not required.
- Configure the TLS/SSL Certificates
TLS/SSL is required for client connections to Unified Access Gateway appliances. Client-facing Unified Access Gateway appliances and intermediate servers that terminate TLS/SSL connections require TLS/SSL server certificates.
TLS/SSL server certificates are signed by a Certificate Authority (CA). A CA is a trusted entity that guarantees the identity of the certificate and its creator. When a certificate is signed by a trusted CA, users no longer receive messages asking them to verify the certificate, and thin client devices can connect without requiring additional configuration.
TLS/SSL server certificates can be imported and assigned to the Admin interface and Internet Interface using the administration console. In case you do not import the certificates during deployment, a self-signed TLS/SSL server certificate is generated. For production environments, Omnissa recommends that you replace the default certificate as soon as possible or configure a trusted certificate during the deployment. The default certificate is not signed by a trusted CA. Use the default certificate only in a non- production environment.
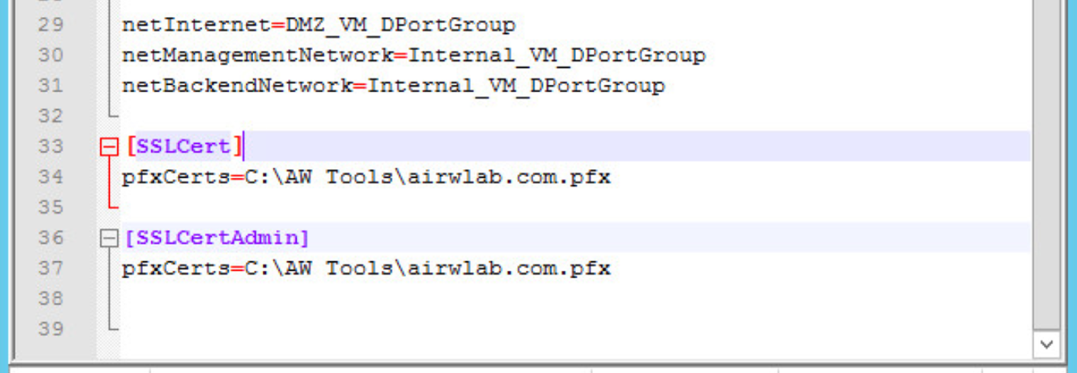
To configure the TLS/SSL certificates use the SSLCert and SSLCertAdmin sections on the INI file, you can use PEM or PFX certificate types for this configuration.
The certificate assigned to the Internet interface applies only to Horizon and Web Reverse Proxy Edge Service. The certificates for the Content Gateway, Workspace ONE Tunnel, and Secure Email Gateway Edge Services must be configured through the Workspace ONE UEM Console.
For PFX certificates, use the pfxCerts setting, when using PEM certificate use the pemPrivKey and pemCerts settings.
For this example, we use PFX certificate.
- For pfxCerts under SSLCert, enter C:\AW Tools\airwlab.com.pfx (this certificate is for the Internet interface).
- For pfxCerts under SSLCertAdmin, enter C:\AW Tools\airwlab.com.pfx (this certificate is for the administration interface).
- Note: The certificate password may get requested during the deployment.
Certificates that you import into the Unified Access Gateway appliance must be trusted by client machines and must also be applicable to all instances of Unified Access Gateway and any load balancer, either by using wildcards or by using Subject Alternative Name (SAN) certificates.
Deployment
Now that you have configured the INI file for your Unified Access Gateway deployment, you can run the uagdeploy.ps1 PowerShell script and provide the INI file as the configuration to automate the deployment.
You can have unique INI files for multiple Unified Access Gateway deployments in your environment. You must change the IP Addresses and the name parameters in the INI file appropriately to deploy multiple appliances.
The Windows machine running the script must have VMware OVF Tool command installed.
Deploying the Unified Access Gateway Appliance
Now that you have configured the INI file for your Unified Access Gateway deployment, you can run the uagdeploy.ps1 PowerShell script and provide this INI file as the configuration to automate the deployment.
- Launch PowerShell on your Windows machine.
- Navigate to the Unified Access Gateway Resources directory under the desktop user folder by entering cd '.\Desktop\UAG Resources' and then press Enter.
- Execute the deployment script.

After you run the uagdeploy.ps1 script, it prompts for input.
- When prompted, enter the information requested, such as in the following example:
.\uagdeploy.ps1 .\uag-2NIC Password1! Password1! false false no
- The first Password1! is the root password for the Unified Access Gateway appliance.
- The second Password1! is the admin password for the REST API management access.
- The first false is to NOT skip the validation of signature and certificate.
- The second false is to NOT skip SSL verification for the vSphere connection.
- The no is to not join the CEIP program.
- When prompted, enter the password for the SSLcert and SSLcertAdmin fields.
To avoid a password request for the certificate, you must provide a certificate without a password.
The deployment starts and you can follow the progress on the same window or on your vSphere Web Client, which you opened at the beginning of this tutorial.
Note: To make sure that the script execution is not restricted, enter the PowerShell set-executionpolicy command.
set-executionpolicy -scope currentuser unrestricted
You must do this only once to remove the restriction. - (Optional) If there is a warning for the script, run the following command to unblock the warning: unblock-file -path .\uagdeploy.ps1
- Confirm that the PowerShell Script deployment completes.

After successfully finalizing the deployment, the script automatically powers on the VM UAG-2.
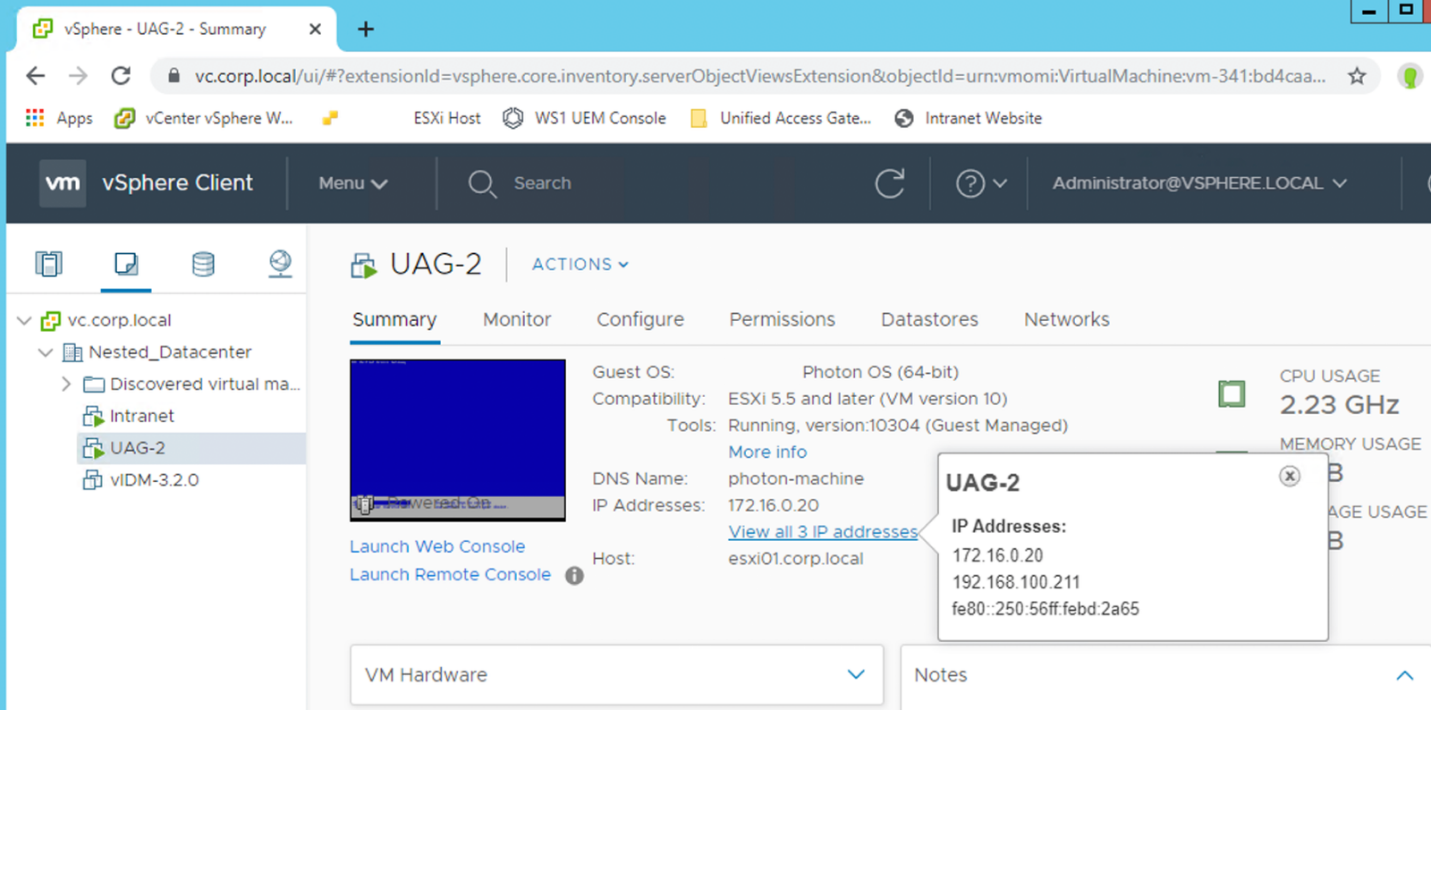
The Received IP address presented by the script log is a temporary IP. The final IPs for NIC 1 and NIC2 are assigned to the Unified Access Gateway appliance during the first start. You can return to the vSphere Web Client to validate that as described in the next step.
- Validate the deployment in the vSphere Client.

- Click VM and Templates.
- Click UAG-2.
- Click View all 2 IP addresses.
Important: If the Unified Access Gateway appliance does not finalize the configuration during the first startup, you receive an error message from vSphere Web Client. If that happens, wait for the appliance to finalize, and refresh the entire Google Chrome browser.
- Log in to the Unified Access Gateway.
- Browse to the Unified Access Gateway Administration Console using the URL, such as https://uagmgt-int.airwlab.com:9443/admin or by clicking a bookmark if you created one.
- Enter the username, such as admin in this example.
- Enter the password created for the Admin API in the Deploy OVF Wizard.
- Click Login.
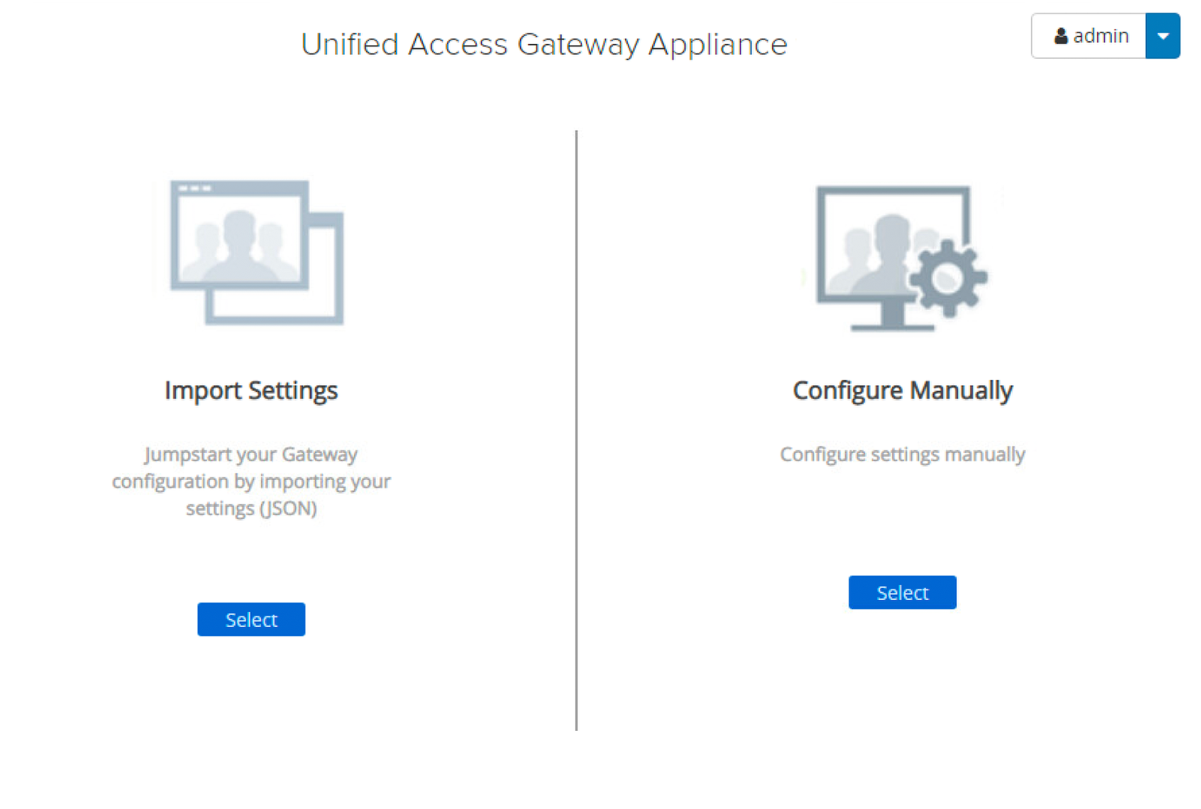
- Confirm the Administration Console Login on the internal network.

A successful login redirects you to the initial window where you can import settings or manually configure the Unified Access Gateway appliance.
Click Select under Configure Manually.
Validating the Horizon Edge Service Configuration
At this point, the Unified Access Gateway appliance has been deployed and you can access the administration console to manage the appliance configuration.
In this exercise, you learn how to review and update the configuration (when necessary) of the Horizon edge service.
- Access Horizon settings.

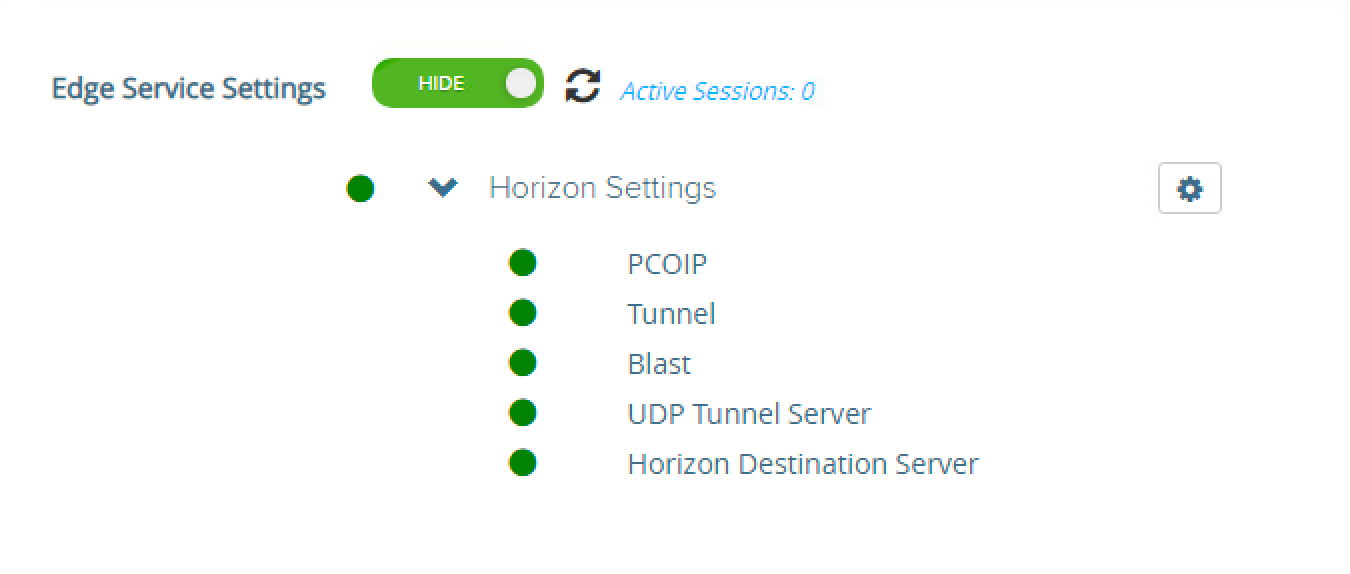
- Click the Show toggle next to Edge Service Settings. After you click, it switches to display the Hide option.
- Click the Arrow on Horizon Settings to show the status of the communication between the appliance and Horizon.
- Click the gear icon next to Horizon Settings.
All items should be GREEN, representing that the appliance can communicate with the Horizon Connection Server through the multiple protocols configured. Items not fully functional are presented in RED.
- The configuration defined in the INI file is presented and can be updated any time through the Horizon settings.

- Click Cancel to close the settings.
Testing Client Connectivity
In this exercise, you learn how to configure the Horizon Client to connect to a virtual desktop or application through Unified Access Gateway and validate that everything was configured properly.
In a real scenario, you connect through Unified Access Gateway from an external network.
Connecting to a Horizon Resource through Unified Access Gateway
In this activity, connect to a desktop to confirm access through the Unified Access Gateway.
- Add Unified Access Gateway Connection to the Horizon Client.

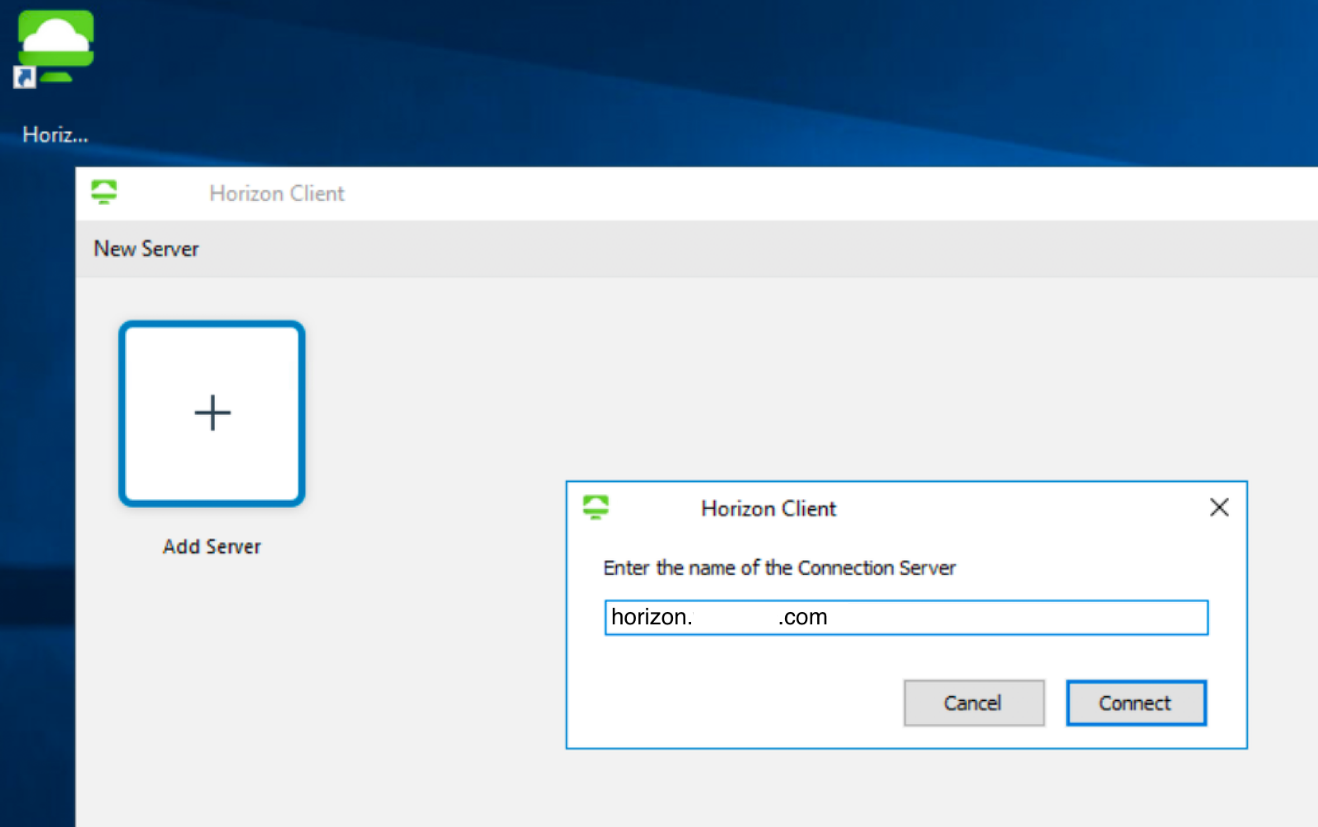
- Launch Horizon Client.
- Click Add Server.
- Enter the Unified Access Gateway or load balancer FQDN.
- Click Connect.
- Authenticate through Horizon Client (XML-API Protocol)

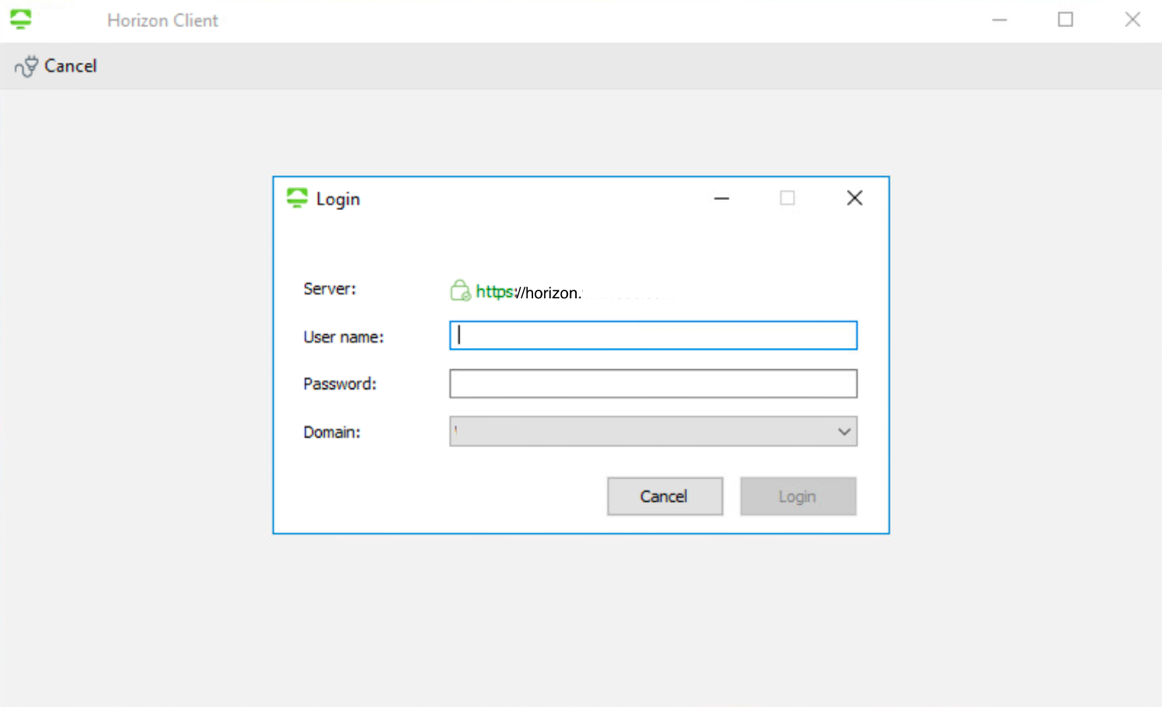
After you configure the Connection Server instance to connect to Unified Access Gateway, the Horizon Client will require user credentials to perform the authentication. This is known as XML-API connection and is responsible for authentication, authorization, and session management.
- Enter the Username and Password.
- Select the Domain.
- Click Login.
Note: In case the login fails because of an SSL certificate error and the Connection Server used a self-signed certificate, return to the Unified Access Gateway Admin UI and under the Horizon Edge Service settings, ensure the Connection Server thumbprint matches the one used by the Connection Server certificate.
- Launch a Virtual Desktop or Application (Secondary Protocol).

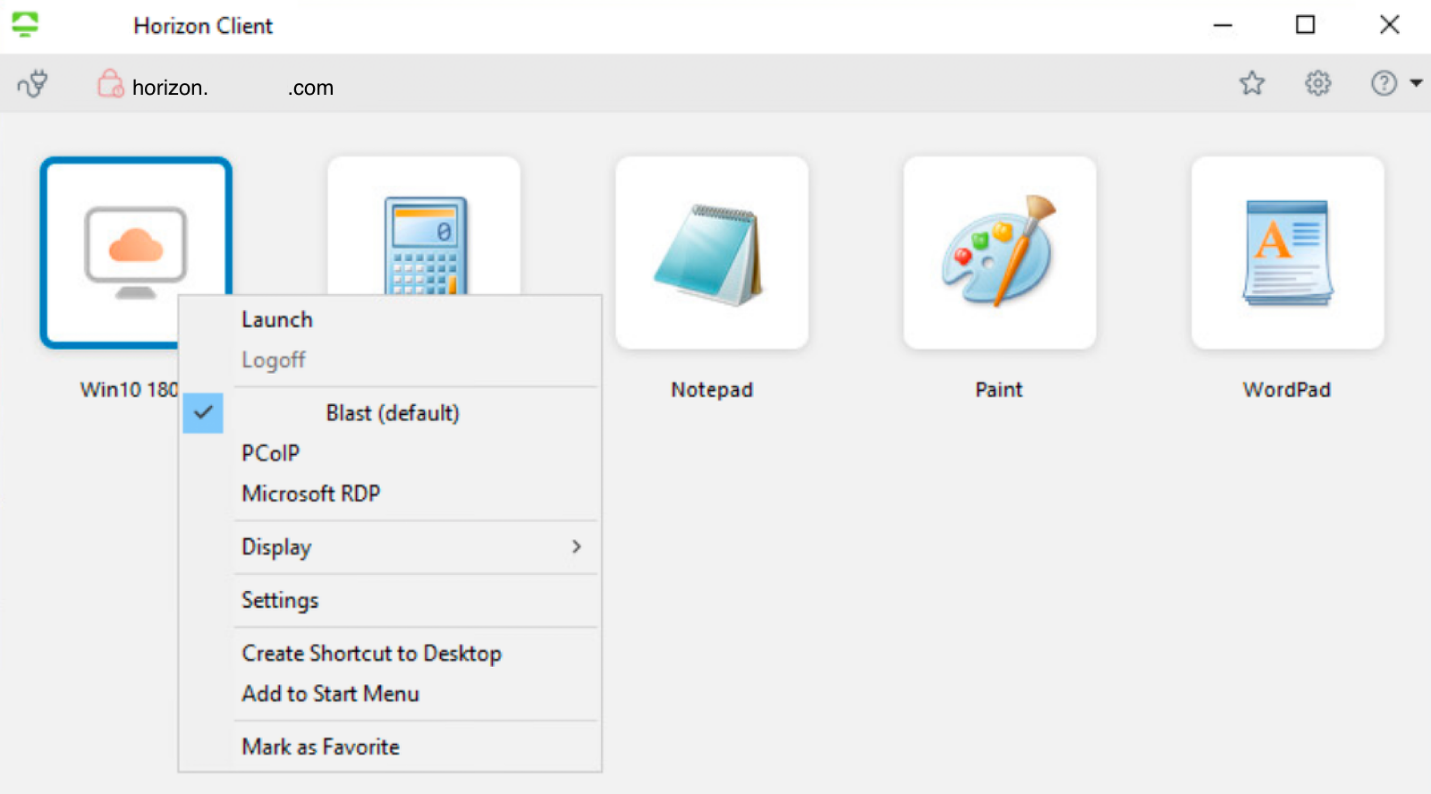
A successful connection will present the desktops and applications entitled to logged-in users. In this exercise, you can see one virtual desktop (Win10 1803) and four other virtual applications (Calculator, Notepad, Paint, WordPad).
- Right-click the desktop or one of the applications.
- Ensure that Blast (default) is selected.
- Click Launch.
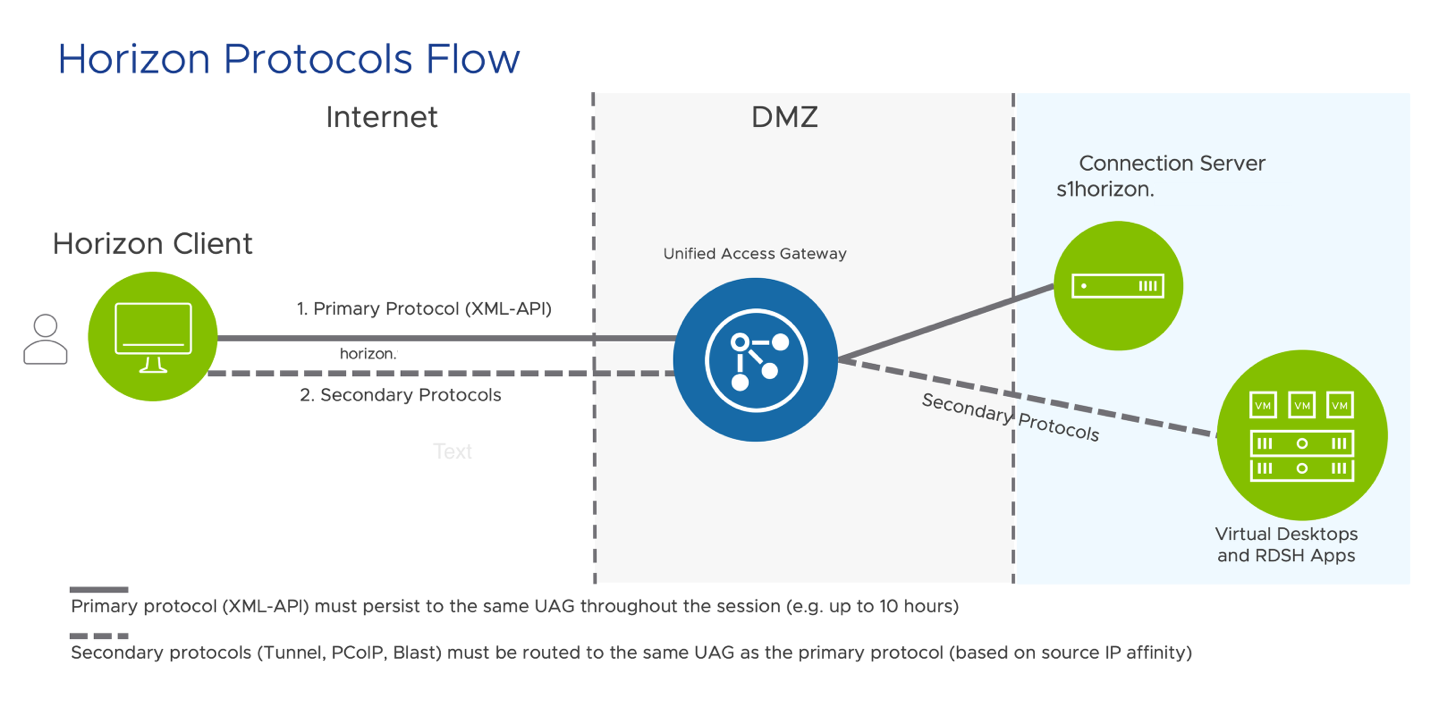
When you launch the desktop or applications, Horizon client opens a secondary connection through Unified Access Gateway based on the display protocol selected. The secondary Horizon protocols must be routed to the same Unified Access Gateway appliance to which the primary Horizon XML-API protocol was routed. This allows the Unified Access Gateway to authorize the secondary protocols based on the authenticated user session.
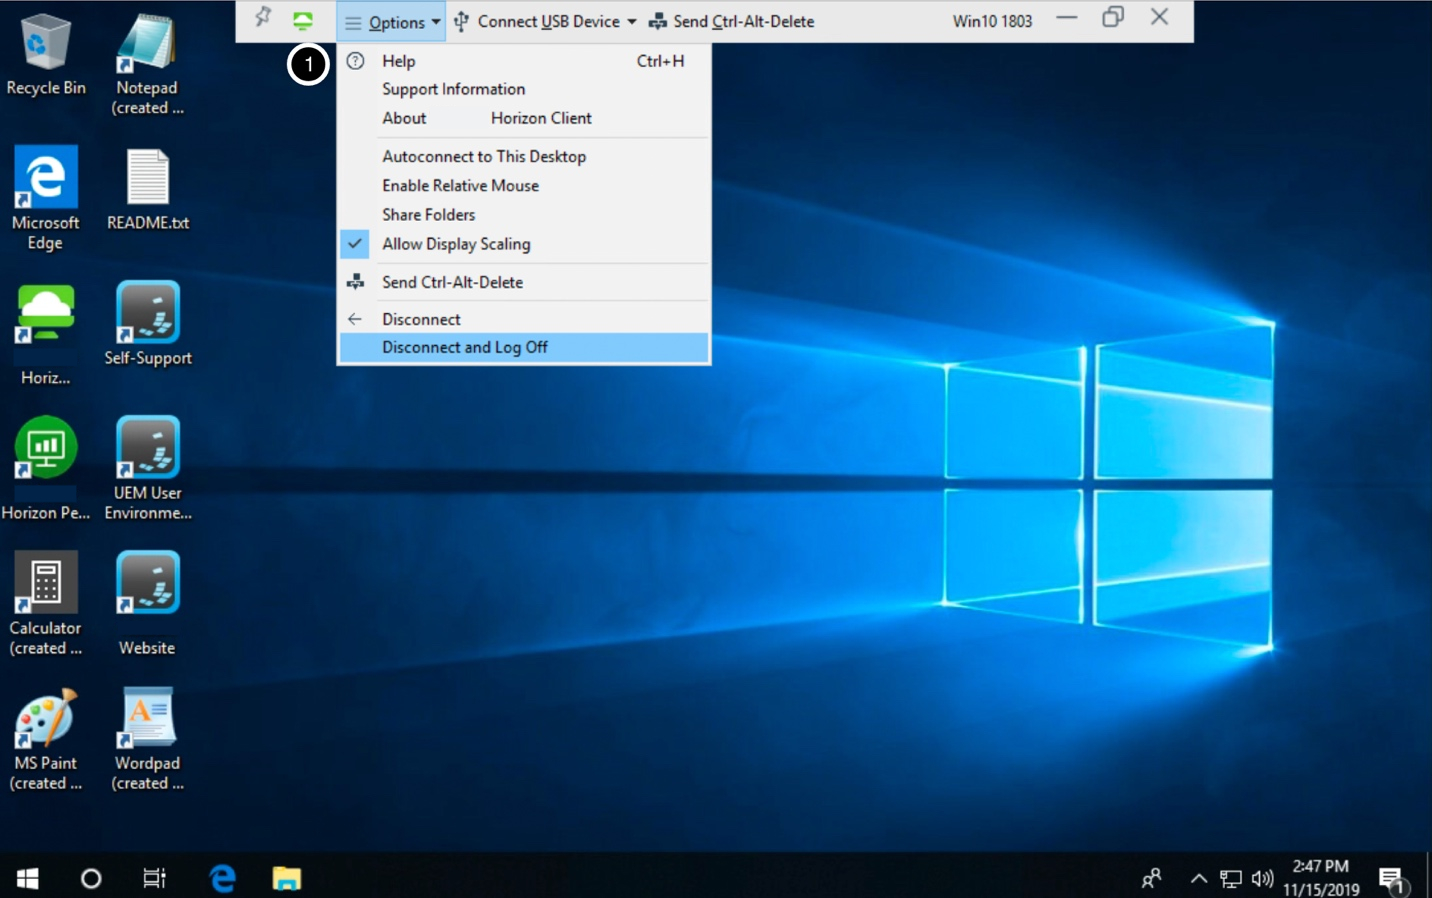
- Confirm the Virtual Desktop or Application has been launched.

- Click Options.
- Click Disconnect and Log Off.
- Review Horizon Protocols flow.

The following diagram demonstrates the flow for the primary (XML-API) and secondary protocols used in this section. These protocols were invoked in exercises 2 and 3; when you authenticated through the Horizon Client and launched the virtual desktop or application.
Summary and Additional Resources
In these exercises, you have learned how to:
- Deploy the Unified Access Gateway and configure the Horizon edge service through a PowerShell script.
- Update Horizon edge service configuration through the Unified Access Gateway administration console.
- Configure Horizon Client to access virtual desktops and applications through Unified Access Gateway.
Additional Resources
For more information, explore the following product pages on Digital Workspace Tech Zone. You will find everything from beginner to advanced curated assets in the form of articles, videos, and labs.
Additionally, you can check out the Omnissa Reference Architecture which provides a framework and guidance for architecting an integrated digital workspace using Omnissa Workspace ONE and Omnissa Horizon.
Changelog
The following updates were made to this guide:
| Date | Description of Changes |
| 2024/07/20 | Update links. |
| 2019/09/08 | Guide was published. |
About the Author and Contributors
This tutorial was written by:
- Andreano Lanusse, Omnissa alumni.
Feedback
Your feedback is valuable.
To comment on this paper, either use the feedback button or contact us at tech_content_feedback@omnissa.com.


