Reducing rollout risks with automated deployment rings in Workspace ONE Intelligence

Introduction
Deployment rings are an industry standard deployment method, allowing administrators to streamline rollouts to their endpoints while minimizing the risks of widespread issues. Using Freestyle Orchestrator Workflows in Intelligence, you can automatically distribute devices into rings, then assign resources to each ring using Smart Groups. You can even create exceptions for special groups, such as early adopters or users who are sensitive to change.
Freestyle Orchestrator Workflows now support conditions within Workflows, allowing administrators to build a single Workflow to add Tags to all devices. You can also build multiple Workflows if you’d like different deployments to utilize different ring structures. Want five tiers for Windows updates, but only three for an application rollout? Freestyle Orchestrator Workflows make it possible.
How are devices automatically distributed?
Freestyle Orchestrator Workflows can apply a Tag for each ring to devices based on a randomly generated value. While there are a few ways to generate the pseudo-random value, one of the easiest is to use the Workspace ONE UEM Device GUID attribute. This is a standard 128-bit GUID in hexadecimal (0-9 and A-F) form generated within Workspace ONE for each enrolled device. This attribute is consistent across all supported platforms and does not rely on any tools outside of Workspace ONE. We can use the first character of this attribute as a pseudo-random hexadecimal value. Depending on the percentage of devices you want in each ring, the Filters defining each ring will match a certain number of hexadecimal characters. Each character you include will represent approximately 1/16th of the devices, or a bit more than 6%.
While there are other pseudo-random attributes in Intelligence like Device ID, serial number, MAC Address, IMEI, or Device UDID, I would not recommend using these as they either do not support the correct filter operators, are not sufficiently random, or are not consistent across platforms. Because Workspace ONE UEM Device GUID is generated within Workspace ONE and is always the same format for every platform, it provides the most consistent outcome.
Note that Intelligence has a default limit of 10 filters per Condition. If you’d like a ring to have more than 62.5% of devices in it, you’ll need to create two conditions with identical actions.
Defining rings
The first step is to define your rings. You must determine the number of rings to deploy to, what percentage of devices will be in each ring, and if any special users should always be the first or last to receive new resources. Keep in mind that different platforms and resources may be better suited to faster or slower deployments. Defining more rings can reduce risk, but will extend the time it takes to fully deploy a resource.
In this example, we’ll create the following ring structure for our deployment. However, you can adjust this based on the needs of your organization.
- Early Adopters – Devices with special criteria that will not be placed into one of the following rings.
- Ring 1 – Devices with a GUID starting with 0-1, accounting for ~12.5% of the total devices.
- Ring 2 – Devices with a GUID starting with a-f, accounting for ~37.5 % of the total devices.
- Ring 3 – Devices with a GUID starting with 2-9, accounting for ~50% of the total devices.
Note that the specific character ranges you use to define each ring are arbitrary, as each character has an equal chance of appearing.
Creating Tags
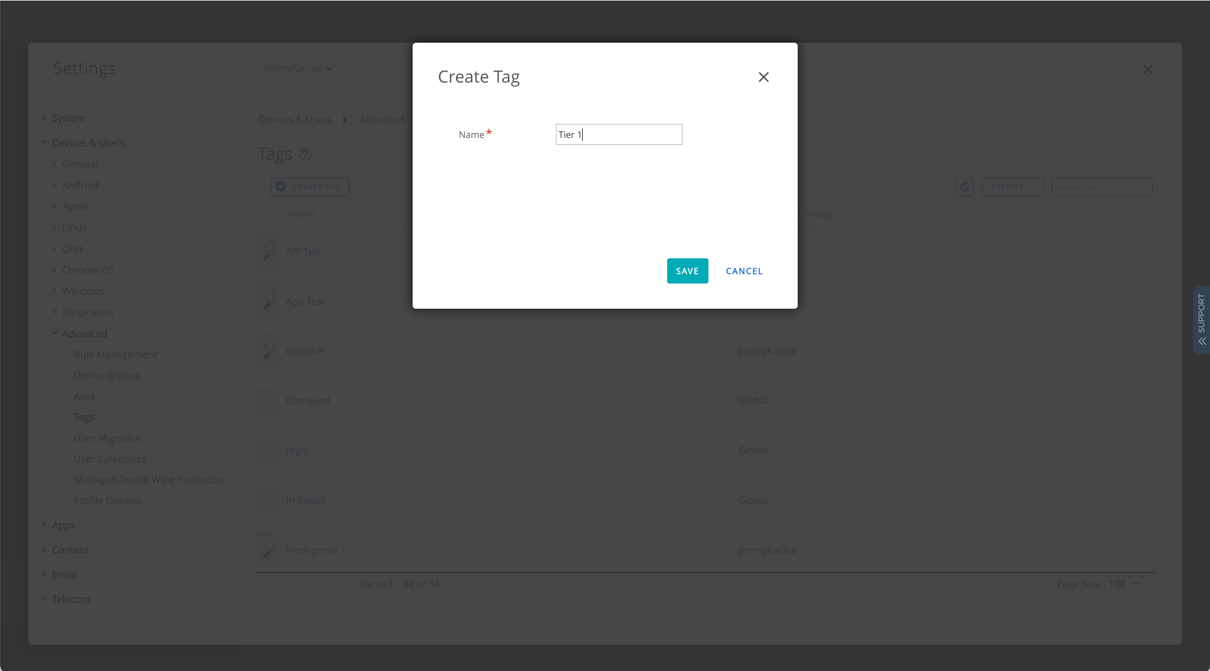
After you’ve defined your rings, create a Tag for each one. You can create these in the Workspace ONE UEM console under Groups & Settings > Devices & Users > Advanced > Tags > Create Tag. If you want to utilize different ring sets for different deployments, give the tag a unique name such as Update Ring 1 or App Ring 1.
Building the Freestyle Orchestrator Workflow
Next, create a new Workflow. Open the Intelligence console and select Workspace > Freestyle > Add Workflow. The Workflow editor will open. Follow these steps to build the Workflow:
- For the Data Source, select Workspace ONE UEM > Devices.
- For the Trigger Setting, select Automatic. Using Automatic ensures newly enrolled devices will be placed into the appropriate tier shortly after enrollment.
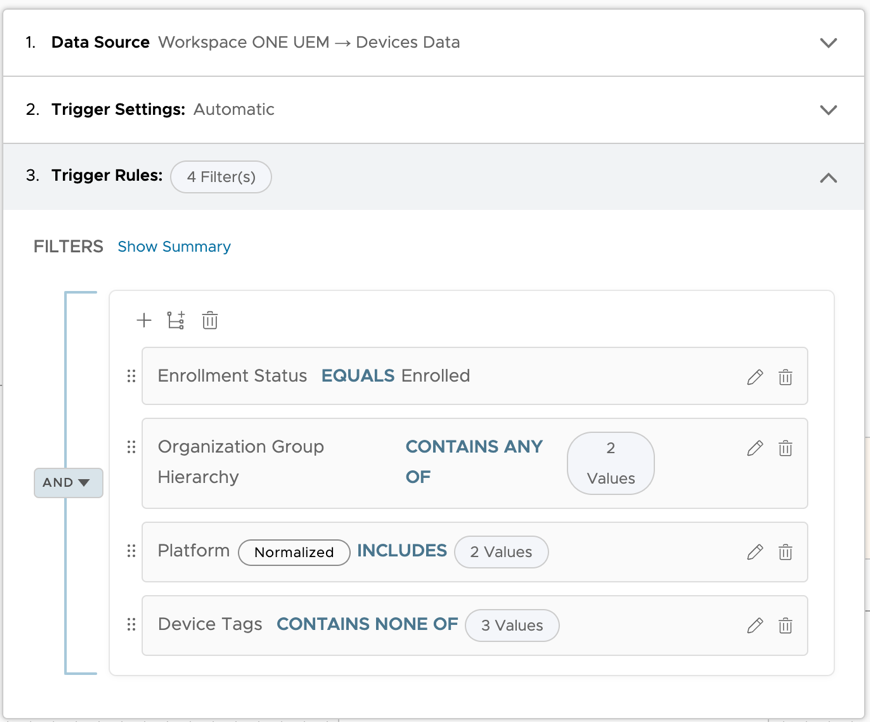
- Next, define the Workflow Trigger Rules. The Workflow will only run for devices that match these filters. The Trigger Rules should always include:
- Enrollment Status EQUALS Enrolled
- This will ensure the automation only targets currently enrolled devices.
- Device Tags CONTAINS NONE OF (Select all of the Tags for each ring)
- If you add any exceptions for special groups like early adopters or executives, this will prevent their ring from unintentionally changing if those conditions no longer apply. With this trigger rule in place, once a device is in a ring it will not change automatically.
Understand that removing this filter will require you to add additional actions and logic in the workflow to remove old tags and ensure devices aren’t in two rings at the same time. This is possible but is outside the scope of this blog post.
- If you add any exceptions for special groups like early adopters or executives, this will prevent their ring from unintentionally changing if those conditions no longer apply. With this trigger rule in place, once a device is in a ring it will not change automatically.
- Enrollment Status EQUALS Enrolled
Tip: You may need to temporarily add the newly created Tags to a test device in Workspace ONE UEM for them to show in the Filter drop-down menu. You can remove the Tags from the device after you’ve defined the rule.
- (Optional) Other filters like Organization Group and Platform can be added if you want to limit the devices that are placed into the defined rings. For instance, if this Workflow is defining Windows Update rings, you can add a filter for Platform EQUALS Windows Desktop.

Setting up Workflow actions
Next, build the Workflow steps.
Freestyle Workflows now support THEN/ELSE conditions within the workflow, allowing admins to specify separate criteria for each ring within a single Workflow.
To add the first Condition, click Add Step, or drag in the Condition component from the sidebar.
The first condition(s) will be for devices or users you want to put into special rings, such as early adopters or those sensitive to change. This condition should always go first, otherwise devices will match the later filters for one of the default randomized rings. You can use User Groups, Tags, Organization Groups, and most other filters to define these special rings. Note that Condition filters have some constraints compared to Trigger Rules; more information is available in the product documentation.
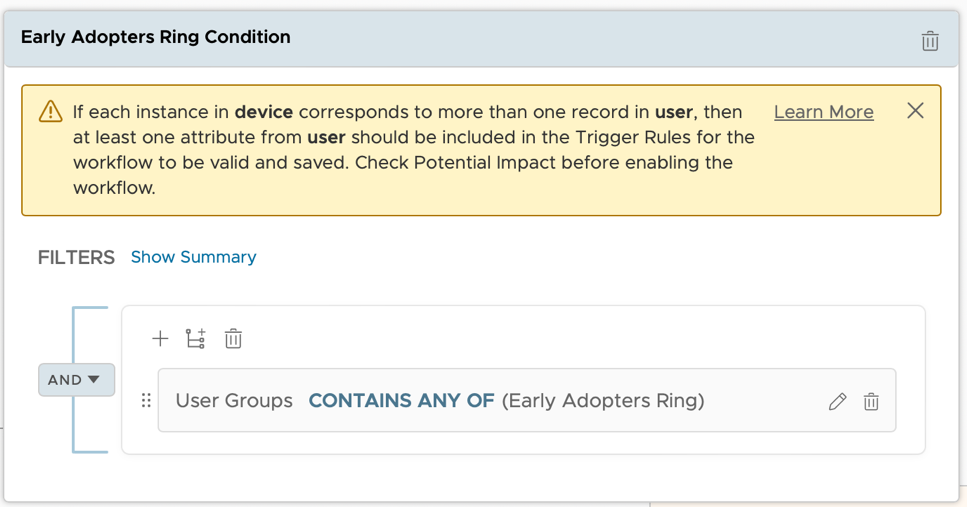
Note the message we receive when using a User-based filter. Ensure your trigger and condition rules are compatible before saving the Workflow.
You can also rename Conditions by clicking the default name (Condition 1) in the Filter editing pane. This allows for easier organization of nested Conditions.
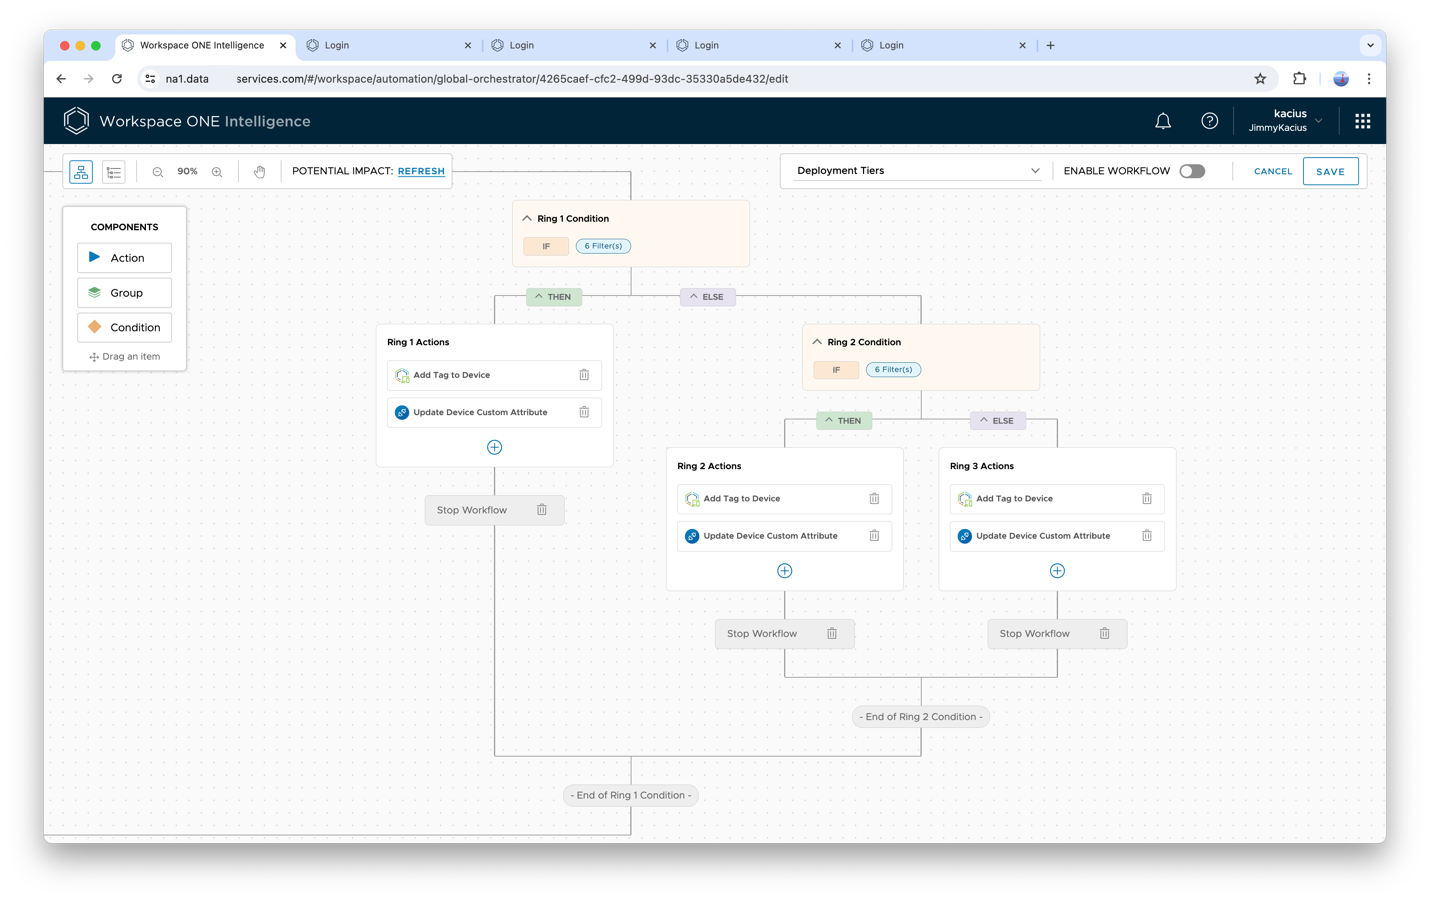
Each Condition has THEN and ELSE branches. If the Condition filters are matched, the actions under the THEN branch will run. Otherwise, actions under the ELSE branch will run.
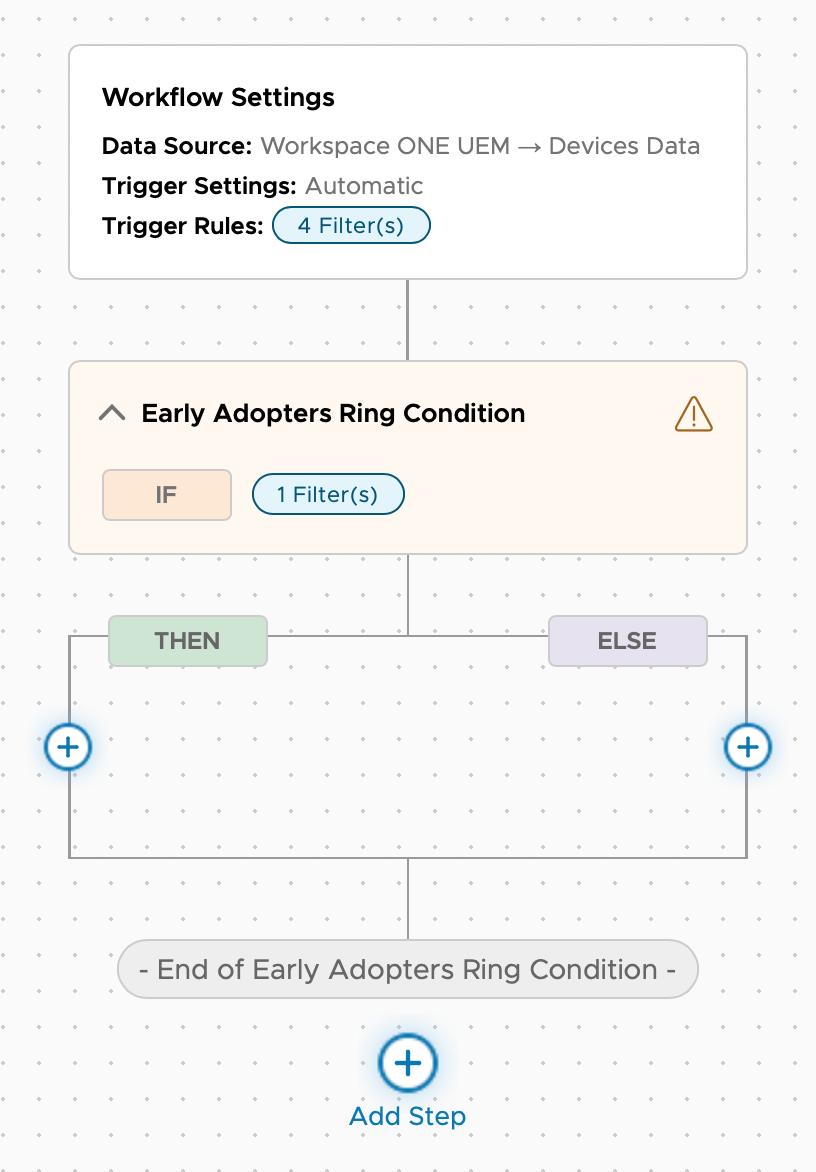
For this Workflow, add the Action that adds a Tag (and any other Actions you’d like) under the THEN branch, and nest additional Conditions under the ELSE branch. Devices that match the filters set in the Condition will proceed to the THEN branch and receive a Tag, while devices that don’t match will proceed to the ELSE branch and be evaluated by the next Condition.
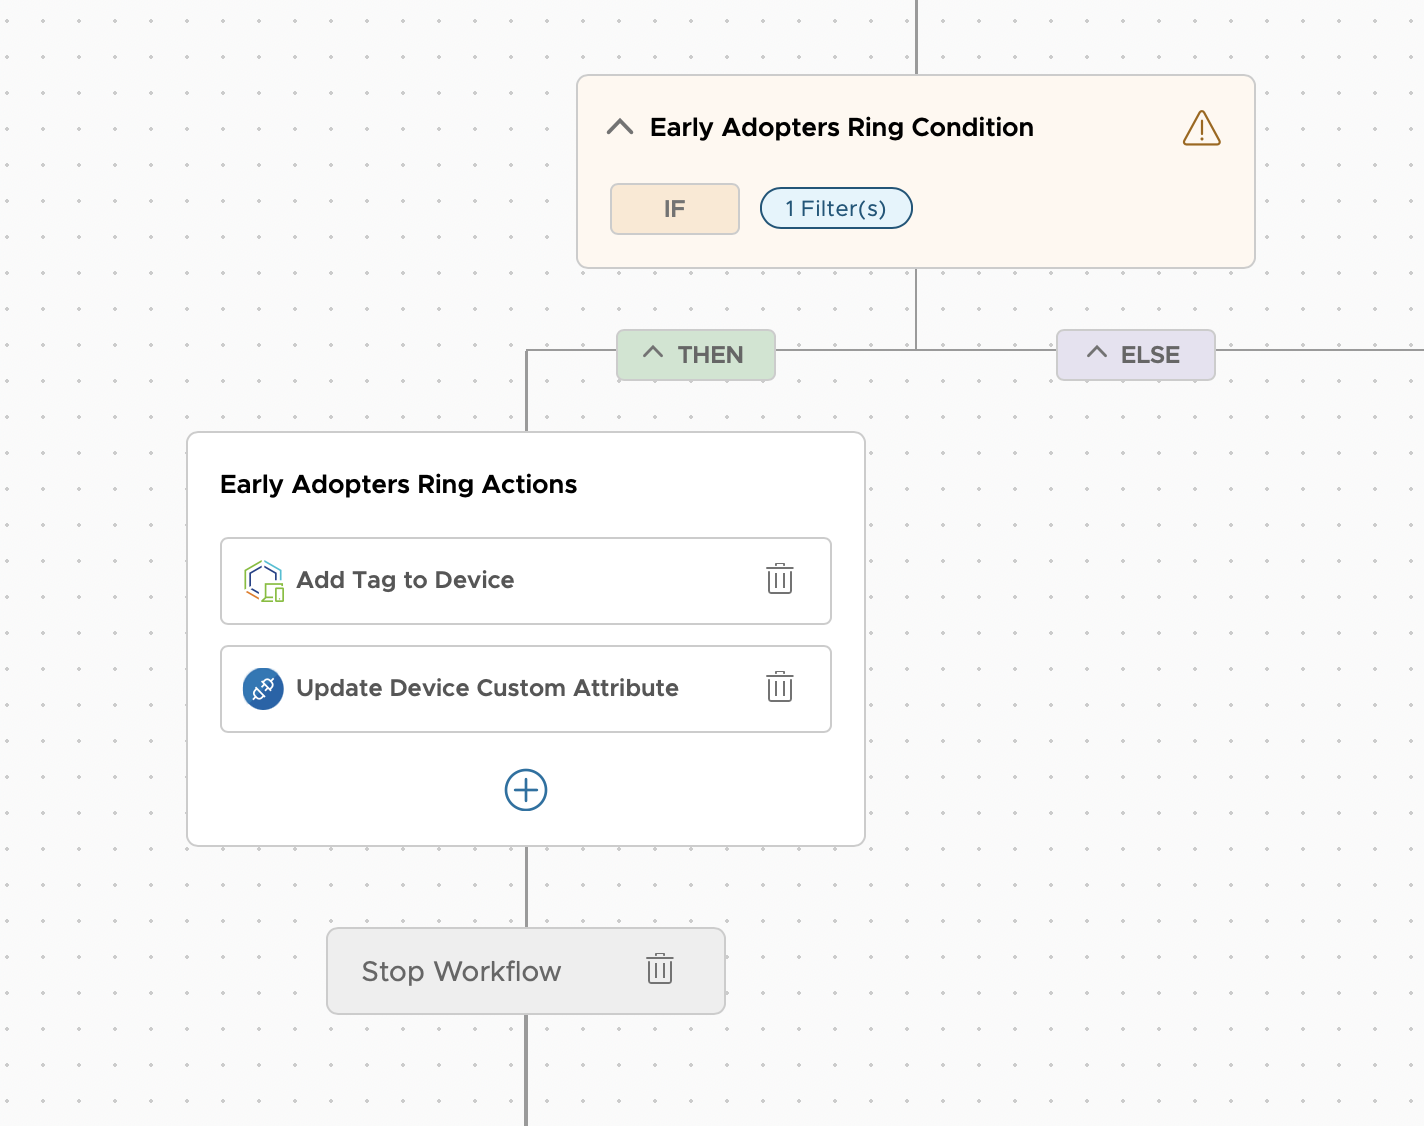
Freestyle Workflows also now support Action Groups, allowing you to easily organize Workflow Actions. The Actions in a group will execute in parallel. If you want to both add a Tag and carry out additional Actions, a group can more clearly organize those actions. In the screenshots, you can see that I’ve added a Custom Workflow to update a Custom Attribute for the device in UEM.
To add a group, click Add Step under the THEN branch or drag in the Group component from the sidebar. Like Conditions, Groups can be renamed for easier organization.
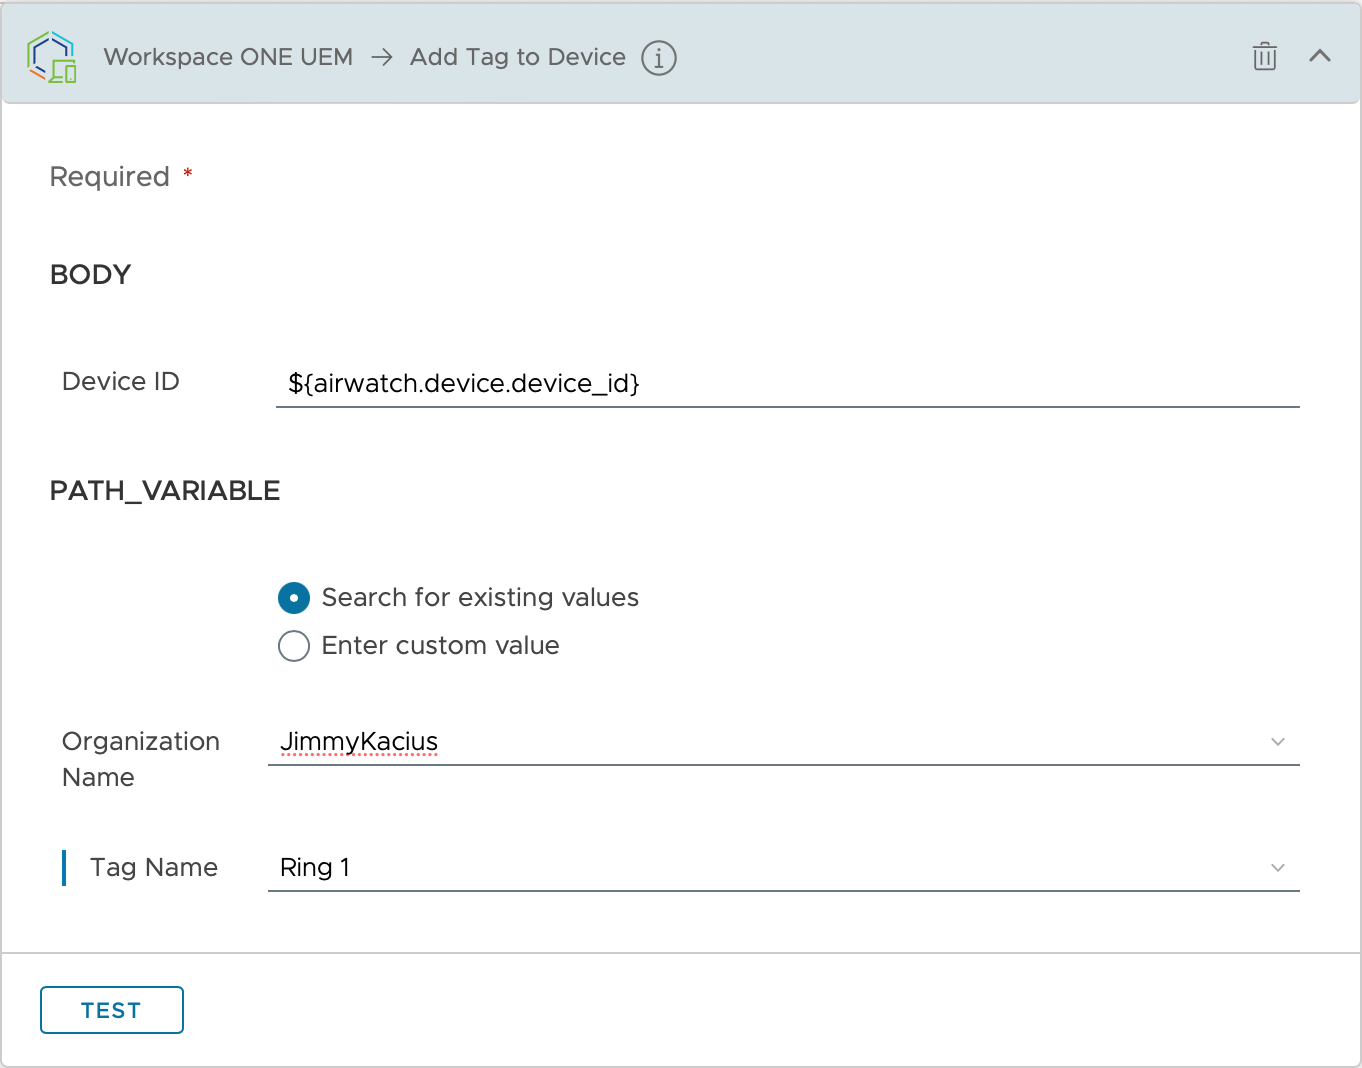
To add an Action that adds a Tag to a device, click the blue + icon inside the group. In the Available Actions pane, select Workspace ONE UEM > Add Tag to Device. In the Organization Name field, enter the name for the Organization Group where the Tag was created (normally this is the top-level OG). In the Tag Name field, search for and select the correct Tag.

Next, define the remaining rings. Each additional Condition will go under the prior Condition’s ELSE branch, as shown here:
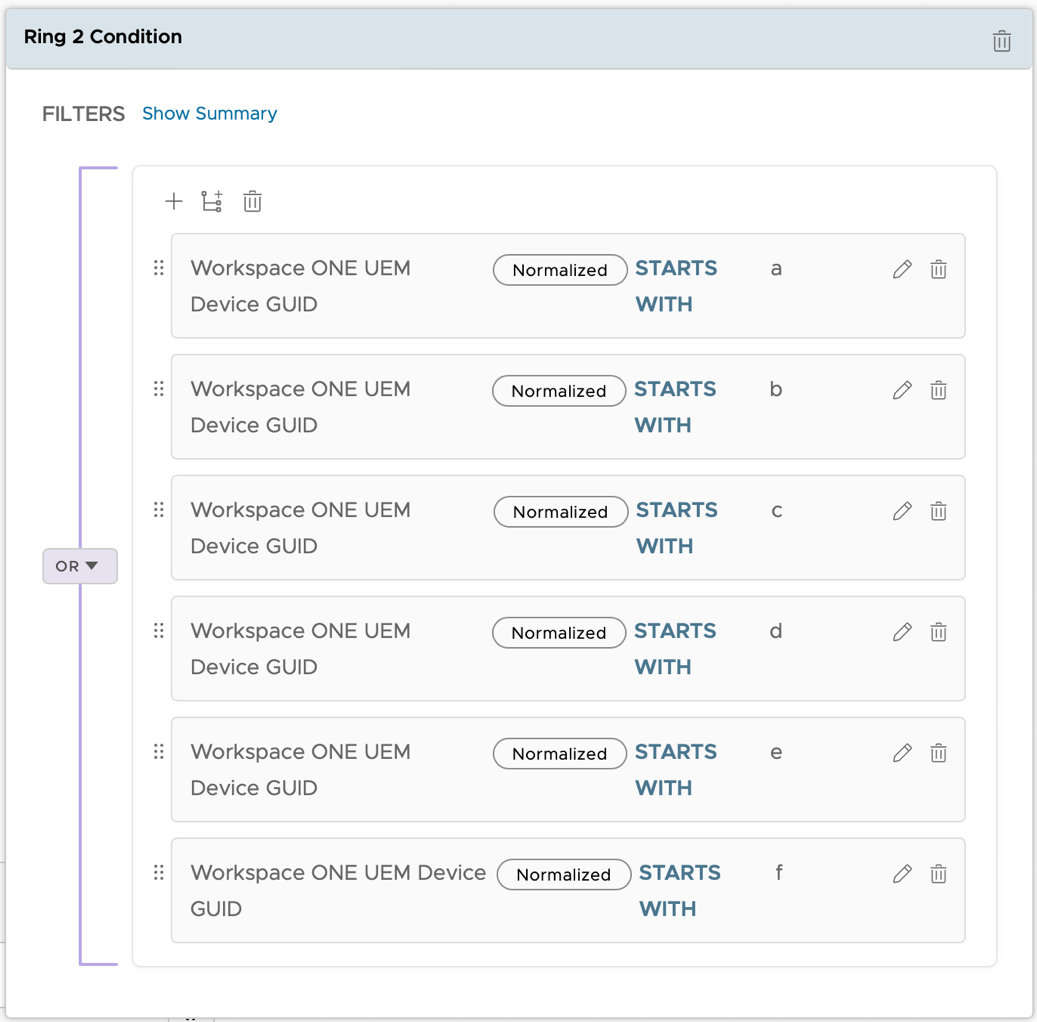
For each Condition filter, add a rule for each hexadecimal value you want to include in that ring. Ensure that the filter is set to OR so that a device will match if any of the rules are true. In the example below, any device with a GUID starting with a, b, c, d, e, or f will match the Condition. Any device with a GUID starting with 0 through 9 will not match.
Continue to nest Conditions and Actions until you’ve defined each ring. For the final ring, you can place the Actions directly under the final Condition’s ELSE branch. This will catch any devices that did not match any of the previous filters.
Adding stop Workflow step
While not required for this Workflow structure, you can add a Stop Workflow step under each Group as shown above. When nesting many Conditions and Actions, the Stop Workflow step makes it clear that the Workflow has completed.
Creating Smart Groups
Once devices have received the Tag for their ring, you can use Smart Groups to assign resources. Create a Smart Group for each deployment ring, selecting the ring’s Tag as the criteria.

Once you’ve created the Smart Groups, you can begin assigning resources to the first ring. When you’re ready to begin deploying to the next ring, simply add its Smart Group to the resource’s assignments.
Summary
Using the new Conditions functionality in Freestyle Orchestrator Workflows, administrators can more seamlessly automate placing all managed devices into deployment rings. Use this blog as a starting point to build your own deployment ring methodology in Workspace ONE. Happy automating!

